USER MANUAL AJ3431 PHILIPS
Let's make things better.
INDEX
Important notes for users in the U.K.
Mains plug
This apparatus is fitted with an approved moulded 13 Amp plug. To change a fuse in this type of plug proceed as follows:
- Remove fuse cover and fuse.
Fix new fuse which should be a BS1362 5 Amp, A.S.T.A. or BSI approved type.
- Refit the fuse cover.
If the fitted plug is not suitable for your socket outlets, it should be cut off and an appropriate plug fitted in its place.
If the mains plug contains a fuse, this should have a value of 5 Amp. If a plug without a fuse is used, the fuse at the distribution board should not be greater than 5 Amp.
Note: The severed plug must be disposed to avoid a possible shock hazard should it be inserted into a 13 Amp socket elsewhere.
How to connect a plug
The wires in the mains lead are coloured with the following code: blue = neutral (N), brown = live (L).
As these colours may not correspond with the colour markings identifying the terminals in your plug, proceed as follows:
- Connect the blue wire to the terminal marked N or coloured black.
- Connect the brown wire to the terminal marked L or coloured red.
- Do not connect either wire to the earth terminal in the plug, marked E (or 12 ) or coloured green (or green and yellow).
Before replacing the plug cover, make certain that the cord grip is clamped over the sheath of the lead - not simply over the two wires. Copyright in the U.K.: Recording and playback of material may require consent. See Copyright Act 1956 and The Performer's Protection Acts 1958 to 1972.
English 4
Francais 10
Espanol 16
Deutsch 22
Nederlands 28
Italiano 34
Polski 40
Portugues 46
Dansk 52
Svenska 58
Suomi 64
Elambdavika 70
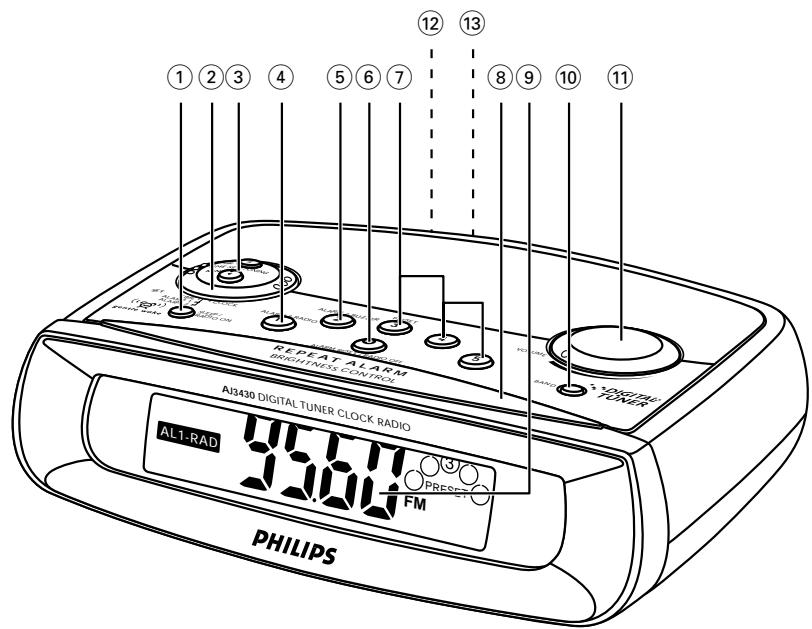
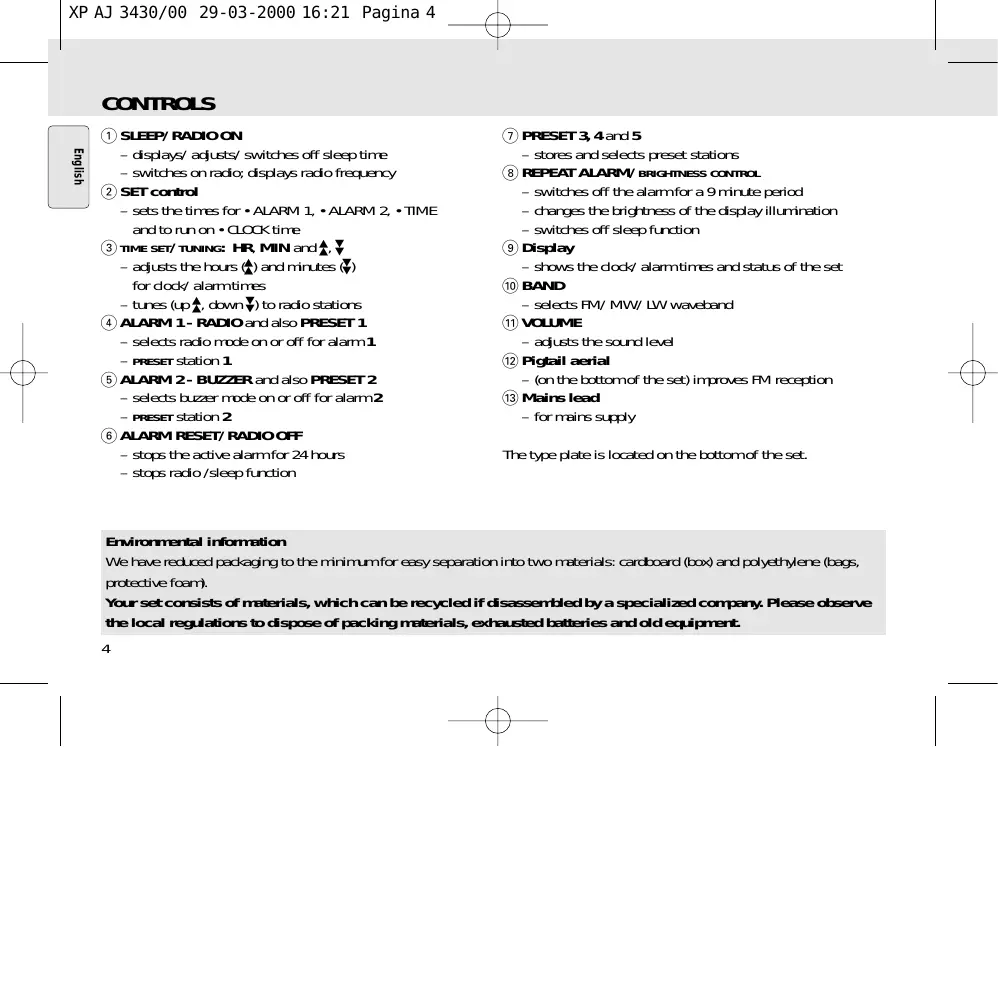
CONTROLS
① SLEEP/RADIO ON
- displays/ adjusts/ switches off sleep time
- switches on radio; displays radio frequency
② SET control
- sets the times for •ALARM 1, •ALARM 2, •TIME and to run on •CLOCK time
③ TIME SET/TUNING: HR, MIN and ▲, ▼
- adjusts the hours (A) and minutes (V) for clock/ alarm times
-tunesup down to radio stations
④ ALARM 1 - RADIO and also PRESET 1
- selects radio mode on or off for alarm 1
- PRESET station 1
⑤ ALARM 2 - BUZZER and also PRESET 2
- selects buzzer mode on or off for alarm 2
- PRESET station 2
⑥ ALARM RESET/ RADIO OFF
- stops the active alarm for 24 hours
- stops radio /sleep function
⑦ PRESET 3, 4 and 5
stores and selects preset stations
⑧ REPEAT ALARM/ BRIGHTNESS CONTROL
- switches off the alarm for a 9 minute period
changes the brightness of the display illumination
-switches off sleep function
⑨ Display
shows the clock/ alarm times and status of the set
⑩ BAND
- selects FM/ MW/ LW waveband
VOLUME
- adjusts the sound level
⑫ Pigtail aerial
- (on the bottom of the set) improves FM reception
13Mains lead
- for mains supply
The type plate is located on the bottom of the set.
We have reduced packaging to the minimum for easy separation into two materials: cardboard (box) and polyethylene (bags, protective foam).
Your set consists of materials, which can be recycled if disassembled by a specialized company. Please observe the local regulations to dispose of packing materials, exhausted batteries and old equipment.
MAINS SUPPLY AND DEMO MODE
- Check if the power voltage, shown on the type plate on the bottom of the set, corresponds to your local mains supply. If it does not, consult your dealer or service centre.
- Connect the mains plug into the wall socket. The mains supply is now switched on and the display will show the PHILIPS demo mode.
PH..IL ..IPS scrolls across the display continuously.
- Turn the SET control to SET TIME to exit the demo mode.
- To disconnect the set completely from the mains supply, withdraw the mains plug from the wall socket.
POWER BACK-UP
The power back-up conveniently allows your preset stations, alarm and clock time settings to be stored for up to 3 minutes when there is a power interruption e.g. AC mains failure.
The complete clock radio and display illumination will be switched off. As soon as the mains supply returns, the display will indicate the correct time.
If mains supply returns after 3 minutes and the display shows:
- clock time blinking - indicates you need to re-adjust the clock time
PHILIPS demo mode - indicates you need to re-enter preset stations and the clock and alarm times.
- Check if the SET control is turned to CLOCK position and the radio is switched off.
-
Press REPEAT ALARM/ BRIGHTNESS CONTROL once or more.
-
The brightness of the display will change in this sequence: BRIGHT→MEDIUM→LOW→BRIGHT...
Note: when an alarm or the SLEEP function is active, brightness cannot be adjusted.
RESET
Should the display and electronic functions of your set receive interference e.g. static electricity from carpets, thunderstorms, etc. RESET allows you to clear all previous settings and start up again.
- Use a ballpoint pen to press the RESET hole found on the bottom of the set.
The time is displayed using the 24 hour clock.
- Turn the SET control to TIME.
- Press repeatedly or hold down on the button to adjust the hours.
Release when you reach the correct hour.
- Press repeatedly or hold down on the button to adjust the minutes.
Release when you reach the correct minute setting.
- Turn the SET control to CLOCK.
RADIO
- Press SLEEP/ RADIO ON once to switch on the radio.
Display shows the radio frequency of the last selected waveband briefly before returning to the clock time. Your preset station is also shown if you are listening to a preset.
- Press BAND if you wish to change waveband.
- Adjust the sound using VOLUME.
- Press ALARM RESET/ RADIO OFF to switch off.
TUNING TO RADIO STATIONS
Automatic tuning
- Press or one second or more to tune to your station. The radio automatically tunes to a station of sufficient reception.
Manual tuning
- Press or briefly and repeatedly until you reach the desired frequency.
To improve reception:
FM: Adjust the pigtail aerial for optimum reception.
MW/LW: Uses a built-in aerial inside the set. Direct the antenna by adjusting the position of your set.
STORING AND USING PRESET STATIONS
You can store up to a total of 10 radio stations in the memory, 5 on each waveband.
- Tune to your desired station (see TUNING TO RADIO STATIONS).
- To store a preset, hold down briefly on a PRESET button 1-5 until you hear a double beep.
Display shows the preset number of your station.
- Repeat steps 1 and 2 to store your other stations.
- You can overwrite a preset station by storing another frequency in its place.
- Press a PRESET button 1-5 to listen to a preset station.
GENERAL
Two different alarm times can be set. This can be useful when you need to be woken up at a different time e.g. during the week and at the weekend:
- ALARM 1 - radio mode
- ALARM 2 - buzzer mode. The gentle wake buzzer alarm increases its beep tone frequency within seconds.
SETTING THE ALARM TIME AND MODE
- Turn the SET control to ALARM 1 or ALARM 2.
Display shows the alarm time digits with the AL1-RAD or AL2-BUZ indicators flashing.
- Press repeatedly or hold down on the button to adjust the hours. Release when you reach the correct hour.
- Press repeatedly or hold down on the button to adjust the minutes. Release when you reach the correct minute setting.
- Turn the SET control back to CLOCK.
- While the radio is switched off, select your choice of alarm mode by pressing ALARM 1-RADIO or ALARM 2-BUZZER. Display shows AL1-RAD or AL2-BUZ
Notes: If you have selected the ALARM 1 RADIO, make sure you have properly tuned to a station before turning off the set. If you set and activate the same alarm time for both alarms, only the ALARM 2-BUZZER will be activated at the set time.
SWITCHING OFF THE ALARM
There are three ways of switching off the alarm. Unless you cancel the alarm completely, the 24 hour alarm reset option will be automatically selected after 59 minutes, from the time your alarm time first goes off.
24 hour alarm reset
If you want the alarm mode to be stopped immediately but also wish to retain the same alarm setting for the following day:
- Press ALARM RESET/ RADIO OFF.
→ You will hear a beep tone confirming 24 hour reset activation.
Cancelling the alarm completely
To cancel the set alarm time before it goes off, or during the alarm call:
- With the radio switched off, press ALARM 1-RADIO or ALARM 2-BUZZER once or more until the selected alarm indicator disappears from the display.
Repeat alarm
This repeats your alarm call at 9-minute intervals.
- During the alarm call, press REPEAT ALARM/ BRIGHTNESS CONTROL.
Display shows AL1-RAD or AL2-BUZ flashing during a repeat alarm.
- Repeat if desired up to 6 times.
ABOUT SLEEP
This set has a built-in sleep timer which enables the set to be automatically switched off during radio playback after a set period of time. There are four sleep times before the set turns itself off: 60, 30, 15 minutes and off.
SETTING SLEEP
- Press SLEEP/ RADIO ON to switch on the radio.
- Within 1 second, press SLEEP/ RADIO ON again once or more until the display shows SLEEP and 5L:6G
While in the SLEEP display, press SLEEP/ RADIO ON once or more to select your sleep time.
Display shows in sequence: SLEEP and the sleep period time options: SL:60, SL:30, SL:15 and OFF.
→ The sleep time and radio frequency appear briefly before showing standby clock time with the SLEEP indicator, if SLEEP is activated.
-
To cancel sleep, press either:
-
ALARM RESET/ RADIO OFF
- REPEAT ALARM/ BRIGHTNESS CONTROL
- SLEEP/RADIO ON once or more until SLEEP disappears from the display.
MAINTENANCE
- If you do not intend to use the set for a long time, withdraw the mains plug from the wall socket.
- Do not expose the set to humidity, rain, sand or excessive heat caused by heating equipment or direct sunlight.
- To clean the set, use a soft, slightly dampened chamois leather. Do not use any cleaning agents containing alcohol, ammonia, benzene or abrasives as these may harm the housing.
If a fault occurs, first check the points listed below before taking the set for repair. If you are unable to remedy a problem by following these hints, consult your dealer or service centre.
WARNING: Under no circumstances should you try to repair the set yourself, as this will invalidate the guarantee.
PROBLEM
-POSSIBLECAUSE
- REMEDY
No sound
Volume not adjusted
- Adjust the VOLUME
Display error/ no reaction to any controls
- Electrostatic discharge
- Press RESET
Occasional crackling sound during FM broadcast
- Weak signal
- Adjust the position of the pigtail aerial
Continuous crackling/ hiss disturbance during MW/LW broadcast
- Electrical interference from TV, computer, fluorescent lamp, mobile phone, etc.
- Move set away from other electrical equipment
The alarm does not function
- Alarm time/modem not set
See SETTING THE ALARM
Volume too low for ALARM 1-RADIO
- Adjust the volume
- ALARM 1-RADIO not tuned to a radio station
- Check if the set is tuned to a radio station before setting the ALARM 1-RADIO, and when switching off
This product complies with the radio interference requirements of the European Union.
COMMANDES
① SLEEP/RADIO ON
④ ALARM 1 - RADIO and also PRESET 1
FM: Adjust the pigtail aerial for optimum reception.
Pas de son
Volume non régle
- Reglez le VOLUME
No hay sonido
- Electrical interference from TV, computer, fluorescent lamp, mobile phone, etc.
- Move set away from other electrical equipment
CENNI SU SLEEP (SONNO)
-POSSIBLE CAUSA
RIMEDIO
Assenza di suono
RESET (KASOWANIE USTAWIEN)
Cancelar Completely o alarme
Nāo há som
- Under呼吸道 testing, inhalation, and/or nasal swabs are used to confirm the presence of viral particles in the nasal swab. The nasal swab is then used to perform respiratory culture for the purpose of identifying the source of infection.
- Man kan genteage vækningen op til 6 gange, hvis man onsker det.
OM SLEEP (SLUMRE-FUNKTIONEN)
OM SLEEP (INSOMNINGSFUNKTIONEN)
Akooyovtai triypoi ota FM
Philips Consumer Electronics
Philips, Glaslaan 2
5616 JB Eindhoven, The Netherlands

Printed in Hong Kong