MM503 - Mill Manta - Free user manual and instructions
Find the device manual for free MM503 Manta in PDF.


| Product Type | Mill (Coffee/Spice Grinder) |
| Model | MM503 |
| Brand | Manta |
| Dimensions (H x W x D) | Approx. 20 x 10 x 10 cm |
| Weight | Approx. 500 g |
| Power Source | Electric (AC 220-240V, 50/60Hz) |
| Power Consumption | 150 W |
| Capacity | Up to 60 g beans |
| Grinding Settings | Adjustable coarseness (fine to coarse) |
| Material | Stainless steel burrs, plastic housing |
| Functions | Grinding coffee beans, spices, herbs |
| Operation | Push-button control |
| Safety Features | Overheat protection, non-slip base |
| Cleaning | Wipe with damp cloth; removable burrs for cleaning |
| Maintenance | Periodic oiling of burrs recommended |
| Spare Parts | Replacement burrs available from Manta |
| Warranty | 1 year limited warranty |
| Country of Origin | China |
| Certification | CE, RoHS |
Frequently Asked Questions - MM503 Manta
User questions about MM503 Manta
0 question about this device. Answer the ones you know or ask your own.
Ask a new question about this device
Download the instructions for your Mill in PDF format for free! Find your manual MM503 - Manta and take your electronic device back in hand. On this page are published all the documents necessary for the use of your device. MM503 by Manta.
USER MANUAL MM503 Manta
natural_image
White MANTA-branded electrician tool with stainless steel handle and meshing (no visible text or symbols)MM503
MM415 Microwave

natural_image
White microwave oven with black screen and control knobs (no visible text or symbols)Pojemność 17 l
Sterowanie manualne
Moc mikrofal 1200W/ Moc grila 900W
natural_image
Exterior view of a stainless steel microwave oven with open door and control panel (no visible text or symbols)Obudowa typu INOX
Pojemność 17 l
How to use you appliance ....12
Mincer....12
Making sausages 12
Making kebbe ....13
Guide Of Stuffed Kebbe....13
Tips....14
How to clean your appliance....14
Návod k obsluze
Uvodem....15
Seznám....16
A - Popychacz
B – Tacka podająca
C - Komora mielenia
natural_image
Diagram showing mechanical components and motion indicators (no text or labels)natural_image
3D rendering of a white plastic container with a cylindrical port and directional arrows indicating flow or movement (no text or symbols)natural_image
Mechanical component with a downward arrow indicating force or movement (no text or symbols visible)natural_image
White kitchen grater with a downward arrow indicating compression or lifting (no text or symbols visible)Mielenie:
natural_image
Mechanical assembly diagram showing a shaft, gear, and housing with directional arrows indicating motion (no text or labels)natural_image
Close-up of a white industrial machine tool with a conical tip and mechanical components (no visible text or symbols)INSTRUKCJA OBSŁUGI
natural_image
Mechanical device with a lever and handle, showing a downward arrow indicator (no text or symbols present)natural_image
Mechanical device with a cylindrical component and a base, showing no visible text or symbols.natural_image
Diagram showing mechanical components including a rotating gear, motor, and valve assembly (no text or labels)natural_image
Mechanical component with metallic shaft and housing, showing motion arrows (no text or symbols)natural_image
Close-up of a white kitchen feedstock with a downward arrow indicating compression (no text or symbols visible)natural_image
Mechanical device with a cylindrical component and a downward arrow indicator (no text or symbols)natural_image
Top-down view of a gray plastic electronic device casing with internal compartments and mounting holes (no text or symbols visible)natural_image
Exploded view of a mechanical component with internal cutouts and a separate cylindrical part (no text or symbols visible)If your appliance suddenly stops running:
- Pull the mains plug out of the socket.
- Press the switch button to turn off the appliance.
- Let the appliance cool down for 60 minutes.
- Put the mains plug in the socket.
- Switch the appliance on again.
CAUTION:
In order to avoid a hazardous situation, this appliance must never be connected to a timer switch.
Important
Read these instructions for use carefully and look at ● the illustrations before using the appliance.
Keep these instructions for use for future reference. ●
- Check if the voltage indicated on the appliance corresponds to the local mains voltage before you connect the appliance.
● Never use any accessories of parts from other manufactures. Your guarantee will become invalid if such accessories or parts have been used.
Do not use the appliance if the mains cord, the plug or other parts are damaged.
If the mains cord of this appliance is damaged, it must always be replaced by manufacture or a service center authorized. In order to avoid hazardous situations
Thoroughly clean the parts that will come into contact ● with food before you use the appliance for the first time.
Unplug the appliance immediately after use. ● Never use you finger or an object to push ingredients ● down the feed tube while the appliance is running. Only the pusher is to be used for this purpose.
- Keep the appliance out of the reach of children or inform persons. Do not let them use the appliances without supervision.
Never let the appliance run unattended. ●
●Switch the appliance off before detaching any accessory.
Wait until moving parts have stopped running before ● you remove the parts of the appliance.
●Never immerse the motor unit in water or any other liquid, nor rinse it under the tap. Use only a moist cloth to clean the motor unit.
- o not attempt to grind bones, nuts or other hard items.
●lever reach into the cutter housing. Always use the pusher.
Unplug the appliance immediately after use. ●
- o not operate the appliance for more than 15 minutes at one time. After 15 minutes continuous use, allow a few minutes rest before next use.
Never operation the appliance continuously for more ● than 3 minutes at 500W.
USER'S MANUAL
Description

A - Pusher
B - Tray
C - Cutter housing
D - Switch button
E - Reversal button
F - Reversal button
G - Motor unit
I - Fine grinding disc
J - Medium grinding disc
K - Worm shaft
L - Cutter blade x 2
M - Coarse grinding disc
N - Screw ring
O - Separator
P – Sausage horn
Q - Former
R - Cone
USER'S MANUAL
How to use you appliance
Mincer
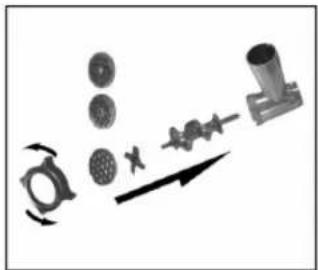
- Insert the worm shaft into the cutter housing, the plastic end first.
Place the cutter unit onto the worm shaft. (The cutting edges should be at the front)
Place the medium grinding disc or coarse grinding disc(depending on the consistency you prefer) onto the worm shaft. (Make sure the notch of the grinding disc fit onto the projections of the mincer head.)
natural_image
Diagram showing mechanical components and motion arrows, no text or symbols presentTurn the screw ring in the direction of the arrow on the cutter housing until it is properly fastened.
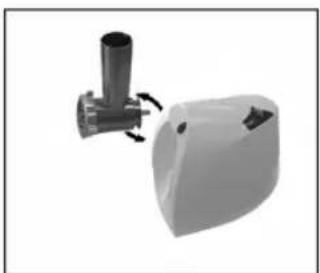
- Attach the cutter housing to the motor unit.
natural_image
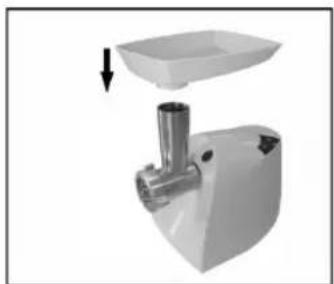
3D rendering of a mechanical component with a cylindrical shaft and housing, showing rotational motion arrows (no text or symbols)- Place the tray on the upright part of the cutter housing.
natural_image
Mechanical component with a downward arrow indicating force or direction (no text or symbols visible)- Now the appliance is ready for mincing MINCING:
Cut the meat into 10cm-long, 2cm-thick strips. Remove bones, pieces of gristle and sinews as much as possible. (Never use frozen meat!)
Put the meat in the tray. Use the pusher to gently push the meat into the cutter housing.
(For steak tartare, mince the meat with the medium grinding disc twice.)
Making sausages
- Mince the meat.

natural_image
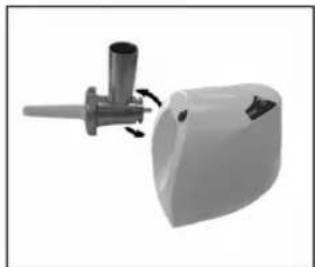
Mechanical assembly diagram showing a shaft, gear, and valve mechanism with directional arrow (no text or labels)Insert the worm shaft into the cutter housing, the plastic end first.
Place the separator in the cutter housing.
Place the sausage horn on the cutter housing.
And then screw the ring on the cutter housing.
(Make sure the notches of the separator fit onto the projections of the mincer head.)
natural_image
Mechanical component with a shaft and lever assembly, showing rotational motion (no text or symbols)- Attach the cutter housing to the motor unit.
natural_image
Mechanical device with a lever and handle, showing a downward arrow indicator (no text or symbols present)USER'S MANUAL
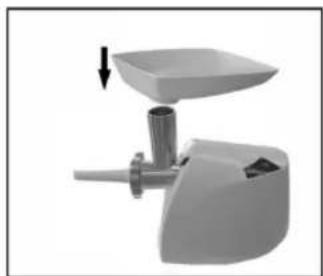
- Place the tray on the upright part of the cutter housing.

natural_image
Mechanical device with a cylindrical component and a base, showing no visible text or symbols.- Now the appliance is ready for making sausages.
Making sausages:
Put the ingredients in the tray. Use the pusher to gently push the meat into the cutter housing.
- Put the sausage skin in lukewarm water for 10 minutes. Then slide the wet skin onto the sausage horn. Push the (seasoned) minced meat into the cutter housing. If the skin gets stuck onto the sausage horn, wet it with some water.
Making kebbe
- Insert the worm shaft into the cutter housing, the plastic end first.

natural_image
Exploded view diagram of mechanical components (no text or labels)Place the cone in the cutter housing.
Place the former on the cutter housing and screw the ring on the cutter housing.

natural_image
Mechanical device with a cylindrical component and rotating arm (no visible text or symbols)(Make sure the notches of the separator fit onto the projections of the mincer head.)
- Attach the cutter housing to the motor unit.

natural_image
White kitchen utensil with a downward arrow indicating compression (no text or symbols visible)- Place the tray on the upright part of the cutter housing.

natural_image
Close-up of a white kitchen grater with a downward arrow indicating compression (no text or symbols visible)- Now the appliance is ready for making kebbe.
Making Kebbe:
Feed the prepared kebbe mixture through the kebbe maker. Cut the continuous hollow cylinder into the desired lengths and user as required.
- Bebble is a traditional Middle Eastern dish made primarily of lamb and bulgur wheat which are minced together to form a paste the mixture is extruded through the kebbe maker and cut into short lengths. The tubes can then be stuffed with a minced meat mixture, the ends pinched together and then deep fried.
Guide Of Stuffed Kebbe
Outer Casing
- 500g/1lb 2oz lamb, cut into strips
- 500g/1lb 2oz washed and drained bulgur wheat
- 1 small onion
Pass alternate batches of lamb and bulgur wheat through the mincer fitted with the fine screen, adding the onion before all the lamb and wheat are minced. Mix the minced lamb, onion and wheat together then pass back
USER'S MANUAL
through the mincer a second time. If an extra fine screen and mince the mixture for a third time, alternatively continue mincing using the fine screen. The mixture is now ready to extrude through the kebbe maker attachment.
Filling
- 400 g/14 oz lamb, cut into strips
- 15 ml/1 tbsp oil
- 2 medium onions, finely chopped
- 5-10 ml/ 1-2 tsp allspice
- 15 ml/1 tbsp plain flou
- Salt and pepper
To make the filling, mince the lamb using the fine screen, fry the onion in the oil until golden brown, add the lamb and allow to brown and cook through. Add the remaining ingredients and cook for 1-2 minutes. Drain off any excess fat if necessary and allow to cooling.
Extrude the casing mixture through the kebbe maker and cut into approximately 7 1/2cm/3in lengths. Pinch one end of the tube together, end which can be pinched together, then carefully fill with the stuffing mixture leaving a small gap at the open end which can be pinched together to seal. Deep fry the kebbe in batches in hot oil 190C/375F for approximately 6 minutes of until golden brown and the filling piping hot.
Tips
Lash down the power cord, then foist it into the place with arrow diagramming.

natural_image
Top-down view of a gray plastic electronic component with internal slots and mounting holes (no text or symbols visible)- if the appliance is plugged, please press Reversal button.

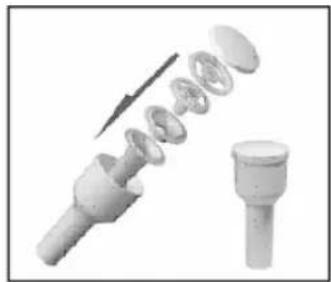
●the parts of "O", "P", "Q", "R" can be stowed in the pusher.
natural_image
Exploded view of a mechanical component with exploded view (no text or symbols)How to clean your appliance
Meat left behind in the cutter housing may be removed from the inside of the appliance by passing a slice of bread through the cutter housing.
- Before you clean the appliance, switch the appliance off and remove the plug from the socket.
- Press the release button and turn the whole cutter housing in the direction of the arrow. Remove the pusher and the tray.
- Unscrew the screw ring and remove all parts of the cutter housing. Do not clean the parts in the dishwasher!
- Wash all parts that have come into contact with meat in hot soapy water. CLEAN THEM IMMEDIATELY AFTER USE.
- Rinse them with clear hot water and dry them IMMEDIATELY.
- We advise you to lubricate the cutter unit and the grinding discs with some vegetable oil.
- The blades are very sharp, please attention.
NÁVOD K OBSLUZE
Návod k obsluze
Uvodem
A - Tlacidlo
B – Podávací podnos
C - Těleso hlavice
natural_image
Diagram showing mechanical components and directional arrows, no text or symbols presentnatural_image
Mechanical component with cylindrical shaft and housing, showing rotational motion (no text or symbols)natural_image
Mechanical component with a downward arrow indicating force or movement (no text or symbols visible)natural_image
Mechanical assembly diagram showing a shaft, gear, and housing with directional arrows indicating motion (no text or labels)natural_image
Mechanical component with a cylindrical shaft and curved housing, showing rotational motion (no text or symbols)natural_image
Mechanical tool with a lever and adjustment knob, no visible text or symbolsNÁVOD K OBSLUZE
natural_image
3D rendered mechanical component with a cylindrical top and base, showing internal structure and a downward arrow (no text or symbols)natural_image
Diagram showing mechanical components with arrows indicating motion (no text or labels)natural_image
Mechanical component with a cylindrical shaft and housing, showing motion arrows (no text or symbols)natural_image
Close-up of a white kitchen grater with a downward arrow indicating compression (no text or symbols visible)natural_image
Mechanical device with a cylindrical component and a downward arrow indicator (no text or symbols)Výroba kebbe
natural_image
Exterior view of a gray electronic device casing with internal compartments and mounting holes (no text or symbols visible)natural_image
Exploded view of a mechanical component with internal parts and a separate cylindrical part (no text or symbols visible)Cistení zařízení
A - Tolóka
B - Tál
C - Fejtörzs
D - Be-/kikapcsoló
natural_image
Diagram showing mechanical components and motion indicators (no text or labels)natural_image
Mechanical component with pipe fitting and housing (no visible text or symbols)natural_image
Mechanical component with a downward arrow indicating force or direction (no text or symbols visible)natural_image
White kitchen grater with a downward arrow indicating compression or lifting (no text or symbols visible)natural_image
Diagram of a mechanical assembly with rotating components and directional arrows (no text or labels)natural_image
Mechanical component with a cylindrical shaft and lever, showing motion arrows (no text or symbols)HASZNÁLATI ÚTMUTATÓ
natural_image
Mechanical device with a lever and handle, no visible text or symbolsnatural_image
Mechanical device with a cylindrical component and a base, showing no visible text or symbols.natural_image
Exploded view diagram of mechanical components (no text or labels)natural_image
Mechanical device with a cylindrical component and directional arrows indicating motion (no text or symbols visible)natural_image
Close-up of a white kitchen grater with a downward arrow indicating compression (no text or symbols visible)natural_image
Mechanical device with a cylindrical component and a downward arrow indicator (no text or symbols)natural_image
Exterior view of a gray plastic electronic device casing with internal circuitry and mounting holes (no text or symbols visible)natural_image
3D illustration of a mechanical component with exploded view showing internal parts (no text or symbols)A - Stopfer
B - Einfüllschale
C - Schneidkammer
natural_image
Diagram showing mechanical components and motion indicators (no text or labels)natural_image
3D rendering of a white plastic container with a cylindrical inlet and directional arrows indicating flow or movement (no text or symbols)natural_image
Mechanical component diagram showing a feeding or processing unit with a downward arrow indicating force (no text or symbols present)natural_image
White kitchen grater with a downward arrow indicating compression or lifting (no text or symbols visible)Zerkleinern:
natural_image
Mechanical assembly diagram showing a shaft, gear, and housing with motion arrows (no text or labels)natural_image
Close-up of a white mechanical component with a cylindrical shaft and a curved base, showing no visible text or symbols.natural_image
Mechanical device with a lever and handle, showing a downward arrow indicator (no text or symbols present)natural_image
Mechanical device with a cylindrical component and a base, showing no visible text or symbols.Wursterzeugung:
natural_image
Diagram showing mechanical components with arrows indicating motion or assembly (no text or labels)natural_image
Mechanical device with a cylindrical component and rotating arrow mechanism (no visible text or symbols)natural_image
Close-up of a white kitchen grater with a downward arrow indicating compression (no text or symbols visible)natural_image
Mechanical device with a cylindrical component and a downward arrow indicator (no text or symbols)natural_image
Top-down view of a gray electronic device casing with internal circuitry and mounting holes (no visible text or symbols)natural_image
Exploded view of a mechanical component with internal parts and a separate cylindrical part (no text or symbols visible)A - Толкатель
В – Подающая чашка
С – Камера размола
D – Выключатель
natural_image
Diagram showing mechanical components and motion indicators (no text or labels)natural_image
Mechanical component with cylindrical shaft and housing, shown in 3D rendering (no text or symbols)natural_image
Mechanical component with a downward arrow indicating force or motion (no text or symbols visible)natural_image
White kitchen grater with a downward arrow indicating compression (no text or symbols visible)Размол:
natural_image
Mechanical assembly diagram showing a shaft, gear, and housing with directional arrows (no text or labels)natural_image
Mechanical device with a cylindrical shaft and curved housing, showing rotational motion arrows (no text or symbols)natural_image
Mechanical kitchen tool with lever and handle (no visible text or symbols)natural_image
Mechanical device with a cylindrical component and a base, showing no visible text or symbols.natural_image
Diagram showing mechanical components with arrows indicating motion or assembly (no text or symbols)natural_image
Close-up of a mechanical component with a cylindrical shaft and a white housing, showing rotational motion arrows (no text or symbols)natural_image
Close-up of a white kitchen grater with a downward arrow indicating compression (no text or symbols visible)natural_image
3D rendering of a mechanical device with a cylindrical component and an arrow indicating direction (no text or symbols)natural_image
Exterior view of a mechanical component with internal slots and mounting holes (no text or symbols visible)natural_image
Exploded view of a mechanical component with internal components and a separate cylindrical part (no text or symbols visible)Очистка устройства
Brand : Manta
Model : MM503
Category : Mill