Missisipi - Exercise bike Spokey - Free user manual and instructions
Find the device manual for free Missisipi Spokey in PDF.


| Product Type | Magnetic Exercise Bike (Stationary Bike) |
| Brand | Spokey |
| Model | Missisipi |
| Assembled Dimensions (L x W x H) | 93 x 60 x 148 cm |
| Net Weight | 33 kg |
| Flywheel Weight | 7 kg |
| Maximum User Weight | 150 kg |
| Resistance System | Magnetic, computer-controlled |
| Resistance Levels | 1 to 16 |
| Power Supply | 230V/50Hz or 60Hz, adapter output 6V AC/0.5A |
| Display Functions | Speed, Distance, Time, Calories, Pulse, RPM, Watt, Body Fat, Recovery |
| Connectivity | Bluetooth for tablet (Android/iOS) |
| Programs | Manual, 12 preset programs, 4 user profiles |
| Pulse Measurement | Hand grip pulse sensors |
| Adjustable Saddle | Yes, vertical height via knob |
| Adjustable Handlebar | Yes, angle via knob |
| Transport Wheels | Yes, on front stabilizer |
| Included Accessories | Allen key wrench, combination wrench, adapter, water bottle holder |
| Safety Class | H and A (home use only) |
| Recommended Use | Home fitness, not for therapeutic or rehabilitation purposes |
Frequently Asked Questions - Missisipi Spokey
User questions about Missisipi Spokey
0 question about this device. Answer the ones you know or ask your own.
Ask a new question about this device
Download the instructions for your Exercise bike in PDF format for free! Find your manual Missisipi - Spokey and take your electronic device back in hand. On this page are published all the documents necessary for the use of your device. Missisipi by Spokey.
USER MANUAL Missisipi Spokey
MISSISIPI
830675
(PL) ROWER MAGNETYCZNY / 1
(EN) MAGNETIC BIKE / 5
(RU) МАГНЕТИЧЕСКИЙ ВЕЛОТРЕНАЖЕР / 9
(CZ) MAGNETICKÝ ROTOPED / 13
(SK) MAGNETICKÝ BICYKEL / 17
(LT) MAGNETINIS DVIRATIS / 21
(LV) MAGNĚTISKS VELOTRENAŽIERIS / 25
SCHEMAT / DIAGRAM / CXEMA / SCHÉMA / SCHEMA / SHÊMA / 29
NOTES Please keep this operation manual for future use. This exercise machine is intended for home use only.
SAFETY REMARKS
- Prior to the assembly of the device and training, read carefully this instruction manual. Safe and effective use of the device can be guaranteed only if it is assembled, maintained, and used appropriately, in a manner described in the manual. If you are not the user, please provide all the users with this instruction and inform them about all possible hazards and precautions.
- Prior to starting with any exercises, please consult a doctor in order to make sure that there are no mental or physical conditions that could be harmful to your health and safety. The consultancy with a doctor may also protect you against an inappropriate use of the device. A doctor will specify whether taking drugs that would have an effect on pulse, pressure or cholesterol level is justified.
- Pay attention to your body signals. Inappropriate or excessive training may have a negative influence on your health. Immediately stop exercising if any of the following symptoms occurs: pain, chest constriction, irregular pulse, exceptional shortness of breath, faints, vertigo, nausea. If any of the above symptoms occurs, contact your doctor immediately and give up training until then.
- Children and animals should be kept away from the device. The device is intended only and exclusively for adults.
- The device should be placed on a straight, stable and tough surface, protected with a mat or a carpet. For the sake of safety, 2 m of free space, needed for a safe usage, should be left to each side around the device. Prior to starting any exercises, make sure that all the bolts and nuts are tightly fitted. Please, pay special attention to the parts that are prone to wearing out the most.
- The safety of the equipment can only be guaranteed if it is subject to regular maintenance inspections and checks with relation to damages and wear
- The device should be always used in accordance with its purpose.
Should during the assembly or use any of the parts appear to be faulty
- or make alarming sounds, stop using the exerciser and have it serviced. You must not use a damaged device.
- During training, wear appropriate clothes. Avoid loose clothes that could get caught in the device or such that could restrict or even make movement impossible. It is also advised to exercise in appropriate sport shoes. At the beginning, set a slow pace. During exercises, hold handgrips and do not leave the saddle.
- The bicycle is intended for home use. Maximum allowed user's body weight amounts to 150 kg.
- Take special precautions while lifting and moving the device. The device should be always moved by two persons. While lifting or moving the equipment, maintain an appropriate posture so as to avoid backbone damage.
- The equipment was counted among class H and A and is intended for home use exclusively. The equipment is not suitable for therapeutic or rehabilitation purposes
- While assembling the device, strictly follow the enclosed instruction and use only the parts included in the set. Prior to the assembly, check whether the set contains all the parts that the enclosed list includes.
- It is advised against leaving control devices, which could restrict movement, in such a position that any of the elements sticks out.
Warning: prior to starting a training on this device, read the instruction manual carefully.
We do not hold responsibility for injuries or damages to objects caused by an inappropriate use of
This product.
Body injuries may happen due to an inappropriate or too intensive training.
TECHNICAL SPECIFICATIONS
Net weight - 33 kg
Flywheel - 7 kg
Dimensions of the assembled exercise machine - 93 x 60 x 148 cm
Maximum weight of the user - 150 kg
LIST OF PARTS
Diagram - p. 30
| Part | Desc. | Qty |
| 1 | Computer | 1 |
| 2 | Screw M5 | 4 |
| 3L | Computer plastic cover (Left) | 1 |
| 3R | Computer plastic cover (Right) | 1 |
| 4 | Screw M5 | 3 |
| 5 | Self-tapping screw M4 | 7 |
| 6 | Saddle | 1 |
| 7 | Round head screw M7 | 1 |
| 8 | Tube spacer | 1 |
| 9 | T-shaped Knob | 1 |
| 10 | Spring washer | 1 |
| 11 | Tube end cap | 2 |
| 12L | Seat post plastic cover(Left) | 1 |
| 12R | Seat post plastic cover(Right) | 1 |
| 13 | Handlebar post | 1 |
| 14 | Screw M5 | 2 |
| 15 | Seat post | 1 |
| 16 | Tube bundle | 1 |
| 17 | Round head grooved pin | 1 |
| 18 | Motor cable | 1 |
| 19 | Knob M12 | 1 |
| 20 | Slide tube | 1 |
| 21 | Nut | 1 |
| 22 | Bearing | 3 |
| 23 | Washer | 3 |
| 24 | Wave washer | 1 |
| 25 | C shaped washer | 1 |
| Part | Desc. | Qty |
| 30 | Anti-loose hex head bolt M8 | 2 |
| 31 | Crank end cap | 2 |
| 32L | Pedal (Left) | 1 |
| 32R | Pedal (Right) | 1 |
| 33 | Self-tapping screw M4 | 8 |
| 34 | Nut M10 | 2 |
| 35 | Hex nut M10 | 2 |
| 36 | Bearing | 1 |
| 37 | Washer | 1 |
| 38 | Flywheel | 1 |
| 39 | Oneway bearing | 1 |
| 40 | Bearing | 1 |
| 41 | Axle for flywheel | 1 |
| 42 | Small belt wheel | 1 |
| 43 | Bearing | 1 |
| 44 | Flywheel shaft | 1 |
| 45 | Tapered spring | 1 |
| 46 | Hex screw M6 | 1 |
| 47 | Nut M6 | 1 |
| 48 | Washer | 1 |
| 49 | Nut M6 | 1 |
| 50 | Plastic washer | 1 |
| 51 | Hex screw M6 | 2 |
| 52 | Manget set | 1 |
| 53 | Washer | 2 |
| 54 | Spring washer | |
| 55L | Rear end cap Left | 1 |
| Part | Description | Qty |
| 62 | Hex nut M8 | 1 |
| 63 | Idler rack | 1 |
| 64 | Spring | 1 |
| 65 | Flat washer | 4 |
| 66 | Allen head screw M8 | 5 |
| 67 | Wave washer | 1 |
| 68 | Idler | 1 |
| 69 | Sensor | 1 |
| 70 | Washer | 2 |
| 71 | Belt wheel | 1 |
| 72 | Belt | 1 |
| 73 | Pedal Axle | 1 |
| 74 | Allen head screw M8 | 3 |
| 75 | Upper protective cover | 1 |
| 76L | Front end cap Left | 1 |
| 76R | Front end cap Right | 1 |
| 77 | Front Stabilizer | 1 |
| 78 | Screw M5 | 14 |
| 79 | Curved washer | 2 |
| 80 | Main frame | 1 |
| 81 | Lower computer cable | 1 |
| 82 | Handlebar | 1 |
| 83 | Hand pulse pad | 2 |
| 84 | Handlebar foam | 2 |
| 85 | End cap | 2 |
| 86 | Self-tapping screw M3.5 | 2 |
| 87 | Hand pulse cable | 2 |
| 26 | Joint lever | 3 |
| 27L | Front plastic cover (Left) | 1 |
| 27R | Front plastic cover (Right) | 1 |
| 28L | Chain cover (Left) | 1 |
| 28R | Chain cover (Right) | 1 |
| 29L | Crank (Left) | 1 |
| 29R | Crank (Right) | 1 |
| 55R | Rear end cap Right | 1 |
| 56 | Allen head screw M8 | 4 |
| 57 | Rear Stabilize | 1 |
| 58 | DC line | 1 |
| 59 | Motor | 1 |
| 60 | Screw M5 | 3 |
| 61 | Nut M8 | 1 |
| 88 | Handlebar holder plate | 1 |
| 89 | Upper computer cable | 1 |
| 90 | Allen key wrench | 1 |
| 91 | Combination wrench | 1 |
| 92 | Adapter | 1 |
| 93 | Plastic water bottle holder | 1 |
| 94 | Screw M5 | 2 |
INSTALLATION INSTRUCTIONS (Drawings - p. 32 - 35)
STEP 1 Connect the front stabilizer (77) with the main frame (80) using two M8 screws (56). Next, repeat the same step with the rear stabilizer (57).
STEP 2 The next stage of the bike assembly process is mounting the guard of the handlebar post (75) and connecting the handlebar post (13) with the main frame (80). Note: please remember to carefully connect the protruding cables: the lower cable (81) and the upper cable (89).
Please exercise particular caution while mounting the handlebar post so as to avoid accidental damage to the cables.
Next, screw the handlebar post (13) to the main frame (80) using the screws (66) and washers (65, 79).
STEP 3 Connect the saddle (6) with the post base (15) using two nuts.
Next, put the saddle post (15) into the main frame (80) and place the spring knob (17) in the saddle post.
STEP 4 Next, connect the left pedal (32) and the right pedal (32) with the main frame pin (29).
Note: the right pedal should be screwed clockwise, and the left pedal should be screwed counterclockwise.
Please connect the strips attached with the pedals. "R" means the right pedal, "L" means the left pedal.
STEP 5 The next step is connecting the meter cables (1) with the cables protruding from the handlebar post (87, 89).
Next, please mount the meter (1) at the top of the handlebar post using four M5 screws (2).
The next stage is mounting the handlebar (82) on its post (13) using the clamp (88) and the knob (9). Using the knob, you can adjust the position of the handlebar. Please remember to connect the pulse sensor cables according to the drawing.
STEP 6 Please connect the handlebar guards (3) with the handlebar (82) using the M4 screw (5) and the M5 screw (4). In order to start exercising, connect the power adapter to the power source.
Moving the device (drawing - p. 35)
Lift the trainer carefully onto the front transport wheels and holding it on both sides, move it to a chosen place.
RESISTANCE ADJUSTMENT
The function of intensity regulation allows you to change pedal resistance. High resistance requires a greater effort during pedalling while a low one reduces the needed effort. Resistive force can be regulated by means of
the computer. To achieve a satisfying result, intensity should be adjusted during a workout, by means of buttons UP (+) and DOWN (-). Available resistance levels: from 1 to 16. The load system is independent of speed.
Height adjustment of the bike saddle (drawing - p. 36)
Bike saddle height can be adjusted by removing the handwheel and setting the saddle shank at the correct height.
The shank of the bike saddle has a few holes, i.e. a few possible ways to get the right seat height.
To adjust the saddle height, loosen the bolt clamping the seat shank in a bike frame.
Then select the appropriate seat height for a user by moving the saddle shank up or down.
After selecting a given height, tighten the handwheel so that it is not possible to change the position of the saddle shank.
Note: Do not remove the seat shank above the minimum or maximum signs marked on the shaft of the bike saddle.
Handlebar position adjustment (drawing - p. 36)
The position of handlebars can be adjusted by turning the handwheel in a counter-clockwise direction, and setting it in an appropriate position. Make
sure to tighten the handwheel, so that the set position is well secured.
Levelling (drawing - p. 36)
Before starting your workout, you should check if the device is stable.
Please level the trainer with the rear stabilizer legs.
HOW TO OPERATE THE BIKE METER
Power supply – in order to use the computer functions, before starting a workout session, plug the power supply into an electrical outlet. After the above mentioned action has been completed, the display screen will switch on and make a specific sound immediately after being switched on.
Programme choice – Please, use UP and DOWN buttons to choose an appropriate programme and press MODE to confirm your choice.
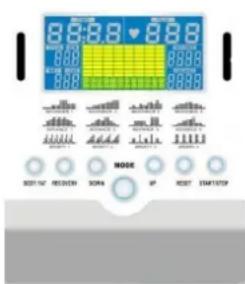
The meter was designed in order to make it possible to connect it with a tablet over Bluetooth.
The following Android or iOS system should be installed on the tablet:
Android tablet OS 4.0 or higher
Android tablet resolution 1280X800 pixels
Android phone OS 4.0 or higher
Android phone resolution 800X480 pixels
You can install a number of free software programs on the tablet to entertain yourself during the training session, ie. iconsole.
Note: connecting a tablet over Bluetooth can affect the performance of the wireless network.
In order to connect a tablet, perform the following steps:
a) activate Bluetooth on the tablet,
b) find the console device and connect to it,
c) activate iconsole, and then the connection button in order to start exercising.
d) password: 0000
Buttons
DOWN - This button allows you to:
reduce the entered value
choose a workout programme
RECOVERY - Press the RECOVERY button in order to check the status of heart beat rate
BODY FAT- Press the BODY FAT button in order to check the fat level in the body expressed as % and in order to check the BMI level, that is – the body fat index level considering the user's height, weight, and sex
RESET - Press the RESET button in order to:
confirm the function or program selected
return to the main menu
reset the values or return to the original values by pressing the button and holding it for 2-3 seconds (after you finish the training session),
START/STOP - Press the START/STOP button in order to start or end a workout session. After pressing the button, exercises can be started. All the values are counted from "0" up. confirm the program selection
UP - This button allows you to:
increase the entered value
choose a workout programme
MODE - This button is used to:
confirm the selection of the function whose value you want to specify, that is – time, distance, calories, pulse
Switching on / off automatically (auto on/off)
The display screen switches on automatically when you plug the power supply into an electrical outlet, start moving the pedals or press any button.
Functions
SPEED – Displays the current speed of doing exercises (0.0\~99.9 km/h)
DISTANCE - Displays the distance covered during an exercise (0.00\~99.99 km)
TIME – Displays workout time (0:00\~99:59)
CALORIES – Displays the number of calories burnt during an exercise (0\~999)
PULSE – Displays a current pulse rate. Pulse is measured by means of sensors installed in the handlebar grips (P\~30\~240)
Warning: the heart beat monitoring systems may be imprecise. Too much exercise can lead to serious injuries or death. If you feel faint, stop exercising immediately
RPM - Displays a current number of turns per minute (0\~999)
WATT – absorbed energy, including time, covered distance and burnt calories (10\~350)
AGE – in order to use some of the programmes, it is needed to enter age which is indispensable to calculate an appropriate pulse rate for a particular age.
RECOVERY: In order to use this function, press the RECOVERY button after you complete your exercise session and immediately place both of
The display screen switches off automatically when you stop training for longer than 4 minutes or unplug the power supply from the electrical outlet.
your palms on the pulse sensors. All the values, except for time, will be erased from the display. Then the countdown from 1 minute to 0:00 will start. After this phase is finished, the current H.R.C status, that is the measurement of resting pulse rate with fitness assessment, will be displayed. The available levels are: F1 (best)-F6 (worst). In order to return to the main menu, press the RECOVERY button again.
Attention: if the letters „P“ or „ERR“ appear on the display, this means that the meter has not received any signal from the pulse sensors. In such a case, please repeat the steps starting from the beginning, paying special attention to placing both of your palms on the pulse sensors.
NUMBER OF USERS – four (U1\~U4)
HRC – in order to use this function, provide your age. Next, select the appropriate program in accordance with the options provided below: 55% (light), 75% (medium), 90% (sport).
TEMPERATURE, CALENDER, CLOCK – this information is displayed when the equipment is connected to a power source and not used for exercising.
Programmes - basic rules of use (diagrams, p. 37)
- Choose an appropriate programme (from P 1 to P 12) by means of the UP, DOWN buttons.
- Confirm the choice of programme by pressing the MODE button.
■ Before starting to exercise with the use of a specific programme, by means of the UP and DOWN buttons, values that you want to achieve in case of the following functions: TIME, DISTANCE, CALORIES,
PULSE can be set. Confirm the choice of he values by pressing the MODE button.
- Workout session starts at the moment of pressing the START/STOP button.
- During an exercise, resistance level can be changed by pressing the UP and DOWN button.
Manual programme
- During an exercise, resistance level can be changed by pressing the UP and DOWN button.
- by means of the UP and DOWN buttons, values that you want to achieve in case of the following functions: TIME, DISTANCE, CALORIES, PULSE can be set. Confirm the choice of the values by pressing the MODE button.
-
After entering all the values, press the START button in order to start
-
exercising. During an exercise, all the values are counted down. Each time, after reaching the particular value of a function, the computer will make a specific sound and stop counting.
- In the case when one of the values of the above mentioned functions has been reached and the other have not been reached yet, press the START/ STOP button in order to continue exercising.
User's programmes (u1\~u4)
- Choose an appropriate programme by means of the UP, DOWN buttons.
■ Before starting to exercise, the following data need to be entered: sex, age, height, weight. -
Confirm the choice of the programme and entered data by pressing the MODE button.
-
Before starting to exercise, the user can freely, by means of the UP and
- DOWN buttons, set the values that he/ she wants to achieve as for TIME, DISTANCE, CALORIES, PULSE, RESISTANCE. Confirm the choice of the values by pressing the MODE button.
- The entered values are kept in the computer memory. Each graph comprising 10 columns illustrates the user's profile.
E-2 error
- If the "E-2" message appears on the display, press and hold the following buttons simultaneously for about 5-6 seconds:
■ MODE + START/STOP + RESET -
The "255" code should appear on the display.
-
Next, press the lower "√" button 4 times.
- The number 101 or 99 will be displayed.
- Press and hold the RESET button for about 3 seconds.
- The meter should be reset.
Computer power supply:
230V/50Hz or 60Hz Output: 6V AC/0.5A
In the event when the display screen fails to switch on, unplug the power supply from the electrical outlet and wait 15 seconds.
Device error
If on the display screen no readout appears, make sure that all the cables are connected appropriately.
MAINTENANCE
- Prior to each use of the bicycle, make sure that all the bolts, nuts and knobs are tightly fitting.
- Aggressive cleaning products must not be used to clean the device. Use a soft, damp cloth to remove dirt and dust. Clean sweat traces since acidic pH may damage the upholstery.
- The device should be kept in a dry place in order to protect it against dampness and corrosion.
- Should the computer work incorrectly, make sure that all the cables are
connected appropriately, especially the upper cable with the computer. If the computer still does not work, make sure that batteries have been put in appropriately and that they are not worn-out. If the readout on the display screen is not legible or some elements are invisible, replace batteries immediately.
- In case of no resistance adjustment, make sure that the upper sensor cable is well connected with the lower cable.
USAGE
Your body position
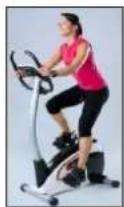
Sit on the saddle, put your feet in the pedals so that they are blocked between the pedal base and the protective belt, put your hands on the handlebar. During exercises, keep your back straight (see the drawing below).
Exercises with the use of stationary bicycle can replace exercises done with the use of an ordinary bicycle.
Shaping your muscles
To shape your muscles during exercises, you should increase the resistance substantially. This will bring about the increased muscle tension and it may mean that you will not be able to train for as long as you want. If you would also like to exercise your fitness, you should change your training programme. You should exercise practising the
following stages: warm-up stage, proper training stage and relaxation stage. However, at the end of your training, you should increase the resistance, so that you can enhance the workout of your leg muscles. You should also reduce your speed, so that the pulse remains at the indicated level.
Weight loss
An important factor here is the effort you put into your exercises. The longer and harder you train, the more calories you will burn. It will be a success to obtain the same efficiency as for fitness training.
Intensive training, which helps you to lose your weight, should be carried out more frequently, for at least approx.: 45-50 minutes
TRAINING MANUAL
Adherence to the following TRAINING CYCLE will bring many benefits to your health, such as physical fitness, muscle development and weight loss - in conjunction with the calorie intake control.
Warm-up stage
This step guarantees a proper flow of blood through the body systems, as well as it ensures the correct work of your muscles. Warming up reduces the risk of contraction and muscle damage. It is recommended to do a few stretching exercises as set out in the figures set out below. Each position
should be maintained for about 10-15 seconds. Do not strain or pull muscles during your exercises. If you happen to experience any pain, you should stop immediately. Repeat every exercise several times.

Stretching the muscles of your thighs and buttock Do the exercise as shown in the figure.
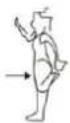
Stretching the muscles of your thighs
Put your right hand on the wall. Grasp your left foot with the left hand. Then grasp your right foot with the right hand.

Stretching the muscles of your thighs and knees Sit on the floor. Pull the legs forward. Then bend forward to touch the feet with your hands

Stretching the muscles of your upper body Stand on the floor with your legs slightly apart, place both hands over your head (as shown in figure), and then stretch the arm muscles.
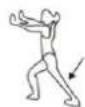
Stretching the muscles of your calves
Stand next to the wall with your legs apart. Put your hands against the wall. Throw your legs back alternately to stretch the leg muscles.

Stretching the muscles of your legs
Lie down on the floor. Bend your knees and pull them to the chest.
Training stage, relaxation, manner of finishing training session and braking
This stage requires your effort. In time, with regular training, your leg muscles become more flexible. You should exercise at your own pace, but it is important to constantly keep the same speed.
Relaxation allows you to restore a normal heartbeat and "cool down" your muscles. This stage is a repetition of the warm-up and it should be continued for about 5 minutes. Please repeat the stretching exercises, remembering not to strain your muscles. It is recommended to train at least three times a week.
In order to stop the exerciser, stop pedalling. The bicycle is not equipped with a blocking system and a safety brake. Braking system is not adjustable and independent of speed.

Refers to the meter
The equipment label depicting a crossed-out wheeled bin symbol informs that it is forbidden to dispose of waste electrical and electronic equipment together with other types of waste. In accordance with the WEE directive on waste electrical and electronic equipment, separate waste management processes should be applied for this type of equipment. The user who intends to dispose of such a product is obliged to return it to an electronic equipment collection point thanks to which they can contribute to its re-use, recycling, and recovery and, in this way, protect the environment. To do this, contact the sales point where the equipment was purchased or a representative of the local authorities. Hazardous substances included in electronic equipment can have negative long-term influence on the natural environment and they can also have negative effect on human health.

KROK / STEP / ШАГ / ŽINGSNIS / SOLIS 1


KROK / STEP / WAF / ZINGSNIS / SOLIS 2


(79)

(65)

(66)

KROK / STEP / ШАГ / ŽINGSNIS / SOLIS 3

KROK / STEP / ШАГ / ŽINGSNIS / SOLIS 3

KROK / STEP / ШАГ / ŽINGSNIS / SOLIS 5.1

KROK / STEP / ШАГ / ŽINGSNIS / SOLIS 5.2


KROK / STEP / ШАГ / ŽINGSNIS / SOLIS 6


PRZENOSZENIE URZĄDZENIA / MOVING THE DEVICE / ПЕРЕНОС УСТРОЙСТВА / PŘENÁŠENÍ ZAŘÍZENÍ / PRENÁŠANIE ZARIADENIA / İRENGINIO PERKĚLIMAS I KITĄ VIETĄ / IERİCES PĂRVIETOŠANA


REGULACJA SIODEŁKA / ADJUSTMENT OF THE BIKE SADDLE / PEGYLIPOVBKA CEDLA / NASTAVENÍ SEDLA / NASTAVENIE SEDADLA / SĘDYNĖS REGULIAVIMAS / SĘDEKŁA REGULĘŚANA
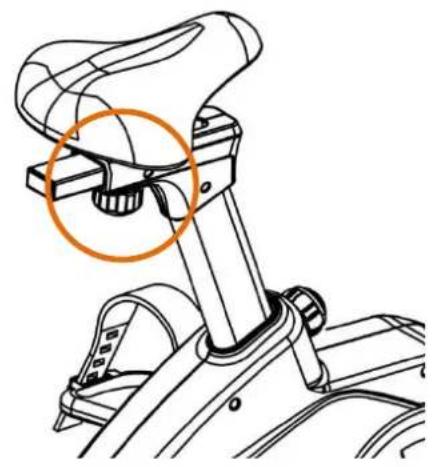

(PL) Gałka do regulacji
(EN) Knob
(RU) Ручка для регулировки
(CZ) Knoflik pro regulace
(SK) Kluka na regulovanie
(LT) Reguliavimo rankutė
(LV) Regulēšanas rokturis
REGULACJA POŁOŻENIA KIEROWNICY / ADJUSTING THE HANDLEBAR HEIGHT / PEGYLIROVKA POLOЖЕНИЯ РУЛЯ / NASTAVENÍ POLOHY RÍDÍTEK / REGULÁCIA NASTAVENIA VOLANTU / VAIRO PADĚTIES REGULIAVIMAS / STŮRES POZÍCIJAS REGULĚŠANA
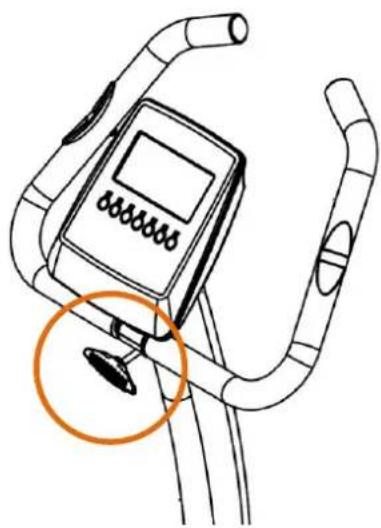
(PL) Gałka do regulacji
(EN) Knob
(RU) Ручка для регулировки
(CZ) Knoflík pro regulace
(SK) Kluka na regulovanie
(LT) Reguliavimo rankutė
(LV) Regulēšanas rokturis
POZIOMOWANIE URZĄDZENIA / LEVELLING / ГОРИЗОНТАЛЬНОЕ РАЗМЕЩЕНИЕ УСТРОЙСТВА / KALIBRACE ZAŘÍZENÍ / VODOROVNÁ POLOHA ZARIADENIA / PRIETAISO HORIZONTALUMO NUSTATYMAS / IERÍCES HORIZONTĚLA NOVIETOŠANA

(PL) Zaślepki tylnego stabilizatora
(EN) Rear Stabilizer End Cap
(RU) Заглушки заднего стабилизатора
(CZ) Záslepky zadního stabilizátoru
(SK) Záslepky zadného stabilizátora
(LT) Užpakalinio stabilizatoriaus aklės
(LV) Pakalējā stabilizatora tapas
DOKUMENT GWARANCYJNY


LIVEWITH PASS!ON
PL
Spokey sp. z o.o.
ul. Woźniaka 5,
40-389 Katowice
biuro@spokey.pl / office@spokey.eu
Distributors:
CZ
- MISSISIPI
- SAFETY REMARKS
- TECHNICAL SPECIFICATIONS
- INSTALLATION INSTRUCTIONS (DRAWINGS - P. 32 - 35)
- MOVING THE DEVICE (DRAWING - P. 35)
- RESISTANCE ADJUSTMENT
- HEIGHT ADJUSTMENT OF THE BIKE SADDLE (DRAWING - P. 36)
- HANDLEBAR POSITION ADJUSTMENT (DRAWING - P. 36)
- LEVELLING (DRAWING - P. 36)
- HOW TO OPERATE THE BIKE METER
- BUTTONS
- SWITCHING ON / OFF AUTOMATICALLY (AUTO ON/OFF)
- FUNCTIONS
- NUMBER OF USERS – FOUR (U1\~U4)
- PROGRAMMES - BASIC RULES OF USE (DIAGRAMS, P. 37)
- MANUAL PROGRAMME
- USER'S PROGRAMMES (U1\~U4)
- E-2 ERROR
- COMPUTER POWER SUPPLY
- DEVICE ERROR
- MAINTENANCE
- USAGE
- YOUR BODY POSITION
- SHAPING YOUR MUSCLES
- WEIGHT LOSS
- TRAINING MANUAL
- WARM-UP STAGE
- STRETCHING THE MUSCLES OF YOUR THIGHS
- STRETCHING THE MUSCLES OF YOUR CALVES
- STRETCHING THE MUSCLES OF YOUR LEGS
- TRAINING STAGE, RELAXATION, MANNER OF FINISHING TRAINING SESSION AND BRAKING
- REFERS TO THE METER
- DOKUMENT GWARANCYJNY
- LIVEWITH PASS!ON
Brand : Spokey
Model : Missisipi
Category : Exercise bike