BK2S - Food processor Eldom - Free user manual and instructions
Find the device manual for free BK2S Eldom in PDF.


| Product Type | Food Processor |
| Model | BK2S |
| Brand | Eldom |
| Dimensions (approx.) | 30 x 20 x 30 cm |
| Weight (approx.) | 3 kg |
| Power | 800 W |
| Bowl Capacity | 1.5 L |
| Speed Settings | 2 speeds + pulse |
| Functions | Blending, chopping, mixing, dough kneading |
| Blade Material | Stainless steel |
| Housing Material | Plastic |
| Safety Features | Non-slip feet, safety lock, overload protection |
| Dishwasher Safe Parts | Bowl, lid, blades, accessories |
| Accessories Included | Stainless steel blade, whisk, dough hook |
| Warranty | 2 years |
Frequently Asked Questions - BK2S Eldom
User questions about BK2S Eldom
0 question about this device. Answer the ones you know or ask your own.
Ask a new question about this device
Download the instructions for your Food processor in PDF format for free! Find your manual BK2S - Eldom and take your electronic device back in hand. On this page are published all the documents necessary for the use of your device. BK2S by Eldom.
USER MANUAL BK2S Eldom
natural_image
Exterior view of a modern ELDOM blender with clear glass and black casing (no text or symbols visible on body)Eldom sp. z o.o.
natural_image
Two kitchen blender units shown from different angles (labeled 7, 8, 9), no text or symbols on the objects themselves.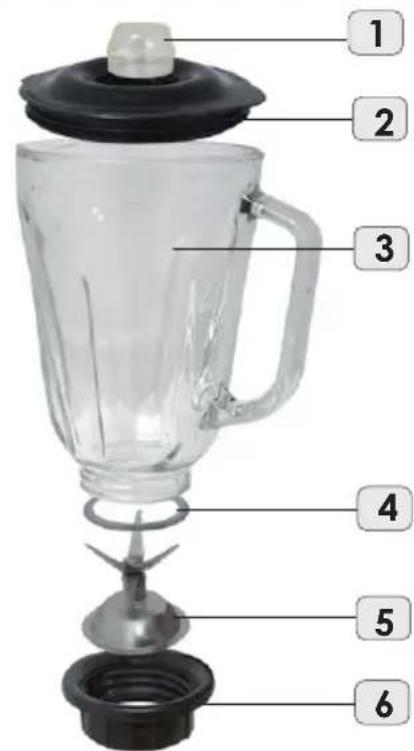
DANE TECHNICZNE
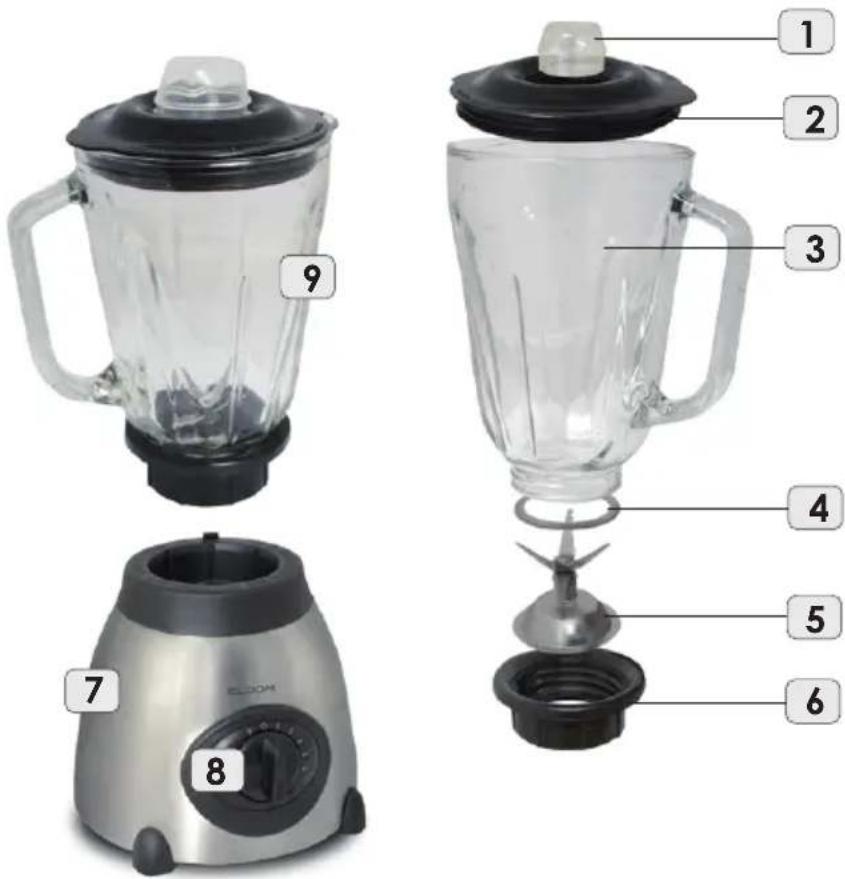
- Measuring Cup
- Lid
- Glass Jar
- Sealing ring
- Cutting blade
- Cup base
- Motor Base
- Rotary switch
- Jar Assembly
TECHNICAL DATA
- power: 500W
- mains voltage: 230V \~50Hz
- maximum time of continuous
operation: 3 minutes - break before continuation of operation: 1 minute
HOW TO USE THE APPLIANCE
All parts of the blender are to be thoroughly cleaned before being used for the first time. (see section: cleaning and maintenance).
Assembling the Glass Jar:
- Make sure that the blender is switched off (Switch in the '0' setting).
- Put the rubber sealing ring (4) on the inner edge of the blade unit (5).
- Put the blade unit with sealing ring into the cup base (6).
- Insert the assembled Cup Base onto the bottom of the glass jar and secure tightly.
- Mount the glass cup (3) onto the cup base unit and tune the cup base unit, and turn clockwise until glass jar locks into place.
- Mount the Measure Cup (1) onto the Lid (2).
- Secure the Lid onto Glass Jar and press down.
How to Use
- Place the foodstuff you wish to process into the glass jar.
- Put the lid on the glass jar and close securely.
Place the measuring cap into the hole in the lid and turn clockwise to lock.
- Switch on the motor base (see table: speed setting)
Make sure you observe the maximum time of continuous operation of the appliance. Exceeding the time limit and failing to provide appropriate breaks during the operation of the appliance may cause irreparable damage to the engine.
After using the blender, always move the switch into the '0' setting and pull out the mains plug. To remove the glass jar simply lift it off the motor base. You do not have to rotate the glass jar to remove it.
| Speed setting Use | |
| Low (1-2 setting) | for light usage with liquids |
| High (3-5 setting) | for more solid consistency, for mixing liquids and solid foodstuffs |
| Pulse ( hold the switch in the „P" setting) | or ice crushing & short, powerful impulse movements |
USEFUL TIPS
- To achieve the best results when pureeing solid ingredients, place small portions into the glass jar one by one instead of placing a large quantity all at once.
- If you are processing solid ingredients, cut them into small pieces (2-3cm) first.
- Always place your hand on top of the blender when you are operating the device.
- Be careful when processing hot liquids.
- For stirring solid or very thick liquid ingredients we recommend that you use the blender in impulse mode to prevent the blades from becoming stuck.
CLEANING AND MAINTENANCE
Simple cleaning / rinsing out the assembled glass jar:
- Empty the glass jar and fill it with water.
- Place the glass jar on the motor base and turn the switch several times into the 'P' setting.
- Empty the glass jar and rinse until clean.
Thorough cleaning of the dismantled glass jar:
- Ensure that the glass jar is completely empty before you unscrew the retaining ring.
- Be careful when handling the cutting blade.
- All removable parts are suitable for the dishwasher.
Motor Base:
- Never immerse the motor base in water.
- Wipe it only with a moist cloth.
ENVIRONMENTAL PROTECTION
- the appliance is made of materials which can be recycled,
- it should be handed over to the applicable collection point for the recycling of electrical and electronic equipment
WARRANTY
- this appliance is designed for domestic use only,
- it cannot be used for professional purposes or for other than the intended use,
- improper use will nullify the guarantee. Warranty details in the appendix
SAFETY INSTRUCTIONS
- carefully read all instructions before using the appliance
- connect the appliance only to a suitably earthed socket compatible with the parameters indicated in the instructions
- to protect against electrical shock, do not immerse cord, plug or appliance itself in water or other liquids.
- do not use outdoors
- do not touch hot surfaces. Use handles or knobs.
- close supervision is necessary when appliance is used by or near children.
- Make sure you observe the maximum time of continuous operation of the appliance. Exceeding the time limit and failing to provide appropriate breaks during the operation of the appliance may cause irreparable damage to the engine.
- do not place any of the following materials inside the unit: Paper, cardboard, plastic and the like.
- Do not turn the device on when the container is not properly placed on the casing of the engine or when the lid with measure is not properly placed.
- always place your hand on top of the blender when you are operating the device
- Before taking the container out from the casing of the engine or before raising the lid, turn the device off (switch in the position "0") and wait until the blade will completely stop.. Unplug from outlet when not in use and before cleaning. Allow to cool before putting on or taking off parts.
- do not let cord hang over edge of table or counter or touch hot surfaces.
- oversized foods or metal utensils must not be inserted in the appliance as they may cause a fire or risk of electrical shock.
- a fire may occur if the appliance is covered or touching flammable material including curtains, draperies, walls and the like when in operation.
- this appliance is not intended for use by person (including children) with reduced physical, sensory or mental capabilities, or lack of experience and knowledge, unless they have been given supervision or instruction concerning use of the appliance by a person responsible for their safety. Children should be supervised to ensure that they do not play with the appliance.
- It is essential to pay attention not to plug in too many receivers into one power supply circuit.
- do not clean with metal scouring pads. Pieces can break off the pad and touch electrical parts, involving a risk of electrical shock.
- never use the appliance if the supply cord is damaged. If found damaged in any way, consult the producer's authorized service centre. The list of service centres is to be found in the appendix and on www.eldom.eu
- refer servicing to an authorized service centre. Modifying the appliance or using spare parts or elements other than the original ones is forbidden and can expose the user to hazard
- Eldom sp. z o.o. shall not be responsible for any damages occurring as a result of improper usage
natural_image
Two kitchen appliances: a plastic blender with lid and a stainless steel blender with control knob, both labeled with numbers 7 and 8 (no text or symbols on the objects themselves)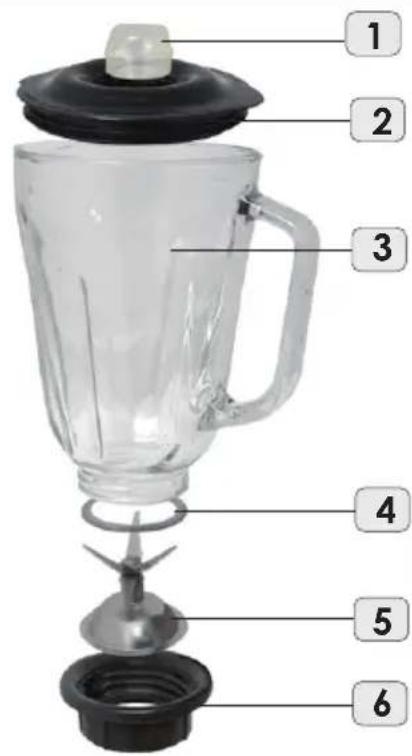
TECHNISCHE DATEN
natural_image
Close-up of a plastic blender with black lid and side ports (no visible text or symbols)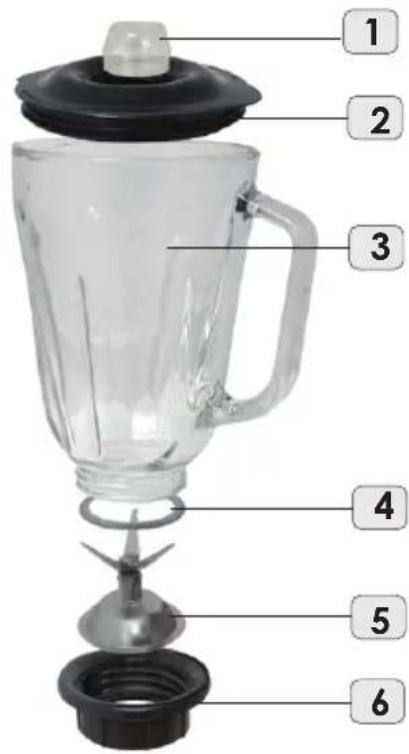
natural_image
Close-up of a modern stainless steel blender with labeled buttons (7 and 8), no visible text or symbols on the device itself.natural_image
Two kitchen appliances: a plastic blender and a stainless steel blender, both with numbered labels (7, 8, 9) indicating part numbers.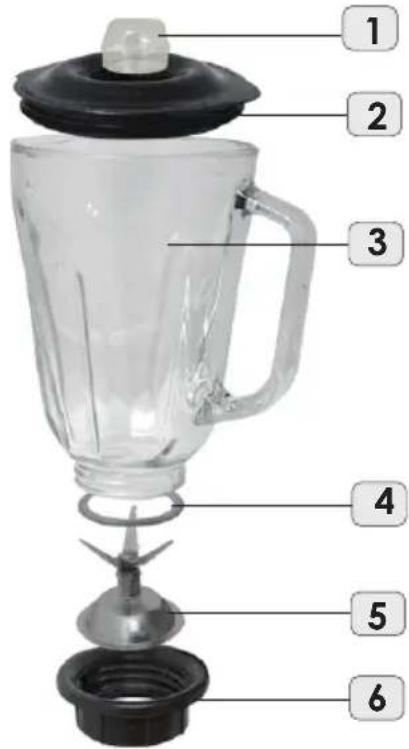
MÜSZAKI ADATOK
TECHNICKÉ ÚDAJE
- DANE TECHNICZNE
- TECHNICAL DATA
- HOW TO USE THE APPLIANCE
- Assembling the Glass Jar:
- How to Use
- USEFUL TIPS
- CLEANING AND MAINTENANCE
- Simple cleaning / rinsing out the assembled glass jar:
- Thorough cleaning of the dismantled glass jar:
- Motor Base:
- ENVIRONMENTAL PROTECTION
- WARRANTY
- SAFETY INSTRUCTIONS
- TECHNISCHE DATEN
- MÜSZAKI ADATOK
- TECHNICKÉ ÚDAJE
Brand : Eldom
Model : BK2S
Category : Food processor