CR-M33DAB - Radio KENWOOD - Kostenlose Bedienungsanleitung
Finden Sie kostenlos die Bedienungsanleitung des Geräts CR-M33DAB KENWOOD als PDF.
Benutzerfragen zu CR-M33DAB KENWOOD
0 Frage zu diesem Gerät. Beantworten Sie die, die Sie kennen, oder stellen Sie Ihre eigene.
Eine neue Frage zu diesem Gerät stellen
Laden Sie die Anleitung für Ihr Radio kostenlos im PDF-Format! Finden Sie Ihr Handbuch CR-M33DAB - KENWOOD und nehmen Sie Ihr elektronisches Gerät wieder in die Hand. Auf dieser Seite sind alle Dokumente veröffentlicht, die für die Verwendung Ihres Geräts notwendig sind. CR-M33DAB von der Marke KENWOOD.
BEDIENUNGSANLEITUNG CR-M33DAB KENWOOD
BEDIENUNGSCANLEITUNG
JVCKENWOOD Corporation
Inhaltsverzeichnis
Inhalt Seite
- Vor der Inbetriebnahme / Sicherheitshinweise 3
- Informationen zum Akku 5
- Konformitätserklarung 6
- Inbetriebnahme 7
- Bedienung des Radios 9
- Verwendung des DAB+ Radios 12
- Verwendung des UKW Radios 13
- BLUETOOTH Audio 14
- Verwendung eines Kopfhörers 15
- Fehlerbehebung 15
- Wartung und Pflege 15
- Entsorgung 16
- Technische Daten 17
- Garantie 18
1. Vor der Inbetriebnahme
WICHTIGESICHERHEITSANWEISUNGEN
Achtung: Lesen Sie diese Seite aufmerksam durch, um den sicheren Betrieb des Gerätes zu gewährleisten.
Hinweise aufmerksamlesen!
- Befolgen Sie alle Sicherheits- und Bedienungsanweisungen, wenn Sie diesen Produkt in Betriebnehmen.
Hinweise sorgfältig aufbewahren!
- Sie sollen die Sicherheits- und Bedienungsanweisungen für spätere Nachschlagezwecke aufbewahren.
Alle Warnhinweise beachten!
- Sie sollenn alle an dem Produkt angegebenen und in der Bedienungsanleitung aufgeführten Warnungen strikt befolgen.
Nur mit einem trockenen Tuch saubern!
- Ziehen Sie alle Kabel vom Gerät ab, bevor Sie diesen Produkt reinigen. Verwenden Sie niemals flüssige Reinigungsmittel oder Reinigungssprays. Verwenden Sie nur ein leicht angefeuchtetes Tuch für das Reinigen.
Zubehör
- Verwenden Sie nur das vom Hersteller angegebene Zubehör.
Verwenden Sie diesen Gerät nicht in der Nähe von Wasser
- Das Gerätarf niemals Wassertropfen oder Wasserspritzern ausgesetzt werden, wie sie zum Beispiel in der Höhe einer Badewanne, eines Waschbeckens, einer Kühensprüle, einer Waschmaschine, in einem feuchten Kellerraum oder in der Höhe eines Schwimmbeckens usw. auftreten. Stellen Sie niemals mit Flüssigkeiten gefüllte Behälter, wie z. B. Blumenvasen, auf das Gerät oder direkt darüber das Gerät.
Belüftung
- Schlitze und Öffnungen im Gehäuse dieren der Belüftung des Geräts, um den zuverlässigen Betrieb des Geräts sicherzustellen und um das Gerät vor Überhitzung und einer möglichen Selfsentzündung zu schützen. Blockieren Sie die Lüftungsöffnungen nicht. Installieren Sie das Gerät nach Angaben des Herstellers. Blockieren Sie niemals die Belüftungsöffnungen, indem Sie das Gerät auf einem Bett, Sofa, Teppich oder einer ähnlich weichen Unterlage abstellen. Dieses Gerät sollt nicht in ein Bücherregal oder Einbauschrank eingebaut werden, wenn nicht für ausreichende Belüftung gesorgt ist.
Spannungsvorsorgung
- Dieses Gerät darf nur mit dem mitgelieferten USB-C Netzadapter an die Netzspannung angeschlossen werden. Verwenden Sie den USB-Netzadapter ausschließlich für das Kompaktradio CR-M33DAB. Achten Sie in jedem Fall daraufuf, dass die örtliche Netzspannung mit den Angaben auf dem Steckernetzteil übereinstimmen. Wenn Sie sich über die Art der Spanningsversorgung in ihrer Wohnung nicht sicher sind, wenden Sie sich an ihren Fachhändler oder an das örtliche Energieversorgungsunternehmen.
USB-Netzadapter
- Sorgen Sie davon, dass der USB-Netzadapter nicht Mechanisch beschädigt wird und dass man nicht über das Kabel stolpern kann. Das Kabelarf auf keinen Fall gequetscht oder abgeknicht werden, auch nicht am Austritt aus dem USB-Netzadapter.
Gewitter
- Das Gerät bei Gewittern und wenn es längerere Zeit nicht verwendet wird vom Netz trennen.
Überlastung
- Überlasten Sie niemals Netzsteckdosen, Verlängerungskabel oder Mehrfachsteckdosen, weil sonst die Gefahr von Feuer oder elektrischen Schlägen besteht.
Eindringen von Fremdmaterial und Flüssigkeit
- Achten Sie darauf, dass niemals Fremdmaterial oder Flüssigkeit durch Öffnungen in das Gerät oder den USB-Netzadapter eindringt, da es anderenfalls zu Kontakt mit unter hoher Spannung stehenden Bauteilen bzw. zu einem Kurzschluss mit dem sich daraus ergebenden Brand oder elektrischen Schlag kommt kann. Verschüttten Sie niemals Flüssigkeiten jeglicher Art auf diesen Gerät oder seinen USB-Netzadapter.
Wartung
- Versuchen Sie niemals selbst, die Wartung these Gerätes auszuführen, da durch die Öffnungen oder durch das Entfernen von Abdeckungen unter Spannung stehende Teile freigelegt werden können, deren Berührung eine Gefahrenquelle darstellt. Überlassen Sie alle Wartungsarbeiten dem qualifizierten Kundendienstpersonal.
Beschädigungen, die eine Reparatur erfordern
- Wartungs- und Reparaturarbeiten nur von einem qualifizierten Kundendienst ausführten halten. Eine Wartung/Reparatur ist erforderlich, wenn das Gerät beschädigt wurde (z. B. den USB-Netzadapter), wenn Flüssigkeit in das Gerät gelaufen ist, wenn Gegenstände in das Gerät eingedrungen sind, wenn das Gerät Regen oder Nasse ausgesetzt war, wenn es nicht mehr einwandfrei Funktioniert oder heruntergefallen ist.
Ersatzteile
- Wenn Ersatzteile bereits werden, überzeugen Sie sich, dass der Kundendiensttechniker Ersatzteile verwendet, die vom Hersteller vorgeschreiben sind oder die gleichen Eigenschaften wie die Originalteile aufweisen. Nicht zugelassene Ersatzteile konnen zu Feuer, elektrischen Schlägen oder anderen Unfallen führen.
Sicherheitsprüfung
- Bitten Sie den Kundendiensttechniker nach der Beendigung von Wartungs- oder Reparaturarbeiten an thisem Gerät um die Durchführung einer Sicherheitsprüfung, um festzustellen, ob sich das Gerät im einwandfrei Zustand befindet.
Wärme
- Installieren Sie das Gerät nicht in der Höhe von bereits Oberflächen wie z. B. Heizkörpern, Heizluftern, Öfen oder anderen Geräten (einschließlich Verständern), die heißt werden können. Stellen Sie niemals Objekte mit offenen Flammen, wie Kerzen oder Laternen, auf oder in die Höhe des Gerätes. Die installierten Batterien dürfen keiner großigen Hitze, wie direktem Sonnenlicht, Feuer oder ähnlichem, ausgesetzt werden.
Risiken in Verbindung mit hohen Lautstärken
Um möglichn Horschaden vorzubeugen, horen Sie nicht über langere Zeiträume mit hoher Lautstärke.
Automatische Energiesparfungtion
Das Gerät ist mit einer automatischen Energiesparfunktion ausgestattet. Diese schaltet das Gerät innerhalb von 15 Minuten in den Standby-Modus, wenn kein Audiosignal empfangen wurde oder keine Bedienung erfolgte.
2. Informationen zum Akku
Der Lithium-lonen-Akku enthalt entflammbare Stoffe wie z. B. organisches Lösungsmittel. Bei falscher Handhabung kann der Akku bersten und Feuer fangen oder extreme Hitze freiisetzen, in seiner Leistungsfähigkeit nachlassen oder andere Schäden entwickeln. Beachten Sieitte insbesondere diese Hinweise, welche Behandlung sich verbieten.
Brandgefahr
Schützen Sie das Gerät mit dem fest eingebauten Lithium-lonen-Akku vor mechanischen Beschädigungen.
- Kerzen und andere offene Flammen müssen zu jeder Zeit von dieser Produkt ferngehalten werden, um ein Entflammen des Gerätes zu verhindern.
- Schützen Sie das Gerät vor Hitze: Es besteht Brandgebung. Wenn Sie das Gerät in einem Regal aufstellen, halten Sie an den Seiten einen Abstand von mindestens 10 cm ein.
Gefahr durch integrierten Akku
- Benutzen Sie das Gerät nicht, wenn es sichtbare Beschädigungen am Gehäuse oder dem USB-Ladekabel aufweist. Reparaturen am Gerät dürfen ausschließlich vom autorisierten Kundendienst vorgenommen werden.
- Setzen Sie das Gerät nicht direkter Sonne oder Hitze aus. Die Umgebungstemperatur soll +5^ nicht unter- und +35^ nicht überschreiben. In einem KFZ kann die Temperatur ggf. deutlich über 35^ liegen.
- Laden Sie den Akku ausschließlich über den mitgelieferten USB-Netzadapter auf.
- Wenn der Akku das Ende seiner Lebenszeit erreicht hat, muss das Gerät mit dem integrierten Akku fachgerecht entsorgt werden. Versuchen Sie nicht, den Akku auszubauen oder zuersetzen.
- Der Akkuarf nicht wiederverwendet oder auseinandergenommen werden.
- Sollte aus dem Akku Elektrolytösung auslaufen, vermeiden Sie den Kontakt mit Augen, Schleimhäuten und Haut. Spulen Sie betroffene Stellen sofort mit reichlich klarem Wasser und suchen Sie einen Arzt auf. Die Elektrolytösung kann Reizungen hervorrufen.
- Der Akkuarf nicht kurzgeschlossen werden. Der Akku kann uberhitzen und explodieren.
- Das Gerätarf nicht ins Feuer geworfen werden. Der Akku kann explodieren.
- Es ist nicht gestattet, Umbauten an dem Gerät vorzunehmen.
Vorsicht!
Explosionsgefahr, wenn die Batterie durch einen falschen Typ ersetzt wird;
- bei extrem hohen oder niedrigen Temperatures, denen eine Batterie während der Verwendung, Lagerung oder des Transports ausgesetzt sein kann;
- bei niedrigem Luftdruck in großer Höhe;
- beim Austausch einer Batterie durch einen falschen Typ, der eine Sicherung umgehen kann (z.B. bei einigen Lithium-Batterietypen);
- bei der Entsorgung einer Batterie in Feuer oder einem bereits Ofen, oder beim mechanischen Quetschen oder Schneiden einer Batterie;
- beim Belassen einer Batterie in einer Umgebung mit extrem hohen Temperaturen oder einem extrem niedrigen Luftdruck, was zu einer Explosion oder dem Austreten brennbarer Flüssigkeiten oder Gase führen kann.
3. Konformitätserklärgung
Hiermit erklart die JVCKENWOOD Europe B.V., dass der Funkanlageotyp [KENWOOD] CR-M33DAB der Richtlinie 2014/53/EU entspricht. Der vollständige Text der EU-Konformitätserklärung ist unter der folgenden Internetadresse verfügbar: https://www.kenwood.com/euukdoc/
Hersteller:
JVCKENWOOD Corporation
3-12, Moriyacho, Kanagawa-ku, Yokohama-shi, Kanagawa 221-0022, JAPAN
https://www.jvckenwood.com/en.html
EU-Kontaktadresse:
JVCKENWOOD Europe B.V.
Rendementsweg 20 B-9, NL 3641 SL Mijdrecht, THE NETHERLANDS
Die Bluetooth® Wortmarke und die Logos sind eingetragene Marken von BLUETOOTH SIG Inc. und jegliche Verwendung dieser Marken durch die JVCKENWOOD Corporation erfolgt unter Lizenz. Andere Marken und Handelsnamen sind die ihrer jeweiligen Eigentümer.
4. Inbetriebnahme
4.1 Auspacken
Packen Sie das Gerät vorsichtig aus und achtEN Sie daraufuf, dass alle Zubehörteile vorhanden sind:
USB-C Netzadapter
Bedienungsanleitung
4.2 Bedienelemente und Anschlüsse


1 - Teleskopantenne
2-Lautstärke
3-MODE
4 - Sleeptimer 5 - MENU / INFO 6 - OK / SCAN
7 - Runter
8 - Preset 2
9 - Preset
10 - Preset 1
11 - ▲ Hoch
12-LCD-Anzeige
13 - USB-C Eingang Netzteil 14 - Kopfhörerbuchse
4.3 Informationen zur LCD-Anzeige

| 1 | Anzeige für Wecker 1 |
| 2 | Anzeige für Wecker 2 |
| 55 | Sleeptimer Restzeit |
| Lautstärke | |
| 1 | Ausgewählter Preset 1 - 20 |
| Anzeige für Stereoempfang | |
| R·D·S | Anzeige für RDS-Signal |
| Empfangstarke | |
| Anzeige BLUETOOTH | |
| Anzeige Akkuladestand |
4.4 Aufladen des Akkus
Um eine Beschädigung des eingebauten Akkus zu vermeiden, ist dieser beim Kauf nur halb aufgeladen. Laden Sie den Akku vollständig auf, bevor Sie das Radio zum ersten Mal benutzen.
Verbinden Sie dazu den Anschluss „DC IN" mit dem mitgelieferten USB-Netzadapter und stecken Sie diesen in eine leicht zugängliche Steckdose.
Während des Ladevorgangs leuchtet eine LED oberhalb des Anschlusses rot. Sobald der Akku vollständig geladen ist, erlischt die Kontrollleuchte. Die übliche Ladezeit bei leerem Akku beträgt ca. 4-6 Stunden. Sie können das Radio während des Ladevorgangs verwenden, allerdings verlangert sich dadurch die Ladezeit.
- Je nach Umgebungsbedingungen, Lautstärke usw. beträgt die Wiedergabedauer ca. 6 Stunden (bei 50% Lautstärke).
- Um die volle Kapazität des Akkus so lange wie möglich zu erhalten, sollen den Akku alle 2 bis 3 Monate vollständig aufladen, auch wenn Sie das Radio nicht benutzen.
- Laden Sie den Akku in einer Umgebung zwischen +5 und +35^ .
- Der Akku hält seine Ladung am besten bei Raumtemperatur.
- Je niedriger die Umgebungstemperatur,esto kürzer die Akkulaufzeit.
- Der Akku muss aufgeladen werden, wenn das Symbol für einen leeren Akku auf dem Display erscheint.
Achtung: Im Akkubetrieb ist die Weckfunktion nicht verfügbar.
4.5 Betrieb mit USB-Netzadapter
Sie können das Radio auch mit dem mitgelieferten Netzadapter betreiben. In dieser Betriebsart stehen ihren die Funktion „Wecker" zur Verfügung.
4.6 DAB+ / UKW Teleskopantenne
- Entriegeln Sie vorsichtig die Antenne am rechten hinteren Teil des Gehäuses.
- Drehen Sie die Antenna nach oben undziehen Sie alle Elemente komplett hersaus.
- Richten Sie die Antenna aus, um den besten Empfang zu erhalten.
5. Bedienung des Radios
5.1 Ein-/Ausschalten (Standby)
Halten Sie die Taste < 业 / MODE> gedrückt, bis sich das Radio einschaltet. Um das Gerät in den Standby-Modus zu versehen, halten Sie die Taste gedrückt, bis die Uhrzeit auf dem Display erscheint. Um das Gerät aus dem Standby-Modus wieder einzuschalten, drücken sie die Taste kurz.
Um es aus dem Standby-Modus vollständig auszuschalten, halten Sie die Taste < MODE> gedrückt. Im Display erscheint kurz „POWER OFF", und das Gerät schaltet ab.
Achtung: Im Akkubetrieb sollte das Radio bei Nichtbenutzung immer vollständig ausgeschelt sein, um ein Entladen des Akkus zu verhindern.
5.2 Navigieren in den Menüs
Halten Sie die Taste
- Beschreibung
- Name des Senders, des aktuellen Programms, Inhalte, Themen, etc..
Genre - Signalpegel und Signalfehler
- Bitrate
- Kanalinformation
Heutiges Datum und aktuelle Uhrzeit
5.5 Einstellen der Menüsprache
- Schalten Sie das Radio ein und rufen das Menu mit der Taste
auf. - Mit den Tasten
oder dem Lautstärkeregler das Menu „Language" auswahlen und anschliessend bestätigten. - Mit den Tasten
die gewünschte Sprache auswahlen und mit bestätigten.
5.6 Einstellen von Uhrzeit und Datum
Beim Empfang eines DAB+ oder UKW Senders in ausreichender Qualität wird die Uhrzeit automatisch eingestellt. Je nach Empfangsstärke nauert dieser Vorgang einige Zeit. Soltte kein entsprechender Sender zur Verfügung stehen, können Sie die Uhrzeit auch manuell einstehen:
- Schalten Sie das Radio ein und rufen das Menu mit der Taste
auf. - Mit den Tasten
oder dem Lautstärkeregler das Menu „Uhrzeit/Datum" auswahlen und anschliessend bestätigten. - "Zeit/Datum einstellen" auswahlen und bestätigen. Anschließlich Tag, Monat, Jahr, Stunden und Minuten auswahlen, einstellen und bestätigen.
Weitere Einstellungen im Menu „Uhrzeit/Datum"
Folgende Funktionen können im Menu „Uhrzeit/Datum" eingestellt werden:
"Stundensystem einstellen": Einstellung des Zeitformats.
Auswahlmöglichkeiten: „24 Stunden“ / „12 Stunden“
"Datumformat einst.": Einstellung des Datumformats.
Auswahlmöglichkeiten: „dd-mm-yyyy“ / „mm-dd-yyyy“ / ”
"Uhrstil": Einstellung des Uhrendesigns im Standby-Modus.
Auswahlmöglichkeiten: „Analog“ / „Digital“
"Autom. Update": Einstellung für automatische Zeiteinstellung.
Auswahlmöglichkeiten: „Kein Update" / „Update vom Radio"
5.7 Einstellen der Display-Beleuchtung
Die Display-Beleuchtung kann in 3 Helligeitsstufen programmiert werden. Folgende Einstellungen können im Menu „Beleuchtung" vorgenommen werden:
"Abschaltung": Zeit, bis die Hintergrundbeleuchtung des Displays abgescheltet wird.
Auswahlmöglichkeiten: „Aus / 10 Sek. / 20 Sek. / 30 Sek. / 45 Sek. / 60 Sek. / 90 Sek. /
120 Sek. / 180 Sek.
Im Modus „Aus" wird die Hintergrundbeleuchtung nicht ausgeschaltet. Dadurch verkürzt sich die Akkulaufzeit.
"Niveau": Helligkeit des Displays wenn das Radio angeschaltet wird.
Auswahlmöglichkeiten: „Nachtmodus" / „Niedrig" / „Mittel" / „Hoch"
Zur Einstellung gehen Sieittewie folgt vor:
-
Schalten Sie das Radio ein und rufen das Menu mit der Taste
auf. -
Wahlen Sie mittels
oder dem Lautstärkeregler das Menu „Beleuchtung" und drücken dann . -
Mit den Tasten
oder dem Lautstärkeregler das Menu „Abschaltung" oder „Niveau" auswahlen und anschliessend mit bestätigten.
5.8 Einstellen des Sleeptimers
Der Sleeptimer wird verwendet, um das Radio nach einem voreingestelltener Zeitraum automatisch abzuschalten. Zur Einstellung gehen Sieitte wie folgt vor:
- Schalten Sie das Radio ein und drücken Sie die Taste
. - Im folgenden Menuitte aus folgenden Mochlichkeiten wahlen: Aus / 15 Min. / 30 Min. / 45 Min. / 60 Min. / 1 Std. 15 Min. / 1 Std. 30 Min. / 1 Std. 45 Min. / 2 Std."
Die gewünschte Einstellung bestätigten Sie mit der Taste. - Im Display erscheint das Symbol für den Sleeptimer mit der Restzeit bis zum Auschalten des Radio. Möchten Sie den Sleeptimer deaktivieren, so wahren Sieitte die Zeiteinstellung „Aus".
5.9 Einstellen des Weckers
Bitte beachten Sie, dass die Funktion „Wecker" nur bei angeschlossen Netzteil vorhanden ist. Im Akkubetrieb kann die Weckfunktion nicht verwendet werden.
Beim CR-M33DAB让学生们2)_Weckzeiten einstellen. These Weckzeiten konnen für folgende Inteillagesprogrammiert werden: "Einmal" / "Täglich" / "Wochende" / "Werktage".
Zur Einstellung der Weckzeit gehen Sieitte wie folgt vor:
- Schalten Sie das Radio ein und rufen das Menu mit der Taste
auf. - Mit den Tasten
oder dem Lautstärkeregler das Menu „Wecker" auswahlen und anschliessend bestätigen. - "Wecker 1" wird angezeigt. Sie können nun die Weckzeit 1 einrichten oder mit den Tasten
oder dem Lautstärkeregler auf die Weckzeit 2 wechseln ("Wecker 2"). -
Nach der Bestätigung mit der Taste
führen Sieitte folgende Schritte durch: -
Einstellung Wecker „Ein" oder „Aus" (Auswahlen mit
oder dem Lautstärkeregler, weiter mit der Taste ). - Einstellung von Stunden und Minutes (Zahlen auswahlen mit
oder dem Lautstärkeregler, weiter mit der Taste ). - Einstellung der Quelle „FM“, „DAB“ oder „Weckton“ mit
oder dem Lautstärkeregler auswahlen, weiter mit der Taste . - Einstellung „Intervall": „Einmal" / „Täglich" / „Wochenende" / „Werktage" auswahlen mit
oder dem Lautstärkeregler, weiter mit . - Einschaltlautstärke unter „Lautstärke" auswahlen mit
oder dem Lautstärkeregler, weiter mit .
Die Weckzeit ist nun gespeichert, und das Menu kann nun verlassen werden. Ein entsprechendes Weckersymbol erscheint im Display.
Für die Einstellung der 2. Weckzeit gehen Sie analog vor. Um einen eingestellten Wecker zu Löschen, so wahlen Sie im letzten Schritt der Einstellung „Wecker Aus".
Der Wecker schaltet sich zur angegebenen Zeit ein. Mochten Sie das Wecksignal unterbrechen, so drücken Sie eine beliebige Taste ggf. mehrfach, um den Schlummerfungtion mit folgenden Intervallen zu aktivieren: 5 - 10 - 15 - 30 Minuten.
Drucken Sie die Taste < 业 /MODE>, um das Wecksignal zu deaktivieren.
5.10 Klang einstellen (Equalizer)
Das Radio hat sieben voreingestelle Klangeinstellungen:
"Klassik" / "Pop" / "Jazz" / "Rock" / "Mittig" / "Soundtrack" / "Nachrichten"
These konnen im Menu "EQ" ausgewählt werden.
5.11 Werkseinstellung
Im Menu „Werkseinstellung" konnen Sie das Radio in den Auslieferungszustand versetzen. Wahlen Sie dazu „Ja" aus, und das Radio startet neu. Bei „Nein" wird die vorherige Menüebene aufgerufen.
6. Verwendung des DAB+ Radios
Drucken Sie die Taste < MODE> mehrfach, bis im Display „DAB" erscheint.
6.1 Einstellen der DAB+ Sender
Bei Inbetriebnahme des Gerätes wurde bereits ein Sendersuchlauf durchgeführt. Die damit gefundenen Sender werden alphabetisch in der Stationstufe gespeichert.
Erneutes Starten des automatischen Sendersuchlaufs:
- Rufen Sie das Menu mit der Taste
auf. Wahlen Sie „Suchlauf", und starten Sie den Suchlauf mit der Taste . - Wahlrend des Suchlaufs zeigt das Display die Zahl bisher gefundenen Sender an.
- Sollten während des Suchlaufs keine Stationen gefunden werden, so steht „Kein Empfang!" im Display.itte überprüfen Sie dann die korrekte Ausrichtung der Antenne oder versuchen Sie einen anderen Standort fur das Gerät zu finden, um einen besseren Empfang zu erreichen. Rufen Sie danach erneuert das Menu „Suchlauf" auf.
- Der Suchlauf startet auch durch längeres Drucken der Taste
.
Manuelles Einstellen von Ensembles:
Rufen Sie das Menu mit der Taste
- Wahlen Sie mittels
- Verwenden Sie die Tasten
- Mit der Taste
Anwahlen eines DAB+ Senders
Die in der Stationsliste alphabetisch gespeicherten Sender让他们可以获得更多的信息。
- Drücken Sie die Tasten
, um vorwärts oder rückwärts in der Senderliste zu blättern. - Wenn der gewünschte Sender ausgewähl ist, drücken Sie die Taste
, um die Wiedergabe zu starten. - Sollte der Empfangspegel beim ausgewählten Sender für eine störungsfreie Wiedergabe nicht ausreichen, so entscheid im Display „Kein Signal!". Wahlen Sie dannitte einen anderen Sender aus oder verändern Sie die Antennenposition.
6.2 Speichern von Stationen im Senderspeicher (Favorite)
Um DAB-Sender zum leichteren Auffunden abzuspeichern, stehen 40 Speicherplätze zur Verfügung. 2 Speicherplätze können darauf über Direktwahltasten gewählt werden.
1. Speicherung auf den Direktwahltasten P1 & P2:
- Wahlen Sie einen Sender zur Speicherung aus.
- Halten Sie die entsprechende Taste gedrückt, bis „Sender gespeichert" im Display erscheint.
-
Gespeicherte Sender konnen durch kurzes Drucken der Direktwahltasten aufgerufen werden.
-
Belegung der Speicherplätze 3 - 40:
-
Wahlen Sie einen Sender zur Speicherung aus.
- Halten Sie die
Taste gedrückt, bis „Sender speichern" im Display erscheint.
Wahlen Sie mit den Tastenoder dem Lautstärkeregler einen Speicherplatz aus. - Drücken Sie die Taste
, um die Speicherung abzuschlieben. Im Display wird „Sender gespeichert" angezeigt. - Gespeicherte Sender konnen über die Taste
aufgerufen und mit den Tastes oder dem Lautstärkeregler ausgewählt und mit geladen werden.
6.3 Menüfungtionen DAB+
Halten Sie die Taste
- Senderliste: Alle gefundenen Sender in alphabetischer Reihenfolge
- Senderspeicher: Alle gespeicherten Favoriten
- Sender speichern: Hier konnen Sie den aktuellen Sender auf einen Speicherplatz (Favoriten) legen.
- Suchlauf: Automatischer Sendersuchlauf.
- Manuelle Sueche: Damit lassst sich manuell ein bestimmter Empfangskanal einstellen.
- Leeren: Damit werden ungültige Stationen aus der Stationsliste gelöscht. Auswahlen mit der Taste
, „Nein/Ja" mit den Taten oder dem Lautstärkeregler auswahlen und mit bestätigten.
Die weiteren Menus sind unter Kapitel 5 beschreiben.
7. Verwendung des UKW Radios
Drucken Sie die Taste < 业 / MODE> mehrfach, bis im Display "FM" erscheint.
7.1 Einstellen eines UKW Senders
- Drucken Sie die Taste < Hoch> um die Empfangsfrequency zu erhöhen.
- Drücken Sie die Taste < Runter> um die Empfangsfrequency zu verringern.
- Wenn Sie die Tasten <▲ Hoch> oder <▼ Runter> gedrückt halten, startet ein automatischer Sendersuchlauf, der bei der nthsten gefundenen Station stoppt.
- Wenn Sie die
Taste gedrückt halten, beginnt die automatische Stationssuche. Alle gefundenen Stationen werden im Senderspeicher abgelegt.
RDS-Funktionen
Folgende Informationen können durch wiederholtes Drucken der Taste
Bei unzureichenden Empfangsbedingungen kann der Empfang dieser Informationen gestört oder nicht möglich sein.
7.2 Speichern von Stationen im Senderspeicher (Favorite)
Um UKW-Sender zum leichteren Auffinden abzuspeichern, stehen 40 Speicherplätze zur Verfügung. 2 Speicherplätze können damit über Direktwahltasten gewählt werden.
1. Speicherung auf den Direktwahltasten P1 & P2:
- Wahlen Sie einen Sender zur Speicherung aus.
- Halten Sie die entsprechende Zifferntaste gedrückt, bis „Sender gespeichert" im Display erscheint.
-
Gespeicherte Sender konnen durch kurzes Drucken der Direktwahltasten aufgerufen werden.
-
Belegung der Speicherplätze 3 - 40:
-
Wahlen Sie einen Sender zur Speicherung aus.
- Drücken Sie die
Taste, bis „Sender speichern" im Display erscheint.
Wahlen Sie mit den Tastenoder dem Lautstärkeregler einen Speicherplatz aus. - Drücken Sie die Taste
, um die Speicherung abzuschlieben. Im Display wird „Sender gespeichert" angezeigt. - Gespeicherte Sender konnen über die Taste
aufgerufen, mit den Taten oder dem Lautstärkeregler ausgewählt und mit geladen werden.
7.3 Menüfungtionen UKW
Halten Sie die Taste
- Senderspeicher: Alle gespeicherten Favoriten
- Sender speichern: Hier konnen Sie den aktuellen Sender auf einen Speicherplatz (Favoriten) legen.
- Suchlauf-Einstellungen: „Alle Sender“ oder „Starke Sender".
Audio-Einstellung: „Stereo" oder „Mono".
Verwenden Sie „Mono" in Umgebungen mit schlechten Empfangseigenschaften.
Die weiteren Menüs sind unter Kapitel 5 beschreiben.
8. BLUETOOTH Audio
Die BLUETOOTH-Funktion erlaubt die drahtlose Übertragung von Musicdateien (Audio Streaming) an das Radio. Es konnen Smartphones, Tablets oder ähnliche Geräte gekoppelt werden.
Drucken Sie die Taste <MODE> mehrfach, bis im Display "BLUETOOTH" erscheint.
8.1 Herstellen einer Verbindung
- Im Display steht „Getrennt", und das gelbe BLUETOOTH-Symbol blinkt im Display.
- Starten Sie einen Gerätescan auf Ihr dem mobilen Gerät. Wahlen Sie „CR-M33DAB" aus der Gerätesleste aus, und koppeln Sie beide Geräte wie gewohnt.
- Auf dem Display wird „Verbunden" angezeigt und eine Sprachansage ertont.
Nun können Sie über Ihr mobiles Gerät die gewünschten Inhalte wiedergeben.
Sie können grundlegende Abspielfunktionen auch über das Radio steuern:
- Taste
: Wiedergabe/Pause Funktion - Tasten <▲ Hoch> oder <▼ Runter>: Titelsprung rückwärts oder vorwärts
8.2 Trennen einer Verbindung
Es kann immer nur ein Gerät über BLUETOOTH mit dem Radio verbunden sein. Wenn Sie ein anderes Gerät anschließen möchten, müssen Sie zuerst das aktuelle Gerät trennen. Gehen Sie wie folgt vor:
- Trennen Sie die Kopplung der Geräte auf Ihrm mobilen Gerät.
Die Geräte werden auch entkoppelt, wenn Sie sie außerhalb der BLUETOOTH Reichweite bewegen...
Wenn Sie das Radio ausschalten, verbindet es sich automatisch wieder mit dem BLUETOOTH-Gerät, sobald es wieder eingeschaltet wird, sofern es sich in der Höhe befindet, eingeschaltet ist und die BLUETOOTH-Funktion aktiviert ist.
9. Verwendung eines Kopfhörers
Um das CR-M33DAB mit Kopfhörern zu benutzen, verwenden Sieitte handelsübliche Modelle mit 3,5mm Klinkenstecker. Sofern der gewährte Radiosender ein Stereosignal sendet, erfolgt die Kopfhörer-wiedergabe auch in Stereo.
Achtung!
Regelmäßiges Horen von Musik in hoher Lautstärke kann zu Gehörschäden führen. Stellen Sie die Lautstärke auf einen niedrigen Wert ein, bevor Sie mit der Musikwiedergabe vom Radio beginnen.
10. Fehlerbehebung
Hinweise zur Fehlersuche
| Problem Lösung | |
| Keine Funktion | • Ist der USB-Netzadapter ordnungsgemäß verbunden? • Ist der Akku komplett aufgeladen? |
| Kein Ton | • Ist die Lautstärke ganz heruntergereilt? • Erhöhen Sie ggf. die Lautstärke am Abspielgerät. • Ist der gewünschte Sender einwandfrei zu empfangen? |
| Das Radio reagiert nicht auf Tastendruck | • Entfernen Sie den USB-Netzadapter und/oder warten Sie, bis der Akku entladen ist. Danach verbinden Sie den USB-Netzadapter erneut. |
| Probleme beim Radioempfang | • Richten Sie die Antenne neu aus. • Suchen Sie einen geeigneteren Standort. • Andere Elektrogeräte stären den Empfang. • Standort nicht für den Empfang von DAB+ Signalen geeignet. |
11.Wartung und Pflege
Reinigung des Gehäuses: Benutzen Sie ein mit einem milden Reinigungsmittel leicht angefeuchtetes Tuch. Benutzen Sie keine Reinigungsmittel, die Alkohol, Ammoniak oder Scheuermittel enthalten.
Vorschindweis zur Kondensationsbildung
Kondensation (Tau) kann sich im Innern des Geräts bilden, wenn zwischen der Temperatur des Geräts und der Umgebungstemperatur ein wesentlicher Unterschied besteht. Sollte im Innern des Geräts Kondensation auftreten, ist eine einwandfrei Funktion nicht mehr gewährleistet. In thisem Fall muss eine Stunden gewartet werden; nachdem die Feuchtigkeit getrocknet ist, kann das Gerät wieder verwendet werden.
Besondere Vorsicht ist unter den folgenden Umständen geboten
Wenn das Gerät von einem Ort zu einem anderen bewegt wird, der eine wesentlich höhere oder niedrigere Temperatur aufweist, oder wenn sich die Luftfeuchtigkeit am Aufstellort des Geräts erhöht, usw.
12. Entsorgung
Entsorgung von gebrauchten elektrischen und elektronischen Geräten und Batterien.


Das Symbol (durchgestrichene Mülltonne) auf dem Produkt oder seiner Verpackung weist daraufhin, dass diese Produkt an seinem Lebensende nicht als normaler Haushaltsabfall behandelt werden darf, sondern bei einer Sammelstelle eines öffentlich-rechtlichen Entsorgungsträgers oder bei einer von Herstellern oder Vertreibern eingerichteten Rücknahmestelle unentgeltlich abgegeben werden muss.
Besitzer von Elektroaltgeräten haben Altbatterien und Altakkumulatoren, die nicht vom Altgerät fest umschlossen sind, im Regelfall vor der Abgabe an der Erfassungsstelle vom Altgerät zu trennen. Dies gilt nicht, sowie Altgeräte einer Vorbereitung zur Wiederverwendung unter Beteiligung eines öffentlich-rechtlichen Entsorgungssträgers zugeführrt werden. Durch ihren Beitrag zur korrekten Entsorgung these Produktes schützen Sie die Umwelt und die Gesundheit ihrer Mitmenschen. Unsachgemäß oder falsche Entsorgung gefährden Umwelt und Gesundheit. Weitere Informationen über das Recycling von Elektroaltgeräten und Batterien erhalten Sie von ihrer Gemeinde oder den communalen Entsorgungsbetrieben.
Entsorgungshinweise für Verbraucher in Deutschland: Entsorgungshinweise für Verbraucher in Österreich:
https://www.e-schrott-entsorgen.org/ https://www.elektro-ade.at/
Entsorgungshinweise fur Verbraucher in Irland:
https://www.mywaste.ie/
Entsorgungshinweise für Verbraucher im Vereinigten Königreich: https://www.recyclenow.com/
Entsorgungshinweise fur Verbraucher in Frankreich: https://www.quefairodemesdechets.fr
13. Technische Daten CR-M33DAB
| Spanningsversorgung | |
| Haupteinheit | |
| Eingangsspannung Gleichspannung 5,0 V | (Verwendung des USB-Netzadapters) |
| Aufnahmeleistung im Bereitschaftsbetrieb 0,45 W | |
| Aufnahmeleistung 5 W | |
| USB-Netzadapter | |
| Hersteller USB-Netzadapter Shenzen GUIJIN Technology | Co. Ltd. Building 3 of Songxin Industry Park, Songgang, Baoan, Shenzhen, China 518105 PEOPLE'S REPUBLIC OF CHINA |
| Marke und Modellkennung USB-Netzadapter GJTL AK06WG-0500100VW / AK06WG-0500100BW | |
| Eingangsspannung Wechselspannung ~ 100 – 240 V | |
| Eingangswechselstromfrequenz 50/60 Hz | |
| Ausgangspannung / -strom / -leistung Gleichspannung 5,0 V / 1,0 A / 5,0 W | |
| Steckertype USB-C | |
| Durchschnittliche Effizienz im Betrieb 73,62 % | |
| Leistungsaufnahme bei Nulllast 0,1 W | |
| Akku | |
| Typ Lithium-Ionen | |
| Spannung / Kapazität / Energieinhalt 3,7 V / 2000 mAh | / 7,4 Wh |
| Betriebszeit / Ladezeit max. 6 Std. / ca. 4 Std. | |
| UN Nummer UN3481 Lithium-Ionen-Batterien, enthalten in der Ausrüstung | |
| BLUETOOTH | |
| BLUETOOTH Version / Leistungsklasse V5.3 / Klasse 2 | |
| Maximale Sendeleistung | < 20 dBm |
| Reichweite | ca. 10 Meter (kann je nach Umgebung abweichen) |
| Frequenzbereich | 2,402 GHz – 2,480 GHz |
| BLUETOOTH Profile | A2DP (Advanced Audio Distribution Profile, AVRCP (Audio/Video Remote Control Profile) |
| Tuner UKW/DAB+ | |
| DAB-Abstimmbereich BAND III | 174,928 MHz – 239,200 MHz |
| UKW-Abstimmbereich | 87,50 MHz – 108,00 MHz |
| Kopfhöheranschluss | 3,5 mm Klinkenbuchse |
| Verständkarteil | |
| Ausgangsleistung | 1,8 W RMS / 2,3 W maximale Ausgangs-leistung |
| Maße und Gewichte | |
| Radio | (B x H x T) 160 x 100 x 54 mm / 0,39 kg |
| Temperaturbereich +5°C bis 35 °C | |
14. Garantie
Sehr geehrter Kunde,
wir dampen Ihnen fur den Kauf these Kenwood-Produkts. Sollte these Produkt unter normalen Betriebsbedingungen Material- oder Verarbeitungsmangel aufweisen, werden wir diese in Übereinstimmung mit den nachfolgenden Garantiebestimmungen kostenlos beseitigen, bzw. das Gerät umtauschen.
Bittle bewahren Sie diese Garantiekarte sorgfältig auf.
Kenwood gewährt auf这点 Gerät eine Garantie von zwei Jahren ab Kaufdatum laut Rechnung oder Kaufbeleg des Kenwood-Ähändlers.
These Garantie erstreckt sich auf Material- und Verarbeitungs-Mängel. Wir behalten uns das Recht vor, das Produkt umzutauschen, falls eine wirtschaftliche Instandsetzung nicht mehr möglich ist. Kosten für Verpackung und Installation sowie Kosten und Risiken im Zusammenhang mit der eigentlichen Instandsetzung sind nicht in der Garantieleistung enthalten und werden in Rechnung gestellt.
Bedingungen
A. Zur Geltendmachung von Garantieansprüchen sind zusätzlich zur Vorlage dieser Garantiekarte folgenden Angaben erforderlich:
(a) Ihr Name mit vollständiger Anschrift
(b) Der Kassenbeleg oder die Rechnung eines in einem EU-Staat ansässigen Einzelhändlers, aus der das ursprüngliche Kaufdatum hervorgeht.
(c) Der vollständige Name und die Anschrift des Einzelhändlers, bei dem das Produkt gekauft wurde.
(d) Die Seriennummer und die Modellbezeichnung des Produkts.
Kenwood besteht sich das Recht vor, Garantieleistungen abzulehnen, wenn die vorgenannten Informationen fehlen oder wenn seit Ersterwerb Veränderungen am Produkt vorgenommen wurden.
B. Zum Zeitpunkt der Auslieferung an den Handel erfüllt these Produkt alle im Bestimmungsland gültigen Normen und Sicherheitsvorschriften.
Erforderliche Modifikationen zum Betrieb des Gerätes in Ländern außerhalb des Bestimmungslandes fallen nicht unter die vorgenannten Garantiebestimmungen. Außen dem übernehmen wir keinerlei Haftung für Arbeiten in thisum Zusammenhang oder fur Beschädigungen des Produktes, die durch solche Arbeiten entstehen.
Wird das Produkt in einem Land benutzt, für das这点 nicht konzipiert und hergestellt worden ist, dann werden Garantiearbeiten nur dann ausgeführrt, wenn die Kosten für Umrüstung des Gerätes auf national gültige Normen und Sicherheitsvorschriften vom Benutzer getragen werden.
Unterscheidet sich außer dem das Produkt von den durch den officiellen Importeur vertriebenen Produkten und sollenn für die Reparatur thesese Produktes Eratzteile nicht verfügbar sein, muß der Benutzer die Kosten für Hin- u. Rücktransport des Gerätes in das Kaufland/TRagen.
Gleiches gilt, wenn im betreffenden Land aus anderen berechtigten Gründen keine Garantieleistungen angeboten werden können.
C. Ausgenommen von den Garantieleistungen sind:
(a) Veränderungen am Produkt, sowie normale Wartungs und Justage-Arbeiten, einschließlich der in der in der Bedienungsanleitung erwähnten regelmäßigen Kontrollen.
(b) Schaden am Produkt, die durch mangelhafte oder nicht fachgerechte Arbeiten entstanden sind, wenn diese Arbeiten von Dritten vorgenommen wurden, die nicht zur Durchführung von Garantieleistungen im Name des Herstellers ermächtigt sind.
(c) Schaden durch Nachlüssigkeit, Unfälle, Änderungen, unsachgemäß Montage, mangelhafte Verpackung, Fehlbedienung oder Verwendung falscher Ersatzteile bei einer Reparatur.
(d) Schaden durch Feuer, Wasserschaden, Blitzschlag, Erdbeben, unzureichende Belüftung, höhere Gewalt, Anschluß an falsche Netzspannung oder sonstige von Kenwood nicht zu verantwortende Ursachen.
(e) Schaden an Laufsprechern durch Überlastung. Schaden an anderen Gegenständen, die nicht Bestandteil des Produkts sind, wie z.B.: DVD's, Compact Discs, USB-Speichermedien, Smartphones usw.
(f) Verbrauchs- oder Verschleiße, die im Rahmen des normalen Kundendienstes auszutauschen sind, wie z.B.: Batterien, wiederaufladbare Akkus, Lampen usw.
(g) Alle Produkte, bei denen die Seriennummer(n) ganz oder teilweise entfernt, verändert oder unkenntlich gemacht wurde(n).
These Garantie kann von allen Personen beansprucht werden, die das Produkt legal erworben haben. In der Übereinstimmung mit den vorgenannten Garantiebedingungen, wird das Produkt kostenlos instandgesetzt oder umgetauscht. Dieses Recht beeinträchtigt in keiner Weise sonstige Rechte des Benutzers im Rahmen der gultigen rechtlichen Bestimmungen. Instandsetzung oder Austausch bewirken keine Veränderung der Garantiezeit. Weitergehende Ansprüche sind ausgeschlossen, insbesondere solche auf Wandelung, Minderung oder Schadenersatz.
Kontaktadresse:
JVCKENWOOD DEUTSCHLAND GmbH
Konrad-Adenauer-Allee 1-11, 61118 Bad Vilbel
Tel. 06101-4988 0, www.kenwood.de
KENWOOD
KENWOOD
Portable DAB+ Radio
CR-M33DAB
OPERATING INSTRUCTIONS
JVCKENWOOD Corporation
Table of contents
Content Page
- Before start-up / safety instructions 3
- Info regarding the battery 5
- Declaration of Conformity 6
- Start-up 7
- Operating the radio 9
- Using the DAB + radio 12
- Using the FM radio 13
- BLUETOOTH audio 14
- Using headphones 15
- Troubleshooting 15
- Maintenance and care 15
- Disposal 16
- Technical specifications 17
14.Guarantee 18
1. Before start-up
IMPORTANT SAFETY INSTRUCTIONS
Attention: Read this page carefully to ensure safe operation of the device.
Read instructions carefully!
- Follow all safety and operating instructions when using this product.
Keep the instructions in a safe place!
- You should keep the safety and operating instructions for future reference.
Follow the warning instructions!
- You should strictly follow all warnings provided on the product and listed in the operating instructions.
Clean only with a dry cloth!
- Pull out all cables from the device before cleaning this product. Never use liquid cleaning detergents or cleaning sprays. Use only a slightly damp cloth for cleaning.
Accessories
- Use only the accessories specified by the manufacturer.
Do not use this device near water
- The device should never be exposed to water droplets or water splashes, such as those found near a bathtub, wash basin, kitchen sink, washing machine, wet basement or swimming pool. Never place containers filled with liquids, such as e.g. flower vases, on the device or directly next to the device.
Ventilation
- Slots and openings in the housing are used to ventilate the device to ensure reliable operation of the device and to protect the device from overheating and possible autoignition. Do not block the ventilation holes. Install the device according to the manufacturer's instructions. Never block the ventilation holes by placing the device on a bed, sofa, rug, or similar soft surfaces. This device should not be installed in a bookshelf or built-in wardrobe unless adequate ventilation is ensured.
Power supply
- This device may only be connected to the mains voltage with the supplied USB-C power adapter. Use the USB power adapter exclusively for the compact radio CR-M33DAB. In any case, make sure that the local mains voltage matches the specifications on the power adapter. If you are unsure about the type of power supply in your home, contact your specialised dealer or power company.
USB power adapter
- Make sure that the USB power adapter is not mechanically damaged and the cable is not tripped over. Under no circumstances should the cable be crushed or bent, including when being pulled out of the USB power adapter.
Thunderstorm
- The device should be disconnected from the mains during thunderstorms and if it is not used for a long time.
Overload
- Never overload mains sockets, extension cords or multiple sockets, otherwise there is a risk of fire or electric shock.
Penetration of foreign material and liquid
- That sure that foreign materials or liquids never penetrate into the device or the USB mains adapter through the openings, as otherwise there might be contact with high voltage components or short circuit resulting in fire or electric shock. Never spill liquids of any kind on this device or its USB power adapter.
Maintenance
- Never attempt to carry out the maintenance of this device yourself, because live parts can be exposed through the openings or by removing covers, contacting which can be hazardous. Leave all maintenance to qualified service personnel.
Damage requiring repair
- Maintenance and repair work should only be carried out by a qualified customer service. Maintenance/repair is required if the device has been damaged (e.g. the USB power adapter), if liquid has penetrated into the device, if objects have entered the device, if the device has been exposed to rain or moisture, it stops working properly or has fallen down.
Spare Parts
- If replacement parts are required, make sure that the customer service technician uses spare parts specified by the manufacturer or that have the same characteristics as the original parts. Unauthorised parts may cause fire, electric shock or other accidents.
Safety test
- Once maintenance or repair of this device has been completed, ask the customer service technician to perform a safety check to determine if the equipment is in perfect working order.
Heat
- Do not install the device near hot surfaces, such as radiators, fan heaters, stoves or other devices (including amplifiers) that can be hot. Never place objects with open flame, such as candles or lanterns, on or near the device. The installed batteries should not be exposed to excessive heat such as direct sunlight, fire or the like.
Risks associated with high volume
To prevent possible hearing damage, do not listen at high volume for long periods.
Automatic energy saving function
The device is equipped with an automatic energy saving function. This switches the device within 15 minutes to the standby mode, if no audio signal is received or there is no operation.
2. Info regarding the battery
The Lithium-lon battery contains flammable substances such as organic solvents. If handled incorrectly, the battery can burst and catch fire or release extreme heat, deteriorate in its performance or develop other damage. Please pay particular attention to these instructions, which treatment is prohibited.
Fire hazard
- Protect the device with permanently built-in Lithium-Ion battery against mechanical damages.
- Keep candles and any other open flames away from this product at all times to prevent the device from catching fire.
- Protect the device against heat: There is a fire hazard. If you plan to set this device on a shelf, keep a distance of at least 10cm on the sides.
Hazard from the integrated battery
- Do not use the device if there are visible damages to the casing or the USB charge cable. Repairs on the device must be carried out exclusively by those authorised by the Customer Service.
- Do not expose the device to direct sunlight or heat. The ambiance temperature must not fall below +5^ C and must not exceed +35^ C. The temperature in motor vehicle can be significantly higher than 35^ C.
- Charge the battery exclusively using the supplied USB power adapter.
- If the battery has reached the end of its service life, the device with the integrated battery must be disposed of properly. Do not attempt to remove or replace the battery.
- The battery should note be reused or taken apart.
- Should the battery leak electrolyte solution, avoid contact with the eyes, mucous membranes and skin. Rinse the affected spots immediately with plenty of clear water and seek medical attention. The electrolyte solution can cause irritation.
- The battery must not be short circuited. The battery can overheat and explode.
- The device must not be thrown into fire. The battery can explode.
- It is not allowed to make modifications to the device.
Caution!
Danger of explosion if the battery is replaced by a incorrect type;
- with extremely high or low temperatures that a battery is exposed to during use, storage or transport;
with low air pressure at high altitudes; - when replacing a battery by an incorrect type that can bypass a fuse (for example, some lithium battery types);
- when disposing of a battery in fire or a hot oven, or with mechanical crushing or cutting of a battery;
- when leaving a battery in an environment with extremely high temperatures or with extremely low air pressure, which may cause an explosion or escaping of flammable liquids or gases.
3. Declaration of Conformity
Hereby, JVCKENWOOD Europe B.V. declares that the radio equipment type [KENWOOD] CR-M33DAB complies with Directive 2014/53/EU. The full text of the EU Declaration of Conformity is available at the following Internet address: https://www.kenwood.com/euukdoc/
Manufacturer:
JVCKENWOOD Corporation
3-12, Moriyacho, Kanagawa-ku, Yokohama-shi, Kanagawa 221-0022, JAPAN
https://www.jvckenwood.com/en.html
EU Contact address:
JVCKENWOOD Europe B.V.
Rendementsweg 20 B-9, NL 3641 SL Mijdrecht, THE NETHERLANDS
https://nl.jvckenwood.com/
UK contact address:
JVCKENWOOD U.K. Limited
First Floor, Gleneagles, The Belfry, Colonial Way, Watford, Hertfordshire WD24 4WH, UNITED KINGDOM
https://uk.jvckenwood.com/
The Bluetooth® word mark and logos are registered trademarks of BLUETOOTH SIG Inc. and any use of such marks by JVCKENWOOD Corporation takes place under license. Other trademarks and trade names are those of their respective owners.
4. Start-up
4.1 Unpacking
Carefully unpack the device and make sure all accessories are present:
USB-C power adapter
- Operating instructions
4.2 Control elements and connectors


1 - Telescopic antenna
2 - Volume
3-0/MODE
4 - Sleep timer 5 - MENU / INFO 6 - OK / SCAN
7-Down
8 - Preset 2
9 - Preset
10 - Preset 1
11 - ▲ Up
12-LCD display
13 - USB-C input power adapter
14 - Headphone jack
4.3 Information on LCD display

| ① | Alarm clock 1 display |
| ② | Alarm clock 2 display |
| 55 | Sleeptimer remaining time |
| Volume | |
| 1 | Selected preset 1-20 |
| Stereo reception display | |
| R·D·S | RDS signal display |
| Reception strength | |
| BLUETOOTH display | |
| Battery level display |
4.4 Charging the battery
To prevent the built-in battery from being damaged, it should be only half charged upon purchase. The battery must be fully charged before using the radio for the first time.
For this, connect the "DC IN" connection with the supplied USB power adapter and plug it in an easily accessible socket.
While charging is in progress the LED lights up red above the connection. As soon as the battery is fully charged the control light goes out. The usual charging time for an empty batter is approx. 4-6 hours.
You can use the radio while the charging is in progress, but doing so would prolong the charging time.
- Depending on environmental conditions, volume, etc. the playback time is approx. 6 hours (with 50% volume).
- To maintain the full capacity of the battery as long as possible, you should fully charge the battery every 2 to 3 months, even if you do not use the radio.
- Charge the battery in ambient temperature of between +5 and +35^ C .
- The battery maintains its charge best at room temperature.
- The lower the ambient temperature, the shorter the battery life.
- The battery must be charged when the battery empty symbol appears on the display.
Attention: The alarm function is not available in battery mode.
4.5 Operation with USB power adapter
You can also operate the radio with the supplied power adapter. The "Alarm clock" function is available in this operating mode.
4.6 DAB + / FM telescopic antenna
- Carefully unlock the antenna on the right rear part of the casing.
- Turn the antenna upwards and pull out all the elements completely.
- Align the antenna for the best reception.
5. Operating the radio
5.1 Switching On/Off (standby)
Hold and press the button until the radio is switched on. To set the device in the Standby mode, hold and press until the time appears on the display. To switch the device back on again from the Standby mode, briefly press the button.
In order to switch it off completely from the Standby mode, press and hold the < MODE> button. The "POWER OFF" appears briefly in the Display and the device switches off.
Attention: In battery mode, the radio should be switched off completely if not used to avoid discharging of the battery.
5.2 Navigate in the menus
Keep the
You can navigate in the menu by pressing the <▲ Up> or <▼ Down> buttons. You can also use the volume control for browsing. Confirm the menu selection with the
5.3 Adjusting the volume
You can adjust the volume by turning the volume control. The volume setting is graphically displayed in the Display.
5.4 Additional information
By repeatedly pressing the
Description
- Name of the station, the current program, content, topics, etc.
Genre
- Signal level and signal error
- Bit rate
- Channel information
Today's date and current time
5.5 Setting the menu language
- Switch on the radio and call up the menu with the
button. - Using the
button or the volume control, select the "Language" menu and confirm. - Select the desired language with the
button and confirm with .
5.6 Setting the time and date
When receiving a DAB + or FM station in sufficient quality, the clock will be set automatically. Depending on the reception strength, this process may take some time. If no corresponding station is available, you can also set the time manually:
- Switch on the radio and call up the menu with the
button. - Using the
button or the volume control, select the "Time/Date" menu and confirm. - Select "Set Time/Date" and confirm. Finally, select, set and confirm Day, Month, Year, Hours and Minutes.
Additional settings in the "Time/Date" menu
The following functions can be set in the "Time/Date" menu:
"Set Hour System": Setting the time format.
Choices: "24 hour system" / "12 hour system"
"Set Date Format": Setting the date format.
Choices: "dd-mm-yyyy" / "mm-dd-yyyy/ yyyy-mm-dd"
"Clock style": Setting the Clock design in the Standby mode.
Choices: "Analog" / "Digital"
"Auto Update": Setting for automatic time setting.
Choices: "No Update" / "Update from Radio"
5.7 Setting the display illumination
The display illumination can be programmed in 3 brightness levels. The following settings can be made in the "Backlight" menu:
"Timeout": Time, until the background light of the display is switched off.
Choices: "OFF / 10 sec. / 20 sec. / 30 sec. / 45 sec. / 60 sec. / 90 sec. /
120 sec. / 180 sec."
In the "OFF" mode the background light is not switched off. This shortens the battery life.
"Level": Brightness of the display when the radio is switched on.
Choices: "Night mode"/"Low"/"Medium"/"High"
For adjustment, please proceed as follows:
- Switch on the radio and call up the menu with the
button. - Using the
or the volume control select the "Backlight" and then press . - Using the
buttons or the volume control select the "Timeout" or "Level" menu and confirm with OK/SCAN>.
5.8 Setting the sleep timer
The sleep timer is used to automatically turn off the radio after a preset period of time. For adjustment, please proceed as follows:
- Switch on the Radio and press the
button. - In the following menu please choose from the following options: "Off / 15 min / 30 min / 45 min / 60 min / 1 h 15 min / 1 h 30 min / 1 h 45 min / 2 h".
Confirm the desired setting with thebutton. - The symbol for the Sleeptimer appears in the Display with the time remaining until the radio is switched off.
If you would like to deactivate the sleep timer, please select the time setting "Off".
5.9 Setting the alarm clock
Please note that the "Alarms" function is available only with the connected power supply. The alarm function cannot be used in the battery mode.
The CR-M33DAB can be set to 2 different alarm times. These alarm times can be programmed for the following intervals: "Once" / "Daily" / "Weekend" / "Business Days".
To set the alarm time, please proceed as follows:
- Switch on the radio and call up the menu with the
button. - Using the
button or the volume control, select the "Alarms" menu and confirm.. - "Alarm 1" is displayed. Now you can set up the Alarm Time 1 or using the
buttons or volume control switch to Alarm Time 2 ("Alarm 2"). -
After confirming with the
button, perform the following steps: -
Alarm clock setting "On" or "Off" (Select with
or the volume control, continue with the button). - Setting of hours and minutes (Select numbers with
or the volume control, continue with the button). - Select the setting for the Source "FM", "DAB" or "Buzzer" with
or the volume control, continue with button. - Setting the "Interval": Select "Once" / "Daily" / "Weekends" / "Workday" with
on the volume control, continue with . - Select start-up volume under "Volume" with
or the volume control, continue with .
The Alarm Clock is now stored and you can leave the menu. A corresponding Alarm clock symbol appears in the Display.
Proceed analogously for setting the 2nd Alarm Clock. To delete a set alarm clock, select "Alarm off" in the last step.
The Alarm clock switches off at the specified time. To interrupt the Alarm Signal press any button, if needed, several times to activate Snooze Function with following intervals: 5 - 10 - 15 - 30 minutes. Press the
5.10 Setting the sound (Equaliser)
The radio has seven preset sound settings:
"Classic" / "Pop" / "Jazz" / "Rock" / "Flat" / "Movie" / "News"
These can be selected in the "EQ" menu.
5.11 Factory Reset
In the "Factory Reset" menu, you can set the radio in the delivery state. To do this select "Yes" and restart the radio. With "No", you can call up the previous menu level.
6. Using the DAB + radio
Press the
6.1 Setting the DAB + stations
During start-up of the device, a station search has already been carried out. The stations found are stored alphabetically in the station list.
Restart automatic station search:
- Call up the menu with the
button.
Select "Scan", and start scanning with thebutton. - During the search, the display will show the number of stations found so far.
- If no stations are found while scanning "No reception!" appears in the Display. Please check the correct orientation of the antenna or try to find another location for the device for better reception. Then, call up the "Scan" menu again.
- You can also start scanning by pressing and holding the
button.
Manual tuning of ensembles:
- Call up the menu with the
button. - Using the
or the volume control select the "Manual tune" and then press . The current set station with the associated frequency appears in the Display. - Use the
button or the volume control, to manually select another station. - Using the
button, confirm the selection. Thereafter, the signal level is shown in the display, another pressing stores the selected ensemble.
Selecting a DAB + station
The stations stored alphabetically in the station list can be selected as follows:
- Press the <UP/DOWN> , button to scroll forwards or backwards in the station list.
- Once the desired station is selected press the
button to start the playback. - "No Signal!" appears on the display if the reception level on the selected station is insufficient for trouble-free playback. Then, please select another station or change the position of the antenna.
6.2 Storing stations in the station memory (favourites)
To store DAB stations for easier retrieval, 40 memory slots are available. 2 memory locations can be selected via direct selection buttons.
1. Saving on the direct selection buttons P1 & P2:
- Select a station to save
- Keep the corresponding button button pressed until "Favorite Station Set!" appears in the display.
-
Stored stations can be called up by briefly pressing the direct selection buttons.
-
Assignment of the memory locations 3 - 40:
-
Select a station to save
- Press and hold the
button, until the "Preset Store" appears on the display. - Use the
button or the volume control to select to select a memory location. - Press the
button, to complete saving. The "Favorite Station Set!" is displayed in the Display. - You can call up the saved stations with the
button, selected with the button or the volume control and stored with mit .
6.3 Menu functions DAB +
Keep the
- Station list: All found stations in alphabetical order
- Preset Recall: All saved favourites
- Preset Store: Here you can store the current station on a memory location (Favourites).
- Scan: Automatic station scan.
- Manual tune: This allows you to manually set a specific reception channel.
- Prune invalid: This deletes invalid stations from the station list. Select with the
button, select "No/Yes" with the buttons or volume control and confirm with .
Further menus are described under Chapter 5.
7. Using the FM radio
Press the <�/MODE> button several times, until "FM" appears on the display.
7.1 Setting an FM station
- Press the < Up > button to increase the reception frequency.
- Press the Down> button to reduce reception frequency.
- If you press and hold the < Up> or < Down> buttons an automatic station search starts and stops at the next station found.
- Pressing and holding the
starts the automatic station search.
All found stations are stored in the station memory.
RDS functions
The following information can be retrieved by repeatedly pressing the < MENU/ INFO> button: PTY (Program Type) / RDS Radio text / Frequency reception / Time / Date
In case of inadequate reception conditions, the reception of this information may be interrupted or not possible.
7.2 Storing stations in the station memory
To store FM stations for easier retrieval, 40 memory slots are available. 2 memory locations can be selected via direct selection buttons.
1. Saving on the direct selection buttons P1 & P2:
- Select a station to save
- Keep the corresponding number button pressed until "Favorite Station Set!" appears in the display.
-
Stored stations can be called up by briefly pressing the direct selection buttons.
-
Assignment of the memory locations 3 - 40:
-
Select a station to save
- Press the
button, until the "Preset Store" appears in the display. - Use the
button or the volume control to select to select a memory location. - Press the
button, to complete saving. The "Favorite Station Set!" is displayed in the Display. - You can call up the saved stations with the
button, selected with the button or the volume control and stored with mit .
7.3 Menu functions FM
Keep the
- Preset Recall: All saved favourites
- Preset Store: Here you can store the current station on a memory location (Favourites).
- Scan setting: "All stations" or "Strong stations".
- Audio setting: "Stereo" or "Mono".
Use the "Mono" in environments with poor reception quality.
Further menus are described under Chapter 5.
8. BLUETOOTH audio
The BLUETOOTH function enables the wireless transmission of music files (audio streaming) to the radio. Smartphones, tablets or similar devices can be paired.
Press the
8.1 Establishing a connection
- In the Display you see the "Disconnected", and the yellow BLUETOOTH symbol flashes in the Display.
- Start a device scan on your mobile device. Select "CR-M33DAB" from the device list and pair both devices as usual.
- The "Connected" is displayed in the Display and a voice prompt sounds.
Now you can playback the desired content on your mobile device.
You can control basic playback functions on the radio as well:
button: Playback/Pause Function - The < Up> or < Down> buttons: Skip track backwards or forwards.
8.2 Disconnect a connection
Only one device can be connected via BLUETOOTH with the radio at any one time. If you want to connect other devices, you must first disconnect the current device. Proceed as follows:
- Disconnect the pairing of the device on your mobile device.
- The devices are also unpaired, if you move them outside the range of the BLUETOOTH.
If you switch off the radio, it reconnects automatically with the BLUETOOTH device as soon as it is switched on again, as long as it is nearby, is switched on and the BLUETOOTH function is activated.
9. Using headphones
To use the CR-M33DAB with headphones, please use the commercially available models with 3.5mm jack plug. As long as the selected radio station sends a stereo signal, the headphone playback is also made in stereo.
Attention!
Regular listening to music at high volume can impair your hearing. Set the volume to a low value before music playback with the radio.
10. Troubleshooting
Notes on troubleshooting
| Problem Solution | |
| No function | • Is the USB power adapter properly connected? • Is the battery fully charged? |
| No sound | • Is the volume fully turned down? • Increase the volume on the playback device, if needed. • Is the desired station received properly? |
| The radio does not respond at the touch of a button | • Remove the USB power adapter and/or wait until the battery is discharged. Then reconnect the USB power adapter |
| Problems with radio reception | • Reorient the antenna. • Find a more suitable location. • Other electrical appliances interfere with the reception. • Location not suitable for receiving DAB + signals. |
11.Maintenance and care
Cleaning the housing: Use a cloth lightly moistened with a mild detergent. Do not use detergents containing alcohol, ammonia or scouring agents.
Cautions on condensation
Condensation (dew) may form inside the unit if there is a significant difference between the temperature of the unit and the ambient temperature. If condensation occurs inside the unit, proper function is no longer guaranteed. In this case, you have to wait a few hours; After the moisture has dried, the device can be reused.
Special care should be taken in the following circumstances
When the unit is moved from one place to another at a much higher or lower temperature, or when the humidity at the installation site increases, etc.
12. Disposal
Disposal of used electrical and electronic equipment and batteries.

The (crossed-out wheeled bin) symbol on the product or its packaging indicates that this product must not be handled as normal household waste, but handed in to a collection point managed by public waste management authorities or to a collection point set up by the manufacturer or distributor, free of charge.
The owners of electrical devices should usually separate the waste batteries and waste accumulators which are not firmly enclosed in the waste devices from these waste devices before handing them over to collection points. This does not apply if the waste devices are prepared for recycling with the participation of a public waste management authority. By helping to properly dispose of this product, you are protecting the environment and the health of your fellow human beings. Improper or incorrect disposal endangers the environment and health. For more information on the recycling of these electrical devices and batteries, please contact your local authority or your municipal waste disposal companies.
Disposal instructions for consumers in Germany: https://www.e-schrott-entsorgen.org/ Disposal instructions for consumers in Austria: https://www.elektro-ade.at/
Disposal instructions for consumers in Ireland: https://www.mywaste.ie/ Disposal instructions for consumers in United Kingdom: https://www-recyclenow.com/ Disposal instructions for consumers in France: https://www.quefairedemesdechets.fr
13. Technical specifications CR-M33DAB
| Power supply | |
| Main unit | |
| Power supply DC voltage 5.0V | (Using USB power adapter) |
| Power consumption in standby mode 0.45 W | |
| Power consumption 5 W | |
| USB power adapter | |
| Manufacturer USB power adapter Shenzen GUIJIN Technology Co. Ltd. Building 3 of Songxin Industry Park, Song-gang, Baoan, Shenzhen, China 518105 PEOPLE'S REPUBLIC OF CHINA | |
| Power adapter brand and USB power adapter GJTL AK 06WG-0500100VW / AK-06WG-0500100BW | |
| Input voltage AC voltage ~ 100 – 240 V | |
| AC input frequency 50/60 Hz | |
| Output voltage / current / power DC voltage 5.0 V / 1.0 A / 5.0 W. | |
| Plug type USB-C | |
| Average operational efficiency 73.62 % | |
| Power consumption at no-load 0.1 W | |
| Battery | |
| Type Lithium-Ion | |
| Voltage / capacity / energy content 3.7 V / 2000 mAh / | 7.4 Wh |
| Operating time / Charging time max. 6 hrs. / approx. 4 hrs. | |
| UN Number UN3481 Lithium-Ion batteries included in the equipment | |
| BLUETOOTH | |
| BLUETOOTH version / performance class V5.3 / Class 2 | |
| Maximum transmission power | < 20 dBm |
| Reach | about 10 meters (may vary depending on the environment) |
| Frequency range | 2.402 GHz - 2.480 GHz |
| BLUETOOTH profile | A2DP (Advanced Audio Distribution Profile, AVRCP (Audio/Video Remote Control Profile) |
| Tuner FM/DAB + | |
| DAB tuning range BAND III | 174.928 MHz - 239.200 MHz |
| FM tuning range | 87.50 MHz - 108.00 MHz |
| Headphone socket | 3.5 mm jack socket |
| Amplifier part | |
| Output capacity | 1.8 W RMS / 2.3 W maximum output power |
| Dimensions and weight | |
| Radio | (W x H x D) 160 x 100 x 54 mm / 0.39 kg |
| Temperature range | +5°C to 35°C |
14. Guarantee
Dear customer,
thank you for purchasing this Kenwood product. If this product shows defects in material or workmanship under normal operating conditions, we will remove these free of charge or replace the device in accordance with the following warranty provisions.
Please keep this warranty card in a safe place.
Kenwood guarantees this device for a period of two years from the date of purchase as shown on the invoice or sales receipt from the Kenwood dealer.
This warranty covers material and workmanship defects. We reserve the right to replace the product if cost-efficient repair is no longer possible. Costs for packaging and installation as well as costs and risks in connection with the actual repair are not included in the warranty and will be invoiced.
Conditions
A. To assert warranty claims, in addition to submitting this warranty card, the following information is required:
(a) Your name with full address
(b) The receipt or invoice from a retailer based in an EU country indicating the original date of purchase.
(c) The full name and address of the retailer from whom the product was purchased.
(d) The serial number and model name of the product.
Kenwood reserves the right to refuse warranty service if the aforementioned information is missing or if changes have been made to the product since it was first purchased.
B. At the time of delivery to the retailer, this product complies with all standards and safety regulations applicable in the country of destination.
Modifications required to operate the device in countries outside the country of destination are not covered by the aforementioned warranty conditions. In addition, we do not accept any liability for work in this context or for damage to the product resulting from such work.
If the product is used in a country for which it was not designed and manufactured, warranty work will only be carried out if the user bears the costs for upgrading the device to nationally applicable standards and safety regulations.
In addition, if the product differs from the products sold by the official importer and if spare parts are not available for the repair of this product, the user must bear the costs of transporting the device to and from the country of purchase.
The same applies if no warranty services can be offered in the country concerned for other legitimate reasons.
C. The following are excluded from the warranty:
(a) Changes to the product, as well as normal maintenance and adjustment work, including the regular checks mentioned in the Operating Instructions.
(b) Damage to the product caused by inadequate or improper work if this work was carried out by third parties who are not authorised to carry out warranty services on behalf of the manufacturer.
(c) Damage caused by negligence, accidents, changes, improper installation, defective packaging, incorrect operation or the use of incorrect spare parts for repairs.
(d) Damage caused by fire, water damage, lightning strikes, earthquakes, inadequate ventilation, force majeure, connection to incorrect mains voltage or other causes for which Kenwood is not responsible.
(e) Damage to speakers due to overloading. Damages to other items that are not part of the product, such as: DVDs, compact discs, USB storage media, smartphones, etc.
(f) Consumable or wearing parts that have to be replaced as part of normal customer service, such as: Batteries, rechargeable batteries, lamps, etc.
(g) All products in which the serial number(s) has been completely or partially removed, changed or made illegible.
This warranty can be claimed by anyone who has purchased the product legally.
In accordance with the aforementioned warranty conditions, the product will be repaired or replaced free of charge. This right does not in any way affect other rights of the user within the framework of the applicable legal provisions.
Repairs or replacements do not extend the warranty period.
Further claims are excluded, in particular those for conversion, reduction or compensation.
Contact address:
JVCKENWOOD U.K. Limited
First Floor, Gleneagles, the Belfry, Colonial Way, Watford, Hertfordshire WD24 4WH
Email: Enquiries@uk.jvckenwood.com www.kenwood-electronics.co.uk
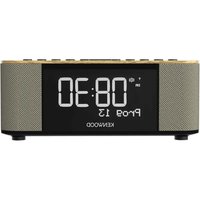
KENWOOD
KENWOOD
Radio DAB+ portable
CR-M33DAB
MANUEL D'EMPLOI
JVCKENWOOD Corporation
Sommaire
Contenu Page
- Avant la mise en service/consignes de sécurité 3
- Informations au sujet de l'accu 5
- Déclaration de conformité 6
- Mise en service 7
- Commande de la radio 9
- Utilisation de la radio DAB+ 12
- Utilisation de la radio FM 13
- Audio Bluetooth 14
- Utilisation d'un casque audio 15
- Élimination des défaillances 15
- Maintenance et entretien 15
- Mise au rebut 16
- Caracteristiques techniques 17
- Garantie 18
1. Avant la mise en service
CONSIGNES DE SECURITE IMPORTANTES
Attention : Lisez attentivement cette page afin d'assurer l'utilisation sure de l'appareil !
Lire attentivement ces consignes!
Respectez toutes les consignes de sécurité et d'action lorsque vous mettez ce produit en service.
Conserver soigneusement ces consignes!
- Conservez les consignes de sécurité et d'action afin de pouvoir vous y reporter ultérieurement.
Respecter toutes les mises en garde !
Respectez scrupuleusement toutes les mises en garde figurant sur le produit et dans la notice d'emploi.
Nettoyer uniquely avec un chiffon sec !
- Débranche tous les cables de l'appareil avant de le nettoyer. N'utilisez jamais de détergents liquides ou en aérosol. Utilisez uniquement un chiffon légarement humide pour nettoyer l'appareil.
Accessoires
- Utilisez uniquement les accessoires indiqués par le fabricant.
N'utilisez pas cet apparéil à proximité de l'eau
- L'appareil ne doit jamais être exposé à des gouttes ou projections d'eau – par exemple à proximité d'une baignoire, d'un lavabo, d'un évier, d'une machine à laver, dans un sous-sol humide ou à proximité d'une piscine, etc. Ne posez jamais des recipients contenant de l'eau sur l'appareil ou à proximité immédiate de l'appareil, par exemple un vase avec des fleurs.
Ventilation
- Les fentes et orifices du boîtier servent à la ventilation de l'appareil, afin d'assurer le bon fonctionnement de l'appareil et le protégger contre toute surchauffe qui pourrait occasionner une auto-ignition. N'obturez pas les orifices de ventilation. Installez l'appareil conformément aux consignes du fabricant. N'obturez pas les orifices de ventilation en posant l'appareil sur un lit, un canapé, un tapis ou un autre support mou similaire. En absence d'une ventilation suffisante, l'appareil ne doit pas être encastré dans une bibliothèque ou un placard.
Alimentation electrique
- Cet apparéil ne doit être branché au secteur qu'à l'aide de l'adaptateur secteur USB-C fourni. Utilisez uniquement l'adaptateur secteur USB pour la radio compacte CR-M33DAB. Veillez systématiquement à ce que la tension de secteur locale corresponde aux indications figurant sur le bloc d'alimentation à fiche. Si vous avez des doutes sur le type d'alimentation électrique de votre logement, veuillez vous adresser à votre revendeur spécialisé ou à votre fournisseur d'énergie local.
Adaptateur secteur USB
- Veiliez à ce que l'adaptateur secteur USB ne soit pas endommagé mécaniquement et que l'on ne puisse pas trèbucher sur son cordon d'alimentation. Veiliez à ne jamais écraser ou plier le cable, même à sa sortie de l'adaptateur secteur USB.
Orages
- Débranche l'appareil du secteur en cas d'orage ou s'il n'est pas utilisé pendant une durée prolongée.
Surcharge
- N'exposez jamais les prises secteur, rallonges ou multiprises à une surcharge, puisque cela génére un risque d'incendie ou d'électrisation.
Pénetration de corps étrangers et de liquides
- Veiliez à ce qu'aucun corps étranger ou liquide ne puisse pénétrer dans l'appareil par les orifices. Cela pourrait conduire à un contact avec des éléments sous haute tension de l'appareil ou de l'adaptateur secteur USB, ou à un court-circuit, qui peuvent occasionner un incendie ou une électrisation. Ne déversez jamais un liquide quelconque sur l'appareil ou son adaptateur secteur USB.
Maintenance
- Ne tentez jamais d'effectuer vous-même la maintenance de cet apparéil, car l'ouverture ou le retrait de caches peuvent donner accès à des éléments sous tension. Tout contact avec ces éléments génére des risques. Confiez les opérations de maintenance aux collaborateurs compétents d'un service clients.
Détériorations qui nécessent une réparation
- Ne faites effectuer les opérations de maintenance et de réparation que par un service clients qualifié. La maintenance/réparation est nécessaire lorsque l'appareil a été endommagé (par ex. l'adaptateur secteur USB), qu'un liquide a pénétré dans l'appareil, que des objets ont pénétré dans l'appareil, que l'appareil a été exposé à la pluie ou l'humidité, lorsqu'il ne fonctionne plus correctement ou est tombé.
Pièces détachées
- En cas de mise en place de pieces détaches, assurez-vous que le technicien du service clients utilise des pieces détaches prescrites par le fabricant ou présente les mêmes caractéristiques que les pieces d'origine. Les pieces détaches non homologuees peuvent occasionally des incendes, électrisations ou autres accidents.
Contrôle de sécurité
- Àprous la réalisation d'opérations de maintenance ou de réparation, priez le technicien du service clients d'effectuer un contrôle de sécurité afin de s'assurer du parfait état de fonctionnement de l'appareil.
Chaleur
- N'installez pas l'appareil à proximé de surfaces chaudes telles que par exemple des radiateurs, radiateurs soufflants, poèles ou autres appareils pouvant dégager de la chaleur (y compris les amplificateurs). Ne posez jamais des objets avec des flammes nues tels que des bougies ou des lanternes sur ou à proximé de l'appareil. Les piles installées ne doivent pas être exposés à une chaleur elevée occasionnée par ex. par la lumière directe du soleil, le feu, etc.
Risques liés à un volume sonore élevé
Pour éviter les évventuels dommages auditifs, nous vous recommendons de ne pas trop prolonger l'écoute à un volume sonore élevé.
Fonction d'économie d'énergie automatique
L'appareil est équipé d'une fonction d'économie d'énergie automatique. En absence de signal audio ou d'intervention de l'utilisateur, cette fonction commutes l'appareil en mode veille après un-delai de 15 minutes.
2. Informations au sujet de l'accu
L'accu lithium-ions contient des substances inflammables telles que par ex. des solvants organiques. En cas de manipulation inadaptée, l'accu peut se rompre et prendre feu ou dégager une chaleur extréme, subir une perte de performances ou développement d'autres dysfonctionnements. Observe surtout les consignes au sujet des actions à omettre.
Risques d'incendie
- Protégéz l'appareil équipé de l'accu lithium-ion intégré contre les détiérations mécaniques.
- Tenez toujours les bougies et autres flammes nues à l'écart de ce produit, afin d'empêcher que l'appareil ne prenne feu.
- Protégez l'appareil de la chaleur : Risques d'incendie. Si vous placez l'appareil dans une étagère, voirlez à un espace libre d'au moins 10 cm sur les côtés.
Risques liés à l'accu intégré
- N'utilisez pas l'appareil s'il presente des déteriorations évidentes du boîtier ou du cable USB. Les réparations de l'appareil ne doivent être réalisées que par un service clients autorisé.
- N'exposez pas l'appareil au soleil ou à la chaleur. La température ambiante doit se situer entre +5^ et +35^ . Dans un vehicule, la température peut être considérablement supérieure à +35^ .
- Chargez l'accu uniquement à l'aide de l'adaptateur secteur USB fourni.
- Lorsque l'accu arrive en fin de vie, l'appareil avec l'accu intégré doit être mis au rebut conformément aux réglementations en vigueur. Ne tentez pas de démonter ou de replacer l'accu.
- L'accu ne doit pas être réutilisé ou désassemblé.
- Si l'accu présente des fuites d'électrolyte, évitez le contact avec les yeux, les muqueuses et la peau. Rincez immédiatement et abondamment à l'eau les zones souillées et consultez un Médecin. La solution d'électrolyte peut provoquer des irritations.
- L'accu ne doit pas être court-circuité. L'accu peut surchauffer et exploser.
- Ne pas jeter l'appareil au feu. L'accu peut exploser.
- Les transformations de l'appareil sont interdites.
Prudence!
Risque d'explosion en cas de remplacement de la pile par une pile d'un type inadapté ;
- de températures élevées ou basses extrêmes auxquelles une pile peut être exposée pendant l'utilisation, le stockage ou le transport;
d'une pression atmosphérique faible à grande altitude;
- du remplacement de la pile par un type inadapté, qui peut shunter une sécurité (par ex. certains types de piles au lithium);
- de la mise au feu ou dans un four chaud d'une pile, ou l'écrasement ou le sectionnement mécanique d'une pile;
- de l'exposition prolongée d'une pile à un environnement à des températures très élevées ou une pression atmosphérique très faible, qui peuvent conduire à l'explosion ou à la fuite de liquides ou gaz inflammables.
3. Déclaration de conformité
Par la presente, la société JVCKENWOOD Europe B.V déclare que le type de dispositif radio [KENWOOD] CR-M33DAB satisfait aux exigences de la directive 2014/53/UE. Le texte complet de la déclaration de conformité UE est disponible via l'adresse Internet suivante : https://www.kenwood.com/euukdoc/
Fabricant :
JVCKENWOOD Corporation
3-12, Moriyacho, Kanagawa-ku, Yokohama-shi, Kanagawa 221-0022, JAPON
https://www.jvckenwood.com/en.html
Coordonnées en Union Européenne :
JVCKENWOOD Europe B.V.
Rendementsweg 20 B-9, NL 3641 SL Mijdrecht, THE NETHERLANDS
https://nl.jvckenwood.com/
Coordonnées (Royaume-Uni) :
JVCKENWOOD U.K. Limited
First Floor, Gleneagles, The Belfry, Colonial Way, Watford, Hertfordshire WD24 4WH, UNITED KINGDOM
https://uk.jvckenwood.com/
La marque et les logos Bluetooth® sont des marques déposées de la société Bluetooth SIG Inc. Toute utilisation de ces marques par la société JVCKENWOOD Corporation. Fait l'objet d'une licence. Les autres marques et appellations commerciales appartiennent à leurs propriétaires respectifs.
4. Mise en service
4.1 Déballage
Déballez avec précaution l'appareil en veillant à ce que tous les accessoires soient prênts.
Adaptateur secteur USB-C
- Notice d'emploi
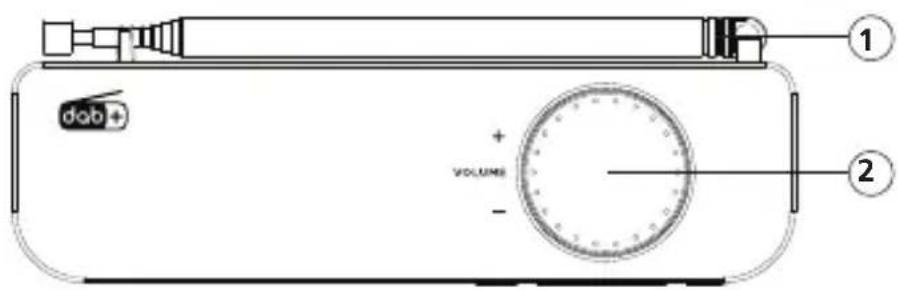
4.2 Éléments de commande et connecteurs


1 - Antenne téléscopique
2 - Volume
3-MODE
4 - Sleeptimer 5 - MENU / INFO 6 - OK / SCAN
7 - Bas
8 - Preset 2
9 - Preset
10 - Preset 1
11-▲Haut
12 - Afficheur à LCD
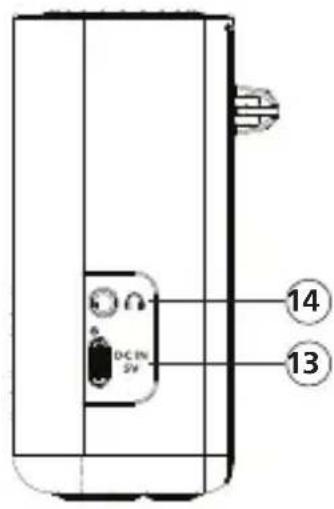
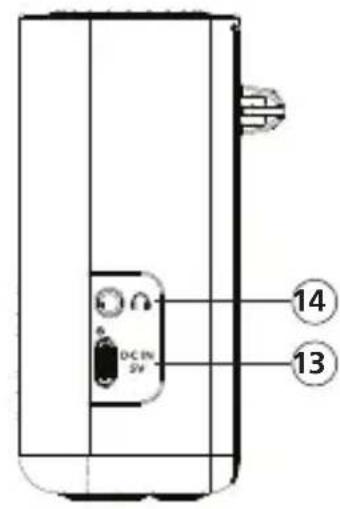
13 - Port USB-C du bloc d'alimentation
14 - Port de casque audio
4.3 Informations au sujet de l'afficheur LCD

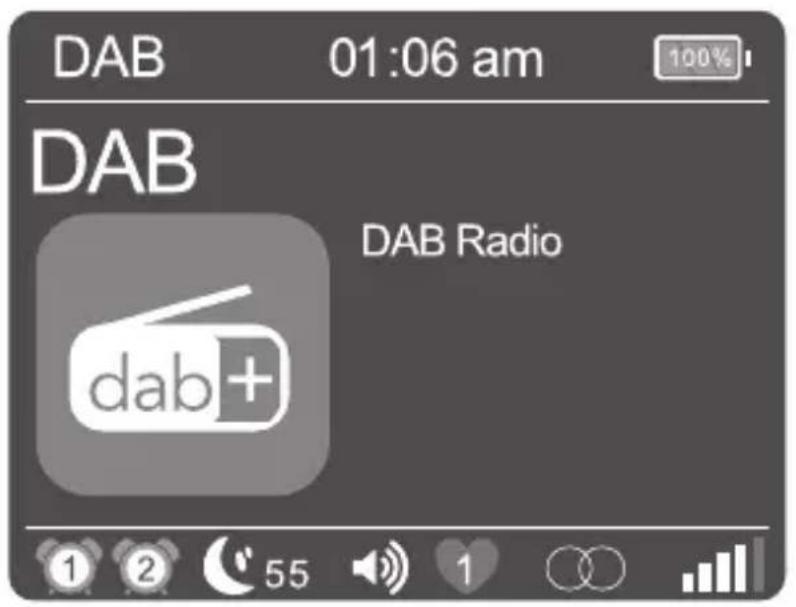
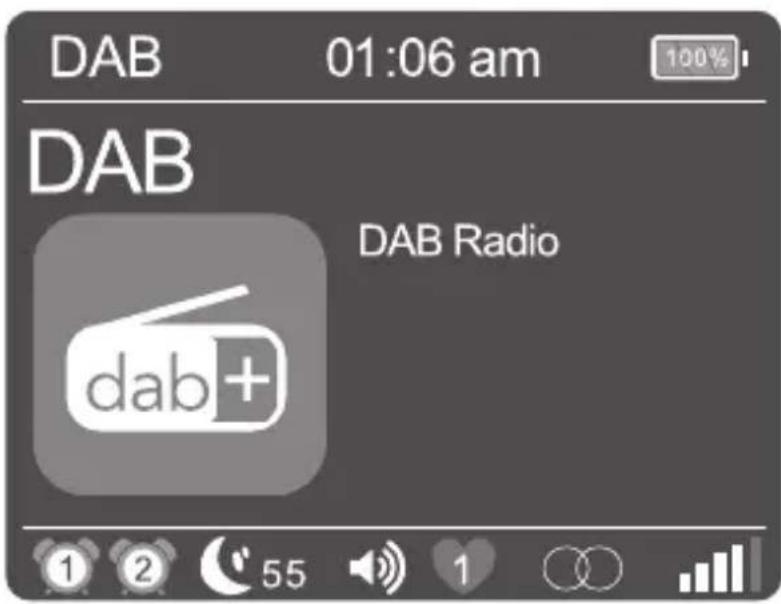
| 1 | Affichage pour Réveil 1 |
| 2 | Affichage pour Réveil 2 |
| 55 | Durée résiduelle du minuteur de sometimeil |
| Volume | |
| Station mémorisée 1-20 sélectionnée | |
| Affichage pour réception stéréo | |
| R·D·S | Affichage pour signal RDS |
| Puissance du signal | |
| Affichage BLUETOOTH | |
| Affichage de l'état de charge de l'accu |
4.4 Charge de l'accu
Pour éviter toute dépréciation de l'accu intégré, ce dernier n'est chargé que partiellement lors de l'achat. Chargez l'accu entièrement avant d'utiliser la radio pour la première fois.
Reliez à cet effet le port « DC IN » à une prise secteur facilement accessible à l'aide de l'adaptateur secteur USB fourni.
Pendant le processus de charge, une LED s'allume en rouge au-dessus du connecteur. Dés que l'accu est entièrement chargé, le voyant de contrôle s'éteint. La durée de charge normale d'un accu épuisé est d'env. 4-6 heures. Vous pouvez utiliser la radio pendant le processus de charge, sachant toute fois que cela rallonge la durée de charge.
- En fonction des conditions ambiantes, du volume, etc. la durée d'utilisation est d'env. 6 heures (à 50 % du volume max.).
- Pour conserver aussi longtemps que possible la capacité intégrale de l'accu, il convient de charger entièrement l'accu tous les 2 à 3 mois, même lorsqu'elles n'utilise pas la radio.
- Chargez l'accu à une température ambiante de +5 à +35 °C.
- L'accu conserve sa charge au moins à température ambiente.
- Plus la température ambiente est basse, plus la durée d'utilisation de la batterie sera courte.
- L'accu doit être chargeéès que le symbole d'accu vide s'affiche à l'écran.
Attention: En mode accu, la fonction de réveil n'est pas disponible.
4.5 Utilisation avec l'adaptateur secteur USB
Vous pouvez utiliser la radio aussi avec l'adaptateur secteur fourni. Dans ce mode, vous disposez de la fonction « Réveil »
4.6 Antenne télécopique DAB+ / FM
- Déverrouillez avec précaution l'antenne installée sur la partie arrêté droite du boîtier.
- Tournez l'antenne vers le haut et extrayez-la entierement.
- Orientez l'antenne de sorte à obtaining une réception optimale.
5. Commande de la radio
5.1 Activer / Désactiver (Standby)
Appuyez sur la touche < 山 / MODE> jusqu'à ce que la radio s'allume. Pour commuter l'appareil en mode veille, maintenez la touche appuyée jusqu'à ce que l'heure s'affiche à l'écran. Pour rallumer l'appareil depuis le mode veille, appuyez brievement sur la touche.
Pour eteindre entierement I'appareil depuis le mode « Veille », appuyez de maniere prolongee sur la touche
Attention: En mode batterie, la radio doit toujours être entière eteinte lorsqu'elle n'est pas utilisée pour éviter toute décharge de la batterie.
5.2 Navigation dans les menus
Appuyez de manière prolongée sur la touche
Appuyez sur les boutons <▲ Haut> ou <▼ Bas> pour parcourir les menus. Pour feuilleter, vous pouvez utiliser aussi le régulateur de volume. Confirmez le choix de menu à l'aide de la touche
Si vous appuyez brièvement sur la touche
5.3 Réglage du volume
Pour régler le volume, il suffit de tournier le bouton de réglage de volume. Le réglage du volume s'affiche sous forme d'un graphique à l'écran.
5.4 Informations complémentaires
L'actionnement repété de la touche
Description
- Nom de la station, du programme actuel, contenus, thèmes, etc.
Genre
- Niveau de signal et erreurs de signal
Vitesse de transmission
- Informations sur le canal
- Date du jour et heures actuelle
5.5 Réglage de la langue des menus
- Allumez la radio et ouvre le menu à l'aide de la touche
. - Sélectionnez à l'aide des touches
ou du régulateur de volume le menu « Language», puis confirmez. - Sélectionnez à l'aide des touches
la langue souhaitée, puis confirmez par .
5.6 Réglage de la date et de l'heure
Lors de la réception d'une station DAB+ ou FM d'une qualité suffisante, l'heure est régée automatiquement. En fonction de la qualité de la réception, ce processus peut prendre un certain temps. Si aucune station appropriée n'est disponible, vous pouvez aussi régler l'heure manuelle :
- Allumez la radio et ouvre le menu à l'aide de la touche
. - Sélectionnez à l'aide des touches
ou du régulateur de volume le menu « Heure», puis confirmez. - Sélectionnez « Régl. heures/date » et confirmez. Sélectionnez ensuite le jour, le mois, l'année, les heures et les minutes, réglez-les, puis confirmez.
Autres réglages dans le menu « Heure/date »
Les fonctions suivantes peuvent etre regles dans le menu « Heure » :
« Système 12/24H »: Réglage du format de l'heure.
Options dispensibles : « 24 heures » / « 12 heures »
« Régl.format date » : Réglage du format de la date.
Options dispensibles : « jj-mm-aaaa » / « mm-jj-aaaa / aaaa-mm-jj »
« Style horloge »: Réglage du design de l'horloge en mode « Veille ».
Options disponibles : « Analogue » / « Numérique »
« MAJ Automatique »: Réglage pour le réglage automatique de l'heure.
Options disponibles : « Pas de MAJ » / « MAJ depuis radio »
5.7 Réglage de l'éclairage de l'écran
L'éclairage de l'afficheur peut être ajusté selon 3 niveaux de luminosité. Les fonctions suivantes peuvent être régles dans le menu « Rétroéclairage »:
« Temporisation »: Durée jusqu'à ce que le rétroéclairage de l'écran soit étient.
Options dispensibles : « Arrêt / 10 sec. / 20 sec. / 30 sec. / 45 sec. / 60 sec. / 90 sec. /
120 sec. / 180 sec.
En mode « Arrêt», le rétroéclairage n'est jamais étant. Cela abrège l'autonomie de l'accu.
« Niveau »: La luminosité de l'afficheur lorsqu'la radio est mise en marche.
Options disponibles : « Mode nuit » /« Bas » / « Moyen » / « Élevé »
Pour le réglage, procédez comme suit :
- Allumez la radio et ouvre le menu à l'aide de la touche
. - À l'aide de
ou du régulateur de volume, Sélectionnez le menu « Rétroéclairage », puis appuyez sur . - À l'aide des touches
ou du bouton de réglage du volume, Sélectionnez le menu « Temporisation » ou « Niveau » puis validez avec .
5.8 Réglage du minuteur de sommeil
Le minuteur de sommeil est utilise pour eteindre la radio automatiqueen apres uneDurée predefinie. Pour le reglage, procedez comme suit :
- Allumez la radio et appuyez sur la touche
. - Dans le menu suivant, selectionnez l'une des options suivantes: « Arrêt / 15 min. / 30 min. / 45 min. / 60 min. / 1 h 15 min. / 1 h 30 min. / 1 h 45 min. / 2 h »
Confirmez le réglage souhaité à l'aide de la touche
- L'écran affiche le symbole du minuteur de sometime et le temps résiduel jusqu'à l'arrêt de la radio. Pour désactiver le Sleeptimer, il vous suffit de selectionner le réglage de durée « Arrêt »
5.9 Réglage du réveil
Veuillez notes que la fonction « Alarmes » n'est disponible que lorsque le bloc d'alimentation est branché au secteur. En mode accu, la fonction de réveil ne peut pas être utilisée.
Le CR-M33DAB permet de régler 2 horaires de réveil différents.
Ces heures de réveil peuvent être programmés pour les intervalles suivants :
« Une fois » / « Tous les jours » / « Week-ends » / « Jours de semaine »
Pour le réglage de l'heure du réseau, procédez comme suit :
- Allumez la radio et ouvre le menu à l'aide de la touche
. - À l'aide des touches
ou du bouton de réglage du volume, Sélectionnez le menu « Alarmes » puis validez. - « Réveil 1 » s'affiche. Vous pouvez à présent regler l'heure du Réveil 1 ou passer à l'heure du Réveil 2 (« Réveil 2 ») à l'aide des touches
ou du bouton de réglage du volume. -
Confirmez par
, puis executer les étapes suivantes : -
Réglage Réveil « Marche » ou « Arrêt » (seLECTIONnez à l'aide des touches
ou du régulateur de volume, puis confirmez par ). - Réglage des heures et des minutes (seLECTIONnez à l'aide des touches
ou du régulateur de volume, puis confirmez par ). - Réglage de la source « FM», « DAB » ou « Alarme » à l'aide des touches
ou du régulateur de volume, puis confirmez par . - Réglage « Répéter » : Sélectionnez « Une fois » / « Tous les jours » / « Week-ends » / « Jours deSEAmine » à l'aide des touches
ou du régulateur de volume, puis confirmez par . - Sélectionnez le volume d'activation dans « Volume » à l'aide des touches
ou du régulateur de volume, puis confirmez par .
L'heure du réveil est enregistrée et vous pouvez quitter le menu. Un symbole de réveil correspondant s'affiche à l'écran.
Procedez de manière identique pour le réglage de la 2ème heures de réveil. Pour supprimer un réveil régèle, sélectionnez à la première étape l'option « Réveil Éteint »
Le réveil s'allume à l'heure paramétrée. Pour interrompre le signal de réveil, appuyez le cas échéant plusieurs fois sur une touche quelconque pour activer la fonction Sommeil avec les intervalles suivants :
5 - 10 - 15 - 30 minutes.
Appuyez sur la touche
5.10 Réglage du son (égalisateur)
La radio possède sept réglages de son prédéfinis :
« Classique » / « Pop » / « Jazz » / « Rock » / « Plat » / « Film » / « Actualités »
Ils peuvent être seLECTIONnés dans le menu « Égaliseur »
5.11 Paramétrage d'usine
Le menu « Réinitialisation » permet de réinitialiser la radio aux réglages d'usine. Si vous Sélectionnez « Oui » pour cette option, la radio redémarrage. Si vous Sélectionnez « Non », vous revenez au niveau de menu précédent.
6. Utilisation de la radio DAB+
Appuyez plusieurs fois sur la touche < MODE> jusqu'à ce que l'écran affiche « DAB »
6.1 Réglage des stations DAB+
Lors de la mise en service de l'appareil, une recherche de stations a ete realisede. Les stations trouvées ainsi sont enregistrées par ordre alphabetique dans la liste des stations.
Relancement de la recherche de stations :
- Ouvrez le menu à l'aide de la touche
.
Selectionnez « Recherche » pour démarrer la recherche automat. à l'aide de la touche. - Pendant la recherche de stations, l'afficheur affiche le nombre de stations deja trouvees.
- Si aucune station n'est trouvée pendant la recherche automatique, l'écran affiche « Pas de programme ! ». Vous doivent contrôler alors l'orientation correcte de l'antenne ou déplacer l'appareil afin d'améliorer la réception. Ouvrez alors une nouvelle fois le menu « Recherche »
- La recherche automatique démarre après un actionnement prolongé de la touche
.
Réglage manuel des ensembles :
- Ouvrez le menu à l'aide de la touche
. - À l'aide de
ou du régulateur de volume, Sélectionnez le menu « Réglage manuelle », puis appuyez sur . Le canal régèle actuellement s'affiche à l'écran avec sa fréquence. - Utilisez les touches
ou le régulateur de volume pour sélectionner manuellement un autre canal. - Confirmez la sélection à l'aide de la touche
. Le niveau du signal s'affiche alors à l'écran. Un nouvel actionnement de la touche charge l'ensemble sélectionné.
Selection d'une station DAB+
Pour afficher les stations méorisées par ordre alphabetique dans la liste des stations, procédez comme suit :
- Appuyez sur les touches
pour faire défiler la liste des stations dans un sens ou dans l'autre. - Lorsque vous avez selectionné la station souhaïée, appuyez sur la touche
, pour démarrer la lecture. - Si le niveau de réception de la station sélectionnée est insuffisant pour une lecture fluide, le message « Pas de programme! » s'affiche à l'écran. Sélectionnez ensuite une autre station ou modifiez la posit. l'antenne.
6.2 Enregistrement des stations dans la mémoire de stations (favoris)
40 emplacements mémoire sont disponibles pour enregistrer des stations DAB afin de les trouver plus facilement. 2 emplacements mémoire peuvent être affecté à des touches de selection directe.
1. Enregistrement sur les touches de selection directe P1 & P2 :
- Sélectionnez une station pour l'enregistrer.
- Maintenez la touche correspondante enforcée jusqu'à ce que « Favori memorisé » s'affiche à l'écran.
-
Les stations enregistrées peuvent être ouvertes en appuyant brievement sur les touches de seLECTION directe.
-
Affection des emplacements mémoire 3 à 40 :
-
Sélectionnez une station pour l'enregistrer
- Maintenez la touche
enforcée jusqu'à ce que l'écran affiche « Mémorisation». - À l'aide des touches
ou du régulateur de volume, Sélectionnez un emplacement de mémoire. - Appuyez sur la touche
, pour confirmer l'enregistrement. L'écran affiche alors « Favori memorisé » - La touche
permet d'ouvrir les stations mémorisées, tandis que les touches ou le régulateur de volume permettent de les sélectionner avant de les charger par .
6.3 Fonctions du menu « DAB+ »
Appuyez de manière prolongée sur la touche
- Listé stations : Toutes les stations trouvées par ordre alphabétique.
Rap.preselection : Tous les favors memorisés. - Mémorisation : Cette option permet d'affector un emplac. mémoire à la station actuelle (favoris).
- Recherche : Recherche de stations automatique.
- Réglage manuel : Il permet de régler manuellement un canal de réception spécifique.
- Vider : La fonction sert à supprimer les stations invalides de la liste des stations. À l'aide de la touche
, Sélectionnez « Non/Oui », puis avec les touches ou le régulateur de volume, puis confirmer par .
Les autres menus sont décrits au chapitre 5.
7. Utilisation de la radio FM
Appuyez plusieurs fois sur la touche
7.1 Réglage d'une station FM
- Appuyez sur la touche < Haut>, pour augmenter la fréquence de réception.
- Appuyez sur la touche < Bas>, pour diminuer la fréquence de réception.
- Si vous maintainez les touches < Haut> ou < Bas> appuyées, l'appareil lance une recherche de stations automatiques qui sera interrompu à la prochaine station trouvée.
- La recherche automatique des stations est lancée lorsque vous maintainez la touche
. Toutes les stations détectées sont enregistrées dans la mémoire des stations.
Fonctions RDS
Les informations suivantes peuvent etre affichees en appuyant de maniere repetee sur la touche
7.2 Enregistrement des stations dans la mémoire de stations
40 emplacements mémoire sont disponibles pour enregistrer des stations FM afin de les trouver plus facilement. 2 emplacements mémoire peuvent être affecté à des touches de sélection directe. 1. Enregistrement sur les touches de selection directe P1 & P2 : - Sélectionnez une station pour l'enregistrer - Maintenez la touche numérique correspondante appuyée jusqu'à ce que « Favori的记忆é » s'affiche à l'écran. - Les stations enregistrées peuvent être ouvertes en appuyant brievement sur les touches de seLECTION directe.2. Affection des emplacements mémoire 3 à 40 :
- Sélectionnez une station pour l'enregistrer. - Appuyez sur la touche7.3 Fonctions du menu « FM »
Appuyez de manière prolongée sur la touche8. Audio Bluetooth
La fonction BLUETOOTH permet la transmission sans fil des fichiers de musique (Streaming audio) à la radio. Des smartphones, tablettes ou apparciels similaires peuvent être appariés à la radio. Appuyez plusieurs fois sur la touche8.1 Étabir une connexion
L'ecran affiche « Déconnecté » et le symbole BLUETOOTH jaune clignote. - Lancez la recherche d'appareils depuis votre apparéil mobile. Sélectionnez « CR-M33DAB » dans la liste des apparéils et appariez les deux apparéils comme d'habitude. L'ecran affiche « Connecté » et un message vocal retentit. Yououpvezalsordfuserlescontenussoushaitedesepuisvotreappareilmobile. Vouss pouvez commander les fonctions de lecture de base aussi depuis la radio. - Touche8.2 Déconnexion
Seul un apparéil peut être relié à la radio par BLUETOOTH. Si vous souhaïez connecter un autre apparéil, vous doivent déconnecter l' apparéil connecté actuellement. À cet effet, procédez comme suit : Annulez I'appariage depuis votre apparéil mobile. - Les apparils se déconnectent aussi lorsque vous les déplacez hors de la portée BLUETOOTH. Si vous coupez la radio, elle se reconnecte automatiquement à l'appareil BLUETOOTH dés que vous le rallumez, sous réserve que cet apparéil se trouve à proximité, est allumé et que sa fonction BLUETOOTH est activée.9. Utilisation d'un casque audio
Pour utiliser la radio CR-M33DAB avec un casque audio, vous devez désir un modele du commerce équipé d'une fiche Jack de 3,5 mm. Si la station radio émet un signal stéreo, la lecture est transmise en stéreo au casque.Attention!
L'écoute régulière de musique à un volume élevé peut occasionner des lésions auditives. Diminuez le volume avant d'entamer la diffusion de musique depuis la radio.10. Élimination des défaillances
Remarques concernant la recherche de défaillances| Problème Solution | |
| Sans fonction | L'adaptateur secteur USB est-il correctement branché? L'accu est-il entièrement chargé? |
| Absence de son | Le volume est-il régle au minimum? Augmentez évientuèlement le volume depuis l'appareil de lecture. La réception de la station souhaïée est-elle correcte? |
| La radio ne réagit pas à l'actionnement des touches | Débranchez l'adaptateur secteur USB et/ou attendez que la batterie se soit décharge. Puis rebranchez l'adaptateur secteur USB. |
| Problèmes lors de la réception radio | Réorientez l'antenne. Trouvez un endroit adapté pour l'installation. D'autres appar兼s électroniques perturbent la réception. Le lieu d'installation n'est pas adapté à la réception de signaux DAB+. |
11.Maintenance et entretien
Nettoyage du boîtier : Utilisez un chiffon légèrement humecté avec un détergent doux. N'utilisez pas de détergents contenant de l'alcool, de l'ammoniac ou d'abrasifs.Mises en garde au sujet de la formation de condensation
La condensation (rosée) peut se former à l'intérieur de l'appareil si la différence entre la température de l'appareil et la température ambiente est trop importante. Si la condensation se forme à l'intérieur de l'appareil, elle peut nuire à son bon fonctionnement. Dans ce cas, il convient d'attendre quelques heures. Une fois l'humidité disparue, l'appareil peut de nouveau être utilisé.Des précautions particulières sont à prendre dans les cas suivants :
Si l'appareil est déplaced d'un endroit à un autre dont la température est considérablement plus élevé ou BASSE, si I'humiidity ambiente augmente sur le lieu d'installation de I'appareil, etc.12. Mise au rebut
Mise au rebut d'appareils électriques et électroniques usages et de piles   Le symbole (poubelle barrée) sur le produit ou son emballage indique qu'en fin de vie, ce produit ne doit pas etejeted aux ordures menagères, mais doit etre remis gratuiteme a un point de collecte installe par un service public de gestion des déchets ou un distributeur. De manière générale, les propriétaires d'appareils ELECTriques et électroniques usages doivent rester de l'apparil les piles et accus usages qui ne sont pas intégrés en fixe dans l'appareil usage avant de remettre ce dernier au centre de traitement de déchets. Cela ne s'applique pas si les apparciels usages sont remis à la préparation de revalorisation sous la responsabilité d'un centre de traitement de déchets de droit public. Par cette contribution à l'élimination correcte de ce produit, vous protégEZ l'environnement et la santé de vos concitoyens. Une mise au rebut non conforme ou erronée occasionne des risques pour l'environnement et la santé. Vous pouvez obtenir des informations plus détaillées au sujet du recyclage des apparciels ELECTriques et électroniques usages, ainsi que des piles usages auprès de votre commune ou des entreprises de traitement de déchets communaux. Consignes de mise au rebut à l'attention des consommateurs en Allemagne : https://www.e-schrott-entsorgen.org/ Consignes de mise au rebut à l'attention des consommateurs en Autrique : https://www.elektro-ade.at/ Consignes de mise au rebut à l'attention des consommateurs en Irlande : https://www.mywaste.ie/ Consignes de mise au rebut à l'attention des consommateurs aux Royaume-Uni : https://www.recyclenow.com/ Consignes de mise au rebut à l'attention des consommateurs en France : https://www.quefairedemesdechets.fr 13. Caractéristiques techniques - CR-M33DAB| Alimentation en tension | |
| Module principal | |
| Tension d'alimentation Tension continue 5,0 V | (utilisation de l'adaptateur secteur USB spécial) |
| Puisance absorbee en mode veille 0,45 W | |
| Puisance absorbee 5 W | |
| Adaptateur secteur USB | |
| Fabricant de l'adaptateur secteur USB Shenzen GUIJIN | Technology Co. Ltd. Building 3 of Songxin Industry Park, Song-gang, Baoan, Shenzhen, China 518105 RéPUBLICQUE POPULAIRE DE CHINE |
| Marque et identifiant du modele de l'adaptateur secteur USB | GJTL AK06WG-0500100VW / AK06WG-0500100BW |
| Tension d'entrée Tension alternative ~ 100 - 240 V | |
| Fréquence de courant alternatif d'entrée 50/60 Hz | |
| Tension/intensité/puisance de sortie Tension continue | 5,0 V/ 1,0 A/5,0 W |
| Type de fiche USB-C | |
| Efficiency moyenne en service 73,62 % | |
| Puisance absorbee en charge à vide 0,1 W | |
| Accu | |
| Type Lithium-ions | |
| Tension/Capacité/Energie disponible 3,7 V / 2000 mAh | / 7,4 Wh |
| Durée de service/durée de charge Max. 6 heures/Env. 4 heures | heures |
| N° UN UN3481 Accu lithium-ions intégré à l'équi- | pement |
| BLUETOOTH | |
| Version BLUETOOTH / Classe de performances V5.3 / Classe 2 | |
| Puisance émettrice maximale < 20 dBm | |
| Portée | Env. 10 m (peut varier en fonction de l'environnement) |
| Plage de fréquences | 2,402 GHz - 2,480 GHz |
| Profil BLUETOOTH | A2DP (Advanced Audio Distribution Profile, AVRCP (Audio/Video Remote Control Profile) |
| Tuner FM/DAB+ | |
| Gamme d'accord DAB LANDE III | 174,928 MHz - 239,200 MHz |
| Gamme d'accord FM | 87,50 MHz - 108,00 MHz |
| Port pour casque audio | Douille de jack 3,5 mm |
| Amplificateur | |
| Puisance de sortie | 1,8 W RMS / 2,3 W de puissance de sortie maximale |
| Dimensions et poids | |
| Radio (L x H x P) 160 x 100 x 54 mm / 0,39 kg | |
| Plage de température | +5°C à 35°C |
14. Garantie
Cher client,
Nous vous remercions d'avoir opté pour ce produit Kenwood. Si ce produit avaitprésenter des défauts de pieces ou de main d'œuvre sous des conditions d'utilisation normales, nous les éliminerons gratuitemment ou replacerons l'appareil à nos frais, conformément à nos conditions de garantie. Veuillez conserveur soigneusement la presente carte de garantie. Kenwood accorde sur cet apparéil une garantie de deux ans à partir de la date d'achat indiqués sur la facture ou le justificatif d'achat du revendeur Kenwood. Cette garantie s'etend aux defaults de pieces et main d'oeuvre. Nous nous réservons le droit de remplaier le produit si sa réparation n'est plus appropriée sur le plan économique. Les coûts d'emballage et d'installation, ainsi que les coûts et risques liés à la réparation elle-même ne sont pas inclus dans la prestation de garantie et seront facturés. Conditions A. Pour faire valor un droit de garantie, les données suivantes sont nécessaire en plus de la presentation de la presente carte de garantie : (a) Vos noms et adresse complets. (b) Le ticket de caisse ou la facture d'un détaillant domicile dans un état membre de l'Union Européenne, sur lesquels figurent la date d'achat d'origine. (c) Les noms et adresse complets du détaillant auprès duquel le produit a été acheté. (d) Le nombre de série et la désignation du modele du produit. Kenwood se reserve le droit de refuser la prestation de garantie sir les informations indiquées ci-dessus ne sont pas disponibles ou si le produit a ete modifie depuis son acquisition initiale. B. À a date de la livraison au commercant, leprésent produit satisfait à toutes les normes et disposition de sécurité applicables dans le pays de destination. Les modifications nécessaires à l'utilisation de l'appareil dans les pays en dehors du pays de destination sont exclues des dispositions de garantie susnommées. De plus, nous déclinons toute responsabilité pour les interventions réalisées dans ce contexte, ni pour les déteriorations du produit occasionnées par de telles interventions. Si le produit est utilisé dans un pays pour lequel il n'est ni conscience, ni fabriqué, nos interventions de garantie ne sont réalisées que si les coûts pour la transformation de l'appareil en fonction des normes et dispositions de sécurité nationales applicables sont prises en charge par l'utilisateur. Si de plus, le produit est différent des produits commercialisés par l'importateur officiel et si certaines pieces détachées n'était pas disponibles pour la réparation du produit, l'utilisateur doit prendre en charge les frais pour les transports aller et return de l'appareil vers et depuis le pays d'acquisition. Cela s'applique également si dans le pays concerné, les prestations de garantie ne peuvent pas'être proposées pour d'autres raisons. C. Sont exceptés des prestations de garantie : (a) Les modifications du produit ainsi que les opérations de maintenance et de réglage normales, y compris les contrôleurs réguliers indiqués dans la notice d'emploi. (b) Les dommages sur le produit occasionnés par des opérations défectueuses ou non-conformes, si ces opérations ont été réalisées par des tiers qui n'ont pas été habilités pour la réalisation de prestations de garantie au nom du fabricant. (c) Les dommages occasionnés par de la négligence, des accidents, des modifications, un montage non-conforme, un emballage insuffisant, des erreurs d'utilisation ou l'usage de pieces détachées erronées lors d'une réparation. (d) Les dommages liés au feu, les dégats des eaux, la foudre, les tremblements de terre, une ventilation insuffisante, des cas de force majeure, le raccordement à une tension de secteur erronée ou d'autres causes non imputables à Kenwood. (e) Détérioration des haut-parleurs suite à une surcharge. Détériorations d'autres objets qui ne font pas partie du produit, par ex.: DVD, CD, supports mémoire USB, smartphones, etc. (f) Les consommables et pieces d'usure à remplaner dans le cadre du service clients normal, par ex.: Piles, accus rechargeables, luminaires, etc. (g) Tous les produits dont le ou les numéroes de série ont ete retirés entierement ou en partie, modifiés ou rendus illisibles. Cette garantie peut etre exercede par toute personne ayant acquis le produit en toute legalite. Conformément aux dispositions de garantie sus-nommées, le produit est réparé ou remplace gratuitement. Ce droit ne nuit en aucun cas aux autres droits de l'utilisation dans le cadre des dispositions juridiques applicables. La réparation ou le emplacement ne donnent pas lieu à une prolongation de la durée de garantie. Les droits complémentaires sont exclus, notamment ceux relatifs à la rédhibition, la réduction du prix ou les dommages-intérêts.Coordonnées :
JVCKENWOOD Europe B.V. 145 rue Michel Carré, Parc des Algorithms, Bâtiment Euripide F - 95100 Argenteuil TEL: +33 1-80-04-45-00KENWOOD
KENWOOD
Radio portatile DAB+CR-M33DAB
MANUALE DI ISTRUZIONI
JVCKENWOOD CorporationIndices
#
Pagina 1. Prima della messa in funzione / Istruzioni di sicurezza 3 2. Informazioni sulla batteria 5 3. Dichiarazione di conformità 6 4. Messa in servizio 7 5. Funzionamento della radio 9 6. Uso della radio DAB+ 12 7. Uso della radio FM 13 8. BLUETOOTH Audio 14 9. Uso di cuffie 15 10. Eliminazione errori 15 11. Cura e manutenzione 15 12. Smaltimento 16 13. Dati tecnici 17 14.Garanzia 181. Prima della messa in servizio
IMPORTANT ISTRUZIONI DI SICUREZZA
Attenzione: Leggere attendamente questa pagina per garantire un funzionamento sicuro dell'unità.Leggere attendamente queste istruzioni!
- Seguire tutte le istruzioni di sicurezza e d'uso durante l'utilizzo di quello prodotto.Conservare le note in un luogo sicuro!
- Conservare le istruzioni di sicurezza e d'uso per futuro consultagioni.Osservare tutte leindicazioni di avventenza!
Seguirc scrupolosamente tutte le avertenze riportate sul prodotto e nelle istruzioni per l'uso.Pulire solo con un panno asciutto!
- Prima di pulire il prodotto, scollegare tutti i cavi dall'apparecchio. Non utilizzato mai detergenti liquidi o spray di pulizia. Per la pulizia utilizzato solo un panno leggermente umido.Accessori
- Utilizzare solo gli accessori specificati dal produttore.Non usare quello prodotto vicino all'acqua
- Non esporre mai l'apparecchio a gocce o spruzzi d'acqua - ad esempio in prossimità di una vasca da bagno, lavabo, lavandino, lavello, lavatrice, cantina umida, piscina, ecc. Non collocare mai contentitori pieni di liquidi, come vasi di fiori, sull'apparecchio o direttamente accanto adesso.Ventilazione
- Le fessure e le aperture all'interno dell'involucro sono previste per la ventilazione dell'apparecchio per garantire un funzionamento affidabile dell'apparecchio, per proteggerlo dal surriscaldamento e dall'eventuale autoaccensione. Non bloccare le aperture di ventilazione. Installare l'apparecchio secondo le istruzioni del produttore. Non bloccare mai le aperture di ventilazione collocando l'apparecchio su un letto, un divano, una moquette o una superficie morbida simile. Questa unità non delve essere installata in una libreria o in un armadio a meno che non vi sia un'adeguata ventilazione.Alimentazione della tensione
- Questo dispositivo può essere collegato alla tensione di rete solo utilizzando l'adattatore di rete USB-C in dotazione. Utilizzato l'adattatore di rete USB solo per la radio compatta CR-M33DAB. In agli caso, assicurarsi che la tensione di rete locale corrisponda alle specifiche dell'alimentatore. Se non siete sicuri del tipo di alimentazione elettrica della vostra casa, contattate il vostro rivenditore o l'azienda elettrica locale.Adattatore di rete USB
- Assicurarsi che l'adattatore di rete USB non sia danneggiato meccanicamente ed evitare che si possa inciampare a causa del cavo. Il cavo non deve essere schiacciato o attorcigliato in nessun caso, nemmeno all'uscita dell'adattatore di rete USB.Intemperie
- Scollegare l'apparecchio alla rete elettrica durante i temporali e quando non verrà utilizzato per un lungo periodo di tempo.Sovraccarico
- Non sovraccaricare mai le prese di alimentazione, le prolonghe o le prese multiple, in quanto sussiste il rischio di incendio o scossa elettrica.Penetrazione di materiale estraneo e liquido
- Assicurarsi che corpi estranei o liquidi non entrino mai nel disposativo o nell'adattatore di rete USB outweigho le aperture, altrimenti si potrebbe verificare un contatto con componenti sotto tensione o un cortocircuito, con seguenti incendi o scosse elettriche. Non versare mai liquidi di alcun tipo su quello dispositivo o sul suo adattatore di alimentazione USB.Manutenzione
- Non tentare mai di riparare l'apparecchio da soli, poiché le aperture o la rimozione delle copertura possono esporre parti sotto tensione che potrebbero essere pericolose al contatto. Per tutti gli interventi di manutenzione rivolgersi a personale qualificato.Danni che richiedono una riparazione
- I lavori di manutenzione e riparazione devono essere eseguite esclusivamente da un centro di assistenza clienti qualificato. La manutenzione/riparazione è necessaria se il disposativo è stato danneggiato (ad esempio l'adattatore di rete USB), se è penetrato del liquido nel disposativo, se sono penetrati degli oggetti, se il disposativo è stato esposto alla pioggia o all'umidità, se non funziona più correttamente o se è caduto a terra.Ricambi
- Se sono necessarie parti di ricambio, assicurarsi che il technique dell'assistenza utilizzzi parti di ricambio prescritte dal costruttore o aventi le stesse caratteristiche delle parti originali. Ricambi non autorizzati possono causare incendi, scosse elettriche o altri incidenti.Controllo di sicurezza
- Al termine dei lavori di manutenzione o riparazione di questo appearecchio, chiedere al tecnico dell'assistenza di eseguire un controllo di sicurezza per determinare se l'apparecchio è in perfette condizioni.Calore
- Non installare l'unità in prossimità di superfici calde come radiatori, termoventilatori, stufe o altre apparecchiature (compresi gli amplificatori) che potrebbero surriscaldarsi. Non collocare mai oggetti con fiamme libero, come candele o lanterne, sopra o vicino al prodotto. Non esporre le batterie installate a calore eccessivo, come luce solare diretta, fuoco o simili.Rischi associati a volumi elevati
Per evitare possibili danni all'udito, non ascoltare ad alto volume per lunghi periodi di tempo.Funzione automatica di risparmio energetico
L'unità è dotata di una funzione di risparmio energetico automatico. Se non è stato ricevuto alcun segnale audio o non è stata eseguita alcuna operazione, l'unità passa in modalità standby entro 15 minuti.2. Informazioni sulla batteria
La batteriaagliioni di litio contiene sostane inflammabili come ad es. solvente organico. Se maneggiata male, la batteria puo scoppiare e prendere fuoco o rilasciare calore estremo, degradare le prestazioni o sviluppare altri danni. Si prega di prestare particolare attenzione a queste istruzioni, quale trattamento è vietato.Pericolo di incendio
Proteggere l'unità con la batteria agli ioni di litio installata in modo permanente da danni meccanici. - Candele e altre fiamme libero devono essere tenute sempre lontane da quello prodotto per evitare che l'apparecchio prenda fuoco. - Proteggere l'unità dal calore: C'é un rischio di incendio. Se si colloca l'unità su uno scaffale, mantenere una distanza di almeno 10 cm dai tutti i lati.Pericolo dovuto alla batteria integrata
- Non utilizzato l'unità in caso di danni visibili all'involucro o al cavo di ricarica USB. Le riparazioni dell'apparecchio sono essere effettuate solo dal servizio clienti autorizzato. - Non esporre l'unità alla luce diretta del sole o al calore. La temperatura ambiente non deve scendere al di sotto di +5^ e non deve superare i +35^ . In un'automobile, la temperatura può significativamente superiore a 35^ . - Caricare la batteria solo con l'adattatore di rete USB in dotazione. - Quando la batteria ha raggiunto la fine della sua vita utile, il dispositorio con la batteria integrata devese smaltito correttamente. Non tentare di rimuovere o sostuire la batteria. Non riutilizzare o smontare la batteria. - Se la soluzione elettrolitica fuorises alla batteria, evitare il contatto con gli occhi, le mucose e la pelle. Sciacquare immediatamente le zone colpite con abbondante acqua pulita e rivolgersi a un medico. La soluzione elettrolitica può causare irritazioni. - La batteria non deve essere messa in cortocircuito. La batteria potrebbe surriscaldarsi ed esplodere. - L'apparecchio non deve essere gettato nel fuoco. La batteria potrebbe esplodere. - Non è consentito apportare modifiche al disposativo.Prudenza!
Pericolo di esplosione se la batteria viene sostituita con una di tipo non corretto; - alte o bassate temperature estreme alle quali una batteria può essere esposta durante l'uso, lo stoccaggio o il trasporto; - abassa pressione dell'aria ad alta quota; - quando si sostituisce una batteria di tipo non corretto che può bypassare un fusabile (ad esempio, alcuni tipi di batterie al litio); - quando si smaltisce una batteria nel fuoco o in un forno caldo, o quando si schiaccia o taglia meccanicamente una batteria; - quando di lascia la batteria in un ambiente con temperature extremamente elevate o con una pressione dell'aria extremamente Bassa, che potrebbe causare un'esplosion o la fuoriuscita di liquidi o gas inflammabili.3. Dichiarazione di conformità
JVCKENWOOD Europe B.V. dichiara che l'apparecchiatura radio tipo [KENWOOD] CR-M33DAB è conforme alla Direttiva 2014/53/UE. Il testo integrale della dichiarazione di conformità UE è disponibile al seguente indirizzo Internet: https://www.kenwood.com/eukdoc/Produttore:
JVCKENWOOD Corporation 3-12, Moriyacho, Kanagawa-ku, Yokohama-shi, Kanagawa 221-0022, GIAPPONE https://www.jvckenwood.com/en.htmlIndirizzo di contatto UE:
JVCKENWOOD Europe B.V. Rendementsweg 20 B-9, NL 3641 SL Mijdrecht, THE NETHERLANDS https://nl.jvckenwood.com/Indirizzo di contatto UK:
JVCKENWOOD U.K. Limited First Floor, Gleneagles, The Belfry, Colonial Way, Watford, Hertfordshire WD24 4WH, UNITED KINGDOM https://uk.jvckenwood.com/ Il marchio denominativo e i loghi Bluetooth® sono marchi registrati di BLUETOOTH SIG Inc. e qualsiasi uso di questi marchi da parte di JVCKENWOOD Corporation è concesso in licenza. Gli altri marchi e nomi commerciali sono quelli dei rispetti proprietari.4. Messa in servizio
4.1 Sconfezionamento
Sconfezionare delicatamente il dispositivo e assicurarsi che tutti gli accessori siano presenti: - Adattatore di rete USB-C - Manuale di istruzioni4.2 Controller connessioni
   1 - Antenna telescopica 2 - Volume 3-0/MODE 4 - Timer di spegnimento 5-MENU/INFO 6-OK/SCAN 7 -▼ Giu 8 - Preset 2 9 - Preset 10 - Preset 1 11- Su 12 - Display LCD 13 - Alimentatore con ingresso USB-C 14 - Presa per cuffie4.3 Informazioni sul display LCD
| 1 | Display per la sveglia 1 |
| 2 | Display per la sveglia 2 |
| 55 | Tempo residuo del timer di spegnimento |
| Volume | |
| Preselezione selezionata 1 - 20 | |
| Display per la riscizione steroe | |
| R·D·S | Display per il segnale RDS |
| Potenza di riscizione | |
| Display BLUETOOTH | |
| Indicatore del livello di carica della batteria |
4.4 Caricare la batteria
Per evitare di danneggiare la batteria integrata, al momento dell'acquisto esta è carica solo a metà. Caricare completamente la batteria prima di utilizzato la radio per la primaolta. A tal fine, collegare il cavo "DC IN" con l'adattatore di rete USB in dotazione e collegarlo a una presa di corrente disponibile accessibile. Durante la ricarica, un LED sopra il connettore si illumina di rosso. Non appena la batteria è completamente carica, la spia si spegne. Il tempo di ricarica normale a batteria scarica è di circa 4-6 ore. É possibile utilizzato la radio durante la ricarica, ma quello aumento è il tempo di ricarica. - A seconda delle condizioni ambientali, del volume, ecc. la durata della riproduzione è di circa 6 ore (al 50% del volume). - Per mantenere la piena capacité della batteria il più a lungo possibile, è necessario caricarla completeness anni 2 o 3 mesi,anche se non si utilizza la radio. - Caricare la batteria in un range di temperatura compreso tra +5 e +35^ . - La batteria mantiene la carica al meglio a temperature ambiente. - Più bassa è la temperatura ambiente, più breve è la durata della batteria. - La batteria deve essere ricaricata quando sul display compare il symbolo di batteria scarica. Attenzione: La funzione di allarme non è disponibile in modalità batteria.4.5 Funzionamento con adattatore di rete USB
É possibile utilizzato la radio ancche con l'adattatore di rete in dotazione. In questa modalità operativa la funzione "Sveglia" è disponibile.4.6 Antenna telescopica DAB+ / FM
1. Sbloccare con cautela l'antenna sulla parte posteriore destra dell'alloggiamento. 2. Girare l'antenna verso l'alto ed estrarre completeness tutti gli elementi. 3. Allineare l'antenna per ottenere la migliorere ricezione.5. Funzionamento della radio
5.1 Accensione / Spegnimento (Standby)
Tenere premuto il tasto < 品 / MODE> finché la radio non si accende. PerMETtere l'apparecchio in modalità standby, tenere premuto il tasto finché sul display non compare l'ora. Per riaccendere l'apparecchio alla modalità standby, premere brevamente il tasto. Per spegnerlo completeness dallas modalita standby, tenere premuto il tasto 一 y MODE>. Il display visualizza brevamente "POWER OFF" e l'unita si spegne. Attenzione: In modalità batteria, la radio deve essere sempre spenta completamente quando non viene utilizzata per evitare che la batteria si scarichi.5.2 Navigazione dei menu
Tenere premuto il tasto5.3 Regolare il volume
Ruotando il controllo del volume, è possibile regolare il volume. L'impostazione del volume viene visualizzata graficamente sul display.5.4 Ulteriori informazioni
Premendo ripeturamente il tasto5.5 Impostazione della lingua dei menu
1. Accendere la radio e richiamare il menu con il tasto5.6 Impostazione della data e dell'ora
Quando si riceve il segnale di una stazione DAB+ o FM di qualità sufficiente, l'ora viene impostata automaticamente. A seconda dell'intensità di riscezione, quello processo cui richiedere del tempo. Se non è disponibile una stazione corrispondente, è possibile impostare l'oraanche manualmente: 1. Accendere la radio e richiamare il menu con il tastoUlteriori impostazioni nel menu "Ora"
Si possono selezionare le seguenti funzioni nel menu "Ora": "Imposta oraSYSTEMA": Impostazione del formato dell'ora. Possibilità di scelta: "24 ore" / "12 ore" "Impost.formato data": Impostazione del formato della data. Possibilità di scelta: "gg-mm-aaaa" / "mm-gg-aaaa / aaaa-mm-gg" "Stile orologio": Impostazione del design dell'orologio in modalità standby. Possibilità di scelta: "Analogico" / "Digitale" "Aggiorn. automatico": Impostazione per la regolazione automatica dell'ora. Possibilità di scelta: "Nessun aggiorn." / "Aggiornamento alla radio"5.7 Impostazione dell'illuminazione del display
L'illuminazione del display può essere programmata in 3 livelli di luminosità. Nel menu è possible effettuire le seguenti impostazioni di "Retroilluminaz." "Timeout": Tempo che intercorre fino allo spegnimento della retroilluminazione del display. Possibilità di scelta: "Disattivato / 10 sec. / 20 sec. / 30 sec. / 45 sec. / 60 sec. / 90 sec. / 120 sec. / 180 sec." In modalità "Disattivato" la retroilluminazione non è spenta. Questo riduce la durata della batteria. "Livello": Luminosità del display quando la radio è accesa. Possibilità di scelta: "Modalità notturna" / "Bassa" / "Medio" / "Alto" Per effettuare I'impostazione procedere come segue: 1. Accendere la radio e richiamare il menu con il tasto5.8 Regolazione del timer di sospensione
Il timer di spegnimento viene utilizzato per spegnere automaticamente la radio dopo un periodo di tempo prestabilitito. Per effettuire l'impostazione procedere come segue: 1. Accendere la radio e premere il tasto < SLEEP> 2. Scegliere una delle seguenti opzioni nel menu seguente: "Off / 15 min / 30 min / 45 min / 60 min / 1 ora e 15 min / 1 ora e 30 min / 1 ora e 45 min / 2 ore". Confermare l'impostazione desiderata con il tasting < OK / SCAN> 3. Sul display appeare il symbolo del timer di spegnimento con il tempo rimanente fino allo spegnimento della radio. Se si desidera disattivare il timer di spegnimento, selezionare l'impostazione dell'ora "OFF".5.9 Impostazione della sveglia
Si noti che la funzione "Svegli" è disponibile solo quando l'unità di rete è collegata. La funzione di allarme non può essere utilizzata in modalità batteria. Con il CR-M33DAB è possibile impostare 2 diversi tempi della sveglia. Questi tempi di allarme possono essere programmati per i seguenti intervalli: "Una volta" / "Ogni giorno" / "Fine settimana" / "Giorni lavorativo". Per effettuare l'impostazione della sveglia, procedere come segue: 1. Accendere la radio e richiamare il menu con il tasto5.10 Regolazione del suono (equalizzatore)
La radio dispone di sette impostazioni audio preimpostate: "Classica" / "Pop" / "Jazz" / "Rock" / "Flat" / "Film" / "Notizie" Questi possono essere selezionati nel menu "EQ" menu.5.11 Impostazioni di fabbrica
Nel menu "Ripristino di default" è possibile ripristinare le impostazioni di fabbrica della radio. A tal fine, selezionare "Si" e la radio si riavvia. A "No" viene richiamato il livello di menu precedente.6. Uso della radio DAB+
Premere il tasto < MODE> finché sul display non appeare "DAB".6.1 Impostazione delle stazioni DAB+
La ricerca delle stazioni era più stata effettuata quando l'apparecchio è statoMESSO in funzione. Le emittenti trovate sono memorizzate in ordine alfabetico nell'elenco delle stazioni.Riavvio della ricerca automatica delle stazioni:
- Richiamate il menu con il tastoImpostazione manuale dell'emittente:
- Richiamate il menu con il tastoSelezione di una stazione DAB+
Le stazioni memorizzate in ordine alfabetico nell'elenco delle stazioni possono essere selezionate come segue: - Premere i pulsanti < SU / GI > , per scorrere in avanti o indietro nell'elenco dei canali. - Una volta selezionato il canale desiderato, premere il tasto6.2 Memorizzazione delle stazioni nella memoria delle stazioni (preferiti)
Per facilitare la ricerca a un stazione DAB sono disponibili 40 posizioni di memoria. Con i tasti di selezione diretta è possibile selezionare 2 positizioni di memoria.1. Memorizzazione sui tasti di selezione diretta P1 e P2:
- Selezionare una stazione da memorizzare. - Tenere premuto il tasting correspondente finché sul display non appeare "Impostato con successo". - Le stazioni memorizzate possono essere richiamate premendo breveamente i tasti "One Touch". 2. Assegnazione delle posizioni di memoria 3 - 40: - Selezionare una stazione da memorizzare. - Tenere premuto il tasting6.3 Funzioni di menu DAB+
Tenere premuto il tasto7. Uso della radio FM
Premere il tasto < 口 / MODE> finché sul display non appeare "FM".7.1 Impostazione di un stazione FM
- Premere il pulsante < Su> per augmentare la frequenza di ricezione. - Premere il pulsante < Giu> per ridurre la frequenza di riscezione. - Se si utilizzato i pulsanti < Su> o < Giu> si avvia una ricerca automatica della stazione, che si ferma alla stazione successiva trovata. - Quando si preme il tastoFunzioni RDS
Premendo ripeturamente il tasto7.2 Memorizzazione delle stazioni nella memoria delle stazioni
Per facilitare la ricerca a un stazione FM sono disponibili 40 posizioni di memoria. Con i tasti di selezione diretta è possibile selezionare 2 positizioni di memoria.1. Memorizzazione sui tasti di selezione diretta P1 e P2:
- Selezionare una stazione da memorizzare. - Premere e tenere premuto il tasting numerico corrispondente fino a quando "Impostato con successo" appeare sul display. - Le stazioni memorizzate possono essere richiamate premendo breveamente i tasti "One Touch". 2. Assegnazione delle posizioni di memoria 3 - 40: - Selezionare una stazione da memorizzare. - Premere il tastingo fina a quando "Memor.preselez." appeare sul display. - Selezionare con i tasti7.3 Funzioni di menu FM
Tenere premuto il tasto8. BLUETOOTH Audio
La funzione BLUETOOTH permette la trasmissione senza fili di file musicali (streaming audio) alla radio. Smartphone, tablet o dispositivi similii possono essere accopiati. Premere il tasto < MODE> finché sul display non appeare "BLUETOOTH".8.1 Stabilire una connessione
- Il display visualizza "Scollegato" e il symbolo giallo BLUETOOTH lampeggia sul display. - Avviare una SCAN del dispositivo sul dispositivo mobile. Selezionare "CR-M33DAB" dall'elenco dei dispositivi e accoppiare entrambi i dispositivi come di consueto. - Il display visualizza "Collegato" sul display e viene emesso un segnale vocale. Ora è possible riproduire il contentuto desideratotramite il proprio dispositivo mobile. É inottre possiblè controllare le funzioni di riproduzione di base tramite la radio: - Tasto8.2 Scollegamento
É possibile collegare alla radio un solo dispositivo alla voltatramite BLUETOOTH. Se si desidera collegare un altro dispositivo, è necessario prima scollegare il dispositivo corrente. Procedere come segue: - Disaccoppiare i dispositivi sul dispositivo mobile. - Le unità vengono inoltre disaccoppiate se si spostano fuori alla portata del BLUETOOTH. Se si spegne la radio, esta si riconnette automaticamente al dispositorio BLUETOOTH non appena viene riaccesa, a condizione che si trovi nelle vicinanze, sia accesa e la funzione BLUETOOTH sua attivata.9. Uso di cuffie
Perutilizzare il CR-M33DAB con le cuffie,utilizzare i modelli disponibili in commercio con spina jack da 3,5mm .Se la stazione radio selezionata trasmette un segnale stereo,anche la riproduzione in cuffia aviene in stereo.Attenzione!
L'ascolto regolare di musica ad alto volume cui danneggiare l'udito. Impostare il volume a un livello basso prima di iniziare a riproduire la musica alla radio.10. Eliminazione errori
Suggerimenti per la risoluzione dei problemi| Problema Soluzione | |
| Nessuna funzione | L'adattatore di rete USB è collegato correttamente? La batteria è completamente carica? |
| Nessun suono | Il volume è abbassato? Se necessario, aumento il volume dellettore. Il canale desiderato più essere ricevuto alla problemi? |
| La radio non risponde alla pressione dei tasti | Rimuovere l'adattatore di rete USB e/o attendere che la batteria si scarichi. Ricollegare quando l'adattatore di rete USB. |
| Problemi di ricezione radio | Riorientare l'antenna. Trovare una posizione più adatta. Altri apparetti elettrici interferiscono con la ricezione. Posizione non adatta alla ricezione di segnali DAB+. |
11.Cura e manutenzione
Pulizia dell'alloggamento: Utilizzare un panno leggermente inumidito con un detergente delicato. Non utilizzare detergenti contenti alcohol, ammoniaca o abrasivi.Precauzioni per evitare la formazione di condensa
La condensa (rugiada) può formarsi all'interno dell'apparecchiatura se vi è una differenza significativa tra la temperatura dell'apparecchiatura e la temperatura ambiente. Se all'interno dell'unità si forma della condensa, non è possibile garantire il corretto funzionamento. In quello caso, l'unità deve essere sotto-posta a manutenzione per alcune ore; dopo che l'umidità si via asciugata, l'unità può essere riutilizzata.Particolare attenzione delve essere prestata nelle seguenti circostanze
Se l'apparecchiatura viene spostata da un luogo ad un altro dove la temperatura è significativamente più alta o più bassa, o se l'umidità nel luogo in cui l'apparecchiatura è installata aumenta, ecc.12. Smaltimento
Smaltimento delle apparecchiature elettriche ed elettroniche e delle batterie usate.   Il simbolo (pattumiera barrata) presente sul prodotto o sulla sua confezione indica che questo prodotto non deve essere trattato come un normale rifiuto domestico a fine vita, ma deve essere consegnato Gratisamente presso un punto di raccolta di un'autorità pubblica di smaltimento dei rifiuti o presso un punto di ritiro istituito dai produttori o dai distributori. Di norma, i proprietari dei RAEE devono分开are le pile e gli accumulatorati esausti che non sono saldamente racchiusi nei RAEE da questi ultimi prima di consegnarli al punto di raccolta. Ciò non si applica se i RAEE sono preparati per il riutilizzo con la partecipazione di un'autorità pubblica di gestione dei rifiuti. Contribuendo al corretto smaltimento di quello prodotto, si protege l'ambiente e la salute degli altri esseri umani. Uno smaltimento improprio o non corretto mette in pericolo l'ambiente e la salute. Per ulteriori informazioni sul riciclaggio dei vecchi apparecchi elettrici e delle batterie è possibile rivolgersi alle autorità locali o alle aziende municipalizzate che si occupano dello smaltimento dei rifiuti. Istruzioni per lo smaltimento per i consumatori in Germania: https://www.e-schrott-entsorgen.org/ Istruzioni per lo smaltimento per i consumatori in Austria: https://www.elektro-ade.at/ Istruzioni per lo smaltimento per i consumatori in Irlanda: https://www.mywaste.ie/ Istruzioni per lo smaltimento per i consumatori del Regno Unito: https://www-recyclenow.com/ Istruzioni per lo smaltimento per i consumatori in Francia: https://www.quefairedemesdechets.fr13. Dati tecnici CR-M33DAB
| Alimentazione | |
| Unità principale | |
| Tensione d'ingresso Tensione diretta 5,0 V | (utilizzo dello speciale USB adattatore di rete) |
| Potenza assorbita nella modalità stand-by 0,45 W | |
| Potenza di assorbimento 5 W | |
| Adattatore di rete USB | |
| Adattatore di rete USB del produttore Shenzen GUIJIN | Technology Co. Ltd. Edificio 3 di Songxin Industry Park, Songgang, Baoan, Shenzhen, Cina 518105 PEOPLE'S REPUBLIC OF CHINA |
| Identificatore dimarca e modello Adattatore di rete USB | GJTL AK06WG-0500100VW / AK06WG-0500100BW |
| Tensione d'ingresso Tensione alternata ~ 100 - 240 V | |
| Frequenza di corrente alternata in ingresso 50/60 Hz | |
| Tensione / corrente / potenza in uscita Tensione continu | ua 5,0 V / 1,0 A / 5,0 W |
| Tipo di spina USB-C | |
| Efficienza media in funzione 73,62 % | |
| Consumo di potenza a vuoto 0,1 W | |
| Batteria | |
| Tipo Ioni di litio | |
| Tensione / capacità / contento energetico 3,7 V / 2000 | mAh / 7,4 Wh |
| Tempo di funzionamento/tempo di ricarica Max. 6 ore/circa 4 ore. | |
| Numero UN UN3481 Batterieagli ioni di litio contenate | in apparecchiature |
| BLUETOOTH | |
| Versione BLUETOOTH / classe di prestazioni V5.3 / Classe 2 | |
| Massima potenza di trasmissione < 20 dBm | |
| Autonomia Circa 10 metri (può variare a seconda | dell'ambiente) |
| Intervallo di frequenza 2,402 GHz - 2,480 GHz | |
| BLUETOOTH Profile | A2DP (Advanced Audio Distribution Profile, AVRCP (Audio/Video Remote Control Profile) |
| Tuner FM/DAB+ | |
| Intervallo di sintonizzazione DAB BAND III 174,928 MHz - 239,200 MHz | |
| Gamma di sintonia FM | 87,50 MHz - 108,00 MHz |
| Jack per cuffie | Presa jack da 3,5 mm |
| Amplificatore | |
| Potenza in uscita | 1,8 W RMS / 2,3 W di potenza massima in uscita |
| Pesi e misure | |
| Radio | (L x A x P) 160 x 100 x 54 mm / 0,39 kg |
| Intervallo di temperatura | +5°C / 35°C |
14. Garanzia
Gentile Cliente,
grazie per aver acquistato quello prodotto Kenwood. Se il prodotto presente difetti di materiale o di lavorazione in normali condizioni di funzionamento, provvederemo ad eliminariamente o a sostituire l'apparecchio secondo le seguenti dispositions di garanzia. Si prega di conservare esta scheda di garanzia in un luogo sicuro. Kenwood garantisce quello prodotto per due anni nella data di acquisto come da fattura o provad'acquisto del rivenditore Kenwood. Questa garanzia copre i difetti dei materiali e di lavorazione. Ci riserviamo il diritto di sostuire il prodotto se una riparazione eseguita in economia non è più possibile. Iosti per l'imballaggio e l'installazione, nonché iosti e i rischi connessi alla riparazione effettiva non sono inclusi nel servizio di garanzia e saranno fatturati. Condizioni A. Per far valere i diritti di garanzia,或者其他 alla presentazione della presente scheda di garanzia sono necessarie le seguenti informazioni: (a) Nome e indirizzo completo. (b) La ricevuta o la fattura di un rivenditore stabilito in un paese dell'UE che riporta la data originale di acquisto. (c) Il nome e l'indirizzo completo del rivenditore presso il quale il prodotto è stato acquistato. (d) Il numero di seri e il nome del modello del prodotto. Kenwood si riserva il diritto di rifiutare il servizio di garanzia se le informazioni di cui sopra sono assenti o se sono state apportate modifiche al prodotto alla data di acquisto. B. Al momento della messa in commercio, quello prodotto è conforme a tutte le normative e le norme di sicurezza applicabili nel paese di destinazione. Eventuali modifiche necessarie per il funzionamento dell'apparecchio in paesi diversi da quello di destinazione non sono coperte dalle suddette condizioni di garanzia. Inoltre, non ci assumiamo una responsabilità per lavori eseguiti in quello contesto o per danni al prodotto causati da tali lavori. Se il prodotto viene utilizzato in un paese per il quale non è stato progettato e fabbricato, gli interventi in garanzia saranno effettuali solo se iosti per l'adeguamento dell'apparecchio alle norme nazionali e alle norme di sicurezza sono a carico dell'utente. Inoltre, se il prodotto differisce dai prodotti venduti dall'importatore ufficiale e i pezzi di ricambio non sono disponibili per la riparazione di quello prodotto, l'utilizzatore deve sostenere le spese di trasporto del dispositivo da e verso il paese di acquisto. Lo stesso vale se non è possibile offrirere servizi di garanzia nel paese in questione per altri motivi giustificati. C. Sono esclusi alla garanzia: (a) Modifiche al prodotto, nonché i normali lavori di manutenzione e di regolazione, compresi i controlli periodici menzionati nelle istruzioni per l'uso. (b) Danni al prodotto causati da lavori difettosi o impropri, se quosti lavori sono stati eseguiti da terzi non autorizzati ad eseguire servizi di garanzia periconte del produttore. (c) Danni causati da negligenza, incidenti, modifiche, alterazioni, installment non corretta, imballaggio inadequato, funzionamento difettoso o uso di pezzi di ricambio non corretti durante la riparazione. (d) Danni causati da incendio, danni causati da acqua, fulmini, terremoti, ventilazione insufficiente, forza maggiore, collegamento a una tensione di rete errata o altre cause non imputabili a Kenwood. (e) Danniagli altoparlanti dovuti a sovraccarico. Danneggiamento di altri oggetti non facenti parte del prodotto, ad es: DVD, compact disc, supporti di memorizzazione USB, smartphone, ecc. (f) Materiali di consumo o parti soggette ad usura da sostituire nell'ambito del normale servizio clienti, come ad esempio Batterie, accumulatori ricaricabili, lampade, ecc. (g) Tutti i prodotti per i quali il numero o i numeri di series sono stati rimossi, modificati o cancellati in tutto o in parte. Questa garanzia è disponibile per tutte le personne che hanno acquistato legally il prodotto. In conformità con le condizioni di garanzia di cui sopra, il prodotto sare riparato o sostituito gratuito. Que do diritto non pregiudica in alcun modo gli altri diritti dell'utente nell'ambito delle disposizioni di legge applicabili. La riparazione o la sostituzione non proroga il periodo di garanzia. Sono esclude ulteriori rivendicazioni, in particolare le richieste di conversione, riduzione o risarcimento dai. Indirizzo di lavoro : JVCKENWOOD ITALIA S.p.A. Via G. Sirtori 7/9, 20129 Milano Tel. +39(02)204821 www.kenwood.it info@it.jvckenwood.comKENWOOD
KENWOOD
Draagbare DAB+ radioCR-M33DAB
GEBRUIKSAANWIJZING JVCKENWOOD CorporationInhoudsopgave
Inhoud Pgina
1. Vóor de ingebruikname/veiligheidsinstructies 3 2. Informatie over de accu 5 3. Conformiteitsverklaring 6 4. Ingebruikname 7 5. Bediening van de radio 9 6. Gebruik van de DAB+ radio 12 7. Gebruik van de FM-radio 13 8. BLUETOOTH Audio 14 9. Gebruik van een hoofdtelefoon 15 10. Oplossing van fouten 15 11. Onderhoud en zorg 15 12. Afvalverwerwijdering 16 13. Technische gegevens 17 14. Garantie 181. Vóró de ingebruikname
BELANGRIJKE VEILIGHEIDSINSTRUCTIES
Let op: Lees deze网首页 aandachtig door om de veilige werkking van het apparaat te garanderen.Opmerkingen aandachtig lezen!
- Geef gevolg aan alle veiligheids- en bedieningsinstrumenties wanner u dit product in gebruik neemt.Instructies zorgvuldig bewaren!
- U dient de veiligheids- en bedieningsinstructies te bewaren om ze later te konnen raadplegen.Alle waarschuwingsinstructies in acht nemen!
- U dient aan alle aan het product aangegeven en in de gebruiksaanwijzing vermelde waarschuwingen strikt gevolg te gehen.Alleen met een droge doek reinigen!
- Trek alle kabels van het apparaat af voordat u dit product reinigt. Gebruik nooit vloeibare reinigingsmiddelen of reinigingssprays. Gebruik voor de reiniging alleen een Lichtjes bevochtigde doeck.Accessoires
- Gebruik alleen de door de fabrikant aangegeven accessoires.Gebruik dit apparaat Niet in de nabijheid van water
- Het apparaat mag nooit aan waterdruppels of -spatten blotgesteld worden, zoals bijvoorbeeld in de nabijheid van een badkuip, een wastafel, een aanrecht in de keuken, een wasmachine, in een vochtige kelderruimte of in de nabijheid van een zwembad, enz. Zet nooit met vloeistoffen gemulde houders, zoals bv. bloemenvazen, op het apparaat of direct naast het apparaat.Ventilatie
- Sleuven en openings in de behuizing dienen voor de verluchting van het apparaat, om de betrouwbare werkung van het apparaat�ilig te stellen en om het apparaat gegen oververhitting en een möglichke zelfontbranding te beschermen. Blokveer de ventilatieoppeningen Niet. Installer het apparaat in overeenstemming met de door de fabrikant verstrekte gegevens. Blokveer nooit de ventilatieopeningen doordat u het apparaat op een bed, bank, tapijt of een al even zachte onderlaagzet. Dit apparaat mag Niet in een boekenrek of inbouwkast ingebouwd worden wanner er nicht voor voldoende ventilatie gezorgd is.Spanningsvoorziening
- Dit apparaat mag alleen met de bijgeleverde USB-C-netadapter op de netspanning aangesloten worden. Gebruik de USB-netadapter uitsluitend voor de compacte radio CR-M33DAB. Let er in ieder geval op dat de lokale netspanning met de gegevens op de stekkernetvoeding overeenstemmen. Als u Niet zeker bent van het type van de spanningsvoorziening in uw woning, richt u zich tot uw dealer of tot het lokale energiebedrijf.USB-netadapter
- Zorg ervoor dat de USB-netadapter Niet mechanismisch beschadigd worden en dat men Niet over het snoer kan struikelen. Het snoer mag in geen geval geplet of geknakt worden, ook Niet aan de uitlaatuit de USB-netadapter.Onweer
- Het apparaat van het stroomnet verbreken bij onweer en wonneer het langere vrijd Niet gebruikt worden.Overbelasting
- Overbelast nooit wandcontactdozen, verlengsnoeren of meervoudige contactdozen, odomat anders het gevaar voor brand of elektrische schokken bestaat.Binnendringen van vreemd materiaal en vloeistof
- Let erop dat er nooit vreemd materialial of vloeistof door openingsen het apparaat of de USB-netadapter binnendringt, omdat het in het andere geval tot contact met onder hoge spanning staande componenten resp. tot een kortsluiting met de waaruit resulterende brand of tot een elektrische schok kan koemen. Mors nooit vloeistoffen van eender welke aard op dit apparaat of op de USB-netadapter waarvan.Onderhoud
- Tracht nooit zich, het onderhoud van dit apparaat uit te voeren,.ovdat door de openings of door het verwijderen van afdekkingen onder spanning staande onderdelen vrij gelegd+kennen worden. De aanraking van deze onderdelen kan immers bevaren met zich meebrengen. Laat alle onderhoudswerkzaamheden over aan gekwalificeerd klantenservicepersoneel.Beschadigingen die een reparatie vereisen
- Onderhouds- en reparatiewerkzaamheden alleen door een gekwalificeerde klantenservice latentuitvoeren. Een onderhoud/reparatie isoodzakelijk als het apparaat beschadigd werk (bv. USB-netadapter), als er vloeistof in het apparaat gelopen is, als voorwerpen het apparaat binnengedrongen zijn, als het apparaat aan regen of vocht blootgesteld werk, als het Niet meer perfect functioneert of neergevallen is.Wisselstukken
- Wanneer er wisselstukken benodigd worden, overtuigt u er zich van dat de klantenservicetechnicus wisselstukken gezrukt die door de fabrikant voorgeschreiben zijn of diedezelfde eigenschappen als de originele onderdelen hebben. Niet-toelaatbare wisselstukken konnen tot brand, elektrische schokken of andere ongevallen leiden.Veiligheidscontrole
- Verzoek de klantenservicetechnicus na de beeindiging van onderhouds- of reparatiewerkzaamheden om de uitvoering van een verilgheidstest om vast tee stellen, of het apparaat zich in een perfecte staat bevindt.Warmte
- Installeer het apparaat Niet in de nabijheid van hare oppervlakken zoals bv. radiatoren, straalkachels, ovens of andere apparaten (versterkers inbegrepen) die heet kuren worden. Stel nooit objecten met open vlammen, zoals kaarsen of lantaarns, op of in de buurt van het apparaat op. De geinstalleerde batterijen mogen Niet aan felle hitte, zoals direct zonlicht, vuur of dergelijkke, bootgesteld worden.Risico's in combinatie met hoge volumes
Om möglich gehoorschade te voorkomen, luistert u Niet gedurende langere perioden met een hoog volume.Automatische energiebesparingsfunctie
Het apparaat is met een automatische energiebesparingsfunctie uitgerust. Deze schakelt het apparaat binnen 15 minutes in de stand-by modus wanner er geen audiosignal ontvangen ward of als er geen bediening plaatsvond.2. Informatie over de accu
De lithium-ion-accu bevat ontvlambare stoffen zoals bv. organisch oplosmiddel. Bij een verkeerde hantering kan de accu barsten en vuur vatten of extreme hitte doen vrijkomen, kan het prestatievermögen van de accu afnemen of hunnen er andere beschadigingen tot ontwikkeling komen. Gelieve in het bijzonder deze aanwijzingen, welke (be)handeling verboden is, in acht te nemen.Brandgevaar
- Bescherm het apparaat met de vast ingebouwde lithium-ion-accu gegen Mechanische beschadigingen. - Kaarsen en ander open vlammen要去en te allen tijde buiten het bereik van het product gehonden worden om te verhinderen dat het apparaat zou ontvlammen. - Bescherm het apparaat gegenitte: Er bestaat brandgevaar. Als u het apparaat in een rek opstelt, neemt u aan de zijkanten een afstand van minstens 10 cm in acht.Gevaar door geintegreerde accu
- Gebruik het apparaat Niet als het zichtbare beschadigingen aan de behuizing of aan de USB-Iaadkabel vertoont. Reparations aan het apparaat mogen uitsluitend door de geautoriseerde klantenservice uitgevoerd worden. - Stel het apparaat Niet bloot aan direct zonlicht of aan ditte. De omgevingstemperatuur moet minimaal +5^ en maximaal +35^ bedragen. In een motorvoertuig kan de temperatuur eventueel duidelijkmeer dan 35^ bedragen. - Laad de accu uitsluitend door middel van de bijgeleverde USB-netadapter op. - Wonneer de accu het einde van haar levensduur bereikt heeft, moet het apparaat met de geintegreerde accu vakkundig afgevoerd worden. Tracht Niet, de accu te demonteren of te verrangen. - De accu mag Niet opniew gebruikt of uit elkaar gehaald worden. - Indien er uit de accu elektrytoplossing uitloopt, vermijdt u het contact met ogen, slijmvliezen en huid. Spoel getroffen lichaamsdelen onmiddelijk met overvloedig veel helder water en consulteer een arts. De elektrytoplossing kan irritaties teweegbrengen. - De accu mag nicht kortgesloten worden. De accu kan oververhit raken en ontploffen. - Het apparaat mag Niet in het vuur geworpen worden. De accu kan ontploffen. - Het is Niet toelaatbaar om ombouwwerkzaamheden aan het apparaat UIT te voeren.Opgepast!
Explosiegevaar als de batterij door een verkeerd type verrangen worden; - bij extreem hoge of lage temperatures, waaraan een batterij tijdens het gebruik, de opslag of het transport blootgesteld kan zich; - beilage luchtdruk op grote hoogte; - bij de verwanging van een batterij door een verkeerd type dat een beveiliging kan omzeilen (bv. bij een aantal lithiumbatterijtypes); - als een batterij in vuur of in een hete oven gegood of als een batterij mechanisch geplet of gesneden wordt; - als een batterij in een omgeving met extreem hoge temperaturen gelaten wordt of bij een extreem lage luchtdruk, hetgeen tot een ontploffing of tot het vrijkomen van brandbare vloeistoffen of gassen kan leiden.3. Conformiteitsverklaring
Hiermee verklaart de JVCKENWOOD Europe B.V. dat de radio-installatie van het type [KENWOOD] CR-M33DAB aan de richtlijn 2014/53/EU voldoet. De volledige tekst van de EU-conformiteitsverklaring is op volgende website beschikbaar: https://www.kenwood.com/euukdoc/Fabrikant:
JVCKENWOOD Corporation 3-12, Moriyacho, Kanagawa-ku, Yokohama-shi, Kanagawa 221-0022, JAPAN https://www.jvckenwood.com/en.htmlEU-contactadres:
JVCKENWOOD Europe B.V. Rendementsweg 20 B-9, NL 3641 SL Mijdrecht, THE NETHERLANDS https://nl.jvckenwood.com/UK-contactadres:
JVCKENWOOD U.K. Limited First Floor, Gleneagles, The Belfry, Colonial Way, Watford, Hertfordshire WD24 4WH, UNITED KINGDOM https://uk.jvckenwood.com/ Het Bluetooth®-woordmerk en de logo's zijn geregisteerde merken van BLUETOOTH SIG Inc. en eender welke gebruikmaking van deze merken door deirma JVCKENWOOD Corporation vindt onder licentie plaat. Andere merken en handelsnamen zijn die van hun betreffende holders.4. Ingebruikname
4.1 Uitpakken
Pak het apparaat voorzichtig uit en let erop dat alle accessoires aanwezig zijn: USB-C netadapter - Gebruiksaanwijzing4.2 Bedieningselementen en aansluitingen
   1 - Telescoopantenne 2 - Volume 3-0/MODE 4 - Sleeptimer 5 - MENU / INFO 6 - OK / SCAN 7 - Omlaag 8 - Preset 2 9 - Preset 10 - Preset 1 11 - Omhoog 12-LCD-display 13 - USB-C ingang netvoeding 14 - Hoofdtelefoonbus4.3 Informatie over het LCD-display
| ① | Indicator voor wekker 1 |
| ② | Indicator voor wekker 2 |
| 55 | Sleeptimer resterendearend |
| Volume | |
| 1 | Geselecteerde Preset 1 - 20 |
| Indicator voor stereo-ontvangst | |
| R·D·S | Indicator voor RDS-siŋnaal |
| Ontvangststerkte | |
| Indicator BLUETOOTH | |
| Indicator acculaadstand |
4.4 Opladen van de accu
Om een beschadiging van de ingebouwde accu te vermijden, is deze bij de aankoop slechts half opgeladen. Laad de accu volledig op voordat u de radio voor de eerste keer gebruikt. Verbind waarvoor de aansluiting „DC IN" met de bijgeleverde USB-netadapter en stek.Deze in een gemakkelijk toegankelijk stopcontact. Tijdens het laadproces is een LED boven de aansluiting rood verlicht. Zodra de accu volledig geladen is, dooft het controleampje. De gebruikelijke laadtijd bij een lege accu bedraagt ca. 4-6 uur. U kunt de radioijdens het laadproces gebruiken, daardoor worden evenwel de laadtijd verlangd. - Afhankelijk van omgevingsomstandigheden, volume, enz. bedraagt de weergaveur ca. 6 uur (bij 50% volume). - Om de maximale capaciteit van de accu zo lang möglich te handhaven, dient u de accu telkens na 2 tot 3 maanden volledig op te laden, ook wanner u de radio Niet gebrukt. - Laad de accu in een omgeying met een temperatuur tussen +5 en +35^ . - De accu handhaft haar lading het best bij kamertemperatuur. Hoe lager de omgevingstemperatuur, hoe korter de inschakelduur van de accu is. - De accu moet opgeladen worden wanneer het symbol voor een lege accu op het display verschiint Let op: In de accumodus is de wekfunctie Niet beschikbaar.4.5 Gebruik met USB-netadapter
U=knt de radio ook met de bijgeleverde netadapter gebruiken. In deze modus staat de functie „Alarm" u ter beschikkung.4.6 DAB+ / FM-telescoopantenne
1. Ontgrendel voorzichtig de Antenne aan het achefterste rechtsgeredeelte van de behuizing. 2. Draai de antennae hier boven en trek alle elementen er compleetuit. 3. Positioneer de antennne om tot de Beste ontvangst te komen.5. Bediening van de radio
5.1 In-/ uitschakelen (Standby)
Houd de toets < 出 / MODE> ingedrukt totdat de radio inschakelt. Om het apparaat in de stand-bymodus te zetten, houdt u de toets ingedrukt totdat het uur op het display verschijnt. Om het apparaat vanuit de stand-bymodus waar in te schakelen, drukt u de toets kort in. Om het vanuit de stand-bymodus volledig uit te schakelen, houdt u de toets < 业 / MODE> ingedrukt. Op het display verschijnt kort „POWER OFF" en het apparaat schakelt UIT. Let op: ij het gebruik met accu dient de radio bij Niet-gebruik algtd volledig uitgeschakeld te zich om een ontladen van de accu te verhinderen.5.2 Navigeren in de menu's
Houd de toets5.3 Volume aanpassen
Door aan de volumeregelaar te draaien,kest u het volume aanpassen.De instelling van het volume wordt grafisch op het display weergegeven.5.4 Bijkomende informatatie
Door het herhaaldelijk indrukken van de toets5.5 Instellen van de menutaal
1. Schakel de radio in en roep het menu met de toets5.6 Instellen vanijd en datum
Bij de ontvangst van een DAB+ of FM-zender in voldoende kwaliteit worden het=uur automatisch ingesteld. Afhankelijk van de ontvangststerkte neemt dit proces enige tijd in beslag. Indien er geen passende zender ter beschikking staat, kut u het uur ook handmatig instellen: 1. Schakel de radio in en roep het menu met de toetsBijkomendeinstallingen in het menu „Tijd/datum"
Volgende functies können in het menu „Tijd/Datum" ingesteld worden: "Tijd formaat instellen": Instelling van hetijdformaat. Keuzemogelijkheden: „24 uur systemd" / „12 uur systemd" "Datum formaat instellen": Instelling van het datumformaat. Keuzemogelijkheden: dd-mm- jjjj / ,mm-dd-jjjj / jjjj-mm-dd" "Klokstijl": Instelling van het klokdesign in de stand-bymodus. Keuzemogelijkheden: „Analoog" / „Digital" "Auto update": Instelling voor automatisch tijsdinstelling. Keuzemogelijkheden: "Geen update" / "Update van radio"5.7 Instellen van de displayverlichting
De displayverlichting kan in 3 helderheidstrappen geprogrammeerd worden. Volgende instellenungen küssen in het menu „Achtergrondverlichting" doorgevoerd worden: "Duurtijd": Tijdspanne totdat de achtergrondverlichting van het display uitgeschakeld worden. Keuzemogelijkheden: "Uit / 10 sec. / 20 sec. / 30 sec. / 45 sec. / 60 sec. / 90 sec. / 120 sec. / 180 sec." In de modus „Uit" worden de hintergrondverlichting Niet uitgeschakeld. Daardoor worden de inschakelduur van de accu verkort. "Niveau": Helderheid van het display wanner de radio ingeschakeld worden. Keuzemogelijkheden: "Night Mode" / „Laag“ / „Midden“ / „Hoog" Gelieve voor de instelling als volgt te werk te gaan: 1. Schakel de radio in en roep het menu met de toets5.8 Instellen van de Sleeptimer
De sleptimer worden gebruikt om de radio na een vooraf ingestelde tijdspanne automatisch uit te schakelen. Gelieve voor de instelling als volgt te werk te gaan: 1. Schakel de radio in en druk op de toets5.9 Instellen van de wekker
Gelieve in acht te nemen dat de functie „Alarm" alleen bij een aangesloten netvoeding beschikbaar is. Bij het gebruik met accu kan de wekfunctie Niet gebruikt worden. Bij de CR-M33DAB konnen er 2 verschillende wektijden ingesteld worden. Deze wektijden konnen voor volgende intervallen geprogrammeerd worden: „1 Maal" / „Dagelijks" / „Weekends" / „Werkdag". Gelieve voor de instelling van de wektijd als volgt te werk te gaan: 1. Schakel de radio in en roep het menu met de toets5.10 Klank instellen (equalizer)
De radio heeft zeven vooraf ingestelde klankinstelleningen: "Klassiek" / "Pop" / "Jazz" / "Rock" / "Vlaak" / "Film" / "Nieuws" Deze kuren in het menu "EQ" geseleerd worden.5.11 Fabrieksinstelling
In het menu „Fabrieksinstellungen Reset"kest u de radio in de toestand bij levering zetten. Selecteer waar voor „Ja" en de radio start opnieuw. Bij „Nee"wordt het vorige menuniveau opgeroepen.6. Gebruik van de DAB+ radio
Drukdotoets6.1 Instellen van de DAB+ zenders
Bij ingebruikname van het apparaat werd er reeds een automatische afstemming van de zendersuitgevoerd. De waar bij gezonden zenders worden alfabetisch in de stationslijst opgeslagen.Opnieuw starten van de automatische afstemming van zenders:
- Roep het menu met de toetsHandmatig stellen van ensembles:
- Roep het menu met de toetsSelecteren van een DAB+ zender
De in de stationslijst alfabetisch opgeslagen zenders können als volgt geselecteerd worden: - Druk op de toetsen6.2 Opslaan van stations in het zendergeheugen (favorieten)
Om DAB-zenders op te slagen om gemakkelijk aan te treffen, staan er 40 geheugenplaatsen ter beschikking. 2 geheugenplaatsen konnen waar bij door middel van directe keuzetoetsen gekozen worden.1. Opslag op de snelkeuzetoetsen P1 & P2:
- Selecteer een zender om op te slaan - Houd de betreffende toets ingedrukt totdat „Zender opgeslagen" op het display verschijnt. - Opgeslagen zenders können opgeroepen worden door de directe keuzetooetsen in te drukken. 2. Bezetting van de geheugenplaatsen 3 - 40: - Selecteer een zender om op te slaan. - Houd de toets6.3 Menufuncties DAB+
Houd de toets7. Gebruik van de FM-radio
Drukdotoets 一 _ 0 ^ MODE>meermaals in totdat op het display DAB"verschijnt.7.1 Instellen van een FM-zender
- Druk de toets < Omhoog> in om de ontvangstfrequentie te verhogen. - Druk de toets <▼ Omlaag> in om de ontvangstfrequentie te verlagen. - Wonneer u de toetsen< Omhoog> of < Omlaag> ingedrukt houdt, start er een automatische afstemming van de zenders die bij het volgende gezonden station stocht. - Wonneer u de toetsRDS-functions
Volgende informatie kan opgevraagd worden door de toets7.2 Opslaan van stations in het zendergeheugen
Om FM-zenders op te slaan om ze gemakkelijker te vinden, staan er 40 geheugenplaatsen ter beschikking. 2 geheugenplaatsen konnenkaarbij door middel van directe keuzetoetsen gekozen worden.1. Opslag op de snelkeuzetotoetsen P1 & P2:
- Selecteer een zender om op te slaan. - Houd de betreffende cijfertoets ingedrukt totdat „Zender opgeslagen" op het display verschijnt. - Opgeslagen zenders können opgeroepen worden door de directe keuzetoetsen in te drukken. 2. Bezetting van de geheugenplaatsen 3 - 40: - Selecteer een zender om op te slaan - Druk op de toets7.3 Menufuncties FM
Houd de toets8. BLUETOOTH Audio
De BLUETOOTH-functie waar de draadloze overdracht van muziekbestanden (Audio Streaming) aan de radio toe. Er konnen smartphones, tablets of gelijkaardige apparaten gekoppeld worden. Druk de toets8.1 Tot stand brengen van een verbinding
- Op het display staat „Koppelen" en het gele BLUETOOTH-symbol Knippert op het display. - Start een apparataatscan op uw mobiel toestel. Selecteer „CR-M33DAB"uit de apparatenlijst en koppel beiden apparaten zoals gewoonlijk. - Op het display worden „Verbonden" aangegeven en er werklijk een gesproken melding. Nu kurz u via uw mobiel toestel de gewenste inhoud weergeven. U kurz bepalende aftspeelfuncties ook via de radio sturen: -Toets8.2 Loskoppelen van een verbinding
Er kan altijd slechts een apparaat via BLUETOOTH met de radio verbonden zijn. Als u een ander apparaat wenst aan te sluiten, moet u eerst het actuele apparaat loskoppelen. Ga als volgt te werk: - Koppel de koppeling van de apparaten op uw mobiel toestel los. - De apparaten worden ook ontkoppeld wonneer ze buiten de BLUETOOTH-reikwijdtte in beweging zich. Wanner u de radio uitschakelt, worden het automatisch weever verbonden met het BLUETOOTH-apparaat zodra het werk ingeschakeld worden, voor zover het zich in de buurt bevindt, ingeschakeld is en de BLUETOOTH-functie geactiveerd is.9. Gebruik van een hoofdtelefoon
Gelieve, om de CR-M33DAB met hoofdtelefoons te gebruiken, in de handel verkrijgbare modellen met 3,5mm klinkstekker te benutten. Voor zover de gekozen radiozender een stereosignal zendt, vindt de weergave van de hoofdtelefoo n ook in stereo plaats.Let op!
Het regelmatig beluisteren van muziek met een hoog volume kan tot gehoorschade leiden. Stel het volume op een lage waarde in voordat u met de weergave van muziek van de radio begint.10. Oplossing van fouten
Aanwijzingen voor de foutoversporing| Probleem Oplossing | |
| Geen functie | • Is de USB-netadapter correct verbonden? • Is de accu complet opgeladen? |
| Geen klank | • Werd het volume op het minimum gezet? • Verhoog eventueel het volume aan het afspeelapparaat. • Is de gewenste zender perfect te ontvangen? |
| De radio reageert nicht wanner er een toets ingedrukt worden | • Verwijder de USB-netadapter en/of wacht totdat de accu ontladen is. Daarna verbindt u de USB-netadapter opnieuw |
| Problemen bij de radio-ontvangst | • Positioneer de Antenne opnieuw. • Zoek eenmeer geschikte locatie. • Andere elektrische apparaten storen de ontvangst. • Locatie Niet geschikt voor de ontvangst van DAB+ signalen. |
11. Onderhoud en zorg
Reiniging van de behuizing: Gebruik een met een mild reinigingsmiddel Lichtjes bevochtigde doeck. Gebruik geen reinigingsmiddelen die alcohol, ammoniak of schuurmiddel bevatten.Waarschuwingsinstrumenties betreffende de vorming van condensatie
Condensatie (dauw) kan binnenin het apparaat tot ontwikkeling komen als er:tussen de temperatuur van het apparaat en de omgevingstemperatuur een wezenlijk verschil bestaat. Indien er zich binnenin het apparaat consensatie voordoet, is een perfecte werkung Nieteergerandeerd. In dit geval moet er enkele uren lang gewacht worden; nadat de vochtigheid gedroogd is, kan het apparaat wee gebruikt worden.In volgende omstandigheden要去 men uiterst voorzichtig te werk gaan
Wanneer het apparaat verplaatst worden van de ene maar de andere plaats, waar er een beduidend hogere of lagere temperatuur heerst, of wanneer de luchtvochtigheid op de plaats van opstelling van het apparaat toeneemt, enz.12. Afvalverwerwijdering
Afvoer van gebruikte elektrische en elektronische apparaten en batterijen.  Het symbol (doorgestreepte vuilnisbak) op het product of op de verpakking waarvan wijst erop dat dit product op het einde van de levensduur waarvan Niet als normala huisvuil behandeld mag worden, maar op een inzamelpunt van een publickrechtenlijke, voor de afvalverwijdering bevoegde instantie of bij een door fabrikanten of distributeurs voorzien inzamelpunt gratis afgegeven moet worden. Eigenaars van oude elektrische apparaten dienen oude batterijen en oude accumulatoraten, die Niet door het oude apparaat vast omsloten zich, in principe vór afgithe op het inzamelpunt van het oude apparaat los te koppelen. Dit geldt Niet voor zover oude apparaten in samenwerking met een publiekrechtelijke, voor de afvalverwijdering bevoegde instantie op de recyclage voorbereid worden. Door uw bijdrage aan een correcte afvoer van dit product beschermt u het milieu en de gezondheid van uw medemens. Een onvakkundige of verkeerde afvoer brengt milieu en gezondheid in gevaar. Bijkomende informatatie over de recycling van oude elektrische apparaten en batterijen krijgt u van uw gemeentebestuur of van de gemeentelijk afvalverwerkende bedrijven. Aanwijzingen voor consumenten in Duitsland met het oog op de afvalverwijdering: https://www.e-schrott-entsorgen.org/ Aanwijzingen voor consumenten in Oostenrijk met het oog op de afvalverwijdering: https://www.elektro-ade.at/ Afvoerinstructies voor consumenten in Ierland: https://www.mywaste.ie/ Afvoerinstructies voor consumenten in het Verenigd Koninkrijk: https://www.recyclenow.com/ Afvoerinstructies voor consumenten in Frankrijk: https://www.quefairodedemesdechets.fr13. Technische gegevens CR-M33DAB
| Spanningsvoorziening | |
| Hoofdeenheid | |
| Ingangsspanning Gelijkspanning 5,0 V | (bebruk van de speciale USB-netadapter) |
| Opnamecapaciteit in de stand-by modus 0,45 W | |
| Opnamecapaciteit 5 W | |
| USB-netadapter | |
| Fabrikant USB-netadapter Shenzen GUIJIN Technology | Co. Ltd. Building 3 of Songxin Industry Park, Song-gang, Baoan, Shenzhen, China 518105 PEOPLE'S REPUBLIC OF CHINA |
| Merk en typeaanduiding USB-netadapter GJTL AK06WG-0500100VW / AK-06WG-0500100BW | |
| Ingangsspanning Wisselspanning ~ 100 – 240 V | |
| Ingangswisselstroomfrequentie 50/60 Hz | |
| Uitgangsspanning/-stroom/-vermogen Gelijkspanning 5,0 V / 1,0 A / 5,0 W | |
| Stekkertype USB-C | |
| Gemiddelde efficiente tijdens de werkung 73,62% | |
| Opgenomen vermogen bij onbelaste werkung 0,1 W | |
| Accu | |
| Type Lithiumionen | |
| Spanning/capaciteit/energie-inhoud 3,7 V / 2000 mAh | 7,4 Wh |
| Inschakelduur/laadtijd Max. 6 uur/ca. 4 uur | |
| UN-nummer UN3481 Lithium-ion-batterijen, inbegrepenn in de uitrusting | |
| BLUETOOTH | |
| BLUETOOTH-versie / prestatieklasse V5.3 / Klasse 2 | |
| Maximaal zendvermogen | < 20 dBm |
| Reikwijdte | Ca. 10 meter (kan afhankelijk van omgeving afwijken) |
| Frequentiegebied | 2,402 GHz - 2,480 GHz |
| BLUETOOTH Profile | A2DP (Advanced Audio Distribution Profile, AVRCP (Audio/Video Remote Control Profile) |
| Tuner FM/DAB+ | |
| DAB-afstembereik BAND III | 174,928 MHz - 239,200 MHz |
| FM-afstembereik | 87,50 MHz - 108,00 MHz |
| Hoofdtelefoonaansluiting | 3,5 mm stekkerbus |
| Versterkergedeelte | |
| Uitgangsvermogen | 1,8 W RMS / 2,3 W maximaal uitgangsvermogen |
| Afmetingen en gewichten | |
| Radio | (b x h x d) 160 x 100 x 54 mm / 0,39 kg |
| Temperatuurbereik | +5°C tot 35 °C |