
PARKWAY SGL - Siège auto BRITAX - Notice d'utilisation et mode d'emploi gratuit
Retrouvez gratuitement la notice de l'appareil PARKWAY SGL BRITAX au format PDF.
| Intitulé | Description |
|---|---|
| Type de produit | Siège auto rehausseur |
| Dimensions approximatives | Largeur : 45 cm, Profondeur : 40 cm, Hauteur : 25 cm |
| Poids | Environ 2,5 kg |
| Groupes de poids | Groupe 2/3 (15-36 kg) |
| Installation | Installation avec ceinture de sécurité 3 points |
| Système de sécurité | Système de protection latérale (SICT) |
| Conformité aux normes | Norme ECE R44/04 |
| Entretien et nettoyage | Housse lavable en machine à 30°C |
| Accessoires inclus | Guide d'installation, manuel d'utilisation |
| Garantie | 2 ans |
| Informations générales | Convient aux enfants de 4 à 12 ans environ |
FOIRE AUX QUESTIONS - PARKWAY SGL BRITAX
Questions des utilisateurs sur PARKWAY SGL BRITAX
0 question sur cet appareil. Repondez a celles que vous connaissez ou posez la votre.
Poser une nouvelle question sur cet appareil
Téléchargez la notice de votre Siège auto au format PDF gratuitement ! Retrouvez votre notice PARKWAY SGL - BRITAX et reprennez votre appareil électronique en main. Sur cette page sont publiés tous les documents nécessaires à l'utilisation de votre appareil PARKWAY SGL de la marque BRITAX.
MODE D'EMPLOI PARKWAY SGL BRITAX
natural_image
Line drawing of a Britax car seat with a 'No. 100' and 'Protection' badge, no text or symbols present.Safety Information....2
Warnings 2
Important Notes......4
Certification 5
Registration....5
Child Size: Height and Weight Limitations.... 6
Vehicle Compatibility 8
Vehicle Buckle Position....9
Vehicle Seat Belts....10
Incompatible Vehicle Seat Belts 11
Child Seat Features.... 12
Using the Child Seat 14
Attaching the Backrest.... 14
Removing the Backrest.... 15
Adjusting the Backrest 16
Adjusting Head Restraint Height 17
Using ISOFLEX™ 18
SecureGuard™ 20
Using the Retractable Cup Holders 21
Positioning the Booster Seat
Positioning the Booster Seat and Securing
Your Child with Backrest and ISOFLEX™ 22
Positioning the Booster Seat and Securing
Your Child without Backrest and with ISOFLEX™ 25
Positioning and Securing Your Child
with Backrest and Lap-shoulder Belt Only 28
Positioning and Securing Your Child
without Backrest and Lap-shoulder Belt Only 30
Care and Maintenance.... 32
Warranty 34
- Use only with children who weigh between 40 and 120 lbs (18.1 and 54.4 kg) and whose height is between 38 and 63 inches (96.5 and 160 cm).
- Use only the vehicle's lap and shoulder belt system when restraining the child in this booster seat.
- Secure this child restraint with the vehicle child restraint anchorage system if available, or with a vehicle seat belt.
- Follow all instructions on this child restraint and in the written instructions located under the base of the seat.
- Register your child restraint with the manufacturer.
- This booster seat is NOT for use with children who weigh less than 40 lbs (18.1 kg).
- Use this booster seat forward-facing only.
- DO NOT use this booster seat as a backless booster seat unless it is used in a seating position with a vehicle head restraint.
- DO NOT use this booster seat as a backless booster seat unless proper vehicle belt placement can be achieved.
- This booster seat must not be used in the home, in boats, or in other non-certified applications.
- Secure this booster seat with a vehicle child restraint anchorage system or a vehicle seat belt even when it is not occupied. In a crash, an unsecured booster seat may injure other occupants.
- Based on crash statistics, the National Highway Traffic Safety Administration (NHTSA) recommends that parents select the rear seat as the safest location for a properly positioned booster seat. Please study the section on Vehicle Compatibility in this booklet to ensure the child's safety. If in doubt about installing this booster seat, consult the vehicle owner's manual.
- DO NOT use any part of this booster seat with other seat cushions or backrests.
- The use of non-Britax covers, inserts, toys, accessories or tightening devices is not approved by Britax. Their use could cause this booster seat not to perform as intended.
- To prevent injury due to deterioration, discontinue use of a booster seat that is older than six years or has been in a severe crash.
- The primary protection for occupants of a vehicle in a collision is the structure of the vehicle itself; a booster seat will not protect a child when the vehicle is seriously impacted. However, correctly installed, a booster seat will substantially improve the chances for survival in most crashes. Make sure that all users fully understand the correct ways to use this booster seat in a vehicle.
Important Notes
- The NHTSA and the American Academy of Pediatrics recommends that children should remain in a child seat with a 5-point harness until reaching the maximum weight or height allowed.
- Cover the booster seat when the vehicle is parked in direct sunlight. Parts of the booster seat could become hot enough to burn a child.
- Store the booster seat in a safe place when it is not being used. Avoid placing heavy objects on top of the booster seat.
- DO NOT leave children alone in a vehicle, even for a short time.
- DO NOT, except as described in this booklet, attempt to disassemble any part of the booster seat or change the way the vehicle's seat belts are used.
- DO NOT leave loose objects, e.g. books, bags, etc., in the back of a vehicle. In the event of a sudden stop, loose objects will keep moving, potentially causing serious injuries.
- DO NOT leave folding vehicle seats unsecured. In the event of a sudden stop, a loose seat back could cause the booster seat not to perform as intended.
- DO NOT allow children to play with this booster seat.
- DO NOT use anything to raise the booster seat off the vehicle seat. In a crash, this could cause the booster seat not to perform as intended.
Certification
This child restraint system conforms to all applicable Federal Motor Vehicle Safety Standards (FMVSS 213). This Child Restraint is Approved for Use in Motor Vehicles. This Restraint is Not Certified for Use in Aircraft, because Aircraft do not have shoulder belts.
Registration
Child restraints could be recalled for safety reasons. You must register this restraint to be reached in a recall. Send your name, address, e-mail address if available, and the restraint's model number and manufacturing date to Britax Child Safety, Inc. P.O. Box 91167 Allentown, PA 18109-9925, or call 1-888-427-4829, or register online at www.BritaxUSA.com/registration. For recall information, call the U.S. Government's Vehicle Safety Hotline at 1-888-327-4236 (TTY 1-800-424-9153), or go to http://www.NHTSA.gov.
For your convenience, record all the information about your booster seat below. Refer to the Serial Number and Manufacture Date Label for all information, see page 13.
Model Name and Number: ____
Serial Number:
Batch Number: ____
Date of Manufacture: ____
Child Size: Height and Weight Limitations
When Using with Backrest
Only use forward-facing with children:
• who weigh between 40 and 120 lbs (18.1 and 54.4 kg) and
• who are between 38 and 63 in. (96.5 and 160 cm) in height and
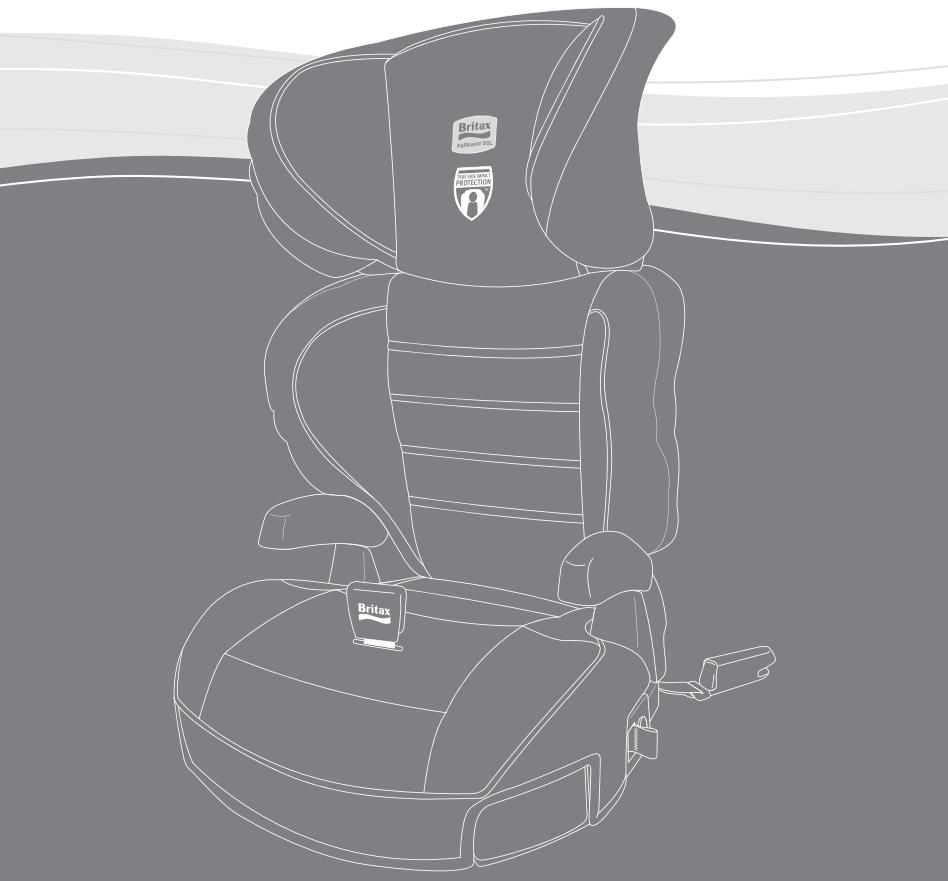
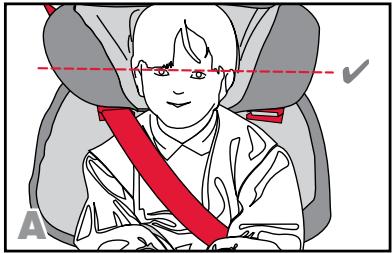
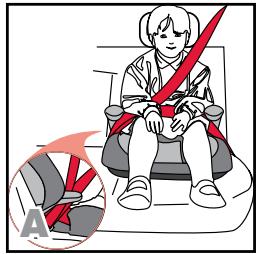
- when the top of the child's ears are below the top of the
head restraint (Fig. A) and
- when the shoulder belt lies across the center of the child's chest and is positioned at or above the child's shoulder through the shoulder belt guide and
- when the lap belt is routed under the armrests, through the SecureGuard, across the child's upper thighs.
natural_image
Illustration of a person wearing a car seatbelt with a red belt, no text or symbols present
WARNING! DO NOT use the booster seat with the
backrest if any of the following apply:
- the child weighs less than 40 lbs (18.1 kg) or
- the child weighs more than 120 lbs (54.4 kg) or
- the child is less than 38 in. (96.5 cm) in height or
- the child exceeds 63 in. (160 cm) in height or
- the top of the ears are above the top of the fully raised head restraint (Fig. B).
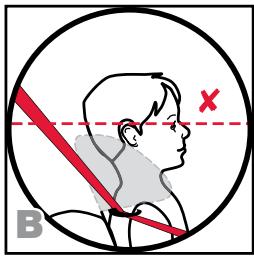
text_image
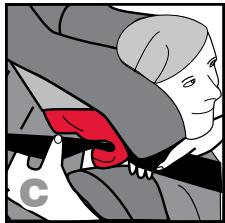
B XWhen Using without Backrest
Only use forward-facing with children:
• who weigh between 40 and 120 lbs (18.1 and 54.4 kg) and
• who are between 38 and 63 in. (96.5 and 160 cm) in height and
- when the top of the child's ears are below the top of the vehicle head restraint and
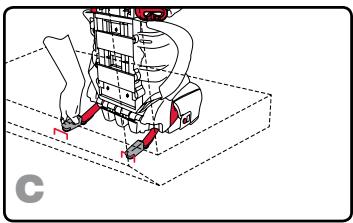
- when the shoulder belt lies across the center of the child's chest and is positioned at or above the child's shoulder (Fig. C) and
- when the lap belt is routed under the armrests, through the SecureGuard, across the child's upper thighs.
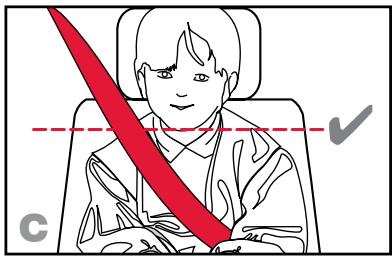
text_image
C
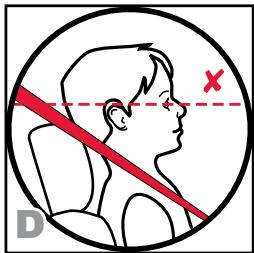
WARNING! DO NOT use the booster seat without
the backrest if any of the following apply:
• the child weighs less than 40 lbs (18.1 kg) or
• the child weighs more than 120 lbs (54.4 kg) or
- the child is less than 38 in. (96.5 cm) in height or
- the child exceeds 63 in. (160 cm) in height or
- the top of the ears are above the top of the fully raised vehicle head restraint (Fig. D) or
- proper vehicle seat belt positioning cannot be achieved across the child's shoulder and upper thighs.
text_image
D
WARNING!
Based on crash statistics, the National
Highway Traffic Safety Administration (NHTSA) recommends that parents select the back seat as the safest location for a properly positioned booster seat.
DO NOT place a booster seat on the front seat with an air bag unless it is deactivated. DEATH or SERIOUS INJURY can occur. See your vehicle owner's manual for booster seat positioning instructions. The back seat is the safest place for children 12 and under.
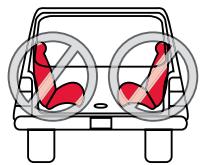
This booster seat must only be used in forward-facing vehicle seats. Side-facing or rear-facing seats CANNOT be used. For questions about positioning the booster seat consult the vehicle owner's manual.
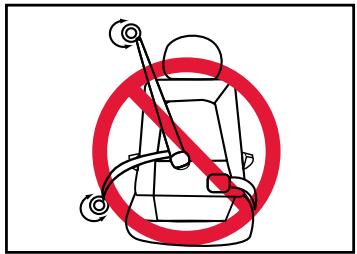
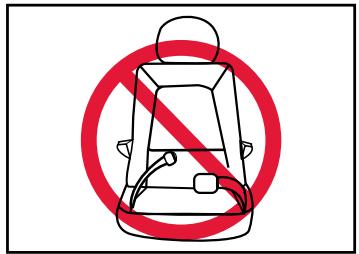
Some vehicles have no seating positions which are compatible with this booster seat or any other child seat. See diagram below.
text_image
Diagram showing car seatbelting with no text labels and red diagonal stripes indicating absence or prohibition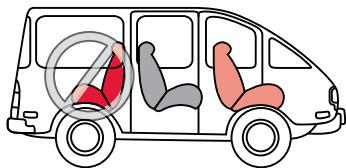
text_image
Diagram showing car interior compartments with a no-smoking symbol, indicating vehicle safety or accessibility issues.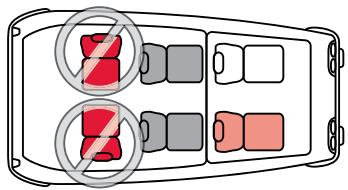
text_image
Diagram showing two car seats with red and gray symbols indicating no number of seats, enclosed by a crossed-out circle.
text_image
Diagram showing a vehicle front panel with two red prohibition signs and gray/red blocks, indicating no barrier or absence.Vehicle Buckle Position

WARNING! The position of the vehicle seat belt kle can adversely affect the stability of the booster seat.
If the buckle lies near the incorrect position (✗) when the vehicle seat belt is tightened, try fitting the booster seat in another seating position OR consult your vehicle owner's manual to see if you can lower the vehicle buckle position by twisting the vehicle buckle stalk.
If it is not possible to achieve the correct position (√) for the buckle, then another seating position or child seat MUST be used.
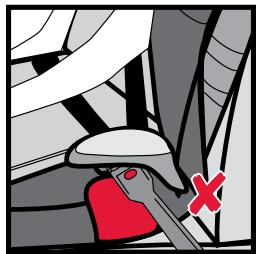
natural_image
Mechanical diagram showing a red belt buckle securing a car seatbelt with a red X mark (no text or symbols)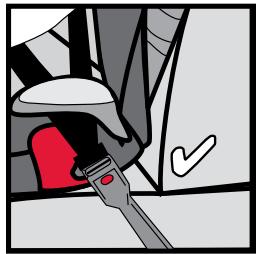
natural_image
Illustration of a car seatbelt buckle being inserted, with a checkmark indicating the correct position (no text or symbols present)Vehicle Seat Belts
IMPORTANT: Vehicle seats and vehicle seat belts differ from vehicle to vehicle. Refer to your vehicle owner's manual for specific information about vehicle seat belts and their use with child seats. This booster seat can fit securely in most vehicles using existing vehicle seat belts. However, some vehicles do not have seating positions which are compatible with this booster seat or any other child seat. If in doubt, contact the vehicle manufacturer for assistance.
To protect your child in a crash, you must use this booster seat with vehicle seat belts that are compatible. This booster seat can only be used with three-point (shoulder and lap) vehicle seat belts. The vehicle owner's manual will have information on the types of vehicle seat belts in your vehicle. If your vehicle seat belt type is identified on page 11 as incompatible, select another seating position.
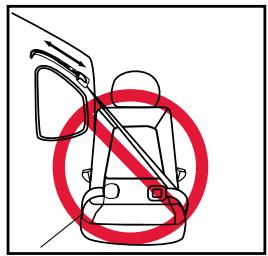
Incompatible Vehicle Seat Belts

WARNING! The following types of vehicle seat belts are NOT compatible with this booster seat:

natural_image
Diagram of a car seatbelt with no text or symbols, featuring a red prohibition symbol (no text or labels)1 Vehicle seat belts with top or bottom anchor points on the vehicle door.

text_image
Prohibition sign with red prohibition symbol and car silhouette, indicating no use or restriction2 Inflatable lap-shoulder belts.
text_image
Diagram showing a car seatbelt with a red prohibition symbol indicating no vehicle use or restriction.3 Motorized, automatic vehicle seat belts
text_image
Prohibition sign with red prohibition symbol and car silhouette, indicating no traffic or parking restriction4 Lap-shoulder belts that have a separate retractor each for the lap and shoulder parts.
text_image
Prohibition sign showing a car seat with a red diagonal line and no text5 Lap belts of any kind.
text_image
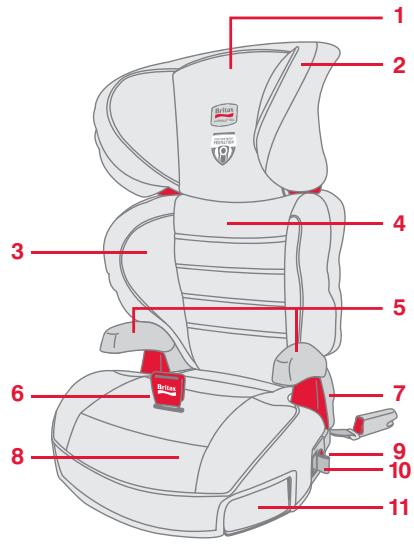
1 2 3 4 5 6 7 8 9 10 11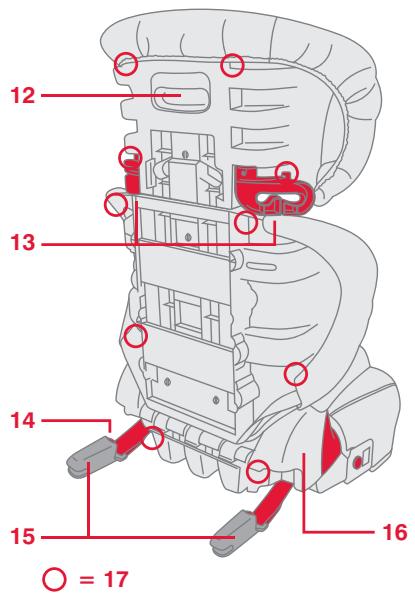
text_image
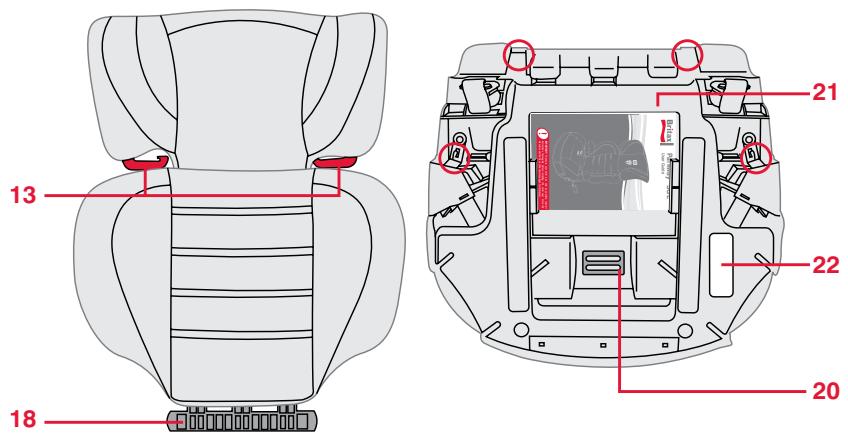
12 13 14 15 16 ○ = 171 Head Restraint
2 Head Restraint Cover
3 Backrest Cover
4 Backrest
5 Armrests
6 SecureGuard™ Clip
7 Base Belt Guide
8 Base Cover
9 ISOFLEX™ Release Button
10 ISOFLEX™ Adjuster Strap
11 Cup/Snack Holders
12 Head Restraint Height Adjuster
13 Shoulder Belt Guides
14 Lower Connector Release Button
15 Lower Connectors
16 Base
17 Elastic Retainers
text_image
13 18 20 21 22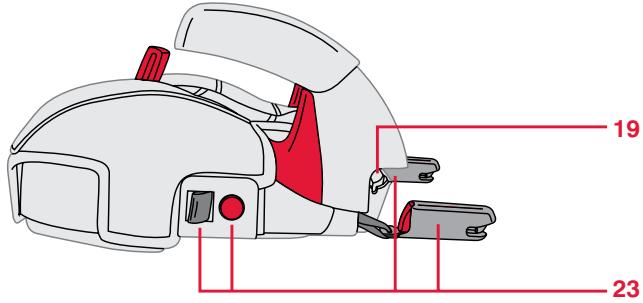
text_image
19 2318 Backrest Hinge Cylinder
19 Base Hinge Slot
20 SecureGuard™ Adjuster
21 User Guide Storage Slot
22 Serial Number and Manufactured Date Label
23 ISOFLEX™ Flexible Lower LATCH Connection System
Before you use this booster seat for the first time, you will have to complete the assembly steps below.
Attaching the Backrest
IMPORTANT: Keep fingers away from moving parts to avoid potential injury.
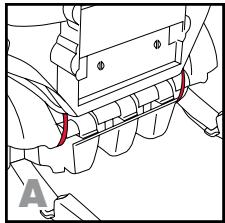
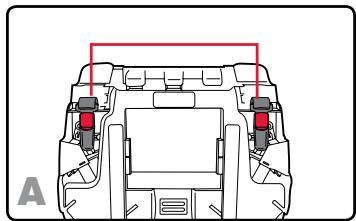
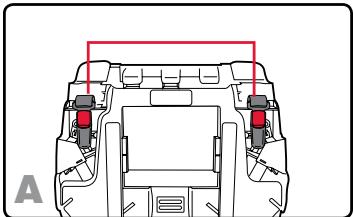
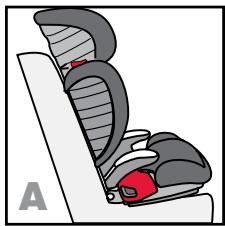
1 Detach the elastic loops from the elastic retainers on the base cover from the back of the booster seat base (Fig. A).
2 Place the base on a flat surface. From the child's left side of the booster seat, align the backrest hinge cylinder with the hinge slot on the base.
3 Push the backrest hinge all the way into the base hinge slot (Fig. B).
IMPORTANT: DO NOT rotate the backrest until the cylinder has been completely inserted into the base hinge slot. Rotating the backrest before it has been completely inserted may result in damage to the booster seat.
4 Rotate the backrest up until it doesn't rotate into the flat position under its own weight (Fig. C).
5 Attach the elastic loops of the base cover to the elastic retainers on the back of the booster seat (Fig. D).
natural_image
Mechanical assembly diagram showing a component with red highlighted parts, labeled 'A' (no text or symbols beyond label)
natural_image
Illustration of a hand holding a device with a red arrow pointing to it, labeled 'B' (no text or symbols on the device itself)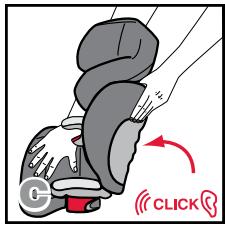
text_image
CLICK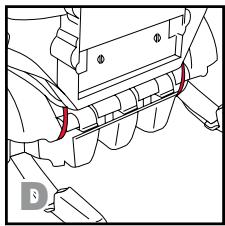
natural_image
Technical line drawing of a mechanical assembly with red fasteners (no text or symbols)Removing the Backrest
1 Place the booster seat on a flat surface.
2 Detach the seat cover from the base by unhooking the elastic loops from the elastic retainers on the back of the base (Fig. E).
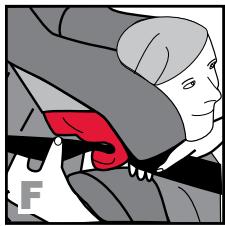
3 Push the backrest down until it lies flat and align the backrest hinge cylinder with the hinge slot on the base (Fig. F).
4 Slide the backrest from the child's left side of the base (Fig. G).
5 Attach the elastic loops of the base cover to the elastic retainers on the back of the base (Fig. H).
NOTE: Store the backrest in a safe place.

natural_image
Technical line drawing of a mechanical assembly with red highlighted parts (no text or symbols)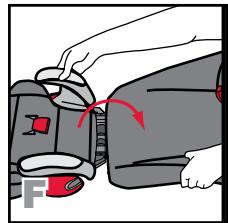
natural_image
Illustration of a person adjusting a device with arrows indicating motion (no text or symbols)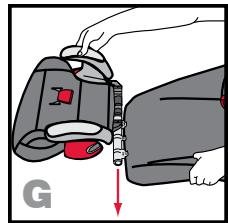
natural_image
Illustration of a hand holding a medical device with a red arrow pointing to it, no text or symbols present.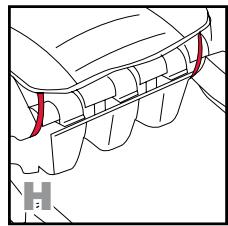
natural_image
Technical line drawing of a mechanical component with red highlighted sections (no text or symbols)Adjusting the Backrest
WARNING! Reclining the vehicle seat back may adversely affect the position of the vehicle seat belt across the child and may result in death or serious injury in a crash. Refer to your vehicle owner's manual for information on adjusting the vehicle seat back with child seats.
Push the backrest until it rests against the vehicle seat back (Fig. A). If the vehicle seat back is adjustable, move it to the upright position.
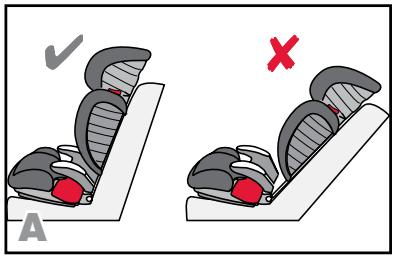
text_image
✓ A ✗IMPORTANT: Do not recline the backrest past the allowable adjustable range (Fig. B).
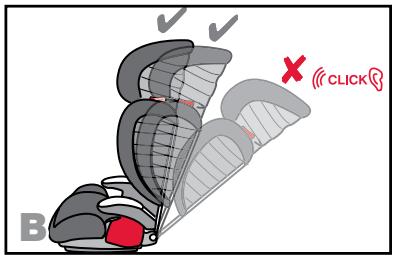
text_image
B ✓ ✓ × CLICKAdjusting Head Restraint Height
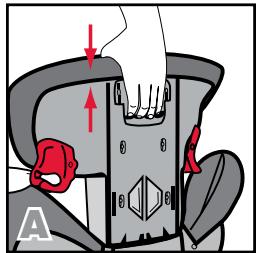
The head restraint can be adjusted and locked into different positions. Choose the position best suited to your child's safety. See page 6.
Tip: Check the fit with child seated in booster seat. Ensure that the shoulder belt guides are even with, or just above, the child's shoulder. See page 6.
1 Squeeze and hold the height adjustment handle to adjust the head restraint (Fig. A).
2 Slide head restraint up or down to the desired level (Fig. B).
3 Release the adjustment handle. Repeat this process until the shoulder belt rests comfortably across the center of the child's chest when positioned through the shoulder belt guide (Fig. C).
4 Ensure the head restraint has locked into place.
natural_image
Illustration of a hand pressing down on a mechanical component with red arrows indicating motion (no text or symbols)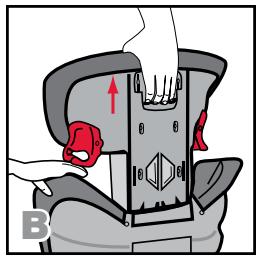
natural_image
Diagram of a mechanical device with red arrows indicating force or movement, no visible text or symbols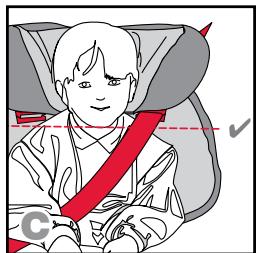
natural_image
Illustration of a person wearing a seatbelt with a red belt and checkmark (no text or symbols)Using ISOFLEX™ Flexible Lower LATCH Connection System
The ISOFLEX™ System helps to anchor the booster seat into the car for added stability and safety in the event of a crash.
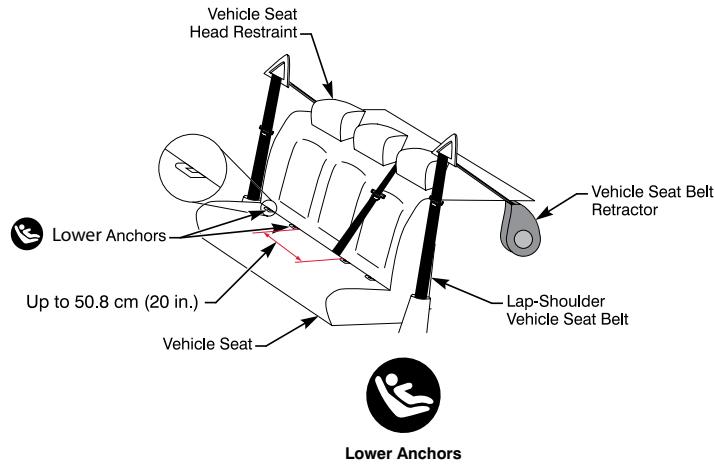
LOWER UNIVERSAL ANCHORAGE SYSTEM LOCATIONS
text_image
Vehicle Seat Head Restraint Lower Anchors Up to 50.8 cm (20 in.) Vehicle Seat Belt Retractor Lap-Shoulder Vehicle Seat Belt Lower AnchorsThe figure above shows typical locations for lower anchors in a vehicle. Check your vehicle owner's manual to learn if it is equipped with lower anchors.
Standard vehicle seat spacing between lower anchors is 11 inches (27.9 cm). This child seat can be used in a seating position with up to 20 inches (50.8 cm) of space between the lower anchors if the vehicle manufacturer allows.
Using the Lower Connectors
Where to find the Lower Connectors
The lower connectors are located in the back of the base of the booster seat. Store the connectors in the slots when not in use.
To remove the lower connector from the storage slot or lower anchor:
1 Press and hold the red release button.
natural_image
Illustration of a hand holding a device with a red arrow pointing to the button (no text or symbols present)2 Pull the lower connector from the storage slot or lower anchor.
natural_image
Illustration of a hand holding a device with a red arrow pointing to the left side (no text or symbols present)To attach the lower connector to the storage slot or lower anchor:
Firmly push the lower connector into the slot or lower anchor until a click is heard.
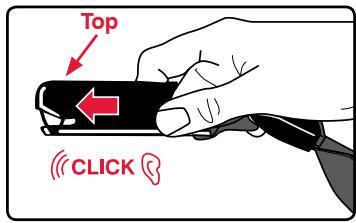
text_image
Top CLICKSecureGuard™
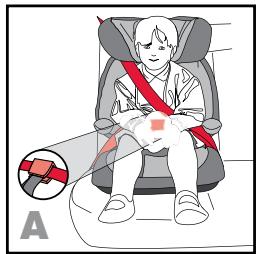
Britax recommends using SecureGuard to achieve the best vehicle seat belt placement. The SecureGuard™ clip should hold the lap part of the vehicle seat belt in place. The SecureGuard™ clip should be adjusted to keep the lap part of the vehicle seat belt positioned low across your child's upper thighs (Fig. A). Ensure the bottom edge of the SecureGuard™ clip is level with your child's upper thighs, however, the clip itself should not press into your child's upper thighs.
IMPORTANT: The lap part of the vehicle seat belt must not rest on the child's abdomen.
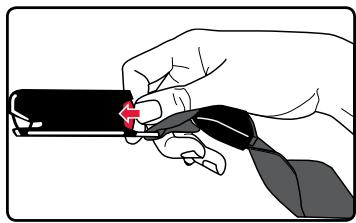
Adjusting SecureGuard™ Fit
- To Shorten:
1 Locate the SecureGuard™ adjuster under the base. See page 13.
2 Pull the SecureGuard™ adjuster away from the base.
3 Feed the webbing through the SecureGuard™ adjuster (Fig. B).
4 Pull the end of the SecureGuard™ adjuster webbing to tighten (Fig. C).
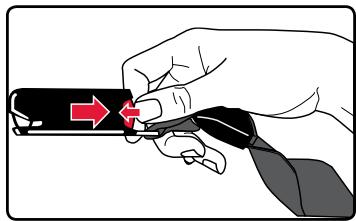
- To Lengthen:
1 Locate the SecureGuard™ adjuster under the base. See page 13.
natural_image
Illustration of a child in a car seat with a red belt and orange bandage, showing seatbelting (no text or symbols)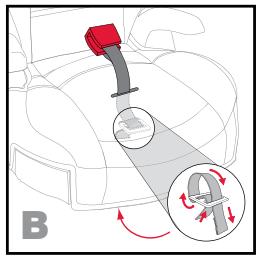
text_image
B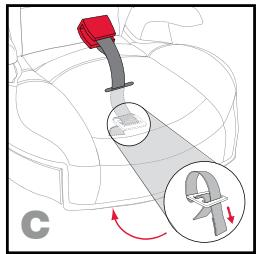
text_image
C2 Pull the SecureGuard ^™ adjuster away from the base.
3 Feed the end of the SecureGuard™ webbing through the SecureGuard™ adjuster (Fig. D).
4 Pull the webbing to remove slack from the SecureGuard™ adjuster.
5 Move the SecureGuard™ clip to the center of the SecureGuard™ webbing.
The lower edge of the SecureGuard™ clip should be level with the child's upper thighs once they have been secured in the booster seat.

text_image
DUsing the Retractable Cup Holders
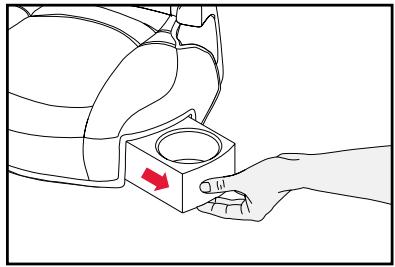
natural_image
Line drawing of a hand pressing a small mechanical component with a red arrow indicating motion (no text or symbols)Pull the cup holder out from the booster base to use.
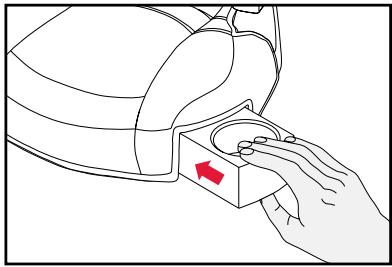
natural_image
Line drawing of a hand pressing a button on a device (no text or symbols)Push the cup holder into the booster base to store.
IMPORTANT:
• DO NOT use with hot liquids.
- DO NOT step on or put excess weight on the cup holder.
Positioning the Booster Seat and Securing Your Child with Backrest and ISOFLEX™

BEFORE YOU BEGIN:
√ Check that your vehicle has lower anchors.
√ If the vehicle seat back is adjustable, ensure it is in the upright position before placing the booster seat on the vehicle seat.
√ Adjust the head restraint appropriately to fit child (see page 17).
NOTE: Before using the booster seat for the first time, you will need to complete the assembly instructions on page 14.
1 Remove lower connectors from the storage slots in the base (Fig. A).
2 Push the ISOFLEX™ adjuster release button on one side of the booster seat and pull to fully extend the lower connector strap. Then repeat on the opposite side to ensure that all slack has been released from the ISOFLEX™ system (Fig. B).
3 Place the booster on the vehicle seat.
* Using the lower anchor farthest from you first will allow for easiest positioning.
* You may need to turn the back of the booster seat towards you for easier access to the lower anchors.
natural_image
Top-down schematic of a vehicle head with red and black components, no text or symbols present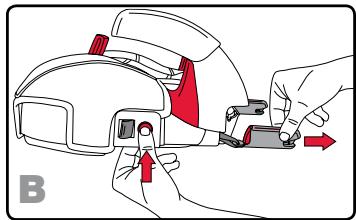
natural_image
Illustration of hands using a tool to adjust or install a device (no text or symbols visible)4 Verify that the ISOFLEX™ straps are not twisted and push the lower connectors onto their adjacent lower anchors (Fig. C).
* A click confirms attachment.
NOTE: If a click is not heard when connecting the lower connectors, the lower connector strap may be twisted or there may be debris in the lower connector. Correct either situation before continuing with the positioning process.
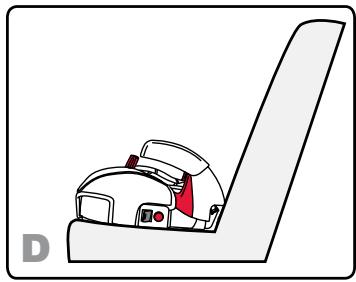
5 Ensure that the booster seat is positioned correctly on the vehicle seat (Fig. D). Guide the seat into place while pulling the ISOFLEX™ adjuster strap on either side of the booster seat to remove slack (Fig. E).
NOTE:
* If needed, adjust or remove the vehicle's head restraint to allow the backrest to lie flat against the vehicle's seat back.
* Only tighten until the slack is removed from the strap. Over-tightening the strap can force the backrest of the booster seat forward (Fig. F).
natural_image
Technical line drawing of a mechanical assembly with no visible text or symbols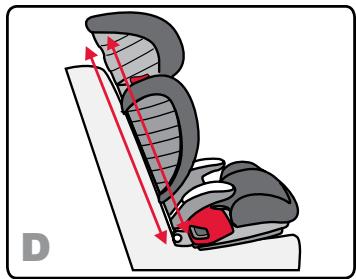
natural_image
Illustration of a car seat assembly with red arrows indicating force direction (no text or symbols)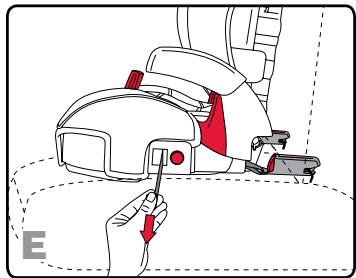
natural_image
Illustration of a car hood being adjusted using a tool, showing the blade and seat (no text or symbols)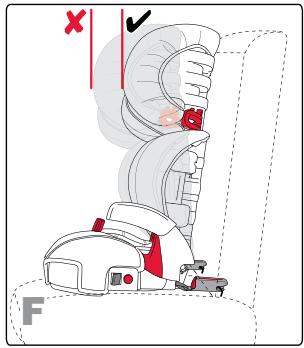
text_image
Diagram of a car seatbelt seat with red checkmark and cross symbol indicating correct or incorrect statusPositioning the Booster Seat
6 Sit your child in the booster seat and check the head restraint for proper height adjustment.
7 Pull the vehicle seat belt out and route the shoulder part of the vehicle seat belt through the upper belt guide (Fig. F).
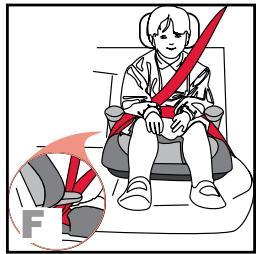
8 Route the lap part of the vehicle seat belt under the armrest and over both red belt guides (Fig. G).
9 Verify that the vehicle seat belt is not twisted and fasten across the child (Fig. H).
1 Route the lap part of the vehicle seat belt through the SecureGuard™ clip (Fig. I).
* The lap part of the vehicle seat belt should rest low on the child's upper thighs.
1 1 Remove slack from the vehicle seat belt.
* The shoulder part should cross the chest in the center of the child's collar bone.

Checklist
√ Vehicle seat belt is not twisted
√ Vehicle seat belt is securely fastened
√ Shoulder part of the vehicle seat belt is routed through the shoulder belt guide
√ Lap part of the vehicle belt is routed through the SecureGuard™ clip
√ Vehicle seat belt is properly positioned low across the child's upper thighs and does not contact the child's neck
√ If the lower connectors in your vehicle prevent proper vehicle belt fit across your child you cannot use the lower anchors to position this booster seat
natural_image
Illustration of a person wearing a hooded garment with a red zipper, partially covered by dark clothing (no text or symbols)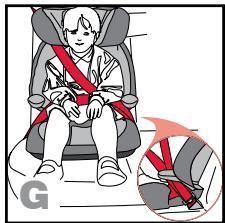
natural_image
Illustration of a child wearing a car seatbelt, with a magnified inset showing the same seat (no text or symbols present)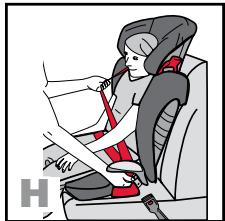
natural_image
Illustration of a child wearing a red and black seatbelt, seated in a car seatbelt (no text or symbols visible)
natural_image
Illustration of a child wearing a car seatbelt and red straps, seated with hands placed (no text or symbols)Positioning the Booster Seat and Securing Your Child without Backrest and with ISOFLEX™

BEFORE YOU BEGIN:
√ Check that your vehicle has lower anchors.
√ If the vehicle seat back is adjustable, ensure it is in the upright position before placing the booster seat on the vehicle seat.
√ Ensure the booster seat is positioned in a location that has a vehicle head restraint.
1 Remove lower connectors from the storage slots in the base (Fig. A).
2 Push the ISOFLEX™ adjuster release button on one side of the booster seat and pull to fully extend the lower connector strap. Then repeat on the opposite side to ensure that all slack has been released from the ISOFLEX™ system (Fig. B).
3 Place the booster seat on the vehicle seat.
* Using the lower anchor farthest from you first will allow for easiest positioning.
* You may need to turn the back of the booster seat toward you for easier access to the lower anchors.
4 Verify that the ISOFLEX™ straps are not twisted and push the lower connectors onto their adjacent lower anchors (Fig. C).
* A click confirms attachment.
natural_image
Top-down view of a vehicle head panel with red indicator lines and labeled section A (no text or symbols on the diagram itself)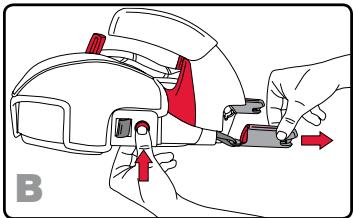
natural_image
Illustration of hands using a tool to adjust or install a device, with red arrows indicating action direction (no text or symbols present)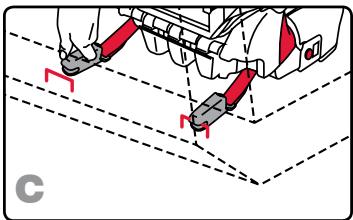
natural_image
Technical illustration of a robotic arm with red-handled joints and dashed alignment lines (no text or symbols)Positioning the Booster Seat
NOTE: If a click is not heard when connecting the lower connectors, the lower connector strap may be twisted or there may be debris in the lower connector. Correct either situation before continuing with the positioning process.
5 Ensure that the booster seat is positioned correctly on the vehicle seat (Fig. D). Guide the seat into place while pulling the ISOFLEX™ adjuster strap on either side of the booster to remove slack (Fig. E).
NOTE: Only tighten until the slack is removed from the strap.
natural_image
Illustration of a car seatbelt device with red buttons and a white seat (no text or symbols)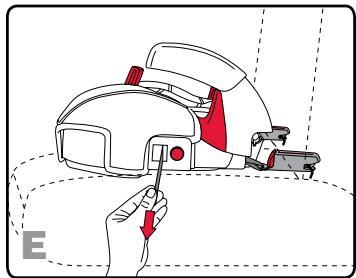
natural_image
Illustration of a hand using a screwdriver to adjust a car helmet (no text or symbols present)6 Sit your child in the booster seat.
7 Pull the vehicle seat belt out, positioning the lap belt under both armrests and over both red belt guides (Fig. F).
8 Verify that the vehicle seat belt is not twisted and then fasten.
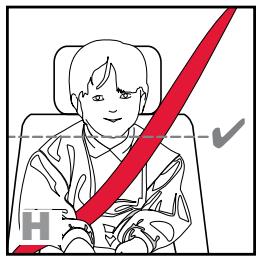
9 Adjust the vehicle seat belt's shoulder part so that it crosses the chest and center of the child's collar bone.
natural_image
Illustration of a child wearing a seatbelt and red belt, with an inset showing a magnified view of the face (no text or symbols)Positioning the Booster Seat
1 Route the lap part of the vehicle seat belt through the SecureGuard™ clip (Fig. G).
* The lap part of the vehicle seat belt should rest low on the child's upper thighs.

natural_image
Illustration of a person seated in a seat bearing a red belt and seatbelt, with no visible text or symbols.1 1 Remove slack from the vehicle seat belt.
* The shoulder part should cross the chest in the center of the child's collar bone (Fig. H).
text_image
Diagram showing a person in a car seat with a red diagonal line and checkmark, likely indicating a safety or compliance threshold.
Checklist
√ Vehicle seat belt is not twisted
√ Vehicle seat belt is securely fastened
√ Lap part of the vehicle belt is routed through the SecureGuard™ clip
√ Vehicle seat belt is properly positioned low across the child's upper thighs and does not contact the child's neck
√ If the lower connectors in your vehicle prevent proper vehicle belt fit across your child you cannot use the lower anchors to position this booster seat
Positioning and Securing Your Child with Backrest and Lap-shoulder Belt Only

BEFORE YOU BEGIN:
√ If the vehicle seat back is adjustable, ensure it is in the upright position before placing the booster seat on the vehicle seat.
√ Adjust the head restraint appropriately to fit child (see page 17).
Note: Before using the booster seat for the first time, you will need to complete the assembly instructions on page 14.
1 Place the booster seat on the vehicle seat.
2 Push the backrest until it rests against the vehicle seat back (Fig. A). If the vehicle seat back is adjustable, move it to the normal upright position.
NOTE: If needed, adjust or remove the vehicle's head restraint to allow the backrest to lie flat against the vehicle's seat back.
3 Sit your child in the booster seat and check the head restraint for proper height adjustment (Fig. B).
natural_image
Illustration of a car seat with black and red buttons, labeled 'A' (no text or symbols on the diagram itself)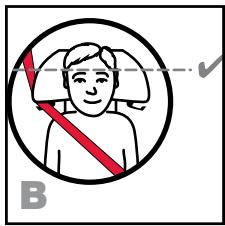
text_image
B4 Pull the vehicle seat belt out and route the shoulder part of the vehicle seat belt through the upper belt guide (Fig. C).
5 Route the lap part of the vehicle seat belt under both armrests, over your child's upper thighs and over both red belt guides (Fig. D).
6 Verify that the vehicle seat belt is not twisted and then fasten the vehicle seat belt across the child (Fig. E).
7 Route the lap part of the vehicle seat belt through the SecureGuard™ clip (Fig. I).
* The lap part of the vehicle seat belt should rest low on the child's upper thighs.
8 Remove slack from the vehicle seat belt.
* The shoulder part should cross the chest in the center of the child's collar bone.

Checklist
√ Vehicle seat belt is not twisted
√ Vehicle seat belt is securely fastened
√ Shoulder part of the vehicle seat belt is routed through the shoulder belt guide
√ Lap part of the vehicle belt is routed through the SecureGuard™ clip
√ Vehicle seat belt is properly positioned low across the child's upper thighs and does not contact the child's neck
natural_image
Illustration of a person wearing a hooded garment with a red zipper, partially covered by black lines (no text or symbols)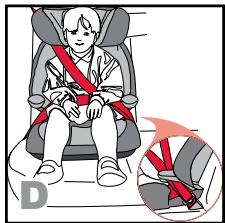
natural_image
Illustration of a child wearing a car seatbelt with a red belt, showing seatbelting and seatbelting details (no text or symbols)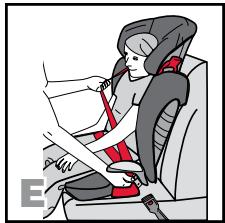
natural_image
Illustration of a child wearing a red and black seatbelt, seated in a car seatbelt (no text or symbols visible)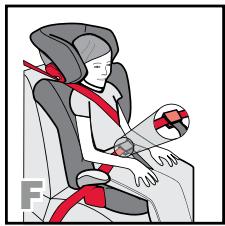
natural_image
Illustration of a child wearing a seatbelt and red straps, seated with hands placed (no text or symbols)Positioning and Securing Your Child without Backrest and Lap-shoulder Belt Only

BEFORE YOU BEGIN:
√ If the vehicle seat back is adjustable, ensure it is in the upright position before placing the booster seat on the vehicle seat.
√ Ensure the booster seat is positioned in a location that has a vehicle head restraint.
Note: Before using the booster seat without the backrest, you may need to complete the removal instructions on page 15.
1 Place the booster seat base on the vehicle seat and push it back against the vehicle seat back.
2 Sit your child in the booster seat.
3 Pull the vehicle seat belt out from the retractor, positioning the lap belt under both armrests and over both red belt guides (Fig. A).
4 Verify that the vehicle seat belt is not twisted and then fasten across the child.
5 Adjust the vehicle seat belt's shoulder part so that it crosses the chest and center of the child's collar bone (Fig. B).
natural_image
Illustration of a child sitting in a seat with a red belt, showing seatbelt and seatbelt (no text or symbols)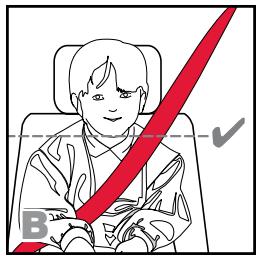
text_image
Medical illustration showing a patient in a seatbelt with a red arrow indicating a decrease or reduction, marked with check and 'B' symbols.6 Route the lap part of the vehicle seat belt through the SecureGuard™ clip (Fig. C).
* The lap part of the vehicle seat belt should rest low on the child's upper thighs.
7 Remove slack from the vehicle seat belt.
* The shoulder part should cross the chest in the center of the child's collar bone.

natural_image
Illustration of a person seated in a seat with a red belt and a small inset showing a heart-shaped object (no text or symbols)
Checklist
√ Vehicle seat belt is not twisted
√ Vehicle seat belt is securely fastened
√ Lap part of the vehicle belt is routed through the SecureGuard™ clip
√ Vehicle seat belt is properly positioned low across the child's upper thighs and does not contact the child's neck
Cover Removal
Removing the Backrest Cover
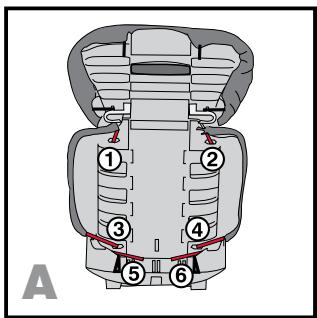
1 Detach the elastic loops (6 total) from the backrest (Fig. A).
2 Remove the backrest cover.
NOTE: Be careful not to damage the EPS foam.
Removing the Head Restraint Cover
1 Detach the elastic loops (6 total) from the backrest (Fig. B).
2 Remove the head restraint cover.
Removing the Seat Cover
1 Detach the elastic loops (4 total) from the booster seat base (Fig. C).
2 Slide the plastic retainer flaps (3 total) from the front and sides of the booster seat base (Fig. D).
3 Remove the booster seat cover.
text_image
A ① ② ③ ④ ⑤ ⑥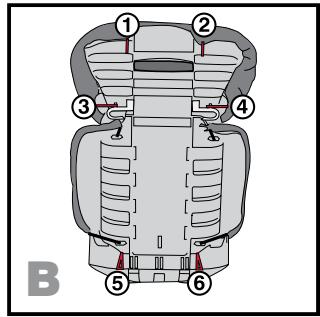
text_image
① ② ③ ④ ⑤ ⑥ B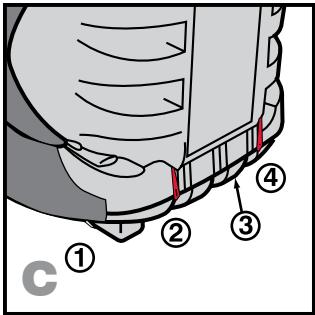
text_image
c ① ② ③ ④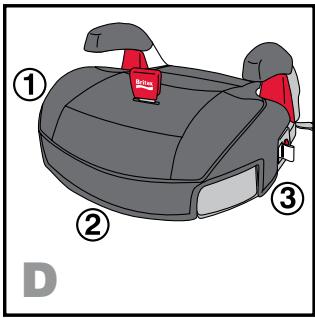
text_image
① ② ③ DCleaning the Cover
- HAND WASH, using cold water and mild soap.
• LINE DRY, to prevent cover from shrinking. - DO NOT: Bleach, machine wash, or machine dry.
Replacing the Cover
To replace the cover, reverse the steps of each section.
Cleaning the Shell
- SPONGE CLEAN, using warm water and mild soap.
- TOWEL DRY
- DO NOT: Use solvents, abrasive cleaners, or disassemble the booster seat in any way, except as instructed.
Warranty
This booster seat was manufactured by Britax. Britax Child Safety, Inc. (“Britax”) warrants this product to the original retail purchaser as follows:
LIMITED WARRANTY
This booster seat is warranted against defective materials or workmanship for one year from the date of original purchase. Proof of purchase is required. The exclusive remedy for this warranty is that Britax will, at its option, provide repair or replacement components for this product. Britax reserves the right to discontinue or change fabrics, parts, models or products, or to make substitutions.
To make a claim under this warranty, contact Britax Consumer Services at 1-888-427-4829 or write to us using the address on the back cover of this booklet. Proof of purchase is required.
PLEASE COMPLETE AND MAIL THE OWNER REGISTRATION CARD WITHIN (30) DAYS OF PURCHASE OR VISIT WWW.BRITAXUSA.COM/REGISTRATION.
WARRANTY LIMITATIONS
This warranty does not include damages that arise from negligence, misuse or use not in accordance with the product instruction.
The use of non-Britax Child Safety, Inc. covers, inserts, toys, accessories, or tightening devices is not approved by Britax. Their use could cause this child seat to fail Federal Safety Standards or not perform as intended in a crash. Their use automatically voids the Britax warranty.
LIMITATION OF DAMAGES
The warranty and remedies as set forth above are exclusive and in lieu of all others, oral or written, express or implied. In no event will Britax, or the retailer selling this product, be liable for any damages, including incidental or consequential damages, or loss of use arising out of the use or inability to use this product.
LIMITATIONS OF WARRANTIES AND OTHER WARRANTY TERMS AND STATE LAWS
Any implied warranties, including implied warranties of merchantability and fitness for a particular purpose, shall be limited to the duration and terms of the express written warranty. Some states do not allow limitations on how long an implied warranty lasts or the exclusion or limitation of incidental or consequential damages, so the above limitations may not apply. This warranty gives you specific legal rights, and you may have other rights, which vary from state to state. Neither Britax, nor the retailer selling this product, authorizes any person to create for it any other warranty, obligation, or liability in connection with this product.

natural_image
Solid red horizontal bar on white background (no text or symbols)Britax Child Safety, Inc.
13501 South Ridge Drive
Charlotte, NC 28273
USA
A Britax Childcare Group
Limited company
Tel.: 1-888-427-4829
www.Britax.com