TS 302 - Lecteur multimédia portable MPMAN - Notice d'utilisation et mode d'emploi gratuit
Retrouvez gratuitement la notice de l'appareil TS 302 MPMAN au format PDF.


| Type d'appareil | Lecteur multimédia portable |
| Contrôle | Écran tactile |
| Formats audio supportés | MP3, autres formats courants |
| Formats vidéo supportés | Formats vidéo standards |
| Capacité de stockage | Non précisé |
| Écran | Écran couleur |
| Connectivité | USB |
| Autonomie | Non précisé |
| Fonctions supplémentaires | Lecture vidéo, lecture audio |
| Poids | Non précisé |
| Dimensions | Non précisé |
| Langues disponibles | Multilingue |
| Alimentation | Batterie rechargeable |
| Interface utilisateur | Écran tactile avec menus |
| Accessoires inclus | Non précisé |
FOIRE AUX QUESTIONS - TS 302 MPMAN
Questions des utilisateurs sur TS 302 MPMAN
0 question sur cet appareil. Repondez a celles que vous connaissez ou posez la votre.
Poser une nouvelle question sur cet appareil
Téléchargez la notice de votre Lecteur multimédia portable au format PDF gratuitement ! Retrouvez votre notice TS 302 - MPMAN et reprennez votre appareil électronique en main. Sur cette page sont publiés tous les documents nécessaires à l'utilisation de votre appareil TS 302 de la marque MPMAN.
MODE D'EMPLOI TS 302 MPMAN

text_image
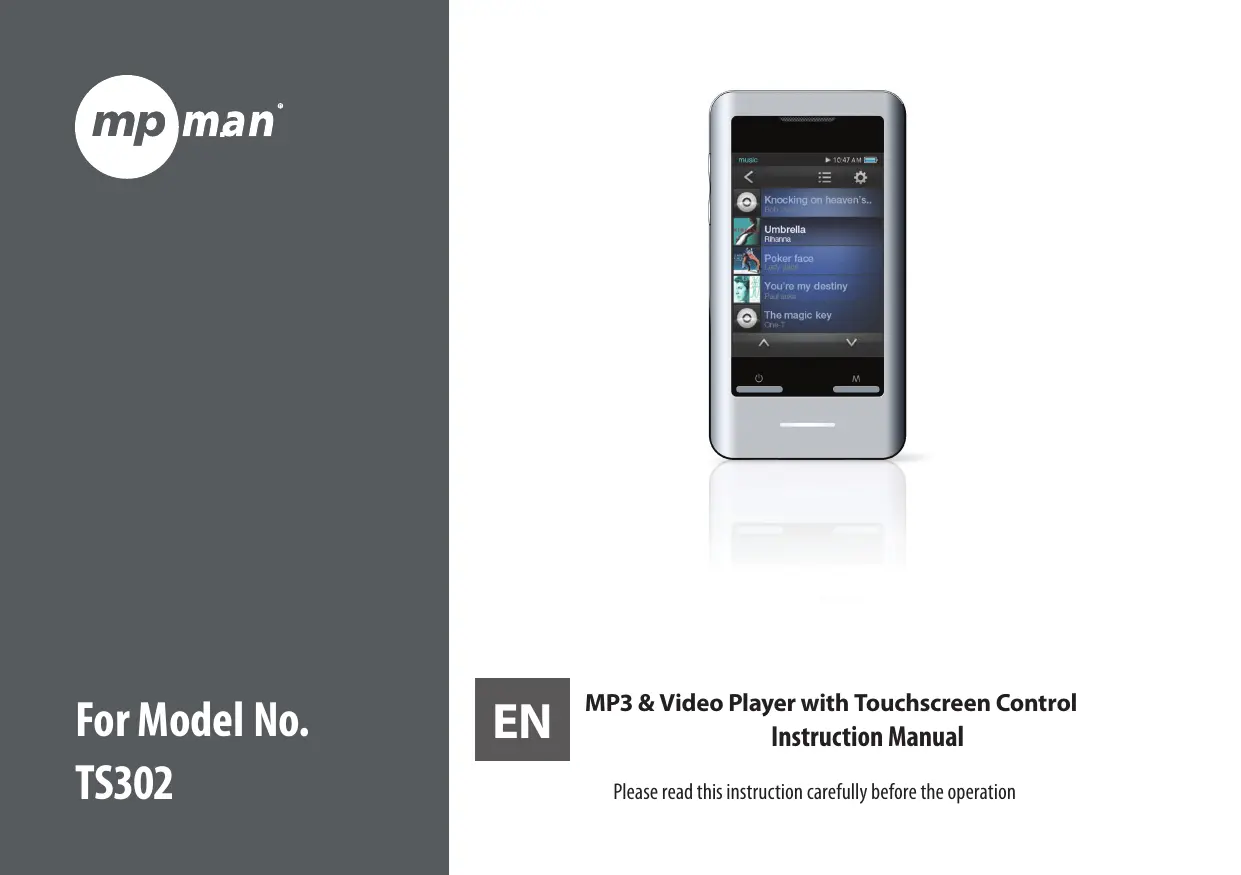
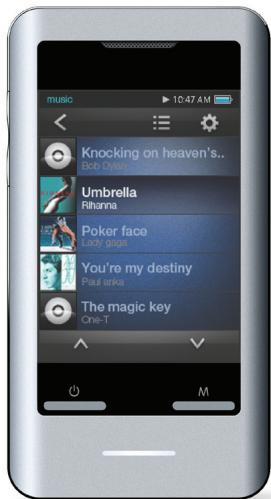
mp man®For Model No.
TS302
text_image
music 10:47 AM Knocking on heaven's.. Pick Davis Umbrella Rihanna Poker face Lady Gaga You're my destiny Paul atka The magic key One-T MEN
MP3 & Video Player with Touchscreen Control Instruction Manual
Please read this instruction carefully before the operation

Table of Contents
THANK YOU....5
Package Contents....5
Features....5
CONTROLS AT A GLANCE......6
GETTING STARTED 8
Charging the Battery....8
Charging with a Computer 8
Turning the Player On/Off 8
Resetting the Player 9
Using the Touchscreen Controls 9
Installing a microSD Memory Card....9
MAIN MENU....10
Main Menu Controls 10
MUSIC MODE....11
Music Browser Controls....11
Now Playing Controls (Music Playback)....12
Quick Option Menu 13
VIDEO MODE....15
Movie Browser Controls 15
Movie Playback Controls 16
PHOTO MODE 17
Photo Browser Controls....17
Photo Viewer Controls 17
Quick Option Menu 18
RADIO MODE....19
Radio Tuning Controls....19
Quick Option Menu 20
TEXT MODE 22
Text Browser Controls 22
Text Reader Controls....22
Quick Option Menu 23
EXPLORER MODE 25
Explorer Controls 25
Quick Option Menu 25
SETTING MODE 27
DV MODE....29
CAMERA MODE 30
CALENDAR MODE 31
CLOCK MODE....32
MPMANAGER 33
SPECIFICATIONS....34
TROUBLESHOOTING & SUPPORT......35

Thank You
Congratulations on your purchase of the Video & MP3 player. This manual is designed to help you easily set up and begin using your new player right away. Please read this manual carefully and retain it for future reference.
Package Contents
Please make sure that the items shown below are included in the package. Should an item be missing, please contact the local retailer from which you purchased this product.
✦ Video & MP3 player
USB Cable
✦ Instruction Manual & Documentation
✦ Professional Stereo Earphones
Protective Pouch

This package may contain plastic bags or other materials that pose a hazard to children. Be sure to safely dispose of all packing materials after opening.
Features
✦ Integrated flash memory
✦ Intuitive touchscreen control
2.8" TFT Display
◆ Plays music, video, photos and text
ID3 and LRC support for song and synchronized lyric information display
◆ microSD card slot for easy memory capacity upgrades (microSD card not included)
♦ Integrated FM Radio
✦ Integrated 0.3 Mega Pixel Camera
USB 2.0 Hi-speed for fast file transfers
Controls at a Glance
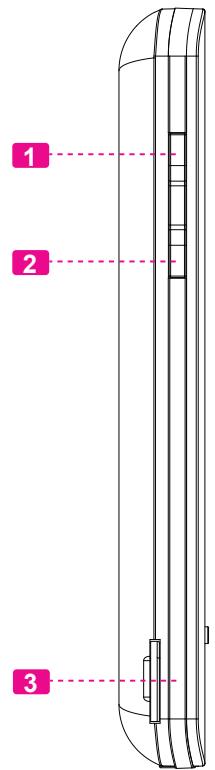
| Left View | |
| 1. Volume Up button | |
| 2. Volume Down button | |
| 3. microSD Card slotLoad a microSD memory card here to upgrade the memory capacity of the player. | |
| Front View | |
| 4. Speaker | |
| 5. LCD touchscreenTap the display with your finger to activate the on-screen control. | |
| 6. Power/Enter buttonPress and hold the button to power the palyer on or off. | |
| 7. LED indicator | |
| 8. Menu button | |
| Rear View | |
| 9. Camera LENS | |
| 10. Reset button | |
| Bottom View |
| 11. USB Port/ChargeConnect to a computer to transfer media files to the player. |
| 12. 3.5mm Headphone Jack |
text_image
1 2 3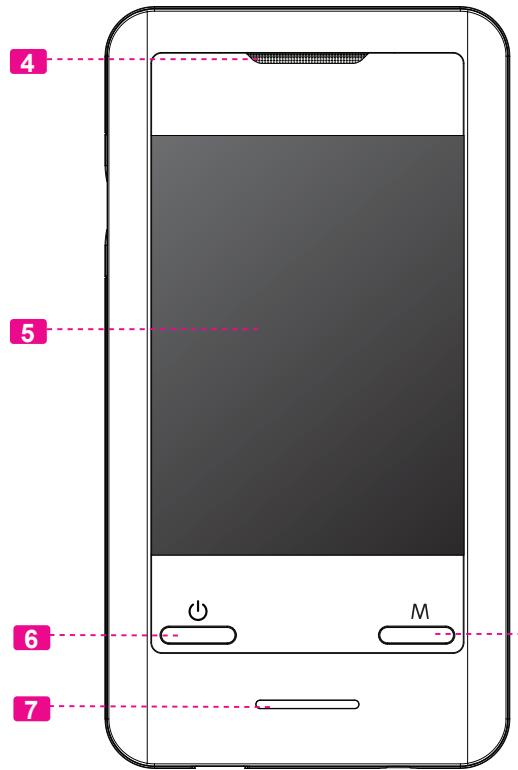
text_image
4 5 6 7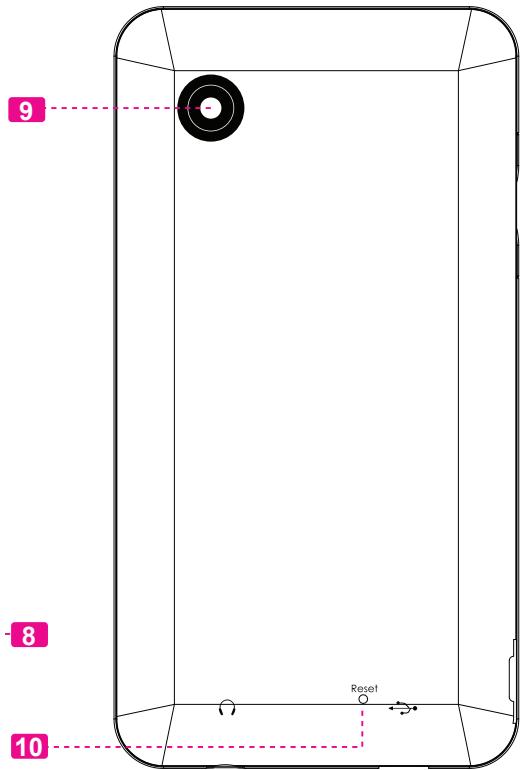
text_image
9 8 10 Reset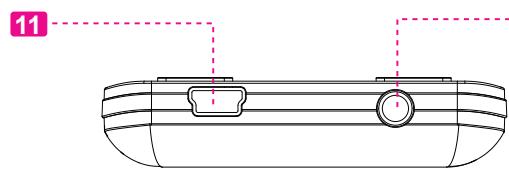
text_image
11-12

Getting Started
Charging the Battery
Your player has an integrated rechargeable battery. Upon initial use, the battery should be charged fully to ensure optimal performance and battery life.
If the player has not been used in a while, the battery may need to be recharged overnight (about 8 hours).

The battery used in this device may present a fire or chemical burn if mistreated. Do not disassemble, incinerate, or heat the battery. Do not leave the battery in a place subject to direct sunlight, or in a car with its windows closed.

Do not connect the player to a power source other than that which is indicated here or on the label as this may result in the risk of fire or electric shock.
Charging with a Computer
Your player can be charged through a USB computer connection. Use the supplied USB cable to connect the player to a high-power USB port of a computer. The computer must be powered on and not in sleep mode.

When the player is connected and charging, a USB symbol will be displayed on the player's screen.
Turning the Player On/Off
To turn the player on, press and hold the
To turn the player off, press and hold the
Resetting the Player
Reset the player if it should freeze and not respond or otherwise malfunction.
- Disconnect your player if it is connected to a computer.
- Use a paper clip to gently press the
button located on the rear of the player.
Using the Touchscreen Controls
Your video MP3 player comes equipped with an easy-to-use touchscreen which allows access to the player's functions. Use your finger tip or the stylus to tap the area of the screen where a control icon is displayed. If you tap and hold an icon, it will register as a continuous button press.

To avoid damaging the screen, do not touch it with excessive force or with any object other than your finger or the stylus. For best response, make sure your hands are clean before using the touchscreen controls.
Installing a microSD Memory Card (optional)
You can upgrade the memory capacity of your player by adding microSD memory card.
Insert microSD card into the slot as shown in the illustration below.

This player supports memory cards up to 2GB in size.

Main Menu
When you turn on the player, you will see the Main menu.
From the Main menu, you can access each of your MP3 player's function modes. These modes are:
| Music | Browse and play music |
| Video | Browse and play movies |
| Photo | Browse and view pictures |
| Radio | Listen to FM radio broadcasts |
| Text | Browse and read text files |
| Explorer | Browse all files |
| Setting | Adjust the player's options |
| DV | Record video clips |
| Camera | Capture still images |
| Calendar | Launch the calendar program |
| Clock | Set the internal clock display |
Main Menu Controls
Each function mode is represented by an icon on the Main Menu screen. To enter a mode, tap the icon with your finger.
You may also use the player's standard controls to access each mode:
◆ Press the
✦ Press

Music Mode
Browse for and play your music files.

For information about loading music onto your player, please refer to the section "Transferring Files to the Player".
Music Browser Controls
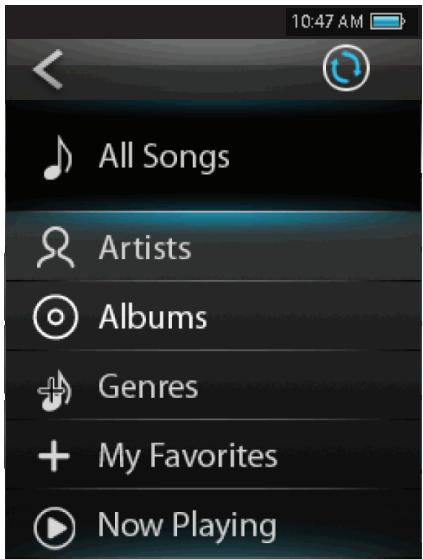
When you choose MUSIC mode from the Main menu, you will see the Music Browser screen.
| Function | Key Action |
| To browse through the Music & folders | Pressor |
| To select/view an item | Press, or tap the desired selection on the LCD screen. |
| To return to the previous screen | Tap < on screen or press |
| To return to the Main menu | Hold |
You can also touch the < 📄> icon to refresh the music library if you have loaded new music files onto the player, this process may take several minutes. You will not be able to access the Music Browser screen until you refresh the music library.
text_image
10:47 AM All Songs Artists Albums Genres My Favorites Now PlayingNow Playing Controls (Music Playback)
To start playing music, browse for a song and then tap the song title to start playback, or you can press
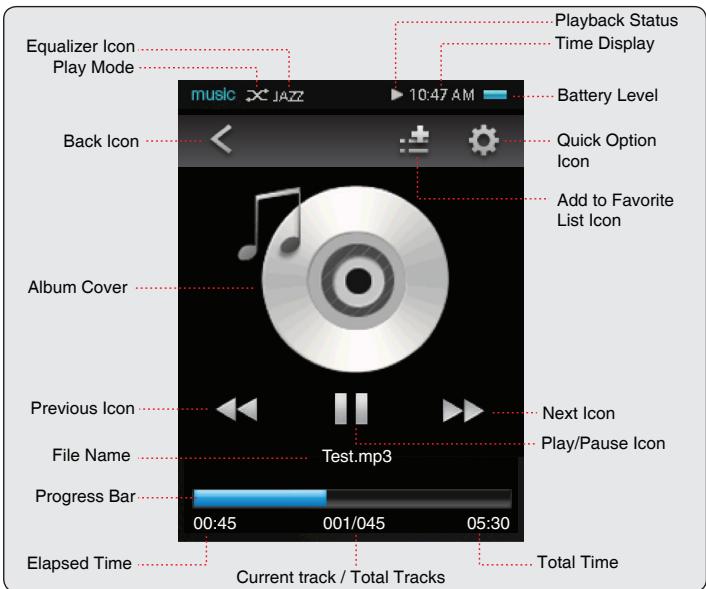
When a song is playing, the Now Playing screen appears (see below).
text_image
Equalizer Icon Play Mode music JAZZ 10:47 AM Back Icon Album Cover Previous Icon File Name Test.mp3 Progress Bar 00:45 001/045 05:30 Elapsed Time Current track / Total Tracks Playback Status Time Display Battery Level Quick Option Icon Add to Favorite List Icon Next Icon Play/Pause Icon Total TimeThe following functions may be performed from the Now Playing screen.
| Function | Key Action |
| To pause/resume playback | Pressor tap the Play/Pause Icon on screen |
| To play the next track | Tap▶▶ on screen |
| To forward-scan through the track | Hold▶▶ on screen |
| To play the previous track | Tap◀◀ on screen |
| To reverse-scan through the track | Hold◀◀ on screen |
| To adjust the volume level | Pressorbutton. |
| To access the Quick Option menu (see section below for details) | Tap💡 on screen |
| To return to the Music Explorer screen | Tap< on screen or pressbutton |

Tap the screen once to view the controls.
Quick Option Menu
To access the quick option menu, tap <💡> on the Now Playing screen.
To browse through the settings, press the
To select a setting, press the
To return to the previous screen, tap < < > on screen or press the
Repeat Mode
Change the repeat options to adjust the order in which tracks are played.
| Item | Description |
| Normal | Play tracks in normal order and no repeat. |
| Single | Play the current track repeatedly. |
| Random | Play all tracks in random order. |
| All | Play all tracks repeatedly. |
Equalizer
Select a digital equalizer preset to optimize the way the player processes audio signals. The options are: Normal, Classic, Pop, Rock, and Jazz.
Add to Favorite
Add the current song to the Favorite list.
You can also tap :icon on the Now Playing screen to add the song to the Favorite list.

To play the favorite songs, select "My Fave-reites" from the Music Browser screen.
Lyric
Set the Lyric display ON or OFF.

Lyric display requires a ".LRC" lyric file which may be found on the internet or may be created with a Lyric file editor. Lyric files can contain synchronized timing information as well as lyric information.
Lyric files must have the same name as its corresponding music file (e.g., "SongTitle1.lrc" and "SongTitle1.mp3") and must be placed in the same directory.

Video Mode
Browse for and play your movie files.

Your player supports AVI files. Videos may need to be encoded with the included software for device playback.
| To return to the Main menu | Hold |
Movie Browser Controls
When you choose Video mode from the Main menu, you will see the Movie Browser screen.
Use the Movie Browser to find all movie files loaded on your player.
| Function | Key Action |
| To browse through the list of movie files & folders | Pressor |
| To select/play an item | Pressor tap the selection on screen directly |
| To return to the previous screen | Tap< on screen or press |
Movie Playback Controls
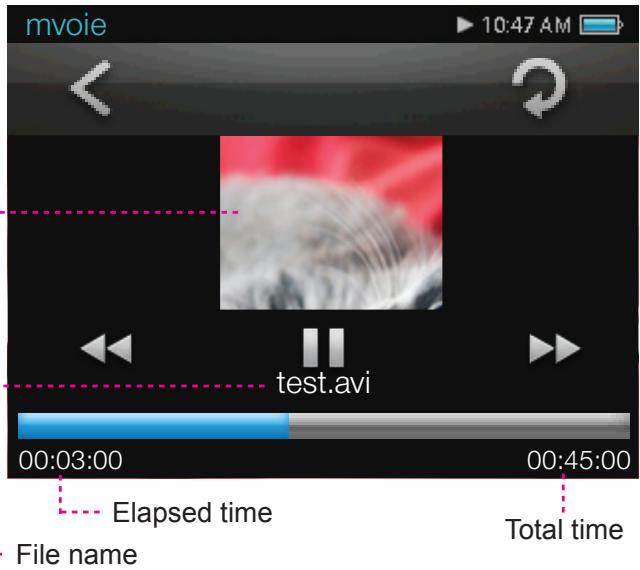
When a video is playing, hold the player horizontally, the Now Playing screen appears:
Video playing window
text_image
mvoie 10:47 AM test.avi 00:03:00 00:45:00 Elapsed time File name Total time
Tap the screen once to view the controls.
The following functions may be performed from the Now Playing screen.
| Function | Key Action |
| To play the next movie | Tap▶▶ |
| To play the previous movie | Tap ◀◀ |
| To forward-scan quickly through the current movie | Hold▶▶ |
| To reverse-scan quickly through the current movie | Hold ◀◀ |
| To pause/resume playback | Pressor tap || |
| To adjust the volume level | Pressor |
| To return to the Movie Browser screen | Pressor tap< |
| To return to the Main menu | Hold |

Photo Mode
Browse for and view your photo files.
Photo Browser Controls
When you choose Photo mode from the Main menu, you will see the Photo Browser screen. Your Photo will be displayed as thumbnail images.
Use the Photo Browser to find all Photo files loaded on your player.
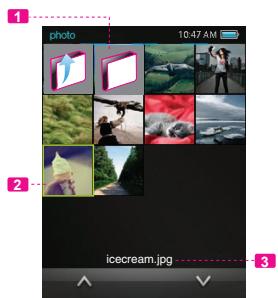
text_image
photo 10:47 AM icecream.jpg- Folder
- Photo
- Name of the selected folder or photo
| Function | Key Action |
| To browse through the Photo & folders | Press <UP> or <DOWN> |
| Function | Key Action |
| To select/view an item | Press, or tap the desired selection on the LCD screen. |
| To return to the previous screen | Tap < on screen or press |
| To return to the Main menu | Hold |
Photo Viewer Controls
To view a Photo, browse through the thumbnail Photo and then press
The following functions may be performed from the Photo Viewer screen.
| Function | Key Action |
| To view the next or previous Photo | Pressor,ortap◄◄ or ►► on screen |
| To start or stop slideshow mode | Tap► or || |
| To rotate the Photo | Pressor tap○ on screen |
| To access the Quick Option menu | Tap○ on screen |
| To return to the Photo Browser screen | Pressor tap< on screen |
| To return to the Main menu | Hold |

Tap the screen once to view the controls.
Quick Option Menu
To access the quick option menu, tap <○> on the photo viewing screen.
To browse through the settings, press the
To select a setting, press the
To return to the previous screen, tap < < > on screen or press the
Save to PowerOn picture
Save the current photo as a PowerOn picture that will display when you power on the player.
Save to PowerOff picture
Save the current photo as a PowerOff picture that will display when you power off the player.
Slide Setting
Enter this menu to turn slideshow mode on or off, or to adjust the amount of time between photos during slideshow mode.

Radio Mode
Listen to FM radio broadcasts.

You must have a pair of headphones connected to the headphone jack to receive FM broadcasts; your player will utilize the headphone cord as an antenna.
Radio Tuning Controls
When you choose RADIO from the Main menu, you will see the Radio Tuning screen. You can search for stations, tune to stations manually, or tune to preset stations.
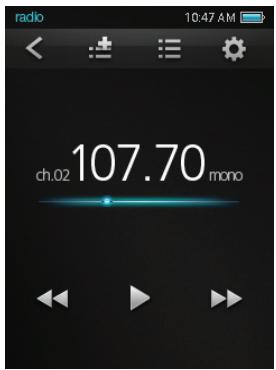
text_image
radio 10:47 AM ch.02 107.70 monoThe following functions may be performed from the Radio Tuning screen.
| Function | Key Action |
| To tune to a higher station manually | Tap ▶▶ |
| To tune to a lower station manually | Tap ◀◀ |
| To tune to the next preset station | Tap ▶ |
| To access the Quick Option menu | Tap ⚙️ |
| To adjust the volume level | Press <UP> or <DOWN> |
| To return to the Main menu | Tap < on screen or press <MENU> |
Quick Option Menu
To access the quick option menu, tap <💡> on the Radio screen.
To browse through the settings, press the
To select a setting, press the
To return to the previous screen, tap < < > on screen or press the
Search Station
Scan for all stations in broadcast reception range. The player will automatically seek and save all frequencies with a broadcast signal to the Preset Station list.

The auto scan feature will overwrite any previously stored Preset Stations.
Area Select
Set the FM frequency range area
Save Station Info
Save the current station to the Preset Station list.
You can also tap: on the Radio screen to add the current station to the Preset Station list.
Read Station Info
Load the Preset station list.
You can also tap 🐘 on the Radio screen to load the list.
✿ Press
✿ Press
Delete Station Info
Delete station from the Preset Station list.
Delete All Stations Info
Delete all stations from the Preset Station list.

Text Mode
Read .TXT files loaded on your player.
Text Browser Controls
When you choose Text from the Main menu, you will see the Text Browser Screen.
Use the Text Browser to find all text files loaded on your player.
| Function | Key Action |
| To browse through the Photo & folders | Pressor |
| To select/view an item | Press, or tap the desired selection on the LCD screen. |
| To return to the previous screen | Tap < on screen or press |
| To return to the Main menu | Hold |
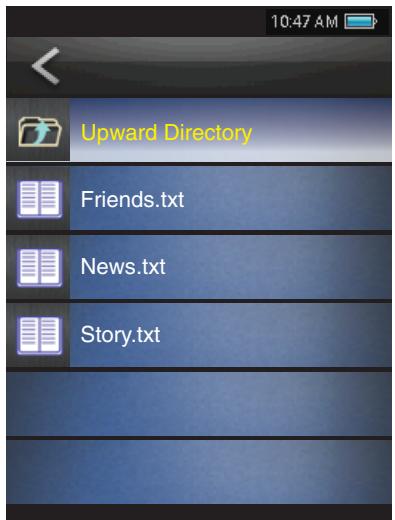
text_image
10:47 AM Upward Directory Friends.txt News.txt Story.txtText Reader Controls
The following functions may be performed from the Text Display screen.
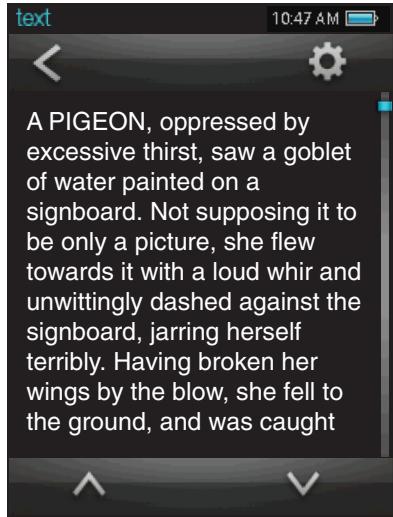
text_image
A PIGEON, oppressed by excessive thirst, saw a goblet of water painted on a signboard. Not supposing it to be only a picture, she flew towards it with a loud whir and unwittingly dashed against the signboard, jarring herself terribly. Having broken her wings by the blow, she fell to the ground, and was caught| Function | Key Action |
| To read the next page |  |
| To read the previous page |  |
| To read the next line |  |
| To read the previous line |  |
| To access the Quick Option menu |  |
| To return to the Text Browser screen |  |
| To return to the Main menu | Hold |
Quick Option Menu
To access the quick option menu, tap <○> on the Text reading screen.
To browse through the settings, press the
To select a setting, press the
To return to the previous screen, tap < < > on screen or press the
Auto Browse
Set the auto page scroll on or off.
✿ Press
Scroll Interval
Adjust the amount of time between pages during Auto Scroll mode.
✿ Press
✨ Press
✿ Press
Scroll Extent
Set the type of Auto Scroll with One Line or One Page.

Explorer Mode
Enter Explorer mode to browse all folders and files loaded on your player.
To enter Explorer mode, select and confirm EXPLORER from the Main Menu.
Explorer Controls
When you choose EXPLORER mode from the Main menu, you will see the File Explorer screen.
| Function | Key Action |
| To browse through the Photo & folders | Pressor |
| To select/view an item | Press, or tap the desired selection on the LCD screen. |
| To access the Quick Option menu | Tap |
| To return to the previous screen | Tap < on screen or press |
| To return to the Main menu | Hold |
Files and folders will be displayed in a list. If a compatible file is selected, it will be played in its corresponding mode:
| Playback Mode | File Type |
| Music | MP3, WMA |
| Video | AVI |
| Photo | JPG, BMP, GIF |
| Text | TXT |
Quick Option Menu
To access the quick option menu, tap 📍 on the Explorer Browsing screen.
To browse through the settings, press the
To select a setting, press the
To return to the previous screen, tap < on screen or press the
Add audio to List
Add the current song to the Favorite list.

This additional setting just available when you selected a music file.
- Tap 🔒 to access the Quick Option menu.
- Select "Paste" and tap it to confirm.
File Information
Select to view the file storage information.
Delete
Delete the selected file or folder
Delete All
Delete all files in the selected folder.
Copy
Copy the selected file to another location on the player. Once you have copied the desired file:
- Tap < on screen or press the
- Press
or to highlight a desired destination folder that you want to copy the file to.
Setting Mode
Enter the Setup mode to set your player's system options.
To enter Setup mode, select SETUP in the Main menu.
| Function | Key Action |
| To browse through the options | Pressor |
| To select an item | Press, or tap the desired selection on the LCD screen. |
| To cancel and return to the previous screen | Tap< on screen or press |
| To return to the Main menu | Hold |
The following options are available. Some of these options may be set from the Quick Option menus.
| Item | Description |
| Language | |
| -- | Set the on-screen menu language. |
| Memory Information | |
| -- | View used and available memory info. |
| Version | |
| -- | View the player's firmware version. |
| Factory Setup | |
| -- | Restore all of the player's settings to their factory-default state. |
| Personal Setup | |
| Auto PowerOff Time | Set the duration of time (in minutes) that the player will remain on when it is idle. The setting of "Close" will disable this power-saving feature. |
| Screen Savers Time | Adjust the duration of time (in seconds) that the backlight will remain on after a key press. A setting of "Close" will keep the backlight on continuously. |
| Screen Calibrate | Follow the screen signal to calibrate the touch point of LCD. |
| animation UI | Set the slide transition effect between the different menu displays. |

DV Mode
Record video clips from your player.
Video Recording Controls
When you choose DV from the Main menu, you will see the Video Recording screen.
◆ Press the
- Press the
The video recording files will be saved to the folder "C:\VIDEO\RECORD" and named "AKXXXXXX.AVI" where XXXXXX corresponds to the numerical sequence in which the recording was made (numbering starts from 000001).
◆ Press the
Change the video recording resolution
Tap 📋 on the right side of screen to toggle the resolution, the options include: 176 x 144, 352 x 288, 640 x 480. A lower recording resolution will result in a smaller size video.

Camera Mode
Capture still images from your player. Image Capturing Controls
When you choose Camera from the Main menu, you will see the Image Capturing screen.
Hold the player steady, then press the
The images were be saved to the directory: C:/IMAGE/RECORD and named "AKXXXXXX.JPG" where XXXXXX corresponds to the numerical sequence in which the recording was made (numbering starts from 000001).
◆ Press the