
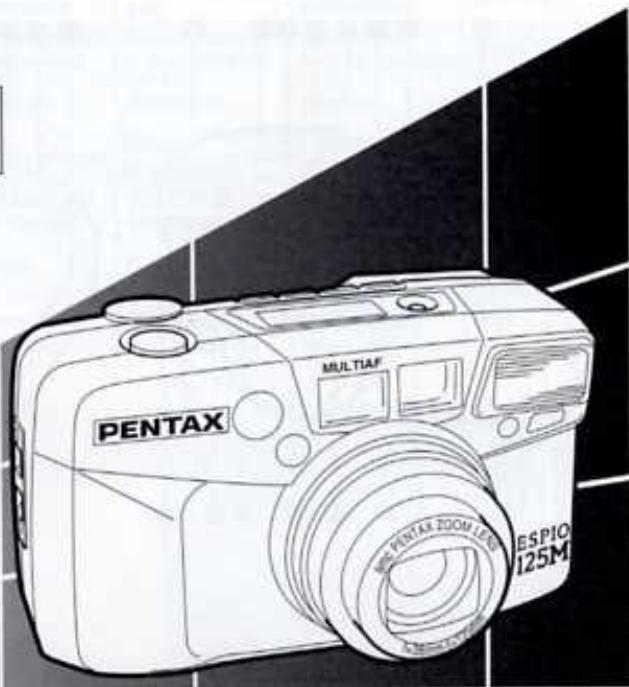
ESPIO 125M - Appareil photo argentique compact PENTAX - Notice d'utilisation et mode d'emploi gratuit
Retrouvez gratuitement la notice de l'appareil ESPIO 125M PENTAX au format PDF.

| Type de produit | Appareil photo argentique compact autofocus |
| Marque | PENTAX |
| Modèle | ESPIO 125M |
| Format de film | 35 mm, DX-codé (ISO 25 à 3200), non-DX réglé sur ISO 25 |
| Format d'image | 24 x 36 mm (standard) / environ 13 x 36 mm (panorama) |
| Objectif | Pentax zoom 38-125 mm f/4.8-11.5 (8 éléments en 6 groupes) |
| Autofocus | AF passif à 5 points, plage 0,8 m à l'infini, verrouillage de mise au point, mode paysage infini, spot AF |
| Obturateur | Obturateur électronique programmé (1/400 s à 2 s, pose B jusqu'à 1 min) |
| Flash intégré | Avec réduction d'yeux rouges, automatique, portée 0,8-7,6 m (grand-angle) / 1,08-3,8 m (télé) à ISO 400 |
| Modes de prise de vue | Auto, flash forcé (synchro jour), synchro lente, flash désactivé, pose B, synchronisation pose B, paysage infini, spot AF, retardateur (10 s), télécommande (option) |
| Zoom | Électrique 38-125 mm |
| Viseur | Zoom réel, correction dioptrique -3 à +1 D, cadres AF, témoins vert (mise au point) et rouge (flash) |
| Alimentation | Une pile lithium 3 V (CR-123A ou équivalente) |
| Autonomie | Environ 13 rouleaux de 24 poses avec 50% d'utilisation du flash (conditions Pentax) |
| Dimensions | 113,5 x 66,0 x 50,0 mm (L x H x P) |
| Poids | 235 g (sans pile) |
| Modèle Date | Intégré, imprime la date (jusqu'en 2030) sur le film, modes : AAAA/MM/JJ, JJ/MM/AAAA, MM/JJ/AAAA, heure, ou désactivé |
| Télécommande (option) | Infrarouge, délai 3 s, portée <5 m devant l'appareil |
| Entretien et nettoyage | Nettoyer l'objectif avec une soufflette et un pinceau. Extérieur avec un chiffon sec ou traité silicone. Ne pas utiliser de solvants. |
| Sécurité | Ne pas démonter l'appareil (circuits haute tension). Ranger les piles hors de portée des enfants. Ne pas jeter les piles au feu. |
| Pièces détachées et réparabilité | Pile CR-123A disponible dans le commerce. Pour la télécommande, remplacer la pile par un centre Pentax. En cas de choc, confier à un centre de service Pentax. |
| Informations générales | Fonctionne de -10°C à 50°C. Utiliser un film DX-codé pour la sensibilité automatique. Ne pas obstruer les fenêtres de l'autofocus ou du flash. |
FOIRE AUX QUESTIONS - ESPIO 125M PENTAX
Questions des utilisateurs sur ESPIO 125M PENTAX
0 question sur cet appareil. Repondez a celles que vous connaissez ou posez la votre.
Poser une nouvelle question sur cet appareil
Téléchargez la notice de votre Appareil photo argentique compact au format PDF gratuitement ! Retrouvez votre notice ESPIO 125M - PENTAX et reprennez votre appareil électronique en main. Sur cette page sont publiés tous les documents nécessaires à l'utilisation de votre appareil ESPIO 125M de la marque PENTAX.
MODE D'EMPLOI ESPIO 125M PENTAX
PENTAX®
ESPIO125M
QUARTZ DATE
E English
F Français
S Español
P português
C 中國語
natural_image
Line drawing of a Pentax digital camera with visible lens and branding (no text or symbols on body)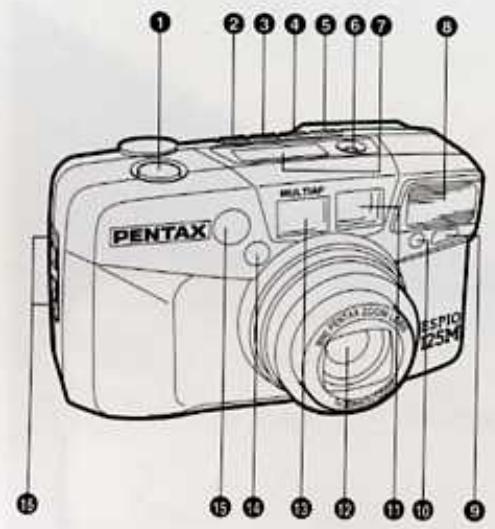

| Operation direction | Sens de la manoeuvre | Dirección de uso | Operação automática | 操作方向 | ||
| Automatic operation | Fonctionnement automatique | Funcionamiento automático | Sentido de funcionamento | 自動操作 | ||
 | Attention | Attention | Atención | Atenção | 注意 | |
| [88BA] | Lamp lighted | Témoin allumé | Piloto encendido | Lâmpada acesa | 燈號亮起 | |
 | Lamp blinking | Clignotement d'un témoin | Piloto intermitente | Lâmpada que pisca | 燈號閃動 | |
 | Correct | Correct | Correcto | Correcto | 正確 | |
 | Incorrect | Incorrect | Incorrecto | Incorrecto | 錯誤 | |
Fig. 1
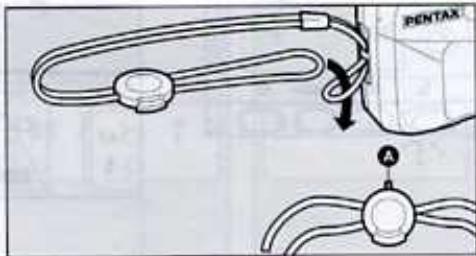
Fig. 2-1
natural_image
Technical diagram of a mechanical component with a tool inserted, showing internal parts and no visible text or symbols.Fig. 2-2
natural_image
Diagram of a device component with a magnified view showing a circular component and a magnified inset (no text or symbols)Fig. 2-3
natural_image
Diagram of a device's internal component with a highlighted section (no text or symbols)Fig. 3
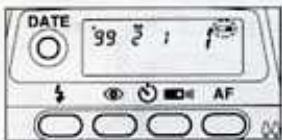
Fig. 4
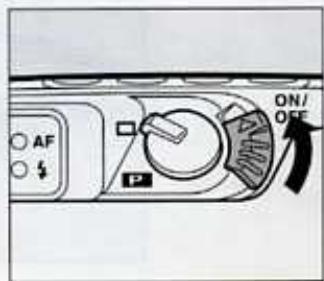
Fig. 5
natural_image
Close-up of a digital camera module with AF indicator and control buttons (no text or symbols visible)Fig. 6-1
natural_image
Diagram of a device's front panel with buttons and an arrow indicating a location (no text or symbols present)Fig. 6-2
natural_image
Hand holding a device with a circular dial indicator (no text or symbols visible)Fig. 6-3
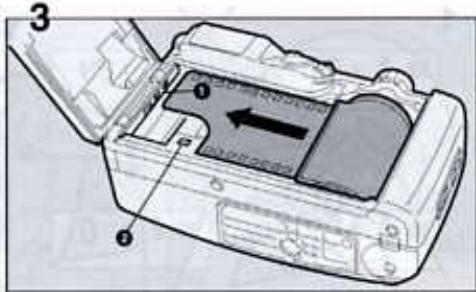
Fig. 6-4
natural_image
Diagram of a mechanical device with a curved arrow indicating motion or force (no text or symbols present)Fig. 6-5
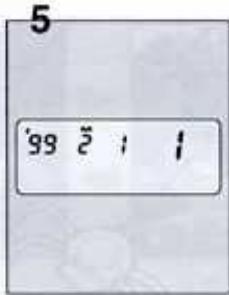
Fig. 6-6
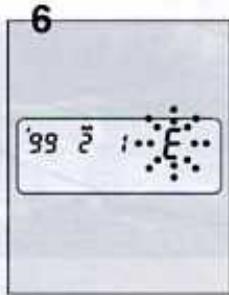
Fig. 7-1
flowchart
graph TD
    A["96 36"] --> B["96 24"]
    B --> C["0 0"]
    C --> D["96 0"]
Fig. 7-2
natural_image
Illustration of a camera module being held, showing a hand holding the camera and a black arrow indicating rotation (no text or symbols present)Fig. 8
natural_image
Diagram of a computer monitor connected to a circular device with cables (no text or symbols visible)Fig. 9

natural_image
Illustration of hands holding a camera against a sun and partial moon (no text or symbols)
natural_image
Illustration of hands installing or adjusting a camera lens (no text or symbols visible)
natural_image
Illustration of hands holding a small object, with a circular background and a cross mark (no text or symbols)Fig. 10
natural_image
Technical line drawing of a mechanical device with no visible text or symbols
natural_image
Black-and-white photo of a young girl resting her chin on her hands, outdoors with blurred foliage background (no text or symbols visible)△

natural_image
Person sitting on grass with a chair and blanket, holding up a large stack of papers (no visible text or symbols)Fig. 11-1

natural_image
Black-and-white photo of a woman and a child sitting outdoors in a park, no visible text or symbolsFig. 11-2
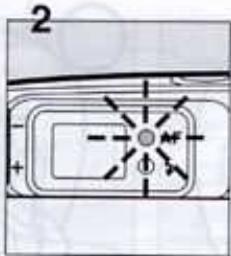
Fig. 11-3
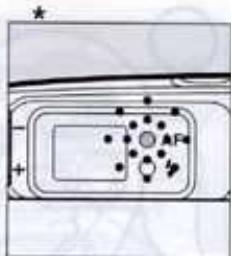
Fig. 12
natural_image
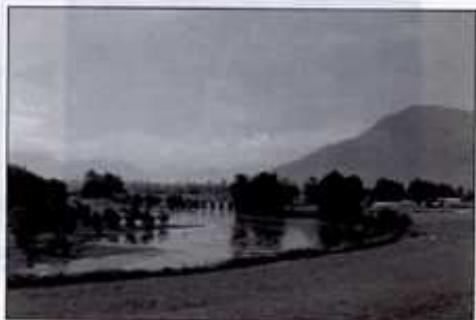
Black-and-white landscape photo showing a river with trees and distant mountains under an overcast sky (no text or symbols visible)Fig. 13-1
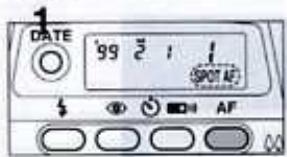
Fig. 13-2
natural_image
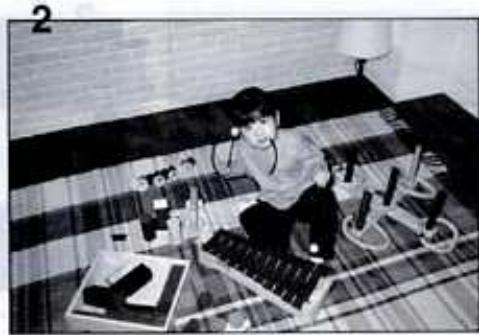
Black-and-white photo of a person sitting on a patterned rug with test tubes and equipment, no visible text or symbolsFig. 14-1
natural_image
Simple line drawing of a person sitting on a bench with no text or symbolsFig. 14-2
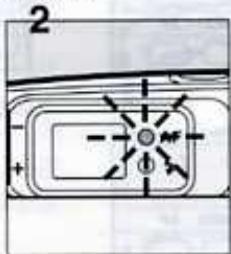
Fig. 14-3
natural_image
Illustration of a person sitting on a bench with a bridge and landscape background (no text or symbols)Fig. 15-1
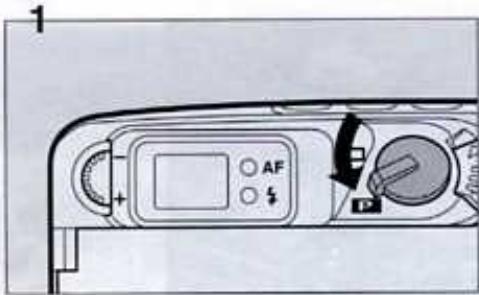
Fig. 16
Fig. 15-2
![2 [ ( ) ]](/content/2020/05/87369/images/a039b603690ff3f2a8904319dae5d10c68dde04b81f28fadd8e9e0fc4a7f4cee.jpg)
Fig. 18

Fig. 19
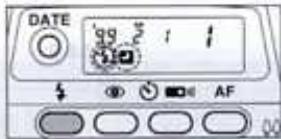
Fig. 20
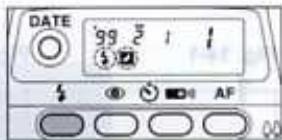
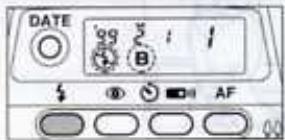
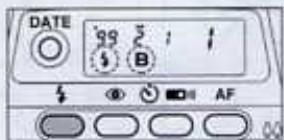
Fig. 21-1
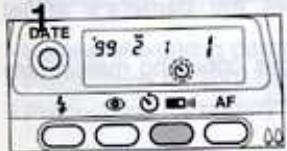
Fig. 21-2
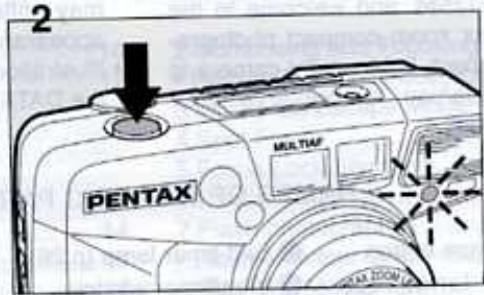
Fig. 22-1
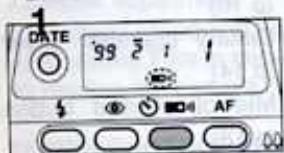
Fig. 22-2
natural_image
Illustration of a hand holding a PENTAN digital camera with a pointer pointing to it (no text or symbols present)Congratulations on your purchase of the PENTAX ESPIO125M and welcome to the world of Pentax zoom compact photography! Your compact, light weight camera is a great companion to preserve your favorite memories.
- Pictures and illustrations shown herein may differ from the camera's actual appearance.
• Illustrations in this operating manual are the DATA MODEL.
NAMES OF WORKING PARTS
① Shutter release button
2 AF/Infinity-landscape button (p.20)
③ Drive button (p.24)
4 Red-eye reduction flash button (p.23)
⑤ Mode button (p.23)
6 Date button (p.28)
⑦ LCD panel
Built-in flash
9 Remote control receiver (p.27)
10 Self-timer lamp (p.26)
⑪ Viewfinder window
12 Lens
13 Autofocus window
14 Spotbeam window (p.19)
15 Light sensor window
16 Strap lug (p.14)
⑰ Diopter adjustment dial (p.16)
18 Viewfinder eyepiece
19 Green lamp
20 Red lamp
21 Panorama switch (p.22)
22 Main switch
② Zoom lever (p.19)
24 Back cover release lever (p.16)
25 Battery chamber cover (p.14)
Mid-roll rewind button (p.18)
Tripod socket
29 Film information window
20 Back cover (p.16)
TABLE OF CONTENTS
- Names of working parts 10
• Precautions for your camera ..... 12
• Precautions for battery usage ..... 13
ABOUT THE CAMERA
1.Strap attachment.... 14
2.Battery Installing / Replacing ..... 14
3.Battery exhaustion warning 14
4.Main switch 15
5.Viewfinder Display 15
6.Lamp Indications....16
7.Diopter adjustment 16
8. Loading / Unloading the film..... 16 - 18
9.Rewinding Film in mid-roll 18
10.Holding the camera 18
TAKING PHOTOGRAPHS
1.Operating the 38-125mm zoom lens... 19
2.Composing and Focusing 19
• Hard-to Autofocus Subjects 20
3.Infinity-Landscape Mode 20
4.Spot Focus 20
5.Focus Lock Shooting 21
6.Panorama Mode 22
7. Flash photography 22
- Flash effective range 23
8.Shooting Modes 24
9.Daylight-Sync Shooting 25
10.Slow Shutter Speeds 25
11.Bulb Modes 26
12.Self-timer photography 26
13. Using wireless remote control (option) 27
14.DATE MODEL 28
Specifications 30
PRECAUTIONS FOR YOUR CAMERA
Precautions when taking pictures
- Do not allow the camera to get wet. Should the camera get wet wipe it off immediately with a dry soft cloth.
- Do not drop the camera or allow it to hit a solid object. If the camera suffers a severe shock or impact, take it to a Pentax service center for inspection.
- Be careful not to subject the camera to strong vibrations, shock or pressure. Cushion the camera during transportation.
- Condensation on the interior or the exterior of the camera may be harmful to the camera mechanism. When taking the camera from a warm temperature to a subfreezing one or vice versa, put the camera into a case or plastic bag so that any changes in temperature difference is minimized. Do not remove it from the bag until the temperature has stabilized.
- Regular size color prints may cut off what appears on the extreme edges of the film frame. Compose your picture with a margin of safety at the edges.
Precautions for storage
- Avoid leaving the camera for extended periods in places where temperature and humidity are high, such as in a car.
- Store the camera in a cool, dry place with good air circulation that is free of dirt, dust, or chemicals.
Precautions for proper care
- Use a blower and lens brush to remove dust accumulated on the lens or the viewfinder window.
- To clean the external camera surfaces - but not glass surfaces - use a dry or silicone-treated cloth.
- Never use solvents such as paint thinner, alcohol or benzene to clean the camera.
- The electric circuits inside the camera contain high voltage working parts. Never attempt to disassemble the camera yourself.
Other precautions
- The temperature range at which this camera functions properly is 50°C to -10°C (122°F to 14°F).
- The PENTAX warranty provided is only for the repair of defects in materials or workmanship. Damage of any kind cannot be repaired at no charge under the term of the warranty. If the difficulty is caused as a direct result of the product being used in conditions contrary to the instructions outlined in this manual, charges will be assessed or a repair quotation will be provided.
LCD (Liquid-crystal display)
- When the LCD is exposed to high temperatures over about 60°C, it may blacken, but when the temperature normalizes, it will return to normal.
- The LCD may also slow down in response to lower temperatures, but this is a normal characteristic of an LCD.
PRECAUTIONS FOR BATTERY USAGE
- Use one 3V lithium battery, type CR-123A or the equivalent.
- Misuse of a battery can cause hazards such as leakage, overheating, explosions, etc. The battery should be inserted with the "+" and "-" sides facing correctly.
- Never try to disassemble, short or recharge the battery. Do not dispose of the battery in fire.
- Battery performance may be temporarily hindered in low temperatures, but will recover in normal temperatures.
- Be sure to store batteries out of the reach of children. Seek medical assistance immediately if accidentally swallowed.
For customers in Canada
This class B digital apparatus meet all requirements of the Canadian interference-Causing Equipment Regulations.
ABOUT THE CAMERA
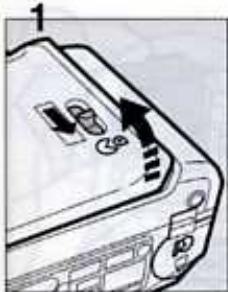
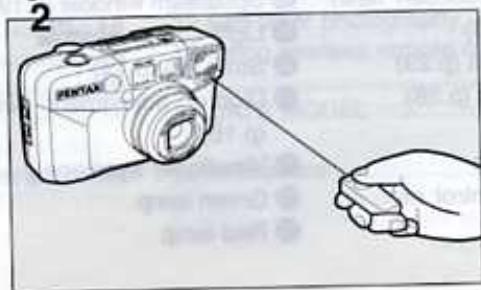
1 STRAP ATTACHMENT
Fit the strap on the camera as illustrated. (Fig.1)
- Use the illustrated part for opening the battery chamber cover, or pushing the mid-roll rewind button.
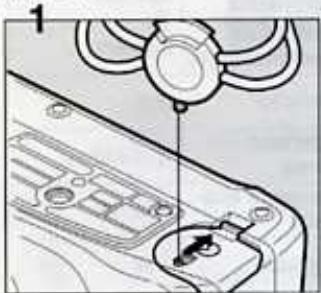
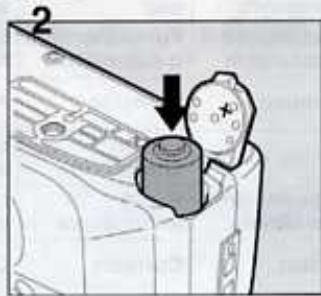
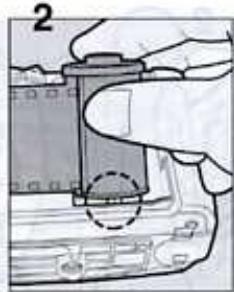
2 INSTALLING/REPLACING BATTERY
Ensure that the power is OFF before replacing the battery.
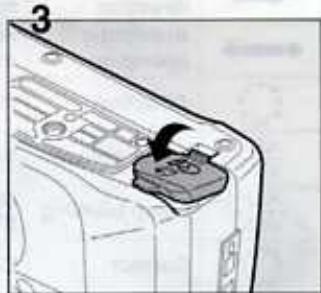
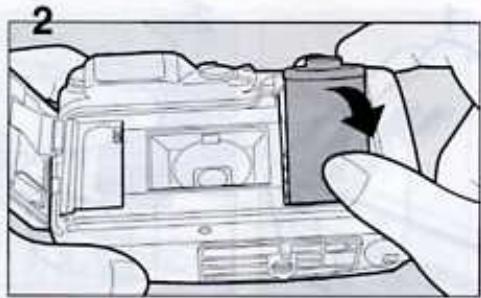
1 Open the battery chamber cover by using the strap's clamp protrusion as shown. (Fig.2-1)
2 Insert one lithium battery (type CR-123A or the equivalent) with the plus/minus (+/-) sides matching the indications in the battery compartment. (Fig.2-2)
3 Close the battery chamber cover. Ensure that the cover is locks with a click. (Fig 2-3)
- If the battery is correctly loaded, the zoom lens moves slightly and the motor operates for a few seconds.
- On the DATE MODEL, the time is initialized to 0.00 and (---) bar appears on the LCD panel when the battery chamber cover is opened. Correct the time. See page 28.
3 BATTERY EXHAUSTION WARNING
When the battery is nearly exhausted, the battery symbol (☐) appears on the LCD panel to warn you. (Fig.3).Replace the battery as soon as possible. When (☐) starts blinking, no operations can be performed.
Battery life (using 24-exposure film rolls):
Approx. 13 rolls using flash 50% of the time (using the CR-123A battery and under Pentax testing conditions). Actual battery life / performance may vary drastically depending on usage of Power Zoom, Flash and external conditions such as temperature and freshness of the battery.
4 MAIN SWITCH
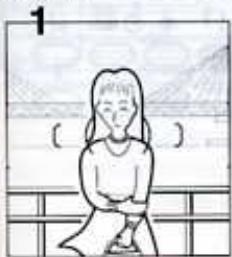
To switch ON, set the main switch to the ON position. (Fig.4)
When the power turns ON, the lens slightly extends and the lens cover opens. The camera is now ready to shoot.
- If the camera is ON and left unused for over 3 minutes, the lens automatically retracts and the power is switched OFF to save the battery.
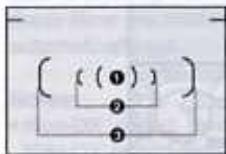
5 VIEWFINDER DISPLAYS
flowchart
graph TD
    A[" "] --> B{ (① ) }
    B --> C["②"]
    C --> D["③"]
![(())]](/content/2020/05/87369/images/0afdbf1bfe949f22547d44ea9ff3c6edd680f9d109c9d96443161b8e80f50e35.jpg)
① Spot AF Frame
Select the Spot AF frame to focus on a particular spot in the frame.
② and ③ Multi-focus Frame
For normal photography, compose the scene within this frame. When the lens is set at the 38mm setting, compose the scene within the AF frame ②. When the lens is set at the 125mm setting, compose the scene within the AF frame ③.
Close distance compensation frame ④.
When the camera-to-subject-distance is closer than 1.4m, compose the scene within this frame.
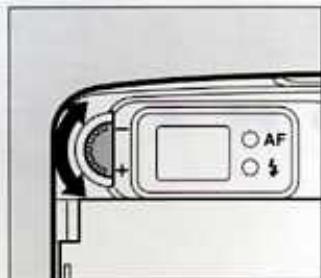
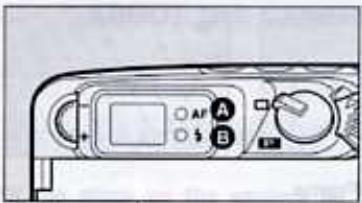
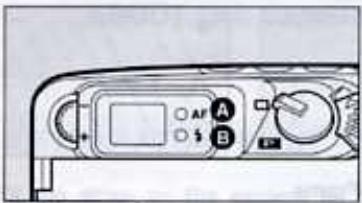
6 LAMP INDICATIONS
natural_image
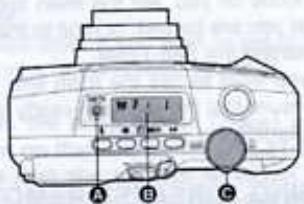
Close-up of a camera control panel with labeled buttons (A, B) and a display screen (no readable text or symbols beyond labels)When you depress the shutter release button halfway down, the lamp Ⓐ and/or Ⓑ lights up or blinks as shown above.
Green lamp (Focus status):
When the subject is in focus, it will light up to indicate that you can take the picture; when the subjects not in focus, it will blink, indicating that you cannot take the picture.
① Red lamp (Flash status) :
When the flash is ready to discharge, it will light up. When the flash is being charged, it will blink.
7 DIOPTER ADJUSTMENT
Aim the camera toward a bright subject. While looking through the viewfinder, rotate the diopter adjustment dial to the right or left until the AF frame appears in the sharpest focus. (Fig.5)
8 FILM LOADING
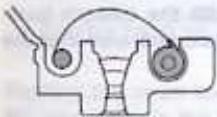
1 Slide the back cover release lever down and pull the back open the back as illustrated. (Fig.6-1)
2 Place the film cartridge in the film chamber by fitting the flat side onto the top of the rewind shaft first and then slide the top end of the film cartridge into the camera. (Fig.6-2)
3 Pull the film leader out far enough from the cartridge to reach the take-up spool. Align the tip of the film with the film leader end mark ① and ensure the film is placed properly between the film guides. (Fig.6-3)
6 LAMP INDICATIONS
When you depress the shutter release button halfway down, the lamp Ⓐ and/or Ⓑ lights up or blinks as shown above.
Green lamp (Focus status):
When the subject is in focus, it will light up to indicate that you can take the picture; when the subjects not in focus, it will blink, indicating that you cannot take the picture.
① Red lamp (Flash status) :
When the flash is ready to discharge, it will light up. When the flash is being charged, it will blink.
7 DIOPTER ADJUSTMENT
Aim the camera toward a bright subject. While looking through the viewfinder, rotate the diopter adjustment dial to the right or left until the AF frame appears in the sharpest focus. (Fig.5)
8 FILM LOADING
1 Slide the back cover release lever down and pull the back open the back as illustrated. (Fig.6-1)
2 Place the film cartridge in the film chamber by fitting the flat side onto the top of the rewind shaft first and then slide the top end of the film cartridge into the camera. (Fig.6-2)
3 Pull the film leader out far enough from the cartridge to reach the take-up spool. Align the tip of the film with the film leader end mark ① and ensure the film is placed properly between the film guides. (Fig.6-3)
Notes:
- If there is dirt on the film detector ②, film cannot be wound properly.
- Ensure the film is taut as illustrated on the illustration. Take up any slack in the film by pushing it back into the cartridge.
natural_image
Pure mechanical diagram showing a piston-cranked joint with two circular components (no text or symbols)× Slack

natural_image
Pure mechanical component diagram without any text, numbers, or symbols
Flat
Yes!
4 After the back cover is closed, the film automatically advances to the first frame. (Fig.6-4)
5 When “:” appears in the exposure counter on the LCD panel, the film automatically stops winding. (Fig.6-5)
6 If (E) blinks on the LCD panel, the film is not properly loaded. Reload the film. (Fig.6-6)
- The exposure counter indication will remain on even if the main switch is turned OFF.
Automatic film speed setting
This camera is designed to use DX-coded films with ISO rating from 25 to 3200. When any of these films are loaded, the proper film speed is automatically set.
Notes:
- Non-DX coded films should not be used. If Non-DX coded film is used, the film speed is automatically set to the ISO 25.
UNLOADING FILM
1 Rewinding the film
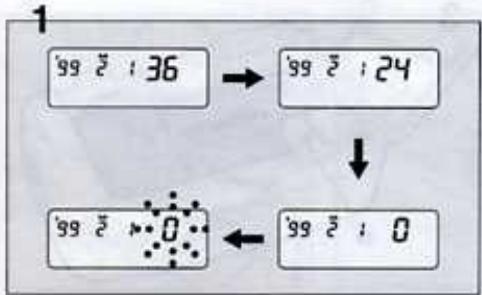
After you have exposed the last frame of the roll, the lens retracts and the film rewinds automatically, the motor stops, and (2) blinks as shown to indicate that the film has been rewound. (Fig. 7-1)
- A 24-exposure roll of film takes about 20 seconds to be rewound.
- During rewinding, the exposure counter counts frame numbers in reverse.
- The entire roll of film including the film leader is always rewound into the cartridge to prevent any part of the film being exposed to light.
2 Unloading film
To unload the film, open the back cover, and remove the cartridge from the chamber by pulling the top of the film cartridge out first with your finger. (Fig.7-2)
- Never open the back cover until the whole film roll is rewound.
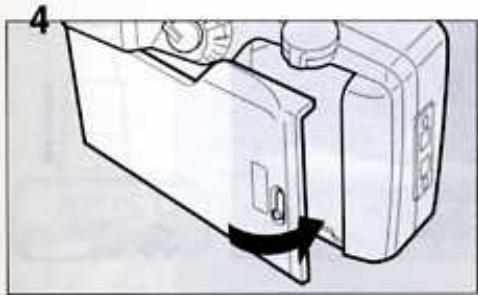
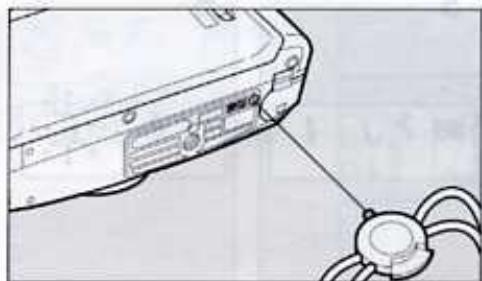
9 REWINDING A FILM IN MID - ROLL
If you wish to unload a film before exposing all the frames, push the mid-roll rewind button with the protrusion part of the strap clamp; the lens retracts and then film rewinding starts. When rewind is completed, the motor stops, and (0) blinks, indicating that the back cover may be opened safely. (Fig.8)
10 HOLDING THE CAMERA
Keep the camera as still as possible, and gently depress the shutter release button. If too much force is applied, the camera is likely to shake, and the picture will be blurred. When using the flash with the camera positioned vertically, hold the camera so that the flash is above the lens.
(Fig.9)
Notes:
- Do not hold the zoom lens because it moves back and forth while in operation.
- Make sure not to obstruct the autofocus window, lens, light sensor window or the built-in flash with your fingers, hair or other object.
TAKING PHOTOGRAPHS
The standard format and panorama format allow a shooting range from (infinity) to 0.8m (2.6 ft).
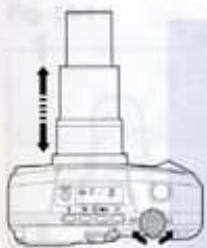
1 OPERATING 38 - 125mm ZOOM LENS
Pushing the zoom lever to the right (▲) moves the lens towards the 125mm telephoto setting. Pushing the zoom lever to the left (▲) moves the lens moves towards the wide - angle 38mm setting. When the lens zooms to the desired setting, release the zoom lever and depress the shutter release button fully to take pictures. (Fig.10)
- Do not apply force to the zoom lens as doing so causes damage to the camera.
- The shutter cannot be released while the lens is zooming.
2 COMPOSING AND FOCUSING
1 After zooming the lens, compose the scene, and place the autofocus frame on the subject. Release the shutter. (Fig.11-1)
2 Check the lamp indication (Fig.11-2)
When the subject is in focus, the green lamp will light up.
• The green lamp blinks if the subject is too close or if the subject is difficult to autofocus. (Fig.11-3)
Focus aid illuminator
In low light situations and / or hard-to-autofocus subjects, a red light is automatically projected to assist the autofocus system when the shutter release button is depressed halfway down.
HARD - TO - AUTOFOCUS SUBJECTS
a) Extremely low-contrast subjects such as a white wall or blue sky in the autofocus frame.
b) Subjects which don't reflect much light in the autofocus frame.
c) Fast moving subjects.
d) Subjects with horizontal lines or complex or detailed patterns in the autofocus frame.
e) Multiple subjects in foreground of the autofocus frame.
1) Subjects positioned against reflected or strong backlight or with extremely bright background.
3 INFINITY-LANDSCAPE MODE
Use the Infinity-Land Mode to lock the focus at infinity or to take a picture of a distant scene through a window.
Press the AF/Infinity-Landscape button repeatedly until (▲) appears on the LCD panel. (Fig.12)
• After the picture is taken, this mode is canceled.
- The flash will not discharge in the auto exposure mode even in dark light situations.
4 SPOT FOCUS
Select the Spot AF Mode to focus on a particular spot in the frame.
1 Depress the AF/Infinity-Landscape mode button so that the [SPOT AF] appears on the LCD panel. (Fig.13-1)
2 Focus on the subject
Focus on the subject with the Spot AF frame [(1)] in the center of the viewfinder. (Fig.13-2)
5 FOCUS-LOCK SHOOTING
If you shoot without positioning the autofocus frame (☐) on the main subject as shown above, only the background will be in focus. When the main subject is off the autofocus frame in the center of the viewfinder, use the focus-lock technique.
1 Focus on the subject with the autofocus frame ( ). (Fig.14-1)
2 Depress the shutter release button halfway down. The green lamp in the viewfinder lights up and the exposure and focus are temporarily locked. (Fig.14-2)
3 While holding the shutter release button halfway down, re-aim the camera or recompose the picture, then press the release button all the way to release the shutter. (Fig.14-3)
Note:
- You can release focus lock simply by lifting your finger from the shutter release button.
6 PANORAMA MODE
You can switch between the panorama format and standard format picture taking mode at any time by moving the panorama lever. The panorama format picture allows horizontally positioned dynamic pictures to be taken (approx. 13x36mm on film).
1 Move the panorama switch to (P) to select the panorama format mode. (Fig.15-1)
- When the picture frame is switched to panorama, the viewfinder switches to the horizontal panorama format frame.
2 Compose the scene as you would normally and release the shutter. (Fig.15-2)
- When the camera-to-subject distance is less than 1.4m, use of the panorama format is not recommended.
- Panorama format processing facilities differ depending on the area and requirements. Your local film processor of camera dealers will advise you on all the options to you.
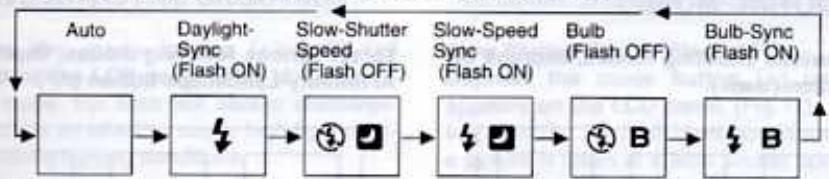
7 FLASH PHOTOGRAPHY
Automatic Flash Emission
The flash automatically discharges in low light or in a backlit conditions. When the shutter release button is pressed halfway down, the red lamp lights up indicating that the flash is ready. If the red lamp blinks, the built-in flash is being charged and the shutter cannot be released.
TO SELECT OTHER FLASH MODES
To select the various flash modes, depress the mode button (1).
flowchart
graph LR
    A["Auto"] --> B["Daylight Sync (Flash ON)"]
    B --> C["Slow-Shutter Speed (Flash OFF)"]
    C --> D["Slow-Speed Sync (Flash ON)"]
    D --> E["Bulb (Flash OFF)"]
    E --> F["Bulb-Sync (Flash ON)"]
    F --> G["Power Supply"]
    B --> H["Power Supply"]
    C --> I["Power Supply"]
    D --> J["Power Supply"]
    E --> K["Power Supply"]
    F --> L["Power Supply"]
- For normal use, set the auto exposure mode as shown in above.
• The camera is automatically re-set to the Auto Exposure Mode when the power is turned off.
FLASH EFFECTIVE RANGE (Color negative film)
| Lens ISO | 38mm meters | 125mm meters |
| 25 | 0.8 - 1.9(2.6 - 6.2ft) | • • |
| 50 | 0.8 - 2.7(2.6 - 8.9ft) | 1.08 - 1.4(3.5 - 4.6ft) |
| 100 | 0.8 - 3.8(2.6 - 12.5ft) | 1.08 - 1.9(3.5 - 6.2ft) |
| 200 | 0.8 - 5.4(2.6 - 17.7ft) | 1.08 - 2.7(3.5 - 8.9ft) |
Red-Eye Reduction Lamp
- To reduce the red-eye phenomenon, depress the red-eye reduction flash button (☐).
- The flash discharges two consecutive times, reducing the appearance of the red-eye effect. To cancel this mode, depress the red-eye reduction flash button again.
| Lens ISO | 38mm meters | 125mm meters |
| 400 | 0.8 - 7.6(2.6 - 25ft) | 1.08 - 3.8(3.5 - 12ft) |
| 800 | 0.8 - 10.8(2.6 - 35ft) | 1.08 - 5.4(3.5 - 18ft) |
| 1600 | 0.8 - 15.2(2.6 - 50ft) | 1.08 - 7.6(3.5 - 25ft) |
| 3200 | 1.2* - 21.6(3.9* - 71ft) | 1.08 - 10.8(3.5 - 35ft) |
* With high speed film, overexposure may occur at close range due to the film's high sensitivity.
** The proper exposure will not be obtained.
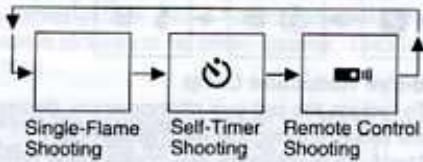
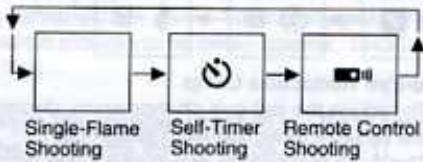
8 SHOOTING MODES
To set various shooting modes, depress the drive button (☐☐☐).
flowchart
graph LR
    A["Single-Flame Shooting"] --> B["Self-Timer Shooting"]
    B --> C["Remote Control Shooting"]
    C --> A
- For normal use, set the Single-Frame Shooting Mode.
- In the Self-Timer Shooting and/or the Remote Control Shooting Mode, if the button (○) is depressed after the shutter is released, the Single-Frame Shooting Mode returns.
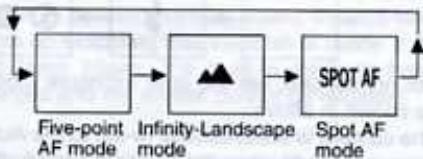
To set various focusing modes, depress the AF/Infinity-Landscape button (AF).
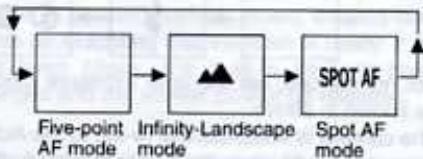
flowchart
graph LR
    A["Five-point AF mode"] --> B["Infinity-Landscape mode"]
    B --> C["Spot AF mode"]
    C --> D["SPOT AF"]
- For normal use, set the Five-point AF Shooting Mode.
8 SHOOTING MODES
To set various shooting modes, depress the drive button (☐☐☐).
flowchart
graph LR
    A["Single-Flame Shooting"] --> B["Self-Timer Shooting"]
    B --> C["Remote Control Shooting"]
    C --> A
- For normal use, set the Single-Frame Shooting Mode.
- In the Self-Timer Shooting and/or the Remote Control Shooting Mode, if the button (○) is depressed after the shutter is released, the Single-Frame Shooting Mode returns.
To set various focusing modes, depress the AF/Infinity-Landscape button (AF).
flowchart
graph LR
    A["Five-point AF mode"] --> B["Infinity-Landscape mode"]
    B --> C["Spot AF mode"]
    C --> D["SPOT AF"]
- For normal use, set the Five-point AF Shooting Mode.
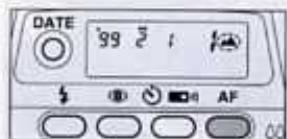
9 DAYLIGHT-SYNC SHOOTING
Depress the mode button (s) until (s) appears on the LCD panel. (Fig. 16)
In this mode, the flash will always discharge. This mode is an effective way to high-light shadows in strong lighting conditions.
Note:
- Make sure you're within the flash-effective range even when you use the built-in flash as a fill-in flash in daylight.
10 SLOW SHUTTER SPEEDS MODES
Slow Shutter Speed (Flash-OFF)
Depress the mode button (s) until (s0) appears on the LCD panel. (Fig.17)
In this mode, the flash does not discharge, and a picture is taken at a slow shutter speed up to approx. 2 seconds. Use this mode in places where flash photography is prohibited or for a natural existing light effect in low ambient photography.
Slow-Speed-Sync Shooting (Flash-On)
Depress the mode button (s) until (s□) appears on the LCD panel. (Fig.18)
It is possible to photograph subjects and background in a balanced way by using the built-in flash to properly expose the foreground subject and a slow-speed to expose the low light background.
Notes:
- When shooting in low light, the shutter speed gets slower, and camera shake is likely to blur your picture. Use of a tripod is recommended.
- In all flash modes make sure you are within the flash-effective range.
11 BULB SHOOTING, BULB-SYNC SHOOTING
Bulb Mode (⑥B)
Depress the mode button (1) until (9B) appears on the LCD panel. (Fig.19)
This mode is useful for long exposures required for shooting fireworks and night scenes. Use of a tripod is recommended.
Bulb-Sync Mode ( B)
Depress the mode button (s) until (sB) appears on the LCD panel. (Fig.20)
This lets you use the flash in addition to the Bulb Mode, so you can take a portrait photograph with a night scene in the background.
- In all flash modes make sure you are within the flash-effective range.
- The shutter remains open as long as the shutter release button held down.
• Use of a tripod is recommended.
12 SELF-TIMER PHOTOGRAPHY
Self-Timer
Use the self-timer if you wish to get in the picture. Use of a tripod is recommended.
1 Depress the drive button (◎) until (◎) appears on the LCD panel. (Fig.21-1)
2 Assure that the subject is within the AF frame in the viewfinder. Depress the shutter release button fully. (Fig.21-2)
The shutter will be released in about 10 seconds. When the self-timer is working, the Self-Timer symbol ( ) blinks on the LCD panel, and the Self-Timer lamp blinks 3 seconds before the shutter is released.
To cancel
To stop the self-timer operation at any time after its been activated, set the main switch to the OFF position or depress one of any buttons except the shutter release button.
- Do not stand directly in front of the camera when starting the Self-Timer, as the camera will be focus on you, not the main subject. Be sure that you are behind, or next to the camera when starting the Self-Timer.
- When you want to use the flash with the self-timer, ensure that the red flash-ready lamp is lit before starting the self-timer.
13 USING WIRELESS REMOTE CONTROL (OPTION)
If you have purchased the optional wireless remote control, read this section.
The wireless remote control allows you to trip the shutter at a distance. The shutter will be released in 3 seconds after the shutter release button on the remote control is depressed.
- Use a tripod when shooting with the wireless remote control.
- When the remote control is used, the Self-Timer Shooting Mode and the Infinity-Landscape Mode cannot be used.
- Use the remote control to take pictures in the Bulb mode to avoid camera shake. While the remote control's shutter release button is held down, the shutter remains open up to a max. of 5 minutes.
1 Depress the camera's drive button repeatedly until (■) symbol appears on the LCD panel. (Fig.22-1) Compose the scene and frame the subject with the AF frame.
2 Aim the remote control transmitter towards the remote control receiver on the camera, and then depress the shutter release button on the remote control. (Fig.22-2)
- If the shutter is released by the camera's release button, picture will be taken in the ordinary shooting mode.
-
When the camera is set in the Remote Control Shooting Mode and left unused for 5 minutes, the lens automatically retracts power and the Single-frame Mode is set.
-
The self-timer lamp blinks rapidly for 3 seconds and then the shutter is released.
- Focus cannot be locked when the remote control is in use. The subject framed in the AF frame will be in focus when the remote control's shutter release button is depressed.
Operating Distance of the Wireless Remote Control from the camera's front: within approx. 5m (16ft) straight in front of the camera
- The remote control may not work in a backlight situation. In this case, use the camera's shutter release button in the Self-Timer Mode to take pictures.
- The remote control does not work while the flash is being charged.
Battery life on the Remote Control
About 30,000 commands can be issued using the Remote Control with a battery installed. If the battery is exhausted, please have it replaced at your local Pentax Service center (there is a charge for this service).
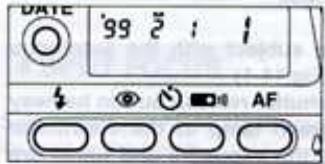
14 DATE MODE
The dating unit automatically switches the DATE position between the standard and panorama according to the format mode selected.
• The DATE model records dates up to the year 2030 on pictures.

flowchart
graph TD
    A["Year Month Day"] --> B["Hour Minute"]
    B --> C["---- (blank)"]
    C --> D["Month Day Year"]
    D --> E["Day Month Year"]
    E --> A
Switching the Mode
Press the DATE button Ⓐ with your finger, the mode on the LCD panel switches as shown.
Notes:
- The data on the LCD panel will be imprinted on the film.
• "----" indicates no data will be imprinted.
• "M" on the LCD panel indicates "Month".
Correcting the date Switch the power on.
- Pressing the DATE button Ⓐ for 3 seconds: the "Year" digits and (◀) will blink.
- Each time the DATE button Ⓠ is depressed, the blinking digits changes in the following manner:
Year - Month - Day - Time - Minutes Release the button when the desired digits appear.
-
Move the zoom lever Ⓐ to the right or left, when you wish to change the blinking digits. The digits increase by one each time the lever moves to the right and the digits decrease by one each time the lever moves to the left. Holding the zoom lever for about one second will change the digits continuously.
-
After the data has been adjusted, depress the DATE button ① repeatedly until blinking stops.
- The blinking "minutes" allows precise fine-tuning of the internal clock to the beginning of a specified minute. When "minutes digits" are blinking, depress the DATE button ⬆ in sync with a time signal.
- If you release the shutter while the blinking data is being corrected, the data will not be imprinted.
- When the shutter is released, the bar (-) mark on the display blinks for a few seconds, indicating the data has been imprinted.
- If there is a white or yellow object in the corner of the picture where the data is imprinted, the data may be difficult to read. When composing your photographs, try to avoid brightly-colored subjects in that corner.

natural_image
Black-and-white photo of a person sitting on a bench, holding an object (no visible text or symbols)* The date in the picture above is simulated.
SPECIFICATIONS
Type 35mm fully automatic lens-shutter with built-in zoom lens and auto flash
Film Auto film speed setting with 35mm perforated DX-coded film with ISO rating from 25-3200 (1EV step). Non-DX coded films are automatically set to ISO25
Format: 24x36mm (Approx. 13x36 in panorama format)
Film loading: —— Auto film loading. Closing the back cover will automatically wind the film to first exposure.
Film winding: —— Auto film winding (single-frame)
Film rewinding: —— Auto film rewinding at the end of roll. Auto stop upon completion of rewinding. Rewinding time: approx. 20sec, with 24-exposure film. Rewinding in mid-roll provided.
Frame number: —— Automatic readout of successive frame numbers in ascending order when shooting, and descending order when rewinding.
Lens: Pentax power zoom 38-125mm f/4.8 -11.5 8 elements in 6 groups, Angle of view:59-19.5
Pentax phase-matching passive five-point autofocus system. Autofocusing range: 0.8m (2.6 ft) - infinity, Maximum magnification; approx. 0.12X. Focus lock is provided. Infinity-landscape mode (focus is fixed to infinity). Focus aid illuminator is automatically emitted in low light/ or hard-to-autofocus subject.
Zooming: — Electronic zoom
Shutter: Programmed AE electronic shutter with speed approx. 1/400 - 2 sec. Bulb: 1/2 sec.-1min, Electromagnetic release.
Self-timer: Electronic lamp indication. Approx.10 sec. Cancellation after activation is possible.
Standard/panorama switchable, Actual image zoom viewfinder, Viewfinder area: 83%, Magnification: 0.40X (38mm WIDE) - 1.22X(125mm TELE), Diopter adjustment: -3 to +1D, Five-point AF frames for Wide-angle and Telephoto settings. Spot AF frame, Picture frame, Close distance compensation frame, Panorama format picture area, Green lamp lighting: in-focus signal Green lamp blinking: When subject is too close and/or hard-to-autofocus subject, Red lamp lighting: Flash-ready status, Red lamp blinking: Flash being charged
| Exposure control: | Programmed auto-exposure control with multi segment (6) metering system, Range: EV10 - EV18 at 38mm WIDE, EV14 - EV20 at 125mm TELE in Auto or Daylight-Sync Mode (ISO 400), EV5 - EV18 at 38mm WIDE Ev6.5 -EV20 at 125mm in Slow-Shutter-Speed Mode (ISO 400), Automatic exposure compensation in a backlit situation. |
| Flash: | Built-in flash with red-eye reduction mode, Automatic discharge in low lighting and backlighting situations in auto mode, Flash ON-Day-light Sync/Slow-Shutter-Speed Sync (up to 2 sec.), Flash-OFF Mode, Bulb-Sync 1/2 sec. - 1min. |
| Flash effective range: | 0.8(2.6ft)-7.6m(25ft) (38mm WIDE),1.08(3.5ft)-3.8m(12ft) (125mm TELE) (ISO 400film used). |
| Flash recycling time: | Approx. 5 sec. under Pentax testing conditions. |
| Power source: | One 3V lithium battery (CR-123A or the equivalent) |
| Battery life: | Approx. 13rolls of 24exposure film when 50% of shooting uses flash (under Pentax testing conditions) |
| Battery exhaustion | ( □ ) appears on the LCD panel. Shutter is locked when ( □ ) is blinking. |
| Warning: | |
| Size & Weight: | 113.5(W) x 66.0(H) x 50.0(D)mm (4.5" x 2.6" x 2.0") 235g (8.3oz) without battery |
| DATE MODEL | |
| Date mechanism: | Crystal quartz controlled; LCD with digital clock, auto calendar up to 2030. Possible to imprint both standard and panoramic format frames. |
| Imprinting mode: | "Year, Month and Day", "Day, Hour and Minutes, ----" blank, Month, Day and Year" or "Day, Month and Year". |
| Size & Weight: | 113.5 (W) x 66.0(H) x 50(D)mm (4.5" x 2.6" x 2.0") 235g(8.3oz) without battery |
| REMOTE CONTROL | |
| Remote control: | Infrared wireless remote control, 3-seconds delay shutter release, Effective range: Closer than 5m when projected from the camera's front. |
| Power source for | One lithium battery CR1620 (replaced by Pentax Service facility) |
| Remote Control: | |
| Size & weight for | 22.0(W) x50.0(L) x9.5(D)mm (0.9" x2.0" x0.4"), 9g(0.3oz) including battery |
| Remote Control: |
SPECIFICATIONS ARE SUBJECT TO CHANGE AT ANY TIME WITHOUT NOTIFICATION OR ANY OBLIGATION ON THE PART OF THE MANUFACTURER.
- PENTAX®
- AF
- NAMES OF WORKING PARTS
- TABLE OF CONTENTS
- ABOUT THE CAMERA
- TAKING PHOTOGRAPHS
- PRECAUTIONS FOR YOUR CAMERA
- Precautions when taking pictures
- Precautions for storage
- Precautions for proper care
- Other precautions
- LCD (Liquid-crystal display)
- PRECAUTIONS FOR BATTERY USAGE
- STRAP ATTACHMENT
- INSTALLING/REPLACING BATTERY
- BATTERY EXHAUSTION WARNING
- Battery life (using 24-exposure film rolls):
- MAIN SWITCH
- VIEWFINDER DISPLAYS
- ① Spot AF Frame
- ② and ③ Multi-focus Frame
- Close distance compensation frame ④.
- LAMP INDICATIONS
- Green lamp (Focus status):
- ① Red lamp (Flash status) :
- DIOPTER ADJUSTMENT
- FILM LOADING
- Notes:
- Automatic film speed setting
- UNLOADING FILM
- Rewinding the film
- Unloading film
- REWINDING A FILM IN MID - ROLL
- HOLDING THE CAMERA
- OPERATING 38 - 125mm ZOOM LENS
- COMPOSING AND FOCUSING
- Focus aid illuminator
- HARD - TO - AUTOFOCUS SUBJECTS
- INFINITY-LANDSCAPE MODE
- SPOT FOCUS
- Focus on the subject
- FOCUS-LOCK SHOOTING
- Note:
- PANORAMA MODE
- FLASH PHOTOGRAPHY
- Automatic Flash Emission
- Red-Eye Reduction Lamp
- SHOOTING MODES
- DAYLIGHT-SYNC SHOOTING
- SLOW SHUTTER SPEEDS MODES
- BULB SHOOTING, BULB-SYNC SHOOTING
- Bulb Mode (⑥B)
- Bulb-Sync Mode ( B)
- SELF-TIMER PHOTOGRAPHY
- Self-Timer
- To cancel
- USING WIRELESS REMOTE CONTROL (OPTION)
- Operating Distance of the Wireless Remote Control from the camera's front: within approx. 5m (16ft) straight in front of the camera
- Battery life on the Remote Control
- DATE MODE
- Switching the Mode
- SPECIFICATIONS
Marque : PENTAX
Modèle : ESPIO 125M
Catégorie : Appareil photo argentique compact