
PC-50 - Appareil photo compact PENTAX - Notice d'utilisation et mode d'emploi gratuit
Retrouvez gratuitement la notice de l'appareil PC-50 PENTAX au format PDF.
| Type de produit | Appareil photo compact 35 mm |
| Format d'image | 24 x 36 mm |
| Objectif | Pentax 35 mm f/4,5 (3 éléments en 3 groupes) |
| Mise au point | Autofocus actif infrarouge avec verrouillage |
| Distance minimale de mise au point | 1,2 m |
| Obturateur | Central, vitesse fixe 1/125 s |
| Flash intégré | Automatique en basse lumière, portée 1,2 à 6,3 m (selon ISO) |
| Temps de recharge du flash | Environ 6 secondes |
| Retardateur | Électronique, délai d'environ 10 secondes |
| Alimentation principale | 2 piles alcalines AA 1,5 V (Ni-Cd et manganèse non compatibles) |
| Alimentation du dos dateur | 1 pile lithium CR2025 3 V |
| Dimensions (sans dos dateur) | 126 x 73 x 49 mm |
| Dimensions (avec dos dateur) | 126 x 73 x 52 mm |
| Poids (sans piles) | Environ 190 g (sans dos dateur) ; 200 g (avec dos dateur) |
| Dos dateur (modèle PC-50 DATE) | Impression de la date au dos du film, 5 modes |
| Capacité du film | Jusqu'à 10 rouleaux de 24 poses avec piles alcalines neuves |
| Nettoyage | Chiffon doux ; ne pas utiliser de solvants |
| Sécurité | Ne pas démonter (haute tension) ; manipuler les piles avec soin |
| Garantie | 12 mois contre vices de matériaux et de fabrication |
FOIRE AUX QUESTIONS - PC-50 PENTAX
Questions des utilisateurs sur PC-50 PENTAX
0 question sur cet appareil. Repondez a celles que vous connaissez ou posez la votre.
Poser une nouvelle question sur cet appareil
Téléchargez la notice de votre Appareil photo compact au format PDF gratuitement ! Retrouvez votre notice PC-50 - PENTAX et reprennez votre appareil électronique en main. Sur cette page sont publiés tous les documents nécessaires à l'utilisation de votre appareil PC-50 de la marque PENTAX.
MODE D'EMPLOI PC-50 PENTAX
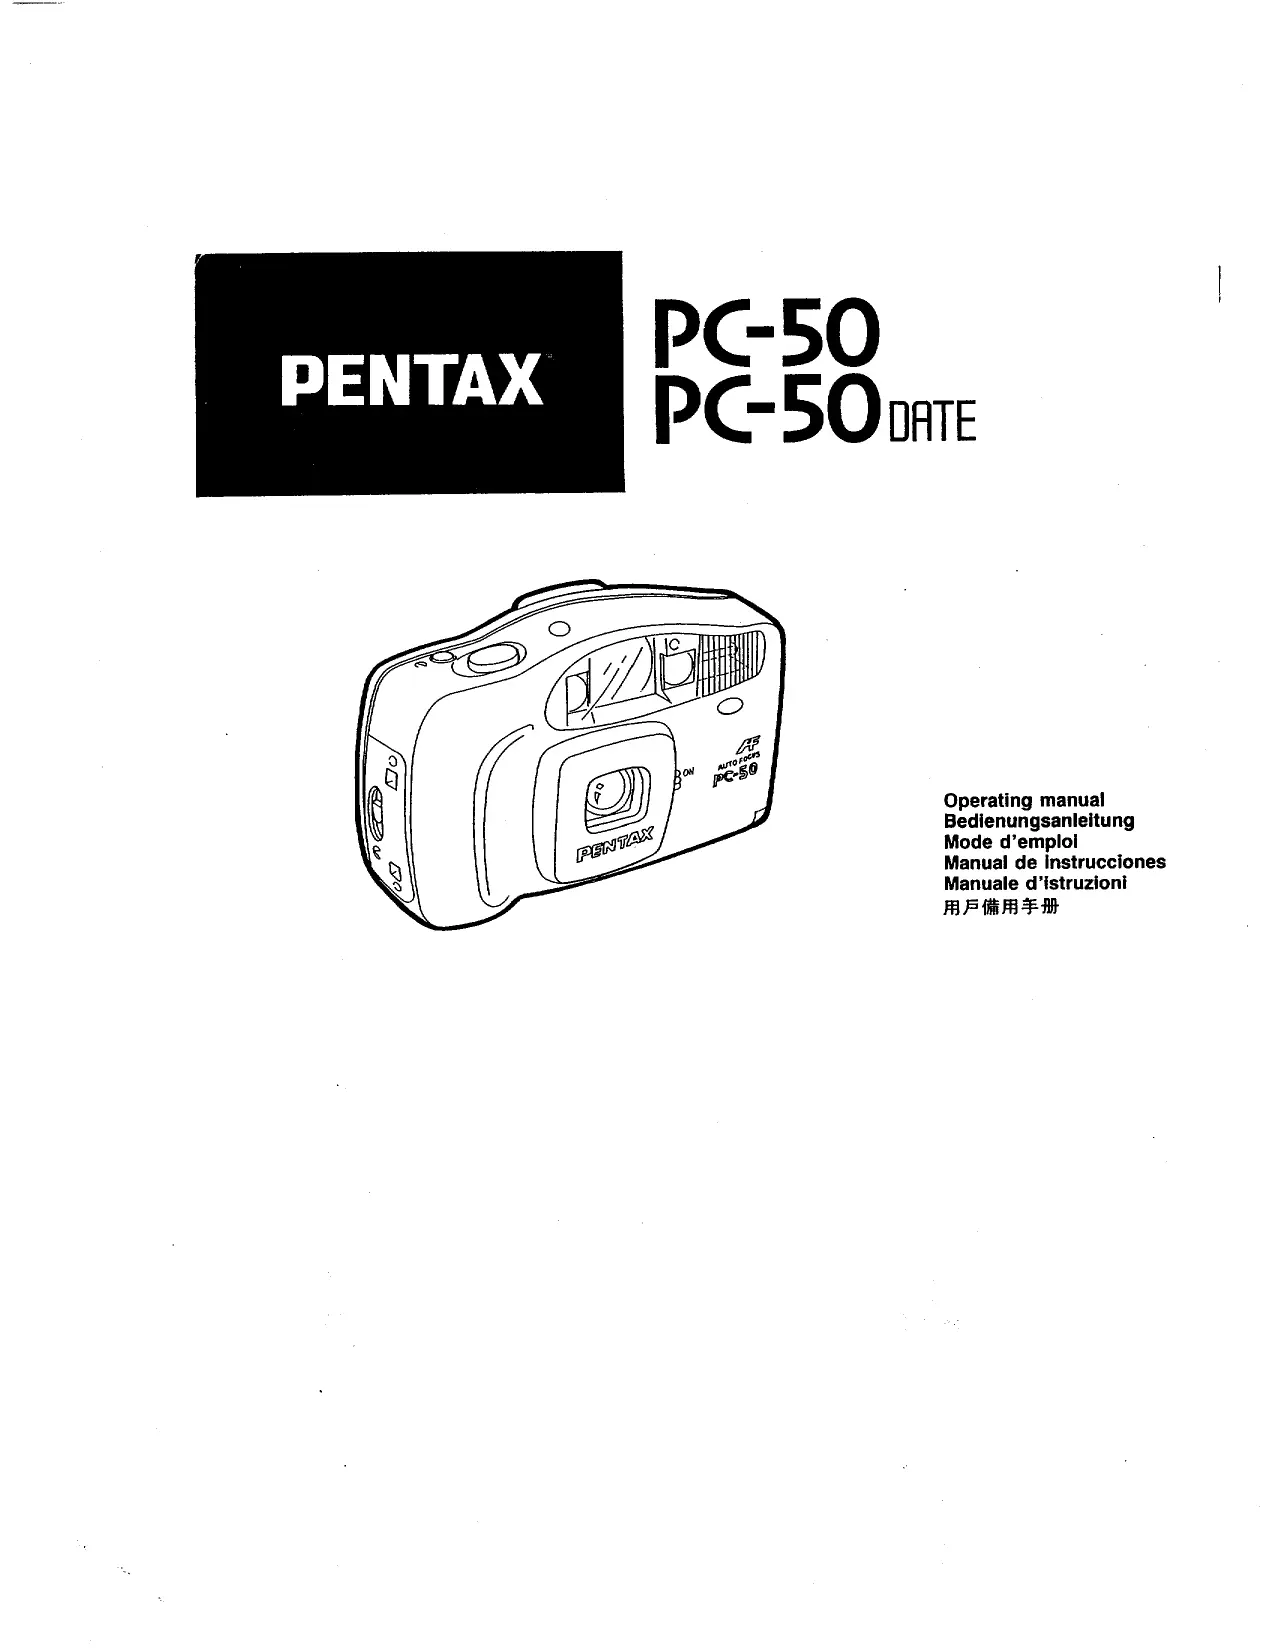
PENTAX
PC-50 PC-50 DATE
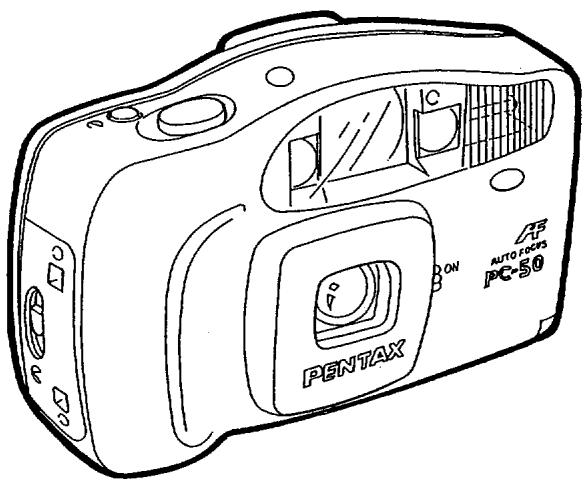
text_image
PENTAX AUTO-FOCKS PC-50Operating manual
Bedienungsanleitung
Mode d'emploi
Manual de instrucciones
Manuale d'istruzioni
用戶備用手冊
text_image
Labeled diagram of a Cameroon camera with numbered parts and internal components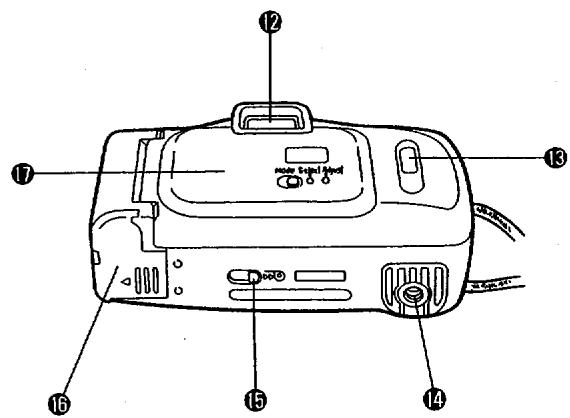
text_image
Labeled diagram of a portable air purifier with numbered parts for identification| NAMES OF PARTS | BEZEICHNUNGEN DER TEILE | DESCRIPTIF TECHNIQUE |
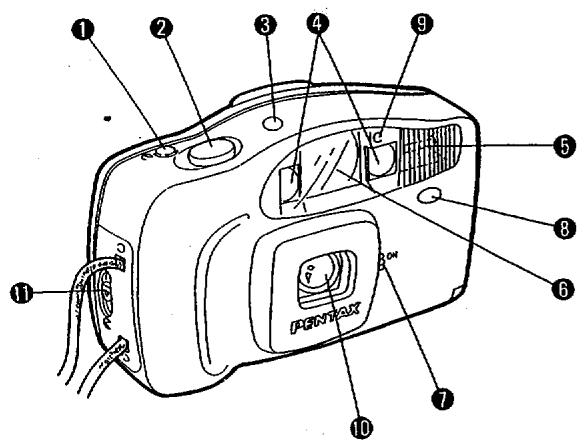
| 1 Self-timer Button2 Shutter Release Button3 Film Counter4 Autofocus Window5 Built-in Flash6 Viewfinder Window7 Lens Protector Lever8 Self-timer/Red-eye Reduction Lamp9 Light Sensor Window10 Lens11 Back Cover Release Lever12 Viewfinder Eyepiece13 Film Information Window14 Tripod Socket15 Film Rewind Lever16 Battery Chamder Cover17 Back Cover | 1 Selbstauslösertaste2 Auslöser3 Bildzählwerk4 Autofokus-Fenster5 Eingebauter Blitz6 Sucherfenster7 Objektivschutzhebel8 Selbstauslöser/Vorblitz-Lampe9 Meßzelle10 Objektiv11 Rückwandentriegelung12 Sucherokular13 Filminformationsfenster14 Stativgewinde15 Rückspulhebel16 Batteriefachdeckel17 Rückwand | 1 Bouton du retardateur2 Déclencheur3 Compteur de vue4 Fenêtre autofocus.5 Flash incorporé6 Fenêtre du viseur7 Levier du protecteur d'objectif8 Retardateur/éclair de réduction9 Cellule10 Objectif11 Levier d'ouverture du dos12 Oculaire de visée13 Fenêtre d'information sur la pellicule14 Ecrou de pied15 Bouton de Rebobinage16 Couvercle du longement de pile17 Dos |
| NOMENCLATURA | DESCRIZIONE DELLE PARTI | 各部機件名稱 |
| 1 Botón del autodisparador2 Disparador3 Contador de la película4 Ventana del enfoque automático5 Flash incorporado6 Ventanilla del visor7 Palanca de protector del objectivo8 Temporizador / Piloto de Reducción del efecto "ojos rojos"9 Ventanilla del fotosensor10 Objetivo11 Palanca de apertura de la tapa posterior12 Ocular del visor13 Ventanilla de información de la película14 Rosca para tripode15 Palanca de rebobinado de la película16 Tapa del compartimento de la pila17 Tapa posterior | 1 Pulsante di autoscatto2 Pulsante di scatto3 Contafotogrammi4 Finestrella autofocus5 Flash incorporato6 Finestrella del mirino7 Levetta del copri-obiettivo8 Spia autoscatto / funzione di riduzione dell'effetto "occhi rossi"9 Sensore luce10 Obiettivo11 Levetta di apertura dorso12 Oculare del mirino13 Finestrella di informazioni pellicola14 Attacco per treppiede15 Leva per il rievvolgmento del film16 Coperchio del vano pila17 Dorso | 1 自拍按鈕2 快門釋放掣3 膠卷計數表4 自動對焦窗5 內置閃燈6 觀景器7 鏡頭保護蓋桿8 自拍 / 消減“紅眼”燈9 光度感應窗10 鏡頭11 機背開桿12 觀景接目器13 膠卷資料顯示窗14 脚架插孔15 膠卷回捲掣16 電池蓋17 相機背 |
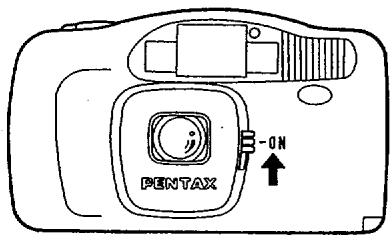
Power Switch
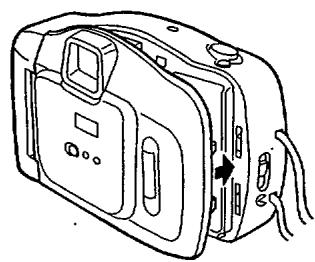
The power is turned on by opening the lens protector. (See figure [1].)
Film Loading
DX-coded film with ISO ratings from 100 to 400 can be used. Camera film speed is automatically set when the film is inserted.
Camera film speed is set to ISO 400 when ISO 400 or faster films are inserted and set to ISO 100 when films slower than ISO 400 are inserted.
Do not expose the film to direct sunlight when it is inserted.
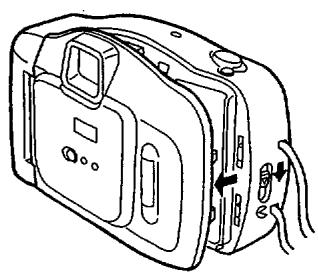
- Press down the back cover release lever to open the back cover. (See figure 2.)
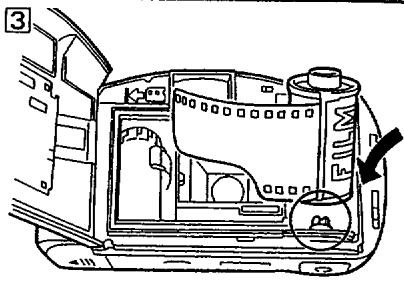
- The film can easily be loaded by fully inserting the lower end of the film cartridge first and then inserting the top end. (See figure 31.)
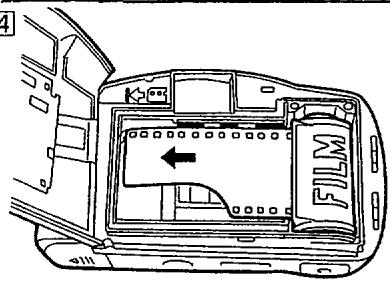
- Align the film leader with the film load mark. (See figure 4.) * Insert the film between the guide rails and remove any slack
- Close the back cover. (See figure 5.)
- Open the lens protector and press the shutter button once to automatically load the film and "1" is displayed in the film counter. If "." is not displayed, the film has not been loaded properly. Load it again. (See figure 6.)
Photography
Keep a distance of at least 1.2 m between the subject and the camera. When taking pictures outdoors, keep the sun behind you to take good pictures.
Caution: Make sure not to put your fingers or hair in front of the autofocus finder, lens, light sensor window and built-in flash.
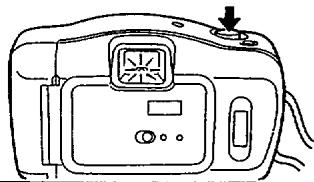
- Open the lens protector. Look through the viewfinder and compose your image. (See figure 7.)
* The lens cannot be focused at distances less than 1.2m. - Depress the shutter release button halfway and the green lamp in the finder lights up. The picture can now be taken. If the green lamp blinks, this indicates that the built-in flash is being charged or that battery power is too low. In this case, release the button and wait a few seconds before pressing it again. The picture can be taken if the green lamp in the finder lights up. (See figure 8.)
- When the green lamp is blinking, the flash is not charged. Release the shutter release button and wait a few seconds for the flash to be charged.
- If the green lamp is still blinking after waiting 10 seconds or more, the batteries should be replaced.
FOCUSING (See figure 9-11.)
Place the subject at the center of the viewfinder when you take a picture. To focus on the subject in a peripheral area, point the center of the viewfinder at the subject first, then depress the shutter release button halfway, recompose the picture and release the shutter.
Flash Photography
-
The built-in flash in this camera is automatically activated when available light is not sufficient for proper exposure. When the shutter release button is fully depressed, the red-eye reduction lamp illuminates and then the flash is charged.
-
The table on the right shows the distance ranges that will produce good pictures.
| ISO | Flash-effective ranges |
| 100 | 1.2~3.1m(3.9~10.2ft.) |
| 200 | 1.2~4.4m(3.9~14.4ft.) |
| 400 | 1.6~6.3m(5.2~20.7ft.) |
Red-eye phenomenon in flash photography
When a picture is taken using a flash, a subject's eyes may appear red in the print. This phenomenon is caused by the reflection of the electronic flash in the retina. It can be reduced when the surroundings of the subject are brightened, or shooting distance is shortened with the lens set at the wide-angle position or by employing the red-eye reduction flash feature.
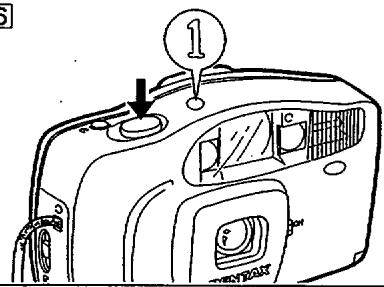
Self-Timer Photography
This function allows the photographer to include himself in the picture.
As illustrated, when the self-timer button is pressed, the self-timer lamp lights up and the timer starts as soon as the button is pressed. The picture is taken 10 seconds after the button is pressed. (The lamp starts blinking during the final three seconds.) (See figure [12].)
* If you want cancel the self-timer after depressing the self-timer button, close the lens protector by moving the lens protector lever.
* The self-timer does not operate in dark places when the flash is not charged. Check that the green lamp lights up before using the self-timer.
* Use of a tripod is recommended for self-timer photography.
REWINDING FILM
The motor stops automatically at the end of the film.
- To rewind the film, push the film rewind lever in the direction of the arrow and hold it there until rewind finishes. (See figure 13.)
- The motor stops automatically with the exposure counter showing "S". (See Figure 14.)
- Open the back cover and remove the film cartridge from the chamber. (See figure 15.)
1
text_image
PENTAX -ON2
natural_image
Line drawing of a device with handle, buttons, and internal compartments (no text or symbols)3
text_image
Technical diagram of a car interior with labeled components and an arrow indicating direction4
text_image
Technical diagram of a car interior with labeled components and directional arrow indicating movement or flow5
natural_image
Line drawing of a compact electronic device with buttons and ventilation slots (no text or symbols)6
text_image
Technical diagram of a device with numbered component and labeled parts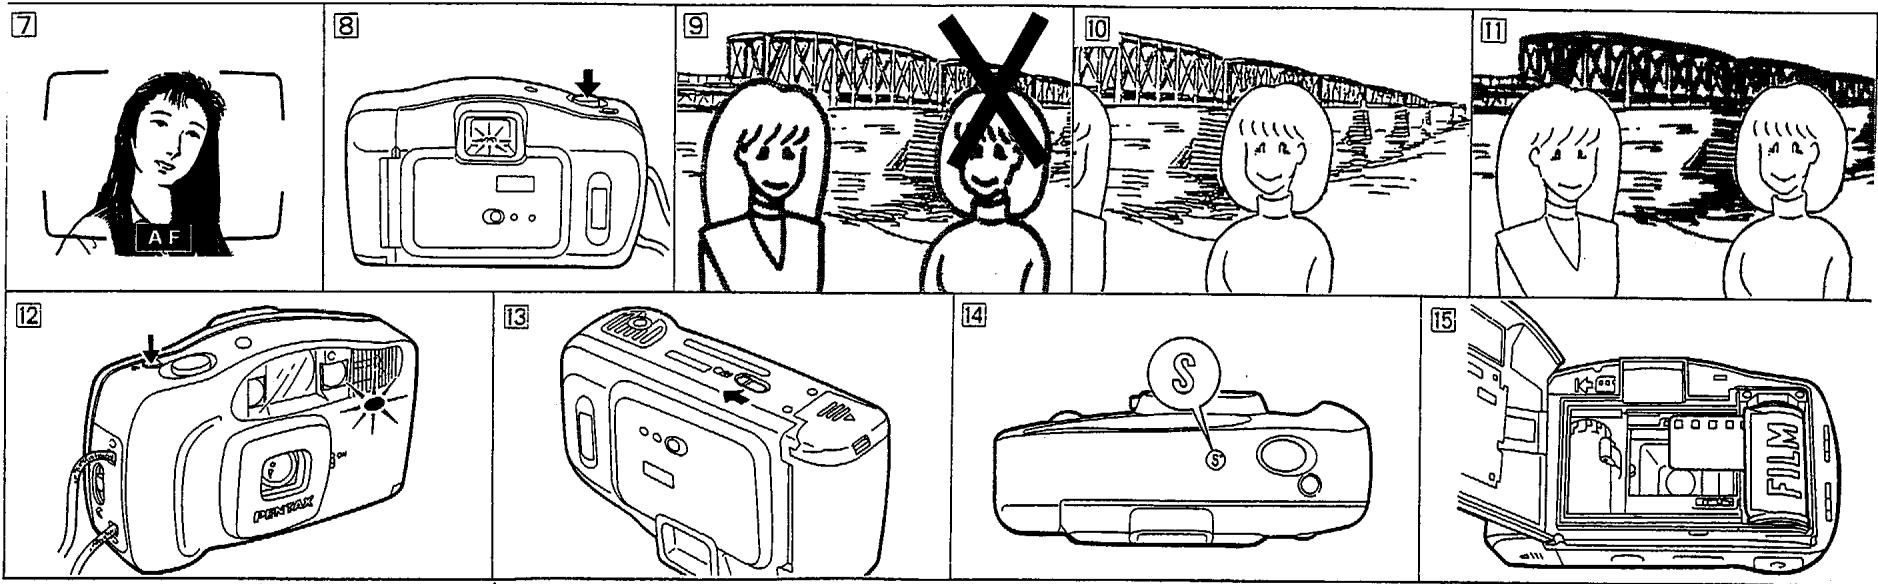
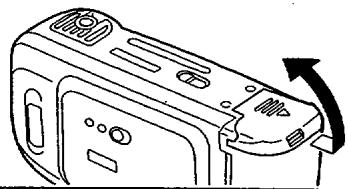
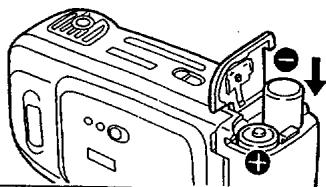
INSTALLING/REPLACING BATTERIES
You need two "AA" alkaline batteries to operate this camera. Ni-Cd and manganese batteries are not usable.
-
Open the battery chamber cover. (See figure 16.)
-
Insert two batteries by aligning (+) and (−) marks of the batteries with marks on the cover, then close the cover. (See figure 17.)
* Up to 10 rolls of 24 -exposure film can be taken with new alkaline (LR 6) batteries assuming that all of pictures are taken with flash. (According to Pentax testing conditions)
Battery Check
When the batteries are properly inserted and the shutter button is pressed halfway, the green lamp at the center bottom of the finder light up or blinks. (See figure 18.)
• The camera does not operate when the batteries have been used up or have been improperly inserted.
* As the batteries deplete, flash recharging and film winding/rewinding will take longer. Replace the batteries as soon as you notice this.
- Batteries must be handled with care. Incorrect use of batteries can cause overheating or even explosions.
- Battery performance is poor at low temperatures but returns to normal at ordinary temperatures. - Do not short-circuit, disassemble, recharge or throw used batteries into fire as they may explode.
Handling Precautions
-
This is not an underwater camera and it may not be possible to repair it if it is immersed in water. Contact authorized service facility.
-
Sand or mud entering the camera may damage the camera. Do not place it directly on a sandy beach. It is not designed for professional or other taxing uses.
-
Do not use paint thinner, benzene or other solvents for cleaning the camera.
-
Do not store or leave the camera for a long time in places where the temperature is high.
-
Moisture condensation will form in the camera when it is brought into a warm room after shooting in cold weather. Put the camera in the camera bag or a vinyl bag before bringing it in to lower the temperature change. Take out the camera when the temperature change is less drastic.
-
A camera is a precision instrument. Do not drop it or bang it against objects. Have it inspected when it is exposed to strong shock or pressure.
-
The camera operates normally within a temperature range of 40°C(104°F) to -5°C(23°F).
B. The camera contains high voltage circuits. To prevent electric shock and other hazards, do not disassemble the camera.
- The camera should be returned in for service every year or every other year to keep it in proper working order. It is also a good idea to have it inspected when it has not been used for a long time or before taking important photographs.
16
natural_image
Line drawing of a device casing with an arrow indicating rotation (no text or symbols)17
natural_image
Diagram of a microwave oven with labeled ports and directional arrows (no text or symbols)18
natural_image
Line drawing of a digital camera with an LCD screen and control buttons (no text or symbols)DATABASEK OPERATION
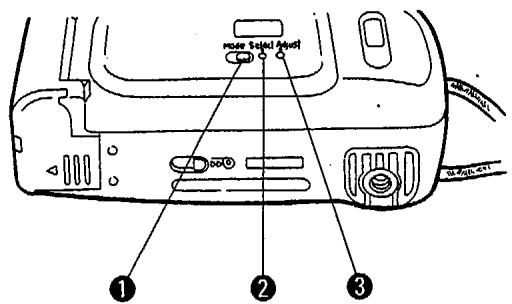
NOTE: THIS IS APPLICABLE TO THE PC 50 DATE MODEL ONLY.
① Mode button ② Select button ③ Adjust button ④ Battery cover fixing screw
Changing the Mode
Each time you press the Mode button ①, the mode in the LCD panel changes in succession from "Month-Day-Year" to "Day-Hour-Minute" to "____" to "Month-Day-Year"
A. "Year-Month-Day to B. Day-Hour-Minute to C." Stop pressing the button when the desired mode appears. "____"
to E Day-Month Year: Step printing indicates that no data will be imprinted on the picture.
NOTE: "M" in the LCD panel indicates "Month". Use a ball-point pen or a fine pointed device
to depress the buttons.
Correcting the Data
-
Press the "Select" button ② until you reach the flickering digit which you want to change the digit of specified category you chose with the "Select"
-
Press the "Adjust" button ③ to change the digit of specified category you should be done. If you keep it
button 2. Digits increase by one each time you prove the way to be a second, then decrease the digit will advance continuously after two or three seconds.
-
Adjusting the second: Press the "Select" button ② until ":" will flicker. And press the "Adjust"
-
Adjusting the second. Please note that the button is in sync with a time signal to set the second to zero.
-
After the correction, press the "Select" button ② to make the data imprinting possible (the bar
mark (-) appears on the LCD panel).
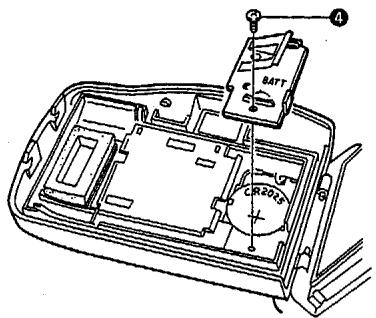
Battery
The databack is powered by one CH2025 3V Lithium Battery. When the displays in the battery are connected to the watch function becomes unstable, replace the Battery with a new one be seen clearly or when the watch function becomes unstable, replace the battery in descending Battery cover fixing screw. When the battery is set correctly, Data will be displayed.
by loosening Battery cover fixing screw ⚪️ when the Reset the data according to "Correcting the Data".
Reset the data according to
19
text_image
no more selected level ① ② ③
flowchart
graph LR
    A["95 1 1"] --> B["15:30"]
    B --> C["---"]
    C --> D["195"]
    D --> E["1795"]
    E --> F["End"]
20
text_image
Technical diagram of a car interior with labeled components including battery and reading dialSPECIFICATIONS
| Type: | 35 mm fully automatic lens-shutter camera |
| Film: | 35 mm DX-coded film with ISO rating from 100 to 400; J135 cartridge. The camera film speed is automatically set to ISO 100 when non-DX film is used. |
| Picture format: | 24 mm × 36 mm |
| Film loading: | Auto film loading. Closing the back cover and pressing the shutter release button will automatically wind film to first exposure. |
| Film transport : | Auto film winding and rewinding. Rewinding stops upon completion. |
| Frame number: | Automatic readout of successive frame numbers in ascending order when shooting and descending order when rewinding. |
| Lens: | Pentax 35 mm, f/4.5, 3 elements in 3 groups |
| Focusing system: | Infrared active autofocusing with focus-lock.Range : approx. 1.2 m (3.9 ft.) to infinity |
| Shutter: | Behind-the-lens shutter with fixed shutter speed at 1/125 sec. |
| Self-timer: | Electronic lamp indication. Approx. 10-sec delay.Cancellation after activation is possible. |
| Viewfinder: | Albada type bright frame finder |
| Exposure control : | Auto-aperture controlf/4.5 Automatic low-luminance firingf/8 ISO100/200f/16 ISO400 |
| Flash: | Built-in flash with automatic low-luminance firing. |
| Charging time: | Approx. 6 sec according to Pentax testing conditions. |
| Power source: | Two 1.5 V "AA" alkaline batteries. (Ni-Cd and maganese batteries are not usable.) |
| Size and weight: | 126(W)×73(H)×49(D)mm;approx.190g without batteries. |
| Date recording system: | Information is recorded on the reverse side of the film. |
| Date imprinting modes: | Push button to set unit to any of five modes; "Year/Mon/Day", "Day/Hour/Min", "-- --" (Blank), "Mon/Day/Year" or "Day/Mon/Year". |
| Date imprinting power source: | 3 V lithium battery (one CR2025 battery) |
| Size and weight: | 126(W)×73(H)×52(D)mm;approx.200g without batteries. |
| Reversal film (slide film) may not be properly exposed. Use of negative color film (print film) is recommended. | |
WARRANTY POLICY
All Pentax cameras purchased through authorized bona fide photographic distribution channels are guaranteed against defects of material or workmanship for a period of twelve months from date of purchase. Service will be rendered and defective parts will be replaced without cost to you within that period, provided the equipment does not show evidence of impact, sand or liquid damage, mishandling, tampering, battery or chemical corrosion, operation contrary to operating instructions, or modification by an unauthorized repair shop. The manufacturer or its authorized representatives shall not be liable for any repairs or alterations except those made with its written consent and shall not be liable for damages from delay or loss of use or for other indirect or consequential damages of any kind, whether caused by defective material or workmanship or otherwise; and it is expressly agreed that the liability of the manufacturer or its representatives under all guarantees or warranties, whether express or implied, is strictly limited to the replacement of parts as hereinbefore provided. No refunds will be made on repairs performed by nonauthorized Pentax service facilities.
Procedure during 12-month Warranty Period
Any Pentax equipment which proves defective during the 12-month warranty period should be returned to the dealer from whom you purchased the equipment or to the manufacturer. If there is no representative of the manufacturer in your country, send the equipment to the manufacturer, with postage prepaid. In this case, it will take a considerable length of time before the equipment can be returned to you owing to the complicated customs procedures required. If the equipment is covered by warranty, repairs will be made and parts replaced free of charge, and the equipment will be returned to you upon completion of servicing. If the equipment is not covered by warranty, regular charges of the manufacturer or of its representatives will apply. If your Pentax equipment was purchased outside of the country where you wish to have it serviced during the warranty period, regular handling and servicing fees may be charged by the manufacturer's representatives in that country. Notwithstanding this, Pentax equipment returned to the manufacturer will be serviced free of charge according to this procedure and warranty policy. In any case, however, shipping charges and customs clearance fees are to be borne by the sender. To prove the data of your purchase when required, please keep the receipts or bills covering the purchase of your equipment for at least a year. Before sending your equipment for servicing, please make sure that you are sending it to the manufacturer's authorized representatives or their accredited repair shops, unless you are sending it directly to the manufacturer. Always obtain a quotation of the service charge, and only after you accept the quoted service charge, instruct the service station to proceed with the servicing.
This warranty does not apply to Pentax products purchased in the U.S.A., U.K. or Canada. The local warranty policies available from Pentax distributors in those countries supersede this warranty policy.

Asahi Optical Co., Ltd. 11-1, Nagata-cho 1-chome, Chiyoda-ku, Tokyo 100, JAPAN
Pentax Europe n.v. Weiveldlaan 3-5, 1930 Zaventem, BELGIUM
Pentax Handelsgesellschaft mbH. Julius-Vosseler-Strasse, 104, D-22527 Hamburg, CERMANY
Pentax U.K. Limited. Pentax House, Heron Drive, Langley, Slough SL3 8PN, U.K.
Pentax France S.A. Z.I. Argenteuil, 12, rue Ambroise Croizat, 95100 Argenteuil, FRANCE
Pentax Benelux (for Netherlands) Spinveld 25, 4815 HR Breda, NETHERLANDS
(for Belgium & Luxemburg) Weiveldlaan 3-5, 1930 Zaventem, BELGIUM
Pentax (Schweiz) AG Industriestrasse 2, 8305 Dietlikon, SWITZERLAND
Pentax Scandinavia AB Falhagsleden 57, 75127 Uppsala, SWEDEN
Pentax Corporation 35 Inverness Drive East, Englewood, Colorado 80112, U.S.A.
Pentax Canada Inc. 3131 Universal Drive, Mississauga, Ontario LAX 2E5, CANADA