
PPO-E05 - Accessoire photo OLYMPUS - Notice d'utilisation et mode d'emploi gratuit
Retrouvez gratuitement la notice de l'appareil PPO-E05 OLYMPUS au format PDF.
| Type de produit | Port d'objectif étanche |
| Marque | OLYMPUS |
| Modèle | PPO-E05 |
| Boîtier compatible | Série PT-E |
| Objectif compatible | ZUIKO DIGITAL ED14-42 mm F3.5-5.6 |
| Profondeur maximale d'utilisation | 40 mètres |
| Dimensions (diamètre × profondeur) | 143 mm × 80 mm |
| Poids | 739 g (sans objectif de conversion) |
| Matériau du corps | Aluminium |
| Matériau de la fenêtre | Verre chimiquement renforcé |
| Matériau des joints toriques | Caoutchouc silicone |
| Matériau de l'engrenage de zoom | Caoutchouc NBR |
| Matériau du pare-avant | Caoutchouc NBR |
| Matériau du pare-arrière | Résine polyéthylène |
| Fonctionnalité principale | Permet le zoom sous-marin avec engrenage de zoom inclus |
| Pièces d'usure | Joint torique silicone (POL-E101), graisse pour joint torique (PSOLG-1) |
| Entretien | Nettoyer les joints toriques après chaque plongée, appliquer la graisse fournie |
| Sécurité | Ne pas dépasser 40 m de profondeur ; ne pas démonter ; éviter les températures élevées |
| Accessoires fournis | Pare-avant, pare-arrière, engrenage de zoom, graisse, extracteur de joint torique |
| Réparabilité | Pièces d'usure remplaçables (joints et graisse) |
FOIRE AUX QUESTIONS - PPO-E05 OLYMPUS
Questions des utilisateurs sur PPO-E05 OLYMPUS
0 question sur cet appareil. Repondez a celles que vous connaissez ou posez la votre.
Poser une nouvelle question sur cet appareil
Téléchargez la notice de votre Accessoire photo au format PDF gratuitement ! Retrouvez votre notice PPO-E05 - OLYMPUS et reprennez votre appareil électronique en main. Sur cette page sont publiés tous les documents nécessaires à l'utilisation de votre appareil PPO-E05 de la marque OLYMPUS.
MODE D'EMPLOI PPO-E05 OLYMPUS
PPO-E05
natural_image
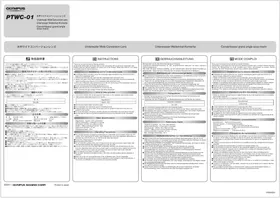
Technical line drawing of a mechanical component with concentric rings and internal slots (no text or symbols)| En | Instruction ManualUnderwater Lens Port for the PT-E Series | |
| Fr | Mode d’emploiPort d’objectif étanche pour la série PT-E | |
| De | BedienungsanleitungUnterwasser-Objektiv-Port für PT-E Serie | |
| Sp | Manual de instruccionesPuerto de objetivo hermético para la serie PT-E |
Thank you for buying this product. To assure safe and correct use of this product, please read this instruction manual carefully. After reading, store the manual together with the warranty card in a safe, easily accessible place.
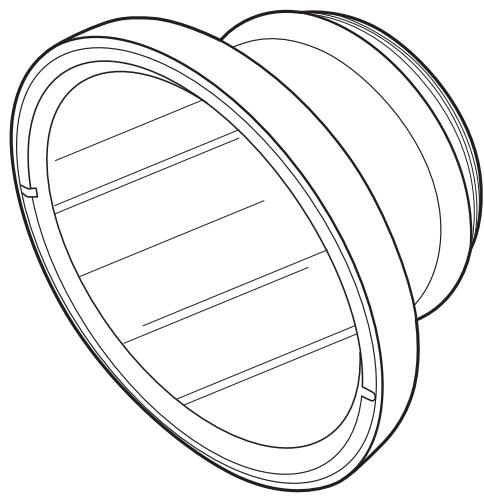
This product is the Waterproof Lens Port (PPO-E05) designed exclusively for use with the PT-E series of waterproof case.
■ Underwater zooming is made possible by attaching the zoom gear, provided with this product, to the zoom ring of an applicable camera lens.
Disclaimer
■ Unauthorized copying of this manual in part or in full, except for personal use, is prohibited. Unauthorized reproduction is strictly prohibited.
■ Olympus shall not be responsible for damages, loss of profit or any claims by third parties in case of any damage occurring from incorrect use of this product.
IMPORTANT - Please read the following before using the product
This product has been designed to be used underwater at depths up to 40 meters. Handle this product with care.
This product must always be used in combination with an applicable lens. Do not combine this product with an inapplicable lens.
■ To ensure correct and safe use of this product, always use it as described in this instruction manual.
For safe use
This instruction manual uses pictographs to show how to use the product correctly and how to prevent danger to the user and other persons as well as damage to property. These pictographs and their meanings are shown below.
| WARNING | Please pay particular attention to this information. If ignored when using the product, there is a risk of serious injury and even death. |
| CAUTION | Ignoring this information when using the product could lead to injury or material damage. |
WARNING
● This product should be kept out of reach of infants and children to prevent accidents such as the following:
- Injury caused by the product falling from a height and striking the body from a height.
- Injury caused by the swallowing of small parts. Please consult a doctor immediately if this happens.
- This product is partly made of glass. If it is broken or smashed by being dropped or hit against a hard object, glass splinters could cause injury. Please handle this product carefully.
- If water gets into this product during underwater use, immediately stop using it, remove the moisture from the product and detach it from the camera and lens.
- Do not disassemble or modify this product. This may result in injury.
● The silicone O-ring grease is not edible.
CAUTION
- Do not expose this product to high temperatures for extended periods. This may lead to deterioration of the product's components.
- When mounting this product on the PT-E series waterproof case, be sure to follow the steps described in this manual.
- Before detaching this product from the PT-E series waterproof case, make sure that the case is completely dry and free of moisture.
- Never attach or detach this product in locations where there is a lot of sand, dust or dirt. If any foreign matter gets on the O-ring sections, the waterproof sealing will be compromised and water leakage may result.
- This product has been designed and manufactured for use in a water pressure equivalent to a depth of 40 meters. Please note that diving in depths over 40 meters may cause irreparable damage and/or may result in water leaking into this product and the camera and lens.
- The maximum depth that this product can be used is 40 meters, regardless of what case it is combined with. For example, even when combined with a PT-E series case certified for 60 meters, the maximum depth is still limited to 40 meters.
- When sealing this product, make sure that no foreign matter is caught on the O-rings or O-ring contact surfaces.
● Before storing this product, always remove it from the camera and lens. - To control lens zooming from this product, the provided zoom gear must be attached to the zoom ring of the lens. Correctly attach the zoom gear to the zoom ring of the lens as instructed in this manual.
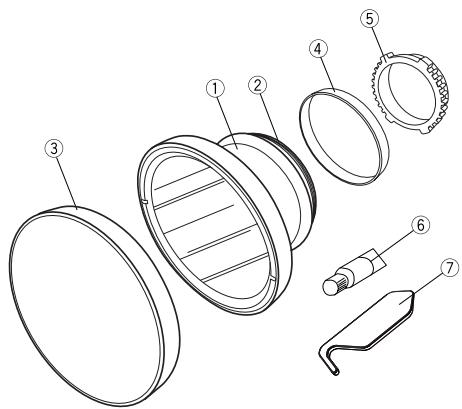
1 Name of Parts
① PPO-E05 main body
② Silicon O-ring (POL-E101)
③ Front cap
④ Rear cap
⑤ Zoom gear (PPZR-E06)
⑥ Grease for silicone O-ring
⑦ O-ring remover
2 Mounting the PPO-E05 on the Waterproof Case
This section describes how to mount this product on the PT-E series case. Before mounting, check that no foreign matter is attached to the O-rings, the port mount thread on the PT-E series case, or the O-ring contact surfaces. Apply a thin layer of the provided silicone O-ring grease.
Grease applying surface on O-rings
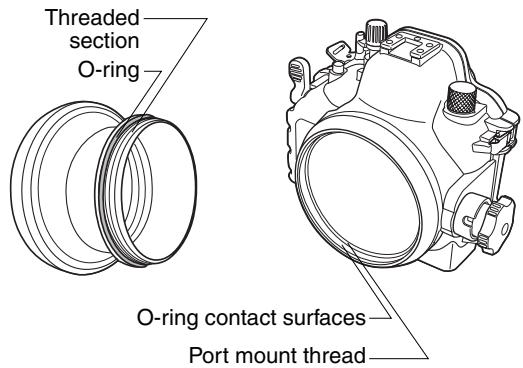
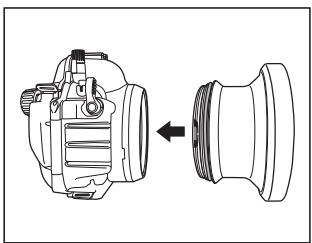
① Align the threaded section of the PPO-E05 with the port mount thread on the PT-E series case.
② Hold the PT-E series case firmly with one hand, hold the main body of the PPO-E05 with your other hand and screw it into the PT-E series by turning the PPO-E05 clockwise.
③ Resistance increases as the PPO-E05 is screwed in more deeply. However, be sure to screw it in all the way until there is no gap visible below the threaded section of the PPO-E05.
natural_image
Technical line drawing of a mechanical component with an arrow indicating assembly or transformation (no text or symbols present)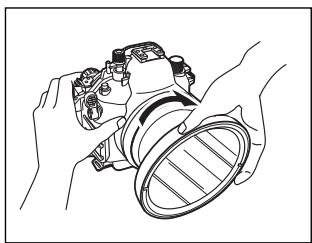
natural_image
Line drawing of hands holding a mechanical component, no text or symbols present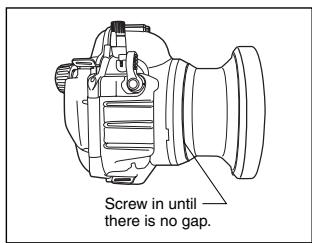
3 Dismounting the PPO-E05
natural_image
Diagram of a mechanical or fluidic component with no visible text, numbers, or symbols① If any water is on the product, wipe it completely away and make sure that the product is dry.
natural_image
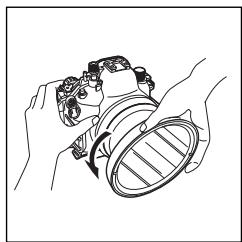
Line drawing of hands holding a camera lens (no text or symbols)② Holding the PT-E series case firmly with one hand, loosen the PPO-E05 by turning it about 90 degrees counterclockwise. If the PPO-E05 is attached too tightly to turn, wrap it with a piece of rubber or similar non-slip material.
natural_image
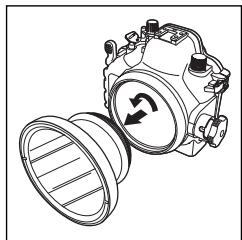
Technical line drawing of a mechanical component with rotating arrows indicating motion (no text or symbols)③ After loosening the PPO-E05, point its lens downward and turn it further counterclockwise until it is separated from the PT-E series case. Be careful not to drop the PPO-E05 or PT-E series case.
CAUTION: • While dismounting the PPO-E05 from the case, water remaining on the PPO-E05 may splatter on the lens or camera. If this happens, wipe the water off the lens and camera with a dry cloth.
- Make sure that the port is completely dry before dismounting.
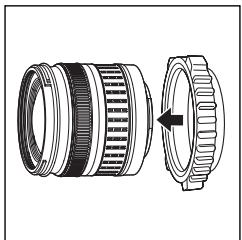
4 Attaching the Zoom Gear to the Lens
To use this product for lens zooming, attach the zoom gear provided with this product to the zoom ring of the lens.
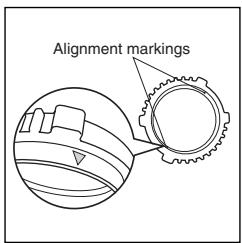
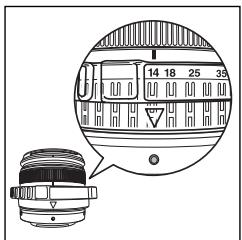
① The zoom gear has two marks ( ) for use in aligning its position on the lens. Use either mark to adjust the position of the zoom gear with respect to the lens.
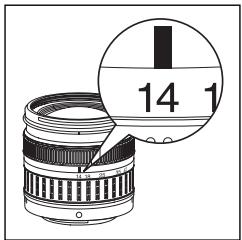
② Turn the lens's zoom ring to full wide-angle end and align the "14 mm" position with the index.
natural_image
Technical illustration of a camera lens assembly showing the main and side views (no text or symbols)③ Attach the zoom gear to the lens from the direction of the lens mount. Be sure to attach the zoom gear in the correct orientation.
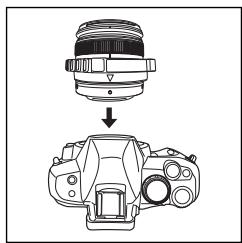
④ Adjust the position of the zoom gear so that its front end is aligned with the front end of the lens' zoom ring and the alignment mark ( ) on the zoom gear is aligned with the mounting index on the lens.
natural_image
Diagram showing a camera lens being processed into a DSLR camera (no text or symbols present)⑤ Mount the lens/zoom gear combination on the lens.
CAUTION:
- If the zoom gear position in the rotation and/or front-rear directions is inappropriate, the lens cannot be zoomed smoothly. Be sure to attach the zoom gear properly and ensure that it is correctly positioned.
- For details on how to load the camera into the PT-E series case, refer to the case's instruction manual.
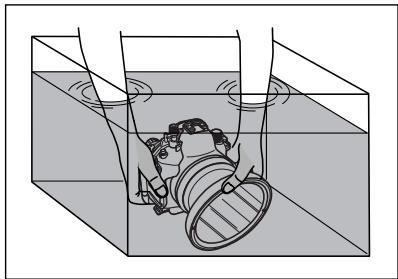
5 Maintenance
For safe use of this product, always perform maintenance after each diving session.
For details, refer to “Handling After Shooting” and “Maintaining the Waterproof Function” in the PT-E series case instruction manual. Apply the same procedures to this product.
natural_image
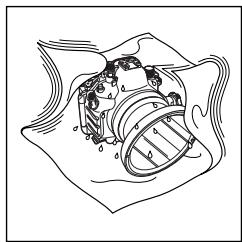
Diagram of a mechanical device inside a container with rotating arms (no text or symbols)① After shooting, remove the inserted camera and lens, then re-seal the empty case and immerse it in tap water to remove any salt as soon as possible.

natural_image
Technical line drawing of a mechanical device with a rotating knob and housing (no text or symbols)② After making sure that the PT-E series case is completely dry, dismount this product from the case.
natural_image
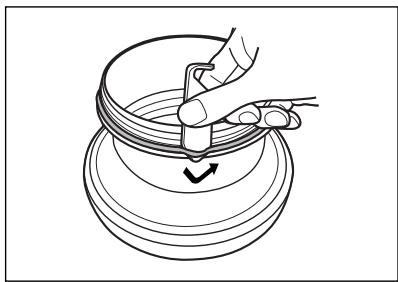
Line drawing of a hand using a tool to lift a circular object with a checkmark (no text or symbols)③ Insert the O-ring remover between the O-ring and O-ring groove so that the tip of the O-ring remover slides under the O-ring (take care not to damage the groove with the tip of the O-ring remover). When the O-ring is raised, pinch it with your fingers and separate it from the case.
natural_image
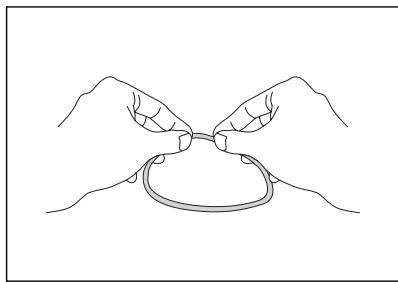
Line drawing of two hands tying a knot around a ring (no text or symbols)④ Remove any dust that you can see from the O-ring, and then pinch the O-ring with your fingers and rub it along its length to check for foreign objects such as sand, damage and cracks.
natural_image
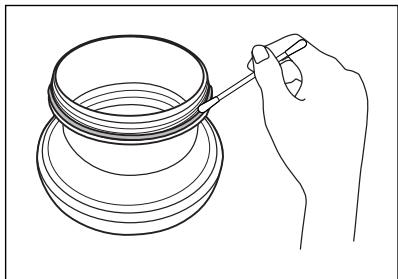
Line drawing of a hand pouring liquid into a container (no text or symbols)⑤ If any foreign matter is attached to the O-ring grooves, remove it using a clean, lint-free cloth or cotton swab. Also remove any foreign matter from the O-ring contact surfaces and from the port mount thread on the PT-E series case.
natural_image
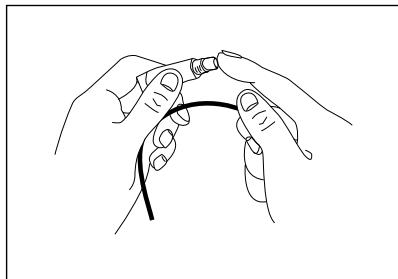
Line drawing of two hands holding a thin cable or wire (no text or symbols)⑥ After removing foreign matter, apply the provided grease to the O-rings and fit them into the O-ring grooves. To apply grease to each O-ring, squeeze a drop of grease about the size of a grain onto your finger and lightly rub the entire circumference of the O-ring to spread the grease thinly and evenly.
6 Specifications
| Applicable case | : PT- E series |
| Applicable lens | : ZUIKO DIGITAL ED14-42mm F3.5-5.6 |
| Main materials | |
| Main body | : Aluminum. |
| Lens window | : Chemically reinforced glass. |
| O-rings | : Silicon rubber. |
| Zoom gear | : NBR rubber. |
| Front cap | : NBR rubber. |
| Rear cap | : Polyethylene resin. |
| Withstanding pressure | : Water depth of 40 m |
| Dimensions | : Max. diameter 143 mm x Depth 80 mm |
| Weight | : 739 g (excluding the conversion lens) |
Note) We reserve the right to change the external appearance and specifications without notice.
7 Consumable Items
This product uses the following consumable items.
■ Silicon O-rings
| Product Model | Description |
| POL-E101 | O-ring for use with the PT-E series case. |
■ Grease for silicone O-ring
| Product Model | Description |
| PSOLG- 1 | Grease for O-rings |
OLYMPUS®
http://www.olympus.com/
OLYMPUS IMAGING CORP.
Shinjuku Monolith, 3-1 Nishi-Shinjuku 2-chome, Shinjuku-ku, Tokyo, Japón
OLYMPUS IMAGING AMERICA INC.
3500 Corporate Parkway, P.O. Box 610, Center Valley, PA 18034-0610, EE.UU. Tel. 484-896-5000
Asistencia técnica (EE.UU.)
24/7 Ayuda automatizada en línea: http://www.olympusamerica.com/support
Soporte telefónico al cliente: Tel. 1-888-553-4448 (Llamada gratuita)
El horario de atención de nuestro soporte telefónico al cliente es de 8 am a 10 pm
(Lunes a viernes) ET
E-Mail: distec@olympus.com
Las actualizaciones de los software Olympus se pueden obtener en:
http://www.olympusamerica.com/digital
OLYMPUS IMAGING EUROPA GMBH
Locales: Wendenstrasse 14-18, 20097 Hamburg, Alemania
Tel: +49 40-23 77 3-0 / Fax: +49 40-23 07 61
Entregas de mercancía: Bredowstrasse 20, 22113 Hamburg, Alemania
Correspondencia: Postfach 10 49 08, 20034 Hamburg, Alemania
Asistencia técnica al cliente en Europa:
Visite nuestra página web http://www.olympus-europa.com
o llame a nuestro TELÉFONO GRATUITO* : 00800 - 67 10 83 00
para Austria, Bélgica, Dinamarca, Finlandia, Francia, Alemania, Italia, Luxemburgo, Países Bajos, Noruega, Portugal, España, Suecia, Suiza, Reino Unido
* Por favor, tenga en cuenta que algunos proveedores de servicios de telefonía (telefonía móvil) no permiten al acceso o requieren el uso de un prefijo adicional para los números de llamada gratuita (+800).
Para los países europeos que no figuran en la relación anterior y en caso de no poder conectar con el número antes mencionado, utilice los siguientes
NÚMEROS DE PAGO: +49 180 5 - 67 10 83 ó +49 40 - 237 73 899
El horario de nuestro servicio de Asistencia técnica al cliente es de 09:00 a 18:00 (CET, hora central europea), de lunes a viernes.
- PPO-E05
- Disclaimer
- IMPORTANT - Please read the following before using the product
- For safe use
- WARNING
- CAUTION
- Name of Parts
- Mounting the PPO-E05 on the Waterproof Case
- Dismounting the PPO-E05
- Attaching the Zoom Gear to the Lens
- CAUTION:
- Maintenance
- Specifications
- Consumable Items
- OLYMPUS®
- OLYMPUS IMAGING CORP.
- OLYMPUS IMAGING AMERICA INC.
- Asistencia técnica (EE.UU.)
- OLYMPUS IMAGING EUROPA GMBH
- Asistencia técnica al cliente en Europa:
Marque : OLYMPUS
Modèle : PPO-E05
Catégorie : Accessoire photo