
51521 - Souffleur TORO - Notice d'utilisation et mode d'emploi gratuit
Retrouvez gratuitement la notice de l'appareil 51521 TORO au format PDF.


| Type de produit | Souffleur / Aspirateur électrique |
| Marque | Toro |
| Modèle | 51521 |
| Alimentation | Électrique sur secteur (câble) |
| Double isolation | Oui |
| Niveau de pression sonore (à l'oreille de l'opérateur) | 95 dB(A) |
| Niveau de puissance sonore | 110 LwA |
| Niveau de vibrations (main-bras) | 2,5 m/s² |
| Usage prévu | Résidentiel extérieur |
| Fonctions principales | Soufflage et aspiration avec broyage (sac) |
| Accessoires inclus | Tube de soufflage, tube d'aspiration, sac de collecte, buse concentrateur |
| Longueur du câble | Environ 5 m (estimation) |
| Poids | Environ 3,5 kg (estimation) |
| Matériau du boîtier | Plastique renforcé |
| Sécurité | Arrêt automatique en cas de blocage, verrouillage du câble |
| Entretien du sac | Lavage à la main une fois par an, séchage à l'air |
| Entretien général | Nettoyer régulièrement les entrées d'air, vérifier l'état du câble |
| Pièces détachées | Sac de remplacement, tubes, capuchon d'entrée |
| Réparabilité | Service après-vente agréé Toro |
| Garantie | 24 mois (conditions en notice) |
FOIRE AUX QUESTIONS - 51521 TORO
Questions des utilisateurs sur 51521 TORO
0 question sur cet appareil. Repondez a celles que vous connaissez ou posez la votre.
Poser une nouvelle question sur cet appareil
Téléchargez la notice de votre Souffleur au format PDF gratuitement ! Retrouvez votre notice 51521 - TORO et reprennez votre appareil électronique en main. Sur cette page sont publiés tous les documents nécessaires à l'utilisation de votre appareil 51521 de la marque TORO.
MODE D'EMPLOI 51521 TORO
TORO®
Superblower/Vac
Blower/Vacuum
ModelNo.51521—200000001&Up
Operator's Manual
Important Safety Instructions
When using an electrical appliance, basic precautions should always be followed, including the following:
ReadAllInstructionsBefore UsingThisAppliance
Warning —Toreducetheriskoffire,electric
shock, or injury, follow the ses safety instructions.
Toensuremaximumsafety, bestperformance, and to gain knowledge of the appliance, its essential that you and any other operator of the appliance read and understand the content of this manual before operating the appliance. Pay particular attention to
thesafetyalertsymbol △ whichmeansCAUTION, WARNINGorDANGER—personalsafetyinstruction. Readandunderstandtheinstructionbecauseithas todowithsafety.Failureretocomplywiththese instructionsmayresultinpersonalinjury,riskof fire,orelectricalshock.
Donotleavetheappliancewhenpluggedin.Unplug fromoutletwhennotinuseandbeforeservicing.
Donotallowappliancetobeusedasatoy.Donot usenearchildren.Donotletchildrenusethe appliance.
Useonlyasdescribedinthismanual.Useonly manufacturer'srecommendedattachments.
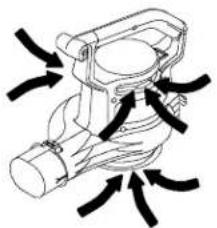
Dressproperly.Donotwearlooseclothingor jewelry.Pinuplonghair.Beawareofthepositionof theblowerandtheairinletsduringoperation.Loose clothing,jewelryandhaircanbedrawnintotheinlets (refertothefollowingfigure)andmayresultin personalinjury.Alwayswearsubstantialfootwear, longpants,andeyeprotection.
natural_image
Diagram of a mechanical component with multiple curved arrows indicating motion or flow (no text or symbols present)Donotusewithdamagedcordorplug.Ifapplianceis notworkingasitshould,hasbeendropped, damaged,leftoutdoors,ordroppedintowater,return ittoaservicedealer.
Donotpullorcarrybycord, usecordasahandle, closeadooroncord, orpullcordaroundsharpedges orcorners. Keepcordawayfromheatedsurfaces.
Donotunplugbypullingoncord.Tounplug,grasp theplug,notthecord.
Donothandleplugorappliancewithwethands.
Donotputanyobjectintoopenings.Donotusewith anyopeningblocked;keepfreeofdust,lint,hair,and anythingthatmayreduceairflow.
Turnoffallcontrolsbeforeunplugging.
Useextracarewhencleaningonstairs.
Donotusetovacuumupflammableorcombustible liquids, such as gasoline, or use in areas where they may be present.
This appliance is provided with double insulation. Use only identical replacement parts. See instructions for servicing of Double-Insulated Appliances.
Donotvacuumanythingthatisburningorsmoking, suchascigarettes, matches, orhotashes.
Donotusewithoutvacbagorproperattachmentsin place.
SoundPressureLevel
Thisunithasasoundpressureattheoperator'sear of95dB(A), basedonmeasurementsofidentical machinesperDirective81/1051/EEC.
SoundPowerLevel
Thisunithasasoundpowerlevelof110LwA, based on measurementsofidenticalmachinesperDirective 79/113/EEC.
VibrationLevel
Thisunithasamaximumhand-armvibrationlevelof 2.5m/s², basedonmeasurementsofidentical machinesperEN1033.
SaveTheseInstructions
Symbol@bssary
Safetyalerttriangle—symbolwithintriangle indicatesahazard
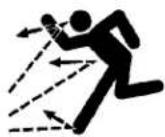
Thrownorflying objects—Wholebody exposure
SafetyalertsymbolKeepdry


Readoperator's manual

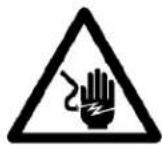
Electrical shock/electrocution
Consulttechnical manualforproper serviceprocedures

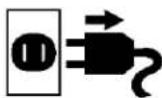
Disconnectpower
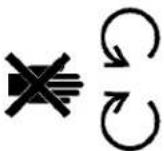
Donotopenor removesafetyshields whileengineis running
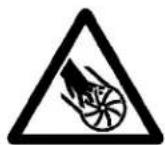
Severingoffingersor hand—impellerblade
Weareyeprotection

Alignmentofthe impellercover

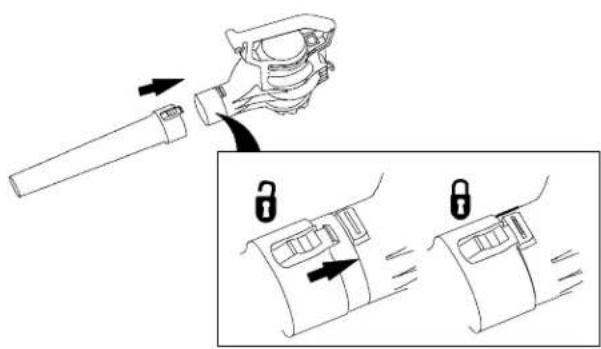
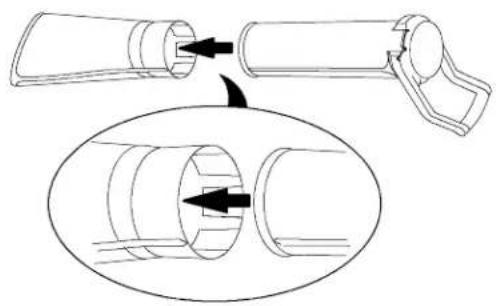
Assembly AssemblingtheBlower
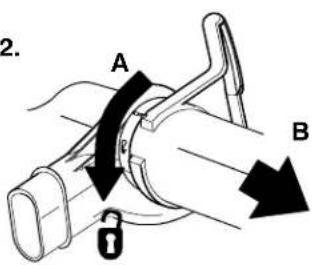
ConvertingfromBlower toVacuum
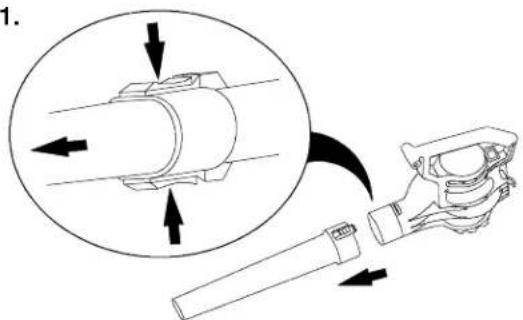
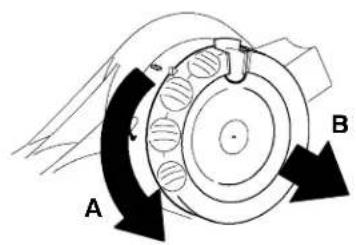

Caution

!
Theimpellerrotatesforafewsecondsafter youturnofftheblowerandcancutorinjure fingers.
!
Donotremovethebottominletcoverwhen themotorisrunningorwhentheunitis pluggedintoapoweroutlet.
natural_image
Diagram showing a mechanical assembly with an open cylindrical component and a close-up view of its internal structure (no text or symbols)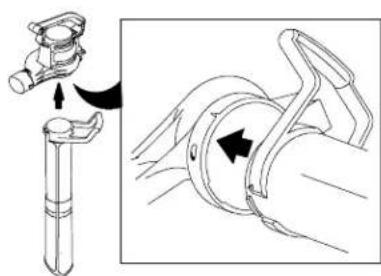
natural_image
Medical illustration showing a mechanical device being adjusted to a joint with a circular component, no text or symbols present.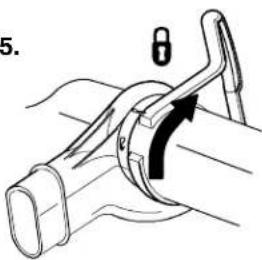
natural_image
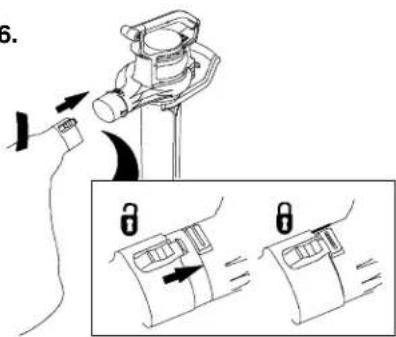
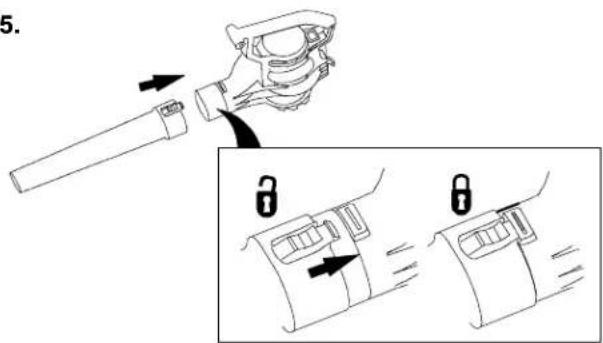
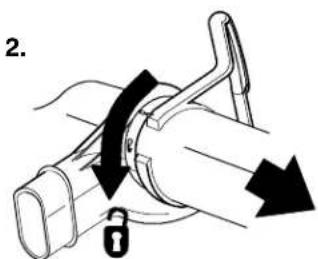
Diagram of a mechanical joint or clamp mechanism with an arrow indicating rotation (no text or symbols present)Important: The vacuum will not run unless the vacuum tube is turned clockwise as far as possible, locking it in place (step 5).
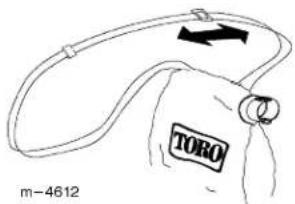
- Adjust the strap as needed for comfortable operation.
ConvertingfromVacuum toBlower
natural_image
Diagram of a mechanical component with an arrow indicating direction (no text or symbols present)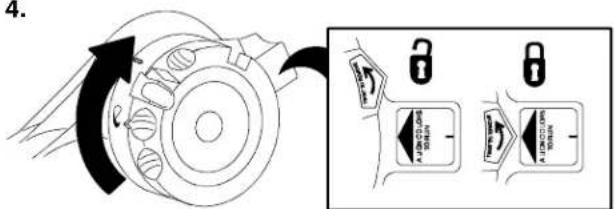
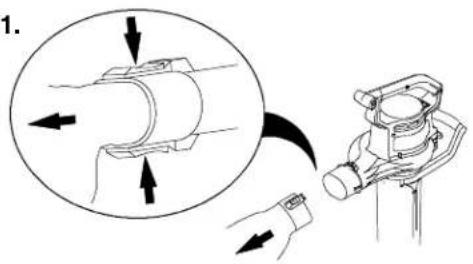
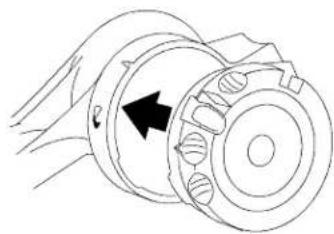
Important: Theblowerwillnotrununlessthebottom inletcoveristurnedclockwiseasfaraspossible, lockingitinplace(step4).
Operation ConnectingtoaPower Source
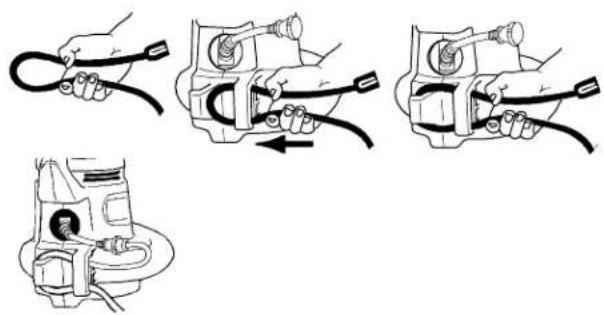
Useonlyanextensioncordrecommendedforoutdoor use.
natural_image
Illustration of a mechanical assembly with three steps showing hand positioning and cable installation (no text or symbols)
Warning

⚠️ If you donotfully seat the extension cordon the inlet plug, the loose plug could lead to overheating and cause a fire, possibly burning you or others.
⚠ Ensurethatyoufullyseatthecordonthe plugandusethecordlockfeaturetosecure thecord.
Important: Check the power cord frequently during use for holes in the insulation. Donot use a damaged cord. Donot run the cord through water or wet grass.
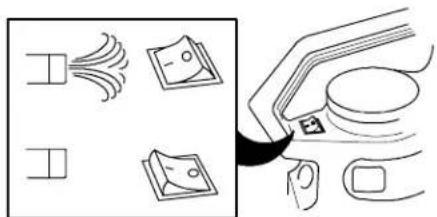
Starting/Stopping
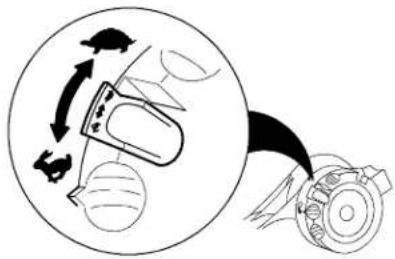
AdjustingtheBlowerAir Speed
natural_image
Diagram showing a device with directional arrows and a circular inset view of a mechanical component (no text or symbols)UsingtheConcentrator NozzleAccessory
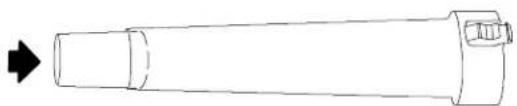
Installtheconcentratornozzleintotheblowertubeto helpreachintonarrowspacesortomovematted debrisoffofhardsurfaces.

natural_image
Simple line drawing of a cylindrical object with a handle and arrow indicating direction (no text or symbols)Removetheconcentratornozzlewhenfinished.
natural_image
Simple line drawing of a cylindrical object with an arrow pointing to it (no text or symbols)UsingtheBlower
Theblowerisintendedforresidentialuseonly. Use thebloweroutdoorstomovedebrisasneeded.

Caution

Theblowercanthrowdebris,possibly causingseriouspersonalinjurytothe operatorbystanders.Readandusethe followingprecautionswhenusingtheblower:
- Donotblowhardobjectssuchasnails, bolts,orrocks.
- Donotoperatetheblowernearbystanders orpets.
- Useextracarewhencleaningdebrisfrom stairsorothertightareas.
⚠️ • Wearsafetygogglesorothersuitableeye protection, longpants, and shoes.
UsingtheVacuum

Caution

Thevacuumcanthrowdebris,possibly causingseriouspersonalinjurytothe operatororbystanders.
⚠️ Donotoperatethevacuumwithoutthebag installedorwiththebagzipperopen.
⚠️ Donotvacuumsharp, pointed, or hard object that could be thrown through the fabric of the bag, such as wires, staples, nails, or rocks.
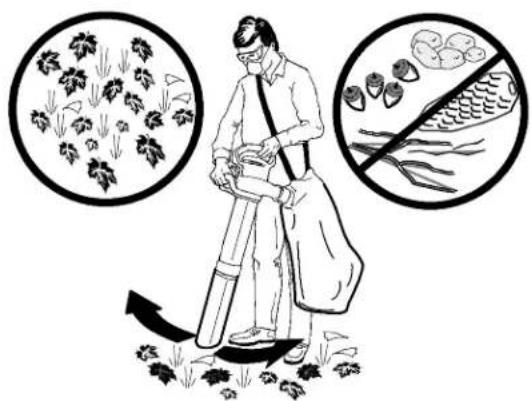
natural_image
Illustration of a person cleaning grass with circular insets showing leafy plants and a fish (no text or symbols)Important: Donotforcethevacuumtubeintoapile ofdebrisorholdthetubeuprightwhileforcefeeding debrisintothetube. Eitheractionmayclogand damagetheimpeller. Ifthevacuumstartstovibrate ormakeabnormalnoise,stopit,unplugthecord, andcheckforthecause.
EmptyingtheBag
- Turnoff and unplug the vacuum from the power source.
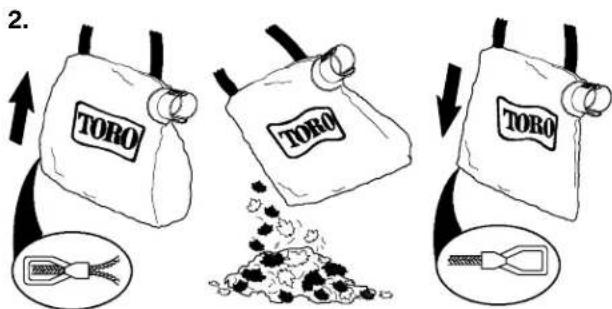
Donotstoredebrisinthebag.Tocleanthebag,turn itinsideoutandshakeoutanyexcessdebris.Once ayear,handwashthebaginsoapywaterandallowit toairdry.

Warning

Normalusageofthebagcausesittowear anddeteriorateovertime.Awornor deterioratedbagallowssmallobjectstobe thrownthroughthebag,possiblyinjuringthe operatorbystanders.
⚠️ Checkthebagfrequently.Ifitiswornor deteriorated,replaceitwithagenuineToro vacuumbag.
RemovingCloggedDebris fromthelmpeller
- Turn off and unplug the vacuum from the power source and wait for all moving part to stop.
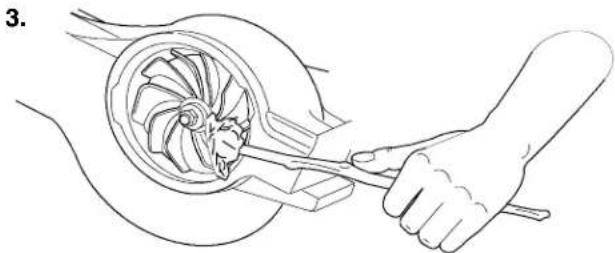
natural_image
Line drawing of a hand using a tool to adjust or install a turbine component (no text or symbols present)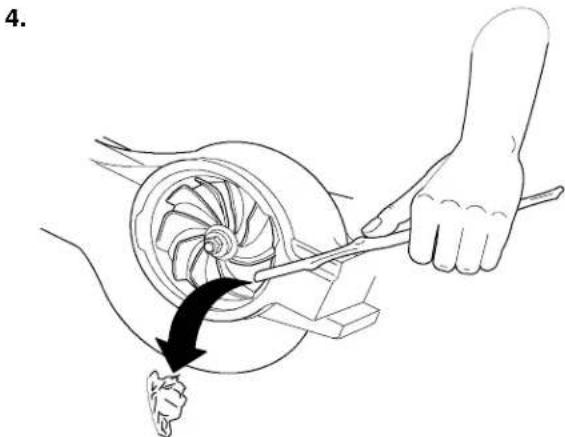
natural_image
Illustration of a hand using a tool to adjust or install a turbine component, with a black arrow indicating the motion direction (no text or symbols present)-
Check the impeller for any sign of damage. If it is damaged, contact your Authorized Toro Dealer.
-
Install the vacuum tube or if you want to switch to blower mode, the bottom inlet cover. Referto Converting from Blow to Vacuum or Converting from Vacuum to Blower form more information.
Storage
Storetheblower/vacuumandextensioncordindoors, inacooldrylocation,outofreachofchildrenand animals.
Troubleshooting
If your blower fail for un when you turn it on, consult the following list before contacting your Authorized Toro Dealer:
- Ensure that the bottominlet cover or vacuum tube is locked in place.
- Ensure that the power cord is secured in place on the back of the blower and that the plug is fully seated.
Service
Torohasdesignedthisproducttogiveyouyearsof troublefreeuse.Shoulditneedservice,bringthe producttoyourAuthorizedToroServiceDealer.Your ToroDealerisspeciallytrainedtofixToroproducts andwillensurethatyourTorostays"All"Toro.
Double-insulated Appliances
Inadouble-insulatedappliance,twosystemsof insulationareprovidedinsteadofgrounding.No groundingmeansisprovidedonadouble-insulated appliance,norshouldameansforgroundingbe addedtotheappliance.Servicingadouble-insulated appliancerequiresextremecareandknowledgeof thesystem,andshouldbedoneonlybythequalified servicepersonnelatyourAuthorizedToroService Dealer.Replacementpartsforadouble-insulated appliancemustbeidenticaltothepartstheyreplace. Adouble-insulatedapplianceismarkedwiththe words"DoubleInsulation"or"DoubleInsulated."The symbol(squarewithinasquare) mayalsobe markedontheappliance.
Subject to the warranty condition below, thistool (hereinaftercalled "theproduct") is warranted by Toro Australia (hereinaftercalled "theCompany") to be free from defect in material or workmanship for a period of 24 months from the date of original purchase recovering both parts and labour. Under the term so this warranty, therepair or replacement of any part shall be the opinion of the Company or its authorised agent. Should service become necessary during the warranty period, the owners should contact the Authorised Toro Retailer from whom the product was purchased, orthenearest Company Branch Office. In order to obtain warranty service, the owner must present the sales docket and Warranty Certificato confirm date of purchase. This product is sold by the dealer or agent as principal, and the dealer has no authority from the Company to give any additional warranty guarantee on the Company's behalf except a herein contained or herein referred to.
WarrantyConditions
This warranty applies provided the product has been used in accordance with the manufacturer's recommendations under normal use and reasonable
care(intheopinionoftheCompany), and such warranty does not cover damage, malfunction or failureresulting from misuse, neglect, abuse or use for purpose for which it was not designed or not suited; and no repairs, alterations or modifications have been attempted by other than an Authorised Service Agent. This guarantee will not apply if the tool is damaged by accident or if repairs arise from normal wear and tear.
TheCompanyacceptsnoadditionalliability pursuanttothiswarrantyforthecostsoftravelling ortransportationoftheproducttoandfromthe servicedealeroragent--whichcostsarenot includedinthiswarranty.
Certainlegislation,includingtheTradePractices Act,1974(asamended)andotherstateand territoriallawsgiverightstothebuyerandimpose liabilityonthesellerincertaincircumstances. Nothinghereinshallhavetheeffectofexcluding, restrictingormodifyinganycondition,warranty, rightorliabilityimposed,totheextentonlythatsuch exclusion,restrictionormodificationwouldrender anytermhereinvoid.
ToroAustraliaPtyLimited
A.C.N.001310443IncorporatedinS.A.
Adelaide:53HowardsRoad,Beverley,SA5009131588
Brisbane:Unit2,480NudgeeRoad,Hendra QLD4011(07)32681385
Perth:Unit3,21LedgarRoad,BalcattaWA6021(08)94783773
Sydney:Unit4,148-308JamesRuseDrive ParramattaNSW2150(02)96872366
Melbourne:59WoodlandsDrive,Braeside, VIC3195(03)95807355
This Warranty Form should be retained by the customer at all times
Foryourrecordandtoassistinestablishingdateofpurchase(necessaryforin-warrantyservice),please keepyourpurchasedocketandthisformcompletedwiththefollowingparticulars:
Purchasingfrom:
AddressofDealer:
Date: ModelNo.SerialNo.
Present this form with your purchased socket when warranty service is required.
- TORO®
- Superblower/Vac
- Blower/Vacuum
- ModelNo.51521—200000001&Up
- Important Safety Instructions
- ReadAllInstructionsBefore UsingThisAppliance
- SoundPressureLevel
- SoundPowerLevel
- VibrationLevel
- SaveTheseInstructions
- Symbol@bssary
- Assembly AssemblingtheBlower
- ConvertingfromBlower toVacuum
- Caution
- ConvertingfromVacuum toBlower
- Operation ConnectingtoaPower Source
- Warning
- Starting/Stopping
- AdjustingtheBlowerAir Speed
- UsingtheConcentrator NozzleAccessory
- UsingtheBlower
- UsingtheVacuum
- EmptyingtheBag
- RemovingCloggedDebris fromthelmpeller
- Storage
- Troubleshooting
- Service
- Double-insulated Appliances
- WarrantyConditions
- ToroAustraliaPtyLimited
- This Warranty Form should be retained by the customer at all times
Marque : TORO
Modèle : 51521
Catégorie : Souffleur