
76833 - Hotte KENMORE - Notice d'utilisation et mode d'emploi gratuit
Retrouvez gratuitement la notice de l'appareil 76833 KENMORE au format PDF.

| Type de produit | Cuisère à gaz (gaziniàre) avec four |
| Marque | Kenmore |
| Modèle | 76833 (série 982.7683#) |
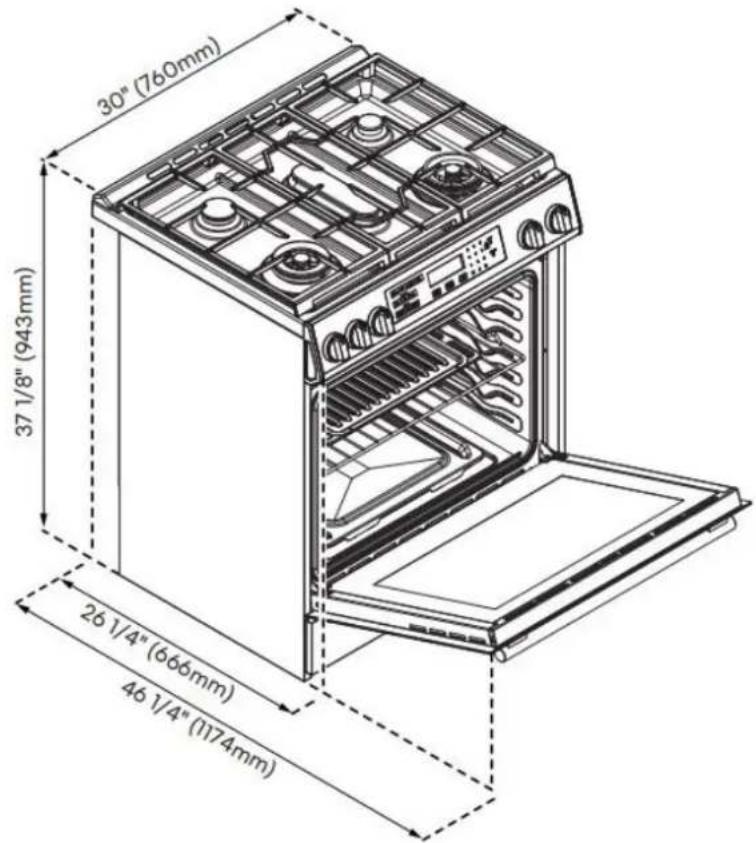
| Dimensions (L x P x H) | 76,2 cm x 94,3 cm x 117,4 cm |
| Poids | Environ 70 kg |
| Alimentation électrique | 120 V, 60 Hz, 15 A (prise 3 broches avec mise à la terre) |
| Alimentation gaz | Gaz naturel (convertible en propane avec kit optionnel) |
| Brûleurs de surface | 5 brûleurs : auxiliaire, semi-rapide, rapide, triple couronne, ovale |
| Allumage | Électronique (allumage manuel possible en cas de panne de courant) |
| Fonctions du four | Cuisson (Bake), Gril (Broil), Maintien au chaud / Levée de pâte (Warm/Proof) |
| Plage de température du four | 77 – 288 °C (170 – 550 °F) |
| Éclairage du four | Ampoule standard 25 W (G9) |
| Matériaux | Acier inoxydable, émail, porcelaine sur les grilles et chapeaux de brûleurs |
| Nettoyage | Surface : nettoyant doux ; four : détergent doux (pas de nettoyant pour four auto-nettoyant) |
| Sécurité | Dispositif anti-bascule, détection de flamme, verrouillage enfant (hold Start 3s) |
| Pièces détachées | Grilles, chapeaux de brûleurs, diffuseurs, ampoules, résistances de four |
| Réparabilité | Réparation par un technicien qualifié ; pièces disponibles auprès de Kenmore |
| Informations générales | Garantie limitée Kenmore ; installation confiée à un professionnel |
FOIRE AUX QUESTIONS - 76833 KENMORE
Questions des utilisateurs sur 76833 KENMORE
0 question sur cet appareil. Repondez a celles que vous connaissez ou posez la votre.
Poser une nouvelle question sur cet appareil
Téléchargez la notice de votre Hotte au format PDF gratuitement ! Retrouvez votre notice 76833 - KENMORE et reprennez votre appareil électronique en main. Sur cette page sont publiés tous les documents nécessaires à l'utilisation de votre appareil 76833 de la marque KENMORE.
MODE D'EMPLOI 76833 KENMORE
Use & Care Guide
Kenmore®
Gas Range
Model: 982.7683#
Transform SR Brands Management LLC Hoffman Estates, IL, U.S.A. 60179 U.S.A www.kenmore.com

PRODUCT RECORD
In the space below, record the date of purchase, model and serial number of your product. You will find the model and serial number printed on an identification label located on the inside right lip of the oven cavity. Have these items of information available whenever you contact Sears concerning your product.
Model No. Date of Purchase
Serial No.
Save these instructions and attach your sales receipt for future reference.
Kenmore Limited Warranty
Kenmore ^® products are sold and distributed by Kenmore and Kenmore authorized distributors and licensees in various countries.
For information on the limited warranty and authorized provider applicable to your product and country please visit: https://www.kenmore.com/warranty-information/
For a printed copy please contact us at 1-844-553-6667 or at the address below:
ATTN: Kenmore Warranty Request
5407 Trillium Suite B120
Hoffman Estates, IL 60192
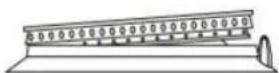
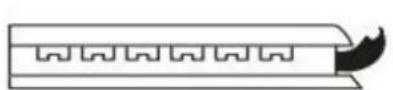
TABLE OF CONTENTS
RANGE SAFETY....6
OVERVIEW....13
CONTROL PANEL....15
COOKTOP USE....18
OVEN USE....20
RANGE CARE....25
TROUBLESHOOTING....29
Installation Requirements....32
Installation Instructions....44
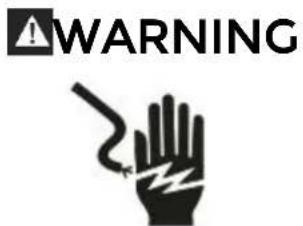
WARNING

Fire Hazard
If the information in this manual is not followed exactly, a fire or explosion may result causing property damage, personal injury or death.
- Do not store or use gasoline or other flammable vapors and liquids in the vicinity of this or any other appliance.
- WHAT TO DO IF YOU SMELL GAS
• Do not try to light any appliance.
• Do not touch any electrical switch.
• Do not use any phone in your building.
• Clear the room, building, or area of all occupants.
- Immediately call your gas supplier from a neighbor's phone. Follow the gas supplier's instructions.
• If you cannot reach your gas supplier, call the fire department.
- Installation and service must be performed by a qualified installer, service agency or the gas supplier.
WARNING
Never Operate the Top Surface Cooking Section of this Appliance Unattended.
- Failure to follow this warning statement could result in fire, explosion, or burn hazard that could cause property damage, personal injury, or death.
- If a fire should occur, keep away from the appliance and immediately call your fire department.
DO NOT ATTEMPT TO EXTINGUISH AN OIL/GREASE FIRE WITH WATER
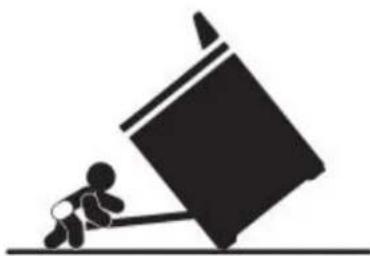
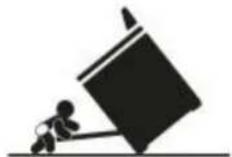
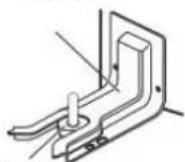
THE ANTI-TIP BRACKET
WARNING
natural_image
Silhouette of a person pushing a large object on a flat surface (no text or symbols)Tip Over Hazard
A child or adult can tip the range and be killed.
Connect anti-tip bracket to rear range foot.
Reconnect the anti-tip bracket, if the range is moved.
See the installation instructions for details.
Failure to follow these instructions can result in death or serious burns to children and adults.
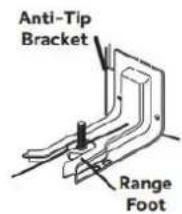
Making sure the anti-tip bracket is installed:
- Slide range forward.
- Look for the anti-tip bracket securely attached to floor.
- Slide range back so rear range foot is under anti-tip bracket.
WARNING Gas leaks cannot always be detected by smell.
Gas suppliers recommend that you use a gas detector approved by UL or CSA. For more information, contact your gas supplier.
WARNING Do not install a ventilation system that blows air downward toward this cooking appliance. This type of ventilation system may cause ignition and combustion problems with this cooking appliance resulting in personal injury or unintended operation.
Your safety and the safety of others are very important.
We have provided many important safety messages in this manual and on your appliance. Always read and obey all safety messages.

This is the safety alert symbol.
This symbol alerts you to potential hazards that can kill or hurt you and others.
All safety messages will follow the safety alert symbol and either the word "DANGER," "WARNING" or "CAUTION." These words mean:
| DANGER | You can be killed or seriously injured if you don't immediately follow instructions. |
| WARNING | You can be killed or seriously injured if you don't follow instructions. |
| CAUTION | A potentially hazardous situation which, if not avoided, could result in minor or moderate injury. |
All safety messages will tell you what the potential hazard is, tell you how to reduce the chance of injury, and tell you what can happen if the instructions are not followed.
In the State of Massachusetts, the following installation instructions apply:
• Installations and repairs must be performed by a qualified or licensed contractor, plumber, or gasfitter qualified or licensed by the State of Massachusetts.
• If using a ball valve, it shall be a T-handle type.
• A flexible gas connector, when used, must not exceed 3 feet.
State of California Proposition 65 Warnings:

WARNING This product contains bisphenol A(BPA), which is known to the state of
California to cause birth defects, or other reproductive harm, and lead and lead compounds, which are known to the state of California to cause cancer and birth defects or other reproductive harm.
For more information, go to : www.P65Warnings.ca.gov.
IMPORTANT SAFETY INSTRUCTIONS
WARNING To reduce the risk of fire, electrical shock, injury to persons, or damage when using the range, follow basic precautions, including the following:
- WARNING TO REDUCE THE RISK OF TIPPING OF THE RANGE, THE RANGE MUST BE SECURED BY PROPERLY INSTALLED ANTI-TIP DEVICES. TO CHECK IF THE DEVICES ARE INSTALLED PROPERLY, SLIDE RANGE COMPLETELY FORWARD, LOOK FOR ANTI-TIP BRACKET SECURELY ATTACHED TO THE FLOOR OR WALL, AND SLIDE RANGE BACK SO THE REAR RANGE FOOT IS UNDER ANTI-TIP BRACKET.
- WARNING NEVER use this appliance as a space heater to heat or warm the room. Doing so may result in carbon monoxide poisoning and overheating of the oven.
- WARNING NEVER cover any slots, holes or passages in the oven bottom or cover an entire rack with materials such as aluminum foil. Doing so blocks airflow through the oven and may cause carbon monoxide poisoning. Aluminum foil linings may also trap heat, causing a fire hazard.
- CAUTION Do not store items of interest to children in cabinets above a range or on the back guard of a range - children climbing on the range to reach items could be seriously injured. - Do Not Leave Children Alone - Children should not be left alone or unattended in area where range is in use. They should never be allowed to sit or stand on any part of the range.
- Wear Proper Apparel – Loose fitting or hanging garments should never be worn while using the range.
- User Servicing – Do not repair or replace any part of the range unless specifically recommended in the manual. All other servicing should be referred to a qualified technician.
- Storage in or on Range – Flammable materials should not be stored in an oven or near surface units.
- This appliance is not intended for storage.
READ AND SAVE THESE INSTRUCTIONS
IMPORTANT SAFETY INSTRUCTIONS
- Do Not Use Water on Grease Fires - Smother fire or flame or use dry chemical or foam-type extinguisher.
- Use Only Dry Potholders - Moist or damp potholders on hot surfaces may result in burns from steam. Do not let potholder touch hot heating elements. Do not use a towel or other bulky cloth.
- Never Leave Surface Units Unattended at High Heat Settings – Boilover causes smoking and greasy spillovers that may ignite.
- Glazed Cooking Utensils – Only certain types of glass, glass/ceramic, ceramic, earthenware, or other glazed utensils are suitable for range top service without breaking due to the sudden change in temperature.
- Utensil Handles Should Be Turned Inward and Not Extend Over Adjacent Surface Units - To reduce the risk of burns, ignition of flammable materials, and spillage due to unintentional contact with the utensil, the handle of a utensil should be positioned so that it is turned inward, and does not extend over adjacent surface units.
- Disconnect power before servicing.
- Proper Installation – The appliance, when installed, must be electrically grounded in accordance with local codes, or in the absence of local codes, with the National Electrical Code, ANSI/NFPA 70 or the Canadian Electrical Code, CSA C22.1-02. In Canada, the appliance must be electrically grounded in accordance with Canadian Electrical Code. Be sure your appliance is properly installed and grounded by a qualified technician.
- Injuries may result from misuse of appliance doors or drawers such as stepping, leaning, or sitting on the doors or drawers.
- Maintenance – Keep range area clear and free from combustible materials, gasoline, and other flammable vapors and liquids.
- Do not let cooking grease or other flammable materials accumulate in or near the range. Grease in the oven or on the cooktop may ignite.
- Top burner flame size should be adjusted so it does not extend beyond the edge of the cooking utensil. This instruction is based on safety considerations.
READ AND SAVE THESE INSTRUCTIONS
IMPORTANT SAFETY INSTRUCTIONS
- Do not use replacement parts that have not been recommended by the manufacturer (e.g. parts made at home using a 3D printer).
- Clean Cooktop With Caution – If a wet sponge or cloth is used to wipe spills on a hot cooking area, be careful to avoid steam burn. Some cleaners can produce noxious fumes if applied to a hot surface.
- Use Care When Opening Door - Let hot air or steam escape before removing or replacing food.
- Do Not Heat Unopened Food Containers - Build-up of pressure may cause container to burst and result in injury.
- Keep Oven Vent Ducts Unobstructed.
- Never broil with door open. Open-door broiling is not permitted due to overheating of control knobs.
-
Placement of Oven Racks – Always place oven racks in desired location while oven is cool. If rack must be moved while oven is hot, do not let potholder contact hot heating element in oven.
-
Care must be taken to prevent aluminum foil and meat probes from contacting heating elements.
- DO NOT TOUCH HEATING ELEMENTS OR INTERIOR SURFACES OF OVEN – Heating elements may be hot even though they are dark in color. Interior surfaces of an oven become hot enough to cause burns. During and after use, do not touch, or let clothing or other flammable materials contact heating elements or interior surfaces of oven until they have had sufficient time to cool. Other surfaces of the appliance may become hot enough to cause burns – among these surfaces are cooktop, burners, grates, oven vent openings and surfaces near these openings, oven doors, windows of oven doors, and crevices around the oven doors.
- Top burner flame size should be adjusted so it does not extend beyond the edge of the cooking utensil.
- Have the installer show you the location of the range gas shut-off valve and how to turn it off if necessary.
READ AND SAVE THESE INSTRUCTIONS
IMPORTANT SAFETY INSTRUCTIONS
- Proper Disposal of Your Appliance - Dispose of or recycle your appliance in accordance with Federal and Local Regulations. Contact your local authorities for the environmentally safe disposal or recycling of your appliance.
For units with ventilating hood - - Clean Ventilating Hoods Frequently - Grease should not be allowed to accumulate on hood or filter. - When flambé cooking under the vent hood, turn the fan on.
For self-cleaning ranges - - Do Not Clean Door Gasket - The door gasket is essential for a good seal. Care should be taken not to rub, damage, or move the gasket. - Do Not Use Oven Cleaners - No commercial oven cleaner or oven liner protective coating of any kind should be used in or around any part of the oven. - Clean Only Parts Listed in Manual. - Before Self-Cleaning the Oven - Remove broiler pan and other utensils. Wipe off all excessive spillage before initiating the cleaning cycle.
READ AND SAVE THESE INSTRUCTIONS
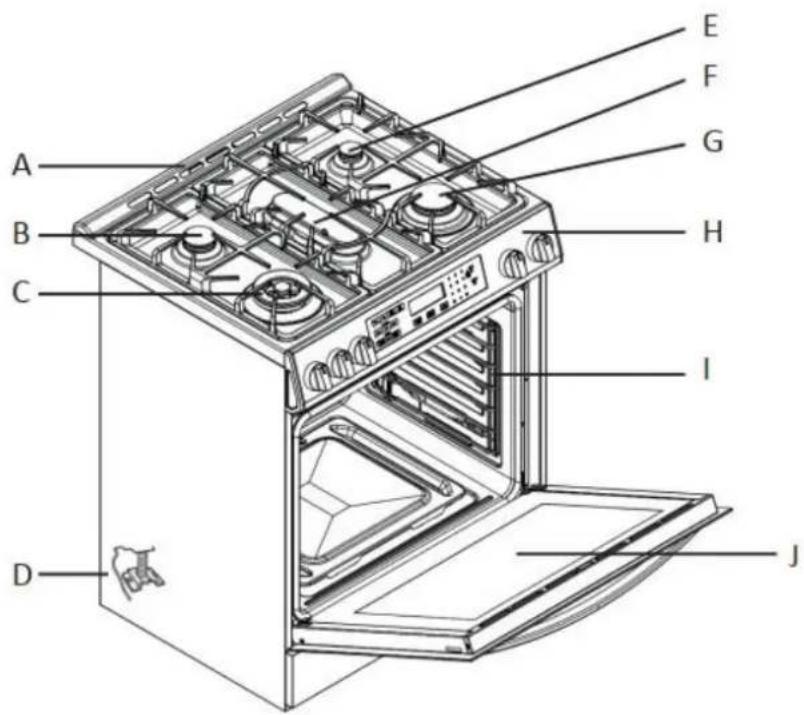
A Backsplash
B Semi-Rapid Burner
C Triple Burner
D Anti-tip Bracket
E Auxiliary Burner
F Oval Burner
G Rapid Burner
H Control Panel
I Oven Rack Positions
J Oven Door Window
BURNER LAYOUT
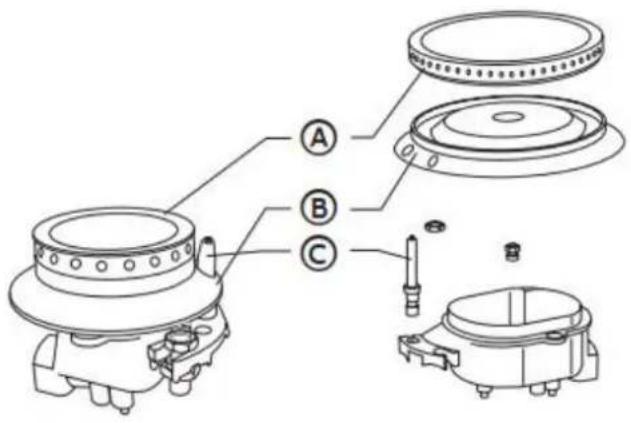
A Burner Cap
B Burner Head
C Electrode
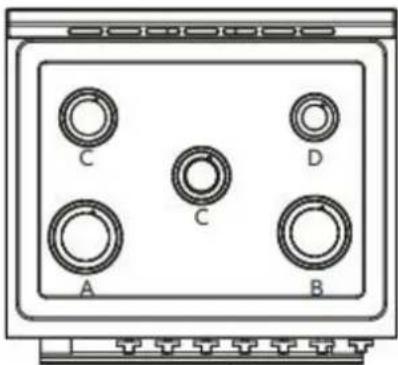
CONTROL PANEL

A Front Left Burner
B Rear Left Burner
C Oven Touch Control
C Middle Burner
D Rear Right Burner
E Front Right Burner
G Cook Time
H Delay Start
I Settings
J Timer
K Light
L Start/Control Lock (hold 3 seconds)
M Cancel
N Display

Child lock icon – After holding "Start" button for 3 seconds, the icon will appear on the display.
IMPORTANT: Clock must be set in order for the timed oven functions to work.
NOTE: In the event of a power failure, all settings including the clock time set will be lost.
When the power is returned, clock must be set again.
Oven Settings Guide
Clock
- Press "Settings" repeatedly until the display shows "---:-- Timed".
- Press numbers to enter the time.
- Press "Start" to save.
Selecting Fahrenheit or Celsius
- Press "Settings" repeatedly until "Unit" appears in the display.
- Press "1" to select F (Fahrenheit) or (Celsius).
- Press "Start" to save.
Sound
- Press "Settings" repeatedly until "Snd" appears in the display.
- Press "1" to select On or Off.
- Press "Start" to save.
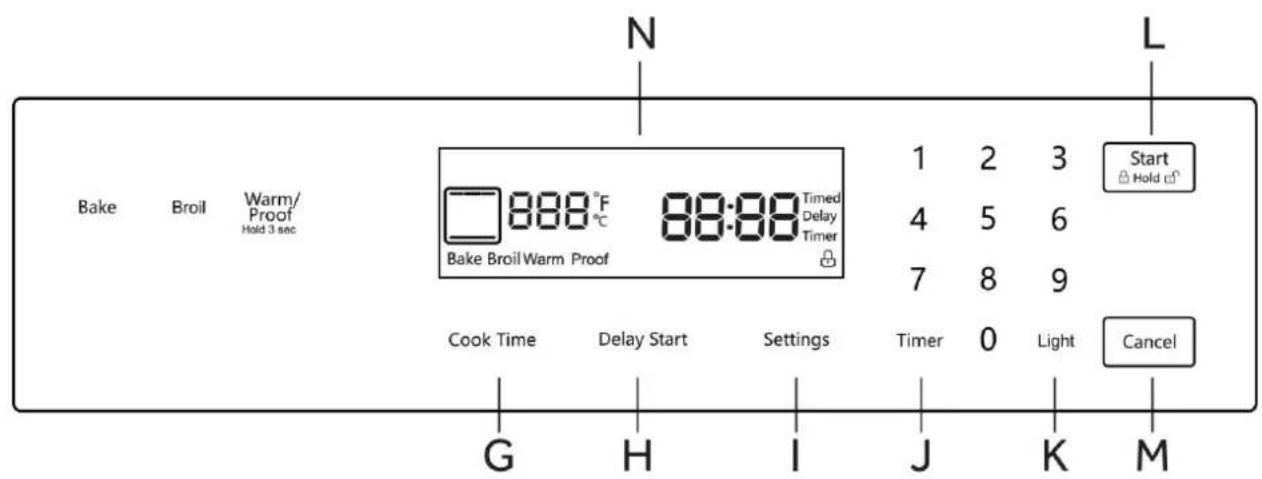
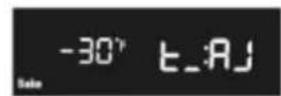
Adjusting the Oven Temperature
- Press "Settings" repeatedly until "t_AJ" appears in the display.
- Press "1" to select the mode you want to adjust temperature.
- Press "3" or "6" to select the temperature.
- Press "Start" to save.
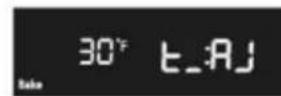
Demo mode
- Press "Settings" repeatedly until "dEno" appears in the display.
- Press "1" to select On or Off.
- Press "Start" to save.


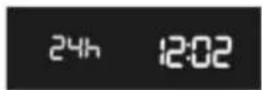
Setting the Hour Mode
- Press "Settings" repeatedly until "12h" or "24h" appears in the display.
- Press "1" to select "12h" or "24h".
- Press "Start" to save.
COOKTOP USE
Read the instructions before installing or using this appliance.
- This appliance shall be installed in accordance with the regulations in force and only used in a well-ventilated space.
- The use of a gas-cooking appliance results in the production of heat and moisture in the room in which it is installed. Ensure that the kitchen is well ventilated: keep natural ventilation holes open or install a mechanical ventilation device (mechanical extractor hood).
- Prolonged intensive use of the appliance may call for additional ventilation, for example opening of a window, or more effective ventilation, for example increasing the level of mechanical ventilation where present.
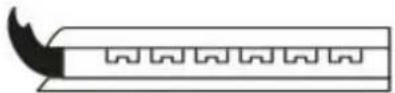
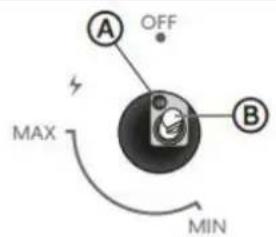
IGNITION AND OPERATION OF THE BURNERS
To ignite a burner, push down on the burner knob and rotate it counterclockwise until the knob indicator is aligned with the ignite icon. Release the knob and adjust the flame intensity by further rotating the knob counterclockwise from MAX (maximum) to MIN (minimum).
NOTE: For models with a flame failure safety device - Once the flame is lit, hold the knob depressed for about 3-4 seconds until the device keeps the burner automatically lit. If the burner fails to ignite, wait one minute for the gas to dissipate before attempting to reignite. To turn off the burner, rotate the knob clockwise until the indicator on the knob is aligned with OFF.
POWER FAILURE
In case of prolonged power failure, the surface burners can be lit manually. Hold a lit match near a burner and turn knob counterclockwise until the indicator is aligned with MAX. After the burner is lit, turn knob to desired setting.
In the case of unintentional flame extinguishing, the safety valve intervenes by shutting off the gas to the burners.
The electric igniter must not be actuated for longer than 15 seconds. Should the burner not light, or should the burner be unintentionally turned off, immediately close the burner, and wait at least 1 minute before repeating. Once ignited, adjust the flame as desired.
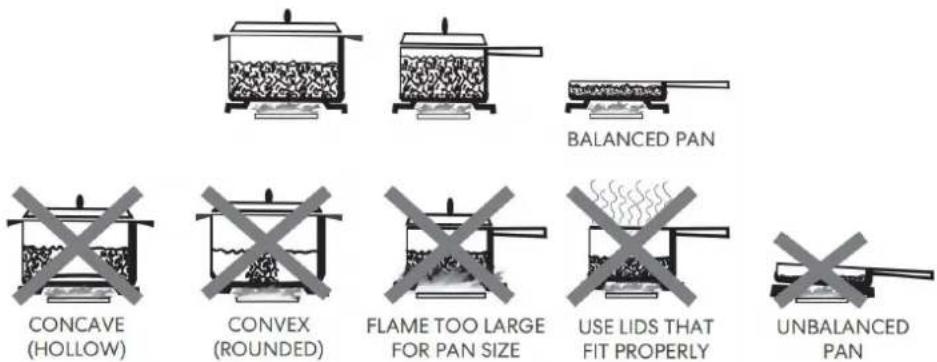
For lower gas consumption and a better result, use saucepans with a diameter matching the diameter of the burner, to avoid the flame coming up around the sides of the saucepan. See the Container Table. Use only flat-bottomed pans.
As soon as liquid starts to boil, turn the flame down to a level sufficient to maintain boiling.
COOKWARE
MATCH PAN DIAMETER TO FLAME SIZE
The flame should be the same size as the bottom of the pan or smaller. Do not use small pans with high flame settings as the flames can lick up the sides of the pan. Oversize pans that span two burners are placed front to rear, not side to side.
USE BALANCED PANS
Pans must sit level on the cooktop grate without rocking. Center the pan over the burner.
USE A LID THAT FITS PROPERLY
A well-fitting lid helps shorten the cooking time. Flat, heavy bottom pans provide even heat and stability.
CONTAINER TABLE
| Burner | Min Saucepan | Max Saucepan |
| Auxiliary | 3.5" (9.0 cm) | 6.3" (16 cm) |
| Semi-rapid | 5.1" (13 cm) | 7.1" (18 cm) |
| Rapid | 5.9" (15 cm) | 10.2" (26 cm) |
| Triple ring | 8.3" (21 cm) | 10.2" (26 cm) |
OVEN USE
This oven includes the functions of traditional oven modes. Use the Cooking Mode control, located on the control panel, to select the oven mode.
BEFORE USING THE OVEN FOR THE FIRST TIME
- Close the oven door.
- Press Bake.
- Press 500°F (260°C) on the number keypad.
- Press Start.
NOTE: Allow the oven to operate for 30 minutes with the door closed and no food in the cavity.
- ool.
NOTE: Any odor that may be detected during this initial use is due to the evaporation of substances used to protect the oven during storage.
GENERAL
IMPORTANT: Do not place anything, including dishes, foil and oven trays, on the bottom of the oven when it is in operation to avoid damaging the enamel.
- Place bakeware with food on the rack provided with the oven.
- Close the oven door.
NOTE: The oven cannot be set with the door open.
- Press the desired oven mode ie. BAKE.
- Set the oven to the desired temperature.
- Press START.
OVEN RACKS
The oven racks can be placed in any of the six height positions within the oven.
Oven racks have a stop to keep them from being unintentionally withdrawn fully.
PREHEATING
When beginning a Bake cycle, the oven will begin preheating after Start is pressed. The oven will take approximately 12 to 15 minutes to reach 350^ F ( 177^ C) with all of the oven racks provided with your oven inside the oven cavity. Higher temperatures will take longer to preheat. The preheat cycle rapidly increases the oven temperature. The actual oven temperature will go above your set temperature to offset the heat lost when you open the oven door to place the food on the rack. This ensures that cooking will begin at the proper temperature. Do not open the door while the oven is preheating. When the oven has heated to the set temperature, a tone will sound. You can then open the door and place food in the oven.
OVEN MODES
BAKE
Baking is cooking with heated air. Lower burner in the oven is used to heat the air but no fan is used to circulate the heat.
Follow the recipe or convenience food directions for baking temperature, time and rack position. Baking time will vary with the temperature of ingredients and the size, shape and finish of the baking utensil.
The temperature can be set from 170^ F ( 77^ C) to 550^ F ( 288^ C).
General Guidelines
- For best results, bake food on a single rack with at least 1'' - 1^1/2'' (2.5 - 4 cm) space between bakeware and oven walls.
- Use one rack when selecting the bake mode.
- Check for doneness at the minimum time.
- Use metal bake ware (with or without a non stick finish), heatproof glass, glass ceramic, pottery or other utensils suitable for the oven.
- When using heatproof glass, reduce temperature by 25^ (15°C) from recommended temperature.
- Use baking sheets with or without sides or jelly roll pans.
- Dark metal pans or nonstick coatings will cook faster with more browning. Insulated bake ware will slightly lengthen the cooking time for most foods.
- Do not use aluminum foil or disposable aluminum trays to line any part of the oven. Foil is an excellent heat insulator and heat will be trapped beneath it. This will alter the cooking performance and can damage the finish of the oven.
- Avoid using the opened door as a shelf to place pans.
• See Troubleshooting for tips to Solving Baking Problems.
Bake Chart
| FOOD ITEM | RACK POSITION | TEMP. °F (°C) (PREHEATED OVEN) | TIME (MIN) |
| Cake | |||
| Cupcakes | 2 | 350 (175) | 19-22 |
| Bundt Cake | 1 | 350 (175) | 40-45 |
| Angel Food | 1 | 350 (175) | 35-39 |
| Pie | 2 | 375-400 (190-205) | 45-50 |
| 2 crust, fresh, 9" | 2 | 375 (190) | 68-78 |
| 2 crust, frozen fruit, 9" | |||
| Cookies | |||
| Sugar | 2 | 350-375 (175-190) | 8-10 |
| Chocolate Chip | 2 | 350-375 (175-190) | 8-13 |
| Brownies | 2 | 350 (175) | 29-36 |
| Breads | |||
| Yeast bread loaf, 9x5 | 2 | 375 (190) | 18-22 |
| Yeast rolls | 2 | 375-400 (190-205) | 12-15 |
| Biscuits | 2 | 375-400 (190-205) | 7-9 |
| Muffins | 2 | 425 (220) | 15-19 |
| Pizza | |||
| Frozen | 2 | 400-450 (205-235) | 23-26 |
| Fresh | 2 | 475 (246) | 15-18 |
To Bake:
- Close the oven door.
NOTE: The oven controls cannot be set if the oven door is open.
2. Press BAKE. "BAKE" will appear in the display, and 350°F (177°C) will be displayed.
3. Press START, if you wish to bake at 350^ F ( 177^ C).
OR
Enter the desired temperature by pressing the number keypad, and then press START. The temperature can be set from 170^ F ( 77^ C) to 550^ F ( 288^ C).
NOTES:
- The temperature may be changed at any time during cooking. Press CANCEL to clear the settings. Select oven mode, then enter the desired temperature by pressing the number keypad, and then press START.
-
After selecting an Oven Mode and Temperature, you have the option to set a Cook Time before pressing START.
-
Once START has been pressed, the oven will begin to preheat. When the oven has reached the set temperature, a tone will sound.
-
Place the food in the oven and close the oven door when preheat is complete.
- Press CANCEL when finished cooking, and remove food from the oven.
BROIL
Broiling uses direct radiant heat to cook food. The lower the temperature, the slower the cooking. Thicker cuts and unevenly shaped pieces of meat, fish and poultry may cook better at lower broiling temperatures.
NOTES:
• Before broiling, position rack according to the Broiling Chart.
- For best results, use a two-piece broiler pan with a grid (not provided). It is designed to drain juices which helps to avoid spatter and smoke.
- For proper draining, do not cover the grid with foil. The bottom of the pan may be lined with aluminum foil for easier cleaning.
- Trim excess fat to reduce spattering. Slit the remaining fat on the edges to avoid curling.
- Select HI Broil 350°F (175°C) for most broiling. Select LO Broil 250°F (120°C) for low-temperature broiling for foods that take longer to cook, such as poultry, to avoid over browning.
- Pull out oven rack to stop position before turning or removing food. Use tongs to turn food to avoid the loss of juices. Very thin cuts of fish, poultry or meat may not need to be turned.
- After broiling, remove the pan from the oven when removing the food. Drippings will bake on the pan if left in the heated oven, making cleaning more difficult.
- Position food on grid in the broiler pan, then place it in the center of the oven rack. Close the oven door and set the control.
To Broil:
The temperature can be set between Hi (350°F (175°C)) and Lo (250°F (120°C)).
- Place the food in the oven, preheating is not necessary.
- Close the oven door.
- Press BROIL. "BROIL" and "Set temp or START" and "Hi" will be displayed.
- Press START, if you wish to broil at 350^ F ( 175^ C).
OR
Enter the desired temperature by pressing the number keypad, and then press START. The temperature can be set between Hi and Lo by pressing Broil button repeatedly. NOTES:
- The temperature can be changed at any time during cooking. Press CANCEL to clear the settings. Select oven mode, then enter the desired temperature by pressing the number keypad, and then press START.
- After selecting an Oven Mode and Temperature, you have the option to set a Cook Time before pressing START.
-
BROIL will appear in the display after Start is pressed.
-
When cooking is finished, press CANCEL, and then remove food from the oven.
WARM/PROOF
The Warm mode keeps hot, cooked foods at serving temperature.
The Proof mode prepares dough for baking by activating the yeast. Follow the recipe directions as a guide.

WARNING
Food Poisoning Hazard
Do not let food sit in oven more than one hour before or after cooking.
Doing so can result in food poisoning or sickness.
IMPORTANT: Food must be at serving temperature before placing it in the warmed oven. Food may be held up to 1 hour; however, breads and casseroles may become too dry if left in the oven during the Warm function. For best results, cover food.
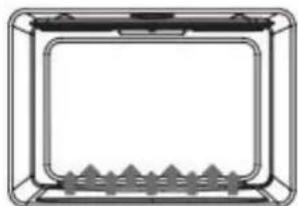
natural_image
Simple line drawing of a rectangular frame with a central rectangular area and triangular supports at the bottom (no text or symbols)Warm
-
Press WARM/PROOF, and then press WARM on the menu screen. "WARM" and 140°F (60°C) will be displayed.
-
Press START, if you wish to Warm food at 140°F (60°C).
OR
Enter the desired temperature by pressing the number keypad, and then press START. The temperature can be set from 140^ F ( 60^ C) to 210^ F ( 99^ C).
- "WARM" will appear in the display, once Start is pressed.
NOTE: After selecting an Oven Mode and Temperature, you have the option to set a Cook Time before pressing START.
-
Place food in the oven and close the door.
-
Press CANCEL when finished, and remove food from the oven.
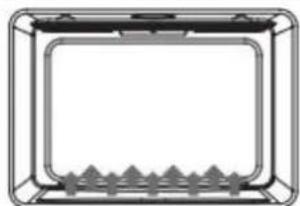
natural_image
Simple line drawing of a rectangular frame with a grid pattern at the bottom (no text or symbols)Proof
Before proofing, place the dough in a lightly greased bowl and cover loosely with wax paper, coated with shortening.
-
Place on second rack from the bottom and close the oven door.
-
Press WARM/PROOF, and then hold for 3 seconds. "PROOF" and 100^ (38°C) will be displayed.
-
Press START, if you wish to Proof dough at 100°F (38°C).
OR
Enter the desired temperature by pressing the number keypad, and then press START. The temperature can be set from 80^ (27°C) to 120^ (49°C).
- "PROOF" will appear in the display, once Start is pressed.
NOTE: After selecting an Oven Mode and Temperature, you have the option to set a Cook Time before pressing START.
-
Let the dough rise until nearly doubled in size, checking after 20-25 minutes. Proofing time may vary depending on dough type and quantity.
-
Press CANCEL when finished.
-
Before second proofing, shape the dough, place it in baking pan(s) and cover loosely with plastic wrap, coated with cooking spray. Follow the same placement and control steps above. Before baking, remove the plastic wrap.
RANGE CARE
CLEANING
IMPORTANT: Before cleaning, make sure all controls are off and the oven and cooktop are cool. Always follow label instructions on cleaning products. Soap, water and a soft cloth or sponge are suggested first unless otherwise noted. Do not use abrasive cleaning products.
EXTERIOR PORCELAIN ENAMEL SURFACES
Food spills containing acids, such as vinegar and tomato, should be cleaned as soon as the entire appliance is cool. These spills may affect the finish.
Cleaning Method:
Glass cleaner, mild liquid cleaner or nonabrasive scrubbing pad: Gently clean around the model and serial number plate because scrubbing may remove numbers.
EXTERIOR STAINLESS STEEL
NOTE: Do not use soap-filled scouring pads, abrasive cleaners, Cooktop Polishing Cream, steel-wool pads, gritty washcloths or some paper towels. Damage may occur, even with one-time or limited use.
Rub in direction of grain to avoid damaging.
Cleaning Methods:
Liquid detergent or all-purpose cleaner: Rinse well with clean water and dry with soft, lint-free cloth.
Stainless Steel Cleaner and Polish. Vinegar for hard water spots.
OVEN DOOR EXTERIOR
Cleaning Method:
Glass cleaner and paper towels or nonabrasive plastic scrubbing pad: Apply glass cleaner to soft cloth or sponge, not directly on panel.
PORCELAIN-COATED GRATES AND CAPS
- Clean as soon as cooktop, grates and caps are cool.
- Food spills containing acids, such as vinegar and tomato, should be cleaned as soon as the cooktop grates and caps are cool. These spills may affect the finish.
- To avoid chipping, do not bang grates and caps against each other or hard surfaces such as cast iron cookware.
• Do not reassemble caps on burners while wet.
Cleaning Method:
Nonabrasive plastic scrubbing pad and mildly abrasive cleanser.
BURNER SPREADER
Wash the burner spreader frequently with boiling water and detergent to remove any deposits which could block the flame outlet.
Before reinstalling, dry the burner spreader thoroughly so the burner will ignite properly.
COOKTOP CONTROL KNOBS
• Pull knobs straight away from control panel to remove.
- When replacing knobs, make sure knobs are in the Off position.
Cleaning Method:
Soap and water or dishwasher:
NOTE: Do not use steel wool, abrasive cleansers or oven cleaner. Do not soak knobs.
CONTROL PANEL
Cleaning Method:
Glass cleaner and soft cloth or sponge: Apply glass cleaner to soft cloth or sponge, not directly on panel.
NOTE: Do not use abrasive cleaners, steel-wool pads, gritty washcloths or some paper towels. Damage may occur.
OVEN CAVITY
Food spills should be cleaned when oven cools. At high temperatures, foods react with porcelain, so staining, etching, pitting or faint white spots can result.
Cleaning Method:
Mild detergent and warm water.
NOTE: Do not use oven cleaners.
OVEN RACKS AND ROASTING RACKS
Cleaning Method:
Steel-wool pad
OVEN DOOR REMOVAL
For normal oven use, there is no need to remove the oven door. However, should it become necessary to remove the door, follow the instructions in this section.
IMPORTANT:
• Make sure oven is cool and power to the oven has been turned off before removing the door.
- The oven door is heavy and fragile, and the door front is glass. To avoid oven door glass breakage, use both hands, and grasp only the sides of the oven door to remove.
- Be sure that both levers are securely in place before removing the door.
• Do not force door open or closed.
To remove the oven door:
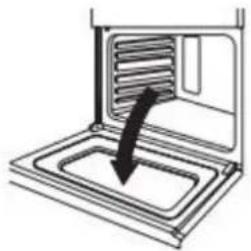
- Open the oven door completely.
natural_image
Diagram of a microwave oven with a downward arrow indicating cooling or ventilation (no text or symbols)- Lift up the hinge latch on each side.
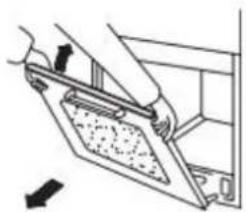
natural_image
Illustration of hands operating a mechanical device with a curved arrow indicating motion (no text or symbols)-
Close the oven door as far as it will shut.
-
While grasping both outside edges of the oven door, lift up on the door.
-
Continue to push the top of the door closed, while pulling the bottom of the door out of the hinge receivers in the door frame.
natural_image
Illustration of a hand using a tool to adjust or install a component, with no visible text or symbols.To replace the oven door:
- Insert both hanger arms into the hinge receivers in the door frame.
- Slowly open the oven door, and you will feel the door set into place.
- Move the hinge latches back into the locked position.
- Check that the door opens and closes freely. If it does not, repeat the door removal and replacement procedures.
Electrical Shock Hazard
Make sure the oven and lights are cool and power to the oven has been turned off before replacing the light bulb(s).
The lenses must be in place when using the oven. The lenses serve to protect the light bulb from breaking.
The lenses are made of glass. Handle carefully to avoid breakage.
Failure to do so could result in death, electric shock, cuts or burns.
The oven light is a standard 25 watt (G9) appliance bulb.
IMPORTANT: Before replacing the bulb, make sure the oven is cool and the controls are turned off.
WARNING:
- Make sure the oven and lights are cool and power to the oven has been turned off before replacing the light bulb(s).
- The lenses must be in place when using the oven. The lenses serve to protect the light bulb from breaking.
- The lenses are made of glass. Handle carefully to avoid breakage.
- Failure to do so could result in death, electric shock, cuts or burns.
REPLACING AN OVEN LIGHT
The oven light is a standard 25-watt (G9) appliance bulb.
IMPORTANT: Before replacing the bulb, make sure the oven is cool and the controls are turned off.
- Disconnect the power.
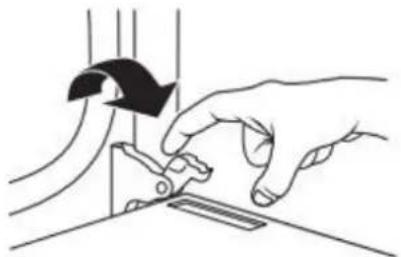
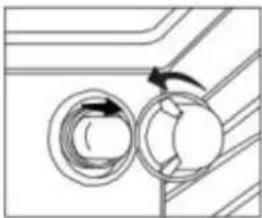
- Remove the bulb cover by turning it anti-clockwise.
natural_image
Pure diagram of two circular components with directional arrows, no text or symbols present- Remove the burned-out bulb from the socket.
NOTE: To avoid damage or decreasing the life of the new bulb, do not touch the bulb with bare fingers. Wear gloves or use a tissue when replacing the light bulb.
- Replace the bulb, and then replace the bulb cover.
- Reconnect the power.
TROUBLESHOOTING
First try the solutions suggested here to possibly avoid the cost of a service call.
BAKING PROBLEMS
With any oven setting poor results can occur for many reasons other than a malfunction of the oven. Check the chart below for causes of the most common problems. Since the size, shape and material of baking utensils directly affect the baking results, the best solution may be to replace old baking utensils that have darkened and warped with age and use.
| PROBLEM | CAUSE |
| Food browns unevenly | Oven not preheatedAluminum foil on oven rack or oven bottomBaking utensil too large for recipePans touching each other or oven walls |
| Food too brown on bottom | Oven not preheatedUsing glass, dull or darkened metal pansIncorrect rack positionPans touching each other or oven walls |
| Food is dry or has shrunk excessively | Oven temperature too highBaking time too longOven door opened frequentlyPan size too large |
| Food is baking or roasting too slowly | Oven temperature too lowOven not preheatedOven door opened frequentlyTightly sealed with aluminum foilPan size too small |
| Pie crusts do not brown on bottom or crust is soggy | Baking time not long enoughUsing shiny steel pansIncorrect rack positionOven temperature is too low |
| Cakes pale, flat and may not be done inside | Oven temperature too lowIncorrect baking timeCake tested too soonOven door opened too oftenPan size may be too large |
| Cakes high in middle with crack on top | Oven temperature too highBaking time too longPans touching each other or oven wallsIncorrect rack positionPan size too small |
| Piecrust edges too brown | Oven temperature too highEdges of crust too thin |
COOKTOP PROBLEMS
| PROBLEM | POSSIBLE CAUSE | SOLUTION |
| Burner will not ignite | There is no power to the range. | Check that range is properly connected to 120V power supply. |
| Burner will not operate | First time use. Air still in the gas line. | Turn on any one of the surface burner knobs to release air from the gas lines. |
| Control knob is not set correctly. | Push in knob before turning to a setting. | |
| The burner port is clogged. | Clean burner port opening using a stiff, nylon toothbrush or a straightened paper clip. | |
| Burner Flames are uneven, yellow and/or noisy | Burner port(s) are clogged. | Clean burner port opening using a stiff, nylon toothbrush or a straightened paper clip. |
| Burner caps are not positioned properly. | Place burner caps so that the alignment pins are properly aligned with the slots. | |
| Propane gas is being used. | The range should be converted to LP gas by a qualified technician. | |
| Burner flame is too high or too low | Cooktop gas supply is not correct. | Ensure the range is set for the correct gas type. It is factory set for natural gas. If connecting to LP gas, the burners should be converted to LP gas with the orifice kit supplied and the pressure regulator converted to the LP gas setting by a qualified technician. |
| The gas pressure is not correct. | Make sure the pressure regulator is installed correctly and the gas line pressure is correct. See Installation Instructions. | |
| Burner makes popping noises | The burner is wet. | Allow the burner to dry before using. |
| The burner cap or gas spreader is not positioned correctly. | Place burner caps so that the alignment pins are properly aligned with the slots. | |
| Excessive heat around cookware on cooktop | The cookware is not the proper size for the burner. | Use cookware with a bottom surface approximately the same size as the cooking area and burner. Cookware should not extend more than 1" (2.5 cm) outside the cooking area. Adjust the flame so that it does not come up around the cookware. |
| Cooking results are not what expected | Using incorrect Cookware. | See the "Cookware" section. |
| The control knob is not set to the proper heat level. | See the "Controls" section. |
OVEN PROBLEMS
| PROBLEM | POSSIBLE CAUSE | SOLUTION |
| Oven is not heating | No power to the range. | Check the circuit breaker or fuse box to your house. Make sure there is proper electrical power to the oven. |
| Oven control not turned on. | Make sure the oven temperature has been selected. | |
| Oven is not cooking evenly | Not using the correct bake ware or oven rack position. | Refer to cook charts for recommended rack position. Always reduce recipe temperature by 25 °F (15 °C) when baking with Convention Bake mode. |
| Oven display stays Off | Power interruption. | Turn off power at the main power supply (fuse or breaker box). Turn breaker back on. If condition persists, call for service. |
| Cooling fan continues to run after oven is turned off | The electronic components have not yet cooled sufficiently. | The fan will turn off automatically when the electronic components have cooled sufficiently. |
| Oven light is not working properly | Light bulb loose or burned-out. | Reinsert or replace the light bulb. Touching the bulb with fingers may cause the bulb to burn out. |
| Oven light stays on | Door is not closing completely | Check for obstruction in oven door. Check to see if hinge is bent or door switch broken. |
| Cannot remove lens cover | Soil build-up around the lens cover. | Wipe lens cover area with a clean, dry towel prior to attempting to remove the lens cover. |
| Clock and timer are not working properly | No power to the range. | Check the circuit breaker or fuse box to your house. Make sure there is proper electrical power to the oven. |
| Excessive Moisture | When using bake mode, preheat the oven first. Convection Bake and Convection Roast will eliminate any moisture in the oven. | |
| Porcelain Chips | Porcelain interior is chipped by oven racks | When removing and replacing oven racks, always tilt racks upward and do not force them to avoid chipping the porcelain. |
Installation Requirements
TOOLS AND PARTS
Gather the required tools and parts before starting installation. Read and follow the instructions provided with any tools listed here.
Tools Needed
- Tape measure
- Flat-blade screwdriver
• Phillips screwdriver - Level
- Drill
- Wrench or pliers
- Pipe wrench
• 15/16" (2.4 cm) combination wrench - 1/8" (3.2 mm) drill bit (for wood floors)
- Marker or pencil
- Pipe-joint compound resistant to Propane gas
- 3/16" (4.8 mm) carbide-tipped masonry drill bit (for concrete/ceramic floors)
• Noncorrosive leak-detection solution
Parts Supplied
 |  |
| Backsplash with screws | Anti-tip bracket with screws |
 |  |
| Gas pressure regulator | Gas pipe adapter with washers |
Parts Needed
natural_image
Pure diagram of a flexible cable with two connectors (no text or symbols)Gas supply line kit
(supply line and 2 adapters)
LOCATION REQUIREMENTS
IMPORTANT: Observe all governing codes and ordinances. Do not obstruct flow of combustion and ventilation air.
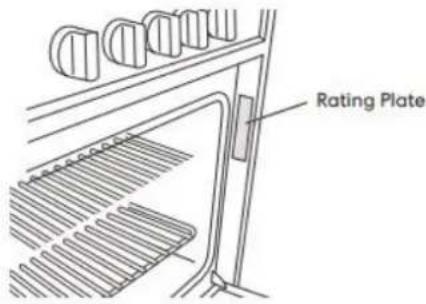
- It is the installer's responsibility to comply with installation clearances specified on the model/serial rating plate. The model/serial rating plate is located behind the oven door on the oven frame.
• The range should be located for convenient use in the kitchen.
- Recessed installations must provide complete enclosure of the sides and rear of the range.
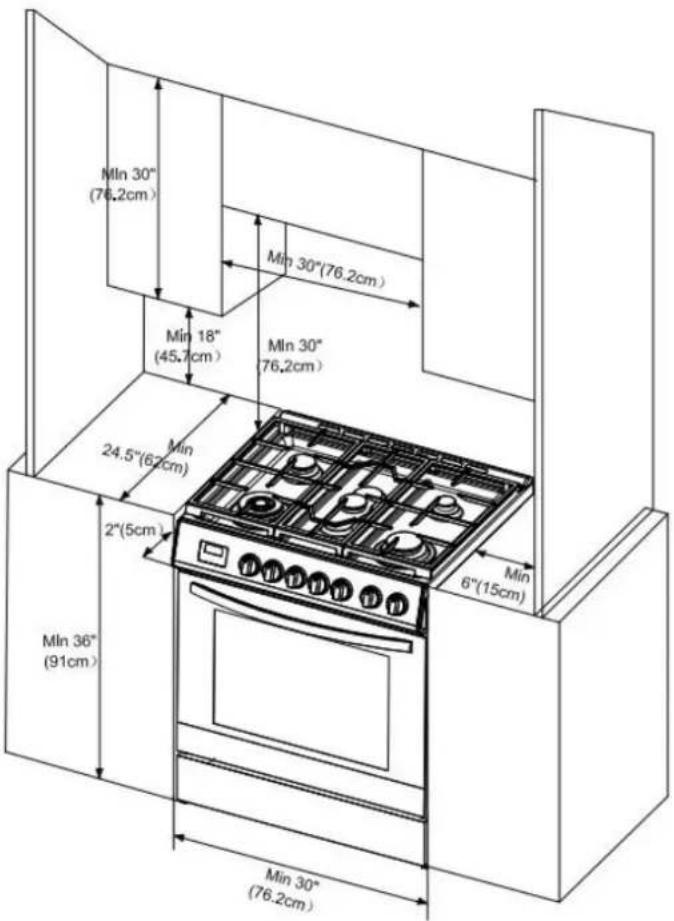
- To eliminate the risk of burns or fire by reaching over heated surface units, cabinet storage space located above the surface units should be avoided. If cabinet storage is to be provided, the risk can be reduced by installing a range hood or microwave hood combination that projects horizontally a minimum of 5" (12.7 cm) beyond the bottom of the cabinets.
• All openings in the wall or floor where range is to be installed must be sealed.
• Do not seal the range to the side cabinets.
• Cabinet opening dimensions that are shown must be used.
• Grounded electrical supply is required. See "Electrical Requirements" section.
- Proper gas supply connection must be available. See "Gas Supply Requirements" section.
- Contact a qualified floor covering installer to check that the floor covering can withstand at least 200^ (93°C).
- Use an insulated pad or 1/4" (0.64 cm) plywood under range if installing range over carpeting.
PRODUCT DIMENSIONS
This manual covers several models. Your model may appear different from the models depicted. Dimensions given are maximum dimensions across all models.
CLEARANCES
IMPORTANT: Some cabinet and building materials are not designed to withstand the heat produced by the oven for baking and self-cleaning. Check with your builder or cabinet supplier to make sure that the materials used will not discolor, delaminate or sustain other damage.
GIVEN DIMENSIONS ARE MINIMUM CLEARANCES.
Power Supply Location
IMPORTANT: An electrical outlet in the floor, may be either recessed or surface mounted, but an electrical outlet in the wall must be recessed to make the connection. For Direct Wiring, the electrical box should be mounted to the wall.
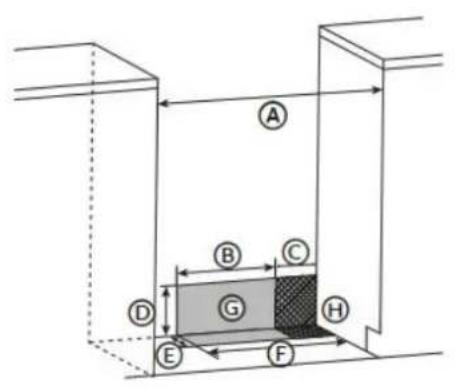
A 30" (76 cm)
B 11 ^1/2 " (29.2 cm)
C 6" (15.2 cm)
D 7 ^1/4 " (18.4 cm)
E 3" (7.6 cm)
F 17 ^1/2 " (44 cm)
G Recommended Location for Electrical Outlet
H Recommended Location for Gas Supply Connection
VENTING REQUIREMENTS
IMPORTANT: This range must be exhausted outdoors unless you are using ductless venting. Observe all governing codes and ordinances. Do not obstruct flow of combustion and ventilation air.
- Do not terminate the vent system in an attic or other enclosed area.
- Use an approved vent cap for proper performance. If an alternate wall or roof cap is used, be certain the cap size is not reduced and that it has a backdraft damper.
- Vent system must terminate to the outside unless you are using a ductless vent kit.
- Rigid metal vent is recommended. For best performance, do not use plastic or metal foil vent.
• If a joist or stud must be cut, then a supporting frame must be constructed.
• The size of the vent should be uniform.
• The vent system must have a damper.
• Seal all joints in the vent system.
• Use caulking to seal exterior wall or roof opening around the cap.
• Determine which venting method is best for your application.
Makeup Air
Local building codes may require the use of makeup air systems when using ventilation systems greater than specified CFM of air movement. The specified CFM varies from locale to locale. Consult your HVAC professional for specific requirements in your area.
ELECTRICAL REQUIREMENTS
120V 60Hz
Electrical Shock Hazard
Electrically ground range.
Failure to do so can result in death, fire or electrical shock.
Electrical Grounding Instructions
This appliance is equipped with a three-prong grounding plug for your protection against shock hazard and should be plugged directly into a properly grounded receptacle. Do not cut or remove the grounding prong from this plug.
This range is equipped with an electronic ignition system that will not operate if plugged into an outlet that is not properly polarized.
If codes permit and a separate ground wire is used, it is recommended that a qualified electrical installer determine that the ground path is adequate and wire gauge is in accordance with local codes.
Do not use an extension cord.
WARNING: Improper connection of the equipment-grounding conductor can result in a risk of electric shock. Check with a qualified electrician or service technician if you are in doubt as to whether the appliance is properly grounded. Do not modify the power supply cord plug. If it will not fit the outlet, have a proper outlet installed by a qualified electrician.
ELECTRICAL REQUIREMENTS - U.S.A. ONLY
Be sure that the electrical connection and wire size are adequate and in conformance with the National Electrical Code, ANSI/ NFPA No. 70-latest edition and all local codes and ordinances.
A copy of the above code standards can be obtained from:
National Fire Protection Association
1 Batterymarch Park
Quincy, MA 02169
Electrical Connection
- Check local codes and consult gas supplier. Check existing electrical supply and gas supply. It is recommended that all electrical connections be made by a licensed, qualified electrical installer.
- Range must be connected to the proper electrical voltage and frequency as specified on the model/serial rating plate. The plate is located behind the oven door on the oven frame. Refer to the illustrations in the "Location Requirements" section.
- A 120 volt, 60 Hz, AC only, 15-amp fused, electrical circuit is required. A time-delay fuse or circuit breaker is also recommended. It is recommended that a separate circuit serving only this range be provided.
- Electronic ignition systems operate within wide voltage limits, but proper grounding and polarity are necessary. Check that the outlet provides 120- volt power and is correctly grounded.
- This gas range is not required to be plugged into a GFCI (Ground-Fault Circuit Interrupter) outlet. It is recommended that you not plug an electric spark ignition gas range or any other major appliance into a GFCI wall outlet as it may cause the GFCI to trip during normal cycling.
- Performance of this range will not be affected if operated on a GFCI-protected circuit. However, occasional nuisance tripping of the GFCI breaker is possible due to the normal operating nature of electronic gas ranges.
• The wiring diagram is located on the back of the range in a clear plastic bag.
NOTE: The metal chassis of the range must be grounded in order for the control panel to work. If the metal chassis of the range is not grounded, no keypads will operate. Check with a qualified electrician if you are in doubt as to whether the metal chassis of the range is grounded.
ELECTRICAL REQUIREMENTS - CANADA ONLY
Be sure that the electrical connection and wire size are adequate and in conformance with the CSA Standard C22.1, Canadian Electrical Code, Part 1 - latest edition and all local codes and ordinances.
A copy of the above code standards can be obtained from:
Canadian Standards Association
178 Rexdale Blvd.
Toronto, ON M9W 1R3 CANADA
Electrical Connection
Check local codes and consult gas supplier. Check existing electrical supply and gas supply. It is recommended that all electrical connections be made by a licensed, qualified electrical installer.
- Check with a qualified electrical installer if you are not sure the range is properly grounded.
• A time-delay fuse or circuit breaker is recommended. - This range is equipped with a CSA International Certified Power Cord intended to be plugged into a standard 14-50R wall receptacle. Be sure the wall receptacle is within reach of range's final location.
• Do not use an extension cord.
• The wiring diagram is located on the back of the range in a clear plastic bag.
NOTE: The metal chassis of the range must be grounded in order for the control panel to work. If the metal chassis of the range is not grounded, no keypads will operate. Check with a qualified electrician if you are in doubt as to whether the metal chassis of the range is grounded.
GAS SUPPLY REQUIREMENTS
WARNING
Explosion Hazard
Use a new CSA International approved gas supply line.
Install a shut-off valve.
Securely tighten all gas connections.
If connected to LP, have a qualified person make sure gas pressure does not exceed 14" (36 cm) water column.
Examples of a qualified person include:
- licensed heating personnel
• authorized gas company personnel
• authorized service personnel
Failure to do so can result in death, explosion or fire.
Observe all governing codes and ordinances.
IMPORTANT: This installation must conform with all local codes and ordinances. In the absence of local codes, installation must conform with American National Standard, National Fuel Gas Code ANSI Z223.1 - latest edition or CAN/CGA B149 - latest edition.
IMPORTANT: Leak testing of the range must be conducted according to the manufacturer's instructions.
TYPE OF GAS
Natural Gas:
This range is design-certified by CSA International for use with natural gas or, after proper conversion, for use with LP gas.
- This range is factory-set for use with Natural gas. The model/serial rating plate located on the right side oven door trim has information on the types of gas that can be used. If the types of gas listed do not include the type of gas available, check with the local gas supplier.
LP Gas Conversion:
Conversion must be performed by a qualified service technician. The qualified agency performing this work assumes the gas conversion responsibility.
No attempt shall be made to convert the appliance from the gas specified on the model/serial rating plate for use with a different gas without consulting the serving gas supplier. See "GAS CONVERSION" section.
GAS SUPPLY LINE
Provide a gas supply line of 3/4" (1.9 cm) rigid pipe to the range location. A smaller size pipe on longer runs may result in insufficient gas supply. Pipe-joint compounds that resist the action of LP gas must be used. With LP gas, piping or tubing size can be 1/2" (1.3 cm) minimum. Usually, LP gas suppliers determine the size and materials used in the system.
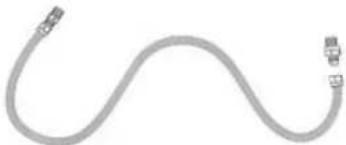
Flexible metal appliance connector:
- If local codes permit, a new CSA design-certified, 4 - 5 ft (122 - 152.4 cm) long, 1/2" (1.3 cm) or 3/4" (1.9 cm) I.D., flexible metal appliance connector may be used for connecting range to the gas supply line.

natural_image
Schematic illustration of a black flexible hose with two connectors (no text or symbols)- A 1/2" (1.3 cm) male pipe thread is needed for connection to the female pipe threads of the inlet to the appliance pressure regulator.
- Do not kink or damage the flexible metal tubing when moving the range.
Rigid pipe connection:
The rigid pipe connection requires a combination of pipe fittings to obtain an in-line connection to the range. The rigid pipe must be level with the range connection. All strains must be removed from the supply and fuel lines so range will be level and in line.
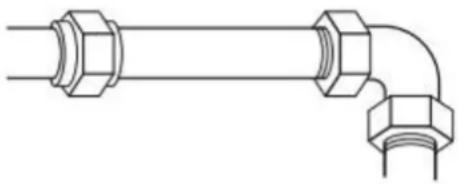
natural_image
Pure technical line drawing of a pipe fitting with hexagonal connectors (no text or symbols)Gas shutoff valve:
A manual gas line shut-off valve must be installed in an easily accessible location. Do not block access to shut-off valve. The valve is for turning on or shutting off gas to the range.
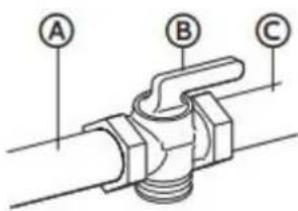 | A Gas Supply LineB Shutoff Valve "Open" PositionC To Range |
GAS PRESSURE REGULATOR
The gas pressure regulator supplied with this range must be used. The inlet pressure to the regulator should be as follows for proper operation:
| Natural gas | LP gas | |
| Minimum pressure | 4" WCP | 10" WCP |
| Maximum pressure | 7" WCP | 11" WCP |
Contact local gas supplier if you are not sure about the inlet pressure.
Burner Input Requirements
Input ratings shown on the model/serial rating plate are for elevations up to 2,000 ft (609.6 m).
For elevations above 2,000 ft (609.6 m), ratings are reduced at a rate of 4% for each 1,000 ft (304.8 m) above sea level (not applicable for Canada).
GAS SUPPLY PRESSURE TESTING
Gas supply pressure for testing regulator must be at least 1" (2.5 cm) water column pressure above the manifold pressure shown on the model/serial rating plate.
Line pressure testing above 0.5 psi gauge (14" WCP)
The range and its individual shutoff valve must be disconnected from the gas supply piping system during any pressure testing of that system at test pressures in excess of 0.5 psi (3.5 kPa).
Line pressure testing at 0.5 psi gauge (14" WCP) or lower
The range must be isolated from the gas supply piping system by closing its individual manual shutoff valve during any pressure testing of the gas supply piping system at test pressures equal to or less than 1/2 psi (3.5 kPa).
Installation Instructions
IMPORTANT: This appliance shall be installed only by authorized persons and in accordance with the manufacturer's installation instructions, local gas fitting regulations, municipal building codes, electrical wiring regulations, local water supply regulations.
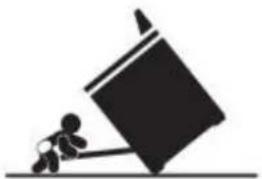
UNPACK RANGE

WARNING
Excessive Weight Hazard
Use two or more people to move and install range.
Failure to do so can result in back or other injury.
- Remove shipping materials, tape and film from the range. Keep cardboard bottom under range. Do not dispose of anything until the installation is complete.
- Remove oven racks and parts package from oven and shipping materials.
- To remove cardboard bottom, first take 4 cardboard corners from the carton. Stack one cardboard corner on top of another. Repeat with the other 2 corners. Place them lengthwise on the floor behind the range to support the range when it is laid on its back.
- Using two or more people, firmly grasp the range and gently lay it on its back on the cardboard corners.
- Remove cardboard bottom.
NOTES:
• The leveling legs can be adjusted while the range is on its back.
- To place range back up into a standing position, put a sheet of cardboard or hardboard on the floor in front of range to protect the flooring. Using two or more people, stand range back up onto the cardboard or hardboard.
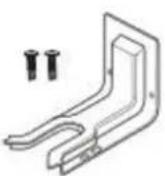
INSTALL ANTI-TIP DEVICE
WARNING
Tip Over Hazard
• A child or adult can tip the range and be killed.
• Install anti-tip bracket to floor or wall per installation instructions.
- Slide range back so rear range foot is engaged in the slow of the anti top bracket.
• Re-engage the anti-tip bracket if range is moved.
- Do not operate the range without anti-tip bracket installed and engaged.
- Failure to follow these instructions can result in death or serious burns to children and adults.
IMPORTANT:
- An anti-tip bracket is provided with the range. The anti-tip bracket uses a rear range foot to secure the range to the floor or wall.
-
Attach the anti-tip bracket to the floor or wall so that the rear range foot will be centered within the bracket when the range is pushed into its final position.
-
Remove the anti-tip bracket and screws from the parts bag.
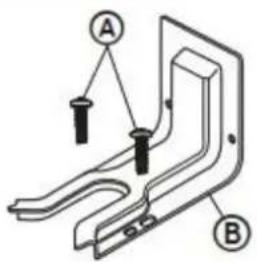
A 16 x 1 ^5 / _8 " Screws (2)
B Anti-tip Bracket
NOTE: The anti-tip bracket must be securely mounted to the subfloor or wall. The flooring's thickness may require longer screws to anchor bracket to subfloor.
- Place the bracket so that the back of the bracket is against the rear wall and the side edge of the bracket is 3/8" to 1/2" from the adjacent cabinet.
NOTE: If there is no adjacent cabinet, place the bracket so that the edge of the bracket is 3/8" to 1/2" in from the range side panel. If the countertop overhangs the cabinet, offset the bracket from the cabinet by the depth of the overhang plus an additional 3/8" to 1/2".
- Using the anti-tip bracket as a template, mark the two holes for either a Floor Wood, Floor Concrete, or Wall installation, as shown.
A Distance from Adjacent Cabinet (3/8" to 1/2" [0.95 cm to 1.27 cm])
B Wall Holes
C Concrete Floor Holes
D Wood Floor Holes
E Rear Range Foot
- Drill two pilot holes where marked. Follow the instructions specific to your construction.
NOTE: A nail or awl may be used to create a pilot hole, if a drill is not available. For concrete construction 1/4" x 1 1/2" Lag Bolts and 1/2" O.D. Sleeve Anchors are required.
Wood
• Floor - Drill a 1/8" pilot hole, as shown.
NOTE: Contact a qualified floor covering installer for the best procedure for drilling mounting holes through your type of floor covering.
• Wall - Drill an angled 1/8" pilot hole, as shown.
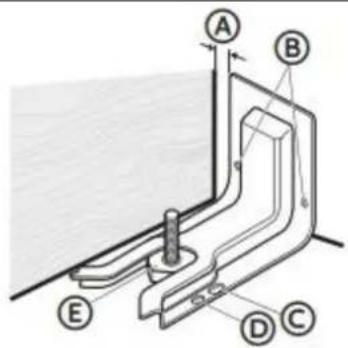
Concrete
- Drill the size hole recommended for the anchors into the concrete at the center of the holes identified as Floor Concrete or Wall.
A Wall
B Anti-tip Bracket
C Floor
5. Install the anti-tip bracket.
Wood
• Using the two screws (provided) fasten the anti-tip bracket to the floor or wall.
NOTE: The screw must enter wood or metal.
Concrete
- Insert the sleeve anchor into the drilled holes and then insert the lag bolts through the anti-tip bracket and into the floor or wall. The bolts must be properly tightened as recommended for the hardware.
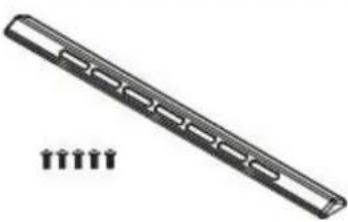
INSTALL BACKSPLASH
• Install the backsplash to rear of range with the screws provided.
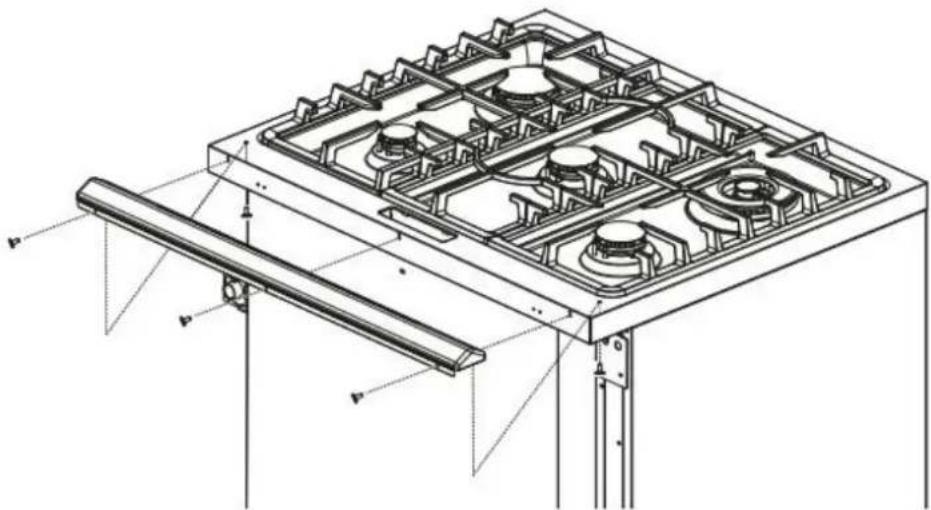
natural_image
Technical line drawing of a gas stove frame structure with mounting brackets and structural supports (no text or symbols)GAS CONNECTION
WARNING
Explosion Hazard
Use a new CSA International approved gas supply line.
Install a shut-off valve.
Securely tighten all gas connections.
If connected to LP, have a qualified person make sure gas pressure does not exceed 14" (36 cm) water column.
Examples of a qualified person include:
- licensed heating personnel
• authorized gas company personnel
• authorized service personnel
Failure to do so can result in death, explosion or fire.
This appliance shall be installed only by authorized persons and in accordance with the manufacturer's installation instructions, local gas fitting regulations, municipal building codes, electrical wiring regulations, local water supply regulations.
This range is factory-set for use with Natural gas. To use this range with Propane gas, see the "GAS CONVERSION section before connecting this range to the gas supply. Gas conversions from Natural gas to Propane gas or from Propane gas to Natural gas must be done by a qualified installer.
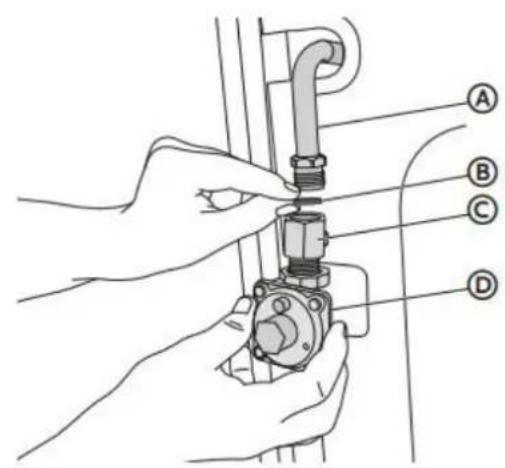
TYPICAL FLEXIBLE CONNECTION
-
Apply pipe-joint compound made for use with LP gas to the smaller thread ends of the flexible connector adapters.
-
Attach one adapter to the gas pressure regulator and the other adapter to the gas shutoff valve. Tighten both adapters, being certain not to move or turn the gas pressure regulator.
 | A Adapter (provided)B Gas Pressure RegulatorC Gas Supply LineD Adapters (From Gas Supply Line Kit)E Gas Shutoff Valve |
- Use a 15/16" (2.4 cm) combination wrench and channel lock pliers to attach the flexible connector to the adapters. Check that connector is not kinked.
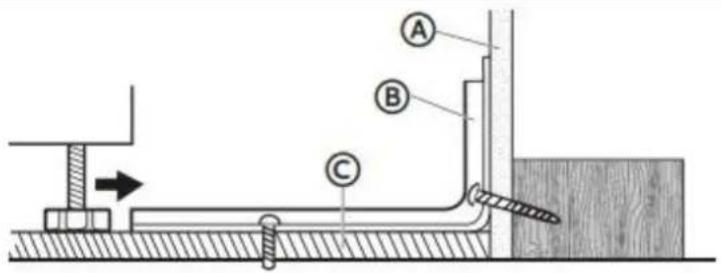
TYPICAL RIGID PIPE CONNECTION
A combination of pipe fittings must be used to connect the range to the existing gas line. Your connections may be different, according to the supply line type, size and location.
- Apply pipe-joint compound made for use with LP gas to all pipe thread connections.
- Using a pipe wrench to tighten, connect the gas supply to the range.
 | A Gas Line from RangeB Washer (provided)C Adapter (provided)D Gas Pressure Regulator (provided) |
CONVERT TO LP GAS (OPTIONAL)
This range is shipped from the factory set up to use natural gas. It can be converted to use LP gas by a qualified service technician.
The LP conversion kit is sold separately. The conversion to LP requires all surface burner orifices and, if applicable, gas oven orifices to be changed. In addition, the nozzle on the gas pressure regulator needs to be reversed.
See "GAS CONVERSION" section for detailed instructions.
NOTE: All replaced orifices must be left with the consumer, including the instructions and retrofit sizes and orifice indication.
COMPLETE CONNECTION
Electrical Shock Hazard
Disconnect power before servicing.
Plug into a grounded 3-prong outlet.
Do not use an adapter or an extension cord.
Failure to do so can result in death, fire, or electrical shock
- Open the manual shutoff valve in the gas supply line. The valve is open when the handle is parallel to the gas pipe.
- Test all connections by brushing on an approved noncorrosive leak-detection solution. If bubbles appear, a leak is indicated. Correct any leak found.
- Remove, if any, packaging tapes securing the burners on the surface. If the cooktop burner bases and caps are not pre-installed, remove them from package containing parts, align and place the burner bases and caps accordingly.
natural_image
Diagram of a control panel with six labeled circular components (A, B, C, D, and an unlabeled top panel), no text or symbols present.Note: Align notches in burner caps with pins in burner base. Burner caps should be level when properly positioned. If burner caps are not properly positioned, surface burners will not light.


Auxiliary Burner Semi Rapid Burner Rapid Burner
Incorrectly Positioned

Correctly Positioned
- Place burner grates over burners and caps.
- Plug in range or reconnect power.
ADJUST FLAME HEIGHT
Check and adjust the height of top burner flames. The cooktop "low" burner flame should be a steady blue flame approximately 1/4" (6 mm) high. Propane gas flames have a slightly yellow tip.
Low Flame
High Flame
If burners do not light properly:
- Turn burner control knob to the "OFF" position.
- Check that the range is plugged in. Check that the circuit breaker has not tripped or the household fuse has not blown.
- Check that the gas shutoff valves are set to the "open" position.
- Check that burner caps are properly positioned on burner bases.
To adjust standard burner:
IMPORTANT: Adjustments must be made with two other burners in operation on a medium setting. This prevents the upper row of flames from being set too low, resulting in the flame being extinguished when other burners are turned on.
The flame can be adjusted using the adjustment screw in the center of the valve stem. The valve stem is located directly behind the control knob.
- Light the burner and turn the knob to the lowest setting (MIN).
- Pull and remove the control knob.
-
Insert a small, flat-blade screwdriver into the adjustment screw, and slowly turn the screw until the flame appearance is correct.
-
Open the valve more if the flames are too small or fluttered.
- Close the valve more if the flames are too large.
A Adjustment Screw B Control Knob Stem
- Replace the control knob.
- Test and check the flame by turning the control knob from the lowest to the highest settings.
NOTE: For burners (on some models) with safety valve, make sure that the regulation obtained is sufficient to maintain heating of the thermocouple. If it is not, increase the minimum flame.
ABNORMAL OPERATION
ANY OF THE FOLLOWING ARE CONSIDERED TO BE ANBORMAL OPERATION AND MAY REQUIRE SERVICING:
- Yellow tipping of the hob burner flame
- Sooting up of cooking utensils.
- Burners not igniting properly.
- Burners failing to remain lit.
- Burners extinguished by oven door.
• Gas valves, which are difficult to turn.
IN CASE THE APPLIANCE FAILS TO OPERATE CORRECTLY, CONTACT THE AUTHORIZED SERVICE PROVIDE IN YOUR AREA.
THE BURNERS REQUIRE NO REGULATION OF THE PRIMARY AIR.
LEVEL RANGE
IMPORTANT: Do not operate the range if its rear foot is not completely engaged in the anti-tip bracket. Never completely remove the leveling legs or the range will not be secured to the anti-tip device properly.
- Slide range into final location, making sure rear leveling leg slides into the anti-tip bracket. Leave a 1" (2.5 cm) gap between the back of the range and the back wall.
- Check that the range is level by placing a level on the oven bottom. If needed, use a wrench to adjust the height of the leveling legs until the range is level from side to side and from front to back.
NOTE: The range must be level for optimum cooking and baking performance.
VERIFY ANTI-TIP BRACKET ENGAGEMENT
- Place the outside of your foot against the bottom of the front panel to keep the range from moving, and then grasp the back of the range, as shown.
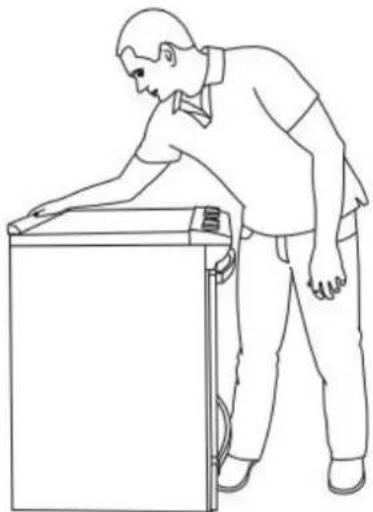
natural_image
Line drawing of a person leaning against the side of a refrigerator (no text or symbols)- Slowly attempt to tilt the range forward.
- If you encounter immediate resistance, the range foot is engaged in the anti-tip bracket. Range installation is completed.
- If the rear of the range lifts more than 1/2" (1.3 cm) off the floor without resistance, stop tilting the range and lower it gently back to the floor. The range foot is not engaged in the anti-tip bracket. Proceed to Steps 3 and 4.
IMPORTANT: If there is a snapping or popping sound when tilting the range, the range may not be fully engaged in the bracket. Check to see if there are obstructions keeping the range from sliding to the wall or keeping the range foot from sliding into the bracket. Verify that the bracket is held securely in place by the mounting screws.
-
Slide the range forward, and verify that the anti-tip bracket is securely attached to the floor or wall.
-
Slide range back so the rear range foot is inserted into the slot of the anti-tip bracket.
IMPORTANT: If the range is pulled away from the wall for any reason, always verify anti-tip bracket engagement again.
Kenmore®
For Customer Care go to:
www.kenmore.com/contact-us/
to select your local area or retailer where this appliance was purchased for contact information on scheduling in-home repair service or ordering replacement parts.

Manual de Uso y Cuidado
Kenmore®
Cocina a Gas
Modelo: 982.7683#
Transform SR Brands Management LLC
Hoffman Estates, IL, U.S.A. 60179 U.S.A
www.kenmore.com

REGISTRO DEL PRODUCTO
En el espacio siguiente, registre la fecha de compra, el modelo y el número de serie de su producto. Encontrará el modelo y el número de serie impresos en una etiqueta de identificación ubicada en el borde interior derecho de la cavidad del horno. Tenga esta información disponible siempre que se comunique con Sears acerca de su producto.
Número de modelo: ____
Fecha de Compra: ____
N.° de Serie:____
Guarde estas instrucciones y adjunte su recibo de venta para referencia futura.
Garantía Limitada de Kenmore
Los productos Kenmore® son vendidos y distribuidos por Kenmore y difusores autorizados y licenciatarios de Kenmore en varios países.
Para obtener información sobre la garantía limitada y el proveedor autorizado aplicable a su producto y país, visite: https://www.kenmore.com/warranty-information/
Para obtener una copia impresa, contáctenos al 1-844-553-6667 o en la siguiente dirección:
ATENCIÓN: Solicitud de Garantía Kenmore
5407 Trillium Suite B120
Hoffman Estates, IL 60192
CATALOGUE
SEGURIDAD DE LA COCINA......6
DESCRIPCIÓN GENERAL....13
PANEL DE CONTROL....15
USO DE LA ESTUFA DE PARRILLA....18
USO DEL HORNO....20
CUIDADO DE LA COCINA....26
SOLUCIÓN DE PROBLEMAS....31
REQUISITOS DE INSTALACIÓN......36
INSTRUCCIONES DE INSTALACIÓN....48

ADVERTENCIA

Peligro de incendio
Si no se sigue exactamente la información contenida en este manual, se puede producir un incendio o una explosión, lo que podría causar daños materiales, lesiones personales o la muerte.
- No almacene ni use gasolina u otros vapores o líquidos inflamables cerca de este o cualquier otro electrodoméstico.
-
QUÉ HACER SI HUELE A GAS
-
No intente encender ningún electrodoméstico.
• No toque ningún interruptor eléctrico.
• No use ningún teléfono en su edificio. - Evacue la habitación, el edificio o el área de todos los ocupantes.
- Llame inmediatamente a su proveedor de gas desde el teléfono de un vecino. Siga las instrucciones del proveedor de gas.
- Si no puede comunicarse con su proveedor de gas, llame a los bomberos.
- La instalación y el servicio deben ser realizados por un instalador calificado, una agencia de servicio o el proveedor de gas.

ADVERTENCIA
Nunca opere la sección de cocción de la superficie superior de este electrodoméstico sin supervisión.
- El incumplimiento de esta advertencia podría resultar en un incendio, explosión o riesgo de quemaduras que podrían causar daños materiales, lesiones personales o la muerte.
- Si se produce un incendio, manténgase alejado del electrodoméstico y llame inmediatamente a su departamento de bomberos.
NO INTENTE APAGAR UN INCENDIO DE ACEITE/GRASA CON AGUA

ADVERTENCIA
natural_image
Silhouette of a person pushing a large block on a horizontal line (no text or symbols)Peligro de vuelco
- Un niño o un adulto pueden volcar la cocina y morir.
- Instale el soporte antivuelco en el piso o la pared según las instrucciones de instalación.
- Deslice la cocina hacia atrás para que el pie trasero de la cocina se enganche en la ranura del soporte antivuelco.
• Vuelva a colocar el soporte antivuelco si mueve la cocina.
• No opere la cocina sin el soporte antivuelco instalado y enganchado. - El no seguir estas instrucciones puede provocar la muerte o quemaduras graves a niños y adultos.
Soporte Antivuelc
Pie de la Cocina
Cómo asegurarse de que el soporte antivuelco esté instalado:
• Deslice la cocina hacia adelante.
- Verifique que el soporte antivuelco esté bien sujeto al piso y la pared.
Deslice la cocina hacia atrás para que el pie trasero de la cocina quede debajo del soporte antivuelco.

ADVERTENCIA
No siempre se pueden detectar las fugas de gas por el olor.
Los proveedores de gas recomiendan que use un detector de gas aprobado por UL o CSA.
Para obtener más información, comuníquese con su proveedor de gas.

ADVERTENCIA
No instale un sistema de ventilación que sople aire hacia abajo hacia este aparato de cocción. Este tipo de sistema de ventilación puede causar problemas de encendido y combustión con este aparato de cocción, lo que podría resultar en lesiones personales o funcionamiento no deseado.
Tu seguridad y la seguridad de los demás son muy importantes.
Hemos proporcionado muchos mensajes de seguridad importantes en este manual y en tu electrodoméstico. Leer y seguir todos las advertencias de seguridad.

Este es el símbolo de alerta de seguridad.
Este símbolo te alerta sobre peligros potenciales que pueden causar lesiones graves o la muerte, a ti o a otras personas.
Todos los mensajes de seguridad estarán precedidos por el símbolo de alerta de seguridad y la palabra "PELIGRO", "ADVERTENCIA" o "PRECAUCIÓN". Estas palabras significan:

PELIGRO
Puedes sufrir lesiones graves o morir si no sigues inmediatamente las instrucciones.

ADVERTENCIA
Puedes sufrir lesiones graves o morir si no sigues las instrucciones.

PRECAUCIÓN
Una situación potencialmente peligrosa que, si no se evita, podría causar lesiones leves o moderadas.
Todos los mensajes de seguridad le indicarán cuál es el peligro potencial, cómo reducir el riesgo de lesiones y qué puede suceder si no se siguen las instrucciones.
En el estado de Massachusetts, se aplican las siguientes instrucciones de instalación:
- Las instalaciones y reparaciones deben ser realizadas por un contratista, plomero o instalador de gas calificado o con licencia del estado de Massachusetts.
- Si utiliza una válvula de bola, debe ser del tipo de manija en T.
- Un conector de gas flexible, cuando se use, no debe exceder los 3 pies (0.9 metros).
Advertencias de la Proposición 65 del Estado de California:

ADVERTENCIA
Este producto contiene bpa, California sabe que el BPA causa
defectos congénitos u otros peligros reproductivos, así como compuestos de plomo y plomo, California desconoce que el BPA puede causar cáncer, defectos congénitos u otros peligros reproductivos. Para obtener más información, consulte: www.p65warnings.ca.gov.
INSTRUCCIONES DE SEGURIDAD INTRUCCIONES

ADVERTENCIA
Para reducir el riesgo de incendio, descarga eléctrica, lesiones personales o daños al usar la cocina, siga las precauciones básicas, que incluyen las siguientes:

ADVERTENCIA
PARA REDUCIR
EL RIESGO DE VUELCO DE LA COCINA, LA COCINA DEBE ESTAR FIJADA CON DISPOSITIVOS ANTIVUELCO INSTALADOS CORRECTAMENTE. PARA VERIFICAR SI LOS DISPOSITIVOS ESTÁN INSTALADOS CORRECTAMENTE, DESLICE LA COCINA COMPLETAMENTE HACIA ADELANTE, BUSQUE EL SOPORTE ANTIVUELCO FIJADO DE FORMA SEGURA AL PISO O LA PARED, Y DESLICE LA COCINA HACIA ATRÁS PARA QUE LA PATA TRASERA DE LA COCINA ESTÉ DEBAJO DEL SOPORTE ANTIVUELCO.

ADVERTENCIA
NUNCA use este
aparato como calefactor de ambiente para calentar la habitación. Esto puede provocar intoxicación por monóxido de carbono y sobrecalentamiento del horno.

ADVERTENCIA
NUNCA cubra
ninguna ranura, orificio o paso en la parte inferior del horno ni cubra una rejilla completa con materiales como papel de aluminio. Esto bloquea el flujo de aire a través del horno y puede causar intoxicación por monóxido de carbono. Los revestimientos de papel aluminio también pueden atrapar el calor y provocar un incendio.

PRECAUCIÓN
No guarde
artículos de interés para los niños en gabinetes encima de la cocina o en la protección posterior de la cocina; los niños que se suban a la cocina para alcanzar artículos podrían lesionarse gravemente.
- No deje a los niños solos - No se debe dejar a los niños solos o sin supervisión en el área donde se esté usando la cocina. Nunca se les debe permitir sentarse o pararse sobre ninguna parte de la cocina.
- Use ropa adecuada - Nunca use prendas hol
- Servicio por parte del usuario - No repare ni reemplace ninguna pieza de la cocina a menos que se recomiende específicamente en el manual. Cualquier otro servicio técnico debe ser realizado por un técnico calificado.
- Almacenamiento en o sobre la cocina - No deben almacenarse materiales inflamables en el horno o cerca de las unidades de superficie.
- Este aparato no está diseñado para almacenamiento.
LEA Y GUARDE ESTAS INSTRUCCIONES
INSTRUCCIONES DE SEGURIDAD INTRUCCIONES
- No use agua sobre incendios de grasa - Apague el fuego o la llama o use un extintor de tipo químico seco o de espuma.
- Use solo agarraderas secas - Las agarraderas húmedas o mojadas sobre superficies calientes pueden causar quemaduras por vapor. No deje que la agarradera toque los elementos calefactores calientes. No use una toalla u otro paño voluminoso.
- Nunca deje las unidades de superficie desatendidas a niveles de calor alto - El hervor fuerte causa humo y derrames grasosos que pueden encenderse.
- Utensilios de cocina esmaltados - Solo ciertos tipos de utensilios de vidrio, vidrio/cerámica, cerámica, barro o otros utensilios esmaltados son adecuados para el uso en la superficie de la cocina sin romperse debido al cambio brusco de temperatura.
-
Los mangos de los utensilios deben estar girados hacia adentro y no sobresalir de las unidades de superficie adyacentes - Para reducir el riesgo de quemaduras, encendido de materiales inflamables y derrames debido al contacto accidental con el utensilio, el mango de un utensilio debe colocarse de manera que esté girado hacia adentro y no se extienda sobre las unidades de superficie adyacentes.
-
Desconecte la alimentación antes de realizar tareas de mantenimiento.
- Instalación adecuada - Una vez instalado, el aparato debe estar conectado a tierra eléctricamente de acuerdo con los códigos locales o, en ausencia de códigos locales, con el Código Eléctrico Nacional, ANSI/NFPA 70 o el Código Eléctrico Canadiense, CSA C22.1-02. En Canadá, el aparato debe estar conectado a tierra eléctricamente de acuerdo con el Código Eléctrico Canadiense.
Asegúrese de que su electrodoméstico esté instalado y conectado a tierra correctamente por un técnico calificado. - El uso incorrecto de las puertas o cajones del electrodoméstico, como pisar, apoyarse o sentarse sobre ellos, puede provocar lesiones.
- Mantenimiento - Mantenga el área de la cocina libre de materiales combustibles, gasolina y otros vapores y líquidos inflamables.
- No permita que se acumule grasa de cocina u otros materiales inflamables en o cerca de la cocina. La grasa en el horno o en la estufa de parrilla puede encenderse.
- El tamaño de la llama de la hornilla superior debe ajustarse para que no se extienda más allá del borde del utensilio de cocina. Esta instrucción se basa en consideraciones de seguridad.
LEA Y GUARDE ESTAS INSTRUCCIONES
INSTRUCCIONES DE SEGURIDAD INTRUCCIONES
- No use piezas de repuesto que no hayan sido recomendadas por el fabricante (por ejemplo, piezas hechas en casa con una impresora 3D).
- Limpie la estufa de parrilla con precaución - Si usa una esponja o un paño húmedo para limpiar derrames en un área de cocción caliente, tenga cuidado de evitar quemaduras por vapor. Algunos limpiadores pueden producir emanaciones nocivas si se aplican sobre una superficie caliente.
- Tenga cuidado al abrir la puerta - Deje escapar el aire caliente o el vapor antes de retirar o reemplazar los alimentos.
- No caliente envases de alimentos sin abrir - La acumulación de presión puede hacer que el envase explote y cause lesiones.
- Mantenga libres de obstrucciones los conductos de ventilación del horno.
- Nunca ase a la parrilla con la puerta abierta. No se permite asar a la parrilla con la puerta abierta debido al sobrecalentamiento de las perillas de control.
-
Colocación de las rejillas del horno - Coloque siempre las rejillas del horno en la posición deseada mientras el horno esté frío. Si necesita mover la rejilla mientras el horno está caliente, no permita que la agarradera toque el elemento calefactor caliente del horno.
-
Se debe tener cuidado para evitar que el papel de aluminio y las sondas para carne entren en contacto con los elementos calefactores.
- NO TOQUE LOS ELEMENTOS CALEFACTORES NI LAS SUPERFICIES INTERIORES DEL HORNO - Los elementos calefactores pueden estar calientes aunque sean de color oscuro. Las superficies interiores de un horno se calientan lo suficiente como para causar quemaduras. Durante y después del uso, no toque ni permita que la ropa u otros materiales inflamables entren en contacto con los elementos calefactores o las superficies interiores del horno hasta que hayan tenido suficiente tiempo para enfriarse. Otras superficies del aparato pueden calentarse lo suficiente como para causar quemaduras - entre estas superficies se encuentran la estufa de parrilla, las hornillas, las rejillas, las aberturas de ventilación del horno y las superficies cercanas a estas aberturas, las puertas del horno, las ventanas de las puertas del horno y las grietas alrededor de las puertas del horno.
- El tamaño de la llama de la hornilla superior debe ajustarse para que no se extienda más allá del borde del utensilio de cocina.
- Pida al instalador que le muestre la ubicación de la válvula de cierre de gas de la cocina y cómo cerrarla si es necesario.
LEA Y GUARDE ESTAS INSTRUCCIONES
INSTRUCCIONES DE SEGURIDAD INTRUCCIONES
- Eliminación adecuada de su electrodoméstico - Elimine o recicle su electrodoméstico de acuerdo con las regulaciones federales y locales. Comuníquese con las autoridades locales para el desecho o reciclaje ambientalmente seguro de su electrodoméstico.
Para unidades con campana extractora:
- Limpie las campanas extractoras con frecuencia - No se debe permitir que la grasa se acumule en la campana o el filtro.
- Cuando cocine flambeados bajo la campana extractora, encienda el ventilador.
Para cocinas autolimpiantes:
- No limpie la junta de la puerta - La junta de la puerta es esencial para un buen sellado. Se debe tener cuidado de no frotar, dañar o mover la junta.
- No use limpiadores de horno - No se debe usar ningún limpiador de horno comercial ni revestimiento protector para horno de ningún tipo en ninguna parte del horno o alrededor de él.
- Limpie solo las partes enumeradas en el manual.
- Antes de la autolimpieza del horno - Retire la bandeja para asar y otros utensilios. Limpie todo exceso de derrames antes de iniciar el ciclo de limpieza.
LEA Y GUARDE ESTAS INSTRUCCIONES
DESCRIPCIÓN GENERAL
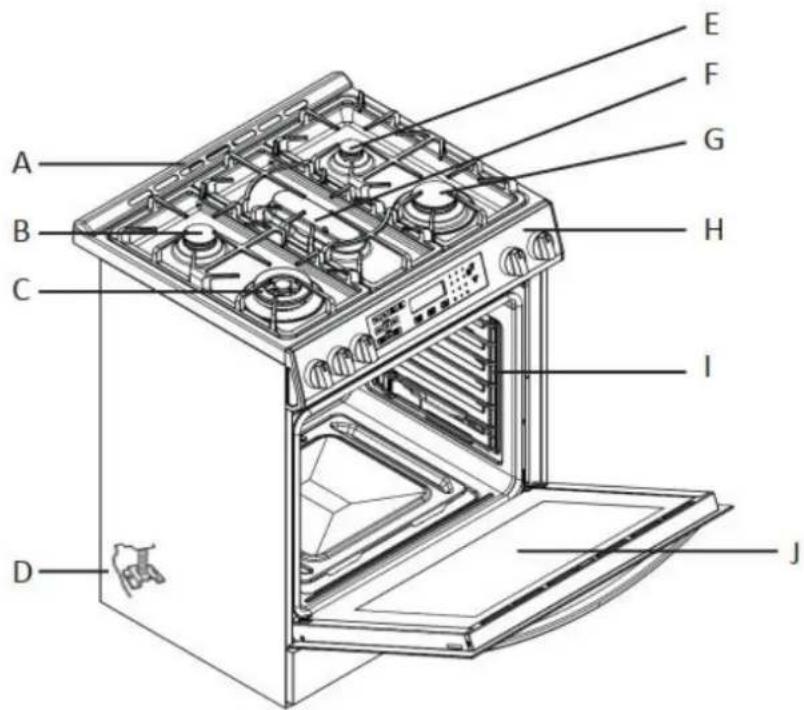
A Revestimiento posterior
B Hornilla Semirrápida
C Hornilla Triple
D Soporte Antivuelco
E Hornilla Auxiliar
F Hornilla Ovalada
G Hornilla Rápida
H Panel de Control
I Posiciones de Rejillas del Horno
J Ventana de la Puerta del Horno
DISTRIBUCIÓN DE HORNILLAS
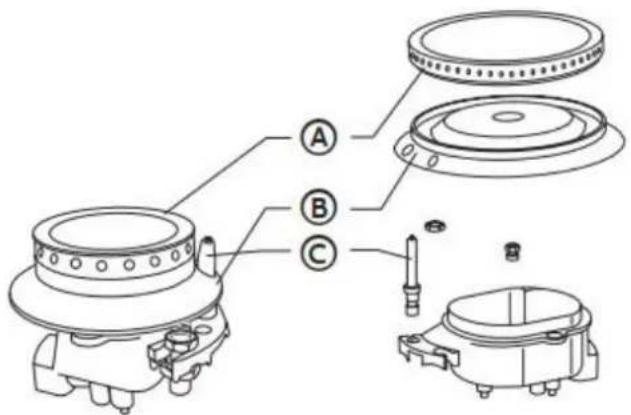
Ⓐ Tapa de la Hornilla
⑧ Cabezal de la Hornilla
© Electrodo
PANEL DE CONTROL
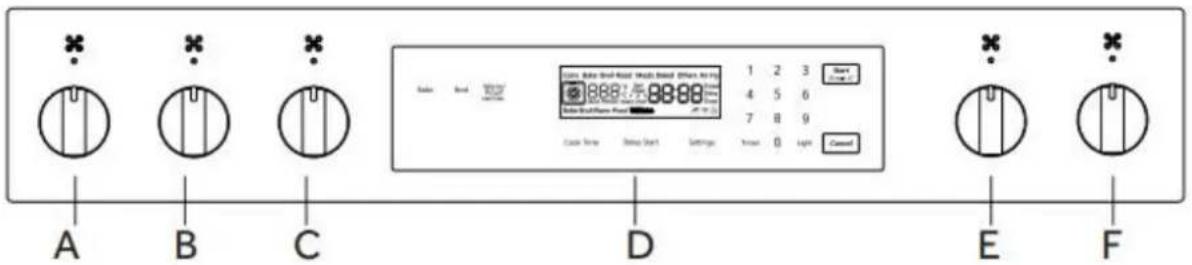
Ⓐ. Hornilla Delantera Izquierda
⑧. Hornilla Trasera Izquierda
©. Control Táctil del Horno
(D). Hornilla Central
E. Hornilla Trasera Derecha
(F). Hornilla Delantera Derecha
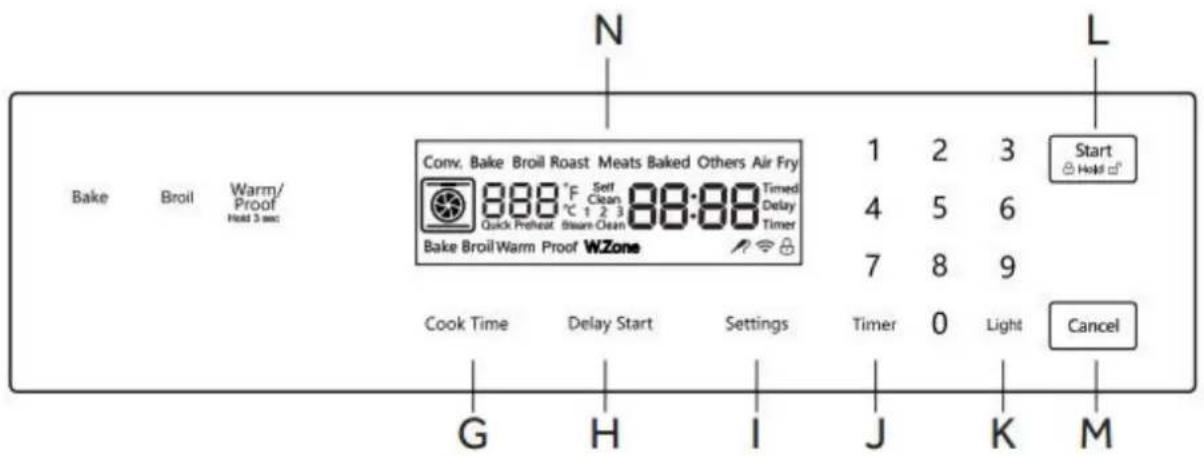
©. Tiempo de Cocción
H. Inicio Diferido
①. Configuraciones
①. Temporizador
K. Luz
L. Bloqueo de Inicio/Control
M. Cancelar
N. Pantalla

Icono de bloqueo para niños: después de mantener presionado el botón "Inicio" durante 3 segundos, el icono aparecerá en la pantalla.
IMPORTANTE: El reloj debe estar configurado para que funcionen las funciones programadas del horno.
NOTA: En caso de un corte de energía, se perderán todos los ajustes, incluida la hora del reloj. Cuando se restablezca la energía, el reloj deberá configurarse nuevamente.
Guía de configuración del horno
Reloj
- Presione "Settings" repetidamente hasta que la pantalla muestre "---:-- Timed".
- Presione los números para ingresar la hora.
- Presione "Start" para guardar.
Selección de Fahrenheit o Celsius
- Presione "Settings" repetidamente hasta que aparezca "Unidad" en la pantalla.
- Presione "1" para seleccionar F (Fahrenheit) o (Celsius).
- Presione "Start" para guardar.
Sonido
- Presione "Settings" repetidamente hasta que aparezca "Snd" en la pantalla.
- Presione "1" para seleccionar Encendido o Apagado.
- Presione "Start" para guardar.
Ajuste de la temperatura del horno
- Presione "Settings" repetidamente hasta que aparezca "t_:AJ" en la pantalla.
- Presione "1" para seleccionar el modo en el que desea ajustar la temperatura.
- Presione "3" o "6" para seleccionar la temperatura.
- Presione "Start" para guardar.
Modo de demostración
- Presione "Settings" repetidamente hasta que aparezca "dEno" en la pantalla.
- Presione "1" para seleccionar Encendido o Apagado.
- Presione "Start" para guardar.


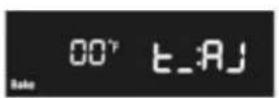

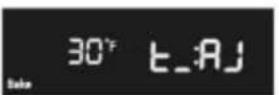

Configuración del modo horario
- Presione "Settings" repetidamente hasta que aparezca "12h" o "24h" en la pantalla.
- Presione "1" para seleccionar "12h" o "24h".
- Presione "Start" para guardar.
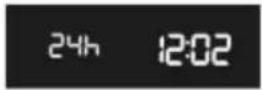
USO DE LA ESTUFA DE PARRILLA
Lea las instrucciones antes de instalar o usar este aparato.
- Este aparato se debe instalar de acuerdo con las regulaciones vigentes y utilizarse únicamente en un espacio bien ventilado.
- El uso de un aparato de cocción a gas produce calor y humedad en la habitación donde está instalado. Asegúrese de que la cocina esté bien ventilada: mantenga abiertas las aberturas de ventilación natural o instale un dispositivo de ventilación mecánica (campana extractora mecánica).
- El uso intensivo prolongado del aparato puede requerir ventilación adicional, por ejemplo, abrir una ventana, o una ventilación más efectiva, por ejemplo, aumentar el nivel de ventilación mecánica si la hubiera.
ENCENDIDO Y FUNCIONAMIENTO DE LAS HORNILLAS
Para encender una hornilla, presione la perilla de la hornilla y gírelo hacia la izquierda hasta que el indicador del mando esté alineado con el icono de encendido. Suelte la perilla y ajuste la intensidad de la llama girando más la perilla hacia la izquierda desde MÁX a MÍN.
NOTA: Para modelos con dispositivo de seguridad por falta de llama: una vez encendida la llama, mantenga la perilla presionada durante unos 3-4 segundos hasta que el dispositivo mantenga la hornilla encendida automáticamente. Si la hornilla no se enciende, espere un minuto a que se disipe el gas antes de intentar volver a encenderlo.
Para apagar la hornilla, gire la perilla hacia la derecha hasta que el indicador de la perilla esté alineado con APAGADO.
FALLO DE ENERGÍA
En caso de un corte de energía prolongado, las hornillas de la superficie se pueden encender manualmente. Sostenga un fósforo encendido cerca de una hornilla y gire la perilla hacia la izquierda hasta que el indicador esté alineado con MÁX. Una vez que la hornilla esté encendida, gire el mando a la posición deseada.
En caso de extinción involuntaria de la llama, la válvula de seguridad interviene cerrando el paso de gas a las hornillas.
El encendido eléctrico no debe accionarse durante más de 15 segundos. Si la hornilla no se enciende o se apaga involuntariamente, cierre inmediatamente la hornilla y espere al menos 1 minuto antes de volver a intentarlo. Una vez encendido, ajuste la llama como desee.
Para un menor consumo de gas y un mejor resultado, utilice ollas con un diámetro que coincida con el diámetro de la hornilla, para evitar que la llama suba por los lados de la olla. Consulte la Tabla de Recipientes. Use solo sartenes de fondo plano.
Tan pronto como el líquido comience a hervir, baje la llama a un nivel suficiente para mantener el hervor.
UTENSILIOS DE COCINA
ADAPTE EL DIÁMETRO DE LA OLLA AL TAMAÑO DE LA LLAMA
La llama debe ser del mismo tamaño que el fondo de la olla o más pequeña. No use ollas pequeñas con llamas altas, ya que las llamas pueden subir por los lados de la olla. Las ollas demasiado grandes que abarcan dos hornillas se colocan de adelante hacia atrás, no de lado a lado.
USE OLLAS BALANCEADAS
Las ollas deben quedar niveladas sobre la rejilla de la estufa de parrilla sin balancearse. Centre la olla sobre la hornilla.
USE UNA TAPADERA QUE AJUSTE BIEN
Una tapa que ajuste bien ayuda a reducir el tiempo de cocción. Las ollas planas con fondo grueso proporcionan calor uniforme y estabilidad.
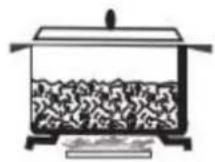
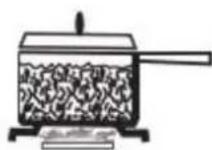
OLLA BALANCEADA
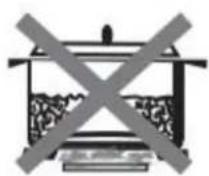
CONCAVE (HUECO)
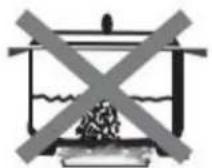
CONVEXO
(REDONDEADO)
natural_image
Simple line drawing of a crossed-out electrical circuit with no text or symbolsLA LLAMA ES DEMASIA USE
GRANDE PARA EL TAMA
DE LA OLLA QUE
natural_image
Symbolic illustration of a fire with smoke and flames crossed out by a barrier (no text or labels)TAPADERAS AJUSTEN BIE

OLLA
DESBALANCEADA
TABLA DE RECIPIENTES
| Hornilla | Olla mínima | Olla máxima |
| Auxiliar | 3.5" (9.0 cm) | 6.3" (16 cm) |
| Semi-rápido | 5.1" (13 cm) | 7.1" (18 cm) |
| Rápido | 5.9" (15 cm) | 10.2" (26 cm) |
| Triple anillo | 8.3" (21 cm) | 10.2" (26 cm) |
USO DEL HORNO
El horno incluye las funciones de los modos de horno tradicionales. Use el control de Modo de cocción, ubicado en el panel de control, para seleccionar el modo de horno.
ANTES DE USAR EL HORNO POR PRIMERA VEZ
- Cierre la puerta del horno.
- Presione BAKE.
- Presione 500°F (260°C) en el teclado numérico.
- Presione START.
NOTA: Deje que el horno funcione durante 30 minutos con la puerta cerrada y sin alimentos en la cavidad.
- Apague el horno y abra la puerta para que el horno se enfrie.
NOTA: Cualquier olor que se pueda detectar durante este uso inicial se debe a la evaporación de las sustancias utilizadas para proteger el horno durante el almacenamiento.
GENERALIDADES
IMPORTANTE: No coloque nada, incluidos platos, papel aluminio y bandejas de horno, en la parte inferior del horno cuando esté en funcionamiento para evitar dañar el esmalte.
- Coloque los utensilios para hornear con comida en la rejilla provista con el horno.
- Cierre la puerta del horno.
NOTA: El horno no se puede programar con la puerta abierta.
-
Presione el modo de horno deseado, por ejemplo. HORNEAR.
-
Ajuste el horno a la temperatura deseada.
-
Presione START.
REJILLAS DEL HORNO
Las rejillas del horno se pueden colocar en cualquiera de las seis posiciones de altura dentro del horno.
Las rejillas del horno tienen un tope para evitar que se saquen completamente sin querer.
PRECALENTAMIENTO
Al iniciar un ciclo de Horneado, el horno comenzará a precalentarse después de presionar Inicio. El horno tardará aproximadamente de 12 a 15 minutos en alcanzar los 350°F (177°C) con todas las rejillas del horno provistas dentro de la cavidad del horno. Las temperaturas más altas tardarán más en precalentarse. El ciclo de precalentamiento aumenta rápidamente la temperatura del horno. La temperatura real del horno superará la temperatura establecida para compensar el calor perdido al abrir la puerta del horno para colocar los alimentos en la rejilla. Esto asegura que la cocción comience a la temperatura adecuada. No abra la puerta mientras el horno se precalienta. Cuando el horno se haya calentado a la temperatura establecida, sonará un tono. Luego puede abrir la puerta y colocar los alimentos en el horno.
MODOS DEL HORNO
HORNEADO
Hornear es cocinar con aire caliente. La hornilla inferior del horno se usa para calentar el aire, pero no se usa ningún ventilador para hacer circular el calor.
Siga las instrucciones de la receta o comida preparada para conocer la temperatura de horneado, el tiempo y la posición de la rejilla. El tiempo de horneado variará según la temperatura de los ingredientes y el tamaño, la forma y el acabado del utensilio de horneado.
La temperatura se puede ajustar de 170°F (77°C) a 550°F (288°C).
Recomendaciones generales
- Para obtener mejores resultados, hornee los alimentos en una sola rejilla con al menos 1" - 1½" (2.5 - 4 cm) de espacio entre los utensilios para hornear y las paredes del horno.
• Use una rejilla al seleccionar el modo de horneado (Bake). - Compruebe la cocción en el tiempo mínimo recomendado.
- Use utensilios para hornear de metal (con o sin acabado antiadherente), vidrio resistente al calor, vitrocerámica, cerámica u otros utensilios adecuados para el horno.
-
Cuando use vidrio resistente al calor, reduzca la temperatura en 25°F (15°C) de la temperatura recomendada.
-
Use bandejas para hornear con o sin lados o moldes para rollos de gelatina.
- Los moldes de metal oscuro o con revestimiento antiadherente se cocinarán más rápido y se dorarán más. Los utensilios para hornear aislados alargarán ligeramente el tiempo de cocción para la mayoría de los alimentos.
- No use papel de aluminio ni bandejas desechables de aluminio para cubrir ninguna parte del horno. El papel de aluminio es un excelente aislante térmico y el calor quedará atrapado debajo de él. Esto alterará el rendimiento de cocción y puede dañar el acabado del horno.
- Evite usar la puerta abierta como estante para colocar moldes.
- Consulte la sección Solución de problemas para obtener consejos sobre cómo resolver problemas de horneado.
Tabla de horneado
| ALIMENTO | POSICIÓN DE LA REJILLA | TEMP. °F (°C) (HORNO PRECALENTADO) | TIEMPO (MÍN) |
| Tarta | |||
| Pastelitos | 2 | 350 (175) | 19-22 |
| Bundt Cake | 1 | 350 (175) | 40-45 |
| Pastel de Ángel | 1 | 350 (175) | 35-39 |
| Pay | |||
| 2 tapas, fresco, 9" | |||
| 2 tapas, fruta | 2 | 375-400 (190-205) | 45-50 |
| congelada, 9" | 2 | 375 (190) | 68-78 |
| Galletitas | |||
| Azúcar | 2 | 350-375 (175-190) | 8-10 |
| Chips de chocolate | 2 | 350-375 (175-190) | 8-13 |
| Pasteles de chocolate | 2 | 350 (175) | 29-36 |
| Panes | |||
| Pan de levadura, molde de 9 × 5 | 2 | 375 (190) | 18-22 |
| Rollos de levadura | 2 | 375-400 (190-205) | 12-15 |
| Biscuit | 2 | 375-400 (190-205) | 7-9 |
| Magdalenas | 2 | 425 (220) | 15-19 |
| Pizza | |||
| Congelada | 2 | 400-450 (205-235) | 23-26 |
| Fresca | 2 | 475 (246) | 15-18 |
Para hornear:
- Cierre la puerta del horno.
NOTA: Los controles del horno no se pueden configurar si la puerta del horno está abierta.
-
Presione BAKE. aparecerá "BAKE" en la pantalla y se mostrarán 350°F (177°C).
-
Presione START si desea hornear a 350°F (177°C).
O
Ingrese la temperatura deseada presionando el teclado numérico y luego presione START. La temperatura se puede ajustar de 170°F (77°C) a 550°F (288°C).
NOTAS:
- La temperatura se puede cambiar en cualquier momento durante la cocción. Presione CANCEL para borrar la configuración. Seleccione el modo de horno, luego ingrese la temperatura deseada presionando el teclado numérico y luego presione START.
-
Tras seleccionar el modo del horno y la temperatura, tiene la opción de programar un tiempo de cocción antes de presionar START.
-
Una vez que se ha presionado START, el horno comenzará a precalentarse. Cuando el horno haya alcanzado la temperatura establecida, sonará un tono.
- Coloque los alimentos en el horno y cierre la puerta del horno cuando se complete el precalentamiento.
- Presione CANCEL cuando termine de cocinar y retire los alimentos del horno.
ASADO
Hornear utiliza calor radiante directo para asar alimentos. Cuanto más baja sea la temperatura, más lenta será la cocción. Los cortes más gruesos y los trozos de carne, pescado y aves de corral con formas irregulares se pueden cocinar mejor a temperaturas de asado más bajas.
NOTAS:
- Antes de asar, coloque la rejilla de acuerdo con la Tabla de Asados.
- Antes de asar, coloque la rejilla de acuerdo con la Tabla de Asados. Está diseñada para drenar los jugos, lo que ayuda a evitar salpicaduras y humo.
- Para un drenaje adecuado, no cubra la rejilla con papel de aluminio. El fondo de la bandeja se puede cubrir con papel de aluminio para facilitar la limpieza.
- Recorte el exceso de grasa para reducir las salpicaduras. Haga cortes en la grasa restante en los bordes para evitar que se enrolle.
- Seleccione "HI Broil" 350°F (175°C) para la mayoría del asado a la parrilla. Seleccione "LO Broil" 250°F (120°C) para asar a la parrilla a baja temperatura alimentos que demoran más en cocinarse, como las aves de corral, para evitar que se doren demasiado.
- Saque la rejilla del horno hasta la posición de tope antes de girar o retirar los alimentos. Use pinzas para voltear los alimentos para evitar la pérdida de jugos. Es posible que no sea necesario voltear cortes muy delgados de pescado, aves o carne.
- Después de asar, retire la bandeja del horno al sacar los alimentos. Los goteos se hornearán en la bandeja si se dejan en el horno caliente, lo que dificulta la limpieza.
- Coloque los alimentos en la rejilla de la asadera, luego colóquela en el centro de la rejilla del horno. Cierre la puerta del horno y ajuste los controles.
Para asar:
La temperatura se puede ajustar entre Hi (350°F [175°C]) y Lo (250°F [120°C]).
- No es necesario precalentar el horno antes de colocar los alimentos.
- Cierre la puerta del horno.
-
Presione BROIL Se mostrará "BROIL" y "Set temp or START" y "Hi" (Alto).
-
Presione START, si desea asar a la parrilla a 350°F (175°C).
O
Ingrese la temperatura deseada presionando el teclado numérico y luego presione START. La temperatura se puede ajustar entre Hi (Alto) y Lo (Bajo) presionando el botón asar repetidamente.
NOTAS:
- La temperatura se puede cambiar en cualquier momento durante la cocción. Presione CANCEL para borrar la configuración. Seleccione el modo de horno, luego ingrese la temperatura deseada presionando el teclado numérico y luego presione START.
-
Tras seleccionar el modo del horno y la temperatura, tiene la opción de programar un tiempo de cocción antes de presionar START.
-
"BROIL" aparecerá en la pantalla después de presionar START.
- Cuando termine la cocción, presione CANCEL y luego retire los alimentos del horno.
CALENTADO/LEUDADO
El modo Calentar mantiene calientes los alimentos cocidos a la temperatura de servicio.
El modo Leudar prepara la masa para hornear activando la levadura. Siga las instrucciones de la receta como guía.

ADVERTENCIA
Peligro de intoxicación alimentaria
No deje reposar los alimentos en el horno durante más de una hora antes o después de cocinarlos.
Esto puede provocar intoxicación alimentaria o enfermedades.
IMPORTANTE: Los alimentos deben estar a la temperatura de servicio antes de colocarlos en el horno caliente. Los alimentos se pueden mantener calientes hasta por 1 hora; sin embargo, el pan y las cazuelas pueden secarse demasiado si se dejan en el horno durante la función Calentar (Warm). Para obtener mejores resultados, cubra los alimentos.
Calentar
-
Presione WARM/PROOF y luego presione WARM en la pantalla del menú. Se mostrará "Tlbio" y 140°F (60°C).
-
Presione START si desea calentar los alimentos a 140°F (60°C). O
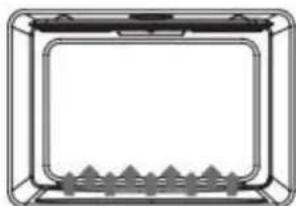
natural_image
Pure technical diagram of a rectangular enclosure with internal components and mounting brackets (no text or symbols)Ingrese la temperatura deseada presionando el teclado numérico y luego presione START. La temperatura se puede ajustar de 140°F (60°C) a 210°F (99°C).
- "WARM" aparecerá en la pantalla una vez que se presione START.
NOTA: Tras seleccionar el modo del horno y la temperatura, tiene la opción de programar un tiempo de cocción antes de presionar START.
- Coloque los alimentos en el horno y cierre la puerta.
- Presione CANCEL cuando termine y retire los alimentos del horno.
Leudar
Antes de leudar, coloque la masa en un bol ligeramente engrasado y cúbrala sin apretar con papel encerado, untado con manteca vegetal.
- Colóquela en la segunda rejilla desde abajo y cierre la puerta del horno.
- Presione WARM/PROOF y luego mantenga presionado durante 3 segundos. Se mostrarán "PROOF" y 100°F (38°C).
- Presione START si desea Leudar la masa a 100°F (38°C).
O
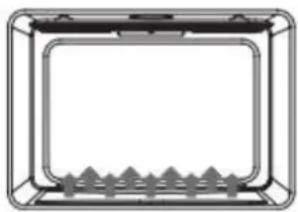
natural_image
Simple line drawing of a rectangular enclosure with a grid pattern at the bottom (no text or symbols)Ingrese la temperatura deseada presionando el teclado numérico y luego presione START. La temperatura se puede ajustar de 80°F (27°C) a 120°F (49°C).
- "LEUDAR" aparecerá en la pantalla una vez que se presione START.
NOTA: Tras seleccionar el modo del horno y la temperatura, tiene la opción de programar un tiempo de cocción antes de presionar START. - Deje que la masa suba hasta que casi duplique su tamaño, revisando después de 20-25 minutos. El tiempo de levado puede variar según el tipo y la cantidad de masa.
- Presione CANCEL cuando termine.
- Antes del segundo levado, forme la masa, colóquela en moldes para hornear y cúbrala sin apretar con papel plástico, rociado con aceite en aerosol. Siga los mismos pasos de ubicación y control anteriores. Antes de hornear, retire el papel plástico.
CUIDADO DE LA COCINA
LIMPIEZA
IMPORTANTE: Antes de limpiar, asegúrese de que todos los controles estén apagados y el horno y la estufa de parrilla estén fríos. Siga siempre las instrucciones de la etiqueta de los productos de limpieza. Se recomienda primero usar agua, jabón y un paño o esponja suave a menos que se indique lo contrario. No utilice productos de limpieza abrasivos.
SUPERFICIES EXTERIORES DE ESMALTE PORCELÁNICO
Los derrames de comida que contienen ácidos, como vinagre y tomate, deben limpiarse tan pronto como todo el aparato esté frío. Estos derrames pueden afectar el acabado.
Método de limpieza:
Limpiador de vidrios, limpiador líquido suave o esponja para fregar no abrasiva: Limpie suavemente alrededor de la placa con el número de modelo y serie porque el frotamiento puede borrar los números.
ACERO INOXIDABLE EXTERIOR
NOTA: No utilice esponjas de fregar con jabón, limpiadores abrasivos, crema para pulir estufas de parrilla, esponjas de lana de acero, paños de lavado ásperos o algunas toallas de papel. Puede dañar la superficie, incluso con un uso único o limitado.
Frote en la dirección de la veta para evitar daños.
Métodos de limpieza:
Detergente líquido o limpiador multiuso: Enjuague bien con agua limpia y seque con un paño suave sin pelusa.
Limpiador y pulidor para acero inoxidable. Vinagre para manchas de agua dura.
EXTERIOR DE LA PUERTA DEL HORNO
Método de limpieza:
Limpiador de vidrios y toallas de papel o esponja para fregar de plástico no abrasiva: Aplique el limpiador de vidrios a un paño suave o esponja, no directamente sobre el panel.
REJILLAS Y TAPAS DE COCINA REVESTIDAS DE PORCELANA
- Limpie tan pronto como la estufa de parrilla, las rejillas y las tapas estén frías.
- Los derrames de comida que contienen ácidos, como vinagre y tomate, deben limpiarse tan pronto como las rejillas y las tapas de la estufa de parrilla estén frías. Estos derrames pueden afectar el acabado.
- Para evitar que se astillen, no golpee las rejillas y las tapas entre sí ni contra superficies duras como los utensilios de cocina de hierro fundido.
- No vuelva a colocar las tapas en las hornillas mientras estén mojadas.
Método de limpieza:
Estropajo de plástico no abrasivo y limpiador ligeramente abrasivo.
DIFUSOR DE HORNILLA
Lave el difusor de la hornilla con frecuencia con agua hirviendo y detergente para eliminar cualquier depósito que pueda bloquear la salida de la llama.
Antes de volver a instalarlo, seque completamente el difusor de la hornilla para que la hornilla se encienda correctamente.
PERILLAS DE CONTROL DE LA ESTUFA DE parrilla
- Para quitar las perillas, tire de ellas hacia afuera del panel de control.
- Al volver a colocar las perillas, asegúrese de que estén en la posición de apagado.
Método de limpieza:
Jabón y agua o lavavajillas:
NOTA: No use lana de acero, limpiadores abrasivos ni limpiador para hornos. No sumerja las perillas.
PANEL DE CONTROL
Método de limpieza:
Limpiador de vidrios y paño o esponja suave: Aplique el limpiador de vidrios a un paño suave o esponja, no directamente sobre el panel.
NOTA: No use limpiadores abrasivos, esponjas de lana de acero, paños de cocina ásperos o algunas toallas de papel. Se pueden producir daños.
CAVIDAD DEL HORNO
Los derrames de comida se deben limpiar cuando el horno se enfríe. A altas temperaturas, los alimentos reaccionan con la porcelana, por lo que pueden producirse manchas, desgaste, picaduras o puntos blancos tenues.
Método de limpieza:
Detergente suave y agua tibia.
NOTA: No use limpiadores para hornos.
REJILLAS PARA HORNO Y REJILLAS PARA HORNEAR
Método de limpieza:
Estropajo de acero
EXTRACCION DE LA PUERTA DEL HORNO
Para el uso normal del horno, no es necesario quitar la puerta del horno. Sin embargo, si fuera necesario quitar la puerta, siga las instrucciones de esta sección.
IMPORTANTE:
- Asegúrese de que el horno esté frío y de que la alimentación del horno esté apagada antes de quitar la puerta.
- La puerta del horno es pesada y frágil, y el frente de la puerta es de vidrio. Para evitar que se rompa el vidrio de la puerta del horno, use ambas manos y sujete solo los lados de la puerta del horno para quitarla.
- Asegúrese de que ambas palancas estén bien colocadas antes de quitar la puerta.
• No fuerce la puerta para abrirla o cerrarla.
Para quitar la puerta del horno:
- Abra completamente la puerta del horno.
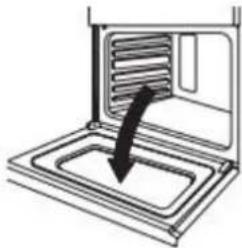
natural_image
Diagram of a kitchen appliance with a downward arrow indicating a process or removal (no text or symbols present)- Levante el pestillo de la bisagra de cada lado.
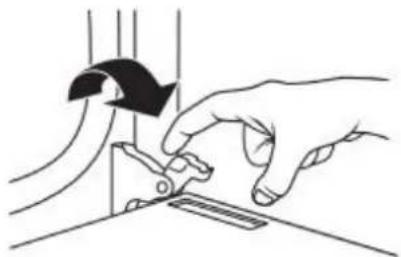
natural_image
Illustration of hands using a tool to adjust or install a component, with no visible text or symbols.- Cierre la puerta del horno tanto como pueda.
- Mientras sujeta ambos bordes exteriores de la puerta del horno, levante la puerta.
- Continúe empujando la parte superior de la puerta para cerrarla, mientras tira de la parte inferior de la puerta para sacarla de los receptores de las bisagras en el marco de la puerta.
natural_image
Illustration of a hand using a tool to adjust or install a component, with no visible text or symbols.Para volver a colocar la puerta del horno:
- Inserte ambos brazos de la bisagra en los receptores de la bisagra en el marco de la puerta.
- Abra lentamente la puerta del horno y sentirá que la puerta se encaja en su lugar.
- Mueva los pestillos de las bisagras a la posición de bloqueo.
- Compruebe que la puerta se abre y se cierra libremente. Si no es así, repita los procedimientos de extracción y reemplazo de la puerta.
REEMPLAZO DE LA LUZ DEL HORNO

ADVERTENCIA
Riesgo de Choque Eléctrico
Asegúrese de que el horno y las luces estén fríos y de que la alimentación del horno esté apagada antes de reemplazar la bombilla(s).
Los lentes deben estar en su lugar cuando se usa el horno. Los lentes sirven para proteger la bombilla de roturas.
Los lentes están hechos de vidrio. Manipúlelos con cuidado para evitar roturas.
Si no lo hace, podría provocar la muerte, descargas eléctricas, cortes o quemaduras.
La luz del horno es una bombilla para electrodomésticos estándar de 25 vatios (G9).
IMPORTANTE: Antes de reemplazar la bombilla, asegúrese de que el horno esté frío y los controles estén apagados.
ADVERTENCIA:
- Asegúrese de que el horno y las luces estén fríos y de que la alimentación del horno esté apagada antes de reemplazar la bombilla(s).
- Los lentes deben estar en su lugar cuando se usa el horno. Los lentes sirven para proteger la bombilla de roturas.
- Los lentes están hechos de vidrio. Manipúlelos con cuidado para evitar roturas.
- Si no lo hace, podría provocar la muerte, descargas eléctricas, cortes o quemaduras.
REEMPLAZO DE LA LUZ DEL HORNO
La luz del horno es una bombilla para electrodomésticos estándar de 25 vatios (G9).
IMPORTANTE: Antes de reemplazar la bombilla, asegúrese de que el horno esté frío y los controles estén apagados.
- Desconecte la corriente.
- Quite la tapa de la bombilla girándola hacia la izquierda.
natural_image
Pure mechanical diagram showing two circular components with directional arrows, no text or symbols present- Retire la bombilla fundida del portalámparas.
NOTA: Para evitar daños o disminuir la vida útil de la bombilla nueva, no la toque con los dedos desnudos. Use guantes o un pañuelo desechable al reemplazar la bombilla.
- Reemplace la bombilla y luego vuelva a colocar la tapa de la bombilla.
- Vuelva a conectar la corriente.
SOLUCIÓN DE PROBLEMAS
Intente primero las soluciones que se sugieren aquí para posiblemente evitar el costo de una llamada de servicio.
PROBLEMAS DE HORNEADO
Con cualquier configuración del horno, pueden ocurrir malos resultados por muchas razones además de un mal funcionamiento del horno. Consulte la tabla a continuación para conocer las causas de los problemas más comunes. Dado que el tamaño, la forma y el material de los utensilios para hornear afectan directamente los resultados del horneado, la mejor solución puede ser reemplazar los utensilios para hornear viejos que se hayan oscurecido y deformado con el tiempo y el uso.
| PROBLEMA | CAUSA |
| Los alimentos se doran de manera desigual | Horno no precalentadoPapel de aluminio en la rejilla del horno o en la base del hornoUtensilio para hornear demasiado grande para la recetaSartenes que se tocan entre sí o con las paredes del horno |
| Los alimentos quedan demasiado dorados en la parte inferior | Horno no precalentadoUso de sartenes de vidrio, metal opaco u oscurecidoPosición incorrecta de la rejillaSartenes que se tocan entre sí o con las paredes del horno |
| La comida está seca o se ha encogido excesivamente | Temperatura del horno demasiado altaTiempo de horneado demasiado largoPuerta del horno abierta con frecuenciaTamaño de la sartén demasiado grande |
| Los alimentos se hornean o asan demasiado lento | Temperatura del horno demasiado bajaHorno no precalentadoPuerta del horno abierta con frecuenciaFuertemente sellado con papel de aluminio (Tightly sealed with aluminum foil)Tamaño de la sartén demasiado pequeño |
| Las bases de las tartas no se doran o quedan empapadas | Tiempo de horneado no lo suficientemente largoUso de sartenes de acero brillantePosición incorrecta de la rejillaLa temperatura del horno es demasiado baja |
| Las tartas están pálidos, planos y es posible que no estén cocidos por dentro | Temperatura del horno demasiado bajaTiempo de horneado incorrectoPastel probado demasiado prontoPuerta del horno abierta con demasiada frecuenciaEl tamaño del molde puede ser demasiado grande |
| Pasteles altos en el centro con grietas en la parte superior | Temperatura del horno demasiado altaTiempo de horneado demasiado largoSartenes que se tocan entre sí o con las paredes del hornoPosición incorrecta de la rejillaTamaño de la sartén demasiado pequeño |
| Los bordes de la tarta están demasiado dorados | Temperatura del horno demasiado altaLos bordes de la corteza son demasiado delgados |
PROBLEMAS DE LA ESTUFA DE parrilla
| PROBLEMA | POSIBLE CAUSA | SOLUCIÓN |
| La hornilla no se enciende | La cocina no tiene energía. | Compruebe que la cocina esté conectada correctamente a una fuente de alimentación de 120 V. |
| La hornilla no funciona | Primer uso. Todavía hay aire en la línea de gas. | Gire cualquiera de las perillas de las hornillas de la superficie para liberar el aire de las líneas de gas. |
| La perilla de control no está configurada correctamente. | Presione la perilla antes de girarla a un ajuste. | |
| El orificio de la hornilla está obstruido. | Limpie la abertura del orificio de la hornilla con un cepillo de dientes de nylon rígido o un clip de papel enderezado. | |
| Las llamas de la hornilla son desiguales, amarillas y/o ruidosas | Los orificios de la hornilla están obstruidos. | Limpie la abertura del orificio de la hornilla con un cepillo de dientes de nylon rígido o un clip de papel enderezado. |
| Las tapas de la hornilla no están colocadas correctamente. | Coloque las tapas de la hornilla de modo que los pasadores de alineación queden alineados correctamente con las ranuras. | |
| Se está utilizando gas propano. | Un técnico calificado debe convertir la cocina a gas LP. | |
| La llama de la hornilla es demasiado alta o baja | El suministro de gas de la estufa de parrilla no es correcto. | Asegúrese de que la cocina esté configurada para el tipo de gas correcto. Viene configurada de fábrica para gas natural. Si se conecta a gas LP, un técnico calificado debe convertir las hornillas a gas LP con el kit de orificios suministrado y ajustar el regulador de presión a la configuración de gas LP. |
| La presión del gas no es correcta. | Asegúrese de que el regulador de presión esté instalado correctamente y que la presión de la línea de gas sea correcta. Consulte las Instrucciones de instalación. | |
| La hornilla hace ruidos de estallido | La hornilla está mojado. | Deje que la hornilla se seque antes de usarlo. |
| La tapa de la hornilla o el difusor de gas no están colocados correctamente. | Coloque las tapas de la hornilla de modo que los pasadores de alineación queden alineados correctamente con las ranuras. | |
| Calor excesivo alrededor de los utensilios de cocina en la estufa de parrilla | Los utensilios de cocina no tienen el tamaño adecuado para la hornilla. | Use utensilios de cocina con una base aproximadamente del mismo tamaño que el área de cocción y la hornilla. Los utensilios de cocina no deben sobresalir más de 1" (2,5 cm) del área de cocción. Ajuste la llama para que no suba alrededor de los utensilios de cocina. |
| Los resultados de cocción no son los esperados | Está utilizando utensilios de cocina incorrectos. | Consulte la sección "Utensilios de cocina". |
| La perilla de control no está ajustada al nivel de calor adecuado. | Consulte la sección "Controles". |
PROBLEMAS DEL HORNO
| PROBLEMA | POSIBLE CAUSA | SOLUCIÓN |
| El horno no calienta | La cocina no tiene energía. | Revise el disyuntor o la caja de fusibles de su casa. Asegúrese de que haya energía eléctrica adecuada para el horno. |
| El control del horno no está encendido. | Asegúrese de que se haya seleccionado la temperatura del horno. | |
| El horno no cocina uniformemente | No se utilizan los utensilios para hornear o la posición de la rejilla del horno correctas. | Consulte las tablas de cocción para conocer la posición recomendada de la rejilla. Siempre reduzca la temperatura de la receta en 25 °F (15 °C) cuando hornee con el modo de Horneado por Convección. |
| La pantalla del horno permanece apagada | Corte de energía. | Apague la alimentación en la fuente de alimentación principal (caja de fusibles o disyuntores). Vuelva a encender el disyuntor. Si el problema persiste, llame al servicio técnico. |
| El ventilador de enfriamiento continúa funcionando después de apagar el horno | Los componentes electrónicos aún no se han enfriado lo suficiente. | El ventilador se apagará automáticamente cuando los componentes electrónicos se hayan enfriado lo suficiente. |
| La luz del horno no funciona correctamente | Bombilla suelta o fundida. | Vuelva a colocar o reemplace la bombilla. Tocar la bombilla con los dedos puede hacer que se queme. |
| La luz del horno permanece encendida | La puerta no cierra completamente | Compruebe si hay obstrucciones en la puerta del horno. Revise si la bisagra está doblada o el interruptor de la puerta está roto. |
| No se puede quitar la tapa de la lente | Acumulación de suciedad alrededor de la tapa de la lente. | Limpie el área de la tapa de la lente con un paño limpio y seco antes de intentar quitar la tapa de la lente. |
| El reloj y el temporizador no funcionan correctamente | La cocina no tiene energía. | Revise el disyuntor o la caja de fusibles de su casa. Asegúrese de que haya energía eléctrica adecuada para el horno. |
| Humedad excesiva | Cuando use el modo Hornear, precaliente el horno primero. Horno por Convección y Horneado por Convección eliminarán cualquier humedad del horno. | |
| Desportillamiento de la porcelana | Las rejillas del horno han astillado el interior de porcelana | Al retirar y colocar las rejillas del horno, inclínelas siempre hacia arriba y no las fuerce para evitar que se desportille la porcelana. |
HERRAMIENTAS Y PIEZAS
Reúna las herramientas y piezas necesarias antes de comenzar la instalación. Lea y siga las instrucciones proporcionadas con cualquier herramienta enumerada aquí.
Herramientas necesarias
- Cinta métrica
- Destornillador plano
- Destornillador de estrella
• Nivelador
- Taladro
- Llave o alicates
• Llave para tubos
• Llave combinada de 15/16" (2,4 cm)
- Broca para taladro de 1/8" (3,2 mm) (para pisos de madera)
• Marcador o lápiz
- Compuesto para juntas de tuberías resistente al gas propano
- Broca para mampostería con punta de carburo de 3/16" (4,8 mm) (para pisos de concreto/cerámica)
- Solución no corrosiva para detección de fugas
Piezas suministradas
natural_image
Pure diagram of a mechanical component with four small pins, no text or symbols presentSalpicadero trasero con tornillos
Regulador de presión de gas
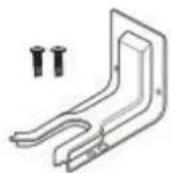
Soporte antivuelco con tornillos
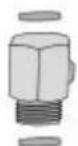
Adaptador para tubería de gas con arandelas
Piezas necesarias
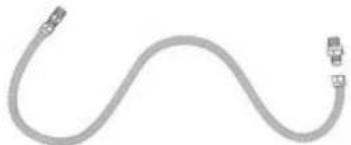
natural_image
Pure electrical circuit lines without any symbolsKit de línea de suministro de gas
(línea de suministro y 2 adaptadores)
REQUISITOS DE UBICACIÓN
IMPORTANTE: Cumpla con todos los códigos y ordenanzas vigentes. No obstruya el flujo de aire de combustión y ventilación.
- Es responsabilidad del instalador cumplir con las distancias de instalación especificadas en la placa de características del modelo/serie. La placa de características del modelo/serie se encuentra detrás de la puerta del horno en el marco del horno.
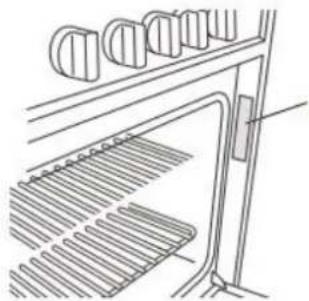
natural_image
Technical line drawing of a rack-mounted heating element with cooling fins (no text or symbols)Placa de característic.
- La cocina debe ubicarse en un lugar conveniente para su uso en la cocina.
- Las instalaciones empotradas deben proporcionar un cerramiento completo de los laterales y la parte posterior de la cocina.
- Para eliminar el riesgo de quemaduras o incendios al alcanzar sobre las unidades de superficie caliente, se debe evitar el espacio de almacenamiento de gabinetes ubicado sobre las unidades de superficie. Si se va a proporcionar almacenamiento en gabinetes, el riesgo se puede reducir instalando una campana extractora o una combinación de campana extractora de microondas que sobresalga horizontalmente un mínimo de 5" (12.7 cm) más allá de la parte inferior de los gabinetes.
- Se deben sellar todas las aberturas en la pared o el piso donde se instalará la cocina.
• No selle la cocina a los gabinetes laterales. - Se deben utilizar las dimensiones de abertura del gabinete que se muestran.
- Se requiere una fuente de alimentación eléctrica con conexión a tierra. Consulte la sección "Requisitos eléctricos".
- Debe haber una conexión de suministro de gas adecuada disponible. Consulte la sección "Requisitos de suministro de gas".
- Póngase en contacto con un instalador calificado de pisos para verificar que el piso pueda soportar al menos 200 °F (93 °C).
- Use una almohadilla aislante o un contrachapado de 1/4" (0.64 cm) debajo de la cocina si la instala sobre una alfombra.
DIMENSIONES DEL PRODUCTO
Este manual cubre varios modelos. Su modelo puede parecer diferente de los modelos mostrados. Las dimensiones dadas son las dimensiones máximas para todos los modelos.

ESPACIOS LIBRES
IMPORTANTE: Algunos gabinetes y materiales de construcción no están diseñados para soportar el calor producido por el horno para hornear y autolimpieza. Consulte con su constructor o proveedor de gabinetes para asegurarse de que los materiales utilizados no se decoloren, delaminen o sufran otros daños.
LAS DIMENSIONES INDICADAS SON ESPACIOS LIBRES MÍNIMOS.

Ubicación de la fuente de alimentación
IMPORTANTE: Un tomacorriente en el piso, puede ser empotrado o de superficie, pero un tomacorriente en la pared debe ser empotrado para hacer la conexión. Para cableado directo, la caja eléctrica debe montarse en la pared.
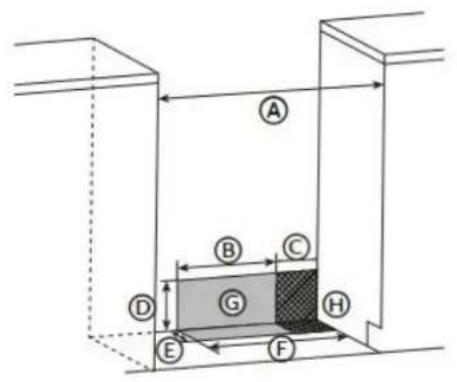
Ⓐ 30" (76 cm)
⑧ 11 ^1/2 " (29,2 cm)
© 6" (15,2 cm)
(D) 3" (18,4 cm)
⑤ 3" (7,6 cm)
⑤ 17 ^1/2 " (44 cm)
© Ubicación recomendada para el tomacorriente
⑧ Ubicación recomendada para la conexión de suministro de gas
REQUISITOS DE VENTILACIÓN
IMPORTANTE: Esta cocina debe tener salida hacia el exterior, a menos que esté usando ventilación sin conducto. Cumpla con todos los códigos y ordenanzas vigentes. No obstruya el flujo de aire de combustión y ventilación.
- No termine el sistema de ventilación en un ático u otra área cerrada.
- Utilice un sombrerete de ventilación aprobado para un rendimiento adecuado. Si se usa un sombrerete de pared o techo alternativo, asegúrese de que el tamaño del sombrerete no se reduzca y que tenga una compuerta cortaviento.
- El sistema de ventilación debe terminar hacia el exterior, a menos que esté usando un kit de ventilación sin conducto.
- Se recomienda un conducto de ventilación rígido de metal. Para un mejor rendimiento, no utilice conductos de ventilación de plástico o papel metálico.
- Si es necesario cortar una viga o montante, se debe construir un marco de soporte.
- El tamaño del conducto de ventilación debe ser uniforme.
- El sistema de ventilación debe tener una compuerta.
- Selle todas las juntas en el sistema de ventilación.
- Use calafateo para sellar la abertura de la pared o techo exterior alrededor del sombrerete.
- Determine cuál es el mejor método de ventilación para su aplicación.
Aire de Reposición
Los códigos de construcción locales pueden requerir el uso de sistemas de aire de reposición cuando se utilicen sistemas de ventilación superiores a un CFM específico de movimiento de aire. El CFM especificado varía de un lugar a otro. Consulte a su profesional de HVAC para conocer los requisitos específicos de su área.
REQUISITOS ELÉCTRICOS ADVERTENCIA

ADVERTENCIA

Riesgo de Choque Eléctrico
Conecte la cocina a tierra eléctricamente.
De no hacerlo, puede provocar la muerte, un incendio o una descarga eléctrica.
Instrucciones de Conexión a Tierra
Este aparato está equipado con un enchufe de conexión a tierra de tres clavijas para su protección contra riesgos de choque y debe conectarse directamente a un receptáculo correctamente conectado a tierra. No corte ni retire la clavija de conexión a tierra de este enchufe.
Esta cocina está equipada con un sistema de encendido electrónico que no funcionará si se conecta a un tomacorriente que no esté polarizado correctamente.
Si los códigos lo permiten y se usa un cable de tierra independiente, se recomienda que un instalador eléctrico calificado determine si la ruta a tierra es adecuada y el calibre del cable cumple con los códigos locales.
No use un cable de extensión.
ADVERTENCIA: La conexión incorrecta del conductor de conexión a tierra del equipo puede provocar riesgo de descarga eléctrica. Consulte con un electricista calificado o un técnico de servicio si tiene dudas sobre si el aparato está correctamente conectado a tierra. No modifique el enchufe del cable de alimentación. Si no entra en el tomacorriente, solicite a un electricista calificado que le instale un tomacorriente adecuado.
REQUISITOS ELÉCTRICOS - SOLO PARA EE. UU.
Asegúrese de que la conexión eléctrica y el calibre del cable sean adecuados y cumplan con el Código Eléctrico Nacional, ANSI/NFPA N.° 70 (última edición) y todos los códigos y ordenanzas locales.
Puede obtener una copia de las normas de código anteriores en:
National Fire Protection Association (Asociación Nacional de Protección contra Incendios)
1 Batterymarch Park
Quincy, MA 02169
Conexiones eléctricas
- Verifique los códigos locales y consulte con el proveedor de gas. Verifique el suministro eléctrico y de gas existentes. Se recomienda que todas las conexiones eléctricas las realice un instalador eléctrico calificado y autorizado.
- La cocina debe conectarse al voltaje y la frecuencia eléctrica adecuados, tal como se especifica en la placa de características del modelo/serie. La placa se encuentra detrás de la puerta del horno en el marco del horno. Consulte las ilustraciones en la sección "Requisitos de ubicación".
- Se requiere un circuito eléctrico de CA solamente, de 120 voltios, 60 Hz, 15 amperios con fusible. También se recomienda un fusible de retardo o disyuntor. Se recomienda que se proporcione un circuito independiente que sirva solo para esta cocina.
- Los sistemas de encendido electrónico funcionan dentro de límites de voltaje amplios, pero se necesita una conexión a tierra y polaridad adecuadas. Verifique que el tomacorriente proporcione energía de 120 voltios y esté correctamente conectado a tierra.
- No es necesario que esta cocina a gas esté conectada a un tomacorriente GFCI (Interruptor de circuito por falla a tierra). Se recomienda no conectar una cocina a gas con encendido electrónico por chispa ni ningún otro electrodoméstico principal a un tomacorriente GFCI, ya que puede hacer que el GFCI se dispare durante el ciclo normal.
- El rendimiento de esta cocina no se verá afectado si se opera en un circuito protegido por GFCI. Sin embargo, es posible que el disyuntor GFCI se dispare ocasionalmente debido al funcionamiento normal de las cocinas a gas electrónicas.
- El diagrama de cableado se encuentra en la parte posterior de la cocina en una bolsa de plástico transparente.
NOTA: El chasis metálico de la cocina debe estar conectado a tierra para que el panel de control funcione. Si el chasis metálico de la cocina no está conectado a tierra, ningún teclado funcionará. Consulte con un electricista calificado si tiene dudas sobre la conexión a tierra del chasis metálico de la cocina.
REQUISITOS ELÉCTRICOS - SOLO PARA CANADÁ
Asegúrese de que la conexión eléctrica y el tamaño del cable sean adecuados y cumplan con la Norma CSA C22.1, Código Eléctrico Canadiense, Parte 1 - última edición, y todos los códigos y ordenanzas locales.
Puede obtener una copia de las normas de código anteriores en:
Canadian Standards Association (Asociación Canadiense de Normalización) 178 Rexdale Blvd.
Toronto, ON M9W 1R3 CANADA
Conexiones eléctricas
Verifique los códigos locales y consulte con el proveedor de gas. Verifique el suministro eléctrico y de gas existentes. Se recomienda que todas las conexiones eléctricas las realice un instalador eléctrico calificado y autorizado.
- Consulte con un instalador eléctrico calificado si no está seguro de que la cocina esté correctamente conectada a tierra.
- Se recomienda un fusible de retardo o disyuntor.
- Esta cocina está equipada con un cable de alimentación certificado por CSA International diseñado para conectarse a un tomacorriente de pared estándar 14-50R. Asegúrese de que el tomacorriente de pared esté al alcance de la ubicación final de la cocina.
- No use un cable de extensión.
- El diagrama de cableado se encuentra en la parte posterior de la cocina en una bolsa de plástico transparente.
NOTA: El chasis metálico de la cocina debe estar conectado a tierra para que el panel de control funcione. Si el chasis metálico de la cocina no está conectado a tierra, ningún teclado funcionará. Consulte con un electricista calificado si tiene dudas sobre la conexión a tierra del chasis metálico de la cocina.
REQUISITOS DE SUMINISTRO DE GAS

AVERTISSEMENT
Peligro de Explosión
Use una línea de suministro de gas nueva aprobada por CSA International.
Instale una válvula de cierre.
Ajuste firmemente todas las conexiones de gas.
Si está conectado a gas propano (LP), un técnico calificado debe asegurarse de que la presión del gas no supere las 14" (36 cm) de columna de agua.
Ejemplos de personal calificado incluyen:
- Personal autorizado en calefacción
- Personal autorizado de la compañía de gas
- Personal de servicio autorizado
De no hacerlo, puede provocar la muerte, una explosión o un incendio.
Cumpla con todos los códigos y ordenanzas vigentes.
IMPORTANTE: Esta instalación debe cumplir con todos los códigos y ordenanzas locales. En ausencia de códigos locales, la instalación debe cumplir con la Norma Nacional Estadounidense, Código Nacional de Gas Combustible ANSI Z223.1 - última edición o CAN/CGA B149 - última edición.
IMPORTANTE: La prueba de fugas de la cocina debe realizarse según las instrucciones del fabricante.
TIPO DE GAS
Gas Natural:
Esta cocina está certificada por diseño por CSA International para usarse con gas natural o, después de una conversión adecuada, para usarse con gas LP.
- Esta cocina viene configurada de fábrica para gas natural. La placa de características del modelo/serie ubicada en la moldura derecha de la puerta del horno tiene información sobre los tipos de gas que se pueden usar. Si los tipos de gas enumerados no incluyen el tipo de gas disponible, consulte con el proveedor de gas local.
Conversión a Gas LP:
La conversión debe ser realizada por un técnico de servicio calificado. El organismo calificado que realice este trabajo asume la responsabilidad de la conversión de gas.
No intente convertir el aparato del gas especificado en la placa de características del modelo/serie para usarlo con un gas diferente sin consultar al proveedor de gas que le atiende. Consulte la sección "CONVERSION A GAS LP".
LINEA DE SUMINISTRO DE GAS
Proporcione una línea de suministro de gas de tubería rígida de 3/4" (1.9 cm) al lugar de la cocina. Un tubo de menor tamaño en tramos más largos puede resultar en un suministro de gas insuficiente. Se deben usar compuestos para juntas de tuberías que resistan la acción del gas LP. Con gas LP, el tamaño de la tubería o del tubo puede ser mínimo de 1/2" (1.3 cm). Por lo general, los proveedores de gas LP determinan el tamaño y los materiales utilizados en el sistema.
Conector flexible para electrodomésticos de metal:
- Si los códigos locales lo permiten, se puede usar un conector flexible para electrodomésticos de metal nuevo, certificado por diseño CSA, de 4 a 5 pies (122 a 152.4 cm) de largo, de 1/2" (1.3 cm) o 3/4" (1.9 cm) de diámetro interior para conectar la cocina a la línea de suministro de gas.
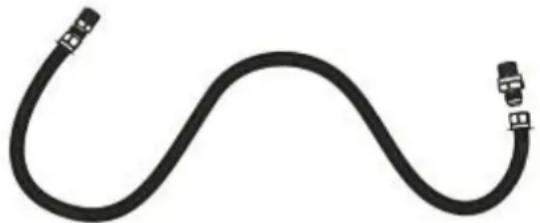
natural_image
Schematic illustration of a black flexible hose with connectors (no text or symbols)- Se necesita una rosca macho de tubería de 1/2" (1.3 cm) para la conexión a las roscas hembra de la entrada del regulador de presión del aparato.
- No doble ni dañe el tubo flexible de metal al mover la cocina.
Conexión de tubería rígida:
La conexión de tubería rígida requiere una combinación de accesorios de tubería para obtener una conexión en línea a la cocina. La tubería rígida debe estar nivelada con la conexión de la cocina. Se deben eliminar todas las tensiones de las líneas de suministro y combustible para que la cocina esté nivelada y alineada.
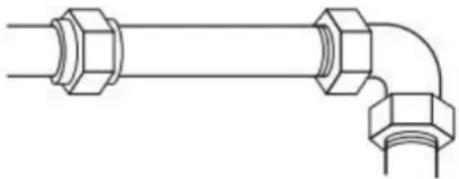
natural_image
Pure technical line drawing of a pipe fitting with hexagonal connectors (no text or symbols)Válvula de cierre de gas:
Se debe instalar una válvula de cierre manual de la línea de gas en un lugar de fácil acceso. No bloquee el acceso a la válvula de cierre. La válvula sirve para abrir o cerrar el gas a la cocina.
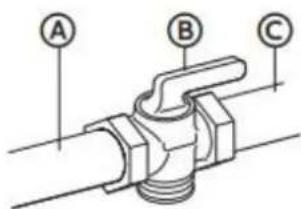
ⒶLínea de suministro de gas
⑧Válvula de cierre en posición "Abierto"
©A la cocina
REGULADOR DE PRESIÓN DE GAS
Se debe usar el regulador de presión de gas suministrado con esta cocina. La presión de entrada al regulador debe ser la siguiente para un funcionamiento adecuado:
| Gas natural | Gas LP | |
| Presión mínima | 4" WCP | 10" WCP |
| Presión máxima | 7" WCP | 11" WCP |
Comuníquese con su proveedor de gas local si no está seguro de la presión de entrada.
Requisitos de entrada de la hornilla
Las clasificaciones de entrada que se muestran en la placa de características del modelo/serie son para elevaciones de hasta 2,000 pies (609.6 m).
Para elevaciones superiores a 2,000 pies (609.6 m), las clasificaciones se reducen a una tasa del 4% por cada 1,000 pies (304.8 m) sobre el nivel del mar (no aplica para Canadá).
PRUEBA DE PRESIÓN DE SUMINISTRO DE GAS
La presión de suministro de gas para probar el regulador debe ser al menos 1" (2.5 cm) de columna de agua por encima de la presión del colector que se muestra en la placa de características del modelo/serie.
Prueba de presión de línea por encima de 0.5 psi de manómetro (14" WCP)
La cocina y su válvula de cierre individual deben desconectarse del sistema de tuberías de suministro de gas durante cualquier prueba de presión de ese sistema a presiones de prueba superiores a 0.5 psi (3.5 kPa).
Prueba de presión de línea a 0.5 psi de manómetro (14" WCP) o menos
La cocina debe aislarse del sistema de tuberías de suministro de gas cerrando su válvula manual individual durante cualquier prueba de presión del sistema de tuberías de suministro de gas a presiones de prueba iguales o inferiores a 1/2 psi (3.5 kPa).
IMPORTANTE: Este aparato solo debe ser instalado por personal autorizado y de acuerdo con las instrucciones de instalación del fabricante, las regulaciones locales de instalación de gas, los códigos de construcción municipales, las regulaciones de cableado eléctrico y las regulaciones locales de suministro de agua.
DESEMPAQUETADO DE LA COCINA

ADVERTENCIA
Peligro de peso excesivo
Use dos o más personas para mover e instalar la cocina.
No hacerlo puede resultar en lesiones en la espalda u otras partes del cuerpo.
- Retire los materiales de embalaje, cinta adhesiva y película de la cocina. Conserve la base de cartón debajo de la cocina. No deseche nada hasta que la instalación esté completa.
- Retire las rejillas del horno y el paquete de piezas del horno y los materiales de embalaje.
- Para quitar la base de cartón, primero quite las 4 esquinas de cartón de la caja. Apile una esquina de cartón sobre otra. Repita con las otras 2 esquinas. Colóquelas a lo largo en el piso detrás de la cocina para sostenerla cuando se la acueste sobre su espalda.
- Con dos o más personas, sujete firmemente la cocina y acuéstela suavemente sobre su espalda sobre las esquinas de cartón.
- Retire la base de cartón.
NOTAS:
- Las patas niveladoras se pueden ajustar mientras la cocina está acostada.
- Para volver a colocar la cocina en posición vertical, coloque una hoja de cartón o cartón rígido en el piso frente a la cocina para proteger el piso. Con dos o más personas, levante la cocina nuevamente sobre el cartón o cartón rígido.
INSTALE EL DISPOSITIVO ANTIVUELCO

ADVERTENCIA
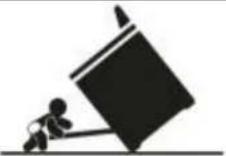
Peligro de vuelco
- Un niño o un adulto pueden volcar la cocina y morir.
- Instale el soporte antivuelco en el piso o la pared según las instrucciones de instalación.
- Deslice la cocina hacia atrás para que la pata trasera de la cocina se enganche en la ranura del soporte antivuelco.
• Vuelva a colocar el soporte antivuelco si mueve la cocina. - No opere la cocina sin el soporte antivuelco instalado y enganchado.
- El no seguir estas instrucciones puede provocar la muerte o quemaduras graves a niños y adultos.
IMPORTANTE:
- Se incluye un soporte antivuelco con la cocina. El soporte antivuelco usa una pata trasera de la cocina para asegurar la cocina al piso o la pared.
-
Fije el soporte antivuelco al piso o la pared de manera que la pata trasera de la cocina quede centrada dentro del soporte cuando la cocina se empuje a su posición final.
-
Retire el soporte antivuelco y los tornillos de la bolsa de piezas.
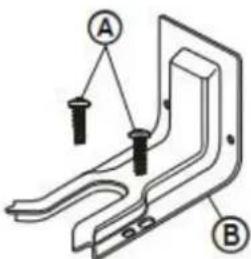
Ⓐ Tornillos de 16 × 1^5/_8 " (2)
©Soporte antivuelco
NOTA: El soporte antivuelco debe montarse de forma segura en el contrapiso o la pared. El grosor del piso puede requerir tornillos más largos para anclar el soporte al contrapiso.
- Coloque el soporte de manera que la parte posterior del soporte esté contra la pared posterior y el borde lateral del soporte esté de 3/8" a 1/2" (de 0.95 cm a 1.27 cm) del gabinete adyacente.
NOTA: Si no hay un gabinete adyacente, coloque el soporte de manera que el borde del soporte esté de 3/8" a 1/2" (de 0.95 cm a 1.27 cm) hacia adentro del panel lateral de la cocina. Si la encimera sobresale del gabinete, desplace el soporte del gabinete por la profundidad del saliente más un adicional de 3/8" a 1/2" (de 0.95 cm a 1.27 cm).
- Usando el soporte antivuelco como plantilla, marque los dos orificios para una instalación de piso de madera, piso de concreto o pared, como se muestra.
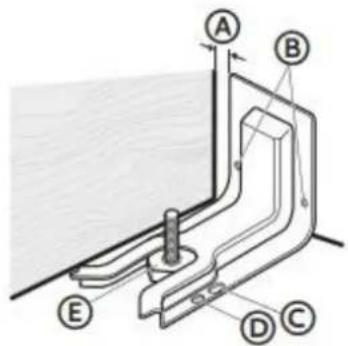
(A) Distancia del gabinete adyacente (3/8" a 1/2" [0.95 cm a 1.27 cm])
⑧ Orificios para la pared
© Orificios para piso de concreto
(D) Orificios para piso de madera
E Pata trasera de la cocina
- Perfore dos orificios piloto donde se indica. Siga las instrucciones específicas para su construcción.
NOTA: Se puede usar un clavo o punzón para hacer un orificio piloto, si no se dispone de un taladro. Para construcciones de concreto, se requieren pernos de cabeza cuadrada de 1/4" x 1 ^1/2 " y anclajes de manguito de 1/2" D.E.
Madera
- Piso - Perfore un orificio piloto de 1/8", como se muestra.
NOTA: Consulte con un instalador calificado de revestimientos de piso para conocer el mejor procedimiento para perforar orificios de montaje a través de su tipo de revestimiento de piso.
- Pared - Perfore un orificio piloto inclinado de 1/8", como se muestra.
Concreto
- Perfore el orificio del tamaño recomendado para los anclajes en el concreto en el centro de los orificios identificados como Piso de concreto o Pared.
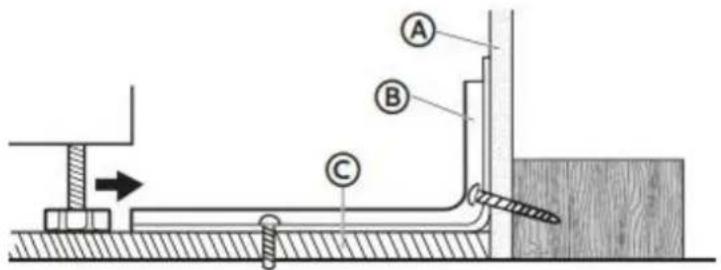
Ⓐ Pared
B Soporte antivuelco
© Piso
- Instale el soporte antivuelco.
Madera
- Con los dos tornillos (incluidos) sujete el soporte antivuelco al piso o la pared.
NOTA: El tornillo debe entrar en madera o metal.
Concreto
- Inserte el anclaje de manguito en los orificios perforados y luego inserte los pernos de cabeza cuadrada a través del soporte antivuelco y dentro del piso o la pared. Los pernos deben estar correctamente apretados según lo recomendado para la tornillería.
INSTALACIÓN DE SALPICADERO
- Instale el salpicadero en la parte posterior de la cocina con los tornillos proporcionados.

natural_image
Technical line drawing of a gas stove or heating unit with multiple fans and mounting brackets (no text or symbols)CONEXIÓN DE GAS

ADVERTENCIA
Peligro de Explosión
Use una línea de suministro de gas nueva aprobada por CSA International.
Instale una válvula de cierre.
Ajuste firmemente todas las conexiones de gas.
Si está conectado a gas propano (LP), un técnico calificado debe asegurarse de que la presión del gas no supere las 14" (36 cm) de columna de agua.
Ejemplos de personal calificado incluyen:
- Personal autorizado en calefacción
• Personal autorizado de la compañía de gas
• Personal de servicio autorizado
De no hacerlo, puede provocar la muerte, una explosión o un incendio.
Este aparato solo debe ser instalado por personal autorizado y de acuerdo con las instrucciones de instalación del fabricante, las regulaciones locales de instalación de gas, los códigos de construcción municipales, las regulaciones de cableado eléctrico y las regulaciones locales de suministro de agua.
Esta cocina viene configurada de fábrica para gas natural. Para usar esta cocina con gas propano, consulte la sección "CONVERSION DE GAS" antes de conectar la cocina al suministro de gas. Las conversiones de gas de gas natural a gas propano o de gas propano a gas natural deben ser realizadas por un instalador calificado.
CONEXIÓN FLEXIBLE TÍPICA
-
Aplique un compuesto para juntas de tuberías hecho para usarse con gas LP a los extremos roscados más pequeños de los adaptadores de conector flexible.
-
Fije un adaptador al regulador de presión de gas y el otro adaptador a la válvula de cierre de gas. Ajuste ambos adaptadores, asegurándose de no mover ni girar el regulador de presión de gas.