. Ein Fortschrittsbalken informiert Sie über den Fortschritt des Suchlaufs und die Anzahl der gefundenen Sender.
DAB-Sender löschen
Sie können die DAB-Sender in der Senderliste löschen, die bei Ihnen nicht empfangen werden können. Diese werden mit einem Präfix
aufgelistet.
Im DAB-Modus:
Drücken Sie lange auf i ☐. Scrollen Sie mit
◀ √ ▶ und wählen Sie <Inaktive Sender
löschen>. Ja>
angezeigt. Scrollen Sie mit ◀✓▶ und wählen Sie . Sender mit einem Präfix <?> werden nicht mehr angezeigt.
Einen DAB-Sender-Favoriten abspeichern
Ihr Radio kann bis zu 20 DAB-Radiosender als Favorit speichern – Sie können also sofort auf Ihre Lieblingssender zugreifen.
Hinweis: Wenn Sie DAB-Radiosender speichern, werden keine UKW-Sender-Favoriten überschrieben.
Stellen Sie das Radio auf den DAB-Radiosender ein, den Sie als Favoriten abspeichern möchten. Drücken Sie lange auf ♥ ▶ bis <speichern <1:(Leer)>> angezeigt wird. Bewegen Sie sich mit ◀ zu dem voreingestellten Speicherort, an dem Sie den Radiosender speichern möchten (1-20). Drücken Sie zur Auswahl √. Das Display bestätigt , wobei „X“ die Nummer des Favoriten ist (1-20)
Hinweis: Wenn unter einem Favoriten schon ein DAB-Sender abgespeichert wurde, wird dieser beim Speichern des neuen Senders überschrieben.
Zu einem DAB-Sender-Favoriten wechseln
Im DAB-Modus:
Um die als Favoriten abgespeicherten Radiosender 1, 2 oder 3 schnell aufzurufen, drücken Sie vorne auf Ihrem Radio entsprechend kurz auf 1, 2 oder 3. Alternativ drücken Sie kurz auf ♥ ▶ || . <Progr. aufrufen <1:>> wird zusammen mit dem Namen oder der Frequenz des dort abgespeicherten Senders angezeigt – oder <(Leer)>, wenn zuvor kein Sender abgespeichert wurde. Nutzen Sie ◀ √ ▶ , um sich zu dem Favoriten-Sender, den Sie gerne hören möchten, zu bewegen und wählen Sie ihn aus (1-20).
Wenn Sie einen DAB-Sender hören, können Sie die auf dem Display erscheinenden Informationen ändern. Die Sender übertragen verschiedene Arten von Informationen. Drücken Sie wiederholt i, um durch die verschiedenen
Informationsoptionen zu blättern:
Dynamic Label Segment (DLS) – dies sind vom Sender bereitgestellte Lauftextinformationen. Dazu gehören beispielsweise Künstlername, Liedtitel, Kontaktdaten des Radiosenders usw.
Signalstärke – Auf dem Display erscheint ein leeres Symbol ☐ dies zeigt die minimale Signalstärke für einen akzeptablen Hörgenuss an. Die Reihe der ausgefüllten Rechtecke zeigt die tatsächlich empfangene Signalstärke an.
- Programmtyp (PTY) – z. B „Rock“, „Pop“, „Talk“ oder „Nachrichten“
- Multiplex-Name – zeigt das Sendegebiet und die Sammlung von Radiosendern auf dieser Frequenz; z. B., BBC National DAB, Digital 1 Network
- Kanal und Frequenz – z. B. 12B 225.648 MHz (Kanal=12B, Frequenz=225.648 MHz)
- Signalfehler – wird als eine Zahl zwischen 0-99 angezeigt. Damit Sie einen Radiosender zufriedenstellend hören können, muss der Signalfehler unter 30 liegen. Richten Sie die
Antenne neu aus oder stellen Sie Ihr Radio an einen anderen Standort, um den Empfang zu verbessern.
Signaldaten – die Datenrate, mit der das Signal übertragen wird.
Betriebsanzeige – zeigt bei einer Stromversorgung über USB; zeigt bei einer Stromversorgung mit Batterien, wobei XX die verfügbare Batterieladung ist.
Uhrzeit
Datum
Dynamic Range Control (DRC)
DRC-Daten werden nicht von allen Sendern übertragen. Mit DRC wird die Differenz zwischen den lautesten und leisesten Geräuschen gesteuert. Ein Beispiel: In einer lauten Umgebung macht das auf maximal eingestellte DRC die leisen Töne vergleichsweise lauter und laute Töne leiser.
Es gibt 3 Komprimierungsstufen:
- DRC aus – keine Komprimierung. Das ist die Standardeinstellung.
DRC tief – mittlere Komprimierung.
Drücken Sie im DAB-Modus lange auf i.
Scrollen Sie mit ◀✓▶ und wählen Sie und anschließend Ihren Favoriten.
Hinweis: Die aktuelle DRC-Einstellung wird mit einem Sternchen (*) auf dem Display markiert.
FM-Radio-Modus
Um in den FM-Modus zu wechseln, drücken Sie kurz auf 🔊 → bis das Radio anzeigt. Wenn Sie beim Ausschalten des Radios einen FM-Sender gehört haben, wird dieser Sender beim erneuten Einschalten des Radios automatisch ausgewählt.
Einen FM-Sender einstellen
Drücken Sie lange auf die Taste ◀◀der , ▶▶▶ um im Frequenzband nach oben oder unten zu suchen. Das Radio startet den Suchlauf und stoppt beim nächsten verfügbaren Sender.
Drücken Sie kurz auf ✕eler, um jede Frequenz in Schritten von 0,05 MHz fein abzustimmen.
Hinweis: Richten Sie die Antenne bei einem schlechten Empfang neu aus oder stellen Sie das Radio an einen anderen Standort.
Die Suchlauf-Einstellungen ändern
Im FM-Modus:
Drücken Sie lange auf i und es wird die <FM
Einstellung> angezeigt. Drücken Sie √.
Es stehen zwei verschiedene Optionen zur Auswahl:
- – der Suchlauf stoppt nur, wenn eine starke Signalstärke empfangen wird; dies ergibt eine bessere Audio-Qualität. Der von Ihnen gesuchte Sender kann mit dieser Option möglicherweise übersehen werden.
- – der Suchlauf stoppt bei jedem empfangenen Sender, auch bei schlechter Signalstärke.
Benutzen Sie die Taste◀ √ ▶ zur Auswahl und
wählen Sie aus den zur Verfügung stehenden Optionen.
Hinweis: Die aktuelle Suchlauf-Einstellung wird mit einem Sternchen (*) auf dem Display markiert.
Einen FM-Sender-Favoriten abspeichern
Ihr Radio kann bis zu 20 FM-Sender als Favoriten abspeichern – Sie können also sofort auf Ihre Lieblingssender zugreifen.
Hinweis: Wenn Sie FM-Radiosender als Favoriten abspeichern, werden keine DAB-Sender-Favoriten überschrieben.
Stellen Sie das Radio auf den FM-Radiosender ein, den Sie als Favorit abspeichern möchten. Drücken Sie lange auf ♥▶|| bis <speichern <1:(Leer)>> angezeigt wird. Bewegen Sie sich mit ◀√▶zu dem Speicherort des Favoriten und wählen Sie den Speicherort aus, an dem Sie den Radiosender speichern möchten (1-20). Das Display bestätigt
, wobei „X“ die Nummer des
Favoriten ist (1-20).
Hinweis: Wenn unter einem Favoriten schon ein FM-Sender abgespeichert wurde, wird dieser beim Speichern des neuen Senders überschrieben.
Auto Memory Store (AMS)
Alternativ können Sie die Funktion „Auto Memory Store (AMS)“ nutzen, um Ihre Favoriten der FM-Radiosender abzuspeichern. Drücken Sie im FM-Modus lange auf i ≡. Scrollen Sie mit ◀ √ ▶ und wählen Sie . Ihr Radio durchsucht jetzt das UKW-Frequenzband und speichert die gefundenen Sender automatisch in den Speicherorten der Favoriten.
Hinweis: Sie können Ihre Favoriten, die Sie per AMS gespeichert haben, manuell überschreiben – führen Sie dazu die oben genannten Schritte unter „Einen FM-Sender-Favoriten abspeichern“ aus.
Zu einem FM-Sender-Favoriten wechseln
Im FM-Modus:
Um die als Favoriten abgespeicherten Radiosender 1, 2 oder 3 schnell aufzurufen, drücken Sie entsprechend kurz auf 1, 2 oder 3. Alternativ drücken Sie kurz auf ♥ ►||. <Progr. aufrufen <1:>> wird zusammen mit dem Namen oder der Frequenz des dort abgespeicherten Senders angezeigt – oder <(Leer)>, wenn zuvor kein Sender abgespeichert wurde. Nutzen Sie ◀ √ ►, um sich zu dem Favoriten-Sender, den Sie gerne hören möchten, zu bewegen und wählen Sie ihn aus (1-20).
Wenn Sie einen FM-Sender hören, können Sie die in der zweiten Zeile des Displays erscheinenden Informationen ändern. Drücken Sie wiederholt i um durch die verschiedenen Informationsoptionen zu blättern:
- Radiotext (RT) – dies sind vom Sender
bereitgestellte Lauftextinformationen. Dazu gehören beispielsweise Künstlername, Liedtitel, Kontaktdaten des Radiosenders usw.
Programmtyp (PTY) – z. B „Rock“, „Pop“, „Talk“ oder „Nachrichten“
Sendername oder Frequenz – z. B. BBC R4, 93,30 MHz
Betriebsanzeige – zeigt bei einer Stromversorgung über USB; zeigt bei einer Stromversorgung mit Batterien, wobei XX die verfügbare Batterieladung ist.
Uhrzeit
Datum
Bluetooth-Modus
Vergewissern Sie sich, dass sich Ihr Radio im Bluetooth-Modus befindet, indem Sie kurz auf
drücken, bis das Radio anzeigt. Ihr Radio sucht nun nach Bluetooth-Geräten. Vergewissern Sie sich, dass das Bluetooth-fähige Gerät, mit dem Sie eine
Verbindung herstellen möchten, erkannt werden kann.
Hinweis: Falls nötig, lesen Sie die Anweisungen für Ihr Gerät, um Bluetooth hinzuzufügen oder einzurichten.
Wenn Ihr Radio gefunden wurde, wird es auf Ihrem Gerät als „SHARP DR-P421“ angezeigt. Wählen Sie es aus, um mit dem Pairen zu beginnen. Sobald es abgeschlossen ist, wird auf Ihrem Radio angezeigt.
Gekoppelte Geräte verbinden sich mit dem Radio, wenn sie sich in Reichweite befinden (innerhalb von 10 Metern in Sichtweite). Ihr Gerät bleibt mit dem Radio gekoppelt, außer Sie trennen die Verbindung.
Um die Bluetooth-Verbindung zu trennen, drücken Sie 3 Sekunden lang auf ♥ ▶|| um die Verbindung mit Ihrem aktuellen Gerät zu trennen nach neuen Geräten zu suchen.
Drahtlos Musik per Bluetooth streamen
Im Bluetooth-Modus können Sie Audiodaten drahtlos über den Lautsprecher des Geräts übertragen. Benutzen Sie die Steuerelemente Ihres gekoppelten Bluetooth-Geräts und die Ihres Radios. Verfügbare Steuerelemente:
Wiedergabe/Pause: Kurz ♥ ▶||drücken
Nächster Track: Kurz ▶drücken
Die Lautstärke kann ebenfalls eingestellt werden – entweder über Ihr Radio und/oder Ihr angeschlossenes Gerät.
Hinweis: Sollte das Radio 20 Minuten lang inaktiv bleiben oder kein Audiosignal empfangen, schaltet es es automatisch in den Stand-by-Modus (oder es schaltet sich aus, wenn es mit Batterien betrieben wird).
Alarmfunktion
Hinweis: Die Alarmfunktion funktioniert nur, wenn das Radio über USB mit Strom versorgt wird. Sie funktioniert nicht bei der Stromversorgung per Batterie (um die Akkulaufzeit zu erhalten).
Einen Alarm einstellen
Hinweis: Prüfen Sie vor der Einstellung eines Alarms, ob das Radio die richtige Uhrzeit und das richtige Datum anzeigt.
flowchart
graph LR
A["DAB+"] --> B["Manuelle Abstimmung System"]
A --> C["DRC Schlaf Wecker"]
A --> D["Löschen Wecker Einstellung Alarm"]
A --> E["System Uhrzeit Einstellung Alarm 2"]
F["FM"] --> G["FM Einstellung Sprache"]
F --> H["AMS Werkseinstellung"]
F --> I["System Software-Version"]
J["BT System"] --> K["Beleuchtung"]
K --> L["End"]
Einstellung Alarm 1 oder 2
Uhrzeit Stunde Minute Dauer 1, 5, 15, 30 oder 60 Minuten Quelle Buzzer, DAB oder FM Frequenz Täglich, einmalig, wochentags oder am Wochenende Lautstärkepegel 25 % - 100 % Wecker An oder Aus
Hinweis: Wurde die Uhrzeit nicht eingestellt oder nicht durch das Funksignal aktualisiert, wird angezeigt, wenn Sie den Alarm einstellen wollen. Das Radio fordert Sie dann auf, die Uhrzeit einzustellen. Erst nachdem die Uhrzeit eingestellt wurde, kann ein Alarm eingestellt werden.
Wenn Sie einen Alarm einstellen wollen, während das Gerät mit Batterien betrieben wird, wird angezeigt. Die Alarmfunktionen stehen nur bei einer Verbindung mit dem Stromnetz zur Verfügung (USB).
Anhalten, Schlummern oder Wecker aus
Um den Alarm anzuhalten, drücken Sie kurz auf und es wird angezeigt.
Das Alarmsymbol ist weiterhin auf dem Display zu sehen und der Alarm ertönt am nächsten Tag zur gleichen Zeit wieder, es sei denn, es wurde eingestellt.
Um den Alarm auf die Schlummern-Funktion
zu schalten, drücken Sie √. wird angezeigt, gefolgt von einem 10-minütigen Countdown. Sobald der Countdown endet, ertönt der Alarm erneut. Sie können das Schlummern beenden, indem Sie √ drücken. Es wird angezeigt.
Um den Alarm auszuschalten, befolgen Sie die Schritte unter „Einen Alarm einstellen“ und wählen Sie .
Sleep-Timer
Sie können Ihr Radio so einstellen, dass es mit dem Sleep-Timer automatisch in den Stand-by-Modus schaltet. Sie haben die Auswahl zwischen , <15>, <30>, <45>, <60> und <90> Minuten. Drücken Sie dazu lange auf i ■. Scrollen Sie mit ◀nd wahlen Sie
/ . Scrollen Sie mit ◀✓▶ und wählen Sie Ihre Präferenz. Es wird angezeigt. Oben rechts auf dem Display des Radios sehen Sie die Anzahl der Minuten, nach denen Ihr Radio in den Stand-by-Modus wechselt, z. B. S90.
Auto-Dimmen der Hintergrundbeleuchtung des Displays
Um das Auto-Dimmen der Hintergrundbeleuchtung des Displays anzupassen, drücken Sie lange i. Scrollen Sie mit ▶ und wählen Sie / / . Scrollen Sie durch die verfügbaren Auto-Dimm-Optionen für die Hintergrundbeleuchtung. Die aktuelle Einstellung wird mit einem Sternchen (*) auf dem Display markiert. Drücken Sie zur Auswahl √. Gleichermaßen nutzen Sie ▶, um die Einstellungen für die Helligkeit der Hintergrundbeleuchtung für die und den zu ändern. Es stehen drei Optionen zur Verfügung: , und .
Display-Sprache
Um die Display-Sprache zu ändern, drücken Sie lange auf i □. Scrollen Sie mit ◀ und ▶ wählen Sie / . Scrollen Sie mit ◀✓ und wählen Sie Ihre bevorzugte Sprache. Es stehen 7 Optionen zur Verfügung: Englisch, Französisch, Deutsch, Italienisch, Spanisch, Polnisch und Niederländisch. Neben der aktuellen Spracheinstellung wird ein Sternchen (*) angezeigt.
Software-Version
Um die Softwareversion Ihres Radios zu überprüfen, drücken Sie lange auf i. Scrollen Sie mit ◀√▶ und wählen Sie / . Die Softwareversion wird angezeigt.
Werkseinstellung
Sie können Ihr Radio auf die ursprüngliche Werkseinstellung zurücksetzen.
Hinweis: Wenn Sie Ihr Radio zurücksetzen, werden Ihre gespeicherten Favoriten gelöscht und
alle verbundenen Bluetooth-Geräte getrennt.
Drücken Sie lange auf i ☐ Scrollen Sie
mit ◀ √ ▶ und wählen Sie /
. <Werkseinstellung?
Es wird Ja> angezeigt. Scrollen Sie
mit ◀ √ ▶ und wählen Sie . Es wird
. Ihr Radio wird neu gestartet und das Display zeigt an.
Problembehandlung
Wenn kein Ton oder Strom vorhanden ist:
Stellen Sie die Lautstärke ein.
Vergewissern Sie sich, dass das USB-Kabel angeschlossen ist und dass sich das Radio nicht im Stand-by-Modus befindet.
Wenn Sie das Produkt mit Batterien betreiben, sollten Sie überprüfen Sie, ob diese ersetzt werden müssen. Verwenden Sie bitte AA-Batterien von hoher Qualität.
Wenn der Radioempfang schlecht ist:
Vergewissern Sie sich, dass die Teleskopantenne vollständig ausgefahren wurde (am besten senkrecht).
Starten Sie einen erneuten Suchlauf nach Radio-sendern – lesen Sie entsprechend den Abschnitt „Nach DAB-Sendern scannen“ und/oder „Einen FM-Sender einstellen“.
Stellen Sie Ihr Radio versuchsweise an einem anderen Standort auf, um herauszufinden, ob sich der Empfang verbessert.
Vergewissern Sie sich, dass sich keine anderen elektrischen Geräte in der Nähe Ihres Radios befinden. Dies kann zu Interferenzen führen.
Wenn Sie keine Verbindung zu einem Bluetooth-Gerät herstellen können:
Vergewissern Sie sich, dass Sie sich im Bluetooth-Modus befinden.
Vergewissern Sie sich, dass Sie sich innerhalb einer Entfernung von 10 Metern zum Radio befinden, damit die Funktionalität der Bluetooth-Verbindung gewährleistet ist.
Bewegen Sie das Radio und das Bluetooth-Gerät von anderen Bluetooth-Geräten/elektrischen Geräten weg.
Schalten Sie nach Möglichkeit andere Bluetooth-Geräte in der Nähe aus oder deaktivieren Sie deren Bluetooth-Funktionalität.
Wenn die Funktionstasten nicht reagieren:
Überprüfen Sie, ob das USB-Kabel an der Rückseite Ihres Radios angeschlossen ist. Drücken Sie kurz ⏻ ⏻ Wenn Sie das Radio mit Batterien betreiben, müssen diese eventuell ausgetauscht werden.
Setzen Sie das Gerät auf die Werkseinstellung zurück.
Hinweis: Wenn Sie das Radio auf die Werkseinstellungen zurücksetzen, werden alle Ihre Einstellungen gelöscht – dazu gehören auch die Liste der Radiosender, die verbundenen Bluetooth-Geräte und alle Favoriten.
Technische Daten
Eingang DC 5 V Batterien 4 x 1,5 V Größe AA (LR-6) (optional, nicht im Lieferumfang enthalten) Audio-Ausgang 2 Watt RMS Stromverbrauch Aktiv: < 2 W Stand-by: < 2 mW DAB-Frequenzbereich Band III, 174 MHz bis 240 MHz FM-Frequenzbereich 87,5 MHz bis 108 MHz Bluetooth 2,4 GHz ~ 2,480 GHz Pairing-Name SHARP DR-P421 Abmessungen (B) x (H) x (T) mm 174 x 90 x 53 Gewicht ca. 0,39 kg
Instrucciones de seguridad importantes
Siga todas las instrucciones de seguridad y preste atención a todas las advertencias. Conserve el manual para futuras consultas.
Este símbolo indica al usuario que consulte el manual de instrucciones para cuestiones relacionadas con la seguridad, el uso y la información de mantenimiento.
Tensión de CC
Precauciones
Seguridad infantil
- Respete siempre las precauciones básicas de seguridad cuando utilice este producto, especialmente si hay niños presentes. Los niños deben ser supervisados para asegurarse de que no juegan con el producto.
Ubicación
- El producto debe instalarse en una ubicación estable y asegurarse de que ni la unidad en sí ni sus componentes sobresalen.
Ventilación
- Los orificios y las aperturas de la carcasa del producto se proporcionan para fines de ventilación con la intención de garantizar un uso fiable y su protección contra el sobrecalentamiento; estas aperturas no deben bloquearse ni taparse. Asegúrese de dejar una distancia mínima de 5 cm en torno al producto para garantizar una ventilación adecuada. No permita que se introduzcan elementos en los orificios, ranuras ni en
ninguna apertura de la carcasa del producto, ya que podrían dar lugar a descargas eléctricas. Calor y temperatura de funcionamiento
- No instale el aparato cerca de ninguna fuente de calor, como radiadores, salidas de aire caliente, estufas u otros aparatos (incluidos amplificadores) que produzcan calor. Evite la exposición directa al sol.
Llamas descubiertas
- Para evitar el riesgo de incendio, mantenga las velas y llamas descubiertas lejos del producto. Entrada de agua, humedad y líquidos
- Para evitar el riesgo de incendio o de descarga eléctrica, no exponga este producto a lluvia, agua ni humedad. No coloque objetos que contengan líquidos sobre el producto o en sus proximidades.
Tormentas y rayos
- Las tormentas son peligrosas para todos los productos eléctricos. Si los cables de alimentación o antena son alcanzados por un rayo, el producto puede resultar dañado, incluso si no
está encendido. Debe desconectar todos los cables y conectores del producto antes de una tormenta.
Cable USB
- No dañe el cable de carga USB, no lo estire ni doble, y no coloque objetos pesados sobre él. Daños
- Inspeccione la unidad tras desembalarla en busca de posibles daños. Si el producto presenta algún daño, no lo utilice y consulte a su distribuidor.
Mantenimiento
- Desenchufe el cable de alimentación de la toma de corriente antes de limpiar el producto. Utilice un paño suave y limpio para limpiar la parte exterior de la unidad. No utilice nunca productos químicos ni detergentes.
Servicio y reparación
- Este producto no contiene ninguna pieza que pueda ser reparada por el usuario. La exposición de ciertas partes internas del dispositivo puede poner en peligro su vida. En caso de avería, pón-
gase en contacto con el fabricante o el servicio técnico autorizado. La garantía del fabricante no cubre las averías resultantes de reparaciones llevadas a cabo por terceros.
Pilas
Instalación
- No utilice pilas diferentes a las especificadas. Tenga en cuenta la polaridad correcta al insertar las pilas. No combine nunca pilas de diferente tipo, y no mezcle pilas nuevas y viejas.
Uso y mantenimiento
- No exponga las pilas a altas temperaturas, por ejemplo, no las sitúe cerca del fuego o directamente bajo la luz del sol Si el producto no se va a utilizar durante un largo periodo de tiempo (más de un mes), retire las pilas para evitar fugas. Si las pilas presentan fugas, limpie la parte interior del compartimento y sustitúyalas por pilas nuevas.
Seguridad infantil
Asegúrese siempre de que el compartimento de las pilas está bien cerrado.
Los niños pueden tragarse con facilidad las pilas, que pueden causar graves quemaduras internas y ocasionar la muerte. Mantenga las pilas lejos del alcance de los niños. Consulte inmediatamente a un médico si sospecha de ingestión de una pila.
Condiciones ambientales
- Mantenga alejadas las pilas de condiciones de baja presión de aire o altas temperaturas, ya que pueden provocar una explosión o a una fuga de gas o líquido inflamable.
Eliminación
- Elimine de forma correcta las pilas siguiendo la guía incluida en este manual (consulte la sección «Eliminación de este equipo y de las pilas»). No las arroje al fuego, no las desmonte y no intente recargar pilas no recargables, ya que podrían producirse fugas o explotar.
Eliminación de este equipo y de las pilas
Información dirigida a los usuarios relativa a la recogida y eliminación de equipos antiguos y pilas usadas.
Este símbolo indica que el producto contiene pilas previstas en la Directiva Europea 2013/56/UE que no deben eliminarse con la basura doméstica normal. Los signos Cd, Hg y Pb que aparecen debajo del símbolo de la papelera con ruedas indican que la pila contiene cadmio (Cd), mercurio (Hg) o plomo (Pb).
Este símbolo indica que el producto está previsto en la Directiva Europea 2012/19/UE y que no debe eliminarse con la basura doméstica normal.
Este símbolo indica que el producto se ha diseñado y fabricado para poder reciclarse y reutilizarse.
- Estos símbolos incluidos en los productos, los embalajes o los documentos acompañantes indican que los productos eléctricos y electrónicos y las pilas no deben mezclarse con la basura doméstica general. Los usuarios deben ponerse en contacto con el establecimiento comercial en el que compraron el producto o en las oficinas públicas locales para obtener detalles sobre dónde y cómo puede reciclar estos artículos de forma respetuosa con el medio ambiente.
Declaración de CE y de CA del Reino Unido:
Por la presente, Sharp Consumer Electronics Poland sp. z o.o. declara que este equipo cumple los requisitos esenciales y otras disposiciones pertinentes de la Directiva RED 2014/53/UE y los reglamentos sobre equipos de radio del Reino Unido de 2017.
El texto completo de la CE y la declaración de conformidad de la UKCA están disponible en sharpconsumer.eu. Una vez en la página, entre en la sección de descarga de su modelo y seleccione «Declaración CE».
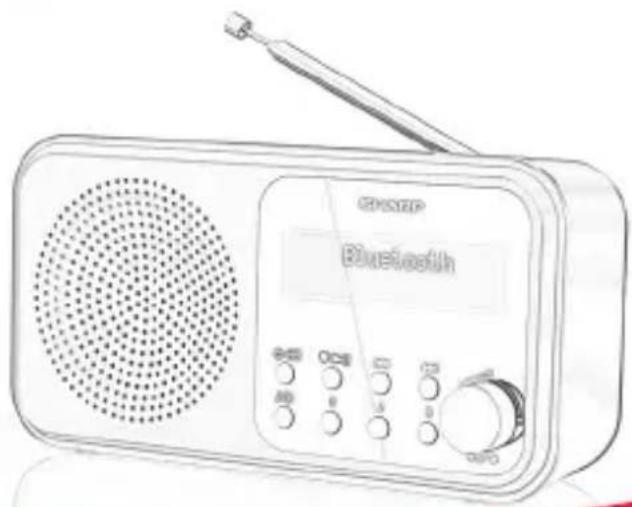
Controles
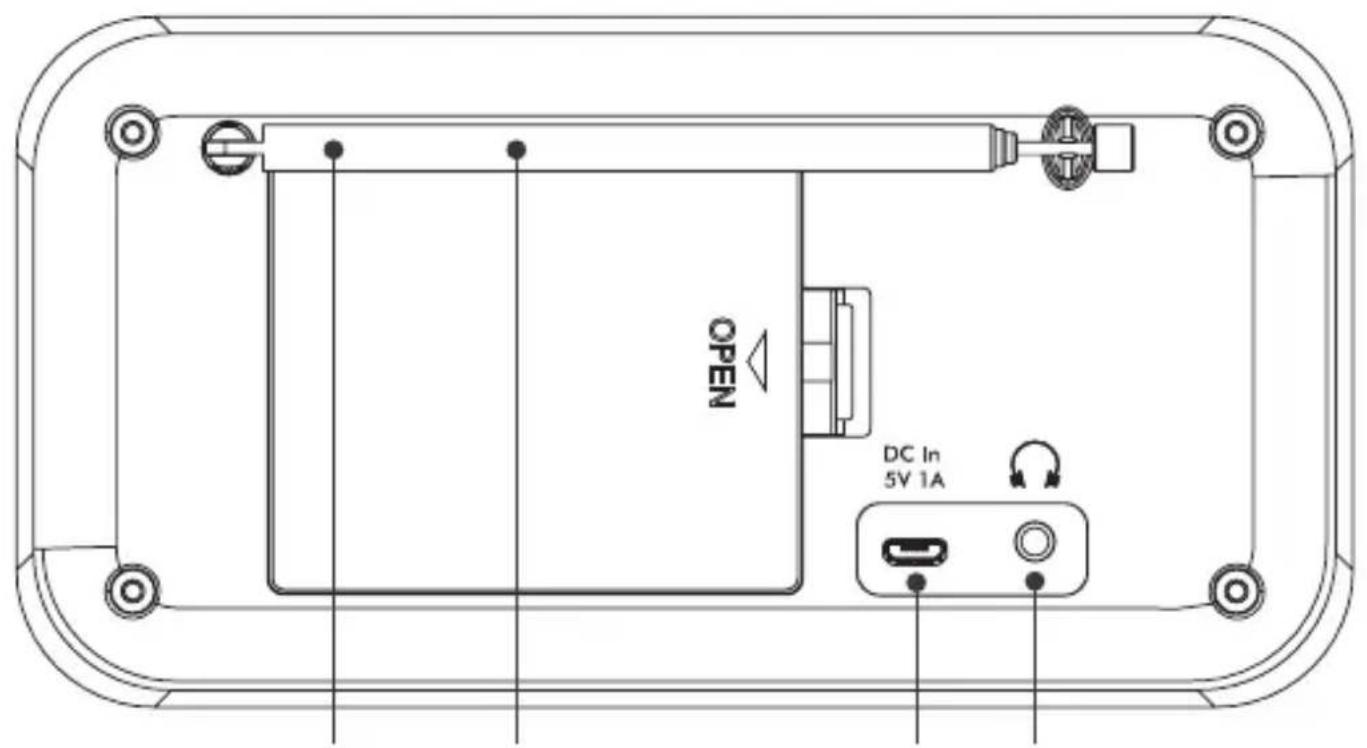
Antena telescópica
Compartimento de las pilas
Puerto Micro USB
Conexión para los auriculares
Pantalla retroiluminada
Encender/apagar o Modo
Si la unidad está apagada, pulse para encender
Si la unidad está encendida, pulse para cambiar de modo
Si la unidad se alimenta a través de USB, mantenga pulsado para entrar en modo de espera
Si la unidad se alimenta a través de las pilas, mantenga pulsado para apagar
♥ ▶IReajustar/Reproducir/Poner en pausa (20 DAB/20 FM)
- Pulse para recuperar una emisora en memoria
Mantenga pulsado para almacenar emisora en memoria
En modo Bluetooth:
Pulse para reproducir o poner en pausa
Mantenga pulsado para desconectar el dispositivo actual y buscar nuevos dispositivos
Pulse para reproducir o poner en pausa
Mantenga pulsado para desconectar el dispositivo actual y buscar nuevos dispositivos
8.
- En modo DAB:
- Pulse para recorrer hacia arriba la lista de emisoras DAB
- En modo FM:
- Pulse para recorrer hacia abajo la banda de frecuencias en intervalos de 0,05 MHz.
- Mantenga pulsado para buscar hacia abajo en la banda de frecuencias.
- En modo Bluetooth: pista anterior
- En el menú: recorrer las opciones del menú
- En modo Bluetooth: pista anterior
- En el menú: recorrer las opciones del menú
9.
- En modo DAB:
- Pulse para desplazarse hacia abajo en la lista de emisoras DAB.
- En modo FM:
- Pulse para recorrer hacia arriba la banda de frecuencias en intervalos de 0,05 MHz.
- Mantenga pulsado para buscar hacia arriba la banda de frecuencias.
- En modo Bluetooth: pista siguiente
- En el menú: recorrer las opciones del menú
- En modo Bluetooth: pista siguiente
- En el menú: recorrer las opciones del menú
- Pulse para obtener información de la emisora
- Mantenga pulsado para entrar en las opciones de menú
- En modo en espera: pulse para introducir los ajustes de activación o desactivación de la alarma 1 y la alarma 2
- Pulse para obtener información de la emisora
- Mantenga pulsado para entrar en las opciones de menú
- En modo en espera: pulse para introducir los ajustes de activación o desactivación de la alarma 1 y la alarma 2
Emisoras almacenadas en memoria 1, 2 y 3
- Pulse para recuperar emisora almacenada en memoria 1 (2 o 3)
- Mantenga pulsado para almacenar emisora en memoria 1 (2 o 3)
- Pulse para recuperar emisora almacenada en memoria 1 (2 o 3)
- Mantenga pulsado para almacenar emisora en memoria 1 (2 o 3)
◀ √ ▶ Control de volumen:
• Gire para ajustar el volumen
- Gire para moverse por el menú o las emiso-
- Gire para ajustar el volumen
- Gire para moverse por el menú o las emiso-
ras almacenadas en memoria: Desplácese a través de las opciones de menú disponibles o las ubicaciones de emisoras almacenadas en memoria
Pulse para seleccionar una emisora de radio/frecuencia, una opción menú o una emisora almacenada en memoria
En modo en espera, pulse para activar una repetición en 10 minutos
Contenido de la caja
Una radio portátil digital DR-P421
Un cable de alimentación USB a Micro USB
Documentación de usuario
Uso de la radio portátil DAB+/FM
Antena telescópica
Extienda completamente la antena telescópica
(preferiblemente de forma vertical) antes de sintonizar una emisora DAB o FM. De esta forma se asegurará la máxima intensidad de la señal cuando la radio inicie el proceso de búsqueda. Extender la antena también garantiza la mejor calidad de sonido.
Conexión
Conecte el cable USB suministrado al puerto Micro USB situado en la parte posterior de la radio. Enchufe el extremo USB-A (estándar) del cable a un dispositivo USB o adaptador para alimentar la radio. La radio se encenderá y mostrará . A continuación, pasará a modo en espera.
Insertar pilas (opcional)
Antes de instalar las pilas (no suministradas), asegúrese de que la radio está apagada mediante y de que el cable USB se ha desenchufado. En la parte posterior de la radio, pulse la pestaña del compartimento de las pilas para retirarla. Inserte cuatro pilas AA de 1,5 V (también conoci-
das como LR-6), teniendo en cuenta los signos + y - para colocarlas correctamente. Vuelva a colocar la tapa de las pilas, asegurándose de que oye un chasquido al cerrar.
Configuración inicial
Pulse brevemente para encender la radio. El aparato iniciará una búsqueda automática de emisoras DAB. Una barra de progreso mostrará el avance del proceso de búsqueda y el número de emisoras encontradas. Una vez completada la búsqueda, la radio seleccionará la primera emisora disponible y empezará a reproducir. De manera predeterminada, las emisoras se presentarán ordenadas numéricamente y, tras ello, por orden alfabético.
Nota: La lista de emisoras de radio DAB se almacena en la memoria; la siguiente vez que se encienda la radio no se llevará a cabo el proceso de búsqueda de emisoras.
Pulse brevemente o para desplazarse a través de las emisoras disponibles. Para seleccionar la emisora, pulse brevemente √. Transcurrirá un breve instante hasta que la radio sintonice la emisora seleccionada.
Ajuste el volumen
Gire hacia la derecha para aumentar el volumen y hacia la izquierda para reducirlo.
Hora y fecha
La hora y la fecha se sincronizarán automáticamente en función de cada emisora mediante el servicio DAB en un formato de 24 horas.
Para ajustar la hora y la fecha manualmente, encienda la radio. Mantenga pulsado para entrar en las opciones de menú.
Utilice para seleccionar /
/ . Se mostrará
y los dígitos de la hora parpa-dearán; utilice para ajustar la hora y los minutos. Se mostrará y el día parpadeará; utilice para el tablecer el día, el mes y el año. Se mostrará cuando se confirme el año y volverá al menú
. Use para cambiar el formato de fecha/hora y los ajustes de actualización automática. Pulse brevemente para salir del menú.
Cambio del modo
Pulse brevemente para alternar entre los modos DAB, FM y Bluetooth. La pantalla de visualización confirmará el modo.
Modo de radio DAB
Seleccionar el modo DAB+
Pulse brevemente hasta que la pantalla muestre . La primera vez que utilice la radio o si la lista de emisoras está vacía, la radio empezará automáticamente a buscar emisoras de radio DAB. Una barra de progreso mostrará el avance del proceso de búsqueda y aparecerá el número de emisoras encontradas. Si estaba escuchando una emisora DAB cuando apagó la radio, la emisora se seleccionará automáticamente cuando vuelva a encender el aparato.
Cambiar emisoras DAB
Utilice y para desplazarse a través de las emisoras disponibles. Pulse √ para seleccionar cuando se muestre la emisora que desea escuchar. Transcurrirá un breve instante hasta que la radio sintonice la emisora seleccionada.
Búsqueda de emisoras DAB
En el entorno de radio DAB, surgen con regularidad emisoras y servicios nuevos. Realice una búsqueda manual periódicamente para asegurarse de que la memoria de su radio almacena la lista más actualizada de radios. Si se ha llevado su radio a una nueva ubicación, por ejemplo, si ha viajado al extranjero, también conviene realizar una búsqueda manual.
En modo DAB:
Mantenga pulsado i □ Utilice para ▶ desplazarse y seleccione . La pantalla cambiará a . Una barra
de progreso mostrará el avance del proceso de búsqueda y el número de emisoras encontradas.
Eliminar emisoras DAB
Puede eliminar las emisoras DAB de la lista de emisoras sin recepción en su área. Estas se indican con un prefijo <?>.
En modo DAB:
Mantenga pulsado i. Utilice ▶ para ▶ desplazarse y seleccione . Sí>. Utilice ▶ √ ▶ para desplazarse y seleccione . Las emisoras con un prefijo <?> dejarán de visualizarse.
Almacenar una emisora DAB en memoria
Su radio puede almacenar hasta 20 emisoras de radio DAB en memoria para permitirle acceder a ellas al instante.
Nota: El almacenamiento de emisoras de radio DAB no sobrescribe las emisoras FM guardadas en memoria.
Sintonice la emisora DAB que desea guardar en memoria. Mantenga pulsado ♥ ▶ hasta que aparezca <Programa guardado <1:(Vacío)>. Utilice ◀ para desplazarse a la ubicación de memoria en la que le gustaría almacenar la emisora de radio (1-20). Pulse √ para seleccionar. La pantalla confirmará con , donde X se corresponde al número de memoria (1-20)
Nota: Si ya se ha almacenado una emisora DAB en memoria, se sobrescribirá al almacenar la nueva emisora.
Sintonizar una emisora DAB guardada en memoria
En modo DAB:
Para acceder rápidamente a emisoras de radio almacenadas en las ubicaciones de memoria 1, 2 o 3, pulse 1, 2 o 3 según corresponda en la parte frontal de la radio. También puede pulsar ♥ ▶II . Aparecerá <Memoria prog <1:>> junto con el nombre o la frecuencia de la emisora almacenada
en esa ubicación o <(Vacío)> si no se almacenó ninguna emisora previamente. Utilice ◀ √ ▶ para desplazarse y seleccionar la emisora guardada en memoria que le gustaría escuchar (1-20).
Si escucha una emisora DAB, puede cambiar la información que se mostrará en la pantalla. Las emisoras pueden enviar diferentes tipos de información. Pulse repetidamente i para recorrer las diferentes opciones de información:
Segmento de etiqueta dinámica (DLS): se trata de información de texto en movimiento suministrada por la emisora. La información puede incluir nombres de artistas, títulos de canciones, detalles para ponerse en contacto con la emisora de radio, etc.
Intensidad de la señal: aparecerá un □vacío en la pantalla para indicar la intensidad mínima de la señal para que el sonido resulte aceptable. Una fila de rectángulos rellenos indica la intensidad de la señal actual que está recibiendo.
Tipo de programa (PTY): p. ej., Rock, Pop, Chat o News
Nombre multiplex: muestra el área de emisión y el grupo de emisoras de radio en la frecuencia, p. ej., BBC National DAB, Digital 1 Network
Canal y frecuencia, p. ej. 12B 225.648 MHz (Canal=12B, Frecuencia=225.648 MHz)
Error de señal: se indica con un número entre 0 y 99. Para escuchar satisfactoriamente una emisora de radio, el error de señal debe situarse por debajo de 30. Ajuste la antena o reubique la radio para mejorar la recepción.
Información de la señal: la velocidad de datos a la que se transmite la señal.
Indicador de encendido: muestra cuando la alimentación se realiza a través de USB; muestra donde XX es la carga de pila disponible.
Hora
Fecha
Control de gama dinámica (DRC)
No todas las emisoras transmiten datos DRC. DRC se utiliza para controlar la diferencia entre los sonidos más altos y los más bajos, por ejemplo, en un entorno ruidoso; ajustar la función DRC al máximo acentúa los sonidos comparativamente bajos y reduce los altos.
Hay tres niveles de compresión:
DRC apagado: sin compresión Este es el ajuste predeterminado. , y seleccione su preferencia.
Nota: El ajuste DRC actual incluirá un asterisco (*) en la pantalla.
Modo de radio FM
Para cambiar al modo FM, pulse hasta que la radio muestre . Si estaba escuchando una emisora FM cuando apagó la radio, la emisora se seleccionará automáticamente cuando vuelva a encender el aparato.
Sintonizar una emisora FM
Mantenga pulsado para el botón 🐎→
buscar hacia arriba o hacia abajo en la banda de frecuencias. La radio buscará y se detendrá en la siguiente emisora disponible.
Pulse 🐘o para ajustar la sintonización de cada frecuencia en pasos de 0,05 MHz.
Nota: Si la recepción no es buena, ajuste la antena o mueva la radio a otra ubicación.
Cambiar la configuración de búsqueda
En modo FM:
Mantenga pulsado i aparecerá <Configurar
búsqueda> Pulse √
Dispone de dos opciones diferentes entre las que elegir:
: la búsqueda solo se detendrá cuando se reciba una señal intensa, que permita una buena calidad del audio. Es posible que la emisora que está buscando se pierda si utiliza esta opción. : la búsqueda se detendrá en cualquier emisora que reciba, incluso si la señal no es buena.
Utilice ◀ √ ▶ para escoger y seleccionar las opciones disponibles.
Nota: El ajuste de búsqueda actual presentará un asterisco (*) en la pantalla.
Almacenar una emisora FM en memoria
Su radio puede almacenar hasta 20 emisoras de FM como memorias programadas para permitirle acceder al instante a sus emisoras preferidas.
Nota: El almacenamiento de emisoras de radio FM no sobrescribe las emisoras DAB guardadas en memoria.
Sintonice la emisora FM que desea guardar en memoria. Mantenga pulsado ♥ ▶II hasta que aparezca <Programa guardado <1:(Vacío)>. Utilice ◀ √ ▶ para desplazarse a la ubicación de memoria en la que le gustaría almacenar la emisora de radio (1-20) y seleccionarla. La pantalla confirmará con , donde X se corresponde al número de programa (1-20).
Nota: Si ya se ha almacenado una emisora FM en memoria, se sobrescribirá al almacenar la nueva emisora.
Almacenamiento automático en memoria (AMS)
También puede utilizar la función de almacenamiento automático en memoria (AMS) para almacenar las emisoras de radio FM que desea guardar en memoria. En modo FM, mantenga
pulsado i. Utilice para desplazarse y
seleccione . La radio pasará a buscar las bandas de frecuencia FM y las emisoras encontradas se almacenarán automáticamente en las ubicaciones de memoria.
Nota: Puede sobrescribir sus emisoras AMS almacenadas siguiendo los pasos de la sección Almacenar una emisora FM en memoria.
Sintonizar una emisora FM almacenada en memoria
En modo FM:
Para acceder rápidamente a emisoras de radio almacenadas en las ubicaciones de memoria 1, 2 o 3, pulse 1, 2 o 3 según corresponda. También puede pulsar ♥ ▶ II Aparecerá <Memoria prog <1:>> junto con el nombre o la frecuencia de la emisora almacenada en esa ubicación o <(Vacío)> si no se almacenó ninguna emisora previamente. Utilice ◀ √ ▶ para desplazarse y seleccionar la emisora guardada en memoria que le gustaría escuchar (1-20).
Cuando escucha una emisora DAB puede cambiar la información que se mostrará en la segunda línea de la pantalla. Pulse repetidamente i para recorrer las diferentes opciones de información:
Modo Bluetooth
Asegúrese de que la radio está en modo Bluetooth pulsando hasta que la radio muestre
. La radio empezará a buscar dispositivos Bluetooth. Asegúrese de que está activada la conexión al dispositivo habilitado con Bluetooth al que desea conectarse.
Nota: Si es necesario, consulte las instrucciones de su dispositivo para añadir o configurar la función Bluetooth
Cuando lo encuentre, la radio se mostrará SHARP DR-P421 en el dispositivo. Seleccione para iniciar el emparejamiento. Una vez completado el proceso, se mostrará en la radio.
Los dispositivos emparejados se conectarán a la radio cuando se encuentre a la distancia adecuada (menos de diez metros de línea de visión). El dispositivo permanecerá emparejado con la radio hasta que decida desconectarlo.
Mantenga pulsado ♥ ▶|| durante tres segundos para desconectar el dispositivo actual y buscar nuevos dispositivos.
Música en streaming a través de Bluetooth
En el modo Bluetooth puede transmitir audio a través del altavoz del producto. Puede utilizar los controles de su dispositivo Bluetooth emparejado, además de los de la radio. Controles disponibles:
Reproducir/poner en pausa: pulse ♥ ▶ II
Pista anterior: pulse
Pista siguiente: pulse
También se puede ajustar el volumen, ya sea usando la radio o el dispositivo conectado.
Nota: Si la radio permanece inactiva durante 20 segundos o no se recibe ninguna señal de audio, el aparato pasará automáticamente a modo en espera (o se apagará si no tienen pilas).
Funcionalidad de alarma
Nota: La funcionalidad de alarma solo se puede utilizar cuando la radio se alimenta a través de USB; no funcionará si se alimenta a través de pilas (para conservarlas).
Ajustar una alarma
Nota: Compruebe que la radio muestra la hora y la fecha correctas antes de ajustar una alarma.
flowchart
graph LR
A["DAB+"] --> B["Búsqueda completa"]
A --> C["Sintonización manual Sistema"]
A --> D["DRC Repetir Alarma"]
A --> E["Recortar Alarma Configuración de alarma 1"]
A --> F["Sistema Hora Configuración de alarma 2"]
G["FM"] --> H["Configurar búsqueda Idioma"]
G --> I["AMS Restaurar valores por defecto"]
G --> J["Sistema Versión de software"]
K["BT Sistema"] --> L["..."]
B --> M["..."]
C --> M
D --> M
E --> M
F --> M
H --> N["Retroiluminación"]
I --> N
J --> N
M --> O["..."]
N --> P["..."]
Ajustes de alarma 1 o alarma 2
Hora Hora Min Duración 1, 5, 15, 30 o 60 minutos Fuente Tono, DAB o FM Frecuencia Diariamente, una vez, días de la semana y fines de semana. Nivel de volumen Del 25 % al 100 % Alarma Apagada o encendida
Nota: Si no se establece la hora o no se actualiza a partir de la señal de la radio, aparecerá cuando intente ajustar la alarma. La radio le pedirá que ajuste la hora. Solo se puede configurar una alarma tras ajustar la hora. Si intenta configurar la alarma cuando la unidad se alimenta a través de las pilas, aparecerá . Las funciones de alarma solo están disponibles cuando el aparato está conectado a la corriente (USB).
Detener, repetir o apagar la alarma
Para detener la alarma, pulse ¿aparecerá . El símbolo de la alarma permanecerá en la pantalla y la alarma volverá a sonar el siguiente día a menos que se configure como .
Para repetir la alarma, pulse √. Se mostrará seguido de una cuenta atrás de 10 minutos. Cuando la cuenta atrás finalice, la alarma volverá a sonar. Puede cancelar la repetición pulsando √. Se mostrará .
Para apagar la alarma, siga los pasos para Ajustar una alarma y seleccione .
Apagado automático
Puede ajustar la radio para que cambie a modo en espera automáticamente mediante el temporizador de desconexión automática. Puede elegir entre , <15>, <30>, <45>, <60> y <90> minutos. Para ello, mantenga pulsado i □. Utilice ◀ para desplazarse y seleccione / . Utilice ◀ √▶ para desplazarse y seleccione su ajuste preferido. Aparecerá . En la parte superior derecha de la pantalla de la radio, se mostrará el número de minutos hasta que la radio cambie al modo en espera, p. ej., S90.
Tiempo de espera de retroiluminación
Para ajustar el tipo de espera de retroiluminación de la pantalla, mantenga pulsado i. Utilice ◀✓▶ para desplazarse y seleccione
/ / . Desplácese a través de las opciones disponibles para el tiempo de espera de la retroiluminación. El ajuste actual será un asterisco (*) en la pantalla. Pulse √ para seleccionar.
De manera similar, utilice ◀ √ ▶ para cambiar los ajustes de brillo de retroiluminación para el y . Hay tres opciones disponibles: , y .
Idioma de la pantalla
Para cambiar el idioma de la pantalla, mantenga pulsado i. Utilice para desplazarse y seleccione / . Utilice
para desplazarse y seleccionar su idioma preferido. Hay siete opciones disponibles: Inglés, Francés, Alemán, Italiano, Español, Polaco y Neerlandés. Se mostrará un asterisco (*) junto al ajuste del idioma actual.
Versión de software
Para comprobar la versión de software de la radio, mantenga pulsado i □. Utilice ▶ para ▶ desplazarse y seleccione / . Se mostrará la versión de software.
Restaurar valores por defecto
Puede restaurar la radio a los ajustes de fábrica originales.
Nota: Si restablece la radio, las memorias almacenadas se eliminarán y se anulará cualquier dispositivo Bluetooth conectado.
Mantenga pulsado i □. Utilice ▶ para ▶ desplazarse y seleccione / . Sí>. Utilice ▶ √ ▶ para desplazarse y seleccione . Se mostrará . Su radio se reiniciará y la pantalla mostrará .
Resolución de problemas
Si no se oye nada o no se enciende:
Ajuste del volumen.
Compruebe que el cable USB está conectado y que la radio no se encuentra en modo en espera.
Si se utiliza el producto con las pilas, compruebe si es necesario sustituirlas. Utilice pilas AA de buena calidad.
Si la recepción de la radio no es buena:
Asegúrese de que tiene extendida completamente la antena telescópica (preferiblemente de forma vertical).
Busque de nuevo emisoras de radio (consulte la sección Buscar emisoras DAB o Sintonizar una emisora FM, según corresponda).
Intente mover la radio a otra ubicación para comprobar si mejora la recepción.
Compruebe que no hay otros equipos eléctricos cerca de la radio. Si los hay, podrían causar interferencias
Si no puede emparejar la radio con un dispositivos Bluetooth:
Compruebe que se encuentra en modo Bluetooth.
Asegúrese de que se encuentra a menos de 10 metros de la funcionalidad Bluetooth.
Aleje la radio y el dispositivos Bluetooth de otros dispositivos Bluetooth o equipos eléctricos.
Si es posible, apague los dispositivos Bluetooth cercanos o desactive su funcionalidad Bluetooth.
Si los botones de función no responden:
Compruebe que el cable USB está conectado a la parte posterior de la radio. Pulse 🔊 →
Restablezca el dispositivo a los valores de fábrica.
Nota: Si se restablece la radio a los ajustes de fábrica, todos los ajustes, incluida la lista de emisoras de radio, dispositivos Bluetooth conectados y cualquier emisora almacenada en memoria se eliminarán.
Especificaciones técnicas
Entrada CC 5V Pilas 4 unidades de tamaño AA de 1,5 V (LR-6) (opcional, no suministras) Salida de audio RMS de 2 vatios Consumo de energía Activo; < 2 W En espera: < 2 mW Rango de frecuencias DAB Banda III, de 174 MHz a 240 MHz Rango de frecuencias FM De 87,5 MHz a 108 MHz Bluetooth 2,4 GHz~2,480 GHz Nombre de emparejamiento SHARP DR-P421 Dimensiones (An x Al x Pr en mm): 174 x 90 x 53 Peso aproximado. 0,39 kg
Consignes de sécurité importantes
Veuillez suivre toutes les consignes de sécurité et tenir compte de tous les avertissements. Gardez ce manuel à titre de référence.
Ce symbole indique à l'utilisateur de consulter le manuel d'utilisation pour plus d'informations sur la sécurité, le
fonctionnement et la maintenance.
Tension continue
Précautions
Sécurité enfant
- Suivez toujours les précautions basiques de sécurité durant l'utilisation de ce produit, particulièrement lorsque des enfants sont présents.
Surveillez les enfants afin de vous assurer qu'ils ne jouent pas avec le produit.
Emplacement
- Le produit doit être installé dans un endroit stable, et vous devez vous assurer que le produit et ses pièces ne sont pas en surplomb.
Ventilation
- Le boîtier dispose de fentes et d'ouvertures pour la ventilation, pour garantir un fonctionnement fiable du produit et protéger celui-ci contre la surchauffe. Ces ouvertures ne doivent pas être bloquées ou obturées. Assurez une distance minimum de 5 cm autour du produit afin de garantir une ventilation suffisante. Ne laissez jamais une personne faire rentrer un objet dans les trous, fentes ou toute autre ouverture du boîtier du produit, cela pouvant causer une électrocution fatale.
Chaleur et température de fonctionnement
- N'installez pas l'appareil à proximité de sources de chaleur telles que des radiateurs, des chauffages, des cuisinières ou d'autres appareils
(y compris des amplificateurs) produisant de la chaleur. Évitez l'exposition directe au soleil.
Flammes nues
Pour éviter tout risque d'incendie, éloignez les bougies ou les flammes nues de ce produit.
- Pour éviter les risques d'incendie ou de choc électrique, n'exposez pas ce produit à la pluie, à l'eau ou à l'humidité. Ne placez pas d'objets remplis de liquide sur ou à proximité de ce produit.
Orages et éclairs
- Les orages sont dangereux pour tous les appareils électriques. Si le secteur ou le câblage aérien est frappé par la foudre, le produit peut être endommagé, même s'il était éteint. Vous devez débrancher tous les câbles et connecteurs du produit avant un orage.
Câble USB
- N'endommagez pas le câble de recharge USB, ne l'étirez pas, ne le pliez pas et ne placez pas d'objets lourds dessus.
Dégâts
- Veuillez inspecter l'appareil après le déballage. S'il est endommagé de quelque manière que ce soit, n'utilisez pas l'appareil et consultez votre revendeur.
Entretien
- Débranchez le câble d'alimentation de la source de courant avant de nettoyer le produit. Utilisez un chiffon doux et propre pour nettoyer l'extérieur de l'appareil. Ne nettoyez jamais l'appareil avec des produits chimiques ou détergents.
Entretien et réparations
- Ce produit ne contient aucune pièce réparable par l'utilisateur. L'exposition aux pièces internes situées à l'intérieur de l'appareil peut mettre votre vie en danger. En cas de défaut, contactez le fabricant ou le département de service après-vente autorisé. La garantie du fabricant ne couvre pas les défauts provoqués par des réparations effectuées par des tiers non autorisés.
Piles
Installation
- N'utilisez pas de piles autres que celles spécifiées. Observez la polarité correcte en insérant les piles. N'utilisez jamais ensemble des piles différentes ou ne mélangez pas des piles neuves et des usagées.
Utilisation et maintenance
- N'exposez pas les piles à des températures élevées, par exemple près d'un feu ou en plein soleil. Lorsque vous ne prévoyez pas d'utiliser le produit pendant une longue période (plus d'un mois), retirez les piles du produit pour éviter les fuites. Si les piles fuient, nettoyez les fuites à l'intérieur du compartiment à piles et remplacez les piles par des piles neuves.
Sécurité pour les enfants
Assurez-vous toujours que le compartiment des piles est fermé et sécurisé.
Les piles sont facilement avalées par les jeunes enfants et peuvent provoquer de graves
brûlures internes et entraîner la mort. Gardez les piles hors de portée des enfants. Consultez immédiatement un médecin si vous pensez qu'une pile a été avalée.
Conditions environnementales
- Gardez les piles à l'écart des basses pressions d'air ou des températures élevées, car cela peut entraîner une explosion ou la fuite d'un liquide ou d'un gaz inflammable.
Mise au rebut
- Veuillez jeter les piles correctement en suivant les instructions de ce manuel (voir la section « Mise au rebut de cet équipement et des piles »). Ne les jetez pas au feu, ne les démontez pas et n'essayez pas de recharger des piles non rechargeables. Elles peuvent fuir ou exploser.
Mise au rebut de cet équipement et des piles
Informations pour les utilisateurs sur la collecte et l'élimination des anciens équipements et des piles usagées.
Ce symbole signifie que le produit contient des piles couvertes par la directive européenne 2013/56/UE, qui ne peuvent pas être jetées avec les ordures ménagères normales. Les indications Cd, Hg et Pb sous le symbole de poubelle signifient que la pile contient du cadmium (Cd), du mercure (Hg) ou du plomb (Pb).
Ce symbole sur un produit signifie que le produit est couvert par la directive européenne 2012/19/UE et ne doit pas être jeté avec vos autres déchets ménagers.
Ce symbole signifie que le produit est conçu et fabriqué de manière à pouvoir être recyclé et réutilisé.
- Ces symboles sur les produits, l'emballage et/ou les documents d'accompagnement signifient que les produits électriques et électroniques usagés ne doivent pas être mélangés avec les ordures ménagères. Les ménages sont invités à contacter le magasin où le produit a été acheté, ou les autorités locales, pour connaître où et comment procéder au recyclage des composants de façon à respecter l'environnement.
Déclaration CE et UKCA :
- Par la présente, Sharp Consumer Electronics Poland sp. z o.o. déclare que cet équipement est conforme aux exigences essentielles et aux autres dispositions pertinentes de la directive RED 2014/53/UE et de la réglementation sur l'équipement radio du Royaume-Uni.
- Le texte complet des déclarations de conformité CE et UKCA est disponible sur sharpconsumer. eu et en entrant ensuite dans la section de téléchargement de votre modèle et en choisissant « CE Statements ».
Commandes
Antenne télescopique
Compartiment des piles
Port micro USB
Prise casque
Écran retroéclairé
⏻ + Alimentation/Mode
Lorsque l'appareil est éteint, pression courte : mise sous tension
Lorsque l'appareil est allumé, pression courte : changer de mode
Lors de l'alimentation par USB, pression longue : veille
Lors de l'alimentation par piles, pression longue : arrêt
♥ ▶IPréréglage/Lecture/Pause (20 DAB/20 FM)
Pression courte : Rappel mémoire
Longue pression Mémoire préréglée
En mode Bluetooth :
Appuyez brièvement pour lire/mettre en pause
Appuyez longuement pour déconnecter l'appareil actuel et rechercher de nouveaux appareils
8.
- En mode DAB :
- Appuyez brièvement pour remonter la liste des stations DAB
- En mode FM :
9.
- En mode DAB :
Appuyez brièvement pour descendre dans la liste de stations DAB
En mode FM :
Pression courte : Montez dans la bande de fréquence de 0,05 MHz.
Longue pression : Analysez la bande de fréquence
En mode Bluetooth : Piste suivante
Dans le menu : Parcourez les options du menu
i
Infos/Menu
Pression courte : Informations sur la station
Longue pression Accéder aux options du menu
En mode veille : appuyez brièvement pour accéder aux paramètres marche/arrêt des alarmes 1 et 2
Préréglages mémoire 1, 2 et 3
Pression courte : Rappeler le préréglage 1 (2 ou 3)
Longue pression Mémoriser le préréglage 1 (2 ou 3)
12.
Contrôle du volume :
Rotation : Réglez le volume
Rotation dans le menu ou les préréglages :
Faites défiler les options de menu disponibles ou les emplacements prédéfinis
Pression courte : Sélectionnez une station radio/fréquence affichée, un menu ou une option prédéfinie
En mode veille, pression courte : activer une veilleuse de 10 minutes.
Contenu de l'emballage
1 radio numérique portable Tokyo DR-P421
Documentation utilisateur
Utilisation de votre radio portable DAB+/FM
Antenne télescopique
Déployez complètement l'antenne télescopique (de préférence verticalement) avant d'essayer de syntoniser une station DAB/FM. Cela garantira que la puissance maximale du signal est disponible lorsque la radio commence à chercher. L'extension de l'antenne garantit également la meilleure qualité sonore possible.
Connexion
Connectez le câble USB fourni au port micro USB à l'arrière de la radio. Branchez l'extrémité USB-A (standard) du câble à un périphérique ou adaptateur USB pour alimenter la radio. La radio s'allumera et affichera . Elle passera alors en mode veille.
Insertion des piles (facultatif)
Avant d'installer les piles (non incluses), assurez-vous que la radio est éteinte avec ⏻ et a été débranchée du câble USB. À l'arrière de la radio, appuyez sur la languette du couvercle du compartiment des piles pour le retirer.
Insérez 4 piles de type AA de 1,5 V (également appelées LR-6), en vous assurant de noter les
repères « + » et « - » et de positionner les piles correctement. Replacez le couvercle des piles en vous assurant qu'il s'enclenche correctement.
Configuration initiale
Appuyez brièvement sur pour allumer la radio. Elle lancera une recherche automatique des stations DAB. Une barre de progression affiche la progression de la recherche et le nombre de stations trouvées. Une fois la recherche terminée, votre radio sélectionnera la première station disponible et commencera à la lire. Par défaut, les stations sont répertoriées par ordre numérique puis alphabétique.
Remarque : La liste des stations radio DAB est stockée en mémoire ; la prochaine fois que la radio est allumée, la recherche de stations n'a pas lieu.
Appuyez brièvement sur ◀ ou ▶ pour faire défiler les stations disponibles. Pour sélectionner la station affichée, appuyez brièvement sur √. Il y aura un court délai pendant que votre radio syntonise la station sélectionnée.
Réglage du volume
Tournez ◀ dans le sens horaire pour augmenter le volume et dans le sens antihoraire pour le diminuer.
Heure et date
L'heure et la date seront automatiquement synchronisées avec celles diffusées par le service DAB au format 24 heures.
Pour régler l'heure et la date manuellement, allumez la radio. Appuyez longuement sur i pour accéder aux options du menu.
Utilisez ◀ √ ▶ pour sélectionner / / .
s'affiche et les chiffres des heures clignotent ; utilisez ◀✓▶ pour régler les heures et les minutes. s'affiche et le jour clignote ; utilisez ◀✓▶ pour régler le jour, le mois et l'année. s'affiche une fois l'année confirmée, et vous reviendrez au menu .
Utilisez ◀ √ ▶ pour modifier le format de
l'horloge/de la date et les paramètres de mise à jour automatique. Appuyez brièvement pour quitter le menu.
Changer de mode
Appuyez brièvement sur pour basculer entre les modes DAB, FM et Bluetooth. L'écran confirmera le mode.
Mode radio DAB
Sélectionner le radio mode DAB
Appuyez brièvement sur jusqu'à ce que l'écran affiche < DAB+>. La première fois que vous utilisez la radio ou si la liste des stations est vide, votre radio commencera automatiquement à rechercher les stations radio DAB. Une barre de progression montrera la progression de la recherche, et le nombre de stations trouvées pendant la recherche sera également affiché. Si vous écoutiez une station DAB lorsque vous avez éteint la radio, cette station sera automatiquement sélectionnée lorsque vous rallumerez la radio.
Changer de station DAB
Utilisez le pour faire défiler les stations disponibles. Appuyez sur √ pour sélectionner la station que vous souhaitez écouter lorsqu'elle s'affiche. Il y aura un court délai pendant que votre radio syntonise la station sélectionnée.
Recherche de stations DAB
Avec la radio DAB, des stations et des services supplémentaires deviennent régulièrement disponibles. Effectuez une recherche manuelle périodiquement pour vous assurer que vous disposez de la liste de stations la plus à jour stockée dans la mémoire de votre radio. Si vous avez déplacé votre radio vers un nouvel emplacement, par exemple si vous partez en vacances à l'étranger, il est également judicieux d'effectuer une recherche manuelle.
En mode DAB :
Appuyez longuement sur i. Utilisez ◀ √▶ pour faire défiler, et sélectionnez . L'écran passera à . Une barre de progression affiche la progression de la recherche et le nombre de stations trouvées.
Écrêter des stations DAB
Vous pouvez supprimer de la liste des stations les stations DAB qui ne peuvent pas être captées dans votre région. Celles-ci sont indiquées avec un préfixe <?>.
En mode DAB :
Appuyez longuement sur i □. Utilisez ◀✓▶ pour faire défiler, et sélectionnez . Oui> s'affiche. Utilisez ◀✓▶ pour faire défiler, et sélectionnez . Les stations avec un préfixe <?> ne s'afficheront plus.
Mémorisation d'un préréglage de station DAB
Votre radio peut stocker jusqu'à 20 stations de
radio DAB en tant que préréglages pour un accès instantané à vos stations préférées.
Remarque : La mémorisation des préréglages de station radio DAB ne remplace pas les préréglages de station FM.
Réglez votre radio sur la station DAB que vous souhaitez prérégler. Appuyez longuement sur ♥ ▶||jusqu'à ce que <Mémor. prérégl. <1:(Vide)>> s'affiche. Utilisez ◀ pour vous déplacer vers l'emplacement préréglé auquel vous souhaitez mémoriser la station radio (1-20). Appuyez sur √ pour sélectionner. L'écran confirmera , où 'X' est le numéro du préréglage (1-20)
Remarque : S'il y a déjà une station DAB enregistrée dans un préréglage, elle sera remplacée lorsque vous enregistrez une nouvelle station.
Régler sur une station radio DAB prédéfinie
En mode DAB :
Pour accéder rapidement aux stations radio enregistrées sous les emplacements de préréglage 1, 2 ou 3, appuyez sur la touche correspondante (1, 2 ou 3) sur le devant de votre radio. Vous pouvez aussi appuyer brièvement sur ♥ ▶ II
<Rappel mémorisé <1:>> s'affiche avec le nom ou la fréquence de la station qui y est mémorisée, ou <(Vide)> si aucune station précédente n'a été mémorisée. Utilisez ◀ √ ▶ pour vous déplacer, et sélectionnez la station préréglée que vous souhaitez écouter (1-20).
Affichage des données DAB
Lorsque vous écoutez une station DAB, vous pouvez modifier les informations qui s'affichent à l'écran. Plusieurs types d'informations sont envoyées par le diffuseur. Appuyez brièvement sur i plusieurs fois pour faire défiler les différentes options d'informations :
Segment d'étiquette dynamique (DLS) - Il s'agit d'informations textuelles défilantes telles que fournies par le diffuseur. Cela peut inclure des noms d'artistes, des titres de chansons, les coordonnées de la station de radio, etc.
Intensité du signal - Un □ vide apparaîtra sur l'écran pour indiquer la puissance minimale du signal pour une écoute acceptable. La ligne de rectangles remplis indique la puissance réelle du signal que vous recevez.
Type de programme (PTY) - par exemple, 'Rock', 'Pop', 'Chroniques' ou 'Informations'
Nom du multiplex - Affiche la zone de diffusion et la collection de stations de radio sur cette fréquence, par exemple, BBC National DAB, Digital 1 Network
Canal et fréquence – Par exemple 12B 225,648 MHz (Canal=12B, Fréquence=225,648 MHz)
Erreur signal - S'affiche sous la forme d'un nombre compris entre 0 et 99. Pour écouter correctement une station de radio, l'erreur de signal doit être inférieure à 30. Ajustez l'antenne
ou déplacez votre radio pour améliorer la réception.
Informations sur le signal - Le débit de données auquel le signal est transmis.
Indicateur d'alimentation - affiche lors de l'alimentation par USB ; affiche où XX est la charge de batterie disponible.
Temps
Date
Contrôle de plage dynamique (DRC)
Les données DRC ne sont pas transmises par tous les diffuseurs. DRC est utilisé pour contrôler la différence entre les sons les plus forts et les plus faibles. Par exemple, dans un environnement bruyant, régler le DRC au maximum rend les sons faibles comparativement plus forts et les sons forts plus silencieux.
Il existe 3 niveaux de compression :
- DRC Désactivé – Pas de compression II s'agit du
paramètre par défaut.
• DRC bas - Compression moyenne
En mode DAB, appuyez longuement sur i
Utilisez ◀ √ pour faire défiler, et sélectionnez
, puis votre préférence.
Remarque : Le réglage actuel de DRC aura un astérisque (*) sur l'écran.
Mode radio FM
Pour passer en mode FM, appuyez brièvement sur 🔍 + jusqu'à ce que la radio affiche . Si vous écoutiez une station FM lorsque vous avez éteint la radio, cette station sera automatiquement sélectionnée lorsque vous rallumerez la radio.
Syntoniser une station FM
Appuyez longuement sur 🔍 🔍 🔍 🔍 🔍 🔍 🔍 🔍 🔍 🔍 🔍 🔍 🔍 🔍 🔍 🔍 🔍 🔍 🔍 🔍 🔍 🔍 🔍 🔍 🔍 🔍 🔍 🔍 🔍 🔍 🔍 🔍 🔍 🔍 🔍 🔍 🔍 🔍 🔍 🔍 🔍 🔍 🔍 🔍 🔍 🔍 🔍 🔍 🔍 🔍 🔴
parcourir la bande de fréquence vers le haut ou le bas. La radio recherchera et s'arrêtera à la
prochaine station disponible.
Appuyez brièvement sur ◀◀ ou ▶▶our affiner chaque fréquence par pas de 0,05 MHz.
Remarque : Si la réception est mauvaise, ajustez l'antenne ou déplacez la radio à un autre endroit.
Modifier le réglage de recherche
En mode FM :
Appuyez longuement sur i □, <Régl.
recherche> s'affichera. Appuyez sur √.
Vous avez le choix entre deux options :
- La recherche ne s'arrêtera qu'à la réception d'un signal fort, ce qui se traduira par une meilleure qualité audio. Il est possible que la station que vous recherchez soit manquée si vous utilisez cette option.
- La recherche s'arrêtera à chaque station trouvée, même si l'intensité du signal est faible.
Utilisez ◀ √ ▶ pour choisir et sélectionner parmi les options disponibles.
Remarque : Le paramètre de numérisation actuel
aura un astérisque (*) sur l'écran.
Mémorisation d'un préréglage de station FM
Votre radio peut stocker jusqu'à 20 stations FM en tant que préréglages pour un accès instantané à vos stations préférées.
Remarque : La mémorisation des préréglages de station radio FM ne remplace pas vos préréglages de station DAB.
Réglez votre radio sur la station FM que vous souhaitez prérégler. Appuyez longuement sur ♥ ▶ Il jusqu'à ce que <Mémor. prérégl.
<1:(Vide)>> s'affiche. Utilisez pour vous déplacer, et sélectionnez l'emplacement préréglé auquel vous souhaitez mémoriser la station radio (1-20). L'écran confirmera , où 'X' est le numéro du préréglage (1-20).
Remarque : S'il y a déjà une station FM enregistrée dans un préréglage, elle sera remplacée lorsque vous enregistrez une nouvelle station.
Stockage en mémoire automatique (AMS)
Alternativement, vous pouvez utiliser la fonction de stockage en mémoire automatique (AMS) pour stocker vos stations radio FM préréglées. En mode FM, appuyez longuement sur i □. Utilisez ◀ √ ▶ pour faire défiler, et sélectionnez . Votre radio va maintenant parcourir la bande de fréquence FM, et les stations trouvées seront automatiquement stockées dans les emplacements préréglés.
Remarque : Vous pouvez remplacer manuellement vos préréglages AMS stockés en suivant les étapes de « Mémorisation d'un préréglage de station FM » ci-dessus.
Syntoniser une station FM préréglée
En mode FM :
Pour accéder rapidement aux stations radio enregistrées sous les emplacements de
préréglage 1, 2 ou 3, appuyez sur la touche correspondante (1, 2 ou 3). Vous pouvez aussi appuyer brièvement sur ♥ ▶ || <Rappel mémorisé <1:>> s'affiche avec le nom ou la fréquence de la station qui y est mémorisée, ou <(Vide)> si aucune station précédente n'a été mémorisée. Utilisez ◀ √ ▶ pour vous déplacer, et sélectionnez la station préréglée que vous souhaitez écouter (1-20).
Affichage des données FM
Lorsque vous écoutez une station FM, vous pouvez modifier les informations qui apparaissent sur la deuxième ligne de l'écran. Appuyez brièvement sur i plusieurs fois pour faire défiler les différentes options d'informations :
- Radiotexte (RT) - Il s'agit d'informations textuelles défilantes telles que fournies par le diffuseur. Cela peut inclure des noms d'artistes, des titres de chansons, les coordonnées de la station de radio, etc.
- Type de programme (PTY) - par exemple, 'Rock',
'Pop', 'Chroniques' ou 'Informations'
Nom ou fréquence de la station – Par exemple, BBC R4, 93,30 MHz
Indicateur d'alimentation - affiche lors de l'alimentation par USB ; affiche où XX est la charge de batterie disponible.
Heure
Date
Mode Bluetooth
Assurez-vous que votre radio est en mode Bluetooth en appuyant brièvement sur jusqu'à ce que la radio affiche . Votre radio commencera à rechercher les appareils Bluetooth. Assurez-vous que l'appareil compatible Bluetooth auquel vous vous connectez est détectable.
Remarque : Si nécessaire, reportez-vous aux instructions de votre appareil pour ajouter ou configurer Bluetooth.
Une fois trouvée, votre radio s'affichera sous le nom « SHARP DR-P421 » sur votre appareil.
Sélectionnez-la pour commencer l'appariement.
Une fois cela fait, s'affichera sur votre radio.
Les appareils appariés se connecteront à la radio lorsqu'ils seront à portée (dans un rayon de 10 mètres sans obstruction). Votre appareil restera apparié avec la radio à moins que vous ne décidiez de le déconnecter.
Pour vous déconnecter du Bluetooth, appuyez sur ♥ ▶ pendant 3 secondes pour dissocier votre appareil actuel et rechercher de nouveaux appareils.
Diffuser de la musique sans fil via Bluetooth
En mode Bluetooth, vous pouvez diffuser de l'audio sans fil via le haut-parleur du produit.
Utilisez les commandes de votre appareil Bluetooth apparié ainsi que celles de votre radio. Commandes disponibles :
Lecture/Pause : Pression courte sur
Piste précédente : Pression courte sur
Piste suivante : Pression courte sur
Remarque : Si la radio est inactive pendant 20 minutes, ou si aucun signal audio n'est reçu, la radio se mettra automatiquement en veille (ou s'éteindra si la radio fonctionne sur piles).
Fonction d'alarme
Remarque : La fonction d'alarme ne fonctionnera que lorsque la radio est alimentée via USB ; elle ne fonctionnera pas lorsqu'elle est alimentée par des piles (pour préserver la durée de vie de ces dernières).
Régler une alarme
Remarque : Vérifiez que la radio affiche l'heure et la date correctes avant de régler une alarme.
flowchart
graph LR
A["DAB+"] --> B["Recherche totale"]
A --> C["Réglage manuel Système"]
A --> D["DRC Mode sommeil Alarme"]
A --> E["Ecrêter Alarme Configuration alarme 1"]
A --> F["Système Heure Configuration alarme 2"]
G["FM"] --> H["Régl. recherche Langue"]
G --> I["AMS Régl. en usine"]
G --> J["Système Version du logiciel"]
K["BT Système"] --> L["..."]
B --> M["..."]
C --> M
D --> M
E --> M
F --> M
H --> N["Rétroéclairé"]
I --> N
J --> N
M --> O["..."]
N --> P["..."]
Paramètres d'alarme 1 ou 2
Heure Heure Min Durée 1, 5, 15, 30 ou 60 minutes Source Buzzer, DAB ou FM Fréquence Tous les jours, Une fois, Semaine ou Week end Niveau de volume 25 à 100 % Alarme Marche ou Arrêt
Remarque : Si l'heure n'est pas réglée ou n'a pas pu être mise à jour à partir du signal radio, s'affiche lorsque vous essayez de régler l'alarme. La radio vous demandera alors de régler l'heure. Une alarme ne peut être réglée qu'après le réglage de l'heure.
Si vous essayez de régler l'alarme alors que l'appareil est alimenté par des piles, s'affiche. Les fonctions d'alarme ne sont disponibles qu'avec l'alimentation secteur (USB).
Arrêter, répéter ou désactiver l'alarme
Pour arrêter l'alarme, appuyez brièvement sur ⏻ +□, s'affichera. Le symbole d'alarme restera à l'écran et l'alarme retentira à nouveau à la même heure le jour suivant, sauf si elle a été réglée sur . Pour répéter l'alarme, appuyez sur √.
s'affiche, suivi d'un compte à rebours de 10 minutes. Une fois le compte à rebours terminé, l'alarme retentit à nouveau. Vous pouvez
mettre fin à la répétition en appuyant sur √.
s'affichera.
Pour désactiver l'alarme, suivez les étapes de 'Régler une alarme' et sélectionnez .
Minuteur de mise en veille
Vous pouvez configurer votre radio pour qu'elle passe automatiquement en mode veille à l'aide de la minuterie de mise en veille. Vous pouvez choisir entre , <15>, <30>, <45>, <60> et <90> minutes. Pour ce faire, appuyez longuement sur i □ Utilisez pour faire défiler, et sélectionnez / . Utilisez ◀ √ pour faire défiler, et sélectionnez votre préférence. s'affichera. En haut à droite de l'écran de la radio, le nombre de minutes jusqu'à ce que votre radio passe en mode veille s'affiche, par exemple S90.
Temporisation du rétroéclairage de l'écran
Pour régler la temporisation du rétroéclairage de
l'écran, appuyez longuement sur i. Utilisez
◀ √ ▶ pour faire défiler, et sélectionnez
/ / .
Faites défiler les options de temporisation du rétroéclairage disponibles. Le réglage actuel aura un astérisque (*) sur l'écran. Appuyez sur √ pour sélectionner.
De même, utilisez ◀ √ ▶ pour modifier les paramètres de luminosité du rétroéclairage pour et . 3 options sont disponibles : <Élevé>, et .
Langue d'affichage
Pour changer la langue d'affichage, appuyez longuement sur i. Utilisez pour faire défiler, et sélectionnez / . Utilisez √ pour faire défiler, et sélectionnez la langue de votre choix. 7 options sont disponibles : Anglais, français, allemand, italien, espagnol, polonais et néerlandais. Un astérisque (*) s'affichera à côté du paramètre de langue actuel.
Version du logiciel
Pour vérifier la version du logiciel de votre radio, appuyez longuement sur i □ Utilisez ◀ √ ▶ pour faire défiler, et sélectionnez / . La version du logiciel s'affiche.
Réinitialisation des paramètres d'usine
Vous pouvez réinitialiser votre radio pour la restaurer aux paramètres d'usine.
Remarque : Si vous réinitialisez votre radio, vos préréglages stockés seront supprimés et tout appareil Bluetooth connecté sera dissocié.
Appuyez longuement sur i □ Utilisez
◀ √ ▶ pour faire défiler, et sélectionnez < Version logiciel> / . Oui> s'affichera. Utilisez
◀ √ ▶ pour faire défiler, et sélectionnez
. s'affichera. Votre radio redémarrera et l'affichage montrera
.
Dépannage
S'il n'y a pas de son ou d'alimentation :
Réglez le volume.
Vérifiez que le câble USB est connecté et que la radio n'est pas en mode veille.
Si le produit est alimenté par des piles, vérifiez si elles doivent être remplacées. Utilisez des piles AA de bonne qualité.
Si la réception radio est mauvaise :
Assurez-vous que vous avez entièrement étendu l'antenne télescopique (de préférence verticalement).
Recherchez à nouveau les stations de radio. Reportez-vous aux sections « Recherche de stations DAB » et/ou « Syntoniser une station FM », selon le cas.
Essayez de déplacer votre radio à un autre
endroit pour voir si la réception s'améliore.
- Vérifiez que vous n'avez pas posé un autre équipement électrique à proximité de votre radio. Cela peut provoquer des interférences.
Si vous ne parvenez pas à apparier un appareil Bluetooth :
Vérifiez que vous êtes en mode Bluetooth.
Assurez-vous que vous êtes à moins de 10 mètres de la radio pour la fonctionnalité Bluetooth.
Éloignez la radio et l'appareil Bluetooth des autres appareils Bluetooth/équipements électriques.
Si possible, éteignez les autres appareils Bluetooth à proximité ou désactivez leur fonctionnalité Bluetooth.
Si les boutons de fonction ne répondent pas :
Vérifiez que le câble USB est connecté à l'arrière de votre radio. Appuyez brièvement sur Si vous utilisez des piles, il se peut qu'elles aient besoin d'être remplacées.
Réinitialisez l'appareil aux paramètres d'usine.
Remarque : Tous vos paramètres, y compris la liste des stations de radio, les appareils Bluetooth connectés et tous les préréglages seront supprimés lors d'une réinitialisation aux paramètres d'usine.
Spécifications techniques
Entrée 5 V CC Piles 4 x 1,5 V taille AA (LR-6) (en option, non fournies) Sortie audio 2 Watts RMS Consommation électrique Active : < 2 W Veille : < 2 mW Plage de fréquences DAB : Bande III, 174 à 240 MHz Plage de fréquences FM 87,5 à 108 MHz Bluetooth 2,4 - 2,480 GHz Nom d'appariement SHARP DR-P421 Dimensions (L) x (H) x (P) mm 174 x 90 x 53 Poids approx. 0,39 kg
Importanti istruzioni di sicurezza
Seguire tutte le istruzioni di sicurezza e fare attenzione a tutte le avvertenze. Conservare il manuale per consultazioni future.
Questo simbolo indica all'utente di consultare il manuale utente per ulteriori informazioni relative a sicurezza, utilizzo e
manutenzione.
Tensione DC
Precauzioni
Sicurezza per i bambini
- Seguire sempre le precauzioni di sicurezza basilari quando si utilizza questo prodotto, specialmente in presenza di bambini. I bambini
dovrebbero essere supervisionati per assicurarsi che non giochi con il prodotto.
Posizione
- Il prodotto deve essere installato in un luogo stabile e bisogna assicurarsi che esso e le sue parti non siano pendenti.
Areazione
- Le fessure e le aperture nell'involucro sono state creare per la corretta areazione, in modo da assicurare un funzionamento affidabile del prodotto e proteggerlo dal surriscaldamento; queste aperture non devono essere ostruite o coperte. Assicurare una distanza minima di 5 cm attorno al prodotto per una ventilazione sufficiente. Mai lasciare che qualcuno inserisca qualcosa nei fori e nelle aperture dell'involucro dell'unità, in quanto ciò potrebbe risultare in una scossa elettrica.
Calore e temperatura di funzionamento
- Non installarlo vicino a fonti di calore come termosifoni, griglie di ventilazione, stufe o altri apparecchi (inclusi amplificatori) che generano
calore. Evitare l'esposizione alla luce diretta del sole.
Fiamme scoperte
- Per prevenire il rischio di incendio, tenere candele o fiamme scoperte lontane da questo prodotto.
Acqua, umidità e infiltrazioni di liquidi
- Per prevenire il rischio di incendio o scossa elettrica, non esporre questo prodotto a pioggia, acqua o umidità. Non collocare oggetti pieni di liquidi sopra o vicino a questo prodotto.
Temporali e fulmini
- I temporali sono pericolosi per i prodotti elettronici. Se i cavi della rete elettrica o l'antenna vengono colpiti da un fulmine, il prodotto potrebbe risultarne danneggiato, anche se spento. È opportuno scollegare tutti i cavi e i connettori che partono dal prodotto prima di un temporale.
Cavo USB
- Non danneggiare, tirare e piegare il cavo di ricarica USB o collocarci sopra qualcosa.
Danni
- Controlla che l'unità non abbia riportato danni dopo aver aperto la confezione. Se è danneggiato in qualsiasi modo, non utilizzare l'unità e consultare il rivenditore.
Manutenzione
- Disconnettere il cavo di alimentazione dalla presa elettrica prima di pulire il prodotto. Usare un panno morbido e pulito per pulire l'esterno dell'unità. Non pulire con agenti chimici e detergenti.
Assistenza e riparazione
- Questo prodotto non ha componenti che possano essere riparate dall'utente. Esporre le parti interne al dispositivo può comportare un pericolo di vita. In caso di guasto, contattate il produttore o l'agente di servizio autorizzato. La garanzia non copre danni causati da riparazioni effettuate da terze parti non autorizzate.
Batterie
Installazione
- Non utilizzare batterie diverse da quelle specificate. Rispettare la corretta polarità quando inserite le batterie. Non usare mai batterie di tipi diversi insieme, né mescolare batterie vecchie con nuove.
Utilizzo e manutenzione
- Non esporre le batterie ad alte temperature, ad es. vicino a fuoco o luce diretta del sole. Quando il prodotto non viene usato per lungo tempo (più di un mese), rimuovere la batteria per prevenire perdite. In caso di perdite di batterie, ripulire la perdita all'interno dello scompartimento e rimpiazzare le batterie vecchie con quelle nuove.
Sicurezza per i bambini
Assicurarsi sempre che lo scompartimento delle batterie sia chiuso e ben fisso.
Le batterie possono essere facilmente ingerite da bambini piccoli e possono provocare gravi
ustioni interne e portare alla morte. Tenere lontano le batterie dai bambini. Cercare immediatamente una consulenza medica se si pensa che una batteria sia stata ingerita.
Condizioni ambientali
- Tenere le batterie lontano da pressione bassa dell'aria o alte temperature in quanto possono provocare un'esplosione o la perdita di un liquido o un gas infiammabile.
Smaltimento
- Smaltire correttamente le batterie seguendo le istruzioni in questo manuale (consultare la sezione "Smaltimento dell'apparecchio e delle batterie"). Non gettarle nel fuoco, non smontarle e non cercare di ricaricarle se non sono ricaricabili. Potrebbero avere perdite o esplodere.
Smaltimento dell'apparecchio e delle batterie
Informazioni per gli utenti su raccolta e smaltimento di vecchi apparecchi e batterie usate.
Questo simbolo indica che il prodotto contiene batterie coperte dalla Direttiva europea 2013/56/EU che decreta che non può essere
smaltito con i normali rifiuti domestici. Cd, Hg e Pb sotto il simbolo del cestino della spazzatura mostra se la batterie contiene cadmio (Cd), mercurio (Hg) o piombo (Pb).
Questo simbolo indica che il prodotto è coperto dalla Direttiva europea 2012/19/EU che decreta che non può essere smaltito o gettato con i normali rifiuti domestici.
Questo simbolo indica che il prodotto è progettato e fabbricato in modo da essere riciclato e riutilizzato.
- Questi simboli sul prodotto, sulla confezione e/o sui documenti che lo accompagnano indicano che i prodotti elettrici ed elettronici usati e le batterie usate non vanno mischiate con i rifiuti domestici generici. Gli utenti in contesti domestici dovrebbero contattare il rivenditore presso cui hanno acquistato il prodotto oppure un ufficio governativo locale per ricevere dettagli su dove e come portare questi oggetti per un riciclaggio che rispetti l'ambiente.
Dichiarazione CE e UKCA:
- Con il presente, Sharp Consumer Electronics Poland sp. z o.o. dichiara che il televisore LED soddisfa i requisiti essenziali e le altre disposizioni rilevanti della direttiva RED 2014/53/EU e delle Normative sulle apparecchiature radio del
Regno Unito del 2017.
- Il testo completo CE e la dichiarazione di conformità UKCA sono disponibili su sharpconsumer.eu e successivamente accedendo alla sezione di download del modello, quindi selezionando "Dichiarazioni CE".
Controlli
Antenna telescopica
Scompartimento delle batterie
Porta micro USB
Ingresso cuffie
Schermo retroilluminato
⏻ + Alimentazione/modalità
Pressione breve da spento: accensione
Pressione breve da acceso: cambio modalità
Pressione lunga durante alimentazione tramite USB: stand-by
Pressione lunga durante alimentazione tramite batteria: spegnimento
♥ ▶ Preselezione/Riproduci/Pausa (20 DAB/20 FM)
- Pressione breve: Richiamo preselezione
- Pressione lunga: Memorizzazione preselezione
- In modalità Bluetooth:
- Pressione breve per riprodurre o mettere
in pausa
- Pressione lunga per disconnettere l'attuale dispositivo e scansionare nuovi dispositivi
8.
- In modalità DAB:
- Pressione breve per scorrere in alto nell'elenco stazioni DAB
- In modalità FM:
- Pressione breve: Scorrere in basso per la banda di frequenza a intervalli di 0,05 MHz.
- Pressione lunga: Scansionare in basso la banda di frequenza.
• In modalità Bluetooth: Traccia precedente
• In Menu: Scorrere per le opzioni del menu
9.
• In modalità DAB:
- Premere brevemente per scorrere in basso nell'elenco delle stazioni DAB.
- In modalità FM:
- Pressione breve: Scorrere in alto per la banda di frequenza a intervalli di 0,05MHz.
- Pressione lunga: Scansionare in alto la
banda di frequenza.
• In modalità Bluetooth: Traccia successiva
Pressione breve: Informazioni sulla stazione
Pressione lunga: Entrare nelle opzioni del menu
In modalità stand-by: pressione breve per entrare nelle impostazioni Accendi/Spegni allarme 1 e 2.
11. Preselezione di memoria 1, 2 e 3
Pressione breve: Richiama preselezione 1 (2 o 3)
Pressione lunga: Memorizza preselezione 1 (2 o 3)
12. ◀ √ ▶ Controllo del volume:
• Rotazione: regolazione del volume
preselezione visualizzati
- Pressione breve in modalità stand-by: attivare un ritardo di 10 minuti.
Contenuto della confezione
1 x Radio digitale portatile Tokyo DR-P421
1 x Cavo di alimentazione USB a Micro USB
Documentazione utente
Usare la radio DAB+/FM portatile
Antenna telescopica
Estendi completamente l'antenna telescopica (preferibilmente in verticale) prima di tentare di sintonizzare una stazione DAB / FM. Ciò assicurerà che sia disponibile la massima intensità del segnale quando viene avviata la scansione della radio. Estendere l'antenna assicura anche la
migliore qualità del suono possibile.
Connessione
Connettere il cavo USB incluso nella porta micro USB sul lato posteriore della radio. Inserire l'estremità USB-A (standard) del cavo in un dispositivo USB o un adattatore per alimentare la radio. La radio si accenderà e mostrerà . Quindi entrerà in modalità stand-by.
Inserire le batterie (facoltativo)
Prima di installare le batterie (non incluse), assicurarsi che la radio sia spenta usando ⏻ e che sia stata disconnessa da cavo USB. Sul lato posteriore della radio, premere la linguetta dello scompartimento delle batterie per rimuoverne il coperchio.
Inserire 4 batterie AA da 1.5V (conosciute anche come LR-6), assicurandosi di seguire i simboli "+" e "-" e di posizione correttamente le batterie. Collocare nuovamente il coperchio dello scompartimento delle batterie, assicurandosi
di sentire uno scatto perché sia chiuso correttamente.
Configurazione iniziale
Premere brevemente per accendere la radio. Inizierà automaticamente a scansionare le stazioni DAB. Una barra del progresso mostrerà l'avanzamento della scansione e il numero di stazioni trovate. Quando la scansione è completa, la radio selezionerà la prima stazione disponibile e inizierà la riproduzione. Per impostazione predefinita, le stazioni sono elencate numericamente e non alfabeticamente.
Nota: L'elenco delle stazioni radio DAB è salvato nella memoria; la prossima volta che la radio viene accesa, non viene effettuata una ricerca delle stazioni.
Premere brevemente o per scorrere per le stazioni disponibili. Per selezionare la stazione visualizzata, premere brevemente √. Ci sarà un breve ritardo mentre la radio si sintonizza alla stazione selezionata.
Regolare il volume
Ruotare in senso orario per aumentare il volume e in senso antiorario per diminuire il volume.
Ora e data
Ora e data saranno sincronizzate automaticamente a quelle trasmesse dal servizio DAB in formato da 24 ore.
Per impostare l'ora e la data manualmente, accendere la radio. Tenere premuto a lungo i ≡ per entrare nelle opzioni del menu.
Usare ◀✓ ▶ per selezionare / / . viene mostrato e le cifre dell'ora lampeggeranno; usare ◀✓ ▶ per impostare ore e minuti. viene mostrato e il giorno lampeggerà; usare ◀✓ ▶ per impostare giorno, mese e anno. verrà mostrato una volta che l'anno è stato confermato la schermata tornerà quindi al menu .
Usare per cambiare il formato orologio/ data e le impostazioni di aggiornamento automatico. Pressione breve per uscire dal menu.
Cambiare la modalità
Premere brevemente per cambiare la modalità tra DAB, FM e Bluetooth. Lo schermo del display confermerà la modalità.
Modalità radio DAB
Selezionare la modalità radio DAB+
Premere brevemente finché lo schermo non mostra . Al primo utilizzo della radio o se l'elenco delle stazioni è vuoto, la radio inizierà automaticamente la scansione delle stazioni radio DAB. Una barra del progresso mostrerà l'avanzamento della scansione e il numero di stazioni trovate durante la scansione. Se si era in ascolto di una stazione DAB quando la radio è stata spenta, questa stazione sarà selezionata automaticamente al momento della riaccensione della radio.
Cambiare stazioni DAB
Usare «pe» norrere per le stazioni disponibili. Premere √ per selezionare la stazione desiderata nel momento in cui viene visualizzata. Ci sarà un breve ritardo mentre la radio si sintonizza alla stazione selezionata.
Scansionare le stazioni DAB
Con la radio DAB, diventano disponibili regolarmente ulteriori stazioni e servizi. Effettuare periodicamente una scansione manuale per assicurarsi di avere l'elenco delle stazioni più aggiornato memorizzato nella memoria della radio. Se la radio è stata spostata in un punto diverso, ad es. in caso di viaggio durante le vacanze, è una buona idea effettuare una scansione manuale.
In modalità DAB:
Pressione prolungata di i Usare per scorrere e selezionare . Il
display cambierà e mostrerà . Una barra del progresso mostrerà l'avanzamento della scansione e il numero di stazioni trovate.
Eliminare stazioni DAB
È possibile rimuovere le stazioni DAB nell'elenco stazioni che non possono essere ricevute nella propria area. Queste sono elencate con un prefisso <?>.
In modalità DAB:
Pressione prolungata di i. Usare ▶ per ▶
scorrere e selezionare . Sì>. Usare ▶ √ ▶ per
scorrere e selezionare . Le stazioni con il
prefisso <?> non saranno più mostrate.
Memorizzare una stazione DAB come preselezione
È possibile memorizzare fino a 20 stazioni radio DAB come preselezione per un accesso istantaneo alle proprie stazioni preferite.
Nota: Memorizzando le stazioni radio DAB
come preselezioni non vengono soprascritte le preselezioni delle stazioni FM.
Sintonizzare la radio alla stazione radio DAB che si desidera memorizzare come preselezione. Tenere premuto ♥ ▶ Ifinché non viene mostrato
<Memor.preselez. <1: (Vuoto)>>. Usare ▶ per passare alla posizione della preselezione su cui si desidera memorizzare la stazione radio (1-20). Premere √ per selezionare. Il display confermerà , dove "X" indica il numero di preselezioni (1-20)
Nota: Se è già presente una stazione DAB in una data preselezione, sarà soprascritta quando viene memorizzata la nuova stazione
Sintonizzarsi su una stazione DAB preselezionata
In modalità DAB:
Per accedere rapidamente alle stazioni radio memorizzate nelle posizioni preselezionate 1, 2 o 3, premere brevemente 1, 2 o 3, come
appropriato, sul lato anteriore della radio.
In alternativa, premere brevemente ♥ ▶ II .<Visual.preselez. <1:>> viene mostrato insieme al nome o alla frequenza della stazione lì memorizzata, oppure <(Vuoto)> se non è stata memorizzata alcuna stazione precedente. Usare
◀ √ ▶ per scorrere e selezionare la stazione preselezionata che si vuole ascoltare (1-20).
Quando si ascolta una stazione DAB, è possibile cambiare le informazioni che appariranno sul display. Ci sono diversi tipi di informazioni che vengono inviate dalla stazione radio. Premere brevemente e ripetutamente i per scorrere tra le diverse opzioni per le informazioni:
- DLS (Dynamic Label Segment): informazioni di testo a scorrimento fornite dalla stazione. Potrebbero comprendere nomi degli artisti, titoli delle canzoni, dettagli di contatto per la stazione radio e altro.
- Signal strength: un simbolo □ vuoto apparirà
sul display per indicare la potenza minima del segnale per un ascolto accettabile. La fila di rettangoli pieni indica l'effettiva potenza del segnale che si riceve.
Program type (PTY): ad es. "Rock", "Pop", "Divertimento" o "Notizie"
Nome multiplex: mostra l'area di trasmissione e la raccolta di stazioni radio su questa frequenza, ad esempio BBC National DAB, Digital 1 Network.
Canale e frequenza: ad es. 12B 225.648 MHz (canale=12B, frequenza=225.648 MHz)
Err. Segnale: viene mostrato come numero compreso tra 0 e 99. Per un ascolto soddisfacente di una stazione radio, questo errore di segnale deve essere inferiore a 30. Aggiustare l'antenna o spostare la radio per migliorare la ricezione.
Informazioni segnale: la velocità di trasmissione alla quale il segnale viene trasmesso.
Indicatore potenza: mostra quando viene utilizzata l'alimentazione tramite USB; mostra in cui XX è
la carica residua della batteria.
DRC (Dynamic Range Control)
I dati DRC non sono trasmessi da tutte le stazioni. DRC viene usato per controllare la differenza tra i suoi più forti e quelli più deboli. Ad esempio, in un ambiente rumoroso, impostare il DRC al massimo rende i suoni deboli relativamente più alti e i suoni forti più bassi.
Ci sono 3 livelli di compressione:
DRC disattivato: nessuna compressione. Questa è l'impostazione predefinita. e quindi selezionare le proprie preferenze.
Nota: L'attuale impostazione DRC sarà contrassegnata da un asterisco (*) sul display.
Modalità radio FM
Per passare alla modalità FM, premere brevemente finché la radio non mostra . Se si era in ascolto di una stazione FM quando la radio è stata spenta, questa stazione sarà selezionata automaticamente al momento della riaccensione della radio.
Sintonizzarsi su una stazione FM
Tenere premuto il pulsante <
ercare su o giù nella banda di frequenze. La radio cercherà la prossima stazione disponibile e poi si fermerà.
Premere brevemente o per affinare la sintonizzazione di ciascuna frequenza a incrementi di 0.05MHz.
Nota: Se la ricezione è scadente, aggiustare l'antenna o sposta la radio in un'altra posizione.
Modificare le impostazioni di scansione
In modalità FM:
Tenere premuto i ☐, quindi apparirà . Premere √.
Ci sono due opzioni diverse tra cui scegliere:
: la ricerca si fermerà solo quando viene ricevuto un segnale forte, che permette una qualità audio migliore. Utilizzando questa opzione, è possibile che la stazione che si sta cercando non venga trovata. : la ricerca si fermerà a ogni stazione ricevuta, anche se la potenza del segnale è scarsa.
Usare ◀ √ ▶ per scegliere e selezionare tra le opzioni disponibili.
Nota: L'attuale impostazione di ricerca sarà contrassegnata da un asterisco (*) sul display.
Memorizzare una stazione FM come preselezione
È possibile memorizzare fino a 20 stazioni FM come preselezione per un accesso istantaneo alle proprie stazioni preferite.
Nota: Memorizzando le stazioni FM come preselezioni non vengono soprascritte le preselezioni delle stazioni DAB.
Sintonizzare la radio alla stazione radio FM che si desidera memorizzare come preselezione. Tenere premuto ♥ ▶ Ifinché non viene mostrato
<Memor.preselez. <1:(Vuoto)>. Usare ▶ √ ▶ per passare alla posizione della preselezione su cui si desidera memorizzare la stazione radio (1-20) e selezionarla. Il display confermerà , dove "X" indica il numero di preselezioni (1-20)
Nota: Se è già presente una stazione FM in una data preselezione, sarà soprascritta quando viene memorizzata la nuova stazione
AMS (Auto Memory Store)
In alternativa, è possibile usare la funzione AMS (Auto Memory Store) per memorizzare come preselezioni le stazioni radio FM. In modalità FM, tenere premuto i □. Usare √per ▶ scorrere e selezionare . La radio ora potrà scansionare la banda di frequenza FM e le stazioni trovate saranno memorizzate automaticamente nelle posizioni delle preselezioni.
Nota: È possibile sovrascrivere le preselezioni memorizzate tramite AMS seguendo le istruzioni della sezione precedente "Memorizzare una stazione FM come preselezione".
Sintonizzarsi su una stazione FM preselezionata
In modalità FM:
Per accedere rapidamente alle stazioni radio memorizzate nelle posizioni preselezionate 1, 2 o 3, premere brevemente 1, 2 o 3, come appropriato. In alternativa, premere brevemente
♥ ▶II. <Visual.preselez. <1:>> viene mostrato insieme al nome o alla frequenza della stazione lì memorizzata, oppure <(Vuoto)> se non è stata memorizzata alcuna stazione precedente. Usare
◀ √ ▶ per scorrere e selezionare la stazione preselezionata che si vuole ascoltare (1-20).
Quando si ascolta una stazione FM, è possibile cambiare le informazioni che appaiono sulla seconda riga sul display. Premere brevemente e ripetutamente i per scorrere tra le diverse opzioni per le informazioni:
Radiotext (RT): informazioni di testo a scorri-
mento fornite dalla stazione. Potrebbero com-
prendere nomi degli artisti, titoli delle canzoni,
dettagli di contatto per la stazione radio e altro.
Program type (PTY): ad es. "Rock", "Pop", "Divertimento" o "Notizie"
Nome stazione o frequenza: ad es. BBC R4, 93,30 MHz
Indicatore potenza: mostra <Alimentazione
USB> quando viene utilizzata l'alimentazione tramite USB; mostra in cui XX è la carica residua della batteria.
Modalità Bluetooth
Assicurarsi che la radio sia in modalità Bluetooth premendo brevemente ⏻ + finché non appare . La radio inizierà la ricerca di dispositivi Bluetooth. Assicurarsi che i dispositivi abilitati al Bluetooth a cui si sta tentando di connettersi sia rilevabile.
Nota: Se necessario, consultare le istruzioni del proprio dispositivo per aggiungere o impostare il Bluetooth.
Una volta trovato, la radio apparirà sul dispositivo come "SHARP DR-P421". Selezionare questa voce per iniziare l'accoppiamento. Una volta completato, sulla radio apparirà . I dispositivi accoppiati si connetteranno alla radio quando saranno entro il raggio di ricezione (entro 10 metri in linea d'aria). Il dispositivo resterà accoppiato alla radio a meno che non si decida di disconnetterlo.
Per disconnettere dal Bluetooth, tenere premuto ♥ ▶|per tre secondi per annullare l'accoppiamento del dispositivo attuale e cercare nuovi dispositivi.
Trasmettere la musica senza fili tramite Bluetooth
In modalità Bluetooth, è possibile trasmettere l'audio tramite le casse del prodotto. Usare i controlli sul dispositivo Bluetooth nonché quelli sulla radio. Controlli disponibili
Riproduci / Pausa: Pressione breve
Traccia precedente: Pressione breve
Traccia successiva: Pressione breve
Il volume può essere regolato usando la radio oppure il dispositivo connesso.
Nota: Se la radio resta inattiva per 20 minuti o non viene ricevuto alcun segnale audio, la radio
entrerà automaticamente in stand-by (oppure si spegnerà se la radio è alimentata a batteria).
Funzione allarme
Nota: La funzione allarme funziona solo quando la radio è alimentata tramite USB: non funzionerà quando si utilizza l'alimentazione tramite batterie (per preservare la durata della batteria).
Impostare un allarme
Nota: Controllare che la radio mostri l'ora e la data corrette prima di impostare un allarme.
106
flowchart
graph LR
A["DAB+"] --> B["Ricerca completa"]
A --> C["Sintonizz. manuale Sistema"]
A --> D["DRC Sospensione Allarme"]
A --> E["Elimina Allarme Configurazione allarme 1"]
A --> F["Sistema Ora Configurazione allarme 2"]
G["FM"] --> H["Impostaz. di ricerca Lingua"]
G --> I["AM Ripristino valori di default"]
G --> J["Sistema Versione software"]
K["BT Sistema"] --> L["..."]
B --> M["..."]
C --> M
D --> M
E --> M
F --> M
H --> N["Retroilluminazione"]
I --> N
J --> N
M --> O["..."]
N --> P["..."]
Impostazioni allarme 1 o 2
Ora Ore Min Durata 1, 5, 15, 30 o 60 minuti Sorgente Cicalino, DAB o FM Frequenza Ogni giorno, una volta, giorni feriali o fine settimana. Livello volume 25%-100% Allarme Attivo o disattivato
Nota: Se l'ora non è impostata o se
l'aggiornamento dal segnale radio non è riuscito, quando si tenta di impostare l'allarme appare
. La radio chiederà quindi di impostare l'ora. L'allarme è impostabile solo se è impostata l'ora.
Se si prova a impostare l'allarme quando l'unità è alimentata dalle batterie, apparirà . Le funzioni di allarme sono disponibili solo con alimentazione da presa (USB).
Interrompere, posticipare o disattivare l'allarme
Per interrompere l'allarme, premere brevemente ⏻ +□, quindi apparirà . Il simbolo dell'allarme resterà sul display e suonerà nuovamente alla stessa ora il giorno successivo a meno che non sia stato impostato come .
Per posporre l'allarme, premere √. Apparirà , seguito da un conto alla rovescia di 10 minuti. Una volta terminato il conto alla
rovescia, l'allarme suonerà nuovamente. Si può terminare il posticipo dell'allarme premendo √. Apparirà .
Per disattivare l'allarme, seguire i passaggi della sezione "Impostare un allarme" e selezionare .
Timer Sleep
È possibile configurare la radio in modo che passi automaticamente in modalità stand-by usando il timer Sleep. È possibile scegliere tra , <15>, <30>, <45>, <60> e <90> minuti. Per fare ciò, tenere premuto i. Usare per scerrere e selezionare / . Usare
◀ √ ▶ per scorrere e selezionare la propria preferenza. Apparirà . In alto sul display della radio, verrà mostrato il numero di minuti prima che la radio passi in modalità stand-by, ad esempio S90.
Timeout retroilluminazione display
Per regolare il timeout retroilluminazione display, tenere premuto i. Usare per scorrere
e selezionare / / . Scorrere tra le opzioni sul timeout della retroilluminazione. L'attuale impostazione sarà contrassegnata da un asterisco (*) sul display. Premere √ per selezionare.
In maniera analoga, usare ◀ √ ▶ per cambiare le impostazioni per la luminosità della retroilluminazione per il e . Ci sono 3 opzioni disponibili: , e .
Lingua display
Per cambiare la lingua del display, tenere premuto i □. Usare ◀ per scorrere e selezionare / . Usare ◀ √ ▶ per scorrere e selezionare la lingua preferita. Ci sono 7 opzioni disponibili: inglese, francese, tedesco, italiano, spagnolo, polacco e olandese Accanto alla lingua impostata attualmente apparirà un asterisco (*).
Versione software
Per controllare la versione del software della radio, tenere premuto i. Usare per scorrere e selezionare / . Verrà mostrata la versione del software.
Ripristino valori di default
È possibile ripristinare la radio ai suoi valori di fabbrica originari.
Nota: Ripristinando la radio, le preselezioni memorizzate saranno cancellate e qualsiasi accoppiamento Bluetooth sarà annullato.
Pressione prolungata di i Usare per scorrere e selezionare / . <Ripristino valori di default?
Apparirà Si>. Usare ◀ √ ▶ per scorrere e selezionare . La tua radio si riavvierà e il display mostrerà .
sharpconsumer.eu> e quindi entrerà in modalità stand-by.
Risoluzione dei problemi
Se non c'è audio o alimentazione:
Regolare il volume.
Controllare che il cavo USB sia connesso e che la radio non sia in modalità stand-by.
Se il prodotto è alimentato tramite batterie, controllare se hanno bisogno di essere sostituite. Usare batterie AA di buona qualità.
Se la ricezione radio è scadente:
Assicurarsi che l'antenna telescopica sia stata allungata completamente (preferibilmente in verticale).
Cercare nuovamente le stazioni radio, consultare "Scansionare le stazioni DAB" e/o "Sintonizzarsi su una stazione FM" a seconda dei casi.
Provare a spostare la radio in un'altra posizione per vedere se la ricezione migliora.
- Controllare che non ci siano altri apparecchi elettronici vicini alla radio. Potrebbero provocare interferenze.
Se non si riesce ad accoppiare un dispositivo Bluetooth:
Controllare di essere in modalità Bluetooth.
Assicurarsi di essere entro 10 metri dalla radio per le funzionalità Bluetooth.
Allontanare la radio e il dispositivo Bluetooth da altri dispositivi/apparecchi elettrici Bluetooth.
Se possibile, spegnere altri dispositivi Bluetooth vicini o disattivare la funzionalità Bluetooth.
Se i pulsanti delle funzioni non rispondono:
Controllare che il cavo USB sia connesso sul retro della radio. Premere ⏻ +. Se si utilizzano le batterie, potrebbe essere necessario sostituirle.
Ripristina il dispositivo ai valori di default.
Nota: Tutte le impostazioni, inclusi l'elenco delle stazioni radio, i dispositivi Bluetooth connesso e qualsiasi preselezione, saranno eliminate quando viene eseguito un ripristino dei valori di default.
Specifiche tecniche
Ingresso DC 5V Batterie 4 tipo AA (LR-6) da 1,5 V (facoltative, non fornite) Uscita audio 2 watt RMS Consumo energetico Attivo: < 2 W Stand-by: < 2 mW Intervallo frequenze DAB Band III, da 174 MHz a 240 MHz Intervallo frequenze FM da 87,5MHz a 108MHz Bluetooth 2,4 GHz ~ 2,480 GHz Nome accoppiamento SHARP DR-P421 Dimensioni (L) x (A) x (S) in mm 174 x 90 x 53 Peso approssimativo 0,39 kg
Belangrijke veiligheidsinstructies
Volg alle veiligheidsinstructies op en neem alle waarschuwingen in acht. Bewaar deze handleiding voor toekomstig gebruik.
Dit symbool wijst de gebruiker erop de gebruikershandleiding te raadplegen voor verdere informatie over veiligheid,
bediening en onderhoud.
DC voltage
Voorzorgsmaatregelen
Veiligheid voor kinderen
- Neem bij het gebruik van dit product altijd de basisvoorzorgsmaatregelen in acht, vooral als er kinderen aanwezig zijn. Kinderen dienen onder
toezicht te staan om er zeker van te zijn dat ze niet met het product spelen.
Locatie
- Installeer het product op een stabiele plaats en zorg ervoor dat het product en de onderdelen ervan niet overhangen.
Ventilatie
- De sleuven en openingen in de behuizing zijn bedoeld voor ventilatie om een betrouwbare werking van het product te waarborgen en om het product te beschermen tegen oververhitting. Deze openingen mogen niet geblokkeerd of afgedekt worden. Zorg voor een minimale afstand van 5 cm rondom het product voor voldoende ventilatie. Laat nooit iemand iets in gaten, sleuven of andere openingen in de behuizing van het apparaat duwen, omdat dit een dodelijke elektrische schok kan veroorzaken.
Warmte en bedrijfstemperatuur
- Installeer het apparaat niet in de buurt van warmtebronnen zoals radiatoren, verwarmingsroosters, fornuizen of andere apparaten
112
(inclusief versterkers) die warmte produceren. Vermijd blootstelling aan direct zonlicht.
Open vlammen
- Om brandgevaar te voorkomen, dient u kaarsen of open vlammen uit de buurt van dit product te houden.
Water, vocht en vloeistoffen
- Om brandgevaar of het risico op elektrische schokken te voorkomen, mag dit product niet aan regen, water of vocht blootgesteld worden. Plaats geen met vloeistof gevulde objecten op of in de buurt van dit product.
Storm en bliksem
- Storm is gevaarlijk voor alle elektrische producten. Indien de voeding of antenne door bliksem wordt geraakt kan het product beschadigd raken, zelfs wanneer dit is uitgeschakeld. U moet vóór de storm alle kabels en aansluitingen loskoppelen van het product.
USB-kabel
- Beschadig de USB-oplaadkabel niet, trek deze niet uit, buig deze niet en plaats er geen zware objecten op.
Schade
- Controleer het product na het uitpakken direct op beschadigingen. Als het product op enigerlei wijze beschadigd is, dan mag u dit niet gebruiken. Neemt contact op met uw dealer.
Onderhoud
- Trek de stekker uit het stopcontact voordat u het product schoonmaakt. Gebruik een zachte en schone doek om de buitenkant van het apparaat schoon te maken. Reinig het apparaat nooit met chemicaliën of reinigingsmiddel.
Service en reparaties
- Dit product bevat geen onderdelen die door de gebruiker kunnen worden gerepareerd. Het blootleggen van de interne onderdelen in het apparaat kan uw leven in gevaar brengen. Neem in het geval van een defect contact op met de fabrikant of een geautoriseerde onderhoudsafdeling. Onder de fabrieksgarantie vallen geen fouten door reparaties uitgevoerd door ongeautoriseerde derden.
Batterijen
Installatie
- Gebruik geen andere batterijen dan de gespecificeerde batterijen. Gebruik de juiste polariteit tijdens het plaatsen van de batterijen. Gebruik nooit batterijen van verschillende types of meng nooit nieuwe en oude batterijen.
Gebruik en onderhoud
- Stel batterijen niet bloot aan hoge temperaturen, bijv. in de buurt van vuur of in direct zonlicht. Verwijder de batterijen uit het product om lekkage te voorkomen, als u het product gedurende langere tijd (langer dan een maand) niet gebruikt, Als de batterijen lekken, veegt u de gelekte vloeistof in het batterijvak weg en vervangt u de batterijen door nieuwe.
Veiligheid van kinderen
Zorg er altijd voor dat het batterijvak gesloten en beveiligd is.
Jonge kinderen kunnen batterijen gemakkelijk inslikken. Deze kunnen ernstige inwendige
brandwonden veroorzaken en zelfs de dood tot gevolg hebben. Houd batterijen uit de buurt van kinderen. Raadpleeg onmiddellijk een arts als u denkt dat een kind een batterij heeft ingeslikt.
Omgevingsfactoren
- Houd batterijen uit de buurt van een lage luchtdruk of hoge temperaturen, aangezien dit kan leiden tot een explosie of het lekken van een ontvlambare vloeistof of gas.
Verwijdering
- Verwijder de batterijen op de juiste wijze conform de aanwijzingen in deze handleiding (zie hoofdstuk "Verwijdering van deze apparatuur en batterijen"). Gooi de batterijen niet in het vuur, haal deze niet uit elkaar en probeer niet om niet-oplaadbare batterijen op te laden. Deze kunnen lekken of ontploffen.
Verwijdering van deze apparatuur en batterijen
Informatie voor gebruikers over de inzameling en verwijdering van oude apparatuur en gebruikte batterijen.
Dit symbool betekent dat het product batterijen bevat die onder de Europese Richtlijn 2013/56/EU vallen. Deze batterijen mogen
niet met het normale huishoudelijke afval weggegooid worden. De aanduidingen Cd, Hg en Pb onder het symbool van de vuilnisbak geven aan of de batterij cadmium (Cd), kwik (Hg) of lood (Pb) bevat.
Dit symbool betekent dat dit product onder de Europese Richtlijn 2012/19/EU valt en niet weggegooid of gedumpt mag worden met ander
huishoudelijk afval.
Dit symbool betekent dat het product zodanig ontworpen en vervaardigd is dat dit gerecycled en hergebruikt kan worden.
- Deze symbolen op de producten, verpakkingen en/of begeleidende documenten betekenen dat u gebruikte elektrische en elektronische producten en batterijen niet met het gewone huishoudelijke afval mag weggooien. Voor bijzonderheden over waar en hoe zij deze artikelen kunnen inleveren voor een milieuveilige recycling kunnen huishoudelijke gebruikers contact opnemen met de detailhandelaar waar zij dit product hebben gekocht of met hun plaatselijke overheidskantoor.
CE- en UKCA-verklaring:
Hierbij verklaart Sharp Consumer Electronics Poland sp. Z o.o. dat dit audioapparaat voldoet aan de essentiële vereisten en andere relevante bepalingen van de RED richtlijn 2014/53/EU en de Britse voorschriften voor radioapparatuur uit 2017.
De volledige tekst van de CE- en UKCA-conformiteitsverklaring is beschikbaar op sharpconsumer.eu. Ga vervolgens naar de downloadsectie van uw model en selecteer "CE Statements" (CE-verklaringen).
Bediening
Uitschuifbare antenne
Batterijvak
Micro-USB-poort
Hoofdtelefoonaansluiting
Display met achtergrondverlichting
In-/uitschakelen/modus
Indien uitgeschakeld, kort indrukken: schakel in
Indien ingeschakeld, kort indrukken: wijzig modus
Bij USB-voeding, lang indrukken: stand-by
Bij batterijvoeding, lang indrukken: schakel uit
♥ ▶Voorinstellen/afspelen/pauzeren (20 DAB/20 FM)
- Kort indrukken: Station opvragen
• Lang indrukken: Station opslaan
- In Bluetooth-modus:
- Kort indrukken voor afspelen/pauzeren
- Lang indrukken om het huidig toestel te onkoppelen en naar nieuwe toestellen te scannen
8.
In DAB-modus:
Kort indrukken om omhoog te scrollen in de DAB-radiostationlijst
In FM-modus:
Kort indrukken: Verlaag de frequentieband met 0,05 MHz. Lang indrukken: Scan de frequentieband aflopend.
In het Menu: Door de menu-opties scrollen
9.
- In DAB-modus:
- Kort indrukken om omlaag te scrollen in de DAB-radiostationlijst.
- In FM-modus:
- Kort indrukken: Verhoog de frequentieband met 0,05 MHz. Lang indrukken: Scan de frequentieband oplopend.
• In Bluetooth-modus: Volgende track
10. i
Kort indrukken: Informatie over het radiostation
In de stand-bymodus: kort indrukken om de aan/uit-instellingen van Alarm 1 en 2 te openen
Geheugen-voorinstellingen 1, 2 en 3
Kort indrukken: Voorinstelling 1 (2 of 3) oproepen
Lang indrukken: Voorinstelling 1 (2 of 3) opslaan
12.
√ ▶ Volumeregeling:
Draaien: het volume aanpassen
Draaien in Menu of Voorinstellingen: Door de beschikbare menu-opties of voorgeprogrammeerde locaties scrollen
Kort indrukken: Selecteer een weergegeven radiostation/frequentie, menu of voorinstelling
- In de stand-bymodus, kort indrukken: een sluimerfunctie van 10 minuten activeren.
Inhoud van de doos
1× DR-P421 Tokyo draagbare digitale radio
1× voedingskabel USB naar micro-USB
Gebruikersdocumentatie
De draagbare DAB+/FM-radio gebruiken
Uitschuifbare antenne
Schuif de telescopische antenne volledig uit (bij voorkeur verticaal) voordat u probeert af te stemmen op een DAB/FM-station. Dit zorgt ervoor dat de maximale signaalsterkte beschikbaar is wanneer de radio begint te scannen. Het uitschuiven van de antenne zorgt ook voor de best mogelijke geluidskwaliteit.
Verbinding
Sluit de meegeleverde USB-kabel aan op de micro-USB-poort aan de achterkant van de radio. Steek het USB-A-uiteinde (standaard) van de kabel in een USB-apparaat of -adapter om de radio van stroom te voorzien. De radio gaat aan en op het display verschijnt . De radio schakelt dan over in de stand-bymodus.
Batterijen plaatsen (optioneel)
Alvorens u de batterijen (niet meegeleverd) plaatst, moet u ervoor zorgen dat de radio is uitgeschakeld met ⏻ + en dat de USB-kabel is losgekoppeld. Druk aan de achterkant van de radio op het lipje van het deksel van het batterijvak om het te verwijderen.
Plaats 4 × 1,5 V AA-batterijen (ook bekend als LR-6). Let daarbij op de "+" en "-" markeringen en plaats de batterijen op de correcte wijze. Plaats het deksel van het batterijvak terug en zorg ervoor dat het goed "dichtklikt".
Eerste instellingen
Druk kort op om de radio aan te zetten. De radio begint automatisch te scannen naar DAB-zenders. Een voortgangsbalk toont de voortgang van de scan en het aantal gevonden stations. Zodra het scannen klaar is, selecteert de radio het eerste beschikbare radiostation en deze beginnen af te spelen. Standaard worden de stations eerst numeriek en dan alfabetisch gerangschikt.
Opmerking: De lijst met DAB-radiozenders wordt in het geheugen opgeslagen. De volgende keer dat u de radio inschakelt, zoekt deze niet naar zenders.
Druk kort op ◆◆◆ of ▶m door de beschikbare zenders te bladeren. Om het weergegeven station te selecteren, drukt u kort op √. Er zal een korte vertraging zijn terwijl uw radio afstemt op de door u geselecteerde station.
Het volume aanpassen
Draai lechtsom om het volume te verhogen en linksom om het volume te verlagen.
Tijd en datum
Tijd en datum worden automatisch gesynchroniseerd met de door de DAB-dienst uitgezonden tijd in 24-uurs formaat.
Om de tijd en datum handmatig in te stellen, zet u de radio aan. Druk lang op i ☐ om de menu-opties te openen.
Gebruik ◀ √ ▶ om / / te selecteren. wordt weergegeven en de uurcijfers knipperen.
Gebruik ◀✓▶om de uren en minuten in te stellen. wordt weergegeven en de dag knippert. Gebruik ◀✓▶om dag, maand en jaar in te stellen. wordt één keer weergegeven zodra u het jaar hebt bevestigd. U keert vervolgens terug naar het menu .
Gebruik ◀✓▶ om het formaat van de klok/ datum en de instellingen voor automatische bijwerking te wijzigen. Druk kort op om het menu te verlaten.
De modus veranderen
Druk kort op om-te schakelen tussen de modi DAB, FM en Bluetooth. Op het display wordt de modus bevestigd.
DAB-radiomodus
De DAB-radiomodus selecteren
Druk kort op hot op het scherm verschijnt. De eerste keer dat u de radio gebruikt of als de radiostationlijst leeg is, scant uw radio automatisch beginnen naar DAB-radiozenders. Een voortgangsbalk toont de voortgang van de scan en het aantal gevonden stations tijdens het scannen wordt ook getoond. Als u naar een DAB-station aan het luisteren was toen u de radio uitschakelde, dan wordt dit radiostation automatisch geselecteerd als u de radio weer inschakelt.
DAB-stations wijzigen
Gebruik ◀ on door de beschikbare stations te bladeren. Druk op √ om te selecteren wanneer het station waarnaar u wilt luisteren wordt weergegeven. Er zal een korte vertraging zijn terwijl uw radio afstemt op de door u geselecteerde station.
Scannen naar DAB-stations
Voor een DAB-radio komen regelmatig extra radiostations en diensten beschikbaar. Voer regelmatig een handmatige scan uit om er zeker van te zijn dat u de meest recente radiostationlijst in het geheugen van uw radio hebt opgeslagen. Als u uw radio op een andere plek hebt neergezet, bijvoorbeeld als u op vakantie gaat naar het buitenland, dan is het ook een goed idee om een handmatige scan uit te voeren.
In DAB-modus:
Lang indrukken i. Gebruik om te scrollen en selecteer . Op het display verschijnt . Een
voortgangsbalk toont de voortgang van de scan en het aantal gevonden stations.
Lijst met DAB-stations inkorten
U kunt de DAB-stations die u in uw omgeving niet kunt ontvangen uit de radiostationlijst verwijderen. Deze stations worden aangeduid met het voorvoegsel <?>.
In DAB-modus:
Lang indrukken i ≡. Gebruik ◀ om te▶
scrollen en selecteer . Ja> wordt weergegeven. Gebruik ◀ √ ▶
om te scrollen en selecteer . Stations met
het voorvoegsel <?> worden nu niet meer
weergegeven.
Een DAB-station als voorinstelling opslaan
Uw radio kan tot 20 DAB-radiostations opslaan als voorinstelling voor directe toegang tot uw favoriete radiostations.
Opmerking: Als u een DAB-station als
voorinstelling opslaat, dan worden de voorinstellingen voor FM-radiostations niet overschreven.
Stem de radio af op het DAB-station dat u als voorinstelling wilt opslaan. Druk lang op ♥ ▶IItot <Station opslaan <1:(leeg>>> wordt weergegeven. Gebruik ◀ ▶om naar de voorinstellingslocatie te gaan waar u het radiostation wilt opslaan (1-20). Druk op √ om te selecteren. Het display bevestigt , waarbij 'X' het nummer van de voorinstelling is (1-20)
Opmerking: Als er al een bestaand DAB-station is opgeslagen onder een voorinstelling, dan wordt dit overschreven wanneer u het nieuwe radiostation opslaat.
Afstemmen op een als voorinstelling opgeslagen DAB- station
In DAB-modus:
Om snel toegang te krijgen tot de radiostations die u hebt opgeslagen onder voorinstelling 1, 2 of 3, drukt u kort op 1, 2 of 3 op de voorkant van uw radio. U kunt ook kort op ♥ ▶|| drukken.
<Station opvragen <1:>> wordt weergegeven met de naam of frequentie van het opgeslagen station. <(Leeg)> verschijnt als er nog niet eerder een station is opgeslagen. Gebruik ◀ √ ▶ om te bladeren en het vooringestelde station te selecteren waar u naar wilt luisteren (1-20).
Als u naar een DAB-station luistert, dan kunt u de informatie die op het display verschijnt wijzigen. Er zijn verschillende soorten informatie die de omroep verzendt. Druk herhaaldelijk kort op
i ☐om de verschillende informatieopties te doorlopen:
Dynamic Label Segment (DLS) - Dit is scrollende tekstinformatie zoals aangeleverd door de omroep. Het kan hierbij gaan om namen van artiesten, titels van liedjes, contactgegevens van het radiostation, enz.
Signaalsterkte - Een lege □verschijnt op het display om de minimale signaalsterkte voor aanvaardbaar luisteren aan te geven. De rij van ononderbroken rechthoeken geeft de werkelijke signaalsterkte aan die u ontvangt.
Programmatype (PTY) - bijv. 'Rock', 'Pop', 'Praat-programma's' of 'Nieuws'
Multiplexnaam - Geeft het uitzendgebied en de verzameling radiostations op deze frequentie weer, bijv. BBC National DAB, Digital 1 Network
Kanaal en frequentie - bijv. 12B 225,648 MHz (kanaal = 12B, frequentie = 225,648 MHz)
Signaalfout - Dit wordt weergegeven als een getal tussen 0-99. Om fatsoenlijk naar een radiostation te kunnen luisteren, moet de signaalfout minder dan 30 zijn. Pas de antenne aan of verplaats uw radio om de ontvangst te verbeteren.
122
Signaalinformatie - De datasnelheid waarmee het signaal wordt verzonden.
Stroomindicator – Toont als de stroom afkomstig is van USB; toont waarbij XX de beschikbare batterijlading is.
Datum
Dynamic Range Control (DRC)
Niet alle omroepen zenden DRC-gegevens uit. DRC wordt gebruikt om het verschil tussen de luidste en de zachtste geluiden te regelen. Bijvoorbeeld in een lawaaierige omgeving: door DRC in te stellen op maximaal, worden zachte geluiden relatief luider en luide geluiden juist stiller.
Er zijn 3 compressieniveaus:
DRC uit - geen compressie. Dit is de standaardinstelling.
◀ √ ▶ om te scrollen en selecteer . Selecteer vervolgens uw voorkeur.
Opmerking: De huidige DRC-instelling krijgt een asterisk (*) in het display.
FM-radiomodus
Om naar de FM-modus over te schakelen, drukt u kort op ⏻ +□ tot de radio weergeeft. Als u naar een FM-station aan het luisteren was toen u de radio uitschakelde, dan wordt dit radiostation automatisch geselecteerd als u de radio weer inschakelt.
Afstemmen op een FM-radiostation
Druk lang op de knop ◀ on▶plopend of aflopend te scannen in de frequentieband. De radio zoekt naar en stoppen bij het eerstvolgende beschikbare radiostation.
Druk kort op ◀◀ of ▶m elke frequentie fijn af te stellen in stappen van 0,05 MHz.
Opmerking: Als de ontvangst slecht is, stel dan de antenne bij of verplaats de radio naar een andere plaats.
De scaninstelling wijzigen
In FM-modus:
Druk lang op i ≡ wordt weergegeven. Druk op √.
U hebt de keuze uit twee verschillende opties:
- De scan stopt alleen wanneer de radio een sterk signaal ontvangt, hetgeen resulteert in een betere geluidskwaliteit. Het is mogelijk dat het radiostation waarnaar u scant met deze optie wordt gemist.
- De scan stopt bij elk radiostation dat de radio ontvangt, zelfs als de signaalsterkte slecht is.
Gebruik ◀ √ ▶ om te kiezen en te selecteren uit de beschikbare opties.
Opmerking: De huidige scaninstelling krijgt een asterisk (*) in het display.
Een FM-station als voorinstelling opslaan
Uw radio kan tot 20 FM-radiostations opslaan als voorinstelling voor directe toegang tot uw favoriete radiostations.
Opmerking: Als u een FM-station als voorinstelling opslaat, dan worden de voorinstellingen voor DAB-radiostations niet overschreven.
Stem de radio af op het FM-station dat u als voorinstelling wilt opslaan. Druk lang op
♥▶||tot <Station opslaan <1:(leeg>>
wordt weergegeven. Gebruik ◀✓▶ om naar de voorinstellingslocatie te gaan waar u het radiostation wilt opslaan (1-20). Het display bevestigt , waarbij 'X' het nummer van de voorinstelling is (1-20).
Opmerking: Als er al een bestaand FM-station is opgeslagen onder een voorinstelling, dan wordt dit overschreven wanneer u het nieuwe radiostation opslaat.
Auto Memory Store (AMS)
U kunt ook de AMS-functie (Auto Memory Store) gebruiken om uw FM-radiostations als voorinstelling op te slaan. Druk in de FM-modus lang op i ■ Gebruik ◄om te
scrollen en selecteer . Uw radio scant nu de FM-frequentieband en de gevonden stations worden automatisch opgeslagen op de voorinstellingslocaties.
Opmerking: U kunt uw via AMS opgeslagen voorinstellingen handmatig overschrijven door de stappen onder 'Een FM-station als voorinstelling opslaan' hierboven te volgen.
Afstemmen op een als voorinstelling opgeslagen FM-station
In FM-modus:
Om snel toegang te krijgen tot de radiostations die u hebt opgeslagen onder voorinstelling 1, 2 of 3, drukt u kort op 1, 2 of 3. U kunt ook kort
op ♥ ▶l|drukken. <Station opvragen <1:>> wordt weergegeven met de naam of frequentie van het opgeslagen station. <(Leeg)> verschijnt als er nog niet eerder een station is opgeslagen. Gebruik ◀ √ ▶ om te bladeren en het vooringestelde station te selecteren waar u naar wilt luisteren (1-20).
Als u naar een FM-station luistert, dan kunt u de informatie op de tweede regel van het display wijzigen. Druk herhaaldelijk kort op i om de verschillende informatieopties te doorlopen:
Radiotekst (RT) - Dit is scrollende tekstinformatie zoals aangeleverd door de omroep. Het kan hierbij gaan om namen van artiesten, titels van liedjes, contactgegevens van het radiostation, enz.
Programmatype (PTY) - bijv. 'Rock', 'Pop', 'Praat-programma's' of 'Nieuws'
Naam of frequentie van het radiostation - bijv. BBC R4, 93.30 MHz
Stroomindicator – Toont als de stroom afkomstig is van USB; toont waarbij XX de beschikbare batterijlading is.
Datum
Bluetooth-modus
Zorg ervoor dat uw radio in Bluetooth-modus staat door kort op 🔍 te drukken tot de radio weergeeft. Uw radio begint te zoeken naar Bluetooth-apparaten. Zorg ervoor dat het Bluetooth-apparaat waarmee u verbinding wilt maken zichtbaar is.
Opmerking: Raadpleeg indien nodig de instructies voor uw apparaat om Bluetooth toe te voegen of in te stellen.
Als uw apparaat de radio detecteert, dan wordt deze op uw apparaat weergegeven als 'SHARP DR-P421'. Selecteer dit om het koppelproces te beginnen. Zodra de verbinding tot stand gebracht is, verschijnt op de radio.
Gekoppelde apparaten maken verbinding met de radio als deze binnen bereik zijn (binnen 10 meter in de zichtlijn). Uw apparaat blijft verbonden met de radio, tenzij u besluit de verbinding te verbreken.
Om de verbinding met Bluetooth te verbreken, houdt u ♥ ▶lgedurende 3 seconden ingedrukt om uw huidige apparaat te ontkoppelen en naar nieuwe apparaten te zoeken.
Draadloos muziek streamen via Bluetooth
In de Bluetooth-modus kunt u draadloos audio streamen via de luidspreker van het product.
Gebruik de knoppen op uw gekoppelde Bluetooth-apparaat en die op uw radio.
Beschikbare bedieningselementen:
Afspelen/pauzeren: ♥ ►||kort indrukken
U kunt het volume ook aanpassen - via uw radio en/of uw verbonden apparaat.
Opmerking: Als de radio gedurende 20 minuten inactief is of als de radio geen audiosignaal ontvangt, dan schakelt deze automatisch over naar de stand-bymodus (of de radio schakelt uit als deze op batterijen werkt).
Wekkerfunctie
Opmerking: De wekkerfunctie werkt alleen als de radio stroom krijg via de USB-voeding. Deze functie werkt niet als de radio stroom krijgt via batterijen (om de levensduur van de batterijen te sparen).
Een wekker instellen
Opmerking: Controleer of de radio de juiste tijd en datum weergeeft alvorens u een wekker instelt.
NL
flowchart
graph LR
A["DAB+"] --> B["Volledige scan"]
A --> C["Handmatig afstemmen Systeem"]
A --> D["DRC Slaapstand Wekker"]
A --> E["Inkorten Wekker Wekker 1 instellen"]
A --> F["Systeem Tijd Wekker 2 instellen"]
G["FM"] --> H["Scaninstelling Taal"]
G --> I["AMS Terugzetten naar fabrieksinstelling"]
G --> J["Systeem Softwareversie"]
K["BT Systeem"] --> L["End"]
B --> M["End"]
C --> M
D --> M
E --> M
F --> M
H --> M
I --> M
J --> M
M --> N["End"]
Instellingen alarm 1 of 2
Tijd Uur Min Duur 1, 5, 15, 30 of 60 minuten Bron Zoemer, DAB of FM Frequentie Dagelijks, eenmalig, werkdagen, weekends. Volumeniveau 25%-100% Wekker Aan of Uit
Opmerking: Als de tijd niet is ingesteld of niet is bijgewerkt via het radiosignaal, dan verschijnt op het scherm wanneer u de wekker probeert in te stellen. De radio vraagt u dan om de tijd in te stellen. U kunt pas een wekker instellen nadat de tijd is ingesteld.
Als u een alarm probeert in te stellen terwijl het apparaat op batterijen werkt, dan verschijnt de melding op het scherm. Wekkerfuncties zijn alleen beschikbaar met netvoeding (USB).
Stoppen, snoozen of het alarm uitschakelen
Om het alarm te stoppen, drukt u kort op ⏻. De melding wordt weergegeven.
Het alarmsymbool blijft op het display staan. De volgende dag gaat het alarm op dezelfde tijd opnieuw af, tenzij u dit hebt ingesteld op .
Om het alarm te sluimeren, drukt u op √. De melding wordt weergegeven,
gevolgd door een aftelprocedure van 10 minuten. Zodra het aftellen is afgelopen, gaat het alarm opnieuw af. U kunt de snoozefunctie beëindigen door op √ te drukken. De melding wordt weergegeven.
Om de wekker uit te schakelen, volgt u de stappen voor 'Een wekker instellen' en selecteert u .
Slaapstand
U kunt uw radio zodanig instellen dat deze automatisch in stand-by gaat met behulp van de slaapstand. U kunt kiezen uit , <15>, <30>, <45>, <60> en <90> minuten. Om dit te doen, drukt u lang op i ≡. Gebruik ◀✓ ▶ om te scrollen. Selecteer / . Gebruik ◀✓ ▶ om te scrollen en uw voorkeur te selecteren. wordt weergegeven. Rechtsboven op het radiodisplay wordt het aantal minuten weergegeven tot uw radio overschakelt naar de stand-bymodus, bijv. S90.
Time-out displayachtergrondverlichting
Om de time-out van de achtergrondverlichting aan te passen, drukt u lang op i ☐ Gebruik
◀ √ ▶ om te scrollen. Selecteer /
/ . Scroll door de beschikbare opties voor de time-out van de achtergrondverlichting. De huidige instelling krijgt een asterisk (*) in het display. Druk op √ om te selecteren.
Op dezelfde manier gebruikt u ◀✓ ▶om de instellingen voor de helderheid van de achtergrondverlichting voor het en te wijzigen. Er zijn 3 opties beschikbaar: , en .
Displaytaal
Om de displaytaal aan te passen, drukt u lang op i Gebruik om te scrollen. Selecteer
/. Gebruik ◀ √ ▶ om te
scrollen en uw voorkeurstaal te selecteren. Er zijn
7 opties beschikbaar: Engels, Frans, Duits, Italiaans, Spaans, Pools en Nederlands. Er verschijnt een asterisk (*) naast de huidige taalinstelling.
Softwareversie
Om de softwareversie van uw radio te controleren, drukt u lang op i. Gebruik ◀m te
scrollen. Selecteer / . De softwareversie wordt weergegeven.
Terugzetten naar fabrieksinstelling
U kunt uw radio resetten om deze terug te zetten naar de oorspronkelijke fabrieksinstellingen.
Opmerking: Als u uw radio reset, dan worden uw opgeslagen voorinstellingen gewist en worden alle aangesloten Bluetooth-apparaten ontkoppeld.
Lang indrukken i Gebruik ◀ √ ▶ om te scrollen. Selecteer / <
Terugzetten naar fabrieksinstelling>.
Ja> wordt weergegeven. Gebruik
◀ √ ▶ om te scrollen en selecteer .
wordt weergegeven. Uw radio wordt opnieuw opgestart en het display toont
.
Probleemoplossing
Als er geen geluid of stroom is:
- Pas het volume aan.
- Controleer of de USB-kabel is aangesloten en of de radio niet in de stand-bymodus staat.
- Als het product stroom krijgt van batterijen, controleer dan of deze vervangen moeten worden. Gebruik AA-batterijen van goede kwaliteit.
Als de radio-ontvangst slecht is:
- Zorg ervoor dat u de telescopische antenne volledig hebt uitgeschoven (bij voorkeur verticaal).
Scan opnieuw naar radiostations, zie de hoofdstukken 'Scannen naar DAB-zenders' en/of 'Afstemmen op een FM-zender'.
Probeer uw radio op een andere plaats te zetten om te zien of dat de ontvangst verbetert.
Controleer of er geen andere elektrische apparaten in de buurt van uw radio zijn. Deze kunnen interferentie veroorzaken.
Als u geen verbinding tot stand kunt brengen met een Bluetooth-apparaat:
Controleer of de Bluetooth-modus geactiveerd is.
Zorg dat u zich binnen 10 meter van de radio bevindt voor Bluetooth-functionaliteit.
Plaats de radio en het Bluetooth-apparaat uit de buurt van andere Bluetooth-apparaten/elektrische apparatuur.
Schakel indien mogelijk andere Bluetooth-apparaten in de buurt uit of schakel hun Bluetooth-functionaliteit uit.
Als de functieknoppen niet reageren:
Controleer of de USB-kabel is aangesloten op de achterkant van uw radio. Druk 🔍 → kort in. Als u batterijen gebruikt, dan moeten deze wellicht vervangen worden.
Reset het apparaat om dit terug te zetten naar de fabrieksinstelling.
Opmerking: Al uw instellingen, inclusief de radiostationlijst, verbonden Bluetooth-apparaten en eventuele voorinstellingen worden gewist wanneer u een reset uitvoert.
Technische specificaties
Ingang DC 5V Batterijen 4×1,5V AA-formaat (LR-6) (pptioneel, niet meegeleverd) Audio-uitgang 2 watt RMS Energieverbruik Actief: < 2 W Stand-by: < 2 mW DAB-frequentiebereik Band III, 174 MHz tot 240 MHz FM-frequentiebereik 87.5 MHz tot 108 MHz Bluetooth 2,4 GHz ~ 2,480 GHz Koppelnaam SHARP DR-P421 Apparaatafmetingen (B) × (H × (D) mm 174 × 90 × 53 Gewicht ca. 0,39 kg
Ważne środki ostrożności
Należy przestrzegać wszystkich podanych środków ostrożności i ostrzeżeń. Instrukcję należy zachować na przyszłość.
Ten symbol informuje użytkownika, aby zapoznał się z instrukcją obsługi w celu uzyskania dodatkowych informacji dotyczących bezpieczeństwa, obsługi i konserwacji.
Napięcie stałe
Ostrzeżenia
Bezpieczeństwo dzieci
- Zawsze zachowuj podstawowe środki ostrożności podczas korzystania z urządzenia, zwłaszcza w obecności dzieci. Nadzoruj dzieci,
by nie bawiły się urządzeniem.
Lokalizacja
- Urządzenie należy zainstalować na stabilnej powierzchni i upewnić się, że urządzenie ani jego elementy nie zwisają.
Wentylacja
- Szczeliny i otwory w obudowie służą do wentylacji urządzenia, w celu zapewnienia niezawodnego działania i ochrony przed przegrzaniem; tych otworów nie wolno blokować ani zakrywać. Należy pozostawić 5 cm wolnego miejsca wokół urządzenia dla zapewnienia odpowiedniej wentylacji. Nigdy nie pozwalaj nikomu wsuwać czegokolwiek w otwory, gniazda i inne szczeliny w obudowie urządzenia, ponieważ może to spowodować porażenie prądem.
Ciepło i temperatura podczas pracy
- Nie umieszczaj urządzenia w pobliżu źródeł ciepła, takich jak grzejniki, nawiewy, piece czy inne urządzenia (w tym wzmacniacze) emitujące ciepło. Należy unikać bezpośredniego działania
promieni słonecznych.
Źródła otwartego ognia
- Aby zapobiec powstaniu pożaru, należy trzymać świece i inne źródła otwartego ognia z dla od urządzenia.
Wniknięcie wody, wilgoci lub cieczy
- Aby zapobiec wystąpieniu pożaru lub porażenia prądem, nie wolno narażać opisywanego urządzenia na działanie deszczu, wody ani wilgoci. Nie wolno umieszczac przedmiotów napełnionych wodą na urządzeniu lub w jego pobliżu.
Burze i wyładowania atmosferyczne
- Burze stanowią niebezpieczeństwo dla wszystkich urządzeń elektrycznych. W przypadku uderzenia pioruna w przewód zasilający lub przewody antenowe urządzenie może zostać uszkodzone, nawet jeśli jest wyłączone. Przed nadejściem burzy należy odłączyć od urządzenia wszystkie przewody i złącza.
Przewód USB
- Należy chronić przewód USB przed uszkodzeni-
em, nie umieszczać na nim ciężkich przedmi-
otów, rozciągać go ani zginać.
Uszkodzenia
- Po usunięciu opakowania należy sprawdzić, czy urządzenie nie jest uszkodzone. W przypadku jakiegokolwiek uszkodzenia nie korzystaj z urządzenia i skontaktuj się ze sprzedawcą.
Konserwacja
- Przed czyszczeniem urządzenia odłącz przewód zasilający od sieci elektrycznej. Do czyszczenia zewnętrznej części obudowy użyj miękkiej, czystej ściereczki. Nigdy nie czyść obudowy chemikaliami ani detergentami.
Serwis i naprawy
- Niniejszy produkt nie posiada żadnych części, które może naprawiać użytkownik. Odsłanianie wewnętrznych części urządzenia może stanowić zagrożenie dla życia. W przypadku wystąpienia usterki skontaktuj się z producentem lub autoryzowanym serwisem. Gwarancja nie obejmuje usterek spowodowanych naprawami wykonywanymi przez nieupoważnione strony trzecie.
Baterie
Instalacja
- Nie używaj innych baterii niż wskazane w instrukcji. Zachowaj prawidłową polaryzację, gdy montujesz baterie. Nigdy nie stosuj jednocześnie różnych baterii ani łącz baterii nowych ze starymi.
Użytkowanie i konserwacja
- Nie wystawiaj baterii na działanie wysokich temperatur, np. w pobliżu ognia lub w bezpośrednim świetle słonecznym. Jeśli urządzenie nie będzie używane przez dłuższy czas (ponad miesiąc), wyjmij z niego baterie, by nie wyciekły. Jeśli baterie wyciekną, wytrzyj pojemnik na baterie i zastąp baterie nowymi.
Bezpieczeństwo dzieci
Upewnij się, ze pojemnik na baterie jest zawsze zamknięty i zabezpieczony.
Baterie mogą zostać łatwo połknięte przez małe dzieci, powodując poważne poparzenia wewnętrzne i doprowadzić do śmierci. Baterie
należy przechowywać w miejscu niedostępnym dla dzieci. Jeśli przypuszczasz, że bateria została połknięta, natychmiast zasięgnij porady lekarza.
Warunki otoczenia
- Baterie należy chronić przed niskim ciśnieniem lub wysokimi temperaturami. W przeciwnym razie mogłoby to spowodować wybuch albo wyciek łatwopalnej cieczy lub gazu.
Utylizacja
- Utylizuj baterie w prawidłowy sposób, postępując zgodnie ze wskazówkami podanymi w niniejszej instrukcji (zapoznaj się z opisem w sekcji „Usuwanie urządzenia i baterii”). Nie wolno ich wrzucać do ognia, demontować ani ładować jednorazowych baterii. Mogłyby wyciec lub eksplodować.
Usuwanie urządzenia i baterii
Informacje dla użytkowników dotyczące zbiórki usuwania zużytych urządzeń i baterii.
Ten symbol oznacza, że produkt zawiera baterie objęte Dyrektywą Europejską 2013/56/UE, których nie wolno usuwać razem ze zwykłymi
odpadkami z gospodarstwa domowego.
Symbole chemiczne Cd, Hg i Pb umieszczone pod symbolem kosza na kółkach informują, że bateria zawiera kadm (Cd), rtęć (Hg) lub ołów (Pb).
Ten symbol umieszczony na urządzeniu oznacza, że produkt jest objęty Dyrektywą Europejską 2012/19/UE i nie wolno go usuwać
razem z innymi odpadkami z gospodarstwa domowego.
Ten symbol oznacza, że produkt został zaprojektowany i wyprodukowany w sposób umożliwiający poddanie go
recyklingowi i ponowne wykorzystanie.
- Te symbole umieszczone na produktach, opakowaniach i/lub załączonych dokumentach oznaczają, że zużytych urządzeń elektrycznych i elektronicznych oraz baterii nie wolno usuwać razem z innymi odpadkami z gospodarstwa domowego. Użytkownicy z prywatnych gospodarstw domowych powinni skontaktować się ze sprzedawcą, u którego zakupili opisywane urządzenie, lub z władzami lokalnymi, aby uzyskać szczegółowe informacje dotyczące miejsca i sposobu przekazania urządzenia do bezpiecznego dla otoczenia recyklingu.
Deklaracja zgodności CE i UKCA:
Sharp Consumer Electronics Poland sp. z o.o. niniejszym oświadcza, że opisywane urządzenia audio jest zgodne z zasadniczymi wymaganiami oraz innymi stosownymi postanowieniami dyrektywy RED 2014/53/UE i brytyjskich przepisów dotyczących urządzeń radiowych z 2017 roku.
Pełny tekst deklaracji zgodności CE jest dostępny pod linkiem www.sharpconsumer.com, a następnie należy przejść do sekcji pobierania posiadanego modelu i wybrać „CE Statements” (deklaracja zgodności CE).
Elementy sterujące
Antena teleskopowa
Pojemnik na baterie
Port Micro USB
Gniazdo słuchawkowe
Podświetlany wyświetlacz
Przycisk włączenia zasilania/wyboru trybu
- Krótkie naciśnięcie spowoduje: wybór
zaprogramowanej stacji
Długie naciśnięcie spowoduje: zapisanie stacji
- Krótkie naciśnięcie spowoduje uruchomienie lub wstrzymanie odtwarzania
- Długie naciśnięcie spowoduje odłączenie bieżącego urządzenia i uruchomienie skanowania w poszukiwaniu nowych urządzeń
8.
• W trybie DAB:
- Krótkie naciśnięcie spowoduje przejście w górę listy stacji DAB
• W trybie FM:
9.
Krótkie naciśnięcie spowoduje: informacje o stacji
Długie naciśnięcie spowoduje: przejście do opcji menu
W trybie gotowości: krótkie naciśnięcie spowoduje przejście do ustawień włączania/wyłączania Alarmu 1 i 2
Przyciski zaprogramowanych stacji 1, 2 i 3
- Krótkie naciśnięcie spowoduje: wybór
zaprogramowanej stacji 1 (2 lub 3)
- Długie naciśnięcie spowoduje: zapisanie stacji 1 (2 lub 3)
◀✓▶ Pokrętło regulacji głośności :
- Obrót spowoduje: regulację poziomu głośności
- Obrót w menu lub zaprogramowanych stacjach spowoduje: przewijanie dostępnych opcji menu lub zaprogramowanych pozycji
- Krótkie naciśnięcie spowoduje: wybór wyświetlanych stacji radiowych/ częstotliwości, menu lub zaprogramowanej opcji
- W trybie gotowości krótkie naciśnięcie spowoduje: włączenie 10-minutowej drzemki
Zawartość opakowania
1 x przenośne radio cyfrowe DR-P421 Tokyo
1 x przewód zasilający USB–Micro USB
Dokumentacja użytkownika
Korzystanie z przenośnego radia DAB+/FM
Antena teleskopowa
Wysuń antenę teleskopową w pełnym zakresie (najlepiej w pionie) zanim spróbujesz dostroić stację DAB/FM. Zapewni to maksymalną siłę sygnału, jeśli radio rozpocznie skanowanie. Wysunięcie anteny zapewnia również najlepszą możliwą jakość dźwięku.
Podłączenie
Podłącz dostarczony w zestawie przewód USB do portu Micro USB znajdujący z tyłu radia. Podłącz koniec przewodu USB-A (standardowy) do pamięci USB lub do zasilacza, aby podłączyć radio do zasilania. Radio wyłączy się i wyświetli napis . Następnie przełączy się do trybu gotowości.
Wkładanie baterii (opcjonalnie)
Przed włożeniem baterii (spoza zestawu) należy upewnić się, że radio jest wyłączone za pomocą przycisku ⏻ a przewód USB został odłączony. Z tyłu radia naciśnij wypustkę na osłonie pojemnika na baterie, aby ją zdjąć. Włóż cztery baterie typu AA 1,5 V (znane również jako LR-6), zwracając uwagę na oznaczenia „+” i „-” i prawidłowe umieszczenie baterii. Nałów osłonę pojemnika na baterie, upewniając się, że została bezpiecznie zamknięta.
Ustawienia początkowe
Krótko naciśnij przycisk daby włączyć radio. Rozpocznie się automatyczne skanowanie stacji DAB. Na pasku postępu pojawi się postęp skanowania i liczba znalezionych stacji. Po zakończeniu skanowania radio wybierze pierwszą dostępną stację i rozpocznie odtwarzanie. Domyślnie stacje wymienione są numerycznie, a następnie alfabetycznie.
Uwaga: Lista stacji radiowych DAB jest
przechowywana w pamięci; przy kolejnym włączeniu radia wyszukiwanie stacji nie odbywa się.
Krótko naciśnij przycisk ◀ lub ▶ aby przewinąć dostępne stacje. Aby wybrać wyświetloną stację, krótko naciśnij przycisk √. Wystąpi krótkie opóźnienie, podczas którego radio dostroi się do wybranej stacji.
Regulacja poziomu głośności
Obróć pokrętło ◀ w prawo, aby zwiększyć głośność, albo obróć w lewo, aby zmniejszyć poziom głośności.
Godzina i data
Godzina i data zostaną automatycznie zsynchronizowane z nadawanymi przez usługę DAB w formacie 24-godzinnym.
Aby ręcznie ustawić godzinę i datę, włącz radio. Długo naciśnij przycisk i, aby przejść do opcji menu.
Użyj ◀√▶, aby wybrać / / . Wyświetli się komunikat
i zaczną pulsować cyfry godziny; użyj ◀✓ ▶ do ustawienia godziny i minut. Wyświetli się komunikat i zacznie pulsować wskazanie dnia; użyj ◀✓ ▶ do ustawienia dnia, miesiąca i roku. Po zatwierdzeniu roku wyświetl się komunikat i nastąpi powrót do menu . Użyj ◀✓ ▶ do zmiany formatu czasu/daty i ustawienia automatycznej aktualizacji. Krótko naciśnij, aby zamknąć menu.
Zmiana trybu
Krótkie naciśnięcie przycisku umożliwia przełączanie między trybami DAB, FM i Bluetooth. Na wyświetlaczu zostanie potwierdzony wybrany tryb.
Tryb DAB
Wybór trybu DAB
Krótko naciśnij przycisk 🚫depóki na wyświetlaczu nie pojawi się napis .
Przy pierwszym użyciu radia, lub jeśli lista stacji jest pusta, radio automatycznie rozpocznie skanowanie stacji radiowych DAB. Na pasku postępu pojawi się postęp skanowania, a także wyświetl się liczba stacji znalezionych podczas skanowania. Jeśli słuchałeś stacji DAB i wyłączyćś radio, po ponownym włączeniu ta stacja zostanie automatycznie wybrana.
Zmiana stacji DAB
Użyj przycisków do przewijania dostępnych stacji. Naciśnij, aby wybrać podczas wyświetlania stacji, której chcesz słuchać. Wystąpi krótkie opóźnienie, podczas którego radio dostroi się do wybranej stacji.
Skanowanie stacji DAB
Dzięki radiu DAB regularnie dostępne są dodatkowe stacje i usługi. Okresowo przewadzaj ręczne skanowanie, aby upewnić się, że posiadasz najbardziej aktualną listę stacji zapisanych w pamięci radia. Jeśli chcesz przenieść radio w nowe miejsce, np. wybierasz się na zagraniczne wakacje,
dobrym pomysłem jest również przeprowadzenie ręcznego skanowania.
W trybie DAB:
Długo naciśnij przycisk i. Użyj ◀✓▶ do przewijania i wybierz opcję . Wskazanie wyświetlacza zmieni się na . Na pasku postępu pojawi się postęp skanowania i liczba znalezionych stacji.
Usuwanie nieaktywnych stacji DAB
Z listy stacji można usunąć stacje DAB, których nie możesz odbierać w swojej okolicy. Są one wymienione z przedrostkiem <?>.
W trybie DAB:
Długo naciśnij przycisk i. Użyj do przewijania i wybierz opcję . Wyświetli się komunikat Tak>. Użyj do przewijania i wybierz opcję . Stacje z przedrostkiem <?> nie będą już wyświetlane.
Zapisywanie zaprogramowanej stacji DAB
Opisywane radio może przechowywać do 20 zaprogramowanych stacji DAB w celu uzyskania natychmiastowego dostępu do ulubionych stacji.
Uwaga: Zapisanie zaprogramowanych stacji DAB nie zastępuje zaprogramowanych stacji FM.
Dostrój radio do stacji DAB, którą chcesz zaprogramować. Długo naciśnij przycisk ♥ ▶ II , dopóki nie wyświetli się komunikat <Zapisano <1:(pusta)>. Użyj przycisków ◀ ▶ aby przejść do pozycji, na której chcesz zapisać stację radiową (1–20). Naciśnij √ , aby wybrać. Na wyświetlaczu pojawi się potwierdzenie , gdzie „X” oznacza liczbę zaprogramowanych stacji (1–20)
Uwaga: Jeśli istnieje już zaprogramowana stacja DAB, zostanie ona zastąpiona podczas zapisywania nowej stacji.
Dostrojenie do zaprogramowanej stacji DAB
W trybie DAB:
Aby szybko uzyskać dostęp do stacji radiowej zaprogramowanej na pozycji 1, 2 lub 3, krótko naciśnij odpowiedni przycisk zaprogramowanej stacji 1, 2 lub 3, znajdujący się z przodu radia. Ewentualnie krótko naciśnij przycisk ♥ ▶ II Wyświetli się komunikat <Wybierz <1:>> razem z nazwą lub częstotliwością zapisanej stacji, albo <(pusty)>, jeśli żadna stacja nie została zapisana. Użyj ◀ √ ▶, aby przejść do i wybrać zaprogramowaną stację, której chcesz słuchać (1–20).
Podczas słuchania stacji DAB możesz zmienić rodzaj informacji, które pojawiają się na wyświetlaczu. Istnieje kilka rodzajów informacji wysyłanych przez nadawcę. Krótko naciśnij kilkakrotnie przycisk i, aby przełączyć rodzaj wyświetlanych informacji:
Dynamic label segment (DLS) – to przewijane informacje tekstowe dostarczane przez nadawcę. Mogą obejmować nazwiska wykonawców, tytuły utworów, dane kontaktowe stacji radiowej itp.
Siła sygnału – na wyświetlaczu pojawi się pusty □ wskazujący minimalną siłę sygnału zadowa-
lającą do słuchania. Rząd pełnych prostokątów
wskazuje rzeczywistą siłę odbieranego sygnału.
Rodzaj programu (PTY) – np. „Rock”, „Pop”, „Rozrywka” lub „Wiadomości”
Nazwa multipleksu – wyświetlany jest obszar nadawania i zbiór stacji radiowych nadających na danej częstotliwości, np. BBC National DAB, Digital 1 Network
Kanał i częstotliwość – np. 12B 225.648 MHz (kanał = 12B, częstotliwość = 225,648 MHz)
Błąd sygnału – wyświetlany jako liczba z zakresu 0–99. Aby zadawalająco słuchać stacji radiowej, błąd sygnału nie może przekraczać 30. Zmień położenie anteny lub radia, aby poprawić jakość odbioru.
Informacje o sygnale – prędkość transmisji
danych, z jaką przesyłany jest sygnał.
Wskaznik zasilania – wyświetla się przy zasilaniu USB; wyświetla się gdzie XX oznacza dostępny poziom naładowania baterii.
Czas
Data
Sterowanie zakresem dynamicznym (DRC)
Dane DRC nie są przesyłane przez wszystkich nadawców. Funkcja DRC służy do kontrolowania różnicy między najgłośniejszymi i najcichszymi dźwiękami, np. w hałaśliwym otoczeniu.
Ustawienie DRC na maksimum powoduje, że ciche dźwięki są stosunkowo głośniejsze, a głośne wyciszone.
Istnieją trzy poziomy kompresji:
DRC wył. – brak kompresji. To jest ustawienie domyślne.
DRC wysoki – maksymalna kompresja
W trybie DAB długo naciśnij przycisk i Użyj
◀√▶ do przewijania i wybierz opcję , a następnie wybierz swoje preferencje.
Uwaga: Aktualne ustawienie DRC będzie oznaczone gwiazdką (*) na wyświetlaczu.
Tryb FM
Aby zmienić tryb na FM, krótko naciśnij przycisk dopóki nie wyświetli się opcja . Jeśli słuchałeś stacji FM i wyłączyćś radio, po ponownym włączeniu ta stacja zostanie automatycznie wybrana.
Dostrojenie do stacji FM
Długo naciśnij przycisk ◀, ab, przeskanować stacje w górę lub w dół pasma częstotliwości. Radio wyszuka kolejną dostępną stacje i zatrzyma skanowanie.
Krótkie naciśnięcie przycisku ◀, lub ◀️ umożliwia dostrojenie każdej częstotliwości ze skokiem o 0,05 MHz.
Uwaga: Jeśli odbierany sygnał jest słaby, zmień położenie anteny lub umieść radio w innym miejscu.
Zmiana ustawień skanowania
W trybie FM:
Długo naciśnij przycisk i ☐, wyświetli się opcja . Naciśnij √.
Do wyboru są dwie opcje:
– skanowanie zostanie zatrzymane dopiero po odebraniu silnego sygnału, co zapewnia lepszą jakość dźwięku. Przy użyciu tej opcji zachodzi możliwość, że stacja, której szukasz, zostanie pominięta. – skanowanie zostanie zatrzymane na każdej odebranej stacji, nawet jeśli sygnał jest słaby.
Użyj ◀ √ ▶ do wyboru dostępnych opcji.
Uwaga: Aktualne ustawienie skanowania będzie oznaczone gwiazdką (*) na wyświetlaczu.
Zapisywanie zaprogramowanej stacji FM
Opisywane radio może przechowywać do 20 stacji FM, zaprogramowanych w celu uzyskania natychmiastowego dostępu do ulubionych stacji.
Uwaga: Zapisanie zaprogramowanych stacji FM nie zastępuje zaprogramowanych stacji DAB.
Dostrój radio do stacji FM, którą chcesz zaprogramować. Długo naciśnij przycisk ♥ ▶ II , dopóki nie wyświetli się komunikat <Zapisano
<1:(pusta)>. Użyj ◀ √ ▶, aby przejść do pozycji, na której chcesz zapisać stację radiową (1–20). Na wyświetlaczu pojawi się potwierdzenie , gdzie „X” oznacza liczbę zaprogramowanych stacji (1–20).
Uwaga: Jeśli istnieje już zaprogramowana stacja FM, zostanie ona zastąpiona podczas zapisywania nowej stacji.
Automatyczne zapisywanie w pamięci (AMS)
Możesz również użyć funkcji automatycznego zapisywania w pamięci (AMS) do zapisywania zaprogramowanych stacji radiowych FM. W trybie FM długo naciśnij przycisk i. Użyj ◀ √ ▶ do przewijania i wybierz opcję . Radio przeskanuje teraz pasmo częstotliwości FM, a znalezione stacje zostaną automatycznie zapisane na zaprogramowanych pozycjach.
Uwaga: Możesz ręcznie zastąpić swoje stacje zapisane z wykorzystaniem funkcji AMS przeprowadzając czynności opisane powyżej w sekcji „Zapisywanie zaprogramowanej stacji FM”.
Dostrojenie do zaprogramowanej stacji FM
W trybie FM:
Aby szybko uzyskać dostęp do stacji radiowej zaprogramowanej na pozycji 1, 2 lub 3, krótko naciśnij odpowiedni przycisk zaprogramowanej stacji 1, 2 lub 3. Ewentualnie krótko naciśnij przycisk ♥ ▶ Wyświetli się komunikat <Wybierz <1:>> razem z nazwą lub częstotliwością zapisanej stacji, albo <(pusty)>, jeśli żadna stacja nie została zapisana. Użyj ◀ √ ▶, aby przejść do i wybrać zaprogramowaną stację, której chcesz słuchać (1–20).
Podczas słuchania stacji FM możesz zmienić rodzaj informacji, które pojawiają się w drugim wierszu wyświetlacza. Krótko naciśnij kilkakrotnie przycisk i aby przełączyć rodzaj wyświetlanych informacji:
Dynamic label segment (RT) – to przewijane informacje tekstowe dostarczane przez nadawcę. Mogą obejmować nazwiska wykonawców, tytuły utworów, dane kontaktowe stacji radiowej itp.
Rodzaj programu (PTY) – np. „Rock”, „Pop”, „Rozrywka” lub „Wiadomości”
Nazwa lub częstotliwość stacji – np. BBC R4, 93.30MHz
Wskaźnik zasilania – wyświetla się przy zasilaniu USB; wyświetla się gdzie XX oznacza dostępny poziom naładowania baterii.
Data
Tryb Bluetooth
Upewnij się, że radio znajduje się w trybie
Bluetooth krótko naciskając przycisk
dopóki radio nie wyświetli napisu .
Radio rozpocznie wyszukiwanie urządzeń
Bluetooth. Upewnij się, że urządzenie obsługujące Bluetooth, z którym chcesz się połączyć, jest wykrywalne.
Uwaga: Jeśli to konieczne, zapoznaj się
z instrukcją urządzenia, aby dodać lub skonfigurować Bluetooth.
Po znalezieniu radio zostanie wyświetlone w
urządzeniu jako „SHARP DR-P421”. Wybierz tę opcję, aby rozpocząć parowanie. Po zakończeniu radio wyświetli komunikat .
Sparowane urządzenia łączą się z radiem, jeśli znajdują się w zasięgu (w promieniu 10 metrów w zasięgu wzroku). Urządzenie pozostanie sparowane z radiem, dopóki nie zdecydujesz się na jego rozłączenie.
Aby rozłączyć z Bluetooth, naciśnij i przytrzymaj przycisk ♥ ▶ przez trzy sekundy, aby usunąć sparowanie z bieżącym urządzeniem i wyszukać nowe urządzenia.
Bezprzewodowe strumieniowanie muzyki poprzez Bluetooth
W trybie Bluetooth możesz bezprzewodowo przesyłać strumień audio przez głośnik urządzenia. Wykorzystaj elementy sterujące na sparowanym urządzeniu Bluetooth oraz na radiu.
Dostępne elementy sterujące:
- Odtwarzanie/pauza: krótkie naciśnięcie przycisku ♥ ▶ II
- Poprzedni utwór: krótkie naciśnięcie przycisku
- Następny utwór: krótkie naciśnięcie przycisku
Poziom głośności można również regulować – za pomocą radia i/lub podłączonego urządzenia.
Uwaga: Jeśli radio pozostaje nieaktywne przez 20 minut lub nie jest odbierany żaden sygnał dźwiękowy, radio automatycznie przełączy się do trybu gotowości (lub wyłączy się, jeśli jest zasilane z baterii).
Funkcja alarmu
Uwaga: Funkcja alarmu działą tylko przy zasialaniu USB; nie działą w przypadku zasilania z baterii (aby wydłużyć trwałość baterii).
Ustawienie alarmu
Uwaga: Przed ustawieniem alarmu należy sprawdzić, czy radio wyświetla prawidłową godzinę i datę.
flowchart
graph TD
A["DAB+"] --> B["Kompletne skanowanie"]
A --> C["Strojenie ręczne System"]
A --> D["DRC Czuwanie Alarm"]
A --> E["Wyświetli się komunikat Usunąć Alarm Konfiguracja Alarmu 1"]
A --> F["System Czas Konfiguracja Alarmu 2"]
G["FM"] --> H["Ustawienia skanowania Język"]
G --> I["AMS Ustawienia fabryczne"]
G --> J["System Wersja oprogramowania"]
K["BT System"] --> L["Podświetlenie"]
Ustawienia Alarmu 1 lub 2
Czas Godzina Minuty Czas trwania 1, 5, 15, 30 lub 60 minut Źródło Budzik, DAB lub FM Częstotliwość Codziennie, jednorazowo, dni robocze lub weekendy Poziom głośności 25–100% Alarm Zał. lub wył.
Uwaga: Jeśli godzina nie zostanie ustawiona lub aktualizacja z sygnału radiowego zakończy się niepowodzeniem, podczas próby ustawienia alarmu wyświetli się komunikat . Radio wyświetli komunikat z prośbą o ustawienie godziny. Alarm można ustawić tylko po ustawieniu godziny.
Jeśli spróbujesz ustawić alarm przy zasilaniu zestawu z baterii, wyświetli się komunikat . Funkcje alarmu są dostępne wyłącznie przy zasilaniu głównym (USB).
Zatrzymanie, ustawienie drzemki lub wyłączenie alarmu
Aby zatrzymać alarm, krótko naciśnij przycisk ⏻ +□, wyświetli się komunikat . Symbol alarmu pozostanie na wyświetlaczu i alarm uruchomi się ponownie następnego dnia o tej samej godzinie, o ile nie nie został ustawiony na ., a następnie rozpocznie
się 10-minutowe odliczanie. Po zakończeniu odliczania alarm włączy się ponownie. Możesz przerwać drzemkę naciskając √. Wyświetli się komunikat .
Aby wyłączyć alarm, postępuj zgodnie ze wskazówkami podanymi w sekcji „Ustawienie alarmu” i wybierz opcję .
Wyłącznik czasowy
Wykorzystując wyłącznik czasowy możesz ustawić radio, aby automatycznie przełączało się do trybu gotowości. Dostępne opcje: , <15>, <30>, <45>, <60> i <90> minut. Aby to wykonać, długo naciśnij przycisk i □. Użyj ◄o√▶ przewijania i wybierz / . Użyj ◄√▶ do przewijania i wybierz swoje preferencje. Wyświetli się napis . W prawym górnym narożniku wyświetlacza radia pojawi się liczba minut, po której radio przełączy się do trybu gotowości, np. S90.
Czas wygaszenia podświetlenia wyświetlacza
Aby ustawić czas wygaszenia podświetlenia wyświetlacza, długo naciśnij przycisk i. Użyj
do przewijania i wybierz /
/ . Przewiń dostępne opcje czasu wygaszenia podświetlenia wyświetlacza. Aktualne ustawienie będzie oznaczone gwiazdką (*) na wyświetlaczu. Naciśnij √, aby wybrać.
Podobnie użyj ◀ √ ▶ do zmiany ustawień jasności podświetlenia wybierając opcję
lub . Dostępne są trzy opcje: , <Średni> i .
Język wyświetlacza
Aby zmienić język wyświetlacza, długo naciśnij
przycisk i □. Użyj do przewijania i
wybierz / . Użyj ◀ √ ▶
do przewijania i wybierz preferowany język.
Dostępnych jest siedem opcji: angielski, francuski, niemiecki, włoski, hiszpański, polski i niderlandzki.
Aktualne ustawienie języka będzie oznaczone gwiazdką (*) na wyświetlaczu.
Wersja oprogramowania
Aby sprawdzić wersję oprogramowania radia, długo naciśnij przycisk i Użyj ▶ ▶ ▶ przewijania i wybierz / . Wyświetli się wersja oprogramowania.
Ustawienia fabryczne
Możesz zresetować radio, aby przywrócić oryginalne ustawienia fabryczne.
Uwaga: Jeśli zresetujesz radio, zapisane stacje zostaną usunięte, a sparowanie każdego podłączonego urządzenia Bluetooth również zostanie usunięte.
Długo naciśnij przycisk i Użyj ▶ ▶
przewijania i wybierz / <Ustawienia
fabryczne>. Wyświetli się komunikat Tak>. Użyj ◀ √ ▶ do przewijania i wybierz opcję . Wyświetli się komunikat . Twoje radio zostanie zrestartowane i na wyświetlaczu pojawi się .
Rozwiązywanie problemów
Brak dźwięku lub zasilania:
Wyreguluj poziomu głośności.
Sprawdź, czy przewód USB jest podłączony i czy radio nie zostało przełączone do trybu gotowości.
Jeśli urządzenie jest zasilane z baterii, sprawdź czy nie wymagają wymiany. Zastosuj dobrej jakości baterie AA.
Jeśli odbiór sygnału radiowego jest słaby:
- Upewnij się, że antena teleskopowa jest wysunięta w pełnym zakresie (najlepiej w pionie).
Ponownie przeprowadź skanowanie stacji radiowych, zapoznaj się z opisami w odpowiednich sekcjach „Skanowanie stacji DAB” i/lub „Dostrojenie do stacji FM”.
Spróbuj przenieść radio w inne miejsce, aby sprawdzić czy odbiór się poprawił.
Sprawdź, czy w pobliżu radia nie znajdują się inne urządzenia elektryczne. Mogą powodować zakłócenia sygnału radiowego.
Jeśli nie jest możliwe sparowanie z urządzeniem Bluetooth:
Sprawdź, czy tryb Bluetooth jest aktywny.
Upewnij się, że znajdujesz się w promieniu 10 metrów od radia, aby korzystać z funkcji Bluetooth.
Odsuń radio i urządzenie Bluetooth od innych urządzeń Bluetooth/elektrycznych.
Jeśli to możliwe, wyłącz inne urządzenia Bluetooth znajdujące się w pobliżu lub wyłącz w nich funkcję Bluetooth.
Jeśli przyciski funkcyjne nie reagują:
- Sprawdź, czy przewód USB jest podłączony z
tyłu radia. Krótko naciśnij przycisk ♦Jeśli
używasz baterii, mogą wymagać wymiany.
- Przywróć urządzeniu ustawienia fabryczne.
Uwaga: Wszystkie ustawienia, w tym lista stacji radiowych, podłączone urządzenia Bluetooth i wszystkie zaprogramowane stacje, zostaną usunięte po przywróceniu ustawień fabrycznych.
Dane techniczne
Wejście DC 5V Baterie 4 x bateria typu AA 1,5 V (LR-6) (opcjonalne, spoza zestawu) Wyjście audio 2 W (RMS) Pobór mocy Stan aktywny: < 2 W Tryb gotowości: < 2 mW Zakres częstotliwości DAB Pasmo III, od 174 MHz do 240 MHz Zakres częstotliwości FM Od 87,5 MHz do 108 MHz Bluetooth Od 2,4 GHz do 2,480 GHz Nazwa urządzenia stosowana w trybie parowania S HARP DR-P421 Wymiary (szer. x wys. x gł.) w mm 174 x 90 x 53 Waga ok. 0,39 kg
Важные инструкции по технике безопасности
Соблюдайте все инструкции по технике безопасности и примите во внимание все предупреждающие сообщения. Сохраните данное руководство для использования в будущем.
Данный символ указывает
пользователю на необходимость
изучить указания по технике
безопасности, эксплуатации и техническому обслуживанию, которые содержатся далее в настоящем руководстве по эксплуатации.
DC Напряжение пост. тока
Предостережения
Безопасность детей
- В процессе использования изделия всегда соблюдайте основные правила техники безопасности, особенно в присутствии детей. Дети должны находиться под надзором, чтобы они не могли играть с изделием.
Расположение
- Изделие следует размещать на устойчивом основании, не допуская свисания изделия или его отдельных частей.
Вентиляция
- Для надежного функционирования изделия необходима вентиляция, предотвращающая его перегрев. Она обеспечивается щелями и отверстиями в корпусе изделия, и перекрывать или накрывать их нельзя. Оставьте вокруг изделия зазор шириной не менее 5 см для обеспечения надлежащей вентиляции. Не позволяйте никому, особенно детям, вставлять посторонние предметы в
порты, слоты и прочие отверстия в корпусе устройства, поскольку это может привести к поражению электрическим током.
Источники тепла и рабочая температура
- Ну устанавливайте изделие рядом с источниками тепла, например радиаторами, обогревателями, печами или другими устройствами (включая усилители), вырабатывающими тепло. Не допускайте попадания на изделие прямых солнечных лучей.
Открытый огонь
- Во избежание риска возгорания, не ставьте рядом с изделием свечи или иные источники открытого огня.
Вода, влага и попадание жидкости
- Во избежание риска возгорания или поражения электрическим током, не допускайте попадания на изделие капель осадков, воды или влаги. На ставьте на изделие или рядом с ним предметы, наполненные жидкостями.
Грозы и молнии
- Грозы представляют опасность для всех электроприборов. Удар молнии в сетевой или антенный кабель может привести к повреждению изделия, даже если оно выключено. Перед грозой следует отключать от изделия все кабели и разъемы.
Кабель USB
- Не допускайте повреждения зарядного шнура USB, не растягивайте и не перегибайте его, не ставьте на него тяжелые предметы.
Повреждение
- Распаковав устройство, осмотрите его, чтобы убедиться в отсутствии повреждений. Если оно имеет какие-либо повреждения, не приступайте к эксплуатации изделия, а обратитесь к продавцу.
Техническое обслуживание
- Прежде чем приступить к очистке изделия, отключите шнур питания от источника энергии. Для очистки внешней поверхности устройства используйте мягкую и чистую
салфетку. Никогда не очищайте еще с
помощью химических или моющих средств.
Обслуживание и ремонт
- Данное изделие не содержит компонентов, техническое обслуживание которых пользователь может осуществлять самостоятельно. Контакт с некоторыми частями внутри устройства может представлять опасность для жизни. В случае возникновения неисправностей следует связаться с производителем или представителем авторизованного сервисного центра. Гарантия производителя не распространяется на неисправности, возникшие вследствие проведения ремонта не уполномоченными третьими лицами.
Батарейки
Установка
- Используйте только указанные батарейки.
Вставляя батарейки обращайте внимание на
полярность. Использовать одновременно батарейки разных типов или старые и новые батарейки категорически запрещено.
Эксплуатация и техническое обслуживание
- Не подвергайте батарейки воздействию высоких температур, например в области воздействия прямых солнечных лучей. Если изделие не будет использоваться в течение длительного периода (свыше одного месяца), во избежание протекания батареек выньте их из изделия. Если батарейки протекли, вытрите внутреннюю часть батарейного отсека и замените батарейки новыми.
Безопасность детей
Батарейный отсек должен быть всегда закрыт, а его крышка должна быть зафиксирована.
Батарейки может легко проглотить ребенок; это может привести к возникновению тяжелых внутренних ожогов и смерти. Держите батарейки в недоступном для детей месте. Если имеются основания предполагать, что проглочена батарейка,
немедленно обратитесь за медицинской помощью.
Условия окружающей среды
- Не допускайте попадания батареек в места с низким давлением воздуха или высокой температурой: это может привести к взрыву или утечке воспламеняемой жидкости или газа.
Утилизация
- При утилизации батареек следует соблюдать указания, изложенные в настоящем руководстве (см. раздел "Утилизация оборудования и батареек"). Не бросайте в огонь, не разбирайте и не пытайтесь повторно зарядить обычные батарейки. Они могут протечь или взорваться.
Утилизация
оборудования и батареек
Информация для пользователей, относящаяся к утилизации старого оборудования и использованных батареек.
Данный символ обозначает, что на входящие в состав изделия батарейки распространяется действие Директивы ЕС 2013/56/
EU, которая запрещает их утилизацию вместе с обычными бытовыми отходами. Буквы Cd, Hg и Pb под символом мусорного контейнера указывают на содержание в батарейках кадмия (Cd), ртути (Hg) и свинца (Pb).
Данный символ обозначает, что на изделие распространяется действие Директивы ЕС 2012/19/EU, которая запрещает его утилизацию и вывоз на свалку вместе с
обычными бытовыми отходами.
Данный символ обозначает, что при проектировании и изготовлении изделия предусмотрена
возможность его повторного использования и переработки.
- Данные символы, нанесенные на изделия, упаковку и (или) сопроводительную документацию, обозначают, что использованные электрические и электронные изделия и батарейки нельзя выбрасывать вместе с обычными бытовыми отходами. Для получения подробной информации о порядке и возможных местах экологически безопасной утилизации этих изделий бытовым потребителям следует обращаться либо в торговую точку, в которой они были приобретены, либо в местные органы власти.
Заявление о соответствии требованиям для получения маркировки СЕ и UKCA:
Настоящим компания Sharp Consumer Electronics Poland sp. z o.o. заявляет, что данное аудиоустройство соответствует обязательным требованиям и прочим важным положениям Директивы EC по радиооборудованию 2014/53/EU и Директивы Великобритании в отношении радиооборудования от 2017 года.
Для ознакомления с полным текстом
Декларации о соответствии требованиям для получения маркировки CE и UKCA перейдите на сайт sharpconsumer.com, откройте раздел загрузки для вашей модели и выберите документ «CE Statements».
Элементы управления
Телескопическая антенна
Батарейный отсек
Порт микро-USB
Разъем для наушников
Дисплей с подсветкой
⏻ ⚡️ ⚡️ Питание/режим
Короткое нажатие после включения питания: включение
После включения — короткое нажатие: изменение режима
При питании через порт USB — длинное нажатие: режим ожидания
При питании от батареек — длинное нажатие: выключение
♥ ▶▶▶▶▶▶▶▶▶▶▶▶▶▶▶▶▶▶▶▶▶▶▶▶▶▶▶▶▶▶▶▶▶▶▶▶▶▶▶▶▶▶▶▶▶▶▶▶▶▶▶▶▶▶▶▶▶▶▶▶▶▶▶▶▶▶▶▶▶▶▶▶▶▶▶▶▶▶▶▶▶▶▶▶▶▶▶▶▶▶▶▶▶▶▶▶▶▶▶▶▶>
Короткое нажатие: Вызов предварительно настроенных станций
- В режиме Bluetooth:
- Короткое нажатие: воспроизведение/пауза
- Длинное нажатие: отключение текущего устройства и поиск новых устройств
8.
• В режиме DAB:
9.
• В режиме DAB:
Короткое нажатие: повышение частоты на 0,05 МГц.
Длинное нажатие: сканирование частотного диапазона в сторону повышения частоты.
i Info/Menu
Короткое нажатие: Информация о станции
При нахождении в режиме ожидания: короткое нажатие — переход к настройкам включения/выключения будильников 1 и 2
Предварительно настроенные станции 1,
2 и 3
Короткое нажатие: Вызов предварительно настроенной станции 1 (2 или 3)
Регулятор громкости:
• Вращение: настройка громкости
Содержимое коробки
Портативный цифровой радиоприемник
Tokyo DR-P421 – 1 шт.
Кабель питания USB – микро-USB – 1 шт.
Документация пользователя
Пользование портативным радиоприемником DAB+/FM
Телескопическая антенна
Прежде чем настраивать радиоприемник на радиостанцию DAB / FM, полностью вытяните телескопическую антенну (желательно в вертикальное положение). Это нужно для того, чтобы поиск радиостанций осуществлялся при максимальной устойчивости сигнала. Также при вытянутой антенне обеспечивается наилучшее возможное качество звучания.
Соединение
Вставьте кабель USB, входящий в комплект, в порт микро-USB на задней панели радиоприемника. Разъем USB-A (обычный), расположенный на другом конце кабеля, вставьте в USB-устройство или блок питания радиоприемника. Радиоприемник включится, и на дисплее появится надпись:
. Затем он перейдет в режим ожидания.
Установка батареек (необязательно)
Прежде чем вставлять батарейки (не входят в комплект), убедитесь в том, что радиоприемник выключен кнопками ⏻ + → и отсоединен от кабеля USB. Нажмите на задней стенке радиоприемника язычок крышки батарейного отсека и снимите крышку.
Вставьте 4 батарейки типа AA (LR-6) напряжением 1,5 В, соблюдая полярность согласно обозначениям "+" и "-" . Установите на место крышку батарейного отсека и надежно зафиксируйте ее в закрытом положении.
Первоначальная настройка
Включите радиоприемник, кратковременно нажав кнопку 🔊 →. Он начнет автоматический поиск станций DAB. Ход поиска и количество обнаруженных станций
отображается индикатором степени выполнения. Завершив поиск, радиоприемник выберет первую доступную станцию. По умолчанию, названия станций в списке упорядочены в порядке возрастания: сначала числа, затем буквы.
Примечание. Список радиостанций
DAB хранится в памяти; при следующем
включении радиоприемника поиск станций не
осуществляется.
Для прокрутки списка доступных станций следует кратковременно нажать кнопки или чтобы выбрать отображенную станцию, следует кратковременно нажать кнопку √. Настройка на выбранную станцию сопровождается кратковременной задержкой.
Регулировка громкости
Вращение ручки по часовой стрелке приводит к увеличению громкости, а против часовой стрелки — к уменьшению.
Время и дата
Время и дата автоматически согласуются с данными, передаваемыми службой DAB в 24-часовом формате.
Чтобы установить время и дату вручную, следует прежде всего включить радио.
Продолжительным нажатием кнопки i ☐ откройте меню.
Нажимая кнопку ◀✓▶, выберите пункт / / . На дисплее появится надпись и четыре мигающих цифры; задайте количество часов и минут, нажимая кнопку ◀✓▶. На дисплее появится надпись и цифры даты; задайте день, месяц и год, нажимая кнопку ◀✓▶. После подтверждения года на дисплее появится надпись , и радиоприемник вернется в меню .
Формат времени и даты, а также параметры автоматического обновления можно изменить,
нажимая кнопку «Выйдите из меню, кратковременно нажав кнопку.
Изменение режима
Нажимая кнопку можно перейти в режим DAB, FM или Bluetooth. Изменение режима подтверждается сообщением на экране.
Режим DAB радио
Выбор режима DAB радио
Кратковременно нажимайте кнопку 🔊 ✉
пока на экране не появится надпись . При первом использовании радиоприемника или при отсутствии станций в списке радиоприемник автоматически начинает поиск радиостанций DAB. Ход поиска и количество обнаруженных станций отображается индикатором степени выполнения. Если перед выключением радиоприемника происходило прослушивание станции DAB, при последующем включении радиоприемник возобновит прием той же станции.
Изменение станций DAB
Пользуясь кнопками 🚗️, прокручивайте список доступных станций. Когда на экране будет появится название нужной станции, выберите ее, нажав кнопку √. Настройка на выбранную станцию сопровождается кратковременной задержкой.
Поиск станций DAB
К радиовещанию в формате DAB регулярно присоединяются новые радиостанции и появляются новые службы. Чтобы в памяти радиоприемника всегда был актуальный список станций, следует регулярно выполнять ручной поиск станций. Переехав с радиоприемником в другой район, например при поездке в отпуск в другую страну, также полезно выполнить ручной поиск.
В режиме DAB:
Нажмите и придержите кнопку i ☐.
Нажимая кнопку ◀ √ ▶, найдите и
выберите пункт . На дисплее
появится новое сообщение: .
Ход поиска и количество обнаруженных станций отображается индикатором степени выполнения.
Удаление станций DAB
Станции DAB, прием которых в вашем регионе невозможен, можно удалить из списка. Такие станции в списке помечены значком <?> в начале названия.
В режиме DAB:
Нажмите и придержите кнопку i. Нажимая
кнопку ◀ √ ▶, найдите и выберите пункт
. На дисплее появится запрос: <Prune?
Yes>. Нажав кнопку ◀ √ ▶, выберите ответ . Станции, названия которых начинаются с <?>, больше отображаться не будут.
Сохранение в памяти новой станции DAB
В памяти радиоприемника может храниться до 20 радиостанций DAB, что позволяет быстро переключать его на любимые радиостанции.
Примечание. При сохранении в памяти станций DAB не происходит перезапись FM-станций.
Настройте радиоприемник на станцию DAB, которую вы хотите сохранить в памяти.
Нажмите и удерживайте кнопку ♥ ▶II, пока на дисплее не появится сообщение <Preset Store
<1:(Empty)>>. Нажимая кнопки ◀▶найдите номер (1 – 20), под которым хотите сохранить текущую станцию. Выберите его, нажав кнопку
√. На дисплее появится подтверждающее сообщение: , где "X" — номер записи в памяти (1-20)
Примечание. Если под выбранным номером уже сохранена какая-либо станция DAB, при
сохранении новой станции старые данные стираются.
Выбор предварительно настроенной станции DAB
В режиме DAB:
Для быстрого вызова радиостанций,
сохраненных в памяти под номерами 1, 2
или 3, следует кратковременно нажать на
передней панели радиоприемника кнопки 1,
2 или 3, соответственно. То же можно сделать,
кратковременно нажав кнопку ♥ ▶II.
На дисплее появится сообщение: <Preset
Recall <1:>> с указанием названия станции, записанной в соответствующем блоке памяти, или , если в этом блоке не записана ни одна станция. Нажимая кнопку ◀ √ ▶ , найдите и выберите станцию, которую хотите слушать (1-20).
Отображение DAB информации
При прослушивании станции DAB можно
изменить появляющуюся на дисплее информацию. Вещатель передает в эфир несколько видов информации.
Последовательно нажимая кнопку i
выберите один из вариантов информации:
- Dynamic label segment (DLS) - текст бегущей строки, предоставляемый вещателем. Он может содержать имена исполнителей, названия произведений, контактные данные радиостанции и т. д..
- Устойчивость сигнала - при минимальной устойчивости сигнала, обеспечивающей приемлемое качество звучания, на экране отображается пустой квадрат □. Действительная устойчивость принимаемого сигнала отображается рядом темных прямоугольников.
- Program type (PTY) – например, "Rock", "Pop", "Talk" или "News".
- Multiplex name - отображает вещательную зону и группу радиостанций на этой частоте, например BBC National DAB, Digital 1 Network
Channel and frequency – например, "12B 225.648 MHz"
Signal error – отображается в виде числа в пределах от 0 до 99. Для удовлетворительного прослушивания радиостанции необходимо, чтобы уровень ошибок сигнала был менее 30. Улучшить качество приема можно, изменив положение антенны или переместив радиоприемник в другое место.
Signal information – скорость передачи сигнала.
Индикатор питания – надпись , если для питания используется кабель USB, или , где XX — остаточный заряд батареек.
Дата
Управление динамическим диапазоном (DRC)
Данные о DRC передают лишь некоторые
вещатели. DRC используется для ограничения различия в громкости между самыми громкими и самыми тихими звуками. Например, если установить максимальное значение DRC, то тихие звуки будут усиливаться, а громкие — ослабляться. Это улучшает слышимость передачи в условиях сильного шума.
Существует 3 уровня сжатия:
DRC off — без сжатия. Это настройка по умолчанию. , после чего выберите нужный вариант.
Примечание. Текущая настройка DRC помечается на дисплее "звездочкой" (*).
Режим FM-радио
Чтобы перевести радиоприемник в режим FM-радио, нажимайте кнопку ⏻ +☐ до появления на дисплее надписи . Если перед выключением радиоприемника происходило прослушивание FM-станции, при последующем включении радиоприемник возобновит прием той же станции.
Настройка приемника на FM- станцию
При продолжительном нажатии кнопки ◀◀ и ▶▶ осуществляется сканирование частотного диапазона с увеличением или с уменьшением частоты, соответственно. Радиоприемник начнет поиск радиосигнала и остановит его на первой же обнаруженной радиостанции.
При кратковременном нажатии кнопки ◀◀ или ▶▶ происходит изменение частоты принимаемого сигнала с шагом 0,05 МГц.
Примечание. Если прием слабый, измените положение антенны или перенесите радиоприемник в другое место.
Изменение настройки поиска
В режиме FM:
При продолжительном нажатии кнопки
i ☐отображается надпись .
Нажмите кнопку √.
Можно выбрать один из двух вариантов:
- — поиск
приостанавливается только при обнаружении устойчивого сигнала, при котором обеспечивается улучшенное качество звучания. При использовании этого варианта существует возможность пропуска нужной радиостанции.
- — поиск приостанавливается на каждой обнаруженной станции, даже если ее сигнал неустойчив.
Нажимая кнопку ◀ √ ▶, найдите и выберите один из предлагаемых вариантов.
Примечание. Текущая настройка поиска помечается на дисплее "звездочкой" (*).
Сохранение в памяти новой FM- станции
В памяти радиоприемника может храниться до 20 FM-станций, что позволяет быстро переключать его на любимые станции.
Примечание. При сохранении в памяти FM-станций не происходит перезапись станций DAB.
Настройте радиоприемник на FM-станцию, которую вы хотите сохранить в памяти.
Нажмите и придержите кнопку ♥ ▶▶▶, пока на дисплее не появится сообщение <Preset
Store <1:(Empty)>>. Нажимая кнопку ◀ √ ▶
, найдите и выберите номер (1 – 20), под
которым хотите сохранить текущую станцию.
На дисплее появится подтверждающее
сообщение: , где "X" — номер записи в памяти (1-20)
Примечание. Если под выбранным номером уже сохранена какая-либо FM-станция, при сохранении новой станции старые данные стираются.
Функция автосохранения (AMS)
Сохранить в памяти FM-радиостанцию можно также с помощью функции автосохранения (AMS). В режиме FM нажмите и придержите кнопку i ☐. Нажимая кнопку , найдите и выберите пункт . Радиоприемник обследует частотный диапазон FM и автоматически сохранит обнаруженные радиостанции в соответствующих блоках памяти.
Примечание. Выполнив действия, описанные выше в разделе "Сохранение в памяти новой FM-станции", можно перезаписать станции, сохраненные в памяти с использованием функции AMS.
Выбор предварительно настроенной FM-станции
В режиме FM:
Для быстрого вызова радиостанций,
сохраненных в памяти под номерами 1, 2 или
3, следует кратковременно нажать кнопки 1,
2 или 3, соответственно. То же можно сделать,
кратковременно нажав кнопку ♥ ▶ II.
На дисплее появится сообщение: <Preset
Recall <1:> > с указанием названия станции,
записанной в соответствующем блоке памяти,
или <(Empty)>, если в этом блоке не записана
ни одна станция. Нажимая кнопку ◀ √ ▶,
найдите и выберите станцию, которую хотите
слушать (1-20).
Отображение информации FM
При прослушивании FM-станции можно изменить информацию, появляющуюся во второй строке дисплея. Последовательно нажимая кнопку i, выберите один из вариантов информации:
Radiotext (RT) - бегущая строка с информацией, которую предоставляет вещатель. Он может содержать имена исполнителей, названия произведений, контактные данные радиостанции и т. д..
Program Type (PTY) – например, "Rock", "Pop", "Talk" или "News".
Название станции или частота – например, BBC R4, 93.30MHz
Индикатор питания – надпись , если для питания используется кабель USB, или , где XX — остаточный заряд батареек.
Режим Bluetooth
Переведите радиоприемник в режим Bluetooth, кратковременно нажимая кнопку ⏻ → до появления на экране надписи . Радиоприемник начнет поиск устройств
Bluetooth. Убедитесь в том, что устройство с интерфейсом Bluetooth, к которому нужно подключить радиоприемник, может быть обнаружено.
Примечание. О порядке настройки Bluetooth на этом устройстве можно узнать в соответствующей инструкции по эксплуатации.
После обнаружения радиоприемник отображается на экране устройства под названием "SHARP DR-P421". Чтобы начался процесс установки соединения, выберите этот пункт. После установки соединения на дисплее радиоприемника отображается надпись: <ВТ connected>.
Устанавливать связь с радиоприемником могут подключенные устройства, находящиеся в пределах радиуса действия интерфейса (10 метров в пределах прямой видимости).
Соединение радиоприемника с устройством сохраняется до тех пор, пока не будет преднамеренно разорвано.
Чтобы отключиться от устройства Bluetooth,
следует нажать кнопку ♥ ▶III и удерживать ее 3 секунды, — в результате радиоприемник отсоединится от текущего устройства и начнет поиск других устройств.
Беспроводная потоковая передача музыки через Bluetooth
В режиме Bluetooth можно осуществлять потоковую передачу звука через динамики изделия. При этом используются средства управления как устройства Bluetooth, так и радиоприемника. Доступные средства управления:
• Воспроизведение/пауза: короткое нажатие
Предыдущая запись: короткое нажатие
Следующая запись: короткое нажатие
Также можно регулировать громкость: либо на самом радиоприемнике, либо на подключенном устройстве.
Примечание. Если радиоприемник не используется в течение 20 минут или на него не поступает аудиосигнал, происходит автоматический переход в режим ожидания (или выключение, если питание радиоприемника осуществляется от батареек).
Функция будильника
Примечание. Функция будильника работает, только если питание радиоприемника осуществляется по кабелю USB; при питании от батареек она отключена (с целью экономии заряда батареек).
Настройка будильника
Примечание. Прежде чем приступить к настройке будильника, проверьте правильность времени, отображаемого на дисплее радиоприемника.
RU
flowchart
graph LR
    A["DAB+"] --> B["Full Scan"]
    A --> C["Manual Tune System"]
    A --> D["DRC Sleep Alarm"]
    A --> E["Prune Alarm Alarm 1 Setup"]
    A --> F["System Time Alarm 2 Setup"]
    G["FM"] --> H["Scan setting Language"]
    G --> I["AMS Factory reset"]
    G --> J["System Software Version"]
    K["BT System"] --> L["Backlight"]
    K --> M["End"]
Alarm 1 or 2 settings
Time Hour Min Duration 1, 5, 15, 30 или 60 minutes Источник Buzzer, DAB или FM Частота Daily, Once, Weekdays, Weekends. Volume level 25%-100% Alarm On или Off
Примечание. Если время не настроено или его не удалось обновить по радиосигналу, то при попытке настройки будильника на дисплее появится сообщение: . В таком случае радиоприемник предложит установить время. Настройка будильника возможна только после установки времени.
При попытке настройки будильника в радиоприемнике, питание которого осуществляется от батареек, на дисплее появится сообщение: . Функции будильника работают только при питании от внешнего источника (по кабелю USB).
Остановка, отсрочка сигнала или выключение будильника
Чтобы остановить будильник, кратковременно нажмите кнопку ⏻. При этом на дисплее будет отображено сообщение,. Значок будильника останется на дисплее, и если будильник не был установлен в режим
, то он сработает в то же время на следующий день.
Чтобы отложить сигнал будильника, нажмите кнопку √. На дисплее появится надпись
и таймер обратного отсчета времени продолжительностью 10 минут. После окончания обратного отсчета будильник снова подаст звуковой сигнал. Чтобы прекратить обратный отсчет периода отсрочки, следует нажать кнопку √. На дисплее появится сообщение: .
Чтобы выключить будильник, следует выполнить действия, описанные в разделе "Настройка будильника", и выбрать вариант .
Таймер выключения
Таймер выключения позволяет настроить радиоприемник на автоматическое выключение. Можно выбрать , <15>, <30>, <45>, <60> или <90> минут. Для
этого следует нажать и придержать кнопку i
. Нажимая кнопку ◀ найдите и выберите пункт / . Нажимая кнопку ◀ √ ▶, найдите и выберите нужный вариант. На дисплее появится надпись: . В правом верхнем углу дисплея радиоприемника будет указано время в минутах до перехода радиоприемника в режим ожидания, например: S90.
Интервал выключения подсветки дисплея
Чтобы настроить интервал выключения подсветки дисплея, нажмите и придержите кнопку i ☐. Нажимая кнопку , найдите и выберите пункт / / . Перелистайте возможные варианты интервала выключения подсветки. Текущая настройка помечается на дисплее "звездочкой" (*). Выберите его, нажав кнопку √.
Аналогично, нажимая кнопку ◀ √ ▶,
измените настройки яркости подсветки: <Dim
level> и . Предусмотрено 3 варианта: , и .
Язык дисплея
Чтобы изменить язык дисплея, нажмите и придержите кнопку i. Нажимая кнопку ◀✓▶, найдите и выберите пункт / . Нажимая кнопку ◀✓▶
, найдите и выберите наиболее удобный для себя язык. Предусмотрено 7 вариантов: английский, французский, немецкий, итальянский, испанский, польский и нидерландский. Рядом с текущей настройкой языка появится "звездочка" (*).
Прочая информация
Версия программного обеспечения
Чтобы проверить версию программного обеспечения радиоприемника, нажмите и
придержите кнопку i. Нажимая кнопку
◀ √ ▶, найдите и выберите пункт / . На дисплее будет отображена версия программного обеспечения.
Восстановление заводских настроек
Выполнив сброс радиоприемника, можно восстановить в нем первоначальные заводские настройки.
Примечание. При сбросе радиоприемника сохраненные станции удаляются из памяти, а все подключенные к нему устройства Bluetooth отключаются.
Нажмите и придержите кнопку i ☑. Нажимая кнопку ◀️ √ ►, найдите и выберите пункт / . На дисплее появится запрос: Yes>. Нажав кнопку ◀️ √ ►, выберите ответ . Ваше радио перезагрузится, и на дисплее отобразится .
Поиск и устранение неисправностей
Если звук отсутствует или слабый:
Отрегулируйте громкость.
Убедитесь в том, что USB-кабель подключен, а радиоприемник не находится в режиме ожидания.
Если питание изделия осуществляется от батареек, проверьте, не нуждаются ли они в замене. Используйте в радиоприемнике высококачественные батарейки типа АА.
При слабом радиосигнале:
Убедитесь в том, что телескопическая антенна полностью вытянута (желательно в вертикальное положение).
Повторите поиск радиостанций согласно указаниям в разделе "Поиск станций DAB" и (или) "Настройка приемника на FM-станцию", в зависимости от режима.
Посмотрите, не улучшится ли прием, если перенести радиоприемник в другое место.
Проверьте, не расположены ли рядом с радиоприемником какое-либо еще электроприборы. Они могут создавать помехи.
Если не удается установить связь с устройством Bluetooth:
Проверьте, установлен ли на приемнике режим Bluetooth.
Убедитесь в том, что устройство находится в пределах радиуса действия интерфейса Bluetooth — 10 метров.
Переместите радиоприемник и устройство Bluetooth на достаточное расстояние от других устройств Bluetooth и прочих электроприборов.
Если возможно, выключите расположенные рядом устройства Bluetooth или отключите в них функцию Bluetooth.
Если радиоприемник не реагирует на функциональные кнопки:
- Убедитесь в том, что кабель USB вставлен в гнездо на задней панели радиоприемника. Кратковременно нажмите кнопку
. Если питание радиоприемника осуществляется от батареек, возможно, они нуждаются в замене.
- Восстановите первоначальные заводские настройки радиоприемника.
Примечание. При восстановлении заводских настроек радиоприемника из памяти удаляется список радиостанций, сохраненные станции и подключенные к нему устройства Bluetooth.
Технические характеристики
Вход 5 В пост. тока Батарейки 4 батарейки типа AA (LR-6) напряжением 1,5 В(не обязательно, не входят в комплект) Аудиовыход 2 Вт RMS Энергопотребление В рабочем режиме: < 2 Вт В режиме ожидания: < 2 мВт Частотный диапазон DAB Диапазон III, от 174 МГц до 240 МГц Частотный диапазон FM от 87,5 МГц до 108 МГц Bluetooth от 2,402 ГГц до 2,480 ГГц Название при установке соединения SHARP DR-P421 Размер устройства (Ш) x (В x (Г), мм 174 x 90 x 53 Масса, приблизительно 0,39 кг
Trademarks:
Bluetooth®
The Bluetooth® word mark and logos are registered trademarks owned by Bluetooth SIG,. Inc.
digitalradio DAB+ DAB FM certified
SAU/MAN/0201 V1
CE UK CA
Sharp Consumer Electronics Poland sp. z o.o.
Ostaszewo 57B, 87-148 Łysomice, Poland
Made in China
www.sharpconsumer.eu
SHARP