Tyxia 5612 - Recepteur DELTA DORE - Notice d'utilisation et mode d'emploi gratuit
Retrouvez gratuitement la notice de l'appareil Tyxia 5612 DELTA DORE au format PDF.
| Caractéristique | Détails |
|---|---|
| Type de produit | Récepteur radio |
| Fréquence de fonctionnement | 868 MHz |
| Alimentation | 230 V AC |
| Nombre de canaux | 2 canaux |
| Compatibilité | Compatible avec les télécommandes Tyxia |
| Dimensions | 80 x 80 x 30 mm |
| Installation | Montage en saillie ou encastré |
| Utilisation | Contrôle à distance des équipements électriques |
| Maintenance | Vérifier régulièrement les connexions électriques |
| Sécurité | Conforme aux normes de sécurité électrique |
| Garantie | 2 ans |
FOIRE AUX QUESTIONS - Tyxia 5612 DELTA DORE
Questions des utilisateurs sur Tyxia 5612 DELTA DORE
0 question sur cet appareil. Repondez a celles que vous connaissez ou posez la votre.
Poser une nouvelle question sur cet appareil
Téléchargez la notice de votre Recepteur au format PDF gratuitement ! Retrouvez votre notice Tyxia 5612 - DELTA DORE et reprennez votre appareil électronique en main. Sur cette page sont publiés tous les documents nécessaires à l'utilisation de votre appareil Tyxia 5612 de la marque DELTA DORE.
MODE D'EMPLOI Tyxia 5612 DELTA DORE

DELTA DORE
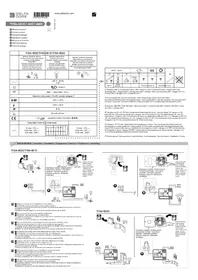
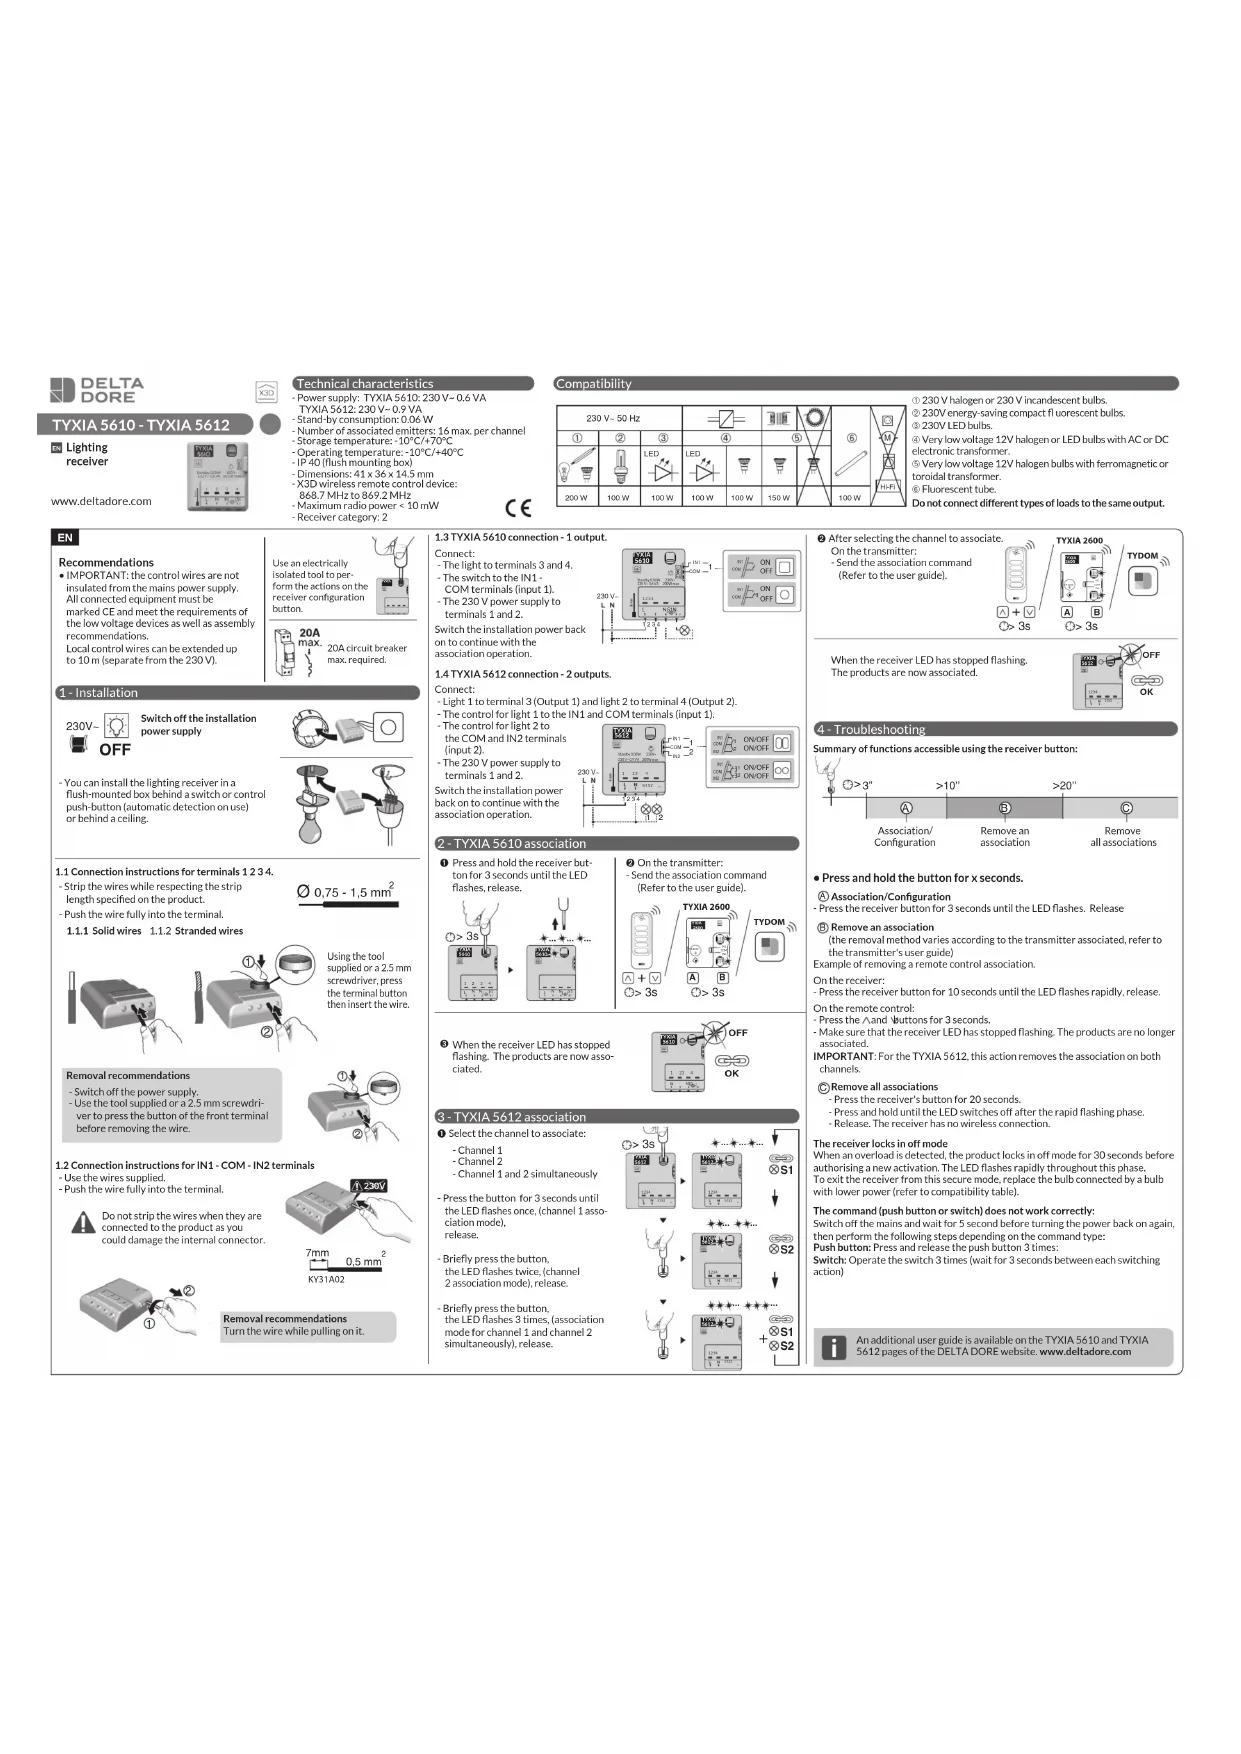
TYXIA 5610 - TYXIA 5612
EN Lighting receiver
www.deltadore.com

Technical characteristics
- Power supply: TYXIA 5610: 230 V\~ 0.6 VA
TYXIA 5612: 230 V\~ 0.9 VA
- Stand-by consumption: 0.06 W
- Number of associated emitters: 16 max. per channel
- Storage temperature: -10°C/+70°C
- Operating temperature: -10°C/+40°C
- IP 40 (flush mounting box)
- Dimensions: 41 x 36 x 14.5 mm
- X3D wireless remote control device:
868.7 MHz to 869.2 MHz
- Maximum radio power < 10 mW
- Receiver category: 2

Receiver category: Z
CE
Compatibility
| 230 V~50 Hz | 6 | ||||||
| 1 | 2 | 3 | 4 | 5 | |||
| LED | LED | ||||||
| 200 W | 100 W | 100 W | 100 W | 100 W | 150 W | 100 W | |
① 230 V halogen or 230 V incandescent bulbs.
② 230V energy-saving compact fluorescent bulbs
③ 230V LED bulbs
④ Very low voltage 12V halogen or LED bulbs with AC or DC
④ very low voltage 12 electronic transformer
⑤ Very low voltage 12V halogen bulbs with ferromagnetic or
© Very low voltage 12V halogen bulbs with electromagnetic or toroidal transformer.
toroidal transformer.
⑥ Fluorescent tube
Do not connect different types of loads to the same output.
EN
Recommendations
- IMPORTANT: the control wires are not insulated from the mains power supply. All connected equipment must be marked CE and meet the requirements of the low voltage devices as well as assembly recommendations.
Local control wires can be extended up to 10 m (separate from the 230 V).
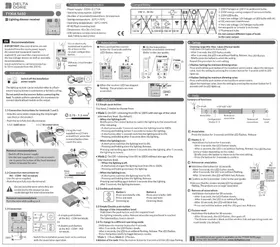
1 - Installation
230V\~

Switch off the installation power supply

Use an electrically isolated tool to perform the actions on the receiver configuration button.


20A circuit breaker max. required.
- You can install the lighting receiver in a flush-mounted box behind a switch or control push-button (automatic detection on use) or behind a ceiling.

1.1 Connection instructions for terminals 1 2 3 4.
- Strip the wires while respecting the strip length specified on the product.
- Push the wire fully into the terminal.
1.1.1 Solid wires 1.1.2 Stranded wires


text_image
Diagram showing two-step installation of a device with labeled parts and a magnified inset showing the component.Using the tool supplied or a 2.5 mm screwdriver, press the terminal button then insert the wire.
Removal recommendations
- Switch off the power supply.
- Use the tool supplied or a 2.5 mm screwdriver to press the button of the front terminal before removing the wire.
The Ground Truth image displays a single, solid horizontal line. According to Rule 2 (UNDERSCORE & LINE RULES), this is a stylistic or background line, not a placeholder underscore. Therefore, the OCR result must ignore it and output nothing or only meaningful text. The provided OCR content is "____", which consists of four underscores. This is an incorrect interpretation of the line as a placeholder, violating the rule that stylistic lines must be ignored. The OCR has hallucinated underscores where none should exist based on the GT's visual context. Hence, the OCR result is inconsistent with the Ground Truth.
1.2 Connection instructions for IN1 - COM - IN2 terminals
- Use the wires supplied.
- Push the wire fully into the terminal.
Do not strip the wires when they are connected to the product as you could damage the internal connector.


Removal recommendations
Turn the wire while pulling on it.
1.3 TYXIA 5610 connection - 1 output.
Connect:
- The light to terminals 3 and 4.
- The switch to the IN1
COM terminals (input 1). - The 230 V power supply to
terminals 1 and 2
Switch the installation power back on to continue with the association operation.
1.4 TYXIA 5612 connection - 2 outputs.
Connect:
- Light 1 to terminal 3 (Output 1) and light 2 to terminal 4 (Output 2).
- The control for light 1 to the IN1 and COM terminals (input 1).
- The control for light 2 to
the COM and IN2 terminals
(input 2).
- The 230 V power supply to
terminals 1 and 2
Switch the installation power
back on to continue with the
association operation.


text_image
TYXIA 5612 IN1 COM IN2 230 V- L N 1 2 3 4 N L N 1 S12 ... IN1 COM IN2 1 ON/OFF ON/OFF IN1 COM IN2 1 ON/OFF ON/OFF IN1 COM IN22 - TYXIA 5610 association
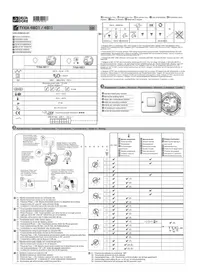
① Press and hold the receiver button for 3 seconds until the LED flashes, release.

② On the transmitter: - Send the association command (Refer to the user guide).

③ When the receiver LED has stopped flashing. The products are now associated.

3 - TYXIA 5612 association
① Select the channel to associate:
Channel 1
Channel 2
Channel 1 and 2 simultaneously
- Press the button for 3 seconds until the LED flashes once, (channel 1 association mode),
release.
- Briefly press the button,
the LED flashes twice. (channel
2 association mode), release.
- Briefly press the button,
the LED flashes 3 times, (association
mode for channel 1 and channel 2
simultaneously), release.

flowchart
graph TD
    A[">3s"] --> B["Input"]
    B --> C["AND"]
    C --> D["S1"]
    D --> E["Output"]
    C --> F["AND"]
    F --> G["S2"]
    G --> H["Output"]
    C --> I["AND"]
    I --> J["S1/S2"]
    J --> K["Feedback Loop"]
    K --> L["+"]
    style A fill:#f9f,stroke:#333
    style L fill:#ccf,stroke:#333
② After selecting the channel to associate.
On the transmitter:
- Send the association command (Refer to the user guide).

When the receiver LED has stopped flashing. The products are now associated.

4 - Troubleshooting
Summary of functions accessible using the receiver button:

text_image
A Association/ Configuration B Remove an association C >3" >10" >20"- Press and hold the button for x seconds.
Ⓐ Association/Configuration
- Press the receiver button for 3 seconds until the LED flashes. Release
(B) Remove an association
(the removal method varies according to the transmitter associated, refer to the transmitter's user guide)
Example of removing a remote control association.
On the receiver:
- Press the receiver button for 10 seconds until the LED flashes rapidly, release.
On the remote control:
- Press the ∧ and √ buttons for 3 seconds.
- Make sure that the receiver LED has stopped flashing. The products are no longer associated.
IMPORTANT: For the TYXIA 5612, this action removes the association on both channels.
© Remove all associations
- Press the receiver's button for 20 seconds.
- Press and hold until the LED switches off after the rapid flashing phase.
- Release. The receiver has no wireless connection.
The receiver locks in off mode
When an overload is detected, the product locks in off mode for 30 seconds before authorising a new activation. The LED flashes rapidly throughout this phase. To exit the receiver from this secure mode, replace the bulb connected by a bulb with lower power (refer to compatibility table).
The command (push button or switch) does not work correctly:
Switch off the mains and wait for 5 second before turning the power back on again, then perform the following steps depending on the command type:
Push button: Press and release the push button 3 times:
Switch: Operate the switch 3 times (wait for 3 seconds between each switching action)

An additional user guide is available on the TYXIA 5610 and TYXIA 5612 pages of the DELTA DORE website. www.deltadore.com