Tyxia 5650 - Recepteur DELTA DORE - Notice d'utilisation et mode d'emploi gratuit
Retrouvez gratuitement la notice de l'appareil Tyxia 5650 DELTA DORE au format PDF.

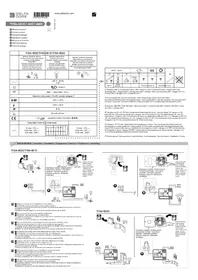
| Marque | Delta Dore |
| Modèle | Tyxia 5650 |
| Type de produit | Récepteur variateur pour éclairage |
| Dimensions (L x l x h) | 41 x 36 x 14,5 mm |
| Alimentation | 230 V~, 0,17 VA |
| Consommation en veille | 0,09 W |
| Indice de protection | IP 40 (en boîte d'encastrement) |
| Fréquence radio | 868,7 - 869,2 MHz |
| Nombre max d'émetteurs associés | 16 |
| Température de fonctionnement | -10°C à +40°C |
| Température de stockage | -10°C à +70°C |
| Types de charges compatibles | Halogène 230 V, fluocompacte 230 V, LED 230 V, halogène/LED 12 V avec transformateur électronique ou ferromagnétique, tube fluorescent |
| Puissance max par sortie | 150 W (halogène 230 V, tube fluo), 6-100 W (fluocompacte, LED 230 V), 150 W (très basse tension 12 V) |
| Modes de fonctionnement | Mode 1 : On/Off + variation avec mémorisation du dernier niveau ; Mode 2 : On/Off + variation sans mémorisation |
| Association des émetteurs | Appui long (3 s) sur le bouton du récepteur jusqu'à clignotement LED, puis commande sur l'émetteur |
| Réglages | Niveaux de variation min et max réglables manuellement |
| Sécurité | Disjoncteur 20 A max, utiliser un outil isolé pour la configuration |
| Entretien | Nettoyer avec un chiffon sec, ne pas utiliser de produits corrosifs |
| Installation | Encastré dans une boîte derrière un bouton poussoir ou au plafond |
| Fonctions supplémentaires | Commande locale filaire simple ou double bouton poussoir |
FOIRE AUX QUESTIONS - Tyxia 5650 DELTA DORE
Questions des utilisateurs sur Tyxia 5650 DELTA DORE
0 question sur cet appareil. Repondez a celles que vous connaissez ou posez la votre.
Poser une nouvelle question sur cet appareil
Téléchargez la notice de votre Recepteur au format PDF gratuitement ! Retrouvez votre notice Tyxia 5650 - DELTA DORE et reprennez votre appareil électronique en main. Sur cette page sont publiés tous les documents nécessaires à l'utilisation de votre appareil Tyxia 5650 de la marque DELTA DORE.
MODE D'EMPLOI Tyxia 5650 DELTA DORE

TYXIA 5650
EN Lighting dimmer receiver


Technical characteristics
- Power supply: 230V\~0,17 VA
- Stand-by consumption : 0,09 W
- Number of associated transmitters: 16 maximum
- Storage temperature: -10°C/+70°C
- Operating temperature: -10°C/+40°C
- IP 40 (flush mounting box)
- Dimensions: 41 x 36 x 14.5 mm
- X3D wireless remote control device:
868.7 MHz to 869.2 MHz
Compatibility

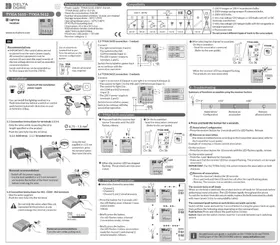
text_image
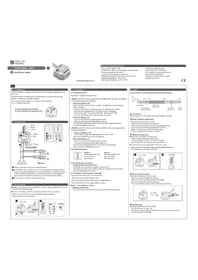
230 V~ 50 Hz ① ② ③ ④ ⑤ ⑥ LED LED ⑥ 12 Max 12 Max 150 W 6-100 W 6-100 W 150 W Hi-F① 230 V halogen or 230 V incandescent bulbs.
② 230V energy-saving compact fluorescent bulbs.
③ 230V LED bulbs.
④ Very low voltage 12V halogen or LED bulbs with AC
or DC electronic transformer.
⑤ Very low voltage 12V halogen bulbs with
ferromagnetic or toroidal transformer.
⑥ Fluorescent tube.
Do not connect different types of loads
to the same output.

Recommendations
IMPORTANT: the control wires are not
insulated from the mains power supply.
All connected equipment must be marked CE and meet the requirements of the low voltage devices as well as assembly recommendations.
Local control wires can be extended up to 10 m (separate from the 230 V).

Use an electrically isolated tool to perform the actions on the receiver configuration button.

20A max. circuit breaker required.
- Installation

Switch off the installation power supply
The lighting receiver can be installed either in a flush-mount housing behind a push button or behind a ceiling.
Do not switch on the receiver before connecting the load. To obtain uniform operation, it is mandatory to connect identical load models on the output.


1.1 Connection instructions for terminals 1 and 2.
- Strip the wires while respecting the strip length specified on the product.
- Push the wire fully into the terminal.
1.1.1 Solid wires
1.1.2 Stranded wires


Using the tool supplied or a 2.5 mm screwdriver, press the terminal button then insert the wire.
Removal recommendations
- Switch off the power supply.
- Use the tool supplied or a 2.5 mm screwdriver to press the button of the front terminal before removing the wire.
1.2 Connection instructions for
IN1 - COM - IN2 terminals
- Use the wires supplied.
- Push the wire fully into the terminal.

Do not strip the wires when they are connected to the product as you could damage the internal connector.
Removal recommendations
Turn the wire while pulling on it.


1.3 Connection


A simple push button: at the IN1 - COM terminals.
Or


- Switch the installation power back on to continue with the association operation.
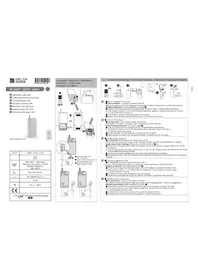
2 - Association
① Press and hold the receiver button for 3 seconds until the LED flashes, release.

③ When the receiver LED has stopped flashing. The products are now associated.
② On the transmitter: Send the association command (Refer to the user guide).


3 - Operation
3.1 Simple push-button
You have 2 modes to choose from:
- Mode 1. On/Off + dimming from 0% to 100% with storage of the latest intermediary level. (by default).
- When the lighting is off:
Briefly press the control button to switch the lighting to the stored level. After releasing:
- A short press under 5 seconds switches the lighting level to 100%.
- Pressing and holding before 5 seconds increases the lighting.
- A short press after 5 seconds switches the lighting level to 0%.
- Pressing and holding after 5 seconds dims the lighting.
- When the lighting is on:
- A short press switches the lighting level to 0%.
- Pressing and holding dims the lighting. Release.
Pressing and holding again before 5 seconds dims the lighting, after 5 seconds,
the lighting increases
- Mode 2. On/Off + dimming from 0% to 100% without storage of the intermediary level.
- When the lighting is off:
- A short press changes the lighting level from 0% to 100%.
- Pressing and holding increases the lighting.
When the lighting is on:
- A short press switches the lighting level to 0%.
- Pressing and holding dims the lighting. Release.
Pressing and holding again before 5 seconds dims the lighting, after 5 seconds, the lighting increases.
3.2 Double push-button

Button 1 Press once briefly: ON Press and hold: Dimming up
Button 2
Press once briefly: OFF Press and hold: Dimming down
3.3 Simple/Double push-button
Storage of the intermediary level:
Hold down the push button until the required level:
the lighting intensity varies. Release when the required level is reached. The intermediary level is stored
3.4 To change to a different operating mode:
- Hold down the receiver button for 6 seconds.
- After 3 seconds, the LED flashes slowly.
- After 6 seconds, the LED is on without flashing. Release. The LED flashes.
- Press the button briefly to toggle between modes.
Mode 1: 1 flash, Mode 2: 2 flashes.
Validation of the mode: Press the receiver button for 3 seconds until the LED stops flashing.
4 - Setup
Dimming range Min. Max. values (Manual mode)
Hold down the button for 6 seconds.
- After 3 seconds, the LED flashes slowly.
- After 6 seconds, the LED is on without flashing. Release. The LED flashes.
- Briefly press the button to select the setting.
Repeat this procedure for each setting.
- 3 flashes: Setting the minimum dimming value:
Press and hold the push button of the local hard-wired control, adjust the minimum value. Save the setting by pressing the receiver button for 3 seconds until its LED lights up.
- 4 flashes: Setting the maximum dimming value:
Press and hold the push button of the local hard-wired control,
adjust the maximum value. Save the setting by pressing the receiver button for 3 seconds until its LED lights up.
5 - Help
Summary of functions:

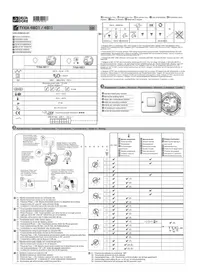
text_image
>3">6" >10">20">30" Association Configuration Modes 1/2 Remove an association Remove all associations Factor resetⒶ Association
Press the button for 3 seconds until the LED flashes. Release
⑧ Modes 1/2
Hold down the button for 6 seconds.
- After 3 seconds, the LED flashes slowly.
- After 6 seconds, the LED is on without flashing. Release. The LED flashes
(once or twice depending on the mode).
- Briefly press the button to move on to the next setting.
- Press the button for 3 seconds to confirm.
© Remove an association
① Hold down the button for 10 seconds:
- After 3 seconds, the LED flashes slowly.
. After 6 seconds, the LED is on without flashing.
· After 10 seconds, the LED will blink fast. Release.
② Confirm on the transmitter (refer to the user guide).
- Make sure that the dimmer module LED has stopped
I make sure that the dimmer module LED has step flashing. The products are no longer associated.
(D) Remove all associations
Hold down the button for 20 seconds:
- After 3 seconds, the LED flashes slowly.
- After 6 seconds, the LED is on without flashing.
- After 10 seconds, the LED will blink fast.
- Press and hold the button until the LED goes out. Release.
E Factory reset
Hold down the button for 30 seconds:
- After 30 seconds, the LED flashes, then goes off.
- The dimmer module is blank and the wireless link and operating mode are reset (mode 1 by default).

An additional user guide is available on the TYXIA 5650 page of the DELTA DORE website. www.deltadore.com