
AquaTrio series 9000 XW9383 - Aspirateur PHILIPS - Notice d'utilisation et mode d'emploi gratuit
Retrouvez gratuitement la notice de l'appareil AquaTrio series 9000 XW9383 PHILIPS au format PDF.
| Type de produit | Aspirateur balai sans fil 2-en-1 (aspiration et lavage des sols durs) |
| Marque | Philips |
| Modèle | AquaTrio series 9000 XW9383 |
| Alimentation | Batterie lithium-ion 25 V, chargeur secteur 34 V |
| Temps de charge | 4 heures |
| Capacité du réservoir d'eau propre | 400 ml |
| Capacité du réservoir d'eau sale | Environ 200 ml (estimé) |
| Buse principale | Buse AquaSpin (lavage) + Buse LED (aspiration seule) |
| Accessoires inclus | Mini Turbo brosse, outil long fente, brosse de nettoyage, station After-Clean & Storage, support mural |
| Fonctions | Aspiration, lavage simultané, mode absorption d'eau, AUTOCLEAN (nettoyage automatique), système de protection active |
| Niveaux de puissance | 2 niveaux (aspiration seule) + 3 modes lavage (normal, intense, absorption) |
| Filtres | Filtre mousse lavable, filtre d'entrée moteur |
| Brossettes | 2 brossettes microfibre pour la buse AquaSpin, brosse rouleau pour buse LED |
| Entretien | Vidange du réservoir d'eau sale après chaque utilisation, nettoyage des filtres régulier, remplacement filtre et brossettes tous les 6 mois |
| Température de stockage/charge | 5°C à 35°C |
| Poids | Environ 5 kg (estimé) |
| Dimensions | Non communiquées |
FOIRE AUX QUESTIONS - AquaTrio series 9000 XW9383 PHILIPS
Questions des utilisateurs sur AquaTrio series 9000 XW9383 PHILIPS
0 question sur cet appareil. Repondez a celles que vous connaissez ou posez la votre.
Poser une nouvelle question sur cet appareil
Téléchargez la notice de votre Aspirateur au format PDF gratuitement ! Retrouvez votre notice AquaTrio series 9000 XW9383 - PHILIPS et reprennez votre appareil électronique en main. Sur cette page sont publiés tous les documents nécessaires à l'utilisation de votre appareil AquaTrio series 9000 XW9383 de la marque PHILIPS.
MODE D'EMPLOI AquaTrio series 9000 XW9383 PHILIPS
AquaTrio Cordless
Wet & Dry Vacuum
9000 Series
XW9385,XW9383


English 6
Čestina 52
Dansk 97
Deutsch 142
Eesti 189
Français 234
Hrvatski 280
Italiano 325
Latviešu 371
Lietuviskai 415
Magyar 460
Nederlands 505
Norsk 551
Polski 595
Româna 641
Slovenscina 686
Slovensky 730
Srpski 775
Suomi 820
Svenska 865
Türkce 910
Былгарскn 955
Contents
Introduction 6
General description 6
Before first use 7
Charging 10
Vacuuming and mopping hard floors 11
Vacuuming soft and hard floors 16
Cleaning the Vacuum & Mop set-up 21
Cleaning the Vacuum only set-up 30
Display icons and their meaning 39
Replacement 42
Troubleshooting 42
Using the Vacuum only set-up 48
Introduction
Thanks for buying this Philips product! To fully benefit from the support that Philips offers, register your product at www.philips.com/myvacuum9000s.
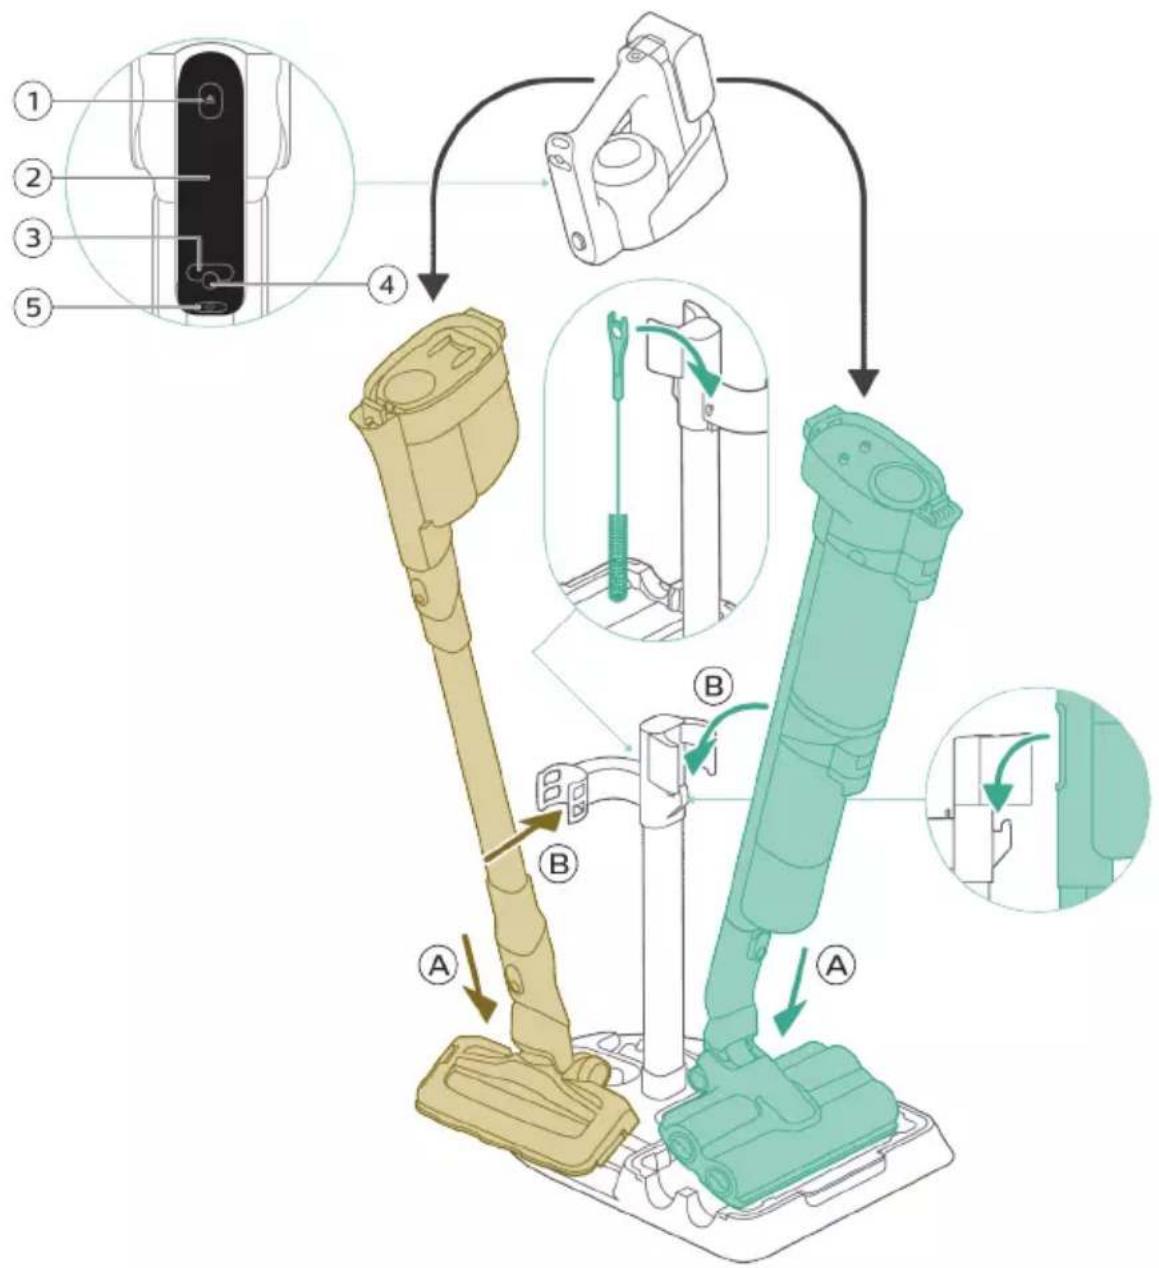
General description
1 Dust bucket release button
2 Display
3 Cleaning mode button
4 Middle button (AUTOCLEAN)
5 On/off button
6 Battery
7 3-in-1 handheld
8 Dust bucket
9 Wall mount
10 Tube
11 LED nozzle
12 Mini Turbo brush
13 Long crevice tool
14 Adapter
15 Power plug
16 Extra charger (XW9385 only)
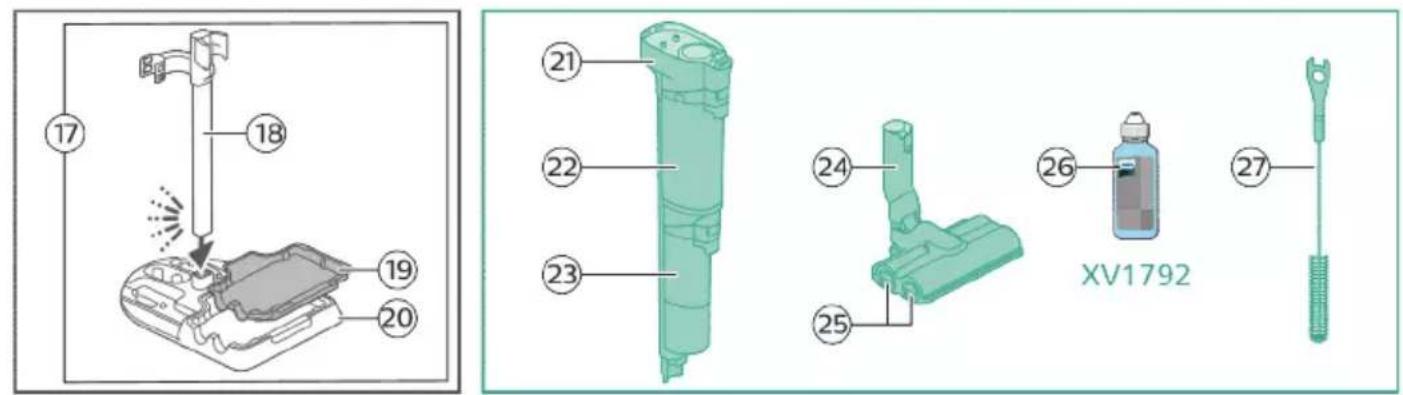
17 After-Clean & Storage station
18 Appliance holder
19 After-Clean tray
20 Baseplate
21 Wet module
22 Dirty water tank
23 Clean water tank
24 AquaSpin nozzle
25 Microfiber brushes
26 Philips Floor Cleaner XV1792
27 Cleaning brush
Before first use
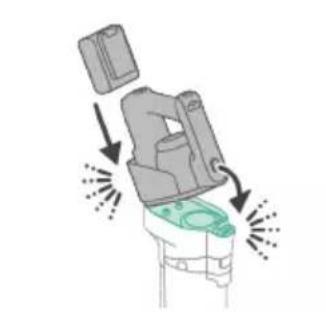
Assembling the After-Clean & Storage station

In order to use the AUTOCLEAN function or store and charge the appliance on the After-Clean & Storage station, you need to first assemble the station by clicking the appliance holder into the baseplate.

Tip: It is possible to slide the holder for Vacuum only set-up and put it back upside down if you want to place the Vacuum only set-up on the other side of the After-Clean & Storage station.
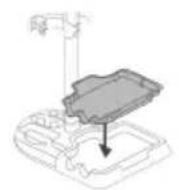
i Note: Make sure that the After-Clean tray is placed in the baseplate and that the temperature in the room where the appliance is stored, charged and cleaned is between 5^ and 35^

Tip: You can hang the cleaning brush on the hook of the appliance holder.
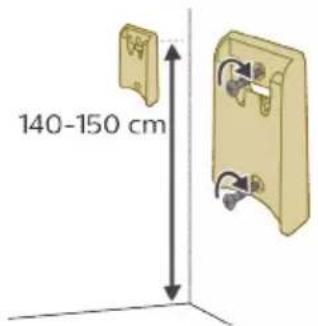
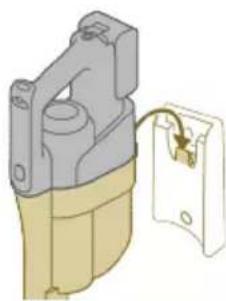
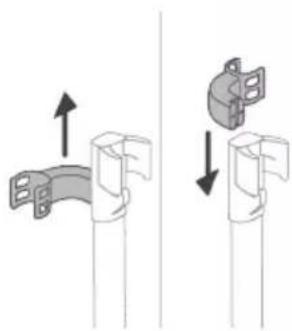
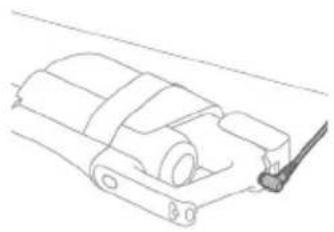
Installing the wall mount
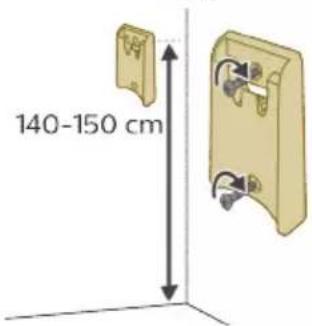

If you want to store and charge the Vacuum only set-up on the wall mount, fasten the wall mount to the wall with the screws supplied. Make sure the wall mount is 140 - 150 cm above the floor.
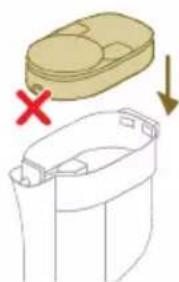
i Note: It is not possible to store the Vacuum & Mop set-up on the wall-mount. It is only possible to store the Vacuum only set-up on the wall mount.
Note: Make sure that the temperature in the room where the appliance is stored or charged is between 5^ and 35^
Caution: Be careful when you drill holes in the wall to fasten the wall mount, to avoid the risk of electric shock.
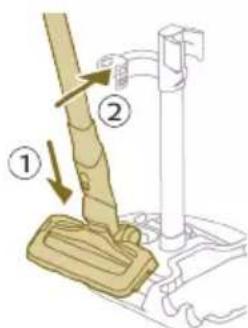
Assembling the Vacuum & Mop set-up

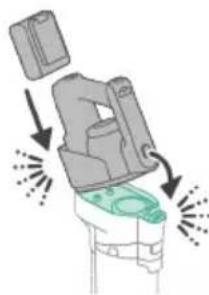
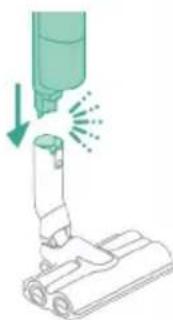
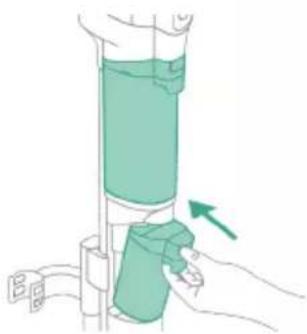
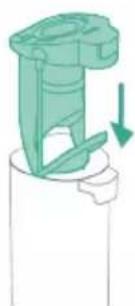
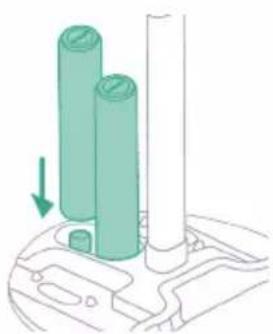
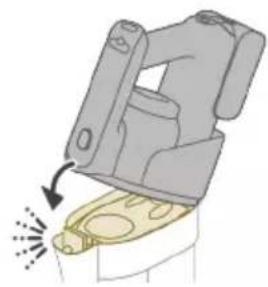
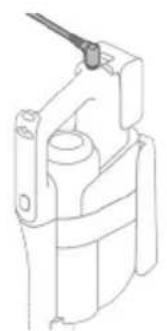
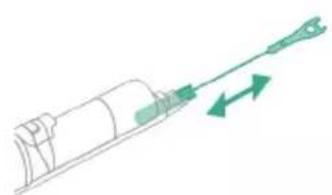
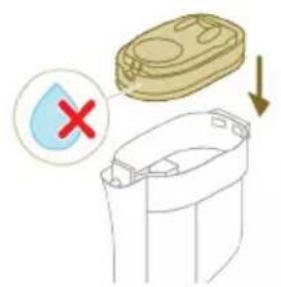
1 To assemble the Vacuum & Mop set-up, insert the battery and attach the 3-in-1 handheld to the wet module ('click').

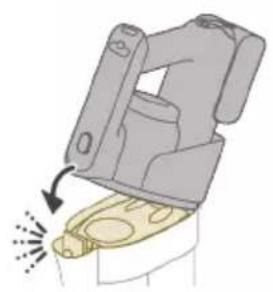
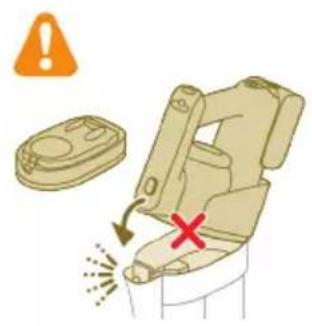
2 Attach the wet module to the AquaSpin nozzle ('click').
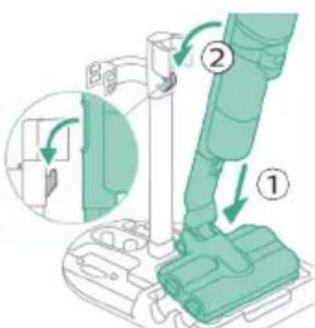
3 To store the Vacuum & Mop set-up, you can place it in the After-Clean & Storage station.
i Note: It is not possible to store the Vacuum & Mop set-up on the wall-mount. It is only possible to store the Vacuum only set-up on the wall mount.
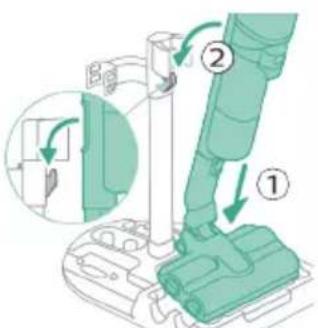
Assembling the Vacuum only set-up
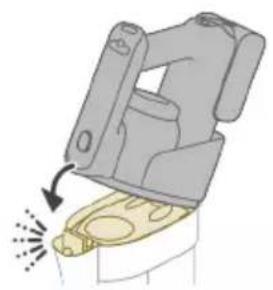
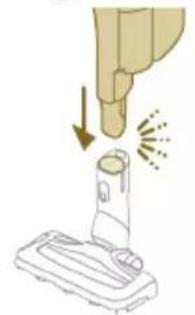
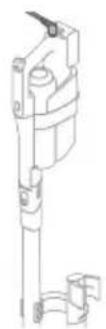
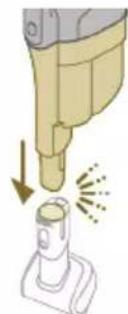
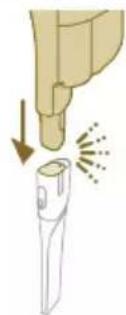
1 To assemble the Vacuum only set-up, attach the 3-in-1 handheld to the dust bucket ('click').
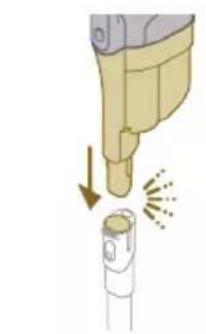
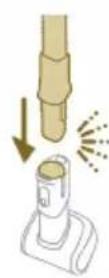
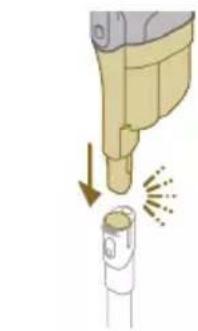
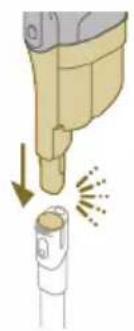
2 Attach the dust bucket to the tube ('click').
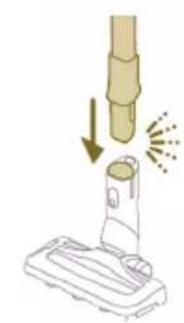
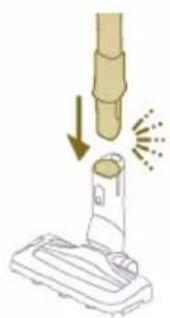
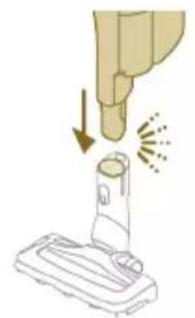
3 Insert the tube into the LED nozzle.
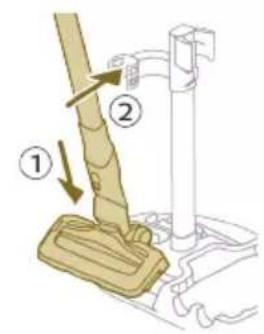
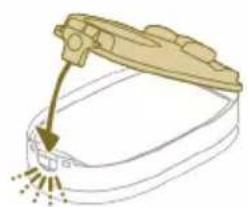
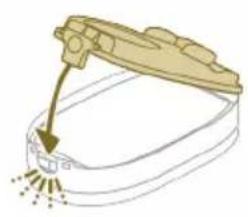
4 To store the Vacuum only set-up, place it in the After-Clean & Storage station by first placing the LED nozzle onto the long side of the baseplate and then pressing the tube into the holder.

Tip: It is possible to slide the holder for the Vacuum only set-up and put it back upside down if you want to place the Vacuum only set-up on the other side of the After-Clean & Storage station.

Charging


The appliance is equipped with a 25 V Li-Ion battery. Charging takes 4 hours.
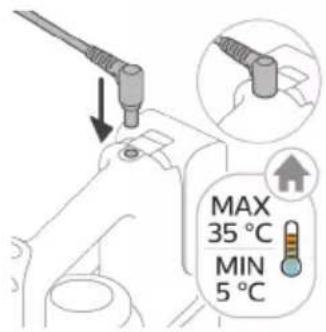
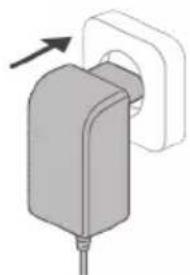
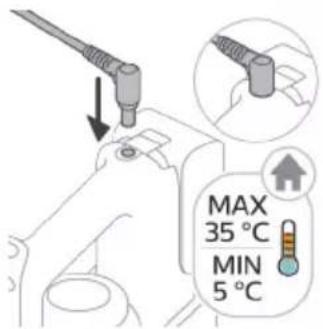
1 To charge the appliance, insert the power plug into the socket on the back of the appliance. Then insert the adapter into the wall socket.
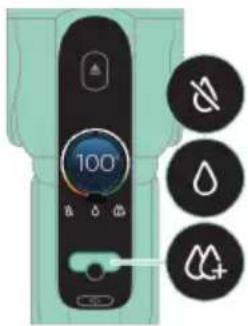
2 A value between 0% and 90% flashes on the screen to indicate that the appliance is charging.
3 When the appliance is fully charged, the value 100% lights up on the screen. After a few minutes, the display will switch off.
A Warning: Store and charge the appliance at a temperature above 5^ and below 35^

Tip: You can charge the appliance when it is attached to the wall mount.

Tip: You can charge the appliance in the After-Clean & Storage station.
Tip: You can charge the appliance separately in a place that suits you best.

Vacuuming and mopping hard floors
Using the Vacuum & Mop set-up
The clean water tank and the dirty water tank are already attached to the appliance upon delivery. With the wet module attached to the AquaSpin nozzle, you can clean hard floors.
Note: This Vacuum & Mop set-up is suitable for vacuuming and mopping at the same time. It is not necessary to vacuum the floor before mopping. The Vacuum & Mop set-up is suitable for vacuuming and mopping all types of hard floors, except uncoated wooden floors (see 'Usage restrictions').
1 To assemble the Vacuum & Mop set-up, insert the battery and attach the 3-in-1 handheld to the wet module ('click').
2 Attach the wet module to the AquaSpin nozzle ('click').
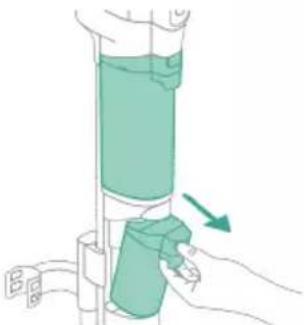
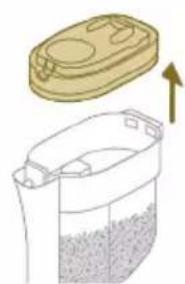
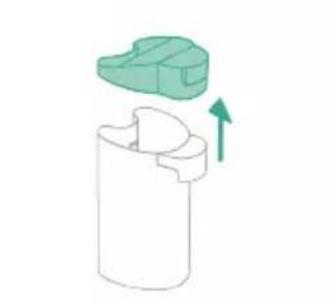
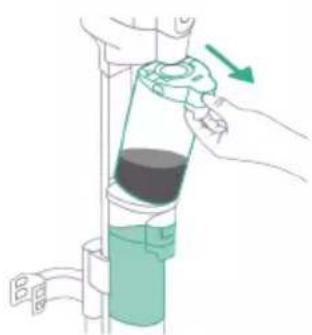
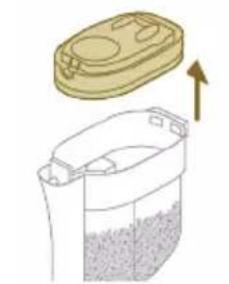
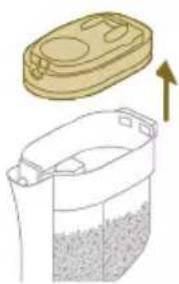
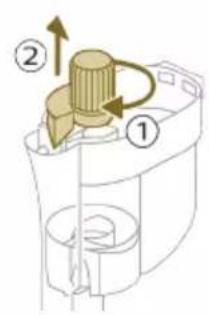
3 Push the button to unlock the clean water tank and remove the clean water tank.

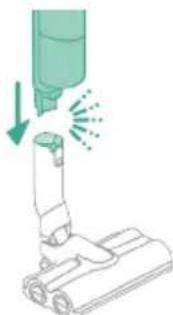
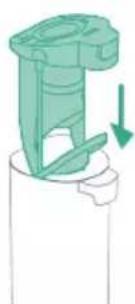
4 Remove the cap from the clean water tank.
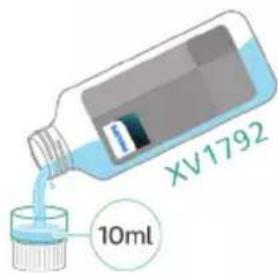
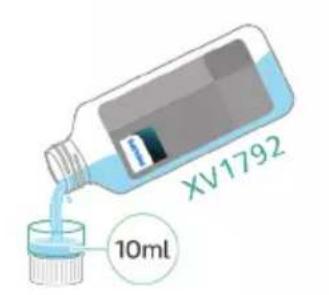
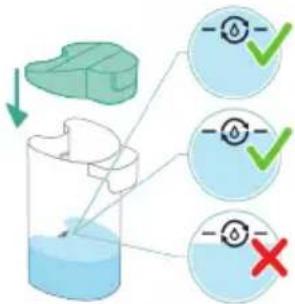
5 Add 10 ml of the XV1792 Philips Floor Cleaner to the clean water tank.

Caution: Philips has only tested this appliance with XV1792 Philips Floor Cleaner. Other detergents may lead to excessive foaming, which reduces performance and may cause the appliance to malfunction. XV1792 Philips Floor Cleaner is available in selected markets. When using any other suitable liquid floor cleaner, add a maximum of 10ml to the clean water tank.
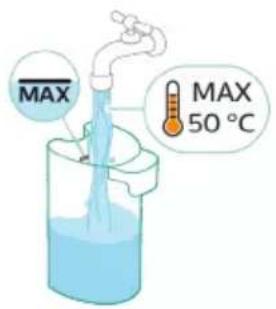
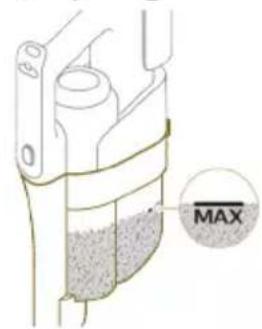
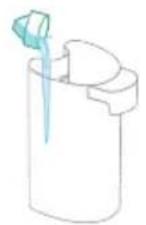
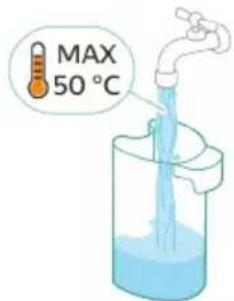
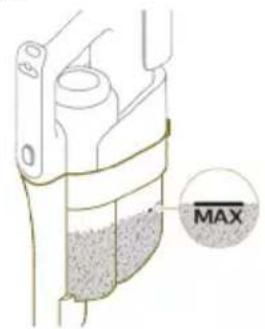
6 Fill the clean water tank with cold or lukewarm tap water up to the MAX indication.
Caution: The tap water that is poured into the clean water tank must not be warmer than 50^ .

7 Place the cap back on the clean water tank.
8 Place the clean water tank back into the appliance.

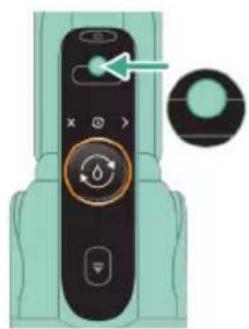
9 To switch on the appliance, press the on/off button and wait until the appliance is ready for use.

10 Use the cleaning mode button to choose between three different settings:
Normal wet mode
- Intense wet mode
Water absorption mode
By selecting the normal water mode, you can use the appliance for regular wet cleaning. The intense wet mode is for cleaning extra stubborn stains.
If there are wet spots on the floor after cleaning, you can select absorption mode to clean them up. We also recommend using it when lifting the appliance over a threshold, carpet or stairs (see 'Tips and other important information').
If you select water absorption mode, the appliance will stop supplying water and increase suction power for 45 seconds to absorb any water on the floor.
Note: older models feature normal wet mode and intense wet mode, but not water absorption mode.
Active protection system
- This appliance is equipped with an active protection system. This active protection system has been designed to recognize when a foreign object other than dirt or liquid is picked up from the floor.
- When the system is activated, the appliance switches off and the i3 message appears on the display (see 'Display icons and their meaning'). The active protection system can also be activated when the microfiber brushes are too wet, when you move the appliance over a carpet or a rug, or when you move it over flooring that is not properly affixed.
Tips and other important information
It is not necessary to vacuum the floor before mopping, as the Vacuum & Mop set-up actively wet-cleans your hard floor to capture all kinds of dirt, including liquids and stains. On carpets and rugs, use the Vacuum only set-up
If your hard floors do not need mopping, simply use the vacuum only set-up which features LED lights and PowerCyclone 12 technology for precise and powerful dirt pick-up.
- You can move the appliance just as quickly as a vacuum cleaner. To remove difficult stains, click the cleaning mode button to activate the intense wet mode and move the appliance slowly over the stains.
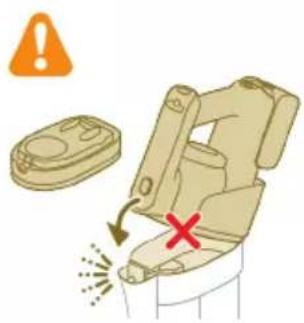
- The appliance can leave a small puddle of water on the floor if you do not move the appliance while switching it off. You can reduce the size of the puddle by moving the appliance while switching it off. If needed, you can remove the last drops with a cloth.
It is recommended to activate the water absorption mode when lifting the appliance over a threshold, carpet or stairs during cleaning. This will prevent dirty water from dripping out of the AquaSpin nozzle.
- When moving the appliance, it is recommended to stretch your arm to reduce unnecessary tension on the muscles. In this position, you have the best control over the appliance when cleaning, and it will be the most comfortable.
Note: When you use the water absorption mode no more water comes out of the appliance and the suction power increases. After 45 seconds, if you
do not take any action, the appliance automatically switches back to normal wet mode
Note: older models feature normal wet mode and intense wet mode, but not water absorption mode. For these models, move the appliance while switching it off to reduce the amount of water left on the floor. It is also recommended to leave the appliance on when lifting it over a threshold, carpet or stairs during cleaning. This will prevent dirty water from dripping out of the AquaSpin nozzle.
Usage restrictions
- The Vacuum & Mop set-up is suitable for vacuuming and mopping all types of hard floors, except uncoated wooden floors.
- The Vacuum & Mop set-up is intended for regular cleaning of hard floors. Always follow the cleaning instructions for your hard floor when you use this appliance.
- If you want to add a liquid floor cleaner other than XV1792 Philips Floor Cleaner to the water in the clean water tank, make sure that you use a low-foaming or non-foaming liquid floor cleaner that can be diluted in water like XV1792 Philips Floor Cleaner.
- As the clean water tank has a capacity of 400ml , you only have to add a few drops (max 10ml) of liquid floor cleaner to the water.
- If you use the Vacuum & Mop set-up on linoleum floors, only do so on linoleum floors that are properly affixed to prevent linoleum from being drawn into the AquaSpin nozzle.
- Do not use the Vacuum & Mop set-up to clean carpets.
- If you move/lift the appliance over a carpet or rug when it is switched off, wastewater droplets may end up on your carpet or rug.
- Do not push the appliance over the floor grilles of convector heaters. As the appliance cannot pick up water that comes out of the nozzle when you move it over the grille, water ends up at the bottom of the convector pit.
- While cleaning, do not lift the AquaSpin nozzle from the floor or move the AquaSpin nozzle sideways, and do not make strong turns, as this leaves water traces. Only move forwards and backwards.
Note: The operating time depends on the power level used during cleaning.
i Note: older models only feature normal wet mode and intense wet mode, but not water absorption mode
Vacuuming soft and hard floors
Using the Vacuum only set-up
1 To vacuum soft or hard floors, attach the 3-in-1 handheld to the dust bucket ('click').

A Caution: Do not attach the 3-in-1 handheld to the dust bucket without the filter case being inserted in the dust bucket.

2 Attach the dust bucket to the tube ('click').
3 Insert the tube into the LED nozzle.

4 To switch on the appliance, press the on/off button and wait until the appliance is ready for use.

5 Use the buttons on the left and right to choose between the two different power settings.
Tip: The LEDs in the LED nozzle make it easier to see dirt on the floor. The tube and LED nozzle allow you to reach under low furniture without the need to twist the appliance.
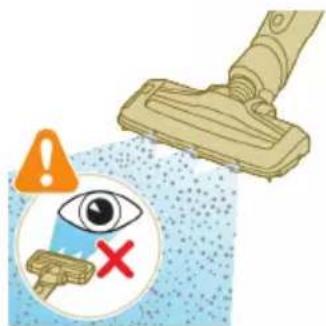
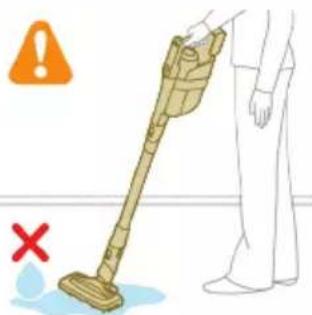
Warning: Do not vacuum up water or other liquids.
Caution: Do not look directly into the LEDs of the LED nozzle or point the LEDs at someone's eyes. The LED light is very bright.
Using the tube
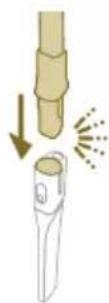
You can attach the tube to the handheld and use it without a nozzle to vacuum tight spaces between or behind pieces of furniture with the end of the tube.

Tip: It is also possible to attach the Mini Turbo brush to the tube.
Tip: It is also possible to attach the long crevice tool to the tube.
Using the handheld
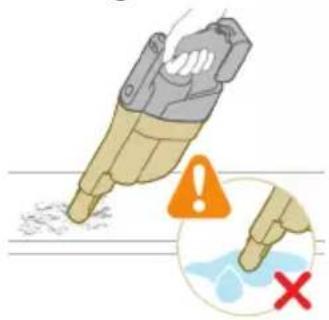
Without the nozzle and tube, you can use the handheld to clean small patches of dust and dirt, such as spilled breadcrumbs, or to vacuum staircases and shelves.
Warning: Do not vacuum up water or other liquids.
Using the LED nozzle
You can use the LED nozzle to clean areas, such as the steps of a staircase, to vacuum up dirt in corners or on narrow ledges, or to clean small patches of dirt, such as spilled bread crumbs.
1 To attach the LED nozzle, insert the tube or the handheld into the nozzle.
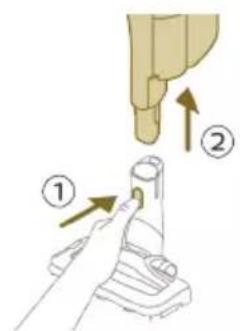
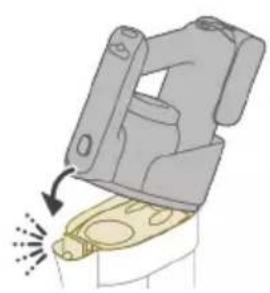
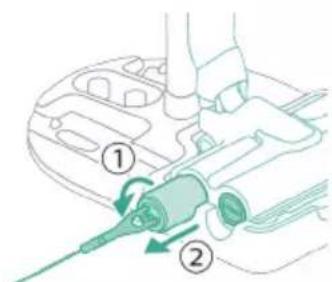
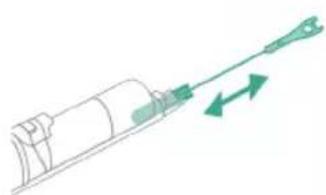
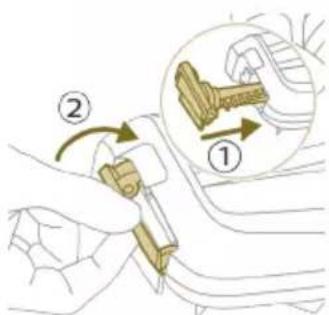
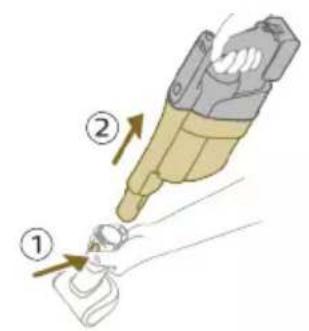
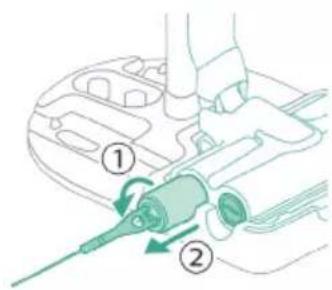
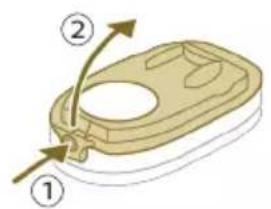
2 To detach the LED nozzle, press the release button (1) and pull the tube or handheld out of the nozzle (2).
Warning: Do not vacuum up water or other liquids.
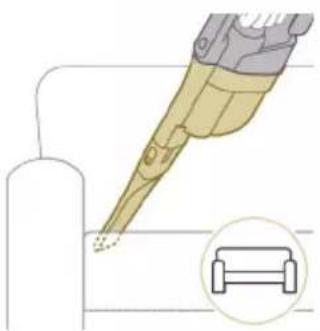
Using the Mini Turbo brush

1 To attach the Mini Turbo brush, insert the tube of the handheld into the Mini Turbo brush.
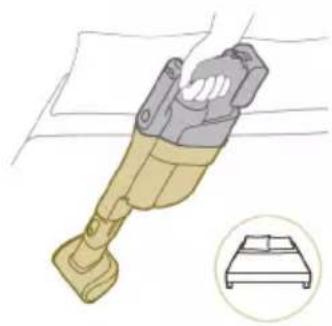
2 You can use the Mini Turbo brush for standard cleaning, for instance of soft areas such as beds and couches. You can adjust the power setting to suit your cleaning needs.

3 You can use the Mini Turbo brush for extra thorough cleaning, for instance to vacuum up pet hair, or to clean small patches of dirt, such as spilled bread crumbs. You can adjust the power setting to suit your cleaning needs.

4 To detach the Mini Turbo brush, press the release button (1) and pull the handheld out of the Mini Turbo brush (2).
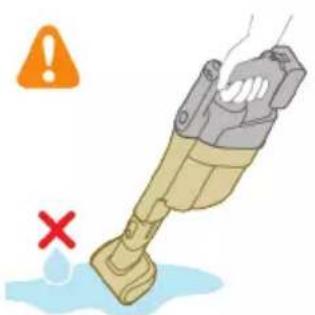
Warning: Do not vacuum up water or other liquids.
Using the long crevice tool

1 To attach the long crevice tool, insert the tube or handheld into the long crevice tool.
2 You can use the long crevice tool to clean narrow corners or hard-to-reach places. You can adjust the power setting to suit your cleaning needs.

3 To detach the long crevice tool, press the release button (1) and pull the tube or handheld out of the long crevice tool (2).

Warning: Do not vacuum up water or other liquids.
Cleaning the Vacuum & Mop set-up
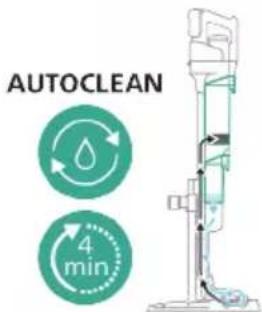
AUTOCLEAN after every use

To prevent odors and scale deposits, use the AUTOCLEAN function after every use. The AUTOCLEAN mode helps you to clean your full appliance in approximately 4 minutes.
1 Place the Vacuum & Mop set-up in the After-Clean & Storage station.

Note: If the dirty water level is below the AUTOCLEAN level, it is not necessary to empty the tank before starting the AUTOCLEAN program. You can skip the following steps and move forward to step 6.

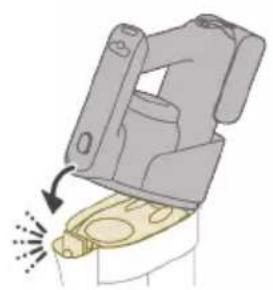
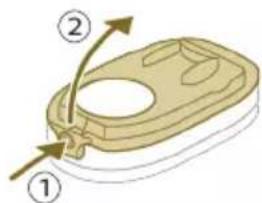
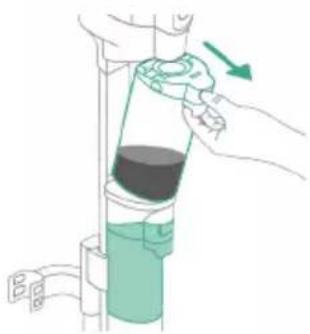
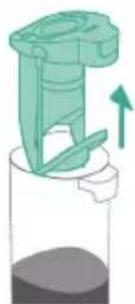
2 Push the button to unlock the dirty water tank and remove it.

3 Remove the wet filter from the dirty water tank.

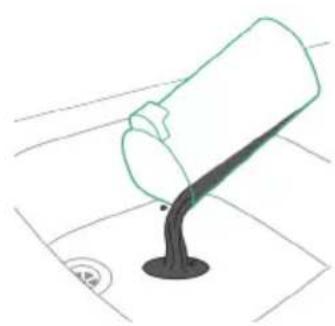
4 Pour the water out of the dirty water tank into the sink.

5 Place the wet filter back on the dirty water tank.

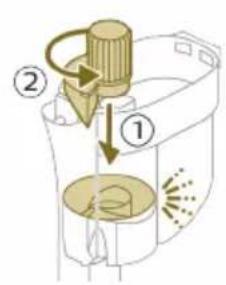
6 Place the empty dirty water tank back into the appliance and take out the clean water tank.

7 Remove the cap from the clean water tank.


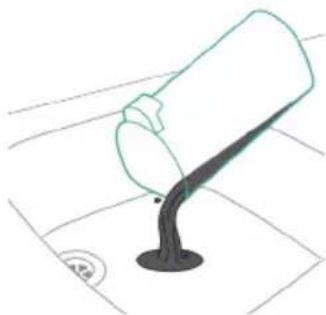
8 Pour any remaining detergent liquid from the clean water tank into the sink.
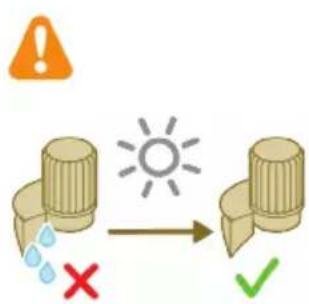
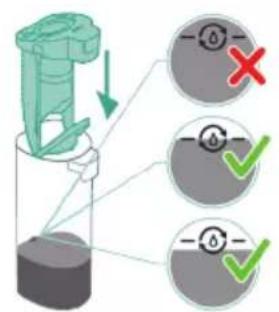
9 Fill the clean water tank with cold or lukewarm tap water at least up to the AUTOLEAN indication.
Caution: The tap water that is poured into the clean water tank must not be warmer than 50^ .
A Caution: Do not use detergent for the AUTOCLEAN as this might lead to excessive foaming.
10 Place the clean water tank back into the appliance.
11 Charge the appliance. Insert the power plug into the socket on the back of the appliance. Then insert the adapter into the wall socket.


12 To start the AUTOCLEAN cycle, press the middle button. If you see a black screen, press the on/off button first to activate the screen.

13 The appliance performs the AUTOCLEAN cycle.
Note: The Autoclean cycle lasts approx. 4 minutes. For best results, let the appliance run through the AUTOCLEAN cycle completely. You can pause or cancel the AUTOCLEAN cycle at any time.
Note: If you cancel the AUTOCLEAN program, the appliance will suck up the remaining water in the After-clean tray for about 10 seconds.

14 Push the button to unlock the dirty water tank and remove it.

15 Remove the wet filter from the dirty water tank.

16 Pour the water out of the dirty water tank into the sink.

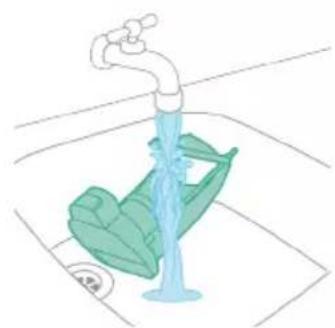
17 Clean the dirty water tank under the tap.
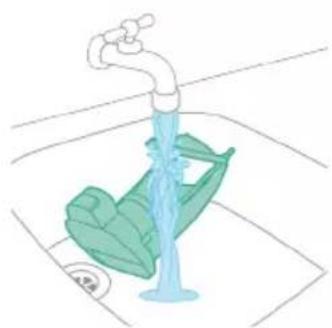
18 Clean the wet filter under the tap.

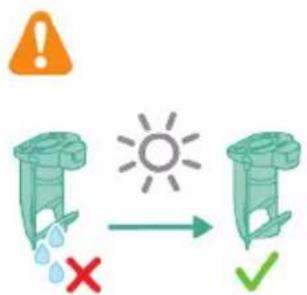
19 Let the wet filter of the dirty water tank and its water flow element dry completely before putting it back on the dirty water tank.
20 Place the wet filter back on the dirty water tank.

21 Place the dirty water tank back into the appliance.
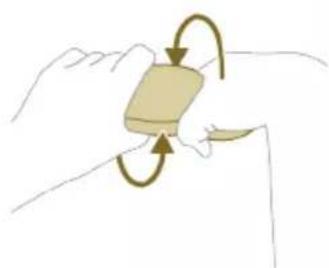
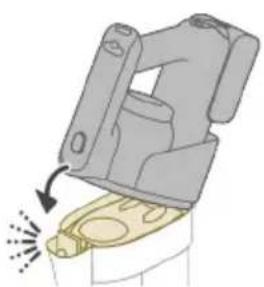
22 Turn the microfiber brushes counterclockwise (1) and remove them from the AquaSpin nozzle (2).

Tip: In case a microfiber brush is difficult to remove, you can use the cleaning brush handle to unlock the microfiber brush.
23 To allow the microfiber brushes to dry, place the open ends of the brushes on the designated holders of the After-Clean & Storage station.
i Note: Drying can take approximately 24 hours.
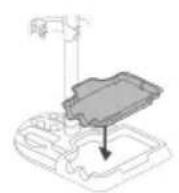
Cleaning the After-Clean tray

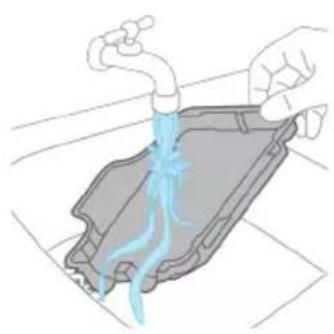
If the After-Clean tray gets dirty, you can clean it by following the steps below. 1 Remove the After-Clean tray from the storage station.

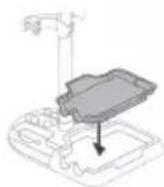
2 Rinse the After-Clean tray under the tap and let it dry before placing it back in the Storage station.
3 Make sure to always put the After-Clean tray back in the Storage station. The After-Clean tray is essential to perform the AUTOCLEAN correctly.
Cleaning the AquaSpin nozzle
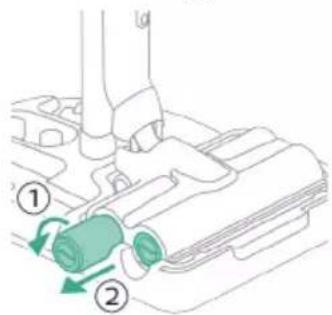
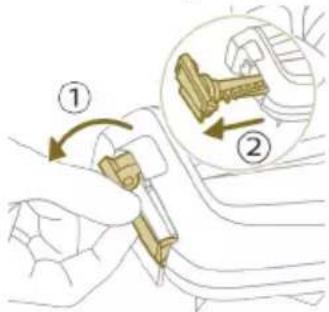
1 Turn the microfiber brushes counterclockwise (1) and remove them from the AquaSpin nozzle (2).
Tip: In case a microfiber brush is difficult to remove, you can use the cleaning brush handle to unlock the microfiber brush.

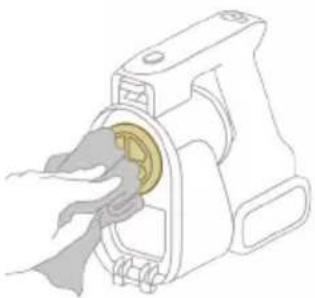
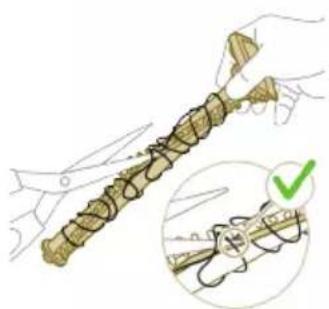
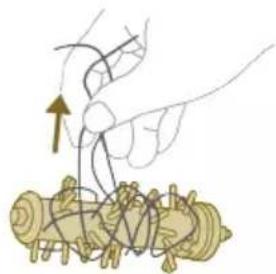
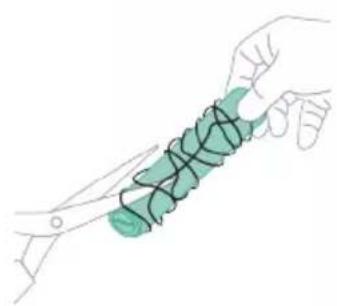
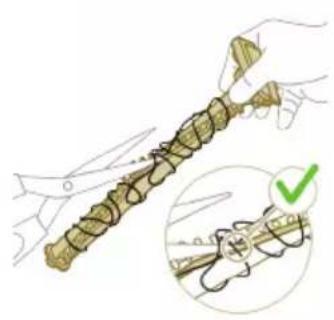
2 You can remove entangled hair or threads from the microfiber brushes by sliding down the microfiber brushes with one hand.

Tip: You can also use a pair of scissors to cut hairs and threads that have become entangled around the microfiber brushes.
Removing blockages from the Vacuum & Mop set-up
The Vacuum & Mop set-up may become clogged. You may notice this when more water gets on the floor than usual or when bigger dirt particles are no longer sucked up and fall back on the floor. Below you can find the instructions to remove blockages from different parts of the Vacuum & Mop set-up.
Clearing blockages from the wet module
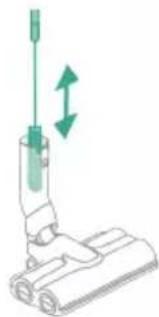
If there is a blockage in the wet module, first switch off the appliance and remove the AquaSpin nozzle and the 3-in-1 handheld. Then remove the blockage by moving the cleaning brush in the suction channel of the wet module up and down.
Clearing blockages from the AquaSpin nozzle

If there is a blockage in the AquaSpin nozzle, it can be removed by moving the cleaning brush up and down in the suction channel of the AquaSpin nozzle.
Clearing blockages from the wetting strips of the AquaSpin nozzle
After long and frequent use of the appliance, the wetting strips of the AquaSpin nozzle may become clogged at some point. Follow the steps below to clear the blockage of the wetting strips of the AquaSpin nozzle.

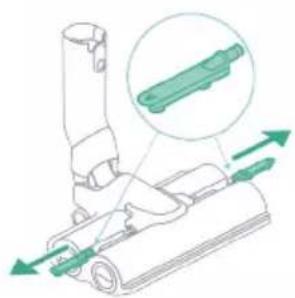
1 Remove the wetting strip covers from the AquaSpin nozzle by moving them sideways.
2 Remove the wetting strips from the AquaSpin nozzle by pulling them out sideways.
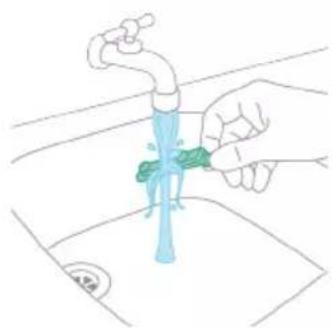
3 Rinse the wetting strips under the tap.
4 Let the wetting strips dry before placing them back in the AquaSpin nozzle.
Cleaning the Vacuum only set-up
Emptying the dust bucket
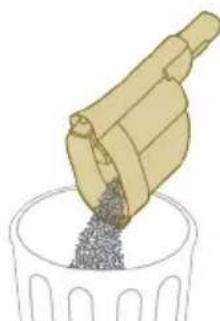
Regularly empty the dust bucket and make sure that the dirt never exceeds the 'Max' indication. This prevents accelerated filter clogging.

1 Press the release button (1) to release the 3-in-1 handheld of the dust bucket and then lift the 3-in-1 handheld off the appliance (2).
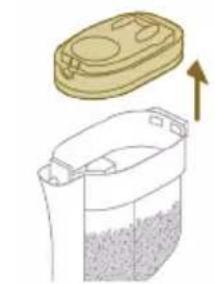
2 Pull the filter case off the dust bucket.

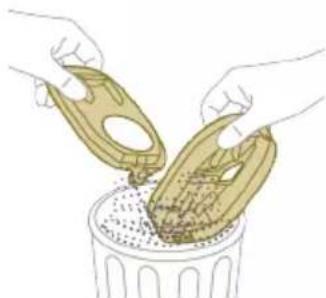
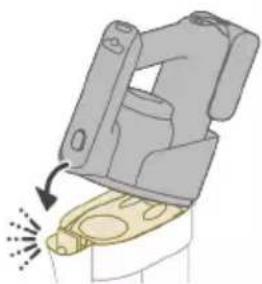
3 Empty the dust bucket into a waste bin.
4 Put the filter case back onto the dust bucket.


5 Reconnect the 3-in-1 handheld to the dust bucket. Make sure that you connect the rear part first, then connect the front part so it locks into place with a click.
Cleaning the dust bucket
1 To clean the dust bucket and the cyclone, remove the filter case.

2 Empty the dust bucket into a waste bin.
3 Remove and clean the cyclone if necessary (see 'Cleaning the cyclone').

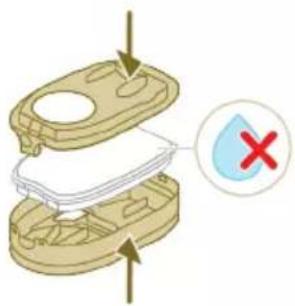
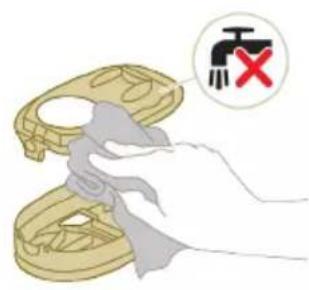
4 If you want, you can use a wet or dry cloth to clean the inside of the dust bucket.
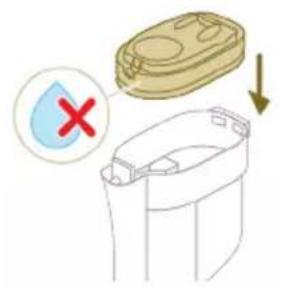
Note: do not let the electronic connectors get wet. If the electronic connectors do get wet, please allow them to dry before using the device again. Always use the appliance with dry electronic connectors. This prevents the appliance from malfunctioning over time.
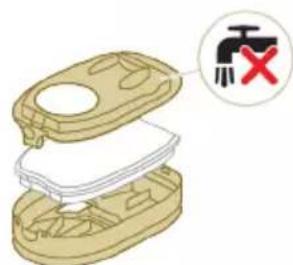
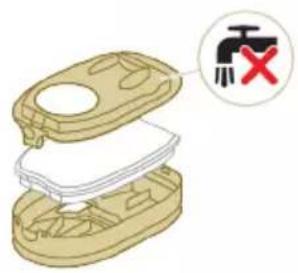
Warning: Do not clean the dust bucket in the dishwasher.
Warning: Do not rinse the dust bucket under the tap.

5 Reattach the filter case back in when the dust bucket is dry.
6 Reconnect the 3-in-1 handheld to the dust bucket.

Caution: Do not reconnect the 3-in-1 handheld to the dust bucket without the filter case being inserted in the dust bucket.
Cleaning the cyclone

1 Turn the cyclone clockwise (1) and remove it from the dust bucket (2).
2 Remove hair and dirt that is stuck in and under the cyclone.

3 If desired, you can rinse the cyclone under the tap.
i Note: Always let the cyclone dry completely before placing it back into the dust bucket.
4 Replace the cyclone (1) and turn it counterclockwise (2) to secure it back into the dust bucket.

A Caution: Make sure to fully tighten the cyclone when placing it back. Rotate the cyclone until the cyclone cannot rotate any further and is fully secured.
Cleaning the filter

When the filter needs to be cleaned, the filter cleaning icon appears on the screen.
1 Pull the filter case off the dust bucket.
2 Press the release button to release the lid of the filter case and remove the foam filter.
A Caution: Make sure that the filter case lid does not get wet during cleaning.
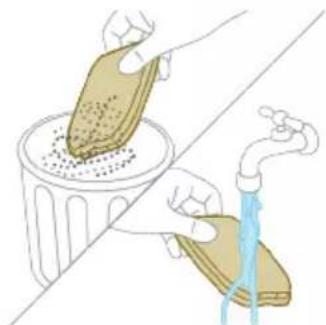
3 Shake the foam filter over a waste bin to remove the layer of dirt on top of the foam filter. Then rinse the foam filter under a tap.
4 Squeeze the foam filter to remove the water.
5 Shake the filter case and lid over a waste bin to remove dust.

6 Clean the filter holder with a damp cloth.
Caution: Do not clean the white material of the filter case lid with a normal vacuum cleaner or a brush. Do not clean the white material of the filter case lid with water or any cleaning agent. It will damage the material. The white material can be tapped over a bin.

7 Let the foam filter dry and make sure that it is completely dry before you put it back into the filter case.
Caution: Make sure that the foam filter is correctly placed in the filter case.
8 Close the filter case.

9 Put the filter case including the foam filter back into the dust bucket.
Caution: Make sure the white material of the filter case lid is facing up.

A Caution: Make sure that the filter case including the foam filter are completely dry before you put them back into the dust bucket.

10 Reconnect the 3-in-1 handheld to the dust bucket.
Caution: Do not reconnect the 3-in-1 handheld to the dust bucket without the filter case being inserted in the dust bucket.
i Note: Replace the filter every 6 months to ensure maximum performance. Replacement filters are available under part number XV1791 (see 'Replacement').
Cleaning the motor inlet filter

The 3-in-1 handheld has a filter that may become blocked with dust. This can reduce the suction power over time. To clean the motor inlet filter, follow these steps:
1 Press the release button (1) to release the 3-in-1 handheld of the dust bucket and then lift the 3-in-1 handheld off the appliance (2).
2 Clean the inlet filter with a cloth or with the cleaning brush.
3 Reconnect the 3-in-1 handheld to the dust bucket. Make sure that you connect the rear part first, then connect the front part so it locks into place with a click.
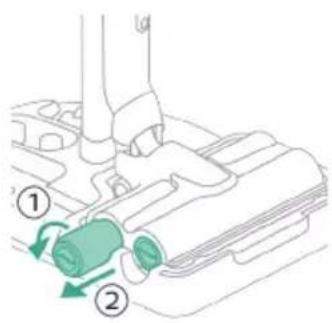
Cleaning the roller brush
1 Pull down the locking lever on the side of the LED nozzle (1) and slide the roller brush out of the LED nozzle (2). You can remove entangled hair or threads from the roller brush by sliding down the roller brush with one hand.
Tip: You can also move one blade of a pair of scissors through the groove on the roller brush to cut hairs and threads that have become entangled around the roller brush.
2 Slide the roller brush back into the LED nozzle (1) and push up the locking lever to lock the roller brush in the LED nozzle ('click').
Cleaning the Mini Turbo brush

1 Unlock the release button on the side of the Mini Turbo brush (1) and lift the roller brush out of the Mini Turbo brush (2).
2 Remove the hairs and dirt entangled around the roller brush.
Tip: You can also move one blade of a pair of scissors through the groove on the roller brush to cut hairs and threads that have become entangled around the roller brush.

3 Press one side of the roller brush back into the Mini Turbo brush (1) and push down the other side of the roller brush to lock the roller brush in the Mini Turbo brush ('click').
Display icons and their meaning
Error code Cause Solution
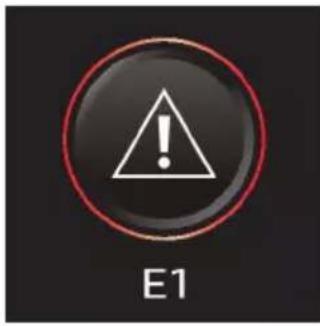
There is a system error. An E1 error code means that your Philips
AquaTrio 9000 series Vacuum Cleaner has a system error.
To solve this, please try one or both of the following options:
- Remove the battery from the appliance and then reinsert the battery. Then try to restart the appliance.
- Disconnect the 3-in-1 handheld from the appliance and press the on/off button on the handheld. If you still see the E1 error on your display, please contact the Consumer Care Center. If you do not see the E1 error and the appliance does still not work, there might be a communication problem with the tube or nozzle. Please contact the Consumer Care Center.
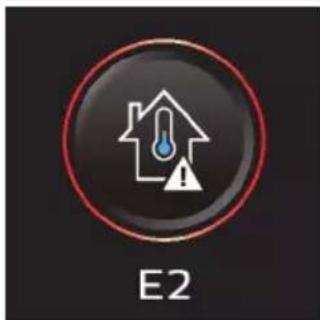
The temperature is too low. Make sure the temperature in the room where the appliance is used, stored, or charged is above 5^ .
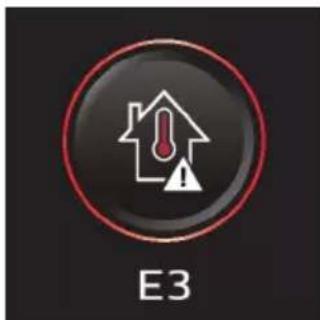
The temperature is too high. Make sure the temperature in the room where the appliance is used, stored, or charged is below 35^ . Do not expose the device to direct sunlight or high temperatures (near hot stoves, in microwave ovens, or on induction cookers). Batteries may explode if overheated.
Information code Cause Solution

The dirty water tank is full. Empty the dirty water tank.
Information code Cause Solution
| i2 | The AquaSpin nozzle is not connected (properly). | Connect the AquaSpin nozzle. |
| i3 | The AquaSpin nozzle is stuck. This is a safety cut-off if something is stuck in the nozzle (for instance, a power cable or a toy). | Check the brushes, bearings, motor parts, and caps for hair or other obstacles and remove them. If there are no obstacles, switching the appliance off and on might solve the problem. |
| i4 | The LED nozzle is stuck. This is a safety cut-off if something is stuck in the nozzle (for instance, a power cable or a toy). | Check the roller brush and the rest of the nozzle for hair or other obstacles and remove them (see 'Cleaning the roller brush'). If there are no obstacles, switching the appliance off and on might solve the problem. |
| i5 | The air inlet openings are blocked. | Check the air inlet openings for blockages and remove them. If this does not solve the problem, check the whole air passage for blockages and remove them. For the Vacuum only set-up, this refers to the nozzle, tube, filter, vortex finder, long crevice tool, and Mini turbo brush. For the Vacuum & Mop set-up, this refers to the nozzle, tube, and the wet filter. |
| i6 | Unplug for use. Unplug the appliance for use. Otherwise, it will not switch on. Only during AUTOCLEAN is it possible to have the appliance plugged in. | |
Information code Cause Solution
| i7 | The wrong charger is connected. | Only charge the appliance with the adapter supplied. Only use 34V adapter S036-1A340100HE. The corresponding adapter number can be found on the adapter. |
| Icons Meaning | ||
| AUTOCLEAN | ||
| Reminder to clean the filter (see 'Cleaning the filter') | ||
| Microfiber brush replacement needed | ||
| Filter replacement needed | ||
Replacement
To buy accessories or spare parts, visit www.philips.com/parts-and-accessories or go to your Philips dealer. You can also contact the Philips Consumer Care Center in your country (see the international warranty leaflet for contact details).
Replacement parts and type numbers:
- Replacement filter XV1791
- Philips Floor Cleaner XV1792
- Replacement microfiber brushes XV1793
Lithium-Ion Battery pack 25.2V XV1797
Replace the filter and the microfiber brushes every 6 months to ensure maximum performance.
i Note: You can dispose of the old filter and the microfiber brushes with the normal household waste.
Troubleshooting
This chapter summarizes the most common problems you could encounter with the appliance. If you are unable to solve the problem with the information below, visit www.philips.com/support for a list of frequently asked questions or contact the Consumer Care Center in your country.
Using the Vacuum & Mop set-up
Problem Possible cause Solution
| The appliance does not work when I push the on/off ① button. | The battery is not connected. Connect the battery to the 3-in-1 Handheld. | |
| The battery is empty. To charge the battery, connect the 3-in-1 Handheld with the charger (see 'Charging'). | ||
| You did not take the appliance out of the After-Clean & Storage station. | Take the Vacuum & Mop set-up out of the After-Clean & Storage station before switching on the appliance. | |
| You pushed the on/off ① button more than one time. | Wait a few seconds and push the on/off ① button again one more time. | |
| You did not connect the 3-in-1 Handheld to the appliance correctly. | Place the lower body of the appliance on the After-Clean & Storage station. Then connect the 3-in-1 Handheld to it. | |
| The appliance is clogged. Switch the appliance off and remove the battery or 3-in-1 handheld. Then locate and remove the cause of the blockage (see 'Removing blockages from the Vacuum & Mop set-up'). After that, restart the appliance. If you cannot identify the cause of the blockage, restart the appliance. This might already solve the problem. | ||
Problem Possible cause Solution
| The microfiber brushes are stuck. | Take the microfiber brushes out and place them back (see 'Cleaning the AquaSpin nozzle').Tip: In case a microfiber brush is difficult to remove, you can use the cleaning brush handle to unlock the microfiber brush (see 'Cleaning the AquaSpin nozzle'). | |
| The appliance stopped working. | You accidentally touched the on/off button with your hand. | Switch on the appliance by pushing the on/off button. |
| The dirty water tank may be full. In this case, there is an information icon shown on the screen (see 'Display icons and their meaning'). | Empty the dirty water tank (see 'AUTOCLEAN after every use'). | |
| The appliance is clogged. Switch the appliance off and remove the battery or 3-in-1 handheld. Then locate and remove the cause for the blockage (see 'Removing blockages from the Vacuum & Mop set-up'). After that, restart the appliance. If you do not identify the cause for the blockage, just restart the appliance. This might already solve the problem. | ||
| The floor is less wet than usual. | The wetting strips are blocked. Remove the two microfiber brushes, fill some water into the clean water tank and switch the appliance on. Make small forward and backward movements on the same position for around 15 seconds. You should be able to see four water stripes on the floor. If this is not the case, or if one or more water stripes only consist out of a few droplets, the wetting strips are partially or fully blocked and you can rinse them under the tap (see 'Clearing blockages from the wetting strips of the AquaSpin nozzle'). If that does not help, you can try to carefully open the holes with a needle. | |
| One side of the floor under the nozzle is less wet than the other one. | One of the two wetting strips is blocked. Remove the two microfiber brushes, fill the clean water tank with some water, and switch the appliance on. Make small forward and backward movements on the same position for around 15 seconds. You should be able to see four water stripes on the floor. If this is not the case, or if one or more water stripes only consist out of a few droplets, the wetting strips are partially or fully blocked and you can rinse them under the tap (see 'Clearing blockages from the | |
Problem Possible cause Solution
| wetting strips of the AquaSpin nozzle'). If that does not help, you can try to carefully open the holes with a needle. | ||
| There is no water on the floor. | The clean water tank is empty. Refill the clean water tank (see 'Using the Vacuum & Mop set-up'). | |
| The wetting strips are blocked. Remove the two microfiber brushes, fill the clean water tank with some water, and switch the appliance on. Make small forward and backward movements on the same position for around 15 seconds. You should be able to see four water stripes on the floor. If this is not the case, or if one or more water stripes only consist out of a few droplets, the wetting strips are partially or fully blocked and you can rinse them under the tap (see 'Clearing blockages from the wetting strips of the AquaSpin nozzle'). If that does not help, you can try to carefully open the holes with a needle. | ||
| If you have checked the above and there is still no water on the floor, take the appliance to a Philips service center or contact the Consumer Care Center. | ||
| There is more water on the floor or in the After-Clean tray than usual. | The water channel of the wet module and/or AquaSpin nozzle is polluted or blocked. | Use the cleaning brush and clean the water channel of the wet module and/or AquaSpin nozzle (see 'Removing blockages from the Vacuum & Mop set-up'). |
| The dirty water tank is not placed correctly. | Place the dirty water tank into the appliance properly (see 'AUTOCLEAN after every use'). It is closed correctly when you can hear a 'click' sound. | |
| The appliance leaves water traces on the floor. | You have moved the appliance sideways. | To prevent water traces on the floor, try to make less strong turns with your AquaTrio 9000 Series and avoid moving the appliance sideways. You can activate the water absorption mode by pressing the cleaning mode button. All the remaining water on your floor will be absorbed. |
| You made strong turns with the appliance. | To prevent water traces on the floor, try to make less strong turns with your AquaTrio 9000 Series and avoid moving the appliance sideways. You can activate the water absorption mode by pressing the cleaning mode button. All the remaining water on your floor will be absorbed. | |
| You have lifted the appliance over a threshold, carpet or | Make sure the microfiber brushes stay in contact with the floor. Make sure water | |
Problem Possible cause Solution
| stairs. absorption mode is switched on before you lift the appliance over a threshold, carpet or stairs to prevent water traces on the floor or to prevent water from splashing from the AquaSpin nozzle (see 'Usage restrictions'). | ||
| You lifted the appliance up from the floor immediately after you switched it off. | Switch on water absorption mode to absorb any remaining water. Move the appliance forwards and backwards a few times with water absorption mode engaged before switching it off. If you switch off the appliance and lift it up immediately afterwards, the water that was present between the brushes leaves a trace of water on the floor (see 'Usage restrictions'). | |
| The wheels are blocked. Check the condition of the wheels. Remove the dirt that blocks the wheels. | ||
| The appliance does not clean as well as it used to. | The clean water tank is empty. Refill the clean water tank (see 'Using the Vacuum & Mop set-up'). | |
| The water strips are blocked. Remove the two microfiber brushes, fill the clean water tank with some water, and switch the appliance on. Make small forward and backward movements on the same position for around 15 seconds. You should be able to see four water stripes on the floor. If this is not the case, or if one or more water stripes only consist out of a few droplets, the water strips are partially or fully blocked and you can rinse them under the tap (see 'Clearing blockages from the wetting strips of the AquaSpin nozzle'). If that does not help, you can try to carefully open the holes with a needle. | ||
| The inside of the AquaSpin nozzle is too dirty. | Run the AUTOCLEAN program before returning to cleaning. If there is dirt accumulation in the edges of the nozzle, remove it. Make sure to use the AUTOCLEAN function after each use (see 'AUTOCLEAN after every use'). | |
| The microfiber Brushes are not present. | Place the microfiber brushes in the AquaSpin nozzle (see 'AUTOCLEAN after every use'). | |
| If you have checked the above and the appliance still does not clean well, take it to a Philips service center or contact the Consumer Care Center. | ||
Problem Possible cause Solution
| Bigger dirt particles are not sucked up anymore and fall back on the floor. | The water channel of the wet module and/or AquaSpin nozzle is polluted or blocked. | Use the cleaning brush and clean the water channel of the wet module and/or AquaSpin nozzle (see 'Removing blockages from the Vacuum & Mop set-up'). |
| The floor dries with stripes. You may have used too much detergent. | Make sure to use the right amount of detergent (see 'Using the Vacuum & Mop set-up'). | |
| The wheels are dirty. Remove the dirt from the wheels. | ||
| There is too much foam while cleaning, but also during AUTOCLEAN. | You may have used too much detergent. | Make sure to use the right amount of detergent (see 'Using the Vacuum & Mop set-up'). |
| There are still detergent residues on the floor. | Clean the floor without detergent several times. Wait a moment before going over the same stain again. | |
| It is difficult to clean stains. You may have used too little water or taken too little time to clean the stain. | Apply water and wait a moment. For example you can go with the appliance over the stain to apply water and come back to the same stain in the end of the cleaning session. | |
| The sound of the appliance changed while cleaning. | There might be hairs or other obstacles entangled around the microfiber brushes | Remove the microfiber brushes and check for obstacles and remove them (see 'Cleaning the AquaSpin nozzle'). |
| The display indicates that the dirty water tank is full (code: i1) and shuts down, although the dirty water tank is not full yet. | There may be foam or contamination of the dirty water tank. | Restart the appliance. If that does not solve the problem, clean the dirty water tank. If foaming is the issue, make sure you do not use more than the recommended amount of detergent (see 'Using the Vacuum & Mop set-up'). |
| Water drips out of the appliance after it is switched off. | The appliance leaves a puddle on the floor because you did not move it while switching it off. This is normal. | The appliance can leave a small puddle of water on the floor if you do not move the appliance while switching it off. You can reduce the size of the puddle by moving the appliance while switching it off. When you switch off the appliance, it will switch to water absorption mode or 4 seconds to clean up any water remaining in the nozzle. If needed, you can remove the last drops with a cloth. |
| The appliance is dripping when carrying it over the floor (holding it in the air). | While cleaning, do not lift the AquaSpin nozzle from the floor, as this leaves water traces. Only move forwards and backwards. | |
| Water leaks from the clean water tank because you overfilled the clean water tank. | Do not fill the clean water tank beyond the MAX indication. If you do, water may spill from the clean water tank when you fasten the cap (see 'Using the Vacuum & Mop set-up'). | |
Problem Possible cause Solution
| There is a crack in one of the tanks. | If one of the tanks is damaged, take it to a Philips service center or contact the Consumer Care Center. | |
| I cannot remove the microfiber brushes. | Hair and/or dirt is entangled in the microfiber brushes. | Use the cleaning brush handle to remove the microfiber brushes from the AquaSpin nozzle. Remove entangled hair or dirt (see 'Cleaning the AquaSpin nozzle'). If it is difficult to pull the brushes out, you can give them a push from below the AquaSpin nozzle. |
| I cannot move the appliance forward or backward. | One or more wheels may be blocked by a small object. | Switch off the appliance and remove the nozzle. Then check the small and the big wheels for blockage. Remove any object that could block the wheel(s). Put the appliance upright again and resume cleaning. |
| The appliance has a lower suction power than usual. | The water channel of the wet module and/or AquaSpin nozzle is polluted or blocked. | Use the cleaning brush and clean the water channel of the wet module and/or AquaSpin nozzle (see 'Removing blockages from the Vacuum & Mop set-up'). |
| The mesh in the dirty water tank was not dry enough before being used again. | Clean and dry the dirty water tank. | |
| Hair entanglement on the microfiber brushes. | Switch the appliance off and remove the hair from the microfiber brushes (see 'Cleaning the AquaSpin nozzle'). | |
| The dirty water tank is not placed correctly. | Place the dirty water tank into the appliance properly (see 'AUTOCLEAN after every use'). It is closed correctly when you can hear a 'click' sound. | |
| The microfiber brushes do not turn anymore | The microfiber brushes are clogged with hair or dirt. | Clean the microfiber brushes with a pair of scissors or by hand (see 'Cleaning the AquaSpin nozzle'). |
| The microfiber brushes pop out. | The microfiber brushes are not locked correctly. | Place the microfiber brushes back in the right position and lock them. |
| The appliance is not charging. | The power plug is not connected properly to the socket or the adapter is not inserted into the wall socket properly. | Make sure that the power plug is connected properly to the socket and that the adapter is inserted into the wall socket properly. |
| The battery is not in. Please insert the battery. | ||
| The battery is not completely inserted. | Please insert the battery until you hear a click sound. | |
| Wrong adapter connected. Please use the original adapter. |
Problem Possible cause Solution
| If you have checked the above and the appliance still does not charge, take it to a Philips service center or contact the Consumer Care Center. | ||
| When I use my vacuum cleaner I sometimes feel static electricity shocks. | Your vacuum cleaner builds up static electricity. The lower the air humidity, the more static electricity the appliance builds up. | Make sure to touch the metal pin with your hand while holding the appliance. |
| You vacuumed up dust and dirt. This also causes static electricity. | Make sure to touch the metal pin with your hand while holding the appliance. |
Using the Vacuum only set-up
Problem Possible cause Solution
| The appliance does not work when I push the on/off button. | You did not connect the battery. | Connect the battery to the 3-in-1 Handheld. |
| The battery is empty. To charge the battery, connect the 3-in-1 Handheld with the charger (see 'Charging'). | ||
| You pushed the on/off button more than one time. | Wait a few seconds and push the on/off button again one more time. | |
| You did not connect the 3-in-1 Handheld to the appliance correctly. | Connect the 3-in-1 handheld correctly to the dust bucket. | |
| The appliance is clogged. Switch the appliance off and remove the battery or powerhouse. Then locate and remove the cause for the blockage. After that, restart the appliance. If you cannot identify the cause of the blockage, restart the appliance. This might already solve the problem. | ||
| The roller brush is stuck. Take the roller brush out and remove any hair around the brush and the motor and place it back (see 'Cleaning the roller brush'). | ||
| It is not possible, to connect the 3-in-1 Handheld to the dust bucket. | The filter case is assembled upside down. | Invert the filter case. The round opening should be visible (see 'Cleaning the dust bucket'). |
| The filter case is not closed properly. | Make sure you hear a click when closing the filter case. If it is difficult to close, the foam filter is probably placed upside down. | |
Problem Possible cause Solution
| The appliance stopped working. | You accidentally touched the on/off button with your hand. | Switch on the appliance by pushing the on/off button. |
| The appliance is clogged. Switch the appliance off and remove the battery or powerhouse. Then locate and remove the cause for the blockage. After that, restart the appliance. If you cannot identify the cause of the blockage, restart the appliance. This might already solve the problem. | ||
| The sound of the appliance changed while cleaning. | There might be hairs or other obstacles entangled around the roller brush. | Please check for obstacles and remove them (see 'Cleaning the roller brush'). |
| Obstacles are blocking the cyclone. | Check the cyclone for obstacles and remove them (see 'Cleaning the cyclone'). | |
| The appliance has a lower suction power than usual. | The filter and/or the cyclone are dirty. | Empty the dust bucket. Clean the filter and the cyclone. Make sure that you remove any hair and dirt that is stuck in the cyclone. You can remove the cyclone for easy maintenance (see 'Cleaning the cyclone'). Make sure that you wash the filter at least once a month if you use the appliance regularly (see 'Cleaning the filter'). |
| Something is blocking the cyclone. | Check the cyclone for objects stuck in it and remove any object that is blocking the cyclone. Make sure that you remove any hair and dirt that is stuck in the cyclone (see 'Cleaning the cyclone'). | |
| The suction channel behind the roller brush is clogged. | Remove the roller brush and check the suction channel for obstacles and remove them. | |
| You have not attached the filter case properly to the dust bucket or you have not attached the dust bucket properly to the appliance. In both cases, there will be a loss of suction power. | Make sure that you attach the filter case to the dust bucket and the dust bucket to the appliance properly (see 'Cleaning the dust bucket'). | |
| The brush is clogged with hair or dirt. | Switch the appliance off and clean the roller brush with a pair of scissors or by hand (see 'Cleaning the roller brush'). | |
| Dust escapes from the appliance. | The foam filter is not present in the filter case, or the top cover is missing. | Make sure that the filter is in the appliance and assembled correctly (see 'Cleaning the filter'). |
Problem Possible cause Solution
| Dust escapes when opening the dust bucket. | This is normal behavior due to underpressure. | If possible, open the appliance outside. |
| The filter cleaning icon is shown on the display and the device shuts down. | The filter may be dirty. We advise you to clean the filter. If you cleaned the filter recently, you can disregard this icon. To continue vacuuming, click the arrow icon. | |
| The appliance does not move smoothly across the floor when I am cleaning a carpet. | You selected a too high suction power. | Reduce the suction power by choosing setting 1 or move more slowly over the carpet. |
| The roller brush does not turn anymore. | The roller brush is clogged with hair or dirt. | Clean the roller brush with a pair of scissors or by hand (see 'Cleaning the roller brush'). |
| The roller brush may stop turning when it encounters too much resistance from high-pile carpet. | Switch off the appliance and then switch it back on again. | |
| You have not assembled the roller brush into the nozzle properly after cleaning. | Follow the instructions in this user manual to slide the roller brush into the nozzle properly (see 'Cleaning the roller brush'). Secure the roller brush inside the nozzle by snapping the locking lever in place. | |
| The LEDs in the nozzle do not turn on. | You have not attached the nozzle to the tube or appliance properly. | Attach the nozzle to the tube or appliance properly. If this does not help, please take it to a Philips service center or contact the Consumer Care Center. |
| The appliance is not charging. | The plug is not connected properly to the socket-outlet or the adapter is not inserted into the wall socket properly. | Make sure that the plug is connected properly to the socket-outlet and that the adapter is inserted into the wall socket properly. |
| The battery is not in. Please insert the battery. | ||
| The battery is not completely inserted. | Please insert the battery until you hear a click sound. | |
| Wrong adapter connected. Please use the original adapter. | ||
| If you have checked the above and the appliance still does not charge, take it to a Philips service center or contact the Consumer Care Center. | ||
| The Mini Turbo brush does not function properly. | The roller brush is blocked. Remove hairs from the brush with a pair of scissors (see 'Cleaning the Mini Turbo brush'). | |
| The roller brush is blocked by fabric or surfaces during cleaning. | Keep the mini Turbo brush aligned with the surface and do not push the Turbo brush into soft surfaces. | |
Problem Possible cause Solution
| The roller brush is not properly inserted into the nozzle. | Make sure the the roller brush is properly inserted into the nozzle and that there is no gap between the parts (see 'Cleaning the Mini Turbo brush'). | |
| When I use my vacuum cleaner I sometimes feel static electricity shocks. | Your vacuum cleaner builds up static electricity. The lower the air humidity, the more static electricity the appliance builds up. | Make sure to touch the metal pin with your hand while holding the appliance. |
| You vacuumed up dust and dirt. This also causes static electricity. | Make sure to touch the metal pin with your hand, while holding the appliance. | |
| Error code 'E2' appears on the display. | The temperature is too low. Make sure the temperature in the room where the appliance is used, stored, or charged is above 5 °C. | |
| Error code 'E3' appears on the display. | The temperature is too high. Make sure the temperature in the room where the appliance is used, stored, or charged is below 35 °C. Do not expose the device to direct sunlight or high temperatures (near hot stoves, in microwave ovens, or on induction cookers). Batteries may explode if overheated. | |
| If you have checked the above and the appliance still does not charge, take it to a Philips service center or contact the Consumer Care Center. | ||
Obsah
Uvod 52
Vseobecn' popis 52
Prid prvnim pouzitim 53
Nabijení 56
Vysavani a vytirani tvrdych podlah 57
Vysavani mekkych a tvrdych podlah 62
Čišění sestavy vysavače a mopu 67
Čišění sestavy samotného vysavače 76
Ikony na displeji a jejich vyznam 84
Vymena 87
Reşení problema 87
Používáni sestavy samotného vysavače 93
Uvod
Dekujeme za zakoupeni tohoto vyrobku Philips. Chcete-li plne vyuzivat vyhod, které nabizi spolecnost Philips, zaregistrujte vyrobek na adrese
www.philips.com/myvacuum9000s.
Všeobecný popis
1 Tlačítko uvolněné prachové nádoby
2 Displej
3 Tlačítko režimu Čištěné
4 Prostřední tlacítko (AUTOCLEAN)
5 Vypínač
6 Baterie
7 Ručné vysavač 3 v 1
8 Prachová nádoba
9 Nastěnný držák
10 Trubice
11 Hubice LED
12 Mini Turbo kartáč
13 Dlouha sterbinová hubice
14 Adapté
15 Napajeci zastrcka
16 Náhradnínabíječka (pouze model XW9385)
17 Stojan pro odlození a uskladnéni
18 Držák prístroje
19 Tacek odklacico stojanu
20 Základna
21 Mokrý modul
22 Nádržka na špinavou vodu
23 Nádržka na Čistou vodu
24 Hubice AquaSpin
25 Kartáče z mikrovlák
26 Prostredek na cisteni podlah Philips XV1792
27 Cistici kartac
Před prvním použitím
Sestavení odkládacího/skladovacího stojanu

Abyste mohli používat funkci AUTOCLEAN nebo ukládat a nabíjet prístroj v odkládacím/skladovacím stojanu, musité stojannejprve sestavit zacvaknutím držák upristroje do základny.

Tip: Pokud chcete umistit sestavu samotného vysavače na druhou stranu odkladaciho/skladovacího stojanu, je možné úchytku pro sestavu samotného vysavače vysunout a vrát ji na mistro zpět obracenou vzhúru nohama.
i Poznámka: Ujistěte se, Že tacek odklacího stojanu je v základné a Že teplota v mistrnosti, kde se prístroj skladuje, nabíjnebo Čistí, je v Rozmezi od 5 °C do 35 °C.

Tip: Kartáček múžete zavěsit na háček držák u prístroje.
Instalace nástěnného držák
Pokud chcete sestavu samotného vysavače ukládat a nabíjet v nástenném držák, pripevněte nástěnný držák pomoci dodaních šroubů ke stěné. Ujistěte se, ze je nástěnný držák ve vyšce 140-150 cm nad podlahou.
i Poznámka: Do nastěnného držák uneni možné ukládat sestavu vysavače a mopu. Do nastěnného držák lze ukládat pouze sestavu samotného vysavače.
Poznámka: Ujistěte se, ze teplota v mistrosti, kde se prístroj skladuje nebo nabíji, je v Rozmezi od 5 °C do 35 °C.
Upozorněni: Při vrtáni otvorů do stěny může dojít k urazu elektrickým proudem, budte proto opatrní.
Sestavení sestavy vysavače a mopu

1 Chcete-li sestavit sestavu vysavače a mopu, zaunte baterii a pripevněte ručni vysavač 3 v 1 k modulu pro mokré vysávání (“zacvaknéte”).
2 Pripevnete modul pro mokre vysavani k hubici AquaSpin (,zacvaknete").
3 Sestavu vysavače a mopu muzete ulozit do odkladacího/skladovacího stojanu.
i Poznámka: Do nastěnného držák uné moźne ukládat sestavu vysavače a mopu. Do nastěnného držák lze ukládat pouze sestavu samotného vysavače.
Sestavení sestavy samotného vysavače
1 Chcete-li sestavit sestavu samotného vysavače, pripevněte ručné vysavač 3 v 1 k nádobě na prach ("zacvaknéte").
2 Nasad'te nádobu na prach k sací trubici ("zacvakněte").

3 Vložte do hubice LED sací trubici.
4 Chcete-li uschovat sestavu samotného vysavače, umistěte ji do odkládacího/skladovacího stojanu tak, ze nejprve umistíte hubici LED na delsī stranu základny a poté zatlacité saci trubici do držáku.
Tip: Pokud chcete umist sestavu samotného vysavače na druhou stranu odkládaciho/skladovacího stojanu, je možné uchytku pro sestavu samotného vysavače vysunout a vrátit ji na mistro zpět obracenou vzhúru nohama.

Nabijeni

Přistroj je vybaven 25V bateri Li-lon. Nabijeni trva 4 hodiny.
1 Chcete-li pristroj nabit,zasunte napajeci zastrcku do konektoru na zadní strane pristroje. Poté adaptorz zapojte do sitové zasuvky.
2 Na displeji začne blikat hodnota mezi 0% a 90% na znameni, ze se pristroj nabiji.
3 Jakmile se pristroj plne nabije, na displeji se Rozsviti hodnota 100% . Po pár minutách se displej automaticky vypne.
Varování: Prístroj uschováveje a nabíjeje prí teploté v Rozmezi 5°C a 35°C.
Tip: Prístroj lze nabijet tehy, když je uložen na nástenný držák.
Tip: Pristroj lze nabijet v odkládacím/skladovacím stojanu.
Tip: Pristroj mužete nabíjet samostatné na miste, které vám nejlépe vyhovuje.
Vysávání a vytíráni tvrdych podlah
Používání sestavy vysavače a mopu
Nádržka na Čistou vodu a nádržka na špinavou vodu jsou k pristroji pripojeny již pri dodání. Po pripevní modulu pro mokré Čistění k hubici AquaSpin mužete Čistit tvrdé podlahy.
i Poznámka: Tato sestava vysavače a mopu je vhodná pro současné vysávání a mopovány. Podlahu není nutné prěd vytiráním vysát.
Tato sestava vysavače a mopu je vhodná pro současné vysávány a mopovány
všech typů tvrdych podlah s výjimkou d'revněch podlah (viz 'Omezení použití) bez pocrchove upravy.
1 Chcete-li sestavit sestavu vysavače a mopu, zaunte baterii a pripevněte ručné vysavač 3 v 1 k modulu pro mokré vysávány (“zacvaknéte”).

2 Připevněte modul pro mokré vysávání k hubici AquaSpin ("zacvaknéte").

3 Stisknutim tlačitka uvolněte nádržku na Čistou vodu a poté nádržku vyjměte.
4 Sejměte uzáver z nádržky na Čistou vodu.
5 Do nádržky na Čistou vodu pridejte 10 ml prostředku na Čistěné podlah Philips XV1792.
Upozorněni: Společnost Philips testovala tento prístroj pouze s prostředkem na Čistěné podlah Philips XV1792. Jine Čistíci prostředky mohou věst k nadměrněmu pěnéni, které snižuje vykon a muže způsobit poruchu prístroje. Prostředek na Čistěné podlah Philips XV1792 je k disposizici na vybranych trzich. Při použití jiného vchodného tekutého prostředku na Čistěné podlah pridejte do nádržky na Čistou vodu maximálné 10 ml.

6 Nádržku na Čistou vodu naplhte studenou nebo vlaznou vodou z vodovodu až po značku MAX.
Upozorněni: Voda z vodovodu, ktera se nahévá do nádržky na Čistou vodu, nesmí byt teplejší než 50 °C.

7 Nasadte uzavér zpět na nádržku na Čistou vodu.

8 Nasadte nadrzku na cistou vodu zpe t do pristroje.

9 Chcete-li pristroj zapnout, stisknete tlacitko zapnuti/vypnuti a pocekjte, dokud nebude pripraven k pouziti.
10 Pomoci tlačitka režimu Čištení muzete volit mezi třemi ruznými nastaveními:
Normání mokrý režim
- Intenzivní mokrý režim
Rezim absorbpe vody
Pokud zvolite normálí vodni režim, muzete prístroj používat k beznému mokrému Čistěné. Intenzivní mokrý režim je určen pro Čistěné mimorádně odolněch skvrn.
Pokud po uklidu zustanou na podlaze mokre skvrny, muzete zvolit absorbpcnreizim a vycistit je. Tento reizim rovnéz doporučujeme použivat pri prénáseni pristroje prés prah, koberec nebo schody (viz Tipy a dalši duležite informace').
Pokud zvolite režim absorpce vody, pristroj prestane dodávat vodu a na 45 sekund zvyši sací vykon, aby absorboval veškerou vodu na podlaze.
i Poznámka: Staré modely mají normálí mokrá režim a intensivné mokrá režim, ale nemají režim absorbpce vody.
Systém aktivné ochrany
- Tento prístroj je vybaven systémem aktivní ochrany. Tento systém aktivní ochrany byl navržen tak, aby Rozpoznal, kdy je z podlahy zachycen neznámý prěděmt jíný než nečistota nebo kapalina.
- Po aktivaci tohoto systému se prístroj vypne a na displeji (viz 'Ikony na displeji a jejich vyznam') se zobraź zpráva i3. Systém aktivné ochrany se muże aktivovat také v pripadě, ze jsou kartace z mikrovláken prilis mokré, když se prístroj pohybuje po koberci nebo rohoži nebo když se pohybuje po podlaze, ktera není rǎdně pripevněna.
Tipy a dalsí duležité informace
- Pred mopováním není nutné podlahu vysávat, protoze sestava vysavace a mopu aktivné mokře cistí tvrdou podlahu a zachycuje vsechny druhy necistot, včetné tekutin a skvrn. Na koberce a rohože používejte sestavu samotného vysavace.
- Pokud vase tvrde podlahy nepotbrebuji vytrit, pouzijte Jednoduše sestavu samotného vysavače, ktera je vybavena světly LED a technologii PowerCyclone 12 pro přesné a vykonné sbíráné nečistot.
S pristrojem se muzete pohybovat stejnre rychle jak s vysavaem. Chcete-li odstranit odolné skvrny, stisknutim tlacitka cisteni aktivujte rezim intenszivniho mokreho cisteni a pomalu pristrojem pohybujte pres skvrny. - Pri prénásení prístroje prés prah, koberec nebo schody během uklidu doporučujeme aktivovat režim absorpce vody. Tim zabrónite odkapávání spinavé vody z hubice AquaSpin.
- Po vypnuti pristroje muze na podlaze zustat mala louze vody. Velikost teto louze muzete snizit tak, ze pred vypnutim pristroje aktivujete rezim absorbpe vody. Se zapnutym rezimem absorbce vody pohybujte pristrojem opakované dopre du a dozadu. V priade potreby muzete posledni kapky odstranit hadrikem.
- Pri premistovani pristroje doporučujeme protáhnout paži, abyste snizili zbytečné napétí svalu. V takové poloze budete mit pristroj pri Čištěné nejlépe pod kontrolou a zároven to prydstavuje tennejpohodlnějs ziþusob.
i Poznámka: Starši modely mají normální mokrá režim a intenszivné mokrá režim, ale nemají režim absorpce vody. U těchto modelů prístrojem pri yvpínáni pohybujte, abyste snizili množstvý vody na podlaze. Pri prenašné prístroje prěs práh, koberec nebo schody během uklidu také doporučujeme nechat prístroj zapnutý. Tim zabránité odkapávány špinavé vody z hubice AquaSpin.
Omezení použití
- Tato sestava vysavače a mopu je vhodná pro současné vysávání a mopoványí všech typů tvrdých podlah s vyjimkou dřevěných podlah bez povrchové upravy.
- Sestava vysavače a mopu je určena pro pravidelné Čistěné tvrdych podlah. Pri používáni tohoto prístroje vždy postupujte podlePokynů pro Čistěné pro vaši tvrdou podlahu.
- Chcete-li do nádržky na Čistou vodu pridat tekuty prostředek na Čištěné podlah jiný než Philips XV1792, používejte vyhradně takový prostředek, který pěné ráno nebo vůbec a je Rozpustné ve vodě, stejně jako prostředek na Čištěné podlah Philips XV1792.
- Objem nádržky na Čistou vodu je 400 ml. Do vody proto stači pridat pouze několik kapek (max. 10 ml) tekutého prostředku na Čistěné podlah.
- Pokud použijete sestavu vysavače a mopu na podlahy z linolea, ujistěte se,Že jsou správně upevněné, aby nedocházelo k nasávání linolea do hubice AquaSpin.
- Sestavu vysavače a mopu nepoužívejte k Čištěné koberců.
- Pokud s vypnutym pristrojem pohybujete nebo jej zvedate nad koberec nebo rohožku, mohou na koberci nebo rohožce skončit kapky odpadni vody.
- Nepřejížděje prístrojem prěs ventilacné mřížky podlahového topení. Na mřížce prístroj není schopen vysát vodu, ktera vyteká z hubice, a voda pak zateče do topného tělesa.
- Pri Čistěné nezvedeje tuhici AquaSpin z podlavy, nepohybjte s ní do stran a neprovádejte prudké otáčky, protože by zanechávala stopy vody. Pohybjte přistrojem pouze směrem dopředu a dozadu.
i Poznámka: Provozní doba závisí na urovní vykonu použité během Čistěné.
i Poznámka: Staré modely mají pouze normální mokrá režim a intenszivné mokrá režim; nemají režim absorbce vody.
Vysávání měkkych a tvrdych podlah
Používáni sestavy samotného vysavače

1 Chcete-li vysavat mekke nebo tvrde podlahy, pripevnete rucnivysava 3 v 1 k nadob na prach (zacvakne).
Upozorněni: Ručné vysavač 3 v 1 nepřipevnujte k prachové nádobě, dokud není do nádoby na prac h vloženo pouzdro s filtrém.
2 Nasad'te nadobu na prach k saci trubici (,zacvakne)

3 Vložte do hubice LED sací trubici.

4 Chcete-li pristroj zapnout, stisknete tlacitko zapnuti/vypnuti a pocekjte, dokud nebude pripraven k pouziti.
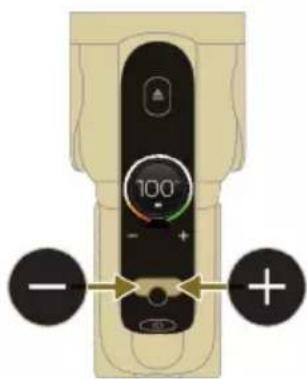
5 Pomoci tlačitek vlevo vpravo mžete volit mezi dvěma nastaveními vykonu.

Tip: LED diody v LED hubici zvyšují viditelnost nečistot na podlaze. Sáci trubice a LED hubice umožnují dosáhnout pod nízký nábytek, aniž syste museli prístrojem otáčet.

Varování: Nevysávejte vodu ani jiné tekutiny.
Upozorněni: Nedívejte se prímo do LED diod hubice ani nemířte LED diodami nikomu do oči. LED dioda je velmi jasná.
Používání trubice
Trubici muzete pripojit k ručínu vysaváči a používat ji bez hubice k vysáváni uzkých prostor mezi nábytkem nebo za nim.


Tip: K trabici je moźne pripojit také mini Turbo kartáč.
Tip: K trabici je také moźne przyposji dlouhý sterbinov'y nástavec.
Používáni ručniho vysavače

Bez hubice a trabice muzete rucni vysavac pouzivat k uklidu mensich mist s prachem a necistotami, jako jsou rozsypané drobky, nebo k vysavani schodu a polic.
Varování: Nevysávejte vodu ani jiné tekutiny.
Používání LED hubice
LED hubici muzete pouzit k uklidu mistr, jako jsou schody na schodi sti, k vysavani necistot v Rozich nebo na uzkych rimsach nebo k uklidu malch necistot, jako jsou rozsypan drobky.
1 Chcete-li pripevnit LED hubici,zasu nte trubici nebo rucnif vysavae do hubice.

2 Chcete-li LED hubici sejmout, stiskněte tlacitko pro uvolnéni (1) a vytáhněte trubici nebo ručné vysavač z hubice (2).
Varování: Nevysávejte vodu ani jiné tekutiny.
Použití mini Turbo kartáče
1 Chcete-li mini Turbo kartáč nasadit, zasuţe trubici ručniho vysavace do mini Turbo kartáče.

2 Mini Turbo kartáč muzete používat například k bežnému Čistěné měkkych ploch, jakůsou postele a pohovky. Nastavení vykonu muzete upravit podle svych potřeb.

3 Mini Turbo kartáč muzete používat k mimořádně dūkladnému Čistěné, například k vysávány chlupů domácích mazláčků nebo k Čistěné malých nečistot, jako jsou rozsypné drobky. Nastavení vykonu muzete upravit podle svych potřeb.
4 Chcete-li mini Turbo kartáč sejmout, stisknéte tlacitko pro uvolnéni (1) a vytáhněte ručné vysavač z mini Turbo kartáče (2).

Varováni: Nevysávejte vodu ani jiné tekutiny.
Používáni dlouhého štěrbinového nástavce
1 Chcete-li pripevnit dlouhy sterbinovy nastavec,zasunte trubici nebo rucni vysavač do dlouheho sterbinoveho nastavce.

2 Dlouhý sterbinový nastavec mužete použít k vysávani uzkych rohu nebo obtízně pristupních mistr. Nastavení vykonu mužete upravit podle svych potřeb.

3 Chcete-li dlouhý stěrbinový nastavec sejmout, stisknéte tlacitko pro uvolnéni (1) a vytáhněte trubici nebo ručné vysavač z dlouhého stěrbinového nástavce (2).

Varování: Nevysávejte vodu ani jiné tekutiny.
Čistěné sestavy vysavače a mopu
Po kaźdem czistění spustte funkci AUTOCLEAN

Abyste zabrani zapachu a usazovani vodniho kamene, pouzivejte po kazdém použiti funkci AUTOCLEAN. Režim AUTOCLEAN umoznuje vyčistit celý prístroj přibližné za 4 minuty.
1 Uložte sestavu vysavače a mopu do odkladaciho/skladovacího stojanu.
i Poznámka: Pokud je hladina špinavé vody pod urovní funkce AUTOCLEAN, není třeba nádržku vyprázdnit préd spustěném funkce AUTOCLEAN. Následujíc kroky muzete prěskočit a prějít ke kroku 6.
2 Stisknutim tlačítka uvolněte nádržku na špinavou vodu a vyjměte ji.

3 Vyjměte mokrá filtr z nádržky na špinavou vodu.
4 Vylijte vodu z nadrzky na spinavou vodu do vylevky.
5 Vložte mokrý filtr zpět do nádržky na špinavou vodu.

6 Vložte prázdnou nádržku na špinavou vodu zpět do prístroje a vyjměte nádržku na Čistou vodu.

7 Sejměte uzáver z nádržky na Čistou vodu.


8 Zbytek Čisticího prostředku z nádržky na Čistou vodu vyljte do výlevky.
9 Nádržku na Čistou vodu naplěte studenou nebo vlăznou vodou z vodovodu alespoř po značku AUTOCLEAN.
Upozorněni: Voda z vodovodu, ktera se nahévá do nádržky na Čistou vodu, nesmi být teplejínež 50 °C.
A Upozorneni: Funkci AUTOCLEAN nepoužívejte s cisticím prostředkem, protoze by mohlo dojt k nadměrnému pěnéni.
10 Nasadte nadrzku na chistou vodu zpét do prístroje.
11 Pristroj nabijte. Zapojte napajeci zastrcku do konektoru na zadni strane pristroje. Poté adapter zapojte do sitové zasuvky.

12 Cyklus AUTOCLEAN zahajite stisknutim prostreednio hlačitka. Pokud se zobrazije Černý displeje,nejprve displeje aktivujte stisknutim tlačitko pro zapnuti/vypnuti
13 Pristroj providc cyklus AUTOCLEAN.
i Poznámka: Cyklus AUTOCLEAN trva príbližné 4 minuty. Nejlepšich vysledkú dosáhnete, když necháte cyklus AUTOCLEAN proběhnout až do konce. Cyklus AUTOCLEAN můžete kdykoli pozastavit nebo zrušit.
i Poznámka: Pokud zrušite program AUTOCLEAN, prístroi bude asi 10 sekund vysávat zbývající vodu v táčku v odkláDACÍM stojanu.
14 Stisknutim tlacitka uvolnete nadrzku na spinavou vodu a vyjmte ji.
15 Vyjměte mokrá filtr z nádržky na špinavou vodu.
16 Vylije vodu z nádržky na špinavou vodu do vylevky.

17 Ocistete nadrzku na spinavou vodu pod tekouci vodou.
18 Očistěte mokrá filtr pod tekouci vodou.
19 Před nasazením zpět na nádržku na špinavou vodu nechte mokrá filtr nádržky a jeho průtokový prvek zcela vyschnout.

20 Vlozte mokrý filtr zpět do nádržky na špinavou vodu.

21 Nasad'te nadrzku na spinavou vodu zpe't do pristroje.

22 Otočte kartáci z mikrovlákten proti směru hodinovych ručíček (1) a vyjměte je z hubice AquaSpin (2).
Tip: Pokud se kartáč z mikrovlák nedaří vyjmout, mžete k jeho uvolnéni použít rukojet Čisticího kartáče.

23 Aby kartáce z mikrovláken mohly rădné uschnout, položte otevřene konce kartáčū na určené držáky v odkladacim/skladovacim stojanu.
i Poznámka: Proceschnuti muge trvat priblizne 24 hodin.
Čistěni tácku v odkládacím stojanu
Pokud se tacek v odkladacim stojanu zaispin, muzete jej vycistit podle nasledujicich krok.

1 Vyndeje tacek ze stojanu.
2 Oplachnete tacek pod tekouci vodou a nechte jej oschnout, nezh o do stojanu vlozite zpet.

3 Dbejte na to, abyste tacekPokazde vratili zpet do odkladaciho stojanu. Tacek je pro spravnou funkci AUTOLEAN nezbytny.
Čistění hubice AquaSpin

1 Otočte kartáci z mikrovlákten proti směru hodinovych ručíček (1) a vyjměte je z hubice AquaSpin (2).

Tip: Pokud se kartáč z mikrovlák nedaí vyjmout, mžete k jeho uvolnéni použit rukojet Čisticího kartáče.

2 Zamotané vlys nebo vlákna muzete z kartáču z mikrovláken odstranit sklouznutím prsty.
Tip: Ke střihní chloupků a vláken, které se zapletly do kartáčů z mikrovlák, mžěte také použít núžky.
Odstrańovani prekážek v sestavě vysavače a mopu
Sada vysavače a mopu se mûze ucpat. Toho si mûžete všimnout, když se na podlahu dostane vice vody než obvykle nebo když větsí Částice nečistot prēstanou být nasávány a padaj zpět na podlahu. Niže naleznete pokyny k odstraněni prěkážek v rúznych Částech sestavy vysavače a mopu.
Odstrańovani prekážek z modulu pro mokré czistěné
Pokud dojde k ucpani modulu pro mokre cisteni,nejprve pristroj vypnete a vyjmte hubici AquaSpin a rucni vysava3 v 1. Pote prekazku odstrahte pohybeb cisticico h cartace nahoru a dolu v sacim kanalu modulu pro mokre cisteni.
Odstrańovani prękázek z hubice AquaSpin
Pokud je hubice AquaSpin ucpana, lze ji odblokovat pohybeb Čisticího kartáče nahoru a dolú v sacím kanálu hubice AquaSpin.
Odstrańovani prekážek ze smáčecích pasků hubice AquaSpin

Po dlouhém a Častém používání prístroje se mohou ucpat smáčecí proužky hubice AquaSpin. Při odstražování prekázek ve smáčecích pascích hubice AquaSpin postupujte podle nizě uvedenychPokynů.
1 Sejměte kryty smáčecího proužku z hubice AquaSpin tak,Že je posunete do strany.
2 Sejměte smáčecí proužky z hubice AquaSpin tak,Že je vysunete do strany.
3 Očistěte smáčecí proužky pod tekouci vodou.

4 Před vlozením zpět na hubici AquaSpin nechte smáčecí proužky uschnout.
Čistěné sestavy samotného vysavače
Vyprázdnéni nádoby na prach
Pravidelné vyprazdnujte nádobu na prach a dbejte na to, aby hladina nečistot nikdy nepřekročila indikátor „Max". Tim se zabrání zrychlenému zanašeni filtru.

1 Stisknutim tlacitka pro uvolneni (1) uvolnete ručni vysavač 3 v 1 z nádoby na prac h a poté ručni vysavač 3 v 1 zdvihněte z prístroje (2).
2 Vytáhněte pouzdro filtracného valce z nádoby na prach.

3 Vyprázdněte nádobu na prach do odpadkového koše.
4 Pouzdro filtracniho valce vlozte zpět do nádoby na prach.

5 Znovu pripevnete ručni vysavač 3 v 1 k nádobě na prach. Ujistěte se, ze nejprove pripevnujete zadné cást, a poté pripevněte prední cást, ktera se pak s cvaknutim zajisti na mistě.
Čistěné nádoby na prach
1 Chcete-li yvciistit nadobu na prach a cyklon, vyjmte pouzdro filtracnioho valce.

2 Vyprázdne tě nádobu na prach do odpadkového koše.
3 V prépadé potreby cyklon vyjměte a vyčistěte (viz 'Čištěné cyklonu').

4 Pokud chcete, muzete vlhkym nebo suchym hadrikem vycistit vnitrek nadoby na prach.
i Poznámka: Dbeje na to, aby elektronické konektory nenavlhly. Pokud elektronické konektory navlhnou, nechte je préd dalşim použitim pristroje vyschnout. Prístroj vždy používejte se suchými elektrickými konektory. Tim lze prédejit nasprávné funkci pristroje, k niz by po čase mohlo dojt.
Varováni: Nádobu na prach neumyvejte v mycce na nádobí.
Varování: Nádobu na prach neoplachujte pod tekouci vodou.
5 Jakmile bude nádoba na prach suchá, nasadte zpět pouzdro filtračniho valce.
6 Znovu pripevnéte ručni vysavač 3 v 1 k nádobě na prach.
A Upozorneni: Ručni vysavač 3 v 1 nepřipevnujte k prachové nádobě, dokud není do nádoby na prac h vloženo pouzdro s filtrém.
Čistěné cyklonu
1 Otočte cyklon ve směru hodinovych ručíček (1) a sejměte ho z nádoby na pracch (2).
2 Odstraţe vlasy a nečistoty ucpané v cyklonu a pod ním.

3 Pokud chcete, cyklon muzete oplachnout pod tekouci vodou.

i Poznámka: Cyklon préd opětovným uložéním do nádoby na prach nechte vždy dūkladné vyschnout.

4 Vratte cyklon zpět (1) a otočením proti směru hodinovych ručíček (2) jej upevněte zpět do nádoby na prach.

Upozorneni: Dbeje na to, abyste cyklon pri zpětném nasazováni zcela utáhli. Otačejte cyklonem, dokud se nebude moci dále otáčet a dokud nebude zcela zajistěn.
Čistěné filtru

Jakmile bude nutné vyčistit filtr, na displeji se zobráží ikona Čišění filtru.

1 Vytáhněte pouzdro filtracného valce z nádoby na prach.


2 Stisknutim tlacitka pro uvolneni otevrete viko pouzdra filtracniho valce a vyjmete penovy filtr.
Upozornéni: Dbeje na to, aby se viko pouzdra filtracniho valce behem cistén nenamočilo.
3 Protrepejte pénovy filtr nad odpadkovym kosem, abyste odstranili vrstvunečistot na horní strane pénového filtru. Poté filtr umyje pod tekouci vodou.
4 Stlacenim pěnoveho filtru odstraťe vodu.
5 Protrepejte pouzdro a vko filtraciho valce nad odpadkovym kosem, abyste odstranili prach.
6 Vycistete drzak filtru navlhcenym hadrikem.
Upozorneni: Bily material vika pouzdra filtracniho valce necistete beznym vysavacem ani kartackem. Bily material vika pouzdra filtracniho valce necistetevodouani cisticimi prostredky.Došlo by k jeho poškozeni. Bily material Ize cistit vyklepánim nad kosem.


7 Nechte pěnový filtr uschnout a prěd vložéním do pouzdra filtráčného valce zkontrolujte, zda je dokonale suchý.
Upozorneni: Ovebre, zda je pěnový filtr správné umistěn v pouzdře filtracihovalce.
8 Poté zavěte pouzdro filtráčného valce.


9 Vložte pouzdro filtracroniho valce včetné pěnového filtru zpět do nádoby na prach.

Upozorněni: Zkontrolujte, zda bílymaterial víka pouzdra filtracného valce směruje nahoru.
Upozorneni: Pred vlozenim zpet do nadoby na prach se ujistete, ze je pouzdro filtracniho valce vctne penevohe filtru zcela suche.
10 Znovu pripevné teručni vysavač 3 v 1 k nádobě na prach.
Upozorněni: Ručné vysavač 3 v 1 nepřipevnujte k prachové nádobě, dokud není do nádoby na prac h vloženo pouzdro s filtrém.
i Poznámka: Filtr vyměñujte kázdych 6 měsíčú, abyste zaručili maximálí vykon. Náhradní filtry lze zakoupit pod Čislem dílu XV1791 (viz 'Výměna').
Čistěné rotačného kartáče

1 Stáhněte upínaci páku na boku LED hubice (1) a vysuǐte rotačné kartáč z LED hubice (2). Zamotanje vlasy nebo vlákna mužete z rotačného kartáče odstranit sklouznutím prsty.
Tip: Také muzete presunout Jedno ostri nuzek do dražky na rotačním kartáci a odstrihnut vlasy a nitě zamotané kolem rotačního kartáce.
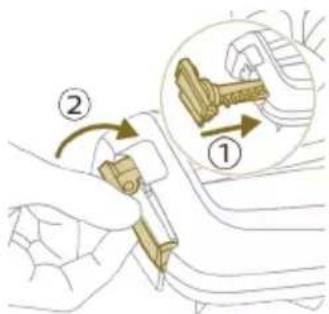
2 Zasunte rotačni kartáč zpět do LED hubice (1) a zatlačte na upinací páku, aby se rotačni kartáč v LED hubici zajistil ("zacvakne").
Čistěné mini Turbo kartáče
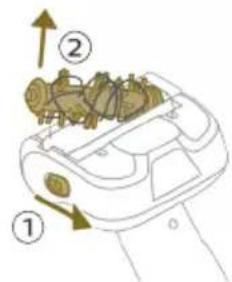
1 Uvolněte tlacitko pro uvolnéni na boku mini Turbo kartáč (1) a vytáhněte rotačné Kartáč z mini Turbo kartáče (2).
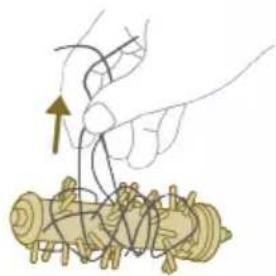
2 Odstrańte vlasy a nečistoty zachycné kolem rotačniho kartáče.
Tip: Také mûžete présunout"Justo ostri nužek do dražky na rotačním cartáci a odstřihnout vlasy a nite zamotané kolem rotačniho cartáce.
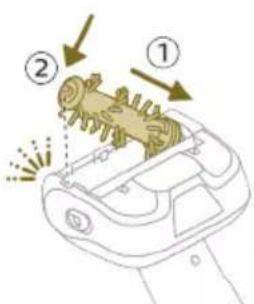
3 Zatlačte jegnu stranu rotačniho kartáče zpět do kartáče Mini Turbo (1) a druhou stranu rotačniho kartáče zatlačte dolú, dokud se rotačné Kartáč v kartáci Mini Turbo nezajisti „nezacvakne".
Ikony na displeji a jejich vyznam
Chybov kód Prícina Rešeni
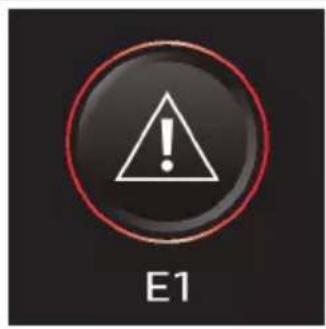
Doslo k systémové chybě. Chybový kód E1 znaméná,Že vás vysavač
Philips AquaTrio 9000 Series vykazuje systémovou chybu.
Tento stav vyresite tak, ze vyzkousite jegnuz techto moznosti nebo obe dve:
- Vyjměte baterii z pristroje a poté ji znovu vložte zpět. Potézkuste pristroj restartovat.
- Odpojte ručni vysavač 3 v 1 od prístroje a stisknéte vypínač na ručním vysavaci. Pokud na displeji stale vidité chybový kód E1, obratte se na středisko peče o zákazníky. Pokud chybový kód E1 nevidíte a prístroj stale nefunguje, je možné,Že je problém v komunikaci u hadice nebo hubice. Oblatte se na středisko peče o zákazníky.
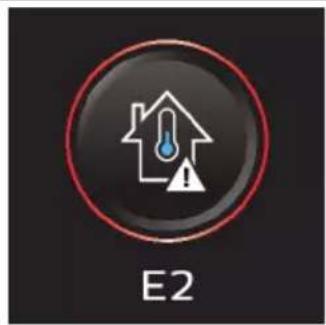
Teplota je prilis nizká. Ujistete se, ze teplota v mistrnosti, kde se pristroj používa, skladuje nebo nabiji, je vyšínež 5 °C.
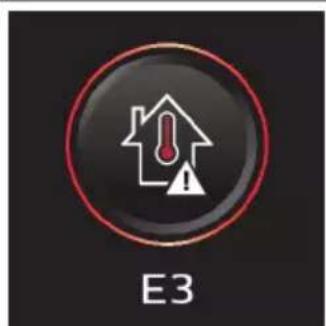
Teplota je prilis vysoká. Ujistete se, ze teplota v mistnosti, kde se prístoj používa, skladuje nebo nabíj, je nižsí než 35 °C. Nevystavujte zaízení prímému slunečnímu zárení ani vysokým teplotám (např. blízko sporák, v mikrovné troubě nebo na indukčné desce). Prěhráté baterie mohou explodovat.
Informaci kód Pricina Reşeni

Nádržka na špinavou vodu je plna.
Vyprázdne tě nádržku na špinavou vodu.
Informaci kód Pricina Reşeni
| i2 | Hubice AquaSpin není (správně) prípojená. | Připoje tuhici AquaSpin. |
| i3 | Hubice AquaSpin se zasekla. Jedné se o bezpečnostní pojistku pro prípad, ze se v hubici něco zasekne (například napájecí kabel nebo hračka). | Zkontrolujte kartáče, ložiska, Časti motoru a krytky, zda na rich nejsou vlasy nebo jiné prěkážky, a odstraťne je. Pokud Žádné prěkážky nevidíte, můze problém vyřěsít vypnutí a zapnutí prístroje. |
| i4 | LED hubice se zasekla. Jedné se o bezpečnostní pojistku pro prípad, ze se v hubici něco zasekne (například napájecí kabel nebohračka). | Zkontrolujte rotačné Kartáč a zbytek hubice, zda na rich nejsou vlasy nebo jiné prěkážky, a odstraťne je (viz 'Čišťné rotačného kartáč'). Pokud Žádné prěkážky nevidíte, můze problém vyřěsít vypnutí a zapnutí prístroje. |
| i5 | Došlo k zablokovány otvorů pro vstrup vzduchu. | Zkontrolujte, zda otvory pro vstrup vzduchu nejsou ucpané a prípadné prěkážky odstraťne. Pokud se tím problém nevyřěsí, zkontrolujte celý vzduchový průchod, zda není ucpaný, a prípadné prěkážky odstraťne. U sestavy samotného vysavače se jegná o hubici, sací trubici, filtr, prěpadovou trubku, dlouhý štrbinový nástavec a mini Turbo Kartáč. U sestavy vysavače a mopu se jegná o hubici, sací trubici a mokráÍ filtr. |
| i6 | Před použitím odpoje. Před použitím prístroj odpoje. Pokud tak neučiněte, nezapne se. Pouze během funkce AUTOCLEAN je možné mít prístroj zapojený do sítě. | |
Informaci kód Pricina Reşeni
| i7 | Je prípojena nesprávná nabíječka. | Prístroj nabíjeje pouze pomocí dodávaného adaptéru. Používejte výhradně 34V adaptér S036-1A340100HE. Na adaptéru naleznete príslušné Číslo adaptéru. |
| Ikony Význam | ||
| AUTOCLEAN | ||
| Připomenutí vyčistěné filtru (viz 'Čištěné filtru') | ||
| Indikátor pro prípomenutí výměny kartáće z mikrovlákence | ||
| Je zapotřebí vyměnit filtrne | ||
Výměna
Chcete-li koupit prisluosenstvnebo nahradni dily, navstivate adresu
www.philips.com/parts-and-accessories nebo se obratte na prodejce vyrobku Philips. Muzete se také obratit na stredisko pece o zakazníky společnosti Philips ve své zemi (kontaktné udaje naleznete na mezinarodním záručním lista).
Náhradní součásti a typová označeni:
- Náhradní filtr XV1791
- Prostředek načistěné podlah Philips XV1792
- Nahradni kartáce z mikrovláken XV1793
Lithium-ionový akumulátor 25.2V XV1797
Filtr a kartáce z mikrovláken vyměñujte každych 6 měsćů, abyste zarucili maximálné vykon.
i Poznámka: Starý filtr a kartáče z mikrovlákem múžete zlikvidovat společné s bězným domácím odpadem.
Reşení problémû
V teto kapitole jsou shnuty nejbeznéjsi problemy, se kterymi se mužete u pristroje setkat. Pokud se vám nepodáří problém vyřešit podle nasledujících informaci, navstivte web www.philips.com/support, kde najdete odpovedi nanejcastějsi dotazy. Připadné kontaktujte středisko peče o zákazníky ve své zemi.
Používání sestavy vysavače a mopu
Problém Możná prícina Žeşné
| Přístroj po stisknutí tlacítka vypínače ānepracuje. | Baterie není prípojená. Připoje baterii k ručnímu vysavači 3 v 1. |
| Baterie je vybitá. Chcete-li nabít baterii, zapojte ručné vysavač3 v 1 do nabíječky (viz 'Nabíjení'). | |
| Přístroj jste nevyjmuli z odkládacího/skladovacího stojanu. Přístroj je nevyjmuli z odkládacího/skladovacího stojanu. | |
| Tlačítko pro zapnutí/vypnutí ➀jste stiskli vícekrát. Počkejte několik sekund a znovu stisknéte ➁tlačítko pro zapnutí/vypnutí. | |
| Ručné vysavač 3 v 1 jste k prístroji nepřipojili správně. Umistěte spodníčast prístroje na odkládací/skladovací stojan. Poté k ní príipoje ručné vysavač 3 v 1. | |
| Přístroj je ucpáný. Vypněte prístroj a vyjměte baterii nebo ručné vysavač 3 v 1. Poté vyhledejte a odstražte príčinu upcání (viz 'Odstražování prěkážek v sestavě vysavače a mopu'). Poté zkuste prístroj restartovat. Pokud nemůžete zjistit príčinu upcání, |
Problém Możná prícina Žěsení
| restartujte prístroj. Je mayne, ze toto problema miž vyřěsi. | ||
| Kartáče z mikrovlák en jsou zaseknuté. | Vyjměte kartáče z mikrovlák a vložte je zpět (viz 'Čišťné hubice AquaSpin').Tip: Pokud se kartáč z mikrovlák nedaří vyjmout, mužete k jeho uvolněné použít rukojet Čisticího Kartáče (viz 'Čišťné hubice AquaSpin'). | |
| Přístroj prěstal fungovat. Omylem jste se rukou dotkli tlačítka pro zapnutí/vypnutí. | Zipněte prístroj stisknutím tlacítka pro zapnutí/vypnutí. | Zapněte prístroj stisknutím tlacítka pro zapnutí/vypnutí. |
| Je mayne, ze nádržka na špinavou je plné. V takovém prípadě se na displeji zobrázi informačné ikona (viz 'Ikony na displeji a jejich vyznám'). | Vyprázděte nádržku na špinavou vodu (viz 'Po každém Čišťné spustte funkci AUTOCLEAN'). | |
| Přístroj je ucpaný. Vypněte prístroj a vyjměte baterii nebo ručné vysavač 3 v 1. Poté vyhledejte odstraťne príćinu upcání (viz 'Odstražoványí prěkážek v sestavě vysavače a mopu'). Poté zkuste prístroj restartovat. Pokud nebudete schopni zjistit príćinu upcání, restartujte prístroj. Je mayne, ze toto problém již vyřěsí. | ||
| Podlaha je méně mokrá než obvkykle. | Smáčecí pásky jsou ucpány. Vyjměte oba kartáče z mikrovlák, do nádržky na Čistou vodu nalijte trochu vody a zapněte prístroj. Provádeťte malé pohyby vpřed a vžad ve stejné poloze po dobu asi 15 sekund. Na podlaze by měly být vidět Čtyří pruhy vodu. Pokud tomu tak není neboPokud sejen nebo vice pruhů vody skláda pouze z Čekolika kapek, jsou smáčecí proužky Částečné nebo zcelaucpané a stačí je opláchnout pod kohoutkem (viz 'Odstražoványí prěkážek ze smáčecích pasků hubice AquaSpin'). Pokud to nepomůze, mužete zkusit otvory opatrné otevřít jehlou. | |
| Jedna strana podlahy pod tryskou je méně mokrá než druhá. | Jeden ze dvou smáčecích proužků je ucpány. | Vyjměte oba kartáče z mikrovlák, nalijtete trochu vody do nádržky na Čistou vodu a zapněte prístroj. Provádeťte malé pohyby vpřed a vžad ve stejné poloze po dobu asi 15 sekund. Na podlaze by měly být vidět Čtyří pruhy vodu. Pokud tomu tak není neboPokud sejen nebo vice pruhů vody skláda pouze z Úkolkika kapek, jsou smáčecí proužky Částečné nebo zcelaucpané a stačí je opláchnout pod |
Problém Możná prícina Žěsení
| kohoutkem (viz 'Odstražováni prěkážek ze smáčecích pasků hubice AquaSpin'). Pokud to nepomůže, můžete zkusit otvory opatrné otevřít jehlou. | ||
| Na podlaze není Žádná voda. Nádržka na Čistou vodu je prázdná. | Smáčecí pásky jsou ucpány. Vyjměte oba kartáče z mikrovláken, nalije trochu vody do nádržky na Čistou vodu a zapnéte prístroi. Provázějte malé pohyby vpřed a vžad ve stejné poloze po robu asi 15 sekund. Na podlaze by měly být vidět Čtyři pruhy vody. Pokud tomu tak není nebo tokud se jeder nebo vice pruhů vody skládá pouze z několika kapek, jsou smáčecí proužky Částěčné nebo zcela ucpané a stačí je opláchnout pod kohoutkem (viz 'Odstražováni prěkážek ze smáčecích pasků hubice AquaSpin'). Pokud to nepomůže, můžete zkusit otvory opatrné otevřít jehlou. | |
| Pokud tyto kroky nepomohou a na podlaze stálne není Žádná voda, prědejte prístroi do autorizovaného servisniho střediska společnosti Philips nebo se obratte na centrum pečě o zákazníky. | ||
| Na podlaze nebo v tácku je více vody než obvykle. | Došlo ke znečěstěné nebo zablokovány vodniho kanálu modulu pro mokrá Čistěné a/nebo hubice AquaSpin. | Pomocić Čisticího kartáčku vyčistěte vodníkaná modulu pro mokrá Čistěné a/nebo hubice AquaSpin (viz 'Odstražováni prěkážek v sestavě vysavače a mopu'). |
| Nádržka na špinavou vodu není správně umístěna. | Nasadte nádržku na špinavou vodu Šádně do prístroje (viz 'Po každém Čistěné spustte funkci AUTOCLEAN'). Jakmile bude správně nasazená, ozve se zacvaknutí. | |
| Přístroi zanechávy mokró stopy na podlaze. | Pohybujete prístrojem do strany. | Pohybujte prístrojem pouze dopředu a dozadu (viz 'Omezení použití'). |
| Se spotřebiěm jest udělali prudné otáčky. | Snažte se s prístrojem provydět méně prudné otáčky (viz 'Omezení použití'). | |
| Zvedlì jest prístroi prěs práh, koberec nebo schody. | Dbejte na to, aby kartenáče z mikrovláken zústaly v kontaktu s podlahou. Préd zvednutím spotřebiěce nad práh, koberec nebo schody se ujistěte, ze je zapnutý režim absorbce vody (je-li k dispozici), abyste zabránili vzniku vodních stop na podlaze nebo vystříknutí vody z hubice AquaSpin (viz 'Omezení použití'). |
Problém Możná prícina Žěsení
| Zdvihli jste prístroj z podlavy ihned po vypnutí. | Zapněte režim absorpce vody (je-li k dispozici), abyste absorbovali veškerou zbývajćí vodu. Se zapnutým režimem absorpce vody pohybujte prístrojem opakovaně dopředu a dozadu a poté ho vypněte. Pokud prístroj vypnete a ihned poté zvednete, prístroj po zvednutí zanechá na podlaze mokrá stopy v dúsledku kapaliny mezi kartáci (viz 'Omezení použiti'). | |
| Došlo k zablokování koleček. Zkontrolujte stav koleček. Odstraťne nečistoty, které kolečka blokuji. | ||
| Prístroj nečistí tak dobře jako dříve. | Nádržka na Čistou vodu je práždná. | Doplěte nádržku na Čistou vodu (viz 'Používání sestavy vysaťace a mopu'). |
| Smáčecí páský jsou ucpány. Vyjměte oba kartáče z mikrovláken, nalijtete trochu vody do nádržky na Čistou vodu a zapnéte prístroj. Provázějte malé pohby VPřed a vžad ve stejné poloze po dobu asi 15 sekund. Na podlaze by měly být vidět Čtyři pruhy vodu. Pokud tomu tak není neboPokud se jeder nebo vice pruhů vody skládá pouze z několika kapek, jsou smáčecí proužky cástěčné nebo zcelaucpané a stačí je opláchnout podkohoutkem (viz 'Odstražování prěkážek ze smáčecích paskú hubice AquaSpin'). Pokud to nepomůze, měžete zkusit otvoryopatrné otevřít jehlou. | ||
| Vnitřníčast hubice AquaSpin je príliš znečěstné. | Prěd námratem k Čižěné spustte program AUTOCLEAN. Pokud se na okrajích hubice nahromadily nečistoty, odstraťte je. Funkci AUTOCLEAN spustte po každém použití (viz 'Po každém Čižěné spustte funkci AUTOCLEAN'). | |
| Chybí kartáče z mikrovlákenn. Vložte kartáče z mikrovlákenn do hubice AquaSpin (viz 'Po každém Čižěné spustte funkci AUTOCLEAN'). | ||
| Pokud tyto kroky nepomohou a prístroj stálne nečistí tak, jak má, obratte se na servisné středisko Philips nebo centrum péče o zákazníky. | ||
| Větěsťástice nečistotprěstávají být nasáványa padají zpět na podlahu. | Došlo ke znečěistěné nebo zablokování vodniho kanálu modulu pro mokró Čižěné a/nebo hubice AquaSpin. | Pomocić Čisticího kartáčku výčistěte vodnikaná modulu pro mokró Čižěné a/nebo hubice AquaSpin (viz 'Odstražování prěkážek v sestavě vysaťace a mopu'). |
| Po uschníjsou na podlaze pruhy. | Je možné,Že jste použili príliš mnoho Čisticího prostředku. | Ujistěte se,Že používáte správné množstvíčisticího prostředku (viz 'Používání sestavy |
Problém Możná prícina Žěsení
| vysavače a mopu'). | ||
| Kolečka jsou špinavá. Odstraťne nečistoty z koleček. | ||
| Při Čišťění, ale i během prováděné funkce AUTOCLEAN se tvóří príliš mnoho pěny. | Je možné,Že jste použili príliš mnoho Čisticího prostředku. | Ujistěte se,Že používáte správné množství Čisticího prostředku (viz 'Používání sestavy vysavače a mopu'). |
| Na podlaze zústávají zbytky Čisticího prostředku. | Podlahu několíkrát vyčistěte bez použití Čisticího prostředku. Před dalámům préjetím stejné skrvny chvili počkejte. | |
| Skvrny se Čiští obtízně. Možné jiste použili príliš málo vody nebo jste Čišťěni skrvny věnovali príliš málo Času. | Přidejte vodu a chvili počkejte. Mûžete například prějíždět prístrojem prěs skrvnu a nanášet na ni vodu a na konci Čišťěné se k títo skrvně vrátit. | |
| Během Čišťěné sezměnil zvuk prístroje. | Kolem kartáčú z mikrovlákemohou být zapletené vlasy nebo jiné nečistoty. | Vvjměte kartáčé z mikrovlákenn, zkontrolujte prěkážky a odstraťte je (viz 'Čišťěné hubice AquaSpin'). |
| Displej ukazuje,Že nádržka na špinavou vodu je plné (kód: i1), a vypne se, prěstože nádržka na špinavou vodu dosud neníplné. | V nádržce na špinavou vodu se může vyskyrovat pěna nebo znečistěné. | Restartujte prístroj. Pokud to problém nevyřěsi, vyčistěte nádobku na špinavou vodu. Pokud je probleémem pěnéni, ujistěte se,Že nepoužíváte větěné než doporučné množství Čisticího prostředku (viz 'Používání sestavy vysavače a mopu'). |
| Po vypnutí prístroje z něj odkapáva voda. | Přístroj zanechal na podlaze louží, protože jste sím prí vypínáni nepohnuli. Je to normální jev. | Zapněte režim absorpce vodu (je-li k disozici), abyste absorbovali veškerou zbývajćí vodu. Se zapnutým režimem absorpce vodu pohybjute prístrojem opakovaně dopředu a dozadu a poté ho vypněte. Pokud prístroj vypnete a ihned poté zvednete, prístroj po zvednutí zanechá na podlaze mokré stopy v dúsledku kapaliny mezi Kartáčí (viz 'Omezení použití'). |
| Z prístroje kape voda pri jeho přeniášeni nad podlahou (drženi ve vduchu). | Při Čišťěné nezvedejte hubici AquaSpin z podláhy, protože tím zpùsobíte mokróský skrvny na podlaze. Pohybjute prístrojem pouze směrem dopředu a dozadu. | |
| Vytéká voda z nádržky na Čiastou vodu, protože jste nádržku prěplnili. | Negrěte vodní nádržku na Čiastou vodu nad urovečn značky MAX. Pokud tak učinité, můze se stát,Že priupevnováni uzávěru bude z nádržky na Čiastou vodu vytékat voda (viz 'Používání sestavy vysavače a mopu'). | |
| V Jedné z nádržek je prasklina. Pokud je jejda z nádrží poškozena, prědejte prístroj servisnímu středisku Philips nebo se obratte na centrum péće o zákazníky. | ||
Problém Możná prícina Žěsení
| Nemohu vyjmout kartáče z mikrovláken. | Do kartáčú z mikrovlák se zamotávaji vlasy a/nebo nečistoty. | Pomocí rukojeti Čiasticýo kartáčé Vyjměte kartáčé z mikrovlák z hubice AquaSpin. Odstraťe zamotané vlasy a nečistoty (viz 'Čišťní hubice AquaSpin'). Pokud je obtěné kartáčé vytáhnout, műžete na ně zatlačit zespodu hubice AquaSpin. |
| Nemohu prístrojem pohybovat dopředu ani dozadu. | Mohlo dojít k zablokování jednoho nebo vice koleček malým prědmětem. | Vypněte prístroj a sejměte hubici. Poté zkontrolujte, zda nejsou malá a velká kolečka ucpaná. Odstraťne věchny prědměty, které by mohly blokovat kolečka. Spotěbič opět postavte do svislé polohy aPokračujte v Čišťnéí. |
| Sací vykon prístroje je nižsí, než je obvykle. | Došlo ke znečěstěné nebo zablokoványívodniho kanálu modulu pro mokré Čišťnéí a/nebo hubice AquaSpin. | Pomocí Čiasticýo kartáčku vyčistěte vodní kaná modulu pro mokrá Čišťnéí/a/nebo hubice AquaSpin (viz 'Odstražování prěkážek v sestavě vysavačě a mopu'). |
| Síftka v nádržće na špinavou vodu nebyla prěd dalşím použitím dostatečné suchá. | Vyciastěte a usuSTE nádržku na špinavou vodu. | |
| Do kartáčú z mikrovlák se zamotaly vlasy. | Vypněte prístroj odstraťne vlasy z kartáčú z mikrovlák (viz 'Čišťnéí hubice AquaSpin'). | |
| Nádržka na špinavou vodu není správně umístěna. | Nasadte nádržku na špinavou vodu Žádně do prístroje (viz 'Po každém Čišťnéí spustte funkci AUTOCLEAN'). Jakmile bude správně nasazená, ozve se zacvaknutí. | |
| Kartáče z mikrovlák se přestaly otáčet. | Kartáče z mikrovlák jsou ucpané vlasy nebo nečistotami. | Vyciastěte kartáčé z mikrovlák núžkami nebo rukou (viz 'Čišťnéí hubice AquaSpin'). |
| Kartáče z mikrovlák vyskakuji. | Kartáče z mikrovlák nejsou správně zajístěné. | Umístěte kartáčé z mikrovlák do správné polohy a zajístěte je. |
| Prístroj se nenabíj. Napájecí zástrčka není správně zapojena do konektoru nebo adaptér není správně zapojeny do zásuvky. | Ujistěte se, ze je napájecí zástrčka správně zapojena do konektoru a ze adaptér je správně zapojeny do zásuvky. | |
| Baterie není vložena. Vložte baterii. | ||
| Baterie není zcelazasunuta. Zasunte baterii, až dokud neuslyšíte zacvaknutí. | ||
| Je prípojen nasprávný adaptér. Použijte prosím originálné adaptér. | ||
| Pokud tyco kroky nepomohou a prístroj se stále nenabíj, obratte se na naše servisné středisko nebo centrum peće o zákazníký. | ||
| Pri použivání vysavače občas cítím vyboje statické | Ve vysavačí dochází ke vzniku staticke elektrény. Čím nižné je | Ujistěte se, ze se prí drženi prístroje dótykáte rukou kovového kolíku. |
Problém Możná prícina Žěsení
Používání sestavy samotného vysavače
| elektřiny. vlhkost vzduchu, tímVICE statické elektřiny v prístroji vzníká. | |
| Vysáljiste pracch a nečistoty. I to způsobuje statickou elektřinu. | Ujistěte se,.cz se pri držení prístroje dotýkáte rukou kovového kolíku. |
Problém Możná prícina Žěsení
| Prístroi po stisknuti tlacítka vypínače nepracuje. | Nepřipojili jste baterii. Prípojte baterii k ručnímu vysavači 3 v 1. |
| Baterie je vybitá. Chcete-li nabít baterii, zapojte ručné vysavač 3 v 1 do nabíječky (viz 'Nabíjení'). | |
| Tlačítko pro zapnutí/vypnutí òste stiskli vicekrát. Počkejte několik sekund a znovu stisknéte òtlačítko pro zapnutí/vypnutí. | |
| Ručné vysavač 3 v 1 jste k prístroi nepřipojili správně. Žádně príipevněte ručné vysavač 3 v 1 k nádobě na pracch. | |
| Prístroi je ucpaný. Vypněte prístroi a vyjměte baterii nebo napájecí zdroj. Poté vyhledejte a odstraťte príčinu upcání. Poté zkuste prístroi restartovat. Pokud nemůžete zjistit príčinu upcání, restartujte prístroi. Je možné,Že toto problém již vyřěsi. | |
| Rotačné katráč je zaseknutý. Vyjměte rotačné katráč, odstraťte veškeré vlasy kolem katráče a motoru a vratte jej zpět (viz 'Čistěné rotačného katráč'). | |
| Ručné vysavač 3 v 1 není možné prípojit k nádobě na pracch. | Pouzdro filtračného valce bylo sestaveno vzhūru nohama. Špětte pouzdro filtračného valce. Kuláty otvor by měl být viditelné (viz 'Čistěné nádoby na pracch'). |
| Ujistěte se,Že prí zavíráné pouzdra filtračného valce se ozvalo zacvaknutí. Pokud se obtíné zavírá, je pěnový filtr pravlěpodobné umístěn vzhūru nohama. | |
| Prístroi prěstal fungovat. Omylem jste se rukou dotkli tlacítka pro zapnutí/vypnutí. | Zapné prístroi stisknutím tlacítka pro zapnutí/vypnutí. |
| Prístroi je ucpaný. Vypněte prístroi a vyjměte baterii nebo napájecí zdroj. Poté vyhledejte a odstraťte príčinu upcání. Poté zkuste prístroi restartovat. Pokud nemůžete zjistit príčinu upcání, restartujtes prístroi. Je možné,Že toto problém již vyřěsi. |
Problém Możná prícina Žěsení
| Během Čišťéní sezměnil zvuk prístroje. | Kolem rotačného kartáče mohou být zapretené vlasy nebo jiné nečistoty. | Zkontrolujte Čišťéní rotačného kartáčě'). |
| Překážky blokuji cyklon. Zkontrolujte Čišťéní cyklonu a odstraťe je (viz 'Čišťéní cyklonu'). | ||
| Sací vykon prístroje je nižsí, než je obvyklé. | Filtr a/nebo cyklon jsou znečťěné. | Vypráždněte námobu na prac. Vyčistěte filtr a cyklon. Ujistěte se, ze jste odstranili veškeré vlasy a nečistoty ucpané v cyklonu. Cyklon můžete vyjmout pro snadnou udžržbu (viz 'Čišťéní cyklonu'). Používáte-li prístroj pravidelně, nezapomeće pěnový filtr myt alespořné Jednou měsičné (viz 'Čišťéní filtru'). |
| Cyclon je ucpán. Oveřte, zda není v cyklonu nějaký prědět a odstraťe pripadné nečistoty, které cyklon ucpaly. Ujistěte se, ze jste odstranili veškeré vlasy a nečistoty ucpané v cyklonu (viz 'Čišťéní cyklonu'). | ||
| Je ucpáný sací kanál za rotačním kartáčem. | Vyjměte rotačné Kartáč, zkontrolujte Čišťéní Kartáč. | |
| Špatné jste nasadili pouzdro filtračnéhoivalce na námobu na pracne nebo jste námobu na pracne špatné vložili do prístroje. V obou prípadech bude sací vykon snížený. | Oveřte, zda je pouzdro filtračnéhoivalce správně nasazené na námobě na pracna zda je námoba na prac správně vložné do prístroje (viz 'Čišťéní námoby na prac'). | |
| Kartáč je ucpáný vlasy nebo nečistotami. | Vypněte prístroj a očistěte rotačné Kartáč núžkami nebo rukou (viz 'Čišťéní rotačného Kartáč'). | |
| Z prístroje uniká prach. V pouzdře filtračnéhoivalce není pěnový filtr nebo chybí horní kryt. | Oveřte, zda je filtr správně (viz 'Čišťéní filtru') sestaven a vložen do prístroje. | |
| Pří otevíráné námoby na prac uníká prach. | Jedné se o normálné jev v dúsledku púsobéné podtlaku. | Pokud je to možné, otevírejte prístroj venku. |
| Na displeje se zobraźí ikona Čišťéní filtru a prístroj se vypne. | Filtr může být Špinavý. Doporučujeme Čišťéní filtru. Pokud jste filtr Čistili nedávnó, můžete tutó ikonu ignorovat. Chcete-li Pokračovat ve vysávní, kliknéte na ikonu Šipky. | |
| Přístroj se pri vysávní koberce nepohybuje hladce. | Nastavili jste príliš vysoký sací vykon. | Snižte sací vykon volbou nastavení 1 nebo se po koberci pohybjute pomaleji. |
| Rotačné Kartáč se prěstal otáčet. | Rotačné je ucpáný vlasy nebo nečistotami. | Vycižte Čišťéní Kartáč núžkami nebo rukou (viz 'Čišťéní rotačného Kartáč'). |
Problém Możná prícina Žěsení
| Rotačné Kartáč se mûže prěstat otáčet,Pokud vlákna koberce s dlouhým vlasem kladou príliš velký odpor. | Vypněte prístroj a poté ho znovu zapnéte. | |
| Rotačné Kartáč jste po vyčistěné nevložili zpět do hubice správným zpùsobem. | Rotačné Kartáč správně zasuřte do hubice podle pouků v títo uživatelské príručce (viz 'Čišťné rotačného kartáčě'). Rotačné Kartáč zajistěte v hubici zacvaknutím upírací páky. | |
| LED světla v hubici se nerozsvítí. | Hubici jste k trubici nebo prístroji nepřipojili správně. | Připojte hubici k trubici nebo prístroji správném zpùsobem. Pokud to nepomúže, prědejte prístroj servisnímu středisku Philips nebo se obratte na centrum péće o zákazníky. |
| Přístroj se nenabíj. Zástrčka není správně zapojena do konektoru nebo adaptér není správně zapojený do zásuvky. | Ujistěte se,že je zástrčka správně zapojena do konektoru aže adaptér je správně zapojeny do zásuvky. | |
| Baterie není vložena. Vložte baterii. | ||
| Baterie není zcelazasunuta. Zasuřte bateri,ža dokud neuslyšité zacvaknutí. | ||
| Je prípojen nesprávný adaptér. Použijte prosím originálné adaptér. | ||
| Pokud tyto kroky nepomohou a prístroj se stále nenabíj, obratte se na naše servisí středisko nebo centrum péće o zákazníky. | ||
| Mini Turbo kartáč nefunguje správně. | Rotačné Kartáč je zablokovaný. Núžkami odstraťte z kartáčechlupy (viz 'Čišťné mini Turbo kartáčě'). | |
| Rotačné Kartáč je prí Čišťné blokován tkaninou nebo povrchem. | Udržujte mini Turbo kartáč v urovnì povrchu a nezatačujte ho do měkkych povrchů. | |
| Rotačné Kartáč není správnězasunut do hubice. | Ujistěte se,že je rotačné Kartáč správně vložen v hubice aže mezi díly nejsou Žádné mezery (viz 'Čišťné mini Turbo kartáč'). | |
| Pří používání vysavače občas citím vyboje statické elektrény. | Ve vysavači dochází ke vzniku statické elektrény. Čím niží je vlhkost vzduchu, tím vice statické elektrény v prístroji vzníká. | Ujistěte se,že se prí drženi prístroje dotýkáte rukou kovového kolíku. |
| Vysálí jste prach a nečistoty. I to zpúsobuje statickou elektrínu. | Ujistěte se,že se prí drženi prístroje dotýkáte rukou kovového kolíku. | |
| Na displejei se objeví chybový kód „E2". | Teplota je príliš nízká. Ujistěte se,že teplota vmistnosti, kde se prístroj používá, skladuje nebo nabíjí, je vyší než 5 °C. |
Problém Możná prícina Žěsení
| Na displeji se objéví chybový kód „E3". | Teplota je prěliš vysoká. Ujistěte se, ze teplota v místicanosti, kde se prístroj používa, skladuje nebo nabijí, je nižží než 35 °C. Nevystavujte zařízení prímému slunečnímu zářeni ani vysokým teplotám (např. blízko sporákù, v mikrovlné troubě nebo na indukčné desce). Přehřáté baterie mohou explodovat. |
| Pokud tyto kroky nepomohou a prístroj se stále nenabijí, obratte se na naše servní středisko nebo centrum peće o zákazníky. |
Indhold
Introduktion 97
97
For apparentet tages i brug 98
Opladning 101
Stovsuugning og mopning af harede gulve 102
Stovsgning af blode og harede gulve 107
Rengoring af stovsugnings- og moppesystemet 112
Rengoring af systemet kun til stovsgning 121
Display-ikoner og deres betydning 128
Udskiftning 131
Fejlfinding 132
1. Brug af systemet kun til stovsugning 138
Introduktion
Tak, fordi du har kobtijke Philips-produkt! For at fafuldt udbytte af den stotte, Philips tilbyder, skal du registrere dit produit pa
www.philips.com/myvacuum9000s.
Generel beskrivelse
1 Udloserknap til stovbeholder
2 Display
3 Knap til rengoringstilstand
4 Midterste knap (AUTOCLEAN)
5 On/off-knap
6 Batteri
7 Handholdt 3-i-1-system
8 Stovbeholder
9 Vægbeslag
10 Støvsugerrør
11 LED-mundstykke
12 Mini Turbo-børste
13 Langt sprekkemundstykke
14 Adapter
15 Strømstik
16 Ekstra oplader (kun XW9385)
17 Efterrengorings- og opbevaringsholder
18 Holder til apparatet
19 Efterrengøringsbakke
20 Bundplade
21 Vådmodul
22 Tank til snavset vand
23 Tank til rent vand
24 AquaSpin-mundstykke
25 Mikrofiberbørster
26 Philips-gulvrengoringsmiddel XV1792
27 Renseborste
Før apparatet tages i brug
Samling af afterrengørings- og opbevaringsholder

For at bruge AUTOCLEAN-funktionen eller opbevare og oplade apparatet i efterrengørings- og opbevaringsholderen skal du Forst samle stationen ved at klikke apparatholderen ind i bundpladen.
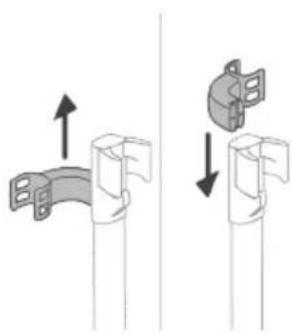
Tip: Det er muligt at skubbe holderen til opsætning af systemet kun til støvsugning og sætte den tilbage med bunden opad, hvis du vil placere støvsugningssystemet på den,anden side af afterrengørings- og opbevaringsholderen.

Bemærk: Sorg for, at afterrengøringsbakken er placeret på bundpladen, og at temperaturen i det rum, hvor apparatet opbevares, oplades og rengores, er mellem 5^ og 35^ .
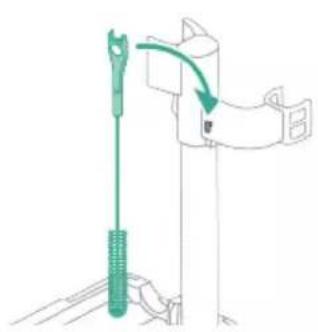
Tip: Du kan hænge rengøringsborsten på apparatholderens krog.
Installation af vægbeslag


Hvis du vil opbevare og oplade stovsugningssystemet pa vægbeslaget, skal du fastgore vægbeslaget pa væggen med de medfolgende skruer. Sørg for, at vægbeslaget er 140 - 150 cm over gulvet.
Bemerk: Det er ikke muligt at opbevare støvsugnings- og moppesystemet på vægbeslaget. Det er kun muligt at opbevare støvsugningsssystemet på vægbeslaget.
Bemerk: Sorg for, temperaturen i det rum, hvor apparatet opbevares ell oplagres, er mellem 5^ og 35^
Forsigtig: Pas på, när du borer hullerne for at montere vægbeslaget, sä du/DD.
Samling af støvsugnings- og moppesystemet

1 For at samle stovsugnings- og moppesystemet skal du isette batteriet og fastgore det handholdte 3-i-1-system til det vade modul ("klik").

2 Fastgor derefter vadmodulet til AquaSpin-mundstykke ("klik").
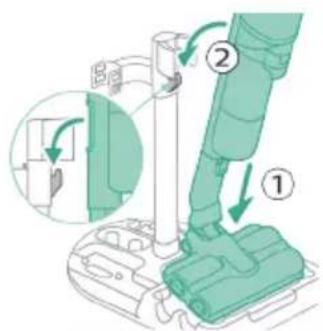
3 Du kan opbevare støvsugnings- og moppesystemet ved at placere det i afterrengørings- og opbevaringsholderen.
Bemerk: Det er ikke muligt at opbevare støvsugnings- og moppesystemet på vægbeslaget. Det er kun muligt at opbevare støvsugningssystemet på vægbeslaget.
Samling af systemet kun til støvsugning

1 Du samler systemet kun til støvsugning ved at fastgore det händholdte 3-i-1-system til støvbeholderen ("klik").
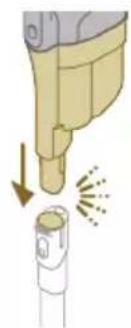
2 Sæt støvbeholderen på røret ("klik").

3 Placer røret i LED-mundstykket.

4 For at opbevare systemet kun til støvsugning skal du placere det i afterrengørings- og opbevaringsholderen ved forst at placere LEDmundstykket pa den lange side af bundpladen og derefter presse roret ind i holderen.

Tip: Det er muligt at skubbe holderen til opsætning af systemet kun til støvsugning og sætte det tilbage med bunden opad, hvis du vil placere støvsugningssystemet på den,anden side af afterrengørings- og opbevaringsholderen.

Opladning


Apparatet er udstyret med et 25 V Li-ion-batteri. En fuld opladning tager 4 timer.
1 For at oplade apparatet skal du isætte strømstikket på bagsiden af apparatet. Tilslut derefter adapteren til stikkontakten.
2 En værdi mellem 0% og 90% blinker grønt på skærmen for at indikere, at apparatet oplades.
3 Når apparatet er fuldt oplatet, lyser værdien 100% på skærmen. Efter et par minutter slukker displayet.
Advarel: Opbevar og oplad apparatet ved en temperatur pa mullem 5^ og 35^ .

Tip: Du kan oplade apparatet, när det er fastgjort til vægbeslaget.
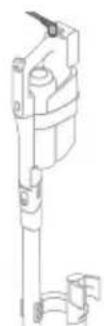
Tip: Du kan oplade apparatet i afterrengørings- og opbevaringsholderen.
Tip: Du kan oplade apparatet separatp a det sted, der passer dig bedst.
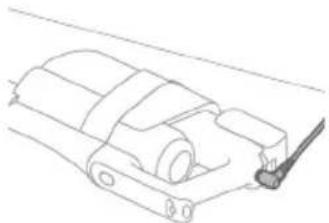
Støvsugning og mopning af harede gulve
Brug af støvsugnings- og moppesystemet
Vandtankene til rent og snavset vand er allerede fastgjort til apparatet ved levering. Med vadmodulet fastgjort til AquaSpin-mundstykket kan du rengore harde gulve.
Bemærk: Dette støvsugnings- og moppesystem er velegnet til at støvsuge og moppe samtidig. Det er/DDvendigt at støvsuge gulvet før mopning. Støvsugnings- og moppesystemet er velegnet til at støvsuge og moppe alle typhårde gulve, undtagen ubehandelte trægulve (se 'Begrænsninger for brug').

1 For at samle stovsugnings- og moppesystemet skal du isette batteriet og fastgore det handholdte 3-i-1-system til det vade modul ("klik").
2 Fastgör derefter vådmodulet til AquaSpin-mundstykke ("klik").
3 Tryk på knappen for at frigore tanken til rent vand, og tag tanken ud.
4 Tag proppen af tanken til rent vand.
5 Tilsæt 10 ml XV1792 Philips-gulvrengøringsmiddel til tanken til rent vand.

A Forsigtig: Philips har kun testet apparatet med XV1792 Philips-gulvrengøringsmiddel. Andre rengøringsmidler kan forårsage meget skum, hvilket kan reducere effekten og medføre, at der opstår Funktionsejl på apparatet. XV1792 Philips-gulvrengøringsmiddel er tilgengeligt på udvalgte markeder. Hvis der anwendes et andet flydende gulvrengøringsmiddel, skal der maksimalt tilsættes 10 ml til tanken til rent vand.
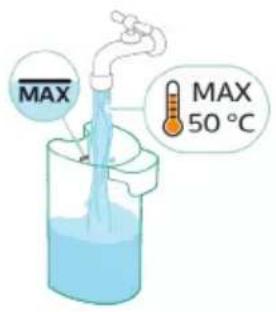
6 Fyld tanken til rent vand med koldt eller lunkent vand fra vandhanen op til MAX-markeringen.
A Forsigtig: Det hanevand, der hældes i tanken til rent vand, mA ikke varere vermere end 50^

7 Saet proppen tilbage pa tanken til rent vand.

8 Sæt tanken til rent vand tilbage i apparatet.

9 Tænd apparatet ved at trykke på tænd/sluk-knappen, og vent indtil apparatet er klartil brug.

10 Brug knappen til rengeringstilstand til at vaelge mellem tre forskellige indstillinger:
Normalvad tilstand
Intens yad tilstand
- Tilstand for absorbing af vand
Ved at vælge den normale vändtilstand kan du bruge apparatet til almindelig vådrengøring. Den intense vædtilstand er til rengøring af ekstra genstridige pletter.
Hvis der er våde steder på gulvet after rengøringen, kan du vælgge absorberingstilstand for at tørre dem op. Vi anbefaler øgså at bruge denen tilstand,ningar stifter apparatet over en taerskel, et æppe eller en trappe (se 'Tip og andre vigtige oplyninger').
Hvis du vælger tilstanden for vandabsorbering, stopper apparatet med at tilføre vand og øger sugekraften i 45 sekunder for at absorbere vand på gulvet.
Bemærk: ældre modeller har normal vådtilstand og intens vådtilstand, men ikke vendabsorberingstilstand.
Aktivt beskyttelsessystem
- Dette apparat er udstyret med et aktivt beskyttelsessystem. Dette aktive beskyttelsessystem er designet til at genkende, nr andre fremmedlegemend snavs eller væske opsamles fra gulvet.
- När systemet er aktiveret, slukker apparatet, og i3-meddelelsen vises på displayet (se 'Display-ikoner og deres betydning'). Det aktive beskyttelsessystem kan ögså blive aktiveret, hvis mikrofiberbörsterne er forvåde, hvis du flytter apparatet over et gulvtæppe eller et tæppe, aller hvis du flytter det hen over et guly, der ikke er ordentligt fastgiort.
Tip og andre vigtige oplysninger
Det er ikke ndvendigt at støvsuge gulvet for vask, da støvsugnings- og moppesystemet aktiv vadrenser dit harde gulv for at opfange al slags snavs, inklusive væsker og pletter. På tæpper skal du kun bruge systemet kun til støvsugning.
- Hvis dine hårde gulve ikke skal moppes, skal du blot bruge systemet kun til støvsugning, som har LED-lys og PowerCyclone 12-teknologi til præcis og effektiv opsamling af snavs.
Du kan bevæge apparatet lige SSE hurtigt som en stovsuger. For at fjerne genstridge pletter kan du klikke P knappen for rengoringstilstand for at aktivere den intense vadtilstand og bevæge apparatet langsomt hen over pletterne.
Vi anbefaler at aktivere tilstanden for absorbing af vand, nr apparatet Ioftes over en taerskel, et taepe ell er en trappe under rengoring. Dette forbinder, at der drypper snavset vand ud af AquaSpin-mundstykket.
Apparatet kan afterlade en lille vandpyt pa gulvet, nar du slukker for det. Du kan reducere vandpytten storrelse ved at aktivere tilstanden for vandabsorbering, for du slukker for apparatet. Bevag apparatet frem og tilbage et par gange, mens vandabsorberingstilstanden er aktiveret. Hvis det er npdvendigt, kan du fierne de sidste draber med en klud.
- Nár du bevæger apparatet, anbefaler vi, at du strækker armen for at reducere unødvendige spændinger i musklerne. I dette position har du den bedste kontrol over apparatet under rengøringen, og det er det mest behagelige.
Bemærk: ældre modeller har normal vådtilstand og intens vådtilstand, men ikke vendabsorberingstilstand. For dette modeller skal du flytte apparatet, mens du slukker det for at reducere mængden af vand, der afterlades på gulvet. Det anbefales øgså at lade apparatet ∀e tændt,ningar det loftes over et ørtrin, et æppe eller op ad trapper under rengøring Dette forhinder, at der drypper snavset vand ud af AquaSpin-mundstykket.
Begrænsninger for brug
- Støvsugnings- og moppesystemet er velegnet til at støvsuge og moppe alle typer hårde gulve, undtagen ubehandelte trægulve.
- Støvsugnings- og moppesystemet er beregnet til almindelig rengøring af hårde gulve. Følg altid rengøringsinstruktionerne for dit hårde gulv, narr du bruger apparatet.
- Hvis du vil tilfoje et andet flydende gulvrengøringsmiddel end XV1792 Philips-gulvrengøringsmiddel til tanken til rent vand, skal du sorge for at bruge et lavtskummende eller ikke-skummende flydende gulvrengøringsmiddel, der kan oploses i vand, lige som XV1792 Philips-gulvrengøringsmiddel.
- Da tanken til rent vand har en kapacitet på 400 ml, behoover du kun at tilsaete et par draber (maks. 10 ml) flydende gulvrengøringsmiddel til vandet.
- Hvis du bruger støvsugnings- og moppesystemet på linoleumsgulve, skal gulvene vare korrekt fastgjorte, for at undgå at linoleum bliver trukket ind i AquaSpin-mundstykket.
- Brug/DDsugnings- og moppesystemet til at rense tæpper.
- Hvis du bevæger/lofter apparatet hen over et tæppe, när det er slukket, kan derkommen dræber af snavset vand på tæppet.
- Skub/DD:Skub icke apparatet hen over konvektorvarmeres gitterabninger i gulvet. Da apparatet icke kan opsamle vand, der kommer ud af mundstykket, när du bevæger det hen over en abning, ender vendet pa bunden af konvektorhullet.
- Under rengøring må du ikke løfte AquaSpin-mundstykket fra gulvet eller flytte AquaSpin-mundstykket sidelæns, og foretag ikke kraftige drejninger,.dk dette afterlader vandspor. Bevæg kun apparatet frem og tilbage.
Bemerk: Brugstiden afhänger af, hvor stort effektniveau der er brucht under rengøringen.
Bemærk: ældre modeller har kun normal vådtilstand og intens vådtilstand, men ikke vendabsorberingstilstand.
Støvsugning af blode og harede gulve
Brug af systemet kun til støvsugning

1 For at stovsuge blode erler harde gulve skal du fastgore det handholdte 3-i-1-system til stovbeholderen ("klik").

Forsigtig: Fastgör ikke det handholdte 3-i-1-system til støvbeholden,uden at isætte filterkabinettet i støvbeholden.
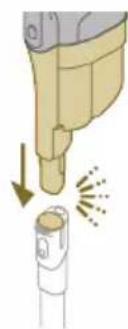
2 Sæt støvbeholderen pa røret ("klik").

3 Placer røret i LED-mundstykket.

4 Tænd apparatet ved at trykke på tænd/sluk-knappen, og vent indtil apparatet er klartil brug.
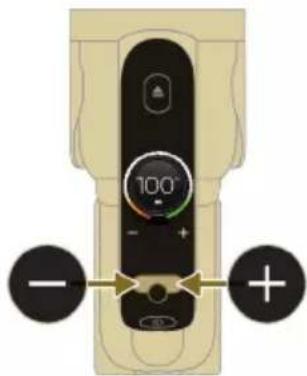
5 Brug knapperne til venstre hore ti t vaelge imellem de to forskellige indstlinger for sugestyrke.
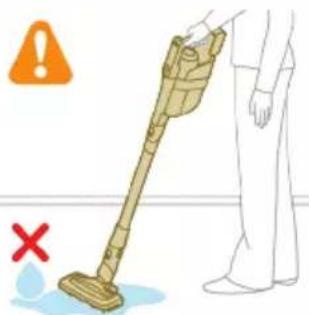
Tip: LED'erne i LED-mundstykket gør det nemmere at se snavs på gulvet. Røret og LED-mundstykket giver dig mulighed for at Nä ind under lave mobler,uden at skulle vride apparatet.

at pege dem i øjnene på andre. LED-lys er meget skarpt.
Brug af røret
Du kan fastgore roret til det handholdte system og bruge det uden mundstykke til at stovsuge tætte mellemrum mellem eller bag mobler med enden af roret.
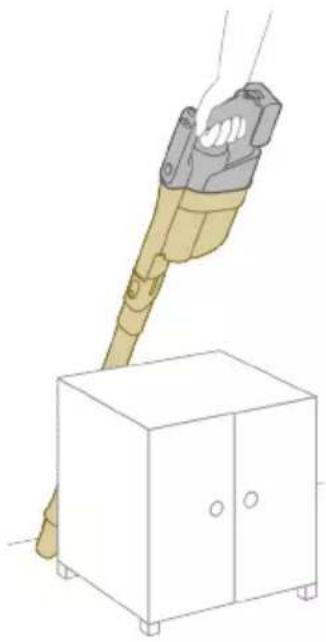
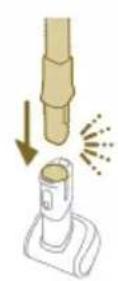
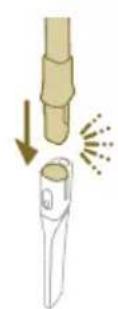
Tip: Det er och muligt at sætte Mini Turbo-børsten på røret.
Tip: Det er och muligt at sætte det lange sprekkemundstykke pa røret.
Brug af den handholdte enched

Uden mundstykket og roret kan du bruge den handholdte enhed til at rense sma pletter af stov og snavs, sasom spildte brodkrummer, ell er til at stovsuge trapper og hylder.
Advarsel: Stovsug aldrig vand ell er andre vasker op.
Brug af LED-mundstykket

Du kan bruge LED-mundstykket til at rense områder sasom trappetrin, til at støvuge snavs op i hjørner eller på smalle aftatser erler til at rense små pletter af snavs, sasom spildte brodkrummer.
1 LED-mundstykket fastgores ved at isætte røret eller den handholdte enhed i mundstykket.
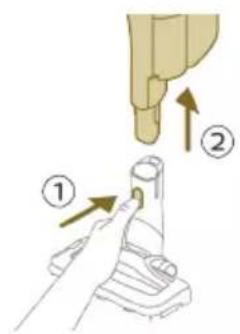
2 For at afmontere LED-mundstykket skal du trykke pa udloserknappen (1) og trække roret ell er den handholdte enhed ud af mundstykket (2).
Advarsel: Stovsug aldrig vand ell er andre vasker op.
Brug af Mini Turbo-børsten

1 Mini Turbo-børsten fastgøres ved at isætte røret til den händholdte enhed i Mini Turbo-børsten.

2 Du kan bruge Mini Turbo-børsten til almindelig rengøring, for eksempel af blnde steder sasom senge og sofaer. Du kan justere styrkeindstillingerne after dine rengøringsbehov.
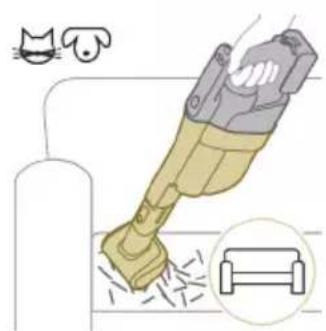
3 Du kan bruge Mini Turbo-børsten til ekstra grundig rengøring, for eksempel til at støvsuge dyrehår eller rense små pletter af snavs, sasom spildte brodkrummer. Du kan justere styrkeindstillingerne after dine rengøringsbehov.
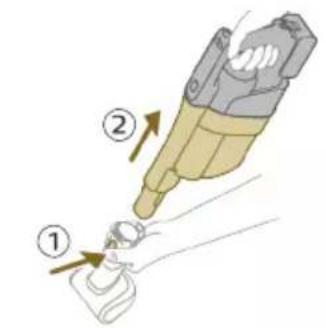
4 For at afmontere Mini Turbo-børsten skal du trykke på udloserknappen (1) og trække den handholdte enhed ud af Mini Turbo-børsten (2).
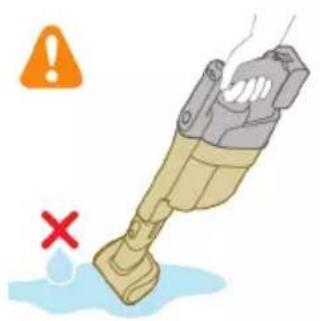
Advarsel: Stovsug aldrig vand ell er andre vasker op.
Brug af langt sprekkemundstykke
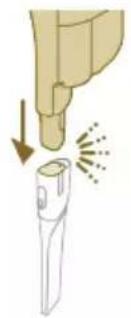
1 Det lange sprækkemundstykke fastgøres ved at isætte røret aller den handholdte enhed i det lange sprækkemundstykke.

2 Du kan bruge det lange sprækkemundstykke til snævre hjørner erller andre steder, hvor det er svært atkommen til. Du kan justere styrkeindstillingerne after dine rengøringsbehov.
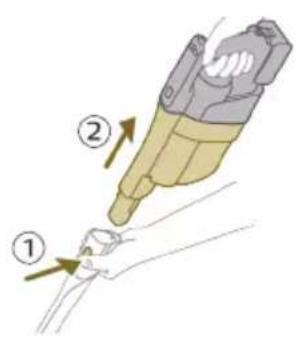
3 Det lange sprækkemundstykke afmonteres ved at trykke på udloserknappen (1) og trække røret aller den handholdte enhed ud af det lange sprækkemundstykke (2).
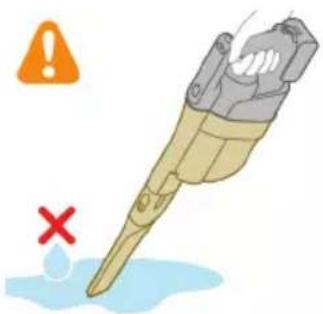
Advarsel: Stovsug aldrig vand ell er andre vasker op.
Rengøring af støvsugnings- og moppesystemet
AUTOCLEAN after hver brug
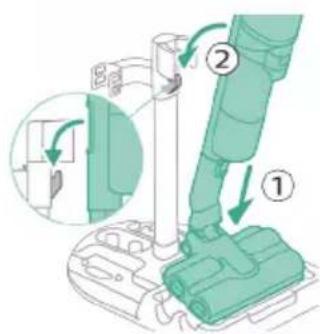
For at forhindre lugt og kalkdannelse skal du bruge AUTOCLEAN-funktionen after haverbrug.AUTOCLEAN-tilstand hjælper dig med at rengre hele apparatet pa ca. 4 minutter.
1 Placer stovsugnings- og moppesystemet i afterrengorings- og opbevaringsholderen.

Bemærk: Hvis niveauet af snavset vand er under AUTOCLEAN-niveauet, er det ikke nødvendigt at toenme tanken, for AUTOCLEAN-programmet startes. Du kan spreinge følgende trin over og gå videre til trin 6.

2 Tryk på knappen for at frigore tanken til snavset vand, og tag tanken ud.

3 Fjern det vade filter fra tanken til snavset vand.
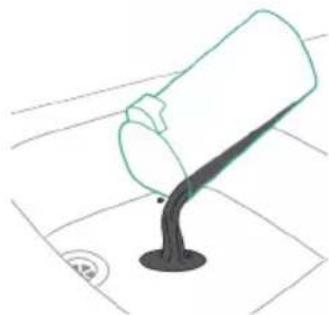
4 Hæld vandet fra tanken til snavset vand ned i vasken.

5 Sæt det våde filter tilbage på tanken til snavset vand.
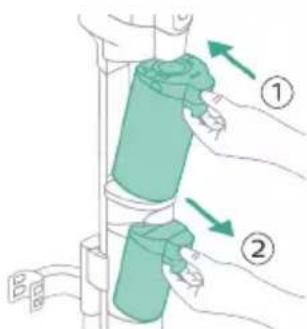
6 Sæt den.tomme tank til snavset vand tilbage i apparatet, og tag tanken til rent vand ud.
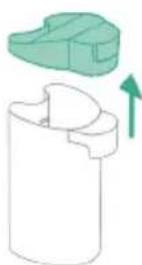
7 Tag proppen af tanken til rent vand.


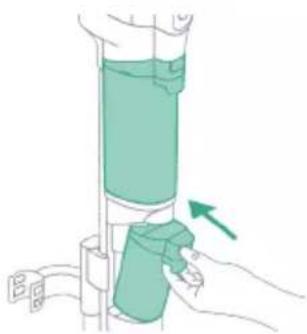

8 Haeld resterende rengøringsmiddel fra tanken til rent vand ud i vasken.
9 Fyld tanken til rent vand med koldt eller lunkent vand fra vandhanen mindst op til AUTOCLEAN-markeringen.
A Forsigtig: Det hanevand, der hældes i tanken til rent vand, på ikke varere pharmere end 50^
Forsigtig: Brug ikke rengøringsmiddel til AUTOCLEAN, da dette kan.fore til overdreven skumdannelse.
10 Sæt tanken til rent vand tilbage i apparatet.
11 Oplad apparatet. Sæt stromstikket ind i stikket på apparatets bagside. Tilslut derefter adapteren til stikkontakten.
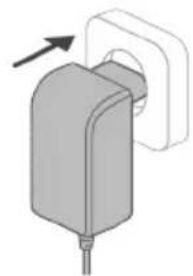

12 Tryk på den midterste knap for at starte AUTOCLEAN-cyklussen. Hvis du fär vist en sort skærm, skal du trykke på tænd/sluk-knappen @forst for at aktivere skærmen.

13 Apparatet udfører AUTOCLEAN-cyklussen.
Bemark: AUTOCLEAN-cyklussen tager ca. 4 minutter. For at fä det bedste resultat skal du lade apparatet gennemføre AUTOCLEAN-cyklussen fuldstændigt. Du kan til enhver tid sætte AUTOCLEAN-cyklussen på pause ell er annullere den.
Bemark: Hvis du annullerer AUTOCLEAN-programmet, vil apparatet sugedet resterende vand op i efterrengorigingsbakken i ca. 10 sekunder.
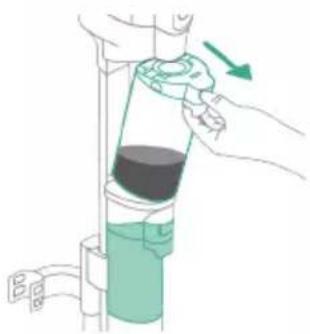
14 Tryk på knappen for at frigore tanken til snavset vand, og tag tanken ud.

15 Fjern det vade filter fra tanken til snavset vand.
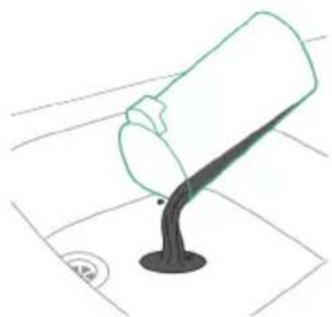
16 Hæld vandet fra tanken til snavset vand ned i vasken.
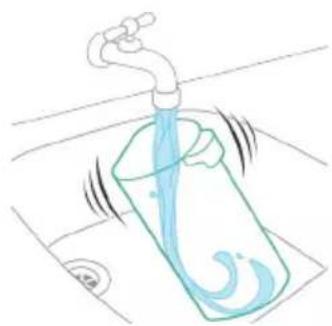
17 Skyl tanken til snavset vand under vandhanen.
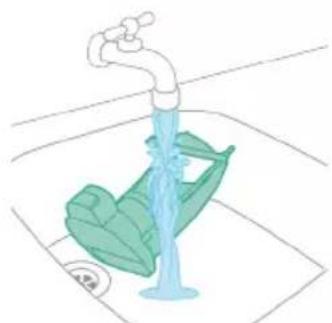
18 Rengör det väde filter under vandhanen.

19 Lad tanken til snavset vands våde filter og dens vandgennemströmningselement tørre helt, for du sætter det tilbage på tanken.

20 Sæt det våde filter tilbage på tanken til snavset vand.
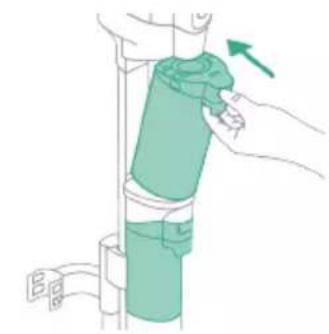
21 Sæt tanken til snavset vand tilbage i apparatet.
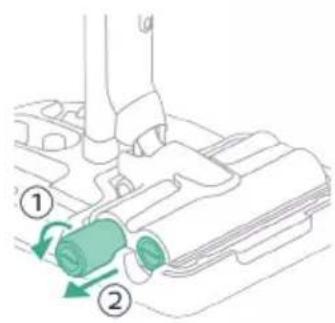
22 Drej mikrofiberbørsterne mod uret (1), og fjern dem fra AquaSpinmundstykket (2).
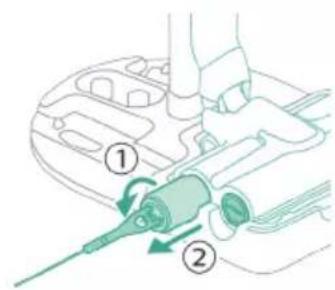
Tip: Hvis en mikrofiberbørste er svær at fjerne, kan du bruge rensebørstens handtag til at lase mikrofiberbørsten op.
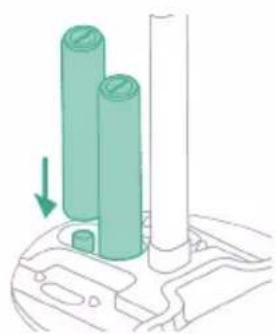
23 For at lade mikrofiberbørsterne tøre skal du placere børsternes Åbne ender på de angivne holdere på afterrengørings- og opbevaringsholderen.
Bemerk: Torring tager ca. 24 timer.
Rengøring af afterrengøringsbakken
Hvis afterrengoringsbakken bliver snavset, kan du rengore den ved at folge nedenstående trin.