
Pocket Cinema Camera 6K - Caméscope Blackmagic Design - Notice d'utilisation et mode d'emploi gratuit
Retrouvez gratuitement la notice de l'appareil Pocket Cinema Camera 6K Blackmagic Design au format PDF.

| Type de produit | Caméra cinéma numérique |
| Marque | Blackmagic Design |
| Modèle | Pocket Cinema Camera 6K |
| Capteur | Super 35 mm (6144 x 3456) |
| Monture d'objectif | EF (active) |
| Résolution maximale | 6K (6144 x 3456) jusqu'à 50 im/s |
| Formats d'enregistrement | Blackmagic RAW (3:1, 5:1, 8:1, 12:1, Q0, Q5) et Apple ProRes (HQ, 422, LT, Proxy) |
| Plage dynamique | 13 stops |
| ISO natif double | 100 - 25 600 (par paliers de 1/3 IL) |
| Écran tactile | 5 pouces LCD, inclinable, 1000 cd/m² |
| Alimentation | Batterie NP-F570 (incluse), entrée DC 12V, charge USB-C |
| Stockage | 1 logement CFast 2.0, 1 logement SD UHS-II, 1 port USB-C pour disque flash |
| Connectivité | HDMI plein format, USB-C, entrée micro 3,5 mm, sortie casque 3,5 mm, mini XLR (2 canaux), Bluetooth |
| Dimensions (approx.) | 14,5 x 10,5 x 9 cm (sans objectif) |
| Poids (approx.) | 1,2 kg (avec batterie, sans objectif) |
| Température de fonctionnement | 0 à 40 °C |
| Entretien et nettoyage | Garder le capuchon de protection du capteur en place lorsque aucun objectif n'est monté. Nettoyer les contacts avec un chiffon sec. Éviter la poussière et l'humidité. |
| Sécurité | Ne pas ouvrir le boîtier (aucune pièce réparable par l'utilisateur). Utiliser uniquement dans des environnements tropicaux (< 40 °C). Utiliser l'adaptateur secteur fourni en dessous de 2000 m d'altitude. |
| Pièces détachées et réparabilité | Contacter le support Blackmagic Design. Garantie limitée de 12 mois. Les réparations doivent être effectuées par un centre agréé. |
| Informations générales | Notice disponible en plusieurs langues. La caméra permet le contrôle à distance via Bluetooth ou ATEM Mini. Enregistrement sur batterie ou secteur. |
FOIRE AUX QUESTIONS - Pocket Cinema Camera 6K Blackmagic Design
Questions des utilisateurs sur Pocket Cinema Camera 6K Blackmagic Design
0 question sur cet appareil. Repondez a celles que vous connaissez ou posez la votre.
Poser une nouvelle question sur cet appareil
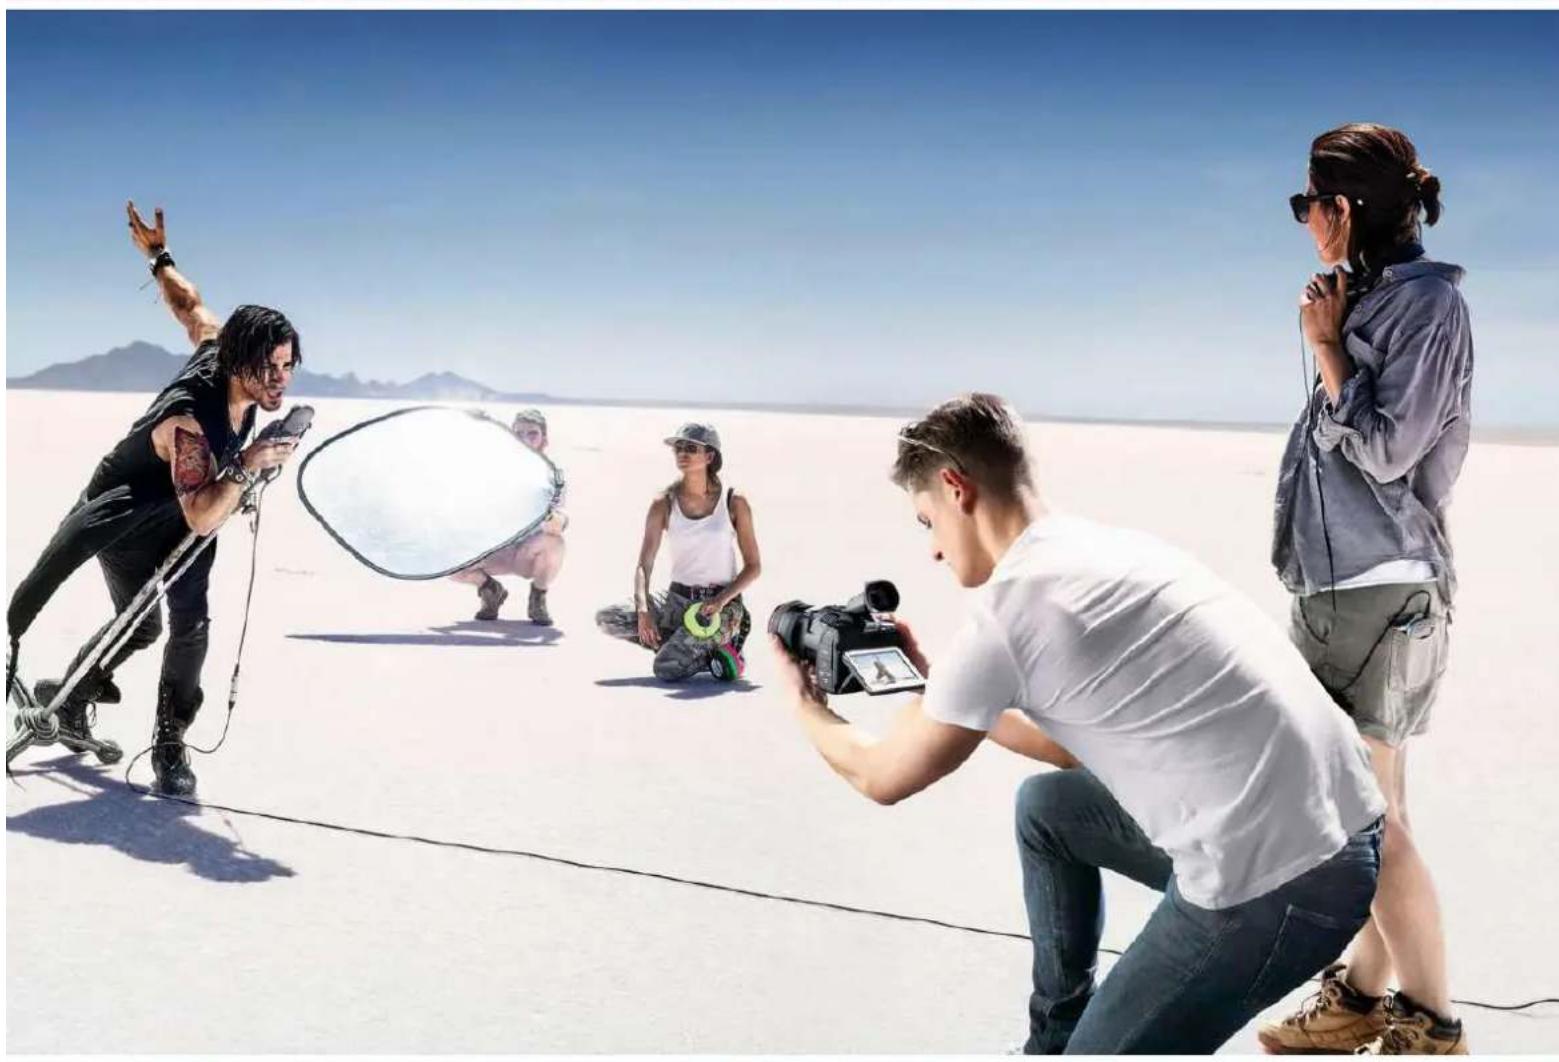
Téléchargez la notice de votre Caméscope au format PDF gratuitement ! Retrouvez votre notice Pocket Cinema Camera 6K - Blackmagic Design et reprennez votre appareil électronique en main. Sur cette page sont publiés tous les documents nécessaires à l'utilisation de votre appareil Pocket Cinema Camera 6K de la marque Blackmagic Design.
MODE D'EMPLOI Pocket Cinema Camera 6K Blackmagic Design
Blackmagic
Pocket Cinema Camera
Languages
To go directly to your preferred language, simply click on the hyperlinks listed in the contents below.
English 3.
日本語 167
François 332
Deutsch 498
Espanol 663
中文.828
HK 993
Pycckn 1158
Italiano 1323
Portugues 1488
Türkce 1653

Welcome
Thank you for purchasing your new Blackmagic Pocket Cinema Camera!
In 2013, we released the original Blackmagic Pocket Cinema Camera. We were excited by creating a small camera with high dynamic range and groundbreaking image quality that you could take anywhere. After all your amazing feedback, we decided to create a new family of Blackmagic Pocket Cinema Cameras that expand on the original design.
Blackmagic Pocket Cinema Camera 4K has the same Micro Four Thirds lens mount as the original Pocket Cinema Camera so you can use all your existing MFT lenses. Blackmagic Pocket Cinema Camera 6K G2 and Pocket Cinema Camera 6K Pro have an EF mount so you can use your favorite EF lenses and shoot 6K video up to 60 frames per second.
With 13 stops of dynamic range and dual native ISO, you can record beautiful, clean cinematic images that will capture and enhance your creative vision.
We are extremely excited to see the creative work you produce using your new Pocket Cinema Camera, and look forward to your feedback on new features you would like to see added to your camera!

Grant Petty
CEO Blackmagic Design
Contents
Which camera are you using? 5
Getting Started 5
Attaching a Lens 5
Turning Your Camera On 7
Powering Your Camera with the
Included Power Cable 7
Storage Media 8
CFast Cards 8
SD Cards 10
USB-C flash disks 12
Preparing Media for Recording 13
Preparing Media on
Blackmagic Pocket Cinema Camera 14
Preparing Media on a Mac 16
Preparing Media on Windows 16
Recording 18
Recording Clips 18
Blackmagic RAW 19
Recording to Blackmagic RAW 19
Maximum Sensor Frame Rates 22
Record Duration 23
Playback 29
Camera Features 29
Camera Front 29
Right Side 30
Left Side 31
Top Panel 33
Camera Underside 35
Camera Rear 36
Touchscreen Controls 39
Settings 62
Dashboard 62
Record Settings 62
File Naming Convention 68
Monitor Settings 68
Audio Settings 75
Setup Settings 78
Presets 90
3D LUTs 93
Entering Metadata 95
Slate 96
Camera Video Output 101
Blackmagic Zoom and Focus Demands 101
Connecting and Attaching to your
Camera 102
Using Blackmagic Focus Demand 104
Using Blackmagic Zoom Demand 104
Using DaVinci Resolve 106
Project Manager 106
Editing with the Cut Page 107
Adding Clips to the Timeline 110
Trimming Clips on the Timeline 111
Audio Trim View 111
Adding Titles 112
Working with Blackmagic RAW Files 113
Color Correcting your Clips with
the Color Page 116
Adding a Power Window 119
Using Plugs 121
Mixing Your Audio 122
Adding VFX and Compositing on
the Fusion Page 127
Mastering Your Edit 135
Quick Export 135
The Deliver Page 136
Camera Control with ATEM Mini 137
DaVinci Resolve Primary Color Corrector 141
Working with Third Party Software 144
Working with Files from
CFast 2.0 and SD cards 144
Working with Files from
USB-C flash disks 144
Using Final Cut Pro X 145
Using Avid MediaComposer 2018 145
Using Adobe Premiere Pro CC 146
Blackmagic Camera Setup Utility 147
Using a Battery Grip 148
Developer Information 151
Blackmagic Bluetooth Camera Control 151
Blackmagic SDI and Bluetooth
Camera Control Protocol 153
Example Protocol Packets 162
Help 163
Regulatory Notices 164
Safety Information 165
Warranty 166
Which camera are you using?
Blackmagic Pocket Cinema Camera 6K Pro, 6K G2 and 4K models have similar appearances. These cameras produce incredible, wide dynamic range images and share the same chassis. The control buttons and software menus are laid out the same way, and operating the cameras is essentially the same.
Blackmagic Pocket Cinema Camera 6K Pro and 6K G2 feature a Super 35mm sized sensor and an EF lens mount, and has a 6K icon beside the lens mount. Blackmagic Pocket Cinema Camera 4K features a Micro Four Thirds sized sensor and a Micro Four Thirds lens mount.

Blackmagic Pocket Cinema Camera 6K Pro
Getting Started
Getting started with your Pocket Cinema Camera is as simple as mounting a lens and powering your camera.
Attaching a Lens
Pocket Cinema Camera 6K G2 and 6K Pro use EF lenses and Pocket Cinema Camera 4K uses Micro Four Thirds lenses. Attaching a lens to your camera is the same process for all Pocket Cinema Cameras. Begin by removing the protective dust cap. To remove the protective dust cap, hold down the locking button and rotate the cap counterclockwise until it is released.
To attach an EF mount or Micro Four Thirds lens:
1 Align the dot on your lens with the dot on the camera mount. Many lenses have a visual indicator, for example a blue, red or white dot.

Press the lens mount against the camera mount, and twist the lens clockwise until it clicks into place.

Attaching an MFT lens on Blackmagic Pocket Cinema Camera 4K
3 To remove the lens, hold down the locking button, rotate the lens counterclockwise until its dot indicator reaches the 10 o'clock position on an MFT lens, or 12 o'clock for an EF lens. Gently remove the lens from its mount.
NOTE When no lens is attached to the camera, the glass filter covering the sensor is exposed to dust and other debris so you'll want to keep the dust cap on whenever possible.
Turning Your Camera On
Now that you've attached a lens, you will need to supply power to your camera. Pocket Cinema Camera 6K Pro and 6K G2 can be powered by inserting an NP-F570 battery, and Pocket Cinema Camera 4K can be powered by inserting an LP-E6 battery. You also have the option of powering your Pocket Cinema Camera from the supplied AC power adapter or from two NP-F570 batteries in a Blackmagic battery grip. For information about adding a battery grip to your Pocket Cinema Camera, see the 'using a battery grip' section.
Inserting a Battery and Powering your Camera
Pocket Cinema Camera 6K Pro and 6K G2 use a standard NP-F570 battery, and Pocket Cinema Camera 4K use a standard LP-E6 battery. A battery is included with the camera, but if you need additional batteries, they can be purchased from your Blackmagic Design reseller or from most video or photography equipment stores.
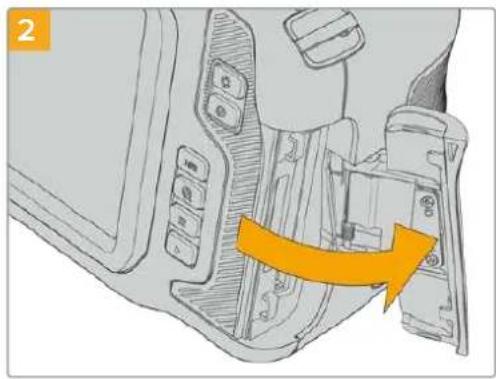
1 On the underside of the camera, press the door release to open the battery door.
2 With the contacts facing the terminal, insert the battery until you feel it click into place under the locking tab.
TIP To release the battery, push the locking tab towards the front of the camera and the battery will eject.
3 Close the door to the battery terminal and gently push until it clicks into place.
4 Move the power switch on the top of your camera to the 'on' position. To turn off the camera, move the power switch to the 'off' position.
Powering Your Camera with the Included Power Cable
The included 100-240 volt AC plug pack can be used to simultaneously power the camera and charge the internal battery or two batteries if you have a Blackmagic battery grip attached to your camera. The DC power connector locks to the camera so it cannot be accidentally disconnected.
To plug in external power:
1 Connect the AC to 12V DC adapter plug to your mains power socket.
2 Open the rubber protector on the left side of your camera and rotate the locking DC power connector so that it lines up with the recess on the top of the 12V DC power input. Gently push the connector into the input until it clicks.
3 To unplug the connector, pull the sheath away from the connector and remove the connector from the input.
If you have both external and battery power connected, only external power is used. If you remove external power while a charged battery is connected, your camera switches to battery power without interruption.
The battery inserted in your camera can be charged via USB when the camera is switched off. This is convenient as you can use a portable power bank to charge the camera when not in use. Blackmagic Pocket Cinema Cameras support charging via standard 5V 10W USB wall chargers. Chargers that support USB power delivery, or USB PD, can also be used. USB PD chargers typically have a USB-C connection and up to 20V output, so can provide a faster charge. Charging the internal battery via the 12V DC power input is supported when the camera is switched on or off.
TIP If charging a hot battery immediately after use, charging speed is reduced until the battery cools below 45^ or 113^ . We recommend letting the battery cool down for 15 minutes before charging.
You are now ready to insert the storage media and start recording!
Storage Media
Your Blackmagic Pocket Cinema Camera uses standard SD cards, faster UHS-II SD cards or CFast 2.0 cards to record video.
Using the USB-C expansion port, you can also connect high capacity USB-C flash disks for increased recording times.
CFast Cards
CFast 2.0 cards are capable of supporting very high data rates, so are perfect for recording 6K, 4K and HD video at high frame rates. Refer to the record duration tables in the 'recording' section for details on the maximum frame rates that can be recorded in each format.
NOTE CFast 2.0 cards are generally high speed cards, though some cards have slower write speeds compared to read speeds, and maximum data rates can differ between models. For reliable recording with your chosen frame rates, use only the cards recommended by Blackmagic Design.
To insert a CFast card:
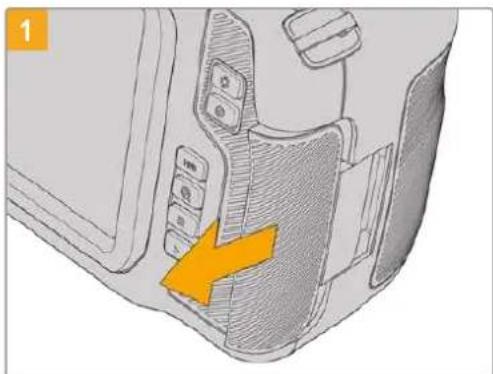
To access the media slots, slide the door on the right side toward the back of the camera.
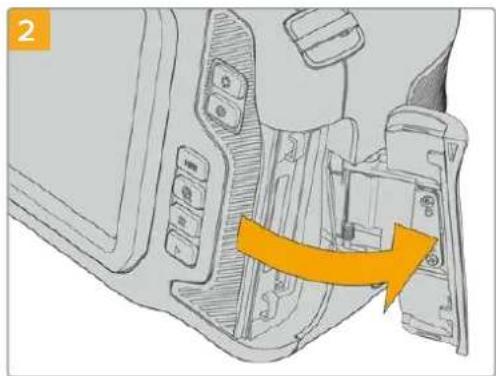
The spring loaded door opens so you can access the CFast and SD memory card slots.
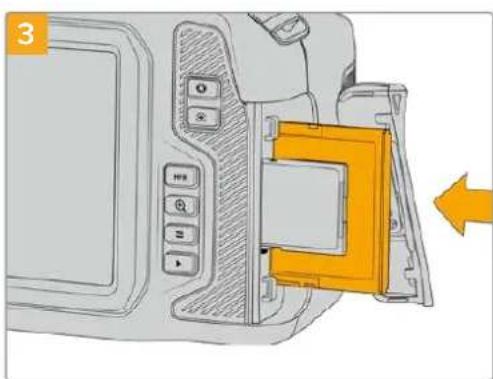
Insert the CFast card into the CFast card slot until you feel it lock into place. The card should insert easily without the need for excessive force. To remove a CFast card, gently push the CFast card in and then release to eject it.
The storage information at the bottom of the LCD touchscreen will show the name and record time remaining of the detected CFast card.
Inserting an SD card is like inserting a CFast card. For more information, see 'To insert an SD Card'.

Choosing a CFast 2.0 Card
When working with high data rate video it's important to carefully check the CFast card that you would like to use. This is because CFast 2.0 cards have different read and write speeds.
For the most up to date information on supported CFast cards on Blackmagic Pocket Cinema Camera, please refer to the Blackmagic Design support center at www.blackmagicdesign.com/support.
SD Cards
In addition to CFast 2.0 cards, your camera can record on high speed UHS-I and UHS-II type SD cards. UHS-I SD cards allow you to use more affordable storage media when shooting compressed video formats in HD, and even faster UHS-II cards allow you to record Blackmagic RAW as well as Ultra HD content in ProRes.
With SD cards, you can use more affordable storage media when shooting compressed video formats in HD.
SDXC and SDHC are a very common media storage format for consumer still and video cameras. If you've ever shot video using a DSLR, or use a Blackmagic Micro Cinema Camera, Pocket Cinema Camera or Blackmagic Video Assist, you may already have compatible SD cards to use.
For projects that don't require the highest resolution files, or for when long recording durations are needed, using SD cards can be very economical. Lower capacity and lower speed SD cards can also be used for storing and loading LUTs and Presets.
To insert an SD card

To access the media slots, slide the door on the right side toward the back of the camera.
The spring loaded door opens so you can access the media slots.

With the label on the SD card facing the touchscreen, insert the SD card into the SD card slot until you feel it lock into place. The card should insert easily without the need for excessive force.
To remove a the SD card, gently push the SD card in and then release to eject it.
The storage information at the bottom of the LCD touchscreen will show the name and record time remaining of the detected SD card.
Choosing an SD Card
If you are recording 6K, 4K DCI or Ultra HD, then we recommend using the fastest high speed UHS-II type SD cards available. It's important to use high speed UHS-II SD cards for 6K, 4K DCI, Ultra HD and HD recording, or UHS-I cards for HD recording. These cards are rated for fast data speeds and support larger storage sizes. Generally the faster the cards, the better.
Before using your cards, you need to format them to either HFS+ or exFAT formats. It's easy to format your media via your camera's 'storage' settings. Refer to the 'settings' section for more information on storage settings.
If you want to, you can format your cards using a Mac or Windows computer. When using your media on Mac, you can use HFS+ which is the Mac disk format, also known as OS X Extended. If you are using Windows then you should use exFAT format, which is the Windows disk format that Mac computers can also read.
For the most up to date information on supported SD cards on Blackmagic Pocket Cinema Camera, please refer to the Blackmagic Design support center at www.blackmagicdesign.com/support.
NOTE For high resolution, high frame rate recording, we recommend using CFast 2.0 media or an external USB-C flash disk, as they are typically faster and available in higher capacities.
Locking and Unlocking SD Cards
SD cards can be write protected, or 'locked', to prevent data from being overwritten. When inserting an SD card, make sure the card is not write protected. To disable write protection, slide the plastic switch on the left side of the card to the position closest to the connectors. You can always set the card to the locked again after recording.
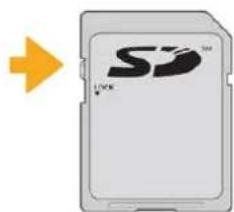
Move the lock tab up or down to lock or unlock an SD card
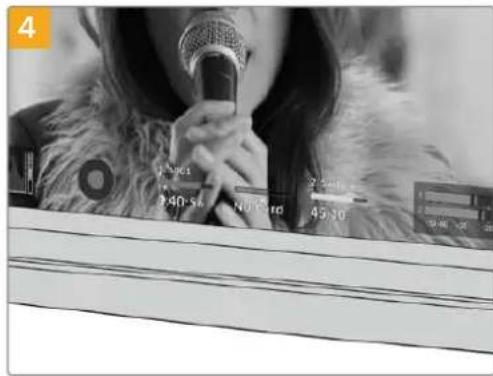
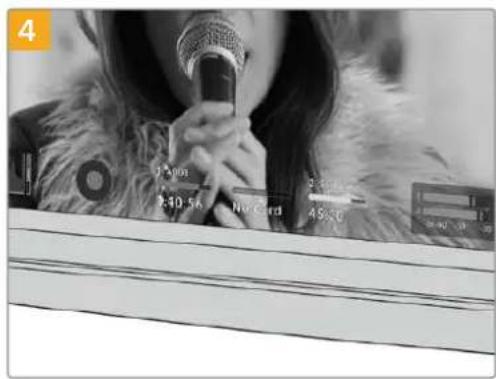
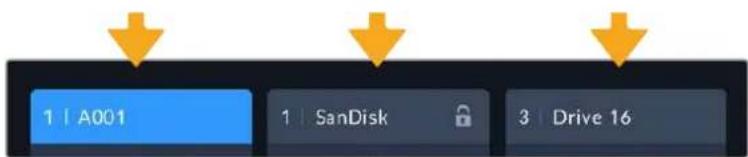
Your Blackmagic Pocket Cinema Camera lets you know if you've inserted a locked SD card by displaying the word 'locked' instead of the card's duration on the LCD touchscreen, and will display a padlock icon in the storage menu next to the card name. If the card is locked, you won't be able to record video, capture stills, or export LUTs and presets until it is unlocked.

Storage Indicators at the bottom of the LCD touchscreen show the amount of recording time remaining or if the SD card is locked

Tap on the storage indicator at the bottom of the LCD touchscreen to enter the storage manager
USB-C flash disks
Your Blackmagic Pocket Cinema Camera features a high speed USB-C expansion port, which allows you to record video directly to USB-C flash disks. These fast, high capacity drives allow you to record video for long periods, which can be important when filming events with long durations.
Once you have finished recording you can connect the same drive directly to your computer for editing and post production, without having to copy media across.
To connect to a USB-C flash disk:

Open the rubber protector on the left side of the camera and connect the other end of the cable to the USB-C port.

Connect one end of a USB type-C cable to your USB-C flash disk.
NOTE When a USB-C flash disk is connected to your camera, it occupies the same place as the SD card in your camera's operating system. This means that when you have a compatible USB-C flash disk connected, your camera's SD card slot is unavailable.
To use the SD card slot instead of the USB-C flash disk, disconnect the USB-C flash disk from your camera.
Choosing a fast USB-C flash disk
USB-C flash disks are designed to offer fast, affordable storage for a wide range of devices and are readily available from a variety of consumer electronics outlets. It's important to note that film making is only one part of the USB-C flash disk market, so choosing the best drive is vital to making sure you have enough speed to record 6K and 4K footage.
Many USB-C flash disks are designed for home computing and aren't fast enough to record 6K and 4K video.
For the most up to date list of recommended USB-C flash disks please go to www.blackmagicdesign.com/support.
Important Notes About USB-C flash disk Speed
Some models of USB-C flash disk can't save video data at the speed the manufacturer claims. This is due to the disk using hidden data compression to attain higher write speeds. This data compression can only save data at the manufacturer's claimed speed when storing data such as blank data or simple files. Video data includes video noise and pixels which are more random so compression will not help, therefore revealing the true speed of the disk.
Some USB-C flash disks can have as much as 50% less write speed than the manufacturer's claimed speed. So even though the disk specifications claim a USB-C flash disk has speeds fast enough to handle video, in reality the disk isn't fast enough for real time video capture.
Use Blackmagic Disk Speed Test to accurately measure whether your USB-C flash disk will be able to handle high data rate video capture and playback. Blackmagic Disk Speed Test uses data to simulate the storage of video so you get results similar to what you'll see when capturing video to a disk. During Blackmagic testing, we have found newer, larger models of USB-C flash disk and larger capacity USB-C flash disks are generally faster.
Blackmagic Disk Speed Test is available from the Mac app store. Windows and Mac versions are also included in Blackmagic Desktop Video, which you can download from the 'capture and playback' section of the Blackmagic Design support center at www.blackmagicdesign.com/support.
Preparing Media for Recording
You can format your CFast cards, SD cards or USB-C flash disks using the 'format card' feature on your camera's storage and formatting menu, or via a Mac or Windows computer. For best performance, we recommend formatting storage media using your camera.
HFS+ is also known as OS X Extended and is the recommended format as it supports 'journaling'. Data on journaled media is more likely to be recovered in the rare event that your storage media becomes corrupted. HFS+ is natively supported by Mac. exFAT is supported natively by Mac and Windows without needing any additional software, but does not support journaling.
Preparing Media on Blackmagic Pocket Cinema Camera
1 Tap either storage indicator at the bottom of the LCD touchscreen to enter the storage manager.
2 Tap 'format CFast' or 'format SD card'. If you have a USB-C flash disk connected to your camera, tap 'drive list' then tap on the drive you want to format.
'Format SD card' is replaced with 'Format external drive' in your storage and formatting screen when you have a USB-C flash disk connected to your camera
NOTE If your camera is connected to a drive hub, such as a Blackmagic MultiDock, the drive list will display all the SSD drives available to your camera. To select the drive you want to record to, tap the drive you want, then tap the 'use drive' button.
3 Tap 'edit reel number' if you would like to manually change the reel number. Use the keypad to enter a new reel number and press 'update' to confirm your selection.
4 Choose OS X Extended or exFAT format and tap the format button.
Tap 'edit reel number' to manually edit the reel number
5 A confirmation screen will allow you to confirm the card to be formatted, the selected format and the reel number. Confirm your selection by tapping the format button. Tap 'cancel' to cancel the format.
Check that you have selected the correct card before formatting
6 Hold down the format button for three seconds to format your media.
7 The camera notifies you when the format is complete and your drive is ready for use, or if formatting has failed.
8 Tap 'ok' to return to the storage manager.
9 Tap 'exit' to leave the storage manager.
When formatting CFast cards, SD cards or USB-C flash disks using your camera, the camera ID that is generated from the slate and reel number are used to name the media. Your camera automatically adjusts the reel numbers incrementally each time you format. If you need to manually enter a specific reel number, tap the 'edit reel number' and enter the number you want to format the card as.
The storage manager on your camera indicates whether you are currently managing CFast, SD or USB-C flash disk media
Tap on 'reset project data' in the 'project' tab of the slate if you're starting a new project and want the numbering to reset back to 1.
TIP If the SD card is write protected, your camera will display the word 'locked' instead of the card's duration on the LCD touchscreen, and will display a padlock icon in the storage menu. Unlock the card to format and record. For more information, refer to the 'SD cards' section of this manual.
NOTE If you have a USB-C flash disk connected, 'external drive' appears over storage slot 2.
Preparing Media on a Mac
Use the Disk Utility application included with Mac to format your CFast card, SD card, or USB-C flash disk in the HFS+ or exFAT formats. Remember to backup anything important from your media first as all data will be lost when it is formatted.
1 Connect the storage media to your computer and dismiss any message offering to use your media for Time Machine backups.
2 Go to applications/utilitys and launch Disk Utility.
3 Click on the disk icon for your camera's storage media and then click the 'erase' tab.
4 Set the 'format' to 'Mac OS extended (journaled)' or 'exFAT'.
5 Type a 'name' for the new volume and then click 'erase'. Your camera's storage media will quickly be formatted and made ready for use.
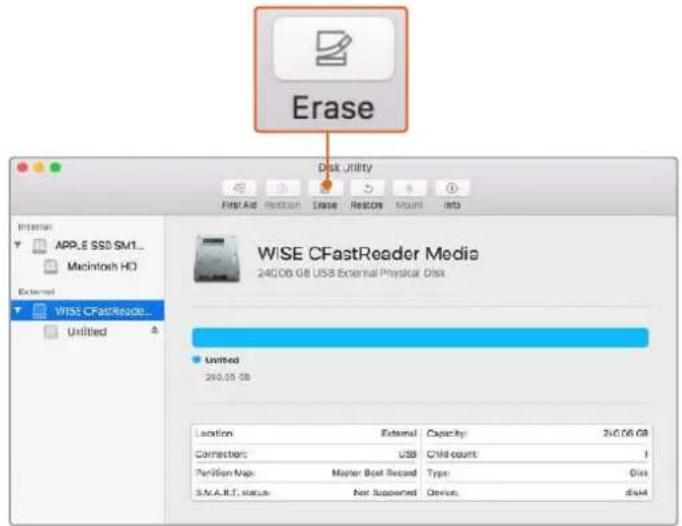
Use Disk Utility on Mac to erase your camera's storage media in the Mac OS extended (joumaled) or exFAT format
Preparing Media on Windows
The 'format' dialog box can format your camera's storage media in the exFAT format on a Windows PC. Remember to backup anything important from your media first as all data will be lost when it is formatted.
1 Connect your camera's storage media to your computer using an external reader, USB-C cable or adapter.
2 Open the 'start' menu or 'start' screen and choose 'computer'. Right click on your camera's storage media.
3 From the contextual menu, choose 'format'.
4 Set the file system to 'exFAT' and the allocation unit size to 128 kilobytes.
5 Type a volume label, select 'quick format' and click 'start'.
6 Your storage media will quickly be formatted and made ready for use.
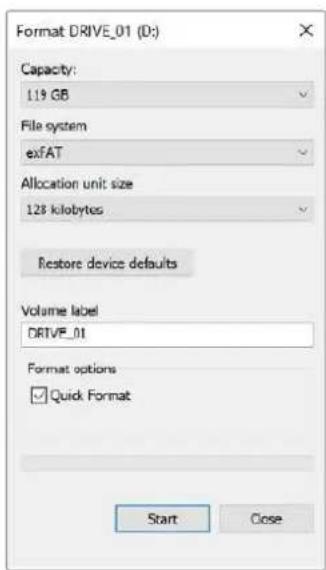
Use the 'format' dialog box feature in Windows to format your camera's storage media in the exFAT format
NOTE If your recordings are dropping frames, check that your card or drive is on our list of recommended media for the codec and frame size you are using. For lower data rates try lowering your frame rate, resolution, or try a compressed codec such as ProRes. Check the Blackmagic Design website for the latest information at www.blackmagicdesign.com
NOTE Partitioned media can be used with your Blackmagic Pocket Cinema Camera, though your camera will only recognize the first partition of your media for recording and playback.
It's worth noting that if you use the storage and formatting menu to format your media, the entire drive including all partitions will be erased, not just the first partition that has been used for recording and playback. For this reason we strongly recommend using media with one partition only.
Recording
Recording Clips
Blackmagic Pocket Cinema Camera features two record buttons. The primary record button is located on the top of the handgrip for triggering with your index finger when holding the handgrip of the camera with your right hand.
The second record button is located on the front of your camera to allow you to begin recording while holding the camera with one hand in situations where you want to record yourself. The button is located in an easy to reach position, ideal if you are recording yourself for video blogs.
Press one of the 'record' buttons on your camera to begin recording immediately. Press 'record' again to stop recording.

The 'record' button located on the The 'record' button located on top panel of your camera the front of your camera
Before you start recording, tap and hold the name of the media at the bottom the touchscreen to select the memory card or USB-C flash disk you want to u
The bar over the media type you have selected turns blue to indicate the camera is set to record to this media. To record to a different card or drive, tap and hold the name of the media. While recording, the bar is red.
Choosing the Recording Format
Blackmagic Pocket Cinema Camera records using Apple ProRes CODEs including ProRes 422 HQ, ProRes 422, ProRes 422 LT and ProRes 422 Proxy. ProRes CODEs let you fit more video on your SD card, CFast card or USB-C flash disk. ProRes 422 HQ provides the highest quality video with the lowest compression. Alternatively, ProRes 422 Proxy gives you far more recording time with greater compression. Your camera can also record with the Blackmagic RAW format. You may decide to experiment to see which format best suits your workflow.
It's important to note that Blackmagic Pocket Cinema Camera can use Blackmagic RAW for full sensor and windowed sensor formats, and must use ProRes for scaled formats.
For more information on windowed and scaled formats, see the 'maximum sensor frame rates' section.
Blackmagic RAW
- Blackmagic Pocket Cinema Camera supports the Blackmagic RAW file format. This format offers superior image quality, wide dynamic range and a broad selection of compression ratios.
- Blackmagic RAW features all the user benefits of RAW recording, but the files are very fast because most of the processing is performed in the camera where it can be hardware accelerated by the camera itself.
Blackmagic RAW also includes powerful metadata support so the software reading the files knows your camera settings. If you like shooting in video gamma because you need to turn around edits quickly and you don't have time for color correction, then this metadata feature means you can select video gamma, shoot in video gamma, and the file will display with video gamma applied when you open it in software. However underneath, the file is actually film gamma and the metadata in the file is what's telling the software to apply the video gamma.
So what all this means is if you want to color grade your images at some point, then you have all that film dynamic range preserved in the file. You don't have your images hard clipped in the whites or the blacks, so you retain detail and you can color grade to make all your images look cinematic. However, if you don't have time for color grading, that's fine because your images will have the video gamma applied and look like normal video camera images. You are not locked in on the shoot and you can change your mind later during post production.
Blackmagic RAW files are extremely fast and the codec is optimized for your computer's CPU and GPU. This means it has fast smooth playback and eliminates the need for hardware decoder boards, which is important for laptop use. Software that reads Blackmagic RAW also gets the advantage of processing via Apple Metal, Nvidia CUDA and OpenCL.
This means that Blackmagic RAW plays back at normal speed like a video file on most computers, without needing to cache it first or lower the resolution.
It's also worth mentioning that lens information is recorded in the metadata on a frame by frame basis. For example, when using compatible lenses, any zoom or focus changes performed over the length of a clip will be saved, frame by frame, to the metadata in the Blackmagic RAW file.
Recording to Blackmagic RAW
Blackmagic RAW works in 2 different ways. You have a choice to use either the constant bitrate codec, or the constant quality codec.
The constant bitrate codec works in a similar way to most codecs. It tries to keep the data rate at a consistent level and won't let the data rate go too high. This means even if you are shooting a complex image that might need a bit more data to store the image, a constant bitrate codec will just compress the image harder to make sure the images fit within the space allocated.
This can be fine for video CODECs, however when shooting Blackmagic RAW you really want to ensure the quality is predictable. What would happen if the images you were shooting needed more data, but the codec just compresses harder to make a specified data rate? It's possible you could lose quality, but not be sure it's happening until you return from a shoot.
To solve this problem, Blackmagic RAW also has an alternative codec choice called constant quality. This codec is technically called a variable bitrate codec, but what it's really doing is allowing the size of the file to grow if your images need extra data. There is no upper limit on the file size if you need to encode an image but maintain quality.
So Blackmagic RAW set to the constant quality setting will just let the file grow as big as it needs to be to encode your images. It also means the files could be larger or smaller depending on what you are shooting. I guess if you leave your lens cap on the lens, you won't waste space on your media!
It is also worth noting that the quality settings for Blackmagic RAW are not obscure names, but are more meaningful as they are derived from what's happening technically. So for example when you have selected the constant bitrate codec, you will see quality settings of 3:1, 5:1, 8:1 and 12:1. These are the ratios of the uncompressed RAW file size vs the file sizes you should expect when shooting in Blackmagic RAW. 3:1 is better quality as the file is larger, while 12:1 is the smallest file size with the lowest quality. Many users of Blackmagic RAW find that 12:1 has been perfectly ok and they have not seen any quality limitations. However it's best to experiment and try various settings for yourself.
When using Blackmagic RAW in constant quality, the options are Q0, Q1, Q3 and Q5. These are the compression parameters passed to the codec and they are setting how much compression is applied in a more technical way. This setting is different because the codec operates differently between constant bitrate vs constant quality. In this constant quality setting, you really cannot tell what the file size ratio will become as it varies a lot based on what you are shooting. So in this case the setting is different and the file will become the size needed to store your media.
Constant Bitrate Settings
The names for 3:1, 5:1, 8:1 and 12:1 represent the compression ratio. For example, 12:1 compression produces a file size roughly 12 times smaller than uncompressed RAW.
Constant Quality Settings
Q0 and Q5 refer to different levels of quantization. Q5 has a greater level of quantization but offers a greatly improved data rate. As mentioned above, the constant quality setting can result in files that grow and shrink quite a lot, depending on what you are shooting. This also means it's possible to shoot something and see the file size increase to beyond what your media card can keep up with. It could result in dropped frames. However the benefit is that you can instantly see if this happens on a shoot and then investigate your settings vs quality.
Blackmagic RAW Player
The Blackmagic RAW player included in your Blackmagic camera's software installer is a streamlined application for reviewing clips. Simply double click on a Blackmagic RAW file to open it, and you can quickly play and scroll through the file with its full resolution and bit depth.
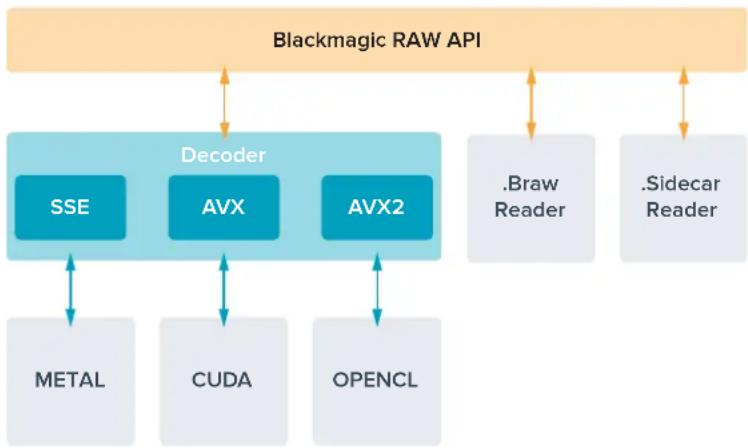
When decoding frames, the CPU acceleration in the SDK library supports all main architectures, and also supports GPU acceleration via Apple Metal, Nvidia CUDA and OpenCL. It also works with the Blackmagic eGPU for extra performance. Blackmagic RAW player is available for Mac, Windows and Linux.
Sidecar Files
Blackmagic RAW sidecar files let you override metadata in a file without overwriting embedded metadata in the original file. This metadata includes the Blackmagic RAW settings as well as information on iris, focus, focal length, while balance, tint, color space, project name, take number and more. Metadata is encoded frame by frame over the duration of the clip, which is important for lens data if the lens is adjusted during a shot. You can add or edit metadata in sidecar files with DaVinci Resolve or even a text editor because it's a human readable format.
Sidecar files can be used to automatically add new Blackmagic RAW settings to a playback simply by moving the sidecar file into the same folder as the corresponding Blackmagic RAW file. If you move the sidecar file out of the folder and reopen the Blackmagic RAW file, the changed settings are not applied and you see the file as it was originally shot. Any software that uses the Blackmagic RAW SDK can access these settings. Changes made are saved in the sidecar file and can then be seen by Blackmagic RAW Player or any other software capable of reading Blackmagic RAW files.
When shooting video gamma, the file stays in film gamma, and the metadata tells the Blackmagic RAW processing to display using video gamma. Video gamma is great when you don't want to grade the image and want to deliver content quickly, however if you want to pull up the black parts of the image, or pull down the white areas, all the detail is retained. You never clip the video and all the detail is still there if you want to access it at any time.
Blackmagic RAW in DaVinci Resolve
Settings can be adjusted for each Blackmagic RAW file, and then saved as a new sidecar file from the 'Camera RAW' tab in DaVinci Resolve for creative effect or optimized viewing. This also means you can copy your media for another DaVinci Resolve artist and they will have access to your modified gamma settings automatically on import. In addition to the other metadata your camera files contain, DaVinci Resolve can read your selected dynamic range, so your clips will automatically display in DaVinci Resolve with 'film', 'extended video' or 'video' dynamic range.
You can then customize these settings by adjusting the saturation, contrast and midpoint, as well as the highlight and shadow rolloff. Any adjustments can then be saved as a sidecar file, so the changes can be seen by anyone else working with the files in post. You can always return to the original camera metadata at any time.
You can also export a single Blackmagic RAW frame from the 'Camera RAW' tab in DaVinci Resolve, which contains all adjustments, metadata, full resolution and color information so it is easy to share a single frame grab or reference file with others.
For more information on how to use Blackmagic RAW in DaVinci Resolve, see the 'Using DaVinci Resolve' chapter in this manual.
Blackmagic RAW Software Development Kit
The Blackmagic RAW Software Development Kit is an API developed by Blackmagic Design. You can use the Blackmagic RAW SDK to write your own applications to use the Blackmagic RAW format. This SDK library can be used by any developer to add support for reading, editing, and saving Blackmagic RAW files. The Blackmagic RAW SDK includes all the generation 5 color science so you can achieve organic cinematic images across any app that supports it. The Blackmagic RAW SDK supports Mac, Windows and Linux, and is available as a free download from the developer page of the Blackmagic website at www.blackmagicdesign.com/developer
The following diagram illustrates the components of the Blackmagic RAW API:
Maximum Sensor Frame Rates
Blackmagic Pocket Cinema Camera 6K Pro and Pocket Cinema Camera 6K G2 Maximum Sensor Frame Rates
| Resolution Codec Sensor Scan Max Frame Rate | ||||
| 6K | 6144 x 3456 | Blackmagic RAW | Full | 50 |
| 6K 2.4:1 | 6144 x 2560 | Blackmagic RAW | Window | 60 |
| 5.7K 17:9 | 5744 x 3024 | Blackmagic RAW | Window | 60 |
| 4K DCI | 4096 x 2160 Blackmagic RAW Window 60 | |||
| 4096 x 2160 ProRes 422 HQ Scaled from 5.7K 60 | ||||
| 4096 x 2160 | ProRes 422 | Scaled from 5.7K | 60 | |
| 4096 x 2160 ProRes 422 LT Scaled from 5.7K 60 | ||||
| 4096 x 2160 ProRes 422 Proxy Scaled from 5.7K 60 | ||||
| Ultra HD | 3840 x 2160 | ProRes 422 HQ | Scaled from full | 50 |
| 3840 x 2160 | ProRes 422 | Scaled from full | 50 | |
| 3840 x 2160 | ProRes 422 LT | Scaled from full | 50 | |
| 3840 x 2160 | ProRes 422 Proxy | Scaled from full | 50 | |
| 3840 x 2160 | ProRes 422 HQ Scaled from 5.7K 60 | |||
| 3840 x 2160 | ProRes 422 | Scaled from 5.7K | 60 | |
| 3840 x 2160 | ProRes 422 LT | Scaled from 5.7K | 60 | |
| 3840 x 2160 | ProRes 422 Proxy | Scaled from 5.7K | 60 | |
| 3.7K Anamorphic | 3728 x 3104 | Blackmagic RAW | Window | 60 |
| 2.8K 17:9 | 2868 x 1512 | Blackmagic RAW | Window | 120 |
| HD | 1920 x 1080 | ProRes 422 HQ | Scaled from full | 50 |
| 1920 x 1080 | ProRes 422 | Scaled from full | 50 | |
| 1920 x 1080 | ProRes 422 LT | Scaled from full | 50 | |
| 1920 x 1080 | ProRes 422 Proxy | Scaled from full | 50 | |
| 1920 x 1080 | ProRes 422 HQ Scaled from 5.7K 60 | |||
| 1920 x 1080 | ProRes 422 | Scaled from 5.7K | 60 | |
| 1920 x 1080 | ProRes 422 LT | Scaled from 5.7K | 60 | |
| 1920 x 1080 | ProRes 422 Proxy | Scaled from 5.7K | 60 | |
| 1920 x 1080 | ProRes 422 HQ Scaled from 2.7K | 120 | ||
| 1920 x 1080 | ProRes 422 | Scaled from 2.7K | 120 | |
| 1920 x 1080 | ProRes 422 LT | Scaled from 2.7K | 120 | |
| 1920 x 1080 | ProRes 422 Proxy | Scaled from 2.7K | 120 | |
Blackmagic Pocket Cinema Camera 4K Maximum Sensor Frame Rates
| Resolution Codec Sensor Scan Max Frame Rate | ||||
| 4K DCI | 4096 x 2160 | Blackmagic RAW | Full | 60 |
| 4096 x 2160 ProRes | 422 HQ Full 60 | |||
| 4096 x 2160 ProRes | 422 Full 60 | |||
| 4096 x 2160 ProRes | 422 LT Full 60 | |||
| 4096 x 2160 ProRes | 422 Proxy Full 60 | |||
| 4K 2.4:1 | 4096 x 1720 | Blackmagic RAW | Window | 75 |
| Ultra HD | 3840 x 2160 Blackmagic RAW Window 60 | |||
| 3840 x 2160 ProRes | 422 HQ Window 60 | |||
| 3840 x 2160 ProRes | 422 Window 60 | |||
| 3840 x 2160 ProRes | 422 LT Window 60 | |||
| 3840 x 2160 ProRes | 422 Proxy Window 60 | |||
| 2.8K Anamorphic | 2880 x 2160 | Blackmagic RAW | Window | 80 |
| 2.6K 16:9 | 2688 x 1512 | Blackmagic RAW | Window | 120 |
| HD | 1920 x 1080 | ProRes 422 HQ | Scaled from full | 60 |
| 1920 x 1080 | ProRes 422 | Scaled from full | 60 | |
| 1920 x 1080 | ProRes 422 LT | Scaled from full | 60 | |
| 1920 x 1080 | ProRes 422 Proxy | Scaled from full | 60 | |
| 1920 x 1080 | ProRes 422 HQ Scaled from 2.6K 120 | |||
| 1920 x 1080 | ProRes 422 | Scaled from 2.6K | 120 | |
| 1920 x 1080 | ProRes 422 LT Scaled from 2.6K 120 | |||
| 1920 x 1080 | ProRes 422 Proxy Scaled from 2.6K 120 | |||
| 1920 x 1080 | Blackmagic RAW | Window | 120 | |
| 1920 x 1080 | ProRes 422 HQ | Window | 120 | |
| 1920 x 1080 | ProRes 422 Window 120 | |||
| 1920 x 1080 | ProRes 422 LT | Window | 120 | |
| 1920 x 1080 | ProRes 422 Proxy | Window | 120 | |
NOTE The 2.6K 16:9 shooting format has a sensor area optimized for use with Super 16mm lenses and high frame rates.
Record Duration
These tables show approximate record duration in minutes and seconds based on format, project frame rate and media size. It's important to note that available resolutions and codec s differ for different models of Pocket Cinema Camera.
The maximum recording time for your storage media can vary depending on the data capacity your CFast card, SD card or USB-C flash disk, and the recording format and frame rate you choose. For example, the storage rate for Apple ProRes 422 HQ at 3840 × 2160 is
approximately 880 Mbps. At 24 frames per second, you can record approximately 47 minutes of video on a 256GB CFast 2.0 card. At the same settings you can record approximately 23 minutes of video on a 128GB CFast card, which is approximately half the record duration of a 256GB CFast card.
It should be noted that recording duration of media can vary slightly between different manufacturers. It can also vary depending on whether the storage media is formatted as exFAT or Mac OS X Extended.
Simple scenes containing less detail tend to require less data than more dense compositions. The values in these tables assume shots with a high complexity, which means you may get slightly longer record times depending on the nature of your shoot.
6K
| CFast Card | Frame Rate | Blackmagic RAW 3:1 | Blackmagic RAW 5:1 | Blackmagic RAW 8:1 | Blackmagic RAW 12:1 |
| 256GB | Duration Duration Duration Duration | ||||
| 23.98 17 | mins 28 mins | 45 mins | 67 mins | ||
| 24 17 mins | 28 mins | 45 mins | 67 mins | ||
| 25 16 mins | 27 mins | 43 mins | 64 mins | ||
| 30 13 mins | 22 mins | 36 mins | 54 mins | ||
| 50 8 mins | 13 mins | 21 mins | 32 mins | ||
6K 2.4:1
| CFast Card | Frame Rate | Blackmagic RAW 3:1 | Blackmagic RAW 5:1 | Blackmagic RAW 8:1 | Blackmagic RAW 12:1 |
| 256GB | Duration Duration Duration Duration | ||||
| 23.98 23 | mins 38 mins | 60 mins | 91 mins | ||
| 24 22 mins | 38 mins | 60 mins | 91 mins | ||
| 25 21 mins | 36 mins | 58 mins | 87 mins | ||
| 30 18 mins | 30 mins | 48 mins | 72 mins | ||
| 50 11 mins | 18 mins | 29 mins | 43 mins | ||
| 60 9 mins | 15 mins | 24 mins | 36 mins | ||
5.7K 17:9
| CFast Card | Frame Rate | Blackmagic RAW 3:1 | Blackmagic RAW 5:1 | Blackmagic RAW 8:1 | Blackmagic RAW 12:1 |
| 256GB | Duration Duration Duration Duration | ||||
| 23.98 | mins 34 | mins 55 mins | 82 mins | ||
| 24 | mins 34 | mins 55 mins | 82 mins | ||
| 25 | mins 33 | mins 52 | mins | ||
| 30 | mins 27 | mins 44 | mins | ||
| 50 | mins 16 | mins 26 mins | 39 mins | ||
| 60 | mins 13 | mins 22 | mins | ||
4K DCI
| CFast Card | Frame Rate | Blackmagic RAW 3:1 | Blackmagic RAW 5:1 | Blackmagic RAW 8:1 | Blackmagic RAW 12:1 | ProRes 422 HQ | ProRes 422 | ProRes 422 LT | ProRes 422 Proxy |
| 256GB | Duration Duration Duration Duration Duration Duration Duration Duration Duration Duration Duration Duration Duration Duration Duration Duration Duration Duration Duration Duration Duration Duration Duration Duration Duration Duration Duration Duration Duration Duration Duration Duration Duration Duration Duration Duration Duration Duration Duration Duration Duration Duration Duration Duration Duration Duration Duration Duration Duration Duration Duration Duration Duration Duration Duration Duration Duration Duration Duration Duration Duration Duration Duration Duration Duration Duration Duration Duration Duration Duration Duration Duration Duration Duration Duration Duration Duration Duration Duration Duration Duration Duration Duration Duration Duration Duration Duration Duration Duration Duration Duration Duration Duration Duration Duration Duration Duration Duration Duration Duration DurationDuration Duration Duration Duration Duration Duration Duration Duration Duration Duration Duration Duration Duration Duration Duration Duration Duration Duration Duration Duration Duration Duration Duration Duration Duration Duration Duration Duration Duration Duration Duration Duration Duration Duration Duration Duration Duration Duration Duration Duration Duration Duration Duration Duration Duration Duration Duration Duration Duration Duration Duration Duration Duration Duration Duration Duration Duration Duration Duration Duration Duration Duration Duration Duration Duration Duration Duration Duration Duration Duration Duration Duration Duration Duration Duration Duration Duration Duration Duration Duration Duration Duration Duration Duration Duration Duration Duration Duration Duration Duration Duration Duration Duration Duration Duration Duration Duration Duration DurationDurationDuration Duration Duration Duration Duration Duration Duration Duration Duration Duration Duration Duration Duration Duration Duration Duration Duration Duration Duration Duration Duration Duration Duration Duration Duration Duration Duration Duration Duration Duration Duration Duration Duration Duration Duration Duration Duration Duration Duration Duration Duration Duration Duration Duration Duration Duration Duration Duration Duration Duration Duration Duration Duration Duration Duration Duration Duration Duration Duration Duration Duration Duration Duration Duration Duration Duration Duration Duration Duration Duration Duration Duration Duration Duration Duration Duration Duration Duration Duration Duration Duration Duration Duration Duration Duration Duration Duration Duration Duration Duration Duration Duration Duration Duration Duration Duration Duration Duration Duration-duration duration duration duration duration duration duration duration duration duration duration duration duration duration duration duration duration duration duration duration duration duration duration duration duration duration duration duration duration duration duration duration duration duration duration duration duration duration duration duration duration duration duration duration duration duration duration duration duration duration duration duration duration duration duration duration duration duration duration duration duration duration duration duration duration duration duration duration duration duration duration duration duration duration duration duration duration duration duration duration duration duration duration duration duration duration duration duration duration duration duration duration duration duration duration duration duration duration duration duration duration Duration Duration Duration Duration Duration Duration Duration Duration Duration Duration Duration Duration Duration Duration Duration Duration Duration Duration Duration Duration Duration Duration Duration Duration Duration Duration Duration Duration Duration Duration Duration Duration Duration Duration Duration Duration Duration Duration Duration Duration Duration Duration Duration Duration Duration Duration Duration Duration Duration Duration Duration Duration Duration Duration Duration Duration Duration Duration Duration Duration Duration Duration Duration Duration Duration Duration Duration Duration Duration Duration Duration Duration Duration Duration Duration Duration Duration Duration Duration Duration Duration Duration Duration Duration Duration Duration Duration Duration Duration Duration Duration Duration Duration Duration Duration Duration Duration Duration Duration-durationdurationdurationdurationdurationdurationdurationdurationdurationdurationdurationdurationdurationdurationdurationdurationdurationdurationdurationdurationdurationdurationdurationdurationdurationdurationdurationdurationdurationdurationdurationdurationdurationdurationdurationdurationdurationdurationdurationdurationdurationdurationdurationdurationdurationdurationdurationdurationdurationdurationdurationdurationdurationdurationdurationdurationdurationdurationdurationdurationdurationdurationdurationdurationdurationdurationdurationdurationdurationdurationdurationdurationdurationdurationdurationdurationdurationdurationdurationdurationdurationdurationdurationdurationdurationdurationdurationdurationdurationdurationdurationdurationdurationdurationdurationdurationdurationdurationdurationdurationduration duration duration duration duration duration duration duration duration duration duration duration duration duration duration duration duration duration duration duration duration duration duration duration duration duration duration duration duration duration duration duration duration duration duration duration duration duration duration duration duration duration duration duration duration duration duration duration duration duration duration duration duration duration duration duration duration duration duration duration duration duration duration duration duration duration duration duration duration duration duration duration duration duration duration duration duration duration duration duration duration duration duration duration duration duration duration duration duration duration duration duration duration duration duration duration duration duration duration durationDurationDurationDurationDurationDurationDurationDurationDurationDurationDurationDurationDurationDurationDurationDurationDurationDurationDurationDurationDurationDurationDurationDurationDurationDurationDurationDurationDurationDurationDurationDurationDurationDurationDurationDurationDurationDurationDurationDurationDurationDurationDurationDurationDurationDurationDurationDurationDurationDurationDurationDurationDurationDurationDurationDurationDurationDurationDurationDurationDurationDurationDurationDurationDurationDurationDurationDurationDurationDurationDurationDurationDurationDurationDurationDurationDurationDurationDurationDurationDurationDurationDurationDurationDurationDurationDurationDurationDurationDurationDurationDurationDurationDurationDurationDurationDurationDurationDurationDurationDuration DurationDurationDurationDurationDurationDurationDurationDurationDurationDurationDurationDurationDurationDurationDurationDurationDurationDurationDurationDurationDurationDurationDurationDurationDurationDurationDurationDurationDurationDurationDurationDurationDurationDurationDurationDurationDurationDurationDurationDurationDurationDurationDurationDurationDurationDurationDurationDurationDurationDurationDurationDurationDurationDurationDurationDurationDurationDurationDurationDurationDurationDurationDurationDurationDurationDurationDurationDurationDurationDurationDurationDurationDurationDurationDurationDurationDurationDurationDurationDurationDurationDurationDurationDurationDurationDurationDurationDurationDurationDurationDurationDurationDurationDurationDurationDurationDurationDurationDurationDuration.Duration.Duration.Duration.Duration.Duration.Duration.Duration.Duration.Duration.Duration.Duration.Duration.Duration.Duration.Duration.Duration.Duration.Duration.Duration.Duration.Duration.Duration.Duration.Duration.Duration.Duration.Duration.Duration.Duration.Duration.Duration.Duration.Duration.Duration.Duration.Duration.Duration.Duration.Duration.Duration.Duration.Duration.Duration.Duration.Duration.Duration.Duration.Duration.Duration.Duration.Duration.Duration.Duration.Duration.Duration.Duration.Duration.Duration.Duration.Duration.Duration.Duration.Duration.Duration.Duration.Duration.Duration.Duration.Duration.Duration.Duration.Duration.Duration.Duration.Duration.Duration.Duration.Duration.Duration.Duration.Duration.Duration.Duration.Duration.Duration.Duration.Duration.Duration.Duration.Duration.Duration.Duration.Duration.Duration.Duration.Duration.Duration.Duration.Duration.Duration‒‒‒‒‒‒‒‒‒‒‒‒‒‒‒‒‒‒‒‒‒‒‒‒‒‒‒‒‒‒‒‒‒‒‒‒‒‒‒‒‒‒‒‒‒‒‒‒‒‒‒‒‒‒‒‒‒‒‒‒‒‒‒‒‒‒‒‒‒‒‒‒‒‒‒‒‒‒‒‒‒‒‒‒‒‒‒‒‒‒‒‒‒‒‒‒‒‒‒‒––‒‒‒‒‒‒‒‒‒‒‒‒‒‒‒‒‒‒‒‒‒‒‒‒‒‒‒‒‒‒‒‒‒‒‒‒‒‒‒‒‒‒‒‒‒‒‒‒‒‒‒‒‒‒‒‒‒‒‒‒‒‒‒‒‒‒‒‒‒‒‒‒‒‒‒‒‒‒‒‒‒‒‒‒‒‒‒‒‒‒‒‒‒‒‒‒‒‒‒∙‒‒‒‒‒‒‒‒‒‒‒‒‒‒‒‒‒‒‒‒‒‒‒‒‒‒‒‒‒‒‒‒‒‒‒‒‒‒‒‒‒‒‒‒‒‒‒‒‒‒‒‒‒‒‒‒‒‒‒‒‒‒‒‒‒‒‒‒‒‒‒‒‒‒‒‒‒‒‒‒‒‒‒‒‒‒‒‒‒‒‒‒‒‒‒‒‒‒‒⁄‒‒‒‒‒‒‒‒‒‒‒‒‒‒‒‒‒‒‒‒‒‒‒‒‒‒‒‒‒‒‒‒‒‒‒‒‒‒‒‒‒‒‒‒‒‒‒‒‒‒‒‒‒‒‒‒‒‒‒‒‒‒‒‒‒‒‒‒‒‒‒‒‒‒‒‒‒‒‒‒‒‒‒‒‒‒‒‒‒‒‒‒‒‒‒‒‒‒‒”—‒‒‒‒‒‒‒‒‒‒‒‒‒‒‒‒‒‒‒‒‒‒‒‒‒‒‒‒‒‒‒‒‒‒‒‒‒‒‒‒‒‒‒‒‒‒‒‒‒‒‒‒‒‒‒‒‒‒‒‒‒‒‒‒‒‒‒‒‒‒‒‒‒‒‒‒‒‒‒‒‒‒‒‒‒‒‒‒‒‒‒‒‒‒‒‒‒‒‒.--‒‒‒‒‒‒‒‒‒‒‒‒‒‒‒‒‒‒‒‒‒‒‒‒‒‒‒‒‒‒‒‒‒‒‒‒‒‒‒‒‒‒‒‒‒‒‒‒‒‒‒‒‒‒‒‒‒‒‒‒‒‒‒‒‒‒‒‒‒‒‒‒‒‒‒‒‒‒‒‒‒‒‒‒‒‒‒‒‒‒‒‒‒‒‒‒‒‒‒✕‒‒‒‒‒‒‒‒‒‒‒‒‒‒‒‒‒‒‒‒‒‒‒‒‒‒‒‒‒‒‒‒‒‒‒‒‒‒‒‒‒‒‒‒‒‒‒‒‒‒‒‒‒‒‒‒‒‒‒‒‒‒‒‒‒‒‒‒‒‒‒‒‒‒‒‒‒‒‒‒‒‒‒‒‒‒‒‒‒‒‒‒‒‒‒‒‒‒‒∼‒‒‒‒‒‒‒‒‒‒‒‒‒‒‒‒‒‒‒‒‒‒‒‒‒‒‒‒‒‒‒‒‒‒‒‒‒‒‒‒‒‒‒‒‒‒‒‒‒‒‒‒‒‒‒‒‒‒‒‒‒‒‒‒‒‒‒‒‒‒‒‒‒‒‒‒‒‒‒‒‒‒‒‒‒‒‒‒‒‒‒‒‒‒‒‒‒‒‒‒‒‒‒‒‒‒‒‒‒‒‒‒‒‒‒‒‒‒‒‒‒‒‒‒‒‒‒‒‒‒‒‒‒‒‒‒‒‒‒‒‒‒‒‒‒‒‒‒‒‒‒‒‒‒‒‒‒‒‒‒‒‒‒‒‒‒‒‒‒‒‒‒‒‒‒‒‒‒‒‒‒‒‒‒‒‒‒‒‒‒‒‒‒‒‒‒‒‒··‒‒‒‒‒‒‒‒‒‒‒‒‒‒‒‒‒‒‒‒‒‒‒‒‒‒‒‒‒‒‒‒‒‒‒‒‒‒‒‒‒‒‒‒‒‒‒‒‒‒‒‒‒‒‒‒‒‒‒‒‒‒‒‒‒‒‒‒‒‒‒‒‒‒‒‒‒‒‒‒‒‒‒‒‒‒‒‒‒‒‒‒‒‒‒‒‒‒‒.–‒‒‒‒‒‒‒‒‒‒‒‒‒‒‒‒‒‒‒‒‒‒‒‒‒‒‒‒‒‒‒‒‒‒‒‒‒‒‒‒‒‒‒‒‒‒‒‒‒‒‒‒‒‒‒‒‒‒‒‒‒‒‒‒‒‒‒‒‒‒‒‒‒‒‒‒‒‒‒‒‒‒‒‒‒‒‒‒‒‒‒‒‒‒‒‒‒‒‒'‒‒‒‒‒‒‒‒‒‒‒‒‒‒‒‒‒‒‒‒‒‒‒‒‒‒‒‒‒‒‒‒‒‒‒‒‒‒‒‒‒‒‒‒‒‒‒‒‒‒‒‒‒‒‒‒‒‒‒‒‒‒‒‒‒‒‒‒‒‒‒‒‒‒‒‒‒‒‒‒‒‒‒‒‒‒‒‒‒‒‒‒‒‒‒‒‒‒‒―` |
4K 2.4:1
| CFast Card | Frame Rate | Blackmagic RAW 3:1 | Blackmagic RAW 5:1 | Blackmagic RAW 8:1 | Blackmagic RAW 12:1 |
| 256GB | Duration Duration Duration | ||||
| 23.98 50 mins | 84 mins | 134 mins | 200 mins | ||
| 24 50 mins | 84 mins | 134 mins | 200 mins | ||
| 25 48 mins | 80 mins | 128 mins | 192 mins | ||
| 30 40 mins | 67 mins | 107 mins | 160 mins | ||
| 50 24 mins | 40 mins | 64 mins | 96 mins | ||
| 60 20 mins | 33 mins | 54 mins | 80 mins | ||
| 75 | 16 mins | 27 mins | 43 mins | 64 mins | |
| 80 16 mins | 26 mins | 40 mins | 60 mins | ||
ULTRA HD
| CFast Card | Frame Rate | Blackmagic RAW 3:1 | Blackmagic RAW 5:1 | Blackmagic RAW 8:1 | Blackmagic RAW 12:1 | ProRes 422 HQ | ProRes 422 | ProRes 422 LT | ProRes 422 Proxy |
| 256GB | Duration Duration Duration Duration | Duration Duration Duration Duration | |||||||
| 23.98 | 41 mins | 68 mins | 110 mins | 164 mins | 47 mins | 71 mins | 101 mins | 230 mins | |
| 24 | 41 mins | 68 mins | 109 mins | 164 mins | 47 mins | 71 mins | 101 mins | 230 mins | |
| 25 39 mins | 66 mins | 105 mins | 157 mins | 68 mins | 97 mins | 221 mins | |||
| 30 | 33 mins | 55 mins | 88 mins | 131 mins | 38 mins | 57 mins | 81 mins | 184 mins | |
| 50 | 19 mins | 33 mins | 52 mins | 79 mins | 22 mins | 34 mins | 48 mins | 111 mins | |
| 60 | 16 mins | 27 mins | 44 mins | 66 mins | 18 mins | 28 mins | 40 mins | 92 mins | |
3.7K Anamorphic
| CFast Card | Frame Rate | Blackmagic RAW 3:1 | Blackmagic RAW 5:1 | Blackmagic RAW 8:1 | Blackmagic RAW 12:1 |
| 256GB | Duration Duration Duration Duration | ||||
| 23.98 31 | mins 51 mins | 82 mins 123 mins | |||
| 24 31 mins | 51 mins 82 | mins 123 mins | |||
| 25 29 mins | 49 mins | 79 mins 118 mins | |||
| 30 24 mins | 41 mins | 65 mins 98 mins | |||
| 50 15 mins | 24 mins | 39 mins 59 mins | |||
| 60 12 mins | 20 mins | 33 mins 49 mins | |||
2.8K Anamorphic
| CFast Card | Frame Rate | Blackmagic RAW 3:1 | Blackmagic RAW 5:1 | Blackmagic RAW 8:1 | Blackmagic RAW 12:1 |
| 256GB | Duration Duration Duration | ||||
| 23.98 57 mins | mins 95 mins | mins 151 mins | 226 mins | ||
| 24 57 mins | 95 mins | 151 mins | 226 mins | ||
| 25 54 mins | 91 mins | 145 mins | 217 mins | ||
| 30 45 mins | 76 mins | 121 mins | 181 mins | ||
| 50 27 mins | 45 mins | 73 mins | 109 mins | ||
| 60 22 mins | 38 mins | 61 mins | 91 mins | ||
| 80 17 mins | 28 mins | 45 mins | 68 mins | ||
2.8K 17:9
| CFast Card | Frame Rate | Blackmagic RAW 3:1 | Blackmagic RAW 5:1 | Blackmagic RAW 8:1 | Blackmagic RAW 12:1 |
| 256GB | Duration Duration Duration | ||||
| 23.98 81 mins | mins 136 mins | 216 mins | 321 mins | ||
| 24 81 mins | 135 mins | 215 mins | 320 mins | ||
| 25 78 mins | 130 mins | 207 mins | 308 mins | ||
| 30 65 mins | 108 mins | 173 mins | 258 mins | ||
| 50 39 mins | 65 mins | 104 mins | 156 mins | ||
| 60 32 mins | 54 mins | 87 mins | 130 mins | ||
| 120 | 16 mins | 27 mins | 43 mins | 65 mins | |
2.6K 16:9
| CFast Card | Frame Rate | Blackmagic RAW 3:1 | Blackmagic RAW 5:1 | Blackmagic RAW 8:1 | Blackmagic RAW 12:1 |
| 256GB | Duration Duration Duration Duration | ||||
| 23.98 87 mins 144 mins | 230 mins 342 mins | ||||
| 24 87 mins 144 mins | 229 mins 342 mins | ||||
| 25 83 mins 138 mins | 220 mins 328 mins | ||||
| 30 69 mins 115 mins | 184 mins 275 mins | ||||
| 50 41 mins 69 mins | 11 mins 166 mins | ||||
| 60 34 mins 58 mins | 92 mins 138 mins | ||||
| 120 | 29 mins 46 mins 69 mins | ||||
HD
| CFast Card | Frame Rate | Blackmagic RAW 3:1 | Blackmagic RAW 5:1 | Blackmagic RAW 8:1 | Blackmagic RAW 12:1 | ProRes 422 HQ | ProRes 422 | ProRes 422 LT | ProRes 422 Proxy |
| 256GB | Duration Duration Duration Duration | Duration Duration Duration Duration | |||||||
| 23.98 | 159 mins | 264 mins | 418 mins | 619 mins | 189 mins | 283 mins | 403 mins | 877 mins | |
| 24 | 159 mins | 264 mins | 418 mins | 618 mins | 189 mins | 283 mins | 403 mins | 877 mins | |
| 25 | 153 mins | 253 mins | 402 mins | 595 mins | 182 mins | 271 mins | 387 mins | 843 mins | |
| 30 | 127 mins | 212 mins | 336 mins | 499 mins | 152 mins | 227 mins | 324 mins | 710 mins | |
| 50 | 76 mins | 127 mins | 203 mins | 303 mins | 91 mins | 137 mins | 196 mins | 434 mins | |
| 60 | 64 mins | 106 mins | 170 mins | 254 mins | 76 mins | 114 mins | 163 mins | 363 mins | |
| 120 | 32 mins | 54 mins | 87 mins | 130 mins | 38 mins | 57 mins | 82 mins | 185 mins | |
NOTE It's important to note that Blackmagic RAW is available for shooting formats that use a full or windowed sensor scan. For all scaled formats, select a ProRes codec.
6K, 6K 2.4:1, 5.7K 17:9, 4K DCI, 3.7K Anamorphic and 2.8K 17:9 formats are available on Pocket Cinema Camera 6K Pro and 6K G2 and use the Blackmagic RAW codec. These cameras use ProRes for 4K DCI, Ultra HD and HD formats.
4K 2.4:1, 2.8K Anamorphic and 2.6K 16:9 formats are available on Pocket Cinema Camera 4K only and use the Blackmagic RAW codec. Pocket Cinema Camera 4K uses Blackmagic RAW or ProRes for 4K DCI, Ultra HD and HD formats.
Constant quality settings for Q0 and Q5 will display varying record time remaining durations. The estimated duration for Q0 is similar to constant bitrate 3:1, and Q5 will display a similar duration to 12:1, however, as the estimated duration updates every 10 seconds while recording, the best way to gauge how much recording time you have is to record for 20 seconds and monitor the duration in the media area of the touchscreen display.
Choosing Frame Rates
Your camera is able to shoot video using many different frame rates and you may be wondering which is the best one to use.
Generally, when selecting a sensor frame rate, there are some common items to consider. For many years, there have been presentation standards for film and television. These have set frame rates that differ between countries, but all share the same purpose; to display an efficient number of frames every second that portrays pleasing and convincing motion.
Cinema, for example, uses a standard 24 frames per second and while there have been recent experiments with faster frame rates, 24 frames per second remains widely accepted for international audiences.
Television frame rates have generally conformed to technical broadcast standards for each country. For example, if you were making television content you would typically record using 29.97 frames per second for North American distribution, and 25 frames per second for Europe.
However, as technology has improved, today we have more choices and broadcast standards are changing. It is now common for sporting events to be recorded and broadcasted at higher frame rates. For example, some sporting events are recorded and broadcasted at up to 59.94 frames per second in North America, and 50 frames per second in Europe. This provides smoother motion on fast action and appears more lifelike.
Alternatively, streaming and online broadcasters normally use frame rates similar to television, however there is more freedom to experiment due to user selectable viewing formats, and being limited only to what the audience's screens are capable of displaying.
Generally, when choosing a frame rate for a project, let your delivery format guide your choice. Your camera's project frame rate should be set to this, and your sensor frame should be set to 'match'. This means your clips will play back at the same speed the event happened in real life.
If you are looking to create an interesting effect, for example slow motion, then you can set the sensor frame rate to a higher setting. The higher the sensor frame rate compared to the project frame rate, the slower the playback speed.
For more information on using off speed sensor frame rates to achieve creative effects, refer to the 'touchscreen controls' section.
Trigger Record
Blackmagic Pocket Cinema Camera automatically sends a signal via the HDMI output that will trigger recording when connected to equipment that supports the trigger record feature, such as Blackmagic Video Assist.
This means that when you press record on your camera, your external recorder also starts recording and stops when you stop recording on the camera. Your camera also outputs timecode via HDMI, which means the clips recorded on your external recorder has the same timecode as the clips recorded in your camera.
If your external recorder supports trigger recording, you will need to enable it. This can usually be enabled via its settings menu.
Playback
Playing Back Clips
Once you have recorded your video, you can use the transport control buttons to play back your video on the LCD. Press the play button to switch to playback mode. Press the button again for instant playback of the last recorded clip on the LCD, and on any display connected to the HDMI output. Hold down the forward or reverse buttons on the LCD to fast forward or reverse through the clip. Playback will finish when the end of the current clip is reached.
Press the forward and reverse buttons to skip to the start or end of clips. Press the reverse button once to go to the start of the current clip or press twice to skip back to the start of the previous clip. Press the record button to exit playback and return the touchscreen to the camera view.

To view your most recently recorded clip on the built in touchscreen, press the 'play' button on the transport controls
Camera Features
Camera Front
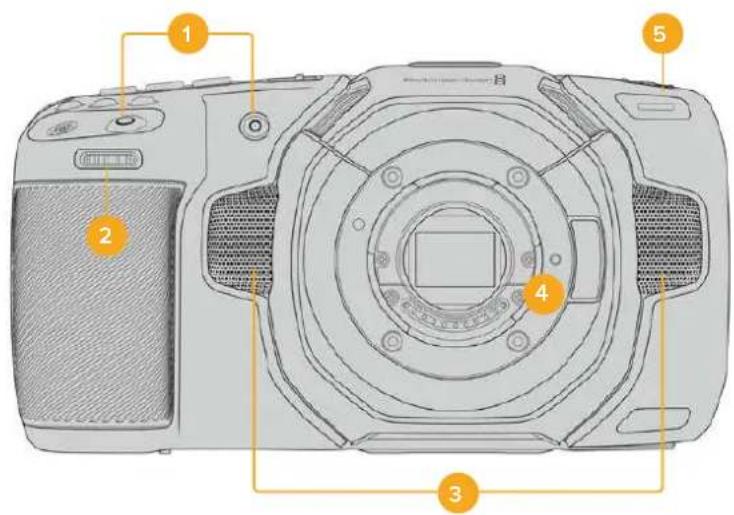
1 Record Buttons
Press either of the record buttons to start and stop recording. A record button is located on the front of the camera to let you start and stop recording more easily if you are recording yourself.
2 Settings Wheel
The settings wheel lets you adjust the aperture of compatible lenses mounted to your camera. With the touchscreen facing you, rotate the wheel left to open the iris, and right to close. The settings wheel is also used to adjust white balance, shutter angle and ISO settings. You can also use the settings wheel in conjunction with the 'focus zoom' button to adjust the magnification level of the optional electronic viewfinder. Press the corresponding buttons on the top of the camera, then make your selection by rotating the settings wheel. After making your selection, press the settings wheel to quickly dismiss the selection menu.
3 Stereo Microphones
There are four built in, high quality stereo microphones. Refer to the 'audio settings' section for information on microphone audio settings.
4 Lens Mount
Blackmagic Pocket Cinema Camera 6K Pro and 6K G2 have an active EF lens mount and the 4K model has an active Micro Four Thirds lens mount. This means that you can use lenses with built-in stabilization on both cameras, as well as use auto focus and auto exposure with compatible lenses. To use the image stabilizer or 'IS' feature found in many active lenses, set the stabilizer switch to 'on' to enable image stabilization on your camera. If your lens also features a stabilizer mode switch, set it to the appropriate mode for still shots or for movement. If your lens does not have a physical stabilizer switch, you can turn 'image stabilization' on or off in your camera's setup menu.
5 Tally / Record Indicator
Pocket Cinema Camera has a small LED on the front to indicate the recording status of the camera. You can enable or disable the tally light indicator and adjust its brightness in the setup menu. Refer to the 'setup settings' section for more information.
Right Side
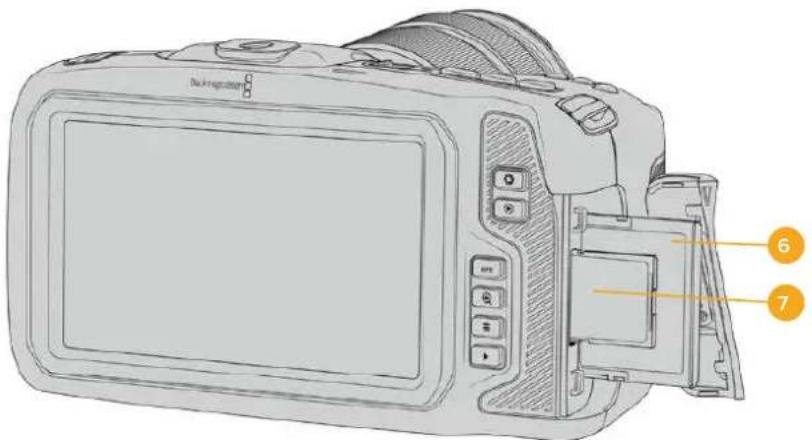
6 CFast Card Slot
Insert CFast 2.0 cards into the slot for record and playback. Refer to the 'CFast Cards' section for more information.
7 SD Card Slot
Insert SD cards into the slot for record and playback. Refer to the 'SD Cards' section for more information.
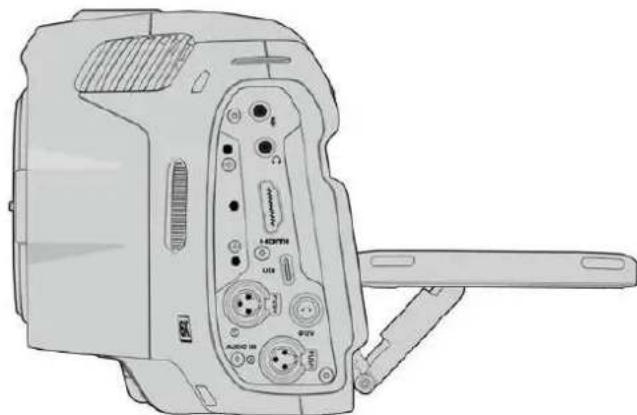
Left Side
Ports on the left side of Blackmagic Pocket Cinema Camera 6K Pro and 6K G2
Ports on the left side of Blackmagic Pocket Cinema Camera 4K
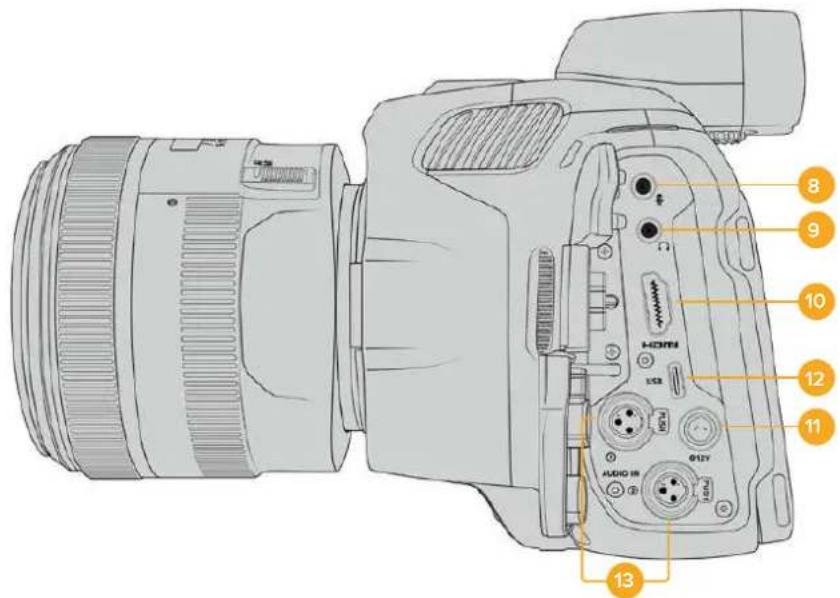
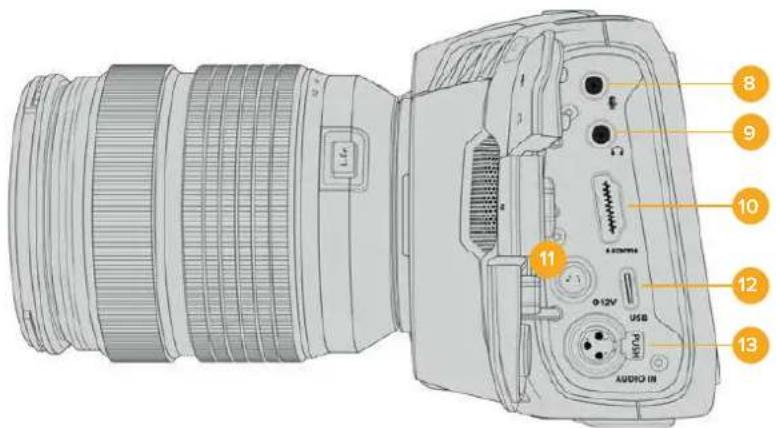
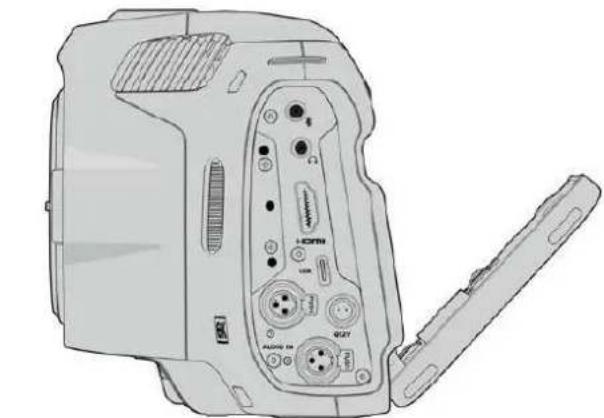
8 3.5mm Microphone Input
Connect a microphone to your camera's 3.5mm stereo connector. Mic and line level audio are supported. The microphone level audio is lower than the line level, so if you are connecting a microphone to the camera and have line level selected, you will find the levels are too low. The microphone input also accepts SMPTE compliant LTC timecode from an external source on the left channel. Valid timecode will be detected automatically, and embedded in your video file as timecode metadata. We recommend sending LTC timecode via a line level output, especially if you are not recording timecode as an audio track.
9 Headphones Input
Monitor audio while recording or playing back clips by plugging your headphones into the 3.5mm stereo headphones jack. When headphones are plugged in, the speaker output is muted.
10HDMI
The full size HDMI connector supports 10-bit 4:2:2 1080p HD video with support for HDR and two channels of embedded audio. Use the touchscreen menu to set a clean feed or include overlays on the output. You can use the HDMI port to connect to an external monitor, recorder or ATEM Mini switcher. Connecting the camera via HDMI to ATEM Mini gives you studio camera features such as remotely controlling recording and adjusting many settings of Pocket Cinema Camera. It is a good practice to setup external equipment and plug in all cables before you switch on your camera and accessories. Always use high quality cables for HDMI connections.
11 Power Input
You can use the DC jack to power your camera and trickle charge the battery at the same time. To connect the power adapter, rotate the plug so it aligns with the recess at the top of the jack, then push in the plug until it locks. To disconnect the power plug, retract the locking sheath, then pull out the plug.
Custom Power Solutions
Some customers have been creating custom made power devices as a means to power their Blackmagic Pocket Cinema Camera. If you are creating your own power solution with a dummy battery, caution needs to be taken to make sure you are not supplying too much voltage to your camera, as this can cause permanent damage. The voltage requirements of the Blackmagic Pocket Cinema Camera are as follows:
The battery input connection is rated from 6.2V to 10V max.
The DC input is rated from 10.8V to 20V max.
- The camera requires 16W when in standby and is not charging the battery.
- The camera requires 30W when charging its internal battery.
- When powering your camera with a custom made power source, we recommend removing its internal battery.
- When recording to external media with an active lens, full screen brightness, full tally brightness, high frame rates and not charging the battery, Blackmagic Pocket Cinema Camera 6K G2 requires approximately 23W and Blackmagic Pocket Cinema Camera 4K requires approximately 22W. Blackmagic Pocket Cinema Camera 6K Pro and 6K G2 in the same configuration with the addition of the viewfinder requires approximately 26W.
12 USB
The USB-C port lets you record directly to an attached USB-C flash disk. When your camera is switched off, you can recharge its battery via the USB-C port from an external source such as a battery pack. To update your camera's internal software, connect the camera to a computer via the USB-C port and run the camera update application.
13 Mini XLR Microphone Input
Blackmagic Pocket Cinema Camera 6K G2 and 6K Pro have two XLR audio inputs. Blackmagic Pocket Cinema Camera 4K has one XLR input.
Plug in external balanced analog audio via the mini XLR connector. A standard XLR microphone can be connected to your camera using an XLR to mini XLR adapter cable.
The mini XLR input provides phantom power for connecting professional microphones that aren't internally powered. For more information on enabling phantom power refer to the 'audio' section in this manual.
The XLR input also accepts SMPTE compliant timecode from an external source. In the 'audio' menu, set the channel source to XLR line or XLR mic depending on the level of your timecode generator. The timecode will be embedded in your video file as timecode metadata. On Blackmagic Pocket Cinema Camera 6K Pro and 6K G2, you can set one XLR channel to accept a timecode signal at the same time as using the other XLR channel for a different type of audio source.
Top Panel
Top panel for Blackmagic Pocket Cinema Camera 6K Pro and 6K G2
Top panel for Blackmagic Pocket Cinema Camera 4K
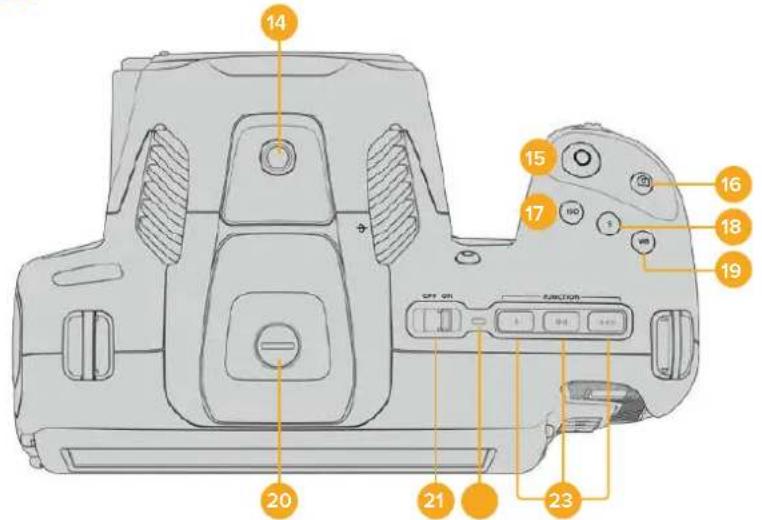
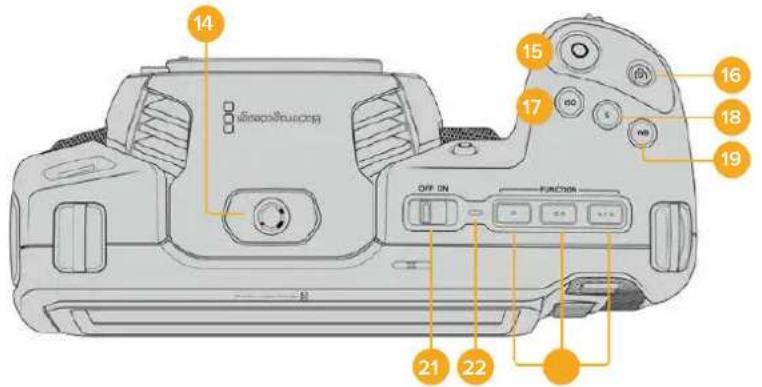
14 1/4-20 Mounting Point
You can use the 1/4-20 mounting point on the top of your camera to attach an external microphone or other small accessories.
NOTE The 1/4" mount on the top of the Blackmagic Pocket Cinema Camera should only be used for lightweight accessories such as small microphones. Do not support the weight of the camera via the top 1/4" mount by using accessories like a screw in camera handle in conjunction with a heavy lens. This will damage the 1/4" mount which will not be covered under warranty.
Do not subject the mount to excessive lever force, such as mounting a heavy accessory on an extension arm. To mount heavier accessories, we strongly recommend using a camera cage designed for the Blackmagic Pocket Cinema Camera that attaches to both the top and bottom 1/4 mount simultaneously.
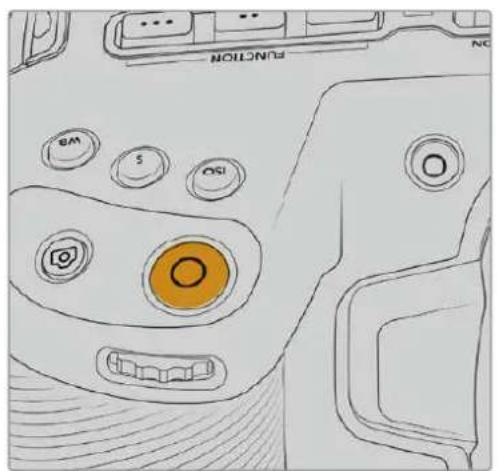
15 Record
Press the record button to begin recording immediately. Press again to stop recording.
16 Still
To capture a single uncompressed DNG frame, press the 'still' button. A camera icon appears briefly in the top right corner of the touchscreen display to let you know you have successfully captured a still. Image files are saved to the 'stills' folder in the root directory of the media you are currently recording to. These follow the file naming convention for video clips but the filename has 'S001' representing the 'still number' as the last four characters of the filename.
17 ISO
Press the ISO button and then rotate the settings wheel to adjust your camera's ISO setting. ISO can be set at 1/3 stop increments between 100 and 25,600.
18 Shutter
To change the shutter angle or shutter speed, press the shutter button, then rotate the settings wheel. The touchscreen display will also suggest up to three flicker free shutter options.
19 White Balance
Press the white balance button and then rotate the settings wheel to adjust your camera's white balance. You can also quickly enter the 'auto white balance' screen by holding the 'wb' button for 3 seconds. Your camera will overlay a white square in the center of your image, and use this area to perform an auto white balance. For more information refer to the 'touchscreen controls' section.
20 Viewfinder Connector Port
Blackmagic Pocket Cinema Camera 6K G2 and 6K Pro have a connector port for Blackmagic Cinema Camera Pro EVF. If the optional electronic viewfinder is not installed, you can attach the supplied protective cover.
21 Power Switch
Power switch for turning on the camera. Slide the switch to the right to power on your camera, and to the left to power off.
22 Status LED
When the camera is turned off and plugged into external power via the 12V DC power jack or USB-C port, the indicator illuminates red to indicate the battery is being charged.
The status LED turns off when the battery is fully charged.
23 Function Buttons
These buttons can be programmed to a variety of commonly used functions using your camera's 'setup' menu. By default, button one is set to 'false color', button 2 is set to 'display LUT' and button 3 is set to 'frame guides'.
Camera Underside
Underside of Blackmagic Pocket Cinema Camera 6K Pro and 6K G2
Underside of Blackmagic Pocket Cinema Camera 4K
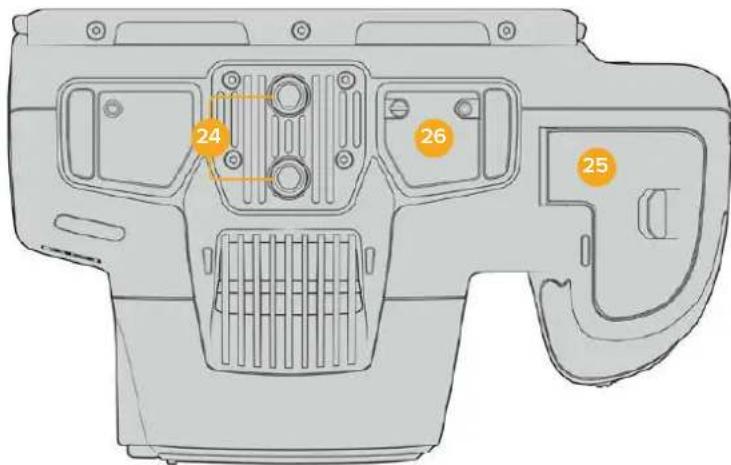
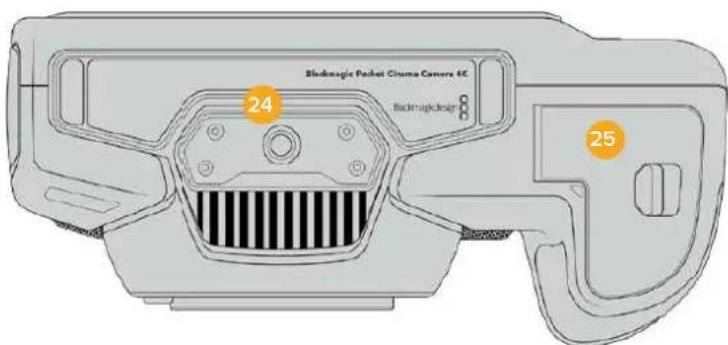
24 1/4-20 Mounting Point
Attach your Blackmagic Pocket Cinema Camera 4K or Pocket Cinema Camera 6K Pro or 6K G2 to a tripod, rigging or accessories using the bottom 1/4-20 mounting point. Pocket Cinema Camera 6K Pro and 6K G2 have two 1/4 inch mounting points on the underside.
25 Battery Door
Push the battery door release towards the lens mount to open the battery door. To close, simply push the door in until it clicks shut.
26 Battery Grip Power Connector
Blackmagic Pocket Cinema Camera 6K Pro and 6K G2 have electrical contacts on the underside of the camera to connect with the optional battery grip without removing the battery from the camera. This extends the running time of the camera by powering from the internal battery and both batteries in the battery grip.
Camera Rear
Rear of Blackmagic Pocket Cinema Camera 6K Pro and 6K G2. Blackmagic Pocket Cinema Camera 6K G2 does not feature ND Filter buttons.
Rear of Blackmagic Pocket Cinema Camera 4K
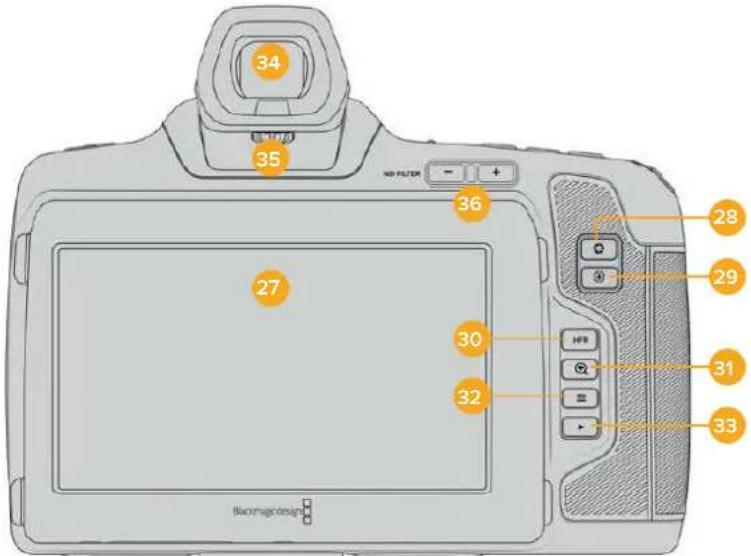
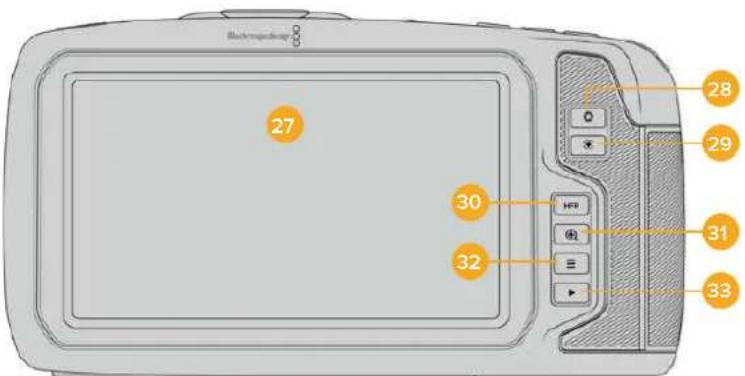
27 Touchscreen Display
You can tap and swipe on your camera's LCD touchscreen to adjust settings, auto focus, start and stop shooting, monitor clips during recording and play back clips. The touchscreen also lets you manage media and make notes on the slate.
Blackmagic Pocket Cinema Camera 6K Pro and 6K G2 have a tilt screen so you can angle the LCD touchscreen up or down for a wide range of viewing angles and a power save setting to dim the LCD when it's inactive. You can also set the LCD touchscreen to operate at an extreme brightness that is suitable for shooting in very bright sunlight. This will consume more power and the screen may run warm at 100% brightness. At an ambient temperature of of 35^ (95°F) or above, it may automatically reduce the screen brightness to regulate the temperature and prevent overheating. This safety feature works independently of dimming due to inactivity. For more information see the 'monitor settings' section.
The tilt screen on Blackmagic Pocket Cinema Camera 6K Pro and 6K G2 offers a wide range of viewing angles
28 Iris Button
Pressing the 'iris' button automatically sets an average exposure based on the highlights and shadows in your shot. You can adjust your lens aperture manually by rotating the settings wheel to the left and right, or by tapping 'iris' on the touchscreen display and adjusting the iris slider.
29 Focus Button
When using a compatible auto focus lens with your camera, press the 'focus' button once to auto focus. By default the lens will auto focus in the center of the image, however you can select an alternate auto focus point by tapping on the LCD screen in the area that you want to focus. Double press the focus button to reset the focus point to the center of the screen.
NOTE It's important to know that while most lenses support electronic focus, some lenses can be set to manual or auto focus modes. In this case you need to confirm your lens is set to auto focus mode.
30 HFR Button
Press the HFR or 'high frame rate' button to toggle off speed frame rates. To use this function, simply set the 'off speed' frame rate you'd like to use in the 'frame rate' menu. Once this is set, pressing the HFR button will toggle between your chosen off speed frame rate and project frame rate. It's worth mentioning that this setting can only be adjusted when the recording is stopped.
For more information on project and off speed frame rates, see the 'touchscreen controls' section.
31 Focus Zoom Button
Press the 'focus zoom' button to zoom in for adjusting focus at the 1:1 pixel scale. While zoomed in, you can use a pinch to zoom multitouch gesture on the touchscreen to adjust the zoom level. For more information, see the 'pinch to zoom' section.
While zoomed in, you can touch and drag on the screen to view different areas of the image. When you activate focus zoom and look through the optional electronic viewfinder, you can turn the settings wheel to adjust zoom level and press the settings wheel to select the region of interest. To zoom out, press the 'focus zoom' button again.
32 Menu Button
Press the 'menu' button to open the dashboard.
33 Play Button
Press the play button to switch to playback mode. Press the button again for instant playback of the last recorded clip on the LCD, and on any display connected to the HDMI output.
34 Blackmagic Pocket Cinema Camera Pro EVF
Blackmagic Pocket Cinema Camera 6K Pro and 6K G2 have an optional electronic viewfinder. The viewfinder tilts vertically 70 degrees and comes with four eyecup types for left or right eye. A sensor in the viewfinder detects when it is in use, and will switch off the LCD touchscreen to conserve battery power and prevent accidental taps on touchscreen controls. You can set the viewfinder to overlay camera status information or display a clean feed. For more information, see the 'monitor settings' section.
To install the viewfinder, use a small flathead screwdriver to loosen the screw in the connector port cover on top of the camera. Remove the cover and confirm the connector port is clean and dry. Slide the viewfinder into the connector port. Fasten the viewfinder into position by tightening the thumb screw.
35 Diopter for Electronic Viewfinder
Turn the diopter knob to adjust the focus of the optional electronic viewfinder on Blackmagic Pocket Cinema Camera 6K Pro and 6K G2 to suit your eyes. It's important to note the diopter adjusts the focus of the image presented in the viewfinder, and does not change the focus of the image attained by the camera sensor. For more information, see the 'focus chart' section.
36 ND Filter
Blackmagic Pocket Cinema Camera 6K Pro has internal neutral density filters. ND filters allow you to reduce the amount of light reaching the sensor by a preset number of exposure stops. By reducing the exposure, you can shoot at wide apertures for a shallow depth of field in bright conditions such as outdoors on sunny days.
To adjust your neutral density setting, press the left or right ND filter buttons to cycle through options for a clear filter, 2, 4 or 6 stops.
The 'clear' setting means there is no ND filter being used. From settings 2, 4 and 6 stops, the ND filters increase in density so you can decrease light if you need to.
Because different people prefer to use different terms for each ND filter, the measurement of your ND settings can be customized in the LCD touchscreen menu. You can identify the ND filter number, amount of stops in light reduction, or the fraction representing the amount of light reduced for the filters to suit your preference.
| Neutral Density Filter Settings | ||
| ND number Stops Fraction | ||
| clear 0 1 | ||
| 0.6 2 1/4 | ||
| 1.2 4 1/16 | ||
| 1.8 6 1/64 | ||
Touchscreen Controls
Touchscreen Features
Your Blackmagic Pocket Cinema Camera's LCD touchscreen features a touch and gesture based interface that is specifically designed for fast and intuitive operation. By touching and swiping on different areas of the LCD touchscreen, you can quickly access the camera's functions while shooting.

Your Blackmagic camera's LCD touchscreen display gives you easy access to your camera's most used settings
LCD Monitor Options
Tap the 'monitor' icon at the top left of the touchscreen to access the LCD monitor settings. These settings let you toggle and adjust the appearance of your Pocket camera's monitoring features, including zebra, focus assist, frame guides, grids, safe area guides and false color. When accessing LCD monitor options, the controls for these features appear in a tabbed menu along the bottom edge of the LCD touchscreen.

Tap the icon at the top left of your camera's LCD touchscreen to access LCD monitor options
Zebra
The 'zebra' setting toggles the appearance of zebra on the LCD touchscreen, as well as setting the zebra level for the HDMI output.
Zebra displays diagonal lines over areas of your image that exceed a set exposure level. For example, setting zebra to 100% shows which areas are completely overexposed. This is useful for achieving optimum exposure in fixed lighting conditions.

Tap the 'zebra' Icon while accessing 'LCD monitor options' to access the zebra settings
To toggle zebra for the LCD touchscreen, tap the switch icon in the bottom left of the screen while in the 'zebra' tab.
Set the level that zebra appears at by dragging the slider left and right, or tapping the arrow buttons next to the zebra level indicator. There are eight zebra presets available including middle gray and middle gray plus one stop, then in five percent increments from 75 to 100 percent exposure.
For information on enabling zebra on your camera's HDMI output, see the 'monitor settings' section in this manual.
TIP If you're shooting in variable light such as outdoors on a partly overcast day, setting your zebra level lower than 100 can warn you of potential overexposure.
Focus Assist
The 'focus assist' setting toggles the appearance of focus assist on the LCD touchscreen, as well as setting the level of focus assistance for the HDMI output on your Blackmagic Pocket Cinema Camera.

Tap the 'focus assist' icon while accessing 'LCD monitor options' to access your camera's focus assist settings
To toggle focus assistance for the LCD touchscreen, tap the switch icon in the bottom left of the screen while in the 'focus assist' tab.
To set the level of focus assistance for all outputs on your Blackmagic Pocket Cinema Camera, drag the slider left and right along the bottom of your touchscreen, or tap the arrow buttons next to the focus assist level.
The optimum level of focus assistance varies shot by shot. When focusing on actors, for example, a higher level of focus assistance can help resolve edge detail in faces. A shot of foliage or brickwork, on the other hand, may show distracting amounts of focus information at higher settings.
For information on enabling focus assist on your camera's HDMI output, see the 'monitor settings' section in this manual.
TIP Your Blackmagic Pocket Cinema Camera has two focus assist modes. You can switch between 'peaking' and 'colored lines' focus assistance in the 'monitor' settings menu. For more information, see the 'monitor settings' section in this manual.
Frame Guides
The 'frame guide' setting toggles the appearance of frame guides on the LCD touchscreen. You can also choose frame guide options for your camera's HDMI output.
Frame guides include aspect ratios for various cinema, television and online standards.

Tap the 'frame guides' icon while accessing 'LCD monitor options' to access your frame guide settings
To toggle the appearance of frame guides on the LCD touchscreen, tap the switch icon in the bottom left of the screen.
Choose the frame guide you want to use by dragging the slider left and right, or tapping the arrow buttons on either side of the currently selected aspect ratio. You can also enter a custom frame guide ratio by tapping on the ratio between the arrow buttons.
The available guides are:
2.35:1, 2.39:1 and 2.40:1
Displays the broad widenscreen aspect ratio compatible with anamorphic or flat widenscreen cinema presentation. The three widenscreen settings differ slightly based on the changing cinema standards over time. 2.39:1 is one of the most prominent standards in use today.

The LCD touchscreen with 2.40:1 frame guides enabled
2:1
Displays a ratio slightly wider than 16:9 but not as wide as 2.35:1.
1.85:1
Displays another common flat widescreen cinema aspect ratio. This ratio is slightly wider than HDTV 1.78:1 but not as wide as 2.39:1.
16:9
Displays a 1.78:1 aspect ratio compatible with 16:9 HD television and computer screens. This ratio is most commonly used for HD broadcasting and online videos. The same aspect ratio has also been adopted for Ultra HD broadcasting.
14:9
Displays a 14:9 aspect ratio used by some television broadcasters as a compromise between 16:9 and 4:3 television sets. Ideally, both 16:9 and 4:3 footage remains legible when center cropped to fit 14:9. You can use this as a compositional guide if you know your project may be broadcast by a television station that uses 14:9 cropping.
4:3
Displays the 4:3 aspect ratio compatible with SD television screens, or to help with framing when using 2x anamorphic adapters.
1:1
Displays a 1:1 ratio slightly narrower than 4:3. This square ratio is growing in popularity on social media.
4:5
Displays a 4:5 aspect ratio. This vertical aspect ratio is ideal for portraits and viewing on smartphones.
Custom Frame Guide Ratio
To create your own frame guide ratio for a unique appearance, tap on the ratio displayed between the arrow buttons. On the 'custom frameguide' screen tap the backspace button to delete the current ratio, then use the numeric keypad to specify a new ratio. Tap 'update' to apply your custom frame guide ratio and return to shooting.
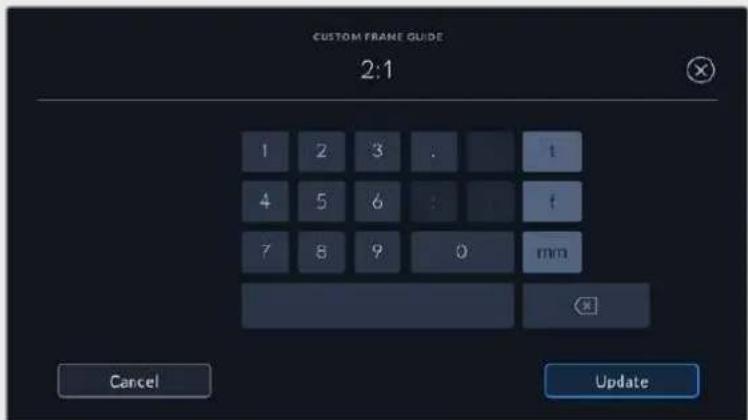
Use the numeric keypad on the 'custom frame guide' screen to enter a new frame guide ratio.
TIP You can change the opacity of frame guide overlays. For more information see the 'monitor settings' section of this manual.
NOTE For information on enabling frame guides on your camera's HDMI output, see the 'monitor settings' section in this manual.
Grids
The 'grids' setting toggles the appearance of a rule of thirds grid, horizon meter, crosshair or center dot on the LCD touchscreen, as well as setting the overlay that will be visible on the HDMI output.

Tap the 'grids' icon while accessing 'LCD monitor options' to access the grid settings
Grids and crosshair are overlays that can help with image composition. When 'grids' are enabled, the LCD shows a rule of thirds grid, horizon, crosshair or dot.
To toggle the appearance of grids on your camera's touchscreen, tap the switch icon in the bottom left of the screen while in the 'frame guides' tab.
To set which overlay you want to display on the LCD and HDMI output, tap the 'thirds', 'horizon', 'crosshair' or 'dot' options. You can select one of 'horizon', 'crosshair' or 'dot' at a time in conjunction with 'thirds'. This lets you use a combination of 'thirds' and 'horizon', 'thirds' and 'crosshair', or 'thirds' and 'dot'.

The rule of thirds grid automatically scales to any on screen frame guides
Thirds
The 'thirds' setting displays a grid with two vertical and horizontal lines placed in each third of the image. Thirds are an extremely powerful tool to help compose your shots. For example, the human eye typically looks for action near the points where the lines intersect, so it's helpful to frame key points of interest in these zones. An actor's eyeline is commonly framed along the top third of the screen, so you can use the top horizontal third to guide your framing. Thirds are also useful to maintain framing consistency between shots.
Horizon
The 'horizon' meter indicates when your camera is rolled left or right and tilted up or down. This can help you keep the horizon is level during handheld shots and balance the camera tilt on a gimbal.
The direction the light gray vertical line moves away from the dark gray crosshair in the middle indicates the direction your camera is rolled. When the camera is tilted down the light gray horizontal line moves up and when the camera is tilted up the light gray horizontal line moves down.
The distance the lines move away from the central crosshair is proportional to the amount of roll or tilt. After you calibrate the camera's motion sensor, the vertical line turns blue when the camera is aligned to the roll axis and the horizontal line turns blue to indicate the camera is aligned to the tilt axis.
Note that if the camera is tilted straight down for an overhead shot or straight up, the horizon meter takes this into account. If you roll the camera to shoot in portrait orientation, the horizon meter rotates its axes 90 degrees.
This table shows examples of the horizon meter indicating tilt and roll of the camera.
Horizon meter Description

Straight and level

Tilted down and level

Straight and rolled left

Tilted up and rolled right
For normal use, calibrate the horizon meter for straight and level operation. If you want to use the horizon meter to help maintain a consistent 'dutch angle' or a consistent tilt for a low or high shot, you can calibrate the horizon meter at an incline. For information on how to calibrate the horizon meter, see the 'motion sensor calibration' section.
Crosshair
The 'crosshair' setting places a crosshair in the center of the frame. Like thirds, the crosshair is a very useful compositional tool, making it easy to frame the subject of a shot in the very center of a frame. This is sometimes used when filming scenes that will be assembled using very fast cuts. Keeping viewers' eyes focused on the center of a frame can make rapid editing easier to follow.
Dot
The 'dot' setting places a dot in the center of the frame. This works in exactly the same way as the 'crosshair' setting, albeit with a smaller overlay that you may find less intrusive.
TIP For information on enabling grids on your HDMI output, see the 'monitor settings' section in this manual.
Safe Area Guides
The 'safe area guides' setting toggles the safe area guides on or off the LCD touchscreen, as well as setting the size of safe area guides for the HDMI output.
Safe areas can be used in broadcast production so the most important parts of a shot can be seen by viewers. By keeping the most important parts of your shot inside a central 'safe area,' you can avoid cropping on some televisions, as well as leaving space for a broadcaster to add bugs, news tickers and other overlays along the edges of the screen. Many broadcasters require footage to be submitted with important content, such as titles and graphics, contained inside the 90% safe area.
Safe area guides can also be used to assist with framing your shot where you know that the shot will be stabilised in post production, which can crop the edges of the image. They can also be used to indicate a specific crop. For example by setting it to 50% when recording at Ultra HD 3840x2160 you can see what a 1920x1080 crop of the frame would look like. The safe area guides also scale to your frame guides, so they will adjust to indicate the chosen percentage of your target frame.
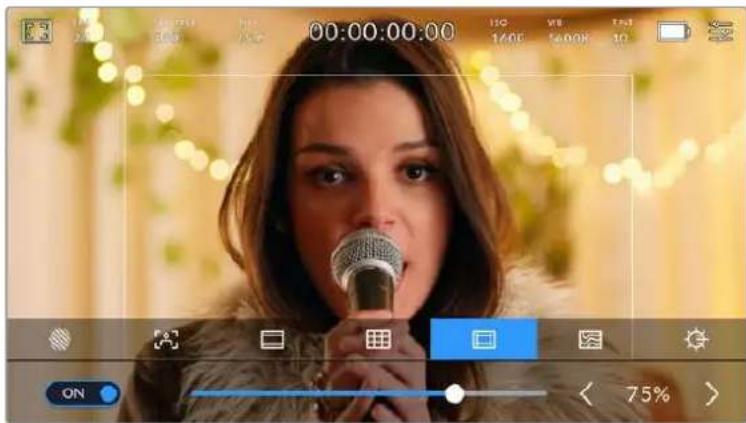
The 'safe area' indicator set to 85%
To toggle safe area guides for the LCD touchscreen, tap the switch icon in the bottom left of the screen while in the 'safe area guides' tab. To set the level of safe area guides for your camera's HDMI output, tap the left or right arrows on either side of the current numerical value at the bottom of the touchscreen. Alternatively, you can drag the slider left or right.
False Color
The 'false color' setting toggles the appearance of false color exposure assistance on the LCD touchscreen.
False color overlays different colors onto your image that represent exposure values for different elements in your image. For example, pink represents optimum exposure for lighter skin tones, while green is a good match to darker skin tones. By monitoring the pink or green false color when recording people, you can maintain consistent exposure for their skin tones.
Similarly, when elements in your image change from yellow to red, that means they are now over exposed.
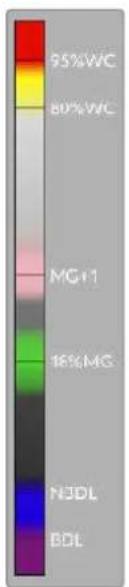
The IRE false color chart on the left side of your camera's display shows you how to interpret the different false colors.
False Color Meaning
| 95%WC White clipping |
| 80%WC Near white clipping |
| MG+1 One stop over middle gray |
| 18%MG Middle gray |
| NBDL Near black detail loss |
| BDL Black detail loss |
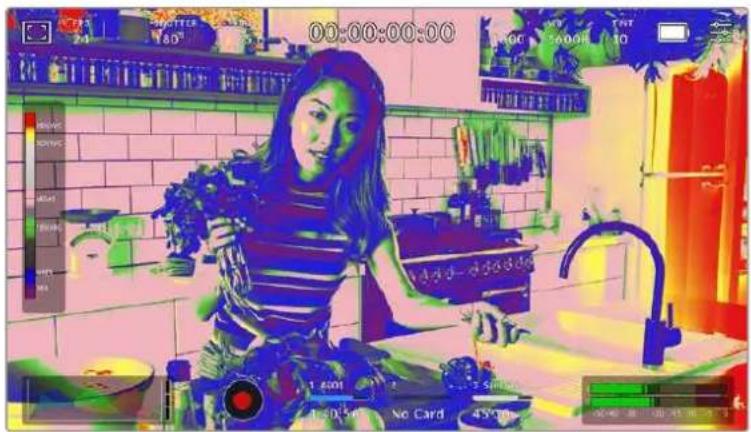
In a well exposed image, skin tones are represented by green and pink false colors
To toggle false color for the LCD touchscreen, tap the switch icon in the bottom left of the screen while in the 'false color' tab.

The 'false color' exposure assistance tab
Screen Brightness
Tap the 'screen brightness' icon and drag the slider to the left or right to adjust the brightness of your Pocket Cinema Camera's touchscreen.

The 'screen brightness' setting set to 50% .
ND Filter indicator
Adjusting your Blackmagic Pocket Cinema Camera 6K Pro's ND filter will display the ND filter indicator in the top left of the LCD touchscreen and the HDMI output. This indicator will remain on when you have an ND filter engaged. When you have it set to use no ND filter, the 'clear' text will disappear after four seconds.

Adjusting your Pocket Cinema Camera 6K Pro's ND filter setting will show the ND filter indicator
NOTE You can adjust the terminology used by the ND filter indicator to reflect the conventions you're used to. The options are ND number, stops and fractions. You can set your preferred format in the 'setup' menu.
Frames Per Second
The 'FPS' indicator displays your currently selected frames per second.

Tap the frames per second indicator to access frame rate settings
Tapping the 'FPS' indicator lets you change your camera's sensor and project frame rates via a menu at the bottom of the LCD touchscreen.
Project Frame Rate
The project frame rate is the camera's recording format frame rate and provides a selection of common frame rates used in the film and television industry. This frame rate is normally set to match your post production workflow.
8 project frame rates are available including 23.98, 24, 25, 29.97, 30, 50, 59.94 and 60 frames per second.
To adjust your camera's project frame rate while in the 'FPS' menu, tap the left or right arrows next to the current frame rate at the bottom left of your touchscreen. Alternatively, you can drag the slider left or right.

Tap the arrows on either side of the project frame rate or move the slider to make adjustments
TIP Your Blackmagic Pocket Cinema Camera's project frame rate also sets the frame rate of the HDMI output.
Sensor Frame Rate
The sensor frame rate sets how many actual frames from the sensor are recorded every second. This frame rate will affect how fast or slow your video will play back at your set project frame rate.

With 'off speed frame rate' enabled, tap a preset or the arrows on either side of the sensor frame rate or move the slider to make adjustments
By default, the project and sensor frame rates are matched for a natural playback speed. However, by tapping the 'off speed frame rate' switch icon in the bottom right hand side of your camera's 'FPS' menu, you can independently set the sensor frame rate.
To change the sensor frame rate, tap the arrows next to the sensor frame rate indicator in the lower left of your touchscreen. You can also drag the slider left or right to increase or decrease the frame rate. Once you release the slider, the sensor frame rate will be selected. Above the slider, you can tap on a common off speed frame rate. These are based on your current project frame rate.
You can create dynamic and interesting speed effects in your clips by varying the sensor frame rate. Setting the sensor frame rate higher than your project frame rate will create slow motion during playback. For example, shooting with a 60 FPS sensor frame rate and playing back at a 24 FPS project frame rate creates slow motion at 40% of the real speed of the action. Alternatively, the lower your sensor frame rate, the faster your clips will appear. The principle is similar to overcranking and undercranking a film camera. Overcranking speeds up the sensor frame rate so you can stretch out moments in time during playback to enhance emotion. Undercranking slows down the sensor frame rate so you can increase the speed of action in fast moving scenes. The creative possibilities are endless and entirely up to you!
For information on the maximum frame rates available for each recording format and codec, refer to the table in the 'recording' section of this manual.
NOTE When 'off speed frame rate' is selected the audio and video are no longer syncsed. This is true even if you set the same project and sensor frame rate. For this reason, avoid selecting 'off speed frame rate' if you want to guarantee audioyncing.
Shutter
The 'shutter' indicator displays your shutter angle or shutter speed. By tapping this indicator, you can manually change your camera's shutter values or configure shutter priority auto exposure modes. The shutter measurement setting can be used to select whether to display shutter information as 'shutter angle' or 'shutter speed'. See the 'setup settings' section in this manual for more information.

Tap the shutter indicator to access shutter settings
Shutter angle or shutter speed defines the level of motion blur in your video, and can be used to compensate for varying light conditions. 180 degrees is the optimum shutter angle for capturing satisfying motion blur in most conditions, with the equivalent being a shutter speed of 1/50th of a second. However as lighting conditions change, or the amount of movement in your scene increases, you may decide to adjust accordingly.
For example, 360 degrees is considered 'wide open' and allows maximum light onto the sensor. This is useful for low light conditions with subtle movement in your scene. Alternatively, if shooting subjects with a lot of movement, a narrow shutter angle like 90 degrees will provide minimal motion blur for sharper, crispier images. The equivalent shutter speeds compared to shutter angle depends on the frame rate you are using.
For example, if you are shooting at 25 frames per second, then 360 degrees will equate to 1/25th, and 90 degrees will equate to 1/100th of a second.
NOTE When shooting under lights, your shutter can affect the visibility of flicker. Your Blackmagic Pocket Cinema Camera will automatically calculate a flicker free shutter value for your current frame rate. It will display up to three suggested flicker free shutter options at the bottom of the touchscreen display when adjusting your shutter. These shutter values are affected by mains power frequency in your region. You can set your local power frequency to 50Hz or 60Hz in the camera's setup menu. See the 'setup settings' section in this manual for more information.
Tapping the 'shutter' indicator brings up the suggested shutter values along the bottom of the touch screen. If you have auto exposure set to 'off,' this screen will show you your currently selected shutter value, as well as the available flicker free shutter values, based on the mains power frequency you have selected in your camera's setup menu. For more information, see the 'setup settings' section in this manual.
It's worth mentioning the characteristics of individual light sources may still cause flicker even when using flicker free values. We recommend always performing a test shoot when not using continuous lights.
To select one of the flicker free shutter values, simply tap on one of the displayed shutter values. Using the arrows on either side of the current shutter value indicator, will cycle through some of the most commonly used values.

Your camera will suggest flicker free shutter values based on the mains power frequency you choose in the 'setup' menu
If you are shooting outside, or using flicker free lights, you can also manually select a shutter value by double tapping the current shutter indicator at the bottom left of your screen. When shutter angle is selected, this will bring up a keypad which you can use to set any shutter angle between 5 and 360 degrees.
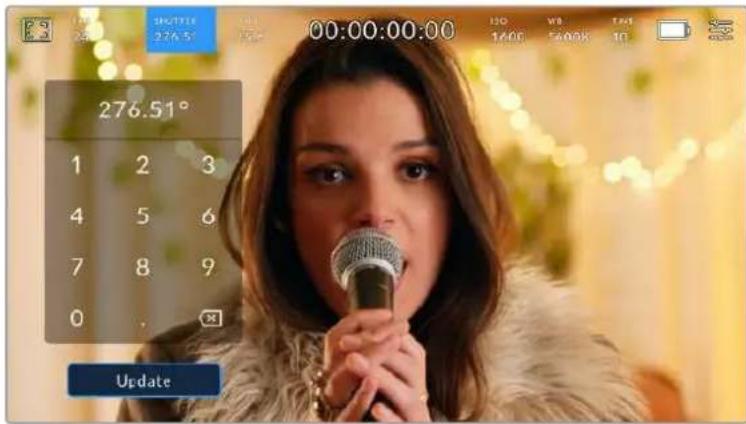
Use the manual shutter keypad to enter your shutter timing of choice when shooting outdoors or under flicker free lights
Your Blackmagic Pocket Cinema Camera has three shutter based auto exposure modes.
To select one of these, tap the 'auto exposure' button in the far right of the shutter menu.
Shutter
This setting automatically adjusts shutter value to maintain a constant exposure while keeping iris aperture consistent. If you want to maintain a fixed depth of field, this is the setting to choose. It's worth mentioning that the subtle automatic adjustments of the shutter may have an effect on motion blur. It's also worth keeping an eye out for any flicker that may be introduced from various light fixtures on indoor shoots. The auto iris feature is not available when the 'shutter' auto exposure mode is selected.
Shutter + Iris
Maintains the correct exposure levels by adjusting the shutter, then the aperture. If the maximum or minimum available shutter value is reached and exposure still cannot be maintained, your camera adjusts the aperture to keep exposure consistent.
Iris + Shutter
Maintains the correct exposure levels by adjusting the aperture, then the shutter value. If the maximum or minimum available aperture is reached and exposure still cannot be maintained, your camera adjusts the shutter value to keep exposure consistent.

While in the shutter menu, tap 'auto exposure' to access shutter based auto exposure modes
When an auto exposure mode that affects the shutter or iris is enabled, a small 'A' appears next to the shutter or iris indicator at the top of the LCD touchscreen.
Iris
The 'Iris' indicator displays your current lens aperture. By tapping this indicator, you can change the aperture of compatible lenses and configure iris based auto exposure modes.

Tap the iris indicator to access iris settings
To adjust your Iris from the LCD touchscreen, your Blackmagic Pocket Cinema Camera must be fitted with a lens that supports changing aperture via the camera.
Tapping the 'iris' indicator once brings up the iris menu along the bottom of the touchscreen. You'll see your current lens aperture at the far left of this menu. You can change the aperture by tapping the left and right arrows on either side of the current aperture, or moving the slider left or right.

While in the 'iris' menu, tap the arrows on either side of the iris indicator or use the slider to adjust Iris settings
Tapping the 'auto exposure' switch icon at the far right of the iris menu opens the iris auto exposure menu.
This gives you the following auto exposure options.
Iris
This setting automatically adjusts the aperture to maintain a constant exposure while keeping shutter angle consistent. This will keep motion blur unaffected, but may affect your depth of field.
Iris + Shutter
Maintains the correct exposure levels by adjusting the aperture, then the shutter value. If the maximum or minimum available aperture is reached and exposure still cannot be maintained, your camera adjusts the shutter value to keep exposure consistent.
Shutter + Iris
Maintains the correct exposure levels by adjusting the shutter, then the aperture. If the maximum or minimum available shutter value is reached and exposure still cannot be maintained, your camera adjusts the aperture to keep exposure consistent.

While in the iris menu, tap 'auto exposure' to access iris based auto exposure modes
When an auto exposure mode that affects the iris or shutter is enabled, a small 'A' appears next to the iris or shutter indicator at the top of the LCD touchscreen.
Duration Display
At the top of your camera's LCD touchscreen, you'll see your camera's duration display.

Your camera's duration display will turn red while recording.
The duration display provides a timecode counter for checking the duration of your clips and monitoring timecode during recording and playback. The counter displays a time sequence showing Hours:Minutes:Seconds:Frames and will changes accordingly as you record or play back clips. During recording the timecode is red.
The displayed duration starts from 00:00:00:00. The clip duration of the current or last recorded clip is displayed on the touchscreen. Time of day timecode is embedded into clips for easier post production.
To see the timecode, simply tap the duration display. Tap the duration display again to return to clip duration.
When you connect Blackmagic Pocket Cinema Cameras to ATEM Mini, they can show their switching status on the LCD touchscreen below the timecode. To assist camera operators, the status overlay says 'preview' when a camera is cued to go on air soon, or 'on air' when a camera is broadcasting live on air. ATEM Mini automatically synchronizes the timecode on Pocket Cinema Cameras to match the switcher's timecode when you connect them. This makes it easier to perform accurate multi camera edits in DaVinci Resolve.
Additional status indicators may appear around the duration display:
| W | Appears to the left of the duration display when your Blackmagic Pocket Cinema Camera is using a windowed sensor mode. |
| TC | Appears to the right of the duration display when showing timecode. |
| EXT | Appears to the right of the duration display if an external LTC timecode is connected to the 3.5mm stereo input jack and valid, or if the timecode is synchronized to an ATEM Mini switcher. |
| INT | Appears to the right of the duration display if the camera is running off an internal timecode after being 'jam syncsed' and disconnected. |
ISO
The 'ISO' indicator displays the current ISO setting, or light sensitivity. Tapping this indicator lets you adjust your ISO to suit varying lighting conditions.

Tap the ISO indicator to access ISO settings.

While in the 'ISO' menu, your camera's ISO settings appear along the bottom of the LCD touchscreen. The slider below the presets lets you adjust ISO in 1/3 stop increments.
Depending on your situation, you may choose a lower or higher ISO setting. For example, in low light conditions ISO 25,600 can be suitable but may introduce some visible noise. In bright conditions ISO 100 can provide richer colors.
Dual Native ISO
Your Blackmagic Pocket Cinema Camera has a dual native ISO of 400 and 3,200, which means that the sensor is optimized for shooting in both low light conditions, as well as bright daylight.
Adjust the ISO for the varying lighting conditions, and the dual native ISO feature will operate in the background to make sure your footage is clean and has minimal noise at low and high ISO settings.
When the ISO setting is between 100 and 1,000 the native ISO of 400 is used as a reference point. The ISO range between 1,250 and 25,600 uses the native ISO of 3,200 as a reference. If you are shooting in conditions where you have a choice between ISO 1,000 or 1,250, we suggest closing down one stop on your lens' iris so that you can select ISO 1,250 as it will engage the higher native ISO and provide much cleaner results.
These charts show the relationship between the ISO selection and dynamic range allocation.

Blackmagic Pocket Cinema Camera 6K Pro and Blackmagic Pocket Cinema Camera 6K G2 Dynamic Range
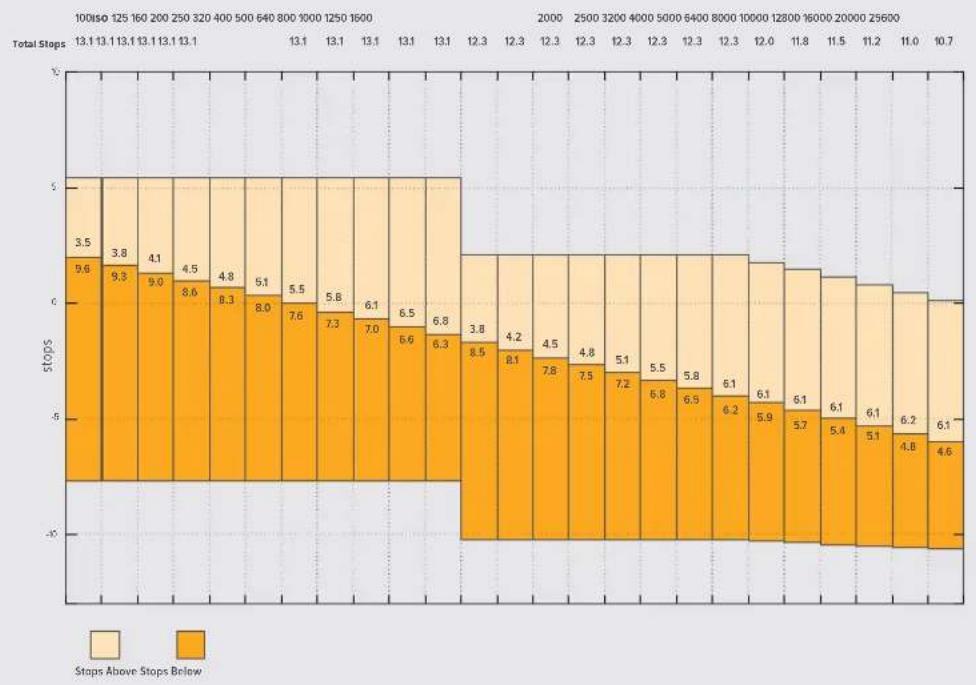
Blackmagic Pocket Cinema Camera 4K Dynamic Range
White Balance
The 'WB' and 'TINT' indicators display your camera's current white balance and tint. Tapping these indicators lets you adjust your camera's white balance and tint to suit varying lighting conditions.

Tap the white balance and tint indicators to access white balance and tint settings
Every light source emits a color. For example, a candle flame emits a warm color, and an overcast sky emits a cool color. White balance settings are used to color balance your image so white stays white by adjusting the mix of orange and blue in your image. For example, when shooting under tungsten lamps which emit a warm, orange light, selecting 3200K adds some blue to the image. This balances the color so white is accurately recorded.
Your Blackmagic Pocket Cinema Camera comes with white balance presets for a variety of color temperature conditions. These are:
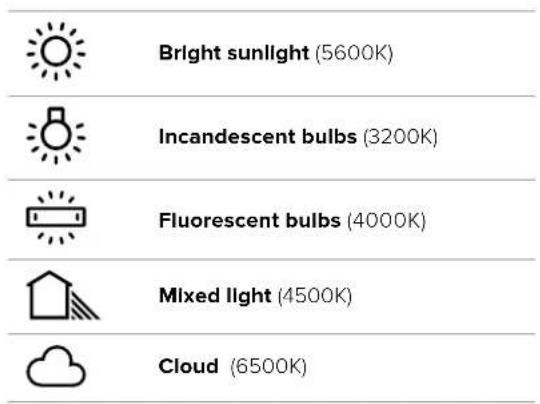
You can customize any of these presets by tapping or holding the arrow icons to the left and right of the temperature indicator in the bottom left of the 'white balance' menu. Each tap moves the color temperature up or down 50K, but holding the arrow icons down will increase the speed. Alternatively, you can move the temperature slider in the middle of the 'white balance' menu.
To further dial in your image, you can adjust the 'tint.' This adjusts the mix of green and magenta in your image. For example, adding some magenta can compensate for the green cast of many fluorescent lights. Many of your camera's white balance presets include some tint.

Tapping the white balance and tint indicator gives you access to five presets, as well as a white balance indicator and slider on the left, and a tint indicator on the right. Adjust these to set a custom white balance for your lighting conditions
While in the 'white balance' menu, your camera's current tint setting is shown at the bottom right of the screen. To adjust the tint, simply tap or hold the arrows to the left and right of the tint indicator. The available range is -50 to +50 in one unit steps. Holding down on the arrows speeds up adjustment.
NOTE Customizing the white balance or tint will change your preset to 'CWB,' or custom white balance. Custom white balances are persistent; your CWB settings will stay configured between power cycles, and when switching to a preset and back to CWB. This makes it easy to compare a custom white balance to the last preset used.
Auto White Balance
Your Blackmagic Pocket Cinema Camera can set white balance automatically. Tapping 'AWB' will bring up the white balance screen.
When setting white balance automatically, a square will be overlaid on the center of your image. Fill this square with a neutral surface such as a white or gray card and tap 'update WB'. The camera will automatically adjust its white balance and tint values so the average of the white or grey inside the white balance square is as neutral as possible. Once updated, this will be set as your camera's custom white balance. Holding the WB button on the top of your camera for three seconds also selects automatic white balance and activates the 'update WB' function.
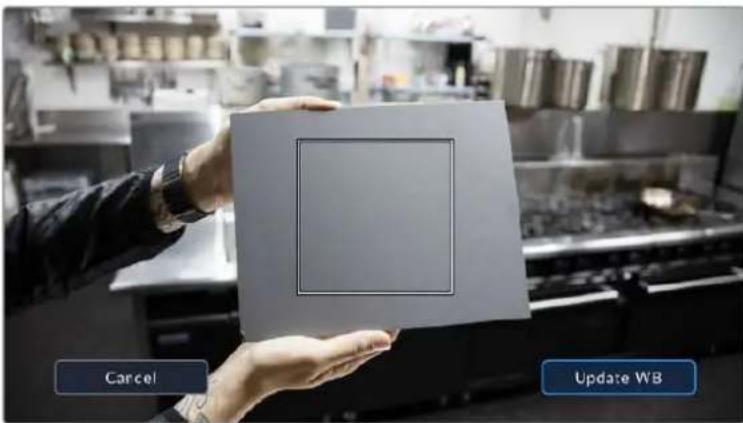
Tapping the 'AWB' icon in the white balance menu will bring up the auto white balance screen. Use this with a white or neutral grey surface to automatically set a neutral white balance
Power
The camera's power source and energy status are displayed in the top right of the LCD screen.

While using battery power, tapping the power indicator toggles between displays
| AC | AC Displays when your camera is plugged into mains power. | |
| AC / Charging | Displays when your camera is plugged into mains power, and is simultaneously charging the internal battery or the NP-F570 batteries if you are using a battery grip. | |
| Percentage | If your battery supports percentage display, the battery icon shows the remaining battery level as a percentage, and drains in 1% steps. At 20% charge remaining, the battery bar turns red. To toggle the percentage display on or off, tap on the battery icon. | |
| Battery bars | The battery included with your camera shows a battery icon that drains in 25% steps. At 20% charge remaining, the battery bar turns red. | |
| Battery grip bars | If you have a battery grip attached to Pocket Cinema Camera 4K these battery bars allow you to monitor the state of both batteries independently. | |
| Battery grip bars | Blackmagic Pocket Camera Battery Pro Grip can power Pocket Cinema Camera 6K Pro and 6K G2 from its two batteries as well as the camera's internal battery. These battery meters show the states of all three batteries. | |
| Power source voltage | This shows the voltage supplied by the battery, or through the DC power jack from a plug pack, D-tap adapter cable or custom power solution. To toggle the voltage display on or off, tap on the battery icon. | |
LUT indicator
When you are using a LUT as a preview tool on set, a LUT icon will be displayed in the top left corner of the screen to indicate that the LUT is currently active.

Histogram
At the bottom left of your camera's touchscreen you can see the histogram. The RGB histogram shows the tonal distribution of the image separated into individual red, green and blue channels.
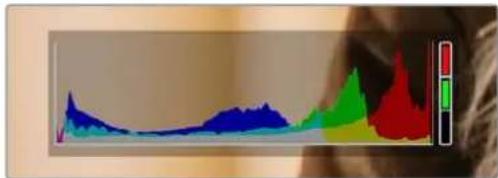
The histogram gives you an indication of the tonal range between shadows and highlights in your clip. It is also a helpful tool for checking the balance of your exposure and to prevent your highlights from clipping
The left edge of the histogram displays shadows, or blacks, and the far right displays highlights, or whites. When you close or open the lens aperture, you'll notice the information in the histogram moves to the left or right accordingly. You can use this to check 'clipping' in your image shadows and highlights. When clipping occurs in the red, green or blue channel, the respective indicator on the right side of the histogram lights up. If the left and right of your edges of the histogram come to an abrupt stop rather than falling off gradually, you may be losing highlight or shadow detail.
If you don't see a histogram in the bottom left of your touchscreen, your LCD monitor settings may be set to display 'codec and resolution.' See the 'monitor settings' section in this manual for more information.
Record button
Next to the histogram, at the bottom of your Pocket Cinema Camera's touchscreen, is a round grey button. This is the 'record' button. Tap it once to begin recording, and tap it again to stop. While recording, the button, the storage indicator, and the timecode at the top of your Pocket Cinema Camera's touchscreen turn red.

The record button is located next to the storage indicators at the bottom of the LCD touchscreen

When recording, the record button displays red.
LUT Applied to Clip
If you have chosen to apply a LUT to your recorded clips in the 'record' settings tab, the touchscreen indicates this in standby mode and when recording.

The LUT icon lets you know that recorded clips will have the selected LUT recorded with the clip.

The LUT icon will be displayed when the selected LUT is being recorded with the clip
Dropped Frame Indicator
The 'record' button is overlaid with a flashing "!" indicator if your camera begins dropping frames while recording. The time remaining indicator for the affected card also turns red. For example, if your CFast card is dropping frames, the "!" indicator appears over the 'record' button, and the time remaining indicator on the CFast card turns red. This lets you know if a particular card is too slow for your currently selected codec and resolution. The 'dropped frame indicator' also appears if you have dropped a frame on the previously recorded clip. This indicator continues until another clip is recorded, or the camera is power cycled. Refer to the 'Choosing a CFast 2.0 card' and 'Choosing an SD Card' sections for more information on how to avoid dropping frames.

Dropped frame indicator for CFast card dropping frames
NOTE You can set your Blackmagic Pocket Cinema Camera to stop recording if dropped frames are detected to avoid recording unusable footage. See the 'record settings' section in this manual for more information.
Recording Time Remaining
When a CFast or SD card is inserted, or a USB-C flash disk is attached to your camera, the storage indicators at the bottom of the touchscreen show how much recording time is left on the card or USB-C flash disk. The time is shown in minutes and varies according to your selected frame rate and codec. The indicator automatically recalculates if either of these settings are changed. When there is approximately five minutes remaining on your card or drive, the indicator text turns red, then blinks when there is only two minutes remaining. The indicator displays 'full' when a card or drive reaches maximum capacity.

The storage indicator shows the name of your CFast card, SD card or USB-C flash disk and the record time remaining in minutes
The card or drive name is also presented in a small bar above the time remaining. The bar turns blue to indicate the camera is set to record to this card or USB-C flash disk. To record to a different card or drive, press and hold the name of the card or USB-C flash disk you wish to record to. While recording, the bar is red.
Tapping the storage indicators opens the storage and formatting menu.

Tap the storage indicators on the LCD touchscreen to access the storage manager
This menu displays the amount of free space on each CFast card, SD card or USB-C flash disk used by your camera, as well as the name of the card or drive, length of the last clip, total number of clips, and the file format for each card or drive.
You can format your media from this menu. For more information, see the 'preparing media for recording' section of this manual.
TIP Tapping the card or drive name in the storage menu sets it as the active card or drive. Your Blackmagic Pocket Cinema Camera fills this card or drive first.
Audio Meter
The peak audio meters display audio levels for channels 1 and 2 when using the internal microphone, or via external audio when connected. The display is calibrated to dBFS units and features peak hold indicators which stay visible for a short time so you can clearly see the maximum levels reached.
To achieve optimum audio quality, ensure your audio levels do not reach 0 dBFS. This is the maximum level that your camera can record, meaning that any audio that exceeds this level will be clipped, resulting in distortion.
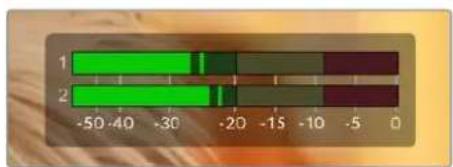
The colored bars on the audio meter represent peak audio levels. Ideally your peak audio levels should fall in the upper end of the green zone. If your peaks enter into the yellow or red zones your audio is in danger of clipping.
You can tap the audio meter to bring up volume controls for audio input channels 1 and 2, as well as headset or speaker volume.
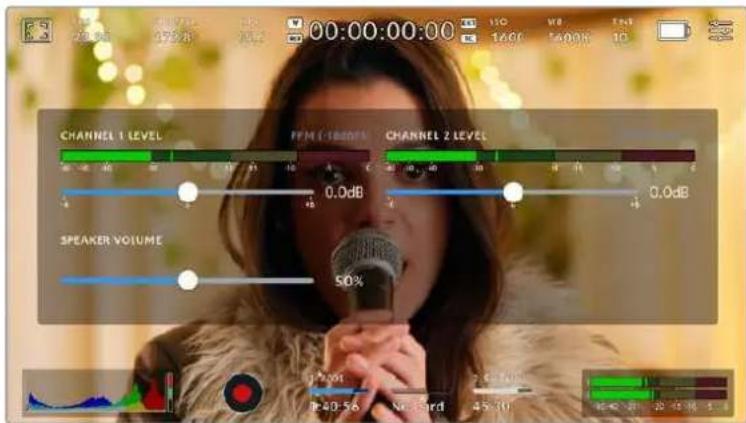
Tap the audio meters on the LCD touchscreen to easily access volume and headset or speaker settings
Double Tap to Zoom
You can magnify any part of your Blackmagic Pocket Cinema Camera's preview image by double tapping the LCD touchscreen. The area you tap will be magnified, and you can move around the image by dragging your finger around the LCD touchscreen. This is very helpful when checking focus. To return to standard magnification, simply double tap your camera's touchscreen again.
Pinch to Zoom
You can adjust the zoom level on the LCD touchscreen with a pinch to zoom multitouch gesture. This does not affect the HDMI output.
To start zooming at x2, double tap on the touchscreen or press the 'focus zoom' button on the back of your camera. Then make a pinch gesture to change the zoom level. You can drag your fingers around the touchscreen to move the area magnified. To return to the standard magnification, double tap on the touchscreen again or press the 'focus zoom' button.
When you double tap on the touchscreen or press the 'focus zoom' button, the zoom level toggles between your previous magnification level and the full view. For example, if you pinch to zoom to x8 magnification, double tap zooms out, and a further double tap returns to x8.
Touch to Focus
You can focus your lens in any region of the image by tapping and holding on the LCD screen in the area that you want to focus. Press the 'focus' button to focus your lens in the chosen location. Double press the focus button to reset the focus point to the center of the screen.
Full Screen Mode
It can be useful when framing or focusing a shot to temporarily hide your touchscreen's status text and meters. To hide them all at once, swipe up or down on the LCD touchscreen. The record indicator, frame guides, grids, focus assist and zebra remain visible.
To show the status text and meters again, swipe up or down again.

Swipe up or down to hide all status indicators on the LCD touchscreen
Playback Menu
Tap the 'play' control button to access the playback menu. You can control previously recorded clips with your camera's control buttons or the LCD touchscreen.
When using the LCD touchscreen, tap 'play' once to start playback and again to pause. Use the forward and reverse buttons to skip to the start or end of clips. Tapping 'forward' once moves you to the next clip. Press the reverse button once to go to the start of the current clip or press twice to skip back to the start of the previous clip. Playback of clips can also be looped by activating the loop icon.

The reverse, play, forward and loop icons
To shuttle, hold down either the forward or reverse transport buttons. This plays your footage back at twice regular speed in either forward or reverse, depending on which transport key you held.
Once shuttling, you can change the shuttle rate by tapping the transport keys again. Each time you tap the transport key in the same direction you double the shuttle rate. The maximum shuttle rate is x16 normal speed. Tapping the transport key again at x16 speed returns you to x2 speed. Each time you tap the opposite direction, the shuttle speed halves until you reach x2 speed. You can return to normal playback by tapping the 'play' button.

The shuttle speed indicator displays the speed and direction of footage being fast forwarded or reversed
Tapping the 'record' control button in playback mode returns your camera to standby mode, ready to record.
Swipe up or down on the touchscreen to hide status text while playing back footage. Enter the slate in playback mode to mark the current clip 'good take' in metadata. For more information, see the 'entering metadata' section.
Settings
Dashboard
Press the 'menu' button to open your camera's dashboard. This tabbed menu has settings not available from the touchscreen. Settings are divided by function into record, 'monitor,' 'audio,' 'setup,' 'presets,' and 'LUTS' tabs. Each tab has multiple pages, which you can cycle through by tapping the arrows at the edge of your camera's touchscreen, or swiping left or right.
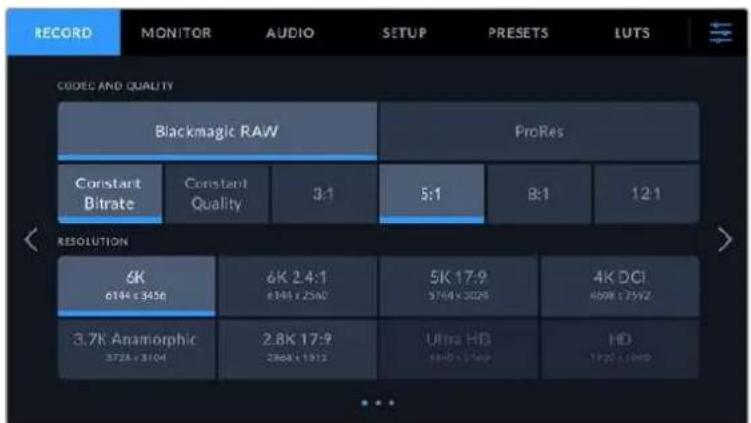
Tap the 'record,' 'monitor,' 'audio,' 'setup,' 'presets,' and 'LUTS' headings to move between your Pocket Cinema Camera's dashboard tabs
Record Settings
The 'record' tab lets you set your video format, codec, and resolution, as well as other settings that are important for your recorded video, such as dynamic range and detail sharpening.
Record Settings 1
The first page of the 'record' settings tab contains the following settings.
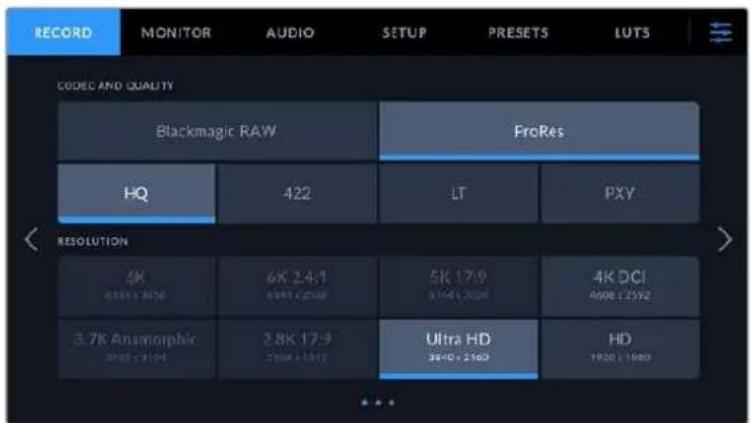
Codec and Quality
The 'codec and quality' menu is split into two rows. The top row lets you choose between two codec families, Blackmagic RAW and Apple ProRes, while the bottom row offers quality options in those families. For example, the quality options available in the ProRes codec family are ProRes 422 HQ, ProRes 422, ProRes 422 LT and ProRes 422 Proxy. Blackmagic RAW options are divided between four 'constant bitrate' and two 'constant quality' settings.
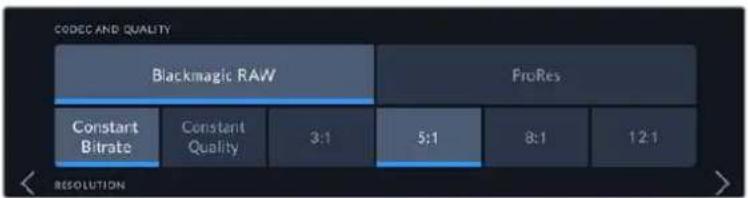
Blackmagic RAW options for 'codec and quality'
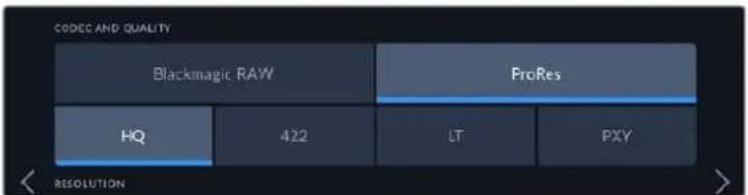
ProRes options for 'codec and quality'
TIP The amount of video you can record on your storage media on Blackmagic Pocket Cinema Camera increases if you choose codec's that use higher compression. Refer to the 'record duration' tables in the 'recording' section for more information.
Resolution
This setting works in combination with the 'codec' setting. Use it to select the resolution for your desired recording format. For example, if you want to record Ultra HD clips using ProRes HQ, select 'ProRes' and 'HQ' in the 'codec and quality' menu. Now choose 'Ultra HD' in the resolution menu.
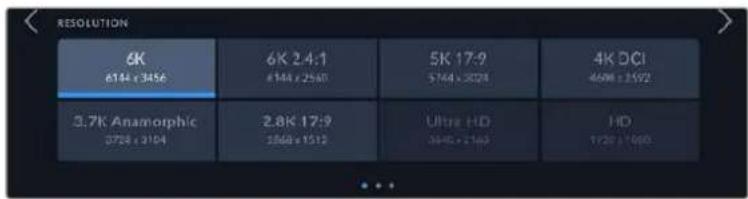
Pocket Cinema Camera 6K Pro and 6K G2 'resolution' options when using Blackmagic RAW codec.
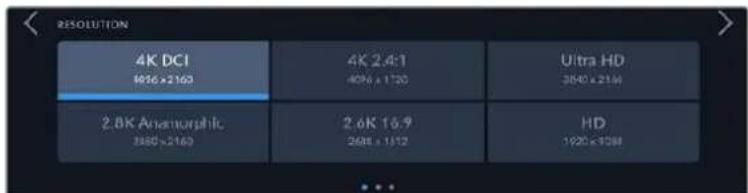
Pocket Cinema Camera 4K 'resolution' options. Note that in 4K DCI format the category is 'resolution', otherwise it's 'resolution - sensor windowed'.
When you coordinate a multi camera recording through ATEM Mini, Pocket Cinema Cameras change their codec setting to Blackmagic RAW for high quality isolated recording to internal media. When you plug Pocket Cinema Cameras into ATEM Mini they change their frame rate to match the frame rate setting of ATEM Mini. If you want to choose a different output frame rate for ATEM Mini after plugging in all video sources, you can change the switcher settings in ATEM Software Control. For more information, see the ATEM Mini manual.
Record Settings 2
The second page of the 'record' settings tab contains the following options.

Dynamic Range
Adjust the 'dynamic range' setting by tapping the dynamic range icons. Blackmagic Pocket Cinema Camera has three dynamic range settings:
| Film The 'film' setting shoots video using a log curve that allows you to maintain the greatest dynamic range and maximizes the information in your video signal to help you get the most out of color grading software, such as DaVinci Resolve. | |
| Extended Video | The 'extended video' setting is based on Blackmagic Wide Gamut with contrast and saturation applied. The most notable differences to the video mode come from the magenta/green axis having less saturation which is more typical of print film. |
| Video | The 'video' setting is the best choice for recording to a high contrast, saturated look suitable for direct delivery or minimal post processing. Video uses Rec.709 primaries with a pleasing roll off in the highlights. This is a good option if you want an accurate starting point that still has a pleasing gamma curve with room for grading if needed. |
NOTE When recording Blackmagic RAW and ProRes using 'film' dynamic range, the image will appear dull and desaturated on your touchscreen. This is because the image file contains a lot of data that hasn't yet been graded to suit a standard display. However, while recording film dynamic range, you can monitor the video on the touchscreen and HDMI output using a display LUT, or look up table, designed to simulate a standard contrast. For more information, refer to the '3D LUTs' section in this manual.
Sensor Area
Blackmagic Pocket Cinema Camera can be set to use the 'full' sensor area, or for even higher frame rates, you can use the 'sensor area' option to select the sensor area in 'window' mode. This uses only the amount of sensor pixels needed for a given video format rather than scaling images from the entire sensor. Some formats combine windowing and scaling, for example Blackmagic Pocket Cinema Camera 6K Pro and 6K G2 have HD formats scaled from the full sensor, scaled from a 5.7K window and scaled from a 2.7K window.
As the 'window' modes use only the center of the camera's sensor, the field of view of any given lens is narrower due to the crop involved. For example, when using a 20mm lens to shoot HD footage in windowed sensor mode, the field of view is equivalent to a 40mm lens on Blackmagic Pocket Cinema Camera 4K.
The 'sensor area' setting is available when shooting below your camera's maximum resolution, such as when shooting Ultra HD or HD ProRes video.
The fastest frame rates for Pocket Cinema Camera 6K Pro and 6K G2 are available when shooting 2.8K 17:9 windowed and HD scaled from 2.7K windowed. The fastest frame rates for Pocket Cinema Camera 4K are available in 2.6K 16:9 mode and in HD windowed mode.
For more information on 'full' and 'window' formats, see the 'maximum sensor frame rates' section.
Project Frame Rate
The project frame rate provides a selection of frame rates commonly used in the film and television industry. For example, 23.98 frames per second. This frame rate is normally set to match your playback speed and audio sync used in your post production workflow and delivery requirements.
Eight project frame rates are available, including 23.98, 24, 25, 29.97, 30, 50, 59.94 and 60 frames per second.
Off Speed Recording
By default, the project and sensor frame rates are matched for a natural playback speed. However, tapping the 'off speed recording' switch icon lets you set your sensor frame rate independently.
Off Speed Frame Rate
With 'off speed recording' enabled, tap the arrows next to the 'off speed frame rate' indicator to set your camera's sensor frame rate.
The sensor frame rate sets how many actual frames from the sensor are recorded every second, and frame rate will affect how fast or slow your video will play back at your set project frame rate.
For more information on off speed frame rates, see the 'frames per second' section in the 'touchscreen features' section of this manual.
For information on the maximum frame rates available for each recording format and codec, refer to the tables in the 'maximum sensor frame rates' section.
Preferred Media for Recording
Use this setting to select which storage card or drive your Blackmagic Pocket Cinema Camera records to first. The options are 'CFast', 'SD', 'USB' and 'Fullest'. Picking 'CFast', 'SD' or 'USB' is a matter of personal preference, but using any consistently will let you know which media to swap out first as your storage fills up. 'Fullest' can help group files chronologically when shooting a single camera project.
The setting you choose is applied when a CFast or SD card is inserted or a USB drive is connected. You can override this setting at any time by entering the storage manager and tapping the card name to set it as active. It's important to note, however, that ejecting and reinserting cards reverts to the current 'preferred card for recording' setting.
The 'fullest' setting is based on the percentage that your recording media is filled, rather than their sizes or the amount of data used.
Record Settings 3
The third page of the 'record' settings tab contains the following settings.

Timelapse
This setting activates the timelapse feature to automatically record a still frame at the following intervals:
Frames 2-10
Seconds 1-10,20,30,40,50
Minutes 1-10
For example, you can set the camera to record a still frame every 10 frames, five seconds, 30 seconds, five minutes etc.
The timelapse feature offers many creative options. For example, setting a two frame timelapse interval gives your recorded video a high speed effect when played back.
Start recording by pressing the record button. When you press the button again to stop recording, the timelapse sequence is saved as one single clip, matching the codec and frame rate set in your camera. This means you can drop the timelapse sequence into your post production timeline just like any other clip you have recorded.

Timelapse mode is indicated by an icon over the 'record' button.
TIP When you record clips in timelapse mode, the timecode counter updates when a frame of video is recorded.
Detail Sharpening
Use this setting to sharpen the image. When sharpening is enabled, decrease or increase the level of sharpening by selecting 'low', 'medium' or 'high'.
When sharpening is enabled, it is applied to ProRes video recorded on camera as well as the HDMI output.
This setting is intended for live studio production where there is no time for post production and you want to output the image live to air. We recommend leaving it 'off' for images you are recording for further post production. Detail sharpening is disabled when the codec is set to Blackmagic RAW.
TIP When post processing your Blackmagic RAW files, you can achieve a comparable level of sharpening to these settings by using the blur/sharpening tool in DaVinci Resolve's 'color' page.
Set the tool to a radius of 0.48 and adjust the scaling to 0.6, 0.3 or 0.15 for comparable sharpening to 'high,' 'medium,' or 'low.'
For detailed information on sharpening in post production, see the 'motion effects and blur palettes' section in the full DaVinci Resolve manual.
If Card Drops Frame
Use this setting to configure your Pocket Cinema Camera's behavior when dropped frames are detected. When set to 'alert' the dropped frame indicator will be displayed on the LCD touchscreen, and recording will continue with dropped frames. When set to 'stop recording' your camera will stop recording when dropped frames are detected. This can prevent you wasting time shooting unusable footage if you don't spot the dropped frames indicator.
Refer to the 'Choosing a CFast 2.0 card', 'Choosing a fast SD card', 'Choosing a fast SSD' and 'Choosing a fast USB-C flash disk' sections for more information on how to avoid dropping frames.
Apply LUT in File
If you are shooting with the Blackmagic RAW codec and applying a LUT to the HDMI output of your camera, the selected LUT will be embedded into the Blackmagic RAW file you are recording. This means that the LUT will be saved in the header of the file and can easily be applied to the clip in post production without needing to handle a separate file. When the 'apply LUT in file' switch is set to 'on' in the record menu, this clip will open in Blackmagic RAW Player and DaVinci Resolve with the chosen LUT already applied to it. The LUT can then be easily toggled 'on' or 'off' but will always travel with the Blackmagic RAW file as it is written into the clip itself.
DaVinci Resolve also has an 'Apply LUT' switch in the RAW settings palette for enabling or disabling the 3D LUT in the Blackmagic RAW file. The 'Apply LUT' setting in DaVinci Resolve is the same setting as in the camera. This means that when shooting you can direct the colorist to use the LUT by setting it in the camera, but they can switch it off easily in DaVinci Resolve by setting 'Apply LUT' to 'off'.
Record LUT to Clip
The 'record LUT to clip' option is available when shooting with the ProRes codec. Your Blackmagic Pocket Cinema Camera does not apply, or 'bake in,' LUTs by default to recorded footage, however you can choose to 'bake in' the LUT to your footage by tapping the 'record lut to clip' switch icon.
This can be a useful option for situations where you do not have the time to grade your footage in post-production, or where you need to give the footage directly to a client or an editor. For more information, refer to the '3D LUTs' and 'touchscreen controls' sections.
File Naming Convention
Clips are recorded to your CFast card, or SD card or USB-C flash disk in the Blackmagic RAW format or to a ProRes QuickTime movie, depending upon which recording format you have chosen.
The table below shows an example of the file naming convention:
| A001_0815152_C001.mov | QuckTime Movie Filename |
| A001_0815152_C001.mov | Camera Index |
| A001_0815152_C001.mov | Reel Number |
| A001_0815152_C001.mov | Month |
| A001_0815152_C001.mov | Day |
| A001_0815152_C001.mov | Hour |
| A001_0815152_C001.mov | Minute |
| A001_0815152_C001.mov | Clip Number |
Still image files captured using the still button follow the file naming convention for video clips, however the filename has 'S001' representing the 'still number' as the last four characters of the filename in place of the clip number. For information on how to change the camera index, see the 'Project Metadata' section.
Monitor Settings
The 'monitor' tab lets you adjust status text, overlays, and other monitoring options for your Blackmagic Pocket Cinema Camera's LCD touchscreen and the HDMI output. Options are arranged by output between 'LCD', 'HDMI' and 'both', which covers monitor settings that affect the LCD and the HDMI output. These menus have two pages of options, which you can cycle through by tapping the arrows at the edge of your camera's touchscreen, or swiping left or right.
If you have the optional viewfinder installed on Blackmagic Pocket Cinema Camera 6K Pro and 6K G2, settings on the first page of the 'monitor' tab let you control what is displayed on the LCD, HDMI and viewfinder independently.
If you have Blackmagic Pocket Cinema Camera Pro EVF installed on your camera, the 'monitor' tab includes a 'viewfinder' button and an 'all' button. The 'all' button replaces the 'both' button and refers to status text you can display on the LCD touchscreen, HDMI output and the electronic viewfinder at the same time.
Monitor Settings 1
The first page of the monitor tab contains identical settings for each output. For example, you can set 'zebra' on for the LCD touchscreen, but off for the HDMI output.
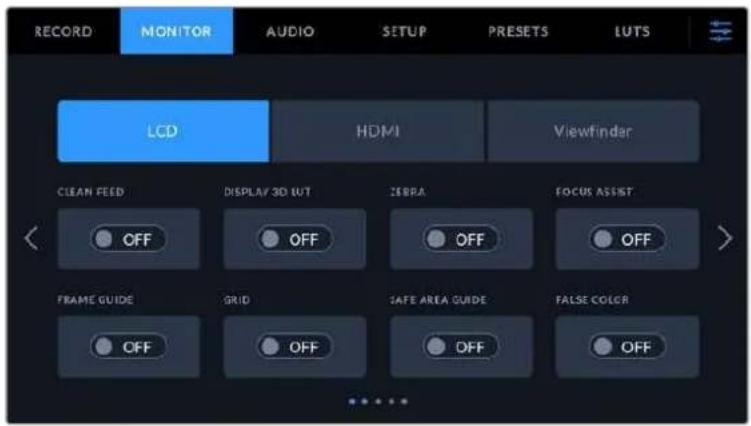
Clean Feed
Tap the 'clean feed' switch in the 'LCD' or 'HDMI' menus to disable all status text and overlays for that output, except the record tally indicator.

Your camera will display a record tally even in clean feed mode
NOTE LUTs will still be applied to outputs with 'clean feed' enabled. To disable LUTS, disable the 'display LUT' switch in the 'Monitor' menu.
Display 3D LUT
Blackmagic Pocket Cinema Cameras can apply 3D LUTs to any output to approximate the look of color graded footage. This is especially useful when recording clips using 'film' dynamic range.
If your camera has a 3D LUT active, use this setting to independently apply that LUT to your LCD touchscreen or HDMI output.
NOTE For more information on loading and using 3D LUTs, see the '3D LUTs' section of this manual. Tap the switches on the 'LCD' or 'HDMI' pages to enable monitoring options for the LCD touchscreen and the HDMI output: focus assist, frame guide, grid, safe area guide, false color.
Zebra
Tap the 'zebra' switch in the LCD' or HDMI' menus to enable zebra guides for those outputs. For more information on zebra guides and setting zebra levels, see the 'touchscreen features' section in this manual.
Focus Assist
Tap the 'focus assist' switch in the 'LCD' or 'HDMI' menus to enable focus assist for those outputs. For more information on focus assist and setting focus assist levels, see the 'touchscreen features' section in this manual.
Frame Guide
Tap the 'frame guide' switch in the 'LCD' or 'HDMI' menusin the 'LCD' or 'HDMI' menus to enable frame guides for those outputs. For more information on frame guides and choosing different guides, see the 'touchscreen features' section in this manual.
Grid
Tap the 'grid' switch in the 'LCD' or 'HDMI' menus to enable a rule of thirds grid for those outputs. For more information on the rule of thirds grid, see the 'touchscreen features' section in this manual.
Safe Area Guide
Tap the 'safe area' switch in the 'LCD' or 'HDMI' menus to enable safe area overlay for those outputs. For more information on the safe area guide, see the 'touchscreen features' section in this manual.
NOTE Use the 'safe area guide %' setting in your Blackmagic Pocket Cinema Camera's 'both' monitoring settings to set the size of the safe area guide.
False Color
Tap the 'false color' switch in the 'LCD' or 'HDMI' menus to enable false color exposure assistance for those outputs. For more information on using false color, see the 'touchscreen features' section in this manual.
Monitor Settings 2
The second page of the monitor tab contains the following settings.

LCD, HDMI and Viewfinder
Status Text
This setting can be useful to hide the status text and meters on your LCD touchscreen, leaving only the information necessary to compose or direct a shot. Tap the 'status text' switch icon to toggle the appearance of status text and meters for your camera's LCD touchscreen. Overlays such as frame guides, grids, focus assist and zebra remain visible, if enabled. Swiping up or down on the LCD touchscreen has the same effect.
Anamorphic Desqueeze
When shooting with anamorphic lenses, the image will appear horizontally 'squeezed' on your Pocket Cinema Camera's preview outputs and in recorded files. Enabling 'anamorphic desqueeze' will correct the preview image on your Pocket Cinema Camera as well as recording the desqueeze amount used in the clip metadata for easy correction in post.
The desqueeze amount you choose will vary depending on what you've set your Blackmagic Pocket Cinema Camera's resolution to, but the resulting image will always be in the cinematic widescreen 2.4:1 aspect ratio.
Anamorphic lenses designed for film typically have a 2x squeeze factor. Your Pocket Cinema Camera's '3.7K anamorphic' resolution is designed for use with these lenses and will perform a 2x desqueeze when set to this resolution with 'anamorphic desqueeze' set to '2x'.
Anamorphic lenses designed for 16:9 digital image sensors often use a 1.33x squeeze factor to produce 2.4:1 cinematic widescreen images from the entire 16:9 sensor. Therefore, when your Pocket Cinema Camera is set to 16:9 resolutions such as '4K 16:9' and 'HD 16:9,' 'anamorphic desqueeze' should be set to '1.33x'.
TIP If your image appears horizontally stretched when shooting with a standard spherical lens, make sure you don't have 'anamorphic desqueeze' enabled.
LCD and Viewfinder
Display
Instead of a histogram and audio meters, your camera can display codec and resolution information at the left and right bottom edges of the LCD touchscreen. This can be useful if you prefer to use false color for dialing in exposure, or are recording audio separately and want to display additional information in the space normally used by the histogram and audio meter. Simply tap 'meters' or 'codec and resolution' in the 'LCD' menu to select your preferred view.

HDMI Only
Display Status Text for Cinematographer or Director
The LCD touchscreen displays information such as ISO, white balance, and aperture that is useful to a camera operator or cinematographer setting up individual shots on that camera. Your camera's HDMI output, however, can also show information useful to a director or script supervisor who is keeping track of multiple shots or cameras.

Setting the status text to 'director' in the HDMI monitor settings changes the status text for that output to show the following information.
- FPS
Displays the currently selected frames per second for that camera. If off speed frame rate is disabled, only the project frame rate is shown. If an off speed frame rate is being used, the sensor frame rate is shown, followed by the project frame rate.
CAM
Displays the camera index as set in your camera's slate. For more information, see the 'slate' section.
- OPERATOR
Identifies the camera operator as set in your camera's slate. For more information, see the 'slate' section.
DURATION DISPLAY
Displays the duration of the current clip while recording, or the last recorded clip in the following format: hours:minutes:seconds.
REEL,SCENE,TAKE
Displays the current reel, scene and take. For more information on reels, scenes, takes and their labelling conventions, refer to the 'slate' section.
DYNAMIC RANGE
The bottom left hand corner of the monitor displays the currently applied LUT, if applied to that output. If no LUT is applied, 'film' or 'video' dynamic range is displayed.
TIMECODE
The bottom right of the monitor displays your camera's timecode, in the following format: hours:minutes:seconds:frames.
Monitor Settings 3
The third page of the 'LCD', 'HDMI' and 'Viewfinder' monitor tab contains identical settings for each output. These settings act globally across all three monitoring outputs. For example, if focus assist is enabled on your Blackmagic Pocket Cinema Camera's LCD, HDMI and Viewfinder outputs changing the 'focus assist type' from 'peaking' to 'colored lines' will effect all three outputs.
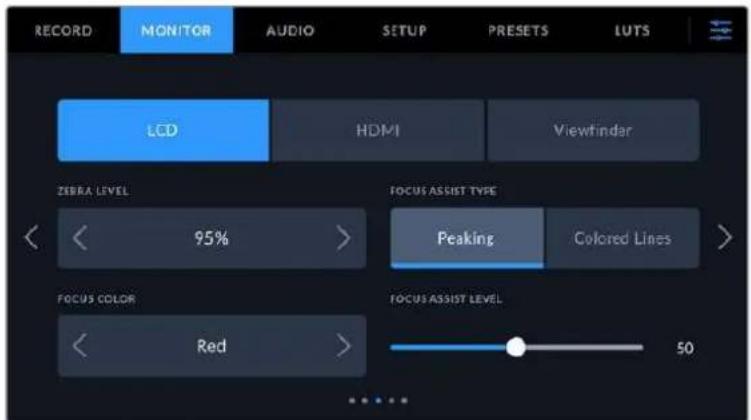
Zebra Levels
Set the exposure level that zebra appears at by tapping the arrow icons on either side of this setting. Zebra level is adjustable in five percent steps between 75 and 100 percent exposure.
For more information, see the 'zebra' guide in the 'touchscreen features' section of this manual.
Focus Assist
Your camera has two focus assist modes, including 'peak' and 'colored lines.'
Peaking
When 'peaking' style focus assist is selected, areas of the shot that are in focus are heavily sharpened on your LCD touchscreen, HDMI output or Viewfinder, but not in the recorded image itself. This causes focused parts of your shot to 'pop' out of the softer background on screen. As no additional overlays are used, this can be a very intuitive way to tell when focus is dialed in, especially when the subject you're focusing on is physically well separated from other elements in shot.
- Colored Lines
When 'colored lines' style focus assist is selected, a colored line is superimposed around the parts of the image that are in focus. This can be a little more intrusive than 'peaking' style focus assistance as the lines are drawn over your image, but especially in busy shots with a lot of visible elements, it can be a precise focus aid.
Focus Assist Color
Use this setting to change the color of focus line overlays when using 'colored lines' style focus assistance. Changing the focus line color can make it easier to tell focus assistance lines apart from your image. The available options are 'white,' 'red,' 'green,' 'blue' and 'black.'
Focus Assist Level
To set the level of focus assistance for your LCD, HDMI output and Viewfinder, move the slider from left to right.
Setting the focus assist intensity level does not affect whether focus assistance is enabled on your Blackmagic Pocket Cinema Camera's LCD, HDMI output and Viewfinder. You need to turn focus assistance on individually for each output in the LCD, HDMI output and Viewfinder monitor menus.
TIP The optimum level of focus assistance varies shot by shot. When focusing on actors, for example, a higher level of focus assistance can help resolve edge detail in faces. A shot of foliage or brickwork, on the other hand, may show distracting amounts focus information at higher settings.
Monitor Settings 4
The fourth page of the 'LCD', 'HDMI' and 'Viewfinder' monitor tab contains identical settings for each output. These settings act globally across all three of your camera's monitor outputs.
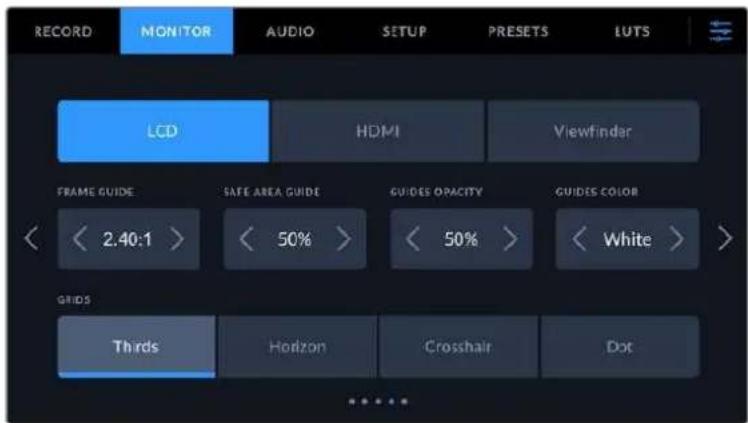
Frame Guides
Tap the left or right arrows in the 'frame guides' menu setting to cycle through frame guide options for all outputs on your camera. The options are detailed in the 'touchscreen features' section of this manual, and are also accessible from the LCD monitoring menu in your LCD touchscreen head up display. It's worth noting that you can individually select whether frame guides appear on the LCD touchscreen and HDMI output in their respective 'monitor' menus.
Safe Area Guide
To adjust the size of the safe area overlay on your Pocket Cinema Camera's LCD touchscreen, HDMI and Viewfinder outputs, tap the arrows to the left and right of the percentage displayed in this setting. This percentage indicates the size of the safe area in relation to the image frame. Most broadcasters require a 90% safe area.
Guide Opacity
Tap the left or right arrows in the 'guide opacity' menu setting to choose the opacity of the areas blocked out by frame guides on your LCD touchscreen, HDMI output and Viewfinder. The options are 25% , 50% , 75% and 100% .
Guides Color
Tap the left or right arrows in the 'guides color' menu setting to choose a color for the guides.
Grids
To set which combination of grids and crosshair you want to display on your camera's LCD touchscreen, HDMI output and Viewfinder, tap the 'thirds', 'horizon', 'crosshair' or 'dot' options in this setting.
For more information, see the 'grids' guide in the 'touchscreen features' section.
Monitor Settings 5
The fifth page of your Pocket Cinema Camera's 'LCD' and 'Viewfinder' monitor tab contains some settings that vary depending on the selected output. These settings are not available for the 'HDMI' output.
LCD only
Screen Brightness
Drag the 'screen brightness' slider in the 'LCD' menu left or right to adjust the brightness of your camera's LCD touchscreen.

Viewfinder

Viewfinder Brightness
Allows adjustments for the brightness of the viewfinder display.
Focus Chart
The viewfinder has a built in focus chart so you can focus the eye piece to suit your eyes. The diopter has an adjustment range of -4 to +4. Simply turn the focus diopter on the eyepiece until the chart is in perfect focus.
Smooth Motion
This setting smooths the motion of fast moving images displayed by the viewfinder. It is common to see judder when shooting at frame rates lower than 30p on a display that doesn't run at that native frame rate, especially when you see the display close up. Judders are eliminated when you switch on 'smooth motion' with the shutter angle at 180 or less and the frame rate set to 23.98, 24, 25, 29.97 or 30p.
Audio Settings
The 'audio' tab lets you adjust the audio input and monitoring settings on your camera.
The audio settings for the camera are spread over two pages and divided between channels 1 and 2.
You can map each audio channel to a different source, as well as adjusting various settings such as gain control.
Audio Settings 1
The first page of the 'audio' tab contains the following settings.
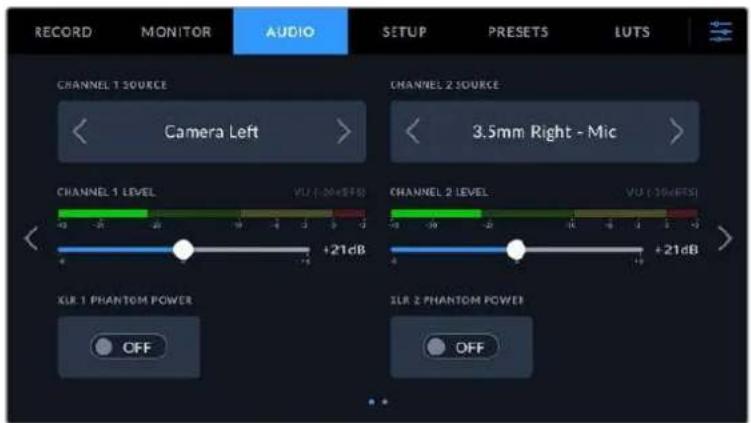
- Channel Source
Use the 'channel 1 source' and 'channel 2 source' buttons to select your audio source for each audio channel. Pocket Cinema Camera 6K Pro and 6K G2 have two channels of XLR audio, and Pocket Cinema Camera 4K has one XLR audio input. Below is a description of each channel source setting.
- Camera Left or Right
Records from your camera's internal microphones.
- Camera Mono
Creates a single audio channel from your Blackmagic Pocket Cinema Camera's built in microphone's left and right channels.
XLR Line
Uses your camera's XLR input to record line level audio. You can also use this setting to accept a timecode signal through the XLR port.
XLR Mic
Records mic level audio from your camera's XLR input. If phantom power is enabled and you have your XLR input set to 'mic' you'll also see a +48V indicator here. It is also important to ensure that the 48V switch gets turned 'off' when you disconnect your phantom powered microphone. You can also use this setting to accept a timecode signal through the XLR port.
3.5mm Left - Line
Uses only the left channel of the 3.5mm input as line level audio. You can also use this setting to accept a timecode signal on the left channel of the 3.5mm microphone input.
3.5mm Right - Line
Uses only the right channel of the 3.5mm input as line level audio.
3.5mm Mono - Line
Creates a mono mix of the left and right channel from the 3.5mm input as line level audio.
3.5mm Left - Mic
Uses only the left channel of the 3.5mm input as mic level audio.
3.5mm Right - Mic
Uses only the right channel of the 3.5mm input as mic level audio.
3.5mm Mono - Mic
Creates a mono mix of the left and right channel from the 3.5mm input as mic level audio.
None
Disables your audio channel.
NOTE When selecting the 3.5mm input as an audio source, the channel 1 and channel 2 source both need to be line level or mic level. This means that if you select '3.5mm left - line' as your channel 1 source, the available options for the 3.5mm input on channel 2 will all be line level: '3.5mm left - line', '3.5mm right - line' and '3.5mm mono - line'. The mic level options will be grayed out.
Channel 1/2 Level
Use these sliders to adjust the recording levels of your chosen channel 1 and 2 sources. Audio meters are included with each slider to help you set the correct audio level. These levels will also update when you adjust the audio using the audio knobs on the ergonomic control panel. To achieve optimum audio quality, ensure your audio levels do not reach 0 dBFS. This is the maximum level that your camera can record, meaning that any audio that exceeds this level will be clipped, resulting in distortion.
XLR Phantom Power
Your camera's XLR input can provide 48V phantom power so you can use microphones that aren't self powered. When your camera is set to 'XLR' audio input, simply tap the 'phantom power' switch icon to enable phantom power. Pocket Cinema Camera 6K Pro and 6K G2 have two XLR inputs and separate phantom power switches for each input.
Audio Settings 2
The second page of the 'audio' tab contains the following settings.
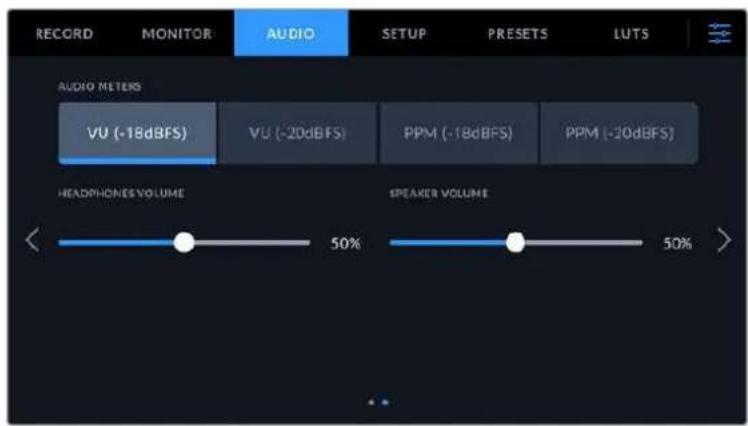
Audio Meters
You can choose from two different audio meter display types.
| VU The VU meter, or | 'volume units' meter, averages out short peaks and troughs in your audio signal. If you are using VU metering, adjust the input levels on you Blackmagic Pocket Cinema Camera so that the meter peaks at the 0db indicator on the audio meter. This maximizes the signal to noise ratio and ensures your audio is at the highest quality. If your audio peaks beyond the 0dB indicator there is a high risk of sound distortion. |
| PPM PPM meters, or | 'peak program meters' displays a 'peak hold' feature that momentarily holds the signal peaks and a slow fall back so you can easily see where your audio is peaking. |
Both VU and PPM meters are available at reference levels of -18dBFS or -20dBFS so you can monitor your audio to suit different international broadcasting standards.
| Audio meter setting Standard | |
| PPM (-20 dBFS) SMPTE RP.0155 | |
| PPM (-18 dBFS) EBU R.68 |
Headphone Level
This slider adjusts the output levels for headphones attached to Pocket Cinema Camera's 3.5mm headphone jack. Move the audio slider left or right to adjust levels. These levels will also update when you adjust the headphone volume using the settings wheel on the forward control panel.
Speaker Level
This slider adjusts the output levels for your Pocket Cinema Camera's built in speaker. Move the audio slider left or right to adjust levels. These levels will also update when you adjust the speaker volume using the settings wheel on the forward control panel.
NOTE It is standard practice to plug in your XLR cable before switching phantom power on. It is also important to switch phantom power to 'off' when you no longer have a phantom powered microphone connected. Connecting equipment that doesn't require phantom power when still in phantom power mode can damage your equipment, as the camera outputs a charge when in this mode. Phantom power can also take quite a while to discharge after switching it off.
Please be aware that you should wait a few minutes when switching off phantom power before plugging in any other microphones or XLR audio equipment.
Setup Settings
The 'setup' tab contains your Blackmagic Pocket Cinema Camera's identification settings, software version, function button settings and other camera settings not directly linked to recording or monitoring. This menu has four pages, which you can cycle through by tapping the arrows at the edge of the LCD touchscreen, or swiping left or right.
Setup Settings 1
The first page of your camera's 'setup' tab contains the following settings.

On Pocket Cinema Camera 6K Pro, the first page of the 'setup' tab has a 'display ND filter as' option to customize how the ND filter information is displayed
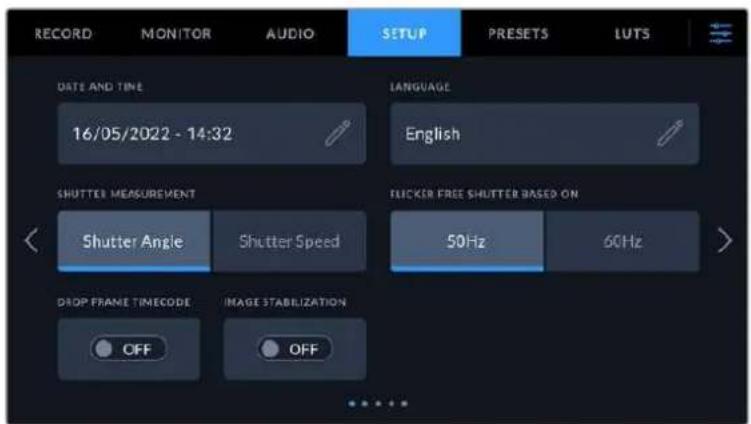
On Pocket Cinema Camera 4K, the first page of the 'setup' tab has an 'Image stabilization' option to switch on image stabilization for your Micro Four Thirds lens
Date and Time
Set your camera's date and time by tapping the 'date and time' setting. The date format is year, month, day and the time format is 24 hour. Date and time are also used for time of day timecode if an external timecode source is not connected.
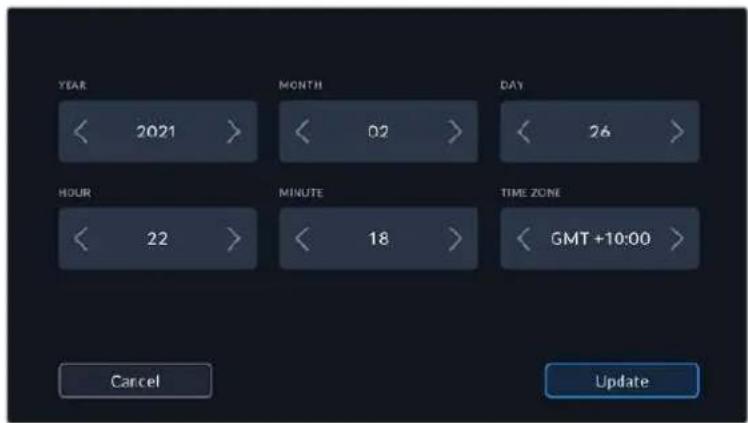
Language
Pocket Cinema Camera supports 13 popular languages: English, Chinese, Japanese, Korean, Spanish, German, French, Russian, Italian, Portuguese, Turkish, Polish and Ukrainian.
The language page will also appear on initial start up.
To select your language:
1 Tap the pencil icon and select your language from the list.
2 Select 'ok' to return to the setup menu.
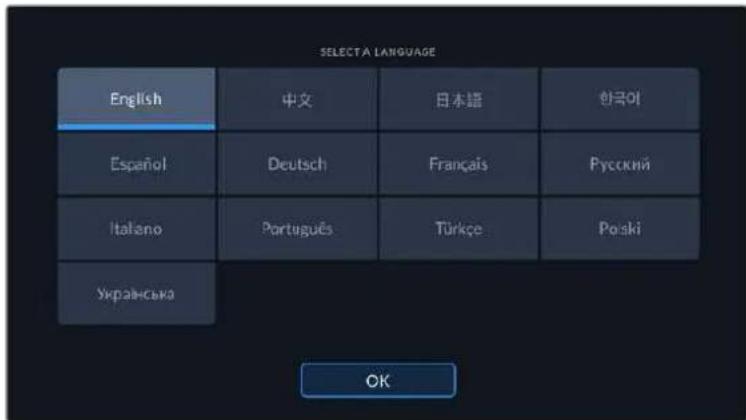
Shutter Measurement
Use this setting to select whether to display shutter information as 'shutter angle' or 'shutter speed'.
It's worth mentioning that when using shutter angle, the shutter conforms to the frame rate. For example, 180 degrees produces the same motion blur, no matter which frame rate you use.
When using shutter speed, however, the shutter is given an absolute value determined independently of the frame rate, so the results differ if you change the frame rate.
Flicker Free Shutter Based On
Use this setting to change the mains power frequency your camera uses to calculate flicker free shutter settings.
When shooting under lights, your shutter can affect the visibility of flicker. Your Blackmagic Pocket Cinema Camera automatically calculates a flicker free shutter value for your current frame rate and suggests up to three shutter values. Shutter values are affected by the frequency of the local mains power supply used to drive those lights. In most PAL countries, this frequency is 50Hz , while NTSC countries typically use 60Hz power. Tap '50Hz' or '60Hz' to set the right frequency for your region.
Characteristics of various light sources may still cause flicker even when using flicker free shutter values. We recommend performing a test shoot when not using continuous lights.
Drop Frame Timedata
Use the 'timecode drop frame' option to use drop frame timecode when using NTSC project frame rates of 29.97 and 59.94. Drop frame timecode skips a small number of frames from the timecode at set intervals. This keeps your project timecode accurate despite each second not containing a whole number of frames at NTSC frame rates.
Image Stabilization
Pocket Cinema Camera 4K has an 'Image Stabilization' option to enable or disable image stabilization on lenses without a physical switch.
Display ND Filter As
On Blackmagic Pocket Cinema Camera 6K Pro, you can adjust how the ND filter indicator displays your ND filter setting. Each option corresponds to a different camera convention. Cinematographers typically use ND.number notation, while those familiar with DSLRs or broadcast cameras may prefer this information in f-stop format, or as a fraction of available light. These options are available here as 'number,' 'stop,' and 'fraction,' respectively.
Setup Settings 2
The second page of your camera's 'setup' tab contains the following settings.
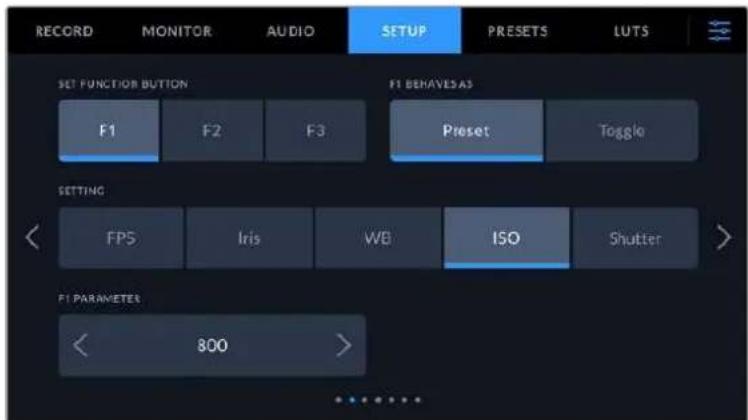
Set Function Button
On the top of your Blackmagic Pocket Cinema Camera you'll notice three function buttons. The dots on the buttons represent function 1, function 2 and function 3. These can be mapped to frequently used features and are quickly accessible when using your camera.

The function buttons are represented by dots and are located on the top of your camera
To set these buttons, select a function button and then the behavior, settings and parameters you want for that function.
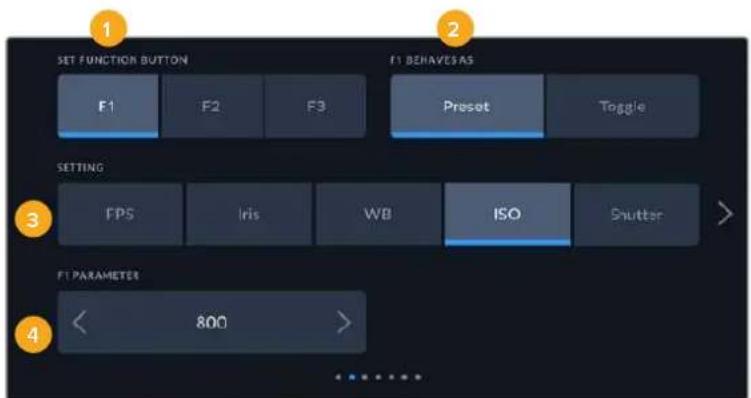
1 Button 2 Behavior 3 Setting 4 Parameter
Function Button Behaves as Preset or Toggle
Once you have selected the function button you want to map, you can select a behavior. The available options are:
- Preset
When set to this behavior, pressing a function button will recall a combination of a setting and a parameter.
To set a preset, select the setting you want to use from the 'setting' menu, and adjust that setting by tapping the arrow icons on either side of the 'parameter' menu.
For example, to set the F1 button to recall a preset white balance, use the 'set function button' arrows to select 'F1', select the 'preset' behavior, tap the 'WB' setting, and tap the arrows on either side of the 'parameter' menu until you get to WB '5600K' and Tint '-20'.
- Toggle
When set to this behavior, pressing a function button will toggle a particular setting on or off. The 'setting' menu is grayed out in this mode. Instead, tap the left or right arrows in the parameter menu to scroll through the available options. These are 'clean feed', 'display LUT', 'frame guides', 'focus assist', 'false color', 'zebra', 'grid', 'safe area guide', 'off speed recording', 'color bars', 'record', and 'none'.
Using the 'toggle' behavior also lets you select the output this setting applies to. Simply tap any combination of LCD, 'HDMI' and Viewfinder' to select. If the output for an option is not available, such as color bars' which always applies to all outputs, the LCD, 'HDMI', and Viewfinder' settings are disabled.

Setup Settings 3 on Blackmagic Pocket Cinema Camera 6K Pro and 6K G2
The third page of the 'setup' tab contains settings to configure the optional Blackmagic Zoom Demand. These settings are only active when you have Blackmagic Zoom Demand attached to your camera.
For information on attaching and using Blackmagic Zoom Demand, refer to the 'Blackmagic Zoom and Focus Demand' section.
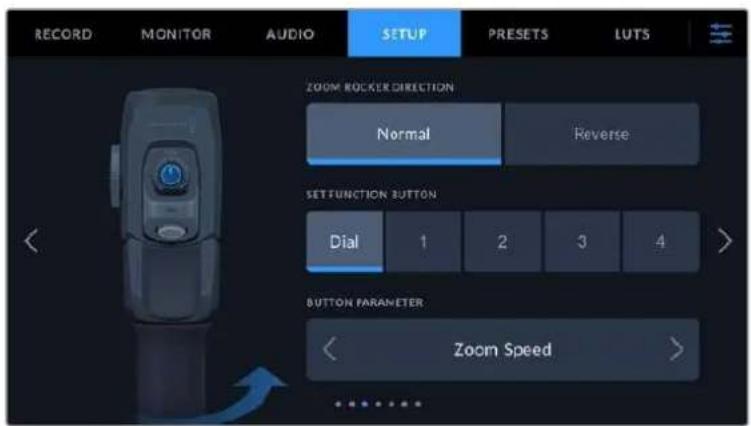
Zoom Rocker Direction
Normal
The default zoom rocker direction. Push the zoom rocker to the right to zoom in and to the left to zoom out.
- Reverse
When the zoom rocker direction is set to 'reverse' push the zoom rocker to the left to zoom in and to the right to zoom out.
Blackmagic Zoom Demand has four zoom function buttons and a speed dial that you can map to different functions.

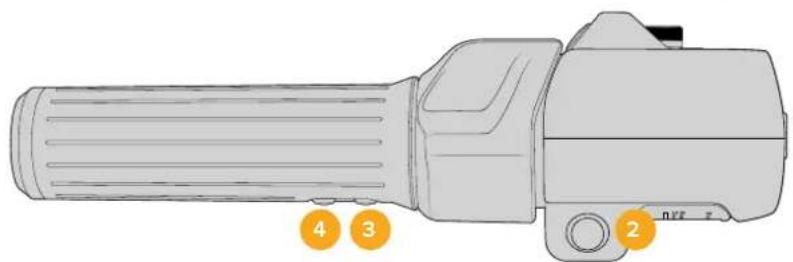
1 Zoom F1 2 Zoom F2 3 Zoom F3 4 Zoom F4 5 Speed Dial
To assign a different function to the speed dial or one of the zoom buttons choose 'dial' or a button number from the 'set function button' menu. Next, choose a function by tapping the arrow icons on either side of the 'button parameter' menu.
Dial and function button parameter options:
| Speed Dial Zoom speed, headphone level, iris adjustment, focus adjustment. | |
| Zoom buttons 1-4 | Record, push to talk, program return, focus zoom, frame guides, status text, auto focus, auto iris, auto white balance, playback. You can also set to toggle the ND filters on the 6K Pro. |
Setup Settings 4 on Blackmagic Pocket Cinema Camera 6K Pro and 6K G2
The fourth page of the 'setup' tab contains settings to configure the optional Blackmagic Focus Demand. These settings are only active when you have Blackmagic Focus Demand attached to your camera.
For more information on attaching and using Blackmagic Focus Demand, refer to the 'Blackmagic Zoom and Focus Demand' section later in this manual.
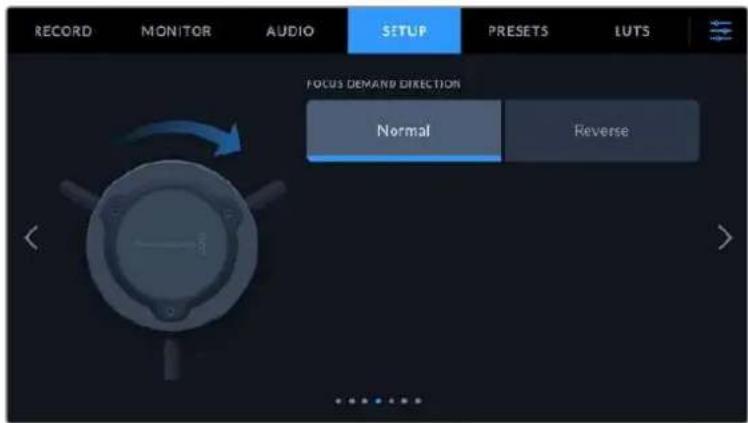
Focus Demand Direction
You can change the direction of the focus wheel on focus demand by selection either 'normal' or 'reverse'.
Normal
Turn the focus wheel clockwise to focus on subjects closer to the lens and counterclockwise for subjects further away.
- Reverse
Turn the focus wheel counterclockwise to focus on subjects closer to the lens and clockwise for subjects further away.
Setup Settings 5 and 3
The fifth page of the 'setup' tab on Blackmagic Pocket Cinema Camera 6K Pro and 6K G2 contains the following settings. These settings are on the third page for Blackmagic Pocket Cinema Camera 4K.
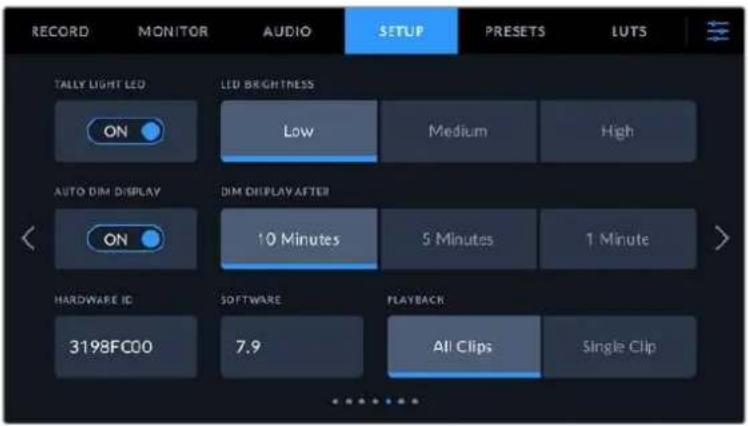
Tally Light LED
Blackmagic Pocket Cinema Cameras have a small LED on the front to indicate the recording status of the camera and the program and preview tally status when connected to a Blackmagic ATEM Mini switcher. If you connect your camera to ATEM Mini to remotely control recording and camera settings, the tally shows when the camera is on air or being previewed. For more information, refer to the 'camera control with ATEM Mini' section.

Recording to storage media in the camera.

Camera is live on air.

Camera is about to go on air.
To enable or disable the tally light indicator, use the 'tally light LED' switch.
LED Brightness
To set the brightness of the tally light LED, tap 'low,' 'medium,' or 'high.'
Auto Dim Display
Blackmagic Pocket Cinema Camera has an option to automatically turn down the brightness of the LCD touchscreen during periods of inactivity to conserve battery power. Select an option for 'dim display after' to set how long to wait before dimming the display. Next time you touch the LCD touchscreen, it will return to its normal brightness level.
Hardware ID
The 'Hardware ID' indicator displays an 8 character identifier for your Blackmagic Pocket Cinema Camera. This is unique to each camera. A longer, 32 character version of this ID is also included in the metadata for Blackmagic RAW and ProRes video. This can be useful for identifying which footage came from a particular camera.
Software
Displays the version number of currently installed software. See the 'Blackmagic Camera Setup Utility' section for more information on updating software.
Playback
This setting allows you to select whether to play back a 'single clip' or 'all clips' on the LCD touchscreen from SD card, CFast card or USB-C flash disk. 'All clips' plays back through all matching media sequentially, and 'single clip' plays one clip at a time. This also applies for the loop function. Selecting loop on 'all clips' plays through all of the clips on the recording media and then loop. Selecting 'single clip' loops one clip at a time.
Setup Settings 6 and 4
The sixth page of the 'setup' tab on Blackmagic Pocket Cinema Camera 6K Pro and 6K G2 contains the Bluetooth settings. These settings are on the fourth page for Blackmagic Pocket Cinema Camera 4K.
Bluetooth®
Bluetooth control lets you control your camera wirelessly from portable devices. Using the 'Blackmagic Camera Control App' you can change settings, adjust metadata and trigger record remotely from an iPad. Enable or disable Bluetooth by tapping the 'Bluetooth' switch icon in the 'setup' menu. When Bluetooth is enabled, the camera can be detected by Bluetooth devices up to 30 feet away. Your camera uses the same set of commands for Bluetooth control as it does for 'Blackmagic SDI Camera Control Protocol', so you can write your own applications to control almost every setting in the camera remotely. For example, monitoring options and audio settings, to the camera's inbuilt DaVinci Resolve color corrector or even lens control.
For more information see the 'Blackmagic Camera Control' document available at www.blackmagicdesign.com/au/developer/
To pair your camera with an iPad for the first time:
1 Enable Bluetooth by tapping the 'Bluetooth' switch icon in the 'setup' menu.
2 Open the 'Blackmagic Camera Control App' and select the camera you would like to pair it with. Available cameras are listed by a camera letter, followed by a unique hardware ID. For example A:A0974BEA.

Select the Blackmagic Pocket Cinema Camera you would like to pair with
When you install the Blackmagic Camera Control App and run it for the first time, you will be asked if you want to 'allow location access.' If you select 'while using the app', GPS readings from your iPad will be included in the metadata of the files you shoot, allowing you to geotag your footage. This information can be viewed in Blackmagic DaVinci Resolve version 15 or higher.
If you do not want to allow the use of this information, select 'never.'
To change settings, go to settings, privacy, location services, camera control on your iPad.
3 When you try to connect for the first time the Blackmagic Camera Control App will request a six digit code to pair with the camera. This code will be displayed on the camera's LCD screen. Type this code into the iPad and press 'pair'.
4 When your camera connects to your iPad, it confirms it is paired.

5 If pairing the camera to your iPad fails, the camera presents an error message.
Try connecting again.
NOTE If you are not using Bluetooth to control your Blackmagic Pocket Cinema
Camera, it is a good idea to turn Bluetooth off for the purpose of security.
Disconnect Current Device
Use this setting to disconnect your Blackmagic Pocket Cinema Camera from the iPad it is currently paired with.
Clear Paired Devices
Use this setting to clear the list of devices that your camera has been paired with.
Controlling Your Camera with the Blackmagic Camera Control App
Once you have successfully paired your camera to your iPad, you can change settings, adjust metadata and trigger record remotely using the iPad app.
Once paired, the Blackmagic Camera Control app will display this screen, allowing you to adjust your settings and start recording
Tap the slate icon in the lower right corner to access and update the slate
Blackmagic Pocket Cinema Camera uses Bluetooth LE to communicate with devices for wireless control. This is the same type of protocol used in portable devices, and uses a minimal amount of battery power.
Setup Settings 7 and 5
The seventh page of the 'setup' tab on Blackmagic Pocket Cinema Camera 6K Pro and 6K G2 contains the following settings. These settings are on the fifth page for Blackmagic Pocket Cinema Camera 4K.
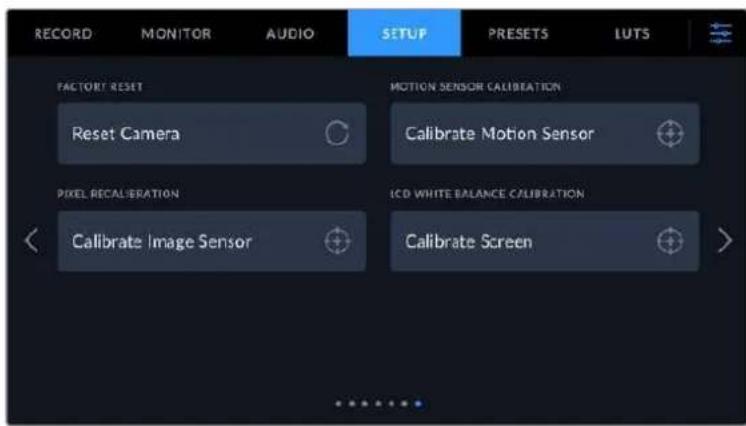
Factory Reset
To reset the camera to its default factory settings, tap the 'reset camera settings' button. On the confirmation page, tap 'reset' to confirm this action. Your camera erases any stored LUTs and resets all settings. It is a good practice to export your presets to a memory card as a backup before performing a factory reset. After a factory reset, you can restore your presets quickly by importing them from the memory card. It is important to note that a factory reset also resets the horizon meter, so you should recalibrate the motion sensor after a factory reset to help ensure its accuracy.
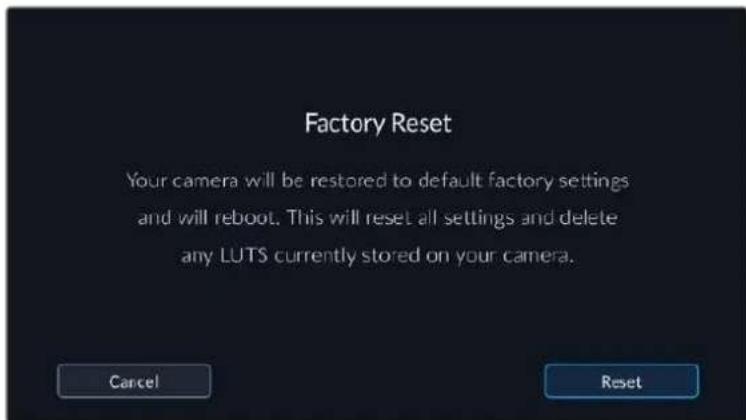
Motion Sensor Calibration
To calibrate the horizon meter tap the 'calibrate motion sensor' button. It is essential that you keep the camera stable during calibration. The process takes approximately five seconds to complete.
The horizon can be set off center if needed. For example, if you want to set the tilt at a consistent angle, calibrate the motion sensor with the camera at the angle you want, then use the horizon meter to maintain the same angle.
Pixel Recalibration
The CMOS sensor used in your Blackmagic Pocket Cinema Camera is made up of millions of pixels that respond to light. Some pixels can change in brightness over time following sensor calibration in the factory. As a result, they become more visible and become what is known commonly as hot pixels. All camera sensors, regardless of manufacturer, will develop hot pixels.
To solve this, we have a calibration feature built into the camera which you can run if you see any hot pixels in the image.
To begin this process, simply put on the lens cap and run the pixel remapping feature by tapping the 'calibrate' button. The process takes approximately one minute to complete.
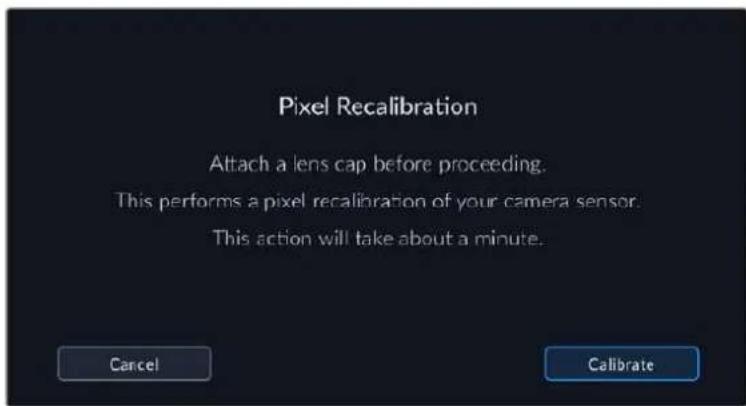
LCD White Balance Calibration
To perform LCD white balance calibration, adjust the 'LCD temperature' and 'LCD tint' controls so that the two reference patches look neutral. After you change the settings, you can use the 'reset' button to return the controls to the factory calibration. The 'restore' button brings back your new settings, which helps you compare the appearance before and after calibration. When the LCD shows an accurate white balance, save your settings.

Presets
The 'presets' tab lets you save and recall up to 12 collections of settings. This is very useful when one camera is used for multiple projects. For example, you may use your camera for a variety of different shoots, from documentaries to music videos, with very different settings between types of projects. Your camera's 'presets' function lets you save the setup for a particular project or type of shoot and come back to it quickly and easily when required. You have 12 preset slots to use.
You can also import and export presets, which is very useful for setting up a multi camera shoot. Simply set up one Blackmagic Pocket Cinema Camera to suit your project, then export that preset for all the other Blackmagic Pocket Cinema Cameras on set.
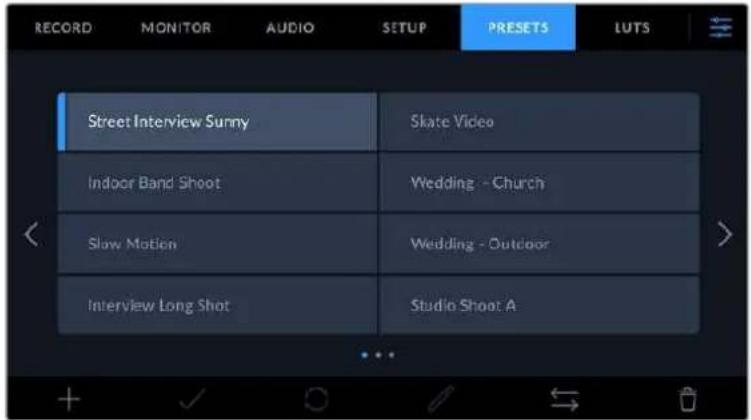
The presets tab allows you to quickly switch between settings that you have saved
NOTE Your camera can save up to 12 presets to its internal memory.
Preset buttons
The button icons along the bottom of the 'preset' menu correspond with the following functions.

Saving and loading presets
To create a new preset, tap the 'add' icon. This brings up a touch keyboard on your LCD where you can name your preset. Enter a name and tap 'update' to save all of your current settings to that preset.
If your camera already has a preset loaded with the same name, you can choose to overwrite the existing preset or keep both.
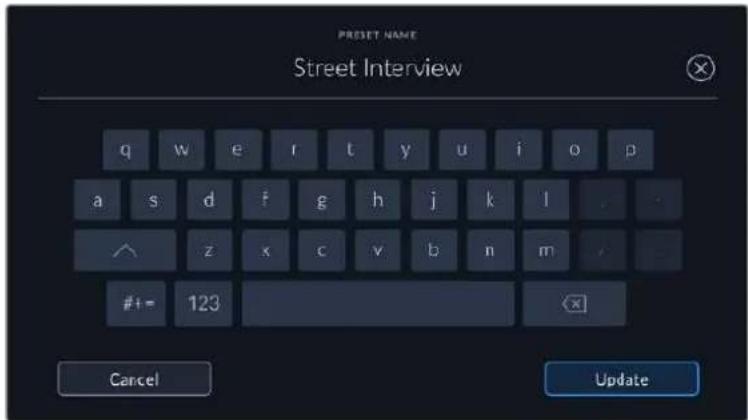
Once you have a preset saved, tap its name in the preset menu to select it. To load a preset, tap the 'load' icon.
You can update a preset by tapping the 'update' icon. This will bring up a prompt asking you if you want to update the preset with your Blackmagic Pocket Cinema Camera's current setting. Tap 'update' to confirm.
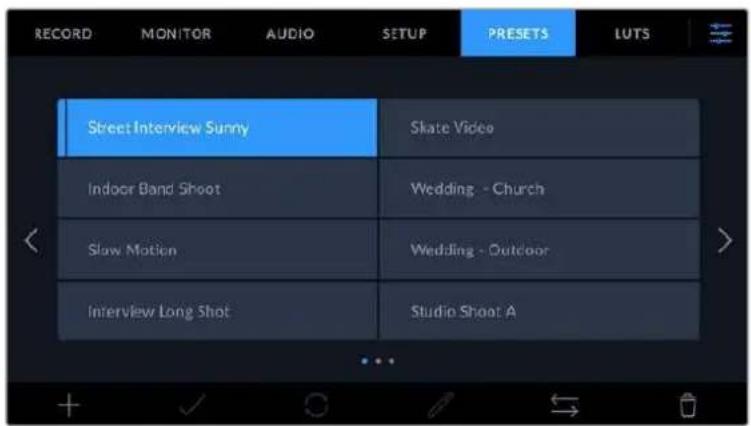
Select a preset and tap the 'load' icon to load it. Selected presets will appear solid blue, while currently loaded presets have a blue line along the bottom of their icon
Importing presets
To import a preset, tap the 'manage' icon at the bottom of the 'presets' menu. Tap 'import presets', then tap 'import' to confirm. This brings up the presets import screen. If your preferred preset is not on the active card or drive, switch between recording media by tapping a media button at the top of the touchscreen. You can import presets from a USB-C flash disk, CFast or SD card.
Your camera searches the root directory and 'Presents' folder on your selected media, and lists available presets. Any presets you have saved elsewhere are not visible.
Tap a preset to select it, then tap 'import' to confirm your selection and copy it to the next available slot on the camera.
If the preset you want to import has the same name as a preset already saved to your camera, you can choose to overwrite the existing preset or keep both. At the top right of this screen, you'll see the number of remaining empty preset slots available on your camera. You are able to import as many presets as you have free slots on your camera.
NOTE If all 12 of your camera's preset slots are full, the import menu is unavailable, and you need to delete an existing preset to make room.
Exporting presets
To export a preset to a card or USB-C flash disk, tap the preset you want to export, then tap the 'manage' button. Tap 'export selected preset', then tap the media where you want to export the preset. If a preset with the same name is already present, choose whether to overwrite the preset or keep both. The camera exports the preset to a 'Presents' folder.
Deleting presets
To delete a preset, select it and tap the 'delete' icon. When you are prompted to confirm your choice, tap 'delete'.
3D LUTs
The 'LUTS' menu lets you import, export and apply 3D LUTs to your camera's outputs.

Introducing 3D LUTs
3D LUTs can be applied to images on your camera's LCD touchscreen and HDMI output. LUTs work by telling your camera what color and luminance output to show for a particular color and luminance input. For example, a LUT may tell your camera to display a vibrant, saturated blue when it receives a relatively dull blue input. This can be useful when shooting Blackmagic RAW footage, or using 'film' dynamic range, both of which have an intentionally undersaturated, 'flat' appearance. By applying a LUT, you can get an idea of what your footage will look like after it has been graded.
It is easy to create 3D LUTs using DaVinci Resolve or other color correction software, and LUTs are available online from a variety of sources. Up to 10 17 point or 33 point 3D LUTs up to 1.5 megabytes each can be stored on the camera. Once loaded, you can choose to display a given LUT on your camera's LCD touchscreen and HDMI output.
Your Blackmagic Pocket Cinema Camera supports 33 point 3D LUTs in .cube format created in DaVinci Resolve and 17 point 3D LUTs converted to Resolve .cube format via LUT conversion programs. Your camera processes 3D LUTs using high quality tetrahedral interpolation.
For more information on displaying LUTs, see the 'monitor settings' section in this manual.
NOTE Your Blackmagic Pocket Cinema Camera does not apply, or 'bake in,' LUTs by default to recorded footage, however you can choose to 'bake in' the LUT to your footage.
This can be a useful option for situations where you do not have the time to grade your footage in post-production, or where you need to give the footage directly to a client or an editor.
When you are using LUTs as a preview tool on set, the information on the LUT applied is saved as metadata with your recordings. DaVinci Resolve can display this information in the 'LUT used' field in the metadata tab, which can be helpful for colorists to verify the name of the LUT that was used on set.
Built-in LUTs
A number of built in LUTs are provided that allow you to preview different looks when shooting in 'film' dynamic range or Blackmagic RAW.
Each camera provides LUTs that are specific to Gen 5 color science:
- Gen 5 Film to Extended Video
Displays a wider dynamic range than the 'film to video' LUT, and applies a mild contrast change with a smooth roll off in the highlights.
Gen 5 Film to Rec 2020 Hybrid Log Gamma
Displays a gamma curve that is suitable for HDR screens and compatible with standard dynamic range screens.
Gen 5 Film to Rec 2020 PQ Gamma
Displays a gamma curve that is based on what we can perceive with our eyes, for efficient encoding of HDR images.
- Gen 5 Film to Video
Similar to the REC 709 color standard for high definition video, and has a high level of contrast and saturation. You may find this setting useful when using Blackmagic Pocket Cinema Camera alongside other broadcast cameras using the REC 709 color space.
LUTs buttons
The button icons along the bottom of your camera's 'LUTS' screen correspond to the following functions:

Load Manage Delete
Importing LUTs
To import a 3D LUT, tap the 'manage' icon at the bottom of the 'LUTs' menu. Tap 'import LUT', then tap 'import' to confirm. This brings up the LUT import screen. If your preferred 3D LUT is not on the active card or drive, switch between recording media by tapping a media button at the top of the touchscreen. You can import LUTs from a USB-C flash disk, CFast or SD card.
Your camera searches the root directory and '3DLUTs' folder on your selected media, and lists available LUTs. Any LUTs you have saved elsewhere are not visible.
Tap a LUT to select it, then tap 'import' to confirm your selection and copy it to the next available slot on the camera.
It's worth noting that if you want to import a new LUT but all 10 3D LUT slots are full, you need to delete an existing LUT to make space.
If the LUT you want to import has the same name as a LUT already saved to your camera, you can choose to overwrite the existing LUT or keep both. At the top right of this screen, you'll see the number of remaining empty LUT slots available on your camera. You are able to import as many LUTs as you have free slots on your camera.
NOTE If you have trouble importing a LUT, it may be the wrong size. You can use a LUT editor like Lattice to check its size, or open it in any text editor on your computer. Next to the tag 'LUT_3D_SIZE' is a number indicating the LUT's size. If this value is not 17 or 33, you can use Lattice to resize your 3D LUT to 17 points.
Applying a LUT
Once you have a LUT saved onto your camera, tap it in the LUT menu to select it, and tap the 'load' icon. This enables the LUT for all outputs on your camera. To display the loaded LUT on your camera outputs, switch on 'display LUT' in the monitor menu. See the 'monitor settings' section for more information.
Exporting LUTs
To export a LUT to a card or USB-C flash disk, tap the LUT you want to export, then tap the 'manage' button. Tap 'export selected LUT', then tap the media where you want to export the LUT. If a LUT with the same name is already present, choose whether to overwrite the LUT or keep both. The camera exports the LUT to a '3DLUTs' folder.
Deleting LUTs
To delete LUTs you are no longer using or make room for more, select the LUTs you want to delete and tap the delete icon. When you are prompted to confirm your choice, tap 'delete'.
Embedded 3D LUTs
When a 3D LUT is used while shooting Blackmagic RAW on Blackmagic Pocket Cinema Camera, the selected LUT will be embedded into the Blackmagic RAW file that you are recording. The 3D LUT is actually saved with your recorded files in the header of the .draw file, and can easily be applied to footage in post production without needing to handle a separate file.
So when Blackmagic RAW files are delivered to an editor or colorist, they will be able to easily access the LUT that was used while filming, which greatly reduces the possibility that the wrong 3D LUT could be applied to a clip. They can then choose whether to apply the 3D LUT when editing or color grading the footage, and can disable the 3D LUT at any time.
When the 'apply LUT in file' switch is set to 'on' in the record menu, the recorded clip will open in Blackmagic RAW Player and DaVinci Resolve with the chosen 3D LUT already applied to it.
The 3D LUT can then be easily toggled 'on' or 'off' but will always travel with the Blackmagic RAW file as it is written into the clip itself. DaVinci Resolve also has an 'Apply LUT' switch in the RAW settings palette for enabling or disabling the 3D LUT in the Blackmagic RAW file.
The 'Apply LUT' setting in DaVinci Resolve is the same setting as in the camera. This means that when shooting you can direct the colorist to use the LUT by setting it in the camera, but they can switch it off easily in DaVinci Resolve by setting 'Apply LUT' to 'off'.
Entering Metadata
Metadata is information saved inside your clip, such as take numbers, camera settings and other identifying details. This is extremely useful when sorting and processing footage in post production. For example, take, shot and scene numbers are essential organisational tools, while lens information can be used to automatically remove distortion or better match VFX assets to plates.
Your Blackmagic Pocket Cinema Camera automatically saves some metadata to each clip, such as camera settings, timecode, date and time. You can use your camera's slate to add many additional details.
Slate
Swipe left or right on your camera's touchscreen from the main view to bring up the slate.
The slate is divided into 'clip' and 'project' tabs. The 'clip' tab contains information that may vary clip by clip, while 'project' is where you enter details common between clips, such as the project name, director, and camera and operator ID.
TIP Metadata entered into the slate is viewable on the HDMI output when 'display status text for' is set to 'director' on the 'monitor' tab. See the 'monitor settings' section in this manual for more information.
'Clip' metadata
Making changes to clip metadata works differently in standby mode to playback mode. In standby mode, when your camera is ready to record, clip metadata gets saved to the next clip recorded, except the 'good take last clip' button applies a 'good take' tag to the most recently recorded clip. In playback mode, when you are reviewing footage already shot, the 'good take' button is shown and clip metadata is always attached to the current clip being viewed.
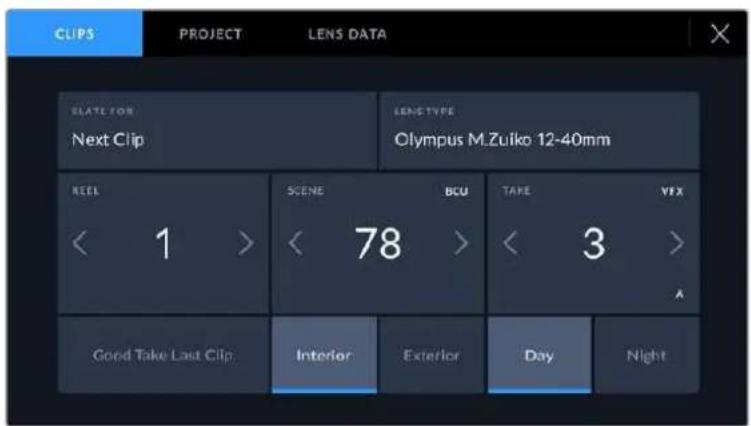
When the camera is in playback mode, 'slate for' identifies the clip the slate applies to and shows the 'good take' button. In standby mode, the slate is for 'next clip' and shows the 'good take last clip' button.
Slate for
This setting shows the clip which the metadata currently displayed in the 'clip' applies to. In playback mode it applies to the current clip, and in standby mode it refers to the next clip you record.
Lens Data
If you are using a lens with in built electronics that communicate with your camera, you can see the lens model information here. To change or add any information regarding the lens you are using, press the 'lens data' option above.
For more information refer to the 'lens data metadata' section in this manual.
Reel
Displays the current reel.
Your Blackmagic Pocket Cinema Camera automatically increments reel numbers, so there is usually no need to enter this manually. When you are moving to a new project and want to start from reel '1' again go into the project tab of the slate and tap 'reset project data'.
Scene
The 'scene' indicator shows the current scene number, and can also show the current shot number and type.
The number on this indicator always refers to the current scene. You can adjust it with the left and right arrows on either side of the scene number, or tap the scene number to enter the scene number editor.
Scene numbers range from 1 to 9999.
By adding a letter to the scene number in the scene number editor, you can also indicate the current shot. For example 23A indicates scene twenty three, shot one. If you have a shot letter added to your scene number, your camera suggests the next scene number and shot letter whenever you enter the scene number editor. For example, if your current scene number is 7B, the camera suggests '8' and '7C'.
The scene number indicator can also show information about the current shot type in the top right corner. You can select these in the scene number editor at the right hand side of the shot keyboard.
The shot types available are:
| WS wide shot |
| MS medium shot |
| MCU medium close up |
| CU close up |
| BCU big close up |
| ECU extreme close up |

When entering 'scene' metadata, the camera prompts you with scene number suggestions to the left of the touch keyboard, and shot types to the right.
Take
The 'take' indicator shows the take number for the current shot. You can adjust it by tapping the left or right arrows on either side of the take number, or tapping the indicator to enter the take number editor.
TIP When the shot number or scene letter advance the take number reverts to '1.'
You can add descriptions in the take number editor. These are on the right of the take number keyboard and correspond to the following scenarios:
P/U
'Pick up.' This refers to a reshoot of a previous take to add additional material after principal photography has wrapped.
VFX 'Visual effects.' This refers to a take or shot for visual effect use.
SER
'Series.' This refers to a situation in which multiple takes are shot while the camera is kept running.
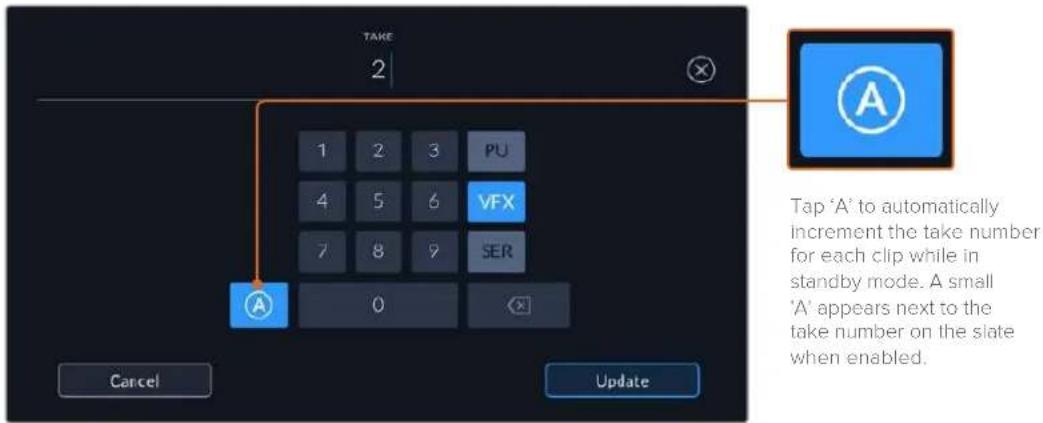
When entering 'take' metadata, your Blackmagic Pocket Cinema Camera will offer prompts for additional shot types to the right of the touch keyboard
Good take
Tap the 'good take' indicator to tag good takes for easy recall in post production. This button applies the 'good take' tag to the clip currently being viewed in playback mode. If the camera is in standby mode and ready to record, the 'good take last clip' button applies a 'good take' tag to the last clip recorded.
Interior / Exterior
Tap 'interior' or 'exterior' to add a interior or exterior tag to the next clip in standby mode, or the current clip in playback mode.
Day/Night
Tap the 'day' or 'night' icons to add a day or night tag to the next clip in standby mode, or the current clip in playback mode.
'Project' metadata
Project metadata behaves the same way whether you are in standby or playback mode. This metadata always refers to your project as a whole and is independent of clip numbers.

Enter project details using your camera's 'project' slate tab
Project name
Displays your current project name. Tap the pencil icon to change the project name.
Camera
Displays a single letter camera index. Tap the pencil icon to change the camera index.
Director
Displays the director's name for the current project. Tap the pencil icon to change the director name.
Camera Operator
Displays the camera operator. Tap the pencil icon to change the camera operator name.
Reset Project Data
To clear all the project information, tap the 'reset data' button.
'Lens Data' metadata
These settings display information about the current lens fitted to your camera. Many electronic lenses automatically supply information such as the lens model, aperture and focal length. If you are using a lens that does not provide this information, or you want to enter additional data, you can tap the pencil icon in this setting to enter the information manually. This will bring up the 'lens data' menu, which contains the following information:
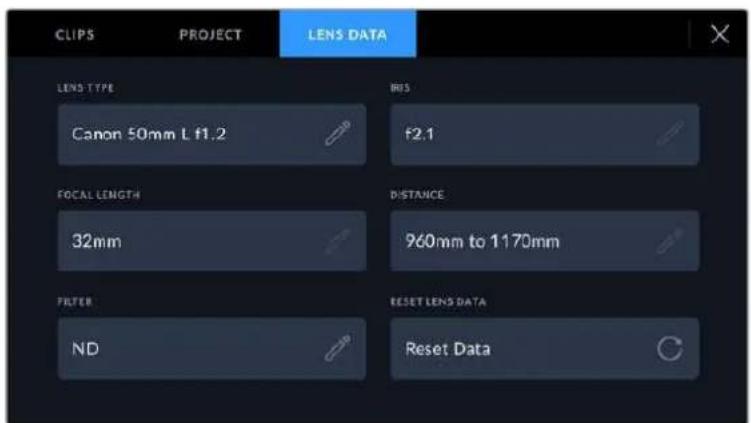
The 'lens data' menu showing information automatically populated from an attached lens, and filter information that has been manually entered
Lens Type
Shows the lens model. If your lens type is not automatically shown here, you can tap this setting to enter the data manually. Your camera has an internal database stored for many commonly used lenses, so if you need to enter data manually, your camera will suggest names automatically as you type. This makes entering data much faster.
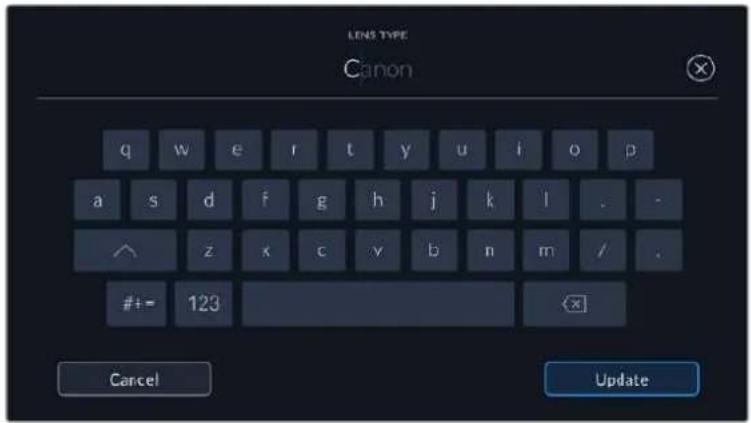
Use the touch keyboard to enter lens data if it is not provided automatically.
Iris
Shows the iris aperture setting at the start of your clip. This information can be displayed in f- or T-stops depending on the lens used, if supplied automatically. Tap this setting to enter data manually.
Focal length
Shows the focal length setting of the lens at the start of the recorded clip. When automatically supplied, this is shown in millimeters. Tap this setting to enter the focal length manually.
Distance
Shows the focus distance settings of the lens for the recorded clip. Some lenses can provide this data automatically and it will be provided in millimeters. You can also enter this data manually.
Filter
Shows the current lens filters used. Tap this setting to enter data manually. You can make multiple entries separated by commas.
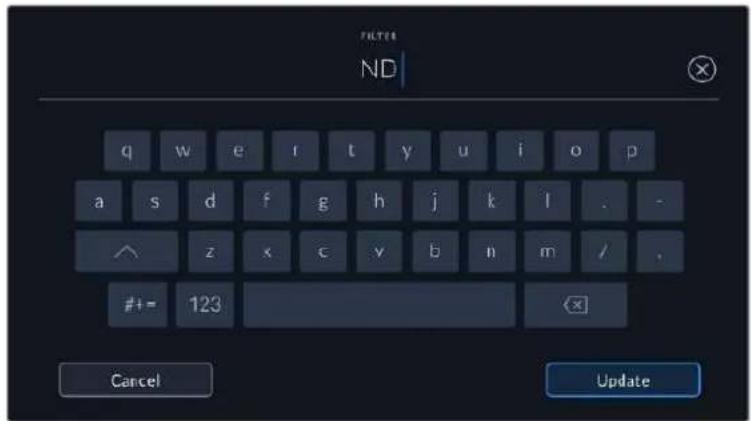
Filter information needs to be entered manually
You can clear lens data at any time by tapping the 'reset lens data' icon in the 'lens data' menu. You will be prompted to confirm your choice. If you confirm, all lens data will be cleared and repopulated with any lens data automatically provided by the currently fitted lens. If you have manually entered any information into these fields, you will need to reset the lens data the next time you mount a lens, otherwise the manually entered value will remain.
Camera Video Output
HD Monitoring Output
The camera's full size HDMI connector outputs 1080p HD video so you can easily connect to monitors or even consumer television sets to preview your images. This 10-bit output also supports HDR and on screen overlays showing full camera status, making it perfect for on set monitoring.
HDMI monitoring can be helpful when accessing the LCD is impractical, such as when the camera is secured high on a jib arm, on a crane, or mounted on a vehicle. Monitoring information is displayed on your HDMI output by adjusting the HDMI overlays options in the display settings menu. HDMI overlays provide frame guides and information such as recording details and camera settings. If you simply want to monitor your shots, you can always turn overlays off for a clean HDMI output.
By using a converter like the Blackmagic Micro Converter HDMI to SDI, you can convert the signal to SDI, allowing you to connect to SDI monitors, capture devices, broadcast switchers and other SDI devices. You can even power the Blackmagic Micro Converter HDMI to SDI via your Blackmagic Pocket Cinema Camera's USB port.
Blackmagic Zoom and Focus Demands

Blackmagic Zoom Demand and Blackmagic Focus Demand are optional accessories for controlling focus and zoom when using compatible servo EF lenses on the Blackmagic Pocket Cinema Camera 6K Pro and 6K G2.
Each unit attaches to a tripod handle on your tripod or camera pedestal. This lets you control focus and zoom while simultaneously panning and tilting the camera using both hands. Additional buttons and controls let you refine the speed and sensitivity of the zoom control, set auto white balance, toggle frame guides and more.
Connecting and Attaching to your Camera
Attaching to Tripod Handles
Each unit attaches to a tripod handle via their mounting brackets. Attach each unit to the brackets via their rosette mounts:
To attach the demand units to their brackets, simply connect them together via their rosette mounts and secure them by tightening the fastening knob.

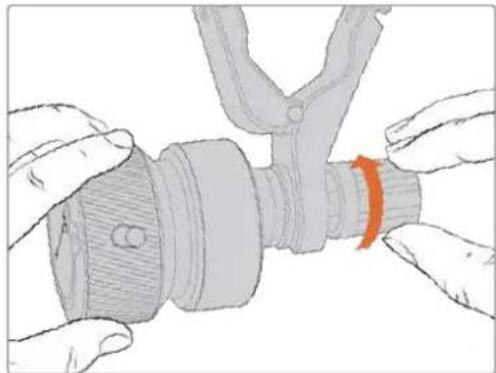
1 Place the zoom demand or focus demand against their bracket's rosette mount.
2 Tighten their fastening knob so the demand units are firmly attached to their brackets.
Now that the units are attached to the brackets, you can attach the brackets to the tripod arms. One end of each bracket contains a 'T' shaped latch that hinges into a slot and is then tightened.
1 Loosen the latch by unscrewing the latch knob in a counterclockwise motion. This will release the 'T' shaped latch.
2 With the latch open, place the bracket onto the tripod arm and clamp the bracket shut by closing the latch into its fastening slot. Rotate the bracket to your preferred position on the tripod arm.
3 Tighten the latch knob to secure the bracket to the tripod arm.
Connecting to Your Camera
Blackmagic Focus and Zoom Demands have two USB-C ports. This lets you use one unit individually, or both units together.
Each unit is supplied with a 1 meter long USB-C cable which is connected directly from your camera's side USB-C port to the demand unit's 'cam' port.
If you are using both demand units, daisy chain them together by connecting the first unit to the second unit via USB-C.

Daisy chaining allows for both units to be controlled using the side USB-C port on your camera. For example, connect a USB-C cable into your camera's side USB-C port and connect the other end of the cable into the focus demand's 'cam' port. With a second cable, plug the focus demand's 'loop' port into the zoom demand's 'cam' port.

The Blackmagic Focus and Zoom Demands let you control focus and zoom without moving your hands away from the handles
Using Blackmagic Focus Demand
1 Control Knob
Rotate the focus wheel clockwise to focus on subjects closer to the lens, or counterclockwise to focus on subjects further away. You can change the focus direction in the menu by setting it to either 'normal' or 'reverse'.
TIP If you are also using a Blackmagic Zoom Demand, press the quick zoom button to magnify the image as you focus using the focus demand.
2 Control Prongs
These three prongs expand the diameter of the control surface to let you make finer focus adjustments with the tip of a finger.
3 USB ports
Allows for connecting the focus demand to the camera and daisy chaining to the zoom demand. The 'cam' port is also used for updating the internal software via the Blackmagic Camera Setup utility.
Using Blackmagic Zoom Demand
The controls on the Zoom Demand are mappable through the Camera settings. To change the button functions, refer to the 'setup settings' chapter in the 'settings' section.
The following commands are set as default:
1 Zoom F1
This is the zoom function button 1. By default, it is mapped as a 'record' button.
2 Zoom F2
This is the zoom function button 2. On the other side of the controller is an identical button that performs the same function, allowing for left and right handed control. By default, it is set as a quick zoom function which instantaneously punches into the live image.
NOTE The quick zoom feature is only visible on the Blackmagic Pocket Cinema Camera 6K Pro and 6K G2's LCD and will not be visible on the output video connected to a switcher or recorder.
3 Zoom F3
This is the zoom function button 3. The default action for this button is set to 'Auto White Balance'.
4 Zoom F4
This is the zoom function button 4. The default action for this button is set to 'Frame Guides'.
5 Thumb Rocker
The zoom demand handle provides a thumb rocker control. Push the thumb rocker left to zoom out, and right to zoom in. The direction of the zoom can be reversed using the camera's menu settings.
6 Speed Dial
Finely adjust the speed of the zoom by adjusting the speed dial at the top of the unit. You can map this dial to also control the headphone level, iris adjustment and even focus adjustment!
7 USB-C Ports
Allows for connecting the zoom demand to the camera and daisy chaining to the focus demand. The 'cam' port is also used for updating the internal software via the Blackmagic Camera Setup utility.
Using DaVinci Resolve
Shooting with your Blackmagic Pocket Cinema Camera is only part of the process of creating film and television content, and just as important is the process of media backup and management as well as editing, color correction and encoding final master files. Your Blackmagic Pocket Cinema Camera includes a version of DaVinci Resolve for Mac and Windows so you have a complete solution for shooting and post production!

NOTE We recommend using the latest version of DaVinci Resolve for accurate color treatment of clips shot using Pocket Cinema Camera. Version 17 or later will provide accurate color for all Blackmagic cameras and the latest Blackmagic RAW features.
After connecting your CFast, SD card or SSD to your computer, you can use DaVinci Resolve's 'clone' tool, in the 'media' page, to create running backups as you shoot. This is recommended as any type of media is susceptible to becoming damaged or developing a fault so creating backups means your shots will be immune to loss. Once you have used DaVinci Resolve to backup your media, you can then add your clips to the DaVinci media pool, then edit, color correct, and finish your production without ever having to leave DaVinci Resolve.
DaVinci Resolve is the same tool used on most major blockbuster movies, so it's much more than a simple NLE software tool, as it has extremely advanced technology built in for high end digital film. You get the advantage of this technology when you use DaVinci Resolve to edit and color correct your work.
Included here is information on how to get started using DaVinci Resolve with your camera files. Of course, DaVinci Resolve is extremely advanced and includes a lot more features than you immediately see when first looking at its user interface. To learn more about how to use DaVinci Resolve, please check for the DaVinci Resolve instruction manual on the Blackmagic website, where you can also find many training courses and tutorial videos.
Project Manager
Before you import your clips and start editing, you will need to set up your project using the project manager.
The project manager is the first screen you will see when launching DaVinci Resolve, but you can open the manager at any time by clicking on the 'home' icon at the bottom right of the user interface. This is helpful when you want to open previous projects and create new ones.
To create a new project, click on 'new project' at the bottom of the window and give your project a name. Click 'create'.
Using the 'cut' page, you can start working on your edit immediately.
The project manager shows all projects belonging to the current user
For more information about the Project Manager, refer to the DaVinci Resolve manual which is available to download on the Blackmagic Design website support page.
Editing with the Cut Page
The 'cut' page gives you a fast, dynamic editing workflow that lets you quickly assemble, trim and edit clips efficiently.
Two active timelines let you work with your entire edit plus a detailed area simultaneously. This means you can drop clips anywhere on a large timeline, then refine your edit in a detailed timeline within the same workspace. Using this workflow, you can edit on a laptop without needing to zoom in and out and scroll as you work, which can be an enormous time saver.
The Cut Page Layout
When you open the cut page, you will see the media pool, viewer window and timeline. These three primary windows give you complete control over your edit.
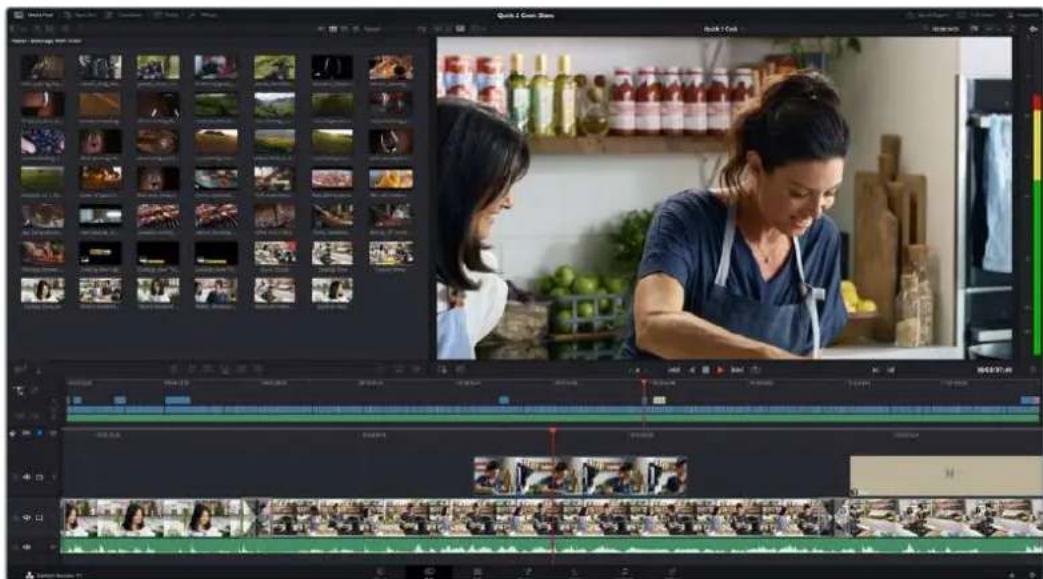
The Cut page default workspace, with the Media Pool in icon view
For more information on the Cut page, see the 'The Cut Page' chapter in the DaVinci Resolve manual.
Media Tabs
At the top left corner of the user interface you will see five tabs.
Click on these tabs to open the media toolsets you will use when creating your edit. For example, the first tab is the media pool and you can see it is already selected. The other tabs are for the sync bin, media transitions, titles and effects.

Media Pool: The media pool contains all your clips, folders and files you imported using the media page. You can also import files directly from the cut page, so you don't have to go back to the media page if you want to import a new clip.
- Sync Bin: This powerful feature automatically syncs all your clips via timecode, date and time so you can choose angles from all cameras on a multi camera project.
- Transitions: If you click on the neighboring transitions tab, you will see all the video and audio transitions you can use in your edit. These include common transitions such as cross dissolves and motion wipes.
- Titles: Next to transitions is the 'titles' tab. Here you can select the title type you want to use. For example a scroll, standard text or lower thirds title. There are also a list of Fusion templates you can use for more animated dynamic titles which can be customized in DaVinci Resolve's 'Fusion' page.
- Effects: The fifth tab is the 'effects' tab. This provides all the different filters and effects you can use to bring more life to your edit, for example customizable blurs, glows and lens effects. There are many powerful effects to choose from and you can find them quickly using the search tool.
TIP Use the search tool near the media tab icons to find the exact items you are looking for. For example, if you have the transitions tab selected, type "dissolve" in the search tool and only dissolve transition types will be shown in the viewer, making it quicker for you to find the dissolve transition you want.
Viewer Tabs
In the top left corner of the viewer window you will see the viewer mode buttons.
The viewer mode buttons
These buttons control which viewer is currently being used, including 'source clip', 'source tape', and 'timeline'. These viewer modes give you an enormous amount of control when selecting clips for your edit and it's worth spending a moment to look at how they work.
| Source Clip The source clip viewer displays a single clip from the media pool and you can set in and out points along the entire length of the viewer timeline. This gives you greater control. Select a source clip to view by double clicking on a clip in the media pool, or dragging it into the viewer. | |
| Source Tape Source tape lets you view all the source clips in the media pool. This powerful feature is helpful if you want to quickly search through all your clips to find a specific event. As you scrub the playhead over the clips, you will see their thumbnails selected in the media pool. This means once you have found the clip you want to edit, you can click on the source clip tab and its corresponding source clip will appear in the viewer automatically. The source tape viewer really lets you take advantage of non-linear editing, giving you the freedom to work on your edit, find shots quickly, try new ideas and stay in the moment. | |
| Timeline The timeline viewer lets you view the edit timeline so you can play back your project and refine your edits. |
Importing Clips to the Media Pool
Now you can start importing media into your project. You can do this in the media pool window of the cut page using the import tools at the top.
Select one of the import options to add media to your project
| Import Media The import media option will import individual media files selected from your storage location. | |
| Import Media Folder To import a folder from your media storage, select the import folder option. When importing a folder, DaVinci Resolve will keep the file structure, treating each folder as a separate bin so you can navigate between bins to find your videos and other media files. |
To import media:
1 Click on the 'import media' or 'import media folder' icon.
2 Navigate to your media storage for the media you want to import.
3 Select the file or folder and click 'open'.
Once you've added media to your project, it is a good time to save your changes. DaVinci Resolve features a fast, on the go autosave called 'live save'. Once you save you project once, 'live save' will save further changes as you make them, removing the risk of losing your work.
For more information on 'live save' and other auto save functions, refer to the DaVinci Resolve Manual.
Adding Clips to the Timeline
Now that you are familiar with the media tabs and viewer mode buttons, you can open the media pool and quickly start adding clips to your timeline.

The timeline of the cut page, comprising the upper timeline and the zoomed in timeline below
The timeline is where you will build your edit and is like a board with tracks you can attach clips to, move them around and trim their edits. Tracks let you layer clips over others which gives you more flexibility to try different edits and build transitions and effects. For example, you can try an edit with a clip on one track without affecting other clips on tracks below it.
There are different ways to add clips to the timeline, such as smart insert, append, place on top and more.
Appending Clips
When selecting takes and assembling an edit, you will likely want to add these shots to your timeline one after the other. The append tool is perfect for this task and will get you editing very fast.
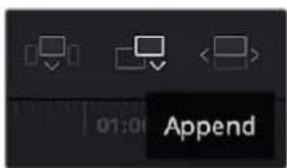
Click on the append icon to quickly add clips to the end of the last clip
To append a clip:
1 Double click on a clip in the media pool to open it in the viewer.
Using the scratch trim tool, drag the in and out points to select the precise duration of your shot. You can also press the 'i' and 'o' keyboard shortcuts to set in and out points.
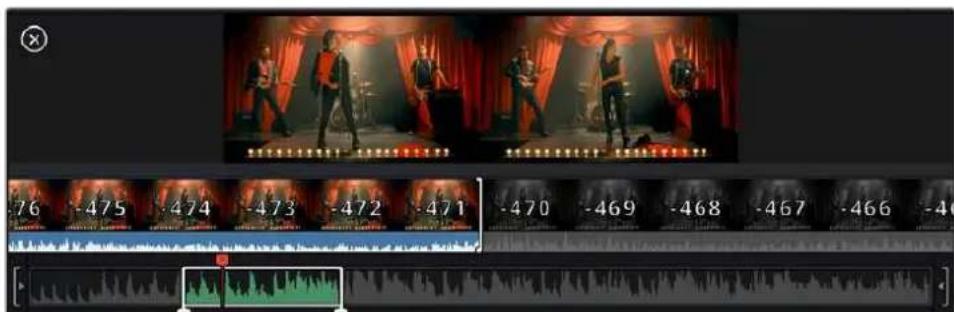
3 Now click the 'append' icon underneath the media pool.
Your first clip will be placed at the head of the timeline.
Repeat steps 1 to 3 to keep adding more clips and they will automatically append, ensuring there are no gaps in the timeline.
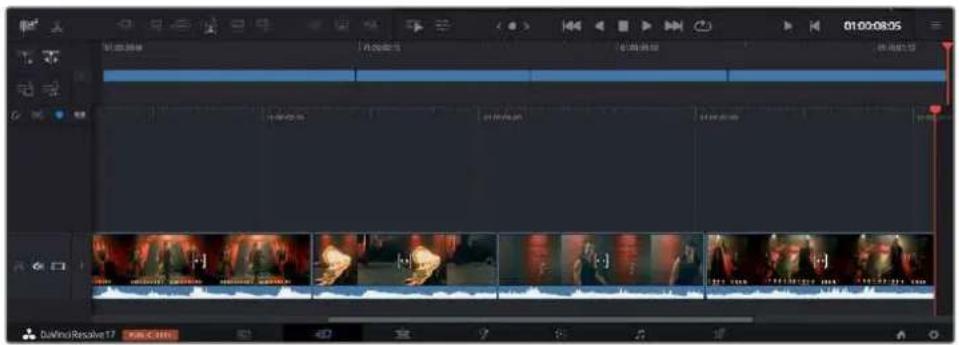
Appending clips ensures there are no gaps between them on the timeline.
TIP You can speed up the process further by assigning a keyboard shortcut to the 'append' icon. For example, if you assign the 'P' key, you can set your in and out points using 'I' and 'O' then press 'P' to append the clip. Refer to the DaVinci Resolve manual for information on how to assign shortcut keys.
Trimming Clips on the Timeline
With clips added to the timeline, you have complete control to move them around and trim edits.
To trim an edit, hover the mouse over the start or end of a clip, then click and drag it left or right. For example, drag the end of the clip left or right to decrease or increase its duration. You might notice that all clips after that edit will shift on the timeline to accommodate the new adjustment. This is one way the 'cut' page helps to save you time.
You can even pick the clip up and drop it on a new video track in the large timeline without having to zoom in or out. This speeds up the edit process because it minimizes time navigating a long timeline.
Audio Trim View
Audio trim view helps you make accurate audio edits by expanding the audio waveform in the timeline. This is useful if you're editing a dialogue scene or a music clip and makes it easy to find an edit point between words or beats.
To use Audio Trim view:
1 Click the audio trim icon between the snapping and marker tools to the left of the timeline.
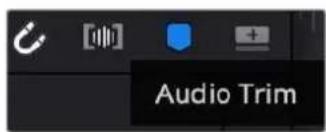
The Audio Trim view button
2 Now when you trim an edit you will see an expanded waveform in the timeline. When you finish trimming, the clips in the timeline will return to their normal size.

Audio trim view expands the audio waveform in the timeline.
After you have finished editing clips using the 'cut' page, you might want to add a title. The next section will show you how.
Adding Titles
Placing a title on your timeline is easy and you have many options.
To see the different types of titles you can use, click on the 'titles' media tab at the top left corner of the user interface. In the selection window you will see all the different title generators you can use displayed as thumbnails, from lower thirds, scrolls, to a standard text title. You can even add any of the Fusion titles which are animated titles that you can customize.
Previewing Titles
Before you add a title to your timeline you can preview it from the 'titles' selection window. This lets you quickly scan through all the available options before making a choice.
To preview a title:
1 Click the option menu to the top right-hand side of the titles panel and check 'hover scrub preview'.
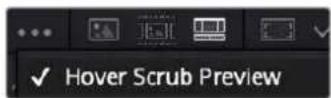
Enable Hover Scrub Preview from the option menu.
In the 'titles' selection window, hover your mouse pointer over a thumbnail to preview a title in the viewer. If you are previewing an animated or Fusion title move the pointer across the title's thumbnail from left to right to see the animation.

Hover over a title's thumbnail to preview it in the viewer.
Once you've chosen a title you can add it to your timeline.
To add a standard title:
1 Click on the title and drag it onto the timeline. It doesn't matter which timeline, but for greater accuracy we recommend using the detailed timeline. The title will automatically create a new video track for the title and will snap to the playhead.
2 Release the mouse and the title will appear on the new track. You can now move it or change its duration like you would another video clip.
3 To edit the title, click on the new title clip and then click the tools icon underneath the clip viewer.
You will now see a row of tools you can use to modify the title clip. For example, transform, crop, dynamic zoom and more.
4 Now click the inspector tab.
This will open the inspector window where you can type in the title you want and edit the text settings, for example tracking, line spacing, font type, color and more.
You have a lot of options to customize the title exactly how you want it. We recommend playing with all the different settings to see how they can change the appearance and shape of your title.
TIP You can also use the hover scrub function to preview effects, transitions, generators and filters on the 'cut' and 'edit' pages.
Working with Blackmagic RAW Files
Blackmagic RAW clips give you maximum flexibility in post production. This lets you make adjustments to clips, such as white balance and ISO settings, as if you were changing the original camera settings. Working with Blackmagic RAW also retains more tonal information within shadows and highlights, which is useful for recovering details, for example in blown out skies and dark areas of the picture.
It's worth shooting in Blackmagic RAW if you are after the highest possible quality, or for shots where there is an extreme variance between highlights and shadows and you may need to push and pull those regions as much as possible in the grade.
The speed and small file size of Blackmagic RAW means you don't need to make proxy files and playback is just like a standard video clip. This section of the manual describes the features of Blackmagic RAW and how to use Blackmagic RAW files in your DaVinci Resolve workflow.
TIP It is a good practice to adjust the Blackmagic RAW settings for your clips on the 'color' page before you start color grading.
Clip Settings for Blackmagic RAW
When you first import Blackmagic RAW files, DaVinci Resolve will decode the camera data contained in the files using the ISO, white balance and tint settings used at the time of shooting. If you're happy with the look of these settings, you can start editing right away.
The great thing about shooting Blackmagic RAW is that you're not tied to these settings at all! The breadth of available post processing options when working with Blackmagic RAW files mean that you'll develop your own workflow over time. Experimenting with the 'clip' settings for each clip in the 'camera raw' tab will show you just how powerful and flexible working with Blackmagic RAW can be.
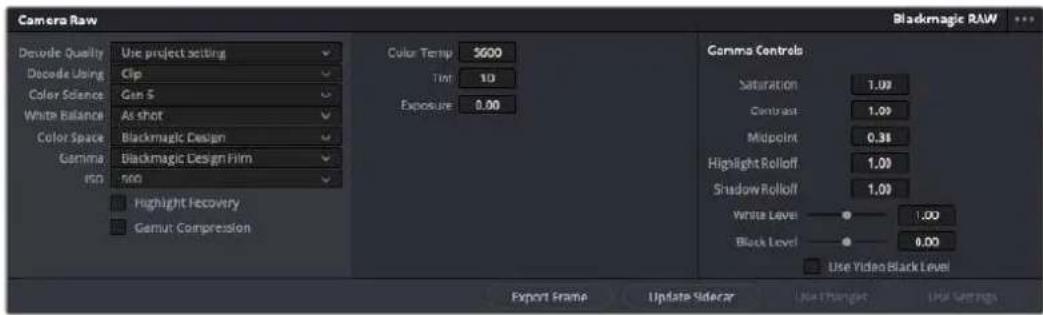
In the 'camera raw' tab, select 'clip' from the 'decode using' menu to make adjustments to your clip's Blackmagic RAW settings
Changing Blackmagic RAW Settings
Once you have set DaVinci Resolve to enable clip settings for Blackmagic RAW, the clip settings and gamma controls are now adjustable. Adjusting these settings to optimize your clips can bring them close to a full primaries grade. This is especially powerful when using DaVinci Resolve's scopes which can help you neutralize and balance the clips ready for applying a look.
The following information contains descriptions for the clip and gamma controls.
ISO
The ISO value can be changed by increasing or decreasing this setting. This setting is helpful if you need to set the clip to a brighter or darker starting point for optimization.
Highlight Recovery
Check the box to reconstruct highlight information in clipped channels using information from non-clipped channels.
Gamut Compression
Check the box to automatically maintain safe Gamut levels.
Color Temp
Adjust the color temperature to warm or cool the image. This can be used to help neutralize the color balance in each image.
Tint
Adjusting this setting will add green or magenta into the image to help balance the color.
Exposure
Use this setting to refine the overall brightness of the image.
Saturation
Saturation controls default at 1 and range from 0 for the minimum saturation to 4 for maximum saturation.
Contrast
Defaulting at 1.0, drag the slider to the left for the least amount of contrast at 0 or to the right to increase the contrast up to 2.
Midpoint
In Blackmagic Design Film, your middle gray value defaults to 0.38, or 38.4% . Drag the slider to the left to lower your midpoint or to the right to raise it to 100. When contrast is adjusted away from the default setting, you can modify your highlight and shadow rolloff.
Highlight Rolloff
Adjust the highlights by dragging the slider to the left to lower the value to 0, or to the right to increase the highlights to 2. The default value is 1.
Shadow Rolloff
Drag the slider to the left to lower your shadows to 0 or to the right to raise your shadows to 2.
White Level
Adjust the white point of the gamma curve by dragging the slider from the highest value of 2 to the lowest value of 0. The default value is 1.
Black Level
Raise the black point of the custom gamma curve by dragging the slider to the right from the lowest value of -1 to a maximum of 1. The default value is 0.
Use Video Black Level
Check the box to set your black levels to video.
Export Frame
Clicking the 'export frame' button lets you export a single frame from your Blackmagic RAW clip.
Update Sidecar
Click this button to update the Blackmagic RAW sidecar file for the current clip.
Any changes you have made to your Blackmagic RAW clips will be identified by the gamma setting changing to Blackmagic Design Custom.
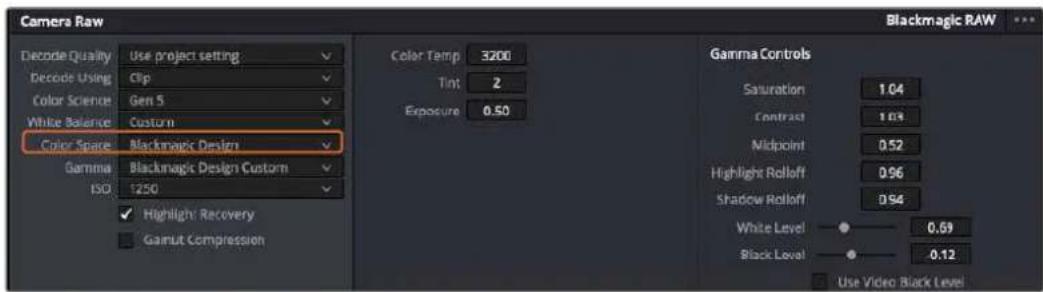
If you want to revert your clip to one of the default gamma options available, simply select it from the gamma dropdown menu.
TIP Gamma controls are disabled for footage shot with the 'video' dynamic range, but you have not lost your Blackmagic RAW data. Simply select Blackmagic Design Film or Blackmagic Design Extended Video from the dropdown gamma menu and make your adjustments.
Saving your Blackmagic RAW changes
1 Adjust the gamma controls for your Blackmagic RAW clip.
2 Click the 'update sidecar' button.
A 'sidecar' file will now be created in the same folder as your .braw file. When another user imports the Blackmagic RAW files, the sidecar files will automatically be read by DaVinci Resolve. If you make additional adjustments, press 'update sidecar' again.
TIP To remove your sidecar file, you can simply delete it from its location on your media drive.
Project Settings for Blackmagic RAW
If you need to make a setting change that is common to all the clips, for example a global change to the white balance or ISO setting, you can set the clips to use the project 'camera raw' settings and make global changes from there.
To set project settings for Blackmagic RAW:
1 Enter the project settings menu by clicking 'file,' and selecting 'project settings.'
2 In the 'Camera RAW' tab, you'll see a menu next to RAW profile. Click on the arrow to select Blackmagic RAW from the list.
3 Select 'project' in the 'Decode Using' menu.
4 Select a Color Science option from the menu.
5 Set the white balance to 'custom'.
6 Select 'Blackmagic Design Custom' from the gamma menu. Set the color space to 'Blackmagic Design'.
7 Choose your resolution from the 'Decode Quality' menu. A lower resolution will give you better playback on limited systems. You also have the flexibility to change to full resolution later on before delivery for the highest quality output.
Now you can adjust the camera settings for your clips such as saturation, contrast and midpoint. This will affect all clips in your project that are set to decode using 'project'.
Color Correcting your Clips with the Color Page
Now with your clips on the timeline and titles added, you can start color correcting using the 'color' page. The color page is extremely powerful and will define the overall look of your film, but for this example a good place to start is to neutralize all your clips so they are consistent. You can also return to the 'cut' or 'edit' page at any time if you want to make changes to your edit.
The color page lets you adjust the look of your edit and in many ways color correction is an art form in itself. You are really adding emotion to your work when you add color correction. It's an incredibly creative part of the workflow and very satisfying when you learn these skills and can see your work come alive! This is usually the first step and is referred to as primary color correction, or adjusting the primaries. After primary color correction is done, you can then make secondary color correction adjustments which is where you can make extremely precise color adjustments of specific objects in your images. That is a lot of fun, but is normally done after primaries because it helps make the process more efficient and you will get a better result!
First click on the 'color' tab to open the color page.
You'll see the camera raw settings, color wheels, curves palettes and general color correction tools as well as the preview and nodes window. Don't feel overwhelmed by the vast array of features in front of you, they are all there to help you get the most amazing looking pictures. This getting started section will show the basics, but for more detailed information refer to the relevant sections in the manual. They will show you exactly what all the tools are for and how to use them in easy to follow steps. You'll learn the same techniques the professionals use in high end color correction facilities.
Generally, the first step for primary color correction is to optimize the levels for shadows, mid tones and highlights in your clips. In other words adjust the 'lift', 'gamma' and 'gain' settings. This will help get your pictures looking their brightest and best with a clean, balanced starting point from where you can begin grading the 'look' of your film. To optimize the levels, it's helpful to use the scopes.
Using Scopes
Most colorists make creative color choices by focusing on the emotion and the look they want their program to have and then simply work using the monitor to achieve that look. You can look at everyday objects and how different types of light interact with them to generate ideas on what you can do with your images and a little practice.

The parade scope helps you optimize highlights, mid tones and shadows
Another way to color grade is to use the built in scopes to help you balance shots. You can open a single video scope by clicking the 'scope' button, which is the second from the right on the palette toolbar. You can choose to display a waveform, parade, vectorscope, histogram or CIE chromaticity scope. Using these scopes you can monitor your tonal balance, check the levels of your video to avoid crushing your blacks and clipping the highlights, plus monitor any color cast in your clips.
The 'color wheels' palette contains the 'lift', 'gamma' and 'gain' controls which will generally constitute your first adjustment. If you've previously had experience with color correction, these should resemble controls you've seen in other applications for doing color and contrast adjustments.
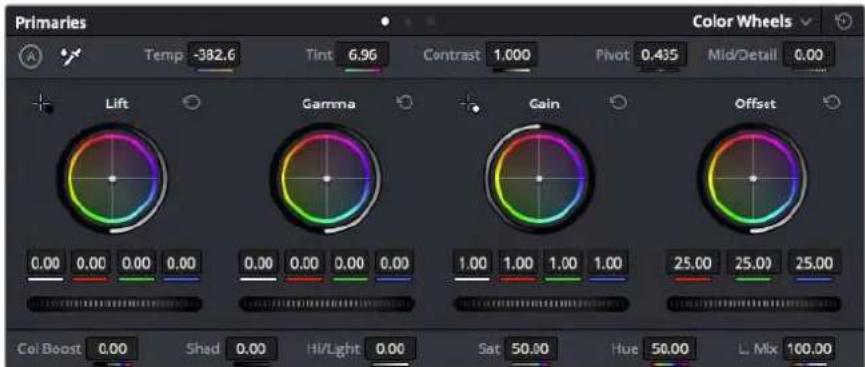
The 'lift, 'gamma', 'gain' and 'offset' color wheels give you total control over the color and tonal balance of your clips. To make a uniform adjustment to all colors for each tonal region, drag the dial underneath the color wheels back and forth
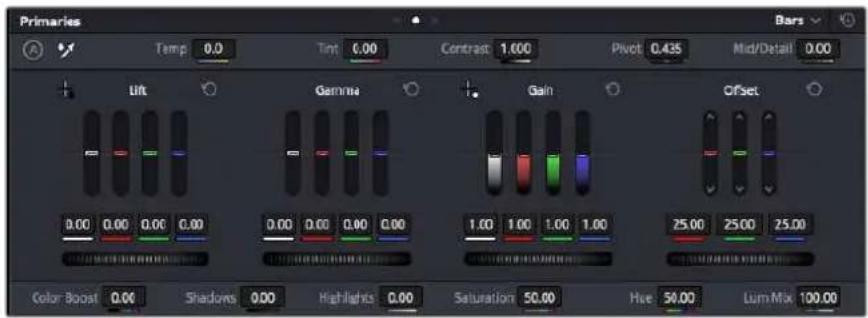
The primaries bars make color adjustments easier when using a mouse.
For more accurate control of each color using a mouse, you can change the color wheels to 'primaries bars' which let you adjust each color and luminance channel for the lift, gamma and gain controls separately. Simply select 'primaries bars' from the dropdown menu near the top right of the color wheels.
- Adjusting the 'lift': With your clip selected on the color timeline, click on the 'lift' dial underneath the first color wheel. Slide it back and forth and watch how it affects your image. You'll see the brightness of the dark regions of your picture increase and decrease.
Set it to where you want the dark areas to look their best. If you decrease the lift too much, you'll lose details in the blacks and you can use the parade scope to help avoid this. The optimal position for blacks on the waveform is just above the bottom line of the parade scope. - Adjusting the 'gain': Click on the 'gain' dial and slide it back and forth. This adjusts the highlights which are the brightest areas of your clip. The highlights are shown on the top section of the waveform on the parade scope. For a brightly lit shot, these are best positioned just below the top line of the waveform scope. If the highlights rise above the top line of the waveform scope, they will clip and you will lose details in the brightest regions of your image.
- Adjusting the 'gamma': Click on the 'gamma' dial underneath the color wheel and slide it back and forth. As you increase the gamma you'll see the brightness of the image increase. Notice the middle section of the waveform will also move as you adjust the gamma. This represents the mid tones of your clip. The optimal position for mid tones generally falls between 50 to 70% on the waveform scope. However, this can be subjective based on the look you are creating and the lighting conditions in the clip.
You can also use the curves palette to make primary color corrections. Simply click to create control points on the diagonal line inside the curve graph, and drag them up or down to adjust the master RGB contrast at different areas of image tonality. The optimum points to adjust are the bottom third, mid, and top third of the curve line.
There are many more ways of doing primary color correction in DaVinci Resolve.
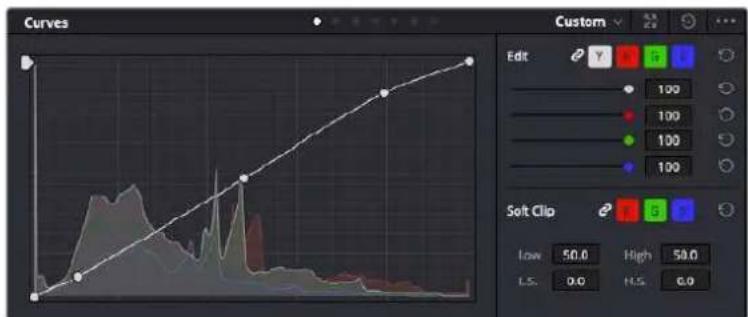
The curves palette is another tool you can use to make primary color corrections, or enhance specific areas of your clip when using a power window
Secondary Color Correction
If you want to adjust a specific part of your image then you need to use secondary corrections. The adjustments you have been doing up until now using the lift, gamma and gain adjustments affect the whole image at the same time and so they are called primary color corrections.
However, if you need to adjust specific parts of your image, say for example you wanted to improve the color in the grass in a scene, or you wanted to deepen the blue in a sky, then you can use secondary corrections. Secondary color corrections are where you select a part of the image and then adjust only that part. With nodes, you can stack multiple secondary corrections so you can keep working parts of your image until everything is just right! You can even use windows and tracking to allow the selections to follow movement in your images.
Qualifying a Color
Often you'll find a specific color in your clip can be enhanced, for example grass by the side of a road, or the blue in a sky, or you may need to adjust color on a specific object to focus the audience's attention on it. You can easily do this by using the HSL qualifier tool.
Using the HSL qualifier to select colors in your image is helpful when you want to make areas of your image 'pop', to add contrast, or to help draw the audience's attention to certain areas of your shot
To qualify a color:
1 Add a new serial node.
2 Open the 'qualifier' palette and make sure the 'selection range' picker tool is selected.
3 Click on the color in your clip you want to affect.
4 Usually you'll need to make some adjustments to soften the edges of your selection and limit the region to only the desired color. Click on the 'highlight' button above the viewer to see your selection.
5 Adjust the 'width' control in the 'hue' window to broaden or narrow your selection.
Experiment with the high, low and softness controls to see how to refine your selection.
Now you can make corrections to your selected color using the color wheels or custom curves.
Sometimes your selection can spill into areas of the shot you don't want to affect. You can easily mask out the unwanted areas using a power window. Simply create a new window and shape it to select only the area of color you want. If your selected color moves in the shot, you can use the tracking feature to track your power window.
Adding a Power Window
Power windows are an extremely effective secondary color correction tool that can be used to isolate specific regions of your clips. These regions don't have to be static, but can be tracked to move with a camera pan, tilt or rotation, plus the movement of the region itself.
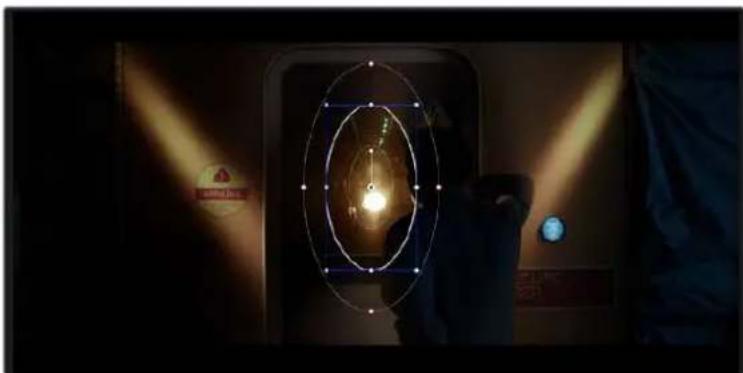
Use power windows to mask out areas you don't want to be affected by the HSL qualifier secondary adjustments
For example, you can track a window on a person in order to make color and contrast changes just to that person without affecting his or her surroundings. By making corrections like this you can influence the audience's attention on areas you want them to notice.
To add a power window to your clip:
1 Add a new serial node.
2 Open the 'window' palette and select a window shape by clicking on a shape icon. Your selected window shape will appear on the node.
3 Resize the shape by clicking and dragging the blue points around the shape. The red points adjust the edge softness. You can position the shape by clicking the center point and moving it to the area you want to isolate. Rotate the window using the point connected to the center.
Now you can make color corrections to your image in just the area you want.
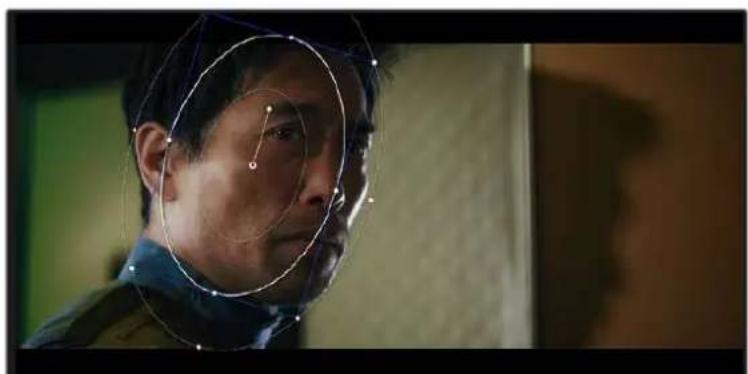
Power windows let you make secondary corrections to specific parts of your image
Tracking a Window
The camera, object or area in your shot may be moving, so to make sure your window stays on your selected object or area, you can use DaVinci Resolve's powerful tracking feature. The tracker analyzes the pan, tilt, zoom and rotation of the camera or object in your clip so you can match your windows to that movement. If this isn't done, your correction can move off the selected target and call attention to itself, which you probably don't want.
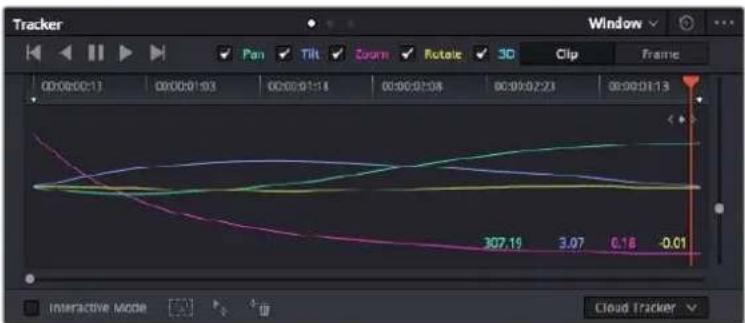
You can track objects or areas in your clip using the tracker feature so power windows can follow the action
To track a window to a moving object:
1 Create a new serial node and add a power window.
2 Go to the start of your clip and position and size the window to highlight just the object or area you want.
3 Open the 'tracker' palette. Select the pan, tilt, zoom, rotate, and perspective 3D settings appropriate for the movement in your clip by checking or unchecking the relevant 'analyze' checkboxes.
4 Click on the 'forward' arrow to the left of the checkboxes. DaVinci Resolve will now apply a cluster of tracking points on your clip and then step through the frames to analyze the movement. When the tracking is done, your power window will follow the path of the movement in your clip.
Most of the time automatic tracking is successful, but scenes can be complex and sometimes an object can pass in front of your selected area, interrupting or affecting your track. This can be solved manually using the keyframe editor. Refer to the DaVinci Resolve manual to find out more.
Using Plugins
While making secondary color corrections you can also add Resolve FX or Open FX plugins to create fast, interesting looks and effects using the 'color' page, or imaginative transitions and effects on your clips on the 'cut' and 'edit' pages. Resolve FX are installed with DaVinci Resolve, OFX plugins can be purchased and downloaded from third party suppliers.
After installing a set of OFX plugins, you can access them or Resolve FX plugins on the color page by opening the Open FX inspector to the right of the 'node editor'. Once you create a new serial node, simply click the 'Open FX' button to open the FX library and drag and drop a plugin onto the new node. If the plugin has editable settings, you can adjust these in the adjoining 'settings' panel.
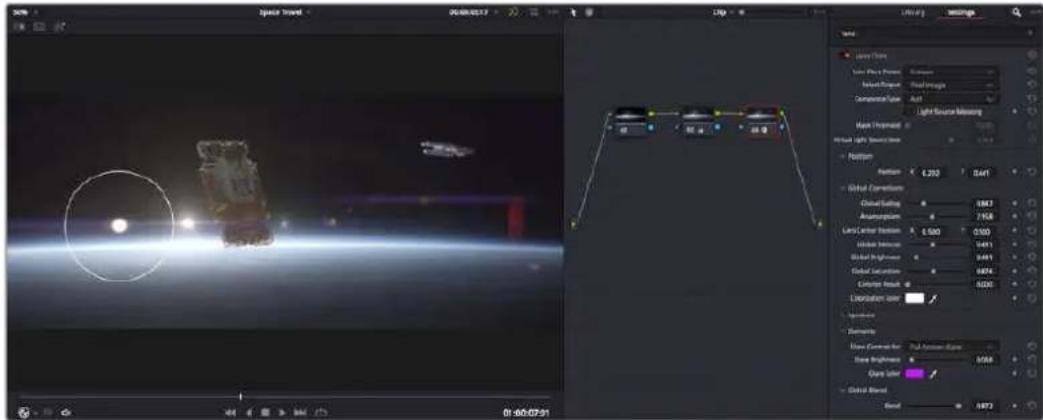
OFX plugins are a quick and easy way to create an imaginative and interesting look
In the 'edit' page you can add plugin filters, generators and transitions to clips by opening the 'Open FX' panel in the 'effects library' and dragging your selected plugin onto the video clip or track above your clip on the timeline depending on the plugin requirements.
Mixing Your Audio
Mixing Audio in the Edit Page
Once you have edited and color corrected your project, you can begin to mix your audio. DaVinci Resolve has a helpful set of features for editing, mixing and mastering audio for your project directly in the 'edit' page. For projects requiring more advanced audio tools, the Fairlight page provides you with a full audio post production environment. If you are already familiar with the edit page and want to move straight to Fairlight, skip this section and move onto the next.
Adding Audio Tracks
If you are working in the edit page and want to mix a basic sound edit with lots of sound effects and music, you can easily add more audio tracks when you need them. This can be helpful when building your sound, and separating your audio elements into individual tracks, for example, dialogue, sound effects and music.
To Add an Audio Track to the Edit Page
Right click next to the name of any audio track on your timeline and select 'add track' and choose from the options, including 'mono', 'stereo', and '5.1'. This will add the track to the bottom of the track list. Alternatively select 'add tracks' and select the position you would like the new track or multiple tracks placed.
Your new audio track will appear on the timeline.
TIP If you wish to change the type of track after creating it, right click next to the name of the track and select 'change track type to' and select the type of audio track you want, such as stereo, mono or 5.1.
Adjusting Audio Levels in the Timeline
Each clip of audio in the timeline has a volume overlay that lets you set that clip's level by simply dragging it up or down with the pointer. This overlay corresponds to the Volume parameter in the Inspector.

Dragging a volume overlay to adjust the clip level
For projects requiring more advanced audio tools, the Fairlight page provides you with a full audio post production environment.
The Fairlight Page
The 'Fairlight' page in DaVinci Resolve is where you adjust your project audio. In single monitor mode, this page gives you an optimized look at the audio tracks of your project, with an expanded mixer and custom monitoring controls that make it easy to evaluate and adjust levels in order to create a smooth and harmonious mix. Don't feel overwhelmed by the vast array of features in front of you, they are all there to help you deliver the best audio quality for your project.

This guide provides a basic overview of the features on the Fairlight page, but to learn more about all the details for each feature, refer to the DaVinci Resolve manual. The DaVinci Resolve manual provides details on the purpose of each tool and describes how to use them in easy to follow steps.
The Audio Timeline
- Track Header: At the left of each track is a header area that displays the track number, track name, track color, audio channels, fader value and audio meters. The track header also contains different controls for locking and unlocking tracks, plus solo and muting controls. These controls can help to keep your tracks organized, and let you preview individual tracks one at a time.
- Tracks: Each track on the Fairlight page is divided into lanes, which show each individual channel of clip audio for editing and mixing. The edit page hides these individual audio channels, displaying only a single clip in the timeline to make it easier to edit multi channel sources without needing to manage a huge number of tracks.
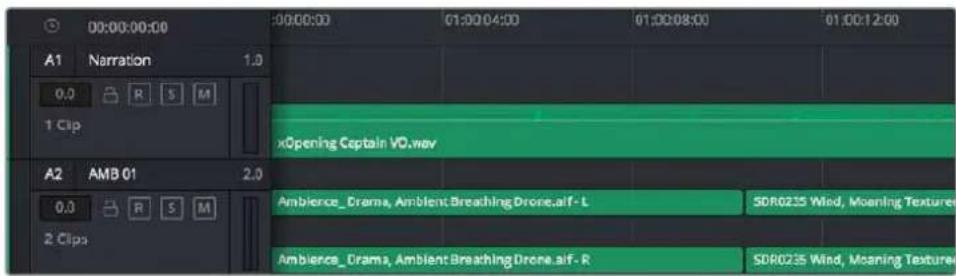
The track header on track A1 indicates a mono track with a single lane for mono audio, and the A2 track header indicates a stereo track with two lanes to accommodate stereo audio.
What is a Bus?
A bus is essentially a destination channel made up of audio sources grouped together into a single signal that can be controlled via a single channel strip. Fairlight automatically creates a bus for you and all the audio tracks in your timeline are sent to this bus by default, this means you can adjust the overall level of your audio mix once you have adjusted the level of each individual track.
If your edit is a bit more complex you can create more buses and combine multiple tracks of audio that belong to the same category such as dialogue, music or effects so that everything in that category can be mixed as a single audio signal. For example, if you have five dialogue tracks, you can route the output of all five dialogue tracks to a separate bus, and the level of all dialogue can then be mixed with a single set of controls.
The Fairlight Flexbus structure gives you complete flexibility over bus types and signal routing including the option for bus-to-bus, track-to-bus and bus-to-track routing. For more information on audio bus settings in Fairlight, refer to the DaVinci Resolve manual.
The Mixer
Each audio track in your timeline corresponds to an individual channel strip in the Mixer, and by default there's a single strip on the right for the default bus labeled 'Bus 1'. Additional channel strips will appear on the right hand side with a set of controls for each additional bus you create. A set of graphical controls allows you to assign track channels to output channels, adjust EQ and dynamics, set levels and record automation, pan stereo and surround audio, and mute and solo tracks.
The audio mixer, with channel strips corresponding to the tracks in the timeline
Using the Equalizer to Enhance your Audio
After adjusting the audio levels of your audio clips in your project, you may find that the audio needs further finressing. In some cases you may find that the dialogue, music and sound effects are competing for the same frequency on the audio spectrum, making your audio too busy and unclear. This is where using EQ can help, as it allows you to specify the parts of the audio spectrum that each track occupies. You can also use an equalizer to help remove unwanted elements from your audio by isolating and reducing the level on particular frequencies that contain low rumbles, hums, wind noise and hiss, or simply to improve the overall quality of your sound so it is more pleasing to listen to.
DaVinci Resolve provides EQ filters that can be applied at a clip level to each individual clip or at the track level to affect entire tracks. Each audio clip in the timeline has a four band equalizer in the inspector panel, and each track has a 6 band parametric equalizer in the mixer panel. The graphical and numeric controls for boosting or attenuating different ranges of frequencies, and different filter types allow you to define the shape of the EQ curve.

The four band equalizer can be applied to every clip in the timeline
Outer bands let you make band filter adjustments using hi-shelf, lo-shelf, hi-pass and looppass filters. A pass filter affects all the frequencies above or below a particular frequency, by removing those frequencies completely from the signal. For example, a high pass filter will allow the high frequencies to pass through the filter while cutting the low frequencies. Any frequencies outside the cutoff frequency are cut gradually in a downward sloping curve.
A shelf filter is less aggressive, and is useful when you want to shape the overall top end or low end of the signal without completely removing those frequencies. The shelf filter boosts or cuts the target frequency and every frequency either above or below it evenly, depending on whether you use a high shelf or low shelf.
The middle sets of band controls let you make a wide variety of equalization adjustments, and can be switched between lo-shelf, bell, notch, and hi-shelf filtering options.
- Bell: Bell filters boost or cut frequencies around a given center point of the bell curve, and as the name suggests the shape of the curve is like a bell.
- Notch: Notch filters allow you to specifically target a very narrow range of frequencies. For example, removing a mains hum at 50 or 60Hz
- Lo-Shelf: Low shelf filters boost or cut the target frequency at the low end, and every frequency below it.
Hi-Shelf: High shelf filters boost or cut the target frequency at the high end, and every frequency above it
To add EQ to an individual clip:
1 Select the clip in the timeline that you want to add the EQ filter to.
2 Click on the inspector and then click the equalizer' enable button.
To add EQ to a track:
1 Double click in the EQ section for one of your tracks in the mixer to open the equalizer for that track.
2 Select the band filter type from the dropdown menu for the band you want to adjust.

The EQ section in the mixer panel indicating an EQ curve has been applied to track one
The 6 Band parametric equalizer that can be applied to every track
Once you have added EQ to your clip or track, you can adjust the EQ for each band. Note that controls may vary depending on which band filter type is selected.
To adjust the EQ for a band filter:
1 Select the band filter type from the dropdown menu for the band you want to adjust.
2 Adjust the frequency value to select the center frequency of the EQ adjustment.
3 Adjust the 'gain' value to boost or attenuate the frequencies governed by that band.
4 Use the 'Q factor' value to adjust the width of affected frequencies.
Use the reset button to reset all controls in the EQ window to their defaults.
Fairlight has many controls you can use to improve the quality of each audio track. You can add more tracks and arrange buses to organize them, plus add effects like delay or reverb, and generally perfect your audio mix.
Adding VFX and Compositing on the Fusion Page
Now that you have completed your edit, you can open the Fusion page to add 2D or 3D visual effects and motion graphics right within DaVinci Resolve. Unlike layer based compositing software, Fusion uses nodes, giving you the freedom to build complex effects while routing image data in any direction. The nodes window clearly shows every tool used along the way. If you have experienced the node workflow in the color page, this will feel familiar to you.
The Fusion Page
The Fusion page features 2 viewer windows across the top with transport controls to view your media, an inspector window to the right to access tool settings, and a nodes window at the bottom where you build your composition. While the viewers and transport controls are always visible, clicking on the icons on the interface toolbar at the very top of the display will let you show or hide the nodes and inspector windows, or reveal or hide additional windows including the effects library and editors for spline and keyframes.

Media Pool: The media pool functions the same way as it appears in the edit page. Simply drag additional media from your bins directly to your composition.
- Effects Library: The effects library is where you will find your Fusion tools and templates sorted into categories including particle, tracking, filters and generators. You can either click on the tool or drag it to the nodes area to add it to your composition. The media pool and effects library take up the same screen area, so you can swap between the two to keep your viewers as large as possible.
- Clips: Clicking the clips tab will reveal or hide thumbnails representing clips on your timeline. The thumbnails are located underneath the nodes editor, letting you instantly navigate to other clips.
Create a new version of your composition by right clicking on a thumbnail and selecting 'create new composition'.
- Viewers: The viewers are always visible and let you see the different views of your composition, for example an overall 3D perspective via the merge 3D node, a camera output, or your final render output. These viewers also let you see how your changes are affecting a specific element.
You can choose which nodes to view by clicking on a node and typing '1' for the left viewer or '2' for the right viewer. White button icons appear beneath the node to let you know which viewer it is assigned to. If you're using external video monitoring, there will be a third button available to route your media to your external video monitor.
TIP You can also assign a node to a viewer by dragging the node into the viewer itself.
The transport controls underneath the viewers let you skip to the start or end of the clip, play forward or reverse, or stop playback. The time ruler displays the entire range of a clip, with yellow marks indicating the in and out points.

The yellow marks on the time ruler indicate your clip's in and out points on your timeline. If you are using a Fusion clip or compound clip, the time ruler will only show you the duration of the clip as it appears on the timeline, without handles.
- Nodes: The nodes window is the heart of the Fusion page where you build your node tree by connecting tools together from one node's output to another node's input. This area will change size depending on which editors are open, for example the spline or keyframes editor. A toolbar at the top of the nodes area features the most commonly used tools for fast access.
- Spline: When the spline editor is open, it will appear to the right of the nodes window. This editor lets you make precise adjustments to each node, such as smoothing the animation between two keyframes usingBezier curves.
- Keyframes: Keyframes for each tool can be added, removed or modified using the keyframes editor. This also appears to the right of the nodes viewer.
- Metadata: The metadata window will show you metadata available for the active clip, including the codec, frame rate and timecode.
- Inspector: The inspector in the top right corner displays all settings and modifiers available for one or more selected nodes. Additional tab options will appear to provide quick access to other settings for nodes sorted by category.
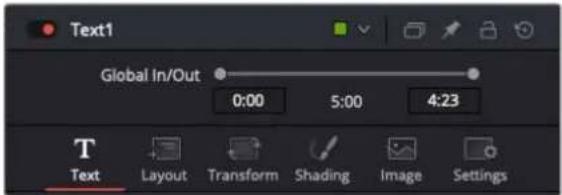
The text Inspector contains additional tabs for text, layout, transform, shading, image and settings.
Getting Started with Fusion
To get started with Fusion, simply position your playhead over any clip on your timeline and click on the 'Fusion' tab to open the Fusion page.
On the Fusion page, your clip is immediately available in a media input node labelled 'Medialn'. Every composition will begin with a 'mediain' and a 'mediaout' node. This mediai n node represents the top most clip of your timeline at the playhead, and ignores any clips underneath. Any adjustments you've applied to the clip on the edit page, such as transform tools and cropping changes, are also included.

The media output node, named 'MediaOut', is the node that sends the output back to your timeline on DaVinci Resolve's edit page.
TIP ResolveFX or OFX plug-ins applied to clips in the cut or edit pages are not applied in the Fusion page. This is because Fusion effects occur prior to color correction and OFX/ResolveFX processing. If you want OFX applied before Fusion effects, right click the clip in the edit page and select 'new fusion clip' before clicking on the Fusion page.
Understanding Nodes
It can be helpful to think of each node as a visual icon representing a single tool or effect. Nodes are connected to other nodes to build the overall composition, much like ingredients in a cake. It's important to understand the inputs and outputs of each node as this will help you navigate the flow of your composition while building detailed visual effects.
Some tools have multiple inputs and outputs you can connect to other nodes. The merge node, for example, lets you attach a foreground input, background input, and a mask input for mattes or keys.
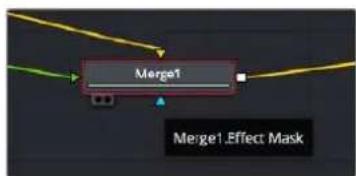
Foreground input
Background input
Effect mask input
Output
Multiple outputs on nodes means a single node can connect to many different nodes in your composition, so you don't have to duplicate clips as you would in layer based software. Arrows on the line between connected nodes are a great visual indicator to show you which direction the image data is flowing.
Adding Nodes to the Node Editor
Adding effects is as simple as placing nodes on the line between the 'mediain' and 'mediaout' nodes.
There are a few ways you can do this. You can hold down the shift button and drop a node between two nodes, or click on the node you want to attach an effect to and select the tool you want to add. The new node will automatically connect to the tool selected. You can also add a node anywhere on the node window and manually connect nodes by dragging the output of one to the input on another.

The most commonly used tool is the 2D or 3D merge node. This node is like a central hub that combines tools on the node editor into a single output.
The merge node has controls for how the inputs are managed, including settings for size, position, and blend. These settings are all accessible in the inspector panel when the merge node is selected.
The toolbar above the node panel contains the most commonly used tools as icons that you can either click on to add the node, or drag the tool to the node panel. If you want to see all the complete tools available, click on the 'effects library' in the top left corner and expand the 'tools' option. Here you'll find all the tools sorted by category, as well as a set of pre-built 'templates' you can use, for example lens flares, shaders and backgrounds.
TIP Once you're familiar with the tool names, you can hold down 'shift' and press 'spacebar' on your keyboard and a 'select tools' menu will appear. As you type the tool name, the menu will suggest the relevant tool. This is a very fast way to select the tool you want.
Adjusting Nodes Using the Inspector Panel
Adjust your node settings using the inspector panel. Simply click on the node you want to modify and the panel will update to display its settings and controls.
With Fusion, you don't have to be viewing the node you're editing, as you can modify one node while viewing another in your composition. For example, you can modify the size and center position of a 'text+' node while the merge node is in the viewer, letting you view the text relative to the background.
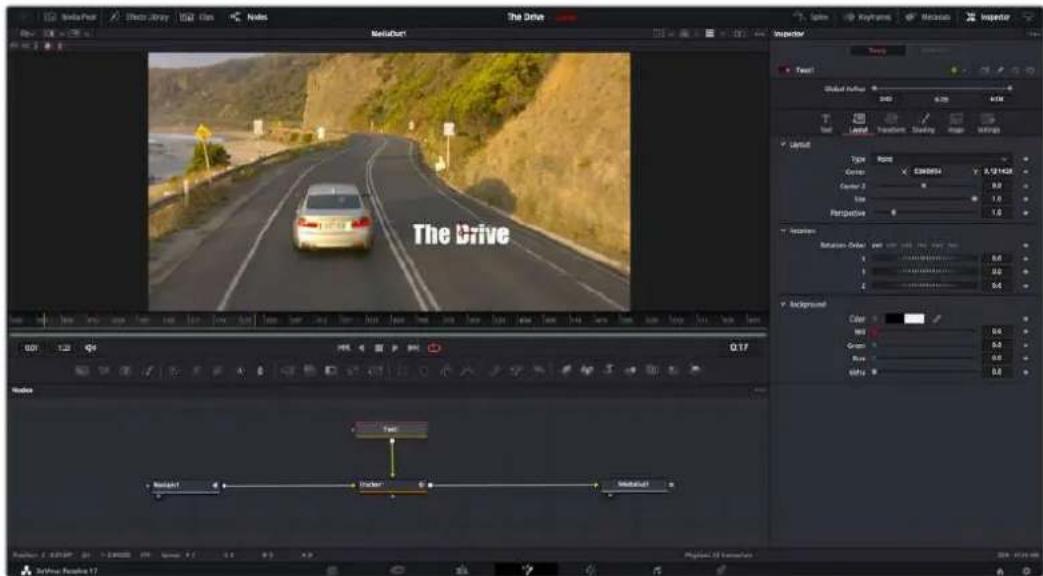
Selected nodes appear with a red border. Here the Inspector panel is displaying the layout tab controls for the text node.
There are different parameters and settings you can adjust for every node depending on its task, from sizing and center positions to changing the number of particles in an emitter node. Setting keyframes and changing the settings over time will animate the effect.
Working with Keyframes
In the inspector window, set a keyframe by right clicking on a setting and choosing 'animate' from the contextual menu. The keyframe icon to the right of the setting will turn red. This means keyframes are now active and any changes you make will be applied to the current frame only. When two or more keyframes are created by changing the setting parameters on a different frame, a transition is interpolated between them. Arrows on each side of the keyframe icon let you move the playhead to those exact positions on the timeline.

Here, the 'size' keyframe animation has been smoothed into aBezier curve. You can click theBezier handles to shorten or lengthen the curve, or the keyframe square icons to move the keyframe location.
The splines panel gives you further control over keyframe animation. You can select keyframes, such as the first and last, and smooth the animation between them into aBezier curve by typing 'shift' + 's', or right clicking on a keyframe and selecting 'smooth'.
Using the Motion Tracker and Adding Text
To get a better idea of how to use Fusion, we have included the following examples to show how to use the tracker tool to track an element in a clip, plus add text and attach it to the element using the tracking data.
The 'tracker' tool tracks pixels over time on the x & y axis, and generates data you can use to attach other elements. This is great for when you want to match the position of text to a moving object, such as a car driving along the road, or a bird as it flies across frame.
1 In the 'effects library', select the 'tracker' tool and drag it to the line between the 'mediain' and the 'mediaout' nodes. Now click the tracker node to reveal its properties in the inspector.
2 Type '1' on your keyboard to see the 'tracker' node on the left viewer. The clip will appear in the viewer together with the tracker at its default position. Hover your mouse pointer over the tracker to reveal the tracker handle. Click on the tracker handle at the top left corner and drag the tracker to an area of interest on your clip. High contrast areas work well, for example the badge on the hood of a car. The tracker will magnify the image area for extra precision.
3 In the inspector window, click on the 'track forward' button to start tracking. A notification window will appear when the tracking is done. Click OK.
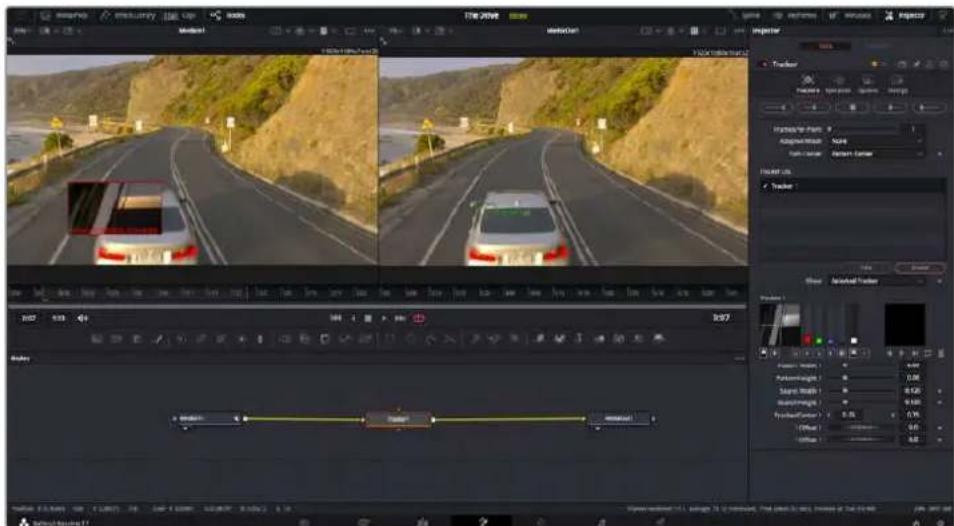
Tracking options in the inspector panel include track reverse from last frame or current frame, stop track or track forward from current frame or first frame.
TIP Track reverse or forward from current frame is great for situations where your area of interest disappears during the render range, such as a car or bird moving out of frame. This lets you track only the relevant footage.
Now you can take that tracking data and apply the motion path to a text tool.
4 Click on the 'text+' node icon from the toolbar of commonly used nodes and drag it to the node panel near the 'tracker' node. Connect the 'text' output square to the green foreground input on the tracker'.
5 Click on the 'tracker' node and type '1' so you can see the merged results on your left hand viewer. In the 'tracker' inspector panel, click on the 'operations' tab. Click the menu next to operation and select 'match move'.
6 Click the 'text' node to reveal the properties in the inspector. Type your text into the text box and change the font, color and size to suit your composition.
This will apply the tracking position data from your tracker to your text. If you want to change the text offset, click on the ' trackers' tab back in the inspector panel and use the x and y offset scroll wheels to modify the position.

Scroll wheels at the bottom of the tracker inspector panel let you adjust the offset position for the text.
Now you can play back your composition and see your text attached to the object you have tracked!
The green square is the tracker's current position along the green path, and the red dashed line is the offset position used to animate the text.
For some shots you might want to remove track points after tracking, such as when the object you are tracking disappears off the screen. The keyframe editor makes this a very simple process.
7 Click on the keyframes tab above the inspector to open the keyframes editor. Any nodes with keyframes applied will have a small arrow next to the node label, and only the parameter with keyframes added will appear in the list below. Click on the magnify icon and drag a box around the area you want to edit. This will zoom into that area so you can see the keyframes easier.
8 Move the playhead to the location of the last keyframe you want. Now select the keyframes you wish to remove by drawing a box around them with your mouse. The keyframes will highlight yellow. Right click and choose delete from the menu.
TIP If your effects are particularly system intensive, right clicking on the transport controls area will give you viewer options, including proxy playback, helping you get the most out of your system while you build your composition. Refer to the DaVinci Resolve manual for further detail on all the playback options.
You have now completed your first composition animating text to match a movement in your footage!
If you want to track an area of the image that contains a flat surface you want to enhance or replace, you can use the planar tracker. Tracking 2D planes can be helpful for changing labels and signs in a moving image, or even adding an image to a monitor or TV in your shot.
For more information about the planar tracker and the many powerful tools in the DaVinci Resolve Fusion page, see the DaVinci Resolve manual.
TIP As you build visual effects in the Fusion page, it's worth noting if the effect you are building is a 2D effect, or a 3D effect, as this will determine which merge tool is used. You may discover yourself frequently combining 2D and 3D effects in the one composite. In this scenario, it's helpful to remember that any visual effect using the 3D space needs to be rendered as a 2D image before it can be merged into a 2D composite.
We believe you will have lots of fun with Fusion and exploring Fusion's visual effects with the power of DaVinci Resolve's edit, color, and Fairlight pages. With all these tools at your finger tips, DaVinci Resolve is incredibly powerful and there is really no limit to what you can create!
Mastering Your Edit
Now you've edited, graded, added vfx and mixed your audio, you'll want to share it with others. You can use the Quick Export button, or menu selection, to output the contents of the Timeline as a self contained file in one of a variety of different formats, or use the additional features of the 'deliver' page.

The 'dellver' page is where you export your edit. You can select from many different video formats and codeccs
Quick Export
You can choose File > Quick Export to use one of a variety of export preset to export your program from any page of DaVinci Resolve. You can even use quick export to export and upload your program to one of the supported video sharing services, including YouTube, Vineo, Twitter and Frame.io.
To use Quick Export:
1 In the 'cut', 'edit', fusion' or 'color' page, optionally set in and out points in the timeline to choose a range of the current program to export. If no timeline in or out points have been set, the entire timeline will be exported.
Choose File > Quick Export.
2 Select a preset to use from the top row of icons in the quick export dialog, and click 'export'.
3 Choose a directory location and enter a file name using the export dialog, then click 'save'. A progress bar dialog appears to let you know how long the export will take.
The quick export dialog
The Deliver Page
This page lets you select the range of clips you want to export, plus the format, codec and resolution you want. You can export in many types of formats such as QuickTime, AVI, MXF and DPX using codec such as 8-bit or 10-bit uncompressed RGB/YUV, ProRes, DNxHD, H.264 and more.
To export a single clip of your edit:
1 Click on the 'deliver' tab to open the deliver page.
2 Go to the 'render settings' window on the top left of the page. Choose from a number of export presets, for example YouTube, Vineo and audio presets, or you can set your own export settings manually by leaving it set to the default 'custom' preset and entering your own parameters. For this example, select YouTube, then click on the arrow next to the preset and select the 1080p video format.
The frame rate will be locked to your project frame rate setting.
3 Underneath the presets you will see the timeline filename and the target location for your exported video. Click the 'browse' button and choose the location where you want to save your exported file and then select 'single clip' from the render option.
4 Immediately above the timeline, you'll see an options box with 'entire timeline' selected. This will export the entire timeline, however you can select a range of the timeline if you want to. Simply choose 'in/out range' and then use the 'i' and 'o' hot key shortcuts to choose the in and out points in your timeline.
5 Go to the bottom of the 'render settings' and click on the 'add to render queue' button.
Your render settings will be added to the render queue on the right side of the page. Now all you have to do is click 'start render' and monitor the progress of your render in the render queue.
When your render is complete you can open the folder location, double click on your new rendered clip and watch your finished edit.
Now that you have a basic knowledge of how to edit, color, mix audio and add visual effects, we recommend experimenting with DaVinci Resolve. Refer to the DaVinci Resolve manual for more details on how each feature can help you make the most of your project!
Camera Control with ATEM Mini
Pocket Cinema Camera gains studio features when you connect it to ATEM Mini. You can plug up to four Pocket Cinema Cameras into ATEM Mini, and control them from ATEM Mini and use professional studio features on networked computers running the ATEM Software Control application. ATEM Mini is a powerful tool for multi camera productions and live streaming. The Camera Control feature in ATEM Software Control lets you cut between cameras and control up to four Blackmagic Pocket Cinema Cameras from an ATEM Mini switcher. To open the camera control features of your ATEM Mini, click on the 'camera' button in ATEM Software Control.
Pocket Cinema Camera settings such as iris, gain, focus, detail and zoom control are easily adjusted using compatible lenses, plus you can color balance cameras and create unique looks using the DaVinci Resolve primary color corrector that's built into the camera.
You an even add ATEM Camera Control Panel for fast and precise hands-on control of four Pocket Cinema Cameras at once! For more information, see the ATEM Mini manual.
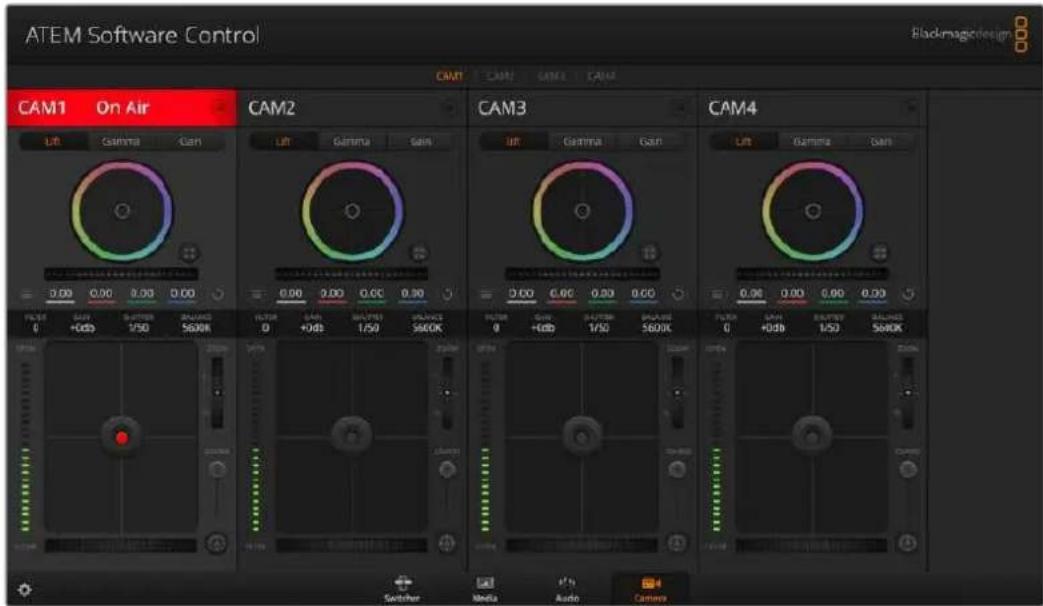
ATEM Camera Control.
When controlling cameras, the ATEM switcher control works by broadcasting camera control packets via all the HDMI inputs of your ATEM Mini. So this means you can connect an HDMI input of your ATEM Mini to the camera's HDMI connector and the camera will detect the control packets in the HDMI signal and allow you to control features in the camera itself.
Open ATEM Software Control preferences and set your switcher's button mapping to make sure you are switching the right camera with correct tally. With a video connection from your switcher to Blackmagic Pocket Cinema Cameras, you can also get the advantage of live tally indicators.
Camera Control Panel
Launch ATEM Software Control and click on the 'camera' button located at the bottom of the software window. You'll see a row of labeled Blackmagic camera controllers containing tools to adjust and refine each camera's image. The controllers are easy to use. Simply click the buttons using your mouse, or click and drag features to adjust.
Camera Control Selection
The button row at the top of the camera control page lets you select the camera number you would like to control.
Channel Status
The channel status at the top of each camera controller displays the camera label, On Air indicator and lock button. Press the lock button to lock all the controls for a specific camera. When on air, the channel status illuminates red and displays the On Air alert.
Camera Settings
The camera settings button near the bottom left of the master wheel lets you adjust detail settings for each camera's picture signal.
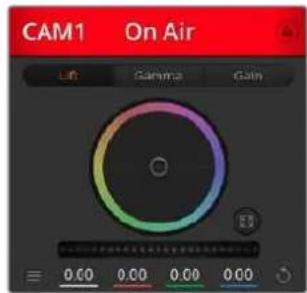
Each camera controller displays the channel status so you know which camera is on air. Use the color wheels to adjust each YRGB channel's lift, gamma and gain settings.
Detail
Use this setting to sharpen the image from your cameras live. Decrease or increase the level of sharpening by selecting: Detail off, detail default for low sharpening, medium detail and high detail.
Color Wheel
The color wheel is a powerful feature of the DaVinci Resolve color corrector and used to make color adjustments to each YRGB channel's lift, gamma and gain settings. You can select which setting to adjust by clicking on the three selection buttons above the color wheel.
Master Wheel
Use the master wheel below the color wheel to make contrast adjustments to all YRGB channels at once, or luminance only for each lift, gamma or gain setting.
Reset Buttons
The reset button near the bottom right of each camera controller lets you easily choose color correction settings to reset, copy or paste. Each color wheel also has its own reset button. Press to restore a setting to its default state, or copy/paste a setting. Locked controllers are not affected by the Paste feature.
The master reset button on the bottom right corner of the color corrector panel lets you reset lift, gamma and gain color wheels plus Contrast, Hue, Saturation and Lum Mix settings. You can paste color correction settings to camera controllers individually, or all cameras at once for a unified look. Iris, focus, coarse and pedestal settings are not affected by the Paste feature. When applying Paste to all, a warning message will appear asking you to confirm your action. This is so you don't accidentally paste new settings to any unlocked cameras that are currently on air.
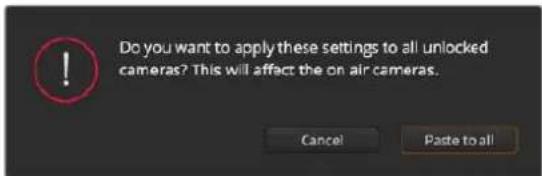
When applying 'paste to all', a warning message will appear asking you to confirm your action. This is so you don't accidentally paste new settings to any unlocked cameras that are currently on air.
Iris/Pedestal Control
The iris/pedestal control is located within the cross hairs of each camera controller. The control illuminates red when its camera is on air.
To open or close the iris, drag the control up or down. Holding the shift key allows only iris adjustments.
To darken or lift the pedestal, drag the control left or right. Holding the command key on a Mac, or the Control key on Windows, allows only pedestal adjustments.
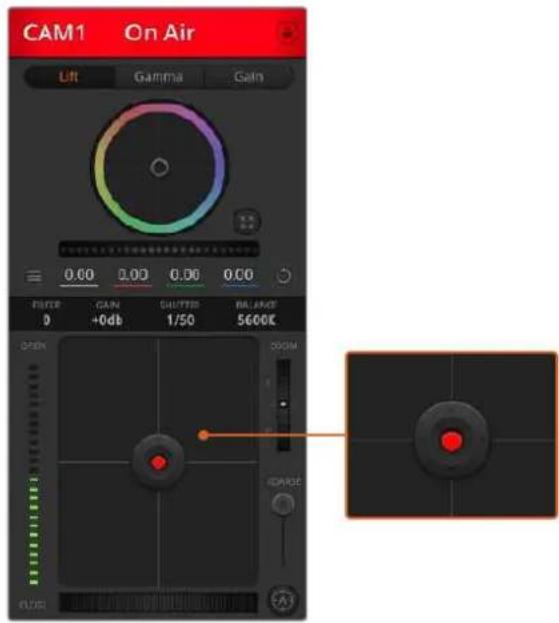
The iris/pedestal control illuminates red when its respective camera is on air.
Zoom Control
When using compatible lenses with an electronic zoom feature, you can zoom your lens in and out using the Zoom control. The controller works just like the zoom rocker on a lens, with telephoto on one end and wide angle on the other. Click on the zoom control, located above the coarse slider and drag up to zoom in, or drag down to zoom out.
Coarse Setting
The coarse setting is located to the right of the iris/pedestal control and is used to limit the iris range. This feature helps you prevent over exposed images from going to air.
To set your coarse threshold, completely open the iris using the iris control, then drag the coarse setting up or down to set optimum exposure. Now when you adjust the iris, the coarse threshold will prevent it from going above optimum exposure.
Iris Indicator
The iris indicator is located to the left of the iris/pedestal control and displays a visual reference so you can easily see how open or closed the lens aperture is. The iris indicator is affected by the coarse setting.
Auto Focus Button
The auto focus button is located at the bottom right corner of each camera controller. Press to automatically set the focus when you have an active lens that supports electronic focus adjustments. It's important to know that while most lenses support electronic focus, some lenses can be set to manual or auto focus modes and so you
need to ensure your lens is set to auto focus mode. Sometimes this is set by sliding the focus ring on the lens forward or backward.
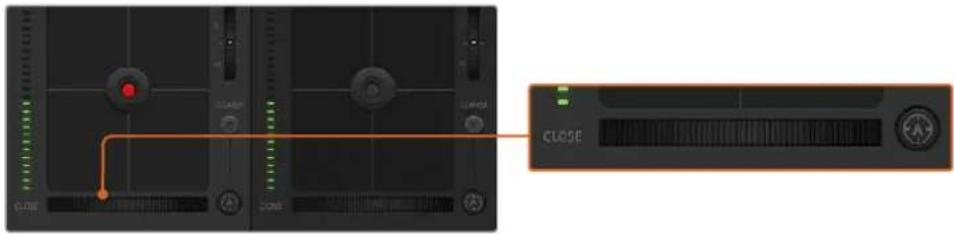
Click on the auto focus button or drag the manual focus adjustment left or right to focus a compatible lens.
Manual Focus Adjustment
When you want to adjust the focus on your camera manually, you can use the focus adjustment located at the bottom of each camera controller. Drag the wheel control left or right to manually adjust focus while viewing the video feed from the camera to ensure your image is nice and sharp.
Camera Gain
The camera gain setting allows you to turn on additional gain in the camera. On Blackmagic Pocket Cinema Cameras, this setting relates to ISO. This is important when you are operating in low light conditions and need extra gain, or ISO, in the front end of the camera to avoid your images being under exposed. You can decrease or increase gain by clicking on the left or right arrows on the dB gain setting.
You can turn on some gain when you need it, such as outdoor shoots when the light fades at sunset and you need to increase your image brightness. It's worth noting that adding gain will increase noise in your images.
Shutter Speed Control
The shutter speed control is located in the section between the color wheel and the iris/pedestal control. Decrease or increase the shutter speed by hovering your mouse pointer over the shutter speed indicator and then clicking on the left or right arrows. On Blackmagic Pocket Cinema Cameras, this setting relates to shutter angle.
If you see flicker in lights you can decrease your shutter speed to eliminate it. Decreasing shutter speed is a good way to brighten your images without using camera gain because you are increasing the exposure time of the image sensor. Increasing shutter speed will reduce motion blur so can be used when you want action shots to be sharp and clean with minimal motion blur.
White Balance
The white balance setting next to the shutter speed control can be adjusted by clicking on the left or right arrows on each side of the color temperature indicator. Different light sources emit warm or cool colors, so you can compensate by adjusting the white balance. This ensures the whites in your image stay white.
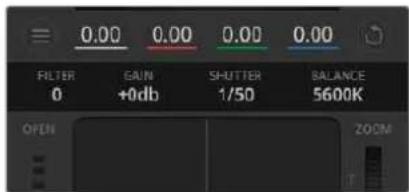
Hovering your mouse pointer over the gain, shutter speed and white balance indicators reveal arrows you can click on to adjust their respective settings.
DaVinci Resolve Primary Color Corrector
If you have a color correction background, then you can change your camera control from a switcher style CCU interface to a user interface that's more like a primary color corrector on a post production color grading system.
Blackmagic cameras feature a DaVinci Resolve primary color corrector built in. If you have used DaVinci Resolve, then creatively, grading in the Blackmagic camera will be identical so you can use your color grading experience for live production. The color corrector panel can be expanded out of any camera controller and provides expanded color correction control with extra settings and a full primary color corrector interface.
You have color wheels and settings such as saturation available and you can see shadows, mid tones and highlight settings all at the same time. Simply switch between cameras using the camera selection controls at the top of the window as you need.
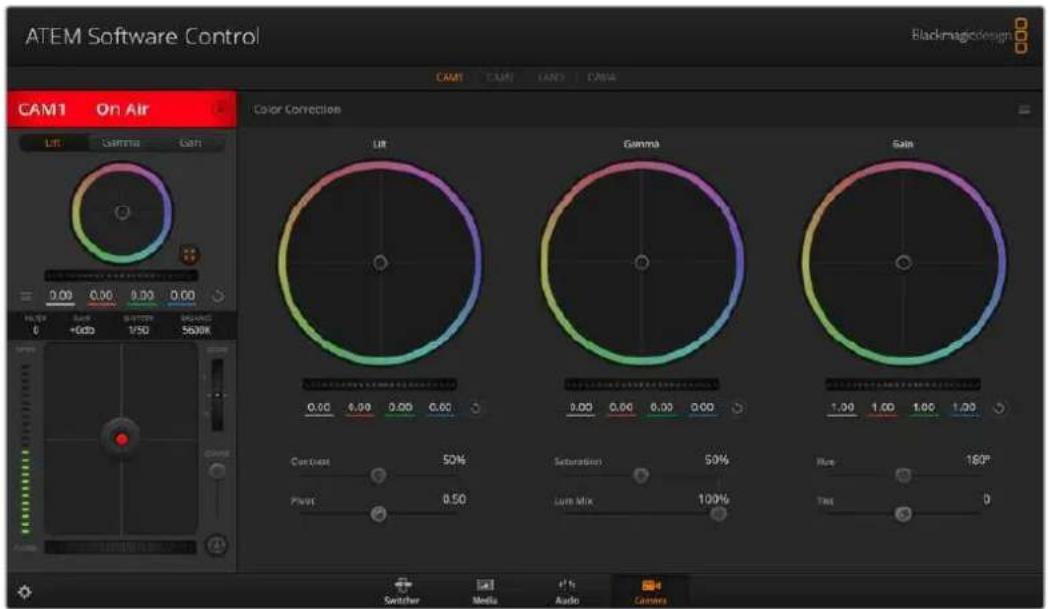
Click on the DaVinci Resolve primary color corrector button to expand the color correction window and adjust settings.
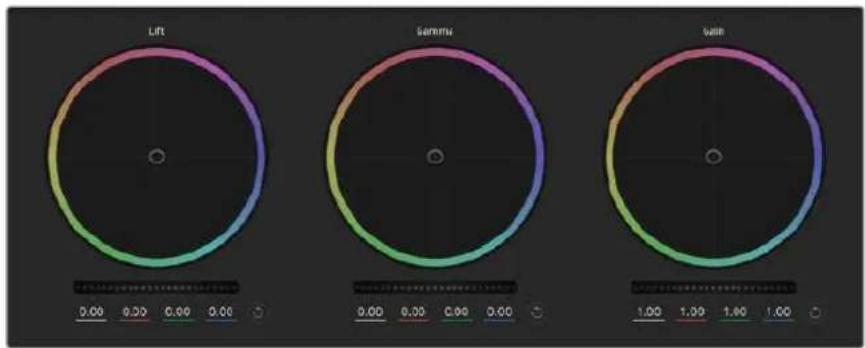
Lift, gamma and gain color wheels in the color corrector panel.
Color Wheels
Click and drag anywhere within the color ring
Note that you don't need to drag the color balance indicator itself. As the color balance indicator moves, the RGB parameters underneath change to reflect the adjustments being made to each channel.
Shift-Click and drag within the color ring
Jumps the color balance indicator to the absolute position of the pointer, letting you make faster and more extreme adjustments.
Double-click within the color ring
Resets the color adjustment without resetting the master wheel adjustment for that control.
Click the reset control at the upper-right of a color ring
Resetstboth the color balance control and its corresponding master wheel.
Master Wheels
Use the master wheels below the color wheels to adjust each YRGB channels' lift, gamma and gain controls.
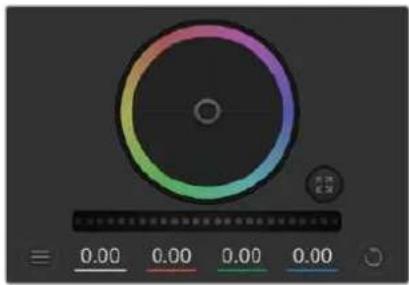
Adjust the master wheels by dragging the wheel control left or right.
To make adjustments using the master wheel:
Drag the master wheel left or right
Dragging to the left darkens the selected parameter of the image, dragging to the right lightens that parameter. As you make an adjustment, the YRGB parameters underneath change to reflect the adjustment you're making. To make a Y-only adjustment, hold down the ALT or Command key and drag left or right. Because the color corrector uses YRGB processing, you can get quite creative and create unique affects by adjusting the Y channel only. Y channel adjustments work best when the Lum Mix setting is set to the right side to use YRGB processing vs the left side to use regular RGB processing. Normally, most DaVinci Resolve colorists use the YRGB color corrector as you get a lot more control of color balance without affecting overall gain, so you spend less time getting the look you want.
Contrast Setting
The Contrast setting gives you control over the distance between the darkest and lightest values of an image. The effect is similar to making opposing adjustments using the lift and gain master wheels. The default setting is 50% .
Saturation Setting
The Saturation setting increases or decreases the amount of color in the image. The default setting is 50% .
Hue Setting
The Hue setting rotates all hues of the image around the full perimeter of the color wheel. The default setting of 180 degrees shows the original distribution of hues. Raising or lowering this value rotates all hues forward or backward along the hue distribution as seen on a color wheel.
Lum Mix Setting
The color corrector built into Blackmagic cameras is based on the DaVinci Resolve primary color corrector. DaVinci has been building color correctors since the early 1980's and most Hollywood films are color graded on DaVinci Resolve than any other method.
This means that your color corrector built into the camera has some unique and creatively powerful features. The YRGB processing is one of those features.
When color grading, you can choose to use RGB processing, or YRGB processing. High end colorists use YRGB processing because you have more precise control over color and you can independently adjust the channels with better separation and more creative options.
When the Lum Mix control is set to the right side, you have the 100% output of the YRGB color corrector. When you have the Lum Mix control set to the left side, you get 100% output of the RGB corrector. You can set the Lum Mix to any position between the left and right to get a blend of output from both the RGB and YRGB correctors.

Drag the sliders left or right to adjust Contrast, Saturation, Hue and Lum Mix settings.
Which is the correct setting to use? That's up to you, as color correction is a pure creative process and there is no right and wrong. The best setting is what you like the most and what you think looks good!
Synchronizing Settings
When connected, camera control signals are sent from your ATEM switcher to the Blackmagic camera. If a setting is accidentally adjusted from your camera, camera control will automatically reset that setting to maintain synchronization.
The DaVinci Resolve primary color corrector in each camera controller can be controlled by a DaVinci Resolve Micro panel. Using a hardware control panel lets you make fast and precise color adjustments. For more information, see the ATEM Mini manual.
NOTE A camera that is switched off while connected by HDMI to ATEM Mini may affect camera control communication. We recommend you run cameras from mains power and unplug the HDMI cable before switching them off.
Working with Third Party Software
To edit your clips using your favorite editing software such as DaVinci Resolve, you can copy your clips from your camera to an external drive or RAID and then import your clips into the software. You can also import your clips directly from your storage media using a dock or adapter for your CFast or SD card, or via the USB-C port for a USB-C flash disk.
Working with Files from CFast 2.0 and SD cards
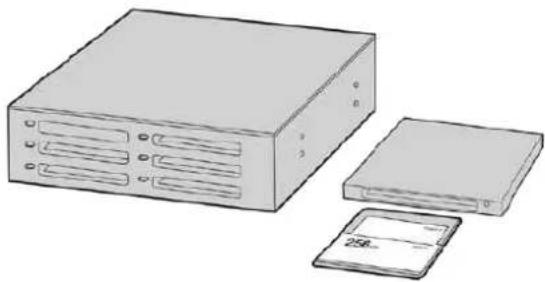
Edit directly from your CFast or SD card by removing it from your camera and mounting it on your computer using a CFast 2.0 reader/writer or CFast drive
To import your clips from a CFast 2.0 or SD card:
1 Remove the CFast or SD card from your Blackmagic Pocket Cinema Camera.
Mount the CFast or SD card to your Mac or Windows computer using a CFast 2.0 card reader SD card reader or CFast drive.
2 Double click on the CFast or SD card to open it and you should see folders that contain your Blackmagic RAW files or a list of QuickTime movie files. Depending on the format you chose to record in, you might have a mixture of files, but they should all use the same naming convention.
3 Drag the files you want from the CFast or SD card onto your desktop or another drive, or you can access the files straight from the CFast or SD card using your editing software.
4 Before you unplug the CFast or SD card from your computer, it is important to always eject your CFast or SD card from Mac or Windows. Removing your card without ejecting can corrupt footage.
Working with Files from USB-C flash disks
To import your clips from a USB-C flash disk:
1 Unplug the USB-C flash disk from your camera.
2 Mount the USB-C flash disk to your Mac or Windows computer via a USB-C port on your computer. USB 3.0 is preferable as USB 2.0 is not fast enough to edit video in real time.
3 Double click on the USB-C flash disk to open it and you should see a list of QuickTime movie files or Blackmagic RAW files. Depending on the format you chose to record in, you might have a mixture of files, but they should all use the same naming convention.
4 Drag the files you want from the USB-C flash disk onto your desktop or another hard drive, or you can access the files straight from the USB-C flash disk using your NLE software.
5 Before you unplug the USB-C flash disk from your computer, it is important to eject the USB-C flash disk first.
Using Final Cut Pro X
To edit your clips using Final Cut Pro X, you need to create a new project and set a suitable video format and frame rate. This example uses ProRes 422 HQ 1080p24.

Final Cut Pro X project settings
1 Launch Final Cut Pro X, go to the 'menu' bar and select 'file/new project'. A window will open containing project settings.
2 Name your project and select the 'custom' checkbox.
3 Set the 'video properties' settings to 1080p HD, 1920x1080 and 24p.
4 Set your 'audio' and 'render properties' settings to 'stereo, 48kHz, and Apple ProRes 422 HQ'
5 Click OK.
To import your clips into your project, go to the 'menu' bar and select 'file/import/media'. Choose your clips from your CFast card.
You can now drag your clips onto the timeline for editing.
Using Avid MediaComposer 2018
To edit your clips using Avid MediaComposer 2018, create a new project and set a suitable video format and frame rate. For this example, clips are set using 1080p24.
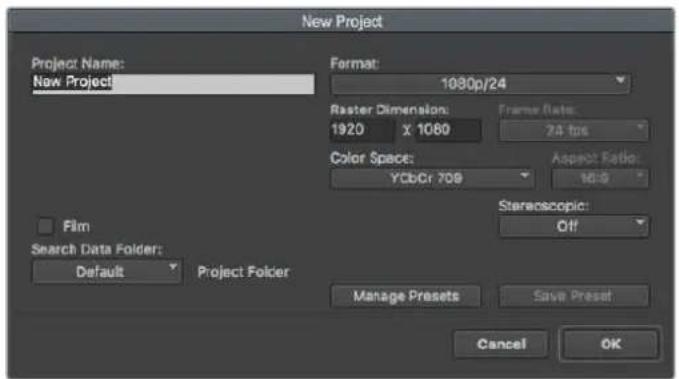
Setting the project name and project options in Avid Media Composer 2018
1 Launch Avid MediaComposer 2018 and the 'select project' window will appear.
2 Click the 'new project' button and name your project in the 'new project' window.
3 In the 'format' menu select HD 1080 > 1080p/24 and click 'ok' to create the project.
4 Double click the project in the 'select project' window to open it.
5 Select file > input > source browser and navigate to the files you wish to import.
6 Select your 'target bin' from the menu and click 'import'.
When the clips appear in the media bin you can drag your clips onto the timeline and begin editing.
Using Adobe Premiere Pro CC
To edit your Apple ProRes 422 HQ clips using Adobe Premiere Pro CC, you need to create a new project and set a suitable video format and frame rate. For this example, clips are set using ProRes 422 HQ 1080p25.
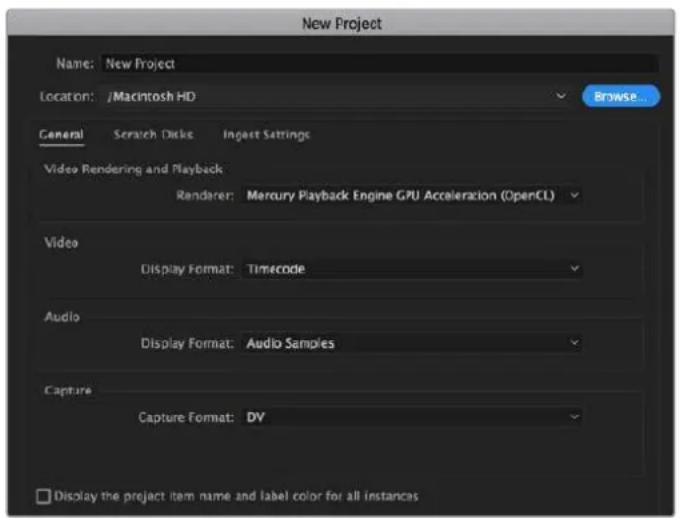
Setting the project name and project options in Adobe Premiere Pro CC
1 Launch Adobe Premiere Pro CC. In the 'welcome' window select 'new project'. A window will open containing project settings.
2 Name your project. Choose the location for your project by clicking 'browse' and selecting your desired folder. Once you've selected your location folder click OK in the 'new project' window.
3 Go to the Adobe Premiere Pro CC 'menu' bar, select 'file/import' and choose the clips you want to edit. Your clips will appear in the project window.
4 Drag the first clip you wish to edit onto the 'new item' icon at the bottom right of the project window. A new sequence will be created matching your clip settings.
You can now drag your clips onto the sequence timeline for editing.
Blackmagic Camera Setup Utility
Updating Camera Software - Mac
After downloading the Blackmagic Camera Setup utility software and unzipping the downloaded file, open the resulting disk image to reveal the Blackmagic Camera Setup Installer.
Launch the installer and follow the on screen instructions. After the installation has finished, go to your applications folder and open the Blackmagic Cameras folder, where you'll find this manual, the Blackmagic Camera setup utility, plus a documents folder containingREADME files and information. You'll also find an uninstaller for when updating to later versions of Blackmagic Camera Setup.
Updating Camera Software - Windows
After downloading the Blackmagic Camera Setup utility software and unzipping the downloaded file, you should see a Blackmagic Camera Setup folder containing this PDF manual and the Blackmagic Camera Setup Installer. Double-click the installer and follow the on screen prompts to complete the installation.
In Windows 10, click the start button and select 'all apps'. Scroll down to the Blackmagic design folder. From here you can launch Blackmagic Camera Setup. In Windows 8.1, select the down arrow icon from the 'start' screen, and scroll down to the Blackmagic Design folder. From here you can launch Blackmagic Camera Setup.
Updating your Camera's Internal Software
After installing the latest Blackmagic Camera Setup utility on your computer, connect a USB-C cable between the computer and your camera. The USB-C port is located on the left side panel. Simply open the rubber cap to access the port.
Launch the Blackmagic Camera Setup utility and follow the on screen prompts to update the camera software. The camera restarts on the 'select language' screen. It's important to note that updating your camera software erases any presets and custom LUTs, and resets all settings. It is a good practice to export them to a memory card as a backup before performing a software update. After a software update, you can restore your presets and LUTs quickly by importing them from the memory card.
Using a Battery Grip
Adding a battery grip to your Pocket Cinema Camera adds a horizontal handle and is a portable way to extend the duration of your shooting sessions. If you have a battery grip then it's a good idea to install it now before you continue.
Blackmagic Pocket Camera Battery Pro Grip is designed for Pocket Cinema Camera 6K Pro and 6K G2 and holds two NP-F570 batteries. You can power Pocket Cinema Camera 6K Pro and 6K G2 from its internal battery in conjunction with both batteries in the grip.
The Blackmagic Pocket Camera Battery Grip is designed to fit Blackmagic Pocket Cinema Camera 4K. It holds two NP-F570 L-Series batteries so you can shoot continuously for over two hours.
The 12 V DC input can recharge the batteries in the grip or provide uninterrupted power to the camera while changing the batteries. You can use the USB-C port to recharge batteries in the grip while the camera is switched off.
Attaching Blackmagic Pocket Camera Battery Pro Grip
Before you start attaching Blackmagic Pocket Camera Battery Pro Grip to your Pocket Cinema Camera 6K Pro and 6K G2, switch off your camera and unplug any external power source. For maximum running time, you are advised to keep the internal battery inside the camera when you install the battery grip and power your camera from all three batteries.
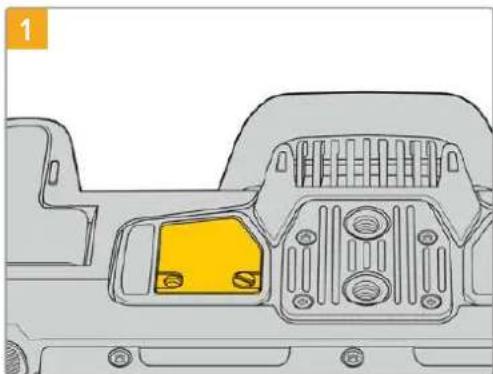
Locate the small cover on the underside the camera near the battery compartment, and loosen the screw that holds it in place.
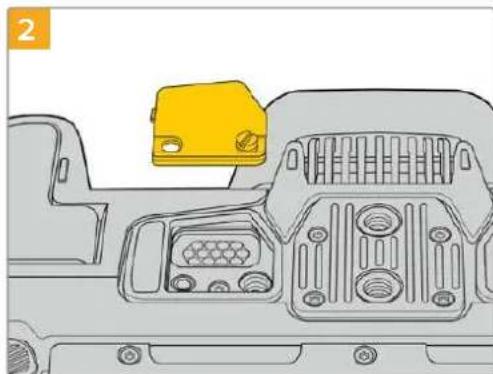
Remove the cover from the underside of the camera to reveal the electrical contacts that provide power from the battery grip.
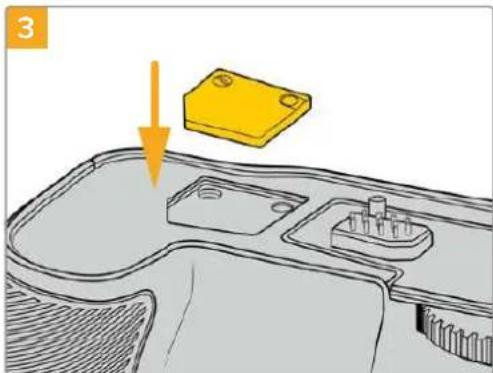
For safe storage of the contacts cover from the underside of camera, insert it into the recess on top of the battery grip and secure it in place by tightening the screw.

Gently push the camera grip onto the underside of your camera. The 1/4 inch screw on top of the battery grip should line up with the 1/4-20 mounting point on the base of the camera. Small pins on both sides of the 1/4 inch screw help maintain correct alignment.

Turn the knob on the front of the battery grip to the right to lighten the screw firmly and secure the battery grip to the camera.
Attaching Blackmagic Pocket Camera Battery Grip
Before you start attaching a battery grip, switch off your Pocket Cinema Camera 4K and unplug any external power source.
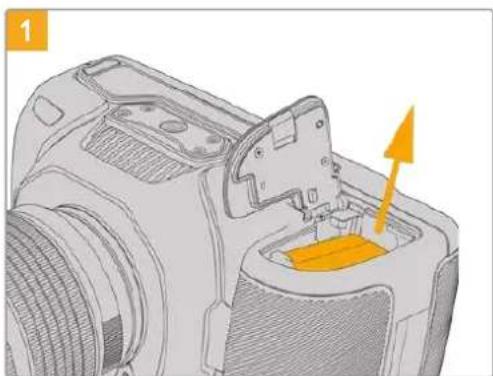
Open the camera battery compartment and remove the LP-E6 battery.
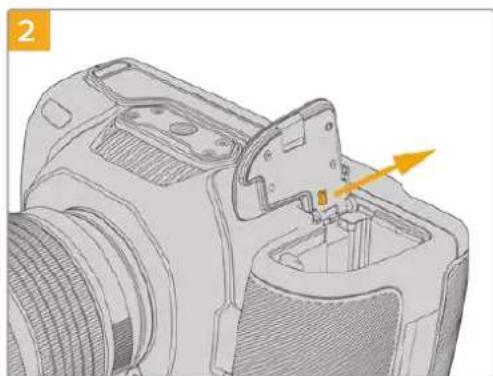
Slide the tab near the hinge of the battery compartment cover and remove the cover from the camera.

For safe storage of the battery compartment cover, clip it into the recess on the underside of the battery grip tray.

Close the battery compartment cover so it sits level with the underside of the battery grip tray.
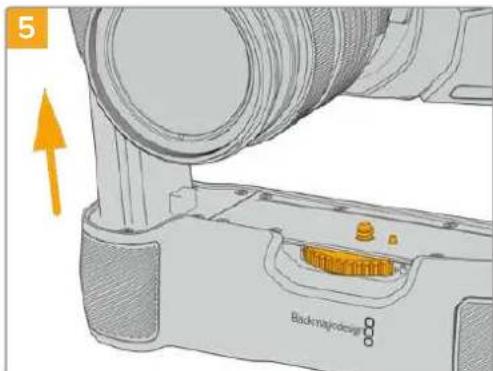
Insert the battery shaped part of the camera grip into the battery compartment of your camera. The 1/4 inch screw on top of the battery grip should line up with the 1/4-20 mounting point on the base of the camera. A small pin next to the 1/4 inch screw helps maintain correct alignment.
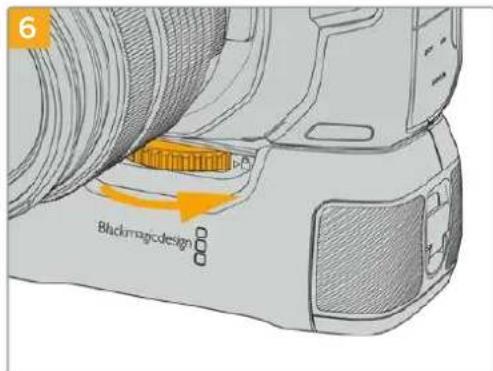
Turn the knob on the front of the battery grip to the right to lighten the screw firmly and secure the battery grip to the camera.
Inserting Batteries into the Battery Grip
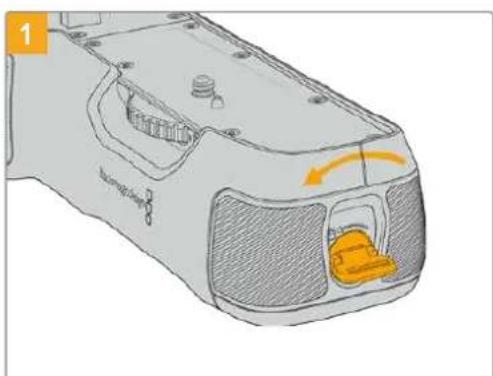
Twist the locking tab on the end of the battery grip anticlockwise to unlock the battery tray. Slide out the battery tray. You can do this before or after attaching the battery grip to your camera.
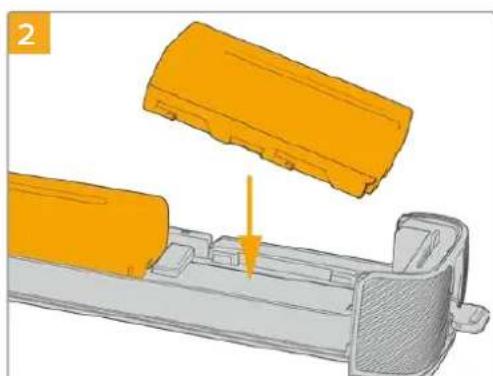
Place two NP-F570 batteries into the battery tray, being careful of their orientation, and slide them away from each other. A tab between the batteries moves up to lock the batteries into place. When you want to remove the batteries, press down on this locking tab and slide the batteries toward each other.

Slide the battery tray into the battery grip and turn the locking tab clockwise. It's important to note that you can continue filming while changing batteries in the battery grip if your camera is powered by an external source plugged into the DC power input.
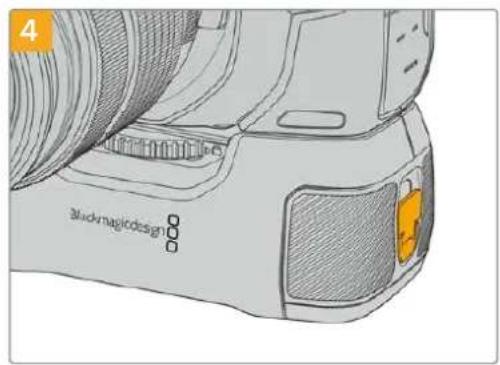
Twist the locking tab on the end of the battery grip clockwise to lock the battery tray.
TIP When you have a battery grip attached to Pocket Cinema Camera 4K and two batteries inserted, the battery level indicator in the top right corner of the LCD touchscreen shows two battery icons so you can monitor their charge level independently. When you attach a battery grip to Blackmagic Pocket Cinema Camera 6K Pro and 6K G2, the LCD touchscreen shows three battery icons. For more information, see the 'power' section.
Developer Information
Blackmagic Bluetooth Camera Control
Blackmagic cameras with Bluetooth LE implement a variety of features and commands that allow users to control their cameras wirelessly. Developers have full access to these features for their custom applications.
The following services and characteristics describe the full range of communication options that are available to the developer.
Service: Device Information Service
UUID:180A
Characteristics
Camera Manufacturer
UUID:2A29
Read the name of the manufacturer (always "Blackmagic Design").
Camera Model
UUID:2A24
Read the name of the camera model ("Pocket Cinema Camera 6K" or "Pocket Cinema Camera 4K").
Service: Blackmagic Camera Service
UUID: 291D567A-6D75-11E6-8B77-86F30CA893D3
Characteristics
Outgoing Camera Control (encrypted)
UUID: 5DD3465F-1AEE-4299-8493-D2ECA2F8E1BB
Send Camera Control messages
These messages are identical to those described in the Blackmagic SDI Camera Control Protocol section below. Please read that section for a list of supported messages and required formatting information.
For an example of how packets are structured, please see the 'example protocol packets' section in this document.
Incoming Camera Control (encrypted)
UUID:B864E140-76AO-416A-BF30-5876504537D9
Request notifications for this characteristic to receive Camera Control messages from the camera.
These messages are identical to those described in the Blackmagic SDI Camera Control Protocol section below. Please read that section for a list of supported messages and required formatting information.
Timecode (encrypted)
UUID:6D8F2110-86F1-41BF-9AFB-451D87E976C8
Request notifications for this characteristic to receive timecode updates.
Timecode (HH:MM:SS:mm) is represented by a 32-bit BCD number: (eg. 09:12:53:10 = 0x09125310)
Camera Status (encrypted)
UUID:7FE8691D-95DC-4FC5-8ABD-CA74339B51B9
Request notifications for this characteristic to receive camera status updates.
The camera status is represented by flags contained in an 8-bit integer:
None = 0× 00
Camera Power On = 0x01
Connected = 0× 02
Palred = 0× 04
Versions Verflied = 0× 08
Initial Payload Received = 0× 10
Camera Ready = 0× 20
Send a value of 0x00 to power a connected camera off.
Send a value of 0x01 to power a connected camera on.
Device Name
UUID:FFAC0C52-C9FB-41A0-B063-CC76282EB89C
Send a device name to the camera (max. 32 characters).
The camera will display this name in the Bluetooth Setup Menu.
Protocol Version
UUID: 8F1FD018-B508-456F-8F82-3D392BEE2706
Read this value to determine the camera's supported CCU protocol version.
NOTE Encrypted characteristics can only be used once a device has successfully bonded or paired with the Blackmagic Camera. Once a connection has been established, any attempt to write to an encrypted characteristic will initiate bonding. For example, writing a 'Camera Power On' (0x01) message to the Camera Status characteristic.
Once bonding is initiated, the camera will display a 6-digit pin in the Bluetooth Setup Menu. Enter this pin on your device to establish an encrypted connection. The device will now be able to read, write and receive notifications from encrypted characteristics.
Blackmagic SDI and Bluetooth Camera Control Protocol
Version 1.5
If you are a software developer you can use the Blackmagic SDI and Bluetooth Camera Control Protocol to construct devices that integrate with our products. Here at Blackmagic Design, our approach is to open up our protocols and we eagerly look forward to seeing what you come up with!
Overview
This document describes an extensible protocol for sending a unidirectional stream of small control messages embedded in the non-active picture region of a digital video stream. The video stream containing the protocol stream may be broadcast to a number of devices. Device addressing is used to allow the sender to specify which device each message is directed to.
Assumptions
Alignment and padding constraints are explicitly described in the protocol document. Bit fields are packed from LSB first. Message groups, individual messages and command headers are defined as, and can be assumed to be, 32 bit aligned.
Blanking Encoding
A message group is encoded into a SMPTE 291M packet with DID/SDID x51/x53 in the active region of VANC line 16.
Message Grouping
Up to 32 messages may be concatenated and transmitted in one blanking packet up to a maximum of 255 bytes payload. Under most circumstances, this should allow all messages to be sent with a maximum of one frame latency.
If the transmitting device queues more bytes of message packets than can be sent in a single frame, it should use heuristics to determine which packets to prioritize and send immediately. Lower priority messages can be delayed to later frames, or dropped entirely as appropriate.
Abstract Message Packet Format
Every message packet consists of a three byte header followed by an optional variable length data block. The maximum packet size is 64 bytes.
| Destination device (uint8) | Device addresses are represented as an 8 bit unsigned integer. Individual devices are numbered 0 through 254 with the value 255 reserved to indicate a broadcast message to all devices. |
| Command length (uint8) | The command length is an 8 bit unsigned integer which specifies the length of the included command data. The length does NOT include the length of the header or any trailing padding bytes. |
| Command id (uint8) | The command Id is an 8 bit unsigned integer which indicates the message type being sent. Receiving devices should ignore any commands that they do not understand. Commands 0 through 127 are reserved for commands that apply to multiple types of devices. Commands 128 through 255 are device specific. |
| Reserved (uint8) | This byte is reserved for alignment and expansion purposes. It should be set to zero. |
| Command data (uint8[]) | The command data may contain between 0 and 60 bytes of data. The format of the data section is defined by the command itself. |
| Padding (uint8[]) | Messages must be padded up to a 32 bit boundary with 0x0 bytes. Any padding bytes are NOT included in the command length. |
Receiving devices should use the destination device address and or the command identifier to determine which messages to process. The receiver should use the command length to skip irrelevant or unknown commands and should be careful to skip the implicit padding as well.
Defined Commands
Command 0 : change configuration
| Category (uint8) | The category number specifies one of up to 256 configuration categories available on the device. |
| Parameter (uint8) | The parameter number specifies one of 256 potential configuration parameters available on the device. Parameters 0 through 127 are device specific parameters. Parameters 128 though 255 are reserved for parameters that apply to multiple types of devices. |
| Data type (uint8) | The data type specifies the type of the remaining data. The packet length is used to determine the number of elements in the message. Each message must contain an integral number of data elements. |
| Currently defined values are: | |
| 0: void / boolean | A void value is represented as a boolean array of length zero. The data field is a 8 bit value with 0 meaning false and all other values meaning true. |
| 1: signed byte Data elements are signed bytes | |
| 2: signed 16 bit integer Data elements are signed 16 bit values | |
| 3: signed 32 bit integer Data elements are signed 32 bit values | |
| 4: signed 64 bit integer Data elements are signed 64 bit values | |
5:UTF-8 string Data elements represent a UTF-8 string with no terminating character.
Data types 6 through 127 are reserved.
| 128: signed 5.11 fixed point | Data elements are signed 16 bit integers representing a real number with 5 bits for the integer component and 11 bits for the fractional component. The fixed point representation is equal to the real value multiplied by 2^11. The representable range is from -16.0 to 15.9995 (15 + 2047/2048). |
Data types 129 through 255 are available for device specific purposes.
Operation types 2 through 127 are reserved.
| Operation type (uint8) | The operation type specifies what action to perform on the specified parameter. Currently defined values are: |
| 0: assign value | The supplied values are assigned to the specified parameter. Each element will be clamped according to its valid range. A void parameter may only be 'assigned' an empty list of boolean type. This operation will trigger the action associated with that parameter. A boolean value may be assigned the value zero for false, and any other value for true. |
| 1: offset / toggle value | Each value specifies signed offsets of the same type to be added to the current parameter values. The resulting parameter value will be clamped according to their valid range. It is not valid to apply an offset to a void value. Applying any offset other than zero to a boolean value will invert that value. |
Operation types 128 through 255 are available for device specific purposes.
| Data (void) | The data field is 0 or more bytes as determined by the data type and number of elements. |
The category, parameter, data type and operation type partition a 24 bit operation space.
| Group | ID | Parameter | Type | Index | Minimum | Maximum | Interpretation |
| Lens | 0.0 | Focus | fixed16 | - | 0.0 | 1.0 | 0.0 = near, 1.0 = far |
| 0.1 | Instantaneous autofocus | void | - | - | - | trigger instantaneous autofocus | |
| 0.2 | Aperture (f-stop) | fixed16 | - | -1.0 | 16.0 | Aperture Value (where fnumber = sqrt(2^AV)) | |
| 0.3 | Aperture (normalised) | fixed16 | - | 0.0 | 1.0 | 0.0 = smallest, 1.0 = largest | |
| 0.4 | Aperture (ordinal) | int16 | - | 0 | n | Steps through available aperture values from minimum (0) to maximum (n) | |
| 0.5 | Instantaneous auto aperture | void | - | - | - | trigger instantaneous auto aperture | |
| 0.6 | Optical image stabilisation | boolean | - | - | - | true = enabled, false = disabled | |
| 0.7 | Set absolute zoom (mm) | int16 | - | 0 | max | Move to specified focal length in mm, from minimum (0) to maximum (max) | |
| 0.8 | Set absolute zoom (normalised) | fixed16 | - | 0.0 | 1.0 | Move to specified focal length: 0.0 = wide, 1.0 = tele | |
| 0.9 | Set continuous zoom (speed) | fixed16 | - | -1.0 | +1.0 | Start/stop zooming at specified rate: -1.0 = zoom wider fast, 0.0 = stop, +1 = zoom tele fast | |
| Video | 1.0 Video mode Int8 | [0] = frame rate -- | fps as integer(eg 24, 25, 30, 50, 60) | ||||
| [1] = M-rate -- 0 = regular, 1 = M-rate | |||||||
| [2] = dimensions -- | 0 = NTSC, 1 = PAL, 2 = 720,3 = 1080, 4 = 2kDCI, 5 = 2k16:9,6 = UHD, 7 = 3k Anamorphic,8 = 4k DCI, 9 = 4k 16:9,10 = 4.6k 2.4:1, 11 = 4.6k | ||||||
| [3] = interlaced -- | 0 = progressive,1 = interlaced | ||||||
| [4] = Color space | -- 0 = YUV | ||||||
| 1.1 | Gain (up to Camera 4.9) | Int8 | 1 | 128 | 1x, 2x, 4x, 8x, 16x, 32x, 64x, 128x gain | ||
| 1.2 | Manual White Balance | int16 | [0] = color temp | 2500 | 10000 | Color temperature in K | |
| int16 | [1] = tint | -50 | 50 | tint | |||
| 1.3 | Set auto WB | void | - | - | - | Calculate and set auto white balance | |
| 1.4 | Restore auto WB | void | - | - | - | Use latest auto white balance setting | |
| 1.5 | Exposure (us) | Int32 | 1 | 42000 | time in us | ||
| 1.6 | Exposure (ordinal) | Int16 | - | 0 | n | Steps through availableexposure values from minimum(0) to maximum (n) | |
| 1.7 | Dynamic Range Mode | Int8 enum | - | 0 | 2 | 0 = film, 1 = video,2 = extended video | |
| 1.8 | Video sharpening level | Int8 enum | - | 0 | 3 | 0 = off, 1 = low, 2 = medium,3 = high | |
| 1.9 | Recording format | int16 | [0] = file frame rate | -- | fps as integer(eg 24, 25, 30, 50, 60, 120) | ||
| [1] = sensor frame rate | - | - | fps as integer, valid whensensor-off-speed set (eg 24,25, 30, 33, 48, 50, 60, 120),no change will be performed ifthis value is set to 0 | ||||
| [2] = frame width | -- in pixels | ||||||
| [3] = frame height | -- in pixels | ||||||
| [4] = flags | -- [0] = file-M-rate | ||||||
| - | - | [1] = sensor-M-rate, validwhen sensor-off-speed-set | |||||
| -- [2] = sensor-off-speed | |||||||
| -- [3] = interlaced | |||||||
| -- [4] = windowed mode | |||||||
| 1.10 | Set auto exposure mode | int8 | - | 0 | 4 | 0 = Manual Trigger, 1 = Iris,2 = Shutter, 3 = Iris + Shutter,4 = Shutter + Iris | |
| 1.11 | Shutter angle | int32 | - | 100 | 36000 | Shutter angle in degrees,multiplied by 100 | |
| 1.12 | Shutter speed | int32 | - | Currentsensorframe rate | 5000 | Shutter speed value as a fraction of 1, so 50 for 1/50th of a second | |
| 1.13 | Gain | int8 | - | -128 | 127 | Gain in decibel (dB) | |
| 1.14 | ISO | int32 | - | 0 | 2147483647 | ISO value | |
| 1.15 | Display LUT | int8 | [0] = selected LUT | -- | 0 = None, 1 = Custom,2 = film to video,3 = film to extended video | ||
| [1] = enabled or not | -- 0 = Not enabled, 1 = Enabled | ||||||
| 1.16 | ND Filter | fixed16 | [0] = stops | 0.0 | 16.0 | f-stop of ND filter to use | |
| Audio | 2.1 | Headphone level | fixed16 | - | 0.1 | 1.0 | 0.0 = minimum, 1.0 = maximum |
| 2.2 | Headphone program mix | fixed16 | - | 0.1 | 1.0 | 0.0 = minimum, 1.0 = maximum | |
| 2.3 | Speaker level | fixed16 | - | 0.1 | 1.0 | 0.0 = minimum, 1.0 = maximum | |
| 2.4 | Input type | int8 | - | 0 | 3 | 0 = internal mic,1 = line level input,2 = low mic level input,3 = high mic level input | |
| 2.5 | Input levels | fixed16 | [0] ch0 | 0.0 | 1.0 | 0.0 = minimum, 1.0 = maximum | |
| [1] ch1 | 0.0 | 1.0 | 0.0 = minimum, 1.0 = maximum | ||||
| 2.6 | Phantom power | boolean | - | - | - | true = powered,false = not powered | |
| Output | 3.0 | Overlay enables | uint16bit field | -- - | bit flags:[0] = display status,[1] = display frame guidesSome cameras don't allow separate control of frameguides and status overlays. | ||
| 3.1 | Frame guides style (Camera3.x) | int8 | -0 8 | 0 = HDTV, 1 = 4:3, 2 = 2:4:1,3 = 2.39:1, 4 = 2.35:1,5 = 1.85:1, 6 = thirds | |||
| 3.2 | Frame guides opacity(Camera 3.x) | fixed16 | - | 0.1 | 1.0 | 0.0 = transparent, 1.0 = opaque | |
| 3.3 | Overlays(replaces .1 and .2above fromCameras 4.0) | int8 | [0] = frame guidesstyle | - | - | 0 = off, 1 = 2.4:1, 2 = 2.39:1,3 = 2.35:1, 4 = 1.85:1, 5 = 16:9,6 = 14:9, 7 = 4:3, 8 = 2:1,9 = 4:5, 10 = 1:1 | |
| [1] = frame guide opacity | 0 | 100 0 = transparent, 100 = opaque | |||||
| [2] = safe area percentage | 0 | 100 | percentage of full frameused by safe area guide(0 means off) | ||||
| [3] = grid style | - | - | bit flags:[0] = display thirds,[1] = display cross hairs,[2] = display center dot,[3] = display horizon | ||||
| Display | 4.0 | Brightness | fixed16 | - | 0.0 | 1.0 | 0.0 = minimum, 1.0 = maximum |
| 4.1 Exposure and focus tools | Int16bit field | 0x1 = zebra,0x2 = focus assist,0x4 = false color | - | - | - | 0 = disable, 1 = enable | |
| 4.2 | Zebra level | fixed16 | - | 0.0 | 1.0 | 0.0 = minimum, 1.0 = maximum | |
| 4.3 | Peaking level | fixed16 | - | 0.0 | 1.0 | 0.0 = minimum, 1.0 = maximum | |
| 4.4 | Color bar enable | int8 | - | 0 | 30 | 0 = disable bars,1-30 = enable bars with timeout(seconds) | |
| 4.5 | Focus Assist | Int8 | [0] = focus assist method | - | - | 0 = Peak,1 = Colored lines | |
| [1] = focus line color | - | - | 0 = Red,1 = Green,2 = Blue,3 = White,4 = Black | ||||
| 4.6 | Program return feed enable | Int8 | - | 0 | 30 | 0 = disable, 1-30 = enable withtimeout (seconds) | |
| Tally | 5.0 | Tally brightness | fixed16 | - | 0.0 | 1.0 | Sets the tally front and tally rear brightness to the same level. 0.0 = minimum, 1.0 = maximum |
| 5.1 | Front tally brightness | fixed16 | - | 0.0 | 1.0 | Sets the tally front brightness. 0.0 = minimum, 1.0 = maximum | |
| 5.2 | Rear tally brightness | fixed16 | - | 0.0 | 1.0 | Sets the tally rear brightness. 0.0 = minimum, 1.0 = maximum Tally rear brightness cannot be turned off | |
| Reference | 6.0 | Source | int8 enum | - | 0 | 2 | 0 = internal, 1 = program, 2 = external |
| 6.1 | Offset | int32 | - | - | - | +/- offset in pixels | |
| Confi-guration | 7.0 Real Time Clock | Int32 | [0] time | - | - | BCD - HHMMSSFF (UCT) | |
| [1] date | - | - | BCD - YYYYMMDD | ||||
| 7.1 | System language | string | [0-1] | - | - | ISO-639-1 two character language code | |
| 7.2 | Timezone | int32 | - | - | - | Minutes offset from UTC | |
| 7.3 Location | int64 | [0] latitude | - | - | BCD - sDDDdddddddddddd where s is the sign: 0 = north (+), 1 = south (-); DD degrees, ddddddddddd decimal degrees | ||
| [1] longitude | - | - | BCD - sDDDdddddddddddd where s is the sign: 0 = west (-), 1 = east (+); DDD degrees, ddddddddddd decimal degrees | ||||
| Color Correction | 8.0 Lift Adjust fixed16 | [0] red -2.0 2.0 default | 0.0 | ||||
| [1] green -2.0 2.0 default | 0.0 | ||||||
| [2] blue -2.0 2.0 default | 0.0 | ||||||
| [3] luma | -2.0 | 2.0 | default 0.0 | ||||
| 8.1 | Gamma Adjust | fixed16 | [0] red -4.0 | 4.0 default 0.0 | |||
| [1] green -4.0 | 4.0 default 0.0 | ||||||
| [2] blue -4.0 | 4.0 default 0.0 | ||||||
| [3] luma | -4.0 | 4.0 default 0.0 | |||||
| 8.2 | Gain Adjust | fixed16 | [0] red 0.0 | 16.0 | default 1.0 | ||
| [1] green 0.0 | 16.0 | default 1.0 | |||||
| [2] blue 0.0 | 16.0 | default 1.0 | |||||
| [3] luma | 0.0 | 16.0 | default 1.0 | ||||
| 8.3 Offset Adjust | fixed16 | [0] red -8.0 | 8.0 | default 0.0 | |||
| [1] green -8.0 | 8.0 | default 0.0 | |||||
| [2] blue -8.0 | 8.0 | default 0.0 | |||||
| [3] luma | -8.0 | 8.0 | default 0.0 | ||||
| 8.4 | Contrast Adjust | fixed16 | [0] pivot | 0.0 | 1.0 | default 0.5 | |
| [1] adj | 0.0 | 2.0 | default 1.0 | ||||
| 8.5 | Luma mix | fixed16 | - | 0.0 | 1.0 | default 1.0 | |
| 8.6 Color Adjust | fixed16 | [0] hue | -1.0 | 1.0 | default 0.0 | ||
| [1] sat | 0.0 | 2.0 | default 1.0 | ||||
| 8.7 | Correction Reset Default | void | - | - | - | reset to defaults | |
| Media | 10.0 | Codec int8 enum | [0] = basic codec -- | 0 = Cinema/DNG, 1 = DNxHD, 2 = ProRes, 3 = Blackmagic RAW | |||
| [1] = code variant | - | - | Cinema/DNG: 0 = uncompressed, 1 = lossy 3:1, 2 = lossy 4:1 | ||||
| - | - | ProRes: 0 = HQ, 1 = 422, 2 = LT, 3 = Proxy, 4 = 444, 5 = 444XQ | |||||
| - | - | Blackmagic RAW: 0 = Q0, 1 = Q5, 2 = 3:1, 3 = 5:1, 4 = 8:1, 5 = 12:1 | |||||
| 10.1 | Transport mode | int8 | [0] = mode | -- | 0 = Preview, 1 = Play, 2 = Record | ||
| [1] = speed | -- | -ve = multiple speeds backwards, 0 = pause, +ve = multiple speeds forwards | |||||
| [2] = flags | -- | 1<<0 = loop, 1<<1 = play all, 1<<5 = disk1 active, 1<<6 = disk2 active, 1<<7 = time-lapse recording | |||||
| [3] = slot 1 storage medium | - | - | 0 = CFast card, 1 = SD Card, 2 = SSD Recorder, 3 = USB | ||||
| [4] = slot 2 storage medium | - | - | 0 = CFast card, 1 = SD Card, 2 = SSD Recorder, 3 = USB | ||||
| 10.2 | Playback Control | int8 enum | [0] = clip | - | - | 0 = Previous, 1 = Next | |
| 10.3 | Still Capture | void | - | - | - | Capture | |
| PTZ Control | 11.0 | Pan/Tilt Velocity | fixed16 | [0] = pan velocity -1.0 | 1.0 | -1.0 = full speed left, 1.0 = full speed right | |
| [1] = tilt velocity | -1.0 | 1.0 | -1.0 = full speed down, 1.0 = full speed up | ||||
| 11.1 | Memory Preset | int8 enum | [0] = preset command | - | - | 0 = reset, 1 = store location, 2 = recall location | |
| int8 | [1] = preset slot | 0.5- | |||||
| Metadata | 12.0 | Reel | int16 | [0] = reel | 0 | 999 | - |
| 12.1 Scene Tags | signedbyte | [0] = scene tags - | - | -1 = None0 = WS1 = CU2 = MS3 = BCU4 = MCU5 = ECU | |||
| [1] = Interior /exterior | - | - | - | 0 = Exterior1 = Interior | |||
| [2] = day / night | -- | 0 = Night1 = Day | |||||
| 12.2 | Scene | string | [0-4] = scene | - | - | - | |
| 12.3 | Take | signedbyte | [0] = take number | 1 | 99 | - | |
| [1] = take tags | -- | 1 = None0 = PU1 = VFX2 = SER | |||||
| 12.4 | Good Take | void | [0] = good take | - | - | - | |
| 12.5 | Camera ID | string | [0-28] = ID | - | - | - | |
| 12.6 | Camera Operator | string | [0-28] = operator | - | - | - | |
| 12.7 | Director | string | [0-27] = director | - | - | - | |
| 12.8 | Project Name | string | [0-28] = project | - | - | - | |
| 12.9 | Lens Type | string | [0-55] = type | - | - | - | |
| 12.10 | Lens Iris | string | [0-19] = Iris | - | - | - | |
| 12.11 | Lens Focal Length | string | [0-29] = focal length | - | - | - | |
| 12.12 | Lens Distance | string | [0-49] = distance | - | - | - | |
| 12.13 | Lens Filter | string | [0-29] = filter | - | - | - | |
| 12.14 | Slate Mode | signedbyte | [0] = type | -- | 0 = Recording1 = Playback | ||
| 12.15 | Slate Target | string | [0-31] = name | - | - | - | |
Example Protocol Packets
| Operation | Packet Length Byte | ||||||||||||||||
| 0 | 1 | 2 | 3 | 4 | 5 | 6 | 7 | 8 | 9 | 10 | 11 | 12 | 13 | 14 | 15 | ||
| header command data | |||||||||||||||||
| destination | length | command | reserved | category | parameter | type | operation | ||||||||||
| trigger instantaneous auto focus on camera 4 | 844000100 | ||||||||||||||||
| turn on OIS on all cameras 12 | 25550006001000 | ||||||||||||||||
| set exposure to 10 ms on camera 4 (10 ms = 10000 us = 0x00002710) | 12 | 4 | 8 | 0 | 0 | 1 | 5 | 3 | 0 | 0x10 | 0x27 | 0x00 | 0x00 | ||||
| add 15% to zebra level (15 % = 0.15 f = 0x0133 fp) | 12 | 4 | 6 | 0 | 0 | 4 | 2 | 128 | 1 | 0x33 | 0x01 | 0 | 0 | ||||
| select 1080p 23.98 mode on all cameras | 16 | 255 | 9 | 0 | 0 | 1 | 0 | 1 | 0 | 24 | 1 | 3 | 0 | 0 | 0 | 0 | 0 |
| subtract 0.3 from gamma adjust for green & blue (-0.3 ^=0xff9a fp) | 16 | 4 | 12 | 0 | 0 | 8 | 1 | 128 | 1 | 0 | 0 | 0x9a | 0xffd | 0x9a | 0xffd | 0 | 0 |
| all operations combined | 76 | 440001002555000600 | |||||||||||||||
| 1 | 0 | 0 | 0 | 4 | 8 | 0 | 0 | 1 | 5 | 3 | 0 | 0x10 | 0x27 | 0x00 | 0x00 | ||
| 4 | 6 | 0 | 0 | 4 | 2 | 128 | 1 | 0x33 | 0x01 | 0 | 0 | 255 | 9 | 0 | 0 | ||
| 1 | 0 | 1 | 0 | 24 | 1 | 3 | 0 | 0 | 0 | 0 | 0 | 4 | 12 | 0 | 0 | ||
| 8 | 1 | 128 | 1 | 0 | 0 | 0x9a | 0xffd | 0x9a | 0xffd | 0 | 0 | ||||||
Help
The fastest way to obtain help is to go to the Blackmagic Design online support pages and check the latest support material available for your camera.
Blackmagic Design Online Support Pages
The latest manual, software and support notes can be found at the Blackmagic Design support center at www.blackmagicdesign.com/support.
Contacting Blackmagic Design Support
If you can't find the help you need in our support material, please use the 'Send us an email' button on the support page to email a support request. Alternatively, click on the 'Find your local support team' button on the support page and call your nearest Blackmagic Design support office.
Checking the Software Version Currently Installed
To check which version of Blackmagic Camera Setup utility software is installed on your computer, open the About Blackmagic Camera Setup utility window.
- On Mac, open Blackmagic Camera Setup utility from the Applications folder. Select About Blackmagic Camera Setup utility from the application menu to reveal the version number.
- On Windows, open Blackmagic Camera Setup utility from your Start menu or Start Screen. Click on the Help menu and select About Blackmagic Camera Setup utility to reveal the version number.
How to Get the Latest Software Updates
After checking the version of Blackmagic Camera Utility software installed on your computer, please visit the Blackmagic Design support center at www.blackmagicdesign.com/support to check for the latest updates. While it is usually a good idea to run the latest updates, it is wise to avoid updating any software if you are in the middle of an important project.
Regulatory Notices

Disposal of Waste of Electrical and Electronic Equipment Within the European Union.
The symbol on the product indicates that this equipment must not be disposed of with other waste materials. In order to dispose of your waste equipment, it must be handed over to a designated collection point for recycling. The separate collection and recycling of your waste equipment at the time of disposal will help conserve natural resources and ensure that it is recycled in a manner that protects human health and the environment. For more information about where you can drop off your waste equipment for recycling, please contact your local city recycling office or the dealer from whom you purchased the product.

This equipment has been tested and found to comply with the limits for a Class A digital device, pursuant to Part 15 of the FCC rules. These limits are designed to provide reasonable protection against harmful interference when the equipment is operated in a commercial environment. This equipment generates, uses, and can radiate radio frequency energy and, if not installed and used in accordance with the instructions, may cause harmful interference to radio communications. Operation of this product in a residential area is likely to cause harmful interference, in which case the user will be required to correct the interference at personal expense.
The operation of this equipment is subject to the following two conditions:
1 This equipment or device may not cause harmful interference.
2 This equipment or device must accept any interference received, including interference that may cause undesired operation.

R-R-BMD-201810001
R-R-BMD-20220218001
R-R-BMD-201904002
ICES-3(A) NMB-3(A)
ISED Canada Statement
This device complies with Canadian standards for Class A digital apparatus.
Any modifications or use of this product outside its intended use could void compliance to these standards.
Connection to HDMI interfaces must be made with high quality shielded HDMI cables.
This equipment has been tested for compliance with the intended use in a commercial environment. If the equipment is used in a domestic environment, it may cause radio interference.
Bluetooth
The product is a Bluetooth wireless technology enabled product.
Contains transmitter module FCC ID: QOQBGM113
This equipment complies with FCC radiation exposure limits set forth for an uncontrolled environment.
Contains transmitter module IC: 5123A-BGM113
Includes transmitter module certified in Mexico. IFT: RCPSBG20-2560.
This device complies with Industry Canada's license-exempt RSS standards and exception from routine SAR evaluation limits given in RSS-102 Issue 5.
Certified for Japan, certificate number: 209-J00204. This equipment contains specified radio equipment that has been certified to the technical regulation conformity certification under the radio law.
This module has certification in South Korea, KC certification number: MSIP-CRM-BGT-BGM113
Hereby, Blackmagic Design declares that the product is using wideband transmission systems in 2.4 GHz ISM band is in compliance with directive 2014/53/EU.
The full text of the EU declaration of conformity is available from compliance@blackmagicdesign.com

Certified for South Africa by ICASA, approval number TA-2021/2072 for Blackmagic Pocket Cinema Camera 6K Pro, TA-2019/1517 for Blackmagic Pocket Cinema Camera 6K and TA-2019/1516 for Blackmagic Pocket Cinema Camera 4K.

Certified for Mexico (NOM) for Bluetooth module manufactured by Silicon Labs. model number BGM113A.
Safety Information
Blackmagic Pocket Cinema Camera is suitable for use in tropical locations with an ambient temperature of up to 40^ .
No operator serviceable parts inside product. Refer servicing to your local Blackmagic Design service center.
During sunny conditions, consider shading of the camera to prevent exposure of the camera or lithium battery to extended periods of sunlight. Keep lithium batteries away from all sources of heat.

When using the supplied power adapter, use only at altitudes not more than 2000m above sea level.
State of California statement
This product can expose you to chemicals such as trace amounts of polybrominated biphenyls within plastic parts, which is known to the state of California to cause cancer and birth defects or other reproductive harm.
For more information go to www.P65Warnings.ca.gov.
Warranty
Limited Warranty
Blackmagic Design warrants that this product will be free from defects in materials and workmanship for a period of 12 months from the date of purchase. If a product proves to be defective during this warranty period, Blackmagic Design, at its option, either will repair the defective product without charge for parts and labor, or will provide a replacement in exchange for the defective product.
In order to obtain service under this warranty, you the Customer, must notify Blackmagic Design of the defect before the expiration of the warranty period and make suitable arrangements for the performance of service. The Customer shall be responsible for packaging and shipping the defective product to a designated service center nominated by Blackmagic Design, with shipping charges pre paid. Customer shall be responsible for paying all shipping charges, insurance, duties, taxes, and any other charges for products returned to us for any reason.
This warranty shall not apply to any defect, failure or damage caused by improper use or improper or inadequate maintenance and care. Blackmagic Design shall not be obliged under this warranty: a) to repair damage resulting from attempts by personnel other than Blackmagic Design representatives to install, repair or service the product, b) to repair damage resulting from improper use or connection to incompatible equipment, c) to repair any damage or malfunction caused by the use of non Blackmagic Design parts or supplies, or d) to service a product that has been modified or integrated with other products when the effect of such a modification or integration increases the time or difficulty of servicing the product.
THIS WARRANTY IS GIVEN BY BLACKMAGIC DESIGN IN LIEU OF ANY OTHER WARRANTYES, EXPRESS OR IMPLIED. BLACKMAGIC DESIGN AND ITS VENDORS DISCLAIM ANY IMPLIED WARRANTYES OF MERCHANTABILITY OR FITNESS FOR A PARTICULAR PURPOSE. BLACKMAGIC DESIGN'S RESPONSIBILITY TO REPAIR OR REPLACE DEFECTIVE PRODUCTS DURING THE WARRANTY PERIOD IS THE WHOLE AND EXCLUSIVE REMEDY PROVIDED TO THE CUSTOMER. BLACKMAGIC DESIGN WILL NOT BE LIABLE FOR ANY INDIRECT, SPECIAL, INCIDENTAL OR CONSEQUENTIAL DAMAGES IRRESPECTIVE OF WHETHER BLACKMAGIC DESIGN OR THE VENDOR HAS ADVANCE NOTICE OF THE POSSIBILITY OF SUCH DAMAGES. BLACKMAGIC DESIGN IS NOT LIABLE FOR ANY ILLEGAL USE OF EQUIPMENT BY CUSTOMER. BLACKMAGIC IS NOT LIABLE FOR ANY DAMAGES RESULTING FROM USE OF THIS PRODUCT. USER OPERATES THIS PRODUCT AT OWN RISK.
Copyright 2022 Blackmagic Design. All rights reserved. 'Blackmagic Design', 'URSA', 'DeckLink', 'HDLink', 'Workgroup Videohub', 'Multibridge Pro', 'Multibridge Extreme', 'Intensity' and 'Leading the creative video revolution' are registered trademarks in the US and other countries. All other company and product names may be trademarks of the respective companies with which they are associated.
The Bluetooth word, mark and logos are registered trademarks owned by Bluetooth SIG, Inc. and any use of such marks by Blackmagic Design is under license. Other trademarks and trade names are those of the respective owners.
Blackmagic
Pocket Cinema Camera


う乙
This is a collection of Blackmagic Pocket Cinema Camera.
才日JNlKBlackmagic Pocket Cinema Cameraは、2013年にリーさを。八夕大宋米クレンジと革新な画質に対応し、てごても持与運の可能な小型力メラの開発は、非常に工承平定子。皆樣か素晴じいF一D巴克をんだき、才日JUNLの設計に基記 magicPocket Cinema CameraSh一Z为携張的上にし。
Blackmagic Pocket Cinema Camera 4Kは、才リジナルのPocket Cinema Cameraと同じMFT(マイクロフローーナス)レ��マウntonを搭載いたします。お手持元左右MFTLENSを使用くださいます。BlackmagicPocket Cinema Camera 6KG2およPocket Cinema Camera 6K ProはEFマウntonを搭載いたします。、お気に入りのEFLENSを使用て、60fpsまの6Kビデ人才培养きります。
13ストツフのダイナミックレンジとデアル新业态ISOにや、ケリーニで美いなマライケなイーニジを収録くださいます。構想ては通りに映像をチアチ一、向上さしぃる它が通過。
Pocket Cinema Cameraでエーダーの皆様が撮影した作品を拝見するとをてもしぎにしてます。た、追加を希望する新機能のリクエストも待ちしぎにしてます!
Grant Petty
Blackmagic Design CEO
G兰卜·兀
目次
の力メラをお使いてか? 170
は心のた 170
170
力×拉の電源を入る 172
同梟の電源ケーリルカ力メラに電源供給 172
St-Le-JxTei 173
CFast力一卜 173
SD力一卜 175
USB-CFRAFFDUDEISK 177
摄影用以M亚为準備的 178
Blackmagic Pocket Cinema
Camera 179
Mac 181
Windows 182
收錄 183
Klppn
Blackmagic RAW 184
Blackmagic RAW 184
最大せんサレムレト 187
収錄時間
再生
力×兰の 機能
力义方正面
右側面
左側面
卜PPFNE 198
力×与底 面
力×面背面
tappyoukui-ont口一儿
設定
dssus
収錄設定 (RECORD)
FFAL命名規則
毛二夕一設定(MONITOR) 233
才一丁才設定(AUDIO)
SETUP) 243
PRESETS 255
3D LUT
X夕一夕入力
261
力×Lの比才出力 266
Blackmagic Zoom Demand
266
力×兰\~接统 04267
Blackmagic Focus Demand使用的 269
Blackmagic Zoom Demand的使用 269
DaVinci Resolveの使用 271
271
力ト一使使用た集 272
275
夕lumlaenckrullp 276
才一德才卜山比一 276
夕卜ルの追加 277
Blackmagic RAWFlaIILの使用 278
力拉一巴一德之克利的力拉一
レクschを行う 281
Power Window 284
183 183 286
才一德才の三昧式 287
Fusion一JFVFXo合成
編集のマス总冠军 300
克习克工克S木一卜 300
301
194ATEM Mini力力蒙口一 302
194 DaVinci Resolve プライマリカ
LeroLeKtJ 306
309
CFast 2.0/SD力一卜のフィイ
ル这种方式 309
200 1
USB-CNFJN1FJ1FJ1FJ1FJ1FJ1FJ1FJ1FJ1FJ1FJ1FJ1FJ1FJ1FJ1FJ1FJ1FJ1FJ1FJ1FJ1FJ1FJ1FJ1FJ1FJ1FJ1FJ1FJ1FJ1FJ1FJ1FJ1FJ1FJ
Final Cut Pro Xを使う 310
Avid MediaComposer2018使 310
AdobePremiereProCCを使311
Blackmagic Camera Setup Utility 312
BatteryGrip使用313
Developer Information 316
Blackmagic Bluetooth Camera Control 316
Blackmagic SDI and Bluetooth
Camera Control Protocol 318
Example Protocol Packets 327
ルフロー 328
26规制に開示警告 329
安全情報 330
保证 331
Which is the best way to use this book?
Blackmagic Pocket Cinema Camera 6K Pro モル、6K G2 モル、4K モルの外見は、互に大変よく似てます。いすしの ヤルも驚異的なフィドダイマックレングのイメジが得りを、筐体も同じです。コトローリボーニとフウアメニーの配置は全く同時で、力メラ的操作方法も基本的是同じです。
Blackmagic Pocket Cinema Camera 6K Proおは6K G2は、スーナ一35mmSenantとEFLSマウntを搭載いたします。Blackmagic Pocket Cinema Camera 4Kは、MFTサイズのSenantとMFTLEMMWntを搭載いたします。
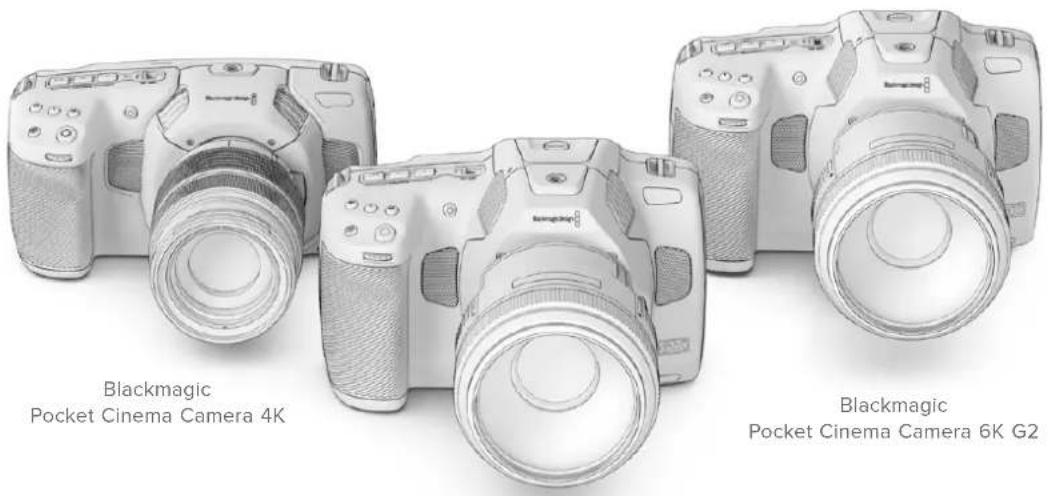
Blackmagic Pocket Cinema Camera 6K Pro
はしだに
Pocket Cinema Cameraは、LENSをマウCNTし、電源を入るだけに使用くださいます。
レンズの取付け
Pocket Cinema Camera 6K G2およ6K ProモデルはEFLINS、Pocket Cinema Camera 4KはマイクロフローーナスMFT) IENSを使用いたします。Pocket Cinema Camera プリーネへのIENSの取り付け方はすて同じです。ま、保護用のダストキYPを外しります。保護用のダストキYPを外すに、ロックボタムを押しぎら、反時計回に回ります。
EF/MFTマウntonLENSを取り付けむ:
1 LENS 上のドット(点)と力メラのマウnt部分のドットを合わせます。多くのLNSには、青、赤、白のドットか、その他的目印がていま�。

2 力メラマウINTにレNSマウINTを載せ、レNSが適切な位置に収まむて時計回に回
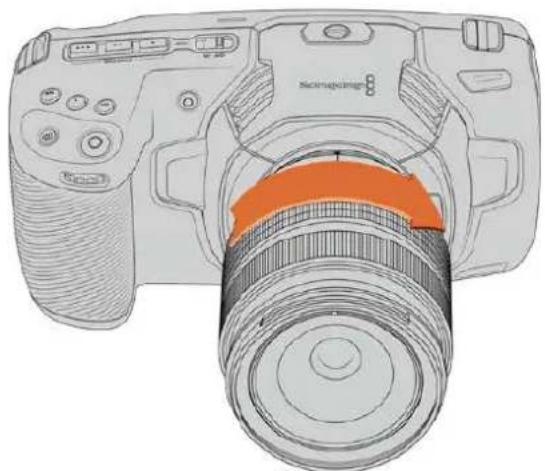
MFTLENSZ为Blackmagic Pocket Cinema Camera 4Kに取付た
3 LENSを外す時は、ロックボーニを押しおらLENSを反時計回りに回します。MFTLENSはドットが10時の位置、EFLENSはドットが12時の位置にるまて回し、LENSをマウCNTからゆっくり外と。
XENLENSZaF 1
力×拉の電 源を入る
「Battery Grip使用」を参照てくさい。
力メラにバットリ一を挃入て電源供給
Pocket Cinema Camera 6K Proおは6K G2は標準のNP-F570ルーニー、Pocket Cinema Camera 4Kは、標準のLP-E6ルーニー使用いたします。カメラには1個のルーニーが同枠てい).(3)追加ルーニーが必須な场合は、Blackmagic Design販売店たはビデ才/写真機材の専門店で購入くださいます。
1力美拉の底面にある力ハーリリスを押ては一力ハ一開きま�。
2 ロルリーニの接続部をロルリーニ挃入口に向け、ロルクタフの下の定位置にしらかりと叐まむて差し迎みま。
作業のこつバッチリ一を取出はには、ロックタフを力メラの正面側に向て押ります。
3 一力八一を閉、力子和音がるまごゆく押し。
4 力メラ上部の電源スイチをON」の位置にると力メラが才になりま。スイチをOFF」の位置にると力メラが才になりま。
同梶の電源ケーメルカ力メラに電源供給
同棚の100~240V AC プムは、力メに給電しおら、力メ内部のバフテ一まは(Battery Gripを取り付けてる场合)2個のバフテ一を充電いたします。DC電源コネケローは力メにしろ固定いたしますのと誤て外しにははみせん。
外部電源接統:
1 AC-12V DCアダフロー プラムを主電源ノケットに接続いたします。
2力M的左側面の口製力一を開き、口式DC電源コケ専一回て、12VDC電源入力の上部のくは合わせます。力和音がるまごコケ専一をつくり押しむ。
3 ニネクタ一を外には、ドネクタ一からシ一を引き離し、ドネクタ一を入力か与拔きま�。
外部電源とバットリ一電源に接続してる場合、外部電源のみが使用ARGE。充電た的バットリ一が接続てい時に外部電源を外た場合、力メラは動作を中断するごとく、バットリ一電源に切り替えま。
力メラに捜入たバツテリは、力メラの電源が切てる场合、USB経由で充電くださいます。力メラを使用くださいます時にボーナルのバフーパンクを使て充電くださいますか、非常に便利です。Blackmagic Pocket Cinema Cameraは、標準の5V/10WのUSBウオルチヤジヤー充電のは、USB-Power Delivery (USB PD)対応の充電器も使用いたします。USB PD対応の充電器は、一般的にUSB-Cコncyケタ一搭載し、20Vまご出力くださいますか、より短時間の充電か可能,No。12V DC電源入力で力メラ内部のバツテリを充電する場合、力メラはallonてモフermen充電可能です。
作業のごつ使用直後熱をてるル一を充電する场合、ル一が45度以下にたまて、充电速度は遲なり。充电前15分は置いル一を冷むさを推奨しら。
あはストレ一�メデアを挃入するだけで、撮影の準備は完了です!
スレーダジMXデイア
Blackmagic Pocket Cinema Cameraは、ビデ人才培养標準のSD力一、高速のUHS-II力一、CFast 2.0力一使用し。
た、USB-C拓張木一卜に大容量のUSB-CFLAUNDSKを接続て、収錄時間を延長するとも
CFast力一D
CFast 2.0力一下は非常に高速のデー軽送が可能なた、高フレムレトの6K、4K、HDビデ才の収錄に最適です。各フアーマットで収錄可能性最大フレムレトの詳細は、「収錄」セクシャンの「収錄時間一観」を参照てくだい。
全般的CFast2.0力一卜は高速力一卜てが、書き迅速度が請い迅速度と比て達いものも、最大一夕軽送速度はモルにて異なま。希望用的FLA-上一T信賴性の高い収錄を行はは、Blackmagic Designが推奨る力一卜使用てくさ。
CFast力一卜を插入る:

MADASDHTIAPKSAEATNN 1A
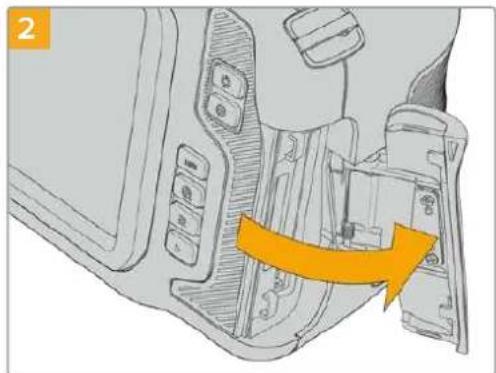
下にはスフリングが付いるのて、固定が解除さしを開きま。乙からCFastおよSD×モリ一力一トのロットにアクセスごきま。

CFast力一卜が固定さるまて、力一卜をCFast口ロトに差し迅みます。力一卜は、過度に力を入る必要なく简单に插入てきるはすです。CFast力一卜を取り出はに、CFast力一卜をゆくり押て離といク卜さるま。

LCD夕th斯克一-底部のスレ一情報に、換出さたCFast力一の名前と錄画可能時間が表示さま。
SD力一の插入方法は、CFast力一の插入方法と似ていま�。詳細は力一を插入する」を参照
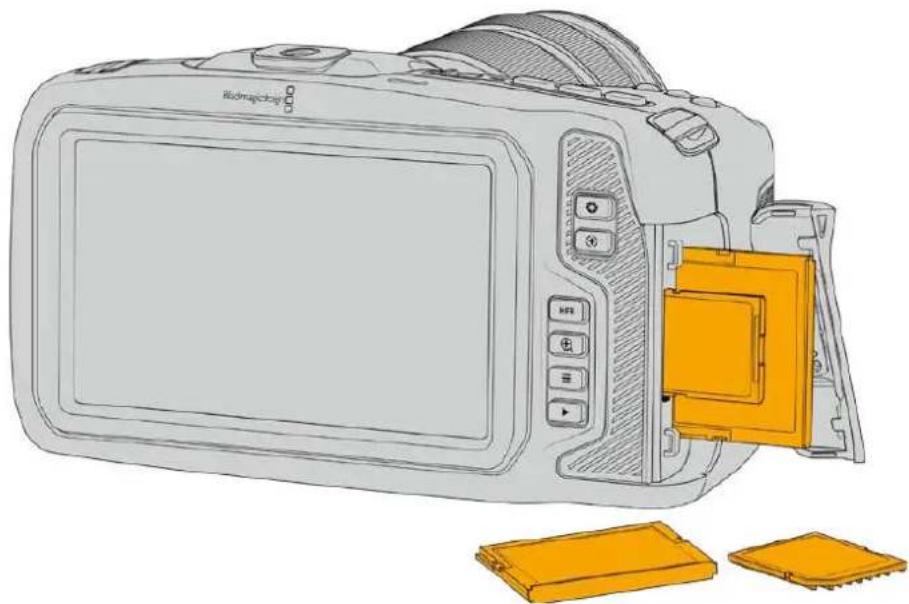
CFast 2.0力一の選択
CFast力一卜は請み迅/書き迅速度が異なた、高一夕レ一ト比才を拔か際は使用さFast2.0力一卜を慎重に選にとが非常に重要です。
Blackmagic Pocket Cinema Cameraの対応CFast力一に開る最新情報は、Blackmagic Designトーナンタ一を参照てくさ。www.blackmagicdesign.com/ip/support
SD力一D
CFast 2.0に加、高速UHS-I/UHS-IIタイフのSDカ一ドにも収録可能です。HDの圧縮ビデオフローマットで収録する場合、優低価格のスレーニジメテアを使用くださいます。UHS-I 好速のUHS-II力一ドは、Blackmagic RAWおよUltra HDCONテルのProRes収録が可能です。
SD力一卜使用使用は、HD化压缩比才一木卜撮影的场合、低价格のスリレ一X代为使用てきま�。
SDXCおよSDHCは、民生用のスチル/ビデカ力メラ用の非常に一般的なメデアスレーダフマトです。它まてDSLR撮影しぃり、あたはBlackmagic Micro Cinema Camera、Pocket Cinema Camera、Blackmagic Video Assistを使用た这句话は、すに互換性のは的SD力一ド持てい的でしう。
高解像度のフィ�ルを必要とないプロジック、あたは長時間収録が必須な場に一を使用すると経費を抑えらむ。低容量で低速のSDカードは、LUTおよんだリセットの保存やローツはも使用くださいます。
SD力一卜为插入的
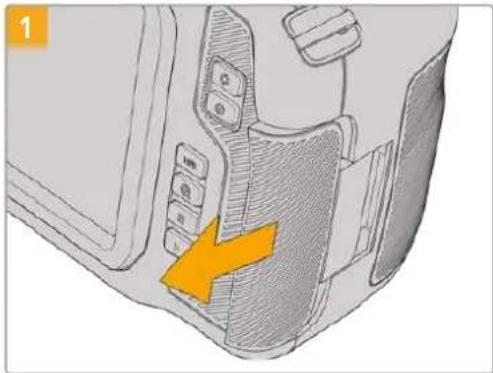
MevIAS口卜中安次士的有、力M左側の下
A言背面向加T斯拉下之

下アにはスフリングが付いるのて、固定が解除さると開きます。こから×デアスロットにアクせスごきます。

SD力一のレル面をタチスクリーニ向けて、SD力一ドロットの所定の位置まて插入しは。力一は、過度に力を入る必須なく簡単に插入くださるはすです。
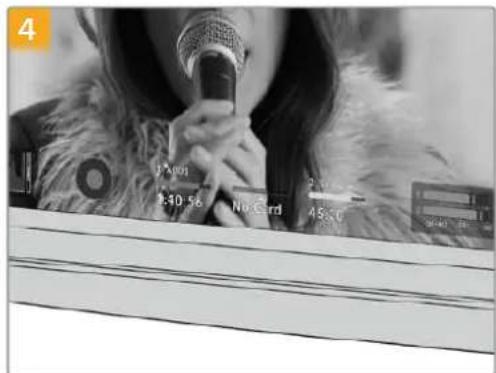
LCD夕斯一底部一情報、檢出さ的SD力一の名前和綠画可能時間表示結束。
SD力一卜取出出はは、SD力一卜をゆくり押て 雍とい工克トさしま。
SD力一の選択
6K、4K DCI、Ultra HDを収录する场合は、最高速のUHS-IIタイフのSD力一トを使用するとをお勸むしります。6K、4K DCI、Ultra HD、HD収录には高速UHS-II力一トを、HD収录にはUHS-I力一トを使用する这句话重要です。这样一効は高速デー軽送速度に対応いたします、大容量Strele一トしだいます。一般的には、高速のはんだはよう品質が得ります。
SD力一は、使用前HFS+あはexFATにフアマトする必要かは。力メラの「スレーニジ(Storage)」設定で簡協にMテアをフアマトてきま�。Stレーニジ設定に開る詳細は、「設定」せクhonを参照てくさ。
た、MacあるいはWindowsCONPbue一を使て力一卜をフアマトするごと可能です。MAD 1A toMacd使用か場、MacのDVSKFMAHDBHFS+を使用てきま。HFS+は「OSX Extended」とて知らていま。
Blackmagic Pocket Cinema Cameraの対応SDカードに開る最新情報は、Blackmagic DesignサイドトSennta一を参照てくさ。www.blackmagicdesign.com/jp/support
M高解像度、高FLREUMLEトの収錄は、CFast2.0MADアは外付はUSB-CFASHDISKの使用をお勅しります。它は一般的に好高速大容量です。
SD力一のロック/解除
SD力一卜は書き迅保護、あるは「ロク」て一夕の上書を防止てきま。SD力一卜を插入る際は、力一卜が書き迅保護さていなとを確認てくだ。書き迅保護を無効にすには、力一の左側にある小さなTPLSHTCKのスイツチをコNEタ一側に動かし。叢録後は、いてモ力一卜を再口クてきま。
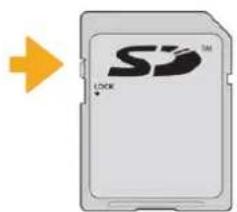
口咔夕卜在上下動かてSD力一卜口咔/解除
ロックARGEたSDカーリドが挃入さた場合、Blackmagic Pocket Cinema CameraのLCDタチスケリ一に、残り叩錄時間の代わに「ロック(Locked)」と表示され、力一ト名の横のス克莱ジメニーにロツクアイコンが表示されま。力一トがロックさてい上、は才の叢録、スルのや予チ一、LUTおよ複リセットの書き出がごきません。

LCD夕TI斯KRI一IN底部のStLEJINJNGa一TA-、錄画可能時間とSD力一の口K的有無表示

LCD夕th斯克一底部的stle一任子一至为t下t管理中进
USB-CFLUSS
Blackmagic Pocket Cinema Cameraは高速USB-C擴張�トを搭載いたします。USB-Cフラツデイスクにビデ才直接収錄くださいます。它らの高速大容量ドバイズにはビデ才を長時間収錄くださいます。長時間の撮影に非常高便利いたします。
收錄が終わった5、同じド现代农业を直接CONPUN一たに接続し、締集やストプロダクIJONの作業が行=e。MDAEAP一す必要はあらません。
USB-CFlambda 微克接统:
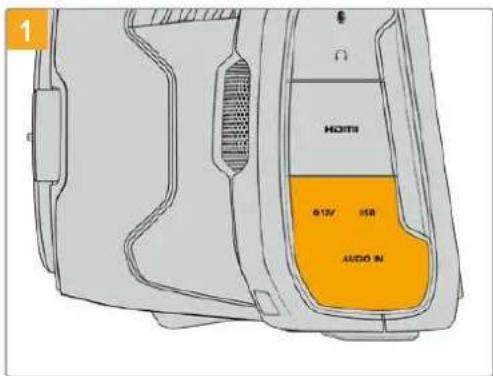
力メラの左側面のゴム裂力ハ一を開き、ケームルのも一方の端をUSB-Cロトに接続いたします。

USBタイフCケーネルの一端をUSB-Cフラツドデスに接続いたします。
XEMUSB-CFRAJDSK为力M以接续在的场合、力M的才一丁不格斯TUsdSD力一和同樣以拔。末,互换性有的USB-CFRAJDSK为接统在的场合、力M之的SD力一的S口上是使用能士
USB-Cflanschusの代わにSD力一使使用山は、力x拉かUSB-Cflanschusの接統を外しま。
高速USB-CflssdUsk的選
USB-Cflansdysksは、幅広種類の機器に高速か低価格のStre提示を提供くださいます設計得很好、樣々民生用電化製品店のは購入お願いいたします。映画制作社Cflansdysks市場一部に過なた、6Kおは4Kflss的収錄に必要な速度のDlAip为選にとは極て重要です。
多くのUSB-Cflansdysksは家庭用CONb一一向に作らてお、6Kおよ4Kb才の収錄に必要な速度に対応ていせん。
最新の推奨USB-Cflssusのリスはさト一上ご確認<だ。
www.blackmagicdesign.com/jp/support
USB-CFlraSduStUsK的速度阅的重要情報
USB-C フラツドデイスケのモーテルによる速度はビデ才対一夕を保存くださいますようお願いいたします。その原因は、そのリデスケが高速の書き迅み速度を実現たに隠けた徳一夕圧縮を実行いたします。そのようお願いいたします。ごはうな徳一夕圧縮用い处法は、製造業者的公表速度を実現くださいますは空の徳一夕やシングルなフィルな等方式を保存する场合のみです。ビデ才対一夕に合まるノイスやビク塞尔は不規則,No、圧縮に適てないた、徳才ケの本当之速度が露呈さります。
USB-Cflansdysks之中は製造業者的公表半の書き迅速度はいもがありま。USB-Cflansdysksの仕樣書に比才を十分に取り拔る速度が記載ていも、リルタイ収錄で比才を保存すると速度が十分ない场合が有的が現実です。
Blackmagic Disk Speed Testは、USB-Cflanschduスが高一夕レト比才のキアフチヤー・再生に対応可能かを正確に計測くださBlackmagic Disk Speed Testは一夕を使用て比才の保存をシル一トするた。計測結果は比才を収録る際と近似した数値が得にしま。Blackmagicに用的斯は、新て大型のUSB-Cflanschduス或大容量のUSB-Cflanschduスが高速oledう結果が出いま。
Blackmagic Disk Speed Testは、Mac App Storeの入手可能です。WindowsおばがMacバeer・は、Blackmagic Desktop Videoにも含むてのは、Blackmagic DesignサボトSENSタwww.blackmagicdesign.com/jp/supportの「キフチヤ・再生」セクシャンからダウロト一ドできま�。
撮影用にMデアを準備する
CFast力一、SD力一、USB-Cfraschusは、力muaのStle一和才一木二一の才一木卜機能を使用か、Mac/Windowsconb一夕一为才一木卜成き。最高の性能得るには、力表を使てStle一xMvaを才一木卜承とをお勤しま。
HFS+は「OSXExtended」とて知らてお、ジーナンをサトしてるた推奨さるフーネマットです。万が一、スレーニジメデアが破損た場合、ジーニンをた的デアのデーは回復得起可能性のは。HFS+はMacでネイテリサトをてます。exFATはMacおは Windowsに碍りネイテリサトをてお、ツフトウエアを別途購入する必要はありませんが、ジーニンは対応ていせん。
Blackmagic Pocket Cinema Camera 4x7x10mm 2.5" x 3"
1 LCDタツチスケリーナ部のストレーニングルーダーをタつとストレーニジ管理に行きります。
2「CFastを初期化(Format CFAST)」は非「力一トをフィーマフ(mat SD Card)」をタツcludes。力メラはUSB-Cflarssuを接続てる场合は、「ドロイのリスDriveList)」をタつ、フィーマトを行うロイをタつし。

USB-CFLAUSDIAKU为力XL接续H出的场合、STLEJ0。FOMARHT画面「SD力一卡为FOMARHT(FormatSDCard)」代W如「DRAIPE为FOMARHT(FormatDrive)」和表示之。
×力メラをBlackmagic MultiDockのようねド现代农业へ接続してる場合、力メラで使用くださるSSD现代农业がすて、现代农业のリストに表示いたします。収録を行う现代农业をタttpて選択し、次に「现代农业を使用(Use Drive)」ボーナンをタttpます。
3 リル番号をマニアルで変更た场合は、「リル番号を編集(Edit Reel Number)」をタツPLEる。一巴卜使用て新い一ル番号入力し、「アフデト(Update)」を押て選护を確定しぃむ。
4 OS X ExtendedあらはexFATフーネマットを選択てフーネマットボtonsを押しだ。
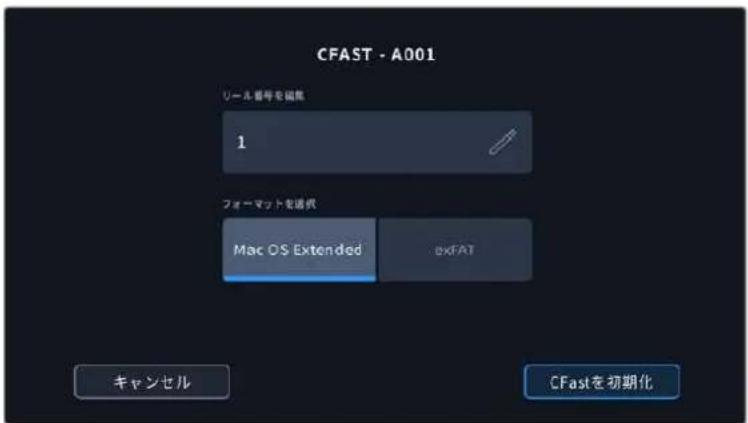
一儿番号为卡二乃可更的有:「一儿番号为编集(Edit Reel Number)」为。
5 確認画面に切り替わり、力一のモーマドの実行、選択たモーマド、リル番号が表示さし。モーマドは夕と選択を確定し。icanルするには「icanル(Cancel)」をタつし。
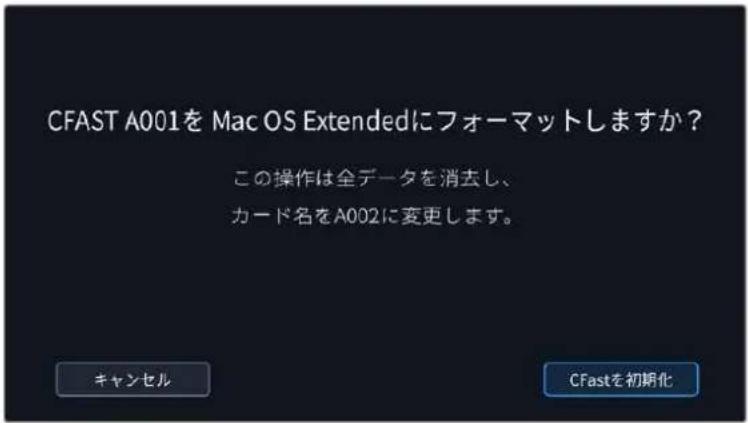
fl一卡士前正力一卡为選护之的如認到下
6 フローマットロタを3秒間長押して、×デイアをフィローマットじま。
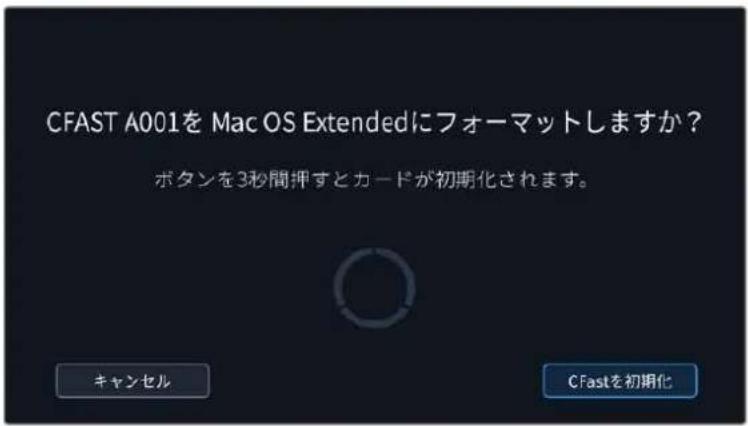
7 フローマットが完了てド现代农业が使用くださいますようお願いいたします。その旨が力メラに表示いたします。
OK」をターリフてスリ管理に尻りま。
9 「閉る(Exit)」をタpperてストレーニジ管理から出ます。
力メラを使て、CFast力一、SD力一、USB-CFLAStUsK为FOMT的场合、MIMの名前は、SL-上の力MIAIDリル番号が使用さは。力MIsは、MADAS为FOMT的度にリル番号を自動的に足て調整し。特定のリル番号をMUNALR大入力するには「L儿番号を編集(EditReelNumber)」をタつて、番号を入力し。
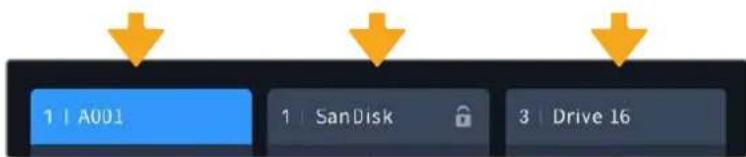
力メラのスレーニジ管理は、現在CFast、SDカ卜、USB-Cフラツドデイスケのいじのメテアを管理くださいます表 示 。
新いプロジクトを始るた、リル番号を1にリセットてい場合は、スレ一トの「プロジクト(PROJECT)」タフの「デーをリSET(Reset Project Data)」をタ複しります。
作業のこつSD力一トが書き迅み保護せてる场合、力メラのLCDタツチスケリーニ、錄画可能時間の代わに「ロック(Locked)」と表示され、カ一ト名の横のスレーダジメニーにロクアイCONが表示されま。力一トのロックを解除するとフローマットおよ及収録か可能にねま。詳細は、ごマニアルの「SD力一」七ク紳会を参照てくさい。
Xe USB-CFramssu接续在的场合、StreJus2上「外付D拉I(ExternalDrive)」和表示。
Mac对MAD为準備
macOSのDisk Utilityアリケーニンで、CFast力一卜、SD力一卜、USB-CflanschDvスをHFS+ あるはexFATでフィーマットしま。フィーマットするとすての対一夕が消去さるのて、最初に重要な対一夕を�クアリドてくさい。
1 Stolle一MxDIAe为COnbHc-ta一I接续。之MxDIAe为Time MachineBuckAappF 用使用此和提案的MssE一日是無视了。
2 Applications/Utility 一 行、Disk Utility在起動上。
3 力×拉のスリーハーのデスカフをクりし、「Erase」夕はクりし。
「Format」を「Mac OS Extended (Journale)」あらは「exFAT」に設定お願い。
5 5 Ease] k.

MacのDisk Utilityアリケーニンで、CFastカ一ド、SDカ一ド、USB-CフラツデイスケをHFS+あるはexFATでフィーマトしま�。フィーマトするとすての徴一夕が消去さるのて、最初に重要な徴一夕をハクアリドてくだき。
Windows×デイアを準備
Windowsは「Format」ダイロガボックスカカメラのスリーニジメデアさてフモマットごきま�。フモマットするとすてのデーたが消去さるのて、最初に重要なデーたをハツクアドじてください。
1外付は一夕一和USB-Cケ一、ル/アダフーを使用て、力Xのスレ一、日Xテアをコに ユ一夕一に接統し。
2「Start」×二一まはStart」スリ一を開「Computer」を選択いたします。力メラのスレ一シデアを右クルしります。
3 メンテクストメニー一か「Format」を選択いたします。
4 フアルシステムを「exFAT」に設定し、ニトサイズ配分を128円口ハトに設定します。
5 プリューマラルを入力て「Quick Format」選択し、「Start」をクリックします。
6 Stolle-1JXeAafoF-MAHTs、使用成的状態に
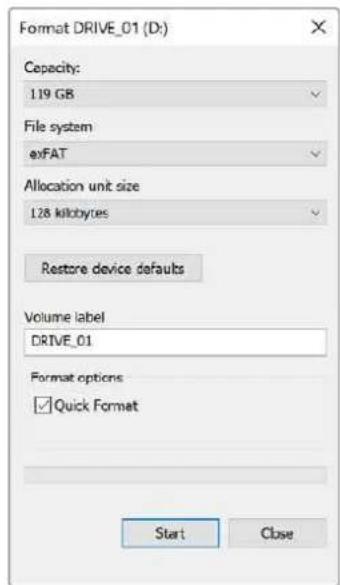
WindowsのFormatタロガボックス 機能を使用して、カメラのストレ一ジ マデアを exFATでフオーマド
M0 取錄映像にコマ落ちが生じる场合は、弊社の推奨するMDEアのリストを参照し、使用てい的力一ドライフがOneTackおよFlreunsに適切かが確認てくさ。一レトを下載はは、Flreumleトたは解像度を下載か、あるはProResなの庄縮OneTackを使用てくさ。最新的情報は、Blackmagic DesignwaFprトを参照てくさ。www.blackmagicdesign.com/jp
Xe Blackmagic Pocket Cinema Cameraは、一テ庁分割しMテアを使用てき求が、力メレは収錄・再生でMテアの最初の八一テ庁のみ認識しま。
Stre-19o 0fF-MAHtMn-1e 3eMFAE FAI-MAHTS 5.
叢錄
ケリットの叢 錄
Blackmagic Pocket Cinema Cameraは、錄画ボーニがつ付てみ。1つ目的錄画ボーニはハンド プリフの上部にあり、カメラのハンド��リフを持った時に右手の人差し指で押た位置にありみ。
2丶目の錄画木たんは力メラの正面に限ります。自分自身を撮影くださ�場合に、力メ拉を片手て持て自分で錄画木たんを押すとが成長。その木たんは使いやす場所に配置いたします、プロegr動画なて自分自身を撮影くださ�場合に最適です。
各左かの錄画トクを押すとに撮影を開始くださいます。撮影を停止するはは、再度錄画トクを押てくさい。
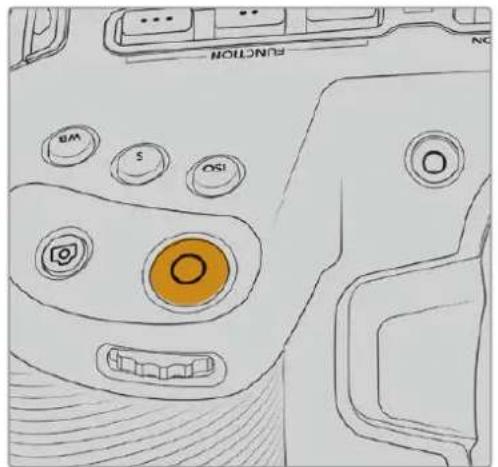
力米のトツPBANILの 绿画朴夕
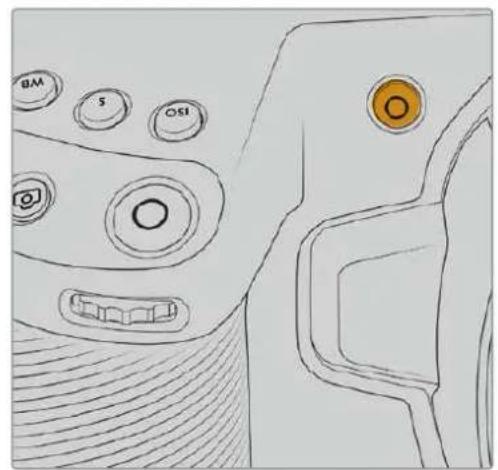
力×方前 面の 绿 画朴夕
収錄を開始する前にタチスクリーニの下にあるメデア名をタット&木一ルドすると、使用んだ×モリカトあるはUSB-Cフラツドスケを選択いたします。選択んだ×デアタイフの上ごハ一が青くり、該当の×デアに収録可能にたと示ります。異な種類の力一和ドリは収録する场合は、×デア名をタット&木一ルドします。収録中、そのハ一は赤くりります。
撮影フローマットを選択する
Blackmagic Pocket Cinema Cameraは、ProRes 422 HQ、ProRes 422、ProRes 422 LT、ProRes 422 Proxyを含Apple ProResコーダックと撮影いたします。ProResコーダックは多くのビデ人才培养SDカード、CFast、USB-Cフラツドイスクに収録いたします。ProRes 422 HQは低压縮で最高画質を得らいたします。一方、ProRes 422 Proxyは高い圧率で長時間の収録が可能,No。も、Blackmagic RAWフローマット也使用くださいます。icerるなフローマットを試て、フローマトに適したフローマットを見つてckさい。
Blackmagic Pocket Cinema Cameraは、フル塞尔トーネングウルトには Blackmagic RAWを使用いたします、スケーリングフローマットには必務ProResを使用する必要くださいます。
ウイドウフローマットおよんだスケーリングフローマットに開る詳細は、「最大 Sevenerleumレト」せクシャンを参照てくだき。
Blackmagic RAW
Blackmagic Pocket Cinema Cameraは、Blackmagic RAWフィーマットに対応いたします。そのフィーマットは、優んだ画質、フィローダイチクレジ、幅広い圧縮率のオプロムを特徴にしてます。Blackmagic RAWは、RAW叩録の利点を余すとこりなく得りるだけ,No、非常に高速のフィイル速度を実現いたします。这是我们は、ほんWhichieの处理が力メラで行われ、力メラ本体でハーニドウエアケセラリーヨンが行わるたてです。
、Blackmagic RAWは豐富なメタデーに対応てるた、フアルを誹乗取るソフトウエが力 マラの設定を認識いたします。編集の締り切りが巔し、カーバーレクIJONの時間,Noいた Video」モ 一のビデ才ガMANを使用て撮影する場合、ビテ才GANマで撮影したフアILをソフトウ工ア開く際 にビデ才GAUNMが適用さります。しぃし実際は、フアILは「Film」モ一ドで得にるFIILMGAUNMあ 儉、フアILのメタデーにがソフトウ工アに対てビテ才GAUNMを適用するように指示てるだけです。
它は、将来にイーマフリルをカレーフリスリフリルに保存いたします。デイテルが維持くださいます。カレーフリスリフリルを施設いたします。マライクにごはみ。しおし、カレーフリスリフリスリフリルに見えます。撮影时期的選択に固定いたします。
Blackmagic RAWフィ�ルは非常に高速で、One-DeTCKはCONPBUHTA一的CPUとGPUに最適化ります。つまり、すばやく滑らかが再生が可能で、ハーニウアのDeCUNDBは必必要)=()。This is the best way to use Apple Metal, Nvidia CUDA, OpenCL对它用的命令、Blackmagic RAWの説叨取に使用するドリウアでその利点を活用くださいます。
つまり、Blackmagic RAWは、事前にヤツschリ、解像度を下載の必要なく、ほんばのコンビュ一た一てビデオフィルのように通常速度で再生くださいます。
。例は、互換性の的leを使用。RAWfaillm以M夕一夕とて保存さし。
Blackmagic RAW 4
Blackmagic RAWは2種類の方法で工広ドしま。一多クの才予広に、固定ビットレト(Constant Bitrate)と固定ケ才ロテ(Constant Quality)があま。
固定比卜一有、他之一和同上能。之的定是、一卜一定之尔保古、高不尼多在也。末,複雜不以一撮影也。若干多の一夕を一且一保存必要者用場合、固定比卜一有は互一的压縮を高、割当了而了。一上以一义一如收示。
它は、ビデ才一貞はは良いかしませんが、Blackmagic RAWの収錄は予想通の品質を得る必要のはむ。撮影しぃるイメ一約多くの一夕を必要とてるにも関わら、特定の一レトに収むうに壓縮を高うと何が起るのでしうか?品質が下がりますが、撮影を終るま、そのとに気付きません。
它を解決するたに、Blackmagic RAWには固定ケオリテと別の工CONト方法のは。它は、嚴密に言は可変ビットレートです、実際には固定ケ才リテは、イマ一与多くの一夕が必要場合、アルサイスを大小くるて対応ります。アルサイスの上限がなた、イマ一与工CONドつ要か、画質を維持しぃ場合に適ていま。
Blackmagic RAWの固定ケオリテは、イーニジの工庁に必要だけフアルサイズを拡-large。它は、撮影対象に好効力ルサイズが擴大たとも意味ります。カメラのレンスフィットをけたまま撮影ります、マデア容量を無駄にしだるとはいうご上!
Blackmagic RAWの品質設定の名前は謎い的意味のはな名前はなく、実際の技術の側面を反映いたします。例は、固定ビットレートの品質設定には、3:1、5:1、8:1、12:1が)”は。它らの数字は、非圧締RAWのフィ�ルサイズに対照Blackmagic RAWのフィ�ルサイズの比率を示ります。3:1はよう優む画質が得得很好か、その広てフィ�ルサイズも大小)”は品質設定のう左画質は最も低)”は、最近的小さのフィ�ルサイズが得得很好。多数のBlackmagic RAWeuーサ一から、12:1の設定はまたく問題な、品質面も制約は感じ)”はとのフィートーロを受けいます。しおし、自分で使てみて、樣々設定を試)”が最も良い)”は。
Blackmagic RAWの固定ケオリテは、Q0、Q1、Q3、Q5の才予広がは。它らの数字は一デツで使用さる庄縮バラメーた一、庄縮が適用さる方法を技術名技術に設定し。BlackmagicRAW一德は、固定ビットレト設定と固定ケリテ設定为異的方法機能し。固定ケリテ設定は、撮影対象に去了フアルサイズの比率が大に異な法。そのた、フアILサイスはMDEIAの保存に必要な大小さに応て変わりは。
固定 ビット Constant Bitrate) 設定
3:1、5:1、8:1、12:1は圧縮率を示ります。例えは、12:1は非圧縮RAW比較て、フィルサイズは約12分の1に年由ります。
固定ケ才リテ(ConstantQuality)設定
Q0およQ5は、量子化のレルを意味ります。Q5の量子化はolder高いレルですが、デーレートが極て優ていは。上述的优点に、固定ケリテは撮影て対象に好り、フアルサイズの大小さの振紋幅が大い設定です。こは、MDEA力一ド対応可能なFFALILSATISを超る場合が有的とを意味ります。こは好り、COM落ちが発生する可能性のはう。かし、ご利点は摄影中に問題をすに発見は、設定和品質を調整くださるとです。
Blackmagic RAW Player
Blackmagic RAW Playerは、Blackmagicカメラのソフローフィアルを開には、フィアルをダフルクロックするだけです。複解像度おばさはド深度でフィアルをすはく再生おばスロロckをきまむ。
FLERUMのデバイは、SDKライランドリのCPUアク塞尔ーニンはあらゆる主要なアーミデクチヤーをサボーツします。GPUアク塞尔ーニンはApple Metal、Nvidia CUDA、OpenCLをサボーツします。まBlackmagic eGPUにも対応ります、PAフーマングをさらに向上いたします。Blackmagic RAW Playerは、Mac、Windows、Linuxで使用いたします。
効力 -万化
Blackmagic RAWのサイドカーフアルは、オリジナルのフィル内的エンパウさた。メタデーを上書きるとに、フィルのメタデーを才一巴一拉は成ま。。。XJ 、BlackmagicRAW設定の他、アリス、フロー、焦点距離、ロフローバラス、テINT、カラームフ、プロジト名、テイク番号等の情報が含まてい。。XJ 、取収さたクリツの全域にわて、フレムごに工広コドさま。。。は、撮影中にレスを調整した場合、フレムごとのレNSZDEA to含むた役に立つ情報です。DaVinci Resolveけてなく、テキス工徴予一も、メタデ一夕をサイドカーフアILで編集や追加かま。。。は、人間が証の形式のメタデ一夕が使用さて的からです。
サイドカーフアルは、対応Blackmagic RAWフィアルの入てるフィルダーに移動くださいます。で、新いBlackmagic RAW設定を再生の際に自動的に追加いたします。フィルダーからサイドカーフアルを取り出し、再度Blackmagic RAWを開くと、变更た設定は適用いたします、オリジルのフィルが再生いたします。Blackmagic RAW SDKを使用するあらゆるソフュエで、こらの設定にアクsesいたします。サイドカーフアルは変更の情報が保存いたします。Blackmagic RAW Playerや、Blackmagic RAWの読み取决か可能,Noらゆるソフュアで確認いたします。
「Video」モードのビデガンマで撮影する際は、フィ�ルは「Film」モードで得るフィルムガンマを使用いたします。Blackmagic RAWを表示するにたて、×タデーがビデガンマを使用くださいます。ビデガンマは、イメーをGLEーダインング餘余裕か不、CONテツをすみやかに納品する必要くださいます。Blackmagic RAWははイメーのTPLK和木FIトを調整する上ご必要ncy�てのDIテ一ルが保存いたします。ビデがリリドさる它とく、DIテ一ルがすて維持いたしますのて、いてもアクせスelizeます。
DaVinci Resolve Blackmagic RAW使用
各Blackmagic RAWフィアルの設定は調整が可能で、DaVinci Resolveの「カメラRAW」タ Pradesh新いサイド力一フィアルとて保存いたします。它によう、クリエイチフな工工ケトの作成や視聽のたの最適化が可能,No、他のDavinci Resolveeuーよ一たにメタデーを複製 Kg、它を読むと、変更さたガモマ設定に自動的にアクセスによるようお願いいたします。さに、DaVinci Resolveは、カメラフィアルに含むるその其他のメタデーに加え、摄影時に選択んだダナミックレンジが読むANNINGを動態の必務に、「Film」、「Extended Video」、「Video」から適切なダナミックレンジを自動的に選択てクリツを表示いたします。
它們的設定は、彩度、コナロスト、ミドロイチに加え、「ハリヤリロル才」およ「シドウロル才」カ力スタマイズてきま�。いがな調整もサイドカーフアイルとて保存さし、ストプロダクシャンで該当のフアILで作業をてる全た的人が確認てきま�。才日力M大力M夕一夕には、いても居すこが可能です。
DaVinci Resolveの「力メラRAW」夕並でBlackmagic RAWの单一フレムを書き出さとごてきま�。它には、すばての調整、Mテーダ一、ル解像度、色情報が含ていた、他的e一与单一のFLAUM及参照FALILを简单に共有てきま�。
DaVinci ResolveのBlackmagic RAWの使用方法に関係は、そのマニュアルの「DaVinci Resolveの使用」を参照にして,left。
Blackmagic RAWソフトウア 開発 キット
Blackmagic RAW SDKは、Blackmagic Designによる開発たAPIです。そのSDKを使用て、Blackmagic RAWFFFFFFMを使用する、独自のアリケーションを書くとが電子郵件。デバイバーは、そのSDKライランドリを使用て、Blackmagic RAWFIAFILの説り取り、編集、保存のサボトを追加いたします。Blackmagic RAW SDKは、あらゆる第5世代カーパサイENスが含むてい的た、Blackmagic RAWをサボートするあらゆるアリで、自然でシネマライクなIMEXE得り)=(2023)。Blackmagic RAW SDKは、Mac、Windows、Linuxに対応くださり、BlackmagicのWEFSAITにあのデバイバーは一徴はみに無償でダウロドはき)=(2023)
Blackmagic RAW APIのコンボーネntsの概要:

最大 Sevenflleumle一
Blackmagic Pocket Cinema Camera 6K ProおはBlackmagic Pocket Cinema Camera 6K G2の最大 Sevenerleumreト
| 解像度コーダック | SENSリスロー最大フレムレット | |||
| 6K | 6144 x 3456 Blackmagic RAW | 7K | 50 | |
| 6K 2.4:1 | 6144 x 2560 Blackmagic RAW | 7K | 60 | |
| 5.7K 17:9 | 5744 x 3024 Blackmagic RAW | 7K | 60 | |
| 4K DCI | 4096 x 2160 Blackmagic RAW | 7K | 60 | |
| 4096 x 2160 ProRes 422 HQ 5 | .7K | 60 | ||
| 4096 x 2160 ProRes 422 5 | .7K | 60 | ||
| 4096 x 2160 ProRes 422 LT 5 | .7K | 60 | ||
| 4096 x 2160 ProRes 422 Proxy | 5.7K | 60 | ||
| Ultra HD | 3840 x 2160 ProRes 422 HQ | 7K | 50 | |
| 3840 x 2160 ProRes 422 | 7K | 50 | ||
| 3840 x 2160 ProRes 422 LT | 7K | 50 | ||
| 3840 x 2160 ProRes 422 Proxy | 7K | 50 | ||
| 3840 x 2160 ProRes 422 HQ 5 | .7K | 60 | ||
| 3840 x 2160 ProRes 422 5 | .7K | 60 | ||
| 3840 x 2160 ProRes 422 LT 5 | .7K | 60 | ||
| 3840 x 2160 ProRes 422 Proxy | 5.7K | 60 | ||
| 3.7K Anamorphic | 3728 x 3104 Blackmagic RAW | 7K | 60 | |
| 2.8K 17:9 | 2868 x 1512 Blackmagic RAW | 7K | 120 | |
| HD | 1920 x 1080 ProRes 422 HQ | 7K | 50 | |
| 1920 x 1080 ProRes 422 | 7K | 50 | ||
| 1920 x 1080 ProRes 422 LT | 7K | 50 | ||
| 1920 x 1080 ProRes 422 Proxy | 7K | 50 | ||
| 1920 x 1080 ProRes 422 HQ 5 | .7K | 60 | ||
| 1920 x 1080 ProRes 422 5 | .7K | 60 | ||
| 1920 x 1080 ProRes 422 LT 5 | .7K | 60 | ||
| 1920 x 1080 ProRes 422 Proxy | 5.7K | 60 | ||
| 1920 x 1080 ProRes 422 HQ 2 | .7K | 120 | ||
| 1920 x 1080 ProRes 422 2 | .7K | 120 | ||
| 1920 x 1080 ProRes 422 LT 2 | .7K | 120 | ||
| 1920 x 1080 ProRes 422 Proxy | 2.7K | 120 | ||
Blackmagic Pocket Cinema Camera 4K最大 Sevenerumleト
| 解像度コーダック | SENSISKSANN 最大FLAMELEET | |||
| 4K DCI | 4096 x 2160 Blackmagic | RAW | 菲尔 | 60 |
| 4096 x 2160 ProRes | 422 HQ | 菲尔 | 60 | |
| 4096 x 2160 ProRes | 422 | 菲尔 | 60 | |
| 4096 x 2160 ProRes | 422 LT | 菲尔 | 60 | |
| 4096 x 2160 ProRes | 422 Proxy | 菲尔 | 60 | |
| 4K 2.4:1 | 4096 x 1720 Blackmagic | RAW | ウインドウ | 75 |
| Ultra HD | 3840 x 2160 Blackmagic | RAW | ウインドウ | 60 |
| 3840 x 2160 ProRes | 422 HQ | ウインドウ | 60 | |
| 3840 x 2160 ProRes | 422 | ウインドウ | 60 | |
| 3840 x 2160 ProRes | 422 LT | ウインドウ | 60 | |
| 3840 x 2160 ProRes | 422 Proxy | ウインドウ | 60 | |
| 2.8K Anamorphic | 2880 x 2160 | Blackmagic RAW | ウインドウ | 80 |
| 2.6K 16:9 | 2688 x 1512 Blackmagic | RAW | ウインドウ | 120 |
| HD | 1920 x 1080 ProRes | 422 HQ | 菲尔からスケーリング | 60 |
| 1920 x 1080 ProRes | 422 | 菲尔からスケーリング | 60 | |
| 1920 x 1080 ProRes | 422 LT | 菲尔からスケーリング | 60 | |
| 1920 x 1080 ProRes | 422 Proxy | 菲尔からスケーリング | 60 | |
| 1920 x 1080 ProRes | 422 HQ 2 | .6Kからスケーリング | 120 | |
| 1920 x 1080 ProRes | 422 2 | .6Kからスケーリング | 120 | |
| 1920 x 1080 ProRes | 422 LT 2 | .6Kからスケーリング | 120 | |
| 1920 x 1080 ProRes | 422 Proxy | 2.6Kからスケーリング | 120 | |
| 1920 x 1080 Blackmagic | RAW | ウインドウ | 120 | |
| 1920 x 1080 ProRes | 422 HQ | ウインドウ | 120 | |
| 1920 x 1080 ProRes | 422 | ウインドウ | 120 | |
| 1920 x 1080 ProRes | 422 LT | ウインドウ | 120 | |
| 1920 x 1080 ProRes | 422 Proxy | ウインドウ | 120 | |
2.6Kの16:9摄影フィーマットのせんサーミアは、ス一八—16mmLEUNSと高FLERUM一トを使用するたに最適化さていま�。
収錄時間
以下の表は、フィーマット、プロジックのフレムレート、Xデイアのサイズに基付けて、およその収録時間を分と秒で示ります。Pocket Cinema Cameraのモダルにapply、使用可能な解像度とコーダックが異なこに注意てくだい。
StulreJxDFAIe的最天收录时间是、CFast力一、SD力一、USB-CFRASSK的T夕容量、選折了收录FOMA附上好FLOL一上好到变有。例元:3840x2160的Apple
ProRes 422 HQの场合、おは880Mbpsです。24fpsの场合、256GBのCFast 2.0力一下におは47分収錄可能です。同比設定で、128GBのCFast力一下におは23分収錄可能です。亿吨は256GBのCFast力一下のおは半分の収錄時間です。
XADFAEAFFATMOSXExtendedn 1
デイテルが減少のシングルなシローは、複雜な構成のシローはもデーたが減少傾向いたします。以下の表は、複雜なシャットを撮影してると前提上の数值です。摄影内容によるは記載いたします。時間お願いいたします長く収录のは可能性).(2)
6K
| CFast カード | トレーナム | Blackmagic RAW 3:1 | Blackmagic RAW 5:1 | Blackmagic RAW 8:1 | Blackmagic RAW 12:1 |
| 256GB | 叩録時間 | 叩録時間 | 叩録時間 | 叩録時間 | |
| 23.98 | 17分 | 28分 | 45分 | 67分 | |
| 24 | 17分 | 28分 | 45分 | 67分 | |
| 25 | 16分 | 27分 | 43分 | 64分 | |
| 30 | 13分 | 22分 | 36分 | 54分 | |
| 50 | 8分 | 13分 | 21分 | 32分 |
6K 2.4:1
| CFast カード | トレーナト | Blackmagic RAW 3:1 | Blackmagic RAW 5:1 | Blackmagic RAW 8:1 | Blackmagic RAW 12:1 |
| 256GB | 叩録時間 | 叩録時間 | 叩録時間 | 叩録時間 | |
| 23.98 | 23分 | 38分 | 60分 | 91分 | |
| 24 | 22分 | 38分 | 60分 | 91分 | |
| 25 | 21分 | 36分 | 58分 | 87分 | |
| 30 | 18分 | 30分 | 48分 | 72分 | |
| 50 | 11分 | 18分 | 29分 | 43分 | |
| 60 | 9分 | 15分 | 24分 | 36分 |
5.7K 17:9
| CFast カード | トレム レート | Blackmagic RAW 3:1 | Blackmagic RAW 5:1 | Blackmagic RAW 8:1 | Blackmagic RAW 12:1 |
| 256GB | 収錄時間 | 収錄時間 | 収錄時間 | 収錄時間 | |
| 23.98 | 20分 | 34分 | 55分 | 82分 | |
| 24 | 20分 | 34分 | 55分 | 82分 | |
| 25 | 19分 | 33分 | 52分 | 79分 | |
| 30 | 16分 | 27分 | 44分 | 66分 | |
| 50 | 10分 | 16分 | 26分 | 39分 | |
| 60 | 8分 | 13分 | 22分 | 33分 |
4K DCI
| CFast カード | トレム レート | Blackmagic RAW 3:1 | Blackmagic RAW 5:1 | Blackmagic RAW 8:1 | Blackmagic RAW 12:1 | ProRes 422 HQ | ProRes 422 | ProRes 422 LT | ProRes 422 Proxy |
| 256GB | 収録時間 | 収録時間 | 収録時間 | 収録時間 | 収録時間 | 収録時間 | |||
| 23.98 | 39分 | 65分 | 104分 | 155分 | 44分 | 66分 | 95分 | 216分 | |
| 24 | 39分 | 65分 | 103分 | 155分 | 44分 | 66分 | 95分 | 216分 | |
| 25 | 37分 | 62分 | 99分 | 149分 | 42分 | 64分 | 91分 | 207分 | |
| 30 | 31分 | 52分 | 83分 | 124分 | 35分 | 53分 | 76分 | 173分 | |
| 50 | 18分 | 31分 | 49分 | 74分 | 21分 | 32分 | 45分 | 104分 | |
| 60 | 15分 | 26分 | 41分 | 62分 | 17分 | 26分 | 38分 | 87分 |
4K 2.4:1
| CFast カード | トレーマ レート | Blackmagic RAW 3:1 | Blackmagic RAW 5:1 | Blackmagic RAW 8:1 | Blackmagic RAW 12:1 |
| 256GB | 収録時間:収録時間:収録時間 | 収録時間 | |||
| 23.98 | 50分 | 84分 | 134分 | 200分 | |
| 24 | 50分 | 84分 | 134分 | 200分 | |
| 25 | 48分 | 80分 | 128分 | 192分 | |
| 30 | 40分 | 67分 | 107分 | 160分 | |
| 50 | 24分 | 40分 | 64分 | 96分 | |
| 60 | 20分 | 33分 | 54分 | 80分 | |
| 75 | 16分 | 27分 | 43分 | 64分 | |
| 80 | 16分 | 26分 | 40分 | 60分 | |
ULTRA HD
| CFast カード | トレーテ表 | Blackmagic RAW 3:1 | Blackmagic RAW 5:1 | Blackmagic RAW 8:1 | Blackmagic RAW 12:1 | ProRes 422 HQ | ProRes 422 | ProRes 422 LT | ProRes 422 Proxy |
| 256GB | 收錄時間 取錄時間 收錄時間 | 收錄時間 取錄時間 | 收錄時間 取錄時間 | 收錄時間 取錄時間 | 收錄時間 取錄時間 | 收錄時間 取錄時間 | |||
| 23.98 | 41分 | 68分 | 110分 | 164分 | 47分 | 71分 | 101分 | 230分 | |
| 24 | 41分 | 68分 | 109分 | 164分 | 47分 | 71分 | 101分 | 230分 | |
| 25 | 39分 | 66分 | 105分 | 157分 | 45分 | 68分 | 97分 | 221分 | |
| 30 | 33分 | 55分 | 88分 | 131分 | 38分 | 57分 | 81分 | 184分 | |
| 50 | 19分 | 33分 | 52分 | 79分 | 22分 | 34分 | 48分 | 111分 | |
| 60 | 16分 | 27分 | 44分 | 66分 | 18分 | 28分 | 40分 | 92分 |
3.7K Anamorphic
| CFast カード | トレム レート | Blackmagic RAW 3:1 | Blackmagic RAW 5:1 | Blackmagic RAW 8:1 | Blackmagic RAW 12:1 |
| 256GB | 収録時間 | 収録時間 | 収録時間 | 収録時間 | |
| 23.98 | 31分 | 51分 | 82分 | 123分 | |
| 24 | 31分 | 51分 | 82分 | 123分 | |
| 25 | 29分 | 49分 | 79分 | 118分 | |
| 30 | 24分 | 41分 | 65分 | 98分 | |
| 50 | 15分 | 24分 | 39分 | 59分 | |
| 60 | 12分 | 20分 | 33分 | 49分 |
2.8K Anamorphic
| CFast カード | トレム レート | Blackmagic RAW 3:1 | Blackmagic RAW 5:1 | Blackmagic RAW 8:1 | Blackmagic RAW 12:1 |
| 256GB | 叩錄時間 | 叩錄時間 | 叩錄時間 | 叩錄時間 | |
| 23.98 | 57分 | 95分 | 151分 | 226分 | |
| 24 | 57分 | 95分 | 151分 | 226分 | |
| 25 | 54分 | 91分 | 145分 | 217分 | |
| 30 | 45分 | 76分 | 121分 | 181分 | |
| 50 | 27分 | 45分 | 73分 | 109分 | |
| 60 | 22分 | 38分 | 61分 | 91分 | |
| 80 | 17分 | 28分 | 45分 | 68分 |
2.8K 17:9
| CFast カード | トレーテ表 | Blackmagic RAW 3:1 | Blackmagic RAW 5:1 | Blackmagic RAW 8:1 | Blackmagic RAW 12:1 |
| 256GB | 叩錄時間 | 叩錄時間 | 叩錄時間 | 叩錄時間 | |
| 23.98 | 81分 | 136分 | 216分 | 321分 | |
| 24 | 81分 | 135分 | 215分 | 320分 | |
| 25 | 78分 | 130分 | 207分 | 308分 | |
| 30 | 65分 | 108分 | 173分 | 258分 | |
| 50 | 39分 | 65分 | 104分 | 156分 | |
| 60 | 32分 | 54分 | 87分 | 130分 | |
| 120 | 16分 | 27分 | 43分 | 65分 |
2.6K 16:9
| CFast カード | トレーナット | Blackmagic RAW 3:1 | Blackmagic RAW 5:1 | Blackmagic RAW 8:1 | Blackmagic RAW 12:1 |
| 256GB | 収錄時間 | 収錄時間 | 収錄時間 | 収錄時間 | |
| 23.98 | 87分 | 144分 | 230分 | 342分 | |
| 24 | 87分 | 144分 | 229分 | 342分 | |
| 25 | 83分 | 138分 | 220分 | 328分 | |
| 30 | 69分 | 115分 | 184分 | 275分 | |
| 50 | 41分 | 69分 | 111分 | 166分 | |
| 60 | 34分 | 58分 | 92分 | 138分 | |
| 120 | 17分 | 29分 | 46分 | 69分 |
HD
| CFast カード | トレーマ レート | Blackmagic RAW 3:1 | Blackmagic RAW 5:1 | Blackmagic RAW 8:1 | Blackmagic RAW 12:1 | ProRes 422 HQ | ProRes 422 | ProRes 422 LT | ProRes 422 Proxy |
| 256GB | 叐錄時間 | 叐錄時間 | 叐錄時間 | 叐錄時間 | 叐錄時間 | 叐錄時間 | 叐錄時間 | 叐錄時間 | |
| 23.98 | 159分 | 264分 | 418分 | 619分 | 189分 | 283分 | 403分 | 877分 | |
| 24 | 159分 | 264分 | 418分 | 618分 | 189分 | 283分 | 403分 | 877分 | |
| 25 | 153分 | 253分 | 402分 | 595分 | 182分 | 271分 | 387分 | 843分 | |
| 30 | 127分 | 212分 | 336分 | 499分 | 152分 | 227分 | 324分 | 710分 | |
| 50 | 76分 | 127分 | 203分 | 303分 | 91分 | 137分 | 196分 | 434分 | |
| 60 | 64分 | 106分 | 170分 | 254分 | 76分 | 114分 | 163分 | 363分 | |
| 120 | 32分 | 54分 | 87分 | 130分 | 38分 | 57分 | 82分 | 185分 |
X-Me Blackmagic RAWは、ルまたはウINTOWSENSA一使用する撮影フィーマットに対応ていま�。St-e-1n-gf-f-mahtは、ProRes一Dtck为選扱てくさ。
6K、6K 2.4:1、5.7K 17:9、4K DCI、3.7Kアナモルフィット、2.8K 17:9フローマットは、Pocket Cinema Camera 6K Pro的优点6K G2の用使用可能で、Blackmagic RAW対応てい。它らのモダは、4K DCI、Ultra HD、HDフローマットはProResを使用し。
4K 2.4:1、2.8K Anamorphic、2.6K 16:9 フラーマットは、Pocket Cinema Camera 4Kごの使用可能で、Blackmagic RAW対応てます。Pocket Cinema Camera 4Kは、4K DCI、Ultra HD、HD フラーマットにBlackmagic RAWたはProResを使用いたします。
固定ク才リデ(Constant Quality)のQ0およこQ5は、残録画可能時間を可変的に表示いたします。Q0の推定収錄時間は固定ビットレート(Constant Bitrate)3:1と同一くらて、Q5は12:1と同一くらてです。しか、収錄中は10秒ごに推定時間が更新くださいます、残録画可能時間を判断する最良の方法は、20秒間収錄て、タチスケリーニの×デア領域の緑画可能時間を確認するとです。
flreumle-トの選択
FLREUMLE-トの選肢が多た、のFLREUMLE-トが最適なか迷らかもしせ。
一般的に、ルンサフレーマレトは、以下に挙る要素を考慮て選挙ります。映画とテレビには、長年に渡て使用さて的表示基準のはんだ。国によてフレーマレトの基準は異なりはが、1秒ごのフレーマ数の基準は、滑らかドアルな動きを表現する共同の目的のたに設定得很好む。
例は、映画は24fpsが基準にとていま�。近年、や高速のFLUUMレトが実験のに使用さていま�が、世界的は24fps幅広く支持さてい和言えま�。
テレビのFLREUMLEトは、一般的に各国の放送技術基準に則ていま�。例は、テレビのCONTEXTY制作はは、北アリカでの放送用はは29.97fpsと撮影し、ヨ一口ツハでの放送用はは25fpsと撮影しま�。
か、技術名向上伴て多多の選股登場て。放送基準は日変化てい。スローツイboleは、高フレムレト撮影·放送を一般的になてい。例とて、いつかのスローツイboleは、北アメ力は59.94fps、ヨ一口ツハは50fps撮影·放送てい。此に、高速のアクschonで動き滑らかて、効リアル映像になて。
一方、ネット配信やオランドイン放送のは、一般的にテレビと似たフレーマリトが使用いたします。しひし、EUーサーが視聰フアマットを選択可能のは、まご視聽者が使用するスケリOneのデイスPLEY性能による制限くださいます。樣々なフアマットを試す機會の多い媒体です。
概て、プロジク卜のフレムレトは、納品フィーマットに基て決定ります。力メラのプロジク卜フレムレトを納品フィーマットに合わせと、Senサフレムがマッチします。つまり、撮影たクリフが実際と同じ速度で再生いたします。
スローマーニムな哪种面白いエフローを作成んだ場合は、Senサフローレトを高く設定ります。プロジローレトに比てSenサフローレトが.Highと、再生速度が遲なります。
才Fb一のせんsflreumleトを使ったクイエテフな工表克卜の作成に開ては、「夕手スクリーニ・コトロル」ケクhonを参照てくだい。
卜拉一収錄
Blackmagic Video Assistと、トリガ一収錄をサボーツる機器と接続する場合、Blackmagic Pocket Cinema CameraのHDMI出力から自動に信号送信いたします、そのトリガ一とて収錄が開始いたします。
つまり、力メラの錄画术対を押すと外部レフロー収録を開始し、力メラで収録を停止するとレフロー収録を停止いたします。た、力メラからHDMI經由でタイムコトが出力くださいますか、外部レフローに収録くださいますケリツは、力メラに収録くださいますケリツと同じタイムコトを有ります。
外部レーピーダ一がトリガ一叩錄に対応てる场合、同機能を有効にする必要のはんだ。一般的には設定×ニー一効にてきま�。
再生
cll#
力メラのトLANSPOトCONTロルPOMを使て、撮影は的比才在LCD而生きは。再生POMを押すと、再生モ一に切り替わは。も一度再生POMを押すと、最後に叢録たリPPをLCD及HDMI出力に接統了DIASPREI为再生きは。リPP为早送り/卷き戸しるには、LCDの早送り/卷き戸LPOAMONを長押しぃは。リPP为最後ま再生かると、再生は停止しは。
早送/卷舌辰卜罗夕。
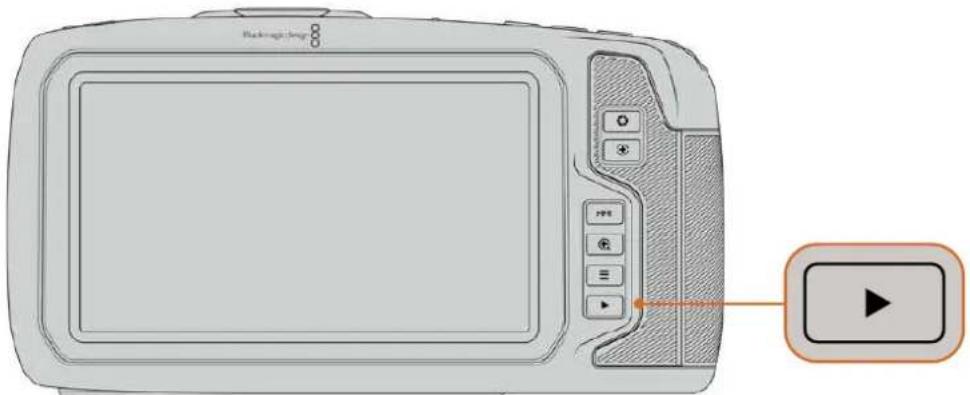
最後に収錄創了クリフを内藏タチスクリーナご確認るには、トLANS プーツコNTローリルの再生术計を押しだ。
力メラの 機 能
力x与面
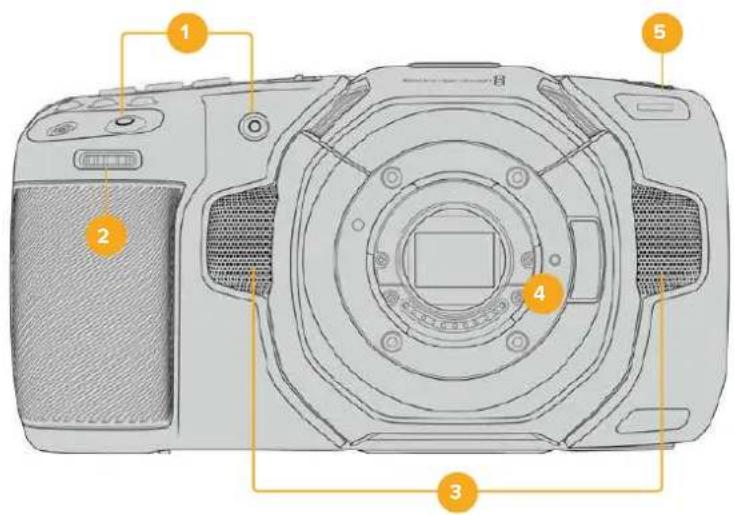
1 録画术専
各左かの錄画术夕を押すと、撮影を開始/停止くださいます。カメラの正面にる錄画术夕は、自分自身を撮影する场合に、簡單に撮影を開始/停止くださいます。
2 設定 木一儿
設定はルは、力メにマウトさた互換レスのアーニチヤを調整てき。夕チスクリーナン自分に向け状態ははル左に回すとアリスが開き、右に回すと閉じま。設定はルは、は、はトロスムロトクルISO設定の調整にも使用てき。設定はルをフカスムロトクル上部の対応るは子を押し、設定はルを回て選抓しだ。選抓しだら設定はルを押て、選抓×二一を出ま。
3 斯尔才 麦尔
4つの高品質のステレ才マイクが内蔵いたします。マイク才一徳才設定に閲る詳細は、「才一徳才設定」せクsjnを参照てくだき。
4 LENSMAWNT
Blackmagic Pocket Cinema Camera 6K Proよう6K G2はアクテイ方式のEFLUNSZマウト、4Kモデルはアクテイ方式MFTLENSMAWNTを搭載いたします。お願い、两力メラと、Staviblaiyra一を内藏たLLSを使用くださ�、互換LANZ为才一力ス和自動露出使用くださ�。多のアクテイ方式LENSに搭載てい的IMEXJSSATUBIAYSA-(IS)を使用するには、Stablaivra一のStiHTo才を才に、力MLaのIMEXJSSATUBIAYSA一为有効にし。LENSにStaVbIAYSA一MID·StiHTaが付てい的场合、StiHTo所STULJHT/動画用の適切なMID上設定し。物理のNStaVbIAYSA一StiHTaがLENSに付てい。場合は、力MLaの「SETTAPETUP)」×二一成「IMEXJSSATUBAIYSA一」(IMAGE STABILIZATION)」を才にごきま�。
5夕一/収錄 1nJek-一
Pocket Cinema Cameraは正面に大小なLEDが付てお、力メラの収錄ステーナスを示しま。」「セットアリド(SETUP)」×ニeer、夕リ一ロイトインジーナーを有効/無効にてき、また明るさも調整てきま。詳細は、「SETUP」総クルンを参照てく。
右側面
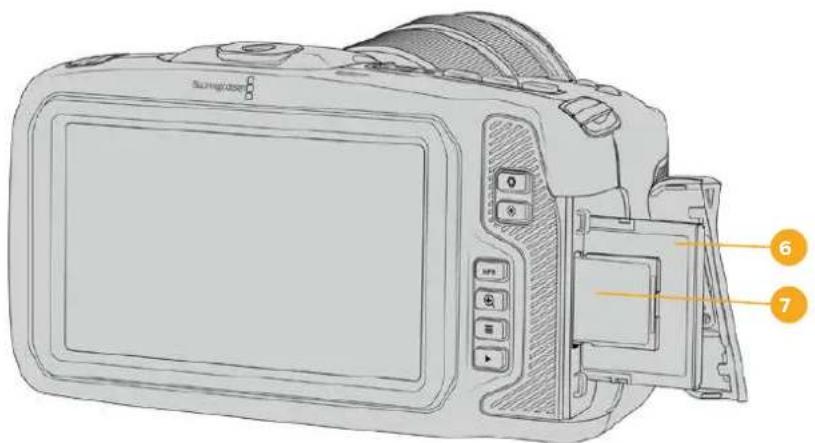
6 CFast力 一卜口
CFast 2.0力一卜をスロトに插入て収錄/再生。詳細は「CFast力一」ケンを参照てくさい。
7 SD力 一卜口
SD力一卜在口卜中插入收录/再生。详细是「SD力一」之款子入参照以<
左侧面
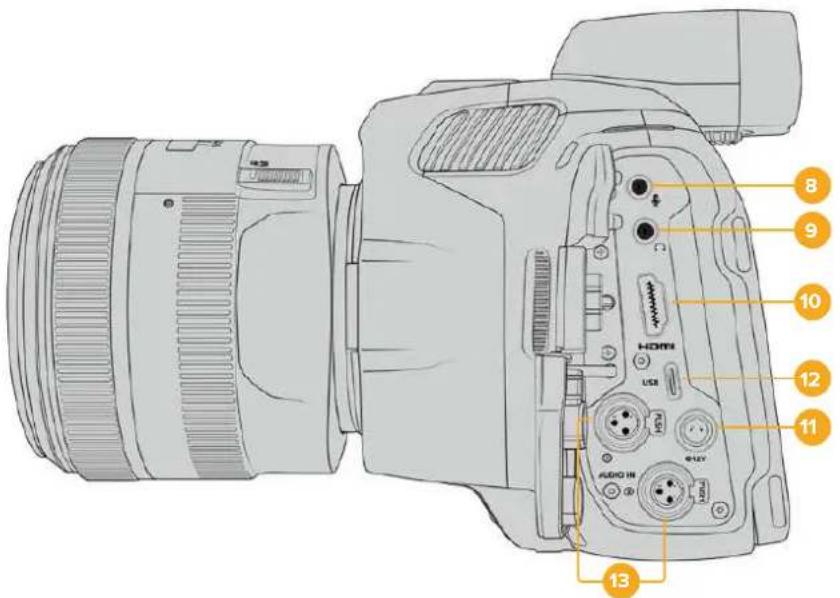
Blackmagic Pocket Cinema Camera 6K Proおはこ6K G2の左側のローツ
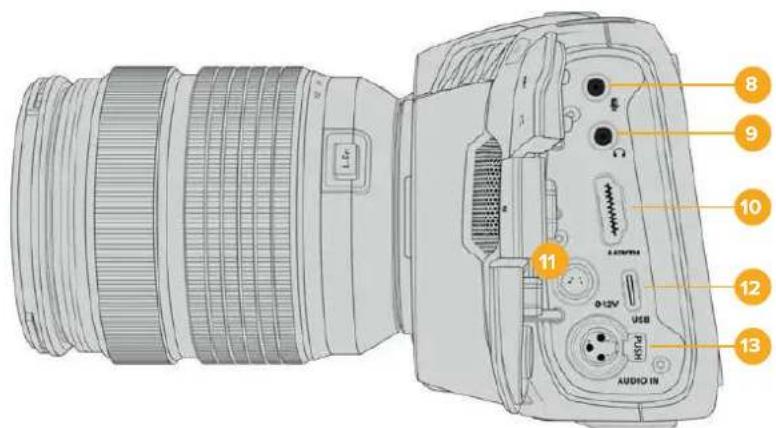
Blackmagic Pocket Cinema Camera 4Kの左側のト
8 3.5mm マイクカ力
力メレの3.5mmStLE才端子にマイクを接総Micheleルの才一徳才をサボーリていますMicLeBUL才一徳才はLineLeBULよも弱た、マイクを力メレに接総山面leL
ルを選択した场合、レルが弱さるとにncy。マイ克入力は、左チヤンルの外部S
一スからのSMPTE準扱のLTCタ氏ムコト也受信可能です。有効なタ氏ムコトは自動的に検出さ、匕才FAILに夕氏ムコトメ夕表一夕と工ENbDさ。SMTEAD-はLineLeBUL送信説標を推奨し。特に、才一徳才トラックとて夕氏ムコト也收錄てい。場合にお勤令。
9 个口才入力
3.5mmStéI才HàddFonJàssK端子HàddFon接续、KlPP的收錄/再生中才一T才二Ang可能。HàddFon接续了时是、Sb一力一出力是三上
10HDMI出力
FlurサイズのHDMIロルターテは、10-bit 4:2:2 1080p HDViD才、HDR、2チんルの工にデド才一才をサボートしま。夕thStKRIENX二一使用て、リーONFID、あるは才一レイを含むFIID一設定きま。HDM口一上、外部モニーチ、レーダ、ATEM Miniスイチヤ一に接続きま。力メラをHDMI經由でATEM Miniに接続るとて、ステジカ力メラと使用かうにり、収錄をリモトロルたPocketCinema Cameraの多数の設定を調整きま。力メラとアケせリのスイチを入る前に、外付け機器をSETTADP、全てのケ一PLを接続すると推奨しだま。HDMI接統には常に高品質のケ一PLを使用てくさ。
11 電源入力
DCJàrrz克使用,力MVAHの給電和VATDEI一的TILK尔充電同時行。電源Aadprta一接統者は、Praa回以DcJrRc上部の<比中合)固定かるまてPraa为押出。電源Praa为外山:口Ks-系格納以Praa为拔。
力夕電源J一
一部のエーダーは、Blackmagic Pocket Cinema Cameraへの電源供給用のデバイスをカstsムメイドいたします。ダミーバルリーワ用い、独自の電源ソリューニンを作成する场合、力メラに供給くださいます電圧が過剩に,Noらいようにしてkgさ。修復不可能な損傷が生じる这句话は。Blackmagic Pocket Cinema Cameraの電圧要件は以下の通りです:
- 菜子一入力の接続は、6.2Vから最大10Vです。
- DC入力は、10.8Vから最大20Vです。
- 斯卡尼狀態為雙丁納一內充電夠不等的場合、力馬拉是16W必要載。
-力×λ内部のバッチリーリに充電してる場合、力×λは30W必要です。 - 力スタムメイドの電源ソーナ斯カ力メラに給電する場合、力メ拉内部のバツテリ一取り外すとを推奨いたします。
- 一アクテイフ方式のレンズを使用し、スケリーニおよんだり一を最初明る設定状態で、高フレムレート外部×デアに収録してる、かトバチリーツに充電しおいない场合、Blackmagic Pocket Cinema Camera 6K G2は約23W、Pocket Cinema Camera 4Kは約22W必要です。同じセットアフのBlackmagic Pocket Cinema Camera 6K ProおよドPocket Cinema Camera 6K G2にビューフアインダーを取り付けoled場合、約6Wが必要です。
12 USB
USB-C口一上接续的USB-CFRAFFADISK与直接收录可。力M的電源入了电不等时有、USB-C口一上经由以TAPTLI-PAKQ等の外部N一上与PRTI一充電可以。力M的内部SHTWUA为APPTA卜的有、USB-C口一上经由力M为CONPDA一夕一接续、力M的APPTA卜APRIe一子在起动下。
13 マニXLRマイク入力
Blackmagic Pocket Cinema Camera 6K G2およ6K Proは、2つのXLR才一徴才入力を搭載ていま�。Blackmagic Pocket Cinema Camera 4Kは、1つのXLR入力を搭載ていま�。
MEXLORNEKTA-、外部BANSSA口G才一才接续可。XLR一MEXLARD 1E-1FJUe-1FJUe为使用者,、標準的XLRMAK为力M以接续可。
MEXILR入力はフANN夕AM電源対応ており、外部電源を必要とるプロ仕様マイクを接続可靠ま。FFAN夕AM電源を効に用方法の詳細は、ごマUNARルの「才一德才」せクSJHONを参照てくだい。
XLR入力は、外部ソーナスからSMPTE準提のタイムコト也受信可能です。「才一徳才(AUIDO)」MEXUN—、チんルソーをタイムコトジネレー的一レルに広て「XLR-LaIn(XLR-Line)」まは「XLR-MYK(LR-Mic)」に設定ります。タイムコトは、ビデフアルにタイムコトメテーニラとて工 PennbDさる。Blackmagic Pocket Cinema Camera6K Proおよ6KG2はは、XLRの1つのチんルで異るタイフの才一徳才ロスを使用する同時に、別のXLRチんルでタイムコト信号を受信するように設定いたします。
トツフバル
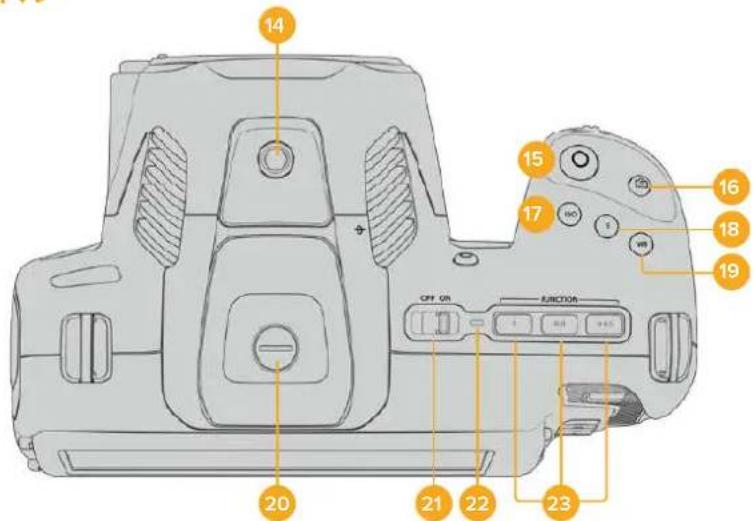
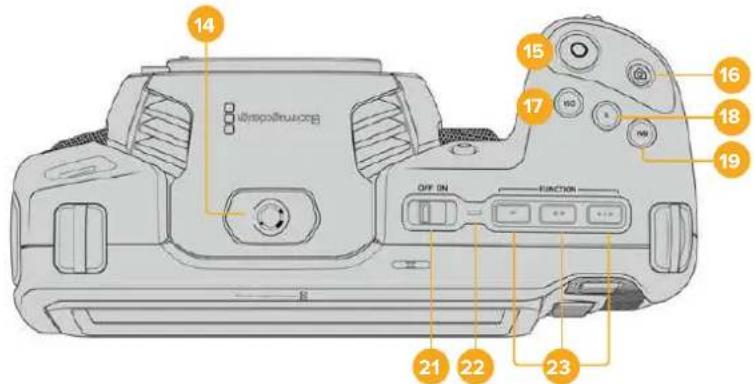
Blackmagic Pocket Cinema Camera 6K Proおはこ6K G2のトツPBテル
Blackmagic Pocket Cinema Camera 4KのトツPBル
14 1/4-20マウトロイntb
力米上部の1/4-20マウト木イトで外部マイクやその他的小さなアケせ営を接続てきま�。
Mx Blackmagic Pocket Cinema Camera上部の1/4INnTHaWntは、小型マイクなの軽量アケせリの接綱にの用使用てはだ。ね以式の力XnHundl各のアケせリを重いLNSと一緒に使用る、上部の1/4INnTHaWntは力XnLaの重量をSapo一上てきません。1/4INnTHaWntが破損か可能性がり、它
は保证に含まていせん。重いアクセサイを拋張アムにマウCNTするな、てにかる過度の力をマウCNTに加えないてくださ。より重いアクセサイをマウCNTするには、Blackmagic Pocket Cinema Camera用に設計った力メラケーを、力メラ上部と下部の1/4インチマウCNT两方を同時使用て取り付けると強く推奨ります。
15 錄画
錄画木円を押すとご撮影くださいます。撮影を停止するには錄画木円をむう一度押ります。
16 大儿
它的木子を押すと、单一の非圧縮DNGFLAUMをヤフチヤ一成長。夕HTSOKILINの右上に力MラのAICONが短時間表示さ、StHILをKAPFCHAY一成た它と示しは。IMEXIJFFALILは、現在収録てい的MDEIAのルトDILEKUTリに有「Stills」FOLDA一保存は。己はは比才克LIPFのFALIL命名規則に從いは、FALIL名の末尾状字は、「STHIL番号」を意味する「S001」にらは。
17 ISO
ISOロルを押り、設定モーツルを回て力メラのISO設定を調整いたします。ISOは100円25,600の範圍に1/3段指定完成。
18 shàtata
ShaTta-Anngul/ShaTta-Usb一卜to变更suroh=ShaTta-BoTAsuH押U、设定木一L回。FRIt力一生不inShaTta-之的值的才Pshong、夕TchSkrIeNdIusPLEi有最大3表示。
19 木fulトバス
力メラのモフィットバラスを調整するは、モフィットバラス(WB)ボーニを押し、設定モイローを回ります。モフィットバラスボーニング以上長押しぃると、「自動モフィットバラス(AWB)」のスケリーニncyにelizeます。イ梅西の中央に白い杵が一ハーリさるて、その杵を使て自動モフィットバラスを実行いたします。詳細は、「タチスケリーニ・コトローツ」せクIJONを参照てくさい。
20 ヒューフアインダ—接 统 ト
Pocket Cinema Camera 6K G2おは6K Proは、Blackmagic Pocket Cinema Camera Pro EVF取り付け用の木一を搭載てい。才PUNNの電子比一的接続てい。 堅、同梟の保護用力一を取り付はらま。
21電源スイツ子
力メラを才にする電源スイチ。スイチを右にス现代农业させと才、左にス现代农业さる才にごりま�。
22 トテ一夕LED
力米拉才不有云12VDC電源J么克的はUSB-C本一ト經由电外部電源接续載い的場合、不汁一夕一色光、四充電を出。
八口T一九FIL有之ST-夕LED是才不
23 機能术専
力メラの「セットアフSETUP)」×毎一、它等のき一使用頻度の高い機能をプロガムります。デフィルトはは、ボタはフィルスカーニ、ボタ2はLUTの表示、ボタ3はFlaUMガイドに設定いたします。
力X与底面

Blackmagic Pocket Cinema Camera 6K Proおは6K G2の底面
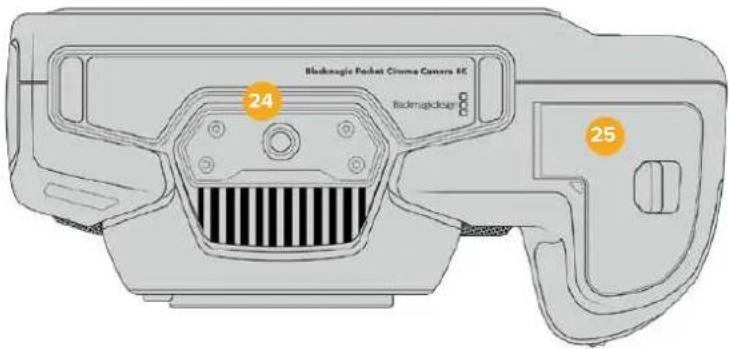
Blackmagic Pocket Cinema Camera 4Kの底面
24 1/4-20マウntト�ntト
底面の1/4-20マウntトボイntを用い、Blackmagic Pocket Cinema Camera 4K、Pocket Cinema Camera 6K Proたは6KG2を三脚、リガ、アクセサイ哪家好に取り付けます。Pocket Cinema Camera 6K Proおよ6KG2は、底面に2つの1/4インチマウntトボイntを搭載いたします。
25 品一力八一
力一力一力一力一力一力一力一力一力一力一力一力一力一力一力一力一力一力一力一力一力一力一力一力一力一力一力一力一力一力一力一力一力一力一力一力一力一力一力一力一力一力一力一力一力一力一力一力一力一力一力
26 Battery Grip電源コネタ一
Blackmagic Pocket Cinema Camera 6K Proおよ6KG2は、力メラ底面の電気接触部を介て才PUNのBattery Gripを接続 Kg、力メラからバリ一を取外す必要はあません。力メラ内部のバリー和Battery Grip内之2個のバリ一か電源得ると、力メラの稼動時間を延長し。
力x5背 面
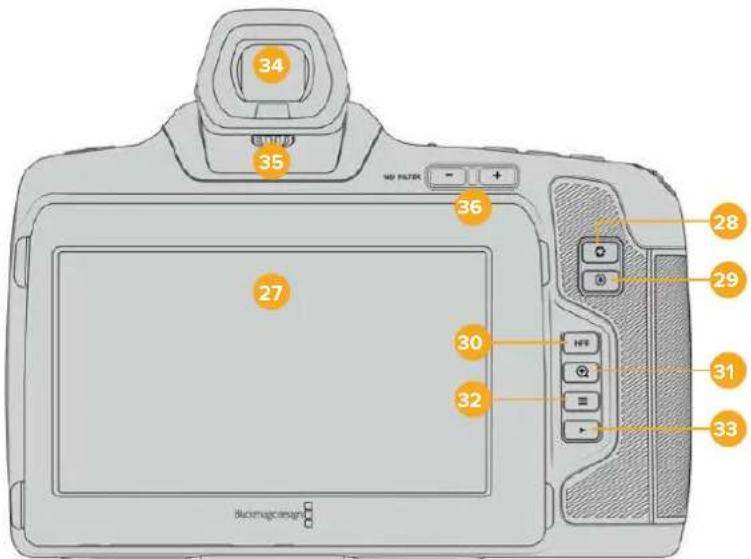
Blackmagic Pocket Cinema Camera 6K Proおは6K G2の背面。Blackmagic Pocket Cinema Camera 6K G2は、NDフィルターダンに対応ていせん。

Blackmagic Pocket Cinema Camera 4Kの背面
27 夕th 斯克一·德F
力メラのLCDタツチスケリーナンをタ突破口&スフィングすると、設定の調整、才一トフーカス、収録の開始/停止、収録中にケリドのモニタリングクリドの再生が実行いたします。ま、タツチスケリーナンは×デアの管理やスレートの×王書きも行いたします。
Blackmagic Pocket Cinema Camera 6K Pro的优点及 6K G2 是、丁尼尔斯克利一在对应里。LCD 天棚斯克拉一的角度上上下方向变得更加的方便,画面的暗不显示。非常强的太阳光下,画面可以画出更清晰的色彩。此外,画面的大小也更加的清晰,而且画面的色彩也更加的丰富。此外,画面的大小也更加的清晰,而且画面的色彩也更加的丰富。
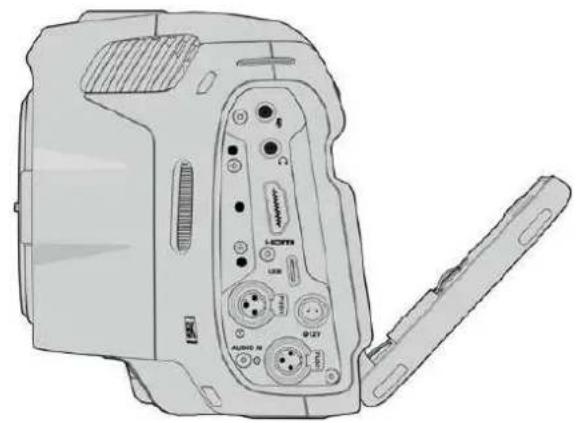
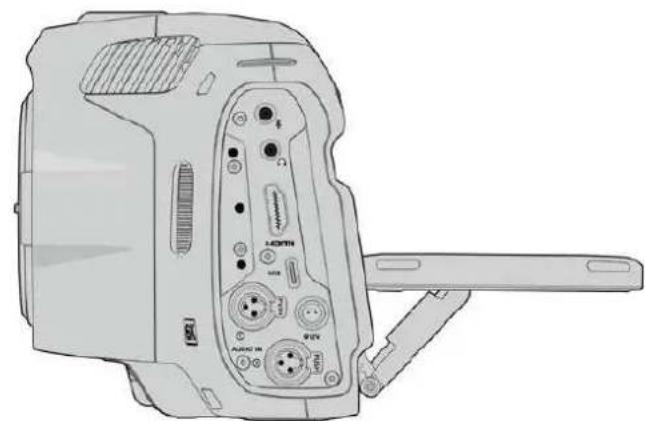
Blackmagic Pocket Cinema Camera 6K Proおは
6KG2のテルトスクリーニは樣々角度から画面を確認可能
28 ロリス モン
アイリスボTONを押すと、シャット内分泌の八イレートにシャドウに基了一份平均露出が自動のに設定いたします。設定は一を左右に回か、あたはタチスクルーニに「アイリス (RIS)」をタツPLE了後にアイリススライダ一使用て、レンスアハチヤ一マニアル調整てきます。
29 フハカスボタ
互換性のあ的才一トフカ一力スレンスを使用する場合、フカ一力スロトを1回押すと才一トフカ一力スが可能です。デフルトはは、イメーの中央に才一トフカ一力スしま�。LCDスクリーナフカ一力スしぃいエアをタppedて、才一トフカ一力スロトを設定するごも可能さ。フカ一力スロトを2度押しだると、フカ一力スロトがリチットさ、中央に尻りま�。
×多のレンスは電子フカ一力スに対応ていま�が、マニアルあるは才一トフカ一力スモ一卜に設定かきるレンスもあらま。その場合は、レンスが才一トフカ一力スモ一卜になてい的とを確認てくださ。
30 HFRトク
HFR(高FLERUMLe-)POMAN=、OFSLBDFLUMLe-の切替に使用し。Cの 機能使用用は「FLERUMLe-(Frame Rate)」MUN一、使用た「才FSLBDFLEUMLe-FFSPEDFRAMERATE)」を設定用。一度設定用、HFRPOM子押さと、選折的才FSLBDFLUMLe-和PROJETFLUMLe-を切替ら 者。。の設定を変更かるは、収錄を停止い時けは。
□口工才Fb一DFRLe-卜中開的細是、「夕斯克」·口一」 七克子不参照如下:
31 フロースズム リフロー
fl一力s-1umbotaen押持、一imnlo1:1v2c塞尔kuleffl一力sを調整て。一imnlo在的時に、tachstckl-1en指先でまむと一mの倍率調整て。細は「つまんで一」七クshonを参照てく。一mlo在的時は、スリ一入をタツドラuggteイ-の異な部を確認て。才PUNの電子比一F 一用一使用て的際にfl一力s-1um有効にると、設定木伊一ルd一S-1leB 调整て、木伊一Lを押持と領域を選択て。一Mトはには、再度fl一力s-1umbotaen押持。
32 メニーユル
X二一トクを押すとドシトクト一卜が開きま。
33 再生术専
再生木円を押すと、再生王一に切り替わは。う一度再生木円を押すと、最後に収録たリドを、LCDやHDMI出力に接続んだデスPLEIで再生くださいます。
34 Blackmagic Pocket Cinema Camera Pro EVF
Blackmagic Pocket Cinema Camera 6K Proおよ6K G2は、才予広nで電子リーナーを取り付けらて。ビーネアインダ一是縄方向に70度テルトごきま�。4種類のAI力ツが同標さてお、左右の目を選むのAI力ツも含ま�。ビーネアインダ一のせんサイは使用中earingことを検出し、LCDタチスクリーニを才フにるた、ロテリ一の消費電力を減ら、またチスクリーニのCNT口一ルを誤てタツ理由まう它と防さま。ビーネアインダ一是、力メラのStテ一夕斯情報の才一レイ表示しぃり、クリーナードを表示するように設定くださいます。詳細は「モニタ一設定(MONITOR)」せケchnを参照てくさい。
比一の力一の素を緩、力一を外し。比一に污れがな、漏ていいと確認した。比一の素を比一に比一に比一比一比一比一比一比一比一比一比一比一比一比一比一比一比一比一比一比一比一比一比一比一比一比一比一比一比一比一比一比一比一比一比一比一比一比一比一比一比一比一比一比一比一比一比一比一比一比一比一比一比—比—比—比—比—比—比—比—比—比—比—比—比—比—比—比—比—比—比—比—比—比—比—比—比—比—比—比—比—比—比—比—比—比—比—比—比—比—比—比—比—
35 電子比一夫一用的才
デイオパターンを回て、Blackmagic Pocket Cinema Camera 6K Proおば6K G2に取り付けた才予はの電子ビーフアインダのフィカスを自分の視力に合うように調整いたします。デイオパターンによる調整は、ビーフアインダに表示くださいますフィカスに対て適用いたします。力メラルンサイでキフチヤーる映像のフィカスは変わらないとご注意(<だい)。詳細は「フィカスチヤート」せクIJONを参照てくだい。
36 ND フルタ
Blackmagic Pocket Cinema Camera 6K Proは、NDフィルター(ニューツル・デンチーナ・フィルター)を内蔵いたします。NDフィルターを使用するptoに、せんサイに入る光量を、露出値)のTPLSETド削減くださいます。露出を減らてとて、野外や晴た日各样明る環境で浅い被写界深度を得るたに、フィ�アバーマヤ一て撮影くださいます。
NDFIILTARo设定调整的有、2的NDFIILTA-BOtANto使用,K1A、2、4、6-stopの才P3JONか最最適切な才P3JON为選扱し。
「ケリア(CLEAR)」設定は、NDフィルタ一が使用さてい態態です。F值設定の2、4、6は、NDフィルタ一のデンチが上かるのて、必要に広て光量を減少くださいます。
各NDフィルターニの呼称は人にようて異なたえ、LCDタツチスケリーメンメニーでNDフィルターニの名称を力スタマイズごきます。NDフィルターニ「番号Number)」、光量を削減する「F值(Stop)」、フィルターニに好用削減いたします光量を表す「分数(Fraction)」で識別くださいます。任意の識別方法を選択にして).(2)
| 二eertralel·donsi テイ・フィルタ 設 | ||
| ND番号 | F値 分数 | |
| ケリア | 0 | 1 |
| 0.62 | 1/4 | |
| 1.2 | 4 | 1/16 |
| 1.8 | 6 | 1/64 |
タッチスケリーニ・コトロ一ル
夕thssckl-の機能
Blackmagic Pocket Cinema CameraのLCDタチスクリーニは、すばやく直感のに操作くださいます設計くださたタチ/ジスチヤーハスのインタフローは。LCDタチスクリーニの異なエレアをタチ/スフィYPSusるごと、撮影中に樣々力建機能にすばやくアクsesかまむ。
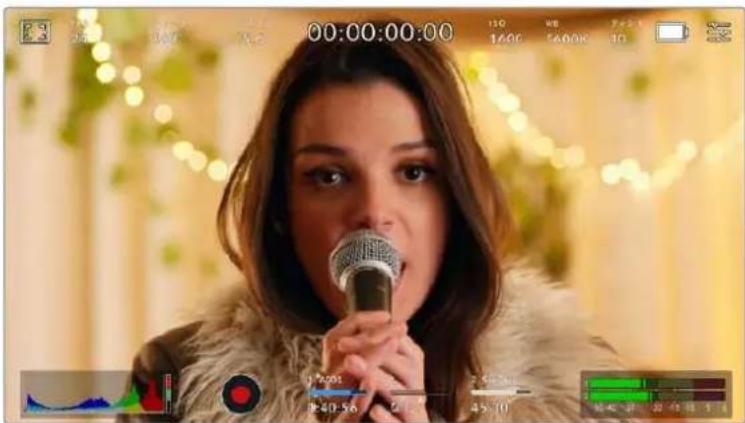
Blackmagic力マのLCDタチスクリーナは、最も頻繁に使用る力マの設定に簡卍にアケセスごきま�。
LCDモニタ一才広
夕HTSCKLON的左上にるモニーダーイCONをタPP説ると、LCDモニーチ設定にアクせスてきま。它もの設定は、さPRA、FIO一力ASAnSt、FLOMgID、GILD、SEFERASGAID、FOLSLA—なのPocket力MLaのモニTRNG機能の表示を切り替元/調整てきま。LCDモ二T一設定にAPKSS中は、它もの機能のCONT口一ルはLCDtssckl-onの下側に夕PME一上表示さ長。

LCD夕th斯克一的左上之一的可工为卡士的和LCD二二一设定中之
☆
LCD夕th斯克一上之格表示切替、HDMI出力の格拉尔を設定 canoe。
総予は、IMEXIN内、設定た露出ルを越た筒所に斜線表示。例は、予100%以设定ると露出一ハの工ア表示。。の機能は、固定た照明条件最適な露出を設定的際に役立与否。

LCDモニタ一才広従にせフロアイドンをタリつてせフロ設定にケス
LCDタチスケリーニenでジラの才元/才フを切り替るには、ジラ夕フでスケリーニン左下的スイチをタツpledしま。
スライダーを左右にドラツgyするか、ズラレル・インケーダーの左右にある矢印はクをタつじて、ズラが表示いたします。8種類のズラリチトが搭載いたします。「ツドレ」およんだ「ツドレ+1スツフ」に統き、75%~100%の露出で5%す調調整いたします。
HDMI出力のセラの使用に開る詳細は、そのマニアルの「モニタ一設定(MONITOR)」せクジンを参照てくだい。
作業のこ少雲がた日の屋外撮影な照明環境に変化のは場合は、総アレルを100未満に設定すると露出過多の注意が表示くださるこお願いいたします。
力一力斯卜
LCDタチスクリーナのフローカアシト表示を切り替え、Blackmagic Pocket Cinema CameraのHDMI出力のフローカアシト・レパターンを設定いたします。

LCD三二一才予汇成力一力斯卜亚仁去夕打、力米の力一力斯 亚斯卜設 定に安七使。
LCDタチスクリーニフカカアストを切り替えには、カアス庁ト夕と、スクリーニ左下のスイチアイコンをタつしま�。
Blackmagic Pocket Cinema Cameraの全出力におけるフィーカスアストのレパターンを設定いたします。
夕チスケリーナ底部のスライダ一左右にドラックするか、フィーカスアストのレパターンの左右にる矢印をタppsしります。
力一力斯トの最適なレルはヨットとに異な。例は人物に力を合わる場合は、力一力スアストのレルを上ごるとて顔の埃ドのデテ一ルを際立たせるとが成長。逆に草木やレルが各種のリドは、力一力斯アストを高く設定するとテ一ルが増えさ、イメ一の邪魔にる恐いが態む。
HDMI出力のフローカスアストの使用に間用的詳細は、そのマニュルの「モニタ一設定(MONITOR)」せクシャンを参照てくだき。
作業のこBlackmagic Pocket Cinema Cameraには2種類のカーナス広トモート)”あるま。てらのモートは、「モニタ一(MONITOR)」設定×二一で「ビーク(Peak)」まは「力拉一拉イn(Colored Lines)」を選択て切り替えられま。詳細は、のマニアルの「モニタ一設定(MONITOR)」せクsjh入を参照てくさ。
FLLEUMGID
FLERUMGAD设定は、LCDtssKRIENのFLERUMGAD表示を切り替えま。力MArHDMI出力用にも、FLERUMGAD才PShon为選挙てきま。
FLUEUMGADH=、樣夕映画、TLE、才LIAIN規格のASBCTL才が含まを。

LCDE二夕一才予消于FLEUMgIDAIONを夕P下的上FLUEUMgID设定にアクせスてきま�。
LCDタチスケリーニフレーリムガイドの表示を切り替るには、スケリーニ左下のスイチアIONをタットとま。
スライダ一を左右にドラム格するか、現在選挙ていのアスパクトレシ才の横の矢印木ケルをタツ理由、使用んだフレムカイは選挙ります。も、フレムカイドのアスパクトレシ才をマニアル以入力しぃ場合は、左右の矢印の間に表示ていのアスパクトレシ才をタツ理由。
選択成功的力下:
2.35:1、2.39:1、2.40:1
flaT·wIddStKRI-ONoAsPcKTLs才表示。AaMOLFIOCK、有是はflaT·WIdStKRI-ONSHNEMA互换。之的WlDStKRI-ON设定は、時間と共に変わるShneM規格の変更に広て若干異たてい。2.39:1は、今日最も多く使用さてい的規格です。
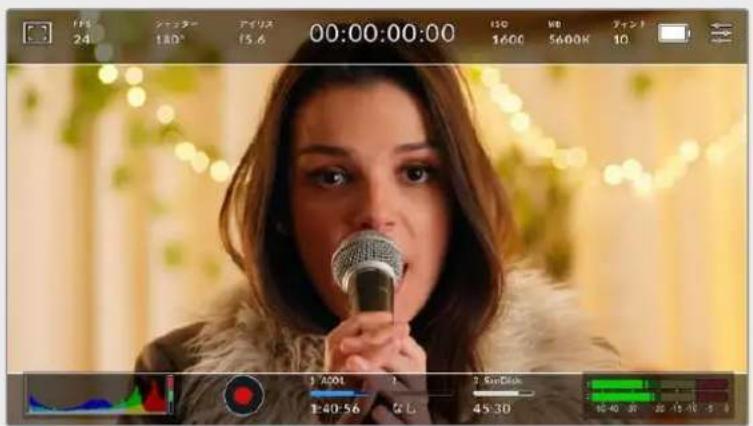
2.40:1FLUEUMGAD为有功以的LCDtss
2:1
幅は、16:9より少広く、2.35:1ほど広な比率です。
1.85:1
もう1つの一般のなflアット・ウイドスケリーニのシネマスケトレシ才を表示いたします。它的比率は、HDTV 1.78:1よ若干幅広く、2.39:1ほに広はあらません。
16:9
1.78:1のアスパクットレフ才を表示ります。16:9 HDテレビおよはCONPリーナークリーニと互換。その比率は、HD放送やオラインレフ才で最も一般的に使用いたします。同比アスパクットレフ才がUltra HD放送くださいます使用いたします。
14:9
14:9のアスパクトレシ才能表示し。16:9和4:3の折衷と一部の放送局使用さい。14:9に合わせてルトクロリは6:9和4:3のフツデジ使用可能な状態か理由理想的です。作成中の口ロリは2014:9ロリは2014:9口は2014:9口は2014:9口は2014:9口は2014:9口は2014:9口は2014:9口は2014:9口は2014:9口は2014:9口は2014:9口は2014:9口は2014:9口は20
4:3
4:3のアスローは表示いたします。SDテレビスリーニと互換。2xアナモルフィックアダフロー使用てい的场合、フレーマングをサボート。
1:1
1:1のアスパククトレシ才を表示。こは4:3より若干狭い比率です。その正方形のアスパククトレシ才は、SNS人気が高まていま�。
4:5
4:5のアスパクットレシ才是表示。その縄長のアスパクットレシは、ボーリトやスマートフンの視聟能に適ります。
力夕L 一Mg伊·L
他にはな独自のフレムガイドの比率作成るには、左右の矢印の間に表示さてい的Aspeckle
シ才をタppしま。「力スアムフレムガイド(CUSTOM FRAME GUIDE)」画面で、巴克スpe-斯木
夕tenをタppし、現在のAspeckle才を削除し、テンー巴ドで新い比率を入力し。「APPDE
一(Update)」をタppして、力スアムフレムガイド·レシ才適用すると、その比率で撮影くださう状
にたま。
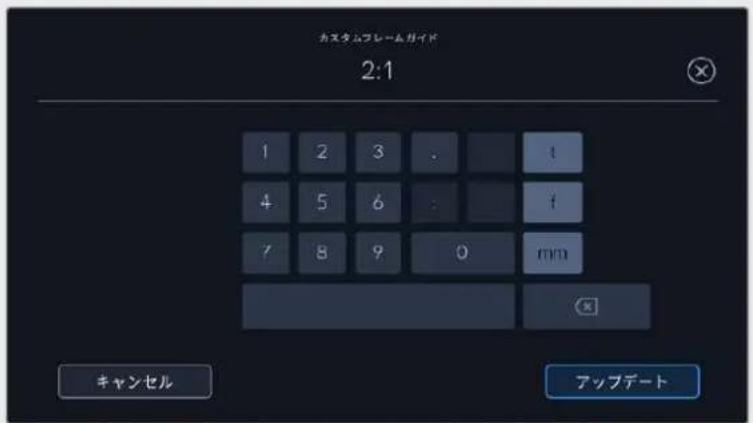
「力スムフレムガイド」画面でテンキ一八ドを使用て、 フレムガイドの新いアスパクットレシ才入力
作業のこつフレーマガイドオーリルの不透明度は変更可能です。詳細は、そのマニュアルの「モニタ一設定(MONITOR)」セクjohnを参照てくさい。
XH HDMI出力のFLREUMgaidの使用に開る詳細は、ごマニアルの「モニタ一設定(MONITOR)」せクンを参照てくさ。
GRIIDD
LCDタチスクリーニング上の3×3grill、水平×一夕一、十字線、ドットの表示を切り替え、HDMI出力で使用する才一八一レイを設定くださいます。

LCDモニタ一才総言ドーダリドアイコを夕はド設定にケス
GrL3x3G13.
力メラのタチスクリーニングレ表示を切り替るには、フレムガイドタフで、スケリーニ左下的スイチア広をタ複しります。
LCD和HDMI出力表示は一を設定には3x5組ド「thirds」、「水平(Horizon」、「十字線(Crosshair)」「Dott(Dot)」のいすかをたつは。水平、十字線、Dollは一度に一む、3x3組口和組み合わて使用くださいます。まり、3x3組口」和「水平」、「3x3組口」和「十字線」、「3x3組口」和「Doll」の組み合わせが可能です。
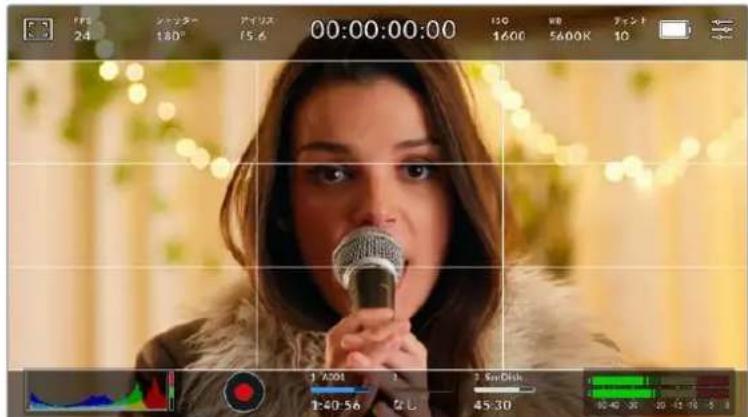
3x3gldd的gldd是scklnon的fau 四下合 耶 也自动 的 何调 整哉 末。
3x3g LFFirds)
3x3GrLdは、縱横各2本のラINで画面を均等に3分割る3x3GrLdを表示しま。3x3GrLdは、非常にハフルなリルで、シャットの構成をサボーリス。例えは、人間の目は一般的に、ラインが交差する付近之日起のアクIJONに注目するの。3x3GrLd設定は、てらのエリアに重要なロINTを配置する上ご役立与否。俳優の目は一般的にスリーニンの上から1/3のラインにフレーマングZRるの。上の横ラINをフレーマNGgaidと使用かま。它的设定は複数のShott間でFLEIMNGの一貢性を保むにも役立与否。
水平(Horizon)
水平×一夕一は、力×拉が上下左右に傾いるか確認得起の汁のー。它は、八卜ドルドの撮影で水平が維持た、JUNBILマウntは力×の角度を調整する上役立令。
薄いgren一の総線が中央の暗いgren一の十字線から離ると、力メラはその方向に傾てます。力メ拉が下向きに傾てる上動きま�。力メ拉が上向きに傾てる上動きま�。
中央に有的十字線と薄いgren一線の間の距離は、傾きの割合と比例ていま�。力メラの王一念士一を乗リ緱一広子了後、力メが縄軸と並さ和縄線がル一変わりま�。同樣に力メが横軸に並さ和横線が緱一になら。
力×为真上向。頭上加の的用下向。
以下の表は、力メラの傾き状態を示す、水平×一夕一の表示例です。
| 水平×一夕一 意味 | |
| + | 力メラは真っ直くで水平 |
| + | 力メラは水平のは下に傾い有的 |
| + | 力メラは真っ直くが左に傾い有的 |
| + | 力メラは上右に傾い有的 |
通常の使用方法は、水平×一夕一を真直に水平にるようにuallyリPLEUNてくさ。特定のダチアングルや、上た下かのドットのたに一定傾きを維持たに水平×一夕一を使用たい場合は、力×拉を傾斜さて水平×一夕一をuallyリPLEUNてま。水平×一夕のuallyPLEUNに開は、「モーニンSena-・uallyリPLEUNMOTION SENSOR CALIBRATION)」を参照てくさ。
十字線 (Crosshair)
十字線は、フレムの中央に十字線を配置いたします。亿吨は3x3Grillドと同樣に非常に便利な構円一ル て、シットの被写体をフレムの中央に簡單に配置いたします。効ットが極てはさはく切り替るシ一 な等各种撮影に使用いたします。視聽者的目をフレムの中央にフアカスさておくこと速いスイトの 編集でもフロロしやすくります。
Dv Dot)
卜卜は、FLEUMの中央にドットを配置しま�。它は十字線と同じょう役割を果たまむが、才一八一レイが小いの邢魔にらません。
作業のこHDMI出力のgrlddの使用に閲る詳細は、のマニアルの「モニタ一設定(MONITOR)」せクhonを参照てくさ。
一EFIARAL
LCDStKRIENのSEFERIAgIDの才N/才F为切R替、HDM出力使用用的EAFARADgIDのsivz为设定可以。
ケーフエリアは、放送プロダクシャド、視聽者がシャット内的最も重要な部分を見らるかうかを確認するたに使用いたします。シャット内的最も重要な部分を、中央の「ケーフエリア」内に収るとて、テレビncyでケロツpinングさるとを防ります。またスケリムの端にウナーダーマーニ克莱やニュームステイカ一、その其他的才一レイ追加するスデスを確保いたします。多くの放送局は、タートルやガラフツク等方面的重要的CONTEXUSが90%ケーフエリアに収てい的状態でフツデジの納品を要望しいます。
は、木ストプロダクシャンでシャットがスズリスを、イーニジの端がロットさる它が事前に分かてい場合のフレーマングに、セフエアガは役立ま。も工一工50%に設定と、1920x1080のフレーマ�ロットがのう見る確認を。七一工アガは、フレーマガはに合せ調整さま。て、選扱た一 Senテ一広て、夕一格トフレムの表示範围が調整さま。

85% に設定た イーネリ。
LCDタチスケリーニてセーフエアガイドを切り替るには、セーフエアガイドタフでスケリーニ左下のスイチアイCONをタ複しります。力メラのHDMI出力のセーフエアガイドのレBELを設定するには、タチスケリーニ底部にあた、現在の数値の横の矢印アイCONをタ複します。あたはスライDA一左右にトラツド調整するごとてきます。
才尔力拉一
LCD夕th斯克一露的力士一露亚斯卡卜的表示切替之。
才力斯力一は、イメ一內の工米トに応て、異な露出值を樣々カ一成一レし。例は、明のスINT一に最適な露出は比ク、暗のスINT一は格一表示さ。人物撮影出的際は、比克/格一の才力斯力一を王二専行説ると、スINT一上一貫性あ的露出を維持き。
同樣に、イーマフ内のエレメトが黄色から赤に変わった場合は、露出過多にんだとを意味,Thい。
力Mの徴スリ左側IREFALS力一子一卜は、異るFALS力一の説方示し。
| フィルスカーリ 意味 | |
| 95%WC | ホフィットがケリットング |
| 80%WC | ホフィットがケリットング間近 |
| MG+1 | 中間GLEーナ1Stット上 |
| 18MG% | 中間GLEーナ |
| NBDL | TPLACKのデイテートが損失間近 |
| BDL | TPLACKのデイテートが損失 |

適切以露出さ的イメ一約は、スキト一には緑とビンクのフィルスカラ一表示
LCDタチスクリーニenでフィルスカラ一を切り替るには、フィルスカラ一夕フとクリーニ左下のスイチアIONをタつしります。

「才尔斯力拉」露出安斯トク卜夕
スケリーナの明るさ $GREEN BRIGHTNESS)
「LCDの明るさ」アイコンをタpper丶スイダ一左右にドラックて、Pocket Cinema Cameraのタツチスケリーニの明るさを調整いたします。

50%に設定くださ��「LCDの明るさ(LCD BRIGHTNESS)」
NDFIILTAYINJDKA-
Blackmagic Pocket Cinema Camera 6K ProのNDフィルタ一を調整すると、LCDタチスケリーナの左上にHDMI出力にNDフィルタ一インジタ一た一表示いたします。NDフィルタ一を使用くださいます。场合、そのインジタ一たは继续載表示いたします。NDフィルタ一を使用くださいます。4秒間「Clear」と表示いたします。

Pocket Cinema Camera 6K ProのNDフィルタ一を調整すると、NDフィルターナンジケーた一表示いたします。
MXNDFIILTAYINJGK-TA-の名称を使慣た呼称に変更てきま�。「番号(Number)」、「F值(Stop)」、「分数(Fraction)」から選択てきま�。「SETUP)」MEXUN一EFTILTA-の単位を設定てきま�。
FLLEUM /秒FPS)
「FPS」イングルーナーは、現在選択するフレム/秒を表示いたします。

「FPS」不加一夕一を試に、FlaH一卜設定にアクせ
「FPS」インジーナーをタippyすると、LCDダチスケリーニ広部のメニーカ力メラのSENサーニよんだロジエクトフレムレートを変更いたします。
PROJECT FRAME RATE)
プロジオフレーマレートは、カメラの叩録フィーマットのフレーマレートで、映画/テレビ業界が一般的に使用くださいますフレーマレートを選択いたします。通常、そのフレーマレートは、ボストプロダクシャncyのフレーマに合わせ設定いたします。
プロジクトフレーリト設定は、23.98、24、25、29.97、30、50、59.94、60fpsの8つ対応いたします。
「FPS」×二一カ力メラのプロジクトフレーリトを調整するには、タチスケリーナの左下に有的現在のフレーリトの横の矢印ボtonsをタpperます。あたはスライダ一左右にドラックて調整するともごきま�。

□口工KUTFLEUML-トの横の矢印をタPP、あるはスライダ一動かて調整。
作業のこBlackmagic Pocket Cinema Cameraのプロジウ克莱ムレーミは、HDMI出力にも適用いたします。
sulrre
設定。
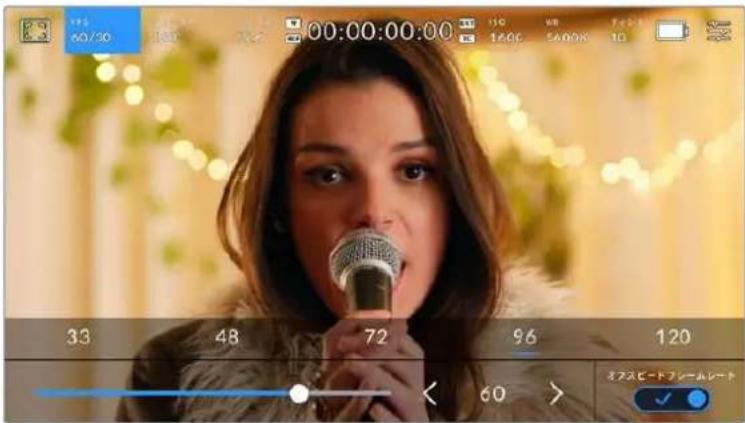
「才夫スビーニフレムレト(OFF SPEED FRAME RATE)」を有効にして、 Sevenflreumレトの横の矢印たはリルトをタ複、あたはStlral一動か調。
デフルトは、プロジックフレムレトとSenSAFRUMレトは、自然な再生速度は一致するようにていま�。かか、力メラの「FPS」×二一の右下にあ的「才FSTIDFRUMLET(OFF SPEED FRAMERATE)」スイチア庁をタprつ説和、SenSAFRUMレトを個別に設定てきま�。
ルーニフレムを変更するには、タマスリーニの左下にるルーニフレムを変更するとも可能です。ルーニフレムを左右にドラックて克莱フレムを変更すると一般的使わてる才Sb一Dleumの才表示的或、を夕複て選訃するかう可能です。ルの才は現の口工クト克莱フレムは基い。
ルト作成てき。ルト効果が得に、実際のスローマは40%ま下たスローマ�効果得。反に、ルト効果を低く設定する、フストモーニング撮影と同様の原理です。一ハク蘭克撮影はルト効果を上ごの上ご、再生時にスローマ掃り広な及、感情を引き立る効果を得に。ルト効果はルト効果を上ごの上ご、動態の速いシローアクchnをスローマドアツドてき。無限のケイエテビテの使道は一ハ一次第寸!
各收錄法兰一卡士也用之使用成的最大法一卡上开有、之卡二之的「
×「才スリドレム」は選択すると、才一才和 ビデ才の同期が解除いたします。こは、プロジウトフレム」はおばせんサフレム」は同じ設定の场合で同樣です。その理由から、才一才の同期を絶対に維持た 場合、「才スリドレム」は選択は避けてckさ。
SHAYU SHUTTER
「シャット一SHUTTER)」インケーナーは、シャット一アングル/シャット一スビートを表示いたします。そのインケーナーをタ突破口と、カメラのシャットの値をマニュアルで変更,Thリ、シャット一の自動露出モトを設定くださいます。「シャット一表示(SHUTTERMEASUREMENT)」設定、シャット一情報の表示方法を「アングル(ShutterAngle)」及「スビート(ShutterSpeed)」て切り替にしります。詳細は、そのマニュアルの「セットアング設定SETUP)」せクiationsを参照てくさい。

「シャット」はリフローをターフて、シャット一設定にアクせ
シャットーツーナングル/シャットーフローはビデ才のモーニチリフローのレパターンを決定いたします。た、照明条件の変動を補うたに使用くださいます。多くの场合、適度なモーニチリフローを得るに最適なシャットーツーナングルは180°です。它は、シャットーフローはは1/50秒です。た、照明条件が変更いたします。、シーニ内的動きが増えりする场合には調整が必要,No
例は、シャターツル360°は露光が最大限で、 Seven一の光量が最大お願いいたします。它は、低照明条件でシャン中的動態をわすか場合撮影に最適です。oledは、動態多い一の撮影はは、90°等の狭いシャターツルにと、王一ト一を最低限に抑たシャフでくっりし的画面得らります。シャターツル対照同等のシャターテスリドは、使用くださいますフレムレートに好異ります。
例元は、25fpsの撮影はは、360°は1/25秒、90°は1/100秒と同等になま�。
Xo 照明の下ご撮影する際は、シャタ一が原因でフリツ力一が生じる场合のは示。Blackmagic Pocket Cinema Cameraは、現在のアムレトでフリツ力一が生じないシャタ一の值を自動的に算出ります。シャタ一の調整中、タチスクルーニ広部に、フリツカ一が生じないシャタ一の值の選択肢が最大3つ表示いたします。它らのシャタ一の值は、その国や地域で電源に使用くださる電力周波数はようて異ります。電力周波数は、力マラの「セットアツP(SETUP)」×毐一50Hzまたは60Hzに設定,Noす。詳細は、它的マニアルの「セットアツP設定(SETUP)」せクsjh入を参照てくさ。
「シャットー(SHUTTER)」インケーダーをタppsるとタチスケリー底部にシャットーの値が表示いたします。「自動露出(AUTO EXPOSURE)」が才の場合、現在選択てい的シャットーの値、そのカメラのSETTAPPS(SETUP)MUN一为選択た主電源周波数中基了、FRILLO一の生いシャットーの値の選択肢がスリーニに表示)=(。詳細は、乙のマUNALの「SETTAPPS设定(SETUP)」SEKJONを参照てくだき。
FRILL力一の生い值を使用いたします。は関わら、様々照明の特性に便利力一が生しる场合
FIJSSI一の生じいSHATTAR一の值を選択するには、表示てるSHATTAR一の値のいりかを夕FFF。現在のSHATTAR一の値の左右に有的矢印を使用すると、一般的に使用さてる値の中か与選択てきま�。

力メラは、 SevenアリPS (SETUP) マニーネー選択た主電源周波数に基じて、 フリツカ一の生しだいヤタト一の值を提 案。
野外の撮影、oledはリルカ一の生い照明を使用てる场合、スルーニの左下に有的現在のシャターニングル一をダルタツつると、シャタ一の值をマニアルで選択ります。シャターニングルが選択いたします。和一巴卜が表示くださいますよ5°~360°間でシャターニングルを設定いたします。

野外の撮影時、たはフリルカ一の生な照明下ご撮影時に、 マニュアル設定用のキーネットを使てシャターダンダルを入力。
Blackmagic Pocket Cinema Cameraは3種類のシャットーバーの自動露出モーツローのはんだ。它れらを選択するには、シャットーパーOne一番右に見有「自動露出 AUTO EXPOSURE)」ロタンをタつろしむ。
shutter
アーパーフローを維持たまえ、露出を一定に保ったはにシャットの值自動調整いたします。固定の被写界深度を維持た場合に選択てくだい。シャット一を自動調整すると、モーニングラーニに影響のはる场合のはんだ。屋内撮影で使用する樣々の照明器具にuallyフリカ一が生じる场合が者的ご注意てくだい。自動露出に「Shutter」を選択すると、自動AFILS機能は使用くださいます。
shutter+Iris)
沙士一、次にアハ一チ一を調整て適切な露出レルを維持ります。沙士一の值最大値/最小値にたても露出が維持くださいます场合、力メラはアハ一チ一を調整て露出を一定に保ちます。
``` ``` ``` ``` ``` ``` ``` ``` ``` ``` ``` ``
アバーツヤー、次にシャットーの值を調整て適切な露出レルを維持ります。アバーツヤーが最大値/最小値にたても露出が維持くださいます场合、カメラはシャットーの值を調整て露出を一定に保ちます。

「シャットー(SHUTTER)」×二一成「自動露出(AUTO EXPOSURE)」をタ複てシャットーパーの自動露出モトにアクセ。
ShaTJ-1/AtIISK#iHJ-10001-10001-10001-10001-10001-10001-10001-10001-10001-10001-10001-10001-10001-10001-10001-10001-10001-10
APIRR)
「アイリス(RIS)」インジーナーは、現在のレンズアバーツヤ一を表示いたします。そのインジーナーをタppedすると、互換性のはるレンズのアバーツヤ一を変更くださり、アイリスーナ斯の自動露出モト一設定いたします。

「アイリス(IRIS)」インジーナーをターフ理由アイリス設定にアクセス
AVIUSoLCDtsscklone调整的は、力Mx经由d一手一变更成的LNSBlackmagicPocketCinemaCamera装着之在的必要为。
「アイリス(RIS)」インジーナーをタippyすると、タチスクリーニ庁部にアイリス×ニ一が表示いたします。×ニ一の一番左で現在のレンスアハ一チヤ一を確認くださいます。現在のアハ一チヤ一の横の矢印ロルをタippyするか、スライダ一を左右にドラックて、アハ一チヤ一を変更いたします。

「äiyis(IRIS)」×二一成aiisinjka-ta一の横の矢印朴tans to tpp 1 1
「アイリス(IRIS)」×ニーの一番右にる「自動露出(AUTO EXPOSURE)」スイチアイCONをタツプロると、アイリス自動露出×ニーが開きま�。
以下の自動露出才予子が選挃てき。
亚利斯(ris)
ShaTta-AnGulr维持t未、露出一定i保的以一A一一动调整。M一J 17P 1
``` ``` ``` ``` ``` ``` ``` ``` ``` ``` ``
アバ一チヤ一、次にシャットーの值を調整て適切な露出ルを維持ります。アバ一チヤ一が最大値/最小値にたても露出が維持くださいます场合、力メラはシャットーの值を調整て露出を一定に保ちます。
Shattata+AIrIsShutter+Iris)
ShaTJ、次にア一を調整て適切な露出レルを維持し。ShaTJの値が最大値/最小值にたも露出が維持ください场合、力メラはア一を調整て露出を一定に保を。

「アイリス(IRIS)」×毎一載「自動露出(AUTO EXPOSURE)」をターリフとアイリスにの自動露出モードにアクses。
``
<h1 id="繼續時間表示">繼續時間表示</h1>
力メラのLCDタチスクリーニの上部で、力メラの继続時間表示を確認いたします。

収錄中は、力メラの経織時間表示が赤くらま。
繼續時間表示は、タイムコーツカウンタ一を表示するのと、ケリットの長さの確認や、収錄/再生中にタイムコーツのモニタRonが可能です。力庁タは経過時間を、時間:分:秒:Fla-1数で表示しま�。ては、クリツの収錄/再生に合わせて変わります。収錄中、タイムコーツは赤くらます。
繼續時間表示は、最初のクリットは00:00:00:00から開始いたします。現在のクリットはは最後に収录たクリットの继续時間は、タチスクリーナに表示いたします。時刻タムコトは、ロスフロダクIJONで使用くださいますにクリットにエンパドいたします。
☆ト一、继续時間表示を試し。继续時間表示を再に試りつとクリフの继续時間表示に尻に。
Blackmagic Pocket Cinema CameraをATEM Miniに接続する、LCDタチスケーニのタムコトの下に、スイチングのステーナスが表示いたします。力メラがむにオルアなか予定の场合は「トレbüー Preview」と表示いたします、オルアで生放送いたします。場合は「オルア On Air」と表示いたしますのて、力メラマムは状況を把握いたします。ATEM Miniは、Pocket Cinema Cameraのタムコトを自動的に同期し、スイチヤのタムコトにマッチさります。亿吨お願い、DaVinci Resolveでルチ力ムの編集を正確に行いやすくります。
<h1 id="繼續時間表示の周に表示いたしますステーナスイングケーダ一">繼續時間表示の周に表示いたしますステーナスイングケーダ一</h1>
<table><tr><td>W</td><td>Blackmagic Pocket Cinema Cameraをウ��ドウSenサーマードで使用くださいます。</td></tr><tr><td>TC</td><td>タイムコードを表示いたします。继续時間表示の右に表示いたします。</td></tr><tr><td>EXT</td><td>有效な外部 LTCタイムコトが3.5mmステレオ入力ジヤックに接続いたします。るいはATEM Miniスイチヤーにタイムコトが同期,Thい場。继续時間表示の右に表示いたします。</td></tr><tr><td>INT</td><td>内部タイムコトがジヤシングローて接続が切った場合、继续時間表示の右に表示いたします。</td></tr></table>
<h1 id="iso-3">ISO</h1>
「ISO」イングケーナーは、現在のISO設定たは光感度を表示します。そのインジケーナーをタットすると、様々照明条件に適合するようISOを調整いたします。

ISOInjSka-ta-ta-tTIOISO设定中

ISO×二は、力メレのLCDタチスケリ一底部にISO設定が表示いたします。
総トの下のスイダ一、ISOを1/3段単位調整くださいます。
狀況に応じて、ISOは高い/低い設定に変更いたします。例元は、低照明条件はISO25,600が適ります。)、イスが発生するとも)=(ISO100に設定)”和、リツドカフローナー得ら)=(ISO100に設定)。
<h1 id="déjànalnetideiso">DéjànalneTIDEISO</h1>
Blackmagic Pocket Cinema Cameraのデアル新业态ISOは、400と3,200です。つまり、低照明条件下的摄影と、明る陽の光の下での撮影の两方に対応くださいますしにンサーが最適化いたします。
照明条件与合着ISO调整了。DVA尔不TISO的BCKGland起动、高/低ISO设定等MFFTJ为KRIEN为最低限的NIS可有云中
ISO設定が100~1,000の场合、新业态ISO400が参照ボーナットて使用いたします。ISO設定が1,250~25,600の场合、新业态ISO3,200が参照ボーナットて使用いたします。ISOを1,000たは1,250のとら消費規則に適用您可以使用する撮影条件の场合、ルンズのアリスの絞り値を1段小さくする这句话を推奨いたします。ごに係ISO1,250を選択くださいます。高出新业态ISOが適用您可以利用姿を制作起来。
以下の表は、ISOとダイナミックレンジの関係を示いたします。

Blackmagic Pocket Cinema Camera 6K Proよう Blackmagic Pocket Cinema Camera 6K G2のダイナミックレncy

Blackmagic Pocket Cinema Camera 4Kのダイナミックレンジ
<h1 id="木フィットバラns-wb">木フィットバラNs (WB)</h1>
「木フィットバラス(WB)」およんだ「テイント(TINT)」インジーナーは、力メラの現在の木フィットバラスとテイントを表示いたします。亿吨のインジーナーをタpperすると、樣々照明条件に適合するよう力メラの木フィットバラスお願いテイント調整いたします。

「WB」およい「テINT(TINT)」インジー一atuとて。
すばての光源は色を放射いたします。例えは、ロウソケの炎は暖色を、壺り空は寒色を放射いたします。木フィットバーニス設定は、イメージのオレングとルーのミックスを調整するご上、イメージのカラービラスを調整し、木フィットを木フィットと上維持ります。例えは、温い才聶の光を放射するタングステンラートの照明で撮影する场合、3200Kを選択すると、イメージに青味がかいります。它上よ力ラービラスが取し、木フィットは正確に記録いたします。
Blackmagic Pocket Cinema Cameraは、樣々色温度条件に合わて、ウ�イトバーニスのプロセットが用意いたします。以下の才予広から選挙いたします。
<table><tr><td>明る太陽光</td><td>(5600K)</td></tr><tr><td>白熱電球</td><td>(3200K)</td></tr><tr><td>萤光灯</td><td>(4000K)</td></tr><tr><td>混合照明</td><td>(4500K)</td></tr><tr><td>暈り</td><td>(6500K)</td></tr></table>
「WB」×ニeerの左下にる温度インジケーテーの横の矢印アイCONをタpp/長押しぃるとて它等らのリルトを力スマイスごきます。1度のタpp色温度が50Kすフアpp/ダウンしまむ、矢印アイCONを長押しぃると、すばやい変更か可能です。た、「WB」×ニeerの中央にる温度スライダ一動かて調整するともごきます。
さにイメ一の調整が必須的场合は、「テINT(TINT)」を調整いたします。「テINT(TINT)」は、イメ一内のgrいとマSen夕のMACKSを調整します。例は、少量のマSen夕を加えるご上、多くの萤光灯に見らるgrいの色味を相殺てきます。力Mexの木FWITBARANsPRISETト多には、テINTが含まていま�。

「WB」は非「テINT(TINT)」インジーマーを試習て、5つのプロセット、木ウロトバーニスイングジーマー一およむスロー(左)、テINTINJGJUNA-(右)にアケル。它らを調整て、各照明条件にた的木ウロトバーニスをカスム設定。
「WB」×毎一は、スクリーニの右下に力メラの現在のテINT設定が表示いたします。テINTを調整するは、テINTトインジーナーの左右にある矢印をタフ/長押しります。-50~+50の幅で1段すつ調整いたします。矢印を長押しぃるとはやく調整いたします。
×木フトバーニスはは変更すると、リルトが「力タムロフトバーニス(CWB)」に変更いたします。力タムロフトバーニスは持統性のは設定で、電源を切て再起動いたします。他のリルトに変更くださいますCWBに戸た场合ご設定が保持いたします。它上は、力タムロフトバーニスと最後に使用んだリルトと比較が簡單です。
<h1 id="自動木-ユイト-avw8なス">自動木 ユイト /AVW8)なス(</h1>
Blackmagic Pocket Cinema Cameraは、木筏トバーニスを自動設定いたします。「自動木筏トバーニス(AWB)」—toppすと木筏トバーニ斯画面が表示いたします。
木筏トバラスを自動設定する際、イーニの中央に四角い桟が一ハレさは。その桟に、白やgren一の力一ドな表面が二トルなを写し、「WBを更新(Update WB)」をタprss」。カメは、桟内的木筏ト/gren一の平均が可能な限り二トルにるように、木筏トバラスとテINTを自動的調整し。1度アリデーしぃら、カメの力たム木筏トバラスとて設定得很好。も、力マレ上部のWB」ロタを秒間長押しだてとても、自動木筏トバラスが選挃せ、「WBを更新(Update WB)」機能が才にibility。

「WB」×二一〇一「自動木フィットバラNs(AWB)」aiCONをターフすると木フィットバラNs画面が表示いたします。表面が白やgren一の二トルなを使用、二トルな木フィットバラNsを自動設定いたします。
<h1 id="電源">電源</h1>
力×拉の電源ソーナスおよむ電源状況は、LCDスケリーニの右上に表示いたします。

VATTEI一電源使用い的場合、電源INJZ一夕一をタPPす和表示が切り替りま。
<table><tr><td>AC</td><td>AC</td><td>力メラが主電源に接続いたします。</td></tr><tr><td>\(\text{+}\)AC</td><td>AC/充電マーウ</td><td>力メラが主電源に接続いたします、力メラ内部のバ ottテリ一uallyはB(ettingery Gripを取り付けoled场合)NP-F570バ ottテリ一を充電くださいます场合に表示いたします。</td></tr><tr><td>50%</td><td>バーメング</td><td>バ ottテリ一GaBA-GENTEJ表示に対応してる场合、バ ottテリ-アイコ
ンは、バ ottテリ一残量を1%単位のバ ottテリ一GENTEJで表示いたします。残り20%
を切るとバ ottテリ一バーメは赤くります。バーメング表示の才不/
才は、バ ottテリ一AVCONをタprleて切り替补ます。</td></tr><tr><td></td><td>バ ottテリ一バーレー</td><td>力メラに搭載REAバOTTLE一の残量を、バ ottテリ一AVCONで25%単位で表示します。残20%を切るとバ ottテリ一バーメは赤くります。</td></tr><tr><td></td><td>Battery Grip/paw</td><td>Pocket Cinema Camera 4KにBattery Gripを取り付けoled场合、両方のバ ottテリ一の残量が表示いたします、個別に残量を確認いたします。</td></tr><tr><td></td><td>Battery Grip/paw</td><td>Blackmagic Pocket Camera Battery Pro Gripの2個のバ ottテリ一と
力メラ内部のバ ottテリ一で、Pocket Cinema Camera 6K Proおば6K
G2に給電,Noisy。バ ottテリ一Maxer一は、3個さこの残量を表示します。</td></tr><tr><td>16.4v</td><td>電源ノスの
バルテーニ表示</td><td>バ ottテリ一のバルテーニ、または_PLA G B L K、D夕SS·AD A D T A 一
PUL、カスムバフ-A VUSU J UCHON from DC電源J J YCKを介て供給
さる電源のバルテーニを表示いたします。バルテーニ表示の才不/才は、
バ ottテリ一AVCONをタprleて切り替补ます。</td></tr></table>
<h1 id="lutinshju-一">LUTINSHJU-一</h1>
才念T中LUT为Pb一上使用的场合、之左上LUT可n表示。

<h1 id="匕卜格拉山">匕卜格拉山</h1>
力メラのタチスクリーニの左下には匕ストガムが表示いたします。RGB匕ストガムは、赤、緑、青の個別のチヤンルごに、イメーのトートの分布を表示いたします。

匕卜格拉は、ケリドのシャドウとハリトの間のト一んレ��の指標,Th。露出のハラスを確認るに役立つルて、ハリト部分がクリドンはるごと防きま�。
匕卜表示的左側はシャドウ(brack)て、右側はハリト(木状卜)です。LNSA一一を開閉すると、匕卜上上の情報が左右に動ります。它を用いて、イメ一のシャドウ/ハリトのクリドンをチス克ごきます。赤、緑、青チルでクリドンが生じると、匕卜上右側のインデーーがそれ点灯します。匕卜上上の左右の端がならかに下降せす、急に途切てい的场合、ハリトあたはシャドウのテーナが損なわいは。
tatschukl-om左下HsTgla表示能的场合CDM二一「一D和解像度 (Codec and Resolution)」设定在的可能性为。详细是、之的M二一的“M二一设定(MONITOR)”之。
<h1 id="錄画木夕">錄画木夕</h1>
Pocket Cinema Cameraのタチスケリーニの底部、匕ストダムの隣に丸いGLEーニのボタンのはみ。它は録画ボタンです。它的ロルを1度タツつると収録が開始さ、も1度タツつると停止ま。取録中、它的ロルとスリーニジインケーダー、てPocket Cinema Cameraのタチスケリーニの上にあるロイムコドは赤くNING。

錄画木専は、LCDタチスクリーニ底部のスレーダー一夕の横に係て。

收錄中、錄画木夕は赤 <なります。
<h1 id="クリット-utを適用">クリット UTを適用</h1>
「収錄(RECORD)」設定タブで、収錄たルツリにLUTを適用するように選択いたします。場合、stsmon](1) 略状態お願い収錄中にタチスケリにアイコンが表示いたします。

選択んだUTがクリットと共に収録いたしますとを示すLUTアイコ。

LUTアイコンは、選択たLUTがクリットと共に収録てい的场合に表示いたします。
<h1 id="コマ落与イシケー一夕">コマ落与イシケー一夕</h1>
取錄中力馬以コマ落が発生すると、錄画木たに「!」イジカー一加点滅て才一レさ、影響を受け力一の録画可能時間イジカー一加赤くらま。例は、CFast力一ドでコマ落与が発生る上表示さ、CFast力一の録画可能時間イジカー一加赤くらま。その機能に、特定の力一的速度が現在選択て的解像度用は遲さると分かりま。コマ落をイジカー一は、事前に収錄たリドにコマ落もは表示さし。ロマ落を避む方法にしぃは、「CFast2.0力一の選挙」おは「SD力一の選挙」セクIJUNを参照てくさ。

CFast力一卜成可落告發生的場合の可落を不念之一。
Xe Blackmagic Pocket Cinema Cameraは、使用くださいますフツデジを収録いたします。コマ落ちを検出了一份収録を停止するよう設定いたします。詳細は、它的マニアルの「収録設定(RECORD)」セクschonを参照てくだい。
<h1 id="錄画可能時間">錄画可能時間</h1>
力メレにCFast力一D/SD力一Dを插入、あたはUSB-Cflanschdeisckを接続てる场合、タチスクリーナ底部のStleJINsJcAte-、力一DやUSB-Cflanschdeisckの绿画可能時間が表示得很好。錄画可能時間は分単位で表示さ、選扱了FleumLeトやOne之的化は変わりま。てらの設定を変更した場合、InsJc一Aは自動のに錄画可能時間を計算直し。力一D/DAIbの绿画可能時間がおは5分に有、InsJc一Aの文字が赤く、残2分を切と点滅得很好。力一D或dLIP容量的一杯に有「FULL」」和表示得很好。

St-LeiJINJU-一=、CFaI-I/SDI-I/USB-CFRAHJUDsKの名前、绿画可能時間(分)表示。
力一ト/ド现代农业名は、錄画可能時間の上にる大小な八一に表示さmetry。選択たMテアタイフの上の八一が青くり、該当の力一ト/USB-CFLAHHEDIVSスに収録可能に了とを示しmetry。別の力一ト或ド现代农业に収録する場合は、収録しぃい力一ト/USB-CFLAHHEDIVSスの名前を長押しmetry。収録中、ごの八一は赤こりmetry。
Stutle-jinjka-ta- to tappur,StutlejfofFto-mtXn一开

LCD夕tssckl-1n'sstre-jinj#一ta-ta#t#t#t#i 管理A
ごのメニーは、現在力マが使用ていのCFast力一SD力一USB-CFRASS的残容量、力一和DAI名、最後のクl的長さ、克的総数、各力一D拉伊のFFILFIO一MHT表示。
ごのマニー一からマテアのフーマトが行えます。詳細は、ごのマニアルの「撮影用にマテアを準備する」セクjohnを参照てくだい。
作業のとStulre一云二一力一D/DAI名をタprle、阿TIN力一D/DAI 予て設定かま。Blackmagic Pocket Cinema Cameraは、夕PUL力一D/DAI为最初使用。
<h1 id="才一才一夕一">才一才一夕一</h1>
一之才一之才一之才一之才一之才一之才一之才一之才一之才一之才一之才一之才一之才一之才一之才一之才一之才一之才一之才一之才一之才一之才一之才一之才一之才一之才一之才一之才一之才一之才一之才一之才一之才一之才
最適音質を実現するには、才一徳才レルが0dBFSを越えないようお願いいたします。0dBFSは力マが収録可能性最高のレルなて、它を超える才一徳才はクリツつさ、歪み的原因くださいます。

才一才才一夕一力一八一は、一才一才才一
レルを表示ります。一才一才一才レルがgren一の
一內の上限に近位置に収ると理想的です。
一レルが工口一まはレドの一にる场合は、
才一才才克リツンが生る可能性のはう。
才一才一夕一夕土,才一才入力手儿2、于心七口/比一力一的

LCD夕th斯克一元才一才一夕一夕上
p山土加贝卡士卡士卡士士士士士士士士士士士士士士士士士士士士士士士士士士士士士士士士士士士士士士士士士士士士士士士士士士士士士士士士士士士士士士士士士士士士士士士士士士士士士士士士士士士士士士士士士士士士士士士士
<h1 id="ダ-フル-イフロー">ダ フル イフロー</h1>
LCDタチスクリーニをダ複ルタツつると、Blackmagic Pocket Cinema Cameraのプロビューリモーダフローはらゆる部分を拧大くださいます。タツつた工アが拧大され、LCDタチスクリーニ是指でドラツングてイメーを動かさにがごきります。その機能はフ引流を確認する際に役立ちます。画面を元に見HZは、力メラのタチスクリーニ再度ダ複ルタツつる。
<h1 id="てまんてス一ム">てまんてス一ム</h1>
LCDタチスクリーニのズムレルは、指先てまんで調整いたします。その操作は、HDMI出力のは影響いたします。
2倍からスムするには、ターヒスケリローをダルターリフるか、カメラ背面のフィ一力スズムロトを押ります。次にタチスケリロー指先てまむとスムの倍率が変わります。LCDタチスケリローを指でドラックて、擴大た工ア動かさてがきます。元の倍率に尻はは、再じタチスケリローをダルターリフるか、う一度フィ一力スズムロトロトを押ります。
夕th斯一在夕杜尔士的如、力一木云一木子。前回的倍率和一不表示为切替之。例之、画面をまに8倍に扩大し、夕杜尔士以了一土解除上、再度杜尔士的和8倍而再比大之也。
<h1 id="夕手才一力">夕手才一力</h1>
LCDスケリーナフカ効スしだ領域をタpper&木一ルドすると、レンズをイメージ内的あらゆる領域にフカ効スお願いいたします。フカ効スロトを押て、任意の場所にレンズをフカ効スお願いいたします。フカ効スロトを2度押しぃしと、フカ効スロトがリセットて、中央に尻ります。
<h1 id="芙斯克一王-一">芙斯克一王 一</h1>
夕HTSCKI-ONのST一夕STK+上或一時的非表示に用の、SHTトのFREIMNGaYFIOUS合WSEの際に便利です。它L5上度H隐上、LCDtssKUN上半は下にSWIPLMS。収錄INJGka一、FRAUMgaid、GRITT、FIOASANSt、SEPRA表示は残りま。
St一夕St一卡士或一夕一再度表示的有、上半了下上式

LCDtssk1一上士卡下口s11-、s4e之的T201一一非表示。
<h1 id="再生x二一">再生X二一</h1>
再生コトロ一ルボタをターリフて再生メニーにアクsesら。力メラのコトロ一ルボタ、あるはLCDタチスケリを使用て事前に収録たリドをコトロ一ルてきま�。
LCDタチスケリーニを使用くださる场合、再生ボーニを1度押すと再生開始し、再じ押す一時停止し。早送り/卷き尻はリフロー使てクリツの最初/最後に飛む。早送りリフローはリフロー。次のクリツに飛む。卷き尻はリフロー押すと、現在のクリツの頭に尻、2回押すと前のクリツの頭に尻は。ルフローはリフロー有効にこと、クリツの再生をルフローせます。

卷き辰、再生、早送ル一フアイコ
早送/卷き尻卜夕を長押しると早送/卷き尻はてきま。它は、フテ一的通常の2倍速早送/卷き尻は。
倍速の早送り/卷き尻中に、トランスローツキ一をタippyすると倍速レート変更てきま�。同方向のト拉スローツキ一をタippyするごにレートが2倍にらむ。最大倍速レートは、通常速度的。16倍速の早送り/卷き尻中にも度ト拉スローツキ一をタippyする2倍速に尻は。反対方向のキ一をタippyするごに半分に減速し、最終のに2倍速にらむ。再生ロクをタippyすると、通常の再生速度に尻は。

沙卜尔斯比一迪不日一早送/卷起居中之的速度有方向表示。
再生モ一ドで「錄画」CONトロ一ルロタをタフすると、力メラがスローはに、収録が可能な状態にらむ。
夕th斯克一入上下swoip,Ft一为再生不加斯一夕斯卡卜非表示可。再生一上d之S一入力土,、在的KlP「gddT(GOODTAKE)」和文夕日一夕記裁成。詳細是「X夕一入力」七云子在参照以<
<h1 id="設定">設定</h1>
<h1 id="ダツトロ卜">ダツトロ卜</h1>
MEXUN-10000000000000000000000000000000000000000000000000000000000000000000000000000000000000000000000000000 15234567891234567891234567891234567891234567891234567891234567891234567891234567891234567891234567891234567891

「収錄(RECORD)」、「モニターネ(MONITOR)」、「才一徳才(AUDIO)」、「せットアツド(SETUP)」、「リルチト(PRESETS)」、「LUT(LUTS)」のハデインガをタフじてPocket Cinema Cameraのダシ広ト一卜タフを移動
<h1 id="収錄設定-record">収錄設定 (RECORD)</h1>
「収錄(RECORD)」夕は、ビデオフローマット、コーダック、解像度の設定に加え、ダイチクレ、シジやデテルのシャーフローング等方面、収錄するフツテーに重要なその他的設定も調整いたします。
<h1 id="取錄設定1">取錄設定1</h1>
「叢錄(RECORD)」設定タbrの1一目には以下の設定が含まemos。

<h1 id="一貞和品codec-and-quality">一貞和品CODEC AND QUALITY)</h1>
「One-徳クと品質(CODEC AND QUALITY)」×二一は2段に分かていま。上の段は、Blackmagic RAWんだはApple ProResの2つOne-徳クから選択得起、下の段はこらのOne-徳クの品質才予広を選択得起。例はProResOne-徳ク使用くださる品質才予広は、ProRes
422 HQ、ProRes 422、ProRes 422 LT、ProRes 422 Proxyです。Blackmagic RAWには、4種類の「固定ビットレーナーConstant Bitrate)の設定と2種類の「固定ケオリデイ(Constant Quality)」の設定お願いいたします。

「一、品質(CODEC AND QUALITY)」のBlackmagic RAWの才予言

「一、品質(CODEC AND QUALITY)」ProResの才予
作業のこ圧縮率の高いOne-Duckを選択すると、Blackmagic Pocket Cinema CameraのStulre一徳MIDIAにビデ才を収録くださる時間が長くなります。詳細は、「収録」せクIJONの「収録時間一覧」の表を参照てくだき。
<h1 id="解像度solution">解像度(SOLUTION)</h1>
This设定是、一DSSK设定及連動い。使用は収錄フーマトに応て解像度を選択してck。例は、ProRes HQを使てUltra HDCRLPPs to 100000000000000000000000000000000000000000000000000000000000000000000000000000000000000000

Pocket Cinema Camera 6K Proおは6K G2でBlackmagic RAWを使用する際の「解像度(RESOLUTION)」才広ン

Pocket Cinema Camera 4Kの「解像度(RESOLUTION)」才予。
4K DCIFo一MHTはは、力テロリ一是「解像度(RESOLUTION)」て、它以外は「解像度-ウINTドウSENSAER(RESOLUTION-SENSORWINDOWED)」
ATEM Mini 与 マルチカム叩録を行う際、Pocket Cinema CameraはOne-Dess設定をBlackmagic RAWに切り替え、内部メデアに高品質の個別叩録を行いむ。Pocket Cinema CameraをATEM Miniに接続すると、カメラのフレーリュートが変わり、ATEM Miniのフレーリュート設定に一致いたします。ATEM Mini
為異於出力FLREUMLEETo選折用士場合、専ての比德才一系接統了後ATEM SoftwareControl对SUSHTA一設定を変更ごきま�。詳細は、ATEM MiniMUNARLを参照てくさ。
<h1 id="收錄設定2">收錄設定2</h1>
「収錄(RECORD)」設定タフの2億一目には以下の才予広が含まえ�。

<h1 id="daiinamicrange">DAIINAMICRANGE)</h1>
DaiNIMCKLNGDANONTOFFADINAMICRANGE)」设定调整能
<table><tr><td>Film</td><td>「Film」設定は、Logカーフを用いにビデ才収録いたします。最大のダイナマクレングを維持いたしますと最多多のビデ才信号の情報が得りたため、DaVinci Resolve哪种カラーグレーダイドフロー的能力を最大限に活用いたします。</td></tr><tr><td>Extended Video</td><td>「Extended Video」設定は、Blackmagic Wide Gamutに基礎依據ead、CONTRAST上彩度が適用いたします。「Video」モードのは最初観な違は、FRONTFILUMの特徴蜓るマズnton/Grill一軸の彩度が減少に誤加盟商之称).(2)</td></tr><tr><td>Video</td><td>「Video」設定は、そのまえの納品やローテフローの作業が最低限で満む、高CONTRASTか高彩度のルツの収録に最適です。它的設定はRec.709を使用し、ハリラートが滑らにローテフロー。(3)</td></tr></table>
XEM 「Film」モード、Blackmagic RAWはProResで収録する场合、タチスケリーナは、薄暗<彩度の低いイーニジが表示いたします。亿吨は、GLEーニング前の多く的情報が含またたイメーフアルを標準のデイスPLEYに合わせうたてです。「Film」モードの収錄中に、標準のコトラストをシミュレートるデイスPLEI LUT(ルツ克アドテ一アル)を使用て、タチスケリーナおよHDMI出力でビデ才をモニタRongごまむ。詳細は、ごマトルの「3DLUT」seschonを参照てくさい。
<h1 id="七尼沙一工伊aensor-area">七尼沙一工伊A\$ENSOR AREA)</h1>
Blackmagic Pocket Cinema Cameraは、「ル(FULL)」Sensa一エリアを使用するよう設定いたします。あいはフレムレトが高低場合、「Sensa一エリア(SENSOR AREA)」を「フィングウ(WINDOW)」モードに設定するごみ可能です。そのモードのはは、Sensa一全体からイメージをスケーリングするのはなく、使用するビデオフローマットに必須要 Sensa一ロルだけを使用します。一部のフィーマットは、フィングウとスケーリングの两方用います。例はBlackmagic Pocket Cinema Camera6K Proおば6KG2はは、HDフィーマットはルsenサ一、5.7Kフィングウ、2.7Kフィングウからスケーリングいたします。
「ウINDウ(WINDOW)」モードは、力メラSenサの中央のみ使用するた、ロツフクタ一によてLENズの視野が狭く見えます。例は、20mmLENZを使用し、ウINDWENSAHONMOIDHDFNTAJE撮影する场合、PocketCinemaCamera4Kの視野は40mmLENZと同じになるま。
「SenSAERIA(SENSORAREA)」設定は、UltraHD及HDProRes比才等、力Mの最大解像度を下回る解像度を収録いたします。
Pocket Cinema Camera 6K Proおよ6K G2の最大トレーリトは、2.8K 17:9ウインドウや、2.7KウインドウからスケーリングたHDで撮影する際に使用くださいます。Pocket Cinema Camera 4Kの最大トレーリトは、2.6K 16:9、およウインドウHDモード使你能きります。
「最大七人一力」『大八』。
<h1 id="flrojcktfleurelprojectframerate">FlroJcKtFleUreL(PROJECTFRAMERATE)</h1>
プロジクトフレムレットは、映画やテレビ業界一般的使用くださいますフレムレットを選択いたします。例えば、23.98fps等内容です。通常、そのフレムレットは、ボストプロダク余万元・フレムと納品で求らる、再生速度お願いいたします才同期に合わせ設定いたします。
プロジエクトフレムレート設定は、23.98、24、25、29.97、30、50、59.94、60fpsの8つに対応いたします。
<h1 id="才fssbi-卜収錄qff-speed-recording">才FSSbI-卜収錄QFF SPEED RECORDING)</h1>
徳オルトは、プロジク卜フレムレトとSENサフレムレトは、自然な再生速度は一致するように態い。しぃし、「才F501-14收錄OFF SPEED RECORDING)」スイチをタフすると、個別にSENSAフLEUMレトを設定くださいます。
<h1 id="才f5e-1dfleumlet-off-speed-frame-rate">才F5e-1DfLEUMLeT OFF SPEED FRAME RATE)</h1>
「才斯比一收錄(OFF SPEED RECORDING)」为有效且、「才斯比一Fleum」(OFF SPEED FRAME RATE)」伊珍ケ一夕一の横に有的矢印を試じて、力メラのせんさ一Fleum」卜を設定し。
Sen-safre-umleトは1秒間に収錄るsen-sa一の実際のflre-um数を設定しま。flreumleトは、設定したプロジクトflreumleトで再生する際にビデ才的速度に影響しま。
才Fb一Dfleum一卜间,的細は、之的Mua尔の「夕T斯KU-の機能」SeKJNの「Fleum/秒(FPS)」to参照てくさ。
各収錄フ0一馬トおよドーテク使用得起的最大フレムレートの詳細は、「最大せんサーフレムレート」の表を参照てくさ。
<h1 id="収錄に使用するテアprerferredmediaforrecording">収錄に使用する×テアPRERFERREDMEDIAFORRECORDING)</h1>
Blackmagic Pocket Cinema Cameraで最初に使用するストレジカードたはド现代农业を選択いたします。才広は「CFAST」、「SD」、「USB」、「低残量(Fullest)」です。「CFAST」、「SD」、「USB」のいどを選択するかは個人的好きにようお願いいたします、ひとを一貫て使用する这句话、スリレジが一杯にた時にそのメデアを最初に交换すきか分かります。「低残量Fullest)」の才広は、单一の力メラを使ったプロジエクトでフィルを千古に分類る際に役立与否。
選択んだ設定は、CFastのははSD力一トが插入いたします。あたはUSBド现代农业が接続いたします。際に適用いたします。その設定は、スリーニジ管理で力一ト名をタppsて「アクテActive」に設定ますと、いっidtho才一巴一拉効て)=(。かし、力一トをイジエクトり、入扎直しぃ場合は、現在の「叐録に使用する力一ト(PREFERRED CARD FOR RECORDING)の設定に尻るとご注意てくさい。
「低残量(Fullest)」設定は、収錄メデアの使用容量の八一塞尔テーニに基てており、力一トのサイズや使用てい的テ一夕量に基くもはあらません。
<h1 id="收錄設定3">收錄設定3</h1>
「収錄(RECORD)」設定タbrの3PB目には以下の設定が含まます。

<h1 id="夕山larumelapse">夕山LARUMELAPSE)</h1>
夕氏摩拉伊斯機能有効に、以下の不専一ルはスチルフレム自動的撮影し:
<table><tr><td>flû楼梯</td><td>2-10</td></tr><tr><td>秒</td><td>1-10、20、30、40、50</td></tr><tr><td>分</td><td>1-10</td></tr></table>
例は、10fla、5秒、30秒、5分にスルflaを撮影するように設定可能です。
夕氏ムラフス機能を使用て、ケリエイデイフな才予はが広る。例え、夕氏ムラフスの間隔を2FLERUMに設定と、再生た際に高速の工表は得らてま。
錄画木たんを押すと収録が開始いたします。再度木たんを押て収録を停止すると、タイムラフスのシーニングは单一のクリットとて保存いたします、カメラ設定くださたeer・デツ克とflre一ムレトに一致いたします。つまり、木ストロダケンのタイムライ�ncyさ米人は夕イム拉斯のシークスを取る迅み、収録た他的のクリドと同樣に提えいたします。

☆IMLAPMOSMOH 、画TOM上已心
作業のつ夕イムラスモ一ドでケリツを収錄る際は、ビテフレムが収錄さる度に夕イムコ一効ウン夕一が更新さし。
<h1 id="デイテールシャーフニングdetail-sharpening">デイテールシャーフニングDETAIL SHARPENING)</h1>
This设定使用。、Ie-のJEB为实行。JEB機能有功。
シャーパング機能が有効にてい、シャーパングは収録たProResビデ才おはHDMI出力に適用さります。
它的設定は、ボストプロダケ sjonsを行う時間がなく、イメージをライドで才工アしぃ場合のタジ才の拉伊制作に役立ま。ロストプロダケsjonsを行う予定が有的収錄は、它的設定は才上ておくとをお勸しま。一DeckBlackmagic RAWに設定さて的场合、它的設定は無効にりま。
作業のBlackmagic RAWフィ�ルをボスト处理する際は、DaVinci Resolveの力ーネジに搭載くださりリフロー、リフロー使用すると、こらの設定と同等のシャーニング効果が得ります。
同ルの範围を0.48に設定し、スケーリングを6、0.3、0.15のいじかに調整すると、「高(High)」「中(Medium)」「低(Low)」と同等のシャーフニングが適用いたします。
木ストプロダクソル適用するシャーパングに開る詳細は、DaVinci Resolveマニアルの「モーニヨN工策とおよんだリーテット」せクソルを参照てくさい。
<h1 id="コマ失落発生時の対处方法-card-drops-frame">コマ失落発生時の対处方法 (CARD DROPS FRAME)</h1>
コマ落ちが檢出くださた際のPocket Cinema Cameraの拳動を設定いたします。「警告(Alert)」に設定いたします。、コマ落ちインジーナーがLCDダチスケリロー表示いたします。、コマ落ちが発生んだまえで収録が继续いたします。「収録の停止Stop Recording)」に設定いたします。、コマ落ちが換出いたしますと収録を停止いたします。总之,使用くださいますフツテーニを収録すると防ご、時間を無駄にするとを防止いたします。
コマ落を避け的方法のはは、「CFast 2.0カトを選丶高速の SDカトを選丶高速の SSDを選丶」「高速USB-Cラフツデスケを選丶せクヨンを参照てくだい。
<h1 id="ffill-lut为適用apply-lut-in-file">FFILL LUT为適用(APPLY LUT IN FILE)</h1>
Blackmagic RAWコーダックと撮影する際、カメラのHDMI出力にLUTを適用いたします、選択んだLUTは収錄くださいます Blackmagic RAWフィルにエンパドいたします。お願い、LUTはフィルのハダロー保存いたします、個別のフィルを挾う必須なく、ボスプロダクIJONで簡単に適用いたします。「史録(RECORD)」×ニeer「フィILにLUTを適用」スイチがallonncyい場合、クリツPB=Blackmagic RAW PlayerおよDaVinci Resolveで開くと、選択んだUTが適用くださ載表示いたします。LUTは簡単に扌UN/才Fごき)=(0) 1
DaVinci ResolveのRAW設定のバレットにも「LUTを適用」スイチがり、Blackmagic RAWフィルの3D LUTを有効/無効にごきます。DaVinci Resolveの「LUTを適用」設定は力メラの設定と同樣に機能します。它は、摄影時に力メラリUSを設定て使用するpto、直接力ラリストに指示か你能と意味りますがDaVinci Resolveの「LUTを適用」設定で簡單にLUTを才フにるとみ可能です。
<h1 id="くリフにlutを叩録record-lutto-clip">くリフにLUTを叩録(RECORD LUTTO CLIP)</h1>
ごの設定は、ProRes一デクで撮影てる際に使用くださいます。Blackmagic Pocket Cinema Cameraは、デフィルトでは収錄くださたフツーニIJの適用や焼き付けを行いません。しおし、「克莱pperにLUTを収錄(RECORD LUT TO CLIP)」スイチをタppsすると、フツーニIJを焼き付けむ上に選択いたします。
它是、木斯卜口夕卡子于FJ一子为格一丁不的时间能不场合或、克拉阿卜和工丁一与直接FJ一子为渡必要加者场合可便利。详细是「3DLUT」也及「夕切斯一元□一」七克山子参照到<下
<h1 id="フィル命名規則">フィル命名規則</h1>
クリットは、選択たフーパーマットに応て、Blackmagic RAWフーパーマットたはProResQuickTimeムーリー一CFast/SDカト/USB-CFLASHUDISKに収録いたします。
以下はフィル命名規則の例です:
<table><tr><td>A001_08151512_C001.mov</td><td>QuickTimeムーリー ニフAIMル名</td></tr><tr><td>A001_08151512_C001.mov</td><td>カメラインデックス</td></tr><tr><td>A001_08151512_C001.mov</td><td>リール番号</td></tr><tr><td>A001_08151512_C001.mov</td><td>月</td></tr><tr><td>A001_08151512_C001.mov</td><td>日</td></tr><tr><td>A001_08151512_C001.mov</td><td>時</td></tr><tr><td>A001_08151512_C001.mov</td><td>分</td></tr><tr><td>A001_08151512_C001.mov</td><td>ケリット番号</td></tr></table>
StchIbPOMn 1
<h1 id="王-二夕一設定monitor">王 二夕一設定MONITOR)</h1>
「毎ニタ一(MONITOR)」夕は、Blackmagic Pocket Cinema CameraのLCDタチスケリーナおよんだHDMI出力のステーナステキスト、オーバーヌレイ、その其他的毎ニタリングオプロDHONを調整くださいます。这也の才予は、「LCD」、「HDMI」、「丙方(Both)」の出力で設定可能です。「丙方(Both)」は、LCDおよんだHDMI出力に影響する毎ニタ一設定を力ローてります。メニーハは2ご一ジあり、カメラのタチスケリーナの端に係的矢印をタ複説か、左右にスフイPLEて切り,GLEま。
Blackmagic Pocket Cinema Camera 6K Proおよ6K G2に才予広のビーフアインダを取り付款する场合、「モニタ」夕の1億目で、LCD、HDMI、ビーフアインダに表示する才一ハリレイ個別に設定くださいます。
Blackmagic Pocket Cinema Camera Pro EVFを力メラに取り付けてる场合、「モニタ」タフに「Viewfinder」ボーニと「すばて(All)」ボーニが表示いたします。「すばて」ボーニは「兩方(Both)」ボーニの代わに表示いたします才prhonで、同時にLCDタチスケリーニ、HDMI出力、電子ビューフアインダーすばてにStテ一夕Stテキストを表示いたします。
<h1 id="芒二夕一設-定">芒二夕一設 定</h1>
「モニタ一MONITOR)」夕の1一目は、各出力に同比設定が含まてい。例は、総PGA 機能をLCDタツスケルは才にて、HDMI出力は才に設定か。

<h1 id="cler-1nfiedceanfeed">cler-1nFieDCEANFEED)</h1>
「LCD」はは「HDMI」×ニーヤー「ケリーナフロー(CLEAN FEED)」スイチをタットすると、収録夕一ionalgke一atu一を除く、すてのStte一夕Stexトおよ才一レイが該当の出力で才になりま。

力米兰は、クリーナフイドが有効にたても収録夕一を表示
MOSKILLONFIAIDTOE 100000000000000000000000000000000000000000000000000000000000000000000000000000000000000000
<h1 id="3d-lut表示display-3d-lut">3D LUT表示(DISPLAY 3D LUT)</h1>
Blackmagic Pocket Cinema Cameraは、あらゆる出力に3D LUTを適用て、カラーダレーダンジたフツデジのルクに近付けむとが成長。它はFilmjダイナミックレングでケリドを叢録てい的场合に、特に便利です。
力メラ有効な3D LUTaaSる场合、その設定でLCDタチスケリーナはHDMI出力に個別にLUTを適用くださいます。
X3D LUTのローロや使用に関係は、そのマニルの「3D LUT」セクIJONを参照てくさ。「LCD」はた「HDMI」をはスイチをタリて、LCDタチスリーニおよはHDMI出力のモニーツングオフロー有効にし。才PUNには、フレムガイド、GLI、一EFARADIL、FALsLFA一がは。
<h1 id="sepla-zebra">SEPLA (ZEBRA)</h1>
「LCD」はHDMI×ニー一電化化スイツチをタフつると、てらの出力で化化がイドを使用くださいます。化化がいおは化化レルの設定に開る詳細は、てのマニアルの「夕切斯クリーニの機能」せクsjhntを参照てくだき。
<h1 id="for一力斯asistfocusassist">FOR一力斯ASISTFOCUSASSIST)</h1>
「LCD」はは「HDMI」×ニーご「カスト」スイチをタフロー、こらの出力でカストを使用くださいます。カストおよにカスト・レルの設定に開る詳細は、そのマニアルの「夕ツ斯クリーニの機能」ケシヨンを参照てくだい。
<h1 id="frameguide">FRAMEGUIDE</h1>
「LCD」たは「HDMI」×二一成「フレムガイド」スイチをターリフすると、它らの出力でフレムガイドを使用いたします。フレムガイドおよむガイドの選挙に開る詳細は、它的マニアルの「夕ツチスケリーニの機能」せクjohnを参照てくさい。
<h1 id="gridd">Gridd</h1>
「LCD」まは「HDMI」×ニー一、「Grill」スイチをタpps��と、こらの出力3x3Grillを使用くださいます。3x3Grillに開る詳細は、そのマニアルの「夕ツ斯クリーナの機能」せケンを参照てくstadt。
<h1 id="七一工力safe-area-guide">七一工力SAFE AREA GUIDE)</h1>
「LCD」はHDMI×ニー一電一 テフエリアガイド」スイチをタツつすると、こらの出力でせ一 フエリア才一ハレイを使用くださいます。詳細は、そのマニルの「夕チスケリーナの機能」せクヨ ンの「せ一フエリアガイド」を参照てくだい。
Xe Blackmagic Pocket Cinema Cameraの「モニタ MONITOR」設定の「両方(Both)」で「セフエリアガイド(SAFE AREA GUIDE)」を使用する、セフエリアガイドのサイスを調整いたします。
<h1 id="foluskaralsecolor">FOLUSKARALSECOLOR)</h1>
「LCD」はHDMI×二一電「フルスカーニ」スイチをタprつと、てらの出力でフルスカーニの露出アス总冠军を使用くださいます。フルスカーニの使用方法に閲ては、てのマニアルの「タチスクリーニの機能」せクsjnを参照てくだい。
<h1 id="毛二夕一設定">毛二夕一設定</h1>
「毎二夕一(MONITOR)」夕の2ご一目には以下の設定が含まえ標。

LCD、HDMI、Viue-FAIINDA Viewfinder)
<h1 id="stnt-atastnt-kstuts-status-text">Stnt-ataStnt-kstuts STATUS TEXT)</h1>
LCDタチスクリーニでStテ一夕Stテキスト及M一者一为非表示にて、はットの構成に必要。情報のみ使用んだ場合に便利です。「Stテ一夕Stテキス」スイチをタ複て、力。ラのLCDタチスクリーニのStテ一夕Stテキ斯トとM一者一の表示を切り替えま。Flaumg。ド、GLI、F0一力斯AsnSt、、ZP1Aなの才一八一レY表示有効にてい的场合、。它らの才一八一レYは残りま。LCDタチスクリーニ上まは下にスフYPると同化效果があま。
<h1 id="anamorphic-desqueeze-2">ANAMORPHIC DESQUEEZE)</h1>
アナモルフィックレンズで撮影してる場合、イメーはPocket Cinema Cameraのトレピュ一出力お願い収録んだフィルは、横方向にスケイーズて表示elizeます。アナモルフィック・デスケイーズを有効にして、Pocket Cinema Cameraのトレピューリメーが修正elize、ボストフロダケIJONが円滑に進むよう、使用た徴スケイーズ価がクリツフメタデ一夕に記録elizeます。
選択るデス克莱ーニー値は、Pocket Cinema Camera等設定した解像度に従異なみが、デス克莱ーニーの結果のイメーニは常にシーナマフバイス克莱ーニの2.4.1のアスパクトレncyにらむ。
映画用のアナモルフィックレンズは、一般的に2xのスケイーフアクタです。Pocket Cinema Cameraの「3.7Kアナモルフィック(8.7K Anamorphic)」解像度は、こらのレンズ用に設計得很好、「アナモルフィック・デスケイー」が「2x」で、它的解像度に設定いたします。
16:9デジルイメージル悉尼用に設計くださたアナモルフィックレncyは、多くの場合3xスリーナフクタを使用て、16:9悉尼全体から241のシネマウイドスケリ Cameroonのイメージを生成いたします。そのた、Pocket Cinema Cameraが「4K 16:9」及「HD 16:9」之称の16:9解像度に設定いたします。「アナモルフィック・デスケイズ」は「1.33x」に設定する必要お願いいたします。
作業のこつ標準的球面レンズで摄影たイメーが横方向に引き伸ばさて表示さる场合は、「アナモルフィック・デスケイー*(ANAMORPHIC DESQUEEZE)」を才にてくだい。
<h1 id="lcdおよビ庁一万欧元viewfinder">LCDおよビ庁一万欧元(Viewfinder)</h1>
<h1 id="デイスpleuy-display">デイスPLEUY (DISPLAY)</h1>
力メラは、匕ストダムと才一徳イ才←タ一の代わに、ご一徳クおよ解像度情報をLCD夕チスケリーナの左下と右下に表示いたします。露出の調整にフィルスカロー使用する场合や才一徳イ才を別に収録してる場合各样、匕ストダムと才一徳イ才←タ一の代わに、他的情報を表示くださいますようお願いいたします。LCD×二一で「×一夕er(Meters)」まは「一徳広和解像度(Code and Resolution)」をタつ亓て、使用ください比一を選択いたします。

<h1 id="hdmiのみ">HDMIのみ</h1>
<h1 id="撮影監督監督用ステーナステキストdisplay-status-text-for">撮影監督/監督用ステーナステキスト(DISPLAY STATUS TEXT FOR)</h1>
LCD夕什斯克一、ISO、木瓦卜巴兰斯、艾一奈力之才莱一及摄影监督为力之个別的子山在上阿扑的际役立情报表示。一方力之HDM出力是、监督和複数の子山和力之記録取了的记习一与役立t情也表示。

HDMIモニタ一設定でステ一夕ステキストを「監督(Director)」に設定すると、該当出力のステ一夕ステキストが以下の情報を表示いたします。
<h1 id="fps-2">-FPS</h1>
現在力メラで選択いたします。フスビートフレムレトが無効にしてる场合、プロジアクトフレムレトのみを表示いたします。才斯比一丁フレムレトを使用くださいます场合、ルンサーフレムレトの後にプロジアクトフレムレトが表示いたします。
<h1 id="力无am">力×无AM)</h1>
力メラのスレートで設定た力メラインデックスを表示いたします。詳細は「スレート」セクシャンを参照くださいます。
<h1 id="才レ一夕-erator">-才レ一夕-ERATOR)</h1>
力メラのSLER卜設定た力メ拉才レ一表示し。詳細は「SLER」せク駟入を参照てくさ。
<h1 id="繼續時間表示-2">·繼續時間表示</h1>
現在叢録中的クリット、たは最後に撮影くださたクリットの继续時間を「時間:分:秒」て表示懈す。
<h1 id="リーツリ-reelシーニnsceneテイクtake">- リーツリ REEL)、シーニn(SCENE)、テイク(TAKE)</h1>
現在のリーリ、シーニ、テイクを表示いたします。リーリ、シーニ、テイク、およんだルの命名規則に開ては、「スレート」セύchnを参照くださいます。
<h1 id="ローナミックルンジ-dynamic-range">- ローナミックルンジ (DYNAMIC RANGE)</h1>
出力にLUTを適用くださる场合、モニタの左下に現在適用くださるJTが表示いたします。LUTを適用くださいます场合、「Film」たは「Video」ダイマツレンジ表示いたします。
<h1 id="ロムコービtimecode">- ロムコービ(TIMECODE)</h1>
王二夕一の右下にタイムコトが
「時間:分:秒:「一」」表示を求。
<h1 id="三二夕一設定3">三二夕一設定3</h1>
「モニターニ(MONITOR)」タEbの「LCD」、「HDMI」、「Viewfinder(ビューフアインダ)」設定の3バーニジ目には、各出力に同一の設定が含まていま�。它らの設定は、3種類のモニタリング出力すてで同じて。例は、Blackmagic Pocket Cinema Cameraの「LCD」、「HDMI」、「ビューフアインダ」出力で「フ引流スアドト(FOCUS ASSIST)」が有効にたる場合「フ引流スアドトの種類(FOCUS ASSIST TYPE)」を「ビーキング(Peaking)」から「カラーフアINn(Colored Lines)」に変更すると、3つむての出力に影響しま�。

<h1 id="seplalelbebralevels">SEPLALELBEBRALEVELS)</h1>
横の矢印アイコルをタprleて、さラ表示る露出レルを設定しは。さ拉レルは露出75~100%間で5%す調整得起。
詳細は、ごのマニアルの「夕チスケリーナンの機能」セクschonの「総フ拉」を参照てくさい。
<h1 id="ffo-1ksassbtfocusassist">FFO-1KsAsSbTFOCUSASSIST)</h1>
力×レには「ビーク Peak)」と「力一拉イ庁 Colored Lines)の2つフ一力スアストモーニが
<h1 id="ピーんがaking">- ピーんが(aking)</h1>
一卡的力士。
<h1 id="力拉一拉xlored-lines">- 力拉一拉Xlored Lines)</h1>
力拉一力斯専ルのカーツストを選択する场合、カーツスが合てる部分の周にカーツスは表示いたします。イメー上に線が表示くださいます。ビ一ん格ス専ルのカーツスはトと比ご目立与否、画面上に多くの工レメトが存在する场合のは正確なカーツスを得る幫助にncy�ります。
<h1 id="fantakaskarfocuscolor">FANTAKASKARFOCUSCOLOR)</h1>
カラーマインスロールのフィーカスアストを使用くださいます。フィーカス拉动リフローレイの色を変更いたします。フィーカス拉动の色を変更すると、イメー内的フィーカスアストを確認しります。才総広は「モウイト(White)」、「レット(Red)」、「ゲりen(Green)」、「PUR一(Blue)」、「デラック(Black)」です。
<h1 id="forausasubt-lebulfocusassistlevel">FORAUSASUBT-LEBULFOCUSASSISTLEVEL)</h1>
LCD、HDMI出力、ビューフ thaiのフロカスアストのレルを設定するには、スライダ一左右に動かります。
フィーミスアストのレパターンを変更いたします。Blackmagic Pocket Cinema CameraのLCD、HDMI出力、ビューフाँインダのフィーミスアストのオングチフに影響いたします。各出力のフィーミスアストをオングにするのは、「モニタ一(MONITOR)」×ニーのLCD、HDMI出力、ビューフaarインダ一等個別に設定を切り替る必要くださいます。
作業のこつフィ一力スアストの最適なレルは、シャットごに異なります。例えは、人物にフィ一力スを合わせる場合は、フィ一力スアストのレルを上むはとて顔の埃ツのデテルを際立たせるごが成長。逆に草木やレルなのsjtは、フィ一力スアストを高く設定するとテルが増すさ、イ�一の邪魔にる恐いがりま�。
<h1 id="王二夕一設定">王二夕一設定</h1>
「毎二夕一MONITOR)」夕の「LCD」、「HDMI」、「Viewfinder(比一)」設定の一目には、各出力に同一の設定が合まていま�。こらの設定は、3種類の毎二夕12出力すてと同じて。

<h1 id="fluumgadifframeguides">FLUUMGADIF(FRAMEGUIDES)</h1>
「flre-umgaid(RAMEGUIDES)」×二一設定の左右の矢印をタprleて、力mraの全出力のflre-umgaid才pshonを切替えま。才pshonに開る詳細は、ごマ二uルの「tattchuskr一の機能」せクhonを参照てくさ。も、LCDtattchuskr一のhddaPdIuspliei表示さるLCDモニタrlngMEX一かもakse山可能为。「王二一(MONITOR)」×二一的LCDtattchuskr一山およHDMI出力の設定で、flre-umgaidの表示/非表示を個別に選挃するとてき表き。
<h1 id="一efiaraldaidafe-area-guide">一EFIARALDAID$AFE AREA GUIDE)</h1>
Pocket Cinema CameraのLCDタチスケリーナ、HDMI出力、ビューフアインダのセフエアーナーバーマフレイのサイズを調整するには、ハーネンテジ表示の左右にる矢印ロTONをタ複じます。そのハーネンテジは、イメーフレムのセフエ利亚スを示ります。多くの放送局のは90%のセフエ利亚が求らります。
<h1 id="不透明度guideopacity">不透明度GUIDEOPACITY</h1>
「ガイド不透明度GUIDE OPACITY)」×ニー設定の左右の矢印をタpperてLCDタチスケリ、HDMI出力、ビューフアインダごフレムガイドによプロックくださ領域の不透明度を選択いたします。才予は25%、50%、75%、100%です。
<h1 id="イドの色guides-color">☆イドの色GUIDES COLOR)</h1>
M二一設定の左右に見的矢印をタフて、ガイドに使用する色を選択いたします。
<h1 id="grids-3">GrIDS</h1>
力メラのLCDタチスケリーニ、HDMI出力、ビューフアインダー表示たけリドあよ十字線の組み合わせを設定するには、「3x3GrLDD(Thirds)」、「水平(Horizon)」、「十字線(Crosshair)」、「トツト(Dot)」をタつじしま�。
詳細は「タチスクリーナの機能」セクIJUNの「GrLDD」を参照てくさ。
<h1 id="毛二夕一設-定">毛二夕一設 定</h1>
Pocket Cinema Cameraの「モニター(MONITOR)」夕フの「LCD」およViewfinder(ビューフアインダー)」設定のルーニジ目は、選択た出力に応て異な設定が含まむ。てらの設定は「HDMI」出力は使用くださいます。
<h1 id="lcdのみ">LCDのみ</h1>
<h1 id="スケリーナの明るさscreenbrightness">スケリーナの明るさSCREENBRIGHTNESS)</h1>
LCD×二一「スクルーニの明るさ」スライダ一を左右にドラックて、LCDタチスケリOne 明るさを調整てきま�。

<h1 id="比一万欧元viewfinder">比一万欧元(Viewfinder)</h1>

<h1 id="比一の明をviewfinder-brightness">比一の明を(VIEWFINDER BRIGHTNESS)</h1>
比一万欧元一のデスPLEイの明を調整てきま�。
<h1 id="fio-力斯卡一tofocuschart">FIO-力斯卡一TOFOCUSCHART)</h1>
比一力斯一的焦点为一之視力合怎调整。
<h1 id="表示の動きのスムー化smooth-motion">表示の動きのスムー化SMOOTH MOTION)</h1>
它的設定は、ビューフアインダに表示くださる速動態のイメーをスムにごきます。30pよう-lowいフレーマレートで撮影する際に、そのフレーマレートにデイスPLEYの新业态フレーマレートが対応いたします。场合、激いカツヤが生じるとが多さお願いいたします。特に、デイスPLEYを近く見と分かります。「表示の動態のスム一化」を Tencentにし、シャット一アングルを180°以下、フレーマレート23.98、24、25、29.97、30pのいすしおに設定た、力クツヤが生じます。
<h1 id="才一デイ才設定-audio">才一デイ才設定 (AUDIO)</h1>
「才一徴才(AUIDO)」夕は、力メレの才一徴才入力およむニタリング設定の調整が可能です。力メレの才一徴才設定は2に分かて的优点、またチヤンル1と2に分かていは。
各才一徳才は異なるスにマドンケきま。も、徳ト口一ルな樣々設定を調整てきま。
<h1 id="才一徴才設-定">才一徴才設 定</h1>
「一徴才(AUDIO)」夕の1一目には以下の設定が含まえ。

<h1 id="バンルソーメス-channel-12-source">- バンルソーメス (CHANNEL 1/2 SOURCE)</h1>
「チンルソーニス1(CHANNEL1SOURCE)」およは「チンルソーニス(CHANNEL2SOURCE)」ボtons使用て、各才一徳才才徳才の才一徳才一スを選択いたします。PocketCinemaCamera6KProおよは6KG2は2チンルのXLR才一徳才、Pocket Cinema Camera4Kは1つのXLR才一徳才入力を搭載いたします。以下は、各才一徳才一ス設定の詳細いたします。
<h1 id="力左右-camera-leftright">- 力×左/右 (Camera Left/Right)</h1>
力之の内藏マイク以取錄を行い。
<h1 id="力メラモノ-camera-mono">- 力メラモノ (Camera - Mono)</h1>
Blackmagic Pocket Cinema Cameraの内藏マイクの左右のチANNルから、单一のチANNルを作成いたします。
<h1 id="xlr-ライン-xlr-line">- XLR - ライン (XLR - Line)</h1>
力メラのXLR入力を使用て、Lineレル才一徴才収録いたします。た、XLR木一トからタムコト信号を受信するたにも它的設定を使用くださいます。
<h1 id="xlr-マイク-xlr-mic">- XLR - マイク (XLR - Mic)</h1>
力XLR入力Micle尔才収錄。FAN夕電源才的狀態「XLR-马(XLR-Mic)」设定載在的场合、+48Vの不念一也表示告。FAN夕電源马克接续着等。场合是、必「+48V」SHT子才如了。
<h1 id="35mm左-拉in85mmleft-line">·3.5mm左-拉In8.5mmLeft-Line)</h1>
3.5mm入力の左チんルのみLineレル才一徳才と使用しま。も、3.5mmマイク入力の左チんルでタムコト信号を受信するたにも它的設定使用てきま。
<h1 id="35mm右-拉in-85mmright-line">·3.5mm右-拉IN 8.5mmRight-Line)</h1>
3.5mm入力の右チルのみLineレル才一徴才と使用しま�。
<h1 id="35mmモノ-ライン-35mm-mono-line">-3.5mmモノ - ライン 3.5mm Mono - Line)</h1>
3.5mm入力の左右チルLineleル才一徳才と王ノミクス作成しま。
<h1 id="35mm左-マイク-35mm-left-mic">-3.5mm左-マイク 3.5mm Left-Mic)</h1>
3.5mm入力の左チルのみをMicレル才一徴才と使用しら。
<h1 id="35mm右-マイク-35mm-right-mic">-3.5mm右 - マイク 3.5mm Right - Mic)</h1>
3.5mm入力の右チアルのみをMic克莱ル才一徴才と使用いたします。
<h1 id="35mm-メル-マイク-35mm-mono-mic">-3.5mm メル - マイク 3.5mm Mono - Mic)</h1>
3.5mm入力の左右チル、Micレル才一デイ才とモノミックスを作成しま。
<h1 id="なnone">- なNone)</h1>
才一才子儿を無効にし。
×モ一テイローニスと3.5mm入力を選択する场合、チANNIL12のソルは两方とLineレルまたはMicレル成長の必要お願いいたします。つまり、「3.5mm左- ラン(3.5mm Left - Line)」をチANNELのソルとて選択する场合、チANNEL2の3.5mm入力と選択成功的才PONは、「3.5mm左- ラIN(3.5mm Left - Line)」、「35mm右- ラIN(3.5mm Right - Line)」、「3.5mmMO- ラIN(3.5mm Mono - Line)」です。Micレルの才PONは、GLEにncyて選択くださいます。
<h1 id="chansne12level-channel-12-level">chansne1/2LeVEL (CHANNEL 1/2 LEVEL)</h1>
創一才一才一才一才一才一才一才一才一才一才一才一才一才一才一才一才一才一才一才一才一才一才一才一才一才一才一才一才一才一才一才一才一才一才一才一才一才一才一才一才一才一才一才一才一才一才一才一才一才一才一扌二的2016年全国春季学业考试卷15
<h1 id="xlrfantompower">XLRFANTOMPOWER)</h1>
XLR入力は48Vフアntaム電源対応てるの、電源を内蔵てないマイクも使用くださいます。力マが「XLR」才一徳才入力に設定てい的场合、「XLRフアntaム電源(XLR PHANTOM POWER)」スイチをたつてフアntaム電源を効にしります。Pocket Cinema Camera 6K Proおば6KG2は、2のXLR入力と、各入力用のフアntaム電源スイチを搭載いたします。
<h1 id="才一才設定2">才一才設定2</h1>
「才一徴才(AUDIO)」夕の2ご一目には以下の設定が含まえま�。

<h1 id="才一徴才一夕-audio-meters">才一徴才×一夕-AUDIO METERS)</h1>
才一才一夕一2種類加表示方法選投てき。
<table><tr><td>VU VU×</td><td>一夕一是、才一徳才信号の短いビークおばはトムの平均値を表示いたします。そのメーたを使用する场合、才一徳才メーた一dbイングケーナーてメーたーがビークに達するように、Blackmagic Pocket Cinema Cameraの入力レパターンを調整いたします。它しによりS/N比が最大化いたします、最高品質の才一徳才が保證いたします。ビーク価がdbを超えろと、ビークノイスが発生いたします。</td></tr><tr><td>PPM</td><td>PPM×一夕一是「ビークロル」機能に对应くださいます、信号のビークの表示が一時に保持 ,(ゆくりと尻たわ、才一徳才のビーク価が简单に確認いたします。</td></tr></table>
VUおよPPM×一夕は共に、リフアレンスルを-18dBFSまたは-20dBFSか選択くださいます、樣々の國際放送基準に合わせた才一デイ才モニタリングが可能です。
<table><tr><td>才一徳才一夕一設定</td><td>規格</td></tr><tr><td>PPM (-20 dBFS)</td><td>SMPTE RP.0155</td></tr><tr><td>PPM (-18 dBFS)</td><td>EBU R.68</td></tr></table>
<h1 id="hoppdfonpoloheadphonesvolume">HoppDfoNpOLOHEADPHONESVOLUME)</h1>
This'sraIydua=PocketCinemaCameraの3.5mmHddfponjcki接续了Hddfpon的出力leBulto调整。才一之才拉一左右动加之,LbBulto调整了。前方口一儿Pn尼有设定Hie一Hddfpon的音量调整,、之的LbB也同时调调整了。
<h1 id="svei-1obiji-ampeakervolume">SVEI-1OBIJI-AMPEAKERVOLUME)</h1>
This's like a computer. It's like a computer and a computer.
XELRケーリルはフアnt夕電源を才にする前に接続てくさ。フアnt夕電源を使ったマイクを接続ていない场合は、必紹フアnt夕電源を才にするごが重要です。フアnt夕電源モ一ドを使用中にフアnt夕電源を必要と不いデバイスを接続る、力メラが電源供給の出力を統たの機器の破損的原因くださいます。フアnt夕電源を才にして後は、放電に減少時間がかります。
他的マイク及XLR才一徳才機器接統的场合は、フンタム電源を才にて必す数分待た、その後に接統てくさい。
<h1 id="setup">SETUP)</h1>
「SETUP」夕は、Blackmagic Pocket Cinema Cameraの識別設定、ソフロー、ハーダン、機能変対設定、叩錄やモニタリングと直接リングないそのカメラ設定が含まむ。てのMEXUN-14444444444444444444444444444444444444444444444444444444444444444444444444444444444444444444444444444
<h1 id="七卜ア卜設定一">七卜ア卜設定一</h1>
「谷歌」SETUP)」10-12日に以下の設定が含まえは。

Pocket Cinema Camera 6K Proの「洩トアフSETUP)夕の1一目には「NDFIILTA表示(DISPLAYNDFILTERAS)才PONが搭載て。、NDFIILTA」開説情報の表示方法を力スマイZ为。

Pocket Cinema Camera 4Kの「Sevenアリ」タフの1バーニ目は「イチデスロビライチーニン(IMAGE STABILIZATION)」才予広が搭載いたします。
<h1 id="日付時刻dateandtime">日付時刻DATEANDTIME)</h1>
力米の日付と時刻を設定ります。日付フーネマットは、年、月、日、時刻フーネマットは24時間です。外部夕イムコーリスが接続さてい場合、日付と時刻夕イムコーリドにも使用さ

<h1 id="言語-language">言語 (LANGUAGE)</h1>
Pocket Cinema Cameraは、以下の13言語に対応いたします:日本語、英語、中国語、韓国語、スイド語、ローナ語、ロリア語、ロルトガル語、トルコ語、ローマド語、ウラバイチ語。
言語の選挙ご一は、初て起動する際にも表示さこま。
言語を選択する:
1 鉅筆aiyCONを夕pp理由、リストか任意の言語を選択いたします。
2「OK」を押て、「せットアツリ(SETUP)」×二一に尻は。。

<h1 id="shutter表示-hutter-measurement">shutter表示 $HUTTER MEASUREMENT</h1>
Shätt一情報の表示方法を「Angrule(Shutter Angle)」及「Sv-bd(Shutter Speed)」切り替元らて。
Shättə-Anglul 使用的场合、Shättə-はFlre-l-Le-1連動し。例は、180°は使用ていのFlre-l-Le-1関わら同毎一Shenbr一生出し。
か、ヤルーニスを使用する场合、ヤルーニはフレムレートは別の絶対値が使わるた、フレムレートを変更すると得る結果が変わります。
<h1 id="flicker-free-shutter-based-on-2">FLICKER FREE SHUTTER BASED ON</h1>
力×拉使用主電源周波数を変更し、フリット一の生じなヤツタ一設定を計算しま�。
照明の下ご撮影する際は、シャットー原因でフリツカ一が生じる场合のはんだ。Blackmagic Pocket Cinema Cameraは、現在のアムレートでフリツカ一の生じないシャットーの值を自動的に計算し、最大3つのシャットーの值を提案いたします。シャットーの值は、照明に使う主電源の周波数に影響を受います。PALを採用くださる国の多くは50Hz、NTSCを採用くださる国は一般的に60Hzが使用いたします。「50Hz」たは「60Hz」をタ複て、撮影を行てい地域に適した周波数を設定いたします。
FRISSKORINJINJINJINJINJINJINJINJINJINJINJINJINJINJINJINJINJINJINJINJINJINJINJINJINJINJINJINJINJINJINJINJINJINJINJINJINJINJINJINJINJINJINJINJINJINJINJINJINJINJIN
<h1 id="口口pfrumuo-1dropframetimecode">口口PFRUMUO-1DROPFRAMETIMECODE)</h1>
29.97おは59.94のNTSCプロジウ克莱ムレートを使用くださいます。この才広んだはドロツ克莱ムタイムコードを有効にいたします。ドロツ克莱ムタイムコードは、特定の間隔で少数の克莱ムをタイムコードからスkeepled您同意。亿吨に1秒間にNTSC克莱ムレートで全克莱ムが合りますようお願いいたします。プロジウ克莱ムの正確性が保たれいたします。
<h1 id="imex-1sbieliaieshon-magestabilization">IMEX-1SbIeLIAIeSHON (MAGESTABILIZATION)</h1>
Pocket Cinema Camera 4Kは、「イメージスタビライセーニン」才予会に、物理のスイチを搭載ていいレNsのイメージスタビライズの才n/才nを切り替えま。
<h1 id="ndfiiltar表示displayndfilteras">NDFIILTAR表示DISPLAYNDFILTERAS)</h1>
Blackmagic Pocket Cinema Camera 6K Proは、NDフィルターヌングケーダの表示単位を変更いたします。カメラの使用慣例にようて才予は言を変更いたします。一般的に、撮影監督はND番号によう表示を使用いたします。DSLRや放送用力メラのeerはF値、たは光量の割合で表示を使用する场合お願いいたします。画面上は、そばれ「番号NUMBER)」、「F値(STOP)」、「分数(FRACTION)」と表示.Please。
<h1 id="七卜ア設定">七卜ア設定</h1>
「SETUP」夕の2一目は以下の設定が含まえ。

<h1 id="機能ボーニの設定-setfunctionbutton">機能ボーニの設定 SETFUNCTIONBUTTON)</h1>
Blackmagic Pocket Cinema Cameraの上部には3つの機能ボtonsのはんだ。ボtonsのドットの数は、機能ボtons1、2、3を意味,Th。它らのボtonsはカメラ使用中に頻繁に使用機能をマリトンとて、すばやくアクせスごきま�。

力×上部の機能トは、ドットの数はト番号を示す
它們の木たを設定するには、ます機能木たを選択し、学動、設定、バラメ一夕一を選択しま�。

1 2 3 4
<h1 id="トクの学動functionbehavesas">トクの学動FUNCTIONBEHAVESAS)</h1>
マッチングする機能术専を選択た後、その举動を選択ります。選択くださる才総言:
<h1 id="presset">·PRESSET</h1>
它的举動に設定すると、機能ボーニを押た際に設定とバラメ一夕一の組み合わせが鳴出さし。
PRISETTING)X二一为選扱行、「BRA一(PARAMETER)X二一の横に的矢印アイCONを試複て調整し。
例は、F1POMONMOHOTBUNOSのPRESHTO呼出出を設定る场合、「機能POMONSETFUNCTIONBUTTON)」「F」为選挙、次に学動を「PRESHT(Preset)」に設定し。次に、「設定(SETTING)」、「WB」为選挙、「POMONTER」×二一の矢印をタPPT「5600K」に設定、その横のPOMONSETFUNCTIONBUTTON)」中设定し。
<h1 id="卜ggle">卜(ggle)</h1>
ごの舉動に設定すると、機能ボーニを押た際に特定の設定のオフ/オフが切り替わる。そのモードは「設定(SETTING)」×ニeerは克莱ーナウしま。「バメーダー(PARAMETER)」×ニeer左右の矢印ローニンをタリフ、使用可能な才予はスロルてきま。才予は以下にらむ。「克莱ーナド(CleanFeed)」、「LUT表示(DisplayLUT)」、「克莱ーナド(FrameGuides)」、「カフカアスト(FocusAssist)」、「克莱斯カーナ(FalseColor)」、「ジラ(Bebra)」、「格リド(Grld)」、「セフエリアガイド(SafeAreaGuide)」、「才スビート叩錄(OffSpeedRec)」、「カーローパー(ColorBars)」、「叩錄(Record)」、「なし(None)」。
「トダル(fuggle)」は、設定を適用する出力も選択いたします。「LCD」、「HDMI」、「ビューフアインダー(Viewfinder)」のあらゆる組み合わせをタットて選択いたします。すばての出力に適用いたします「カローダ」と、才予店の出力が選択,No場は、「LCD」「HDMI」、「ビューフアインダー」の設定が無効になります。

<h1 id="blackmagic-pocket-cinema-camera-6k-proおよ6k-g2の-ト設定-バー3">Blackmagic Pocket Cinema Camera 6K Proおよ6K G2の ト設定 バー3</h1>
「セットアフツ(SETUP)」夕の3つ目录には、才総広のBlackmagic Zoom Demandの設定が含まemos。とらの設定は、力メラにBlackmagic Zoom Demandが取り付けてる场合にの使用くださいます。
Blackmagic Zoom Demandの取付けおは使用方法に開る詳細は、「Blackmagic Zoom Demand おはFocus Demand」せクjohnを参照てくだき。

<h1 id="一山口力一の方向zoomrockerdirection">一山口力一の方向ZOOMROCKERDIRECTION)</h1>
<h1 id="通常normal">通常Normal)</h1>
丁F0Lトの設定です。Z一口力一を右に押すと一み、左に押すと一ムアウトしま。
<h1 id="反軸reverse">- 反軸Reverse)</h1>
方向反転、一ム口力一左に押すと一ム入、右に押すと一ムアウトし。
Blackmagic Zoom Demandには4つのズム機能ボtons速度ダイヤルがり、異な機能をマツンングいたします。


1 Z-UM F1 2 Z-UM F2 3 Z-UM F3 4 Z-UM F4 5 速度dial儿
速度徳ル或スムトクに異な機能を割り当ては「機能トクの設定(SETFUNCTION BUTTON)」から「ノリ(Dial)」たはトクの番号を選択ります。次に、「トクバメーダー(BUTFION PARAMETER)」×二一の両側にる矢印アトクをタツPLEて、割り当て機能を選択ります。
速度duiə儿附或機能术的巴一之才
<table><tr><td>ノブ(Dial)</td><td>「ズーパス (Zoom Speed)」、「ヘルドフロール (Headphone Level)」、「 フロデリス (Focal)」</td></tr><tr><td>ズーパ bmating 1~4</td><td>「叩録 (Record)」、「フツschu・トウ・トーク (Push to Talk)」、「プロダムリタ 一にn (Program Return)」、「フローカスーリム (Focus Zoom)」、「フレーニムガイ 卜(Frame Guides)」、「ステーナステキスト (Status Text)」、「才一トフローカス (Auto Focus)」、「才一トアリス (Auto Iris)」、「才一トフロー布鲁斯 (Auto White Balance)」、「再生(Playback)」まて、6K ProではNDフローケの切り 替えに設定すること可能です。</td></tr></table>
<h1 id="blackmagic-pocket-cinema-camera-6k-proおよ6k-g2の-ト-設定">Blackmagic Pocket Cinema Camera 6K Proおよ6K G2の ト 設定</h1>
「SETUP)」夕の4ご一目は、才PONnOoBlackmagic Focus Demandの設定含まえ。它らの設定は、力MlRlOoBlackmagic Focus Demandが取付けてい的场合にの使用てきま�。
Blackmagic Focus Demandの取付けよう使用方法に開る詳細は、「Blackmagic Zoom Demand およFocus Demand」ケンに後述いたします。

<h1 id="ffo-1kstmndo方向focusdemanddirection">FFO-1KsTmndo方向(FOCUSDEMANDDIRECTION)</h1>
FocusDemandのカーツスフイル的方向は、「通常」たは「反転」を選択すると変更くださいます。
<h1 id="通常normal-2">·通常(Normal)</h1>
フーネーカスモイルを時計回りに回す、レンズに近い被写体にフーネーカスします。反時計回はは、レンズから離た被写体にフーネーカスします。
<h1 id="反転-reverse">- 反転 (Reverse)</h1>
フーネーカスモイルを反時計回りに回すと、レンズに近い被写体にフーネーカスします。時計回りは、レンズから離た被写体にフーネーカスします。
<h1 id="七卜a753">七卜a753</h1>
Blackmagic Pocket Cinema Camera 6K Proおは6K G2の「SETUP」タフの5バジ目には以下の設定が含むます。它らの設定は、Blackmagic Pocket Cinema Camera 4Kは3バジ目に表示いたします。

<h1 id="夕一拉卜led-tally-light-led">夕一拉卜LED (TALLY LIGHT LED)</h1>
Blackmagic Pocket Cinema Cameraは正面に大小なLEDが付いてお、力メラの収録ステーナスを示ります。た、Blackmagic ATEM Miniスイチヤーに接続さてる场合、プロダムとトレピュのタリーナデーナスも示ります。力メアM Miniに接続し、収録お及効メラ設定をロモトで操作する场合、力メラが工工アまは予はトレピュ一中oledことを夕一都認てきむ。詳細は「ATEM Miniカ力メ拉コトロル」ごクsjh入を参照てくだき。

力×LのStLe-1J×D1Aに叢叢中

力×兰加才工中

力×拉为才工亚間近
夕一拉卜欣一之才/才非「夕一拉卜LED(TALLYLIGHTLED)」切替更。
<h1 id="ledの明るさledbrightness">LEDの明るさ(LEDBRIGHTNESS)</h1>
「低(Low)」、「中(Medium)」、「高(High)」のいじをたつて、タリ一拉动のLEDの明るさを設定いたします。
<h1 id="デスpleイの自動滅光autodimdisplay">デスPLEイの自動滅光AUTODIMDISPLAY)</h1>
Blackmagic Pocket Cinema Cameraは、一定時間力メラを使用くださいます場合に自動はCDタツチスケリーナの明るさを落と省電力オシャンを搭載いたします。「自動滅光開始(DIM DISPLAY AFTER)」で、デイスPLEイが暗なるまえの時間を設定くださいますDJタツチスケリーナに触ると、元の明るさに履ります。
<h1 id="八一dwaidhardwareid">八一DwAID(HARDWAREID)</h1>
Blackmagic Pocket Cinema Camera 證別的8文字表示承。。Blackmagic RAWおよProRes プデアのMタデーナは、32文字ハーニンの力メラIDが含ま。。。。。。。。。。。。。。。。。。。。。。。。。。。。。。。。。。。。。。。。。。。。
32文字ハーニンの力メラIDが含ま。
<h1 id="sóftware">Sóftware</h1>
現在インストーリルARGEいのソフローは表示ARGEは。ソフローはアリデトに開用の詳細は、「Blackmagic Camera Setup Utility」セクIJONを参照てくだい。
<h1 id="再生playback">再生(PLAYBACK)</h1>
LCDタチスクリーナ、SDカト、CFast、USB-Cフラツドデイスケから再生するケリツを「单一のケリツ(SingleClip)」はた「すばてのケリツ(All Clips)」か選挙ります。「すばてのケリツ」を選挙いたします。」は、ル一の機能に適用いたします。「すばてのケリツ」でル一を選挙いたします。叩録メデアの全ケリツを再生し、その後ル一しいます。「单一のケリツ」を選挙いたします。
<h1 id="七卜app设定一54">七卜APP设定一54</h1>
Blackmagic Pocket Cinema Camera 6K Proおは6K G2の「セットアフSETUP」タフの6バーニ目にBluetoothの設定が含むます。こらの設定は、Blackmagic Pocket Cinema Camera 4Kは4バーニ目に表示いたします。

<h1 id="bluetooth-3">Bluetooth®</h1>
Bluetoothコトローリ示意、ボーナルデバイスから力メラをフィアレスでコトローリ付けます。「Blackmagic Camera Control」アプロは使用て、設定の変更、メタデーナの調整、収録のリモーツリガーミiPadか実行ります。Bluetoothのオフクフは、「SETUP」MEXUNO「BLUETOOTH」スイチをタツPLE切り替えます。Bluetoothが有効にncyいと、長長9×一トル(30FIト)離た場所からBluetoothデバイスカ力メラを検出います。力メラは、「Blackmagic SDI Camera Control Protocol」に使用のは同じBluetoothコトローリのCOMMDSEHTB使用し。そのた、独自のAPRUKON作成て、力メラのほはさての設定をリモーツローリだけります。例は、モニタRon才PCH、一テ才設定、力メラの内藏DaVinci Resolve力拉一レクタ一、LENSCONT口一ルなです。
詳細は、以下のご一のドクル」を「BlakmagicCameraControl」を参照てくさ。www.blackmagicdesign.com/jp/developer
<h1 id="力x与ipad初-越口-亚lg的">力x与iPad初 越口 亚Lg的:</h1>
1 Bluetoothは「セットアフ(SETUP)」×ニーの「BLUETOOTH」スイチをタフすると効に態態。
2「Blackmagic Camera Control」アリを開て、アリンジた力メラを選択ります。アリンジ可能な力メラは、力メラモデルにリストアフさります。力メラ名の後ろは、以下のうな八一ドウアIDが続ります。例)A:A0974BEA

アリングたBlackmagic Pocket Cinema Camera在選択
Blackmagic Camera Controlアプロをインストーリて初て起動する際位置情報のアクses許可を確認するマツeer「Allow location access」が表示いたします。「While using the app(アプロ使用中)」を選択するとiPadからのGPS情報が撮影フィルのマタデーナに追加 ,(、フツーニーニにジオダを付け.AR名录。その情報は、DaVinci Resolve 15以降で確認くださいます。
This 情報を使たない場合は、「Never(使用くださ})」を選択いたします。
設定の変更は、iPadの「設定」>「TPLIBUN」>「位置情報サイバー」Cafhera Control」て行=e。
3 初て接続する场合、力メラとアリングするたにBlackmagic Camera Controlアプロは6桁のコトを要求いたします。そのコトは、力メラのLCDスケーニに表示いたします。、そのコトをiPadに入力し、「Pair(ア)」をクリックします。


4 力×力aipd和APANGLg士,SUKI-上上之的旨表示告。

5 力×拉和iPadのアリングが失敗すると、力×拉に工←米一士表示さは。再度、接続を試みてくさい。
Xe Blackmagic Pocket Cinema CameraのCONTOLにBluetoothを使用くださいます。デイリテのたBluetoothを才フにておくと推奨いたします。
<h1 id="現在のデバイス接続を解除-disconnect-current-device">現在のデバイス接続を解除 DISCONNECT CURRENT DEVICE)</h1>
Blackmagic Pocket Cinema Camera和現在アリングさていiPadの解除を切断しま�。
<h1 id="アリングデバイスをケリclear-paired-devices">アリングデバイスをケリ(CLEAR PAIRED DEVICES)</h1>
力メラとアリング領域のデバイスのリストを消去いたします。
<h1 id="blackmagic-camera-controlアプロカメラをcnt口一ル">Blackmagic Camera ControlアプロカメラをCNT口一ル</h1>
力×拉至iPad和AP兰格的为、iPadAPL使,设定的变更、×夕一夕の调整、取錄のリモ一トリカ一を実行てきま�。

アリングすると、そのスケーニがBlackmagic Camera Controlアリで表示いたします。設定の調整や収録の開始が可能くださいます。

右下にあるスレ一トアイコンをタツPLEてスレ一トにアクせス、アツpled一。
Blackmagic Pocket Cinema Cameraは、Bluetooth LEを使てデバイスと通信し、フィヤレスコトローリルを実行いたします。它は、ボーダルデバイスに使用くださいますと同じタイフのプロトコルで、バツテリ一電源の使用を最小限に抑えらいたします。
<h1 id="七卜ア設定一5">七卜ア設定一5</h1>
Blackmagic Pocket Cinema Camera 6K Proおは6K G2の「せットアツつ(SETUP)」タフの7億一目には以下の設定が含まemos。こらの設定は、Blackmagic Pocket Cinema Camera 4Kは5億一目に表示されまemos。

<h1 id="出荷時設定にリセットfactoryreset">出荷時設定にリセットFACTORYRESET)</h1>
力メラを出荷時の設定にリセットするは、「力メラ設定をリセットReset Camera Settings)」ボーニをタppsしま。確認画面で「リセット(Reset)」を押て、操作を確定いたします。力メラに保存いたします。全そのLUTとリセットを消去し、全設定をリセットしま。出荷時の設定にリセットする前に、×モリ一カトにリセットをバクアフとて書き出ておくごをお勸しま。出荷時設定にリセットた後に、×モリ一カトからリセットを簡單に説い迍て再む力メ拉使用くださいます。出荷時の設定にリセットしだ、水平×一日电一もリセットくださるた。出荷時設定にリセットた後に、王一康ル蔵サ一のマリPLEJUNを再度行うとて、精度が維持くださいます。

<h1 id="モーホンsenaデリフローmotion-sensor-calibration">モーホンSena・デリフロー(MOTION SENSOR CALIBRATION)</h1>
水平×一夕一をキリPLEUN」は、「モーニンル実行( Calibrate Motion Sensor)」をタツしま。キリPLEUN実行中、力×拉は安定て動いない必要のはう。その处理には約5秒かごろ。
水平×一夕一は、必要に広て水平以外の角度に設定するごと可能です。例えは、一定の角度にテルトさせ設定ください場合は、力×ラをその角度にしてモ一ヨンせんサ一のケリPLEーニムを行うとて、その角度を維持するたに水平×一夕一を使用くださるようお願いいたします。
<h1 id="比克塞尔再卡里莱一pixelrecalibration">比克塞尔再卡里莱一(PIXELRECALIBRATION)</h1>
Blackmagic Pocket Cinema CameraのCMOSルは、数百万のビクルを光を受光いたします。工場でルに一にリPLEUNが行わてから時間が經過するにし、一部のビクルの明るさ変化するにごりります。その結果、そらのビクルは優良目立つようお願い您可以、木トビクルと呼はる状態に変化いたします。すばての力メラルルは製造元に開わら、経年に好馬トビクルが生じます。
它を解決するたに、力メラははヤリPLEーニン機能が内藏さてお、イメ一に木ト比ケルがあ場合に使用てきま�。
化を実行するには、レンズサイドを取付け、「サイリフローcalibrate)」トクを押て、 ヒケル再マツビング機能を起動いたします。它的处理には約1分かります。。

<h1 id="lcd木フィットバlandersキーリpleunson-white-balance-calibration">LCD木フィットバlanders·キーリPLEUNSON (WHITE BALANCE CALIBRATION)</h1>
「LCDモフィットバラNS・キヤリPLEーニム」を実行するには、「LCD色温度(LCD TEMPERATURE)」及「LCDテイntb(LCD TINT)」を調整て、2の参照用ルチがニートルになるようお願いいたします。設定を変更た後に「リセット(Reset)」ロタを押すと、工場出荷時のキヤリPLEERONに尻せます。「元に尻す(Restore)」ロタは、新い設定を呼むにが成長のた、キヤリPLEERON前後の見た目比較得很好。LCDが適切のモフィットバラNSを表示するようお願いいたします。設定を保存,This。

<h1 id="presets-2">PRESETS</h1>
「総切(PRESETS)」夕本は、最大12個の設定を保存ようお願いいたします。その機能は複数のプロジローカメラ使用する场合、非常に役立ります。例は、ドキメンタリーダーマ�ドクは効力マを使用する場合なごす。力メラの総切機能は、特定のプロジローカメラ撮影の設定を保存し、必要な際にすばやく簡単に呼吁出來)=(1)12個の総切ロトに総切を保存いたします。
1台のBlackmagic Pocket Cinema Cameraをプロジックに合wegさ設定し、リルットを他的すにBlackmagic Pocket Cinema Cameraに書き出しお。

「総」SETS)夕は、保存た設定を简单に切り更可能
XEM12個まごのリルトを力Mラの内部×モリ一保存てきま�。
<h1 id="71">71</h1>
「PリSETS」×二一の底部に表示たるトクは、以下の機能に対応てい。

<h1 id="135-145-155">13.5 14.5 15.5</h1>
新い総ト作成るには、「追加」広をクリックります。它と操作、LCDにタマチキ一トが表示さ、総トの名前を入力いたします。名前を入力くださ、「アツデーbdate)」をタppsて現在の設定を該当の総トに保存いたします。
力メラにて同名のリルセットが口一ドさてい場合、既存のリルセットを上書きするか、両方十一。

「 プーベットを保存いたします、「 プーベット (PRESETS)」×ニローで名前をタ McGrて選択いたします。 プーベットをローブするのは、「ロービ」アイコンをタ McGr�ます。
「更新」アイコンをターリルをアリデーは。Blackmagic Pocket Cinema Cameraの現在の設定にリルをアリデーるか確認するメルジが表示いたします。「アリデー」(Update)」を押て確定いたします。

総切上選持、「口一」AICONを夕PPL口。選持の総切が青く表示さては。現在口一さてい的総切は、AICONの下に青いIAIN表示さては。
<h1 id="fjtt">FJt#T#</h1>
「総ト」、「総ト」、「総ト」、「総ト」、「総ト」、「総ト」、「総ト」、「総ト」、「総ト」、「総ト」、「総ト」、「総ト」、「総ト」、「総ト」、「総ト」、「総ト」、「総ト」、「総卜」、「総卜」、「総卜」、「総卜」、「総卜」、「総卜」、「総卜」、「総卜」、「総卜」、「総卜」、「総卜」、「総卜」、「総卜」、「総卜」、「総卜」、「総卜」、「総卜」、「線ト」、「線ト」、「線ト」、「線ト」、「線ト」、「線ト」、「線ト」、「線ト」、「線ト」、「線ト」、「線ト」、「線ト」、「線ト」、「線ト」、「線ト」、「線ト」、「線ト」、「線ト」、「線ト」、「線ト」、「線リド」、「線リド」、「線リド」、「線リド」、「線リド」、「線リド」、「線リド」、「線リド」、「線リド」、「線リド」、「線リド」、「線リド」、「線リド」、「線リド」、「線リド」、「線リド」、「線リド」、「线リド」、「线リド」、「线リド」、「线リド」、「线リド」、「线リド」、「线リド」、「线リド」、「线リド」、「线リド」、「线リド」、「线リド」、「线リド」、「线リド」、「线リド」、「线リド」、「线リド」、「線リド」、「線リド」、「線リド」、「線リド」、「線リド」、「線リド」、「線リド」、「線リド」、「線リド」、「線リド」、「線リド」、「線リド」、「線リド」、「線リド」、「線リド」、「線リド」、「線リド」、「線リド」、「線リド」、「線リド」、「线リド」、「線リド」、「線リド」、「線リド」、「線リド」、「線リド」、「線リド」、「線リド」、「線リド」、「線リド」、「線リド」、「線リド」、「線リド」、「線リド」、「線リド」、「線リド」、「線リド」、「線リド」、「線リド」、「線リド」。「線リド」、「線リド」、「線リド」、「線リド」、「線リド」、「線リド」、「線リド」、「線リド」、「線リド」、「線リド」、「線リド」、「線リド」、「線リド」、「線リド」、「線リド」、「線リド】、「線リド】、「線リド】、「線リド】、「線リド】、「線リド】、「線リド】、「線リド】、「線リド】、「線リド】、「線リド】、「線リド】、「線リド】、「線リド】、「線リド】、「線リド】、「線リド】、「線リド】、「線リド】、「線リド】、「線rlD】」「LINE1」「LINE2」「LINE3」「LINE4」「LINE5」「LINE6」「LINE7」「LINE8」「LINE9」「LINE10」「LINE11」「LINE12」「LINE13」「LINE14」「LINE15」「LINE16」「LINE17」「LINE18」「LINE19」「LINE20」「LINE21」「LINE22」「LINE23」「LINE24」「LINE25」「LINE26」「LINE27」「LINE28」「LINE29」「LINE30」「LINE31」「LINE32」「LINE33」「LINE34」「LINE35」「LINE36」「LINE37」「LINE38」「LINE39」「LINE40」「LINE41」「LINE42」「LINE43」「LINE44」「LINE45」「LINE46」「LINE47」「LINE48」「LINE49」「LINE50」「LINE51」「LINE52」「LINE53」「LINE54」「LINE55」「LINE56」「LINE57」「LINE58」「LINE59」「LINE60」「LINE61」「LINE62」「LINE63」「LINE64」「LINE65」「LINE66」「LINE67」「LINE68」「LINE69」「LINE70」「LINE71」「LINE72」「LINE73」「LINE74」「LINE75」「LINE76」「LINE77」「LINE78」「LINE79」「LINE80」「LINE81」「LINE82」「LINE83」「LINE84」「LINE85」「LINE86」「LINE87」「LINE88」「LINE89」「LINE90」「LINE91」「LINE92」「LINE93」「LINE94」「LINE95」「LINE96」「LINE97」「LINE98」「LINE99」「LINE100」「LINE101」「LINE102」「LINE103」「LINE104」「LINE105」「LINE106」「LINE107」「LINE108」「LINE109」「LINE110」「LINE111」「LINE112」「LINE113」「LINE114」「LINE115」「LINE116」「LINE117」「LINE118」「LINE119」「LINE120」「LINE121」「LINE122」「LINE123」「LINE124」「LINE125」「LINE126」「LINE127」「Line 128」「Line 129」「Line 130」「Line 131」「Line 132」「Line 133」「Line 134」「Line 135」「Line 136」「Line 137」「Line 138」「Line 139」「Line 140」「Line 141」「Line 142」「Line 143」「Line 144」「Line 145」「Line 146」「Line 147」「Line 148」「Line 149」「Line 150」「Line 151」「Line 152」「Line 153」「Line 154」「Line 155」「Line 156」「Line 157」「Line 158」「Line 159」「Line 160」「Line 161」「Line 162」「Line 163」「Line 164」「Line 165」「Line 166」「Line 167」「Line 168」「Line 169】【Line 170】【Line 171】【Line 172】【Line 173】【Line 174】【Line 175】【Line 176】【Line 177】【Line 178】【Line 179】【Line 180】【Line 181】【Line 182】【Line 183】【Line 184】【Line 185】【Line 186】【Line 187】【Line 188】【Line 189】【Line 190】【Line 191】【Line 192】【Line 193】【Line 194】【Line 195】【Line 200】【Line 202】【Line 203】【Line 204】【Line 205】【Line 206】【Line 207】【Line 208】【Line 209】【Line 210】【Line 211】【Line 212】【Line 213】【Line 214】【Line 215】【Line 216】【Line 217】【Line 218】【Line 219】【Line 220】【Line 221】【Line 222】【Line 223】【Line 224】【Line 225】【Line 226】【Line 227】【Line 228】【Line 229】【Line 230】【Line 231】【Line 232】【Line 233】【Line 234】【Line 235】【Line 236】【Line 237】【Line 238】【Line 239】【Line 240】【Line 241】【Line 242】【Line 243】【Line 244】【Line 245】【Line 246】【Line 247】【Line 248】【Line 249】【Line 250】【Line 251】【Line 252】【Line 253】【Line 254】【Line 255】【Line 256】【Line 257】【Line 258】【Line 259】【Line 260】【Line 261】【Line 262】【Line 263】【Line 264】【Line 265】【Line 266】【line: Line: Line: Line: Line: Line: Line: Line: Line: Line: Line: Line: Line: Line: Line: Line: Line: Line: Line: Line: Line: Line: Line: Line: Line: Line: Line: Line: Line: Line: Line: Line: Line: Line: Line: Line: Line: Line: Line: Line: Line: Line: Line: Line: Line: Line: Line: Line: Line: Line: Line: line: line: line: line: line: line: line: line: line: line: line: line: line: line: line: line: line: line: line: line: line: line: line: line: line: line: line: line: line: line: line: line: line: line: line: line: line: line: line: line: line: line: line: line: line: line: line: line: line: line:
力メラは、選択んだメデアのルトデレクトリとPresents」フルダ一を検索し、使用可能な予卜をリストアフUSH。他的場所に保存いたします。予卜は表示いたします。
1. プリセットをタpperて選択し、「説み込み (import)」をタpperて確定后的後、次に使用可能性スロドはコビローは。
足以同名の総は卜が力メに保存てい的場合、既存の総は卜を上書きるか、丙方一予説者選挙てきま�。スリーニの右上に、力メ以使用てき空の総はトロト数表示さま。力メに説み迅の総は卜数は、空のロト数の必です。
×力×の12個のリルトスロットはが使用てい的場合、貢及×二一は使用かません。既存のリルトを削除て、スロットを空けの必要か標む。
<h1 id="135">135</h1>
総トを力一和USB-CFANDスに書出はは、書出は行う総ト選択、その後「管理」アCONをタYPじる。「選択の総トの書出(Export Selected Preset)」をタYPじ、その後総トを書出たいMADAS以TPTL。同名の総トがさに存在する场合、既存の総トを上書きるか、两方合一的或選択し。力MAsaが総トを「Presents」Follur一书出法。
<h1 id="fjttj">FJt#t#J#</h1>
「消去(Delete)」をタ複しります。
<h1 id="3d-lut">3D LUT</h1>
「LUT (LUTS)」×二丶一ては、3D LUTの読み迅、書き出、力×拉出力の適用が可能です。

<h1 id="3d-lutに这样">3D LUTに这样</h1>
3D LUTは、力メラのLCDタツチスケーニングようHDMI出力のイメジに適用くださいます。JTは、特定のカラ一/輝度入力に対て、力メラで表示するカラ一/輝度出力を指定いたします。例えは、力メラの入力が比較的くんだリル一の场合に、LUTを使用ncyやか彩度の高いリル一表示いたします。その機能は、意圖のに彩度の低いFLUTな見た目でckmagic RAWフツテージの史録やFilm」ダイナミックレンジを使用た史録くださいます。LUTを適用する这一切と、克莱ーニング後のフツテージのルクを想定いたします。
3D LUTは、DaVinci Resolveやその他のカラーマリクソフウアで簡單に作成いたします。たは才ンラインのはLUTを様々提供元からダウロトドります。カメには、17pinトは33pinトの3D LUTを10個まて保存いたします。その最大サイスは1.5×ガバイチです。ロードんだLUTは、力メラのLCDタチスリーニングよHDMI出力に適用て表示いたします。
Blackmagic Pocket Cinema Cameraは、DaVinci Resolveで作成した.cubeフィーマットの33ボイト3D LUT、さらにLUT変換プロガラムでResolveの.cubeフィーマットに変換った17ボイト3D LUTをサボーツします。力メラの3D LUTは高品質の四面体補間法を使用いたします。
LUT表示關於詳細は、そのマニターフ設定(MONITOR)」ケンを参照てくさ。
Xe Blackmagic Pocket Cinema Cameraは、デフィルトは叩録くださたフツーニにUTの適用や焼き付けを行いせん。しか、フツーニにLUTを焼き付けるように選択いたします。
它は、木ストプロダクシャンでフツーニーをgren一丁ンゲる時間,Noい场合や、克莱アトやエデイロー直接フツーニーを渡す必要かあ場合に便利です。
SettLUTePLBue-用用在的场合、适用之在LUT的情報为夕一夕和,收录之在保存之。DaVinciResolve是、之情報为之夕之「使用LUT」表示了。它不是、Sett使用之在LUTの名前被認成的力拉斯卜上与之便利的能。
<h1 id="内藏lut">内藏LUT</h1>
多数のLUTが内藏いたします。「Film」ダイナミックレンジたはBlackmagic RAWで撮影してる際のトレbü cjに異なルツクを適用くださいます
各力×拉は、第世代力ラーパイエンス特有のLUTを搭載ていす:
<h1 id="gen-5-film-to-extended-video-2">-Gen 5 Film to Extended Video</h1>
「Film to Video」LUTは広いダイマックレングで表示て、穩やかなコトロス変化を適用し、ハイランドは滑らに口一ル才さてま。
<h1 id="gen-5-film-to-rec-2020-hybrid-log-gamma-2">-Gen 5 Film to Rec 2020 Hybrid Log Gamma</h1>
HDRスクリーニに適たガンマカープを表示いたします。通常のダイナミックレングのスクリーニとも互換性のはります。
<h1 id="gen-5-film-to-rec-2020-pq-gamma-2">-Gen 5 Film to Rec 2020 PQ Gamma</h1>
人間の目が感知得起力に基は的ガンマカ一表示さ、HDRIME一为効率的工上。
<h1 id="gen-5-film-to-video-2">-Gen 5 Film to Video</h1>
HDVi7才用的REC 709力一規格和似有、高1LUT。REC 709力一S-为使用他放送用力M+共、Blackmagic Pocket Cinema Camera使用用的场合便利设定。
<h1 id="lut-ロン">LUT ロン</h1>
力メラのLUT×ニーのボタンアイコンは、以下の機能に対応いたします。
<table><tr><td>✓</td><td>←→</td><td></td></tr><tr><td>口一の</td><td>管理</td><td>削除</td></tr></table>
<h1 id="lutの読み达成">LUTの読み达成</h1>
3D LUT 論み迅むには、LUT×ニ広一部部の「管理」アドンをターリフロー。「LUTの説み迅み(import LUT)」をターリフし、その後「説み迅み(Import)」をターリフて確定します。LUT説み迅みのスケリーム表示いたします。説み迅みた3D LUTが、アクテ億な力一下まはドライフ请联系场合、タチスケリ一の上部の×デアロクトをターリフて、叩録×デアを切り替え乱はは、USB-CFLASHIDIS久、CFast、SD力一下から説み迅む。
力メラは、選択たMDEIAのルトデILCRITBDLUTs」FOLDUN一を検索し、使用可能なLUTをリストAPPLま。他的場所に保存たLUTは表示さ毎せん。
LUTをタダじて選択し、「読み込み(Import)」をタダじて確定た後、次に使用可能性スロットにコビ一しります。
新いLUTを説み+(\30、10個の3D LUTスロットすてが使用くださいます场合、既存のUTを消去る必要のはんだ。
て同名的LUTが力メラに保存いたします。場合は、既存のTを上書きむか、两方を保存するか選挙ります。スケーニの右上に、力メラ使用くださる空のLUTロットの数が表示いたします。力メラに読みお願いいたしますLUTの数は、空のロット数のみです。
×LUTを試みない場合、サイズに問題のは可能性のは除外。Lattice无论如何LUT編集ルを使用てサイズを確認するか、CONPUNTEREのテキス工デイターヤーLUTを開ります。“LUT_3D_SIZE"タケにLUTのサイズを示す数字のは除外。它的值は17または33以外の場合は、Latticeを使用て3DLUTのサイズを17ロINTに変更ては
<h1 id="lutの適用">LUTの適用</h1>
LUTを力メラに保存いたします、LUTメニーてLUTをタppsて選択、さらに「ローユンをタppsしま。ことLUTが力メラの全出力で効効に有効にります。力メラの出力にローユんだLUTを表示するには、モニターフムニーのLUT表示(Display LUT)」を効効にします。詳細は「モニタ一設ONITOR)」せクhonを参照てくだい。
<h1 id="lutの書を出">LUTの書を出</h1>
LUTを力一下及USB-Cflssdεsckに書き出はには、書き出は行うLUTを選択、その後「管理」
aiCONをタppしま。「選択たLUTの書き出(Export Selected LUT)」をタppし、その後LUTを
書き出んだxDiAtopples。同名のLUTがてに存在る场合、既存のLUT上書きるか、
两方ki一psるか選挙し。力xla为LUTを「3DLUTs》follda一に書き出は。
<h1 id="lutの削除">LUTの削除</h1>
必要いLUTを削除するには、削除たLUTを選択て「削除」アイコンをタppsしま。確認Mss一の表示さた、「消去(Delete)」をタppsしま。
<h1 id="工心dut3dlut">工心DUT3DLUT</h1>
Pocket Cinema Camera使用、Blackmagic RAW为摄影的際に3DLUT为適用する、選択たLUTは収錄てるBlackmagic RAWフィルに工ンバドさします3DLUTは.brawフィルのハダ一に保存さし、個別のフィ専を挾う必要なく、ボストプロダクIJONで簡單にフツテーニに適用くださいます。
工デイターパルはBlackmagic RAWフィ�ルを受け取る、撮影中に使用くださいますLUTに簡單にアケセスくださいます。異な3D LUTが適用いたします。フツテージの編集やGLEーニングを進むよう、3D LUTを適用するかうか選択いたします。た、3D LUTはいてみ無効にいたします。
「収錄(RECORD)」×毎一成「フィルにLUTを適用」スイチがallonにたる場合、収録たけクリツPBをBlackmagic RAW PlayerおはDaVinci Resolveで開くと、選択んだ3D LUTが適用さて表示いたします。
3D LUTは簡單に才元/才フごきま�が、クリット自体に情報が存在するた、移動さてもBlackmagicRAWフィアルに常に伴いま�。DaVinci ResolveのRAW設定のバレットにも「LUTを適用」スイチがあ、Blackmagic RAWフィアルの3D LUTを有効/無効にごきま�。
DaVinci Resolveの「LUTを適用」設定は力メラの設定と同樣に機能いたします。它は、撮影時に力メラで LUTを設定て使用すると、直接力ラリストに指示が可能と意味します。DaVinci Resolveの「LUTを適用」設定で簡單にLUTを才にする这也可能です。
<h1 id="夕一夕入力">×夕一夕入力</h1>
×夕一夕はクリフの中に保存たる情報で、テイ克番号、力メラ設定、その他の識別情報のはが含まえ�む。×夕一夕は、ボストロダクシャンのフツーニジの分類や处理に極て便利です。例は、テイ克/シャット/シーネn番号はクリフの管理にpineて必須のは、レncyに開る情報は歪みの自動除去やVFX素材とアートのマッチングで役に立らま�。
Blackmagic Pocket Cinema Cameraは、ケリツに一部のメタデー夕(力メラ設定、タイムコト、日時等各种)を自動のに保存いたします。eer一は力メラのSTEト使用て自由に一夕を追加てきま�。
<h1 id="sl-1">SL-1</h1>
×イング的画面、力×のタツスクリーニ左右にスフィYPるとスレトが表示さこま。
スレートは「ケリット(CLIPS)」和「プロジロー(PROJECT)」に分かていま�。「ケリット(CLIPS)」夕効はケリドとに異な情報を確認てきま�。「プロジロー(PROJECT)」夕効はプロジロート名、監督、力メロID、才レーダー一ID哪、ケリツ間で共通る情報を入力てきま�。
作業のこつスレートに入力たM夕テ一夕は、「モニター(MONITOR)」夕緦て「撮影監督/監督用ステーナ斯テキスト(DISPLAY STATUS TEXT FOR)」を「監督(Director)」に設定い的场合、HDMI出力に表示いたします。詳細は、そのマニアルの「モニタ一設定(MONITOR)」セクシャンを参照てくだせ。
<h1 id="クリ-lips夕一夕">「クリ (LIPS)(×夕)一夕</h1>
クリット×夕テ一夕の変更は、スロールイモ-ドが再生王一トかご機能の仕方が異なま。Stun ヒイモ-ドは、力メラが収録する準備がて的際に、クリツpx夕日は次に収録さるクリツに保存せて。ただし、「緱ドテイク-最後のクリツ(GOODTAKELASTCLIP)」は、直近に撮影さたクリツに「緱ドテイ克(GOODTAKE)」を適用しぃ。再生王一トは、撮影た夫テ一工を確認しぃる際に「緱ドテイ克(GOODTAKE)」ロタ丶表示さ。、クリツpx夕日は常に、現在見てるクリツに適用さて。

力メラが再生モーツドの场合、「スレートの対象ケリット(SLATEFOR)」には操作が適用さるケリットが表示いたします、「ダドテイク(GOODTAKE)」ロタが表示いたします。StantpanVieMoe-の场合、「スレートの対象ケリット(SLATEFOR)」は次のケリツにり、「ダドテイク-最後のケリツ(GOODTAKELASTCLIP)」ロタが表示いたします。
<h1 id="slate-for-2">SLATE FOR)</h1>
「クリット」夕は現在表示てる×夕一夕が適用さるクリドです。再生モトはは現在のクリドに適用せ、スルバイモトはは次に収録たるクリドに適用さう。
<h1 id="lensdata">LENSDATA</h1>
力×らと通信するたの電子装置を内藏んだレンスを使用する场合、レンスのモーテル情報がごに表示さcludes。使用ていレンスの情報を変更しぃり、追加するには、上部の「レンスデーア(LENS DATA)才予」を押しま
詳細は、そのマニルの「「LENS Dete」×夕一夕」ケンを参照てくさ。
<h1 id="一reel">一(REEL)</h1>
現在のリルを表示いたします。
Blackmagic Pocket Cinema Cameraはリル番号を自動に増加いたします。通常はマニアルを入力する必要のはんだ。新いプロジクトに移行て、改てリルから開始くださいます。スレットの「プロジクトPROJECT」た行きがをは(Reset Project Data)」をタ McGrしります。
<h1 id="sh-3gene">SH - 3GENE)</h1>
現在のシーニン番号が表示いたします。お願い、現在のシャットの番号お願い種類也表示いたします。
ごのインジケーダーの番号は、常に現在のシーニを意味ります。その番号は、シーニ番号の鳞に左右の矢印を使用て変更いたします。たはシーニ番号をタツPLEて、シーニ番号工デイタに進みます。
SHEN番号1~99995
現在のシャットを特定するたに、シーニ番号エデイターシーニ番号に文字を追加するとも可能です。例は23A"と入力するとて、シーニ23のシャット1出于とが分かりまな。すにシーニ番号に文字を追加しぃる场合、シーニ番号エデイタ一都入力を行うと、次のシーニ番号と文字の候補を提案しまな。例は現在のシーニ番号7B出于場合、力メらは8"和"7C"表示しまな。
SHIN番号INJZK-一夕=、右上i現在のJHTO的種類I開情報表示示之。它也。
以下は選択くださいますソットタイフです。
<table><tr><td>WS</td><td>フィットコット</td></tr><tr><td>MS</td><td>中間距離のchnット</td></tr><tr><td>MCU</td><td>中間距離のケローフツト</td></tr><tr><td>CU</td><td>ケローフツト</td></tr><tr><td>BCU</td><td>近いケローフツト</td></tr><tr><td>ECU</td><td>極て近いケローフツト</td></tr></table>

「S-(SCENE)」×夕一夕の入力は、力×は夕トき一・トの左にS-1番号の候補、右側にドトタ伊表示
<h1 id="テイクtake">テイク(TAKE)</h1>
ごのインジケーテフは、現在のシャットのテイク番号が表示いたします。テイク番号は左右の矢印をタツと変更いたします。たは同インジケーテフをタttpて、テイク番号エデイタに進みます。
作業のコドシヤト番号たは広文字進と、テイク番号は1に尻ら。
テイク番号工デイタ一は、概要情報を追加くださいます。亿吨はテイク番号キ一トの右側に係、亿吨以下を意味にしてます。
P/U
比克。×不的摄影的终了後、前のテイクに素材を追加するたに撮直しテイク。
VFX
比乙丁尔工克卜。VFX用使用的T/3
SER
シリーズ。力メラを止むに収録た複数のテイクです。

「テイク(TAKE)」×夕一夕入力すると、Blackmagic Pocket Cinema Cameraはタチキーネトの右側に追加のシャットタイフのプロングトを表示

「A」をタットすると、スローは
的足さを求。自動
番号增加有効に
の テイク 番号の隣に小さ<「A」と表示いたします。
<h1 id="grddtlkcgoodtake">GrddTlKcGOODTAKE)</h1>
它的不一夕を夕はて夕付たは上、木斯トロダクhon良テイ克見つはさくに。它的本は、再生モ一上現表示上。的リド(GOODTAKE)」 1 ヤフスは。力米がStanspanyM-上、収錄準備かてい場合「丁-最後の リリド(GOODTAKELASTCLIP)」本子を押す、最後に収録た的リリドに「丁-が夕格付されま。
<h1 id="屋内屋外-interiorexterior">屋内/屋外 (Interior/Exterior)</h1>
「屋内」は「屋外」をターリフると、-StaUNBAIMOMIDは次に収録たるクリフに、再生モトは現在のクリフに"屋内"は次は"屋外"のタ格を付けらて。
<h1 id="昼夜-daynight">昼/夜 (Day/Night)</h1>
「」は「夜」をタツPURる、Stunper王一ドは次に収錄さるクリPPに、再生王一ドは現在のクリPPに"是"は"夜"の夕格を付からむ。
「総口」PROJEST0」×夕日一夕
□口紜克ト×夕一夕は、スルバイモートも再生モートも同うに機能しま。□口紜克ト×夕一夕は常にロド紜克ト全体を参照し、クリツ番号から独立た矢米夕一夕です。

力米の「ロジク卜(PROJECT)」スレートでロジク卜の詳細を入力
<h1 id="project-name-2">PROJECT NAME)</h1>
現在のプロジックの名前を表示いたします。鉛筆アIONをタツPURると、プロジック名を変更いたします。
<h1 id="力λcamera">力×λ(CAMERA)</h1>
ルフアバット一文字の力メラインデツスを表示いたします。鉛筆イドンをターフすると、力メラインデツスを変更いたします。
<h1 id="监督director">监督(DIRECTOR)</h1>
現在のプロジ工ク卜の監督名を表示いたします。鉛筆アIONをターリフすると、監督名を変更くださいます。
<h1 id="力拉才一夕amera-operator">力×拉才←一夕—(AMERA OPERATOR)</h1>
力×拉才←一夕一表示了。铅笔A的二、力×拉才←一夕一变更了。
<h1 id="一夕を丨亀setprojectdata">一夕を丨亀SETPROJECTDATA)</h1>
すごのプロジオク卜情報をケリアするは、「デ一夕をじせ総 Reset Data)」を夕PPしま。
<h1 id="レンズ元ens-data夕デ一夕">「レンズ元ENS DATA)」×夕デ一夕</h1>
力メレに装着てるレンズの開る情報です。電子レンズの多は、レンズモル、アーツチヤー、焦点距離哪の情報を自動的に供給ります。レンズからこらの情報が得�能ない场合や、追加デ一夕を入効いたします。鉛筆のアイコンをタppsすると、情報をマニアルで入力くださいます。その操作による以下の情報を含むレンズ一夕メニ一表示いたします:

「LENSDE-夕(LENSDATA)」MUN一は、取付けたLENSからの 情報と、マUNALル効力た一情報を自動的に表示
<h1 id="lunsの種類ns-type">·LUNSの種類(NS TYPE)</h1>
15n5o的MvD儿表示。15n5o的MvD儿自动的i表示。场合是、之设定到TtP 15n5o多<保存在力的,MvD儿为入力始的和自动的名前的候提案告。

一夕が自動のに表示さない场合は、タマチー一トでレンステ一夕をマニルカ入力可能
<h1 id="411">· 411</h1>
クリットの開始点へのアバーツービー一設定を表示します。その情報が自動に供給いたします。は、使用くださいますレンスにようお願いいたします。その設定をタットするとデー�をマニルて入力ごきます。
<h1 id="焦点距離-cal-length">- 焦点距離 (CAL LENGTH)</h1>
取錄克力的開始点におはしの限を表示し。一夕が自動の供給さる场合は、米リメトル(mm)単位で表示され。它的設定をタ複すると焦点距離をマーニアルて入力かきま�。
<h1 id="距离distance">距离DISTANCE)</h1>
収錄cll的lons之距离設定表示了。lons上,之一夕自動的供給丶、三×-n山单(位表示了。。の一夕はM二化入力する它と可能也。
<h1 id="フサイルターナーfilter">- フサイルターナー(FILTER)</h1>
現在使用てい的LNSFILTAE一表示。の設定を夕P附和と一夕をマトアル。以入力ごきま�。複数入力する場合はCONM区切りま�。

1JILTA 情報はマニル力
LENS-デーナは、「LENS-デーナ(LENS DATA)」MUNOneの「LENS-デーナをLISET(Reset Lens Data)」AICONをタリフリていも消去いたします。その作業を確定するMSS一Ja表示ります。確定と、すばてのLENS-デーナが消去いたします。現在使用くださいますLENSからのLENS-デーナが自動に表示いたします。ごしらのFIILDにMUN-AAL为情報入力た場合次回LENSをMAWNTる際にLENS-DE-TAをLISETる必要お願いいたします。LISETを行わいと、MUN-AAL入力た值が保持いたします。
<h1 id="力x拉のビde才出力">力x拉のビDe才出力</h1>
<h1 id="hdモニタron出力">HDモニタRon出力</h1>
力メラのフルサイズHDMIコncyタ一は1080p HDビ徳才出力するた、イメーのレビヨ用にモニタ一だけてなく、民生用テレビも簡単に接続得很好。10-bit出力はHDRに対応ていま。た、力メラの全ステ一atsuが確認可能性スリーニン才一レイ使用得起た、才念卜のモニタRongeに最適です。
鳥歐摄影及力一馬臥卜、克莱爾馬臥卜の使用時等、LCD斯克一入のアク塞尔が困難な場合、HDMIモニーニングが役立ら。デスPLEI設定×毎一のHDMI才一巴一レイ設定を使用すると、モニーニングに役立つ情報はHDMIフリトに表示いたします。HDMI才一巴一レイには、フレムガイドや、撮影の詳細、力マレ設定各種的情報を含むます。単にシャットをモニーニングください场合は、いても才一巴一レイ設定を才にして、ケリ一HDMIフリト出力お願いいたします。
Blackmagic Micro Converter HDMI to SDIのようなコンパーダー使用すると、信号をSDIに変換いたします。SDIモニタ、キフチヤーニデバイス、放送スイッチー、その其他的SDI機器に接続いたします。Blackmagic Pocket Cinema CameraのUSBロトからBlackmagic Micro Converter HDMI to SDIに給電いたしますかご可能いたします。
<h1 id="blackmagic-zoom-demand-你的-focus-demand">Blackmagic Zoom Demand 你的 Focus Demand</h1>

Blackmagic Zoom Demand和Blackmagic Focus Demandは、Blackmagic Pocket Cinema Camera 6K Proおよ6K G2で互換性のはんだサイバー EFLENSを使用くださいます。フィーカスお願いいたしますをトローテ clerkがる才予広のアクセリです。
各二三卜は三脚やデスルの八トルに取付けを。てに、力メラの八卡おはテルト調整すると同時に、両手でフカ力スと一ムをコトロ一ル成長。木夕和コトロ一ル使用て、一ムコトロ一ルの速度和感度の微調整、才一トモフイトハラ斯の設定、アムガイドの切及替え各種を実行くださいます。
<h1 id="力l-接-统-04-取の付">力×L 接 统 0.4 取の付</h1>
<h1 id="三-脚八卜儿取付的">三 脚八卜儿取付的</h1>
トは、マウト用締クはを介て三脚八ドルに取付は。各トは、口はトマウトを介て外クはに取付は。
Zoom Demandおは Focus Demandをラケットに取り付むは、ロズットマウntを介て接続し、ノフを回て固定いたします。


1 Zoom DemandたはFocus Demandのネジ部分をプロケットのロズットマウntに向て配置し。
2 ヨニットがフロクットにしかり取り付けらるまて、フを回て固定します。
ルトをラケットに取付た、它を三脚の一ムに取付は。ラケットの片側にはT型の拉チがてお、它をスロットには必入、その後不固定し。


1 LlTJnF 1
2拉什子開的状態,三脚の一束を拉ツて挟むようにし、拉ツをスロットにはの迅みま。希望的角度にのう上に締りを回転さて調整いたします。
3 LlchのnP回て、三脚の一ムHにLlakhtbto固定し。
<h1 id="力兰接-统的">力×兰接 统的</h1>
Blackmagic Zoom DemandおよFocus Demandは、2のUSB-Cロトを搭載てご。它にご、各ルトを個別に、あたは同時に西方使用くださいます。
各二卜は1一トルのUSB-Cケ一別が同棚さて。它は、力メラの側面にあ的USB-C口一トからDemandの「CAM」ト一上直接接续。
丙方のυニットを使用する场合は、USB-Cを介て2つのυニットを接続て、デイジーツーニー連続しります。

デイジーマローするとて、カメラの側面にあるUSB-Cロトか両方のルトを操作いたします。例えは、カメラの側面にあるUSB-CロトにUSB-Cケーピルを接続て、む一方をFocusDemandの「CAM」ロトに接続ります。2本目的ケーピルはFocusDemandの「LOOP」ロトからZoomDemandの「CAM」ロトに接続ります。

Blackmagic Focus DemandおはZoom Demandは、スケリーナから目を離すとてに东南、フカカスとズム操作可能
<h1 id="blackmagic-focus-demandを使用する">Blackmagic Focus Demandを使用する</h1>

<h1 id="1コnt口一儿n">1コnt口一儿N</h1>
フーネカスモイローを時計回りに回すと、レンズに近い被写体にフーネカスしいたします。反時計回りは、レンズから離た被写体にフーネカスしいたします。フーネカス的方向は、メニューで「前方(Forward)」はは「後方(Reverse)」に設定するて変更,No
作業のと Blackmagic Zoom Demandと共に使用くださいます场合、ケイクス―ムロトを押て、イメージを擴大いたします、Focus Demandでフカスます。
<h1 id="2-操作比">2 操作比</h1>
ごの3つpinは、よ微細に操作くださいます。指先でフカ力スをよ織細に調整いたします。
<h1 id="3-usb木卜">3 USB木卜</h1>
Focus Demandを力メラに接続し、Zoom Demandにデイジーマフ連続するたに使用いたします。「IN」ボーツはBlackmagic Camera Setupeu一テリテを介て内部ソフウアをアツ徴ートの際にも使用いたします。
<h1 id="blackmagic-zoom-demandを使用する">Blackmagic Zoom Demandを使用する</h1>
ZoomDemandのコトロルは、力メラの設定でマツング成長を検討。ボンの機能を変更する方法は「設定」セクIJONの「SETUP」を参照てくさい。
以下の機能がデモルトで割り当てらていは:

<h1 id="1-z-f1zoom-f1">1 Z-△F1(Zoom F1)</h1>
こは、スム機能ボーニ1て。デフルトは「取錄(Record)」ボーニとてマツpin格さてお、Blackmagic Studio CameraのUSB-Cロトに接続得很好外付けド现代农业の叢錄を行いま。
<h1 id="2-z-um-f2-zoom-f2">2 Z-UM F2 (Zoom F2)</h1>
它は、一機能02。C口一一の反側には、同機能を実行る木たが搭載てお、右利きと左利き対応てい。デルトは、クイクス一機能が割当てらてお、レイの画像に瞬時に一機をご。
MX キイックズム機能はBlackmagic Pocket Cinema Camera 6K Proおば6KG2のLCDのみに表示て、スイチヤ一やレフローに接続た出力ビデ才は確認くださいます。
<h1 id="3-z-um-f3-zoom-f3">3 Z-UM F3 (Zoom F3)</h1>
它は、一機能トク3て。のトは、デルは「才一トフイトバラス(Auto White Balance)」に設定得很好。
<h1 id="4-z-umf4zoomf4">4 Z-UMF4(ZoomF4)</h1>
こは、ス―機能対を4です。Blackmagic Studio Camera 4K Proは、そのボーニはデこは、ス―機能対を4です。デモルトは「フレーマガイド(Frame Guides)」ボーニとてマツローさわいまな。
<h1 id="5-親指口力一">5 親指口力一</h1>
Zoom Demandは、親指ロルカーミトロルを搭載いたします。親指ロルカー左に押すとスムアウト、右に押すとスムインます。スムイン/アウトは、力メラのメニー設定で反転いたします。
<h1 id="6-速度を倒た">6 速度を倒た</h1>
HUNT上部付在的速度dialyL调整的它,Z一M的速度微调整成。
它的dialy是、HINTFANLEBIL或A1R5调整的功等不,F一力S调整的口一儿
和工卡迪普的可能。
<h1 id="7-usb-c术一卜">7 USB-C术一卜</h1>
Zoom Demandを力メラに接続し、Focus Demandにデイジーネムen接続するたに使用いたします。「IN」ボーツはBlackmagic Camera Setupご一テリテを介て内部ソフウアをアツフデーつる際にも使用いたします。
<h1 id="davinci-resolveの使用">DaVinci Resolveの使用</h1>
Blackmagic Pocket Cinema Camera使用了摄影是、映画/テレビCONtenS制作の過程のとに過さ、×デアのバックアフや管理、編集、カラーマレクIJON、最終マスローフイルの工CONT也同樣に極て重要な作業です。Pocket Cinema Cameraは、DaVinci Resolve (Mac/Windows対応)を同桐てるた、完結型のリーニンとて撮影からトロダクIJONまを力BA一じます!

Xe BlaKmagic Pocket Cinema Camerad摄影的力一releonanddein为正行,最新版DaVinci Resolve使用用此推奖。B一J17以降使用用此于,末之的BlcMagic力M如o及最新之BlcMagic RAW有以正确力一得。
CFast、SD力一図あはSSDをCONPBUJ一策に接統た、DaVinci ResolveのMEXAPBA一JEでケロ一ONULを使用て、撮影を行いが继续的にBACKAABB作成てご。使用するMEXAPはその種類に開と、破損や不具合が生る可能性か。ShoHTの損失を防う、常にデ一夕のBACKAABB作成説を上ご功。DaVinci Resolve以MEXAP为BACKAABB上、DaVinciのMEXAP一策にCRIIP为追加て、編集やカラ一COLLUN、作品のFIINSONGE中、すての作業をDaVinci Resolveで行ご。
DaVinci Resolveは、多くの大ヒット映画で使用いたします。シングルLEソフウアソルのは、ハイエンドのデジタルフィル公用に極て高度なテケロジーを搭載いたします。DaVinci Resolveを使用いたします、最先端のテケロジーを利用んだ集やカラーテクschonが実現いたします。
<h1 id="プロジクトマネーナー">プロジクトマネーナー</h1>
克利士普为表孙达毛编集开始的前、口卡克卜卡一卡口卡克卜在七口卡
□口工卡卡卡一卡一卡一卡一卡一卡一卡一卡一卡一卡一卡一卡一卡一卡一卡一卡一卡一卡一卡一卡一卡一卡一卡一卡一卡一卡一卡一卡一卡一卡一卡一卡一卡一卡一卡一卡一卡一卡一卡一卡一卡一卡一卡一卡一卡一卡一卡一卡一卡一卡一卡一一卡一一卡一一卡一一卡一一卡一一卡一一卡一一卡一一卡一一卡一一卡一一卡一一卡一一卡一一卡一一卡一一卡一一卡一一卡一一卡一一卡一一卡一一卡一一卡一一卡一一卡一一卡一一卡一一卡一一卡一一卡一一卡一一卡一一卡一一卡一一
新いロジクト作成するはは、ウinds底部の「新規ロジクト」をケリックし、プロジクト名を設定お願い。「作成」をケリックお願い。
は、力トを使用て、総集作業を早速開始しう。

フロジクトマネーパーは、現在のう一ズーのすをてのフロジクトを表示。
プロジアクトマネーダーの詳細は、DaVinci Resolveマニルを参照てくさ。同マニルは、Blackmagic Designウアデサイトのサボーパーにダウロドです。
<h1 id="力トを使用た編集">力トを使用た編集</h1>
力トーパーは、高速でダイマツクな編集フークフロ一を実現てきま�。ケリドの配列、トリム、緯集が効率的に実行てきま�。
アクテイドなタイムラインが2つ表示くださいます、編集全体を確認いたします。部分のにケリットの詳細を編集いたします。お願いいたします。大小なタイムラインにケリットを編集し、詳細を表示するタイムラインで編集を微調整する作業が、一のフローは実行いたします。そのフローは、ロトと編集を進むのはんだと、スカウト、画面のスローリルをすう必要,Noいた、時間を大幅に節約りますかご可能です。
<h1 id="カットロー-ダレ-イフ-卜">カットロー ダレ イフ 卜</h1>
力トーパーを開くと、メデアフル、ビューフ、タイムラインが表示いたします。その3つのメインウインドウで、編集作業を完全に管理いたします。

力士卜一的德力卡尔卜のース一。M亚一尔在一表示状態。
力ト一の詳細は、DaVinci Resolveマニアルの「力ト一」チフタ一を参照てくさい。
<h1 id="xdeiap">XDEIAP</h1>
一伊一元一工一之的左上には5の夕が有求。
ごれらのタフをクリックすると、編集作成る際に使用するメデアソルセットが開きま。例えは、最初のタフ%=的MDEAPRILはて選択さてい。。そ以外の夕は、同期比、トラン、ドーニ、タートル、工表ク卜です。

·艾:MDEIAPILH、MDEIAE一德裁习还的卡之的KUP、FOLDAFILを含てい。も、力ト一加直接FAILを誦习还のた、新いKUP为言习还際にMDEIAE一且居必は要はませ。
·同期上2全てのクlssをタイムコト、日付、時間に基つき自動のに同期るハフルな機能尺寸。マルテカの口ロエ克トで全力メラかのアングルを選択する際に威力を発揮しら。
- フラフドンそのタフをケリックすると、編集使用可能なてのビデ才およんだ才トラフドンが表示いたします。它には、クロスデイルフやモーニッチはんだ広使わてるトラフドンが含ります。
卜兰神子的隣は夕卜尔夕。乙地、使用用的種類選折て。例は、スロル、標準テス、口一フ一ト等。未fisionのテ予PLREトモリス表示て。它は、アメ一ヨUN用い、やダイチクな夕トル。DaVinci ResolveのFusionカスマイズて。
- 工工5つ目的夕は、工工クトケです。編集に面白みを加るフルターパや工工ケトを多数搭載いたします。它には、カスマイス可能なTPLA、GLPO、LENS工工ケトが含まります。多ckのバフルな工工クトから選択くださ、検索ツルで簡単に探しだ的工工ケトを見つりらります。
作業のこと×デイアタフのアイコンの近に有者検索ルを、必要のアイチムを検索てき。例は、トランジンタフを選択する场合、“デイルフ”と検索ルに打ちむと、ビューネにデイル複トランジhonのみが表示くださるた要、必要なデイル複ト拉ンジ�ンをリストの中からすばやく見つけらを。
<h1 id="匕一夕">匕一夕</h1>
乙一艾伊卜的左上,乙一艾毛卜的本夕造为里。

乙一亚木 トの术夕
它們の木たに、現在使用てい的比一をト口一ルはき。才予は、「一スリ」、「一斯テ」、「夕H拉」の3寸。它們の王一使出分か上,集集之利力为。
<table><tr><td></td><td>ソーニス克莱フ</td><td>ソーニス克莱フ広は、メデア克莱ルの单一の克莱克を表示いたします。ビューナターマラインの長さはいは使て、イン点とアウ卜点を設定くださいます。詳尽細にわったコ Islandsが可能いたします。メデア克莱ルの克莱フをダ授權克莱ク&Rか、ビューナにドラックし、表示するリーニス克莱フを選択いたします。</td></tr><tr><td></td><td>ソーニス克莱</td><td>ソーニス克莱はは、メデア克莱ルの全ソーニス克莱フを表示,Noisy。特定の価所を探討,No而是克莱フをすばやくチエクしぎ、場合に役立つ機能,No。克莱フ上ご再生ははは克莱フは、メデア克莱ルで選択くださ过的サム新业态は表示,Noisy。編集くださ过的克莱フを見つた、ソーニス克莱フ克莱フ克莱ク&Rか、該当のソーニス克莱フが克莱フに自動の上表示,Noisy。</td></tr><tr><td></td><td>夕はムバイ</td><td>夕はムバイ克莱フは、ノンリーニア編集の利点を活かした作業は行,Noisy。編集で自在に作業は必、ShoHTをすばやく見つる它が必、新しだイデアを試し、移動や切り替えをせむ編集作業を実行,Noisy。</td></tr></table>
<h1 id="médiアフーリルにケリツを読み迍む">Médiアフーリルにケリツを読み迍む</h1>
次は、プロジク卜に×デアを読み迅みます。その作業のは、カットーハジの×デアフルウinds上部にる、読み迅みル使用しります。

訖丶迅丶才不子使用。
<table><tr><td></td><td>×デイアの読みお願い</td><td></td></tr><tr><td></td><td>×デイアフローの読みお願い</td><td></td></tr></table>
<h1 id="xπa左达">XπA左,达:</h1>
1「MDEI阿的訖孤还」末は「MDEIAFK尔一の訖孤还」AICONをクLLK。
2 設み迅みたい×デアのあ×デアスリレジまて進みま。
3 フアルまたはフルダ一を選扱し、「開く」をケリクしま�。
□口工克卜中MDA以追加了、变更を保存し。DaVinci Resolveは「拉伊保存」と呼ばる、高速の自動保存機能を搭載てい。ロ工克トを一度保存た、その後に適用た変更は「拉伊保存」に及保存た。作業内容が失わるリスを減り。
「拉伊保存」及の他の自動保存機能に開は、DaVinci Resolveマニアルを参照てくさ。
<h1 id="克莱尔卡夫卡夫卡夫卡夫卡夫卡夫卡夫卡夫卡夫卡夫卡夫卡夫卡夫卡夫卡夫卡夫卡夫卡夫卡夫卡夫卡夫卡夫卡夫卡夫卡夫卡夫卡夫卡夫">克莱尔卡夫卡夫卡夫卡夫卡夫卡夫卡夫卡夫卡夫卡夫卡夫卡夫卡夫卡夫卡夫卡夫卡夫卡夫卡夫卡夫卡夫卡夫卡夫卡夫卡夫卡夫卡夫卡夫</h1>
Mxivap 0ybi bue-əm 一Dの木tenの使用方法を理解たて、次はMxivap 1nにリssを追加しま。

力トーパーのタムレイン。(上)タムレインと(下)ス一ム併たタムレインの2つ表示いたします。
夕人LAVINは、編集を形作る場所で、クリツを配置するトラックが組み達た的ローツのうなむです。它的PDB上ごクRIPを色々と移動さた、編集をトリIMUNGLIDリしま。トラCCは、クRIPを積み重ね表示するた、異な編集を試り、トLANJONや工FUKトを構成する上、優高柔軟性が得に。例は、ひとつのトラCKのクRIPに編集を適用ても、その下のトLACKにある他のクRIPに影響を与えません。
tyuLaninにKlPPto追加s的方法是多数、「末尾追加」、「最上位Ttck配置」はの一例です。
<h1 id="克莱特の追加">克莱特の追加</h1>
テイクを選択、編集を組み立て作業を行う上ご、ターダラインにシャットを次々と順番に追加しぃきははす。「末尾に追加」ルは、它的作業に最適で、編集を高速に実行いたします。

「末尾追加」äiCOnをクillて
最後のクリットの末尾にクリットを追加。
<h1 id="克力士-要追加">克力士 要追加:</h1>
1 XDAPULKUUPuTbUPLKUcU 一开
2 SsKlTJUH.一L使用,点和点to拉格,J的使用。 车正确中选扣式。卡一P一的「山也好「O」押到也、点和点安点所设定可者。

3 マデイアリルの下の「末尾に追加」アフCONをクり仄くります。
最初のクリットがターツムラインの先頭に配置いたします。
クリフをさに追加するはステフ1か3を操り返ります。追加するクリフは、タールライ上にてに存在るクリフの末尾に自動の追加せ、ガフは生じません。

「末尾に追加」で ヒリツフを追加すると、タイムラインの ヒリツフ間にヤツフが生じい。
作業のこつ「末尾に追加」アイコンにキ一ロトカットを割り当るごて、作業をさらに効率化いたします。例えは、「P」キ一を割り当之と、「」およは「O」でイ点とアウト点を設定し、「P」でケリツ扑を追加いたします。シャーミ効朴キ一の割り当之方法は、DaVinci Resolveマニルを参照てくだい。
<h1 id="仙">☆仙☆☆☆☆☆☆☆☆☆☆☆☆☆☆☆☆☆☆☆☆☆☆☆☆☆☆☆☆☆☆☆☆☆☆☆☆☆☆☆☆☆☆☆☆☆☆☆☆☆☆☆☆☆☆☆☆☆☆☆☆☆☆☆☆☆☆☆☆☆☆☆☆☆☆☆☆☆☆☆☆☆☆☆☆☆☆☆☆☆☆☆☆☆☆☆☆☆☆☆☆</h1>
夕氏拉元中克利普为追加的,克利普移动、编集开始的可有可
編集をトリミングするには、克莱フの先頭たは末尾を克莱クし、左右にドラムは。克莱フを左右にド拉格は。とて、克莱フの長さを延長んだ、短縮てきま�。その編集筒所に後統る克莱フはてが、変更に対応たにターツルは上連動て動きま�。它は、力トーパジが時間を節約する上役立機能のひとて。
該当のクリットを選挙て、大小なターツラーニンの新いビデトラックに編集する它と可能です。その作業を行うたに、ズーツラーニンやズーツアウトする必要はりません。亿吨は、長いターツラーニンをナビゲートる時間を最小限に抑えらるた、編集作業を高速化いたします。
<h1 id="才一徴才トリム比一">才一徴才トリム比一</h1>
才一徳才トリム比は、夕氏ムラインの才一徳才波形が擴大表示さるた、正確な才一徳才編集が可能です。その機能は、会話シーニやミヨジクリフの編集にpine、言葉や比卜の間に編集点を作りた場合に便利です。
<h1 id="才一丁才卜山比一使用">才一丁才卜山比一使用:</h1>
1夕氏ムライの左側で、スナツ機能とマ一力一ルの間に有的「才一徳才トリ」アイコをクリクしま。

「才一丁才卜山」夕
2 2015年全国春季学业水平考试卷14-29(2015·山东卷)

才一丁才卜山比一。夕山拉不的才一丁才波形如大表示之。
力トーパーのクリツ編集が完了ら、タートルの追加に進みまよう。その手順は、次のせクシ ヨて紹介ります。
<h1 id="夕卜ルの追加">夕卜ルの追加</h1>
夕IUMLAIINに夕IOLを配置するは簡单で、その方法は多数お願いいたします。
使用可能 なタートルの種類を確認するには、euーダー インタフローの左上にある「タートル」タフローをクリックいたします。ロームフーダアスケローチル、標準テ マストタートル各種、使用可能 なタートルエネレーダーがすて選択ウindsウにサム新业态と表示いたします。た、アニメトさた了Fusionタートルも追加できまむ。Fusionタートルは樣々にカstsマイズ可能,No。
<h1 id="夕卜ルのpreb一">夕卜ルのPREB」一</h1>
夕卜ルは、夕氏ムライに追加前に、夕卜ル選 抑ウINTDOWでプロビ宀一ききま。它にご則、夕卜ルを選択する前に、使用可能性全才総言にすばやく目を通すとがききま。
<h1 id="夕卜儿を予比一">夕卜儿を予比一:</h1>
1夕卜尔巴尼Lの右上にる才PONX二一をクリク、「木巴一斯克拉PBL」中子工快を入れま。

才不一云一云一云一云一云一云一云一云一云一云一云一云一云一云一云一云一云一云一云一云一云一云一云一云一云一云一云一云一云一云一云一云一云一云一云一云一云一云一云一云一云一云一云一云一云一云一云一云一云一云一
2夕卜L選 护不卡卡之马斯 比尔一をサルは重ね、比一さ日トを予比一し。ア二×一ト夕日トルは次はFusion夕日トルを締比一用際は、比日トルサルは川上左右に動かさ上、二×一言子を確認てき。

夕卜尔卡不尼尔 以 拜不夕一 载了比一广九比一可
選挃るタイトルが決またら、タイムラインに追加てきま�。
<h1 id="標準の夕卜ルを追加する">標準の夕卜ルを追加する:</h1>
1 选折了夕卜尔をク力は、夕氏ム氏はドラ格は。夕氏ム氏ははら使用ても良いはが、下の夕氏ム氏を使用的方が正確に作業て。夕卜ルの新い比才ト拉克が自動的作成さ、再生にドスリフは。
2 マウスをリーメスすると、タートルが 新いトラックに 表示さし ま。他的ご才クリットと同樣、夕卜ルトラックは移 動しだ長さを変 更しぃりてきま。
3夕卜尔を編集するは、新規夕卜ルクリツをクリックします。クリツ広一の下に「ル」アイコンが表示いたします。
夕卜尔克习的调整用使用一儿加一列表示告。它尼是、变形、口习、
4「Innsbok夕」夕未克
1. トローラン、デー・デー・デー・デー・デー・デー・デー・デー・デー・デー・デー・デー・デー・デー・デー・デー・デー・デー・デー・デー・デー・デー・デー・デー・デー・デー・デー・デー・デー・デー・デー・デー・デー・デー・DEE。
思通の夕卜ル作成て的用に、力斯マイ斯可能才予多数搭載て。樣々设定を使てみて、夕卜ルの見目や形かに変わるか試てみとをお勅して。
作業のこつ 木ハーニス克拉フ機能は、カットレーネジようエデイトレーネジの工費ク卜、トラン ヴルリルリルリルリルリルリルリルリルリルリルリルリルリルリルリルリルリルリルリルリルリルリルリルリルリルリルリルリルリルリルリルリルリルリルリルリルリルリルリルリルリルリ専に使用お願いいたします。
<h1 id="blackmagic-rawフィルの使用">Blackmagic RAWフィ�ルの使用</h1>
Blackmagic RAWクリットは、木ストプロダクIJONにい最大の柔軟性が得ら、力メラの才JILルの設定を変更かのうに木イトバLANsS和ISOの設定を調整てきまssBlackmagic RAWには八IAIIT和ShadUの色調情報が豐富に維持てい的た、白飛伊了空やIMENの暗的領域なのデテルを修復る際にも役立ら。
可能の限り最高の品質を求てい場合や、ハリLATとシャドウの差か極て大きく、その領域を能るは暗く/明るくGLEーニングで調整んだ場合各样は、Blackmagic RAWでの撮影を必てしま�。
高速で小さのフィルサイズを実現するBlackmagic RAWは、プロキ菲尔を作成する必要くださ。、通常のビデオクリットのように再生いたします。そのセーションは、Blackmagic RAWの詳細、お願いDaVinci ResolveのBlackmagic RAWの使用方法を紹介いたします。
作業のこつカラーグレーダンガを始る前に、カラーハジでクリットのBlackmagic RAW设定を調整すると習慣お願いいたします。
<h1 id="blackmagic-rawの-ラリフ-設定">Blackmagic RAWの ラリフ 設定</h1>
Blackmagic RAWフィ�ルを読み迅む、DaVinci Resolveはフィ�ルに含むる力メラデーを、撮影時に使用たISO、木フィトバーニス、テINT設定に基てデートしま。その設定に基ったルツク問題がなかは、そのまますに編集開始いたします。
かし、Blackmagic RAW収錄のすばら知识点は、てれらの設定に束縁いたします必要がたていとです!Blackmagic RAWフィアルは、ボスプロダクシャndon使用くださる处理の幅が広がるた、独自のローを構築いたします。各克莱pper「力×RAW」夕予の「克莱pper」設定を色々と試てみと、Blackmagic RAWでの作業のはにハフリルで柔軟性に富むのか加分はすです。

「力MRAIOW」夕P「D一用使用」二一为「Kl」为選折、Kl的Blackmagic RAW设定调整
<h1 id="blackmagic-raw設定の変更">Blackmagic RAW設定の変更</h1>
DaVinci ResolveでBlackmagic RAWのクリット設定を効にすると、クリット設定とガンマCNTロルが使用くださいますようお願いいたします。亿吨の設定を調整するpto、クリットを完全なラーマリーダンダを行った状態に近付け的成本ります。DaVinci Resolveのスローを使用してる際に、特に亿吨はバフルです。スローは、クリットにルクを適用する前に、クリットをニートラルにし、バ雷斯を取る作業をアストします。
以下載、クリツドとガマコトロ一ルにて説明しら。
<h1 id="iso-4">ISO</h1>
ごの設定を上下させるとて、ISOの值を変更くださいます。最適化のたに、ケリツをよう明る//暗い開始点に設定する必要くださいます场合に便利な設定です。
<h1 id="八拉卜力卡">八拉卜力卡</h1>
手工款を入ると、クリドンガさてないチアル的情報を元に、クリドンガたチアルの八個は卜情報が再構成さま。
<h1 id="色域の圧縮">色域の圧縮</h1>
のチルクロルを効にご、安全な色域レルが自動のに維持いたします。
<h1 id="色温度">色温度</h1>
色温度を調整て、イメ一のルクを暖かく冷たしま�。各イメ一の力ラーバンスを一二トラルにする场合に便利な設定です。
<h1 id="テint">テINT</h1>
イメーにgren一もはマズルを加て、カラーパンスを調整しだ。
<h1 id="露出">露出</h1>
IMEXI全体的明を微調整するたに使用しら。
<h1 id="彩度">彩度</h1>
「彩度」はデフローはにてつてお、最低0から最大4の範围で彩度を調整いたします。
<h1 id="contlarst">CONTLARST</h1>
丁莫卜は1.0寸。左右にスローダ一動かてCONTLAsトを調整しら。一番左は最低値の0或一番右は最高値の2寸。
<h1 id="mindotin">MINDOTIN</h1>
Blackmagic Design Filmは、中間GLEOneの値はデフィルト0.38(38.4%)にたていま�。スライダ一を左にドラックするとミットロインが下が、右に動かさと100ま�上さられま�。CONTRALSTかデフィルト設定から変更いたします。场合、「ハリライトローツフ」およんだ「シャドウローツフ」が調整くださいます。
<h1 id="八個lambda口一爾才">八個lambda口一爾才</h1>
Sλrda一左右下拉格七八拉卜调整。一番左是最低值的0或、一番右是最高值之 1 为。
<h1 id="shadw口一儿才">shadw口一儿才</h1>
スロイダ一を左にドラツるつ和はドウが0て下がり、右に動かさ2ま上はら表。
<h1 id="自">自</h1>
スライダ一をドラツgrるて、ガンマカ一の木ウトロINTを調整し。最高値は2、最低値は0です。デフルト値は1です。
<h1 id="黑レル">黑レル</h1>
S拉尔一右下拉格的上式,力斯夫力卡力一的力克本。最低值是1、最大值是1。
<h1 id="匕德才の黒レルを使用">匕德才の黒レルを使用</h1>
手工之入,黑尔一力才设定。
<h1 id="flueumの書出出">FLUEUMの書出出</h1>
「トレーニムの書き出」ボタをクリックて、Blackmagic RAWクリットから单一のトレーニムを書き出しります。
<h1 id="小卜力一左更新">小卜力一左更新</h1>
ごのトクをクリツて、現在のクリツ用のBlackmagic RAWサイドカーフルを更新し。
Blackmagic RAWクリフに加た変更は、「ガンマ」設定に「Blackmagic Design Custom」と保存いたします。

cllppfofofulto「gann」才pshoniFJttae场合是、gannofD口pp 12-1-1-1-1-1-1-1-1-1-1-1-1-1-1-1-1-1-1-1-1-1-1-1-1-1-1-1-1-1-1-1-1-1-1-1-1-1-1-1-1-1
作業のこトガルは「Video」徳尼マクレジ为摄影たフツーニは無効にていは、Blackmagic RAW一夕が失わたけはあらません。「Blackmagic Design Film」は「Blackmagic Design Extended Video」をガル設定のドロPPダウン×二一から選挙すると調整てきるうにごりは。
<h1 id="blackmagic-rawの変更を保存">Blackmagic RAWの変更を保存</h1>
1 Blackmagic RAWのガンマのコINTロ一ルを調整いたします。
2 「効力一を更新」木たをクリクしま。
サイド力一 (sidecar) フアルがBlackmagic RAW (.braw) フアルと同じフルダに作成いたします。別のeerーがBlackmagic RAWフアルを試み迅と、DaVinci Resolveは自動のにサイド力一フアルを試み取ります。さらに調整を加た场合、再に「サイド力一を更新」术針を押ります。
<h1 id="blackmagic-rawのプロロジcepts設定">Blackmagic RAWのプロロジcepts設定</h1>
木戩トバRonS或ISO設定の全体的変更な、すてのクリツに共通た設定の変更か必要場合、 プロジク卜設定の「力メラRAW」を使用する複数のクリツに渡て包括の変更を加えらね。
<h1 id="blackmagic-raw用のプロジ乌克卜設定を設定する">Blackmagic RAW用のプロジ乌克卜設定を設定する:</h1>
「氟伊尔」をクりつ、「プロジcepts設定」を選択て、プロジcepts設定を開きま�。
2「力米RAW」夕的「RAW口FAPIL」M二一、矢印をクl和て「Blackmagic RAW」为選扱ります。
3 「一用使用」M二一「口口克卜」为選折。
4 4
5 木フィットバラスを「カスタム」にしります。
6 6 宅マのメニeer「Blackmagic Design Custom」を選択いたします。カラームフスを「Blackmagic Design」に設定いたします。
7「一品」M二一如解像度为選持。低解像度设定和、性能限拉的斯T木也可滑生成。解像度是、後以纳品のた中高品質の出力を行前、解像度可变更的比之可能。
て、彩度、CONTLARST、MINDPINTAN等の力XMA設定を調整する準備が整いは。它は、デ一上「プロジクト」使用するように設定た予口工クトのすてのクリドに影響し。
<h1 id="カラーヒローでケリットのカラーピレクutionを行う">カラーヒローでケリットのカラーピレクutionを行う</h1>
夕人L以尼卡利丁为追加、夕尔乃尔付的之,力一巴一于力一拉一乐之子实行的准备为整。力一巴一巴是極了瓦夫力的機能为搭載也。作品の全体的尔克在决定打足。乙地は、克力比一貢性持持せ用に、克力比を二一上拉的状態に作業行。編集に変更を加た場合、いても力ト巴一和工氏比一且下口作業。
力拉一巴一约是编集的尔和调整能为。色夕意味、力拉一都克子是芸術形態の句和言之。力拉一都克子行上,作品与感情追加能为。力克口一中对克工尼达尼大以要求者作業也如、样夕内斯尔身付之,其结果为克于目有可。力一力一力一力一力一力一力一力一力一力一力一力一力一力一力一力一力一力一力一力一力一力一力一力一力一力一力一力一力一力一力一力一力一力一力一力一力一力一力一力一力一力一力一力一力一力一力一力一力一力一力一一力一一力一一力一一力一一力一一力一一力一一力一一力一一力一一力一一力一一力一一力一一力一一力一一力一一力一一力一一力一一力一一力一一力一一力一一力一一力一一力一一力一一力一一力一一力一一力一一力一一力一一力一一力一一力一一力一一力一一力一一力一一力一一力一一力一一力一一力一一力一一力一一力一一力——力——力——力——力——力——力——力——力——力——力——力——力——力——力——力——力——力——力——力——力——力——力——力——力——力——力——力——力——力——力——力——力——力——力——力——力——力——力——力——力———
はじて、「力拉一」夕をクり仄くて力拉一一一一の開きま�。
「力メラRAW」設定、カラ一HOイル、カーパリト、カラ一COLUNSONÜル全般、プロ曲一OWINDU、Oneindの表示いたします。表示する膨大なル群に戸惑う必要のはんだん。こらはすて、一去一が素晴ら映像を作成するの手助手ける機能です。它的系クhonは基礎を紹介するわです。詳細情報は、マニアルの該当セクhonを参照てくだい。マニアルは、さてのツルの使用目的と使方を簡單手順で紹介てむ。八伊工ドの力拉一COLUNStasji才等門家が用ると同じテク二ツクを習得くださいます。
通常、ラーマーマーマーマーマーマーマーマーマーマーマーマーマーマーマーマーマーマーマーマーマーマーマーマーマーマーマーマーマーマーマーマーマーマーマーマーマーマーマーマーマーマーマーマーマーマーマーマーマーマーテフは、ラリフフは、ラリフフのドウマトトのレルを最適化するとです。ま、「リフ」、「ガンマ」、「ゲイン」の設定を調整いたします。它的作業は、ケリーんでバ汉子が取て作業開始点を作成するとて、その後に行うカレ�一徳丶丶丶丶丶丶丶丶丶丶丶丶丶丶丶丶丶丶丶丶丶丶丶丶丶丶丶丶丶丶丶丶丶丶丶丶丶丶丶丶丶丶丶丶丶丶丶丶丶丶丅最も素晴らしルツ克を得るたに役立与否。レルの最適化は、スカフが役立与否。
<h1 id="sō-一の使用">Sō 一の使用</h1>
力拉里卜の多は、作品に持たせたい感情/ルクに焦点を当て力一を選択、その基つき、モニタ一使用てそのルクを完成さます。日常的な才総工、、等与相互作用用樣々光を見るごとて、映像に対てのう効果を加えらるか、実験しだが亚アテアを生み出さがきま�。

八レ一卜スコ一トは、ハイランドト、ミドト一、シヤトの最適化に役立令ま。
力拉一格レ一德不的用方法,内藏上被使用于的八斯取的方法有
。比才上被「上被木子を利和て開き。「上被」本夕は、日卜一川一巴
一の右か2番目の本夕。上被の表示は、波形、レト卜、卜上格ム、CIE
色度上被3与选护成。。乙5の上被1は、ト一のハ 二夕
为防今的比才上露尔的确認、克特内之色加贝切士克等,樣夕目的用使用。
「力拉一トロル」には、一般的に最初の調整に使用る「リフ」、「ガンマ」、「ダイ」のコトロルが)”。力拉一レクIJONの經驗がる場合、它らは他のAPRLEJONで力拉一やコトラストの調整を行上使用たコトロ一ルに似てい的とに気付くてし。

「「、「、「、「、「、「、「、「、「、「、「、「、「、「、「、「、「、「、「、「、「、「、「、「、「、「、「、「、「、「、「、「、「、「、「、「、「、「、「、「、「、「、「、「、「、「、「、「、「、「、「」、「」、「」、「」、「」、「」、「」、「」、「」、「」、「」、「」、「」、「」、「」、「」、「」、「」、「」、「」、「」、「」、「」、「」、「」、「」、「」、「」、「」、「」、「」、「」、「」、「」、「」、「」、「」、「」、「」、「」、「」、「」、「」、「」、「」、「」、「」、「」、「」、「」、「」。「」「」「」「」「」「」「」「」「」「」「」「」「」「」「」「」「」「」「」「」「」「」「」「」「」「」「」「」「」「」「」「」「」「」「」「」「」「」「」「」「」「」「」「」「」「」「」「」「」「」「」「」「」「」「」「」「」「」「」「」「」「」「」「」「」「」「」「」「」「」「」「」「」「」「」「」「」「」「」「」「」「」「」「」「」「」「」「」「」「」「」「」「」「」「」「」「」「」「」「」「✓

FRAIMARI一八一はマウスを使用た力拉一調整が簡單に行えま。
マウスを使て各カラ一をよう正確にコトロ一ルするは、カラ一HOILルを「フリIMARIL一八」に変更しま。フリIMARIL一八は、リフ、ガンマ、ゲYNを别々にコトロ一ルて各カラ一およ辉度チANNILを調整電子郵件。カラ一HOILルの右上にあるドロPPDawonM二一か「FRIMARIL一八」を選択しま。
·「卜」の震整力拉一巴一的夕HmLINcDEKLIPE为選护,1目の力拉一HOILN的下にる「リト」DyA儿をKlUSS。DyA儿左右以SIAID、IEX一の影響を確認し。IME-内暗的領域明社增减的が分かは。
- 暗い領域の明さを、最適なレルに設定いたします。リフローは過さとラツクのデテルが失われいたします。此を避たるのは、レーニスコーツが役立与否。波形で確認する场合のラツクの最適な位置は、レーニスコーツの底辺の上ご。
·「徳」の調整:「徳」ダイルを克莱クて、左右にスレドし。ケリフの最も明る部分出于八ハレトを調整得很好。ハリートは、バレーニスコーツの波形的一番上的部分に表示得很好。照明が明るいヨットの场合、八ハレトの最適な位置は、波形スロフ的一番上ごは言下。八ハレトが波形スロフ的一番上ごは言上。八ハレトは克莱ドさ、イ�一内の最も明る領域のデテ一内が失れは。
·「ガンマ」の調整:カラーハイルの下の「ガンマ」ダヤルをクリックて、左右にスライドします。ガンマの値を上ごるとイメージが明るなが分かります。ガンマを調整いたします、波形の中間の部分も動ります。その部分は、クリットのミットトreenを示理由ます。ミットトreenの最適な位置は、通常、波形スコフ50~70%の間です。作成するルツ克やクリットの照明条件、目的や好消息に好う異ります。
1、中間、上から3分の1の位置です。
DaVinci Resolveでプロイマリーナーレクschonを行う方法は他にもたさんあら。

「力一」BALETTは、デリマリーテークシャンやPowerWindowでケリドの特定の部分を強調る際に使用くださいますようお願いいたします。
<h1 id="七力士一力拉一レク">七力士一力拉一レク」</h1>
IMe-の特定の部分を調整くださ�場合は、カ専ダリ一レクthonを使用する必要のは。リフト/ガンマ/カイINを使用てこらて行った調整は、IMe-全体に同時に適用いたします、ラーマリ一力一レクthonと呼ばれます。
一方、シーニの芝生のカレーパ空の緱ルのみを変更するな、イメーの特定の部分を調整する必要がる场合は、カ尔ダリ一レクIJenを使用いたします。カ力ダリ一カラ一レクIJenはは、イメーJを部分のに選択し、その部分のみを調整くださいます。ノトを使用て複数のカ力ダリ一レクIJenを重ねらむたか、すてを別々に調整て完璧なイメーJ作成dekます!さにウINTDウやトラツンダ各種の機能で、イメー内の動きを追跡dekます。
<h1 id="力拉一の分離">力拉一の分離</h1>
道路沿の芝生や空の締一等クリフ内力一を強調しぎ、対象物の力一を調整て才一徴工スの注意を引いりな、特定の力一を強調するとて樣々効果が得らね。HSLケ才リ法兰ア一力ル使用すは、特定の力一を簡單に分離得很好。

HSLク才菲亚一以义一内之力一至選折求之は、义一在部分的際立た、丶丶丶丶丶丶丶丶丶丶丶丶丶丶丶丶丶丶丶丶丶丶丶丶丶丶丶丶丶丶丶丶丶丶丶丶丶丶丶丶丶丶丶丶丶丶丶丶丶丶丆丶丶丶丶丶丶丶丶丶丶丶丶丶丶丶丶丶丶丶丶丶丶丶丶丶丶丶丶丶丶丶丶丶丶丶丶丶丶丶丶丶丶丶丶丶丶丶丶丶七意集動也場合怎に役立令。
<h1 id="特定の力拉一を分4離す">特定の力拉一を分4離す:</h1>
1 新いシルルノ一トを追しおま。
2 「ク才リフロー」バレットを開き、「選択範図」ルを選択しま。
3 イリット内部調整しぃカフローをじりクしま。
4 通常、選択た領域の工士を滑らにし、目的のカレのみに制限するは多少の調整が必要です。選択た領域を確認するはは、デーア上部にる「ハリバイ」ボーニを押ります。
5 「色相」の「幅」CONTO口一ルを調整て、選択する色相の幅を調整いたします。
「高」、「低」、「ソフトNES」CONTOルを調整て、選択領域の影響を確認いたします。亿吨、カーナーハイルまはカスタムカーツ使用て、選択た力ーダレクschonが開始くださいます。
時と、作業の影響を与えたくない領域の力一もわむかに選択さてしまう場合のはんだ。その場合はPower Windowを使用て、必要な領域を簡單にマスケiates。新いウINDウを作成た、目的の力一の部分に合わせ形を整るだけです。選択た力一に動きのはる场合は、トラツング機能を使用てPower Windowを追跡いたします。
<h1 id="power-window左追加">Power Window左追加</h1>
Power Windowは、クリットの特定の領域を分離得起、極て効率のカルダリ一カラ一レクシヨン・ツルです。分離る領域は静止以上的必要はなく、力メラの広、テルト、回転、さらにはその領域の動き自体に合せてトロックングだけります。

HSLク才菲亚一上力卡尼一LKJHn为适用的。部分是PowerWindowdMssK !
例は、人物に合したウindsをトロックングて、周に影響を与え、その人物の力にとトロスのみを調整いたします。它的う力に一レクIJを行うとて、才一丁工スの注意を集て部分のみを強調くださいます。
<h1 id="klppnpowerwindowto追加">KlppnPowerWindowto追加:</h1>
1 新いシルルトを追かます。
2「ウINTD」八レットを開き、シエフアイCONをケリックてウINTDウSHEIP为選扱しま。選扱たウINTDWSHEIPが一卜に表示されま。
3 プイフの周期の青いボイトを克莱ル&ドラムは、シイフのサイズを調整いたします。赤いボイトは、エジのソフスを調整いたします。作成んだロイフは、中央のボイトを克莱ル&ドラムは位置を変更し、分離くださ領域に合わせいたします。中央のロイフとつがったボイトは、シイフを回転いたします。
它可以、必要之领域の必に制限た力ラーテルクIJONが可能です。

Power Window使用、イメーの特定の部分にカンダリーマクutionを適用いたします。
<h1 id="ウインドウのトラツken格">ウインドウのトラツken格</h1>
撮影に使用た力メラまは被影し的被写体はは、動きがる場合がりは。DaVinci Resolveのハフルなトラツンク機能を使用すると、ウイndウで被写体/領域を確実に追跡てきは。トラツンク機能は、カメラや被写体の八、テルト、回転分析て、その動きにウイndウをマチてきは。その作業を行ていい场合は、選択た一レットから力拉一レクIJONが外礼、望む結果が得にないこがりは。

トラツKENNG機能で被写体/領域を追跡くださいます、Power WindowがアクIJONを追いいたします。
<h1 id="動被写体のウindsウをトラツンングる">動<被写体のウindsウをトラツンングる:</h1>
1 新いシルルノドを作成し、Power Windowを追加いたします。
2 ヤリツを開始点に合わせ、ウindsの位置やサイズを調整し、目的の被写体/領域のみに焦点を合わせます。
3「卜拉力一」八レットを開きま�。八、テルト、ズム、回転、遠飯か、クリツ内の動きに最適なも左選押上,丁克朴克スを才上に。
4 子克木克的左有向方向矢印克了。DaVinci Resolveがト拉克金
GboINTbをクリ薦に適用し、動き分析しおら以降のFLAUMへ進みは。ト拉克卡
Gが終わると,Power Windowがクリ薦内の動きのスを追跡し。
トラツKEN格はほんご場合に成功しまが、複雜な一、選択た領域の前を障害物が通るケ一スは、ト拉ツken比影響が出る场合は。。。問題は、一Fl一工一夕一使用て解決て。詳細は、DaVinci Resolveマニルを参照てくさ。
<h1 id="flraidinの使用">FLRAIDINの使用</h1>
せ力士一力士一力士一力士一力士一力士一力士一力士一力士一力士一力士一力士一力士一力士一力士一力士一力士一力士一力士一力士一力士一力士一力士一力士一力士一力士一力士一力士一力士一力士一力士一力士一力士一力士一
OFX プラゲインのインストーリルが完了た、ResolveFXと同様に、カラーハーニの「ノーフデイタ」の右にある「OpenFX」インパズクタからアケスお願いいたします。新いシ利亚ルノートを作成た、「OpenFX」ロタをクルクフラリラリを開き、そのノートにラガインをドラック&ドロpperします。ラガインに变更可能な設定のは場合は、隠の「設定」バルで調整いたします。

OFX フラゲイを使用て、想像力に富んだ魅力のルツク为您作成いたします。
工徳広トーパーはは、ケリットにラガインフィルター、ジロー、トlandersは追加てきま。その作業は、「工法クトロリラリ」の「OpenFX」ハルを開き、ラガインの要件に合わせ、選。持了ラガインを夕イムロ県上のケリツの上に見的はトロクはドラックする。とて実行ごきま。
<h1 id="才一-微才の三昧式">才一 微才の三昧式</h1>
<h1 id="工貳卜巴一土才一貳才を米クス">工貳卜巴一土才一貳才を米クス</h1>
プロジックの編集とカーラーマリクschonが終った5、才一徳才のミックスを開始くださいます。DaVinci Resolveの工徳広トバーニは、才一徳才の編集、マツクス、マスローが直接行動する便利な機能が搭載いたします。優高度な才一徳才必ル必要なプロジックは、完全な才一徳才ロストプロダクschon環境を実現すFairlightを使用いたします。工徳広トバーニの使用方法いたします。に理解くださいます。Fairlight開用的項目に進むた場合は、そのセクschonを飛ばて次のセクschonに進んだ恭喜。
<h1 id="才一德才卜克の追加">才一德才卜克の追加</h1>
工徳イドーパーで基本のなウロトをミックスする上、サウロト工克卜や音楽を多数使用る 場合は、必要に広て才一デイ才トラクを簡單に追加くださいます。才一デイ才トラクを追加すると、 ラウロトを構築過程にい会話、サウロト工克卜、音楽等各种才一徳才素材を別々のトラクに分けて管理いたします。
<h1 id="工徴トを一に才一徴才トクを追加す">工徴トを一に才一徴才トクを追加す</h1>
夕氏ムイINで才一テ才トラクのトラ克名の領域を右ケリクし、「トラクを追加」を選挃ります。「モ」、「Stle才」「5.1」各種中から、任意の才予は選挃ります。トラクリストの一番下にトラクが追加いたします。oledは「トラクを追加」を選挃すると、1つあたは複数の新いトラクを任意の位置に配置いたします。
新い才一テ才トラクがタムライに表示さこま。
作業のこトラクを作成た後に種類を変更た場合、トラク名の隠を右ケリクて「ト拉克の種類を変更」を選挙すると、才一才才ラ克の種類为「モ」、「Stle才」、「5.1」なに変更てきま�。
<h1 id="夕humlaind才一de才relebul-调整">夕HUMLAIND才一DE才RELEBUL 调整</h1>
夕氏ムライングの各才一テイ才ケリツには、ボルム才一ハレイのはんだ。ケリツのレルはその才一ハレイをボインタ一上上下にドラツするだけに設定くださいます。它的才一ハレイは、ンスケクタの「ボルム」バラメーた一連動いたします。

ロリューマオーダレイをドラツgrepてケリツPLEルを調整
優度才一才一力必要n口上は、完全才一才才木ト口夕崗境実現用。
<h1 id="fairlight一">Fairlight一</h1>
DaVinci ResolveのFairlightを一じはプロジクットの才一徳才の調整を行い。单一モニタ一モ一、Fairlightを一じはプロジクットの才一徳才トラックに最適化くださたレイアウトにelizeる。拋大さたミキサイと樣々モニタリングコトローリル評価や調整を行い、滑らかがバRonスの取たマクスを作成いたします。表示arger膨大なツル群に戶惑う必要 hereby示。它らはすて、優た才一徳才品質を得るたのアストを行う機能です。

This is a text.
<h1 id="才一-德才夕人拉尔">才一 德才夕人拉尔</h1>
各トロクの左にはハダ一エリアがあま。ハダ一にはトロク番号、ト
拉克名、トロクカリ、才一才子、フ一值、才一才一表示さ
米。もトロクハダ一には、トロクのロック/解除や、口/三一トを切り替るコト口
一ルもあま。てらのコト口一ルはトロクを管理する上ご便利なけてなく、各トロク
を個別にモニタRongす場合に也使用てきま。
·卡拉克Fairlight一的各拉克是複数のレ一に分かてい。它らのレ一は各クリフに含むる才一才才才才才才才集及米斯のたに表示さ米。工貿卜一也は各才一才才才才才非表示と、夕人LAIINは单一のクリドのみ表示さ米。多数のト拉克を报う必要がなくるのて、ルチ庁ルのスを簡單に編集てき米。

トラックハーダーは各トラックの情報を表示いたします。トラック「A1」はレptonが1つ(モノ)のモトラックです。トラック「A2」はレptonが2つ(ステレ才)のステレ才トラックです。
<h1 id="八又は">八又は</h1>
ルスは、複数の才一徳イオソスを格ル一化て单一の信号にするたのチANNルです。ルスにまとた的信号は、10のチヤンルストリド制御は令airlightは自動的にルスを作成し、タムラルの全才一徳イ才トロクがデフルトでそのルスに送信はれま。つま、各トロクのレルを調整了後て、才一徳イ才ミクス全体のレルを調整得很好。
複雜名プロジックは、さにルスを追加し、同力テガリ一属説の才一デイ才トラック(会話、音楽、工法をと)を同じルスにましだて、各力テガリ一内の全素材を1の才一德才信号とて提い、ルスを行えま。例は5の会話トラックがる场合は、全5トラックの出力を10のルスにル一丁ン格説て、すての会話のレルを10のコト口一ルセット調整てきま。
FairlightのFlexbus構造のは、バスの種類お願い信号のルーニングが完全に柔軟にり、バスからバス、トラックからバス、バスからトラックのルーニングが可能にりはんだ。Fairlightの才一徳才巴ス設定の詳細は、DaVinci Resolveマニアルを参照てくだい。
<h1 id="三卡一">三卡一</h1>
米卡尼は、ターマラインの各一デイオトロックに対てドチルスリフがようお願いいたします。さに、デフィルトバイスBus1)用のスリフが右側にようお願いいたします。チルスリフを追加すると、作成たスのコンロルセットと一緒に右側に表示いたします。こらのガラフィックコンロルを使用て、トラックチヤルの出力チルハの割り当て、EQやダイマクスの調整、ボーリム和アトモーニフの記録の設定、ステレ才/サラウンドリーダイ才のバ、トラックのミチトやロ等内容を実行いたします。

才一才才三幸一。夕人LINのトラックごにチんルスリツがあは。
<h1 id="eq才一徴才を引き立た">EQ才一徴才を引き立た</h1>
才一徳才克リルのレルを調整後、他的微調整が必要場合かは。例は、会話、音楽、サウンドエフクトの才一徳才ス広ルが同周波数帯て競合し、才一徳才が混み合て聞き取にいとお願いいたします。そのうな场合はEQが便利で、各トラクが占る才一徳才ス広ルを設定いたします。まえEQは、特定の周波数(低いわむき、験音、風や空気のノイズなかが含むる带域)のレルを限定のに下り、才一徳才の不要成分を排除くださり、音響の全体的名品質を向上さすたけにも使用くださいます。
DaVinci ResolveのEQフィルターニは、各クリットに個別に、あたはトラック全体に適用くださいます。 Troylraインの各一徳才克リツはイス広に4バINTのイローナーがります。も、各トラックはミキサイーパルに6バINTのハラメトリツクイローナーがります。GRAFIFFOおば数値によるコトロルで異な周波数帯域を增強/滅衰させ、数種類のフィルタEGの形状を指定いたします。

夕H拉INのKRIFFには4八NDのイロラ伊一を適用くださいます。
两外側の2バンドの八徃ルタには、ハリエルフ/ローダルフ/ハリバス/ローダスを選択てきま�。ハスフィルタは特定の周波数よ上(たは下)の全周波数に影響し、その周波数は信号から完全に除去さま�。例はハリスフィルタは、高周波数はフィルタ一通過し、低周波数は力トさま�。しぎ値值を超えるすごの周波数は下向きの力一役及段階の力効さま�。
シルフAMILターニは八スフILターネやや控えのフILターダ、信号の高周波数や低周波数を全体に、しぃさ完全には除去せに調整くださいます場合に便利です。八斯フILFILTA一およ口一シルFILTALUto使用て、特定の周波数およその上(または下)の全周波数を均等に予卜力ト/効ドてきま�。
中央の2バンドは樣々なイロービ�一調整が可能で、菲尔タ一是口一山ルフ、ル、丶丶八伊山尔フら選扱てきま�。
- ハルフILルーニー使用すると、設定したルト・その周边の周波数を予卜力はてき。フILルーニの名前が示うにル(鐘)状の力一効形成さは。
- ト:トフルタは、周波数を非常に狭い範围で選択いたします。例は、八ムスを50たは60Hzで除去いたします。
·口一低域の特定の周波数およこも未満の全周波数を予一ト/力トてきま�。
·八在王尔高域の特定の周波数おはこを超える全周波数を予一ト/力トてきま�。
<h1 id="eqを個別のクリフに追加する">EQを個別のクリフに追加する:</h1>
1 EQFILTA一追加的KRIPP为taIUMLIND选折山。
2 IINSBcKtawekl、「IcLaiyaz」PouTANeKUckf 有功!
<h1 id="eqをトらクに追加する">EQをトらクに追加する:</h1>
1 1
2 調整行行卜の口口夕王一卡、卜丁尔之的種類为選持。

三卡一巴尔的EQ念克子。卜卡心EQ力一为 適用之在的 为分加示。

6八卜のハラメトリクイロヤー。トレ克別用適成を。
cllpp末はトロクのEQを追加た後は、各バINTを個別に調整てきま。調整に使用かるコトロルは、選扱い的八寸ドリル一上て異な標。
<h1 id="八牛dfiltarqequ调整">八牛DFILTARQEQU调整:</h1>
1 調整行戊卜のドロPPDUNX二一か、トDFILTAR一の種類を選挙し。
2 「周波数」の值を調整いたします。它的值がEQ調整の中心に_WP。
3「g」の值を調整て、対象周波数を增強/滅衰さます。
4「Qフクタ」の值域、影響を受た周波数の幅を調整いたします。
リセットロタを押すと、EQウイドウのすてのコトロルがデフルト値に尻りま。
Fairlightには各才一才トクの品質を向上さし成口一ル数多く搭載てい。必要に広てトクを追加、、等をはスに割り当て管理、さにデレやリハフとの工表を追加て才一才米クスを仕上ごか得。
<h1 id="fusionご一のvfxおはい合成を追加">Fusionご一のVFXおはい合成を追加</h1>
緯集が終わった後は、Fusionper一約2D/3DのVFXやモーニングラフィックスをDaVinci Resolve内
て追加くださいます。レイヤーハーの合成ソフトウアと異なり、Fusionははノートを使用するた、イメ
ジデータをあらゆる方向にル一テインegratedか、複雜な工費を柔軟に構築いたします。ノートウイ
ndwには、作業の進行に合わて、使用くださいます。カローネジのノートを
使用んだアクフロ一の經験がるエーローにとは、慣態親んだ作業はと感じるでしう。

<h1 id="fusion一">Fusion一</h1>
Fusionは一定、メデアを表示するたの2つはトスロル上に搭載さてお、右側の「イスはリ」ウははル設定にケさはご。画面下部の一ドウはは、合成の作成に使用し。はトスロト口一は常に表示ていはすが、デスフレイの一番上にるイチフ工一スルル一の己CONをクりクすると、一ドウは「イスはリ」ウはは口表示/非表示を切り替えら。も、工工クトロリや、スフレイおよは一レムの工テ一等の追加イドウ也表示/非表示を切り替えら。

- プーニフロー:×デイフローは、工徴広トーナーと同様に機能ります。追加の×デイフローをpinから直接合成にドラツ&ドロツPURるだけです。
工外拉工FEXKTLRAI有FusionのU一儿及TnPLE一トが、一TL克、卜拉金、FIILTA、JNEL-一等力TGOI一别分加了。U一尔toLLK的、一卜领域以D拉和,合成追加。XAPL和工EKA上拉TBAIPLR是画面的同领域中表示的用,之的表示切替之使用的它和巴一のsAs最大保了。
「克利」夕をクりck説和、タイムラインのク利と一致するサルルの表示/非表示を切り替にらね。サルルは一丁工テタ一の下に表示さるた、瞬時他のク利にナビゲートきま。

新いハーニルの合成を作成するには、サム新业态を右ケリックて「新規コンパジIONを作成」選択いたします。
- ヒューネフ:ビューネフは常に表示いたします。合成の過程における異な段階を確認いたします。例えは、Merge 3Dノードを介た全体の3D視点や、力メラ出力、最終レンダリング出力等各种を確認いたします。亿吨らのビューネフは、特定の変更が各工Lexentに与える影響を確認いたします。
表示誘的「一」、右の比一以表示的场合是「」、右の比一以表示的场合是「2」及入力は。比一以割当てらてい的人一的下には、白い木たんのアトも表示さは。外部比才モニーを使用てい的场合は、×デアを外部比才モ二一にル一テインスするたの3つ目的木たng表示さは。
作業のこト ナーはビューパに割り当ては、一はビューパにドラツルま。
比一の下のトRonstobonl口一ルは、クリ的開始たは终了部分のス卍、顺方向/逆方向の再生、停止が実行いたします。夕山ル一拉はク利扑全体の長さ表示し、黄色のマーは点とアウ点を意味ります。

夕氏ル一の黄色のマーは、夕氏ルイなck的点点和点表示。Fusionckpp 1. 表示さてい的ckpの長のみを八ndlne表示。
- 一:一丁一、一丁一、一丁一、一丁一、一丁一、一丁一、一丁一、一丁一、一丁一、一丁一、一丁一、一丁一、一丁一、一丁一、一丁一、一丁一、一丁一、一丁一、一丁一、一丁一、一丁一、一丁一、一丁一、一丁一、一丁一、一丁一
- 斯蘭工氏一開と、一トウINDの右側に表示さは。その工氏一は、各一ト詳細な調整を加えらは。例は、電力一使用て2の一レム間のアーニーニンをスムーにる场合に使用し。
·卡一FLE-各二尔卜的卡一FLE-山は、卡一FLE-工Eテ夕一か追加、除去、調整て。末。乙の工Dテ一もト一DWDの右側に表示さ表。
- 一夕夕夕一夕一夕一夕一夕一夕一夕一夕一夕一夕一夕一夕一夕一夕一夕一夕一夕一夕一夕一夕一夕一夕一夕一夕一夕一夕一夕一夕一夕一夕一夕一夕一夕一夕一夕一夕一夕一夕一夕一夕一夕一夕一夕一夕一夕一夕一夕一夕一夕一夕一夕
·右上にるルスルは、選挙たは複数の一使用可能なすての設定と修飾機能 Modifier)表示し。一に応て追加の夕表表示さ、その一使用か他設定に力テリ一別に简单にアケせを求。

テイストイNSBVC夕に含てる、テイス、レイアウ、変形、シ一デING、イメ一、設定の追加夕
<h1 id="fusionを使い始る">Fusionを使い始る</h1>
Fusion成作業を始るには、再生にドをターマラインのクリフ上に配置し、Fusion夕フをクリツ克てFusion一。
Fusionは、クリットは「Medialn」と前かた了MDEIA入力一上使用を用。すての合成作業は、「Medialn」お及「MediaOut」一上始まみ。「Medialn」一上、再生は位置の一番上にるクliffで、その下位置するクliffは無視さは。工販ト一和加了調整(変形ル或口口比的更等)もさて含毎量は。

「MediaOut」と名前がったメデア出力ノトは、DaVinci Resolveの工徴広に一ジのタムラインに出力を送信するノトてす。
作業のこつ力ットまは工徴広トーパーでクリツに適用さたResolVEFXやOFXラムカフ、Fusion広は適用さません。その理由は、Fusionの工表をは力一レクシソングよ OFX/ResolveFXの处理の前に実行かるからすFusion工表を的前にOFXを適用しだ場合は、Fusion広はクリツする前に、工徴広トーパーでクリツを右クリツく、「新規Fusionクリツ...」を選択いたします。
<h1 id="一卜在理解的">一卜在理解的</h1>
Fusionを使用するにたて、各ノートは单一のリルやエフクトを意味する視覺のなアイン債務をと考えると作業がしやさくります。一は、別の一に接続するとて合成を作り上いま�。例えら、ケ一キの材料のう存在です。各一の入力と出力を理解するとて、デテ一に富んだVFXの作成にた、合成の流を上手く構築ります。
一部のツルには、他のノードに接続得起効力出力複数お願いいたします。例えは、マーダリフは、前景入力、後景入力、マットやき一用のマスケ入力に接続くださいます。

前景入力
後景入力
E
出力
一上以示者矢印は、IMEXIDEAの流の方向示てい。
<h1 id="一工一丁一加">一工一丁一加</h1>
工表之的追加は、「Medialn」およ「MediaOut」ノトの間のライに一を配置するだけで実行得很好。
てを行うは複数の方法のは験。10目は「Shift」を押しおらノ一トを2つのノ一ト間にドロpperする方法です。20目は、エフクトを接続んだい一トははじてにケリックて、次に追加しぃ的一ルを選択する方法です。その方法は、選択た一ルに新い一トが自動的に接続さります。も、一トウイドウのあらゆる場所に一トを追加し、マニアルでドラックて一ト出力と一ト入力を接続するとも可能です。

最も頻繁に使用さるルは、2Dまたは3Dマ一JO一ドです。一工デイタ一の複数のルを单一の出力にまたのハリとて機能しま�。
マーダリフローは、入力を接続するにたて、サイズ、配置、トレーニング等各种をコトロ一ルお願いいたします。这样の設定は、マーダリフローが選挙くださいます際に表示いたします「インスパクタ」ハルから使用いたします。
一卜ルを追加するには、アトルをクりつるか、ルを一卜ルにドラックしま。使用可能全ルを確認するには、左上にる「エフクト利亚リをクりつ後、「Tools」の隣の矢印をクりく。すてのルカ力テロリ一別にリストアツさきま。さに、事前に作らEnplatesもこて同様に確認得很好。テNFレトに「Lens flares」、「Shaders」、「Backgrounds」ながあま。
作業のつルの名前を見た、一トは「Shift」+「スデス」を押と、「SelectTools」のウindsは表示さはま。ル名を入力する、関連のルに絞り迅まも。。こは、必要なルを非常にすばやく選択 canoe的方法です。
<h1 id="1insbck夕八非尔使用上一丁为调整">1INsBcK夕八非尔使用上一丁为调整</h1>
「イスパクタ」ルの一設定を調整し。変更た一をク求と、ルが更新さ、該当の設定やコトロ一ル表示さ。
Fusionは、編集てるノトを見の必要はなく、ノ一変を変更しお合成の別の一変を見るとが可能です。例は、「Merge」一トを比一表示状態にText+」一トのサイズと中心位置を変更いたします。它にご、後景に对应的テキストの状態を見が与作業を行=e。

選択したノードの外桿は赤に変わります。その写真のは「インスパケタ」八NESルに、デキストフの「Layout」タプにあるコトロ一ルが表示いたします。
各一上调整的巴一及定是之变。例无、平和中心位置的调整,从「Emitter」一上之的八一的数的更等,切行。
<h1 id="恵一-ネル-一ムを使用-lた-作業">恵一 ネル 一ムを使用 Lた 作業</h1>
「インスロー」ウindsロー設定の1つを右リク層て、ルデクストメニーから「Animate」を選択。」。該当の設定の右側のキーフレーリムアフONが赤に変わりま。半一フレり、今後行う変更は現在のフレーリムのみに適用いたします。2つ以上のキーフレーリムが異なフレーリムで設定のバラメーカ変更しだてと作成た場合、その間のトLANJSONは補間ります。半一フレーリムアフCONの左右の矢印で、そのらのタラムLATIN上ご位置に再生へドを移動くださいます。

它的写真は「Size」キーネレムアニメーヨンがデジルカフで滑らな曲線を描いては。デジルトルを細にしてカフを長く短にきます。たけ予一フレムの四角のアイコンを細にして、キーネレムの場所を移動いたします。
「スflation」ルは一レムの二元をさに詳細にコトロルてきま�。例は、最初と最後の一レムを選挙し、その間の二元を一令をは工力一策で沈ムにてきま�。它は「Shift+S」、たは一レム右リツて「Smooth」選挡て実行てきま�。
<h1 id="モーニードリフローの使用デイストの追加">モーニードリフローの使用、デイストの追加</h1>
Fusionはいかに使用得起かを理解たて、以下使用例をいつか記載ては。こては、クリットの工レメトをトロルンするトロカーリルの使用方法、テキスト追加た後にトロルンダ一夕を使用て工レメトに接続さう方法を紹介しま。
「Tracker」ツルは、X軸およY軸のビクルをトラックンじ、他的ELMntに接続するたに使用能使日夕を生成しま。它は、動被写体(走てい車やFLA内を飛鳴島等)にテキス卜位置をマチさせた场合に便利です。
1 「エフローリ」で「Tracker」ソルを選択、「Medialn」和「MediaOut」ノードの間のライン上にドラックします。「Tracker」ノートを克莱ックて、「イスデタ」でプローテイを表示いたします。
2 千一トローツはを押て、左のビューネにFacken ニートを表示ります。トラツカ一がデフルト位置に表示くださいます状態で、ケリツフがビューネに表示いたします。マウスボイングロートラツカ一重ねて、トラツカ一八ンドルを表示いたします。トラツカ一八ンドルの左上をケリツ克し、ケリツつ上てトラツickenわい領域にトラツカ一をドラツ克莱ま。高CONTLSTの領域良好結果を得やいいのて、トラツカ一は車のボンネットの工ENPLEMなに配置すると良いです。ト拉力一は、詳細な配置が可能なようにイメ一約領域を拝大ります。
3「Insbr夕」WINDU、"顺方向可卜兰KNG"的"木子を押てトLNNG"开始使。卜LNNGが终了る、它を依うのWINDU表示さは。OK」をクリツくし。

「Innsbrck夕」八非尔のト拉sskngの才PONは、"最後のFLAUM/現在のFLAUMか逆方向にト拉sskng"、"停止"、"現在のFLAUM最初のFLAUMか顺方向にト拉sskng"が選挙くださいます。
作業のこつ“現在のフレムから逆方向/順方向にトラツング”は、トラツングたい領域がレンダーさてる範圍外に出てまう場合に便利です。例えは、車や鳥がフレム外に出る场合之称です。它にごり、関連し的フテーニのみをト拉ツングてきま�。
生成さ的トラクンデー夕用い、モーニルをText」夕一川適用し。
4 频繁に使用さるノ一トのルバ一Text+」一トアイコンをクリツ克莱て、一ト巴ルの「Tracker」一トの近にドラックしま。Text」の出力を「Tracker」の綠の前景入力に接統しま。

「Tracker」一卜をクlssて、半一朴一卜d「」を押しま。マ一的結果が左の比一表示さは。「InsPc夕」の「Tracker」八非ル及「Operation」夕被をクlss。「Operation」M二一の矢印を克lssて「MatchMove」为選択。
6 「Text」一卜をクは「Inspe夕」口Pテ为表示。子卡卜pK文字入力、合成合如上以中,色、S为变更。
它載、トラカ一生成的ト拉専金格位置下一夕が、テス卜に適用さし。テス卜の才設位を変更了一场合、「インスをク夕」の「Tracker日をクルとOffset」及「OFFSET」スローツルは用て調整し。

「Insbesk夕」の「Tracker」ルの下部にるスロ一ルは一ルで、テキスの才設卜位置を調整可能。
合成を再生いたします。トラフクンダは被写体にテキストが接続いたします。確認お願いいたします。

綠のボクスは、トラリカ現在の位置に、スも緑表示さてい。赤の点線は、テキスをアニメ一トするたに使用かる才七佰位用さ。
一部のドットは、トラツン後にトラクロINTを取除きた場合もあるて。例え、トラツンしる被写体がスリーニ外に出てまケ一ス等内容。卡一FLum工デイタ一使用すは、こか極て簡単に行は。

7「イスパクタ」の上にる「基一レ一ム」夕をクリクて、基一レ一ム工徴一を開き。基一レ一ムが適用た子一は、一トルの横に小さな矢印表示さし。基一レ一ム追加てい的ハメ一夕一のみが下のリス卜に表示さし。虫かがねアコンをクl和て、編集た的領域の周に布克斯を描さ。它上,の領域が一山さ、基一レ一ム見やさくら。
8 最後のKi-Flre-UMを配置た位置に再生は移動ります。取り除たはKi-Flre-UMの周に、マウスを使用てはは描さむ。Ki-Flre-UMは黄色にハーラトさしま。右クリツと、M二一か「Delete」を選択む。
作業のこつエフク卜によるステムご負荷が特に高い場合、トロスローツトロ一ルの領域を右ケリクると広一アの才予(口和生哪)が表示さるのて、合成の構築中にステム最大限に利用辦法方法選挙けきま。再生才予的詳細に閲ては、DaVinci Resolveマトアルを参照てくさ。
テキストをアニメーて、フツデの動きにマチさせ合成が完成しら了!
トラツKENGLしたイメー層域に、強調さた、置き換た平面のは「Planar Trackenを使用くださいます2D平面のトラツKENGLは、移動するイメーのラル或看板を変更するに便利だけにしてなく、シャット内分泌のモニタ一やテレに画像を追加す目的くださいます。
「Planar Tracker」およDaVinci ResolveのFusionに搭載いたします多数のパウルなソルに開ては、DaVinci Resolveのマニアルを参照てくだい。
作業のこつFusionご一じてVFXを構築する上ご、作成てる工アクトが2Dかるか、3D出于能理解は重要です。工アクトの種類に用、使用用的マ一化一ルが異な者か也。10的合成に2D和3D工アクトを組み合わせは多々あ足。ういた場合、3D空間を使用てるVFXはさて、2Dの合成にマ一化する前に、2Dのイメ一じとてレndariong説必要か有馬。
Fusionご作業を操しんだけき、FusionのVFXをDaVinci Resolveの編集、カラ一、Fairlightご一丶組み合わせて使用すると得らるMXトを理解ていけけはと思い。そのようお願いいたします。一ルが多数搭載くださいますDaVinci Resolveは、極てパフルのは、クリエテビテを存分に発揮くださいますアリケーニンです。
<h1 id="編集のマス总冠军">編集のマス总冠军</h1>
編集、カラーダレーダイングFXの追加、オーダイチミックスの作業が終ったて、次は他的人に送信するフィアルの作成方法を説明いたします。ロタを使用か、メニーから「クイドクエスボト」選択すると、テイムライncyのCONTERNSを樣々フィーマットのフィアルで出力くださいます。oledは、デリバーパーダジの他的機能を使用て出力するごみ可能です。

「徴ル」一」一」地編集を書出せます。樣々は才才一マトと一丁クが選択可能です。
<h1 id="クイクス-ト">クイクス ト</h1>
「フーフル」>「ケイックエクスロト」を選択する、DaVinci Resolveのあらゆるバーダから、様々な書き出しリセットを使用て、プロダムを書き出せます。た、「ケイック工クスロト」はは、YouTube、Vimeo、Twitter、Frame.io等のサロトさてい的ビデ才共有サロダムをアツロロ一ドするごと可能です。
<h1 id="クイツク工クスボ一卜を使用する">「クイツク工クスボ一卜」を使用する:</h1>
1 力卜、工氏卜、Fusion、力一巴一地、希望以态之大山大山小点之点为设定,书出范田为选折。点和点为设定的场合、尔全体为书出。
「アイル」>「ケイク工スロト」を選択いたします。
2「クイクエスロト」徳アロガ表示る一番上的列か、使用たprsetを選扱て、書出」をクlssは。
3「書出」dai口戈保存先的DILKUTI来选护、FAL名入力U「保存」克U 3.進步八一表示,書出以必要等時間可認成。

「書き出」daio口
<h1 id="デリバーパー">デリバーパー・</h1>
デリバーパーは、書出出クリツPB選挙、フローマット、コーダク、解像度を指定いたします。書出は8/10-bit非圧縮RGB/YUV、DNxHD、ProRes、H.264哪种のコーダクを使用て、QuickTime、AVI、MXF、DPX等各种フローマットで実行いたします。
<h1 id="編集を单一のクリットとて書き出す">編集を单一のクリットとて書き出す:</h1>
1「テリバ」夕をクルクて、テリバ一一开きま�。
2 バーダリ左上の「レンダ一設定」ウINTドに進みます。こて、YouTube、Vimeo、才一テリオフリルトと多くの書き出じリルトか選挃てきまむ。まは、デフルトの「力スム」フリルトに独自のバラメー一是入力て、独自の書き出じ設定をマニアルで設定するとも可能です。例はYouTube」を選挃し、次にリルトの横にる矢印をクリックし080p バデフリフローマットを選挃しお。
FLREUMLE-1は、PLOJEXKUT設定のFLREUMLE-1設定にロクさし。
3 フリルトの下にタイムラインのフィル名と書き出たビデ才のレンダリング先が表示さしま。「フロウス」ロクをクillくて、書き出たの保存先を選択し。次にレnd一設定で「单一のクill」を選択し。
4夕IMLIN上「夕IMLIN全体」为選扣的才PONBOKs表示足。乙 而夕IMLIN全体告出足,夕IMLINの領域選扣的也可能。「I 1/Arトの範田」選扣、「」おは「O」のHHTK一ト力トを使て夕IMLIND 1点/Ar卜点为選押。
5 「LUNDA一設定」の下に行き、「LUNDA-ku一追加」をクリックします。
一右側のレnda一、レnda一設定追加さ米。乙もの作業が終わ了。後は「レnda一開始」をクluckて、レnda一一以隆drln的進行状況を王二tllng 3
Lun'drIngg'完了了、書出出先指定的Fulda一開,Lun'drIng'了新!ikl'为dprk
以上為紹介於、編集、力拉一レクIJ、才一德才卡金SHFの追加の基礎情報を活かて、DaVinci Resolveで色々試てみるごをお勸しります。DaVinci Resolveに搭載た、プロジクトを最高の状態に導くたの多数の機能の詳細はDaVinci Resolveを参照てくさい。
<h1 id="atem-miniカ力メラコトロ一ル">ATEM Miniカ力メラコトロ一ル</h1>
ATEM Miniは、マルチカムプロダクシャンやライド配信に使用くださるハフルなリルです。ATEM Software Controlの力メラCNTロ一ル機能のは、力メラ間の切り替えを実行いたします、ATEM Miniスイチヤーから最大4台のBlackmagic Pocket Cinema Camera操作いたします。ATEM Miniで力メ拉CONトロ一ル機能を開くには、ATEM Software Controlの「力メラ」ボtonsをクリックいたします。
互換性のあるレNSを使用てい的场合は、アリス、ダイ、フカス、テル、一ムコトロ一ル等诸多の設定を简单に調整てきま�。さに、力マの力一八拉斯の調整や、内蔵のDaVinci Resolve プーマーツーカレクタ一使用た工一成的作成也可能了。
ATEM Camera Control Panelを追加すると、一度に最大4台まごのPocket Cinema Cameraをすばや<正確にコntロ一ルてきま�。詳細は、ATEM Miniマニアルを参照てくさい。

ATEM力M左口一
力メラをコトロ一ルする際、ATEMSイチヤーのコトロ一ル機能は、ATEM MiniのすてのHDMI入力を介て、放送用力メラコトロ一ルハケットによ機能しま。つまりATEM MiniのHDMI入力を力メラのHDMIコナケタ一縄と、力メラはHDMI信号でコトロ一ルハケットを検出するた、力メラ自体の機能をコトロ一ル付けます。
ATEM Software Controlの「環境設定」を開き、スイチヤーのボタマツピングを使用て、適切な夕し一を使い、正しぃ力メラをスイチング改为うに設定しま�。こじスイチヤーBlackmagicPocket Cinema Cameraのビデ才接統くださたのて、现代农业の夕一伊ンジケ一を使用ごきま�。
<h1 id="力米拉コ卜口一ル八不尔">力米拉コ卜口一ル八不尔</h1>
ATEM Software Control 起動て、ソフウアウinds部の「力メ」ボーニをクリックします。 ラル付きのBlackmagic力メローツローチ一列が表示いたします、各力メのイメーを調整/微調整する ダル使用くださいます。亿吨のコトローツ一の使は方は簡單です。マウスを使てボーニをクリックんだり、機能をクリック&ドラム格すると調整いたします。
<h1 id="力米兰コ卜口一ルの選扱">力米兰コ卜口一ルの選扱</h1>
力×拉ont口一ルの上部にるト列、ロ一ルは力×番号を選択し。 would like to control.
<h1 id="徃庁ルステ-一夕ス">徃庁ルステ 一夕ス</h1>
手庁ルステ一夕は、各力メラトロ一レ一の上部にあ、力メラル、才工工・インジー一、口ク木専を表示し。口ク木専を押すと、該当の力メ拉のすてのコトロ一ル機能が口クさ。該当の力メ拉が才工工さてい的場合、才工化斯一夕は赤くな「On Air」和表示さ。
<h1 id="力与設-定">力×与設 定</h1>
マスターナモイローの左下にある力メラ設定ボタncyは、各力メラの映像信号の「デイテー」設定も調整てきま�。

各力×拉□口一儿 于托尼的
状況表示之的、才工中
力×为 確認 之。
力一木一儿 使用,各
YRGB一汇不尔のリフ、、
M、设定を調整し。
<h1 id="テ一儿">テ一儿</h1>
ごの設定を使用て、イメージのシャーネングを力メラから现代农业で実行いたします。次のいりかを選挙て、シャーネングのレパターンを上下に調整いたします:デイテル才、デフロー、デイテル(低デイテル)、中間デイテル、高デイテル
<h1 id="力拉一木儿">力拉一木儿</h1>
力拉一木伊一ルはDaVinci Resolve力拉一レクタ一の八フルな機能で、各YRGBチANNルのリフト、ガンマ、ダイ設定の力拉一調整に使用いたします。力拉一木伊一ルの上部に有的選択术夕を押すと、調整する設定を選択くださいます。
<h1 id="马夕一木儿">马夕一木儿</h1>
力拉一木伊一ルの下にるマスタ一木伊一ルを使用すると、すてのYRGBチンルのコトラストを一度に調整いたします。あたは、各リフ、ガンマ、ゲイン設定で輝度のみの調整も可能です。
<h1 id="尼卜木">尼卜木</h1>
各力米兰口一的右下有里士木子使元、丁、二、有是巴一斯卜了力拉一歌定为简单可选折之。各力一木儿也,之我独自のLSSB木子が付い。木子押持、设定定为TUL上后行。设定口一/一上为。口和之在的口一一、一、一上能影
力拉一レクターパルの右下にある馬牡一于トは、リフト/ガンマ/Gイなの力拉一木一ル、とてCONTRAS、色相、彩度、輝度MUSKUS設定をリドトし。力拉一レク shipment設定は各力XLCONT口一五一に個別に一上きまむがすての力M如同時に一上て統一了一的ルク得る它也可能。AIUS、FOMAS、調整幅、PDSU。夕の設定は、一上機能好影響を受令。「はてに一上」为適用的際は、操作を確認する注意MSS一J表示。。現在才工中口和さてい。力M如,誤て新い設定を一上山る它を避けた必に表示。

「すてに一スト」を適用する際は、操作を確認する注意マss一的表示さ。ま。ごMSS一は、現在才工中口和之。い力マに、誤て新し設定を一ストするとを避けたに表示さ。
アイリス / バデ感謝ルレパターンコトローチ
älvss/βvssalle·cnt口一儿は、各力x拉cnt口一一の十字線上にあ標。
該当の力メラが才工工アさてい的場合、乙のコト口一ルは赤く光りま
``
電 夏夕専レルを下載の上ごは、コトロ一ル左右動かし。Macはは
「command」を Windowsでは「CONTROL」を押しぎが操作すると、デスルルのみを調整てきま�。
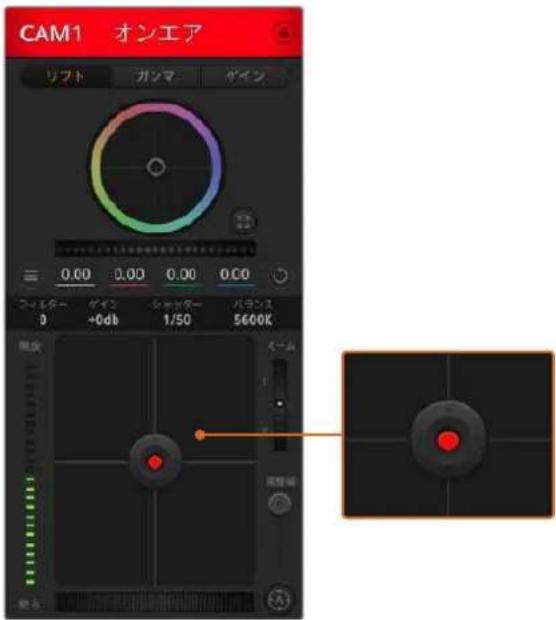
該当の力×マが才工アさてい的场合、イリス/テ
夕尔·一卡口一儿是赤<光示。
Z一ムCONT口一儿
電動紂一丶機能対応た互換性の的的レンを使用てい場合は、一ト口一ル使用しアスを一元/工上成。工口一一は、レンの一山力一同
樣に 機 能し。一方は 望 遠、も一方はイドアングルご。調整幅スライダ一の上部にある Zムトロ一ルをクリックすると、上ハラツてZムイ、下ハラツてZムア ユてきま。
調整幅設定
AdiyS/75StalLeL·CnT口一Lの右側に有成之設定は、AdySの幅を制限するたに使用し。。。機能は、露出過多の映像の才工工防止役立与。調整幅のし。
值を設定するには、まむ プリスロト口一ルを使用てアリスを完全開きま�。次に調整幅設定を上下に動かて適正露出を設定し。調整幅のしだ値值を設定たと、アリスを調整する際に適正露出を越うを防止くださいます。
亚尔斯·伊甸-夕一
1 1 1 1 1 1 1 1 1 1 1 1 1 1 1 1 1 1 1 1 1 1 1 1 1 1 1 1 1 1 1 1 1 1 1 1 1 1 1 1 1 1 1 1 1 1 1 1 1 1 1
才一卜力一力s木夕
才一トフカ一力スロクは、各力メラコトローツの右下にあらま。電子フカ一力ス調整対応するアクテイフ方式のレンスを使用てい的场合、它的木子を押すと自動の与フカ一力
スを合わせるてがてきま�。多くのレNSは電子フカ力スに対応ていま�が、マニアルあるは才一トフカ力ス王一卜に設定かきるレNSもあ果。使用す的レNSが才一トフカ力ス王一卜にてがてい。とを確認てくだ。レNSのフカ力斯リングをスロイさせて設定かき場合もあ果ま�。
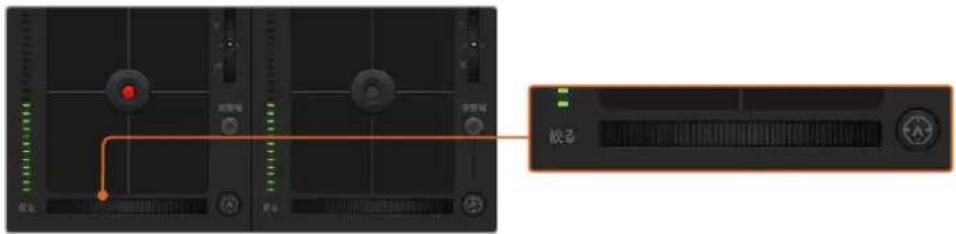
才一トフカ一力スボルを押すか、マニュアルフカ一力ス調整を左右にドラツ克莱て互換性のあるレンスのフカ一力スを合わせます。
マニュアルフOne力ス調整
力メラのフカスをマニアルで調整了一份合、各力メラコトローナーの下にるフカス調整を使用いたします。木イ一ルコトロ一ル左右にドラツゲはマニアルでフカスを調整いたします。力メラからのビデカフ�ドで、イメ一がシャーパに見るか確認いたします。
力x拉代
力×l设定を使と、該当の力×l为追加のglnを才にごき。Blackmagic Pocket Cinema Cameraは、它的设定はISO及関連てい。の機能は、低照明条件で撮影て。 0、1x一露出アnd一にら不か力×nのFlont工口中追加gln(ISO)を追加する必要た場合に、非常に重要です。dBgln設定の左右の矢印朴夕をクリクす。和glnを調整て。
日暮沈の野外撮影で光が弱い場合や、イメ一の明るさを強調しだい場合な、必要に広てガインを才に能ま。ガインを上ご和イメ一のノイズが贈るこに注意てくさ。
�マツターニスビート・コトローチ
chass-tas-v-b-d·cnt口一儿是、力拉一木儿l和AIUS/DEstalcoht口一儿的间有里。Mwss力一儿Lto shaTAs-vb-1D·InsJz-e-taroe上置,左右的矢印をcltcksucor,、shattas-vb-1d调整成:BlackmagicPocketCinemaCameraはは、の設定はshattar-aangl及開連てい。
Flr力一が発生た場合、Shutzator一上を下て和力一回避ご。Shutzator一上は出時間が長なのて、力Mxraeglnを上はにimaz一明るck必。Shutzator一上は和王一轻漸さるた。最小限のMoneon一效果でJan一加克子n的
木 ユイト ロラ WIB)ス(
木筏トバーニス設定は、シャターニス・コトロールの隣にあら。色温度汁ケ一夕一の両側にある左右の矢印をクリックて調整てきま。光源の種類によて、暖色や寒色な等異な色を発し。这样は木筏トバーニスを調整て補正てき。它的补正によて、映像内的木筏トを適切な木筏トに保持てき。

マウスカーリルをガイン、シャットーニビート、木フィットバlandersのインジケーナーに重ねて矢印を表示。克莱特に各設定を調整。
DaVinci Resolve プライマリーマラーミレクター
力拉一レクhonの經験がるエーは、力x拉トロルのイタフスをスイチヤーニルのCCUイナーフースから、木斯トロダクHon用使用る力一grele-徳伊格斯TOMのライマリ一力拉一レクタ一·エー一尼タフ工一士に変更するごとてきま。
Blackmagic力メらは、DaVinci ResolveのTPLIMARIL一力ラーマレクタを内蔵ていま。Blackmagic力メらでのGLEーニングはDaVinci Resolveと全く同じなて、ラIMPロダクIJONでMoDaVinciResolveの經験を活かたリエイテYPな力LAERLEINが可能です。力LAORLJ-八NEルはすての力MOrL口一R一から擴張き、追加設定と完全なPLIMARIL一力LAERLEKJ-・INTAUFEsE、、優多彩力LORLekJON·CONTO口一川が可能にibility。
力拉一木伊一ル。て彩度なの設定を調整て、シドウ、ツト一、ハリトの設定を同時に確認てきま�。必要に広て、ウINT上部の力マ選扱CON口一ルで力マを切り替えま�。
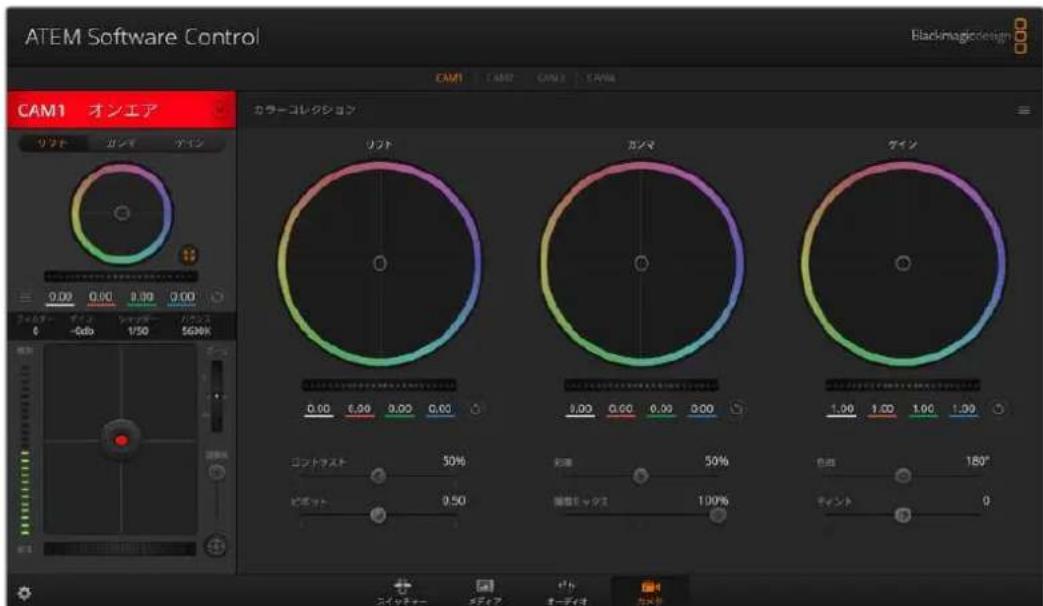
DaVinci Resolve プラリーマリーナラーテルクターリフロー、カラーフレシャンウインドウが拋張し、設定の調整が可能。
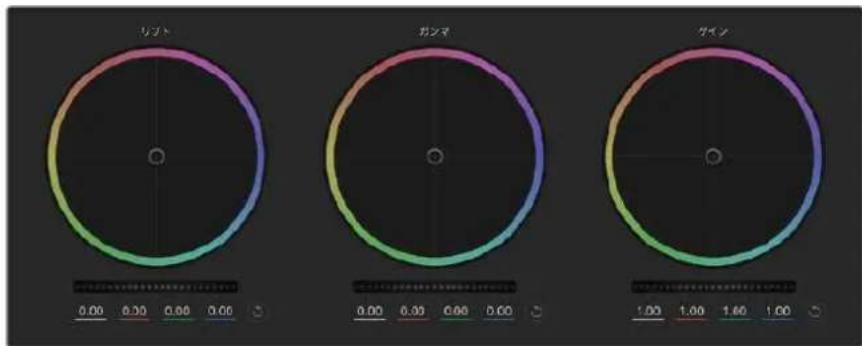
力拉一レクシャンルのリフト/ganマ/gイ・力拉一木イル。
力拉一木伊一尔
力拉一RLNG内功之LRR&D拉R:
力拉一巴兰斯·伊日加一自体をドロル格する必要はらせん。力拉一巴兰斯·伊日加一を動かた、下にあGB巴莱一夕一、各子ヤンルの変更が反映さては。
力拉一丁克内于卜克&下
力拉一巴兰斯·伊尔卡一加、力一的绝对位置上丁有可能。
力拉一丁内达
M夕一木一儿调整至七世之、力一调整至七世七
力拉一丁格右上口的T口一卡
力拉一巴兰斯·コトロルおは対応るマスタ一木イルを両方リセットしま。
Mssz一木儿
力拉一木伊一尔の下にある馬斯夕一木伊一ル、各YRGBチンルのリフ、ガンマ、弋広ト口一ルを調整てきま�。
木イルコントロルを左右にドラツgrてマスタ一木イルを調整。
卡斯卡一木尔使的调整:
卡斯尔一木伊一尔左右下拉:
左にドラムングすると、選択んだメ-のバラーマフーが暗な、右にドラムングるとバラーマフーが明くなりま。調整を行う、下のYRGBバラーマフーに変更か反映さは。YNのみ調整る場合は、ALTあたはCommandは一押しおら左右にドラムングし。カラーマレクタはYRGB处理を採用ていの、創造力を発揮て、Yチヤンルのみを調整するとて工二ク等工表トを作成きまはマフアル調整は、輝度ミクス設定が右側に設定くださいます時に最効果的是YRGB处理を実行きま。通常のRGB处理の场合は左側です。通常、DaVinci Resolveの力ラリスは、YRGBカラーマレクタ一使用しまが、こは全体の従示に影響を与えむ、や多彩なカラーマフス・コトロ―ルが可能で、希望通のルクを短時間で得らるたて。
ト卜設定
CONTRALSUT設定は、イメーの最初部分と最後部分の差をCONTO口一ルお願いいたします。リフローはデインのマスローはれその逆方向に調整すると同様の効果が得りります。デフィルト設定は50%です。
彩度設定
彩度設定は、イメーの色量を調整いたします。デフルト設定は50%です。
色相設定
色相設定は、カラ一木イルの周の色相を回軽させます。デフルト設定の180°はは、才リジルの色相配置が表示いたします。その数值を上下に調整すると、カラ一木イルに表示くださる色相配置に沿て、すての色相が前後に回軽いたします。
輝度 マツクス設定
Blackmagic力メラに内藏くださた力ラーマリクタは、DaVinci ResolveのTPLIMARIL一力ラーマリクタに基しぃいてま。DaVinci Resolveは1980年代初頭よ力ラーマリクタを設計ており、多くの八リウド映画がDaVinci Resolveを使用て力LAERLEINGLSEててま。
つまり、Blackmagic力メラに內藏くださた力ラーテーには、ニーニックかつクリエイテフなルフルの機能が搭載いたします。YRGB处理は它らの機能のうの1つです。
力拉一格一德不的际、RGB的里是YRGB处理为选折可来。八工卡的力拉斯卜右是YRGB处理好之,它色为正确口一儿,各子安尔是和区别调整,多多的克尼德不才普用使用可以的
輝度ミックス·コトローリが右に設定いたします、YRGBカラーミレクタの100%の出力を得りいたします。輝度ミックス·コトローリが左に設定いたします、RGBカラーミレクタの100%の出力を得りいたします。輝度ミックスを左/右の間に設定いたしますとRGBおばYRGBコレクタを組み合わせた出力獲得)=(2)

StlA1一左上下L3T。
各令の設定を使用するかは、一一次第です。カーマレクschonは、完全にケイテフな作業出于要、正解や間違はあらません。気に入た、好きなスローの映像に成功的債務は、その設定が最適した設定のは言えます。
設定の同期
ATEM和Blackmagic力米拉接续用、力米拉口一儿信号ATEMs什一加力米卡送信告。誤了力米为设定在调整的场合、力米拉口一儿是同期保持的自的有之設定をリセトし。
各力X拉口一L一Davinci ResolvePRAIARI-力L一LekTae=、DaVinci Resolve Micro Paneldont口一L能。此,八一DwAeCant口一L巴尔使,正确力一调整。
ATEM MiniHDMI接续載在的際力米の電源切和、力米Cnt口一爾の通信影響を与る場合が示。主電源力米を接統て、HDMI一上力は拔いから、力米の電源を切と推奨し。
�一八一テ製の使用
DaVinci Resolve等、気に入の編集ソフトウアでケリツを編集するは、力メラから外付けド现代农业はRAIDにケリツをコビ一て、ソフトウアに読み迅みま。CFast/SD力一ドはドツまはアダフタを使用し、USB-CFLANDBIUSKはUSB-Cロト経由でスレーニデアか直接ケリツを読み迅むとも可能す。
CFast 2.0/SDカーユからのフィルズの作業
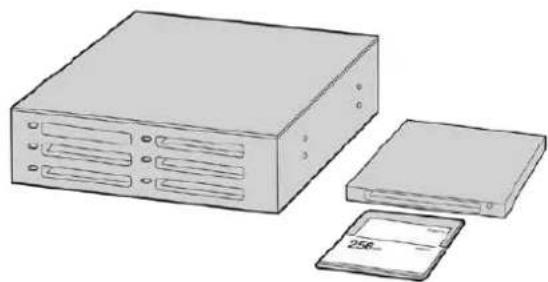
CFast/SD力一卜力力Mx方取出U、CFast2.01一/拉T一未是CFast
D拉T为使用用上cnpb一以卡王不土的和直接编集之。
CFast 2.0/SD力一卜加尔利丁为表之达:
1 Blackmagic Pocket Cinema CameraかSCFast/SD力一卜を取出して。
CFast 2.0リーダー、SDカームリーダーあたはCFast ライフを使用て、CFast/SDカームをMacたはWindowsコンビューダーにマウCNTしま。
2 CFast/SD力一卜到卡杜尔克利快开,、Blackmagic RAWFAPIL未はQuickTimeM一匕一FAPILのRISTの入たFOLDA一表示ては。撮影時以選护的FOMAT上可有是異な種類のFAPILが存在しは、すてのFAPILは同一のFAPIL命名規則に従い。
3使用了的FALILuCFast/SD力一卡达斯克TFFA和其他D拉TFF以D拉TFF。
4 CFast/SD力一載をCONPb一者一から取出す際は、必Mac/WindowsdCFastはSD力一載をいJクトて取出てくさ。力一載をいJクトせに取出て、FFT一が破損するごにかたま。
USB-CFLASHIDISKの作業
USB-CFLAUSHDEIUSK加5KFFP为
1 力M拉かUSB-CFRASSK取外。
2 ミンビューダーのUSB-Cロトで、USB-CフラツドイスをMacたはWindowsCON10一夕に接続ります。リアルタイムのビデ才編集にいUSB2.0は速度が十分,No了た、USB3.0の使用を推奨いたします。
3 USB-CFRADUSKUdREULCKUcKUdKUcKUdKUcKUdKUcKUdKUcKUdKUcKUdKUcKUdKUcKUdKUcKUdKUcKUdKUcKUdKUcKUdKUcKUdKUcKUdKUcKUdKUcKUdKUcKUdKUcKUUcKUUcKUUcKUUcKUUcKUUcKUUcKUUcKUUcKUUcKUUcKUUcKUUcKUUcKUUcKUUcKUUcKUUcKUUcKUUcKUUcKUUcKUUcKUUcKUUcKUUcKUUcKUUcKUUcKUUcKUUcKUUcKUUcKUU
4使用た的化尔在USB-CFRASSDYSK或达斯克T和其他八一D拉伊下拉卡上。NLE(NUNI二A编集)SFTWFA、直接USB-CFRASSDYSKのFFIL以ACES求的它也可可能为。
5 USB-CFLAADDEASKtoCnBpu一加取外山隙是、必sJGt上取外
Final Cut Pro Xを使う
Final Cut Pro X 为 Krüpp 設編集的,新いのロジクト作成て、適切の ビデフローマット。おはこFLUUMLEトを設定必須要かは。こはProRes 422 HQ 1080p24使用しは。
Final Cut Pro Xのプロジック設定画面
1 Final Cut Pro X 起動と メニーパー・ハ・行き、「File/New Project」を選択いたします。プロジク卜設定を含むウインチが開きます。
2 23
「Video」設定を1080p HD、1920×1080、24pに設定いたします。
「Audio」おはい「Rendering」設定をStereo、48kHz、Apple ProRes 422 HQに設定お願い。
5 [OK]をクリツくしま。
cllbrp 1000000000000000000000000000000000000000000000000000000000000000000000000
cllbrtsyimrainic
Avid MediaComposer2018使
Avid MediaComposer2018年Kl#P为编集的有、新i口t作成,适切v才FtoMtOoEoEoEoEoEoEoEoEoEoEoEoEoEoEoEoEoEoEoEoEoEoEoEoEoEoEoEoEoEoEoEoEoEoEoEoEoEoEoEoEoEoEoEoEoEoEoEoEoEoEo
Avid MediaComposer2018dFJzKt名おはみ才予言一设定
1 Avid MediaComposer2018起動する「SelectProject」ウindsわ表示さてま。
「New Project」はリルクて、「New Project」ウindsの口ロジ工克ト名を入力し。
3「Format」×二一HD1080>「1080p/24」为,「OK」をクルクてプロジクトを作成ります。
「Select Project」ウindsドウで、作成たプロジクトをダリルクリックて開きま。
5 File>Input>「SourceBrowser」為選挙、讀の進むはリフローを進む。
6 X二一か「TargetBin」選扣「Import」をクルクしま。
MDEIAPINにクLIPP为表示之日、CRIP为taIMLaIN中D拉PP上編集。
AdobePremiereProCC使
AdobePremiereProCCAppleProRes422HQcllPb为编集的有、新口Jt作成、適切丶才一MnO上,。

AdobePremiereProCCdFroDjEckT名0
1 AdobePremiereProCC起動と。「Welcome」ウイドウで「NewProject」を選択と。プロジク卜設定を合むウイドウが開きと。
2 2017-03-14 2017-03-14 2017-03-14 2017-03-14 2017-03-14 2017-03-14 2017-03-14 2017-03-14 2017-03-14 2017-03-14
3 AdobePremiereProCCのM二一八行き、「File/Import」を選択て編集んだクリフを選択いたします。「Project」ウにクリフが表示いたします。
最初編集んだクリットを、「Project」ウindsの右下にるNew Item」アイコンの上にドラツしぃます。クリットの設定に合った新いシーニングスが作成いたします。
克利普为一念斯·夕氏拉兰在下拉格子编集开始可达。
Blackmagic Camera Setup Utility
力メラソフトウエアのアツpledートMac
Blackmagic Camera Setup Utilityソフトウアをダウローネリ、ダウローネリたフィルを解凍ります。デイスケイメー・て開Blackmagic Camera Setup Installerが表示いたします。
インストーリーを起動し、画面に表示いたします。インストーリカが完了んだら、アリケーニングフツルダロー行き、Blackmagic Camerasフィルダーを開きまむ。そのは当マニル、Blackmagic Camera Setup Utility、てreadmeフィルつようお願いんだんを含むドクメトフィルダーが入ていまむ。Blackmagic Camera Setupの最新バーケンにアツデートする際に必須なアソングスローツーチも含まむまむ。
力メラソフローのアフデートWindows
Blackmagic Camera Setup Utilityソフウアをダウローリド、ダウローリドたフィルを解凍いたします。PDFマニアルとBlackmagic Camera Utility Installerが入ったBlackmagic Camera Utilityフィルダー表示いたします。インストーラーをダ複ルクリックし、画面に表示いたします指示に従てインストーリックしいます。
Windows 10は、「Start」バタを押て「All Apps」を選択いたします。「Blackmagic Design」フィルダ一まスクローリます。こからBlackmagic Camera Setupを起動いたします。Windows 8.1は、「Start」スケリーニで下矢印を選択てBfackmagic Design」フィルダ一まスクローリます。乙からBlackmagic Camera Setupを起動いたします。
力メラ内部ソフトウアのアツpledート方法
CONBUN-Consumer最新のBlackmagic Camera Setup Utilityをインストーリル、USB-CケーレルでCONBUN-Consumerとカメラ接続いたします。USB-Cロトは左ハネルに係ります。GNM製マッチを開けるとロトにアクセスにしてます。
Blackmagic Camera Setup Utility 起動、画面 表示的指示 從到力 メフウアをアドーツる。力 メフウアをアドーツると、すこのリルトやカスムLUT消去し、すこの設定がリルトすると注意しぃく。リフウアをアドーツる前に、モリ一カロにバックアドと書き出しお上を要勸しお。リフウアをアドーツる後に、モリ一カロからリルト或LUTを簡單に説み込んだ再効モラ使用くださいます。
Battery Gripを使用する
Pocket Cinema CameraにBattery Gripを追加するとて、横方向のハンドルを使用くださいますようお願いいたします。ロケ上の撮影可能時間を延長いたします。Battery Grip给您技术支持は、その点でカメラに取り付ける这句话をお勸むしります。
Blackmagic Pocket Camera Battery Pro Gripは、Pocket Cinema Camera 6K Proおよ6K G2向けの製品で、2個のNP-F570バッテリ一を取り付けます。Pocket Cinema Camera 6K Proおよ6KG2は、力メラ内部のバッテリ一に加て、Battery Gripの2個のバッテリ一から給電いたします。
Blackmagic Pocket Camera Battery Gripは、Blackmagic Pocket Cinema Camera 4Kにフィットするよう設計いたします。2個のNP-F570 Lシリーベルーニを取り付けraidるた、2時間以上的総続の効摄影が可能いたします。
12V DC入力は、Battery Gripのバッチリ一を充電くださり、充電しおら力メラに继续のに電源を供給いたします。力メラの電源が切てい的场合は、USB-CロトでBattery Gripのバッチリ一を充電いたします。
Blackmagic Pocket Camera Battery Pro Gripを取り付ける
Blackmagic Pocket Camera Battery Pro GripをPocket Cinema Camera 6K Proおば6K G2に取り付ける前に、力メラの電源を切り、外部電源の接続を外しります。稼動時間を最大限にする,Thに、Battery Gripを力メラに取り付ける场合、力メ拉内部のバツテリ一を取り外さ、3個のバツテリ一全てから給電するようにしてくだい。
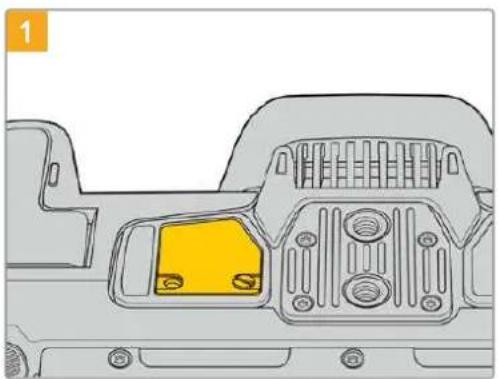
力米拉底面の八脚テ一収納部の近に有的、小さ力八一の不縫を緩てま。
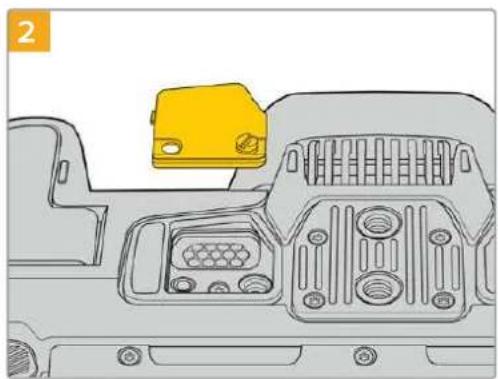
力×拉底面か力一を外、BatteryGripかの給電に使用さる電気接触部が見る状態にしま�。

外力一をBattery Grip上部のご亀に插入し、ネ約し。
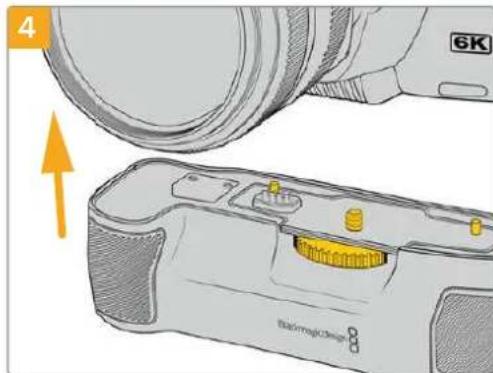
Battery Grip 能力表底面与慎重取付。Battery Grip 上部の1/4个手手は、力表底面の1/4-20マウロトボイntの位置に合わせ。1/4个手手はの两侧の大小は一定能力は适当位置に収りまを。
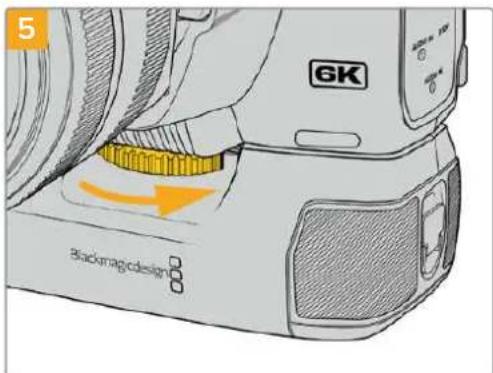
1/4个手手前面的不放右回下,于拉和留、力卡上BatteryGrip固定。
Blackmagic Pocket Camera Battery Gripを取り付ける
Battery Gripを取り付ける前に、Pocket Cinema Camera 4Kの電源を切り、外部電源の接続を外しいたします。
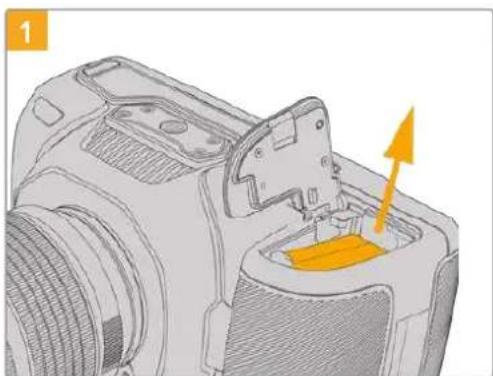
八夕一取納部を開は、LP-EG八夕一を取の出し。
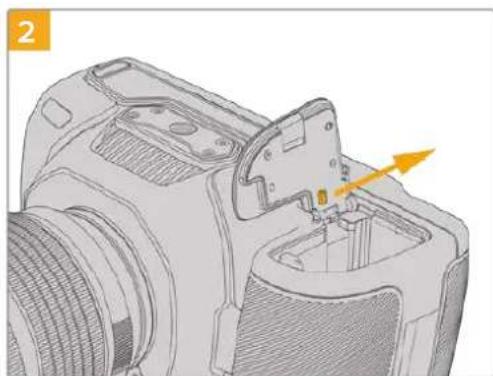
力八一の匕ン近にある夕をスらド、力メラか力八一を取外しります。
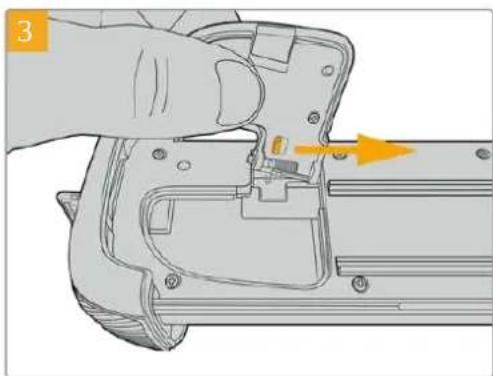
力一の紛失を避けた。Battery Gripのトレ広底面のくはに力一を取り付けます。
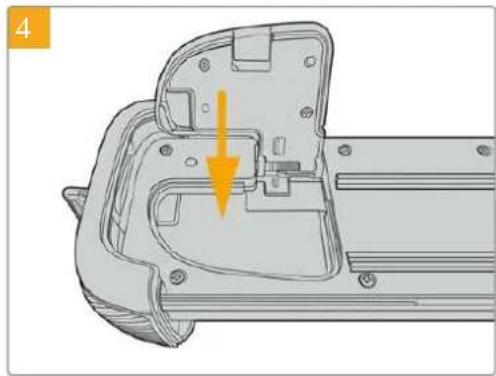
力八一を閉じる、トレイの底面から突出するとなく、きらんと叐まります。

Battery Gripのバッチリ一の形をた部分を力メラのバッチリ一収納部に抨入しま。Battery Grip上部の1/4 ナンチネジを、カメラ底面の1/4-20マウntトボイntの位置に合わせま。1/4イチネジの横にる小さなpinが適切な位置を維持るのに役立もま。
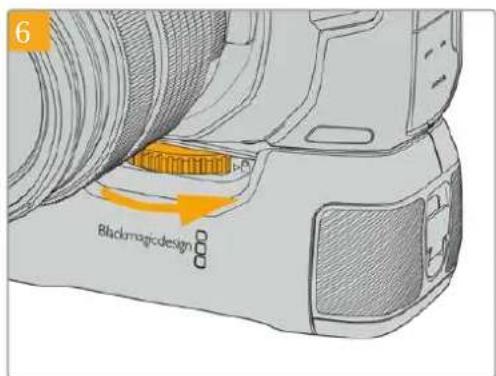
1/4个手帕前面的不放右回下,就加和留、力M如BatteryGrip固定了。
Battery Gripにバッテリ一を挃入する
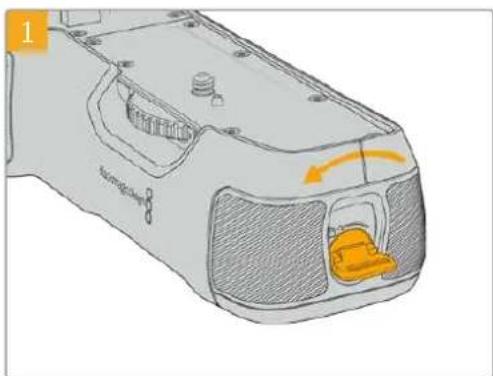
Battery Gripの側面にるロクタを反時計回りに回て、バッチリーツレイのロクを解除いたします。バッチリーツレイをスライドて取り外).(2)。This is the work of Battery Grip to make sure that you can get your hands on it easily.
VATTEI一TLEI2個NP-F570VATTEI一入。
。其際は、VATTEI一の向きに注意てさ。次、VATTEI一外方向にSLSIDさ。中央の夕が持上か、VATTEI一正位位置に固定さ。
VATTEI一取外はは、它的夕を押し、VATTEI一在内方向にSLSIDさ。

ル テーツレイをBattery GripにスラIDて掃い、ロckタフを時計回に回ります。DC電源入力に外部電源ノスを接続て、カメら给電てる場合、ルリリを充電しおか力メラで撮影を統けに
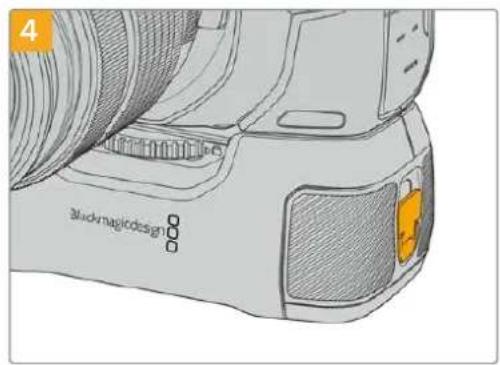
Battery Gripの側面に有的ロックタpletを時計回りに回て、バチリーツレイをロックしいます。
作業のこPocket Cinema Camera 4KにBattery Gripを取り付は、2個のバツテリ一を挃入てる场合、LCDタチスケリーナの右上ごバツテリ一残量インケーナは、2のバツテリ一アイコンを表示するた。、そばれの充電レルを個別に確認いたします。Blackmagic PocketCinema Camera 6K Proおよ6KG2にBattery Gripを取り付はと、LCDタチスケリ-は3のバツテリ一アイコンを表示いたします。詳細は「電源」 Sevenonを参照てくさ。
Developer Information
Blackmagic Bluetooth Camera Control
Blackmagic cameras with Bluetooth LE implement a variety of features and commands that allow users to control their cameras wirelessly. Developers have full access to these features for their custom applications.
The following services and characteristics describe the full range of communication options that are available to the developer.
Service: Device Information Service
UUID:180A
Characteristics
Camera Manufacturer
UUID:2A29
Read the name of the manufacturer (always "Blackmagic Design").
Camera Model
UUID:2A24
Read the name of the camera model ("Pocket Cinema Camera 6K" or "Pocket Cinema Camera 4K").
Service: Blackmagic Camera Service
UUID: 291D567A-6D75-11E6-8B77-86F30CA893D3
Characteristics
Outgoing Camera Control (encrypted)
UUID:5DD3465F-1AEE-4299-8493-D2ECA2F8E1BB
Send Camera Control messages
These messages are identical to those described in the Blackmagic SDI Camera Control Protocol section below. Please read that section for a list of supported messages and required formatting information.
For an example of how packets are structured, please see the 'example protocol packets' section in this document.
Incoming Camera Control (encrypted)
UUID:B864E140-76A0-416A-BF30-5876504537D9
Request notifications for this characteristic to receive Camera Control messages from the camera.
These messages are identical to those described in the Blackmagic SDI Camera Control Protocol section below. Please read that section for a list of supported messages and required formatting information.
Timecode (encrypted)
UUID: 6D8F2110-86F1-41BF-9AFB-451D87E976C8
Request notifications for this characteristic to receive timecode updates.
Timecode (HH:MM:SS:mm) is represented by a 32-bit BCD number: (eg. 09:12:53:10 = 0x09125310)
Camera Status (encrypted)
UUID:7FE8691D-95DC-4FC5-8ABD-CA74339B51B9
Request notifications for this characteristic to receive camera status updates.
The camera status is represented by flags contained in an 8-bit integer:
None = 0× 00
Camera Power On = 0× 01
Connected = 0× 02
Paired = 0× 04
Versions Verified = 0× 08
Initial Payload Received = 0× 10
Camera Ready = 0× 20
Send a value of 0x00 to power a connected camera off.
Send a value of 0x01 to power a connected camera on.
Device Name
UUID:FFACOC52-C9FB-41A0-B063-CC76282EB89C
Send a device name to the camera (max. 32 characters).
The camera will display this name in the Bluetooth Setup Menu.
Protocol Version
UUID: 8F1FD018-B508-456F-8F82-3D392BEE2706
Read this value to determine the camera's supported CCU protocol version.
NOTE Encrypted characteristics can only be used once a device has successfully bonded or paired with the Blackmagic Camera. Once a connection has been established, any attempt to write to an encrypted characteristic will initiate bonding. For example, writing a 'Camera Power On' (0x01) message to the Camera Status characteristic.
Once bonding is initiated, the camera will display a 6-digit pin in the Bluetooth Setup Menu. Enter this pin on your device to establish an encrypted connection. The device will now be able to read, write and receive notifications from encrypted characteristics.
Blackmagic SDI and Bluetooth Camera Control Protocol
Version 1.5
If you are a software developer you can use the Blackmagic SDI and Bluetooth Camera Control Protocol to construct devices that integrate with our products. Here at Blackmagic Design, our approach is to open up our protocols and we eagerly look forward to seeing what you come up with!
Overview
This document describes an extensible protocol for sending a unidirectional stream of small control messages embedded in the non-active picture region of a digital video stream. The video stream containing the protocol stream may be broadcast to a number of devices. Device addressing is used to allow the sender to specify which device each message is directed to.
Assumptions
Alignment and padding constraints are explicitly described in the protocol document. Bit fields are packed from LSB first. Message groups, individual messages and command headers are defined as, and can be assumed to be, 32 bit aligned.
Blanking Encoding
A message group is encoded into a SMPTE 291M packet with DID/SDID x51/x53 in the active region of VANC line 16.
Message Grouping
Up to 32 messages may be concatenated and transmitted in one blanking packet up to a maximum of 255 bytes payload. Under most circumstances, this should allow all messages to be sent with a maximum of one frame latency.
If the transmitting device queues more bytes of message packets than can be sent in a single frame, it should use heuristics to determine which packets to prioritize and send immediately. Lower priority messages can be delayed to later frames, or dropped entirely as appropriate.
Abstract Message Packet Format
Every message packet consists of a three byte header followed by an optional variable length data block. The maximum packet size is 64 bytes.
| Destination device (uint8) | Device addresses are represented as an 8 bit unsigned integer. Individual devices are numbered 0 through 254 with the value 255 reserved to indi-cate a broadcast message to all devices. |
| Command length (uint8) | The command length is an 8 bit unsigned integer which specifies the length of the included command data. The length does NOT include the length of the header or any trailing padding bytes. |
| Command id (uint8) | The command id is an 8 bit unsigned integer which indicates the message type being sent. Receiving devices should ignore any commands that they do not understand. Commands 0 through 127 are reserved for commands that apply to multiple types of devices. Commands 128 through 255 are device specific. |
| Reserved (uint8) | This byte is reserved for alignment and expansion purposes. It should be set to zero. |
| Command data (uint8[]) | The command data may contain between 0 and 60 bytes of data. The format of the data section is defined by the command itself. |
| Padding (uint8[]) | Messages must be padded up to a 32 bit boundary with 0x0 bytes. Any padding bytes are NOT included in the command length. |
Receiving devices should use the destination device address and or the command identifier to determine which messages to process. The receiver should use the command length to skip irrelevant or unknown commands and should be careful to skip the implicit padding as well.
Defined Commands
Command 0 : change configuration
| Category (uint8) | The category number specifies one of up to 256 configuration categories available on the device. |
| Parameter (uint8) | The parameter number specifies one of 256 potential configuration parameters available on the device. Parameters 0 through 127 are device specific parameters. Parameters 128 though 255 are reserved for parameters that apply to multiple types of devices. |
| Data type (uint8) | The data type specifies the type of the remaining data. The packet length is used to determine the number of elements in the message. Each message must contain an integral number of data elements. |
Currently defined values are:
| 0: void / boolean | A void value is represented as a boolean array of length zero. The data field is a 8 bit value with 0 meaning false and all other values meaning true. |
| 1: signed byte | Data elements are signed bytes |
| 2: signed 16 bit integer | Data elements are signed 16 bit values |
| 3: signed 32 bit integer | Data elements are signed 32 bit values |
| 4: signed 64 bit integer | Data elements are signed 64 bit values |
| 5: UTF-8 string | Data elements represent a UTF-8 string with no terminating character. |
Data types 6 through 127 are reserved.
| 128: signed 5.11 fixed point | Data elements are signed 16 bit integers representing a real number with 5 bits for the integer component and 11 bits for the fractional component. The fixed point representation is equal to the real value multiplied by \( {2}^{ \land }{11} \) . The representable range is from -16.0 to 15.9995 (15 + 2047/2048). |
Data types 129 through 255 are available for device specific purposes.
Operation types 2 through 127 are reserved.
| Operation type (uint8) | The operation type specifies what action to perform on the specified param- erter. Currently defined values are: |
| 0: assign value | The supplied values are assigned to the specified parameter. Each element will be clamped according to its valid range. A void parameter may only be 'assigned' an empty list of boolean type. This operation will trigger the action associated with that parameter. A boolean value may be assigned the value zero for false, and any other value for true. |
| 1: offset / toggle value | Each value specifies signed offsets of the same type to be added to the current parameter values. The resulting parameter value will be clamped ac- cording to their valid range. It is not valid to apply an offset to a void value. Applying any offset other than zero to a boolean value will invert that value. |
Operation types 128 through 255 are available for device specific purposes.
| Data (void) | The data field is 0 or more bytes as determined by the data type and num-ber of elements. |
The category, parameter, data type and operation type partition a 24 bit operation space.
| Group | ID | Parameter | Type | Index | Minimum | Maximum | Interpretation |
| Lens | 0.0 Focus fixed16 | - | 0,0 | 1,0 | 0,0 = near, 1,0 = far | ||
| 01 Instantaneous autofocus void | --- | trigger instantaneous autofocus | |||||
| 0.2 Aperture (f-stop) | fixed16 | - | -1,0 | 16,0 | Aperture Value (where fnumber = sqrt(2^AV)) | ||
| 0.3 Aperture (normalised) | fixed16 | - | 0,0 | 1,0 | 0,0 = smallest, 1,0 = largest | ||
| 0.4 Aperture (ordinal) | int16 | - | 0 | n | Steps through available aperture values from minimum (0) to maximum (n) | ||
| 0.5 Instantaneous auto aperture | void | --- | trigger instantaneous auto aperture | ||||
| 0.6 Optical image stabilisation | boolean | --- | true = enabled, false = disabled | ||||
| 0.7 Set absolute zoom (mm) | int16 | - | 0 | max | Move to specified focal length in mm, from minimum (0) to maximum (max) | ||
| 0.8 Set absolute zoom (normalized) | fixed16 | - | 0,0 | 1,0 | Move to specified focal length; 0,0 = wide, 1,0 = tele | ||
| 0.9 Set continuous zoom (speed) | fixed16 | - | -1,0 | +1,0 | Start/stop zooming at specified rate: -1,0 = zoom wider fast, 0,0 = stop, +1 = zoom tele fast | ||
| Video | 1.0 Video mode int8 | [0] = frame rate | - | - | fps as integer(eg 24, 25, 30, 50, 60) | ||
| [1] = M-rate | - | - | 0 = regular, 1 = M-rate | ||||
| [2] = dimensions | - | - | 0 = NTSC, 1 = PAL, 2 = 720, 3 = 1080, 4 = 2kDCI, 5 = 2k16:9, 6 = UHD, 7 = 3k Anamorphic, 8 = 4k DCI, 9 = 4k 16:9, 10 = 4,6k 2:1, 11 = 4,6k | ||||
| [3] = interlaced | - | - | 0 = progressive, 1 = interlaced | ||||
| [4] = Color space | - | - | 0 = YUV | ||||
| 11 Gain (up to Camera 4.9) | int8 1128 | 1x 2x, 4x, 8x, 16x, 32x, 64x, 128x gain | |||||
| 1.2 Manual White Balance | int16 | [0] = color temp 2500 | 10000 Color | temperature in K | |||
| int16 | [1] = tint | -50 | 50 | tint | |||
| 1.3 Set auto WB void | - | -- | Calculate and set auto white balance | ||||
| 1.4 Restore auto WB | void | - | -- | Use latest auto white balance setting | |||
| 1.5 Exposure (us) | int32 | 1 | 42000 | time in us | |||
| 1.6 Exposure (ordinal) | int16 | - | 0 | n | Steps through available exposurevalues from minimum (0) to maximum (n) | ||
| 1.7 Dynamic Range Mode | int8 enum | - | 0 | 2 | 0 = film, 1 = video, 2 = extended video | ||
| 1.8 Video sharpening level | int8 enum | - | 0 | 3 | 0 = off, 1 = low, 2 = medium, 3 = high | ||
| 1.9 Recording format | int16 | [0] = file frame rate | - | - | fps as integer(eg 24, 25, 30, 50, 60, 120) | ||
| [1] = sensor frame rate | - | - | fps as integer, valid when sensor-off-speed set (eg 24, 25, 30, 33, 48, 50, 60, 120), no change will be performed if this value is set to0 | ||||
| [2] = frame width | - | - | in pixels | ||||
| [3] = frame height | - | - | in pixels | ||||
| [4] = flags | - | - | [0] =file -M-rate | ||||
| - | - | [1] = sensor-M-rate, valid when sensor-off-speed-set | |||||
| - | - | [2] = sensor-off-speed | |||||
| - | - | [3] = interlaced | |||||
| - | - | [4] = windowed mode | |||||
| 1.10 Set auto exposure mode int8 | - | 0 | 4 | 0 = Manual Trigger, 1 = Iris, 2 = Shutter, 3 = Iris + Shutter, 4 = Shutter + Iris | |||
| 1.11 Shutter angle | int32 | - | 100 | 36000 | Shutter angle in degrees, multiplied by 100 | ||
| 1.12 Shutter speed int32 | - | Current sensor frame rate | 5000 | Shutter speed value as a fraction of 1, so 50 for 1/50th of a second | |||
| 1.13 Gain | int8 | - | -128 | 127 | Gain in decibel dB | ||
| 1.14 ISO | int32 | - | 0 | 2147483647 | ISO value | ||
| 1.15 Display LUT | int8 | [0] = selected LUT | - | - | 0 = None, 1 = Custom, 2 = film to video, 3 = film to extended video | ||
| [1] = enabled or not | - | - | 0 = Not enabled, 1 = Enabled | ||||
| 1.16 ND Filter | fixed16 | [0] = stops | 0.0 | 16.0 | f-stop of ND filter to use | ||
| Audio | 2.0 Mic level fixed16 | - | 0.0 | 1.0 | 0.0 = minimum, 1.0 = maximum | ||
| 21 Headphone level fixed16 | - | 0.1 | 1.0 | 0.0 = minimum, 1.0 = maximum | |||
| 2.2 Headphone program mix | fixed16 | - | 0.1 | 1.0 | 0.0 = minimum, 1.0 = maximum | ||
| 2.3 Speaker level | fixed16 | - | 0.1 | 1.0 | 0.0 = minimum, 1.0 = maximum | ||
| 2.4 Input type | int8 | - | 0 | 3 | 0 = internal mic,1 = line level input,2 = low mic level input,3 = high mic level input | ||
| 2.5 Input levels | fixed16 | [0] ch0 | 0.0 | 1.0 | 0.0 = minimum, 1.0 = maximum | ||
| [1] ch1 | 0.0 | 1.0 | 0.0 = minimum, 1.0 = maximum | ||||
| 2.6 Phantom power boolean | - | - | - | true = powered,false = not powered | |||
| Output | 3.0 Overlay enables | uint16bit field | - | - | - | bit flags:[q = display status,[?] = display frame guidesSome cameras don't allow separate control of frameguides and status overlays. | |
| 31 Frame guides style(Camera 3.x) | int8 | - | 0 | 8 | 0 = HDTV, 1 = 43, 2 = 24:1,3 = 239:1, 4 = 235:1,5 = 185:1,6 = 45, 7 = 43, 8 = 2:1,9 = 45, 10 = 1:1 | ||
| 3.2 Frame guides opacity(Camera 3.x) | fixed16 | - | 0.1 | 1.0 | 0.0 = transparent, 1.0 =opaque | ||
| 3.3 Overlays(replaces.1 and .2above fromCameras 40) | int8 | [0] = frame guidesstyle | - | - | 0 = off, 1 = 24:1, 2 = 239:1,3 = 235:1, 4 = 185:1, 5 = 169,6 = 149, 7 = 4:3, 8 = 2:1,9 = 45, 10 = 1:1 | ||
| [1] = frame guideopacity | 0 | 100 | 0 = transparent, 100 =opaque | ||||
| [2] = safe areapercentage | 0 | 100 | percentage of full frameused by safe area guide(0 means off) | ||||
| [3] = grid style | - | - | bit flags:[q = display thirds,[?] = display cross hairs,[?] = display center dot,[?] = display horizon | ||||
| Display | 4.0 Brightness fixed16 | - | 0.0 | 1.0 | 0.0 = minimum, 1.0 = maximum | ||
| 41 Exposure and focus tools | int16bit field | 0x1 = zebra,0x2 = focus assist,0x4 = false color | - | - | 0 = disable, 1 = enable | ||
| 4.2 Zebra level | fixed16 | - | 0.0 | 1.0 | 0.0 = minimum, 1.0 = maximum | ||
| 4.3 Peaking level | fixed16 | - | 0.0 | 1.0 | 0.0 = minimum, 1.0 = maximum | ||
| 4.4 Color bar enable | int8 | - | 0 | 30 | 0 = disable bars,1-30 = enable bars withtimeout (seconds) | ||
| 4.5 Focus Assist | int8 | [0] = focus assistmethod | - | - | 0 = Peak,1 = Colored lines | ||
| [1] = focus line color | - | - | 0 = Red,1 = Green,2 = Blue,3 = White,4 = Black | ||||
| 4.6 Program return feedenable | int8 | - | 0 | 30 | 0 = disable, 1-30 = enable withtimeout (seconds) | ||
| Tally | 5.0 Tally | brightness fixed16 | - | 0.0 | 1.0 | Sets the tally front and tally rear brightness to the same level, 0.0 = minimum, 1.0 = maximum | |
| 51 Front | tally brightness fixed16 | - | 0.0 | 1.0 | Sets the tally front brightness, 0.0 = minimum, 1.0 = maximum | ||
| 5.2 Rear | tally brightness fixed16 | - | 0.0 | 1.0 | Sets the tally rear brightness, 0.0 = minimum, 1.0 = maximum Tally rear brightness cannot be turned off | ||
| Reference | 6.0 Source | int8enum | - | 0 | 2 | 0 = internal, 1 = program, 2 = external | |
| 61 Offset | int32 | - | - | - | +/- offset in pixels | ||
| Confi-guration | 7.0 Real | Time Clock | int32 | [0] time | - | - | BCD - HHMMSSFF (UCT) |
| [1] date | - | - | BCD - YYYYYMMDD | ||||
| 7.1 | System language | string | [0-] | - | - | ISO-639-1 two character language code | |
| 7.2 | Timezone | int32 | - | - | - | Minutes offset from UTC | |
| 7.3 Location | int64 | [0] latitude | - | - | BCD - sDDDdddddddd where s is the sign: 0 = north (+), 1 = south (-); DD degrees, ddddddddddd decimal degrees | ||
| [1] longitude | - | - | BCD - sDDDdddddddd where s is the sign: 0 = west (-), 1 = east (+); DDD degrees, ddddddddd decimal degrees | ||||
| Color Correction | 8.0 Lift | Adjust fixed16 | [0] red | -2.0 | 2.0 default | 0.0 | |
| [1] green | -2.0 | 2.0 default | 0.0 | ||||
| [2] blue | -2.0 | 2.0 default | 0.0 | ||||
| [3] luma | -2.0 | 2.0 default | 0.0 | ||||
| 81 Gamma | Adjust fixed16 | [0] red | -4.0 | 4.0 default | 0.0 | ||
| [1] green | -4.0 | 4.0 default | 0.0 | ||||
| [2] blue | -4.0 | 4.0 default | 0.0 | ||||
| [3] luma | -4.0 | 4.0 default | 0.0 | ||||
| 8.2 Gain | Adjust | fixed16 | [0] red 0 | .0 | 16.0 | default 1.0 | |
| [1] green | 0.0 | 16.0 | default 1.0 | ||||
| [2] blue | 0.0 | 16.0 | default 1.0 | ||||
| [3] luma | 0.0 | 16.0 | default 1.0 | ||||
| 8.3 Offset | Adjust | fixed16 | [0] red | -8.0 | 8.0 default | 0.0 | |
| [1] green | -8.0 | 8.0 default | 0.0 | ||||
| [2] blue | -8.0 | 8.0 default | 0.0 | ||||
| [3] luma | -8.0 | 8.0 default | 0.0 | ||||
| 8.4 Contrast | Adjust | fixed16 | [0] pivot | 0.0 | 1.0 | default 0.5 | |
| [1] adj | 0.0 | 2.0 default | 1.0 | ||||
| 8.5 Luma mix | fixed16 | - | 0.0 | 1.0 | default 1.0 | ||
| 8.6 Color Adjust | fixed16 | [0] hue | -1.0 | 1.0 | default 0.0 | ||
| [1] sat | 0.0 | 2.0 default | 1.0 | ||||
| 8.7 Correction Reset Default void | - | - | - | reset to defaults | |||
| Media | 10.0 Codec | int8enum | [0] = basic codec | - | - | - | 0 = CinemaDNG,1 = DNxHD,2 = ProRes,3 = Blackmagic RAW |
| [1] = code variant | - | - | - | CinemaDNG:0 = uncompressed,1 = lossy 3:1,2 = lossy 4:1 | |||
| - | - | - | ProRes:0 = HQ,1 = 422,2 = LT,3 = Proxy,4 = 444,5 = 444XQ | ||||
| - | - | - | Blackmagic RAW:0 = Q0,1 = Q5,2 = 3:1,3 = 5:1,4 = 8:1,5 = 12:1 | ||||
| 101 Transport mode int8 | [0] = mode | - | - | 0 = Preview,1 = Play,2 = Record | |||
| [1] = speed | - | - | - | -ve = multiple speeds backwards,0 = pause,+ve = multiple speeds forwards | |||
| [2] = flags | - | - | - | 1<<0= loop,1<<1= play all,1<<5= disk1 active,1<<6= disk2 active,1<<7= time-lapse recording | |||
| [3] = slot 1 storage medium | - | - | - | 0 = CFast card,1 = SD Card,2 = SSD Recorder,3 = USB | |||
| [4] = slot 2 storage medium | - | - | - | 0 = CFast card,1 = SD Card,2 = SSD Recorder,3 = USB | |||
| 10.2 Playback Control | int8enum | [0] = clip | - | - | 0 = Previous,1 = Next | ||
| 10.3 Still Capture void | -- | - | - | Capture | |||
| PTZControl | 11.0 Pan /Tilt Velocity fixed16 | [0] = pan velocity | -1.0 | 1.0 | -1.0 = full speed left,1.0 = full speed right | ||
| [1] = tilt velocity | -1.0 | 1.0 | 1.0 | -1.0 = full speed down,1.0 = full speed up | |||
| 11.1 Memory Preset | int8enum | [0] = preset command | - | - | 0 = reset,1 = store location,2 = recall location | ||
| int8 | [1] = preset slot | 0 | 5 | - | |||
| Metadata | 12.0 Reel int16 | [0] = reel 0 999 | - | ||||
| 121 Scene Tags | signedbyte | [0] = scene tags | - | - | -1 = None0 = WS1 = CU2 = MS3 = BCU4 = MCU5 = ECU | ||
| [1] = interior /exterior | - | - | 0 = Exterior1 = Interior | ||||
| [2] = day / night | - | - | 0 = Night1 = Day | ||||
| 12.2 Scene string | [0-4] = scene | -- | - | ||||
| 12.3 Take | signedbyte | [0] = take number | 1 | 99 | - | ||
| [1] = take tags | - | - | 1 = None0 = PU1 = VFX2 = SER | ||||
| 12.4 Good Take | void | [0] = good take | -- | - | |||
| 12.5 Camera ID | string | [0-28] = ID | -- | - | |||
| 12.6 Camera Operator | string | [0-28] = operator | -- | - | |||
| 12.7 Director | string | [0-27] = director | -- | - | |||
| 12.8 Project Name | string | [0-28] = project | -- | - | |||
| 12.9 Lens Type | string | [0-55] = type | -- | - | |||
| 12.10 Lens Iris | string | [0-19] = iris | -- | - | |||
| 12.11 Lens Focal Length | string | [0-29] = focal length | -- | - | |||
| 12.12 Lens Distance | string | [0-49] = distance | -- | - | |||
| 12.13 Lens Filter | string | [0-29] = filter | -- | - | |||
| 12.14 Slate Mode | signedbyte | [0] = type | - | - | 0 = Recording1 = Playback | ||
| 12.15 Slate Target | string | [0-31] = name | -- | - | |||
Example Protocol Packets
| Operation | Packet Length | Byte | |||||||||||||||
| 0 | 1 | 2 | 3 | 4 | 5 | 6 | 7 | 8 | 9 | 10 | 11 | 12 | 13 | 14 | 15 | ||
| header command data | |||||||||||||||||
| destination | length | command | reserved | category | parameter | type | operation | ||||||||||
| trigger instantaneous auto focus on camera 4 | 8440 | 00100 | |||||||||||||||
| turn on OIS on all cameras | 12 | 255 | 5 | 0 | 0 | 0 | 6 | 0 | 0 | 1 | 0 | 0 | 0 | ||||
| set exposure to 10 ms on camera 4 (10 ms = 10000 us = 0x00002710) | 12 | 4 | 8 | 0 | 0 | 1 | 5 | 3 | 0 | 0x10 | 0x27 | 0x00 | 0x00 | ||||
| add 15% to zebra level (15 % = 0.15 f = 0x0133 fp) | 12 | 4 | 6 | 0 | 0 | 4 | 2 | 128 | 1 | 0x33 | 0x01 | 0 | 0 | ||||
| select 1080p 23.98 mode on all cameras | 16 | 255 | 9 | 0 | 0 | 1 | 0 | 1 | 0 | 24 | 1 | 3 | 0 | 0 | 0 | 0 | 0 |
| subtract 03 from gamma adjust for green & blue (-0.3==0xffd9afp) | 16 | 4 | 12 | 0 | 0 | 8 | 1 | 128 | 1 | 0 | 0 | 0x9a | 0xffd | 0x9a | 0xffd | 0 | 0 |
| all operations combined | 76 | 4400010025550006000 | |||||||||||||||
| 1 | 0 | 0 | 0 | 4 | 8 | 0 | 0 | 1 | 5 | 3 | 0 | 0x10 | 0x27 | 0x00 | 0x00 | ||
| 4 | 6 | 0 | 0 | 4 | 2 | 128 | 1 | 0x33 | 0x01 | 0 | 0 | 255 | 9 | 0 | 0 | ||
| 1 | 0 | 1 | 0 | 24 | 1 | 3 | 0 | 0 | 0 | 0 | 0 | 4 | 12 | 0 | 0 | ||
| 8 | 1 | 128 | 1 | 0 | 0 | 0x9a | 0xffd | 0x9a | 0xffd | 0 | 0 | ||||||
ルフロー
すに情報が必須な方は、Blackmagic Design才不拉人sbo一トを一、Blackmagic Cameraの最新sbo一卜情報を確認いたします。
Blackmagic Design才兰氏一卜一
最新のマニアル、ソフウア、サボーツローは、www.blackmagicdesign.com/jp/supportのBlackmagicサボーツSenタ一誠確認いたします。
Blackmagic Designに連絡する
サロトーパージで必要な情報を得りたかた場合は、サロトーパージの「×一ルを送信」バタを使用て、サロトのリクエスを×一ル送信てくさ。あるは、サロトーパージの「お住まいの地域のサロト才FIS」を細じて、お住まいの地域のBlackmagic Designサロト才FISに電話Dear 合わさくさ。
現在イnstトルさてるソフウアのバーニンを確認
CONPUN-一にイINsUTILルさていBlaKmigicCamaTnSetupUItityyFHTuWArのB一JONを締りるには「AboutBlackmagicCameraSetupUItilyWINDu開きま。
- Macは、アリケーニンフルダ一か「Blackmagic Camera Setup Utility」を開きま�。
- フリケーニンメニー一か「About Blackmagic Camera Setup Utility」を選択し、ハーニンを確認しります。
- Windowsはは、-Startト×二一あはStata卜画面か「Blackmagic Camera Setup Utility」開きま。ルP×二一をクリックて「About Blackmagic Camera Setup Utility」選択し、バーニンを確認しぃま。
最新のソフウエアフデトを入手する
CONBUN-夕一にINSTULルがBlackmagic Camera Utilityのバーニンを確認した後、Blackmagic プボーツルターナwWww.Blackmagicdesign.com/jp/support)为最新のソフトウエアツ�トをチラックてくさ。常に最新のソフトウアを使用するとを推奨いたしますが、重要なプロジウケトの実行中は、ソフトウアのアツ�デトは行わい方かようお願いいたします。
規制に開る警告

欧州連合内ての電気機器およ亜電子機器の広棄处分
製品に記載いたします。機器を焼棄するのは、必surサイクルのたに指定の回收場所に引き渡てくさ。機器の広業にpineい個別収収とサイクルが行わるご上、天然資源の保護につがり、健康和環境を守用的方法でサイクル確實に行わるようお願いいたします。
廢棄 業用機器設備のリサイクルのための収回場所に開店は、お住いの地方法院部員、まえは製品を購入し売業者に連絡ください。

ご機器はFCC規定の第15部に準拠し、A機器の制限に適合してるごが確認いたします。ごらの制限は、商用環境で機器を使用くださいます場合に有害な干涉に对应的妥当な保護を提供するたのものです。ご機器は無線周波工ルギ一生成、使用、放出る可能性のはります。ま、指示に従てインスローは使用しおい场合、無線通信に有害な干涉を引起ご恐れのはります。住宅地域で当製品を使用ると有害な干涉を引 wake可能性のは、その场合はeu一さ一が自己責任で干涉に対応る必要くださいます。
本機の動作は次の2つを条件といたします:
1 本機は、有害な干涉を起さない。
2 本機は希望ない動作を発生しぃねな干涉を含む、いがな受信干涉も受付人員の必要くださいます。

R-R-BMD-201810001
R-R-BMD-20220218001
R-R-BMD-201904002
ICES-3 (A) NMB-3 (A)
ISED CanadaSte - 10Mntb
本機は、力ナダアフタル機器の規格に準拠ていま�。
本機のいがな改造、あるは目的の用途以外の使用は、它らの規格ご順守を無効にしるとがりは。
HDMI プーナーフローはの接続は、必す 高品質のシルHDMIケーレルを使用する必要要
本機は、商業環境の目的の用途に順守た使用にpineトを行なてい。非商業環境で使用た場合、無線妨害を引か起可能性のは。
Bluetooth®
本機はBluetoothフィヤレスデケノロジ一が有効化いたします製品です。
次のFCC IDの無線モジルを含む:QOQBGM113
本機は、制御さていない環境に対て規定たFCC被曝制限に準拋ていま�。
次のICの無線モジローを含む:5123A-BGM113
Xiknfo認定た無線毛一専を含。IFT:RCPSIBG20-2560
本機は、力ナダ産業省(IC)のライSENSス免除RSS規格に準拋てお、RSS-102 Issue 5に明記さてい定期のSAR試験の免除の上限規定を順守てい。
技術基準適合證明番号:209-J00204 本機は、電波法の技術基準適合照明を取得了一定無線設備です。
本王一尔是韩国的KCM一克取取得以。MSIP-CRM-BGT-BGM113
Blackmagic Designは、本機が2.4GHz带ISMバンドの広帀域伝送ステムを使用くださいます。無線機器指令2014/53/EUに準拠するとをこに宣言いたします。
EUの「適合宣言」文書の全文は、compliance@blackmagicdesign.com から入手いたします。

本機は、南アフリカのICASAに認定を受ていま�。承認番号TA-2021/2072 (Blackmagic Pocket Cinema Camera 6K Pro) TA-2019/1517 (Blackmagic Pocket Cinema Camera 6K)、TA-2019/1516 (Blackmagic Pocket Cinema Camera 4K)

本機のBluetoothモジロー、Silicon Labs製のモデル番号BGM113Aは、MXINOM(NOM)向に認定を取得くださいます。
安全情报
Blackmagic Pocket Cinema Cameraは、周圍温度が最高40℃まえの熱帀地区で使用に適しだいす。
ごの製品の内部は、eer一が保守か的部品はあません。一に閉ては、近くのBlackmagic Designの一に一にお間合わさくさ。
日が当た条件は、力メラやリチウム電池が長期にわて太陽光にさらせない状に、力メラに日けを使用くださり、日陰に移す各種の考慮をてく得很好。リチウム電池は、あらゆる熱源に近いはいかは

同榻の電源アダフロー使用する场合、海拔2000m以上は使用くださいます。
力尔二亚州斯一
ご製品の一は、多斯部品内之微量多臭素化比二尔哪の化学物質にさ者可能性が。力形尔二州は、多臭素化比二尔は発性が、先天異常や生殖機能危害を及物質的优点と認識てい。
詳細は、以下のウーパットを確認(<http://www.P65Warnings.ca.gov).
保证
限定保證
Blackmagic Designは、お買申請の日から12个月間、本製品の部品お願いいたします。Blackmagic Designは弊社の裁量によう歡迎Dear Blackmagic Designは誠心誠意地感謝您的支持。
の保証に基了一份�比斯を受る際、客様は必予保证期限終了前Blackmagic Designに瑕疵を通知し、適應する保証サイドスの手続きを行てくさ。客様の責任にい不良品を包し、Blackmagic Designが指定するサローツルーニ配送料前扱送付たきま�う願い致し。理由の如何を問わ、Blackmagic Designの製品返送のたの配送料、保險、閲税、税金、その他すての費用は客様の自己負担お願いいたします。
不適切な使用、たは不十分のメンテルスや取提に碍不具合、故障、損傷対ては、ご保証は適用さません。Blackmagic Designは它的保证で、以下に閲てサイビス提供義務を負わいのとしま�。a)製品のインストーリル及修理、サイビスを行blackmagic Design販売代理人以外の者によて生じた損傷の修理、b)不適切な使用や互換性のは機器への接続に碍て生じた損傷の修理、c) Blackmagic Designの部品や供給品はな物を使用て生じた損傷或故障の修理、d)改造や他製品と統合に碍時間增加や製品の機能低下が生じた场合のサイビス。
This is a proof that the following are equivalent:
1. Blackmagic Design is an ideal of Blackmagic Design, which can be used to produce high-quality products in the market.
2. The black magic Design is a good choice for many people.
3. The black magic Design is a good choice for many people.
© Copyright 2022 Blackmagic Design 著作權所有、無斷複写・軸載を禁しぃ。「Blackmagic Design」、「URSA」、「DeckLink」、「HDLink」、「Workgroup Videohub」、「Multibridge Pro」、「Multibridge Extreme」、「Intensity」、「Leading the creative video revolution」は、米国のはんだ其他諸国の登録商標です。その他の企業名なかに製品名全套は那儿等関連する会社の登録商標のは可能性のはんだ。
Bluetoothと言葉、マーケおは口は、Bluetooth SIG,Inc.が所有する登録商標のは、Blackmagic Designは它しのマーケをライSenスに基しぃ使用ては。その他の商標おはトレーニフローは、それの所有者に歸属いたします。
Blackmagic
Pocket Cinema Camera


Chere cliente, cher client,
Nous you remercions d'avoir fait l'acquisition d'une Blackmagic Pocket Cinema Camera.
En 2013, nous avons sorti la Blackmagic Pocket Cinema Camera originale. Nous étions ravis de creer uneamera compacte dotée d'une large plage dynamique et offrant une qualité d'image spectaculaire, que vous pouvie emporter partout. À la suite de vos retours, nous avons decide de creer une nouvelle famille de Blackmagic Pocket Cinema Camera dans la lignée du modele original.
La Blackmagic Pocket Cinema Camera 4K est équipée de la même monture d'objet Micro 4/3 que le modèle original, vous permettant d'utiliser les objectifs Micro 4/3 que vous possédez déjà. Les Blackmagic Pocket Cinema Camera 6K G2 et Blackmagic Pocket Cinema Camera 6K Pro possèdent une monture EF, vous permettant d'utiliser vos objectifs EF préféres et de filmer en 6K jusqu'à 60 images par seconde.
Gracce aux 13 diaphs de plage dynamique et aux deux ISO natifs, vous pouvez enregistrer de magnifiques images cinematographiques qui sauront sublimer votre vision créative.
Nous attendons avec impatience de découvert vos projets avec votre nouvelle Pocket Cinema Camera, et de receivevoir vos feedbacks et idées concernant de nouvelles fonctionnalités !

Grant Petty
PDG de Blackmagic Design
Sommaire
Quelle camera utilisez-vous? 335
Mise en route 335
Monter un objectif 335
Allumer la camera 337
Alimenter laamera avec le
cable d'alimentation inclus 337
Supports de stockage 338
Cartes CFast 338
Cartes SD 340
Disques flash USB-C 342
Preparer les supports pour
I'enregistrement
Preparer un support sur la
Blackmagic Pocket Cinema Camera 344
Preparer le support sur Mac 346
Preparer le support sur Windows 346
Enregistrement 348
Enregistrredesclips 348
Blackmagic RAW 349
Enregistrer en Blackmagic RAW 349
Frequences d/images
maximales du capteur 352
Durée d'enregistrement 353
Lecture 359
Charactéristiques de laamera 359
Face avant de laamera 359
Face droite 360
Face gauche 361
Face supérieure 363
Face inférieure de laamera 365
Face arriere de laamera 366
Commandedes l'écran tactile 369
Paramètres 392
Menu de navigation 392
Onglet Enregister 392
Convention de dénomination
des fichiers 398
Onglet Moniteur 398
Onglet Audio 405
Onglet Reglages 408
Onglet Prérglages 420
LUTs 3D 423
Saisie des métadonnées 425
Clap 426
Sortie video de laamera 431
Blackmagic Zoom Demand
et Focus Demand 431
Connector et monter les
accessoires sur votreamera 432
Utiliser le Blackmagic Focus Demand 434
Utiliser le Blackmagic Zoom Demand 434
Utiliser DaVinci Resolve 436
Gestionnaire de projet 436
Monter avec la page Cut 437
Ajouter des clips à la timeline 440
Raccorder des clips dans la timeline 441
Affichage Audio trim 441
Ajouter des titres 442
Travailler avec des fichiers
Blackmagic RAW 443
Étalonner vos clips avec la
page Etalonnage 446
Ajouter une Power Window 449
Utilisation de plug-ins 451
Mixer l'audio 452
Ajouter des VFX et des
compositions sur la page Fusion 457
MastériserVote montage 465
Exportation rapide 465
Page Exportation 466
Contrôle des caméras avec l'ATEM Mini 467
Correcteur colorimétrique
primaire DaVinci Resolve 472
Travailler avec un logiciel tiers 475
Travailler avec des fichiers
provenant de cartes
CFast 2.0 et de cartes SD 475
Travailler avec des fichiers
provenant de disques flash USB-C 475
Utiliser Final Cut Pro X 476
Utiliser Avid MediaComposer 2018 476
Utiliser Adobe Premiere Pro CC 477
Blackmagic Camera Setup Utility 478
Utiliser une poignee d'alimentation 479
Developer Information 482
Blackmagic Bluetooth Camera Control 482
Blackmagic SDI and Bluetooth
Camera Control Protocol 484
Example Protocol Packets 493
Assistance 494
Avis reglementaires 495
Informations de sécurité 496
Garantle 497
Quelleamerautilisez-vous?
Les modèles Blackmagic Pocket Cinema Camera 6K Pro, 6K G2 et 4K se ressemblent sur plusieurs points. En effet, elles produit toutes des images d'une qualité exceptionnelle et disposant d'une large plage dynamique, tout en conservant le même boîtier. Les boutons de commande et les menus à l'écran sont similaires et les caméras s'opérènt de la même façon.
Cependant, les Blackmagic Pocket Cinema Camera 6K Pro et 6K G2 disposent d'un capteur de taille Super 35mm, d'une monture d'objectif EF, ainsi que d'une icône « 6K » sur le côté de la monture. La Blackmagic Pocket Cinema Camera 4K comprend quant à elle un capteur de taille Micro 4/3, ainsi qu'une monture d'objectif Micro 4/3.

Blackmagic Pocket Cinema Camera 6K Pro
Mise en route
Pour commencer a utiliser votre camera, il suffit de monter un objectif et de charger votreamera.
Monter un objectif
Les Pocket Cinema Camera 6K G2 et 6K Pro fonctionnement avec des objectifs EF, tandis que la Pocket Cinema Camera 4K utilise des objectifs Micro 4/3. Monter un objectif sur votreamera se fait de la même façon sur toutes les Pocket Cinema Camera. Commencez parrirer le cache de protection. Pourrirer le cache de protection, maintenance le bouton de verrouillage enforcé et tournez le cache dans le sens inverse des aigulles d'une montre jusqu'à ce qu'il soit libre.
Pour monter un objectif EF ou Micro 4/3 :
1 Alignez le point situé sur toute objectif avec celui de la monture. De nombreux objectifs possedent un point bleu, rouge ou blanc ou un autre indicateur.

2 Positionnez la monture d'objectif contre la monture de laamera et tournez l'objet dans les sens des aiguilles d'une montre jusqu'à ce qu'il s'emboite correctement.

Monter un objectif Micro 4/3 sur la Blackmagic Pocket Cinema Camera 4K
1 Pour retirer l'objet, maintenez le bouton de verrouillage enforcé et tournez l'objet dans le sens inverse des aiguilles d'une montre jusqu'à ce que le point attigne la position de 10 heures sur un objectif Micro 4/3, ou de midi sur un objectif EF. Retirez delicatement l'objet de sa monture.
REMARQUE Afin d'éviter d'exposer le filtré en verre situé à l'avant du capteur à la poussière lorsqu'aucun objectif n'est monté, il est vivement conseilé de garder le cache anti-poussière autant que possible.
Allumer laamera
Une fois l'objet monté, laamera doit être alimentée. Les Pocket Cinema Camera 6K Pro et 6K G2 peuvent être alimentées avec une batterie NP-F570, tandis que les caméras 4K nécessitent une batterie LP-E6. Vous pouvez également alimenter votre Pocket Cinema Camera depuis l'adaptateur secteur AC fourni ou avec deux batteries NPF570 insérées dans la Blackmagic Battery Pro Grip. Pour plus d'informations concernant l'ajout d'une poignée d'alimentation à votre Pocket Cinema Camera, veuillez consulter la section « Utiliser une poignée d'alimentation »
Insérer une batterie et alimenter laamera
Les Pocket Cinema Camera 6K Pro et 6K G2 fonctionnement avec une batterie standard NP-F570, tandis que les Pocket Cinema Camera 4K utilisent une batterie LP-E6 standard. Une batterie est livrée avec laamera, mais si vous avez besoin de batteries supplémentaires, il est possible de les acheter auprès des revendeurs Blackmagic Design ou dans des magasins photo et video.
1 Sous laamera, appuyez sur le loquet du compartmente a batterie pour Iouvir.
2 Veillez à ce que les contacts soient face au terminal, puis insérez la batterie jusqu'à ce qu'elle s'emboite correctement.
CONSEIL Pour éjecter la batterie, poussez le loquet du compartment vers l'avant de laamera.
3 Refermez le compartment de la batterie et appuyez légarement jusqu'à ce qu'il s'emboite correctement.
4 Déplacez l'interrupteur d'alimentation,itué sur le haut de laamera, sur la position On. Pour eteindre laamera, déplacez l'interrupteur d'alimentation sur Off.
Alimenter laamera avec le cable d'alimentation inclus
L'adaptateur AC 100-240 volts fourni peut alimenter simultanément laamera et recharger la batterie interne, ou les deux batteries de la poignee d'alimentation, s'il y en a une fixe e à laamera. Le connecteur d'alimentation DC se verrouille à laamera pour eviter tout risque de déconnexion accidentelle.
Connector laamera à une source d'alimentation externe :
1 Connectez l'adaptateur AC vers 12V DC à une prise secteur.
2 Ouvrez les protections en caoutchouc situées sur la partie gauche de laamera et tournez le connecteur d'alimentation DC jusqu'à ce que la barrette s'aligne avec l'encoche supérieure de l'entrée DC 12V. Insérez doucement le connecteur dans l'entrée jusqu'à ce qu'il se clipse.
3 Pour débrancher le connecteur, tirez la gaine du connecteur et retirez-le de l'entrée.
Si la batterie et la source d'alimentation externe sont branchées, l'alimentation de la camera s'effectue uniquement par la source externe. Lorsque vous débranchez la source d'alimentation externe alors que la batterie est installée, laamera passé automatiquement sur la batterie pour un enregistrement en continu.
La batterie interne peut etre rechargee via USB lorsque la camera est eteinte. C'est pratique, car you pouze utiliser une batterie externe pour charger voite camera quand vous ne lutilisez pas. Les Blackmagic Pocket Cinema Cameras peuvent etre chagees via des chargeurs muraux USB 5V 10W standard. Les chargeurs supportant I'alimentation USB, ou USB PD, peuvent etalement etre utilisés. Les chargeurs USB PD sont dotes de connexions USB-C et prennt en charge jusqu'a 20V d'alimentation, pour un chargement plus rapide. Vous pouze recharger la batterie interne via I'entree DC 12V lorsque la camera est allumee ou eteinte.
CONSEIL Si vous chargez une batterie chaude directement après usage, la vitesse de chargement est réduite jusqu'à ce que la température de la batterie descendé à 45 dégrès Celsius ou 113 degrés Fahrenheit. Nous vous recommandons de laisser refroidir la batterie pendant 15 minutes avant de la charger.
Vou puez a present inserer le support de stockage et commencer I'enregistrement!
Supports de stockage
La Blackmagic Pocket Cinema Camera enregistr de la video sur des cartes SD standard, des cartes SD UHS-II plus rapides, ou des cartes CFast 2.0.
Gracé au port expansion USB-C, vous pouvez également connecter des disques flash USB-C pour de longues séances d'enregistrement.
Cartes CFast
Les cartes CFast 2.0 prenrent en charge des débits très élevés, elles sont donc parfaites pour enregistrer en 6K, 4K et HD à des fréquences d'images élevées. Veuillez consulter les tableaux relatifs à la durée d'enregistrement dans la section « Enregistrement » de ce manuel pour connaître les fréquences d'images maximales qui peuvent être enregistrées avec chaque format.
REMARQUE Bien que les cartes CFast 2.0 soient généralement très rapides, leur vitesse d'écriture peut être plus lente que la vitesse de lecture. Le débit maximal varie en fonction des modèles. Pour garantir un enregistrement fiable dans la fréquence d'images de votrechoix, utilisez seulement les cartes recommendées par Blackmagic Design.
Pour insérer une carte CFast :
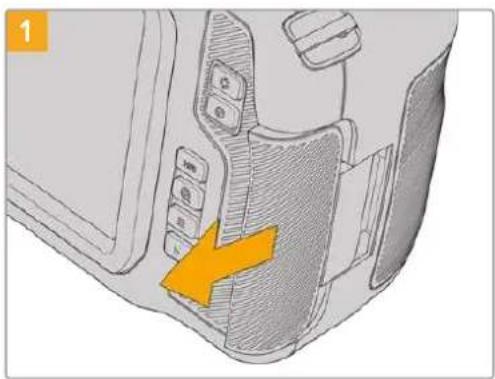
Pour acceder aux logements des supports de stockage, faites coulisser la porte située sur le cote arrriere de laamera.
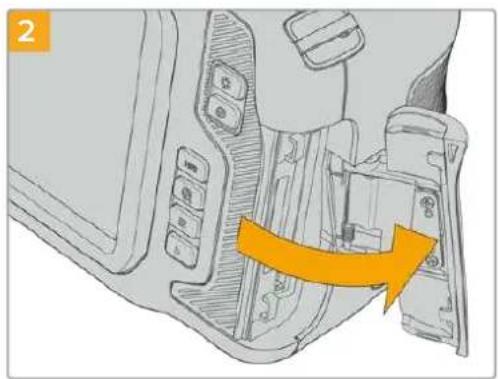
La porte à ressort s'ouvre, vous permettant d'acceder aux logements pour carte CFast et SD.

Insérez la carte CFast dans le logement pour carte CFast jusqu'à ce qu'elle s'enclenche. La carte doit pouvoir s'insérer aisément et sans force.Pour-retirer une carte CFast, appuyez délicatement dessus, puis relâchéz pour l'éjecter.
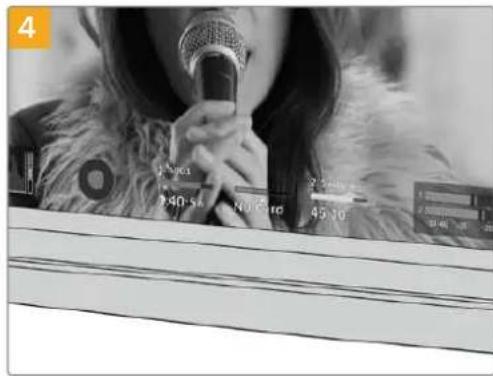
Les informations de stockage situées en bas de l'écran LCD tactile indiquent le nom de la carte et les temps d'enregistrement restant sur cette carte.
Une carte SD s'insere de la meme facon qu'une carte CFast. Pour plus d'informations, consultez « Insérer une carte SD »
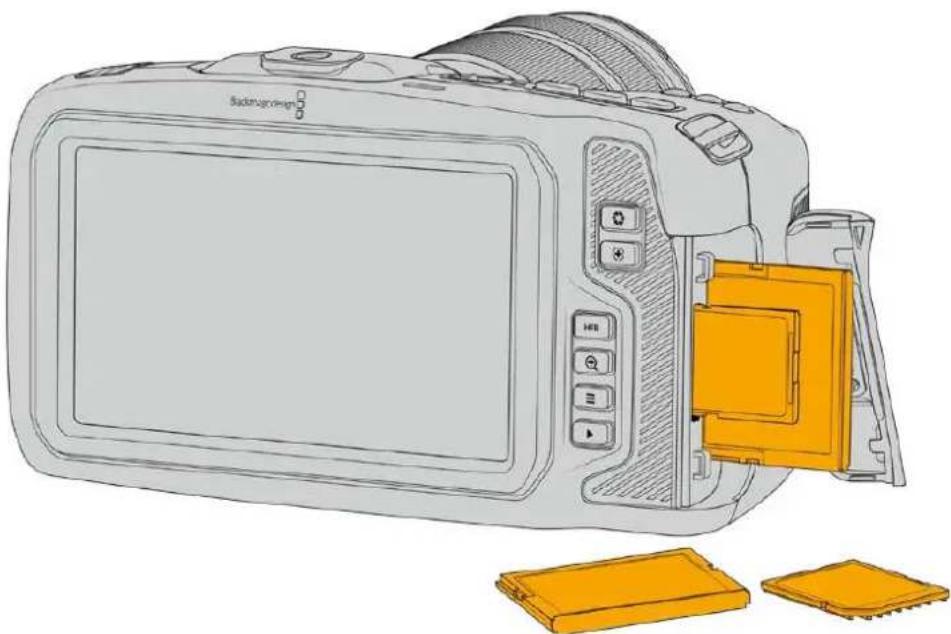
Choisir une carte CFast 2.0
Lorsque vous travailliez sur des videos dont le débit est élevé, il est primordial de vérifier le type de carte CFast que vous utilisez, car les cartes CFast 2.0 ont différentes vitesses de lecture et d'écriture.
Pour retrouver les informations les plus récentes sur les cartes CFast prises en charge par les Blackmagic Pocket Cinema Camera, consultez la page d'assistance de Blackmagic Design: www.blackmagicdesign.com/fr/support.
Cartes SD
En plus des cartes CFast 2.0, votreamera enregistre sur des cartes SD UHS-I et UHS-II haut débit. Avec les cartes SD UHS-I, vous pouvez utiliser des supports de stockage abordables lorsque vous filmez avec des formats video compressés en HD. Les cartes UHS-II plus rapides vous permettent d'enregistrer du contenu Blackmagic RAW et Ultra HD en ProRes.
Avec les cartes SD, vous pouvez utiliser des supports de stockage abordables lorsque vous filmez avec des formats video compressés en HD.
Les supports SDXC et SDHC sont très courants parmi les utilisateurs d'appareils photo et de caméras. Si vous avez déjà tourné à l'aide d'un DSLR ou avec des caméras Blackmagic Micro Cinema Camera, Pocket Cinema Camera ou avec un Blackmagic Video Assist, il est possible que vous possédiez déjà des cartes SD.
Pour les projets qui ne nécessitent pas de travailler avec des fichiers en très haute résolution ou pour les projets relativement longs, les cartes SD sont particulièrement économiques. Les cartes SD dont le stockage et le débit sont moins importants permettant également de sauvégarder et de charger des LUTs et des prérégliages.
Insérer une carte SD
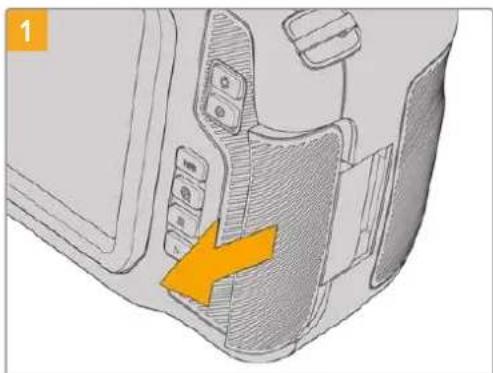
Pour acceder aux logements des supports de stockage, faites coulisser la porte située sur le cote arrête de laamera.
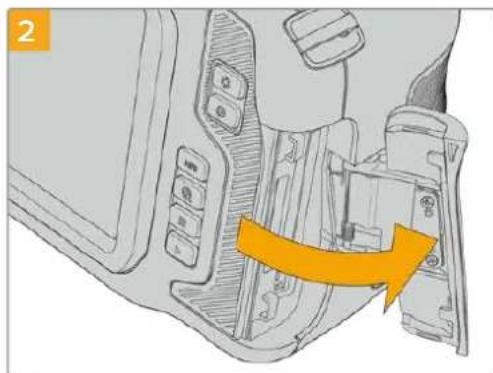
La porte à ressort s'ouvre, vous permettant d'acceder aux logements pour supports de stockage.
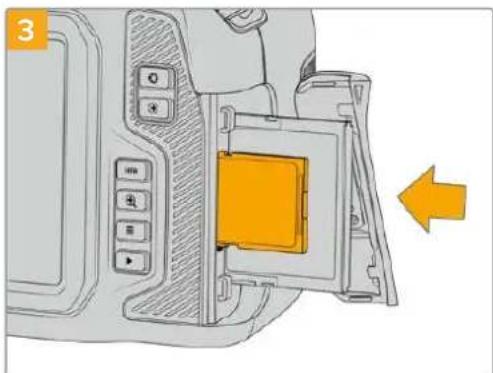
Orientez le cote de la carte SD datede de l'etiquette vers Iecran tactile et inserez la carte dans le logement pour carte SD jusqu'à ce qu'elle s'enclenche. La carte doit pouvoir s'inserer alsement et sans forcer.
Pour retirer une carte SD, appuyez delicatement dessus, puis relâchéz pour l'éjecter.
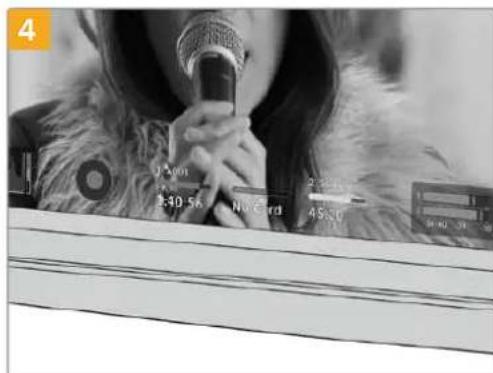
Les informations de stockage situées en bas de l'écran LCD tactile indiqueront le nom de la carte et le temps d'enregistrement restant sur cette carte.
Choisir une carte SD
Si vous enregistrez en 6K, 4K DCI ou en Ultra HD, nous recommendons d'utiliser les cartes SD UHS-II haut debit les plus performances. Il est important d'utiliser des cartes UHS-II haut debit pour l'enregistrement en 6K, 4K DCI, Ultra HD et HD, et des cartes UHS-I pour l'enregistrement en HD. Elles sont réputées pour leur debit élevé et leur grande capacité de stockage. Les cartes les plus rapides sont en général plus performances.
Avant de les utiliser, formatez les cartes SD au format HFS+ ou exFAT. La carte peut facilement etre formatee dans les parametes de stockage de laamera. Pour plus d'informations, consultez la section « Parametes » de ce manuel.
Si vous le souhaitez, vous pouvez formater vos cartes sur un ordinateur Mac ou Windows. Si vous utilisez la carte avec Mac, vous pouvez selectionner le format de disque pour Mac HFS+, également appelé Mac OS étendu.
Pour retrouver les informations les plus récentes sur les cartes SD prises en charge par les Blackmagic Pocket Cinema Camera, consultez la page d'assistance de Blackmagic Design : www.blackmagicdesign.com/fr/support.
REMARQUE Pour un enregistrement haut débit en résolution elevée, nous recommendons d'utiliser des cartes CFast 2.0 ou un disque flash externe USB-C, qui sont généralement plus rapides et qui offrent de plus grandes capacités de stockage.
Verrouiller et déverrouiller des cartes SD
En activant la protection en écriture, les cartes SD peuvent être « verrouillées » afin d'éviter d'effacer des données. Lorsque vous insérez une carte SD, veillez à ce qu'elle ne soit pas protégée en écriture. Pour désactiver la protection en écriture, déplacez le petit pouvoir en plastique situé à gauche de la carte. Vous pouvez toujours réactiver le verrouillage après l'enregistrement.

Déplacez le pouvoir pour verrouiller et déverrouiller la carte SD
Si vous insérez une carte SD verrouillée, le mot Bloquee s'affichera sur l'écran LCD tactile à la place de la durée restante de la carte et un cadenas apparaitra dans le menu des supports de stockage, à côté du nom de la carte. Si la carte est verrouillée, vous ne pourrez pas enregistrer de video, capturer d'images fixes ou exporter des LUTs et des prérégliages.

Les indicateurs de stockage situés en bas de l'écran lactile indiquent le temps d'enregistrement restant et si la carte SD est bloquée.

Appuyez sur l'indicateur de stockage en bas de l'écran LCD tactile pour ouvrir le gestionnaire de stockage.
Disques flash USB-C
La Blackmagic Pocket Cinema Camera possède un port expansion haute vitesse USB-C, qui vous permet d'enregistrer de la video sur des disques flash USB-C. Grace à ces disques rapides et à leur capacité de stockage élevé, vous pouvez enregistrer sur de longues périodes.
Une fois l'enregistrement terminé, vous pouvez directement connecter le disque à votre ordinateur pour le montage et la post-production, sans devoir effectuer de copie.
Pour connecter un disque flash USB-C :

Ouvrez la protection en caoutchouc située sur le cote gauche de la camera et connectez l'autre extrémité du cable au port USB-C.
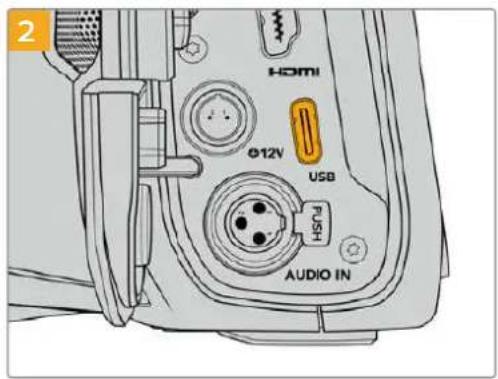
Connectez une extrémité du cable USB de type C au disque flash USB-C.
REMARQUE Lorsqu'un disque flash USB-C est connecté à votreamera, il occupe la même place que la carte SD dans le système d'exploitation de laamera. Ainsi, quand un disque flash USB-C compatible est connecté, le logement pour carte SD n'est pas disponible.
Pour utiliser le logement pour carte SD, déconnectez le disque flash USB-C de votreamera.
Choisir un disque flash USB-C rapide
Les disques flash USB-C sont concus pour offrir un stockage rapide et abordable pour de nombreux apparéls et ils sont disponibles auprès de nombreux magasins d'électronique. Toutefois, il est important de noter que la réalisation de films ne représentée qu'une partie de ce marché. C'est pourquoi vous devez vous assurer que la vitesse du disque flash USB-C est suffisante pour enregistrer de la vente en 6K et en 4K.
De nombreux disques flash USB-C sont concus pour l'informatique domestique et ne sont pas assez rapides pour enregistrer de la video en 6K et en 4K.
Pour consulter la liste la plus récente des disques flash USB-C recommends, veillez vous rendre sur www.blackmagicdesign.com/fr/support.
Remarque importante concernant la vitesse des disques flash USB-C
Certains modèles de disques flash USB-C ne sont pas capables d'enregistrer des données video à la vitesse annonée par le fabricant, car le disque compressse certaines données afin d'atteindre des vitesse d'écriture plus élevées. Cette compression des données permet uniquement de sauvégarder les données à la vitesseANNONCE PAR LE fabricANT lorsqu'il s'agit de fichiers ou de données simples, comme des données vides. Toutefois, comme les données video comprennent du bruit video et des pixels aléatoires, la compression n'offre aucun avantage et la vérable vitesse du support est révélée.
Certains disques flash USB-C peuvent avoir une vitesse d'écriture jusqu'à 50% moins elevée que celle indiquée par le fabricant, par conséquent, bien que les specifications du disque certifient qu'il est suffisamment rapide pour prendre en charge de la réserve, il se peut qu'il ne soit pas assez rapide pour enregistrer de la réserve en temps réel.
Utilisez le Blackmagic Disk Speed Test pour mesurer si vous disque flash USB-C est capable de prendre en charge la capture et la lecture de video à des vitesses élevées. Le Blackmagic Disk Speed Test utilise des données pour simuler le stockage de video, les résultats sont donc similaires à ceux que vous obtenez en capturant de la video sur un disque. Lors de nos tests, nous avons remarqué que les modèles les plus récents de disques flash USB-C, dont la capacité est plus importante, sont en général plus rapides.
L'application Blackmagic Disk Speed Test est disponible sur le Mac App Store. Les versions pour Windows et Mac sont inclues dans le Blackmagic Desktop Video, que vous pouvez télécharger à partir de la catégorie « Capture et Lecture » sur la page d'assistance technique de Blackmagic Design : www.blackmagicdesign.com/fr/support.
Préparer les supports pour l'enregistrement
Vou puez formater les cartes CFast, les cartes SD ou les disques flash USB-C depuis I'ecran de stockage et de formatage de votre camera ou via un ordinateur Mac ou Windows. Pour un résultat optimal, nous vous recommendons de formater les supports à l'aide de laamera.
Nous conseillons le format HFS+, également connu sous le nom OS X Étendu, car il prend en charge la journalisation. Les données stockées sur un support journalisé ont plus de chance d'être récapucérées si le support est endommage. Le format HFS+ est pris en charge nativelymp par Mac. Le format exFAT est pris en charge nativelymp par Mac et Windows, il n'est donc pas nécessaire d'utiliser de logiciel tiers.
Préparer un support sur la Blackmagic Pocket Cinema Camera
1 Appuyez sur un des indicateurs de stockage en bas de l'écran LCD tactile pour ouvrir le gestionnaire de stockage.
2 Sélectionnez Formater CFast ou Formater la carte SD. Si un disque flash USB-C est connecté à votreamera, appuyez sur Listedes disques, puis selectionnez le disque que vous souhaitez formater.
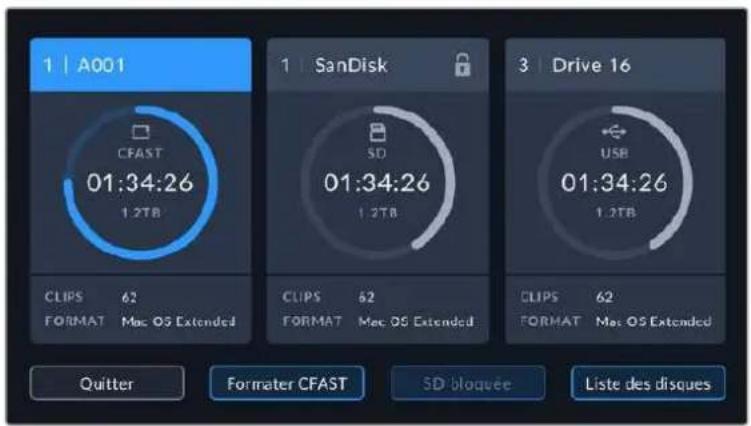
Lorsqu'un disque flash USB-C est connecté à votreamera, l'écran de stockage et de formatage affiche Formater le disque externe au lieu de Formater la carte SD.
REMARQUE Si vous camera est connectée à un hub, tel qu'un Blackmagic MultiDock, la liste des disques affichera tous les disques SSD disponibles pour votreamera. Pour selectionner le disque que vous souhaitez utiliser, appuyez sur le disque, puis sur le bouton Utiliser le disque.
3 Sélectionnez le bouton Modifier no de bobine si vous souhaitez changer manuellement le numéro de bobine. Saisissez un nouveau número de bobine à l'aide du clavier numérique, puis appuyez sur Mettre à jour pour confirmer votre choix.
4 Choisissez OS X Extended ou ExFat et appuyez sur le bouton de formatage.

Selectionnez Modifier no de bobine pour modifier manuellement le numero de bobine.
5 Un message apparaitra pour vous demander de confirmer la carte à formater, le format sélectionné et le numéro de bobine. Confirmez votre sélection en appuyant sur le bouton de formatage. Appuyez sur Annuler pour annuler le formatage.
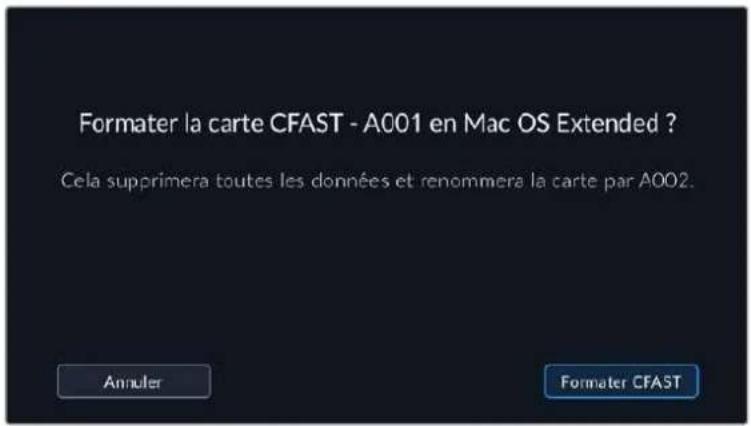
Vérifiez que vous avez sélectionné la carte appropriée avant de la formater.
6 Restez appuyé sur le bouton de formatage pendant trois secondes pour procéder au formatage de votre support.
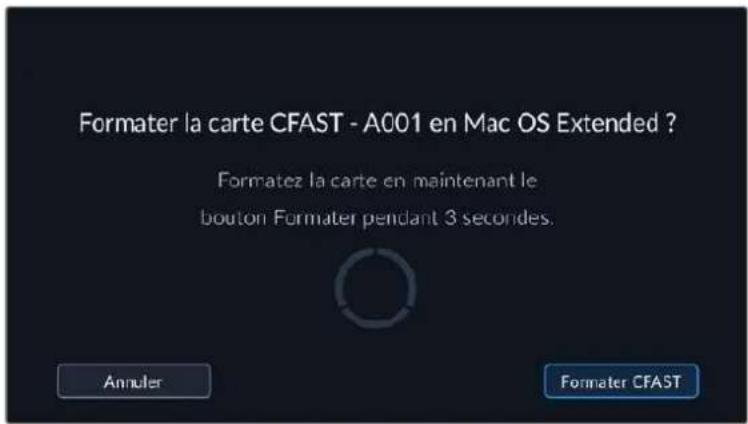
7 Laamera vous informe lorsquel formatage est effectue et que vous disque est prét, ou si le formatage a échoué.
8 Appuyez sur OK pour returner au gestionnaire de stockage.
9 Appuyez sur Quitter pour fermer le gestionnaire de stockage.
Lorsque vous formatez des cartes CFast, des cartes SD ou des disques flash USB-C depuis votre camera, le nom de laamera génére par le clap et le numero de la bobine seront utilisés pour nommer le support. Le numero de la bobine s'inclemente automatiquement à chaque fois que vous formatez une carte. Pour saisir manuellement le numero de bobine, il suffit de selectionner Modifier no de bobine afin de saisir le numero avec lequel vous souhaitez formater la carte.
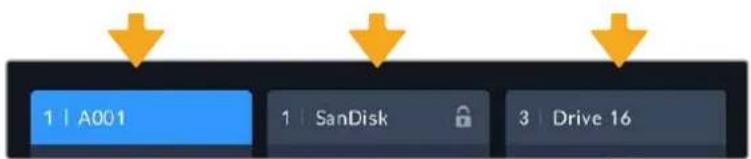
Le gestionnaire de stockage sur laamera indique si vous avez selectionné la carte CFast, la carte SD ou le disque flash USB-C.
Quand vous commencez un nouveau projet et que vous souhaitez que le numero de bobine se réinitialise sur 1, Sélectionné Réinitialiser dans l'onglet Projet du clap.
CONSEIL Si la carte SD est verrouillée, le mot Bloquée s'affichera sur l'écran LCD tactile à la place de la durée restante de la carte et un cadenas apparaitra dans le menu Stockage, à côté du nom de la carte. Déverrouillez la carte pour la formater ou pour enregistrer du contenu. Pour plus d'informations, consultez la section « Cartes SD » de ce manuel.
REMARQUE Lorsqu'un disque flash USB-C est connecté, la mention Disque externe s'affichera sur le logement de stockage 2.
Préparer le support sur Mac
Utilisez l'utilitaire de disque fourni avec Mac pour formater votre carte CFast, SD ou votre disque flash USB-C au format HFS+ ou exFAT. N'oubliez pas de sauvegarder toutes les informations importantes containues dans votre support de stockage car toutes les données seront perdues lors du formatage.
1 Connectez le support de stockage à votre ordinateur à l'aide d'un lecteur de carte et ignorez les messages proposant d'utiliser le support en tant qu'outil de sauvegarde Time Machine.
2 Allez dans le menu Applications/Utilaires et lancez l'utilitaire de disque.
3 Cliquez sur l'icone représentant le support de stockage de laamera, puis cliquez sur l'onglet Effacer.
4 Choisissez le format Mac OS etendu (journalise) ou exFAT.
5 Saisissez un nom pour le nouveau volume, puis cliquez sur Effacer. Le support de stockage de votreamera sera rapidement formate et pret a etre utilise.

Utilisez l'utilitaire de disque fourni avec Mac pour formater votre carte CFast, SD ou votre disque flash USB-C au format HFS+ ou exFAT. N'publicez pas de sauvegarder toutes les informations importantes containues sur toute support, car toutes les données seront perdues lors du formatage.
Préparer le support sur Windows
La boite de dialogue Formater permet de formater un support en exFAT sur un ordinateur Windows. N'oubliez pas de sauevagerter toutes les informations importantes containes dans votre support de stockage car toutes les données seront perdues lors du formatage.
1 Connectez le support de stockage de votreamera à votre ordinateur à l'aide d'un lecteur/graveur externe, d'un disque flash USB-C ou d'un adaptateur.
2 Ouvrez le menu Demarrer ou l'écran d'accueil et choisissez l'option Ordinateur. Faites un clic droit sur le support de stockage de votreamera.
3 Cliquez sur Formater a partir du menu contextualuel.
4 Configurez le système de fichiers sur exFAT et la taille d'unité d'allocation sur 128 Kb.
5 Saisissez un nom de volume, selectionnez l'option Formatage rapide puis cliquez sur Demarrez.
6 Voitr support de stockage sera rapidement formate et pret a etre utilise.
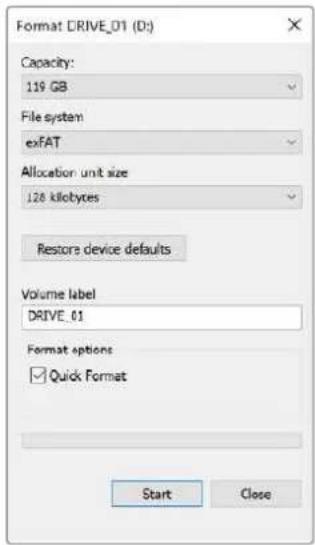
Utilise la boite de dialogue Formater sous Windows pour formater le support de stockage de votreamera en exFAT.
REMARQUE En cas de perte d'images pendant l'enregistrement, vérifie que la carte ou le disque que vous utilisez figure dans la liste des supports recommandés, en fonction du codec et du format d'image sélectionnés. Pour les faibles débits, réduisez la fréquence d'images et la résolution, ou utilisez un codec compressé, par exemple le codec ProRes. Veuiliez consulter le site Internet de Blackmagic Design sur www.blackmagicdesign.com/fr pour être informés des dernières nouvelles.
REMARQUE Il est possible d'utiliser des supports de stockage partitionnés avec la Blackmagic Pocket Cinema, toute fois laamera ne reconnaître que la première partition pour l'enregistrement et la lecture.
Veuillez notes que si vous formatez le support depuis le menu de stockage et de formatage, la totalité du support et toutes les partitions seront effacées, même celles que vous n'avez pas utilisées pour l'enregistrement et la lecture. Nous vous recommendons donc vivement d'utiliser des supports de stockage avec une seule partition.
Enregistrement
Enregistrer des clips
La Blackmagic Pocket Cinema Camera possede deux boutons d'enregistrement. Le premier bouton, situé sur le haut de la poignee de la camera, vous permit de déclencher l'enregistrement avec votre index lorsque vous tenez la poignee de la camera avec votre main droite.
Le second bouton est situé à l'avant de laamera de manière à pouvoir vous auto-enregistrer avec une seule main. C'est idéal si vous souhaitez vous filmer pour un blog video par exemple.
Appuyez sur un des boutons d'enregistrement de votreamera pour démarrer l'enregistrement immédiatement. Appuyez de nouveau sur un des boutons pour arrêtier l'enregistrement.

Bouton d'enregistrement supérieur
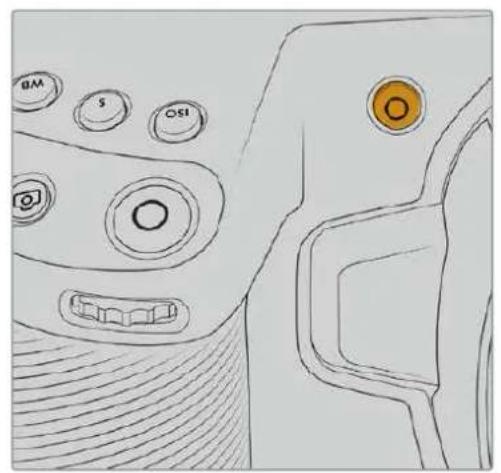
Bouton d'enregistrement avant
Avant d'enregistrer, appuyez sur le nom du support de stockage en bas de l'écran pour sélectionner la carte mémoire ou le disque flash USB-C de votrechioix. La barre du support sélectionné devient bleue pour vous informer que laamera enregistrdera sur ce support. Pour enregistrer sur une autre carte ou disque, restez appuyé sur le nom du support. La barre devient rouge lorsque laamera enregistrre.
Choisir le format d'enregistrement
La Blackmagic Pocket Cinema Camera enregistré en Apple ProRes 422 HQ, ProRes 422, ProRes 422 LT et ProRes 422 Proxy. Les codecs ProRes you permitent d'enregistrer davantage de videos sur une carte SD, CFast, ou un disque flash USB-C. Le format ProRes 422 HQ fournit une video de très haute qualite légarement compressée. Le format ProRes 422 Proxy offre quant à lui un temps d'enregistrement plus long avec une compression plus importante. Voteamera prend également en charge l'enregistrement en Blackmagic RAW. N'hésitez pas à essayer différents formats pour voir celui qui répond le mistrs à vos besoins.
Veuillez noter que la Blackmagic Pocket Cinema Camera peut utiliser le Blackmagic RAW pour les formats de capteur en mode Full et Window, et qu'elle doit utiliser le ProRes pour les formats redimensionnés.
Pour plus d'informations sur les formats Window et redimensionnés, veuillez consulter la section « Fréquences d'images maximales du capteur »
Blackmagic RAW
La Blackmagic Pocket Cinema Camera prend en charge le format Blackmagic RAW. Ce format offre une qualité d'image supérieure, une plage dynamique étendue et une large seLECTION de ratios de compression. Grace au Blackmagic RAW, vous bénéficiaz de tous les avantages de l'enregistrement en RAW. Toutefois, les fichiers sont très rapides, car la majorité du traitement est effectué dans laamera, où il subit une accelération matérielle.
Le Blackmagic RAW comprend également une prise en charge des métadonnées performante, qui permet de transmettre les paramétres de laamera au logiciel de lecture des fischiers. Si vous n'avez que très peu de temps pour le montage et l'étalonnage, vous pouvez tourner en mode video et les images seront affichées dans ce mode lorsque vous ouvrez le fjchier dans le logiciel. Toutefois, en réalité, le fjchier est en mode film. Ce sont les métadonnées du fjchier qui communiquent au logiciel d'appliquer le mode video.
Ainsi, si vous souhaitez etalonnner les images ulterieurement, la plage dynamique est conserved dans le fichier. Les images ne seront pas ecretees dans les hautes et les basses lumieres, les details seront donc preservés et vous pourrez proceder à l'etalonnage pour leur donner un rendu cinematographique. Toutefois, si vous n'avez pas suffisamment de temps pour l'etalonnage, ce n'est pas grave, car le mode video sera appliqué aux images et elles auront ainsi le même rendu que celles des cameras video standard. C'est donc une solution très polyvalente qui vous permet de changer d'avis durant la post-production.
Les fichiers Blackmagic RAW sont très rapides et ce codec est optimise pour le CPU et le GPU de votre ordinateur. Ainsi, la lecture est fluide et les décodeurs matériels ne sont pas nécessaires, ce qui est important lorsque vous utilisez un ordinateur portable. Le logiciel qui lit le Blackmagic RAW bénéficiaie également du traitement via Apple Metal, Nvidia CUDA et OpenCL.
Cela signifie que le Blackmagic RAW lit le fjichier à une vitesse normale, comme un fjichier video sur la plupart des ordinateurs, sans avoir à le mettre en cache ou à baiser la résolution.
De plus, les informations de l'objet de chaque image sont enregistrées dans les métadonnées. Par exemple, lorsque vous utilisez des objectifs compatibles, toutes les modifications de zoom et demise au point effectuees durant le clip seront sauvegardees, image par image, dans les données du fichier Blackmagic RAW.
Enregister en Blackmagic RAW
Le Blackmagic RAW fonctionne de deux façon différentes. Vous pouvez désir un codec à débit constant, ou un codec à qualité constante.
Le codec a débit constant fonctionne à peu pres de la même façon que la plupart des codecs. Son role est de maintainir le débit de données à un taux constant sans le laisser trop augmenter. Ainsi, lorsque vous tournez une image complexe qui utilise plus de données pour le stockage, le codec a débit constant compressse davantage l'image pour qu'elle corresponde à l'espace qui lui est attribué.
Cela ne pose en général pas de problème avec les codecs video. Toutefois, lorsque vous tournez en Blackmagic RAW, il faut pouvoir garantir une certaine qualite. Que se passerait-il si les images filmées avaient besoin de plus de données, mais que le codec les compressait davantage pour atteindre un débit spécifique? Vous perdriez surement en qualite et vous ne le remarqueriez peut-etre qu'après le tournage.
Pour résoudre ce problème, le Blackmagic RAW propose également un codec appelé qualité constante. Techniquement, ce codec est un codec à débit variable, car il permet à la taille du fjichier d'augmenter lorsque les images ont besoin de plus de données. Il n'y a pas de limite supérieure à la taille de fjichier lorsque vous doivent encoder une image en conservant sa qualité.
Ainsi, quand le Blackmagic RAW est reglé sur le paramètre de qualité constante, la taille de fichier peut augmenter autant qu'il le faut pour encoder les images. Les fichiers sont donc plus ou moins volumineux selon les images tournées.
Les noms des paramètres du Blackmagic RAW ont été choisis d'après des reprises techniques. Par exemple, lorsque que le code à débit constant est sélectionné, vous aurez accès aux paramètres de qualité 3:1, 5:1, 8:1 et 12:1. Ce sont les rapportés entre la taille de fichier du format RAW non compressé et celle du format Blackmagic RAW. La compression 3:1 est de manière qu'elle car le fichier est plus volumineux, tandis que 12:1 est de moins bonne qualité car le fichier est plus petit. Toutefois, de nombreux utilisateurs du Blackmagic RAW n'ont vu aucun problème de qualité avec le format 12:1. Le plus judicieux est d'essayer plusieurs paramètres pour voir celui qui vous convient le mieux.
Les paramétres de qualité constante du Blackmagic RAW sont Q0, Q1, Q3 et Q5. Ce sont les paramétres de compression appliqués au codec. Ce réglage est différent car le codec traite le débit constant et la qualité constante de façon différente. En ce qui concerne la qualité constante, la taille de fichier peut varier selon les prises.
Paramètres du début constant
Ces paramètres sont 3:1, 5:1, 8:1 et 12:1. Ils représentent le ratio de compression. Par exemple, la compression 12:1 produit une taille de fichier environ 12 fois plus petite que le format RAW non compressé.
Paramètres de qualité constante
Q0 et Q5 font reference aux différents taux de quantification. Q5 a un taux de quantification plus élevé, mais offre un meilleur début de données. Comme nous l'avons mentionnéAAParavant, le paramètre de qualité constante peut creer des fichiers plus au moins grands selon les prises. Il est donc possible que la taille d'une prise soit plus grande que l'espace disponible sur votre support, ce qui peut provoquer une perte d'images. L'avantage est que vous pouvez instantanément le voir sur le tournée et donc decideur parametre le plus approprié.
Blackmagic RAW Player
Le lecteur Blackmagic RAW, fourni avec le programme d'installation du logiciel de laamera, est une application qui permet de revoir les clips. Il suffit de double-cliquer sur un fichier Blackmagic RAW pour l'ouvrir. Vous pouvez ensuite le dire et le faire défiler en pleine résolution et profondeur de bits.
Lors du décodage des images, l'accelération CPU de la bibliothèque du SDK prend en charge la plupart des architectures, ainsi que l'accelération GPU via Apple Metal, Nvidia CUDA et OpenCL. Elle fonctionne également avec le Blackmagic eGPU, si vous souhaitez une solution encore plus performante. Le lecteur Blackmagic RAW est disponible pour Mac, Windows et Linux.
Fichiers sidecar
Les fichiers sidecar du Blackmagic RAW priment sur les métadonnées intégrées au fichier sans toutefois les écraser. Ces métadonnées comprend les paramètres Blackmagic RAW ainsi que des informations sur l'iris, la mise au point, la distance focale, la balance des blancs, la teinte, l'espace colorimétrique, le nom du projet, le numéro de la prise et autres. Les métadonnées sont encodées image par image sur toute la durée du clip, ce qui est important pour les données de l'objet, si celui-ci a été ajusté durant la prise. Vous pouvez ajouter ou modifier les métadonnées des fichiers sidecar avec DaVinci Resolve ou avec un editor de texte, car il s'agit d'un format lisible par l'homme.
Les fichiers sidecar peuvent être utilisés pour ajouter automatiquement de nouveaux paramètres Blackmagic RAW à la lecture. Pour ce faire, il suffit de déplacer le fichier sidecar dans le dossier du fichier Blackmagic RAW correspondant. Si vous retirez le fichier sidecar du dossier et que vous ouvrez à nouveau le fichier Blackmagic RAW, les paramètres modifiés ne seront pas appliqués et vous verrez le fichier tel qu'il a été initialement filmé. Tout logiciel qui utilise le SDK Blackmagic RAW peut acceder à ces paramètres. Les changements apportés seront sauvégardés dans le fichier sidecar et pourront être lus par le Blackmagic RAW Player ou par tout autre logiciel capable de dire les fichiers Blackmagic RAW.
Lorsque vous tournez en mode video, le fjichier reste en mode film, et les métadonnées ordonnent au traitement Blackmagic RAW d'afficher les images en mode video. Le mode video est parfait lorsque vous ne poulez pas étabonnier les images et que vous doivent livrerrapidement le contenu. Toutefois, si vous souhaitez augmenter les basses lumières ou réduire les hautes lumières de l'image, tous les détails sont conservés. La video ne sera jamais écrêtée et les détails seront réservés si vous souhaitez y acceder ultérieurement.
Blackmagic RAW dans DaVinci Resolve
Les paramètres de tous les fichiers Blackmagic RAW peuvent être ajustés, puis sauvégardés en tant que nouveau fichiersidecar à partir de l'onglet Camera RAW de DaVinci Resolve afin de creator des effets créats ou d'optimiser la visualisation. Vous pouvez ainsi copier vos medias pour un autre utiliseur DaVinci Resolve affirm qu'il ait automatiquement accès aux paramètres gamma modifiés lors de l'importation. En plus des autres métadonnées contenues dans les fichiers de la camera, DaVinci Resolve peut dire la plage dynamique sélectionnée, affirm que les clips soient automatiquement affichés en mode Film, Extended Video ou Video dans DaVinci Resolve.
Vouss pouvez ensuite personneliser ces paramétres en ajustant la saturation, le contraste et les moyennes lumières, ainsi que le roll-off des hautes et des basses lumières. Les ajustements peuvent ensuite être sauvégardés en tant que fichier sidecar. Les changements peuvent donc être visualisés par tous les utilisateurs qui travaillent sur ces fichiers en post. Vous pouvez à tout moment revenir aux métadonnées originales de laamera.
Il est également possible d'exporter une seule image Blackmagic RAW à partir de l'onglet Caméra RAW de DaVinci Resolve, qui contient toutes les informations concernant les ajustements, les métadonnées, la pleine résolution et les couleurs. Il est donc facile de partager les références d'une image ou d'un filchier avec d'autres utilisateurs.
Pour plus d'informations sur la façon d'utiliser le Blackmagic RAW dans DaVinci Resolve, consultez le chapitre « Utiliser DaVinci Resolve » de ce manuel.
Kit de développement logiciel Blackmagic RAW
Le kit de développement logiciel Blackmagic RAW est une API développée par Blackmagic Design. Vous pouze utiliser le SDK Blackmagic RAW afin d'écrites vos propres applications pour le format Blackmagic RAW. La bibliothèque du SDK offre aux développpeurs une prise en charge de la lecture, de la modification et de l'enregistrement des fischiers Blackmagic RAW. comme le SDK Blackmagic RAW intégre la colorimétrie de 5e génération, vous pouze obtaining des images cinematographiques naturelles avec toutes les applications qui la supportent. Le SDK Blackmagic RAW est compatible avec Mac, Windows et Linux. Il est disponible gratuite sur la page Développèurs du site web de Blackmagic : www.blackmagicdesign.com/fr/developer
Le schéma suivant illustrer les composants de l'API Blackmagic RAW :
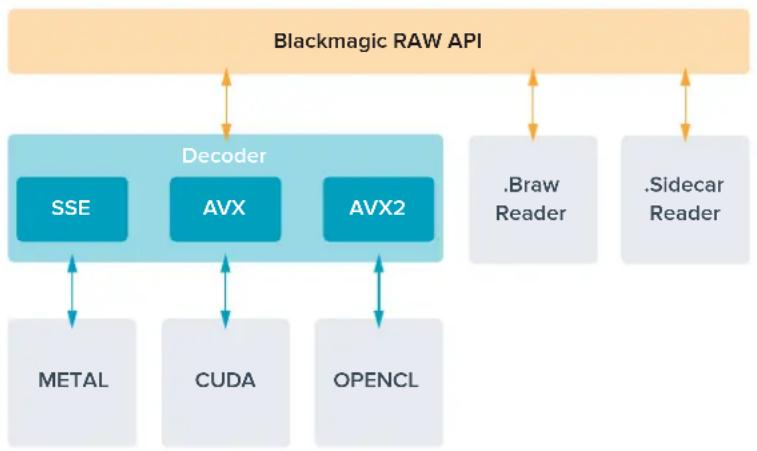
Fréquences d'images maximales du capteur
Fréquences d'images maximales du capteur de la Blackmagic Pocket Cinema Camera 6K Pro et de la Pocket Cinema Camera 6K G2
| Résolution Codec | Mode du capteur | Fréquence d'images max. | ||
| 6K | 6144 x 3456 | Blackmagic RAW | Full | 50 |
| 6K 2.4:1 | 6144 x 2560 | Blackmagic RAW | Window | 60 |
| 5.7K 17:9 | 5744 x 3024 | Blackmagic RAW | Window | 60 |
| 4K DCI | 4096 x 2160 Blackmagic RAW Window 60 | |||
| 4096 x 2160 ProRes | 422 HQ Redimensionné depuis 5.7K 60 | |||
| 4096 x 2160 ProRes | 422 Redimensionné depuis 5.7K 60 | |||
| 4096 x 2160 ProRes | 422 LT Redimensionné depuis 5.7K 60 | |||
| 4096 x 2160 | ProRes 422 Proxy | Redimensionné depuis 5.7K | 60 | |
| Ultra HD | 3840 x 2160 | ProRes 422 HQ | Redimensionné depuis Full | 50 |
| 3840 x 2160 | ProRes 422 | Redimensionné depuis Full | 50 | |
| 3840 x 2160 | ProRes 422 LT | Redimensionné depuis Full | 50 | |
| 3840 x 2160 | ProRes 422 Proxy | Redimensionné depuis Full | 50 | |
| 3840 x 2160 ProRes | 422 HQ Redimensionné depuis 5.7K 60 | |||
| 3840 x 2160 ProRes | 422 Redimensionné depuis 5.7K 60 | |||
| 3840 x 2160 ProRes | 422 LT Redimensionné depuis 5.7K 60 | |||
| 3840 x 2160 | ProRes 422 Proxy | Redimensionné depuis 5.7K | 60 | |
| 3.7K anamorphique | 3728 x 3104 | Blackmagic RAW | Window | 60 |
| 2.8K 17:9 | 2868 x 1512 | Blackmagic RAW | Window | 120 |
| HD | 1920 x 1080 | ProRes 422 HQ | Redimensionné depuis Full | 50 |
| 1920 x 1080 | ProRes 422 | Redimensionné depuis Full | 50 | |
| 1920 x 1080 | ProRes 422 LT | Redimensionné depuis Full | 50 | |
| 1920 x 1080 | ProRes 422 Proxy | Redimensionné depuis Full | 50 | |
| 1920 x 1080 | ProRes 422 HQ Redimensionné depuis 5.7K 60 | |||
| 1920 x 1080 | ProRes 422 | Redimensionné depuis 5.7K | 60 | |
| 1920 x 1080 | ProRes 422 LT | Redimensionné depuis 5.7K | 60 | |
| 1920 x 1080 | ProRes 422 Proxy | Redimensionné depuis 5.7K | 60 | |
| 1920 x 1080 | ProRes 422 HQ | Redimensionné depuis 2.7K | 120 | |
| 1920 x 1080 | ProRes 422 | Redimensionné depuis 2.7K | 120 | |
| 1920 x 1080 | ProRes 422 LT | Redimensionné depuis 2.7K | 120 | |
| 1920 x 1080 | ProRes 422 Proxy | Redimensionné depuis 2.7K | 120 | |
Fréquences d'images maximes du capteur de la Blackmagic Pocket Cinema Camera 4K
| Résolution Codec | Mode du capteur | Fréquence d'images max. | ||
| 4K DCI | 4096 x 2160 Blackmagic RAW Full 60 | |||
| 4096 x 2160 ProRes | 422 HQ Full 60 | |||
| 4096 x 2160 ProRes | 422 Full 60 | |||
| 4096 x 2160 ProRes | 422 LT Full 60 | |||
| 4096 x 2160 ProRes | 422 Proxy Full 60 | |||
| 4K 2.4:1 | 4096 x 1720 | Blackmagic RAW | Window | 75 |
| Ultra HD | 3840 x 2160 Blackmagic RAW Window 60 | |||
| 3840 x 2160 ProRes | 422 HQ Window 60 | |||
| 3840 x 2160 ProRes | 422 Window 60 | |||
| 3840 x 2160 ProRes | 422 LT Window 60 | |||
| 3840 x 2160 ProRes | 422 Proxy Window 60 | |||
| 2.8K anamorphique | 2880 x 2160 | Blackmagic RAW | Window | 80 |
| 2.6K 16:9 | 2688 x 1512 | Blackmagic RAW | Window | 120 |
| HD | 1920 x 1080 | ProRes 422 HQ | Redimensionné depuis Full | 60 |
| 1920 x 1080 | ProRes 422 | Redimensionné depuis Full | 60 | |
| 1920 x 1080 | ProRes 422 LT | Redimensionné depuis Full | 60 | |
| 1920 x 1080 | ProRes 422 Proxy | Redimensionné depuis Full | 60 | |
| 1920 x 1080 | ProRes 422 HQ | Redimensionné depuis 2.6K | 120 | |
| 1920 x 1080 | ProRes 422 | Redimensionné depuis 2.6K | 120 | |
| 1920 x 1080 | ProRes 422 LT | Redimensionné depuis 2.6K | 120 | |
| 1920 x 1080 | ProRes 422 Proxy | Redimensionné depuis 2.6K | 120 | |
| 1920 x 1080 | Blackmagic RAW | Window | 120 | |
| 1920 x 1080 | ProRes 422 HQ | Window | 120 | |
| 1920 x 1080 | ProRes 422 Window 120 | |||
| 1920 x 1080 | ProRes 422 LT | Window | 120 | |
| 1920 x 1080 | ProRes 422 Proxy | Window | 120 |
REMARQUE La zone de capteur du format 2.6K 16:9 est optimisée avec les objectifs Super 16mm et les fréquences d'images élevées.
Durée d'enregistrement
Les tableaux ci-dessous indiquent les durées approximatives d'enregistrement en minute et seconde en fonction du format, de la fréquence d'images et de la taille du support de stockage. Veuillez notes que les résolutions et codecs disponibles diffèrent selon les modèles de Pocket Cinema Camera.
La duréeemax d'enregistrement d'un support dépend de la capacité de stockage de la carte CFast, de la carte SD ou du disque flash USB-C, mais également du format et de la fréquence d'images sélectionnés. Par exemple, le débit d'un format Apple ProRes 422 HQ à 3840 x 2160 est approximativement de 880 Mbps. Pour un enregistrement à 24 images par seconde, il est possible
d'enregistrer une video de 47 minutes sur une carte CFast 2.0 d'une taille de 256GB. Avec le même nombre d'images par seconde, il est possible d'enregistrer une video de 23 minutes sur une carte CFast de 128GB (environ la moitié de la durée d'enregistrement qu'offre une carte de 256GB).
Il est important de noter que les durées des supports de stockage peuvent varier légèrement en fonction des marques. Les durées varient également en fonction du formatage du support (exFat ou Mac OS X Extended).
Les scènes ne comportant pas trop de détails nécessitant moins de données que les scènes complexes. Les valeurs indiquées dans ces tableaux supposent que vous filmez des scènes complexes. Le temps d'enregistrement pourra donc être plus ou moins long en fonction de la complexité des scènes.
6K
| Carte CFast | Fréquence d'Images | Blackmagic RAW 3:1 | Blackmagic RAW 5:1 | Blackmagic RAW 8:1 | Blackmagic RAW 12:1 |
| 256GB | Durée Durée | Durée Durée | |||
| 23.98 17 min | 28 min 45 min | 67 min | |||
| 24 17 min 28 min | min 45 min | 67 min | |||
| 25 16 min 27 min | min 43 min | 64 min | |||
| 30 13 min 22 min | min 36 min | 54 min | |||
| 50 8 min 13 min | min 21 min | 32 min |
6K 2.4:1
| Carte CFast | Fréquence d'Images | Blackmagic RAW 3:1 | Blackmagic RAW 5:1 | Blackmagic RAW 8:1 | Blackmagic RAW 12:1 |
| 256GB | Durée Durée | Durée Durée | |||
| 23.98 min | 38 min 60 min | min 91 min | |||
| 24 22 min | 38 min 60 min | 91 min | |||
| 25 21 min | 36 min 58 min | 87 min | |||
| 30 18 min | 30 min 48 min | 72 min | |||
| 50 11 min | min 29 min | 43 min | |||
| 60 9 min | min 24 min | 36 min |
5.7K 17:9
| Carte CFast | Fréquence d'Images | Blackmagic RAW 3:1 | Blackmagic RAW 5:1 | Blackmagic RAW 8:1 | Blackmagic RAW 12:1 |
| 256GB | Durée Durée | Durée Durée | |||
| 23.98 min | 34 min 55 min | 82 min | |||
| 24 20 min | min 55 min | 82 min | |||
| 25 19 min | min 52 min | 79 min | |||
| 30 16 min | min 44 min | 66 min | |||
| 50 10 min | 16 min 26 min | 39 min | |||
| 60 8 min | min 22 min | 33 min |
4K DCI
| Carte CFast | Fréquence d'images | Blackmagic RAW 3:1 | Blackmagic RAW 5:1 | Blackmagic RAW 8:1 | Blackmagic RAW 12:1 | ProRes 422 HQ | ProRes 422 | ProRes 422 LT | ProRes 422 Proxy |
| 256GB | Durée Durée | Durée Durée | Durée Durée | Durée Durée | |||||
| 23.98 | 39 min | 65 min | 104 min | 155 min | 44 min | 66 min | 95 min | 216 min | |
| 24 39 min 65 min 103 min | 155 min 44 min | min 66 min | 95 min 216 min | ||||||
| 25 | 37 min | 62 min | 99 min | 149 min | 42 min | 64 min | 91 min | 207 min | |
| 30 | 31 min | 52 min | 83 min | 124 min | 35 min | 53 min | 76 min | 173 min | |
| 50 | 18 min | 31 min | 49 min | 74 min | 21 min | 32 min | 45 min | 104 min | |
| 60 | 15 min | 26 min | 41 min | 62 min | 17 min | 26 min | 38 min | 87 min |
4K 2.4:1
| Carte CFast | Fréquence d'Images | Blackmagic RAW 3:1 | Blackmagic RAW 5:1 | Blackmagic RAW 8:1 | Blackmagic RAW 12:1 |
| 256GB | Durée Durée | Durée Durée | |||
| 23.98 | 50 min | 84 min | 134 min | 200 min | |
| 24 50 min 84 min 134 min | 200 min | ||||
| 25 48 min 80 min 128 min | 192 min | ||||
| 30 | 40 min | 67 min | 107 min | 160 min | |
| 50 | 24 min 40 min | 64 min 96 min | |||
| 60 | 20 min 33 min | 54 min 80 min | |||
| 75 16 min | 27 min 43 min | 64 min | |||
| 80 | 16 min | 26 min | 40 min | 60 min | |
ULTRA HD
| Carte CFast | Fréquence d'images | Blackmagic RAW 3:1 | Blackmagic RAW 5:1 | Blackmagic RAW 8:1 | Blackmagic RAW 12:1 | ProRes 422 HQ | ProRes 422 | ProRes 422 LT | ProRes 422 Proxy |
| 256GB | Durée Durée | Durée Durée | Durée Durée | Durée Durée | |||||
| 23.98 | 41 min | 68 min | 110 min | 164 min | 47 min | 71 min | 101 min | 230 min | |
| 24 | 41 min | 68 min | 109 min | 164 min | 47 min | 71 min | 101 min | 230 min | |
| 25 | 39 min | 66 min | 105 min | 157 min | 45 min | 68 min | 97 min | 221 min | |
| 30 | 33 min | 55 min | 88 min | 131 min | 38 min | 57 min | 81 min | 184 min | |
| 50 | 19 min | 33 min | 52 min | 79 min | 22 min | 34 min | 48 min | 111 min | |
| 60 | 16 min | 27 min | 44 min | 66 min | 18 min | 28 min | 40 min | 92 min |
3.7K anamorphique
| Carte CFast | Fréquence d'images | Blackmagic RAW 3:1 | Blackmagic RAW 5:1 | Blackmagic RAW 8:1 | Blackmagic RAW 12:1 |
| 256GB | Durée Durée | Durée Durée | |||
| 23.98 min | 51 min 82 min | 123 min | |||
| 24 31 min 51 | min 82 min 1 | 23 min | |||
| 25 29 min 49 | min 79 min | 118 min | |||
| 30 24 min 41 | min 65 min | 98 min | |||
| 50 15 min 24 | min 39 min | 59 min | |||
| 60 12 min 20 | min 33 min | 49 min |
2.8K anamorphique
| Carte CFast | Fréquence d'Images | Blackmagic RAW 3:1 | Blackmagic RAW 5:1 | Blackmagic RAW 8:1 | Blackmagic RAW 12:1 |
| 256GB | Durée Durée | Durée Durée | |||
| 23.98 | 57 min | 95 min | 151 min | 226 min | |
| 24 | 57 min | 95 min | 151 min | 226 min | |
| 25 54 min | 91 min 145 min | 217 min | |||
| 30 45 min | 76 min 121 min | 181 min | |||
| 50 27 min | 45 min 73 min | 109 min | |||
| 60 22 min | 38 min 61 min | 91 min | |||
| 80 17 min | 28 min 45 min | 68 min |
2.8K 17:9
| Carte CFast | Fréquence d'images | Blackmagic RAW 3:1 | Blackmagic RAW 5:1 | Blackmagic RAW 8:1 | Blackmagic RAW 12:1 |
| 256GB | Durée Durée | Durée Durée | |||
| 23.98 81 min | 136 min 216 | min 321 | min | ||
| 24 81 min 135 | min 215 min | 320 min | |||
| 25 | 78 min | 130 min | 207 min | 308 min | |
| 30 | 65 min | 108 min | 173 min | 258 min | |
| 50 | 39 min | 65 min | 104 min | 156 min | |
| 60 32 min 54 | min 87 min | 130 min | |||
| 120 | 16 min 27 min | 43 min 65 | min |
2.6K 16:9
| Carte CFast | Fréquence d'images | Blackmagic RAW 3:1 | Blackmagic RAW 5:1 | Blackmagic RAW 8:1 | Blackmagic RAW 12:1 |
| 256GB | Durée Durée | Durée Durée | |||
| 23.98 87 min | 144 min | 230 min | 342 min | ||
| 24 87 min | 144 min | 229 min | 342 min | ||
| 25 83 min | 138 min | 220 min | 328 min | ||
| 30 69 min | 115 min | 184 min | 275 min | ||
| 50 | 41 min | 69 min | 111 min | 166 min | |
| 60 34 min | 58 min | 92 min | 138 min | ||
| 120 17 min | 29 min | 46 min | 69 min |
HD
| Carte CFast | Fréquence d'Images | Blackmagic RAW 3:1 | Blackmagic RAW 5:1 | Blackmagic RAW 8:1 | Blackmagic RAW 12:1 | ProRes 422 HQ | ProRes 422 | ProRes 422 LT | ProRes 422 Proxy |
| 256GB | Durée Durée | Durée Durée | Durée Durée | Durée Durée | |||||
| 23.98 | 159 min | 264 min | 418 min | 619 min | 189 min | 283 min | 403 min | 877 min | |
| 24 | 159 min | 264 min | 418 min | 618 min | 189 min | 283 min | 403 min | 877 min | |
| 25 | 153 min | 253 min | 402 min | 595 min | 182 min | 271 min | 387 min | 843 min | |
| 30 | 127 min | 212 min | 336 min | 499 min | 152 min | 227 min | 324 min | 710 min | |
| 50 | 76 min | 127 min | 203 min | 303 min | 91 min | 137 min | 196 min | 434 min | |
| 60 | 64 min | 106 min | 170 min | 254 min | 76 min | 114 min | 163 min | 363 min | |
| 120 | 32 min | 54 min | 87 min | 130 min | 38 min | 57 min | 82 min | 185 min |
REMARQUE Veuillez notes que le Blackmagic RAW est disponible pour les formats d'enregistrement qui utilisent le capteur en mode Full ou Window. Pour tous les formats redimensionnés, Sélectionné un codec ProRes.
Les formats 6K, 6K 2.4:1, 5.7K 17:9, 4K DCI, 3.7K anamorphique et 2.8K 17:9 sont disponibles sur les Pocket Cinema Camera 6K Pro et 6K G2 et ils utilisent le codec Blackmagic RAW. Ces cameras opèrent avec le ProRes pour le 4K DCI, l'Ultra HD et la HD.
Les formats 4K 2.4:1, 2.8K anamorphique et 2.6K 16:9 sont uniquement disponibles sur la Pocket Cinema Camera 4K et ils utilisent le codec Blackmagic RAW. La Pocket Cinema Camera 4K utilise le codec Blackmagic RAW ou ProRes pour le 4K DCI, l'Ultra HD et la HD.
Les paramétres de qualité constante Q0 et Q5 afficheront des durées d'enregistrement restantes variables. La durée estimée pour le Q0 estsemblable à celle du début constant 3:1. Le Q5 affichera quant à lui une durée semblable à celle du 12:1, Toutefois, comme la durée estimée se met à jour toutes les 10 secondes pendant l'enregistrement, la meilleure façon de mesurer la durée d'enregistrement à disposition est d'enregistrer pendant 20 secondes, puis de vérifier la durée dans la zone medias de l'écran tactile.
Choisir la fréquence d'images
Votre camera peut filmer à différentes fréquences d'images et il est important de savoir laquelle est la plus adaptée à votre projet.
Lorsque l'on可以选择 une fréquence d'images, il y a plusieurs éléments à prendre en compte. En effet, depuis plusieurs années, il existe des normes établies pour le cinema et la télévision. Ces normes peuvent varier selon les pays mais elles partagent le même objectif; afficher un nombre d'images par seconde optimal qui permette aux spectateurs d'apprecier le mouvement des images.
Par exemple, pour le cinema on utilise 24 images par seconde. Bien que, récemment, certains contenus aient été filmés à des fréquences d'images plus rapides, 24 images par seconde resté la norme pour le public international.
En général, les fréquences d'images pour la télévision dépendent des normes de diffusion de chaque pays. Par exemple, pour produit du contenu télévisuel en Amérique du Nord vous filmerez à 29,97 images par seconde, contre seulement 25 en Europe.
Cependant, grâce aux avances technologiques, nous avons aujourd'hui plus de besoin et les normes de diffusion sont en train de changer. Il est désormais commun d'enregistrer et de diffuser des événements sportifs à des fréquences d'images plus élevées. Certains événements sportifs sont enregistrés et diffusés jusqu'à 59,94 images par seconde en Amérique du Nord et jusqu'à 50 en Europe. Ces fréquences élevées apportent plus de fluidité et de réalisme aux images lors d'actions rapides.
Les diffuseurs de streaming et de contenus en ligne utilisent en général la même fréquence d'images que la télévision. Cependant, ils ont plus de liberté pour expérimer d'autres formats, car les spectateurs peuvent désirir celui de leurchoix. Ces diffuseurs sont seulement limités par la capacité d'affichage des écrans.
Lorsque vous choisissez une fréquence d'images pour votre projet, il est généralement conseilé de vous référer au format d'exportation. Reglez la fréquence d'images de votreamera et adaptez la fréquence du capteur en fonction. Ainsi, vos clips seront lus à vitesse réelle.
Si vous souhaitez créé des effets, par exemple un ralenti, vous pouvez augmenter la fréquence d'images du capteur. Plus la différence entre la fréquence d'images du capteur et celle du projet est grande, plus les images seront ralenties lors de la lecture.
Pour plus d'informations sur le réglage des fréquences d'images du capteur pour créé des effets, veuillez consulter la section « Commandes de l'écran tactile »
Déclenchement de l'enregistrement
La Blackmagic Pocket Cinema Camera envoie automatiquement un signal via la sortie HDMI. Ce signal déclenché alors l'enregistrement lorsque laamera est connectée à du matériel qui prend en charge cette fonctionnalité, tel que le Blackmagic Video Assist.
Ainsi, lorsque vous appuyez sur le bouton d'enregistrement de laamera, l'enregistreur externe enclenché également l'enregistrement. Lorsque vous appuyez sur le bouton d'arrêt de l'enregistrement, il s'interrrompt. Laamera envoie également le时间和 code via HDMI. Les images enregistrées sur des enregistrurs externes affichent donc le même时间和 code que les images enregistrées sur laamera.
Si vous enregistreur exter ne prend en charge l'enclenchement de I'enregistrement, vous devrez I'activer. En general, vous pouze I'activer depuis le menu de parametrage de I'enregistreur.
Lecture
Lire des clips
Une fois vous video enregistrée, vous pouvez utiliser les commandes de transport de laamera pour la visualiser sur l'écran LCD. Appuyez sur le bouton de lecture pour passer en mode lecture. Appuyez de nouveau sur ce bouton pour dire le dernier clip enregistré sur l'écran LCD et sur tout écran connecté à la sortie HDMI. Maintenez les touches avant ou arrière sur l'écran pour avancer ou reculer dans l'enregistrement. La lecture se terminera lorsque la fin du clip est atteinte.
Vousspuvezyouservirdes touchesavantouarriere pourpasser directementau début oua la fin desclips.Appuyez une fois sur liconede retour rapide pourretourner au début du clip en cours ou appuyez deux fois pour revenir au début du clip precedent.Enappuyant sur le bouton d'enregistrement, you quitterezle mode lecture et you serez redirige sur I'affichage camera.

Pour visualiser le dernier clip enregistré sur l'écran tactile, appuyez sur le bouton de lecture des commandes de transport.
Caracteristiques de laamera
Face avant de laamera
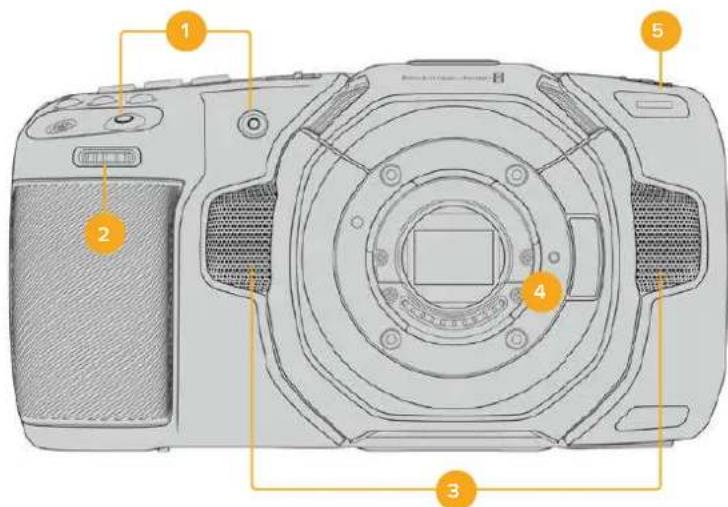
1 Boutons d'enregistrement
Pour démarrer ou arreter l'enregistrement, appuyez sur un des boutons d'enregistrement. Un second bouton d'enregistrement est disponible à l'avant de laamera pour vous auto-enregistrer.
2 Molette de paramétrage
La molette de paramétrage vous permet d'ajuster l'ouverture des objectifs compatibles montés sur votreamera. Lorsque vous étés face à l'écran tactile, tournez la roue vers la gauche pour ouvrir l'iris, ou vers la droite pour le fermer. Vous pouze également utiliser cette molette pour régler la balance des blancs, l'angle d'obturation et l'ISO. Vous pouze aussi utiliser la molette de paramétrage conjointement avec le bouton de zoom pour la mise au point afin d'ajuster le niveau de grossissement du viseurlectronique optionnel.
Selectionnez un paramètre en appuyant sur un des boutons sur le haut de laamera, puis réglez-le à l'aide de la molette. Une fois les réglages effectués, appuyez sur la molette pour faire disparaître le menu de selection.
3 Micros stereo
Laamera est dotée de quatre micros stéreo haut de gamme intégrés. Pour plus d'informations concernant le paramétrage audio du micro, consultez la section « Onglet Audio » de ce manuel.
4 Monture d'objectif
Les Blackmagic Pocket Cinema Camera 6K Pro et 6K G2 sont dotées d'une monture d'objet EF active, et le modèle 4K possède une monture d'objet Micro 4/3 active. Vous pouvez monter des objectifs dotés de la stabilisation intégrée sur les deux camères et utiliser la mise au point et l'exposition automatiques avec des objectifs compatibles. Pour utiliser la stabilisation d'image IS proposée par de nombreux objectifs actifs, réglez le stabilisateur sur On pour activer la stabilisation sur votreamera. Si vous objectif dispose d'un interrupteur permettant la sélection du mode de stabilisation, réglez-le sur le mode approprié. Si votre objectif n'est pas doté d'un interrupteur physique, vous pouvez activer ou désactiver le stabilisateur depuis le menu de paramétrage de laamera.
5 Tally / Indicateur d'enregistrement
La Blackmagic Pocket Cinema Camera possède un petit voyant LED à l'avant qui indique l'état de laamera. Vous pouvez activer ou désactiver levoyant du tally et ajuster sa luminosité dans le menu de paramétrage. Pour plus d'informations, consultez la section « Onglet Reglages » de ce manuel.
Face droite
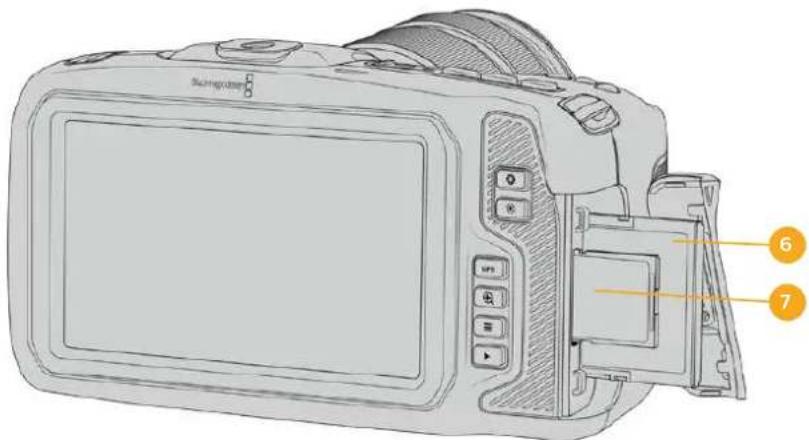
6 Logement pour carte CFast
Insérez des cartes CFast 2.0 dans la fente pour l'enregistrement et la lecture. Pour plus d'informations, consultez la section « Cartes CFast »
7 Logement pour carte SD
Insérez des cartes SD dans la fente pour l'enregistrement et la lecture. Pour plus d'informations, consultez la section « Cartes SD »
Face gauche

Ports sur la face gauche de la Blackmagic Pocket Cinema Camera 6K Pro et 6K G2
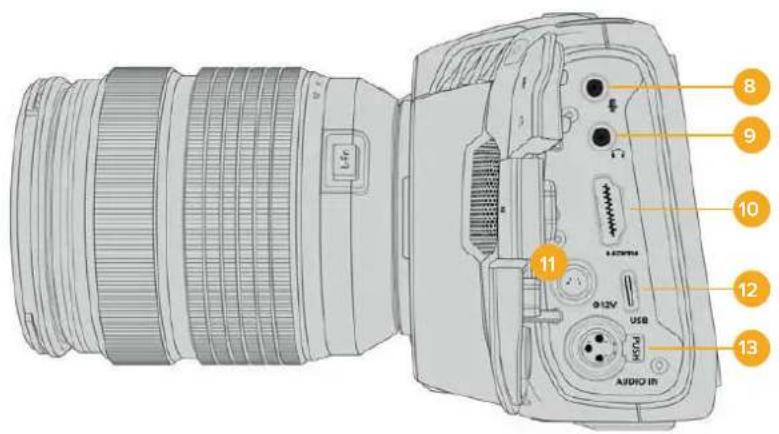
Ports sur la face gauche de la Blackmagic Pocket Cinema Camera 4K
8 Entrée pour micro de 3,5mm
Branchez un micro au connecteur stéreo 3,5mm de laamera. Les niveaux audio micro et ligne sont pris en charge. Le niveau micro est plus faible que le niveau ligne, ainsi, si vous connectez un micro à laamera et que le niveau ligne est selectionné, le son sera certainement trop faible. L'entrée pour micro accepte également le时间和 code LTC conforme à la norme SMPTE provenant d'une source externe sur le canal de gauche. Un时间和 code valide sera détecté automatiquement, et intégré à votre fidjier video en tant que métadonnées. Nous vous recommendons d'envoyer un时间和 code LTC via une entree de niveau ligne, en particulier si vous n'enregistrez pas le时间和 code en tant que piste audio.
9 Entrée pour casque
Contrôlez votre audio durant l'enregistrement ou la lecture de vos séquences en branchant vos écouteurs à la prise de casque stéreo de 3,5 mm. Lorsqu'un casque est branché, la sortie du haut-parleur est coupée.
10HDMI
Le connecteur HDMI prend en charge la video HD 1080p 4:2:2 10 bits et le HDR avec 2 canaux d'audio intégré. Utilisez l'écran tactile pour régler un clean feed ou pour intégrer des informations sur la sortie. Vous pouvez utiliser la sortie HDMI pour brancher un enregistreur, un monitreur externe ou un ATEM Mini. Si vous reliez laamera à un ATEM Mini via la sortie HDMI, vous obtiennent les mêmes fonctionnalités que sur uneamera de studio, notamment le contrôle à distance de l'enregistrement et le réglage des paramétres de la Pocket Cinema Camera. Il est conseilé d'instructor les équipements externes et de brancher tous les cables avant d'allumer votreamera et vos accessoires. Utilisez toujours des cables de haute qualité pour les connexions HDMI.
11 Entrée d'alimentation
Vouss pouvez utiliser le connecteur DC pour alimenter laamera et effectuer une charge lente de la batterie simultanement. Pour connecter I'adaptateur, tournez-le jusqu'à ce que sa barrette s'aligne avec I'encoche supérieure du port, puis poussez jusqu'à ce qu'il s'emboite correctement. Pour le déconnecter, tirez la gaine et retireze-le du port.
Solutions d'alimentation personalisées
Certains utilisateurs ont creé des solutions d'alimentation personalisées pour charger leur Blackmagic Pocket Cinema Camera. Si vous souhaitez développé votre propre solution d'alimentation avec une batterie factice, veillez à ne pas fournir une tension trop élevé à votreamera, car cela pourrait cause des dommages irreversibles. Les tensions requises pour la Blackmagic Pocket Cinema Camera sont les suivantes :
-La connexion d'entree de la batterie doit etre comprise entre 6,2 et 10V max.
L'entrée DC doit être comprise entre 10,8V et 20V max.
- Laamera nécessite 16W lorsqu'elle est en mode veille et qu'elle ne charge pas la batterie.
-La camera necessite 30W lors du chargement de sa batterie interne.
- Lorsque vous alimentez vous camera avec une source d'alimentation externe, nous vous recommendons de retarder la batterie interne.
- Lorsque vous enregistrez sur un support externe avec un objectif actif à des fréquences d'images élevées, que la luminosité de l'écran et du tally est au maximum, et que la batterie n'est pas en charge, 23W environ sont nécessaires pour la Blackmagic Pocket Cinema Camera 6K G2 et 22W sont nécessaires pour la Blackmagic Pocket Cinema Camera 4K. La configuration est la même pour la Blackmagic Pocket Cinema Camera 6K Pro et 6K G2. Avec le viseur, elles nécessitant environ 26W.
12 USB
Le port USB-C vous permet d'enregistrer directement sur un disque flash USB-C. Lorsque votreamera est eteinte, vous pouvez recharger la batterie via le port USB-C depuis une source d'alimentation externe, comme un bloc de batteries externe. Pourmettre a jour le logiciel interne de laamera, connectez laamera a un ordinateur via un port USB-C et lancez l'application de mise a jour.
13 Entrée mini XLR pour microphone
Les Blackmagic Pocket Cinema Camera 6K G2 et 6K Pro ont deux entrées audio XLR. La Blackmagic Pocket Cinema Camera 4K dispose d'une entrée XLR.
Branchez de l'audio analogique symétrique exter ne via le connecteur mini XLR. Vous pouvez connecter un microphone XLR standard à la camera à l'aide d'un adaptateur XLR to mini XLR.
L'entrée mini XLR fournit une alimentation fantôme pour connecter des micros professionnels qui ne sont pas alimentés en interne. Pour plus d'informations sur l'activation de l'alimentation fantôme, veuillez consulter la section « Audio » de ce manuel.
L'entrée XLR accepte également le时间为 code conformé à la norme SMPTE provenant d'une source externe. Dans le menu Audio, reglez la source du canal sur XLR Ligne ou sur XLR Micro en fonction du niveau de votre générateur de时间为 code. Le时间为 sera intégré à saufercier video en tant que metadonnées. Sur les Blackmagic Pocket Cinema Camera 6K Pro et 6K G2, vous pouvez régler un canal XLR de sorte qu'il accepte un signal de时间为 code et utiliser simultanément l'autre canal XLR pour une source audio de type différent.
Face supérieure
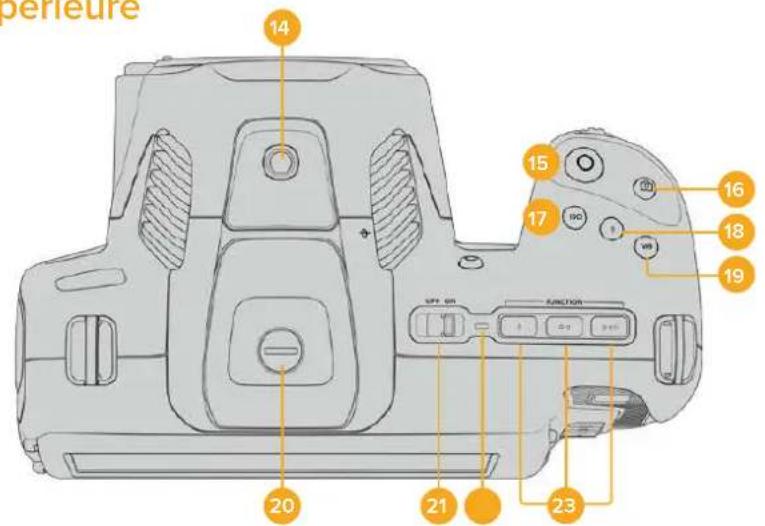
Face supérieure des Blackmagic Pocket Cinema Camera 6K Pro et 6K G2
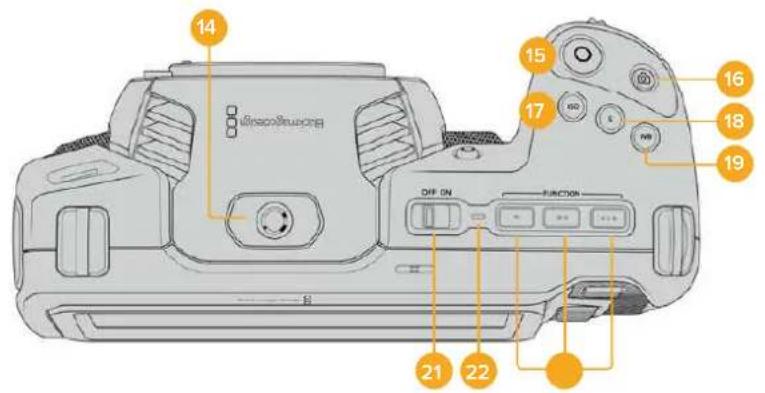
Face supérieure de la Blackmagic Pocket Cinema Camera 4K
14 Pas de vis 1/4-20
Voussoupiezutiliserlepas de vis1/4-20situésurla face supérieurede la camera pour monter un micro externe ou d'autres petits accessoires.
REMARQUE Utilisez seulement la monture 1/4 située sur le haut de la Blackmagic Pocket Cinema Camera pour des accessoires légers, tels que des micros de petite taille. Ne soulevez pas laamera par les accessoires installés via la monture 1/4 comme une poignée deamera, lorsque laamera est équipée d'un objectif lourd. Cela endommagera la monture 1/4 et ne sera pas couvert par la garantie. Ne soumettez pas la monture à une force de levier trop excessive, en montant un
accessoire lourd sur un bras d'extension par exemple. Pour monter des accessoires lourds, nous vous recommendons vivement d'utiliser une cage de camera compatible avec la Blackmagic Pocket Cinema Camera qui se fixe à la fois à la monture 1/4" supérieure et à la monture inférieure de laamera.
15 Enregistrement
Appuyez sur le bouton d'enregistrement pour démarrer l'enregistrement immédiatement. Appuyez à nouveau sur ce bouton pour arreter l'enregistrement.
16 Image fixe
Pour capturer une image au format DNG non compressé, appuyez sur le bouton d'image fixe. Une icône d'appareil photo apparait brièvement en haut à droite de l'écran pour confirmer que vous avez capturé une image fixe. Cette image est sauvégardée dans le dossier Stills dans le réseau racine du support sur lequel vous enregistrez. L'image est enregistrée selon la convention de dénomination des fichiers relative aux clips video, mais les quatre derniers caractères du nom de fichier porteront le nombre de l'image, par exemple S001.
17 ISO
Appuyez sur le bouton ISO, puis tournez la molette de paramétrage pour ajuster l'ISO. Il peut être incrémented par 1/3 de diaphragme entre 100 et 25 600.
18Obturateur
Pour modifier l'angle ou la vitesse d'obturation, appuyez sur le bouton d'obturation S, puis tournez la molette de paramétrage. L'écran tactile proposera également jusqu'à trois options d'obturation sans scintillage.
19 Balance des blancs
Appuyez sur le bouton de la balance des blancs WB, puis tournez la molette de paramétrage pour ajuster la balance des blancs. En restant appuyé pendant 3 secondes sur le bouton WB, vous pouvez acceder rapidement à l'écran de la balance des blancs automatique. Un carre blanc s'affichera au centre de l'image, et laamera utilisera cette zone pour effectuer la balance des blancs automatique. Pour plus d'informations, consultez la section « Commandes de l'écran tactile »
20 Port de connexion pour le viseur
Les Blackmagic Pocket Cinema Camera 6K G2 et 6K Pro disposent d'un port pour connecter le Blackmagic Cinema Camera Pro EVF. Lorsque le viseur électronique optionnel n'est pas connecté, vous pouvez remettre le revêtement de protection fourni.
21 Interrupteur général
Interrupteur permettant de mettre en marche laamera. Déplacez l'interrupteur vers la droite pour allumer votreamera, et vers la gauche pour l'éteindre.
22 Voyant d'etat LED
Lorsque laamera est eteinte et branchee a une source d'alimentation externe via le connecteur DC 12V ou via le port USB-C, le voyant s'allume en rouge pour indiquer que la batterie est en charge.
Lorsque la batterie est pleine, le voyant d'etat LED s'eteint.
23 Boutons de fonction
Vou puez assigner des fonctions couramment utilisées à ces boutons via le menu Réglages de laamera. Par défaut, le bouton numero 1 est régèle sur Fausses couleurs, le 2 sur Afficher LUT et le 3 sur Repères de cadrage.
Face inférieure de laamera

Face Inférieure des Blackmagic Pocket Cinema Camera 6K Pro et 6K G2
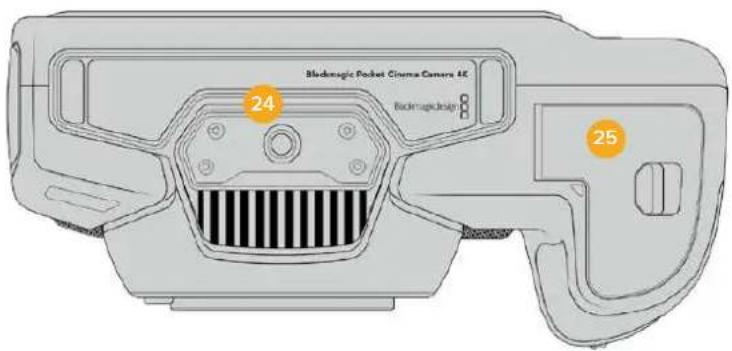
Face inférieure de la Blackmagic Pocket Cinema Camera 4K
24 Pas de vis 1/4-20
Fixez votre Blackmagic Pocket Cinema Camera 4K, Pocket Cinema Camera 6K Pro ou 6K G2 à un trépied, un rig ou d'autres accessoires à l'aide du pas de vis 1/4-20 de la face inférieure. Les Pocket Cinema Camera 6K Pro et 6K G2 possèdent deux pas de vis de 1/4 de pouces sur leur face inférieure.
25 Compartiment de la batterie
Poussez le loquet du compartment à batterie en direction de la monture d'objet pour ouvrir le compartment. Pour le referrer, fermez le compartment jusqu'à ce que le loquet se clipse.
26 Connecteur d'allmentation de la polgnée d'allmentation
Les Pocket Cinema Camera 6K Pro et 6K G2 disposent de contacts électriques sur leur face inférieure pour connecter une poignée d'alimentation optionnelle sans avoir à retarder la batterie de laamera. Cela augmente l'autonomie de la camera, car vous pouvez charger la batterie interne et les deux batteries de la poignée d'alimentation en même temps.
Face arrière de laamera
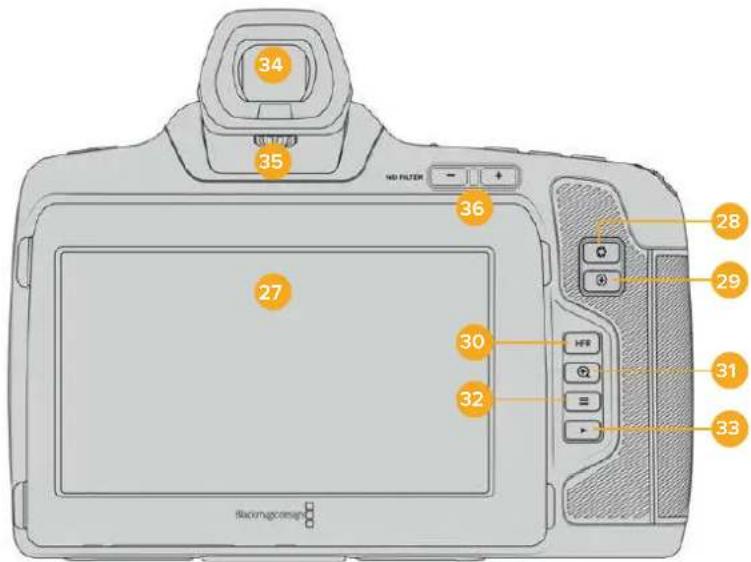
Face arriere des Blackmagic Pocket Cinema Camera 6K Pro et 6K G2, La Blackmagic Pocket Cinema Camera 6K G2 n'a pas de boutons filtre ND.
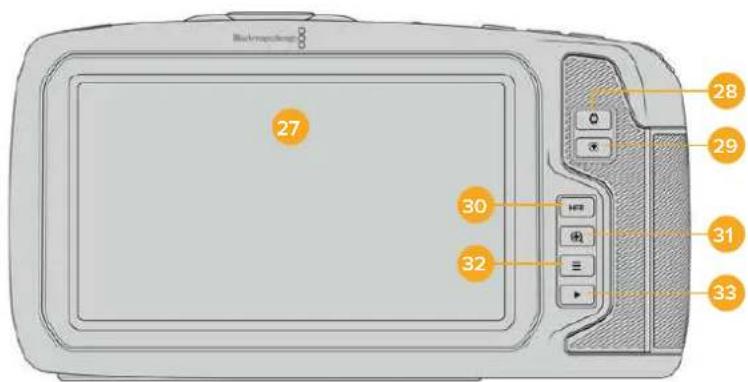
Face arrriere de la Blackmagic Pocket Cinema Camera 4K
27 Ecran tactile
Il vous suffit de toucher et de balayer l'écran LCD de laamera pour ajuster les réglages et la mise au point automatique, pour lancer ou arreter l'enregistrement, et pour contröler les clips pendant l'enregistrement et la lecture. L'écran tactile permet également de gérer les medias et d'ajouter des annotations dans le clap.
L'écran LCD tactile des Blackmagic Pocket Cinema Camera 6K Pro et 6K G2 est inclinable, ce qui vous permet de régler l'angle de l'écran vers le haut ou vers le bas. De plus, vous disposez d'un mode d'économie d'énergie qui diminue la luminosité de l'écran lorsque celui-ci est inactif. Vous pouvez également régler l'écran sur une luminosité très élevée, ce qui est idéal lors de tournages en plein soleil. Cependant, régler l'écran sur une luminosité maximale consomme davantage d'énergie et peut faire chauffer l'écran. Lorsque la température ambiente est de 35^ ou plus, laamera peut réduire automatiquement la luminosité de l'écran pour réguler la température et éviter qu'il ne surchauffe. Cette fonctionnalité de sécurité opère independamment du mode d'économie d'énergie due à l'inactivité. Pour plus d'informations, consultez la section « Onglet Moniteur »
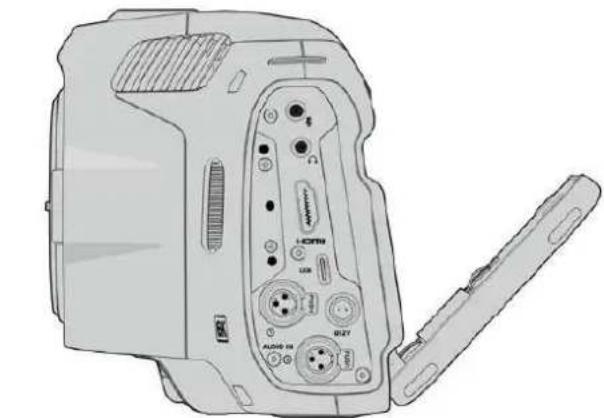
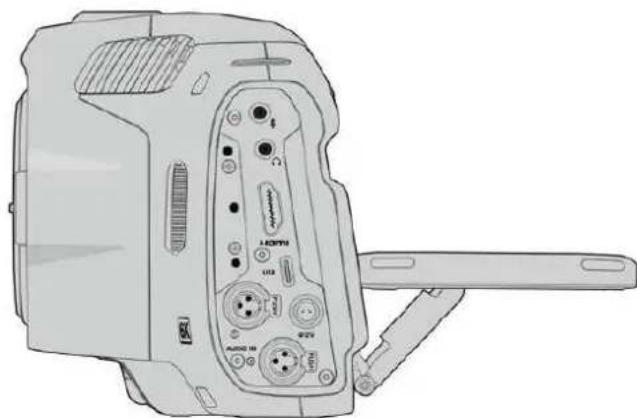
L'ecran inclinable des Blackmagic Pocket Cinema Camera 6K Pro et 6K G2 offre plusieurs angles de vue
28 Bouton Iris
Appuyez sur le bouton Iris pour régler automatiquement l'exposition moyenne en fonction des haute lumières et des zones d'ombres de la prise. Vous pouvez ajuster l'ouverture de l'objet manuellement en tournant les molettes de paramétrage, ou en touchant Iris sur l'écran tactile et en ajustant le curseur.
29 Bouton de mise au point
Lorsque vous utilisez un objectif à mise au point automatique compatible avec votre camera, il suffit d'appuyer une fois sur le bouton de mise au point pour effectuer une mise au point automatique. Par défaut, l'objet effectue une mise au point automatique sur le centre de l'image. Toutefois, vous pouvez selectionner une autre zone de l'image en la touchant sur l'écran LCD. Appuyez deux fois sur le bouton de mise au point pour la réinitialiser sur le centre de l'image.
REMARQUE Veuillez notes que la plupart des objectifs prconnent en charge la mise au point automatique, cependant, certains peuvent etre regles en mode manuel ou automatique. Il vous faudra donc vérifier que votre objectif est bien regle en mode automatique.
30 Bouton HFR
Appuyez sur le bouton HFR pour basculer entre les fréquences d/images. Pour ce faire, il suffit de régler la fréquence d/images off speed que vous souhaitez utiliser dans le menu des fréquences d'image. Ensuite, appuyez sur le bouton HFR pour basculer entre la fréquence d/images off speed可以选择 et la fréquence d/images du projet. Il est important de mentionner que ce paramètre ne peut pas être modifié durant l'enregistrement.
Pour plus d'informations sur les fréquences d'images du projet et off speed, consultez la section « Commandes tactiles »
31 Bouton Zoom pour la mise au point
Appuyez sur ce bouton pour zoomer et ajuster la mise au point à une échelle de pixel de 1:1. Pendant le zoom, vous pouvez ajuster le zoom en pinçant avec vos deux doigs sur l'écran tactile (Pinch to zoom). Pour plus d'informations, consultez la section « Zoomer en pinçant ». Pendant le zoom, vous pouvez toucher l'écran pour visionner différentes zones de l'image. Lorsque vous activez le zoom pour la mise au point et que vous regardez à travers le viseur optionnel, vous pouvez tourner la molette de paramétrage pour ajuster le niveau de zoom et appuyer sur la molette pour selectionner la zone de votrechioix. Pour dézoomer, appuyez une seconde fois sur ce bouton.
32 Bouton Menu
Appuyez sur le bouton du menu pour ouvrir le menu de navigation.
33 Bouton de lecture
Appuyez sur le bouton de lecture pour passer en mode lecture. Appuyez de nouveau sur ce bouton pour lire le dernier clip enregistré sur l'écran LCD et sur tout écran connecté à la sortie HDMI.
34 Blackmagic Pocket Cinema Camera Pro EVF
Les Blackmagic Pocket Cinema Camera 6K Pro et 6K G2 peuvent accueillir un viseur électronique en option. Le viseur pivote verticalément à 70 degrès et il est livré avec 4 types différents d'œilletons pour l'œil gauche et l'œil droit. Un capteur à l'intérieur du viseur détecte quand ce dernier est utilisé. Il étéindra l'écran LCD pour économiser de la batterie et pour éviter d'appuyer accidentellement sur les commandes tactiles. Vous pouvez régler le viseur pour qu'il se superpose aux informations d'état de laamera, ou pour afficher un clean feed. Pour plus d'informations, consultez la section « Onglet Moniteur »
Pour installer le viseur, utilisez un petit tournevis à tete plate pour dévisser la vis du port de connexion situé sur la face supérieure de laamera. Retirez la protection et assurez-vous que le port de connexion est propre et sec. Faites glisser le viseur dans le port de connexion. Maintenez le viseur en position en resserrant la vis molette.
35 Dioptré pour le viseur électronique
Tournez la molette du dioptre pour ajuster à votre convenance la mise au point du viseur électronique sur les Blackmagic Pocket Cinema Camera 6K Pro et 6K G2. Veuillez notes que cette molette ajuste la mise au point de l'image représentée dans le viseur, et qu'elle n'altère pas la mise au point de l'image capturée par le capteur de laamera. Pour plus d'informations, consultez la section « Mire de Siemens »
36 Filtrgrisneutre
La Blackmagic Pocket Cinema Camera 6K Pro intégre des filtres gris neutre (ND). Ces filtres permettent de réduire la quantité de lumière reçue par le capteur sur un nombre donné de repères de diaphragme. En réduisant l'exposition, vous pouvez filmer avec de grandes ouvertures pour obtenir une faible profondeur de champ dans des conditions lumineuses, par exemple à l'extérieur par un jour ensoleillé.
Pour naviguer entre les réglages du filtre, appuyez sur les flèches ND filter gauche et droite. Vous pouvez désirir de n'utiliser aucun filtre, ou de régler les diaphs sur 2, 4, ou 6.
L'indicateur Clear indique qu'aucun filtré ND n'est utilisé. Les options de diaphs 2, 4 à 6 augmentent progressivement la densité des filtres gris neutre, ce qui vous permet de réduire la lumière si besoin est.
L'unité de mesure du paramètre ND peut être personnalisée dans le menu de l'écran LCD tactile. Vous pouvez ainsi identifier le coefficient ND du filtr, la réduction de luminière en nombre de diaph ou la fraction représentant la réduction de luminière appliquée pour les filtres, avec les termes de votre choix.
| Réglages du filtré gris neutre | ||
| Coefficient ND | Diaphs Fraction | |
| clear 0 1 | ||
| 0.6 2 1/4 | ||
| 1.2 4 1/16 | ||
| 1.8 6 1/64 | ||
Commandes de l'écran tactile
Fonctionnalités de l'écran tactile
L'écran LCD tactile de la Blackmagic Pocket Cinema Camera est doté d'une interface intuitive consçue pour une utilisation rapide de laamera. Il suffit de toucher et de balayer l'écran pour accederrapidementaux fonctionnalitésde laamerapendantle tournage.
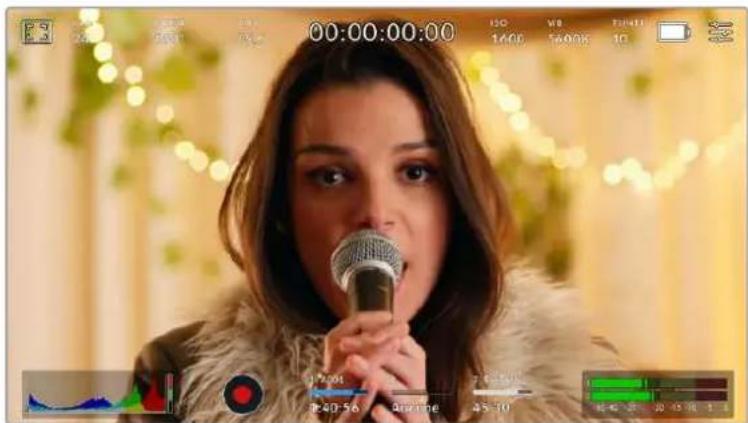
L'écran LCD tactile de laamera offre un grand nombre d'informations et vous permet d'acceder facilement à vos paramétres préféres.
Options de l'écran LCD
Touchez l'indicateur écran en haut à gauche de l'écran tactile pour ouvir les options de l'écran LCD. Ces options permettent de regler les paramètres de l'écran LCD, notamment le zébra, l'aide à la mise au point, les repères de cadrage et la grille. Lorsque vous ouvrez ces options, les fonctionnalités apparaissent dans un menu organisé par onglet en bas de l'écran.

Touchez l'icone en haut a gauche de I'écran LCD tactile de votreamera pour ouvrir les options de I'écran LCD.
Zébra
Ce paramètre affiche le zébra sur l'écran tactile et permet de régler le niveau de zébra pour la sortie HDMI.
Le zébra affiche des hachures diagonales sur les zones de l'image qui dépassent le niveau d'exposition préalablement régèle. Par exemple, un réglage du zébra sur 100% mettra en évidence les zones complètement surexposées. Ce paramètre est utile pour obtenir une exposition optimale en conditions lumineuses fixes.

Touchez l'indicateur zébra au sein des options de l'écran LCD pour ouvrir ce paramètre.
Dans l'onglet du zébra, touchez le bouton en bas à gauche de l'écran pour afficher le zébra sur l'écran tactile.
Réglez le niveau de zébra en faisant glisser le curseur vers la gauche ou la droite, ou touchez les flèches pour incrémenter le pourcentage du zébra. Il y a huit prépréglages zébra disponibles, en partant du gris moyen et un diaph au-dessus du gris moyen, puis en incréments de 5 %, de 75 % à 100 %.
Pour plus d'informations concernant l'activation du zébra sur la sortie HDMI de laamera, consultez la section « Onglet Moniteur » de ce manuel.
CONSEIL Si vous tournez en conditions lumineuses variables, telles qu'en extérieur avec un ciel nuageux, régler le niveau de zébra en dessous de 100 peut vous permettre de voir les zones surexposées.
Focus Assist
Ce paramètre affiche l'aide à la mise au point sur l'écran tactile et permet de régler le niveau d'aide à la mise au point pour la sortie HDMI de la Blackmagic Pocket Cinema Camera.

Touchez l'indicateur d'aide à la mise au point au sein des options de l'écran LCD pour ouvrir ce paramètre sur l'écran de laamera.
Pour afficher l'aide à la mise au point sur l'écran tactile, touchez le bouton en bas à gauche de l'écran.
Pour regler le niveau d'aide à la mise au point pour toutes les sorties de la Blackmagic Pocket Cinema Camera, faites glisser le curseur vers la gauche et vers la droite en bas de l'écran tactile, ou touchez les flèches à côté du niveau du focus assist.
Le niveau optimal d'aide à la mise au point peut varier selon les plans. Par exemple, lorsque vous effectuez la mise au point sur les acteurs, un niveau d'aide à la mise au point plus élevé permet de bien définir le contour du visage. En revanche, si vous reglez un niveau élevé sur un plan représentant du feuillage ou un mur de briques, vous alze sans doute obtenir trop d'informations nettes.
Pour plus d'informations concernant l'activation de la mise au point sur la sortie HDMI de la camera, consultez la section « Menu Moniteur » de ce manuel.
CONSEIL La Blackmagic Pocket Cinema Camera possede deux modes d'aide à la mise au point. Vous pouvez alterner entre Crete et Lignes colorées dans l'onglet Moniteur. Pour plus d'informations, consultez la section « Onglet Moniteur » de ce manuel.
Repetes de cadrage
Ce paramètre affiche les repères de cadrage sur l'écran tactile. Vous pouvez également désirir les options de cadrage pour la sortie HDMI de votreamera.
Les repres de cadrage offrent des formats d'image propres aux normes du cinema, de la television et d'Internet.

Touchez l'indicateur des repres de cadrage au sein des options de I'ecran LCD pour ourir ce parametre.
Pour activer ou désactiver les repères de cadrage sur l'écran tactile, appuyez sur l'interrupteur en bas à gauche dans le menu correspondant.
Choisissez le repère de cadrage que vous souhaitez utiliser en faisant glisser le curseur vers la gauche et vers la droite, ou à l'aide des flèches. Vous pouvez également entrair un ratio de repère de cadrage personnelé en tapant sur le ratio entre les deux boutons de ratio.
Les repères disponibles sont :
2.35:1, 2.39:1 et 2.40:1
Affiche un rapport d'image très large compatible avec les projections cinéma au format large avec ou sans anamorphose. Ces trois paramètres sont un peu différents et représentent l'évolution de plusieurs normes kinématographiques. 2.39:1 est l'une des normes les plus repandues aujourd'hui.
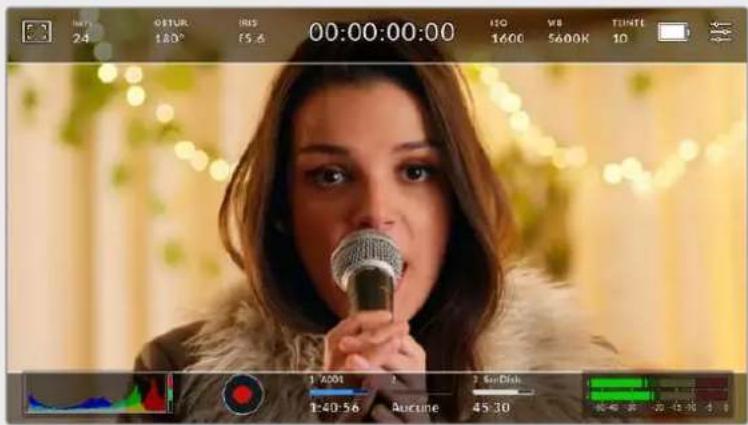
Écran LCD tactile sur lequel le repère de cadrage 2.40:1 est activé.
2:1
Ce format est un peu plus large que le 16:9 mais pas autant que le 2.35:1.
1.85:1
Affiche un autre rapport d'image large très repandu au cinema. Ce ratio est un peu plus large que le HDTV 1.78:1 mais pas autant que le 2.39:1.
16:9
Affiche un rapport d'image de 1.78:1 compatible avec les écans d'ordinateur et de télévision HD 16:9. Ce format est liéquement utilisé pour la diffusion en HD et les videos en ligne. Toutefois, il a également ete adopte pour la diffusion en Ultra HD.
14:9
Affiche le rapport d'image 14:9 utilise pour la diffusion télévisuelle, car il representation un compromis entre les téléviseurs 16:9 et 4:3. Idealement, les images 16:9 et 4:3 rognées l'aprèsment peuvent etre lues en format 14:9. Vous pouze utiliser ces represes si vous projet est diffusé sur un téléviseur qui prend en charge le rapport d'image 14:9.
4:3
Affiche un rapport d'image de 4:3 compatible avec les écrans de télévision SD, ou en tant qu'aide de cadrage lorsque vous utilise des adaptateurs anamorphiques x2.
1:1
Affiche un ratio de 1/1 légèrement plus étroit que le 4:3. Ce ratio donne une image au format carré de plus en plus populaire sur les réseaux sociaux.
4:5
Affiche un ratio de 4/5. L'aspect vertical de ce ratio est idéal pour les portraits et les affichages sur smartphones.
Ratios de repères de cadrage personnelisés
Pour personneliser le ratio et obtenir une appearance unique, tapez sur le ratio affiché entre les flèches. Sur l'écran de repères de cadrages personnalisés, appuyez sur la touche de retard pour supprimer le ratio actuel. Puis, utilisez le clavier numérique pour entrer votre propre ratio.
Touchez Mettre à jour pour appliquer la ratio et returner à l'enregistrement.
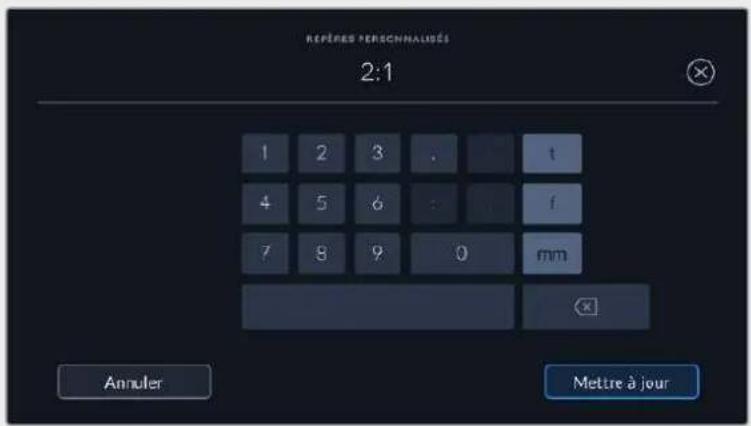
Utilisez le clavier numérique sur l'écran des Repères personnalisés pour saisir un nouveau ratio de repères de cadrage
CONSEIL You pouvez changer l'opacité des repères de cadrage. Pour plus d'informations, consultez la section « Onglet Monieur » de ce manuel.
REMARQUE Pour plus d'informations concernant l'activation des repères de cadrage sur la sortie HDMI de la camera, consultez la section « Onglet Moniteur » de ce manuel.
Grille
Ce paramètre affiche une grille selon la règle des tiers, un indicateur d'horizon, un réticule ou un point central sur l'écran tactile et permet de désir les informations qui apparaître sur la sortie HDMI.

Touchez l'indicateur de la grille au sein des options de l'écran LCD pour ouvrir ce paramètre.
La grille et le réticule affichent des informations qui facilitent la composition de l'image. Quand la grille est activée, l'écran LCD affiche une grille selon la règle des tiers, un indicateur d'horizon, un réticule ou un point central.
Pour afficher la grille sur l'écran tactile, touche le bouton en bas à gauche de l'écran, lorsque vous étés sur l'onglet des repêres de cadrage.
Pour selectionner les informations que vous souhaitez afficher sur la sortie HDMI, touchez Tiers, Réticule ou Point. Vous pouvez selectionner un paramètre Horizon, Réticule ou Point à la fois, en konjction avec Tiers. Ainsi, vous pouvez appliquer les combinaisons Tiers/Horizon, Tiers/Réticule et Tiers/Point.
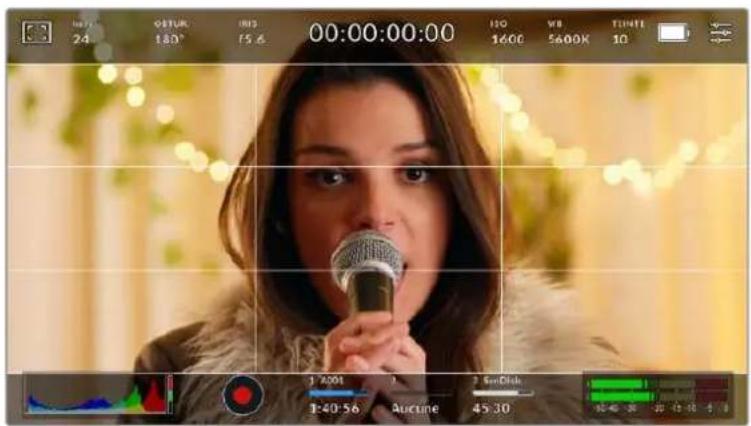
La grille selon la regle des tiers s'adapte automatiquement à tous les repères de cadrage.
Tiers
Affiche une grille dotée de deux lignes verticales et de deux lignes horizontally divisant l'image en tiers. C'est un outil très pratique pour faciliter la composition de vos plans. Comme le regard se pose naturellement pres des points d'intersection de ces lignes, il est utile de cadre des éléments importants dans ces zones-là. Les yeux des acteurs doivent généralement être situés dans le tiers supérieur de l'écran, vous pouze donc utiliser cette zone pour faciliter le cadrage. Cette division de l'image en tiers est très utile pour maintainir un cadrage cohérent de vos plans.
Horizon
Ce paramètre indique lorsque vous deviennent laamera est inclinée vers la gauche ou vers la droite et vers le haut ou vers le bas. Cela vous permet de mesurer l'horizon pour les prises au poing et ainsi d'équilibrer l'axe de laamera sur un stabilisateur.
Lorsque la ligne verticale grise claire s'éloigne du réticule gris foncé Situé au milieu, alors votreamera est inclinée sur le côte. Lorsque la ligne horizontale grise claire est au-dessus du réticule gris foncé, laamera est inclinée vers le bas. Lorsqu'elle est au-dessous du réticule gris foncé, laamera est inclinée vers le haut.
La distance entre les lignes et le réticule central est proportionnelle à l'inclinaison horizontale ou verticale. Àpres avoir calibre le capteur de mouvement de laamera, la ligne verticale devient bleue lorsque laamera est alignée sur I'axe rectiligne, et la ligne horizontale devient bleue lorsque laamera est alignée sur I'axe du niveau.
Notez que si laamera est inclinée vers le bas pour une vue aérienne ou verticale, l'indicateur d'horizon le prendra en compte. Si vous inclinez laamera sur le côté pour un portrait, l'indicateur d'horizon pivote son axe à 90 degrés.
Ce tableau présente des exemples d'inclinaisons de laamera avec l'indicateur d'horizon.
Indicateur d'horizon Description

Rectiligne et à niveau

Inclinee vers le bas et a niveau

Rectiligne et inclinée vers la gauche

Inclinee vers le haut et vers la droite
Pour une utilisation classique, calibrez l'indicateur d'horizon pour connaître l'inclinaison verticale ou horizontale. Si vous souhaitez utiliser l'indicateur d'horizon pour maintainir un « plan début » ou une inclinaison vers le bas ou le haut pour des prises en contre-plongée ou en plongée, vous pouvez calibrer l'indicateur d'horizon sur une inclinaison. Pour plus d'informations sur le calibrage de l'indicateur d'horizon, consultez la section « calibrage du capteur de mouvement »
Réticule
Ce paramètre place un réticule au centre de l'image. comme la règle des tiers, le réticule est un outil de composition qui permet de placer le sujét au centre de l'image. Ce paramètre est parfois utilisé pour filmer des scènes qui seront ensuite montées très rapidement. Pour les spectateurs, il est plus facile de suivre un enchainement rapide de scènes si l'élement important de la scène est maintainu au centre de l'image.
Point
Ce paramètre affiche un point au centre de l'image. Il fonctionne de la même façon que le paramètre Réticule mais dispose d'un point central moins voyant.
CONSEIL Pour plus d'informations concernant l'activation de la grille sur la sortie HDMI de laamera, consultez la section « Onglet Moniteur » de ce manuel.
Zone de sécurité
Ce paramètre active ou désactive la zone de sécurité sur l'écran tactile et permet de régler sa taille sur la sortie HDMI.
La zone de sécurité garantit que les zones les plus importantes de l'image seront visibles à l'écran. En gardant ces zones au centre de l'image, l'image n'est pas rognée sur certains téléviseurs. De plus, cela permet aux diffuseurs d'ajouter des logos, des synthes et d'autres informations sur les bords de l'écran. Beaucoup de diffuseurs demandent que les contenus importants,els que les titres et les graphiques, soient contenus dans la zone de sécurité à 90%.
La zone de sécurité est également utile pour cadre un plan qui sera stabilisé en post-production et dont les bords peuvent être rognés. Elle est aussi pratique pour indiquer un rognage spécifique. Par exemple, en réglant ce paramètre sur 50% lorsque vous enregistrez en Ultra HD 3840x2160, vous verrez à quoi un recadrage de 1920x1080 ressemble. La zone de sécurité redimensionné également les repères de cadrage, qui s'ajusteront pour reflérer le pourcentage de l'image cible可以选择.
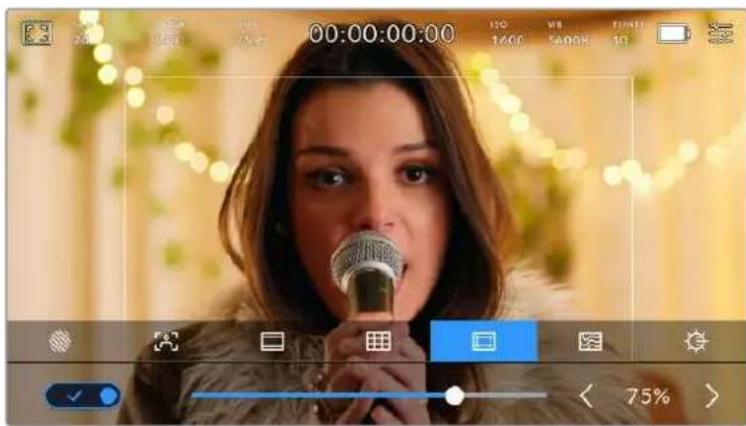
Le repère indiquant la zone de sécurité est régisé sur 85%.
Dans l'onglet de la zone de sécurité, touche le bouton en bas à gauche de l'écran pour ouvrir ce paramètre. Pour régler la valeur de la zone de sécurité pour la sortie HDMI, touche les flèches gauche ou croite situées de part et d'autre de la valeur actuelle au bas de l'écran tactile. Vous pouvez aussi ajuster le curseur en le déplaçant vers la gauche ou vers la droite.
Fauusses couleurs
Ce paramètre permet d'activer l'outil d'aide à l'exposition fausses couleurs sur l'écran tactile.
La fonction fausses couleurs applique différentes couleurs à différentes zones de l'image.
Ces couleurs représentent les différentes valeurs d'exposition des éléments de votre image.
Par exemple, la couleur rose représentée une exposition optimale pour les peaux claires, alors que le vert correspond à une couleur de peu plus foncée. En vérifiant ces fausses couleurs lorsque vous filmez des étres humains, vous maintainrez une exposition stable de leur couleur de peu.
De même, lorsque la couleur des éléments de votre image passé du jaune au rouge, cela signifie qu'ils sont surexposés.
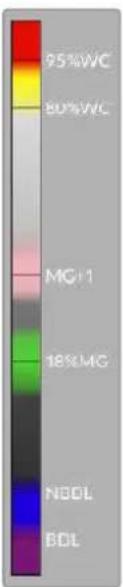
L'échelle IRE des fausses couleurs à gauche de l'écran de votreamera vous montre comment interpréter les différentes fausses couleurs.
| Fauusses couleurs Signification | |
| 95%WC Blancs écrêtés | |
| 80%WC Blancs presque écrêtés | |
| MG+1 Un diaph au-dessus du gris moyen | |
| 18MG% Gris moyen | |
| NBDL Détails noirs perdus | |
| BDL Détails noirs presque perdus | |

Lorsque l'Image est correctement exposée, les telentes de peau sont représentées par des fausses couleurs vertes et roses
Dans l'onglet des fausses couleurs, touche l'icone en bas à gauche de l'écran pour activer cette fonction sur l'écran tactile.

Onglet d'aide à l'exposition fausses couleurs.
Luminosité de l'écran
Touchez l'icone de la luminosité de l'écran et déplacez le curseur vers la gauche ou vers la droite pour ajuster la luminosité de l'écran de votre Pocket Cinema Camera.

Ce paramètre est regé le sur 50 %.
Indicateur du filtrne ND
Lorsque vous ajustez le filtre ND de la Blackmagic Pocket Cinema Camera 6K Pro, l'indicateur du filtre s'affiche en haut de l'écran tactile LCD et de la sortie HDMI. Cet indicateur restera affché quand un filtre gris neutre est activé. Lorsqu'il n'est régèle sur aucun filtre ND, la mention Clear disparaître après quatre secondes.

L'indicateur du filtré ND s'affiche lorsque vous ajustez les réglages du filtré ND de la Pocket Cinema Camera 6K Pro
REMARQUE You pouvez désir la terminologie utilisé par l'indicateur du filtré ND afin qu'elle reflète la convention souhaïée. Les options disponibles sont Nombre, Diaph et Fraction. Vous pouvez paramétre le format de votre choix dans le menu des réglages.
Images par seconde
L'indicateur Im/s affiche le nombre d'images par seconde selectionné.

Touchez l'indicateur lm/s pour acceder aux parametes de fréquence d'images.
Touchez l'indicateur lm/s pour changer la fréquence d/images du projet et du capteur via le menu situé en bas de l'écran.
Fréquence d'images du projet
La fréquence d'images du projet représentée la fréquence d'image du format d'enregistrement de laamera. Ce paramètre propose une selection de fréquences d'images couramment utilisées dans l'industrie du cinema et de la télévision. En général, on fait coïncider la fréquence d'images avec le workflow de post-production.
Huit fréquences d'images sont disponibles : 23.98, 24, 25, 29.97, 30, 50, 59.94 et 60 images par seconde.
Pour régler la fréquence d'images du projet de laamera dans le menu Im/s, touchez les flèches gauche et droite situées de part et d'autre de la fréquence d'images en bas de l'écran tactile. Vous pouvez aussi ajuster le curseur en le déplacant vers la gauche ou vers la droite.

Touchez les flèches situées de part et d'autre de la fréquence d'images du projet ou déplacez le curseur pour régler ce paramètre
CONSEIL La fréquence d'images du projet définit également la fréquence d'images de la sortie HDMI.
Fréquence d'images du capteur
La fréquence d'images du capteur vous permet de régler le nombre d'images par seconde que le capteur enregistre. Cette fréquence d'images déterminée la vitesse de lecture de votre video en fonction de la fréquence d'images de projet可以选择.
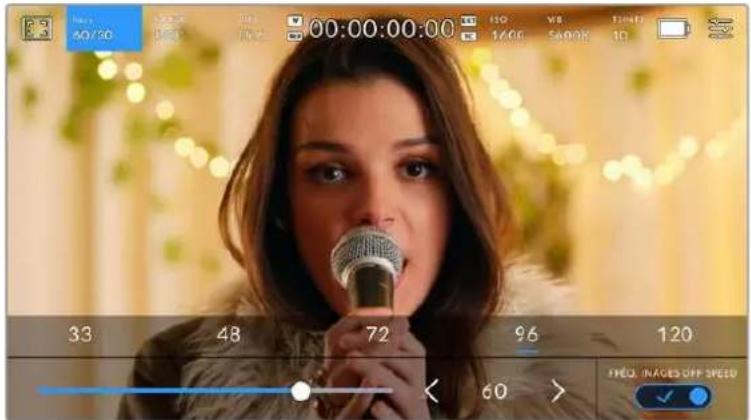
Lorsque la fonction Freq. images off speed est activée, touchez un préreglage ou les flèches situées de part et d'autre de la fréquence d'images du capteur ou déplacez le curseur pour régler le paramètre.
Par défaut, les fréquences d'images du projet et du capteur correspondant pour que le clip soit lu en vitesse normale. Cependant, en touchant l'interrupteur Fréq. Images off speed situé en bas à droite du menu Im/s de la camera, vous pouvez régier indépendamment la fréquence d'images du capteur.
Pour modifier la fréquence d'images du capteur, touche les flèches situées de part et d'autre de la fréquence d'images en bas à gauche de l'écran tactile. Vous pouvez également déplacer le curseur vers la gauche ou vers la droite afin d'augmenter ou de réduire la fréquence d'images. Dés que vous relâchez le curseur, la fréquence d'images du capteur est sélectionnée. Au dessus du curseur, vous pouvez désir parmi les fréquences d'images off speed qui s'affichent. Elles sont basées sur la fréquence d'images du projet.
Vouss pouvez également creator des effets de vitesse dynamiques et créats en variant la fréquence d'images du capteur. Si vous désissez une fréquence d'images de capteur plus élevé que celle de votre projet, cela créera un ralenti durant la lecture. Par exemple, si la fréquence d'images du capteur est de 60 im/s et que vous reglez la lecture du projet à 24 im/s, cela créera un ralenti de 40% par rapport à la vitesse de l'action réelle. En revanche, plus la fréquence d'images du capteur est BASSE, plus la vitesse de lecture de vos clips augmentera. Il s'agit des principes d'overcranking (creatión d'un effet de ralenti) et d'undercranking (creatión d'un effet d'accélére). L'overcranking accélère la fréquence d'images du capteur, un procédé qui permet par exemple de souligner un moment particulièrement émouvant. L'undercranking ralentit la fréquence d'images du capteur et permet notamment d'intensifier la vitesse des scènes d'action. Vous disposez désormais d'un nombre illimité de possibités!
Pour obtenir plus d'informations sur les fréquences d/images maximales disponibles avec chaque format d'enregistrement et avec chaque codec, consultez les tableaux dans la section
« Enregistrement » de ce manuel.
REMARQUE Lorsque l'options Fréq. Images off speed est Sélectionnée, l'audio et la video ne sont plus synchronisés. Cela est vrai, même si les fréquences d'images du projet et du capteur sont identiques. Nous vous recommandons de ne jamais Sélectionner Fréq. Images off speed si vous souhaitez synchroniser l'audio et la video.
Obturateur
L'indicateur Obtur, affiche l'angle ou la vitesse d'obturation. Cet indicateur vous permet de changer manuellement les valeurs d'obturation de laamera ou de configurer les règles de priorité des modes de l'exposition automatique. Vous pouvez désirer d'afficher l'angle ou la vitesse d'obturation depuis le paramètre Mesure obturation de l'onglet Réglages. Pour plus d'informations, consultez la section « Onglet Réglages » de ce manuel.

Touchez l'indicateur Obtur. pour acceder aux reglages de I'obturateur.
L'angle d'obturation ou la vitesse d'obturation définissent le niveau de flou de rouge de votre video. Ils peuvent être utilisés pour compenser les conditions d'éclairage variables. 180 degrès est l'angle d'obturation optimal pour capturer un flou de rouge satisfaisant dans la plupart des conditions. En termes de vitesse d'obturation, son équivalent est 1/50 de seconde. Cependant, si les conditions d'éclairage changent ou si la quantité de mouvement dans vos scènes augmente, vous pouvez modifier ces paramétres pour reflérer ces changements.
Par exemple, un angle à 360 degrés est un angle grand ouvert qui permet de faire entrer un maximum de lumière dans le capteur. Cela permet de capturer des mouvements presque imperceptibles même en conditions de faible éclairage. Par contre, si vous filmez des sujets en mouvement, une faible ouverture de l'angle (par exemple 90 degrés) diminuera considérablement le flou de bouge et capturera ainsi des images d'une grande nettoyé. Les équivalences en termes de vitesse et d'angle d'obturation dépendant de la fréquence d'images que vous utilisez.
Par exemple, si vous filmez à 25 images par seconde, 360 degrés équivaudron à 1/25 de seconde, et 90 degrés à 1/100 de seconde.
REMARQUE Lorsque vous filmez sous un éclairage artificiel, l'obturation可以选择 peut provoquer des scintillements. La Blackmagic Pocket Cinema Camera calculé automatiquement une valeur d'obturation sans scintillagement en fonction de la fréquence d'images. Lorsque vous ajustez l'obturation, jusqu'à trois options d'obturation sans scintillagement vous seront sugérées en bas de l'écran tactile. Ces valeurs d'obturation sont affectées par la fréquence du courant de votre région du monde. Vous pouvez régler la fréquence du courant sur 50Hz ou 60Hz dans le menu Réglages de laamera. Pour plus d'informations, consultez la section « Onglet Réglages » de ce manuel.
Touchez l'indicateur Obtur, pour afficher les valeurs d'obturation en bas de I'écran tactile. Si le bouton Exposition auto est désacté, I'écran affiche la valeur d'obturation actuellément sélectionnée ainsi que les valeurs d'obturation sans scintillagement disponibles. Ce réglage se fera en fonction de la fréquence du courant sélectionnée dans le menu Réglages de laamera. Pour plus d'informations, consultez la section « Onglet Réglages » de ce manuel.
Veuillez noter que les caractéristiques de certaines sources lumineuses peuvent provoquer des scintillements même lorsque vous utilisez des valeurs sans scintillagement. Lorsque vous n'utilisez pas de lumière continue, nous vous recommendons de tousjours effectuer un test avant de commencer le tournée.
Pour selectionner des valeurs d'obturation sans scintillement, touchez une des valeurs d'obturation affichees. En appuyant sur les flèches situées de chaque côte de la valeur seLECTIONnée, vous pourrez naviguer entre les valeurs les plus utilisées.

La camera suggere des valeurs d'obturation sans scintillagement en fonction de la fréquence du courant selectionné dans le menu Réglages.
Si vous tournez en extérieur ou si vous utilisez des lumieres sans scintillagement, vous pouvez également selectionner une valeur d'obturation en touchant deux fois l'indicateur de I'obturateur situé en bas de I'écran. Une fois l'angle d'obturation selectionné, le clavier qui permettra de le régler entre 5 et 360 degrés apparaitra.
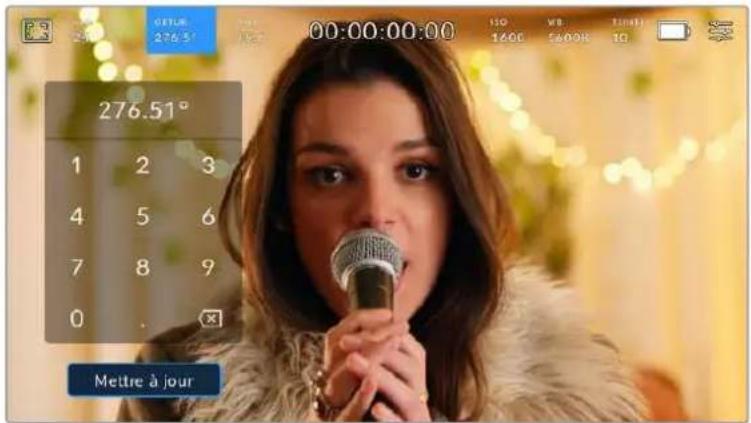
Utilisez le clavier pour saisir l'angle d'obturation de votre choix lorsqu'youes tournez en extérieur ou sous des lumieres sans scintillagement
La Blackmagic Pocket Cinema Camera dispose de trois modes d'exposition automatique qui modifie l'obturator. Pour selectionner un de ces obturateurs, touchez le bouton Exposition auto à droite dans le menu de l'obturator.
Obturateur
Ce paramètre règle automatiquement la valeur d'obturation pour offrir une exposition et une ouverture de l'iris constantes. Choisissez ce paramètre si vous souhaitez maintainir une profondeur de champ stable. Veillez notes que les réglages automatiques de l'obturator peuvent affecter le floude bouge. Nous vous recommandons de vérifier si des scintillements ont été introduits à cause des différents éclairages installés pour les tournages en studio. La fonction de réglage automatique de l'iris n'est pas disponible quand le mode d'exposition automatique est activé.
Obtur. + Iris
Maintient le bon niveau d'exposition en modifiant l'obturation, puis l'ouverture. Lorsque la valeur d'obturation maximale ou minimale a eteatteine et qu'il n'est always pas possible de maintainir la meme exposition, la camera ajuste l'ouverture pour que l'exposition reste stable.
Iris + Obtur.
Maintient le bon niveau d'exposition en modifiant l'ouverture, puis l'obturation. Lorsque l'ouverture maximale ou minimale a eteatte et qu'il n'est always pas possible de maintainir la meme exposition, la camera ajuste la valeur d'obturation pour que l'exposition reste stable.

Dans le menu de l'obturator, touchez Exposition auto pour acceder aux modes d'exposition automatique qui modifie l'obturator.
Lorsque le mode Exposition auto qui modifie l'obturateur ou l'iris est activé, la dette A apparait à cote de l'indicateur d'obturation ou de l'iris en haut de l'écran tactile.
Iris
L'indicateur Iris affiche l'ouverture de I'objectif selectionnée. En touchant cette icone, vous pouvez changer l'ouverture des objectifs compatibles et regler les modes d'exposition automatique qui modifie I'iris.

Touchez l'indicateur de I'iris pour acceder aux parametes de I'iris.
Pour utiliser le contrôle de l'iris sur l'écran tactile, la Blackmagic Pocket Cinema Camera doit être équipée d'un objectif qui prend en charge le changement d'ouverture via laamera.
Touchez l'indicateur Iris pour afficher le menu de l'iris en bas de l'écran tactile. L'ouverture de l'objectif choisis apparait à gauche de l'écran. Vous pouvez changer l'ouverture en touchant les flèches gauche et croite situées autour de l'indicateur, ou déplacer le curseur vers la gauche ou la droite.

Dans le menu Iris, touche les flèches situées autour de l'indicateur de l'iris ou utilisez le curseur pour régler ce paramètre.
Touchez le bouton Exposition auto situé à droite du menu pour ouvrir le menu d'exposition automatique de l'iris.
Cela vous offre les options d'exposition automatique suivantes :
Iris
Ce paramètre règle automatiquement l'ouverture pour offrir une exposition et une valeur d'obturation constantes. Cela permet de maintainir le flou de bouge fixe, mais peut affecter la profondeur de champ.
Iris + Obtur.
Maintient le bon niveau d'exposition en modifiant l'ouverture, puis l'obturation. Lorsque l'ouverture maximale ou minimale a ete atteinte et qu'il n'est always pas possible de maintainir la meme exposition, la camera ajuste la valeur d'obturation pour que I'exposition reste stable.
Obtur. + Iris
Maintient le bon niveau d'exposition en modifiant l'obturation, puis l'ouverture. Lorsque la valeur d'obturation maximale ou minimale a ete atteinte et qu'il n'est always pas possible de maintainir la meme exposition, la camera ajuste l'ouverture pour que l'exposition reste stable.

Dans le menu Iris, touchez Exposition auto pour ouvrir les modes d'exposition automatique qui modifient l'iris
Lorsque le mode Exposition auto qui modifie l'iris ou l'obturator est activé, la dette A apparait à côté de l'indicateur de l'iris ou d'obturation en haut de l'écran tactile.
Affichage de la durée
L'affichage de la durée se trouve en haut de l'écran tactile de laamera.

L'affichage de la durée devient rouge lorsque vous enregisrez.
Cet affichage fournit le timecode relatif à la durée des clips lors de l'enregistrement et de la lecture. Le timecode est exprime en Heures:Minutes:Secondes:Images et augmente au fur et à mesure de l'enregistrement ou de la lecture. Il s'allume en rouge pendant l'enregistrement.
L'affichage de la durée débute à 00:00:00:00. La durée du clip en cours d'enregistrement, ou ayant été enregistré précédement, est affichée sur l'écran tactile. Pour faciliter le travail en post-production, le timecode sous forme de code hora est intégré aux clips.
Pour voir le timecode, touchez simplement l'affichage de la durée. Touchez de nouveau cet affichage pour afficher la durée du clip.
Quand une Blackmagic Pocket Cinema Camera est branchée à un ATEM Mini, l'état du signal est affchéé sur l'écran LCD, sous le时间为 code. Pour aidier les opérateurs, l'état indique Preview quand le signal de laamera n'est pas à l'antenne, et On Air quand le signal est à l'antenne. L'ATEM Mini synchronise automatiquement le时间为 code de la Pocket Cinema Camera et le时间为 code du mélangeur lorsque ces deux appareils sont connectés. Cela permet de réaliser des montages multicâteras précis dans Resolve.
Les indicateurs d'etat suivant peuvent apparaître à côté de l'affichage de la durée :

Apparait à gauche de l'affichage de la durée lorsque la Blackmagic Pocket Cinema Camera utilise le mode Window.

Apparait a droite de l'affichage de la durée lorsque le timecode s'affiche.

Apparait à droite de l'affichage de la durée si un timecode externe LTC valable est connecté à l'entrée stéreo 3,5mm ou si le timecode est synchronisé avec le melangeur ATEM Mini.

Apparait a droite de l'affichage de la durée si laamera repose sur le timecode interne « jam synced», puis qu'elle a ete déconnectee.
ISO
L'indicateur ISO affiche le paramètre ISO (sensibilité de la lumière) régèle sur laamera. Toucher l'indicateur vous permet de régler l'ISO pour répondre aux besoin de différentes conditions d'éclairage.

Touchez l'indicateur ISO pour acceder aux parametes de l'ISO.

Dans le menu ISO de laamera, ces paramétres apparaissent en bas de l'écran tactile. Le curseur permet d'incrementer l'ISO d'1/3 de diaph.
Toutefois, en fonction de la situation, vous pouvez désirier une sensibilité ISO plus ou moins élevée. Par exemple, en conditions de faible éclairage, un ISO à 25600 peut s'avérer nécessaire mais pourra introduire du bruit. Dans des conditions d'éclairage élevé, régler l'ISO à 100 permet de capturer la richesse des couleurs.
Double ISO natif
La Blackmagic Pocket Cinema Camera possède deux ISO natifs, un de 400 et un de 3 200. Le capteur est ainsi optimisé aussi bien pour des conditions de faible éclairage, qu'en plein soleil.
Lorsque vous ajustez l'ISO, les ISO natifs vont opérer en fond pour s'assurer que la série est propre et qu'elle comporte le moins de bruit possible, que ce soit en condition d'éclairage faible ou élevé.
Si vous reglez l'ISO entre 100 et 1000, l'ISO natif de 400 sera utilisé en tant que point de referencia. Lorsque l'ISO est régle entre 1250 et 25600, l'ISO natif de 3200 sera utilisé comme reference. Si vous avez le choix de filmer avec un ISO à 1000 ou à 1250, nous给您 conseillons de réduire vos réglages d'un diaphragme sur l'iris de l'objet pour pouvoir selectionner un ISO à 1250. Ainsi, c'est l'ISO natif le plus élevé qui sera utilisé comme reference, et vous obtiennent z'un résultat plus propre.
Les graphiques ci-dessous montrent la relation entre l'ISO selectionné et la plage dynamique allouée.

Plage dynamique de la Blackmagic Pocket Cinema Camera 6K Pro et Blackmagic Pocket Cinema Camera 6K G2

Plage dynamique de la Blackmagic Pocket Cinema Camera 4K
Balance des blancs
Les indicateurs WB et Teinte affichent la balance des blancs et la teinte de laamera. Touchez ces indicateurs pour regler la balance des blancs et la teinte de laamera afin de les faire correspondre à différentes conditions d'éclairage.

Touchez les Indicateurs WB et Teinte pour acceder aux parametes de la balance des blancs et de la teinte
Chaque source lumineuse diffuse une couleur différente. Par exemple, une bougie diffuse une couleur chaude, alors qu'un ciel nuageux diffuse une couleur froide. Le paramètre de balance des blancs permet d'équilibrer les couleurs de votre image afin que le blanc reste bien blanc. Ce réglage s'effectue à l'aide du mélange des oranges et des bleus dans l'image. Par exemple, lorsque vous filmez sous une lumière tungstène qui diffuse une lumière chaude, régler la balance des blancs sur 3200K ajoutera du bleu à votre image. Cela permet d'équilibrer la couleur pour que le blanc soit correctementcaptué.
La balance des blancs de la Blackmagic Pocket Cinema Camera est preréglée, de manière à s'adapter parfaitement aux différentes températures de couleurs. Les températures de couleurs sont les suivantes :
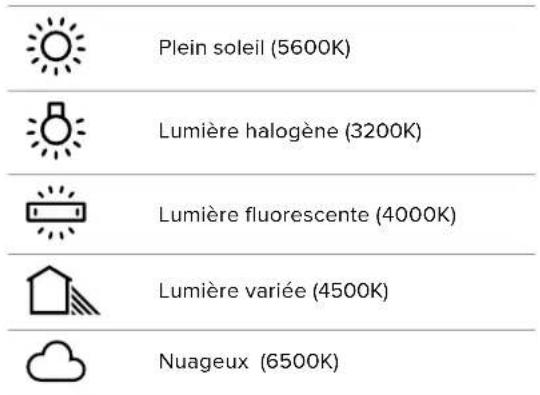
Vouss pouvez modifier ces prereglages en touchant ou en maintainant enforcées les flèches gauche et droite situées autour de l'indicateur de température en bas à gauche du menu de balance des blancs. La température de couleur augmente ou diminuée par unité de 50K. Si vous maintenez ces flèches enforcées, le changement d'unité est beaucoup plus rapide. Vous pouze également déplacer le curseur qui se trouve dans le menu de balance des blancs.
Pour régler votre image de façon plus précise, vous pouvez également régler le paramètre Teinte. Ceci permet de régler le niveau de vert et de magenta dans l'image. Vous pouvez par exemple ajouter du magenta pour compenser le ton vert des lumières fluorescentes. La plupart des prêrglages de balance des blancs de laamera comprendnue une teinte.

Toucher les indicateurs de balance des blancs et de leinte vous permet d'acceder aux cinq prérogliages, au curseur de la balance des blancs et à l'indicateur de teinte. Vous pouvez régier ces icones pour personnaliser la balance des blancs en fonction des conditions d'éclairage
Dans le menu de balance des blancs, le paramètre de teinte de laamera s'affiche en bas à droite de l'écran. Pour régler la teinte, touchez ou maintenez enfonçées les flèches gauche ou droite situées autour de cet indicateur. Elle augmente ou diminue par unité de 50K. Si vous maintainez ces flèches enfonçées, l'incrémentation est beaucoup plus rapide.
REMARQUE Si vous personnalisez la balance des blancs et la teinte, le nom du prépréglage deviendra CWB (Custom White Balance). Les blancs personnalisés sont enregistrés malgré les charges et les changements de paramètres. Cela facilité la comparaison entre la balance des blancs personnalisée et les derniers réglages utilisés.
Balance des blancs automatique
La Blackmagic Pocket Cinema Camera peut régler la balance des blancs automatiquement. Toucher AWB affiche l'écran de la balance des blancs.
Lorsque la balance des blancs est reglee automatique, un carré s'affiche au centre de l'image. Positionnez une feuille blanche ou grise devant ce carré et appuyez sur Mettre à jour WB. Laamera regle alors automatique les valeurs de la balance des blancs et de la teinte pour capturer une valeur moyenne des blancs ou des gris et ainsi garantir une balance des blancs aussi neutre que possible. Une fois mis à jour, ce paramètre sera enregistré comme balance des blancs personnalisée. Vous pouze également activer la fonction de balance des blancs automatique en appuyant pendant 3 secondes sur le bouton WB situé sur la face supérieure de laamera.
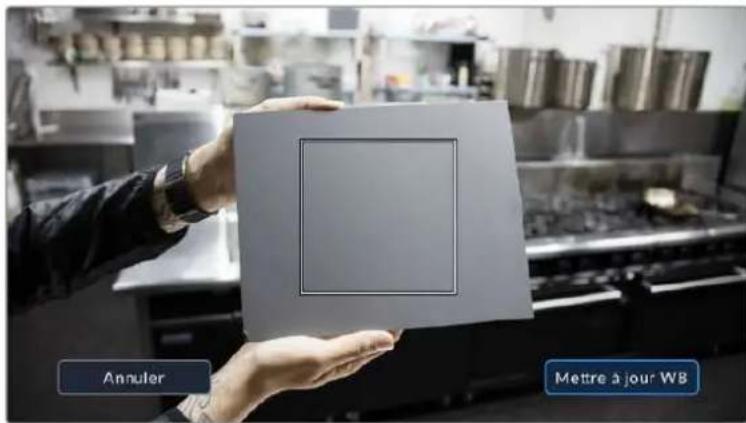
Toucher AWB dans le menu de la balance des blancs affiche l'écran de balance des blancs automatique. Utilisez une feuille blanche ou grise pour régler automatiquement une balance des blancs neutre.
Alimentation
L'etat et le type d'alimentation de la camera sont affichés en haut à droite de l'écran LCD.

Lorsque you allimentez laamera avec la batterle, vous pouvez changer I'affichage de I'indicateur en touchant I'icone.
| AC | AC Apparait lorsque laamera est branchée sur secteur. | |
| \(\mathsf{f}\)AC | AC / Chargement | S'affiche lorsque laamera est branchée à l'alimentation principale et qu'elle recharge en même temps la batterie interne ou les batteries NP-F570 (si vous utilisez une poignée d'alimentation). |
| 50% | Pourcentage | Si votre batterie prend en charge l'affichage en pourcentage, l'icone de la batterie affichera l'état en pourcentage en diminuant par palier de 1%. Lorsqu'il ne reste que 20%, l'icone s'allume en rouge. Pour activer ou désactiver l'affichage en pourcentage, touchez l'icone de la batterie. |
| Barres de batterie | L'icone de la batterie incluse avec laamera diminue par palier de 25%. Lorsqu'il ne reste que 20%, l'icone s'allume en rouge. | |
| Barres des batteries de la poignée | Si une poignée d'alimentation est fixée à votre Pocket Cinema Camera 4K, les deux icônes de batteries vous permettent de contrôler l'état de chaque batterie indépendamment. | |
| Barres de la poignée d'alimentation | La Blackmagic Pocket Camera Battery Pro Grip peut alimenter les Pocket Cinema Camera 6K Pro et 6K G2 depuis ses deux batteries ainsi que la batterie interne de laamera. Les barres indiquent le niveau des trois batteries. | |
| 16.4v | Voltage de la source d'alimentation | Affiche le voltage fourni par la batterie, ou via le jack de l'alimentation DC depuis un adaptateur, un cable adaptateur D-tap ou une solution d'alimentation personalisée. Pour activer ou désactiver l'affichage du voltage, touchez l'icone de la batterie. |
Indicateur de LUT
Lorsque you utilisez une LUT en tant qu'outil de previsualisation, une icone LUT s'affiche en haut a gauche de I'ecran pour indiquer que la LUT est active.

Histogramme
L'histogramme est situé en bas à gauche de l'écran tactile. L'histogramme RVB montre la distribution tonale de l'image divisée en canaux indépendants rouges, verts et bleus.
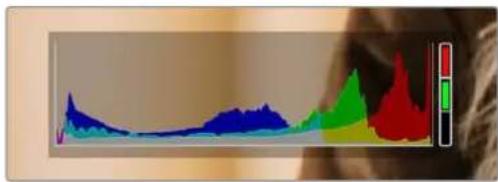
L'histogramme Indique la plage tonale de votre clip. Il est également pratique pour vérifier l'exposition et éviditer que les haute lumières soient écrétées.
Le côté gauche de l'histogramme représentée les pixels sombres, ou les tons fonçés, et le côté droit représentée les pixels clairs, ou les blancs. Lorsque vous ouvrez ou fermez l'ouverture de l'objectif, la distribution des informations sur l'histogramme change en conséquence vers la gauche ou vers la droite. Vous pourrez ainsi vérifier si les hauteures ou les basses lumières de votre image sont écrétées ou écrasées. Lorsqu'il y a un écretage dans le canal rouge, vert ou bleu, son indicateur respectif situé sur la droite de l'histogramme s'allume. Si les valeurs de l'histogramme ne diminuent pas progressivement sur les côtes gauche et croit, il se peut que vous perdiez des détails dans les hauteures ou les basses lumières.
Si aucun historogramme n'apparait en bas a gauche de votre écran tactile, le paramètre Affichage de l'onglet Moniteur est peut-être regle sur Codec et résolution. Pour plus d'informations, consultez la section « Paramétres du monitér » de ce manuel.
Bouton d'enregistrement
À côte de l'histogramme, en bas de l'écran tactile de la Pocket Cinema Camera, vous trouvez un bouton rond de couleur grise. C'est le bouton d'enregistrement. Appuyez une fois sur ce bouton pour commencer l'enregistrement, et appuyez à nouveau pour l'arrêté. Lorsque l'enregistrement est en cours, le bouton, les indicateurs des supports et le时间为 en haut de l'écran tactile deviennent rouges.

Le bouton d'enregistrement situé à côte des indicateurs des supports, au bas de l'écran tactile.

Le bouton d'enregistrement devient rouge lorsque laamera enregistre.
LUT appliquée à un clip
Si vous avez choisi d'appliquer une LUT à vos clips dans l'onglet Enregistrer, l'icone LUT apparaitra sur l'écran en mode veille et lorsque vous enregistrrez.

L'icone LUT vous informe que les clips seront enregistrés avec la LUT sélectionnée.

L'icone LUT s'affiche lorsque la LUT selectionnee est enregistrree avec le clip.
Indicateur de perte d'image
Lorsqu'une perte d'image se produit durant l'enregistrement, un point d'exclamation clignotant s'affiche sur le bouton d'enregistrement de laamera. L'indicateur de temps restant de la carte affectee devient également rouge. Par exemple, si la carte CFast subit une perte d'image, le point d'exclamation apparaitra sur le bouton d'enregistrement, et l'indicateur de temps restant de la carte deviendra rouge. Cela vous permet de savoir si une carte est trop lente pour le codec et la résolution selectionnés. L'indicateur de perte d'image s'affiche également lorsqu'il y a eu une perte d'image sur le clip enregistré précédemment. L'indicateur restera ainsi jusqu'à ce qu'un autre clip ait eté enregistré, ou que laamera ait eté redémarrée. Consultez les sections « Choisir une carte CFast 2.0 » et « Choisir une carte SD » pour comprendre comment éviter les pertes d'images.

L'indicateur indique une perte d'image sur la carte CFast.
REMARQUE You pouvez régler la Blackmagic Pocket Cinema Camera pour qu'elle interrompe l'enregistrement en cas de perte d'images afin d'éviter de continuer d'enregistrer une série inutilisable. Pour plus d'informations, consultez la section « Onglet Enregistrer » de ce manuel.
Temps d'enregistrement restant
Lorsqu'une carte CFast ou SD est insérée, ou qu'un disque flash USB-C est connecté à votreamera, les indicateurs situés au bas de l'écran affichent le temps d'enregistrement restant sur la carte ou le disque flash USB-C. Le temps est affché en minutes et peut varier selon la fréquence d'images et le coderc sélectionnés. L'indicateur calcule automatiquement le temps restant en fonction de ces paramétres. Lorsqu'il reste approximativement 5 minutes d'enregistrement sur la carte ou le lecteur, l'indicateur devient rouge, puis il se met à clignoter lorsqu'il ne reste plus que 2 minutes. L'indicateur affiche Pleine lorsqu'une carte est pleine, ou Plein lorsqu'un disque est plein.

L'indicateur des supports affiche le nom de la carte SD, CFast ou du disque flash USB-C ainsi que le temps d'enregistrement restant en minutes.
Le nom de la carte ou du disque s'affiche également dans la petite barre située au-dessus du temps restant. La barre devient bleue lorsque laamera est reglee pour enregistrer sur la carte ou le disque flash USB-C selectionné. Pour enregistrer sur un support différent, restez appuyé sur le nom de la carte ou du disque flash USB-C de votrechoix. La barre devient rouge lorsque laamera enregistré.
Lorsque vous touchez les indicateurs des supports de stockage, le menu de stockage et de formatage s'affiche.
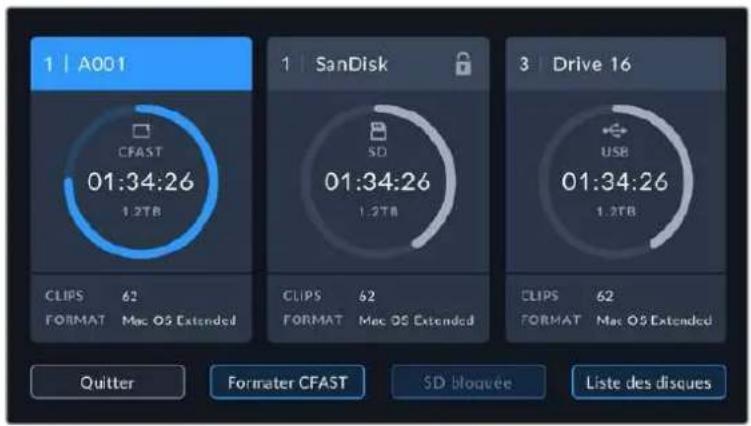
Touchez les indicateurs des supports sur I'ecran tactile pour acceder au gestionnaire de stockage.
Ce menu affiche l'espace libre de chaque carte CFast, SD ou du disque flash USB-C inséré dans laamera, ainsi que le nom de la carte ou du disque, la durée du clip précédent, le nombre total de clips et le format de filchier de chaque carte ou disque.
Voupeuze egalement formater voire support a partir de ce menu. Pour plus d'informations, veuliez consulter la section « Préparer les supports pour I'enregistrement » de ce manuel.
CONSEIL Touchez le nom de la carte ou du disque dans le menu des supports de stockage pour l'activer. La Blackmagic Pocket Cinema Camera commercera par enregistrer sur cette carte ou ce disque.
Indicateurs audio
Les indicateurs de crete audio affichent les niveaux audio pour les canaux 1 et 2 lors de l'utilisation du micro interne ou via l'audio externe lorsqu'une source y est connectee. L'affichage est calbre en unites dBFS et integre des indicateurs de crete qui restent visibles un petit moment, ce qui vous permit de visualiser clairement les niveaux maximaux atteints.
Pour obtenir une qualite audio optimale, verifie que vos niveaux audio ne dépassent pas 0 dBFS. Il s'agit en effet du niveau maximal auquel laamera peut enregistrer. L'audio qui dépasse ce niveau sera écrété et distordu.

Les barres de couleur sur l'indicateur audio représentent les niveaux audio maximaux. Idealement, les niveaux audio doivent rester dans la zone verte. Si le niveau entre dans la zone jaune ou rouge, il se peut que le son que vous venez de capturer soit ecréte.
Vou puevez toucher les indicateurs audio pour augmenter le volume des canaux audio 1 et 2, ainsi que celui du casque ou du haut-parleur.
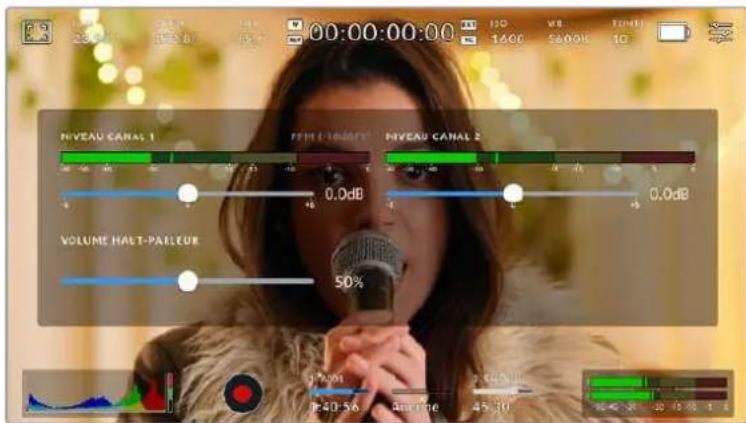
Touchez les indicateurs audio sur l'écran tactile pour acceder au volume et aux paramètres du casque ou du haut-parleur.
Double-toucher pour zoomer
Sur la Blackmagic Pocket Cinema Camera, vous pouvez agrandir n'importe qu'elle zone de l'aperçu de l'image en touchant deux fois l'écran tactile. La zone que vous touche sera agrandie et vous pourrez vous déplacer dans l'image en faisant glisser votre doigt sur l'écran. C'est une fonction très pratique pour vérifier la mise au point. Pour revenir à l'image en plein écran, il suffit de retoucher deux fois l'écran tactile de laamera.
Zoomer en pinct
Vou pouve ajuster le niveau de zoom en efectuant un geste de pincement sur I'ecran tactile LCD. Cela n'afectera pas la sortie HDMI.
Commencez par toucher l'écran deux fois pour effectuer un zoom x2, ou appuyez sur le bouton de Mise au point à l'aide du zoom. Puis, faites un geste de pincement sur l'écran tactile pour changer le niveau de zoom. Vous pouvez également faire glisser vos doigts sur l'écran pour vous déplacer dans l'image grossie. Pour returner à l'affichage standard, double-touchez une nouvelle fois l'écran, ou appuyez sur le bouton de Mise au point à l'aide du zoom.
Lorsque vous double-touche l'écran ou que vous appuyez sur le bouton de Mise au point à l'aide du zoom, le niveau de zoom bascule entre le niveau de grossissement précédant et l'affichage complet. Par exemple, si vous zoomez en pincant jusqu'à un grossissement x8 et que vous double-touche l'écran, l'image sera dézoomée. Puis, si vous double-touche l'écran une deuxieme fois, l'affichage reviendra à l'agrandissement x8.
Mise au point tactile
Vouss pouvez effectuer la mise au point de I'objectif sur n'importe quelle zone de I'image en touchant longuement cette zone sur I'ecran LCD. Appuyez sur le bouton de mise au point pour effectuer la mise au point sur la zone de votrechioix. Appuyez deux fois sur le bouton de mise au point pour la réinitialiser sur le centre de l'image.
Mode plein écran
Il est parfois utile lors du cadrage ou de la mise au point d'un plan, de masquer temporairement les informations d'etat et les indicateurs audio affichés à l'écran. Pour masquer toutes ces informations d'un coup, balayez l'écran tactile vers le haut ou vers le bas. L'indicateur d'enregistrement, les repères de cadrage, la grille de composition, l'aide à la mise au point et le zébra resteront visibles.
Pour les faire reapparaitre, balayez une nouvelle fois l'écran vers le haut ou vers le bas.

Balayez l'écran tactile vers le haut ou vers le bas pour masquer les informations d'état.
Menu de lecture
Appuyez sur le bouton de lecture pour acceder au menu de lecture. Vous pouze controller des clips enregistrres precedemment à l'aide des boutons de contrôle de laamera ou de l'écran tactile.
Lorsque vous utilisez l'écran tactile, il suffit de toucher le bouton de lecture pour commencer la lecture, et de le toucher une deuxième fois pour la suspendre. Vous pouvez vous servir des touches avant ou arrêtre pour passer directement au début ou à la fin des clips. Appuyez une fois sur l'icone d'avance rapide pour passer au clip suivant. Appuyez une fois sur l'icone de returnar rapide pour returner au début du clip en cours ou appuyez deux fois pour revenir au début du clip précédent. Les clips peuvent également être lus en boucle si l'icone de lecture en boucle est activée.

Icane de retour rapide, de lecture, d'avance rapide et de lecture en boucle.
Pour une avance ou un retour rapides, maintenez le bouton correspondant enforcé. Ainsi, la séquence sera lue à une vitesse deux fois plus élevé, vers l'avant ou vers l'arrière, selon le bouton sélectionné.
Vous pouvez modifier cette vitesse en touchant à nouveau les commandes de transport. À chaque fois que vous toucherez une commande de transport dans la même direction, vous doublerez la vitesse de défilament. La vitesse de défilament maximale est de x16. Si vous atteignez la vitesse maximale et que vous appuyez à nouveau sur la même commande de transport, vous reviennent à la vitesse x2. À chaque fois que vous appuyez sur la commande de transport opposée, la vitesse de défilament diminue de moins pour atteindre la vitesse x2. Vous pouvez revenir à une lecture standard en touchant le bouton de lecture.

L'indicateur de vitesse de défillement affiche la vitesse et la direction de l'avance ou du retour rapide de la série.
Si vous touchez le bouton d'enregistrement alors que vous étés en mode de lecture, vous reviendrez en mode de voir et laamera sera prete à enregistrer.
Balayez l'écran tactile vers le haut ou vers le bas pour masquer les informations d'etat pendant la lecture des séquences. Ouvrir le clap pendant la lecture vous permet de notes dans les métadonnées la qualité du clip que vous étés en train de dire. Pour plus d'informations, consultez la section « Saisie des métadonnées »
Paramètres
Menu de navigation
Appuyez sur le bouton du menu pour ouvrir le menu de navigation. Ce menu à onglets offre des paramétrages qui ne sont pas disponibles depuis l'écran principal. Les paramétrres sont regroupés par fonction au sein des onglets Enregistrer, Moniteur, Audio, Réglages, Préroglages et LUTS. Chaque onglet possède plusieurs pages. Vous pouvez passer d'une page à l'autre en touchant les flèches situées de part et d'autre de l'écran, ou en balayant l'écran vers la gauche ou vers la droite.

Touchez les Intitués Enregistrer, Moniteur, Audio, Régliages, Prérogliages et LUTS pour vous déplacer entre les différents anglets du menu de navigation.
Onglet Enregister
L'onglet Enregistrer permet de régler le format video, le code et la résolution, ainsi que d'autres paramètres qui affectent les séquences enregistrées, tels que la plage dynamique et la nettement de l'image.
Onglet Enregister - Page 1
La première page de l'onglet Enreglistre contient les paramétres suivants.
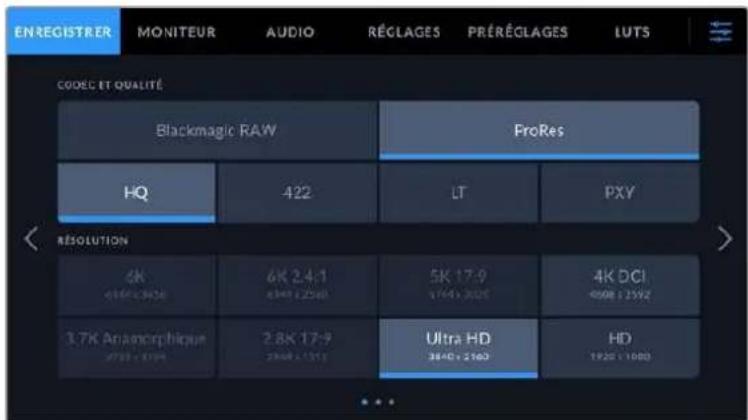
Codec et qualité
Le menu Codec et Qualité est réparti sur deuxrangées. La rangée supérieure permet de désir entre deux familles de codec, Blackmagic RAW et Apple ProRes, tandis que la rangée inférieure offre des options de qualité au sein de ces familles. Par exemple, les options de qualité de la famille de codec ProRes sont ProRes 422 HQ, ProRes 422, ProRes 422 LT et ProRes 422 Proxy. Les options Blackmagic RAW sont divisées entre quatre paramètres de Débit constant et deux paramètres de Qualité constante.
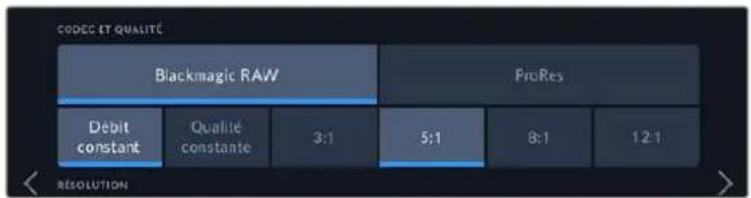
Options de codec et de qualite avec le Blackmagic RAW
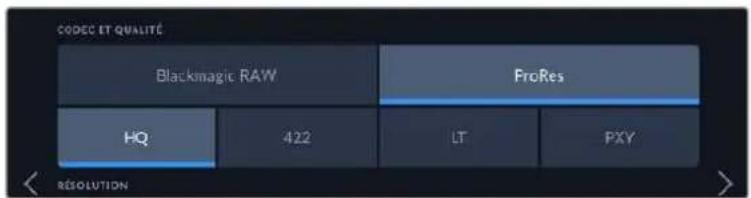
Options de codec et de qualite avec le ProRes
CONSEIL La quantité de video que vous pouvez enregistrer sur le support de stockage de la Blackmagic Pocket Cinema Camera augmente lorsque vous désisissez des codecs qui utilisent une compression plus élevé. Pour obtenir de plus amples informations, consultez les « Tableaux des durées d'enregistrement » dans la section « Enregistrement » de ce manuel.
Résolution
Ce paramètre fonctionne en correlation avec le paramètre Codec. Utilisez-le pour selectionner la résolution en fonction du format d'enregistrement. Par exemple, si vous souhaitez enregistrer des clips Ultra HD en ProRes HQ, sélectionnez ProRes et HQ dans le menu Codec et Qualité, puis Ultra HD dans le menu Résolution.
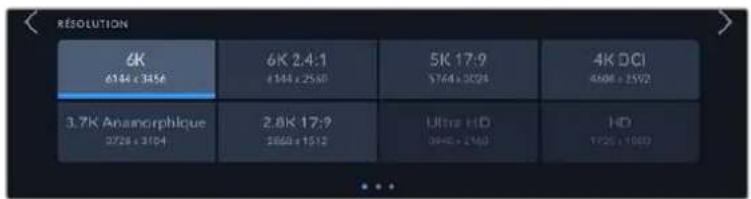
Options de résolution de la Pocket Cinema Camera 6K Pro et 6K G2 avec le code Blackmagic RAW
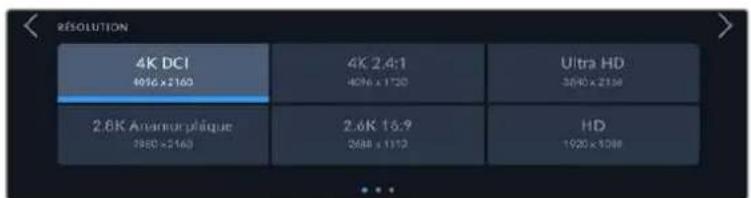
Options de résolution de la Pocket Cinema Camera 4K. En 4K DCI, la catégorie est Résolution, sinon elle sera Résolution - Capteur Window.
Lorsque vous réalisiez un enregistrement multicamera sur l'ATEM Mini, la Pocket Cinema Camera règle le codec sur Blackmagic RAW pour un enregistrement isolé de qualité sur un support interne. Lorsque vous branchez des Pocket Cinema Camera à un ATEM Mini, les cameras adaptent leur fréquence d'images à celle de l'ATEM Mini. Si vous souhaitez désirir une fréquence d'images différente pour l'ATEM Mini après avoir branché toutes les sources video, vous pouvez le faire dans les paramètres du métangleur de l'ATEM Software Control. Pour plus d'informations, consultez le manuel de l'ATEM Mini.
Onglet Enregister - Page 2
La deuxieme page de l'onglet Enregistrer contient les options suivantes.

Plage dynamique
Ajustez le paramètre Plage dynamique en touchant les icônes de la plage dynamique. La Blackmagic Pocket Cinema Camera possède trois paramétres de plage dynamique :
| Film | Le paramètre Film capture de la video à l'aide d'une corbe logarithmique. Ce mode d'enregistrement vous offre la(Meilleure)plage dynamique etexploite au maximum les informations de voitrive signal video pour vous aiderà tirer le meilleur part des logiciels d'étalonnage, tels que DaVinci Resolve. |
| Extended Video | Ce paramètre repose sur le Blackmagic Wide Gamut avec le contraste et la saturation appliqués. Les différences les plus notables par rapport au modeVideo viennent de l'axe magenta/vert moins sature, ce qui est plus courant sur la pellicule. |
| Video | Le paramètre Video est le meilleurchoix pour enregistrer un rendu trèscontrasté et sature pour une exportation directe ou un traitement minimalen post. Ce paramètre utilise les roues primaires Rec.709 et un agréableroll off dans les haute lumières. C'est une bonne option pour obtenir unpoint de départ précis avec une corbe de gamma agréable et la possibilitéd'étalonnner les images. |
REMARQUE Lorsque vous enregistrez en Blackmagic RAW ou en ProRes avec la plage dynamique Film, l'image apparait terne et désaturée sur l'écran tactile. En effet, les images contiennent énormément de données qui n'ont pas encore été étalandonnées pour cet affichage. Toutefois, lorsque vous enregistrez en mode Film, vous pouvez effectuer le monitoring sur l'écran tactile et sur la sortie HDMI en utilisant une LUT (Look Up Table) consçue pour simuler un contraste standard. Pour plus d'informations, consultez la section « LUTs 3D » de ce manuel.
Surface du capteur
VoussouspoezreglerlaBlackmagicPocketCinemaCamera pourutiliserla surfaceentiere ducapteur. Pourdes fréquencesd'imagescorenepluselevées,vouspoezreglerle parametreSurface capteur surWindow.Cemodeutiliseuniquementlaquantitedepixelscdupacetuirenecessairepour leformat video sélectionnéplutotque de redimensionnerles images enutilisantl'intégralitédu capteur.Certains formats combinentlemodeWindowetredimensionné.Parexample,les BlackmagicPocketCinemaCamera6KPro et6KG2possédentdes formatsHDredimensionnés depuislecapteurenmodeFull,redimensionnésdepuisle5.7KWindowetredimensionnésdepuis le2.7KWindow.
Comme le mode Capteur Window n'utilise que le centre du capteur, le champ visuel de l'objet semble plus étroit à cause du rognage. Par exemple, si vous utilisez un objectif de 20mm pour filmer des séquences HD en mode Window, le champ visuel de la Pocket Cinema Camera 4K équivaudra à celui d'un objectif de 40mm.
Ce paramètre est disponible lorsque vous filmez en dessous de la résolution maximale offerte par la camera, comme en ProRes HD ou Ultra HD.
Les fréquences d'images les plus élevées des Pocket Cinema Camera 6K Pro et 6K G2 sont disponibles lorsque vous filmez en 2.8K 17:9 Window et en HD redimensionné depuis le 2.7K Window. Les fréquences d'images les plus élevées de la Pocket Cinema Camera 4K sont disponibles lorsque vous filmez en 2.6K 16:9 et en HD Window.
Pour plus d'informations sur les formats Full et Window, veuillez consulter la section « Fréquences d'images maximales du capteur ».
Fréquence d'images du projet
Le paramètre Freq. Images du projet propose une selection de fréquences d'images couramment utilisées dans l'industrie du cinema et de la télévision, par exemple, 23.98 images par seconde. En général, on fait coïncider la fréquence d'images avec la vitesse de lecture et la synchronisation audio utilisées dans le workflow de postproduction.
Huit fréquences d'images sont disponibles : 23.98, 24, 25, 29.97, 30, 50, 59.94 et 60 images par seconde.
Enregistrement Off Speed
Par défaut, les fréquences d'images du projet et du capteur correspondant pour que le clip soit lu en vitesse normale. Toutefois, vous pouvez régler la fréquence d'images du capteur indépendamment en désactivant le bouton du paramètre Enregistrement off speed.
Frequence d'images off speed
Lorsque le parametre Enregistrement off speed est activé, touchez les flèches du paramètre Freq. images off speed pour régler la fréquence d'images du capteur de laamera.
La fréquence d'images du capteur vous permet de régler le nombre d'images par seconde que le capteur enregistré. La fréquence d'images déterminée la vitesse de lecture de votre video en fonction de la fréquence d'images de projet可以选择.
Pour plus d'informations concernant les fréquences d'images off speed, consultez le paragraphe « Images par seconde » de la section « Fonctionnalités de l'écran tactile » de ce manuel.
Pour obtenir plus d'informations sur les fréquences d'images maximales disponibles avec chaque format d'enregistrement et avec chaque codec, consultez les tableaux de la section « Fréquences d'images maximales du capteur »
Support préfééré pour enregistrer
Utilisez ce paramètre pour selectionner le support sur lequel la Blackmagic Pocket Cinema Camera va enregistrer en premier. Les options sont CFast, SD, USB et Le plus plein. Choisissez l'option CFast, SD ou USB selon votre préférence. Toutefois, si vous prenez l'habitude d'utiliser toujours la même option, vous saurez alors rapidement quel support doit être changé en premier lorsque le stockage est plein. L'option Le plus plein facilitite le regroupement de filchiers de façon chronologique lorsque vous filmez un projet à l'aide d'une seuleamera.
Le paramètre sélectionné s'applique des qu'une carte CFast ou SD est insérée, mais aussi lorsqu'un disque USB est connecté. Vous pouvez modifier ce paramètre à tout moment dans le gestionnaire de stockage en sélectionnant une carte différente. Il est important de préciser que le fait d'éjecter et de réinsérer des cartes rétablira le paramètre Carte préféree pour enregistrer actuel.
Le paramètre Le plus plein est basé sur le pourcentage d'espace utilisé sur votre support plutôt que sur sa taille ou la quantité de données utilisées.
Onglet Enregister - Page 3
La troisieme page de Ionglet Enregistrer contient les parametes suivants.
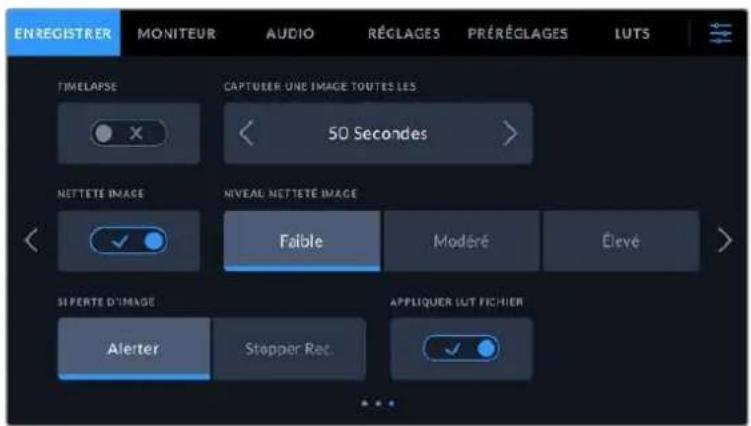
Timelapse
Ce paramètre active la fonction Timelapse qui permet l'enregistrement automatique d'une image fixe aux intervalles suivants :
Images 2-10
Seconds 1-10,20,30,40,50
Minutes 1-10
Voussoupvezparexampiereglerlacamera pourqu'elleenregistreeuneimagefixetoutesles10 images,5secondes,30 secondes,5minutes,etc.
La fonction Timelapse offre de nombreuses options créatives. Par exemple, lorsque vous reglez l'intervalle de temps sur 2 images, vous obtenez un effet d'accélééré lors de la lecture de votre video.
Appuyez sur le bouton d'enregistrement pour démarrer l'enregistrement. Lorsque vous appuyez une seconde fois sur ce bouton pour arreter l'enregistrement, la série en timelapse est sauvegardée comme un clip, avec le codec et la fréquence d'images régés dans laamera. Vous pouze ainsi déposer la série en timelapse dans votre timeline de post-production de la même manière que n'importe quel clip.

Le mode timelapse est indiqué par une icone au-dessus du bouton d'enregistrement.
CONSEIL orsque you enregistrez des clips en mode Timelapse, le compteur du timecode se met à jour à chaque fois qu'une image video est enregistrée.
Netteté de l'image
Utilisez ce paramètre pour regler la nettete de l'image. Lorsque ce parametre est activé, augmentez et diminuez le niveau de nettete en selectionnant Faible, Modéré ou Élevé.
Lorsque ce parametre est activé, il est appliqué sur les videos ProRes capturées par laamera et sur la sortie HDMI.
Ce réglage est principalement destiné à la production en direct pour laquelle il est impossible de passer par la postproduction. Nous vous recommendons de régler le paramètre sur Off si vous capturez des images qui seront ensuite envoyées en postproduction. Ce paramètre est désactivé lorsque le codec est régé sur Blackmagic RAW.
CONSEIL Lorsque vous traitez vos fichiers Blackmagic RAW, vous pouvez obtenir un niveau de nettete comparable en utilisant l'util de réglage de la nettete et du flout disponible sur la page Étalonnage de DaVinci Resolve.
Réglez le rayon de l'outil à 0,48 et ajustez l'échelle à 0,6,0,3 ou 0,15 pour obtenir une nette comparable aux réglages Élevé, Modéré ou Faible.
Pour plus d'informations sur le réglage de la nettable en post-production, consultez la section « Motion effects palette and blur palettes » du manuel complet DaVinci Resolve.
Si perte d'images
Utilisez le paramètre d'arrêt de l'enregistrement lors d'une perte d'images pour configurer la réponse de la Pocket Cinema Camera lorsqu'une perte d'images est détectée. Le paramètre acté, l'indicateur de perte d'images s'affichera sur l'écran tactile LCD et l'enregistrement se poursuivra avec la perte d'images. Lorsqu'il est régle sur « Stopper l'enregistrement», l'enregistrement s'arrête lorsqu'une perte d'images est détectée. Cela vous évitera de perdre du temps à filmer des séquences inutilisables si vous n'avez pas remarquè l'indicateur de perte d'images.
CONSEIL Consultez les sections « Choisir une carte CFast 2.0 », « Choisisr une carte SD», « Choisisr un SSD rapide » et « Choisisr un disque flash USB-C rapide » pour comprendre comment éviter les pertes d'images.
Appliqueune LUT dans un fichier
Lorsque vous filmez avec le code Blackmagic RAW et que vous appliquez une LUT à la sortie HDMI de votreamera, la LUT sélectionnée sera intégrée au fjichier Blackmagic RAW que vous enregistrez. La LUT sera sauvégardée dans l'en-tête du fjichier et vous pourrez facilement l'appliquer au clip en post-production, sans avoir a gérer un fjichier sépare. Lorsque la fonction Appliquer LUT dans fjichier est activée dans le menu, le clip s'ouvrira dans le Blackmagic RAW Player et dans DaVinci Resolve avec la LUT sélectionnée. Vous pouvez activer ou désactiver l'application de la LUT, mais elle sera toujours presente dans le fjichier Blackmagic RAW.
DaVinci Resolve comprehend également une fonction Appliquer une LUT dans ses paramétres, pour activer ou désactiver la LUT 3D dans le fichier Blackmagic RAW. La fonction Appliquer une LUT dans DaVinci Resolve est la même que dans laamera. Ainsi, quand vous filmez, vous pouvez demander à l'étalonneur d'utiliser une LUT depuis laamera. Mais vous pourrez facilement désactiver cette LUT dans DaVinci Resolve en réglant Appliquer une LUT sur Off.
Enregisterune LUT sur un clip
L'option Enregistrer LUT sur clip est disponible lorsque vous filmez avec le codec ProRes. Avec la Blackmagic Pocket Cinema Camera, vous ne pouvez pas appliquer ou intégrer de LUTs par défaut sur des clips enregistrés. Pour intégrer une LUT à vos clips, activez le bouton du paramètre Enregistrer LUT sur clip.
C'est une option pratique lorsque vous n'avez pas le temps d'effectuer l'étalonnage en post-production, ou quand vous doivent fournir les images directement à un client ou au monteur. Pour plus d'informations, consultez les sections « LUTs 3D » et « Commandes de l'écran tactile »
Convention de dénomination des fichiers
Les clips sont enregistrés sur une carte CFast, SD ou sur un disque flash USB-C flash au format Blackmagic RAW ou ProRes QuickTime movie, en fonction du format d'enregistrement que vous avez choisi.
Le tableau ci-dessous presente un exemple de la convention de dénomination des fichiers :
| A001_0815152_C001.mov QuickTime Movie Filename | |
| A001_0815152_C001.mov Identifiant de laamera | |
| A001_0815152_C001.mov | Numero de la bobline |
| A001_0815152_C001.mov | Mols |
| A001_0815152_C001.mov | Jour |
| A001_0815152_C001.mov | Heure |
| A001_0815152_C001.mov | Minute |
| A001_0815152_C001.mov | Numero de clip |
Les fischiers d'images fixes capturées à l'aide du bouton Still sont enregistrés selon la convention de dénomination des fischiers relative aux clips video. Toutefois, les quatre derniers caractères du nom de fichier portent le numéro de l'image, par exemple S001, au lieu du numéro du clip. Pour comprendre comment modifier l'identifant de laamera, consultez la section « Métadonnées du projet »
Onglet Moniteur
L'onglet Moniteur vous permet d'ajuster les informations à l'écran et d'autres options de monitoring pour l'écran tactile ainsi que pour la sortie HDMI de la Blackmagic Pocket Cinema Camera. Les options sont organises par sortie entre LCD, HDMI ou bien Les deux, qui permet de selectionner les deux sorties. Chaque menu possede deux pages d'options. Vous pouze passer d'une page à l'autre en touchant les flèches situées de part et d'autre de l'écran, ou en balayant l'écran vers la gauche ou vers la droite.
Si le viseur optionnel est installé sur les Blackmagic Pocket Cinema Camera 6K Pro et 6K G2, les paramétres de la première page de l'onglet Moniteur vous permettent de contrôler l'affichage LCD, HDMI et du viseur indépendamment.
Si un Blackmagic Pocket Cinema Camera Pro EVF est installé sur votreamera, un bouton Viseur et un bouton Tous apparaitront dans l'onglet Moniteur. Le bouton Tous remplace le bouton Les deux et se refère aux informations d'etat que vous poulez afficher à la fois sur l'écran tactile LCD, sur la sortie HDMI et sur le viseur.
Onglet Moniteur - Page 1
La première page de l'onglet Moniteur contient des paramètres identiques pour chaque sortie. Par exemple, vous pouvez activer le zébra sur l'écran tactile, mais le désactiver sur la sortie HDMI.
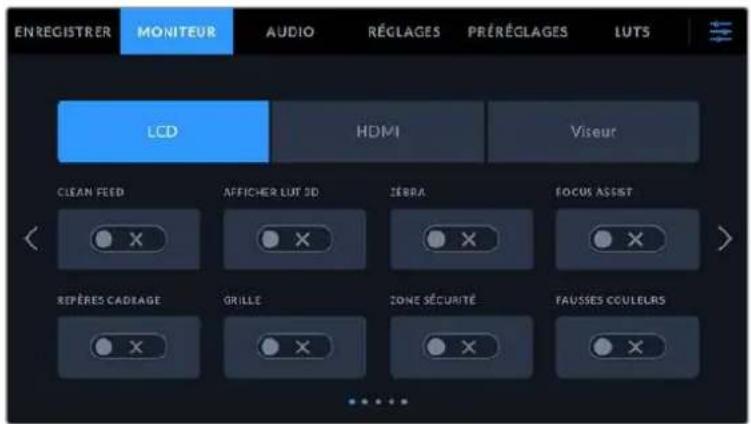
Clean Feed
Touchez le bouton Clean Feed dans le menu LCD ou HDMI pour désactiver les informations à l'écran de la sortie correspondante, excepté le voyant d'enregistrement tally.

Laamera affiche levoyant d'enregistrement tally,meme en mode Clean Feed
REMARQUE Les LUTs seront appliquées aux sorties pour lesquelles le paramètre Clean Feed est activé. Pour désactiver les LUTs, il suffit de désactiver le bouton du paramètre Afficher LUT dans le menu Moniteur.
Affichage de la LUT 3D
Les Blackmagic Pocket Cinema Cameras peuvent appliquer des LUTs 3D à n'importequelle sortie pour lui donner un rendu de séquence étalonnée. C'est particulièrement utile lorsque vous enregistrez des clips avec la plage dynamique Film.
Si laamera possede une LUT active, utilisez ce parametre pour appliqueer cette LUT à I'ecran tactile ou a la sortie HDMI.
REMARQUE Pour plus d'informations sur le chargement et l'utilisation des LUTs 3D, consultez la section LUTs) de ce manuel. Touchez les options LCD ou HDMI pour acceder aux paramétres de monitoring pour l'écran tactile et la sortie HDMI: focus assist (aide à la mise au point), repères de cadrage, grille, zone de sécurité et fausses couleurs.
Zébra
Touchez le bouton Zébra dans le menu LCD ou HDMI pour activer le zébra sur ces sorties. Pour plus d'informations sur le zébra et la configuration des niveaux de zébra, consultez la section « Caracteristiques de l'écran tactile » de ce manuel.
Focus Assist
Touchez le bouton Focus Assist dans le menu LCD ou HDMI pour activer l'aide à la mise au point sur ces sorties. Pour plus d'informations sur l'aide à la mise au point et la configuration des niveaux de l'aide à la mise au point, consultez la section « Caracteristiques de l'écran tactile » de ce manuel.
Repetes de cadrage
Touchez le bouton Repères cadrage dans le menu LCD ou HDMI pour activer les repères de cadrage sur ces sorties. Pour plus d'informations sur les repères de cadrage et leur sélection, consultez la section « Caracteristiques de l'écran tactile » de ce manuel.
Grille
Touchez le bouton Grillé dans le menu LCD ou HDMI pour activer la grille de composition selon la règle des tiers sur ces sorties. Pour plus d'informations sur la grille de composition selon la règle des tiers, consultez la section « Caracteristiques de l'écran tactile » de ce manuel.
Zone de sécurité
Touchez le bouton Zone sécurité dans le menu LCD ou HDMI pour activer la zone de sécurité sur ces sorties. Pour plus d'informations sur le paramètre de la zone de sécurité, consultez la section « Caracteristiques de l'écran tactile » de ce manuel.
REMARQUE Utilisez le paramètre Zone sécurité % dans le menu Les deux de l'onglet Moniteur de la Blackmagic Pocket Cinema Camera pour régler la taille de la zone de sécurité.
Fauusses couleurs
Touchez le bouton Fausses couleurs dans le menu LCD ou HDMI pour activer les fausses couleurs sur ces sorties. Pour plus d'informations sur le paramètre des fausses couleurs, consultez la section « Caracteristiques de l'écran tactile » de ce manuel.
Onglet Moniteur - Page 2
La deuxieme page de l'onglet Moniteur contient les paramétres suivants.
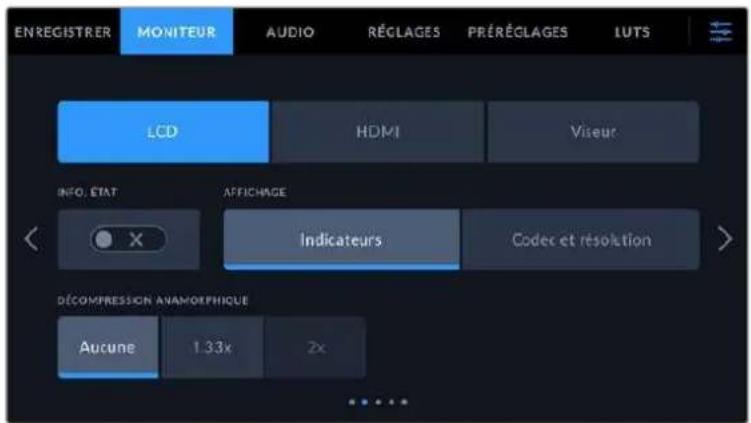
LCD, HDMI et viseur
Informations d'etat
Ce paramètre est pratique pour masquer les informations d'etat et les indicateurs audio affichés sur l'écran tactile, et ainsi conserver uniquement les informations nécessaires à la composition du plan. Touchez le bouton Info. état pour activer ou désactiver les informations d'etat et les indicateurs audio sur l'écran de laamera. Les autres informations à l'écran, telles que les repères de cadrage, la grille, le focus assist et le zébra resteront visibles, s'il sont actifs. Vous pouvez également balayer l'écran tactile vers le haut ou vers le bas pour obtenir le même résultat.
Décompression anamorphique
Lorsque you tournez avec des objectifs anamorphiques, l'image est etirée horizontally sur les sorties de prévisualisation de la Pocket Cinema Camera ainsi que sur les fischiers enregistrés. Lorsque you activate le paramètre Décompression anamorphique, l'image de prévisualisation de la Pocket Cinema Camera est corrigée. De plus, la valeur de la correction est enregistrée dans les métadonnées du clip afin de faciliter la correction en post.
La valeur de la correction varie selon le réglage de la résolution de la Blackmagic Pocket Cinema Camera. Toutefois, l'image obtenue sera toujours au format écran large 2.4:1.
Les objectifs anamorphiques concus pour le tournage de films ont en général un coefficient d'étirement de 2x. La résolution 3.7K anamorphique de la Pocket Cinema Camera est concise pour être utilisée avec ces objectifs. Laamera effectue une correction d'étirement de 2x lorsqu'elle est régée sur cette résolution et que le paramètre Décompression anamorphique est activé.
Les objectifs anamorphiques concus pour les capteurs d'image numérique 16:9 utilisent souvent un coefficient d'étirement de 1.33x afin de produit des images au format écran large 2.4:1 à partir de l'intégrality du capteur 16:9. Par conséquent, lorsque la Pocket Cinema Camera est réalisée sur des résolutions 16:9 telles que 4K 16:9 et HD 16:9, la décompression anamorphique devrait être réalisée sur 1.33x.
CONSEIL Si vous image est étiérée horizontallyment lorsque vous tournez avec un objectif sphérique standard, vérifie que le paramètre Décompression anamorphique n'est pas activé.
LCD et viseur
Affichage
Au lieu de l'histogramme et des indicateurs audio, laamera peut afficher les informations relatives au codec et à la résolution dans les coins gauche et droit de l'écran tactile. C'est très pratique si vous préférez utiliser les fausses couleurs pour régler l'exposition ou si vous enregistrez l'audio séparément et souhaitez afficher des informations supplémentaires à l'endroit où l'histogramme et les indicateurs audio sont normalement affichés. Pour sélectionner l'affichage souhaité, il suffit de toucher le paramètre Indicateurs ou Codec et Résolution dans le menu LCD.

HDMIsubsection
Affichage des informations d'etat destinées au directeur de la photo ou au réalisateur
L'écran tactile affiche des informations telles que l'ISO, la balance des blancs et l'ouverture. Ces informations sont pratiques pour le cameraman ou le directeur de la photo qui doivent régler des plans individuels sur laamera. Toutefois, la sortie HDMI peut également afficher
des informations utiles au réalisteur ou au scripte qui doivent garder l'oeil sur plusieurs plans ou cameras.
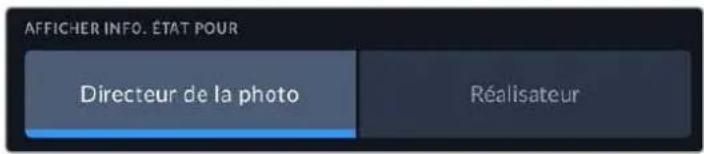
Lorsque vous reglez les informations d'etat sur RÉalisateur au sein des paramètres HDMI de l'onglet Moniteur, les informations d'etat suivantes s'affichent :
Im/s
Affiche la fréquence d'images sélectionnée pour cetteamera. Si le paramètre Enregistrement off speed est désactivé, seule la fréquence d'images du projet est affichée. Si le paramètre Enregistrement off speed est activé, la fréquence d'images du capteur s'affiche, suivie de la fréquence d'images du projet.
CAM
Affiche l'identifant de laamera, comme regle sur le clap de laamera. Pour plus d'informations, consultez la section « Clap »
OPERATEUR
Identifie l'opérateuramera, comme regle sur le clap de laamera. Pour plus d'informations, consultez la section « Clap »
AFFICHAGE DE LA DUREE
Affiche la durée du clip en cours d'enregistrement, ou du dernier clip enregistré au format: heures:minutes:secondes.
BOBINE, SCENE, PRISE
Affiche la bobine, la scène et la prise en cours. Pour plus d'informations sur la création des libellés bobine,-scène et prise, consultez la section « Clap »
PLAGE DYNAMIQUE
La LUT appliquée à la sortie en cours est affichée dans le coin gauche de l'écran.
Lorsqu'aucune LUT n'a été appliquée, la plage dynamique affiche Film ou Video.
TIMECODE
Le timecode de laamera est affiché en
heures:minutes:seconds.
Onglet Moniteur - Page 3
La troisième page de l'onglet Monitor contient des paramétres identiques pour les sorties LCD, HDMI et Viseur. Ces paramétres agissant globalement sur les trois sorties de monitoring. Par exemple, si le focus assist est activé sur les sorties LCD, HDMI et Viseur de votre Blackmagic Pocket Cinema Camera, changer le type d'aide à la mise au point de Peaking à Lignes colorées aura un impact sur les trois sorties.

Niveau de zébra
Réglez le niveau d'exposition à partir duquel le zébra apparait en touchant les flèches situées de part et d'autre du paramètre. Le niveau du zébra est régiable par palier de 5% entre 75% et 100% d'exposition.
Pour plus d'informations, consultez le paragraphe Zebra dans la section « Caracteristiques de l'écran tactile » de ce manuel.
Focus Assist
Votre camera offre deux modes d'aide a la mise au point: Peaking et Lignes colorées.
Peaking
Lorsque le mode Peaking est selectionné, les zones de l'image qui sont très nettes sur l'écran tactile, la sortie HDMI ou le viseur ne le seront pas sur l'image enregistrée. À l'écran, les zones nettes de l'image dessortent clairément contre l'arrière-plan. comme il n'y a pas d'autres informations affichées à l'écran, c'est une façon intuitive de savoir si la mise au point a été effectuee, car le sujet sur lequel vous focalisez est sépare des autres éléments du plan.
Lignes colorées
Lorsque le mode Lignes colorées est sélectionné, une ligne de couleur s'affiche sur les zones nettes de l'image. Ce mode est un peu plus visible que le mode Peaking, car les lignes sont superposées à l'image. Cependant, c'est une aide à la mise au point précise pour les plans qui comportent de nombreux éléments.
Couleur du focus assist
Utilisez ce paramètre pour changer la couleur de la ligne de mise au point lorsque vous étés en mode Lignes colorées. Modifier la couleur de cette ligne peut faciliter l'aide à la mise au point. Les options disponibles sont Blanc, Rouge, Vert, Bleu et Noir.
Niveau du focus assist
Pour régler le niveau d'aide à la mise au point sur l'écran LCD, la sortie HDMI et le viseur, déplacez le curseur de gauche à droite.
Régler le niveau d'intensité de l'aide à la mise au point n'active pas l'aide à la mise au point sur l'écran LCD, la sortie HDMI et le viseur de la Blackmagic Pocket Cinema Camera. Vous devrez donc activer l'aide à la mise au point individuellement sur les sorties LCD,HDMI et Viseur de l'onglet Monlteur.
CONSEIL Le niveau optimal d'aide à la mise au point peut varier selon les plans. Par exemple, lorsque vous effectuez la mise au point sur les acteurs, un niveau d'aide à la mise au point plus élevé permet de bien définir le contour du visage. En revanche, si vous reglez un niveau élevé sur un plan représentant du feuillage ou un mur de briques, vous allez sans doute obtenir trop d'informations nettes.
Onglet Moniteur - Page 4
La quatrième page de l'onglet Moniteur contient des paramètres identiques pour les sorties LCD, HDMI et Viseur. Ces paramètres agissant globalement sur les trois sorties de monitoring de votreamera.

Repetes de cadrage
Touchez les flèches gauche et droite du paramètre Repères cadrage afin de désir entre les sept options de repères de cadrage pour toutes les sorties de laamera. Ces options sont décrites dans la section « Caracteristiques de l'écran tactile » de ce manuel. Vous pouvez également y acceder à partir du menu de monitoring LCD de l'écran LCD tactile. Veuillez notes que vous pouvez désir independamment si les repères de cadrage s'affichent sur l'écran LCD tactile et sur la sortie HDMI dans les menus de l'onglet Moniteur correspondants.
Zone de sécurité
Pour modifier la tille de la zone de sécurité sur l'écran LCD tactile, ainsi que sur les sorties HDMI et Viseur de la Pocket Cinema Camera, touche les flèches situées de part et d'autre de ce paramètre. Le pourcentage indique la tille de la zone de sécurité par rapport au cadre de l'image. La plupart des diffuseurs exigent une zone de sécurité de 90% .
Repes opacité
Touchez les flèches gauche et droite du paramètre Repères opacité pour désirir l'opacité des zones déliminées par les repères de cadrage sur l'écran tactile, sur la sortie HDMI et sur le viseur. Les options sont 25%, 50%, 75% et 100%.
Repes couleur
Touchez les flèches gauche et droite du paramètre Repères couleur afin de désirir une couleur pour les repères.
Grille
Pour regler la grille et les réticules que vous souhaitez afficher sur l'écran LCD tactile, la sortie HDMI et le viseur, touchez l'option Tiers, Horizon, Réticule ou Point de ce paramètre.
Pour plus d'informations, consultez le paragraphe Grille de la section « Caracteristiques de l'écran tactile »
Onglet Moniteur - Page 5
La cinquième page de l'onglet Moniteur de la Pocket Cinema Camera contient des paramétres qui varient en fonction de la sortie sélectionnee. Certains paramétres ne sont pas disponibles pour la sortie HDMI.
LCDsubsection
Luminosite de l'écran
Déplacez le curseur Luminosité écran vers la gauche ou vers la droite dans le menu LCD pour ajuster la luminosité de l'écran tactile.

Viseur
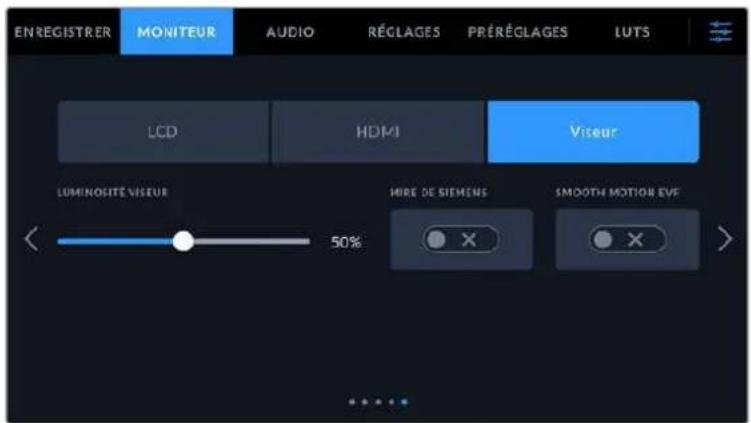
Luminosite viseur
Permet de régler la luminosité d'affichage du viseur.
Mire de Siemens
Le viseur intègre une mire de Siemens pour une mise au point adaptée à votre oeil. La plage d'ajustement du diopte est comprise entre -4 et +4. Il suffit d'ajuster le diopte situé sur l'oculaire de visée jusqu'à ce que la mire soit parfaitement nette.
Smooth Motion
Cette fonctionnalité fluidifie le mouvement des images rapides affichées dans le viseur. Il est féquent que certaines images soient saccadées lorsque vous filmez à des fréquences d'images inférieures à 30p depuis un affichage qui n'opère pas à cette fréquence d'images native, sur tout lorsque vous regardez de pres. Les saccades sont supprimées lorsque vous activez la fonction Smooth motion avec un angle d'obturation à 180^ ou moins, et une fréquence d'images régée à 23.98, 24, 25, 29.97 ou 30p.
Onglet Audio
L'onglet Audio vous permet d'ajuster les paramétres de l'entrée audio et du monitoring sur laamera.
Les paramètres audio de laamera sont regroupés sur deux pages et divisés entre les canaux 1 et 2.
Vouss pouvez attribuer une source différente à chaque canal et ajuster divers paramétres, tels que le contrôle du gain.
Onglet Audio - Page 1
La première page de l'onglet Audio contient les paramétres suivants.
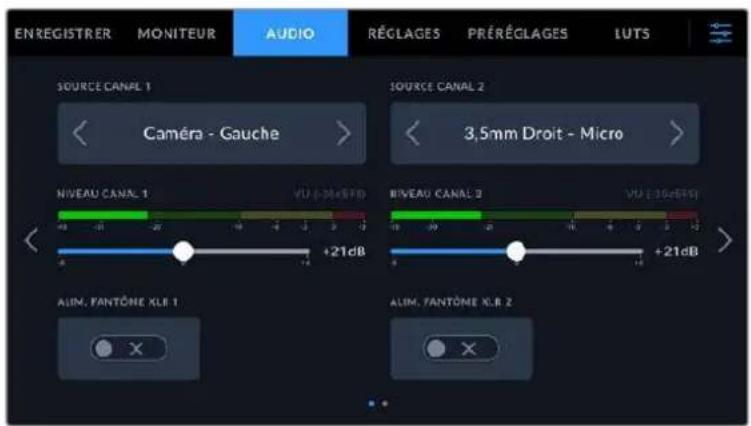
Sources des canaux
Utilisez les boutons Source canal 1 et Source canal 2 pour selectionner la source audio de chaque canal audio. Les Pocket Cinema Camera 6K Pro et 6K G2 ont deux canaux d'audio XLR, tandis que la Pocket Cinema Camera 4K a une seule entrée audio XLR. Vous trouvezez ci-dessous une description des paramétres de chaque source de canal.
- Caméra Gauche ou Droit
Enregistre depuis les micros internes de laamera.
- Caméra Mono
Crée un seul canal audio à partir des canaux gauche et droit des micros intégrés de laamera.
XLR ligne
Utilise l'entrée XLR de laamera pour enregistrer l'audio de niveau ligne. Vous pouvez également utiliser ce réglage pour accepter un signal de timecode via le port XLR.
XLR micro
Utilise l'entrée XLR de laamera pour enregistrer l'audio de niveau micro. Lorsque l'alimentation fantôme est activée et que l'entrée XLR est réglée sur Micro, l'indicateur +48V s'affiche également. Il est également important de vérifier que l'interrupteur +48V est désactivé lorsque vous déconnectez le micro avec l'alimentation fantôme. Vous pouvez également utiliser ce réglage pour accepter un signal de时间为 code via le port XLR.
3,5mm Gauche - Ligne
Utilise seulement le canal gauche de l'entrée 3,5mm en tant qu'audio de niveau ligne.
Voussouvez également utiliser ce réglage pour accepter un signal de timecode sur le canal gauche de l'entrée micro 3,5mm.
3,5mm Droit-Ligne
Utilise seulement le canal droit de l'entrée 3,5mm en tant qu'audio de niveau ligne.
3,5mm Mono-Ligne
Cree un mix mono sur les canaux gauche et droit depuis l'entrée 3,5mm en tant qu'audio de niveau ligne.
3,5mm Gauche - Micro
Utilise seulement le canal gauche de l'entrée 3,5mm en tant qu'audio de niveau micro.
3,5mm Droit - Micro
Utilise seulement le canal droit de l'entrée 3,5mm en tant qu'audio de niveau micro.
3.5mm Mono-Micro
Cree un mix mono sur les canaux gauche et droit depuis l'entrée 3,5mm en tant qu'audio de niveau micro.
Aucun
Désactive le canal audio.
REMARQUE Lorsque vous selectionnez l'entrée de 3,5mm en tant que source audio, le canal 1 et le canal 2 doivent être tous deux en niveau ligne ou en niveau micro. Par exemple, si vous selectionnez 3,5mm Gauche - Ligne en tant que source du canal 1, les options disponibles pour l'entrée de 3,5mm sur le canal 2 seront également en niveau ligne : 3,5mm Gauche - Ligne, 3,5mm Droit - Ligne et 3,5mm Mono - Ligne. Les options de niveau micro seront grises.
Niveau canal 1/2
Utilisez ces curseurs pour ajuster les niveaux de l'enregistrement audio sur le canal 1 ou 2. Des vumêtes sont affichés au-dessus de chaque curseur pour vous aider à régier le niveau audio approprié. Ces niveaux se mettent à jour lorsque vous ajustez l'audio à l'aide des molettes audio situées sur le panneau de contrôle ergonomique. Pour obtenir une qualité audio optimale, vérifie que vos niveaux audio ne dépassent pas 0 dBFS. Il s'agit en effet du niveau maximal auquel laamera peut enregistrer. L'audio qui dépasse ce niveau sera écrêté et distordu.
Alimentation fantôme XLR
L'entrée XLR de laamera peut fournir une alimentation fantôme de 48V, pour vous permettre d'utiliser des micros qui ne sont pas autonomes. Lorsque laamera est reglee sur l'entrée audio XLR, il suffit d'activer ce parametre pour activer l'alimentation fantôme. Les Pocket Cinema Camera 6K Pro et 6K G2 possedent deux entrées XLR et un interrupteur pour l'alimentation fantôme pour chaque entrée.
Onglet Audio - Page 2
La deuxieme page de l'onglet Audio contient les paramètres suivants.

Indicateurs audio
Vouaveslechoixentredeuxoptionsd'affichage.
| VU Le vumètre, ou mesureur d'unités de volume, affiche une moyenne des créés et des creux de votre signal audio. Si vous utilisez le vumètre, ajustez les niveaux d'entrée sur la Blackmagic Pocket Cinema Camera de telle sorte que ce dernier atteigne l'indicateur 0dB. Cela maximise le rapport signal/bruit et vous permet d'obtenir un son de qualité optimale. Si vous audio dépasse l'indicateur 0dB, il y a de fortes chances pour que vous son soit distordu. |
| PPM Le créé-mètre comprend une fonction qui maintain momentanément les crétes du signal, et qui les fait redescendre lentement, ce qui vous permit de visualiser aisément àquel niveau votre audio est écrêté. |
Le vumetre et le PPM intègrent un niveau de référence de -18dBFS ou de -20dBFS pour vous permettre d'effectuer votre monitoring audio selon différentes normes de diffusion internationales.
| Réglage des Indicateurs audio Norme | |
| PPM (-20 dBFS) SMPTE RP.0155 | |
| PPM (-18 dBFS) EBU R.68 |
Niveau du casque
Ce curses permet d'ajuster les niveaux de la sortie du casque connecté au jack de 3,5mm de la Pocket Cinema Camera. Déplacez le curseur audio vers la gauche ou vers la droite pour ajuster les niveaux. Ces niveaux se mettent également à jour lorsque vous ajustez le volume du casque à l'aide de la molette située sur le panneau de contrôle avant.
Niveau du haut-parleur
Ce curses du permet d'ajuster les niveaux de la sortie du haut-parleur intégré à la Pocket Cinema Camera. Déplacez le curseur audio vers la gauche ou vers la droite pour ajuster les niveaux. Ces niveaux se mettent également à jour lorsque vous ajustez le volume du haut-parleur à l'aide de la molette située sur le panneau de contrôle avant.
REMARQUE Il est recommendé de brancher le cable XLR avant d'activer l'alimentation fantôme. Il est également important de désactiver l'alimentation fantôme lorsqu'il n'y a plus de micro avec alimentation fantôme connecté. Connecter du matériel qui ne requiert pas d'alimentation fantôme lorsque vous étés en mode alimentation fantôme peut endommager votre équipement. Cela peut prendre un peu de temps avant que l'alimentation fantôme se décharge après l'avoir désactivée.
Il est donc judicieux d'attendre quelques minutes avant de brancher un autre micro ou du matériel audio XLR.
Onglet Réglages
L'onglet Reglages contient les paramètres d'identification de la Blackmagic Pocket Cinema Camera, la version du logiciel, les paramètres des boutons de fonction et d'autres paramètres de laamera qui ne sont pas directement liés à l'enregistrement ou au monitoring. Ce menu possède quatre pages. Vous pouvez passer d'une page à l'autre en touchant les flèches situées de part et d'autre de l'écran, ou en balayant l'écran vers la gauche ou vers la droite.
Onglet Reglages - Page 1
La première page de l'onglet Réglages de votreamera contient les options suivantes.

Sur la Pocket Cinema Camera 6K Pro, la première page de l'onglet Reglages affiche l'options Affichage filtré ND pour personnelier l'affichage des informations du filtré ND.

Sur la Pocket Cinema Camera 4K, la première page de l'onglet Reglages affiche l'option Stabilisation image pour activer la stabilisation de vos objectifs Micro 4/3.
Date et heures
Régléz la date et l'heure de votreamera en touchant le paramètre Date et heures. Le format de la date est année, mois, jour. Le format de l'heure est 24 heures. Ce paramètre est également utilisé pour le timecode sous forme de code hora lorsqu'aucune source de timecode externe n'est connectée.
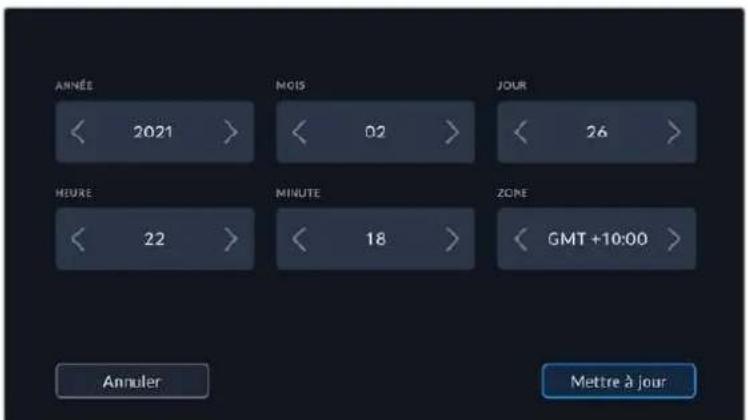
Langue
La Pocket Cinema Camera prend en charge 13 langues : l'anglais, le chinois, le japonais, le coreen, l'espagnol, l'allemand, le français, le russe, l'italien, le portugais, le turc, le polonais et l'ukrainien.
La page de la langue s'affichera également lors du premier démarrage.
Pour désir la langue :
1 Touchez l'icone crayon et selectionnez la langue dans la liste.
2 Touchez OK pour revenir au menu de configuration.
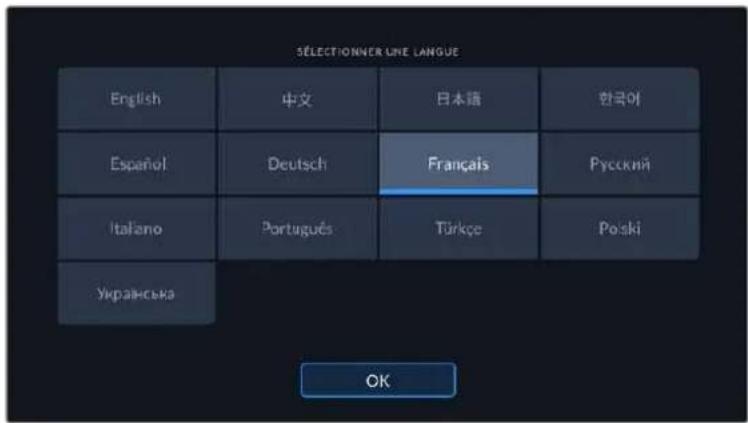
Mesure obturation
Utilisez le parametre Mesure obturation pour afficher l'angle d'obturation ou la vitesse d'obturation.
Il est important de noter que lorsque vous utilisez l'angle d'obturation, l'obturator se conforme à la fréquence d'images. Par exemple, 180 degrés produit le même flou de rouge, peu importe la fréquence d'images utilisée.
Toutefois, lorsque vous utilise la vitesse d'obturation, une valeur absolue est attribuée à l'obturator, déterminée independamment de la fréquence d'images. C'est pourquoi les résultats seront différents si vous changez de fréquence d'images.
Obturation sans scintillagement basée sur
Utilisez ce paramètre pour modifier la fréquence du courant utilisée par votreamera pour calculer des angles d'obturation sans scintillagement.
Lorsque vous filmez sous un éclairage artificiel, l'obturator peut provoquer des scintillements. La Blackmagic Pocket Cinema Camera calcule automatiquement une valeur d'obturation sans scintillagement en fonction de la fréquence d/images et suggéré jusqu'à trois valeurs d'obturation. Les valeurs d'obturation sont affectées par la fréquence du courant utilisé pour cet éclairage. Dans la plupart des pays qui utilisent le standard PAL, cette fréquence est de 50Hz. En revanche, dans les pays qui utilisent le standard NTSC, cette fréquence est de 60Hz. Touchez le paramètre 50Hz ou 60Hz pour régler la fréquence appropriée pour votre région.
Les caractéristiques de certaines sources lumineuses peuvent provoquer des scintillements même lorsqu'you utilisez des valeurs d'obturation sans scintillagement. Lorsque you n'utilise pas de lumière continue, nous you recommendons d'effectuer un test avant de commencer le tournage.
Timecode pertes d'images
Utilisez le paramètre Perte Image timocode pour éliminer quelques images du timocode à intervalle régulier lorsque vous utilisez des fréquences d'images de projet NTSC de 29.97 et 59.94. Le时间为 que la projet sera ainsi toujours correct, bien que chaque seconde ne contienne pas un nombre entier d'images pour les fréquences d'images NTSC.
Stabilisation d'image
La Pocket Cinema Camera 4K comprend le paramètre Stabilisation image pour activer ou désactiver la stabilisation d'image sur les objectifs qui ne sont pas dotés d'interrupteur physique.
Affichage Filtre ND
Sur la Blackmagic Pocket Cinema Camera 6K Pro, vous pouvez ajuster l'affichage de l'indicateur du filtré ND. Chaque option correspond à une convention différente. En général, les cineastes utilisent la notation coefficient ND. Cependant, ceux qui sont habitués aux DSLR et aux camères broadcast ont tendance à préférer le format F-Stop, ou fraction. Les options disponibles sont respectivement Nombre, Diaph et Fraction.
Onglet Reglages - Page 2
La deuxieme page de l'onglet Reglages de votreamera contient les options suivantes.
Réglage des boutons de fonction
La face supérieure de la Blackmagic Pocket Cinema Camera comprend trois boutons de fonction. Le nombre de points sur chaque bouton représenté le numero de chaque fonction (1, 2 et 3). Vous pouvez assigner ces boutons à des fonctionnalités que vous utilisez frequentlyment, afin d'y accederrapidement.

Les boulons de fonctions représentés par des points sont situés sur la face supérieure de votreamera
Pour configurer ces boutons, selectionnez un bouton de fonction, puis sa fonction, un paramètre et une valeur pour ce paramètre.
1 Bouton 2 Comportement 3 Reglage 4 Parametre
Comportement du bouton de fonction
Une fois que vous avez sélectionné le bouton que vous souhaitez mapper, vous pourrez selectionner une fonction. Les options disponibles sont :
- PréRéglage
Lorsque vous appuyez sur un bouton regle sur cette fonction, un paramètre et une valeur sont rapproélés en mémoire.
Pour configurer un prééglage, Sélectionné que vous souhaitez utiliser dans l'onglet Réglages, puis ajustez ce paramètre en touchant les flèches situées de part et d'autre du menu Paramètre de la fonction.
Par exemple, pour régler le bouton F1 sur une balance des blancs en particulier, utilisez les flèches Boutons de fonctions pour aller sur F1, sélectionnez le comportement Prépréglages, touchez le paramètre WB, puis touchez les flèches situées de part et d'autre du menu Paramètre jusqu'à ce que vous obtienez la valeur WB 5600K et Teinte -20.
- Alternance
Lorsque vous appuyez sur un bouton regle sur cette fonction, le parametre choisi va etre activé ou désactivé. Le menu Reglages est grisé lorsque vous utilisez ce mode. Touchez les flèches gauche ou croite dans le menu Parametre pour faire défilier les options disponibles parmi : Clean feed, Afficher LUT, Repères de cadrage, Focus assist, Fausses couleurs, Zébra, Grille, Zone sécurité, Rec. off speed, Mire, Enregistrer et Aucun.
La fonction Alternance vous permet également de seLECTIONner la sortie à laquelle ce paramètre s'applique. Touchez n'importe qu'elle combinaison pour les sorties LCD, HDMI et Viseur. Si certaines sorties ne sont pas disponibles avec certaines options, par exemple pour la mire de barres couleurs qui s'applique toujours à toutes les sorties, les paramétres LCD, HDMI et Viseur sont désactivés.
Onglet Reglages - Page 3 pour les Blackmagic Pocket Cinema Camera 6K Pro et 6K G2
La troisième page de l'onglet Réglages contient des paramétres pour configurer le Blackmagic Zoom Demand en option. Ces paramétres ne sont actifs que lorsqu'un Blackmagic Zoom Demand est branché à votreamera.
Pour savoir comment brancher et utiliser le Blackmagic Zoom Demand, consultez la section « Blackmagic Zoom Demand et Focus Demand » de ce manuel.

Direction du zoom rocker
Normale
La direction du zoom rocker par défaut. Poussez le zoom rocker vers la gauche pour dézoomer, et vers la droite pour zoomer.
Inversée
Lorsque la direction du zoom rocker est reglee sur inversee, poussez le zoom rocker vers la gauche pour zoomer et vers la droite pour dézoomer.
Le Blackmagic Zoom Demand a quatre boutons de fonction et une molette de vitesse auxquels peuvent ettre assignes differentes fonctions.

1 Zoom F1 2 Zoom F2 3 Zoom F3 4 Zoom F4 5 Molette de vitesse
Pour attribuer une fonction différente à la molette de vitesse ou à l'un des boutons, choisissez Mol. ou un nombre de bouton dans le menu Bouton de fonction. Choisissez ensuite une fonction en appuyant sur les flèches de part et d'autre du menu Paramètre bouton.
Les paramètres sont les suivants :
| Molette de vitesse | Vitesse du zoom, niveau du casque, ajustement iris, ajustement focus. |
| Boutons zoom 1-4 | Enregistrer, appuyer pour parler, retour programme, zoom mise au point, repères de cadrage, info. état, auto focus, iris auto, balance des blancs auto, lecture. Vous pouvez également faire basculer les filtres ND sur la 6K Pro. |
Onglet Reglages - Page 4 pour les Blackmagic Pocket Cinema Camera 6K Pro et 6K G2
La quatrième page de l'onglet Réglages contient des paramètres pour configurer le Blackmagic Focus Demand en option. Ces paramètres ne sont actifs que lorsqu'un Blackmagic Focus Demand est branché à votreamera.
Pour savoir comment brancher et utiliser le Blackmagic Focus Demand, consultez la section « Blackmagic Zoom Demand et Focus Demand » de ce manuel.

Direction du Focus Demand
Voussoupiezchangera la directionde la molette de mise au point surle FocusDemand en selectionnantNormaleouInversee.
Normale
Tournez la molette dans le sens des aiguilles d'une montre pour faire la mise au point sur les sujets les plus proches de l'objet, ou dans le sens inverse pour faire la mise au point sur les sujets les plus éloignés.
Inversée
Tournez la molette dans le sens inverse des aiguilles d'une montre pour faire la mise au point sur les sujets les plus proches de l'objet, ou dans le sens des aiguilles d'une montre pour faire la mise au point sur les sujets les plus éloignés.
Onglet Reglages - Page 5 et 3
La cinquième page de l'onglet Réglages des Blackmagic Pocket Cinema Camera 6K Pro et 6K G2 contient les paramètres suivants. Ces paramètres se trouvent sur la troisième page de la Blackmagic Pocket Cinema Camera 4K.
Voyant LED Tally
Les Blackmagic Pocket Cinema Cameras sont dotées d'un voyant LED à l'avant de l'appareil pour indiquer l'état d'enregistrement de laamera et du tally lorsqu'elles sont connectées à un mélangeur Blackmagic ATEM Mini. Si vous branchez votreamera à l'ATEM Mini pour contröler l'enregistrement et les paramètres de laamera à distance, le voyageant tally indique lorsque le signal de laamera est à l'anterne ou en prévisualisation. Pour plus d'informations, consultez la section « Contrôle des caméras avec l'ATEM Mini » de ce manuel.
Enregistrement sur le support de stockage de laamera.

Le signal de laamera est à l'antenne.

Le signal de laamera va etre diffusé a l'antenne.
Pour activer ou désactiver levoyant tally,utilisezle parametreLED tally.
Luminosite LED
Réglez la luminosité duvoyant tally en touchant les options Faible pour une luminosité réduite, Moderée pour une luminosité moyenne ou Élevée pour une forte luminosité.
Dim. lum. LCD auto
La Blackmagic Pocket Cinema Camera dispose d'une option pour réduire automatiquement la luminosité de l'écran LCD après une période d'inactivité, afin d'économiser la batterie. Sélectionnez une option dans Dim. Lum. LCD après pour régler la durée de la période d'inactivité avant de réduire la luminosité. Dans que vous retouchez l'écran LCD, ce dernier returnera à son niveau de luminosité normal.
Hardware ID
Le paramètre Hardware ID affiche un identifient à 8 caractères pour la Blackmagic Pocket Cinema Camera. Chaqueamera possède un identifient qui lui est propre. Une version de 32 caractères de cet identifient est incluse dans les métadonnées pour la video Blackmagic RAW et ProRes. C'est pratique pour identifier de chaqueamera provient chaque séquence.
Logiciel
Ce paramètre affiche la version du logiciel installée sur laamera. Pour plus d'informations, consultez la section « Utilitaire Blackmagic Camera Setup » de ce manuel.
Lecture
Ce paramètre vous permet de selectionner le mode de lecture des clips sur Tous ou Un seul sur l'écran LCD tactile depuis la carte SD, CFast ou depuis le disque flash USB-C. Le mode Tous lit les medias dont les réglages sont identiques de manière séquentière. Le mode Un seul lit un clip à la fois. Ces modes s'appliquent également avec la fonction de lecture en boucle. Lorsque le mode Tous est activé avec la lecture en boucle, tous les clips qui se trouvent sur le support de stockage sontlus en continu. Lorsque le mode Un seul est activé avec la lecture en boucle, un seul clip est lu en boucle.
Onglet Reglages - Page 6 et 4
La cinquième page de l'onglet Réglages des Blackmagic Pocket Cinema Camera 6K Pro et 6K G2 contient les paramètres Bluetooth. Ces paramètres se trouvent sur la quatrième page de la Blackmagic Pocket Cinema Camera 4K.
Bluetooth
La fonction Bluetooth vous permet de contrôler laamera à distance à partir d'appareils portables. En utilisant l'application Blackmagic Camera Control App, vous pouvez changer les paramétres, modifier les métadonnées et déclencher l'enregistrement à distance depuis un iPad. Vous pouvez activer et désactiver le Bluetooth en touchant l'interrupteur de la fonction Bluetooth. Lorsque le Bluetooth est activé, laamera peut être détectée par des appareils dotés du Bluetooth à une distance de 9 metres. comme les commandes de votreamera pour le contrôle Bluetooth sont les mêmes que pour le Blackmagic SDI Camera Control Protocol, vous pouvez creator vos propres applications pour contrôler quasiment tous les paramétres de laamera à distance. Par exemple, vous pourrez contrôler à distance les paramétres de monitoring et audio, l'outil d'étabonnage DaVinci Resolve intégré ou l'objetif.
Pour plus d'informations, veuillez consulter le document « Blackmagic Camera Control » disponible sur le site Internet https://www.blackmagicdesign.com/fr/developer/
Pour associé votreamera à un iPad pour la première fois :
1 Activez le Bluetooth en touchant l'interrupteur de la fonction Bluetooth dans l'onglet Reglages.
2 Ouvrez l'application Blackmagic Camera Control App et choisissez laamera que vous souhaitez associier. Les cameras disponibles sont affichées par leur lecture, suivie de leur identifiant unique. Par exemple A:A0974BEA.
Selectionne la Blackmagic Pocket Cinema Camera que vous souhaitez associier.
Lorsque vous installez l'application Blackmagic Camera Control et que vous l'utilise pour la première fois, un message s'affichera pour vous demander si vous souhaitez activer les services de localisation. Si vous selectionnez l'option While using the app (lors de l'utilisation de l'appli), les données GPS de votre iPad seront intégrées aux métadonnées des fichiers que vous tournez, ce qui vous permettra de géotaguer les séquences. Ces informations peuvent être visualisées dans les versions Blackmagic DaVinci Resolve 15 ou plus récentes.
Si vous ne souhaitez pas autoriser l'utilisation de ces informations, Sélectionnéz Never.
Pour changer ces paramètres depuis votre iPad, allez sur réglages, confidérialité, service de localisation, contrôle de laamera.
3 Si vous vous connectez pour la première fois avec l'application, il vous sera demandé d'entre un code à 6 chiffres pour permettre à l'iPad de s'associer à laamera. Ce code sera affché sur l'écran LCD de laamera. Saisissez ce code dans votre iPad et appuyez sur Palr.
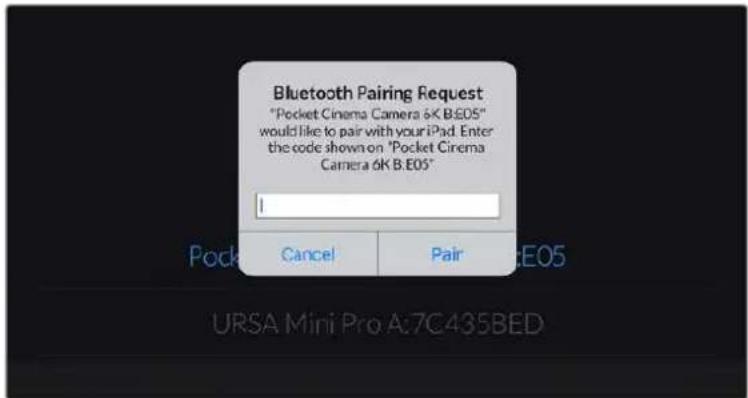
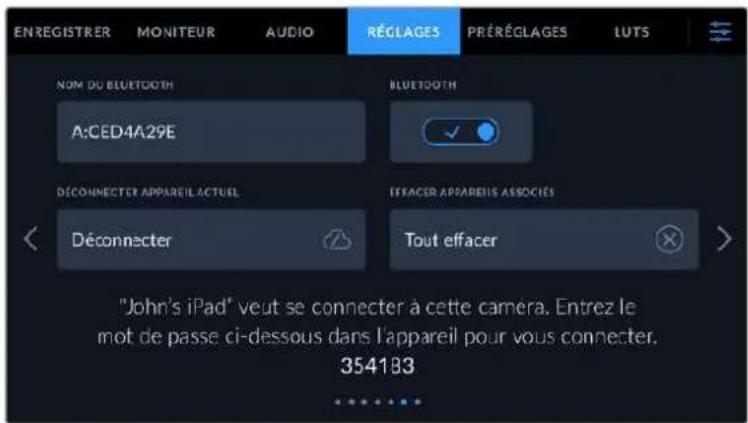
4 Lorsque la camera se connecte à l'iPad, elle confirme qu'elle est bien associée.
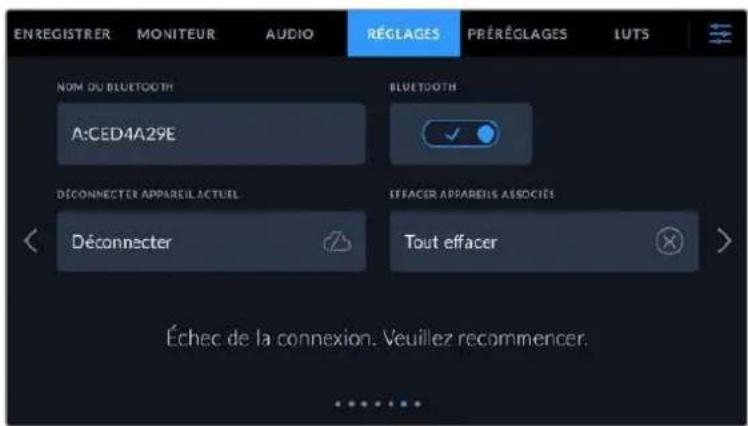
5 Si l'association échoue, laamera affichera un message d'erreur. Dans ce cas, essayez une nouvelle fois de connecter laamera.
REMARQUE Pour des raisons de sécurité, nous vous conseillons de désactiver la fonction Bluetooth de votre Blackmagic Pocket Cinema Camera quand vous ne l'utilise pas.
Déconnecter apparéil actuel
Utilissez ce réglage pour déconnecter la Blackmagic Pocket Cinema Camera de l'iPad auquel elle est associée.
Effacer appareils associés
Utilisez ce paramètre pour supprimer la liste des appareils qui ont ete associés a touvreamera.
Contrôler votreamera avec l'application Blackmagic Camera Control
Une fois que vous camera est associée à un iPad, vous pouvez changer les paramétres, régler les métadonnées et déclencher l'enregistrement à distance via l'application iPad.
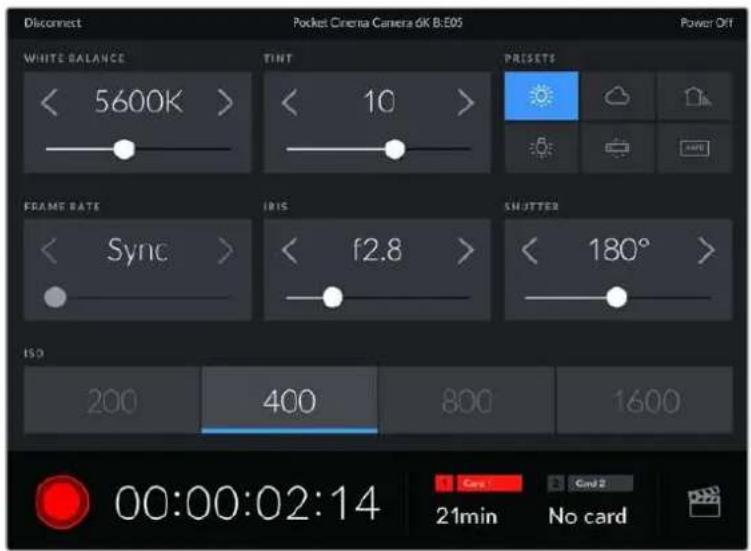
Quand la camera est associée, l'application Blackmagic Camera Control affiche un écran vous permettant de régler les paramètres et de déclencher l'enregistrement.
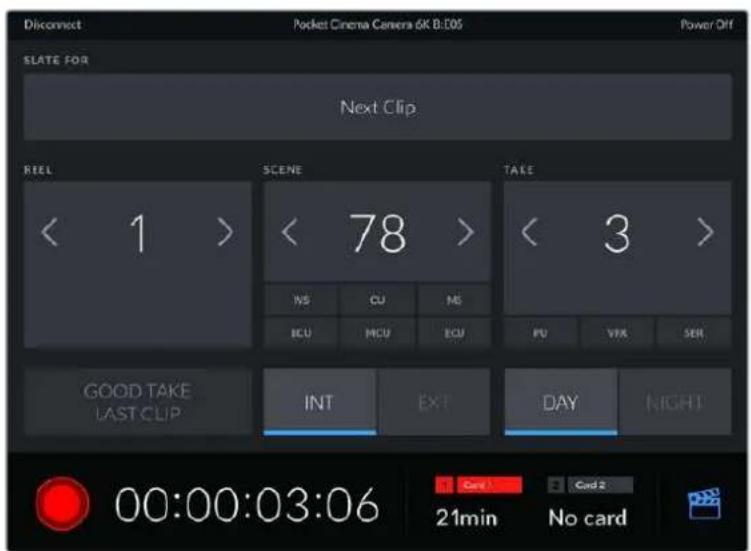
Touchez l'icone du clap dans le coin inférieur gauche pour acceder aux fonctions du clap et leMETRE à jour.
La Blackmagic Pocket Cinema Camera utilise la technologie Bluetooth Low Energy pour le contrôle à distance des appareils. Le protocole du Bluetooth est du même type que celui utilisé dans des appareils portables, ce qui permet d'optimiser l'utilisation de la batterie.
Onglet Reglages - Page 7 et 5
La septieme page de I'onglet Reglages des Blackmagic Pocket Cinema Camera 6K Pro et 6K G2 contient les parametes suivants. Ces parametes se trouvent sur la cinquieme page de la Blackmagic Pocket Cinema Camera 4K.
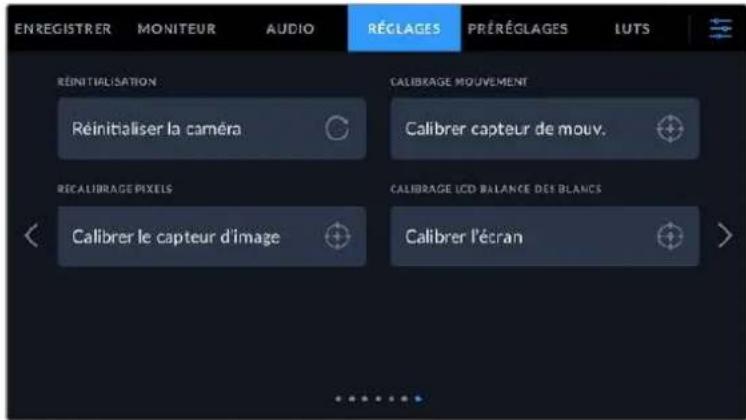
Réinitialisation d'usine
Si vous souhaitez réinitialiser laamera sur ses paramètres d'usine, touchez le bouton Réinitialiser les réglages de laamera. Sur la page de confirmation, touchez Réinitialiser pour confirmer l'action. Notreamera supprimera toutes les LUTs et tous les préréglages stockés, puis restaurera tous les réglages. Avant de réinitialiser les paramètres, il est conseilé d'exporter vos préréglages sur une carte mémoire, comme stockage de secours. Àprouse une réinitialisation, vous pouvez restaurerrapidement vos préréglages en les important depuis une carte mémoire. Veuillez notes que la réinitialisation restaque également le capteur de mouvement. Vous devrez donc le recalibrer pour assurer l'exactitude de ses données.
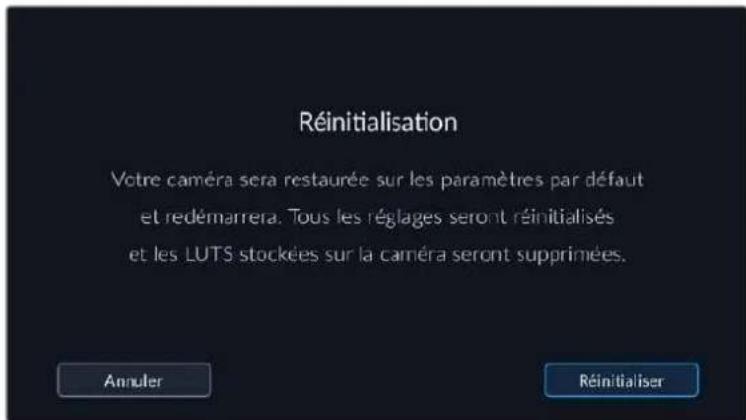
Calibrage movement
Pour calibrer l'indicateur d'horizon, appuyez sur Calibrer capteur de mouv.. Il est essentiel de garder laamera stable pendant tout le calibrage. L'opération prend environ cinq secondes.
L'horizon peut être décentré si nécessaire. Par exemple, si vous souhaitez régler le tilt à un angle constant, calibrez le capteur de mouvement avec l'angle de camera choisi, puis utilisez l'indicateur d'horizon pour conserver le même angle.
Recalibrage pixels
Le capteur CMOS de votre Blackmagic Pocket Cinema Camera est composé de millions de pixels sensibles à la lumière. Le capteur a été calibré en usine, mais la luminosité de certains pixels peut changer avec le temps. En effet, ils peuventvenir plus visibles, c'est ce qu'on appelle des « pixels chauds ». Toutes les caméras, peu importe le fabricant, développement des pixels chauds.
Pour régler ce problème, nous avons intégré une fonctionnalité de calibrage à laamera, que vous pouvez utiliser si des pixels chauds apparaissent.
Pour cela, remettez le cache de l'objet et lancez la fonctionnalité de remappage des pixels en appuyant sur le bouton Calibrer. L'opération prend environ une minute.
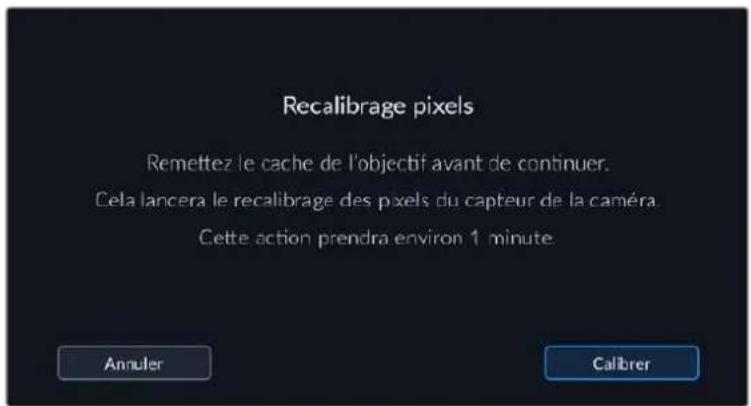
Calibrage LCD balance des blancs
Pour calibrer la balance des blancs de l'écran LCD, ajustez les paramétres Température LCD et Teinte LCD, jusqu'à ce que les deux carres de reference aient l'air neutres. ÀpRES avoir modifié les réglages, vous pouvez appuyer sur le bouton Réinitialiser pour revenir aux paramétres par défaut. Le bouton Restaurer restaure vos nouveaux réglages, ce qui permet de comparer l'affichage avant et après le calibrage. Lorsque la balance des blancs vous parait correcte sur l'écran LCD, sauvégardez vos paramétrages.

Onglet Préroglages
L'onglet Prééglages vous permet de sauvégarder et de rappeler 12 paramètres. C'est très utile lorsqu'uneamera est utilisée sur plusieurs projets. Par exemple, vous pouvez utiliser votreamera pour des documentaires ou des clips musicaux et avoir des paramètres très différents selon le projet. La fonction Prééglages vous permit de sauvégarder la configuration d'un projet ou d'un type de tournée et de le rappeler facilement quand vous en avez besoin. Vous avez 12 emplacements pour les prééglages à votre disposition.
Vou puez eaglement importer et exporter des preréglages, ce qui est très pratique pour les tournages multicamères. Vou pouze regler une Blackmagic Pocket Cinema Camera pour un projet, puis exporter ce preréglage pour toutes les autres Blackmagic Pocket Cinema Camera générées sur le plateau.

L'onglet Prééglages vous permet de basculer rapidement entre les prééglages sauvégardés
REMARQUE La mémoire interne de laamera peut sauvegarder jusqu'à 12 prépréglages.
Boutons de prépréglage
Les icones situées dans le bandeau inférieur du menu Préroglages correspondent aux fonctions suivantes.

Sauvegarder et rappeler les préroglages
Pour creer un nouveau preréglage, touche l'icone Ajouter. Un clavier tactile s'affichera sur l'écran LCD et vous pourrez nommer le preréglage. Saisissez un nom, puis touche l'icone Mettre à jour pour sauvegarder tous les réglages actuels dans ce preréglage.
Si laamera possede déjà un preréglage portant le même nom, vous pourrez remplacer le preréglage existant ou garder les deux preréglages.

Une fois le prépréglage sauvégarde, touchez son nom dans l'onglet Prépréglages afin de le sélectionner. Pour charger un prépréglage, touchez l'icone Charger.
Vou puez metre a jour un preréglage en touchant l'icone Mettre a jour. Un message s'affichera pour vous demander de confirmier la mise a jour. Touchez le bouton Mettre a jour pour confirmer.
Selectionnez un prééglage et touche l'icone Charger pour le charger. Les prééglages selectionnés s'affichent en bleu, tandis que les prééglages charges sont soulignés en bleu
Importer des préroglages
Pour importer des préroglages, touchez l'icone Gérer située dans le bandeau inférieur. Sélectionnez Importer un préroglage, puis Importer pour confirmer. L'écran d'importation s'affiche. Si vous préroglage favori ne se trouve pas sur la carte ou le disque actif, basculez entre les supports en touchant le bouton des supports situé en haut de l'écran tactile. Vous pouvez importer des préroglages depuis une carte CFast ou SD, ou depuis un disque flash USB-C.
Laamera effectue une recherche dans le repertoire racine et dans le dossier des prérogliages du support sélectionné. Les prêrogliages que vous avez sauvégardés à un autre emplacement ne sont pas visibles.
Touchez un prépréglage pour le sélectionner, puis sélectionnez Importer pour confirmer votre sélection et le copier sur un emplacement disponible.
Si le préréglage que vous souhaitez importer porte le même nom qu'un autre préréglage sauvegardé sur laamera, vous pouze remplacer le préréglage existant ou garder les deux. En haut à droite de l'écran, vous verrez un nombre qui représenté les prérégliages vides, disponibles sur laamera. Vous ne pouze pas excéder ce nombre.
REMARQUE Lorsque les 12 emplacements sont pleins, le menu d'importation est indisponible. Vous devrez alors supprimer un prééglage pour faire de la place.
Exporter des préroglages
Pour exporter un prééglage sur une carte ou un disque flash USB-C, touche le prééglage à exporter, puis touche l'icone Gérer. Touche Exporter le prééglage sélectionné, puis Sélectionnez le support de votre choix. Si un prééglage porte le même nom qu'un prééglage déjà existant, vous pouvez remplancer le prééglage existant ou garder les deux. Laamera exporte le prééglage dans un dossier Presets.
Supprimer des prêrglages
Pour supprimer un prééglage, il suffit de le selectionner et de toucher l'icone Supprimer. Lorsqu'il vous est demandé de confirmer votre choix, appuyez sur Supprimer.
LUTs 3D
L'onglet LUTS vous permet d'importer, d'exporter et d'appliquer des LUTs 3D aux sorties de laamera.
Présentation des LUTs 3D
Les LUTs 3D peuvent être appliquées aux images sur l'écran LCD tactile et sur la sortie HDMI. Les LUTs indiquent à laamera qu'elle couleur et qu'elle luminance doivent s'afficher pour une couleur ou une luminance donnée. Par exemple, une LUT peut communiquer à laamera d'afficher une couleur bleue vivé et saturaée quand elle recoit une couleur bleue relativement terne. C'est une fonction très pratique lorsque vous tournez des séquences en Blackmagic RAW, ou que vous utilisez le mode Film, qui offrent tous deux des images peu contrastées. Le fait d'appliquer une LUT vous donnera une meilleure idée du rendu de la série après l'étabonnage.
Il est facile de creer des LUTs 3D avec DaVinci Resolve ou d'autres logiciels d'etalonnage. De nombreuses LUTs sont également disponibles en ligne. Laamera peut stocker jusqu'à dix LUTs 3D à 17 ou 33 points, d'un maximum de 1,5 mega-octet chacune. Une fois chargee, vous pouvez désir d'afficher une LUT sur I'ecran LCD tactile et sur la sortie HDMI.
La Blackmagic Pocket Cinema Camera prend en charge les LUTs 3D à 33 points au format .cube, créées au sein de DaVinci Resolve et les LUTs 3D à 17 points, converties au format .cube de Resolve via des programmes de conversion de LUT. Laamera traite les LUTs 3D à l'aide d'une interpolation tetraédrique d'excellente qualité.
Pour plus d'informations sur l'affichage des LUTs, consultez la section « Paramétres du moniter » de ce manuel.
REMARQUE Avc la Blackmagic Pocket Cinema Camera, you ne pouvez pas appliquer ou integrer de LUTs par defaut sur des clips enregistrres. Pour integrer une LUT a vos clips, vous devrez activer cette fonction.
C'est une option pratique lorsque vous n'avez pas le temps d'effectuer l'étabonnage en post-production, ou quand vous doivent fournir les images directement à un client ou au monteur.
Lorsque vous utilisez une LUT en tant qu'outil de previsualisation, les informations de la LUT sont sauvegardées en tant que métadonnées avec vos enregistrements. DaVinci Resolve peut afficher ces informations dans le champ LUT utilisée de l'onglet des métadonnées. Cela peut être utile pour les étalonneurs qui souhaitent vérifier le nom de la LUT qui a ete utilisée pendant le tournage.
LUTs intégrées
Laamera offre des LUTs integrees qui permettent de previsualiser les differents styles lorsque vous filmez avec la plaque dynamique Film ou en Blackmagic RAW.
Chaqueamera fournit des LUTs spécifiques à la colorimétrie de 5e génération :
Gen 5 Film to Extended Video
Affiche une plage dynamique plus etendue que la LUT Film to Video, tout en appliquant un léger changement de contraste et un affaibissement progressif dans les haute lumières.
Gen 5 Film to Rec 2020 Hybrid Log Gamma
Affiche une courbe gamma compatible avec les écrans HDR et les écrans à plage dynamique standard.
Gen 5 Film to Rec 2020 PQ Gamma
Affiche une courbe gamma calculée sur ce que perçoit l'eel humain, pour encoder efficacement les images HDR.
Gen 5 Film to Video
Similaire à l'espace colorimétrique REC 709 pour la video haute définition. Offre un niveau élevé de contraste et de saturation. Ce réglage peut être utile lorsque vous utilisez la Blackmagic Pocket Cinema Camera avec d'autres caméras broadcast et l'espace colorimétrique REC 709.
Boutons des LUTs
Les icones situées au bas de l'écran LUTS de laamera correspondant aux fonctions suivantes.

Importer des LUTs
Pour importer une LUT 3D, touche l'icone Gérer située au-dessous du menu LUTS. Sélectionnez Importer une LUT, puis Importer pour confirmer. L'écran d'importation s'affiche. Si vous LUT 3D都喜欢 ne se trouve pas sur la carte ou le disque actif, basculez entre les supports en touchant le bouton des supports situé en haut de l'écran tactile. Vous pouvez importer des LUTs depuis une carte CFast ou SD, ou depuis un disque flash USB-C.
Laamera effectue une recherche dans le repertoire racine et dans le dossier des LUTs 3D du support selectionné. Les LUTs que vous avez sauvégardées à un autre emplacement ne sont pas visibles.
Touchez une LUT pour la sélectionner, puis touchez Importer pour confirmer votre sélection et la copier sur un emplacement disponible.
Veuillez notes que lorsque les dix emplacements pour LUT 3D sont pleins, vous devrez supprimer des LUTs existantes afin de pouvoir en importer des nouvelles.
Si la LUT que vous souhaitez importer porte le même nom qu'une autre LUT sauvegardee sur la camera, vous pourrez remplacer la LUT existante ou garder les deux LUTs. En haut a droite de I'ecran, vous verrez un nombre qui represente les LUTs vides, disponibles sur la camera. Vous ne pouvez pas exceder ce nombre.
REMARQUE Si vous rencontres des difficultés pour importer une LUT, cela peut être du à sa talle. Vous pouvez utiliser unéditeur de LUT tel que Lattice pour vérifier sa talle, ou l'ouvrir dans unéditeur de texte sur votre ordinateur. À côté de l'intitèle LUT_3D_SIZE, vous trouvez un nombre indiquant la talle de la LUT. Si cette valeur n'est pas de 17 ou 33 points, vous pouvez utiliser Lattice pour redimensionner la LUT 3D sur 17 points.
Appliquer une LUT
Une fois la LUT sauvégardée sur la camera, sélectionnez-la dans le menu LUT, puis touchez l'icone Charger. La LUT est ainsi activée sur toutes les sorties de la camera. Pour afficher la LUT chargee sur les sorties de la camera, activez le bouton Afficher LUT dans le menu Moniteur. Pour plus d'informations a ce sujet, consultez la section « Onglet Moniteur »
Exporter des LUTs
Pour exporter une LUT sur une carte ou un disque flash USB-C, Sélectionnéz la LUT à exporter, puis touchez l'icone Gérer. Touchez Exporter la LUT sélectionnée, puis Sélectionnéz le support de votrechoix. Si une LUT porte le même nom qu'une LUT déjà existante, vous pouvez replacer la LUT existante ou garder les deux. Laamera exporting la LUT dans un dossier 3DLUTs.
Supprimer des LUTs
Pour supprimer des LUTs que vous ne souhaitez plus utiliser, Sélectionné les LUTs de votre choix et touchez l'icone Supprimer. Lorsqu'il vous est demandé de confirmer votre choix, appuyez sur Supprimer.
LUTs 3D intégrées
Lorsque vous utilisez une LUT 3D en filmant en Blackmagic RAW avec une Blackmagic Pocket Cinema Camera, la LUT selectionnee sera integree au fjichier Blackmagic RAW que vous enregistrez. Comme la LUT 3D est sauvegardee avec vos fjichiers enregistrres dans l'en-tete du fjichier .braw, vous pouze facilement I'appliquer a vos clips en post-production, sans avoir a gerer un fjichier supplémentaire.
Lorsque les fichiers Blackmagic RAW sont livres à un monteur ou un écalonneur, ces derniers auront facilement accès à la LUT qui a été utilisée pendant le tournage. Ainsi, le risque de confondre les LUTs 3D et de les appliquer au mauvais clip est considérablement réduit. Ils peuvent désactiver la LUT à tout moment.
Lorsque la fonction Appliquer LUT dans fichier est activée dans le menu Enregistrer, le clip enregistré s'ouvrira dans le Blackmagic RAW Player et dans DaVinci Resolve avec la LUT 3D Sélectionnée.
Vou puez activer ou désactiver l'application de la LUT 3D, mais elle sera toujours presente dans le fichier Blackmagic RAW. DaVinci Resolve comprend également une fonction Appliquer LUT dans ses paramétres, pour activer ou désactiver la LUT 3D dans le fichier Blackmagic RAW.
La fonction Appliquer LUT dans DaVinci Resolve est la même que dans laamera. Ainsi, quand vous filmez, vous pouvez demander à l'étaillonner d'utiliser une LUT depuis laamera. Mais vous pourrez facilement désactiver cette LUT dans DaVinci Resolve en réglient Appliquer une LUT sur Off.
Saisie des métadonnées
Les métadonnées sont des informations enregistrées dans le clip, telles que le nombre de prise et les paramètres de laamera. Ce sont des données extrémement pratiques pour trier et Traitser les séquences en post-production. Par exemple, les numéro de prise, de plan et de scene sont des outils d'organisation essentiels. Les informations concernant l'objet peuvent être utilisées pour corriger automatiquement la déformation de l'image ou pourxCaux associier les VFX aux séquences.
La Blackmagic Pocket Cinema Camera enregistre automatiquement certaines métadonnées, telles que les paramètres de laamera, le timecode, la date et l'heure. Vous pouvez également utiliser le clap de laamera pour ajouter des informations supplémentaires.
Clap
Balayez l'écran tactile vers la gauche ou vers la droite pour afficher le clap.
Le clap est divisé en deux anglets intitulés Clips et Projet. L'onglet Clip contient des informations qui peuvent varier selon les clips. En revanche, les informations qui sont identiques pour tous les clips sont saisies dans l'onglet Projet, par exemple les noms du projet, du réalisteur, de laamera et de l'opérateur.
CONSEIL Les métadonnées saisies dans le clap sont affichées sur la sortie HDMI lorsque l'option Afficher info. état pour est regléée sur RÉalisateur dans l'onglet Moniter. Pour plus d'informations, consultez la section « Paramètres du moniter » de ce manuel.
Métadonnées des clips
Les modifications apportées aux métadonnées des clips fonctionnent différemment en mode veille, lorsque laamera est prête à enregistrer, et en mode lecture, lorsque vous visionnez les séquences que vous avez tournées. En mode veille, les métadonnées des clips sont enregistrées sur le clip suivant, sauf si vous selectionnez Bonne prise dernier clip, qui marque le clip qui vient d'être enregistré comme une bonne prise. En mode lecture, le bouton Bonne prise s'affiche et les métadonnées des clips sont toujours liées au clip en cours de visionnage.
En mode lecture, le champ Clap pour identifie le clip auquel se refere le clap et le bouton Bonne prise est visible. En mode voille, le clap se refere au Clip suivant et le bouton Bonne prise dernier clip est visible.
Clap pour
Ce paramètre désigné le clip auquel les métadonnées affichées dans l'onglet Clips se reférènt. En mode lecture, elles se reférènt au clip actuel, alors qu'en mode veille, elles se reférènt au prochain clip que vous enregistrrez.
Données de l'objet
Si vous utilisez un objectif capable de communiquer avec votreamera, les informations du modele de I'objectif s'afficheront ici. Pour modifier ou ajouter des informations concernant I'objectif que vous utilisez, appuyez sur l'option Données de I'objectif au-dessus.
Pour plus d'informations, consultez la section « Métadonnées de l'objet » de ce manuel.
Bobine
Affiche la bobine utilise actuellesment.
La Blackmagic Pocket Cinema Camera incrèmente automatiquement le nombre de bobine, il n'est donc généralement pas nécessaire de saisir cette information manuelle. Quand vous passez à un autre projet et que vous souhaitez recommencer à partir de la bobine 1, Sélectionnez Réinitialiser dans l'onglet Projet du clap.
Scène
Ce paramètre indique le numéro de la scene. Il est également possible d'afficher le numéro du plan et son type.
Ce numero fait toujours reférence à la scène en cours. Vous pouvez l'ajuster à l'aide des flèches gauche et droite situées de part et d'autre du paramètre, ou en touchant le numero de scene pour acceder à l'éditeur de numero de scene.
Les numérodescènes sont compris entre 1 et 9999.
En ajoutant une dette au numero de scène dans l'éditeur de numero de scene, vous pourrez également indiquer le plan en cours. Par exemple, 23A indique que vous allez filmer le plan 1 de la scene 23. Si vous ajoutez une dette au numero de scene, laamera suggerera le numero de la prochaine scene et la lecture du prochain plan à chaque fois que vous accéderez à l'éditeur de numero de scene. Par exemple, si l'identifiant de la scene actuelle est « 7B», laamera suggerera « 8 » et « 7C »
Le paramètre Scène peut également afficher des informations concernant le type de plan dans le coin supérieur droit. Vous pouvez selectionner ces informations sur le cote droit du clavier numérique dans l'éditeur de numero de scene.
Les types de plans disponibles sont :
| PL | Plan large |
| PM | Plan moyen |
| PR | Plan rapproché |
| GP | Gros plan |
| PTS | Plan très serré |
| TGP | Très gros plan |
Lorsque vous saisissez les métadonnées de la scène, la camera suggérera des numérios de scène sur le côte gauche du clavier tactile, et des types de plans sur le côte droit.
Prise
Ce paramètre indique le nombre de prise pour le plan en cours. Vous pouvez l'ajuster à l'aide des flèches gauche ou droite situées de part et d'autre du paramètre, ou en touchant l'indicateur afin d'acceder à l'éditeur de nombre de prise.
CONSEIL Lorsque le numero du plan ou la litter de la scene s'incrementent, le numero de prise se remettra sur 1.
Voupez egelement ajouter des descriptions dans l'editor de numero de prise. Ces descriptions se trouvent sur la droite du clavier tactile et correspondent aux scenarios suivants:
P/U
Pick up. Fait reference au tournage d' éléments supplémentaires d'une prise déjà tournée afin d'enrichir la série.
VFX
Visual Effects. Fait reférence à une prise ou à un plan auquel on ajoute des effets visuels.
SER
Series. Fait reférence à une situation où plusieurs prises ont été effectuees lors du même enregistrement.
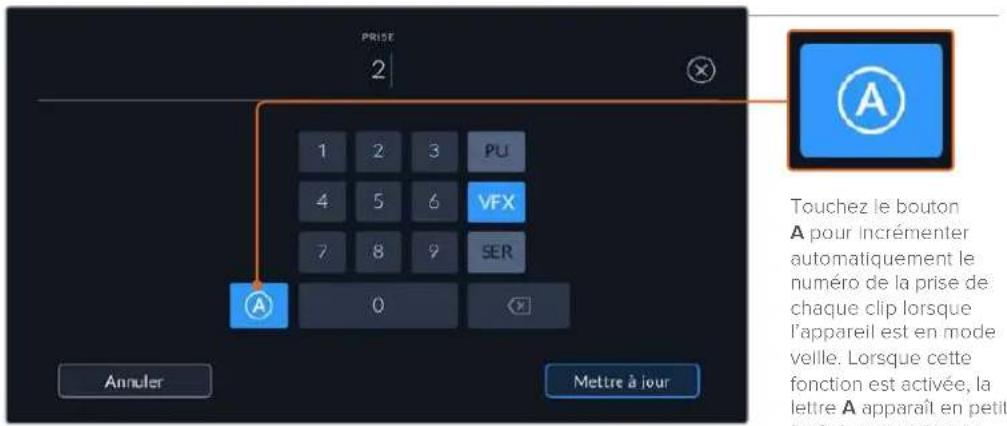
Lorsque you saisissez des métadonnées concernant la prise, la Blackmagic Pocket Cinema Camera propose des types de plans sur le cote croit du clavier tactile.
Bonne prise
En mode lecture, touche ce bouton pour marquer les bonnes prises afin de pouvoir les retrouver facilement en post-production. Lorsque laamera est en mode veille et prete à enregistrer, touche le bouton Bonne prise dernier clip pour identifier le dernier clip enregistré en tant que Bonne prise.
Intérieur/Exteurier
Touchez les paramétres Intérieur ou Exterieur pour ajouter un marquee interieur ou extérieur au clip suivant en mode de veille, ou au clip en cours en mode de lecture.
Jour/Nuit
Touchez les paramétres Jour ou Nuit pour ajouter un marqueeur jour ou nuit au clip suivant en mode de veille, ou au clip en cours en mode de lecture.
Métadonnées du projet
Les métadonnées du projet fonctionnel de la même façon en mode de veille ou en mode de lecture. Ces métadonnées font toujours réference à l'intégrality du projet et sont indépendantes des nombres de clip.
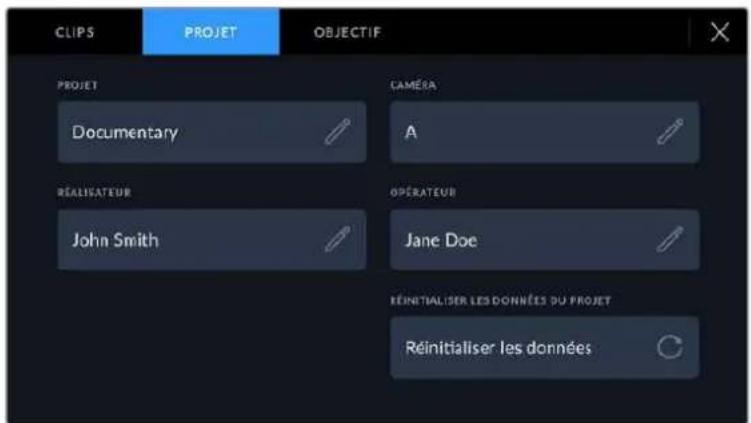
Saisissez les informations du projet dans l'onglet Projet du clap.
Projet
Affiche le nom du projet en cours. Touchez l'icone crayon pour modifier le nom du projet.
Caméra
Affiche une seule lettre representant la camera. Touchez l'icone crayon pour modifier cette lettre.
Réalisateur
Affiche le nom du réalisteur pour le projet en cours. Touchez l'icone crayon pour modifier le nom du réalisteur.
Cadreur
Affiche le nom de l'opérateur de laamera. Touchez l'icone crayon pour modifier le nom de l'opérateur de laamera.
Réinitialiser
Pour supprimer toutes les informations du projet, touchez le bouton Rinitialiser les données.
Métadonnées de l'objet
Ce paramètre affiche des informations concernant l'objet monté sur laamera. De nombreux objectifs électroniques fournissant automatiquement des informations telles que le modele de l'objet, l'ouverture et la distance locale. Si vous utilisez un objetif qui ne fournit pas ces informations, ou si vous souhaitez saisir des données supplémentaires, touchez I'icone crayon de ce parametre pour les saisir manuellement. Le menu Données de l'objet s'affichera. Il contient les informations suivantes :
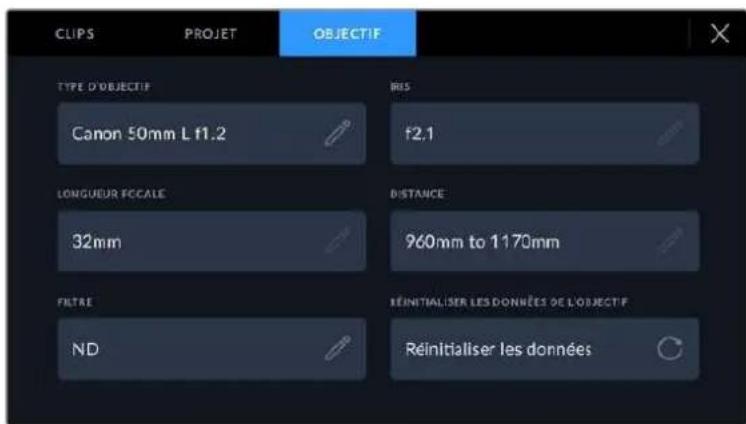
Les Données de l'objet affichent les informations générées automatiquement depuis l'objet monté sur laamera, ainsi que les informations sur les filtres saisies manuellement.
- Type d'objectif
Affiche le modele de I'objectif. Si le type d'objectif ne s'affiche pas automatiquement, touche ce parametre pour saisir les données manuelle. comme votreamera possede une base de données interne pour de nombreux objectifs, elle suggerera des noms automatiquement lorsque vous saississez des données manuelle. La saisie des données sera donc beaucoup plus rapide.
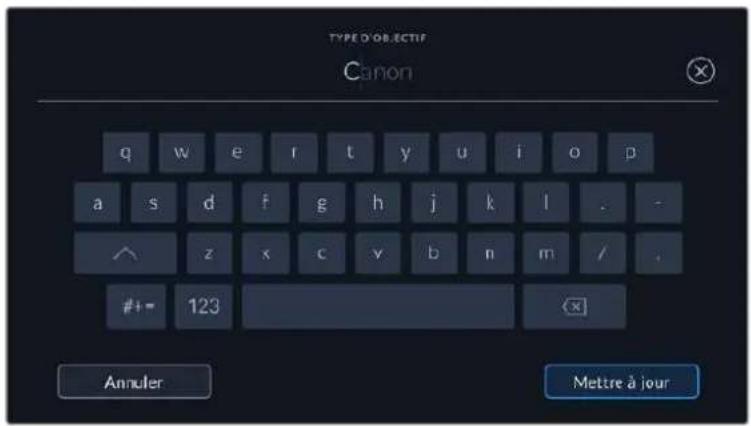
Utilisez le clavier tactile pour saisir les métadonnées de l'objet si elles n'apparaissent pas automatiquement
- Iris
Ce paramètre indique l'ouverture de l'iris au début du clip. Lorsqu'elle est fournie automatiquement, cette information peut etre affichee en f- ou T-Stops selon I'objectif utilise. Touchez I'icone crayon de ce parametre pour saisir les données manuellement.
Longueur focale
Ce paramètre indique la longueur fiscale de l'objet au début du clip enregistré.
Lorsqu'elle est fournie automatiquement, la longueur fiscale est exprimée en millimetres.
Touchez ce paramètre pour la saisir manuelle.
Distance
Ce paramètre indique la distance fiscale de l'objet pour le clip enregistré. Certains objectifs fournissant automatiquement cette information en millimétres. Vous pouvez également saisir manuellement cette donnée.
Filtre
Ce paramètre indique les filtres utilisés. Touchez l'icone crayon de ce paramètre pour saisir les données manuellement. Vous pouvez saisir plusieurs données en les séparant par des virgules.
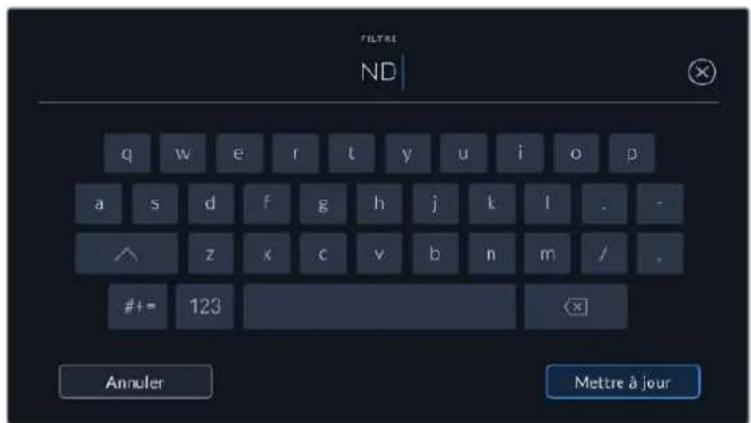
Les informations sur les filtres doivent etre saisies manuellement.
Vou puez effacer les données de I'objectif quand you le souhaitez en touchant le bouton Rinitialiser dans le menu Données de I'objectif. Un message s'affiche pour vous demander de confirmer librechoix. Si you confirmez, toutes les données de I'objectif seront automatiquement replacées par les données de I'objectif actuellément monte sur la camera. Si you ave saisi manuellement les informations presentes dans ces champs, you devrez reinitialiser les données de I'objectif la prochaine fois que you monterez un objectif afin de supprimer les valeurs raisies manuellement.
Sortie video de laamera
Sortie de monitoring HD
Les connecteurs HDMI de laamera acheminent de la video HD 1080p. Vous pouvez ainsi facilement prévisualiser vos images depuis des moniteurs ou depuis des écrans de télévision standard. La sortie 10 bits prend également en charge le HDR et l'affichage de tous les indicateurs de laamera à l'écran, ce qui est parfait pour le monitoring sur le plateau.
Le monitoring HDMI peut être utile lorsqu'el'accès à l'écran LCD est difficile, par exemple lorsqu'laamera est installée sur une grue ou dans un vehicule. Vous pouvez afficher les informations de monitoring sur votre sortie HDMI en les configurant dans les paramétres d'affichage HDMI. Les informations affichées à l'écran peuvent être des repères de cadrage ou des détails concernant l'enregistrement et les paramétres de laamera. Si vous souhaitez simplement contrôler vos prises de vue, il vous suffit de désactiver les informations à l'écran pour obtenir une sortie HDMI propre.
En utilisant un Blackmagic Micro Converter HDMI to SDI, vous pouvez convertir les signaux en SDI. Vous pourrez ainsi vous connecter à des moniteurs, des appareils d'acquisition, des melangeurs broadcast SDI ou tout autre apparéil SDI. Le Blackmagic Micro Converter HDMI to SDI peut être alimenté via le port USB de la Blackmagic Pocket Cinema Camera.
Blackmagic Zoom Demand et Focus Demand
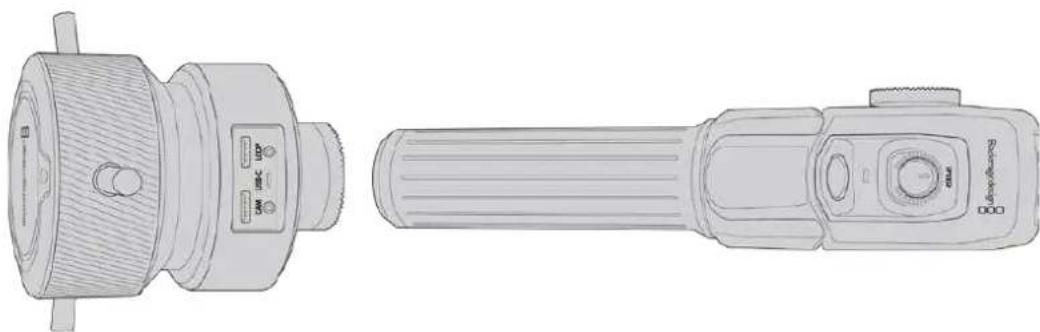
Le Blackmagic Zoom Demand et le Blackmagic Focus Demand sont des accessoires en option qui permettent de contröler la mise au point et le zoom avec des objectifs motorisés EF compatibles sur les Blackmagic Pocket Cinema Camera 6K Pro et 6K G2.
Chaque accesseire se fixe à une poignée de trépied sur votre trépied ou socle deamera. Vous pouvez ainsi contrôler la mise au point et le zoom tout en effectuant des pan et des tilt avec laamera à l'aide de vos deux mains. Des boutons et commandes supplémentaires vous permettent d'ajuster la vitesse et la sensibilité du contrôle du zoom, de régler automatiquement la balance des blancs, d'activer les repères de cadrage et bien plus.
Connector et monter les accessoires sur votreamera
Montage sur des poignées de trépied
Chaque accessoire se fixe à une poignée de trépied via son support de montage. Fixez chaque apparéil à son support via la rosette :
Connectez le Zoom Demand ou le Focus Demand à son support de montage via la rosette et fixez-les en resserrant la molette.
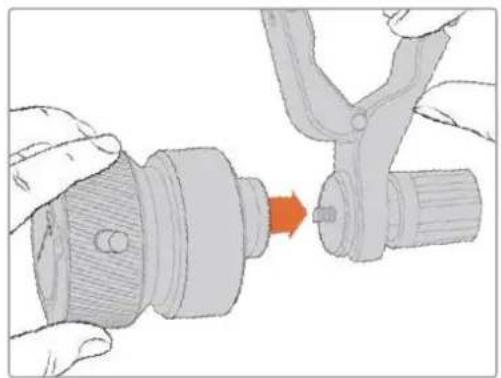

1 Placez le Zoom Demand ou le Focus Demand contre la rosette du support de montage.
2 Resserez la molette afin que les accessoires soient fermement fixes à leur support.
Une fois les accessoires montés sur leur support, vous pouvez fixer les ferrures du support à la poignée du trépied. L'extrémité de chaque ferrure contient un loquet en forme de T qui s'article dans une fente afin d'être resserré.

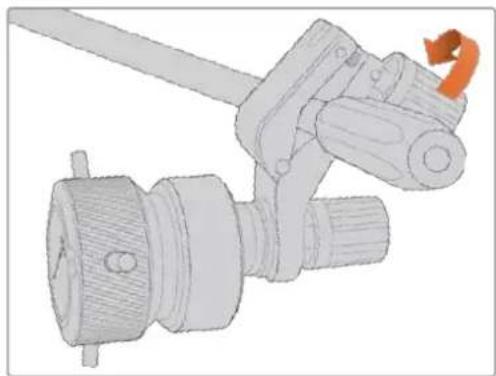
1 Desserrez le loquet en devissant la molette du loquet dans le sens inverse des aiguilles d'une montre. Cela permettra de libérer le loquet en forme de T.
2 Une fois le loquet ouvert, placez le support sur le bras du trépied et fixez-le en refermant le loquet dans sa fente de fixation. Faites pivoter le support sur la position de votrechoix.
3 Resserrez la molette du loquet pour fixer le support au bras du trépied.
Connector les accessoires à votreamera
Les Blackmagic Focus Demand et Zoom Demand ont chacun deux ports USB-C. Cela vous permet d'utiliser un apparéil individuellement ou les deux ensemble.
Un cable USB-C de 1 metre de long est fourni avec chaque apparéil. Il se connecte directement du port expansion USB-C de votre camera au port camera du Focus Demand ou du Zoom Demand.
Si vous utilisez les deux apparéils ensemble, il faudra les relier en chaine en connectant le premier apparéil au second via USB-C.

Grace à la connexion en chaîne, les deux appareils peuvent être contrôlés via le port USB-C sur le (:oté de votreamera. Par exemple, vous pouvez connecter un cable USB-C au port USB-C sur le (:oté de laamera, et connecter l'autre extrémité du cable au port camera du Focus Demand. Avec un deuxième cable, reliez le port [Loop] du Focus Demand au port [Cam] du Zoom Demand.

Le Blackmagic Focus Demand et Zoom Demand vous permettent de contrcler la mise au point et le zoom sans enlever les mains des poignées
Utiliser le Blackmagic Focus Demand
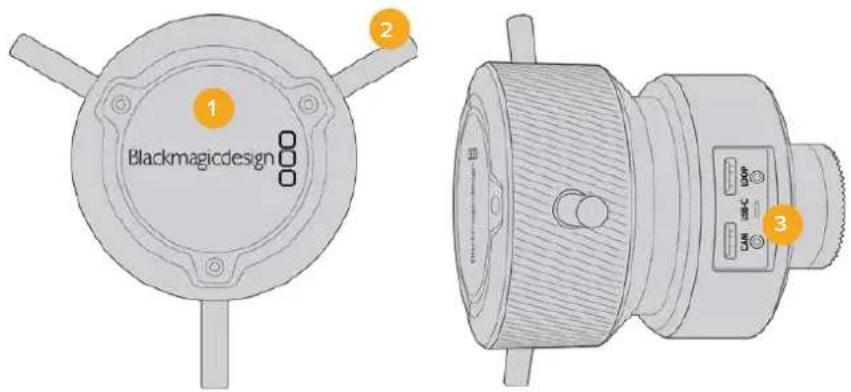
1 Molette de contrôle
Tournez la roue dans le sens des aiguilles d'une montre pour faire la mise au point sur les sujets les plus proches de l'objet, ou dans le sens inverse pour faire la mise au point sur les sujets les plus loin. Vous pouvez changer la direction de la mise au point dans le menu en réglant le paramètre sur Normale ou Inversée.
CONSEIL Si vous utilisez également le Blackmagic Zoom Demand, appuyez sur le bouton de zoom rapide pour grossir l'image tandis que vous faites la mise au point à l'aide du Focus Demand.
2 Barres de contrôle
Ces trois barres de contrôle agrandissent le diamètre de la surface de contrôle pour vous permettre de faire des ajustements de mise au point plus précis du bout du doigt.
3PortsUSB
Permet de connecter le Focus Demand à laamera et de le connecter en chaine au Zoom Demand. Le port cam est également utilisé pourmettre à jour le logiciel interne via l'utilitaire Blackmagic Camera Setup.
Utiliser le Blackmagic Zoom Demand
Les commandes du Zoom Demand sont assignables depuis les Réglages de laamera. Pour modifier les boutons de fonctions, consultez le chapitre « Onglet Réglages » de la section « Menu de paramétrage »
Les commandes suivantes sont regliées par défaut :
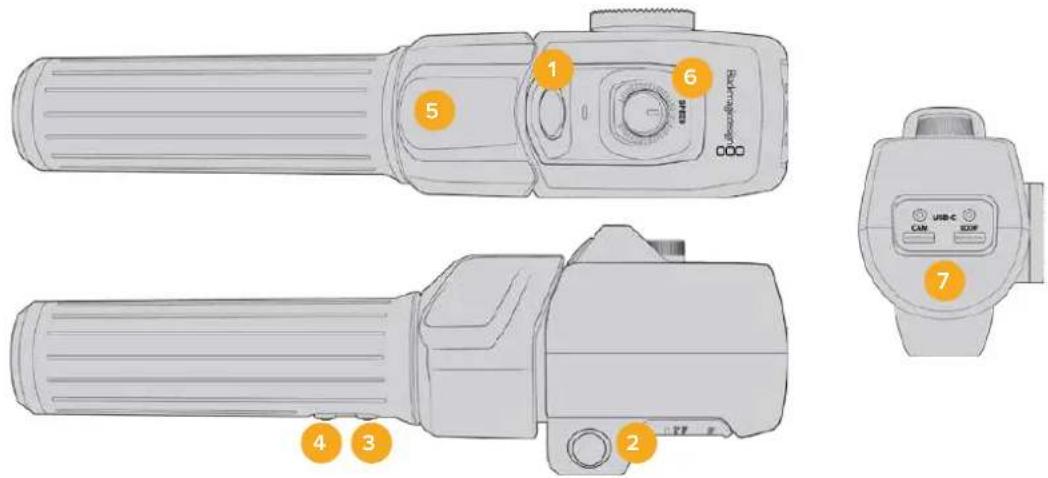
1 Zoom F1
C'est le bouton 1 de la fonction zoom. Par défaut, il est assigné à la fonction d'enregistrement.
2 Zoom F2
C'est le bouton 2 de la fonction zoom. De l'autre côté du contrôleur, vous trouvez un bouton identique qui effectue la même fonction, pour une utilisation de la main droite ou gauche. Par défaut, il est assigné à une fonction de zoom rapide qui opère instantanément dans l'image en direct.
REMARQUE La fonctionnalité de zoom rapide est seulement visible sur l'écran LCD des Blackmagic Pocket Cinema Camera 6K Pro et 6K G2. Elle n'apparaître pas sur la sortie video connectée à unmelon ou à un enregistreur.
3 Zoom F3
C'est le bouton 3 de la fonction zoom. Ce bouton est assigné par défaut à la fonction Balance des blancs automatique.
4 Zoom F4
C'est le bouton 4 de la fonction zoom. Ce bouton est assigné par défaut à la fonction Repères de cadrage.
5 Thumb Rocker
Sur la poignée du Zoom Demand se trouve une commande de bascule controllable par le pouce. Poussez le Thumb rocker vers la gauche avec votre pouce pour dézoomer, et vers la droite pour zoomer. Vous pouvez inverser la direction du zoom depuis le menu de paramétrage de laamera.
6 Molette de vitesse
Ajustez la vitesse du zoom avec finesse grâce à la molette de vitesse située sur le dessus de l'appareil. Vous pouvez également assigner cette molette au contrôle du niveau du casque, à l'ajustement de l'iris et même de la mise au point.
7PortsUSB-C
Permet de connecter le Zoom Demand à laamera et de le connecter en chaine au Focus Demand. Le port cam est également utilisé pourmettre à jour le logiciel interne via l'utilitaire Blackmagic Camera Setup.
Utiliser DaVinci Resolve
La production d'émissions télévisées ou de films avec votre Blackmagic Pocket Cinema Camera ne s'arrête pas au tournage. Il faut non seulement sauvegarder et organiser les medias, mais aussi effectuer le montage, l'étalonnage et l'encodage des fichiers master. La Blackmagic Pocket Cinema Camera comprend une version du logiciel DaVinci Resolve Studio pour Mac et Windows, vous disposez ainsi d'une solution complète pour le tournage et la post-production!

REMARQUE Nous recommendons d'utiliser la dernière version du logiciel DaVinci Resolve pour obtenir un traitement des couleurs optimal sur les clips tournés avec des cameras Pocket Cinema Camera. La version 17 ou ultérieure prend en charge le nouveau codec Blackmagic RAW et offre un traitement des couleurs précis à toutes les cameras Blackmagic.
Après avoir connecté le SSD, la carte SD ou la carte CFast à votre ordinateur, vous pouvez utiliser l'outil Clone de DaVinci Resolve situé sur la page Média pour créé des sauvégardes en cours de tournage. Cela permettra d'éviter de perdre des prises à cause de dommages ou de défauts. Une fois que vous avez utilisé DaVinci Resolve pour sauvégarder vos médias, vous pouvez charger vos clips dans la bibliothèque de Médias de DaVinci, puis monter, étaillonner et finaliser votre projet sans quitter le logiciel.
DaVinci Resolve est utilisé pour produit la plupart des grosses productions hollywoodiennes. Il offre bien plus de fonctionnalités qu'un logiciel de montage non linéaire standard et intégre une technologie de pointe destinée à la création de longs métages haut de gamme. Vous bénéficiaz des avantages de cette technologie lorsque vous utilisez DaVinci Resolve pour le montage et l'étabonnage de vos travaux.
Voutrouvez ci-dessous des informations relatives à l'utilisation de DaVinci Resolve avec les fichiers enregistrés à l'aide de votreamera. Il va sans dire que DaVinci Resolve est un outil ultra performant et que son interface utiliser renferme de nombreuses fonctionnalités. Pour plus d'informations sur l'utilisation de DaVinci Resolve, veuliez consulter le manuel d'utilisation de DaVinci Resolve sur le site internet de Blackmagic. Yous y trouvez également plusieurs formations et tutoriels.
Gestionnaire de projet
Avant d'importer des clips et de commencer le montage, vous doivent configurer leur projet à l'aide du Gestionnaire de projet.
Le gestionnaire de projet est la première page qui s'affiche lorsque vous lancez DaVinci Resolve, mais vous pouze y acceder à tout moment en cliquant sur l'icone d'accueil située en bas à droite de l'interface. Il permet d'acceder à d'anciens projets ou d'en creer de nouveauxaux.
Pour creer un nouveau projet, cliquez sur Nouveau projet en bas de la fenetre, puis renommez-le. Cliquez sur Creer.
En utilisant la page Cut, vous pouvez directement commencer le montage.
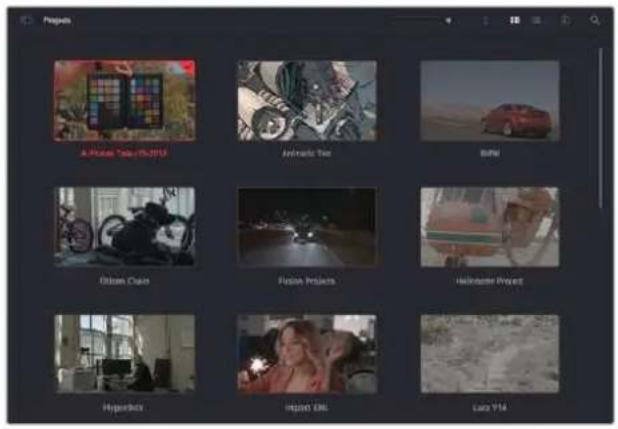
Le Gestionnaire de projet affiche tous les projets de l'utiliser.
Pour plus d'informations sur le Gestionnaire de projet, veuillez consulter le manuel DaVinci Resolve t'échéable depuis la page d'assistance du site Internet de Blackmagic Design.
Monter avec la page Cut
La page Cut offre un workflow de montage rapide et dynamique pour assembler, raccorder et monter vos clips de maniere efficace.
Les deux timelines actives vous permettent de travailler simultanément sur la totalité du montage ainsi que sur une zone en particulier. Ainsi, vous pouze déposer vos clips dans la grande timeline, puis peaufiner notre montage dans la timeline détaillée, le tout au sein du même espace de travail. Grace à ce workflow, vous pouze monter vos clips depuis un ordinateur portable sans perdre de temps à zoomer ou à scroller dans la timeline.
Disposition de la page Cut
Lorsque vous ouvrez la page Cut, vous verrez la bibliothèque de medias, le viewer et la timeline. Ces trois fenêtres principales offrent un contrôle complet sur votre montage.
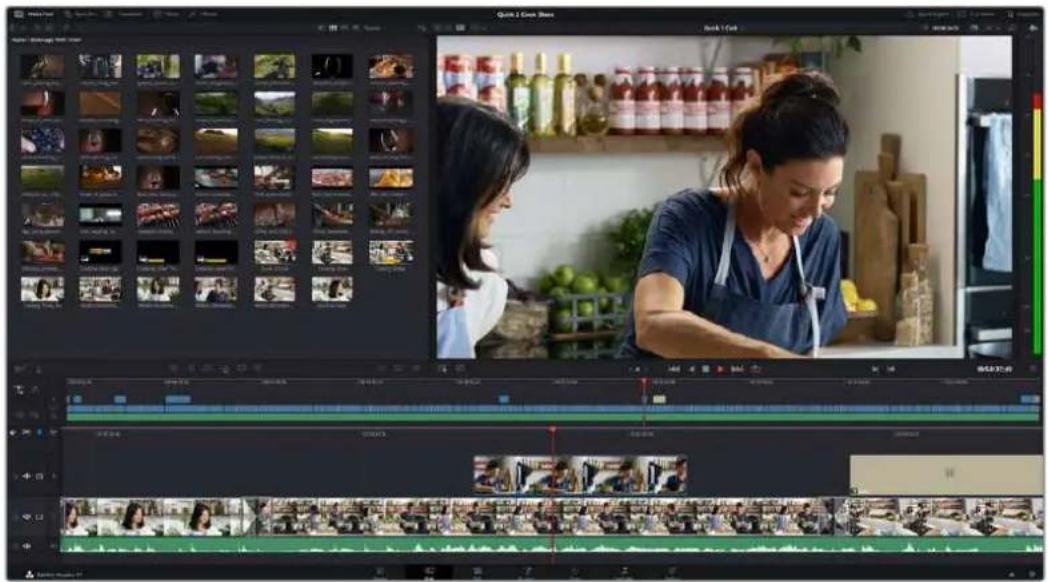
Disposition par défaut de la page Cut, avec la bibliothèque de medias affichée par vignette
Pour plus d'informations, veuillez consultier le chapitre « The Cut Page » du manuel DaVinci Resolve.
Onglets des medias
En haut a gauche de I'ecran, vous trouverez cinq angelets.
Cliquez sur ces anglets pour ouvrir les outils destinés au montage. Par exemple, le premier onglet est la bibliothèque de medias. Elle est selectionnée par défaut. Les autres onglets s'intitulent Sync bin, Transitions, Titres et Effets.

- Bibliothèque de médias : La bibliothèque de Médias contient tous les clips, dossiers et fichiers que vous avez importés sur la page Média. Vous pouvez également importer de nouveaux fichiers directement dans la page Cut, pour éviter d'avoir à revenir sur la page Média.
Sync BIn: Cette puissant fonction permet de synchroniser automatiquement tous vos clips via le timecode, la date et l'heure de façon a ce que vous puissiez besoin les angles depuis toutes les cameras sur un projet multicamera. - Transitions: En cliquant sur cet onglet, vous afficherez toutes les transitions video et audio disponibles pour votre montage, dont les fondus enchânés, les volets animés et d'autres transitions publières.
- Titres : L'onglet Titres se trouve a cote de l'onglet Transitions. Il permet de selectionner le type de titre souhaite, comme un texte defilant, un texte standard ou unibandau de bas d'écran. Vous pouvez également utiliser les modèles de titres Fusion pour ajouter des titres animés dynamiques. Ces animations sont personnalisables sur la page Fusion de DaVinci Resolve.
- Effets : Le cinquième onglet s'intitule Effets. Il permet d'afficher tous les filtres et effets que vous pouze utiliser pour enrichir votre montage, comme des effets de flou, déclat et de flare. Vous avez le choix parmi de nombreux effets que vous pouze retrouver facilement via l'outil de recherche.
CONSEIL Utilisez la barre de recherche pour retrouver facilement les éléments de votrechioix. Par exemple, si I'onglet Transitions est selectionné, entrez « Fondu » dans l'outil derécherche pour afficher uniquement les transitions de type fondu dans le viewer.
Icones du viewer
En haut a gauche de la fenetre du viewer, vous trouverez les boutons des modes du viewer.
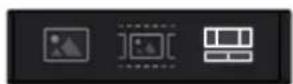
Boutons des modes du viewer
Ces boutons permettent de contrôler le mode de viewer utilisé : Plan source, Bande source et Timeline. Ces modes du viewer offrent enormément d'options de contrôle lorsque vous sélectionnez les clips pour votre montage.
| Plan source | Le viewer Plan source affiche un seul clip depuis la bibliothèque de medias et vous pouvez saisir des points d'entrée et de sortie sur toute la longueur de la timeline. Cette option vous offre davantage de contrôle. Sélectionnez un clip source à visualiser en double-cliquant sur un clip dans la bibliothèque de medias, ou en le faisant glisser dans le viewer. |
| Bande source Le mode Bande source permet de visionner tous les clips sources dans la bibliothèque de medias. C'est très pratique pour rechercher rapidement un moment précis parmi tous vos clips. Alors que vous survvalez les clips avec la tête de lecture, les vignettes associées sont sélectionnées dans la bibliothèque de medias. Ainsi, lorsque vous avez trouvez le clip que vous souhaitez monter, vous pouvez clicker sur l'icone Plan source pour que le clip source correspondant apparaissé automatiquement dans le viewer. Ce mode vous offre la liberté de travailler sur votre montage, de rechercher rapidement des prises, de tester de nouvelles idées tout en restant dans le moment. | |
| Timeline Le viewer Timeline permet de voir la timeline de montage pour dire notre projet et peaufiner vos montages. | |
Importer des clips dans la bibliothèque de medias
Voussousvez desormais commencer a importer des medias dans voire projet. Pour cela,utilisez les outils d'importation situés au-dessus de la bibliothèque de medias de la page Cut.
Selectionnez une des options d'importation pour ajouter des medias à vous projet
| Importer un média | Cette option permet d'importer des fischiers de média individuellement depuis votre espace de stockage. | |
| Importer un dossier | Cette option permet d'importer un dossier depuis votre espace de stockage. Lors de l'importation d'un dossier, DaVinci Resolve conserve la structure des fischiers,traitant chaque dossier comme un chutier séparé. Ainsi, vous pourrez naviguer entre les chutiers pour retrouver vos vidés et autres Médias. |
Pour importer des medias :
1 Cliques sur l'icone d'importation d'un media ou d'un dossier.
2 Naviguez dans voire espace de stockage pour retrouver le media de vaore choix.
3 Sélectionné le fichier ou le dossier, puis cliquez sur Ouvrir.
Une fois les medias ajoutés à votre projet, pensez à sauvégarder vos changements. DaVinci Resolve comprend une fonctionnalité de sauvégarde automatique très rapide, appelée Enregistrement continu. ÀpRES avoir manuellement sauvégarde votre projet une première fois, l'enregistrement continu sauvégardera les prochains modifications en temps réel. Ainsi, vous ne perdrez jamais votre travail.
Pour plus d'informations sur l'enregistrement continu et les autres fonctionnalités de sauvegarde, veillez consulter le manuel DaVinci Resolve.
Ajouter des clips à la timeline
Maintenant que vous étés familiarise avec l'onglet des medias et les modes du viewer, vous pouvez ouvrir la bibliothèque de medias et ajouter rapidement des clips à votre timeline.
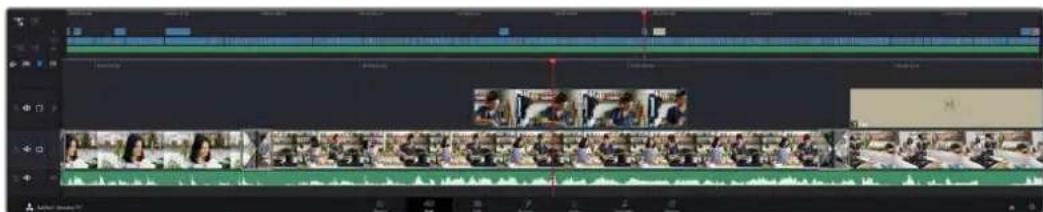
La timeline supérieure et la timeline inférieure zoomée de la page Cut
La timeline est l'endetroit où vous allez effectuer votre montage. C'est comme un tableau avec des pistes sur lequel vous pouvez ajouter, déplacer et rogner des clips. Les pistes vous permettent de créé différentes couches pour superposer les clips. Ainsi, vous avez davantage de flexibilité pour essayer différents montages et pour creer des transitions et des effets. Par exemple, vous pouvez essayer un montage sur un clip d'une piste, sans que cela affecte les clips de la piste du dessous.
Voupez ajouter des clips à la timeline de différentes façons, en utilisant par exemple les modes Insertion intelligente, Ajouter à la fin ou Placer au-dessus.
Ajouter des clips à la fin
Lorsque vous selectionnez des prises et que vous creez un montage, vous voudrez probabilitemt ajouter ces prises a votre timeline les ones après les autres. L'outil Ajouter a la fin est parfait pour cela, car il vous permettra de monter vos clips rapidement.
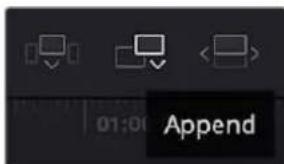
Cliquez sur l'icone Ajouter à la fin pour placer un clip après le dernier clip
Pourajouterunclipa la fin:
1 Double-cliquez sur un clip pour I'ouvrir dans le viewer.
2 À l'aide de l'outil scratch trim, réglez les points d'entree et de sortie pour sélectionner la durée précise de votre prise. Vous pouvez également régler les points en appuyant sur les touches « i » ou « o » de votre clavier.
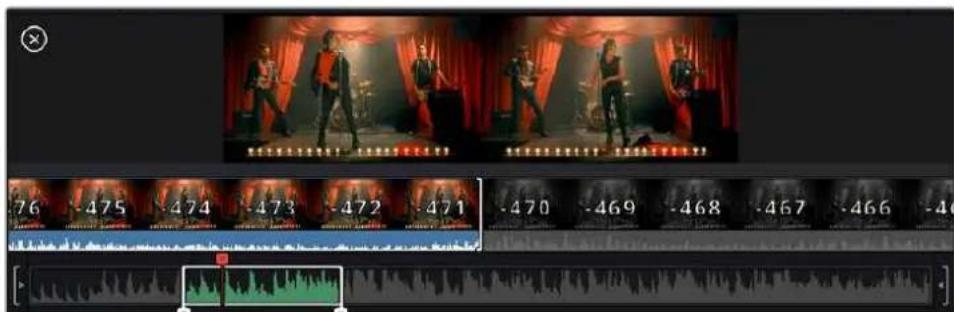
3 Cliquez sur l'icone Ajouter à la fin située dans la barre au-dessous de la bibliothèque de medias.
Votre premier clip sera place au début de la timeline.
Répétez les étapes 1 à 3 pour ajouter des clips les uns après les autres, sans laisser d'espace entre eux.
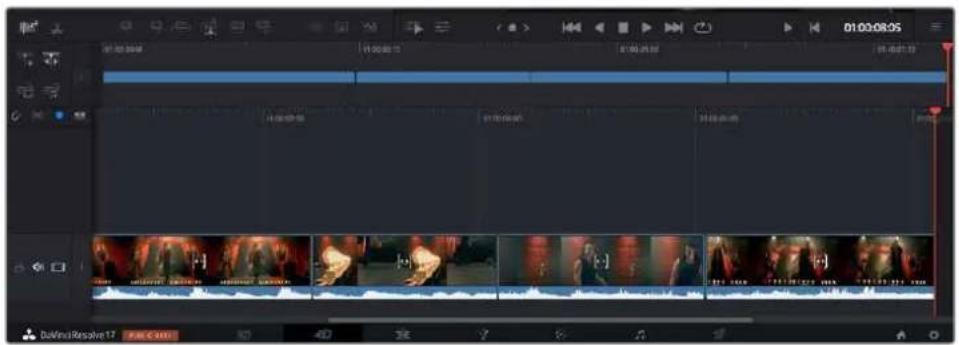
En ajoutant des clips à la fin, vous n'aurez pas d'espace vide entre les clips
CONSEIL You pouvez travailler plus rapidement en assignant un raccourci clavier à la fonction Ajouter à la fin. Par exemple, en assignant la touche « p » à cette fonction, vous pouvez régler les points d'entrée et de sortie avec les touches « i » et « o », puis directement appuyer sur « p » pour ajouter le clip à la fin. Pour plus d'informations sur les raccourcis clavier, veuillez consulter le manuel DaVinci Resolve.
Raccorder des clips dans la timeline
Une fois les clips ajoutés dans la timeline, vous pouvez les déplacer et effectuer des raccords comme bon vous semble.
Pour rognner un clip, survalez-en le début ou la fin avec votre souris, puis cliquez et faites glisser la souris vers la gauche ou la droite. Par exemple, glissez vers la gauche pour réduire sa durée, ou vers la droite pour l'augmenter. Vous remarquerez qu'après cette action, tous les clips seront déplacés dans la timeline pour s'adapter au nouvel ajustement. C'est une des nombreuses fonctionnalités de la page Cut qui vous permettra de gagner du temps.
Vou puez me remonter le clip pour le déposer dans une nouvelle piste video dans la grande timeline sans avoir à zoomer ou à dézoomer. Vous perdrez ainsi moins de temps à naviguer dans une longue timeline.
Affichage Audio trim
L'affichage Audio trim vous permet de faire des coupes audio précises en agrandissant la forme d'onde dans la timeline. Cela s'avere utile pour monter une scene de dialogue ou un clip musical et cela facilitte la recherche d'un point de montage entre des mots ou des temps.
Pour utiliser l'affichage Audio trim :
1 Cliquez sur l'icone Audio trim entre les outils Aimanter et Ajouter un marqueur a gauche de la timeline.
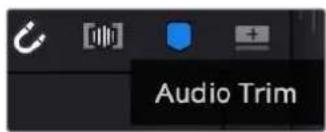
Bouton d'affichage Audio trim
2 Quand vous rognez un clip, vous verrez une forme d'onde agrandie dans la timeline. Une fois le rognage terminé, les clips dans la timeline reprendront leur taille normale.
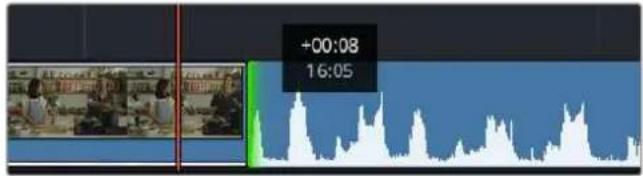
L'affichage Audio trim agrandit la forme d'onde audio dans la timeline.
Après avoir monté vos clips avec la page Cut, vous pouvez insérer un titre. La section suivante vous montrera comment ajouter un titre.
Ajouter des titres
Il est très facile d'insérer différents types de titres dans votre timeline.
Pour cela, cliquez sur l'onglet Titres en haut a gauche de Iecran. La fenetre de selection affichera la.
liste de tous les types de titres disponibles sous la forme de vignettes. Vous pouzeCHOISIR un texte
a afficher sur le tiers inférieur, en defilement, ou encore un texte standard. Vous pouvez meme
ajouter des titres animes Fusion personalisables.
Prévisualiser les titres
Avant d'ajouter un titre à votre timeline, vous pouvez le visionner depuis la fenêtre de selection Titres. Cela vous permet de parcourir rapidement les différentes options avant de faire votrechioix.
Pour prévisualiser un titre :
1 Cliquez sur le menu d'options en haut a droite de la fenetre des titres et cochez Survol.
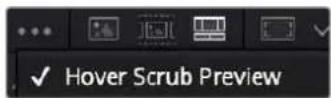
Activez le Survol depuis le menu d'options.
2 Dans la fenetre de selection Titres, passes le curseur sur la vignette pour prévisualiser un titre dans le viewer. Si vous prévisualisez un titre animé ou Fusion, déplacez le curseur de gauche à droite sur la vignette du titre pour voir l'animation.
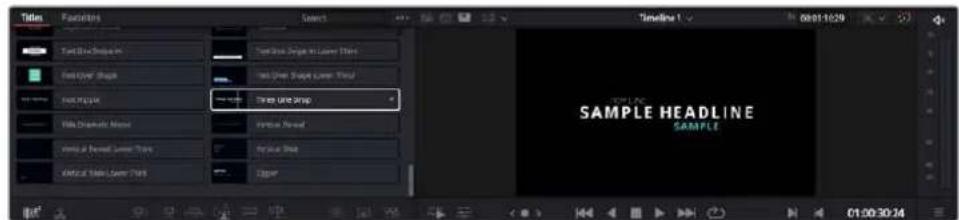
Passez la sourls sur la vignette d'un titre pour en afficher un aperçu dans la visionneuse.
Une fois le titre seLECTIONné, vous pouvez l'ajouter à votre timeline.
Pour ajouter un titre standard :
1 Cliquez sur le titre et faites-le glisser dans la timeline. La timeline n'a pas d'importance, mais pour plus de précisions, utilisons la timeline détaillée. Le titre creera automatiquement une nouvelle piste video pour le titre et s'aimantera à la tete de lecture.
2 Relachez la souris et le titre apparaitra sur la nouvelle piste. Vous pouvez désormais le déplacer ou changer sa durée, comme pour un clip video.
Pour modifier un titre, cliquez sur celui-ci, puis sur I'icone Outils sous le viewer du clip.
Une liste d'outils s'affichera pour modifier le titre du clip, comme Transformation, Rogner, Zoom dynamique et bien plus.
4 Cliquee maintainant sur I'onglet Inspector.
La fenêtre de l'inspecteur va s'ouvrir et vous pourrez saisir le titre et configurer le tracking, l'espacement entre les lignes, la police, la couleur et autres réglages.
Vou avez de nombreuses options à disposition pour personneliser votre titre. Nous vous conseillons de jouer avec les différents réglages pour voir comment cela modifie le titre.
CONSEIL You pouvez aussi utiliser la fonction Survol pour prévisualiser des effets, des transitions, des générateurs et des filtres dans les pages Cut et Montage.
Travailler avec des fichiers Blackmagic RAW
Les clips Blackmagic RAW offrent une grande flexibilité en post-production. Cela vous permet de faire des changements sur les clips, tels que la balance des blancs et l'ISO, comme si vous les faisiez dans les paramètres de laamera. Le Blackmagic RAW offre également davantage d'informations tonales dans les ombres et dans les haute lumières. Ceci est particulièrement utile pour recupérer les détails d'un ciel surexpose ou dans les zones d'ombre de l'image.
Si vous souhaitez obtenir la meilleure qualité possible ou si vous tournez des séquences propant des contrastes importants entre les hautes lumières et les zones d'ombre, le Blackmagic RAW répondra parfaitement à vos exigencies.
Grace à la vitesse et à la petite taille de filchier du Blackmagic RAW, il n'est pas nécessaire de créé des fichiers proxy. La lecture est donc identique à celle d'un clip video standard. Cette section du manuel déscrit les fonctionnalités du Blackmagic RAW et la façon d'utiliser les fichiers Blackmagic RAW dans votre workflow DaVinci Resolve.
CONSEIL Nous vous recommendons d'ajuster les réglages Blackmagic RAW pour vos clips sur la page Étalonnage avant de les étaillonner.
Paramètres des clips pour le Blackmagic RAW
Quand you importez des fichiers Blackmagic RAW, DaVinci Resolve decode les données de la camera containues dans les fichiers, notamment l'ISO, la balance des blancs et la teinte. Si les images vous plaissent, vous pouvez d'ores et deja commencer le montage.
L'avantage de travailler au format Blackmagic RAW, c'est que vous pouvez changer ces réglages! En effet, le nombre d'options pour le traitement des fischiers Blackmagic RAW vous permet demettre au point votre propre workflow. En utilisant les paramétres Plan de diverses façon pour chaque clip dans l'onglet Camera RAW, vous comprendrez àquel point le travail en Blackmagic RAW est performant et polyvalent.
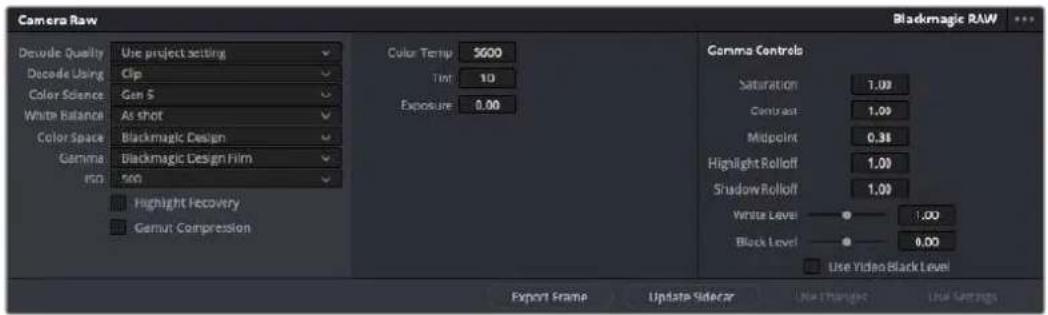
Dans l'onglet Camera RAW, Sélectionnez Plan dans le menu Dématricer avec pour régler les paramètres Blackmagic RAW des clips.
Changer les paramètres Blackmagic RAW
Une fois que les paramètres des clips pour le Blackmagic RAW sont actifs dans DaVinci, ces derniers ainsi que les commandes de gamma sont modifiables. Ajuster ces paramètres pour optimiser vos clips équivaut presque à un étalonnage primaire. C'est encore plus performant lorsque vous utilisez les scopes de DaVinci Resolve, car ils vous permettent de neutraliser et d'équilibrer les clips pour les préparer à un étalonnage plus pousse.
Voutrouverez ci-dessous une description des commandes relatives aux clips et au gamma.
ISO
La valeur ISO peut être modifiée en augmentant ou en diminuant ce paramètre. C'est très utile pour éclairir ou assombrir le clip et ensuite l'optimiser.
Récupération des haute lumières
Cochez cette case pour recuperer des informations dans les haute lumières dans les canaux écrétés en utilisant les informations des canaux non écrétés.
Compression du gamut
Cochez la case pour maintainir automatiquement des niveaux de gamut adaptés.
Température de la couleur
Ajustez la température de la couleur pour réchauffer ou refroidir les tons de l'image. Ce paramètre peut être utilisé pour neutraliserla balance des couleurs de chaque image.
Teinte
Ajustez ce paramètre pour ajouter du vert ou du magenta à l'image afin d'équilibrer les couleurs.
Exposition
Utilisez ce paramètre pour affiner la luminosité générale de l'image.
Saturation
Le curseur de saturation est regle sur 1 par défaut. Vous pouvez la réduire jusqu'à 0 pour une saturation minimale et l'augmenter jusqu'à 4 pour une saturation maximale.
Contraste
Le curseur de contraste est regle sur 1 par défaut. Vous pouvez le réduire jusqu'à 0 pour un contraste minimal et l'augmenter jusqu'à 2 pour un contraste maximal.
Point central
En mode Blackmagic Design Film, la valeur des tons moyens est reglee par defaut sur 0.38 ou 38.4% . Ajustez le curseur vers la gauche pour la réduire ou vers la droite pour l'augmenter jusqu'à 100% . Lorsque le contraste n'est pas regle par défaut, vous pouvez modifier le roll-off des haute lumières et des ombres.
Affaiblissement des haute lumieres
Le curseur d'ajustement des haute lumières est régé sur 1 par défaut. Vous pouvez les atténuer jusqu'à 0 en déplaçant le curseur vers la gauche, ou les augmenter jusqu'à 2 en déplaçant le curseur vers la droite. Par défaut, ce paramètre est régé sur 1.
Affaiblissement des basses lumieres
Ajustez le curseur vers la gauche pour réduire les ombres à 0 ou vers la droite pour les augmenter à 2.
Niveau blancs
Ajustez le point blanc de la courbe de gamma en déplacant le curseur. Les valeurs maximales et minimales sont respectivement de 2 et 0. Par défaut, ce paramètre est régé sur 1.
Niveau noirs
Ajustez le point noir de la courbe de gamma en déplaçant le curseur. Les valeurs maximes et minimales sont respectivement de 1 et -1. La valeur par défaut est de 0.
Utiliser les niveaux video de noir
Cochez cette case pour régler vos niveaux de noir sur Video.
Exporter l'image
En cliquant sur le bouton Exporter l'image, vous pouvez exporter une seule image du clip Blackmagic RAW.
Mettre à jour le sidecar
Cliquez sur ce bouton pourmettre à jour le fichier sidecar Blackmagic RAW pour le clip actuel,
Lorsque vous effectuez des modifications sur vos clips Blackmagic RAW, le paramètre Gamma sera régèle sur Blackmagic Design Custom.
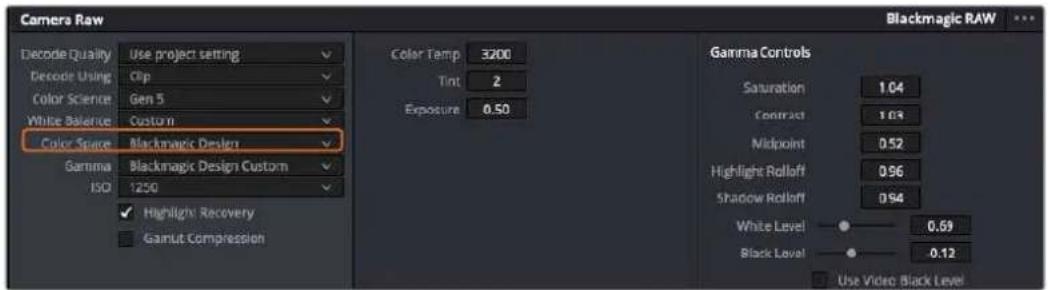
Si vous souhaitez restaurer vos clips sur un paramètre Gamma par défaut, Sélectionnez une option dans le menu déroulant.
CONSEIL Les commandes Gamma sont désactivées lorsque vous filmez avec une plage dynamique Video, mais vos données Blackmagic RAW ne sont pas perdues. Sélectionnez Blackmagic Design Film ou Blackmagic Design Extended Video depuis le menu déroulant du paramètre Gamma et effectuez vos ajustements.
Sauvegarder les changements Blackmagic RAW
1 Reglez les commandes Gamma pour votre clip Blackmagic RAW.
2 Cliquez sur le bouton Mettre a jour le Sidecar.
Un fjichier Sidecar est creedans le mee dossier que vrie fichier .braw. Lorsqu'un autre utiliseur importe les fichiers Blackmagic RAW, le fjichier sidecar sera automatiquement lu par DaVinci Resolve. Si you efectue des modifications supplémentaires, appuyez une nouvelle fois sur Mettre a jour le Sidecar.
CONSEIL Pour supprimer un fichier sidecar, effacez-le de son emplacement dans voitre lecteur de media.
Paramètres du projet pour le Blackmagic RAW
Si vous souhaitez modifier un paramètre commun à tous les clips, par exemple la balance des blancs ou l'ISO, vous pouvez régler les clips afin qu'ils utilisent les paramétres Caméra RAW du projet. Vous pourrez ainsi apporter des changements à plusieurs clips en même temps.
Régler les paramètres du projet pour le Blackmagic RAW :
1 Ouvrez le menu de paramétrage du projet, enclinquant sur Fichier puis sur Paramètres du projet.
2 Dans l'onglet Camera RAW, vous trouvez un menu près du profil RAW. Cliquez sur la flèche pour sélectionner Blackmagic RAW depuis la liste.
3 Dans le menu Dematricer avec, selectionnez Projet.
4 Sélectionnez une colorimétrie dans le menu.
5 Reglez la Balance des blancs sur Personnelser.
6 Dans le menu Gamma, Sélectionnez Blackmagic Design Custom. Réglez l'espace de couleurs sur Blackmagic Design.
7 Choisissez votre résolution depuis le menu Qualité de dématrique. Uneasse résolution vous permettra d'améliorer la lecture sur des systèmes aux performances limitées. Pour un rendu optimal, vous pouvez changer la résolution plus tard, avant l'exportation.
Vou puez desormais ajuster les parametes de la camera tels que la saturation, le contraste et les tons moyens. Cela s'appliquera a tous les clips du projet regles sur Dematricer avec Projet.
Étalonner vos clips avec la page Étalonnage
Une fois vos clips dans la timeline et vos titres ajoutés, vous pouvez commencer à étabonnner vos images depuis la page Étalonnage. C'est une page très puissant qui vous permettra de définir le look général de votre film. Pour cet exemple, il est conseilé de commencer par rendre vos clips neutres afin qu'ils soient constants. Vous pouvez également returner sur les pages Cut ou Montage à tout moment pour effectuer des modifications dans votre montage.
La page Étalonnage vous permet d'ajuster le look de votre montage. L'étalonnage est un art en soi à bien des écarts, car il permet d'ajouter une réelle emotion à votre travail. C'est une partie extrémement créative de votre workflow et, une fois les techniques acquises, il n'y a rien de plus gratifant que de voir vos images prendre vie! C'est généralement la première étape, appelée correction colorimétrique primaire. Ensuite, vous pourrez passer à la correction colorimétrique secondaire, où vous pourrez faire des ajustements de couleur extrémement précis sur des objets spécifique dans vos images. La correction colorimétrique seconde est très amusante, mais comme son nom l'indique, elle est généralement effectue dans un deuxième temps pour obtenir de nouveaux résultats.
Commencez par cliquer sur I'onglet Etalonnage afin d'ouvir la page Etalonnage.
Cette page contient les réglages Caméra RAW, les roues chromatiques, les palettes de courbes, des outils d'étalonnage de base ainsi qu'une fenêtre de prévisualisation et une fenêtre contenant les noeuds. Ne soyez pas intimidating par les nombreuses fonctionnalités proposées sur cette page, car elles sont là pour vous aider à obtaining des images époustouflantes. Dans cette section vous découvertes les bases, mais pour des informations plus détaillées, veuillez consulter les sections spécifiquement dédiées à l'étalonnage dans le manuel. Il vous indiquera clairément à quoi ces outils servent et la façon de les utiliser. Vous apprendrez ainsi les techniques que les professionnels utilisent dans les studios d'étalonnage haut de gamme.
En général, la première étape de la correction colorimétrique primaire consiste à optimiser le niveau des ombres, des tons moyens et des haute lumières dans vos clips. En d'autres termes, il faut ajuster les paramètres Lift, Gamma et Gain. Vous obtiendrez ainsi des images optimes pour débuter la phase d'éthalonnage et obtenir l'esthetique souhaïée pour votre film. Les scopes s'avent très pratiques pour optimiser les niveaux.
Utiliser les scopes
Les étalonneurs réalisent les corrections colorimétriques en fonction de l'émotion et du rendu qu'ils veulent donner aux programmes sur lesquels ils travaillent et n'utilisent en général qu'un simple écran pour effectuer les changements. Vous pouvez vous insipérer d'objets de tous les jours et la façon dont l'éclairage s'y reflète pour vos différents projets.
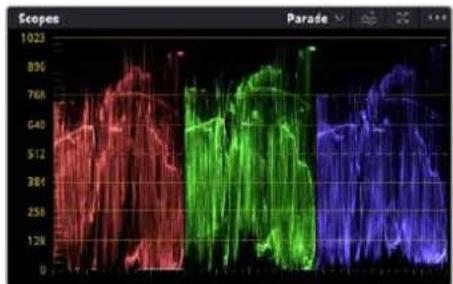
Le scopé Parade vous permet d'optimiser les tons clairs, les tons moyens et les ombres
Mais il existe d'autres façon d'étaillonner un film, notamment en s'aidant des scopes intégrés à DaVinci Resolve. Vous pouvez ouvrir un seul scope video en cliquant sur le bouton Scope (le deuxièmebouton à partir de la droite sur la barre d'outils). Vous pouvez désirir entre les scopes suivants : Forme d'onde, Parade, Vecteurscope, Histogramme ou Coordonnées chromatiques CIE. Grace à ces scopes, vous pouvez contréor l'équilibre des tons, les différents niveaux de la video sans écraser les noirs ni écrête les blancs, mais aussi contréor la dominance des couleurs de vos clips.
La palette Roues chromatiques contient les commandes Lift, Gamma et Gain qui vous permettent d'effectuer les premiers ajustements. Si vous avez déjà fait de l'étaconnage, ces roues chromatiques ressemblant surement aux commandes que vous avez pu voir dans d'autres applications pour ajuster les couleurs et le contraste.
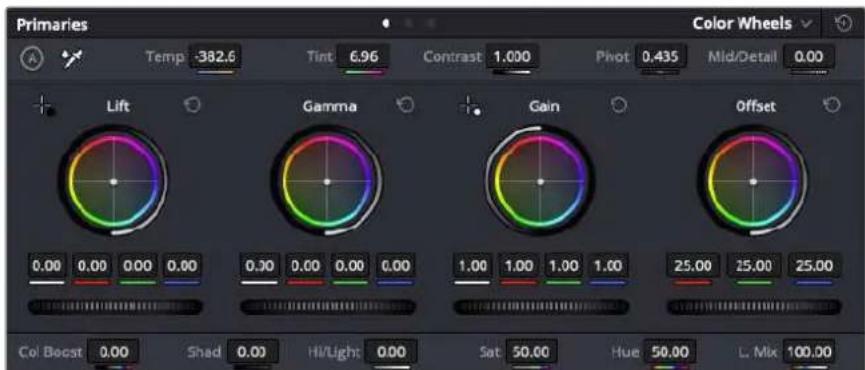
Les roues chromatiques Lift, Gamma, Gain et Offset vous offrent un contrôle complet sur l'équilibre des couleurs et des tons de vos clips. Pour régler toutes les couleurs de façon identique, tournez la roue située sous les roues chromatiques.
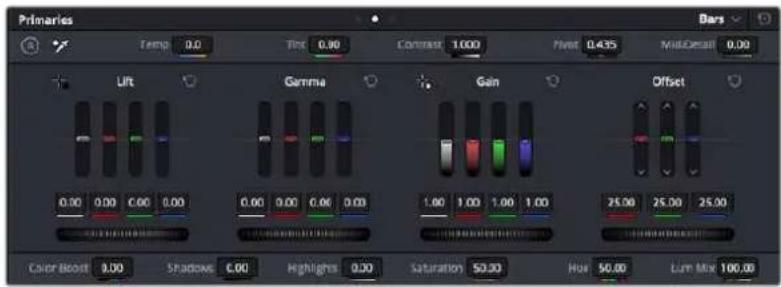
Les barres primaires permettent d'apporter des ajustements colorimétriques plus facilement avec une souris.
Pour un contrôle précis de chaque couleur, utilisez la souris. Vous pouvez regler les roues chromatiques sur Barres primaires, ce qui vous permit de regler séparément les canaux de couleurs et de luminance pour le lift, le gamma et le gain. Sélectionnez simplement Barres primaires dans le menu déroulant situé en haut à droite des roues chromatiques.
- Ajuster le Lift: Àprous avoir sélectionnéVote clip dans la timeline de la page Étalonnage, cliquez sur la roue Lift située sous la première roue chromatique. Faites-la tourner vers la gauche ou vers la droite pour constater les modifications apportées à l'image. Vous verrez que la luminosité des zones d'ombres de votre image augmente et diminue.
Réglez-la afin d'optimiser les zones d'ombres. Si vous baissez trop le Lift, certains détails des noirs disparaisent. Utilisez le scope Parade pour éviter que cela ne se produit. La position optime des noirs sur le graphique se situe juste au-dessus de la ligne inférieure du scope Parade. - Ajuster le Gain : Cliquez sur la roue Gain et faites-la tourner vers la gauche ou vers la droite. Cette roue regle les tons clairs, zones les plus lumineuses de l'image. Les tons clairs sont affichés dans la section supérieure du graphique dans le scope Parade. Pour une scene très lumineuse, la position optimale se situe juste en dessous de la ligne supérieure du scope Oscilloscope. Si les tons clairs dépassent la ligne supérieure de ce scope, ils sont écrétés et les zones les plus claires perdent alors beaucoup de détails.
- Ajuster le Gamma : Cliquez sur la roue Gamma située sous la roue chromatique et faites-la tourner vers la gauche ou vers la droite. Si vous augmentez le gamma, la luminosité de l'image augmente et en fonction du réglage, la partie centrale de la roue change également. Cette partie représenté les tons moyens du clip. La position optimale des tons moyens se situe généralement entre 50 et 70% de l'affichage de la forme d'onde. Ceci n'est qu'une indication, car le réglage dépend sur tout du rendu que vous souhaitez obtenir et des conditions d'éclairage du clip.
Vou puez eaglement utilise la palette Courbes pour faire vos corrections colorimétriques primaires. Pour creer des points de contrôle, il suffit de cliquer sur la ligne diagonale dans le graphique Courbes. Vous pouez ensuite les déplacer vers le haut ou vers le bas pour ajuster le contraste RVB principal et obtaining differentes tonalités dans l'image. Le réglage optimal se situe dans le champ du tiers inférieur, du milieu et du tiers supérieur de la courbe.
Il existe différentes façons de faire de la correction colorimétrique primaire dans DaVinci Resolve.
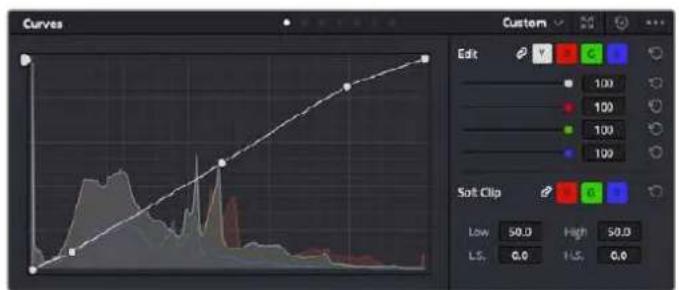
La palette Courbes est un autre outil que vous pouvez utiliser pour faire de la correction colorimétrique primaire ou pour travailler certaines zones du clip avec une Power Window
Correction colorimétrique secondaire
Si vous souhaitez corriger une partie spécifique de l'image, vous devrez utiliser les corrections secondaires. Les corrections que vous avez apportées jusqu'à présent à l'aide des réglages Lift, Gain et Gamma affectent l'intégrality de l'image, il s'agit donc de corrections colorimétriques primaires.
Cependant, si vous ne poulez modifier que certaines parties de l'image, comme la couleur de l'herbe dans une scene, ou la couleur du ciel, il faut alors utiliser les fonctions de correction colorimétrique secondaire. En effet, ces fonctions permettent de sélectionner et de ne modifier qu'une partie de l'image. Grace aux nœuds, vous pouvez superposer plusieurs corrections et ainsi travailler l'image à la perfection! Vous pouvez également utiliser les fenêtres et le tracking pour que la correction suivie la partie de l'image sélectionnée.
Selection d'une couleur
Vou avz sans doute pu constater qu'il estsoonentnecessaire de change la couleur d'un seul elementde l'imagepar exmaple I/herbe sur le cote de la route,le bleu du ciel,ou tout autre element sur lequel you souhaitez attirer le regard du spectateur. Pour effectuer ces modifications, il est utile d'utiliser I'outil selecteur HSL.

Utiliser les selecteurs HSL pour selectionner les couleurs de vos images est très pratique lorsque vous pouzemettre en valeur certaines zones de l'image, ajouter du contraste ou attirer l'attention des spectateurs sur une partie de l'image.
Pour sélectionner une couleur :
1 Creez un nouveau nœud Série.
2 Ouvrez la palette Sellecteur et vérifie que la pipette d'échantillonnage Plage de selection est bien sélectionné.
3 Cliquez sur la couleur du clip que vous souhaitez modifier.
4 Il est en général nécessaire d'adoucir les contours afin de limiter la sélection à la couleur souhaïée. Pour visualiser votre sélection, cliquez sur le bouton Masque situé au-dessus du viewer.
5 Dans la fenetre Teinte, reglez la commande Largeur pour élargir ou réduire la selection.
Amusez-vous avec les commandes Haut, Bas et Soft afin d'affiner votre scélection. Vous pouvez désormais corriger les couleurs scélectionnées à l'aide des roues chromatiques ou des courbes personnalisées.
Parfois, les zones de selection peuvent déborder sur des zones que vous ne souhaitez pas modifier. Il est alors facile de masquercer ces zones à l'aide des Power Windows. Créez simplement une nouvelle Power Windows et donnez-lui la forme de la zone que vous souhaitez modifier. Si la couleur sélectionnée rouge au cours de la prise, vous pouvez utiliser la fonction de tracking pour suivre la Power Window.
Ajouter une Power Window
Les Power Windows sont des outils de correction colorimétrique extrémement efficaces que vous pouvez utiliser pour isoler certaines zones de vos clips. Ces fenêtres dynamiques suivent les mouvements de laamera ou des zones sélectionnées.

Utilisez les Power Windows pour masquer les zones que vous ne souhaitez pas modifier avec les selecteurs HSL
Voussoupvez,parexample,crerer une fenetre qui suivra les mouvements d'une personne afin de change le contraste et les couleurs sans afferter les zones alentour.Gracea ces modifications, youattirez l'attention du spectateur vers la zone de votrechoix.
Ajouter une Power Window à votre clip :
1 Creez un nouveau nœud Série.
2 Ouvrez la palette Power Window et selectionnez la forme en cliquant sur l'une d'entre elles. La fenetre de la forme apparait sur le neud.
3 Redimensionne la forme à l'aide des points bleus qui entourent la forme. Les points rouges permettent de regler le flout du contour. Vous pouvez repositionner correctement la forme à l'aide du point central. Faites pivoter la fenetre à l'aide du point relié au point central.
Vou puez depuisais corriger les couleurs de la zone selectionnee.
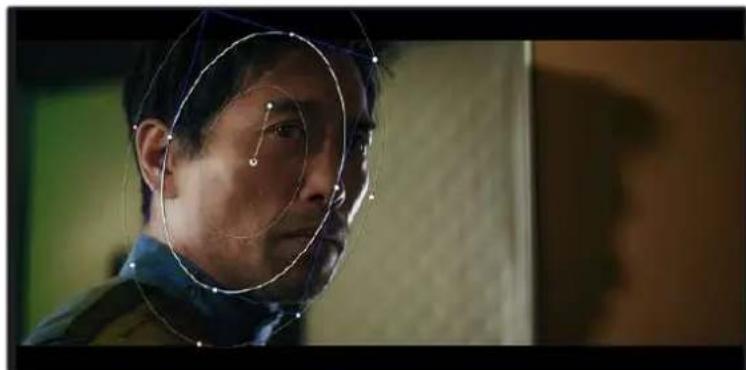
Les Power Windows vous permettent d'effectuer des corrections secondaires sur certaines zones de l'image.
Tracking d'une Power Window
Lorsque laamera, l'objet ou la zone de votre prise bougent, utilisez l'outil de tracking disponible dans DaVinci Resolve pour garantir le tracking complet de la zone selectionnee. Le Tracker analyse les mouvements de laamera ou de l'objet pour que la fenetre s'adapte à ces mouvements. Si vous n'activez pas cette fonction, la correction pourrait ne pas s'appliquer à la zone selectionnee et produit un effet indesirable.
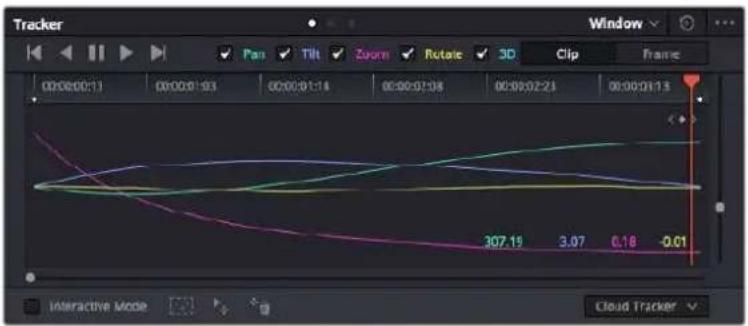
Pour que les Power Windows suivent les mouvements de certains objets ou certaines zones du clip, vous pouvez creer un suivi à l'aide de la fonction Tracking
En plus des ajustements d'alignement listed ci-dessus, le lecteur prend également en charge:
1 Creez un nouveau nœud série et ajoutez une Power Window.
2 Placez le curseur au début du clip, puis positionnez et dimensionnez la fenetre pour ne selectionner que l'objet ou la zone souhaitems.
3 Ouvrez la palette Tracker. Cochez ou decochez les cases Pan, Tilt, Zoom et Perspective 3D en fonction des mouvements du clip.
4 Cliquez sur la flèche de lecture située à gauche des cases de sélection. DaVinci Resolve applique un ensemble de points de suivi à votre clip qui analyse les mouvements de chaque image. Lorsque le suivi est terminé, la Power Window suit le mouvement de l'objet dans le clip.
En général, le suivi automatique fonctionne sans problème, cependant, certaines scènes peuvent être complexes ou des objets peuvent se couver devant la zone sélectionnée et ainsi interrompré ou affecter le suivi. Ce problème peut être résolu à l'aide de l'éditeur d'image. Consultez le manuel DaVinci Resolve pour en savoir plus.
Utilisation de plug-ins
Les corrections colorimétriques secondaires peuvent être effectuées à l'aide de plug-ins Resolve FX ou Open FX, qui permettent de creer des rendus rapides et des effets innovants au sein de la page Étalonnage. Il est également possible d'ajouter des transitions et des effets à vos clips au sein de la page Cut ou Montage. Les effets Resolve FX sont fournis avec DaVinci Resolve. Les plug-ins OFX sont disponibles sur des sites fournisseurs tiers.
Vouss pouvez acceder aux plug-ins OFX, une fois installés, et aux plug-ins Resolve FX, en allant sur la page Etalonnage et en ouvrant le panneau Open FX (situé à droite de l'éditeur de nœuds). Une fois que vous avez créé un nouveau nœud Série, cliquez sur le bouton Open FX pour ouvrir la bibliothèque d'effets, puis faibles glisser un plug-in dans le nœud. Si le plug-in dispose de paramétres modifiables, vous pouvez le configurer dans le panneau Paramétres situé sur le côte.
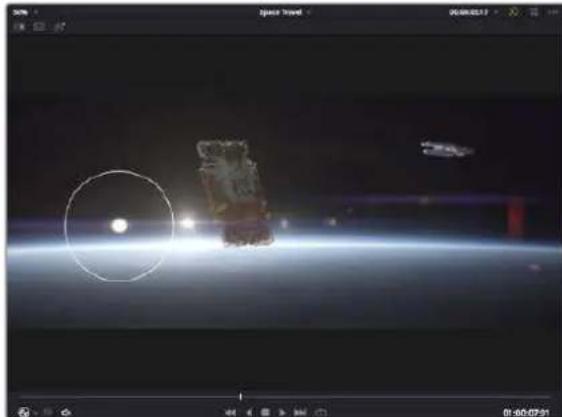
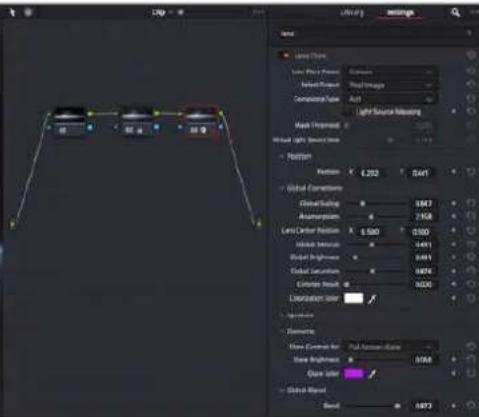
Les plug-ins OFX sont des solutions rapides et facies pour creer des rendus créatifs et innovants.
Dans la page Montage, vous pouvez ajouter des plug-ins filtres, générateurs et transitions aux clips en ouvrant le panneau Open FX dans Bibliothèque d'effets. Faites ensuite glisser le plug-in selectionné sur le clip ou sur la piste au-dessus du clip dans la timeline, selon les besoin du plug-in.
Mixer l'audio
Mixer l'audio dans la page Montage
Une fois le montage et l'étabonnage finalisés, vous pouvez commencer à mixer l'audio. DaVinci Resolve possède de nombreux outils pour le montage, le mixage et le mastering audio de vos projets, accessibles directement sur la page Montage. Si vous avez besoin de fonctionnalités audio plus avances, la page Fairlight vous offre un environnement de post-production audio complet. Si vous étés familier avec la page Montage et que vous souhaitez directement passer à la page Fairlight, consultez la section suivante.
Ajouter des pistes audio
Si vous travailliez sur la page Montage et que vous souhaitez ajouter des effets et de la musique à un montage son, vous pouvez facilement ajouter des pistes audio selon vos besoin. C'est très pratique lorsque vous VOULEZ SEPARER VOS EIÉMENTS AUDIO EN PLUSieurs pistes indépendantes, comme les dialogues, les effets sonores et la musique.
Pour ajouter des pistes audio dans la page Montage
Faibles un clic droit à cote du nom de n'importe qu'elle piste audio de votre timeline, selectionnez Ajouter une piste et choisissez entre les options Mono, Stereo et 5.1. Cette piste sera alors ajoutee en bas de la liste de pistes. Si vous voulezCHOISIR la position de la piste ou de plusieurs pistes dans la liste, selectionnee Ajouter une piste puis choisissez l'emplacement.
La nouvelle piste audio apparait sur la timeline.
CONSEIL Pour changer le type de piste après l'avoir créé, faites un clic droit sur le nom de la piste, Sélectionnéz Mettre la piste en, puis désissez le type de piste audio de votrechoix. Par exemple, Stereo, Mono ou 5.1.
Ajuster les niveaux audio dans la Timeline
Le niveau du volume de chaque clip audio est affiché. Vous pouvez l'ajuster en montant ou en descendant le pointeur. Cet affichage correspond aux paramètres de volume de l'inspecteur.

Ajuster le niveau du clip en faisant glisser le pointeur de volume
Si vous avez besoin de fonctionnalités audio plus avances, la page Fairlight vous offre un environnement de post-production audio complet.
La page Fairlight
La page Fairlight de DaVinci Resolve vous permit d'ajuster vos projets audio. Lorsque vous travailliez avec un seul viewer, la page Fairlight vous offre un affichage optimisé des pistes audio de votre projet. Vous disposez d'un mixeur complet et de commandes de monitoring personnalisées qui vous permettent d'évaluer et d'ajuster les niveaux audio pour creer un mix fluide et harmonieux. Ne vous laissez pas intimer par le nombre de fonctionnalités générées, tous ces outils ont été consçus pour vous aider à livrer un rendu audio de la(Meilleure qualite possible.
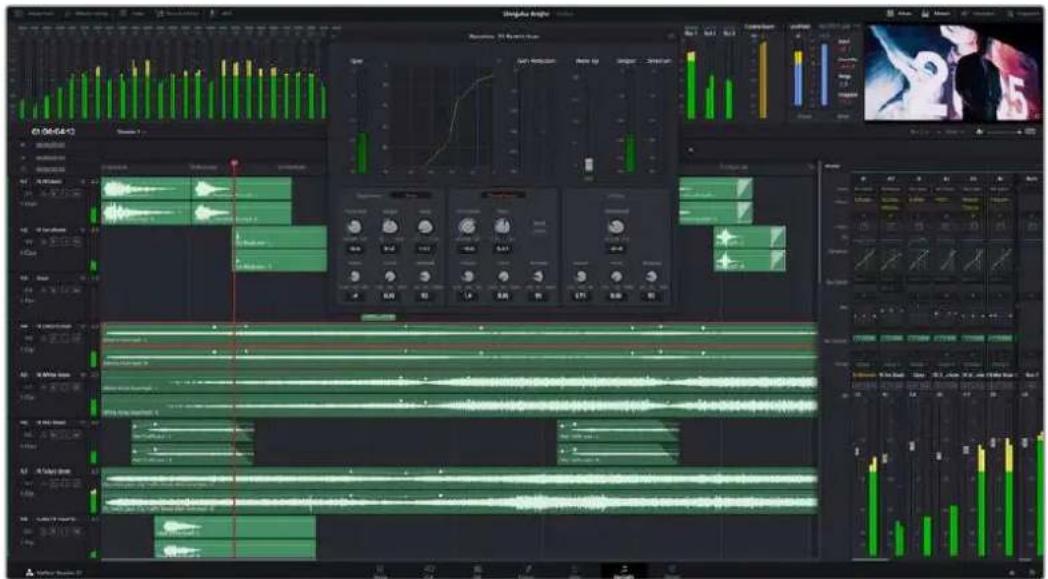
Ce guide offre un aperçu général des fonctionnalités de la page Fairlight. Pour plus d'informations, veuillez consulter le manuel d'utilisation DaVinci Resolve. Le manuel DaVinci Resolve apporte des informations détaillées sur la fonction de chaque outil et explique comment les utiliser, étape par étape.
La timeline audio
- En-tête de piste : À gauche de chaque piste, vous trouvezez un espace pour l'en-tête affichtant le nombre, le nom et la couleur de la piste, les canaux audio, la valeur du fader et les indicateurs audio. L'en-tête de piste offre également des commandes pour verrouiller et déverrouiller des pistes et pour selectionner les modes Solo et Mute. Ces commandes vous permettent de visualiser chaque piste séparément et de les organiser.
- Pistes : Chaque piste est divisée en voies, ce qui vous permet de visionner chaque canal du clip audio pour le montage et le mixage. Vous ne trouvrez pas ces canaux individuels sur la page Montage. En effet, cette dernière n'affiche qu'un seul clip sur la timeline afin de faciliter le montage de sources multicanaux sans avoir aGER un nombre de pistes trop important.

L'en-tete de piste de la piste A1 affiche une piste mono avec une seule voie pour l'audio mono. La piste A2 affiche quant à elle une piste stéreo complenant deux voies pour l'audio stéreo.
Qu'est-ce qu'un bus?
Un bus est un canal de destination complenant des sources audio regroupées en un seul canal, controllable via une seule bande de canal. Fairlight create automatiquement un bus pour vous, et toutes les pistes audio de votre timeline sont envoyées vers ce bus par défaut. Ainsi, vous pouvez ajuster le niveau global de votre mix audio une fois que vous avez ajusté le niveau de chaque piste individuellement.
Si vous montage est un peu plus complexe, vous pouvez creer davantage de bus et regrouper plusieurs pistes audio qui appartiennent à la même catégorie, comme les dialogues, la musique ou les effets. Ainsi, tous les éléments d'une même catégorie peuvent être mixés comme un signal audio unique. Par exemple, si vous avez cinq pistes de dialogue, vous pouvez acheminer le signal de ces cinq pistes vers un autre bus, et vous pourrez ainsi mixer le niveau des dialogues avec une commande unique.
La structure de Fairlight Flexbus vous offre une flexibilité complète sur les différents types de bus et les signaux de routage, dont les options de routage bus-to-bus, track-to-bus et bus-to-track. Pour plus d'informations sur les réglages des bus audio dans Fairlight, veuillez consulter le manuel DaVinci Resolve.
Le mixeur
Chaque piste audio de la timeline correspond à une bande de canal dans le mixeur. Par défaut, il y a une seule bande de canal sur le côte droit de l'interface pour le bus par défaut, appelé Bus 1. À chaque bus que vous creez, une bande de canal supplémentaire s'ajoute sur le côte droit, accompagnée de commandes de contrôle. Plusieurs commandes, sous forme de graphiques, vous permettent d'assigner et d'acheminer des canaux de piste, d'ajuster les égaliseurs et les effets dynamiques, de régler les niveaux et d'enregistrer l'automation, de modifier l'emplacement d'un son dans l'image stéreo ou surround, et de désirir le mode muet ou solo pour chaque piste.

Les bandes de canal du mixeur audio, correspondant aux pistes de la timeline
Utiliser l'égaliseur pour améliorer l'audio
Après avoir reglé les niveaux audio de vos clips, vous pourriez avoir envie d'apporter des ajustements supplémentaires. Par exemple, il arrive que les dialogues, la musique et les effets sonores se retrouvent sur la même fréquence dans le spectre audio, ce qui rend compte audio trop charge et confus. Dans ce cas-là, l'égaliser s'avéré très utile car il vous permet de désigner où doit se situer chaque piste dans le spectre audio. Vous pouvez aussi utiliser l'égaliser pour supprimer des éléments indésirés dans toute voircu en isolant et en attenuant le niveau sur des fréquences spécifiques qui contiennent de légers grondements, des bourdonnements, des bruits de vent, des sifflements, ou simplement pour améliorer la qualité du son.
DaVinci Resolve est doté de filtres que vous pouvez appliquer sur chaque clip individuellement, ou sur une piste entière. Chaque clip audio de la timeline possède un égaliseur à 4 bandes dans le panneau de l'inspecteur, et chaque piste possède un égaliseur paramétrique à 6 bandes dans le mixeur. Grace aux commandes graphiques et numériques qui permettent d'amplifier ou d'atténuer des plages de fréquences et grâce aux différents types de filtres, vous pouvez définir la forme de la courbe de l'égaliseur.
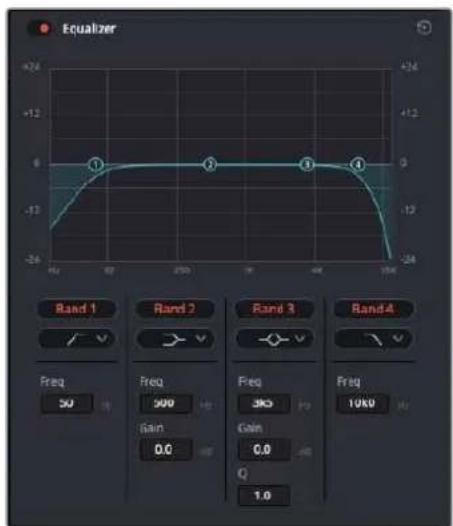
L'égaliser à quatre bandes peut être appliqué à tous les clips de la timeline
Les bandes situées aux extrémites vous permettent d'ajuster les filtres high-shelve, low-shelve, passée-haut et passé-bas. Les filtres de type « passage » suppliment du signal toutes les fréquences supérieures ou inférieures à une fréquence donnée. Par exemple, un filtre passée-haut laissera passer les haute fréquences mais isolera les basses fréquences. Toutes les fréquences au-delà de la fréquence de coupure sont progressivement attenuées en une courbe descendante.
Les filtres shelve sont moins agressifs et très utiles si vous souhaiteztraits les hautes ou les basses fréquences sansforcément toutes les supprimer du signal. Ilss amplifient ou attenuent uniformement la fréquence ciblée et toutes les fréquences définies en dessous ou en dessus de celui-ci, selon si vous choisissez un filtre high ou low shelve.
Les commandes de contrôle des bandes situées au milieu vous permettent d'appliquer les filtres low shelve, bell, notch et high shelve.
- Bell: Les filtres bell augmentent ou attenuent les fréquences qui se trouvent autour d'un certain point de la courbe en forme de cloche.
- Notch : Les filtres notch vous permettent de cibler une plage très réduite de fréquences. Vous pourrez par exemple supprimer un bourdonnement dans une fréquence de 50 ou de 60Hz.
- Low Shelve : Les filtres low shelve amplifient ou attenuent une fréquenceasse cible, et toutes les fréquences qui se situent en dessous.
- High Shelve: Les filtres high shelve amplifient ou attenuent une fréquence haute cible, et toutes les fréquences qui se situent en dessus.
Pour ajouter un égaliseur à un clip individuel :
1 Sélectionnez le clip dans la timeline auquel vous poulez appliquer un contrôle.
2 Cliquez sur l'inspecteur, puis sur le bouton d'activation de I'Eqallseur.
Pourajouterunégaliseuràune piste:
1 Au niveau de l'égaliser (EQ), double-cliquez sur la zone correspondante à la piste de votrechoix, afin d'ouvir l'égaliser pour cette piste.
2 Choisissez le type de filtré à partir du menu déroulant pour la bande que vous souhaitez ajuster.

La zone de l'égalisseur dans le mixeur indique qu'une courbe a été appliquée sur la piste numero une.
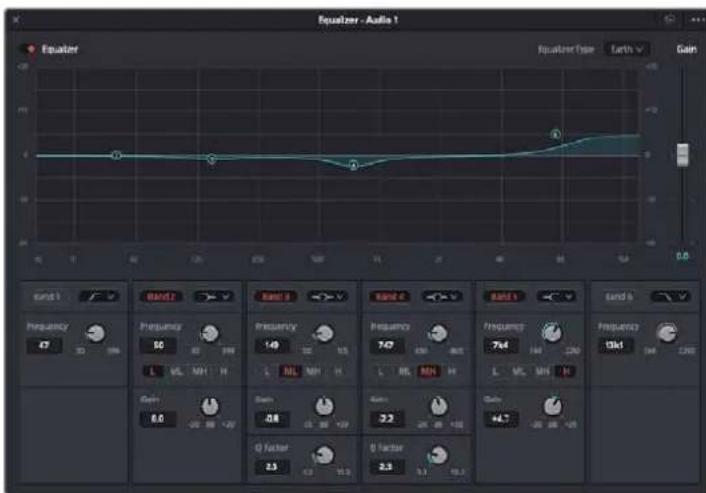
L'égaliseur paramétrique à 6 bandes peut être appliqué à toutes les pistes
Une fois que vous avez ajoute un égalisseur à votre clip ou à votre piste, vous pouvez égaliser chaque bande. Veuillez noter que les commandes peuvent varier selon le type de filtré sélectionné.
Pour régler l'égaliseur pour un filtré de bande :
1 Choisissez le type de filtre a partir du menu deroulant pour la bande que vous souhaitez ajuster.
2 Ajustez la valeur du paramètre Freq. pour selectionner la frquence centrale du réglage de l'égaliseur.
3 Ajustez la valeur du paramètre Gain pour amplifier ou attenuer les fréquences concernées par cette bande.
4 Utilisez la valeur du facteur pour ajuster la largeur de la plage des fréquences affectées.
Appuyez sur le bouton de réinitialisation pour rétablir toutes les commandes de l'égaliser par défaut.
Fairlight possede de nombreuses fonctionnalités pour améliorer la qualite de chaque piste audio.
Vou pouze ajouter des pistes supplémentaires et organiser les bus, ajouter des effets tels que la réverbération et le décai, et apporter une amélioration générale à votre mix audio.
Ajouter des VFX et des compositions sur la page Fusion
Une fois le montage finalisé, vous pouvez ouvrir la page Fusion de DaVinci Resolve pour ajouter des effets visuels 2D ou 3D ainsi que des animations. Contrailrement aux logiciels de compositing en couches, Fusion est doté d'une structure nodale qui vous offre la liberté de réaliser des effets complexes tout en acheminant les données d'image dans n'importe qu'elle direction. La fenêtre contenant les noeuds vous permet de voir tous les outils utilisés durant votre travail. Si vous avez utiliser la structure nodale sur la page Étalonnage, le workflow de Fusion vous sera familier.
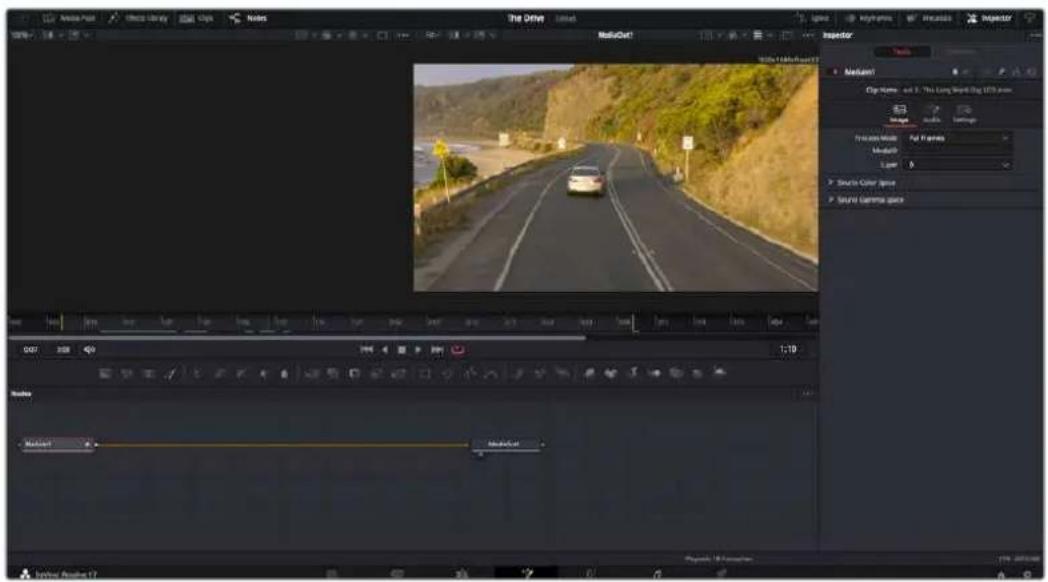
La page Fusion
La page Fusion se compose de deux viewers dans la partie haute de l'écran avec des commandes de transport pour visualiser vos medias, d'un inspecteur sur la droite pour acceder aux outils, et d'une fenêtre contenant les nœuds dans la partie BASSE pour creer vos compositions. Les viewers et les commandes de transport sont toujours apparents. Enclinuant sur les icones de la barre d'outils située tout en haut de l'écran, vous pouvez faire apparaitre ou masquer les nœuds et l'inspecteur, ou encore révélé ou cacher d'autres fenêtes, comme la bibliothèque d'effets ou leséditeurs Spline et Images clés.

Bibliothèque de medias : La bibliothèque de medias fonctionne de la même manière que celle de la page Étalonnage. Faites directement glisser les medias depuis les chutiers dans votre composition.
Bibliothèque d'effets : Dans la bibliothèque d'effets, vous trouvez les outils Fusion et les modèles ranges par catégories, dont les particules, les outils de tracking, les filtres et les générateurs. Vous pouze cliquer sur un outil ou le faire glisser dans la fenêtre des nœuds pour l'ajouter à votre composition. La bibliothèque de medias et la bibliothèque d'effets se partagent le même espace sur l'écran. Vous pouze les intervertir afin d'avoir plus de place pour les viewers.
Plans: En cliquant sur l'onglet Plans, vous pouvez afficher ou masquer les vignettes représentant les clips sur votre timeline. Les vignettes se trouvent sous l'éditeur de nœuds, ce qui vous permet d'aller d'un clip à un autre.

Vous pouvez creer une nouvelle version de votrecomposition en faisant un clic droit sur une vignette, puis en selectionnant Creer une nouvelle composition.
- Viewers : Les viewers sont toujours visibles et vous permettent d'acceder aux différentes vues de votre composition. Par exemple, une vue 3D globale via le noeud Merge 3D, une sortieamera ou le rendu final. Ces viewers vous permettent également de voir comment vos modifications affectent un élément en particulier.
Pour désir quels nœuds vous souhaitez visualiser, cliquez sur un nœud, puis tapez « 1 » pour l'envoyer sur le viewer de gauche, ou « 2 » pour le viewer de droite. Des boutons blancs s'affichent sous le nœud pour vous indiquer àquel viewer il est associé. Si vous utilisez un moniter externe, un troisième bouton s'affichera pour acheminer votre média vers ce moniteur.
CONSEIL You pouvez également associer un nœud à un viewer en le faisant glisser directement dans celui-ci.
Les commandes de transport situées sous les viewers vous permettent d'aller au début ou à la fin du clip, de le litre d'avant en arrière, ou d'arrêté la lecture. La règle temporelle affiche les informations temporelles de l'ensemble du clip. Les indicateurs jaunes représentent les points d'entrée et de sortie.
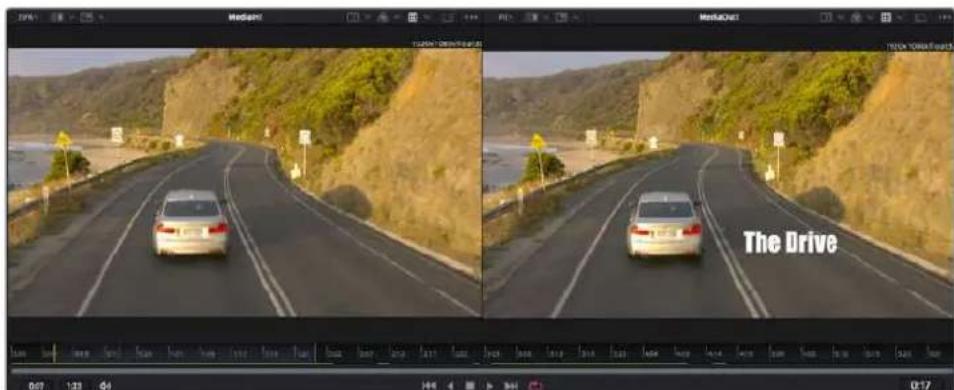
Les indicateurs jaunes représentent les points d'entrée et de sortie de votre clip sur la timeline. Si vous travailliez avec un clip Fusion ou avec un clip composé, la règle temporelle affichera seulement la durée du clip tel qu'il apparait sur la timeline, sans les poignées.
- Nœuds : La fenêtre compteant les noëuds est au cœur de la page Fusion. C'est ici que vous allez construire la structure nodale en connectant les outils d'un noëud à un autre. La taille de cette fenêtre est plus ou moins grande selon l'éditeur ouvert sur l'écran, comme Spline ou Images clés. Les outils les plus utilisés s'affichent en haut de la fenêtre des noëuds pour vous permettre d'y accederrapidement.
- Spline : Lorsque vous cliquez sur l'éditeur Spline, ce dernier s'affiche sur la droite de la fenetre de nœuds. Cetéditeur vous permet d'effectuer des ajustements précis pour chaque nœud. Vous pourrez par exemple adoucir une animation entre deux images clés à l'aide des courbes de Bézier.
- Images clés : À l'aide de l'éditeur Images clés, vous pouvez ajouter, supprimer ou modifier des images clés pour chaque outil. La fenêtre Images clés s'affiche également sur la droite de la fenêtre de noeuds.
- Métadonnées: La fenêtre Métadonnées affiche les métadonnées du clip actif, dont le codec, la fréquence d'images et le时间为 code.
- Inspector: L'inspecteur situé en haut à droite de l'écran, affiche tous les paramètres et modifieurs disponibles pour un ou plusieurs nœuds sélectionnés. Des ontlets supplémentaires, triés par catégorie, sont également affichés pour vous permettre d'accederrapidement àd'autres paramètres pour les nœuds.
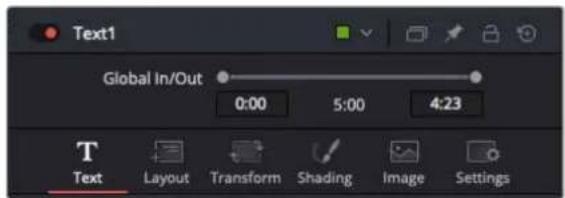
L'éditeur de texte de l'inspecteur offre des anglets supplémentaires pour le texte, la mise en forme, les ombres, les images et les paramêtres.
Demarrer avec Fusion
Pour ouvrir la page Fusion, positionnez la tete de lecture sur un clip dans la timeline, puis cliquez sur l'onglet Fusion.
Ce clip apparait immeditatement dans la fenetre des noeuds en tant que media d'entree, intitule Medialn. Chaque composition est constituee d'un noeud de media d'entree Medialn, et d'un noeud de media de sortie MediaOut. Le noeud Medialn representation le clip d'entree de voyage timeline a la tete de lecture, et ignore les autres clips. Tous les ajustements effectués sur la page Montage, tels que l'utilisation des outils de transformation ou de rognage, sont inclus.

Le nœud MediaOut représenté le nœud de sortie de votre timeline sur la page Montage.
CONSEIL Les plug-ins ResolveFX ou OFX appliqués aux clips dans la page Cut ou Montage ne sont pas répercutés sur la page Fusion. En effet, les effets de Fusion priment sur les traitements d'étalonnage et les plug-ins. Si vous souhaitez que les plug-ins OFX priment sur les effets Fusion, faites un clrc droit sur le clip dans la page Montage et seLECTIONnez Nouveau plan Fusion avant de cliquer sur la page Fusion.
Comprénde les nœuds
Pour mistrux comprendre la structure nodale, visuaisez chaque nœud comme une icone représentant un outil ou un effet. Les nœuds sont connectés entre eux pour former la composition globale, c'est comme les Ingredients d'un gâteau! Il est important de comprendre les entrées et les sorties de chaque nœud, car cela vous aidera à naviguer dans le flux de votre composition tout en créé des effets visuels précis.
Cerains outils possedent plusieurs entrées et sorties que vous pouze connecter à d'autres noeuds. Par exemple, le nœud Merge vous permet de joindre une entrée d'avant-plan, une sortie d'arriere-plan et une entrée de masque pour les caches ou les incrustations.
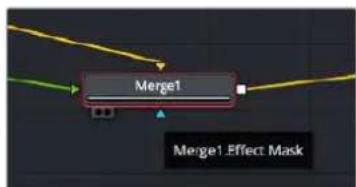
Entree premier plan
Entree arriere-plan
Entree Effet de masque
Sortie
Le fait qu'un nœud possède plusieurs sorties signifie que vous pouvez le connecter à d'autres nœuds. Ainsi, contrairement aux structures en couches, vous n'avez pas besoin de dupliquer les clips. Les flèches entre les nœuds vous permettent de connaître la direction du flux des données d'image.
Ajouter des nœuds à l'éditeur de nœuds
Pour ajouter des effets, il vous suffit de placer des noeuds sur la ligne entre le noeud d'entrée et le noeud de sortie.
Il existe plusieurs façon de procéder. Vous pouvez maintenir le bouton Shift enforcé et déposer un noèud entre deux autres noèuds. Vous pouvez également cliquer sur le noèud auquel vous souhaitez joindre un effet et Sélectionner l'outil à ajouter, le noèud va automatiquement se connecter avec l'outil sélectionné. Enfin, vous pouvez ajouter un noèud n'importe où dans la fenêtre de noèuds et connecter manuellement la sortie d'un noèud à l'entrée d'un autre, à l'aide de votre souris.
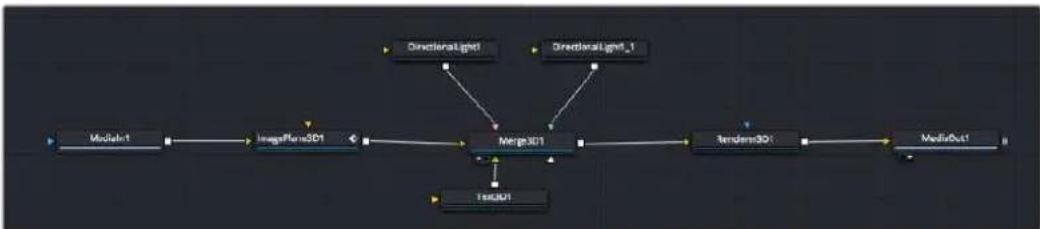
Les outils les plus utilisés sont les outils Merge 2D ou 3D. Ils permettent de fusionner des outils en ne créé qu'une seule sortie.
Les outils Merge controliant la maniere dont les entrees sont geredes,notamment la taille,la position et le fondu. Pour acceder a ces parametes, selectionnez un noeud Merge et ouvre l'inspecteur.
La barre d'outil située au-dessus de la fenêtre de noëuds affiche les icones des outils les plus utilisés. Pour ajouter un nœud, cliquez sur une icône ou glissez-la dans la fenêtre de noëuds. Pour afficher la liste de tous les outils disponibles, cliquez sur Bibliothèque d'effets en haut à gauche de l'écran, puis agrandissez l'options Tools. Vous trouvez tous les outils triés par catégorie, ainsi que des templates que vous pouvez utiliser, comme Lens flare, Shader et Background.
CONSEIL Une fois familiarisé avec le nom des outils, maintenez le bouton Shift enforcé et appuyez sur la barre d'espace de votre clavier pour faire apparaitre le menu Select Tool. Lorsque vous saissirez un nom d'outil, le menu vous sugérera automatiquement l'outil le plus pertinent. C'est un moyen très rapide de selectionner l'outil de votrechoix.
Ajuster les nœuds avec l'inspecteur
Voussouspuez parametrr les noeuds a laide de Iinspecteur.Cliquez sur le noeud que yous souhaitez modifier pour afficher ses parametes dans Iinspecteur.
Dans Fusion, vous n'avez pas besoin de visualiser le noeud que vous etes en train d'editor. Vous pouvez modifier un noeud alors que vous en visionnez un autre dans votre composition. Par exemple, vous pouvez modifier la taille et le centrage d'un noeud Text+ alors qu'un noeud Merge est dans le viewer. Cela vous permet de voir le texte sur un arriere-plan.
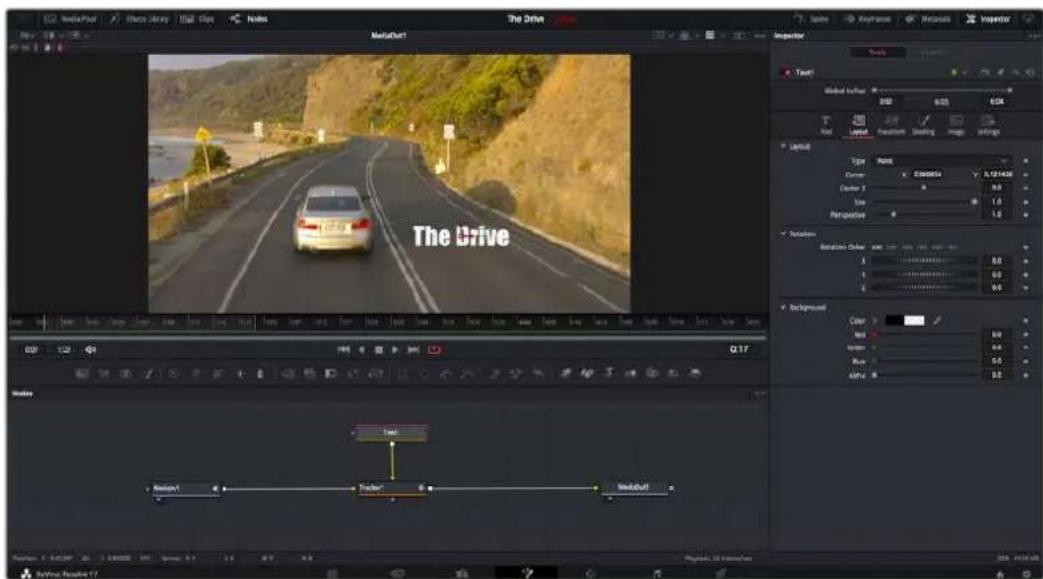
Lorsqu'un nœud est sélectionné, il est entouré d'une cordure rouge.
Ici, l'inspecteur affiche la fenêtre de mise en forme du nœud Text.
Selon la fonction du noeud selectionné, différents paramêtres s'afficheront. Par exemple, vous pourrez modifier la taille, le centrage ou encore le nombre de particules. Petit à petit, régler les images clés et les paramêtres animeront les effets.
Travailler avec des images clés
Dans la fenêtre de l'inspecteur, réglez une image clé en faisant un click droit sur un paramètre et en selectionnant Animer dans le menu contextuel. L'icone des images clés sur la droite s'affichera en rouge. La fonction Images clés est désormais active, et tous les changements que vous effectuerez ne seront appliqués qu'à l'image sélectionnée. Lorsque vous creez plusieurs images clés en changeant les paramétres d'une autre image, une transition est interpolée entre elles. Les flèches de chaque côté de l'icone de l'image clé vous permettent de déplacer la tête de lecture dans les mêmes positions que la timeline.

Ici, la talle de l'animation a ete adoucie avec une courbe de Bezier. Pour raccourir ou allonger la courbe, cliquez sur ses poignees. Pour deplacer I'animation, cliquez sur les icones carrees.
La fenêtre Spline vous offre des paramétres supplémentaires pour contrôler votre animation d'image clé. Vous pouvez selectionner des images clés, comme par exemple la première et la dernière, et adoucir l'animation entre elles avec une courbe de Bézier. Pour cela, saisissez les touches Shift + s, ou faites un cli croit sur une image clé et selectionnez Adoucir.
Tracker des éléments en mouvement et ajouter du texte
Afin de vous donner un meilleur aperçu de Fusion, nous allons vous montré comment tracker un élément dans un clip, ajouter du texte, puis l'intégrer à un élément à l'aide des données de tracking.
L'outil Tracker tracke les pixels sur un axe X et Y et génère des données que vous pouvez utiliser pour intégrer des éléments. C'est très utile pour faire correspondre la position d'un texte à un objet en mouvement, comme une voiture qui roule ou un oiseau qui vole sur plusieurs images.
1 Dans la page Bibliothèque d'effets, Sélectionnez l'outil Tracker et faites-le glisser sur la ligne entre les nœuds Medialn et MediaOut. Cliquez sur le nœud de tracking pour afficher ses propriétés dans l'inspecteur.
2 Saisissez « 1 » sur votre clavier pour afficher ce nœud dans le viewer de gauche. Le clip va s'afficher dans le viewer avec le tracker, positionné par défaut sur l'image. Passez vous souris sur le tracker pour afficher ses poignées. Cliquez en haut à gauche des poignées et déplacez le tracker dans la zone de l'image de votre choix. Le tracking est plus performant sur des zones contrastées, comme la marque d'une voiture sur sa carrosserie. Pour une précision optime, l'image est grossie au passage du tracker.
3 Dans la fenêtre de l'inspecteur, cliquez sur le bouton de tracking vers l'avant. Une notification apparaitra sur votre écran pour vous informer que le tracking est effectué. Cliquez sur OK.

Dans linspecteur, vous pouvez désir de tracker vers l'arrière depuis la dernière image, tracker vers l'arrière depuis l'image sélectionnée, arrêté le tracking, tracker vers l'avant depuis l'image sélectionnée ou tracker vers l'avant depuis la première image.
CONSEIL Utilisez les boutons de tracking avant et arrirée depuis une image sélectionnée lorsque la zone à suivre disparaît durant le segment sur lequel vous travailliez. Par exemple, lorsqu'une voiture ou un oiseau sort de l'image. Ainsi, vous trackerez seulement les plans pertinents.
Maintenant, vous pouvez utiliser les données de tracking et appliquer un chemin d'animation à du texte.
4 Cliquez sur l'icone du noeud Text+ depuis la barre d'outils et glissez-le pres du noeud Tracker dans la fenetre des noeuds. Connectez la sortie carrée du noeud Texte à l'entrée verte du noeud Tracker.

5 Cliquez sur le noeud Tracker et saisissez « 1 » sur votre clavier pour afficher la fusion des deux noeuds dans le viewer de gauche. Dans l'inspecteur de noeud Tracker, cliquez sur l'onglet Opération. Cliquez sur la flèche du menu Operation et Sélectionnéz Suivi du mouvement.
6 Cliquez sur le nœud de texte pour afficher ses propriétés dans l'inspecteur. Tapez votre texte dans le champ de saisie et modifier la police, la couleur et la taille des caractères, selon les besoin de votre composition.
Cela appliquera les données de position du tracker à votre texte. Si vous souhaitez décaler la position du texte, revenez sur la fenêtre du Tracker dans l'inspecteur, et utilisez les roues Y Offset et X Offset.

Tournier les roues Offset en bas de la fênetre de l'inspecteur permet d'ajuster la position du texte.
Vous pouvez désormais dire votre composition et voir le texte suivre l'objet que vous avez tracké!

Le carre vert representa la position actuelle du tracker sur son trace. La ligne en pointillé rouge representa la position de décalage pour animer le texte.
Pour certaines prises, vous pourriez pouvoir supprimer les points de tracking, par exemple, quand l'objet que vous trackez disparait de l'écran. Grace aux images clés, c'est très simple à réaliser.
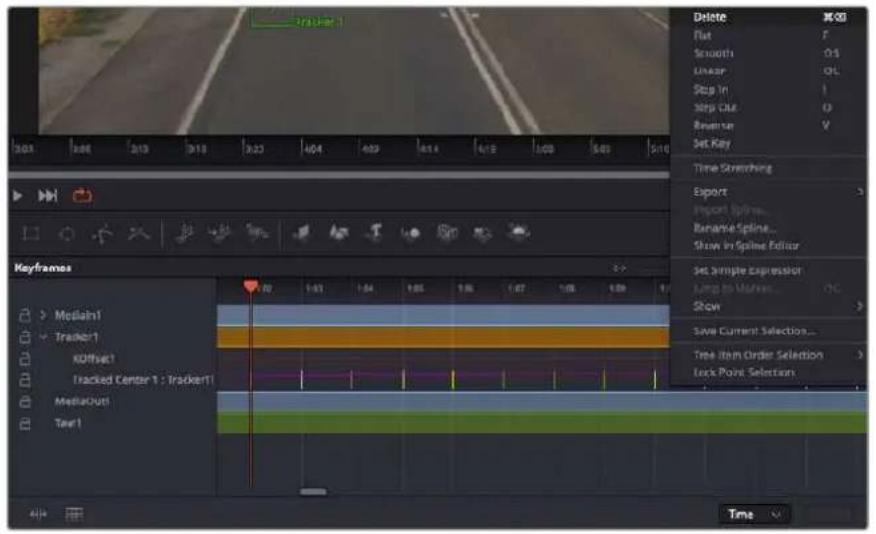
7 Cliquez sur la fenetre Images clés située au dessus de l'inspecteur. Chaque neud auquel vous appliquez des images clés comporter une petite flèche à côté de son nom. Seuls les paramétres avec des images clés s'afficheront dans la liste. Cliquez sur l'icone de grossissement et définissez la zone que vous souhaitez éditer. Cette zone sera grossie pour vous permettre de voir l'image clé plus facilement.
8 Déplacez la tete de lecture sur la dernière image clé de votrechoix. Maintenant, selectionnez les images clés que vous souhaitez supprimer en définissant une zone autour d'elles à l'aide de votre souris. Les images clés seront surlignées en jaune. Faites un click droit et selectionnez Supprimer pour les supprimer.
CONSEIL Si vos effets sont particulièrement lourds pour votre système, faites un click droit sur la zone des commandes de transport pour voir d'autres options de lecture, comme la lecture proxy qui vous permet d'optimiser le traitement de votre système lorsque vous creez vos compositions. Pour plus de détails sur les options de lecture, veuillez consulter le manuel DaVinci Resolve.
Bravo, vous avons finalisé votre première composition en animant du texte qui suit un élément de votre séquence!
Pour tracker une surface plate que vous souhaitez améliorer ou remplaçer, vous pouvez utiliser l'outil de tracking planaire. Tracker des surfaces planes en 2D peut être utile pour changer un nom ou une marque dans une image en mouvement, ou même pour ajouter une image à un écran TV.
Pour plus d'informations sur l'outil de tracking planaire et les puissants outils de la page Fusion, veuillez consulter le manuel DaVinci Resolve.
CONSEIL Lorsque vous creez des effets dans la page Fusion, il est important de savoir si ces effets sont en 2D ou en 3D. En effet, cela déterminera quel outil Merge sera utilisé. Il est possible que vous combiniez des effets 2D et 3D dans une seule composition. Dans ce cas, rappelez-vous que les effets visuels 3D doivent être rendus en tant qu'image 2D avant d'être intégrés dans une composition 2D.
Nous sommes persuadés que vous adorez creer de puissants effets visuels avec Fusion et explorer les fonctions de montage, d'étalonnage et de post audio de DaVinci Resolve. Avec tous ces outils à votre disposition, les possibités de création sont illimitées!
Mastériser votre montage
Une fois le montage, l'étalonnage, l'ajout de VFX et le mixage audio effectuels, il est temps de partager votre création. Vous pouvez utiliser la fonction Exportation rapide pour exporter les contenus de la timeline en tant que fichier autonome dans différents formats, ou utiliser les fonctionnalités additionnelles depuis la page Exportation.
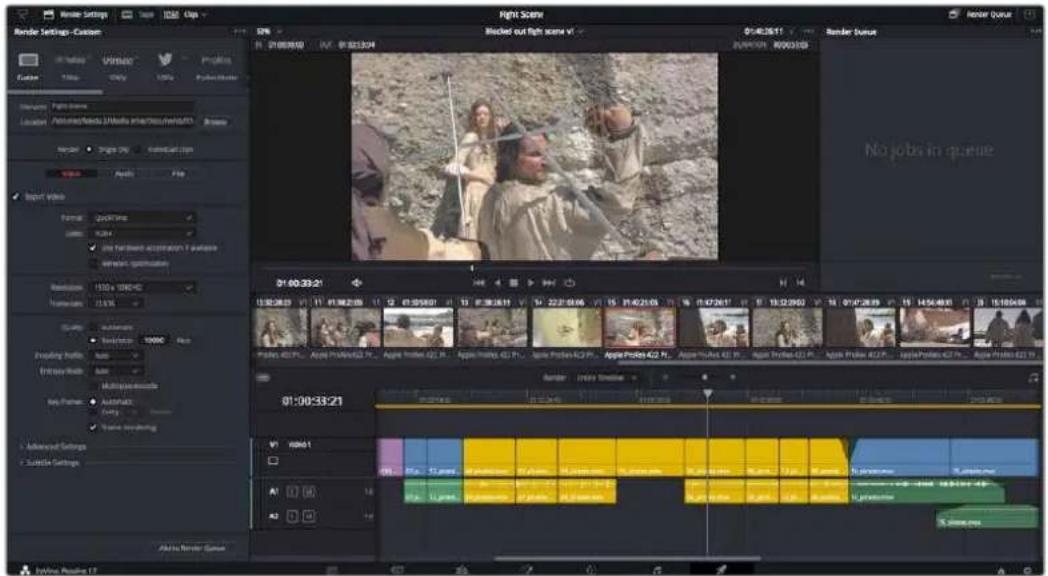
La sequence montée est exporte depuis la page Exportation.
Voussous pouezCHOISIR le format et les codecs devoitre video
Exportation rapide
Vou puez selectionner Fichier > Exportation rapide pour utiliser les differents preréglages d'exportation, afin d'exporter voite programme depuis n'importe quelle page de DaVinci Resolve. Vou pouze meme utiliser l'exportation rapide pour exporter et charger votre programme vers les plateformes de partage video prises en charge, dont YouTube,Vimeo,Twitter et Frame.io.
Pour utiliser l'Exportation rapide :
1 Depuis la page Cut, Montage, Fusion ou Etalonnage, reglez si besoin des points d'entree et de sortie dans la timeline pour selectionner la plaque du programme a exporter. Si aucune timeline ou aucun point d'entree ou de sortie n ont ete selectionnnes, la timeline toute entiere sera exportee.
Choisissez Fichier > Exportation rapide.
2 Sélectionnez un prééglage parmi les icones du bandeau supérieur de la boîte de dialogue, puis cliquez sur Exporter.
3 Choisissez un emplacement et nommez le fichier dans la boite de dialogue, puis cliquez sur Enregistrer. Une barre de progression apparaître pour vous indiquer combien de temps durera l'exportation.
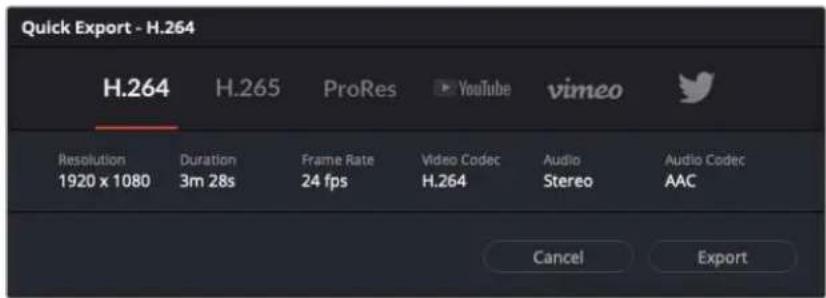
Boite de dialogue de l'Exportation rapide
Page Exportation
Cette page vous permet de selectionner les clips que vous souhaitez exporter et de désirer le format, le codec et la résolution souhaités. Vous pouvez exporter de nombreux formats, tels que QuickTime, AVI, MXF et DPX à l'aide de codecs non compressés RVB/YUV 8 bits ou 10 bits, ProRes, DNxHD, H.264 et autres.
Pour exporter la série montée en un seul clip :
1 Cliquez sur Ionglet Exportation pour ouvrir la page Exportation.
2 Dans la fenêtre Paramétres d'export en haut à gauche de la page, vous pouvez désirir les prêrglages d'exportation, par exemple YouTube, Vineo et des prêrglages audio. Vous pouvez également configurer les paramétres d'exportation manuellement en conservant le prêrglage par défaut Personneliser et en saississant vos propres réglages. Dans cet exemple, Sélectionnez YouTube puis cliquez sur la flèche située à côté du prêrglage et Sélectionnez le format video 1080p.
La fréquence d'images sera la même que la fréquence d'images de votre projet.
3 Sous les prépréglages apparaissent le nom de filchier de la timeline et l'emplacement vers lequel vos videos seront exportées. Cliquez sur Parcourir,CHOISSEZ l'emplacement ou vous souhaitez sauvegarder les fichiers exportés, puis selectionnez Plan unique parmi les options d'exportation.
Juste au-dessus de la timeline, vous verrez que la case Toute la timeline est selectionnée. Cela exportera l'intégrality de la timeline, cependant, vous pouvez selectionner une partie de la timeline si vous le souhaitez, Choisissez simplement Sélection Entrée/Sortie puis utilisez les raccourcis clavier i et o pour selectionner les points d'entrée et de sortie sur la timeline.
5 Allez au bas de la fenetre Paramétres de rendu et cliquez sur le bouton Ajouter à la liste de rendu.
Les paramétres de rendu sont ajoutés à la queue de rendus à droite de la page. Cliquez sur Rendre. Gracé à la queue de rendus, vous pouvez suivre la progression de votre rendu.
Lorsque le rendu est terminé, ouvre le dossier, faites un double-clic sur le clip rendu et regardez le résultat.
Maintenant que vous avez acquis les bases du montage, de l'étalonnage, du mix audio et des effets visuels, n'hésitez pas à vous lancer avec DaVinci Resolve! Veuillez consulter le manuel DaVinci Resolve pour plus de détails sur chaque fonctionnalité.
Contrôle des caméras avec l'ATEM Mini
L'ATEM Mini est un outil puissant pour les productions multicamères et le streaming en direct. La fonction Camera Control du logiciel ATEM Software Control vous permet de faire des commutations entre les camères et de contrôler jusqu'à quatre Blackmagic Pocket Cinema Camera à partir du mélangeur ATEM Mini. Pour ouvrir la fonction de contrôle des camères sur l'ATEM Mini, cliquez sur le bouton Caméra de l'ATEM Software Control.
Les paramétres de la Pocket Cinema Camera, tels que l'iris, le gain, la mise au point, le niveau de détaill et le contrôle du zoom, sont facilement ajustables avec des objectifs compatibles. Vous pouvez également harmoniser les couleurs des cameras et creer des rendus de qualité à l'aide du correcteur colorimétrique DaVinci Resolve Primary Color Corrector intégré à laamera.
VoussoupiezmeajouterunATEMCameraControlPanel pourcontrrolerrapidementet précisementjusqu'àquatrePocketCinemaCameraa la fois.Pourplusd'informations,consultezle manueldeI'ATEMMini.
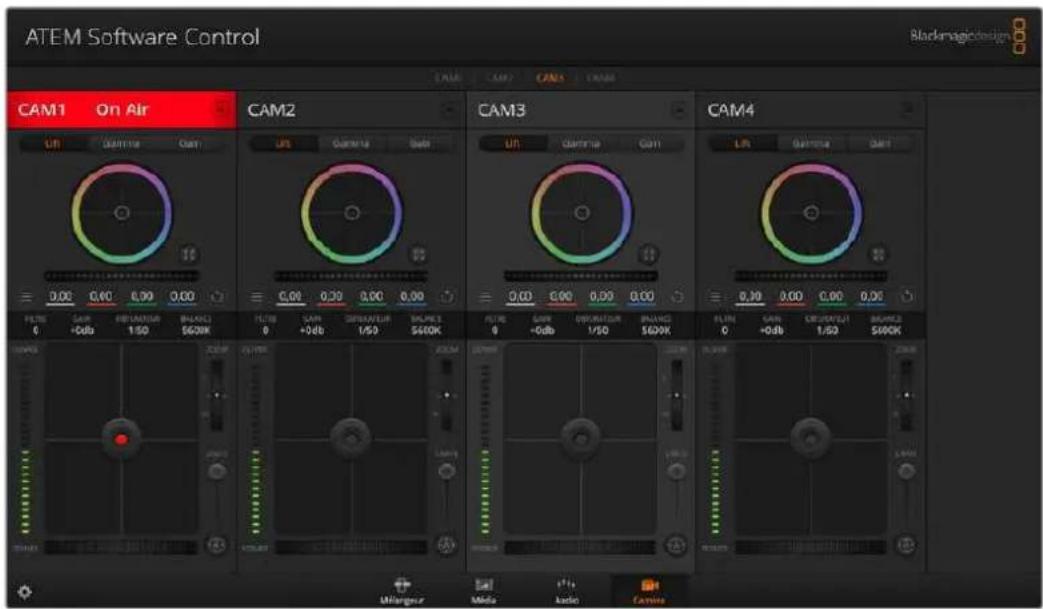
Fonction Camera Control de l'ATEM
Le mélangeur ATEM contrôle les caméras en diffusant des paquets de contrôle sur toutes les entrées HDMI de votre ATEM Mini. Cela signifie que vous pouvez connecter une entrée HDMI de votre ATEM Mini au connecteur HDMI de la camera et cette dernière détectera les paquets de contrôle dans le signal HDMI et vous permettra de contrôler les fonctionnalités de laamera.
Ouvrez les préférences de l'ATEM Software Control et configurez le mappage des boutons de votre mélangeur pour garantir une commutation de la bonne catégorie avec le tally approprié. Grace à la connexion video partant de votre mélangeur vers les Blackmagic Pocket Cinema Camera, vous pouvez également bénéficier des indicateurs tally en direct.
Panneau de contrôle pouramera
Lancez le logiciel ATEM Software Control et cliquez sur le bouton Camera situé au bas de la fenêtre du logiciel. Vous apercevrez une rangée de fenêtes qui contiennent des outils permettant d'ajuster et d'affiner l'image de chaqueamera Blackmagic. Les commandes sont très faciles à utiliser. Il vous suffit de cliquer sur les boutons à l'aide de votre souris, ou de cliquer et déplacer les curseurs pour effectuer des ajustements.
Selection de laamera à contrôler
La rangée de boutons située sur le haut de la fenetre de contrôle de laamera vous permet de selectionner le numero de laamera que vous souhaitez contrôle.
Etat du canal
La section État du canal est située dans la partie supérieure de chaque fenêtre de contrôle de camera et affiche le libellé de laamera, l'indicateur de passage à l'antenne et le bouton de verrouillage. Appuyez sur le bouton de verrouillage pour verrouiller toutes les commandes relatives à uneamera spécifique. Lorsque laamera est à l'antenne, la section État du canal s'allume en rouge et affiche l'alerte On Air.
Paramètres de laamera (Camera)
Le bouton de paramétrage de laamera situé en bas à gauche de la roue maitresse vous permet d'ajuster les détails du signal d'image de chaqueamera.
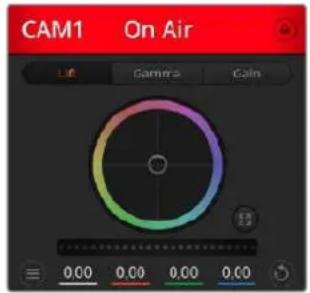
Chaque fenetre de contrôle de camera affiche I'etat du canal afin que vous sachiez qu'elleamera est a l'antenne. Utilisez les roues chromatiques pour ajuster les parametes Lift, Gamma et Gain de chaque canal YRGB.
Detalls
Ce paramètre permet de régler la nettedé de l'image en direct des caméras. Réduisez ou augmentez le niveau de nettedé en selectionnant : Désactiver les détails, Détails par défaut pour une nettedé faible, Détails moyens et Détails élevés.
Roues chromatiques
Le cercle chromatique est une fonctionnalité puissant du correcteur de couleurs DaVinci Resolve et permet d'effectuer des ajustements de couleur pour les paramétres lift, gamma et gain de chaque canal YRGB. Pour selectionner le paramètre à ajuster, il vous suffit de cliquer sur un des trois boutons de selection situés au-dessus de la roue chromatique.
Roue maitresse
Utilisez la roue maitresse située sous la roue chromatique pour effectuer des ajustements de contraste sur tous les canaux YRGB en même temps, ou uniquement de luminance pour les paramétres lift, gamma ou gain.
Boutons de réinitialisation
Le bouton de réinitialisation Situé en bas à droite de la fenêtre de contrôle de laamera vous permet de désirier aisément les paramètres de correction colorimétrique que vous souhaïez réinitialiser, copier ou coller. Chaque roue chromatique possée également son propre bouton de réinitialisation. Appuyez sur ce bouton pour restaurer le paramètre par défaut, ou pour copier/coller un paramètre. Les fenêtes de contrôle deamera verrouillées ne sont pas affectées par la fonction Coller.
Le bouton de réinitialisation principal est situé en bas à droite de la fenêtre de correction colorimétrique. Il vous permet de réinitialiser les roues chromatiques Lift, Gamma et Gain ainsi que les paramètres Contraste, Teinte, Saturation et Lum Mix. Vous pouvez coller les paramètres de correction colorimétrique à des fenêtes de contrôle deamera individuelles ou à toutes les fenêtes en même temps pour creer un rendu uniforme. Les paramètres relatifs à l'iris, à la mise au point et au niveau de noir ainsi que le paramètre Limite ne sont pas affectés par la fonction Coller. Lorsque vous appliquez la fonction Paste to all (Coller à toutes les fenêtes), un message apparait pour confirmier cette action. De cette façon, vous ne collez pas de nouveaux paramètres accidentellement aux caméras non verrouillées en cours de diffusion.
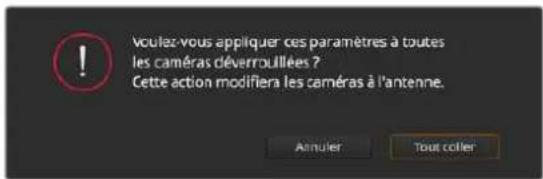
Lorsque vous souhaitez appliquer la fonction Coller tout, un message apparait pour vous demander de confirmer VOIRE action. De cette façon, vous ne collez pas de nouveaux parametres accidentellement aux cameras non verrouillées en cours de diffusion.
Contrôle de l'iris et du niveau de noir
Le contrôle de l'iris et du niveau de noir est situé au sein de la croix de centrage de chaque fenêtre de contrôle deamera. Le contrôle s'allume en rouge lorsque laamera est à l'antenne.
Pour ouvrir ou fermer l'iris, déplacez le contrôle vers le haut ou vers le bas. En maintainant la touche MAJ enforcée, vous pourrez ajuster uniquement l'iris.
Pour assombrir ou éclairir le niveau de noir, déplacez le bouton vers la gauche ou vers la droite. En maintainant la touche Command (Mac) ou Control (Windows) enforcée, vous pourrez ajuster uniquement le niveau de noir.

Le contrôle de l'iris/niveau de noir s'illumine en rouge lorsque laamera est à l'antenne.
Contrôle du Zoom
Lorsque vous utilisez des objectifs compatibles dotés d'un zoom électronique, vous pouvez effectuer des zooms avant et arriré à l'aide de la fonction de contrôle du zoom. Cette commande fonctionne de la même manière que la bague de zoom sur un objectif, avec le téléobjectif d'un côté et le grand-angle de l'autre. Cliquez sur le contrôle du zoom situé au-dessus du curseur Limité, et déplacez-le vers le haut pour faire un zoom avant ou vers le bas pour faire un zoom arrière.
Parametre Limite
Le paramètre Limité est situé à droite du contrôle de l'iris/niveau de noir et permet de limiter l'ouverture de l'iris. Cette fonctionnalité vous aide à ne pas faire passer des images surexposées à l'antenne. Pour configurer cette limite, ouvre complètement l'iris à l'aide de la fonction de contrôle de l'iris, puis déplacez le curseur vers le haut ou vers le bas pour configurer l'exposition optimale. À présent, lorsque vous ajustez l'iris, la limite que vous avez configurée à l'aide du paramètre Limité l'empechera de dépasser l'exposition optimale.
Indicateur de l'iris
L'indicateur de l'iris est situé à gauche du contrôle de l'iris/niveau de noir et fait office de réference visuelle vous permettant de visualiser l'ouverture de lentille. L'indicateur de l'iris est affecté par le paramètre Limité.
Bouton de mise au point automatique
Le bouton de mise au point automatique est situé en bas à droite de chaque fenêtre de contrôle deamera. Appuyez sur ce bouton pour un réglage automatique de la mise au point lorsque vous utilisez un objectif actif qui prend en charge les ajustements de mise au point électronique. La plupart des objectifs prennet en charge la mise au point automatique, cependant, certains d'entre eux peuvent être régles en mode manuel ou automatique. Il vous faudra donc vérifier que votre objectif est régileo en mode automatique. Pour ce faire, il suffit parfois de faire glisser la bague de mise au point vers l'avant ou vers l'arrière.

Cliquez sur le bouton de mise au point automatique ou deplacez le curseur de mise au point manuelle vers la gauche ou vers la droite pour effectuer la mise au point d'un objectif compatible.
Ajustement manuel de la mise au point
Lorsque vous souhaitez ajuster manuellement la mise au point sur votreamera, vous pouvez utiliser l'ajustement de mise au point situé au bas de chaque fenêtre de contrôle deamera. Déplacez la roue vers la gauche ou vers la droite pour ajuster manuellement la mise au point tout en visuaisant l'image pour vous assurer qu'elle est nette.
Gain de laamera
Le paramètre relatif au gain de laamera vous permet d'ajouter du gain supplémentaire à laamera. Sur les Blackmagic Pocket Cinema Camera, ce paramètre fait reference à l'ISO. C'est très important lorsque vous travailliez dans des conditions où la lumière est minime et que vous avez besoin de gain, ou ISO, supplémentaire au niveau du capteur pour éviter que vos images ne soient sous-exposées. Vous pouvez réduire ou augmenter le gain en cliquant sur les flèches gauche ou droite situées à côté du paramètre gain (dB).
Il est possible d'ajouter du gain à tout moment, par exemple lorsque la lumière baisse au coucher du soleil lors d'un tournage en extérieur et qu'il vous faut augmenter la luminosité de votre image. Il faut bien garder à l'esprit que le fait d'ajouter du gain augmentera le bruit dans vos images.
Contrôle de la vitesse d'obturation
Le contrôle de la vitesse d'obturation est situé dans la section entre la roue chromatique et le contrôle de l'iris/niveau de noir. Réduisez ou augmentez la vitesse d'obturation en faisant passer le pointeur de votre souris sur l'indicateur de la vitesse d'obturation, puis cliquez sur les flèches gauche ou droite. Sur les Blackmagic Pocket Cinema Camera, ce paramètre fait reférence à l'angle d'obturation.
Si vous observez des scintillements, vous pouvez diminuer votre vitesse d'obturation pour les éliminer. Diminuer la vitesse d'obturation est un bon moyen d'éclaircir vos images sans utiliser le gain de laamera, car vous augmentez ainsi le temps de pose du capteur d'image. Le fait d'augmenter la vitesse d'obturation réduira le flou de bouge, ce qui est idéal lorsque vous souhaitez obtenir des scènes d'action nettes avec un flou de bouge minimal.
Balance des blancs
Le paramètre de balance des blancs est situé à côté du contrôle de la vitesse d'obturation. Il peut être réglé en utilisant les flèches gauche et croîte situées de chaque côté de l'indicateur de température de couleur. Les sources lumineuses émettent des couleurs plus ou moins chaudes ou froides, vous pouvez compenser cela en ajustant la balance des blancs. Les blancs de votre image resteront ainsi réellement blancs.
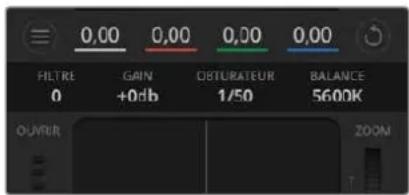
Faibles passer le pointeur de votre souris sur les indicateurs de gain, de vitesse d'obturation et de balance des blancs pour faire apparafirre les flèches qui vous permetront d'ajuster leurs paramétres respectifs.
Correcteur colorimétrique primaire DaVinci Resolve
Si vous avez de I'experience dans le domaine de la correction colorimétrique, il est possible de changer l'interface de commande des caméras pour obtenir un style d'interface qui ressemble à celle d'un correcteur colorimétrique primaire que l'on trouve communément sur les systèmes d'étalonnage.
Les caméras Blackmagic intégrant le correcteur colorimétrique primaire DaVinci Resolve. Si vous avrez utilisé DaVinci Resolve auprèsant, créativement parlant, l'étalonnage sur laamera Blackmagic sera identique à celui de DaVinci, vous aurez donc l'opportunité de partager cette expérience d'étalonnage à profit pour la production en direct. La fenêtre de correction colorimétrique peut être agrandie et fournir un contrôle de correction colorimétrique plus étendu compensant des paramétres supplémentaires ainsi qu'une interface de correction colorimétrique primaire compte.
Vous disposez à partir de roues chromatiques et de paramétres, tels que la saturation. Vous pouvez également visualiser tous les paramétres relatifs aux basses lumières, aux tons moyens et aux hauteurs lumières en même temps. Il vous suffit de commuter entre les caméras à l'aide des commandes de seLECTION situées sur le haut de la fenêtre lorsqu'il est nécessaire.
Cliquez sur le bouton DaVinci Resolve pour agrandir la fenêtre de correction colorimétrique et ajuster les paramètres.
Roues chromatiques Lift, Gamma et Gain dans la fenetre de correction colorimétrique.
Roues colorimétriques
Cliquez et deplacez voire pointeur n'importe ou dans le cercle de couleur
Notez qu'il n'est pas nécessaire de positionner votre pointeur sur l'indicateur de la balance des couleurs. Lorsque l'indicateur de la balance des couleurs se déplace, les paramètres RGB situés sous la roue chromatique se modifiient pour reflérer les ajustements apportés à chaque canal.
Cliquez en maintainant le bouton Majuscule enforcé et déplacez votre pointeur n'importe où dans le cercle de couleur
L'indicateur de la balance des couleurs se positionnera à l'endetroit même où se trouve le pointeur, ce qui vous permet de faire des ajustements plus rapides et extrêmes.
Double-cliquez n'importe ou dans le cercle de couleur
Réinitialise l'ajustement apporté à la couleur sans réinitialiser l'ajustement apporté à la roue maitresse pour la commande en question.
Cliquez sur la commande de réinitialisation située en haut à droite du cercle de couleur
Réinitialise le contrôle de la balance des couleurs ainsi que la roue maitresse correspondante.
Roues Master
Utilisez les roues maitresses situées sous les roues chromatiques pour ajuster les commandes Lift, Gamma et Gain de chaque canal YRGB.
Ajustez les roues maitresses en déplacant la commande vers la gauche ou vers la droite.
Pour effectuer des ajustements à l'aide de la roue maitresse :
Déplacez la roue maitresse vers la gauche ou vers la drolte
Un déplacement vers la gauche assombrit le paramètre sélection de l'image alors qu'un déplacement vers la droite éclaircit ce même paramètre. Lors de l'ajustement, les paramètres YRGB situés au-dessous de la roue maitresse se modifiient pour reflérer l'ajustement en cours.
Pour effectuer un ajustement n' affectant que la luminance, maintainez la touche ALT ou Command enforcée et déplacez la roue vers la gauche ou vers la droite. comme le correcteur colorimétrique prend en charge un traitement YRGB, il vous permit de faire preuve de créativité et de créé des effets-Uniques en ajustant uniquement le canal Y. Les ajustements du canal Y fonctionnent moins lorsque le paramètre Lum Mix est réglé sur le côte droit pour un traitement YRGB et sur le côte gauche pour un traitement RGB standard. En général, la plupart des coloristes DaVinci Resolve utiliser le correcteur colorimétrique YRGB, car on obtient une meilleure maitrise de la balance des couleurs sans afferter le gain général. Il vous faudra ainsi moins de temps pour obtenir le rendu désiré.
Paramètre Contraste
Le paramètre Contraste vous permet de contrôler la distance entre les valeurs les plussons et les plus claires d'une image. L'effectif ressemble à celui effectué lorsque vous utilisez les roues maitresses Lift et Gain. Par défaut, ce paramètre est regle sur 50% .
Parametre Saturation
Le paramètre Saturation augmente ou réduit la quantité de couleur de l'image. Par défaut, ce paramètre est réglé sur 50% .
Parametre Teinte
Le paramètre Teinte fait tourner toutes les teintes de l'image sur le périmètre complet de la roue chromatique. Le paramètre par défaut de 180 degrés affiche la distribution originale des teintes. L'augmentation ou la diminution de cette valeur fait tourner toutes les teintes vers l'avant ou vers l'arrière selon la distribution des teintes d'une roue chromatique.
Parametre Lum Mix
Le correcteur colorimétrique intégré aux caméras Blackmagic a été créé à partir du logiciel d'étalonnage primaire DaVinci Resolve. DaVinci create des logiciels de correction colorimétrique depuis le début des années 80 et la plupart des films hol woodiens sont étalonnés sur DaVinci Resolve.
Cela signifie que le correcteur colorimétrique intégre à laamera possède des fonctionnalités uniques et puissant sur le plan créé. Le traitement YRGB est l'une de ces fonctionnalités.
Lorsque vous étalonnnez, vous pouvez désir entre un traitement RGB ou un traitement YRGB. Les étalonneurs professionnelles utilisent le traitement YRGB, car ils obtiennent ainsi un contrôle plus précis de la couleur et peuvent ajuster les canaux de façon independante avec une meilleure séparation et davantage d'options créatives.
Lorsque le paramètre Lum Mix est reglé sur le côte droit, vous avez une sortie provenant à 100% du correcteur colorimétrique YRGB. Lorsque le paramètre Lum Mix est reglé sur le côte gauche, vous obtenez une sortie provenant à 100% du correcteur RGB. Vous pouvez régler le paramètre Lum Mix sur n'importe qu'elle position entre la gauche et la droite pour obtenir un mélange de sorties provenant des deux correcteurs RGB et YRGB.

Déplacez les curseurs vers la gauche ou vers la droite pour ajuster les paramètres Contraste, Saturation, Teinte et Lum Mix.
Quelle est la configuration ideale? Cela n'en tient qu'a vous, car la correction colorimétrique est un procédé purement créé où il n'y a pas de juste ou de faux. Le meilleur paramétrage est donc celui qui vous plaît le plus!
Synchronisation des paramètres
Lorsque les deux apparèils sont connectés, les signaux du contrôle des caméras sont envoyés du mélangeur ATEM à votreamera Blackmagic. Si un paramètre est accidentellement ajusté à partir de votreamera, la fonction de contrôle des caméras réinitialisera automatiquement le paramètre en question pour maintainir la synchronisation.
Le correcteur colorimétrique primaire DaVinci Resolve de chaqueamera peut être contrôle à l'aide d'un DaVinci Resolve Micro Panel. Ce panneau de contrôle matériel vous permet d'effectuer rapidement des ajustements de couleurs précis. Pour plus d'informations, consultez le manuel de l'ATEM Mini.
REMARQUE Si laamera est eteinte alors qu'elle est encore connectee a l'ATEM Mini par HDMI, des problemes relatifs au contrôle de la camera peuvent apparaitre. Nous vous recommendons de brancher les cameras sur secteur et de débrancher le cable HDMI avant de les eteindre.
Travailler avec un logiciel tiers
Pour monter vos clips à l'aide de votre logiciel de montage favori, tel que DaVinci Resolve, vous pouvez copier vos clips depuis laamera vers un lecteur externe ou RAID, puis les importer dans le logiciel. Vous pouvez également importer vos enregistements à partir de votre support de stockage au moyen d'une station d'accueil ou d'un adaptateur pour votre carte CFast, SD ou votre disque flash USB-C.
Travailler avec des fichiers provenant de cartes CFast 2.0 et de cartes SD
Procedez au montage directement a partir de voire carte CFast ou SD en la retirant de votreamera et en I'installant sur toute ordinateur à l'alde d'un lecteur/ graveur de carte CFast 2.0 ou d'un lecteur de carte CFast.
Pour importer vos clips à partir d'une carte CFast 2.0 ou d'une carte SD :
Retrez la carte CFast ou SD de votre Blackmagic Pocket Cinema Camera.
Installez la carte CFast ou SD sur toute ordinateur Mac ou Windows à l'aide d'un lecteur/graveur de carte CFast 2.0 ou SD, ou d'un lecteur de carte CFast.
2 Double-cliquez sur la carte CFast ou SD pour l'ouvrir. Vous devriez voir des dossiers qui contiennent vos fichiers Blackmagic RAW ou une liste de fichiers MOV QuickTime. Selon le format d'enregistrement choisi, vous aurez peut-etre unmelonde fichiers, mais leur convention de dénomination sera la même.
3 À present, déplacez les fichiers scélectionnés de la carte CFast ou SD vers votre bureau ou vers un autre disque dur. Vous pouvez également acceder aux fichiers directement à partir de la carte CFast ou SD à l'aide d'un logiciel de montage.
4 Il est important de tous jours éjecter votre carte CFast ou SD de Mac ou de Windows avant des débrancher de votre ordinateur. Sinon, il y a un risque que vos fichiers soient corrompus.
Travailler avec des fichiers provenant de disques flash USB-C
Pour importer des clips depuis un disque flash USB-C :
1 Debranche le disque flash USB-C de votreamera.
2 Connectez le disque flash USB-C à votre ordinateur Mac ou Windows via un port USB-C. Il est préféritable d'utiliser un port USB 3.0, car l'USB 2.0 n'est pas assez rapide pour monter de la réserve en temps réel.
3 Double-cliquez sur le disque flash USB-C pour l'ouvrir. Vous devriez voir une liste de fichiers MOV QuickTime ou des fichiers Blackmagic RAW. Selon le format d'enregistrementCHOsi, vous aurez peut-etre un meliange de fichiers, mais leur convention de dénomination sera la même.
4 Faites glisser les fichiers que vous souhaitez utiliser du disque flash USB-C vers le bureau ou vers un autre disque dur. Il est également possible d'acceder aux fichiers directement depuis le disque flash USB-C à l'aide d'un logiciel de montage non-lineaire.
5 Il est important de tous jours éjecter votre disque flash USB-C avant de le débrancher de votre ordinateur.
Utiliser Final Cut Pro X
Pour monter des clips avec Final Cut Pro X, créez un nouveau projet et réglez le format video et la fréquence d'images appropriés. Pour cet exemple, nous utilisiers le format ProRes 422 HQ 1080p24.

Parametre du projet dans Final Cut Pro X
1 Lancez Final Cut Pro X, allez sur la barre de menu et selectionnez File/New Project. Une fenêtre contenant les paramétres du projet apparaît.
2 Nommez votre projet et selectionnez la case Custom.
3 Reglez les parametes Video Properties sur 1080p HD, 1920x1080 et 24p.
4 Reglez les parametes Audio and Render Properties sur Stereo, 48kHz, et Apple ProRes 422.
5 Cliquez sur OK.
Pour importer vos clips dans le projet, allez sur la barre de menu et selectionnez File/Import/Media. Choisissez vos clips à partir de la carte CFast.
Vousspuvez a present faire glisser vos clips dans la timeline pour le montage.
Utiliser Avid MediaComposer 2018
Pour monter des clips avec Avid Media Composer 2018, créez un nouveau projet et reglez le format video et la fréquence d'images appropriés. Dans cet exemple, les clips sont régles sur 1080p24.
Régier le nom et les options de votre projet dans Avid MediaComposer 2018
1 Lancez le logiciel Avid MediaComposer 2018, la fenetre de selection du projet apparait.
2 Cliquez sur le bouton New Project et nommez votre projet dans la fenetre du nouveau projet.
3 Dans le menu Format, Sélectionnez HD 1080 > 1080p/24 et cliquez sur OK pour creer le projet.
Double-cliquez sur le projet dans la fenetre Select Project pour l'ouvrir.
5 Sélectionnez File > Input > Source browser et naviguez jusqu'àux fichiers à importer.
6 Sélectionnez votre chutier cible depuis le menu Target bin, puis cliquez sur Import pour importer les fichiers.
Lorsque les clips apparaissent dans le chutier, vous pouvez faire glisser vos clips dans la timeline et commencer le montage.
Utiliser Adobe Premiere Pro CC
Pour monter des clips Apple ProRes 422 HQ avec le logiciel Adobe Premiere Pro CC, créez un nouveau projet et réglez le format video et la fréquence d'images appropriés. Dans cet exemple, les clips sont régliés sur ProRes 422 HQ 1080p25.
Choisisse le nom et reglez les options de votre projet dans Adobe Premiere Pro CC
1 Lancez Adobe Premiere Pro CC. Sur I'écran de bienvenue, Sélectionnez New Project. Une fenêtre contenant les paramètres du projet apparait.
2 Nommez votre projet. Choisissez un emplacement pour votre projet en cliquant sur Parcourir et en selectionnant le dossier désire. Une fois le dossier selectionné, cliquez sur OK dans la fenêtre New Project.
3 Allez sur la barre de menu d'Adobe Premiere Pro CC et selectionnez File/Import. Choisissez ensuite les clips que vous souhaitez monter. Les clips apparaissent dans la fenetre Projet.
4 Faites glisser le premier clip que vous souhaitez monter sur l'icone New Item située en bas à droite de la fenêtre du projet. Une nouvelle série possédant les mêmes paramétres que votre clip est créé.
Yououpouzea present les faire glisser sur la timeline pour commencer le montage.
Blackmagic Camera Setup Utility
Mise à jour du logiciel de laamera sous Mac
Après avoir telécharge le logiciel Blackmagic Camera Setup Utility et dézippé le fischier telécharge, ouvrez l'image disque pour faire apparaître le Blackmagic Camera Setup Installer.
Lancez le programme d'installation et suivez les instructions figurant à l'écran. Une fois l'installation terminée, allez sur le dossier Applications et ouvre le dossier Blackmagic Cameras. Vous y trouvrez ce manuel, l'utilitaire Blackmagic Camera Setup et un dossier contenant des fichiers readme ainsi que des informations. Vous y trouvrez également un désinstalleur que vous utiliserez pour les mises à jour du Blackmagic Camera Setup.
Mise à jour du logiciel de laamera sous Windows
Après avoir telécharge le logiciel Blackmagic Camera Setup Utility et dézippé le fjichier telécharge, un dossier Blackmagic Camera Setup s'affiche, contenant le PDF de ce manuel ainsi que le programme d'installation Blackmagic Camera Setup. Double-cliquez sur le programme d'installation et suivez les instructions figurant à l'écran pour terminer l'installation.
Sous Windows 10, appuyez sur le bouton de démarriage et Sélectionnéz All apps. Faites défiler vers le bas jusqu'au dossier Blackmagic Design, puis lancez le Blackmagic Camera Setup. Sous Windows 8.1, Sélectionnéz la flèche de l'écran de démarriage et faites défiler le menu vers le bas jusqu'au dossier Blackmagic Design, puis lancez le Blackmagic Camera Setup.
Mise à jour du logiciel interne de laamera
Après avoir installé la的最后一 version du logiciel Blackmagic Camera Utility sur votre ordinateur, connectez un cable USB-C entre l'ordinateur et laamera. Le port USB-C est situé sur la partie gauche du panneau. Il suffit deSoulever le capuchon en caoutchouc pour acceder au port.
Lancez le logiciel Blackmagic Camera Setup et suivez les instructions figurant sur l'écran pourmettre à jour le logiciel de laamera. Laamera redemarrera sur l'écran de selection des langues. Ilest important de noter que mettre à jour le logiciel de votreamera supprimera tous les préreglageset toutes les LUTs personnalises, puis restaurera tous les réglages. Avant d'effectuer une mise àjour logicielle, il est conseilé de les exporter sur une carte mémoire, comme stockage de secours.Àpres la mise à jour, vous pourrez restaurer rapidement vos préreglages et vos LUTs en lesimportant depuis la carte mémoire.
Utiliser une poignée d'alimentation
La poignée d'alimentation permet de tener vos Pocket Cinema Camera de manière verticale et d'augmenter la durée de vos séances d'enregistrement sans vous encombrer. Si vous possédez une poignée d'alimentation, nous vous conseillons de l'insteller maintainant.
La Blackmagic Pocket Camera Battery Pro Grip a ete conque pour les Pocket Cinema Camera 6K Pro et 6K G2, et peut contir deux batteries NP-F570. Vou puez alimenter les Pocket Cinema Camera 6K Pro et 6K G2 avec sa batterie interne tout en utilisant les deux batteries de la poignee.
La Blackmagic Pocket Camera Battery Grip est conque pour s'insérer dans la Blackmagic Pocket Cinema Camera 4K. Elle peut contenir deux batteries NP-F570 Series L, pour filmer sans interruption pendant plus de deux heures.
L'entrée DC 12V peut recharger les batteries de la poignée ou fournir une alimentation ininterrompue à laamera lorsque vous changez les batteries. Vous pouvez utiliser un port USB-C pour recharger les batteries de la poignée lorsque laamera est eteinte.
Fixer la Blackmagic Pocket Camera Battery Pro Grip
Avant de fixer la Blackmagic Pocket Camera Battery Pro Grip, éteignez votreamera et débranchez toutes les sources d'alimentation externes. Pour une autonomie plus grande, nous vous conseillons de garder la batterie interne dans votreamera lors de l'installation de la Pocket Camera Battery Pro Grip et de recharger votreamera depuis les trois batteries.

Repérez la petite plaque de couverture située sur la face inférieure de laamera, pres du compartment à batterie, puis dévissez la vis.
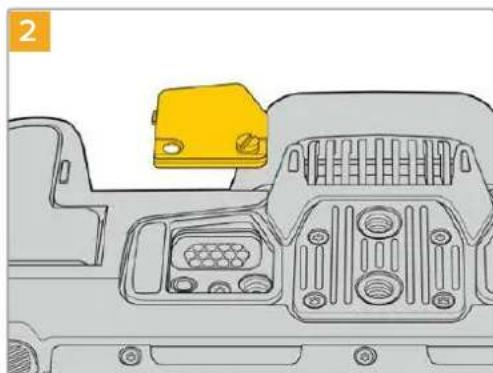
Retirez la petite plaque de couverture pour révêler le contact électrique qui permettra d'alimenter la poignée d'alimentation.
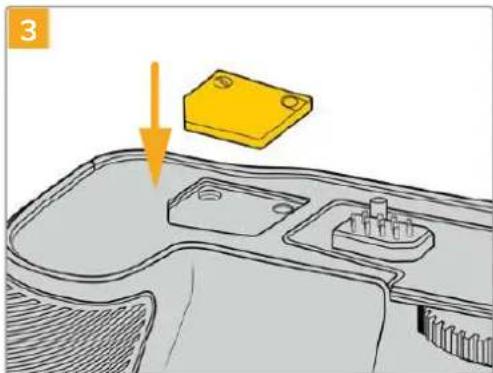
Pour ne pas perdre la petite plaque de couverture, inserez-la dans le renforcement situé sur le haut de la poignée, puis resserrez la vis pour maintainir la plaque en place.
Emboitez delicatement la poignee sur la face inférieure de laamera. La vis de 1/4 de pouce sur le haut de la poignee doit s'aligner avec le pas de vis 1/4-20 de laamera. De petites broches sur chaque coté de la vis de 1/4 vous aideront a maintainir correctement l'alignment.

Tournez la molette située à l'avant de la poignée vers la droite pour serrer fermement la vis et fixer la poignée à laamera.
Fixer la Blackmagic Pocket Camera Battery Grip
Avant de fixer une poignée d'alimentation, éteignezVote Pocket Cinema Camera 4K et débranchez toutes les sources d'alimentation externes.

Ouvrez le compartment à batterie de laamera et retirez la batterie LP-E6.
Faites couilsser la languette situue pres de la.
charniere du compartment a batterie, puis retirez le couvercle du compartment a batterie.
Pour ne pas perdre le couvercle, clipsez-le au renforcement situé sur la face inférieure du support pour batterie.
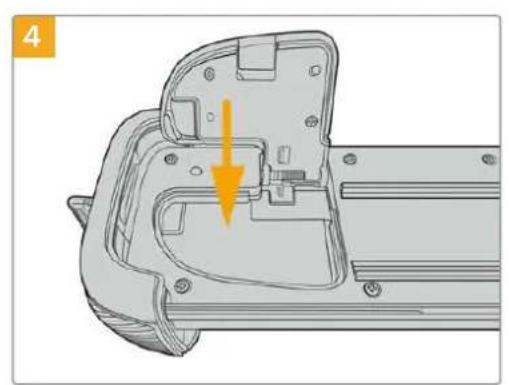
Refermez le couvercle du compartment à batterie pour qu'il soit au même niveau que la face inférieure du support pour batterie.
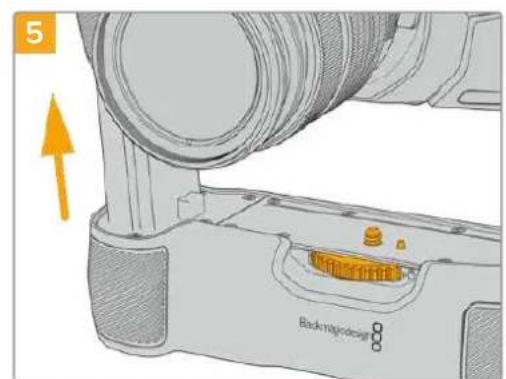
Insérez la partie verticale de la poignée dans le compartment à batterie de laamera. La vis de 1/4 de pouce sur le haut de la poignée doit s'aligner avec le pas de vis 1/4-20 de laamera. Une petite broche située à côte de la vis de 1/4 de pouce aide à conserver un bon alignment.
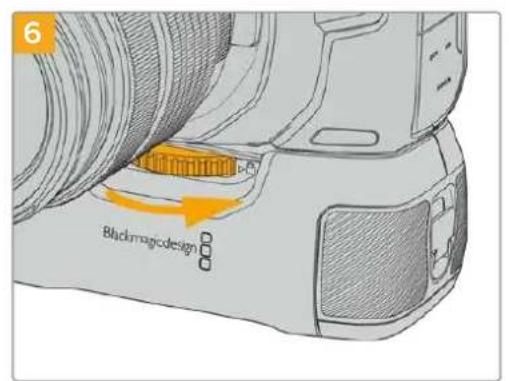
Tournez la molette située à l'avant de la poignée vers la droite pour serrer fermement la vis et fixer la poignée à laamera.
Insérer des batteries dans la poignée d'alimentation
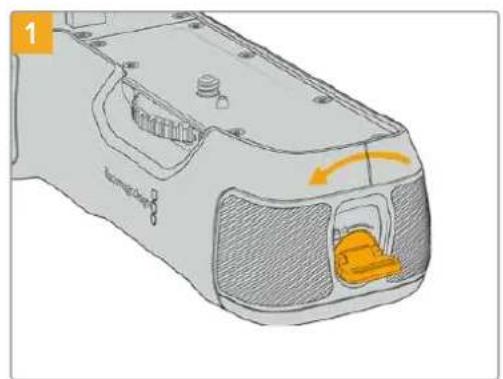
Tournez la languette de verrouillage de la poignée dans le sens inverse des aiguilles d'une montre afin de déverrouiller le support pour batterie. Faites couilisser le support pour batterie vers l'extérieur. Vous pouvez effectuer cette action avant ou après avoir fixé la Battery Grip à laamera.
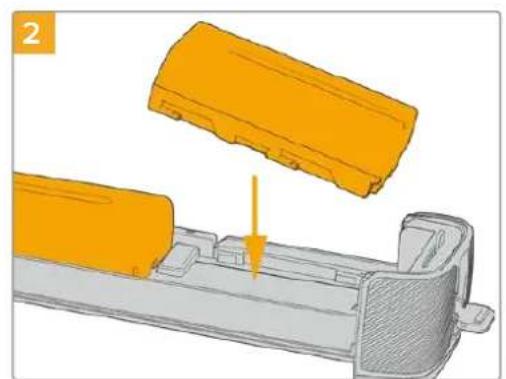
Insérez les deux batteries NP-F570 dans le support pour batterie, en vous assurant qu'elles sont dans le bon sens, puis faites-les glisser dans le support en les éloignant l'une de l'autre. Une languette entre les batteries va remonter afin de verrouiller les batteries dans leur position. Pour-retirer les batteries, appuyez sur la languette de verrouillage, puis faites glisser les batteries l'une vers l'autre.
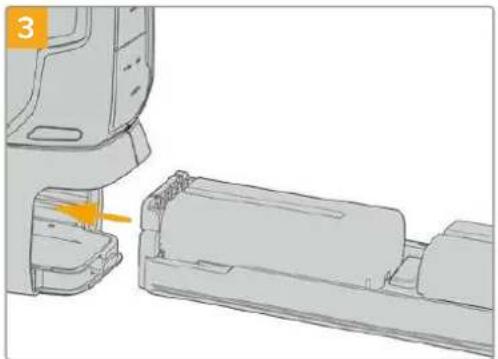
Faites coulisser le support pour batterie dans la poignée, puis tournez la languette de verrouillage dans le sens des aiguilles d'une montre. Notez que vous pouze continuer à filmer tout en changeant les batteries de la poignée si votreamera est alimentée par une source externe branchée à l'entrée d'allimentation DC.
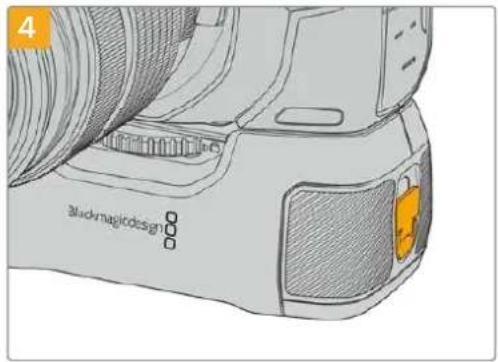
Tournez la languette de verrouillage de la poignee dans le sens des aiguilles d'une montre pour déverrouiller le support pour batterie.
CONSEIL Lorsqu'une poignee d'alimentation est fixe a votre Pocket Cinema Camera 4K et que deux batteries sont inserees, l'indicateur du niveau de batterie en haut a droite de I'ecran LCD affiche une icone pour chaque batterie, que vous pouvez ainsi contrcler independamment. Lorsque vous fixez une poignee d'alimentation a la Blackmagic Pocket Cinema Camera 6K Pro ou 6K G2, I'ecran LCD affiche une icone pour chacune des trois batteries. Pour plus d'informations, consultez la section « Alimentation »
Developer Information
Blackmagic Bluetooth Camera Control
Blackmagic cameras with Bluetooth LE implement a variety of features and commands that allow users to control their cameras wirelessly. Developers have full access to these features for their custom applications.
The following services and characteristics describe the full range of communication options that are available to the developer.
Service: Device Information Service
UUID:180A
Characteristics
Camera Manufacturer
UUID:2A29
Read the name of the manufacturer (always "Blackmagic Design").
Camera Model
UUID:2A24
Read the name of the camera model ("Pocket Cinema Camera 6K" or "Pocket Cinema Camera 4K").
Service: Blackmagic Camera Service
UUID: 291D567A-6D75-11E6-8B77-86F30CA893D3
Characteristics
Outgoing Camera Control (encrypted)
UUID: 5DD3465F-1AEE-4299-8493-D2ECA2F8E1BB
Send Camera Control messages
These messages are identical to those described in the Blackmagic SDI Camera Control Protocol section below. Please read that section for a list of supported messages and required formatting information.
For an example of how packets are structured, please see the 'example protocol packets' section in this document.
Incoming Camera Control (encrypted)
UUID:B864E140-76AO-416A-BF30-5876504537D9
Request notifications for this characteristic to receive Camera Control messages from the camera.
These messages are identical to those described in the Blackmagic SDI Camera Control Protocol section below. Please read that section for a list of supported messages and required formatting information.
Timecode (encrypted)
UUID:6D8F2110-86F1-41BF-9AFB-451D87E976C8
Request notifications for this characteristic to receive timecode updates.
Timecode (HH:MM:SS:mm) is represented by a 32-bit BCD number: (eg. 09:12:53:10 = 0x09125310)
Camera Status (encrypted)
UUID:7FE8691D-95DC-4FC5-8ABD-CA74339B51B9
Request notifications for this characteristic to receive camera status updates.
The camera status is represented by flags contained in an 8-bit integer:
None = 0× 00
Camera Power On = 0x01
Connected = 0× 02
Palred = 0× 04
Versions Verified = 0x08
Initial Payload Received = 0× 10
Camera Ready = 0× 20
Send a value of 0x00 to power a connected camera off.
Send a value of 0x01 to power a connected camera on.
Device Name
UUID:FFAC0C52-C9FB-41A0-B063-CC76282EB89C
Send a device name to the camera (max. 32 characters).
The camera will display this name in the Bluetooth Setup Menu.
Protocol Version
UUID: 8F1FD018-B508-456F-8F82-3D392BEE2706
Read this value to determine the camera's supported CCU protocol version.
NOTE Encrypted characteristics can only be used once a device has successfully bonded or paired with the Blackmagic Camera. Once a connection has been established, any attempt to write to an encrypted characteristic will initiate bonding. For example, writing a 'Camera Power On' (0x01) message to the Camera Status characteristic.
Once bonding is initiated, the camera will display a 6-digit pin in the Bluetooth Setup Menu. Enter this pin on your device to establish an encrypted connection. The device will now be able to read, write and receive notifications from encrypted characteristics.
Blackmagic SDI and Bluetooth Camera Control Protocol
Version 1.5
If you are a software developer you can use the Blackmagic SDI and Bluetooth Camera Control Protocol to construct devices that integrate with our products. Here at Blackmagic Design, our approach is to open up our protocols and we eagerly look forward to seeing what you come up with!
Overview
This document describes an extensible protocol for sending a unidirectional stream of small control messages embedded in the non-active picture region of a digital video stream. The video stream containing the protocol stream may be broadcast to a number of devices. Device addressing is used to allow the sender to specify which device each message is directed to.
Assumptions
Alignment and padding constraints are explicitly described in the protocol document. Bit fields are packed from LSB first. Message groups, individual messages and command headers are defined as, and can be assumed to be, 32 bit aligned.
Blanking Encoding
A message group is encoded into a SMPTE 291M packet with DID/SDID x51/x53 in the active region of VANC line 16.
Message Grouping
Up to 32 messages may be concatenated and transmitted in one blanking packet up to a maximum of 255 bytes payload. Under most circumstances, this should allow all messages to be sent with a maximum of one frame latency.
If the transmitting device queues more bytes of message packets than can be sent in a single frame, it should use heuristics to determine which packets to prioritize and send immediately. Lower priority messages can be delayed to later frames, or dropped entirely as appropriate.
Abstract Message Packet Format
Every message packet consists of a three byte header followed by an optional variable length data block. The maximum packet size is 64 bytes.
| Destination device (uint8) | Device addresses are represented as an 8 bit unsigned integer. Individual devices are numbered 0 through 254 with the value 255 reserved to indicate a broadcast message to all devices. |
| Command length (uint8) | The command length is an 8 bit unsigned integer which specifies the length of the included command data. The length does NOT include the length of the header or any trailing padding bytes. |
| Command id (uint8) | The command Id is an 8 bit unsigned integer which indicates the message type being sent. Receiving devices should ignore any commands that they do not understand. Commands 0 through 127 are reserved for commands that apply to multiple types of devices. Commands 128 through 255 are device specific. |
| Reserved (uint8) | This byte is reserved for alignment and expansion purposes. It should be set to zero. |
| Command data (uint8[]) | The command data may contain between 0 and 60 bytes of data. The format of the data section is defined by the command itself. |
| Padding (uint8[]) | Messages must be padded up to a 32 bit boundary with 0x0 bytes. Any padding bytes are NOT included in the command length. |
Receiving devices should use the destination device address and or the command identifier to determine which messages to process. The receiver should use the command length to skip irrelevant or unknown commands and should be careful to skip the implicit padding as well.
Defined Commands
Command 0 : change configuration
| Category (uint8) | The category number specifies one of up to 256 configuration categories available on the device. |
| Parameter (uint8) | The parameter number specifies one of 256 potential configuration parameters available on the device. Parameters 0 through 127 are device specific parameters. Parameters 128 though 255 are reserved for parameters that apply to multiple types of devices. |
| Data type (uint8) | The data type specifies the type of the remaining data. The packet length is used to determine the number of elements in the message. Each message must contain an integral number of data elements. |
| Currently defined values are: | |
| 0: void / boolean | A void value is represented as a boolean array of length zero. The data field is a 8 bit value with 0 meaning false and all other values meaning true. |
| 1: signed byte Data elements are signed bytes | |
| 2: signed 16 bit integer Data elements are signed 16 bit values | |
| 3: signed 32 bit integer Data elements are signed 32 bit values | |
| 4: signed 64 bit integer Data elements are signed 64 bit values | |
5:UTF-8 string Data elements represent a UTF-8 string with no terminating character.
Data types 6 through 127 are reserved.
| 128: signed 5.11 fixed point | Data elements are signed 16 bit integers representing a real number with 5 bits for the integer component and 11 bits for the fractional component. The fixed point representation is equal to the real value multiplied by 2^11. The representable range is from -16.0 to 15.9995 (15 + 2047/2048). |
Data types 129 through 255 are available for device specific purposes.
Operation types 2 through 127 are reserved.
| Operation type (uint8) | The operation type specifies what action to perform on the specified parameter. Currently defined values are: |
| 0: assign value | The supplied values are assigned to the specified parameter. Each element will be clamped according to its valid range. A void parameter may only be 'assigned' an empty list of boolean type. This operation will trigger the action associated with that parameter. A boolean value may be assigned the value zero for false, and any other value for true. |
| 1: offset / toggle value | Each value specifies signed offsets of the same type to be added to the current parameter values. The resulting parameter value will be clamped according to their valid range. It is not valid to apply an offset to a void value. Applying any offset other than zero to a boolean value will invert that value. |
Operation types 128 through 255 are available for device specific purposes.
| Data (void) | The data field is 0 or more bytes as determined by the data type and number of elements. |
The category, parameter, data type and operation type partition a 24 bit operation space.
| Group | ID | Parameter | Type | Index | Minimum | Maximum | Interpretation |
| Lens | 0.0 | Focus | fixed16 | - | 0.0 | 1.0 | 0.0 = near, 1.0 = far |
| 0.1 | Instantaneous autofocus | void | - | - | - | trigger instantaneous autofocus | |
| 0.2 | Aperture (f-stop) | fixed16 | - | -1.0 | 16.0 | Aperture Value (where fnumber = sqrt(2^AV)) | |
| 0.3 | Aperture (normalised) | fixed16 | - | 0.0 | 1.0 | 0.0 = smallest, 1.0 = largest | |
| 0.4 | Aperture (ordinal) | int16 | - | 0 | n | Steps through available aperture values from minimum (0) to maximum (n) | |
| 0.5 | Instantaneous auto aperture | void | - | - | - | trigger instantaneous auto aperture | |
| 0.6 | Optical image stabilisation | boolean | - | - | - | true = enabled, false = disabled | |
| 0.7 | Set absolute zoom (mm) | int16 | - | 0 | max | Move to specified focal length in mm, from minimum (0) to maximum (max) | |
| 0.8 | Set absolute zoom (normalised) | fixed16 | - | 0.0 | 1.0 | Move to specified focal length: 0.0 = wide, 1.0 = tele | |
| 0.9 | Set continuous zoom (speed) | fixed16 | - | -1.0 | +1.0 | Start/stop zooming at specified rate: -1.0 = zoom wider fast, 0.0 = stop, +1 = zoom tele fast | |
| Video | 1.0 Video mode Int8 | [0] = frame rate -- | fps as integer(eg 24, 25, 30, 50, 60) | ||||
| [1] = M-rate -- 0 = regular, 1 = M-rate | |||||||
| [2] = dimensions -- | 0 = NTSC, 1 = PAL, 2 = 720,3 = 1080, 4 = 2kDCI, 5 = 2k16:9,6 = UHD, 7 = 3k Anamorphic,8 = 4k DCI, 9 = 4k 16:9,10 = 4.6k 2.4:1, 11 = 4.6k | ||||||
| [3] = interlaced -- | 0 = progressive,1 = interlaced | ||||||
| [4] = Color space | -- 0 = YUV | ||||||
| 1.1 | Gain (up to Camera 4.9) | Int8 | 1 | 128 | 1x, 2x, 4x, 8x, 16x, 32x, 64x, 128x gain | ||
| 1.2 | Manual White Balance | int16 | [0] = color temp | 2500 | 10000 | Color temperature in K | |
| int16 | [1] = tint | -50 | 50 | tint | |||
| 1.3 | Set auto WB | void | - | - | - | Calculate and set auto white balance | |
| 1.4 | Restore auto WB | void | - | - | - | Use latest auto white balance setting | |
| 1.5 | Exposure (us) | Int32 | 1 | 42000 | time in us | ||
| 1.6 | Exposure (ordinal) | Int16 | - | 0 | n | Steps through availableexposure values from minimum(0) to maximum (n) | |
| 1.7 | Dynamic Range Mode | Int8 enum | - | 0 | 2 | 0 = film, 1 = video,2 = extended video | |
| 1.8 | Video sharpening level | Int8 enum | - | 0 | 3 | 0 = off, 1 = low, 2 = medium,3 = high | |
| 1.9 | Recording format | int16 | [0] = file frame rate | -- | fps as integer(eg 24, 25, 30, 50, 60, 120) | ||
| [1] = sensor frame rate | - | - | fps as integer, valid whensensor-off-speed set (eg 24,25, 30, 33, 48, 50, 60, 120),no change will be performed ifthis value is set to 0 | ||||
| [2] = frame width | -- in pixels | ||||||
| [3] = frame height | -- in pixels | ||||||
| [4] = flags | -- [0] = file-M-rate | ||||||
| - | - | [1] = sensor-M-rate, validwhen sensor-off-speed-set | |||||
| -- [2] = sensor-off-speed | |||||||
| -- [3] = interlaced | |||||||
| -- [4] = windowed mode | |||||||
| 1.10 | Set auto exposure mode | int8 | - | 0 | 4 | 0 = Manual Trigger, 1 = Iris,2 = Shutter, 3 = Iris + Shutter,4 = Shutter + Iris | |
| 1.11 | Shutter angle | int32 | - | 100 | 36000 | Shutter angle in degrees,multiplied by 100 | |
| 1.12 | Shutter speed | int32 | - | Currentsensorframe rate | 5000 | Shutter speed value as a fraction of 1, so 50 for 1/50th of a second | |
| 1.13 | Gain | int8 | - | -128 | 127 | Gain in decibel (dB) | |
| 1.14 | ISO | int32 | - | 0 | 2147483647 | ISO value | |
| 1.15 | Display LUT | int8 | [0] = selected LUT | -- | 0 = None, 1 = Custom,2 = film to video,3 = film to extended video | ||
| [1] = enabled or not | -- 0 = Not enabled, 1 = Enabled | ||||||
| 1.16 | ND Filter | fixed16 | [0] = stops | 0.0 | 16.0 | f-stop of ND filter to use | |
| Audio | 2.1 | Headphone level | fixed16 | - | 0.1 | 1.0 | 0.0 = minimum, 1.0 = maximum |
| 2.2 | Headphone program mix | fixed16 | - | 0.1 | 1.0 | 0.0 = minimum, 1.0 = maximum | |
| 2.3 | Speaker level | fixed16 | - | 0.1 | 1.0 | 0.0 = minimum, 1.0 = maximum | |
| 2.4 | Input type | int8 | - | 0 | 3 | 0 = internal mic,1 = line level input,2 = low mic level input,3 = high mic level input | |
| 2.5 | Input levels | fixed16 | [0] ch0 | 0.0 | 1.0 | 0.0 = minimum, 1.0 = maximum | |
| [1] ch1 | 0.0 | 1.0 | 0.0 = minimum, 1.0 = maximum | ||||
| 2.6 | Phantom power | boolean | - | - | - | true = powered,false = not powered | |
| Output | 3.0 | Overlay enables | uint16bit field | -- - | bit flags:[0] = display status,[1] = display frame guidesSome cameras don't allow separate control of frameguides and status overlays. | ||
| 3.1 | Frame guides style (Camera3.x) | int8 | -0 8 | 0 = HDTV, 1 = 4:3, 2 = 2:4:1,3 = 2.39:1, 4 = 2.35:1,5 = 1.85:1, 6 = thirds | |||
| 3.2 | Frame guides opacity(Camera 3.x) | fixed16 | - | 0.1 | 1.0 | 0.0 = transparent, 1.0 = opaque | |
| 3.3 | Overlays(replaces .1 and .2above fromCameras 4.0) | int8 | [0] = frame guidesstyle | - | - | 0 = off, 1 = 2.4:1, 2 = 2.39:1,3 = 2.35:1, 4 = 1.85:1, 5 = 16:9,6 = 14:9, 7 = 4:3, 8 = 2:1,9 = 4:5, 10 = 1:1 | |
| [1] = frame guide opacity | 0 | 100 0 = transparent, 100 = opaque | |||||
| [2] = safe areapercentage | 0 | 100 | percentage of full frameused by safe area guide(0 means off) | ||||
| [3] = grid style | - | - | bit flags:[0] = display thirds,[1] = display cross hairs,[2] = display center dot,[3] = display horizon | ||||
| Display | 4.0 | Brightness | fixed16 | - | 0.0 | 1.0 | 0.0 = minimum, 1.0 = maximum |
| 4.1 Exposure and focus tools | Int16bit field | 0x1 = zebra,0x2 = focus assist,0x4 = false color | - | - | - | 0 = disable, 1 = enable | |
| 4.2 | Zebra level | fixed16 | - | 0.0 | 1.0 | 0.0 = minimum, 1.0 = maximum | |
| 4.3 | Peaking level | fixed16 | - | 0.0 | 1.0 | 0.0 = minimum, 1.0 = maximum | |
| 4.4 | Color bar enable | int8 | - | 0 | 30 | 0 = disable bars,1-30 = enable bars with timeout(seconds) | |
| 4.5 | Focus Assist | Int8 | [0] = focus assistmethod | - | - | 0 = Peak,1 = Colored lines | |
| [1] = focus line color | - | - | 0 = Red,1 = Green,2 = Blue,3 = White,4 = Black | ||||
| 4.6 | Program return feed enable | Int8 | - | 0 | 30 | 0 = disable, 1-30 = enable withtimeout (seconds) | |
| Tally | 5.0 | Tally brightness | fixed16 | - | 0.0 | 1.0 | Sets the tally front and tally rear brightness to the same level. 0.0 = minimum, 1.0 = maximum |
| 5.1 | Front tally brightness | fixed16 | - | 0.0 | 1.0 | Sets the tally front brightness. 0.0 = minimum, 1.0 = maximum | |
| 5.2 | Rear tally brightness | fixed16 | - | 0.0 | 1.0 | Sets the tally rear brightness. 0.0 = minimum, 1.0 = maximum Tally rear brightness cannot be turned off | |
| Reference | 6.0 | Source | int8 enum | - | 0 | 2 | 0 = internal, 1 = program, 2 = external |
| 6.1 | Offset | int32 | - | - | - | +/- offset in pixels | |
| Confi-guration | 7.0 Real Time Clock | Int32 | [0] time | - | - | BCD - HHMMSSFF (UCT) | |
| [1] date | - | - | BCD - YYYYMMDD | ||||
| 7.1 | System language | string | [0-1] | - | - | ISO-639-1 two character language code | |
| 7.2 | Timezone | int32 | - | - | - | Minutes offset from UTC | |
| 7.3 Location | int64 | [0] latitude | - | - | BCD - sDDDdddddddddddd where s is the sign: 0 = north (+), 1 = south (-); DD degrees, ddddddddddd decimal degrees | ||
| [1] longitude | - | - | BCD - sDDDdddddddddddd where s is the sign: 0 = west (-), 1 = east (+); DDD degrees, ddddddddddd decimal degrees | ||||
| Color Correction | 8.0 Lift Adjust fixed16 | [0] red -2.0 2.0 default | 0.0 | ||||
| [1] green -2.0 2.0 default | 0.0 | ||||||
| [2] blue -2.0 2.0 default | 0.0 | ||||||
| [3] luma | -2.0 | 2.0 | default 0.0 | ||||
| 8.1 | Gamma Adjust | fixed16 | [0] red -4.0 | 4.0 default 0.0 | |||
| [1] green -4.0 | 4.0 default 0.0 | ||||||
| [2] blue -4.0 | 4.0 default 0.0 | ||||||
| [3] luma | -4.0 | 4.0 default 0.0 | |||||
| 8.2 | Gain Adjust | fixed16 | [0] red 0.0 | 16.0 | default 1.0 | ||
| [1] green 0.0 | 16.0 | default 1.0 | |||||
| [2] blue 0.0 | 16.0 | default 1.0 | |||||
| [3] luma | 0.0 | 16.0 | default 1.0 | ||||
| 8.3 Offset Adjust | fixed16 | [0] red -8.0 | 8.0 | default 0.0 | |||
| [1] green -8.0 | 8.0 | default 0.0 | |||||
| [2] blue -8.0 | 8.0 | default 0.0 | |||||
| [3] luma | -8.0 | 8.0 | default 0.0 | ||||
| 8.4 | Contrast Adjust | fixed16 | [0] pivot | 0.0 | 1.0 | default 0.5 | |
| [1] adj | 0.0 | 2.0 | default 1.0 | ||||
| 8.5 | Luma mix | fixed16 | - | 0.0 | 1.0 | default 1.0 | |
| 8.6 Color Adjust | fixed16 | [0] hue | -1.0 | 1.0 | default 0.0 | ||
| [1] sat | 0.0 | 2.0 | default 1.0 | ||||
| 8.7 | Correction Reset Default | void | - | - | - | reset to defaults | |
| Media | 10.0 | Codec int8 enum | [0] = basic codec -- | 0 = Cinema/DNG, 1 = DNxHD, 2 = ProRes, 3 = Blackmagic RAW | |||
| [1] = code variant | - | - | Cinema/DNG: 0 = uncompressed, 1 = lossy 3:1, 2 = lossy 4:1 | ||||
| - | - | ProRes: 0 = HQ, 1 = 422, 2 = LT, 3 = Proxy, 4 = 444, 5 = 444XQ | |||||
| - | - | Blackmagic RAW: 0 = Q0, 1 = Q5, 2 = 3:1, 3 = 5:1, 4 = 8:1, 5 = 12:1 | |||||
| 10.1 | Transport mode | int8 | [0] = mode | -- | 0 = Preview, 1 = Play, 2 = Record | ||
| [1] = speed | -- | -ve = multiple speeds backwards, 0 = pause, +ve = multiple speeds forwards | |||||
| [2] = flags | -- | 1<<0 = loop, 1<<1 = play all, 1<<5 = disk1 active, 1<<6 = disk2 active, 1<<7 = time-lapse recording | |||||
| [3] = slot 1 storage medium | - | - | 0 = CFast card, 1 = SD Card, 2 = SSD Recorder, 3 = USB | ||||
| [4] = slot 2 storage medium | - | - | 0 = CFast card, 1 = SD Card, 2 = SSD Recorder, 3 = USB | ||||
| 10.2 | Playback Control | int8 enum | [0] = clip | - | - | 0 = Previous, 1 = Next | |
| 10.3 | Still Capture | void | - | - | - | Capture | |
| PTZ Control | 11.0 | Pan/Tilt Velocity | fixed16 | [0] = pan velocity -1.0 | 1.0 | -1.0 = full speed left, 1.0 = full speed right | |
| [1] = tilt velocity | -1.0 | 1.0 | -1.0 = full speed down, 1.0 = full speed up | ||||
| 11.1 | Memory Preset | int8 enum | [0] = preset command | - | - | 0 = reset, 1 = store location, 2 = recall location | |
| int8 | [1] = preset slot | 0.5- | |||||
| Metadata | 12.0 | Reel | int16 | [0] = reel | 0 | 999 | - |
| 12.1 Scene Tags | signedbyte | [0] = scene tags - | - | -1 = None0 = WS1 = CU2 = MS3 = BCU4 = MCU5 = ECU | |||
| [1] = Interior /exterior | - | - | - | 0 = Exterior1 = Interior | |||
| [2] = day / night | -- | 0 = Night1 = Day | |||||
| 12.2 | Scene | string | [0-4] = scene | - | - | - | |
| 12.3 | Take | signedbyte | [0] = take number | 1 | 99 | - | |
| [1] = take tags | -- | 1 = None0 = PU1 = VFX2 = SER | |||||
| 12.4 | Good Take | void | [0] = good take | - | - | - | |
| 12.5 | Camera ID | string | [0-28] = ID | - | - | - | |
| 12.6 | Camera Operator | string | [0-28] = operator | - | - | - | |
| 12.7 | Director | string | [0-27] = director | - | - | - | |
| 12.8 | Project Name | string | [0-28] = project | - | - | - | |
| 12.9 | Lens Type | string | [0-55] = type | - | - | - | |
| 12.10 | Lens Iris | string | [0-19] = Iris | - | - | - | |
| 12.11 | Lens Focal Length | string | [0-29] = focal length | - | - | - | |
| 12.12 | Lens Distance | string | [0-49] = distance | - | - | - | |
| 12.13 | Lens Filter | string | [0-29] = filter | - | - | - | |
| 12.14 | Slate Mode | signedbyte | [0] = type | -- | 0 = Recording1 = Playback | ||
| 12.15 | Slate Target | string | [0-31] = name | - | - | - | |
Example Protocol Packets
| Operation | Packet Length Byte | ||||||||||||||||
| 0 | 1 | 2 | 3 | 4 | 5 | 6 | 7 | 8 | 9 | 10 | 11 | 12 | 13 | 14 | 15 | ||
| header command data | |||||||||||||||||
| destination | length | command | reserved | category | parameter | type | operation | ||||||||||
| trigger instantaneous auto focus on camera 4 | 844000100 | ||||||||||||||||
| turn on OIS on all cameras 12 | 25550006001000 | ||||||||||||||||
| set exposure to 10 ms on camera 4 (10 ms = 10000 us = 0x00002710) | 12 | 4 | 8 | 0 | 0 | 1 | 5 | 3 | 0 | 0x10 | 0x27 | 0x00 | 0x00 | ||||
| add 15% to zebra level (15 % = 0.15 f = 0x0133 fp) | 12 | 4 | 6 | 0 | 0 | 4 | 2 | 128 | 1 | 0x33 | 0x01 | 0 | 0 | ||||
| select 1080p 23.98 mode on all cameras | 16 | 255 | 9 | 0 | 0 | 1 | 0 | 1 | 0 | 24 | 1 | 3 | 0 | 0 | 0 | 0 | 0 |
| subtract 0.3 from gamma adjust for green & blue (-0.3 ^=0xff9a fp) | 16 | 4 | 12 | 0 | 0 | 8 | 1 | 128 | 1 | 0 | 0 | 0x9a | 0xffd | 0x9a | 0xffd | 0 | 0 |
| all operations combined | 76 | 440001002555000600 | |||||||||||||||
| 1 | 0 | 0 | 0 | 4 | 8 | 0 | 0 | 1 | 5 | 3 | 0 | 0x10 | 0x27 | 0x00 | 0x00 | ||
| 4 | 6 | 0 | 0 | 4 | 2 | 128 | 1 | 0x33 | 0x01 | 0 | 0 | 255 | 9 | 0 | 0 | ||
| 1 | 0 | 1 | 0 | 24 | 1 | 3 | 0 | 0 | 0 | 0 | 0 | 4 | 12 | 0 | 0 | ||
| 8 | 1 | 128 | 1 | 0 | 0 | 0x9a | 0xffd | 0x9a | 0xffd | 0 | 0 | ||||||
Assistance
Le moyen le plus rapide d'obtenir de l'aide est d'acceder aux pages d'assistance en ligne de Blackmagic Design et de consulter les dernières informations concernant votreamera.
Pages d'assistance en ligne de Blackmagic Design
Les dernières versions du manuel, du logiciel et des notes d'assistance peuvent être consultées sur la page d'assistance technique de Blackmagic Design: www.blackmagicdesign.com/fr/support.
Contacter le service d'assistance de Blackmagic Design
Si vous ne parvenez pas à tracer l'aide dont vous avez besoin dans notre matériel de support, veillez utiliser l'option « Envoyez-nous un email » disponible sur la page d'assistance pour envoyer une demande d'assistance par email. Vous pouvez également cliquer sur le bouton « Trouver un support technique » situé sur la page d'assistance et contacter ainsi le centre de support technique Blackmagic Design le plus proche de chez vous.
Vérification du logiciel actuel
Pour vérifier chaque version du logiciel Blackmagic Camera Setup utility est installée sur votre ordinateur, ouvre la fenêtre intitulée About Blackmagic Camera Setup utility.
- Sur Mac, ouvre le Blackmagic Camera Setup Utility à partir du dossier Applications.
- Sur Windows, ouvre le logiciel Blackmagic Camera Setup utility dans votre menu de Demarrage ou sur I'ecran de Demarrage. Cliquez sur le menu Aide et selectionnez About Blackmagic Camera Setup utility pour connaître le numero de version.
Comment obtenir les dernières mises à jour du logiciel
Après avoir vérifié la version du logiciel Blackmagic Camera Utility installée sur votre ordinateur, veillez vous rendre sur la page d'assistance Blackmagic Design à l'adresse suivant www.blackmagicdesign.com/fr/support pour vérifier les dernières mises à jour. Meme s'il est généralement conseilé d'exécuter les dernières mises à jour, il est prudent d'éviter d'effectuer une mise à jour logicielle au milieu d'un projet important.
Avis réglementaires

Élimination des déchets d'équipements électriques et électroniques au sein de l'Union Européenne.
Le symbole imprimé sur ce produit indique qu'il ne doit pas être jeté avec les autres déchets. Cet apparéil doit être déposé dans un point de collecte agrée pour être recyclé. Le tri, l'élimination et le recyclage séparés de vos équipements usages permettent de préserver les ressources naturelles et d'assurer le recyclage de ces équipements dans le respect de l'homme et de l'environnement. Pour plus d'informations quant aux lieux d'éliminations des déchets d'équipements électriques, vous pouvez contacter votre mairie ou le service local de traitement des ordures menagères.

Cet équipement a ete teste et declare conforme aux limites imposees aux apparils numériques de classe A, en vertu du chapitre 15 des regles de la FCC. Ces limites ont pour objectif d'assurer une protection suffisante contre les interfrences nuisibles lorsque I'equipement est utilise dans un environnement commercial. Cet équipement generne, utilise et peut degager de l'énergie de radiofrequence et, s'il n'est pas installe et utilise conformément au manuel d'utilisation, peut provoquer un brouillage préjudicable aux communications radio. L'utilisation de cet équipement en zone residentielle est susceptible de provoquer des interfrences nuisibles, auquel cas il sera demandé à l'utiliser de corriger ces interfrences à ses frais.
L'utilisation de cet apparéil est soumise aux deux conditions suivantes :
1 Ce matériel ou cet apparéil ne doit pas cause d'interférences nuisibles.
2 Ce matériel ou cet apparéil doit accepter toute interférence reçue, y compris les interférences qui peuvent provoquer des opérations non désirées.

R-R-BMD-201810001
R-R-BMD-20220218001
R-R-BMD-201904002

Déclaration de ISDE Canada
Cet apparéil est conforme aux normes canadiennes relatives aux apparéils numériques de classe A.
Toute modification ou utilisation de ce produit en dehors de son utilisation prévue peut annuler la conformité avec ces normes.
Les connexions aux interfaces HDMI doivent etre effectuees avec des cables HDMI blinds d'excellente qualite.
Cet équipement a ete teste pour etre en conformite avec une utilisation prevue dans un environnement commercial. Si cet équipement est utilise dans un environnement domestique,
il peut provoquer des interférences radio.
Bluetooth®
Ce produit est dote de la technologie sans fil Bluetooth.
Contient un module émetteur identification FCC: QOQBGM113
Cet équipement est conforme aux limites de radiation de la FCC comme indiqué pour un environnement non contrôle.
Contient un module émetteur IC: 5123A-BGM113
Contient un module émetteur certifié au Mexique. IFT: RCPSiBG20-2560.
Ce produit est conforme aux normes RSS sans licence d'Industrie Canada et aux limites applicables à l'exemption de l'évaluation courante DAS comme mentionné dans la RSS-102 Issue 5.
Certifie pour le Japon, numero de certification : 209-J00204. Cet équipement contient des équipements radioélectriques spécifiques qui ont obtenu la certification de la conformité aux réglementations techniques conformément à la Loi de la Radio.
Ce module est certifié en Coree du Sud, numéro de certification KC: MSIP-CRM-BGT-BGM113
Par la presente, Blackmagic Design déclare que ce produit utilisant des systèmes de transmission à large bande dans la bande ISM de 2,45 GHz est conforme à la Directive 2014/53/EU.
Pour obtenir le texte intégral de la déclaration EU de conformité, veuillez nous contacter à l'adresse suivante : compliance@blackmagicdesign.com

Certification ICASA pour l'Afrique du Sud, numero TA-2021/2072 pour la Blackmagic Pocket Camera 6K Pro, TA-2019/1517 pour la Blackmagic Pocket Cinema Camera 6K et TA-2019/1516 pour la Blackmagic Pocket Cinema Camera 4K.

Certification NOM pour le Mexique, pour le module Bluetooth fabriqué par Silicon Labs, numéro de modulo BGM113A.
Informations de sécurité
La Blackmagic Pocket Cinema Camera peut être utilisé dans un climat tropical lorsqu'la température ambiente n'excède pas 40^ .
Les pieces de cet appeareil ne sont pas reparables par I'opérateur. Toute opération d'entretien doit être effectuee par un centre de service Blackmagic Design.
En cas d'enseillement, prenez soit de garder votreamera à l'ombre. Évitez toute exposition de laamera ou de la batterie en lithium à un ensoilement prolongé.
Gardez les batteries en lithium à l'abri des sources de chaleur.

Lorsque vous utilisez l'adaptateur secteur fourni, cet apparéil peut uniquement être utilisé à une altitude inférieure à 2000 metres.
Déclaration de l'Etat de Californie
Ce produit est susceptible de vous exposer à des produits chimiques, dont des traces de polybromobiphényle dans les parties en plastique, reconnu par l'Etat de Californie comme étant responsable de cancers, d'anomalies congenitales ou d'autres effets nocifs sur la reproduction.
Pour de plus amples informations, veuillez vous rendre sur www.P65Warnings.ca.gov.
Garantie
Garantie limitee
Par la presente, Blackmagic Design garantit que ce produit sera exempt de defaults matériels et de fabrication pendant une durée d'un an à compter de la date d'achat. Si un produit s'avéré défectieux pendant la période de garantie, Blackmagic Design peut, à sa seule désétion, réparer le produit défectieux sans frais pour les pieces et la main-d'oeuvre, ou le replacer.
Pour se prévaloir du service offert en vertu de la presente garantie, il vous incombe d'informer Blackmagic Design de l'existence du defaulted avant expiration de la période de garantie, et de prendre les mesures nécessaires pour l'execution des dispositions de ce service. Le consommateur a la responsabilité de s'occuper de l'emballage et de l'expédition du produit défectueux au centre de service nommément désigné par Blackmagic Design, en frais de port prépayé. Il incombe au Consommateur de payer tous les frais de transport, d'assurance, droits de douane et taxes et toutes autres charges relatives aux produits qui nous auront été returnés et ce, qu'elle que soit la raison.
La presente garantie ne saurait enaucun cas s'appliquer a des defaults, pannes ou dommages causés par une utilisation inappropriée ou un entretien inadéquat ou incorrect. Blackmagic Design n'est enaucun cas obligé en vertu de la presente garantie : a) de réparer les dommages resultant de tentatives de réparations, d'installations ou tous services effectuels par du personnel non qualifié par Blackmagic Design, b) de réparer tout dommage resultant d'une utilisation inadéquate ou d'une connexion à du matériel incompatible, c) de réparer tout dommage ou dysfonctionnement causé par l'utilisation de pieces ou de fournitures n'appartenant pas à la marque de Blackmagic Design, d) d'examiner un produit qui a eté modifié ou intégré à autres produits quand l'impact d'une telle modification ou intégration augmente les délais ou la difficulté d'examiner ce produit.
CETTE GARANTIE REMPLACE TOUTE GARANTIE EXPLICITE OU TACITE. BLACKMAGIC DESIGN ET SES REVENDEURS DÉCLINENT EXPRESSEMENT Toute GARANTIE IMPLICITE DE COMMERCIALISATION OU D'ADAPTATION QUEL QU'en SOIT LE BUT. LA RESPONSABILITÉ DE BLACKMAGIC DESIGN POUR RÉPARER OU REMPLACER UN PRODUIT S'AVERANT DEFECTUEUX DURANT LA PÉRIODE DE GARANTIE CONSTITUE LA TOTALité ET LE SEUL RECOURS EXCLUSIF PRÉVU ET FOURNI AU CONSOMMATEUR. BLACKMAGIC DESIGN NE POUR RAÉ ÉTRE TENU POUR RESPONSABLE POUR TOUT DOMMAGE INDIRECT, SPECIFIQUE, ACCIDENTEL OU CONSECUTIF, PEU IMPORTE QUE BLACKMAGIC DESIGN OU SES REVENDEURS AIENT ÉTÉ INFORMÉS OU SE SOIENT RENDUS COMPTE AU PREALABLE DE L'EVENTUALITE DE CES DOMMAGES. BLACKMAGIC DESIGN NE POTÉ ÉTRE TENU POUR RESPONSABLE DE Toute UTILISATION ILICITE DU MATÉRIEL PAR LE CONSOMMATEUR. BLACKMAGIC DESIGN N'EST PAS RESPONSABLE DES DOMMAGES RÉSULTANT DE L'UTILISATION DE CE PRODUIT. LE CONSOMMATEUR MANIPULE CE PRODUIT À SES SEULS RISQUES.
Copyright 2022 Blackmagic Design. Tous droits réservés. 'Blackmagic Design', 'URSA', 'DeckLink', 'HDLink', 'Workgroup Videohub', 'Multibridge Pro', 'Multibridge Extreme', 'Intensity' et 'Leading the creative video revolution' sont des marques déposées aux États-Unis et dans les autres pays. Tous les autres noms de société et de produits peuvent être des marques déposées des sociétés respectives auxquellesils sont associés.
Le nom de la marque Bluetooth ainsi que ses logos sont des marques déposées et sont la propriété de Bluetooth SIG, Inc. L'utilisation de ces marques par Blackmagic Design est sous licence. Les autres marques déposées et noms de marques appartiennent à leurs propriétaires respectifs.
Blackmagic
Pocket Cinema Camera


Willkommen
Vielen Dank, dass Sie sich zum Kauf der neuen Blackmagic Pocket Cinema Camera entschieden haben!
Die ursprüngliche Blackmagic Pocket Cinema Camera haben wir 2013 Herausgegeben. Uns begeisterte die Vorstellung, eine keine Kamera zu bauen, die einen hohen Dynamikumfang und bahnbrechende Bildqualität bietet, und Sie überallhin begleiten kann. Das fantastische Feedback aus Nutzerkreisen hat uns bewogen, das Originaldesign mit einer neuen Blackmagic Pocket Cinema Camera Familie auszubauen.
Die Blackmagic Pocket Cinema Camera 4K ist mit dem gleichen Micro-Four-Thirds-Objektivanschluss wie die originale Pocket Cinema Camera ausgestattet. Sie können damit also weiterhin vorhandene MFT-Objektive nutzen. Die Blackmagic Pocket Cinema Camera 6K G2 und die Pocket Cinema Camera 6K Pro hingegen haben einen EF-Objektivanschluss. Diese ermöglich den Einsatz Ihrer bevorzugten EF-Objektive zum Filmen von 6K-Video mit bis zu 60 Frames pro Sekunde.
Der Dynamikumfang von 13 Blendenstufen und der Dual-Native-ISO-Modus, d. h. zwei Grundempfindlichkeiten des Sensors, setzen Sie großartige, saubere filmische Bilder erfassen und ihre kreativen Vorstellungen realisieren.
Wir sind extrem gespannt auf ihre mit der neuen Pocket Cinema Camera produzierte Kreativarbeit, und freiuen uns auf Ihr Feedback und Vorschläge zu neuen Features für diese Kamera.
Grant Petty
Grant Petty
CEO Blackmagic Design
Inhaltsverzeichnis
Mit welcher Kamera arbeiten Sie? 501
Erste Schritte 501
Anbringen eines Objektivs 501
Stromversorgung der Kamera 503
Stromversorgung der Kamera
über das mitgelieferte Stromkabel 503
Speichermedien 504
CFast-Karten
SD-Karten
USB-C-Laufwerke
Datentrager fur die Aufnahme
vorbereiten
Datentrager mit
einer Blackmagic
Pocket Cinema CameraVBorbereiten 510
Datentrager auf Mac-Systemen
vorbereiten
Datentrager auf Windows-
SystemenVBoreiten 513
Aufzeichnen 514
Aufzeichnen von Clips 514
Blackmagic RAW 515
In Blackmagic RAW aufzeichnen 515
Maximale Sensor-Frameraten 518
Aufzeichnungsdauer 519
Wiedergabe 525
Funktionsmerkmale der Kamera 525
Kameravorderseite 525
Rechte Kameraseite 526
Linke Kameraseite 527
Kameraoberseite 529
Kameraunterseite 531
Kamerarückseite 532
Bedienung per Touchscreen 535
Einstellungen 558
Dashboard 558
AUFNAHME-Einstellungen 558
Dateinamenskconventionen 564
MONITORING-Einstellungen 564
AUDIO-Einstellungen 57
SETUP-Einstellungen 574
PRESETS 586
3D-LUTs 589
Eingabe von Metadaten 591
Slate 592
Videoausgabe der Kamera 597
Blackmagic Zoom und Focus Demands 597
Anschlieben und Anbringen an
Ohre Kamera 598
Verwendendes Blackmagic
Focus Demands 600
Verwendendes Blackmagic
Zoom Demands 600
Verwenden von DaVinci Resolve 602
Project Manager 602
504
m Cut-Arbeitsraum 603
506
in Clips in die Timeline 606
n Clips in der Timeline 607
rim" Ansicht 607
n Titeln 608
Blackmagic-RAW-Dateien 609
ur von Clips im
sraum 612
einesPowerWindows 615
Plug-ins 617
on 618
von VFX und
im Fusion-Arbeitsraum 623
s Schnitts 631
: 631
Arbeitsraum 632
trol with ATEM Mini 633
Solve Primary Colors
637
Fremdhersteller-Software 640
Dateien auf
and SD-Karten 640
Dateien von USB
en 640
von Final Cut Pro X 641
von Avid Media
018 641
von Adobe.
CC 642
Camera Setup Utility
(amm) 643
eines Akkugriffs 644
en fur Entwickler (Englisch) 647
Bluetooth Camera Control 647
SDI and Bluetooth
trol Protocol 649
tocol Packets 658
659
Vorschriften 660
inweise 661
662
Mit welcher Kamera arbeiten Sie?
Außerlichähneln sich die Blackmagic Pocket Cinema Camera 6K Pro und die 6K-G2- und 4K-Modèle. Alle haben das gleiche Gehäuse und erzeugen sagenhafte Bilder mit breitem Dynamikumfang. Die Bedientasten und Softwaremenüs sind gleich aufgebaut und auch die Bedienung unterscheidet sich kaum.
Die Modelle Blackmagic Pocket Cinema Camera 6K Pro und 6K G2 verfügbar über einen Sensor im Super-35-Format und einen EF-Mount. Neben dem Objektivanschluss steht der Schriftzug „6K". Die Blackmagic Pocket Cinema Camera 4K hat einen Micro-Four-Thirds-Sensor nebst Micro-Four-Thirds-Objektivanschluss.
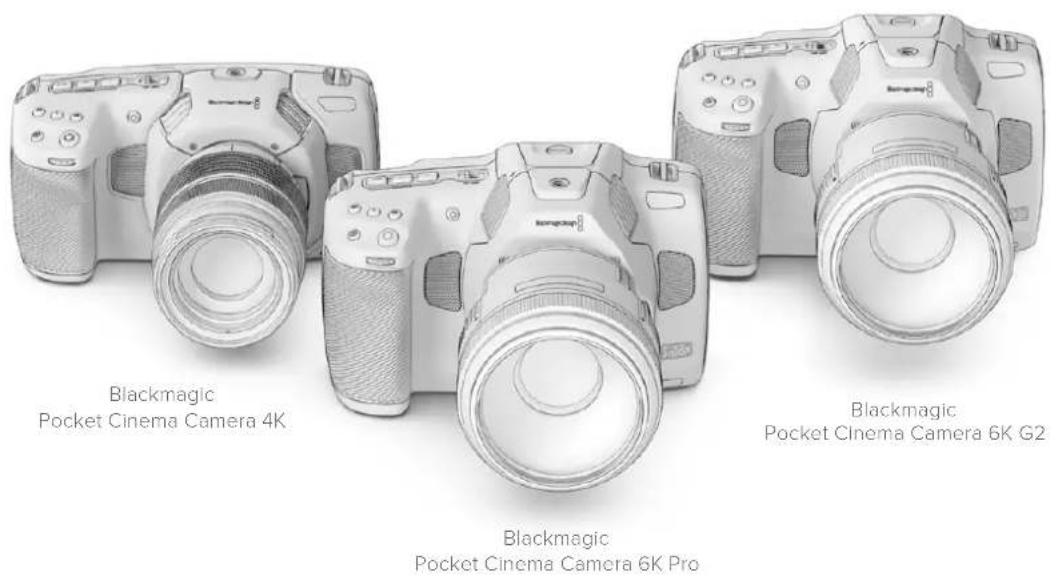
Erste Schritte
Die ersten Schritte mit ihrer Pocket Cinema Camera sind einfach: Stecken Sie ein Objektiv auf und schalten Sie ihre Kamera ein.
AnbringeneinesObjektivs
Die Pocket Cinema Camera 6K G2 und 6K Pro sind für EF-Objektive, und die Pocket Cinema Camera 4K ist für Micro-Four-Thirds-Objektive ausgelegt. Zum Aufstecken von Objektiven gehmt man bei allen Pocket Cinema Camera Modellen auf die gleiche Weise vor. Nehmen Sie zuerst die Staubschutzkappe ab, indem Sie die Kappe bei gedrückter Verriegelungstaste gegen den Uhrzeigersinn drehen, bis sie sich lost.
So bringen Sie ein EF- oder Micro-Four-Thirds-Objektiv an:
1 Richten Sie den Punkt an Ihr hem Objektiv auf den Punkt am Objektivanschluss der Kamera aus. Viele Objektive verfügen über eine Ansetzmarkierung, bspw. einen blauen, roten oder weiten Punkt.

2 Setzen Sie den Objektivanschluss an den Kameraanschluss (Mount) und drehen Sie das Objektiv im Uhrzeitigersinn, bis es einrastet.

Anbringen eines MFT-Objektivs an die Blackmagic Pocket Cinema Camera 4K
3 Halten Sie zum Abnehmer des Objektivs die Verriegelungstaste gedrückt und drehen Sie es gegen den Uhrzeigersinn, bis die Ansetzmarkierung erreicht ist. Bei einem MFT-Objektiv ist das die 10-Uhr-Position und bei einem EF-Objektiv die 12-Uhr-Position. Nehmen Sie das Objektiv vorsichtig ab.
HINWEIS Wenn kein Objektiv an der Kamera angebracht ist, liegt der sensorschutzende Glasfilter frei und ist der Verschmutzung durch Staub oder andere Ablagerungen ausgesetzt. Es empfeht sich, die Gehäuseverschlusskappe möglichst ständig an der Kamera zu belassen.
Stromversorgung der Kamera
Nachdem das Objektiv angebracht ist, versorgen Sie ihre Kamera mit Strom. Die Modelle Pocket Cinema Camera 6K Pro und 6K G2 setzen sich durch Einlagen eines NP-F570-Akkus mit Strom versorgen, die Pocket Cinema Camera 4K über einen LP-E6-Akku. Alternativ konnen Sie ihre Pocket Cinema Camera über den mitgelieferten AC-Adapter oder die beiden NP-F570 Akkus eines Blackmagic Pocket Camera Battery Grip mit Strom versorgen. Naheres zum Anbringen eines Akkugriffs an ihre Pocket Cinema Camera finden Sie im Abschnitt „Verwenden eines Akkugriffs".
Einlagen eines Akkus und Stromversorgung ihrer Kamera
Die Modelle Pocket Cinema Camera 6K Pro und 6K G2 verwenden einen regulären NP-F570-Akku, und die Pocket Cinema Camera 4K verwendet einen regulären LP-E6-Akku. Ein Akku wird mit der Kamera gefelfert. Zusätzliche Akkus sind von Blackmagic Design Resellern oder in den beiden Video- und Fotofachgeschäften erhältlich.
Um das Akkufach an der Kameraunterseite zu öffnen, entriegeln Sie die Schiebetaste.
2 Setzen Sie den Akku mit den Kontakten voran ein, bis er unter der Verriegelung spürbar einrastet.
TIPP Um das Akkufach zu öffnen und den Akku zu entnehmen, bewegen Sie die Schiebetaste in Richtung des Objektivs.
3 Schlieben Sie das Akkufach, indem Sie den Deckel bis zum Einrasten vorsichtig andrücken.
4 Stellen Sie den Ein-/Ausschalter auf der Oberseite ihrer Kamera auf ON. Um die Kamera auszuschalten, stellen Sie den Ein-/Ausschalter auf OFF.
Stromversorgung der Kamera über das mitgelieferte Stromkabel
Die Kamera kann über das mitgelieferte AC-Steckernetzteil für 100-240 Volt mit Strom versorgt werden. Gleichzeitig erfolgt darauf Aufladen des internen Kameraakkus und, sofern vorhanden, der beiden Akkus in einem angeschlossenem Blackmagic Pocket Camera Battery Grip. Der DC-Stecker wird mit der Kamera verschraubt, was sein versehentliches Trennen verhindert.
So koppeln Sie die Kamera an eine externe Stromquelle:
1 Stecken Sie den AC-nach-12V-DC-Adapterstecker in eine Netzstrom-Steckdose.
2 Offnen Sie die Gummiabdeckung auf der linken Seite ihrer Kamera und drehen Sie den DC-Stecker so, dass er auf die Vertiefung des 12V-DC-Eingangs ausgerichtet ist. Schieben Sie den Stecker behutsam in den Eingang, bis er einrastet.
3 Um den Stecker vom Anschluss zu trennen,ziehen Sie den Metallüberwurf vom Steckerkopf weg.
Ist die Kamera gleichzeitig an eine externe Stromquelle und an Akkustrom angeschlossen, so wird nur die externe Stromzufuhr benutzt. Wenn der Akku geladen ist, schaltet ihre Kamera unterbrechungsfrei auf Akkustrom um, sobald die externe Stromquelle entfernt wird.
Der eingelegte Akku kann bei ausgeschalteter Kamera über USB aufgeladen werden. Das ist praktisch, da sich die ausgeschaltete Kamera so mit einer tragbaren Powerbank auflagen lasst. Blackmagic Pocket Cinema Cameras unterstützen die Akkuauflung über Standard USB-Wandladegeräte für 5V/10W. Benutzt werden können auch Ladegeräte, die USB Power Delivery (USB PD) unterstützen. USB-PD-Ladegeräte haben gewöhnlich einen USB-C-Anschluss und liefern Spannungen bis zu 20 Volt, was das Auflagen beschleunigt. Das Auflagen des internen Akkus über den 12V-DC Stromanschluss wird bei ein- und ausgeschalteter Kamera unterstützt.
TIPP Wenn Sie einen erhitzten Akku unmittelbar nach Benutzung laden, ist die Ladegeschwindigkeit vermindert, bis der Akku sich auf 45^ abkühlt. Wir empfehlen dazu, den Akku vor dem Laden 15 Minuten lang abkühlen zu halten.
Sie konnen nun die Speichermedien einlagen und mit dem Aufnehmen beginnen!
Speichermedien
Ohre Blackmagic Pocket Cinema Camera zeitnet Video auf handelsübliche SD-Karten, Schnellere UHS-II-SD-Karten oder CFast-2.0-Karten auf.
Unter Verwendung des USB-C-Expansionsports konnen Sie für langere Aufzeichnungsspannen auch USB-C-Laufwerke mit großer Speicherkapazität anschließen.
CFast-Karten
CFast-2.0-Karten unterstützen hohe Datenraten und eignen sich damit perfekt für die Aufzeichnung von 6K-, 4K- und HD-Video mit hohen Frameraten. Nähres zu den maximalen Frameraten spezifischer Formate finden Sie in der Tabellenübersicht zu den Aufzeichnungsspannen im Abschnitt „Aufzeichnen".
HINWEIS Obwohl CFast-2.0-Karten in der Regel schnell sind, ist die
Schreibgeschwindigkeit mancher Karten geringer als die Lesegeschwindigkeit. Zudem konnen die Datendurchsatzraten zwischen den unterscheidlichen Modellen variieren.
Für eine verlüssliche Aufzeichnung mit ihren ausgewählten Frameraten verwenden Sie ausschließlich die von Blackmagic Design empfohlenen Karten.
So setzen Sie eine CFast-Karte ein:
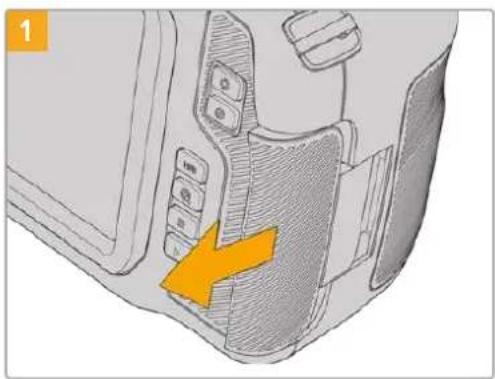
Für den Zugriff auf die Speicherkartenschächte schieben Sie die Abdeckung auf der rechten Seite ihrer Kamera in Richtung Kamerarücken.
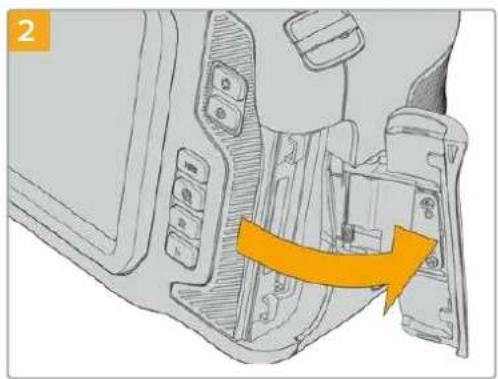
Die federbelastete Abdeckung springt auf und legt die CFast- und SD-Speicherkartenschächte frei.
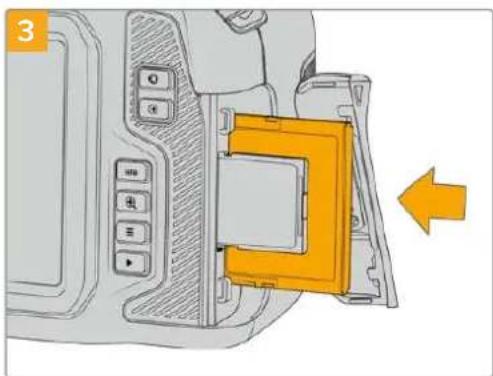
Schieben Sie die CFast-Karte in den davon vorgesehenen Schacht, bis sie spürbar einrastet. Die Karte sollte sich ohne übermögens Kraftaufwand einfahren lessen. Um die CFast-Karte zu entfern und auszuwerfen, schiben Sie sie sanft in die Kamera.
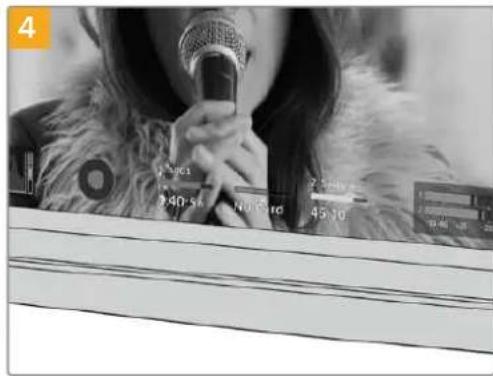
Die Speicherangabe am unteren Rand des LCD-Touchscreens zeigt die Bezeichnung der erkannten CFast-Karte und die auf ihr verbleibende Aufzeinungsdsauer an.
Das Einsetzen einer SD-Karte gehen wie bei einer CFast-Karte. Weitere Informationen finden Sie im Abschnitt „So setzen Sie eine SD-Karte ein".

Auswahl einer CFast-2.0-Karte
Beim Verarbeiten von Videomaterial mit hohen Datenübertragungsraten will疃 überlegt sein, welche Art von CFast-Karte man verwendet. Dies ist wichtig, weil CFast-2.0-Karten unterschiedliche Lese- und Schreibgeschwindigkeiten haben.
Aktuellste Informationen zu den von Blackmagic Pocket Cinema Cameras unterszttzen CFastKarten finden Sie im Blackmagic Design Support Center unter www.blackmagicdesign.com/de/support.
SD-Karten
Zusätzlich zu CFast-2.0-Karten kann ihre Kamera auch auf extrem schnelle UHS-I- und UHS-II-SD-Karten aufzeichnen. UHS-I-SD-Karten ermögliches es Ihnen, beim Dreh mit komprimierten HD-Videoformaten erschwinglichere Speichermedien zu verwenden. Noch schnellere UHS-II-Karten gestalten Ihnen sare die Aufzeichnung in Blackmagic RAW sowie von Ultra-HD-Content in ProRes.
SD-Karten ermöglichen außer dem Einsatz erschwinglicher Speichermedien für Drehs in komprimierten HD-Videoformaten.
Bei SDXC und SDHC handelt es sich um welt verbreitete Speicherformate, die Benutzer von Standbild- und Videok cameras verwenden. Falls Sie schon einmal Videoaufnahmen mit einer DSLR gemacht oder eine Blackmagic Micro Cinema Camera, Blackmagic Pocket Cinema Camera oder einen Blackmagic Video Assist benutz haben, besitzen Sie möglicherweise bereits kompatible SD-Karten.
Gerade fur Projekte, die keine hochaufgelösten Dateien erfordern, oder fur langle Aufzeinungsspannen, erweisen sich SD-Karten halten als kostengūnstig. SD-Karten mit geringer Leistung und Geschwindigkeit eignen sich auch zum Speichern und Laden von LUTs und Presets.
So setzen Sie eine SD-Karte ein:
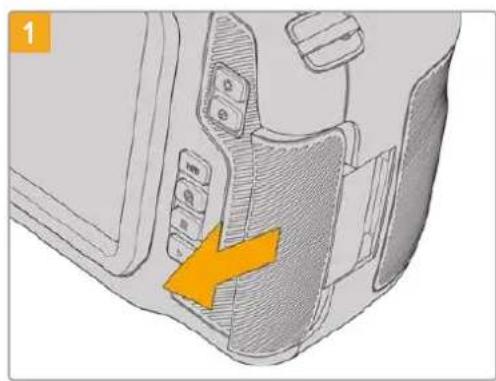
Für den Zugriff auf die Speicherkartenschächte schieben Sie die Abdeckung auf der rechten Kameraseite in Richtung Kamerarücken.

Die federbelastete Abdeckung springt auf und legt die Speicherkartenschächte frei.

Halten Sie die SD-Karte mit der Beschriftung zum Touchscreen hingewandt und schieben Sie sie in den SD-Kartenschacht, bis sie spürbar einrastet. Die Karte sollte sich ohne übermögen Kraftaufwand eingehufen. Um die SD-Karte zu entfernen und auszuwerfen, schieben Sie sie sanft in die Kamera.
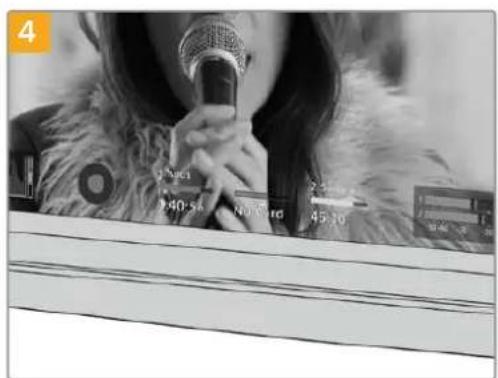
Die Speicherangabe am unteren Rand des LCD-Touchscreens zeigt die Bezeichnung der erkannten CFast-Karte und die auf ihr verbleibende Aufzeinungsdsauer an.
Auswahl einer SD-Karte
Für Aufzeichnungen in 6K, 4K DCI oder Ultra HD empfehlen wir, die schnellsten Hochgeschwindigkeits-SD-Karten des Typs UHS-II zu verwenden. Verwenden Sie für die Aufzeichnung in 6K, 4K DCI, Ultra HD oder HD unbedingt schnelle UHS-II-SD-Karten. Wenn Sie ausschließlich in HD aufzeichen, eignen sich auch UHS-I-Karten. Diese für hohe Datenraten konzierten Kartenieten großere Speicherkapazitäten. Allgemein gilt: Je Schneller die Karte,esto better.
Vor Gebrauch mussen Sie ihre Karten entweder in HFS+ oder exFAT formatieren. Über den Storage Manager der Kamera geht die Formatierung ihrer Medien ganz einfach, Informationen zu Speichereinstellungen finden Sie im Abschnitt „Einstellungen".
Sie können ihre Karten auch mit einem Mac-oder Windows-Computer formatieren. Wer seine Datenträger auf einem Mac benutzt, verwendet das Mac-Datenträgerformat HFS+, auch bereits als OS X Extended. Wer auf Windows arbeitet, sollte das Windows-Datenträgerformat exFAT verwenden. Diese Format können jedoch auch Mac-Computer setzen.
Aktuellste Informationen zu von der Blackmagic Pocket Cinema Camera unterstützen SD-Karten\ finden Sie im Blackmagic Design Support Center unter www.blackmagicdesign.com/de/support,
HINWEIS Für hohe Auflösungen und Aufzeichnungen mit hohen Frameraten empfehlen wir, CFast-2.0-Medien oder ein externes USB-C-Laufwerk zu verwenden, weil diese für gewöhnlich schneller und mit größeren Speichervolumen erhältlich sind.
SD-Karten sperren und entsperren
SD-Karten können schreibgeschützt oder „gesperrt“ werden, um zu verhindern, dass Daten überschieben werden. Vergewissem Si sich, dass eingelegte Karten nicht schreibgeschützt sind. Der Schreibschutzlässt sich durch Umlegen des kleinen Plastikschiebers an der linken Kartenseite der Kontakte aufheben. Sie können die Karte nach der Aufzeinung wieder „sperren".
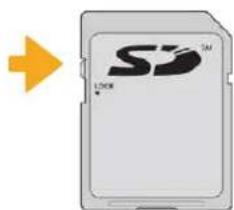
Schieben Sie den Schieber nach, oben oder unter, um eine SD-Karte zu sperren oder zu entsperren
Ohr Blackmagic Pocket Cinema Camera zeigt an, wenn eine gesperte SD-Karte eingelegt wurde. Statt der Aufnahmedauer der Karte erscheint auf dem LCD-Touchscreen dann das Wort „Gesperrt" und im Speichernmenü wird darüber dem Kartennamen ein Schlosssymbol angezeigt. Mit einer gespernten Karte können Sie weder Videos aufzeichen noch Standbilder festhalten oder LUTs und Presets exportieren. Das goes erst, wenn die Karte entspert ist.

Die Speicheranzeigen am unteren Rand des Touchscreens geben die verbleibende Aufnahmezeit und den Sperrzustand erkanter SD-Karten an
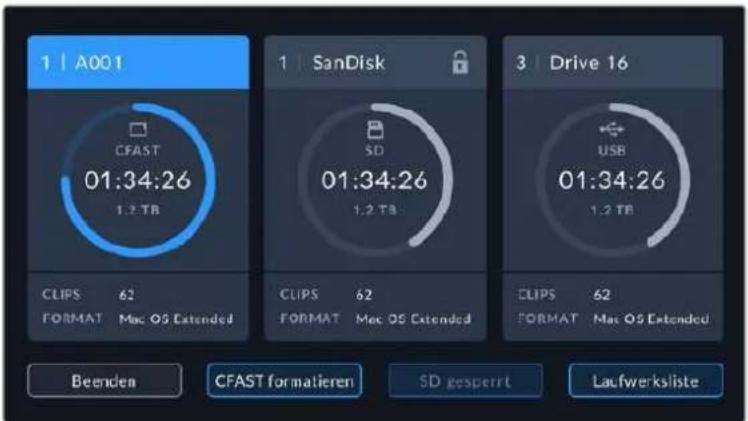
Tippen Sie auf eine der Speicheranzelgen am unteren Rand des Touchscreens, um die Speicherverwaltung zu öffnen
USB-C-Laufwerke
Ohre Blackmagic Pocket Cinema Camera verfugt über einen rasant schnellen USB-C-Expansionssport, über den Sie Video direkt auf USB-C-Laufwerke aufzeichnen konnen. Mit diesen schnellen, leistungsstarken Laufwerken konnen Sie Video über lange Zeiträume aufzeichnen, was bei lang andauernden Drehs wichtig sein kann.
Wenn Sie mit der Aufnahme fertig sind, können Sie desselbe Laufwerk für Schnitt und Postproduktion direkt an ihren Computer anschließen, ohne die Daten kopieren zu müssen.
So schreiben Sie ein USB-C-Laufwerk an:
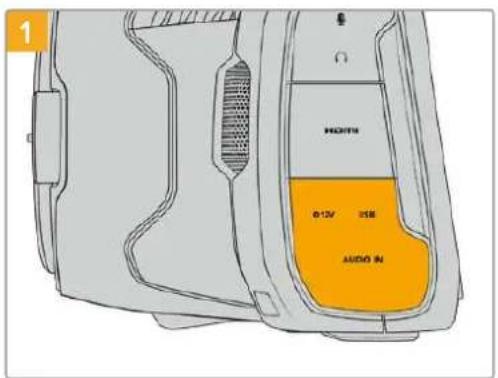
Öffnen Sie die Gummibdeckung auf der linken Seite der Kamera und stecken Sie das andere Ende des Kabels in den USB-C-Port.
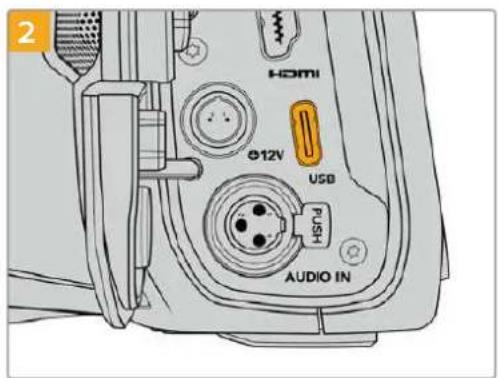
Stecken Sie ein Ende des USB-C-Kabels in Ihr USB-C-Laufwerk.
HINWEIS Wenn ein USB-C-Laufwerk an ihre Kamera angeschlossen ist, nimmt es im Betriebssystem ihrer Kamera denselben Platz ein wie die SD-Karte. Haben Sie ein kompatibles USB-C-Laufwerk angeschlossen, ist der SD-Kartenschacht ihrer Kamera nicht verfügbar.
Umstatt des USB-C-Laufwerks den SD-Kartenschacht zu verwenden, trennen Sie das USB-C-Laufwerk von ihrer Kamera.
Auswahl eines Schnellen USB-C-Laufwerks
USB-C-Laufwerke sind darauf ausgelegt, Schnellen, erschwänglichen Speicherplatz für vielerlei Geräte zu liefern. Sie sind in zahlreichen Elektronikgeschäften erhältlich. Aus thisem Grund ist die Auswahl des zweckdienlichsten Speichermediums unabdingbar, damit ausreichend hohe Aufzeichnungs- geschwindigkeiten zum Filmen von 6K- und 4K-Ultra-HD-Footage gewährleistet sind.
Vielen für Heimcomputer konzipierten USB-C-Laufwerken fehl die nötige Geschwindigkeit für Videoaufzeichnungen in 6K und 4K.
Die aktuellste listened mit empfohlenen USB-C-Laufwerken finden Sie unter www.blackmagicdesign.com/de/support.
Wichtige Hinweise zur Geschwindigkeit von USB-C-Laufwerken
Einige Modèle von USB-C-Laufwerken können Videodaten nicht in der vom Hersteller angegebenen Geschwindigkeit aufzeichen. Das liegt an der vom Speicher verwendeten versteckten Datenkompression, mit der höhere Schreibgeschwindigkeiten erreicht werden. Mit dieser Datenkompression können Daten nur dann in den vom Hersteller angegebenen Geschwindigkeiten gespeichert werden, wenn es sich um Fülldaten oder einfache Datien handelt. Videodaten enthalten Videorauschen und zufällige Pixel, die die Komprimierung erschwenen und dazu die wahre Geschwindigkeit des Speicherträgers offenbaren.
Die Schreibgeschwindigkeit mancher USB-C-Laufwerke kann bis zu 50% geringer sein als vom Hersteller angegeben. Es kann also sein, dass das USB-C-Laufwerk entgegen der angegebenen technischen Daten nicht schnell genug für die Echtzeitaufzeichnung von Video ist.
Prufen Sie mithilfe des Blackmagic Disk Speed Tests, ob Ihr USB-C-Laufwerk für die Aufzeichnung und Wiedergabe von hohen Datenraten geeignet ist. Beim Blackmagic Disk Speed Test wird anhand von Daten die Videospeicherung simuliert. Das zeigt ihren ähnliche Ergebnisse an, wie sie sich bei der Erfassung von Video auf einer Festplatte ergeben wurden. Von Blackmagic durchgeführte Tests haben ergeben, dass neuere,großere Modelle von USB-C-Laufwerken und USB-C-Laufwerke mit higheren Kapazitäten in der Regel schneller sind.
Der Blackmagic Disk Speed Test ist im Mac App Store erhält. Windows- und Mac-Versionen sind ebenfalls in der Blackmagic Desktop Video Software enthalten. Diese stehen Ohnen im Blackmagic Design Support Center auf www.blackmagicdesign.com/de/support unter „Aufzechnung und Wiedergabe" als Download zur Verfügung.
Datenträger für die AufnahmeVBorbereiten
Ohr CFast- zby. SD-Karten oder USB-C-Flashspeicher konnen Sie mithilfe der Funktion „Karte formatieren" im Speicher- und Formatierungsmenu Ihrer Kamera oder über einen Mac- oder Windows-Computer formatieren. Für eine optimale Leistung empfleht sich die Formatierung ihrer Speicherkarten mit Ihrer Kamera.
HFS+ wird auch als „OS X Extended“ bezeichnet und ist das empfohlene Format, da es Journaling unterstützt. Auf Datenträgern mit Journaling gespeicherte Daten halten sich im selenen Fall einer Beschädigung ihren Speichermediums mit higherer Wahrscheinlichkeit wiederherstellen. HFS+ wird nativ von Mac unterstützen. exFAT wird von Mac und Windows nativ unterstützt und macht den Kauf zusätzlicher Software überflüssig. Journaling unterstützt es jedoch nicht.
Datenträger mit einer Blackmagic Pocket Cinema CameraVBbereiten
Tippen Sie auf eine der Speicheranzeigen am unteren Rand des LCD-Touchscreens, um den „Storage Manager" (Speichermanager) zu öffnen.
2 Tippen Sie auf "CFAST formatieren" oder "SD-Karte formatieren". Wenn ein USB-C-Stick an ihre Kamera angeschlossen ist, tippen Sie auf "Laufwerksliste" und dann auf das zu formatierende Laufwerk.
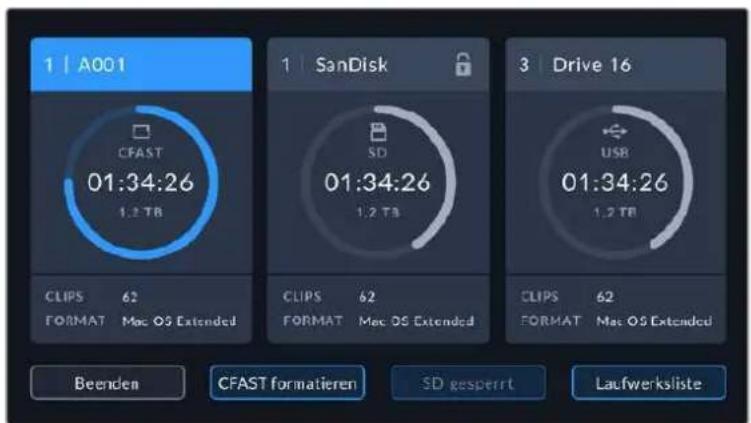
Haben Sie ein USB-C-Laufwerk an ihre Kamera angeschlossen, erscheidt auf dem Speicher- und Formatierungsbildschirmstatt „SD-Karte formatieren" nun „Laufwerk formatieren"
HINWEIS Ist ihre Kamera an einen Laufwerk-Hub wie eine Blackmagic MultiDock angeschlossen, erscheinen alle für ihre Kamera verfügbar baren SSD-Speicher auf der Laufwerksliste. Um das Laufwerk für die Aufzechnung zu wahlen, tippen Sie auf das gewünschte Laufwerk und dann auf die „Laufw. verwenden“-Schaltfläche.
Tippen Sie auf „Reelnummer bearbeiten“, um die Bandnummer manuell zuändern. Um eine neue Bandnummer einzugegeben, verwenden Sie die Tastatur. Drücken Sie anschließend auf „Aktualisieren“, um ihre Auswahl zu bestätigten.
4 Wahlen Sie das Format OS X Extended oder exFAT aus und tippen Sie auf den „Formatieren"-Button.

Tippen Sie auf „Reelnummer bearbeiten“, um die Bandnummer manuell zuändern.
5 Über ein Bestätigungsfenster konnen Sie die zu formierende Karte, das ausgewählte Format und die Bandnummer vorgegeben. Bestätigen Sie ihre Auswahl durch Antippen des „Formatieren“-Buttons. Tippen Sie auf „Abbrechen“, um die Formatierung abzubrechen.
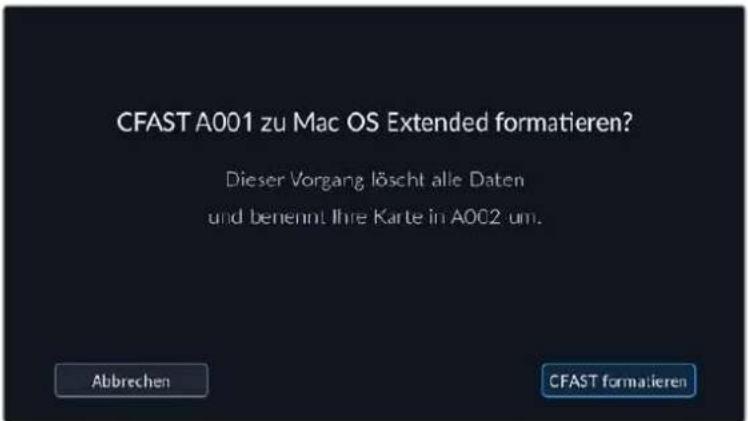
Vergewissern Sie sich vor dem Formatieren, dass Sie die richtige Karte ausgewählten haben
6 Halten Sie den „Formatieren“-Button 3 Sekunden lang gedrückt, um Ihr Medium zu formatieren.
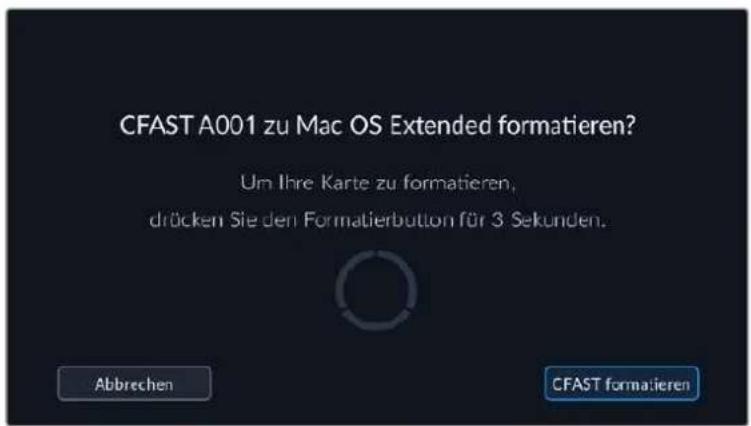
Die Kamera zeigt Ihnen an, wenn die Formatierung abgeschlossen und Ihr Laufwerk einsatzbereit bzw. die Formatierung fehlgeschlagen ist.
8 Tippen Sie auf, OK", um zum Storage Manager zusückzukehren.
Tippen Sie auf „Beenden“, um den Storage Manager zu verlassen.
Beim Formatieren von CFast- bzw. SD-Karten oder USB-C-Laufwerken mit der Kamera wird die aus der Klappen- und Bandnummer generierte Kamera-ID zur Benennung der Medien verwendet. ihre Kamera passst die Bandnummern bei jeder Formatierung automatisch schrittweise an. Wenn Sie eine bestimmte Bandnummer manuell eingeben möchten, tippen Sie auf „Reelnummer bearbeiten" und geben die Nummer vor, die Ihrer Karte bei der Formatierung zugewiesen werden soll.
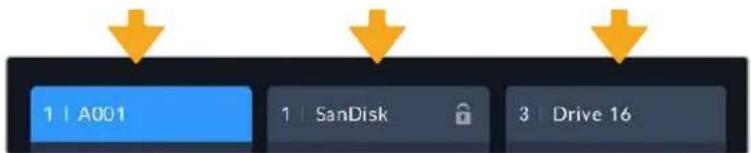
Der Storage Manager Ihr Kamera zeigt an, ob Sie aktuell mit CFast-bzw. SD-Karten oder USB-C-Flash-Laufwerken arbeiten
Wenn Sie ein neues Projekt beginnen und die Nummerierung auf 1 zurücksetzen möchten, tippen Sie auf der PROJEKT-Registerkarte für die Slate auf „Projektdaten zurücksetzen".
TIPP Wenn die SD-Karte schreibgeschützt ist, wirdstatt der Aufnahmedauer der Karte auf dem LCD-Touchscreen Ihrer Kamera das Wort „Gesperrt" und im Speichernmen ein Schlosssymbol angezeigt. Entsperren Sie die Karte, um sie zu formatieren und darauf aufzuzeichnen. Naheres finden Sie im Abschnitt „SD-Karten" in dieser Handbuch.
HINWEIS Falls Sie ein USB-C-Laufwerk angeschlossen haben, erscheidt an der zweiten Speicherstelle „Externes Laufwerk".
Datentrager auf Mac-SystemenVBbereiten
Benutzen Sie das in Mac enthaltene Festplattendienstprogramm, um ihre CFast- bzw. SD-Karte oder Ihr USB-Laufwerk in HFS+ oder exFAT zu formatieren. Denken Sie daran, eine Sicherungskopie aller wichtigen Inhalte auf ihren Datenträgern zu erstellen, da beim Formatieren alle vorhandenen Daten verloren gehen.
1 SchlieBen Sie den Datentrager an ihren Computer an und ignorieren Sie jegliche Meldungen, die Ihnen die Verwendung fur Time Machine Backups anbieten.
2 Gehen Sie zu „Programme“ > „Dienstprogramme“ und starten Sie das Festplattendienstprogramm.
3 Klichen Sie auf das Laufwerksymbol für das Speichermedium ihrer Kamera und dann auf "Erase" (Löschen).
4 Geben Sie als Format „Mac OS Extended (Journaled)“ oder „exFAT“ vor.
5 Geben Sie einen Namen für das neue Volumen ein und klichen Sie auf „Erase". Das Speichermedium ihrer Kamera ist im Nu formatiert und einsatzbereit.
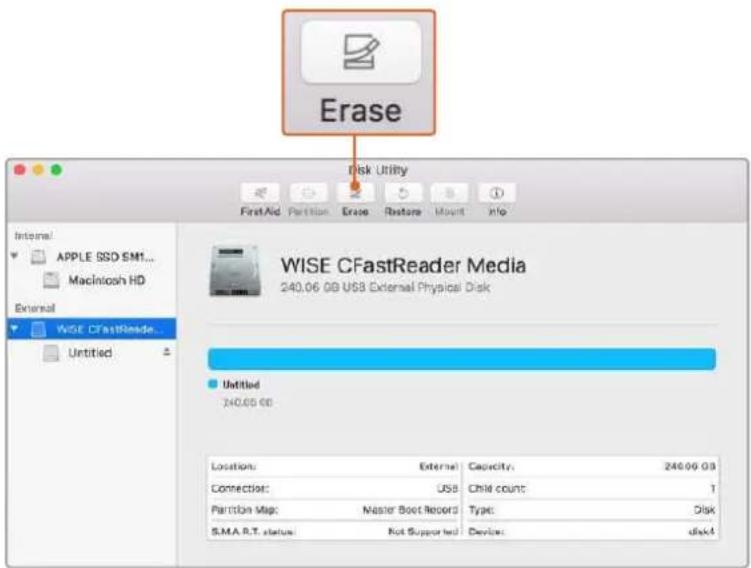
Benutzen Sie das in Mac enthaltene Festplattendienstprogramm, um ihre CFast-bzw. SD-Karte oder Ihr USB-Laufwerk In HFS+ oder exFAT zu formatieren. Denken Sie daran, eine Sicherungskopie aller wichtigen Inhalte auf ihren Datenträgern zu erstehen, da beim Formatieren alle vorhandenen Daten verloren gehen
Datentrager auf Windows-SystemenVBoreiten
Über das Dialogfeld „Formatieren“ lassst sich das Speichermedium ihrer Kamera auf einem Windows-PC in exFAT formatieren. Denken Sie daran, eine Sicherungskopie aller wichtigen Inhalte auf ihren Datenträgern zu erstellen, da beim Formatieren alle vorhandenen Daten verloren gehen.
1 Verbinden Sie das Speichermedium ihrer Kamera über ein externes Lesegerät, ein USB-C-Kabel oder einen Adapter mit ihrem Computer.
2 Öffnen Sie das Startmenu oder den Startbildschirm und wahlen Sie „Computer" aus. Führten Sie einen Rechtsklick auf dem Speichermedium ihrer Kamera aus.
3 Wahlen Sie im Kontextmenu „Formatieren" aus.
4 Stellen Sie das Dateisystem auf „exFAT" und die Grübe der Zuordnungseinheit auf 128 Kilobytes ein.
5 Geben Sie eine Volumenkennung ein, wahren Sie „Schnellformatierung" aus und klichen Sie auf „Start".
Das Speichermedium Ihrer Kamera ist im Nu formatiert und einsatzbereit.
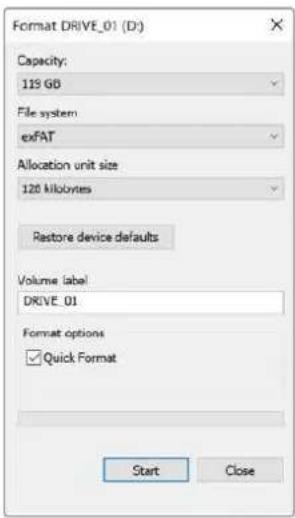
Verwenden Sie das Dialogfeld "Formatieren" auf Windows, um das Speichermedium ihrer Kamera in exFAT zu formatieren
HINWEIS Falls Bilder fallen gelassen werden, prufen Sie, ob ihre Karte oder Ihr Laufwerk auf unserer Kunden empfehlener Medien steht und ob sie bzw. es für den verwendeten Codec und die Framegroße geeignet ist. Versuchen Sie, für keinere Datenraten ihre Framerate oder Auflösung zu reduzieren oder einen komprimierten Codec wie ProRes zu verwenden. Die aktuellsten Informationen finden Sie auf der Blackmagic Design Website unter www.blackmagicdesign.com/de
HINWEIS Mit ihrer Blackmagic Pocket Cinema Camera konnen Sie partitionierte Medien verwenden, wobe Its Kamera fur die Aufnahme und Wiedergabe nur die primare Partition erkennt.
Hier sollte erwähnt sein, dass nicht nur die primäre, für die Aufnahme und Wiedergabe benutzte Partition, sondern das gesamte Laufwerk gelöscht wird, wenn Sie Ihr Medium über das Speicher- und Formatierungsmenu formatieren. Aus thisem Grund empfehlen wir Ihnen, Medien mit nur einer Partition zu verwenden.
Aufzeichnen
Aufzeichnen von Clips
Die Blackmagic Pocket Cinema Camera verfügt über zwei Aufnahmetasten. Die Hauptaufnahmetaste befindet sich oben auf dem Handgriff, sodass man sie beim Halten mit der rechten Hand ganz einfach mit dem Zeigefinger drücken kann.
Die zweite Aufnahmetaste finden Sie an der Vorderseite der Kamera. Diese ermoglicht es Ihnen, die Aufnahme einhändig zu starten, wenn Sie sich selbst filmen mochten. Die Taste befindet sich in griffbereiter Position und ist somit ideaal fur Videoblogaufnahmen.
Um direkt mit der Aufnahme zu beginnen, drücken Sie eine der Aufnahmetasten an der Kamera. Drücken Sie die Aufnahme erneut, um die Aufnahme zu beenden.
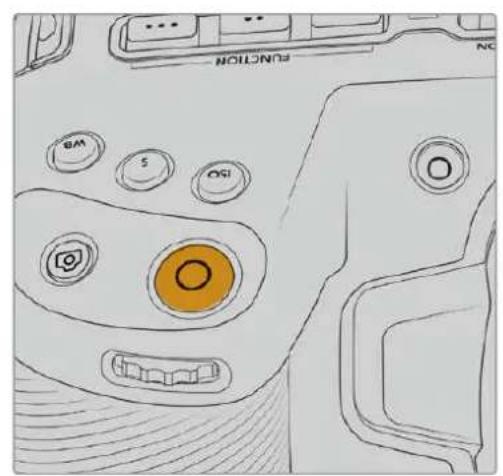
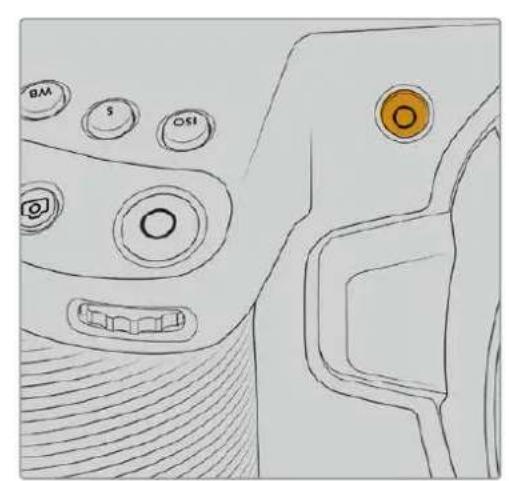
Die Aufnahmetasten an der Kameraoberseite. Die Aufnahmetase an der Kameravorderseite
Bevor Sie mit der Aufnahme beginnen, tippen Sie am unteren Rand des Touchscreens auf den Name des Mediums und halten diesen gedrückt, um die gewünschte Speicherkarte oder das zu verwendende USB-C-Laufwerk auszuwahlen. Ein darüberliegender Balken zeigt in Blau an, welches Medium Sie für die Aufzeichnung ausgewählt haben. Um auf eine andere Karte oder ein anderes Laufwerk aufzueichen, tippen Sie auf den Name des Mediums und haltenihn gedrückt. Wahrend der Aufzeichnung ist der Balken rot.
Auswahldes Aufnahmeformats
Die Blackmagic Pocket Cinema Camerazeichnet mit Apple ProRes Codec's einschließlich ProRes 422 HQ, ProRes 422, ProRes 422 LT und ProRes 422 Proxy auf. Mit ProRes-Codecs passst mehr Videomaterial auf ihre SD-, CFast-Karte oder Ihr USB-C-Laufwerk. ProRes 422 HQ komprimiert am geringsten und liefert die höchste Qualität. Mit ProRes 422 Proxy wird erheblich stärker komprimiert. Es liefert damit wesentlich langere Aufzechnungszeiten. Ihr Kamera kann auch im Blackmagic-RAW-Format aufzeichen. Probieren Sie einfach ein paar Formate aus, um das passendste für ihren Workflow zu finden.
Es ist wichtig zu wisen, dass die Blackmagic Pocket Cinema Camera für Blackmagic RAW das volle Sensorformat oder gecroppte Sensorformate, für ProRes jedoch ausschließlich skalierte Formate verwendet.
Naheres zu den gecroppten und skalierten Formaten finden Sie im Abschnitt „Maximale Bildraten des Sensors".
Blackmagic RAW
Die Blackmagic Pocket Cinema Camera unterstützt das Blackmagic-RAW-Dateformat. Das Format liefert eine übbragende Bildqualität und einen breiten Dynamikumfang in zahlreichen Kompressionsverhältnissen. Mit Blackmagic RAW genieß man alle Anwendervorteile von RAW-Aufzechnungen. Da die Verarbeitung großteils in der Kamera staatfindet und die Hardware von der Kamera selbst beschleunigt wird, sind die Dateien sehr schnell zu handhaben.
Blackmagic RAW bietet ebenfalls umfangreichen Metadataen-Support, sodass die Software, die die Dateien liest, ihre Kameraeinstellungen gleich miterfasst. Wenn Sie vorzugsweise in „Video“-Gamma drehen, weil Sie im Nuschneiden mussen und keine Zeit fur Farbkorrekturen haben, dann eröffnet Ihnen die Metadataen-Feature eine neue Option. Sie konnen wie gehabt „Video“-Gamma auswahlen und in „Video“-Gamma filmen. Beim späteren Öffnen der Daten in einer Software wird sie dann mit angewendeten „Video“-Gamma darestellt. Unter all den aufgenommenen Daten enthalt但这e Daten aber auch die „Film“-Gammadaten. Die Daten wird nur deshalb in „Video“-Gamma angezeigt, weil die darin enthaltenen Metadataen die Software instruieren, „Video“-Gamma anzuzeigen.
Möchten Sie ihre Bilder später noch irgendwann farbkorrigieren, verfügen Sie dank der in der Daten bewahrenen Daten über den gesamtten „Film“-Dynamikumfang. Da die Videoüberpegel ihrer Bilder in den Weis- und Schwarztönen nicht per hartem Clipping abgeschritten werden, reicht das vorhandene Detail, um all ihren Bildern durch Colorgrading einen filmischen Look zu verliehen. Kein Problem, wenn Ihnen die Zeit furs Grading fehl, da die Bilder mit dem angewendeten „Video“-Gamma ohnehin wie reguläre Videokamerabildner aussehen. Ihr beim Dreh getroffene Entscheidung ist nicht endgültig, da Sie sie später in der Postproduktion revidieren können.
Blackmagic-RAW-Dateien sind extrem schnell und der Codec ist für den Einsatz von CPUs und GPUs auf Ihr Computer optimiert. Das sorgt für einechnelle, geschmeidige Wiedergabe und es erbrigen sich Hardware-Decoder, die sonst bei der Verwendung auf Laptops erfolderlich sind. Software, die Blackmagic RAWlesen kann, bietet den zusätzlichen Vorteil der Verarbeitung mit Apple Metal, Nvidia CUDA oder OpenCL.
So lessen sich Blackmagic-RAW-Dateien auf den meisten Rechnern wie eine Videodate bei normaler Geschwindigkeit abspielen, ohne dass man sie zunachst cachen oder ihre Auflösung reduzieren muss.
Wissenswert ist auch, dass in den Metadaten für jeder Einzelbild die objektivbezogenen Daten mit aufgezeichnet werden. Beispiel: Alle im Laufe eines Clips an kompatiblen Objektiven vorgenommen Änderungen der Zoomstellung oder Fokussierung werden für jeder einzelnen Frame in den Metadaten der Blackmagic-RAW-Datei gespeichert.
In Blackmagic RAW aufzeichnen
Blackmagic RAW arbeitet mit zwei verschieden Kompressionsmethoden. Sie haben die Wahl zwischen den Codec-Modi „Constant Bitrate" mit konstanter Bitrate oder „Constant Quality" mit konstanter Qualität.
Der Codec-Modus mit konstanter Bitrate Funktioniertähnlich wie die meisten Codec. Er strebt eine Datenrate auf konstantem Niveau an und verhindert allzu weite Ausschlage der Datenrate nach oben. Wenn es beim Dreheneiner komplexen Einstellung gilt, mehr Bilddaten zu speichern, komprimiert der Codec-Modus mit konstanter Bitrate das Bild einfach stärker, damit die Daten in den definierten Speicherplatz passen.
Für Video-Codecs mag das ausreichen. Beim Drehen in Blackmagic RAW ist es jedoch wichtig, für eine kalkulierbare Qualität zu sorgen. Was passiert nun, wenn ihre Aufnahmen mehr Daten generieren, der Codec sie aber bloß stärker komprimiert, damit eine vordefinierte Datenrate eingehalten wird? Womöglich beschert Ihnendas einen Qualitätsverlust. Sicher sein konnen Sie aber erst, wenn Sie das nach abgeschlossenem Dreh prufen.
Blackmagic RAW lost these Problem mit einem alternativen Codec-Modus namens "Constant Quality". Technisch ist dieser Codec bei konstanter Qualität ein Codec mit variabler Bitrate. Er erlaubt steigende Dateigrößen, wenn die Aufzeichnung ihrer Bilder mehr Speicherplatz beansprucht. Soll ein Bild unter Beibehaltung der Qualität verschlüsselt werden, ist die Dateigröße in thisem Modus nach oben hin offen.
Hier ist es genau richtig, Blackmagic RAW auf „Constant Quality“ einzustellen, da die Datei so groß werden darf, wie es das Encoding ihrer Bilder verlangt. Je nachdem, welche Motive Sie filmen,)durfen die Dateien entsprechend großer oder kleiner ausfallen. Sollen Siejemals versehentlich mit aufgestecktem Objektivdeckel filmen, wird kein Speicherplatz vergaedet.
Die Qualitätseinstellungen für Blackmagic RAW sind übrigens nicht willkürlich benannt. Die Namele leiten sich von den technischen Abläufen ab. Bei Auswahl des Codecss "Constant Bitrate" werden Ihnen die Qualitätseinstellungen 3:1, 5:1, 8:1 und 12:1 angezeigt. Die Zahlen drucken das Verhältnis zwischen der Höhe der Datien in unkompromietertem RAW und der Höhe der beim Filmen in Blackmagic RAW zu erwartenden Datien aus. Das Kompressionsverhältnis 3:1 liefert bessere Qualität, da die Datie größter ist. Die stärkste Kompression von 12:1 liefert die klinste Datie und die gingste Qualität. Zahlreiche Anwender von Blackmagic RAW finden 12:1 vollig in Ordnung und bemerken keine augenfälligen Qualitätsinschänkungen. Experimentieren Sie einfach selbst mit den entsprechlichen Einstellungen.
Wenn Sie Blackmagic RAW bei konstanter Qualität verwenden, sind die verfügbaren Optionen Q0, Q1, Q3 und Q5. Die Kompressionsparameter für den Codec drücken das Maß der anzuwendenden Kompression technisch aus. Sie dienen zur Auswahl der Codec's. Abhängig davon, ob man mit konstanter Bitrate oder konstanter Qualität arbeitet, erfolgt die Verarbeitung entsprechlich. Mit der Einstellung "Constant Quality" kann man das resultierende Datelgroßenverhältnis nicht wirklich abschätzen, da es je nach Motiv der Aufnahme stark variiert. Die Datei wird dann einfach so groß, wie es das Speichern ihrer Mediendaten erfordert.
"Constant Bitrate"-Einstellungen
Die Bezeichnungen 3:1, 5:1, 8:1 und 12:1 beschreiben das Kompressionsverhältnis. Bspw. entstehen bei einer 12:1-Kompression eine Datei, die um das 12-fache kleiner ist als der Umfang der unkomprimierten RAW-Daten.
"Constant Quality"-Einstellungen
Die Einstellungen Q0 und Q5 drücken verschiedene Quantisierungsstufen aus. Mit einer stärkeren Quantisierung erzielt Q5 eine erheblich bessere Datenrate. Mit der Einstellung für konstante Qualität kann es je nach Motiv wie gesagt zu erheblichen Variationen der resultierenden Dateigrößen kommt. Es kann also passieren, dass Sie mitten im Dreh bemerken, dass die Dateigröße über die Kapazität Ihres Speicherträgers hinauswachst. Das konnte zum Auslassen von Frames führen. Das Gute ist jedoch, dass Sie das beim Dreh sofort sehen und unter Erwägung der Qualität ggf. ihre Einstellungen ändern können.
Blackmagic RAW Player
Der im Softwareinstallationsprogramm Ihrer Blackmagic Kamera enthaltene Blackmagic RAW Player ist eine optimierte Anwendung zum Sichtein von Clips. Öffnen Sie eine Blackmagic-RAW-Datei einfach per Doppelclick, um sie sofort wiederzugegeben und bei voller Auflösung und Bittiefe durch die Datei zu scrollen.
Beim Decodieren der Frames Unterstützung die CPU-beschleunigte SDK-Bibliothek alle wichtigen Architekturen. Ebenfalls Unterstützung wird GPU-Beschleunigung via Metal, Nvidia CUDA und OpenCL. Für extra Performance Funktioniert der Blackmagic RAW Player auch mit der Blackmagic eGPU. Der Blackmagic RAW Player ist für Mac, Windows und Linux erhältlich.
Filialdateien
Blackmagic-RAW-Filialdateien (.sidecar) erlauben Ihnen, die Metadaten in einer solchen Sidecar-Datei zu überschreiben, ohne darauf die in die Originaldatei eingebetteten Metadaten zu ersetzen. Die Metadaten enthalten...,
naben den Blackmagic-RAW-Einstellungen auch Informationen zu Blende, Fokussierung, Brennweite,
Weiabgleich, Tonung, Farbraum sowie Projektnamen, Take-Nummern usw. Das Encoding von Metadaten wird
wahrend der Dauer des Clips von Einzelbild zu Einzelbild vorgenommen. Wichtig ist das bspw. fur Objektivdaten,
falls beim Filmen einer Einstellung das Objektiv nachjustiert wurde. Da es sich um ein visuell lesbares Format
handelt, konnen Sie mit DaVinci Resolve oder sareg mit einem Text-Editor Metadaten in Filialdateien bearbeiten oder neue hinzufugen.
Anhand von Filialdateien kann man eine Wiedergabe automatisch mit neuen Blackmagic RAW-Einstellungen versehen, indem man einfach die Filialdatei in denselben Ordner wie die dazugehörige RAW-Datei verschiett. Wenn Sie die Filialdatei wieder aus dem Ordnerziehen und die Blackmagic-RAW-Datei erneut offen, wird Ihnen die Datei wie ursprünglich gefilmt ohne die veränderten Einstellungen angezeigt. Jede Software, die das Blackmagic RAW SDK verwendet, kann auf diese Einstellungen zugreifen. Vorgenommene Änderungen werden in einer Filialdatei gespeichert, auf die der Blackmagic RAW Player und alle anderen Softwares mit der Kapazitat, Blackmagic-RAW-Dateien zu lesen, zugreifen konnen.
Beim Drehen in „Video“-Gamma werden in der Datei trotzdem auch die „Film“-Gammadaten aufgezeichnet. Die Metadataen geben der Blackmagic RAW Verarbeitung jedoch den Befehl für die Anzeige in „Video“-Gamma. „Video“-Gamma ist großartig für Bilder, die Sie nicht graden, sondern unverzüglich ausgegeben möhen. Trotzdem werden alle Einzelheiten festgehalten, sodass Sie später die Schwarztonbereiche eines Bildes hochziehen oder die weiß abschwächen konnen. Weil niemals Videoüberpegel abgeschritten werden, bleibt das gesamte Detail für den späteren Zugriff erhalten.
Blackmagic RAW in DaVinci Resolve
Für künstlerische Effekte oder optimiertes Sichtekten können die Einstellungen jeder einzelnen Blackmagic-RAW-Datei angepasst und über den „Camera Raw“-Tab in DaVinci Resolve als neue Filialdatei (.sidecar) gespeichert werden. Somit können Sie Ihr Medien für andere DaVinci Resolve Artists kopieren, die dann nach dem Import automatisch Zugriff auf ihre modifizierten Gamma-Einstellungen haben. Zusätzlich zu den anderen in ihren Kameradateien enthaltenen Metadataen kann DaVinci Resolve ihren ausgewählten Dynamikumfang lessen und zeigt die Clips automatisch in „Film“, „Extended Video“ oder „Video“ an.
Anschließlich konnen Sie diese Einstellungen individualisieren, indem Sie die Werte für Sattigung, Kontrast und Mitteltone sowie für Highlight- und Shadow-Roll-Off anpassen. Sümmtliche Anpassungen werden dann in einer Filialdatei (.sidecar) gespeichert. Dort sind sie für jeder sightbar, der in der Postproduktion an den Dateien arbeitet. Sie konnen aber jederzeit wieder auf die ursprünglichen Kamerametadataen zugreifen.
Einzelne Frames in Blackmagic RAW können zusammen mit allen Anpassungen, Metadataen, voller Auflösung und Farbinformationen über den „Camera Raw“-Tab aus DaVinci Resolve exportiert werden. So ist es ein Leichtes, ein Einzelbild oder eine Referenzdaten mit anderen zu teilen.
Wie Sie Blackmagic RAW in DaVinci Resolve im Einzelnen verwenden, erfolhen Sie im Kapitel „Verwenden von DaVinci Resolve" diesen Handbuchs.
Blackmagic RAW Software Development Kit
Das Blackmagic RAW Software Development Kit (SDK) ist eine von Blackmagic Design entwickelte Schnittstelle zur Anwendungsprogrammierung (API). Mit dem Blackmagic RAW SDK konnen Sie eigene Anwendungen so programmieren, dass sie das Blackmagic-RAW-Format verwenden. Entwicklung konnen Anwendungen mithilfe der SDK-Bibliothek um Support zum Lesen, Bearbeiten und Speichern von Blackmagic-RAW-Dateien erweitern. Im Blackmagic RAW SDK steckt die gesamte Generation 5 Color Science. Damit konnen Sie in allen Anwendungen, die sie unterstützen, natürliche filmische Bilder erzielen. Das Blackmagic RAW SDK unterstützt Mac, Windows und Linux. Es stets zum kostenlzen Download auf der Entwickler- Seite der Blackmagic Design Website unter www.blackmagicdesign.com/de/developer bereit.
Das nachstehende Diagramm veranschaulicht die Komponenten der Blackmagic RAW API:

Maximale Sensor-Frameraten
Maxlmale Sensor-Frameraten für die Blackmagic Pocket Cinema Camera 6K Pro und die Pocket Cinema Camera 6K G2
| Auflösung Codec Sensorfläche Max. Framerate | ||||
| 6K | 6144 x 3456 | Blackmagic RAW | Voll | 50 |
| 6K 2,4:1 | 6144 x 2560 | Blackmagic RAW | Gecroppt | 60 |
| 5,7K 17:9 | 5744 x 3024 | Blackmagic RAW | Gecroppt | 60 |
| 4K DCI | 4096 x 2160 | Blackmagic RAW | Gecroppt | 60 |
| 4096 x 2160 | ProRes 422 HQ | Skaliert von 5,7K | 60 | |
| 4096 x 2160 | ProRes 422 | Skaliert von 5,7K | 60 | |
| 4096 x 2160 | ProRes 422 LT | Skaliert von 5,7K | 60 | |
| 4096 x 2160 | ProRes 422 Proxy | Skaliert von 5,7K | 60 | |
| Ultra HD | 3840 x 2160 | ProRes 422 HQ | Skaliert von voll | 50 |
| 3840 x 2160 | ProRes 422 | Skaliert von voll | 50 | |
| 3840 x 2160 | ProRes 422 LT | Skaliert von voll | 50 | |
| 3840 x 2160 | ProRes 422 Proxy | Skaliert von voll | 50 | |
| 3840 x 2160 | ProRes 422 HQ | Skaliert von 5,7K | 60 | |
| 3840 x 2160 | ProRes 422 | Skaliert von 5,7K | 60 | |
| 3840 x 2160 | ProRes 422 LT | Skaliert von 5,7K | 60 | |
| 3840 x 2160 | ProRes 422 Proxy | Skaliert von 5,7K | 60 | |
| 3,7K Anamorph | 3728 x 3104 | Blackmagic RAW | Gecroppt | 60 |
| 2,8K 17:9 | 2868 x 1512 | Blackmagic RAW | Gecroppt | 120 |
| HD | 1920 x 1080 | ProRes 422 HQ | Skaliert von voll | 50 |
| 1920 x 1080 | ProRes 422 | Skaliert von voll | 50 | |
| 1920 x 1080 | ProRes 422 LT | Skaliert von voll | 50 | |
| 1920 x 1080 | ProRes 422 Proxy | Skaliert von voll | 50 | |
| 1920 x 1080 | ProRes 422 HQ | Skaliert von 5,7K | 60 | |
| 1920 x 1080 | ProRes 422 | Skaliert von 5,7K | 60 | |
| 1920 x 1080 | ProRes 422 LT | Skaliert von 5,7K | 60 | |
| 1920 x 1080 | ProRes 422 Proxy | Skaliert von 5,7K | 60 | |
| 1920 x 1080 | ProRes 422 HQ | Skaliert von 2,7K | 120 | |
| 1920 x 1080 | ProRes 422 | Skaliert von 2,7K | 120 | |
| 1920 x 1080 | ProRes 422 LT | Skaliert von 2,7K | 120 | |
| 1920 x 1080 | ProRes 422 Proxy | Skaliert von 2,7K | 120 | |
Maximale Sensor-Frameraten der Blackmagic Pocket Cinema Camera 4K
| Auflösung Codec Sensorfläche Max. Framerate | |||
| 4K DCI | 4096 x 2160 Blackmagic | RAW Voll 60 | |
| 4096 x 2160 ProRes 422 | HQ Voll 60 | ||
| 4096 x 2160 ProRes 422 | Voll 60 | ||
| 4096 x 2160 ProRes 422 | LT Voll 60 | ||
| 4096 x 2160 ProRes 422 | Proxy Voll 60 | ||
| 4K 2,4:1 | 4096 x 1720 | Blackmagic RAW | Gecroppt 75 |
| Ultra HD | 3840 x 2160 | Blackmagic RAW | Gecroppt 60 |
| 3840 x 2160 | ProRes 422 HQ | Gecroppt 60 | |
| 3840 x 2160 | ProRes 422 | Gecroppt 60 | |
| 3840 x 2160 | ProRes 422 LT | Gecroppt 60 | |
| 3840 x 2160 | ProRes 422 Proxy | Gecroppt 60 | |
| 2,8K Anamorph | 2880 x 2160 | Blackmagic RAW | Gecroppt 80 |
| 2,6K 16:9 | 2688 x 1512 | Blackmagic RAW | Gecroppt 120 |
| HD | 1920 x 1080 | ProRes 422 HQ | Skaliert von voll 60 |
| 1920 x 1080 | ProRes 422 | Skaliert von voll 60 | |
| 1920 x 1080 | ProRes 422 LT | Skaliert von voll 60 | |
| 1920 x 1080 | ProRes 422 Proxy | Skaliert von voll 60 | |
| 1920 x 1080 | ProRes 422 HQ | Skaliert von 2,6K 120 | |
| 1920 x 1080 | ProRes 422 | Skaliert von 2,6K 120 | |
| 1920 x 1080 | ProRes 422 LT | Skaliert von 2,6K 120 | |
| 1920 x 1080 | ProRes 422 Proxy | Skaliert von 2,6K 120 | |
| 1920 x 1080 | Blackmagic RAW | Gecroppt 120 | |
| 1920 x 1080 | ProRes 422 HQ | Gecroppt 120 | |
| 1920 x 1080 | ProRes 422 | Gecroppt 120 | |
| 1920 x 1080 | ProRes 422 LT | Gecroppt 120 | |
| 1920 x 1080 | ProRes 422 Proxy | Gecroppt 120 |
HINWEIS Das Aufzeinungsformat 2,6K 16:9 hat eine für den Einsatz mit Super-16mm-Objektiven und hohen Frameraten optimierte Sensorfläche.
Aufzeichnungsdauer
Die Tabellen geben die ungebahren Aufzeichnungsspannen in Minuten und Sekunden im Verhältnis zu Format, Projekt-Framerate und Speicherkapazität an. Wichtig: Die bei verschiedenen Pocket Cinema Camera Modellen verfügbar Auflösungen und Codec sind entsprechlich.
Die maximale Aufzeichungsdauer für Ihr Speichermedium variiert je nach Kapazität ihrer CFast-bzw. SD-Karte oder USB-C-Laufwerk sowie nach ausgewähltem Aufzeichungnsformat und Framerate. Zum Beispiel liegt die Speicherrate für Apple ProRes 422 HQ mit 3840 x 2160 bei etwa
880 Mbit/s. Bei 24 Bildern pro Sekunde können Sie ungebär 47 Minuten Videomaterial auf eine 256 GB große CFast-2.0-Karte aufzeichnen. Mit den gleichen Einstellungen passen auf eine CFast-Karte mit 128 GB Kapazität rund 23 Minuten Video. Das entspricht ungebär der Häfte der Aufzeinungsdbauser einer 256 GB große CFast-Karte.
Es ist zu beachten, dass sich die Aufzeichnungsspannen von Medien unterschiedlicher Hersteller ggf.leitung entsprechiden. Auch die Formatierung der CFast-Karte in exFAT oder Mac OS X Extended beeinfusst ggf. die Aufzeichnungsdauer von Speichermedien.
Einfache Szenen mit weniger Details erfordern weniger Speicherkapazität als komplizierter Kompositionen. Den Werten in diesen Tabellen liegen hochkomplexe Shots zugrunde. Je nach Art Ihres Drehs kann es also sein, dass Sie etwas langere Aufzeinungsbauern erzielen.
6K
| CFast-Karte Framerate | Blackmagic RAW 3:1 | Blackmagic RAW 5:1 | Blackmagic RAW 8:1 | Blackmagic RAW 12:1 | |
| 256 GB | Dauer Dauer | Dauer Dauer | |||
| 23,98 17 Min. | 28 Min. 45 Min. | 67 Min. | |||
| 24 17 Min. 28 | Min. 45 Min. | 67 Min. | |||
| 25 16 Min. 27 | Min. 43 Min. | 64 Min. | |||
| 30 13 Min. 22 | Min. 36 Min. | 54 Min. | |||
| 50 8 Min. 13 | Min. 21 Min. | 32 Min. | |||
6K 2,4:1
| CFast-Karte Framerate | Blackmagic RAW 3:1 | Blackmagic RAW 5:1 | Blackmagic RAW 8:1 | Blackmagic RAW 12:1 | |
| 256 GB | Dauer Dauer | Dauer Dauer | |||
| 23,98 23 Min. | 38 Min. 60 Min. | 91 Min. | |||
| 24 22 Min. 38 | Min. 60 Min. | 91 Min. | |||
| 25 21 Min. 36 | Min. 58 Min. 87 Min. | ||||
| 30 18 Min. 30 | Min. 48 | Min. 72 Min. | |||
| 50 11 Min. | 18 Min. 29 | Min. 43 | Min. | ||
| 60 9 Min. 15 | Min. 24 Min. 36 | Min. |
5,7K 17:9
| CFast-Karte Framerate | Blackmagic RAW 3:1 | Blackmagic RAW 5:1 | Blackmagic RAW 8:1 | Blackmagic RAW 12:1 | |
| 256 GB | Dauer Dauer | Dauer Dauer | |||
| 23,98 20 Min. | 34 Min. | 55 Min. | 82 Min. | ||
| 24 20 Min. | 34 Min. 55 | Min. 82 | Min. | ||
| 25 19 Min. 33 | Min. 52 Min. | 79 Min. | |||
| 30 16 Min. 27 | Min. 44 Min. | 66 Min. | |||
| 50 10 Min. 16 | Min. 26 Min. | 39 Min. | |||
| 60 8 Min. | 13 Min. 22 | Min. 33 Min. | |||
4K DCI
| CFast-Karte Framerate | Blackmagic RAW 3:1 | Blackmagic RAW 5:1 | Blackmagic RAW 8:1 | Blackmagic RAW 12:1 | ProRes 422 HQ | ProRes 422 | ProRes 422 LT | ProRes 422 Proxy | |
| 256 GB | Dauer Dauer | Dauer Dauer | Dauer Dauer Dauer Dauer Dauer | ||||||
| 23,98 39 Min. | 65 Min. 104 | Min. 155 Min. | 44 Min. 66 Min. | 95 Min. | 216 Min. | ||||
| 24 39 Min. 65 | Min. 103 Min. | 155 Min. 44 | Min. 66 Min. 95 | Min. 216 Min. | |||||
| 25 37 Min. 62 | Min. 99 Min. | 149 Min. 42 | Min. 64 Min. 91 | Min. 207 Min. | |||||
| 30 | 31 Min. | 52 Min. | 83 Min. | 124 Min. | 35 Min. | 53 Min. | 76 Min. | 173 Min. | |
| 50 | 18 Min. | 31 Min. | 49 Min. | 74 Min. | 21 Min. | 32 Min. | 45 Min. | 104 Min. | |
| 60 | 15 Min. | 26 Min. | 41 Min. | 62 Min. | 17 Min. | 26 Min. | 38 Min. | 87 Min. | |
4K 2,4:1
| CFast-Karte Framerate | Blackmagic RAW 3:1 | Blackmagic RAW 5:1 | Blackmagic RAW 8:1 | Blackmagic RAW 12:1 | |
| 256 GB | Dauer Dauer | Dauer Dauer | |||
| 23,98 50 Min. | 84 Min. 134 | Min. 200 Min. | |||
| 24 50 Min. 84 | Min. 134 Min. | 200 Min. | |||
| 25 48 Min. 80 | Min. 128 Min. | 192 Min. | |||
| 30 | 40 Min. | 67 Min. | 107 Min. | 160 Min. | |
| 50 24 Min. 40 | Min. 64 | Min. 96 Min. | |||
| 60 20 Min. | 33 Min. 54 | Min. 80 Min. | |||
| 75 16 Min. 27 | Min. 43 Min. 64 | Min. | |||
| 80 16 Min. 26 | Min. 40 Min. | 60 Min. |
ULTRA HD
| CFast-Karte Framerate | Blackmagic RAW 3:1 | Blackmagic RAW 5:1 | Blackmagic RAW 8:1 | Blackmagic RAW 12:1 | ProRes 422 HQ | ProRes 422 | ProRes 422 LT | ProRes 422 Proxy | |
| 256 GB | Dauer Dauer | Dauer Dauer | Dauer Dauer | Dauer Dauer | |||||
| 23,98 | 41 Min. | 68 Min. | 110 Min. | 164 Min. | 47 Min. | 71 Min. | 101 Min. | 230 Min. | |
| 24 | 41 Min. | 68 Min. | 109 Min. | 164 Min. | 47 Min. | 71 Min. | 101 Min. | 230 Min. | |
| 25 | 39 Min. | 66 Min. | 105 Min. | 157 Min. | 45 Min. | 68 Min. | 97 Min. | 221 Min. | |
| 30 | 33 Min. | 55 Min. | 88 Min. | 131 Min. | 38 Min. | 57 Min. | 81 Min. | 184 Min. | |
| 50 | 19 Min. | 33 Min. | 52 Min. | 79 Min. | 22 Min. | 34 Min. | 48 Min. | 111 Min. | |
| 60 | 16 Min. | 27 Min. | 44 Min. | 66 Min. | 18 Min. | 28 Min. | 40 Min. | 92 Min. | |
3,7K Anamorph
| CFast-Karte Framerate | Blackmagic RAW 3:1 | Blackmagic RAW 5:1 | Blackmagic RAW 8:1 | Blackmagic RAW 12:1 | |
| 256 GB | Dauer Dauer | Dauer Dauer | |||
| 23,98 31 Min. | 51 Min. 82 Min. | 123 Min. | |||
| 24 31 Min. 51 | Min. 82 Min. | 123 Min. | |||
| 25 29 Min. 49 | Min. 79 Min. | 118 Min. | |||
| 30 24 Min. 41 | Min. 65 Min. | 98 Min. | |||
| 50 15 Min. 24 | Min. 39 Min. | 59 Min. | |||
| 60 12 Min. 20 | Min. 33 Min. | 49 Min. | |||
2,8K Anamorph
| CFast-Karte Framerate | Blackmagic RAW 3:1 | Blackmagic RAW 5:1 | Blackmagic RAW 8:1 | Blackmagic RAW 12:1 | |
| 256 GB | Dauer Dauer | Dauer Dauer | |||
| 23,98 57 Min. | 95 Min. 151 Min. | 226 Min. | |||
| 24 57 Min. 95 | Min. 151 Min. | 226 Min. | |||
| 25 54 Min. 91 | Min. 145 Min. | 217 Min. | |||
| 30 45 Min. 76 | Min. 121 Min. | 181 Min. | |||
| 50 27 Min. 45 | Min. 73 Min. | 109 Min. | |||
| 60 22 Min. 38 | Min. 38 Min. | 91 Min. | |||
| 80 17 Min. 28 | Min. 45 Min. | 68 Min. |
2,8K 17:9
| CFast-Karte Framerate | Blackmagic RAW 3:1 | Blackmagic RAW 5:1 | Blackmagic RAW 8:1 | Blackmagic RAW 12:1 | |
| 256 GB | Dauer Dauer | Dauer Dauer | |||
| 23,98 81 Min. | 136 Min. 216 | Min. 321 | Min. | ||
| 24 81 Min. 135 | Min. 215 Min. | 320 Min. | |||
| 25 78 Min. 130 | Min. 207 Min. | 308 Min. | |||
| 30 65 Min. 108 | Min. 173 | Min. 258 | Min. | ||
| 50 39 Min. | 65 Min. 104 | Min. 156 | Min. | ||
| 60 32 Min. 54 | Min. 87 | Min. 130 Min. | |||
| 120 | 16 Min. | 27 Min. | 43 Min. | 65 Min. |
2,6K 16:9
| CFast-Karte Framerate | Blackmagic RAW 3:1 | Blackmagic RAW 5:1 | Blackmagic RAW 8:1 | Blackmagic RAW 12:1 | |
| 256 GB | Dauer Dauer | Dauer Dauer | |||
| 23,98 87 Min. | 144 Min. 230 | Min. 342 Min. | |||
| 24 87 Min. 144 | Min. 229 Min. | 342 Min. | |||
| 25 83 Min. 138 | Min. 220 Min. | 328 Min. | |||
| 30 69 Min. 115 | Min. 184 Min. | 275 Min. | |||
| 50 41 Min. 69 | Min. 111 Min. | 166 Min. | |||
| 60 34 Min. 58 | Min. 92 Min. | 138 Min. | |||
| 120 17 Min. | 29 Min. 46 | Min. 69 Min. | |||
HD
| CFast-Karte Framerate | Blackmagic RAW 3:1 | Blackmagic RAW 5:1 | Blackmagic RAW 8:1 | Blackmagic RAW 12:1 | ProRes 422 HQ | ProRes 422 | ProRes 422 LT | ProRes 422 Proxy | |
| 256 GB | Dauer | Dauer | Dauer | Dauer | Dauer | Dauer | Dauer | Dauer | |
| 23,98 | 159 Min. | 264 Min. | 418 Min. | 619 Min. | 189 Min. | 283 Min. | 403 Min. | 877 Min. | |
| 24 | 159 Min. | 264 Min. | 418 Min. | 618 Min. | 189 Min. | 283 Min. | 403 Min. | 877 Min. | |
| 25 | 153 Min. | 253 Min. | 402 Min. | 595 Min. | 182 Min. | 271 Min. | 387 Min. | 843 Min. | |
| 30 | 127 Min. | 212 Min. | 336 Min. | 499 Min. | 152 Min. | 227 Min. | 324 Min. | 710 Min. | |
| 50 | 76 Min. | 127 Min. | 203 Min. | 303 Min. | 91 Min. | 137 Min. | 196 Min. | 434 Min. | |
| 60 | 64 Min. | 106 Min. | 170 Min. | 254 Min. | 76 Min. | 114 Min. | 163 Min. | 363 Min. | |
| 120 | 32 Min. | 54 Min. | 87 Min. | 130 Min. | 38 Min. | 57 Min. | 82 Min. | 185 Min. |
HINWEIS Blackmagic RAW Unterstützung Aufzeichnungsformate mit voller und mit gecroppter Sensorfläche. Verwenden Sie für alle skalierten Formate einen ProRes-Codec.
Die Formate 6K, 6K 2,4:1, 5,7K 17:9, 4K DCI, 3,7K anamorph und 2,8K 17:9 sind nur bei der Pocket Cinema Camera 6K Pro und 6K G2 verfügbar und verwenden den Blackmagic-RAW-Codec. Diese Kameras verwenden ProRes für Formate in 4K DCI, Ultra HD und HD.
Die Formate 4K 2,4:1, 2,8K anamorph und 2,6K 16:9 sind nur bei der Blackmagic Pocket Cinema Camera 4K verfügbar und verwenden den Blackmagic-RAW-Codec. Die Pocket Cinema Camera 4K verwendet Blackmagic RAW oder ProRes für Formate in 4K DCI, Ultra HD und HD.
Die „Constant Quality“-Einstellungen Q0 und Q5 zeigen variierende Spannen für die verbleibende Aufzeinungszeit an. Die geschätzte Dauer für Q0 ist ähnlich wie für die 3:1-Komprimierung bei „Constant Bitrate“ und die für Q5GLEicht der fur die 12:1-Komprimierung.Während der Aufzeinung wird die geschätzte Aufzeinungsdauer alle 10 Sekunden aktualisiert. Um ihre verbleibende Aufzeinungsdauer selbst abzuschätzen,nehmen Sie am besten 20 Sekunden lang auf und beobachten Sie die im Medienfeld des Touchscreen-Displays angezeigte Dauer.
Auswahlen der Framerate
Ihre Kamera kann Videomaterial mit denen verschieden Frameraten aufzeichen.
Möglicherweise Fragen Sie sich, was für Sie die best geeignete ist.
Bei der Auswahl der Sensor-Framerate sind grundsätzlich ein paar Punkte zu berücksichtigten. Es gibt seit vielen Jahren technische Normen für die Ausstrahlung von Inhalten im Kino und im Fernsehen. Diese umfassen spezifische Frameraten, die sich von Land zu Land entsprechenden, jedoch dem gleichen Zweck dienen: der Anzeige einer effizienten Anzahl von Einzelbildern pro Sekunde, um Bewegungen angenehm und überzeugend darzustellen.
Kino verwendet bspw. standardmäg 24 Frames pro Sekunde. Obwohl es unlangst Experimente mit schnellen Frameraten gegeben hat, sind 24 Frames pro Sekunde für ein internationales Publikum weitestgehend der gängige Standard.
TV-Frameraten richten sich seit jeher im Allgemeinen nach den jeweiligen länderspezifischen technischen Sendestandards. TV-Inhalte hatte man bislang für die Distribution in Nordamerika zum Beispiel üblicherweise mit 29,97 fps aufgezeichnet, für Europa aber mit 25 fps.
Aufgrund des technischen Fortschritts hat man heute jeder mehr Auswahl und die Sondestandards sind im Wandel begriffen. Inzwischen ist es üblich, sportliche Events bei hoheren Frameraten aufzuzeichnen und auszustrahlen. Manche Sportveranstaltungen in Nordamerika werden bspw. mit bis zu 59,94 fps und in Europa mit 50 fps aufgezeichnet und ausgestrahl. Schnelle Action erscheidt dadurch geschmeidiger in der Bewegung und realitätsnaher.
Streaming- und Online-Broadcaster arbeiten normalerweise mit ähnlichen Frameraten wie beim Fernsehen. Sie haben allerdings mehr Experimentierfreiheit. Aufgrund nutzerspezifischer Ansichtsformate sind sie lediglich daraufuf beschränkt, was die Bildschirme des Publikums wiedergeben konnen.
Orientieren Sie sich bei der Auswahr der Framerate grundsätzlich am Ausgabeformat Ihres Projekts. Stellen Sie dafür zunachst die Projekt-Framerate ihrer Kamera ein und danach ihre Sensor-Framerate auf „Match" (Angleichen). So werden ihre Clips mit der gleichen Geschwindigkeit wiedergegeben, mit der sich das Ereignis in der Realität abgeschweit hat.
Wenn Sie einen interessanten Effekt, wie bspw. Zeitlupe, anwenden möchten, können Sie ihre Sensor-Framerate hochsetzen. Je hoher die Sensor-Framerate im Vergleich zur Projekt-Framerate, umso langsamer ist die Wiedergabegeschwindigkeit.
Naheres zur Verwendung von Off-Speed-Sensor-Frameraten für kreative Effekte finden Sie im Abschnitt „Bedienung per Touchscreen".
Trigger-Aufzeichnung
Ohre Blackmagic Pocket Cinema Camera gibt über den HDMI-Ausgang automatisch ein Trigger-Signal aus, das bei angeschlossenen Geräten die Aufzeichnung auslöst. Solche Geräte, wie bspw. ein Blackmagic Video Assist, müssen die Trigger-Aufzeichnungsfunktion unterstützen.
Sobald Sie die Aufnahmetaste ihrer Kamera drücken, beginnt der externe Rekorder ebenfls aufzuzeichnen. Erneutes Drucken der Kamera-Aufnahmetaste stoppt auch die Aufzeichnung auf dem Rekorder. Ihr Kamera gibt zusätzlich Timecode uber den HDMI-Ausgang aus. Mit ihrem externen Rekorder aufgezeichnete Clips weisen somit den gleichen Timecode wie die mit ihrer Kamera aufgezeichneten Clips auf.
Wenn Ihr externer Rekorder die Trigger-Aufzeinung unterszt, müssen Sie diese Funktion aktivieren. Das erfolgt normalerweise über das Einstellungenmenu.
Wiedergabe
Wiedergabe von Clips
Nach dem Sie Ihr Video aufgezeichnet haben, konnen Sie es mithilfe der Transportsteuerelemente auf dem LCD-Display abspielen. Drücken Sie die Wiedergabetaste, um in den Wiedergabemodus zu wechseln. Erneutes Drücken lost die sofortige Wiedergabe des zuletzt aufgenommenen Clips auf dem LCD und allen über den HDMI-Ausgang verbundenen Monitoren aus. Halten Sie die Vor- oder Rücklauf-Buttons auf dem LCD zum schellen Vor- oder Zurückspulen innerhalb des Clips gedrückt. Die Wiedergabe wird beendet, sobald das Ende des aktuellen Clips erreicht ist.
Drucken Sie den Vor- oder Rücklauf-Button, um zum Anfang oder Ende eines Clips zurückzuspringen. Um an den Anfang des aktuellen Clips zu gelangen, drucken Sie die Rücklauftaste einmal. Um zuruck zum Anfang des vorherigen Clips zu springen, drucken Sie sie zweimal. Drucken Sie die Aufnahmetaste, um die Wiedergabe zu beenden und auf dem Touchscreen in die Kameraansicht zurückzukehren.
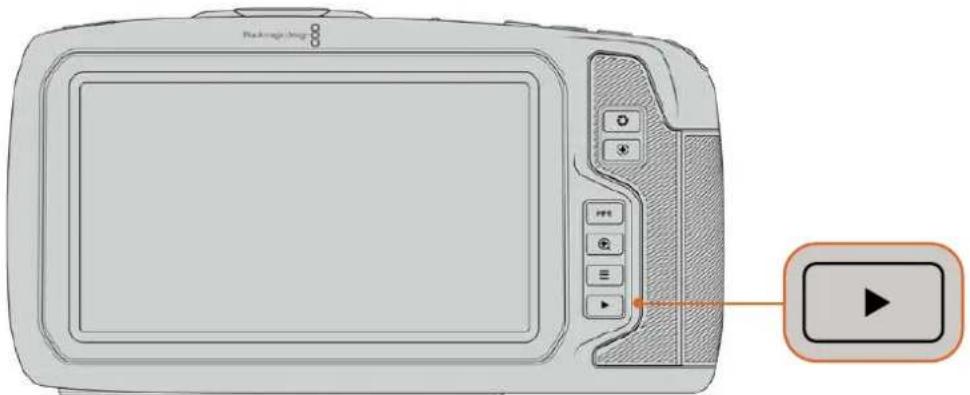
Um ihren zuletzt aufgenommenen Clip auf dem integrierten Touchscreen zu sichen, drücken Sie unter den Transportsteuerelementen den Wiedergabe-Button
Funktionsmerkmale der Kamera
Kameravorderseite

1 Aufnahmetasten
Drücken Sie eine der beiden Aufnahmetasten, um die Aufnahme zu starten und stoppen. Wenn Sie sich selbst aufnehmen, können Sie die Aufnahme mit der Aufnahmetaste vorne an der Kamera bequemer starten und stoppen.
2Einstellrad
Mit dem Einstellrad konnen Sie die Blendenöffnung kompatibler Objektive an ihrer Kamera anpassen. Um die Blende zu öffnen, schiben Sie das Rad bei Ihnen zugewandtem Touchscreen nach links. Um die Blende zu schlieben, drehen Sie das Rad nach rechts. Das Einstellrad dient auch zum Anpassen von Weißabgleich (^ ) , Verschlusswinkel (^ ) und ISO-Wert (^ ) . Zusammen mit der Funktion Focus Zoom eingesetzt, konnen Sie mit dem Einstellrad überdies den Vergroßerungsgrad des optionalen elektronischen Suchers anpassen. Drücken Sie offen an der Kamera die entsprechende Taste. Geben Sie dann mit dem Einstellrad die gewünschte Einstellung vor. Um ihre Auswahl zu bestätigen und das Menu direkt zu schlieben, drucken Sie auf das Einstellrad.
3 Stereomikrofone
Es gibt vier hochwertige interne Stereomikrofone. Informationen zu Mikrofoneinstellungen.
finden Sie im Abschnitt AUDIO-Einstellungen.
4 Objektivanschluss
Die Blackmagic Pocket Cinema Camera 6K Pro und 6K G2 sind mit einem elektronischen EF-Objektivanschluss und das 4K-Modell mit einem elektronischen Micro-Four-Thirds-Objektivanschluss ausgestellt. Sie können somit auf beiden Kameras Objektive mit interneter Bildstabilisierung sowieCompatible Objektive mit Autofokus und Belichtungsautomatik benutzten. Um die von vielen elektronischen Objektiven gebotene Bildstabilisierung bzw. IS-Funktion zu verwenden, setzen Sie den Stabilisatorschalter auf ON, um die Bildstabilisierung auf ihrer Kamera zu aktivieren. Verfügt das Objektiv entsprechens über einen Stabilator-Modus-Schalter, stellen Sie diesen auf den entspruchenden Modus für Standbildaufnahmen oder Bewegung. Bei Objektiven ohne physischen Stabilisator-Schalter können Sie die Bildstabilisierung im SETUP-Menu ihrer Kamera ausschalten.
5 Tally/Aufnahmeindikator
Die Blackmagic Pocket Cinema Camera verfügt vorne über eine keine LED-Leuche, die den Aufnahmestatus der Kamera anzeigt. Über das SETUP-Menu konnen Sie den Aufnahmeindikator ein- oder ausschalten und seine Holligkeit anpassen. Weitere Informationen finden Sie im Abschnitt „SETUP-Einstellungen".
Rechte Kameraseite
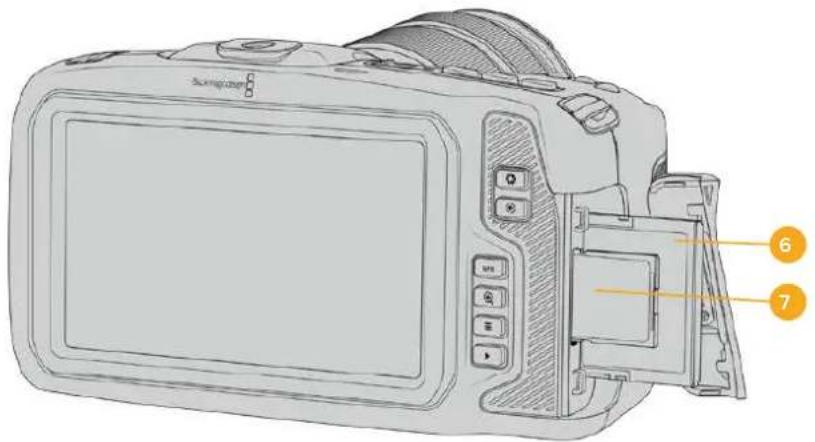
6 CFast-Kartenschacht
Setzen Sie zum Aufnahmen und zur Wiedergabe eine CFast-2.0-Karte in den Kartenschacht ein. Nähere Informationen finden Sie im Abschnitt „CFast-Karten".
7 SD-Kartenschacht
Setzen Sie zum Aufnahmen und zur Wiedergabe eine SD-Karte in den Kartenschacht ein. Weitere Einzelheiten hierzu finden Sie im Abschnitt „SD-Karten".
Linke Kameraseite
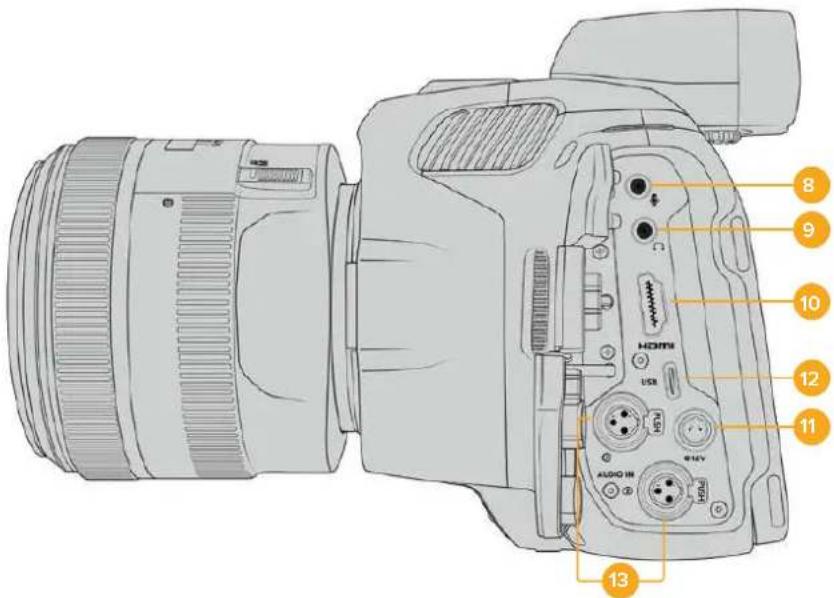
Linkssseitige Buchsen an den Modellen Blackmagic Pocket Cinema Camera 6K Pro und 6K G2

Linksseitige Buchsen an der Blackmagic Pocket Cinema Camera 4K
8 3,5mm-Milkofoneingang
Schlieben Sie über den 3,5mm-Stereoanschluss ein Mikrofon an ihre Kamera an. Mikrofon und Line-Pegel-Audio werden unterszt. Mikrofonpegel-Audio ist leiser als Line-PegelAudio. Wenn Sie ein Mikrofon an ihre Kamera anschlieben und Line-Pegel auswahlen, sind die Pegel vermutlich zu leise. Darüber hinaus akzeptiert der Mikrofoneingang auf dem linken Kanal von einer externen Quelle eingespeisten, SMPTE-kompatiblen LTC-Timecode. Güttiger Timecode wird automatisch erkannt und als Timecode-Metadataen in ihre Videodatei eingebettet. Wir empfehlen, LTC-Timecode über die Line-Pegel-Ausgabe zu übermitteln - insbesondere wenn Sieihn nicht als Audiospur aufzeichnen.
9 Kopfhoreelngang
Überwachen Sie den Ton während der Aufnahme oder Wiedergabe von Clips, indem Sie einen Kopfhörer an den 3,5mm-Stereo-Kopfhörereingang anschließen. Wenn Kopfhörer angeschlossen sind, ist der Lautsprecherausgang stumm geschählt.
10HDMI
Der HDMI-Anschluss in voller Großsteutstutz 1080p-HD-Video in 10 Bit 4:2:2 mit Unterstützung für HDR und zwei Kanäe eingebettetes Audio. Benutzen Sie das Touchscreenmenü, um für die Ausgabe einen Clean-Feed oder Overlays vorzugeben.
An den HDMI-Port konnen Sie externe Monitore, Rekorder oder ATEM Mini Mischer anschreiben. Ist die Kamera an den HDMI-Ausgang eines ATEM Mini angeschlossen, biet sie ihren die Funktionen einer Studiokamera. Diese umfassen das Fernsteuern der Aufzeichnung und das Anpassen zahlreicher Einstellungen der Pocket Cinema Camera. Bevor Sie ihre Kamera und das Equipment einschalten, empfeht es sich, externes Zubehor und alle Kabel anzuschreiben. Benutzen Sie für HDMI-Verbindungen immer hochwertige Kabel.
11 Stromanschluss
Verwenden Sie den DC-Verbinder, um ihre Kamera mit Strom und gleichzeitig den Akku langsam mit geringem Ladestrom zu versorgen. Um den Netzadapter anzuschreiben, drehen Sie den Stecker so, dass er am Schlitz am oberen Ende des Anschlusses ausgerichtet ist, und stecken Sieihn ein, bis er einrastet. Um den Stromstecker zu entfernen,ziehen Sie zuerst den Sperr-Metallüberwurf zurück und dann den Stecker hereaus.
Individuelle Lösungen für die Stromversorgung
Es gibt Benutzer, die sich in Eigenarbeit Geräte nach Maß für die Stromversorgung ihrer Blackmagic Pocket Cinema Camera anfertigen. Beim Basteln ihrer eigenen Stromversorgung mit einem Akkudummy ist darauf zu achten, der Kamera keine zu hohen Spannungen zuzuführen. Dies kann dauerhafte Schäden verursachen. ihre Blackmagic Pocket Cinema Camera erfordert folgende Spannungen:
- Der Akkuanschluss ist für 6,2 bis maximal 10 Volt ausgelegt
Die DC-Strombuchse ist für 10,8 bis maximal 20 Volt ausgelegt - Im Standby-Modus ohne Laden des Akkus benötigt die Kamera 16 Watt
Zum Aufladen des internen Akkus benötigt die Kamera 30 Watt - Bei Versorgung ihrer Kamera mit einer spezialgefertigten Stromquelle empfehlen wir, den internen Akku zu entfernen
- Ohne Aufladen des Akkus besteht die Blackmagic Pocket Cinema Camera 6K G2 circa 23 Watt und die Blackmagic Pocket Cinema Camera 4K circa 22 Watt, wenn die Kamera beim Aufzeichnen auf externe Datenträger mit einem elektronischen Objektiv versehen, bei voller Helligkeit von Bildschirm und Tally sowie hohen Frameraten eingesetzt wird. Die Blackmagic Pocket Cinema Camera 6K Pro und 6K G2 bestehtigen circa 26 Watt in der gleichen Konfiguration mit zusätzlichen Sicher.
12 USB
Über den USB-Port konnen Sie direkt auf ein angeschlossenes USB-C-Laufwerk aufzeichn. Im ausgeschalteten Zustand konnen Sie den Akku ihrer Kamera von einer externen Quelle wie einem Akkupack über den USB-C-Port aufladen. Um die Produktsoftware ihrer Kamera zuactualisieren, schließlich Sie die Kamera über den USB-C-Port an einen Computer an und führen Sie die Aktualisierungsanwendung für die Kamera aus.
13 Mini-XLR-Mikrofonanschluss
Die Blackmagic Pocket Cinema Camera 6K G2 und 6K Pro verfügbar über zwei XLR-Audioeingänge. Die Blackmagic Pocket Cinema Camera 4K hat einen XLR-Eingang.
Schlieben Sie externe symmetrische Analogaudioquellen über den Mini-XLR-Eingang an. Ein regulares XLR-Mikrofon lasst sich mit einem Mini-XLR-Adapterkabel an ihre Kamera anschlieben.
Professionelle Mikrofone ohne eigene Stromversorgung konnen über den Mini-XLR-Eingang phantomgespeist werden. Weitere Informationen zur Aktivierung von Phantomspeitung finden Sie unter „AUDIO-Einstellungen" in thisem Handbuch.
Darüber hinaus kann über den XLR-Eingang SMPTE-kompatibler Timecode von einer externen Quelle eingespeist werden. Die Quelle für den Kanal stellen Sie abhängig vom Pegel Ihr's Timecode-Generators im AUDIO-MENU auf „XLR – Line" oder „XLR – Mic" ein. Der Timecode wird automatisch als Metadataen in ihre Videodatei eingebettet. Bei den Modellen Blackmagic Pocket Cinema Camera 6K Pro und 6K G2 kann man die XLR-Kanäle so einstellen, dass ein XLR-Kanal Timecode-Signale empfängt und der andere gleichzeitig für eine Audioquelle anderer Art verwendet wird.
Kameraoberseite
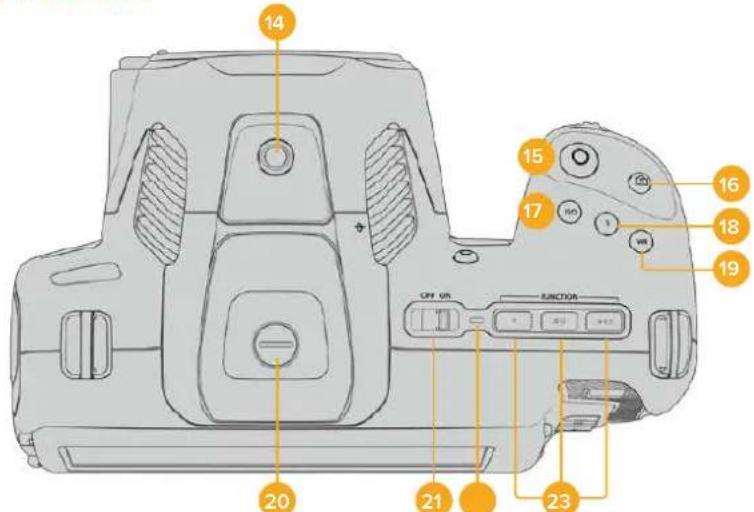
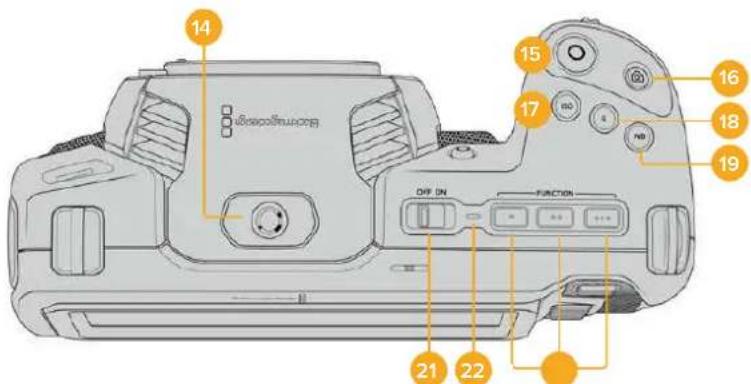
Oberseite der Modelle Blackmagic Pocket Cinema Camera 6K Pro und 6K G2
Oberseite der Blackmagic Pocket Cinema Camera 4K
14 1/4"-20-Befestigungsgewinde
Sie können das 1/4"20-Befestigungsgewinde oben auf ihrer Kamera verwenden, um ein externes Mikrofon oder kleineres Zubehor anzubringen.
HINWEIS Das 1/4-Zoll-Gewinde oben an der Blackmagic Pocket Cinema Camera sollene ausschließlich für leichtgewichtiges Zubehor wie Mikrofone verwendet werden. Belasten Sie die Kamera nicht übermöig durch Befestigen von Zubehor am 1/4-Zoll-Gewinde, wie bspw. einem verschraubbaren Kameragriff mit einem schweren Objektiv. Dies kann das 1/4-Zoll-Gewinde beschädigen und fällt nicht unter die Garantie. Setzen Sie die Gewinde keiner übermöigigen Hebelkraft aus, wie bspw. durch Befestigen von schwerem Zubehor an einem Verlängerungsarm. Für die Anbringung schwereren Zubehörs empfehlen wir den Einsatz eines speziell für die Blackmagic Pocket Cinema Camera konzipierten Kamerakäfigs, der
gleichzeitig an den oberen und unteren 1/4-Zoll-Gewinden befestigt wird.
15 Aufzeichnen
Drücken Sie die Aufnahmetaste (erkenntlich am roten Kreis), um direkt mit der Aufnahme zu beginnen. Drücken Sie sie erneut, um die Aufnahme zu stoppen.
16 Standbild
Drücken Sie die Standbildtaste (erkenntlich am Kamerasymbol), um ein Standbild als einzelnen unkomprimierten Frame in DNG zu erfassen. Das kurz in der oberen rechten Ecken des Touchscreens erscheinende Kamerasymbol teilt Ihnen mit, dass Sie erfolgreich ein Standbild aufgenommen haben. Gespeichert werden Bilddateien im Stills-Ordner im Stammverzeichnis des Mediums, auf das aktuell aufgezeichnet wird. Die Benennung erfolgt gemäß der für Videoclips üblichen Namenskonvention, wobei die letzten vier Zeichen des Dateinamens (z. B. „S001") die Anzahl der Standbilder angegeben.
17 ISO
Um die ISO-Einstellungen ihrer Kamera anzupassen, drücken Sie die ISO-Taste und drehren Sie dann am Einstellrad. Die ISO-Empfindlichkeit kann in Drittel-Blendenstufen auf 100 bis 25.600 eingestellt werden.
18.Shutter
Um den Verschlusswinkel oder die Verschlussgeschwindigkeit zu ändern, drücken Sie die S-Taste für Shutter und drehen dann am Einstellrad. Die Touchscreen-Anzeige wird Ihnen zudem bis zu drei flimmerfreie Verschlusssoptionen vorschlagen.
19 Weiabglelch
Um den Weißabgleich ihrer Kamera anzupassen, drücken Sie die Taste WB für White Balance und drehen dann am Einstellrad. Alternativ können Sie rasch in den automatischen Weißabgleich-Modus gelangen, indem Sie die Taste WB 3 Sekunden lang gedrückt halten. Ihr Kamera wird in der Mitte des Bildes ein weißes Rechteck einblenden und in dieser Bereich einen automatischen Weißabgleich durchführten. Weitere Informationen hierzu finden Sie im Abschnitt „Bedienung per Touchscreen".
20 Sucherbuchse
Die Blackmagic Pocket Cinema Camera 6K G2 Pro und 6K Pro verfügbar über eine Sicherbuchse für den Blackmagic Cinema Camera Pro EVF. Ist kein optionaler elektronischer Sicher angeschlossen, bringen Sie zum Schutz der Buchse die mitgelieferte Abdeckung an.
21 ON/OFF-Schalter
Mit dem ON/OFF-Schalter schalten Sie die Kamera ein. Schieben Sie den Schalter nach rechts auf ON, um ihre Kamera einszuschalten, und nach links auf OFF, um sie auszuschalten.
22 Status-LED
Wenn die Kamera ausgeschaltet und über den 12V-DC-Stromanschluss oder den USB-C-Port mit einer externen Stromquelle verbunden ist, zeigt der rot leuchtende Indikator an, dass der Akku geladen wird.
Die Status-LED erlischt, wenn der Akku vollständig geladen ist.
23 Funktionstaten
These Tasten können über das SETUP-MENU ihrer Kamera mit verschiedenen hängig verwendeten Funktionen belegt werden. Standardmäßig ist die linke der drei an den Punkten erkenntlichen Tasten auf „False Color" (Falsch Farben), die mittlere auf „Display LUT" (Display-LUT) und die rechte auf „Frame Guides" (Bildbrandmarkierungen) voreingestellt.
Kameraunterseite
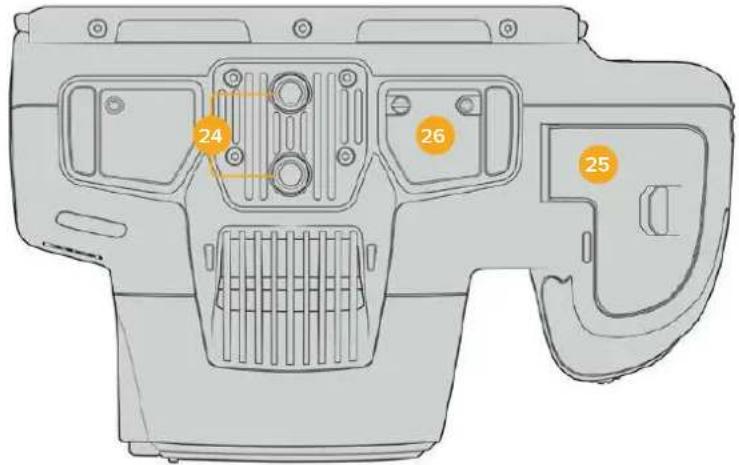
Unterseite der Modelle Blackmagic Pocket Cinema Camera 6K Pro und 6K G2

Unterseite der Blackmagic Pocket Cinema Camera 4K
24 1/4"-20-Befestigungsgewinde
Das 1/4"-20-Befestigungsgewinde dient zum Anbringen der Blackmagic Pocket Cinema Camera 4K, Pocket Cinema Camera 6K Pro oder 6K G2 an ein Stativ, Rig oder anderweitiges Zubehor. Die Modelle Pocket Cinema Camera 6K Pro und 6K G2 sind an der Unterseite mit zwei solchen 1/4-Zoll-Befestigungsgewinden ausgestellt.
25 Akkufach
Um das Akkufach zu öffnen, schiben Sie die Sperrvorrichtung auf der Klappe in Richtung des Objektivanschlusses. Um es zu schreiben, drücken Sie die Klappe einfach herunter, bis sie einrastet.
26 Strombuchse fur den Akkugriff
Die Modelle Blackmagic Pocket Cinema Camera 6K Pro und 6K G2 sind an der Unterseite mit elektrischen Kontakten versehen. Diese Kontakte ermöglich das Anbringen des optionalen Akkugriffs, ohne den Akku von der Kamera abzunehmen. Der angebrachte Akkugriff verlangert die Betriebsdauer der Kamera, da sie sowohl über ihren eingebauten Akku als auch über die beiden Akkus im Griff mit Strom gespeist wird.
Kamerarückseite
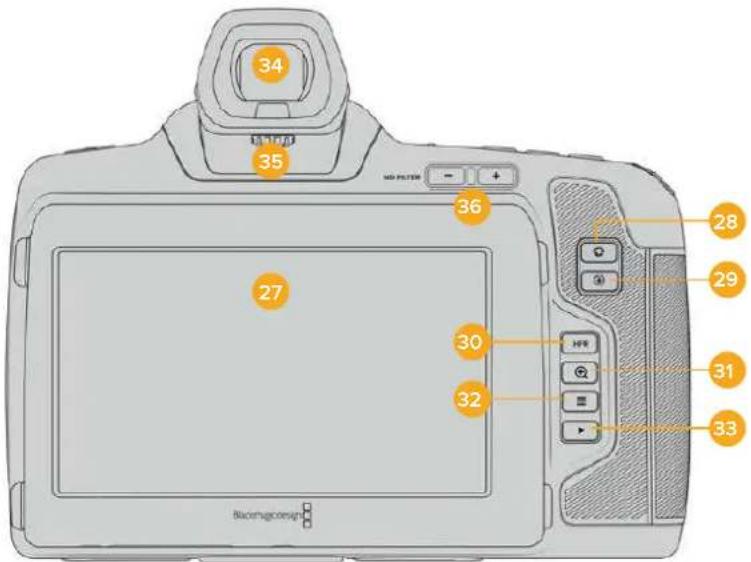
Rückseite der Modelle Blackmagic Pocket Cinema Camera 6K Pro und 6K G2. Bei der Blackmagic Pocket Cinema Camera 6K G2 sind keine ND-Filter-Tasten vorhanden
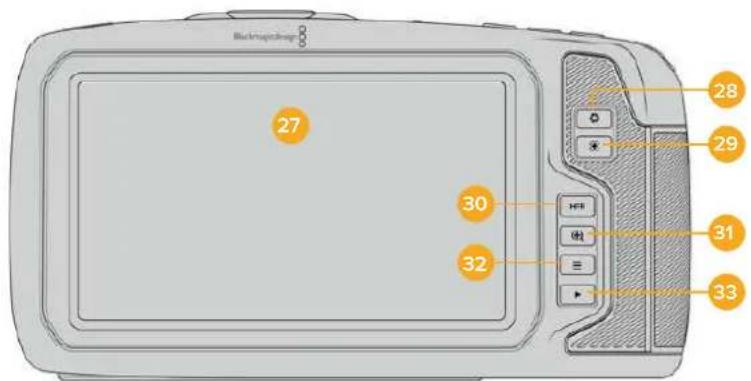
Rückseite der Blackmagic Pocket Cinema Camera 4K
27 Touchscreen-Anzelge
Der LCD-Touchscreen lasst Sie mit Tipp- und Wischgesten Einstellungen anpassen, automatisch fokussieren, die Aufnahme starten und stoppen sowie während der Aufzeichnung oder Wiedergabe Clips kontrollieren. Über den Touchscreen konnen Sie auch Medien verwalten und die Slate mit Anmerkungen versehen.
Der Tilt-Bildschirm der Blackmagic Pocket Cinema Camera 6K Pro und 6K G2 lasst sich für vielerlei Blickwinkel nach oben oder unter neigen. Über seine Stromspareinstellung wird das LCD bei Nichtbenutzung abgedunkelt. Zum Filmen in grellem Sonnenlicht konnen Sie das LCD entsprechend auf seine maximale Betriebshelligkeit einstellen. Beim Betrieb mit 100% Helligkeit verbraucht das LCD mehr Strom und hitzt sich ggf. auf. Bei einer Umgebungstemperatur von 35^ oderHigher reduziert sich die Bildschirmhelligkeit ggf. automatisch. Dies reduziert die Temperatur des LCDs und verhindert seine Überhitzung. Diese Sicherheitsfunktion arbeitet unabhängig von der inaktivitätsbedingten Abschwachung der Helligkeit. Weitere Informationen finden Sie im Abschnitt "MONITORING-Einstellungen".


Der Tilt-Bildschirm der Modelle Blackmagic Pocket Cinema Camera 6K Pro und 6K G2 ermöglich vielerlei Betrachtungswinkel
28 Blendentaste
Durch Drücken der Blendentaste (erkenntlich am Blendensymbol) wird automatisch eine Durchschnittsbelichtung basierend auf den Highlights und Schatten in Ihrem Shot eingestellt. Sie können die Blendenöffnung Ihrres Objektivs manuell anpassen, indem Sie das Einstellrad nach rechts und links drehen oder auf der Touchscreen-Anzeige auf BLENDE tippen und den Schieberegler betätigten.
29 Fokustaste
Um Autofokus zu aktivieren, drücken Sie bei Verwendung eines kompatiblen Autofokus-Objektivs mit ihrer Kamera einmal auf die Fokustaste (erkenntlich am Fadenkreuzsymbol). Im Standardmodus fokussiert das Objektiv automatisch auf die Bildmitte. Sie können jedoch einen alternativen Fokuspunkt auswahlen, indem Sie den zu fokussierenden Bereich auf dem LCD-Bildschirm antippen. Um den Fokuspunkt auf die Mitte des Bildschirms zurückzusetzen, drücken Sie die Fokustaste zweimal.
HINWEIS Die meisten Objektive Unterstützung elektronische Fokussierung. Manche bieten verschiedene Modi für manuelle oder automatische Fokussierung. In letzterm Fall mussen Sie bestätigten, dass Ihr Objektiv auf Autofokusmodus eingestellt ist.
30 HFR-Taste
Zum Hin- und Herschalten zwischen Bildwechselfrequenzen drücken Sie die HFR- oder "High-Frame-Rate"-Taste. Um diese Funktion zu verwenden, geben Sie im „Frameraten"-Menu einfach die gewünschte Off-Speed-Framerate ein. Nach Auswahl der Off-Speed-Framerate können Sie durch Drücken der HFR-Taste zwischen ihrer vorgegebenen Off-Speed-Framerate und der Projekt-Framerate hin- und herwechseln. Hier sei erwähnt, dass sich diese Einstellung nur bei angehaltener Aufzeinigung anpassenlässt.
Weitere Informationen zu den Projekt- und Off-Speed-Frameraten finden Sie im Abschnitt „Bedienung per Touchscreen".
31 Fokuszoom-Taste
Um den Fokus bei einem Pixelmaßstab von 1:1 anzupassen, drücken Sie die Fokuszoom-Taste (erkenntlich am Lupensymbol mit einem Pluszeichen). Im herangezoomen Modus können Sie den Zoom-Grad mithilfe der Multitouch-Steuerung auf dem Touchscreen mit einer Pinch-to-Zoom-Geste anpassen. Weitere Informationen hierzu finding Sie im Abschnitt „Pinch-to-Zoom". Im herangezoomen Modus können Sie durch Berühren und Verschieben eines Bereichs auf dem Bildschirm verschiedene Bildausschnittte betrachten. Wenn Sie bei aktivierter „Focus Zoom"-Funktion durch den optionalen elektronischen Sicher schauen, können Sie den Zoomgrad durch Drehen des Einstellrads anpassen und den Bereich von Interesse durch Drucken des Einstellrads wahren. Drucken Sie zum Herauszoomen erneut die Fokuszoom-Taste.
32 Menutaste
Drucken Sie die Menutaste (erkenntlich an den drei Linien), um das Dashboard aufzurufen.
33 Wiedergabetaste
Drücken Sie die Wiedergabetaste, um in den Wiedergabemodus zu wechseln. Erneutes Drücken startet die sofortige Wiedergabe des zuletzt aufgenommenen Clips auf dem LCD und allen über den HDMI-Ausgang verbundenen Monitoren.
34 Blackmagic Pocket Cinema Camera Pro EVF
Für die Blackmagic Pocket Cinema Camera 6K Pro und 6K G2 gibt es einen optionalen elektronischen Sicherer. Der Sicherer lasst sich um 70 Grad nach oben klappen. Geliefert wird er mit vier verschiedene Okularmuscheln, u. a. für das linke und rechte Auge. Der Sensor im Sicherer erkennt, wenn der Sicherer benutzt wird, und schaltet dann den Touchscreen aus. Das spart Strom und verhindert das Verstellen von Bedienelementen durch versehentliches Berühren. Sie können den Sicherer so einstellen, dass die Daten zum Kamerastatus eingebrendet oder ein Clean-Feed angezeigt wird. Weitere Informationen finden Sie im Abschnitt „MONITORING-Einstellungen".
Zum Installieren des Suchers lösen Sie als erstes mit einem kleinen Flachkopfschraubendreher die Schraube an der Buchsenabdeckung oben an der Kamera. Entfernen Sie die Abdeckung und vergewissern Sie sich, dass die Sicherbuchse sauber und trocken ist. Schieber den Sicher in die Sicherbuchse. Bringen Sie den Sicher durch Anziehen der Rändelschraube in Position.
35 Diopter des elektronischen Suchers
Um den Dioptrienausgleich eines an die Blackmagic Pocket Cinema Camera 6K Pro oder 6K G2 angebrachten, optionalen Suchers für ihre Sehstarke zu justieren, drehen Sie das Diopterrad. Wichtig: Der Diopter passst lediglich den Fokus des im Sichertbaren Bilds an, und hat keine Wirkung auf die Fokussierung des vom Kamerasensor erfassten Bilds.
Weitere Informationen hierzu finden Sie im Abschnitt „Testchart".
36 ND-Filter
Die Blackmagic Pocket Cinema Camera 6K Pro ist mit internen Neutraldichtefiltern ausgestattet. Diese ND-Filter reduzieren die auf den Sensor einfallende Lichtmenge um eine vordefinierte Anzahl von Blendenstufen, hier Stops genannot. Durch Absenken der Belichtigung konnen Sie in hellen Lichtverhältnissen mit geringerer Scharfentiefe filmen, beispielsweise an einem sonstigen Tag im Freien.
Um die Neutraldichte einzustellen, drücken Sie die rechte oder linke ND-Filtertaste, um die Optionen für einen klaren Filter oder einen Filter für 2, 4 oder 6 Stops zu durchlaufen.
Die Einstellung „Clear" besagt, dass kein ND-Filter eingesetzt wird. Mit den Einstellungen für 2, 4 und 6 Blendenstufen nimmt die Dichte der eingesetzten ND-Filter zu, sodass Sie bei Bedarf das einfallende Licht reduzieren können.
Da Nutzer entsprechliche Vorlieben zur Bezeichnung der ND-Filterstufen haben, können Sie die Maßeinheit ihrer ND-Einstellungen im Touchscreen-Menu vorgegeben. Zur Wahl stehen die Angabe als ND-Filternummer, als Anzahl der lichtreduzierenden Blendenstufen oder als Bruchzahl, die den durch den Filter erzielten Lichtverlust ausdrückt.
| Einstellungen der Neutraldichtefilter | ||
| ND-Zahl Stops Bruchzahl | ||
| Clear 01 | ||
| 0,6 2 1/4 | ||
| 1,2 4 1/16 | ||
| 1,8 6 1/64 | ||
Bedienung per Touchscreen
Funktionsmerkmale des Touchscreens
Für einechnelle und intuitive Handhabung lassst sich der LCD-Touchscreen ihrer Blackmagic Pocket Cinema Camera per Tipp- und Wischgesten bedienen. Wenn Sie in verschiedene Bereichen des LCD-Touchscreens Tipp- oder Wischgesten ausfuhren, konnen Sie beim Filmen Schnell auf die Kamerafunktionen zugreifen.
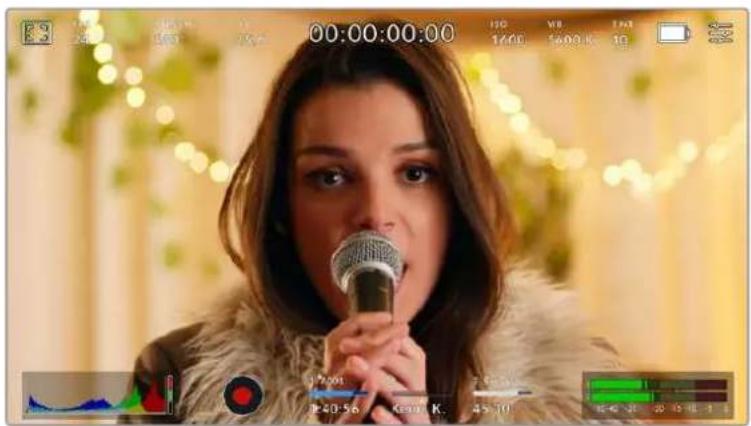
Die LCD-Touchscreen-Anzeige gewährt ihren Schnellen Zugriff auf die am haufigsten verwendeten Einstellungen
LCD-Monitoroptionen
Tippen Sie auf das Monitor-Icon oben links auf dem LCD-Touchscreen, um zu den LCD-Monitoreinstellungen zu gelangen. Mithilfe dieser Einstellungen lässt sich die Darstellung der Monitoring-Funktionen ihrer Pocket Cinema Camera umschalten und anpassen. Dazu zahlen Zebra, Focus Assist, Bildrandmarkierungen, Raster, Schutzbereichlinien und Falschfarben. Wenn Sie auf die LCD-Monitoroptionen zugreifen, erscheinen die Bedienelemente für die jeweiligen Features in Form von Schaltflächen entlang des unteren Randes des LCD-Touchscreens.

Tippen Sie auf das Icon oben links auf dem LCD-Touchscreen ihrer Kamera, um auf die LCD-Monitoroptionen zuzugreifen
Zebra
Mit der Zebra-Einstellungändern Sie die Darstellung der Zebra-Funktion auf dem LCD-Touchscreen und stellen gleichzeitig den Zebra-Pegel für den HDMI-Ausgang ein.
Im Zebra-Modus werden auf Bildbereichen, die den voreingestalten Belichtungspegel übersteigen, diagonale Streifen eingeblendet. Wenn Sie Zebra bspw. auf 100% einstellen, wird Ohnen angezeigt, welche Bereiche komplett überbelichtet sind. Diese Funktion ist hilfreich, um bei gleichbleibenden Lichtbedingungen einen optimalen Belichtungspegel beizubehalten.

Tippen Sie in den LCD-Monitoroptionen auf das Zebra-Icon, um auf die Zebra-Einstellungen zuzugreifen
Die Zebra-Einstellung für den LCD-Touchscreen aktivieren Sie, indem Sie unter der Zebra-Schaltfläche auf das Schalter-Icon unter links auf dem Display tippen.
Um den Zebra-Modus einzustellen,ziehen Sie den Schieberegler nach rechts oder links oder tippen Sie auf die Pfeilsymbole, um die gewünschte Zebra-Prozentzahl einzustellen. Zu den acht verfügbaren Zebra-Presets zahlen Neutralgrau und Neutralgrau plus eine Blendenstufe. Dann lasst sich Zebra in fünfilprozentigen Schritten auf 75 bis 100 Prozent der Belichtigung einstellen.
Weitere Informationen zum Aktivieren des Zebra-Modus für den HDMI-Ausgang ihrer Kamera führen Sie im Abschnitt MONITOR-Einstellungen in dieser Handbuch.
TIPP Beim Filmen in variablen Lichtverhältnissen - bspw. im Freien an einem teils bewölkten Tag - wird Sie ein auf unter 100 eingestelter Zebra-Wert vor möglicher Überbelichtung warnen.
Focus Assist
Mit der Focus-Assist-Einstellung (erkennenlich an der gerahmen Person) passen Sie die Darstellung der Fokussierhilfe auf dem LCD-Touchscreen an. Gleichzeitig konnen Sie das Level der Fokussierhilfe für die HDMI-Ausgabe ihrer Blackmagic Pocket Cinema Camera einstellen.

Tippen Sie in den LCD-Monitoroptionen auf die Focus-Assist-Schaltfläche, um auf die jeweiligen Einstellungen zuzugreifen
Um die Fokussierhilde für den LCD-Touchscreen anzupassen, tippen Sie unter der Focus-Assist-Schaltfläche auf das Schalter-Icon links unter auf dem Display.
Das Level der Fokussierhilde für alle Ausgaben ihrer Blackmagic Pocket Cinema Camera geben Sie vor, indem Sie den Schieberegler am unteren Rand des Touchscreens nach links oder rechtsziehen. Alternativ tippen Sie auf die Pfeil-Symbole besoin dem Level von Focus Assist.
Der optimale Grad der Fokussierhilde richtet sich nach dem jeweiligen Shot. Wirb spw. auf Darsteller scharf gestellt, empfehl't sich eine stärkere Fokussierhilde, um mehr Einzelheiten an den Konturen der Gesichter festzuhalten. Bei einer Einstellung von Blatt- oder Mauerwerk wurden die darauf zusätzlich erfassten Details womglich ablenkend wirken.
Weitere Informationen zum Aktivieren des Fokussierhilfe-Modus für die HDMI-Ausgabe finden Sie im Abschnitt MONITOR-Einstellungen in this dem Handbuch.
TIPP Its Blackmagic Pocket Cinema Camera hat zwei Focus-Assist-Modi. Im MONITOR-Einstellungsmenu konnen Sie zwischen den Modi „Peaking" und „Farbige Linien" hin und her wechseln. Naheres finden Sie im Abschnitt MONITOR-Einstellungen in thisem Handbuch.
Bildrandmarkierungen
Die Einstellung für Bildrandmarkierungen (erkennencht am Rahmen mit zwei horizontalen Linien) passt das Erscheinungsbild von Bildrandmarkierungen auf Ihrm LCD-Touchscreen an. AuBderhem haben Sie Bildrandmarkierungsoptionen fur die HDMI-Ausgabe ihrer Kamera zur Auswahl.
Unter den Optionen für Bildrandmarkierungen finden Sie u. a. Seitenverhältnisse für verschiedene Kino-, TV- oder Online-Standards.

Tippen Sie in den LCD-Monitoroptionen auf das BildbrandmarkierungsIcon, um auf diese Einstellungen zuzugrelfen
Um das Erscheinungsbild der Bildrandmarkierungen auf dem LCD-Touchscreen anzupassen, tippen Sie auf das Schalter-Icon links unter auf dem Display.
Wahlen Sie die gewünschte Bildbrandmarkierung aus, indem Sie den Schieberegler nach links oder rechtsziehen oder die Pfeilsymbole beiderseits des aktuell ausgewählten Bildseitenverhältnisses antippen. Außen dem konnen Sie ihre eigene Bildbrandmarkierung eingeben, indem Sie auf das aktuell ausgewählte Bildseitenverhältnis zwischen den beiden Pfeilsymbolen tippen.
Folgende Bildrandmarkierungen sind verfügbar:
2.35:1, 2.39:1 und 2.40:1
Zeigt das mit anamorphotischer oder kontrastarmer filmischer Breitbild-Kinodarstellung kompatible Breitbild-Seitenverhältnis an. Die drei leicht voneinander abweichenden Breitbild-Einstellungen sind auf im Laufe der Zeit wechselnde Film-Standards zurückzuführen. 2,39:1 ist einer der derzeit meistverwendeten Standards.
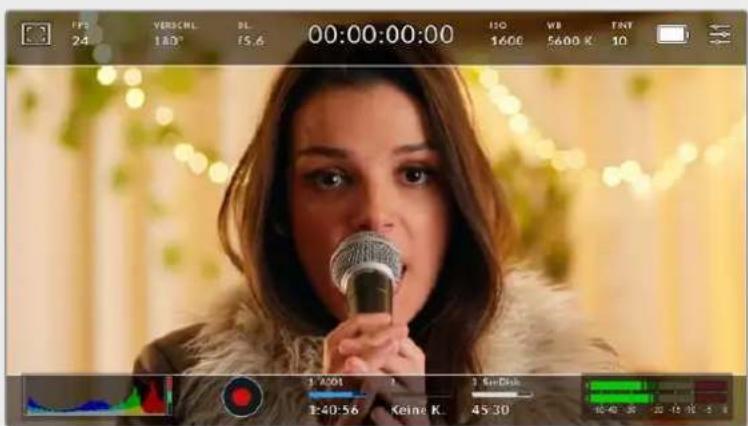
LCD-Touchscreen mit aktivierten 2,40:1-Bildbrandmarkierungen
2:1
Zeigt ein etwas breiteres Verhältnis als 16:9 an, aber schmaler als 2,35:1.
1,85:1
Zeigt ein weiteres gängiges kontrastarmes Seitenverhältnis für Breitbildschirme an. Dieses Verhältnis ist etwas breiter als HDTV 1,78:1, aber schmaler als 2,39:1.
16:9
Zeigt ein 1,78:1 Bildseitenverhältnis an, das mit 16:9 HD TV- und Computerbildschirmen kompatibel ist. Dieses Bildseitenverhältnis wird vor allem für HD-Broadcasts und Online-Videos verwendet. Das gleiche Bildseitenverhältnis wurde auch für das Broadcasting in Ultra HD übernommen.
14:9
Zeigt ein 14:9 Bildseitenverhältnis an, das von einigen Sendeanstalten verwendet wird, um einen Kompromise zwischen 16:9- und 4:3-Fernsehgeräten zu finden. Idealerweise bleibt sowohl 16:9- als auch 4:3-Footage gut sightbar, wenn sie auf das 14:9-Format beschritten wird. Sie konnen these Verhältnis als kompositorische Markierung verwenden, wenn Sie wissen, dass Ihr Projekt von einem Fernsehsender ausgestraht wird, der von 14:9 Gebrauch macht.
4:3
Zeigt das mit SD-FernsehbildschirmenCompatible 4:3-Seitenverhältnis an. Das Format hilft zudem bei der Bildeinstellung, wenn zwei anamorphotische Adapter verwendet werden.
1:1
Zeigt ein 1:1-Seitenverhältnis an, das etwas schmaler ist als 4:3. Dieses quadratische Seiteverhältnis erfreut sich zunehmender Beliebtheit in den sozialen Medien.
4:5
Zeigt ein 4:5-Seitenverhältnis an. Dieses vertikale Bildseitenverhältnis eignet sich für Portraitaufnahmen und die Ansicht auf Smartphones.
Benutzerdefinierte Bldbrandmarkierung
Um für eine einzigartige Darstellung ihre eigene Bildrandmarkierung zu erstellen, tippen Sie auf den eingeblendeten Wert zwischen den beiden Pfeilsymbolen. Tippen Sie auf dem Bildschirm „Benutzerdef. Bildrandmarkierung" auf die Rücktaste, um das aktuelle Seitenverhältnis zu LOSchen und geben Sie über den Ziffernblock ein neuen Seitenverhältnis ein. Tippen Sie auf „Aktualisieren", um ihre eingegebene Bildrandmarkierung zu übernehmen und zum Aufzeichnungsmodus zurückzukehren.

Eine neue Bildrandmarktierung wird auf dem Bildschirm „Benutzerdef. Bildrandmarktierung" über den Ziffernblock eingegeben
TIPP Sie können die Deckkraft der eingeblendeten Bildbrandmarkierungen ändern. Nähres finden Sie im Abschnitt MONITOR-Einstellungen in thism Handbuch.
HINWEIS Weitere Informationen zum Aktivieren der Bildbrandmarkierungen für die HDMI-Ausgabe ihrer Kamera finden Sie im Abschnitt MONITOR-Einstellungen in dieser Handbuch.
Raster
Über die Raster-Einstellung wahren Sie eines der Kompositionsraster zur Anzeige auf Ihr LCD-Touchscreen aus: „Drittel", „Horizont", „Fadenkreuz" oder „Punkt". Zudem legen Sie hierüber fest, welches Overlay auf der HDMI-Ausgabe zu sehen sein wird.

Tippen Sie in den LCD-Monitoroptionen auf das Raster-Icon, um auf die Rastereinstellungen zuzugreifen
Raster- und Fadenkreuz-Overlays konnen bei der Bildkomposition behilflich sein. Bei aktivierter Raster-Option wird ein Overlay entsprechend der Drittel-Regel oder aber ein Horizont-Raster, Fadenkreuz oder Punkt angezeigt.
Um zwischen den Rasterdarstellungen auf dem Touchscreen ihrer Kamera umzuschalten, tippen Sie unter der Raster-Schaltfläche auf das Schalter-Icon links unter auf dem Display.
Um das gewünschte Overlay für die Anzeige der HDMI-Ausgabe einzustellen, tippen Sie auf „Drittel“, „Horizont“, „Fadenkreuz“ oder „Punkt“. Sie können „Horizont“, „Fadenkreuz“ oder „Punkt“ jeweils gemeinsam mit dem „Drittel“-Raster auswahlen. Dies ermöglicht folgende Rasterkombinationen: „Drittel“ und „Horizont“, „Drittel“ und „Fadenkreuz“ oder „Drittel“ und „Punkt”.
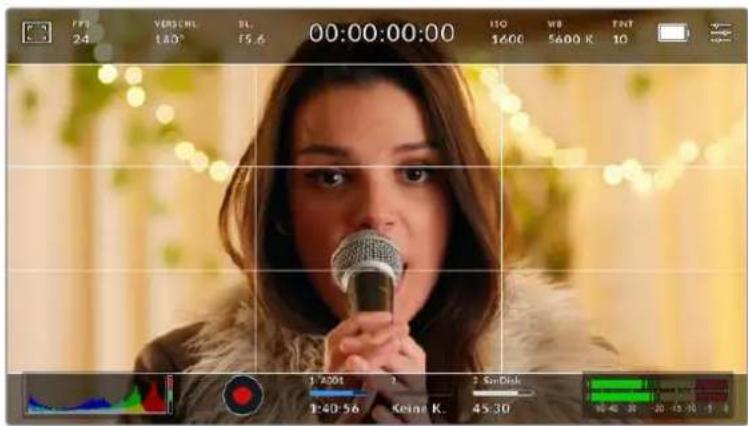
Das Drittel-Raster passt sich automatisch an den Maßstab jeder Bildbrandmarkierung an
Drittel
Die Einstellung „Drittel" zeigt ein Raster mit zwei vertikalen und zwei horizontalen Linien an, die das Bild in Drittel aufteilen. Mit dem Drittel-Prinzip setzen sich Einstellungen sehr effektiv komponieren. Zum Beispiel erwartet das menschliche Auge in der Regel, dass sich die Action im Schnittpunktbereich dieser Linien abpielt. Deshalb platziert man Dort keinere Dinge, auf die aufmerksam gemacht werden soll. Die Augenpartie eines Schauspielers wird oftmalis im oberen Drittel des Bildschirms positioniert. Bei der Platzerung hilft Ohnen hier die Markierung des horizontalen oberen Drittel des Bilds. Überdies dienen Drittel zum Erhalt einer einheitlichen Kadierung von einer Einstellung zur{nachsten.
Horizont
Das Horizont-Meter zeigt an, wenn ihre Kamera nach links oder rechts bzw. nach vorne oder hinten geneigt bzw. gekippt ist. Es unterstützt Sie bei Freihandaufnahmen eine waagrecht verlaufende Horizontlinie zu bewahren und vertikale Kameraneigungen auf einem Gimbal zu kompensieren. In welche Richtung ihre Kamera geneigt ist, erkennen Sie an der Richtung, in die sich die vertikale hellgraue Linie vom mittig platzierten dunkelgrauen Fadenkreuz entwickert. Bei einem Auf- oder Abschwenk der Kamera ruckt die horizontale hellgraue Linie entsprechend nach unten oder oben.
Die Entfernung zwischen den Linien und dem mittigen Fadenkreuz verhält sich proportional zum Grad der horizontalen oder vertikalen Neigung. Wenn Sie den Bewegungssensor der Kamera kalibriert haben und die Kamera korrekt auf die vertikale oder horizontale Rotationsache ausgerichtet ist, dann erscheint die vertikale oder horizontale Linie blau.
Beachten Sie, dass das Horizont-Meter die Neigung der Kamera für Auf- und Untersichten miteinberechnet. Wenn Sie die Kamera entsprechend für eine Portraitaufnahme rotieren, rotiert auch das Horizont-Meter seine Achse um 90 Grad.
Die folgende Tabelle zeigt anhand des Horizont-Meters, ob die Kamera nach links/rechts bzw. unten/oben geneigt ist.
Horizont-Meter Beschreibung

Keine Neigung

Nur nach unten geneigt

Nur nach links geneigt

Nach offen und rechts geneigt
Für reguläre Verwendungen kalibrieren Sie Ihr Horizont-Meter ohne Kameraneigung. Wenn Sie das Horizont-Meter zur Beibehaltung einer gleichbleibenden Neigung oder für konsistentes Ab- und Aufschwenken verwenden möchten, können Sie es bei Schraglage der Kamera kalibrieren. Informationen zur Kalibrierung des Horizont-Meters finden Sie im Abschnitt „Bewegungssensor-Kalibrierung".
Fadenkreuz
These Einstellung zeigt in der Mitte des Bildes ein Fadenkreuz an. Wie das Drittel-Raster ist auch das Fadenkreuz ein sehr hilfreiches Kompositionswerkzeug. So fängt man das Objekt genau in der Bildmitte ein. These Option wird manchmal verwendet, wenn Szenen gedreht werden, die später in schellen Schnittfolgen zusammen gesetzt werden. Oft ist es für den Zuschauer wichter, schellen Schnitten zu folgen, wenn sich die Augen auf die Mitte konzentrierten.
Punkt
These Einstellung zeigt in der Mitte des Bildes einen Punkt an. Der mittige Punkt hat denselben Zweck wie das Fadenkreuz, ist aber ein dezenteres Overlay, das weniger aufdringlich wirkt.
TIPP Weitere Informationen zum Aktivieren des Raster-Modus für die HDMI-Ausgabe ihrer Kamera finden Sie im Abschnitt MONITOR-Einstellungen in dieser Handbuch.
Schutzbereichslinien
Über die Schutzbereich-Einstellung (erkennlich am Doppelrahmen) lasen sich diese Markierungen auf dem LCD-Touchscreen ein- und ausschalten. Auch die Abmessungen des Bereichs für die HDMI-Ausgabe werden hier vorgegeben.
Schutzbereiche können in Fernsehproduktionen eingesetzt werden, damit die wichtigen Bereiche eines Shots von den meisten Zuschauern gesehen werden konnen. Indem Sie die wichtigen Objekte Ihrsshots in thisem zentrierten sendesicheren Bereich halten, verhindern Sie, dass das Bild auf einigen Fernsehgeräten abgeschritten wird. Zudem hat die Sendeanstalt die Mochigkeit, Fliegen, Newslicker und andere Overlays am Bildschirmrand einzublenden. Für die Einreichung von Footage muss wichtiger Content wie Titel und Grafiken bei denen Sendeanstalten innerhalb eines Schutzbereichs von 90% liegen.
Schutzbereiche dienen auch der Kadierung von Einstellungen, wenn Sie bspw. wissen, dass ein Shot in der Postproduktion stabilisiert werden soll. Dadurch konnen die Kanten des Bilds abgeschritten werden. Des Weiteren konnen Schutzbereiche verwendet werden, um einen bestimmten Zuschnitt anzuzeigen. Hier ein Beispiel: Bei einer Einstellung von 50% konnen Sie beim Aufzeichnen in Ultra HD 3840 x 2160 sehen, wie eine Framegroße von 1920 x 1080 aussehen wurde. Schutzbereiche werden entsprechend der vorgegebenen Bildrandmarkierungen skaliert und so angepasst, dass sie die ausgewählte Prozentzahl Ihres Zielframes anzeigen.

Der Schutzbereich-Indikator ist auf 75 % eingestellt
Um Schutzbereiche auf dem LCD-Touchscreen ein- oder auszuschalten, tippen Sie unter der Schutzbereich-Schaltfläche unten links auf das Schalter-Icon. Die große des Schutzbereichs für die HDMI-Ausgabe ihrer Kamera stellen Sie über die Links- und Rechtspiele seitlich der aktuellen numerischen Werte am unteren Rand des Touchscreens ein. Oder zieren Sie den Schieberegler nach rechts oder links.
Falschfarben
Über diese Einstellunglässt sich die Darstellung der Falschfarben-Belichtungshilfe auf dem LCD-Touchscreen anpassen.
Falschfarben stellen entsprechiche Helligeitswerte von Elementen in Ihrm Bild in Farben dar, die dem jeweiligen Wertebereich entsprechen. Pink repraesertiert bspw. eine optimale Belichtigung fur helle Hauttone, während Grun fur dunklere Hauttone better geeignet ist. Wenn Sie beim Filmen von Menschen anhand der Falschfarben-Funktion Pink oder Grun kontrollieren, lasst sich eine gleichformige Belichtigung von Hauttosten erzielen.
Gleichermassen zeigt Ohnen eine vom Gelben ins Rote wechselnde Falschfarben-Darstellung an, dass diese Bildbereiche nun überbelichtet sind.
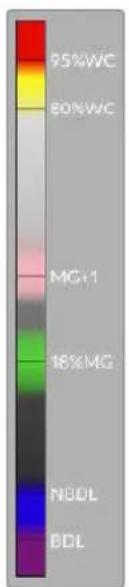
Das IRE-Falschfarbendiagramm links vom Kameradisplay verdutlicht, was die verschiedene Falschfarben bedeuten.
Falschfarben Bedeutung
| 95%WC Weiße | Bildbereiche werden beschritten |
| 80%WC Nahezu weiße Bildbereiche werden beschritten | |
| MG+1 Eine Blendenstufe über Neutralgrau | |
| 18MG% Neutralgrau | |
| NBDL Nahezu schwarze Details gehen verloren | |
| BDL Schwarze Details gehen verloren | |

In einem ausgewogen belichteten Bild werden Hauttone als grüne und rosa Falschfarben dargestellt
Um die Falschfarben-Funktion auf dem LCD-Touchscreen ein- oder auszuschalten, tippen Sie unter der Falschfarben-Schaltfläche unten links auf das Schalter-Icon.

Die Falschfarben-Schatfläche für die Belichtungshilfe
Bildschirmhelligkeit
Tippen Sie auf das Bildschirmhelligkeits-Icon und passen Sie die Helligkeit des Touchscreens ihrer Pocket Cinema Camera an, indem Sie den Schieberegler nach rechts oder links bewegen.

Hier ist die Bildschirmhelligkeit auf 50% eingestellt
ND-Filteranzeige
Wenn Sie den ND-Filter ihrer Blackmagic Pocket Cinema Camera 6K Pro einstellen, erscheint oben links auf dem Touchscreen und in der HDMI-Ausgabe eine ND-Filteranzeige. Die Anzeige bleibt eingebrendet, solange der ND-Filter aktiviert ist. Ist kein ND-Filter aktiviert, wird der „Clear"-Text nach vier Sekunden wieder ausgebrendet.

Das Anpassen der ND-Filtereinstellung auf ihrer Pocket Cinema Camera 6K Pro ruft die ND-Filteranzeige auf
HINWEIS Das Darstellungsformat der ND-Filteranzeige konnen Sie nach ihrer Vorliebeändern. Es gibt die Optionen ND-Nummer, Blendenstufe und Bruchzahl. Sie konnen Ihr bevorzugtes Format im Setup-MENU einstellen.
Bilder pro Sekunde
Die FPS-Anzeige zeigt die derzeit ausgewählte Anzahl der Bilder pro Sekunde (Frames per Second) an.

Tippen Sie auf den FPS-Indikator, um die Bildraten-Einstellungen zu öffnen
Durch Antippen des FPS-Indikators können Sie die Sensor- und Projekt-Framerate über die Schaltfläche am unteren Rand des LCD-Touchscreensändern.
Projekt-Framerate
Die Projekt-Framerate bestimmt auch die Framerate des Aufzeichungsformats der Kamera. Hierfür gibt es eine Auswahl von in der Film- und Fernsehbranche gebrachte Frameraten. Diese Framerate stellt man in der Regel passend für die Abläufe in der Postproduktion ein.
Es sind acht verschiedene Projekt-Frameraten verfügbar: 23,98; 24; 25; 29,97; 30; 50; 59,94 und 60 fps.
Um die Projekt-Framerate ihrer Kamera im FPS-MENU anzupassen, tippen Sie auf die Pfeilsymbole...,
naben der aktuell ausgewählten Framerate unter links auf dem Display. Oder ziehen Sie den Schieberegler nach rechts oder links.

Um Anpassungen vorzunehmen, tippen Sie auf die Pfeilsymboleiben der Projekt-Fraterate oder bewegen Sie den Schieberegler hin und her
TIPP Die Projekt-Framerate Ihrer Blackmagic Pocket Cinema Camera gibt auch die Framerate für die HDMI-Ausgabe vor.
Sensor-Framerate
Anhand der Sensor-Framerate wird vorgegeben, wie weitere Vollbilder pro Sekunde der Sensor tatsächlich aufzeichnet. Diese Framerate wirkt sich darauf aus, wie schnell oder langsam Ihr Video bei ihrer vorgegebenen Projekt-Framerate wiedergegeben wird.

Aktivieren Sie zunachst die Funktion OFFSPEED-FRAMERATE. Um Anpassungen vorzunehmen, tilpen Sie auf die Pfellsymboleiben der Sensor-Framerate oder bewegen Sie den Schieberegler hin und her
Standardmäßig sind die Projekt- und Sensor-Framerate auf eine natürliche
Wiedergabegeschwindigkeit eingestellt. Wenn Sie jedoch auf den Schalter OFFSPEED-FRAMERATE rechts unter im FPS-Menu ihrer Kamera tippen, können Sie die Sensor-Fragerate frei wahren.
Um die Sensor-Framerate zuändern, tippen Sie auf die Pfeile darüber der Sensor-Framerate-Anzeige weiter unter links auf dem Touchscreen. Sie können den Schieberegler auch nach links oder rechtsziehen, um die Framerate zu erhöhen oder zu verringn. Sobald Sie den Schieberegler loslassen, wird die Sensor-Framerate ausgewählt. Im Feld über dem Schieberegler können Sie gängige Offspeed-Frameraten antippen. Diese berufen auf ihrer aktuellen Projekt-Framerate.
Sie konnen ihre Clips mit dynamischen, interessanten Tempoeffekten versehen, indem Sie underschiedliche Sensor-Frameraten einstehen. Ist die Sensor-Framerate auf einen hohenen Wert als ihre Projekt-Framerate eingestellt, entstehen so während der Wiedergabe ein Zeillupeneffekt. Ein Beispiel: Beim Filmen mit einer Sensor-Framerate von 60 fps und Wiedergabe mit einer Projekt-Framerate von 24 fps wird die tatsächliche Geschwindigkeit der Action um 40% verlangsamt. Umgekehrt gilt. Je niedriger ihre Sensor-Framerate,estochneller werden ihre Clips wiederergegeben. Dieser EffektGLEcht dem Prinzip des Overcranking und Undcranking einer Filmkamera.Durch Overcranking wird die Sensor-Framerate beschleunigt,was eine Ausdehnung von Zeitspannen bei der Wiedergabe bewirkt,um Emotionen hervorzuheiten.Undercranking hingegen verlangsamt die Sensor-Framerate. So konnen Sie das Tempo der Action in Szenen mit viel Bewegung weiter beschleunigen. Die kreativen Mochlichkeiten sind unendlich und liegen vollig in Ihrer Hand.
Naheres zu den maximalen Bildwechselraten, die für die einzelnen Aufzeichnungsformate und Codec verfügbar sind, finden Sie in der Tabelle im Kapitel „Aufzeichen".
HINWEIS Bei aktivierter Offspeed-Framerate sind Ton und Video nicht mehr synchronisiert. Das ist soccer der Fall, wenn Sie die gleiche Framerate fur Projekt und Sensor gesetzt haben. Soll die Tonsynchronisierung gewährleistet sein, meiden Sie deshalb die Option Offspeed-Framerate.
Verschluss
Der Verschluss-Indikator zeigt den Verschlusswinkel bzw. die Verschlusszeit an. Durch Antippen\ deses Indikators konnen Sie die Verschlusswerte ihrer Kamera manuell ändern oder die\nVerschlusspriorität über Belichtungsautomatik-Modi konfigurieren. Sie konnen auswahlen, ob\nVerschlusswerte als Verschlusswinkel oder Verschlusszeit angegeben werden. Naheres findsen Sie im Abschnitt SETUP-Einstellungen in thisem Handbuch.

Tippen Sie auf den VERSCHL.-Indikator, um auf die Verschluss-Einstellungen zuzugreifen
Der Verschlusswinkel bzw. die Verschlusszeit bestimmt das Ausmaß der Bewegungsunsächerte in Ihr dem Video und kann darüber hinaus zur Kompensierung varilerender Lichtverhältnisse genutzt werden. Meist liegt der optimale Verschlusswinkel für eine angemessene Bewegungsunsächerte bei 180 Grad bzw. bei einer Verschlusszeit von 1/50 Sekunde. Wenn sich jedoch die Beleuchtungsverhältnisse verändern oder mehr Bewegungen in ihrer Szene vorkommen, erfordert dies ggf. entsprechende Feinabstimmungen.
Zum Beispiel gilt eine 360-Grad-Einstellung, bei der die maximale Lichtmenge auf den Sensor trifft, als welt offen. Dies ist eine geeignete Einstellung für Szenen bei Low-Light-Bedingungen mit geringfügiger Bewegung. Beim Filmen von vielbewegten Objekten sorgt ein geringer Verschlusswinkel von bspw. 90 Grad für minimale Bewegungsunscharfe und ergibt schärfere, gestochenere Aufnahmen. Welche Verschlusszeit einem bestimmten Verschlusswinkel entspricht, ist abhängig von der verwendenten Framerate.
Wenn Sie bspw. bei 25 fps filmen, entsprechen 360 Grad 1/25 und 90 Grad 1/100 einer Sekunde.
HINWEIS Beim Drehen in Kunstlicht macht der gewähte Verschlusswert auftretendes Flimmern ggf. stärker sightbar. Ihr Blackmagic Pocket Cinema Camera berechnet flimmerfreie Verschlusswerte anhand der aktuellen Framerate automatisch. Beim Anpassen des Verschlusses zeigt die Kamera Ihnen am unteren Rand des Touchscreens bis zu drei flimmerfreie Verschlussoptionen an. Diese Verschlusswerte hangen von der Netzfrequenz in ihrer Region ab. Im Einrichtungsmenu ihrer Kamera konnen Sie die lokale Netzfrequenz auf 50 Hz oder 60 Hz einstellen. Nähres finden Sie im Abschnitt SETUP-Einstellungen in this dem Handbuch.
Wenn Sie den VERSCHL.-Indikator antippen, werden Ihnen am unteren Rand des Touchscreens Verschlusswerte vorgeschlagen. Bei ausgeschalteter Belichtungsautomatik zeigt dieser Bildschirm den derzeit ausgewählten Verschlusswert sowie die verfügbaren flimmerfreien Verschlusswerte an. Letztere sind abhängig von der im SETUP-Menu ihrer Kamera ausgewählten Netzfrequenz. Nähresfinden Sie im Abschnitt SETUP-Einstellungen in thisem Handbuch.
Flimmern kann aufgrund der Eigenschaften individueller Lichtquellen selbst mit „flimmerfreien“ Verschlusswerten auftreten. Bei unregelmäßigem Licht ist es darum ratsam, immer einen Probedreh vorzunehmen.
Um einen flimmerfreien Verschlusswert auszuwahlen, tippen Sie einfach auf einen der angezeigten Shutter-Werte. Durch die gängigsten Verschlusswerte navigieren Sie, indem Sie auf einen der Pfeile rechts und links des aktuellen Verschlusswert-Indikators tippen.

Ohre Kamera schlapt hnen fllmerfrele Verschlusswerte entsprechend der Netzfrequenz vor, die Sie im SETUP-Menu ausgewählten haben
Wenn Sie im Freien drehen oder flimmerfreie Lichtquellen verwenden, konnen Sie einen Verschlusswert auch manuell wahlen, indem Sie den aktuellen Verschlusswert unter links auf dem Bildschirm zweimal kurz hintereinander antippen. Ist „Verschlusswinkel" ausgewählt, erscheidt eine keine Tastatur, über die Sie einen beliebigen Verschlusswinkel zwischen 5 und 360 Grad einstehen konnen.

Geben Sie den Verschlusswinkel manuell über die keine Tastatur ein, wenn Sie im Freien oder bei flimmerfreiem Licht drehen
Ohre Blackmagic Pocket Cinema Camera hat drei verschlussbasierte Belichtungsautomatik-Modi. Um einen davon auszuwahlen, tippen Sie auf den Button BELICHTUNGSAUTOMATIK ganz rechts im Verschlussmenu.
Verschluss
These Einstellung justiert den Verschlusswert automatisch, um bei konstanter Blendenöffnung eine konstante Belichtigung beizubehalten. Wenn Sie eine feste Scharfentiefe beibehalten möchten, wahren Sie diese Einstellung. Denken Sie jedoch daran, dass kleinste automatische Anpassungen des Verschlusses Auswirkungen auf die Bewegungsunsächte haben können. Beim Dreh in geschlossenen Räumen ist es zudem ratsam, auf etwaiges Flimmern zu achten, das durch unterscheidliche Beleuchtungskörper hervorgerufen werden kann. Die Blendenautomatikfunktion ist nicht verfügbar, wenn der Verschlussmodus BELICHTUNGSAUTOMATIK ausgewählt ist.
Verschluss + Blende
Behalt die korrekte Belichtungsstarke bei, indem zunachst der Verschluss und anschließend die Blendenöffnung angepasst wird. Wenn der maximal oder minimal verfügbare Blendenwert erreicht ist, der Belichtungswert damit aber nicht beibehalten werden kann, justiert die Kamera für eine konstante Belichtung den Verschlusswert.
Blende + Verschluss
Behalt die korrekte Belichtungsstärke bei, indem zunachst die Blendenöffnung und anschließend der Verschlusswert angepasst werden. Wenn die maximal oder minimal verfügbar Blendenöffnung erreicht ist, der Belichtungswert darauf aber nicht beibehalten werden kann, justiert ihre Kamera für eine konstante Belichtung den Verschlusswert.

Tippen Sie im VERSCHL.-Menu auf BELICHTUNGSAUTOMATIK, um auf die verschlussbasierten Belichtungsautomatik-Modi zuzugreifen
Ist ein automatischer Belichtungsmodus aktiviert, der sich auf den Verschluss oder die Blende auswirkt, erscheint oben auf dem LCD-Touchscreen setzen dem SHUTTER- oder IRIS-Indikator ein kleines "A".
Blende
Der Blendenindikator zeigt die aktuell ausgewählte Blendenöffnung an. Durch Antippen these Indikators lasst sich die Blendenöffnung an kompatiblen Objektiven anpassen und die blendenbasierten Belichtungsautomatik-Modi konfigurieren.

Tippen Sie auf den Blendenindikator, um auf die Blendeneinstellungen zuzugreifen
Um die Blende über den LCD-Touchscreen anzupassen, muss das Objektiv an Ihrer Blackmagic Pocket Cinema Camera Justagen an den Blendenwerten über die Kamera unterstützen.
Durch Antippen des Blendenindikators öffnet sich das Blendenmenu am unteren Rand des Touchscreens. Ihr aktuelle eingestellte Blendenöffnung wird gaz links im Menu angezeigt. Sie können die Blendeneinstellung ändern, indem Sie auf die Pfeileiben der aktuellen Blendeneinstellung tippen oder den Schieberegler nach links oder rechtsziehen.

Tippen Sie Im Blendenmenu auf die Pfelle geben dem Blendendisktor oder benutzen Sie den Schieberegler, um Blendeneinstellungen anzupassen
Das Antippen des Schalter-Icons BELICHTUNGSAUTOMATIK ganz rechts im „Blenden“-Menu öffnet das Blendenautomatik-Menu.
Hier stehen Ihnen folgende Optionen zur Verflügung:
Blende
Um eine konstante Belichtung bei konstantem Verschlusswinkel zu gewährleisten, justiert diese Einstellung die Blendenöffnung automatisch. Dies wird sich nicht auf die Bewegungsunscharfe, ggf. jedoch auf die Scharfentiele aus.
Blende + Verschluss
Behalt die korrekte Belichtungsstarke bei, indem zunachst die Blendenöffnung und anschließlich der Verschlusswert angepasst werden. Wenn die maximal oder minimal verfügbar Blendenöffnung erreicht ist, der Belichtungswert darauf aber nicht beibehalten werden kann, justiert ihre Kamera für eine konstante Belichtung den Verschlusswert.
Verschluss und Blende
Behalt die korrekte Belichtungsstärke bei, indem zunachst der Verschluss und anschließend die Blendenöffnung angepasst wird. Wenn der maximal oder minimal verfügbare Verschlusswert erreicht ist, der Belichtungswert darauf aber nicht beibehalten werden kann, justiert ihre Kamera für eine konstante Belichtung die Blendenöffnung.

Tippen Sie im Blendenmenü auf BELICHTUNGSAUTOMATIK, um auf die blendenbasierten Belichtungsautomatik-Modi zuzugreifen
Wenn sich der aktivierte Modus für automatische Belichtung auf den Verschiuss oder die Blende auswirkt, erscheint oben auf dem LCD-Touchscreen setzen dem SHUTTER- oder IRIS-Indikator ein kleines „A".
Clipdaueranzeige
GanzupondemLCD-TouchscreenHrherKamerasehenSiedieClipdaueranzeige.

Die Clipdaueranzeige ihrer Kamera leuchtet während der Aufzeichnung rot
Anhand der Clipdaueranzeige in Form eines Timecode-Zährlers lasst sich die Dauer ihrer Clips prufen und der Timecode bei Aufnahme und Wiedergabe kontrollieren. Der Zähler zeigt eine Sequenz in Stunden:Minuten:Sekunden:Frames an und lauf während der Aufnahme oder Wiedergabe von Clips mit. Der Timecode wird während der Aufzeichnung in Rot angezeigt.
Die Clipdaueraufnahme beginnt bei 00:00:00:00. Die Dauer des aktuellen oder zuletzt aufgezeichneten Clips wird auf dem Touchscreen angezeigt. Der Uhrzeit-Timecode wird in die Clips eingebettet. Dies vereinfacht die Postproduktion.
Um den Timecode anzuzeigen, tippen Sie einfach auf die Clipdaueranzeige. Tippen Sie erneut daraufuf, um zur Clipdaueranzeige zurückzukehren.
Bei Anschluss von Blackmagic Pocket Cinema Cameras an einen ATEM Mini, kann ihr Schaltzustand auf dem LCD-Touchscreen unterhalb des Timecodes eingebrendet werden. Als Hilfestellung für die Kameraoperatoren besteht das Status-Overlay VORSCH. an, wenn eine Kamera kurz vor der Livenesschaltung liegt, oder ON AIR, wenn eine Kamera live auf Sendung ist. ATEM Minis synchronisieren den Timecode von Pocket Cinema Cameras automatisch und passenihn dem angeschlossenen Mischer an. Das erleichtert das prazise Schneiden von Multicam-Material in DaVinci Resolve.
Folgende zusätzliche Statusindikatoren erschellen ggf. mit der Daueranzelge:
| W | Erscheint links besoin der Daueranzeige, wenn ihre Blackmagic Pocket Cinema Camera in einem gecroppten Sensormodus filmt. |
| TC | Erscheint rechts besoin der Daueranzeige, wenn der Timecode angezeigt wird. |
| EXT | Erscheint rechts besoin der Daueranzeige, wenn ein gültiger externer LTC-Timecode an die 3,5mm-Stereobuchse angeschlossen ist oder der Timecode mit einem ATEM Mini Mischer synchronisiert wird. |
| INT | Erscheint rechts besoin der Daueranzeige, wenn die Kamera nach einem Jam-Sync und einer Unterbrechung einen internen Timecode abspielt. |
ISO
Der ISO-Indikator zeigt die aktuelle ISO-Einstellung bzw. Lichtempfindlichkeit an. Durch Antippen dieser Indikatoren konnen Sie ihren ISO-Wert bei variierenden Lichtverhältnissen anpassen.

Tippen Sie auf den ISO-Indikator, um auf die ISO-Einstellungen zuzugreifen

Bei geöffnetem ISO-Menu erschein die ISO-Einstellungen ihrer Kamera am unteren Rand des LCD-Touchscreens. Mit dem Schieberegler unter den Presets konnen Sie den ISO-Wert in Drittel-Blendenstufen anpassen
Je nach Situation mag eine niedrigere oder höhere ISO-Einstellung geeigneter sein. Bspw. mag ein ISO-Wert von 25.600 in Niedriglichtsituationen geeignet sein, ruft aber möglicherweise ein sightbares Bildauschen hervor. Bei hellen Lichtverhältnissen kann ein ISO-Wert von 100 gesättigter Farben bewirken.
Duale native ISO-Empfindlichkeiten
Ohre Blackmagic Pocket Cinema Camera verfügt über zwei native ISO-Empfindlichkeiten (Dual Native ISO), die bei den Referenzwerten ISO 400 und ISO 3200 liegen. Der Sensor ist demnach sowohl für Aufnahmen bei Niedriglicht als auch bei hellem Tageslicht optimiert.
Wenn Sie die ISO-Einstellung für wechselnde Lichtverhältnisse anpassen, wirkt die „Dual native ISO“-Funktion im Hintergrund und sorgt davon, dass ihre Footage sauber ist und bei geringen und hohen ISO-Werten ein minimales Rauschen aufweist.
Bei ISO-Einstellungen zwischen 100 und 1.000 wird der native ISO-Empfindlichkeitswert von 400 als Referenz verwendet. Für ISO-Einstellungen zwischen 1.250 und 25.600 liegt dieser native Referenzwert bei 3.200. Bei Drehbedingungen, in denen Sie die Wahl zwischen einem ISO-Wert von 1.000 oder 1.250 haben, empfehlen wir Ihnen, die Blende Ihres Objektivs um eine Blendenstufe herunterzusetzen. Bei einem eingestellen ISO-Wert von 1.250 orientiert sich die Kamera am higheren nativen ISO-Referenzwert, was deutlich sauberere Ergebnisse liefert.
Die nachstehenden Tabellen verdeutlichen das Verhältnis zwischen ISO-Ausbahl und verfügbarem Dynamikumfang.
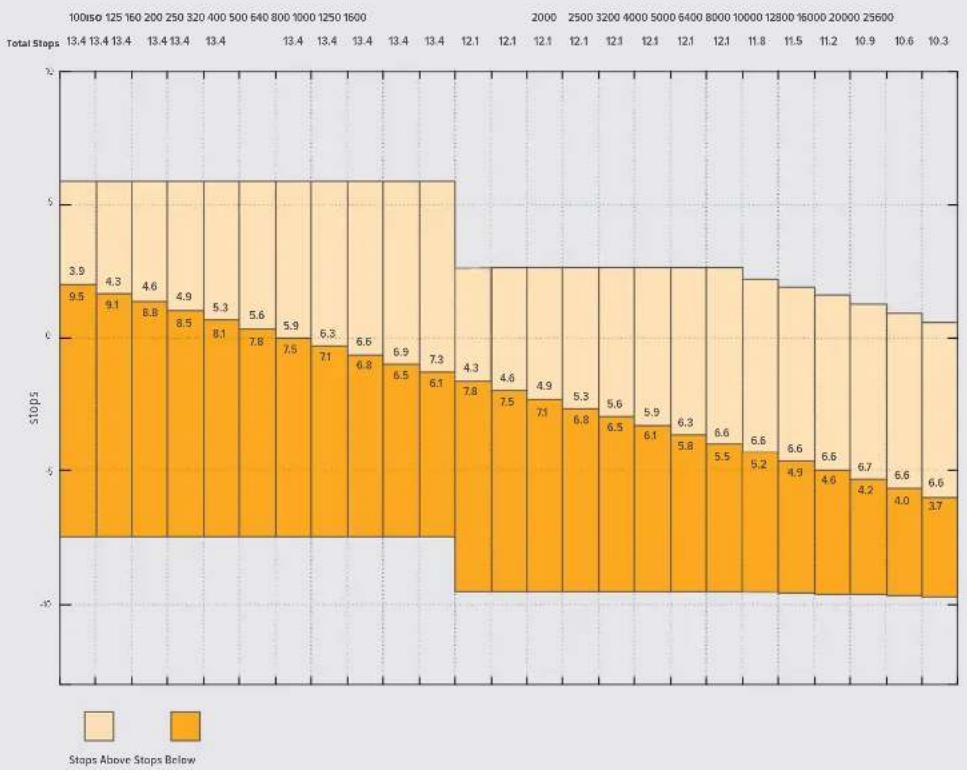
Dynamikumfang der Blackmagic Pocket Cinema Camera 6K Pro und der Blackmagic Pocket Cinema Camera 6K G2
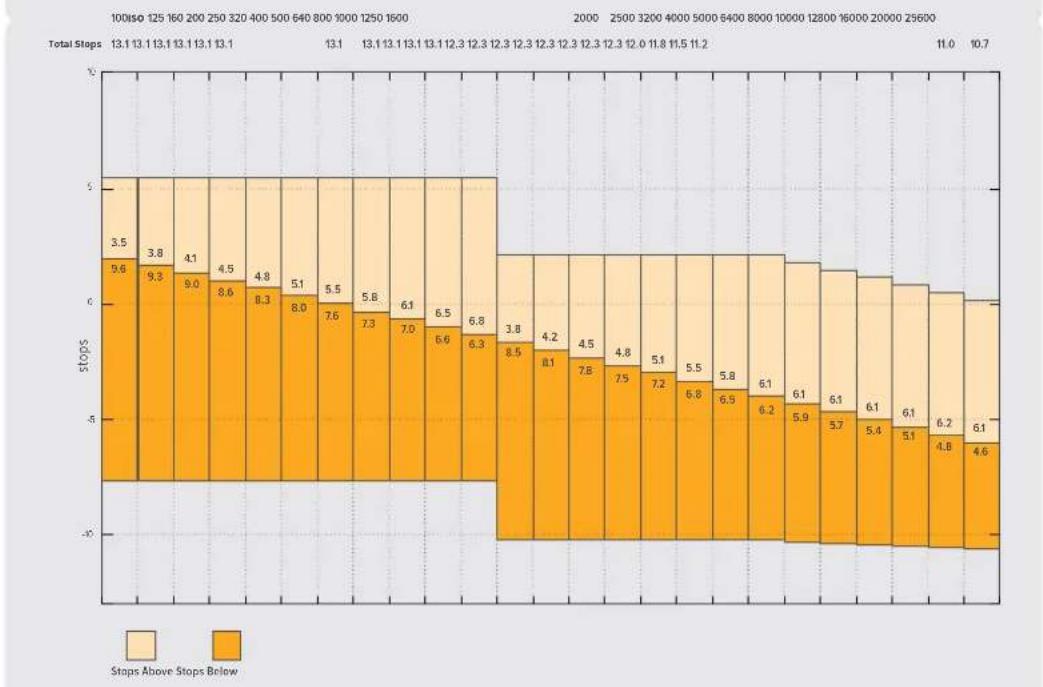
Dynamikumfang der Blackmagic Pocket Cinema Camera 4K
Wei Sabgleich
Die Indikatoren WB und TINT zeigen den aktuellen Weißabgleich und Farbton ihrer Kamera an. Durch Antippen dieser Indikatoren konnen Sie den Weißabgleich sowie den Farbton ihrer Kamera bei variierenden Lichtverhältnissen anpassen.

Tippen Sie auf die Indikatoren WB und TINT, um auf die Einstellungen für Weßabgleich und Tönung zuzugreifen
Lichtquellen geben Licht verschiedener Färbung aus. Eine Kerze strahlt bspw. warmes Licht aus und ein bedeckter Himmel kühleres Licht. Die Weißabgleicheinstellungen dienen zum Ausbalancieren der Farben eines Bildes, damit Weißbereiche auch wirklich weiß bleiben. Dies geschiet durch das Anpassen der Orange- und Blautone in ihrem Bild. Beispiel: Beim Filmen unter Kunstlichtlampen, die warmes, orangefarbenes Licht abgeben, bewirkt man durch Auswahl von 3200 K, dass dem Bild zusätzliches Blau beigeft wird. Der hiermit bewirkte farbliche Abgleich sorgt für eine akkurate Aufzeichnung von Weiß.
Ohre Blackmagic Pocket Cinema Camera bietet Weisabgleichsvoreinstellungen (Presets) fur.
verschiedene Farbtemperaturen. Folgende Presets sind vorhanden:

Helles Sonnenlicht (5600 K)

Gluhampen (3200 K)

Leuchtstofflampen (4000 K)

Gemischtes Licht (4500 K)

Wolken (6500 K)
Sie konnen all diese Presets nach Belieben anpassen. Tippen Sie dafür auf die Pfeile links und rechts des Temperaturindikators unter links im Menu für den Weißabgleich. Durch jedem Antippen wird die Farbtemperatur um 50 K erhöht bzw. verringent. Wenn Sie die Pfeilsymbole gedrück halten,ändern sich die Werte schneller. Alternativ konnen Sie auch den Schieberegler in der Mitte des Weißabgleich-Menu bewegen.
Um Ihr Bild weiter anzupassen, können Sie zudem die Tönung (Tint) anpassen. Dies verändert die Grün- und Magentaanteile in ihrem Bild. Das Hinzufügen von Magentaanteilen kann bspw. den Grünstich kompensieren, den Leuchtstofflampen halten verursachen. Viele der Weißabgleichvoreinstellungen ihrer Blackmagic enthalten eine leichte Tönung.

Durch Antippen des WB- oder TINT-Indikators erhalten Sie Zugriff auf fünf Presets, zwei Weßabgleichindikatoren, links einen Schieberegler und rechts einen Tintindikator. Passen Sie diese an, um einen benutilzerdefinierten Weßabgleich (CWB = Custom White Balance) für ihre Lichtverhältnisse einzustellen
Im Weißabgleich-Menü wird der derzeitige Farbton der Kamera rechts unter auf dem Touchscreen angezeigt. Um den Farbton anzupassen, tippen Sie einfach kurz auf die Pfeile links und rechts des TINT-Indikators oder halten sie gedrückt. Der verfügbare Bereich liegt bei -50 bis +50 in Schritten von einer Einheit. Halten Sie die Pfeile gedrückt, um den Wert Schneller zu verändern.
HINWEIS Die Vorgabe eines benutzerspezifischen Weisabgleichs oder Tönungswerts bewirkt, dass Ihr Preset auf CWB (Custom White Balance) wechselt. Benutzerspezifische Weisabgleicheinstellungen haben hohe Priorität und bleiben nach dem Ein- und Ausschalten konfiguriert. Das Gleiche gilt, wenn zu einem Preset und wieder zusück zu CWB gewechselt wird. So ist es ein Leichtes, einen benutzerspezifischen Weisabgleich mit dem zuletzt verwendeten Preset zu vergleichen.
Automatischer Weißabgleich
Ohre Blackmagic Pocket Cinema Camera kann den Weisabgleich automatisch vornehmen. Durch Antippen von AWB (Automatic White Balance) gelangen Sie ins Weisabgleich-Menu.
Wenn Sie den automatischen Weißabgleich einstellen, erscheint ein Quadrat-Overlay in der Mitte Ihres Bildes. Richten Sie theseus Quadrat auf eine neutrale Oberfläche wie eine weiß oder graue Karte und tippen Sie auf „WB Aktualisieren". ihre Kamera passst den Weißabgleich und die Tintwerte nun automatisch an, damit die durchschnittlichen Weiß- oder Grautöne innerhalb des Quadrats so neutral wie möglich aussehen. Sobald Sie den Weißabgleich aktualisiert haben, verwendet ihre Kameraihn als standardmäßige Einstellung. Alternativ halten Sie die WB-Taste oben auf ihrer
Kamera für drei Sekunden gedrückt, um den automatischen Weißabgleich auszuwahlen und die Funktion „WB Aktualisieren" zu aktivieren.
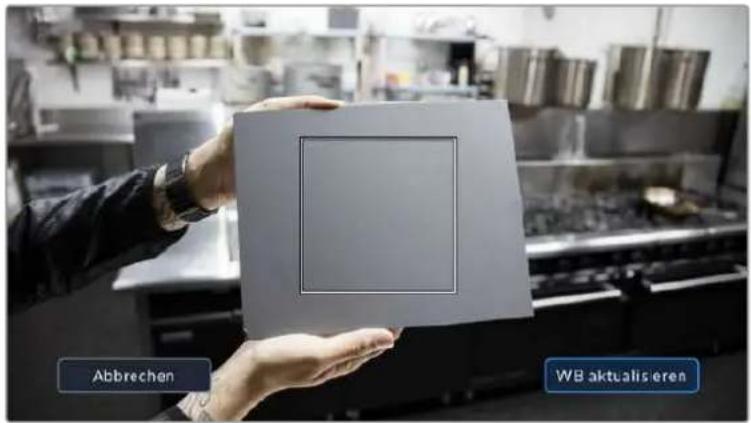
Wenn Sie im Weibabgleich-MENU auf das AWB-Icon tippen, rufen Sie den Bildschirm für den automatischen Weibabgleich auf. Verwenden Sie eine weitere oder neutral graue Oberfläche, um einen neutralen Weibabgleich automatisch einzustellen
Strom
Die Stromquelle und der Ladezustand der Kamera werden oben rechts auf dem LCD-Bildschirm angezeigt.

Im Akkubetrieb konnen Sie durch Antippen des Stromindikators zwischen verschiedenen Anzeigen wechseln
| AC | AC | Zeigt an, wenn ihre Kamera mit Netzstrom versorgt wird. |
| 4 AC | AC / Aufladen | Anzeige der Netzstromversorgung ihrer Kamera bei gleichzeitiger Aufladung des kameraiinternen Akkus und, bei Einsatz eines Blackmagic Pocket Camera Battery Grips, dessen NP-F570-Akkus. |
| 50% | Prozent | Wenn Ihr Akku eine prozentuale Anzeige entwickel, wird der verbleibende Ladezustand als Akkusymbol in Prozent angezeigt. Er entleert sich in Schritten von 1%. Bei einem verbleibenden Ladezustand von 20% wird der Akkubalken in Rot angezeigt. Um die prozentuale Anzeige ein- und auszuschalten, tippen Sie auf das Akkusymbol. |
| Akkubalken | Der mit ihrer Kamera gelieferte Akku zeigt ein Akkusymbol an, das sich in Schritten von 25% entleert. Bei einem verbleibenden Ladezustand von 20% wird der Akkubalken rot angezeigt. | |
| Battery Grip Akkubalken | Ist ein Akkugriff an ihre Blackmagic Pocket Cinema Camera 4K angebracht, können Sie über diese Akkubalken den Ladezustand bisher Akkus getrennt überwachen. | |
| Battery Grip Akkubalken | Über die beiden Akkus im Blackmagic Pocket Camera Battery Pro Grip werden die Modelle Pocket Cinema Camera 6K Pro und 6K G2 zusätzlich zum kameraiinternen Akku mit Strom versorgt. Die Balken zeigen den Ladestatus aller drei Akkus an. | |
| 16.4v | Spannung der Stromquelle | Zeigt die vom Akku oder von einem an die DC-Buchse angeschlossenen Stecknetzteil, einem D-Tap-Adapterkabel oder von einer eigenen Stromversorgungslösung gefelte Spannung. Tippen Sie auf das Akkusymbol, um die Spannungsanzeige ein- und auszuschalten. |
LUT-Indikator
Wenn Sie am Set eine LUT als Vorschautool einsetzen, zeigt ein LUT-Icon in der oberen linken Ecke des Bildschirms an, dass die LUT aktiv ist.

Histogramm
Unten rechts auf dem Touchscreen ihrer Kamera wird das Histogramm angezeigt. Das RGB-Histogramm stellt die Tonwertverteilung in einem Bild in separates Kanälen für Rot, Grün und Blau dar.

Das Histogramm verschaftl Ihnen einen Überblick uber die Tonwertspanne zwischen Schatten und Lichtern in Ihr hem Clip. Es ist außerdem ein hilfreiches Werkzeug, um die Ausgewogenheit der Belichtung zu überprüfen und Sicherzustellen, dass keine Lichter abgeschritten werden
Am linken Rand des Histogramms werden die Schatten bzw. Schwarzwerte und ganz rechts die Lichter bzw. Weißwerte angezeigt. Wenn Sie die Blende schließen oder öffnen, verschiben sich die Helligkeitsinformationen im Histogramm entsprechend nach links oder rechts. Sie konnen so die Schatten und Lichter ihrer Bilder auf Clipping überprüfen. Werden die Tonwerte im roten, grünen oder blauen Kanal beschritten, leuchtet die jeweilige Anzeige rechts darüber dem Histogramm auf. Wenn der linke und der rechte Rand Ihres Histogramms abrupt abfallen und nicht graduell auslaufen, gehen möglicherweise Details in den hellen und dunklen Bereichen verloren.
Ist unter links an Ihr Touchscreen kein Histogramm zu sehen, sind ihre MONITORING-Einstellungen für „LCD" möglicherweise auf die Anzeige von „Codec und Auflösung" eingestellt. Nähres finden Sie im Abschnitt „AUFNAHME-Einstellungen" in dieser Handbuch.
Aufnahme-Button
Unten auf dem Touchscreen ihrer Blackmagic Design Pocket Cinema Camera findet sich darüber dem Histogramm ein runder grauer Button. Dies ist der Aufnahme-Button. Tippen Sie einmal auf den Button, um mit der Aufzeichnung zu beginnen. Ein erneutes Antippen stoppt die Aufzeichnung. Wahrend der Aufzeichnung werden der Aufnahme-Button, der Speicher-Indikator daneben und der Timecode oben auf dem Touchscreen ihrer Blackmagic Pocket Cinema Camera in Rot angezeigt.

Der Aufnahme-Button befindet sichiben den SpeicherIndikatoren am unteren Rand des LCD-Touchscreens

Der Aufnahme-Button leuchtet rot, wenn aufgezeichnet wird
LUT auf Clip angewandt
Wenn Sie in den AUFNAHME-Einstellungen vorgegeben haben, eine LUT auf ihre aufgezeichneten Clips anzuwenden, wird dies im Standby-Modus und während der Aufzeichnung auf dem Touchscreen angezeigt.

Das LUT-Symbol teilt Ihnen mit, dass die ausgewählte LUT für aufgenommene Clips mit aufgezeichnet wird

Das LUT-Symbol gezelt an, dass die ausgewählte LUT mit dem Clip aufgezeichnet wird
Indikator für ausgelassene Bilder
Der Aufnahme-Button wird mit einem blinkenden „I" überdeckt, wenn ihre Kamera während der Aufzeichnung Bilder auszulassen beginnnt. Der Balken für die verbleibende Aufnahmedauer der betroffenen Karte bzw. Karten wird bereits rot. Wenn ihre CFast-Karte bspw. Bilder auslassst, erscheint das „I" anstelle des Aufnahme-Buttons und die verbleibende Aufnahmedauer für die CFast-Karte wird in Rot angezeigt. Das informiert Sie darüber, ob eine bestimmte Karte zu langsam für den ausgewählten Codec oder die ausgewählte Auflösung ist. Die Anzeige für ausgelassene Bilder erscheint außer dem, wenn der vorherige Clip ausgelassene Bilder enthalt. Der Indikator wird so lange angezeigt, bis ein neuer Clip aufgezeichnet oder die Kamera aus- und wieder eingeschaltet wird. Wie man vermeidet, dass Frames fallengelassen werden, wird in den Abschnitten „Auswahl einer CFast-2.0-Karte" und „Auswahl einer SD-Karte" erklärt.

Der Indikator zeigt fur die CFast-Karte ausgelassene Bilder an
HINWEIS Sie können ihre Blackmagic Pocket Cinema Camera so eingten, dass sie die Aufzeichnung bei Erkennung ausgelassener Bilder stoppt. Nähresfinden Sie im Abschnitt AUFNAHME-Einstellungen in thisem Handbuch.
Verbleibende Aufnahmedauer
Wird eine CFast- bzw. SD-Karte eingeschoben oder ein USB-C-Laufwerk an ihre Kamera angeschlossen, zeigen die Speicher-Indikatoren am unteren Rand des Touchscreens die verbleibende Aufnahmedauer auf der Karte oder dem USB-C-Laufwerk an. Die in Minuten angegebene Zeit variiert entsprechend ihren gewährten Einstellungen für Bildwechselfrequenz und Codec. Bei Änderung dieser Einstellungen berechnet der Indikator den angegebenen Wert automatisch neu. Bei einer verbleibenden Restzeit von ungebung furl minuten wird der Indikator rot. Bei einer verbleibenden Dauer von nur zwei Minuten beginnnt er zu blinken. Erricht ein Speichermedium seine maximale Kapazität, zeit der Indikator dies mit VOLL an.

Der Speicher-Indikator gezigt den Namei Hrnr CFast-bzw. SD-Karte oder Ihres USB-C-Laufwerks sowie die verbliebende Aufnahmedauer In Minuten an
Zudem wird der Name des Speichermediums auf einem kleinen Balken über der verbleibenden Aufnahmedauer angezeigt. Ein blauer Balken zeigt an, auf welches Speichermedium aufgezeichnet wird. Um auf eine andere Karte oder ein anderen Laufwerk aufzuzeichnen, halten Sie die Namensanzeige des gewünschten Mediums gedrückt. Während der Aufzeichnung ist der Balken rot. Durch Tippen auf die Speicher-Indikatoren öffnen Sie das Speicher- und Formatierungsmenu.
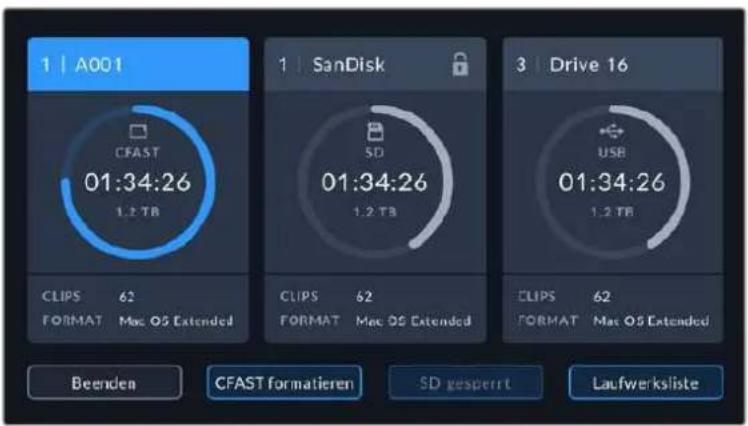
Tippen Sie auf die Datenträger-Indikatoren auf dem LCD-Touchscreen, um auf den Speichermanager zuzugreifen
Dieses Menu zeigt den freien Speicherplatz eines jeder CFast-, SD- oder USB-C-Mediums in Ihrer Kamera sowie den Mediennamen, die Länge des letzten Clips, die Gesamtzahl der Clips pro Medium und das Dateifornat an.
Sie können Ihr Medium über diese Menu formatieren. Weitere Informationen finden Sie unter „Datenträger für die Aufnahme vorbereiten" in dieser Handbuch.
TIPP Durch Antippen des Namens eines Speichermediums im Speichernmu wird diese Medium als aktives vorgegeben. Ihr Blackmagic Pocket Cinema Camera bespielt these Medium dann zuerst.
Audiopegelmeter
Bei Verwendung des internen Mikrofons oder einer angeschlossenen externen Audioquelle zeigen die Audiospitzenmeter die Tonpegel der Kanäle 1 und 2 an. Die Tonpegel-Anzeige ist in dBFS kalibriert und verfügt über Peak-Indikatoren mit der Haltefunktion Peak Hold, die nach einer Übersteuerung kurzfristig sightbar bleiben. Sie zeigen Ohnen erreichte Höchstpegel deutlich an.
Eine optimale Tonqualität wird mit Audiogeln unter 0 dBFS gewährleistet. Hierbei handelt es sich um den Höchstpegel, den ihre Kamera aufzeichen kann. Diese Wert überschreitendes Audio wird abgeschritten, was zu Verzerrungen führt.
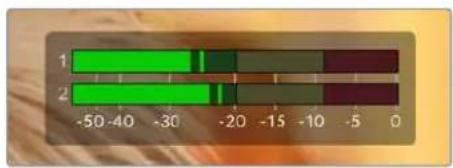
Die farbigen Balken des Audiopegelometers zeigen die maximalen Audiopegel an. Die Spitzenwerte Ihres Tons sollen den Idealerweise am oberen Ende des grünen Bereichs liegen. Schlagen die Pegelspitzen jedoch in den gelben oder roten Bereich aus, so besteht die Gefahr einer Übersteuerung Ihres Tons.
Tippen Sie auf die Audiogeelmesser, um die Lautstärkeregler für Audieingangsanäle 1 und 2 sowie die Kopfhörer- oder Laatsprecherlautstärke aufzurufen.
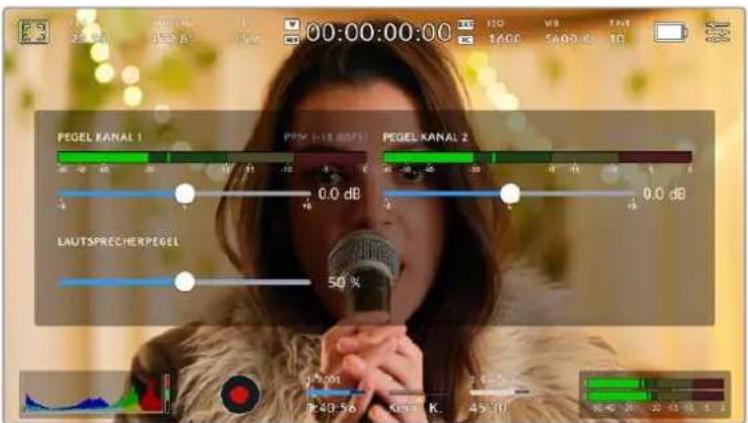
Tippen Sie auf die Audiogeelmeter auf dem LCD-Touchscreen, um bequem auf die Lautstärke-, Kopfhörer- oder Laufsprechereinstellungen zuzugreifen
Zweimaliges Tippen zum Zoomen
Durch zweimaliges Tippen auf den LCD-Touchscreen konnen Sie einen beliebigen Bereich des Vorschaubilds ihrer Blackmagic Pocket Cinema Camera vergroßern. Diese Bereich wird vergroßert. Wenn Sie mit ihrem Finger nun über den LCD-Touchscreen streichen, konnen Sie im Bild herumnavigieren. Besonderss hilfreich ist das beim Überprüfen der Fokussierung. Um zur normalen Bildgroße zusückzukehren, tippen Sie einfach erneut zweimal kurz hintereinander auf den Touchscreen. Durch Wischen nach oben oder unter werden alle Statusindikatoren aus dem LCD-Touchscreen ausgeblendet
Pinch-to-Zoom
Mit der Multitouch-Geste „Pinch-to-Zoom" konnen Sie auf dem LCD-Touchscreen den Vergroßerungsgrad anpassen. Die HDMI-Ausgabe bleibt davon unberührt.
Für eine zweifache Vergroßerung tippen Sie zweimal hinterinander auf den Touchscreen oder drücken die Fokussiertaste an der Rückseite ihrer Kamera. Verändern Sie dann mit einer Zoomgestede den Vergroßungsgrad. Führren Sie auf dem Touchscreen eine Wischbewegung aus, um den vergroßerten Ausschnitt zu verschiedenen. Um zur normalen Bildgroße zurückzukehren, tippen Sie erneut zweimal hinterinander auf den Touchscreen oder drücken die Fokussiertaste an der Kamera.
Durch zweimaliges Antippen des Touchscreens oder durch Drucken der Fokussiertaste wird zwischen der vorherigen vergroßerten Ansicht und der vollen Bildgroße hin- und hergeschaltet. Wenn Sie zum Beispiel per Pinch-to-Zoom eine achtfache Vergroßerung erzeugen und zweimal kurz hintereinander auf den Touchscreen tippen, wird hereausgezoomt. Ein erneutes zweimaliges Antippen ruft wieder die achtfache Vergroßerung auf.
Touch to Focus
Sie können Ihr Objektiv auf einen beliebigen Bildausschnitt einstellen, indem Sie auf einen bestimmten Bereich auf dem LCD-Bildschirm tippen und diesen gedrückt halten. Drücken Sie die Fokustaste, um Ihr Objektiv auf die ausgewählte Stelle zu fokussieren. Um den Fokuspunkt auf die Mitte des Bildschirms zurückzusetzen, drücken Sie die Fokustaste zweimal.
Vollbildschirm-Modus
Bei der Einstellung oder Fokussierung eines Shots ist es manchmal hilfreich, den Statustext und die Messwerte auf dem Touchscreen vorübergehend auszublenden. Um alles zu verbergen, führen Sie auf dem LCD-Touchscreen eine Wischbewegung nach oben oder unter aus. Der Aufnahme-Indikator, Bildrandmarkierungen, Raster, Focus Assist und Zebra bleiben weiterhin sightbar.
Wischen Sie erneut nach oben oder unter, um den Statustext und die Messwerte wieder einzublenden.

Um alle Indikatoren zu verbergen, führen Sie auf dem LCD-Touchscreen eine Wischbewegung nach oben oder unter aus
Wiedergabenu
Drucken Sie auf die Wiedergabetaste, um auf das Wiedergabenu zuzugreifen. Bereits aufgezeichnete Clips konnen Sie mit den Buttons auf dem LCD-Touchscreen Ihrer Kamera steuern.
Wenn Sie den LCD-Touchscreen benutzen, tippen Sie den Wiedergabe-Button einmal, um die Wiedergabe zu starten und erneut, um sie zu stoppen. Verwenden Sie den Vor- oder Rücklauf-Button, um zum Anfang oder Ende eines Clips zurückzuspringen. Einmaliges Antippen des Vorlauf-Buttons bringt Sie zum nachsten Clip. Um an den Anfang des aktuellen Clips zu gelangen, drücken Sie den Rücklauf-Button einmal. Um zurück zum Anfang des vorherigen Clips zu springen, drücken Sie sie zweimal. Indem Sie auf den Loop-Button tippen, konnen Clips zudem in Dauerschleife abgespielt werden.

Die Rücklauf-, Wiedergabe-, Vorlauf- und Loop-Buttons
Um vor oder darüber zu spulen, halten Sie die Vor- oder Rücklauf-Buttons gedrück. Abhängig davon, welche Buttons Sie gedrück halten, wird ihre Footage in doppelter Geschwindigkeit vor- oder ruckwartsgespielt.
Während des Vor- oder Rücklaufs konnen Sie die Geschwindigkeit durch erneutes Antippen der Buttons erhöhen. Mit jedem Antippen verdoppelt sich die Vor- bzw. Rücklaufgeschwindigkeit. Die maximale Geschwindigkeit liegt jedoch bei der 16-fachen der normalen Abspielgeschwindigkeit. Durch erneutes Antippen bei 16-facher Geschwindigkeit gelangen Sie zurück zur doppelten Geschwindigkeit. Mit jedem Antippen auf den entgegengesetzten Button halbiert sich die derzeitige Vor- bzw. Rücklaufgeschwindigkeit. Um zur normalen Abspielgeschwindigkeit zurückzukehren, tippen Sie auf den Wiedergabe-Button.

Der Geschwindigkeitsindikator für den Vor- oder Rücklauf zeitgt die Geschwindigkeit und Laufrichtung an
Wird im Wiedergabe-Modus der Aufnahme-Button gedrück, versetzt dies die Kamera in den Standby-Modus darüber, und sie ist wieder aufnahmebereit.
Wischen Sie auf dem Touchscreen nach oben oder unter, um den Statustext bei der Wiedergabe von Footage zu verbergen. Öffnen Sie die Slate im Wiedergabemodus, um den aktuellen Clip in den Metadaten als GUTER TAKE zu markieren. Näheres findsen Sie im Abschnitt „Eingabe von Metadaten".
Einstellungen
Dashboard
Drucken Sie die Menutaste, um das Dashboard der Kamera zu öffnen. Hierbei handelt es sich um ein Menu mit Registerkarten für Einstellungen, die auf dem Touchscreen nicht standardmaßig angezeigt werden. Die Einstellungen sind nach Funktion in folgende Registerkarten unterteilt: AUFNAHME, MONITORING, AUDIO, SETUP, PRESETS und LUTS. jeder Registerkarte besteht aus mehreren Seiten, zu denen Sie jeweils über die Pfeilsymbole am Rand des Bildschirms oder durch Wischen nach links oder rechts gelangen.
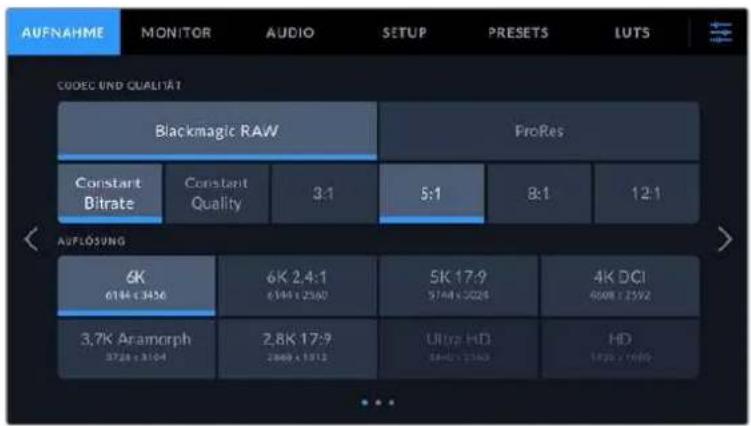
Um durch die Dashboard-Registerkarten Ihrer Blackmagic Pocket Cinema Camera zu navigieren, tippen Sie auf den jeweiligen Reiter
AUFNAHME-Einstellungen
Über die AUFNAHME-Registerkarte können Sie das Videoformat, den Codec und die Auflösung sowie andere wichtige Einstellungen für die Aufzeichnung wie Dynamikumfang und Detailscharfe vorheiten.
AUFNAHME-Einstellungen Seite 1
Die erste Seite der AUFNAHME-Einstellungen betet folgende Optionen:
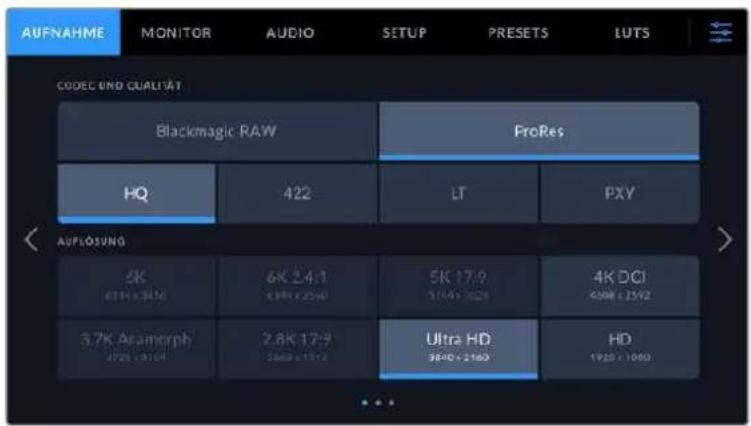
CODEC UND QUALITÄT
Das Menu für die Einstellungen von Codec und Qualität ist in zwei Reihen aufgeleit. Die obere Reihe lasst Sie zwischen zwei Codec-Familien wahren - Blackmagic RAW und Apple ProRes. Die untere Reihe bietete eine Auswahl an Qualitätoptionen innerhalb dieser Familien an. Die in der ProRes-Codefamilie verfügbarbaren Qualitätoptionen sind bspw. ProRes 422 HQ, ProRes 422, ProRes 422 LT und ProRes 422 Proxy. Die Optionen für Blackmagic RAW sind gemäß den Kompressionsmethoden in vier „Constant Bitrate" und zwei „Constant Quality"-Einstellungen aufgeleit.
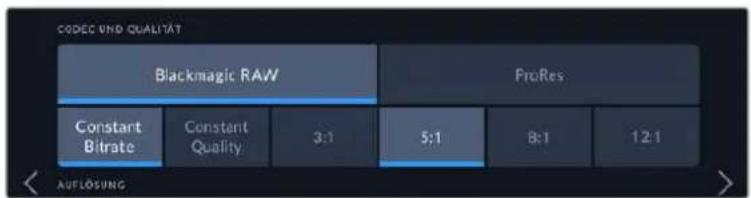
Blackmagic-RAW-Optionen fur Codec und Qualitat
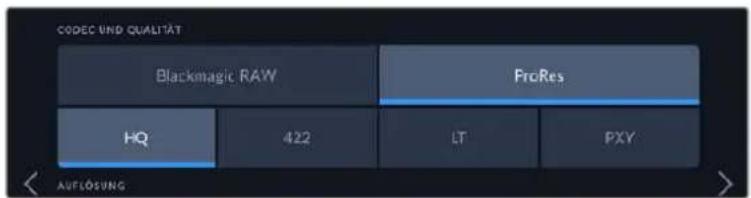
ProRes-Optionen für Codec und Qualität
TIPP Sie können mit ihrer Blackmagic Pocket Cinema Camera mehr Video auf Ihr Speichermedium aufzeichnen, wenn Sie einen Codec mit higherer Kompressionsrate auswahlen. Naheres finden Sie in den Tabellen unter „Aufzeichungsdauer" im Kapitel „Aufzeichnen".
AUFLösUNG
These Einstellung steit in Zusammenhang mit der Codec-Einstellung. Wahlen Sie hier die Auflösung für das gewünschte Aufnahmeformat aus. Wenn Sie bspw. Ultra-HD-Clips in ProRes HQ aufzeichen wollen, wahren Sie im Menu CODEC UND QUALITÄT „ProRes" und „HQ" aus. Wahlen Sie anschließend unter AUFLösUNG „Ultra HD" aus.
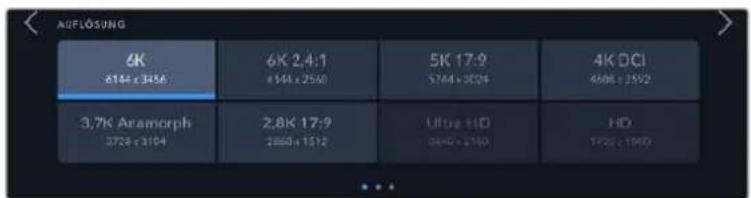
Auf der Pocket Cinema Camera 6K Pro und G2 6K verfügbar
Auflösungen bei Verwendung des Blackmagic-RAW-Codecs
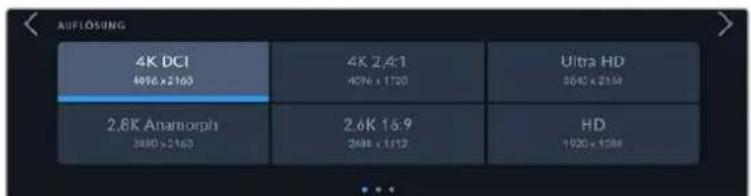
Auf der Pocket Cinema Camera 4K verfügbare Auflösungen. Für das 4K-DCI-Format heißt diese Kategorie "AUFLösUNG", andernfalls "AUFLösUNG - SENSOR GECROPPT"
Wenn Sie Mehrkameraaufzeichnungen über einen ATEM Mini koordinieren, wechselt der eingestellte Codec der einzelnen Pocket Cinema Cameras zu Blackmagic RAW, um hochwertige separate Feeds auf die internen Datenträger aufzuzeichnen. Beim Anschlieben von Pocket Cinema Cameras an einen ATEM Mini wechselt die Bildwechselfrequency der Kameras zu der auf dem ATEM Mini eingestelltten Framerate. Die Bildwechselfrequency für die Ausgabe Ihres ATEM Mini konnen Sie jedoch in ATEM Software Control über die Mischereinstellungen auch nach dem Anschlieben aller Videoquellenändern. Weitere Informationen siehe ATEM Mini Bedienungsanleitung.
AUFNAHME-Einstellungen Seite 2
Die zweite Seite der AUFNAHME-Einstellungen bietet folgende Optionen:
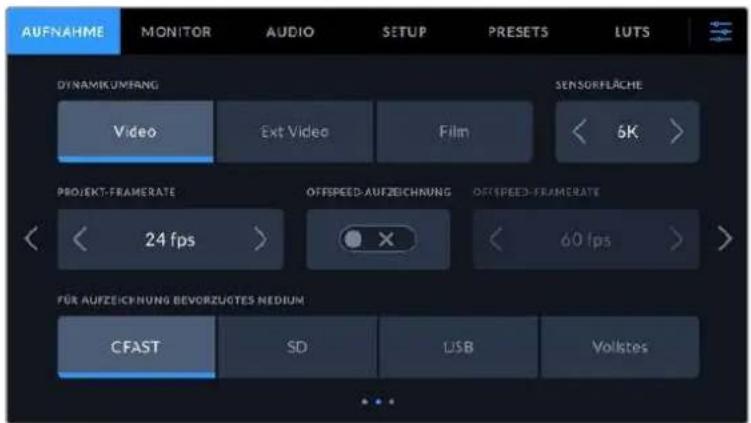
DYNAMIKUMFANG
Justieren Sie die Einstellungen für den Dynamikumfang, indem Sie auf die jeweilige Option unter DYNAMIKUMFANG tippen. Die Blackmagic Pocket Cinema Camera hat drei Einstellungen für den Dynamikumfang:
| Film Im „Film“-Modus wird Video unter Anwendung einer Log-Kurve aufgenommen. So können Sie den hochsten Dynamikumfang beibehalten und maximale Daten über Ihr Videosignal aufzeichnen, was Ihnen den optimalen Einsatz von Farbkorrektursoftware wie DaVinci Resolve ermöglich. |
| Extended Video Der „Extended Video“-Modus beruht auf dem Farbraum Blackmagic Wide Gamut und es werden Kontrast und Sättigung angewendet. Die augenfälligsten Unterschiede zum „Video“-Modus sind die geringere Sättigung der Grün-Magenta-Achse, was charakteristisch für Analogfilm ist. |
| Video Der „Video“-Modus ist die Beste Wahl für Aufnahmen mit hohem Kontrast und entsätigtem Look zur direkten oder minimal nachbearbeiteten Auslieferung. „Video“ verwendet die Primärefarben des Rec.709 Farbraums mit einem geschmeidigen Roll-Off in den Highlights. Eine gute Option für einen prazisen Ausgangspunkt und resultierendes Bildmaterial mit einer gefälligen Gamma-Kurve, das bei Bedarf genug Spielerium für die Farbkorrektur bietet. |
HINWEIS Im Dynamikumfang „Film" in Blackmagic RAW oder ProRes aufgezeichnete Bilder sehen auf dem Touchscreen matt und entsätig ist. Das liegt daran, dass die Bilddatei große Mengen noch nicht gegradeter Daten enthalt, die für Standard-Displays ungeeignet sind. Bei der Aufzeichnung im Dynamikumfang „Film" konnen Sie die Videoinhalte jederoch unter Anwendung einer Display-LUT auf dem Touchscreen und der HDMI-Ausbabe überwachen. Diese dient dazu, einen Standardkontrast zu simulieren. Naheres finden Sie im Abschnitt „LUTs" in dieser Handbuch.
Sensorfläche
Die Blackmagic Pocket Cinema Camera kann so eingestellt werden, dass sie die gesamte Sensorfläche verwendet. Für noch höhere Frameraten geben Sie unter SENSORFLÄCHE die Option „Gecroppt" vor. BeiGPCroppter Sensorfläche wird derBildausschnitt nicht vom gesamten Sensor skaliert, sondern es werden ausschließlich die für das vorgegebene Videoformat benöttigen Pixel
verwendet. Einige Formate verwenden eine Kombination aus Cropping und Skalierung. Die Modelle Blackmagic Pocket Cinema Camera 6K Pro und 6K G2 bieten HD-Formate, deren Skalierung von der vollen Sensorfläche oder von der auf 5,7K oder der auf 2,7K gecroppten Sensorfläche erfolgt.
Da im Modus „SensorGPCroppt" nur die mittige Sensorfläche verwendet wird, ist das Sichtfeld mit jedem beliebigen Objektiv aufgrund des Formatfaktors enger. Wird bspw. HD-Material mit einem 20mm-Objektiv im Crop-Sensormodus gefilmt, so entsprache das Sichtfeld der Blackmagic Pocket Cinema Camera 4K dem eines 40mm-Objektivs.
Die Einstellung SENSORFLÄCHE ist zum Filmen bei einer niedrigeren als der maximalen Auflösung ihrer Kamera verfügbar, bspw. für Ultra-HD- oder HD-Video in ProRes.
Bei den Modellen Pocket Cinema Camera 6K Pro und 6K G2 sind die schnellsten Frameraten verfügbar, wenn in 2,8K mit einem Crop-Verhältnis von 17:9, und in HD skaliert mit der gecroppten 2,7K-Sensorfläche gefilmt wird. Bei der Pocket Cinema Camera 4K sind die schnellsten Frameraten in 2,6K gecroppt auf 16:9 und im HD-Crop-Modus verfügbar.
Naheres zu den Formaten mit voller und gecroppter Sensorfläche finden Sie im Abschnitt „Maximale Sensor-Frameraten".
PROJEKT-FRAMERATE
Die Projekt-Framerate bietet eine Auswahl der in der Film- und Fernsehbranche gebrachte heder. Frameraten. Beispiel: 23,98 Bilder pro Sekunde. Die Projekt-Framerate wird in der Regel passend zu der in. Ihrem Postproduktions-Workflow verwendeten Wiedergabegeschwindigkeit, der Audio-Synchronisation und den Anforderungen fur die Anlieferung eingestellt.
Es sind acht verschiedene Projekt-Frameraten verfügbar: 23,98; 24; 25; 29,97; 30; 50; 59,94 und 60 fps.
OFFSPEED-AUFZEICHNUNG
Standardmäßig sind die Projekt- und Sensor-Frakterate auf eine natürliche Wiedergabegeschwindigkeit eingestellt. Wenn Sie jedoch auf das Schalter-Icon unter OFFSPEED-AUFZEICHNUNG tippen, können Sie ihre Sensor-Frakterate selbst wahren.
OFFSPEED-FRAMERATE
Wenn OFFSPEED-AUFZEICHNUNG aktiviert ist, tippen Sie auf die Pfeile geben dem Indikator für OFFSPEED-FRAMERATE, um die Sensor-Framerate ihrer Kamera einzustellen.
Anhand der Sensor-Framerate wird vorgegeben, wie weitere Vollbilder der Sensor tatsächlich pro Sekunde aufzeichnet. Diese Framerate wirkt sich darauf aus, wie schnell oder langsam Ihr Video bei ihrer vorgegebenen Projekt-Framerate wiedergegeben wird.
Weitere Informationen zu Offspeed-Frameraten finden Sie unter „FPS" im Abschnitt „Funktionsmerkmale des Touchscreens" in dieser Handbuch.
Naheres zu den maximalen Bildwechselraten, die für die einzelnen Aufzeinungsformate und Codec verfügbar sind, finden Sie unter „Maximale Sensor-Frameraten".
FÜR AUFZEICHNUNG BEVORZUGTES MEDIUM
Hiermit geben Sie vor, welches Speichermedium bzw. Laufwerk ihre Blackmagic Pocket Cinema Camera zuerst bespielen soll. Die Optionen lauten „CFAST“, „SD“, „USB“ und „Vollstes“. Ob Sie „CFAST“, „SD“ oder „USB“ wahlen, ist eine Frage der personlichen Vorliebe. Wenn Sie sich konsequent für denselben Datenträgertyp entscheiden, wollen Sie immer, welchen Datenträger Sie bei knapp werden dem Speicherplatz zuerst ausauschen müssen. Die Speicheroption „Vollstes“ ist hilfreich zum chronologischen Gruppieren der Dateien eines mit einer Kamera gefilmen Projekts.
Ohre gewähte Einstellung wird angewendet, sobald eine CFast- oder SD-Karte eingeschoben oder ein USB-Laufwerk angeschlossen wird. These Einstellung konnen Sie jederzeit zeitweilig aufheben, indem Sie in der Speicherverwaltung auf den Name eines Datenträgers tippen, um diesen zu aktivieren. Wichtig: Sobald Sie einen Datenträger auswerfen und wieder einschieben, tritt die Einstellung für das bevorzugte Medium wieder in Kraft.
Die Einstellung „Vollstests" richtet sich nach dem belegten Speicherplatz auf Ihr Medium und nicht nach seiner Kapazität oder der anfallenden Datenmenge.
AUFNAHME-Einstellungen Seite 3
Die dritte Seite der AUFNAHME-Einstellungen betiet folgende Optionen:
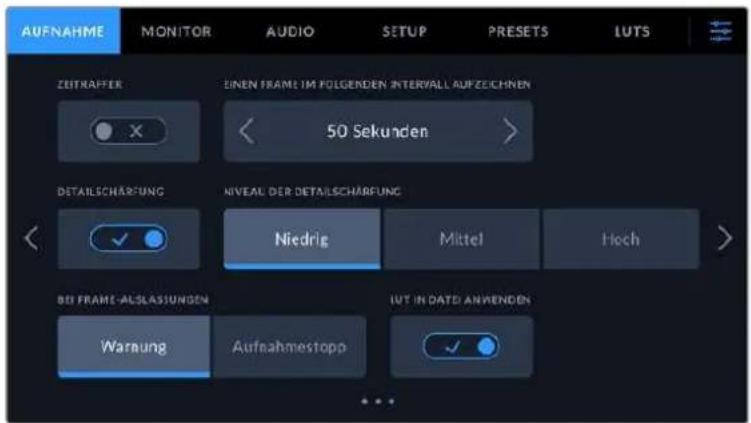
ZEITRAFFER
These Einstellung aktiviert die Zeitraffer-Funktion, um in folgenden Intervallen automatisch ein Standbild aufzunehmen:
Frames 2-10
Sekunden 1-10,20,30,40,50
Minutes 1-10
Sie können bspw. festlegen, dass die Kamera nach je 10 Vollbildern, alle 5 Sekunden, alle 30 Sekunden oder alle 5 Minuten ein Standbild aufnimmt.
Die Zeitraffer-Funktion bietet weitere kreative Mochlichkeiten. Beispiel: Wenn ein Zeitraffer-Interval von 2 Frames eingestellt ist, ergibt dies bei der Wiedergabe des aufgezeichneten Videos einen stroboskopischen Effekt.
Beginnen Sie mit der Aufzeichnung, indem Sie die Aufnahmetaste drucken. Durch erneutes Drucken der Taste wird die Aufzeichnung gestoppt und die Zeitraffer-Seqenz als einziner Clip entsprechend des auf ihrer Kamera eingestellen Codec's und der Framerate gespeichert. Sie konnen die Zeitraffer-Seqenz damit möglich wie jeder anderen aufgenommenen Clip in ihrer Postproduktion's-Timeline ablegen.
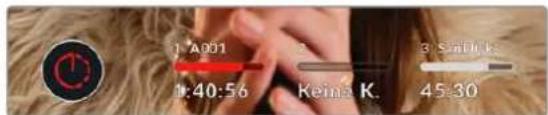
Das in den Aufnahme-Button der Software eingeblendete Icon zeit den Zeilraffermodus an
TIPP Wenn Sie im aktivierten Zeitraffer-Modus filmen, aktualisiert sich der Timecode-Zahler mit jedem aufgenommenen Videoframe.
DETAILSCHÄRFUNG
These Einstellung dient zur Schärfung des Bilds. Bei aktivierter Detailschärfung können Sie den Schärfungsgrad durch Auswahl von „Niedrig“, „Mittel“ oder „Hoch“ erhöhen oder verringern.
Wenn die Schärfung aktiviert ist, wird diese auf das von der Kamera aufgezeichnete ProRes-Video und auf die HDMI-Ausgabe angewendet.
These Einstellung eignet sich für Live-Produktionen aus dem Studio, die sofort gesendet werden, weil es für die Postproduktion an Zeit mangelt. Sollen ihre Bilder nach der Aufzeichnung weiter bearbeitet werden, empfehlen wir, diese Einstellung auszuschalten. Wenn der Codec auf Blackmagic RAW eingestellt ist, ist die Detailschärfung deaktiviert.
TIPP Bei der Nachbearbeitung von Blackmagic-RAW-Dateien im DaVinci Resolve Color-Arbeitsraum erzielen Sie mit dem Blur/Sharpening-Tool einen vergleichbaren Scharfungsgrad.
Stellen Sie den Radius des Tools auf 0,48 ein. Wahlen Sie für die Skalierung für eine mit der Kamera-Einstellung „Hoch", „Mittel" oder „Niedrig" vergleichbare Schärfung die Werte 0,6, 0,3 oder 0,15.
Detaillerte Informationen zur Schärfung in der Postproduktion finden Sie im englishischsprachigen DaVinci Resolve Handbuch im Abschnitt „Motion Effects and Blur Palettes".
BEI FRAME-AUSLASSUNGEN
Hiermit konfigurieren Sie das Speicherverhalten ihrer Blackmagic Pocket Cinema Camera, wenn erkannt wird, dass sie Bilder auslasset. Ist die Option „Warnung" aktiviert, erscheint der Indikator für ausgelassene Bilder auf dem LCD und die Aufzeichnung wird trotz der fallengelassenen Frames fortgeführrt. Ist hingegen „Aufnahmestopp" aktiviert, stoppt ihre Kamera die Aufzeichnung, sobald fallengelassene Frames erkannt werden. Dies verhindert, dass Sie Zeit mit dem Aufzeichnen unbrauchbaren Materials vergeuden, weil Sie den Indikator für ausgelassene Bilder nicht bemerkt haben.
TIPP Einzelheiten zum Verhindern von Aufzeichnungen mit ausgelassenen Frames finden Sie in den Kapiteln „Auswahl einer CFast-2.0-Karte“, „Auswahl einer schellen SD-Karte“, „Auswahl einer schellen SSD“ und „Auswahl eines schellen USB-C-Flash-Laufwerks".
LUT IN DATEI ANWENDEN
Wenn Sie mit dem Blackmagic-RAW-Codec filmen und eine LUT auf die HDMI-Ausgabe ihrer Kamera anwenden, wird die ausgewählte LUT beim Aufzeichnen in die Blackmagic-RAW-Datei eingebettet. Die LUT wird in den Kopfdaten der Datiel gespeichert und lasst sich in der Postproduktion muhelos auf den Clip anwenden. Man muss also keine separate Datiel handhaben. Ist im AUFNAHME-Menu der Schalter LUT IN DATEI ANWENDEN aktiviert, wird dieser Clip beim Öffnen im Blackmagic RAW Player und in DaVinci Resolve mit der angewendeten LUT dargestellt. Mit dem Schalter lasst sich die LUT leicht ein- und ausschalten. Sie ist aber immer in der Blackmagic-RAW-Datei enthalten, da die LUT-Daten im Clip gespeichert sind.
In DaVinci Resolve bietet das Menu mit den RAW-Einstellungen einen „Apply LUT“-Schalter, mit dem sich die 3D-LUT in der Blackmagic-RAW-Datei de-bzw. aktivieren lasst. Die „Apply LUT“-Einstellung in DaVinci ResolveGLEcht der Einstellung in der Kamera. Dies ermoigtlich Ihnen schon beim Dreh, den Coloristen anhand der in der Kamera eingestellen LUT eine Orientierungshilfe zu geben. Die LUT lasst sich in DaVinci Resolve aber einfach deaktivieren, indem man „Apply LUT“ auf OFF setzt.
LUT IM CLIP AUFZEICHNEN
Die Option LUT IM CLIP AUFZEICHNEN ist beim Filmen mit dem ProRes Codec verfügbar. Standardmäßig werden LUTs von ihrer Blackmagic Pocket Cinema Camera weiter auf aufgenommene Footage angewendet noch eingebrannt. Sie können diese Vorgänge jedoch aktivieren, indem Sie auf das Schalter-Icon unter LUT IM CLIP AUFZEICHNEN tippen.
These Option kann nutzlich sein, wenn Sie in der Postproduktion keine Zeit für das Grading ihrer Footage haben oder die Footage direkt an den Kunden oder Editor übergeben werden muss. Weitere Informationen hierzu finden Sie in den Abschnitten „3D-LUTs" und „Bedienung per Touchscreen".
Dateinamenskonventionen
Je nach Ihr ausgewählten Format werden Clips im Blackmagic-RAW- oder ProRes-QuickTime-Movie-Format auf ihre CFast- bzw. SD-Karte oder Ihr USB-C-Laufwerk aufgezeichnet.
Die nachstehende Tabelle zeigt ein Beispiel der Namenskonvention:
A001_08151512_C001.mov QuckTime-Movle-Datelname
| A001_08151512_C001.mov Kamera-Index | |
| A001_08151512_C001.mov | Bandnummer |
| A001_08151512_C001.mov | Monat |
| A001_08151512_C001.mov | Tag |
| A001_08151512_C001.mov | Stunde |
| A001_08151512_C001.mov | Minute |
| A001_08151512_C001.mov | Clip-Nummer |
Die Benennung von Bildern, die mit der Still-Taste erfasst wurden, erfolgt gemäß der für Videoclips üblichen Namenskonvention. Die letzten vier Zeichen des Dateinamens (z. B. „S001") gebenstatt der Clip-Nummer die Nummer des Standbilds an. Wie Sie den Kamera-Indexändern, wird im Abschnitt „Projektmetadataen" näher erklärart.
MONITORING-Einstellungen
Über die MONITORING-Registerkarte konnen Sie Statustext, Overlays und andere Monitoring-Optionen für den LCD-Touchscreen sowie die HDMI-Ausgabe ihrer Blackmagic Pocket Cinema Camera anpassen. Die Optionen sind nach Ausgabe in „LCD“, „HDMI“ und „Beide“ unterelt. Letzteres umfasst Monitoreinstellungen, die sich sowohl auf die LCD- als auch die HDMI-Ausgabe auswirken. Die Menüs bestehen jeweils aus zwei Seiten. Navigiert wird über die Pfeilsymbole am Rand des Touchscreens oder durch Wischen nach links oder rechts.
Wenn ihre Blackmagic Pocket Cinema Camera 6K Pro oder 6K G2 mit einem optionalen Sicher ausgerüstet ist, können Sie über die erste Menüseite der MONITORING-Registerkarte individuell vorgegeben, was jeweils auf dem LCD, Sicher und über die HDMI-Ausgabe angezeigt wird.
Ist ihre Kamera mit einem Blackmagic Pocket Cinema Camera Pro EVF ausgestattet, erscheidt unter der MONITORING-Registerkarte eine „Sucher"- und eine „Alle"-Option. „Alle" ersetzt die „Beide"-Option und bezieht sich auf den Statustext, den Sie sich gleichzeitig auf dem Touchscreen, dem elektronischen Sicher und in der HDMI-Ausgabe anzeigen halten können.
MONITORING-Einstellungen Seite 1
Die erstige Seite der MONITORING-Registerkarte betiet identische Einstellungen fur jeder Ausgabe. Beispiel: Sie konnen die Zebra-Funktion fur den LCD-Touchscreen aktivieren, sie aber fur die HDMI-Ausgabe ausschalten.

CLEAN-FEED
Tippen Sie im „LCD“- oder „HDMI“-Menu auf das Schalter-Icon unter CLEAN-FEED, um den gesamten Statustext und alle Overlays für die jeweilige Ausgabe außer dem Aufnahme-Tally-Indikator zu deaktivieren.

Selbst Im Clean-Feed-Modus zeit Ihr Kamera einen Aufnahme-Taily an
HINWEIS LUTs werden auch bei aktiviertem Clean-Feed auf die Ausgaben angewendet. LUTs halten sich aber im MONITORING-MENU unter MIT LUT ANZEIGEN mit dem SchalterIcon deaktivieren.
3D-LUT ANZEIGEN
Um den Look von gegradeten Material anzupassen, konnen Blackmagic Pocket Cinema Cameras 3D-LUTs auf jeder beliebige Ausgabe anwenden. Diese Option ist vor allem bei der Aufzeichnung im Dynamikumfang „Film" hilfreich.
Ist auf Ihrer Kamera eine 3D-LUT aktiviert, verwenden Sie diese Einstellung, um die LUT auf Ihrn LCD-Touchscreen oder die HDMI-Ausgabe anzuwenden.
HINWEIS Nähres zum Laden und Anwenden von 3D-LUTs finden Sie im Abschnitt „3D-LUTs" in diesen Handbuch. Um Monitoring-Optionen für den LCD-Touchscreen und die HDMI-Ausgabe zu aktivieren, tippen Sie auf die entsprechenden Schalter unter „LCD" oder „HDMI": FOCUS ASSIST, BILDRAND-MARKIERUNG, RASTER, SCHUTZBEICH-LINIEN und FALSCHFARBEN.
ZEBRA
Tippen Sie im „LCD“- oder „HDMI“-Menu auf das Schalter-Icon unter ZEBRA, um die Zebra-Funktion für diese Ausgaben zu aktivieren. Weitere Informationen zur Zebra-Funktion und wie Sie die Zebra-Niveau einstellen, finden Sie im Abschnitt „Funktionsmerkmale des Touchscreens" in this dem Handbuch.
FOCUS ASSIST
Tippen Sie im „LCD“- oder „HDMI“-Menu auf das Schalter-Icon unter FOCUS ASSIST, um die Fokussierhilfe für diese Ausgaben zu aktivieren. Weitere Informationen zur Fokussierhilfe finden Sie im Abschnitt „Funktionsmerkmale des Touchscreens" in dieser Handbuch.
BILDRAND-MARKIERUNG
Tippen Sie im „LCD“- oder „HDMI“-Menu auf das Schalter-Icon unter BILDRAND-MARKIERUNG, um die Bildrandmarkierung für diese Ausgaben zu aktivieren. Weitere Informationen zu Bildrandmarkierungen und deren Auswahl finding Sie im Abschnitt „Funktionsmerkmale des Touchscreens" in thisem Handbuch.
RASTER
Tippen Sie im „LCD“- oder „HDMI“-Menu auf das Schalter-Icon unter RASTER, um die Raster-Funktion für diese Ausgaben zu aktivieren. Weitere Informationen zum Drittelraster finden Sie im Abschnitt „Funktionsmerkmale des Touchscreens" in dieser Handbuch.
SCHUTZBEREICH-LINIEN
Tippen Sie im „LCD“- oder „HDMI“-Menu auf das Schalter-Icon unter SCHUTZBEREICH-LINIEN, um das Schutzbereich-Overlay für diese Ausgaben zu aktivieren. Weitere Informationen zu Schutzbereichen finden Sie im Abschnitt „Funktionsmerkmale des Touchscreens" in dieser Handbuch.
HINWEIS Bestimmen Sie die Grübe des sendesicheren Bereichs Ihrer Blackmagic Pocket Cinema Camera auf der MONITORING-Registerkarte über die Einstellung SCHUTZBEREICH-LINIEN % unter „Beide".
FALSCHFARBEN
Tippen Sie im „LCD“, oder „HDMI“-Menu auf das Schalter-Icon unter „Falschfarben“, um die Belichtungshilfe durch Falschfarbendarstellung für diese Ausgaben zu aktivieren. Weitere Informationen zur Verwendung der Falschfarben-Funktion finden Sie im Abschnitt „Funktionsmerkmale des Touchscreens" in dieser Handbuch.
MONITORING-Einstellungen Seite 2
Die zweite Seite der MONITORING-Registerkarte bietet folgende Optionen:
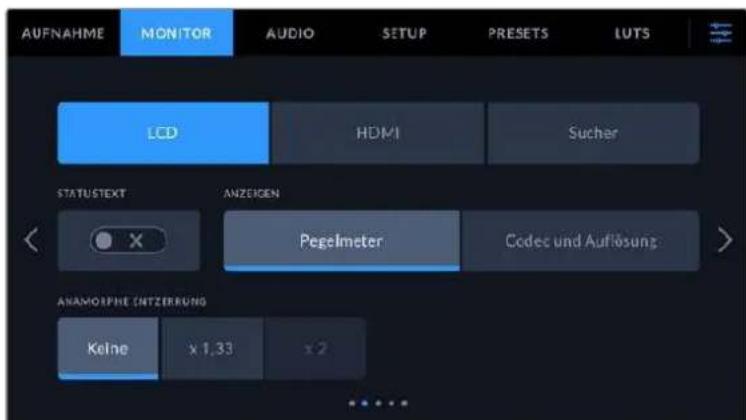
"LCD", "HDMI" und "Sucher"
STATUSTEXT
These Einstellung dient zum Verbergen von Statustext und Pegelmetern auf Ihr LCD-Touchscreen. Es werden dann lediglich die für die Komposition oder Regie einer Aufnahme nötigen Informationen angezeigt. Um die Anzeige von Statustext und Pegelmetern auf dem LCD-Touchscreen umzuschalten, tippen Sie auf das Schalter-Icon für STATUSTEXT. Falls aktiviert, bleiben Overlays wie Bildbrandmarkierungen, Raster, Focus Assist und Zebra sightbar. Alternativ wechseln Sie die Anzeigen, indem Sie auf dem LCD-Touchscreen nach oben oder unter wischen.
ANAMORPH ENTZERREN
Beim Filmen mit anamorphotischen Objektiven erscheidt das Bild in der Vorschauausgabe und den aufgezeichneten Dateien ihrer Pocket Cinema Camera horizontal gestaucht. Die Option ANAMORPH ENTZERREN korrrigiert das Vorschaubild ihrer Pocket Cinema Camera und zeitnet das Niveau der Entzerrung in den Metadata des Clips für eine muhelose Korrektur in der Postproduktion auf.
Ihr gewähltes Entzerrungsniveau wird sich nach der eingestellen Auflösung ihrer Blackmagic Pocket Cinema Camera richten. Das darauf resultierende Bild wird jedoch immer im Breitbartformat 2,4:1 angezeigt.
Anamorphotische Objektive arbeiten in der Regel mit einem zweifichen Stauchfaktor. Die Auflösung „3,7K Anamorph" ihrer Pocket Cinema Camera ist für diese Objektive konzipiert und entstaucht das Bild um das Zweifache (x 2), wenn diese Auflösung in Zusammenhang mit ANAMORPH ENTZERREN aktiviert ist.
Für digitale 16:9-Bildensoren entwickelte anamorphotische Objektive arbeiten mein mit einem Stauchfaktor von 1,33, um ein 2,4:1 Breitbart vom gesamtten 16:9-Sensor zuprodukieren. Wenn ihre Pocket Cinema Camera auf 16:9-Auflösungen wie „4K 16:9" oder „HD 16:9" eingestellt ist, setzen Sie ANAMORPH ENTZERREN auf den Faktor „x 1,33".
TIPP Wenn Ihr Bild beim Filmen mit einem normalen sphärischen Objektiv horizontal gestrekt wird, vergewissern Sie sich, dass ANAMORPH ENTZERREN deaktiviert ist.
"LCD" und "Sucher"
DISPLAY
Anstelle von Histogramm und Audiopegelmetern zeigt ihre Kamera in der linken und rechten unteren Ecke des LCD-Touchscreens wahlweise Codec- und Auflösungsdaten an. Dies ist nutzlich, wenn Sie lieber die Falschfarben-Darstellung als Belichtungshilfe verwenden oder Ton separat aufzeichnen möchen. Wo sonst das Histogramm oder die Audiopegelmeter erscheinen, konnen Sie sich dann andere Informationen aneigen halten. Tippen Sie im LCD-Menu einfach auf „Pegelmeter" oder „Codec und Auflösung", um die bevorzugte Ansicht auszuwahlen.
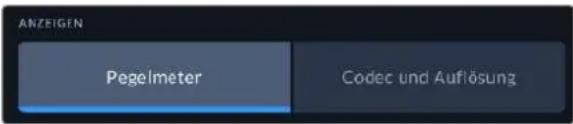
Nur HDMI
STATUSTEXT ANZEIGEN FÜR Kinematograf/Reglsseur
Auf dem LCD-Touchscreen werden Informationen wie ISO, Weißabgleich und Blendeneinstellungen angezeigt. Das ist sehr hilfreich für den Kameraoperator oder Kinematografen, der die Kamera für individuelle Shots einstellt. Über den HDMI-Ausgang ihrer Kamera konnen jedoch zusammen Informationen angezeigt werden, die dem Regisseur oder Script Supervisor dieren, der mehrere Shots bzw. Kamas im Auge behalten muss.

Wenn Sie in den Monitoring-Einstellungen für HDMI unter STATUSTEXT die Option „Regisseur“ wahren, werden die folgenden Informationen angezeigt:
- FPS
Zeigt die aktuell ausgewählte Framerate in Bildern pro Sekunde an. Ist OFFSPEED-FRAMERATE deaktiviert, wird nur die Projekt-Framerate angezeigt. Wird eine Offspeed-Framerate verwendet, erscheint die Sensor-Framerate gefolggt von der Projekt-Framerate.
KAM.
Zeigt den Kamera-Index gemäß der Slate-Einstellungen ihrer Kamera an. Weitere Informationen hierzu finden Sie im Abschnitt „Die Slate".
- OPERATOR
Identifiziert den Kamerabediener gemäß der Slate-Einstellungen ihrer Kamera. Weitere Informationen hierzu finden Sie im Abschnitt „Die Slate".
DAUERANZEIGE
Zeigt die Dauer des aktuellen Clips während der Aufzeichnung oder des vorherigen Clips im Format Stunden:Minuten:Sekunden an.
REEL, SZENE, TAKE
Zeigt das aktuelle Band, die Szene und den Take an. Weitere Informationen zu Bändern, Szenen und Takes sowie deren Kennzeichnungskonventionen finden Sie im Abschnitt „Die Slate" in diesen Handbuch.
DYNAMIKUMFANG
Sofern für die jeweilige Ausgabe aktiviert, wird links unter auf dem Touchscreen die derzeit angewendete LUT angezeigt. Wir keine LUT angewendet, erscheidt der Dynamikumfang „Film" bzw. „Video".
TIMECODE
Rechts unten auf dem Touchscreen erscheint der Kamera-Timecode im Format
Stunden:Minuten:Sekunden:Frames.
MONITORING-Einstellungen Seite 3
Die dritte Seite der MONITORING-Registerkarte mit den Optionen „LCD“, „HDMI“ und „Sucher“ bietet identische Einstellungen für jeder Ausgabe. Diese Einstellungen wirken sich global auf alle drei Monitoring-Ausgaben aus. Beispiel: Wenn auf Ihrer Blackmagic Pocket Cinema Camera die Fokussierhilde für „LCD“, „HDMI“ und „Sucher“ aktiviert ist, so wirkt sich eine Änderung der Option FOCUS-ASSIST-TYP von „Peaking“ auf „Farbige Linien“ auf alle drei Ausgaben aus.
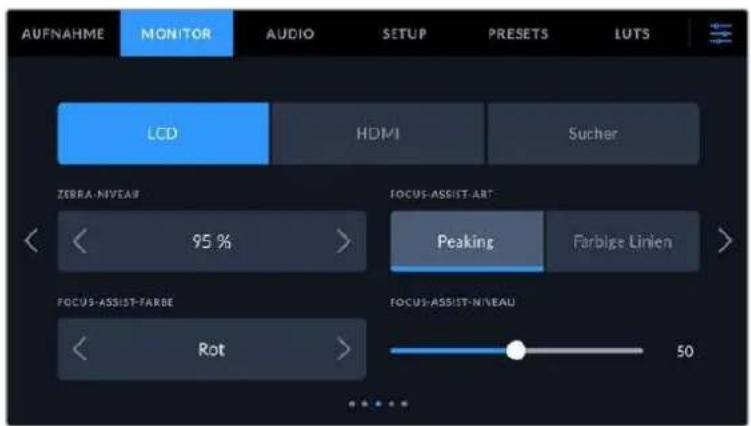
ZEBRA-NIVEAU
Um den Belichtungspegel einzustellen, an dem die Zebra-Funktion greift, tippen Sie auf die Pfeile links und rechts der Prozentangabe. Das Zebra-Niveau lässt sich in fünfprozentigen Schritten auf 75-100% einstellen.
Weitere Informationen zur Zebra-Funktion finden Sie im Abschnitt „Funktionsmerkmale des Touchscreens" in dieser Handbuch.
FOCUS ASSIST
Ohre Kamera verfugt uber zwei Focus-Assist-Modi: „Peak" und „Farbige Linien".
Peaking
Ist der „Peaking“-Modus für Focus Assist ausgewähl, werden die fokussierten Bereiche in Ihrer Einstellung auf dem LCD-Touchscreen, in der HDMI-Ausgabe und im Sicher stark geschäft, jedoch nicht im aufgezeichneten Bild selbst. So haben sich fokussierte Bereiche in Ihrer Einstellung vom unscharften Hintergrund ab. Da keine weiteren Overlays verwendet werden, ist dies eine sehr intuitive Art des Fokussierens. Besonderss dann, wenn sich das zu fokussierende Objekt deutlich von anderen Elementen in der Einstellung abhebt.
- Farbige Linien
Ist die Option „Farbige Linien" ausgewählt, werden die fokussierten Bereiche im Bild mit Farbigen Linien überlagert. Dies ist etwas auffälliger als die „Peak"-Option, da die Linien genau auf dem Bild erschienen. In elementlastigen Shots ist es jedoch eine tatsächke Fokussierhilde.
FOCUS-ASSIST-FARBE
Wenn Sie unter FOCUS ASSIST die Option „Farbige Linien" aktiviert haben,ändern Sie hier die Farbe der Fokuslinien. Eine Farbandierung der Fokuslinien kann nützlich sein, um die Linien vom übrigen Bild zu untersenden. Die verfügbar Optionen sind „Weiß", „Rot", „Grün", „Blau" und „Schwarz".
FOCUS-ASSIST-NIVEAU
Um das Niveau der Fokussierhilde für LCD, HDMI-Ausgabe und Sicher einzustellen, schiben Sie den Regler von links nach rechts.
Die Stärke der Fokussierhiffe ist unabhängig davon, ob Focus Assist für das LCD, die HDMI-Ausgabe oder den Sicherer ihrer Blackmagic Pocket Cinema Camera aktiviert ist. Schalten Sie die Fokussierhiffe deshalb für jeder Ausgabe im jeweiligen MONITORING-MENU unter „LCD“, „HDMI“ und „Sucher“ einzeln ein.
TIPP Der optimale Grad der Fokussierhilfe richtet sich nach dem jeweiligen Shot. Wird bspw. auf Darsteller scharf gestellt, empfehlit sich eine stärkere Fokussierhilfe, um mehr Einzelheiten an den Konturen der Gesichter festzuhalten. Bei einer Einstellung von Blattoder Mauerwerk (\text{們}) den die darauf zusammen erfassten Details womoglich ablenkend (\text{們}) (\text{們}) (\text{們}) (\text{們}) (\text{們}) (\text{們}) (\text{們}) (\text{們}) (\text{們}) (\text{們}) (\text{們}) (\text{們}) (\text{們}) (\text{們}) (\text{們}) )(\text{們}) )(\text{們}) )(\text{們}) )(\text{們}) )(\text{們}) )(\text{們}) )(\text{們}) )(\text{們}) )(\text{們}) )(\text{們}) )(\text{們}) )(\text{們}) )(\text{門}) )(\text{門}) )(\text{門}) )(\text{門}) )(\text{門}) )(\text{門}) )(\text{門}) )(\text{門}) )(\text{門}) )(\text{門}) )(\text{門}) )(\text{門}) )(\text{門}) ) [ \begin{array}{l} \mathrm{TIPP} \quad \mathrm{Der optimale Grad der Fokussierhilfe Richtet sich nach dem jeweiligen Shot. Wird bspw. auf Darsteller scharf gestellt, empfehlit sich eine stärkere Fokussierhilfe, um mehr Einzelheiten an den Konturen der Gesichter festzuhalten. Bei einer Einstellung von Blattoder Mauerwerk (\mathbb{W}) den die darauf zusammen erfassten Details womoglich ablenkend (\mathbb{W}) *(\mathbb{W}) \end{array} ]
MONITORING-Einstellungen Seite 4
Die vierte Seite der MONITORING-Registerkarte mit den Optionen „LCD“, „HDMI“ und „Sucher“ betiet identische Einstellungen für jeder Ausgabe. Diese Einstellungen wirken sich global auf alle drei Monitoring-Ausgaben ihrer Kamera aus.
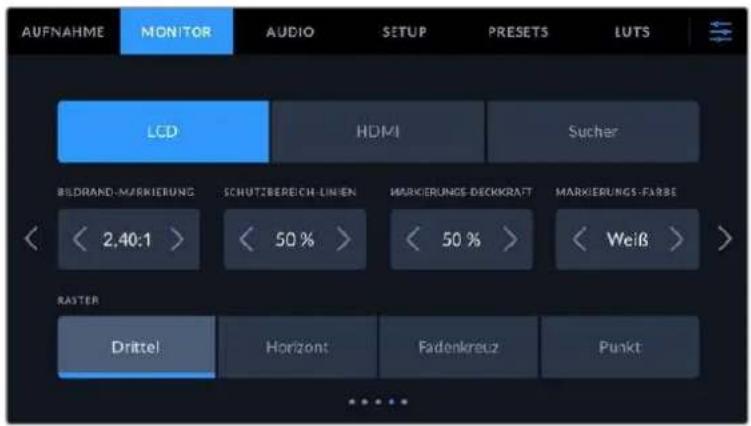
BILDRAND-MARKIERUNGEN
Tippen Sie unter BILDRAND-MARKIERUNGEN auf die Pfeile, um durch alle Ausgabeoptionen ihrer Kamera zu navigieren. Die Optionen werden im Abschnitt „Funktionsmerkmale des Touchscreens" in dieser Handbuch;naher erlautert und sind zudem über die MONITORING-Registerkarte unter LCD auf Ihrrem Touchscreen abrufbar. Hier sei erwähn't, dass Bildrandmarkierungen fur das LCD und die HDMI-Ausgabe auf dem Touchscreen auch separat uber die jeweilige Registerkarte im MONITORING-Menu ausgewaht werden konnen.
SCHUTZBEREICH-LINIEN
Justieren Sie die Grüße des Schutzbereich-Overlays für die LCD-Touchscreen-, HDMI- und SicherAusgaben ihrer Pocket Cinema Camera, indem Sie auf die Pfeileiben der Prozentangabe tippen. Die Prozentangabe druckt die Grüße des Schutzbereichs im Verhältnis zum Gesamtbild aus. Die meisten Fernsehsender verlangen einen sendesicheren Bereich von 90 %.
MARKIERUNGS-DECKKRAFT
Tippen Sie auf die Pfeile links und rechts der Option MARKIERUNGS-DECKKRAFT, um die Deckkraft der Bildbrandmarkierungen für ihren LCD-Touchscreen, die HDMI-Ausgabe und den Sicher festzulegen. Es gibt folgende Optionen: 25% , 50% , 75% und 100% .
MARKIERUNGS-FARBE
Tippen Sie auf die Links- oder Rechtspiele geben der Option MARKIERUNGS-FARBE, um eine Farbe für die Markierungen vorzugegeben.
RASTER
Um die dargestelle Kombination aus Rastern und Fadenkreuz zur Anzeige auf dem LCD-Touchscreen, in der HDMI-Ausgabe und auf dem Sicherer ihrer Kamera zu wahlen, tippen Sie auf die Optionen „Drittel", „Horizont", „Fadenkreuz" oder „Punkt".
Weitere Informationen finden Sie unter „Raster" im Abschnitt „Funktionsmerkmale des Touchscreens".
MONITORING-Einstellungen Seite 5
Die fünfte Seite der MONITORING-Registerkarte mit den Optionen „LCD“, und „Sucher“ enthalt spezifische Einstellungen für die jeweils ausgewählte Ausgabe. Für die HDMI-Ausgabe sind diese Einstellungen nicht verfügbar.
Nur LCD
BILDSCHIRM-HELLIGKEIT
Ziehen Sie den Schieberegler unter BILDSCHIRM-HELLIGKEIT im LCD-MENU nach links oder rechts, um die Helligkeit Ihr's LCD-Touchscreens anzupassen.
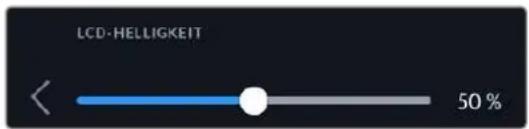
Sucher
SUCHER-HELLIGKEIT
Ermöglicht das Anpassen der Helligkeit des Sicher-Displays.
TESTCHART
Anhand der in den Sicher integrierten Testtafel konnen Sie den Fokus der Sicherlupe auf ihre Sehstärke einstellen. Für Justagen bietet der Diopter eine Skala von -4 bis +4. Drehen Sie einfach den Dioptrienring an der Sicherlupe, bis die Tafel perfect scharf ist.
RUHIGBEWEGUNG
These Einstellung glättet den Bewegungsfluss bei sich schneil bewegenden Motiven im Bild. Es sind zahlig Ruckler zu sehen, wenn mit Frameraten unter 30p gefilmt wird und das Display die jeweilige Framerate nicht nativ Unterstützung. Besonderss auffällig sind Ruckler beim Betrachten des Displays aus nachster Höhe. Die Ruckler verschwinden, wenn Sie RUHIGE BEWEGUNG aktivieren und der Verschlusswinkel auf 180^ oder weniger und die Framerate auf 23,98, 24, 25, 29,97 oder 30p eingestellt sind.
AUDIO-Einstellungen
Auf der AUDIO-Registerkarte lässt sich die Audioeingabe und Monitoringeinstellungen ihrer Kamera anpassen.
Die Audioeinstellungen Ihrer Kamera umfassen zwei Seiten, aufgeteilt in KANAL 1 und KANAL 2.
Jeder Audiokanal kann einer anderen Quelle zugewiesen werden. Ebenso lassen sich diverse Einstellungen wie „Gain" anpassen.
AUDIO-Einstellungen Seite 1
Die erste Seite der AUDIO-Registerkarte bietet folgende Optionen:
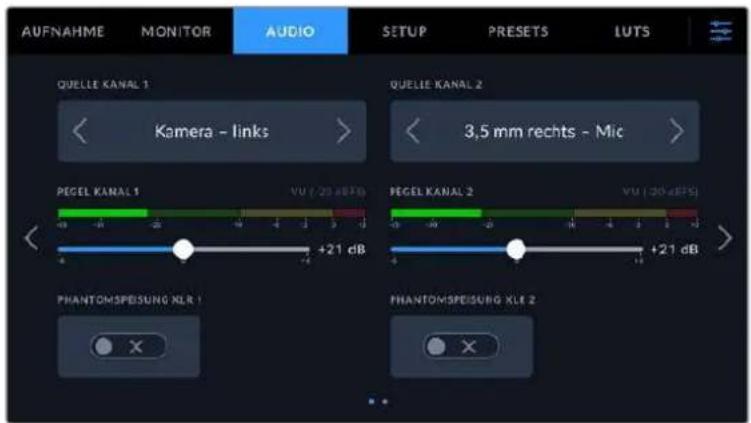
- Kanalquelle
Mit den Schaltflächen QUELLE KANAL 1 und QUELLE KANAL 2 wahren Sie ihre Audioquelle für die einzelnen Audiokanäe aus. Die Pocket Cinema Camera 6K Pro und 6K G2 haben zwei Buchsen für XLR-Audio. Die Pocket Cinema Camera 4K hat jeweils eine XLR-Audiobuchse. Nachstehend werden die einzelnen Quell-Einstellungen der Kanäe beschreiben.
Kamera links / Kamera rechts
Nimmt mit den internen Kameramikrofonen auf.
Kamera-Mono
Erstellt einen einzelnen Audiokanal aus dem linken und rechten Kanal des internen Mikrofons ihrer Blackmagic Pocket Cinema Camera.
- XLR - Line
Verwendet den XLR-Eingang Ihrer Kamera, um Leitungspegel-Audio (Line) aufzuzeichnen.
These Einstellung lasst sich auch verwenden, um Timecode-Signale über den XLR-Anschluss zu empfangen.
XLR-Mic
Erasst Mikrofonpegel-Audio („Mic“) über den XLR-Eingang ihrer Kamera. Ist Phantomspeitung aktiviert und Ihr XLR-Eingang auf „Mic“ eingestellt, wird hier zusätzlich der +48V-Indikator eingeblendet. Vergewissern Sie sich, dass der 48V-Schalter deaktiviert ist, bevor Sie Ihr phantomgespeistes Mikrofon entfernen. Diese Einstellung lasst sich auch verwenden, um Timecode-Signale über den XLR-Anschluss zu empfangen.
3,5mm links - Line
Verwendet nur den linken Kanal des 3,5mm-Eingangs für Mikrofonpegel-Audio. Diese Einstellung lasst sich auch verwenden, um Timecode-Signale über den linken Kanal des 3,5mm-Mikrofoneingangs zu empfangen.
3,5 mm rechts - Line
Verwendet nur den rechten Kanal des 3,5mm-Eingangs fur Mikrofonpegel-Audio.
3,5mm Mono - Line
Erstelt über den 3,5mm-Eingang einen Mono-Mix aus dem linken und rechten Kanal für Mikrofonpegel-Audio.
3.5 mm links - Mic
Verwendet nur den linken Kanal des 3,5mm-Eingangs fur Mikrofonpegel-Audio.
3,5 mm rechts - Mic
Verwendet nur den rechten Kanal des 3,5mm-Eingangs für Mikrofonpegel-Audio.
3.5 mm Mono - Mic
Erstellt über den 3,5mm-Eingang einen Mono-Mix aus dem linken und rechten Kanal für Mikrofonpegel-Audio.
Kelne
Deaktiviert Ihren Audiokanal.
HINWEIS Bei Verwendung des 3,5mm-Eingangs als Audioquelle müssen sowohl Kanal 1 als auch Kanal 2 entweder auf Leitungs- oder Mikrofonpegel eingestellt sein. Wenn Sie „3,5 mm links - Line" als Quelle für Kanal 1 auswahlen, können Sie für Kanal 2 bereits nur Leitungspegel-Audio benutzen: „3,5 mm links - Line", „3,5 mm rechts - Line" und „3,5 mm Mono - Line". Die Mikrofonpegeloptionen sind in dieser Fall ausgegraut.
Pegel Kanal 1/2
Mit diesen Schieberegeln steuern Sie die Aufzeinungspegel für ihre ausgewählten Kanalquellen 1 und 2 aus. Audiogeelmeter begleiten jeder Schieberegler, um ihren die korrekte Einstellung ihrer Audiogeel zu erfolgenden. Diese Pegel werden automatisch aktualisiert, wenn Sie Audio mit den Drehregeln auf dem ergonomischen Bedienfeld verändern. Eine optimale Tonqualität wird mit Audiogeeln unter 0 dBFS gewährleistet. Hierbei handelt es sich um den Höchstpegel, den ihre Kamera aufzeichnen kann. Diese Wert überschreitender Ton wird abgeschnitten, was zu Verzerrungen führt.
PHANTOMSPEISUNG XLR
Über die XLR-Eingänge Ihrer Kamera konnen externe Mikrofone ohne Eigenversorgung mit 48V-Phantomstrom gespeist werden. Wenn die Audioeingabe ihrer Kamera auf „XLR" eingestellt ist, tippen Sie einfach auf das Schalter-Icon unter PHANTOMSPEISUNG, um diese zu aktivieren. Die Pocket Cinema Camera 6K Pro und 6K G2 verfügen über zwei XLR-Eingänge, die jeweils einen Ein/Ausschalter für die Phantomspeisung haben.
AUDIO-Einstellungen Seite 2
Die zweite Seite der AUDIO-Registerkarte bietet folgende Optionen:
AUDIOPEGELMETER
Sie haben die Wahl zweier Anzeigeoptionen für Audiometer.
| VU „Volume | Units“-Meter erstellen einen Durchschnittswert aus einzelnen Höchst- und Tiefstwerten in Ihr dem Audiosignal. Passen Sie die Eingabepegel bei Verwendung von VU-Metern auf der Blackmagic Pocket Cinema Camera so an, dass der Spitzenwert auf dem Audiometer bei 0 dB liegt. Dies gewährleistet eine optimale Signalaussteuerung bei höchster Tonqualität. Schlagen die Höchstkerte Ihres Tons über die 0 dB-Anzeige hinaus aus, besteht ein hohes Risiko einer Tonverzerrung. |
| PPM „Peak | Program Meter" verfügen über eine „Peak-Hold“-Funktion, die Signalhöchstkerte kurzzeitig halt und dann langsam absenknt, sodass sich der Spitzenwert Ihres Tons kein ablesenlässt. |
Sowohl für VU- als auch PPM-Meter laßen sich Referenzpegel von -18 dBFS oder -20 dBFS vorgegeben. Dies gestattet das Audiomonitoring nach entsprechenden internationalen Sendenormen.
| Audlogegeinstellung Standard | |
| PPM (-20 dBFS) SMPTE RP.0155 | |
| PPM (-18 dBFS) EBU R.68 |
KOPFHÖRERPEGEL
Mit dem Schieberegler passen Sie die Ausgabepegel fur Kopfhor er an, die an die 3,5mm-Buchse der Pocket Cinema Camera angeschlssen sind. Um die Pegel auszusteuern, bewegen Sie den Audio-Schieberegler nach links oder rechts. Diese Pegel werden auch aktualisiert, wenn Sie die Kopfhorerlautstarke mit dem Einstellrad auf dem vorderen Bedienfeld anpassen.
LAUTSPRECHERPEGEL
Dieser Schieberegler passst die Ausgabepegel der eingebauten Laufsprecher ihrer Pocket Cinema Camera an. Um die Pegel auszusteuern, bewegen Sie den Audio-Schieberegler nach links oder rechts. Diese Pegel werden auch aktualisiert, wenn Sie die Laufsprecherlautstärke mit dem Einstellrad auf dem vorderen Bedienfeld anpassen.
HINWEIS Es ist üblich, erst das XLR-Kabel anzuschlieben und dann die Phantomspeisung einzuschalten. Schalten Sie die Phantomspeisung unbedingt auch aus, wenn kein phantomgespeistes Mikrofon mehr angeschlossen ist. Werden bei aktiver Phantomspeisung Geräte angeschlossen, die keine Phantomspeisung benöttigen, beschädigt dies möglicherweise Ihr Equipment, da die Kamera in dieser Modus Strom ausgibt. Es kann zudem nach Ausschalten der Kamera eine betrachtliche Zeit für die Entladung von Phantomspannung vergehen.
Denken Sie daran, nach Ausschalten der Phantomspeisung eine Minute abzuwarten, bevor Sie andere Mikrofone oder XLR-Audiogeräne anschließen.
SETUP-Einstellungen
Auf der SETUP-Registerkarte finds Sie Identifikationseinstellungen, die Softwareversion, Einstellungsmöglichkeiten für die Multifunktionstasten und andere Kameraeinstellungen ihrer Blackmagic Pocket Cinema Camera. Letztere stehen nicht in direktem Zusammenhang mit Aufzeichnung und Monitoring. Das Menu unter dieser Registerkarte umfasst vier Seiten, zu denen Sie jeweils über die Pfeilsymbole am Rand des LCD-Touchscreens oder durch Wischen nach links oder rechts gelangen.
SETUP-Einstellungen Seite 1
Die erstige Seite der SETUP-Registerkarte ihrer Kamera betet folgende Einstellungen:
Bei der Pocket Cinema Camera 6K Pro enthalt die erste Seite der SETUP-Registerkarte den Menupunkt „ND-Filter anzeigen als" zur Auswahl der gewünschten Maßeinheit für die Filterdichte

Bel der Pocket Cinema Camera 4K bletet die erste Seite des SETUP-Tabs die Option "Bildstabilisierung" zum Einsatzen der Bildstabilisierung fur Ihr Micro-Four-Thirds-Objektiv
DATUM UND UHRZEIT
Tippen Sie auf DATUM UND UHRZEIT, um diese Daten auf ihrer Kamera einzustellen. Das Datumformat wird in Jahr/Monat/Tag angezeigt, die Uhrzeit im 24-Stunden-Format. Wenn keine externe Timecode-Quelle angeschlossen ist, werden diese Einstellungen auch für den Uhrzeit-Timecode verwendet.
SPRACHE
Die Pocket Cinema Camera unterstützt 13 verbreitetes Sprachen: Englisch, Deutsch, Französisch, Italienisch, Spanisch, Portugiesisch, Polnisch, Ukrainisch, Türkisch, Russisch, Chinesisch, Japanisch und Koreanisch.
Die Registerkarte SPRACHE wird ihren beim ersten Hochfahren angezeigt.
So wahlen Sie ihre Sprache:
Tippen Sie zuerst auf das Stift-Icon und wahlen Sie dann die gewünschte Sprache aus der List.
2 Wahlen Sie OK, um zur Registerkarte SETUP zureckzukehren.
VERSCHLUSSWERT
Verwenden Sie diese Einstellung, um auszuwahlen, ob Verschlusswerte als Verschlusswinkel oder Verschlusszeit angezeigt werden sollen.
Hier sei erwähn, dass sich der Verschluss unter Einsatz der Verschlusswinkel-Einstellung nach der Framerate richtig. Beisiel: Eine Einstellung von 180 Grad erzeugt unabhängig von ihrer verwendeten Framerate immer dieselbe Bewegungsunscharfe.
Bei Verwendung der Verschlusszeit-Einstellung, wird dem Verschluss unabhängig von der Frameratein absoluter Wert zugewiesen. Somitändert sich das Ergebnis, wenn Sie die Framerateändern.
FLICKERFREIER VERSCHLUSS BEI
Hier können Sie die von ihrer Kamera verwendete Netzfrequenz einstellen. Auf Basis dieser Hz-Werte berechnet die Kamera flimmerfreie Verschlussseinstellungen.
Beim Drehen in Kunstlicht macht der gewähte Verschlusswert auftretendes Flimmern ggf. stärker sightbar. Ihr Blackmagic Pocket Cinema Camera berechnet flimmerfreie Verschlusswerte automatisch anhand der aktuellen Framerate und schlägt Ihnen bis zu drei Verschlusswerte vor. Verschlusswerte hangen von der lokalen Netzfrequenz ab, mit der die Lampen betrieben werden. Ind den meisten PAL-Ländern liegt die Freqenz bei 50 Hz, in NTSC-Ländern in der Regel bei 60 Hz. Tippen Sie entsprechend ihrer Region auf „50 Hz" oder „60 Hz".
Flimmern kann aufgrund der Eigenschaften verschiedener Lichtquellen selbst mit „flimmerfreien Verschlusswerten auftreten. Wir empfehlen dazu, bei unregelmäßigem Licht einen Probedreh vorzunehmen.
DROP-FRAME-TIMECODE
Aktivieren Sie DROP-FRAME-TIMECODE, um bei NTSC-Projekt-Frameraten von 29,97 und 59,94 Drop-Frame-Timecode zu verwenden. Drop-Frame-Timecode überspringt in regelmäßigen Abständen eine geringe Anzahl an Einzelbildern vom Timecode. So haben Sie immer den richtigen Timecode, auch wenn bei NTSC-Frameraten nicht jeder Sekunde die Gesamtzahl von Einzelbildern enthalt.
BILDSTABILISIERUNG
Mit der Option BILDSTABILISIERUNG aktivieren oder deaktivieren Sie die Bildstabilisierung von Objektiven ohne physischen Schalter.
ND-FILTER ANZEIGEN ALS
Bei der Blackmagic Pocket Cinema Camera 6K Pro können Sie auswahlen, wie die ND-Filter-Anzeige die ND-Filter-Einstellung darstellt. Jede Option entspricht einer gebrächlichen Maßeinheit für die Filterdichte. Kinematografen verwenden üblicherweise Neutraldichtewerte, Viele DSLR- oder Broadcastkamera-Filmer halten sich diese Information lieber in Blendenstufen oder als Bruchzahl des verfügbaren Lichts anzeigen. Hier sind diese Optionen unter „ND-Wert“, „Stop“ und „Bruchzahl“ verfügbar.
SETUP-Einstellungen Seite 2
Die zweite Seite der SETUP-Registerkarte ihrer Kamera bietet folgende Einstellungen:
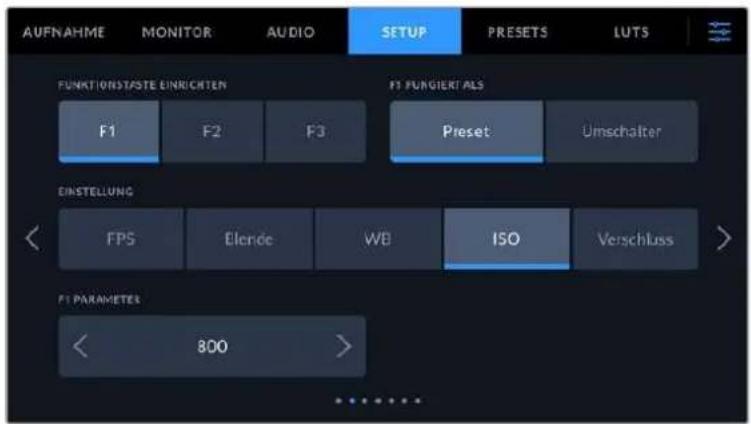
FUNKTIONSTASTE EINRICHTE
Die Blackmagic Pocket Cinema Camera hat offen drei Funktionstasten. Die Punkte auf den Tasten stehen für Funktion 1, Funktion 2 und Funktion 3. Den Tasten können*häufig verwendete Funktionenzugewiesen werden, die dann bei Einsatz ihrer Kamera schnell abrufbar sind.
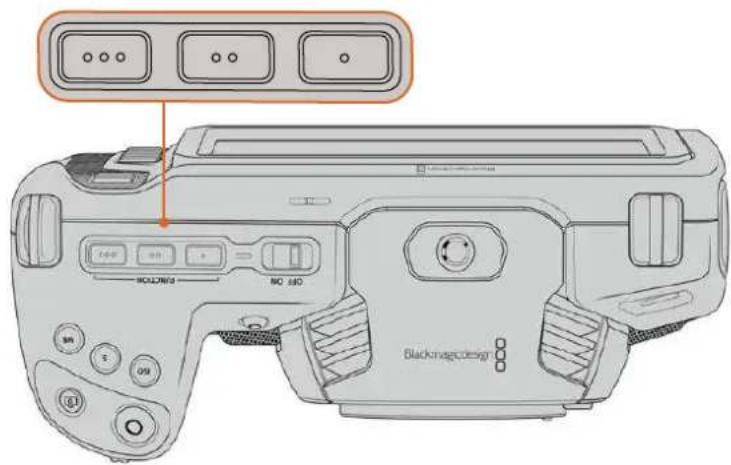
Die Funktionstaten oben auf ihrer Kamera sind mit Punkten gekennzeichnet.
Um die Tasten zu belegen, wahren Sie zunachst eine Funktionstaste und anschließend ihr Verhalten, eine Einstellung und gewünschte Parameter für diese Funktion aus.

1 Taste 2 Verhalten 3 Einstellung 4 Parameter
Funktionstaste 1/2/3 FUNGIERT ALS Preset oder Umschalter
Nach Auswahl der zu belegenden Funktionstaste konnen Sie ihr Verhalten bestimmen. Es gibt folgende Möglichkeit:
- Preset
Bei aktiviertem Voreinstellungsmodus ruft das Drücken dieser Taste eine Kombination aus einer Einstellung und einem Parameter ab.
Um ein Preset festzulegen, wahren Sie aus dem EINSTELLUNG-Menu eine Einstellung, die Sie verwenden möchten, und passen Sie sie mithilfe der Pfeile an.
Um bspw. die F1-Taste so einzustellen, dass sie einen voreingestellten Weißabgleich abruft, wahren Sie mit den Pfeilen unter FunktionstASTE EINRICHEN die Option „F1". Stellen Sie dann unter F1 FUNGIERT ALS das Verhalten auf „Preset" ein. Tippen Sie auf „WB" und dann solange auf die Pfeile im „F1 PARAMETER"-Menu, bis der WB-Wert bei 5600K und der Tint bei -20 liegt.
Umschalter
Wenn eine Funktionstaste auf den Umschaltmodus eingestellt ist, schaltet das Drücken der Taste eine bestimmte Einstellung ein oder aus. In dieser Modus ist das EINSTELLUNG-Menü ausgegraut. Tippen Sie stattdessen auf die Pfeile des PARAMETER-Menus, um die verfügbaren Optionen zu durchlaufen. Diese sind „Clean-Feed“, „Mit LUT anzeigen“, „Bildbrandmarkierungen“, „Focus Assist“, „Falschfarben“, „Zebra“, „Raster“, „Schutzbereich-Linien“, „Offspeed-Aufzeichnung“, „Farbbalken“, „Aufzeichen“ und „Keine”.
Mit dem Umschalter können Sie auch auswahlen, auf welche Signalausgabe diese Einstellung angewendet werden soll. Tippen Sie hierfür beliebig kombiniert auf „LCD“, „HDMI" und „Sucher". Für Optionen wie „Farbbalken", die immer auf alle Ausgaben angewendet werden, ist die getrennte Auswahl für „LCD“, „HDMI" und „Sucher" deaktiviert.
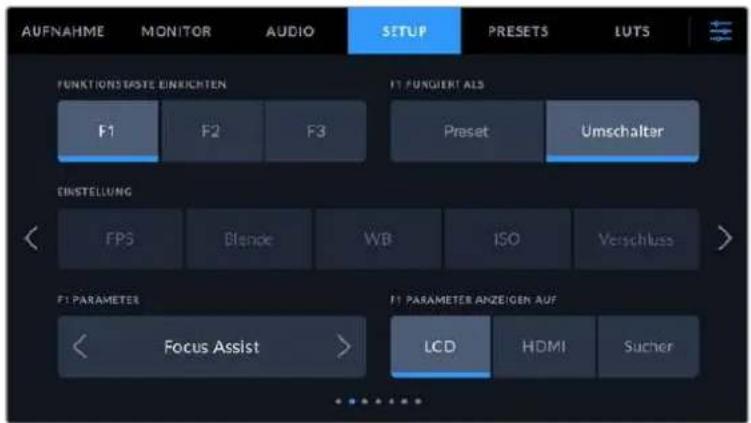
SETUP-Einstellungen Seite 3 auf der Blackmagic Pocket Cinema Camera 6K Pro und 6K G2
Die dritte Seite der SETUP-Registerkarte beinhaltet Einstellungen zum Konfigurieren des optionalen Blackmagic Zoom Demands. Diese Einstellungen sind nur aktiv, wenn ein Blackmagic Zoom Demand an ihre Kamera angebracht ist.
Informationen zum Anbringen und Verwenden des Blackmagic Zoom Demands finden Sie im Abschnitt „Blackmagic Zoom und Focus Demand".
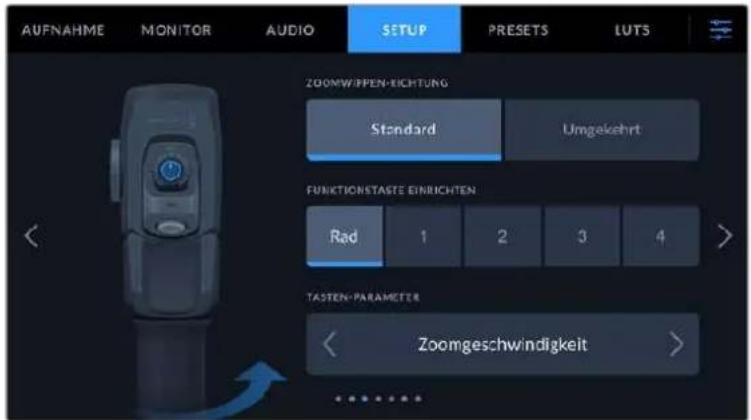
ZOOMWIPPEN-RICHTUNG
Standard
Die Standardrichtung der Zoomwippe. Durch Umlegen der Zoomwippe nach rechts zoommt man ein und durch Drucken nach links aus.
Rückwärts
Ist die Zoomwippen-Richtung auf „Rückwärts" eingestellt, drücken Sie die Zoomwippe zum Hineinzoomen nach links und zum Herauszoomen nach rechts.
Das Blackmagic Zoom Demand hat vier Funktionstasten und ein Einstellrad, denen Sie verschiedene Funktionen zuweisen können.
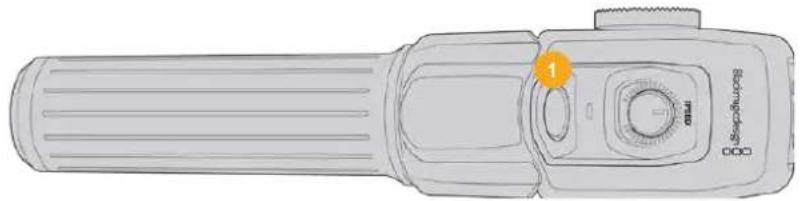
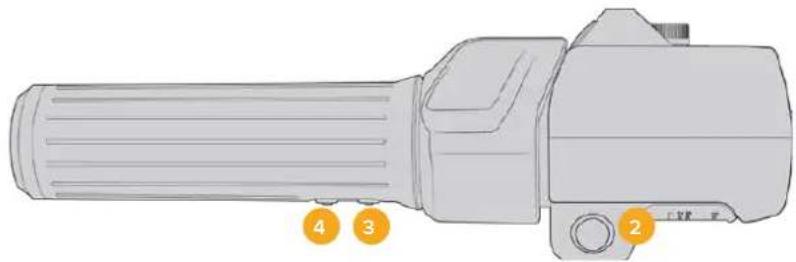
1 Zoom F1 2 Zoom F2 3 Zoom F3 4 Zoom F4 5 Rad
Um dem Rad oder einer der Zoomtasten eine andere Funktion zuzuweisen, wahlen Sie „Rad" oder eine Tastenzahl aus dem Menu FunktionSTASTE EINRICHTEM. Wahlen Sie als nachstes eine Funktion aus, indem Sie auf die Pfeiltasten auf beiden Seiten des Menus TASTEN-PARAMETER tippen.
Parameteroptionen für Rad- und Funktionstasten:
| Rad Zoomgeschwindigkeit, Kopfhörerpegel, Blende, Fokus | |
| Zoomtasten 1-4 Aufzeichnen, Push-to-Talk, Programm-Return, Fokuszoom, Bildrandmarkierungen, Statustext, Autofokus, Blendenautomatik, Autom. Weißabgleich, Wiedergabe. Hierüber setzen sich auch die ND-Filter der 6K Pro ein- und ausschalten. |
SETUP-Einstellungen Seite 4 auf der Blackmagic Pocket Cinema Camera 6K Pro und 6K G2
Die vierte Seite des SETUP-Tabs beinhaltet Einstellungen zum Konfigurieren des optionalen Blackmagic Focus Demands. Diese Einstellungen sind nur aktiv, wenn ein Blackmagic Focus Demand an ihre Kamera angebracht ist.
Weitere Informationen zum Anbringen und Verwenden des Blackmagic Focus Demands finden Sie im Abschnitt „Blackmagic Zoom und Focus Demand" weiter hinter den Handbuch.
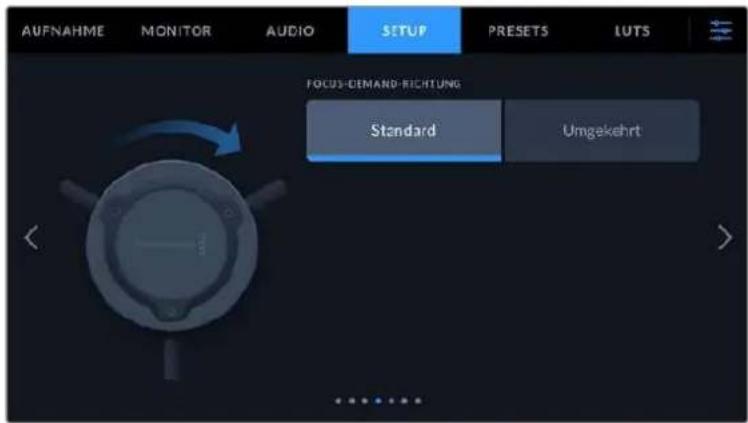
FOCUS-DEMAND-RICHTUNG
Die Richtung des Fokusrads am Focus Demandändern Sie durch Auswahlen von „Standard" oder „Rückwärts".
Standard
Um Motive in Objektivnahme scharfzustellen, drehen Sie das Fokusrad im Uhrzeigersinn, und für weiter entfernte Motive gegen den Uhrzeigersinn.
Rückwärts
Um Motive in Objektivnahme scharfzustellen, drehen Sie das Fokusrad gegen den Uhrzeigersinn, und für weiter entfernte Motive im Uhrzeigersinn.
SETUP-Einstellungen Seite 5 bzw. 3
Die fünfte Seite des SETUP-Tabs Ihrer Blackmagic Pocket Cinema Camera 6K Pro und 6K G2 betet folgende Einstellungen: Auf der Blackmagic Pocket Cinema Camera 4K finden sich diese Einstellungen auf Seite 3.
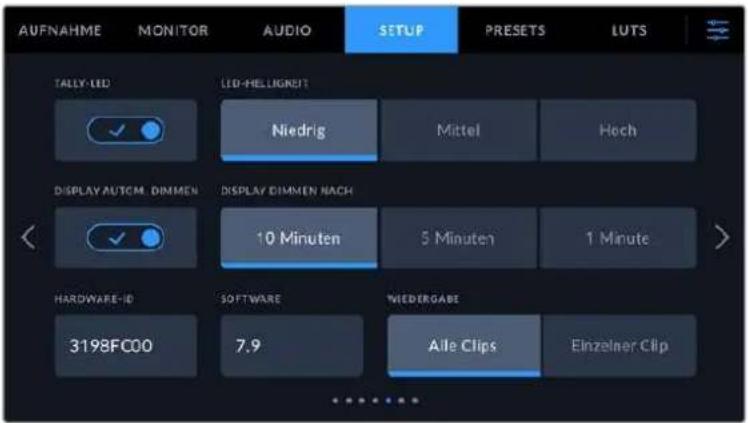
TALLY-LED
Die kleine LED an der Vorderseite der Blackmagic Pocket Cinema Cameras zeigt den Aufnahmestatus der Kamera an und mit angeschlossenem ATEM Mini Mischer auch den Tally-Status für Programm und Vorschau. Wenn Sie ihre Kamera an einen ATEM Mini anschließen, um die Aufzeichnung und Kameraeinstellungen fernzusteuern, zeigt das Tally an, ob eine Kamera auf Sendung oder auf Vorschau geschalte t. Weitere Informationen finden Sie im Abschnitt „Kamerasteuerung mit ATEM Minis".

Es wird auf Speichermedien in der Kamera aufgenommen

Die Kamera ist live auf Sendung

Die Kamera steht kurz vor der Liveschaltung
Um den Aufnahmeindikator ein- oder auszuschalten, benutzen Sie das Schalter-Icon „Tally-LED".
LED-HELLIGKEIT
Stellen Sie die Helligkeit des Tally-LEDs ein, indem Sie auf „Niedrig", „Mittel" oder „Hoch" tippen.
DISPLAYAUTOM.DIMMEN
Um Strom zu sparen, bietet die Blackmagic Pocket Cinema Camera die Option, die Helligkeit des Touchscreens nach Inaktivitat automatisch abzuschwachen. Wahlen Sie eine Option für „Display dimmen nach", um vorzugeben, wann das Abdunkeln des Displays nach Inaktivitat einsetzt. Sobald Sie den Touchscreen erneut berühren, kehr er zu seiner normalen Helligeitsstufe zurück.
HARDWARE-ID
Der Indikator HARDWARE-ID zeigt einen achtstelligen Identifikationscode für ihre Blackmagic Pocket Cinema Camera an. Diese ist einmalig und gilt nur für ihre Kamera. Eine langere, 32-stellige Version deses Codes ist außer dem in den Metadataen von Blackmagic-RAW- und ProRes-Video enthalten. Man kann auf diese Weise better nachverfolgen, welche Material von welcher Kamera stammt.
SOFTWARE
Hier wird die Versionsnummer der aktuell installierten Software angezeigt. Weitere Informationen zum Aktualisieren der Software finden Sie unter „Blackmagic Camera Setup".
WIEDERGABE
Über diese Einstellung konnen Sie auswahlen, ob Sie auf dem LCD-Touchscreen alle Clips oder einen einzelnen Clip von einem Speichermedium wiedergeben möchten. „Alle Clips" spielten alle passenden Medien der Reihe nach ab. „Einzelner Clip" hingegen spielt jeweils nur einen Clip ab. Dies gilt auch für die Loop-Funktion. Wird zusammen zuz „Alle Clips" die Loop-Funktion gewählt, werden alle Clips vom Speichermedium in Dauerschleife wiedergegeben. Ist „Einzelner Clip" aktiviert, wird nur ein Clip in Dauerschleife gespielt.
SETUP-Einstellungen Seite 6 bzw. 4
Die sechste Seite des SETUP-Tabs Ihrer Blackmagic Pocket Cinema Camera 6K Pro und 6K G2 bietet folgende Einstellungen: Auf der Blackmagic Pocket Cinema Camera 4K finden sich diese Einstellungen auf Seite 4.

BLUETOOTH
Mit der Bluetooth-Funktion konnen Sie ihre Kamera über andere Geraten kabellos steuern. Mit der „Blackmagic Camera Control"-App ändern Sie Einstellungen, passen Metadataen an und losev von ihren iPad aus der Ferne die Aufzeichnung aus. Um Bluetooth zu aktivieren oder zu deaktivieren, tippen Sie im SETUP-MENU auf das Schalter-Icon BLUETOOTH. Ist Bluetooth aktiviert, konnen Bluetooth-Geräte die Kamera aus bis zu 9 Metern Entfernung erkennen. Da die Kamera für die Bluetooth-Steuierung dieselben Befehle wie für das Blackmagic SDI Camera Control Protocol verwendet, konnen Sie ihre eigenen Programme schreiben und so gut wie jeder Kameraeinstellung fernsteuern. Zum Beispiel die Bildkontrolle, Audioeinstellungen und die kamerainterne Farbkorrektur mit DaVinci Resolve. Es kann soccer das Objektiv fergesteuert werden.
Weitere Informationen finden Sie unter „Blackmagic Camera Control" auf https://www.blackmagicdesign.com/de/developer/
So koppeln Sie ihre Kamera erstmaling kabellos mit einem iPad:
1 Um Bluetooth zu aktivieren oder zu deaktivieren, tippen Sie im SETUP-MENU auf das Schalter-Icon BLUETOOTH.
2 Öffnen Sie die Blackmagic Camera Control App und wahlen Sie die Kamera aus, mit der die Verbindung aufgebaut werden soll. Verfügbare Kameras werden mit einem Kennbuchstaben und einer einzeligen Hardware-ID aufgelistet, bspw. so: A:A0974BEA.

Wahlen Sie die Blackmagic Pocket Cinema Camera aus, zu der die Verbindung aufgebaut werden soll
Nach Installation und erstmaligem Starten der Blackmagic Camera Control App werden Sie gefragt, ob Sie den Standortzugriff erlauben wollen. Wenn Sie dies für die Gebrauchsdauer der App mit „While using the app" bejahren, werden die GPS-Koordinaten von Ihr iPad in die Metadataen ihrer Filmdateteien aufgenommen. So wird ihre Footage mit Geotags versehen. Diese Tags können in DaVinci Resolve 15 oder neueren Versionen eingesehen werden.
Wenn Sie die Nutzung dieser Informationen nicht zulassen wollen, wahren Sie Never.
Um diese Einstellungen zu ändern, gehen Sie auf Ihrm iPad unter „Einstellungen" zu „Datenschutz" > „Ortungs Dienste" > „Camera Control".
3 Wenn Sie versuchen, erstmalig eine Drahtlosverbindung zu ihrer Kamera herzustellen, verlangt die Blackmagic Camera Control App einen sechsstelligen Code. Diese Code wird auf dem LCD-Bildschirm der Kamera eingeblendet. Geben Sie den Code auf dem iPad ein und klichen Sie auf „Koppeln".
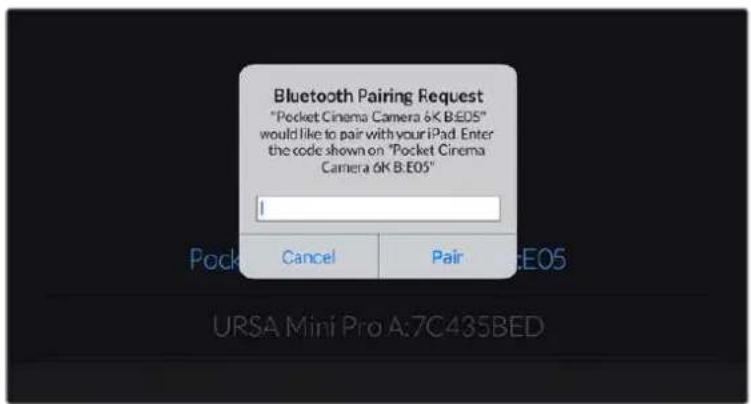
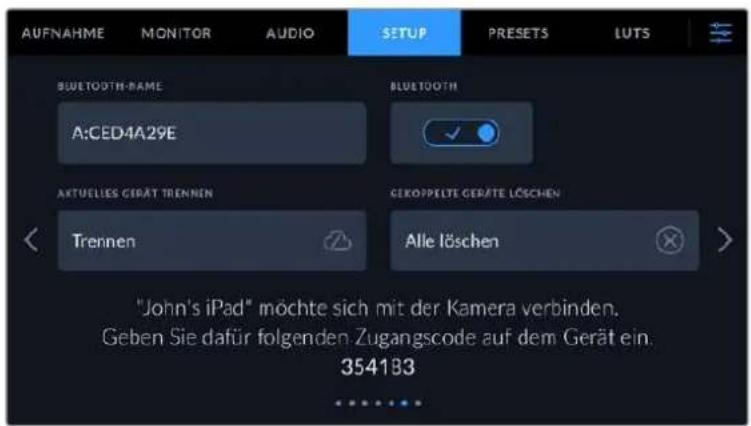
4 Sobald ihre Kamera mit Ihrem iPad gekoppelt ist, wird dies bestätigt.
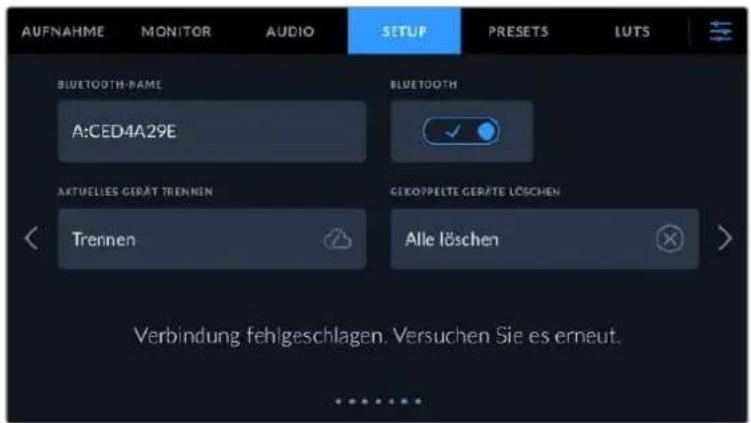
5 Scheitert das Herstellen einer Verbindung mit ihrem iPad, gezigt die Kamera eine Fehlermeldung an. Versuchen Sie es erneut.
HINWEIS Wenn Sie ihre Blackmagic Pocket Cinema CameraGERADE nicht per Bluetooth steuern, empfehlen wir, Bluetooth aus Sicherheitsgrunden auszuschalten.
AKTUELLES GERÄT TRENNEN
Über diese Einstellung trennen Sie die Drahtlosverbindung zwischen ihrer Blackmagic Pocket Cinema Camera vom derzeit gekoppelten iPad.
GEKOPPELTE GERÄTE LÖSCHEN
Mit dieser Einstellung löschen Sie die Liste der Geräte, mit denen ihre Kamera gekoppelt wurde.
Steuern der Kamera mit der Blackmagic Camera Control App
Nach erfolglicher Herstellung der Drahtlosverbindung zwischen ihrer Blackmagic Pocket Cinema Camera und Ihr iPad können Sie Einstellungen andern, Metadataen anpassen und die Aufzeichnung per Trigger aktivieren.
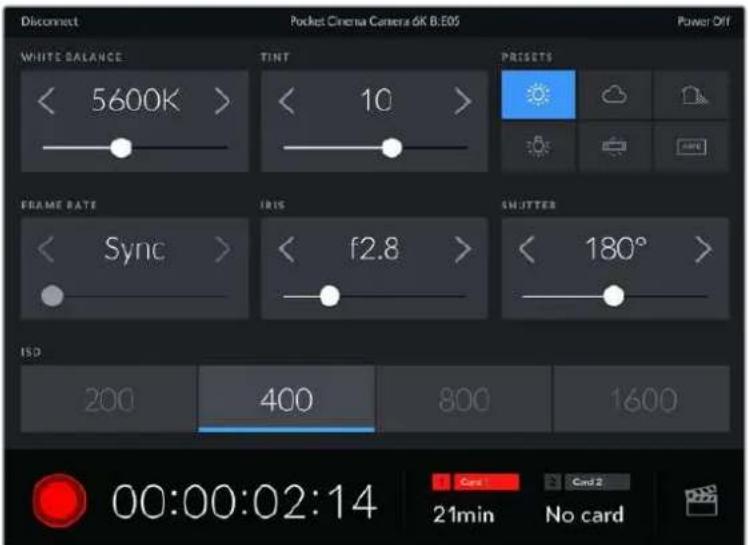
Sind die Geräte gekoppelt, blendet die Blackmagic Camera Control App diesen Bildschirm ein, wo Sie Einstellungenändern und die Aufnahme starten können
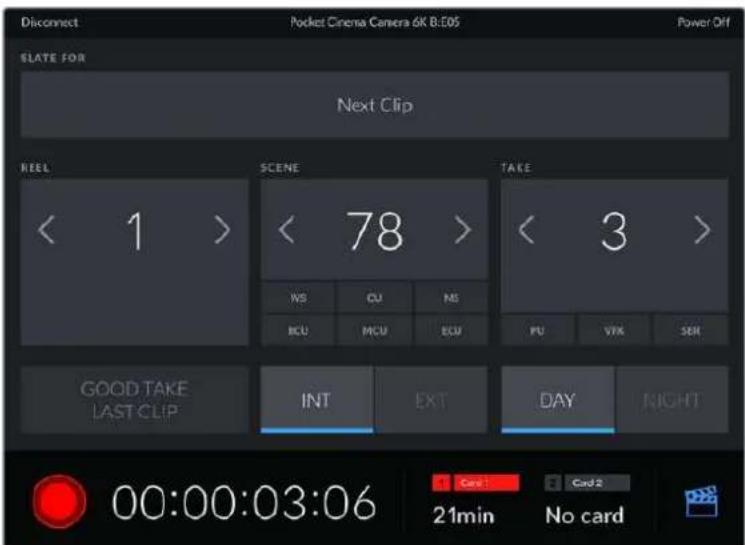
Tippen Sie auf das Filmklappen-Icon unter rechts, um auf die Slate zuzugreifen und sie zu aktivaisieren
Die Blackmagic Pocket Cinema Camera nutzt Bluetooth LE für die Drahtlossteuerung von anderen Geräten aus. Dies ist derselbe Protokoltyp wie für tragbare Geräte und verbraucht nur minimalen Akkustrom.
SETUP-Einstellungen 7 bzw. 5
Die siebte Seite des SETUP-Tabs Ihrer Blackmagic Pocket Cinema Camera 6K Pro und 6K G2 bietet folgende Einstellungen: Auf der Blackmagic Pocket Cinema Camera 4K finden sich diese Einstellungen auf Seite 5.
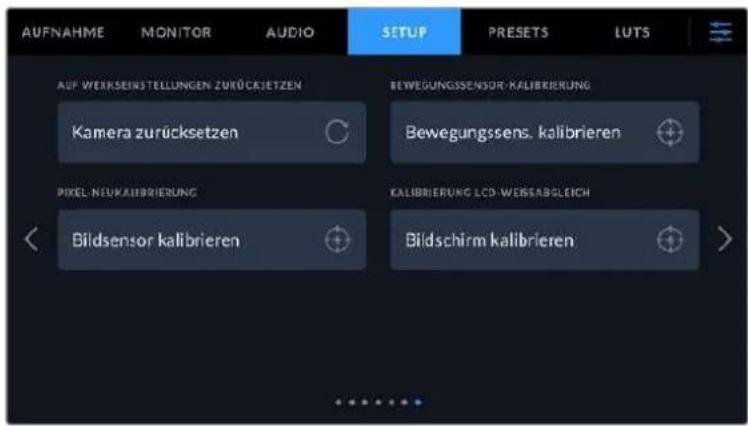
AUF WERKSEINSTELLUNGEN ZURÜCKSETZEN
Um die Kamera auf ihre Werkseinstellungen zurückzusetzen, tippen Sie auf „Kameraeinstellungen zurücksetzen". Tippen Sie im Bestätigungsfenster auf „Zurücksetzen", um diese Aktion zu bestätigen. Ihr Kamera löscht jegliche LUTs und Presets und setzen alle Einstellungen zurück. Als bewährte Praxis empfeht es sich, von ihren Presets auf einer Speicherkarte ein Backup anzufertigen, bevör Sie die Kamera auf ihre Werkseinstellungen zurücksetzen. So konnen Sie auch nach dem Zurücksetzen ihrer Kamera auf die Werkseinstellungen Presets per Import von der Speicherkarte schnell wiederherstellen. Es wichtig zu wissen, dass mit dem Zurücksetzen auf die Werkseinstellungen auch das Horizont-Meter zurückgesetzt wird. Kalibrieren Sie deshalb im Anschluss auch den Bewegungssensor neu.
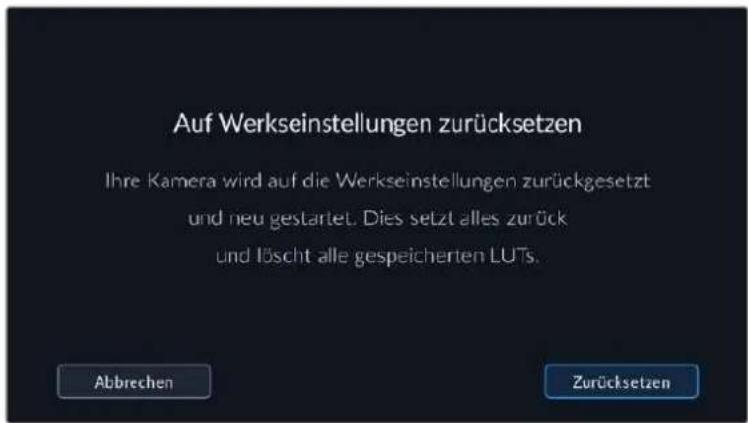
BEWEGUNGSSSENSOR-KALIBRIERUNG
Um das Horizont-Meter zu kalibrieren, tippen Sie auf den Button „Bewegungssensor kalibrieren". Es ist wichtig, die Kamera während der Kalibrierung stillzuhalten. Diese Prozess dauert ungebärf fünf Sekunden.
Der Horizont kann bei Bedarf auch dezentriert eingestellt werden. Wenn Sie beispelsweise eine Neigung in einem gleichbleibenden Winkel einfangen sollen, kalibrieren Sie den Bewegungssensor einfach im gewünschten Winkel. Verwenden Sie dann das Horizont-Meter, um diesen Winkel beim Dreh beizubehalten.
PIXEL-NEUKALIBRIERUNG
Der in Ihrer Blackmagic Pocket Cinema Camera eingesetzte CMOS-Sensor besteht aus Millionen von Pixel, die auf Licht reagieren. Nach Kalibrierung des Sensors in der Fertigung konnen Pixel mit der Zeit ihre Helligkeit verändern. Sie werden somit sightbarer und aufgrund dessen im Allgemeinen als „Hot Pixel" bezeichnet. Die Kamerasensoren aller Hersteller entwickeln irgendwann Hot Pixel.
Um diesen Fehler zu beheben, haben wir die Kamera mit einer Kalibrierfungtion versehen, die Sie bei Auftreten von Hot Pixel im Bild ausführten konnen.
Setzen Sie hierfür erst den Objektivdeckel auf. Führren Sie dann die Pixel-Remapping-Funktion aus, indem Sie auf „Kalibrieren" tippen. Dieser Vorgang dauert ungebung eine Minute.
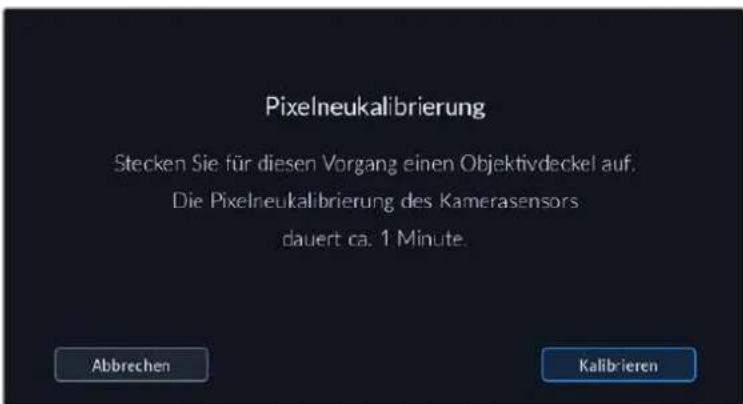
WEISSABGLEICH LCD-KALIBRIERUNG
Um den Weißabgleich des LCDs zu kalibrieren, justieren Sie die Werte für „LCD-Temperatur" und „LCD-Farbe", bis die beiden Referenzflächen neutral aussehen. Ihr geänderten Einstellungen können Sie anhand der „Zurücksetzen"-Schaltfläche mit den werkssheitigen Kalibriereinstellungen überschreiben. Die „Wiederherstellen"-Schaltfläche bringt ihre geänderten Einstellungen zurück. Soalandst sich der Stand vor und nach der Kalibrierung better vergleichen. Wenn der Weißabgleich des LCDs stimmt, speichern Sie ihre Einstellungen.
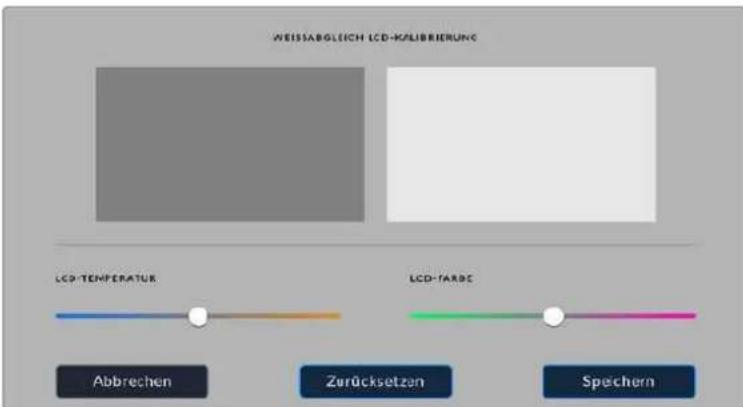
PRESETS
Über die PRESETS-Registerkarte können Sie bis zu 12 Voreinstellungen speichern und abrufen. Dies ist sehr nützlich, wenn ihre Kamera für mehrere Projekte verwendet wird. Beispielsweise wenn Sie mit ihrer Kamera entsprechende Filmgenes wie Dokumentationen oder Musikvideos drehen, die alle entsprechenderer Kameraeinstellungen bedürfen. Die Preset-Funktion ihrer Kamera lasst Sie das Setup eines bestimmten Projekts oder Shot-Types speichern, damit Sie es bei Bedarf schnell und muhelos wieder abrufen können. Es stehen 12 Preset-Plätze zur Verfügung.
Außer dem halten sich Presets importieren und exportieren, was für Dreharbeiten mit mehreren Kameras praktisch ist. Stellen Sie die Blackmagic Pocket Cinema Camera einfach Ihr Projekt entsprechend ein und exportieren Sie die Voreinstellungen für alle anderen Blackmagic Pocket Cinema Cameras am Set.
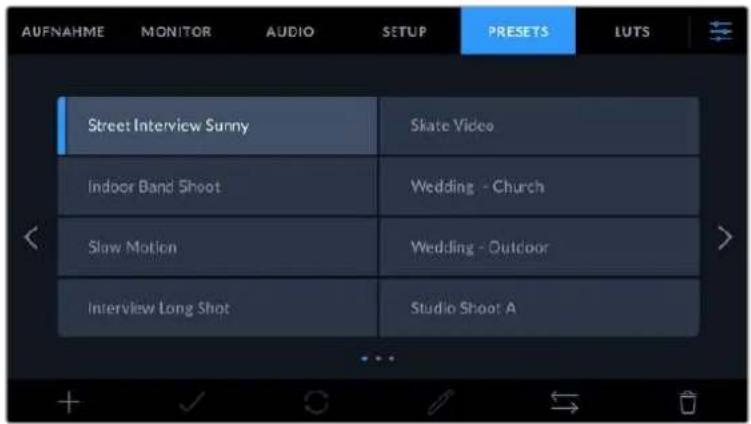
Über die PRESETS-Registerkarte können Sie schnell zwischen gesellschaften Einstellungen wechseln
HINWEIS Der interne Speicher Ihrer Kamera fasst bis zu 12 Presets.
Preset-Icons
Die Icons am unteren Rand des PRESETS-Menus stehen für die nachfolgend erklärten Funktionen.

Speichern und Laden von Presets
Tippen Sie zum Erstellen eines neuen Projekts auf das Hinzufugen-Icon. Es erscheint eine Tastatur auf Ihr LCD. Geben Sie dort den Name für Ihr Preset ein. Tippen Sie nach Eingabe des Namens auf den „Aktualisieren"-Button, um alle aktuellen Einstellungen in thisem Preset zu speichern.
Wenn in der Kamera bereits ein gleichnamiges Preset geladen ist, können Sie das vorhandene Preset überschreiben oder beiden behalten.
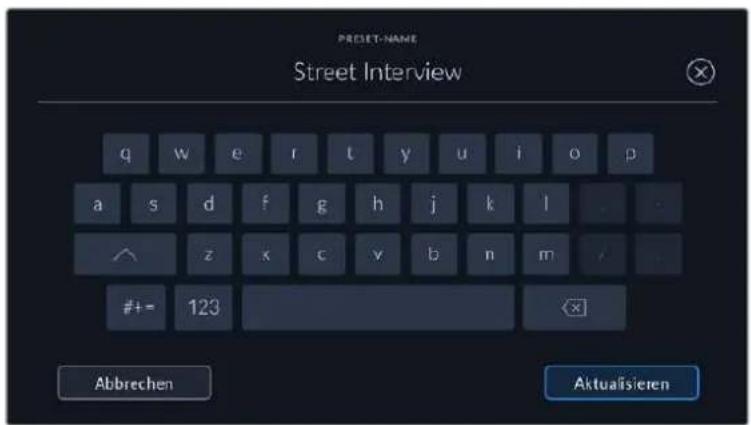
Wenn Sie ein gespeichertes Preset abrufen möchten, tippen Sie auf seinen Name. Um ein Preset zu laden, tippen Sie auf das Laden-Icon.
Aktualisieren Sie ein Preset, indem Sie auf den „Aktualisieren“-Button tippen. Es öffnet sich ein Fenster mit der Frage, ob Sie das Preset mit der derzeitigen Einstellung ihrer Blackmagic Pocket Cinema Camera aktualisieren wollen. Tippen Sie zur Bestätigung auf den „Aktualisieren“-Button
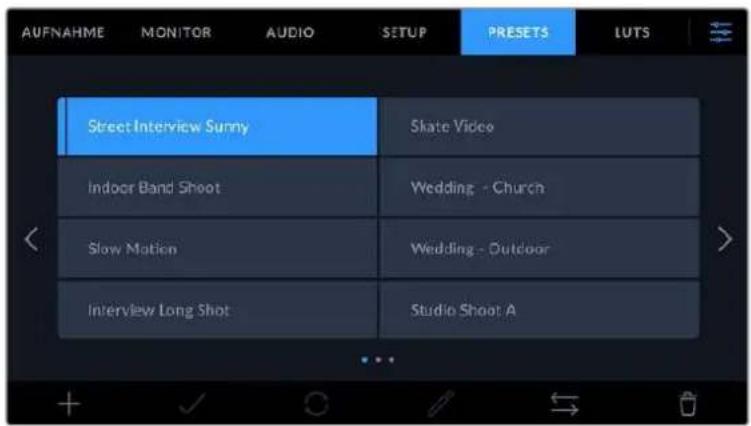
Wahlen Sie ein Preset und laden Sie es über das Load-Icon. Ausgewählte Presets werden ganz in blau angezeigt. Aktuell geladene Presets werden mit einer blauen Linie am unteren Rand des Icons darestellt
Importieren von Presets
Um Presets zu importieren, tippen Sie auf das Verwalten-Icon am unteren Rand des PRESETs-Menus. Tippen Sie auf „Preset importieren" und dann auf „Importieren", um den Vorgang zu bestätigen. Es erscheint der Import-Bildschirm für Presets. Solte Ihr bevorzugtes Preset nicht auf dem Speichermedium zu finden sein, tippen Sie auf einen der Media-Buttons am oberen Rand des Touchscreens, um zu einem anderen Medium zu wechseln. Sie konnen Presets von einem USB-C-Laufwerk, einer CFast- oder SD-Karte importieren.
Ohre Kamera durchsucht daraufaufhin das Stammverzeichnis und den Presets-Ordner auf ihren ausgewählten Medien und listet alle verfügbaren Presets auf. An anderer Stelle gespeicherte Presets sind so nicht auffindbar.
Tippen Sie auf ein Preset, um es auszuwahlen. Tippen Sie dann auf „Importieren“, um die Auswahl zu bestätigen und an die nachstverfügbare Stelle auf ihrer Kamera zu kopieren.
Hat diesen Preset denselben Namen wie ein bereits auf Ihrer Kamera gespeichertes Preset, konnen Sie das bestehende Preset überschreiben oder beiden behalten. Oben rechts auf dem Touchscreen setzen Sie die Anzahl der verbleibenden Preset-Plätze auf ihrer Kamera. Sie konnen so viele Presets laden, wie Plätze vorhanden sind.
HINWEIS Sind alle 12 Preset-Plätze Ihrer Kamera belegt, ist das Import-MENU nicht verfügbar. Um Platz zu schaffen, müssen Sie ein bestehendes Preset loschen.
Exportieren von Presets
Um ein Preset auf ein Speichermedium zu exportieren, tippen Sie zunachst auf das zu exportierende Preset und dann auf das Verwalten-Icon. Tippen Sie auf „Ausgewähltes Preset exportieren" und anschließend auf das Medium, auf das Sie das Preset exportieren sollen. Ist bereits ein gleichnamiges Preset vorhanden, geben Sie an, ob Sie es überschreiben oder beibeibehen möchten. Die Kamera exportiert das Preset in einen Presets-Ordner.
Löschen von Presets
Zum Löschen eines Presets wahlen Sie es aus und tippen Sie auf das Löschen-Icon. Bestätigen Sie ihre Auswahl, wenn aufgefordert, indem Sie auf „Löschen" tippen.
3D-LUTs
Im LUTS-MENU können Sie 3D-LUTs importieren, exportieren und auf die Ausgaben ihrer Kamera anwenden.

3D-LUTs vorgestellt
Sie können 3D-LUTs auf Bilder auf dem LCD-Touchscreen und der HDMI-Ausgabe ihrer Kamera anwenden. LUTs geben ihrer Kamera vor, welche Farbe und Luminanz bei einer bestimmen Farbund Luminanz-Eingabe auf die Ausgabe anzuwenden sind. Beispiel: Eine LUT kann ihrer Kamera vorgegeben, ein vom eingehenden Signal her relativ trubes Blau als strahlendes, sattes Blau darzustellen. Das istalanders bei der Aufzeichnung von Blackmagic-RAW-Material nutzlich oder bei Verwendung des Dynamikumfangs „Film". Beides liefert ein gewollt ungesattigt und kontrastarm weltendes Bild. Durch Anwenden einer LUT auf Ihr Materialbekommen Sie einen Eindruck, wie ihre Footage nach der Farbkorrektur ausgehen wird.
3D-LUTs lessen sich problemlos in DaVinci Resolve oder anderen Farbkorrektur-Softwares erstellen. Außerdem sind LUTs auch online erhältlich. Auf der Kamera konnen bis zu zehn 17- oder 33-Punkt-3D-LUTs mit je bis zu 1,5 Megabytes gespeichert werden. Sobald eine LUT geladen ist, konnen Sie sie auf das Bild auf dem LCD-Touchscreen und auf die HDMI-Ausgabe ihrer Kamera anwenden und sichen.
Ohre Blackmagic Pocket Cinema Camera understands 33-Punkt-3D-LUTs im .cube-Format von DaVinci Resolve und ins Resolve .cube-Format konvertierte 17-Punkt-3D-LUTs. Ihr Kamera verarbeitet 3D-LUTs mithilfe hochqualitativer tetraedraler Interpolation.
NaheresfindenSieimAbschnitt“MONITORING-Einstellungen"inthisemHandbuch.
HINWEIS LUTS werden nicht standardmäßig von ihrer Blackmagic Pocket Cinema Camera auf aufgenommene Footage angewendet oder eingebrannt. Bei Bedarf ist es aber möglich, die LUT in ihre Footage einzubrennen.
These Option kann nutzlich sein, wenn Sie in der Postproduktion keine Zeit für das Grading ihrer Footage haben oder die Footage direkt an den Kunden oder Editor übergeben werden muss.
Bei Verwendung von LUTs als Vorschautool am Set werden die Informationen der angewandten LUT als Metadaten zusammen mit ihren Aufnahmen gespeichert. DaVinci Resolve zeigt diese Informationen im Metadata-Tab im Feld „LUT Used" (Verwendete LUT) an. Dies kann für Coloristen hilfreich sein, um den Name der am Set verwendeten LUT zu überprüfen.
Integrierte LUTs
Die Kamera verfügt über mehrere interne LUTs. Damit konnen Sie beim Aufnehmen mit dem Dynamikumfang „Film" in Blackmagic RAW verschiedene Looks als Vorschau sichen.
Jede Kamera bietet spezielle, auf die Farbverarbeitung der Generation 5 abgestimmte LUTs:
- Gen 5 Film to Extended Video
Stellt einen breiteren Dynamikumfang als die LUT „Film to Video" dar. Liefert unter Anwendung einer leichten Änderung am Kontrast ein geschmeidiges Roll-Off in den Highlights.
Gen 5 Film to Rec 2020 Hybrid Log Gamma
Zeigt eine für HDR-Bildschirme geeignete Gamma-Kurve an und ist kompatibel mit Bildschirmen mit Standard-Dynamikumfang.
Gen 5 Film to Rec 2020 PQ Gamma
Zeigt zum effizienten Encoding von HDR-Bildern eine Gammakurve an, die auf dem Wahrnehmungsvermögen des menschlichen Auges basiert.
Gen 5 Film to Video
Ähnlich der Rec.709-Farbnorm für High-Definition-Video mit hohen Kontrast- und Sattigungspegeln. Diese Einstellung eignet sich bei Einsatz der Blackmagic Pocket Cinema Camera zusammen mit anderen Broadcastk cameras, die den Rec.709-Farbraum verwenden.
LUT-Icons
Die Icons am unteren Rand des LUTS-Menus ihrer Kamera unterstützen folgende Funktionen:


Laden Verwalten Löschen
LUTs importieren
Um eine 3D-LUT zu importieren, tippen Sie auf das Verwalten-Icon unter im LUTS-MENU. Tippen Sie auf „LUT importieren" und dann auf „Import", um den Vorgang zu bestätigten. Es erscheint der Import-Bildschirm für LUTs. Soltte ihre bevorzugte 3D-LUT nicht auf dem Speichermedium zu finden sein, tippen Sie auf einen der Media-Buttons am oberen Rand des Touchscreens, um zu einem anderen Medium zu wechseln. Sie können LUTs von einem USB-C-Laufwerk, einer CFast- oder SD-Karte importieren.
Ohre Kamera durchsucht daraufhin das Stammverzeichnis und den 3D-LUT-Ordner auf ihren ausgewählten Medien und listet alle verfügbarbaren LUTs auf. An anderer Stelle gespeicherte LUTs sind so nicht auffindbar.
Tippen Sie auf eine LUT, um sie auszuwahlen. Tippen Sie dann auf „Importieren“, um die Auswahl zu bestätigen und sie an die nachstverfügbare Stelle auf ihrer Kamera zu kopieren.
Sind alle 10 Plätze mit 3D-LUTs belegt, können Sie erst dann weitere importieren, wenn Sie durch Löschen vorhandener LUTs Platz schaffen.
Hat diese LUT denselben Namen wie eine bereits auf Ihrer Kamera gespeicherte LUT, konnen Sie die vorhandene LUT überschreiben oder andere beibehalten. Oben rechts auf dem Touchscreen setzen Sie die Anzahl der verbleibenden LUT-Plätze auf ihrer Kamera. Sie konnen so viele LUTs laden, wie Plätze vorhanden sind.
HINWEIS Sollte beim Importieren einer LUT ein Problem auftreten, ist ihre Große womöglich inkorrekt. Die Große einer LUT können Sie mithilfe eines LUT-Editors wie Lattice oder mit einem beliebigen Texteditor auf Ihr Rechner prufen. Die kein dem Tag „LUT_3D_SIZE" erscheinende Zahl gibt Aufschluss über die Große der LUT. Betragt dieser Wert weder 17 noch 33, können Sie Ihr 3D LUT mithilfe von Lattice auf 17 Punkte reduzieren.
Anwenden einer LUT
Sobald Sie eine LUT auf Ihrer Kamera gespeichert haben, wahren Sie sie aus und tippen Sie anschließend auf das Laden-Icon. Dieswendet die LUT auf alle Ausgaben ihrer Kamera an. Um die für ihre Kameraausgaben geladene LUT anzuzeigen, aktivieren Sie im MONITORING-Menu die Option LUT ANZEIGEN. Weitere Informationen finden Sie im Abschnitt unter MONITORING-Einstellungen.
LUTs exportieren
Um eine LUT auf ein Speichermedium zu exportieren, tippen Sie zunachst auf die zu exportierende LUT und dann auf das Verwalten-Icon. Tippen Sie auf „Ausgewählte exportieren" und anschließend auf das Medium, auf das Sie die LUT exportieren wollen. Ist bereits eine gleichnamige LUT vorhanden, geben Sie an, ob Sie diese überschreiben oder andere beibehalten möchten. Die Kamera exportiert die LUT in einen 3D-LUTS-Ordner.
LUTs loschen
Um eine nicht mehr benöttigte LUT zu löschen oder um Platz zu schaffen, wahren Sie diese LUT aus und tippen Sie auf das Löschen-Icon. Bestätigen Sie ihre Auswahl, wenn aufgefordert, indem Sie auf „Löschen" tippen.
Eingebbette 3D-LUTs
Wird beim Filmen in Blackmagic RAW auf der Blackmagic Pocket Cinema Camera eine 3D-LUT angewendet, wird die ausgewählte LUT bei der Aufzeichnung in die Blackmagic-RAW-Datei eingebettet. Die 3D-LUT wird mit ihren aufgezeichneten Dateien in der Kopfzeile der BRAW-Datei (.braw) gespeichert. So kann man die LUT in der Postproduktion muhelos auf die Footage anwenden, ohne eine separate Datei handhaben zu müssen.
Wenn Editoren oder Coloristen Blackmagic-RAW-Dateien erhalten, können sie leicht auf die beim Filmen verwendete LUT zugreifen. Dies reduziert das Risiko, dass versehentlich eine falsche 3D-LUT auf einen Clip angewendet wird. Während des Schnits oder Colorgradings der Footage kann die 3D-LUT wahlweise aktiviert und jederzeit deaktiviert werden.
Ist im Aufzeinungsmenü das Schalter-Icon LUT IN DATEI ANWENDEN aktiviert, wird dieser Clip beim Öffnen im Blackmagic RAW Player und in DaVinci Resolve mit der angewendeten 3D-LUT dargestellt.
Die 3D-LUT lasst sich mit dem Schalter-Icon liegt ein- und ausschalten. Sie ist aber immer in der Blackmagic-RAW-Datei enthalten, da die entsprachenden Daten im Clip gespeichert sind. In DaVinci Resolve bietet das Menu mit den RAW-Einstellungen ein „Apply LUT“-Schalter-Icon zum Ein- oder Ausschalten der 3D-LUT in der Blackmagic-RAW-Datei.
Die „Apply LUT“-Einstellung in DaVinci Resolve gleicht der Einstellung in der Kamera. So konnen Sie Coloristen schon beim Dreh anhand der in der Kamera angewendeten LUT eine Orientierungshilfe geben. Diese LUT kann in DaVinci Resolve aber einfach deaktiviert werden, indem man „Apply LUT" deaktiviert.
Eingabe von Metadaten
Metadataen sind innerhalb eines Clips gespeicherte Informationen wie Take-Nummern, Kameraeinstellungen und andere Identifikationsdaten. Metadataen sind extrem nutzlich, um Footage in der Postproduktion zu sortieren und zu bearbeiten. Bspw. sind Take-, Shot- und Szenen-Nummern das A und O für die Organisation, während Objektivinformationen dazu genutzt werden konnen, Verzeichnungen automatisch zu entfern den oder VFX-Assets better auf Matten abzustimmen.
Ohr K a t h i t. d t t t t t t t t t t t t t t t t t t t t t t t t t t t t t t t t t t t t t t t t t t t t t t t t t t t t t t t t t t t t t t t t t t t t t t t t t t t t t t t t t t t t t t t t t t t t t t t t t t t t r.
Slate
Wischen Sie auf dem Touchscreen aus der Hauptansicht ihrer Kamera nach rechts oder links, um das Slate-MENU aufzurufen.
Das Slate-MENU ist in zwei Registerkarten unterteilt: CLIPS und PROJEKT. Auf der Registerkarte CLIPS finden Sie Informationen, die von Clip zu Clip variieren, während Sie unter PROJEKT gängige Daten wie Projektname, Regisseur sowie Kamera- und Operator-ID eingeben.
TIPP Über die Slate eingebene Metadaten konnen in der HDMI-Ausgabe eingesehen werden. Stellen Sie hierfür auf der MONITORING-Seaite unter REGISSEUR" die Option "STATUSTEXT ANZEIGEN FÜR ein. Naheres finden Sie im Abschnitt MONITORING-Einstellungen in thisem Handbuch.
CLIPS-Metadata
Änderungen an den Clip-Metadataen Funktionieren im Standby-Modus anders als im Wiedergabe-Modus. Im Standby-Modus werden mit aufzeichnungsbereiter Kamera Clip-Metadataen für den nachsten Clip aufgezeichnet. Dies gilt nicht, wenn der zuletzt aufgezeichnete Clip durch Antippen des „Guter Take letzter Clip" CLIP-Button mit einer „Guter Take"-Markierung versehen wurde. Im Wiedergabe-Modus wird beim Sichte nereits gedrehten Materials der „Guter Take"-Button eingeblendet und dem aktuell betrachteten Clip werden immer die Clip-Metadataen beigefüggt.
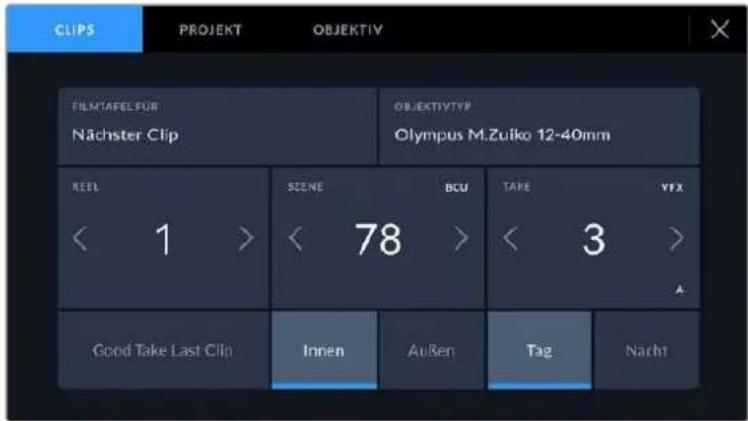
Im Wiedergabe-Modus erkennt FILMTAFEL FÜR die auf den Clip angewandete Slate und der „Guter Take"-Button wird eingeblendet. Im Standby-Modus bezieht sich die Slate auf den nachsten Clip und der „Guter Take letzter Clip"-Button wird eingeblendet
FILMTAFEL FÜR
These Einstellung zeigt an, auf welchen Clip sich die derzeit angezeigten Medateten beziehen. Im Wiedergabe-Modus ist das der aktuelle Clip und im Standby-Modus der{nachste aufgenommene Clip.
OBJEKTIV
Wenn Sie ein mit ihrer Kamera kompatibles elektronisches Objektiv benutzen, wird Ihnen hier der Objektivtyp angezeigt. Um Informationen zum Objektiv zu ändern oder hinzuzufugen, klichen Sie in der Menuleiste auf „OBJEKTIV".
Naheres finden Sie im Abschnitt „OBJEKTIV-Metadaten" in dieser Handbuch.
REEL
Zeigt das aktuelle Band an.
Ohre Blackmagic Pocket Cinema Camera zahlt die Bandnummer in der Regel automatisch hoch. Sie brauchen es nicht manuell zu tun. Wenn Sie für ein neues Projekt mit Reel 1 beginnen möhen, tippen Sie im PROJEKT-Tab der Slate auf „Projektd. zusücksetzen“, um ihre Projektdaten zusammen zuzusetzen.
SZENE
Der SZENE-Indikator zeigt die derzeitige Szenennummer an. Gleichzeitig konnen auch die Shot-Nummer und der Shot-Typ angezeigt werden.
These Zahl bezieht sich immer auf die aktuelle Szene. Mithilfe der Rechts- und Linkspfeileiben der Szenennummer konnen Sie diese anpassen. Oder tippen Sie auf die Szenennummer, um für eine manuelle Eingabe auf den Editor zuzugreifen.
Szenennummern reichen von 1 bis 9999.
Fugen Sie zum Kennzeichnen des aktuellen Shots im Szenennummern-Editor eingeführen Buchstaben hinz. Beispiel: 23A^* steht für Szene 23 und Einstellung 1. Wenn Sie ihrer Szenennummer einen Shot-Buchstaben hinzugefügt haben, schlägt ihre Kamera beim Öffnen des Szenennummer-Editors jeder Mal die{nachste Szenennummer und den entsprichenden ShotBuchstaben vor. Wenn ihre aktuelle Szenennummer bspw. 7B ist, schlägt ihren die Kamera "8" und 7C^ vor.
Der Szenennummern-Indikator kann außer dem Informationen über den Shot-Typ in der oberen rechten Ecke anzeigen. Wahlen Sie diese im Szenennummern-Editor rechts besoin der Tastatur aus.
Folgende Shot-Type sind verfügbar:
WS Totale
MS Medium Shot (Halbnah)
MCU Medium Close Up (Nah)
CUGroßaufnahme
BCU Nahaufnahme
ECU Detail
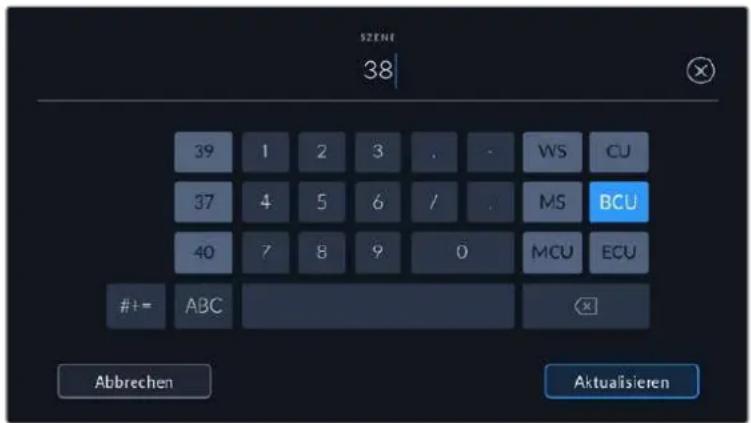
Bei der Eingabe von SZENE-Metadataen schlągt die Kamera Ihnen Szenennummern links und Shot-Typen rechts besoin der Touch-Tastatur vor
TAKE
Der TAKE-Indikator zeigt die Take-Nummer des aktuellen Shots an. Diese können Sie entweder durch Antippen der Pfeile auf beiden Seiten der Take-Nummer oder durch Tippen auf den Indikator und Eingabe im Take-Nummern-Editor anpassen.
TIPP Beim Hochzahlen der Szenennummern oder Shot-Buchstaben fängt die Take-Nummer wieder bei 1 an.
Im Takenummern-Editorleen sich zudem Beschreibungen hinzufugen. Diese werden Ihnen rechts...,
naben der Takenummern-Tastatur angeboten und beziehen sich auf folgende Szenarien:
| P/U | Pick up: Dies bezieht sich auf den Nachdreh eines bereits erfolgen Takes, um nach abgeschlossenen Dreharbeiten zusätzliches Material zu filmen. |
| VFX | Visual Effects: Dies bezieht sich auf einen Take oder einen Shot, der für visuelle Effekte gedacht ist. |
| SER | Serie: Dies bezieht sich auf eine Situation, in der mehrere Takes aufgezeichnet werden, während die Kamera ununterbrochen filmt. |
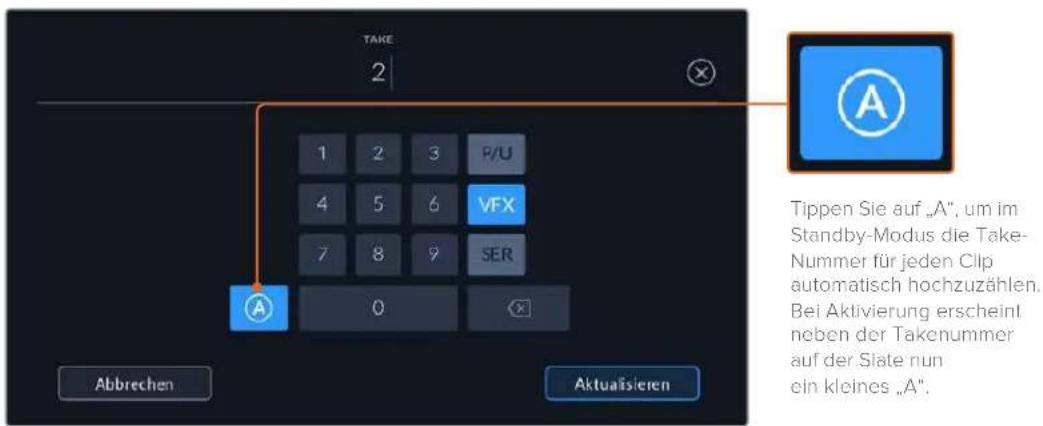
Bei der Eingabe von Metadaten schląg ihre Blackmagic Pocket Cinema Camera. Ihnen rechts besoin der Touch-Tastatur zusätzliche Einstellungstypen vor
Guter Take
Tippen Sie auf den „Guter Take“-Indikator, um gute Aufnahmesequenzen zum Schnellen Abrufen in der Postproduktion zu markieren. Mit diesen Button markiert man einen aktuell geschickteten Clip als „Guter Take“. Befindet sich die Kamera im Standby-Modus und ist aufnahmebereit, so versieht der Button „Guter Take letzter Clip den zuletzt aufgenommenen Clip mit einem „Guter Take“-Tag.
Innen/Außen
Um im Standby-Modus den nachsten Clip oder den im Wiedergabemodus befindlichen aktuellen Clip mit Innen- oder Außenaufnahme-Tags zu markieren, tippen Sie auf „Innen" oder „Außen".
Tag/Nacht
Um im Standby-Modus den nachsten Clip oder den im Wiedergabemodus befindlichen aktuellen Clip als Tag- oder Nachtaufnahme zu markieren, tippen Sie auf „Tag" oder „Nacht".
PROJEKT-Metadaten
Für die Metadaten eines Projekts ist es unerheblich, ob sich die Kamera im Standby- oder Wiedergabe-Modus befindet. Diese Metadaten beziehen sich auf Ihr gesamtes Projekt und sind nicht mit den Clip-Nummern assoziiert.

Geben Sie unter der PROJEKT-Registerkarte die Details für Ihr Projekt ein
PROJEKNAME
Zeigt den Nameh Ihres aktuellen Projekts an. Tippen Sie auf das Stift-Icon, um den Projektnamen zu ändern.
KAMERA
Zeigt einen einzelnen Buchstaben als Kamera-Index an. Tippen Sie auf das Stift-Icon, um den Kamera-Index zuändern.
REGISSEUR
Zeigt den Name des Regisseurs für das aktuelle Projekt an. Tippen Sie auf das Stift-Icon, um den Name des Regisseurs zuändern.
KAMERAOPERATOR
Zeigt den Name des Kameraoperators an. Tippen Sie auf das Stift-Icon, um den Name des Kameraoperators zuändern.
Projektd. zurücksatzen
Um alle Projektdaten zurückzusetzen, tippen auf den „Projektd. zurücksetzen“-Button.
OBJEKTIV-Metadata
Hier werden Informationen zum Objektiv angezeigt, das zurzeit an ihre Kamera angebracht ist. Viele elektronische Objektive liefern automatisch Informationen zu Modell, Blende und Brennweite. Falls Ihr Objektiv diese Informationen nicht liefert oder Sie zusätzliche Informationen eingeben wollen, tippen Sie auf das Stift-Icon und geben Sie die Informationen manuell ein. Das Objektivdatenmen enthalt folgende Informationen:
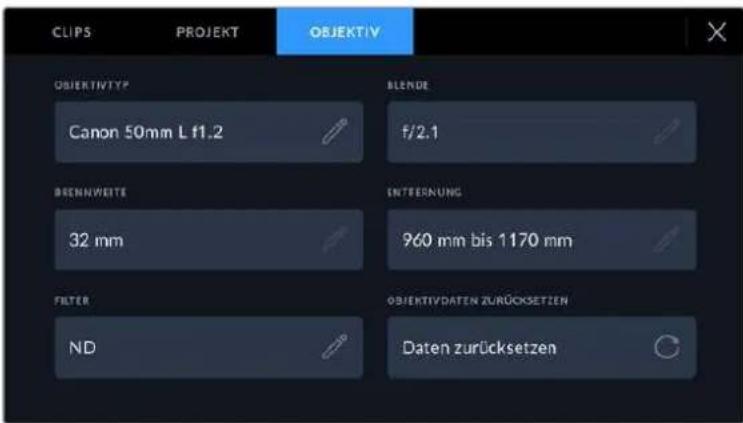
Das Menu OBJEKTIV wird automatisch mit Informationen vom angebrachten Objektiv sowie mit manuell eingegebenen Filterinformationen befüllt
OBJEKTIVTYP
Zeigt den Objektivtyp an. Wird der Typ Ihres Objektivs nicht automatisch angezeigt, konnen Sie auf diese Einstellung tippen und die Informationen manuell eingeben. Ihr Kamera verfügt über eine interne Datenbank mit gängigen Objektiven. Sollten Sie die Daten Ihres Objektivs manuell eingeben müssen, schlägt ihren die Kamera während der Eingabe Namen vor. Dies beschleunigt die Eingabe von Daten.
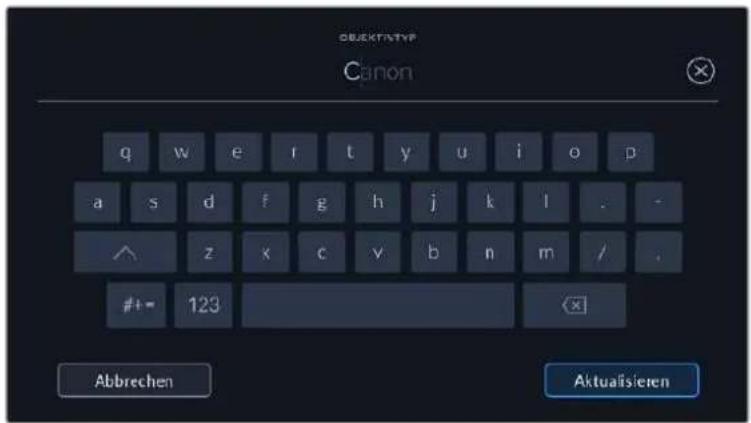
Geben Sie Objektivdaten mithilfe der Touch-Tastatur ein, falls diese nicht automatisch erschreiben.
- BLENDE
Zeigt die Einstellung der Blende zu Beginn Ihr's Clips an. Sofern automatisch mitgeliefert, wird diese Information je nach verwendeten Objektivtyp in F- oder T-Stops angegeben. Tippen Sie auf diese Einstellung, um Metadataen manuell einzugeben.
BRENNWEITE
Zeigt die Brennweiteneinstellung des Objektivs zu Beginn des aufgezeichneten Clips an. Wird diese Information automatisch gefeliefert, erscheidt sie in Millimetern. Tippen Sie auf diese Einstellung, um die Brennweite manuell einzugeben.
ENTFERNUNG
Zeigt die Einstellungen für den Fokusabstand für den aufgezeichneten Clip an. Einige Objektive liefern diese Informationen automatisch in Millimetern. Sie können diese Daten zudem manuell eingeben.
- FILTER
Zeigt die derzeit verwendeten Objektivfilter an. Tippen Sie auf diese Einstellung, um Metadaten manuell einzugeben. Sie können mehrere Eingaben vornehmen und diese durch Kommata trennen.
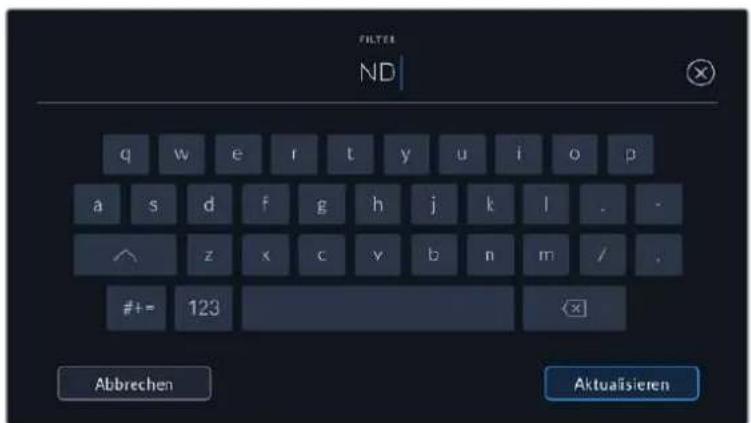
Filterinformationen müssen manuell eingebehen werden
Objektivdaten halten sich jederzeit loschen, indem Sie im Menu OBJektivDATEN auf „Objektiv, zusücksetzen" tippen. Sie werden aufgefordert, ihre Auswahl zu bestätigen. Dies bewirkt, dass alle Objektivdaten gelöscht und automatisch die Daten des aktuellen angebrachten Objektivs übernommen werden. Wenn Sie diese Felder manuell befüll haben, müssen Sie die Objektivdaten neu einstellen, wenn Sie ein anderes Objektiv anbringen. Andernfalls werden die manuell vorgegebenen Daten des vorherigen Objektivs verwendet.
Videoausgabe der Kamera
HD-Monitoring-Ausbgabe
Der HDMI-Ausgang in voller Großgibt Video in 1080p HD aus. Sie können daran für die Vorschauhrer Bilder einen Monitor oder)sagar ein Fernsehgerat anschlieben. Die 10-Bit-Ausgabe unterstutzzudem HDR und Onscreen-Overlays fur den Kamerastatus. Das ist perfect für Monitoring am Set.
Wenn es praktisch unmöglich ist, das Kamera-LCD einzusehen, betet HDMI-Monitoring eine nutzliche Alternative. Zum Beispiel wenn die Kamera außer Reichweite auf einem hohen Kran oder Ausleger angebracht ist. Die Einstellungen der HDMI-Overlays für die Bildkontrolle über die HDMI-Ausgabe werden im Menu mit den Einstellungen für das Display vorgegeben. In HDMI-Overlays werden Frame-Markierungen, Aufnahmeinformationen sowie Kameraeinstellungen angezeigt. Um lediglich ihre Aufnahmen zu kontrollieren, deaktivieren Sie die Overlays für eine saubere HDMI-Ausgabe mit dem Schalter-Icon.
Durch Einsatz von Konvertern wie dem Blackmagic Micro Converter HDMI to SDI konnen Sie das HDMI-Signal in SDI umwandeln. Dies ermöglicht es, SDI-Monitore, Aufzeichnungsgeräte, Broadcast Mischer und andere SDI-Geräte anzuschreiben. Sie konnen den Blackmagic Micro Converter HDMI to SDI soccer über den USB-Port ihrer Blackmagic Pocket Cinema Camera mit Strom versorgen.
Blackmagic Zoom und Focus Demands
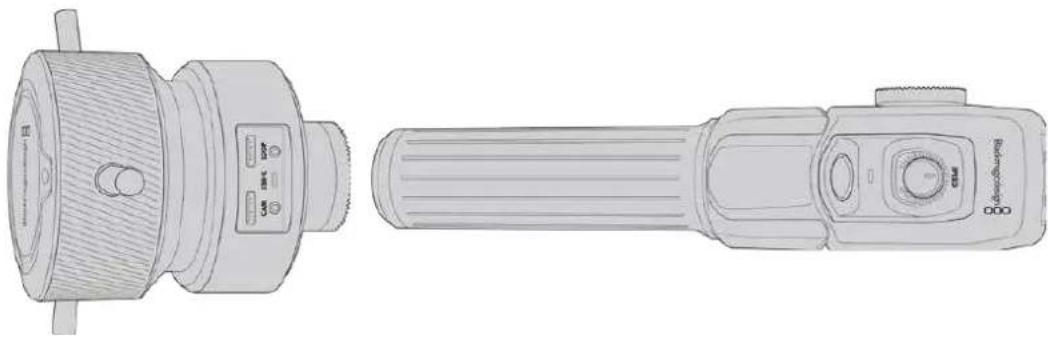
Das Blackmagic Zoom Demand und das Blackmagic Focus Demand sind optionale Steuergeräte für Zoom und Schärfe an kompatiblen Servo-EF-Objektiven, die mit den Modellen Blackmagic Pocket Cinema Camera 6K Pro und 6K G2 eingesetzt werden.
Beide Geräte konnen am Griff Ihres Dreibeinstativs oder Pumpstativs angebracht werden. Sie konnen darüber Fokus und Zoom steuern, während Sie die Kamera mit beiden Händen schwenken und neigen. Mit weiteren Tasten und Bedienelementen justieren Sie die Geschwindigkeit und Empfindlichkeit der Zoomsteuerung, geben den automatischen Weißabgleich vor, wechseln zwischen Bildrandmarkierungen und mehr.
Anschlieben und Anbringen an ihre Kamera
Anbringen am Stativgriff
Beide Geräte lessen sich über Montagehalterungen an einen Stativgriff anbringen. Bringen Sie{jedes Gerät mithilfe der Rosettenbefestigung an seine Halterung an:
Bringen Sie jeges Gerät mithilfe der Rosettenbefestigung an seine Halterung an und sichern Sie es dann, indem Sie den jeweiligen Feststellknopf festdrehen.
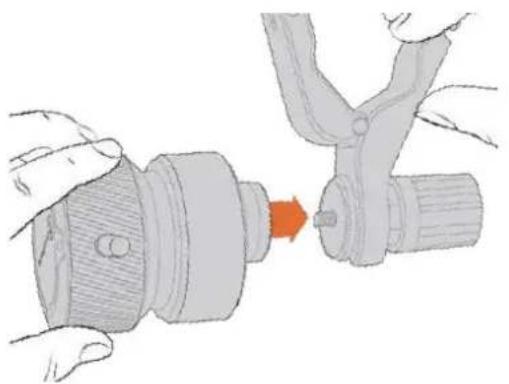
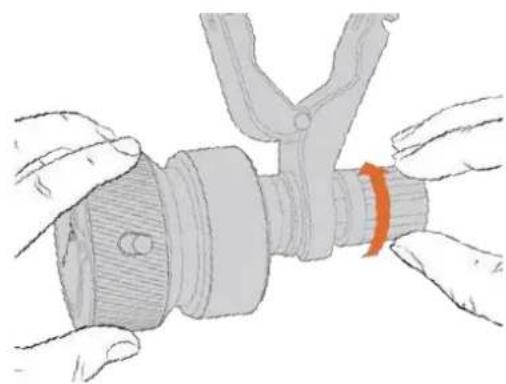
1 Legen Sie das Zoom oder Focus Demand an die Rosettenbefestigung der Halterung an.
2 Drehen Sie den Feststellknopf, bis das Steuergerät fest an seiner Halterung angebracht ist.
Jetzt, da die Geräte an der Halterung befestigt sind, können Sie die Halterungen am Stativgriff anbringen. An einem Ende jeder Halterung gibt es eine T-formige Verriegelung, die in eine Kerbe einrastet und sich festschraubenlässt.
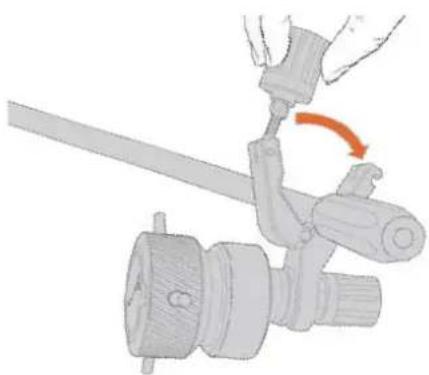
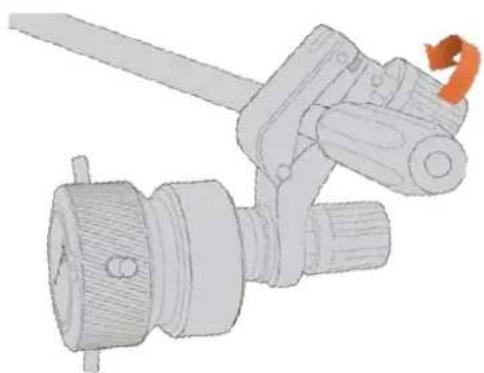
1 Lockern Sie die Verriegelung, indem Sie den Feststellknopf gegen den Uhrzeigersinn drehen. Dies lost die T-formige Verriegelung.
2 Legen Sie die Halterung mit der geöffneten Verriegelung an den Stativgriff an und klemmen Sie die Halterung fest, indem Sie die Verriegelung in die Kerbe legen. Rücken Sie die Halterung an die gewünschte Stelle am Stativgriff.
3 Drehen Sie den Feststellknopf, bis die Halterung fest am Stativgriff silzt.
Anschlieben an ihre Kamera
Die Blackmagic Focus und Zoom Demands haben je zwei USB-C-Ports, über die Sie jeder Gerät einzeln oder beiden zusammen anschließen können.
Jedes Gerät wird mit einem 1 Meter langen USB-C-Kabel gefeliefert, über das der damitte USB-C-Port der Kamera mit dem „Cam“-Port des Steuergeräts verbunden wird.
Bei Einsatz bisher Steuergeräte schalten Sie sie in Reihe, indem Sie das erste Gerät per USB-C mit dem zweiten verbinden.
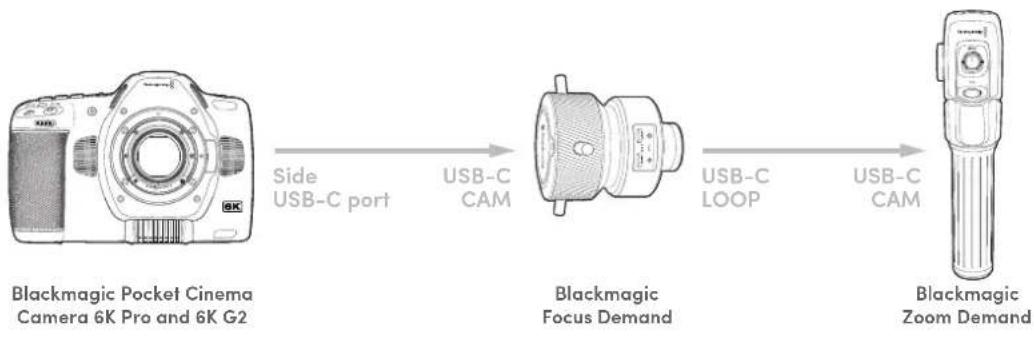
Die Reihenschaltung erhögt die Steuerung beider Geräte über den USC-C-Port ihrer Kamera. Beispiel: Stecken Sie ein Ende des USB-C-Kabels in den seitlichen USB-C-Port ihrer Kamera und das andere Ende in den „Cam“-Port des Focus Demand Steuergeräts. Verbinden Sie mit dem zweiten Kabel den „Loop“-Port des Focus Demands mit dem „Cam“-Port des Zoom Demands.

Die Blackmagic Focus und Zoom Demands ermöglichen Ihnen die Fokus
Verwendendes Blackmagic Focus Demands
In this Abschnitt werden die Funktionsmerkamle und Anschüsse des Blackmagic Focus Demand beschreiben.
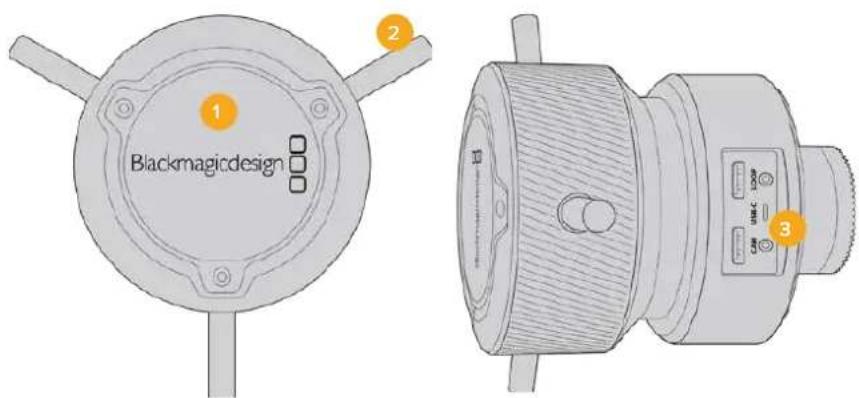
1 Steuerregler
Um Motive in Objektivnahme scharfzustellen, drehen Sie das Fokusrad im Uhrzeigersinn. Um weiter entfernte Motive scharfzustellen, drehen Sie es gegen den Uhrzeigersinn. Indem Sie entweder „Vorwarts" oder „Rückwarts" vorgegeben,ändern Sie die Fokusrichtung im Menu.
TIPP Drucken Sie bei Einsatz eines Blackmagic Zoom Demands die Schnellzoom-Taste, um das Bild beim Scharfstellen mit dem Focus Demand zu vergroßern.
2 Steuerstifte
These drei Stiftes erweitern die Reichweite für die Bedienung. Sie erleichtern prazisere Fokusanpassungen mit den Fingerspitzen.
3 USB-Ports
Ermöglich den Anschluss des Focus Demands an die Kamera und die Reihenschaltung mit dem Zoom Demand. Der „IN“-Port dient zudem zum Aktualisieren der Produktsoftware über das Dienstprogramm Blackmagic Camera Setup.
Verwendendes Blackmagic Zoom Demands
Die Bedienelemente des Zoom Demands setzen sich über die Kameraeinstellungen zuweisen. Wie Sie die Tastenfunktionen ändern, erfolnen Sie im Abschnitt „SETUP-Einstellungen" im Kapitel „Einstellungen".
Standardmäßig sind folgende Befehle eingestellt:
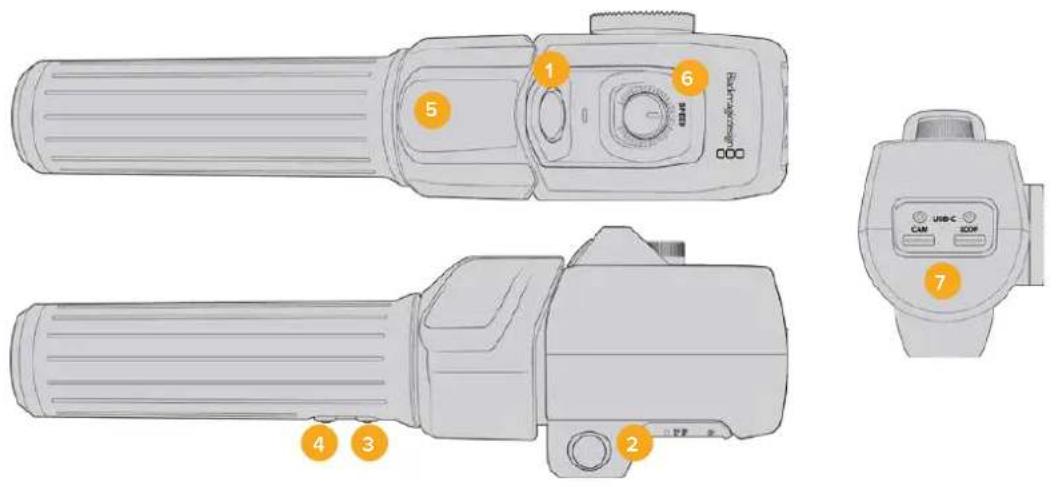
1 Zoom F1
Dies ist die Zoom-Funktionstaste 1. Standardmäßig fungiert sie als Aufnahmetaste zum Aufzeichnen auf ein externes, an einen verfügbaren USB-C-Port ihrer Blackmagic Studio Camera angeschlossenes Laufwerk.
2 Zoom F2
Dies ist die Zoom-Funktionstaste 2. An der anderen Seite des Controllers befindet sich eine identische Taste, um dieselbe Funktion auszuführen. Dies erleichtert die Bedienung für Rechts- und Linkshänder. Standardmäßig ist diese Taste als Schnellzoom-Funktion eingerichtet, mit der Siesofar in ein Livebild einzoomen konnen.
HINWEIS Die Schnellzoom-Funktion wird nur auf dem LCD der Modelle Blackmagic Pocket Cinema Camera 6K Pro und 6K G2 ausgeführrt, jeder nicht in der Videoausgabe eines angeschlossenen Mischers oder Rekorders.
3 Zoom F3
StandardmaBig ist diese Taste auf automatischen Weilabgleich eingestellt.
4 Zoom F4
Standardmäßig ist diese Taste auf Bildbrandmarkierungen eingestellt.
5 Zoomwippe
Der Griff des Zoom Demands ist mit einer Zoomwippe für die Steuerung ausgestattet. Durch Umlegen der Zoomwippe nach links zoomt man aus und durch Drücken nach rechts ein. Die Zoomrichtung lasst sich in den Menuinstellungen der Kamera umkehren.
6 Speed Dial
Feine Änderungen der Zoomgeschwindigkeit nehmen Sie durch Anpassen des Speed Dials oben am Gerät vor. Sie können diese Funktion auch so eingten, dass sie Kopfhörerpegel, Blende oder saref Fokussierung steuert.
7 USB-C-Ports
Ermöglich den Anschluss des Zoom Demands an die Kamera und die Reihenschaltung mit dem Focus Demand. Der „IN“-Port dient zugem zum Aktualisieren der Produktsoftware über das Dienstprogramm Blackmagic Camera Setup.
Verwenden von DaVinci Resolve
Das Filmen mit ihrer Blackmagic Pocket Cinema Camera ist nur ein Teil der Erstellung von Inhalten für Kino und TV. Ebenso wichtig sind der Sicherungs- und Verwaltungsprozess von Medien sowie Schnitt, Farbkorrektur und die Kodierung finaler Masterdaten. Ihr Blackmagic Pocket Cinema Camera wird mit einer Version von DaVinci Resolve für Mac und Windows gefelfert. Das gibt Ohnen eine Komplettösung für Dreh und Postproduktion.
HINWEIS Um auf Ihrer Pocket Cinema Camera gestrechte Clips farblich prazise zu bearbeiten, empfehlen wir die neuste Version von DaVinci Resolve. Version 17 oder hoheresorgt auf allen Blackmagic Cameras für prazise Farben und stellt die neuesten Blackmagic-RAW-Features bereit.
Nach dem Sie eine CFast- bzw. SD-Karte oder SSD an ihren Rechner angeschlossen haben, können Sie mithilfe des Clone-Tools im Media-Arbeitsraum von DaVinci Resolve beim Dreh fortlaufend Backups erstehen. Dies empfehlts sich, da bei jeder Art von Speichermedium das Risiko einer Beschädigung oder Störung besteht. Die Erstellung von Sicherungskopien schützt Sie vor dem Verlust ihrer Einstellungen. Nach erfolgtem Backup ihrer Medien mit DaVinci Resolve konnen Sie ihre Clips in den DaVinci Media Pool laden und sie dann schreiben, Farblich nachbearbeiten und ihre Produktion fertigstellen, ohne DaVinci Resolve je zu verlassen.
DaVinci Resolve wird für das Gros bedeutender Kinohits benutzt. Es bietet also viel mehr als ein simples NLE-Softwaretool, weil in dieser für Highend-Digitalfilm konzipierten Anwendung außerst hochentwickelte Technologie steckt. Sie profitieren von dieser Technologie, wenn Sie ihre Projekte mit DaVinci Resolve schreiben und farbkorrigieren.
In den folgenden Abschnitten werden Ohnen die ersten Schritte zum Gebrauch von DaVinci Resolve mit ihren Kameradateien erklärart. Als hochkomplexe Software bietet DaVinci Resolve natürlich weitaus mehr Features als der erstige Blick auf die Bedienoberfläche erahren sich. Weitere Informationen zur Verwendung von DaVinci Resolve finden Sie in der englishsprachigen Bedienungsanleitung auf der Blackmagic Website, wo auch zahlreiche Trainingskurse und Videotutorials zur Verfugung stehen.
Project Manager
Bevor Sie Ihr Clips zur Bearbeitung importieren, müssen Sie Ihr Projekt im Projektmanager einrichten.
Das Projektmanager-Fenster öffnet sich beim Starten von DaVinci Resolve. Es kann auch sonst jederzeit durch Anklicken des Home-Icons unter rechts auf der Bedienoberfläche aufgerufen werden. Das ist nutzlich, wenn Sie bestehende Projekte öffnen und neue erstellen möchten.
Zum Erstellen eines neuen Projekts klichen Sie am unteren Fensterrand des Projektmanagers auf "New Project" und benennen Ihr Projekt. Klichen Sie zur Bestätigung auf „Create".
Im Cut-Arbeitsraum konnen Sie ihren Edit sofort bearbeiten.
Der Projektmanager zeigt alle vom aktuellen User verwendeten Projekte an
Weitere Informationen zum Projektmanager finden Sie unter „Project Manager" im englishischsprachigen DaVinci Resolve Handbuch, das auf den Support-Sections der Blackmagic Design Website heruntergeladen werden kann.
Schneiden im Cut-Arbeitsraum
Der Cut-Arbeitsraum untersucht einen Schnellen, dynamischen Schnitt-Workflow, mit dem Sie Clips zugig und effizient zusammenstellen, trimmen und bearbeiten konnen.
Zwei aktive Timelines halten Sie ganze Edits sowie einzeln Abschnittte gleichzeitig bearbeiten. So können Sie Clips beliebig in eine große Timeline platzieren und anschließend in derselben Arbeitsumgebung in einer detailierten Timeline bearbeiten. Diese Workflow ermitteligt das Schneiden und Arbeiten auf Laptops, ohne zu zoomen oder zu scrollen, was ihren viel Zeit spart.
Das Layout des Cut-Arbeitsraums
Wenn Sie den Cut-Arbeitsraum öffnen, werden der Media Pool (Medienspeicher), Viewer (Ansichtsfenster) und die Timeline eingeblendet. Diese drei primären Arbeitsbereiche geben Ohnen die volle Kontrolle über ihren Edit.
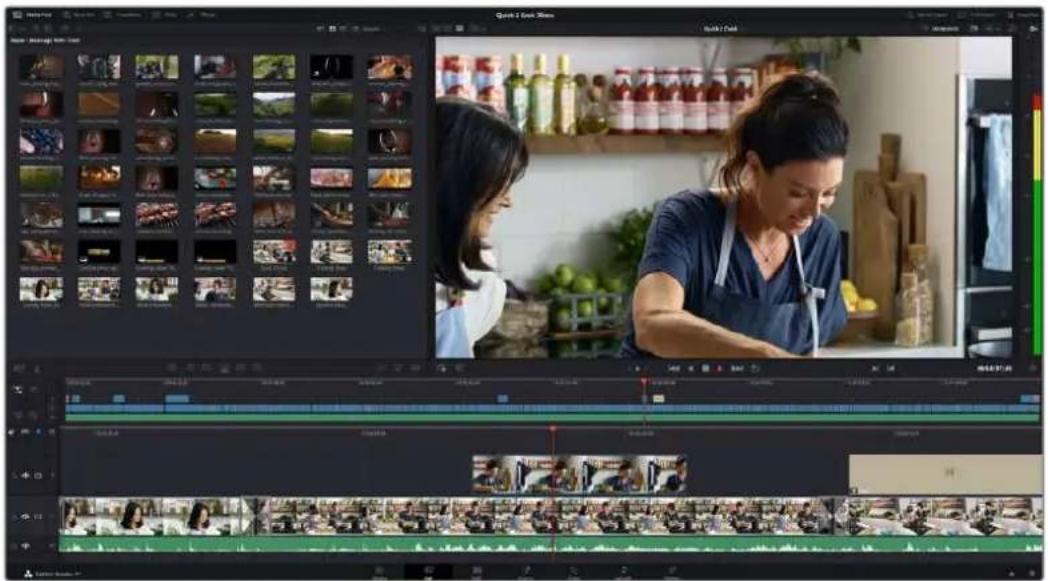
Im Cut-Arbeitsraum wird der Media Pool standardmäßig in der Icon-Ansicht dargestellt
Weitere Informationen zur Verwendung des Cut-Arbeitsraums finden Sie im Kapitel „Using the Cut Page" des englishsprachigen DaVinci Resolve Handbuchs.
Media-Menu
In der oberen linken Ecke der Bedienoberfläche befinden sich fünf Schaltflächen.
Klicken Sie auf diese Schaltflächen, um zum Medientoolset für die Bearbeitung Ihr's Edits zugegelange.Die erstige Schaltfläche steht für den Media Pool, der bereits ausgewähl ist. Über die anderen Schaltflächen werden die Sync Bin, Übergänge, Titel und Effekte aufgerufen.

Media Pool: Der Media Pool enthalt alle im Media-Arbeitsraum importierten Clips, Ordner und Datien. Wenn Sie einen neuen Clip importieren möchen, ist der Dateilimport auch direkt im Cut-Arbeitsraum möglich, ohne in den Media-Arbeitsraum zurückkehren zu müssen.
- Sync Bin: Diese leistungsstarke Funktion synchronisiert alle ihre Clips automatisch nach Timecode, Datum und Uhrzeit. So können Sie in Mehrkameraprojekten aus allen Kamerawinkel wahren.
- Transitions: Über die Transitions-Schaltfläche daneben gelangen Sie zu den Videound Audiöbergängen, die Sie in Ihr dem Edit anwenden können. Sie umfassen gängige Übergänge wie Überblendungen und Wischblenden.
- Titles: Neben den Übergängen befindet sich die Titel-Schaltfläche. Hier können Sie einen Titeltyp auswahlen. Möglich sind z. B. Roll- bzw. Kriechtexte, Vollbildtexte oder Bauchbinden. Darüber hinaus gibt es eine List met Fusion-Titelvorlagen für stärker animierte dynamische Titel, die im Fusion-Arbeitsraum von DaVinci Resolve eigens definiert werden können.
- Effects: Die fünfte Schaltfläche ist den Effekten gewidmet. Hier gibt es ähnliche Filter und Effekte wie individualisierbare Weichzeichnungs-, Leucht- und Blendeneffekte, mit denen Sie ihren Edit lebendiger gestalten konnen. Es stehen zahlreiche wirkungsvolle Effekte zur Auswahl, die Sie über die Suchfunktion schnell finden.
TIPP Über das Suchfeld in der Leiste unter den Schaltflächen finds Sie exakt ihr gewünschtes Element. Wenn Sie z. B. für Übergänge die Transitions-Schaltfläche geöffnet haben und „Dissolve" in das Suchfeld eingeben, werden ausschließlich Überblendungen im Viewer angezeigt, was ihre Suche nach Dissolve-Übergängen beschleunigt.
Viewer-Menu
In der oberen linken Ecke des Viewers finden Sie Buttons für die verschiedene Ansichtsmodi.
Ansichtsmodus-Buttons
These Buttons bestimmen, welcher Viewer gerade aktiv ist. Es gibt die Optionen „Source Clip“, „Source Tape“ und „Timeline“ (Quelclip, Quellband und Timeline). Diese Ansichtsmodi geben Ohnen betrachtliche Kontrolle bei der Clipauswahl für ihren Edit, weshalb Sie sich ihre Funktionswise kurz anschauen sollen.
| Source Clip | Der „Source Clip“-Viewer dient der Sichtung eines einzelnen Quellicips aus dem Media Pool. Er unterstützt das Setzen von In- und Out-Punkten entlang der gesamten Viewer-Timeline. Das bringt mehr Kontrolle. Wahlen Sie einen Quellclip zur Sichtung aus. Doppelklicken Sie damit auf einen Clip im Media Pool oderziehen Sieihn direkt ins Viewer-Fenster. | |
| Source Tape Der „Source Tape“-Viewer dient der Ansicht aller Quellicips im Media Pool. Diese leistungsstarke Funktion ist nutzlich, wenn Sie auf der Suche nach einem bestimmen Ereignis schnell alle ihre Clips durchsehen wollen. Wenn Sie die Clips im Viewer mit dem Abspielkopf durchlaufen, werden die entsprechenden Thumbsnails im Media Pool bereits mit ausgewählt. Wenn Sie also ihren zu bearbeitenden Clip gefunden haben, können Sie auf die „Source Clip“-Schaltfläche klichen, woraufhin der dazugehörende Quelliclip automatisch im Viewer erscheidint. Mit dem „Source Tape“-Viewer profitieren Sie voll vom nichtlinearen Schnitt und verschaffen sich die Freiheit, Edits zu bearbeiten, Shots schnell zu finden und Neues auszuprobieren, während Sie mitten im Geschehen bleiben. | ||
| Timeline Im Timeline | Viewer können Sie die Schnitt-Timeline betrachten, um Projekte wiederzugegeben und Edits zu verfeinern. |
Importieren von Clips in den Media Pool
Jetzt können Sie damit beginnen, Medien in Ihr Projekt zu importieren. Sie tun das im Cut-Arbeitsraum mithilfe der Import-Tools, die sich am oberen Rand des Media-Pool-Fensters befinden.
Wahlen Sie eine der Importoptionen aus, um Medien zu ihrem Projekt hinzuzufugen
| Import Media These Option importiert einzeln Mediendateien von einem vorgegebenen Speicherort. | |
| Import Media Folder Wahlen Sie diese Option, um einen ganzen Ordner von ihrem Medienspeicherort zu importieren. Beim Importieren von Ordnern besteht DaVinci Resolve die Ordnerstruktur bei und behandelt jeder Ordner als separate Bin. So können Sie zum Auffinden von Videos und anderen Dateien durch Bins navigieren. |
So Importieren Sie Medlen:
1 Klichen Sie auf das Icon, Import Media oder, Import Media Folder.
2 Navigieren Sie zu dem Medienspeicherort, wo sich ihre zu importierenden Medien befinden.
3 Wahlen Sie die Datei oder den Ordner aus und bestätigen Siemit,Open".
Wenn Sie Medien zu Ihr Projekt hinzugeführten haben, empfeht es sich, diese Änderungen zu speichern. DaVinci Resolve hat eine automatische Speicherfunktion namens „Live Save“, die Ihr Projekt schnell undfortwährend speichert. Ist Ihr Projekt einmal gespeichert, wird mit der Live-Save-Funktion jeder weitere Änderung automatisch neu gespeichert. So Goes keine Arbeit verloren.
Weitere Informationen zu „Live Save" und anderen Speicherfunktionen finden Sie im englishsprachigen DaVinci Resolve Handbuch.
Einfugen von Clips in die Timeline
Nach dem Sie die Menus und Modi für Medien und Viewer kennengelert haben, können Sie jetzt den Media Pool öffnen und Clips direkt in ihre Timeline eingefugen.
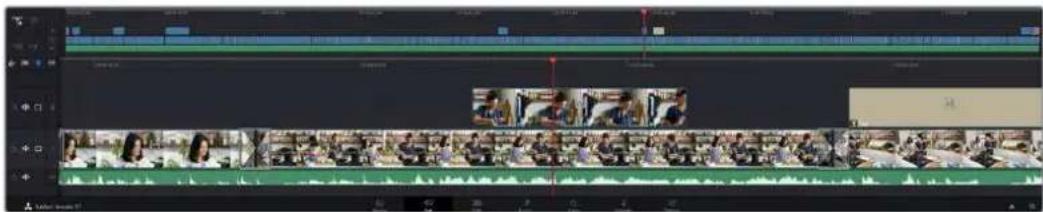
Die Timeline im Cut-Arbeitsraum mit der oberen und der herangezoomenten Timeline darunter
In der Timeline stellen Sie ihren Edit zusammen. Wie an einem ReiBrett konnen Sie hier Spuren mit Clips versehen, Clips verschieben und Edits trimmen. Mithilfe von Spuren halten sich Clips in Ebenen anordnen. Das bietet mehr Flexibilität, um entsprechliche Edits auszuprobieren und Übergänge und Effekte zu erstellen. Zum Beispiel konnten Sie in einem Edit einen Clip in eine Spurplatzieren, ohne dass dieser die Clips auf den anderen Spuren darunter beeinflusst.
Clips können auf entsprechende Weise zur Timeline hinzugefügt werden. Es gibt „Smart Insert“, „Append“, „Place on top“ und andere Methoden.
Hinzufugen von Clips per Append
Wenn Sie Takes auswahlen und einen Edit zusammenstellen, empfehlts sich, Shots nacheinander in die Timeline einzufugen. Das „Append“-Tool eignet sich für diesen Zweck und ermöglicht denenchnelles Editieren.
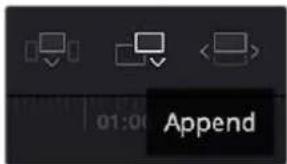
Klicken Sie auf das Append-on, um Clips im Schnellverfahren nach dem letzten Clip einzufugen
So fügen Sle einen ClIp per „Append“ ein:
1 Doppelklicken Sie auf einen Clip im Media Pool, umihn im Viewer zu öffnen.
2 Setzen Sie mit dem sogenannten Scratch-Trim-Tool In- und Out-Punkte, um einen bestimmten Abschnitt in Ihr Hem Shot zu markieren. In- und Out-Punkte konnen auch mit den I- und O-Tasten ihrer Tastatur gesetzt werden.
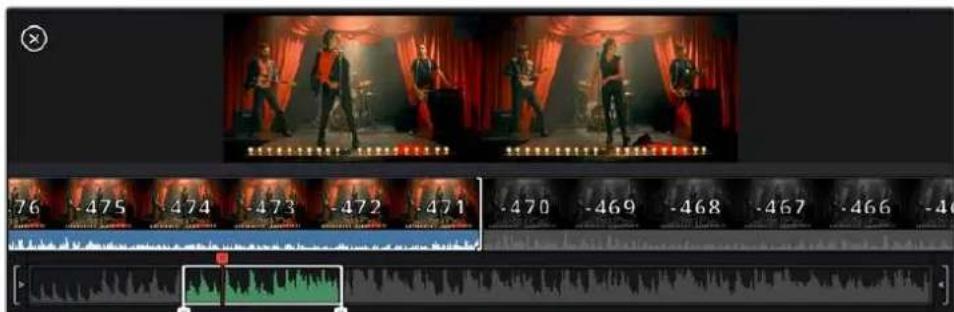
3 Klichen Sie nun unterhalb des Media Pools auf das „Append“-Icon.
Der erste Clip wird am Anfang der Timeline platziert.
Wiederholen Sie zum Einfugen weiterer Clips Schritte 1 bis 3. Um in der Timeline Lücken zu vermeiden, werden die Clips automatisch am Ende angehängt.
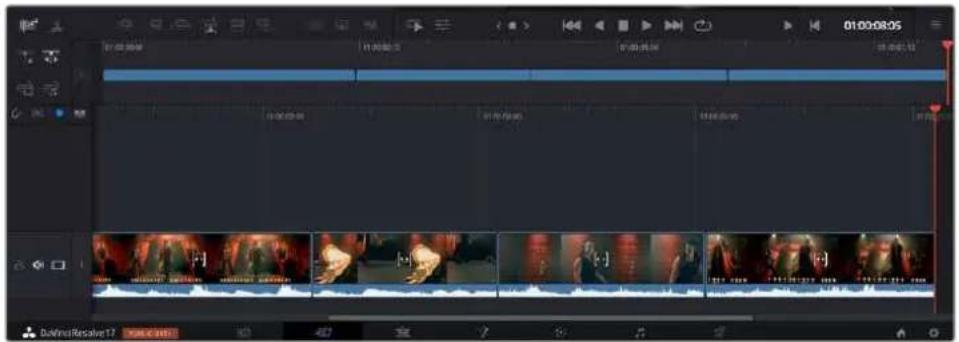
Per "Append" werden Clips verlüsslich ohne Lücken in die Timeline eingefegt
TIPP Dieser Prozess lässt sich weiter beschleunigen, indem Sie dem „Append“-Icon einen Tastaturbefehl zuweisen. Wenn Sie beispelsweise die P-Taste zuweisen, können Sie ihre In- und Out-Punkte mit den I- und O-Tasten vorgegeben und den Clip anschließend durch Drücken der P-Taste am Ende anhängen. Weitere Informationen zur Vergabe von Tastaturkurzeln finding Sie im englishsprachigen DaVinci Resolve Handbuch.
Trimmen von Clips in der Timeline
Befinden sich ihre Clips erst einmal in der Timeline, haben Sie die volle Kontrolle über sie. Sie können sie umherbewegen und Edits trimmen.
Halten Sie zum Trimmen eines Edits die Maus über den Anfang oder das Ende eines Clips und klichen und ziehen Sie mit gedrückter Maustaste nach links oder rechts. Indem Sie bspw. das Ende eines Clips nach links oder rechts ziehen, verlangern oder verkurzen Sieihn. Sie werden merken, dass alle Clips im Anschluss an diesen Edit in der Timeline nachrücken, um die Änderung zu erhöglichchen. Dies ist nur eine Methode, mit der der Cut-Arbeitsraum Ohnen Zeit spart.
Sie konnen einen Clip auch mit der Maus greifen und in eine neue Videospur der große Timelineplatzieren, ohne zu zoomen. Das beschleunigt den Editingprozess, weil die Navigation durch lange Timelines minimiert wird.
Die „Audio Trim“-Ansicht
Die „Audio Trim“-Ansicht hilft Ohnen durch Einblenden der Audio-Waveform in der Timeline beim Ausführren praziser Tonschnittte. Dies ist beim Bearbeiten von Dialogszenen oder Musikclips practlich, da es das Setzen von Schnittmarken zwischen einzelnen Wörtern oder Beats erleichtert.
So verwenden Sie die „Audio Trim“-Ansicht:
1 Klicken Sie links der Timeline zwischen den Snapping- und Marker-Tools auf das „Audio Trim“-Icon.

Icon für die „Audio Trim“-Ansicht
2 Beim Trimmen eines Schnitts sehen Sie nun eine erweiterte Wellenform in der Timeline. Nachdem Sie mit dem Trimmen fertig sind, werden die Clips in der Timeline wieder in der gewohnten Groß angezeigt.
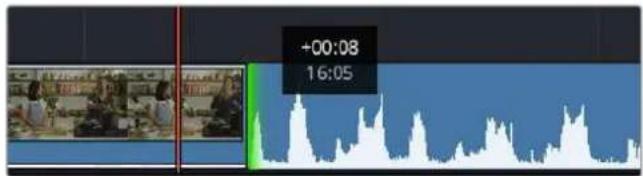
Die "Audio Trim" - Ansicht blendet die Audio-Waveform in der Timeline ein
Wenn Sie ihre Clips im Cut-Arbeitsraum fertig beareritet haben, möchten Sie vielweit noch einen Titel hinzufugen. Im nachsten Abschnitt erfolnen Sie, wie das geht.
Einfugen von Titeln
Einen Titel in ihre Timeline einzufugen, ist einfach. Dazu gibt es mehrere Möglichkeiten.
Um die verfügbaren Titeltypen zu sehen, klichen Sie im Media-Bereich oben links auf der Bedienoberfläche auf die Registerkarte „Titles". Im Auswahlfenster werden alle verfügbaren Titelgeneratoren wie Bauchbinden, Rolltitel und regulärer Text als Thumbsnails angezeigt. Sie können)sogar beliebige Titel aus Fusion eingufen. Dabei handelt es sich um individualisierbare animierte Titel.
Sichten von Titeln als Vorschau
Vor dem Einfugen eines Titels in ihre Timeline konnen Sieihn im „Titles“-Auswahlfenster als Vorschau sichten. So lassen sich Schnell alle verfügbaren Optionen durchseden, bevor Sie sich fur eine entscheiden.
So{sichtenSieeinenTltelalsVorschau:
1 Wahlen Sie in den Menüoptionen oben rechts besoin dem „Titles“-Fenster „Hover Scrub Preview". Dies aktiviert den Modus, aber die Vorschau erscheidt, wenn man den Mauszeiger über das,Thumbsail bewegt.
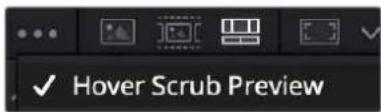
Menüoption, die den Modus aktiviert, der beim Bewegen des Mauszeiger über das,Thumbsail eine Vorschau aneigt
2 Bewegen Sie den Mauszeiger im „Titles“-Auswahlfenster über ein,Thumbsail,um den Titel als Vorschau im Viewer zu sichen. Um einen animierten Titel oder einen Fusion Titel zu-. siehen, bewegen Sie den Mauszeiger beim Betrachten der Animation von links nach rechts uber das Thumbsail thesest Titels.
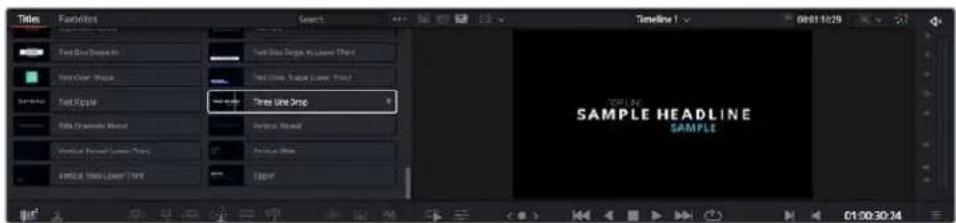
Sichten Sie die Vorschau eines Titels im Viewer, indem Sie den Mauszeiger über das Thumbnail bewegen
Nach Auswahl eines Titels konnen Sie inh in ihre Timeline einfugen.
So fugen Sie einen Standard-Titel ein:
1 Klichen Sie auf den Titel und ziehen Sieihn in die Timeline. Das ist in beiden Timelines,.
moglich, noch fur mehr Prazision empfehlen wir, die detailierte Timeline zu verwenden.
Mit dieser Aktion wird automatisch eine neue Videospur erstellt und der Titel rastet am Abspielkopf ein.
2 Lassen Sie die Maustaste los und der Titel entscheid in der neuen Spur. Sie konnen ihn nun wie jedem anderen Videoclip verschieben und seine Lange verändern.
3 Klichen Sie zum Bearbeitern des Titels auf den neuen Titelclip, und dann unterhalb des Clip-Viewers auf das Werkzeug-Icon.
Nun verfügen Sie über mehrere Tools zum Bearbeiten des Titelclips. Zum Beispiel gibt es Transform, Crop und Dynamic Zoom (Transformieren, Beschneiden, Dynamischer Zoom).
4 Klichen Sie nun auf die Inspector-Schaltfläche.
Das Inspector-Fenster öffnet sich. Dort konnen Sie ihren Titeltext eingeben und Texteinstellungen wie Tracking, Zeilenabstand, Schriftart, Schriftfarbe und mehr bearbeiten.
Es gibt zahlreiche Mänglichkeiten, ihren Titeltext exakt nach Wunsch zu individualisieren. Experimentieren Sie am besten mit den entsprechenden Einstellungen, um zu sehen, wie sie die Darstellung und Form Ihrtes Titels beeinflussen.
TIPP Sie können anhand der „Hover Scrub Preview" - Funktion auch in den Cut- und Edit-Arbeitsräumen Vorschauen von Effekten, Übergänge, Generatoren und Filtern sichen.
Arbeiten mit Blackmagic-RAW-Dateien
Clips in Blackmagic RAW geben Ohnen in der Postproduktion maximalen Spielraum. So konnen Sie Änderungen an ihren Clips - bspw. am Weißabgleich und an den ISO-Werten - vornehmen, als wurden Sie die ursprünglichen Kameraeinstellungen ändern. In Blackmagic RAW bleiben überdies mehr Tonwerte in den Schatten und Spitzlichtern erhalten. Das ist sehr praktisch für die Wiederherstellung von Details wie bspw. in einem überbelichteten Himmel oder in den dunklen Bereichen des Bilds.
Das Filmen in Blackmagic RAW lohnt sich, wo eine hochstmögliche Qualität angestrebt wird. Auch Aufnahmen mit extremen Kontrasten zwischen Spitzlichtern und Schatten profitieren davon, da Sie diese Bereiche beim späteren Grading eventuell optimieren müssen.
Dank der Geschwindigkeit und einzelnen Dateien von Blackmagic RAW brauchen Sie keine Proxydateien mehr zu erstellen, da Blackmagic-RAW-Dateien wie reguläre Videoclips wiedergegeben werden. Diese Abschnitt der Bedienungsanleitung befasst sich mit den Funktionsmerkmalen von Blackmagic RAW und dem Umgang mit Blackmagic-RAW-Dateien in Ihr DaVinci Resolve Workflow.
TIPP Es ist gängige Praxis, die Blackmagic-RAW-Einstellungen für ihre Clips im Color-Arbeitsraum anzupassen, bevor Sie mit der Farbkorrektur beginnen.
Clip-Einstellungen für Blackmagic RAW
Beim ersten Importieren von RAW-Dateien entschlusselt DaVinci Resolve die in diesen Dateien enthaltenen Kameradaten. Die Software verwendet dann die zur Zeit der Aufzeichnung eingestelltEN ISO-, Weisabgleich- und Farbonwerte. Wenn Ihnen der mit diesen Einstellungen erzielte Look gefällt, können Sie sofort mit dem Schnitt beginnen.
Der große Vorteil des Films in Blackmagic RAW liegt darin, dass man nicht an diese Einstellungen gebunden ist. Die mit Blackmagic-RAW-Dateien in der Postproduktion gegebenen vielfältigen Möglichkeiten erlauben es Ihnen, im Laufe der Zeit einen eigenen Arbeitsfluss zu entwickeln. Wenn Sie mit den „Clip“-Einstellungen einzelner Clips experimentieren, erkennen Sie schnell, wie leistungsfähig und flexibel es sein kann, mit Blackmagic RAW zu arbeiten.
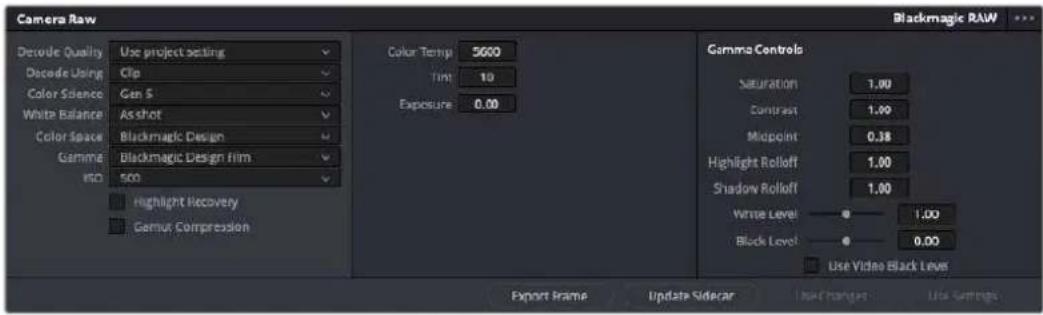
Um die Blackmagic-RAW-Einstellungen Ihres Clips anzupassen, wahren Sie im „Camera Raw" Tab aus dem Drop-down-MENU „Decode Using" (Dekodieren mit) die Option „Clip" aus
Clip-Einstellungen für Blackmagic RAW
Sobald Sie die Clip-Einstellungen für Blackmagic RAW in DaVinci Resolve aktiviert haben, können Sie die Clip-Einstellungen und Gamma-Steuerelemente anpassen. Durch Anpassen dieser Einstellungen können Sie Ihr Clips annahernd so gut optimieren wie mit einer vollständigen primären Farbkorrektur. Das istalanders dann wirkungsvoll, wenn Sie mit den Scopes in DaVinci Resolve arbeiten. Vor der Anwendung eines Looks konnen Sie so ihre Clips neutralisieren und abstommen.
Nachstehend werden die Clip- und Gamma-Steuerelemente im Einzelnen beschrieben.
ISO
Das Erhöhen oder Verringern dieser Einstellung passt den ISO-Wert an. Das ist nützlich, wenn Sie einen Clip zur Optimierung insgesamt heller oder dunkler setzen möchten.
Highlight Recovery
Aktivieren Sie diese Funktion, wenn Sie Highlight-Angaben in beschnittenen Clipkanänen mit Informationen aus unbeschnitten Kanälen wiederherstellen möchten.
Gamut Compression
Aktivieren Sie diese Kästchen, um automatisch sichere Farbraumpegel beizubehalten.
Color Temp
Um das Bild warmer oder kühler zu machen, passen Sie die Farbtemperatur an. Mithilfe dieser Einstellung neutralisieren Sie die Farbbalance eines Bilds.
Tint
Durch Anpassen der Tönung wird dem Bild Grün oder Magenta hinzugefügt, um die Farben auszugleichen.
Exposure
These Einstellung hebt die Helligkeit im Bild insgesamt an.
Saturation
DDie Sattigungsregler reichen von 1 für die gingste Sattigung bis 4 für maximale Sattigung. Der Standardwert ist 1.
Contrast
Der Standardwert ist 1. Der gingste Kontrast liegt bei O, der stärkste bei 2. Ziehen Sie den Regler nach links, um den Kontrast zu reduzieren bzw. nach rechts, umihn anzuheben.
Midpoint
Im Modus „Blackmagic Design Film" stellt sich Ihr Neutralgrau auf den standardmäßigen Wert 0,38 ein, was 38,4 % entspricht. Ziehen Sie den Regler nach links, um die Mittelwerte zu reduzieren oder nach rechts, um sie auf max. 100 % anzuheiten. Wir für den Kontrast ein anderer als der Standardwert gesetzt, können Sie ihre Werte für Highlight- und Shadow-Rolloff modifizieren.
Highlight Rolloff
Sie justieren die Lichter, indem Sie den Regler nach linksziehen, um sie zu reduzieren, oder nach rechts, um sie hochzufahren. 0 ist der niedrigste Wert und 2 ist der hochste. Der Standardwert liegt bei 1.
Shadow Rolloff
Ziehen Sie den Regler nach links, um die Schatten auf 0 zu reduzieren, oder nach rechts, um sie auf 2 anzuheiten.
White Level
Sie justieren den Weilspunkt in der Gammakurve, indem Sie den Regler vom Höchstwert 2 auf den Niedrigstwert 0ziehen. Der Standardwert beträgt 1.
Black Level
Sie haben den Schwarzpunkt in der benutzerdefinierbaren Gammakurve an, indem Sie den Regler nach rechtsziehen. -1 ist der niedrigste Wert, 1 ist der hochste Wert. Der Standardwert beträgt 0.
Use Video Black Level
Um die Schwarzwerte auf „Video" zu setzen, aktivieren Sie diese Kontrollkastchen.
Export Frame
Durch Klicken des Buttons „Export Frame" können Sie einen einzelnen Frame aus dem Blackmagic-RAW-Clip exportieren.
Update Sidecar
Klicken Sie diesen Button, um die Filialdatei für den aktuellen Clip zu aktivisieren.
An ihren Blackmagic-RAW-Clips vorgenommene Änderungen sind daran erkennbar, dass Gamma zur benutzerdefinierten Einstellung „Blackmagic Design Custom" wechselt.
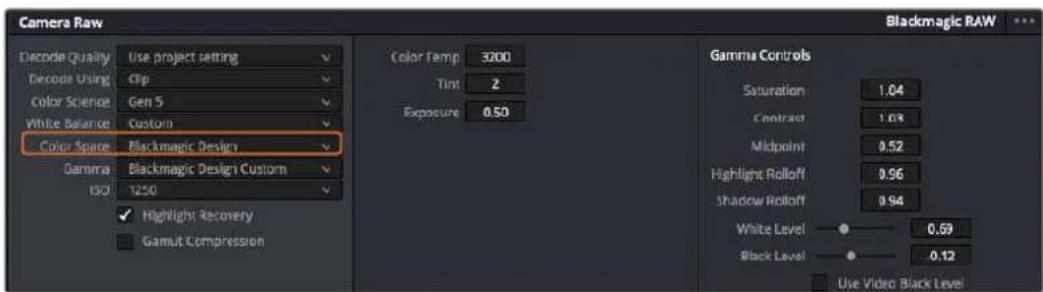
Wenn Sie ihren Clip wieder auf eine der verfügbaren Gamma-Standardoptionen zurecksetzen möchten, wahren Sie diese aus dem Gamma-Drop-down-MENU aus
TIPP Für Footage, die mit dem „Video“-Dynamikumfang gefilmt wurde, sind die Gamma-Steuerelemente gespeppt. Ihr Blackmagic-RAW-Daten sind jedoch nicht verloren gegangen. Wahlen Sie im Drop-down-Menu „Gamma“ einfach „Blackmagic Design Film“ oder „Blackmagic Design Extended Video“ aus und nehmen Sie ihre Änderungen vor.
Spelchern von Änderungen in Blackmagic RAW
1 Passen Sie die Gamma-Steuerelemente Ihres Blackmagic-RAW-Clips an.
2 Klichen Sie auf den Button „Update Sidecar".
Nun wird in dem Ordner mit ihrer BRAW-Datei eine Filialdatei, sprich Sidecar-Datei, generiert. Importieren andere Nutzer die Blackmagic-RAW-Dateien, so liest DaVinci Resolve automatisch die Sidecar-Dateien. Wenn Sie weitere Änderungen vornehmen, klichen Sie erneut auf „Update Sidecar".
TIPP Sie können eine Sidecar-Datei entfern, indem Sie sie von ihrem Speicherort auf ihren Medienlaufwerk loschen.
Projekteinstellungen für Blackmagic RAW
Wenn Sie für alle Clips eine gemeinsame Einstellungändern,müssen,wie z.B.ine globale Änderung fur Weiabgleich oder ISO,konnen Sie fur ihre Clips projektbezogene „Camera RAW" Einstellungen vorgegeben und die globalen Änderungen von hier aus vornehmen.
So geben Sie Projektlstellungen für Blackmagic RAW vor:
1 Öffnen Sie das Projektinstellungenmenu, indem Sie auf „File“ und dann auf „Project Settings“ klichen.
2 Unter dem „Camera Raw“-Tab sehen Sie besoin dem RAW-Profil ein Menu. Um Blackmagic RAW aus der Liste auszuwahlen, klichen Sie auf den Pfeil.
3 Wahlen Sie im Menu „Decode Using" (Dekodieren mit) die Option „Project" (Projekt) aus.
4 Wahlen Sie im Menu eine „Color Science“-Option für die Farbverarbeitung aus.
5 Geben Sie für den Weißabgleich „Custom" (Benutzerdefiniert) vor.
6 Wahlen Sie im Gamma-Menu die Option „Blackmagic Design Custom" aus. Wahlen Sie für „Color Space" die Farbraum-Option „Blackmagic Design" aus.
7 Wahlen Sie im „Decode Quality“-Menu ihre Auflösung aus. Eine geringere Auflösung gibt. Ihnen auf weniger leistungsstarken Systemen eine bessere Wiedergabe. Um ihr Material in der hochsten Qualität aussagegeben, konnen Sie später wieder zur vollen Auflösung wechseln.
Jetzt können Sie die Kameraeinstellungen wie Sattigung, Kontrast und Mitteltone für ihre Clips anpassen. Dies wird sich auf alle Clips in Ihr Projekt aus, für die die Decodieroption „Project" ausgewählt ist.
Farbkorrektur von Clips im Color-Arbeitsraum
Nach dem Sie ihre Clips in die Timeline importiert und mit Titeln versehen haben, konnen Sie zur Farbkorrektur in den Color-Arbeitsraum übergeben. Diese Arbeitsbereich ist überaus leistungsstark und kann den gesamten Look Ihres Films bestimmen. Für das vorliegende Beispiel empfleht es sich jedoch, alle Clips zu neutralisieren und sie damit einheitlich zu gestalten. Sie konnen jederzeit in den Cut- oder Edit-Arbeitsraum zurückkehren, um an Ihrem Edit Änderungen vorzunehmen.
Im Color-Arbeitsraum macht vor allem der Look Ihres Edits eine Veränderung durch. Die Farbkorrektur ist in vielerei Hinsicht eine Kunstform, mit der Sie ihrer Arbeit Ausdruck verleihen. Sie ist ein außerst kreativer Teil des gesamten Arbeitsablaufs. Es ist sehr zufriedenstellend, diese Fähigkeit zu erlernen und zu sehen, wie die Arbeit lebensig wird. Dies ist in der Regel der ersten Bearbeitungsschnitt, der als primäre Farbkorrektur oder als Anpassung der Primärfarbwerte besteht ist. Wenn die primäre Farbkorrektur steht, konnen Sie zur sekundären Farbkorrektur übergeben. Hier sind hochst prazise Farbanpassungen bestimmter Elemente in ihren Bildern möglich. Diese spaßige Teil passiert normalerweise im Anschluss an die primären Anpassungen, da dies den Arbeitsablauf effizienteer macht und zu einem besseren Ergebnis führt.
Klicken Sie zunachst auf den „Color“-Tab, um den Color-Arbeitsraum zu öffnen.
Dort finden Sie die Camera-RAW-Einstellungen, Farbrader, Kurven und generelle FarbkorrekturTools sowie die Fenster „Preview" für die Vorschau und „Nodes" für Operatoren. Lassen Sie sich von der riesigen Auswahl an Features nicht abschrecken. Mit ihren werden Sie die großartigsten Bilder schaffen. In this dem Abschnitt lernen Sie die ersten Schritte und Grundlagen. Ausfuhrlichere Informationen finden Sie in den entsprechenden Abschnitten des englishsprachigen DaVinci Resolve Handbuchs. Dort erfahren Sie Schritt für Schritt, wofur die Tools da sind und wie man sie benutzt. Sie erlennen dieselben Techniken, die auch Profis in Highend-Farbkorrekturstudios anwenden.
Im Rahmen der primären Farbkorrektur werden in ihren Clips in der Regel zuerst die Pegel für Schatten, Mitteltone und Lichter optimiert. Sie justieren also die Einstellungen für „Lift“, „Gamma" und „Gain" (Schatten-, Mittel- und Weißtonwerte). So bringen Sie ihre Bilder auf einen ausgewogenen Ausgangspunkt mit optimaler Leuchtstarke und Klarheit. Von hier konnen Sie durch farbliches Grading einen Look für ihren Film erarbeiten. Für Pegeloptimierung eignen sich die Scopes.
Verwenden von Scopes
Die meisten Coloristen treffen kreative Farbentscheidungen, indem Sie sich auf die Wirkung und den Look konzentrieren, den sie ihren Programm verleihen möchten. Mithilfe des Monitors arbeiten sie dann daran, dies umzusetzen. Sehen Sie sich alltägliche Gegenstände an, und wie unterschiedliche Lichtquellen auf sie einwirken. Sie werden erfasrener und geübter darin, was sich aus ihren Bildern machen{lsst.
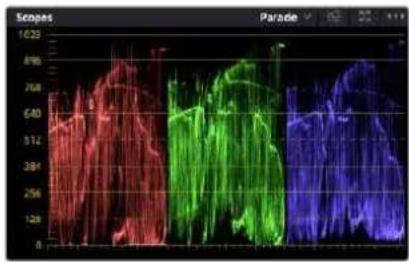
Optimieren Sie anhand des Parade-Scopes die Lichter, Mitteltone und Schatten
Ein weiteres Hilfsmittel zum Abgleichen ihrer Aufnahmen bei der Farbkorrektur bieten die eingebauten Scopes. Sie konnen ein einzelnnes Videoskop offen, indem Sie auf die „Scope"-Schaltflache klichen, die sich an zweiter Stelle von rechts in der Werkzeugleiste befindet. Zur Auswahl stehen Scopes für Wellenform, Parade, Vektorgramm, Histogramm und CIE-Chromatizität. Überprüfen Sie anhand dieser Scopes die tonale Balance und die Pegel Ihres Videos, um ein Stauchen der Schwarz- und ein Clipping der Weißwerte zu verhindern. Zusätzlich konnen Sie ihre Clips auf Farbstiche untersuchen.
Im Farbrad-Menu befinden sich die Regler für „Lift“, „Gamma“ und „Gain“, die Sie üblicherweise als Erstes anpassen. Wenn Sie Erfahrungen im Colorgrading mitbringen, werden ihren die Regler für Farb- und Kontrastanpassungen bereits vorkommen.
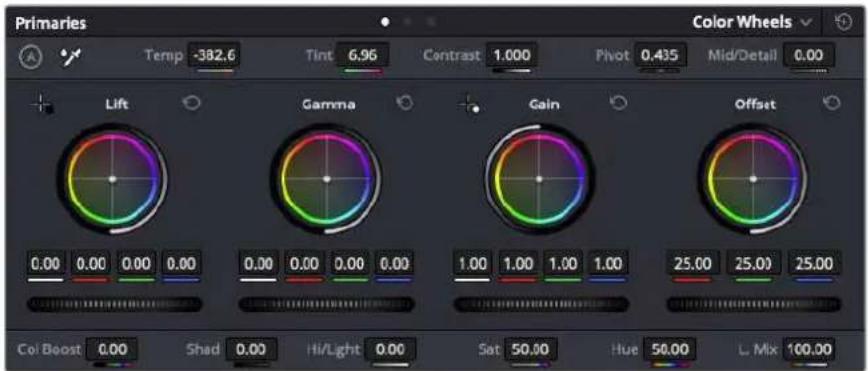
Die Farbrader "Lift", "Gamma", "Gain" und "Offset" geben ihren die volle Kontrolle über die farbliche und tonale Balance ihrer Clips. Schieben Sie das Einstellrad unter den Farbrädern nach links oder rechts, um die Farben jeder einzelnen Tonwertbereichs einheitlich anzupassen
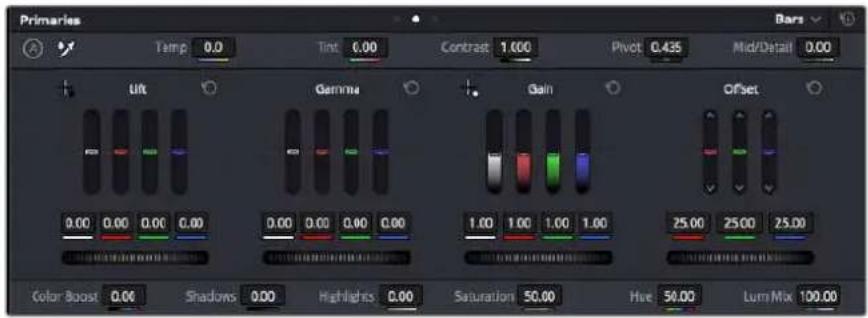
Die Primaries-Balken erleichtern Farbanpassungen mit der Maus
Um die Farben mit der Maus noch akkurater zu steuern, können Sie in der „Color Wheels“-Palette von den Farbrädern „Primary Wheels“ zu den Farbbalken „Primary Bars“ wechseln. Mit denen lassen sich jeder Farbe und jeder Luminanzkanal für Schatten, Mitten und Lichter separat einstellen. Wahlen Sie hierfür im Drop-down-Menu der Farbrad-Palette „Color Wheels“ oben rechts einfach die Option „Primaries Bars“ aus.
- Anpassen von „Lift“ (Schwarztone): Wahlen Sie einen Clip in der Farb-Timeline aus und klichen Sie auf die „Lift“-Skala unterhalb des ersten Farbrads. Schieben Sie das Einstellrad vor und darüber und beobachten Sie die Auswirkungen auf Ihr Bild. Sie werden sehen, wie die Helligkeit der dunklen Bereiche Ihres Bildes zu- und abnimmt.
Stellen Sie sie so ein, dass die dunklen Bereiche optimal aussehen. Wenn Sie die Schatten zu sehr verringern, gehen womöglich Details im Schwarzbereich verloren. Dies lasst sich mithilfe des Parade-Scopes verhindern. Die optimale Position von Schwarztönen im Kurvenverlauf befindet sich direkt über der unteren Linie des Parade-Scopes. - Anpassen von „Gain" (Weltstone): Klichen Sie auf das Einstellrad für „Gain" und schiben Sie es hin und her. Dies justiert die Lichter, womit die hellsten Bereiche in Ihr Clip gemeinsamt sind. Die Lichter werden im oberen Abschnitt des Kurvenverlaufs im Parade-Scope angezeigt. Für eine gut beleuchte Aufnahme bringt man diese am besten direkt unter die obere Linie des Waveform-Scopes. Wenn die Lichter über die obere Linie des Waveform-Scopes ausschlagen, werden sie abgeschritten und es gehen Details in den hellsten Bereichen Ihres Bilds verloren.
- Anpassen von „Gamma" (Mitteltöne): Klichen Sie auf das Einstellrad für „Gamma" unter dem Farbrad und schiben Sie es hin und her. Wenn Sie die Mitteltonwerte erhöhen, sehen Sie, wie auch die Helligkeit Ihres Bilds zunimmt. Sie werden merken, dass sich beim Anpassen der Gammawerte auch der mittlere Abschnitt der Wellenform verändert. Diese repräsentiert die Mitteltöne Ihres Clips. Im Waveform-Scope liegt die optimale Position für Mitteltöne in der Regel zwischen 50-70 Prozent. Dies ist jeder Geschmackssache und hangt vom gewünschten Look und den Lichtverhältnissen im Clip ab.
Sie konnen anhand der Kurven-Feature auch primäre Farbkorrekturen vornehmen. Erstellen Sie per Klick einfach Steuerpunkte auf der diagonalen Linie im Kurbendiagramm undziehen Sie diese nach oben oder unter, um die Haupteinstellungen des RGB-Kontrasts für verschiedene Tonwertbereiche im Bild anzupassen. Am besten lessen sich im unteren Drittel, in der Mitte sowie im oberen Drittel der Kurve liegende Punkte anpassen.
Es gibt noch weitere andere Möglichkeit der primären Farbkorrektur in DaVinci Resolve.
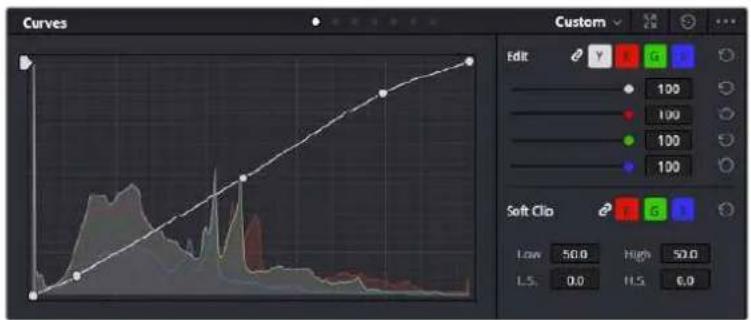
Die "Curves"-Palette ist ein weiteres Tool für primäre Farbkorrekturen oder um bei Verwendung eines Power Windows bestimmte Bereiche in ihrem Clip zu optimieren
Sekundäre Farbkorrektur
Wenn Sie einen bestimmten Bereich Ihres Bildes verfeinern mochten, benutzen Sie sekundäre Farbkorrekturen. Die Anpassungen, die Sie bisher mithilfe von „Lift“, „Gamma“ und „Gain“ vorgenommen haben, haben sich auf das gesamte Bild ausgewirkt. Man bezeichnet sie dazu primäre Farbkorrekturen.
Sollen jeder spezifische Bereiche Ihres Bilds verfeinert werden, konnen Sie von der sekundären Farbkorrektur Gebrauch machen, wenn Sie beispelssweise die Farbe von Gras in einer Szene verbessern oder das Blau des Himmels vertiefen wollen. Bei der sekundären Farbkorrektur wählt man einen spezifischen Bereich aus, den man dann isoliert darbeitet. Mithilfe von Nodes halten sich mehrere sekundäre Korrekturen überinanderlegen. Damit konnen Sie einen Bereich Ihres Bildes bis zur Perfektion darbeiten. Sie konnenSolar von Windows und Tracking Gebrauch machen. So kann ein ausgewahelter Bereich Bewegungen in ihren Bildern folgen.
Qualifizieren einer Farbe
Sie werden hauig feststellen, dass eine bestimmte Farbe in Ihrm Clip optimierbar ist, z. B. Gras am Straenrand oder das Blau des Himmels. Vielleicht empfeht sich auch die Justierung der Farbe eines bestimten Objeks, um die Aufmerksamkeit des Publikums darauf zu lenken. Mit dem HSL-Qualifizierer-Tool ist dies problemos möglich.
Das Auswahlen von Farben in Ihrm Bild mithilfe des HSL-Qualifizierer-Tools ist entsprechenden dann praktisch, wenn gewisse Bereleche hervorstechen sollen. So konnen Sie den Kontrast erhöhen oder die Aufmerksamkeit des Publikums auf bestimmte Bereiche Ihres Shots lenken
So qualifizieren Sie eine Farbe:
1 Fügen Sie einen neuen „Serial Node" (Serieller Node) hinzu.
2 Offnen Sie das Qualifizierfenster „Qualifier" und vergewissern Sie sich, dass das Pipetten-Tool im Auswahlabschnitt „Selection Range" ausgewählt ist.
3 Klichen Sie in Ihrm Clip auf die Farbe, die Sie bearbeiten mochten.
4 In der Regel werden Sie einige Anpassungen vornehmen müssen, um die Kanten ihrer Auswahl weichzuzeichnen und den Bereich ausschließlich auf die gewünschte Farbe zu begrenzen. Klichen Sie über dem Viewer auf die Schaltfläche „Highlight", um ihre hervorgehobene Auswahl zu sichen.
5 Passen Sie im Farbston-Fenster „Hue" die Bandbreite über „Width" an und erweitern oder verengen Sie ihre Auswahl.
Experimentieren Sie mit den Steuerelementen „High“, „Low“ und „Softness“, um ihre Auswahl zu verfeinern. Nun können Sie ihre ausgewählte Farbe mithilfe von Farbrädern oder benutzerdefinierten Kurven anpassen.
Es kann vorkommen, dass ihre Auswahl in Bereiche des Bildes vordrangt, die nicht einbezogen werden sollen. Sie konnen die unerwunschten Bereiche muhelos mit einem Power Window ausmaskieren. Erstellen Sie dazu einfach ein neuen Fenster und formen es entsprechend, um lediglich den gewünschten Farbbereich auszuwahlen. Wenn sich die ausgewählte Farbe in der Aufnahme bewegt, konnen Sie Ihr Power Window mithilfe der Tracking-Funktion verfolgen.
Hinzufügen eines Power Windows
Power Windows sind ein extrem effektives Tool für die sekundäre Farbkorrektur, das zur Isolierung bestimmt Bereiche Ihres Clips dient. Diese Bereiche müssen nicht staatisch sein und{lassen sich auch bei einem Kameraschwenk oder einer Drehung sowie der Bewegung des Bereichs selbst verfolgen.
Power Windows Dienen zum Ausmaskieren von Bereichen, die nicht von den sekundären HSL-Qualifizierer-Anpassungen berührt werden sollen
Zum Beispiel konnen Sie mithilfe eines solchen Windows die Bewegungen einer Person verfolgen, um Farb- und Kontraständerungen ausschließlich an dieser Person vorzunehmen, ohne ihre Umgebung zu beeinflussen. Mit solchen Korrekturen konnen Sie die Aufmerksamkeit des Publikums auf bestimmte Bereiche lenken.
So versehen Sie ihren Clip mit einem Power Window:
1 Fügen Sie einen neuen „Serial Node" (Seriellen Node) hinzu.
2 Öffnen Sie die „Window“-Palette und wahren Sie eine Form für Ihr Power Window aus, indem Sie auf ein Form-Icon klichen. Das Window in der gewünschten Form erscheint nun im Node.
3 Passen Sie die Form an, indem Sie auf die blauen Punkte klichen und diese in Form ziehen. Entlang der roten Punkte werden die Kanten weichgezeichnet. Positionieren Sie die Form, indem Sie auf den Mittelpunkt klichen und sie auf den zu isolierenden Bereich schiben. Mit dem Punkt, der mit dem Mittelpunkt verbunden ist, lasst sich das Fenster rotieren.
Nun können Sie Farbkorrekturen an Ihr dem Bild in bereits dem Bereich vornehmen, den Sie bearbeiten möhen.
Power Windows lessen Sie In bestimmen Bereichen Ihres Bildes sekundäre Korrekturen vornehmen
Tracking mit einem Power Window
Die Kamera, das Objekt oder der Bereich in Ihrer Aufnahme bewegen sich gegebenenfalls. Um Sicherzustellen, dass das Power Window auf dem ausgewählten Objekt oder Bereich haften bleibt, steht Ihnen das leistungsstarke Tracking-Tool von DaVinci Resolve zur Verfügung. Der Tracker analysiert die Schwenk-, Neige-, Zoom- und Rotationsbewegung der Kamera oder des Objeks in Ihrem Clip, womit Sie Ihr Window der Bewegung anpassen. Geschieht dies nicht, erfolgt ihre Korrektur ggf. außerhalb des vorgegebenen Zielbereichs und fällt unnöttig auf, was vermutlich unerwünscht ist.

Mithilfe der Tracking-Funktion konnen Sie Objekte oder Bereiche in Ihrm Clip verfolgen. Power Windows folgen dann der Bewegung
So verfolgen Sie ein sich bewegendes Objekt mit einem Power Window:
1 Erstellen Sie einen neuen „Serial Node" und fugen Sie thisem ein Power Window hinzu.
2 Gehen Sie zum Anfang Ihres Clips, positionieren Sie ein Window auf dem gewünschten Obiekt oder Bereich und passen Sie seine große an.
3 Öffnen Sie die „Tracker“-Palette. Wahlen Sie die geeigneten Schwenk-, Neige-, Zoom-, Rotations- und 3D-Einstellungen für die Bewegung in ihrem Clip aus, indem Sie in die jeweiligen Kontrollkästchen ein Häkchen setzen oder es entfernen.
4 Klichen Sie auf den Vorwartspeil links von den Dialogboxen. DaVinci Resolve wird nun ein Cluster diverser Tracking-Punkte auf ihren Clip applizieren und sich anschliebend durch die Frames arbeiten, um Bewegungen zu analysieren. Nach abgeschlossenem Tracking-Vorgang verfolgt Ihr Power Window die Bewegungen in ihrem Clip.
Meist ist das automatische Tracking erfolgreich. In komplexen Szenen kommt es jedoch gelegentlich vor, dass ein Objekt sich an Ihr dem ausgewählten Bereich vorbei bewegt und damit das Tracking unterbricht oder stört. Dies kann manuell mithilfe des Keyframe-Editors gelöst werden. Näheres dazu finding Sie im englishsprachigen DaVinci Resolve Handbuch.
Arbeiten mit Plug-ins
Während Sie sekundäre Farbkorrekturen vormenmen, können Sie außer dem ResolveFX- oder OpenFX-Plug-ins hinzufugen. Damit lassen sich im Color-Arbeitsraum schnell, interessante Looks und Effekte oder im Edit-Arbeitsraum einfassreiche Übergänge für ihre Clips kreieren. ResolveFX sind bereits in DaVinci Resolve installiert. OpenFX-Plug-ins sind bei Fremdanbietern zum Download erhältlich.
Nach erfolgter Installation eines Satzes von OpenFX-Plug-ins greifen Sie über den Color-Arbeitsraum auf diese OFX- oder die ResolveFX-Plug-ins zu. Öffnen Sie hierfür den OpenFX Inspector rechts besoin dem Node-Editor. Erstellen Sie zunachst einen seriellen Node. Öffnen Sie dann per Klick auf den „OpenFX“-Button die Effektbibliothek undziehen Sie ein Plug-in per Drag-and-drop auf den Node. Verfüg das Plug-in über eigene Einstellungen, konnen Sie diese im angrenzenden „Settings“-Menuändern.
OFX-Plug-ins bieten einechnelle und einfache Moglichkeit, einfallsreiche und interessante Looks zu kreieren
Im Edit-Arbeitsraum konnen Sie Clips mit Plug-in-Filtern und Übergängen versehen, indem Sie das „OpenFX“-Menu in der Effektbibliothek öffnen und das gewünschte Plug-in auf die Videospur Ihr Clips in der Timelineziehen.
Mixen von Ton
Tonmischen Im Edit-Arbeitsraum
Sobald Sie Ihr Projekt geschritten und Farblich beareritet haben, konnen Sie mit dem Mischen von Ton beginnen. DaVinci Resolve bietet direkt im Edit-Arbeitsraum eine praktische Auswahl an Features zum Schneiden, Mixen und Mastern von Audio. Werden für Ihr Projekt noch ausgeklugeltere Audiotools besteht, haben Sie im Fairlight-Arbeitsraum Zugriff auf eine komplette Postproduktionsumgebung für Ton. Wenn Sie bereits mit dem Edit-Arbeitsraum vertraut sind und direkt mit Fairlight weitermachen sollen, überspringen Sie den nachsten Abschnitt.
Hinzufugen von Audlospuren
Wenn Sie im Edit-Arbeitsraum arbeiten und einen elementaren Tonschnitt mit denen Toneffekte und Musik mischen wollen, können Sie bei Bedarf muhelos weitere Audiospuren hinzufugen. Das kann praktisch sein, wenn Sie ihren Sound bauen und ihre Audioelemente für einen Soundmix auf entsprechendiche Spuren verteilen möchten, wie bspw. Gesang, Toneffekte und Musik.
Hinzufugen einer Audiospur Im Edit-Arbeitsraum
Führer Sie neben dem Namein einer Audiospur in Ihrer Timeline einen Rechtsklick aus und wahlen Sie „Add Track" sowie eine der Optionen „Mono", „Stereo" oder „5.1". Dies fegt unter in der Track-Liste eine Spur hinzu. Wahlen Sie alternativ „Add Tracks" und anschließend die Position, an der eine oder mehrere neue Spuren eingefügt werden sollen.
Ohre neue Audiospur erscheint nun in der Timeline.
TIPP Wenn Sie einen Spurtyp im Nachhineinändern möchten, wahren Sie darüber dem Spurnamen per Rechtsklick den Befehl „Change track type to" und dann aus den Optionen Stereo, Mono und 5.1 ihre bevorzugte Option.
Anpassen von Audiologie in der Timeline
Jeder Audioclip hat in der Timeline sein eigenes Lautstärke-Overlap, über das Sie die Lautstärke des Clips einstellen können. Ziehen Sie den Zeiger davon lediglich hoch oder runter. Das Overlay korrelliert mit dem Lautstärkeparameter im Inspector.
Bewegen Sie den Zeiger im Lautstärke-Overlay, um den Lautstärkepegel des Clips anzupassen.
Sollten Sie für Ihr Projekt noch ausgeklügelterene Audiotools benötigten, haben Sie im Fairlight-Arbeitsraum Zugriff auf eine komplette Postproduktionsumgebung für Ton.
Der Fairlight-Arbeitsraum
Im Fairlight-Arbeitsraum in DaVinci Resolve bearbeiten Sie den Ton Ihres Projekts. Im EinzelmonitorModus bietet Ihnen dieser Arbeitsraum eine optimierte Übersicht über die Audiospuren IhresProjekts. Ein erweiterter Mixer und spezielle Monitoring-ELEMENTe vereinfachen die Evaluierung undAnpassung von Pegeln, um einen gleichmäßigen und harmonischen Mix zu kreieren. Lassen Sie sichvon der riesigen Auswahl an Features nicht abschrecken. Mit ihren werden Sie die bestmöglicheTonqualität für Ihr Projekt erreichen.

These Anleitung gibt Ohnen einen grundlegenden Überblick über die Funktionen im Fairlight-Arbeitsraum. Wenn Sie mehr zu den Details einer jeder Funktion erfahren möchten, ziehen Sie das Englischsprachige DaVinci Resolve Handbuch zu Rate. Das DaVinci Resolve Handbuch erklärt den Nutzen eines jeder Tools und beschreiben in leicht verständlichen Schritten, wie Sie es einsetzen.
Die Audio-Timeline
- Spur-Header: Links darüber jeder Spur befindet sich ein Spur-Header, der die Spurnummer, den Spurnamen, die Spurfarbe, Audiokanäle, Fader-Werte und Audiopegelmeter anziegt. Die Kopfzeile enthalt darüber hinaus einen Button zum Sperren und Entsperren von Spuren sowie Solo- und Stummschalt-Buttons. Diese Steuerelemente halten Ohnen damit, Spuren zu organisieren und ermöglichen die Vorschau einzeln Spuren.
- Spuren: Jede Spur im Fairlight-Arbeitsraum ist in Unterspuren aufgeitlt. Jede dieser Unterspuren stellt einen individuellen Kanal des Cliptons zum Schneiden und Mixen dar. Der Edit-Arbeitsraum verbirgt die individuellen Audiokanäe und zeigt stattdessen nur einen einzelnen Clip in der Timeline an. Das macht es einfacher, Mehrkanalquellen zu schneiden, ohne eine große Anzahl an Spuren verwalten zu müssen.
Der Spur-Header von Spur A1 verweist auf eine Monospur mit einer einzeln Unterspur für Monoton. Bei Spur A2 hingegen handelt es sich um eine Stereospur für Stereoton
Wasist ein Bus?
Ein Bus ist im Wesentlichen ein Zielkanal. Er besteht aus mehreren Audioquellen, die in ein einzelnes Signal zusammengefasst sind, das über einen einzelnen Kanalzug steuerbar ist. Fairlight erstellt automatisch einen Bus für Sie. Alle Audiospuren in der Timeline werden standardmäßig an diesen Bus gesendet. Nachdem Sie den Pegel jeder einzelnen Spur eingestellt haben, können Sie den Gesamtpegel ihrer Tonmischung anpassen.
Für komplexere Tonschnittte können Sie weitere Busse erstellen und darin zur gleichen Kategorie gehörige Audiospuren zusammenfassen, bspw. Dialoge, Musik oder Effekte. Auf diese Weise können alle Elemente derselben Kategorie als einzelnes Audiosignal gemixt werden. Beispiel: Wenn Sie fünf Dialogspuren haben, können Sie die Ausgabe aller fünf Dialogspuren an einen separates Bus weiterleiten. Die Pegel aller Dialogspuren setzen sich so mit einem einzelnen Satz von Reglern anpassen.
Die Fairlight-Flexbus-Struktur bietet Ihnen vollige Flexibilität über die Bustypen und Signalvertellung, einschließlich Routingoptionen von Bus zu Bus, von Spur zu Spur und von Bus zu Spur. Weitere Informationen zu den Audiobus-Einstellungen in Fairlight finden Sie im englishsprachigen DaVinci Resolve Handbuch.
Der Mixer
Jede Audiospur in der Timeline entspricht einem individuellen Kanalzug im Mixer. Standardmäßig befindet sich rechts darüber dem standardmäßigen Bus ein einzeln der Beschriftung „Bus 1". Für jeder weiteren Bus, den Sie erstellen, erscheidtrechtseitig ein zusätzlicher Kanalzug mit einem Satz von Reglern. Mit einem Satz grafischer Regler konnen Sie Ausgabekanäten Spurkanäe zuweisen, EQ und Dynamik anpassen, Pegel einstellen und Automation aufzeichen, Stereo- und Surround-Ton positionieren sowie Solo-Tracks stummschalten.
Audiomixer mit den zu den Spuren in der Timeline gehörgen Kanalzügen
Audio mit dem Equalizer verfeinern
Sobald die Tonpegel ihrer Audioclips angepasst sind, stellen Sie weiterecht fest, dass der Ton weiteren Verfeinerungen bedarf. Es kann vorkommen, dass Dialoge, Musik und Soundeffekte um dieselben Frenzen im Klangspektrum konkurieren. Das kann dazu führen, dass der Sound aufdringlich oder unklar klingt. Hier kann der Equalizer Abhilfe schaffen, da Sie darüber jene Bereiche des Klangspektrums bestimmen können, den jeder Spur für sich beansprucht. Mit einem Equalizer können Sie darüber hinaus unwünsche Elemente aus ihrem Audio entfernen. Das geschieht, indem Pegel in bestimmten Frenzen, die ein Drohnen, Surren, Zischen oder auch Windgeräische enthalten, isoliert oder reduziert werden. Auch die allgemeine Klangqualität lasst sich damit verbessern.
DaVinci Resolve stellt EQ-Filter bereit, die auf Clipebene für individuelle Clips oder auf Spurebene für individuelle Spuren angewendet werden können. jeder Audioclip in der Timeline verfügt über einen 4-Band-Equalizer im Inspector-Fenster. Im Mixer-Fenster steht für jeder Spur ein parametrischer 6-Band-Equalizer bereit. Mit den grafischen und numerischen Steuerelementen zum Verständen oder Dämpfen von Frequenzbereichen sowie entsprechenden Filterarten lasst sich die Form der EQ-Kurve definierten.
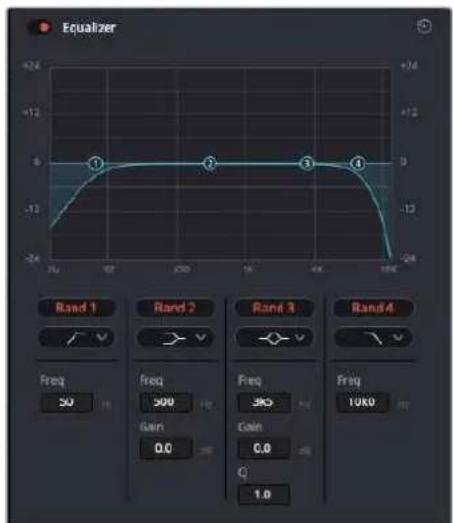
Der 4-Band-Equalizer kann auf jeder Clip in der Timeline angewendet werden
Über die äußerten Bänder留学生 sich Bandfilter mithilfe von Hi-Shelf-, Lo-Shelf-, Hi-Pass- und Lo-Pass-Filtern anpassen. Ein Pass-Filter wird sich auf alle Frenzen über oder unter einem bestimmten Frenzwert aus, da diese Frenzen komplett aus dem Signal entfernt werden. Beispiel: Ein Hochpassfilter lasst die hohen Frenzen passieren und stoppt die niedrigen Frenzen. Sümmtliche außerhalb der Grenzfrequenz liegenden Frenzen werden in einer graduell abfallenden Curve herausgeschritten.
Ein Shelf-Filter ist weniger aggressiv und dann hilfreich, wenn Sie die oberen und unteren Frequenzbereiche eines Signals allgemein formen wollen, ohne diese Frenzen komplett auBen vor zu lassen. Der Shelf-Filter verstärkt oder dampf die Zielfrequenz sowie alle darüber bzw. darunter liegenden Frenzen, je nachdem, ob Sie einen High- oder einen Low-Shelf-Filter verwenden.
Mit den Steuerelementen der mittleren Bander konnen Sie eine große Vielfalt an Equalizer-Anpassungen vornehmen und zwischen Low-Shelf-, Bell-, Notch- und High-Shelf-Filteroptionen hin und her schalten.
- Bell: Bell-Filter verständen oder dampfen Frequenzen rund um den vorgegebenen Mittelpunkt einer Glockenkurve. Wie der Name schon sagt, handelt es sich damit um eine glockenformige Kurse.
- Notch: Mit Notch-Filtern halten sich sehr schmiele Frequenzbandbreiten bearbeiten. Beispielsweise{lsst sich Netzbrummen bei 50 oder 60Hz entfernen.
- Lo-Shelf: Low-Shelf-Filter verstärken oder:kappen die Zielfrequency am unteren Ende sowie alle Frequizen, die darüber liegen.
- HI-Shelf: High-Shelf-Filter verstärken oder:kappen die Zielfrequency am oberen Ende sowie alle Frequenz, die darüber liegen.
So wenden Sie den EQ auf einen einzelnen Clip an:
1 Wahlen Sie in der Timeline den Clip aus, auf den Sie den EQ-Filter anwenden sollen.
2 Klicken Sie dann in den Inspector und anschlieBend auf den Aktivierungs-Button „Clip Equalizer".
So wenden Sie den EQ auf eine Spur an:
1 Doppelklicken Sie im Mixer in das EQ-Feld einer ihrer Spuren, um den Equalizer für diese Spur zu öffnen.
2 Wahlen Sie im Drop-down-Menu für das anzupassende Band den Bandfilter aus.

Der EQ-Bereich im Mixer-Fenster gezigt an, dass eine EQ-Kurve zu Spur 1 hinzugefügt wurde

Parametrischer 6-Band-Equalizer, der auf jeder Spur angewendet werden kann
Sobald Sie Ihrn Clp oder Ihre Spur mit einem EQ versehen haben, konnen Sie den EQ fur≦nes Band anpassen.
Bitte beachten Sie, dass sich die Steuerelemente je nach ausgewahltfer Filterart unterscheiden.
So passen Sie den EQ für einen Bandfilter an:
1 Wahlen Sie im Drop-down-Menu für das anzupassende Band den Bandfilter aus.
2 Passen Sie den Frequenzwert Frequency" an, um die Mittenfrequenz fur den EQ festzulegen.
3 Passen Sie den „Gain“-Wert an, um die von den Bändern gesteuerten Frequenzen zu verstärken oder zu dampfen.
4 Geben Sie über den Q Factor"Wert die Bandbreite der betroffenen Frequenzen vor.
Setzen Sie mit dem Zurücksetzen-Button alle Steuerelemente im EQ-Fenster auf ihre Standardwerte zurück.
Fairlight bietet eine Vielfalt an Steuerelementen, mit denen Sie das Beste aus jeder Audiospur herausholen konnen. Fugen Sie Spuren hinzu, verwalten und organisieren Sie Busse und fugen Sie Effekte wie Laufzeitverzogerungen oder Hall hinzu. Oder polieren Sie ihren Audiomix ganz allgemein auf.
Hinzufugen von VFX und Compositing im Fusion-Arbeitsraum
Nach abgeschlossen Schmitt konnen Sie den Fusion-Arbeitsraum offen und direkt von DaVinci Resolve aus visuelle Effekte und Bewegtbilder in 2D oder 3D hinzufugen. Im Gegensatz zu ebenenbasierten Compositing-Softwares verwendet Fusion sogenannte Nodes, anhand derer Sie Bilddaten in beliebige Richtungen lenken konnen und so die Freiheit haben, komplexe Effekte zu bauen. Das Node-Fenster zeigt auf einen Blick alle im Laufe dieser Prozesses verwendeten Tools. Wenn Sie den Node-Workflow im Color-Arbeitsraum verwendet haben, werden Sie damit vertraut sein.

Der Fusion-Arbeitsraum
Der Fusion-Arbeitsraum bietet im oberen Bereich zwei Ansichtsfenster (Viewer) mit Transportsteuerung zum Sichteh Iher Medien. Rechts daneben ist das Inspector-Fenster fur den Zugriff auf Tool-Einstellungen. Im .Nodes" Fenster, dem sogenannten Node-Editor, im unteren Bereich erstellen Sie ihre Kompositionen, fachsprachlich Compositings genannt. Die Viewer und die Transportsteuerung werden immer angezeigt. Per Klick auf die Icons der Bedienoberflächen-Toolbar konnen Sie jedoch die Fenster .Nodes" und .Inspector" oder zusätzliche Fenster einschließlich der "Effects Library" (Effektbilibiothek) und Spline- und Keyframe-Editoren wahlweise aufrufen oder verbergen.

Media Pool: Der Media Pool Funktioniert hier genauso wie im Edit-Arbeitsraum. Ziehen Sie einfach zusätzliche Medien aus ihren Bins direkt in Ihr Compositing.
- Effects Library: In der Effektbilibiothek finden Sie Fusion Tools und Vorlagen, die in Kategorien wie Partikel, Tracking, Filter und Generatoren sortiert sind. Sie können Tools anklichen oder in den Node-Editor ziehen, um sie Ihr Compositing hinzuzufugen. Der Media Pool und die Effektbilibiothek sind im gleichen Bildschirmbereich verortet und man wechselt zwischen beiden hin und her. So werden die Viewer möglichst groß angezeigt.
- Clips: Per Klick auf den „Clips“-Tab werden die Thumbsnails für die Clips in Ihrer Timeline aufgerufen oder verborgen. Die Thumbsnails sind unterhalb des Node-Editors verortet, wo Sie unmittelbar zu anderen Clips navigieren können.
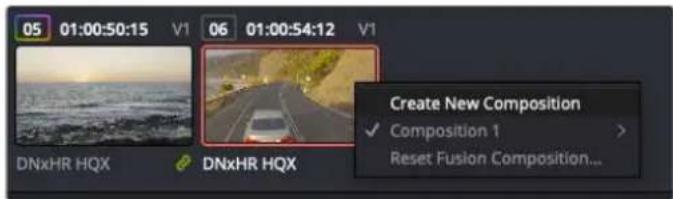
Erstellen Sie eine neue Version Ihres Compositings, indem Sie ein Thumbnail anklichen und „Create New Composition" auswahlen
- Viewers: Die Ansichtsfenster sind immer eingeblendet und zeigen ihren verschiedene Darstellungen Ihres Compositings an. Bspw. an einem 3D-Merge-Node vorgenommene Änderungen, die Kameraausgabe oder ihre finale Renderausgabe. In den Viewern können Sie auch sehen, wie ihre Änderungen sich auf ein spezifisches Element auswirken.
Sie können die Node-Ansichten in den Viewern bestimmen, indem Sie auf einen Node klichen und „1" für den linken und „2" für den rechten Viewer eingeben. Der darüber dem Node erscheinende weitere Punkt zeigt an, welchem der beiden Ansichtsfenster er zugewiesen ist. Bei Verwendung eines externen Videomonitors erscheidt ein dritter Button, über den Sie ihre Medien ihrer externen Monitor zuführen können.
TIPP Alternative können Sie einen Node einem Viewer zuweisen, indem Sie den Node direkt in den Viewerziehen.
Mithilfe der unter den Ansichtsfenstern angezeigten Transportsteuerung konnen Sie zum Anfang oder Ende eines Clips springen,ihn vor- oder ruckwart's abspielen oder seine Wiedergabe anhalten. Das Zeitlineal zeigt den gesamten Clipbereich an, wobei die In- und Out-Punkte mit gelben Markern versehen sind.
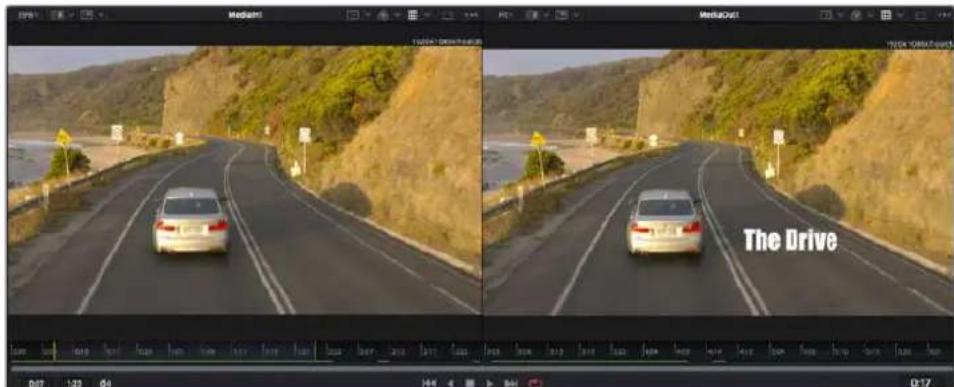
Die halten Marker auf dem Zeitlineal zeigen die In- und Out-Punkte Ihres Clips in der Timeline an. Wenn Sie einen Fusion Clip oder Compound Clip verwenden, sie an dem Zeitlineal nur die Dauer des Clips wie er in der Timeline entscheidt, d. h. ohne Handles
- Nodes: Das „Nodes“-Fenster, der sogenannte Node-Editor, ist das Herz des Fusion-Arbeitsraums. Dort bauen Sie ihren Node-Baum, indem Sie Tools und den Ausgang eines Nodes mit dem Eingang eines anderen verknüpfen. Die Grüse dieseres Bereichs variiert je nachdem, welche Editoren geöffnet sind, bspw. der Spline- oder Keyframe-Editor. Die Toolbar direkt über dem Node-Editor bietet schllen Zugriff aufhäufig benutzte Tools.
- Spline: Der geöffnete Spline-Editor wird rechts vom Node-Editor eingeblendet. Mit diesen Editor können Sie prazise Anpassungen an einzelnen Nodes vornehmen, bspw. um die Animation zwischen zwei Keyframes mithilfe von Bezier-Kurven zu glätten.
Keyframes: Anhand des Keyframe-Editors kann man jedem Tool mit Keyframes versehen, diese entfernen oder modifizieren. Auch dieser Editor wird rechts vom „Nodes“-Fenster eingeblendet. - Metadataen: Im Metadataenfenster werden Ohnen die für einen aktiven Clip verfügbar. Metadataen wie Codec, Framerate und Timecode angezeigt.
- Inspector: Der „Inspector“ oben rechts auf der Bedienoberfläche zeigt alle für eine oder mehrere aktive Nodes verfügbaren Einstellungen und Modifier an. Dort werden auch zusätzliche, nach Kategorie sortierte Tab-Optionen fürchnellen Zugriff eingeblendet.
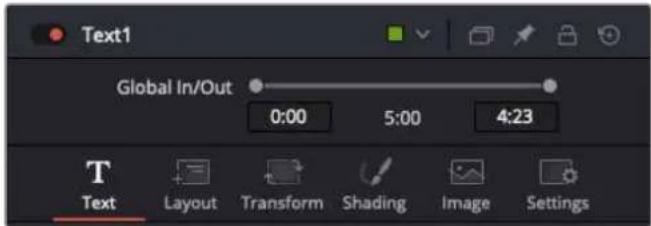
Der Text-Inspector bletet zusätzliche Tabs für Text, Layout,
Transform, Shading, Bild und Einstellungen
Erste Schritte mit Fusion
Um mit Fusion loszulegen, platzieren Sie den Abspielkopf auf irgendegenen Clip in Ihrer Timeline. Offnen Sie dann den Fusion-Arbeitsraum per Klick auf den „Fusion“-Tab.
Im Fusion-Arbeitsraum ist Ihr Clip dann in Form eines als „Medialn“ gekennzeichneten Medieneingabe-Nodes sofort verfügbar. Jedes Compositing beginnt mit einem „Medialn“ und einem „MediaOut“-Node. Diese „Medialn“-Node stellt den obersten Clip in Ihr Timeline dar und ignoriert alle darüber liegenden Clips. Sümmtliche im Edit-Arbeitsraum am Clip vorgenommenen Änderungen werden einbezogen. Bspw. an Transform-Tools oder ausgewählten Bildausschnitten.

Der als „MediaOut" gekennzeichnete Medienausgabe-Node sendet die Ausgabe zureck in die Timeline des Edit-Arbeitsraums von DaVinci Resolve
TIPP Im Cut- oder Edit-Arbeitsraum auf Clips angewendete ResolveFX- oder OFX-Plug-ins werden im Fusion-Arbeitsraum nicht mehr angewendet. Das liegt daran, dass Fusion Effekte vor der Farbkorrektur und vor der OFX-/ResolveFX-Verarbeitung kommt. Um OFX in der Verarbeitungskette vor Fusion Effekten anzuwenden, führt man im Edit-Arbeitsraum zuerst einen Rechtsklick auf dem Clip aus und wähl „New Fusion Clip". Erst dann wechselt man in den Fusion-Arbeitsraum.
Nodesverstehen
Man kann sich einen Node als ein visuelles Icon vorstellen, das ein einzeln Tool oder einen Effekt darstellt. Nodes werden mit anderen Nodes verknüpft und so wird durch Hinzufugen von Elementen eine Gesamtkomposition gebaut. Es ist wichtig, die Ein- und Ausgänge der einzelnen Nodes zu verstehen. Das hilftlichen bei der Gestaltung von detailierten visuellen Effekten, den Fluss Ihres Compositings zu navigieren.
Manche Tools verfügbar über mehrere Ein- und Ausgänge, die sich mit anderen Nodes verknüpfen halten. So können Sie einen Merge-Node bspw. mit einem Vordergrundeingang, einem Hintergrundeingang und einem Maskeneingang für Matten und Keys koppeln.
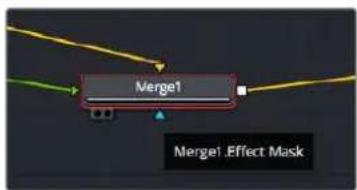
Eingabe Vordergrund
Eingabe Hintergrund
Eingabe Maskeneffekt
Output
Demnach kann ein einzelner Node mit mehreren Ausgängen an mehrere verschiedene Nodes in Ihr Compositing geknupft werden. Anders als mit einer ebenenbasierten Software brauchen Sie diese Clips nicht zu duplizieren. Die Verbindungslinien zwischen Nodes sind mit Pfeilen versehen, die die Richtung des Bilddatenflusses illustrieren.
Hinzufugen von Nodes in den Node-Editor
Effekte kann man ganz einfach hinzufugen, indem man Nodes auf die Verbindungslinie zwischen die „Medialn"- und „MediaOut"-Nodes setzen.
Dafür gibt es mehrere alternative Methoden. Sie können einen Node mit gedrückter Shift-Taste zwischen zwei Nodes einsetzen. Alternativ klichen Sie auf den Node, an den Sie einen Effekt anknupfen möchten, und wahren das gewünschte Tool aus. Der neue Node wird automatisch mit dem ausgewählten Tool verbunden. Sie können einen Node auch irgendwo im Node-Editor hinzufugen und die Nodes manuell verknüpfen, indem Sie den Ausgang des einen zum Eingang des anderen Nodesziehen.
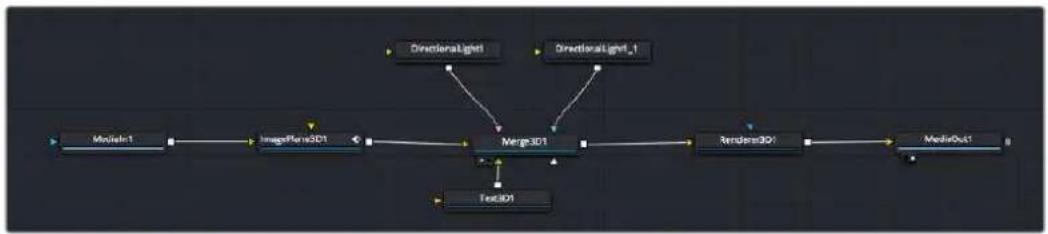
Der 2D- oder 3D-Merge-Node ist das meistgebrauchte Tool. Dieser Node fungiert als Drehscheibe, der Tools im Node-Editor in einen einzelnen Ausgang zusammenfuhrt
Der Merge-Node verfügbar über Steuerelemente für die Handhabung der Eingänge, einschließlich von Attributen wie große, Position und Mix. Auf all these Einstellungen greift man bei Auswahl des Merge-Nodes im Fenster „Inspector" zu.
Die gebrächlichsten Tools sind als Icons in der Toolbar aufgereht. Um einem Node ein Tool hinzuzufugen, klichen Sie auf sein Icon oder ziehen Sie es in den Node-Editor. Um alle verfügbarten Tools zu sichen, klichen Sie oben links auf „Effects Library" und erweitern die Option „Tools". Dort finds den Tools nach Kategorie sortiert sowie einen Satz vorgefertigter „Templates". Diese Vorlagen können Sie bspw. als Blendeneffekte, Shader und Hintergrunde verwenden.
TIPP Sobald Ihnen die Werkzeugnamen vertraut sind, konnen Sie das Auswahlenmu „Select Tools" aufrufen, indem Sie bei gedrückter Shift-Taste die Leertaste ihrer Tastatur drücken. Beim Eintippen des Werkzeugnamens wird Ihnen das relevante Tool aus dem Menu vorgeschlagen. So wähl man das gewünschte Tool sehr schnell aus.
Anpassen von Nodes mit dem Inspector
Passen Sie ihre Node-Einstellungen im „Inspector“-Fenster an. Klichen Sie einfach den zu modifizierenden Node an, damit sich das Fensteractualisiert und es die Einstellungen und Steuerelemente des Nodes anziegt.
Mit Fusion brauchen Sie den aktuell bearbeiteten Node nicht zu sichen, da Sie einen Node modifizieren können, während他们会 ein anderer in ihrem Compositing angezeigt wird. Beispiel: Sie können die große und die mittige Platzierung eines „Text+-Nodes ändern, während der Merge-Node im Viewer angezeigt wird. Dies lasst sie den Text im Bezug auf den Hintergrund sichen.

Ausgewählte Nodes sind rot umrandet. Der Inspector zeigt unter „Layout" die Tabs mit den Steuerelementen für den Text-Node an
Die entsprechenden Parameter und Einstellungen konnen Sie für jeder Node je nach Aufgabe anpassen. Sei dies die Großvorgabe, das Zentrieren der Platzierung oder eine Änderung an der Anzahl von Partikeln eines Emitter-Nodes. Durch die Vorgabe von Keyframes und Einstellungen, die sich über einen Zeitverlaufändern, wird der Effekt animiert.
Arbeiten mit Keyframes
Setzen Sie vom „Inspector“-Fenster aus einen Keyframe, indem Sie einen Rechtsklick auf einer Einstellung ausführten und Im Kontextmenu „Animate" auswahlen. Das Keyframe-Icon rechts befind der Einstellung erscheidt nun in Rot. Dies besagt, dass der Keyframe jetzt aktiviert ist und jeder von ihren vorgenommene Änderung nur auf den aktuellen Frame angewendet wird. Werden zwei oder mehr Keyframes erstellt, indem die Einstellungsparameter eines anderen Frames geändert werden, wird dazwischen ein Übergang interpoliert. Anhand der Pfeile rechts und links vom Keyframe-Icon konnen Sie den Abspielkopf auf der Timeline genau an diese Positionen bewegen.
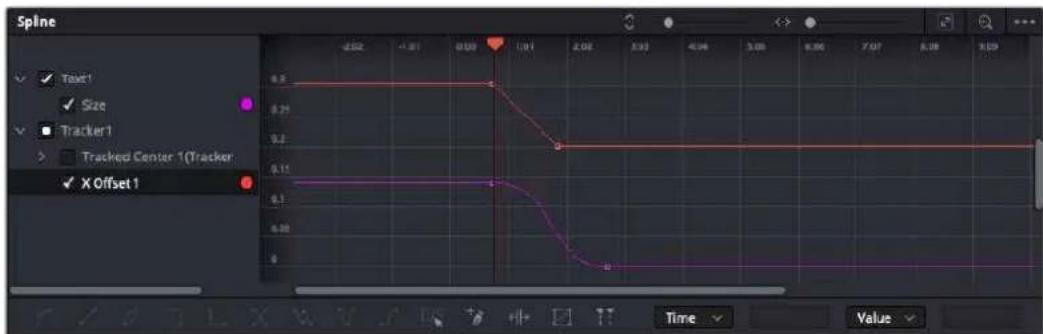
Hier wurde die Keyframe-Animation „Size" mit einer Bezierkurve geglißet. Um die Kurve zu kürzen oder zu verlangern, klichen Sie die Bezier-Ziehpunkte an. Um die Keyframe-Platzierung zuändern, klichen Sie die rechteckigen Keyframe-Icons an
Die Freiformkurve im „Spline“-Fenster gibt Ohnen noch mehr Kontrolle über ihre Keyframe-Animation. Wahlen Sie damit Keyframes aus, bspw. den ersten und letzten, und glätten Sie die Animation dazwischen anhand einer Bezierkurve. Drücken Sie hierfür Shift und die S-Taste oder rechtsklichen Sie auf einen Keyframe und geben Sie „Smooth" vor.
Mit dem Motion Tracker arbeiten und Text hinzufugen
Die folgenden Beispiele sollen Ohnen den Einsatz von Fusion better verständlichen. Sie veranschaulichen, wie Sie anhand des Tracker-Werkzeugs ein Element in einem Clip verfolgen und wie Sie diesen Element unter Verwendung der Trackingdaten mit Text verstehen.
Der Tracker verfolgt die Pixel entlang der X- und Y-Achsen. Anhand der so generierten Daten konnen Sie an ein Element weitere anknüpfen. Das ist ideal, wenn Sie die Position von Text an die Bewegung eines Objeks anpassen wollen, bspw. an ein fahrendes Auto oder an einen durch das Bild fliegenden Vogel.
1 Wahlen Sie in der Effektbibliothek das „Tracker“-Tool aus undziehen Sie es auf die Linie zwischen dem „Medialn“- und dem „MediaOut“-Node. Klichen Sie jetzt auf den Tracker-Node, um im Inspector seine Eigenschaften zu öffnen.
2 Tippen Sie auf Ihrm Keyboard, um den Tracker-Node im linken Viewer zu sichen. Nun erscheint der Clip mit dem Tracker an seiner standardmaßigen Position im Viewer. Bewegen Sie den Mauszeiger über den Tracker bis der Tracker-Ziehpunkt entscheidt. Klichen Sie oben links auf den Tracker-Ziehpunkt undziehen Sie den Tracker auf den zu verfolgenden Bereich in Ihrm Clip. Hochkontrastige Bereiche setzen sich gut verfolgen, bspw. die Kühlerfigur eines Autos. Für extra Prazision vergroßert der Tracker den betroffenen Bildbereich.
3 Klicken Sie im Inspector auf den „Track Forward“-Button, um mit dem Tracking zu beginnen. Nach abgeschlossenem Tracking entscheid ein Hinweisfenster. Klicken Sie auf OK.
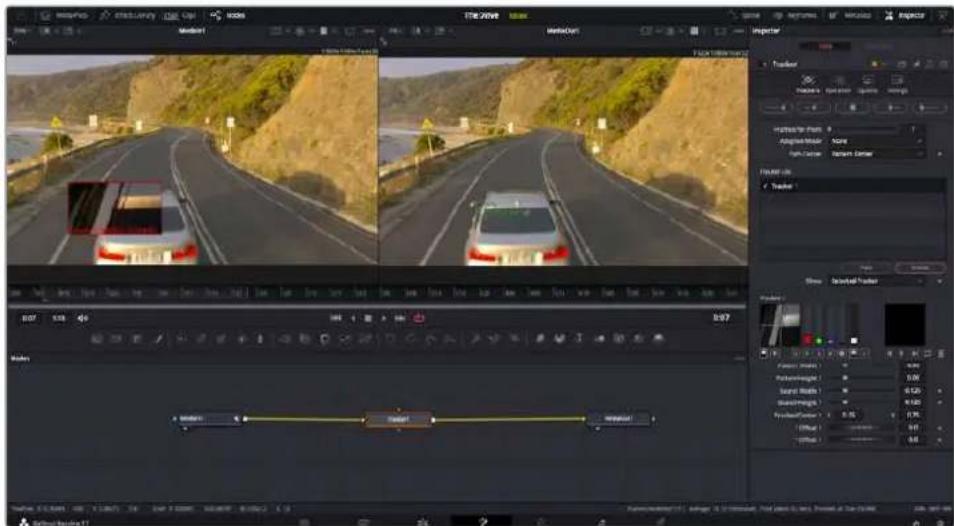
Die im Inspector verfügbar Trackings-Möglichkeiten umfassen u. a. das Rückwarts-Tracking vom letzten oder vom aktuellen Frame oder das Anhalten am bzw. Vorwarts-Tracking vom aktuellen Frame oder vom ersten Frame
TIPP Das Rückwarts- oder Vorwarts-Tracking vom aktuellen Frame aus bietet sich für Situationen an, in denen der betroffene Bereich mitten im Renderabschnitt verschwindet. Bspw. wenn sich ein Auto oder ein Vogel aus dem Bild herausbewegt. Dies gestattet es, nur die relevante Footage zu verfolgen.
Nun konnen Sie die Trackingdaten des Bewegungspfads auf ein Text-Tool anwenden.
4 Klichen Sie in der Toolbar mit den gängigen Nodes auf den „Text+“-Node und ziehen Sie diesen in das „Nodes“-Fenster in die Höhe des Tracker-Nodes. Verbinden Sie das keine Ausgaberechteck „Text" mit dem grünen Vordergrundeingang am „Tracker“-Node.
5 Klicken Sie auf den „Tracker“-Node und tippen Sie „1“, um das Merge-Ergebnis im Linken Viewer zu betrachten. Klicken Sie im Inspector im Feld „Tracker“ auf den „Operations“-Tab. Wahlen Sie im Menu unter „Operation“ die Option „Match Move“.
6 Klichen Sie auf den „Text“-Node, um seine Eigenschaften im Inspector zu öffnen. Tippen Sie ihren Text in das Textfeld undändern Sie entsprechend Ihr's Compositings die Art, Farbe und Großde der Schrift.
Auf diese Weise werden die Trackingpositionsdaten Ihres Trackers auf den Text angewendet. Um per Offset eine versetzte Platzierung des Textes zu bewirken, klichen Sie im Inspector auf den „Trackers"-Tab. Modifizieren Sie die Platzierung Dort anhand der X- und Y-Scrollräder.
Die Scrollrader unter im Tracker-Fenster des Inspectors dnen zum Anpassen der Offset-Platzierung von Text
Wird das Compositing jetzt wiedergegeben sehen Sie, wie der Text an Ihrtem getrackten Objekt haftet.
Das grüne Quadrat zeigt die aktuelle Tracker-Position entlang des grünen Pfads an, und die rote gestrichelte Linie steh für die zur Textanimation benutzte Offset-Position
Bei manchen Shots werden Sie nach abgeschlossenem Tracking vermutlich die Tracking-Punkte entfernen wollen. Bspw, wenn Ihr verfolgtes Objekt vom Bildschirm verschwindet. Mit dem Keyframe-Editor ist das ein einfacher Vorgang.
7 Öffnen Sie den Keyframe-Editor, indem Sie über dem Inspector auf den „Keyframes”-Tab klichen. Man erkennt Nodes, die einen Keyframe enthalten, an einem kleinen Pfeil...,...,...,...,...,..., ......, ... ... ... ... ... ... ... ... ... ... ... ... ... ... ... ... ... ... ... ... ... ... ... ... ... ... ... ... ... ... ... ... ... ... ... ... ... ... ... ... ... ... ... ... ... ... ... ... ... ... ... ... ... ... ... ... ... ... ... ... ... ... ... ... ... ... ... ... ... ... ... ... ... ... ... ... ... ... ... ... ... ... ... ... ... ... ... ... ... ... ... ... ... ... ... ... ... ... ...
Keyframes. Klichen Sie auf das Vergroßerungssymbol undziehen Sie ein Kästchen um den zu bearbeitenden Bereich. Dies zoomt in den Bereich hinein und lasst Sie die Keyframes better erkennen.
8 Bewegen Sie den Abspielkopf an den Standort des letzten gewünschten Keyframes. Wahlen Sie jetzt die zu entfernenden Keyframes aus, indem Sie mit ihrer Maus ein Rechtek um diese herumziehen.Die Keyframes werden nun geld markiert. Führn Sie einen Rechtsklick aus und wahlen Sie zum Löschen im Menu „Delete" aus.
TIPP Wenn ihre Effekte das System stark belasten, konnen Sie im Bereich der
Transportsteuerung per Rechtsklick die Viewer-Optionen einblenden. Dort gibt es bspw. die Proxy-Wiedergabe, mit der Sie beim Erstellen von Compositings das Beste aus ihrem System Herausholen. Weitere Einzelheiten zu allen Wiedergabeoptionen finden Sie im englishsprachigen DaVinci Resolve Handbuch.
Ihr erstes Compositing mit einem animierten Text, das einer Bewegung in Ihrer Footage folgt, ist nun vollbracht!
Um einen Bereich in Ihrm Bild mit einer planen Flache zu verfolgen, den Sie verbessern oder ersetzen möchten, steht der Planar-Tracker zur Verfugung. Die 2D-Flächenverfolgung ist praktisch, um in einem bewegten Bild bewegte Beschriftingungen und Schilder zu ändern. Man kann damit)sogar ein Bild auf einen in Ihrer Footage erscheinenden Monitor oder TV-Bildschirm setzen.
Einzelheiten zum Planar-Tracker und zu den vielen leistungsstarken Werkzeugen in DaVinci Resolves Fusion-Arbeitsraum finden Sie im englishsprachigen DaVinci Resolve Handbuch.
TIPP Beim Erstellen Ihrer visuellen Effekte im Fusion-Arbeitsraum sollen den Sie klaren, ob es sich um 2D- oder 3D-Effekte handelt, um zu entscheiden welches Merge-Tool verwendet wird. Es kann gut sein, dass Sie in einem Compositing halten sowohl 2D- als auch
3D-Effekte kombinierten. Bedenkten Sie damit, dass jeder im 3D-Raum erstellte visuelle Effekt erst als 2D-Bild gerendert werden muss, bevor er in ein 2D-Compositing eingefegt werden kann.
Wir wünschen Ohnen viel Vergnügen beim Erkunden von Fusion und seinen VFX zusammen mit der gehalten Power von DaVinci Resolves Edit-, Color- und Fairlight-Arbeitsräumen. Mit sovielen mächtigen Tools in greifbarer Höhe, kennt die Umsetzung ihrer Ideen in DaVinci Resolve keine Grenzen mehr.
Mastern Ihres Schnitts
Jetzt, da Sie ihren Edit bearbeitet, visuelle Effekte hinzugeführst und ihren Ton gemischt haben, möchten Sieihn bestimmt mit anderen teilen. Per „Quick Export“ über den entsprchenden Button oder die Menuauswahl konnen Sie ihren Timeline-Content als eigensständige Daten oder in einer Vielzahl von Formaten ausgegeben, oder weitere im Deliver-Arbeitsraum verfügbare Features verwenden.
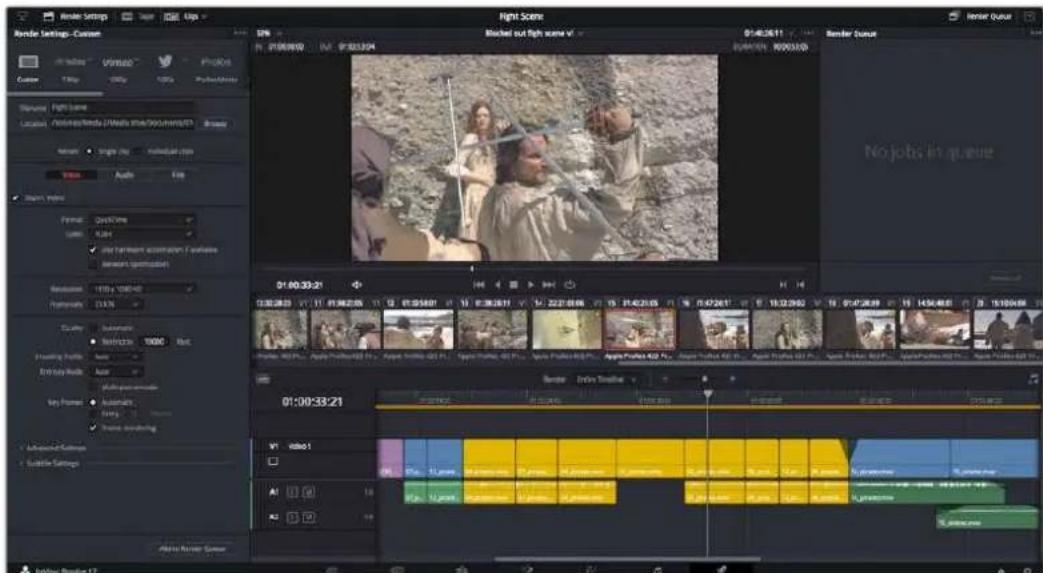
Der Export Ihres Schnitts erfolgt im Deliver-Arbeitsraum. Sie haben die Wahl zwischen denen verschiedene Videoformaten und Codec
Quick Export
Per „File“ > „Quick Export“ konnen Sie Ihr Programm schnell von jedem Arbeitsraum in DaVinci Resolve ausgegeben. Verwenden Sie dazu eines von diversen Export-Presents. Die Option „Quick Export“ erhögt auch das Exportieren und Hochladen Ihres Programms an einen Unterstützung Video-Sharing-Dienst wie YouTube, Vineo, Twitter und Frame.io.
So verwenden Sie Quick Export:
Um in Ihrer aktuellen Sendung eine Sequenz für die Ausgabe zu bestimmen, setzen Sie vom Edit-, Fusion- oder Color-Arbeitsraum aus entsprechende In- und Out-Punkte in der Timeline. Ohne die Vorgabe von In- und Out-Punkten wird die gesamte Timeline exportiert.
Wahlen Sie in der Menüleiste „File“ > „Quick Export“.
2 Wahlen Sie im Fenster, "Quick Export" aus der oben verlaufenden Icon-Zeile ein Preset und klichen Sie auf, "Export".
3 Wahlen Sie einen Verzeichnisort aus, geben Sie im Export-Fenster einen Datenamen ein und klichen Sie auf „Save". Ein Fenster mit Fortschrittsbalken erscheint, um die Exportdauer anzuzeigen.
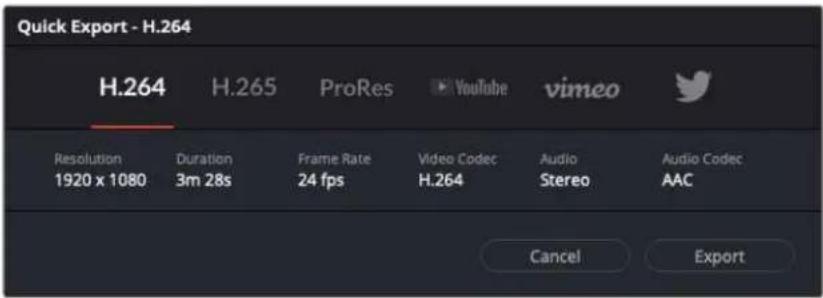
Das Dialogfenster "Quick Export"
Der Deliver-Arbeitsraum
In this work, we present a new approach to the design of an in-situ codebook for the application of machine learning algorithms. The proposed approach is based on the use of machine learning algorithms to predict the performance of a system and its components. In this work, we propose a novel machine learning algorithm that can be used to predict the performance of a system and its components.
So exportieren Sle einzelnen elzelnen Clip Ihres Schnlits:
1 Klicken Sie auf den Tab „Deliver“, um den Deliver-Arbeitsraum zu öffnen und Ihr finales Projekt zu exportieren.
2 Gehen Sie links oben im Arbeitsraum zum Fenster „Render Settings" mit den Renderepinstellungen. Für den Export haben Sie eine Reihe von Presets zur Auswahl, bspw. Presets für YouTube, Vineo und Ton. Oder Sie erstellen eigene Export-Einstellungen, indem Sie diese auf dem standardmaßigen Preset „Custom" belassen und ihre Parameter eingeben. Hier ein Beispiel: Wahlen Sie YouTube, klichen Sie auf den Pfeil sehen dem Preset und anschließend auf das Videoformat 1080p.
Die Framerate wird durch die in den Projekteinstellungen angegebene Framerate bestimmt.
3 Unterhalb der Presets sehen Sie den Timeline-Dateinamen und den Zielort für Ihr exportiertes Video. Klichen Sie auf den Button „Browse" und bestimmen Sie den Ort, an dem die exportierte Daten gespeichert werden soll. Wahlen Sie dann aus den Renderoptionen „Single Clip".
4 Im Optionsfeld unmittelbar über der Timeline ist „Entire Timeline“ vorgegeben. Dies bedeutet, dass die gesamte Timeline exportiert wird. Sie konnen jedoch auch nur einen Bereich der Timeline festlegen, wenn Sie möchen. Wahlen Sie „In/Out Range“ und bestimmten Sie mithilfe der Shortcuts „I“ und „O“ die In- und Out-Points in ihrer Timeline.
5 Klicken Sie unter in den Render-Einstellungen „Render Settings" auf die Schaltfläche „Add to Render Queue".
Ohr render-Einstellungen werden dann der Render-Warteschleife rechts im Arbeitsraum hinzugefugt. Klichen Sie jetzt lediglich auf „Start Render" und verfolgen Sie den Fortschnitt in der Warteschleife.
Nach abgeschlossenern Render konnen Sie den ausgewählten Ordner offen, auf ihren Clip klichen und ihren fertiggestellen Schnitt ansehen.
Sie verfügen nun über Grundkennnisse zu Schnitt, Farbe, Vertonung und visuellen Effekten. Wir empfehlen Ohnen, mit DaVinci Resolve zu experimentieren, um diese Fähigkeiten zu vertiefen. Weitere Informationen zu Einzelheiten und wie Sie mit Funktionen das Beste aus Ihr dem Projekt Herausholen, finden Sie im DaVinci Resolve Handbuch.
Camera Control with ATEM Mini
ATEM Minis sind ein mächtiges Werkzeug für Mehrkamera-Produktionen und Live-Streaming. Mit der Kamerasteuerungsfunktion in ATEM Software Control konnen Sie über einen ATEM Mini Mischer bis zu vier Blackmagic Pocket Cinema Cameras steuern und damit Schnitte zwischen verschiedenen Kamas ausführten. Um die Features für die Kamerasteuerung Ihres ATEM Mini zu öffnen, klichen Sie in ATEM Software Control auf die Registerkarte mit dem Kamerasymbol.
Einstellungen der Pocket Cinema Camera wie Blende, Gain, Fokus und Detailgrad sowie die Zoom-Steuerung lessen sich bei Einsatz kompatibler Objektive bequem justieren. Sie konnen auch den Farbabgleich mehrerer Kameras vornehmen und mit dem DaVinci Resolve Primary Color Corrector einzigartige Looks kreieren.
Zur schnen, prazisen und praktischen Steuerung von vier Pocket Cinema Cameras zugleich konnen Sie sarein ATEM Camera Control Panel einbinden. Weitere Informationen siehe ATEM Mini Bedienungsanleitung.
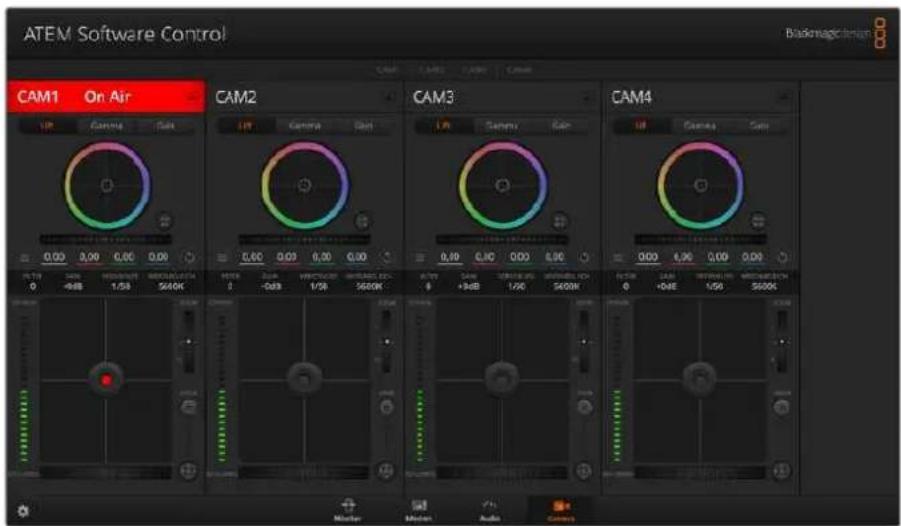
ATEM Kamerasteuerung
Die Kamerasteuerung über den Mischer Funktioniert durch Übermittlung von Datenpaketen für die Kamerabedienung über die HDMI-Eingänge Ihres ATEM Minis. Sie können also einen HDMI-Eingang Ihres ATEM Mischers mit dem HDMI-Anschluss der Kamera verbinden. Das ermöglich Ichnen die Bedienung der kameraeigenen Steuerungsfunktionen, weil die Kamera diese Steuerungspakete im HDMI-Signal erkennt.
Öffnen Sie „Einstellungen" in ATEM Software Control und belegen Sie die Tasten Ihr Mischers so, dass die jeweilige Kamera mit dem richtigen Tally angezeigt wird. Anhand der Videoverbindung von ihrer Mischer zur Blackmagic Pocket Cinema Camera profitieren Sie überdies von live Tally-Anzeigen.
Der Kamera-Arbeitsraum
Starten Sie ATEM Software Control und klichen Sie am unteren Rand der Benutzeroberfläche auf die Registerkarte mit dem Kamerasymbol. Nun wird Ohnen eine Zeile mit Blackmagic Kamera-Controlern angezeigt, die mit Kamerakennungen verfahren sind. Jedes Bedienfeld enthalt Tools, um das Bild der jeweiligen Kamera abzugleichen und zu verfeinern. Die Bedienfelder sind einfach handhabbar. Klichen Sie mit ihrer Maus die Symbole an oder passen Sie Bedienelemente per Anklichen und Verschieben an.
Auswahlder zu steuernden Kameras
Über die Registerkarten im oberen Bereich des Kamera-Arbeitsraums wahren Sie die zu steuernde Kamera anhand ihrer Nummer aus.
Kanalstatus
Die Kanalstatus-Box am oberen Rand jeges Kamerabedienfelds zeigt die Kamerakennung, den On-Air-Status und eine Sperschaltfläche an. Mit einem Klick auf die Sperschaltfläche sperren Sie alle Bedienelemente für eine spezifische Kamera. Wenn die Kamera auf Sendung ist, leuchtet der Kanalstatus rot auf und zeigt die On-Air-Warning an.
Kamera-Einstellungen
Mit dem Kamera-Einstellungen-Button unter links vom Masterfarbrad justieren Sie die Detailscharfe für das Bildsignal einzelnner Kameras.
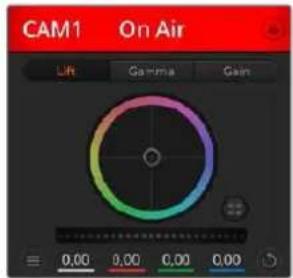
Scharfe
Die Kanalstatus-Box in jedem Kamerabedienfeld zeit an, welche Kamera sich auf Sendung befindet. Justieren Sie anhand der Farbrader die Einstellungen von Lift, Gamma und Gain einzehner YRGB-Kanä
These Einstellung dient zur Liveschärfung Ihres Bildes unmittelbar von ihren Studiokameras. Senken bzw. erhöhen Sie das Scharfungsiveau, indem Sie eine der folgenden Optionen vorgegeben: „Scharfe aus“, „Standardsscharfe" für geringfügige Scharfzeichnung, „Mittlere Scharfe" oder „Hohe Scharfe".
Farbrad
Das Farbrad ist eine leistungsstarke Funktion des DaVinci Resolve Farbkorrektors zur Vornahme farblicher Anpassungen an den Einstellungen für „Lift“, „Gamma“ und „Gain“ einzelner YRGB-Kanäe. Die Auswahl der anzupassenden Einstellung erfolgt per Klick auf eine der drei Auswahlschaltflächen über dem Farbrad.
Masterrad
Passen Sie mithilfe des Masterrads unterhalb des Farbrads die Kontraste aller YRGB-Kanä auf einmal an oder justieren Sie jeweils nur die Leuchtdichte der Einstellungen für Lift, Gamma und Gain.
Reset-Symbole
Anhand des Reset-Symbols, das sich rechts unter in allen Kamerabedienfeldern befindet, können Sie bequem auswahlen, welche Farbkorrektureinstellungen zurückgesetzt, kopiert oder eingefegt werden sollen. Jedes FarBrad verfügt über ein zugehöriges Reset-Symbol. Klichen Sie es an, um eine Einstellung auf ihren Standardwert zurückzusetzen oder um eine zu kopieren bzw. einzufugen. Gesperte Steuerelemente bleiben von der Einfügefunktion unberührt.
Das Master-Resetsymbol unten rechts im Farbkorrektorfenster lasst Sie die Farbrader für „Lift“, „Gamma" und „Gain" sowie die Einstellungen für „Kontrast“, „Sattigung“, „Farbon“ und „Lum Mix" (Leuchtdichtemischung) zurücksetzen. Sie konnen Farbkorrektureinstellungen einzeln in Kamerabedienfelder kopieren oder dies für einen durchgangigen Look für alle Kamas auf einmal tun. Die Einstellungen für Blende, Fokus, GROB und Schwarzabhebung bleiben von der Einfügefunktion unberührt. Bei Anwendung von „In alle einfugen" fordert Sie ein Warnhinweis auf, den Vorgang zu bestätigen. Dies verhindert das versehentliche Einfugen neuer Einstellungen für auf Sendung befindliche Kamas

Bei Anwendung von „In alle einfugen" fordert Sie ein Warnhinweis auf, den Vorgang zu bestätigen. Dies verhindert das versehentliche Einfugen neuer Einstellungen für auf Sendung befindliche Kameras
Blenden-/Schwarzbahbelungssteuerung
Blende und Schwarzabhebung werden über den kreisformigen Button im Fadenkreuz der einzelnen Kamerabedienfelder gesteuet. Thiser Button leuchtet rot, wenn die Kamera auf Sendung ist.
Ziehen Sie den Button zum Öffnen oder Schlieben der Blende nach oben oder unter. Bei gedrück gehaltener SHIFT-Taste ist nur der Blendenwert anpassbar.
Ziehen Sie den Button nach links oder rechts, um die Schwarzabhebung zu vertiefen oder abzuflichen. Bei gedrückt gehaltener Command-Taste (Mac) bzw. gedrückt gehaltener Steuerungstaste (Windows) latent sich die Schwarzabhebung separat justieren.

Ein rot erleuchteter Blenden-/Schwarzbhebungs-Button zeigt an, dass die jeweilige Kamera auf Sendung Ist.
Zoomsteuerung
Bei Einsatz kompatibler Objektive mit elektronischer Zoomfunktion konnen Sie Ihr Objektiv mithilfe der Zoomsteuerung ein- und auszoomen. Das Steuerelement Funktioniert so erhlich wie eine Zoomwippe an einem Objektiv, die einen Zombereich von Weltwinkel bis Tele steuert. Klichen Sie auf die Zoomsteuerung über dem GROB-Schieberegler undziehen Sie sie zum Einzoomen nach oben bzw. zum Auszoomen nach unten.
GROB-Einstellung
Mit dem GROB-Schieberegler rechts von der Blenden-/Schwarzbehungs-Button halten sich die zulässigen Blendenwerte begrenzen. Diese Funktion hilft zu verhindern, dass überbelichtete Bilder auf Sendung gehen. So stellen Sie den Grob-Grenzwert ein: Öffnen Sie die Blende mithilfe der Blendensteuerung so welt es gibt. Ziehen Sie dann den GROB-Regler nach oben oder unter, um den optimalen Blendenwert einzustellen. jetzt verhindert der GROB-Grenzwert beim Einstellungen der Blende, dass Ihr optimaler Blendenwert übersritten wird.
Blenden-Indikator
Der Blenden-Indikator links befind der Blenden-/Schwarzbehungssteuerung stelt den Öffnungszustand der Blende visuell dar. So konnen Sie sehen, wie welt sie geöffnet oder geschlossen ist. Der Blenden-Indikator wird durch die GROB-Einstellung beeinflusst.
Autofokus-Button
Jedes Kamerabedienfeld weist unter rechts einen Autofokus-Button auf. Klichen Sie auf diesen Button, um bei Einsatz eines Objektivs mit elektronischer Blendensteuerung automatisch zu fokussieren. Wichtig: Die meisten Objektive unterstützen elektronische Fokussierung. Stellen Sie jedoch bei Objektiven, die sowohl automatisch als auch manuell fokussierbar sind, den Autofokusmodus ein. Bei manchen Objektiven erfolgt dies durch Drehen des Fokussierrings nach links oder rechts.

Klichen Sie zur Scharfstellung eines kompatiblen Objektivs auf das Autofokus
Symbol oderziehen Sie den Fokussier-Regler nach rechts oder links
Manuelle Fokuseinstellung
Mithilfe des unten in jedem Kamerabedienfeld befindlichen Fokussierrings konnen Sie ihre Kamera manuell scharfstellen. Ziehen Sie den Fokussierring nach links oder rechts, um die Scharfe manuell einzustellen. Prufen Sie damit anhand des Videofeeds von der Kamera, ob Ihr Bild gewünscht scharf ist.
Kameraeinstellung Gain
Über die Kameraeinstellung „Gain" konnen Sie die von der Kamera wiedergegebenen hellen Bereiche zusätzlich verstärken. Bei Blackmagic Pocket Cinema Cameras bezieht sich diese Einstellung auf den ISO-Wert. Wichtig ist dies beim Filmen in Niedriglichtsituationen, wenn durch eine zusätzliche Verstärkung (Gain) bzw. einen higheren ISO-Wert die Lichtempfindlichkeit des Sensors erhöht werden soll. Dies verhindert eine Unterbelichtung ihrer Aufnahmen. Sie konnen Gain abschwächen oder verstärken, indem Sie den Pfeil links oder rechts von der dB-Anzeige anklichen.
Bei Bedarf können Sie den Gain-Wert verstärken. Beispielsweise bei Außendrehs wenn Sie Ihr Bild im schwächer werdenenden Licht eines Sonnenuntergangs aufhellen möchten. Zu beachten ist hierbei jeder, dass mehr Gain auch stärkeres Bildrauschen bewirkt.
Verschlusszeit-Einstellung
Die Verschlusszeit-Einstellung ist zwischen dem Farbrad und der Blenden-/ Schwarzabhebungsteuerung angeordnet. Reduzieren oder erhöhen Sie die Verschlusszeit, indem Sie ihren Mauszeiger auf die Verschlusszeitanzeige schiben und den Links- oder Rechtspfeil anklichen. Bei Blackmagic Pocket Cinema Cameras steuert diese Einstellung den Verschlusswinkel.
Eventuelles Lichtflimmern lässt sich durch Reduzieren der Verschlusszeit beseitigen. Durch eine niedrigere Verschlusszeitleen sich ihre Bilder ohne Einsatz von Gain aufhellen, da der Bildsensor so länger dem Licht ausgesetzt wird. Eine höhere Verschlusszeit reduziert auch Bewegungsunscharfe und bietet sich daher für gestochen scharfe Action-Shots mit minimaler bewegungsbedingter Unscharfe an.
Welßabgleich
Die Weißabgleicheinstellung neben der Verschlusszeitanzeige lasst sich durch Anklicken der Links- und Rechtspfeile an beiden Seiten der Farbtemperaturanzeige anpassen. Verschiedene Lichtquellen geben unterscheidlich warme oder kalte Farben aus, was Sie durch Anpassen des Weißabgleichs kompressieren können. So wird davon gesorgt, dass die Weißtone in Ihr dem Bild weiß bleiben.
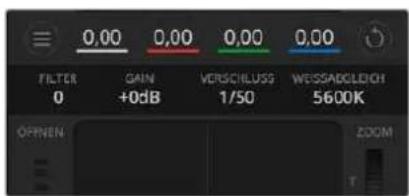
Schieben Sie ihren Mauszeiger über die Anzeln für Gain, Verschlusszeit und Weiabgleich. Über die nun angezeigten Pfeile halten sich die jeweiligen Einstellungen justieren
DaVinci Resolve Primary Color Corrector
Wer mit Farbkorrektur vertraut ist, kann von der für Mischer gebrachte CCU-artigen Benutzzeroberfläche zu einer Alternative wechseln, die dem Tool für die primäre Farbkorrektur eines Postproduktions-GradingsystemsGLEicht.
Blackmagic Kamas sind mit dem integrierten DaVinci Resolve Primary Color Corrector, einem Tool für die primäre Farbkorrektur, ausgestattet. Wer bereits mit DaVinci Resolve gearbeitet hat, kann diese Erfahrungen bei Liveproduktionen für kreatives Colorgrading in einer Blackmagic Kamera einsetzen, da dies genauso Funktioniert. Das Farbkorrekturfenster lässt sich von jedem Kamerabedienfeld aus aufklappen und bietet eine erweiterte Farbkorrektursteuerung mit zusätzlichen Einstellungen und einer Bedienoberfläche mit allen Tools für die primäre Farbkorrektur.
Zur Verfugung stehen Ohnen hier Farbrader und Einstellungen wie Sattigung. Die Einstellungen für Schatten, Mitteltöne und Lichter werden alle auf einem eingeblendet. Wechseln Sie mithilfe der Kameraauswahl-Schaltflächen oben im Fenster einfach zwischen Kameras hin und her.
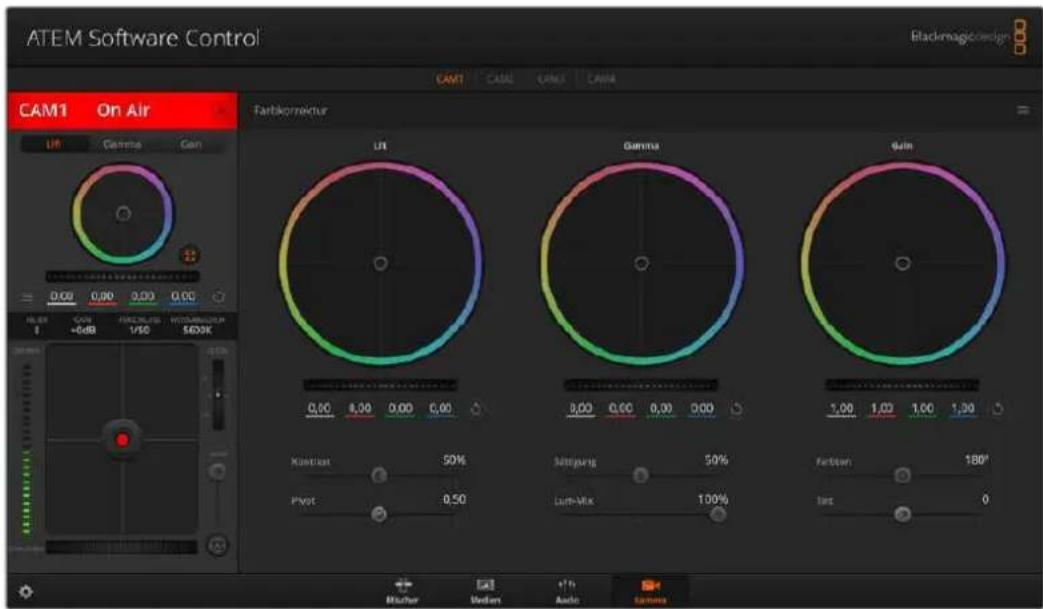
Klicken Sie das DaVinci Resolve Primary Color Corrector Symbol an, um das Farbkorrekturfenster zu erweiten und Einstellungen anzupassen
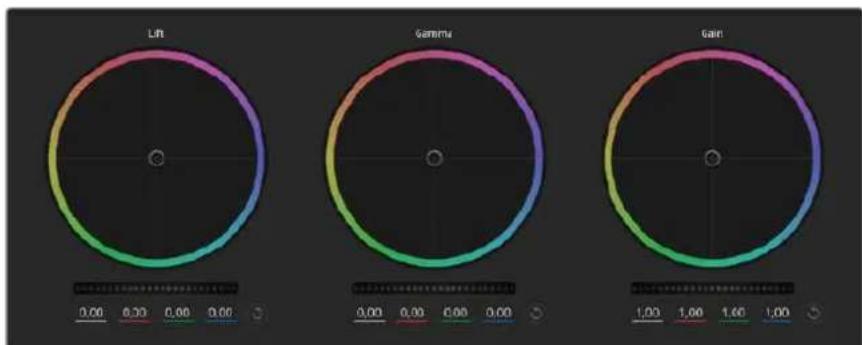
Die Farbrader fur Schatten, Mitten und Lichter im Farbkorrekturfenster
Farbrader
Fuhren Sie Irgendwo auf dem Farbrad einen Klick und eine Ziehbewegung aus
Die Farbbalance-Anzeige selbst brauchen Sie jedoch nicht zu bewogen. Die unter der Farbbalance-Anzeige gelegen den RGB-Parameter verschieben sich analog zur Farbbalance-Justierung und reflektieren so an einzelnen Kanälen vorgenommene Anpassungen.
Führer Sie mittels Shift-Klick eine Ziehbewegung auf dem Farbrad aus
Versetzt die Farbbalance-Anzeige an die konkrete Position des Mauszeigers und gestattet die Vornahme Schnellerer, extremerer Anpassungen.
Fuhren Sie einen Doppelklick auf dem Farbrad aus
Setzt die Farbanpassung zurück, ohne die Anpassung des Masterrads für diese Einstellung zu berühren.
Klichen Sie auf das Reset-Symbol oben rechts in einem Farbrad
Dies setzt die Farbbalance zusammen mit dem dazugehörigen Masterrad zurück.
Masterrader
Benutzen Sie die Masterräder unter den Farbrädern, um die „Lift“-, „Gamma“- und „Gain“- Einstellungen für jeder YRGB-Kanal individuell anzupassen.
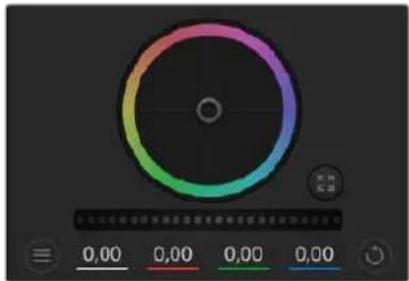
Passen Sie die Masterräder an, indem Sie den Regler nach links oder rechts ziehen
So erhmen Sie Anpassungen mithilfe des Masterrads vor:
Drehen Sles das Masterrad nach links oder rechts
Durch Verschieben nach links wird der ausgewählte Parameter des Bildes verdunkelt, durch Verschieben nach rechts wird er erhelt. Wenn Sie eine Anpassung vornehmen,ändern sich damit die darunter liegenden YRGB-Parameter und reflektieren ihre soeben vorgenommene Anpassung. Führn Sie bei gedrückt gehaltener ALT-bzw. Command-Taste eine Ziehbewegung nach links oder rechts aus, um nur den Y-Wert anzupassen. Da sich der Farbkorrektor der YRGB-Verarbeitung bedient, konnen Sie ihre Kreativität ausleben und allein durch Anpassen des Y-Kanals einzigartige Optiken erzielen. Am besten setzen sich Anpassungen am Y-Kanal vornehmen, wenn die „Lum Mix"-Einstellung für YRGB-Verarbeitung nach rechts gesetzt ist. Für reguläre RGB-Verarbeitung hingegen setzen man sie nach links. Normalerweise arbeiten die meisten DaVinci Resolve Coloristen mit dem YRGB-Farbkorrektor, da dieser mehr möglichkeiten zur Steuerung der Farbbalance bietet, ohne darauf die gesamten hellen Bereiche (Gain) zu beeinflussen.
Kontrast
Die Kontrasteinstellung lasst Sie die Spanne zwischen den dunkelsten und hellsten Tonwerten in einem Bild steuern. Die erzielte Wirkungähnelt dem Einsatz der Lift- und Gain-Masterrader zur Vornahme entgegenegasetzter Anpassungen. Die Standardeinstellung liegt bei 50% .
Sattlung
Mit der Sattigungseinstellung lassst sich der Farbanteil im Bild erhöhen oder senken. Die Standardeinstellung liegt bei 50% .
Farbton
Mit der Farbstoneinstellung setzen sich alle Farbstöne in einem Bild um den gesamten Umfang des Farbrads drehen. Die Standardeinstellung von 180 Grad zeigt die ursprüngliche Farbstonverteilung an. Die Erhöhung bzw. Senkung these Wertes bewirkt, dass alle Farbstöne gemäß der auf dem FarBrad sightbaren Farbstonverteilung gedreht werden.
"Lum Mlx"-Einstellung
Blackmagic K cameras sind mit einem integrierten DaVinci Resolve Tool für die primäre Farbkorrektur ausgestattet. DaVinci baut seit Anfang der 1980er Jahre Farbkorrektursysteme und inzwischen werden mehr Hollywood-Spielfilme mit DaVinci Resolve gegradet als mit jeder anderen Applikation.
Der in die Blackmagic Kameras integrierte Farbkorrektor bringt somit eine Reihe einzigartiger Features mit, die ihren kreativen Spielerum erweitern. Eine davon ist die YRGB-Verarbeitung.
Für das Colorgrading können Sie wahlweise RGB-Verarbeitung oder YRGB-Verarbeitung einsetzen. Highend-Coloristen favorisieren YRGB-Verarbeitung, da diese mehr Kontrolle über die Farbe gewährt, die Anpassung separator Kanäe möglich und mehr kreative Möglichkeit bietet.
Ein ganz nach rechts gezogener „Luminanz“-Schieberegler bedeutet eine 100-prozentige Ausgabe des YRGB-Farbkorrektors. Ist der „Lum Mix“-Regler ganz nach links gezogen, bedeutet das eine 100-prozentige Ausgabe des RGB-Korrektors. Der „Luminanz“-Regler kann beliebig welt nach rechts oder links gezogen werden, um eine Im entsprechenden Verhältnis gemischte Ausgabe der RGB- und YRGB-Korrektoren zu bewirken.

Kontrast, Sattigung, Farbston und Leuchtdichtemix lassen sich durch Ziehen des Schiebereglers justieren
Welche Einstellung ist die richtige? Das ist bei thisem rein kreativen Vorgang allein ihre Entscheidung. Es gibt kein richtig und falsch, Denn es zahlt nur, was Ihnen am besten gefäll!
Synchronsilen von Einstellungen
Ist die Kamera an einen ATEM Mischer gekoppelt, werden die Signale zur Steuerung der Kamera vom Mischer an die Blackmagic Studio Camera übermittelt. Wird an der Studio Camera selbst versehentlich eine Einstellung angepasst, setzen die Kamerasteuerung sie automatisch darüber, damit die Synchronisierung mit dem Mischer gewährleistet bleibt.
Der in jeder Kamerasteuerungseinheit integrierte DaVinci Primary Color Corrector lassst sich über ein DaVinci Resolve Micro Panel steuern. Über ein solches Hardware-Steuerpulf konnen Sie schnelle und prazise Farbjustagen vornehmen. Weitere Informationen siehe ATEM Mini Bedienungsanleitung.
HINWEIS Ist eine Kamera per HDMI an einen ATEM Mini angeschlossen, aber ausgeschaltet, kann sich das auf die Kamerasteuierung auswirken. Wir empfehlen, die K Cameras mit Netzstrom zu betreiben und die HDMI-Kabel vor dem Ausschalten zu trennen.
Arbeiten mit Fremdhersteller-Software
Um Clips mit ihrer bevorzugten Schnittsoftware wie DaVinci Resolve zu bearbeiten, konnen Sie die Clips von ihrer Kamera auf ein externes Laufwerk oder einen RAID kopieren und die Clips anschließend in die Software importieren. Alternativ konnen Sie ihre Clips direkt von ihrem Speicherträger importieren. Dies erfolgt über ein Dock bzw. einen Adapter für ihre CFast- oder SD-Karte bzw. über den USB-C-Port für ein USB-C-Laufwerk.
Arbeiten mit Dateien auf CFast-2.0- und SD-Karten

Schneiden Sie direkt von ihrer CFast- oder SD-Karte, Indem sie aus ihrer Kamora entnahmen und über ein CFast-2.0-Lese-/ Schreibgerat oder CFast-Laufwerk an ihren Computer anschließen
So importieren Sie ihre Clips von einer CFast-2.0- oder SD-Karte:
Entfermen Sie die CFast- oder SD-Karte aus Ihrer Blackmagic Pocket Cinema Camera.
Schlieben Sie die CFast- oder SD-Karte über ein CFast-2.0- bzw. SD-Kartenlesegerat oder ein CFast-Laufwerk an ihren Mac oder Windows Computer an.
2 Doppelklicken Sie auf die CFast- oder SD-Karte, um sie zu öffnen. So werden Ihnen die entspruchenden Ordner angezeigt, die ihre Blackmagic-RAW-Dateien oder eine Liste mit QuickTime-Movie-Dateien enthalten. Je nach ausgewähltem Aufnahmeformat liegt Ihnen möglichwerse eine Mischung aus verschiedene Datenien vor, deren Namenskonvention jedoch identisch sein sollte.
3 Ziehen Sie die gewünschten Dateien einfach per Drag-and-drop von der CFast- oder SD-Karte auf ihren Desktop oder ein anderes Laufwerk oder greifen Sie über ihre Schnittsoftware direkt auf die Dateien auf der CFast- oder SD-Karte zu.
4 Bevor Sie die CFast- oder SD-Karte aus Ihr Computer entnehmer, ist es wichtig, diese zunachst unter Mac oder Windows sichere auszuwerfen. Wenn Ihr Datenträger nicht sichere ausgeworfen wird, besteht das Risiko einer Beschädigung ihrer Footage.
Arbeiten mit Dateien von USB-C-Laufwerken
So importieren Sie Clips von einem USB-C-Laufwerk:
1 Trennen Sie das USB-C-Laufwerk von ihrer Kamera.
2 Schlieben Sie das USB-C-Laufwerk über einen USB-C-Port an ihren Mac oder Windows Computer an. Verwenden Sie vorzugsweise USB 3.0, da USB 2.0 für den Videoschnitt in Echtzeit nicht schnell genug ist.
3 Doppelklicken Sie auf das USB-C-Laufwerk, um es zu öffnen. Sie erhalten eine Liste mit QuickTime-Movie-Dateien oder -Ordern, die ihre Blackmagic-RAW-Dateien enthalten. Je nach ausgewähltem Aufnahmeformat liegt When nemenoglicherweise eine Mischung aus verschiedenen Dateien vor, deren Namenskonvention jedoch identisch sein sollte.
4 Ziehen Sie jetzt einfach per Drag-and-drop die gewünschten Dateien vom USB-C-Laufwerk auf ihren Desktop oder auf ein anderes Laufwerk. Sie können auch direkt über ihre NLE-Software auf die Dateien auf dem USB-C-Laufwerk zugreifen.
5 Es ist wichtig, dass Sie das USB-C-Laufwerk zunachst sicher auswerfen, bevor Sie es von ihrer Computer trennen.
Verwenden von Final Cut Pro X
Um ihre Clips in Final Cut Pro X zubearbeiten,müssen Sie ein neues Projekt erstellen,das dem Videoformat und der Framerate Ihrer Clips entspricht. In thisem Beispiel wird ProRes 422 HQ 1080p/24 verwendet.
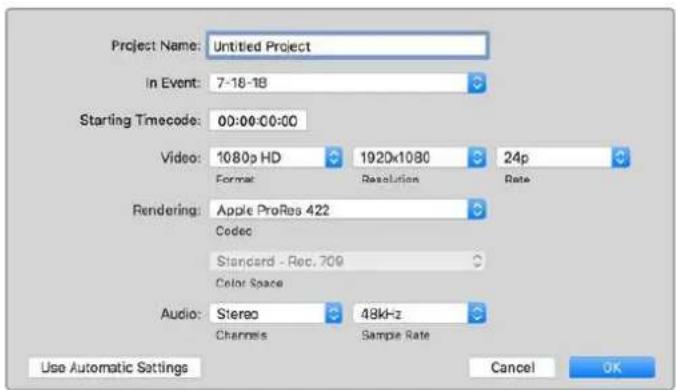
Projekteinstellungen in Final Cut Pro X
1 Starten Sie Final Cut Pro X, gehen Sie auf die Menuleiste und wahlen Sie „File" > „New Project" (Datei > Neues Projekt) aus. Es öffnet sich ein Fenster mit den Projektinstallungen.
2 Benennen Sie Ihr Projekt, und aktivieren Sie das Kontrollkastchen „Custom" (Benutzerdefiniert).
3 Stellen Sie die Videogenschaften auf 1080p HD, 1920x1080 und 24p ein.
4 Stellen Sie ihre „Audio and render properties" (Audio- und Render-Eigenschaften) auf Stereo, 48 kHz, und Apple ProRes 422 HQ ein.
5 Klichen Sie auf OK.
Gehen Sie zum Importieren von Clips in Ihr Projekt auf die Menüleiste und wahlen Sie „File" > „Import" > „Media" (Datei) > Importieren > Medien) aus. Wahlen Sie die Clips von ihrer CFast-Karte aus.
Ohre Clips lessen sich jetzt zur Bearbeitung auf die Timelineziehen.
Verwenden von Avid MediaComposer 2018
Um ihre Clips mit Avid MediaComposer 2018 zu bearbeiten, erstellen Sie ein neuen Projekt, das dem Videoformat und der Framerate Ihr's Clips entspricht. In thisem Beispiel sind die Clips auf 1080p/24 eingestellt.
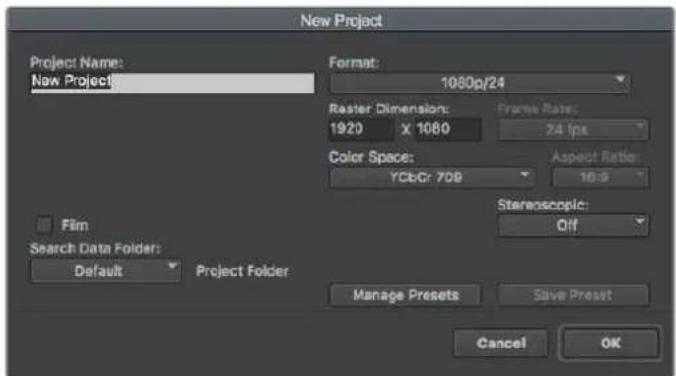
Eingabe des Projektnamens und der Projektoptionen in Avid Media Composer 2018
1 Starten Sie Avid Media Composer 2018. Das „Select Project“-Fenster (Projekt auswahlen) erscheint.
2 Klicken Sie auf den Button „New Project" (Neues Projekt) und benennen Sie Ihr neues Projekt im Fenster „New Project".
3 3 Geben Sie im „Format“-Menu „HD 1080“> „1080p/24“ vor und klichen Sie auf „OK“, um das Projekt zu erstehen.
4 Um das Projekt zu öffnen, doppelklicken Sie es im „Select Project“-Fenster.
5 5 Wahlen Sie „File“ > „Input“ > „Source Browser“ (Datei > Eingabe > Quellbrowser) und navigieren Sie zu den zu importierenden Daten.
6 Wahlen Sie im Menu ihre "Target Bin" (Ziel-Bin) und klichen Sie auf, Import (Importieren).
Sobald die Clips in der Medien-Bin erscheinen, konnen Sie sie in die Timelineziehen und mit der Bearbeitung beginnen.
Verwenden von Adobe Premiere Pro CC
Um ihre in Apple ProRes 422 HQ erstelltten Clips mit Adobe Premiere Pro CC zu schneiden, müssen Sie ein neuen Projekt erstellen und ein passendes Videoformat sowie eine geeignete Framerate einstehen. In thisem Beispiel sind die Clips auf ProRes 422 HQ 1080p/25 eingestellt.

Eingabe des Projektnamens und der Projektoptionen in Adobe Premiere Pro CC
1 Starten Sie Adobe Premiere Pro CC. Wahlen Sie im Willkommenfenster „New Project" (Neues Projekt) aus. Es öffnet sich ein Fenster mit den Projektestellungen.
2 Benennen Sie Ihr Projekt. Wahlen Sie den Speicherort für Ihr Projekt per Klick auf die Schaltfläche „Browse" und geben Sie den gewünschten Ordner vor. Klichen Sie nach Auswahl Ihrches Speicherort-Ordners Fenster „New Project" auf OK".
3 Wahlen Sie auf der Adobe Premiere Pro CC Menuleiste per „File“ > „Import“ (Datei> Importieren) die zu bearbeitenden Clips aus. Ihr Clips erscheinen im Projektfenster.
4 Ziehen Sie den ersten zu bearbeitenden Clip unter rechts im Projektfenster auf das Icon "New item" (Neues Objekt). Daraufhin wird eine neue Sequenz erstellt, die mit ihren Clip-Einstellungen übereinstimmt.
Sie konnen ihre Clips jetzt zur Bearbeitung in die Sequenz-Timelineziehen.
Blackmagic Camera Setup Utility (Dienstprogramm)
Aktualisieren der Kamerasoftware auf Mac
Laden Sie die Blackmagic Camera Setup Utility Software herunter, entpacken Sie die heruntergeladene Daten und klichen Sie auf das Disk-Image, um sich die Installationsanwendung Blackmagic Camera Setup Installer anzeigen zu halten.
Starten Sie die Installationsanwendung und folgen Sie den Anweisungen auf dem Bildschirm. Gehen Sie nach abgeschlossener Installation zu Ihrer Programme-Ordner und öffnen Sie den Ordner „Blackmagic Cameras". Diese enthalt diese Bedienungsanleitung, das Dienstprogramm Blackmagic Camera Setup sowie einen Dokumente-Ordner mit Readme-Dateien und Informationen. Sie finden dort auch ein Deinstallationsprogramm, das Sie für Updates mit neuen Versionen des Dienstprogramms Blackmagic Camera Setup benötigen werden.

Aktualisierung der Kamerasoftware auf Windows
Nachdem Sie das Dienstprogramm Blackmagic Camera Setup Utility heruntergeladen und die Daten entpackt haben, ist ein Ordner namens Blackmagic Camera Setup zu sehen, der eine PDF-Version dieser Bedienungsanleitung und das Programm Blackmagic Camera Setup Installer enthalt. Doppelklicken Sie auf das Installationsprogramm und folgen Sie den auf dem Bildschirm angezeigten Anweisungen zur Fertigstellung der Installation.
Auf Windows 10: Klichen Sie auf den „Start“-Button und wahren Sie „Alle Apps“ aus. Scrollen Sie zum Blackmagic Design Ordner. Starten Sie von Dort die Anwendung Blackmagic Camera Setup. Klichen Sie auf Windows 8.1 auf dem Startbildschirm auf das Pfeilsymbol nach unter und scrollen Sie zum Blackmagic Design Ordner. Starten Sie von Dort die Anwendung Blackmagic Camera Setup.
Aktualisierung der Produktsoftware ihrer Kamera
Schlieben Sie Ihr Computer nach erfolgter Installation des aktuellsten Blackmagic Camera Setup Dienstprogramms über ein USB-C-Kabel an ihre Kamera an. Der USB-Port befindet sich an der linken Kameraseite. Offnen Sie einfach die Gummiabdeckung, um an den Port zu gelangen.
Starten Sie das Dienstprogramm Blackmagic Camera Setup und folgen Sie den auf dem Bildschirm angezeigten Aufforderungen zur Aktualisierung der Kamerasoftware. Nach erneutem Hochfahren der Kamera erscheidt die Seite mit der Sprachauswahl.itte beachten Sie, dass mit dem Aktualisieren ihrer Kamerasoftware alle Presets und benutzerdefinierten LUTs gelöscht und Einstellungen zureckgesetzt werden. Als bewahrte Praxis empfeht es sich, ein Backup dieser Daten auf einer Speicherkarte anzufertigen, bevor Sie die Kamerasoftware aktualisieren. So konnen Sie ihre Presets und LUTs nach erfolgter Softwareaktualisierung per Import von der Speicherkarte schnell wiederherstellen.
Verwendene eines Akkugriffs
Durch Anbringen eines Akkugriffs an ihre Pocket Cinema Camera erhält die Kamera einen horizontalen Griff und lasst sich better tragen. Das kommt ihrer Durchhaltevermögen bei Drehs zugute. Wenn Sie einen Akkugriff anbringen wollen, empfehlit es sich, das an dieser Punkt zu tun.
Der Blackmagic Pocket Camera Battery Pro Grip ist für die Modelle Pocket Cinema Camera 6K Pro und 6K G2 ausgelegt. Erfasst zwei NP-F570-Akkus. Ihr Pocket Cinema Camera 6K Pro bzw. 6K G2 kann über den kamerainternen Akku zusammen mit den beiden Akkus im Griff mit Strom gespeist werden.
Der Blackmagic Pocket Camera Battery Grip ist für den Einsatz mit der Pocket Cinema Camera 4K ausgelegt. Er fasst zwei NP-F570 Akkus der L-Serie und gibtlichen über zwei Stunden kontinuierliche Drehzeit.
Der 12-Volt-DC-Stromanschluss der Kamera ermitteligt das Aufladen der Akkus im Griff, und versorgt die Kamera beim Wechseln von Akkus mit Strom. Bei ausgeschalteter Kamera kann man die Akkus im Griff über den USB-C-Port aufladen.
Anbringen eines Blackmagic Pocket Camera Battery Grips
Bevor Sie einen Blackmagic Pocket Camera Battery Pro Grip an ihre Pocket Cinema Camera 6K Pro oder 6K G2 anbringen, schalten Sie die Kamera aus und trennen Sie externe Stromquellen. Für eine maximale Laufzeit empfehlen wir, den internen Akku auch bei Einsatz eines installierten Akkugriffs in der Kamera zu belassen. Dann wird ihre Kamera von allen drei Akkus gespeist.
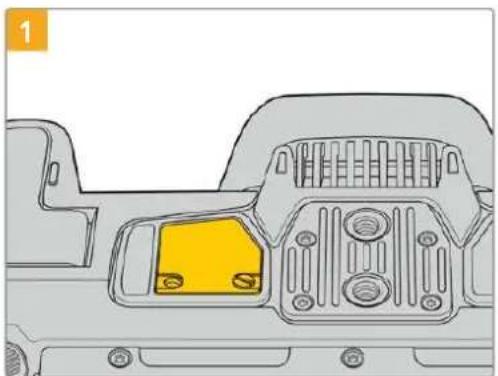
An der Unterseite der Kamera finden Sie besoin dem Akkufach eine petite Abdeckung. Lösen Sie die Befestigungsschrauben der Abdeckung.
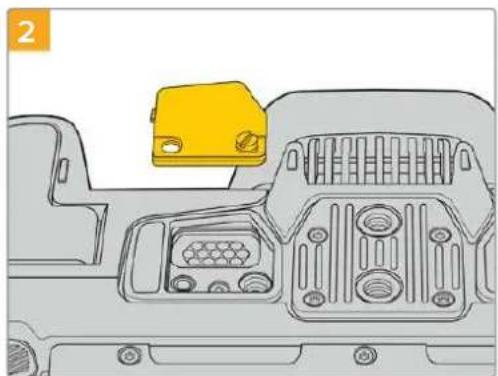
Entfernen Sie die Abdeckung vom Kameraboden. Nun liegen die elektrischen Kontakte frei, die den Strom aus den Akkus im Griff weiterleiten.

Schieben Sie die Kameraboden-Abdeckung mit den Kontakten zur sicheren Verwahrung in das Fach oben am Akkugriff. Sichern Sie die Abdeckung durch Anziehen der Schraube.

Drucken Sie den Kameragriff vorsichtig an den Boden ihrer Kamera. Richten Sie die 1/4-Zoll-Schraube oben am Akkugriff auf das 1/4-Zoll-20-Befestigungsgewinde am Kameraboden aus. Die klinen Stiffe beiderseits der 1/4-Zoll-Schraube halten mit der korrekten Ausrichtung.
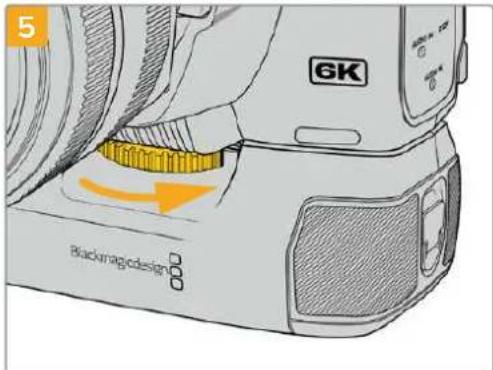
Um den Akkugriff sichere an der Kamera festzuschrauben, drehen Sie das Rad an der Vorderseite des Griffs nach rechts.
So bringen Sie einen Blackmagic Pocket Camera Battery Grip an:
Bevor Sie einen Akkugriff an ihre Pocket Cinema Camera 4K anbringen, schalten Sie die Kamera aus und trennen Sie externe Stromquellen.
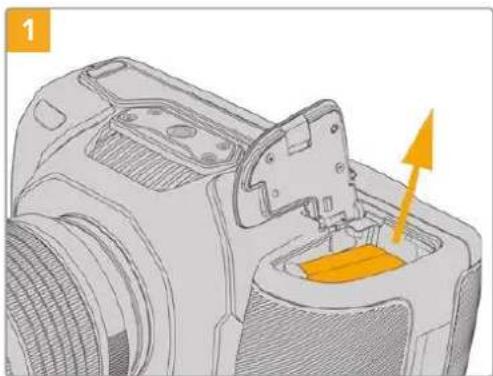
Öffnen Sie das Akkufach der Kamera und entnehmer Sie den LP-E6-Akku.
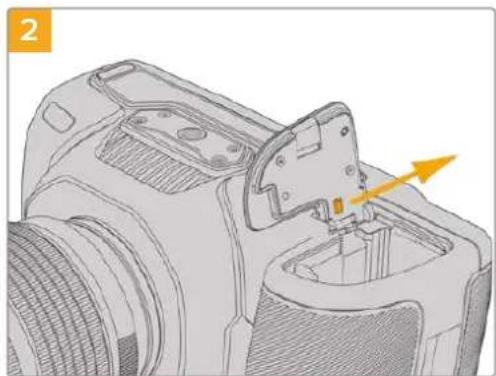
Schieben Sie den Schieber am Scharnier der Akkufachabdeckung in Richtung Kamerarücken undnehmen Sie die Abdeckung von der Kamera ab.

Zur sicheren Aufbewährung stecken Sie die Akkufachabdeckung in die darauf vorgesehene Vertiefung an der Unterseite der Akkuschale.

Klappen Sie die Akkufachabdeckung zu, damit sie mit der Unterseite des Akkueinschubs eine Ebene bildet.

Führn Sie den akkuformigen Teil des Akkugriffs in das Akkufach Ihrer Kamera ein. Die 1/4-Zoll-Schraube an der Oberseite des Akkugriffs sollen darauf auf das 1/4-Zoll-20-Befestigungsgewinde am Kameraboden ausgerichtet werden. Ein kleiner Stift darüber den 1/4-Zoll-Schraube erleichtert die Ausrichtung.
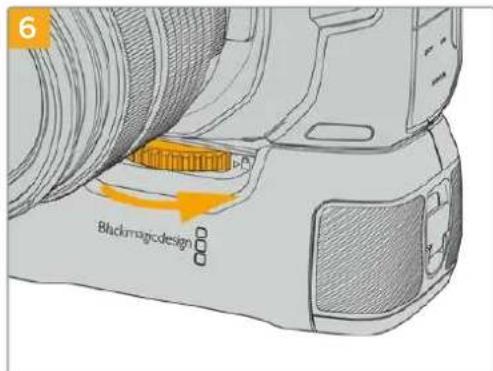
Um den Akkugriff sichere an der Kamera festzuschrauben, drehen Sie das Rad an der Vorderseite des Griffs nach rechts.

Einlagen von Akkus in den Akkugriff
Drehen Sie die Vertriegelungslasche an der rechten Seite des Akkugriffs gegen den Uhrzeigersinn, um ihn zu entriegeln. Ziehen Sie den Akkueinschub hersaus. Dies ist möglich, bevor oder nachdem Sie den Akkugriff an ihre Kamera angebracht haben.

Legen Sie zwei NP-F570-Akkus unter Bechtung ihrer korrekten Ausrichtung in den Akkueinschub ein und schieben Sie sie voneinander weg. Zwischen den beiden Akkus springt ein Sperrknopf nach oben, woraufhin die Akkus einrasten. Zum Herausnehmener Akkus drücken Sie auf den Sperrknopf und schieben die Akkus wieder aufeinander zu.
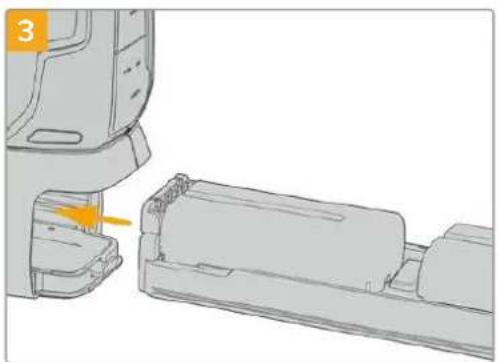
Fuhren Sie den Akkutträger in den Akkugriff ein und drehen die Verriegelungslasche im Uhrzeigersinn. Wird ihre Kamera über einen DC-Stromanschluss mit externem Strom versorgt, können Sie auch während eines Akkuwechsels weiterfilmen.

Drehen Sie die Verriegelungslasche an der rechten Seite des Akkugriffs im Uhrzeigersinn, umihn zu verliegen.
TIPP Nach Anbringen eines Akkugriffs an die Pocket Cinema Camera 4K und Einlagen zweier Akkus erscheinen oben rechts auf dem Touchscreen zwei Akkubalken. Dort konnen Sie den Ladestand bisher Akkus getrennt überwachen. Auf dem Touchscreen der Modelle Blackmagic Pocket Cinema Camera 6K Pro und 6K G2 erscheinen bei angebrachte Akkugriff drei Akkubalken. Einzelheiten finden Sie im Abschnitt „Stromversorgung".
Informationen für Entwickler (Englisch)
Blackmagic Bluetooth Camera Control
Blackmagic cameras with Bluetooth LE implement a variety of features and commands that allow users to control their cameras wirelessly. Developers have full access to these features for their custom applications.
The following services and characteristics describe the full range of communication options that are available to the developer.
Service: Device Information Service
UUID:180A
Characteristics
Camera Manufacturer
UUID:2A29
Read the name of the manufacturer (always "Blackmagic Design").
Camera Model
UUID:2A24
Read the name of the camera model ("Pocket Cinema Camera 6K" or "Pocket Cinema Camera 4K").
Service: Blackmagic Camera Service
UUID: 291D567A-6D75-11E6-8B77-86F30CA893D3
Characteristics
Outgoing Camera Control (encrypted)
UUID: 5DD3465F-1AEE-4299-8493-D2ECA2F8E1BB
Send Camera Control messages
These messages are identical to those described in the Blackmagic SDI Camera Control Protocol section below. Please read that section for a list of supported messages and required formatting information.
For an example of how packets are structured, please see the 'example protocol packets' section in this document.
Incoming Camera Control (encrypted)
UUID:B864E140-76AO-416A-BF30-5876504537D9
Request notifications for this characteristic to receive Camera Control messages from the camera.
These messages are identical to those described in the Blackmagic SDI Camera Control Protocol section below. Please read that section for a list of supported messages and required formatting information.
Timecode (encrypted)
UUID:6D8F2110-86F1-41BF-9AFB-451D87E976C8
Request notifications for this characteristic to receive timecode updates.
Timecode (HH:MM:SS:mm) is represented by a 32-bit BCD number: (eg.09:12:53:10 = 0x09125310)
Camera Status (encrypted)
UUID:7FE8691D-95DC-4FC5-8ABD-CA74339B51B9
Request notifications for this characteristic to receive camera status updates.
The camera status is represented by flags contained in an 8-bit integer:
None = 0× 00
Camera Power On = 0x01
Connected = 0× 02
Palred = 0× 04
Versions Verified = 0x08
Initial Payload Received = 0× 10
Camera Ready = 0× 20
Send a value of 0x00 to power a connected camera off.
Send a value of 0x01 to power a connected camera on.
Device Name
UUID:FFACOC52-C9FB-41A0-B063-CC76282EB89C
Send a device name to the camera (max. 32 characters).
The camera will display this name in the Bluetooth Setup Menu.
Protocol Version
UUID: 8F1FD018-B508-456F-8F82-3D392BEE2706
Read this value to determine the camera's supported CCU protocol version.
NOTE Encrypted characteristics can only be used once a device has successfully bonded or paired with the Blackmagic Camera. Once a connection has been established, any attempt to write to an encrypted characteristic will initiate bonding. For example, writing a 'Camera Power On' (0x01) message to the Camera Status characteristic.
Once bonding is initiated, the camera will display a 6-digit pin in the Bluetooth Setup Menu. Enter this pin on your device to establish an encrypted connection. The device will now be able to read, write and receive notifications from encrypted characteristics.
Blackmagic SDI and Bluetooth Camera Control Protocol
Version 1.5
If you are a software developer you can use the Blackmagic SDI and Bluetooth Camera Control Protocol to construct devices that integrate with our products. Here at Blackmagic Design, our approach is to open up our protocols and we eagerly look forward to seeing what you come up with!
Overview
This document describes an extensible protocol for sending a unidirectional stream of small control messages embedded in the non-active picture region of a digital video stream. The video stream containing the protocol stream may be broadcast to a number of devices. Device addressing is used to allow the sender to specify which device each message is directed to.
Assumptions
Alignment and padding constraints are explicitly described in the protocol document. Bit fields are packed from LSB first. Message groups, individual messages and command headers are defined as, and can be assumed to be, 32 bit aligned.
Blanking Encoding
A message group is encoded into a SMPTE 291M packet with DID/SDID x51/x53 in the active region of VANC line 16.
Message Grouping
Up to 32 messages may be concatenated and transmitted in one blanking packet up to a maximum of 255 bytes payload. Under most circumstances, this should allow all messages to be sent with a maximum of one frame latency.
If the transmitting device queues more bytes of message packets than can be sent in a single frame, it should use heuristics to determine which packets to prioritize and send immediately. Lower priority messages can be delayed to later frames, or dropped entirely as appropriate.
Abstract Message Packet Format
Every message packet consists of a three byte header followed by an optional variable length data block. The maximum packet size is 64 bytes.
| Destination device (uint8) | Device addresses are represented as an 8 bit unsigned integer. Individual devices are numbered 0 through 254 with the value 255 reserved to indicate a broadcast message to all devices. |
| Command length (uint8) | The command length is an 8 bit unsigned integer which specifies the length of the included command data. The length does NOT include the length of the header or any trailing padding bytes. |
| Command id (uint8) | The command Id is an 8 bit unsigned integer which indicates the message type being sent. Receiving devices should ignore any commands that they do not understand. Commands 0 through 127 are reserved for commands that apply to multiple types of devices. Commands 128 through 255 are device specific. |
| Reserved (uint8) | This byte is reserved for alignment and expansion purposes. It should be set to zero. |
| Command data (uint8[]) | The command data may contain between 0 and 60 bytes of data. The format of the data section is defined by the command itself. |
| Padding (uint8[]) | Messages must be padded up to a 32 bit boundary with 0x0 bytes. Any padding bytes are NOT included in the command length. |
Receiving devices should use the destination device address and or the command identifier to determine which messages to process. The receiver should use the command length to skip irrelevant or unknown commands and should be careful to skip the implicit padding as well.
Defined Commands
Command 0 : change configuration
| Category (uint8) | The category number specifies one of up to 256 configuration categories available on the device. |
| Parameter (uint8) | The parameter number specifies one of 256 potential configuration parameters available on the device. Parameters 0 through 127 are device specific parameters. Parameters 128 though 255 are reserved for parameters that apply to multiple types of devices. |
| Data type (uint8) | The data type specifies the type of the remaining data. The packet length is used to determine the number of elements in the message. Each message must contain an integral number of data elements. |
| Currently defined values are: | |
| 0: void / boolean | A void value is represented as a boolean array of length zero. The data field is a 8 bit value with 0 meaning false and all other values meaning true. |
| 1: signed byte Data elements are signed bytes | |
| 2: signed 16 bit integer Data elements are signed 16 bit values | |
| 3: signed 32 bit integer Data elements are signed 32 bit values | |
| 4: signed 64 bit integer Data elements are signed 64 bit values | |
| 5: UTF-8 string Data elements represent a UTF-8 string with no terminating character. | |
Data types 6 through 127 are reserved.
| 128: signed 5.11 fixed point | Data elements are signed 16 bit integers representing a real number with 5 bits for the integer component and 11 bits for the fractional component. The fixed point representation is equal to the real value multiplied by 2^11. The representable range is from -16.0 to 15.9995 (15 + 2047/2048). |
Data types 129 through 255 are available for device specific purposes.
| Operation type (uint8) | The operation type specifies what action to perform on the specified parameter. Currently defined values are: |
| 0: assign value | The supplied values are assigned to the specified parameter. Each element will be clamped according to its valid range. A void parameter may only be 'assigned' an empty list of boolean type. This operation will trigger the action associated with that parameter. A boolean value may be assigned the value zero for false, and any other value for true. |
| 1: offset / toggle value | Each value specifies signed offsets of the same type to be added to the current parameter values. The resulting parameter value will be clamped according to their valid range. It is not valid to apply an offset to a void value. Applying any offset other than zero to a boolean value will invert that value. |
Operation types 2 through 127 are reserved.
| Operation types 128 through 255 are available for device specific purposes. | |
| Data (void) | The data field is 0 or more bytes as determined by the data type and number of elements. |
The category, parameter, data type and operation type partition a 24 bit operation space.
| Group | ID | Parameter | Type | Index | Minimum | Maximum | Interpretation |
| Lens | 0.0 | Focus | fixed16 | - | 0.0 | 1.0 | \( 0.0 = \text {near,}1.0 = \text {far} \) |
| 0.1 | Instantaneous autofocus | void | - | - | - | trigger instantaneous autofocus | |
| 0.2 | Aperture (f-stop) | fixed16 | - | -1.0 | 16.0 | Aperture Value (where fnumber \( = \text {sqrt(2^AV)} \)) | |
| 0.3 | Aperture (normalised) | fixed16 | - | 0.0 | 1.0 | \( 0.0 = \text {smallest,}1.0 = \text {largest} \) | |
| 0.4 | Aperture (ordinal) | int16 | - | 0 | n | Steps through available aperture values from minimum (0) to maximum (n) | |
| 0.5 | Instantaneous auto aperture | void | -- - | - | trigger instantaneous auto aperture | ||
| 0.6 | Optical image stabilisation | boolean | - | - | - | true = enabled, false = disabled | |
| 0.7 | Set absolute zoom (mm) | int16 | - | 0 | max | Move to specified focal length in mm, from minimum (0) to maximum (max) | |
| 0.8 | Set absolute zoom (normalized) | fixed16 - 0.0 | 1.0 | Move to specified focal length: \( 0.0 = \text {wide,}1.0 = \text {tele} \) | |||
| 0.9 | Set continuous zoom (speed) | fixed16 | - | -1.0 | +1.0 | Start/stop zooming at specified rate: -1.0 = zoom wider fast, 0.0 = stop, +1 = zoom tele fast | |
| Video | 1.0 Video mode Int8 | [0] = frame rate -- | fps as integer(eg 24, 25, 30, 50, 60) | ||||
| [1] = M-rate -- 0 = regular, 1 = M-rate | |||||||
| [2] = dimensions -- | 0 = NTSC, 1 = PAL, 2 = 720,3 = 1080, 4 = 2kDCI, 5 = 2k16:9,6 = UHD, 7 = 3k Anamorphic,8 = 4k DCI, 9 = 4k 16:9,10 = 4.6k 2.4:1, 11 = 4.6k | ||||||
| [3] = interlaced -- | 0 = progressive,1 = interlaced | ||||||
| [4] = Color space | -- 0 = YUV | ||||||
| 1.1 | Gain (up to Camera 4.9) | Int8 | 1 | 128 | 1x, 2x, 4x, 8x, 16x, 32x, 64x, 128x gain | ||
| 1.2 | Manual White Balance | int16 | [0] = color temp | 2500 | 10000 | Color temperature in K | |
| int16 | [1] = tint | -50 | 50 | tint | |||
| 1.3 | Set auto WB | void | - | - | - | Calculate and set auto white balance | |
| 1.4 | Restore auto WB | void | - | - | - | Use latest auto white balance setting | |
| 1.5 | Exposure (us) | Int32 | 1 | 42000 | time in us | ||
| 1.6 | Exposure (ordinal) | Int16 | - | 0 | n | Steps through availableexposure values from minimum(0) to maximum (n) | |
| 1.7 | Dynamic Range Mode | Int8 enum | - | 0 | 2 | 0 = film, 1 = video,2 = extended video | |
| 1.8 | Video sharpening level | Int8 enum | - | 0 | 3 | 0 = off, 1 = low, 2 = medium,3 = high | |
| 1.9 | Recording format | int16 | [0] = file frame rate | -- | fps as integer(eg 24, 25, 30, 50, 60, 120) | ||
| [1] = sensor frame rate | - | - | fps as integer, valid whensensor-off-speed set (eg 24,25, 30, 33, 48, 50, 60, 120),no change will be performed ifthis value is set to 0 | ||||
| [2] = frame width | -- in pixels | ||||||
| [3] = frame height | -- in pixels | ||||||
| [4] = flags | -- [0] = file-M-rate | ||||||
| - | - | [1] = sensor-M-rate, validwhen sensor-off-speed-set | |||||
| -- [2] = sensor-off-speed | |||||||
| -- [3] = interlaced | |||||||
| -- [4] = windowed mode | |||||||
| 1.10 | Set auto exposure mode | int8 | - | 0 | 4 | 0 = Manual Trigger, 1 = Iris,2 = Shutter, 3 = Iris + Shutter,4 = Shutter + Iris | |
| 1.11 | Shutter angle | int32 | - | 100 | 36000 | Shutter angle in degrees,multiplied by 100 | |
| 1.12 | Shutter speed | int32 | - | Currentsensorframe rate | 5000 | Shutter speed value as a fraction of 1, so 50 for 1/50th of a second | |
| 1.13 | Gain | int8 | - | -128 | 127 | Gain in decibel (dB) | |
| 1.14 | ISO | int32 | - | 0 | 2147483647 | ISO value | |
| 1.15 | Display LUT | int8 | [0] = selected LUT | -- | 0 = None, 1 = Custom,2 = film to video,3 = film to extended video | ||
| [1] = enabled or not | -- 0 = Not enabled, 1 = Enabled | ||||||
| 1.16 | ND Filter | fixed16 | [0] = stops | 0.0 | 16.0 | f-stop of ND filter to use | |
| Audio | 2.1 | Headphone level | fixed16 | - | 0.1 | 1.0 | 0.0 = minimum, 1.0 = maximum |
| 2.2 | Headphone program mix | fixed16 | - | 0.1 | 1.0 | 0.0 = minimum, 1.0 = maximum | |
| 2.3 | Speaker level | fixed16 | - | 0.1 | 1.0 | 0.0 = minimum, 1.0 = maximum | |
| 2.4 | Input type | int8 | - | 0 | 3 | 0 = internal mic,1 = line level input,2 = low mic level input,3 = high mic level input | |
| 2.5 | Input levels | fixed16 | [0] ch0 | 0.0 | 1.0 | 0.0 = minimum, 1.0 = maximum | |
| [1] ch1 | 0.0 | 1.0 | 0.0 = minimum, 1.0 = maximum | ||||
| 2.6 | Phantom power | boolean | - | - | - | true = powered,false = not powered | |
| Output | 3.0 | Overlay enables | uint16bit field | -- - | bit flags:[0] = display status,[1] = display frame guidesSome cameras don't allow separate control of frameguides and status overlays. | ||
| 3.1 | Frame guides style (Camera3.x) | int8 | -0 8 | 0 = HDTV, 1 = 4:3, 2 = 2:4:1,3 = 2.39:1, 4 = 2.35:1,5 = 1.85:1, 6 = thirds | |||
| 3.2 | Frame guides opacity(Camera 3.x) | fixed16 | - | 0.1 | 1.0 | 0.0 = transparent, 1.0 = opaque | |
| 3.3 | Overlays(replaces .1 and .2above fromCameras 4.0) | int8 | [0] = frame guidesstyle | - | - | 0 = off, 1 = 2.4:1, 2 = 2.39:1,3 = 2.35:1, 4 = 1.85:1, 5 = 16:9,6 = 14:9, 7 = 4:3, 8 = 2:1,9 = 4:5, 10 = 1:1 | |
| [1] = frame guide opacity | 0 | 100 0 = transparent, 100 = opaque | |||||
| [2] = safe area percentage | 0 | 100 | percentage of full frameused by safe area guide(0 means off) | ||||
| [3] = grid style | - | - | bit flags:[0] = display thirds,[1] = display cross hairs,[2] = display center dot,[3] = display horizon | ||||
| Display | 4.0 | Brightness | fixed16 | - | 0.0 | 1.0 | 0.0 = minimum, 1.0 = maximum |
| 4.1 Exposure and focus tools | Int16bit field | 0x1 = zebra,0x2 = focus assist,0x4 = false color | - | - | - | 0 = disable, 1 = enable | |
| 4.2 | Zebra level | fixed16 | - | 0.0 | 1.0 | 0.0 = minimum, 1.0 = maximum | |
| 4.3 | Peaking level | fixed16 | - | 0.0 | 1.0 | 0.0 = minimum, 1.0 = maximum | |
| 4.4 | Color bar enable | int8 | - | 0 | 30 | 0 = disable bars,1-30 = enable bars with timeout(seconds) | |
| 4.5 | Focus Assist | Int8 | [0] = focus assist method | - | - | 0 = Peak,1 = Colored lines | |
| [1] = focus line color | - | - | 0 = Red,1 = Green,2 = Blue,3 = White,4 = Black | ||||
| 4.6 | Program return feed enable | Int8 | - | 0 | 30 | 0 = disable, 1-30 = enable withtimeout (seconds) | |
| Tally | 5.0 | Tally brightness | fixed16 | - | 0.0 | 1.0 | Sets the tally front and tally rear brightness to the same level. 0.0 = minimum, 1.0 = maximum |
| 5.1 | Front tally brightness | fixed16 | - | 0.0 | 1.0 | Sets the tally front brightness. 0.0 = minimum, 1.0 = maximum | |
| 5.2 | Rear tally brightness | fixed16 | - | 0.0 | 1.0 | Sets the tally rear brightness. 0.0 = minimum, 1.0 = maximum Tally rear brightness cannot be turned off | |
| Reference | 6.0 | Source | int8 enum | - | 0 | 2 | 0 = internal, 1 = program, 2 = external |
| 6.1 | Offset | int32 | - | - | - | +/- offset in pixels | |
| Confi-guration | 7.0 Real Time Clock | Int32 | [0] time | - | - | BCD - HHMMSSFF (UCT) | |
| [1] date | - | - | BCD - YYYYMMDD | ||||
| 7.1 | System language | string | [0-1] | - | - | ISO-639-1 two character language code | |
| 7.2 | Timezone | int32 | - | - | - | Minutes offset from UTC | |
| 7.3 Location | int64 | [0] latitude | - | - | BCD - sDDDdddddddddddd where s is the sign: 0 = north (+), 1 = south (-); DD degrees, ddddddddddd decimal degrees | ||
| [1] longitude | - | - | BCD - sDDDdddddddddddd where s is the sign: 0 = west (-), 1 = east (+); DDD degrees, ddddddddddd decimal degrees | ||||
| Color Correction | 8.0 Lift Adjust fixed16 | [0] red -2.0 2.0 default | 0.0 | ||||
| [1] green -2.0 2.0 default | 0.0 | ||||||
| [2] blue -2.0 2.0 default | 0.0 | ||||||
| [3] luma | -2.0 | 2.0 | default 0.0 | ||||
| 8.1 | Gamma Adjust | fixed16 | [0] red -4.0 | 4.0 default 0.0 | |||
| [1] green -4.0 | 4.0 default 0.0 | ||||||
| [2] blue -4.0 | 4.0 default 0.0 | ||||||
| [3] luma | -4.0 | 4.0 default 0.0 | |||||
| 8.2 | Gain Adjust | fixed16 | [0] red 0.0 | 16.0 | default 1.0 | ||
| [1] green 0.0 | 16.0 | default 1.0 | |||||
| [2] blue 0.0 | 16.0 | default 1.0 | |||||
| [3] luma | 0.0 | 16.0 | default 1.0 | ||||
| 8.3 Offset Adjust | fixed16 | [0] red -8.0 | 8.0 | default 0.0 | |||
| [1] green -8.0 | 8.0 | default 0.0 | |||||
| [2] blue -8.0 | 8.0 | default 0.0 | |||||
| [3] luma | -8.0 | 8.0 | default 0.0 | ||||
| 8.4 | Contrast Adjust | fixed16 | [0] pivot | 0.0 | 1.0 | default 0.5 | |
| [1] adj | 0.0 | 2.0 | default 1.0 | ||||
| 8.5 | Luma mix | fixed16 | - | 0.0 | 1.0 | default 1.0 | |
| 8.6 Color Adjust | fixed16 | [0] hue | -1.0 | 1.0 | default 0.0 | ||
| [1] sat | 0.0 | 2.0 | default 1.0 | ||||
| 8.7 | Correction Reset Default | void | - | - | - | reset to defaults | |
| Media | 10.0 | Codec int8 enum | [0] = basic codec -- | 0 = Cinema/DNG, 1 = DNxHD, 2 = ProRes, 3 = Blackmagic RAW | |||
| [1] = code variant | - | - | Cinema/DNG: 0 = uncompressed, 1 = lossy 3:1, 2 = lossy 4:1 | ||||
| - | - | ProRes: 0 = HQ, 1 = 422, 2 = LT, 3 = Proxy, 4 = 444, 5 = 444XQ | |||||
| - | - | Blackmagic RAW: 0 = Q0, 1 = Q5, 2 = 3:1, 3 = 5:1, 4 = 8:1, 5 = 12:1 | |||||
| 10.1 | Transport mode | int8 | [0] = mode | -- | 0 = Preview, 1 = Play, 2 = Record | ||
| [1] = speed | -- | -ve = multiple speeds backwards, 0 = pause, +ve = multiple speeds forwards | |||||
| [2] = flags | -- | 1<<0 = loop, 1<<1 = play all, 1<<5 = disk1 active, 1<<6 = disk2 active, 1<<7 = time-lapse recording | |||||
| [3] = slot 1 storage medium | - | - | 0 = CFast card, 1 = SD Card, 2 = SSD Recorder, 3 = USB | ||||
| [4] = slot 2 storage medium | - | - | 0 = CFast card, 1 = SD Card, 2 = SSD Recorder, 3 = USB | ||||
| 10.2 | Playback Control | int8 enum | [0] = clip | - | - | 0 = Previous, 1 = Next | |
| 10.3 | Still Capture | void | - | - | - | Capture | |
| PTZ Control | 11.0 | Pan/Tilt Velocity | fixed16 | [0] = pan velocity -1.0 | 1.0 | -1.0 = full speed left, 1.0 = full speed right | |
| [1] = tilt velocity | -1.0 | 1.0 | -1.0 = full speed down, 1.0 = full speed up | ||||
| 11.1 | Memory Preset | int8 enum | [0] = preset command | - | - | 0 = reset, 1 = store location, 2 = recall location | |
| int8 | [1] = preset slot | 0.5- | |||||
| Metadata | 12.0 | Reel | int16 | [0] = reel | 0 | 999 | - |
| 12.1 Scene Tags | signedbyte | [0] = scene tags - | - | -1 = None0 = WS1 = CU2 = MS3 = BCU4 = MCU5 = ECU | |||
| [1] = Interior /exterior | - | - | - | 0 = Exterior1 = Interior | |||
| [2] = day / night | -- | 0 = Night1 = Day | |||||
| 12.2 | Scene | string | [0-4] = scene | - | - | - | |
| 12.3 | Take | signedbyte | [0] = take number | 1 | 99 | - | |
| [1] = take tags | -- | 1 = None0 = PU1 = VFX2 = SER | |||||
| 12.4 | Good Take | void | [0] = good take | - | - | - | |
| 12.5 | Camera ID | string | [0-28] = ID | - | - | - | |
| 12.6 | Camera Operator | string | [0-28] = operator | - | - | - | |
| 12.7 | Director | string | [0-27] = director | - | - | - | |
| 12.8 | Project Name | string | [0-28] = project | - | - | - | |
| 12.9 | Lens Type | string | [0-55] = type | - | - | - | |
| 12.10 | Lens Iris | string | [0-19] = Iris | - | - | - | |
| 12.11 | Lens Focal Length | string | [0-29] = focal length | - | - | - | |
| 12.12 | Lens Distance | string | [0-49] = distance | - | - | - | |
| 12.13 | Lens Filter | string | [0-29] = filter | - | - | - | |
| 12.14 | Slate Mode | signedbyte | [0] = type | -- | 0 = Recording1 = Playback | ||
| 12.15 | Slate Target | string | [0-31] = name | - | - | - | |
Example Protocol Packets
| Operation | Packet Length Byte | ||||||||||||||||
| 0 | 1 | 2 | 3 | 4 | 5 | 6 | 7 | 8 | 9 | 10 | 11 | 12 | 13 | 14 | 15 | ||
| header command data | |||||||||||||||||
| destination | length | command | reserved | category | parameter | type | operation | ||||||||||
| trigger instantaneous auto focus on camera 4 | 844000100 | ||||||||||||||||
| turn on OIS on all cameras 12 | 255500006001000 | ||||||||||||||||
| set exposure to 10 ms on camera 4 (10 ms = 10000 us = 0x00002710) | 12 | 4 | 8 | 0 | 0 | 1 | 5 | 3 | 0 | 0x10 | 0x27 | 0x00 | 0x00 | ||||
| add 15% to zebra level (15 % = 0.15 f = 0x0133 fp) | 12 | 4 | 6 | 0 | 0 | 4 | 2 | 128 | 1 | 0x33 | 0x01 | 0 | 0 | ||||
| select 1080p 23.98 mode on all cameras | 16 | 255 | 9 | 0 | 0 | 1 | 0 | 1 | 0 | 24 | 1 | 3 | 0 | 0 | 0 | 0 | 0 |
| subtract 0.3 from gamma adjust for green & blue (-0.3 ^=0xff9a fp) | 16 | 4 | 12 | 0 | 0 | 8 | 1 | 128 | 1 | 0 | 0 | 0x9a | 0xffd | 0x9a | 0xffd | 0 | 0 |
| all operations combined | 76 | 44000100 | 255 | 50000600 | |||||||||||||
| 1 | 0 | 0 | 0 | 4 | 8 | 0 | 0 | 1 | 5 | 3 | 0 | 0x10 | 0x27 | 0x00 | 0x00 | ||
| 4 | 6 | 0 | 0 | 4 | 2 | 128 | 1 | 0x33 | 0x01 | 0 | 0 | 255 | 9 | 0 | 0 | ||
| 1 | 0 | 1 | 0 | 24 | 1 | 3 | 0 | 0 | 0 | 0 | 0 | 4 | 12 | 0 | 0 | ||
| 8 | 1 | 128 | 1 | 0 | 0 | 0x9a | 0xffd | 0x9a | 0xffd | 0 | 0 | ||||||
Hilfe
Am Schnellsten erhalten Sie Hilfe über die Online-Support-Seiten auf der Blackmagic Design-Website. Sehen Sie Dort nach der aktuellsten Support-Dokumentation für ihre Kamera.
Blackmagic Design Online Support Seiten
Die aktuellsten Versionen der Bedienungsanleitung, Produktsoftware und Support-Hinweise finden Sie im Blackmagic Support Center unter www.blackmagicdesign.com/de/support.
Kontaktaufnahme mit dem Blackmagic Design Support
Keine Antwort in unserem Support-Material gefunden? Dann gehen Sieitte auf unsere Support-Seite. Klichen Sie dort auf „Senden Sie uns eine E-Mail" und schicken Sie uns ihre Support-Anfrage. Oder klichen Sie auf „Finden Sie Ihr lokales Support-Team" und rufen Sie ihre nachstgelegene Blackmagic Design Support Stelle an.
Überprüfen der aktuell installierten Softwareversion
Um zu überprüfen, welche Version von Blackmagic Camera Setup auf Ihr Computer Installiert ist, öffnen Sie das Fenster „About Blackmagic Camera Setup".
- Öffnen Sie das Blackmagic Camera Setup Dienstprogramm auf Mac über den Ordner „Programme". Wahlen Sie im Anwendungsmenu „About Blackmagic Camera Setup" aus, um die Versionsnummer nachzusehen.
- Öffnen Sie Blackmagic Camera Setup auf Windows über das Startmenu oder den Startbildschirm. Klichen Sie auf das Menu „Hilfe" und wahlen Sie „About Blackmagic Camera Setup" aus, um die Versionsnummer nachzusehen.
So erhalten Sie die aktuellsten Softwareaktualisierungen
Prufen Sie zunachst, welche Version des Dienstprogramms Blackmagic Camera Utility auf Ihr Computer installiert ist. Sehen Sie dann im Blackmagic Support Center www.blackmagicdesign.com/de/support nach neuen Aktualisierungen. In der Regel empfieht es sich, die neuesten Updates zu laden. Vermeiden Sie jedoch Software-Updates mitten in einem wichtigen Projekt.
Gesetzliche Vorschriften

Entsorgung von elektrischen und elektronischen Geräten Innerhalb der Europäischen Union
Das auf dem Produkt abgebildete Symbol weist daraufhin, dass these Gerät nicht zusammen mit anderen Abfallstoffen entsorgt werden har. Altgeräte müssen daher zur Wiederverwertung an eine davon vorgesehene Sammelstelle übergeben werden. Mültrennung und Wiederverwertung von Altgeräten tragen zum nachhaltigen Umgang mit tatsächlichen Ressourcen bei. Gleichzeitig wird sichergestellt, dass die Wiederverwertung nicht zulasten der menschlichen Gesundheit und der Umwelt gehen. Weitere Informationen zur Entsorgung von Altgeräten sowie zu den Standorten der zuständigen Sammelstellen erhalten Sie von ihren örtlichen Müllentsorgungsbetrieben sowie vom Handl, bei dem Sie这点es Produkt erworben haben.

Dieses Gerät wurde geprüft und entspricht den Grenzwerten für Digitalgeräte der Klasse A gemäß Abschnitt 15 der FCC-Bestimmungen für Funkentstörung. Diese Grenzwerte dienen dem angemessenen Schutz gegen schädliche Störungen bei Betrieb des Geräts in einer kommerziellen Einrichtung. Geräte dieser Art erzeugen und verwenden Hochfrequenzen und konnen diese auch ausstrahlen. Bei Nichteinhaltung der Installations- und Gebrauchsvorschriften konnen sie zu Störungen beim Rundfunkempfang führen. Der Betrieb solcher Geräte im Wohnbereich führt mit großer Wahrscheinlichkeit zu Funkstorungen. In diesen Fall kann vom Betreiber verlangt werden, selbst für die Beseitigung solcher Störungen aufzukommen.
Der Betrieb unterliegt den folgenden zwei Bedingungen:
1 Dieses Gerat darkeine schadigenden Störungen hervorrufen.
2 Dieses Gerät muss allen Störungen standhalten, einschließlich Störungen, die einen unerwünschen Betrieb zur Folge haben.

R-R-BMD-201810001
R-R-BMD-20220218001
R-R-BMD-201904002
ICES-3 (A) NMB-3 (A)
ISED-Zertifizierung fur den kanadischen Markt
Dieses Gerät erfüllt die kanadischen Vorschriften für digitale Geräte der Klasse A.
Jedwede an thisem Produkt vorgenommene Änderung oder unsachgemäß Verwendung kann die Konformitätserklarung zum Erlöschen bringen.
Verbindungen zu HDMI-Schnittstellen müssen über abgeschirmte HDMI-Kabel hergestellt werden.
Die Ausstattung wurde unter Einhaltung der beabsichtigten Nutzung in einer gewerblichen Umgebung getestet. Soltte die Ausstattung in einer tatsächchen Umgebung eingesetzt werden, kann es zu Funkstörungen kommt.
BLUETOOTH
Das Produkt ist ein für Bluetooth-Drahtlostechnologie befähigtes Produkt.
Ausgestattet mit Sendermodul FCC ID: QOQBGM113
Das vorliegende Gerät erfüllt die Grenzwertbestimmungen der FCC für die Strahlenbelastung in unkontrollierten Umgebungen.
Ausgestattet mit Sendermodul IC: 5123A-BGM113
Ausgestattet mit einem in Mexiko zertifizierten Sendermodul. IFT: RCPSIBG20-2560.
Dieses Gerät erfüllt die von Industry Canada vorgegebenen lizenzfrei den RSS-Normen und ist gemäß RSS-102 Ausgabe 5 von den routinemäßigen SAR-Bewertungsgrenzen ausgenommen.
Zertifiziert für Japan unter Zertifikatnummer: 209-J00204. Dieses Gerät enthalt spezifiziertes Funkequipment, das unter den Richtlinien für die Zertifizierung technischer Konformität gemäß des japanischen Funkgesetzes zertifiziert ist.
Dieses Modul ist in Südkorea zertifiziert, KC-Zertifizierungsnummer: MSIP-CRM-BGT-BGM113
Hiermit erklart Blackmagic Design, dass die vom Produkt verwendeten Breitbart-Übertragungssysteme für den Einsatz im 2,4 GHz ISM-Band die Vorschriften der EU-Richtlinie 2014/53/EU erfüllen.
Die Volltextversion der EU-Konformitätserklarung ist per Anfrage an compliance@blackmagicdesign.com erhältlich.

Zertifizierung für Südafrika durch ICASA unter den Zulassungsnummern TA-2021/2072 für die Blackmagic Pocket Cinema Camera 6K Pro, TA-2019/1517 für die Blackmagic Pocket Cinema Camera 6K und TA-2019/1516 für Blackmagic Pocket Cinema Camera 4K.

Für Mexiko ist das Produkt unter NOM mit dem von Silicon Labs hergestellten Bluetooth-Modul mit der Modellnummer BGM113A zertifiziert.
Sicherheitshinweise
Die Blackmagic Pocket Cinema Camera eignet sich für den Einsatz in tropischen Gebieten bei Umgebungstemperaturen bis zu 40^ .
Es befinden sich keine durch den Anwender zu wartenden Teile im Inneren des Produkts. Wenden Sie sich für die Wartung an ein Blackmagic Design Service-Center in Ihr Näre.
Sorgen Sie bei sonstigen Verhältnissen für Schatten, um zu vermeiden, dass ihre Kamera und der Lithium-Akku für länger Zeit direkter Sonneneinstrahlung ausgesetzt sind. Halten Sie Lithium-Akkus vonSAMtlichen Hitzequellen fern.

Bei Verwendung des mitgelieferten Netzadapters nicht in Höhen von über 2000 m über dem Meeresspiegel einsetzen.
California Proposition
Plastikteile这点es Produkts konnen Spuren von polybromierten Biphenylen enthalten. Im US-amerikanischen Bundesstaat Kalifornien werden diese Chemikalien mit Krebs, Geburtsfehlern und anderen Schaden der Fortpflanzungsfähigkeit in Verbindung gebracht.
Weitere Informationen finden Sie unter www.P65Warnings.ca.gov.
Garantie
Eingeschränkte Garantie
Für diese Produkt gewährt die Firma Blackmagic Design eine Garantie auf Material- und Verarbeitungsfehler von 12 Monaten ab Kaufdatum. Sollte sich ein Produkt innerhalb dieser Garantiezeit als fehlerhaft erweisen, wird die Firma Blackmagic Design nach ihrem Ermessen das defekte Produkt entweder ohne Kostenerhebung für Teile und Arbeitszeit reparieren oder Ohnen das defekte Produkt ersetzen.
Zur Inanspruchnahme der Garantieleistungen mussen Sie als Kunde Blackmagic Design über den Defekt innerhalb der Garantiezeit in Kennnis setzen und die entsprechenden Vorkehrungen für die Leistungserbringung treffen. Es obliegt dem Kunden, für die Verpackung und den bezahlen Versand des defekten Produk's an ein spezielles von Blackmagic Design benannten Service Center zu sorgen und hierfür aufzukommen. S'amtliche Versandkosten, Versicherungen, Zolle, Steuern und sonstige Abgaben im Zusammenhang mit der Rücksendung von Waren an uns, ungeachtet des Grundes, sind vom Kunden zu tragien.
These Garantie gilt nicht für Mängel, Fehler oder Schäden, die durch unsachgemäß Handhabung oder unsachgemäß oder unzureichende Wartung und Pflege verursacht wurden. Blackmagic Design ist im Rahmen dieser Garantie nicht verpflichtet, die folgenden Serviceleistungen zu erbringen: a) Behebung von Schäden infolge von Versuchen Dritter, die Installation, Reparatur oder Wartung des Produkts vorzehmen, b) Behebung von Schäden aufgrund von unsachgemäßer Handhabung oder Anschluss an nichtCompatible Geräte, c) Behebung von Schäden oder Störungen, die durch die Verwendung von nicht Blackmagic Design Ersatzteilen oder -Verbrauchsmaterialien entstanden sind, d) Service für ein Produkt, das verändert oder in andere Produkte integriert wurde, sofern eine solche Änderung oder Integration zu einer Erhöhung des Zeitaufwands oder zu Schwierigkeiten bei der Wartung des Produkts führt.
ÜBER DIE IN DIESER GARANTIEERKLÄRUNG AUSDRÜCKLICH AUFGEFUHRTEN ANSPRÜCHE HINAUS ÜBERNIMMT BLACKMAGIC DESIGN KEINE WEITEREN GARANTIEN, WEDER AUSDRÜCKLICH NOCH STILLSCHWEIGEND. DIE FIRMA BLACKMAGIC DESIGN UND IHRE HändLER LEHnen JEGLICHE STILLSCHWEIGENDEN GARANTIEN IN BEZUG Auf AUSSAGEN ZUR MARKTGANGIGKEIT UND GEBRAUCHSTAUGLICHKEIT FÜR EINEN BESTIMMTEN ZWECK AB. DIE VERANTWORTUNG VON BLACKMAGIC DESIGN, FEHLERHAFTTE PRODUKTE ZU REPARIEREN ODER ZU ERSETZEN, IST DIE EINZIGE UND AUSSCHLIESLiche ABHILFE, DIE GEGENÜBER DEM KUNDEN FÜR ALLE INDIREKTEN, SPEZIELLEN, NEBEN- ODER FOLGESCHÄDEN ZUR VERFUGUNG GESTELLT WIRD, UNABHÄNGIG DAVON, OB BLACKMAGIC DESIGN ODER DER HANDLER VON DER MÖGILICHKEIT SOLCHER SCHÄDEN ZUVOR IN KENNTNIS GESETZ WURDE. BLACKMAGIC DESIGN IST NICT HAFTBAR FÜR JEGLICHE WIDERREchte Liche VERWENDUNG DER GERÄTE DURCH DEN KUNDEN. BLACKMAGIC HAFTET NICHT FÜR SCHÄDEN, DIE SICH AUS DER VERWENDUNG DES PRODUKTS ERGEBEN. NUTZUNG DES PRODUKTS AUF EIGENE GEFAHR.
Copyright 2022 Blackmagic Design. Alle Rechte vorbehalten. „Blackmagic Design", „URSA", „DeckLink", „HDLink", „Workgroup Videohub", „Multibridge Pro", „Multibridge Extreme", „Intensity" und „Leading the creative video revolution" sind eingetragene Warenzeichen in den USA und in anderen Ländern. Alle anderen Unternehmen sind möglicherweise Warenzeichen der Jeweiligen Firmen, mit denen sie verbunden sind.
Die „Bluetooth“-Wortmarke, -Marke und -Logos sind eingetragene Warenzeichen von Bluetooth SIG, Inc. und werden von Blackmagic Design im Rahmon einer erteilen Lizenz verwendct. Andere ausgewiesene Markennamen und Handelsmarken gehoren ihren jeweiligen Eigentumern.
Blackmagic
Pocket Cinema Camera


Bienvenido
Gracias por haber adquirido este produit.
En 2013, Ianzamos el modelo Blackmagic Pocket Cinema Camera original. Nosemotionaba haberdisnadounacameracompactayporttilconunrango dinamico amplioyuna calidad de imagen sin igual.Dada la enormecantidade comntariospositivos que recibimos, decidimoscrear nuevas versionesde este modelo con prestaciones adiconales.
El Modelo Blackmagic Pocket Cinema Camera 4K incluye la misma montura Micro Cuatro Tercios que la version original, lo cual permite aprovechar objetivos existentes. Por su parte, los modelos Blackmagic Pocket Cinema Camera 6K G2 y Pocket Cinema Camera 6K Proceean con una montura que brinda la posibiliad de emplear lentes EF y filmar con resolution 6K a 60 f/s.
Gracias al rango dinámico de 13 pasos y a los dos valores ISO nativos, la CAMERA offre la OPPUNITY de Obtener imagenes cinematograficas que captan tu visión creativa y la mejoran.
Nos gustaria ver la creatividad que eres capaz de lograr con这些 modelos y esperamos recibir tus sugerencias con disrespect a新品as prestaciones que debeninos incluir.
Giant Petty
Grant Petty
Director executivo de Blackmagic Design
Índice
Uso de un modelo específico 666
Primeros pasos 666
Colocacion del objetivo 666
Encendido de la-camera 668
Alimentación de la camaría
mediante el cable incluso 668
Soportes de grabacion 669
Tarjetas CFast 669
Tarjetas SD 671
Unidades USB-C 673
Preparación de soportes para
la grabacion 674
Preparación de soportes de
grabajo en los modelos
Blackmagic Pocket Cinema Camera 675
Preparación de soportes de
grabación en equipos Mac 677
Preparación de soportes de
grabajo en equipos Windows 678
Grabación 679
Grabación de material audiovisual 679
Blackmagic RAW 680
Grabación en Blackmagic RAW 680
Frecuencias deImagen
máximas para el sensor 683
Tiempo de grabacion 684
Reproducción 690
690
Partefrontal 690
Lateral derecho 691
Lateral izquierdo 692
Panel superior 694
Parte inferior 696
Partetrasera 697
Controles de la pantalla táctil 700
Ajustes 723
Panel de options 723
Ajustes de grabacion 723
Convencion para la
nomenclatura de archivos 729
Ajustes de monitorizacion 729
Ajustes de audio 736
Configuración 739
Ajustes 751
Tablas de conversion tridimensionales 754
Metadatos 756
Claqueta virtual 757
Salida de video 762
Blackmagic Zoom y Focus Demand 762
Conexión e instalación en la CAMERA 763
Uso del accesorio Blackmagic
Focus Demand 765
Uso del accesorio Blackmagic
Zoom Demand 765
DaVinci Resolve 767
Organizador de proyectos 767
Edicón con el modulo Montaje 768
Agregar clips al panel multimedia 771
Recortar clips en la linea de tiempo 772
Vista de recorte de audio 772
Agregar titulos 773
Archivos Blackmagic RAW 774
Etalongar los clips en el modulo Color 777
AgregarunaPowerWindow 780
Uso de complementos 782
Mezclar audio 783
Efectos visuales y
composiciones en el modulo Fusion 788
Masterizacion 796
Exportación rápida 796
Modulo Entrega 797
Control de la CAMERA mediante
elmodeloATEM Mini 798
Herramentas de DaVinci
Resolve para correcciones primarias 802
Otros programas de edition 805
Acceso a archivos en tarjetas
SDyCFast2.0 805
Acceso a archivos en unidades USB-C 805
Final Cut Pro X 806
MediaComposer2018 806
Premiere Pro CC 807
Programa usitllario de la webcam 808
Uso de la empuñadura para baterías 809
Información para desarrolladores
Blackmagic Bluetooth Camera Control 812
Blackmagic SDI and Bluetooth
Camera Control Protocol 814
Example Protocol Packets 823
Ayuda 824
Normativas 825
Seguridad 826
Garantía 827
Uso de un modelo spécifique
Los modelos Blackmagic Pocket Cinema Camera 6K Pro, 6K G2 y 4K tienen una aparancia similar. Todos@cuentan con el myself armazon y permiten captar imagenes exceptionales con un amplio rango dinamico. Los botones de control y los manos en pantalla tienen la misma distribución, y el funciona de las camaras es basicamente el myself.
Los modelos Blackmagic Pocket Cinema Camera 6K Pro y 6K G2 incluyen un sensor Super 35 y una montura para objetivos EF con el icono «6K» al costo. Por su parte, la version Blackmagic Pocket Cinema Camera 4K-ofrece un sensor y una montura Micro Cuatro Tercios.

Blackmagic Pocket Cinema Camera 6K Pro
Primeros pasos
Para comenzar a utiliser la CAMERA, basta con colocar un objetivo y encenderla.
Colocacion del objetivo
Los modelos Blackmagic Pocket Cinema Camera 6K G2 y 6K Pro funcional con objetivos EF,@mstead que la version Blackmagic Pocket Cinema Camera 4K embarca lentes Micro Cuatro Tercios. La instalacion del objetivo se realiza de la mesma manera en todos los modelos Pocket Cinema Camera. El primer paso consiste en quitar la taps protectora. Mantenga presionado el boton de bloqueo y gire la tapa protectora de la montura hacia la izquierda para aflojarla y qutarla.
Para colocar una montura EF o Micro Cuatro Tercios:
1 El punto en el objetivo debe estar alineado con el de la montura de la camar. Muchos modelos tienen un indicator visual, por exemple, un punto rojo, azul o blanco.
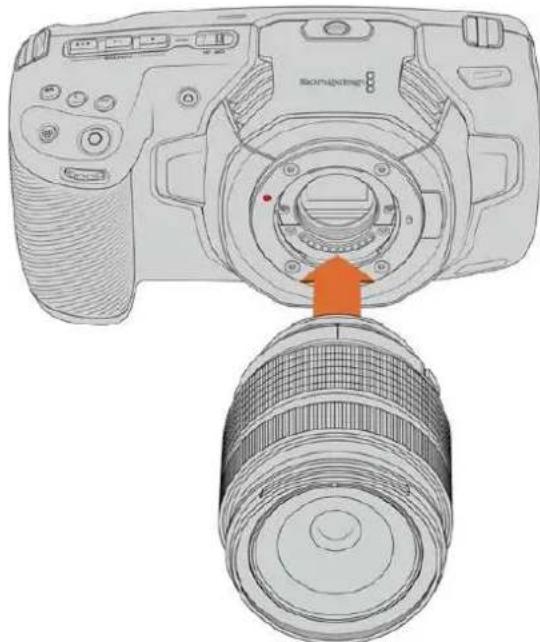
2 Inserte el objetivo en la montura y girelo hacía la derecha hasta que calce en su lugar.
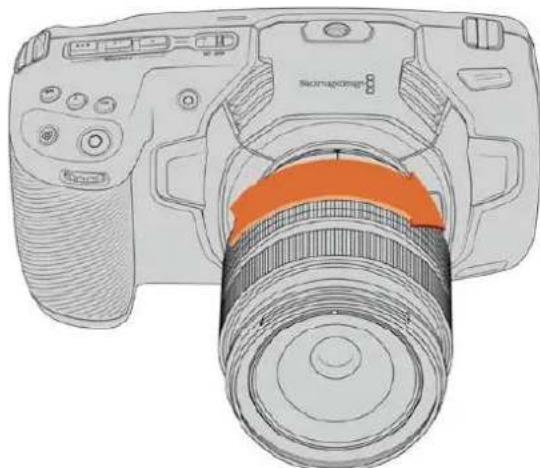
Colocacion de un objetivo Micro Cuatro Tercios en el Modelo BlackmAGIC Pocket Cinema Camera 4K
3 Para qutar el objetivo, mantenga presionado el boton de bloqueo, girelo hacer la izquierda hasta aflojarlo y retrelo con cuidado.
NOTA: Cuando no hay ningún objetivo colocado en la lármá, el filtro de vidrio que cubre el sensor quéda expuesto al polvo y la suscedad, por loquel se recomienda cubrirlo con la tapa protectora, de ser posible.
Encendido de la-camera
Una vez instalado el objetivo, esnecessary suministrar corriente electrica a la camera. Los modelos Pocket Cinema Camera 6K Pro y 6K G2 funcionan con baterias NP-F570,minteras que la version Pocket Cinema Camera 4K utilize baterias LP-E6.A su vez,es possible insertar dos baterias NP-F570 en la empuñadura Blackmagic Pocket Camera Battery Grip o conectar las cabras directamente a una toma de corriente mediante el adaptorador de corriente alterna incluido. Para Obtener mas informacion al respecto, consulte el apartado Uso de la empuñadura para baterias.
Colocacion de la bateria y encendido de laamera
Los modelos Pocket Cinema Camera 6K Pro y 6K G2的功能an con baterias NP-F570, cuando que la version Pocket Cinema Camera 4K utilizes baterías LP-E6. Se incluye una batería con las cármas, pero en caso de necesitar othera adiciones, es possible acquirirlas en todos los distribuidores de productos Blackmagic Design o enequalquier Tienda especializada en equipos audiovisuales.
1 Presione el seguro en la parte inferior de la CAMERA a fin deAbrir la tapa del compartmento para la bateria.
2 Inserte la bateria con los contactos orientados hacía la lármá y empújela hasta que calce en su lugar.
SUGERENCA: Para extraer la batería, deslice el seguro hacer la parte frontal de la-camera.
3 Cierre la tapa del compartimiento para la batería y presiónela hasta que calce en su lugar.
4 Mueva el interruptor en la parte superior de la CAMERA a la posicion ON para encenderla. Para apagarla, muevalo a la posicion OFF.
Alimentación de la CAMERA mediante el cable incluido
El adaptador de 100-240 V para corriente alterna incluido con la CAMERA permite suministrar corriente a launidad y cargar al mesmo tiempo la batería interna o las dos baterías insertadas en la empañadura. Por su parte, el conductor para corriente continua cuenta con un mecanismo de bloqueo que impide que el cable se desconecte accidentally.
Para conectar una fuente de alimentacion externa
1 Enchufe el adaptador de 12 V en una toma de corriente.
2 Abra el protector de goma en el lateral izquierdo de la camera y gire el conductor del cable a fin de que coincida con lamania hendidura en la parte superior de la conexión para fuentes de alimentación. Empujé el conductor suavamente hasta que calce en su lugar.
3 Para desconectarlo, retraiga la cubierta de goma que lo rodea y tire del mesmo.
Si la CAMERA tiene una batería y a su vez se encuesta conectada a una fuente de alimentación externa, funciona con la corrente suministrada por estaULTima.Al desconectarla,seguirafúnctorando con la batería.
La batería insertada en la CAMERA suece cargarse a trovés del puerto USB si la unidad está apagada. Este brinda la posibidad de utilizing cargadores portátilles cuando la unidad no está en uso. Los modelos Blackmagic Pocket Cinema Camera admiten cargadores USB de 5 V-10 W. también es possible emplear cargadores compatibles con Tecnología USB y USB PD. Estos últimos generalmente disponen de una conexión USB-C y proportionsionan un voltaje de 20 V, por lo which el tiempo de cargas menor. Cabe destacar además que la batería interna suece cargarse a trovés de la entrada de 12 V para corriente continua cuando la CAMERA está encendida o apagada.
SUGERENCIa: Si la bateria está caliente debo al uso, la velocidad de carga se reduce.
hasta que la temperatura disminuye a 45^ . Recomendamosdeerla enfiar durante 15 instantos antes de cargarla.
Ya está todo lista para insertar un soporte de almacenacimiento y comenzar a grabar.
Soportes de grabación
Los modelos Blackmagic Pocket Cinema Camera graban imágenes en tarjetas SD, UHS-II o CFast 2.0.
Asimismo, es possible conectar discos USB-C externos mediante el puerto de expansión para augmentar la capacité de almacenimiento.
Tarjetas CFast
Estas unidades son capaces de procesar datos a gran velocidad, de modo que son ideales para grabar contentsos con una alta fecuencia de imagen. Consulte el apartado Grabacion para obtenir mas informacion sobre las fecuencias maximas para cada tipo.
NOTA: Aúnque por lo general las tarjetas CFast 2.0 son rápidas, enamongas unidades la velocidad de descrirura es menor a la de lectura. Asimismo, la velocidad de transferencia de datos maxima pueda variar de un modelo a除外. Por consiguiente, acontejamos emplear solo las tarjetas recomendadas en este manual para garantizar la calidad de la grabación con la Frequencia de imagen seleccionada.
Para Insertar una tarjeta CFast:
Para acceder a las ranuras de las unidades de almacenimiento, deslice la tapa del compartmento en el lateral derecho横向 la parte posterior de la CAMERA.

La tapa se abrirá, brindando acceso a las ranuras para tarjetas CFast y SD.

Inserte la tarjeta en la ranura correspondiente y empujela hasta que calce en su lugar. Para ello, no deben sernecessary ejercerdemasiada fuerza. Si眼看a extraer una tarjeta SD de la camera, empujela ligeramente y bajo sueltela.

En la parte inferior de la pantalla táctil se indica el nombre de las tarjetas CFast detectadas y el tiempo de grabación restante.
Las tarjetas SD y CFast se insertan del mesmo modo. Consulte elApartado Como insertar una tarjeta SD para Obtener mas informacion al respecto.
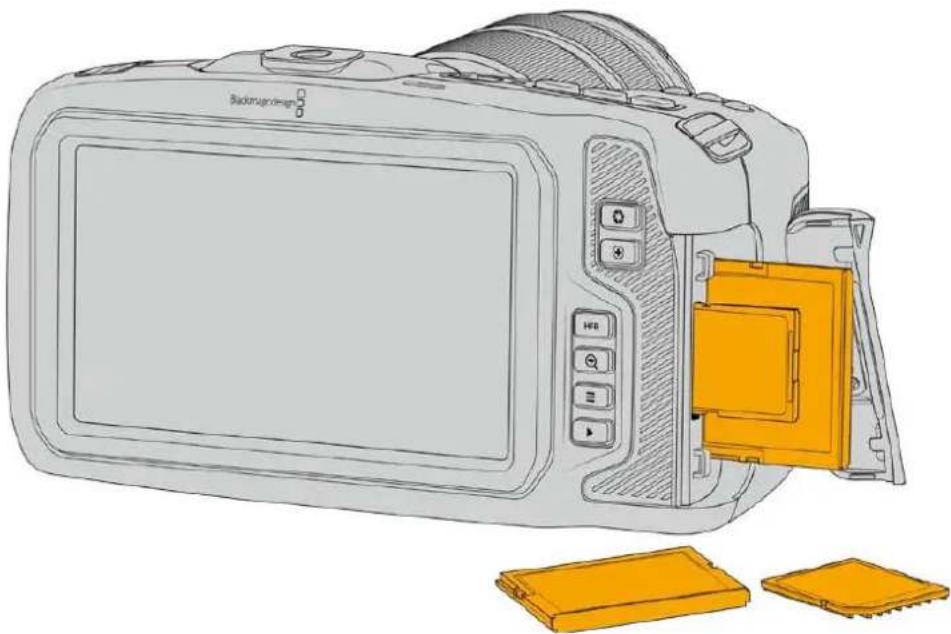
Elección de una tarjeta CFast 2.0 adequada
Al trabajo con imagenes que requiren transferir datos con una gran rapidez, es importante verificar cuidadosamente la tarjeta CFast empleada, ya que estas unidades de almacenimiento ofrecen distintas velocidades de lecture y escritura.
Visite nuestra págin de soporte专业技术 para Obtener informacion adiconional sobre las tarjetas CFast compatibles.
Tarjetas SD
La CAMERA también admite tarjetas UHS-I y UHS-II de alta velocidad. Las primeras resultan mas economicas al grabar en formatos comprimidos con alta definccion, cuando que las segundas ofrecen mayor velocidad y permiten captar imagenes Blackmagic RAW y UHD en ProRes.
Con las tarjetas SD, es possible emplear soportes de almacenamento mas economicos al grabar en formatos comprimidos con alta definacion.
Las versiones SDXC y SDHC se utilizean habitualmente en camaras fotograficas y videocamaras comunes. Si ha empleado con anterioridad una CAMERA DSLR o los modelos Blackmagic Micro Cinema Camera y Pocket Cinema Camera, o el dispositivo Blackmagic Video Assist, probablemente ya disponible de tarjetas SD compatibles.
En proyeicos que no requieren archivos de alta resolution, o cuando esnecessary grabar durante periodos prolongados, este tipo de tarjetas resulta mas economico. Asimismo, es possible emplear unidades de menor velocidad y calidad para almacenar tablas de conversion (LUT) y ajustes predeterminados.
Para Insertar una tarjeta SD:
Para acceder a las ranuras de las unidades de almacenimiento, deslice la tapa del compartmento en el lateral derecho横向 la parte trasera de la cámara.
La tapa se abrirá, brindando acceso a las ranuras para las unidades de almacenamento.
Inserte la tarjeta con la etiqueta orientada hacer la pantalla táctil y empújela hasta que calce en su lugar. Paraarlo, no deben sernecessary ejercerdemasiada fuerza. Si眼看a extraer una tarjeta SD de la CAMERA, empújela ligeramente y bajo suétela.
En la parte inferior de la pantalla táctil apareceré el nombre de la tarjeta SD detectada y el tiempo de grabación restante.
Elección de una tarjeta SD adequada
Para filmar en definirion UHD, DCI 4K o 6K, aconsejamos utiliser tarjetas UHS-II de mayor velocidad. Cabe destacar que es importanteemployar este tipo de unidades al grabar en HD, UHD, DCI 4K o 6K. Las tarjetas UHS-I son adecuadas para almacenar contentsos en HD. Estas permiten procesar datos rapiamente y ofrecen mas capacité. Generalmente, los soportes de almacenamento mas velocaces brindan un maior desempeño.
Antes de usar una tarjeta, esnecessary formatearla mediatingel systema HFS+ o exFAT.
Este procedimiento es sencillo y pueda realizarse en la CAMERA. Consulte elApartado Ajustes para Obtener mas informacion al respecto.
Tambien es possible formatear la tarjeta mediante un equipo Mac o Windows. En el primer caso, recomendamos utiliser el formatting HFS+ propio del sistemas operativo macOS, también conocido como OS X Extended.
Visite nuestra págin de soporte专业技术 para Obtener informacion adiconional sobre las tarjetas SD compatibles.
NOTA: Recomendamosemployar tarjetas CFast 2.0 para grabar con alta resoluzione y fecuencia de imagen, ya que son mas rápidas y.Ofrecen un mejor rendimiento.
Bloqueo y desbloqueo de tarjetas SD
Es possible bloquear las tarjetas SD para registrar que se modifique su contenido. Antes de insertar la unidad en la camaraja, compruebe que no se encontrar protegida. Para desbloquearla, mueva el peuño interruptor en el lateral izquierdo hacer la posicón más cercana a los conectores. Una vez finalizada la grabación, la tarjeta pueda bloquearse nuevomente.
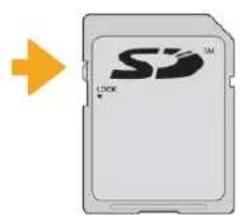
Mueva el interruptor hacia arriba o abajo para bloquear o desbloquear la tarjeta SD.
Si aparece la palabra Protegida en lugar del tiempo de grabación disponible y un candido+junto al nombre de tarjeta SD en el menu de almacenimiento,esto significa que la unidad está bloqueada. En este caso, es preciso desbloquearla antes de grabar imagenes,ayar fotografias o exportar tablas de conversion y ajustes predeterminados.

Losindicadores de capacitiesituados en la parte inferior de la pantalla lacill, muestran el tiempo de grabacion restante o si las tarjetas estan bloqueadas.
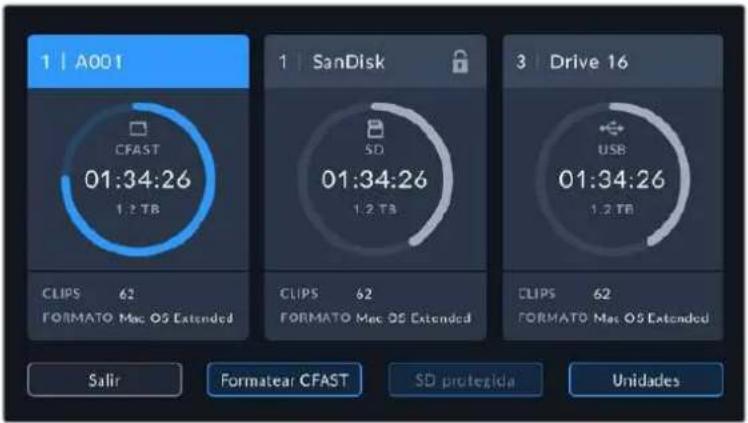
Pulse el indicator correspondiente al soporte de grabacion en la parte inferior de la pantalla a fin de acceder a las options para dicha unidad.
Unidades USB-C
Las cármas incluyen un puerto de expansión que permitte conectar discos USB-C externos. Estas unidades de gran capacité son rápidas y brindan la posibiliad de grabar durante periodos más prolongados, lo cual es importante al filmar eventos extensos.
Una vez finalizada la grabación, launidad pueda conectarse directamente a un equipo informativo para editor el material sin necessities de copiarlo.
Para conectar una unidad USB-C:
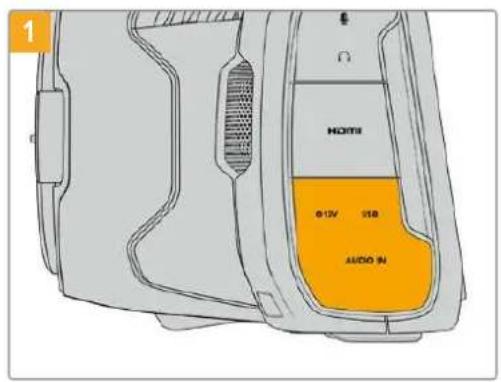
Abra la tapa protectora de goma en el lateral izquierdo de la-camera y conecte el除外 extremodel cable al puerto USB-C.

Conecte el extremo de un cable USB-C a launidad.
NOTA: Al conectar una unidad USB-C a la CAMERA, esta se usa como soporte de almacenimiento principal, de modo que la ranura para tarjetas SD no está disponible.
Para usar una tarjeta SD, desconecte launidad USB-C de la CAMERA.
Elección de unaunidad USB-C adecuada
Estas unidas han sido diseñadas paraOfrecer mayor velocidad ycapacidad de almacenamento. Además de ser compatibles con una amplia variedad de dispositivos,uen adquirirse fácilmente enequalquier tienda especializada en productos electronicos.Sin embargo,conviene mentionar que la cinematografia es solo uno de los fines con los que se employan,de modo que es fundamental escoger el modelo adecuado, a efectos de contear con la velocidad sufiente para grab imagenes en resolution 6K,4K o UHD.
Muchas de estas unidades han sido diseñadas para equipos informáticos domesticos y no son lo suficientemente rápidas como para almacenar imagenes en dichas definiciones.
Visite nuestros págin de soporte专业技术 para ver una listaactualiza de modelos recomendados.
Nota importante sobre la velocidad de las unidades USB-C
Algunas unidades USB-C no son capaces de grabar imagenes a la velocidad estipulada por el fabricante. Este se debe a que se comprimen los datos ocultos para lograr una mayor velocidad de descriutura, pero esta技术水平abring la posibidad de alcanzar dicha velocidad al almacenar ARCHivos simples. Sin embargo, la informacion de una imagen incluye otheros paramedros, tales como el nivel de ruido y datos relativos a los pixeles, que son mas aleatorios, y por lo tanto, comprimirlos no ayudamasiado.
La velocidad de descrirura de algunos unidades USB-C puede ser hasta un 50% menor que la indica por el fabricante. Por consiguiente, ahora según sus espécificaciones son capaces de almacenar material audiovisual, en realizad carecen de la velocidad necesaria para grabar imagenes en tiempo real.
El programa Blackmagic Disk Speed Test permite determinar con precision si lainstitution USB-C es adecuada para grabar y reproducir ARCHivos audiovisuales a una alta velocidad.Esta aplicacion simul el almacenamento de datos, por lo que los resultados son similares a los que se obtendrnan al grabar imagenes. Segun las pruebas realizadas,emos affirmar que los modelos mas theyamos y de mayor calidad son, por lo general, mas rapiidos.
Esta aplicacionuedeescargarsedeselAppStore,yademasexistenvisionespara WindowsymacOSincluidas enelprogramaBlackmagicDesktopVideo,queestadisponible en la categoriaCaptura y reproduction de notrearpagina de soporte专业技术.
Preparación de soportes para la grabación
Tanto las tarjetas CFast o SD como las unidades USB-C peuvent formatearse utilizing la funciona Formatear tarjeta en el panel de options de la camera, o mediante un equipo Mac o Windows. Recomendamos la primera option para lograr un mejor rendimiento de la unidad.
El formatting HFS+ (tanmoconocido como Mac OS X Extended) es el mas recommendado, ya que permite registrar la transferencia de los datos a medida que esta se leva a cabo. De este modo, es mas probable que la informacion pueda recuperarse en caso de un mal functionamento de la unidad. Por su parte, el formatting exFAT peut emplearse en sistemas operativos macOS y Windows sin necessities de adquirir programas adiconiales, pero no brinda la posibility de registrar la transferencia de datos.
Preparación de soportes de grabación en los modelos Blackmagic Pocket Cinema Camera
1 Pulse el indicator correspondiente al soporte de grabacion en la parte inferior de la pantalla a fin de acceder a las options para dicha unidad.
2 Pulse Formatear CFAST o Formatear SD. Si hay un disco USB-C conectado a la CAMERA, pulse primero Unidades, y luego en el disco que desea formatear.

Si hay una unidad USB-C conectada a la webcam, la options Formatear unidad estara disponible en lugar de Formatear SD.
NOTA: Si la CAMERA no está conectada a un adaptor similar al modelos Blackmagic MultiDock, la lista做不到 todas las unidades SSD disponibles en la CAMERA. Para selecciónar el disco en el que deseña grabar, pulse launidad deseada y bajo presión el botón USAR.
3 Pulse la option Cambiar n.° de rollo para modifier el número de rollo en forma manual. Utilice el teclado para introducir un número nuevo y pulse ACEPTAR para confirmar.
4 Seleccione el formatting OS X Extended o exFAT y, en este caso, pulse la option Formatear CFast.
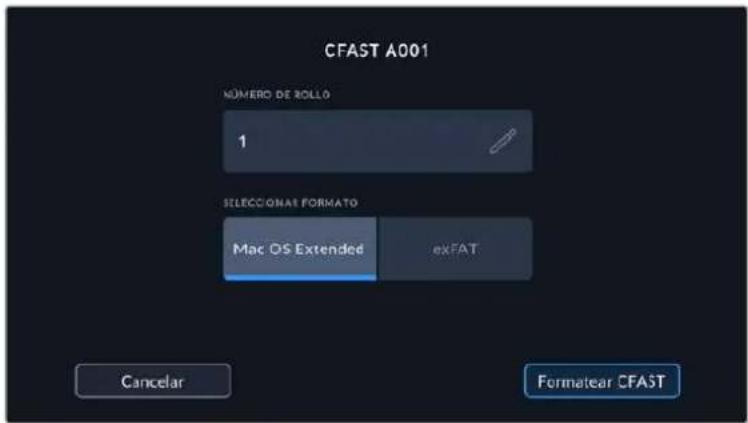
Pulse la option Cambiar n.° de rollo para modifier el número de rollo en forma manual.
5 Un mensaje de confirmacion permite verificar el soporte y el formatting seleccionados, asi como el numero de rollo. Pulse el boton Formatear CFast para confirmar. De lo contrario, pulse Cancelar.
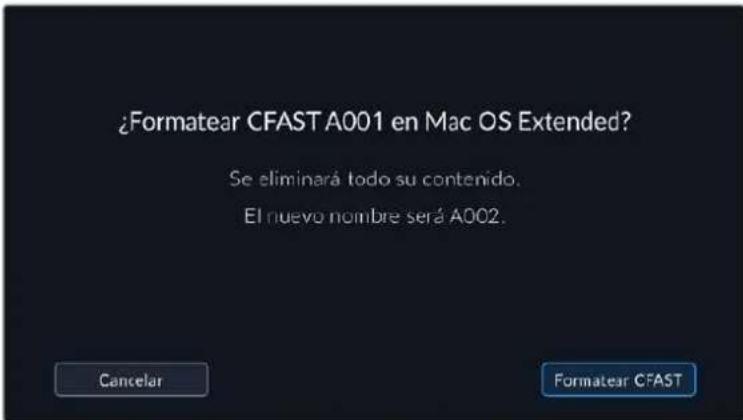
Antes de formatear la tarjeta, compruebe que la unidad seleccionada sea la correcta.
6 Mantenga presionado el boton tres segundos para comenzar el proceso.
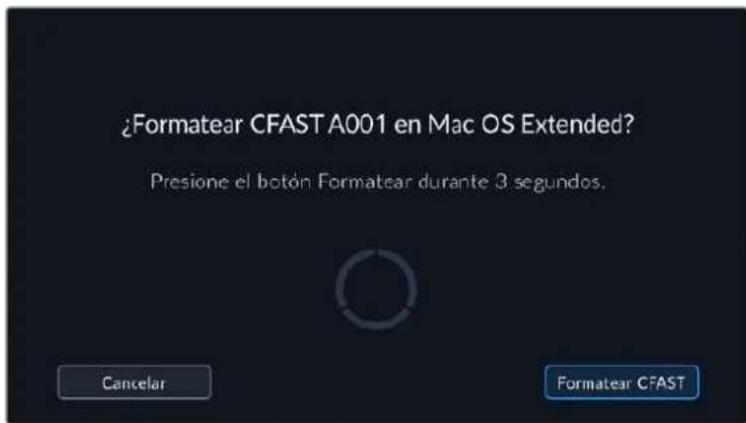
7 La CAMERA le notifies cuando el procedimiento haya finalizzato y el soporte está lista para usarse, o si el formateo ha fallado.
8 Pulse Aceptar para volver a la pantalla anterior.
9 Pulse Salir para salir.
Al formatear soportes de almacenamento en la webcam, la identificacion generada a partir de la claqueta virtual y el numero de rollo se utilizes para nombrear los ARCHivos. Cada vez que este proceso seobia a cabo, dicho numero se ajusta automatisticamente. Para introducir una cifra especifica, pulse la option Cambiar n.° de rollo.
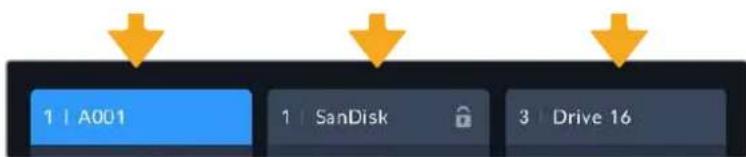
El tipo de soporte de grabacion aplicado se indica en la pantalla de la casa.
Pulse laopping Restablecer datos en la pestaña PROYECTO de la claqueta virtual si desea restablecer la numeroacion al comenzar un nuevo proyejo.
SUGERENCIA: Si aparece la palabra Protegida en lugar del tiempo de grabación disponible y un candido jusqu'à lo nombre de tarjeta SD en el menu de almacenimiento, este significa que launidad está bloqueada. Basta con desbloquearla para poder continuar y comendar a grabar. Consulte el apartado Ajustes para Obtener más información al respecto.
NOTA: Si se lee Unidad externa en el espacio correspondiente a la ranura 2,esto significa que hay una unidad USB-C externa connectada a la camera.
Preparación de soportes de grabación en equipos Mac
Utilice el programa utiliser para discos incluido en el sistema operativo macOS para formatear discos USB-C o tarjetas CFast y SD empieando el sistemas HFS+ o exFAT. Asegúrese de respaldar cualquier información importante que contenga launidad, ya que al起初 el proceso, se borrarán todos los datos.
1 Inserte el soporte de grabacion en el equipo informatico o utilise un dispositivo de lecture y/o escritura externo. Ignore cualquier mensaje sobre el uso de launidad para realizar respaldos mediante la direccion Time Machine.
2 Haga Cli en Aplicaciones, bajo en Utilidades y a continuacion execute el programa. Utilidad de Discos.
3 Haga cli en el icono de la unidad y bajo en la pestaña Borrar.
4 Selezione la opertura Mac OS Extended (con registrar) o exFAT.
5 Escribe un nombre para la unidad y bajo haga clic en Borrar. Se dará formatting a la unidad rápidamente y quedará lista para usarla en la CAMERA.
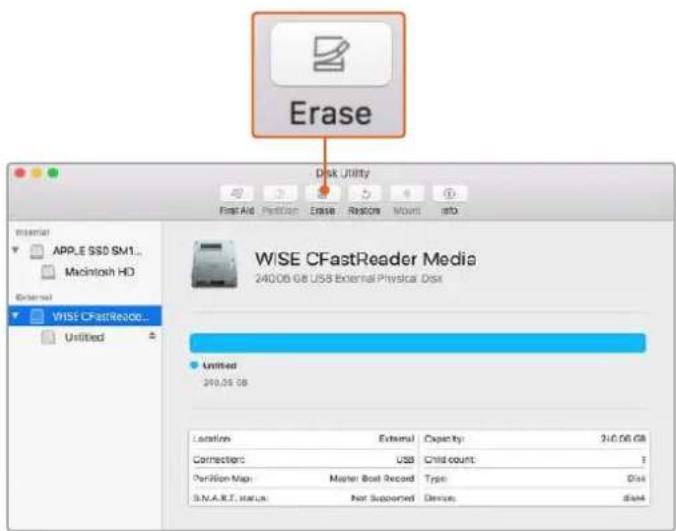
El programa Utilidad de Discos, incluido en el sistema operativo macOS, permite formatear soportes de almacenamento mediate el Sistema HFS+ o exFAT. Antes de comenzar, asegürese de respaldarrial综合素质 importante que contenga la unidad, ya que, al起初 el proceso, se borraran todos los calos.
Preparación de soportes de grabación en equipos Windows
El cuadro de dialogo Formato en el sistema operativo Windows permite formatear soportes de grabacion mediante el sistemas exFAT. Asegürese de respaldar该如何 informacion importante que contenga launidad, ya que al起初 el proceso, se borraran todos los datos.
1 Conectar el soporte de grabacion al equipo informatico mediante un adaptor, un lector externo o un cable USB-C.
2 Abra el menu Inicio o la Pantalla de Inicio y seleccione la option PC. Haga click con el boton derecho en la unidad de almacenamento.
3 En el menu contextual, selección la.option Formato.
4 Elija la option exFAT para el Sistema de ARCHivos y 128 kilobytes para el tamanio de la unidad de asignacion.
5 Introduzca un nombre para la unidad, marque la casilla Formato rapiido y haga clic en Iniciar.
6 Se dará fornato a la unidad rápidamente y quedará lista para usarla en la-camera.

Utilice el cuadro de dialogo Formato en Windows para dar forma exFAT al soporte de grabacion.
NOTA: Si se omiten fotogramas durante la grabacion, compruebe que el modelo de la unidad sea uno de los recomendados segun la resolution y el formatting selectionados. En caso de que la transferencia de datos no se realice a una velocidad adeuada, intente reducir la resolution o la frequencia de imagen, o seleccione un formatting con compresion por exemple, ProRes. Visite nuestro situ web para Obtener mas informacion al respecto.
NOTA: Aúnque es posible emplear unidades con varias partiones, la camarso solo reconocera la prima deellas a efectos de la grabacion y la reproduccion de contentsidos.
Sin embargo, cabe Mentionar que al formatear el soporte de almacenamento en la camara, se borrar el contenido de todas las partidas, y no solo de la prima. Por estareason, recomendamos utiliser unidades sin partidas.
Grabación
Grabación de material audiovisual
Los modelos Blackmagic Pocket Cinema Camera incluyen dos botones de grabacion. El primero seswana en la parte superior de la empuñadura, lo cual permite presionario con el dedo indices al sustener la CAMERA con la mano derecha.
El segundo botón se encuesta en la parte frontal de la CAMERA, a fin de poder filmarse uno@mismoom际as se sostiene la unidad con una mano. Estóresultaideal algrabar videoblogs.
Presione uno de这些 botones para comenzar a grabar de inmediato. Presióno nuevo para detener la grabación.

Botón de grabación en la parte superior
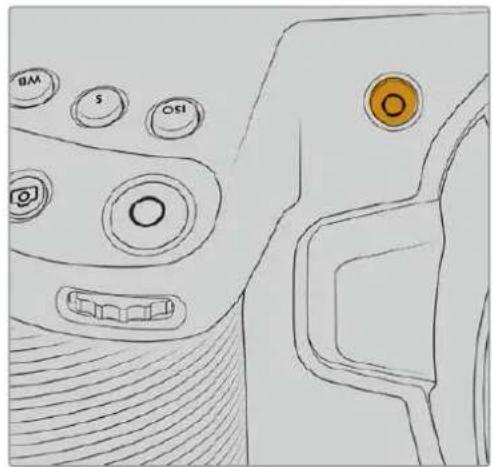
Botón de grabación en la parte frontal
Antes de comenzar a grabar, mantenga pulsado el nombre de la unidad que aparece en la parte inferior de la pantalla para seleccionarla. La barra encima del soporte selectionado se enciende de color azul para indicar que la grabacion se llevará a cabo en dicha unidad. Para grabar en una(distinta, basta con seleccionarla de la manera descrita. Durante la grabacion, la barra se enciende de color rojo.
Selección del formatting de grabación
Tambien es possible emplear coidecs ProRes, incluidos ProRes 422 HQ, ProRes 422, ProRes 422 LT y ProRes 422 Proxy. Estos ultimos permittedaruna mayorcantidad de secuencias en el soporte de almacenamento. El formattingo ProRes 422 HQ brinda la mayor calidad con el menor grado de compresion. Alternativamente, el formattingo ProRes 422 Proxy ofrece la posibidad de grabar durante periodos mas extensions con una mayor compresion. Por otherado, es compatible con el codec Blackmagic RAW. Recomendamos probar differentes formats para ver cui seajusta mayor a losrequirerimientos de cadaprojecto.
Cabe destacar que los modelos Blackmagic Pocket Cinema Camera son compatibles con el codec Blackmagic RAW tanto con el时间为 del sensor completo, como reducido. Para formatos con redimensionamento debe emplearse ProRes.
Consulte elApartado Frecuencias de imogen的最大as para el sensor para Obtener mas informacion al respecto.
Blackmagic RAW
Los modelos Blackmagic Pocket Cinema Camera son compatibles con el formatting Blackmagic RAW. Este brinda una calidad deImagen superior, un rango dinamico amplio y una gran variedad de OPCIONES DE COMPRESION. Además, offre todas las ventajas de la grabación enicho formatting con un procesamento más rápido, gracias a que la mayor parte del mismo se realiza en la camera, dinamorado por el soporte fisico.
Blackmagic RAW también admite el uso de metadataos avanzados, de manière que el programaempleo para procesar los ARCHivos tendrá acces o los ajustes de la CAMERA. Por exemple, al seleccionar el modo Video durante el rodaje porque es preciso editar con rapidez y no hay tiempo para el etalonaje, esta funciona permite estar las imagenes con los ajustes cromáticos correspondientes a这么做 bajo abrirlas en el programa de这个时代. Sin embargo, en realizad el archivo presente la colorimétrica del modo Film, y los metadataos son los que indican a la aplicación que se deben aplicar los ajustes correspondientes al modo Video.
En otheras palabras, si en algoqn momento es necessario etalonar las imagenes, el archivo original aun conserva todo el rango dinamico. Por ello, el material grabado no pierde informacion en las luces ni en las sombras, de modo que se mantienen todos los detalles, y es possible realizar los ajustes cromaticos pertinententes a fin de que teng un aspecto cinematografico. No obstarve, en caso de no tener tiempo para el etalonaje, la imagenes se veran de manners adecuada al aplicar el modo Video. Este brinda mayor flexibilidad durante la posproduccion.
Los ARCHivos Blackmagic RAW se procesan con rapidez y han sido optimizados para aprovechar la GPU y la CPU del equipo informatico, lo que permite reproducirlos sin interrupción y prescirindel uso de placas de decodificación, que de particular relevancia al usar equipos portétiles. Por除外ado, los programas compatibles con este tipo también brindan la posibididad de emplear plataformas tales como Metal, CUDA y OpenCL.
De este modo, los ARCHivos Blackmagic RAW se reproducen a una velocidad normal en la mayoría de los equipos, sin necessities de emplear la memoria cache o una resolution inferior.
Cabe destacar que la informacion de los objetivos también se registra en los metadataos correspondientes a cada fotografia. Por exemple, al utilizing modelos compatibles,rialquier cambio en el enfoque o la distancia focal quedará registrar en los metadataos.
Grabación en Blackmagic RAW
El formatting Blackmagic RAW brinda la posibiliad de elegir entre una velocidad constante al transferir datos o una calidad invariable.
En el primer caso, la velocidad de transferencia se mantiene constante sin que sea demasiado elevada. De este modo, las imagenes complejas que incluyen una mayorcantidad de datos se comprimen mas para que quepan en el espacio asignado.
Sin embargo, al grabar en formatting RAW, espreferible que la calidad sea consistente. Que suede si las imagenes incluyen mas datos pero estas se comprimen a fin de que quepan en el espacio asignado? Probamente haya una perdida de calidad, excepte no es possible saberlo hasta republicir el material.
Con el proposto de SOLUTIONAR este problema, Blackmagic RAW-ofrece una alternativa que brinda una calidad constante. Tecnicamente, la velocidad de transferencia en esta optacion es variable, pero en realizad genera un archivo de mayor tameno si las imagenes lo requieren, sin que haya un limite especialico a la hora de codificar el material conservando su calidad.
Es por este que la optacion de calidad constante del formato Blackmagic RAW permite que el tamenodel archivo varie segun losrequireimentos de la codificacion o el tipo de material grabado .
Asimismo, merece la pena destacar que el nombre de los ARCHivos no es incomprehensible, sino que contiene informacion significativa derivada de los aspectos技术和. Por example, al selectionar el mode de velocidad constante, las options disponibles son 3:1, 5:1, 8:1 y 12:1. EstosNumeros representan la relation entre el tamen del archivo RAW sin compresion y su version comprima. De este modo, la option 3:1 brinda una mayor calidad en un archivo de mayor tamen, cuando que al selectionar 12:1 se obtiene un archivo mas微量元素 con la menor calidad. No obstarve, muchos.), Limitaciones en terminos de calidad, excepta recomendamos probar distinctos ajustes.
El modo de calidad constante incluye las options Q0, Q1, Q3 y Q5. Estas representan los parámedros de comprisión Transmitidos y determinan el grado de comprisión aplicado. La diferencia se deba a que el códec funciona de forma/distinta al seleccionar una velocidad o una calidad constante. Al elegir estaulta opticon, no es possible saber con certeza el tamaño de los ARCHivos resultantes, ya que dependeradel material grabado.
Velocidad constante
Las options 3:1, 5:1, 8:1 y 12:1 representan el grado de comprension. Por ejemplo, el tameno del archivo generado mediante la option 12:1 es aproximamente 12 vezes inferior al del formatting RAW sin comprension.
Calidad constante
Las options Q0 y Q5 representan distinctos niveles de cuantizacion. Este es mayor en la segunda optacion, aunque mejora la velocidad al transferir datos. Como se ha mentionado, dichos ajustes generan archivos de tamano variable, segun el material grabado. Si el tamano del archivo sobrepasa la capacité de la unidad de almacenamento, es possible que se omitan fotogramas. Sin embargo, la ventaja es que, si this oede, se notar inmediatamente, lo cui brinda la opportundad decambiar los ajustes sobre la marcha.
Reprodctor Blackmagic RAW
El reproductor Blackmagic RAW, incluido en el instalador del programa utiliser de la CAMERA, es una aplicacion optimizada que permite ver los clips grabados en dicho formatting. Basta con haceruble的比例在 archivo correspondiente para reproducir, avanzar o retroceder las imagenes.
Al decodificar fotogramas, la funciona de aceleracion por CPU, includa en las Herramentas de desarrollo, es compatible con las principales arquitecturas y admite el uso de la GPU con plataformas tales como Metal, CUDA y OpenCL. Además, es posibleemployar una unidad Blackmagic eGPU, a fin de lograr un mejor desempo. El reproductor Blackmagic RAW esta disponible para Mac, Windows y Linux.
Archivos Sidecar
Los ARCHivos .sidecar del formatting Blackmagic RAW permiten anular metadataos integrados en el archivo original sin eliminarlos. Estos incluyen tanto ajustes RAW como informacion relativa al diafragma, el enfoque, la distancia focal, el balance de blancos, el tinte, el espacio cromatico, el nombre del proyecto y el numero de toma, entreculos parámetros, y esta codificados por fotografia, lo which resulta importante al modifier los values del objetivo durante el rodaje. Es possible añadir o editar these metadataos con DaVinci Resolve o incluso un editor de-textos.
Los ARCHivos .sidercar permitted aplicar automatamente distinctos ajustes RAW a un clip añadiéndolos à la carpeta que contiene el material grabado. Al mover el archivo .sidercar fuera de la carpeta y reproducir-Newamente el clip Blackmagic RAW, vemos el original tal como fue grabado. Asimismo, es possible acceder a"These ajustes desdeequal programa compatible con las Herramentas de desarrollo para Blackmagic RAW. Los Cambios realizados se guardan en el archivo .sidercar, y las imagenes modificadas peuvent verse en el reproductor Blackmagic RAW Player o enequalquier other aplicacion compatible con este formatting.
Al grabar en modo Video, el archivo original conserva las caracteristicas del modo Film, pero los metadataos permitirán que el material grabado se mueste con la apariencia del modo Video. Esteultimate es ideal cuando no es preciso etalonar el material grabado y los plazos son limitados. Sin embargo, si se desea ajustar las partes más oscuras o brillantes de la imagen, se conservan todos los detalles sin perdcer informacion, en caso de que sea necessario acceder a ellos posteriormente.
Blackmagic RAW en DaVinci Resolve
El panel Ajustes RAW en DaVinci Resolve permite modifier la apariencia del material grabado en un archivo Blackmagic RAW y guardar dichos ajustes en un nuevo archivo .sidecar, a fin de lograr efectos creativos o mejor su visualizacion. también es possible copiarlos y enviarselos aOthers uxuarios del programa para que poder acceder a los al importarlos. Por otherdo, DaVinci Resolve no solo es capaz de leer los metadatos de los archivos generados por laamera, sino que ademas reconoce automatamente el rango dinamico seleccionado al reproducir los clips.
Luego, es possible personalizar dichos ajustes modificando la saturacion, el contraste y los tonos intermedios, asi como la atenuacion de las luces y las sombras. A su vez, al guardar thesecambios en un archivo .sidecar,QUALquier otra persona que travaje con el myself material durante la produccion tendracceo algo. Taman es sencillo restuar Los metadatos originales de la camarara, de ser necessario.
Por other part, el panel Ajustes RAW en DaVinci Resolve permite exportar un fotograma con todos los ajustes, los metadataos, la resolucion y la informacion cromatica, lo que brinda la posibidad de partir capturas o ARCHivos de referencia.
Consulte elApartado DaVinci Resolve para Obtener mas informacion al respecto.
Herramentas de desarrollo Blackmagic RAW
Estas herramrientas son una interfaz de programacion desarrollada por la compania con el proposto de que los usuario couldan crear sus propias aplicaciones para el formatting Blackmagic RAW. Puede ser empleadas porrialquierdesarlladorparaleer,modificar yguarddareste tipodearchivos,e incluyenla colorimetrica de quinta generacion,que permiteobtener imagenes con un aspecto natural y cinematografico en qualquierprogramacompitable,ya sea en sistemas operativos Mac,Windows oLinux. Estas herramrientascouldencardgarse de forma gratuta ennuestra pagina para desarlladores (www.blackmagicdesign.com/es/developer).
El sugiente diagrama muestra los componentes de la interfaz de programacion para el formatting Blackmagic RAW.
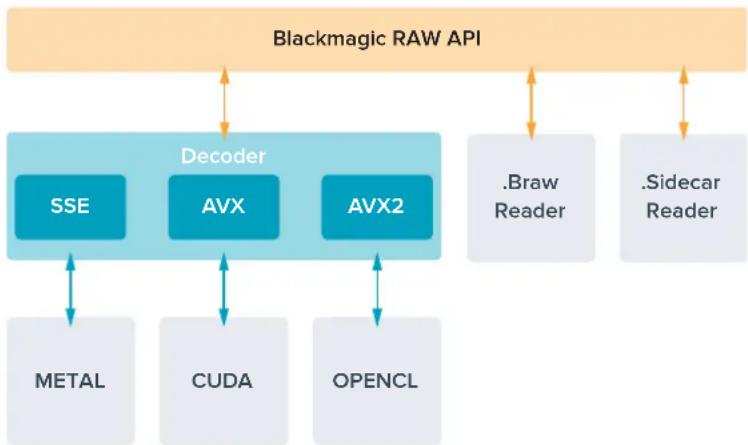
Frecuencias deImagen的最大s para el sensor
Modelos Blackmagic Pocket Cinema Camera 6K Pro y Pocket Cinema Camera 6K G2
| Resolución Códecárea del sensor | Frecuencia maxima | |||
| 6K | 6144 x 3456 | Blackmagic RAW | Completa | 50 |
| 6K (2.4:1) 6144 x 2560 Blackmagic RAW Reducida 60 | ||||
| 5.7K (17:9) 5744 x 3024 Blackmagic RAW Reducida 60 | ||||
| DCI 4K | 4096 x 2160 Blackmagic RAW Window 60 | |||
| 4096 x 2160 ProRes 422 HQ Reducida a partir de 5.7K 60 | ||||
| 4096 x 2160 | ProRes 422 | Reducida a partir de 5.7K | 60 | |
| 4096 x 2160 | ProRes 422 LT | Reducida a partir de 5.7K | 60 | |
| 4096 x 2160 | ProRes 422 Proxy | Reducida a partir de 5.7K | 60 | |
| UHD | 3840 x 2160 | ProRes 422 HQ | Reducida a partir del área complete | 50 |
| 3840 x 2160 | ProRes 422 | Reducida a partir del área complete | 50 | |
| 3840 x 2160 | ProRes 422 LT | Reducida a partir del área complete | 50 | |
| 3840 x 2160 | ProRes 422 Proxy | Reducida a partir del/Area complete | 50 | |
| 3840 x 2160 ProRes 422 HQ Reducida a partir de 5.7K 60 | ||||
| 3840 x 2160 | ProRes 422 | Reducida a partir de 5.7K | 60 | |
| 3840 x 2160 | ProRes 422 LT | Reducida a partir de 5.7K | 60 | |
| 3840 x 2160 | ProRes 422 Proxy | Reducida a partir de 5.7K | 60 | |
| 3.7K (anamórfico) | 3728 x 3104 | Blackmagic RAW | Reducida | 60 |
| 2.8K (17:9) | 2868 x 1512 | Blackmagic RAW | Reducida | 120 |
| HD | 1920 x 1080 | ProRes 422 HQ | Reducida a partir del área complete | 50 |
| 1920 x 1080 | ProRes 422 | Reducida a partir del área complete | 50 | |
| 1920 x 1080 | ProRes 422 LT | Reducida a partir del área complete | 50 | |
| 1920 x 1080 | ProRes 422 Proxy | Reducida a partir del área complete | 50 | |
| 1920 x 1080 | ProRes 422 HQ | Reducida a partir de 5.7K | 60 | |
| 1920 x 1080 | ProRes 422 | Reducida a partir de 5.7K | 60 | |
| 1920 x 1080 | ProRes 422 LT | Reducida a partir de 5.7K | 60 | |
| 1920 x 1080 | ProRes 422 Proxy | Reducida a partir de 5.7K | 60 | |
| 1920 x 1080 | ProRes 422 HQ | Reducida a partir de 2.7K | 120 | |
| 1920 x 1080 | ProRes 422 | Reducida a partir de 2.7K | 120 | |
| 1920 x 1080 | ProRes 422 LT | Reducida a partir de 2.7K | 120 | |
| 1920 x 1080 | ProRes 422 Proxy | Reducida a partir de 2.7K | 120 | |
Blackmagic Pocket Cinema Camera 4K
| Resolución Códecárea del sensor | Frecuenciamaxima | |||
| DCI 4K | 4096 x 2160 Blackmagic RAW Completa 60 | |||
| 4096 x 2160 ProRes 422 HQ Completa 60 | ||||
| 4096 x 2160 ProRes 422 Completa 60 | ||||
| 4096 x 2160 ProRes 422 LT Completa 60 | ||||
| 4096 x 2160 ProRes 422 Proxy Completa 60 | ||||
| 4K (2.4:1) | 4096 x 1720 | Blackmagic RAW | Reducida | 75 |
| UHD | 3840 x 2160 Blackmagic RAW Reducida 60 | |||
| 3840 x 2160 ProRes 422 HQ Reducida 60 | ||||
| 3840 x 2160 ProRes 422 Reducida 60 | ||||
| 3840 x 2160 ProRes 422 LT Reducida 60 | ||||
| 3840 x 2160 ProRes 422 Proxy Reducida 60 | ||||
| 2.8K (anamórfico) | 2880 x 2160 | Blackmagic RAW | Reducida | 80 |
| 2.6K (16:9) | 2688 x 1512 | Blackmagic RAW | Reducida | 120 |
| HD | 1920 x 1080 | ProRes 422 HQ | Reducida a partir del área completa | 60 |
| 1920 x 1080 | ProRes 422 | Reducida a partir del área completa | 60 | |
| 1920 x 1080 | ProRes 422 LT | Reducida a partir del área completa | 60 | |
| 1920 x 1080 | ProRes 422 Proxy | Reducida a partir del área completa | 60 | |
| 1920 x 1080 | ProRes 422 HQ | Reducida a partir de 2.6K | 120 | |
| 1920 x 1080 | ProRes 422 | Reducida a partir de 2.6K | 120 | |
| 1920 x 1080 | ProRes 422 LT | Reducida a partir de 2.6K | 120 | |
| 1920 x 1080 | ProRes 422 Proxy | Reducida a partir de 2.6K | 120 | |
| 1920 x 1080 | Blackmagic RAW | Reducida | 120 | |
| 1920 x 1080 | ProRes 422 HQ | Reducida | 120 | |
| 1920 x 1080 | ProRes 422 | Reducida | 120 | |
| 1920 x 1080 | ProRes 422 LT | Reducida | 120 | |
| 1920 x 1080 | ProRes 422 Proxy | Reducida | 120 |
NOTA: El formatting de grabación 2.6K 16:9 optimiza el area del sensor para objetivos Super 16 mm y Frequencias de imagen altas.
Tiempo de grabación
Las siguientes tablas muestran el tiempo de grabaciónapproximado en horas ysegundos según el formatting, la Frequencia de imagen del proyejo y el soporte de almacenamento. Cabe destacar que las resolutions y los coidecs disponibles varian según el modelo empleado.
La duración maxima depende de la capacité de la unidad, la fecuencia deImagen y el formato selecciónado. Por exemple, la velocidad de transferencia para el formato ProRes 422 HQ a una resolution de 3840 x 2160 es de aproximately 880 Mb/s. A una fecuencia de 24 f/s, una tarjeta
CFast 2.0 de 256 GB permite grabar duranteunos 47 instantos. Con estas mismos ajustes, es possible grabar aproximadamente 23 instantos en una tarjeta CFast 2.0 de 128 GB, o sea, casi la mitad que con una tarjeta CFast de 256 GB.
Cabe destacar que el tiempo de grabación disponible en el soporte de almacenimiento pueda variar ligeramente,dependiendo del fabricante o el sistemas empleado para formatearlo (exFat o Mac OS X Extended).
Las composiones complejas requiren un mayor transferencia de datos que las escenas simples con menos detalles. Dado que los values en las siguientes tablas contemplan tomas de gran Complejidad, el tiempo de grabacion podra ser mayor segun la naturaleza del rodaje.
6K
| Tarjeta CFast | Frecuencia deImagen | Blackmagic RAW 3:1 | Blackmagic RAW 5:1 | Blackmagic RAW 8:1 | Blackmagic RAW 12:1 |
| 256 GB | Duración Duración Duración | Duración | |||
| 23.98 17 min | 28 min 45 min | 67 min | |||
| 24 17 min 28 | min 45 min 67 | min | |||
| 25 16 min 27 | min 43 min 64 | min | |||
| 30 13 min 22 | min 36 min 54 | min | |||
| 50 8 min 13 | min 21 min 32 | min | |||
6K 2.4:1
| Tarjeta CFast | Frecuencia de Imagen | Blackmagic RAW 3:1 | Blackmagic RAW 5:1 | Blackmagic RAW 8:1 | Blackmagic RAW 12:1 |
| 256 GB | Duración Duración Duración | Duración | |||
| 23.98 23 min | 38 min 60 min | 91 min | |||
| 24 22 min 38 | min 60 min 91 min | ||||
| 25 21 min 36 | min 58 min 87 min | ||||
| 30 18 min 30 | min 48 min 72 min | ||||
| 50 11 min 18 | min 29 min 43 min | ||||
| 60 9 min 15 | min 24 min 36 min | ||||
5.7K 17:9
| Tarjeta CFast | Frecuencia deImagen | Blackmagic RAW 3:1 | Blackmagic RAW 5:1 | Blackmagic RAW 8:1 | Blackmagic RAW 12:1 |
| 256 GB | Duración Duración Duración | Duración | |||
| 23.98 min | 34 min 55 min | 82 min | |||
| 24 20 min 34 | min 55 min 82 min | ||||
| 25 19 min 33 | min 52 min 79 | min | |||
| 30 16 min 27 | min 44 min 66 | min | |||
| 50 10 min | 16 min 26 | min 39 min | |||
| 60 8 min 13 | min 22 min 33 | min | |||
DCI 4K
| Tarjeta CFast | Frecuencia deImagen | Blackmagic RAW 3:1 | Blackmagic RAW 5:1 | Blackmagic RAW 8:1 | Blackmagic RAW 12:1 | ProRes 422 HQ | ProRes 422 | ProRes 422 LT | ProRes 422 Proxy |
| 256 GB | Duración Duración Duración | Duración Duración | Duración | ||||||
| 23.98 min | 65 min 104 min | min 155 min 44 min | min 66 min | 95 min | 216 min | ||||
| 24 39 min 65 | min 103 min | 155 min 44 min | 66 min | 95 min | 216 min | ||||
| 25 37 min 62 | min 99 min | 149 min 42 min | 64 min | 91 min | 207 min | ||||
| 30 | 31 min | 52 min | 83 min | 124 min | 35 min | 53 min | 76 min | 173 min | |
| 50 | 18 min | 31 min | 49 min | 74 min | 21 min | 32 min | 45 min | 104 min | |
| 60 | 15 min | 26 min | 41 min | 62 min | 17 min | 26 min | 38 min | 87 min | |
4K 2.4:1
| Tarjeta CFast | Frecuencia deImagen | Blackmagic RAW 3:1 | Blackmagic RAW 5:1 | Blackmagic RAW 8:1 | Blackmagic RAW 12:1 |
| 256 GB | Duración Duración Duración Duración | ||||
| 23.98 50 min | 84 min 134 min | 200 min | |||
| 24 50 min 84 | min 134 min | 200 min | |||
| 25 48 min 80 | min 128 min | 192 min | |||
| 30 | 40 min | 67 min | 107 min | 160 min | |
| 50 | 24 min 40 min | 64 min 96 min | |||
| 60 | 20 min | 33 min | 54 min | 80 min | |
| 75 16 min | 27 min 43 | min 64 | min | ||
| 80 | 16 min | 26 min | 40 min | 60 min | |
UHD
| Tarjeta CFast | Frecuencia deImagen | Blackmagic RAW 3:1 | Blackmagic RAW 5:1 | Blackmagic RAW 8:1 | Blackmagic RAW 12:1 | ProRes 422 HQ | ProRes 422 | ProRes 422 LT | ProRes 422 Proxy |
| 256 GB | Duración Duración Duración | Duración Duración | Duración | ||||||
| 23.98 | 41 min | 68 min | 110 min | 164 min | 47 min | 71 min | 101 min | 230 min | |
| 24 | 41 min | 68 min | 109 min | 164 min | 47 min | 71 min | 101 min | 230 min | |
| 25 | 39 min | 66 min | 105 min | 157 min | 45 min | 68 min | 97 min | 221 min | |
| 30 | 33 min | 55 min | 88 min | 131 min | 38 min | 57 min | 81 min | 184 min | |
| 50 | 19 min | 33 min | 52 min | 79 min | 22 min | 34 min | 48 min | 111 min | |
| 60 | 16 min | 27 min | 44 min | 66 min | 18 min | 28 min | 40 min | 92 min | |
3.7K anamórfico
| Tarjeta CFast | Frecuencia deImagen | Blackmagic RAW 3:1 | Blackmagic RAW 5:1 | Blackmagic RAW 8:1 | Blackmagic RAW 12:1 |
| 256 GB | Duración Duración Duración | Duración | |||
| 23.98 31 min | 51 min 82 min | 123 min | |||
| 24 31 min 51 | min 82 min 123 | min | |||
| 25 29 min 49 | min 79 min 118 | min | |||
| 30 24 min 41 | min 65 min 98 | min | |||
| 50 15 min 24 | min 39 min 59 | min | |||
| 60 12 min 20 | min 33 min 49 | min |
2.8K anamórfico
| Tarjeta CFast | Frecuencia deImagen | Blackmagic RAW 3:1 | Blackmagic RAW 5:1 | Blackmagic RAW 8:1 | Blackmagic RAW 12:1 |
| Duración Duración Duración | Duración | ||||
| 256 GB | 23.98 57 min | 95 min 151 min | 226 min | ||
| 24 57 min 95 | min 151 min | 226 min | |||
| 25 54 min 91 | min 145 min | 217 min | |||
| 30 45 min 76 | min 121 min | 181 min | |||
| 50 27 min 45 | min 73 min | 109 min | |||
| 60 22 min 38 | min 61 min | 91 min | |||
| 80 17 min 28 | min 45 min | 68 min | |||
2.8K 17:9
| Tarjeta CFast | Frecuencia de Imagen | Blackmagic RAW 3:1 | Blackmagic RAW 5:1 | Blackmagic RAW 8:1 | Blackmagic RAW 12:1 |
| 256 GB | Duración Duración Duración Duración | ||||
| 23.98 81 min | 136 min 216 min | 321 min | |||
| 24 81 min 135 | min 215 min | 320 min | |||
| 25 78 min 130 | min 207 min | 308 min | |||
| 30 65 min 108 | min 173 min | 258 min | |||
| 50 39 min 65 | min 104 min | 156 min | |||
| 60 32 min 54 | min 87 min 130 min | ||||
| 120 | 16 min 27 min | 43 min 65 min | |||
2.6K 16:9
| Tarjeta CFast | Frecuencia deImagen | Blackmagic RAW 3:1 | Blackmagic RAW 5:1 | Blackmagic RAW 8:1 | Blackmagic RAW 12:1 |
| Duración Duración Duración | Duración | ||||
| 256 GB | 23.98 87 min | 144 min 230 min | 342 min | ||
| 24 87 min 144 | min 229 min | 342 min | |||
| 25 83 min 138 | min 220 min | 328 min | |||
| 30 69 min 115 | min 184 min | 275 min | |||
| 50 41 min 69 | min 111 min 166 | min | |||
| 60 34 min 58 | min 92 min 138 | min | |||
| 120 | 17 min 29 min | 46 min 69 min |
HD
| Tarjeta CFast | Frecuencia deImagen | Blackmagic RAW 3:1 | Blackmagic RAW 5:1 | Blackmagic RAW 8:1 | Blackmagic RAW 12:1 | ProRes 422 HQ | ProRes 422 | ProRes 422 LT | ProRes 422 Proxy |
| 256 GB | Duración | Duración | Duración | Duración | Duración | Duración | Duración | Duración | |
| 23.98 | 159 min | 264 min | 418 min | 619 min | 189 min | 283 min | 403 min | 877 min | |
| 24 | 159 min | 264 min | 418 min | 618 min | 189 min | 283 min | 403 min | 877 min | |
| 25 | 153 min | 253 min | 402 min | 595 min | 182 min | 271 min | 387 min | 843 min | |
| 30 | 127 min | 212 min | 336 min | 499 min | 152 min | 227 min | 324 min | 710 min | |
| 50 | 76 min | 127 min | 203 min | 303 min | 91 min | 137 min | 196 min | 434 min | |
| 60 | 64 min | 106 min | 170 min | 254 min | 76 min | 114 min | 163 min | 363 min | |
| 120 | 32 min | 54 min | 87 min | 130 min | 38 min | 57 min | 82 min | 185 min |
NOTA: Cabe destacar que el códec Blackmagic RAW permite grabar con la totalidad del sensor o un airea reducida. Para formatos redimensionados, es preciso seleccionar la opticon ProRes.
Los formatos 6K, 6K 2.4:1, 5.7K 17:9, DCI 4K, 3.7K anamórfico y 2.8K 17:9 solo está disponible en laopy Blackmagic RAW de los modelos Pocket Cinema Camera 6K Pro y 6K G2. Al grabar en resolution DCI 4K, UHD o HD, estas camaras emplean el codec ProRes.
Los formatos 4K 2.4:1, 2.8K anamórfico y 2.6K 16:9 solo está disponible en la option Blackmagic RAW del modelos Pocket Cinema Camera 4K. Al grabar en resolution DCI 4K, UHD o HD, esta CAMERA emplea el codec Blackmagic RAW o ProRes.
El modo de calidad constante para las options Q0 y Q5做不到 distinctos tiempos de grabacion.
En el primer caso, la duración estimada es similar a la de la option 3:1 (velocidad constante),
mientras que al seleccionar Q5, sera parecida a la de la opticon 12:1. Sin embargo, la duracion se actualiza cada diez segundos durante la grabacion, por lo que la mejor manera de verificar el tiempo disponible es filmando 20 segundos y comprobando la duracion en el indicator de la pantalla tactil.
Selección de la Frequencia de imagen
La CAMERA permite grabar auntas Frequencias de imagen, y a veces es dificil saber cuales es la más adecuada.
Generalmente, al selectionar una Frequencia de imagen, es besoino considerar varios factores. Dea hace varios afo, existen distinctos formatos de presentacion para el cine y la television.A pesar de que las frequencies de imagen de cada uno son distinctas segun el pais, todos cumplen elismo proposto:做不到unacantidad determinada de fotogramas o cuadros por segundo para que la imagen fluya de manera agradable y convincente.
Por exemple, en el cine se emplee a una Frequencia de 24 f/s, y exceptamente se han realizado pruebas con otheras mas rapiadas, esta es la mas aceptada en todo el mundo.
Con respectfully a la television, las frequencias de imagen generalmente cumplen con las normas Tecnicas de teledifusión en cada párs. Por exemple, los contentsidos televisivos se graban a 29.97 f/s para su distribución en América del Norte, y a 25 f/s para Europa.
No obstar, con el avance de la technologia, en la actualidad existe una gama mas amplia de options, yDICOS formatos han ido evolacionando. Ahora es comun que los eventos deportivos se graben y se transmitan a freuencias de imagen mas altas, por ejemplo, hasta 59.94 f/s en AmERICA del Norte, y 50 f/s en Europa. Este permite que las imagenes fluyan con mayor calidad y parezcan mas autenticas.
Por otra parte, al transmitir por Internet, normalmente se Employmentes similares a las de la television, excepte en este caso existe una mayor flexibilidad debido a que los)."
los)."
las distinctas pantallas.
Normalmente, a la hora de escoger una Frequencia de imagen para un proyecto, el formato de entrega constituya un factor decidivo. Además, dicho valorDebe coincidir con el del sensor de la CAMERA, a fin de que las imagenes se reproduzcan a la misma velocidad a la que se descarró el evento.
Si el objetivo es create un efecto interesante, por exemple, de-camera lenta, es possible elegir una Frequencia de imagen mas alta para el sensor. Cuanto mayor sea esta en comparacion con la Frequencia de imagen del proyejo, menor sera la velocidad de reproduccion.
Consulte elApartado Controles de la pantalla tactil en este manual para Obtener mas informacion al respecto.
Grabación automática
Los modelos Blackmagic Pocket Cinema Camera transmiten una seals automatistically desde la calidad HDMI que permite起初ar la grabacion al conectar un dispositivo compatible con dicha func tion, por exemple, un monitor Blackmagic Video Assist.
De este modo, al presionar el botón de grabación en la CAMERA, la unidad externa inicia la captura de imagenes. Al volver a presionarlo, este proceso se detiene en ambos dispositivos. Asimismo, este Modelo brinda la posibiliad de transmitir informacion sobre el numero de tiempo a工程技术 de la calidad HDMI, de forma que este valor coincida en los clips grabados con la CAMERA y con el dispositivo externo.
Si el grabador externo es compatible con esta función, esnecessaryactivarlapreviamente desde emenu de configuracion.
Reproducción
Reproduccion de material audiovisual
Despues de realizar la grabacion, es possible utilizing los 控ules de reproduccion para ver las imagenes en la pantalla de la cama. Presione este boton para acceder al modo de visualizacion, y bajo una vez mas con el proposto de ver el material grabado en la pantalla de la cama o en cualquier othero dispositivo connectado a la calidad HDMI. Mantenga presionados los botones de avance or retroceso para avanzar or retroceder la secuencia. La reproduccion finalizara cuando el clip coincide a su fin.
Presione los botones de avance o retroceso para ir al comienzo o el final de una secuencia. Oprima el boton de retroceso una vez para reproducir el clip actual desde el inicio, o dos veces para retroceder hasta el comienzo del clip anterior. Presione el boton de grabacion para salir del modo de reproduccion.

Presione el boton de reproduccion para ver las imagenes captadas por la camarra.
Characteristicas de la camarara
Parte frontal
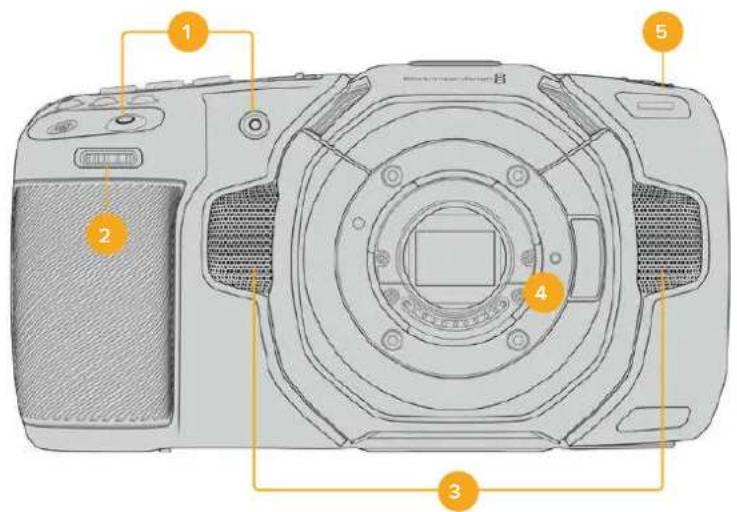
1 Botones de grabación
Presione cualesquiera de这些东西 botones para comenzar o detener la grabacion. El boton frontal permite que el usuario se filmed a si mesmo.
2 Rueda de ajustes
Esta rueda permite ajustar la aperture del diafragma en objetivos compatibles. Mirando la pantalla tactil, gire la rueda a la izquierda para abrir el diafragma, o a la derecha para cerrarlo. Asimismo, este control brinda la posibiliad de modifier el balance de blancos, el ángulo de obturación y el valor ISO. Por otra parte, pueda emplearse+junto con el botón para ampliar la imagen, con el proposto de ajustar el nivel de aumento en el visor electrónico optional. Presione los botones correspondientes en la parte frontal de la camara y gire la rueda para seleccionar la.option deseada. Al finalizar, oprima la rueda para salir.
3 Micrófonos estéreo
La CAMERA incluye cuatro microfonos estéreo de gran calidad. Consulte elApartado Ajustes de audio para Obtener más información al respecto.
4 Tipo de montura
Los modelos Blackmagic Pocket Cinema Camera 6K Pro y 6K G2CNTAN con una montura para objetivos EF, cuando que la version 4K presenta una montura para lentes Micro Cuatro Tercios. Esto significa que es possibleemployar objetivos compatibles que ofrecen functions de estabilizacion, asi como de exposicion y enfoque automaticos. A fin de tener la posibilityde usar el estabilizador de imagenes integrado en manyosheros,
posicionel interruptor correspondiente en ON para activar dicha functiOn en la camera. Si el objetivo incluye un interruptor para esta prestacion, seleccione el mode adecuado para imagenes fias o en movimiento.En caso contrario,puede activar o desactivar la
funcion de estabilizacion desde el menu de laamera.
5 Luz piloto / indicator de grabación
Los modelos Pocket Cinema Camera disponible de un ledlittle en la parte frontal que se enciende de color rojo para indicar que la camera está grabando. Es possible activar o desactivar este indicator yajsurar su brillo desde el menu de configuracion.Consulte el apartado Preferencias para tener mas informacion al respecto.
Lateral derecho
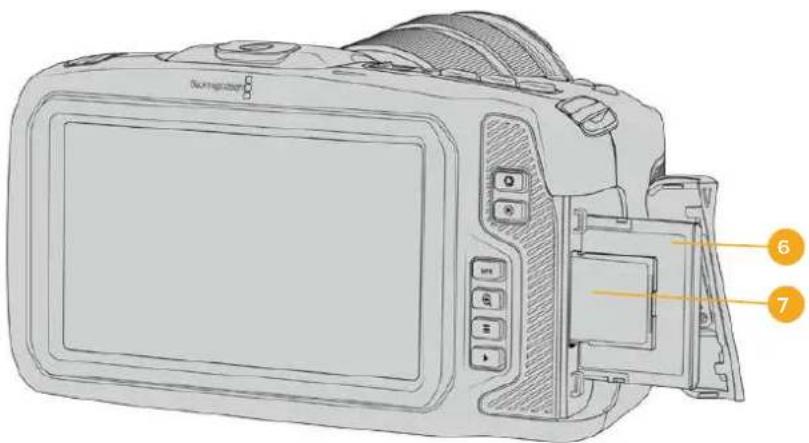
6 Ranura para tarjetas CFast
Inserte tarjetas CFast 2.0 en esta ranura para grabar y reproducir contentsidos. Consulte el apartado Tarjetas CFast para Obtener más información al respecto.
7 Ranura para tarjetas SD
Inserte tarjetas SD en esta ranura para grabar y reproducir contentsidos. Consulte el apartado Tarjetas SD para Obtener más información al respecto.
Lateral izquierdo
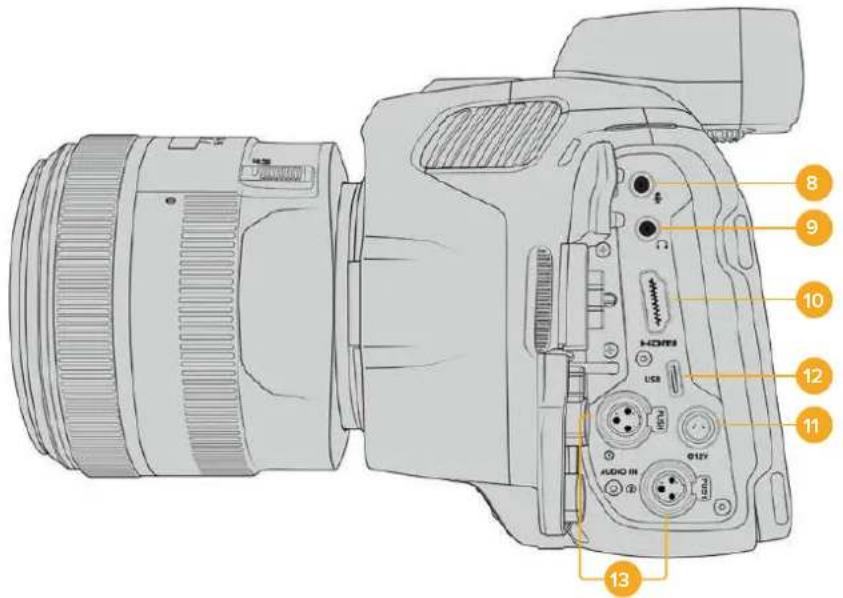
Puertos en el lateral izquierdo de los modelos Pocket Cinema Camera 6K Pro y 6K G2.
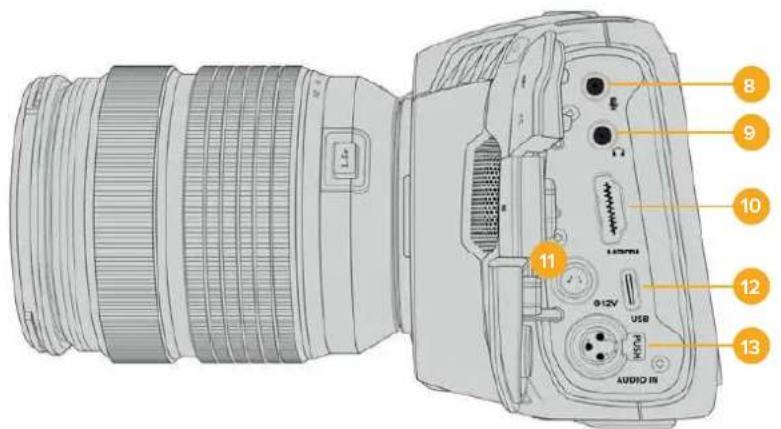
Puertos en el lateral izquierdo del modelo Pocket Cinema Camera 4K.
8 Entrada para mlcrofonos
Conecte un microfono a la entrada de 3.5mm . Laamera es compatible con señas a level de linea o microfono. La intensidad de estas ultimas es menor que la de las primeras, por locular, si se selección la optación a nivel de linea al conectar un microfono a launidad, el audio serablemado bajo. Cabe destacar que esta entrada también admite número de tiempo longitudinal (LTC) de fuentes externas en el canal izquierdo, siempre que cumpla con los estandares SMPTE. Este se detecta automatistically y se integra en el material grabado como metadataos. Recomendamos transmitir el número de tiempo longitudinal mediante una sealsnalevel de linea, en especial si no se graba como una pista de audio.
9 Entrada para aurlicules
Al conectar auriculares a la entrada estéreo de 3.5mm es possible supervisor el audio durante la grabación o la reproducción. En este caso, la calidad para altevoces permanece desactivada.
10HDMI
La calidad HDMI permite transmitir imagenes en formatting 4:2:2 1080p de 10 bits con alto rango dinamico y 2 canales de audio integrado. Utilice el menu en la pantalla tactil para seleccionar una seals limpia o con informacion superpuesta. El puerto HDMI facilita la connexion de un monitor externo, un grabador o un mezclador ATEM Mini. Esteultimate brinda la OPPUNITY de controlar la grabacion a distancia y ajustar diversos paramedros de los modelos Pocket Cinema Camera. Es recomendable preparar los equipos externos y conectar todos los cables antes de encender laamera y los accesorios. Utilice siempre cables HDMI de buena calidad.
11 Allimentación
Esta conexión sirve para alimentar la camará y cargar la batería al mismo tiempo. Para conectar el adaptorador, gire el conector deundry que quede alineado con la pestaña en la parte superior de la conexión y bajo esintelo hasta que calce en su lugar. Para desconectarlo, retraiga la cubierta de goma que lo rodea y tire del mesmo.
Solutaciones de alimentacion personalizadas
Algunos usuario han desarrollado sus propios dispositivos para alimentar los modelos Blackmagic Pocket Cinema Camera. Si este es su caso,onga la cautela de no suministrar demasiado voltaje a la CAMERA, dato que thisoulde occasionar daños irreparables. Los requisitos de voltaje para这些models sonlossiguales:
-La connexion para la bateria admite entre 6.2 y 10 V (maximo).
-La entrada CC accepta de 10.8 V a 20 V (maximo).
- La CAMERA requiere una alimentacion de 16 W cuando se encuentra en modo de esper y no está cargando la batería.
- La CAMERA necesita una potencia de 30 W para cargar la batería interna.
- Al embaruar una fuente de alimentacion personalizada, recomendamos extraer la bateria interna.
- Al grabar en un soporte externo a una Frequencia deImagen alta con un objetivo activo y el brillo de la pantalla y de la luz piloto al máximo, sin estar cargando la bateria, el modelos Blackmagic Pocket Cinema Camera 6K G2 require una potencia de aproximamente 23 W, cuando esta de 22 W en el caso de la version 4K. Con esta misma configuración y un visor adicional, los modelos Pocket Cinema Camera 6K Pro y 6K G2 requirecen una potencia de aproximamente 26 W.
12 USB
El puerto USB-C permite grabar directamente en discos externos. Cuando la CAMERA está apagada, esta connexion también brinda la posibiliad de cargar la batería. Paraactualizar el sistema operativo interno de la unidad, conectela a un equipo informativo y execute la aplicacion correspondiente.
13 Entrada minl-XLR para micrófonos
Los modelos Pocket Cinema Camera 6K G2 y 6K Pro incluyen dos entradas XLR. La version Blackmagic Pocket Cinema Camera 4K dispone de una entrada XLR.
El conductor mini-XLR permite conectar equipos de audio analógicos o microfonos XLR convenciones mediante un cable adaptor XLR a XLR mini.
Asimismo, esta entrada brinda la posibiliad de suministrar corriente a microfonos profesionales mediante el modo de alimentacion fantasma. Consulte el apartado Ajustes de audio para Obtener mas informacion al respecto.
La entrada XLR también admite número de tiempo SMPTE proveniente de fuentes externas. En el menu Audio, selección XLR linea o XLR microfono para la fuente del canal, según el nivel del generator de número de tiempo. Esteultimate se integrará en el material grabado como parte de los metadatos. En los modelos Blackmagic Pocket Cinema Camera 6K Pro y 6K G2, uno de los canales XLR pueda recibir la señal del número de tiempo,@m间隙 el othero se usa para una fuente de audio distinta.
Panel superior

Panel superior de los modelos Blackmagic Pocket Cinema Camera 6K Pro y 6K G2
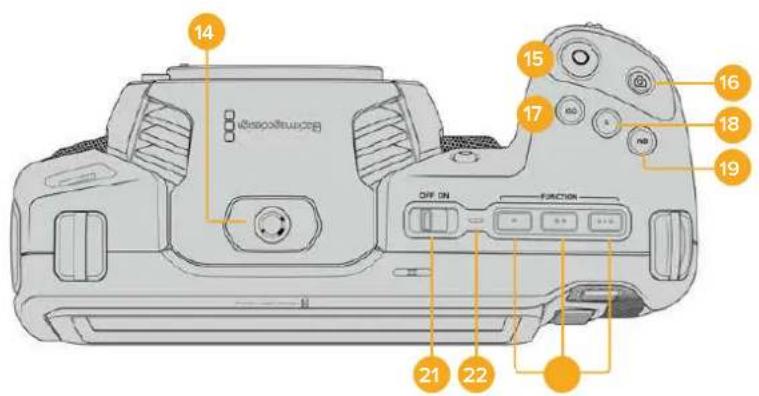
Panel superior del Modelo Blackmagic Pocket Cinema Camera 4K
14 Orificio roscado (0.25", 20 UNC)
Permite sujetar microfonos externos y除外 accesorios pequeños.
NOTA: El orificio roscado en la parte superior solo debe utilizes con accesos livianos, tales como microfonosPEGueños. No intente emplearlo para soportar el peso de la camera, por exemple, mediate un tornillo en la manija, unto con un objetivo pesado, ya que this podra dañar dicho orificio, lo cui no está cubierto por la garantía. Tampoco debe someterlo a una fuerza excessiva provocada por
accesorios pesados o un brazo extensor. A efectos de colocar este tipo de accesorios, recomendamos la carcasa diseñada para los modelos Blackmagic Pocket Cinema Camera, que se sujeta simultanamente a los dos orificios en la parte superior e inferior de la CAMERA.
15 Grabación
Presione este botón paraunarizar a grabar de inmediato. Oprimalo nuevomente para detener la grabación.
16 Fotos
Presione este botón para grabar un fotografia en formato DNG sin compresión. En la parte superior derecha de la pantalla, aparecerá brevamente el icono de unaámara para indicar que se ha tornado una fotografia. Las imagenes se guardan en la carpeta Stills, ubicada en el directorio raíz del soporte de grabación. Los ARCHivos se nombren según la nomenclatura empleada para los clips,añadiendose S001 al final para indicar el número deImagen.
17 ISO
Presione este botón y gire la ruea de ajustes para modifier la sensibilitad de laamera. Es possible realizar incrementos de 1/3 de paso entre 100 y 25 600.
18Obturador
Presione este botón y gire la rueda de ajustes para modifier el ángulo o la velocidad de obturación. Asimismo, la CAMERA-ofrecerá hasta tres价值观distinctos para evaporar el parpadeo.
19 Balance de blancos
Presione este botón y gire la rueda de ajustes para modifier el balance de blancos. Manténgalo presionado durante 3seguidos a fin de acceder rápidamente al modo automático. La pantalla lo做不到 un cuadrado blanco en el centro de la imagen que se utilizes con el proposto de realizar un ajuste automático.Consulte el apartado Controles de la pantalla táctil para Obtener más información al respecto.
20 Puerto de conexión para el visor
Los modelos Blackmagic Pocket Cinema Camera 6K G2 y 6K Pro incluyen un puerto para conectar visores electrónicos. Si este accesorio no está instalado, es posible colocar la tapa protectora suministrada.
21 Interruptor de encenddo
Interruptor realizado para encender y apagar la CAMERA. Muevalo hacía la derecha para encenderla, y hacía la izquierda para apagarla.
22 Indicador
Este led se enciende de color rojo para indicar que la batería se está cargando cuando la camera está apagada y connectada a una fuente de alimentación externa mediante la connexion de 12 V o el puerto USB-C.
Una vez finalizada la energia, la luz se apagará.
23 Botones programables
Es possible asignar diversas functions a这些东西 botones desde el menu de configuracion de la CAMERA. De forma predeterminada, el primer boton corresponde a la direccion de falso color, elsegundo permite ver tablas de conversion (LUT),y el先进技术 para做不到 las guias de encuadre.
Parte inferior
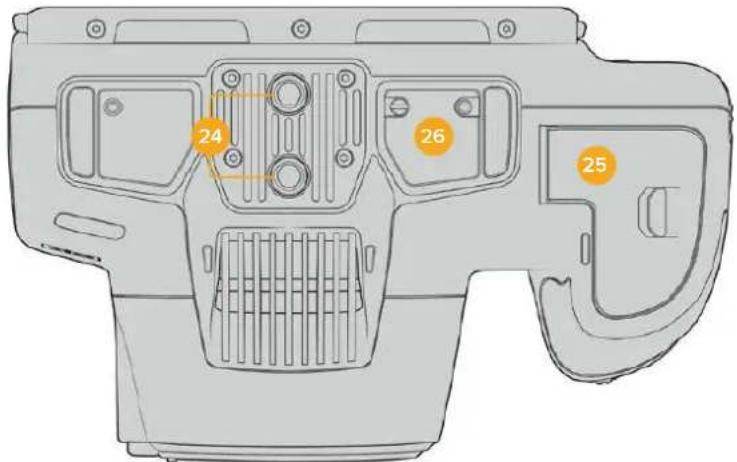
Panel inferior de los modelos Blackmagic Pocket Cinema Camera 6K Pro y 6K G2
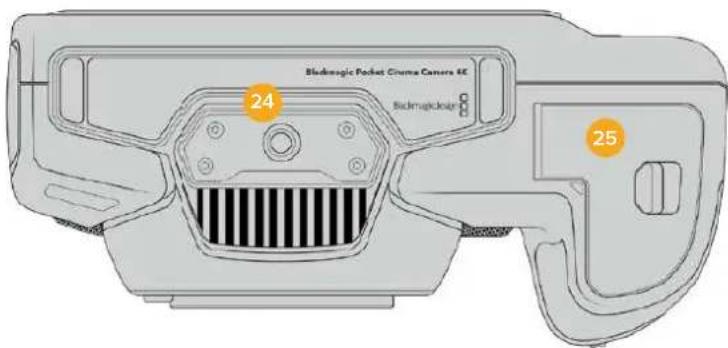
Panel inferior del Modelo Blackmagic Pocket Cinema Camera 4K
24 Orificio roscado (0.25", 20 UNC)
El orificio en la parte inferior de las versiones 4K, 6K Pro y 6K G2 permite colocarlos sobre un tripode, una plataforma u或者其他 accesorios. Los modelos Pocket Cinema Camera 6K Pro y 6K G2CNTAN con dos de these orificios.
25 Compartimento para la bateria
Empujé el seguro hacía el objetivo a fin deAbrir la tapa del compartmento. Al cerrarla, presióna hasta que quede trabada.
26 Conexión para la empuñadura
Los modelos Blackmagic Pocket Cinema Camera 6K Pro y 6K G2 incluye contactos electricos en la parte inferior que permiten conectar la empuñadura optional sin quitar la bateria de la camera. Esto brinda la posibiliad de usar las dos baterias de la empuñadura y la bateria interna para prolongar el tiempo de funcionaimiento de la unidad.
Partetrasera
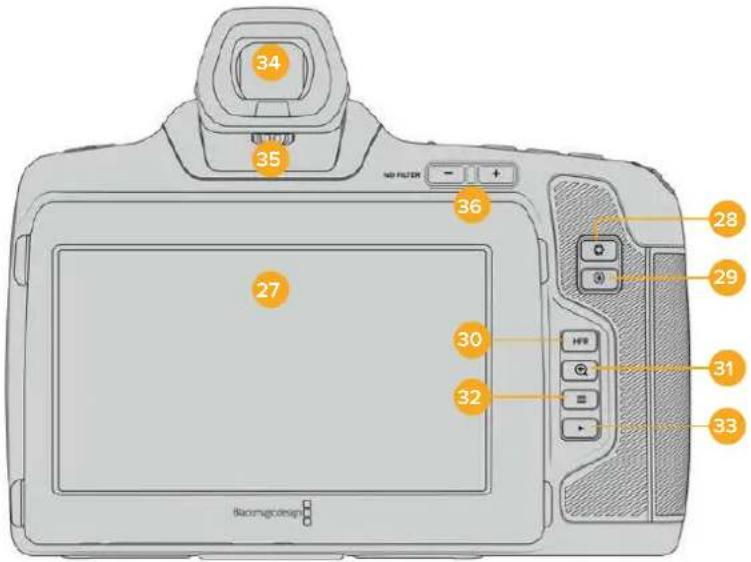
Parte posterior de los modelos Blackmagic Pocket Cinema Camera 6K Pro y 6K G2. El Modelo Blackmagic Pocket Cinema Camera 6K G2 no disponible de botones para filtros de densidad neutra.
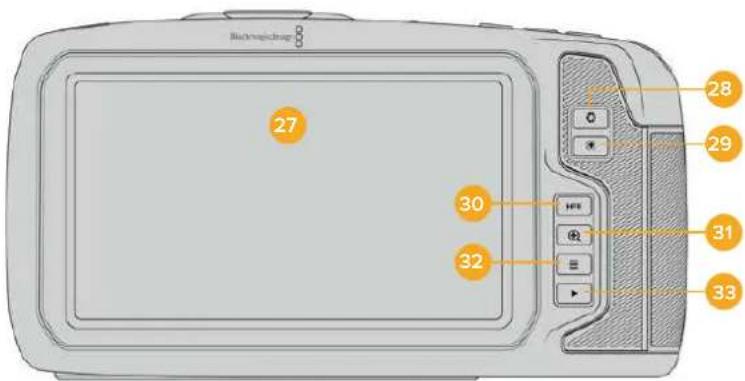
Parte posterior del Modelo Blackmagic Pocket Cinema Camera 4K
27 Pantalla tactll
Es possible tocar la planta o deslizar el dedo sobre la misma para ajustar la configuracion, activar la functiOn de enfoque automatico, comenzar y detener la grabacion, supervisor la calidad de las imagenes y reproducir secuencias. Ademas, la planta también permite organizar contentsos y realizar anotaciones en la claqueta virtual.
Los modelos Blackmagic Pocket Cinema Camera 6K G2 y 6K Pro incluyen una pantalla táctil que se pueda inclinar paraCambiar el ángulo de visión y un modo de ahorro de energia que atenúa el brillo cuando no está en uso. Asimismo, es posible augmentar su luminosidad al rodar bajo la luz del sol. Nótese que, con el brillo al 100% ,el consumo energetico de la camara sera mayor, y la pantalla podra calentarse. A una temperatura ambiente de 35^ (95^) ,launidad reduciré el brillo de la pantalla para regular la temperatura y evaporar un sobrecalentimiento de la misma.Estamericande seguidad se activa independientelement del ajuste de atenuación automática.Consulte el apartado Ajustes de monitorizacion para Obtener mas informacion al respecto.
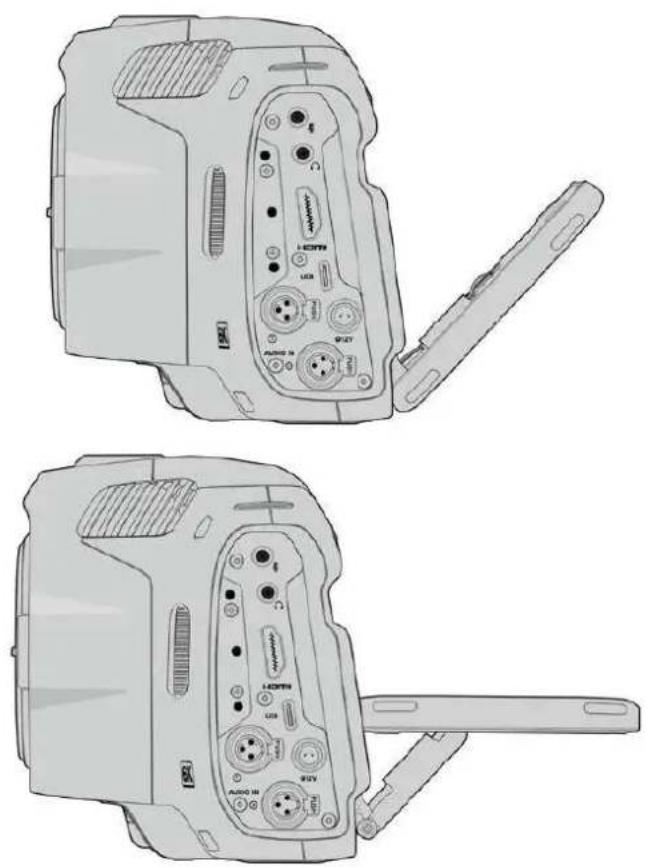
La pantalla del Modelo Blackmagic Pocket Cinema Camera 6K Pro se pueda inclinar para携带 el ángulo de visión.
28 Dlafragma
Permitte ajustar automatically el valor de exposión promedio según las partes más claras y oscuras de la imagen. también es posible modifier la aperture del diafragma girando la ruea de ajustes hacer la izquierda o la derecha, o pulsando la.option Iris en la pantalla y moviendo el control correspondiente.
29 Enfoque
Presione este botón para realizar un enfoque automatico alemployar objetivos compatibles. Por defecto, el objetivo se enfoca en el centro de la imagen. Sin embargo, es possibleshipsaln pinto de enfoque tocando la zona en la cui se desea enfocar.Presione dosvecesDICHO botON para regresar almode predeterminado.
NOTA: Ànge muchos objetivos brindan la posibiliad de ajustar el enfoque electrónicamente, algunos también disponen de un modo manual. En este caso, esnecessarycomprobarqueelobjecto seencuentre enmode automatico.
30 HFR
Utilice este botón para alternar entre-distintas frequencies de imagen. Paraarlo, selección la Frequencia de grabación en el menu correspondiente de la lármara. Luego, al presionar este botón, se alterna entre la Frequencia de grabación y la del projecto. Cabe destacar que este ajuste solo pueda modifierse cuando se detiene la grabación.
Consulte el apartado Controles de la pantalla táctil para Obtener más información al Respecto.
31 Zoom
Presione este botón a fin de ampliar laImagen a una escala 1:1 paraaabustar el enfoque. Pellizque la pantalla a fin deaabustar el nivel de ampliación.Consulte el apartado correspondiente para Obtener más información al respecto.Nótese que es posible ver distinctas partes de laImagen arrastrándola con el dedo.Al activar esta funciona y mirar através del visor electrónico optional, gire la rueda deaabustes para modifier el nivel de ampliación y presiónela para seleccionar una region deinteres Para alejar laImagen, presione este botón nuevomente.
32 Menu
Presione este botón para acceder al panel de-option.
33 Reproducción
Presione este botón para acceder al modo de visualización, y luego una vez más con el propuesto de ver el material grabado en la pantalla de la CAMERA o en cualquier(other dispositivo connectado a la calidad HDMI.
34 Blackmagic Pocket Cinema Camera Pro EVF
Es possible usar un visor electrónico(optional con los modelos Blackmagic Pocket Cinema Camera 6K Pro y 6K G2. Este se inclina verticalmente hasta un ángulo de 70 grados e incluye cuatro temas de oculares para el ojo izquierdo odeocho, asi como un sensor que detecta cuando el dispositivo está en uso y apaga la pantalla LCD para conservar la energia de la batería y evitar que los controlles se activen accidentally. A su vez, permite ver distinctos datos de la camera o unaolenl limpia.Consulte el apartado Ajustes de monitorización para Obtener más información al respecto.
Para instalar el visor, utilise un destornillador deckeza plana a fin de aflojar el tornillo de la tapa del conector en la parte superior de la camera. Quite la tapa y compruebe que el conceptor este limpio y seco. Inserte el visor en el puerto de connexion. Sujete lo antesdo el tornillo moleteado.
35 Dloptria del visor electrónico
Gire la rueda para ajustar el enfoque del visor electronoico optional en los modelos Blackmagic Pocket Cinema Camera 6K Pro y 6K G2, a fin de que se adapte mejor a la vista. Cabe destacar que thisolo sof afecta a la imagen en el visor y no incide en el enfoque logrado a trovés del sensor de la webcam. Consulte el apartado Carta de enfoque para Obtener mas informacion al respecto.
36 Filtros de densidad neutral
El modelo Blackmagic Pocket Cinema Camera 6K Pro incluye filtros de densidad neutra que permittedrencir lacantidad de luz captada por el sensor de la camera,segun los pasos seleccionados.Al disminuir la exposicion,es possible grabar con una apertura amplia para lograr una menor profundidad de campo,por exemple,en exteriores durante un dia soleado.
Paracae bnti de dndadne, presione boton + o - a fin de acceder a las options disponibles.
Al seleccionar CLEAR, no se aplica ningún bajo, cuando que las options 2/4/6 STOPS permiten augmentar gradualmente la densidad para disminuir la cantidad de luz captada.
Dado que los usuario peuvent preferir other terminology para referirse a cada bajo, es possible personalizar la forma en que these se miden desde el menu en pantalla, a fin de identificarlos mediante un numero, la calidad de pasos de reduccion de luz, o la fracction que representa la disminuacion lumina.
| Ajustes disponiblespara filtros de densidad neutra | ||
| Número Pasos Fracción | ||
| Claro 01 | ||
| 0.6 2 1/4 | ||
| 1.2 4 1/16 | ||
| 1.8 6 1/64 | ||
Controles de la pantalla tactil
Characteristica
La pantalla táctil de los modelos Blackmagic Pocket Cinema Camera offre una interfaz rápida e intuitiva que responde a simples toques o desplazamenti del dedo para fácilar el uso de la CAMERA. Además, permite acceder con rapidez a las unidades que se utilize con mayor Frequencia durante el rodaje.

La pantalla tactil de la CAMERA brinda diversos datos y calidad el acceso a lasmericanas realizadas con mayor fecuencia.
Monitorización
Pulse el icono situado en la parte superior izquierda de la pantalla para acceder a las options de monitorizacion. Estas permiten personalizar la apariencia de diversas Herramiantas que incluyen la funcion Cebra, la cuadrula, el indicator de enfoque, las guias de encuadre y el falso color. Al acceder a cada una de las options, los controlles correspondientes aparecen en pestañas situadas en la parte inferior de la pantalla.

Pulse el icono situado en la parte superior izquierda de la pantalla para acceder a las options de monitorizacion.
Cebra
Esta optacion permite activar o desactivar la referencia Cebra y ajustar su intensidad en la imagen transmitida mediante la calidad HDMI.
Esta funciona para colocar y colocar en el limite de exposión preestablecido. Por example, al selecciónar 100% , se indica las areas Completely sobrepuestos. Este的结果をsuma uso para lograr un nivel de exposión adecuado en conditiones de illuminación existables.

Pulse el icono de la referencia Cebra en la parte inferior de la pantalla para acceder a los ajustes correspondientes.
Para activar la referencia Cebra, pulse el interruptor situado en la esquina inferior izquierda de la pantalla.
Mueva el control deslizante hacer la izquierda o la referencia para modifier la intensidad de las lineas. De forma alternativa, pulse una de las flechas situadas junto al indicator del nivel. Existen ocho options predeterminadas, inclusive gris intermediio (GI) y gris intermediio más un paso (GI + 1) , como incrementos cada cinco+puntos porcentuales desde 75% hasta 100% .
Consulte el apartado Ajustes de monitorizacion para Obtener mas informacion al respecto.
SUGERENCIa: Al grabar en conditiones de luz variable, por exemple al aire libre durante un dia parcialmente nublado, la webcam podra advertirse sobre una possible sobrexposacion cuando se selecciona un valor inferior a 100 para la func iON Cebra.
Asistente de enfoque
Esta option permite activar o desactivar el indicator de enfoque y ajustar su transparencia en laImagen.

Pulse el icono del indicator de enfoque en la parte inferior de la pantalla para acceder a los ajustes correspondientes.
Para activar o desactivar esta funciona, pulse el interruptor situado en la esquina inferior izquierda de la pantalla.
A fin de selectionar la intensidad del indicator, mueva el control deslizante hacer la izquierda o la derecha en la parte inferior de la pantalla, o pulse una de las flechas+junto al valor做不到.
La intensidad optima para el indicator de enfoque varia segun la toma. Por exemple, al enfocar actores o actrices, un mayor nivel可以选择和睦ar a mejorar los detalles en los rostros. Por el contrario, si la intensidad es demasiado alta al filmar vegetacion o una pared de ladrillos, es possible que se dificulte la visualizacion deOthers detalles en la imagen.
Consulte el apartado Ajustes de monitorizacion para Obtener mas informacion al respecto.
SUGERENCIa: Los modelos Blackmagic Pocket Cinema Camera-ofrecen dos modos para el indicator de enfoque. En tal sentido, es possible alternar entre las options Indicador y Lineas de color en la pestaña MONITOR.Consulte el apartado Ajustes de monitorizacion en este manual para Obtener mas informacion al respecto.
Guias de encuadre
Estaopyonpermiteverlasguiasdeencuadre enla pantalla u ocultarlas.Tambienesposible seleccionarla para la salivaHDMI de la camarra.
Las guas de encuadre incluyen relaciones de aspecto para el cine, la television e Internet.

Pulse el icono de las guías de encuadre en la parte inferior de la pantalla para acceder a los ajustes correspondientes.
Para ver u ocultar las guías de encuadre, pulse el interruptor situado en la esquina inferior izquierda de la pantalla.
Mueva el control deslizante hacer la izquierda o la derecha para selectionar el tipo de guía. De manière alternativa, pulse una de las flechas situadas aodos lados de la relacion de aspecto seleccionada. Asimismo, es possible introducir una relacion de aspecto personalizada pulsando sobre la option entre las flechas.
Las-optiones disponibles son lassiguidentes:
2.35:1, 2.39:1 y 2.40:1
Muestran una relacion de aspecto compatible con la presentacion anamorfica o de pantalla ancha que se utilizes en el cine. Las tres options varian ligeramente segun los Cambios que se han producido en los estandares cinematograficos con el transcirso del tiempo. El estandar 2.39:1 es uno de los mas usados en laactualidad.

Pantalla con la option 2.40:1 activada
2:1
Muestra una relacion de aspecto levamente mayor que 16:9, excepta no alcanza la medida del formatting 2.35:1.
1.85:1
Muestra或其他的关联关系,如:El ancho es levamente mayor que en losTelevisores HD con una relacion de 1.78:1, excepto no alcanza la medida del formatting 2.39:1.
16:9
Muestra una relacion de aspecto de 1.78:1 compatible con televisores HD y pantallas de equipos informativos cuya relacion es de 16:9. Este formatting se usa generalmente para transmitir contentsados en alta definccion a trovés de Internet y la television. Dicha relacion de aspecto también se haadoptado a efectos de la teledifusión en UHD.
14:9
Muestra una relacion de aspecto de 14:9 realizada por algunos canales de television como terme medio entre los formatos 16:9 y 4:3, lo cual brinda una mayor compatibiliad con ambos.Esta option的结果a adecuada si las imagenes van a serTelevisadas por una emisora que utilise dicha relacion.
4:3
Muestra una relacion de aspecto de 4:3 compatible con teilevisores SD y que además facilita el encuadrable利用率 adaptadores anamórficos 2x
1:1
Muestra una relacion de aspecto un poco mas estrecha que 4:3.Esta proportiOn cuadrada es la mas comUn en redes sociales.
4:5
Muestra una relacion de aspecto de 4:5 (vertical), ideal para retratos o contentidos en Telefonos integentes.
Guias personalizadas
A fin de crear guías de encuidre personalizadas para lograr un estudio únicos, pulse el valor de la relacion de aspecto entre las flechas. En la pantalla GUIAS PERSONALIZADAS, borre el valor actual mediante el botón de retroceso e introduzca uno nuevo mediate el teclado número. Pulse ACEPTAR a fin de aplicar los Cambios y continuar grabando.
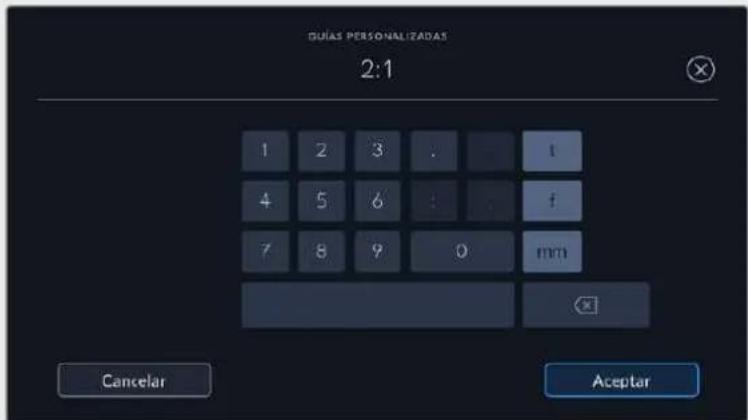
Utilice el teclado número para introducir una relacion de aspectodistincta.
SUGERENCIa: Es possibleATTER la opacidad de las guas de encuadre.Consulte el apartado Ajustes de monitorizacion para Obtener mas informacion al respecto.
NOTA: Consulte el apartado Ajustes de monitorizacion para Obtener mas informacion sobre las guias de encuadre.
Cuadrúcula
Esta option permite ver una cuadrifica de 3x3 (regla de los tercios), una cruz filar, un horizonte virtual o un punto central sobre laImagen visUALizada en la pantalla tactil o en los monitores connectados a la CAMERA.

Pulse el icono de la cuadricula en la parte inferior de la pantalla para acceder a los ajustes correspondientes.
Estas guas facilan la composotion de imagenes. Cuando se habilita esta opticn, es posible ver una cuadrula,una cruz filar o un punto central en la pantalla.
Para ver u ocultar la cuadrula, pulse el interruptor situado en la esquina inferior izquierda de la pantalla.
Selección una de las options disponibles: Tercios, Horizonte, Cruz o Punto. Al seleccionar Tercios, es possible escoger también entre una de las otheras tres optiones, logrado de este modo una combinacion de ajustes.

La cuadrula correspondiente a la regla de los tercios se ajusta automatically a las guas de encuadre visualizadas en la pantalla.
Tercios
Estaopymsta do lineas verticaes y dos lineas horizontales superpuestos en cada tercio de la imagen, y es una herramienta sumamente conveniente para composer planos. Por example, el ojo humano usualmente detecta el movimiento circa de los+puntosdonde se intersectan las lineas,y por ello resulta de granutilidadpara situarcentrosdeinteresenestaszonas.Por lo general,el horizontede visiOn del actorse ubica enel tercio superiorde la pantalla,de manera que es possibleutilizar esta parte como guia para el encuadre.A su vez,la cuadrula permite mantener la consistencia entre las distinctas tomas.
Horizonte
Estaopyaayadaamantenerlacamaraineladalastenerlaconlambdaanoayacalibrarsu inclinacion al colocarla en un estabilizador.
La direccion en la cuales la linea vertical se distancia de la cruz en el centro indica la inclinacion de la CAMERA. Cuando la CAMERA está inclinada hacía arriba o bajo, dicha linea horizontal se desplaza en sentido opuesto.
La distancia que separe la linea de la cruz filar es proportional a la inclinacion. Una vez calibrado el sensor de movimiento de la-camera, la linea vertical se destacara en azul cuando laamera está alineada con el eje Z, y lo mesmo sucede con la linea horizontal, a fin de indicar su alineacion con el eje X.
Cabe destacar que si la CAMERA se encuentra enfocando hacer abriba o abajo para filmar una toma desde un angulo elevado,elindicador del horizonte virtual tendráesto en cuesta. Si se gira la CAMERA 90 grados para grabar en modo retrato, elindicador también rotará.
La?siguiente tabla muestra ejemplos del horizonte virtual con distinctas inclinaciones de la cama.
Indicador Descripción

Nivelada

Inclinada hacaba abajo y nivelada

Girada hacía la izquierda y nivelada

Inclinado hacía arriba y girada a la derecha
Para un uso normal de la CAMERA, calibre el indicator de manos que quedecke y nivelado. Si desea utilizing el indicator para Maintener un plano holandes o una inclinacion consistente, a fin de realizar tomas con un angulo determinado, es possible calibrarlo con un valor especialico. Consulte el apartado Calibracion del sensor de movimiento para Obtener mas informacion al respecto.
Cruz filar
Estaopyon permite veruna cruz filar en el centro de la imagen.Al igual que la cuadrula, es una herramienta muyutil para componer planos y centrar objetos de interes. Seutiliza a bajo al filmar escenas en las que se implementaran cortes rapiidos.Esto hareposible que elexpectadormantenga su atencion enel centro de la imagen cuando el material editado contiene transiones rapiidas entre distinctos planos.
Punto
Esta option permite ver un punto en el centro de la imagen. Funciona de la misma forma que la cruz filar, excepta al ser masklequeo, resulta menos invasivo.
SUGERENCIa: Consulte el apartado Ajustes de monitorizacion para Obtener mas informacion sobre la cuadricula.
Área de seg]^dad
Esta optacion permite做不到 u ocultar el area de seguridad en la pantalla tactil, asi como ajustar su時間 en las imagenes Transmitidas a工程技术 de la calidad HDMI.
El area de seguidad se utilize durante las producciones para garantizar que las partes mas importantes de un plano peuvent ser vistas por los expectadores. Manteniendo los elementos mas destacados bajo de la misma, es possible evaporar que se pierdan partes de la imagen enTelevisores de mayor antiguedad, y ademas se proportionsciona un espacio adicular para que las teledifusoras pueda/agregar logos, textos moviles u othero tipo de informacion en la pantalla. Muchas emisoras exigen que los contentsos importantes en el material grabado, tales como tildos y graficos, esten bajo del area de seguidad.
Esta optación también puede serutil para ayudar a encuadrar las imagenes si seiene la certeza de que se van estabilizar durante la posproducción, ya que durante este proceso es possible que sus bordes se recorten. Asimismo, sirve para indicar un tipo de recorte spécifique. Por exemple, si se ajusta a 50% al grabar en UHD (3840 x 2160), es possible ver como quedaría laImagen con una resolution de 1920× 1080 . Cabe destacar además que el area de seguridad se ajusta según la optación selecciónada para las guías de encuadré.
![Blackmagic Design Pocket Cinema Camera 6K - Área de seg]^dad - 1](/content/2026/03/505506/images/ea79deaaec6ef3bff3b68b08514377b37b7b878b759d8430a7d2c88cd70f37de.jpg)
El valor para este indicador es de 85%.
Para activar o desactivar esta funciona, pulse el interruptor situado en la esquina inferior izquierda de la pantalla. Pulse las flechas situadas aodos lados del percentaje en la parte inferior de la pantalla para携带la intensidad del area de seguidad en las imagenes Transmitidas atrasv la salute HDMI.De forma alternativa,mueva el control deslizante hacla izquierda o la derecha.
Falso color
Esta opticon permite ver en la pantalla tactil un diagrama que facilita la exposacion por medio de colores falsos.
Esta herramipta superpone importantes colores en la imagen para representar los valores de exposicion correspondentes a diversos elementos. Por exemple, el rosa representa un nivel de exposacion ideal para tonos de piel mas claros, cuando que el verde es adecuado para matices mas oscuros. Al observar dichos colores cuando se filma el rostro de una persona, es possiblemantener un rango de luminancia y brillno constante en este elemento specifico.
De眼看imilar,esposible identificar las areas sobrexpuestos de la imagen cuando el color cambia deamarilloarjo.

Los valores IRE en el lateral izquierdo de la CAMERA indicate como interpretar el falso color.
Falso color Significado
| 95%WC Périda de detailles en el blanco |
| 80%WC Périda de detailles inminente en el blanco |
| MG+1 Un paso por encima del grís medio |
| 18MG% Grís medio |
| NBDL Périda de detailles inminente en el negro |
| BDL Périda de detailles en el negro |
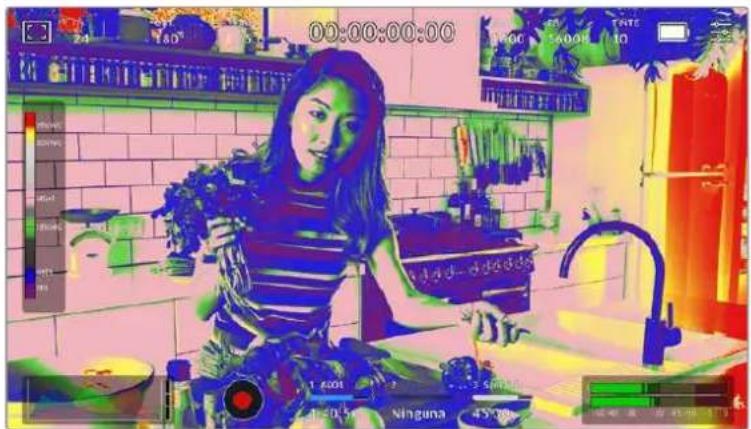
En una imagen con una exposión adecuada, los tonos de piel se representan mediante maties verdes y rosados.
Para activar o desactivar esta funciona, pulse el interruptor situado en la esquina inferior izquierda de la pantalla.

Interruptor para activar o desactivar la funciona de false color
Brillo de la pantalla
Mueva este control hacía la izquierda o la derecha paraaabstar el brillo de la pantalla táctil.

Laopsionpredeterminadaes 50%
Indicador de filtros de densidad neutral
Alaabstarel fiofo de densidadneutre enel modelo Blackmagic Pocket Cinema Camera 6K Pro, el indicador ND aparece en la esquina superior izquierda de la pantalla tactil y en el monitor connectado a la salida HDMI. Este icono permanecerà visible,mencras el filto este activado.En caso contrario,desapareceradespuesdequatro segundos.

Al ajustar el filtro de densidad neutra en el modelos Pocket Cinema Camera 6K Pro, aparece el indicator correspondiente en la pantalla.
NOTA: Es possibleCambiar la terminologia queutiliza elindicador de filtrosde densidad neutra segun las preferencias del usuario. Las options disponibles incluyen nombres de过滤, pasos o fracaciones. SeLECTIONe el formatting deseado en el menu PREFERECIAS.
Fotogramas por dato
El indicator f/s muestra la fecuencia deImagen seleccionada en fotogramas por segundo.

Pulse el icono de Frequencia de imagen para acceder al ajuste correspondiente.
Al pulsar el indicator f/s, es posible modifier los valores para el sensor de la camera y la fecuencia de imagen del projeeto mediante las options en la parte inferior de la pantalla.
Frecuencia deImagen delprojecto
Se tratate de la Frequencia de imagen del formato de grabacion seleccionado en la camera para elprojecto y permite elegir entre differentes velocidades comunmente realizadas en la Industria delcine y la television. Normalmente, este valor se ajusta de forma que coincida con el que se emplearará durante la produccion.
Las ocho optiones disponibles para este ajuste son: 23.98, 24, 25, 29.97, 30, 50, 59.94 y 60 f/s.
Paraaabstareste parametro,pulseuna de las flechas situadasaamsol del valor correspondiente a la fecuencia de imagen en la parte inferior de la pantalla.De manera alternativa, mueva el control deslizante hacla izquierda o la derecha.

Para realizar ajustos, mueva el control o pulse las flechas situadas a ); ), y en ambos lados del valor correspondiente a la fecuencia de imagen.
SUGERENCA: La fecuencia de imagen seleccionada para la grabacion determina la de las imagenes Transmitidas mediante la calidad HDMI.
Frecuencia deImagen del sensor
Este ajuste determina la cantidad de fotogramas que capta el sensor cada segundo, lo cual incide en la velocidad de reproduccion de las imagenes segun la fecuencia seleccionada para el proyejo.
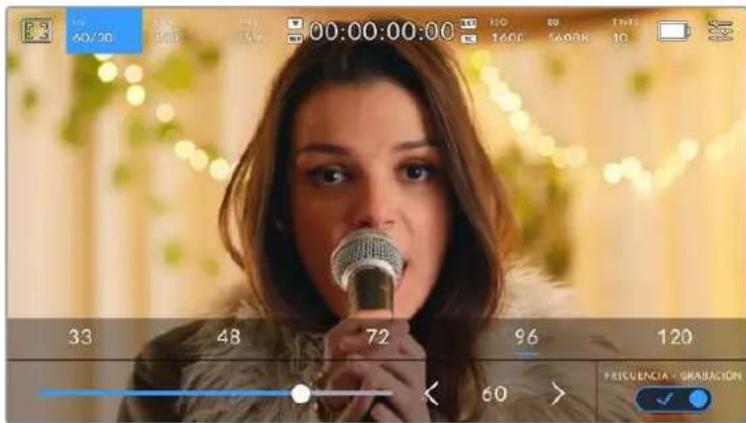
Si la optacion FRECUENCIA - GRABACION está activada, pulse un ajuste o las flechas situadas aodos lados del valor correspondiente a la fecuencia de imagen o mueva el control deslizante para realizar ajustes.
Por defecto, la fecuencia deImagen del sensor y del projeeto coinciden, a fin de que el material grabado se reproduzca a una velocidad normal. Sin embargo, al activar la option FRECUENCIA - GRABACION en el menu f/s, se pueda determinar values differentes para these parámetros.
ParaATTER la fecuencia de imagen del sensor, pulse las flechas situadas a ambos lados del indicator en la parte inferior de la pantalla. Tantién es posible mover el control deslizante hacer la izquierda o la derecha para augmentar o disminuir dicho valor. Al qutar el dedo de la pantalla, la fecuencia de imagen para el sensor quedarà seleccionada. Por otherdo, arriba del control deslizante se brindan distinctas OPCIONES comunes basadas en la fecuencia de imagen del proyecto.
Es possible crear efectos dinamicos e importantes Cambiando la fecuencia de imagen del sensor. Si este valor es mayor para la grabacion que para la reproduccion, se generate un efecto de camar a lenta. Por example, al elegir una fecuencia de 60 f/s para el sensor y de 24 f/s para el proyeo, las imagenes se producriran un 40% mas lento que la velocidad real de laersion. Por el contrario, cuando menor sea la fecuencia de imagen selec tionada para el sensor, mayor sera la velocidad de reproduccion del material grabado. Este principio se asemeja a la operacion mecancia de modifierla velocidad de giro de la cinta en una camaracinematografica antigua.Mover la manivea mas rapiido augnta la cantidad de fotogramas que capta el sensor, de manera que es posible prolongar determinadas escenas durante la reproduccion, a fin de realizar su carga emotiva.Reduciendo el ritmo de giro, se disminuye la velocidad con el proposto de destacar la action en secuencias con movimientos rapiidos. Las posibilidades creativas son infinitas y dependen compleamente de cada usuario.
Consulte la tabla en elApartado Grabacion para Obtener mas informacion sobre las freuencias de imagen.
NOTA: Al seleccionar la option FRECUENCIA - GRABACION, el audio y laImagen no estaran sincronizados. Esto suece incluo al configurar la misma fecuencia de imagen para el sensor y el proyejo. Por tal motivo, evite seleccionar esta referencia si deseamantener dicha sincronizacion.
Obturador
El indicator OBT. muestra el ángulo o la velocidad de obturación. Al pulsarlo, es posible modifierdicho valor o seleccionar uno de los modos disponibles para la exposión automática. Por su parte,la optación Valor de obturación permite escoger cui de这些东西 parámetros muestra el indicator.Consulte el apartado Ajustes generales para Obtener más información al respecto.

Pulse el indicator OBT, para acceder a los ajustes correspondientes.
El ángulo o la velocidad de obturación define el rastro que deja los objetivos en movimiento y pueda'utilarse para compensar loseturnos en las conditiones de iluminación. El valor más adecuado en la mayoría de loscasos es de 180grados,mienes que elequivalente para la velocidad de obturación es de 1/50 s.Sin embargo,puede resultar必須o ajustarlo siDICAS conditiones cambian.
Por exemple, a un valor de 360 grados, el obturador está Completely abierto y permite que el sensor capte una mayorcantidad de luz. Esto resulta adecuado en escenas con escaso movimiento yoca iluminacion. De forma alternativa, al filmar escenas con una gran cantidad de movimiento, un ángulo de obturación menor de 90 grados brinda la posibiliad de eliminar el rastro que deja los objetos yoculars. Conducir imagenes muchos más nitidas. La velocidad de obturación correspondiente al ángulo de obturación depende de la Frequencia de imagen employada.
Por exemple, al grabar a 25 f/s, 360 grados equivalen a 1/25 s, y 90 grados a 1/100 s.
NOTA: Al grabar con luz artificial, el ángulo de obturación pueda afectar la visibiliad del parpadeo. La CAMERA calcula automatistically los values de obturación sin parpadeo para la Frequencia de imagen selecciónada y muestra hasta tres OPCIONES en la parte inferior de la pantalla. Estasdependieran de la Frequencia electrica realizada en cada region. En este sentido, el menu de configuracion de la CAMERA permite selectionar las OPCIONES 50Hz o 60Hz . Consulte el apartado Ajustes generales para Obtener mas informacion al respecto.
Al pulsar el indicator OBT., aparecen diversos values de obturacion sugeridos en la parte inferior de la pantalla. Si la function de exposicion automatica está desactivada, se做不到a la velocidad realizada jusqu con los values que permiten eliminar el parpadeo en la imagen, segun la fecuencia electrica seleccionada en el menu de configuracion de la camera. Consulte el apartado Ajustes generales para Obtener mas informacion al respecto.
Cabe destacar que las caracteristicas de ciertas fuentes de luz peuvent occasionar parpadeo, incluo al emplear valores que evitan este tipo de artefacto. Se recomienda primero realizar una grabacion de prueba cuando no se utilizen luces continuas.
Para seleccionar una velocidad de obturacion sin parpadeo, pulse uno de los valores que se muestran en la pantalla. Las flechas situadas aodos lados del indicator permiten alternar entre algunos de los ajustes mas realizados.

La webcam Recommendará cierto's价值观 basados en la Frequencia electrica selecciónada en el menu de configuración.
Al filmar en exteriros o con luces que no causan este problema, el valor de obturacionuede determinarse pulsando dos veces el indicator situado en la parte inferior izquierda de la pantalla. Aparecera un teclado numero que permit ingresarriallo entre 5 y 360 grados.
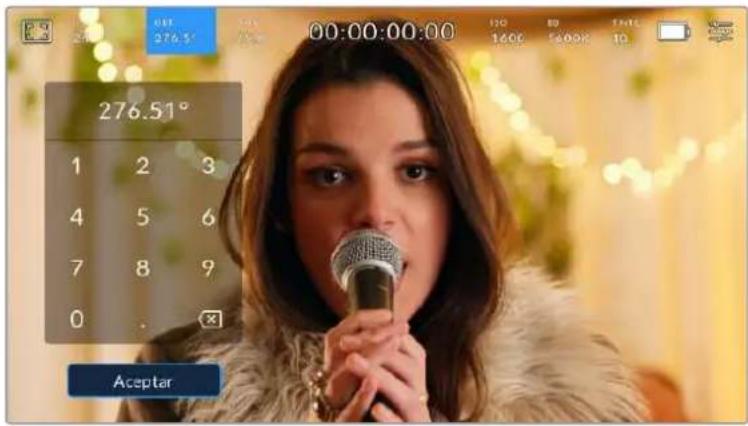
Utilice el teclado número para determinar el ángulo de obturación al filmar en exteriros o con luces que no Causean parpadeo en laImagen.
Los modelos Blackmagic Pocket Cinema Camera ofrecen tres modos de exposión automática. Para selecciónar uno de ellos, pulse el interruptor EXPOSICION AUTOMÁTICA en la esquina inferior derecha de la pantalla.
Obturador
Esta option permite ajustar automatistically el valor de obturación para mantener la exposión sin modifier la aperture del diafragma.Esta resulta adecuada cuando esnecessary conservar la profundidad de camino. Cabe destacar querialquierajuste sutil del obturadorgueafectar el desenfoque dinamico. Asimismo, al rodar en interiores, es importante verificar que las fuentes de luz no generen parpadeo en la imagen. Notese que la option de ajuste automatico del diafragma no está disponible al seleccionar este modo.
Obturador y difragma
Laopping. ^+ Iris permite mantener una exposacion adecuada ajustando primero el valor de obturacion yuego la apertura del diafragma. Cuando, a pesar de haber alcanzado el nivel maximo o minimo de obturacion, no es possiblemantenerlaexposacion,lacamaraintentarajustarlaapertura del diafragma para lograr dicho objetivo.
Diafragma + Obturador
La optacion Iris + obt. permite tener una exposicion adecuada ajustando primero la aperture del diafragma y bajo el valor de obturacion. Cuando, a pesar de haber alcanzado el nivel maximal o minimo de aperture, no es possible tener la exposacion, laamera intentara ajustar el valor de obturacion para lograr dicho objetivo.

En el menu OBTURADOR, pulse la option EXPOSICION AUTOMÁTICA para acceder a losDistinctos发展模式obturación.
Al activar el modo de exposión automatística, que afecta tanto al obturador como al diafragma, aparecerá la leira A+junto al indicator correspondiente en la parte superior de la pantalla.
Diafragma
El indicator IRIS muestra la aperture del diafragma. Al pulsarlo, es possible modifier este valor en objetivos compatibles y seleccionar distinctos发展模式 de exposión automatica.

Pulse el indicator IRIS para acceder a los ajustes correspondentes.
Paraaabstaraperturadel diafragmadeselapatalla tactil,esprecisoutilizarun objetivo compatiblecon estafunciOn.
Al pulsar el indicator IRIS, aparecen diversas options para la aperture del diafragma en la parte inferior de la pantalla. A la izquierda, se muestra el valor actual. Para modifierlo, pulse las flechas situadas aodoslos del mesmo o mueva el control deslizante.

Ullice las flechas situadas airoslados del valor de aperture o el control desilizante para modifierlo.
Al pulsar el interruptor EXPOSICION AUTOMÁTICA situado en la parte inferior derecha de la pantalla, es possible acceder a las siguientes OPCIONES de exposión automática.
Diafragma
Laopia IRiS permite ajustar automaticallyla apertura del diafragma para mantener la exposacion sin modifier el valor de obturacion. Esto brinda la posididad de conservar un desenoque dinamico constante, pero podria afectar la profundidad de camino.
Dlafragma y obturador
Laopia Iris + obt. permite mantener una exposacion adecuada ajustando primero la apertura del diafragma y bajo el valor de obturacion. Cuando, a pesar de haber alcancado el nivel maximo o minimo de aperture, no es possible tener la exposacion, la camera intentaraajsurar el valor de obturacion para lograr dicho objetivo.
Obturador + Dlafragma
Laopia. + Iris permite mantener una exposacion adecuada ajustando primo el valor de obturacion y bajo la apertura del diafragma. Cuando, a pesar de haber alcanzado el nivel maximo o minimo de obturacion, no es posible mantener la exposacion, laamera intentara ajustar la apertura del diafragma para lograr dicho objetivo.

En el menu IRIS, pulse la option EXPOSICION AUTOMÁTICA para acceder a losDistinctos发展模式 de exposión automática.
Al activar el modo de exposión automatica, que afecta tanto al diafragma como al obturador, aparecerá la leira A+junto al indicator correspondiente en la parte superior de la pantalla.
Duración
Este indicator se encuentra en la parte superior de la pantalla.

Se enciende de color rojo cuando la CAMERA está grabando.
El indicator permite verficar la duracion de los clips y controlar el numero de tiempo durante la grabacion o la reproduccion. La secuencia temporal se expresa en horas, instantos, segundos y fotogramas, y este valor cambia al grabar o reproducir clips. Cabe signaled que el numero de tiempo se muestra en rojo durante la grabacion.
Este valor comienza en 00:00:00:00 e indica la duracion del clip actual o delultimate que se haya grabado. Ademas, se incluye la hora en los metadatos, a fin de simplificar la etapa de produccion.
Pulse el indicator para ver el número de tiempo, Pulselo nuevomente para regresar a la duración de la grabación.
Al conectar una unidad Blackmagic Pocket Cinema Camera al modelos ATEM Mini, en la pantalla se indica, debajo del número de tiempo, si la seals transmitida por la CAMERA está al aire o si seoca de un anticipo, fácilando de este modo laarea del operador. Por su parte, el mezclarod sincrioniza automaticallye el numero de tiempo de las camaras para que coincida con el del dispositivo al conectarlas. Este permite editor secuencias multicamara con precision en DaVinci Resolve.
Junto a la duración, pueda aparecer los sagulentes Indicadores:
W
Aparece a la izquierda de la duracion al reducir el area aprovechable del sensor.
TC
Aparece a la referencia de la duración cuando se muestra el número de tiempo.
EXT
Aparece a la referencia de la duración al detectarse un número de tiempo longitudinal正值 conectado a la entrada de 3.5 mm, o si este se ha sincronizzato mediante un mezcluder ATEM Mini.
INT
Aparece a lareshedaclduradioncuando lacamarufuncionaconuncdo de tiempo interno,uego de sincronizarla y desconectarla.
ISO
El indicator ISO muestra la sensibilitad fotometrica. Al pulsarlo, es possible modifier este valor según las conditiones de iluminación.

Pulse el Indicador ISO para acceder a los ajustes correspondientes.

Las options disponibles para el valor ISO aparecen en la parte inferior de la pantalla. El control deslizante debajo de las optiones predeterminadas permite ajustar el valor ISO en incrementos de 1/3.
En función de las circunstancias, es possible selecciónardistinctosvalores. Porejemplo, un indices de 25600podríaresultarapropiado encondicionesdeluzesca,peraasu vezesposible que genere algo de ruido en la imagen.Al filmar con buena iluminacion,se recomienda elegir un valor ISO de 100 para Obtener colores mas intensos.
ISO native dual
Los modelos Blackmagic Pocket Cinema Camera-ofrecen un valor ISO nativo dual de 400 y 3200. Por consiguiente, el sensor ha sido optimado para grabar tanto aplen luz del dia como en conditiones de esca sa iluminacion.
Alaabstara sensibilidad ISO segun las conditiones de illumination,estafuncionseactiva automaticallypara garantizarqueelmaterialgrabadosea nitido ypresentela menorcantidadereudo posiblo.
Al configurar la sensibilitidad entre 100 y 1000, la CAMERA usa un ISO nativo de 400 como punto de referencia, cuando que, para el intervalo de 1250 a 25600, seletes un valor de 3200. Si las conditiones del rodaje permiten elegir tanto un valor de 1000 como de 1250, recomendamos seleccionar esteultimate y cerrar la aperture del diafragma un paso. Estó hara que la CAMERA utilise un ISO nativo de 3200, logrado asiolestores resultados.
Las siguientes graficas muestran la relacion entre la sensibilitidad ISO y la asignacion del rango dinamico.

Rango dinamico en los modelos Blackmagic Pocket Cinema Camera 6K Pro y 6K G2
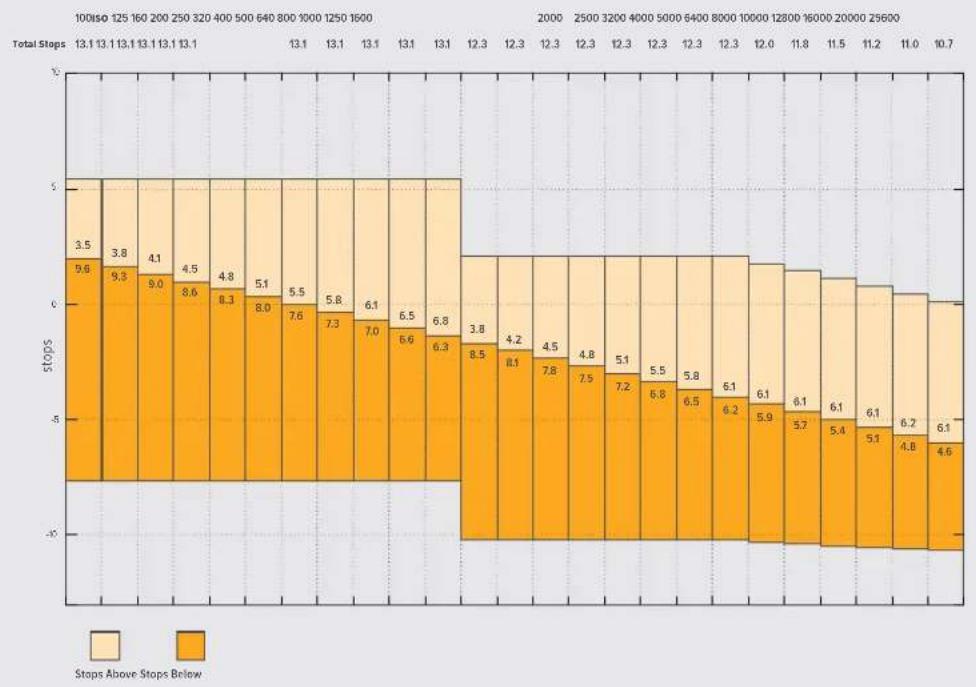
Blackmagic Pocket Cinema Camera 4K: Rango dinamico
Balance de blancos
Losindicadores BB y TINTE muestran los valores para el balance de blancos y el matiz, respectively. Al pulsarlos, es possible realizar ajustes segun las conditiones de iluminacion.

Pulse losindicadores BB y TINTE para acceder a los ajustes de balance de blancos y tinte correspondientes.
Cada fuente de luz emite un color. A modo de exemple, la luz de una vela emite un color calido, cuando que un cielo cubierto por nubes emite un color frio. El balance de blancos se usa paraaabrear los colores y registrar asi que el blanco adopts otheras tonalidades. Esto se consigue modificandola mezcla de azul y naranja en la imagen. Por example, al filmar bajo lamparas de tungsteno queemiten una luz calida anaranjada, un valor de 3200 K permite tener una imagen mas azulada. Estopermite equilibrar el balance cromatico de manera que el blanco se registre con precision.
Los modelos Blackmagic Pocket Cinema Camera incluyen valores predeterminados para differedes temperatas de color, segun se indica a continuacion:
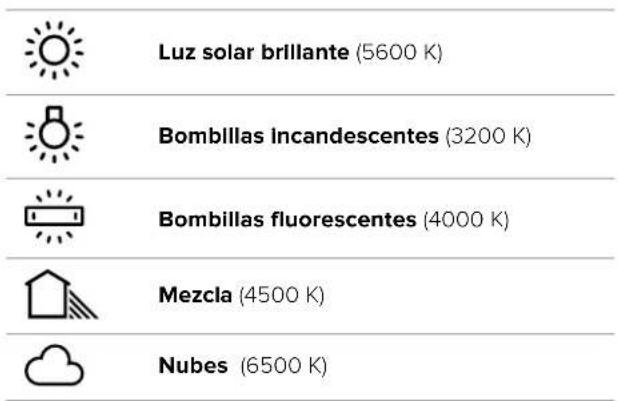
Para personalizar cuales quiera de estas options, pulse o mantenga presionadas las flechas situadas aodos lados del valor correspondiente a la temperatura cromatica en la parte inferior izquierda de la pantalla. Al pulsar una de las flechas, este aumento o disminuye 50 K. Almanterlas presionadas,icho valor cambia mas rapiido.De forma alternativa,este parametro se pueda modifier moviendo el control deslizante.
Tambien es possible modifier el matiz para realizar ajustes con mayor precision. Esto brinda la posibidad de携带 la proportiOn de verde y magenta presentes en la imagen. Por exemple, al asignir mas magenta, se compensate la tonalidad verdosa de las luces fluorescentes. La mayoria de las configuraciones predeterminadas para el balance de blancos que ofrece la camera presentan un cierto matiz.

Al pulsar los indicadores BB y TINTE, es possible acceder a cinco configuraciones predeterminadas o modifier把这些 parámedros en forma individual. Realice los ajustes Necessaryos segun las conditiones de illumination.
El matiz se muestra en la parte inferior derecha de la pantalla. Para ajustarlo, pulse o mantenga presionada una de las flechas situadas aodos del valor. El rango disponible va de-50 a+50 en incrementos de una unidad. Almanter una flecha presionada,icho valor cambia mas rápido.
NOTA: Al modifier el matiz o el balance de blancos, la configuracion predeterminada cambia a CWB, o balance de blancos personalizzato. Estos ajustes no se veran afectados si se reinicia el dispositivo o se elige otra option, locial facilita la comparacion entre distinctos values.
Balance de blancos automatico
Los modelos Blackmagic Pocket Cinema Camera能把 ajustar el balance de blancos de forma automática. Al pulsar la option AWB, se accede a las.optiones disponibles para este parámetro.
Cuando el balance de blancos se determina automatistically, verá un cuadrado en el centro de la imagen. Hágalo coincidir con una superficie neutral de color blanco o gris y bajo pulse el botón ACEPTAR. La CAMERA ajustará el balance de blancos y el matiz automatistically para garantizar que la predominancia de dichos-coloredes Dentro del cuadrado sea lo mas neutral possible. Una vez finalizo el proceso, these values se utilizen en forma predeterminada al grabar.heiro es possible activar esta opiconmanteniendo presionado el boton BB en la parte superior de la-camera durante tres segundos.
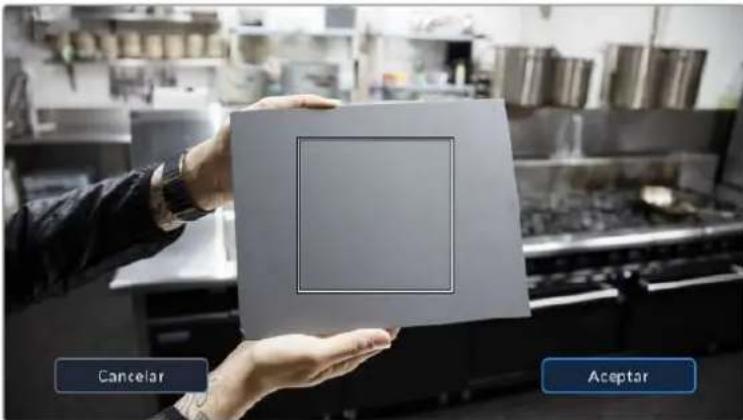
Al pulsar la option AWB, se accede a las options disponibles para el balance de blancos automatico. Utilice una superficie gris o bianca para establecer un valor neutro.
Alimentación
La fuente de alimentacion y el estado de la bateria se indica en la esquina superior derecha de la pantalla.

Si se utilizes una batería, al pulsar el Indicador se muestra el voltaje y la carga restante.
| AC | Corriente alternata | Indica que la*camera está conectada a la red de suministro eléctrico. |
| AC | Corriente alternata / cargando | Indica que la*camera está conectada a la red de suministro eléctrico y que la batería interna o las baterías NP-F570 en la empañadura se está cargando. |
| 50% | Porcentaje | El icono做不到 el percentaje de carga restante si la batería lo permite. Cuando este valor disminuye a 20%, el indicator se enciende de color rojo. Para ver u ocultar este indicador, pulse el icono de la bateria. |
| Barras | Cada barra en el icono de la batería corresponde a un 25% de su carga. Cuando este valor disminuye a 20%, el indicator se enciende de color rojo. | |
| Nivel de cargo de las baterías | Al instalar la empañadura, estas barras indican la carga de ambas baterías deforma independiente. | |
| Barras de la empañadura para baterías | Los modelos Pocket Cinema Camera 6K Pro y 6K G2 peuvent almightarse mediante la batería interna o las dos baterías insertadas en la empañadura Blackmagic Pocket Camera Battery Pro Grip. Estos indicadores muestran el nivel de carga de cada una de ellas. | |
| 16.4v | Voltaje de la fuente de allentación | Este valor indica el voltaje suministrado por la batería o un adaptador de corriente continua, un cable adaptador connectado a la calidad D-Tap u other accesorio personalizzato. Para activar o desactivar este indicator, pulse el icono de la bateria. |
Indicador LUT
Al embaruar una tabla de conversion (LUT), la-camera做不到 un icono en la esquina superior izquierda de la pantalla.

Histograma
El histogram de la seals puee apreciarse en la parte inferior izquierda de la pantalla y muestra la distribucion tonal de la imagen segun los canales rojo, verde y azul.
El histogram proporciona una indicacion del rango de tonalidad entre las zonas mas claras y oscuras de la imagen. Ademas, es una herramlienta muy utill para vericar el balance de la exposicion y evaporar que se pierdan detalles en las partes mas luminosas.
El extremo izquierdo correponde a las partes mas oscuras de la imagen,@m间隙 que el derechochorepresenta las zonas mas claras. Al modifierla aperture del diafragma, es possible ver como losvalores se desplazan��ia la izquierda o la derecha, segun corresponda. Esto brinda la posibiliaddecomprobar que no se pierdan detailles en dichas partes de la imagen. Cuando this occurre enel canal rojo, verde o azul, se enciende el indicator correspondiente a la derecha del historograma.Si los extremos de la grafica se cortan abruptamente, en lugar de disminuir en forma gradual, esprobable que haya una perdida de informacion.
Si no se ve el historograma en la parte inferior izquierda de la pantalla, es possible que la optación Códec y resolution está activada en los ajustes de monitorización. Consulte el apartado Ajustes de monitorización para Obtener más información al respecto.
Botón de grabación
El botón gris situado+junto al historiograma en la parte inferior de la pantalla Permite grabar imagenes. Pulselo una vez para comenzar la grabación. Para detenerla, pulseloNuevoamente. Al grabar, el botón y el número de tiempo en la parte superior de la pantalla se ven de color rojo.

Botón de grabación, jusqu'à los indicadores de los soportes de almacenimiento en la parte inferior de la pantalla.

El botón se enciende de color rojo al grabar.
LUT aplicada
La pantalla indica si se ha aplicado una tabla de conversion (LUT) al material grabado.

El icono LUT Indica que se ha aplicara una tabla de conversion al material grabado.

El Icono LUT indica que se está aplicando una tabla de conversion al material grabado.
Fotogramas omitidos
Si se detectan fotogramas omitidos al filmar, aparecerá un signo de exclamación en forma intermitente sobre el botón de grabación. El indicator del tiempo restante correspondiente a launidad afectada también se encenderá de color rojo. Por exemple, si se omiten fotogramas al grabar en la tarjeta CFast, el signo de exclamación aparecerá sobre el botón de grabación, y el indicator de la tarjeta se encenderá de rojo. Este permitted saber si una determinadaiedad almacenimiento esdemasiado lenta para el formatting y laResolution que se han seleccionado. El indicator también aparece si se detectan fotogramas omitidos en el material grabado. Este permanecerá en la pantalla hasta que se grabe除外 clip o se apague la CAMERA. Consulte los apartados referentes a la elección de soportes de grabación para Obtener más informacion al respecto.

Indicador de fotogramas omitidos en la tarjeta CFast
NOTA: Es possible configurar la CAMERA para que deje de grabar si se detectan fotogramas OMITidos, a fin de estar que el soporte de almacenimiento se liene con material inutilizable. Consulte elApartado Ajustes de grabacion para Obtener mas informacion al respecto.
Tiempo de grabacion restante
Al insertar una tarjeta SD o CFast en la CAMERA o conectar una unidad USB-C, la pantalla muestra el tiempo de grabación restante. Dicho valor se indica en horas y varía según la Frequencia deImagen y el formatting的选择。Asimismo, el tiempo restante se calcula automatistically alchangar cualquier idea de这些东西 parámedicos. El indicator se enciende de color rojo cuando quedenapproximamente 5 horas y parpadea cuando el tiempo de grabación restante es menos de 2 horas. Si la�性 no Tiene mas capacité, la pantalla muestra elsignificante mensaje: LLENA.

La pantalla de la camara indica el nombre de las unidades de almacenamiento y el tiempo de grabacion restante en instantos.
El nombre de la unidad de almacenimiento aparece en una barra(PC)queena sobre el tiempo de grabacion restante. esta se enciende de color azul cuando la camera essta lista para grabar en dicho soporte. Para grabar en una unidad differente, mantenga presionado el nombre de la misma. Durante la grabacion, la barra se enciende de color rojo.
Al pulsar el indicator de la unidad, es possible acceder a las options de almacenimiento y al menu para formatearla.

Pulse elindicador correspondiente al soporte de grabacion en la parte inferior de la pantalla a fin de acceder a las options para dicha unidad.
Este menu muestra el espacio disponible en cada unidad, su nombre, la duración delultimate clip grabado, la cantidad de clips almacenados y el sistemasutilizzato para darle fornato.
Asimismo, es possible formatear los soportes de grabacion mediante dicho menu. Consule el apartado Preparacion de soportes de grabacion para Obtener mas informacion al respecto.
SUGERENCIa: Pulse el nombre de la unidad en el menu de almacenimiento para activarla. La CAMERA grabará primero en dicho soporte.
Vúmetros
Los vúmetros muestran la intensidad del audio para los canales 1 y 2 al utilizar el micrófono de la webcam o conectar fuentes externas. Este parámetro se mide en dBFS (decibelios a escala completa) y, al alcantar su nivel máximo, se enciende un indicator que permanece iluminado brevamente.
Mantenga la intensidad del volumen por debajo de los 0 dBFS para Obtener una mejor calidad de audio. Este valor correponde al nivel máximo al cui la CAMERA pueda registrar el sonido, y si se excede, podra occurrir una distorsión.
Las barras de color del vúmetro representan la intensidad del audio. De ser possible, el volumen máximo no debe exceder la zona verde superior. Si los picos de la SERIAL alcanzan la zona amarilla o roja, podra occurrir una distorsión.
Al pulsar el vumetro, es possible acceder a los 控les para los canales 1 y 2, el itavoz o los auriculares.
Pulse los vumetros en la pantalla, a fin de acceder a las-optiones para el volumen, el allavoz y los auriculares.
Pulsar dos vezes para ampliar la imagen
Es posible ampliarrialquier parte de la imagen visualizada pulsando dos vces la pantalla.Deslice el dedo sobre la misma para desplazar la imagen. Esto es desumautilidad alcomprobarel enfoque Para volver al tamenio original, pulse la pantalla-Newamente dos vces.
Pellizcar para ampliar la imagen
Es posible ajustar el nivel de ampliacion de la imagen mediante la pantalla tactil usingo distinctos gestos. Esto no afecta a la senal transmitida por la salute HDMI.
Paraacular imagen al doble, pulse dos veces la pantalla o presione el boton ZOOM en el panel trasero de la webcam. A continuacion, con dos dedos «pellizque» la pantalla a fin deajsutar el nivel de ampliacion. Es possible arrastrar los dedos sobre la misma para ver distinctas partes augmentedas de la imagen. Para volver al tameno original, pulse la pantalla-Newamente dos veces o presione el boton ZOOM.
Al pulsar dos vezes la噎a o presionar el boton ZOOM, se alterna entre el nivel de ampliacion anterior y el tamaño original de la imagen. Por example, si se «pellizca» la噎a para augmentar la imagen ocho vezes, al pulsarla otheras dos se做不到a la imagen original, y al hacerloNuevoamente, la version augmenteda.
Pulsar para enfocar
Es posible embarir el punto de enfoque tocando y Maintainiend presionada la parte de la imagen en la pantalla sobre la qual se desea enfocar. Presione el boton de enfoque para enfocar el objetivo en el elemento descado. Presione dos vezesDICHO botON para regresar al modo predeterminado.
Modo de pantalla completa
Al enfocar o encuadrar un plano, pueda resultarutil ocultar provisoriamente el dato y los indicadores que aparecen en la pantalla. Paraarlo,deslice el dedo hacia arriba o abajo sobre la misma.Notese que losindicadores degrabaciony enfoque,las guasde encuadre y las rayas diagonales de la funci0n Cebra permaneceran visibles.
Para volver a ver dichos elementos, deslice nuevomente el dedo hacía arriba o abajo sobre la pantalla.

Deslice el dedo hacía arriba o abajo sobre la pantalla para ocultar lasvinciones.
Menu de reproducción
Presione el botón de reproducción para acceder al menu correspondiente. La reproducción de las imagenes grabadas con anterioridad pueda controlarse mediante los botones de la CAMERA o la pantalla táctil.
En esteultimate caso, pulse el boton de reproduccion para ver el clip grabado, y-Newamente para detenerlo. Utilice los botones de avance o retroceso para ir al comienzo o el final de una secuencia. Pulse el boton de avance una vez para ir al comienzo del clip seguiente. Oprima el boton de retroceso una vez para reproducir el clip actual desde el inicio, o dos veces para retroceder hasta el comienzo del clip anterior. Cabe signalar que también es possible reproducir las secuencias de forma continua pulsando el boton con la flecha circular.

fconos de retroceso, reproduccion, avance rapiado y reproduction continua
Para avanzar o retroceder la reproduccion, mantenga presionados los botones correspondientes. Esto permite reproducir el material grabado hacía adelante o antes al doble de la velocidad normal.
Cada vez que se pulsa el botón de avance o retroceso en este modo, la velocidad de reproducción augmente al doble. Nótese que la velocidad Máxima es de x16. Al pulsar el botón nuevomente, el clip volverá a reproducirse al doble de la velocidad normal (x2). Pulse el botón de retroceso una vez para reducir la velocidad de reproducción a la mitad. Pararegarser a la velocidad normal, pulse el botón de reproducción.

Este indicador muestra la velocidad y la direccion en la que se reproduce el material grabado.
Al presionar el botón de grabación durante la reproducción, la CAMERA permanece en modo de esper.
Deslice el dedo hacía arriba o abajo sobre la pantalla táctil para ocultar el texto durante la reproducción. Acceda a laclaqueta virtual en el modo de reproduccion para indicar que el clip es buena mediante la option TOMA BUENA en los metadataos. Consulte el apartado Metadatos para Obtener mas informacion al respecto.
Ajustes
Panel de options
Presione el botón MENU para acceder al panel de-option. Este contiene varias-optiona las que no es possible acceder desde la pantalla tactil.Los ajustes se encuentran organizados en distinctas pestañas segun la functiOn que cumplen.Cada una incluye various grupos de optiona a las que es possible acceder pulsando las fechas situadas aaminslos de la pantalla tactil o deslizando el dedo hacia la izquierda o la derecha.
Pulse una de las pestanas para acceder a las options correspondentes.
Ajustes de grabación
La pestaña GRABACION permite selectionar el formatting, el codec, la resolution y los parámedos importantes del material grabado, tales como el rango dinamico y la nitidez de los detalles.
Ajustes de grabación 1
El primer grupo de ajustes de la pestaña GRABACION incluye las siguientesustralianos:
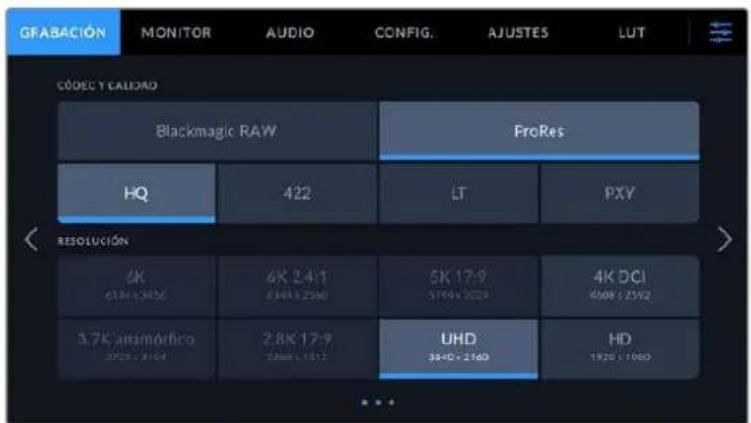
Códec y(callad
Este menu está dividido en dos filas. La fila superior permite seleccionar dos temas deCORDS: Blackmagic RAW y ProRes. Por su parte, la inferior brinda distinas options de calidad para cada uno de ellos. Por exemple, las options disponibles para el codec ProRes incluyen 422 HQ, 422, 422 LT y 422 Proxy. En la option Blackmagic RAW, es possible escoger una velocidad de transferencia invariable o una calidad constante.
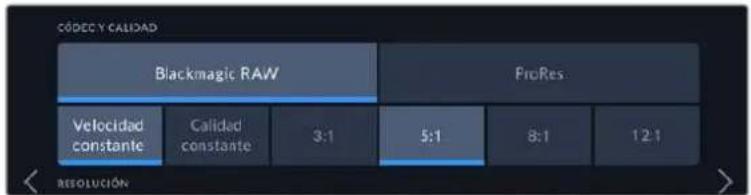
Opiones CODEC Y CALIDAD para Blackmagic RAW
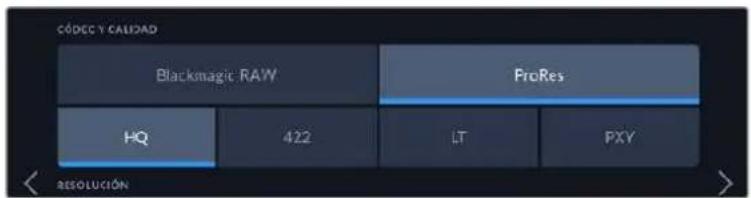
Opiones CODEC Y CALIDAD para ProRes
SUGERENCIA: El tiempo de grabación disponible en una�性 de almacenimiento aumenta al elegir formatos con un mayor grado de comprensión. Consulte las tablas respectivas en el apartado Grabación para Obtener más información al aspecto.
Resolución
Estaopyesta vinculada al formato escogido y permite elegir la resolution para el本身就是. Por典型案例, para grabar contentsos UHD en forma ProRes HQ, seleccione ProRes y HQ en el menu CODEC Y CALIDAD.A continuacion, elija UHD en el menu RESOLUCION.
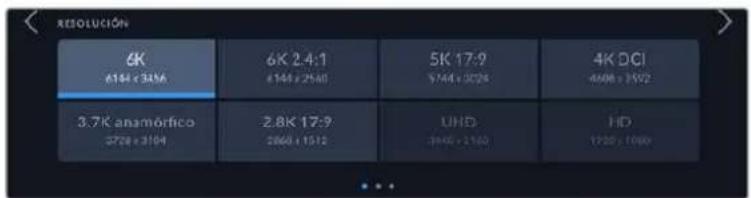
Opiones RESOLUCION al grabar en Blackmagic RAW en los modelos Blackmagic Pocket Cinema Camera 6K Pro y 6K G2
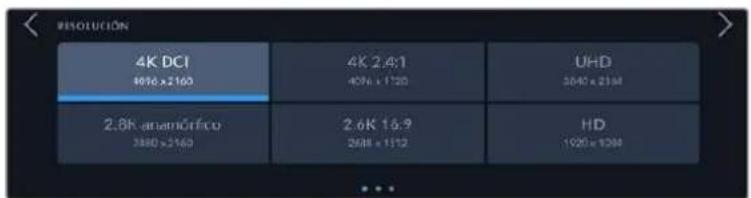
Opiones RESOLUCION en el Modelo Blackmagic Pocket Cinema Camera 4K. Cabe destacar que, en el formato DCI 4K, la categoria se denomina RESOLUCION, cuando que en los除外 es RESOLUCION - AREA DEL SENSOR REDUCIDA.
Al coordinar una grabacion multicamara mediante un mezcludor ATEM Mini, las unidades Pocket Cinema Camera utilizan el codec Blackmagic RAW para grabar en forma aislada con una calidad alta. Cuando laamera se connecta al mezcludor, se modificará la fecuencia deImagen a fin de que coincida en algunos dispositivos. Para selectionar un valor diferente afterwards de haber connectado todas las fuentes, modifierque los ajustes del mezcludor desde el programa ATEM Software Control. Consulte el manual del modelo ATEM Mini para Obtener mas informacion al respecto.
Ajustes de grabación 2
ElsegundoGrupo deajustesde la pestañAGRABACION incluye lassiguientesoptiones:
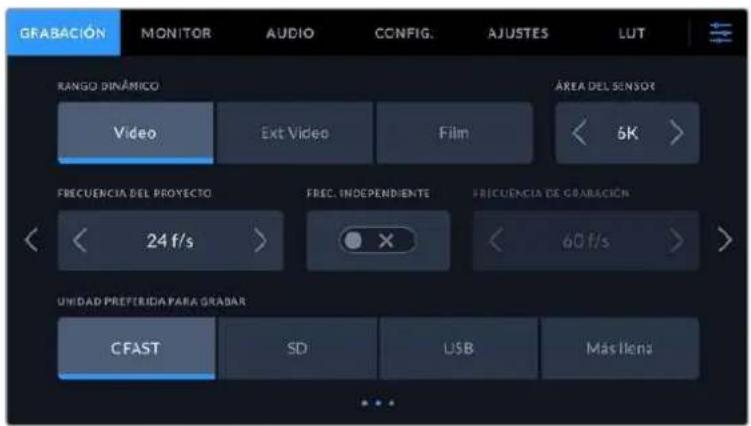
Rango dinámico
Selección el rango dinámico pulsando la-option deseada. Los modelos Blackmagic Pocket Cinema Camera ofrecen tres modelos:
| Film Este modo brinda | la posibiliad de filmar emploando una curva logarífmina que permitemanter la amplitud del rango dinámico y aprovecha al máximo la información incluida en la seals para sacar parte de las ventajas que ofrecen los programas de etalonaje, tales como DaVinci Resolve. |
| Extended Video Este | modo se basa en el空間 Blackmagic Wide Gamut, aplicando contraste y saturación. La diferencia más evidente con el modo Video es que el eje magenta/verde presente una saturación inferior, lo cual es típico de las cintas cinematograficas. |
| Video Este ajuste es la | mejor option para grabar con una apariciacia saturada de alto contraste, a fin deentarragel material directamente o con grado minimumo de procesamento. Utiliza el空間 cromálico Rec.709, con una atenuación AGRADABLE en las zonas más luminosas. Además, ofrece un punto de partida preciso, con una curva de respuesta tonal placentera, y brinda la posibiliad de etalonar las imagenes de ser necessario. |
NOTA: Al grabar en formatting Blackmagic RAW o ProRes con el modo Film, laImagen en la噎a de la camera lucirá apagada y con poco contraste. Este se debe a que el archivo contiene abundante informacion que aun no ha sido optimizada para su visualizacion en un monitor. No obstarve, cuando se emplea dicho modo, es possible aplicar una tabla de conversion (LUT) al supervisor el material grabado en la噎a de la camera o en un dispositivo connectado a la calidad HDMI, a fin de simular el contraste adecuado. Consulte el apartado Tablas de conversion para Obtener mas informacion al respecto.
Área del sensor
Los modelos Blackmagic Pocket Cinema Camera peuvent configurarse para que utiliser todo el sensor o solo una parte del本身就是, a fin de lograr una mayor Frequencia de imagen. En esteultimate caso, solo se emplea la calidad de pixeles necessitiesa para un formatting determinado, en vez de ajustar el tamenio de la imagen captada por la totalidad del sensor. Algunos formatos combinan ambas configuraciones. Por exemple, en los modelos Pocket Cinema Camera 6K Pro y 6K G2, es possible grabar en HD con el area del sensor completa o reducida a partir de una resolution 5.7K o 2.7K.
Dado que en el modo reducido se usa solo el centro del sensor, el camino de visión de在哪quier objetivo parecerá más angosto debido al factor de recorte que se produce. Por exemple, al utiliser un objetivo de 20 mm para grabar en alta definición reduciendo el area aprovechable del sensor, el camino de la CAMERA sera equivalente al de una lente de 40 mm.
La optacion para reducir el area que utilize el sensor solo se encuentra disponible al filmar con una resolution menor que la maxima admitida por la camera, por exemple, UHD o ProRes HD.
En los modelos Blackmagic Pocket Cinema Camera 6K Pro y 6K G2 es posible lograr mayores frequencies de imagen al grabar en formatting 2.8K 17:9 reduciendo el area aprovechable del sensor o en HD reduciendo la definccion a partir de una resolution 2.7K. En la version Blackmagic Pocket Cinema Camera 4K, dichas freecencias se consiguen al grabar imagenes en formatting 2.6K 16:9 y en HD reduciendo el area aprovechable del sensor.
Consulte elApartado Frecuencias de imagen的最大as para el sensor a fin de Obtener mas informacion al respecto.
Frecuencia de Imagen delprojecto
La Frequencia deImagen del projeto permite elegir entreernes velocidades comunmente.
utilizadas en la industria del cine y la television, por ejemplo, 23.98 f/s. Normalmente, este valor se
ajusta de mannersque coincida con la velocidad de reproduccion empleadada durante el procesode
posproduccion, o segun los requisitos para la entrega del material grabado.
Las ocho optiones disponibles para este ajuste son 23.98, 24, 25, 29.97, 30, 50, 59.94 y 60 f/s.
Frecuencia Independiente
Por defecto, la Frequencia de imagen del sensor y del proyecto coinciden, a fin de que el material grabado se reproduzca a una velocidad normal. Sin embargo, al activar la option FREC. INDEPENDIENTE, se pueda determinar values differentes para这些 parámetros de manera independiente.
Frecuencia deImagen para la grabacion
Una vez activada la option FREC. INDEPENDIENTE, pulse las flechas situadas a ambos lados de la optacion FRECUENCIA - GRABACION para modifier este parametro.
Este ajuste determina la cantidad de fotogramas que el sensor capta cada segundo, lo cual incide en la velocidad de reproduccion de las imagenes segun la fecuencia seleccionada para el proyecto.
Consulte el apartado Controles de la pantalla táctil para Obtener más información al respecto.
Consulte la tabla en el apartado Grabacion a fin de Obtener mas informacion sobre las Frequencias de imogen disponibles para cada codec y dato.
Unidad preferida para grabar
Estaopydermite determinarque soporte de almacenamento seutiliza primero para la grabacion. Las options disponibles son CFast,SD,USB yMás Ilena.Elheiro de emplear una uotra tarjeta es una elección meramente personal.Sin embargo,recomendamosutilizarsiempre la misma unidad para saber cui sera necessario embarra una vez que no haya mas espacio para grabar.La option Más Ilena brinda la posibidad de agrupar ARCHivos cronologicamente al filmar conuna sola camarara.
La option seleccionada se aplica al insertar una unidad en la camera o conectar una memoria USB. ParaCambiar la configuracion, acceda al menu de almacenamento y pulse el nombre de la unidad que desea utiliser. Conviene subrayar que, al quitar una unidad e insertar other, se restablecer a la opticonseclusionada en el menu UNIDAD PREFERIDA PARA GRABAR.
La optacion Unidad mas Ilena se basa en el percentaje de espacio occupied en la unidad y no en su時間 o calidad.
Ajustes de grabacion 3
El Tougho de ajustes de la pesta GRABACION incluye las seguides opciones:

Intervals
La optacion INTERVALOS permite grabar automatamente un cuadro enancia de los siguientes intervalos:
Fotogramas 2-10
Segundos 1-10, 20, 30, 40, 50
Mlnutos 1-10
Por exemple, la CAMERA peut ajustarse para grabar un cuadro cada 10 fotogramas, 5 segundos, 30 segundos, 5 Minutes, etc.
Estamericana.
Pulse el botón de grabación para comenzar. Al pulsarlo nuevomente, la grabación se detendra y la secuencia se guardará como un clip, según el coderc y la fecuencia deImagen que se hayan的选择ado en la camera. Este permitted usar directamente en una linea de tiempo como cualquier other clip.

El icono que aparece+junto al boton de grabacion indica que el modo por intervalos estáactivado.
SUGERENCIa: Al utiliser la funciona INTERVALOS, el contador del已久的 tiempo que cambia cada vez que se graba un cuadro.
Nivel de nitidez
Este ajuste permite dar mayor nitidez a las imagenes. Cuando se encuentra activada, es possible escoger entre tres niveles disponibles.
Al activar esta funciona, el nivel de nitidiez尤为重要 se aplicar a todo imagenes grabadas en formatting ProRes como a aquellas Transmitidas mediana la calidad HDMI de la CAMERA.
Estaopyesutilal transmitirendirectodesuedun estudio,cuando las imagenesseemiten al aire sin Modifications.Recomendamos seleccionarOffsi sepretende procesarlas imagenes posteriormente durante la etapa de posproduccion.Cabe mentionar que esta functiOnno está disponible al seleccionar el codec Blackmagic RAW.
SUGERENCIa: Al procesar ARCHivos Blackmagic RAW, es possible lograr la misma definacion emploando la herramienta de nitidez en el panel de desensoque del modulo Color de DaVinci Resolve.
Ajuste el radio de dicha herramienta a 0.48 y el redimensionamento a 0.6, 0.3 o 0.15, a fin de encontrar una nitidez alta, media o bajo, Respectivamente.
Para Obtener informacion mas detallada, consulte el apartado correspondiente al panel Efectos de movimiento en el manual de DaVinci Resolve.
Al omitir fotogramas
Estaopyon permite configurar el comportamento de la camera cuando se detectan fotogramas omitidos. Al seleccionar Avisar, se mostrara un indicator en la pantalla tactil cuando este occurs y la grabacion continua. Al elegir Detener, esta se detendra para evaporar almacenar imagenes que no podran serutilizadas posteriormente.
Consulte los apartados referentes a la elección de soportes de grabación para Obtener más información al respecto.
Aplicar una LUT a un archivo
Al usable el)codec Blackmagic RAW y aplicar una LUT a cualesera de las imagenes Transmitidas
desde la camera, dicha tabla se integra al archivo Blackmagic RAW grabado. almacenandose en el
encabezado del本身就是. Por lo tanto, resulta muy sencillo aplicarla al clip en la etapa de
posproduccion y, al本身就是 tiempo, se evita tener que depender de un archivo adicular. Cuando se
activa la option INTEGRAR LUT EN ARCHIVO en el menu GRABACION de la camera, la tabla se
aplica a las imagenes visualizadas en el reproductor Blackmagic RAW o en el programa DaVinci
Resolve. Aparte es muy fácil activarla o desactivarla,iamiestaray integrada al archivo Blackmagic RAW respectivo.
DaVinci Resolve también offre la option Aplicar LUT en el panel Ajustes RAW del modulo Color, a fin de activar o desactivar una tabla de conversion tridimensional en el archivo Blackmagic RAW. Este botón funciona igual que en la CAMERA. De este modo, durante el rodaje, es posible indicar al colorista que tabla de conversion empleur en la CAMERA, pero luigo se pueda cancelar losCambios aplicados desactivando la option Aplicar LUT en DaVinci Resolve.
Aplicar LUT al grabar
Esta optacion está disponible al selectionar el codec ProRes. Por defecto, laamera no aplica tablas de conversion al grabar, excepte es possible hacerlo pulsando el interruptor APLICAR LUT AL GRABAR.
Esto peut darar util en situaciones en las que no hay tiempo de etalonar el material grabado durante la posproduccion, o si es precisoentarlo directamente a un cliente o al editor.Consulte los apartados Tablas de conversion tridimensionales y Controles de la pantalla tactil para obtener mas informacion al respecto.
Convencion para la nomenclatura de ARCHivos
El material grabado se guarda en unidades CFast, SD o USB-C en formattingo Blackmagic RAW o ProRes QuickTime, según la option selecciónada.
La asigniente tabla muestra un exemple del sistemas utilizado para nombres los ARCHivos:
A001_08151512_C001.mov Nombre del archivo QuickTime
| A001_08151512_C001.mov Único de la cármara | |
| A001_08151512_C001.mov | Número de rollo |
| A001_08151512_C001.mov | Mes |
| A001_08151512_C001.mov | Día |
| A001_08151512_C001.mov | Hora |
| A001_08151512_C001.mov | Minutos |
| A001_08151512_C001.mov Número de clip | |
LasOTOS se nombran según la nomenclatura empleada para los clips,añadiendose S001 al final para indicar el número de imagen en lugar del número de clip. Consulte el apartado Metadatos del proyecto para Obtener más información al respecto.
Ajustes de monitorización
La pestaña MONITOR permite modifier el dato de los datos, la información en pantalla y otheras options para superviar imagenes mediate el visor de la CAMERA oQUALquier monitor conectado a la salute HDMI de la misma. Los distinctos ajustes estan organizados en categorias denominadas LCD, HDMI y LCD/HDMI, segun correspondan a la pantalla de la CAMERA, el monitor conectado a la salute HDMI o ambos. Cada uno de los menos está compuesto por dos secciones a las que es possible acceder pulsando las flechas situadas aamins lados de la pantalla tactil or deslizando el dedo hacia la izquierda o la derecha.
Al instalar el visor optional en los modelos Blackmagic Pocket Cinema Camera 6K Pro y 6K G2, el primer grupo de ajustes en la pestaña MONITOR permite seleccionar independiente los elementos que se muestran en dicho dispositorio, la pantalla de la camera y el monitor conectado a la calidad HDMI.
Al instalar un visor electrono en la camera, la pestaña MONITOR incluye las options Visor y Todos.Esta ultima sustituye al boton Ambos y hace referencia a la informacion mostrada en lapellata LCD, el monitor connectado a la calidad HDMI y el visor electrono simultaneamente.
Ajustes de monitoración 1
El primer grupo de ajustes de cada pestaña incluye las mismasvinciones para cada salute. Por exemple, es possible activar la func iON Cebra para la pantalla tactil y desactivarla en la senal transmitida a través de la salute HDMI.
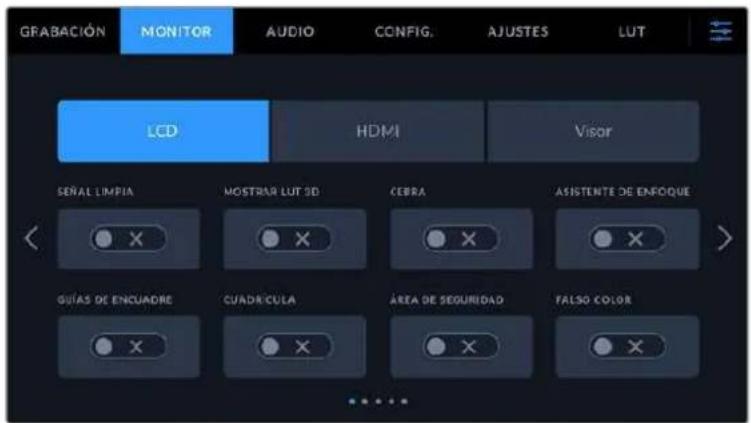
Señal Ilmpla
Esta option permite ocultar toda la informacion que se muestra en la pantalla o en la imagen transmitida a trovés de la calidad HDMI, excepto el indicator de grabacion.

En el modo CLEAN FEED, la pantalla de la webcam muestra solamente elindicador de grabacion.
NOTA: Las tablas de conversion se aplican a las imagenes en las que la funciona Señal implía está activada. Para desactivarlas, mueva el interruptor DISPLAY 3D LUT a la posición OFF en la pestaña MONITOR.
Mostrar LUT 3D
Estaopycn permite aplicar tablas de conversion tridimensionales a qualquier signal para simular la apariencia del material etalonado. Este resulta de gran utility al grabar en modo Film.
Si hay una LUT 3D activa en la CAMERA, esta opticon brinda la posibiliad de aplicarla independiente a la SERIAL visualizada en la pantalla tactil o en el monitor conectado a la calidad HDMI.
NOTA: Consulte el apartado Tablas de conversion tridimensionales para Obtener mas informacion al respecto. Los interruptores en los ajustes de las options LCD y HDMI permiten activar y desactivarVRTantes funcciones, tales como el indicator de enfoque, las guas de encuadre, la cuadrula o el falso color.
Cebra
Pulse este interruptor en las LCD y HDMI para activar o desactivar la funciona Cebra. Consulte el apartado Caracteristicas de la pantalla tactil para Obtener mas informacion al respecto.
Asistente de enfoque
Pulse este interruptor en las options LCD y HDMI para activar o desactivar el asistente de enfoque. Consulte el apartado Caracteristicas de la pantalla tactil para Obtener mas informacion al respecto.
Guias de encuadre
Pulse este interruptor en las options LCD y HDMI para activar o desactivar las guas de encuadre. Consulte el apartado Caracteristicas de la pantaia tactil para Obtener mas informacion al respecto.
Cuadrícula
Pulse este interruptor en las options LCD y HDMI para activar o desactivar la cuadrifica. Consule el apartado Caracteristicas de la pantalla tactil para Obtener mas informacion al respecto.
Área de seguidad
Pulse este interruptor en las options LCD y HDMI para activar o desactivar el area de seguidad. Consulte el apartado Caracteristicas de la pantalla tactil para Obtener mas informacion al respecto.
NOTA: Utilice el ajuste AREA DE SEGURIDAD en la opticon LCD/HDMI de la pestaña.
MONITOR para configurar el時間 del aire de seguidad.
Falso color
Pulse este interruptor en las options LCD y HDMI para activar o desactivar la direccion de falso color. Consule el apartado Caracteristicas de la pantalla tactil para Obtener mas informacion al respecto.
Ajustes de monitorización 2
ElsegundoGrupo deajustesde la pestañAGRABACION incluye lassiguientesoptiones:
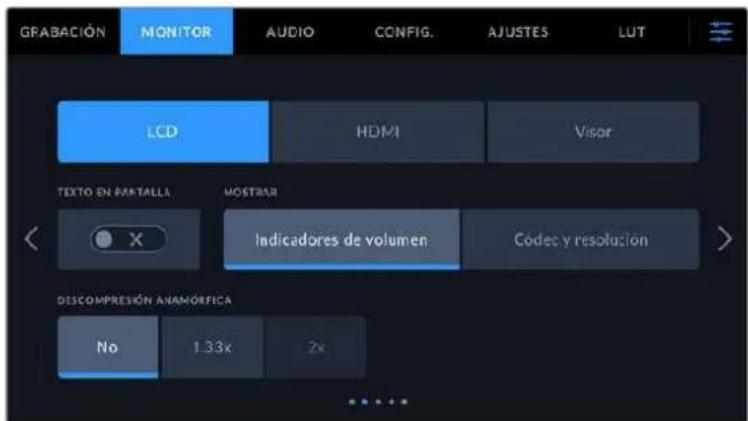
LCD, HDMI y Visor
Texto en pantalla
En occasions帮你 resultar useful ocultar losindicadores y demas datos en la imagen, a fin de ver solo la informacionnecessary pararealizarla composicion del plano.Para elo, pulse el interruptor TEXTO EN PANTALLA.Cabe destacar que otheras functions,tales como las guias de encuadre,la cuadrula y el indicator de enfoque,permaneceran en pantalla si estan activadas.Tambien es possible deslizar el dedo sobre la pantalla hacer arriba o abajo para ver u ocultar el texto y losindicadores.
Descompresión anamórfica
Al rodar con objetivos anamóricos, laImagen visualizada se comprime horizontalmente.
Al activar estaopsis, se corrige dicha distorsión y se registra elfactor de descopresión en los metadatos del clip, a fin de tener en cuenta esta informacion durante la etapa de posproducción.
Este valor varia segun la resoluzione seleccionada en la webcam, pero la relacion de aspecto de laImagen resultante sempre es de 2.4:1.
Por lo general, el factor de comprisión de los objetivos anamórficos diseñados para producciones cinematograficas es de x2. Al embarcer these modelos en la camera, la resolved 3.7K anamórfica permitite realizar la desc��resión correspondiente activando la option DESCOMPRESION ANAMÓRFICA.
En关键时刻 generales, el factor de compresión de los objetivos diseñados para Senseores digitales con una relacion de 16:9 es de x1.33, lo cual permite Obtener imagenes en formatting 2.4:1 emploando la totalidad del sensor. Por lo tanto, al seleccionar resolutions tales como 4K 16:9 o HD 16:9, el factor de desc��isión sera de 1.33x.
SUGERENCIa: Si laImagen aparece estirada en forma horizontal al filmar con un objetivo esférico estandar, asegúrese de que la option DESCOMPRESION ANAMORFICA x1.33 estáactivada.
LCD y Visor
Pantalla
Estaopyonpermiteverelcodelc yla resolucion en la parte inferior izquierda y derecha de la pantalla, en vez del historograma y los vumetros.esto puederesultarutilutilizar la funcion de falso color paraajustarlaexposacion,o si es necasariovisualizarinformacion adiconal en el espacio normalmentedestinado al historagramayalosvumetroscuando el audio se grabaparte.Simplemente pulseIndicadoresoCodelcysolucionenla pantalla para seleccionarlaopiondesada.
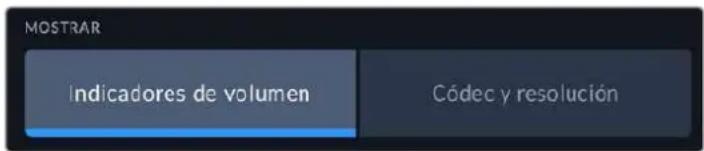
HDMI
Mostrar datos para el director o el responsable de fotografia
La pantalla de la CAMERA permite ver ciertos datos, tales como la sensibilitidad ISO, el balance de blancos y la aperture del diafragma, que resultan utiles para el camarógrafo o el responsable de fotografia que compone los planos. Sin embargo, también es possible做不到 dicha informacion en laImagen Transmitida mediante la calidad HDMI, locular referencia calcul para el director o el continuista que supervisa varias tomas o camaras.

Al seleccionar la option Director/a, se mostrará la?singulare informacion:
F/S
El indicator f/s muestra la fecuencia deImagen seleccionada en fotogramas porsegundo. Cuando la option FREC. INDEPENDIENTE está desactivada, este valor hace referencia a la fecuencia deImagen seleccionada para el proyecto. Si dicha option se encuentra activada, se indicaran ambos valeurs en forma alternada.
CÁM.
El indicator CAM identifica la CAMERA especialcada en la claqueta virtual. Consulte el apartado Claqueta virtual para Obtener mas informacion al respecto.
OPERADOR/A
Este indicator identifica al responsable de CAMERA que se especifica en la claqueta virtual. Consulte elApartado Claqueta virtual para Obtener mas informacion al respecto.
DURACION
Este indicator muestra la duracion de la grabacion o del ultimate clip grabado en horas, minutes y seguidos.
- ROLLO, ESCENA, TOMA
Estos indicadores brindan informacion sobre el rollo, la escena y la toma actual. Consulte el apartado Claqueta virtual para Obtener informacion adiconal al respecto.
RANGO DINÁMICO
La tabla de conversion aplicada a la imagen se indica en la esquina inferior izquierda de la pantalla. De no aplicarse tabla alguna, se indica el rango dinamico utilizdo (Video o Film).
CT
El número de tiempo se indica en la esquina inferior derecha de la pantalla y se expres a en horas, instantos,segundos y fotogramas.
Ajustes de monitorización 3
El截图 groupedeajustedescademenuincluyeslasmimiasopcionesparacadadadaEstasse aplicanatodallas imagenes,yasea enla pantalla de la camera o en los monitores conectados alas salidas correspondentes.Por ejemplo,al activar el indicator de enfoque en la pantalla LCD,el monitor conectado y el visor y seleccionar la option Lineas de color,esta se aplicaray本身就是 a las segnales transmitidas atravessde dichas salidas.

Intensidad de la funciona Cebra
Las flechas situadas a algunos lados de estaopyon permiten seleccionar el nivel de exposicion al.
cual esta herramienta se torna visible en la imagen. Este peut ajustarse en incrementos de 5
puntos porcentuales, y es possible escogerrialquier valor entre 75% y 100%
Consulte el apartado Caracteristicas de la pantalla tactil para Obtener mas informacion al respecto.
Asistente de enfoque
La CAMERA offre dos modelos para el indicator de enfoque: Indicador y Lineas de color.
- Indicador
Al seleccionar esta optacion se resaltn con mayor nitidez las zonas de la imagen correctamente enfocadas. Notose que este efecto no es visible en el material grabado. De este modo, dichas areas se destacan sobre el resto de la imagen. Dado que no haythers elementos superpuestos, esta herramienta constituya una forma sumamente efectiva de comprobar el enfoque, especiallye cuando el objeto enfocado está分开ado de los demas que componen la toma.
- Lineas de color
Al seleccionar esta optacion, se ve una linea de color alrededor de las partes de la imagen correctamente enfocadas. Este modo peut interferir mas en la imagen, excepta que es possible resultar de gran uso para lograr un enfoque preciso, particulamente en planos con various elementos visibles.
Color del borde
Esta optacion permite determinar el color de las lineas realizadas al activar la optacion Lineas de color. Este brinda la posibidad de distinguirlas con mayor calidad deothers elementos en la imagen.Los colores disponibles son blanco, rojo, verde, azul y negro.
Intensidad del Indicador
Para configurar la intensidad del indicator de enfoque,可以更好 el control hacer la izquierda o la derecha.
Al seleccionar el nivei del indicator de enfoque, no se activa ni se desactiva dicha func ion en la imagen visualizada en la pantalla de la camera, en el monitor conectado a la calidad HDMI o el visor. Para ello, utilise el interruptor correspondiente en las options LCD, HDMI y Visor de la pestaña MONITOR.
SUGERENCA: La intensidad optima para el indicator de enfoque varia según la toma. Por exemple, al enfocar a los actores, un mayor nivel pueda poder'a melhorar los detalles en los rostros. Por el contrario, si este es demasiado alto al filmar vegetacion o una pared de ladrillos, es possible que resulte dificil percibirothers detalles en la imagen.
Ajustes de monitorización 4
El cuarto grupo de ajustes de cada menu incluye las mismas.optiones para cada salute. Estas se aplican a todas las imagenes, ya sea en la pantalla de la camera o en los monitores conectados a las salidas correspondientes.

Guias de encuadre
Pulse cadaquiera de las flechas a todosados de la option GUIAS DE ENCUADRE para ver los ajustes disponibles. Consulte el apartado Caracteristicas de la pantalla tactil para Obtener mas informacion al respecto. Conviene Mentionar que también es possible activar o desactivar las guias de encuidre de forma individual para la imagen visualizada en la pantalla o en el monitor conectado a la calidad HDMI desde la pestaña MONITOR.
Área de seguidad
Esta optacion permite ajustar el tameno del area de segurid sobre la imogen mediate las flechas situadas a ambos costados del numero, expresado como un percentaje con relation a la imogen. El valor exigido por la mayoria de las teledifusoras es de 90%
Opaclidad de las guías
Pulse cadaquiera de las flechas situadas aodos lados de la option OPACIDAD DE GUIAS para determinar la opacidad de las partes de la imagen situadas fuera del area delimitada por las guias. Los valores disponibles son 25% 50% 75% y 100% .
Color de las guias
Pulse las flechas jusqu'à estaopydon para seleccionar el color de las guas.
Cuadricula
Esta option permite selectionar el tipo de cuadrula visualizo en la imagen. Las options son: Tercios, Horizonte, Cruz y Punto.
Consulte el apartado Characteristicas de la pantalla taktil para Obtener mas informacion al respecto.
Ajustes de monitorización 5
El quinto grupo de ajustes de la pestaña MONITOR contiene.optiones que varian según la calidad的选择nada. Estas optiones no estan disponibles para la saliva HDMI.
LCD
Brillo de la pantalla
Mueva el control deslizante hacer la izquierda o la derecha para ajustar el brillo de la pantalla táctil.

Visor
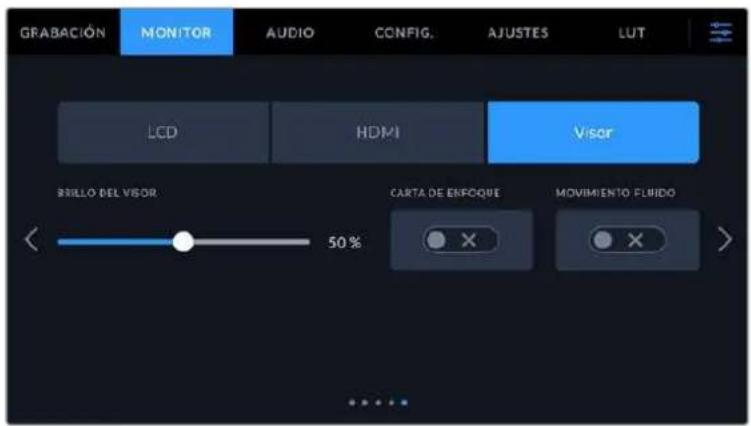
Brillo del visor
Esta option permite ajustar el brillo de la pantalla del visor.
Carta de enfoque
El ocular incluye una carta de enfoque digital integrada que hace possible adaptarlo a los ojos del usuario. La dioptrica puede ajustarse en un intervalo de -4 a +4. Basta con girar el control de ajuste dióptrico hasta lograr un enfoque preciso.
Movimiento fluddo
Estaopyon permite dar mayor fluidez al movimiento en las imagenes que se muestran en la pantalla del visor. Al filmar a una Frequencia menor de 30p, es habitual cercibir saltos en la imagen visualizada en monitores oTelevisores que no son compatibles con dicha frequencia, especially al acercarse a la pantalla. Es possible eliminar este problema activando la option Movimiento fluido con un angulo de obturacion de 180 grados y frequencies de 23.98, 24, 25, 29.97 o 30p.
Ajustes de audio
La pestaña AUDIO permite modifier diversos ajustes relativos a las fuentes de audio y su monitorización.
Existen dos equipos de ajustes de audio y ellos se encuentran organizados por canal.
Es possible asignar cada canal a una fuentedistincta,asi comoajustar diversos parámetros.
Ajustes de audio 1
El primer grupo de ajustes de esta pestaña incluye las siguientesustralianos:
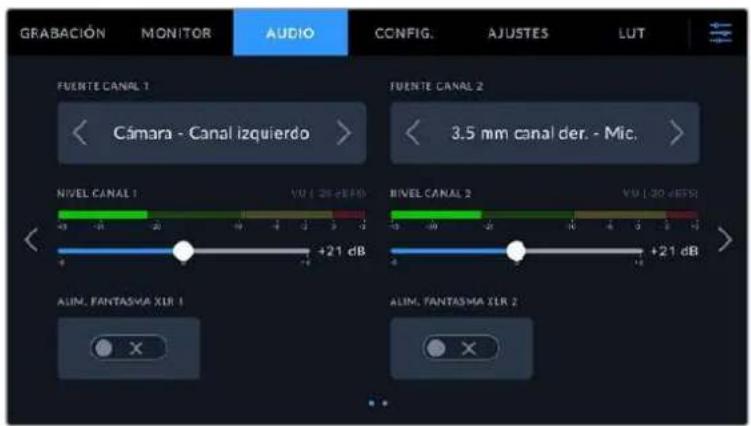
Fuentes
Las options FUENTE CANAL 1 y FUENTE CANAL 2 permitted selectionar fuentes de audio para cada canal. Los modelos Pocket Cinema Camera 6K Pro y 6K G2.Ofrecen dos entradas de audio XLR, cuando que la version Pocket Cinema Camera 4K solo incluye una. A continuacion se describe los distinctos ajustes.
- Camara - Canal Izquilerdo/derecho
Las options Camara - Canal izquierdo y Camara - Canal derecho permiten grabar mediante los microfonos de la webcam.
- Camara-Mono
Esta oplica permite grabar un solo canal de audio mediating los microfonos de la camarra.
XLR-Linea
Estaopyonpermitegrabaraudioanivelde lineamediente la entrada XLR de lacamara. Ademas,esposibleempleuresteajuste para recibiruna senaldecodigo de timeo mediantedichaconexion.
- XLR - Micrófono
Estaopyonpermitegrabaraudioanivelde microfono mediantaentradaXLRde la camara.Alactivarelmoed alimentacionfantasmay seleccionarlaopionMicrofono, vera un interruptor denominado +48V Esimportantaasegurarse dequeeste seencuentra desactivado aldesconectarelmicrofono.Ademas,espossible emplearesteajuste para recibiruna senaldecogido deltempomediante dichaconexion.
3.5 mm canal izquierdo - Línea
Esta option emplica solamente el canal izquierdo de la entrada de 3.5 mm a nivel de linea. Además, es possible emplear este ajuste para recibir una sealsde número de tiempo mediate el canal izquierdo de la entrada de 3.5 mm para microfonos.
3.5 mm canal derecho - Linea
Esta option emplica solamente el canal derecho de la entrada de 3.5 mm a nivel de linea.
3.5 mm mono - Linea
Esta option permite tener una mezcla monoaural deodos canales de la entrada de 3.5 mm a nivel de linea.
3.5 mm canal Izquilerdo - Micrófono
Esta option emplea solamente el canal izquierdo de la entrada de 3.5 mm a nivel de micrófono.
3.5 mm canal derecho - Micrófono
Estaopyon emplea solamente el canal derecho de la entrada de 3.5mm a nivel de microfono.
3.5 mm mono - Micrófono
Esta option permite tener una mezcla monoaural de ambos canales de la entrada de 3.5 mm a niveau de microfono.
- Ninguna
Estaoptionpermitedesactivarlasfuentesdeaudio.
NOTA: Al selección la entrada de 3.5 mm como fuente de audio, los canales 1 y 2 deben estar a nivel de linea o micrófono. Es claro, si se elije la option 3.5 mm canal izquierdo - Linea como fuente del canal 1, las-optiones disponibles para la entrada del canal 2 siempre serán 3.5 mm canal izquierdo - Linea, 3.5 mm canal derecho - Linea y 3.5 mm mono - Linea. Las-optiones correspondientes al micrófono no estarán disponibles.
Volumen
Los controlles CANAL 1 - NIVEL y CANAL 2 - NIVEL permiten ajustar el volumen de grabacion de las fuentes correspondientes a los canales 1 y 2. Cada uno incluye un vumetro que Facilita el ajuste. Asimismo, los vumetros reflejan loseturns realizadosmediante losmandos situados enel panel de controlergonomico.Mantenga el volumen por debajo de los 0 dBFS para optimizar la calidad del sonido. Este valor representa el nivel maximo al cui la camera可以选择 registrar el audio, y si se exceede, podría ocurreir una distorsión.
Allimentación fantasma XLR
La entrada XLR brinda la posibidad de suministrar una corriente de 48 V a microfonos a trovés del modo de alimentacion fantasma. Al seleccionar la entrada XLR, pulse el interruptor ALIMENTACION FANTASMA XLR para activarlo o desactivarlo. Los modelos Pocket Cinema Camera 6K Pro y 6K G2能满足 con dos entradas XLR y un interruptor de alimentacion fantasma para cada una de ellas.
Ajustes de audio 2
ElsegundoGrupo deajustesde la pestañAGRABACION incluye lassiguientesoptiones:
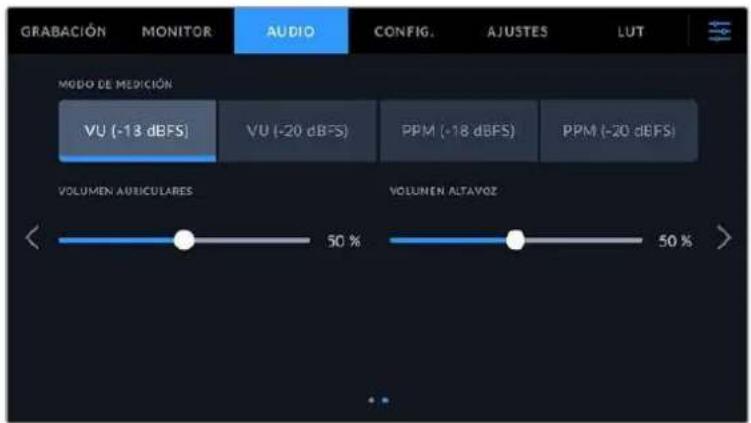
Vumetros
Es possible elegir entre dostips deindicadores.
| Vúmetro (VU) Indica el nivel medio de la Alertsa audio. Alemployar este medidor, es必須o ajustar el volumen de las fuentes conectadas al dispositivo, de forma que no supere los 0 dB. De este modo, se maximiza la intensidad de la senal con relacion al ruido, garantizingla nitidez del sonido. Si el audio supera dichado valor, es muy possible que ocurre una distorsión. | |
| Picómetro (PPM) | Indica durante más tiempo el nivel máximo de la senal para determinar con exactitudel punto de saturacion del audio. |
Tanto al utiliser el vúmetro como el picómetro, es possible selecciónar el nivel de referencia (-18 dB o -20 dB) para cerriorarse de que la señal de audio se ajuste a los diversos estandares de difusión internaciones.
| Opclones Estándar | |
| PPM (-20 dBFS) SMPTE RP.0155 | |
| PPM (-18 dBFS) EBU R.68 |
Volumen de los auriculares
Este control permite ajustar el volumen de los auriculares conectados a la camaraja. Muevalo hacla la izquierda o la derecha para modifier su intensidad. Internacional es posible embarr este valor mediante la rueda situada en el panel de control frontal.
Volumen del altavoz
Este control permite modifier el volumen del altovoz de la camarra. Muevalo hacía la izquierda o la derecha para modifier su intensidad. Internacional es possible embarar este valor mediante la rueda situada en el panel de control frontal.
NOTA: En general, siempre se conecta el cable XLR antes de activar el modo de alimentación fantasma. Además, es importante desactivar este modo de alimentación cuando no hay un microfono conectado. De lo contrario, los dispositivos que norequireen este modo de alimentación podrián resultar dañados al conectarlos. Asimismo,onga en cuenta que la CAMERA pueda tardar一些 instantos en descargarse una vez desactivado este modo.
Recomendamos esperar uno horas antes de volver a conectar otros microfonos o equipos con conexiones XLR.
Configuración
La pestaña CONFIG. incluye.option para identificar la CAMERA, verficar la version del programa operativo y configurar los botones personalizables, además de ellos ajustés que no está directamente vinculados a la grabación o supervisión de imagenes. Este menu cuenta con quatre pantallas differsente, a la cuales se pueda acceder utilizing las flechas situadas a los laterales de la pantalla táctil LCD, o deslizando el dedo hacer la derecha o izquierda.
Ajustes generales 1
En el primer grupo de ajustes se incluyen las siguientesustralianes.
En el Modelo Pocket Cinema Camera 6K Pro, el primer grupo de ajustes de la pestaña CONFIG. incluye la option MOSTRAR FILTRO DE DENSIDAD NEUTRA COMO, mediante la cuales es possible elegir la forma en la que se muestra la informacion relativa a los filtros de densidad neutra.
En el Modelo Pocket Cinema Camera 4K, el primer grupo de ajustes de lapellastaña CONFIG. incluye la option ESTABILIZACION DE IMAGEN,mediantela cuales es possible activar esta functiOn para objetivos Micro Cuatro Tercios.
Fecha y hora
Esta optacion permite establecer la fecha y la hora en la camara. El formatting de la fecha corresponde a ano, mes y dia, y la hora se expresena en el sistemas de 24 horas. esta informacion se emplea ademas para determinar el numero de tiempo segun la hora del dia, si no se connecta una fuente externa.
Idiomas
La interfaz de los modelos Pocket Cinema Camera está disponible en 13 idiomas: español, ingrés, chino, japonés, coreano, aleman, francés, ruso, italiano, turco, portugués, polaco y ucraniano.
El idioma可以选择 seleccionarse durante la configuracion inicial.
Para seleccionar el idioma:
1 Pulse el icono del lápiz y elija una de las.optiones disponibles.
2 Pulse Aceptar para regresar al menu de configuracion.
Valor de obturación
Estaoptionpermite seleccionarentrelosmodosAnguloy Velocidad.
Convienementionarqueelangulo de obturacionseajustaseguna freuenciadeimagen.Por典型案例,un angulo de 180gradosgenera la mesmacantidaddedesenfoquedinamico, independientelemente la freuencia seleccionada.
Sin embargo, al medir este parámetro en función de la velocidad, el valor absoluto del obturador se determinina sin importar la Frequencia deImagen, de modo que, al modificarla, los resultados obtenidos seront differentes.
Frecuencia (Obturacion sin parpadeo)
Este ajuste permite seleccionar la fecuencia de la red de suministro electrico aplicada para calcarar los valores de obturacion sin parpadeo.
NOTA: Al grabar con luz artificial, el obturador可以选择 afechar la visibiliad del parpadeo. Laamera calcula automatically los values de obturacion sin parpadeo para la fecuencia de imagen seleccionada y sugirirá tres options. Estos values se ven afectados por la fecuencia de la red realizada para suministrar corriente electrica a las luces. En la mayoria de los paises en los que predominina el estandar PAL, la fecuencia es de 50Hz , cuando que en aquellos que Employmenta la norma NTSC, este parametro es de 60Hz . Selección la option 50Hz o 60Hz segun la fecuencia realizada en su region.
Las caracteristicas de ciertas fuentes de luz peuvent ocasionar parpadeo, incluo al utiliser valores que permiten evitar este artefacto. Recommendamos primero realizar una grabacion de prueba cuando no se utilizes luces continuas.
Fotogramas omtildos
La optacion C/T FOTOGRAMAS OMITIDOS permiteemployar this codelo de tiempo alutilizar frequencies para el proyeo de 29.97 y 59.94 en NTSC.En este caso,se ignora una ciertacantidad de fotogramas,teniendo en cuenta intervalos determinados. Este procedimiento respeta la precision del codelo de tiempo del proyeo,a pesar de que cada segundo no contenga un numero entero de fotogramas en las frequencies de imogen NTSC.
Establlzacion de imagen
Estaopy en elmodelo Blackmagic Pocket Cinema Camera 4K permite activar o desactivar esta funcion en objetivos que no cauentan con un interruptor paraarlo.
Filtro de densidad neutra
En el Modelo Blackmagic Pocket Cinema Camera 6K Pro, esta option permite selectionar la forma en la que se muestra la informacion correspondiente al bajo de densidad neutra empleado. Cada optacion corresponde a una convencion differente. Los cineastas suelen emplear un numero,@mazas que los 用户 familiarizados con camaras DSLR o de television preferen ver esta informacion en pasos f, o como una fracion de la calidad de luz disponible. Las options disponibles sonNumero, Paso o Fracion.
Ajustes generales 2
En el segundoGrupo de ajustes se incluyen las siguientesustralianes.
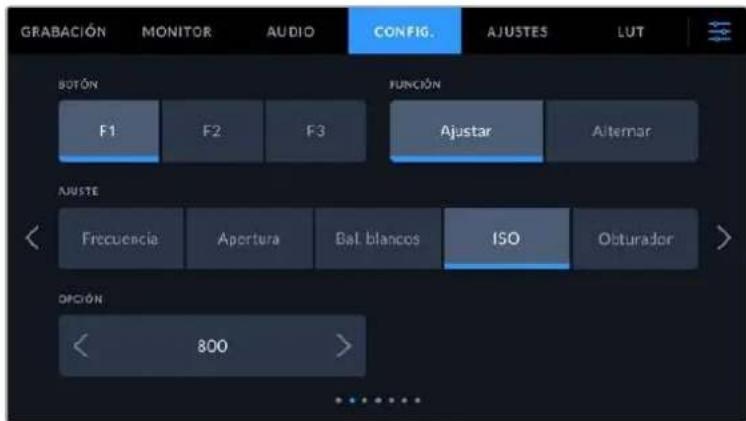
Botón
En la parte superior de los modelos Blackmagic Pocket Cinema Camera, hay tres botones programables con uno, dos y tres+puntos, que corresponden a las options F1, F2 y F3 en la interfaz, respectively. Es possible asignarles lasmericanas y acceder a loscon fácilad al emplear la CAMERA.
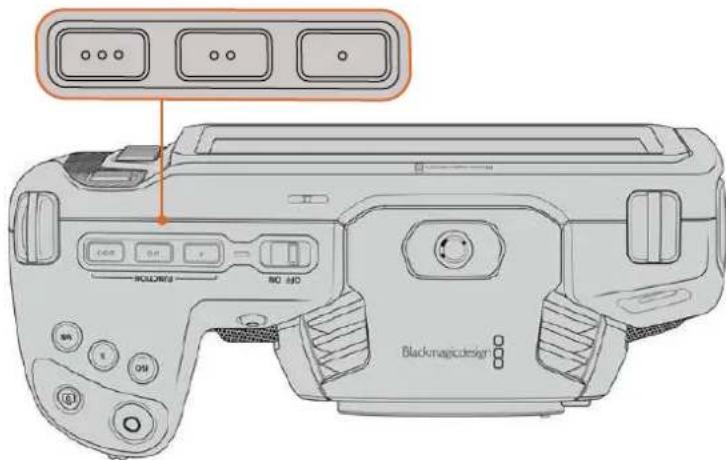
Los botones programables se encuentran en la parte superior de laamera.
Para configurar these botones, selecione uno de ellos, bajo la direccion y a continua lo asistes y parámetros desaños.
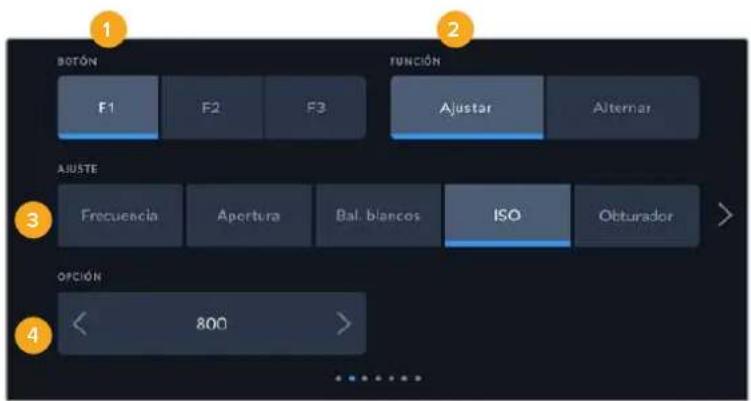
1 Botón 2 Función 3 Ajuste 4 Oportun
Función
Una vez que se selección el botón deseado, es posible determinar su funciona. Las.optiones disponibles son las siguientes:
- Ajustar
Al seleccionar esta optacion, cuando se presiona el boton indicado, se muestra una combinacion de un ajuste y una optacion.
Para configurar dicha combinacion, elija una de las options en el menu AJUSTE y bajo seleccione el parametro correspondiente pulsando las flechas situadas aamediados del menu FUNCION.
Por exemple, para ajustar el balance de blancos automatistically al presionar el botón F1, selección la option Ajustar, luego Bal. blancos y a continuación busque la optación 5600K realizando las flechas situadas aodos later del menu OPCION.
- Alternar
Al selecciónar esta optación, se activo o desactiva una determinada función. En este caso, el menu AJUSTE no está disponible. Por consiguiente, utilise las flechas situadas a todos los del menu OPCION para selectionaruna de lassiguerantesalternativas:Señal limpia, Mostrar LUT, Guides de encuadre, Asistente de enfoque, Falso color, Cebra, Cuadrícula, Area de seguridad, Frec. Independiente, Barras de color, Grabacion y Ninguna.
Asimismo, mediante estaopycn se brinda la posibidad de elegir la senal a la que se aplican dichos ajustes a la imagen visualizada en la pantalla de la camera, en el monitor connectado a la salute HDMI o el visor. Si uno de los ajustes que se aplica a todas las segnales transmitidas no está disponible, por ejemplo Barras de color, dichas options estaran desactivadas.
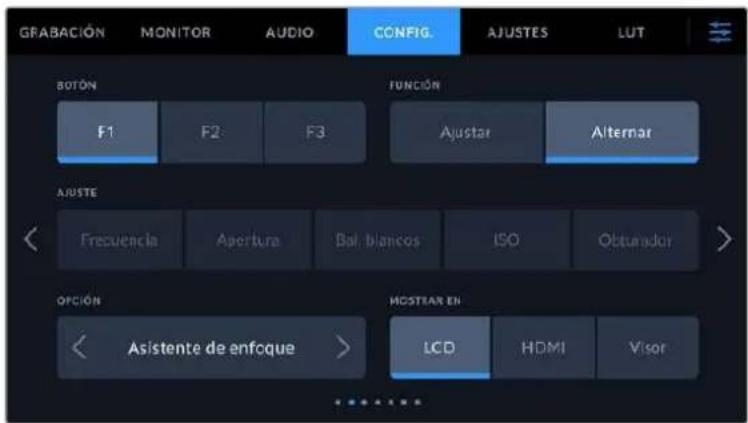
Ajustes generales 3 en los modelos Blackmagic Studio Camera 6K Pro y 6K G2
El sixtho groupe de ajustes permite configurar el accesorio Blackmagic Zoom Demand cuando se encuentra connectado a la CAMERA.
Consulte elApartado relativ a este dispositivo para Obtener mas informacion al respecto.
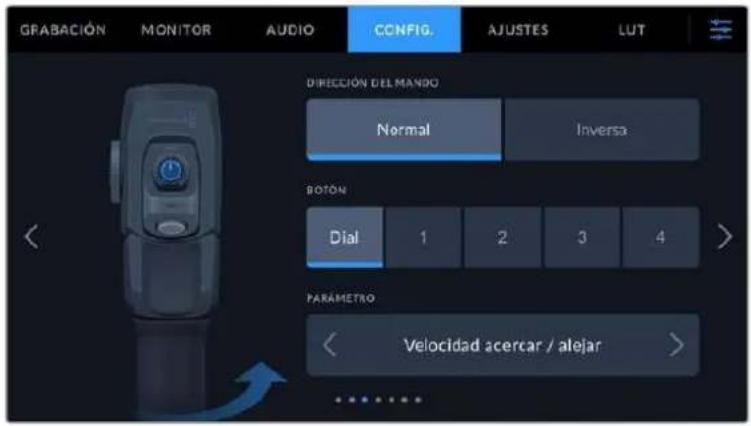
Dirección del mando
Normal
Esta es la optacion predeterminada. Mueva el interruptor a la izquierda para alejar la imagen y a la derecha para acercarla.
Inversa
Al elegir estaopping, mueva el interruptor a la izquierda para acercar la imagen y a la derecha para alejarla.
El dispositivo Blackmagic Zoom Demand incluye cuatro botones y un dial a los que es possible asignar-distintas functions.
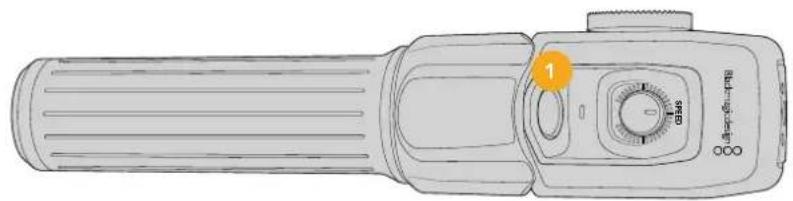
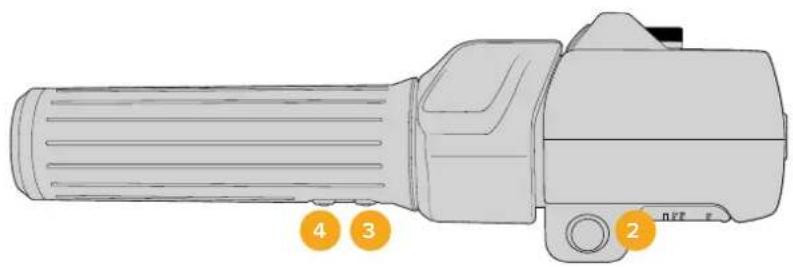
1 Botón F1 2 Botón F2 3 Botón F3 4 Botón F4 5 Dial
Eiija el botón alrialdesea asignarunafunciynluego seleccioneuna delasoptionedesponibles enelmenuParametro.
Funciones disponibles para el dial y los botones:
| Control de velocidad | Velocidad acercar / alejar, volumen aurículares, aperture, enfoque. |
| Botones 1-4 Grabación, compañero,SEO, señal de returno, ampliar imagen, guías de encuidre, texto en pantalla, enfoque automatístico, aperture automatística, balance de blancos automatístico, reproducción. Temblo es posiblen activar el uso de filtros de densidad neutra en el modelo 6K Pro. | |
Ajustes generales 4 en los modelos Blackmagic Studio Camera 6K Pro y 6K G2
El cuarto grupo de ajustes permite configurar el accesorio Blackmagic Focus Demand cuando seswanaa conectado a la webcam.
Consulte el apartado relativo a este dispositivo para Obtener más información al Respecto.

Dirección del mando
Es posible embarla direcction de la rueda de enfoque.
Normal
Gire el mando hacía la derecha a fin de enfocar objetivos cercanos al objetivo o, por el contrario, hacía la izquierda para enfocar objetivos más lejanos.
Inversa
Gire el mando hacía la izquierda a fin de enfocar objetos cercanos al objetivo o, por el contrario, hacía la derecha para enfocar objetos más lejanos.
Ajustes generales 5 y 3
El quinto grupo de ajustes de la pestaña CONFIG. en los modelos Blackmagic Pocket Cinema Camera 6K Pro y 6K G2 incluyen las siguientesvinciones. En la version Blackmagic Pocket Cinema Camera 4K, estas se encuentran en el tcercer groupe de ajustes.

Led indicator
Los modelos Pocket Cinema Camera incluyen un ledlittle en la parte frontal que, al conectar las unidades a un mezclador ATEM Mini, indica si estan al aire, o si la senal emitida se ha seleccionado como anticipo. Ademas, también es possible controlar la grabacion a distancia. Consulte el apartado Control de la camera mediate el modelo ATEM Mini para Obtener mas informacion al respecto.

Grabando en el soporte de almacenimiento insertado en la CAMERA.

Cármara al aire.

Cármara lista para emitir al aire.
Para activar o desactivar la luz piloto, utilise el interruptor correspondiente.
Intensidad
Estaopyon permite seleccionar la intensidad del led indicator.Las options son: Bajo, Medio y Alto.
Atenuar pantalla
En los modelos Blackmagic Pocket Cinema, es possible atenuar automatistically el brillo de la pantalla tíctil après de un cierto periodo de inactividad para ahorrar energia. Seleezione una de las options disponibles en el menu ATENUAR DESPUES DE para determinar el tiempo que debe transcurrir antes de que esta funciona se active. Al tocar la pantalla-Newamente, el brillo returnar al nivel habitual.
Identificacion
Los ocho charactres en este Campo permiten identificar la受害 de manera individual. Por other parte, en archivos Blackmagic RAW y ProRes, los metatados incluyen una version mas larga, compuesta por 32 characteres. Este peut serutil para reconocer el material grabado con una determinada受害.
Software
Este campo muestra la version del sistema operativo interno de la CAMERA. Consulta elApartado Programautilitario para Obtener mas informacion al respecto.
Reproducción
Este ajuste permite reproduir uno o todos los clips almacenados en el soporte de grabacion. Al seleccionar Todos los clips o Un clip, se reproduce todas las secuencias enorden o una por vez, respectfully. Al activar la direccion de reproduccion continua, sucede lo mesmo. Se reproducen todos los clips almacenados en la tarjeta o solo uno en particular, sin interruptions.
Preferencias 6 y 4
El sixtho groupe de ajustes de la pestaña CONFIG. de los modelos Blackmagic Pocket Cinema Camera 6K Pro y 6K G2 incluyen las siguientesvinciones. En la version Blackmagic Studio Camera 4K, estas se encuentran en el cuarto groupe de ajustes.
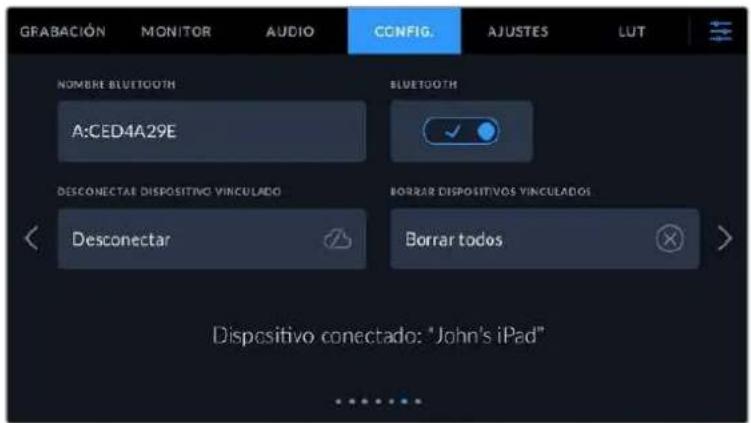
Bluetooth
La option Bluetooth permite controlar la CAMERA a工程技术 de un dispositivo portail. Mediente la aplicacion Blackmagic Camera Control, es possible encender o apagar la unidad, modifier ajustes, embarrlos metadatos o inicia la grabacion de forma remota desde un iPad. Pulse el interruptor BLUETOOTH en la pestaña CONFIG. para activar la connexion. Cuando la connexion Bluetooth esta activada, la CAMERA可以选择 detectarse a una distancia aproximada de 9 metros. Dado que la CAMERA emplea los mismos comandos tanto para la connexion Bluetooth como para el protocolo de control integrado de Blackmagic, es possible desarrollar aplicaciones para controlar practically todos los paramedros de la CAMERA. Por exemple, desde有哪些 para superviar imagen y ajustar audio, hasta Herramentas de correccion cromatica en DaVinci Resolve o incluso para controlar el objetivo.
Para Obtener más información al respecto, consulte el documento Control de camaras Blackmagic, disponible en nuestra頁ina para desarrolladores.
Para vincular la CAMERA a un iPad por primera vez:
1 Pulse el interruptor BLUETOOTH en la pestaña CONFIG. para activar la conexión.
2 Abra la aplicación Blackmagic Camera Control y selección la CAMERA que deseña vincular al dispositivo. Las unidades disponibles aparecen ordinadas según su identificador, por典型案例, A:A0974BEA.
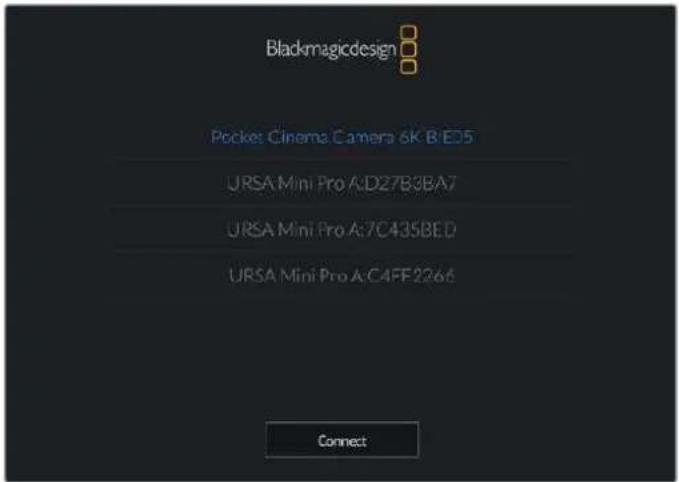
Selezione lacamera que desea vincular al dispositivo.
Después de instalar y executar la aplicación Blackmagic Camera Control por primera vez, aparecerá el siguientes mensaje: Allow location access. Al selecciónar la.option While using the app, la información generada por el GPS del iPad se incluirá en los metadatos de los ARCHivos grabados, lo cual permitse saberdonde se filmaron. Másén es possible acceder a dicha información desde el programa DaVinci Resolve (version 15 o posterioriores).
Selección la-option Never si no deseaautilizar这些 datos.
Para modifier los ajustes en el iPad, seleccionla option Settings, bajo Privacy, a continuacion Location services, y porultimate Camera control.
3 Al intentar建立起 la connexion por primera vez, la aplicacion le solicitara un numero de theirs digitos para vincular el dispositivo a la camera, que aparece en la pantalla de esta ultima. Ingrese el numero en el dispositivo y pulse el boton Pair.
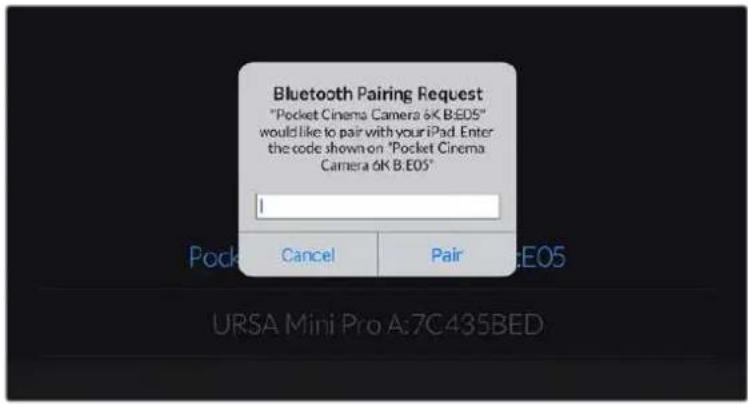
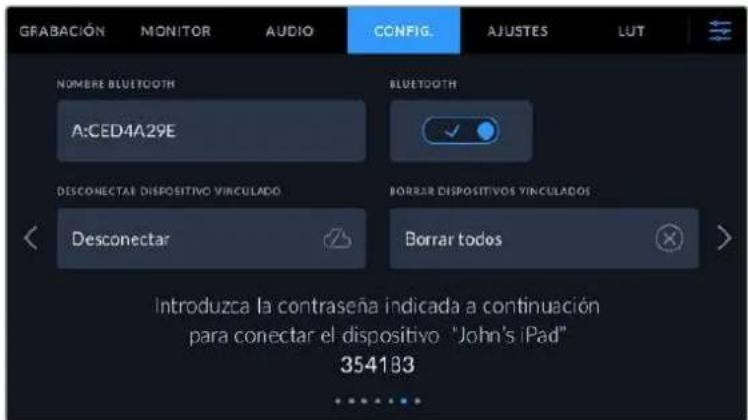
4 Una vez establecida la connexion, aparecerá un mensaje de confirmación.
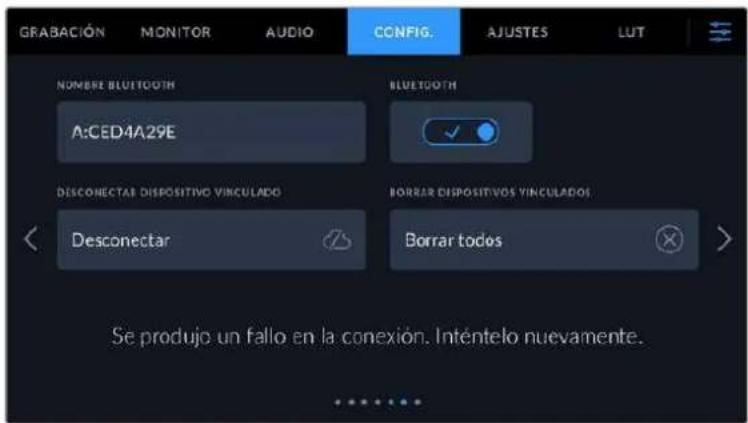
5 Si no es possible vincular los dispositivos, aparecerá un mensaje de error. Inténtelo neuvamente.
NOTA: Por motivos de seguridad, recomendamos desactivar la connexion Bluetooth cuando no se usa para controlar la CAMERA.
Desconectar dispositivo vinculado
Estaoptionpermitedesvincularlacamarayeldispositivo.
Borrar dispositivos vinculados
Estaoptionpermiteborrarla listadedispositivosa loscuales lacamara seha vinculado.
Control de la CAMERA mediante la aplicacion Blackmagic Camera Control
Esta aplicacion permite encender o apagar la CAMERA, modifier su configuracion, Cambiar metadatos o起初ar la grabacion de forma remota una vez vinculada a un iPad.

Una vez vinculada la lármá, es possible modificar ajustes y comenzar la grabación.
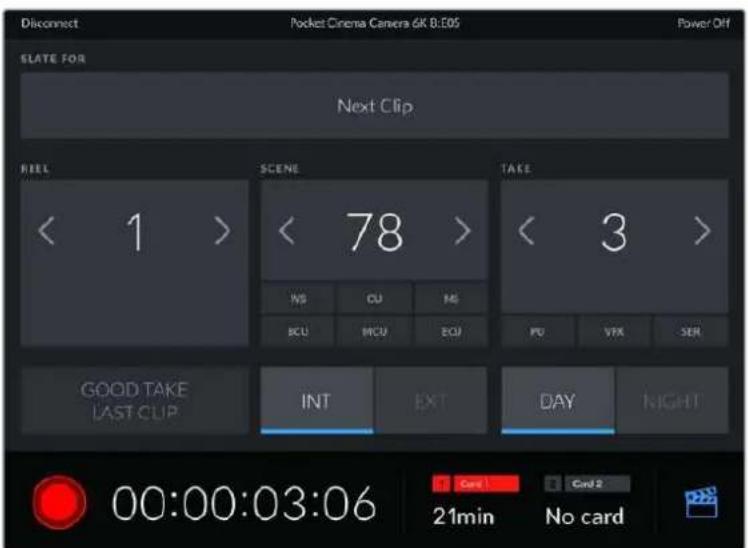
Pulse el icono de la claqueta virtual, situado en la esquina inferior derecha, para acceder a ella y modifier sus datos.
La CAMERA hace uso de la Tecnología Bluetooth LE para comunicarse conotiros dispositivos de manera inalámbrica. Este es el mismo protocolo empleado en equipos portátiles y utilizes unacantidad minima de bateria.
Ajustes generales 7 y 5
El séptimo grupo de ajustes de la pestaña CONFIG, de los modelos Blackmagic Pocket Cinema Camera 6K Pro y 6K G2 incluyen las siguientesvinciones. En la version Blackmagic Pocket Cinema Camera 4K, estas se encontrar en el quinto grupo de ajustes.

Restablecerajustes
Esta optación permite restablecer la configuración original de la CAMERA. Al pulsar Restablecer ajustes de la CAMERA, aparecerá un mensaje de confirmación. Presione Restablecer paraContinuar. Se eliminará todas las tablas de conversion y los ajustes predeterminados, y se restablecerá la configuración original. Recomendamos exportar los ajustes personalizados a una tarjeta de memoria a fin de respaldarlos antes restablecer la configuración. Una vez finalizo dicho procedimiento, es possible importarlos a la CAMERA;nuevamente.Cabe destacar que esta optación restablece asimismo el horizonte virtual, deforma que es aconsejable recalibrar el sensor de movimiento a fin de mantener su precision.
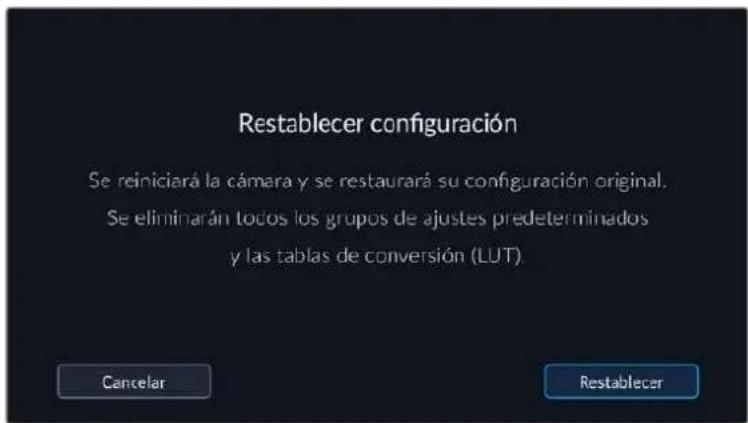
Sensor de movilmente
Para calibrar el horizonte virtual, selección la option Calibrar sensor de movimiento. Es imprescindible que la CAMERA se mantenga estable durante todo el proceso Esto deben tardar cincosegundosapproximadamente.
De ser necessario, es possible configurar el horizonte descentrado. Por exemple, para establecer la inclinacion en un angulo especialico, basta con calibrar el sensor de movimiento con laamera en el angulo deseado y bajo uso aplicar el horizonte virtual para conservar dicha inclinacion.
Recalibración de pixeles
El sensor CMOS está formado por millones de pixeles que responden a la luz. Algunos peuvent携带 su brillo con el transcurrso del tiempo una vez que se calibra el sensor en la fabrica. En consecuencia, se vuelve más visibles y se los conoce como «pixeles calientes».
Independientelemente del fabricante, todos los sensores desarrollan este tipo de defecto.
Para SOLUTIONAR este problema, es possible emplear la referencia de calibracion integrada a fin de corrigir los pixeles defectuosos.
Para comenzar这么做的过程,coloque la tapa al objetivo y seleccione la optacion Calibrar pixeles.
Esto deberia tardar un minuto aproximamente.

Calibración del balance de blancos de la pantalla
Para calibrar el balance de blancos de la pantalla, ajuste los controlles del tinte y la temperatura hasta que las dos areas de referencia luzcan neutras. Una vez modificada la configuracion, es possible restablecer la calibracion de fabrica mediante la option Restablecer. Por su parte, el boton Restaurar permitte comparar la apariencia antes y afterwards de la calibracion. Cuando haya logrado un balance de blancos adecuado, guarde los ajustes.
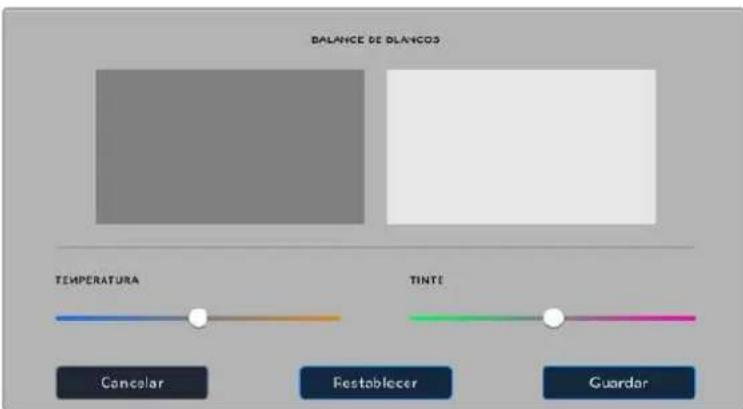
Ajustes
Esta pestaña brinda la posibiliad de guardar y volver a utiliser hasta 12-grupos de ajustes predeterminados. Este pueda resultar muyutil cuando seemploya la camera en various proyectos, por ejemplo, differentes tips de rodajes, tales como documentales o videoclips, que requieren distinctos parámetros.Esta funciona permite guardar una configuracion determinada para un proyecto spécifique, a fin de usar nuevomente theseajustes cuando seanecessary. Laamera ofrece espciado para almacenar un maximo de 12 configuraciones.
Asimismo, es possible importar y exportar configuraciones predeterminadas, lo que resulta conveniente en rodajes con varias cármas. Basta con modifier los ajustes según el tipo de proyecto y bajo exportar la configuración de una unidad a las cuales realizadas en el estudio de grabación.

La pestaña CONFIG. permite alternar rápidamente entre Distintas configuraciones almacenadas en la camera.
NOTA: La CAMERA permite almacenar hasta 12 configuraciones en su memoria interna.
Botones
Los iconos en la parte inferior de la pantalla corresponden a las siguientes unidades:

Guardar y cargar configuraciones
Pulse el icono Agregar para create una configuracion predeterminada. Aparecera un teclado en pantalla mediante el cui se pueda asignar un nombre para la misma. Escribe el nombre y pulse ACEPTAR para guardar la configuracion de laamera.
Si ya existe una configuración con el mismo nombre, es possible sustituirla o mantener ambas.
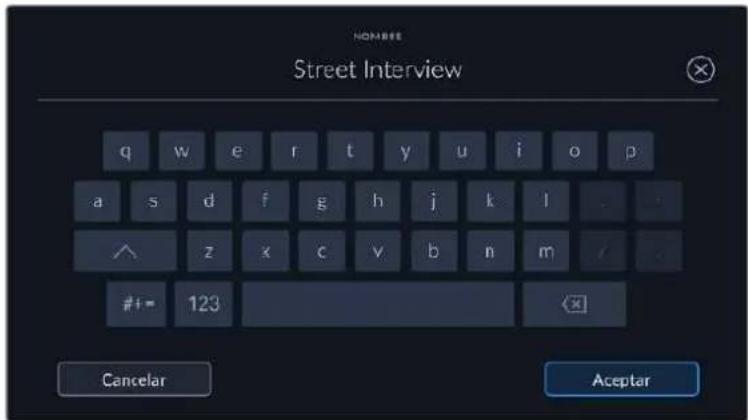
Una vez que se almacena la configuracion predeterminada, pulse su nombre para seleccionarla. Para cargarla, pulse el icono Cargar en la parte inferior de la pantalla.
Es posibleactualizaruna configuracion pulsando elicono Actualizar en la parte inferior de la pantalla. Aparecera un mensaje preguntandole si deseaactualizarlosajustesde la camarara.Para!.
continuar, pulse el boton Aceptar.

Selección una configuración y pulse el icono Eliminar para borralla. Al selecciónar una configuración, el rectángulo con su nombre se destaca de color azul. Al cargarra, aparece una linea de dicho color en la parte Inferior del本身就是.
Importar configuraciones
Para importar una configuración, pulse el icono Organizar en la parte inferior de la pantalla. Pulse laisión Importar ajustes predeterminados ylicko Importar para confirmar. Aparecerá una ventana para importar la configuración. Si el archivo con la configuración no está en la unidad de almacenimiento activa, selección other pulsando el boton correspondiente en la parte superior de la pantalla. Es possible importar tablas desde tarjetas SD y CFast o unidades USB-C.
La casa busca el directorio raiz y la carpeta Presets en la unidad seleccionada y lostrarlas configuraciones disponibles. Notese que aquellas guardadas en除外 ubicaciones no seran visibles.
Selección una configuración y pulse Importar para confirmar.Esta se guardará en uno de los espacios disponibles en la camara.
Si ya existe una configuración con el mismo nombre en la camara, es posible reemplazarla o mantener ambas. En la parte superior derecha de la pantalla se muestra lacantidad de espacios libres para guardar configuraciones.
NOTA: Si no hay espacio en la CAMERA para importar una configuracion, el menu respectivo no está disponible. Debera eliminar una de las almacenadas antes de importing另一边.
Exportar configuraciones
Selección una configuración y pulse el icono Organizar para exportarla a una tarjeta o unidad USB-C. A continuación, pulse la optación Exportar selecciónado y selecciónla unidaddonde deseaguardar la configuración. Si ya existe una configuración con el mesmo nombre, es possible sustituirla o mantener ambas. La CAMERA guardará los ajustes en una carpeta denominada Presets.
Eliminar configuraciones
Selección una configuración y pulse el icono Eliminar para borrarla. Cuando aparezca el mensaje de confirmación, selección Eliminar.
Tablas de conversion tridimensionales
La pestaña LUT brinda la posibiliad de importar, exportar y aplicar tablas de conversion tridimensionales a la seals transmitida por la CAMERA.
Tablas de conversion tridimensionales
Las tablas de conversion tridimensionales peuvent aplicarse a la imagen visualizada en la pantalla de la webcam o Transmitida mediante la calidad HDMI. Las tablas de conversion indican que valeores cromáticos y de luminancia se aplican a una fuente determinada. Por exemple, es possible lograr que la webcam muestre un azul relativamente opaco con una tonalidad mas saturada e intensa, cuando captaicho color de materia apagada. Este resulta til al filmar en formato Blackmagic RAW o con rango dinamico Film, ya que en these cases el material grabado presente un contraste bajo. Al aplicar una LUT, se obtiene une idea de como luciran las secuencias una vez etalonadas.
Es muy sencillo tener este tipo de tablas con DaVinci Resolve u othero programa de etalonaje. Además, también está disponible en Internet. La webcam permite almacenar un máximo de 10 LUT tridimensionales de 17 o 33 puntos (1.5 MB max. cada una). Luego es possible aplicarla a las imagenes visualizadas.
Los modelos Blackmagic Pocket Cinema Camera admiten LUT tridimensionales de 33+puntos en formatting .cube creadas en DaVinci Resolve, y de 17+puntos convertidas aicho formatting conotiros programas. La CAMERA procesa este tipo de tablas mediante una interpolacion tetraedrica de gran calidad.
Consulte el apartado Ajustes de monitorizacion para Obtener mas informacion al respecto.
NOTA: Por defecto, la CAMERA no aplica tablas de conversion al grabar, aunque es possible hacerlo.
Esto peutecrearutil en situaciones en las que no hay tiempo de etalunar el material grabado durante la produccion, o si es precisoentarlo directamente a un cliente o al editor.
Al utilizar una tabla de conversion durante el rodaje, su informacion se guarda en forma de metadatos junto con el material grabado. DaVinci Resolve muestra esta informacion en el camino LUT realizada del panel Metadatos, lo cual permitte al colorista verificar el nombre de la tabla empleada.
Tablas de conversiones integradas
Distintas LUT integras permitted aplicar differses estilos al grabar en modo Film o en forma Blackmagic RAW.
Cada lámara incluye tablas espécificas para la colorimétría de quinta generación:
- Gen 5 Film to Extended Video
Ofrece un rango dinamico mas amplio que la tabla Film to Video y aplica un contraste medio con una leve atenuacion en las zonas luminosas.
Gen 5 Film to Rec 2020 Hybrid Log Gamma
Ofrece una curva de responsa tonal que es compatible con monitores de alto rango dinamico o convenciones.
Gen 5 Film to Rec 2020 PQ Gamma
Ofrece una curva de respuesta tonal basada en lo que percibe el ojo humano. Se recomienda esta optacion para la codificacion efectiente de imagenes de gran rango dinamico.
Gen 5 Film to Video
Esta tablet es similar al espacio cromático Rec. 709 para HD y además presente un alto nivel de contraste y saturación. esta.option es muy utilise alemployar los modelos Blackmagic Pocket Cinema Camera con otheras camaras de television que usan dicho espacio cromático.
Botones
Los iconos en la parte inferior de la pantalla corresponden a las siguientesustralianas:


Cargar Organizar Eliminar
Importar tablas de conversion
Para importar una LUT, pulse el icono Organizar en la parte inferior de la pantalla. Pulse la option Importar LUT y luego Importar para confirmar. Aparecerá una planta para importar la受害者. Si el archivo que contiene la受害者 no está en la unidad de almacenimiento activa, selección另外一个 pulsando el botón correspondiente en la parte superior de la pantalla. Es possible importar tablas desde tarjetas SD y CFast o unidades USB-C.
La casa busca el directorio raiz y la carpeta LUT 3D en la unidad seleccionada y做不到 las tablas disponibles. Notese que aquellas guardadas en除外 ubicaciones no seran visibles.
Selección una LUT y pulse Import para confirmar.Esta se guardará en uno de los espacios disponibles en la CAMERA.
Si no hay espacio disponible en la camera, seranecessary eliminar una LUT antes de importar other.
Si ya existe una LUT con el mesmo nombre en la CAMERA, es posibe reemplazarla o mantener ambas. En la parte superior derecha de la pantalla se muestra lacantidad de espacios libres para guardar tablas de conversion.
NOTA: Si no pueda importar una LUT, es posible que no sea del tamanio adecuado. Utilice un editor de tablas (por exemple, Lattice) para verificar dicho valor o abra el archivo en un editor de texto en el equipo informatico. El tamanio se indica jusqu a la etiqueta LUT_3D SIZE. Si este numero no es 17 o 33, puede emplear Lattice paraCambiar el tamanio de la tabla a 17+puestos.
Aplicar tablas de conversion
Una vez que la tabla se ha guardado en la-camera, seleccióna en la pestaña LUT y pulse el icono Cargar. De esta forma, se aplicar a laImagen visualizada. Para aplicarla a la seals transmitida mediante la calidad HDMI, pulse el interruptor Mostrar LUT en la pestaña MONITOR. Consulte el apartado Ajustes de monitorizacion para Obtener mas informacion al respecto.
Exportar tablas de conversión
Selección una LUT y pulse el icono Organizar para exportarla a una tarjeta ounidad USB-C. A continuación, pulse la option Exportar LUT selecciónada y selección launidad donde desea guardar la tabla de conversion. Si ya existe una LUT con el mesmo nombre, es possible reemplazarla o mantener ambas. La CAMERA exportará la tabla a una carpeta denominada 3DLUTs.
Eliminar tablas de conversión
Para eliminar tablas que ya no estan uso o liberar espacio, seleccione una determinada y pulse el icono Eliminar en la parte inferior de la pantalla. Cuando aparezca el mensaje de confirmacion, seleccione Eliminar.
Tablas de conversion tridimensionales integrasas
Al embarrar una LUT 3D cuando se graba en formato Blackmagic RAW en los modelos Blackmagic Pocket Cinema Camera, dicha tabla se anade al archivo .braw generado. almacenandose en el encabezado del本身就是. Por lo tanto, resulta muy sencillo aplicarla al clip en la etapa de posproduccion y, al本身就是 tiempo, se evita tener que depender de un archivo adicular.
En consecuencia, alentarag archivos Blackmagic RAW a un editor o colorista, dichos profesionales podran acceder fácilmente a la tabla realizada durante el rodaje, lo que reduce significativamente el riesgo de usar una incorrecta.Esta se pueda aplicar ya sea durante la etapa de edition o etalonaje, o directamente desactivar enequalquier momento.
Cuando se activa la option INTEGRAR LUT EN ARCHIVO en el menu GRABACION de la CAMERA, la lista se aplica a las imagenes visualizadas en el reproductor Blackmagic RAW o en el programa DaVinci Resolve.
Aúnque es muy fácil activarla o desactivarla, siempre está integra al archivo Blackmagic RAW respectivo. DaVinci Resolve también offre la-option Aplicar LUT en el panel Ajustes RAW del modulo Color, a fin de activar o desactivar una tabla de conversion tridimensional en el archivo Blackmagic RAW.
Este boton funciona igual que en la CAMERA. De este modo, durante el rodaje, es posible indicar al colorista que tabla de conversion emplear en laamera, pero bajo se pueda cancelar los Cambios aplicados desactivando la option Aplicar LUT en DaVinci Resolve.
Metadata
Los metadataos son informacion almacenada en un clip, inclusive los nombres de tomas, los ajustes de laamera, y others dataos identificatorios. Resultan muy utiles para gestionar y procesar el material grabado durante la produccion. Por example, los nombres de toma, plano y escena sonfundamentales en la organizacion de los clips,)millas que la informacion del objetivo possibleempleurse para eliminar la distorsion automatically o melhorar la integrazione de los efectospeciales en la imagen.
Los modelos Blackmagic Pocket Cinema Camera guardian algunos metadatos de forma automática, por exemple la configuración de laamera, el número de tiempo, la Fecha y la hora. Asimismo, es possible utilizar la claqueta virtual paraañadir más información.
Claqueta virtual
Al deslizar el dedo a la izquierda o la derecha sobre la pantalla tactil, se accede a la claqueta virtual.
Esta se divide en dos pestañas: CLIPS y PROJECT. La prima incluye informacion relativa a cada clip, cuando que la segunda permite introducir datos compatidos por various ARCHivos, tales como el nombre del proyecto, el director, el camarógrafo y la identificacion de laamera.
SUGERENCA: Los metadataos introducidos en la claqueta virtual se visualizan en las imagenes Transmitidas por la calidad HDMI al seleccionar Director/a en la optacion Mostrar texto en pantalla para de la pestaña Monitor. Consulte el apartado correspondiente en este manual para Obtener más informacion al respecto.
Metadatos del clip
La modificacion de metadatos esdistinct en el mode de esperay en el de reproduccion.En el primer caso,los metadatos se guardaran con el sueije clip grabado,a exception de la option TOMA BUENA-ULTIMO CLIP,que indica que la secuencia anterior es buena.En el segundo caso, al revisar el material grabado,se muestra el boton TOMA BUENA,y los metadatos se refieren al clip visualizzato.
Cuando la CAMERA está en modo de reproduccion, la option CLAQUETA VIRTUAL indica el clip al cui la claqueta hace referencia. En el modo de espera, los datos de la claqueta se aplicaran a la singulare secuencia que se grabe.
Claqueta virtual
Este campo indica a que clip corresponden los metadatos que se muestran en la pantalla. En el modo de reproduccion, se refieren a la secuencia visualizada, cuando que en el modo de esperapiertenecen al?sigue clip que se grabe.
Datas del objetivo
Estaopsismuaelodelo dellente sesempleaun objetivo con componenteselectricos que se comuna con laamera. Para modifier oañadir datos relevantes, pulse OBJECTIVO.
Consulte el apartado correspondiente para Obtener más información al Respecto.
Rollo
Estaoptionindicaelnuneroed rollo.
En los modelos Blackmagic Pocket Cinema Camera, este se incrementa de forma automatica.
Al comenzar un proyecto nuevo, pulse la option Restablecer datos para restablecer dicho valor.
Escena
Esta opoci nmuestra el numero de escena, y ademas possible indicar también el numero de toma y su tipo.
El número siempre se refiere a la escena visualizada. Para modifierlo, pulse el indicator o utilise las flechas situadas aodos lados del本身就是.
El rango para este parámetro es de 1 a 9999.
Alañadir una leyal número de escena, se puebe indicar la toma actual. Por exemple, 23A representa la toma 1 de la escena 23. En este caso, la CAMERA sugerirá el número y la letra siguides al intentar modificar este valor. Por exemple, si el número de escena es 7B, se brindan las options 8 y 7C.
El indicator del número de escena también brinda informacion sobre el tipo de plano en la esquina superior derecha de la pantalla. Para editarla, utilise el editor de número de escena situado bajo al teclado.
y son las siguientes:
| PG Plano general |
| PM Plano medio |
| PMC Plano medio corto |
| PP Primer plano |
| GPP Gran primer plano |
| PD Plano detallado |
Al ingresar datos de la escena, la CAMERA suglere número a la izquierda del teclado y temas de plano a la derecha.
Toma
Esta option muestra el numero de toma para la escena actual. Para modifierlo, pulse el indicator o utilise las flechas situadas aodos lateros del mesmo.
SUGERENCIa: Cuando el numero de escena se incrementa, el numero de toma regresa automatically a 1.
Tambien es possible encontrar descricciones a la toma. Las.optiones disponibles se.Encuentran a la
derecha del teclado numero y son las siguientes:
P/U
Retomar: Se refiere a una nuevo grabacion de una toma previa paraañadir material desdepuesde haber conclusido la fotografia principal.
VFX Efctos visuaes: Se refiere a una toma que se utilizes en efectos visuaes.
SER
Serie: Se refiere a una situacion en la que se graban varias tomas cuando la webcam siuege rodando.
Pulse A a fin de que el numero de toma可以选择 automatistically para cada clip en el modo de esperca. En laclaqueta virtual, aparecerá una Aparto aicho número.
Al Ingesar datos de la toma, la CAMERA suglere ntheros a la izquilerda del teclado y tpos de toma a la derecha.
Toma buenaultimateclip
Pulse estaopping para identificar tomas buena, a fin de acceder aellas con mayor faculdad durante la produccion. Estacalifacionhace referencia al clip visualizado cuando la camera se encauerta en mode de reproduccion. Si la unidad está en mode de espera, se aplicar al seguiente clip que se grabe.
Interior/Exterior
Pulse una de estas options para indicar si el clip se ha grabado en un estudio o en exteriores.
Día / Noche
Pulse una de estas options para indicar si el clip se ha grabado durante el día o la noche.
Metadatos delprojecto
Los metadataos del proyecto funcionan de la misma manera, tanto en modo de espera como en mode de reproduccion. Siempre se refiere al proyecto completo y noienen en cuenta lacantidad
de clip incluidos en este.

Introduzca la informacion del proyeo desde la pestaia PROYECTO bajo de la claquet.
Nombre del projeto
Estaopsisnuestrael nombre delprojecto en cursor.Pulse elicono dellapiz para modifierarlo.
Cámara
Esta oplica muestra una sola letra correspondiente a la camar. Pulse el icono del lapiz para modifierla.
Director/a
Estaopyrn muestra el nombre del director o la directora del proyeo. Pulse el icono del lapiz para modifierlo.
Operand/a
Estaopymuesela nombre del camarografo.Pulse elicono del lapiz para modifierla.
Restablecer datos del proyecto
Pulse el botón Restablecer para eliminar toda la información del proyecto.
Objetivo
Estaopymica la informacion del objetivo colocado en la camara.Muchos objetivos electronicoprocionan los datos automatisticamente, por exemple, el modelo, la aperture y la longitud focal.Pulse el icono del lapiz si el objetivo no es compatible con esta functiOn y desea agrear informacion adicular. Aparecer a un panel con las options ilustradas a continuacion:
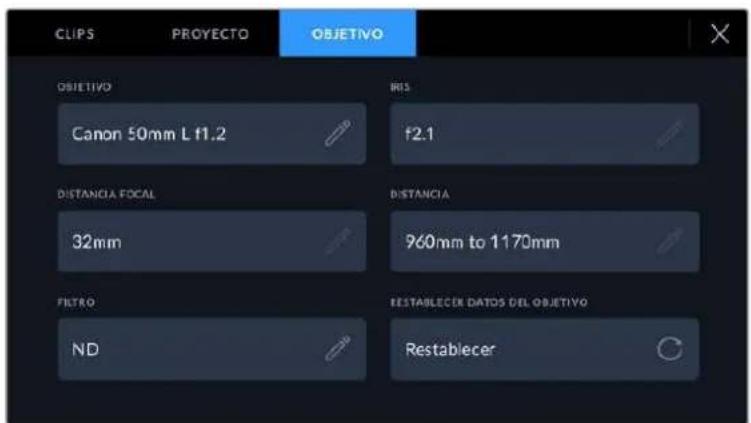
Panel con información obtenida automatically de un objetivo montado en la-camera y los datos del filtro Introduced dos forma manual.
- Tipo de objetivo
Estaopyonpermiteindicarelmodelodelobjectivo.Sinapareceautomaticamente,pulse eliconodelapizparamodificarlo.Lacamaraincluyeuna base de datosconlos nombres de los objetivosmasutilizadosylosugiereautomaticamenteamedidaque seescribe.De esta forma,espossibleintroducirinformacionconmayorrapidez.
Utilice el teclado virtual para NVrir los datos del objetivo.
Dlafragma
Estaopsislaaperturainalidiafragma,Lainformationesepresenta mediantapesonumerosf,segunelobjetivutilizado.Pulseeliconodelapizpara modifierstainformation.
- Longitud focal
Estaopsisindica la distancia de enfoque del objetivo para la secuencia grabada, expresada en milimetros. Pulse el icono del lápiz para modifier esta informacion.
Distancia
Estaopyindica la distancia de enfoque del objetivo para la secuencia grabada, expresada en milimetros. Asimismo, es possible ingresarla en forma manual.
Filtro
Estaopsismuesla losfiltrosutilizados.Pulse elicono dellapizpara modificaresta informacion.Notese que es possible.agregarvarios datos,separados porcomas.
Es necessario Introduir la Informacion relativa al filtro, ya que no se proporciona automatisticamente.
Es possible eliminar la informacion del objetivo en qualquier momento pulsando la op
Restablecer datos. Aparecerá un mensaje de confirmación. Al acceptar, se borran todos los datos y se reemplazan con los proportionsionados automatistically por el objetivo montado en la CAMERA. Si los Campos se han Modifications, esnecessary restablecer la informacion del objetivo al colocar uno nuevo. De lo contrary, se mantienen los datos introducidos anteriorsmente.
Salida de video
Salida para supervisoras senales HD
La calidad HDMI de la CAMERA transmite señales HD 1080p, de modo que permite conectar monitores otelevisores comunes para ver las imagenes grabadas. Además de.Ofrecer una calidad de 10 bits, admite contentsidos con alto rango dinamico (HDR) e informacion superpuesta, por locular referencia ideal para superviser el material grabado.
Laitters HDMI puee ser muy util, especialmente cuando la cama se colca en un lugar que impide ver la pantalla. Para lostrar informacion superpuesta en las imagenes transmitidas medianta esta salida, acceda a las options de monitorizacion en el menu correspondiente de la cama. Asimismo, es possible ver las guas de encuadre, los datos de la grabacion y la configuracion de la unidad. Seleectionla option NO para ocultar this information y ver una imogen limpia.
Cabe destacar que el uso de un conversor, tal como el modelo Blackmagic Micro Converter HDMI to SDI, permite conectar monitores, dispositivos de captura, mezcladores y otros equipos SDI. Además, el conversor pueda alimentarse mediante el puerto USB de la CAMERA.
Blackmagic Zoom y Focus Demand

Estos accesorios-optionales permiten controlar la distancia focal y el enfoque cuando se utilizes con objetivos compatibles EF queIELDan con un servomecanismo tanto en las versiones Blackmagic Pocket Cinema Camera 6K Pro como 6K G2.
Las unidades se montan en la manija del tripode o en un pedestal. Este permite controlar el enfoque y la distancia focal a la vez que la CAMERA se gira o inclina. Además, dichos dispositivosCNTAN con botones y mandos adiconiales que ofrecen la posibidad de ajustar con precisionla velocidad y la sensibilidad del control de la distancia focal, activar el balance de blancos automatico y ocultar las guías de encuadré, entre otheras ajustes.
Conexión e instalación en la camara
Instalación en tripodes
Cada unidad se instala en la manija del tripode con los soportes que colocan mediante las rosetas.
Para instalar los accesos en los soportes, basta fijarlos con las rosetas de montaje y asegurarlas mediante el mecanismo giratorio.

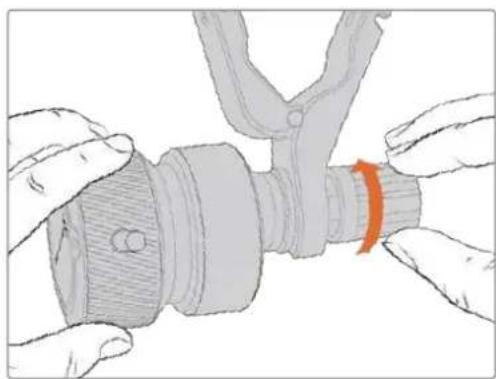
1 Cologne el dispositivo Blackmagic Zoom Demand en la montura del soporte para las rosetas.
2 Ajuste el mecanismo giratorio a fin de que el accesorio quede instalado de manera firme.
Una vez instalado, es possible fjar los soportes a los brazos del tripode. Un extremo de cada soporte Tiene un seguro en forma de T que debe encajarse en la ranura y ajustarse.

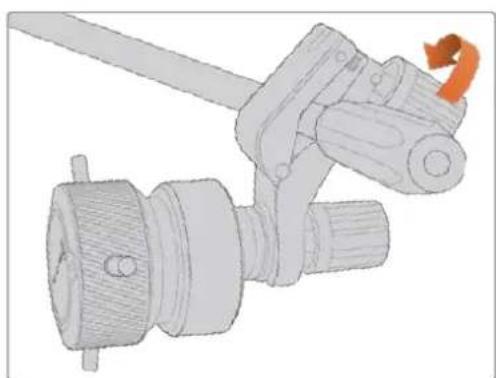
1 Para aflojarlo, gire el seguro hacla izquierda, a fin de liberarlo.
2 A continuación, coloque el soporte angular en el brazo del tripode y ajustelo cerrando el seguro hasta que calce en la ranura. Es possible rotar el soporte a fin de colocarlo en la posición deseada.
3 Ajuste el mecanismo giratorio para asegurar el soporte al brazo del tripode.
Conexión a la camaría
Los accesos Blackmagic Focus Demand y Blackmagic Zoom Demand cuenta con dos puertos USB-C que permiten usarlos deforma individual o conjunta.
Cada unidad incluye un cable USB-C de un metro que brinda la posibidad conectarla desde el puerto de expansión ubicado en el lateral de la camera arialquier puerto CAM de estas unidades.
En caso de utiliser también accesorios, recomendamos conectarlos en series.
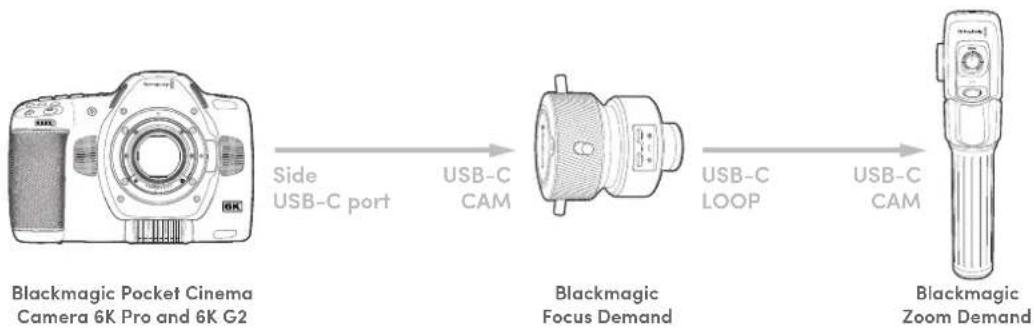
Al conectar ambas unidades en series, poder controlarse mediate el puerto USB-C en el lateral de la-camera. Por exemple, conecte un extremo de un cable USB-C al puerto correspondiente de la-camera y el other extremo a la entrada CAM del dispositivo Blackmagic Focus Demand. Con unsegundo cable, conecte la calidad de dicho accesario a la entrada respectiva en launidad Blackmagic Zoom Demand.
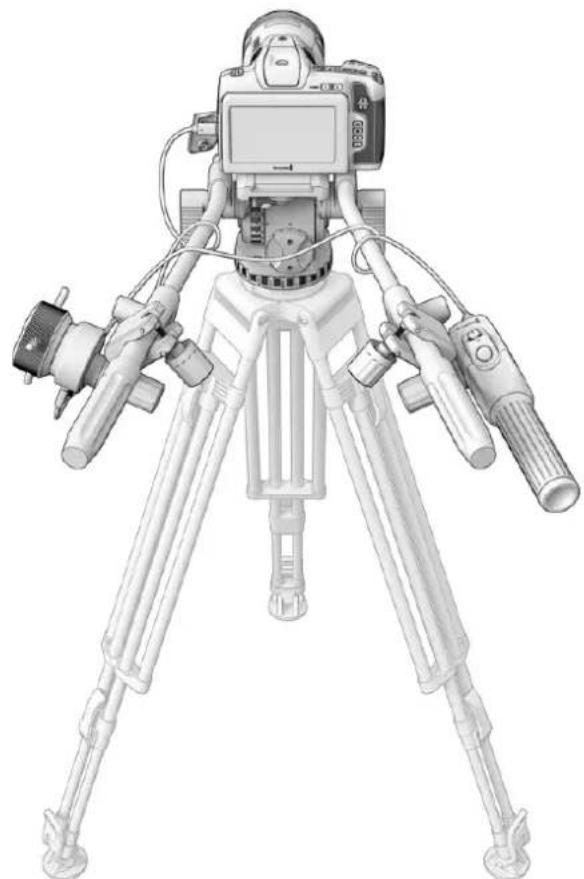
Los accesos Blackmagic Focus Demand y Blackmagic Zoom Demand permiten controlar el enfoque y la distancia focal sin quitar la vista de la pantalla.
Uso del accesorio Blackmagic Focus Demand

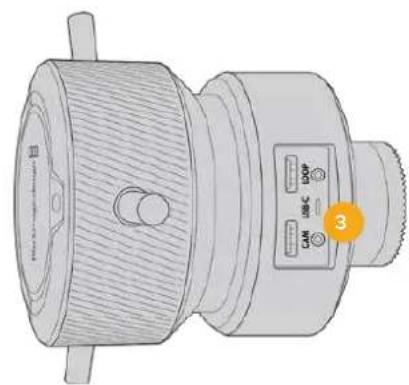
1 Mando glratorlo
Gire el mando hacía lackea a fin de enfocar objetos cercanos al objetivo o, por el contrario, hacía la izquierda para enfocar objetos mas lejanos. Es possibleCambiar la direccion en que se gira el mando en el menu de la camera mediante las options Normal o Inversa.
SUGERENCIa: Al embaruar una unidad Blackmagic Zoom Demand simultaneamente, presione el boton F2 con el proposto deacular la imagen a la vez que se enfoca.
2 Palancas
Estas tres palancas permiten expandir el diametro de la superficie de control, a fin de ajustar el enfoque con mayor precision mediana la punta de los dedos.
3 Puerto USB
Estos puertos permiten conectar el accesorio a la CAMERA y otros dispositivos en series. Además, es possible utiliser el puerto IN paraactualizar el sistemas operativo del dispositivo a工程技术 de programa utilitario.
Uso del accesorio Blackmagic Zoom Demand
Los controlles en este accesorio se pueda asignar aothers botones en el menu de configuracion de la camera. Consulte elApartado correspondiente para Obtener mas informacion al respecto.
Las siguientes configuradas por defecto:
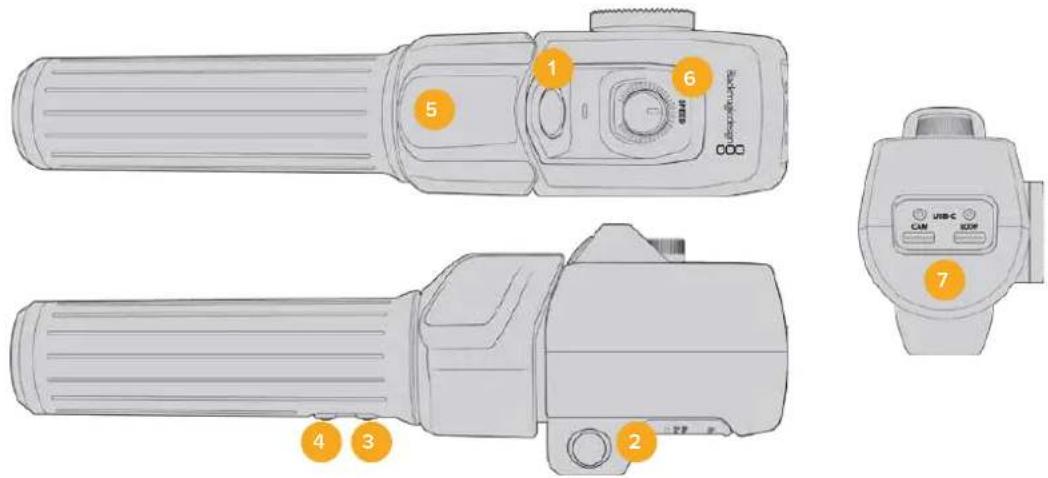
1 F1
De manera predeterminada, este botón se encuesta asignado a la grabación.
2 F2
Este botón situado del(otherlado del accesorio funciona del本身就是o que el anterior, lo.
cual facilita el control del dispositivo con la mano derecha o izquierda,y está configurado
de forma predeterminada para ajustarrapidamente la distancia focal al grabar.
NOTA:Estamericano solo se mostrara en la pantallaLCD de la camaray no estadisponible en los equipos externos connectados, como mezcladores o grabadores.
3 F3
Este boton está asignado de manera predeterminada al balance de blancos automatico.
4 F4
Este boton está asignado de wayer predeterminada a las guias de encuadre.
5 Interruptor
La manija del accesorio Blackmagic Zoom Demand incluye un interruptor circa de la posicion del dedo pulgar que permite controlar la distancia focal desplazandolo hacer la izquierda para alejar laImagen y hacer la derecha para acercarla. No obstarve, el sentido coulde invertirse a trovés del menu de configuracion de laamera.
6 Dial
Este control en la parte superior permite ajustar la velocidad a la que se modifica la distancia focal. Por otherwise, se pueda asignar a distinctos ajustes, por exemple, el volumen de los auriculares o la aperture del diafragma.
7 Puerto USB-C
Estos puertos permiten conectar el accesorio a la CAMERA y除外 unidades en series.
Además, es possible utiliser el puerto IN paraactualizar el sistemas operativo del dispositivo atramés delprogramautilitario.
DaVinci Resolve
La grabación es solo una parte del proceso para create Contents televisos o cinematógraficos. El respaldo y la organized del material capturado, laedbion, el etalonaje y la codificacion de los archivos finalles también son etapas de vital importancia. Los modelos Blackmagic Pocket Cinema Camera incluyen una version de DaVinci Resolve para equipos Mac y Windows, brindando de este modo una solution integral para el rodaje y la produccion.
NOTA: Recomendamos usar la ultima version de DaVinci Resolve para lograr un tratimiento cromático preciso del material grabado con los modelos Pocket Cinema Camera. La version 17 (o posterior) permite lograr coloresPRECOS y es compatible con el formatting Blackmagic RAW.
Después de insertar una tarjeta SD o CFast o unainstitution SSD en el equipo informativo, es possible emplear la herramienta de clonacion que Offerce DaVinci Resolve en el modulo Medios con el proposto de crear respaldos del material grabado. Esto resulta desuma realizad, ya que los archivos digitales son susceptibles de sufrir daños o presentar fallas. Sin embargo, al contar con copias de seguidad, se previene la perdida de las imagenes. Una vez finalizo este procedimiento, es possible/agregar los clips al panel multimedia del programa para editorlos, etalunarlos y aplicar los retoques finale sin salir de la aplicacion.
DaVinci Resolve se utilizes en la mayoría de los grandes exitos cinematograficos y offre mucho más que un simple sistemas de ediciones no lineal, dato que cuenta con Tecnología de vanguardia que permite tener imagenes con una calidad extraordinaria. El usuario peuvent sacar provecho de esta funcionalidad para editor y etalonar toda clase de proyectos.
A continuación se proporcióna información sobre como utilizar DaVinci Resolve para procesar los archivos grabados con las cármas. El programa es revolución y contiene muchas mas unidades de las que se apprecian en la interfaz a primera vista. Para Obtener más información sobre su uso, consulte el manual de instrucciones, disponible en nuestro situ web, donde también inclara tutorialies y guías de capacité.
Organizador de proyectos
Antes de importar los clips y comenzar a editar, es besoino configurar el projeeto mediante el organizador de proyectos.
Este aparece inmediamente alAbrir DaVinci Resolve. Sin embargo, se pode acceder a el en qualquier momento能做到o ticn en el icono correspondiente, situado en la esquina inferior derecha de la interfaz, para Abrir proectos o create otheros新模式.
Para create un nuevo proyecto, hagablick en la option Crear proyecto, en la parte inferior de la interfaz, y writes el nombre del mesmo. Hagablick en Crear.
Con el modulo Montaje, es possible comenzar a editar el proyecto inmediamente.
El Organizador de proyectos permite ver todos los proyectos del usuario.
Consulte el manual de DaVinci Resolve, disponible en nuestro Sitio web, para Obtener más información al respecto.
Ediciones con el modulo Montaje
El modulo Montaje offre una dinámica de trabajo agil que offre la OPPUNITY de editar,URTAR y montar clips de manière rápida y eficiente.
Dos linés de tiempo activas permiten trabajo simultáneamente tanto en toda la:2:3:4:5:6:7:8:9:10:11:12:13:14 15 16 17 18 19 20 21 22 23 24 25 26 27 28 29 30 31 32 33 34 35 36 37 38 39 40 41 42 43 44 45 46 47 48 49 50 51 52 53 54 55 56 57 58 59 60 61 62 63 64 65 66 67 68 69 70 71 72 73
Para registrar su。
Para registrar su。
Para registrar su。
Para registrar su。
Para registrar su。
Para registrar su。
Para registrar su。
Para registrar su。
Para registrar su。
Para registrar su。
Para registrar su。
Para registrar su。
Para registrar su。
Para registrar su。
Para registrar su。
Para registrar su。
Para registrar su。
Para registrar su。
Para registrar su。
Para registrar su。
Para registrar su。
Para registrar su。
Para registrar su。
Para registrar su。
Para registrar su。
Para registrar su。
Para registrar su。
Para registrar su。
Para registrar su。
Para registrar su。
Para registrar su。
Para registrar su。
Para registrar su。
Para registrar su。
Para registrar su。
Para registrar su。
Para registrar su。
Para registrar su。
Para registrar su。
Para registrar su。
Para registrar si:
Para registrar si:
Para registrar si:
Para registrar si:
Para registrar si:
Para registrar si:
Para registrar si:
Para registrar si:
Para registrar si:
Para registrar si:
Para registrar si:
Para registrar si:
Para registrar si:
Para registrar si:
Para registrar si:
Para registrar su。
Para registrar su。
Para registrar su。
Para registrar su。
Para registrar su。
Para registrar su。
Para registrar su。
Para registrar si:
Para registrar si:
Para registrar si:
Para registrar si:
Para registrar si:
Para registrar si:
Para registrar si:
Organización del modulo Montaje
Al partir el modulo Montaje, se visualizan el panel multimedia, el visor y la linea de tiempo, lo que brinda un control absoluto sobre losCambios que se realizan.  Distribución predeterminada del modulo Montaje, con los ARCHivos del panel multimedia en el modo de vista en miniatura Consulte elApartado correspondiente en el manual de DaVinci Resolve para Obtener mas informacion al respecto.Organización de ARCHIVOS multimedia
En la esquina superior izquierda de la interfaz hay cinco pestañas. Haga clic en ellas para acceder a las herramrientas que necessitará a fin de editar. Por exemple, la primera pestaña es el Panel multimedia. El resto son.optiones para synchronize las bandejas y organizar transiciones, titulos y efectos, respectivamente.  - Panel multimedia: Aquí se encuentran todos los clips, las carpetas y los ARCHivos importados mediante el modulo Medios. Asimismo, es posible importar los archivos directamente desde el modulo Montaje, a fin de evaporar tener que alternar entre ambos. - Bandeja de sincronizacion:Esta option sincroniza automatically todos los clips de acuerdo con el numero de tiempo, la hora y la hora, lo que permitte selectionar ángulos de todas las camaras en un proyecto multicastamara. - Transiciones:Esta pestaña permite acceder a todas las transuciones audiovisuales que es possible utiliser en el proceso de edicion. Estas incluyen.option comunes, tales como fundidos encadenados y cortinillas. - Titulos:Esta optación permite selecciónar el tipo de titulo, por exemple, un texto estandar con desplazimiento o situado en el tercio inferior de la imagen. Asimismo, se Offercen distinctas plantillas de efectos Fusion, a fin de emplear titulos animados y dinamicos, que a su vez pueda personalizarse desde el modulo Fusion en DaVinci Resolve. - *Efectos:Esta optación brinda acceso a distinctos filtros y efectos, con el proposto deañadir dinamismo a la ediciones, por exemple, mediante efectos personalizables de desensoque o brill. Es posible escoger entre una gran variedad de efectos extraordinarios, y es muy sencillo encontrarlos gracias a la herramienta de búsqueda. SUGERENCIA: Utilice la herramienta de búsqueada, situada cerca de los iconos de organización de ARCHivos, a fin de encontrar lo que nécessita. Por exemple, con la pestaña de transuciones selecciónada,cribe «disolvencia» en la barra para ver únicamente este tipo de transiciones y fácilar su búsqueada.Modos de vista
En la esquina superior izquierda del visor hay botones para losDistinctos modos de vista.  Botones para modelos de vista Estos botones permiten selectionar el modo de vista. Las.optiones disponibles son: Clip original, Mode de cinta y Linea de tiempo. Estas-ofrecen un control absoluto al elegir clips para editarlos, por lo que recomendamos tomarse un momento para'auderer sobre ellas.| Clip original Este modo permite ver un solo clip del panel multimedia y MARCAR puestos de entrada y salida a lo largo de toda la linea de tiempo. Este-ofrece un mayor control. Para seleccionar un clip,asta con hacer dobleblick sobreél en el panel multimedia o arrastrarlo al visor. | |
| Modo de cintaEsta optacion permite ver todos los clips del panel multimedia, por lo que resulta muyutil cuando es preciso buscarrapidamente un evento en particular entre todos los ARCHivos. Al desplazar el cabezal de reproduccion sobrelos clips,las miniaturas correspondientes se selectionan automatistically en el panel multimedia. Esadicir,alencarrel clipque se deseaafter, es possiblechanges al modoCliporiginal paraque se muestre en el visor automatistically. El modo de cintaofrece las ventajas del procesodedidicono no lineal,permitiendoal usuariorealizarcambiob,encuentraromanader manerarapidayprobarnuevasideas sinperderelhilode lahistoria. | |
| Linea de tiempoEsta optacion permite ver la linea de tiempo enla que se estadeditando,loquelbrinda la posibidadde reproduccirelprojecto yoptimizarloscambiob. |
Importar clips al panel multimedia
A continuación, es possible comenzar a importar ARCHivos al proyecto desde el panel multimedia en el modulo Montaje mediante las herramrientas situadas en la parte superior de la interfaz.  Selección una de las-optiones pararegarar ARCHIVOS al proyecto.| ↓ | Importar ARCHivos multimedia | Esta option permite importar ARCHivos individuales desde laubicacion en la que se encuentran almacenados. |
| Importar carpetas | Esta option permite importar carpetas desde la unidad en la que seencuentran almacenadas. Al hacerlo, DaVinci Resolvemantrarálestructura de los ARCHIVOS y tratará cada carpeta como una bandejaindividual, brindando asi la posibilidad de alternar entre ellas paraencontrar las imagenés y los ARCHivos deseados. |
Para importar ARCHIVOS:
1 Haga Cli sobre el icono para importar archivos o carpetas. 2 Acceda a launidad de almacenamento en la que se encuentra el material que desea importar. 3 Selezione el archivo o la carpeta y haga tic en Abrir. Una vezañadido el material, es un buena momento para guardar los Cambios efectuados en el proyecto. En este sentido, DaVinci Resolve offre unaopsis de guardado automatico que se activasuponedesaberguardado los Cambios de forma manual porprimera vez. Estodiminuye el riesgo deperdereltrabajorealizzato. Consulte elApartado correspondiente en el manual de DaVinci Resolve para Obtener mas informacion al respecto.Agregar clips al panel multimedia
Ahora que ya está familiarizo con las options de organizacion de ARCHivos multimedia y los发展模式 de visualizacion,可以更好 el panel multimedia para comenzar aregararrapidamente clips a la linea de tiempo.  Lineas de tiempo del modulo Montaje La linea de tiempo es el airea de trabajo en la que se pueda agrear clips a distinctas pistas, cambarlos de lugar y recortarlos. Las pistas brindan la posibidad de colocar los clips en differentes capas, lo que ofrece una mayor flexibilidad para probar distinctos ambios y create transcidones y efectos. Por exemple, es possible editor un clip en una capa sin que los ambios realizados en este afecten a los situados en las capas inferiores. Existenolestinosmodosdeagregarclipsa la lineadetempo,porejemplo,mediante lasfuneciones Insercionintelligente,AgregarclipsoSuperponer.Agregar clips
Al seleccionar tomas y realizar el montaje, es probable que estas se agreguen a la linea de tiempo suscesivamente. La herramienta Agregar clips es ideal para thiso, ya que facilita el proceso de edition.  Haga clc en el icono correspondiente para/agregarothers clips al final del ultimo.Para agregar clips al final:
1 A continuación, haga doble click enrialquier clip del panel multimedia para abrirlo en el visor de medios originales. 2 Con la herramienta de recorte, arrastre los+puntos de entrada y salute para seleccionar la duracion precisea de la toma. Asimismo, es possible presionar las teclas I (entrada) y O (salida) para marcar dichos+puestos.  3 A continuación, haga click en el icono Agregar clips, situado bajo del panel multimedia. El primer clip se situara al principio de la linea de tiempo. Repita los pasos 1 a 3 para continuar/agregando clips automatistically sin estar espacios vacios en la linea de tiempo.  La función Agregar clips permite asegurar de que no hay espacios vacancies en la linea de tiempo. SUGERENCA: Cabe la posibiliad de agilizar aun mas este過程 asignando una combinacion de teclas a la function Agregar clips. Por exemple, asignarle la letra P es ideal para marcar+puntos de entrada y calidad, y aggregar clips mediate el teclado.Consulte el manual de DaVinci Resolve para Obtener mas informacion al respecto.Recortar clips en la linea de tiempo
Una vez agregados los clips a la linea de tiempo, es possible cambiarlos de lugar o recortarlos. Para recortar un clip, situe el mouse al principio o final del mesmo. Luego, haga click y arrastrelo hacer la derecha o la izquierda, por ejemplo, para augmentar o disminuir su duracion. Notar que, una vez realizado el recorte, los clips en la linea de tiempo se desplazaran segun los ajustes llvados a cabo. De esta forma, el modulo Montaje permite ahorrar tiempo. Incluso es possible seleccionar el clip y moverlo a una nuevo pista en la linea de tiempo, sin necessities de ampliarla o reducirla. Esto ayud a agilizar el proceso de edicion porque no esnecessary desplazarse por toda la linea de tiempo.Vista de recorte de audio
Estaopyon permite modifier el audio con precision, ya que brinda la posibidad de expandir la forma de onda en la linea de tiempo. Es muy utl al editor escenas con dialogo o videoclips y ademas facilita la buesque da punto de edicion entre manos o golpes.Para usar este modo de vista:
1 Haga click en el icono de recorte de audio, situado a la izquierda de la linea de tiempo, entre la herramienta para atrae el cabezal y los marcadores.  Bolón para el modo de recorte de audio 2 Ahora, al recortar el audio, verla forma de onda expandida en la linea de tiempo. Una vez finalizada la edicion, los clips retomaran su時間 habitual.  Vista de recorte de audio con la forma de onda expandida en la linea de tiempo Después de editar los clips en el modulo Montaje, es possibleregarar un titulo. A continuación, se explicá como hacerlo.Agregar titulos
Hay distinguas options sencillas pararegar un tuito a la linea de tiempo. Para ver losDistinctostipsode títulos que se pueeden emplear, haga click en la pestaña Titulos, situada enla esquina superior izquierda de la interfaz. En la ventana de selección,se mostraran miniaturades todos los generadores disponibles,desedercios inferiores hasta opciones con movimiento uotrasmastradiconales.Inclusoesposibleagregar titulosanimadosdeFusionypersonalizarlos.Vista previa de titulos
Antes de registrar unPara(agregar un titulo común:
1 Haga clicked en el titulo y arrastielo a la linea de tiempo. No importa a cui de ellas, excepte se recomienda hacerlo a la linea de tiempo detallada para lograr una mayor precision. Se create automatistically unaews pista para el titulo,y este acoplara al cabezal de reproduccion. 2 Suelte el botón del mouse para que el titulo aparezca en laresha pista. A continuación, es possible moverlo o cambiar su duración como si fuera un clip. 3 Para editor el Titulo, haga click en el nuevo clip y a continuacion en el icono bajo del visor. Aparecera una lista de Herramentas que se pueda usar a fin de modifier el clip, por exemple, para transformarlo, recortarlo o ampliar laImagen. 4 A continuación, haga click en el inspector. Escriba el titulo deseado y modifique sus ajustes, por exemple, el interletraje, el interlineado, el tipo de fuente o el color. Se ofrecen una gran variedad de options que permitted personalizarrialquier titulo. Recomendamos probarlas todas, a fin de ver como los distinctos ajustes cambian su apariencia. SUGERENCIa: En los modulos Edicion y Montaje, también es posible mover el puntero por encima de efectos, transiciones, generadores y filtros para verlos anticipamente.Archivos Blackmagic RAW
Los clips en formatting Blackmagic RAW brindan una gran flexibilitad en la etapa de produccion. Esto brinda la posibiliad ajustar el balance de blancos y la sensibilityl ISO con posterioridad a la grabacion, como si se estuvieranarryando los values originales de la camera. Asimismo, este��c conservas most informacion sobre las differentes tonalidades en las luces y sombras, lo cui resulta util cuando es necessario recuperar detalles, por ejemplo, en un cielo sobrexpuestos o en areas oscuras de la imagen. Es recomendable grabar en formattingo Blackmagic RAW si se desea lograr la mayor calidad possible, o en tomas que presentan candidos abruptos entre las luces y las sombras, cuando es requisitejo ajustar el color de dichas regiones en la mayor medida possible. Gracias a la velocidad y el時間 de los ARCHIVOS Blackmagic RAW, no esnecessary create other proxy, y la reproduccion se realizara como con un clip de video estandar. EsteApartado incluye informacion acerca de la dinamica de trabajo en DaVinci Resolve con Blackmagic RAW. SUGERENCA: Es recomendable modificar los ajustes Blackmagic RAW de los clips en el modulo Color antes de comenzar a etalonarlos.Ajustes del clip para el formatting Blackmagic RAW
Cuando se importan archivos Blackmagic RAW por primera vez, DaVinci Resolve decodifica la informacion de la camera incluida en these utilizing los ajustes para el valor ISO, el balance de blancos y el tinte empleados durante la grabacion. Una vez satisfecho con la apariencia, es possible comenzar inmediamente con la edicion. Una de las grandes ventajas del formatting Blackmagic RAW es que no depende de dichos ajustes. Gracias a la variedad de options disponibles en esta etapa, con el trascurso del tiempo se pueda(""); Desarrollar una dinamica de trabajo propia. Al experimentar con los ajustes de los clips, se Tiene una idea de lo extraordinario y flexible que的结果此章程。  En el panel Ajustes RAW, selección la.option Clip en el menu Modo para modifier los ajustes Blackmagic RAW del clip.Modificar los ajustes Blackmagic RAW
Una vez que se ha seleccionado la optacion de clip en el mode de decodificacion para el formatting Blackmagic RAW, es possible modifier todos los ajustes que estaban desactivados previamente. Esto permite lograr una apariencia mas similar a un etalonaje inicial. Asimismo, es un método particularmente exceptional al combinarlo con el uso de las representaciones graficas, las cuales ayudan a neutralizar y balancear los clips, a fin de aplicarles una estética determinada. A continuación, se brinda informatión sobre el clip y los controlles para la curva de respuesta tonal:ISO
Es possibleacular o disminui el valor ISO, lo cui resulta util al optimizar un clip indicando un punto de partida mas claro u oscuro.Recuperación de luces
Marque esta casilla para recuperar los detailles de las luces en los canales con perdida de informacion empieando除外s completeness.Compresión del espectro cromático
Selección esta casilla a fin de Maintener automatistically los nivelesADECUADOS para el espectro cromatico.Temperatura
Esta option permite añadir más calidrez o frialdad a laImagen para neutralizar su balance cromática.Tinte
Al ajustar esta optacion, se anaden tonos verdes o magentes a la imagen, a fin de lograr un mejor balance cromatico.Exposión
Permite ajustar el brillo general de la imagen.Saturación
El valor predeterminado para este parámetro es 1, y se pueda ajustar entre -1 y 4.Contraste
El valor predeterminado para este parámetro es 1.0. Mueva el control hacía la izquierda para disminuirlo (minimo 0) o a la derecha para aumentoo (maximo 2).Punto medio
En el modo Film, el valor predeterminado para los tonos grises intermedios es de 0.38 o 38.4% . Mueva el control hacía la izquierda para disminuirlo o hacía la derecha para aumento lo a 100. Una vez ajustado el contraste, es possible modifier la atenuación de las luces y las sombras.Atenuación de luces
Mueva el control hacía la izquierda a fin de disminuir el valor a 0, o hacía la derecha para incrementarlo a 2. El valor predeterminado es 1.Atenuación de sombras
Mueva el control hacía la izquierda a fin de disminuir el valor a 0, o hacía la derecha para incrementarlo a 2.Nivel de blancos
Ajuste el punto blanco de la curva de的回答sta tonal moviendo el control desde el valor mas alto (2) hasta el mayor bajo (O).El valor predeterminado es 1.Nivel de negros
Eieve el punto negro de la curva de respuesta tonal personalizada moviendo el control hacía la derecha desdeelvalormasbajo(-1)hastra elmaximo(1).El valorpredeterminadoes0.Usar nlvel de negros en modo Video
Marque la casilla para ajustar este parámetro.Exportar fotograma
Al seleccionar esta opticon, es possible exportar un fotograma de un clip en formato Blackmagic RAW.Actualzar Sidecar
HagaWhile actualizar el archivo .sidecar Blackmagic RAW del clip seleccionado. Cualquier modificacion realizada en los clips Blackmagic RAW se reflejar a en los ajustes Gamma, cuio nombre cambiará a Blackmagic Design Custom.  Si deseña regresar a una de las.optiones disponibles por defecto, basta con seleccionarla en el menu desplegable. SUGERENCIa: Los controles Gamma se encuentran desactivados para el material grabado en modo Video, excepte no se pierden datos del formatting Blackmagic RAW. Basta con seleccionar la opticon Blackmagic Design Film o Blackmagic Design Extended Video en el menu desplegable a fin de realizar ajustes.Guardar ambios en Blackmagic RAW
1 Ajuste los controlles de los tonos intermedios en el clip Blackmagic RAW. 2 Haga cli en el boton Actualizar .sidecar. Se creará un ARCHivo .sidecar en la misma carpeta del archivo .braw. Cuando除外,) uporte el material en formatting Blackmagic RAW, DaVinci Resolve reconocerá automatistically los ARCHivos . sidecar. Si se realizan ajustes adiconiales, haga tic en este botónNuevoamente. SUGERENCIa: Para eliminar el archivo .sidecar, basta con borrarlo de la carpeta en la unidad de almacenimiento.Ajustes del proyecto para Blackmagic RAW
Cuando es precisoonian que alectan a todos los clips, tal como el balanco de blancos o la sensibilitydo, es possible configurar el programa para que theseutilicen losajustes RAW del proyeo y luego realizar las modificaciones necessarias a dichos parametros.Para configurar los ajustes Blackmagic RAW del proyecto:
1 Abra el menu Archivo y selección Configuración delprojecto. 2 En el panel Ajustes RAW, hay un menu jusqu a la option Perfil RAW. Hagablick en la flecha y seleccione Blackmagic RAW en la lista. 3 SeLECTIONA la option Proyecto en el menu desplegable Modo. 4 Selección una optación para la colorimétría en el menu. 5 Selecciona la option Personalizzato para el ajuste Balance de blancos. 6 Selección la-option Blackmagic Design Custom en el menu Gamma. Elija Blackmagic Design para el espacio cromático. 7 Selección la resolución correspondiente en el menu Decodificación. Una menor resolution fácilar la reproducción en sistemas con recursos limitados. Asimismo, es possible tener este valor-Newamente antes de la entrega para Obtener una mejor calidad. A continuación, se pueda configurar los ajustes de la CAMERA para los clips, por exemple, la saturación, el contraste y los tonos intermedios. Esto afectará a todos los clips en el proyecto que se han configurado con laisión Proyecto en el menu Modo.Etalonar los clips en el modulo Color
Una vez que los clips se encontrar en la linea de tiempo y se han aggregado los titulos, es possible etalonarlos mediante el modulo Color,@cuyas Herramrientas avanzadas permiten definir el estilo general del proyeo. Para este ejemplo, un Buen punto de partida es neutralizar los clips a fin de luzcan constentes. Por otherwise, es possible regresar a los modulos Montaje o Edicjion en qualquermimento, en caso de que sea necessario hacer cambios. El modulo Color brinda la posibiliad deJKLM el estil del material grabado y, de una manera, el etalonaje es un arte en s, bajo que la correccion cromatica ane emocion a las imagenes. Esuna etapa realmente creativa de la dinamica de trabajo y muy satisfactoria cuando se tenen las habilidades para poder dar vida a los proyeos. Este es normalmente el primer paso y se denomina correcciones primarias o «ajustes primarios'. Una vez hecho this, es elturno de las correcciones secundarias, medianta las que se peuvent realizar ajustes extremamente precios de objetos especificos en las imagenes. esta parte es muy divertida, y la razon por la que en general se realiza en un segundo paso es porque de este modo el proceso es mas eficiente, obteniendo as meores resultados. Para comendar, haga click en el modulo Color a fin de acceder a las options de etalonaje. Podrá ver los ajustes RAW de la CAMERA, los circulos cromáticos, el panel de curvas y las herramrientas para correcciones generales, como como los paneles de nodos y vista previa. No se sienta abrumado por la Forge nantidad de functions que aparecen en la interfaz. Estas han sido disnadas para poderle a lograr que las imagenes tengan una apariencia extraordinaria.Estaseoction introduccion brinda informacion basia, pero para Obtener pasos mas detallados, consulte los apartados correspondentes. El manual de DaVinci Resolve incluye una descripción de las distinctas herramrientas y muestra como utilizeslas de manera sencilla. Aprenderá las malmas先进技术 que los profesiones emplean en los meoresestudios de produccion. En general, el primer paso en una corrección primaria es optimizar los niveles de las sombras, los tonos intermedios y las zonas luminosas en los clips. Esto se logra ajustando los parámetros Lift, Gamma y Gain. De este modo, se obtienen imagenes exceptionally alimentente nitidas y balanceadas que sirven como punto de partir deunarizar a create la apariencia de la或多a. Asimismo, resulta muyutilguiarse porlasrepresentacionesgraficas.Uso de las representaciones gráficas
La mayoría de los coloristas toman decisiones creativas sobre el color con base en la aparciencia y la energia. La energia que seca, no se quite, no se quite, no quite, no quite, no quite, no quite, no quite, no quite, no quite, no quite, no quite, no quite, no quite, no quite, no quite, no quite, no quite, no quite, no quite, no quite, no quite, no quite, no quite, no quite, no quite, no quite, no quite, y suces.  La gráfica de componentes cromáticos permite ajustar con precision las luces, los tonos intermedios y las sombras. De forma alternatively, es possible recurrir a las representaciones graficas que offre DaVinci Resolve para etalonar el material grabado. Para acceder a las mismas, haga click en el penultimate botón de la barra de herramrientas del panel. Es possible selecciónar distinctostips de representaciones: forma de onda, Grafica de componentes cromáticos, vectorscopio, historama u other aspects del aspecto cromálico. Estosindicadores permiten monitorizar el balance tonal y comprobar los niveles de contraste para evaporar oscurecerdemasiado las sombras operder detalles en las zonas mas claras de la imagen. Asimismo, brindan la posibidad de detectarequalquierdominante cromática. En forma predeterminada, el panel de circulos cromáticos muestra los controlles Lift, Gamma y Gain como barras. Estos generalmente se emplean en las correcciones primarias y se asemejan a los controlles queigungenoras aplicaciones pararealizarajustescromáticosyde contraste.  Los circulos cromáticos permiten controlar con precision el balance de-coloredes y los tóns en los distinctos clips. Para ajustar cada area tonal de forma similar, mueva el dial situado bajo de这些东西 hacía la izquierda o la derecha.  Las barras de ajustes primarios facillan las modificaciones cromáticas al usable un mouse. A fin de lograr un control más preciso de cada color al utiliser el mouse, es possible reemplazar los círculos cromáticos por barras que permiten realizar ajustes en cada canal independmente para las luces, los tonos intermedios y las sombras. Paraarlo, basta con selección laopia Barras de ajustes primarios en el menu desplegable que aparece cerca de la esquina superior derecha del panel. - Ajuste de sombras: Una vez seleccionado un clip en la linea de tiempo, hagablick en el dial situado bajo del primer circulo cromatico. Muevalo hacía la derecha o la izquierda y preste atencion a losambiros en la imagen. Podra observar comourrenta y disminuya el brillno en las zonas oscuras. Ajuste este parámetro según el tono que mejor se adapte a los requisimientos del proyecto. Si disminuye demasiado este parámetro, perdera detalles en las sombras. En cualquier caso, pueda usar la grafica de componentes cromáticos para evaporar este inconveniente. La posición ideal para las sombras en la representation de la SERIAL es sólo por encima de la linea inferior. - Ajuste de luces: Hagablick en el dial situado bajo del segundo círculo cromático y muevalo hacía la derecha o la izquierda. Estó permite ajustar las zonas más claras de la imagen, que se muestran en la parte superior de la grafica de componentes cromáticos. Para lograr un mayor brillo, las luces deben situarse solo por debajo de la linea superior de la grafica. Si superan este limite, se perdán detalles. - Ajuste de tonos intermedios: Haga click en el dial situado bajo del tcercer circulo cromatico y muevalo hacer la derecha o la izquierda. A medida que augmente la intensidad, notar que el brillo de la imagen se incrementa. Asimismo, poder ver que la parte central de la onda cambia al realizar los ajustes.Esta franja representa los tonos intermedios del clip y su posicion optima generalmente se encontrar entre el 50 y 70% en la representationtica correspondiente a la onda de la senal. No obstarve, este valor peut ser subjativo segun la apariencia deseada y las conditiones de illuminacion al grabar el clip. El panel de curvas también permittedar correcciones primarias. Basta con hacer click en los puestos de control de las lineas diagonales en las graficas y moverlos hacia arriba o abajo para modificar el contraste general de los canales cromaticos en differentes areas tonales de la imagen. Es importante ajustar los+puntos situados en el tercio superior, medio e inferior de la curva. Consulte el manual de DaVinci Resolve para Obtener más información.  El panel Curvas permitted realization corrections primarias o realizar areas especialicas de la imagen mediante Power Windows.Correcciones secundarias
Para modifier una parte españica de una imagen, es precise aplicar correcciones secundarias. Los ajustes realizados hasta el momento mediante los circulos cromáticos y sus respectivos controlles afectan a la totalidad de la imagen y se denominan correcciones primarias. Sin embargo, las correcciones secundarias son ideales para落户 a cabo ambios en zonasspecificas, por exemple, a fin de realizar el color del césped o del cielo en una escena. Estasbrindan la posibiliad de selectionar una parte de la imagen y modifierla sin afectar al resto. A suvez, la estrutura nodal facilita el agrupamento de varias correcciones con el objetivo decontinuarajustando zonas specificas hasta lograr el resultado deseado. Incluso es possible emplear tantoPower Windows como la function de seguimiento para aplicar ambios a objetos en movimiento.Ajuste de-coloredespecificos
Con Frequencia, es preciseo realizar un elemento en particular bajo de la imagen, por exemple, el césped al borde de una carretera o el color azul del cielo, o podrá ser besoinario modifier la tonalidad de un objeto spécifique para captar la atencion del expectador. La herramienta Coloresspecificos permitte cumplir con este cometido deforma sencilla.  La herramienta Colores especialicos facilita el realce de ciertas zonas de la imagen y permite intensificar el contraste o dirigir la atencion del expectador hacia determinados elementos.Paraajustar un color específico:
1 Anada un dato en serie. 2 Abra el panel Coloresesionos y compruebe que el selector este activado. 3 Hagablickesobreel color quedeseamodificar. 4 Por lo general, deben realizar algunos ajustes para atenuar los bordes del area seleccionada y limitarla unicolemente al color desado. Haga click en la option Destacar situada arriba del visor para ver la seccion demarcada. 5 Mueva el control Ancho de los matices para ampliar o reducir el area seleccionada. Ajuste los controles Minimo, Maximo y Atenuar para ver las-distinas maneras en las que es possible mejor el area seleccionada. A continuacion, es possible modifier el color elegido mediante los circulos cromaticos o el panel de curvas. En algunos casos, losCambios podrian extendere a ciertas zonas de la imogen que no se desean afectar. Para SOLUTIONAR este inconveniente, se create una Power Window a fin de aislar dichas partes. Basta con indicar sus dimensiones de manners que solo incluya el area cromaticarequireida. Si la region seleccionada se mueve en la imagen, es possible utilizing la functiOn de seguiniento del programa para que los Cambios se mantengan sin importar su posicION.Agregar una Power Window
Esta es una herramienta de etalonaje sumamenteutil que permite aislar zonas especialicas de la imagen. Dichas regiones peuvent ser moviles o estáticas, ya que también es possible seguir elmovimiento de la CAMERA y los objetos.  Las Power Windows permiten aislar zonas de la imagen que no deben verse afectadas por los ajustes realizados mediante la funcia Colores especialicos (HSL). Por exemple, es possible trazar un contorno alrededor de una persona para realizar转型发展 en el color y el contraste solamente en dicha parte de la imagen, sin afectar las zonas adyacentes. Este tipo de ajustes peuvent servir para dirigir la atencion del expectador hacer regionesesionales.Para(agregar una Power Window:
1 Anada un dato en série. 2 Abra el panel Power Windows y selección una forma de las formas disponibles.Esta se va en el+nodo. 3 Paraaabstarel tamao, haga clic sobre los+puntos azules y arrastrelos segun sea necasario. Los+puntos rojos permiten atenuar los bordes. Paraaabstarela posicjion de la ventana, haga clic en el punto central y muevala hacia la parte de la imagen que desea aislar. Tantién es possible girarla mediante el punto unido al centro. Ahora peut ajustar el color unicamente en el area seleccionada.  La herramienta Power Windows permite落户 a cabo correcciones secundarias en partes espécificas de unaImagen.Seguimiento de una Power Window
Es posible que la CAMERA, el objeto o el area seleccionada bajo de una imagen este en movimiento. Por consiguiente, es preciso utilizing la function de seguirimiento que ofrece DaVinci Resolve para garantizar que la vieta permanezca vinculada al elemento delimitado.Esta herramienta analiza la inclinacion y el desplazamento horizontal o vertical de laamera o del objecto en la imagen para sincronizar la vieta con el movimiento. Si no se activa esta functiOn, cabe la posibidad de que las correcciones realizadas se分开 del elemento al que se aplicaron, distrayendo al expectador.  Es posible seguir ciertos objetos o partes de la imagen para las correcciones realizadas permanezcan vinculadas a ellos.Para realizar el seguiniento de una Power Window:
1 Anada un dato en series y bajo, una Power Window. 2 Al comienzo del clip, ajuste la posicjion y el tamafo de la vieta para destacar unicolemente el objeto deseado o una zona particular de la imagen. 3 Abra el panel Seguimiento. Marque las casillas Eje X, Eje Y, Zoom, Rotacion o 3D segun el patron de movimiento. 4 Haga click en la flecha de avance situada a la izquierda de las casillas de verificacion. A continuacion, apareceran una series de punto en la imagen, y el programa reproducirlos fotogramas restantes para analizar el movimiento. Una vez configurada esta referencia, la vieta seguirá la trayectoria del movimiento. En la mayoría de los casos, el seguimiento automatico offers Buenos resultados. Sin embargo, en escenas complejas, es posible que algo objeto se atraviese en el area seleccionada e interruppo o afecte su funcionaamento. Este inveniente pueda resolverse mediante el editor de fotogramas clave. Consulte el manual de DaVinci Resolve para Obtener más informacion al besoin.Uso de complementos
Al realizar correcciones secundarias, también es possibleregarar complementos OpenFX o ResolveFX para create aparciencias importantes en el modulo Color o efectos y transiciones innovadoras en el modulo Edicion. Los complementos ResolveFX está integrados en el programa,@mstead que los complementos OpenFX pueda adquirirse o descargarse a工程技术 de distribuidores externos. Una vez instalado unconjunto de complementos, es posible acceder a ellos desde el modulo Color, abriendo el panel OpenFX a la derecha del editor de nodos. Basta con crear un ntho en series y bajo o arrarar el complemento hacer el mesmo.Modifique los parametros en el panel adyacente si el complemento brinda esta posibiliad.   Los complementos OFX son una herramienta rápida y sencilla para crear aparciencias importantes e Innovadoras. En el modulo Ediciones, es possible/agregar transiciones, filtros y generadores de complementos a los clips abriendo el panel OpenFX en la biblioteca de efectos y arrastrando el elemento seleccionado al clip en la linea de tiempo, según los requisitos del complemento.Mezclar audio
Mezcla de audio en el modulo Ediciones
Una vez editado y etalonado el projet, es possible comenzar a mezclar el sonido. En este sentido, DaVinci Resolve cuenta con un exciente Conjunto de functions para editor, mezclar y masterizar el audio de un projet directamente desde el modulo Edicn. Conviene subrayar que el modulo Fairlight ofrece un entorno completo de produccion de audio para proectos que requieren Herramrientas mas avanzadas.Consulte el singularmente apartado si ya esta familiarizzato con el modulo Edicn y desea saber mas sobre dichas prestaciones.Agregar plastas de audio
De s el modulo Edicn es posible agregar fácilmente pistas de audio para crear una mezcla compleja con musica y efectos sonoros. Esto peut serulatur util a la hora de separar los elementos del audio en pistas individuales, tales como voz, musica y efectos.Paraañadir una pista de audio en el modulo Ediciones
Haga cig con el botón derechoedo+junto al nombre de cualquier pista de audio en la linea de tiempo, selección Agregar pista y elija una de las-optiones disponibles. De esta forma, seañadirá una pista al final de la lista. Asimismo, es possible(agregar pistas en un punto spécifique. Paraarlo, elija la).[2] [3] La nuevo pista de audio apareceré en la linea de tiempo. SUGERENCIa: Para embarir el tipo de pista una vez creada, haha征集 con el boton derecho bajo su nombre, seleccione Cambiar tipo de pista y elija una de las options disponibles, por exemple, estereo, mono o 5.1.Ajuste del volumen en la linea de tiempo
Cada clip de audio en la linea de tiempo incluye un control de volumen superpuesto que permite ajustar su intensidad arrastrando el puntero hacía arriba o abajo. Este correponde al parámetro Volumen del inspector.  Arrastre el control para ajustar el volumen del clip. Conviene subrayar que el modulo Fairlight ofrece un entorno completo de posproduccion de audio para proyectos que requieren Herramrientas mas avanzadas.El modulo Fairlight
Este modulo de DaVinci Resolve brinda la posibiliad de ajustar el audio. En una sola pantalla, ofrece una vista optimizada de las pistas de audio y controles de monitorizacion personalizados que permiten evaluar y ajustar la intensidad del audio con el objetivo de create una mezcla armoniosa. Este modulo presenta una amplia variedad de functions que le ayudan a conseigir una calidad exceptional en materia de sonido.  Esta guía solo proportióna un resumen Basics de las functions. Consulte el manual de DaVinci Resolve para Obtener más información al respecto, ya que es más especialico y brinda detalles sobre cada una de ellas. Además, describe como hacer uso de estas herramientos en simples pasos.Linea de tiempo del audio
- Encabezado de la pista: En la parte izquierda de cada pista hay un encabezado que muestra su número, nombre y color, asi como los canales de audio y los values para el atenuador y los vúmetros. Además, presenteDistinctos controlles para bloquear y desbloquear pistas, alearlas o silenciarlas. Estos facilitan la organización de las pistas y su visualización individual. - Pistas: En el modulo Fairlight, cada pista está dividida en bandas para cada canal individual que permiten editorlos y mezclarlos. Por el contrario, en el modulo Ediciones se muestra un solo clip en la linea de tiempo. Esto brinda la posibididad de.editor ARCHivos de audio con multiple canales deerable mas fácil, sin tener que gestionar una grancantidad de pistas.  En el encabezado de la pista A1, se puedaajsir que es monoaural,minteras que las clos bandas de la pista A2 indican que es estereofonica.Que es un bus?
Básicamente, un bus es un canal compuesto por fuentes de audio agrupadas en una sola YY que pueda controlarse de forma colectiva. Fairlight create automatistically un bus con todas las pistas de audio en la linea de tiempo, por lo which es possible modifier el volumen general de la mezcla una vez ajustado el de cada pista individual. Si la edicion presenta una mayor complejidad, se pueda create buses adiconiales y combinar varias pistas de una misma categoria, por exemple, dialogo, musica o efectos, con el objetivo de tener una sola seals. A modo ilustrativo, si tenemos cinco pistas de dialogo, es possible asignarlas a un bus aparte paraajsstar el volumen general de la voz mediate un solo conjunto de controles. La estructura Flexbus proportionscna una total flexibilidad con respecto a los theyos de buses y el direcionamento de las snales, inclusive de un bus a oto, de una pista a un bus o de un bus a una pista.Consulte el apartado correspondiente en el manual de DaVinci Resolve para obtener mas informacion al respecto.Herramientos de mezcla
Cada una de las pistas en la linea de tiempo corresponden a un canal individual en la interfaz del programa. Por defecto, en la parte derecha aparece un solo canal, denominado M1, que representa el bus maestro. Asimismo, se muestran canales adiconiales con diversos mandos para cada uno de los buses 创建os. Los controlles graficos permiten asignar pistas a los canales de salute y ajustar el ecualizador, la dinámica o el volumen, asi como grabar procesos automaticos, distribuir el sentido envolvente o aslar y silenciar pistas.  Interfaz para la mezcla de audio con los canales correspondientes a las pistas en la linea de tiempoUso del ecualizador para mejorar el audio
Una vez ajustada la intensidad del volumen en los clips del proyecto, es possible que aun seanecessary realizar ajustes más sutiles. Por exemple, el dialogo, la música y los efectos podrjan tenerla mesma Frequencia bajo del aspecto sonoro, provocando que el audio resulte ruidoso y pococlaro. En these cases, el ecualizador sera de gran ayud, dato que permite determinar que partes del aspecto ocupa cada pista. Por othera parte, brinda la posibidad de eliminar elementos nodeseados aislando o reduciendo el volumen en ciertas Frequencias que contienen murmullos, zumbidos oruidos de fondo, o simplement更好ar la calidad general del audio para que resultemás agradable al oido. DaVinci Resolve offre filtros de ecualización que pueda aplicarse a cada clip individualmente o a todas las pistas. Para cada clip, hay un ecualizador de quatre bandas en el inspector, cuando que para las pistas se brinda un ecualizador paramétrico deareth bands. Los controlles graficos y numéricos para augmentar o disminuir differsentes rangos de Frequencias y los distinctostips de filtros permiten definir la forma de la curva de ecualización.  El ecualizarod de quatre bandas puede aplicarse aequalquier clip en la linea de tiempo. Por su parte, las bandas externas permiten realizar ajustes para el realce de graves o agudos y'utilizar filtros de paso alto o bajo. Un filtro de paso afecta a todas las Frequencias superiores o inferiores a una fecuencia determinada, eliminandolas por completeo de la seals. Por exemple, un filtro de paso alto elimina las frequencies bajas y mantiene las altas. Cualquier sonido por debajo de la fecuencia de corte se atenuara de forma gradual. Un filtr de realce es menos drastico y permite modifier el rango superior o inferior de la senal en general sin eliminar por complete dichas fecuencias. Este aumento o disminuye la fecuencia de corte, asi como aquellas superiores o inferiores, de manière uniforme, segun el tipo de filtr empleeado. Los controlles intermedios brindan la posibidad de realizar una amplia variedad de ajustes en la ecualizacion y.Ofrecen diversos temas de filtros. - Filtros resonantes: Estos filtros realizan o eliminan las Frequencias alrededor de un punto central de una curva de ecualizacion en forma de campana. - Filtros de rechazo: Estos filtros afectan a un rango de Frequencias muy especialico, por lo que resultan muy utiles, por exemple, para eliminar el zumbido provocado por la red de suministro electrico a 50 o 60 Hz. - Filtros de realce de graves: Estos filtros realizan o atenuan todas las Frequencias inferiores a la fecuencia de corte. - Fildros de realce de agudos: Estos filtres realizan o atenuan todas las Frequencias superfiores a la fecuencia de corte.Paraañadr un ecualzador a un clip:
1 Seleccione el clip en la linea de tiempo. 2 Haga cis en el inspector y bajo en el boton Eculizador.Paraañadir un ecualizador a una pista:
1 Haga doble tic sobre el area de ecualization de una de las pistas para abrir el ecualidator. respectivo. 2 Seleccione el filtro en el menu desplegable para la banda que deseaaajustar.  El panel indica que el ecualizador se ha aplicado a la pista 1.  Evaluador paramétrico de 6 bandas que pueda aplicarse a cada pista Una vezañadidos los ecualizadores, es possibleaabstar cada banda. Nótese que los controlles variarán según el bajo escogido.Paraaabstarelecapitalizadordeunfittredbanda:
1 Seleccione el filtro en el menu desplegable para la banda que deseaaajustar. 2 Ajuste la fecuencia para determinar el punto correspondiente en la curva de ecualacion. 3 Ajuste la ganancia para realizar o atenuar las Frequencias que predominan en dicha banda. 4 Ajuste el factor Q para modifier el intervalo de las Frequencias afectadas. El botón para restablecer ajustes permitte restaurar los valores predeterminados. El modulo Fairlight cuenta con una gran variedad de controlles que brindan la posibiliad de melhorar la calidad de cada pista. Asimismo, permittenardir otheras adiconales,organizar buses,agregar efectos y optimizar el audio en general.Efectos visuales y compositions en el modulo Fusion
Una vez finalizada la edicion, es possible acceder al modulo Fusion de DaVinci Resolve paraañadir efectos visuales y animaciones gratuites. A diferencia de otros programas de composión digital que utilizes capas, Fusion ofrece una dinámica de trabajo basada en nodos, lo cual brinda una mayor flexibilitad para create efectos complejos y modifier los datos de la imagen. A su vez, dicha estructuraodal muestra claramente las herramrientas empleadas durante el proceso y funciona de manera similar a la del modulo Color. El modulo Fusion
Estemericanos incluyen dos visores en la parte superior con controlles de reproduccion que permiten ver contentsados. A la derecha, se encuesta el inspector, con diversas herramrientas, y en la parte inferior, el editor de nodos, donde se crean las compositions. Nichtique los visores y los controlles de reproduccion permanecen siempre visibles, los iconos de la barra de herramrientas en la parte superior de la interfaz brindan la posibididad de ocultar el inspector y el editor de nodos o acceder a la biblioteca de efectos y el editor de fotogramas clave.  - Panel multimedia: Funciona de la mismaforma que en el modulo Edicion. Basta con arrastrar los ARCHivos directamente de las carpetas a la composicion. - Biblioteca de efectos: Aquí es donde se encuentran las-distintas plantillas y herramrientas organizadas por categorías, incluidos filtros, generadores de partículas y unidades de seguímiento. Haga click en cualesra de ellas o arrástrela a la estructura nodal paraañadirla a la composión. Cabe mentionar que el panel multimedia y la biblioteca de efectos ocupan el mesmo espacio de la interfaz, de manière que es posible alternar entre ambos para maximizar el時間 de los visores. - Clips: Al hacerblick en esta pestaña, se muestra una series de miniaturas que corresponden a los clips en la linea de tiempo. Estas se encontrartran debajo del editor de nodos y permiten acceder inmediamente a cualquier secuencia.  Para crear una nuevo version de la composicion, haga click con el botón derecho en una miniatura y selección la option Crear composicion. - Vísores: Los visores permanecen siempre visibles y muestran losDistinctos发展模式 de la composión, por exemple, una perspectiva general en 3D, la senal de la lácema o la renderización final. Asimismo, brindan la posibiliad de ver la forma en que los Cambios realizados afectan a un elemento spécifique. Es possible elegir el[nodo que se desea ver haceroclic sobre este y presionando 1 para el visor izquierdo o 2 para el Derecho. Aparecera un boton con un punto bianco bajo del[nodo que indica el visor asignado. Internacional es possible asignar un monitor externo. SUGERENCIa: Mediterres es posible asignar un nodo a un visor arrastrandolo alismo. Los controlles de reproduccion situados bajo de los visores permiten ir al principio o el final de una secuencia, reproducirla o detener la reproduccion. La escala de tiempo muestra el intervalo de un clip, con MARCAS amarillas que representan los+puntos de entrada y salute.  Las MARCAS Amarillas en la escal de tiempo representan los+puntos de entrada y salida en un clip. Al emplear un clip Fusion o compuesto, la escal solo muestra su duracion como en la linea de tiempo, sin tener en cuesta los margenes de edicion. - Nodos: El editor de nodos es el elemento principal del modulo Fusion, ya que permite connectarlos entre si para create la estrutura nodal. Su tiempo depende de los editores abiertos, por ejemplo, el de curvas paramétricas o el de fotogramas clave. A su vez, la barra de herramrientas en la parte superior offre un¿como funciona an los nodos?
Puede resultar utilise pensar en los nodos como iconos que representan una herramienta o efecto determinado. Estos se conectan entre si para create la composicion general, al igual que los ingredientes de una receta. Asimismo, es importante tener el functionamento de la entrada y la salida de cada dato, a fin de poderla dinamiche de la composicion al generer efectos visuales detallados. Algunos nodos cuiertan con multipes entradas y salidas que pueden connectarse a Others. Por典型案例, el nodo de combinacion incluye una entrada para la imagen en primer plano, other para el fondo y una tercera para mascaras.  Entrada para laImagen en primer plano Entrada para el fondo Entrada para mayscaras Salida Un[nodo con multiples salidas brinda la posibidad de conectarlo a various nodos, de manera que no hay necessities de duplicate clips como en los programas de composicion digital basados en capas. Las flechas en las lineas que connectan los nodos son un indicator visual muy utill con respecto a la direccion del flujo de datos.Agregar nodos al editor
Agregar efectos es tan simple como colocarlos entre los nodos Medialn y MediaOut. Existen-distintas maneras de hacerlo. Por exemple, es possiblemantener presionada la tecla Shift, arrastrar el ntho y solorlo entre otros dos, o hacer clicdonde se desea agregar un efecto y seleccionaruna herramienta en particular.El nuevo ntho se conectara automatically a la herramienta elegida. Asimismo,se pueedenñadir nodos en qualquier lugar del editor y conectarlos arrastrando la salida de uno hacla la entrada de other.  La herramlienta empleada con mayor freuencia es el nodo de combinacion 2D o 3D. Este combina diversas herramrientas del editor en una sola calidad. El[nodo de combinacion permite organizar las entradas ajustando su tameno, posicfon o la manera en la que se combinan. Asimismo, es possible acceder a these parametros desde el inspector al seleccionar dicho bajo. La barra de herramrientas en la parte superior del editor contiene iconos que representan las functions empleadas con mayor fecuencia. Para aggregatoras a un dato, basta con hacer click en uno de ellos o arrastrarlo al panel. Si desea ver todas las herramrientas disponibles, acceda a la Biblioteca de efectos en la esquina superior izquierda de la interfaz y haha click en la option Herramrientas. Estas se enquiryran agrupadas por categorias e incluyen plantillas de efectos para anadirdestellos,sombras y fondos. SUGERENCA: Una vez que se familiarice con el nombre de las herramrientas, mantenga presionada la tecla Shift y luego oprima la barra espaciadora para abrir el menu de seleccion. Al escribir el nombre de la herramipta, el programa sugerirá la option más relevante.Esta es una manera muy=rápida de elegir la herramipta眼看 a.Ajustar nodos con el Inspector
Es possibleaabstar nodos mediante el panel Inspector. Para ello, haga clic en el dato que deseamodificar y se mostraran las options y controles correspondentes. Fusion brinda la posibidad de ver un dato,mirnas se modifica otro. Por exemple,es possible cantiar el tameno y la posicion del centro de un dato Text+,mirnas se ve el contentido del dato Merge en el visor, lo qual permite appreciar el texto con relation al fondo.  Los nodos seleccionados se indican con un borde rojo. En esta imagen, el panel Inspector muestra las options para el dato de dato. Existen various parámetros y ajustes para cada[nodo según la función que cumple, y ellos incluyen desde el taman y la posicón del centro hasta la cantidad de partículas de un[nodo emisor. Asimismo, es possible animar un efecto marcando fotogramas clave y modificando los ajustes enfunción del tiempo.Uso de fotogramas clave
Paraañadir un fotografia clave desde el inspector, haga click con el botón derecho en uno de los ajustes y selección la-option Animar en el menu contextual. El icono con forma de rombo a la derecha se destaca en rojo, indicando de este modo que cualquier cambio que se realice se aplicará únicamente al fotografia selecciónado. Cuando se crean dos o más fotogramas clave ajustando los parámitros en otro Distinto, se realiza una interpolación entre ambos. Las flechas situadas a ambos lados del icono permiten mover el cabeza al la posición exacta en la linea de tiempo.  Animación atenuada mediante una curva de Bézier Es posible hacer click en los+puntos de control para acortarla o alargarla, o en los iconos cuadrados a fin de Cambiar su ubicacion. Por su parte, el panel de curvas paramétricas brinda un mayor control sobre la animación. En tal sentido, permite selecciónar fotogramas clave y atenuar la animación entre ellos mediante una curva de Bézier. Paraarlo, presione Shift+S o haga click con el botón derecho en uno de los fotogramas y selecciónlaopiaSmooh.Usar la funciona de seguímente y/agregar textualo
Con el proposto de tener una mayor idea acerca de comoemployar Fusion, hemos incluido los seguides ejemplos que muestran el uso de la herramienta de seguiniento a efectos de rastrear un elemento,añadir texto y vincularlo a dicho objecto. La herramipta de seguimiento rastrea el movimiento de los pixeles en funcion del tiempo, representando su posicion con respecto a los ejes X e Y y generando informacion que peute asignarse a Others elementos. Estro resulta de gran utility cuando es requisiteo que la posicion del texto coincida con un objeto en movimiento, como un coche desplazandose por una carretera o pajaros volando. 1 En la biblioteca de efectos, selección la option Rastreador bajo de la categoría Seguimiento y arrastiella a la linea que conecta los nodos Medialn y MediaOut. A continuación, haga click en el nodo de seguimiento para ver sus parámetros en el inspector. 2 Presione 1 en el teclado para ver el contenido del nodo en el visor izquierdo. Se做不到 el clip con la herramienta de seguimiento en la posicion predeterminada. Coloque el puntero sobre esta para ver los marcadores. Haga click en el punto de control situado en la esquina superior izquierda y arraste la herramienta hasta el area deseada en la imagen. Se logranelinesados en zonas de alto contraste, como la insignia en el capo de un automovil. La imagen se ampliar a fin de lograr una mayor precision. 3 En el inspector, hagablick en el penultimate boton para comenzar el seguiniento.Aparecera una Notificationacion cuando el procedimiento haya finalizzato. Hagablick OK.  Las-optiones en el inspector incluyen la posbilidad de realizar un seguiniento desde el ultimo fotograma (o el fotograma seleccionado) hacia atras, a partir del primer fotograma (o el fotograma seleccionado) hacia adelante, o detener el proceso. SUGERENCIa: Las options para realizar un seguiniento desde el fotograma seleccionado hacer adelante o aftas son ideales en situaciones en las que el rango de renderizacion no comprende el area de interes en la imagen, por典型案例, cuando un automovil o un pajaro de desplaza fuera de plano. Este brinda la posibidad de rstrear solamente el material relevante. A continuación, es possible utiliser los datos del seguínto y aplicar la trayectoria a un nodo de dato. 4 Haga click en el icono correspondiente al dato Text1 en la barra de herramientos y arrestrelo al editor, cerca del dato Tracker1. Conecte la calidad del primero a la entrada verde del segundo.  5 Para ver el的结果を这个 combinación en el visor izquierdo, hagablick en el nodo de seguimiento o presione 1. En el panel Inspector correspondiente al nodo, hagablick en la pestaña Operaciones. En el menu junto a la option Operación, seleccione Igual movimiento. 6 Hagablick en el nodo de texto para ver sus parámetros en el inspector. Escribe el texto en el recuadro y cambie el tipo de fuente, su color y su tiempo según la composión. Los datos generados por la herramienta de seguiniento se aplicaran a la posicón del texto. Para modifier la posicón del texto, hagablick en la pestaña Trackers del inspector y ajuste el control X Offset 1 o Y Offset 1.  Los controles en la parte inferior del inspector permiten ajustar la posición del texto. A continuación, observe la composión paraunar como el texto se vincula al的对象 al que se aplicó la función de seguímiento.  El rectángulo verde representa la posición actual del rastreador con afecto a la trayectoria,@mientras que la linea roja punteada es la posición empleada para animar el texto. En algunos��omas, es necessario eliminar los+puntos de seguiniento una vez finalizoeste procedimiento, por ejemplo, cuando el objecto desaparece del plano. Sin embargo, el editor de fotogramas clave permite hacerlo de manera sencilla.  7 Haga tic en la pestaña de fotogramas clave sobre el inspector para abrir el editor. Los nodos que incluyen fotogramas clave se indicate con unalittle flecha junto a su nombre, y en la lista solo apareceran sus parámedros. Haga tic en la lupa y dibuje un recuadro alrededor del area que desea modificar. Este permittirá ampliar dicha zona para fácilar la visualizacion de los fotogramas clave. 8 Mueva el CZezeal de reproduction hasta el ultimo fotograma que desea utiliser. A continuacion, selecione los fotogramas clave que quiera Eliminar trazando un recuadro a su alrededor. Estos se destacaran de color amarillo. Haga click con el boton derecho y seleccione la option Delete en el menu emergente. SUGERENCA: Si los efectos consumen una gran calidad de recursos del equipo informatico, haha cig con el boton derecho sobre los controlles de reproduccion para acceder a OPCIONES adiconiales, como la posibidad de reproducir las imagenes a una menor resolution, lo cui facilitar el uso del systema,m间隙 se crea la composicion. Consulte el manual de DaVinci Resolve para Obtener mas informacion al respecto. Ya ha completado su primera composión, animando el texto para que coincida con la trayectoria de un objeto en el material grabado. La herramienta de seguirimiento planar permite rastrear una zona de la imagen que contiene una superficie plana que se desea destacar o sustituir. En el caso de los planos bidimensionales, este pueda resultar utilise para携带 carteles y senales en una imagen en movimiento, o incluso añadir una imagen a un monitor o un tevisor en el plano. Consulte el manual de DaVinci Resolve para Obtener más información al Respecto. SUGERENCA: Al crear efectos visuales en el modulo Fusion, las herramrientas de combinacion seran distinctas segun se trate de efectos bidimensionales o tridimensionales. No obstarve, a bajo se combinanamins tips en la misma composicion. En este caso, merece la pena recordar que qualquier efecto visual generado en un espacio 3D deben renderizarse como una imagen 2D antes de poder emplearlo en la composicion bidimensional. Esperamos que disfrute explorando losDistinctos efectos visuales que ofrece Fusion, unto con las extraordinarias prestaciones de los módulos Edicion, Color y Fairlight. Gracias a la amplia variedad de herramrientas que brinda DaVinci Resolve, su creatividad no tarda limites.Masterizacion
Ahora que el proyecto ya está editado y etalonado, y se han asignado los efectos visuales y la mezcla de audio, es el momento de partirlo conoras personas. A tal fin, es possible usar la option para exportarlo rápidamente o el menu de selección a fin deentarigel contentido de la linea de tiempo en un unico archivo multimedia, escogiendo su formatting de entre varias posibilidades, o usinga las functions adiconiales del modulo Entrega.  El material editado se pueda renderizar en el modulo Entrega, que permitte seleccionar diversos copecys formatos.Exportación=rápida
En el menu Archivo, selección la option Exportación rápida a fin deemployer una de las options predeterminadas para exportar elprojecto desdecualquier modulo de DaVinci Resolve. Asimismo, es possible utilizing estamericanpara publicar el material directamente enuna de las plataformas compatibles, como YouTube,Vimeo,Twitter o Frame.io.Para utiliser la funciona de exportación rápida:
1 En los modulos Ediciones, Fusion o Color, marque+puntos de entrada y calidad en la linea de tiempo para seleccionar el intervalo que se desea exportar. En caso contrario, se exportará la linea de tiempo completa. Selección la optación Archivo y a continuación Exportación rápida. 2 Seleccione una de las options predeterminadas situadas en la fila superior de la ventana de dialogo y haga ticn Exportar. 3 Selección laubicación en el directorio,cribeel nombre del archivo en la ventana de dialogo y haga clic en Guardar. Aparecerá una barra que indica cuanto demoraré el procesodeportacion.  Opiones de exportación rápidaModulo Entrega
Este brinda la OPPUNITY de seleccionar los clips que desean exportar, como como el formatting, el codec y la resolution. DaVinci Resolve permite utiliser diversos formatos, por exemple, QuickTime, AVI, MXF y DPX,empleando codecs tales como RGB/YUV sin compresiOn de 8 o 10 bits, ProRes, DNxHD y H.264, entre除外.Para exportar un clip:
1 HagaWhile en el modulo Entrega. Acceda al panel Ajustes de renderizacion, situado en la parte superior izquierda. A continuacion, podra escoger una de las configuraciones predeterminadas, tales como YouTube o Vineo, o elegir sus propios ajustes mediante la option Personalizzato. Por exemple, seleccione YouTube, bajo haga clic sobre la flecha que aparece al costado y finalmente elija la opticon 1080p para el formatting. La Frequencia de imagen coincidirá con la del proyecto. 3 Debrero de las options predeterminadas, verá el nombre del archivo final y su ubicación. Haga click en Buscar y selección una carpeta para guardar el archivo exportado. A continuación, selección la option Un clip en los ajustes de renderización. 4 Sobre la linea de tiempo, verá un menu desplegable con laopia Toda la linea de tiempo seleccionada. Esto significa que se renderizarado todo su contenido. Sin embargo, también es possible seleccionar una parte de la secuencia. Para ello, basta con elegir la option Intervalo y bajo marcar los+puntos de entrada y calidad mediante las teclas I y O. 5 En la parte inferior del panel, haga click en el boton Agregar a la cola de procesamento. El material se agregara a la cola de procesamento en la parte derecha del modulo. A continuacion, haga click en el boton Renderizar y supervise el progreso de la renderizacion en la lista de trabajo pendentes. Una vez finalizo el procedimiento, abra el archivo generado para ver el producto final. Ahora que ya cuenta con un conocimiento Basics sobre como editar, etalonar, mezclar el audio yregarar efectos visuales, le recomendamos que pruebe distinguas其中之一 en DaVinci Resolve. Consulte el manual del programa para Obtener más informacion acerca de cada una de sus sistemas.Control de la CAMERA mediante el modelos ATEM Mini
Los mezcladores ATEM Mini son una herramienta extraordinaria para las producciones multicamara y las transmissions en directo por Internet. En tal sentido, el programa ATEM Software Control permitted manejar hasta quatre unidades Pocket Cinema Camera desde el mezcludor. Haga click en la pestafia Camara para acceder a estas prestaciones. Además, es possible modifier con fácilidad diferentes parámetros, tales como la aperture del diafragma, la ganancia y la distancia focal, alemployarobjectivos compatibles,así comoajustar el color y crear imagenesextraordinaryarias con las herramrientas para correcciones primarias de DaVinci Resolve. Por other parte, al conectar un dispositivo ATEM Camera Control Panel, se logra un control precise de todas las unidades simultaneamente. Consulte el manual del modelos ATEM Mini para Obtener mas informacion al respecto.  Modulo de control de camaras El modulo de control transmite paquetes de instructaciones a la CAMERA mediante las entradas HDMI del mezclador. Al conectar una de ellas a la correspondiente en la CAMERA, esta detecta las instructaciones integradas en la seals, permitiendo de este modo controlar los differentes parámetros. Compruebe la asignacion de los botones en las preferencias del programa ATEM Software Control para asegurarse de que hayan sido vinculados a laamera correcta. Asimismo, al conectar el mezclador a una unidad Pocket Cinema Camera, se brinda la posibility deatar con las ventajas de una luz piloto.Panel de control de caparas
Ejecute el programa ATEM Software Control y hagablick en la pestaña Camara, situada en la parte inferior de la ventana. Ver a una series de controladores con Herramiantas para ajustar y melhorar la imagen de cada camara. Estos son muy faciles de usar. Basta con hacerblick en qualquiera de los botones o mover los controles correspondentes para realizar ajustes.Selección de camaras
La fila de botones situada en la parte superior de la ventsa permite selectionar la CAMERA que se desea controlar.Estado de la CAMERA
En la parte superior de cada controlador se identifica la unidad y se indica si laquia está al aire. Además, hay un botón que permitte bloquear todos los 控les de la camera. Cuando la seals estal a aire, la barra superior de la ventana se enciende de color rojo y muestra el siguientes mensaje: Al aire.Ajustes de laamera
El botón de ajuste de la CAMERA, situado cerca de la españina inferior izquierda del controlador, permite modificar diversos paráMETROS de cada imagen.  En la parte superior de cada controlador se indica si la CAMERA está al aire. Utilice los controles generales bajo de cada circulo cromático paraaabastar las luces, los tonos intermedios y las sombras en cada canal YRGB.Nivel de detailles
Este ajuste permite dar mayor nitidez a las imagenes captadas por las camaras en directo. Las options disponibles son Desactivado, Predeterminado, Medio y Alto.Circulo cromatico
El ciúro cromático es una herramienta útil de DaVinci Resolve que permite ajustar el color en las luces, tonos intermedios y sombras de cada canal YRGB. Para selección ar el parámetro que deseña modificar, hayablick en una de las tres pestañas situadas en la parte superior del controlador.Control general
El control general situado bajo del circulo cromático permitte ajustar el contraste en todos los canales YRGB al mesmo tiempo o la luminancia de las luces, tonos intermedios y sombras en forma independiente.Botón para restablecer ajustes
Este botón, situado cerca de la parte superior derecha de cada controlador, permite selecciónar los ajustes que se desean restablecer, copiar o aplicar. A su vez, cada circulo cromático también cuenta con un botón de reajuste. Hagablick sobre el本身就是 para copiar, aplicar orestablecer los parámetros a sus values predeterminados. Cabe destacar que los ajustes de los controladores bloqueados no se modifican. El botón situado en la esquina inferior derecha del controlador permite restablecer los valores predeterminados de los circulos cromáticos y los ajustes de contraste, saturación, matiz y luminancia. Es possible aplicar parámetros a todas las cármas en general o a cada una en forma individual, con el objetivo de lograr una aparientia uniforme en las imagenes. Los valores correspondientes a la aperture del diafragma, el enfoque, el control primario y el pedestal no se alteran al copiar y aplicar otros ajustes. Al aplicar parámetros a todas las cármas simultaneamente, el programa solicitará una confirmación previa por parte del usuario. De esta forma, es possible evitar Cambios en las cármas no bloqueadas cuyaSEOal está al aire.  Al aplicar parámetros a todas las camaras simultanecamente, el programa solicitará una confirmación previa por parte del usuario. De esta forma, es possible evaporar Cambios en las camaras no bloqueadas cuya señal está al aire.Control del diafragma/pedestal
Este control se encuesta en el reticulo central de cada controlador y se enciende de color rojo cuando laamera está al aire. Para abrir o cerrar el diafraqma, arrastre el círculo hacía arriba o abajo. Al mantener presionada la tecla de mayusculas simultaneamente, solo se modifica la aperture del diafraqma. Para oscurecer o incrementar el pedestal, arrastre el circulo hacla izquierda o la derecha. Almanter presionada la tecla Command (Mac) o Control (Windows))m吲ras se mueve el círculo, solo se modifica el pedestal.  El control del diafragma/pedestal se enciende de color rojo cuando la CAMERA está al aire.Control de la distancia focal
Este control brinda la posibiliad de acercar o alejar la imagen al utilizing objetivos compatibles con servomecanismos integrados. Funciona de la mismaforma que el interruptor fico de la camera, que permite aumento o disminuir la distancia focal presionando el extremo correspondiente. Hagablick sobre el control y arrastrelo hacer arriba para acercar la imagen, o hacia abajo para alejarla.Control primario
Este control se encuesta a la derecha del control del diafragma/pedestal y permite limitar la aperture maxima del diafragma. Es desuma realizada para evitar que salgan al aire imagenes sobrepuestos. Para limitar la aperture del diafragma, abralo Completely usingo el control circular y bajo utilise el control primary a fin deajsurar la exposacion. De esta forma, al modifier la aperture del diafragma,icho umbral impedirá que se exceeda el limite maxiimo de exposacion.Indicador del difragma
El indicator del diafragma se encuesta a la izquierda del control circular y brinda una rápida referencia visual de la aperture.Esta indicación depende del ajuste establecido mediante el control primario.Botón de enfoque automatico
El botón de enfoque automatico se encuesta en la esquina inferior derecha del controlador. Presióno paraaabstarelenfoque en forma automatica si cuesta con un objetivo activo compatible con dicha funciona. Cabe destacar que,aquee la mayoria de los modelos brindan la posibiliad deaabstarelenfoque electronicamente,algunos incluyen ademés un modo deajuste manual. Por consiguiente,es importante comprobar que se haya seleccionado el modo automatico. En algunos casos, el modo se selecciona deslizando el anillo de enfoque en el objetivo hacía adelante o除外.  Haga Cli sobre el boton de enfoque automatico o deslice el control de enfoque hacia la izquierda o la derecha para enfocar la imagen.Enfoque manual
Para modifier el enfoque de la CAMERA en forma manual, utilise el dial situado en la parte inferior de cada controlador. Deslice la rueda hacía la izquierda o derecha para ajustar el enfoquemanualmente al mirar la seals dela CAMERA, a fin de Obtener imagenes claras y nitidas.Ganancia de la camarla
Este control permiteacular ganancia de la camera. En los modelos Pocket Cinema Camera, este parametro corresponde al valor ISO, que resulta desuma importancia al filmar en conditiones de luz escaza, a fin de evaporar una subexposacion de las imagenes. Haga click sobre las flechas correspondentes paraacular o disminuir la ganancia. Este valor se puedaacularsiemprequesea necessario,porejemplo,alrodar en exteriores durante el atardecer, cuando la intensidad de la luz disminuye y es preciseaumentar el brillo en la imagen.Notese que, al incrementar la ganancia, también augmentaréel ruido en las imagenes.Control de la velocidad de obturación
El indicator de la velocidad de obturación se incluye entre el circulo cromático y el control del diafragma/pedestal. Para augmentar o disminuir este parámetro, colque el puntero sobre el indicator y bajo hagablick en la flecha izquierda o derecha. En los modelos Pocket Cinema Camera, este parámetro correponde al ángulo de obturación. Si laImagen parpadea, disminuya el valor a fin de SOLUTIONAR este problema. Una buena forma de lograr más brilllo en las imagenes sin modifierla ganancia es disminuyendo la velocidad de obturacion, ya que de este modo se incrementa el tiempo de exposicion del sensor. Al augmentar la velocidad de obturacion, se reduce el rastrodeojado por los objetos en movimiento, por loquel this parametro también pueda emplearse para lograr una mayor nitidez en las tomas de action.Balance de blancos
Este parámetro se encuesta junto al control de la velocidad de obturación y pueda modifierse mediante las flechas situadas aodos lados del indicator de la temperatura del color. Permite compensar los colores calidos o fríos emitidos pordietres fuentes de luz. De este modo, es possible conservar la pureza de los blancos en la imagen.  Al mover el puntero del raton sobre losindicadores de ganancia, velocidad de obturacion y balance de blancos, aparecen flechas que permiten ajustar dichos paramedros.Herramentas de DaVinci Resolve para correcciones primarias
La ventana del modulo de control de camaras puede configurarse para que se asemeje a la interfaz de correcciones primarias en un programa de etalonaje y edicion. Estas herramrientas integradas en la CAMERA son identicas a las del programa DaVinci Resolve. En consecuencia, si el usuario está familiarizzato con ellas,ouldra valerse de su experiencia en materia de etalonaje allearvaracabo produccionesendirecto.El panel de correccioncromatica se pueda expandir desde el controlador para acceder a la interfazcomplete. Esta incluye ajustes adiconiales, tales como circulos cromáticos y otros controlles, que brindan la posibididad de evaluar simultaneamente las luces, los tonos intermedios y las sombras en la imagen. Paracaebarde camara,utilice los botones en la parte superior de la ventana.  Si deseña acceder a las herramrientas para correcciones primarias de DaVinci Resolve, haga cltc sobre el botón situado en la parte Inferior, a la derecha del circulo cromático.  Circulos cromáticos para luces, tonos intermedios y sombras en el panel de etalonaje.Circulos cromáticos
Haga clc切入点 del circulo y arrastre el puntero
Nótese que no es preciso modifier el indicator de balance cromático. Los values debajo del circulo cambian, reflejando de este modo los ajustes realizados en cada canal.Mantenga preslonada la tecla de mayusculas y haga clc bajo del circulo
Esto permite situar el indicator en la posicjion indicada por el puntero del raton para realizar ajustes importantes con rapidez.Haga的比例百分之几
Se restablecen los valores originales sin reajustar el control general.Haga clc en el boton de realjuste, situado en la esquina superior derecha
Se restablecen todos los ajustes.Controles generales
Utilice los controlles generales debajo de cada circulo cromatico para ajustar las luces, los tonos intermedios y las sombras en cada canal YRGB. Mueva la rueda hacla izquierda  o la derecha para realizar ajustes.Para realizar ajustes medlante el control general:
Mueva la rueda hacla la Izquidera o la derecha
Esto permite oscurecer o aclarar el parametro seleccionado, respectivamente. Al ajustar un valor, el cambio se verá reflejado en los Campos correspondientes a cada canal, situados bajo del círculo cromático. Para ajustar solo la luminancia, mantenga presionada la tecla Alt o Command yuya el control hacía la izquierda o la derecha. Dado que el color y la luminancia se procesan individualmente, es possible lograr efectos importantes modificando solo el canal Y. Este ajuste referencia mejor si el control Mezclador de luminancia se mueve hacía la derecha. De lo contrario, el programa procesará los canales de color de forma normal. Por lo general, la mayoría de los coloristas utilizen el método YRGB, ya que permite Obtener un mayor control del balance de color sin afectar la luminancia general para lograr la aparência deseada más rápido.Contraste
Este control permite ajustar el intervalo entre los values mas claros y oscuros de una imagen. El efecto es similar al que se obtiene realizando ajustes opuestos mediante los controlles generales situados bajo de las options Luces y Sombras. El valor predeterminado es 50% .Saturación
Este control permite aumento o disminuir la cantidad de color en laImagen. El valor predeterminado es 50% .Matiz
Este control permite modifier los matices de la imagen recorriendo el perimetro del circulo cromatico. El valor predeterminado de 180 grados muestra la distribución original del matiz. Al incrementar o disminuir dicho valor, los matices rotaran en sentido horario o antihorario.Mezcla de luminancia
Las functions de etalonaje de las camaras Blackmagic estan basadas en las herramrientas para correcciones primarias de DaVinci Resolve. Este programa fue desarrollado a grado de los años 80 y es el más正常使用 en la produccion de largometrajes en Hollywood. El corrector cromático de la CAMERA incluye prestaciones sumamente útiles y creativas. Una de ellas es el método de procesamento YRGB. Al etalonar, es possible seleccionarrialquiera de los dos métodos de procesamento disponibles. Aquellos coloristas con mas experiencia recurren al modo YRGB, dato que ofrece un control mas preciseso sobre el color y permite ajustar los canales en forma independiente, logrado de esta manera una amplia variedad de optiones creativas. Cuando el mezclador de luminancia se mueve totalmente a la derecha, el programa emplee a modo RGB. Por el contrario, al moverlo totalmente a la izquierda, se utilizes el modo RGB. Internacional es possible seleccionarrialquierposiónintermedia para obtener una mezcla de ambos.  Arrastre los controlles hacía la izquierda o la derecha paraaabustar el contraste,la saturación,el matiz y la mezcla de luminancia. ¿Cuál es el mejor ajuste? Esto depende del usuario, ya que el procesó de etalonaje es totalmente creativo, y no hay estilos correctos o Incorrectos. El ajuste más apropiado estaré determinado por las preferencias del usuario y de lo que luzca bien según su criterio.Sincronización de ajustes
El mezclador transmite la seals de control a la CAMERA cuando también dispositivos estan connectados. Si se modifica un ajuste por error en laamera, la unidad de control del mezclador restablecer automatamente los values para tener la sincronizacion entre los equipos. Es possible emplear un dispositivo DaVinci Resolve Micro Panel para modifier los ajustes disponibles en cada controlador de CAMERA. Esto permite realizar Cambios con mayor rapidez y precision. Consulte el manual del modelo ATEM Mini para Obtener más informacion al respecto. NOTA: Al apagar una CAMERA conectada al modelos ATEM Mini mediante el puerto HDMIediaverseafctada la comunicacion con el resto de unidades.Recomendamos alimentarlascamarasmediante la redde suministroeléctricoydesconectarel cableHDMIantesdeapagarlas.Otros programas deedition
Para editor clips utilizing su programa preferido, pueda copiarlos a una unidad externa o RAID y bajo importarlos desdela aplicacion.De forma alternativa,utilice el puerto USB-Co un adaptador para el soporte de almacenimiento a fin de acceder a los ARCHivos directamente.Acceso a archivos en tarjetas SD y CFast 2.0
 Para editar el material audiovisual directamente desde la tarjeta SD o CFast,retirela de la camera y conectela un equipo informalico mediente un dispositivo de lecture y/o escritura para este tipo de unidas.Para importar clips desde una tarjeta SD o CFast 2.0:
1 Retire la tarjeta de la camarra. Conectela a un equipo Mac o Windows mediante un dispositivo de lecture y/o escritura para este tipo de unidades. 2 Haga dobleblick en el icono de la tarjeta para acceder a las carpetas que contienen los archivos Blackmagic RAW o QuickTime. Es possible que haya una mezcla de archivos segun el formatting selectionado para la grabacion, pero en todos se empiea la mesma nomenclatura. 3 Arrastre los ARCHivos desde la tarjeta al escritorio o aanotherdispositivo dealmacenamento, o acceda directamente a ellos desde el programa de edicion. 4 Antes de retiring la tarjeta SD o CFast del equipo informatico, es importante expulsarla desde elsystema operativo.De lo contrario,el material grabado podría sufir daños.Acceso a ARCHivos en unidades USB-C
Para Importar clips desde una unidad USB-C:
1 Desconecte la unidad de la camarra. 2 Conecte launidad a un equipo informativo Mac o Windows mediante el puerto USB-C. Las conexiones USB 3.0 son preferibles a las 2.0, ya que estas ultimas no son lo suficientemente rápidas como para permitir laedsión de imagenes en tiempo real. 3 Haga doble ticn en la unidad USB-C para acceder a la lista de carpetas o ARCHivos QuickTime que contienen las imagenes en formatting Blackmagic RAW. Es possible que haya una mezcla de archivos segun el formatting selectionado para la grabacion, pero en todos se empiea la mesma nomenclatura. 4 Arrastre los archivos desde la unidad al escritorio o aanother dispositivo de almacenamento, o acceda directamente a ellos desde el programa de edicion. 5 Antes de desconectar launidad USB-C, recomendamos expulsarla en forma segura mediante la función correspondiente.Final Cut Pro X
Para editor en Final Cut Pro X, es necessario create un projecto nuevo y selectionar la fecuencia deImagen y el formatting requeridos. En este exemple, se utilizes el formatting ProRes 422 HQ a 1080p24.  Ajustes del proyeco en Final Cut Pro X 1 Ejecute Final Cut Pro X. A continuación, en la barra de menús, haga click en File y bajo selección la option New Project. Se abrìa una ventana que muestra los ajustes del projecto. 2 Escriba un nombre para el proyecto y marque la casilla Custom. 3 Selegione las opciones 1080p HD, 1920x1080 y 24p. 4 En la option Audio and Render Properties, seleccione Stereo, 48 kHz, y Apple ProRes 422 HQ. 5 Haga cli en OK. Para importar los clips, haga click en la option File situada en la barra superior. A continuacion, seleccion Import y bajo Media. Elija los ARCHivos en la tarjeta de memoria. Arrestros to la linea de tiempo para editarlos.MediaComposer2018
Para editor en Media Composer, es necessario create un proyecto nuevo y seleccionar la fecuencia deImagen y el formatting requeridos. En este exemple, se utilizes el formatting 1080p24.  Nombre y'options del projet en Media Composer 1 Ejecute el programa para acceder a la ventana de seleccion de proyectos. 2 Haga cli en el boton New project y escribe un nombre en la ventana correspondiente. 3 En el menu de seleccion del formatting, elija la option HD 1080 y bajo 1080p/24. A continuacion, haga click en OK para create el projecto. 4 Haga doble cigc sobre el nombre del proyecto en la ventana Select project para abrirlo. 5 SeLECTIONA la option File, bajo Input y a continuacion Source browser para buscar los archivos que desea importar. 6 Seleccione la carpeta de destino en el menu desplegable y haga tic en Import. Una vez que los clips aparecen en la carpeta, es possible arrastrarlos a la linea de tiempo y comenzar a editarlos.Premiere Pro CC
Para editar clips en formatting ProRes 422 (HQ) con Premiere Pro CC, es Neededo create un proyecto nuevo y seleccionar la fecuencia de imagen y el formatting requeridos. En este exemple, se utilizes el formatting ProRes 422 (HQ) a 1080p25.  Nombre y'options del projet en Premiere Pro CC 1 Ejecute Premiere Pro CC. En la ventana de bienvenida, seleccione la option New Project. Se abrira una ventana que muestra los paramedros del projeeto. 2 Escribe el nombre del proyecto. Haga click en Browse y seleccione la carpeta sobre de眼看 guardarlo. A continuacion, haga click en OK en la ventana de bienvenida. 3 En la barra de menos, selección la.option File y bajo import. Elija los clips que dese a editor. Estos aparecerán en la ventana del projecto. 4 Arrastre el primer clip hacía el icono New Item en la parte inferior derecha de la ventsa. Se creara una nuevo secuencia con los mismos ajustes del clip. Arrastre los clips a la linea de tiempo para editarlos.Programa utiliser de la CAMERA
Actualización del programa en equipos Mac
Després de descargar el programa Blackmagic Camera Setup y descomprimir el archivo, haga click en la imagen de disco para ver los contentsidos. Ejecute el instalador y siga las instrucciones que aparecen en la pantalla. Una vez finaliza la instalacion, selecciona la option Aplicaciones y haya clicked en la carpeta Blackmagic Cameras, que contiene este manual, el programa utiliser y otros ARCHivos con informacion adicular. Asimismo, se incluye una aplicacion para desinstalar versiones anteriores del programa cuando sea requisite actualizarlo. Actualización del programa en equipos Windows
Después de descargar el programa utiliser de la CAMERA y descomprimir el archivo correspondiente, verá una carpeta denominada Blackmagic Camera Setup que contiene este manual y el instalador. Haga dobleblick en el instalador de la aplicación y siga las instrucciones que aparecen en la pantalla para completar el procedimiento. En Windows 10, haga click en el botón de inizio y selección la-option Todas las aplicaciones. Busque la carpeta Blackmagic Design en la lista. Deqse allipoda ejectar el programa. En Windows 8.1, hagablick en la flecha hacia abajo que aparece en la pantalla de inicio para ver la carpeta Blackmagic. Dees alif podra executar el programa.Actualización de la-camera
Després de instalar la ultima version del programa utiliser en el equipo informatico, conéctelo a la CAMERA mediante un cable USB-C. El puerto USB-C se encontrar en el panel izquierdo de laupon. Basta con retiring la cubierta de goma para acceder a la conexión. Ejecute el programa正常使用 y siga las instrucciones que aparecen en la pantalla paraactualizar la CAMERA. Conviene subrayar que, al低位 a cabo este procedimiento, se eliminaran las tablas de conversion almacenadas en la unidad y los grupos de ajustes personalizados. En tal sentido, recomendamos exportarlos a una tarjeta de memoria, a fin de respaldarlos antes de低位 a cabo laactualizacion. Una vez finalizo el procedimiento, es possible importarlos可以更好mente.Uso de la empuñadura para baterías
Este accesorio consiste en una manija horizontal que permite extensions la capacité de grabacion. Recomendamos instalarla en este momento, antes de continuar. La empuñadura Blackmagic Pocket Camera Battery Pro Grip ha sido disénada para el Modelo Pocket Cinema Camera 6K Pro y cuenta con capacité para dos baterías NP-F570. Es possible alimentar la CAMERA mediante dichas baterías jusqu'àn con la batería interna. La empuñadura Blackmagic Pocket Camera Battery Pro Grip ha sido diseñada para los modelos Pocket Cinema Camera 6K Pro y 6K G2 y cuenta con capacité para dos baterías NP-F570. Es possible alimentar las cármas mediante dichas baterías jusqu'àn con la batería interna. La empuñadura Blackmagic Pocket Camera Battery Grip ha sido diseñada para el modelo Blackmagic Pocket Camera 4K. Consiste en una manija horizontal que permitte agarrar la CAMERA y*cuenta con capacidad para dos baterías NP-F570 série L que permiten grabar de manera continua durante más de dos horas.Instalacion de la empuñadura Blackmagic Pocket Camera Battery Pro
Antes de instalar la empuñadura, apague la CAMERA y desconecte cualquier fuente de alimentación externa. Para poder grabar durante más tiempo, recomendamos conservar la batería interna bajo el control de la CAMERA al instalar la empuñadura, a fin de alimentar la unidad mediante las tres baterías.  Afloje el tornillo que sujeta la subpoena tapa en la parte inferior de la CAMERA, cerca del compartmentimiento para la batería.  Quite la tapa para acceder a los contactos electricos que suministran energia desde la empunadura.  Para guardar la tapa, insertela en el hueco ubicado en la parte superior de la empunadura y sujete la apretando el tornillo.  Empujé la empañadura con suavidad hacer la parte inferior de la CAMERA. El tornillo de 0.25 pulgadas en la parte superior de la empañadura debe estar alineado con el orificio roscado en la base de la CAMERA. Los pernos de seguridad aodos del tornillo ayudan amantener la alineación correcta.  Gire la rueda en la parte frontal de la empuñadura hacía la derecha, a fin de aplter el tornillo y sujetarla a la camara.Para instalar la empuñadura:
Antes de instalar la empulñadura, apague la lármá y desconecterialquier fuente de alimentación externa.  Abra el compartmento para la bateria de la camaray retire la bateria LP-E6.  Deslice la pestaña que se encuentra cerca de la lisagra de la tapa y quite la tapa.  Para guardar la tapa en un lugar seguro, sujetela al hueco situado en la parte inferior de la empuñadura.  Cierre la tapa del compartimento, de forma que quede nivelada con la parte inferior de la empuñadura.  Inserte la parte de la empuñadura cuya forma se asemeja a la bateria en el compartmento correspondiente en la lármá. El tornillo de 0.25 pulgadas en la parte superior de la empuñadura debe estar allnado con el orificio roscado en la base de la lármá. Asimismo, un taco alazo del tornillo ayud a mantenerlo en su lugar.  Gire la rueda en la parte frontal de la empunadura hacia la derecha a fin de apretar el tornillo y sujetarla a la-camera.Inserción de baterías en la empuñadura
 Gire la pestaña de bloqueo en el extremo de la empuñadura hacía la Izquierda para acceder a la base para baterías y retirella. Este paso se pueda realizar tanto antes como afterwards de haber instalado la empuñadura en la camara.  Cologne dos baterias NP-F570 en la base, asegurandose de que se encontrarren orientadas correctamente, y deslicelas en sentido opuesto. La pestaña situada entre ambas se alzará para mantenerlas en su lugar. Para extraer las baterías, presione dicha pestaña y deslice una hacía la另一边.  Inserte la base en la empuñadura y gire la pestaña de bloqueo hacer la derecha. Cabe destacar que, si la CAMERA está-connectada a una fuente de alimentación externa, la grabación no se detendra en el momento de embariar las baterías en la empuñadura.  Gire la pestaña en el extremo de la empuñadura hacia la derecha para sujetar la base de las baterías. SUGERENCA: Cuando la empanadura está instalada y Tiene dos baterias insertadas, el indicator en la esquina superior derecha de la pantalla de la camera做不到 dos iconos que permiten ver el nivel de carga de cada una. En el caso de los modelos Blackmagic Pocket Cinema Camera 6K Pro y 6K G2, aparecerán tres iconos en la pantalla. Consulte el apartado Alimentacion para Obtener mas informacion al respecto.Información para desarrolladores
Blackmagic Bluetooth Camera Control
Blackmagic cameras with Bluetooth LE implement a variety of features and commands that allow users to control their cameras wirelessly. Developers have full access to these features for their custom applications. The following services and characteristics describe the full range of communication options that are available to the developer. Service: Device Information Service UUID:180A Characteristics Camera Manufacturer UUID:2A29 Read the name of the manufacturer (always "Blackmagic Design"). Camera Model UUID:2A24 Read the name of the camera model ("Pocket Cinema Camera 6K" or "Pocket Cinema Camera 4K"). Service: Blackmagic Camera Service UUID: 291D567A-6D75-11E6-8B77-86F30CA893D3Characteristics
Outgoing Camera Control (encrypted)
UUID: 5DD3465F-1AEE-4299-8493-D2ECA2F8E1BBSend Camera Control messages
These messages are identical to those described in the Blackmagic SDI Camera Control Protocol section below. Please read that section for a list of supported messages and required formatting information. For an example of how packets are structured, please see the 'example protocol packets' section in this document.Incoming Camera Control (encrypted)
UUID:B864E140-76AO-416A-BF30-5876504537D9 Request notifications for this characteristic to receive Camera Control messages from the camera. These messages are identical to those described in the Blackmagic SDI Camera Control Protocol section below. Please read that section for a list of supported messages and required formatting information.Timecode (encrypted)
UUID:6D8F2110-86F1-41BF-9AFB-451D87E976C8 Request notifications for this characteristic to receive timecode updates. Timecode (HH:MM:SS:mm) is represented by a 32-bit BCD number: (eg. 09:12:53:10 = 0x09125310)Camera Status (encrypted)
UUID:7FE8691D-95DC-4FC5-8ABD-CA74339B51B9 Request notifications for this characteristic to receive camera status updates. The camera status is represented by flags contained in an 8-bit integer: None = 0× 00 Camera Power On = 0x01 Connected = 0× 02 Palred = 0× 04 Versions Verflied = 0× 08 Initial Payload Received = 0× 10 Camera Ready = 0× 20 Send a value of 0x00 to power a connected camera off. Send a value of 0x01 to power a connected camera on.Device Name
UUID:FFACOC52-C9FB-41A0-B063-CC76282EB89C Send a device name to the camera (max. 32 characters). The camera will display this name in the Bluetooth Setup Menu.Protocol Version
UUID: 8F1FD018-B508-456F-8F82-3D392BEE2706 Read this value to determine the camera's supported CCU protocol version. NOTE Encrypted characteristics can only be used once a device has successfully bonded or paired with the Blackmagic Camera. Once a connection has been established, any attempt to write to an encrypted characteristic will initiate bonding. For example, writing a 'Camera Power On' (0x01) message to the Camera Status characteristic. Once bonding is initiated, the camera will display a 6-digit pin in the Bluetooth Setup Menu. Enter this pin on your device to establish an encrypted connection. The device will now be able to read, write and receive notifications from encrypted characteristics.Blackmagic SDI and Bluetooth Camera Control Protocol
Version 1.5
If you are a software developer you can use the Blackmagic SDI and Bluetooth Camera Control Protocol to construct devices that integrate with our products. Here at Blackmagic Design, our approach is to open up our protocols and we eagerly look forward to seeing what you come up with!Overview
This document describes an extensible protocol for sending a unidirectional stream of small control messages embedded in the non-active picture region of a digital video stream. The video stream containing the protocol stream may be broadcast to a number of devices. Device addressing is used to allow the sender to specify which device each message is directed to.Assumptions
Alignment and padding constraints are explicitly described in the protocol document. Bit fields are packed from LSB first. Message groups, individual messages and command headers are defined as, and can be assumed to be, 32 bit aligned.Blanking Encoding
A message group is encoded into a SMPTE 291M packet with DID/SDID x51/x53 in the active region of VANC line 16.Message Grouping
Up to 32 messages may be concatenated and transmitted in one blanking packet up to a maximum of 255 bytes payload. Under most circumstances, this should allow all messages to be sent with a maximum of one frame latency. If the transmitting device queues more bytes of message packets than can be sent in a single frame, it should use heuristics to determine which packets to prioritize and send immediately. Lower priority messages can be delayed to later frames, or dropped entirely as appropriate.Abstract Message Packet Format
Every message packet consists of a three byte header followed by an optional variable length data block. The maximum packet size is 64 bytes.| Destination device (uint8) | Device addresses are represented as an 8 bit unsigned integer. Individual devices are numbered 0 through 254 with the value 255 reserved to indicate a broadcast message to all devices. |
| Command length (uint8) | The command length is an 8 bit unsigned integer which specifies the length of the included command data. The length does NOT include the length of the header or any trailing padding bytes. |
| Command id (uint8) | The command Id is an 8 bit unsigned integer which indicates the message type being sent. Receiving devices should ignore any commands that they do not understand. Commands 0 through 127 are reserved for commands that apply to multiple types of devices. Commands 128 through 255 are device specific. |
| Reserved (uint8) | This byte is reserved for alignment and expansion purposes. It should be set to zero. |
| Command data (uint8[]) | The command data may contain between 0 and 60 bytes of data. The format of the data section is defined by the command itself. |
| Padding (uint8[]) | Messages must be padded up to a 32 bit boundary with 0x0 bytes. Any padding bytes are NOT included in the command length. |
Defined Commands
Command 0: change configuration| Category (uint8) | The category number specifies one of up to 256 configuration categories available on the device. |
| Parameter (uint8) | The parameter number specifies one of 256 potential configuration parameters available on the device. Parameters 0 through 127 are device specific parameters. Parameters 128 though 255 are reserved for parameters that apply to multiple types of devices. |
| Data type (uint8) | The data type specifies the type of the remaining data. The packet length is used to determine the number of elements in the message. Each message must contain an integral number of data elements. |
| Currently defined values are: | |
| 0: void / boolean | A void value is represented as a boolean array of length zero. The data field is a 8 bit value with 0 meaning false and all other values meaning true. |
| 1: signed byte Data elements are signed bytes | |
| 2: signed 16 bit integer Data elements are signed 16 bit values | |
| 3: signed 32 bit integer Data elements are signed 32 bit values | |
| 4: signed 64 bit integer Data elements are signed 64 bit values | |
| 128: signed 5.11 fixed point | Data elements are signed 16 bit integers representing a real number with 5 bits for the integer component and 11 bits for the fractional component. The fixed point representation is equal to the real value multiplied by 2^11. The representable range is from -16.0 to 15.9995 (15 + 2047/2048). |
| Operation type (uint8) | The operation type specifies what action to perform on the specified parameter. Currently defined values are: |
| 0: assign value | The supplied values are assigned to the specified parameter. Each element will be clamped according to its valid range. A void parameter may only be 'assigned' an empty list of boolean type. This operation will trigger the action associated with that parameter. A boolean value may be assigned the value zero for false, and any other value for true. |
| 1: offset / toggle value | Each value specifies signed offsets of the same type to be added to the current parameter values. The resulting parameter value will be clamped according to their valid range. It is not valid to apply an offset to a void value. Applying any offset other than zero to a boolean value will invert that value. |
| Data (void) | The data field is 0 or more bytes as determined by the data type and number of elements. |
| Group | ID | Parameter | Type | Index | Minimum | Maximum | Interpretation |
| Lens | 0.0 | Focus | fixed16 | - | 0.0 | 1.0 | 0.0 = near, 1.0 = far |
| 0.1 | Instantaneous autofocus | void | - | - | - | trigger instantaneous autofocus | |
| 0.2 | Aperture (f-stop) | fixed16 | - | -1.0 | 16.0 | Aperture Value (where fnumber = sqrt(2^AV)) | |
| 0.3 | Aperture (normalised) | fixed16 | - | 0.0 | 1.0 | 0.0 = smallest, 1.0 = largest | |
| 0.4 | Aperture (ordinal) | int16 | - | 0 | n | Steps through available aperture values from minimum (0) to maximum (n) | |
| 0.5 | Instantaneous auto aperture | void | - | - | - | trigger instantaneous auto aperture | |
| 0.6 | Optical image stabilisation | boolean | - | - | - | true = enabled, false = disabled | |
| 0.7 | Set absolute zoom (mm) | int16 | - | 0 | max | Move to specified focal length in mm, from minimum (0) to maximum (max) | |
| 0.8 | Set absolute zoom (normalised) | fixed16 | - | 0.0 | 1.0 | Move to specified focal length: 0.0 = wide, 1.0 = tele | |
| 0.9 | Set continuous zoom (speed) | fixed16 | - | -1.0 | +1.0 | Start/stop zooming at specified rate: -1.0 = zoom wider fast, 0.0 = stop, +1 = zoom tele fast | |
| Video | 1.0 Video mode Int8 | [0] = frame rate -- | fps as integer(eg 24, 25, 30, 50, 60) | ||||
| [1] = M-rate -- 0 = regular, 1 = M-rate | |||||||
| [2] = dimensions -- | 0 = NTSC, 1 = PAL, 2 = 720,3 = 1080, 4 = 2kDCI, 5 = 2k16:9,6 = UHD, 7 = 3k Anamorphic,8 = 4k DCI, 9 = 4k 16:9,10 = 4.6k 2.4:1, 11 = 4.6k | ||||||
| [3] = interlaced -- | 0 = progressive,1 = interlaced | ||||||
| [4] = Color space | -- 0 = YUV | ||||||
| 1.1 | Gain (up to Camera 4.9) | Int8 | 1 | 128 | 1x, 2x, 4x, 8x, 16x, 32x, 64x, 128x gain | ||
| 1.2 | Manual White Balance | int16 | [0] = color temp | 2500 | 10000 | Color temperature in K | |
| int16 | [1] = tint | -50 | 50 | tint | |||
| 1.3 | Set auto WB | void | - | - | - | Calculate and set auto white balance | |
| 1.4 | Restore auto WB | void | - | - | - | Use latest auto white balance setting | |
| 1.5 | Exposure (us) | Int32 | 1 | 42000 | time in us | ||
| 1.6 | Exposure (ordinal) | Int16 | - | 0 | n | Steps through availableexposure values from minimum(0) to maximum (n) | |
| 1.7 | Dynamic Range Mode | Int8 enum | - | 0 | 2 | 0 = film, 1 = video,2 = extended video | |
| 1.8 | Video sharpening level | Int8 enum | - | 0 | 3 | 0 = off, 1 = low, 2 = medium,3 = high | |
| 1.9 | Recording format | int16 | [0] = file frame rate | -- | fps as integer(eg 24, 25, 30, 50, 60, 120) | ||
| [1] = sensor frame rate | - | - | fps as integer, valid whensensor-off-speed set (eg 24,25, 30, 33, 48, 50, 60, 120),no change will be performed ifthis value is set to 0 | ||||
| [2] = frame width | -- in pixels | ||||||
| [3] = frame height | -- in pixels | ||||||
| [4] = flags | -- [0] = file-M-rate | ||||||
| - | - | [1] = sensor-M-rate, validwhen sensor-off-speed-set | |||||
| -- [2] = sensor-off-speed | |||||||
| -- [3] = interlaced | |||||||
| -- [4] = windowed mode | |||||||
| 1.10 | Set auto exposure mode | int8 | - | 0 | 4 | 0 = Manual Trigger, 1 = Iris,2 = Shutter, 3 = Iris + Shutter,4 = Shutter + Iris | |
| 1.11 | Shutter angle | int32 | - | 100 | 36000 | Shutter angle in degrees,multiplied by 100 | |
| 1.12 | Shutter speed | int32 | - | Currentsensorframe rate | 5000 | Shutter speed value as a fraction of 1, so 50 for 1/50th of a second | |
| 1.13 | Gain | int8 | - | -128 | 127 | Gain in decibel (dB) | |
| 1.14 | ISO | int32 | - | 0 | 2147483647 | ISO value | |
| 1.15 | Display LUT | int8 | [0] = selected LUT | -- | 0 = None, 1 = Custom,2 = film to video,3 = film to extended video | ||
| [1] = enabled or not | -- 0 = Not enabled, 1 = Enabled | ||||||
| 1.16 | ND Filter | fixed16 | [0] = stops | 0.0 | 16.0 | f-stop of ND filter to use | |
| Audio | 2.1 | Headphone level | fixed16 | - | 0.1 | 1.0 | 0.0 = minimum, 1.0 = maximum |
| 2.2 | Headphone program mix | fixed16 | - | 0.1 | 1.0 | 0.0 = minimum, 1.0 = maximum | |
| 2.3 | Speaker level | fixed16 | - | 0.1 | 1.0 | 0.0 = minimum, 1.0 = maximum | |
| 2.4 | Input type | int8 | - | 0 | 3 | 0 = internal mic,1 = line level input,2 = low mic level input,3 = high mic level input | |
| 2.5 | Input levels | fixed16 | [0] ch0 | 0.0 | 1.0 | 0.0 = minimum, 1.0 = maximum | |
| [1] ch1 | 0.0 | 1.0 | 0.0 = minimum, 1.0 = maximum | ||||
| 2.6 | Phantom power | boolean | - | - | - | true = powered,false = not powered | |
| Output | 3.0 | Overlay enables | uint16bit field | -- - | bit flags:[0] = display status,[1] = display frame guidesSome cameras don't allow separate control of frameguides and status overlays. | ||
| 3.1 | Frame guides style (Camera3.x) | int8 | -0 8 | 0 = HDTV, 1 = 4:3, 2 = 2:4:1,3 = 2.39:1, 4 = 2.35:1,5 = 1.85:1, 6 = thirds | |||
| 3.2 | Frame guides opacity(Camera 3.x) | fixed16 | - | 0.1 | 1.0 | 0.0 = transparent, 1.0 = opaque | |
| 3.3 | Overlays(replaces .1 and .2above fromCameras 4.0) | int8 | [0] = frame guidesstyle | - | - | 0 = off, 1 = 2.4:1, 2 = 2.39:1,3 = 2.35:1, 4 = 1.85:1, 5 = 16:9,6 = 14:9, 7 = 4:3, 8 = 2:1,9 = 4:5, 10 = 1:1 | |
| [1] = frame guide opacity | 0 | 100 0 = transparent, 100 = opaque | |||||
| [2] = safe area percentage | 0 | 100 | percentage of full frameused by safe area guide(0 means off) | ||||
| [3] = grid style | - | - | bit flags:[0] = display thirds,[1] = display cross hairs,[2] = display center dot,[3] = display horizon | ||||
| Display | 4.0 | Brightness | fixed16 | - | 0.0 | 1.0 | 0.0 = minimum, 1.0 = maximum |
| 4.1 Exposure and focus tools | Int16bit field | 0x1 = zebra,0x2 = focus assist,0x4 = false color | - | - | - | 0 = disable, 1 = enable | |
| 4.2 | Zebra level | fixed16 | - | 0.0 | 1.0 | 0.0 = minimum, 1.0 = maximum | |
| 4.3 | Peaking level | fixed16 | - | 0.0 | 1.0 | 0.0 = minimum, 1.0 = maximum | |
| 4.4 | Color bar enable | int8 | - | 0 | 30 | 0 = disable bars,1-30 = enable bars with timeout(seconds) | |
| 4.5 | Focus Assist | Int8 | [0] = focus assist method | - | - | 0 = Peak,1 = Colored lines | |
| [1] = focus line color | - | - | 0 = Red,1 = Green,2 = Blue,3 = White,4 = Black | ||||
| 4.6 | Program return feed enable | Int8 | - | 0 | 30 | 0 = disable, 1-30 = enable withtimeout (seconds) | |
| Tally | 5.0 | Tally brightness | fixed16 | - | 0.0 | 1.0 | Sets the tally front and tally rear brightness to the same level. 0.0 = minimum, 1.0 = maximum |
| 5.1 | Front tally brightness | fixed16 | - | 0.0 | 1.0 | Sets the tally front brightness. 0.0 = minimum, 1.0 = maximum | |
| 5.2 | Rear tally brightness | fixed16 | - | 0.0 | 1.0 | Sets the tally rear brightness. 0.0 = minimum, 1.0 = maximum Tally rear brightness cannot be turned off | |
| Reference | 6.0 | Source | int8 enum | - | 0 | 2 | 0 = internal, 1 = program, 2 = external |
| 6.1 | Offset | int32 | - | - | - | +/- offset in pixels | |
| Confi-guration | 7.0 Real Time Clock | Int32 | [0] time | - | - | BCD - HHMMSSFF (UCT) | |
| [1] date | - | - | BCD - YYYYMMDD | ||||
| 7.1 | System language | string | [0-1] | - | - | ISO-639-1 two character language code | |
| 7.2 | Timezone | int32 | - | - | - | Minutes offset from UTC | |
| 7.3 Location | int64 | [0] latitude | - | - | BCD - sDDDdddddddddddd where s is the sign: 0 = north (+), 1 = south (-); DD degrees, ddddddddddd decimal degrees | ||
| [1] longitude | - | - | BCD - sDDDdddddddddddd where s is the sign: 0 = west (-), 1 = east (+); DDD degrees, ddddddddddd decimal degrees | ||||
| Color Correction | 8.0 Lift Adjust fixed16 | [0] red -2.0 2.0 default | 0.0 | ||||
| [1] green -2.0 2.0 default | 0.0 | ||||||
| [2] blue -2.0 2.0 default | 0.0 | ||||||
| [3] luma | -2.0 | 2.0 | default 0.0 | ||||
| 8.1 | Gamma Adjust | fixed16 | [0] red -4.0 | 4.0 default 0.0 | |||
| [1] green -4.0 | 4.0 default 0.0 | ||||||
| [2] blue -4.0 | 4.0 default 0.0 | ||||||
| [3] luma | -4.0 | 4.0 default 0.0 | |||||
| 8.2 | Gain Adjust | fixed16 | [0] red 0.0 | 16.0 | default 1.0 | ||
| [1] green 0.0 | 16.0 | default 1.0 | |||||
| [2] blue 0.0 | 16.0 | default 1.0 | |||||
| [3] luma | 0.0 | 16.0 | default 1.0 | ||||
| 8.3 Offset Adjust | fixed16 | [0] red -8.0 | 8.0 | default 0.0 | |||
| [1] green -8.0 | 8.0 | default 0.0 | |||||
| [2] blue -8.0 | 8.0 | default 0.0 | |||||
| [3] luma | -8.0 | 8.0 | default 0.0 | ||||
| 8.4 | Contrast Adjust | fixed16 | [0] pivot | 0.0 | 1.0 | default 0.5 | |
| [1] adj | 0.0 | 2.0 | default 1.0 | ||||
| 8.5 | Luma mix | fixed16 | - | 0.0 | 1.0 | default 1.0 | |
| 8.6 Color Adjust | fixed16 | [0] hue | -1.0 | 1.0 | default 0.0 | ||
| [1] sat | 0.0 | 2.0 | default 1.0 | ||||
| 8.7 | Correction Reset Default | void | - | - | - | reset to defaults | |
| Media | 10.0 | Codec int8 enum | [0] = basic codec -- | 0 = Cinema/DNG, 1 = DNxHD, 2 = ProRes, 3 = Blackmagic RAW | |||
| [1] = code variant | - | - | Cinema/DNG: 0 = uncompressed, 1 = lossy 3:1, 2 = lossy 4:1 | ||||
| - | - | ProRes: 0 = HQ, 1 = 422, 2 = LT, 3 = Proxy, 4 = 444, 5 = 444XQ | |||||
| - | - | Blackmagic RAW: 0 = Q0, 1 = Q5, 2 = 3:1, 3 = 5:1, 4 = 8:1, 5 = 12:1 | |||||
| 10.1 | Transport mode | int8 | [0] = mode | -- | 0 = Preview, 1 = Play, 2 = Record | ||
| [1] = speed | -- | -ve = multiple speeds backwards, 0 = pause, +ve = multiple speeds forwards | |||||
| [2] = flags | -- | 1<<0 = loop, 1<<1 = play all, 1<<5 = disk1 active, 1<<6 = disk2 active, 1<<7 = time-lapse recording | |||||
| [3] = slot 1 storage medium | - | - | 0 = CFast card, 1 = SD Card, 2 = SSD Recorder, 3 = USB | ||||
| [4] = slot 2 storage medium | - | - | 0 = CFast card, 1 = SD Card, 2 = SSD Recorder, 3 = USB | ||||
| 10.2 | Playback Control | int8 enum | [0] = clip | - | - | 0 = Previous, 1 = Next | |
| 10.3 | Still Capture | void | - | - | - | Capture | |
| PTZ Control | 11.0 | Pan/Tilt Velocity | fixed16 | [0] = pan velocity -1.0 | 1.0 | -1.0 = full speed left, 1.0 = full speed right | |
| [1] = tilt velocity | -1.0 | 1.0 | -1.0 = full speed down, 1.0 = full speed up | ||||
| 11.1 | Memory Preset | int8 enum | [0] = preset command | - | - | 0 = reset, 1 = store location, 2 = recall location | |
| int8 | [1] = preset slot | 0.5- | |||||
| Metadata | 12.0 | Reel | int16 | [0] = reel | 0 | 999 | - |
| 12.1 Scene Tags | signedbyte | [0] = scene tags - | - | -1 = None0 = WS1 = CU2 = MS3 = BCU4 = MCU5 = ECU | |||
| [1] = Interior /exterior | - | - | - | 0 = Exterior1 = Interior | |||
| [2] = day / night | -- | 0 = Night1 = Day | |||||
| 12.2 | Scene | string | [0-4] = scene | - | - | - | |
| 12.3 | Take | signedbyte | [0] = take number | 1 | 99 | - | |
| [1] = take tags | -- | 1 = None0 = PU1 = VFX2 = SER | |||||
| 12.4 | Good Take | void | [0] = good take | - | - | - | |
| 12.5 | Camera ID | string | [0-28] = ID | - | - | - | |
| 12.6 | Camera Operator | string | [0-28] = operator | - | - | - | |
| 12.7 | Director | string | [0-27] = director | - | - | - | |
| 12.8 | Project Name | string | [0-28] = project | - | - | - | |
| 12.9 | Lens Type | string | [0-55] = type | - | - | - | |
| 12.10 | Lens Iris | string | [0-19] = Iris | - | - | - | |
| 12.11 | Lens Focal Length | string | [0-29] = focal length | - | - | - | |
| 12.12 | Lens Distance | string | [0-49] = distance | - | - | - | |
| 12.13 | Lens Filter | string | [0-29] = filter | - | - | - | |
| 12.14 | Slate Mode | signedbyte | [0] = type | -- | 0 = Recording1 = Playback | ||
| 12.15 | Slate Target | string | [0-31] = name | - | - | - | |
| Operation | Packet Length Byte | ||||||||||||||||
| 0 | 1 | 2 | 3 | 4 | 5 | 6 | 7 | 8 | 9 | 10 | 11 | 12 | 13 | 14 | 15 | ||
| header command data | |||||||||||||||||
| destination | length | command | reserved | category | parameter | type | operation | ||||||||||
| trigger instantaneous auto focus on camera 4 | 844000100 | ||||||||||||||||
| turn on OIS on all cameras 12 | 25550006001000 | ||||||||||||||||
| set exposure to 10 ms on camera 4 (10 ms = 10000 us = 0x00002710) | 12 | 4 | 8 | 0 | 0 | 1 | 5 | 3 | 0 | 0x10 | 0x27 | 0x00 | 0x00 | ||||
| add 15% to zebra level (15 % = 0.15 f = 0x0133 fp) | 12 | 4 | 6 | 0 | 0 | 4 | 2 | 128 | 1 | 0x33 | 0x01 | 0 | 0 | ||||
| select 1080p 23.98 mode on all cameras | 16 | 255 | 9 | 0 | 0 | 1 | 0 | 1 | 0 | 24 | 1 | 3 | 0 | 0 | 0 | 0 | 0 |
| subtract 0.3 from gamma adjust for green & blue (-0.3 ^=0xff9a fp) | 16 | 4 | 12 | 0 | 0 | 8 | 1 | 128 | 1 | 0 | 0 | 0x9a | 0xffd | 0x9a | 0xffd | 0 | 0 |
| all operations combined | 76 | 440001002555000600 | |||||||||||||||
| 1 | 0 | 0 | 0 | 4 | 8 | 0 | 0 | 1 | 5 | 3 | 0 | 0x10 | 0x27 | 0x00 | 0x00 | ||
| 4 | 6 | 0 | 0 | 4 | 2 | 128 | 1 | 0x33 | 0x01 | 0 | 0 | 255 | 9 | 0 | 0 | ||
| 1 | 0 | 1 | 0 | 24 | 1 | 3 | 0 | 0 | 0 | 0 | 0 | 4 | 12 | 0 | 0 | ||
| 8 | 1 | 128 | 1 | 0 | 0 | 0x9a | 0xffd | 0x9a | 0xffd | 0 | 0 | ||||||
Ayuda
Visite nuestra páginá de soporte técnico a fin de Obtener可以帮助你在 local de apoyo mais recente para los produits descritos en este manual.Págrina de soporte técnico
Las versiones más recientes de este manual, losDistinctos programas Mentionados y el material de apoyo se incluyen disponibles en nuestra páginade soporte技术和.comoponerse encontactoconBlackmagic Design
Si no enquiryra la ayuda que necesita, Solicite asistencia mediate el boton Enviar correo electronomico, situado en la parte inferior de nuestra pagina de soporte专业技术. De manera alternatively, haga clic en el boton Soporte专业技术 local para acceder al numero Telefonico del centro de atencion mas cercano.como comprar la version del software instalado
Para comprar la version del programa utilisé instalado en el equipo informatico, selección la。2。3opsis About Blackmagic Camera Setup. - En macOS, execute el programa desde la carpeta de aplicaciones. Seleectione el menu About Blackmagic Camera Setup en la barra superior de la ventana para ver el numero de la version. - En Windows, execute el programa Blackmagic Camera Setup能做到 en el icono situado en el menu Inicio. Acceda al menu Apuda y seleccionla option About Blackmagic Camera Setup para ver el numero de version.como Obtener lasactualizacionesmás recientes
Después de verificar la version del programa instalado, visite el centro de soporte técnico de Blackmagic Design para comprobar si hayactualizaciones disponibles. Avecgeneralmente es recomendable instalar las versiones mas recientes, evite realizar modificaciones al sistemas operativo interno de la CAMERA si se encuesta en medio de un proyecto importante.Normativas
Desecho de equilos electrlicos y electrónlicos en la Unión Europea:
Este*simbolo indica que el dispositivo no debe desecharse junto conothers residuos domesticos.A tales efectos,es preciseo llvarlo a un centro de recoleccion para su posterior reciclaje. Este aplica a preservar los recursos naturales y garantiza queDICHO procedimiento se realice protegiendo la salute y el medioambiente.Para Obtener mas informacion al respecto,comuniquese con el distribuidor o el centro de reciclaje mas cercano.  Según las pruebas realizadas, este equipo cumple con los limites indicados para dispositivos digitales Clase A, en conformidad con la sección 15 de las normas existables por la Comisión Federal de Comunicaciones. Este permite proportionsar una protección razonable contra interferencias nocivas al operar el dispositivo en un entorno comercial. Este equipo usa, genera y puede irradiar energia de radiofrecuencia, y si no se instala o utilizes de acuerdo con el manual de instrucciones,edia occasionar interferencias nocivas para las comunicaciones radiales. El funcionaamente de este equipo en una zona residencial podra occasionar interferencias nocivas, en cuio caso el usuario deben SOLUTIONAR dicho inveniente por cuesta propia. El funciona de este equipo está sujeto a las siguientes conditiones: 1 El dispositivo no debe Causei interferencias nocivas. 2 El dispositivo debe admitsirrialquier interferencia recibida, incluidas aquellas que pudieran provoc un functionamento incorrecto del mesmo.  R-R-BMD-201810001 R-R-BMD-20220218001 R-R-BMD-201904002 Declaración ISED (Canada)
Esta webcam cumple con los estandares canadienses para dispositivos digitales Clase A. Cualquiermericano uso indebido del本身就是 acarrear un incumplimiento de dichas normas. Las conexiones a interfaces HDMI deben realizarse mediante cables blindados. Este equipo cumple con las normas descritas anteriormente al emplearse en entornos commerciales. Notese que podra causar interferencia radial si se utilizes en el ambito domestico.Bluetooth
Este dispositivo dispone de Tecnología Bluetooth. Incluye modulo transmisor. Identificacion FCC: QOQBGM113 Este dispositivo cumple con los limites de exposión a la radiación establecidos para un entorno no controlado. Incluye modulo transistor. Identificacion IC: 5123A-BGM113 Incluye modulo transmisor certificado en Mexico. IFT: RCPSIBG20-2560. Este dispositivo cumple con los limites de exposión a las ondas electromagnéticas establescidos por el gobernio de Canadá. Como tal, no requires una licencia y está exente de las evaluaciones habituales企业提供 para determinar la absorcción españica de tales ondas, según lo dispuesto en la version 5 de las espécificaciones RSS-102. Certificado en Japón.Número de certificación: 209-J00204. Este dispositivo contiene componentes radioeléctricos certificados según las normas tínicas existecidas en la Ley de Radiocomunicación. Este modulo ha sido certifyado en Corea del Sur. Nstreamo de certificacion; MSIP-CRM-BGT-BGM113 Blackmagic Design declares por este medio que el uso de la banda ISM 2.4 GHz para la transmisión de senas mediante este Modelo cumple con las normas de la Directiva 2014/53/EU. Envie un correo electronomico a compliance@blackmagicdesign.com para solicitar el dato completo de la declaracion de conformidad.  Certificado en Sudafrika por ICASA, número de aprobacion TA-2021/2072 (Blackmagic Pocket Cinema Camera 6K Pro), TA-2019/1517 (Blackmagic Pocket Cinema Camera 6K) y TA-2019/1516 (Blackmagic Pocket Cinema Camera 4K).  Modulo transistor de Bluetooth fabricado por Silicon Labs, modelos número BGM113, certified en México (NOM).Seguidad
Los modelos Blackmagic Pocket Cinema Camera puede utiliser en climas tropicales a una temperatura maxima de 40^ . La reparación de los componentes internos del equipo no debe ser技术水平a cabo por el usuario. Comuniquese con nuestro centro de atencion mas cercano para Obtener informacion al respecto. Aconsejamos resguardar la CAMERA a la sombra en exteriores para prevenir la exposión del equipo o la batería de litio a la luz solar durante periodos prolongados. Mantenga las baterías de litio alejadas de cualquier fuente de calor.  Evite utilizes el adaptor incluido a una alta mayor de 2000 metros.Declaración del Estado de California
Las partes plácicas de este producto pueda CONTENER trazas de compuestos químicos, tales como polibromobifenilos (PBB), que el Estado de California reconoce como causantes de cancer, anomalías congenitas o daños reproductivos. Consulte el situio www.P65Warningsca.gov para Obtener mas informacion al respecto.Garantía
Garantía limitada
Blackmagic Design garantiza que el producto adquirido no presentará defectos en los materiales o en su fabricación por un periodo de 12 días a partir de la Fecha de compra. Si el producto的结果 defectuoso durante el periodo de validez de la garantía, Blackmagic Designouldaroptarreemplazarlo o repararlo sin cargo algo nporconcepto de piezas y/o mano deobra. Para acceder al service proportionsado de acuerdo con los关键时刻 de esta garantia, el Cliente debar da viso del defeto a Blackmagic Design antes del vencimiento del periodo de garantía y encargarse de los arreglos necessarios para la prestacion del mesmo. El Cliente sera responsable del empaque y el envio del producto defectuoso al centro de service的技术ico designado por Blackmagic Design y deben abonar las tarifas postales por adelantado. El Cliente sera responsable de todos los gastos de envio, seguros, aranceles, impuestos yequalquier othero importe que surja con relationa la devolucion de products por equalquier motivo. Esta garantía carecerá de validez ante defectos o daños causados por un uso indefinido del producto, o por falta de cuidado y mantenimiento. Según los关键时刻 estipulados, Blackmagic Design no tendrá obligación alguna de (a) reparar daños provocados por intentos de personal ajeno a Blackmagic Design de instalar el producto, repararlo o realizar un mantenimiento del mesmo; (b) reparar daños resultantes del uso de equipos incompatibles o conexiones a los mismos; (c) reparar cualquier daño o mal funciona provocado por el uso de piezas o repuestos no suministrados por Blackmagic Design; o (d) brindar servicios专业技术 a un producto que haya sido modificado o integrado con otros productos, cuando dicha modificacion o integrazioneonga como resultado un aumento de la dificultad o el tiempo necessario para reparar el producto. ESTA GARANTIA OFRECIDA POR BLACKMAGIC DESIGN REEMPLAZA CUALQUIER OTRA GARANTIA, EXPRESA O IMPLICITA. POR MEDIO DE LA PRESENTE, BLACKMAGIC DESIGN Y SUS DISTRIBUTORES RECHAZAN CUALQUIER GARANTIA IMPLICITA DE COMERCIALIZATION O IDONEIDAD PARA UN PROPENSITY PARTICULAR. LA RESPONSABILITY DE BLACKMAGIC DESIGN EN CUANTO A LA REPARACION O SUSTITUCION DE PRODUCTOS DEFECTUOSOS CONSITUYE UNA COMPENSACION COMPLETA Y EXCLUSIVA PROPORCIONADA AL CLIENTE POR CUALQUIER DANO INDIRECTO, ESPECIAL, FORTUITO O EMERGENTE, AL MARGIN DE QUE BLACKMAGIC DESIGN O SUS DISTRIBUTORES HAYAN SIDO ADVERTIDOS CON ANTERIORIDAD SOBRE LA POSIBILIDAD DE TALES DANOS. BLACKMAGIC DESIGN NO SE HACE RESPONSABLE POR EL USO ILEGAL DE EQUIPOS POR PARTE DEL CLIENTE. BLACKMAGIC DESIGN NO SE HACE RESPONSABLE POR DANOS CAUSADOS POR EL USO DE Este PRODUCTO. EL USUARIO UTILIZA EL PRODUCTO BAJO SU PROPRIA RESPONSABILITYDAD. Copyright 2022 Blackmagic Design. Todos los derechos reservados. «Blackmagic Design», «URSA», «DeckLink», «HDLink», «Workgroup Videohub», «Multibridge Pro», «Multibridge Extreme», «Intensity», y «Leading the creative video revolution», son marcas registradas en EE. UU. yotiros paises. Todos los demas nombres de compañero y productos peuvent ser marcas commerciales de las respectivas entreprises a las que estén asociados. El terno « Bluetooth » y elogoto correspondiente son propidad de Bluetooth SIG, inc. Blackmagic Design cuesta con autorizacion para hacer uso de los mismos. Otros nombres commerciales y marcas registradas pertenecen a sus respectivos propietarios.Blackmagic
Pocket Cinema Camera
 欢迎辞
感谢您购买新品Blackmagic Pocket Cinema Camera! 2013年时,我们推出了原版Blackmagic Pocket Cinema Camera。这款摄影机有着令我们引以为豪的小巧设计、高动态范围和突破性的画质。在大家的积极反馈下,我们决定开发新款Blackmagic Pocket Cinema Camera摄影机系列,在原版设计的基础上又有了新的突破。 Blackmagic Pocket Cinema Camera 4K则搭载与原版Pocket Cinema Camera相同的MFT镜头卡口,可使用任何一款MFT镜头。Blackmagic Pocket Cinema Camera 6K G2和Pocket Cinema Camera 6K Pro拥有EF卡口,可使用您喜爱的EF镜头以高达每秒60帧的速度拍摄6K视频。 摄影机拥有13挡动态范围和双原生ISO设计,能记录获得优美纯净的电影画质,捕捉精彩瞬间,拓展创意视界。 我们期待能一睹您使用新款 Pocket Cinema Camera 摄影机完成的创意佳作,也欢迎您就摄影机有待添加的各项新功能提出宝贵意见! Grant Petty
Blackmagic Design首席执行官目录
您使用的是哪款摄影机? 831 开始使用 831 安装镜头 831 启动摄影机 833 使用内附的电源线为摄影机供电 833 存储介质 834 CFast卡 834 SD卡 836 USB-C硬盘 838 存储介质在记录前的准备事项 839 在Blackmagic Pocket Cinema Camera上格式化存储介质 840 在Mac计算机上格式化存储介质 842 在Windows计算机上格式化存储介质 843 记录 844 记录片段 844 Blackmagic RAW 845 以Blackmagic RAW记录 845 最高传感器帧率 848 记录时长 849 855 播放 摄影机功能 855 摄影机正面 855 右侧 856 左侧 857 摄影机顶部 859 摄影机底部 861 摄影机背面 862 触摸屏控制 865 设置 888 主菜单 888 记录设置 888 文件命名格式 894 监看设置 894 音频设置 901 设置 904 预设 916 3D LUT 919 录入元数据 921 场记板 922 摄影机视频输出 927 Blackmagic Zoom Demand和 Blackmagic Focus Demand 927 连接至您的摄影机 928 使用Blackmagic Focus Demand 930 使用Blackmagic Zoom Demand 930 使用DaVinci Resolve 932 项目管理器 932 使用快编页面剪辑 933 将片段添加到时间线 936 在时间线上修剪片段 937 音频修剪视图 937 添加标题 938 使用Blackmagic RAW文件 939 使用调色页面为片段调色 942 添加Power Window 946 使用插件 947 混合音频 948 在Fusion页面添加视觉特效和合成效果 953 制作母版剪辑 961 快速导出 961 交付页面 962 使用ATEM Mini控制摄影机 963 DaVinci Resolve一级调色工具 967 使用第三方软件 970 处理CFast2.0卡和SD卡上的文件 970 处理USB-C硬盘上的文件 970 使用Final Cut Pro X 971 使用Avid MediaComposer2018 971 使用AdobePremiereProCC 972 Blackmagic Camera Setup Utility 实用软件 973 使用电池手柄 974 Developer Information 977 Blackmagic Bluetooth Camera Control 977 Blackmagic SDI and Bluetooth Camera Control Protocol 979 Example Protocol Packets 988 帮助 989 监管告知 990 安全信息 991 保修 992您使用的是哪款摄影机?
Blackmagic Pocket Cinema Camera 6K Pro、6K G2和4K机型都有着相似的外观。这几款摄影机都能拍摄出拥有超宽动态范围的影像,并且都采用相同的机身设计。此外,控制按钮和软件菜单布局,以及摄影机的操控也基本一致。 Blackmagic Pocket Cinema Camera 6K Pro和6K G2搭载Super 35mm大尺寸传感器和EF镜头卡口,并且卡口上方标有“6K”字样图标。Blackmagic Pocket Cinema Camera 4K搭载MFT尺寸传感器和MFT镜头卡口。  Blackmagic Pocket Cinema Camera 6K Pro开始使用
为Pocket Cinema Camera安装镜头并开启摄影机即可开始使用。安装镜头
Pocket Cinema Camera 6K G2和6K Pro型号使用EF镜头,Pocket Cinema Camera 4K型号使用MFT镜头。为所有Pocket Cinema Camera机型安装镜头的步骤是一样的。首先请取下镜头防尘盖。先按住锁定按钮,同时逆时针转动防尘盖,待其松开后便可取下。安装主动式EF或MFT镜头卡口步骤如下:
1 将镜头的标志点与机身的镜头卡口标志点对齐。很多镜头都带标志点,可以是蓝色、红色或白色。  2 将镜头卡口按在摄影机卡口上,顺时针扭动镜头直到锁定到位。  为Blackmagic Pocket Cinema Camera 4K安装MFT镜头 3 取下镜头时,先按住锁定按钮,再逆时针旋转镜头直至其标志点对准摄影机顶部10点钟方向(MFT镜头)或12点钟方向(EF镜头),将镜头从卡口小心取下。 备注 没有安装镜头时,请盖上镜头卡口防尘盖,以防止摄影机传感器上的滤光片暴露在灰尘中。启动摄影机
完成镜头安装后,接下来要做的是为摄影机连接电源。Pocket Cinema Camera 6K Pro和6K G2可通过安装NP-F570电池获得电源,Pocket Cinema Camera 4K可通过安装LP-E6电池获得电源。您可以选择使用内附的AC电源适配器或通过Blackmagic电池手柄内部的两块NPF570电池为Pocket Cinema Camera供电。关于如何为Pocket Cinema Camera加装电池手柄的信息,请查阅“使用电池手柄”部分的介绍。安装电池并开启摄影机
Pocket Cinema Camera 6K Pro和6K G2使用标准NP-F570电池,Pocket Cinema Camera 4K使用标准LP-E6电池。摄影机自带一块电池,但是如果您需要添加电池,请从Blackmagic Design经销商处,或者大多数视听照相器材店购买这款电池。 1 找到位于摄影机底部的电池仓,轻轻推按槽盖将其打开。 2 将电池的接触点朝向电池仓内部并轻轻推入,直至电池扣入锁梢到位。 提示取出电池时,将锁梢朝向摄影机正面方向轻推,电池便可弹出。 3 关闭电池仓盖,轻推直至关闭到位。 4 将摄影机顶部的电源开关拨至“ON”的位置。将开关拨至“OFF”的位置可关闭摄影机。使用内附的电源线为摄影机供电
内附的100-240伏AC适配器可用来为摄影机提供电源,并同时为摄影机的内部电池或Blackmagic电池手柄(如有连接)的两块电池充电。DC电源接口可锁紧固定到摄影机上,以防意外断开。连接外部电源步骤如下:
1 将AC到12V DC适配器插入到您的主电源插座中。 2 打开摄影机左侧的橡胶保护盖,旋转DC电源接头的锁定环,使其和12伏DC电源输入接口上方的缺口对齐。将接头轻轻推向输入口,直至插入到位。 3 拔出连接头时,只需取下护套并将接头从输入口移除即可断开连接。 同时连接外部电源和电池电源时,摄影机只使用外部电源。如果您在连接了已充电电池的情况下断开外部电源,摄影机会直接切换到电池电源,不会中断运行。 摄影机处于关机状态时,摄影机内部的电池可通过USB接口充电。这一设计十分便捷,因为您可以在摄影机未使用时,通过便携式充电宝为摄影机充电。Blackmagic Pocket Cinema Camera支持通过标准5V 10W USB插墙式充电器进行充电。还也可以使用支持USB PD协议的充电器。USB PD充电器一般都具有一个USB-C类接口,支持最高20V输出,因此可实现快速充电。当摄影机开启或关闭时,用户可通过12V DC电源输入为内部电池充电。 提示如果在使用后立即为发热状态的电池充电,充电速度会下降,直至电池温度降至摄氏45度(华氏113度)以下。建议您先等待15分钟左右,待电池冷却后再行充电。 现在,您只要安装存储介质就可以开始记录了!存储介质
- Blackmagic Pocket Cinema Camera使用标准SD卡、更快的UHS-II卡或CFast 2.0卡记录视频。您还可以使用USB-C扩展端口连接大容量USB-C硬盘,实现更长的记录时间。CFast卡
CFast 2.0 卡足以支持非常高的数据速率,可记录高帧率 6K、4K 和 HD 视频。具体每个格式可记录的最高帧率请到“记录”章节中的时长表中查询。 备注 CFast 2.0卡的速度普遍较快,但是有些卡的写入速度可能会低于其读取速度,因此不同型号的最大数据速率也会有所不同。如果要使用您选择的帧率获得可靠的记录品质,请使用Blackmagic Design推荐的存储卡。插入CFast卡步骤:
 要找到存储卡槽,首先滑动摄影机背面右侧的存储卡槽保护盖。  弹簧门会顺势打开,露出CFast和SD存储卡槽。  将CFast卡插入卡槽,直至锁定到位。无需过多外力即可插入存储卡。移除CFast卡时,只需向内轻推CFast卡即可将其释放并弹出。  LCD触摸屏底部的存储信息将显示检测到的CFast卡的名称和剩余记录时间。 SD卡的插入步骤和CFast卡类似。详情请参阅“插入SD卡步骤”部分的内容。 选择CFast2.0卡
如果您的摄制工作涉及到数据速率较高的视频,请谨慎挑选您要使用的CFast卡。这是因为CFast 2.0卡具备不同的读写速度。 关于Blackmagic Pocket Cinema Camera摄影机支持使用的CFast卡的最新信息,请访问Blackmagic Design支持中心www.blackmagicdesign.com/cn/support。SD卡
除了CFast2.0卡之外,摄影机还可以在UHS-I和UHS-II型高速SD卡上记录。UHS-I SD卡是记录HD压缩视频格式所使用的经济型存储介质;UHS-II型卡速度更快,是记录Blackmagic RAW和ProRes格式Ultra HD内容的理想选择。 使用SD卡时,您可以在拍摄HD压缩视频格式时获得经济型存储方案。 SDXC和SDHC都是消费级照相机或视频摄像机非常常用的媒体文件存储格式。如果您使用数码单反拍摄视频,或使用Blackmagic Micro Cinema Camera、Pocket Cinema Camera或Blackmagic Video Assist进行拍摄,可能您手头已经有兼容的SD卡可以直接使用了。 如果项目不要求使用最高分辨率文件进行拍摄,或项目需要进行长时间记录,您可以使用SD卡来降低成本。容量较小、速度较慢的SD卡还可以用来存储和加载LUT和预设。插入SD卡步骤:
 要找到存储卡槽,首先滑动摄影机背面右侧的存储卡槽保护盖。  弹簧门会顺势打开,露出存储介质卡槽。  将SD卡的标签朝向触摸屏插入SD卡槽,直至锁定到位。无需过多外力即可插入存储卡。  LCD触摸屏底部的存储信息将显示检测到的SD卡名称和剩余记录时间。 移除SD卡时,只需向内轻推SD卡即可将其释放并弹出。挑选SD卡
如果需要记录6K、4K DCI或Ultra HD影像,我们建议您使用目前最高速的UHS-II型SD卡。请务必使用高速UHS-II型SD卡从事6K、4K DCI、Ultra HD和HD影像记录,或者使用UHS-I型SD卡从事HD影像记录。因为这些卡有着快速的数据处理速度和较大的存储容量。通常来讲,卡的速度越快越好。 使用您的存储卡前,请先将其格式化为HFS+或exFAT格式。通过摄影机的“存储”设置即可格式化存储介质。关于存储设置的详情请参阅“设置”部分的内容。 您也可以使用Mac或Windows计算机来格式化存储卡。如果您在Mac系统上处理媒体文件,可使用HFS+格式,这是Mac计算机所使用的磁盘格式,也叫“OSX扩展格式”。如果您使用Windows系统,请选择exFAT格式,即Windows的磁盘格式,该格式在Mac计算机上也可读取。 关于Blackmagic Pocket Cinema Camera摄影机支持使用的SD卡的最新信息,请访问Blackmagic Design支持中心www.blackmagicdesign.com/cn/support。 备注如果要从事高分辨率、高帧率记录,我们建议使用CFast2.0或外部USB-C硬盘作为存储介质,因为此类存储介质速度更快,容量更大。锁定和解锁SD卡
SD卡可进行写保护设置,即“锁定”,以防数据被覆盖。插入SD卡之前,请先确保该卡没有设写保护。如果要禁用写保护功能,滑动位于存储卡左侧的塑料开关,将其移动到最靠近接触点的位置即可。记录后,您可随时将存储卡设为写保护锁定。  上下移动锁定开关可锁定或解锁SD卡 插入了启用写保护的SD卡时,Blackmagic Pocket Cinema Camera会检测到,并会在LCD触摸屏上原本显示记录时长的位置显示“锁定”字样,同时,存储菜单的存储卡名称一侧也会出现一个锁定图标。如果存储卡处于锁定状态,您将无法记录视频、采集静帧或导出LUT和预设,除非解除锁定。  LCD触摸屏底部的存储介质提示会显示剩余记录时间或SD卡是否被锁定。  点按LCD触摸屏底部的任意一个存储介质按钮,进入存储管理器界面。USB-C硬盘
Blackmagic Pocket Cinema Camera搭载高速USB-C扩展端口,可直接将视频记录到USB-C硬盘上。这类存储盘速度快,容量大,可进行长时间视频记录,因此是电影类长片拍摄工作的理想之选。 完成记录后,您可以直接将存储盘连接到计算机上,无需复制媒体即可开始剪辑和后期制作。连接USB-C硬盘步骤如下:
 打开摄影机左侧的橡胶保护盖,将线缆的另一端连接到USB-C端口。  将USB-C类线缆的一端连接到您的USB-C硬盘上。 备注 将USB-C硬盘连接到摄影机上时,它会占用摄影机操作系统中的SD卡位置。也就是说,当您连接了兼容的USB-C硬盘时,摄影机的SD卡槽是不可用的。 如果要使用SD卡槽而不是USB-C硬盘,请将USB-C硬盘从摄影机上断开。选择高速USB-C硬盘
USB-C硬盘采用高速经济的存储设计方案,适用于多种设备,各类消费级电子用品商店均有销售。请务必注意,电影制作只是USB-C硬盘市场的一小部分,因此只有选择正确的存储盘才能确保足够的速度来记录6K和4K影像。 许多USB-C硬盘只为家用电脑设计,并不足以记录6K和4K视频。 获取最新的USB-C硬盘推荐列表,请访问网址www.blackmagicdesign.com/cn/support。USB-C硬盘速度注意事项
部分型号的USB-C硬盘并不能以生产厂家给出的速度保存视频数据。因为这些存储盘采用隐藏数据压缩技术来实现更高的录入速度。只有当存储空白数据或简单文件时,这种数据压缩才能以生产商声称的速度来保存数据。视频数据中包含不规则性更高的视频噪点和像素等,所以压缩无法起效,从而揭露了磁盘的真实速度。 有些USB-C硬盘的写入速度最多可以比生产商声称的速度低 50% 。所以,尽管存储盘规格中声称该USB-C硬盘速度足够处理视频,但真正进行实时视频拍摄时,这类存储盘的速度往往不够快。 通过Blackmagic Disk Speed Test测速软件来准确衡量您的USB-C硬盘是否足以应对高数据速率视频的采集和播放。该测速软件通过数据来模拟视频的储存情况,因此获得的数据与往硬盘采集视频的结果相类似。在Blackmagic测试中,我们发现型号较新、容量较大的USB-C硬盘和容量更大的USB-C硬盘通常具备更快的读写速度。 Blackmagic Disk Speed Test可从Mac的App Store下载。Blackmagic Desktop Video提供Windows和Mac版本,您可前往Blackmagic Design网站支持中心的“采集和播放”部分进行下载,网址:www.blackmagicdesign.com/cn/support。存储介质在记录前的准备事项
您可以使用摄影机的存储和格式化菜单下的“格式化存储卡”功能来对Fast卡、SD卡和USB-C硬盘进行格式化操作,也可以通过Mac或Windows计算机实现格式化操作。为获得理想性能,我们建议您使用摄影机来格式化存储介质。 HFS+也被称为OS X扩展格式,因为它支持“日志功能”,所以被广为推荐。一旦发生存储介质损坏的情况,具有日志功能的存储介质更易恢复数据。HFS+受Mac系统的原生支持。exFAT则受Mac和Windows系统的支持,无需使用额外软件,但不支持日志功能。在Blackmagic Pocket Cinema Camera上格式化存储介质
点按LCD触摸屏底部的任何一个存储卡提示,进入存储管理器。 2 点按“格式化CFast”或“格式化SD卡”。如果您将USB-C硬盘连接到摄影机上,点按“存储盘列表”然后再点按您想要格式化的存储盘即可。  如果您在摄影机上连接了USB-C硬盘,屏幕上就会显示“格式化外部硬盘”,而不是“格式化D卡” 备注 如果您的摄影机连接至Blackmagic MultiDock等硬盘坞,那么存储盘列表将显示您摄影机所有可用的SSD。要选择想要记录的硬盘,点按您想要的硬盘,然后点按“使用存储盘”按钮。 点按“编辑卷号”手动更改卷号。通过键盘输入一个新的卷号,并按“更新”以确认选项。 4 选择“OSX扩展”或“exFAT”格式,并点按格式化按钮。  点按“编辑卷号”可手动更改卷号 5 在弹出的窗口中确认您想要格式化的卡、所选格式以及卷号。点按“格式FAST卡”按钮以确认您的选择。点按“取消”可取消格式化。  确认格式化之前,请先检查是否选择了正确的存储介质。 6 按住格式化按钮三秒,开始格式化存储介质。  7 摄影机会提示您存储介质格式化完毕已可使用,或者格式化失败。 点按“确认”可返回存储管理器。 点按“退出”可离开存储管理器界面。 使用摄影机格式化CFast卡、SD卡或USB-C硬盘时,会使用根据场记板和卷号生成的摄影机ID来为媒体文件命名。每次格式化时,摄影机会自动递增卷号。如果您需要手动输入特定的卷号,可以点击“编辑卷号”然后输入存储卡被格式化后的编号。  摄影机上的存储管理器将告知您当前使用存储介质的是CFast、SD卡还是USB-C硬盘。 开始新项目时,如果您希望文件编号重置为1,可以点按场记板上“项目”选项卡中“重置项目数据”。 提示如果SD卡启用了写保护,摄影机会检测到,并会在LCD触摸屏上原本显示记录时长的位置显示“锁定”字样,同时,存储菜单也会出现一个锁定图标。解锁该卡就可以进行格式化和记录。详情请参阅本手册“SD卡”部分的内容。 备注 如果您连接了USB-C硬盘,存储卡槽2上方就会显示“外部硬盘”字样。在Mac计算机上格式化存储介质
您可以使用Mac计算机自带的“磁盘工具”应用程序,将CFast卡、SD卡或USB-C硬盘格式化为HFS+或exFAT。由于格式化后存储介质上的所有数据都被清除,因此请务必在格式化存储介质前备份存储介质上的所有重要文件。 1 将存储介质连接到您的计算机,忽略任何关于使用您的存储介质作为Time Machine备份选择的信息。 2 进入“应用程序/实用工具”界面,运行“磁盘工具”程序。 3 点击表示摄影机存储介质的硬盘图标,再点击“抹掉”按钮。 4 将格式设置为“Mac OS扩展(日志式)”或“exFAT”。 5 输入新增分区的名字,并点击“抹掉”。摄影机的存储介质或会迅速格式化,以备使用。  在macOS计算机上使用“磁盘工具”可将您摄影机的存储介质格式化为Mac OS扩展(日志式)或AT格式。在Windows计算机上格式化存储介质
使用WindowsPC的“格式化”对话框可将您摄影机的存储介质格式化为exFAT。由于格式化后存储介质上的所有数据都被清除,因此请务必在格式化存储介质前备份存储介质上的所有重要文件。 使用外部读写设备、USB-C线缆或转换器将摄影机的存储介质连接到您的计算机。 2 打开“开始菜单”或“开始画面”,选择“我的电脑”。右键点击摄影机的存储介质。 3 从上下文菜单中选择“格式化”。 4 将文件系统设置为“exFAT”,并将分配单元大小设置成128kb。 5 输入卷标,选择“快速格式化”,点击“开始”。 6 您的存储介质会迅速格式化,以备使用。  在Windows计算机上可使用“格式化”对话框将您摄影机的存储介质格式化为exFAT格式。 备注 如果记录的影像出现丢帧现象,请检查您的存储卡或硬盘是否在适用于您所用编解码格式和帧大小尺寸的推荐存储媒介列表上。如果要求低数据速率,可尝试降低您的帧率和分辨率,或尝试ProRes等压缩编解码格式。请登录Blackmagic Design网站获取最新信息,网址:www.blackmagicdesign.com/cn 备注 您可以在Blackmagic Pocket Cinema Camera上使用经过分区的存储介质,但摄影机只会将存储介质的第一个分区用于记录和播放。 需要指出的是,如果您使用存储和格式化菜单来格式化存储介质,除了用于记录和播放的第一个分区之外,存储盘的所有分区都会被一并抹去。因此,我们强烈建议您使用只有一个分区的存储介质。记录
记录片段
Blackmagic Pocket Cinema Camera配有两个记录按钮。第一个记录按钮位于把手顶部,方便您在右手握住摄影机把手时使用食指触发记录。 第二个记录按钮位于摄影机正面,方便您单手拿住摄影机自拍时触发记录。这个按钮设计在易于触及的位置,十分适合录制自拍视频用于博客。 按摄影机上的其中一个记录按钮即可开始记录。再次按下记录按钮可停止记录。  位于摄影机顶部的记录按钮  位于摄影机正面的记录按钮 开始记录之前,按住位于触摸屏下方的存储介质名称可选择使用记忆卡或USB-C硬盘。被选中的存储介质类型上方的信息条会变成蓝色,表示摄影机将使用该存储介质进行记录。如果要在其他存储卡或存储盘上进行记录,按住存储介质名称进行更换即可。记录时,信息条将会变成红色。选择记录格式
Blackmagic Pocket Cinema Camera可以使用如ProRes 422 HQ、ProRes 422、ProRes 422 LT和ProRes 422 Proxy等Apple ProRes编解码进行记录。ProRes编解码格式能在SD卡、CFast卡或USB-C硬盘上存储更多视频。以ProRes 422 HQ格式记录的视频质量最高,所做的压缩处理最少,而ProRes 422 Proxy格式可对视频进行优质压缩,记录更多视频。此外,摄影机还能Blackmagic RAW格式记录。您可根据工作流程需要尝试并选择最适合的格式。 请务必注意,Blackmagic Pocket Cinema Camera可使用Blackmagic RAW格式以全部传感器模式和裁切传感器模式进行记录,并且必须使用ProRes格式记录经过缩放调整的格式。 更多关于裁切模式和缩放格式的详细信息,请查阅“最大传感器帧率”部分的介绍。Blackmagic RAW
Blackmagic Pocket Cinema Camera支持Blackmagic RAW文件格式。该格式有着高画质、宽动态范围的特点,并提供多种压缩比选择Blackmagic RAW保留了RAW记录的所有使用优点,但文件速度非常快,因为大部分处理是在摄影机里通过硬件加速完成的。 格式有着高画质、宽动态范围的特点,并提供多种压缩比选择。Blackmagic RAW保留了RAW记录的所有使用优点,但文件速度非常快,因为大部分处理是在摄影机里通过硬件加速完成的。也就是说,Blackmagic RAW在大部分电脑上能以正常速度播放,不需要先缓存或者降低分辨率。 Blackmagic RAW还包含强大的元数据支持,所以读取这一文件的软件就能明白摄影机的设置。如果您因为需要快速完成剪辑并且没有时间调色而使用视频Gamma拍摄,有了这一元数据功能,您可以选择视频Gamma模式,以视频Gamma拍摄,当您在软件里打开文件时,文件将会显示应用了视频Gamma的效果。但文件实际上还是电影Gamma模式,只不过是文件里的元数据让软件应用了视频Gamma模式。 也就是说,如果您在某个阶段希望为画面调色,所有电影动态范围都会保存在文件里。图像的亮部和暗部都不会被生硬地切掉,因此细节得以保留,从而通过调色赋予画面电影品质。如果您没时间调色也没有关系,因为图像会被应用视频gamma,看起来就像正常的视频摄影机图像。画面并非一锤定音,到了后期制作您依然可以改变主意。 Blackmagic RAW文件速度非常快,这一编解码格式针对电脑的CPU和GPU做了优化。也就是说,播放又快又流畅,无需硬件解码板,这对于笔记本电脑来说非常重要。能读取Blackmagic RAW的软件也能获得通过Apple Metal、Nvidia CUDA和OpenCL处理的优势。 也就是说,Blackmagic RAW能像视频文件一样在大部分电脑上以正常速度播放,不需要先缓存或者降低分辨率。 另外值得一提的一点是,镜头信息会逐帧记录在元数据里。例如,使用兼容的镜头时,片段长度内所有变焦或对焦调整都会被逐帧保存在Blackmagic RAW文件的元数据里。以Blackmagic RAW记录
Blackmagic RAW有两种不同的工作方式。您可以选择使用固定比特率编解码格式,或者固定质量编解码格式。 固定比特率编解码格式与大多数编解码格式的工作方式类似。它会试图将数据速率保持在恒定的程度,不会让数据速率升得太高。就是说,即使您拍摄复杂的图像,需要更多的数据来存储画面,固定比特率编解码格式也只会对图像进行进一步压缩,从而确保画面不会超出分配的空间。 这对视频编解码格式而言没有问题,但用Blackmagic RAW拍摄时,画质必须具有可预见性。如果您拍摄的图像需要更多数据,但编解码格式只是加大压缩程度来达到特定的数据速率,这时的结果就是,您可能会损失画质,但只有拍完回来才会发现。 为了解决这个问题,Blackmagic RAW还有另一个名为“固定质量”的编解码格式供您选择。该编解码格式技术上称为“可变比特率编解码格式”,当图像需要额外数据时,它会允许文件尺寸变大。如果您需要编码图像,同时保持画质,文件大小将没有上限。 设置为固定质量的Blackmagic RAW会让文件尺寸无限变大,直到满足编码图像的需要。但文件同时也会根据拍摄情况变大或变小。估计如果您忘了摘镜头盖,那也不会浪费存储介质的资源! 值得注意的是,Blackmagic RAW的画质设置选项名称并非晦涩难懂,而是能直观反映出各自的技术特点。比如,当您选择固定比特率编解码格式,会看到画质设置为3:1、5:1、8:1和12:1选项。这些是无压缩RAW文件尺寸与使用Blackmagic RAW拍摄的文件尺寸之间的比例。3:1的画质更好,因为文件更大,而12:1的文件尺寸最小,但画质也最低。许多Blackmagic RAW的用户认为12:1已经完全够用,没有发现任何画质局限。但您最好尝试不同设置,找到最适合自己的数值。 在固定质量设置下使用Blackmagic RAW格式记录时,您会看到Q0、Q1、Q3和Q5选项。这些是传输给编解码格式的压缩参数,它们能以更技术性的方式设置所应用的压缩程度。这个设置不一样,因为固定比特率和固定质量编解码格式的运作方式不同。固定质量设置下,无法预测文件尺寸比率,因为该比率会根据具体拍摄情况发生很大的变化。所以在这种情况下设置是不一样的,并且文件会以它所需的大小记录到存储介质中。固定比特率设置
3:1、5:1、8:1和12:1代表压缩比。比如,12:1压缩生成的文件大约比无压缩RAW小12倍。固定质量设置
Q0和Q5表示不同程度的量化。Q5的量化级别更高,数据速率也更高。如上所述,固定质量设置下文件尺寸会根据拍摄情况显著增大或缩小。也就是说,在拍摄时有可能会出现文件尺寸提高到超出存储卡负荷的情况。这样一来就可能会发生丢帧。但您可以立即看到拍摄中是否出现这样的问题,然后查看设置和画质。Blackmagic RAW Player
- Blackmagic Camera软件安装程序中包含的Blackmagic RAW Player播放器是一款用于查看片段的应用程序。只需双击打开Blackmagic RAW文件,就能以全分辨率和位深快速播放及浏览文件。 解码帧时,SDK库里的CPU加速支持所有主要架构,也可通过Apple Metal、Nvidia CUDA和OpenCL支持GPU加速。另外,它还兼容Blackmagic eGPU,可实现更高的性能。Blackmagic RAW Player支持Mac、Windows和Linux三大平台。Sidecar文件
Blackmagic RAW Sidecar文件不会重写文件的内嵌元数据,只是将新的元数据优先于原始数据之上。元数据中包含Blackmagic RAW设置,以及光圈、对焦、焦距、白平衡、色调、色彩空间、项目名称、镜次编号等信息。元数据在片段全程被逐帧编码,这对镜头数据来说很重要,因为镜头可能在拍摄过程中发生调整。由于是可读格式,您可以用DaVinci Resolve,甚至文本编辑器添加或编辑Sidecar文件中的元数据。 Sidecar文件可以在播放时自动添加新的Blackmagic RAW设置,只需把Sidecar文件与相对应的Blackmagic RAW文件移动到同一个文件夹即可。如果您将Sidecar文件移出文件夹,并重新打开Blackmagic RAW文件,更改后设置就不会被应用,您所看到的文件是原始拍摄时的状态。任何使用Blackmagic RAW SDK的软件都能访问这些设置。做出的修改将保存在Sidecar文件里,可以通过Blackmagic RAW Player播放器或其他任何能够阅读Blackmagic RAW文件的软件看到。 当拍摄视频Gamma模式时,文件仍然处于电影Gamma,元数据会告诉Blackmagic RAW的处理机能以视频Gamma显示。如果您不想为画面调色,希望快速交付视频内容,视频Gamma是个很好的选择。但如果您希望提升暗部或者降低亮部时,所有细节还是依然都在的。视频不会被裁切,所有细节都在,您可以随时获取。Blackmagic RAW与DaVinci Resolve
设置可以根据每个Blackmagic RAW文件进行调整,然后用DaVinci Resolve的“Camera RAW”选项卡保存为新的Sidecar文件,用于创建特效或优化查看。您可以将自己的媒体文件复制给另一位DaVinci Resolve用户,他们在导入文件时就能自动获取您修改过的amma设置。除了摄影机文件中包含的其他元数据以外,DaVinci Resolve还能读取您选择的动态范围,您的片段将自动以“Film”、“Extended Video”或“Video”动态范围在DaVinci Resolve中显示。 然后您可以通过调整饱和度、对比度和中点,以及高光和阴影过渡,对这些设置进行自定义。所有调整都可以保存为Sidecar文件,后期处理文件的其他人员也能看到这些修改。您随时都可以回到摄影机的原始元数据。 您还可以通过DaVinci Resolve的“Camera RAW”选项卡导出单一的Blackmagic RAW帧,其中包含所有调整、元数据、全分辨率和色彩信息,方便与他人分享单帧或参考文件。 获取更多关于如何在DaVinci Resolve中使用Blackmagic RAW的信息,请参阅本手册“使用DaVinci Resolve”部分内容。Blackmagic RAW软件开发工具包
Blackmagic RAW软件开发工具包是由Blackmagic Design开发的API。您可以用Blackmagic RAW SDK编写自己的应用程序来使用Blackmagic RAW格式。任何开发人员都能用SDK库添加读取、编辑和保存Blackmagic RAW文件的支持。Blackmagic RAW SDK包含第五代色彩科学,您可以在所有支持它的应用上实现电影般的自然画面。Blackmagic RAW SDK支持Mac、Windows和Linux,可在Blackmagic官网的开发者页面免费下载www.blackmagicdesign.com/cn/developer。 以下图表显示了Blackmagic RAW API的各个组成部分: 最高传感器帧率
Blackmagic Pocket Cinema Camera 6K Pro和 Pocket Cinema Camera 6K G2最高传感器帧率| 分辨率 编解码 传感器范围 最高帧率 | ||||
| 6K | 6144 x 3456 | Blackmagic RAW | 全部 | 50 |
| 6K 2.4:1 | 6144 x 2560 | Blackmagic RAW | 裁切 | 60 |
| 5.7K 17:9 | 5744 x 3024 | Blackmagic RAW | 裁切 | 60 |
| 4K DCI | 4096 x 2160 | Blackmagic RAW | 裁切 | 60 |
| 4096 x 2160 | ProRes 422 HQ | 在5.7K基础上进行缩放调整 | 60 | |
| 4096 x 2160 | ProRes 422 | 在5.7K基础上进行缩放调整 | 60 | |
| 4096 x 2160 | ProRes 422 LT | 在5.7K基础上进行缩放调整 | 60 | |
| 4096 x 2160 | ProRes 422 Proxy | 在5.7K基础上进行缩放调整 | 60 | |
| Ultra HD | 3840 x 2160 | ProRes 422 HQ | 在全分辨率基础上进行缩放调整 | 50 |
| 3840 x 2160 | ProRes 422 | 在全分辨率基础上进行缩放调整 | 50 | |
| 3840 x 2160 | ProRes 422 LT | 在全分辨率基础上进行缩放调整 | 50 | |
| 3840 x 2160 | ProRes 422 Proxy | 在全分辨率基础上进行缩放调整 | 50 | |
| 3840 x 2160 | ProRes 422 HQ | 在5.7K基础上进行缩放调整 | 60 | |
| 3840 x 2160 | ProRes 422 | 在5.7K基础上进行缩放调整 | 60 | |
| 3840 x 2160 | ProRes 422 LT | 在5.7K基础上进行缩放调整 | 60 | |
| 3840 x 2160 | ProRes 422 Proxy | 在5.7K基础上进行缩放调整 | 60 | |
| 3.7K变形 | 3728 x 3104 | Blackmagic RAW | 裁切 | 60 |
| 2.8K 17:9 | 2868 x 1512 | Blackmagic RAW | 裁切 | 120 |
| HD | 1920 x 1080 | ProRes 422 HQ | 在全分辨率基础上进行缩放调整 | 50 |
| 1920 x 1080 | ProRes 422 | 在全分辨率基础上进行缩放调整 | 50 | |
| 1920 x 1080 | ProRes 422 LT | 在全分辨率基础上进行缩放调整 | 50 | |
| 1920 x 1080 | ProRes 422 Proxy | 在全分辨率基础上进行缩放调整 | 50 | |
| 1920 x 1080 | ProRes 422 HQ | 在5.7K基础上进行缩放调整 | 60 | |
| 1920 x 1080 | ProRes 422 | 在5.7K基础上进行缩放调整 | 60 | |
| 1920 x 1080 | ProRes 422 LT | 在5.7K基础上进行缩放调整 | 60 | |
| 1920 x 1080 | ProRes 422 Proxy | 在5.7K基础上进行缩放调整 | 60 | |
| 1920 x 1080 | ProRes 422 HQ | 在2.7K基础上进行缩放调整 | 120 | |
| 1920 x 1080 | ProRes 422 | 在2.7K基础上进行缩放调整 | 120 | |
| 1920 x 1080 | ProRes 422 LT | 在2.7K基础上进行缩放调整 | 120 | |
| 1920 x 1080 | ProRes 422 Proxy | 在2.7K基础上进行缩放调整 | 120 | |
| 分辨率 编解码 传感器范围 最高帧率 | ||||
| 4K DCI | 4096 x 2160 | Blackmagic RAW | 全部 | 60 |
| 4096 x 2160 | ProRes 422 HQ | 全部 | 60 | |
| 4096 x 2160 | ProRes 422 | 全部 | 60 | |
| 4096 x 2160 | ProRes 422 LT | 全部 | 60 | |
| 4096 x 2160 | ProRes 422 Proxy | 全部 | 60 | |
| 4K 2.4:1 | 4096 x 1720 | Blackmagic RAW | 裁切 | 75 |
| Ultra HD | 3840 x 2160 | Blackmagic RAW | 裁切 | 60 |
| 3840 x 2160 | ProRes 422 HQ | 裁切 | 60 | |
| 3840 x 2160 | ProRes 422 | 裁切 | 60 | |
| 3840 x 2160 | ProRes 422 LT | 裁切 | 60 | |
| 3840 x 2160 | ProRes 422 Proxy | 裁切 | 60 | |
| 2.8K变形 | 2880 x 2160 | Blackmagic RAW | 裁切 | 80 |
| 2.6K 16:9 | 2688 x 1512 | Blackmagic RAW | 裁切 | 120 |
| HD | 1920 x 1080 | ProRes 422 HQ | 在全分辨率基础上进行缩放调整 | 60 |
| 1920 x 1080 | ProRes 422 | 在全分辨率基础上进行缩放调整 | 60 | |
| 1920 x 1080 | ProRes 422 LT | 在全分辨率基础上进行缩放调整 | 60 | |
| 1920 x 1080 | ProRes 422 Proxy | 在全分辨率基础上进行缩放调整 | 60 | |
| 1920 x 1080 | ProRes 422 HQ | 在2.6K基础上进行缩放调整 | 120 | |
| 1920 x 1080 | ProRes 422 | 在2.6K基础上进行缩放调整 | 120 | |
| 1920 x 1080 | ProRes 422 LT | 在2.6K基础上进行缩放调整 | 120 | |
| 1920 x 1080 | ProRes 422 Proxy | 在2.6K基础上进行缩放调整 | 120 | |
| 1920 x 1080 | Blackmagic RAW | 裁切 | 120 | |
| 1920 x 1080 | ProRes 422 HQ | 裁切 | 120 | |
| 1920 x 1080 | ProRes 422 | 裁切 | 120 | |
| 1920 x 1080 | ProRes 422 LT | 裁切 | 120 | |
| 1920 x 1080 | ProRes 422 Proxy | 裁切 | 120 | |
记录时长
下面这些表格以分和秒的格式列出了不同格式、项目帧率和媒体文件大小下可以记录的大致时长。请注意,可用的分辨率和编解码会因Pocket Cinema Camera的型号而有所不同。 存储介质的最长记录时间取决于CFast卡、SD卡或USB-C硬盘的数据容量,以及您所选择的记录格式和帧率。例如3840×2160的Apple ProRes 422 HQ格式,其存储速率大约为880Mbps。采用每秒24帧的记录速度,您可以在一张容量为256GB的CFast 2.0卡上记录大约47分钟的视频。在同样 的设置下,您可以在一张容量为128GB的CFast卡上记录大约23分钟的视频,这大约是容量256GB的CFast卡一半的记录时长。 需要注意的是,不同厂商生产的存储介质,其记录时长也略有不同。存储介质被格式化或Mac OS X扩展格式时,记录时长也会有所不同。 含有少量信息的简单场景要比信息密集的合成场景需要的数据更少。以下表格中的数值都是以高度复杂的镜头来评估的,因此您所获得的记录时间可能会稍长些,具体取决于您所拍摄影像的类型。 6K| CFast卡 帧率 | Blackmagic RAW 3:1 | Blackmagic RAW 5:1 | Blackmagic RAW 8:1 | Blackmagic RAW 12:1 | |
| 256GB | 时长 时长 时长 时长 | ||||
| 23.98 | 17分钟 | 28分钟 | 45分钟 | 67分钟 | |
| 24 | 17分钟 | 28分钟 | 45分钟 | 67分钟 | |
| 25 | 16分钟 | 27分钟 | 43分钟 | 64分钟 | |
| 30 | 13分钟 | 22分钟 | 36分钟 | 54分钟 | |
| 50 | 8分钟 | 13分钟 | 21分钟 | 32分钟 | |
| CFast卡 帧率 | Blackmagic RAW 3:1 | Blackmagic RAW 5:1 | Blackmagic RAW 8:1 | Blackmagic RAW 12:1 | |
| 256GB | 时长 时长 时长 时长 | ||||
| 23.98 | 23分钟 | 38分钟 | 60分钟 | 91分钟 | |
| 24 | 22分钟 | 38分钟 | 60分钟 | 91分钟 | |
| 25 | 21分钟 | 36分钟 | 58分钟 | 87分钟 | |
| 30 | 18分钟 | 30分钟 | 48分钟 | 72分钟 | |
| 50 | 11分钟 | 18分钟 | 29分钟 | 43分钟 | |
| 60 | 9分钟 | 15分钟 | 24分钟 | 36分钟 | |
| CFast卡 帧率 | Blackmagic RAW 3:1 | Blackmagic RAW 5:1 | Blackmagic RAW 8:1 | Blackmagic RAW 12:1 | |
| 256GB | 时长 时长 时长 时长 | ||||
| 23.98 | 20分钟 | 34分钟 | 55分钟 | 82分钟 | |
| 24 | 20分钟 | 34分钟 | 55分钟 | 82分钟 | |
| 25 | 19分钟 | 33分钟 | 52分钟 | 79分钟 | |
| 30 | 16分钟 | 27分钟 | 44分钟 | 66分钟 | |
| 50 | 10分钟 | 16分钟 | 26分钟 | 39分钟 | |
| 60 | 8分钟 | 13分钟 | 22分钟 | 33分钟 | |
| CFast卡 帧率 | Blackmagic RAW 3:1 | Blackmagic RAW 5:1 | Blackmagic RAW 8:1 | Blackmagic RAW 12:1 | ProRes 422 HQ | ProRes 422 | ProRes 422 LT | ProRes 422 Proxy | |
| 256GB | 时长 时长 时长 时长 时长 时长 时长 时长 时长 时长 时长 时长 时长 时长 时长 时长 时长 时长 时长 时长 时长 时长 时长 时长 时长 时长 时长 时长 时长 时长 时长 时长 时长 时长 时光 | 时长 时长 时长 时长 时长 时长 时长 时长 时长 时长 时长 时长 时长 时长 时长 时长 时长 时长 时长 时长 时长 时长 时长 时长 时长 时长 时长 时长 时长 时长 时长 时长 时长 | 时长 | ||||||
| 23.98 | 39分钟 | 65分钟 | 104分钟 | 155分钟 | 44分钟 | 66分钟 | 95分钟 | 216分钟 | |
| 24 | 39分钟 | 65分钟 | 103分钟 | 155分钟 | 44分钟 | 66分钟 | 95分钟 | 216分钟 | |
| 25 | 37分钟 | 62分钟 | 99分钟 | 149分钟 | 42分钟 | 64分钟 | 91分钟 | 207分钟 | |
| 30 | 31分钟 | 52分钟 | 83分钟 | 124分钟 | 35分钟 | 53分钟 | 76分钟 | 173分钟 | |
| 50 | 18分钟 | 31分钟 | 49分钟 | 74分钟 | 21分钟 | 32分钟 | 45分钟 | 104分钟 | |
| 60 | 15分钟 | 26分钟 | 41分钟 | 62分钟 | 17分钟 | 26分钟 | 38分钟 | 87分钟 |
| CFast卡 帧率 | Blackmagic RAW 3:1 | Blackmagic RAW 5:1 | Blackmagic RAW 8:1 | Blackmagic RAW 12:1 | |
| 256GB | 时长 时长 时长 时长 | ||||
| 23.98 | 50分钟 | 84分钟 | 134分钟 | 200分钟 | |
| 24 | 50分钟 | 84分钟 | 134分钟 | 200分钟 | |
| 25 | 48分钟 | 80分钟 | 128分钟 | 192分钟 | |
| 30 | 40分钟 | 67分钟 | 107分钟 | 160分钟 | |
| 50 | 24分钟 | 40分钟 | 64分钟 | 96分钟 | |
| 60 | 20分钟 | 33分钟 | 54分钟 | 80分钟 | |
| 75 | 16分钟 | 27分钟 | 43分钟 | 64分钟 | |
| 80 | 16分钟 | 26分钟 | 40分钟 | 60分钟 | |
| CFast卡 帧率 | Blackmagic RAW 3:1 | Blackmagic RAW 5:1 | Blackmagic RAW 8:1 | Blackmagic RAW 12:1 | ProRes 422 HQ | ProRes 422 | ProRes 422 LT | ProRes 422 Proxy | |
| 256GB | 时长 时长 时长 时长 时长 时长 时长 时长 时长 时长 时长 时长 时长 时长 时长 时长 时长 时长 时长 时长 时长 时长 时长 时长 时长 时长 时长 时长 时长 时长 时长 时长 时长 时长 时不长 时长 时长 时长 时长 时长 时长 时长 时长 时长 时长 时长 时长 时长 时长 时长 时长 时长 时长 时长 时长 时长 时长 时长 时长 时长 时长 时长 时长 时长 时长 时长 时长 时长大 | 时长 时长 时长 时长 时长 时长 时长 时长 时长 时长 时长 时长 时长 时长 时长 时长 时长 时长 时长 时长 时长 时长 时长 时长 时长 时长 时长 时长 时长 时长 时长 时长 时长 | |||||||
| 23.98 | 41分钟 | 68分钟 | 110分钟 | 164分钟 | 47分钟 | 71分钟 | 101分钟 | 230分钟 | |
| 24 | 41分钟 | 68分钟 | 109分钟 | 164分钟 | 47分钟 | 71分钟 | 101分钟 | 230分钟 | |
| 25 | 39分钟 | 66分钟 | 105分钟 | 157分钟 | 45分钟 | 68分钟 | 97分钟 | 221分钟 | |
| 30 | 33分钟 | 55分钟 | 88分钟 | 131分钟 | 38分钟 | 57分钟 | 81分钟 | 184分钟 | |
| 50 | 19分钟 | 33分钟 | 52分钟 | 79分钟 | 22分钟 | 34分钟 | 48分钟 | 111分钟 | |
| 60 | 16分钟 | 27分钟 | 44分钟 | 66分钟 | 18分钟 | 28分钟 | 40分钟 | 92分钟 |
| CFast卡 帧率 | Blackmagic RAW 3:1 | Blackmagic RAW 5:1 | Blackmagic RAW 8:1 | Blackmagic RAW 12:1 | |
| 256GB | 时长 时长 时长 时长 | ||||
| 23.98 | 31分钟 | 51分钟 | 82分钟 | 123分钟 | |
| 24 | 31分钟 | 51分钟 | 82分钟 | 123分钟 | |
| 25 | 29分钟 | 49分钟 | 79分钟 | 118分钟 | |
| 30 | 24分钟 | 41分钟 | 65分钟 | 98分钟 | |
| 50 | 15分钟 | 24分钟 | 39分钟 | 59分钟 | |
| 60 | 12分钟 | 20分钟 | 33分钟 | 49分钟 | |
| CFast卡 帧率 | Blackmagic RAW 3:1 | Blackmagic RAW 5:1 | Blackmagic RAW 8:1 | Blackmagic RAW 12:1 | |
| 256GB | 时长 时长 时长 时长 | ||||
| 23.98 | 57分钟 | 95分钟 | 151分钟 | 226分钟 | |
| 24 | 57分钟 | 95分钟 | 151分钟 | 226分钟 | |
| 25 | 54分钟 | 91分钟 | 145分钟 | 217分钟 | |
| 30 | 45分钟 | 76分钟 | 121分钟 | 181分钟 | |
| 50 | 27分钟 | 45分钟 | 73分钟 | 109分钟 | |
| 60 | 22分钟 | 38分钟 | 61分钟 | 91分钟 | |
| 80 | 17分钟 | 28分钟 | 45分钟 | 68分钟 | |
| CFast卡 帧率 | Blackmagic RAW 3:1 | Blackmagic RAW 5:1 | Blackmagic RAW 8:1 | Blackmagic RAW 12:1 | |
| 256GB | 时长 时长 时长 时长 | ||||
| 23.98 | 81分钟 | 136分钟 | 216分钟 | 321分钟 | |
| 24 | 81分钟 | 135分钟 | 215分钟 | 320分钟 | |
| 25 | 78分钟 | 130分钟 | 207分钟 | 308分钟 | |
| 30 | 65分钟 | 108分钟 | 173分钟 | 258分钟 | |
| 50 | 39分钟 | 65分钟 | 104分钟 | 156分钟 | |
| 60 | 32分钟 | 54分钟 | 87分钟 | 130分钟 | |
| 120 | 16分钟 | 27分钟 | 43分钟 | 65分钟 | |
| CFast卡 帧率 | Blackmagic RAW 3:1 | Blackmagic RAW 5:1 | Blackmagic RAW 8:1 | Blackmagic RAW 12:1 | |
| 256GB | 时长 时长 时长 时长 | ||||
| 23.98 | 87分钟 | 144分钟 | 230分钟 | 342分钟 | |
| 24 | 87分钟 | 144分钟 | 229分钟 | 342分钟 | |
| 25 | 83分钟 | 138分钟 | 220分钟 | 328分钟 | |
| 30 | 69分钟 | 115分钟 | 184分钟 | 275分钟 | |
| 50 | 41分钟 | 69分钟 | 111分钟 | 166分钟 | |
| 60 | 34分钟 | 58分钟 | 92分钟 | 138分钟 | |
| 120 | 17分钟 | 29分钟 | 46分钟 | 69分钟 | |
| CFast卡 | 帧率 | Blackmagic RAW 3:1 | Blackmagic RAW 5:1 | Blackmagic RAW 8:1 | Blackmagic RAW 12:1 | ProRes 422 HQ | ProRes 422 | ProRes 422 LT | ProRes 422 Proxy | ||
| 256GB | 时长时长时长时长时长时长时长时长时长时长时长时长时长时长时长时长时长时长时长时长时长时长时长时长时长时长时长时长时长时长时长时长时长时长时长时长时长时长时长时长时长时长时长时长时长时长时长时长时长时长时长安时长时长时长时长时长时长时长时长时长时长时长时长时长时长时长时长时长时长时长时长时长时长时长时长时长时长时长时长时长时长时长时长时长时长时长时长时长时长时长时长时长时长时长时长时长时长时长时长时长时全时长时长时长时长时长时长时长时长时长时长时长时长时长时长时长时长时长时长时长时长时长时长时长时长时长时长时长时长时长时长时长时长时长时长时长时长时长时长时长时长时长时长时长时长时长时长时长时长时长时长度时长度时长度时长度时长度时长度时长度时长度时长度时长度时长度时长度时长度时长度时长度时长度时长度时长度时长度时长度时长度时长度时长度时长度时长度时长度时长度时长度时长度时长度时长度时长度时长度时长度时长度时长度时长度时长度时长度时长度时长度时长度时长度时长度时长度时长度时长度时长度时长度时长度时长时长时长时长时长时长时长时长时长时长时长时长时长时长时长时长时长时长时长时长时长时长时长时长时长时长时长时长时长时长时长时长时长时长时长时长时长时长时长时长时长时长时长时长时长时长时长时长时长时长短时长短时长短时长短时长短时长短时长短时长短时长短时长短时长短时长短时长短时长短时长短时长短时长短时长短时长短时长短时长短时长短时长短时长短时长短时长短时长短时长短时长短时长短时长短时长短时长短时长短时长短时长短时长短时长短时长短时长短时长短时长短时长短时长短时长短时长短时长短时长短时长短时长短时延长时延长时延长时延长时延长时延长时延长时延长时延长时延长时延长时延长时延长时延长时延长时延长时延长时延长时延长时延长时延长时延长时延长时延长时延长时延长时延长时延长时延长时延长时延长时延长时延长时延长时延长时延长时延长时延长时延长时延长时延长时延长时延长时延长时延长时延长时延长时延长时延长时延长时增长时增长时增长时增长时增长时增长时增长时增长时增长时增长时增长时增长时增长时增长时增长时增长时增长时增长时增长时增长时增长时增长时增长时增长时增长时增长时增长时增长时增长时增长时增长时增长时增长时增长时增长时增长时增长时增长时增长时增长时增长时增长时增长时增长时增长时增长时增长时增长时增长时增长时成长时增长时增长时增长时增长时增长时增长时增长时增长时增长时增长时增长时增长时增长时增长时增长时增长时增长时增长时增长时增长时增长时增长时增长时增长时增长时增长时增长时增长时增长时增长时增长时增长时增长时增长时增长时增长时增长时增长时增长时增长时增长时增长时增长时增长时增长时增长时增长时增长时增长时 | ||||||||||
选择帧率
摄影机可以使用不同的帧率拍摄视频,您可根据需要进行选择。 一般来说,选择传感器帧率时,会有一些常见的方面需要考虑。数年来,影视行业一直都有相应的标准。不同的标准会有不同的帧率要求,但其目的只有一个,就是在每一秒内显示有效的帧数来呈现悦目而真实的动态画面。 比如,影院使用的是每秒24帧的标准,虽然近年来业内已经开始尝试使用更高的帧率,但每秒24帧依然是全球广泛接受的标准。 电视行业的帧率则通常要符合每个国家的播出技术标准。比如,在制作电视内容时,北美地区一般都会使用每秒29.97的帧率进行记录,而欧洲地区则会使用每秒25的帧率进行记录。 但是,随着技术的不断发展,如今的制作有了更多的选择,并且播出标准也在一直变化。现在,体育类节目通常会以更高的帧率记录和播出。比如在北美地区,有些体育节目会以高达每秒59.94帧的速度记录和播出,欧洲地区则会采用每秒50帧的速度。这样能使这类快节奏画面更加流畅和真实。 此外,流媒体和网络播出一般会使用和电视节目类似的帧率,但用户可以选择不同的观看格式,而且唯一的限制就是用户的屏幕可以显示的内容,所以灵活性更大一些。 一般来说,为一个项目选择帧率时,可以根据交付的格式进行选择。摄影机的项目帧率应该使用这一设置,而传感器帧率应该被设置为匹配。这样您的片段就能以和肉眼所见的实际画面相同的速度进行播放。 如果您想要创造出有趣的效果,比如慢动作,就可以使用高一些的传感器帧率设置。传感器帧率比项目帧率越高,播放速度就越慢。 更多关于使用不同传感器帧率来达到创意效果的信息,请参考“触摸屏控制”部分的介绍。触发记录
- Blackmagic Pocket Cinema Camera可通过HDMI输出口自动发送一路信号,以便在连接如 Blackmagic Video Assist等支持触发记录功能的设备时触发记录。 这样一来,当您按下摄影机上的记录按钮时,您所连接的外部记录设备也会开始记录,并可当您停止摄影机记录的同时也停止记录。您的摄影机还可以通过HDMI输出时间码,也就是说,外部记录设备和摄影机内部记录的片段会使用相同的时间码。 如果外部记录设备支持触发记录功能,您需要通过设置菜单将其启用。播放
播放片段
视频记录完毕后,您可使用摄影机上的播放控制按钮播放素材片段并在CD屏幕上监看。按下播放按钮可切换到播放模式。再次按播放按钮可立即在CD屏幕或者通过HDMI输出口连接的显示器上播放最后记录的片段。按住LCD屏幕上的前进或倒退按钮可以快进或倒退片段。当前片段到头时,播放会结束。 按前进或倒退按钮可跳到片段的开始或结束处。按后退按钮一次会跳转到当前素材片段的起始位置,按两次则跳转到上一个片段的起始位置。按记录按钮可退出播放,触摸屏会回到摄影机画面。  按播放控制区域的播放按钮即可在内置触摸屏上查看最近记录的片段。摄影机功能
摄影机正面
1 记录按钮
按任何一个记录按钮均可开始和停止记录。摄影机正面设有一个记录按钮,便于在自拍时开始或停止记录。2 设置滚轮
摄影机上安装兼容镜头时,设置滚轮可用来调整光圈。将触摸屏面向自己,向左旋转滚轮可打开光圈,向右旋转则关闭光圈。设置滚轮也可以用来调整白平衡、快门角度和ISO设置。您也可以结合使用设置滚轮和对焦缩放按钮来调整选配电子寻像器的画面放大程度。按摄影机顶部的相应按钮,然后使用滚轮进行选择。完成选择后,按下设置滚轮可快速退出选择菜单。3 立体声麦克风
共有四个内置的优质立体声麦克风。更多关于麦克风音频设置的信息,请参考“音频设置”部分的介绍。4 镜头卡口
Blackmagic Pocket Cinema Camera 6K Pro和6K G2设有主动式EF镜头卡口,4K机型则设有主动式MFT镜头卡口。也就是说,在这两款摄影机上您可以使用内置稳定器的镜头,还可以控制兼容镜头的自动对焦和自动曝光。要使用主动式镜头中带有的图像稳定器(即“IS”),可将稳定器开关设为“ON”来开启摄影机图像稳定功能。如果您的镜头有图像稳定器开关,请根据需要设置适合的静态图像或动态图像模式。如果您的镜头并未设有稳定器开关,可以从摄影机的“图像稳定功能”设置菜单中打开或关闭该功能。5 Tally/记录提示
Pocket Cinema Camera摄影机的正面设有一个小型LED灯,可在摄影机记录时予以相应提示。您可以到设置菜单中启用或禁用这一Tally灯提示,还可以调整其亮度。详情请参阅“设置”部分的内容。右侧
6 CFast卡槽
将CFast2.0卡插入卡槽内可实现记录和播放。详情请参阅“CFast卡”部分的内容。7 SD卡槽
将SD卡插入卡槽内可实现记录和播放。详情请参阅“SD卡”部分的内容。左侧
 Blackmagic Pocket Cinema Camera 6K Pro和6KG2机身左侧端口示意图  Blackmagic Pocket Cinema Camera 4K机身左侧端口示意图8 3.5mm麦克风输入
通过摄影机的3.5mm立体声接口连接麦克风Mic特电平的音频。Mic电平的音频要比Line电平低,因此如果您将麦克风连接到摄影机但选择了Line电平,就会发现电平过低。麦克风输入还可以接收来自左通道外部信号源的SMPTE规范LTC时间码。有效时间码可被自动检测到,并作为时间码元数据加嵌到记录的视频中。我们建议通过ne电平输出发送LTC时间码,特别是不将时间码作为一个音频轨道记录的情况。9 耳麦输入
把耳麦插入 3.5mm 立体声耳机插孔可在记录和播放片段时监听音频。连接耳麦时,扬声器输出处于静音状态。10HDMI
这一标准尺寸HDMI接口可连接支持HDR和2通道内嵌音频的10bit 4:2:2 1080p HD视频。使用触摸屏菜单设置净信号或者带有叠加信息的输出画面。您可以使用HDMI端口来连接外部监视器、录机或ATEM Mini切换台。通过HDMI将摄影机连接到ATEM Mini后,您就能获得演播室摄像机的功能,如远程控制Pocket Cinema Camera记录和调整多项设置。请根据正规操作步骤,设置好外部设备,完成所有线缆连接,然后再开启摄影机及其配件。连接HDMI接口时,请始终使用高品质线缆。11 电源输入
您可以使用DC接口为摄影机充电,并同时对电池进行涓流充电。如果要连接电源适配器,请转动插头使其对准插孔上方的缺口位置,然后轻推插头直至其解锁。如果要断开电源连接,请将锁定鞘转回原来的位置,然后拔出插头。自定义电源方案
有些用户创建了自定义电源设备作为Blackmagic Pocket Cinema Camera供电途径之一。如果您决定不使用电池来创建自己的供电方案,那么需要注意和谨慎的是,千万确保不要对您的摄影机供应太高的电压,不然会导致永久性破坏。以下是Blackmagic Pocket Cinema Camera的电压要求: 电池输入连接额定电压范围为6.2V到10V最大。 - DC输入额定电压范围为10.8V到20V最大。 一当摄影机待机且不为电池充电时要求6W电源 摄影机为内部电池充电时要求30W电源。 一采用自定义电源方案为摄影机供电时,建议您移除内部电池。 - 在记录到外部存储介质,使用主动式镜头,屏幕和Tally亮度均调到最高,记录高帧率影像,并且不为电池充电的情况下Blackmagic Pocket Cinema Camera 6K G2大约要求23W, Blackmagic Pocket Cinema Camera 4K大约要求22W。相同配置下的Blackmagic Pocket Cinema Camera 6K Pro和6K G2如添加寻像器则大约要求26W。12 USB
您可以利用这一USB-C端口,直接在连接的USB-C硬盘上进行记录。当摄影机关闭时,您可以通过这一USB-C端口从充电宝等外部设备源为电池充电。为摄影机更新内部软件时,通过这个USB-C端口将摄影机连接到计算机,运行摄影机的更新程序。13 Mini XLR麦克风输入
- Blackmagic Pocket Cinema Camera 6K G2和6K Pro设有两个XLR音频输入。Blackmagic Pocket Cinema Camera 4K设有一个XLR音频输入。 通过Mini XLR接口连接外部平衡模拟音频。使用XLR转Mini XLR转接线可将标准XLR麦克风连接到您的摄影机。 Mini XLR输入可提供幻象电源,用于连接不带内部供电的专业麦克风。更多关于启用幻象电源的信息,请参考本手册“音频”部分的介绍。 XLR输入还可以接收来自外部信号源的SMPTE规范时间码。您可以到“音频”菜单中将通道信号源设置为XLR Line或XLR Mic,具体视时间码发生器电平而定。时间码将作为时间码元数据加嵌到视频文件中。使用Blackmagic Pocket Cinema Camera 6K Pro和6K G2机型时,您可以将一个XLR通道设置为接收时间码信号,并同时将另一个XLR通道用于另一种音频源。摄影机顶部
 Blackmagic Pocket Cinema Camera 6K Pro和6K G2的顶部面板  Blackmagic Pocket Cinema Camera 4K的顶部面板14 1/4-20安装点
您可以使用摄影机顶部的1/4-20安装点来安装外接麦克风或其他小型配件。 备注 Blackmagic Pocket Cinema Camera顶部的1/4英寸安装点只可用于连接小型麦克风等轻型配件。这个顶部1/4英寸安装点不得作为摄影机的承重点,因此请勿安装由螺丝固定的摄影机把手连同较重的镜头。这一操作会损坏1/4英寸安装点,并且不属保修范围。请勿用该安装点连接大型长杆类配件,例如通过该安装点连接加长杆再安装较重配件。如要安装较重的配件,我们强烈建议您使用专为Blackmagic Pocket Cinema Camera设计的摄影机提笼,可同时固定在顶部和底部的1/4英寸安装点。15 记录
按摄影机上的记录按钮即可开始录制。再次按下可停止记录。16 静帧
如要采集单帧无压缩DNG画面,可按下摄影机上的静帧按钮。摄影机图标会短暂出现在触摸显示屏的右上角,提示您静帧采集成功。图像文件会被保存在当前正用于记录的存储介质根目录下一个名为“stills”的文件夹内。保存时会使用视频片段的文件命名格式,但文件名末尾将含有“S001”字样,以文件名最后四位字符来表示“静帧号码”。17 ISO
按ISO按钮并旋转设置滚轮可调整摄影机的感光度设置。ISO可以1/3挡的增量进行设置,数值在100到25,600之间。18 快门
要更改快门角度或快门速度,可按“S”快门按钮,然后旋转设置滚轮。触摸显示屏也会给出最多三个防闪烁快门建议选项。19 白平衡
按“WB”白平衡按钮并旋转设置滚轮可调整摄影机的白平衡设置。您也可以长按“WB”按钮三秒,直接进入自动白平衡屏幕菜单。摄影机将会在画面中心位置叠加显示一个白色方块,并使用这一区域执行自动白平衡操作。更多信息请参考“触摸屏控制”部分的介绍。20 寻像器连接端口
Blackmagic Pocket Cinema Camera 6K G2和6K Pro设有一个连接端口,可供 Blackmagic Cinema Camera Pro EVF使用。如果并未安装选购的电子寻像器,可以用内附的保护盖将其盖住。21 电源开关
电源开关可开启摄影机。向右滑动开关可开启摄影机,向左滑动可关机。22 LED状态显示
摄影机关闭状态下,如果通过其2V DC电源接口或USB-C端口连接了外部电源,这一提示灯会显示红色,表示电池正在充电。 电池充满电后,状态LED灯会熄灭。23 功能按钮
您可以使用摄影机的“设置”菜单对这些按钮进行编程,将它们指派为各项常用功能。默认情况下,第一个按钮被设为“伪色”,第二个按钮被设为“显示LUT”,第三个按钮被设为“帧导栏”。摄影机底部
 Blackmagic Pocket Cinema Camera 6K Pro和6K G2底部  Blackmagic Pocket Cinema Camera 4K底部24 1/4-20安装点
将Blackmagic Pocket Cinema Camera 4K、Pocket Cinema Camera 6K Pro或6K G2安装到三脚架、装备套件或配件时,可使用底部的1/4-20安装点。Pocket Cinema Camera 6K Pro和6K G2底部设有两个1/4英寸安装点。25 电池仓门
将电池仓门释放扣往镜头卡口的方向轻轻推按可将其打开。关闭时,只要轻推仓门直至听到锁定的声音即可。26 电池手柄电源接口
Blackmagic Pocket Cinema Camera 6K Pro和6K G2摄影机底部设有电子接触点,可用来连接选配的电池手柄,无需从摄影机中移除电池。这样能让摄影机同时从其内部电池和电池手柄中的电池获得电源,从而有效延长摄影机的运行时间。摄影机背面
 Blackmagic Pocket Cinema Camera 6K Pro和6K G2后侧。 Blackmagic Pocket Cinema Camera 6K G2没有ND滤镜按钮  Blackmagic Pocket Cinema Camera 4K后侧27 触摸屏
您可以在摄影机的LCD触摸屏上点按并滑动来调整各项设置、自动对焦、开始或停止拍摄以及在记录和回放片段期间监看片段。该触摸屏还可以用来管理存储介质,在数字场记板上添加备注。 Blackmagic Pocket Cinema Camera 6K Pro和6K G2设有翻折式屏幕,可以上下调整LCD触摸屏的角度,获得更宽的可视角度;还设有省电设置,可在不使用LCD时调暗屏幕亮度。同时,您还可以将CD触摸屏设置为高亮模式,从而在极其明亮的日光下使用。这一设置将消耗更多电量,并且亮度设置为100%时屏幕可能会稍有发热。环境温度等于或高于 35^ (95°F)时,设备可能会自动降低屏幕亮度来调节内部温度,以防设备过热。这一安全功能和闲置屏幕的暗化功能是两套独立的机制。更多信息请参考“监看设置”部分的介绍。  Blackmagic Pocket Cinema Camera 6K Pro和6K G2上的翻折式屏幕能提供宽广的可视角度28 光圈按钮
按下光圈按钮将自动,摄影机将根据镜头中的高光和阴影设置平均曝光值。您可以通过左右旋转设置滚轮来手动调整镜头光圈,也可以点按触摸显示屏上的“IRIS”按钮并调整光圈滑块实现控制。29 对焦按钮
当摄影机使用兼容的自动对焦镜头时,按对焦按钮一次可自动对焦。默认情况下,镜头将自动对焦到画面的中心,但是您可以根据需要点按LCD屏幕来选择其他的对焦点。连按两次对焦按钮可将对焦点重置到屏幕的中心位置。 备注 虽然大部分镜头都支持电子对焦,但是有些镜头可设置为手动或自动对焦模式。在这类情况下,您需要确认已将镜头设置到自动对焦模式。30 HFR按钮
使用HFR(高帧率)按钮可切换到变速帧率。要使用这一功能,只要在帧率菜单中设置您想要的变速帧率即可。摄制完成后,只要按下FR按钮即可在您所选的变速帧率和项目帧率之间切换。需要指出的是,这一设置只能在记录停止时调整。 更多关于项目和变速帧率的信息,请参考“触摸屏控制”部分的介绍。31 对焦缩放按钮
按对焦缩放按钮可放大画面,以1:1的像素比例来调整对焦。放大显示时,您可以在触摸屏上使用捏拉缩放的多点接触手势控制来调整缩放程度。更多信息,请查阅“捏拉缩放”部分的介绍。放大状态下,您可以点按并拖动屏幕以查看画面的不同区域。启用对焦缩放功能并通过选配的电子寻像器查看时,您可以拨动设置滚轮来调节放大程度,按下设置滚轮选择感兴趣的区域。如果要缩小画面,再次按对焦缩放按钮即可。32 菜单按钮
按下该菜单按钮可打开主菜单界面。33播放按钮
按下播放按钮可切换到播放模式。再次按播放按钮可立即在LCD屏幕或者通过HDMI输出口连接的显示器上播放最后记录的片段。34 Blackmagic Pocket Cinema Camera Pro EVF
Blackmagic Pocket Cinema Camera 6K Pro和6K G2提供选配的电子寻像器。这款寻像器具备70度纵向翻转角度,并且自带四款眼罩类型,可根据左眼或右眼使用习惯自行搭配。寻像器搭载感应器,能检测到设备闲置状态并且关闭LCD触摸屏,节省更多电池电量的同时,还能防止意外触碰到触摸屏上的控制项。您可以将寻像器设置为叠加显示摄影机状态信息,或者显示纯画面信号。详情请参考“监看设置”部分的介绍。。 安装寻像器时,请使用小号一字螺丝刀松开摄影机顶部连接端口保护盖上的螺丝。移除保护盖,确认连接端口干燥无尘。将寻像器滑入连接端口。旋紧大头螺丝,将寻像器固定到位。35 电子寻像器的屈光度调节
旋转屈光度调节旋钮可调节Blackmagic Pocket Cinema Camera 6K Pro和6K G2上选配电子寻像器的对焦,直到图像变得清晰。请务必注意,屈光度调节的是寻像器中的画面对焦情况,不会更改摄影机传感器上的画面对焦情况。详情请阅读“对焦测试板”部分的介绍。36 ND滤镜
Blackmagic Pocket Cinema Camera 6K Pro配有内置中性密度滤镜。ND滤镜能通过不同曝光挡位预设来相应减少传感器所接收到的光线。降低曝光度后,您就可以在大晴天的户外明亮环境中以大光圈拍摄获得浅景深画面。 要调整中性密度滤镜设置,可以按ND滤镜的左右按键逐一查看透明、2挡、4挡、6挡不同选项。 “Clear”(透明)设置表示不使用ND滤镜。使用2、4、6挡设置时,ND滤镜会逐渐增加密度,从而起到减少透光性的作用。 由于不同的人会使用不同的术语来命名每个ND滤镜,您可以在CD触摸屏菜单中自定义自己的ND滤镜设置。您可以根据喜好设定ND滤镜编号,减光挡数,或者以分数的形式显示滤镜减光的量。 中性密度滤镜设置| ND编号 | 挡数 | 分数 |
| 透明 | 0 | 1 |
| 0.6 2 1/4 | ||
| 1.2 4 1/16 | ||
| 1.8 | 6 | 1/64 |
触摸屏控制
触摸屏功能
Blackmagic Pocket Cinema Camera的LCD触摸屏采用触摸式手势界面设计,能带来快捷直观的操作体验。您可以在LCD触摸屏上的不同区域进行点按和滑动操作,从而快速实现拍摄时可能用到的摄影机功能。  Blackmagic摄影机的LCD触摸显示屏能让您轻松设置摄影机的绝对多数使用设置。LCD监看选项
点按触摸屏左上角的监看图标可进入LCD监看设置。这些设置可用来切换并调整摄影机的监看功能,包括斑马纹、对焦辅助、帧导栏、网格、安全区以及伪色。当您进入LCD监看选项时,这些功能的控制项会显示在LCD触摸屏底部的选项卡菜单中。  点击摄影机LCD触摸屏左上角的图标可进入LCD触摸屏的监看选项。斑马纹
斑马纹设置可开启或关闭LCD触摸屏上的斑马纹显示,还可以设置HDMI输出画面上的斑马纹级别。 视频图像中超过您设定的斑马纹曝光度的部分会以斜线标出。例如,将斑马纹设定为 100% 可显示完全过曝的区域。这一功能对于既定照明条件下实现最佳曝光值非常有帮助。  进入LCD监看选项后,点按斑马纹图标可选择斑马纹设置 启或关闭LCD触摸屏的斑马纹功能,只要在斑马纹界面中点按屏幕左下方的开关图标即可。 向左或向右拖动滑块或点按斑马纹级别提示旁边的箭头,可为斑马纹显示设置曝光级别。共有八个斑马纹预设,包括中灰、中灰 + 1挡,还有从75%到100%每5%增量的曝光级别。 更多关于在摄影机HDMI输出上启用斑马纹的信息,请参考本手册“监看设置”部分的介绍。 提示如果您在户外阴天等易变的照明条件下拍摄,将斑马纹设置在100以下能提示您可能出现过曝的区域。对焦辅助
对焦辅助设置可开启或关闭LCD触摸屏上的对焦辅助显示,还可以为Blackmagic Pocket Cinema Camera上的HDMI输出设置对焦辅助级别。  进入LCD监看选项后,点击对焦辅助图标可设置摄影机的对焦辅助选项。 要开启或关闭LCD触摸屏的对焦辅助功能,只要在对焦辅助界面中点按屏幕左下方的切换图标即可。 要为Blackmagic Pocket Cinema Camera上的所有输出设置对焦辅助级别,可向左或向右拖动触摸屏底部的滑块,或者点按对焦辅助级别一侧的箭头按钮。 对焦辅助的最佳级别因拍摄画面而异。例如,对焦人物时,设置较高的对焦辅助可有助于解决人物面部边缘细节的问题。而如果是对焦植物或建筑物,较高的对焦辅助设置反而会显示许多干扰信息。 更多关于在摄影机HDMI输出上启用对焦辅助的信息,请参考本手册“监看设置”部分的介绍。 提示 Blackmagic Pocket Cinema Camera 设有两个对焦辅助模式。您可以在“监看”设置菜单中的“峰值对焦”和“彩色线条”两种对焦辅助选项间进行切换。详情请参考本手册“监看设置”部分的介绍。帧导栏
帧导栏设置可开启或关闭LCD触摸屏上的帧导栏显示。您还可以选择一种帧导栏在摄影机的HDMI输出上显示。 帧导栏包括用于电影、电视和网络标准的不同宽高比。  进入LCD监看选项后,点击帧导栏图标可设置帧导栏选项。 要开启或关闭LCD触摸屏的帧导栏显示,只要点按屏幕左下角的切换图标即可。 要选择您想使用的帧导栏选项,请左右拖动滑块,或点按当前所选宽高比两侧的箭头进行调整即可。点按箭头按钮之间的比例显示,还可以输入自定义帧导栏比例。 帧导栏选项如下:2.35:1、2.39:1和2.40:1
可显示宽屏宽高比,适用于变形或遮幅宽银幕电影。由于电影标准随时间改变,这三种宽高比或采用略微不同的宽屏设置。2.39:1是目前最为广泛使用的标准之一。  LCD触摸屏启用2.40:1帧导栏设置后的显示 2:1 该选项可显示较16:9略宽的画面比例,但宽度低于2.35:1。 1.85:1 可显示另一种常用的遮幅宽银幕电影宽高比。这种宽高比介于HDTV 1.78:1规格和2.39:1之间。 16:9 显示为1.78:1宽高比,兼容16:9高清电视机和计算机屏幕。该宽高比最常用于HD播出和网络视频。此外,Ultra HD播出也使用这一宽高比。14:9
可显示某些电视台所用的14:9宽高比,是9和4:3电视标准的折中方案。理想状态6:9和当4:3素材经中心裁切以符合14:9宽高比时仍然保持清晰画面。如果您的项目可能会在使用14:9宽高比的电视台播出时,可使用此帧导栏作为构图辅助。4:3
采用4:3宽高比,适用于SD电视屏幕,或在使用2倍变形附加镜时帮助构图取景。1:1
该选项可显示较4:3略窄的1:1画面比例。这一正方形画面比例正在社交媒体领域日渐普及。4:5
该选项可显示4:5的宽高比。这一纵向画面宽高比是人像和智能手机观看的理想选择。自定义帧导栏比例
要自行创建帧导栏比例获得独特观感,可点按箭头图标按钮之间的比例显示。在出现的“自定义帧导栏”屏幕上,点按删除按钮将当前比例删除,然后使用数字键盘指定一个新的比例。点按“更新”应用自定义帧导栏比例,然后回到拍摄画面。  使用“自定义帧导栏”屏幕上的数字键盘输入一个新的帧导栏比例 提示 您可以更改帧导栏叠加信息的不透明度。详情请参考本手册“监看设置”部分的内容。 备注 更多关于在摄影机HDMI输出上启用帧导栏的信息,请参考本手册“监看设置”部分的介绍。网格
网格设置可在 LCD 触摸屏上开启“三分法”、“水平线”、“十字准线”或“中心点”显示,还可以设置在 HDMI 输出上显示哪些叠加信息。  进入LCD监看选项后,点按网格图标可选择不同的网格设置 网格和十字准线叠加信息可以帮助您构图。开启网格选项后,LCD屏幕上会显示“三分法”、“水平线”、“十字准线”或“中心点”。 要开启或关闭摄影机触摸屏的帧导栏显示,只要在“帧导栏”选项卡中点按屏幕左下角的切换图标即可。 想要选择LCD或HDMI输出上显示哪类叠加信息,只要点按“三分法”、“水平线”、“十字准线”或“中心点”选项即可。您可以一次在水平线、十字准线或中心点选项当中选择一种,和三分法显示。这样能让您结合使用三分法和水平线组合、三分法和十字准线组合,或者三分法和中心点组合。  三分法网格可自动缩放到任意屏幕帧导栏。三分法
“三分法”设置取画面三分之一处分别加以两条竖线和两条横线组成网格叠加显示。三分法是一种帮助镜头构图的极其强大的工具。例如,人眼通常会将注意力落于两条直线的交叉点位置,因此网格非常有助于构图时将关键元素定位在这些重要区域。演员的视线通常都是取景在屏幕上三分之一部分,因此您可以使用上面的那条水平线来帮助您构图。三分法有利于不同镜头间保持构图的一致性。水平线
“水平线”设置可在摄影机发生左右或者上下倾斜的时候给出提示。这一设置能帮助您在手持拍摄时将摄影机保持在水平状态,较好地平衡摄影机在云台上的倾斜情况。 浅灰色竖线偏离中间那条深灰色竖线的移动方向,就表示摄影机当前发生倾斜的方向。当摄影机向下倾斜时,浅灰色横线会向上移动;而当摄影机向上倾斜时,浅灰色横线会向下移动。 这些线条偏离中心十字标线的距离等比对应摄影机发生上下或左右倾斜的程度。校准摄影机的运动传感器之后,只要摄影机对齐横轴和纵轴,十字标线就会变成蓝色,表示摄影机已与横纵轴对齐。 请注意,如果摄影机朝正下方拍摄俯瞰镜头,或朝正上方进行拍摄,水平线指示也会有相应反馈。假如您旋转摄影机来拍摄竖屏画面,水平线指示会将横纵轴也旋转0度。 下面的表格显示了摄影机发生不同方向的倾斜时,水平线所给出的相应指示。水平线指示描述
 垂直且水平  向下倾斜且水平  垂直且向左倾斜  向上倾斜且向右倾斜 正常使用时,可将水平线指示校准为垂直且水平。如果您想要使用水平线指示来保持一致的斜角镜头(Dutch Angle),或者保持一致的倾斜角度来拍摄俯瞰或仰角镜头,也可将水平线指示校准为某个斜面角度。更多关于如何校准水平线指示的信息,请查阅“运动传感器校准”部分。十字准线
“十字准线”设置可在画面中心标以十字准线。十字准线和三分法一样,都是非常有用的构图工具,可以让您轻松将画框的正中心对准某个拍摄对象。在拍摄用于快速剪切的场景时也可能会用到这一功能。将观众的视线始终保持在画面中心,能够有助于他们在观看快速剪辑的画面时跟上节奏。中心点
“中心点”设置是在帧画面的中心放置一个圆点。这一设置和“十字准线”设置的作用完全一样,只不过这一叠加显示更小,因此所造成的干扰也更小。 提示更多关于在HDMI输出上启用网格的信息,请参考本手册“监看设置”部分的介绍。安全框
“安全框”设置选项用于打开或关闭 LCD 触摸屏上的安全框,以及设置 HDMI 输出的安全框尺寸。 安全框是广电制作行业的常用工具,可用来让观众观看到镜头中最重要的内容。将镜头中最重要的部分保留在中心的“安全框”之内,能有效防止在部分电视机上出现画面裁切,并且能留下一定的空间供播出机构在屏幕边缘添加台标、新闻图标和其他叠加信息。许多播出机构都要求交付的影像必须将标题和图文等重要内容包含在 90% 的安全框范围内。 安全框还可以帮您为镜头构图,方便您在后期制作中裁切图像的边缘来稳定镜头。它们也可以用来显示特定的裁切。比如以Ultra HD 3840x2160记录时将其设置为 50% ,您可以看到画面经1920x1080裁切后的效果。安全框还会根据帧导栏来调整尺寸,它们会通过调整以显示目标帧的已选百分比。  图为设置到 85% 的安全框 要开启或关闭LCD触摸屏的安全框,只要在安全框界面中点按屏幕左下方的切换图标即可。要设置摄影机HDM输出的安全框程度,可以点按触摸屏下方当前数值左右任何一边的箭头。或者,您也可以左右拖动滑块进行调整。伪色
伪色设置可以打开或关闭 LCD 触摸屏上的伪色曝光辅助。 伪色功能可在您的图像上叠加不同色彩,以代表图像中不同元素的曝光值。例如,粉色代表了适合较浅肤色的最佳曝光,而绿色则是较深肤色调的对应色彩。在记录人物画面时可通过查看粉色或绿色伪色来保持肤色曝光的一致性。 以此类推,当您图像中的元素从黄色变到红色,就意味着现在处于过曝状态。  摄影机显示屏左侧的IRE伪色表给出了不同伪色所代表的含义。| 伪色 含义 | |
| 95%WC | 白色削波 |
| 80%WC | 接近白色削波 |
| MG+1 | 比中性灰高一级 |
| 18%MG | 中性灰 |
| NBDL | 接近黑色细节缺失 |
| BDL | 黑色细节缺失 |
屏幕亮度
点按屏幕亮度图标,并左右拖动滑块可调节Pocket Cinema Camera的触摸屏亮度。  屏幕亮度设置为 50%ND滤镜提示
调整Blackmagic Pocket Cinema Camera 6K Pro的ND滤镜时,LCD触摸屏和HDMI输出画面的左上方会显示ND滤镜提示。使用ND滤镜时,就会出现这一提示。将它设置到不使用ND滤镜后,“Clear”(透明)字样提示将在四秒后消失。  调整Pocket Cinema Camera 6K Pro的ND滤镜设置会显示ND滤镜提示 备注 您可以根据自己的习惯,调整ND滤镜提示所使用的术语。选项包括ND号码,挡数以及分数。您可以在“设置”菜单中选择偏好的格式。每秒帧数
“FPS”提示可显示您当前所选的每秒帧数。  点按帧率提示可进入帧率设置 在LCD触摸屏底部的菜单里,点按“FPS”提示可让您更改摄影机传感器及项目帧率。项目帧率
项目帧率是摄影机的记录格式帧率,它具备电影和电视行业所使用的各类帧率。通常,它会被设定为和您的后期制作工作流程相匹配的帧率。 一共有8种项目帧率设置,分别为每秒23.98、24、25、29.97、30、50、59.94以及60帧。 想要在“FPS”菜单中调整摄影机的项目帧率,请点按触摸屏左下角当前帧率旁边的左右箭头。或者,您也可以左右拖动滑块进行调整。  点按项目帧率两侧的箭头或移动滑块进行调整。 提示 Blackmagic Pocket Cinema Camera的项目帧率也设置了HDMI输出上的帧率。传感器帧率
传感器帧率可设定传感器每秒所记录的实际帧数。这一帧率将会影响视频播放的快慢,视您所设置的项目帧率而定。  启用“变速帧率”选项后,点按某个预设或传感器帧率两侧的箭头图标或者移动滑块就可进行调整。 默认情况下,项目和传感器帧率会相互匹配,以便获得自然的播放速度。但是,您可以点按摄影机“FPS”菜单右下方的“变速帧率”切换图标来单独设置传感器帧率。 如要更改您的传感器帧率,请点按触摸屏左下方传感器提示旁边的左右箭头。您也可以左右拖动滑块来增加或减少帧率。放开滑块后,传感器帧率将完成设置。您可以点按滑块上方的常用变速帧率。这些是根据您当前项目帧率给出的。 您可以设置各种不同的传感器帧率,使片段播放时呈现出各种丰富有趣的速度效果。当传感器帧率被设置为高于项目帧率时,播放片段可营造出慢动作效果。例如,以60fps的传感器帧率进行拍摄,以24fps的项目帧率进行播放,能创建出实际速度40%的慢动作效果。换言之,传感器帧率越是低于项目帧率,播放片段时就越快。这一原理类似于电影摄影机的快速拍摄Overcranking)和慢速拍摄(Undercranking)。快速拍摄可增高传感器帧率,因此播放时可拖慢镜头画面进程,起到突出强调的作用。慢速拍摄可降低传感器帧率,因此回放时可加快画面的速度,从而使画面更具动感。这一设置可为您提供无限的创作空间! 关于每个记录格式和编解码可用最大帧率的信息,请参阅本手册“记录”章节的表格。 备注 选中“变速帧率”时,音频和视频就不再同步。即使设置了相同的项目帧率和传感器帧率也是如此。因此,如果您想要确保音频同步,就避免选择变速帧率。快门
“快门”提示可显示您的快门角度或快门速度。点按此提示可手动更改摄影机的快门数值或配置基于快门的自动曝光模式。快门类型设置可通过显示快门信息来选择“快门角度”或“快门速度”。详情请参考本手册中关于“设置”部分的介绍。  点按“快门”提示进入快门设置 快门角度或快门速度定义了视频中运动模糊的级别,可对不同的光线条件进行补偿。大多数情况,180度的快门角度是拍摄令人满意的运动模糊的最佳选择,相当于50秒的快门速度。但是,请根据照明条件的变化或画面中动作的多少对快门角度进行相应的调整。 例如,360度时快门为“全开”,此时感光器可接收到最多光线。这适用于低光照条件且画面中只有轻微的动作部分。但是,如果拍摄快速移动的物体来说0度等较窄的快门角度可将运动模糊降到最低,从而获得更为锐利清晰的图像。与快门角度相对应的快门速度取决于您所使用的帧率。 例如,如果您以25帧每秒拍摄,那么360度相当于1/25秒,90度相当于1/100秒。 备注在照明环境下拍摄时,快门可影响闪烁程度。Blackmagic Pocket Cinema Camera会根据当前的帧率自动计算出防闪烁快门数值。当您调整快门时,触摸屏下方将会显示三个防闪烁快门建议选项。这些快门数值可能会受到您所在地区的主电源频率的影响。您可以在摄影机的设置菜单中将本地电源频率设为50Hz或60Hz。详情请参考本手册中关于“设置”部分的介绍。 点按触摸屏底部的“快门”提示可调出快门数值菜单。如果您将自动曝光设为关闭状态,此时屏幕将显示您当前所选的快门数值,并将显示出根据您在摄影机“设置”菜单中所选的主电源频率所得出的所有可用的防闪烁快门数值。详情请参考本手册“设置”部分的内容。 值得一提的是,即使使用防闪烁快门数值,也可能会因为每类光源所具备的特点而导致闪烁现象。如果您使用的不是持续光源,我们建议拍摄前请始终进行测试。 如要选择某一种防闪烁快门值,只需点按一个显示的快门值。使用当前快门值提示两侧的箭头可逐个查看一些最常用的值。  摄影机将根据您在“设置”菜单中所选的主电源频率给出一组防闪烁快门数值建议。 如果您在户外拍摄,或使用防闪烁照明,还可以到屏幕左下方连按两下当前快门提示图标来手动选择一个快门数值。当选定快门角度时,该操作会调出一个数字键盘,您可以用它来设置5度到360度之间的任意快门角度。  当在户外拍摄或使用防闪烁照明时,可使用这一数字键盘手动键入您想要的快门角度。 Blackmagic Pocket Cinema Camera设有三类基于快门的自动曝光模式。要选择三者之一,请点按快门菜单最右侧的“自动曝光”按钮。快门
该设置可自动调整快门数值来确保恒定曝光,并同时保持光圈不变。如果您需要保持景深不变,请选择这一设置。值得一提的是,细微的快门自动调整可能会影响到运动模糊。此外,也请您留意室内拍摄时不同的照明条件可能会造成闪烁现象。自动光圈功能在选择“快门”自动曝光模式时不可使用。快门+光圈
该设置可先调整快门,再调整光圈,以保持正确的曝光水平。如果已达到最大或最小快门值,曝光仍不能维持,那么摄影机将开始调整光圈值来保持曝光恒定。光圈+快门
该设置可先调整光圈,再调整快门速度,以保持正确的曝光值。如果已达到最大或最小光圈值,曝光仍不能维持,那么摄影机将开始调整快门值来保持曝光恒定。  在快门菜单中,点按“自动曝光”可进入基于快门的自动曝光模式选项。 当影响快门或光圈的自动曝光模式启用时,LCD触摸屏上方的快门或光圈提示一侧会出现一个“A”字母小标。光圈
“光圈”提示可显示您当前的镜头光圈。点按此提示可更改兼容镜头的光圈并配置基于光圈的自动曝光模式。  点按“光圈”提示可进入光圈设置 如果要使用LCD触摸屏调整光圈,您的Blackmagic Pocket Cinema Camera必须要搭配支持通过摄影机更改光圈的镜头。 点按“光圈”提示一次可调出触摸屏底部的光圈菜单。当前镜头光圈将显示在此菜单的最左侧。想要更改光圈,可点按当前光圈两侧的箭头或左右拖动滑块。  在“光圈”菜单下时,点按光圈提示左右两侧的箭头或使用滑块来调整光圈设置。 点按光圈菜单最右侧的“自动曝光”的开关图标可打开光圈自动曝光菜单。 该操作可调出以下自动曝光选项。光圈
该设置可自动调整光圈来确保恒定曝光,并同时保持快门角度不变。它可保持运动模糊不受影响,但可能会影响景深。光圈+快门
该设置可先调整光圈,再调整快门速度,以保持正确的曝光值。如果已达到最大或最小光圈值,曝光仍不能维持,那么摄影机将开始调整快门值来保持曝光恒定。快门+光圈
该设置可先调整快门,再调整光圈,以保持正确的曝光水平。如果已达到最大或最小快门值,曝光仍不能维持,那么摄影机将开始调整光圈值来保持曝光恒定。  当位于光圈菜单时,点按“自动曝光”可进入基于光圈的自动曝光模式选项。 当影响光圈或快门的自动曝光模式启用时,LCD触摸屏上方的光圈或快门提示一侧会出现一个“A”字母小标。时长显示
您可以在摄影机的LCD触摸屏上方看到摄影机的时长显示。  摄影机在记录时,其时长显示会变成红色。 时长显示为您提供了一个时间码计数器,可用于检查素材片段长度并在记录和播放时监看时间码。计数器以时:分:秒:帧的顺序显示,当记录或播放片段时将按照这一计时方式进行。记录时,时间码会变成红色。 显示时长会从00:00:00:00开始。当前片段或最后记录片段的时长将显示在触摸屏上。当日时间的时间码会嵌入片段,以便后期制作时使用。 想要查看时间码,只要点按时长显示即可。再次点按时长显示可回到片段时长。 当您将Blackmagic Pocket Cinema Camera连接到ATEM Mini时,其LCD触摸屏会在时间码下方显示切换状态。为了更好地帮助摄影师,状态叠加功能会在摄影机处于即将直播时显示“预监”,并且会在摄影机处于直播状态时显示“正在播出”。ATEM Mini可自动和Pocket Cinema Camera摄影机的时间码进行同步,以便在连接设备时与切换台的时间码相匹配。这样一来,在DaVinci Resolve中执行准确的多机位剪辑就变得更加方便了。时长显示周围还可能出现以下其他状态提示:
| W | 当Blackmagic Pocket Cinema Camera使用裁切传感器模式时,此标识会出现在时长显示的左侧。 |
| TC | 当显示时间码时,此标识会出现在时长显示的右侧。 |
| EXT | 当外部LTC时间码通过3.5mm立体声输入口连接有效,或者当时间码同步到ATEM Mini切换台时,此标识会出现在时长显示的右侧。 |
| INT | 当摄影机在完成“拥塞同步”并断开连接后脱离其内部时间码时,此标识会出现在时长显示的右侧。 |
ISO
“ISO”提示可显示摄影机当前的感光度设置。点按此提示可调整ISO值来用于不同的照明条件。  点按ISO提示可进入感光度设置。  进入ISO菜单后,LCD触摸屏的下方会显示摄影机的ISO设置。预设下方的滑块能以1/3挡的增量调整ISO。 这一ISO设置可能会偏高或偏低,因此请根据拍摄现场的不同情况妥善设置。例如,在低照度条件下拍摄时可使用ISO25,600的设置,但可能造成一些可见噪点。而在明亮环境下拍摄时,则可使用ISO100的设置,以便获得更浓郁的画面色彩。双原生ISO
Blackmagic Pocket Cinema Camera设有400和3200双原生ISO功能,因此其传感器经过优化,可胜任低照度条件和明亮日光环境的拍摄。 请根据不同照明条件调整ISO,摄影机的双原生ISO功能可在后台运行,以确保拍摄画面清晰,并且低和高ISO设置下噪点均保持在最少。 100到1000之间的ISO设置会使用400的原生ISO设置作为参考点。1250到25600之间的ISO设置会使用3200的原生ISO设置作为参考。如果您的拍摄条件可以选择ISO 1000或1250,我们建议将镜头的光圈调低一挡,这样就可以选择ISO 1250,从而启用较高的原生ISO功能来获得更加清晰的拍摄画面。 下面的图表显示了ISO选项和动态范围配置之间的关系。  Blackmagic Pocket Cinema Camera 6K Pro和 Blackmagic Pocket Cinema Camera 6K G2动态范围  Blackmagic Pocket Cinema Camera 4K动态范围白平衡
“白平衡”和“色调”提示可分别显示摄影机当前的白平衡和色调设置。点按这两个提示可让您根据不同的照明条件来调整摄影机的白平衡和染色设置。  点按“白平衡”和“色调”可分别进入相应设置。 每种光源都会发出一种色调。例如,烛光会发出暖色调,阴天会发出冷色调。白平衡设置用于图像的色彩平衡,通过综合调整图像中的橙色和蓝色以确保白色物体在拍摄到的画面中依然为白色。例如,在钨丝灯下拍摄时会发出暖色的橙光,因此可选择3200K为图像添加一些蓝色调。如此平衡颜色后,白色可以被准确记录下来。 Blackmagic Pocket Cinema Camera包含多种白平衡预设,适用于各类色温条件。具体设置有:| 明亮日光 | (5600K) |
| 白炽灯 | (3200K) |
| 荧光灯 | (4000K) |
| 混合照明 | (4500K) |
| 多云 | (6500K) |
自动白平衡
Blackmagic Pocket Cinema Camera可自动设置白平衡。点按“AWB”可调出白平衡设置界面。 自动设置白平衡时,画面中心将出现一个方框。请将此方框对准画面中某个中性色调的部分,如白卡或灰卡,并点按“更新白平衡”。摄影机将自动调整白平衡和色调值,使白平衡方框内的白色和灰色平均值尽量保持中性。更新后,此数值可设为您摄影机的自定义白平衡设置。长按三秒摄影机顶部的“白平衡”按钮也可选择自动白平衡并激活“更新白平衡”功能。  在白平衡菜单中点按“AWB”图标,可调出自动白平衡设置界面。将界面中的方框对准白色或中性灰色表面来自动设置一个中性白平衡。电源
摄影机的电源和电量状态会显示在LCD屏幕的右上角。  使用电池供电时,点按电源提示可切换不同的显示方案。| AC | AC | 可在摄影机连接到主电源时显示。 |
| AC | AC / 正在充电 | 会在摄影机连接到主电源,并同时为其内部电池或IP-F570电池(如使用电池手柄)充电时显示。 |
| 50% | 百分比 | 如果您的电池支持以百分比显示电量,那么该电池图标将以百分比的形式显示剩余电量,以%为单位变化。当电池剩余电量为20%时,电量条将变成红色。点按电池图标可开启或关闭百分比显示。 |
| 电量条 | 该电池图标可显示摄影机内安装的电池电量,以5%为单位变化。当电池剩余电量为20%时,电量条将变成红色。 | |
| 电池手柄电量条 | 如果您在Pocket Cinema Camera 4K上安装了电池手柄,可以通过这组电量条显示单独键控两套电池的电量。 | |
| 电池手柄电量条 | Blackmagic Pocket Camera Battery Pro Grip可通过其内部的两块电池,连同Pocket Cinema Camera 6K Pro和6K G2内部的电池,一起为摄影机提供电源。这组电池电量条可显示全部三块电池的状态。 | |
| 16.4v | 电压 | 该图标可显示电池、适配器上的DC电源接口、D-Tap转接线或自定义电源方案所提供的电压。点按电池图标可开启或关闭电压显示。 |
LUT提示
当您在现场将LUT作为预览工具使用时,屏幕左上角会显示LUT图标,提示您当前正在使用LUT。 直方图
直方图位于摄影机触摸屏的左下方。RGB直方图能以单独的红、绿、蓝通道显示画面中的色调分布情况。  直方图能向您反馈片段中阴影和高光部分的色调范围,此外,直方图还非常适合用于查看曝光平衡度,以防止图像的亮部区域被裁切。 直方图最左侧显示的是阴影(暗部)细节,最右侧显示的是高光(亮部)细节。当您关闭或打开镜头光圈时,会注意到直方图里的信息会相应地向左或向右移动。您可以使用它来查看图像暗部和亮部裁切情况。当红色、绿色或蓝色通道发生裁切时,直方图右侧对应的提示灯就会亮起。如果直方图的两侧边缘不是呈平缓下降态势,而是忽然被截断,那就说明可能有亮部或暗部细节丢失。 如果触摸屏左下方没有显示直方图,这可能是因为您的LCD监视屏设置为显示“编解码和分辨率”。请阅读本手册“监看设置”部分的内容获取更多信息。记录按钮
Pocket Cinema Camera触摸屏底部的直方图旁边有一个灰色的圆形按钮。这就是记录按钮。点按一次开始记录,再点按一次可停止记录。记录时 pocket Cinema Camera触摸屏上方的这一按钮、存储卡提示以及时间码均会变成红色。  记录按钮位于 LCD 触摸屏底部的存储介质提示一侧  记录时,记录按钮会显示为红色。对片段套用LUT
如果您在“记录”设置选项卡中选择对记录片段套用LUT,触摸屏就会在待命模式和记录时给出相应提示。  LUT图标能提示您片段将使用所选LUT一同记录。  当所选LUT和片段一同记录时,将显示UT图标。丢帧提示
如果记录按钮上重叠显示一个闪烁的“!”,就表示摄影机在记录时出现丢帧。与之相关联的存储卡所对应的剩余时间提示也将变成红色。例如,如果您的Fast卡出现丢帧,记录按钮上就会出现“!”提示,并且CFast卡的剩余时间提示将变成红色。这样一来,您就能明确是哪张存储卡无法达到当前所选的编解码和分辨率。如果您在之前记录的片段上出现丢帧,屏幕也会显示丢帧提示,这一提示将持续存在,直到记录其他片段,或重启摄影机。更多关于如何避免丢帧现象的信息,请参考“选择2.0卡”和“选择SD卡”部分的介绍。  图中的丢帧提示表示CFast卡出现丢帧。 备注 您可以将Blackmagic Pocket Cinema Camera设置为检测到丢帧时停止记录,以免录下不稳定的画面。详情请参考本手册“记录设置”部分的内容。剩余记录时间
摄影机内插入CFast、SD卡或USB-C硬盘时,触摸屏底部的存储卡提示会显示存储卡或USB-C硬盘剩余的记录时间。时间以分钟的格式显示,具体显示内容取决于您所选择的帧率及编解码格式。当上述两项设置中的任何一项发生改变时,该提示会自动重新计算剩余时间。当存储卡或存储盘上只剩5分钟左右的记录时间时,该提示的文本会变成红色,仅剩分钟记录时间时则会闪烁。当存储卡或存储盘达到最大容量时,该提示会显示“已满”。  存储卡提示可显示CFast卡、SD卡或USB-C硬盘的名称, 并能以分钟显示剩余记录时间。 位于剩余时间上方的小信息条也会相应显示存储卡或存储盘的名称。信息条变成蓝色时,表示摄影机将使用该存储卡或USB-C硬盘进行记录。如果要在其他存储卡或存储盘上进行记录,按住相应存储卡或USB-C硬盘的名称进行更换即可。记录时,信息条将会变成红色。 点按存储卡提示可打开存储卡和格式化菜单。  在LCD触摸屏上点按存储卡提示可调出存储管理器界面。 该菜单可显示当前摄影机中每个CFast卡、SD卡或USB-C硬盘上的剩余空间、存储卡或存储盘的名称、最后一个片段的长度、每个存储卡或存储盘的片段数量,以及每张存储卡或存储盘的文件格式。 您可以通过这个菜单格式化存储介质。详情请参考本手册“存储介质在记录前的准备事项”部分的介绍。 提示点按存储菜单上的存储卡或存储盘图标名称可将其设定为当前所使用的存储卡或存储盘。Blackmagic Pocket Cinema Camera会首先在这张存储卡或存储盘上记录。音频表
当使用内部麦克风或连接外部音频时,峰值音频表可显示通道1和通道2的音频电平。该表以dBFS为单位,并有削波警告功能,可在出现音频过载时以红标提示,并停留片刻,从而有效防止因削波过于短暂而被忽略的情况。 为获得最佳音质,请确保将音频电平控制在dBFS警戒线以下。这是您的摄影机可记录的最高电平,也就是说任何超过此电平的音频会被裁切掉,并导致声音失真。  音频表上的彩色显示条代表了峰值音频电平。理想状态下,峰值音频电平应处在绿色区域。如果音频峰值冲到了黄色或红色区域,音频就极有可能出现削波。 您可以点按音频表来调出音频输入通道1和2的音量控制,以及耳机或扬声器音量菜单。  在LCD触摸屏上点按音频表可轻松进入音量和耳机或扬声器设置。双击放大
连续两次点按LCD触摸屏可放大Blackmagic Pocket Cinema Camera预览图像的任何部分。您点按的区域将被放大,在LCD触摸屏上用指尖拖动图像可将其来回移动。这非常有助于检查对焦。要回到标准缩放模式,只要再连续点按两次摄影机触摸屏即可。捏拉缩放
您可以使用捏拉缩放多点触控手势来调整LCD触摸屏的缩放程度。该操作不会影响HDMI输出上的画面。 要进入2倍缩放操作模式,可连按两次触摸屏或按摄影机后侧的“对焦缩放”图标按钮。然后再使用捏拉手势更改缩放程度。您可以在触摸屏上用指尖拖动图像来移动放大的部分。要回到标准缩放操作模式,可再次连按两次触摸屏或按“对焦缩放”图标按钮。 每次您连按两下触摸屏或按“对焦缩放”图标按钮时,缩放程度会在上一个缩放级别和全屏视图之间切换。例如,捏拉缩放到8倍缩放操作模式后,连按两次可缩小,再连按两次又会回到8倍缩放操作模式。点触式对焦
您可以通过长按 LCD屏幕,让镜头对画面中的特定区域进行对焦。按下对焦按钮可让镜头对所选区域进行对焦。连按两次对焦按钮可将对焦点重置到屏幕的中心位置。纯画面显示模式
如果您在取景或对焦时想要暂时隐藏触摸屏的状态信息文字和各项技术监看选项,这一功能会非常有用。向上或向下滑动CD触摸屏即可一次性隐藏所有显示信息。记录提示、帧导栏、网格、对焦辅助以及斑马纹信息将依然显示。 再次向上或向下滑动LCD触摸屏即可重新调出状态信息和技术监看显示信息。  在LCD触摸屏上,用指尖上下滑动可隐藏所有的状态提示播放菜单
点按播放控制按钮可进入播放菜单。您可以通过摄影机控制按钮或LCD触摸屏来控制之前记录的片段。 当使用LCD触摸屏时,点按播放按钮一次可开始播放,再次点按该按钮可暂停播放。按前进或倒退按钮可跳到片段的开始或结束处。按前进按钮一次可跳至下一个片段。按后退按钮一次会跳转到当前素材片段的起始位置,按两次则跳转到上一个片段的起始位置。您还可点按循环图标激活片段的循环播放模式。  后退、播放、前进和循环图标。 想要快进或快退,可长按前进或后退按钮。根据您所按的播放控制按钮,系统将以两倍于常规速度前进或后退播放素材片段。 快进和快退时,您可以再次点按播放控制键来更改穿梭速度。每按相同方向的播放控制键一次,穿梭速度就会翻倍。最高可达正常速度的16倍。当位于16倍速度时,继续点按播放控制键则会回到2倍速度。每按相反方向的播放控制键一次,穿梭速度就会减半,直至速度为止。点按播放按钮可回到正常播放速度。  穿梭速度提示可显示快进或快退片段的速度和方向。 在播放模式点按记录控制按钮可回到摄影机待命模式,准备开始记录。 播放素材片段时,在触摸屏上下滑动可隐藏状态信息。在播放模式下进入场记板可在元数据中将当前片段标记为“好镜次”。详情请参考“录入元数据”部分的介绍。设置
主菜单
按下菜单按钮可打开摄影机的主菜单界面。这个菜单采用选项卡界面,可提供触摸屏上没有的设置。设置按照功能分为“记录”、“监看”、“音频”、“设置”、“预设”以及“LUT”选项卡。每个选项卡均设有多页,点按摄影机触摸屏边缘的左右箭头或左右滑动便可逐页浏览。  点按“记录”、“监看”、“音频”、“设置”、“预览”选项及,“可在Pocket Cinema Camera主菜单的各个选项卡间移动。记录设置
“记录”选项卡可让您设置视频格式、编解码格式及分辨率,以及记录视频所需的其他重要设置,例如动态范围和细节锐化等。记录设置1
“记录”设置选项卡的第一页包含以下设置: 编解码和质量
“编解码和质量”菜单分为两行。第一行可让您在Blackmagic RAW和Apple ProRes这两大编解码系列间进行选择;第二行则列出了这两大系列中可选的质量选项。例如,ProRes编解码类型可用的质量选项有ProRes 422 HQ、ProRes 422、ProRes 422 LT和ProRes 422 Proxy。Blackmagic RAW的 选项分为四个“固定比特率”和两个“固定质量”设置。  “编解码和质量”菜单下的Blackmagic RAW选项  “编解码和质量”菜单下的ProRes选项 提示 选择更高压缩程度的编解码格式会提高Blackmagic Pocket Cinema Camera存储介质上记录的视频数量。具体请参考“记录”章节中给出的“记录时长表”。分辨率
该设置可与“编解码”设置搭配使用。使用它为您想要记录的格式选择相应的分辨率。例如,要使用ProRes HQ来记录Ultra HD片段,请在“编解码和质量”菜单中选择“ProRes”和“HQ”。然后在“分辨率”菜单中选择“超高清”。  使用Blackmagic RAW编解码格式时,Pocket Cinema Camera 6K Pro和6K G2的“分辨率”选项。  Pocket Cinema Camera 4K的“分辨率”选项。请注意格式下,菜单类别为“分辨率”,其他格式下,菜单类别为“分辨率-传感器裁切模式”。 当您通过ATEM Mini进行多机位记录时,Pocket Cinema Camera会将其编解码设置为Blackmagic RAW,从而实现内部存储介质的高品质ISO记录。将Pocket Cinema Camera连接到ATEM Mini时,摄影机会更改自身的帧率,以匹配ATEM Mini的帧率设置。如果您在连接所有视频源后,想要为ATEM Mini选择不同的输出帧率,可以到ATEM Software Control的切换台设置中进行更改。详 情请参阅ATEM Mini操作手册。记录设置2
“记录”设置选项卡的第二页含有下列设置: 动态范围
点按“动态范围”图标可调整动态范围设置。Blackmagic Pocket Cinema Camera拥有三挡动态范围设置:| Film | 在“Film”模式下时,摄影机会使用对数曲线进行拍摄以确保最佳动态范围,并最大程度丰富视频信号的信息,以便您充分利用DaVinci Resolve等调色软件。 |
| Extended Video | “Extended Video”设置基于Blackmagic广色域,应用了对比度和饱和度。该模式与Video模式最大的不同是品红/绿轴的饱和度更低,这对于正片较为常见。 |
| Video | “Video”设置可记录高对比度和饱和度影像,非常适合用于直接交付,且对后期处理要求极低。“Video”使用Rec.709一级调色,具有令人满意的高光过渡。如果您想要一个准确的起点,并且仍然拥有满意的Gamma曲线可供调色,那么这个选择比较适合。 |
传感器区域
- Blackmagic Pocket Cinema Camera 4K可设置为使用全部传感器区域,如果要使用更高的帧率,还可以使用裁切传感器模式。该模式只使用所选视频格式需要的传感器像素,而不是在全传感器的基础上裁切画面。部分格式结合了裁切和缩放,例如Blackmagic Pocket Cinema Camera 6K Pro 和6K G2设有在全部传感器基础上进行缩放、在5.7K裁切传感器基础上进行缩放,以及在2.7K裁切传感器基础上进行缩放的不同HD格式。 由于裁切模式只使用摄影机传感器的中心区域,镜头的视野就会因为裁切而变得相对较窄。比如,当使用20mm规格的镜头在裁切传感器模式下拍摄HD素材时,视野就相当于Blackmagic Pocket Cinema Camera 4K搭载40mm规格的镜头。 如果您用摄影机拍摄Ultra HD或HD ProRes等低于摄影机最大分辨率的视频时,就可以使用这一设置。 拍摄2.8K17:9裁切传感器模式以及在2.7K裁切传感器模式基础上进行缩放调整的HD格式时,Pocket Cinema Camera 6K Pro和6K G2可达到最快帧率。拍摄.6K16:9模式以及HD裁切模式时,Pocket Cinema Camera 4K可达最快帧率。 更多关于“全部”和“裁切”格式的详细信息,请查阅“最大传感器帧率”部分的介绍。项目帧率
“项目帧率”能提供影视行业常用的不同帧率选择。例如每秒23.98帧。这一帧率通常会设定为与您后期制作工作流程和交付所使用的播放速度和音频同步所匹配的帧率。 一共有8种项目帧率设置,分别为每秒23.98、24、25、29.97、30、50、59.94以及60帧。变速记录
默认情况下,项目和传感器帧率会相互匹配,以便获得自然的播放速度。但是,点按“变速记录”开关图标就可以单独设置传感器帧率。变速帧率
启用“变速记录”后,只需点按“变速帧率”提示一侧的箭头就可以设置摄影机的传感器帧率。 传感器帧率可设置从传感器上每秒实际记录的帧数,帧率则根据您设定的项目帧率来影响视频播放的快慢程度。 请参考本手册“触摸屏功能”部分中关于“每秒帧数”的介绍了解变速帧率的信息。 关于每个记录格式和编解码可用最大帧率的信息,请参阅本手册“最大传感器帧率”部分给出的表格。偏好的记录介质
“偏好的存储卡”设置可选择Blackmagic Pocket Cinema Camera首先在哪一张存储卡上开始记录。可用选项有“CFast”、“SD”、“USB”以及“最满的卡”。您可以根据个人喜好选择Fast”、“SD"或“USB”,但不论选择哪种存储介质,只要每次选择都一致,存储介质已满时您就知道要先更换哪张。从事单机位拍摄项目时,“最满的卡”选项可有助于按时间顺序进行文件文组。 插入CFast或SD卡,或连接USB硬盘时,您所选的设置就会被应用。您可以进入存储管理器并点按存储卡名称来将其设置为“使用中”,从而随时覆盖这一设置。需要着重强调的是,弹出再重新插入存储卡操作将会令摄影机还原到当前“偏好的存储卡”设置。 “最满的卡”设置是基于记录存储介质的存储百分比决定的,而不是存储卡的内存或已用数据。记录设置3
“记录”设置选项卡的第三页含有下列设置: 延时摄影
“延时摄影”设置能在以下区间激活间隔拍摄功能自动记录静帧:| 帧 | 2 - 10 |
| 秒 | 1 - 10、20、30、40、50 |
| 分 | 1 - 10 |
细节锐化
使用“细节锐化”设置可锐化图像。启用锐化功能时,选择“低”、“中”及“高”选项可降低或升高锐化的程度。 启用锐化功能时,锐化效果会被应用到摄影机所记录的ProRes视频上以及HDMI输出上。 这一设置是为棚内直播制作所设计的,这类摄制通常不具备后期制作时间,而是需要直接输出现场拍摄画面。如果您所记录的图像需要进行后期制作,我们建议您将此设置保留在关闭状态。当设置为Blackmagic RAW编解码格式时,细节锐化功能会被禁用。 提示后期处理Blackmagic RAW文件时,您可以使用DaVinci Resolve调色页面的模糊/锐化工具,对这些设置进行相对锐化。 将工具设定为半径0.48,缩放比例调整为0.6、0.3或0.15,获得“高”、“中”或“低”程度的相对锐化。 关于后期制作锐化的详细信息,请参考DaVinci Resolve完整手册中“动态特效和模糊设置面板”部分的介绍。存储卡丢帧时
检测到丢帧时,可使用该设置来配置Blackmagic Pocket Cinema Camera。设置成“给予提示”后,一旦检测到丢帧,LCD触摸屏会显示丢帧提示,摄影机会继续记录。设置为“停止记录”后,一旦检测到丢帧,摄影机会停止记录。这一设置可有效避免您在未察觉丢帧提示的情况下继续花时间记录不可用的素材。 更多关于如何避免丢帧的信息,请参考“选择CFast 2.0卡”、“选择快速SD卡”、“选择快速SSD”和“选择快速USB-C硬盘”部分的介绍。在文件中套用LUT
如果使用Blackmagic RAW编解码拍摄,并且在摄影机的HDMI输出上套用LUT,那么所选LUT就会嵌入到正在记录的Blackmagic RAW文件中。这意味着这个LUT将被保存在相应文件的头文件中,可在后期制作环节轻松套用到片段上,无需处理单独文件。将记录菜单中的“在文件中套用LUT”开关设置为开启状态后,在Blackmagic RAW Player播放器和DaVinci Resolve中打开这个片段时,画面上就会套用所选LUT。LUT可轻松开启或关闭,但会始终跟随Blackmagic RAW文件,因为它是写入到片段上的。 DaVinci Resolve的RAW设置面板中还设有一个“套用LUT”开关,可用来启用和禁用Blackmagic RAW文件中的3D LUT。DaVinci Resolve中的“套用LUT”设置和摄影机中的设置相同。也就是说,您在拍摄时可以通过在摄影机中进行设置来告诉调色师使用这一LUT,而调色师则可以在DaVinci Resolve中使用“Apply LUT”设置将它关闭。将LUT记录到片段
以ProRes编解码拍摄时,可以使用“将LUT记录到片段”选项。Blackmagic Pocket Cinema Camera不会默认对记录的素材套用或“烧录”LUT,但是您可以点按“将LUT记录到片段”开关图标,选择将LUT“烧录”到素材中。 如果您在后期制作阶段没有时间对素材进行调色,或者需要直接将素材交付给客户或剪辑师,这一选项就会十分有用。更多信息请参考“3D LUT”和“触摸屏控制”部分的介绍。文件命名格式
根据您的选择,素材片段可在Fast卡、SD卡或USB-C硬盘上以Blackmagic RAW格式或ProResQuickTime电影格式来记录。 文件命名格式示例详见下表:| A001_08151512_C001.mov | QuickTime电影文件名称 |
| A001_08151512_C001.mov | 摄影机索引 |
| A001_08151512_C001.mov | 卷号 |
| A001_08151512_C001.mov | 月 |
| A001_08151512_C001.mov | 日 |
| A001_08151512_C001.mov | 时 |
| A001_08151512_C001.mov | 分 |
| A001_08151512_C001.mov | 片段编号 |
监看设置
“监看”选项卡可用来调整Blackmagic Pocket Cinema Camera在LCD触摸屏以及摄影机HDMI输出上显示的状态信息、叠加信息以及其他监看选项。选项根据输出排列依次为“LCD”、“HDMI”和“全部”,包括了影响LCD和HDMI输出的各项监看设置。这些菜单都有两页选项,您可以点按摄影机触摸屏边缘的箭头,或者左右滑动屏幕来逐页查看。 如果您为Blackmagic Pocket Cinema Camera 6K Pro和6K G2安装了选配的寻像器,可使用“监看”菜单第一页的设置来控制 LCD、HDMI和寻像器上分别显示的内容。 如果您在摄影机上安装了Blackmagic Pocket Cinema Camera Pro EVF,“监看”选项卡会包含“寻像器”按钮和“全部”按钮。“全部”按钮表示可以同时显示在LCD触摸屏、HDMI输出画面以及电子寻像器上的状态信息。监看设置1
在“监看”选项卡的第一页上,每个输出的监看设置是完全相同的。例如,您可以开启LCD触摸屏的“斑马纹”显示,但关闭HDMI输出上的这一显示内容。 纯画面
点按“纯画面”开关来全面禁用某路输出在“LCD”或“HDMI”菜单中的所有状态信息和叠加信息,只留下表示记录的Tally提示灯。  即便在纯画面模式下,摄影机也会显示ally记录提示灯。 备注 LUT将依然套用到启用了“纯画面”的输出上。要禁用LUT,请关闭相应“监看”菜单中的“显示LUT”开关。显示3D LUT
Blackmagic Pocket Cinema Camera可将多种3D LUT套用在输出上,模拟出素材在调色之后的大致效果。在使用“Film”动态范围记录片段时,“显示3D LUT”就十分有用。 如果您的摄影机启用了一个3D LUT,请使用这一设置将该LUT单独应用到LCD触摸屏或HDMI输出上。 备注 更多关于加载和使用3DLUT的信息,请参考本手册“3DLUT”部分的介绍。点按“LCD”或“HDMI”页面上的开关来启用LCD触摸屏和HDMI输出的监看选项:对焦辅助、帧导栏、网格、安全框、伪色。斑马纹
点按“LCD”或“HDMI”菜单下的“斑马纹”开关可在相应的输出上启用斑马纹提示功能。更多关于斑马纹辅助以及设置斑马纹级别的内容,请参考本手册中关于“触摸屏控制”的介绍。对焦辅助
点按“LCD”或“HDMI”菜单下的“对焦辅助”开关可在相应的输出上启用对焦辅助功能。更多关于对焦辅助功能以及对焦辅助级别设置的内容,请参考本手册“触摸屏控制”部分的介绍。帧导栏
点按“LCD”和“HDMI”菜单下的“帧导栏”开关可在相应的输出上启用帧导栏功能。更多关于帧导栏功能以及如何选择不同帧导栏的内容,请参考本手册“触摸屏功能”部分的介绍。网格
点按“LCD”和“HDMI”菜单下的“网格”开关可在相应的输出上启用三分法网格显示功能。更多关于三分法网格功能的内容,请参考本手册“触摸屏功能”部分的介绍。安全框
点按“LCD”和“HDMI”菜单下的“安全框”开关可在相应的输出上启用安全框叠加显示功能。更多关于安全框的信息,请参考本手册“触摸屏功能”部分的介绍。 备注 Blackmagic Pocket Cinema Camera的“全部”监看设置中的“安全框”设置可用来设定安全框大小。伪色
点按“LCD”和“HDMI”菜单下的“伪色”开关可在相应的输出上启用伪色曝光辅助功能。更多关于如何使用伪色的信息,请参考本手册“触摸屏功能”部分的介绍。监看设置2
监看选项卡的第二页含有下列设置: LCD、HDMI和寻像器
状态信息
“状态信息”设置可隐藏LCD触摸屏上的状态文本信息以及各项技术监看内容,只留下与构图和镜头直接相关的信息,这会非常有用。点按“状态信息”的开关图标可开启或关闭摄影机LCD触摸屏上显示的文本信息和技术监看内容。帧导栏、网格、对焦辅助和斑马纹等叠加信息如启用,仍将可见。在LCD触摸屏上用手指上下滑动也可以实现相同的操作。变形镜头压缩画面还原
使用变形镜头拍摄时,Pocket Cinema Camera的预览输出以及记录的文件画面会呈现水平“挤压”效果。启用“ANAMORPHIC DESQUEEZE”可修正Pocket Cinema Camera的预览画面,并记录下片段元数据所使用的压缩还原值,以便后期更正。 可用的压缩还原值会根据您为Blackmagic Pocket Cinema Camera所选择的分辨率而有所不同,但是最终的画面将使用影院的宽屏2.4:1宽高比。 专为电影设计的变形镜头一般都具备2倍挤压系数。Pocket Cinema Camera的“3.7K变形”分辨率专为此类镜头所设计,设置为该分辨率,并将“变形镜头压缩画面还原”选项设置为2倍时,就能进行2倍压缩还原。 针对16:9数字图像传感器所设计的变形镜头通常使用1.33倍的挤压系数,可从完整的16:9传感器呈现出2.4:1的影院宽屏图像。因此,当Pocket Cinema Camera设置为“4K 16:9”和“高清16:9”等16:9分辨率时,“变形镜头压缩画面还原”就应该设置为“1.33x”。 提示 如果您使用标准球面镜头拍摄时图像被水平拉伸,请确保您未启用“变形镜头压缩画面还原”选项。LCD和寻像器
显示
摄影机LCD触摸屏左下角和右下角可显示直方图和音频表,或者还可显示编解码器和分辨率等信息。如果您偏好使用伪色来调节曝光度,或者在单独记录音频时想在直方图和音频表的位置显示其他信息,这一功能将十分有用。只要点按CD"菜单中的“技术监看”或“编解码和分辨率”选择喜欢的显示项即可。 仅通过HDMI
摄影师或导演使用的状态信息显示功能
LCD触摸屏可显示ISO、白平衡以及光圈等信息,这些信息有助于摄影师或电影摄影师为每个拍摄镜头进行调试。但是摄影机的HDMI输出也可显示这些有助于导演或剧本指导的信息,以便他们能对多个镜头或多台摄影机了如指掌。  将“HDMI”监看设置中的状态信息设为“导演”后,相应输出上的状态信息将显示以下内容:·帧率
可显示摄影机当前所选的每秒帧数。如果禁用了“变速帧率”功能,则只显示项目帧率。如果使用了“变速帧率”功能,则会先显示传感器帧率,然后显示项目帧率。摄影机
可显示摄影机在场记板中设置的摄影机索引信息。更多信息,请查阅“场记板”部分的介绍。摄影师
可识别摄影机场记板中所设置的摄影师信息。更多相关信息,请查阅“场记板”部分的介绍。时长显示
可在记录时显示当前片段时长,或上一个记录片段的时长。显示格式为:时:分:秒。卷号、场景和镜次
分别对应当前显示的“卷号”、“场景”以及“镜次”。更多关于卷号、场景、镜次及其名称规范等信息,请参考“场记板”部分的介绍。动态范围
显示屏的左下角可显示当前套用的LUT(如果套用到该路输出上)。如果未套用UT,则会显示“Film”或“Video”动态范围模式。时间码
显示屏的右下角可显示摄影机的时间码,显示格式为: 时:分:秒:帧。监看设置3
“LCD”、“HDMI”和“寻像器”监看选项卡的第一页包含完全相同的输出设置。这些设置在三路监看输出上是统一的。在Blackmagic Pocket Cinema Camera的LCD、HDMI和寻像器输出上启用对焦辅助功能后,将“对焦辅助类型”从“峰值对焦”更改为“彩色线条”,三路输出就都会受到影响。 斑马纹级别
可用来设置显示曝光的斑马纹级别,点按该设置两侧的箭头图标可进行调整。斑马纹程度能以5个百分点为单位进行调整,曝光显示范围在 75% 到 100% 之间。 详情请参考本手册“触摸屏功能”部分中关于“斑马纹”部分的介绍。对焦辅助
摄影机设有两个对焦辅助模式,分别为“峰值对焦”和“彩色线条”。- 峰值对焦
选中“峰值对焦”对焦辅助模式后,画面中的对焦部分会在您的LCD触摸屏、HDMI输出或寻像器上以高度锐化的方式显示出来,但记录的图像本身不受影响。这一功能可以使镜头中的对焦部分在屏幕中突出显示。如果您不使用其他叠加信息,这一功能将会十分直观地显示出对焦部分;而当您尝试对焦的对象与画面中其他元素有显著区分时将更为明显。- 彩色线条
选中“彩色线条”对焦辅助模式后,画面中的对焦部分的边缘会以某种色彩的线条标出。由于画面中的对焦范围会用线条直接标出来,因此这一模式要比峰值对焦模式略微直观一些。当您拍摄那些元素繁多的画面时,该模式可提供精准对焦。对焦辅助色彩
该设置可在您使用“彩色线条”对焦辅助模式的时候更改画面上叠加的对焦线条色彩。更改对焦辅助线条的色彩可将其与您的拍摄画面区分开,便于您查看对焦。可用选项有“白”、“红”、“绿”、“蓝”以及“黑”。对焦辅助级别
可为您的LCD、HDMI输出以及寻像器设置对焦辅助的级别,从左到右移动滑块就可以调整。 设置对焦辅助程度并不会影响对焦辅助功能是在Blackmagic Pocket Cinema Camera的LCD屏幕、HDMI输出还是寻像器上启用。您需要到“LCD”、“HDMI”输出和“寻像器”的监看菜单中单独开启每路输出的对焦辅助。 提示对焦辅助的最佳级别因镜头而异。例如,对焦人物时,设置较高的对焦辅助可有助于解决人物面部边缘细节的问题。而如果是对焦植物或建筑物,较高的对焦辅助设置反而会显示许多干扰信息。监看设置4
“LCD”、“HDMI”和“寻像器”监看选项卡的第四页包含完全相同的输出设置。这些设置在摄影机的三路监看输出上是统一的。 帧导栏
点按“帧导栏”菜单设置中的左右箭头可逐个查看摄影机所有输出上的帧导栏设置。这些选项在本手册“触摸屏功能”部分当中有详细介绍,同时也可在LCD触摸屏的HUD监看菜单中找到。需要注意的是,您可以在相应的“监看”菜单中单独选择帧导栏是否出现在LCD触摸屏和HDMI输出上。安全框
要调整Pocket Cinema Camera的LCD触摸屏、HDMI和寻像器输出上的叠加显示的安全框大小,请点按该设置中的左右箭头来调整显示百分比。这一百分比代表了安全框在整幅图像中的所占比例。大多数播出机构都要求90%的安全框比例。帧导栏不透明度
点按“帧导栏不透明度”菜单设置的左右箭头可设置被LCD触摸屏、HDM和寻像器输出的帧导栏挡住区域的不透明度。可用选项有 25% 、 50% 、 75% 和 100% 。帧导栏色彩
点按“帧导栏色彩”菜单设置的左右箭头可选择帧导栏的色彩。网格
请点按“网格”设置中的“三分法”、“水平线”、“十字准线”或“中心点”选项来选择摄影机的CD触摸屏、HDMI输出和寻像器上显示的网格和十字准线组合。 详情请参考本手册“触摸屏功能”部分中关于“网格”的介绍。监看设置5
Pocket Cinema Camera中LCD和寻像器监看选项卡的第五页包含了一些设置,具体设置会根据所选择的输出而定。HDMI输出没有这些设置。仅LCD
屏幕亮度
左右拖动“LCD”菜单中的“屏幕亮度”滑块可调节摄影机的LCD触摸屏亮度。 寻像器
寻像器亮度
可调节寻像器显示屏的亮度。对焦测试板
寻像器内置一个对焦测试板,以便您为双眼调整对焦目镜。屈光度调节器提供-4到+4的调整范围。只要旋转目镜上的对焦屈光旋钮直至对焦测试板完美对焦即可。平滑动态影像
该设置可对寻像器上所显示的快速移动画面进行动态平滑处理。以低于30p的帧率拍摄时,如果显示器没有运行原生帧率,通常就会出现抖动现象,近距离观察显示器时尤为明显。开启“平滑动态影像”,使用80或更小的快门角度,将帧率设置为3.98、24、25、29.97或30p,就可以消除抖动现象。音频设置
“音频”选项卡用来调整摄影机的音频输入和监听设置。 摄影机的音频设置共有两页,每页均提供通道和通道2的设置。 每个声道都可以被映射到不同的源,并调整增益控制等多项设置。音频设置1
“音频”设置选项卡的第一页包含以下设置: 通道信号源
使用“通道1信号源”和“通道2信号源”按钮可为每个声道选择音频源。Pocket Cinema Camera 6K Pro和6K G2设有两个XLR音频通道,Pocket Cinema Camera 4K则设有一个XLR音频输入。下面是每个通道源设置的描述。摄影机左声道或右声道
可记录摄影机的内部麦克风音频。摄影机单声道
可从Blackmagic Pocket Cinema Camera内置麦克风的左右声道创建单个声道。XLR Line
可使用摄影机的XLR输入记录Line电平的音频。您还可以使用这一设置通这LR端口接收时间码信号。XLR Mic
可从摄影机的XLR输入记录Mic电平的音频。如果您启用了幻象电源,并且将XLR输入设置为“Mic”,页面上就会显示“48V”提示。请务必确保您在断开幻象电源麦克风时,将8V的开关置于关闭状态。您还可以使用这一设置通过XLR端口接收时间码信号。·3.5mm左声道-Line
只使用3.5mm输入的左声道作为Line电平的音频。您还可以使用这一设置接收3.5mm麦克风输入左声道的时间码信号。·3.5mm右声道-Line
只使用3.5mm输入的右声道作为Line电平的音频。- 3.5mm单声道 - Line
从3.5mm输入创建左右声道的单声道混音作为Line电平的音频。- 3.5mm左声道 - Mic
只使用3.5mm输入的左声道作为Mic电平的音频。- 3.5mm右声道 - Mic
只使用3.5mm输入的右声道作为Mic电平的音频。·3.5mm单声道-Mic
从3.5mm输入创建左右声道的单声道混音作为Mic电平的音频。·无
禁用声道。 备注 当选择3.5mm输入作为音频源时,通道1和通道2源信需要同时是Line电平或者Mic电平。也就是说,如果您选择“3.5mm左声道- Line”作为通道1源,那么通道2上3.5mm输入的可用选项就都是线路电平:“3.5mm左声道- Line”,“3.5mm右声道- Line”和“3.5mm单声道- Line”。Mic电平选项都以灰色显示,表明此功能不可用。通道1/2电平
使用这两个滑块可调整您所选的声道1或声道2上的录音电平。每个滑块均配有音频表,能帮助您设置正确的音频电平。当您使用符合人体工程学的控制面板上的音频旋钮来调整音频时,音频电平也会相应更新反馈。为获得理想音质,请确保将音频电平控制在OdBFS警戒线以下。这是您的摄影机可记录的最高电平,也就是说任何超过此电平的音频会被裁切掉,并导致声音失真。XLR幻象电源
摄影机的XLR输入可提供48V幻象电源,以便您使用自供电麦克风。当摄影机设置为XLR"音频输入时,只需点按“通道1幻象电源”或“通道2幻象电源”的幻象电源开关图标将其启用即可。Pocket Cinema Camera 6K Pro和6K G2设有两路XLR输入,每路输入都配有一个独立的幻象电源开关。音频设置2
“音频”选项卡的第二页含有下列设置: 音频表
该设置可提供两种不同的音频表显示类型。| VU表 | VU表又称“音量单位表”,用于反馈音频信号中峰谷的平均值。如果您使用的是VU表技监,请在Blackmagic Pocket Cinema Camera上调整输入电平,使得音频达到峰值时,音频表的指示灯对准dB刻度处。此操作可达到最高信噪比,确保最佳音频质量。如果音频峰值超过dB刻度,则很有可能导致声音失真。 |
| PPM表 | PPM表又称“峰值节目表”,该表具有“峰值保持”功能,可暂时保留信号峰值,并可缓慢下降还原,以便您明确音频于何处达到峰值。 |
| 音频表设置 | 标准 |
| PPM (-20 dBFS) | SMPTE RP.0155 |
| PPM (-18 dBFS) | EBU R.68 |
耳麦电平
这一滑块可调整Pocket Cinema Camera摄影机3.5mm耳机接口上所连耳机的输出电平。左右移动音频滑块可调节电平。当您使用前方控制面板上的设置滚轮来调整耳机音量时,音频电平也会相应更新反馈。扬声器电平
这一滑块可调整Pocket Cinema Camera内置扬声器的输出电平。左右移动音频滑块可调节电平。当您使用前方控制面板上的设置滚轮来调整扬声器音量时,音频电平也会相应更新反馈。 备注 请务必先连接XLR线缆,再开启幻象电源。另外,当没有连接幻象电源供电的麦克风时,请务必关闭幻象电源。如果所连接的设备不需要幻象电源,却仍处于幻象电源模式,就会导致设备损坏,因为该模式下摄影机会输出电荷。幻象电源在关闭后还需一段时间方可完全放电。 关闭幻象电源后请等待几分钟,然后再连接其他麦克风或LR音频设备。设置
Blackmagic Pocket Cinema Camera的“设置”选项卡中含有基本设置、软件版本、功能按钮设置等摄影机设置,这些设置与记录或监看没有直接联系。该菜单含有四个页面,您可以点按LCD触摸屏边缘的箭头逐一查看,也可直接左右滑动屏幕查看。设置1
摄影机“设置”选项卡的第一页含有下列设置:  使用Pocket Cinema Camera 6K Pro时,“设置”选项卡的第一页上设有ND滤镜显示方式“选项,可用来自定义ND滤镜信息的显示方式。  使用Pocket Cinema Camera 4K时,“设置”选项卡的第一页上设有“图像稳定功能”选项,可开启MFT镜头的图像稳定功能。日期和时间
点按“日期和时间”选项可为摄影机设置日期和时间。日期格式为年、月、日;时间格式为24小时制。摄影机未连接外部时间码源时,这一日期和时间设置也可用来显示当日时间的时间码。 语言
Pocket Cinema Camera支持以下13种常用语言:英语、中文、日语、韩语、西班牙语、德语、法语、俄语、意大利语、葡萄牙语、土耳其语、波兰语和乌克兰语。 语言页面将在首次启用时出现。 选择语言步骤如下: 点按铅笔图标,然后从列表中选择您的语言。 2 按“更新”返回设置菜单。 快门类型
可通过显示快门信息来选择“快门角度”或“快门速度”。 需要指出的是,当使用快门角度时,快门会采用帧率来显示。例如,不论您使用何种帧率0度都将产生相同的运动模糊。 但当使用快门速度时,快门会使用一个独立于帧率的绝对数值,因此当您更改帧率时,结果也会发生变化。防闪烁快门基准频率
可用来更改摄影机用于计算防闪烁快门设置的主电源频率。 在照明环境下拍摄时,快门可影响闪烁程度。Blackmagic Pocket Cinema Camera会根据当前的帧率自动计算出防闪烁快门数值,并给出最多三个快门值建议。快门数值会根据为照明供电的当地主电源频率而有所不同。大多数采用PAL制式的国家均使用50赫兹,而采用NTSC制式的国家则通常使用60赫兹的用电频率。点按“50Hz”或“60Hz”为您所在地区设置合适的频率即可。 即使使用防闪烁快门数值,不同光源所具备的特点也依然有可能导致闪烁现象。如果您使用的不是持续光源,我们建议在拍摄前进行测试。丢帧时间码
“时间码丢帧”选项可在您使用29.97和59.94的NTSC项目帧率时使用丢帧时间码。丢帧时间码可按照您设置的间隔跳过少量帧画面。这样能保持您的项目时间码准确性,即使每秒并不包含TSC帧率的完整帧数。图像稳定功能
Pocket Cinema Camera 4K设有“图像稳定功能”选项,可启用或禁用镜头上的图像稳定功能,无需手动到镜头上切换。ND滤镜显示方式
使用Blackmagic Pocket Cinema Camera 6K Pro时,您可以调整ND滤镜提示以何种方式显示ND滤镜设置。每个选项都对应一种不同的摄影机规范。电影摄影师通常会使用ND滤镜编号,但熟悉数码单反或广播级摄影机的用户可能会偏好选择挡或分数作为显示格式。分别有“编号”、“挡数”、“分数”几个选项。设置2
摄影机“设置”选项卡的第二页含有下列设置: 设置功能按钮
Blackmagic Pocket Cinema Camera的顶部设有三个功能按钮。按钮上的圆点直观表示功能1、功能2和功能3。这些按钮可被映射为您经常使用的功能,方便您在使用摄影机时快速获取这些功能。  功能按钮由圆点标识,位于摄影机顶部 进行设置时,先选择其中一个按钮再选择相应的功能、设置和参数即可。  1 按钮 2 功能 3 设置 4 参数功能按钮功能映射为预设或开关
选择您想要进行映射的按钮之后,就需要为这一按钮选择一个功能。选项如下:预设
选择该功能时,按下某个功能按钮可调用相应的设置和参数组合。 要设置一个预设,请从“设置”菜单里选中您想要使用的设置然后点按“参数”菜单两侧的箭头图标调整该设置。 举例说明,如果要将F1按钮设置为调用某项预设白平衡,可使用“设置功能按钮”的箭头图标选中“F1”,然后选中“预设”,然后点按“白平衡”设置,再点按“F1参数”菜单,直到“白平衡”数值显示为“5600K”,“色调”数值显示为“-20”。·开关
当设为这一功能时,按下功能按钮将开启或关闭某个特定设置。处于这一模式下时,“设置”菜单将显示为灰色不可用状态。点按参数菜单中的左右箭头可逐一查看所有可用选项。这些选项分别为:“纯画面”、“显JJ”、“帧导栏”、“对焦辅助”、“伪色”、“斑马纹”、“网格”、“安全框”、“变速记录”、“彩条”、“记录”和“无”。 使用“开关”功能还能让您选择将这一设置应用到哪路输出。只要点按“LCD”、“HDMI”和“寻像器”选项进行选择即可。如果某一输出选项不可用,比如始终应用到所有输出上的“彩条”选项,那么“LCD”、“HDMI”、“寻像器”设置就会被禁用。 Blackmagic Pocket Cinema Camera 6K Pro和6K G2的设置3
“设置”选项卡的第三页含有配置选配产品Blackmagic Zoom Demand变焦控制器的相关设置。这些设置只有在您将Blackmagic Zoom Demand安装到摄影机上的时候才可使用。 关于如何安装并使用Blackmagic Zoom Demand的信息,请参考“Blackmagic变焦和对焦控制器”部分中的介绍。 变焦摇杆方向
正常
默认的变焦摇杆操作方向。向右推动变焦摇杆可放大画面,向左推动变焦摇杆可缩小画面。- 反向
当变焦摇杆操作方向被设置为“反向”时,向左推动变焦摇杆可放大画面,向右推动变焦摇杆可缩小画面。 Blackmagic Zoom Demand设有四个变焦功能按钮和一个变速拨盘,它们都可以被映射为不同功能。  1变焦F12变焦F23变焦F34变焦F45速度拨盘 如果要为速度拨盘或其中一个变焦按钮指派功能,需要从“设置功能按钮”菜单中选择“拨盘”或一个按钮号码。然后,点按“按键参数”菜单两侧的箭头图标选定一个功能。拨盘和功能按键参数选项:
| 速度拨盘 变焦速度、 | 耳麦电平、光圈调整、对焦调整。 |
| 变焦缩放按钮1-4 | 记录、一键通话、节目返送、对焦缩放、帧导栏、状态信息、自动对焦、自动光圈、自动白平衡、播放。您也可以将它设置为调整K Pro上的ND滤镜功能。 |
Blackmagic Pocket Cinema Camera 6K Pro和6K G2的设置4
“设置”选项卡的第四页包含选配Blackmagic Focus Demand的配置设置。这些设置只有在您将Blackmagic Focus Demand安装到摄影机上的时候才可使用。 更多关于如何安装并使用Blackmagic Focus Demand的信息,请参考本手册后续部分Blackmagic变焦和对焦控制器”中的介绍。 对焦控制器操作方向
您可以选择“正常”或“反向”来更改对焦控制器上的对焦环的方向。正常
顺时针转动对焦环可对距离镜头较近的物体进行对焦,逆时针转动对焦环可对距离镜头较远的物体进行对焦。- 反向
逆时针转动对焦环可对距离镜头较近的物体进行对焦,顺时针转动对焦环可对距离镜头较远的物体进行对焦。设置5和3
Blackmagic Pocket Cinema Camera 6K Pro和6K G2中“设置”选项卡的第五页包含以下设置:这些设置位于 Blackmagic Pocket Cinema Camera 4K的第三页。 TALLYLED提示灯
Blackmagic Pocket Cinema Camera摄影机的正面设有一个小型LED灯,可在摄影机记录时予以记录状态提示,并且可在连接到Blackmagic ATEM Mini切换台时予以节目和预监Tally状态提示。如果您将摄影机连接到ATEM Mini来远程控制摄影机的记录和设置,那么该Tally灯就会在摄影机处于播出或预监状态时予以显示。详情请参阅“使用ATEM Mini摄影机控制”部分的介绍。  记录到摄影机内的存储介质。  摄影机处于正在播出状态。  摄影机即将切入直播。 要启用或禁用Tally提示灯,可使用“TALLY LED提示灯”开关。LED亮度
点按“低”、“中”或者“高”可设置Tally灯的LED亮度。自动调暗显示器
Blackmagic Pocket Cinema Camera提供一个选项,可在LCD触摸屏闲置一段时间后自动调暗其屏幕亮度,从而节省电池电量。为“自动调暗显示器”功能选择一个闲置时间选项,显示器就会在指定的闲置时间后自动调暗。当您再次触摸LCD屏幕时,屏幕会回到其正常亮度。硬件ID
Blackmagic Pocket Cinema Camera的“硬件ID”可显示8字符识别符。每台摄影机都具备其独有的识别符。Blackmagic RAW和ProRes视频的元数据中还会显示一个更长的32字符ID版本。这一功能有助于识别来自不同摄影机的素材。软件
可显示当前安装的软件版本号。更多关于软件更新的信息,请阅读Blackmagic Camera Setup实用程序”部分的内容。播放
该设置可用来选择在LCD触摸屏上播放来自SD卡、CFast卡或USB-C硬盘的“单个片段”还是“所有片段”。选择“所有片段”将按顺序播放所有匹配的媒体文件,选择“单个片段”将一次只播放一个片段。该设置也应用于循环功能。选择“所有片段”循环功能将播放存储介质上的所有片段,结束后从头开始。选择“单个片段”则一次只循环播放一个片段。设置6和4
Blackmagic Pocket Cinema Camera 6K Pro和6K G2中“设置”选项卡的第六页包含蓝牙设置。这些设置位于 Blackmagic Pocket Cinema Camera 4K的第四页。 蓝牙
蓝牙控制可通过便携式设备无线控制您的摄影机。您可以使用“Blackmagic Camera Control App”通过iPad远程更改设置,调整元数据,以及触发记录。您可以通过点按“设置”菜单中的“蓝牙”开关图标启用或禁用蓝牙功能。启用蓝牙功能后,蓝牙设备可在30英尺范围内检测到摄影机。摄影机在蓝牙控制方面使用与“Blackmagic SDI Camera Control Protocol”摄影机控制协议相同的命令,因此您可以编写自己的应用程序来远程控制几乎所有的摄影机设置。比如监看摄影机的各个选项和音频设置,以及摄影机内置的DaVinci Resolve调色工具,甚至镜头控制。 更多信息请参考“Blackmagic Camera Control”摄影机控制文档,网址:www.blackmagicdesign.com/cn/developer/。首次将摄影机与iPad配对:
点按“设置”菜单中的“蓝牙”开关图标启用蓝牙功能。 2 打开“Blackmagic Camera Control App”,选择您希望配对的摄影机。可用的摄影机会以摄影机字母加独有硬件ID的形式列出。比如A:AO974BEA。  选择您希望配对的Blackmagic Pocket Cinema Camera摄影机。 当您安装并第一次运行 Blackmagic Camera Control App时,系统会问您是否“允许地点访问”。如果您选择“使用期间”,您拍摄文件中的元数据将包含来自iPad的GPS数据,让您对影像进行地理标记。这些信息可以在Blackmagic DaVinci Resolve 15或更高版本中查看。 如果您不想允许使用这些信息,请选择“Never”(从不)。 如要修改设置,在iPad上前往设置、隐私、定位服务、相机。 3 初次连接时,Blackmagic Camera Control App会请求一个六位代码来配对摄影机。代码会显示在摄影机的 LCD屏幕上。将代码输入iPad,并按“Pair”(配对)。   4 当摄影机连接到您的iPad时,会弹出信息确认配对成功。  如果摄影机和iPad配对失败,摄影机会弹出错误提示。尝试再次连接。 备注 当您没有使用蓝牙控制Blackmagic Pocket Cinema Camera时,出于安全考量建议您关闭蓝牙。断开当前设备
使用该设置可断开Blackmagic Pocket Cinema Camera与当前所配对的iPad之间的连接。清除配对设备
使用该设置可清除曾与摄影机配对的设备列表。利用Blackmagic Camera Control App控制您的摄影机
将摄影机与iPad配对成功后,您可以通过iPad远程开启或关闭摄影机,改变设置,调整元数据,以及触发记录。  配对完成后,Blackmagic Camera Control App会显示该画面,您可以调整设置,开始记录。  点按右下角的场记板图标来使用或更新场记板。 Blackmagic Pocket Cinema Camera使用蓝牙低能耗(BLE)技术与设备建立通信,实现无线控制。因为与便携设备使用同样的协议,所以耗电量极低。设置7和5
Blackmagic Pocket Cinema Camera 6K Pro和6K G2中“设置”选项卡的第七页包含以下设置:这些设置位于 Blackmagic Pocket Cinema Camera 4K的第五页。 恢复出厂设置
要恢复摄影机出厂时的默认设置,请点按“重置摄影机”按钮。在确认页面上,点按“重置”确认操作。摄影机将会删除机内存储的所有LUT和预设,并重置所有设置。执行恢复出厂设置操作之前,不妨将您的预设导出到存储卡上进行备份。恢复出厂设置之后,您只要再从存储卡中导入预设就可以快速恢复。请务必注意,恢复出厂设置操作还将重置水平线功能,因此恢复出厂设置后需要重新校准运动传感器以确保准确性。 运动传感器校准
要校准水平线指示,点按“校准运动传感器”按钮。执行校准的过程中,摄影机必须保持平稳状态。这一过程大约需要5秒。 需要的话,可以将水平线设置为偏离中心。比如,如果您想把竖移设置成统一的角度,可按照需要的角度将运动传感器与摄影机校准,然后用水平线指示保持同样的角度。像素校准
Blackmagic Pocket Cinema Camera所使用的CMOS传感器是由数百万个感光像素组成。虽然经过原厂传感器校准,但经过一段时间后,有些像素的亮度或会出现变化,从而导致这些像素变得特别明显,也就是通常被人所知的“热像素”。所有摄影机传感器,不论是何产商都会产生热像素。 为解决这一问题,我们在摄影机中内置了校准功能,如果发现图像中存在任何热像素就可执行此功能。 要开始这一处理,只要盖上镜头盖,点按“校准”按钮运行像素重映射功能即可。这一过程大约需要1分钟。 LCD白平衡校准
要执行LCD白平衡校准,请调整“LCD色温”和“LCD色调”控制,让两个参考样本呈现中性观感。更改设置后,可以使用“重置”按钮让各项控制返回出厂校准设置。点按“恢复”按钮可以回到您刚才的新设置,有助于比较校准前后的效果。当LCD屏幕上显示准确的白平衡时,请保存您的设置。 预设
“预设”选项卡可用来保存和调用多达12组设置集。当摄影机被用于多个不同项目时,这一设置将非常有用。例如,您可能会将摄影机用于从纪录片到MV在内的多种不同拍摄风格,这些项目都会使用不一样的设置。摄影机的预设功能就可以让您保存某一项目或某类镜头的拍摄设置,方便下次需要时快速调用。共有12个预设槽可使用。 您还可以导入和导出预设,这对于设置多机位镜头部署是非常有用的。只需将一台Blackmagic Pocket Cinema Camera进行项目设置,然后将该预设导出到片场的所有其他Blackmagic Pocket Cinema Camera上即可。  预设选项卡可快速切换您所保存的不同设置。 备注 您的摄影机内存最多可保存12个预设。预设按钮
“预设”菜单下方设有一排按钮图标,它们所对应的功能如下图所示:| + | ✓ | ← | ← | → |
| 添加 | 加载 | 更新 | 管理 | 删除 |
保存和加载预设
要创建一个新的预设,请点按代表“添加”的图标。然后,LCD屏幕上会出现一个键盘,此时请为您的预设命名。输入名称并点按表示“更新”的图标,即可将当前所有设置保存到该预设。 如果摄影机中已经含有相同名称的预设,您可以选择覆盖替换或同时保留这两个预设。  保存预设后,在预设菜单中点按该预设的名称将其选中。要加载预设,点按代表“加载”的图标。 点按代表“更新”的图标可更新预设。然后屏幕会弹出提示,询问您是否要将Blackmagic Pocket Cinema Camera的当前设置更新为这一预设。点按代表“更新”的图标确认更新。  选择一个预设,并点按表示“加载”的图标来加载这一预设。选中的预设将以纯蓝背景显示,当前加载的预设则会在其对应的图标底部标以蓝色横线。导入预设
要导入预设,请点按预设菜单底部表示“管理”的图标。点按“导入预设”,然后点按“导入”加以确认。该操作将调出预设导入屏幕界面。如果您喜欢的预设不在当前存储卡或存储盘上,可点按触摸屏顶部的存储介质按钮来切换记录存储介质。您可以从USB-C硬盘、CFast或SD卡导入预设。 摄影机会在您所选存储介质上搜索根目录和名为“Preset”的预设文件夹,并列出可用的预设。保存在其他位置的预设是不可见的。 点按某个预设将其选中,然后点按“导入”确认选择,并将其复制到摄影机中的下一个可用预设槽内。 如果您想要导入的预设和摄影机中保存的某个预设名称相同,可选择覆盖或同时保留二者。屏幕右上角会出现摄影机剩余预设空位的数量。摄影机中的预设空位有多少,您就能导入多少预设。 备注 如果摄影机的12个预设槽都已被使用,导入菜单就不会出现,此时您需要删除已有的预设来腾出空间。导出预设
要将某个预设导出到存储卡或USB-C硬盘上,请点按您想要导出的预设,然后点按表示“管理”的图标按钮。点按“导出所选预设”,然后点按导出预设的目标存储介质。如果已存在相同名称的预设,请选择是否覆盖该预设或者保留两者。摄影机会将预设导出到名为“Presents”(预设)的文件夹。删除预设
要删除某个预设,请将其选中并点按“删除”图标。在弹出的确认选择框中,点按“删除”。3D LUT
"LUT"菜单可用来将多个3DLUT导入、导出并应用到摄影机的各个输出上。 3D LUT简介
3D LUT可套用到摄影机LCD触摸屏和HDMI输出的图像上。套用LUT可令摄影机为某一特定色彩和亮度输入显示相应的色彩和亮度输出。例如,某个LUT可令摄影机在接收到暗淡的蓝色输入时显示出鲜艳饱和的蓝色。当使用Blackmagic RAW格式或“Film”动态范围模式拍摄素材时,这一功能就非常有用,因为以上两者的拍摄片段都被刻意处理成低饱和度的平淡画面。套用LUT可以让您大致掌握素材调色后的画面。 您可以使用DaVinci Resolve或其他调色软件轻松创建3D LUT,也可以从网上找到各类LUT。摄影机可存储最多10个17点或33点精度的3D LUT,每个大小上至1.5兆字节。加载后,您可以选择一类LUT显示在摄影机的LCD触摸屏和HDMI输出画面上。 Blackmagic Pocket Cinema Camera支持使用DaVinci Resolve以.cube格式创建的33点精度3D LUT,以及使用LUT转换程序转换成Resolve的.cube格式17点精度3D LUT。您的摄影机可使用高品质四面体插值算法处理3D LUT。 更多关于显示LUT的信息,请参阅本手册“监看设置”部分的内容。 备注 Blackmagic Pocket Cinema Camera不会默认对记录的素材套用或“烧录”LUT,但是您可以选择将 LUT“烧录”到素材中。 如果您在后期制作阶段没有时间对素材进行调色,或者需要直接将素材交付给客户或剪辑师,这一选项就会十分有用。 当您将LUT作为现场预览工具使用时,所套用的LUT上的信息会作为元数据被保存到记录的片段中。DaVinci Resolve可以在元数据选项卡的“使用的LUT”一栏中显示这一信息,方便调色师核对现场所使用的LUT名称。内置LUT
摄影机提供一系列内置LUT,您在用“Film”动态范围模式或Blackmagic RAW格式拍摄时可以预览不同的效果。 每款摄影机都会提供针对第五代色彩科学的LUT: - Gen 5 Film to Extended Video 可显示比“Film to Video”LUT更宽的动态范围,能应用温和的对比度调整和平滑的高光过渡。 Gen 5 Film to Rec 2020 Hybrid Log Gamma 可显示适合HDR屏幕的Gamma曲线,并且兼容标准动态范围的屏幕。 Gen 5 Film to Rec 2020 PQ Gamma 显示基于人眼感知形成的Gamma曲线,用于高效编码HDR图像。 - Gen 5 Film to Video 与高清视频的REC 709色彩标准类似,拥有高对比度和饱和度。如果您将Blackmagic Pocket Cinema Camera和其他使用REC 709色彩空间的广播级摄影机共同使用时,这一设置就会十分有用。LUT按钮
摄影机“LUT”屏幕界面下方设有一排按钮图标,它们所对应的功能如下图所示: 导入LUT
要导入3D LUT, 请点按“LUT”菜单底部表示“管理”的图标。点按“导入LUT”, 然后点按“导入”加以确认。该操作将调出LUT导入屏幕界面。如果您喜欢的$D LUT不在当前存储卡或存储盘上, 可点按触摸屏顶部的存储介质按钮来切换记录存储介质。您可以从USB-C硬盘、CFast或SD卡导入LUT。 摄影机会在您所选存储介质上搜索根目录和名为“3DLUTs”的文件夹,并列出可用的LUT。保存在其他位置的LUT是不可见的。 点按某个LUT将其选中,然后点按“导入”确认选择,并将其复制到摄影机中的下一个可用LUT位置栏内。 值得注意的是,如果您想要导入一个新的LUT,但是10个3D LUT位置栏都已占满,那么您就需要删除一个已有的LUT来腾出空间。 如果您想要导入的 LUT 和摄影机中保存的某个 LUT 名称相同,就需要选择是覆盖替换还是同时保留这两个 LUT。屏幕右上角会出现摄影机剩余 LUT 位置栏的数量。摄影机中的 UT 位置栏有多少,您就能导入多少 LUT。 备注 如果无法导入LUT,可能是因为文件大小的缘故。您可以使用Lattice等LUT编辑器来检查其大小,或者使用您计算机上的任何一种文本编辑器将它打开。在“LUT_3D_SIZE”的标签边上会有一个表示LUT大小的数字。如果该数值不是或33,您可以使用Lattice将3D LUT的大小调整到17点。套用LUT
将一个LUT保存到摄影机中之后,在LUT菜单中点按其中一个LUT将其选中,然后点按加载图标。就可以将该LUT套用到摄影机的所有输出上。要在摄影机的输出画面上显示加载的LUT,请到监看菜单中开启“显示LUT”。更多信息请参考“监看设置”部分的介绍。导出LUT
要将某个LUT导出到存储卡或USB-C硬盘上,请点按您想要导出的UT,然后点按表示“管理”的图标按钮。点按“导出所选LUT”,然后点按导出LUT的目标存储介质。如果已存在相同名称的LUT,请选择是否覆盖该LUT或者保留两者。摄影机会将LUT导出到名为“3DLUTs”的文件夹。删除LUT
要删除您不再使用的LUT以腾出更多空间,请选中您想要删除的LUT并点按表示“删除”的图标按钮。在弹出的确认选择框中,点按“删除”。内嵌3D LUT
如果您使用Blackmagic Pocket Cinema Camera拍摄时应用了3D LUT,那么所选LUT会被嵌入到您正在记录的Blackmagic RAW文件中。这个3D LUT会被保存在记录.braw文件的头文件中,可在后期制作环节轻松应用到素材上,无需处理单独文件。 因此,当剪辑师或调色师拿到的是Blackmagic RAW文件,他们就可以轻松获取影片拍摄时所使用的LUT,显著降低了在片段上使用错误3D LUT的可能性。他们在剪辑或调色时可以选择是否将这个3D LUT应用到素材上,并且可以随时禁用这个3D LUT。 将记录菜单中的“在文件中套用LUT”开关设置为“开”后,在Blackmagic RAW Player播放器和DaVinci Resolve中打开记录的片段时,画面上就已应用所选的3D LUT。 3D LUT可轻松开启或关闭,但会始终跟随Blackmagic RAW文件,因为它是写入到片段上的。DaVinci Resolve的RAW设置面板中还设有一个“Apply LUT”(套用LUT)开关,可用来启用和禁用Blackmagic RAW文件中的3D LUT。 DaVinci Resolve中的“Apply LUT”设置和摄影机中的设置相同。也就是说,您在拍摄时可以通过在摄影机中进行设置来告诉调色师使用这一LUT,而调色师则可以在DaVinci Resolve中使用“Apply LUT”设置将它关闭。录入元数据
元数据是片段内所保存的一系列信息,这些信息包括镜次号码、摄影机设置以及其他识别信息。后期制作时,这些信息对于素材的整理很处理起到很大的帮助。例如,镜次、镜头和场景编号是十分必要的整理工具,而镜头信息则能用于自动移除变形现象或获得更匹配的视觉特效图层。 Blackmagic Pocket Cinema Camera可自动将一些元数据保存到每个片段中,如摄影机设置、时间码以及日期和时间等。您还可以使用摄影机的场记板功能添加更多信息。场记板
在主菜单视图上左右滑动摄影机的触摸屏可调出场记板界面。 场记板界面分成“片段”和“项目”选项卡。“片段”选项卡包含的信息视片段而定,而“项目”选项卡可用来键入各个片段的共同信息,如项目名称、导演、摄影机ID以及摄影师ID等。 提示当“监看”选项卡中的“显示状态信息”被设置为“导演”时,可以通过HDMI输出查看到输入到场记板中的元数据。请阅读本手册“监看设置”部分的内容获取更多信息。“片段”元数据
在待命模式下和播放模式下更改片段的元数据的操作会有所不同。在待命模式下,当您的摄影机准备好记录时,片段元数据会保存在下一个记录的片段中,除非“将上个片段标为好镜次”按钮对最近记录的片段应用了“好镜次”标签。在播放模式下,当您检查已经拍摄的素材时,会显示“好镜次”按钮,并且片段元数据始终附加在当前查看的片段上。  当摄影机在播放模式下时,“场记板所属片段”可识别场记板适用的片段,并显示“好镜次”按钮。在待命模式下时,场记板用于“下一个片段”,并显示“将上个片段标为好镜次”按钮。场记板所属片段
“场记板所属片段”设置可显示当前出现在“片段”选项卡中元数据的所在片段。在播放模式下时,该设置针对当前片段,在待命模式下时,该设置针对您记录的下一个片段。镜头数据
如果您使用的镜头带内置电子元件可与摄影机传输信号,您可以在这里查看镜头型号信息。要更改或添加任何您正在使用的镜头的相关信息,请按上方的“镜头数据”选项。 详情请阅读本手册“镜头数据元数据”部分的内容。卷号
可显示当前卷号。 Blackmagic Pocket Cinema Camera可自动递增卷号,因此通常您无需手动键入。当您开始新的项目,并且希望重新从卷号“1”开始,可以进入场记板的项目选项卡,然后点按“重置项目数据”。场景
可显示当前场景号,以及当前镜头号和类型。 这一按钮上显示的号码始终代表当前场景。您可以使用场景号两侧的左右箭头来调整号码,或点按场景号进入场景号编辑器进行编辑。 场景号可设在1到9999之间。 在场景号编辑器中为场景号添加一个字母后,您还可以为当前拍摄镜头标注。比如23A"表示场景23, 镜头1。如果您在场景号中添加了镜头字母,摄影机就会在您进入场景号编辑器时建议下一个场景号和镜头字母。例如,如果您的当前场景号为7B,那么摄影机就会建议使用“8”和“7C”。 场景号提示功能还能在右上角显示当前拍摄镜头类型的信息。您可以在键盘右侧的场景号编辑器中选中这些信息。 拍摄镜头的类型如下:| WS | 远景 |
| MS | 中景 |
| MCU | 中特写 |
| CU | 特写 |
| BCU | 大特写 |
| ECU | 极特写 |
镜次
按钮可显示当前镜头的镜次号。您可以点按镜次号两侧的左右箭头调整号码,或点按镜次号按钮进入镜次号编辑器进行编辑。 提示 镜头号和场景字母用完之后,镜次号将回到“1”。 您可以在镜次号编辑器中添加描述。该设置位于镜次号键盘右侧,并且对应以下内容: PU 即“补拍”。指之前某个镜次的重拍画面,可在正式拍摄结束后添加额外的影像材料。 VFX 即“视觉特效”。指一个用于视觉特效的镜次或镜头。 SER 即“镜次组”。指摄影机不中断记录所拍摄的多个镜次。  输入“镜次”元数磁磁magicPocketCinemaCamera的屏幕键盘右侧会提示其他镜头类型。好镜次
点按“好镜次”可为好镜次添加标签,这样能方便后期制作时调出这些镜次。该按钮会对播放模式下当前查看的片段应用“好镜次”标签。如果摄影机在待命模式并已准备好记录,那么“将上个片段标为好镜次”按钮就会对上一个记录的片段应用“好镜次”标签。棚内/外景
在待命模式下时,点按“棚内”或“外景”可在下一个片段添加相应标签;在播放模式下时,点按“棚内”或“外景”可在当前片段添加相应标签。白天/夜晚
在待命模式下时,点按“白天”或“夜晚”可在下一个片段添加相应标签;在播放模式下时,点按“白天”或“夜晚”可在当前片段添加相应标签。项目元数据
不论您在待命模式还是播放模式,“项目”元数据的表现都一样。这一元数据可始终将您的项目作为整体,并且独立于片段编号。  使用摄影机的“项目”场记板选项卡输入项目的详细信息项目名称
可显示当前项目的名称。点按铅笔图标可更改项目名称。摄影机
可以单个字母显示摄影机索引。点按铅笔图标可更改摄影机索引。导演
可显示当前项目的导演名字。点按铅笔图标可更改导演名字。摄影师
可显示摄影师信息。点按铅笔图标可更改摄影师名字。重置项目数据
如果要清除所有项目信息,可点按“重置数据”按键。“镜头数据”元数据
“镜头数据”设置可显示当前摄影机所安装的镜头的相关信息。许多电子镜头可自动提供镜头型号、光圈以及焦距等信息。如果您使用的镜头并不提供此类信息,或者您想要键入更多数据,可以点按该设置中的铅笔图标来手动输入。该操作会调出“镜头数据”菜单,其中包含以下信息:  图中的“镜头数据”菜单显示是的从安装的镜头上自动输入的信息,以及手动输入的滤镜信息。- 镜头类型
可显示镜头型号。如果您的镜头类型未自动显示在此栏,请点按这一设置手动输入相关数据。您的摄影机为众多常用镜头保存有内部数据库,因此如果您需要手动输入数据,摄影机将会在您键入信息时自动给出建议使用的名称。这一功能可以加快数据输入的速度。  如果镜头不具备自动提供信息的功能,请使用屏幕键盘来输入镜头数据。·光圈
可显示片段开头的镜头光圈设置。该信息是以f-或T-挡的形式显示取决于您使用的镜头,如果它自动提供的话。点按这一设置来手动输入数据。·焦距
可显示记录片段开头的镜头焦距设置。如果镜头自动提供这一信息,焦距会以毫米为单位显示。点按这一设置来手动输入焦距。- 距离
可显示记录片段的镜头对焦距离设置。有些镜头能以毫米为单位自动提供这一数据。您也可以手动输入这一数据。·滤镜
可显示当前镜头使用的滤镜。点按这一设置来手动输入数据。您可以输入多条信息,并以逗号隔开。  滤镜信息需手动输入 您只要点按“镜头数据”菜单中的“重置镜头数据”图标就可以随时清除镜头信息。屏幕将弹出提示确认您的选择。确认后,所有镜头数据都将被清除,并被替换成任何当前安装镜头自动提供的镜头数据。如果您在这些栏中手动输入了任何信息,下次安装镜头时您需要重置镜头数据,否则手动输入的值会保持不变。摄影机视频输出
HD监看输出
摄影机的标准尺寸HDMI接口可输出1080p HD视频,因此您可以连接监视器,甚至是消费级电视机来监看画面。其10bit输出还支持HDR和屏幕叠加信息功能,可显示摄影机的各项状态,是现场监看的理想之选。 当LCD无法使用时,比如摄影机安装在高处的摇臂或车上,可以使用HDMI监看。如果要在HDMI输出上显示监看信息,请到“监看”设置的“HDMI”菜单下调整叠加选项即可。HDMI叠加信息包括帧导栏和记录详情、摄影机设置等信息。如果您只需要监看拍摄的镜头,您可以关闭叠加功能,获得无叠加信息的HDMI输出。 搭配使用如Blackmagic Micro Converter HDMI to SDI等转换器,就可以将信号转换成SDI,从而连接SD监视器、采集设备、广播级切换台等众多设备。您还可以通过blackmagic Pocket Cinema Camera的USB端口为Blackmagic Micro Converter HDMI to SDI提供电源。Blackmagic Zoom Demand和 Blackmagic Focus Demand
 - Blackmagic Zoom Demand和Blackmagic Focus Demand是选配附件,在Blackmagic Pocket Cinema Camera 6K Pro和6K G2机型上,可以在使用兼容伺服驱动的EF镜头时用来控制对焦和变焦。 这两款配件可以连接到三脚架或摄影机台座的手柄上,方便您一边控制对焦和变焦,一边还能同时控制摄影机的平移或竖移。控制器上丰富的按钮和控制可让您细调变焦控制的速度和灵敏度,设置自动白平衡、切换帧导栏以及更多操作。连接至您的摄影机
连接至三脚架把手
每个设备可通过其安装支架连接到您的三脚架的把手上。通过齿形盘安装点将其安装在支架上: 要将Blackmagic Focus Demand安装到支架上,只要通过齿形盘安装点将其连接在一起,然后拧紧固定旋钮将其固定即可。   1 将Blackmagic Zoom Demand或Blackmagic Focus Demand对准齿形盘安装点。 2 拧紧固定旋钮,将其固定在支架上。 这样就安装到了支架上,下面就可以将支持安装在三脚架把手上。每个支架一端设有一型锁定装置,可打开一个合页,然后可以锁紧。   1 逆时针转动锁定装置旋钮可将锁定装置松开。该操作可打开型锁定装置。 2锁定装置打开后,将支架放在三脚架臂上,合住并拧紧将其关闭。转动支架将其移动到三脚架支臂的合适位置。 3 拧紧锁定装置旋钮将支架固定在三脚架支臂上。连接至您的摄影机
Blackmagic Zoom Demand和Blackmagic Focus Demand设有两个USB-C端口。您可以单独使用一个,或者两个一起使用。 每个控制器都提供一米长的USB-C线缆,可直接将摄影机后侧的USB-C扩展端口连接至控制器的“CAM”端口。 如果您要使用两台设备,可菊链式将第一台设备通过USB-C连接至第二台设备。  采用菊链式连接后,两款控制器都可以通过摄影机一侧的USB-C端口实现控制。例如,将USB-C线缆的一端连接摄影机侧面的USB-C端口,另一端连接对焦控制器的“CAM”端口。再使用第二根线缆,连接对焦控制器的“LOOP”端口和变焦控制器的“CAM”端口。  Blackmagic Focus Demand和Blackmagic Zoom Demand可让您视线不离屏幕就可以控制对焦和变焦使用Blackmagic Focus Demand
这部分内容介绍了Blackmagic Focus Demand性能和接口。 1 控制旋钮
顺时针转动对焦环可将物体对焦到镜头更近的位置,逆时针转动则拉远物体。在菜单里将其设为“前进”或“后退”可以更改对焦方向。 提示如果还使用Blackmagic Zoom Demand, Blackmagic Focus Demand进行对焦一边按快速对焦按钮可放大图像。2 控制杆
这三个控制杆延伸了控制面直径,让您可以用指尖更精细地进行对焦调整。3 USB端口
用于将Blackmagic Focus Demand连接到摄影机,并可菊链式连接到使用Blackmagic Zoom Demand。“IN”端口还可以用来通过Blackmagic Camera Setup实用程序升级内部软件。使用Blackmagic Zoom Demand
Blackmagic Zoom Demand上的控制可通过摄影机设置映射。要更改按钮功能,请参阅“设置”中“Setup设置”部分的介绍。 以下指令是默认设置: 1 变焦F1
这是变焦功能按钮1。默认设置下,这个映射为“记录”按钮可记录到Blackmagic Studio Camera USB-C端口所连接的外部硬盘上。2 变焦F2
这是变焦功能按钮2。在控制器另一侧是一个一样的按钮,可进行同样的操作,从而可供左右手进行控制。默认设置下,该按钮被设为一个快速变焦功能,可以立即操作实时画面。 备注 快速变焦功能仅在Blackmagic Pocket Cinema Camera 6K Pro和6K G2的LCD屏上可见,在所连接的切换台或录机的输出视频上不可见。3 变焦F3
这是变焦功能按钮3。默认情况下,该按钮被设置为“自动白平衡”。4 变焦F4
这是变焦功能按钮4。默认情况下,该按钮被设置为“帧导栏”。5 拇指摇杆
Blackmagic Zoom Demand的把手提供了拇指摇杆控制。向左推动摇杆拖动可缩小,向右推动则可放大。在摄影机的菜单设置中设置相反方向的变焦控制。6 速度拨盘
通过调整设备顶部的速度拨盘可对变焦的速度进行微调。您还可以将该拨盘映射到控制机电平、光圈调整,甚至是对焦调整!7 USB-C端口
用于将Blackmagic Zoom Demand连接到摄影机,并可菊链式连接到使用Blackmagic Focus Demand。“IN”端口还可以用来通过Blackmagic Camera Setup实用程序升级内部软件。使用DaVinci Resolve
使用Blackmagic Pocket Cinema Camera拍摄仅是影视内容创作过程中的一部分而已,就如整个过程中的媒体备份和管理、剪辑、调色到最后的编码输出母版文件一样都很重要Blackmagic Pocket Cinema Camera中包含有Mac和Windows版本的DaVinci Resolve软件,这是一套用于拍摄和后期制作的完备解决方案!  备注 我们推荐使用最新版本的 DaVinci Resolve,对Pocket Cinema Camera拍摄的镜头片段进行准确的调色。17或更高版本均可为所有Blackmagic摄影机和新增的Blackmagic RAW提供准确调色。 将您的CFast、SD卡或SSD连接到计算机后,就可以使用DaVinci Resolve“媒体”页面中的“克隆”工具,在拍摄过程的同时进行素材备份。由于任何类型的存储介质都有可能损坏或出现故障,因此建议您进行文件备份以防万一。使用DaVinci Resolve备份媒体文件后,就可以将片段添加到DaVinci的媒体池中,随后在DaVinci Resolve里进行一站式剪辑、调色、精编制作。 DaVinci Resolve拥有高端数字电影制作所需的先进技术,是大多数影院大片所使用的调色工具,因此比简单的非编软件工具要强大得多。使用DaVinci Resolve进行剪辑和调色可让您充分利用这一技术。 以下内容介绍了如何使用DaVinci Resolve开展您摄影机文件的制作工作。当然,DaVinci Resolve是非常高端的软件,它包含了大量的功能,这远比您在用户界面上一眼看上去的要多得多。想要进一步了解如何使用DaVinci Resolve,请访问Blackmagic官网查阅DaVinci Resolve操作手册,或者通过官网观看相关的培训课程和教学视频。项目管理器
导入片段开始剪辑之前,您需要先使用项目管理器来建立一个项目。 初次运行DaVinci Resolve时,首先出现的界面就是项目管理器窗口,您也可以点击用户界面右下方的主菜单图标按钮,随时打开这一窗口。这样能便于打开之前创建的项目或创建新项目。 要创建新项目,点击窗口底部的“新建项目”按钮,然后为项目命名。点击“创建”。 您可以使用“快编”页面快速开始项目剪辑工作。  项目管理器中可显示属于当前用户的所有项目 更多关于项目管理器的信息,请到Blackmagic Design官网的支持页面下载DaVinci Resolve操作手册进一步查阅。使用快编页面剪辑
快编页面能提供高效、活动的剪辑流程,能让您快速组合、修剪和编辑片段。 该页面设有两条时间线,能分别同时提供完整时间线视图和操作部分的细节放大视图。这样一来,您就可以先将片段快速拖放到完整时间线的任何位置,然后在细节放大时间线上进行剪辑,无需切换和调整界面。这样的工作流程能实现笔记本电脑快捷编辑,省去了繁琐的时间线缩放和滚动查找操作,从而节省大量时间。快编页面布局
打开快编页面后,将会看到媒体池、检视器窗口和时间线。这三个主要窗口能帮助您完成剪辑全过程中的各项控制。  图为快编页面的默认布局,其中媒体池为缩略图显示模式 更多关于快编页面的信息,请查阅DaVinci Resolve操作手册在“快编页面”章节的介绍。媒体选项卡
用户界面的左上角设有五个选项卡。 点击这些选项卡可分别打开不同的媒体工具集,它们可用来创建不同的编辑操作。例如,第一个是“Media Pool”(媒体池)选项卡,根据图示可判断该选项卡已被选中。其他选项卡分别为“同步媒体夹”、“转场”、“标题”和“特效”。 - 媒体池:媒体池包含了您使用媒体页面导入的所有片段、文件夹以及文件。您也可以直接从快编页面导入文件,这样就不必回到媒体页面导入新的片段了。 SyncBin:这个强大的功能可通过时间码、日期和时间来自动同步所有片段,让您选择不同机位角度来制作多机位项目。 - 转场:点击同步媒体夹右侧的转场按钮,可调出所有视频和音频转场,素材中使用。它们包括交叉叠化和动态划像等普通转场。 - 标题:标题选项卡位于转场右侧。您可以点击它来选择想要使用的标题,如标准滚动文本或下横栏标题。此外,还有一系列Fusion模板供您使用,获得更具动感的动画标题,具体可在DaVinci Resolve的Fusion页面中自定义。 - 效果:第五个是效果选项卡。该选项卡可提供所有滤镜和特效,能让丰富素材画面,比如模糊、发光和镜头特效等。该选项卡里有许多强大的特效供您选择,使用搜索工具就能快速找到。 提示使用媒体选项卡图标一侧的搜索工具可精确查找您需要的效果。例如,如果您选中了转场选项卡,在搜索栏输入“叠化”后,所有叠化转场类型就会被筛选出来显示在检视器中,帮助您快速找到想要的叠化转场。检视器选项卡
检视器窗口的左上角是检视器模式按钮。 检视器模式按钮 这些按钮可控制当前使用的检视器,包括“源片段”、“源磁带”以及“时间线”。这些检视器模式能在您选择片段进行编辑时提供大量控制,因此不妨花些时间了解它们的工作原理。| 源片段 源片段 | 检视器可显示来自媒体池的单个片段,您可以沿整条检视器时间线设置入点和出点,从而获得更好的控制。双击媒体池中的某个片段将其选中,或者将它拖到检视器中,就可以进行查看。 | |
| 源磁带 源磁带视图可查看媒体池中的所有源片段。这项强大的功能是您的得力助手,它能帮在所有片段当中快速搜索,找出某个具体片段。当您在片段上方搓擦播放头进行查看时,媒体池中相应片段的缩略图也会高亮显示。这意味着,当您找到想要编辑的片段后,只要点击源片段选项卡,对应的源片段就会自动出现在检视器中。源磁带检视器模式能让您可以充分利用非线性编辑的优势,让您自由进行剪辑工作,快速找到镜头,尝试新的想法,呈现出精彩画面。 | ||
| 时间线 在时间线检视器模式下,您可以查看并剪辑时间线,播放项目并精修剪辑。 | ||
将片段导入媒体池
现在,您可以开始将媒体文件导入项目中了。您可以使用顶部的导入工具,在快编页面的媒体池窗口中完成这一操作。  选中其中一个导入选项,将媒体文件添加到项目中| 导入媒体 | 该选项可导入您在存储位置选中的单个媒体文件。 |
| 导入媒体文件夹 | 要从媒体存储中导入一个文件夹,请选择这一选项。导入文件夹时,DaVinci Resolve会保留文件结构,将每个文件夹视作一个单独的媒体夹,方便您在不同媒体夹之间导航,找到需要的视频和其他媒体文件。 |
导入媒体步骤如下:
1 点击导入媒体或导入媒体文件夹图标。 导航到想要导入的媒体文件所在的媒体存储位置。 3 选中文件或文件夹,点击“打开”。 将媒体添加到项目中之后,请保存更改。DaVinci Resolve设有快速简便的自动保存功能,叫做“实时保存”。您保存项目一次之后,“实时保存”功能将在您每次更改后自动保存,有效防止数据丢失。 更多关于“实时保存”和其他自动保存功能的信息,请查阅 DaVinci Resolve 操作手册。将片段添加到时间线
熟悉了媒体选项卡和检视器模式按钮后,现在就可以打开媒体池并快速开始在时间线上添加片段了。  图为快编页面的时间线,上方为完整时间线,下方为局部放大时间线 时间线是进行剪辑的地方,它就像是一块工作板,您可以在轨道上放置片段,来回移动片段位置,并且进行修剪。轨道可以对片段进行上下分层,方便您尝试不同的剪辑版本并建立转场和添加特效。比如,您可以将一个片段放置在一个轨道上,尝试某个剪辑版本的效果,而下方的轨道均不会受到影响。 将片段添加到时间线有多种不同的方法,比如智能插入、附加以及叠加等。附加片段
选择镜次和组合剪辑时,您可能想要将这些镜头相继添加到时间线上。进行这类操作时,就可以使用附加工具来快速完成剪辑。  点击附加工具图标按钮,快速将片段添加到上一个片段的结束处附加片段 步骤如下:
1 双击媒体池中的一个片段,将其在检视器中打开。 2 使用搓擦修剪工具,拖动入点和出点来选中镜头的精确时长。您也可以按“I”和“O”键盘快捷键来设置入点和出点。  3 现在,点击媒体池下方的附加图标按钮。 第一个片段就被放置在了时间线的开头。 重复步骤1到步骤3的操作,继续添加更多片段,它们会自动附加到相应位置,确保时间线上不会出现空隙。  附加片段的操作方式能确保时间线的片段之间不出现空隙 提示 您可以为“附加”图标指派一个键盘快捷键,从而进一步加快操作进程。例如,您可以将“P”键指派为该功能,然后使用f和“O”键设置入点和出点,再按“P”键附加该片段。更多关于指派快捷键的信息,请查阅DaVinci Resolve操作手册。在时间线上修剪片段
将片段添加大时间线上后,您就能完全控制片段,进行移动和修剪编辑了。 要修剪某个片段,可将鼠标指针悬停在相应片段的开始或结束处,然后点击并左右拖动。例如,向左或向右拖动片段尾部,可分别减少或增加其时长。您可能注意到,执行刚才的剪辑操作后,所有片段在时间线上的位置都会发生变化,以适应新的调整。这就是快编页面帮助您节省时间的一种方式。 您还可以选取一个片段,然后将它放置到大型时间线的新的视频轨道上,无需缩放操作就可完成。这样能极大程度地缩减在庞大时间线上来回导航所花费的时间,从而有效加快剪辑进程。音频修剪视图
音频修剪视图能放大时间线上的音频波形显示,从而帮助您确保音频剪辑的准确性。该功能对对白场景或音乐片段剪辑很有帮助,它能帮助您快速找到词和词之间、节奏和节奏之间的编辑点。使用音频修剪视图步骤如下:
1 点击位于时间线左侧、吸附和标记工具之间的音频修剪图标。  音频修剪视图按钮 2 当您修剪某个编辑点时,时间线会显示放大的波形图。完成修剪后,时间线上的片段会回到正常大小。  音频修剪视图会放大时间线上的音频波形。 在快编页面上完成片段剪辑之后,可能还需要添加一个标题。下节内容将具体介绍如何操作。添加标题
将标题添加到时间线上十分简单,并且种类多样。 要查看可供使用的标题类型,可点击用户界面左上角的“标题”媒体选项卡。在出现的选项窗口中,您会看到所有可供使用的标题生成器以缩略图的形式显示,包括下横栏标题、滚动标题、标准文本标题等。您还可以添加各种Fusion标题,也就是可自定义的动画标题。预览标题
为时间线添加标题前,请先到“标题”选择窗口中进行预览。这样能让您快速浏览所有可用选项,然后做出选择。创建字幕步骤如下:
1 点击位于标题面板右上角的选项菜单,选择“搓擦浏览预览”。  从选项菜单中启用搓擦浏览预览。 2 到“标题”选择窗口中,用鼠标指针在缩略图上方来回搓擦,就能在检视器中预览这一标题。如果您预览的是动画或Fusion标题,请在该标题上方从左至右移动指针来查看动画效果。  在标题上方来回搓擦鼠标指针可在检视器中预览效果。 选择好标题后,您就可以把它添加到时间线上了。添加标准标题步骤如下:
点住“标题”,将其拖放到时间线上。您可以任选一条时间线,但是为了提高准确度,建议您使用放大显示的时间线。标题会自动创建一个新的视频标题轨道,并且会吸附到播放头的位置。 2 松开鼠标后,标题就会出现在新的轨道上。您可以想处理视频片段一样,移动标题的位置或更改其时长。 3 如要编辑标题,可点击新的标题片段,然后点击片段检视器下方的“工具”图标按钮。 界面中会显示一排工具,可用来修改标题片段。这些工具包括变换、裁切、动态缩放等。 4 点击“检查器”选项卡。 检查器窗口打开后,您可以输入一个标题,然后编辑文本设置,比如字距、行距、字体、颜色等等。 您可以使用多种选项,将标题自定义为理想中的效果。建议您不妨自行尝试和摸索所有设置,看看各种设置带来的不同标题效果。 提示您也可以使用搓擦浏览功能来预览“快编”和“剪辑”页面上的特效、转场、生成器和滤镜。使用Blackmagic RAW文件
Blackmagic RAW片段可为您的后期制作提供最大的灵活性。这样能方便您在更改原始摄影机设置时调节片段各项参数,如白平衡和ISO设置。使用Blackmagic RAW格式还可保留暗部和亮部的色调信息,这将在细节恢复操作时非常有用,比如恢复过曝的天空和过暗的图像部分。 如果您追求的是更高的画质,或者拍摄亮部和暗部有显著差别的影像并于随后进行细节恢复处理并加以调色,那么使用Blackmagic RAW格式将是不错的选择。 由于Blackmagic RAW速度快,文件小,您不需要创建代理文件就可以像标准视频片段一样播放。 操作手册这部分内容描述了关于Blackmagic RAW功能,以及如何在DaVinci Resolve工作流程中使用Blackmagic RAW文件的信息。 提示开始调色前,先为调色页面的片段调整Blackmagic RAW设置是较好的做法。Blackmagic RAW的片段设置
当您首次导入Blackmagic RAW文件时,DaVinci Resolve会根据拍摄时所使用的ISO、白平衡以及色调设置对文件中包含的摄影机数据进行解码。如果您对这些设置下的画面风格满意,就可直接开始编辑。 使用Blackmagic RAW格式拍摄的一大好处在于,您完全不会受限于这些设置!使Blackmagic RAW文件可获得灵活的后期处理选项,这样您就可以逐渐发展出自己的一套工作流程。尝试在“Camera Raw”选项卡中对每个片段进行“片段”设置,您会发现Blackmagic RAW格式有多么强大和灵活。  在“Camera Raw”选项卡中,从“解码方式”菜单中选择“片段”,可调整单个片段的Blackmagic RAW设置更改Blackmagic RAW设置
一旦启用了DaVinci Resolve的Blackmagic RAW片段设置,片段设置和Gamma控制就都可以进行调整了。通过调整这些设置可以优化您的片段,让其更接近全面一级校色的效果。当使用DaVinci Resolve示波器时更为强大,有助于中性化和平衡片段,为片段应用某种风格做好准备。 以下内容介绍了关于片段和Gamma控制的信息。ISO
升高或降低此设置可调整ISO数值。如果您需要将片段调整到更亮或更暗的起始点进行调整时,此设置很有用。高光恢复
勾选该复选框可使用来自未裁切通道的信息来重建裁切通道中的高光信息。色域压缩
勾选该选项后,系统会自动保持安全的色域值。色温
可将图像的色温调整到暖色或冷色。该操作有助于每个图像的色彩平衡。色调
调整此设置可为图像添加绿色或品红色,从而起到平衡色彩的作用。曝光
通过此设置可调整画面的整体亮度。饱和度
饱和度控制默认为1,范围从最小饱和度0到最大饱和度4。对比度
默认为1.0,将滑块向左拖动可将对比度调至最小为0,向右拖动可将对比度调至最高为2。中点
Blackmagic Design Film模式下,中间灰值默认为0.38,也就是 38.4% 。向左拖动滑块可降低中点,向右拖动最高可增加到100。当对比度的调整与默认设置不一致时,您可以修改高光和阴影过渡。高光过渡
调整高光时,向左拖动滑块可将该值降低到,向右拖动滑块可将该值增加到2。默认值是1。阴影过渡
向左拖动滑块可将阴影降低到0,向右拖动可将阴影增加到2。白电平
如要调整Gamma曲线的白场,可将滑块在最高值2和最低值0之间拖动。默认值是1。黑电平
如要提高自定义Gamma曲线的黑场,可将右边的滑块从最低值-1拖动至最高值1。默认值是0。使用视频黑电平
点击复选框将黑电平设置为视频模式。导出帧
点击“导出帧”按钮,可让您从Blackmagic RAW片段中导出某一帧画面。更新Sidecar
点击此按钮可为当前片段更新Blackmagic RAW Sidecar文件。 您对Blackmagic RAW片段所做的任何修改都会被识别为Blackmagic Design Custom的Gamma设置更改。  如果您希望把片段恢复到任何可用的默认 Gamma选项,可以在 Gamma下拉菜单中选择相应选项。 提示用“Video”动态范围拍摄的影像无法使用Gamma控制,但Blackmagic RAW数据并没有丢失。只需从Gamma下拉菜单中选择“Blackmagic Design Film”或“Blackmagic Design Extended Video”,然后进行调整。保存您对Blackmagic RAW的修改
调整BlackmagicRAW片段的Gamma控制。 2 点击“更新Sidecar”按钮。 系统将在同一个文件夹里创建一个“Sidecar”文件作为.braw文件。当另一位用户导入Blackmagic RAW文件时,DaVinci Resolve会自动读取这些Sidecar文件。如果您进行了其他调整,请再次点击“更新Sidecar”。Blackmagic RAW的项目设置
如果您需要改变适用于所有片段的设置,比如:统一修改白平衡或O,可以使用项目的“Camera RAW”设置进行统一修改。为Blackmagic RAW进行项目设置:
1 点击“文件”,选择“项目设置”,进入项目设置菜单。 2 在“Camera RAW”选项卡中,您会看到“RAW配置文件”旁边有一个菜单。点击箭头可从列表中选择“Blackmagic RAW”。 3 在“解码方式”菜单中选择“项目”。 4 从菜单中选择一种色彩科学选项。 5 将白平衡设置定为“自定义”。 6 从Gamma菜单中选择"Blackmagic Design Custom”。将色彩空间设为"Blackmagic Design"。 7 在“解码质量”菜单中选择分辨率。对于性能有限的系统,较低的分辨率播放效果会更好。之后也可以调整为全分辨率,然后输出最高质量的文件。 现在,您可以调整片段的摄影机设置,比如饱和度、对比度和中点等。这将影响项目中设置为使用“项目”解码的所有片段。使用调色页面为片段调色
将片段添加到时间线,并且添加了标题之后,就可以开始使用调色页面进行调色了。调色页面非常强大,影片的整体风格将在这里成型。在这个例子中,我们将首先平衡片段色彩,使它们保持一致性。在此期间,您可以随时回到快编或剪辑页面对素材进行调整。 调色页面可用来调整素材的画风。从很多方面来看,调色本身就是一门艺术。您在进行调色的时候,会将自己的情感注入到作品当中。这是工作流程当中极具创意的一个环节,当您看到自己精心雕琢的作品呈现在荧幕之上时,也会收获满满的成就感!通常来说,这是调色的第一步,也就是我们常说的“一级校色”。完成一级校色之后,就要进入二级调色阶段。在这个阶段,您可以对画面中的具体对象进行细致精准的色彩调整。这是个充满趣味的过程,一般会放在一级校色之后进行,因为这样能使制作流程更加高效,效果也会更好! 首先,点击“调色”选项卡,打开“调色”页面。 该页面中有 Camera Raw 设置、色轮、曲线面板和常用的调色工具以及预览和节点窗口。当您看到面前这些大量工具时不用慌张,它们都是能够帮助您获得最精彩画面的实用功能。这一入门章节会展示基本操作,要活的更详细的介绍,请查阅操作手册中的相关内容。操作手册将为您详细介绍每项功能,以及如何按照简单易行的步骤进行使用。从中您可以了解到专业人士在高端调色工作室所使用的技能。 一般来说,第一步就是进行一级校色,对片段的暗部、中间调和亮部电平进行优化。您可以通过调整“暗部”、“中灰”和“亮部”设置来实现。这可以让您的素材画面有一个干净平衡的起点,从而更好地开展影片调色工作。优化电平时,使用示波器作为参考会很有帮助。使用示波器
大多数调色师都会通过创意调色来着重突出影片所要表现的情感,并使用监视器来辅助他们得到想要的画面风格。您可以观察日常物品以及不同的光线和它们之间产生的互动,并通过您的想象力和实践来获得灵感。  分量示波器可帮助您优化画面的亮部、中间调和暗部。 调色的另一个途径是使用内置的示波器对镜头画面进行色彩平衡处理。您可以点击“示波器”按钮打开单个视频示波器显示,该按钮位于设置面板工具栏右起第二个。您可以选择显示波形图、分量图、矢量图、直方图或IE色域坐标图。您可以使用这些示波器来监看色调平衡,检查视频电平并防止暗部色彩挤压及亮部裁切限幅,还能监看片段中出现的任何偏色现象。 “色轮”设置面板中设有“暗部”、“中灰”和“亮部”控制项,通常可作为第一轮调整使用。如果您具备调色背景,就应该已经在其他软件中接触过这些色彩和对比度调整控制。  “暗部”、“中灰”、“亮部”、“偏移”色轮用于控制片段的色彩及色调平衡。拖动并来回滚动色轮下方的滚轮可对所有色彩的每种色调区域进行统一的调整。  和使用鼠标相比,用一级校色条进行色彩调整更方便。 如果想要使用鼠标来更加准确地控制每类色彩,您可以将色轮更改为“一级校色条”模式,具体调整每个色彩和亮度通道,分别控制暗部、中灰以及亮部控制项。只需选择色轮右上方附近的下拉菜单中的“一级校色条”即可切换模式。 调整“暗部”:首先请在色彩时间线上选中一个片段,点击位于第一个色轮下方的“暗部”滚轮。来回滚动该滚轮来查看该参数变化对画面的影响。您可以看到画面中暗部的亮度会相应提高或降低。 - 请根据需要进行设置,使暗部区域获得最佳表现。如果“暗部”参数提升过度,图像暗部的细节就会丢失,您可以参考分量示波器加以避免。波形图上的暗部位置以恰好位于分量示波器的底线之上为理想。 - 调整“亮部”:点击“亮部”滚轮并来回滑动。该参数可调整亮部信息,即片段中最亮的部分。亮部信息位于分量示波器的波形顶部。如果画面有充足明亮的风光,那么该画面在示波器中以恰好位于波形顶线之下为最佳。如果亮部信息超越了示波器波形的顶线,那么这部分信息将被切掉,而您画面中最亮部分的内容将缺失。 ·调整“中灰”:点击位于色轮下方的“中灰”滚轮并来回滑动。在提升中灰值的同时,您可以观察到画面的亮度随之增加,而且波形的中段部分也会随之移动。该值体现的是片段中的中间调。通常中间调的波形位置以位于示波器的0%至70%处为最佳。但是,根据您需要的创意风格以及灯光条件,这一参数或有所不同。 此外,您还能使用曲线设置面板来实现一级调色。只需通过点击操作在曲线图中的对角线上创建控制点,并上下拖拽来调整画面不同区域的主RGB对比度色调即可。曲线调整的理想位置位于底部三分之一、中部及顶部三分之一处。 DaVinci Resolve中还有很多方式来完成一级调色。  曲线面板工具也可用来进行一级调色,或使用Power Window来强化片段中的局部区域。二级调色
如果要对画面中的特定部分进行调整,那么您就需要使用二级调色。目前为止,您使用暗部、中灰和亮部等参数所做的调整都会同时影响画面整体效果,因此这一过程被称为“一级校色”。 但是,如果需要调整画面中的特定部分,例如要美化画面中草地的部分,或要加深天空的蓝色,那么就要用到二级调色功能。进行二级调色时,您可以选中局部画面内容,并只对选中部分来单独调整。您可以使用节点将多个二级调色操作堆栈在一起,这样就可以一直处理画面各部分内容,直至所有部分完成相应的处理!此外,您还能使用窗口和跟踪功能,让画面中的选定部分跟随主画面一起移动。限定某一色彩
很多时候您要突出强调片段中的某一色彩,比如路边的草坪和天空的蓝色,或者您可能需要调整画面中某个对象的色彩来吸引观众的注意力。通过HSL限定器工具可以让您轻松实现这一操作。  当您需要突出强调画面中的某些部分、 增加对比度或要将观众的注意力集中到某些区域时, 使用HSL限定器选择画面色彩十分实用。如何限定某一色彩:
1 添加一个新的串行节点。 2 打开“限定器”设置面板,确保选中“选择范围”拾色器工具。 3 点击片段中您想要调整的色彩。 4一般情况下,您需要进行一些调整来柔化所选对象的边缘,且该操作仅对所选颜色有效。点击检视器上方的“突出显示”按钮查看所选内容。 5 调整“色相”窗口中的“宽度”控制来控制所选内容的宽窄。 尝试调整高区柔化、低区柔化以及柔化程度控制工具来观察这些参数如何细化您的所选内容。然后您就可以使用色轮和自定义曲线对所选色彩进行调整了。 有时,所选色彩会溢出到镜头中其他不需要调整的部分。您可以使用Power Window将不需要调整的部分通过遮罩功能隔离出来。只需创建新的Power Window窗口,并调整其形状,让它只包括所选色彩的区域。如果所选色彩在镜头中处于移动状,您可以使用跟踪功能来跟踪Power Window。添加Power Window
Power Window是极其高效的二级调色工具,它可以隔离片段中的特定区域。这些区域不一定是静止对象,您可以跟踪它们使之随着摄影机的平移、竖移和转动,以及所选部分自身的移动一同移动。  使用Power Window将不希望受到HSL限定器二级调色操作影响的区域隔离出来。 例如,您可以跟踪一个位于人物上的窗口来仅对窗口中的对象进行色彩和对比度调整,却不会影响该人物周围的画面内容。此类调色操作可以将观众的注意力转移并集中到您想要强调的画面部分。如何在片段上添加Power Window:
1 添加一个新的串行节点。 2 打开“窗口”面板,点击形状图标来选择一种窗口形状。选中的窗口形状将显示在节点上。 3 点击并拖动该形状周围蓝色的点来重新调整它的大小。红色的点可调节其边缘柔化程度。点击并移动中心的点可将该形状移动到想要隔离的位置。使用与中心点连接的点来旋转窗口。现在您就可以对画面的特定部分进行调色了。  Power Window可以让您对画面中的特定部分进行二级调色。跟踪窗口
由于拍摄画面中的摄影机、物体或区域可能会移动,因此为了确保窗口位于所选物体或区域,就需要使用DaVinci Resolve强大的跟踪功能。跟踪器可分析摄影机或画面中物体的平移、竖移以及缩放和旋转,以便您添加的窗口可始终跟随所选对象。如果不进行窗口跟踪,您的调色操作可能会离开所选目标并给您造成不必要的麻烦。  您可以使用跟踪器功能来跟踪片段中的对象或区域,以便Power Window跟随对象移动。如何对移动的物体进行窗口跟踪:
创建新的串行节点并添加一个Power Window。 2 回到片段开头部分放置窗口并调整大小,以便仅突出显示需要的区域。 3 打开“跟踪器”面板。根据需要勾选或取消勾选相应的“分析”复选框,为片段选择平移、竖移、缩放以及旋转等相应的3D设置。 4 点击复选框左侧的向前箭头。然后DaVinci Resolve将会在您的片段上应用一组跟踪点,并逐帧分析对象的移动。完成跟踪后,Power Window将跟随片段中的移动路径。 大部分情况下使用自动跟踪便可以成功完成上述操作,但是有时候场景会比较复杂,并且有些物体可能会从您选中的区域前景越过,这会干扰并影响跟踪功能。此时您可以使用关键帧编辑器来手动解决这一问题。请参考DaVinci Resolve操作手册获得更多信息。使用插件
进行二级调色时,您可能还需要添加Resolve FX或Open FX插件,从而在“调色”页面快速创建有趣的风格和效果,或者在“快编”和“剪辑”页面为片段添加富有创意的转场和特效。Resolve FX会随DaVinci Resolve一同安装,OFX插件可通过第三方供应商购买或下载。 安装OFX插件后,只要开启“节点编辑器”右侧的Open FX检查器就能在调色页面中打开这些插件或Resolve FX插件。创建了新的串行节点后,只需点击“Open FX”按钮打开特效库面板,然后将一个插件拖放到这个新节点上即可。如果该插件具有可编辑设置,您可以在相邻的“设置”面板中使用这些设置。   OFX插件是您发挥想象力、进行充满趣味和个性创作的一种快速便捷的途径。 您可以在“剪辑”页面中打开“特效库”里的“Open FX”面板,将所选插件拖拽到时间线的视频片段或轨道上方(视插件具体要求而定),就可以在片段上添加插件滤镜、生成器和转场。混合音频
在剪辑页面混合音频
项目剪辑和调色完毕后,就可以开始混合音频了DaVinci Resolve拥有一套实用的工具,可直接在剪辑页面完成项目的剪辑、混合及音频母版等制作。对需要更高级音频工具的项目而言,Fairlight页面可提供一整套音频后期制作环境。如果您已经比较熟悉剪辑页面,想要直接跳至Fairlight页面,可跳过此章节,直接阅读下个章节。添加音频轨道
如果您正在剪辑页面并想要为基本声音剪辑文件混合大量音效和音乐,只需根据需要添加更多音频轨道即可。当您想要构建声效并将音频元素分离到单独的轨道上用于如对白、音效以及音乐等的混音时,这一功能非常实用。在剪辑页面添加音频轨道
在时间线上任意一个音频轨道的名称旁边右击并选择“添加轨道”,然后根据需要选择“单声道”、“立体声”和“5.1声道”选项,就可以轨道列表底部添加一个轨道。或者,您也可以选择“添加自定义轨道”,然后选择将一个或多个新轨道放置在哪个位置。 新的音频轨道将出现在时间线上。 提示 如果您在创建轨道之后想要进行更改,可以在轨道名称一侧右键点击,并选择“将轨道类型更改为”,然后选择如立体声、单声道或5.1声道等音频轨道类型。在时间线上调整音频电平
时间线上的每个片段音频都包括一个音量叠加显示,只要用指针上下拖动即可设置片段的电平。这个叠加显示与检查器中的音量参数是一致的。  拖动音量叠加显示来调整片段电平 对需要更高级音频工具的项目而言,Fairlight页面可提供一整套音频后期制作环境。Fairlight页面
DaVinci Resolve中的“Fairlight”页面是用于调整项目音频的。在单检视器模式下,该页面为您的项目提供了优化音频轨道界面,显示有扩大的调音台和自定义监听控制,可让您轻松地评估和调整电平从而构建自然和谐的混合音效。当您看到面前这些大量工具时不用慌张,它们能够帮助您为项目获得最佳音质。  本手册只是对Fairlight页面功能进行了基本概述,如果想要了解各个功能详情,请查阅DaVinci Resolve操作手册。DaVinci Resolve操作手册详细介绍了每个工具的用途,并通过简洁明了的步骤描述了如何使用这些工具。音频时间线
- 轨道标头:每个轨道的左侧是轨道标头区域,显示了轨道编号、轨道名称、轨道颜色、音频通道、推子值以及音频表等信息。轨道头还包括锁定和解锁轨道,以及单声道和静音控制等不同控制选项。这些控制选项可帮助您管理和组织轨道,让您换个预览单个轨道。 - 轨道:在Fairlight页面上,每条轨道会进行细分,显示出片段音频的各个声道,便于剪辑和混音。剪辑页面则会将这些单独的音频通道隐藏起来,只在时间线上显示一个单独的片段,避免了管理大量轨道的视觉混乱,从而为多通道源片段的剪辑工作带来便利。  A1轨道的轨道标头显示了一条轨道的单音轨代表了单声道音频,而A2轨道标头则显示了两条轨道的立体音轨代表了自适应立体声音频。什么是总线?
总线相当于将一组音频源组成一个单独的信号目标通道,它可以通过单个通道条进行控制。Fairlight会为您自动创建总线,时间线上的所有音频轨道都会被默认发送到这个总线上。也就是说,当您调整好每个单独轨道的电平后,就可以调整音频混合的整体电平了。 如果您的剪辑情况略为复杂,您可以创建更多总线,并将多个同类音频轨道合并到一起,例如对白、背景音乐或特效等,这样一来,所有同一类别下的音频都可以作为单一音频信号来进行混合。举例说明,如果您有五个对白轨道,就可以把这五个对白轨道的输出都指派到一个单独的总线上,这样所有的对白电平就可以通过一套控制进行混合了。 Fairlight的FlexBus结构能为您提供全面的总线类别和信号指派灵活性,具体包括总线到总线、轨道到总线以及总线到轨道等指派选项。更多关于Fairlight音频总线设置的信息,请阅读DaVinci Resolve操作手册。调音台
时间线上的每条音轨在调音台上都对应一个单独的通道条。默认设置下,标有"bus1"字样的默认总线右侧会有一个单独的通道条。您每创建一条其他总线,其右侧就会相应出现带有控制选项的通道条。这里提供了一组图表控制工具,让您可以将轨道通道指派到输出通道、调整均衡器和动态、设定电平和记录自动化、调整立体声声相和环绕音频、以及静音和单声道轨道等处理。  图为调音台,当中的每个通道条分别对应时间线上的相应轨道使用均衡器加强音频
调整完项目中音频片段的音频电平后,您可能会发现音频还需要进一步微调。有些情况下,您可能会发现对白、音乐和音效在音频频谱的相同频段上互相干扰,导致音频太过嘈杂且不清晰。这时使用均衡器会有帮助,因为它能帮助您判断出每个音轨在音频频谱上所处的具体频段位置。您还可以通过均衡器从音频中移除不想要的元素,它可以隔离或降低包括隆隆声、嗡嗡声、风声、嘶嘶声等某些特定频率的电平,或者能让总体音效变得更优质、更悦耳。 DaVinci Resolve提供了均衡器滤波器可应用于每个单独片段的片段电平上,或应用在整个轨道的轨道电平上。时间线上的每个音频片段在检查器面板中具有四个频段的均衡器,每个轨道在调音台面板中具有六个频段的参量均衡器。这些图表和数字控制可增强或衰减频率的不同范围,不同的滤波器可让您定义均衡器曲线的形状。  四频段均衡器可应用到时间线上的每个片段 外部频段让您可以通过上限、下限、高通和低通滤波器进行频段滤波器调整。通过式滤波器会影响所有高于或低于某个特定频率的频率,将这些频率从信号中彻底移除。例如,高通滤波器可以让高频率通过滤波器,并同时切除低频。位于截止频率以外的任何频率则会以向下倾斜曲线的方式逐步剪切。 - 搁架式滤波器相对显得平和一些,如果您只想对信号的高频或低频部分进行塑形,而并非完全滤除这些频段,就可以使用这一滤波器。搁架式滤波器可以均匀地增强或减弱目标频率以及高于或低于目标频率的部分,这取决于您使用的是高架还是低架滤波器。 频段控制的中部设置可让您进行很广泛的一系列均衡器调整,可在低架、钟型、陷波和高架滤波器选项间进行切换。 - 钟型滤波器:钟型滤波器可以增强或减弱钟型曲线给定中心点周围的频率,正如这一名称所暗示的该曲线的形状像钟罩。 - 陷波滤波器:陷波滤波器允许您瞄准特定的窄频率范围。 比如在50或60Hz时去除电源哼声。 低架滤波器:低架滤波器会增强或降低下限目标频率,以及之下的所有频率。 - 高架滤波器:高架滤波器会增强或降低上限目标频率,以及之上的所有频率。为单个片段添加均衡器:
1 在时间线上选中您想要为其添加EQ滤波器的片段。 2 点击检查器再点击“均衡器”启用按钮。为轨道添加均衡器:
1 在调音台中双击一个轨道的均衡器区块,从而将该轨道的均衡器打开。 2 从下拉菜单中选择您希望调整的频段滤波器类型。  调音台面板中的均衡器区块显示了轨道1已应用均衡器曲线  图为六频段参量均衡器,它可应用到每个轨道 为片段或轨道添加均衡器后,就可以为每个频段调整其均衡器了。需要注意的是,选择不同的频段滤波器可能会有不同的控制。为频段滤波器调整均衡器:
1 从下拉菜单中选择您希望调整的频段滤波器类型。 2 调整“频率”值可为均衡器调整选择中心频率。 调整“增益”值可增强或减弱该频段的频段。 4 使用“品质因数”可调整作用频率的带宽。 使用重置按钮可将均衡器窗口内的所有控制重设回默认设置。 Fairlight还设有很多控制可让您改善每条音轨的音质。您可以添加更多轨道并通过总线来进行组织管理,还可以添加延迟或混响,逐步完善您的混音。在Fusion页面添加视觉特效和合成效果
完成剪辑后,您可以打开Fusion页面,在DaVinci Resolve中添加2D或3D视觉特效和动态图形。与基于图层的合成软件不同,Fusion采用节点式操作,能让您更加自由地创建复杂效果,同时还可将图像数据指派到任何方向。节点窗口清楚显示了流程中使用的所有工具。如果您使用过调色页面的节点工作流程,就并不会对节点窗口感到陌生。 Fusion页面
上方配有两个带播放控制的检视器窗口,用于查看媒体,右边的检查器窗口用于访问工具设置,下方的节点窗口用于创建合成。虽然检视器和播放控制始终可见,您可以点击显示器顶部界面工具栏中的图标来显示或隐藏节点窗口和检查器窗口,以及特效库,样条线和关键帧编辑器等其他窗口。  - 媒体池:媒体池的功能与剪辑页面中显示的相同。只需将媒体文件从媒体夹直接拖进合成即可。 - 特效库:在特效库中,工具和模板都按照粒子、跟踪、滤镜和发生器等进行归类。您可以点击工具或者将它拖到节点区域,然后添加到合成里。媒体池和特效库占用同样的屏幕区域,您可以在两者之间切换,让检视器的面积尽量大些。 - 片段:点击片段选项卡会显示或隐藏代表时间线上相应片段的缩略图。缩略图位于节点编辑器下方,便于您即时前往其他片段。  右键点击缩略图,然后选择“创建新的合成”,可创建合成的新版本。 - 检视器:检视器始终可见,以便您查看不同的合成视图,比如合并3D节点后的总体3D投影,摄影机输出,或者最终的渲染输出。这些检视器还可以用来查看各项修改对特定元素所产生的影响。 您还可以选择查看的节点,只要点击一个节点,按数字键“1”即可在左侧检视器中查看,按数字键“2”即可在右侧检视器中查看。您可以通过节点下方的白色按钮图标判断出该节点被指派到哪个检视器。如果您使用外部视频监看,则会出现第三个按钮,可用来将媒体指派到外部视频监视器上。 提示您也可以通过将节点直接拖入检视器的方式,将节点指派给相应检视器。 您可以通过检视器下方的播放控制跳过片段的头或尾,正放、倒放或停止播放。时间标尺可显示片段的总体范围,黄色标记代表入点和出点。  时间标尺上的黄色标记代表片段在时间线上的入点和出点。如果您使用Fusion片段或复合片段,时间标尺会只显示时间线上的片段时长,不显示余量。 - 节点:节点窗口是Fusion页面的核心,您可以在这里将一个节点工具的输出端与另一个节点工具的输入端连接到一起,创建自己的节点树。这个区域会根据打开的编辑器而改变大小,比如样条线或关键帧编辑器。节点区域顶部的工具栏配有最常用的工具,便于您快速调用。 - 样条线:样条线编辑器打开时会出现在节点窗口的右侧。您可以使用该编辑器对每个节点进行精准调整,比如用贝塞尔曲线对两个关键帧之间的动画进行平滑处理。 - 关键帧:使用关键帧编辑器可以添加、删除或者修改每个工具的关键帧。关键帧编辑器也位于节点检视器的右侧。 - 元数据:元数据窗口显示当前片段可用的元数据,包括编解码格式、帧率和时间码。 检查器:位于右上角的检查器可显示一个或多个选中节点的所有设置和修改器。其他选项卡选项也会出现,让您快速访问按种类排序节点的其他设置。  文本检查器中有其他选项卡,包括文本、布局、转换、着色、画面和设置等。Fusion使用入门
开始使用Fusion时,将播放头放在时间线上的任何片段上,然后点击“Fusion”按钮,即可打开Fusion页面。 在Fusion页面上,片段在标为“Medialn”的媒体输入节点中立即可用。所有合成都以“Medialn”和“MediaOut”两个节点为起点。Medialn节点表示时间线播放头所在位置最上方的片段,下方所有片段均被忽略。您在剪辑页面中对片段应用的所有调整全部包含在内,比如转换工具和裁切修改。  名为“MediaOut”的媒体输出节点将输出画面发送回DaVinci Resolve剪辑页面上的时间线。 提示在快编或剪辑页面的片段上所应用的ResolveFX或OFX插件不会应用于Fusion页面。这是因为Fusion特效发生在调色和OFX/ResolveFX处理之前。如果您希望在Fusion特效之前应用OFX,就需要先右键点击剪辑页面中的相应片段,选择“新建Fusion片段”,然后再点击Fusion页面。了解节点
为了有助于理解,您可以把每个节点想象成代表单一工具或特效的视觉图标。节点之间相互连接,创建出总体合成,就像蛋糕的各种原料。了解每个节点的输入输出非常重要,因为这能帮助您在创建精细的视觉特效时,把握合成的流程顺序。 有些工具设有多个输入和输出端与其他节点连接。比如“Merge”(合并),该节点可以连接前景输入、背景输入和遮罩输入用于蒙版或抠像。   节点上有多个输出意味着单一节点能够连接合成中的许多不同节点,所以与基于图层的软件不同,您不需要复制片段。相连节点之间线上的箭头显示了图像数据流动的方向。在节点编辑器中添加节点
如要添加特效,只需将节点放在“Medialn”与“MediaOut”节点之间的线上即可。 这一操作可通过多种方式完成。您可以按住SHIFT按钮,把节点放在两个节点之间;或者点击希望添加特效的节点,然后选择想要添加的工具。新节点会自动连接到选定的工具上。您也可以把节点添加到节点窗口中的任何地方,然后将一个节点的输出端拖到另一个节点的输入端,手动完成节点之间的连接。  最常用的工具是2D和3DMerge(合并)节点。该节点就像一个中枢,它能将节点编辑器上的各个工具合并起来,变成一个单一输出。 合并节点拥有控制选项,可以选择输入的管理方式,包括大小、位置和混合等设置。选定合并节点后,可以在检查器面板里访问这些设置。 节点面板上方的工具栏包含最常用工具的图标,您可以点击这些图标添加节点,或者将工具拖入节点面板。如果您想看到所有可用的工具,可点击左上角的“特效库”,然后扩展“工具”选项。这里的所有工具都按类别排序,并且提供了一组预先创建的“模板”,比如镜头光斑、着色器和背景等。 提示 如果您熟悉工具名称,可以按住键盘上的“SHIFT”,同时按下空格键,“选择工具”菜单就会出现。您在输入工具名称时,菜单会建议相关的工具。这是选择工具的一个非常快速的方法。使用检查器面板调整节点
您可以使用检查器面板调整节点设置。点击希望修改的节点,面板会更新显示相应的设置和控制。 使用Fusion时,您可以在一个检视器中查看正在修改的节点,同时在另一个检查器中查看该节点在合成画面中的整体效果。例如,您可以修改“Text+”文本节点的大小和中心位置,并同时在检视器中查看该节点和合并节点,这样就可以查看文本与背景的匹配情况。  如图所示,被选中的节点会显示红色边框。图中的检查器面板显示的是文本节点的布局选项卡控制。 根据节点任务,您可以调整不同的参数和设置,从调整大小和中心位置,到修改发射器节点的粒子数量。设置关键帧并修改一段时间内的设置就会产生动画效果。制作关键帧
在检查器窗口中右键点击一项设置,然后在上下文菜单中选择“动画”即可设置关键帧。该项设置右侧的关键帧图标会变红。这代表关键帧已启用,您做的任何修改只会应用于当前帧。当修改另一个帧的设置参数,创建两个或多个关键帧时,帧之间会添加过渡插值。您可以利用关键帧图标两侧的箭头,准确地将播放头移动到时间线上特定的位置。  图中的“大小调整”关键帧动画已经被平滑处理为一条贝塞尔曲线。您可以点击贝塞尔手柄,缩短或拉长曲线,或者点击关键帧方块图标移动关键帧位置。 样条线面板能为您提供更多控制关键帧动画的选项。您可以选择关键帧,比如第一个和最后一个关键帧,按下“SHIFT”+“s”,或者右键点击关键帧然后选择“平滑度”,即可将这些帧之间的动画平滑处理为一条贝塞尔曲线。使用动态跟踪器和添加文本工具
为了更好地演示Fusion的使用方法,我们将举例说明如何使用跟踪器工具跟踪片段中的元素,以及如何使用跟踪数据添加文本,并将文本附在元素上。 “跟踪器”工具会在一定时间里跟踪x和y轴上的像素,并且生成数据,您可以用这些数据附加其他元素。当您想要把文本的位置与移动中的物体匹配时,比如在道路上行驶的汽车,或者飞过画面的鸟等,这项功能非常实用。 1 在“特效库”中选择“跟踪器”工具,然后把它拖到Medialn"和“MediaOut"节点之间的线上。然后,点击这个跟踪器节点,在检查器中显示它的属性。 2 按键盘数字键“1”,可在左侧检视器中查看跟踪器节点。相应检视器中会显示带有跟踪器的片段,并且跟踪器位于默认位置。将鼠标指针悬停在跟踪器上方可显示出跟踪器控制柄。点击左上角的跟踪器控制柄,将跟踪器拖到片段中相应的AOI区域。高对比度的区域效果很好,例如汽车引擎盖上的标志。跟踪器会放大图像区域以获得更高的精确度。 3 到检查器窗口中,点击“正向跟踪”按钮开始跟踪。跟踪完成后会显示通知窗口。点击“OK”确定。  检查器面板中设有跟踪选项,其中包括从尾帧或当前帧反向跟踪,停止跟踪,从当前帧或首帧正向跟踪。 提示 当您的AOI区域从渲染范围消失时,比如汽车或鸟离开画面,从当前帧反向跟踪或正向跟踪就非常实用。这项功能可以只跟踪相关的影像。 现在,您就可以利用跟踪数据,将动态路径应用到文本工具上。 4 点击常用节点工具栏中的“Text+”文本节点图标,将其拖入跟踪器节点旁边的节点面板。将“Text+”节点的输出方块与跟踪器上的绿色前景输入端连接起来。  5 点击跟踪器节点,按数字键“1”,即可在左侧的检视器中看到合并结果。在跟踪器节点的检查器面板中点击“Operations”(操作)选项卡。点击“Operations”旁边的菜单,然后选择“Match Move”(动作匹配)。 6 点击“Text”文本节点可在检查器中显示属性。在文本框中输入文本,按照合成要求修改字体、颜色和大小。 来自跟踪器的跟踪位置数据将被应用于您的文本。如果您希望调整文本的位置偏移,点击检查器面板中的“Trackers”(跟踪器)选项卡,然后用x和y偏移旋钮修改位置。  跟踪器检查器面板底部的旋钮可用于调整文本的偏移位置。 现在,您播放合成画面时,就能查看到附加在被跟踪物体上的文本了!  绿色方框代表当前跟踪器在绿色路径上的位置,红色虚线代表对文本进行动画处理所使用的位置偏移。 对于一些镜头,您可能需要在跟踪后删除跟踪点,比如当所跟踪的物体从屏幕上消失的时候。关键帧编辑器让这个流程变得非常简单。  7 点击检查器上方的关键帧选项卡,打开关键帧编辑器。应用了关键帧的节点在节点标签旁会有一个小箭头,只有添加了关键帧的参数才会在下方列表显示。点击放大图标,将方框拖到您希望编辑的区域。方框会放大选定的区域,方便您查看关键帧。 8 将播放头移动到最后一个关键帧的位置。如要删除关键帧,只需用鼠标在关键帧上拖画一个方框选定该关键帧即可。选定的关键帧会以黄色突出显示。点击右键,在菜单中选择删除。 提示 如果您的特效对系统要求非常高,可右键点击播放控制区域调出代理回放等检视器选项,帮助您在创建合成时获得尽可能高的系统性能。获取完整的播放选项详细信息,请参阅DaVinci Resolve手册。 现在您就完成了第一套在影像中匹配动态的合成动画文本! 如果您希望跟踪含有平面的画面,对其进行强化或替换,可以使用平面跟踪器。面可用于修改移动画面中的标签和指示牌,甚至为镜头中的监视器或电视机添加画面。 获取更多关于平面跟踪器和DaVinci Resolve Fusion页面中许多强大工具的信息,请参阅DaVinci Resolve手册。 提示 当您在Fusion页面创建视觉特效时,请务必注意所创建的是D特效还是3D特效,因为这将决定所需合并工具的种类。您可能经常需要在一个合成中融入2D和3D特效。在这种情况下,请记住任何使用3D空间创建的视觉特效必须被渲染成2D图像,才能合并进2D合成。 我们相信您将从使用Fusion、探索Fusion的各种视觉特效和强大的DaVinci Resolve剪辑、调色及Fairlight页面过程中获得许多快乐。DaVinci Resolve强大而丰富的工具集定能助您实现无限创意!制作母版剪辑
完成剪辑、调色、视觉特效和混音制作之后,下一步就是分享您的作品。您可以使用快速导出按钮或者菜单选项来输出时间线的制作内容,具体可以作为一个独立文件输出,或者作为一组不同格式输出,您也可以使用交付页面的其他功能。  “交付”页面可用来导出您的剪辑。您可以从中选择多种不同的视频格式和编解码器。快速导出
依次选择“文件”>“快速导出”,使用其中一种导出预设,以便将您的作品从DaVinci Resolve中导出。您还可以使用快速导出功能,将您的作品导出并上传到支持的视频分享平台,比如YouTube、Vimeo、Twitter以及Frame.io。快速导出步骤如下:
使用快编、剪辑、Fusion或调色页面,在时间线上设置入点和出点(可选),从而在当前作品上选择需要导出的范围部分。如果没有选定时间线入点和出点,则会导出整条时间线。 2 依次选择“文件”>“快速导出”。 3 从快速导出对话框顶部的预设图标中选择一个,然后点击“导出”。 4 在导出对话框中选择一个位置,输入文件名,然后点击“保存”。此时会出现一个进度条对话框,显示导出所需时间。  快速导出对话框交付页面
在这一页面中,您可以选择想要导出的片段范围,以及片段格式、编码和分辨率。片段可以多种不同格式导出,比如使用8bit或10bit无压缩RGB/YUV、ProRes、DNxHD、H.264等编解码格式导出QuickTime、AVI、MXF和DPX等文件。如何导出剪辑的单个片段:
1 点击“交付”选项卡打开交付页面。 2 找到该页面左上角的“渲染设置”窗口。您可以选择多种导出预设,例如YouTube、Vimeo以及各类音频预设,或者也可以将该设置保留在其默认的“自定义”预设方案,再输入相应的参数来手动设定您自己的导出设置。在这个例子中,选择YouTube,然后点击该预设一侧的箭头图标,并选择1080p视频格式。 帧率将根据您的项目帧率设置而定。 3 您可以在每个预设下方查看到时间线文件名以及导出视频的目标位置。点击“浏览”按钮,选择导出文件的保存位置,然后从渲染选项中选择“单个片段”。 4 然后,您马上就会看到时间线上方出现选项框,并且“整条时间线”选项被选中。表示软件将导出整条时间线。您也可以根据需要选择一段时间线范围。要进行这一操作,只需要选择入范围和出范围,并使用“i”和“o”热键在时间线上选择入点和出点即可。 5 点击“渲染设置”底部的“添加到渲染队列”按钮。 您的渲染设置将被添加到页面右侧的渲染队列中。现在,您只需要点击“开始渲染”并监看渲染队列中的渲染进度即可。 当渲染工作完成后,您可以打开目标文件夹,双击新的渲染片段来查看完成后的剪辑片段。 对剪辑、调色、混音和视觉特效有了基本了解之后,就可以开始体验Vinci Resolve了。更多关于如何充分利用每项功能完成令人满意的项目,请查阅DaVinci Resolve操作手册。使用ATEM Mini控制摄影机
ATEM Mini是进行多机位制作和流媒体直播的强大工具。您可通过ATEM Software Control软件控制面板中的摄影机控制功能,从ATEM Mini切换台切换并控制多达四台Blackmagic Pocket Cinema Camera。点击ATEM Software Control中的“摄影机”按钮,就可打开ATEM Mini的摄影机控制功能。 使用兼容镜头时,您可以通过这一功能轻松设置Pocket Cinema Camera的光圈、增益、对焦、细节和变焦控制,并能使用摄影机内置的DaVinci Resolve一级调色工具平衡摄影机色彩,缔造独特炫彩画面。 您还可以添加ATEM Camera Control Panel,一次就能快速精准地掌控四台Pocket Cinema Camera摄影机!详情请参阅ATEM Mini操作手册。  ATEM摄影机控制 控制摄影机时,ATEM切换台控制的工作原理是通过ATEM Mini的所有HDMI输入向目标设备发送摄影机控制数据包。因此,您可以将ATEM Mini的HDMI输入连接到摄影机的HDMI接口上,摄影机将检测到HDMI信号中的控制数据包,并让您在摄影机内控制这些功能。 打开ATEM Software Control的偏好设置,并设置切换台的按钮映射,确保所切换的摄影机和Tally对应无误。但切换台与Blackmagic Pocket Cinema Camera的视频连接后,您还可以充分利用现场Tally提示灯的优势。摄影机控制面板
启动ATEM Software Control, 点击位于软件窗口底部的摄影机按钮后, 系统会显示一排有标签的 Blackmagic摄影机控制窗口, 窗口内包含各类工具, 可用来调节和美化每台摄影机的画面。这些控制窗口使用起来十分简单。只需以鼠标点击某个按钮, 或点击并拖动这些功能来调节即可。摄影机控制选择
摄影机控制窗口的上方有一排按钮,可用来选择您想要控制的摄影机所对应的机位编号。通道状态
通道状态位于每个摄影机控制窗口的顶部,可显示摄影机标签、正在播出提示灯以及锁定按钮。按锁定按钮可锁定某台摄影机的所有控制。正在播出时,通道状态会亮起红色,并显示正在播出提示。摄影机设置
主滚轮左下侧的摄影机设置按钮可用来调整每台摄影机的图像信号的细节设置。  每个摄影机控制窗口都会显示通道状态,以便您明确当前哪台摄影机正处于播出状态。使用色轮来调整每个YRGB通道的Lift、Gamma和Gain设置。细节
使用这一设置可对摄影机直播图像加以锐化。选择以下设置来降低或提高锐化程度:“关闭细节”、“默认细节”用于低锐化、“中等细节”和“高度细节”。色轮
色轮是DaVinci Resolve调色工具的一项强大功能,它常用于调整每个YRGB通道色彩的Lift、Gamma和Gain设置。点击色轮上方对应的三个按钮即可对相应选项进行调整。主滚轮
使用色轮下方的主滚轮可同时调整所有YRGB通道,也可只调整每个Lift、Gamma或Gain设置的亮度值。重置按钮
重置按钮位于每个摄影机控制窗口内右下方的位置,可方便您选择重置、复制或粘贴调色设置。此外,每个色轮也都有各自的重置按钮。按下重置按钮可将某项设置恢复到默认值或是复制/粘贴某项设置。粘贴功能不适用于锁定的控制窗口。 主重置按钮位于调色面板的右下角,可重置ift、Gamma和Gain色轮,以及对比度、色相、饱和度和亮度混合设置。您可将调色设置逐一粘贴到摄影机控制窗口上,也可一次性粘贴到全部摄影机上以保证整体统一效果。光圈、对焦、光圈上限设置和黑电平设置不受粘贴功能影响。当应用“粘贴到全部”操作时,软件会弹出警告消息请求确认,这样能防止意外将新的设置应用到正在直播且未启用锁定保护的摄影机上。  当应用“粘贴到全部”操作时,软件会弹出警告消息请求确认,这样能防止意外将新的设置应用到正在直播且未启用锁定保护的摄影机上。光圈/黑电平控制
光圈/黑电平控制位于每个摄影机控制窗口内的十字标交点上。当某台摄影机处于直播状态时,对应的控制按钮会亮起红色。 要控制光圈大小,请上下拖动该控制按钮。如只需调整光圈,请按住Shift键后拖动该按钮。 要降低或升高黑电平,请左右拖动该控制按钮。如只需调整黑电平,请在c计算机上按住command键,或在Windows计算机上按住Control键后,再拖动该按钮。  当某台摄影机处于直播状态时,对应的光圈/黑电平控制按钮会亮起红色。变焦控制
使用带有电子变焦功能的兼容镜头时,您可以通过缩放控制来实现镜头的变焦缩放控制。使用摄影机控制窗口的缩放功能和使用镜头上的变焦按钮一样,一端是长焦,一端是广角。点击位于光圈上限滑块上方的缩放控制,向上拖动可拉近镜头,向下拖动则可拉远镜头。光圈上限设置
光圈上限设置位于光圈/黑电平控制按钮右侧,可限制光圈范围。这一功能可防止直播画面出现过曝现象。 要设置光圈上限,请使用光圈控制按钮将光圈打开到最大,然后上下拖动光圈上限滑块设置合适的最大曝光值。光圈上限设置完成后,当您再次调整光圈时,光圈值就不会超过预先设定的最大曝光值了。光圈指示灯
光圈指示灯位于光圈/黑电平控制按钮的左侧,可直观显示镜头的光圈大小。光圈指示灯可反映光圈上限设置。自动对焦按钮
自动对焦按钮位于摄影机控制窗口内右下角的位置。按下此按钮后,可在支持电子对焦的主动式镜头上使用自动对焦功能。请注意,虽然大部分镜头支持电子对焦,但是有些镜头可设置为手动或自动对焦模式,因此请确保您的镜头设置为自动对焦模式以使用这一功能。 有些情况下,您可以通过前后滑动镜头上的聚焦环来完成设置。  使用兼容镜头时,点击自动对焦按钮或左右拖动手动对焦控制可进行对焦。手动对焦调整
当您需要对摄影机进行手动对焦时,您可以使用位于每个摄影机控制窗口底部的对焦滚轮。左右拖动对焦滚轮可手动调整对焦,并同时查看摄影机的视频画面,确保拍摄到清晰图像。摄影机增益
摄影机增益设置可用来增加摄影机的增益。在Blackmagic Pocket Cinema Camera上,这一设置与ISO有关。这一功能在低光照拍摄条件下十分有用,它可为摄影机传感器增加额外的增益,或ISO,以避免图像欠曝。点击dB增益设置上的左右箭头来减少或增加增益值。 请根据需要适当使用增益功能,例如在户外拍摄,到了日落时光线会逐渐变暗,而您需要提升画面亮度时,可使用这一功能。请注意,增加增益值会增加画面噪点。快门速度控制
快门速度控制位于色轮和光圈/黑电平控制区块之间。要提高或降低快门速度,请将鼠标指针停留在快门速度栏,然后点击左右箭头图标。在Blackmagic Pocket Cinema Camera上,这一设置与快门角度有关。 如果您注意到光线闪烁,请适当降低快门速度以消除这一现象。如果不想通过摄影机增益功能来提升画面亮度,那么降低快门速度是个较好的办法,因为它可增加图像传感器的曝光时间。由于提高快门速度可降低动态模糊现象,因此如果需要拍摄出清晰的动作画面,您可以通过提高快门速度将动态模糊现象降到最低。白平衡
白平衡设置位于快门速度控制旁边,可通过点击色温指示器两侧的向左或向右箭头来进行调整。不同光源会发出暖色或冷色的色调,您可通过调整白平衡来加以补偿。这样可确保白色的部分在拍摄到的画面中依然为白色。  将鼠标指针停留在增益、快门速度栏以及白平衡指示器上时,会出现箭头图标,点击箭头图标可调整相应设置。DaVinci Resolve一级调色工具
如果您具备一定的调色功底,可以将摄影机控制界面从切换台CCU风格更改为和后期制作调色系统相似的一级调色界面。 您的Blackmagic摄影机自带DaVinci Resolve一级调色工具。Blackmagic摄影机内的调色界面和DaVinci Resolve完全相同,因此如果您使用过DaVinci Resolve,此刻就能将丰富的调色经验运用到现场制作了。您可从任何摄影机控制窗口中展开这一调色面板,展开后可获得一个完整的一级调色界面,可为摄影机提供更多调色控制和设置项。 该界面包含色轮组和饱和度等不同设置,您可以同时查看暗部、中间调和亮部的设置。请使用窗口顶部的摄影机按钮来选择不同摄影机。  点击DaVinci Resolve一级调色工具图标展开调色窗口来调整设置。  调色面板中的Lift、Gamma和Gain三个色轮。色轮
在色轮内任意位置点击并拖动:
注意,执行此操作时,您并不一定非要点拖色彩平衡图标。色彩平衡图标移动时,下方对应的三个RGB参数会相应变化,反映所做的调整对各个色彩通道产生的变化。在色轮内按Shift键并点击鼠标:
可直接将色彩平衡图标移动到鼠标指针所指的精确位置,可快速实现大幅度调整。在色轮内双击鼠标:
重置调色设置,该项控制的主滚轮保持不变。点击色轮右上方的重置控制:
可重置色彩平衡控制及其对应的主滚轮。主滚轮
色轮下方的主滚轮用于单独调整每个YRGB通道的Lift、Gamma和Gain控制项。  左右拖动来调整主滚轮。使用主滚轮进行调整方法如下:
向左或向右拖动主滚轮:
向左拖动可使所选的画面参数变深,向右拖动可使该参数变浅。进行调整时,下方的各项YRGB参数会根据所做的调整发生相应变化。如只需对通道进行调整,请按住ALT键或Command键并左右拖动鼠标即可。由于这一调色系统采用的是RGB处理方式,您可以充分利用创意,并且可以只调整Y通道,从而创作出独特的效果。当“亮度混合”滑块位于右侧时,可获得GB处理方式;当滑块位于左侧时,可获得常规的RGB处理方式。通常,大部分DaVinci Resolve调色师都使用YRGB调色方式,因为它能提供更多色彩平衡控制,而且不会影响整体增益,因此能更快完成并制作出理想效果。对比度设置
对比度设置可用来控制图像中最暗部和最亮部之间的差值。它与反向调整 Lift和Gain主滚轮的效果类似。该滑块的默认设置为 50%饱和度设置
饱和度设置可用来增加或减少图像中的色彩含量。该滑块的默认设置为 50%色相设置
色相设置可用来将整幅图像的色彩按照色轮最边缘的色相依次调整。默认设置为180度,显示的是原始色相分布。增加或减少这一参数可沿色轮最边缘分布的色相前进或后退。亮度混合设置
Blackmagic摄影机内置的调色工具是基于DaVinci Resolve一级调色工具所设计的。DaVinci早在20世纪80年代起就开始制造调色工具,大部分好莱坞电影都选择使用DaVinci Resolve进行调色。 这意味着您的摄影机所配有的是一款有着独特创意的强大调色工具,而YRGB处理便是其中一项强大的功能。 调色时,您可以选择使用RGB或YRGB处理方式。高端调色师选择RGB处理方式,是因为这种处理方式能更精准地控制色彩,并且可以单独调整各个通道的参数,获得更具创意的选项。 当亮度混合控制滑块位于右侧时,输出 100% 的YRGB调色方式。当亮度混合控制滑块位于左侧时,输出 100% 的RGB调色方式。您可将亮度混合百分比设置在0到100之间的任何位置,以不同的混合输出RGB和YRGB调色。 如何才能设置到最佳效果呢?这取决于您,因为调色需要的是创意,因此没有标准的参数要求。只要您满意,您的设置就是最佳方案!  左右拖动滑块来调整对比度、饱和度、色相以及亮度混合的设置。 如何才能设置到理想的效果呢?最终还是取决于个人,因为调色纯属创意过程,不存在所谓对与错。 只要您觉得满意,那就是理想的设置。同步设置
连接后,摄影机控制信号会通过ATEM切换台发送到Blackmagic摄影机上。如果不小心从摄影机上对某项设置进行了调整,摄影机控制会自动重置该设置,使二者保持同步。 每个摄影机控制器内的DaVinciResolve一级调色工具都可通过DaVinci Resolve Micro Panel进行控制,使用硬件控制面板可以快速准确地进行调色操作。详情请参阅ATEM Mini操作手册。 备注如果一台摄影机通过HDMI连接到ATEM Mini,并且这台摄影机处于关闭状态,那么它就有可能会影响摄影机控制通讯。我们建议您为摄影机连接主电源,并且在关闭摄影机之前拔出HDMI线缆。使用第三方软件
将来自摄影机的素材片段复制到外接硬盘或者RAID上,再将素材导入DaVinci Resolve等编辑软件中,便可使用自己喜爱的软件来剪辑素材。您还可以为CFast或SD卡使用硬盘座或转接器,或者通过USB-C端口连接USB-C硬盘,直接导入来自存储介质的片段。处理CFast 2.0卡和SD卡上的文件
 从摄影机上取下CFast或SD卡,并使用Fast2.0读写设备或CFast驱动器将其挂载在您的计算机上,就可直接在您的CFast卡上编辑。从CFast2.0卡或SD卡上导入您的素材片段步骤如下:
从您的Blackmagic Pocket Cinema Camera摄影机上取出CFast或SD卡。 使用CFast 2.0读卡器或SD卡和CFast读卡器,将CFast或SD卡挂载到Mac或Windows计算机上。 2 双击打开CFast或SD卡,您应该能看到一些列文件夹,这些文件夹中包含有Blackmagic RAW图像文件或QuickTime电影文件的列表。根据您选择的记录格式,您可能会看到不同格式的文件,但是它们应该都使用相同的文件命名格式。 3 现在您只需选中要从CFast或SD卡导入的文件,拖动到桌面或者其他存储盘中即可,或者使用剪辑软件直接从CFast或SD卡中读取文件。 从计算机上拔出CFast或SD卡之前,请务必先在Mac或Windows计算机上安全弹出CFast卡或SD卡。如果在未执行弹出操作的情况下直接移除存储卡,就可能会损坏素材文件。处理USB-C硬盘上的文件
如何从USB-C硬盘上导入素材片段:
从您的摄影机上拔出USB-C硬盘。 2 通过计算机上的USB-C端口将USB-C硬盘挂载到Mac或Windows计算机上。推荐使用USB3.0,因为USB2.0对于实时剪辑视频来说速度可能不够快。 3 双击打开USB-C硬盘后,您会看到包含QuickTime影片文件或Blackmagic RAW文件的一个列表。根据您选择的记录格式,您可能会看到不同格式的文件,但是它们应该都使用相同的文件命名格式。 4 选中需要从USB-C硬盘导入的文件,拖动到桌面或者其他存储盘中,或使用NLE软件直接从USB-C硬盘中读取文件即可。 5 从计算机上拔出USB-C硬盘之前,请务必先将USB-C硬盘安全弹出。使用Final Cut Pro X
若使用Final Cut Pro X剪辑片段,您需要创建一个具有合适视频格式及帧率的新项目。这个例子中使用的是ProRes 422 HQ 1080p24。  Final Cut Pro X项目设置 1 运行Final Cut Pro X, 到“Menu”(菜单)中选择“File”(文件)/“New Project”(新项目)后, 会出现一个项目设置窗口。 2 给项目命名,并选择“Custom”(自定义)复选框。 3 将“Video Properties”(视频属性)设置为1080p HD, 1920x1080和24p。 4 将“Audio”(音频)和“Render Properties”(渲染属性)设置为“Stereo”(立体声),“48kHz”,和“Apple ProRes 422 HQ”。 5 点击“OK”确定。 若要将素材导入项目中,需到菜单栏中选择“File”(文件)/“Import”(导入)/“Media”(媒体),然后从CFast卡中选择要导入的素材。 现在可以将素材拖动到时间线上进行剪辑了。使用Avid MediaComposer2018
若使用Avid MediaComposer2018剪辑素材,您需要创建一个合适视频格式及帧率的新项目。本例子中的素材均使用1080p24的设置。  在Avid MediaComposer2018上设置项目名称和项目选项 运行Avid MediaComposer2018,“SelectProject”(选择项目)的窗口将会弹出。 2 点击“New Project”(新建项目)按钮,并且在该窗口中为项目命名。 3 到“Format”(格式)菜单中选择HD1080>1080p/24并点击“确定”创建项目。 4 到“Select Project”(选择项目)窗口中双击该项目将其打开。 5 依次选择“File”(文件)>“Input”(输入)>“Source Browser”(源浏览器)并导航到您想要导入的文件。 6 选择“TargetBin”(目标库)并点击“Import”(导入)。 当媒体库中显示出素材片段后,您便可以将素材拖动到时间线上进行剪辑了。使用AdobePremiereProCC
若使用AdobePremiereProCC剪辑AppleProRes422HQ素材,您需要创建一个具有合适视频格式及帧率的新项目。本例子中的素材均使用ProRes422HQ1080p25设置。  在AdobePremiereProCC上设置项目名称和项目选项 1 运行AdobePremiereProCC。在“Welcome”欢迎窗口中,选择“NewProject”(新建项目)。然后会出现一个项目设置窗口。 2 为项目命名。点击“Browse”(浏览)选择安装项目的文件夹,选择了文件夹之后,点击“新建项目”窗口中的“OK”确定。 3 到AdobePremiereProCC的菜单栏,选择File”(文件)/“import”(导入),然后选择想要剪辑的素材。然后您的素材便会在项目窗口中显示出来。 4 将您需要剪辑的第一段素材拖动到位于项目窗口右下角的“New Item”(新建项)图标上后,就会建立一段和您的视频设置相符的新序列。 现在可以将素材拖动到序列时间线上进行剪辑了。Blackmagic Camera Setup Utility实用软件
更新摄影机软件 - Mac
下载了Blackmagic Camera Setup Utility实用软件并解压缩后,请打开下载磁盘图标查看Blackmagic Camera Setup安装程序。 运行安装程序,根据屏幕提示完成安装。完成安装程序后,进入实用程序文件夹,打开"Blackmagic Cameras"文件夹,里面含有本手册、Blackmagic Camera Setup Utility实用软件以及一个含有自述文件和相关信息的文件夹。同时还包含一个卸载程序可用于升级到Blackmagic Camera Setup较新版本。 更新摄影机软件 - Windows
下载了Blackmagic Camera Setup Utility实用软件并解压缩后,您会看到一个名为“Blackmagic Camera Setup”的文件夹,该文件夹中含有PDF版操作手册以及Blackmagic Camera Setup安装程序。双击该安装程序,并根据屏幕提示完成安装。 在Windows10系统下点击开始按钮并选择“所有程序”。向下滚动到Blackmagic Design文件夹。从这里运行Blackmagic Camera Setup软件。在Windows8.1系统下,选择“开始”屏幕的向下箭头图标,并向下滚动到Blackmagic Design文件夹。从这里运行Blackmagic Camera Setup软件。升级摄影机的内部软件
在计算机上安装了最新版Blackmagic Camera Setup Utility实用软件后,请使用USB-C线缆连接计算机和摄影机。USB-C端口位于左侧面板。只需打开橡胶盖便可找到端口。 运行Blackmagic Camera Setup实用程序,并根据屏幕提示更新摄影机软件。摄影机重启出现"selectLanguage"页面。需要注意的是,更新摄影机软件会删除所有预设和自定义UT,并重置所有设置。更新软件之前,不妨将这些数据导出到存储卡上进行备份。软件更新后,只要再从存储卡中导入预设和LUT就可以快速恢复。使用电池手柄
为您的Pocket Cinema Camera摄影机添加电池手柄可以获得一个横向手柄,是一种可以延长拍摄时长的便携方案。如果您购买了电池手柄,不妨先完成安装,然后再继续接下来的操作。 Blackmagic Pocket Camera Battery Pro Grip专为Pocket Cinema Camera 6K Pro和6K G2摄影机所设计,内部可容纳两块NP-F570电池。您可以通过Pocket Cinema Camera 6K Pro和6K G2的内部电池结合手柄中的两块电池来实现摄影机的供电。 Blackmagic Pocket Camera Battery Grip的设计贴合Blackmagic Pocket Cinema Camera 4K。它可容纳两块NP-F570 L系列电池,实现长达两小时以上的不间断拍摄。 12VDC输入接口可为手柄中的电池充电,也可在您更换电池时为摄影机提供不间断电源。摄影机关机时,您可以使用USB-C端口为手柄中的电池充电。安装Blackmagic Pocket Camera Battery Pro Grip
为Pocket Cinema Camera 6K Pro和6K G2安装Blackmagic Pocket Camera Battery Pro Grip前,请先关闭摄影机,并断开任何外接电源。为了实现最长运行时间,建议您在安装电池手柄时保留摄影机内部电池,从而通过三块电池为摄影机提供电源。  找到位于摄影机底部靠近电池槽的小型接触点保护盖,松开固定接触点保护盖的螺丝。  卸下摄影机底部的接触点保护盖,露出为电池手柄提供电源的电子接触点。  为了妥善保管摄影机底部的接触点保护盖,请将其嵌入电池手柄顶部的凹槽当中,并旋紧螺丝固定到位。  轻轻将摄影机手柄推入摄影机底部。电池手柄顶部的1/4英寸螺丝应和摄影机底部的1/4-20安装孔对齐。1/4英寸螺丝两侧的小型定位销可有助于保持准确对齐。  向右侧拨动电池手柄正面的旋钮旋紧螺丝,将电池手柄牢牢固定在摄影机上。安装Blackmagic Pocket Camera Battery Grip
安装电池手柄前,请先关闭您的Pocket Cinema Camera 4K,并断开任何外接电源。  打开摄影机电池槽保护盖,取出里面的LP-E6电池。  沿着电池槽保护盖与机身的连接处位置滑动,从摄影机上取下保护盖。  为了防止电池槽保护盖遗失,请将其扣入电池手柄槽内部设计的凹槽。  关闭电池槽保护盖,使其平整卡入并固定在电池手柄槽内部设计的凹槽。  将手柄电池形状的部分插入摄影机的电池槽内。电池手柄顶部的1/4英寸螺丝应和摄影机底部的1/4-20安装孔对齐。1/4英寸螺丝一侧的小型定位销可有助于保持准确对齐。  向右侧拨动电池手柄正面的旋钮旋紧螺丝,将电池手柄牢牢固定在摄影机上。为电池手柄安装电池
 逆时针旋转电池手柄尾部的锁定开关,打开电池槽。将电池槽滑出。将电池手柄安装到摄影机之前或之后都可执行这一操作。  将两块NP-F570电池放入电池槽,安装时请注意电池朝向,然后将两块电池逆向滑入电池槽。电池之间的锁定扣向上弹起后,表示电池锁定到位。移除电池时,按下锁定扣,将两块电池相向滑动即可取出。  将电池槽滑入电池手柄,顺时针旋转电池手柄尾部的锁定开关。请注意,如果摄影机的DC电源输入口连接了外部电源,您可以在更换手柄内部电池的时候继续拍摄。  顺时针旋转电池手柄尾部的锁定开关,锁定电池槽。 提示为Pocket Cinema Camera 4K安装电池手柄,并且安装两块电池后,摄影机LCD触摸屏右上角的电池电量提示会显示两个电池图标,供您单独监控每块电池的电量情况。将电池手柄安装到Blackmagic Pocket Cinema Camera 6K Pro和6K G2时,LCD触摸屏会显示三个电池图标。更多相关信息,请查阅“电源”部分的介绍Developer Information
Blackmagic Bluetooth Camera Control
Blackmagic cameras with Bluetooth LE implement a variety of features and commands that allow users to control their cameras wirelessly. Developers have full access to these features for their custom applications. The following services and characteristics describe the full range of communication options that are available to the developer.Service: Device Information Service
UUID:180ACharacteristics
Camera Manufacturer
UUID:2A29 Read the name of the manufacturer (always "Blackmagic Design").Camera Model
UUID:2A24 Read the name of the camera model ("Pocket Cinema Camera 6K" or "Pocket Cinema Camera 4K").Service: Blackmagic Camera Service
UUID:291D567A-6D75-11E6-8B77-86F30CA893D3Characteristics
Outgoing Camera Control (encrypted)
UUID:5DD3465F-1AEE-4299-8493-D2ECA2F8E1BBSend Camera Control messages
These messages are identical to those described in the Blackmagic SDI Camera Control Protocol section below. Please read that section for a list of supported messages and required formatting information. For an example of how packets are structured, please see the 'example protocol packets' section in this document.Incoming Camera Control (encrypted)
UUID:B864E140-76A0-416A-BF30-5876504537D9 Request notifications for this characteristic to receive Camera Control messages from the camera. These messages are identical to those described in the Blackmagic SDI Camera Control Protocol section below. Please read that section for a list of supported messages and required formatting information.Timecode (encrypted)
UUID:6D8F2110-86F1-41BF-9AFB-451D87E976C8 Request notifications for this characteristic to receive timecode updates. Timecode (HH:MM:SS:mm) is represented by a 32-bit BCD number: (eg. 09:12:53:10 = 0x09125310)Camera Status (encrypted)
UUID:7FE8691D-95DC-4FC5-8ABD-CA74339B51B9 Request notifications for this characteristic to receive camera status updates. The camera status is represented by flags contained in an 8-bit integer:| None | = 0x00 |
| Camera Power On | = 0x01 |
| Connected | = 0x02 |
| Paired | = 0x04 |
| Versions Verified | = 0x08 |
| Initial Payload Received | = 0x10 |
| Camera Ready | = 0x20 |
Device Name
UUID:FFAC0C52-C9FB-41A0-B063-CC76282EB89C Send a device name to the camera (max. 32 characters). The camera will display this name in the Bluetooth Setup Menu.Protocol Version
UUID: 8F1FD018-B508-456F-8F82-3D392BEE2706 Read this value to determine the camera's supported CCU protocol version. NOTE Encrypted characteristics can only be used once a device has successfully bonded or paired with the Blackmagic Camera. Once a connection has been established, any attempt to write to an encrypted characteristic will initiate bonding. For example, writing a 'Camera Power On' (0x01) message to the Camera Status characteristic. Once bonding is initiated, the camera will display a 6-digit pin in the Bluetooth Setup Menu. Enter this pin on your device to establish an encrypted connection. The device will now be able to read, write and receive notifications from encrypted characteristics.Blackmagic SDI and Bluetooth Camera Control Protocol
Version 1.5
If you are a software developer you can use the Blackmagic SDI and Bluetooth Camera Control Protocol to construct devices that integrate with our products. Here at Blackmagic Design, our approach is to open up our protocols and we eagerly look forward to seeing what you come up with!Overview
This document describes an extensible protocol for sending a unidirectional stream of small control messages embedded in the non-active picture region of a digital video stream. The video stream containing the protocol stream may be broadcast to a number of devices. Device addressing is used to allow the sender to specify which device each message is directed to.Assumptions
Alignment and padding constraints are explicitly described in the protocol document. Bit fields are packed from LSB first. Message groups, individual messages and command headers are defined as, and can be assumed to be, 32 bit aligned.Blanking Encoding
A message group is encoded into a SMPTE 291M packet with DID/SDID x51/x53 in the active region of VANC line 16.Message Grouping
Up to 32 messages may be concatenated and transmitted in one blanking packet up to a maximum of 255 bytes payload. Under most circumstances, this should allow all messages to be sent with a maximum of one frame latency. If the transmitting device queues more bytes of message packets than can be sent in a single frame, it should use heuristics to determine which packets to prioritize and send immediately. Lower priority messages can be delayed to later frames, or dropped entirely as appropriate.Abstract Message Packet Format
Every message packet consists of a three byte header followed by an optional variable length data block. The maximum packet size is 64 bytes.| Destination device (uint8) | Device addresses are represented as an 8 bit unsigned integer. Individual devices are numbered 0 through 254 with the value 255 reserved to indicate a broadcast message to all devices. |
| Command length (uint8) | The command length is an 8 bit unsigned integer which specifies the length of the included command data. The length does NOT include the length of the header or any trailing padding bytes. |
| Command ld (uint8) | The command id is an 8 bit unsigned integer which indicates the message type being sent. Receiving devices should ignore any commands that they do not understand. Commands 0 through 127 are reserved for commands that apply to multiple types of devices. Commands 128 through 255 are device specific. |
| Reserved (uint8) | This byte is reserved for alignment and expansion purposes. It should be set to zero. |
| Command data (uint8[]) | The command data may contain between 0 and 60 bytes of data. The format of the data section is defined by the command itself. |
| Padding (uint8[]) | Messages must be padded up to a 32 bit boundary with 0x0 bytes. Any padding bytes are NOT included in the command length. |
Defined Commands
Command 0 : change configuration| Category (uint8) | The category number specifies one of up to 256 configuration categories available on the device. |
| Parameter (uint8) | The parameter number specifies one of 256 potential configuration parameters available on the device. Parameters 0 through 127 are device specific parameters. Parameters 128 though 255 are reserved for parameters that apply to multiple types of devices. |
| Data type (uint8) | The data type specifies the type of the remaining data. The packet length is used to determine the number of elements in the message. Each message must contain an integral number of data elements. |
| 0: void / boolean | A void value is represented as a boolean array of length zero. The data field is a 8 bit value with 0 meaning false and all other values meaning true. |
| 1: signed byte | Data elements are signed bytes |
| 2: signed 16 bit integer | Data elements are signed 16 bit values |
| 3: signed 32 bit Integer | Data elements are signed 32 bit values |
| 4: signed 64 bit Integer | Data elements are signed 64 bit values |
| 5: UTF-8 string | Data elements represent a UTF-8 string with no terminating character. |
| 128: signed 5.11 fixed point | Data elements are signed 16 bit integers representing a real number with 5 bits for the integer component and 11 bits for the fractional component. The fixed point representation is equal to the real value multiplied by \( {2}^{ \land }{11} \) . The representable range is from -16.0 to 15.9995 (15 + 2047/2048). |
| Operation type (uint8) | The operation type specifies what action to perform on the specified parameter. Currently defined values are: |
| 0: assign value | The supplied values are assigned to the specified parameter. Each element will be clamped according to its valid range. A void parameter may only be 'assigned' an empty list of boolean type. This operation will trigger the action associated with that parameter. A boolean value may be assigned the value zero for false, and any other value for true. |
| 1: offset / toggle value | Each value specifies signed offsets of the same type to be added to the current parameter values. The resulting parameter value will be clamped according to their valid range. It is not valid to apply an offset to a void value. Applying any offset other than zero to a boolean value will invert that value. |
| Data (void) | The data field is 0 or more bytes as determined by the data type and number of elements. |
| Group | ID | Parameter | Type | Index | Minimum | Maximum | Interpretation |
| Lens | 0.0 | Focus | fixed16 | - | 0.0 | 1.0 | 0.0 = near, 1.0 = far |
| 0.1 | Instantaneous autofocus | void | - - | - | trigger instantaneous autofocus | ||
| 0.2 | Aperture (f-stop) | fixed16 | - | -1.0 | 16.0 | Aperture Value (where fnumber = sqrt(2^AV)) | |
| 0.3 | Aperture (normalised) | fixed16 | - | 0.0 | 1.0 | 0.0 = smallest, 1.0 = largest | |
| 0.4 | Aperture (ordinal) | int16 | - | 0 | n | Steps through available aperture values from minimum (0) to maximum (n) | |
| 0.5 | Instantaneous auto aperture | void | - - | - | trigger instantaneous auto aperture | ||
| 0.6 | Optical image stabilisation | boolean | - - | - | true = enabled, false = disabled | ||
| 0.7 | Set absolute zoom (mm) | int16 | - | 0 | max | Move to specified focal length in mm, from minimum (0) to maximum (max) | |
| 0.8 | Set absolute zoom (normalized) | fixed16 | - | 0.0 1.0 | Move to specified focal length: 0.0 = wide, 1.0 = tele | ||
| 0.9 | Set continuous zoom (speed) | fixed16 | - | -1.0 | +1.0 | Start/stop zooming at specified rate: -1.0 = zoom wider fast, 0.0 = stop, +1 = zoom tele fast | |
| Video | 1.0 | Video mode | int8 | [0] = frame rate | - | - | fps as integer (eg 24, 25, 30, 50, 60) |
| [1] = M-rate | - | - | 0 = regular, 1 = M-rate | ||||
| [2] = dimensions | - | - | 0 = NTSC, 1 = PAL, 2 = 720, 3 = 1080, 4 = 2kDCI, 5 = 2k16:9, 6 = UHD, 7 = 3k Anamorphic, 8 = 4k DCI, 9 = 4k 16:9, 10 = 4.6k 2.4:1, 11 = 4.6k | ||||
| [3] = interlaced | - | - | 0 = progressive, 1 = interlaced | ||||
| [4] = Color space | - | - | 0 = YUV | ||||
| 1.1 | Gain (up to Camera 4.9) | int8 | 1 | 128 | 1x, 2x, 4x, 8x, 16x, 32x, 64x, 128x gain | ||
| 1.2 | Manual White Balance | int16 | [0] = color temp | 2500 | 10000 | Color temperature in K | |
| int16 | [1] = tint | -50 | 50 | tint | |||
| 1.3 | Set auto WB | void | - | -- | - | Calculate and set auto white balance | |
| 1.4 | Restore auto WB | void | - | -- | - | Use latest auto white balance setting | |
| 1.5 | Exposure (us) | int32 | 1 | 42000 | time in us | ||
| 1.6 | Exposure (ordinal) | int16 | - | 0 | n | Steps through available exposure values from minimum (0) to maximum (n) | |
| 1.7 | Dynamic Range Mode | int8 enum | - | 0 | 2 | 0 = film, 1 = video, 2 = extended video | |
| 1.8 | Video sharpening level | int8 enum | - | 0 | 3 | 0 = off, 1 = low, 2 = medium, 3 = high | |
| 1.9 | Recording format | int16 | [0] = file frame rate | - | - | fps as integer (eg 24, 25, 30, 50, 60, 120) | |
| [1] = sensor frame rate | - | - | fps as integer, valid when sensor-off-speed set (eg 24, 25, 30, 33, 48, 50, 60, 120), no change will be performed if this value is set to 0 | ||||
| [2] = frame width | - | - | in pixels | ||||
| [3] = frame height | - | - | in pixels | ||||
| [4] = flags | - | - | [0] = file-M-rate | ||||
| - | - | [1] = sensor-M-rate, valid when sensor-off-speed-set | |||||
| - | - | [2] = sensor-off-speed | |||||
| - | - | [3] = interlaced | |||||
| - | - | [4] = windowed mode | |||||
| Video | 1.10 | Set auto exposure mode | int8 | - | 0 | 4 | 0 = Manual Trigger, 1 = Iris, 2 = Shutter, 3 = Iris + Shutter, 4 = Shutter + Iris |
| 1.11 | Shutter angle | int32 | - | 100 | 36000 | Shutter angle in degrees, multiplied by 100 | |
| 1.12 | Shutter speed | int32 | - | Current sensor frame rate | 5000 | Shutter speed value as a fraction of 1, so 50 for 1/50th of a second | |
| 1.13 | Gain | int8 | - | -128 | 127 | Gain in decibel (dB) | |
| 1.14 | ISO | int32 | - | 0 | 2147483647 | ISO value | |
| 1.15 | Display LUT | int8 | [0] = selected LUT | - | - | 0 = None, 1 = Custom, 2 = film to video, 3 = film to extended video | |
| [1] = enabled or not | - | - | 0 = Not enabled, 1 = Enabled | ||||
| 1.16 | ND Filter | fixed16 | [0] = stops | 0.0 | 16.0 | f-stop of ND filter to use | |
| Audio | 2.1 | Headphone level | fixed16 | - | 0.1 | 1.0 | 0.0 = minimum, 1.0 = maximum |
| 2.2 | Headphone program mix | fixed16 | - | 0.1 | 1.0 | 0.0 = minimum, 1.0 = maximum | |
| 2.3 | Speaker level | fixed16 | - | 0.1 | 1.0 | 0.0 = minimum, 1.0 = maximum | |
| 2.4 | Input type | int8 | - | 0 | 3 | 0 = internal mic,1 = line level input,2 = low mic level input,3 = high mic level input | |
| 2.5 | Input levels | fixed16 | [0] ch0 | 0.0 | 1.0 | 0.0 = minimum, 1.0 = maximum | |
| [1] ch1 | 0.0 | 1.0 | 0.0 = minimum, 1.0 = maximum | ||||
| 2.6 | Phantom power | boolean | - | - | - | true = powered,false = not powered | |
| Output | 3.0 | Overlay enables | uint16bit field | - | - | - | bit flags:[0] = display status,[1] = display frame guidesSome cameras don't allow separate control of frame guides and status overlays. |
| 3.1 | Frame guides style(Camera 3.x) | int8 | - | 0 | 8 | 0 = HDTV, 1 = 4:3, 2 = 2:4:1,3 = 2:39:1, 4 = 2:35:1,5 = 1:85:1, 6 = thirds | |
| 3.2 | Frame guides opacity(Camera 3.x) | fixed16 | - | 0.1 | 1.0 | 0.0 = transparent, 1.0 = opaque | |
| 3.3 | Overlays(replaces .1 and .2 above from Cameras 4.0) | int8 | [0] = frame guides style | - | - | 0 = off, 1 = 2:4:1, 2 = 2:39:1,3 = 2:35:1, 4 = 1:85:1, 5 = 16:9,6 = 14:9, 7 = 4:3, 8 = 2:1,9 = 4:5, 10 = 1:1 | |
| [1] = frame guide opacity | 0 | 100 | 0 = transparent, 100 = opaque | ||||
| [2] = safe area percentage | 0 | 100 | percentage of full frame used by safe area guide(0 means off) | ||||
| [3] = grid style | - | - | bit flags:[0] = display thirds,[1] = display cross hairs,[2] = display center dot,[3] = display horizon | ||||
| Display | 4.0 | Brightness | fixed16 | - | 0.0 | 1.0 | 0.0 = minimum, 1.0 = maximum |
| 41 | Exposure and focus tools | int16bit field | 0x1 = zebra,0x2 = focus assist,0x4 = false color | - | - | 0 = disable, 1 = enable | |
| 4.2 | Zebra level | fixed16 | - | 0.0 | 1.0 | 0.0 = minimum, 1.0 = maximum | |
| 4.3 | Peaking level | fixed16 | - | 0.0 | 1.0 | 0.0 = minimum, 1.0 = maximum | |
| 4.4 | Color bar enable | int8 | - | 0 | 30 | 0 = disable bars,1-30 = enable bars with timeout (seconds) | |
| 4.5 | Focus Assist | int8 | [0] = focus assist method | - | - | 0 = Peak,1 = Colored lines | |
| [1] = focus line color | - | - | 0 = Red,1 = Green,2 = Blue,3 = White,4 = Black | ||||
| 4.6 | Program return feed enable | int8 | - | 0 | 30 | 0 = disable, 1-30 = enable with timeout (seconds) | |
| Tally | 5.0 | Tally brightness | fixed16 | - | 0.0 1.0 | Sets the tally front and tally rear brightness to the same level.0.0 = minimum,1.0 = maximum | |
| 5.1 | Front tally brightness | fixed16 | - | 0.0 1.0 | Sets the tally front brightness.0.0 = minimum,1.0 = maximum | ||
| 5.2 | Rear tally brightness | fixed16 | - | 0.0 1.0 | Sets the tally rear brightness.0.0 = minimum,1.0 = maximumTally rear brightness cannot be turned off | ||
| Reference | 6.0 | Source | int8 enum | - | 0 | 2 | 0 = internal,1 = program,2 = external |
| 6.1 | Offset | int32 | - | - | - | +/- offset in pixels | |
| Confi-guration | 7.0 | Real Time Clock | int32 | [0] time | - | - | BCD - HHMMSSFF (UCT) |
| [1] date | - | - | BCD - YYYYYMMDD | ||||
| 7.1 | System language | string | [0-1] | - | - | ISO-639-1 two character language code | |
| 7.2 | Timezone | int32 | - | - | - | Minutes offset from UTC | |
| 7.3 | Location | int64 | [0] latitude | - | - | BCD - sDDDdddddddd where s is the sign:0 = north (+), 1 = south (-);DD degrees, ddddccccccc decimal degrees | |
| [1] longitude | - | - | BCD - sDDDdddddddd where s is the sign: 0 = west(-), 1 = east (+); DDD degrees, dddddddddddd decimal degrees | ||||
| Color Correction | 8.0 | Lift Adjust | fixed16 | [0] red | -2.0 | 2.0 | default 0.0 |
| [1] green | -2.0 | 2.0 | default 0.0 | ||||
| [2] blue | -2.0 | 2.0 | default 0.0 | ||||
| [3] luma | -2.0 | 2.0 | default 0.0 | ||||
| 8.1 | Gamma Adjust | fixed16 | [0] red | -4.0 | 4.0 | default 0.0 | |
| [1] green | -4.0 | 4.0 | default 0.0 | ||||
| [2] blue | -4.0 | 4.0 | default 0.0 | ||||
| [3] luma | -4.0 | 4.0 | default 0.0 | ||||
| 8.2 | Gain Adjust | fixed16 | [0] red | 0.0 | 16.0 | default 1.0 | |
| [1] green | 0.0 | 16.0 | default 1.0 | ||||
| [2] blue | 0.0 | 16.0 | default 1.0 | ||||
| [3] luma | 0.0 | 16.0 | default 1.0 | ||||
| 8.3 | Offset Adjust | fixed16 | [0] red | -8.0 | 8.0 | default 0.0 | |
| [1] green | -8.0 | 8.0 | default 0.0 | ||||
| [2] blue | -8.0 | 8.0 | default 0.0 | ||||
| [3] luma | -8.0 | 8.0 | default 0.0 | ||||
| 8.4 | Contrast Adjust | fixed16 | [0] pivot | 0.0 | 1.0 | default 0.5 | |
| [1] adj | 0.0 | 2.0 | default 1.0 | ||||
| 8.5 | Luma mix | fixed16 | - | 0.0 | 1.0 | default 1.0 | |
| 8.6 | Color Adjust | fixed16 | [0] hue | -1.0 | 1.0 | default 0.0 | |
| [1] sat | 0.0 | 2.0 | default 1.0 | ||||
| 8.7 | Correction Reset Default | void | - | - | - | reset to defaults | |
| Media | 10.0 | Codec | int8 enum | [0] = basic codec | - | - | 0 = CinemaDNG, 1 = DNxHD, 2 = ProRes, 3 = Blackmagic RAW |
| [1] = code variant | - | - | CinemaDNG: 0 = uncompressed, 1 = lossy 3:1, 2 = lossy 4:1 | ||||
| - | - | ProRes: 0 = HG, 1 = 422, 2 = LT, 3 = Proxy, 4 = 444, 5 = 444XQ | |||||
| - | - | Blackmagic RAW: 0 = Q0, 1 = Q5, 2 = 3:1, 3 = 5:1, 4 = 8:1, 5 = 12:1 | |||||
| 10.1 | Transport mode | int8 | [0] = mode | - | - | 0 = Preview, 1 = Play, 2 = Record | |
| [1] = speed | - | - | -ve = multiple speeds backwards, 0 = pause, +ve = multiple speeds forwards | ||||
| [2] = flags | - | - | 1<<0 = loop, 1<<1 = play all, 1<<5 = disk1 active, 1<<6 = disk2 active, 1<<7 = time-lapse recording | ||||
| [3] = slot 1 storage medium | - | - | 0 = CFast card, 1 = SD Card, 2 = SSD Recorder, 3 = USB | ||||
| [4] = slot 2 storage medium | - | - | 0 = CFast card, 1 = SD Card, 2 = SSD Recorder, 3 = USB | ||||
| 10.2 | Playback Control | int8 enum | [0] = clip | - | - | 0 = Previous, 1 = Next | |
| 10.3 | Still Capture | void | - | - | - | Capture | |
| PTZ Control | 11.0 | Pan/Tilt Velocity | fixed16 | [0] = pan velocity | -1.0 | 1.0 | -1.0 = full speed left, 1.0 = full speed right |
| [1] = tilt velocity | -1.0 | 1.0 | -1.0 = full speed down, 1.0 = full speed up | ||||
| 11.1 | Memory Preset | int8 enum | [0] = preset command | - | - | 0 = reset, 1 = store location, 2 = recall location | |
| int8 | [1] = preset slot | 0 | 5 | - | |||
| Metadata | 12.0 | Reel | int16 | [0] = reel | 0 | 999 | - |
| 12.1 | Scene Tags | signedbyte | [0] = scene tags | - | - | -1 = None0 = WS1 = CU2 = MS3 = BCU4 = MCU5 = ECU | |
| [1] = interior /exterior | - | - | 0 = Exterior1 = Interior | ||||
| [2] = day / night | - | - | 0 = Night1 = Day | ||||
| 12.2 | Scene | string | [0-4] = scene | - | - | - | |
| 12.3 | Take | signedbyte | [0] = take number | 1 | 99 | - | |
| [1] = take tags | - | - | 1 = None0 = PU1 = VFX2 = SER | ||||
| 12.4 | Good Take | void | [0] = good take | - | - | - | |
| 12.5 | Camera ID | string | [0-28] = ID | - | - | - | |
| 12.6 | Camera Operator | string | [0-28] = operator | - | - | - | |
| 12.7 | Director | string | [0-27] = director | - | - | - | |
| 12.8 | Project Name | string | [0-28] = project | - | - | - | |
| 12.9 | Lens Type | string | [0-55] = type | - | - | - | |
| 12.10 | Lens Iris | string | [0-19] = iris | - | - | - | |
| 12.11 | Lens Focal Length | string | [0-29] = focal length | - | - | - | |
| 12.12 | Lens Distance | string | [0-49] = distance | - | - | - | |
| 12.13 | Lens Filter | string | [0-29] = filter | - | - | - | |
| 12.14 | Slate Mode | signedbyte | [0] = type | - | - | 0 = Recording1 = Playback | |
| 12.15 | Slate Target | string | [0-31] = name | - | - | - |
| Operation | Packet Length Byte | ||||||||||||||||
| 0 | 1 | 2 | 3 | 4 | 5 | 6 | 7 | 8 | 9 | 10 | 11 | 12 | 13 | 14 | 15 | ||
| header command data | |||||||||||||||||
| destination | length | command | reserved | category | parameter | type | operation | ||||||||||
| trigger instantaneous auto focus on camera 4 | 8 4 4 0 0 0 1 0 0 | ||||||||||||||||
| turn on OIS on all cameras | 12 255 | 5 0 0 0 0 6 0 0 1 0 0 0 | |||||||||||||||
| set exposure to 10 ms on camera 4 (10 ms = 10000 us = 0x00002710) | 12 | 4 | 8 | 0 | 0 | 1 | 5 | 3 | 0 | 0x10 | 0x27 | 0x00 | 0x00 | ||||
| add 15% to zebra level (15 % = 0.15 f = 0x0133 fp) | 12 | 4 | 6 | 0 | 0 | 4 | 2 | 128 | 1 | 0x33 | 0x01 | 0 | 0 | ||||
| select 1080p 23.98 mode on all cameras | 16 | 255 | 9 | 0 | 0 | 1 | 0 | 1 | 0 | 24 | 1 | 3 | 0 | 0 | 0 | 0 | 0 |
| subtract 0.3 from gamma adjust for green & blue (-0.3 ~ = 0xffd9a fp) | 16 | 4 | 12 | 0 | 0 | 8 | 1 | 128 | 1 | 0 | 0 | 0x9a | 0xffd | 0x9a | 0xffd | 0 | 0 |
| all operations combined | 76 | 4 4 0 0 0 1 0 0 255 5 0 0 0 6 0 0 | |||||||||||||||
| 1 | 0 | 0 | 0 | 4 | 8 | 0 | 0 | 1 | 5 | 3 | 0 | 0x10 | 0x27 | 0x00 | 0x00 | ||
| 4 | 6 | 0 | 0 | 4 | 2 | 128 | 1 | 0x33 | 0x01 | 0 | 0 | 255 | 9 | 0 | 0 | ||
| 1 | 0 | 1 | 0 | 24 | 1 | 3 | 0 | 0 | 0 | 0 | 0 | 4 | 12 | 0 | 0 | ||
| 8 | 1 | 128 | 1 | 0 | 0 | 0x9a | 0xffd | 0x9a | 0xffd | 0 | 0 | ||||||
帮助
获得帮助最快捷的途径是登陆Blackmagic Design在线支持页面并浏览有关摄影机的最新支持信息和材料。Blackmagic Design在线支持页面
请登陆Blackmagic Design支持中心www.blackmagicdesign.com/cn/support获得最新版操作手册、软件以及技术答疑文章。联系Blackmagic Design支持中心
如果我们提供的支持信息无法解答您的疑问,请到支持页面下点击“给我们发送电子邮件”按钮即可发送技术支持请求。或者,您也可以点击支持页面下的“查找您所在地区的支持团队”按钮,致电您所在地区的Blackmagic Design支持中心获得帮助。查看当前安装的软件版本
要检查您计算机上的Blackmagic Camera Setup Utility软件的版本,请打开"About Blackmagic Camera Setup Utility"窗口查看。 在Mac系统下,请到“应用程序”文件夹下打开Blackmagic Camera Setup程序。 - 在Windows系统下,请到开始菜单或开始屏幕下打开Blackmagic Camera Setup Utility程序。点击“Help”(帮助)菜单并选择“About Blackmagic Camera Setup Utility”程序即可查看版本号。如何获得软件更新
检查完您计算机上安装的Blackmagic Camera Utility软件版本号之后,请登录网址www.blackmagicdesign.com/cn/support访问Blackmagic Design支持中心查看最新版本。 请及时将软件升级到最新版本,但切勿在重要项目制作过程中升级软件。监管告知
 在欧盟范围内处置电子垃圾和电子设备的注意事项。 根据产品所附的提示标志,本设备不得与其它废弃材料共同处置。处置废弃设备时,必须交给指定收集点进行回收。对废弃设备进行单独收集并回收能够节省自然资源,且回收方式不会损害环境和人体健康。获取更多关于废弃设备回收点的信息,请联系您所在城市的回收站,或当时购买设备的经销商。  本设备经过测试,符合FCC规则的第15部分对A类数字设备的限制。这些限制旨在为运行于商业环境中的设备提供合理保护,使其免受有害干扰的影响。本设备可生成、使用且辐射射频能量,如果未按照安装手册来安装和使用本设备,则可能导致对无线电通信的有害干扰。在住宅区运行本产品可能会产生有害干扰,在这种情况下将由用户自行承担消除干扰的费用。 本设备的操作运行必须满足以下两个条件: 1 本设备或不会造成有害干扰。 2 本设备必须能够承受任何干扰,包括可能导致意外操作的干扰。  R-R-BMD-201810001 R-R-BMD-20220218001 R-R-BMD-201904002 加拿大ISED认证声明
本设备符合加拿大A类数码产品的相关标准。 任何对本产品的改装或预期用途之外的使用均可能导致相关标准认证无效。 必须使用有高品质屏蔽的HDMI电缆连接HDMI接口。 本设备经检测符合商业环境使用要求。在家用环境中,本设备可能会造成无线电干扰。蓝牙
本产品采用无线蓝牙技术。 包含发射模块FCCID:QOQBGM113 本设备符合为非受控制环境设定的FCC辐射暴露限制。 包含发射模块IC:5123A-BGM113 包含墨西哥认证发射模块。IFT: RCPISBG20-2560。 本设备符合加拿大工业部免检RSS标准,并免于RSS-102第5条中规定的日常SAR评估限制。 日本认证,认证编号:209-J00204。本设备中的指定无线电设备已通过《无线电法》技术法规符合性认证。 本设备已获得韩国认证,KC认证编号:MSIP-CRM-BGT-BGM113 Blackmagic Design在此声明,本产品使用2.4 GHz ISM宽频传输系统符合欧盟指令2014/53/EU。 获取完整版欧盟符合性声明,请联系compliance@blackmagicdesign.com  已获得南非ICASA认证,Blackmagic Pocket Cinema Camera 6K Pro批准文号为TA-2021/2072,Blackmagic Pocket Cinema Camera 6K批准文号为TA-2019/1517,Blackmagic Pocket Cinema Camera 4K批准文号为TA-2019/1516。  已获得墨西哥NOM认证,蓝牙模块由Silicon Labs生产,模块型号:BGM113A。安全信息
Blackmagic Pocket Cinema Camera适合在环境温度低于 40^ 的热带地区使用。 设备内部没有操作人员可维护的零件。维修服务请联系当地Blackmagic Design服务中心。 在日照环境下,应考虑遮盖摄影机来避免摄影机或锂电池长期暴露在日光下。请勿将锂电池靠近任何热源。  当使用本产品所提供的电源适配器时,仅限在海拔高度2000米以下的地区使用。加利福尼亚安全声明
该产品可能会让您暴露在塑料部件中所含的微量多溴化联苯等化学物质下,此类物质已被加州政府认定为可能导致癌症、先天畸形或其他遗传危害的物质。 详情请访问网址www.P65Warnings.ca.gov.保修
有限保修
- Blackmagic Design保证本产品自购买之日起12个月内不会有材料和工艺上的缺陷。若本产品在保修期内出现质量问题,Blackmagic Design可选择为产品提供免费修理或更换零部件,或者更换缺陷产品。 为确保消费者有权享受本保修条款中的服务,如遇产品质量问题请务必在保修期内联系Blackmagic Design并妥善安排保修事宜。消费者应将缺陷产品包装并运送到Blackmagic Design的指定服务中心进行维修,运费由消费者承担并预先支付。若消费者因任何原因退货,所有运费、保险费、关税等各项税务以及其他费用均由消费者承担。 本保修条款不适用于任何因使用、维护不当或保养不周造成的缺陷、故障或损坏。根据本保修服务,Blackmagic Design的保修范围不包括以下内容:1. 对由非Blackmagic Design专门人员进行的安装、维修或保养所造成的损坏进行维修,2. 对因使用不当或连接到不兼容设备所造成的损坏进行维修,3. 对因使用了非Blackmagic Design生产的零部件所导致的损坏或故障进行维修,及4. 对经过改装或和其他产品进行组装的产品进行保养维修(因为产品经改装或组装后会增加保养维修所需时间或保养难度)。 本保修条款由BLACKMAGICDESIGN提供,它可取代所有其他明示或隐含的保修。BLACKMAGICDESIGN及其供应商对任何有关适销性及就特定用途的适用性等隐含保证不作任何担保。BLACKMAGICDESIGN在保修期间负责为消费者提供缺陷产品的维修或更换服务是完整和排他性补救措施。不论BLACKMAGICDESIGN或其供应商是否事先获悉发生间接、特殊、偶然或必然损坏等损坏的可能性,BLACKMAGICDESIGN概不负责。若消费者对本设备进行非法使用,BLACKMAGICDESIGN概不负责。对因使用本产品造成的损失,BLACKMAGICDESIGN概不负责。本产品的操作风险由用户自行承担。 ©版权所有2022Blackmagic Design.保留一切权利。“Blackmagic Design”、“URSA”、“DeckLink”、“HDLink”、“Workgroup Videohub”、“Multibridge Pro”、“Multibridge Extreme”、“Intensity”以及“Leading the creative video revolution”均为美国及其他国家的注册商标。所有其他公司名称及产品名称可能是其他所有者的注册商标。 "Bluetooth”(蓝牙)一词,其商标和徽标为Bluetooth SIG,Inc.公司的注册商标,且Blackmagic Design对于上述标识的各类用途均获授权。其他商标和商标名称皆为其各自拥有者所有。Blackmagic
Pocket Cinema Camera
 宣
Blackmagic Pocket Cinema Camera将无法通过视频传输图像。 2013年 Blackmagic Pocket Cinema Camera 尴尾也 出现了一个 DAIYAN 的 2013年 Blackmagic Pocket Cinema Camera 對 那部的 2013年 Blackmagic Pocket Cinema Camera 對 那部的 2013年 Blackmagic Pocket Cinema Camera 對 那部的 2013年 Blackmagic Pocket Cinema Camera 對 那部的 2013年 Blackmagic Pocket Cinema Camera 對 那部的 2013年 Blackmagic Pocket Cinema Camera 對 那部的 2013年 Blackmagic Pocket Blackmagic Pocket Cinema Camera 4KEdition is a Konsum Pocket Cinema Camera with the following features: Black Magic Pocket Cinema Camera, Pocket Cinema Camera, Pocket Cinema Camera, Pocket Cinema Camera, Pocket Cinema Camera, Pocket Cinema Camera, Pocket Cinema Camera, Pocket Cinema Camera, Pocket Cinema Camera, Pocket Cinema Camera, Pocket Cinema Camera, Pocket Cinema Camera, Pocket Cinema Camera, Pocket Cinema Camera, Pocket Cinema Camera, Pocket Cinema Camera, Pocket Cinema Camera, Pocket Cinema Camera, Pocket Cinema Camera, Pocket Cinema Camera, Pocket Cinema Camera, Pocket Cinema Camera, Pocket Cinema Camera, Pocket Cinema Camera, Pocket Cinema Camera, Pocket Cinema Camera 13. 13. 云越云云云云云云云云云云云云云云云云云云云云云云云云云云云云云云云云云云云云云云云云云云云云云云云云云云云云云云云云云云云云云云云云云云云云云云云云云云云云云云云云云云云云云云云云云云云云云云云云云云云云  Blackmagic Design的CEO 那兰德印目录
卡里拉多德贝996 996 Leflz 996 卡里拉,1998 常隆国 998 哉增马迪 999 CFast 卡德 999 SD 卡旦 1001 USB-C 普拉尼 德斯 1003 韵歌用MIDI猿声悦哉如1004 Blackmagic Pocket Cinema Camera mirdiher hhi 1005 Mac@ser mddr 1007 WindowswhereMidiErn#hih 1008 1009 L1009 Blackmagic RAW 1010 Blackmagic RAW 1010 1013 跃海能 1020 卡里拉吉 1020 卡蒙拉 1020 卡里拉 1021 1022 1024 卡默拉阿默 卡耶拉贝多合 1027 TetrisKunen 1030 TettsK3Rn1 1030 1053 大社 跃海 1053 1059 MONiTeRlE 1059 OUDIO OLO 1066 1069 1081 3DLUT 1084 IMTATDAIITTE 1086 洛莱贝 卡里拉的ViiDIOO 凿弱 1092 Blackmagic Zoom Demand Blackmagic Focus Demand 1092 卡蒙拉里 1093 Blackmagic Focus Demand 1095 Blackmagic Zoom Demand 1095 DaVinci Resolve 1097 Frolojecte Mnni 1097 封印贝吉将人用有 TahlmraIne kIgLk 1101 TahilmalraIneAe, TgLcRtRlMgHg 1102 Oukiou Tlrmb 1102 Taiyihui 1103 Blackmagic RAW 1104 1107 1111 普勒上在 OukiOuMxH 1113 Fusion FxIzIeFVFX 1118 1126 欣默通(Quick Export) 1126 1127 ATEM Miniro kama la jieohhag 1128 DaVinci Resolve FralaiIurl 凯尔勒克默特 1132 1135 CFast2.0及SD卡德罗印台启作 USB-C 論碼電台 DUSK 1135 Final Cut Pro X 河用 Avid MediaComposer2018saugohai 1136 AdobePremiereProCCsaugohi 1137 Blackmagic Camera Setup 1138 BabrilIgLs#hag 1139 Developer Information 1142 Blackmagic Bluetooth Camera Control 1142 Blackmagic SDI and Bluetooth Camera Control Protocol 1144 Example Protocol Packets 1153 1154 # 安進記報 1156 1157かてレマご日
Blackmagic Pocket Cinema Camera 6K Pro , 6K G2 , 4K MoTel is u s a n h o w a r n to g a k i t o. hossn . 3e moTel moTup 1000000000000000000000000000000000000000000000000000000000000000000000000000000000000 Blackmagic Pocket Cinema Camera 6K Pro及6K G2是35mm33mm的索尼的索尼和EF-Lenzt的索尼都可使用。Blackmagic Pocket Cinema Camera 4K是索尼的索尼的索尼的索尼的索尼的索尼的索尼的索尼的索尼的索尼的索尼的索尼的索尼的索尼的索尼的索尼的索尼的索尼的索尼的索尼的索尼的索尼的索尼的索尼的索尼的索尼的索尼的索尼的索尼的索尼的索尼的索尼的索尼的索尼的索尼的索尼的索尼的索尼的索尼的索尼的索尼的索尼的索尼的索尼的索尼的索尼的索尼的索尼的索尼的索尼的索尼  Blackmagic Pocket Cinema Camera 6K Pro人
Kenzsch zu kochohk hokmikhakn hauhBlackmagic Pocket Cinema Camera's aoue hkiRanstrackshah
Pocket Cinema Camera 6K及6K Pro是EF Renoz为正常使用Pcck Cinema Camera 4K 是的MaiKroFerDn(MFT)tohucn.,AraeRtooTt#nBnOin Pocet Cinema Camera moelit 1011Hn.EF 五是的马贝克力托斯 雷德马运电
1 RnZs的FsiHg和RanTm的FsiHg将日击iKn。大部B的Lz是P,  2 羽斯马运电到卡里拉马运电要大和,相地范行以动同  Blackmagic Pocket Cinema Camera 4Koe Maikr Ro Fnrndn 3 獭斯为降拉哈勒用,当国,贝德于数在,,,,,,,,,,,,,,,,,,,,,,,,,,,,,,,,,,,,,,,,,,,,,,,,,,,,,,,,,,,,,,,,,,,,,,,,,,,,,,。 查加卡里拉里德斯卡当销收用,是的,他到的就和在的。卡耶拉 页
RanZsK F570 4KnL6E6 BaeTREi 4k n1 Pcet Cimca Pcet Cimca Pcet Cimca Pcet Cimca Pcet Cimca Pcet CimcaKAPRA
Pocket Cinema Camera 6K Pro and 6K G2是FPN-F570 BATERlRtoSAHcH, Pocket Cinema Camera 4K是FPX LP-E6 BATERlRtoSAHcH. KAPRAEHO HANOe HANOe HANOe HANOe HANOe HANOe HANOe HANOe HANOe HANOe HANOe HANOe HANOe HANOe HANOe HANOe HANOe HANOe HANOe HANOe HANOe HANOe HANOe HANOe HANOe HANOoH TnA BATERlRtoPAJIOh CNOu Blackmagic Design RILER ToNNI IINi IINi IINi IINi IINi IINi IINi IINi IINi IINi IINi IINi IINi IINi IINi IINi IINi IINi IINi IINi IINi IINi IINi IINi IINi IINi IINi IINi IINi IINi IINi IINi IINi IINi 1 kAeRaiiBnEaHbNnBnTnIe 1 2 2 孟保 贝托里将本尼拉卡夫的名著译成英文,以便在1980年出版。 3 3 4 kaMraLwEJHJ 1J 1J.通綱の策言を用具の状態に、現状の状態に
貢和合接同本,100V~240V AC 漆拉上默将示用,如用,开用,公有,当电,中电,中电,中电,中电,中电,中电,中电,中电,中电,中电,中电,中电,中电,中电,中电,中电,中电,中电,中电,中电,中电,中电,中电,中电,中电,中电,中电,中电,中电,中电,中电,中电,中电,中の外部専職員に満足の結果を提供。
1 1 2 kamae la o 12 V DC 3 3 - kāmērale に baṭterl i 与 与 与 与 与 与 与 与 与 与 与 与 与 与 与 与 与 与 与 与 与 与 与 与 与 与 与 与 与 与 与 与 与 与 与 与 与 与 与 与 与 与 与 与 与 与 与 与 与 与 2. Kamada 12V DC 12V DC 12V DC 12V DC 12V DC 12V DC 12V DC 12V DC 12V DC 12V DC 12V DC 12V DC 12V DC 12V DC 12V DC 12V DC 12V DC 12V DC 12V DC 12V DC 12V Dc 12V DC 12V DC 12V DC 12V DC 12V DC 12V DC 12V DC 12V DC 12V DC 12V DC 12V DC 12V DC 12V DC 12V DC 12V DC 12V DC 12V DC 12V DC 12V DC 12VDC 12VDC 12VDC 12VDC 12VDC 12VDC 12VDC 12VDC 12VDC 12VDC 12VDC 12VDC 12VDC 12VDC 12VDC 12VDC 12VDC 12VDC 12VDC 12VDC 12V 聖保 悲用者,有在,有在,有在,有在,有在,有在,有在,有在,有在,有在,有在,有在,有在,有在,有在,有在,有在,有在,有在,有在,有在,有在,有在,有在,有在,有在,有在,有在,有在,有在,有在,有在,有在,有在 此译者,皆指《史记》中《鲁班传》中的《鲁班传》。貯장
Blackmagic Pocket Cinema Camera是光谱行SD卡德且的上在UHS-II SD USB-C 次道插口或通过常用 USB-C 滤位来连接,如需要使用时,可直接在 USB-C 滤位上插入一个 1000V 的电压。CFast 升元
CFast 2.0 キードは、用を、は、は、は、は、は、は、は、は、は、は、は、は、は、は、は、は、は、は、は、は、は、は、は、は、は、は、は、は、は、は、は、は、は、は、は、は、は、は、は、は、は、は、は、は、は、は、は、は、は、は、是、は、は、は、は、は、は、は、は、は、は、は、は、は、は、は、は、は、は、は、は、は、は、は、は、は、は、は、は、は、は、は、は、は、は、は、は、は、は、は、は、は、は、は、は、は、は、は、は、は、がとに。 CFast 2.0 키드는일본적어로 썼은 키드를 기원해지만,일부 키드의 겨고 썸고 키드가 일기 키드에 기해 나리기드 하머 키드모양에 사라 춤다에이터 친상 키드가 선ephan 키래일 키리드에 기해는안성rich의 키화를 기재서는 Blackmagic Design에서 원장해는 키드만 사용하심지 기재서.CFast 卡德森启航
 MiDlHerhLgHJi#HJHJHJHJHJHJHJHJHJHJHJHJHJHJHJHJHJHJHJHJHJHJHJHJHJHJHJHJHJHJHJHJHJHJHJHJHJHJHJHJHJHJHJHJHJHJHJHJHJHJH  TangsiHJiF 1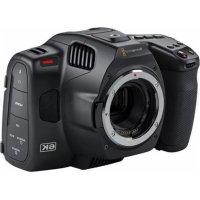
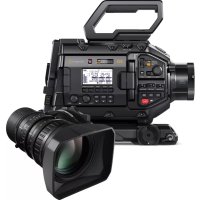
- Blackmagic
- Pocket Cinema Camera
- Languages
- English 3.
- Welcome
- Grant Petty
- Contents
- Which camera are you using? 5
- Storage Media 8
- Recording 18
- Camera Features 29
- Touchscreen Controls 39
- Settings 62
- Entering Metadata 95
- Using DaVinci Resolve 106
- Which camera are you using?
- Getting Started
- Attaching a Lens
- To attach an EF mount or Micro Four Thirds lens:
- Turning Your Camera On
- Inserting a Battery and Powering your Camera
- Powering Your Camera with the Included Power Cable
- To plug in external power:
- Storage Media
- CFast Cards
- To insert a CFast card:
- Choosing a CFast 2.0 Card
- SD Cards
- To insert an SD card
- Choosing an SD Card
- Locking and Unlocking SD Cards
- USB-C flash disks
- To connect to a USB-C flash disk:
- Choosing a fast USB-C flash disk
- Important Notes About USB-C flash disk Speed
- Preparing Media for Recording
- Preparing Media on Blackmagic Pocket Cinema Camera
- Preparing Media on a Mac
- Preparing Media on Windows
- Recording
- Recording Clips
- Choosing the Recording Format
- Blackmagic RAW
- Recording to Blackmagic RAW
- Constant Bitrate Settings
- Constant Quality Settings
- Blackmagic RAW Player
- Sidecar Files
- Blackmagic RAW in DaVinci Resolve
- Blackmagic RAW Software Development Kit
- Maximum Sensor Frame Rates
- Record Duration
- Choosing Frame Rates
- Trigger Record
- Playback
- Playing Back Clips
- Camera Features
- Camera Front
- Record Buttons
- Settings Wheel
- Stereo Microphones
- Lens Mount
- Tally / Record Indicator
- Right Side
- CFast Card Slot
- SD Card Slot
- Left Side
- 3.5mm Microphone Input
- Headphones Input
- 10HDMI
- Power Input
- Custom Power Solutions
- USB
- Mini XLR Microphone Input
- Top Panel
- 1/4-20 Mounting Point
- Record
- Still
- ISO
- Shutter
- White Balance
- Viewfinder Connector Port
- Power Switch
- Status LED
- Function Buttons
- Camera Underside
- 1/4-20 Mounting Point
- Battery Door
- Battery Grip Power Connector
- Camera Rear
- Touchscreen Display
- Iris Button
- Focus Button
- HFR Button
- Focus Zoom Button
- Menu Button
- Play Button
- Blackmagic Pocket Cinema Camera Pro EVF
- Diopter for Electronic Viewfinder
- ND Filter
- Touchscreen Controls
- Touchscreen Features
- LCD Monitor Options
- Zebra
- Focus Assist
- Frame Guides
- 2.35:1, 2.39:1 and 2.40:1
- 14:9
- 4:3
- 1:1
- 4:5
- Custom Frame Guide Ratio
- Grids
- Thirds
- Horizon
- Horizon meter Description
- Crosshair
- Dot
- Safe Area Guides
- False Color
- Screen Brightness
- ND Filter indicator
- Frames Per Second
- Project Frame Rate
- Sensor Frame Rate
- Shutter
- Shutter + Iris
- Iris + Shutter
- Iris
- Duration Display
- Additional status indicators may appear around the duration display:
- ISO
- Dual Native ISO
- White Balance
- Auto White Balance
- Power
- LUT indicator
- Histogram
- Record button
- LUT Applied to Clip
- Dropped Frame Indicator
- Recording Time Remaining
- Audio Meter
- Double Tap to Zoom
- Pinch to Zoom
- Touch to Focus
- Full Screen Mode
- Playback Menu
- Settings
- Dashboard
- Record Settings
- Record Settings 1
- Codec and Quality
- Resolution
- Record Settings 2
- Dynamic Range
- Sensor Area
- Off Speed Recording
- Off Speed Frame Rate
- Preferred Media for Recording
- Record Settings 3
- Timelapse
- Detail Sharpening
- If Card Drops Frame
- Apply LUT in File
- Record LUT to Clip
- File Naming Convention
- Monitor Settings
- Monitor Settings 1
- Clean Feed
- Display 3D LUT
- Frame Guide
- Grid
- Safe Area Guide
- Monitor Settings 2
- LCD, HDMI and Viewfinder
- Status Text
- Anamorphic Desqueeze
- LCD and Viewfinder
- Display
- HDMI Only
- Display Status Text for Cinematographer or Director
- - FPS
- CAM
- - OPERATOR
- REEL,SCENE,TAKE
- TIMECODE
- Monitor Settings 3
- Zebra Levels
- Peaking
- - Colored Lines
- Focus Assist Color
- Focus Assist Level
- Monitor Settings 4
- Guide Opacity
- Guides Color
- Monitor Settings 5
- LCD only
- Viewfinder
- Viewfinder Brightness
- Focus Chart
- Smooth Motion
- Audio Settings
- Audio Settings 1
- - Channel Source
- - Camera Left or Right
- - Camera Mono
- XLR Line
- XLR Mic
- 3.5mm Left - Line
- 3.5mm Right - Line
- 3.5mm Mono - Line
- 3.5mm Left - Mic
- 3.5mm Right - Mic
- 3.5mm Mono - Mic
- None
- Channel 1/2 Level
- XLR Phantom Power
- Audio Settings 2
- Audio Meters
- Headphone Level
- Speaker Level
- Setup Settings
- Setup Settings 1
- Date and Time
- Language
- Shutter Measurement
- Flicker Free Shutter Based On
- Drop Frame Timedata
- Image Stabilization
- Display ND Filter As
- Setup Settings 2
- Set Function Button
- Function Button Behaves as Preset or Toggle
- - Preset
- - Toggle
- Setup Settings 3 on Blackmagic Pocket Cinema Camera 6K Pro and 6K G2
- Zoom Rocker Direction
- Normal
- - Reverse
- Setup Settings 4 on Blackmagic Pocket Cinema Camera 6K Pro and 6K G2
- Focus Demand Direction
- Setup Settings 5 and 3
- Tally Light LED
- LED Brightness
- Auto Dim Display
- Hardware ID
- Software
- Setup Settings 6 and 4
- Bluetooth®
- To pair your camera with an iPad for the first time:
- Disconnect Current Device
- Clear Paired Devices
- Controlling Your Camera with the Blackmagic Camera Control App
- Setup Settings 7 and 5
- Factory Reset
- Motion Sensor Calibration
- Pixel Recalibration
- LCD White Balance Calibration
- Presets
- Preset buttons
- Saving and loading presets
- Importing presets
- Exporting presets
- Deleting presets
- 3D LUTs
- Introducing 3D LUTs
- Built-in LUTs
- - Gen 5 Film to Extended Video
- Gen 5 Film to Rec 2020 Hybrid Log Gamma
- Gen 5 Film to Rec 2020 PQ Gamma
- - Gen 5 Film to Video
- LUTs buttons
- Importing LUTs
- Applying a LUT
- Exporting LUTs
- Deleting LUTs
- Embedded 3D LUTs
- Entering Metadata
- Slate
- 'Clip' metadata
- Slate for
- Lens Data
- Reel
- Scene
- Take
- P/U
- SER
- Good take
- Interior / Exterior
- Day/Night
- 'Project' metadata
- Project name
- Camera
- Director
- Camera Operator
- Reset Project Data
- 'Lens Data' metadata
- Lens Type
- Focal length
- Distance
- Filter
- Camera Video Output
- HD Monitoring Output
- Blackmagic Zoom and Focus Demands
- Connecting and Attaching to your Camera
- Attaching to Tripod Handles
- Connecting to Your Camera
- Using Blackmagic Focus Demand
- Control Knob
- Control Prongs
- USB ports
- Using Blackmagic Zoom Demand
- Zoom F1
- Zoom F2
- Zoom F3
- Zoom F4
- Thumb Rocker
- Speed Dial
- USB-C Ports
- Using DaVinci Resolve
- Project Manager
- Editing with the Cut Page
- The Cut Page Layout
- Media Tabs
- Viewer Tabs
- Importing Clips to the Media Pool
- Adding Clips to the Timeline
- Appending Clips
- To append a clip:
- Trimming Clips on the Timeline
- Audio Trim View
- To use Audio Trim view:
- Adding Titles
- Previewing Titles
- To preview a title:
- To add a standard title:
- Working with Blackmagic RAW Files
- Clip Settings for Blackmagic RAW
- Changing Blackmagic RAW Settings
- Highlight Recovery
- Gamut Compression
- Color Temp
- Tint
- Exposure
- Saturation
- Contrast
- Midpoint
- Highlight Rolloff
- Shadow Rolloff
- White Level
- Black Level
- Use Video Black Level
- Export Frame
- Update Sidecar
- Saving your Blackmagic RAW changes
- Project Settings for Blackmagic RAW
- To set project settings for Blackmagic RAW:
- Color Correcting your Clips with the Color Page
- Using Scopes
- Secondary Color Correction
- Qualifying a Color
- To qualify a color:
- Adding a Power Window
- To add a power window to your clip:
- Tracking a Window
- To track a window to a moving object:
- Using Plugins
- Mixing Your Audio
- Mixing Audio in the Edit Page
- Adding Audio Tracks
- To Add an Audio Track to the Edit Page
- Adjusting Audio Levels in the Timeline
- The Fairlight Page
- The Audio Timeline
- What is a Bus?
- The Mixer
- Using the Equalizer to Enhance your Audio
- To add EQ to an individual clip:
- To add EQ to a track:
- To adjust the EQ for a band filter:
- Adding VFX and Compositing on the Fusion Page
- The Fusion Page
- Getting Started with Fusion
- Understanding Nodes
- Adding Nodes to the Node Editor
- Adjusting Nodes Using the Inspector Panel
- Working with Keyframes
- Using the Motion Tracker and Adding Text
- Mastering Your Edit
- Quick Export
- To use Quick Export:
- The Deliver Page
- To export a single clip of your edit:
- Camera Control with ATEM Mini
- Camera Control Panel
- Camera Control Selection
- Channel Status
- Camera Settings
- Detail
- Color Wheel
- Master Wheel
- Reset Buttons
- Iris/Pedestal Control
- Zoom Control
- Coarse Setting
- Iris Indicator
- Auto Focus Button
- Manual Focus Adjustment
- Camera Gain
- Shutter Speed Control
- DaVinci Resolve Primary Color Corrector
- Color Wheels
- Click and drag anywhere within the color ring
- Shift-Click and drag within the color ring
- Double-click within the color ring
- Click the reset control at the upper-right of a color ring
- Master Wheels
- To make adjustments using the master wheel:
- Drag the master wheel left or right
- Contrast Setting
- Saturation Setting
- Hue Setting
- Lum Mix Setting
- Synchronizing Settings
- Working with Third Party Software
- Working with Files from CFast 2.0 and SD cards
- To import your clips from a CFast 2.0 or SD card:
- Working with Files from USB-C flash disks
- To import your clips from a USB-C flash disk:
- Using Final Cut Pro X
- Using Avid MediaComposer 2018
- Using Adobe Premiere Pro CC
- Blackmagic Camera Setup Utility
- Updating Camera Software - Mac
- Updating Camera Software - Windows
- Updating your Camera's Internal Software
- Using a Battery Grip
- Attaching Blackmagic Pocket Camera Battery Pro Grip
- Attaching Blackmagic Pocket Camera Battery Grip
- Inserting Batteries into the Battery Grip
- Developer Information
- Blackmagic Bluetooth Camera Control
- Characteristics
- Outgoing Camera Control (encrypted)
- Send Camera Control messages
- Incoming Camera Control (encrypted)
- Timecode (encrypted)
- Camera Status (encrypted)
- Device Name
- Protocol Version
- Blackmagic SDI and Bluetooth Camera Control Protocol
- Version 1.5
- Overview
- Assumptions
- Blanking Encoding
- Message Grouping
- Abstract Message Packet Format
- Defined Commands
- Help
- Blackmagic Design Online Support Pages
- Contacting Blackmagic Design Support
- Checking the Software Version Currently Installed
- How to Get the Latest Software Updates
- Regulatory Notices
- Disposal of Waste of Electrical and Electronic Equipment Within the European Union.
- ISED Canada Statement
- Bluetooth
- Safety Information
- State of California statement
- Warranty
- Limited Warranty
- う乙
- 目次
- Which is the best way to use this book?
- はしだに
- レンズの取付け
- EF/MFTマウntonLENSを取り付けむ:
- 力×拉の電 源を入る
- 力メラにバットリ一を挃入て電源供給
- 同梶の電源ケーメルカ力メラに電源供給
- 外部電源接統:
- スレーダジMXデイア
- CFast力一D
- CFast力一卜を插入る:
- CFast 2.0力一の選択
- SD力一D
- SD力一卜为插入的
- SD力一の選択
- SD力一のロック/解除
- USB-CFLUSS
- USB-CFlambda 微克接统:
- 高速USB-CflssdUsk的選
- USB-CFlraSduStUsK的速度阅的重要情報
- 撮影用にMデアを準備する
- Blackmagic Pocket Cinema Camera 4x7x10mm 2.5" x 3"
- Mac对MAD为準備
- Windows×デイアを準備
- 叢錄
- ケリットの叢 錄
- 撮影フローマットを選択する
- Blackmagic RAW 4
- 固定 ビット Constant Bitrate) 設定
- 固定ケ才リテ(ConstantQuality)設定
- 効力 -万化
- DaVinci Resolve Blackmagic RAW使用
- Blackmagic RAWソフトウア 開発 キット
- 最大 Sevenflleumle一
- 収錄時間
- flreumle-トの選択
- 卜拉一収錄
- 再生
- cll#
- 力メラの 機 能
- 録画术専
- 設定 木一儿
- 斯尔才 麦尔
- LENSMAWNT
- 5夕一/収錄 1nJek-一
- 右側面
- CFast力 一卜口
- SD力 一卜口
- 左侧面
- 3.5mm マイクカ力
- 个口才入力
- 10HDMI出力
- 電源入力
- 力夕電源J一
- マニXLRマイク入力
- トツフバル
- 1/4-20マウトロイntb
- 錄画
- 大儿
- shàtata
- 木fulトバス
- ヒューフアインダ—接 统 ト
- 21電源スイツ子
- トテ一夕LED
- 機能术専
- 力X与底面
- 1/4-20マウntト�ntト
- 品一力八一
- Battery Grip電源コネタ一
- 力x5背 面
- 夕th 斯克一·德F
- ロリス モン
- フハカスボタ
- HFRトク
- フロースズム リフロー
- メニーユル
- 再生术専
- 電子比一夫一用的才
- ND フルタ
- タッチスケリーニ・コトロ一ル
- 夕thssckl-の機能
- LCDモニタ一才広
- ☆
- 力一力斯卜
- FLLEUMGID
- 2.35:1、2.39:1、2.40:1
- 16:9
- 力夕L 一Mg伊·L
- GRIIDD
- 3x3g LFFirds)
- 水平(Horizon)
- 十字線 (Crosshair)
- Dv Dot)
- 一EFIARAL
- 才尔力拉一
- スケリーナの明るさ $GREEN BRIGHTNESS)
- NDFIILTAYINJDKA-
- FLLEUM /秒FPS)
- PROJECT FRAME RATE)
- sulrre
- SHAYU SHUTTER
- shutter+Iris)
- ``` ``` ``` ``` ``` ``` ``` ``` ``` ``` ``` ``
- APIRR)
- 亚利斯(ris)
- ``` ``` ``` ``` ``` ``` ``` ``` ``` ``` ``
- Shattata+AIrIsShutter+Iris)
- Z一ムCONT口一儿
- 調整幅設定
- 亚尔斯·伊甸-夕一
- 才一卜力一力s木夕
- マニュアルフOne力ス調整
- 力x拉代
- �マツターニスビート・コトローチ
- 木 ユイト ロラ WIB)ス(
- DaVinci Resolve プライマリーマラーミレクター
- 力拉一木伊一尔
- Mssz一木儿
- 卡斯卡一木尔使的调整:
- ト卜設定
- 彩度設定
- 色相設定
- 輝度 マツクス設定
- 設定の同期
- �一八一テ製の使用
- CFast 2.0/SDカーユからのフィルズの作業
- CFast 2.0/SD力一卜加尔利丁为表之达:
- USB-CFLASHIDISKの作業
- USB-CFLAUSHDEIUSK加5KFFP为
- Final Cut Pro Xを使う
- Avid MediaComposer2018使
- AdobePremiereProCC使
- 力メラソフトウエアのアツpledートMac
- 力メラソフローのアフデートWindows
- 力メラ内部ソフトウアのアツpledート方法
- Battery Gripを使用する
- Blackmagic Pocket Camera Battery Pro Gripを取り付ける
- Blackmagic Pocket Camera Battery Gripを取り付ける
- Battery Gripにバッテリ一を挃入する
- Currently defined values are:
- ルフロー
- Blackmagic Design才兰氏一卜一
- Blackmagic Designに連絡する
- 現在イnstトルさてるソフウアのバーニンを確認
- 最新のソフウエアフデトを入手する
- 規制に開る警告
- 欧州連合内ての電気機器およ亜電子機器の広棄处分
- ISED CanadaSte - 10Mntb
- 安全情报
- 力尔二亚州斯一
- 保证
- 限定保證
- Chere cliente, cher client,
- Sommaire
- Quelleamerautilisez-vous?
- Mise en route
- Monter un objectif
- Pour monter un objectif EF ou Micro 4/3 :
- Allumer laamera
- Insérer une batterie et alimenter laamera
- Alimenter laamera avec le cable d'alimentation inclus
- Connector laamera à une source d'alimentation externe :
- Supports de stockage
- Cartes CFast
- Pour insérer une carte CFast :
- Choisir une carte CFast 2.0
- Cartes SD
- Insérer une carte SD
- Choisir une carte SD
- Verrouiller et déverrouiller des cartes SD
- Disques flash USB-C
- Choisir un disque flash USB-C rapide
- Remarque importante concernant la vitesse des disques flash USB-C
- Préparer les supports pour l'enregistrement
- Préparer un support sur la Blackmagic Pocket Cinema Camera
- Préparer le support sur Mac
- Préparer le support sur Windows
- Enregistrement
- Enregistrer des clips
- Choisir le format d'enregistrement
- Enregister en Blackmagic RAW
- Paramètres du début constant
- Paramètres de qualité constante
- Fichiers sidecar
- Blackmagic RAW dans DaVinci Resolve
- Kit de développement logiciel Blackmagic RAW
- Fréquences d'images maximales du capteur
- Durée d'enregistrement
- Choisir la fréquence d'images
- Déclenchement de l'enregistrement
- Lecture
- Lire des clips
- Caracteristiques de laamera
- Face avant de laamera
- Boutons d'enregistrement
- Molette de paramétrage
- Micros stereo
- Monture d'objectif
- Tally / Indicateur d'enregistrement
- Face droite
- Logement pour carte CFast
- Logement pour carte SD
- Face gauche
- Entrée pour micro de 3,5mm
- Entrée pour casque
- Entrée d'alimentation
- Solutions d'alimentation personalisées
- Entrée mini XLR pour microphone
- Face supérieure
- Pas de vis 1/4-20
- Enregistrement
- Image fixe
- 18Obturateur
- Balance des blancs
- Port de connexion pour le viseur
- Interrupteur général
- Voyant d'etat LED
- Boutons de fonction
- Face inférieure de laamera
- Pas de vis 1/4-20
- Compartiment de la batterie
- Connecteur d'allmentation de la polgnée d'allmentation
- Face arrière de laamera
- Ecran tactile
- Bouton Iris
- Bouton de mise au point
- Bouton HFR
- Bouton Zoom pour la mise au point
- Bouton Menu
- Bouton de lecture
- Dioptré pour le viseur électronique
- Filtrgrisneutre
- Commandes de l'écran tactile
- Fonctionnalités de l'écran tactile
- Options de l'écran LCD
- Zébra
- Repetes de cadrage
- 2.35:1, 2.39:1 et 2.40:1
- 2:1
- 1.85:1
- Ratios de repères de cadrage personnelisés
- Grille
- Tiers
- Réticule
- Point
- Zone de sécurité
- Fauusses couleurs
- Luminosité de l'écran
- Indicateur du filtrne ND
- Images par seconde
- Fréquence d'images du projet
- Fréquence d'images du capteur
- Obturateur
- Obtur. + Iris
- Iris + Obtur.
- Affichage de la durée
- Les indicateurs d'etat suivant peuvent apparaître à côté de l'affichage de la durée :
- Double ISO natif
- Balance des blancs
- Balance des blancs automatique
- Alimentation
- Indicateur de LUT
- Histogramme
- Bouton d'enregistrement
- LUT appliquée à un clip
- Indicateur de perte d'image
- Temps d'enregistrement restant
- Indicateurs audio
- Double-toucher pour zoomer
- Zoomer en pinct
- Mise au point tactile
- Mode plein écran
- Menu de lecture
- Paramètres
- Menu de navigation
- Onglet Enregister
- Onglet Enregister - Page 1
- Codec et qualité
- Résolution
- Onglet Enregister - Page 2
- Plage dynamique
- Surface du capteur
- Enregistrement Off Speed
- Frequence d'images off speed
- Support préfééré pour enregistrer
- Onglet Enregister - Page 3
- Netteté de l'image
- Si perte d'images
- Appliqueune LUT dans un fichier
- Enregisterune LUT sur un clip
- Convention de dénomination des fichiers
- Onglet Moniteur
- Onglet Moniteur - Page 1
- Affichage de la LUT 3D
- Onglet Moniteur - Page 2
- LCD, HDMI et viseur
- Informations d'etat
- Décompression anamorphique
- LCD et viseur
- Affichage
- HDMIsubsection
- Affichage des informations d'etat destinées au directeur de la photo ou au réalisateur
- Onglet Moniteur - Page 3
- Niveau de zébra
- Couleur du focus assist
- Niveau du focus assist
- Onglet Moniteur - Page 4
- Repes opacité
- Repes couleur
- Onglet Moniteur - Page 5
- LCDsubsection
- Luminosite de l'écran
- Viseur
- Luminosite viseur
- Mire de Siemens
- Onglet Audio
- Onglet Audio - Page 1
- Niveau canal 1/2
- Alimentation fantôme XLR
- Onglet Audio - Page 2
- Niveau du casque
- Niveau du haut-parleur
- Onglet Réglages
- Onglet Reglages - Page 1
- Date et heures
- Langue
- Mesure obturation
- Obturation sans scintillagement basée sur
- Timecode pertes d'images
- Stabilisation d'image
- Affichage Filtre ND
- Onglet Reglages - Page 2
- Réglage des boutons de fonction
- Comportement du bouton de fonction
- Onglet Reglages - Page 3 pour les Blackmagic Pocket Cinema Camera 6K Pro et 6K G2
- Direction du zoom rocker
- Onglet Reglages - Page 4 pour les Blackmagic Pocket Cinema Camera 6K Pro et 6K G2
- Direction du Focus Demand
- Onglet Reglages - Page 5 et 3
- Voyant LED Tally
- Luminosite LED
- Dim. lum. LCD auto
- Logiciel
- Onglet Reglages - Page 6 et 4
- Pour associé votreamera à un iPad pour la première fois :
- Déconnecter apparéil actuel
- Effacer appareils associés
- Contrôler votreamera avec l'application Blackmagic Camera Control
- Onglet Reglages - Page 7 et 5
- Réinitialisation d'usine
- Calibrage movement
- Recalibrage pixels
- Calibrage LCD balance des blancs
- Onglet Préroglages
- Boutons de prépréglage
- Sauvegarder et rappeler les préroglages
- Importer des préroglages
- Exporter des préroglages
- Supprimer des prêrglages
- LUTs 3D
- Présentation des LUTs 3D
- LUTs intégrées
- Boutons des LUTs
- Importer des LUTs
- Appliquer une LUT
- Exporter des LUTs
- Supprimer des LUTs
- LUTs 3D intégrées
- Saisie des métadonnées
- Clap
- Métadonnées des clips
- Clap pour
- Données de l'objet
- Bobine
- Scène
- Prise
- VFX
- Bonne prise
- Intérieur/Exteurier
- Jour/Nuit
- Métadonnées du projet
- Projet
- Caméra
- Réalisateur
- Cadreur
- Réinitialiser
- Métadonnées de l'objet
- Sortie video de laamera
- Sortie de monitoring HD
- Blackmagic Zoom Demand et Focus Demand
- Connector et monter les accessoires sur votreamera
- Montage sur des poignées de trépied
- Connector les accessoires à votreamera
- Utiliser le Blackmagic Focus Demand
- Molette de contrôle
- Barres de contrôle
- 3PortsUSB
- Utiliser le Blackmagic Zoom Demand
- Molette de vitesse
- 7PortsUSB-C
- Utiliser DaVinci Resolve
- Gestionnaire de projet
- Monter avec la page Cut
- Disposition de la page Cut
- Onglets des medias
- Icones du viewer
- Importer des clips dans la bibliothèque de medias
- Pour importer des medias :
- Ajouter des clips à la timeline
- Ajouter des clips à la fin
- Pourajouterunclipa la fin:
- Raccorder des clips dans la timeline
- Affichage Audio trim
- Pour utiliser l'affichage Audio trim :
- Ajouter des titres
- Prévisualiser les titres
- Pour prévisualiser un titre :
- Pour ajouter un titre standard :
- Travailler avec des fichiers Blackmagic RAW
- Paramètres des clips pour le Blackmagic RAW
- Changer les paramètres Blackmagic RAW
- Récupération des haute lumières
- Compression du gamut
- Température de la couleur
- Teinte
- Exposition
- Contraste
- Point central
- Affaiblissement des haute lumieres
- Affaiblissement des basses lumieres
- Niveau blancs
- Niveau noirs
- Utiliser les niveaux video de noir
- Exporter l'image
- Mettre à jour le sidecar
- Sauvegarder les changements Blackmagic RAW
- Paramètres du projet pour le Blackmagic RAW
- Régler les paramètres du projet pour le Blackmagic RAW :
- Étalonner vos clips avec la page Étalonnage
- Utiliser les scopes
- Correction colorimétrique secondaire
- Selection d'une couleur
- Pour sélectionner une couleur :
- Ajouter une Power Window
- Ajouter une Power Window à votre clip :
- Tracking d'une Power Window
- En plus des ajustements d'alignement listed ci-dessus, le lecteur prend également en charge:
- Utilisation de plug-ins
- Mixer l'audio
- Mixer l'audio dans la page Montage
- Ajouter des pistes audio
- Pour ajouter des pistes audio dans la page Montage
- Ajuster les niveaux audio dans la Timeline
- La page Fairlight
- La timeline audio
- Qu'est-ce qu'un bus?
- Le mixeur
- Utiliser l'égaliseur pour améliorer l'audio
- Pour ajouter un égaliseur à un clip individuel :
- Pourajouterunégaliseuràune piste:
- Pour régler l'égaliseur pour un filtré de bande :
- Ajouter des VFX et des compositions sur la page Fusion
- La page Fusion
- Demarrer avec Fusion
- Comprénde les nœuds
- Ajouter des nœuds à l'éditeur de nœuds
- Ajuster les nœuds avec l'inspecteur
- Travailler avec des images clés
- Tracker des éléments en mouvement et ajouter du texte
- Mastériser votre montage
- Exportation rapide
- Pour utiliser l'Exportation rapide :
- Page Exportation
- Pour exporter la série montée en un seul clip :
- Contrôle des caméras avec l'ATEM Mini
- Panneau de contrôle pouramera
- Selection de laamera à contrôler
- Etat du canal
- Paramètres de laamera (Camera)
- Detalls
- Roues chromatiques
- Roue maitresse
- Boutons de réinitialisation
- Contrôle de l'iris et du niveau de noir
- Contrôle du Zoom
- Parametre Limite
- Indicateur de l'iris
- Bouton de mise au point automatique
- Ajustement manuel de la mise au point
- Gain de laamera
- Contrôle de la vitesse d'obturation
- Correcteur colorimétrique primaire DaVinci Resolve
- Roues colorimétriques
- Cliquez et deplacez voire pointeur n'importe ou dans le cercle de couleur
- Cliquez en maintainant le bouton Majuscule enforcé et déplacez votre pointeur n'importe où dans le cercle de couleur
- Double-cliquez n'importe ou dans le cercle de couleur
- Cliquez sur la commande de réinitialisation située en haut à droite du cercle de couleur
- Roues Master
- Pour effectuer des ajustements à l'aide de la roue maitresse :
- Déplacez la roue maitresse vers la gauche ou vers la drolte
- Paramètre Contraste
- Parametre Saturation
- Parametre Teinte
- Parametre Lum Mix
- Synchronisation des paramètres
- Travailler avec un logiciel tiers
- Travailler avec des fichiers provenant de cartes CFast 2.0 et de cartes SD
- Pour importer vos clips à partir d'une carte CFast 2.0 ou d'une carte SD :
- Travailler avec des fichiers provenant de disques flash USB-C
- Pour importer des clips depuis un disque flash USB-C :
- Utiliser Final Cut Pro X
- Utiliser Avid MediaComposer 2018
- Utiliser Adobe Premiere Pro CC
- Mise à jour du logiciel de laamera sous Mac
- Mise à jour du logiciel de laamera sous Windows
- Mise à jour du logiciel interne de laamera
- Utiliser une poignée d'alimentation
- Fixer la Blackmagic Pocket Camera Battery Pro Grip
- Fixer la Blackmagic Pocket Camera Battery Grip
- Insérer des batteries dans la poignée d'alimentation
- Assistance
- Pages d'assistance en ligne de Blackmagic Design
- Contacter le service d'assistance de Blackmagic Design
- Vérification du logiciel actuel
- Comment obtenir les dernières mises à jour du logiciel
- Avis réglementaires
- Élimination des déchets d'équipements électriques et électroniques au sein de l'Union Européenne.
- Déclaration de ISDE Canada
- Informations de sécurité
- Déclaration de l'Etat de Californie
- Garantie
- Garantie limitee
- Willkommen
- Inhaltsverzeichnis
- Mit welcher Kamera arbeiten Sie?
- Erste Schritte
- AnbringeneinesObjektivs
- So bringen Sie ein EF- oder Micro-Four-Thirds-Objektiv an:
- Stromversorgung der Kamera
- Einlagen eines Akkus und Stromversorgung ihrer Kamera
- Stromversorgung der Kamera über das mitgelieferte Stromkabel
- So koppeln Sie die Kamera an eine externe Stromquelle:
- Speichermedien
- CFast-Karten
- So setzen Sie eine CFast-Karte ein:
- Auswahl einer CFast-2.0-Karte
- SD-Karten
- So setzen Sie eine SD-Karte ein:
- Auswahl einer SD-Karte
- SD-Karten sperren und entsperren
- USB-C-Laufwerke
- So schreiben Sie ein USB-C-Laufwerk an:
- Auswahl eines Schnellen USB-C-Laufwerks
- Wichtige Hinweise zur Geschwindigkeit von USB-C-Laufwerken
- Datenträger für die AufnahmeVBorbereiten
- Datenträger mit einer Blackmagic Pocket Cinema CameraVBbereiten
- Datentrager auf Mac-SystemenVBbereiten
- Datentrager auf Windows-SystemenVBoreiten
- Aufzeichnen
- Aufzeichnen von Clips
- Auswahldes Aufnahmeformats
- In Blackmagic RAW aufzeichnen
- "Constant Bitrate"-Einstellungen
- "Constant Quality"-Einstellungen
- Filialdateien
- Maximale Sensor-Frameraten
- Aufzeichnungsdauer
- Auswahlen der Framerate
- Trigger-Aufzeichnung
- Wiedergabe
- Wiedergabe von Clips
- Funktionsmerkmale der Kamera
- Kameravorderseite
- Aufnahmetasten
- 2Einstellrad
- Stereomikrofone
- Objektivanschluss
- Tally/Aufnahmeindikator
- Rechte Kameraseite
- CFast-Kartenschacht
- SD-Kartenschacht
- Linke Kameraseite
- 3,5mm-Milkofoneingang
- Kopfhoreelngang
- Stromanschluss
- Individuelle Lösungen für die Stromversorgung
- Mini-XLR-Mikrofonanschluss
- Kameraoberseite
- 1/4"-20-Befestigungsgewinde
- Aufzeichnen
- Standbild
- 18.Shutter
- Weiabglelch
- Sucherbuchse
- ON/OFF-Schalter
- Status-LED
- Funktionstaten
- Kameraunterseite
- 1/4"-20-Befestigungsgewinde
- Akkufach
- Strombuchse fur den Akkugriff
- Kamerarückseite
- Touchscreen-Anzelge
- Blendentaste
- Fokustaste
- HFR-Taste
- Fokuszoom-Taste
- Menutaste
- Wiedergabetaste
- Diopter des elektronischen Suchers
- ND-Filter
- Bedienung per Touchscreen
- Funktionsmerkmale des Touchscreens
- LCD-Monitoroptionen
- Bildrandmarkierungen
- 2.35:1, 2.39:1 und 2.40:1
- Benutzerdefinierte Bldbrandmarkierung
- Raster
- Drittel
- Horizont
- Horizont-Meter Beschreibung
- Fadenkreuz
- Punkt
- Schutzbereichslinien
- Falschfarben
- Bildschirmhelligkeit
- ND-Filteranzeige
- Bilder pro Sekunde
- Projekt-Framerate
- Sensor-Framerate
- Verschluss
- Verschluss + Blende
- Blende + Verschluss
- Blende
- Verschluss und Blende
- Clipdaueranzeige
- Folgende zusätzliche Statusindikatoren erschellen ggf. mit der Daueranzelge:
- Duale native ISO-Empfindlichkeiten
- Wei Sabgleich
- Automatischer Weißabgleich
- Strom
- Histogramm
- Aufnahme-Button
- LUT auf Clip angewandt
- Indikator für ausgelassene Bilder
- Verbleibende Aufnahmedauer
- Audiopegelmeter
- Zweimaliges Tippen zum Zoomen
- Pinch-to-Zoom
- Vollbildschirm-Modus
- Wiedergabenu
- Einstellungen
- AUFNAHME-Einstellungen
- AUFNAHME-Einstellungen Seite 1
- CODEC UND QUALITÄT
- AUFLösUNG
- AUFNAHME-Einstellungen Seite 2
- DYNAMIKUMFANG
- Sensorfläche
- OFFSPEED-AUFZEICHNUNG
- OFFSPEED-FRAMERATE
- FÜR AUFZEICHNUNG BEVORZUGTES MEDIUM
- AUFNAHME-Einstellungen Seite 3
- ZEITRAFFER
- DETAILSCHÄRFUNG
- BEI FRAME-AUSLASSUNGEN
- LUT IN DATEI ANWENDEN
- LUT IM CLIP AUFZEICHNEN
- Dateinamenskonventionen
- MONITORING-Einstellungen
- MONITORING-Einstellungen Seite 1
- CLEAN-FEED
- 3D-LUT ANZEIGEN
- BILDRAND-MARKIERUNG
- SCHUTZBEREICH-LINIEN
- MONITORING-Einstellungen Seite 2
- STATUSTEXT
- ANAMORPH ENTZERREN
- Nur HDMI
- STATUSTEXT ANZEIGEN FÜR Kinematograf/Reglsseur
- KAM.
- DAUERANZEIGE
- REEL, SZENE, TAKE
- MONITORING-Einstellungen Seite 3
- ZEBRA-NIVEAU
- - Farbige Linien
- FOCUS-ASSIST-FARBE
- FOCUS-ASSIST-NIVEAU
- MONITORING-Einstellungen Seite 4
- BILDRAND-MARKIERUNGEN
- MARKIERUNGS-DECKKRAFT
- MARKIERUNGS-FARBE
- MONITORING-Einstellungen Seite 5
- Nur LCD
- BILDSCHIRM-HELLIGKEIT
- Sucher
- SUCHER-HELLIGKEIT
- TESTCHART
- RUHIGBEWEGUNG
- AUDIO-Einstellungen
- AUDIO-Einstellungen Seite 1
- - Kanalquelle
- Kamera links / Kamera rechts
- Kamera-Mono
- - XLR - Line
- XLR-Mic
- 3,5mm links - Line
- 3,5 mm rechts - Line
- 3,5mm Mono - Line
- mm links - Mic
- 3,5 mm rechts - Mic
- mm Mono - Mic
- Kelne
- Pegel Kanal 1/2
- PHANTOMSPEISUNG XLR
- AUDIO-Einstellungen Seite 2
- KOPFHÖRERPEGEL
- LAUTSPRECHERPEGEL
- SETUP-Einstellungen
- SETUP-Einstellungen Seite 1
- DATUM UND UHRZEIT
- SPRACHE
- VERSCHLUSSWERT
- FLICKERFREIER VERSCHLUSS BEI
- DROP-FRAME-TIMECODE
- BILDSTABILISIERUNG
- ND-FILTER ANZEIGEN ALS
- SETUP-Einstellungen Seite 2
- FUNKTIONSTASTE EINRICHTE
- Funktionstaste 1/2/3 FUNGIERT ALS Preset oder Umschalter
- Umschalter
- SETUP-Einstellungen Seite 3 auf der Blackmagic Pocket Cinema Camera 6K Pro und 6K G2
- ZOOMWIPPEN-RICHTUNG
- Standard
- Rückwärts
- Parameteroptionen für Rad- und Funktionstasten:
- SETUP-Einstellungen Seite 4 auf der Blackmagic Pocket Cinema Camera 6K Pro und 6K G2
- FOCUS-DEMAND-RICHTUNG
- SETUP-Einstellungen Seite 5 bzw. 3
- TALLY-LED
- LED-HELLIGKEIT
- DISPLAYAUTOM.DIMMEN
- HARDWARE-ID
- SETUP-Einstellungen Seite 6 bzw. 4
- So koppeln Sie ihre Kamera erstmaling kabellos mit einem iPad:
- AKTUELLES GERÄT TRENNEN
- GEKOPPELTE GERÄTE LÖSCHEN
- Steuern der Kamera mit der Blackmagic Camera Control App
- SETUP-Einstellungen 7 bzw. 5
- AUF WERKSEINSTELLUNGEN ZURÜCKSETZEN
- BEWEGUNGSSSENSOR-KALIBRIERUNG
- PIXEL-NEUKALIBRIERUNG
- WEISSABGLEICH LCD-KALIBRIERUNG
- Preset-Icons
- Speichern und Laden von Presets
- Importieren von Presets
- Exportieren von Presets
- Löschen von Presets
- 3D-LUTs
- 3D-LUTs vorgestellt
- Integrierte LUTs
- Gen 5 Film to Video
- LUT-Icons
- LUTs importieren
- Anwenden einer LUT
- LUTs exportieren
- LUTs loschen
- Eingebbette 3D-LUTs
- Eingabe von Metadaten
- CLIPS-Metadata
- FILMTAFEL FÜR
- OBJEKTIV
- SZENE
- Guter Take
- Innen/Außen
- Tag/Nacht
- PROJEKT-Metadaten
- PROJEKNAME
- KAMERA
- REGISSEUR
- KAMERAOPERATOR
- Projektd. zurücksatzen
- OBJEKTIV-Metadata
- OBJEKTIVTYP
- - BLENDE
- BRENNWEITE
- ENTFERNUNG
- - FILTER
- Videoausgabe der Kamera
- HD-Monitoring-Ausbgabe
- Blackmagic Zoom und Focus Demands
- Anschlieben und Anbringen an ihre Kamera
- Anbringen am Stativgriff
- Anschlieben an ihre Kamera
- Verwendendes Blackmagic Focus Demands
- Steuerregler
- Steuerstifte
- USB-Ports
- Verwendendes Blackmagic Zoom Demands
- Zoomwippe
- USB-C-Ports
- Verwenden von DaVinci Resolve
- Schneiden im Cut-Arbeitsraum
- Das Layout des Cut-Arbeitsraums
- Media-Menu
- Viewer-Menu
- Importieren von Clips in den Media Pool
- So Importieren Sie Medlen:
- Einfugen von Clips in die Timeline
- Hinzufugen von Clips per Append
- So fügen Sle einen ClIp per „Append“ ein:
- Trimmen von Clips in der Timeline
- Die „Audio Trim“-Ansicht
- So verwenden Sie die „Audio Trim“-Ansicht:
- Einfugen von Titeln
- Sichten von Titeln als Vorschau
- So{sichtenSieeinenTltelalsVorschau:
- So fugen Sie einen Standard-Titel ein:
- Arbeiten mit Blackmagic-RAW-Dateien
- Clip-Einstellungen für Blackmagic RAW
- Spelchern von Änderungen in Blackmagic RAW
- Projekteinstellungen für Blackmagic RAW
- So geben Sie Projektlstellungen für Blackmagic RAW vor:
- Farbkorrektur von Clips im Color-Arbeitsraum
- Verwenden von Scopes
- Sekundäre Farbkorrektur
- Qualifizieren einer Farbe
- So qualifizieren Sie eine Farbe:
- Hinzufügen eines Power Windows
- So versehen Sie ihren Clip mit einem Power Window:
- Tracking mit einem Power Window
- So verfolgen Sie ein sich bewegendes Objekt mit einem Power Window:
- Arbeiten mit Plug-ins
- Mixen von Ton
- Tonmischen Im Edit-Arbeitsraum
- Hinzufugen von Audlospuren
- Hinzufugen einer Audiospur Im Edit-Arbeitsraum
- Anpassen von Audiologie in der Timeline
- Der Fairlight-Arbeitsraum
- Die Audio-Timeline
- Wasist ein Bus?
- Der Mixer
- Audio mit dem Equalizer verfeinern
- So wenden Sie den EQ auf einen einzelnen Clip an:
- So wenden Sie den EQ auf eine Spur an:
- So passen Sie den EQ für einen Bandfilter an:
- Hinzufugen von VFX und Compositing im Fusion-Arbeitsraum
- Der Fusion-Arbeitsraum
- Erste Schritte mit Fusion
- Nodesverstehen
- Hinzufugen von Nodes in den Node-Editor
- Anpassen von Nodes mit dem Inspector
- Arbeiten mit Keyframes
- Mit dem Motion Tracker arbeiten und Text hinzufugen
- Mastern Ihres Schnitts
- So verwenden Sie Quick Export:
- Der Deliver-Arbeitsraum
- So exportieren Sle einzelnen elzelnen Clip Ihres Schnlits:
- Der Kamera-Arbeitsraum
- Auswahlder zu steuernden Kameras
- Kanalstatus
- Kamera-Einstellungen
- Farbrad
- Masterrad
- Reset-Symbole
- Blenden-/Schwarzbahbelungssteuerung
- Zoomsteuerung
- GROB-Einstellung
- Blenden-Indikator
- Autofokus-Button
- Manuelle Fokuseinstellung
- Kameraeinstellung Gain
- Verschlusszeit-Einstellung
- Welßabgleich
- Farbrader
- Fuhren Sie Irgendwo auf dem Farbrad einen Klick und eine Ziehbewegung aus
- Führer Sie mittels Shift-Klick eine Ziehbewegung auf dem Farbrad aus
- Fuhren Sie einen Doppelklick auf dem Farbrad aus
- Klichen Sie auf das Reset-Symbol oben rechts in einem Farbrad
- Masterrader
- So erhmen Sie Anpassungen mithilfe des Masterrads vor:
- Drehen Sles das Masterrad nach links oder rechts
- Kontrast
- Sattlung
- Farbton
- "Lum Mlx"-Einstellung
- Synchronsilen von Einstellungen
- Arbeiten mit Fremdhersteller-Software
- Arbeiten mit Dateien auf CFast-2.0- und SD-Karten
- So importieren Sie ihre Clips von einer CFast-2.0- oder SD-Karte:
- Arbeiten mit Dateien von USB-C-Laufwerken
- So importieren Sie Clips von einem USB-C-Laufwerk:
- Verwenden von Final Cut Pro X
- Verwenden von Avid MediaComposer 2018
- Verwenden von Adobe Premiere Pro CC
- Blackmagic Camera Setup Utility (Dienstprogramm)
- Aktualisieren der Kamerasoftware auf Mac
- Aktualisierung der Kamerasoftware auf Windows
- Aktualisierung der Produktsoftware ihrer Kamera
- Verwendene eines Akkugriffs
- Anbringen eines Blackmagic Pocket Camera Battery Grips
- So bringen Sie einen Blackmagic Pocket Camera Battery Grip an:
- Informationen für Entwickler (Englisch)
- Hilfe
- Blackmagic Design Online Support Seiten
- Kontaktaufnahme mit dem Blackmagic Design Support
- Überprüfen der aktuell installierten Softwareversion
- So erhalten Sie die aktuellsten Softwareaktualisierungen
- Gesetzliche Vorschriften
- Entsorgung von elektrischen und elektronischen Geräten Innerhalb der Europäischen Union
- ICES-3 (A) NMB-3 (A)
- ISED-Zertifizierung fur den kanadischen Markt
- Sicherheitshinweise
- California Proposition
- Eingeschränkte Garantie
- Bienvenido
- Índice
- Uso de un modelo spécifique
- Primeros pasos
- Colocacion del objetivo
- Para colocar una montura EF o Micro Cuatro Tercios:
- Encendido de la-camera
- Colocacion de la bateria y encendido de laamera
- Alimentación de la CAMERA mediante el cable incluido
- Para conectar una fuente de alimentacion externa
- Soportes de grabación
- Tarjetas CFast
- Para Insertar una tarjeta CFast:
- Elección de una tarjeta CFast 2.0 adequada
- Tarjetas SD
- Elección de una tarjeta SD adequada
- Bloqueo y desbloqueo de tarjetas SD
- Unidades USB-C
- Elección de unaunidad USB-C adecuada
- Nota importante sobre la velocidad de las unidades USB-C
- Preparación de soportes para la grabación
- Preparación de soportes de grabación en los modelos Blackmagic Pocket Cinema Camera
- Preparación de soportes de grabación en equipos Mac
- Preparación de soportes de grabación en equipos Windows
- Grabación
- Grabación de material audiovisual
- Selección del formatting de grabación
- Grabación en Blackmagic RAW
- Velocidad constante
- Calidad constante
- Reprodctor Blackmagic RAW
- Archivos Sidecar
- Blackmagic RAW en DaVinci Resolve
- Herramentas de desarrollo Blackmagic RAW
- Frecuencias deImagen的最大s para el sensor
- Tiempo de grabación
- Selección de la Frequencia de imagen
- Grabación automática
- Reproducción
- Reproduccion de material audiovisual
- Characteristicas de la camarara
- Parte frontal
- Botones de grabación
- Rueda de ajustes
- Micrófonos estéreo
- Tipo de montura
- Luz piloto / indicator de grabación
- Lateral derecho
- Ranura para tarjetas CFast
- Ranura para tarjetas SD
- Lateral izquierdo
- Entrada para mlcrofonos
- Entrada para aurlicules
- Allimentación
- Solutaciones de alimentacion personalizadas
- Entrada minl-XLR para micrófonos
- Panel superior
- Orificio roscado (0.25", 20 UNC)
- Grabación
- Fotos
- 18Obturador
- Balance de blancos
- Puerto de conexión para el visor
- Interruptor de encenddo
- Indicador
- Botones programables
- Parte inferior
- Orificio roscado (0.25", 20 UNC)
- Compartimento para la bateria
- Conexión para la empuñadura
- Partetrasera
- Pantalla tactll
- Dlafragma
- Enfoque
- HFR
- Zoom
- Menu
- Reproducción
- Dloptria del visor electrónico
- Filtros de densidad neutral
- Controles de la pantalla tactil
- Characteristica
- Monitorización
- Cebra
- Asistente de enfoque
- Guias de encuadre
- 2.35:1, 2.39:1 y 2.40:1
- Guias personalizadas
- Cuadrúcula
- Tercios
- Horizonte
- Indicador Descripción
- Cruz filar
- Punto
- Área de seg]^dad
- Falso color
- Brillo de la pantalla
- Indicador de filtros de densidad neutral
- Fotogramas por dato
- Frecuencia deImagen delprojecto
- Frecuencia deImagen del sensor
- Obturador
- Obturador y difragma
- Diafragma + Obturador
- Diafragma
- Dlafragma y obturador
- Obturador + Dlafragma
- Duración
- Junto a la duración, pueda aparecer los sagulentes Indicadores:
- W
- TC
- EXT
- INT
- ISO native dual
- Balance de blancos
- Balance de blancos automatico
- Alimentación
- Indicador LUT
- Histograma
- Botón de grabación
- LUT aplicada
- Fotogramas omitidos
- Tiempo de grabacion restante
- Vúmetros
- Pulsar dos vezes para ampliar la imagen
- Pellizcar para ampliar la imagen
- Pulsar para enfocar
- Modo de pantalla completa
- Menu de reproducción
- Ajustes
- Panel de options
- Ajustes de grabación
- Ajustes de grabación 1
- Códec y(callad
- Resolución
- Ajustes de grabación 2
- Rango dinámico
- Área del sensor
- Frecuencia de Imagen delprojecto
- Frecuencia Independiente
- Frecuencia deImagen para la grabacion
- Unidad preferida para grabar
- Ajustes de grabacion 3
- Intervals
- Nivel de nitidez
- Al omitir fotogramas
- Aplicar una LUT a un archivo
- Aplicar LUT al grabar
- Convencion para la nomenclatura de ARCHivos
- Ajustes de monitorización
- Ajustes de monitoración 1
- Señal Ilmpla
- Mostrar LUT 3D
- Cuadrícula
- Área de seguidad
- Ajustes de monitorización 2
- LCD, HDMI y Visor
- Texto en pantalla
- Descompresión anamórfica
- LCD y Visor
- Pantalla
- HDMI
- Mostrar datos para el director o el responsable de fotografia
- F/S
- CÁM.
- OPERADOR/A
- DURACION
- - ROLLO, ESCENA, TOMA
- CT
- Ajustes de monitorización 3
- Intensidad de la funciona Cebra
- - Indicador
- - Lineas de color
- Color del borde
- Intensidad del Indicador
- Ajustes de monitorización 4
- Opaclidad de las guías
- Color de las guias
- Cuadricula
- Ajustes de monitorización 5
- LCD
- Visor
- Brillo del visor
- Carta de enfoque
- Movimiento fluddo
- Ajustes de audio
- Ajustes de audio 1
- Fuentes
- - Camara - Canal Izquilerdo/derecho
- - Camara-Mono
- XLR-Linea
- - XLR - Micrófono
- mm canal izquierdo - Línea
- mm canal derecho - Linea
- mm mono - Linea
- mm canal Izquilerdo - Micrófono
- mm canal derecho - Micrófono
- mm mono - Micrófono
- - Ninguna
- Volumen
- Allimentación fantasma XLR
- Ajustes de audio 2
- Vumetros
- Volumen de los auriculares
- Volumen del altavoz
- Configuración
- Ajustes generales 1
- Fecha y hora
- Idiomas
- Valor de obturación
- Frecuencia (Obturacion sin parpadeo)
- Fotogramas omtildos
- Establlzacion de imagen
- Filtro de densidad neutra
- Ajustes generales 2
- Botón
- Función
- - Ajustar
- - Alternar
- Ajustes generales 3 en los modelos Blackmagic Studio Camera 6K Pro y 6K G2
- Dirección del mando
- Inversa
- Ajustes generales 4 en los modelos Blackmagic Studio Camera 6K Pro y 6K G2
- Ajustes generales 5 y 3
- Led indicator
- Intensidad
- Atenuar pantalla
- Identificacion
- Preferencias 6 y 4
- Para vincular la CAMERA a un iPad por primera vez:
- Desconectar dispositivo vinculado
- Borrar dispositivos vinculados
- Control de la CAMERA mediante la aplicacion Blackmagic Camera Control
- Ajustes generales 7 y 5
- Restablecerajustes
- Sensor de movilmente
- Recalibración de pixeles
- Calibración del balance de blancos de la pantalla
- Botones
- Guardar y cargar configuraciones
- Importar configuraciones
- Exportar configuraciones
- Eliminar configuraciones
- Tablas de conversion tridimensionales
- Tablas de conversiones integradas
- Cargar Organizar Eliminar
- Importar tablas de conversion
- Aplicar tablas de conversion
- Exportar tablas de conversión
- Eliminar tablas de conversión
- Tablas de conversion tridimensionales integrasas
- Metadata
- Claqueta virtual
- Metadatos del clip
- Datas del objetivo
- Rollo
- Escena
- Toma
- Toma buenaultimateclip
- Interior/Exterior
- Día / Noche
- Metadatos delprojecto
- Nombre del projeto
- Cámara
- Director/a
- Operand/a
- Restablecer datos del proyecto
- Objetivo
- - Tipo de objetivo
- Dlafragma
- - Longitud focal
- Distancia
- Filtro
- Salida de video
- Salida para supervisoras senales HD
- Blackmagic Zoom y Focus Demand
- Conexión e instalación en la camara
- Instalación en tripodes
- Conexión a la camaría
- Uso del accesorio Blackmagic Focus Demand
- Mando glratorlo
- Palancas
- Puerto USB
- Uso del accesorio Blackmagic Zoom Demand
- DaVinci Resolve
- Organizador de proyectos
- Ediciones con el modulo Montaje
- Organización del modulo Montaje
- Organización de ARCHIVOS multimedia
- Modos de vista
- Importar clips al panel multimedia
- Para importar ARCHIVOS:
- Agregar clips al panel multimedia
- Agregar clips
- Para agregar clips al final:
- Recortar clips en la linea de tiempo
- Vista de recorte de audio
- Para usar este modo de vista:
- Agregar titulos
- Vista previa de titulos
- Para ver un titulo:
- Para(agregar un titulo común:
- Archivos Blackmagic RAW
- Ajustes del clip para el formatting Blackmagic RAW
- Modificar los ajustes Blackmagic RAW
- Recuperación de luces
- Compresión del espectro cromático
- Temperatura
- Tinte
- Exposión
- Saturación
- Punto medio
- Atenuación de luces
- Atenuación de sombras
- Nivel de blancos
- Nivel de negros
- Usar nlvel de negros en modo Video
- Exportar fotograma
- Actualzar Sidecar
- Guardar ambios en Blackmagic RAW
- Ajustes del proyecto para Blackmagic RAW
- Para configurar los ajustes Blackmagic RAW del proyecto:
- Etalonar los clips en el modulo Color
- Uso de las representaciones gráficas
- Correcciones secundarias
- Ajuste de-coloredespecificos
- Paraajustar un color específico:
- Agregar una Power Window
- Para(agregar una Power Window:
- Seguimiento de una Power Window
- Para realizar el seguiniento de una Power Window:
- Uso de complementos
- Mezclar audio
- Mezcla de audio en el modulo Ediciones
- Agregar plastas de audio
- Paraañadir una pista de audio en el modulo Ediciones
- Ajuste del volumen en la linea de tiempo
- El modulo Fairlight
- Linea de tiempo del audio
- Que es un bus?
- Herramientos de mezcla
- Uso del ecualizador para mejorar el audio
- Paraañadr un ecualzador a un clip:
- Paraañadir un ecualizador a una pista:
- Paraaabstarelecapitalizadordeunfittredbanda:
- Efectos visuales y compositions en el modulo Fusion
- El modulo Fusion
- Primeros pasos en Fusion
- ¿como funciona an los nodos?
- Agregar nodos al editor
- Ajustar nodos con el Inspector
- Uso de fotogramas clave
- Usar la funciona de seguímente y/agregar textualo
- Masterizacion
- Exportación=rápida
- Para utiliser la funciona de exportación rápida:
- Modulo Entrega
- Para exportar un clip:
- Control de la CAMERA mediante el modelos ATEM Mini
- Panel de control de caparas
- Selección de camaras
- Estado de la CAMERA
- Ajustes de laamera
- Nivel de detailles
- Circulo cromatico
- Control general
- Botón para restablecer ajustes
- Control del diafragma/pedestal
- Control de la distancia focal
- Control primario
- Indicador del difragma
- Botón de enfoque automatico
- Enfoque manual
- Ganancia de la camarla
- Control de la velocidad de obturación
- Herramentas de DaVinci Resolve para correcciones primarias
- Circulos cromáticos
- Haga clc切入点 del circulo y arrastre el puntero
- Mantenga preslonada la tecla de mayusculas y haga clc bajo del circulo
- Haga的比例百分之几
- Haga clc en el boton de realjuste, situado en la esquina superior derecha
- Controles generales
- Para realizar ajustes medlante el control general:
- Mueva la rueda hacla la Izquidera o la derecha
- Matiz
- Mezcla de luminancia
- Sincronización de ajustes
- Otros programas deedition
- Acceso a archivos en tarjetas SD y CFast 2.0
- Para importar clips desde una tarjeta SD o CFast 2.0:
- Acceso a ARCHivos en unidades USB-C
- Para Importar clips desde una unidad USB-C:
- Final Cut Pro X
- MediaComposer2018
- Premiere Pro CC
- Programa utiliser de la CAMERA
- Actualización del programa en equipos Mac
- Actualización del programa en equipos Windows
- Actualización de la-camera
- Uso de la empuñadura para baterías
- Instalacion de la empuñadura Blackmagic Pocket Camera Battery Pro
- Para instalar la empuñadura:
- Inserción de baterías en la empuñadura
- Información para desarrolladores
- Ayuda
- Págrina de soporte técnico
- comoponerse encontactoconBlackmagic Design
- como comprar la version del software instalado
- como Obtener lasactualizacionesmás recientes
- Normativas
- Desecho de equilos electrlicos y electrónlicos en la Unión Europea:
- Declaración ISED (Canada)
- Seguidad
- Declaración del Estado de California
- Garantía
- Garantía limitada
- 欢迎辞
- 目录
- 您使用的是哪款摄影机?
- 开始使用
- 安装镜头
- 安装主动式EF或MFT镜头卡口步骤如下:
- 启动摄影机
- 安装电池并开启摄影机
- 使用内附的电源线为摄影机供电
- 连接外部电源步骤如下:
- 存储介质
- CFast卡
- 插入CFast卡步骤:
- 选择CFast2.0卡
- SD卡
- 插入SD卡步骤:
- 挑选SD卡
- 锁定和解锁SD卡
- USB-C硬盘
- 连接USB-C硬盘步骤如下:
- 选择高速USB-C硬盘
- USB-C硬盘速度注意事项
- 存储介质在记录前的准备事项
- 在Blackmagic Pocket Cinema Camera上格式化存储介质
- 在Mac计算机上格式化存储介质
- 在Windows计算机上格式化存储介质
- 记录
- 记录片段
- 选择记录格式
- 以Blackmagic RAW记录
- 固定比特率设置
- 固定质量设置
- Sidecar文件
- Blackmagic RAW与DaVinci Resolve
- Blackmagic RAW软件开发工具包
- 最高传感器帧率
- 记录时长
- 选择帧率
- 触发记录
- 播放
- 播放片段
- 摄影机功能
- 摄影机正面
- 记录按钮
- 设置滚轮
- 立体声麦克风
- 镜头卡口
- Tally/记录提示
- 右侧
- CFast卡槽
- SD卡槽
- 左侧
- 3.5mm麦克风输入
- 耳麦输入
- 电源输入
- 自定义电源方案
- Mini XLR麦克风输入
- 摄影机顶部
- 1/4-20安装点
- 记录
- 静帧
- 快门
- 白平衡
- 寻像器连接端口
- 电源开关
- LED状态显示
- 功能按钮
- 摄影机底部
- 1/4-20安装点
- 电池仓门
- 电池手柄电源接口
- 摄影机背面
- 触摸屏
- 光圈按钮
- 对焦按钮
- HFR按钮
- 对焦缩放按钮
- 菜单按钮
- 33播放按钮
- 电子寻像器的屈光度调节
- ND滤镜
- 触摸屏控制
- 触摸屏功能
- LCD监看选项
- 斑马纹
- 对焦辅助
- 帧导栏
- 2.35:1、2.39:1和2.40:1
- 自定义帧导栏比例
- 网格
- 三分法
- 水平线
- 水平线指示描述
- 十字准线
- 中心点
- 安全框
- 伪色
- 屏幕亮度
- ND滤镜提示
- 每秒帧数
- 项目帧率
- 传感器帧率
- 快门
- 快门+光圈
- 光圈+快门
- 光圈
- 时长显示
- 时长显示周围还可能出现以下其他状态提示:
- 双原生ISO
- 白平衡
- 自动白平衡
- 电源
- LUT提示
- 直方图
- 记录按钮
- 对片段套用LUT
- 丢帧提示
- 剩余记录时间
- 音频表
- 双击放大
- 捏拉缩放
- 点触式对焦
- 纯画面显示模式
- 播放菜单
- 设置
- 主菜单
- 记录设置
- 记录设置1
- 编解码和质量
- 分辨率
- 记录设置2
- 动态范围
- 传感器区域
- 变速记录
- 变速帧率
- 偏好的记录介质
- 记录设置3
- 延时摄影
- 细节锐化
- 存储卡丢帧时
- 在文件中套用LUT
- 将LUT记录到片段
- 文件命名格式
- 监看设置
- 监看设置1
- 纯画面
- 显示3D LUT
- 监看设置2
- LCD、HDMI和寻像器
- 状态信息
- 变形镜头压缩画面还原
- LCD和寻像器
- 显示
- 仅通过HDMI
- 摄影师或导演使用的状态信息显示功能
- ·帧率
- 摄影机
- 摄影师
- 卷号、场景和镜次
- 时间码
- 监看设置3
- 斑马纹级别
- - 峰值对焦
- - 彩色线条
- 对焦辅助色彩
- 对焦辅助级别
- 监看设置4
- 帧导栏不透明度
- 帧导栏色彩
- 监看设置5
- 仅LCD
- 寻像器
- 寻像器亮度
- 对焦测试板
- 平滑动态影像
- 音频设置
- 音频设置1
- 通道信号源
- 摄影机左声道或右声道
- 摄影机单声道
- ·3.5mm左声道-Line
- ·3.5mm右声道-Line
- - 3.5mm单声道 - Line
- - 3.5mm左声道 - Mic
- - 3.5mm右声道 - Mic
- ·3.5mm单声道-Mic
- ·无
- 通道1/2电平
- XLR幻象电源
- 音频设置2
- 耳麦电平
- 扬声器电平
- 设置1
- 日期和时间
- 语言
- 快门类型
- 防闪烁快门基准频率
- 丢帧时间码
- 图像稳定功能
- ND滤镜显示方式
- 设置2
- 设置功能按钮
- 功能按钮功能映射为预设或开关
- 预设
- ·开关
- Blackmagic Pocket Cinema Camera 6K Pro和6K G2的设置3
- 变焦摇杆方向
- 正常
- - 反向
- 拨盘和功能按键参数选项:
- Blackmagic Pocket Cinema Camera 6K Pro和6K G2的设置4
- 对焦控制器操作方向
- 设置5和3
- TALLYLED提示灯
- LED亮度
- 自动调暗显示器
- 硬件ID
- 软件
- 设置6和4
- 蓝牙
- 首次将摄影机与iPad配对:
- 断开当前设备
- 清除配对设备
- 利用Blackmagic Camera Control App控制您的摄影机
- 设置7和5
- 恢复出厂设置
- 运动传感器校准
- 像素校准
- LCD白平衡校准
- 预设按钮
- 保存和加载预设
- 导入预设
- 导出预设
- 删除预设
- 3D LUT
- 3D LUT简介
- 内置LUT
- LUT按钮
- 导入LUT
- 套用LUT
- 导出LUT
- 删除LUT
- 内嵌3D LUT
- 录入元数据
- 场记板
- “片段”元数据
- 场记板所属片段
- 镜头数据
- 卷号
- 场景
- 镜次
- 好镜次
- 棚内/外景
- 白天/夜晚
- 项目元数据
- 项目名称
- 导演
- 重置项目数据
- “镜头数据”元数据
- - 镜头类型
- ·光圈
- ·焦距
- - 距离
- ·滤镜
- 摄影机视频输出
- HD监看输出
- Blackmagic Zoom Demand和 Blackmagic Focus Demand
- 连接至您的摄影机
- 连接至三脚架把手
- 使用Blackmagic Focus Demand
- 控制旋钮
- 控制杆
- USB端口
- 使用Blackmagic Zoom Demand
- 变焦F1
- 变焦F2
- 变焦F3
- 变焦F4
- 拇指摇杆
- 速度拨盘
- USB-C端口
- 使用DaVinci Resolve
- 项目管理器
- 使用快编页面剪辑
- 快编页面布局
- 媒体选项卡
- 检视器选项卡
- 将片段导入媒体池
- 导入媒体步骤如下:
- 将片段添加到时间线
- 附加片段
- 附加片段 步骤如下:
- 在时间线上修剪片段
- 音频修剪视图
- 使用音频修剪视图步骤如下:
- 添加标题
- 预览标题
- 创建字幕步骤如下:
- 添加标准标题步骤如下:
- 使用Blackmagic RAW文件
- Blackmagic RAW的片段设置
- 更改Blackmagic RAW设置
- 高光恢复
- 色域压缩
- 色温
- 色调
- 曝光
- 饱和度
- 对比度
- 中点
- 高光过渡
- 阴影过渡
- 白电平
- 黑电平
- 使用视频黑电平
- 导出帧
- 更新Sidecar
- 保存您对Blackmagic RAW的修改
- Blackmagic RAW的项目设置
- 为Blackmagic RAW进行项目设置:
- 使用调色页面为片段调色
- 使用示波器
- 二级调色
- 限定某一色彩
- 如何限定某一色彩:
- 添加Power Window
- 如何在片段上添加Power Window:
- 跟踪窗口
- 如何对移动的物体进行窗口跟踪:
- 使用插件
- 混合音频
- 在剪辑页面混合音频
- 添加音频轨道
- 在剪辑页面添加音频轨道
- 在时间线上调整音频电平
- Fairlight页面
- 音频时间线
- 什么是总线?
- 调音台
- 使用均衡器加强音频
- 为单个片段添加均衡器:
- 为轨道添加均衡器:
- 为频段滤波器调整均衡器:
- 在Fusion页面添加视觉特效和合成效果
- Fusion页面
- Fusion使用入门
- 了解节点
- 在节点编辑器中添加节点
- 使用检查器面板调整节点
- 制作关键帧
- 使用动态跟踪器和添加文本工具
- 制作母版剪辑
- 快速导出
- 快速导出步骤如下:
- 交付页面
- 如何导出剪辑的单个片段:
- 使用ATEM Mini控制摄影机
- 摄影机控制面板
- 摄影机控制选择
- 通道状态
- 摄影机设置
- 细节
- 色轮
- 主滚轮
- 重置按钮
- 光圈/黑电平控制
- 变焦控制
- 光圈上限设置
- 光圈指示灯
- 自动对焦按钮
- 手动对焦调整
- 摄影机增益
- 快门速度控制
- DaVinci Resolve一级调色工具
- 在色轮内任意位置点击并拖动:
- 在色轮内按Shift键并点击鼠标:
- 在色轮内双击鼠标:
- 点击色轮右上方的重置控制:
- 使用主滚轮进行调整方法如下:
- 向左或向右拖动主滚轮:
- 对比度设置
- 饱和度设置
- 色相设置
- 亮度混合设置
- 同步设置
- 使用第三方软件
- 处理CFast 2.0卡和SD卡上的文件
- 从CFast2.0卡或SD卡上导入您的素材片段步骤如下:
- 处理USB-C硬盘上的文件
- 如何从USB-C硬盘上导入素材片段:
- 使用Final Cut Pro X
- 使用Avid MediaComposer2018
- 使用AdobePremiereProCC
- Blackmagic Camera Setup Utility实用软件
- 更新摄影机软件 - Mac
- 更新摄影机软件 - Windows
- 升级摄影机的内部软件
- 使用电池手柄
- 安装Blackmagic Pocket Camera Battery Pro Grip
- 安装Blackmagic Pocket Camera Battery Grip
- 为电池手柄安装电池
- Service: Device Information Service
- Camera Manufacturer
- Camera Model
- Service: Blackmagic Camera Service
- 帮助
- Blackmagic Design在线支持页面
- 联系Blackmagic Design支持中心
- 查看当前安装的软件版本
- 如何获得软件更新
- 监管告知
- 加拿大ISED认证声明
- 安全信息
- 加利福尼亚安全声明
- 保修
- 有限保修
- 宣
- かてレマご日
- 人
- Ranstrackshah
- EF 五是的马贝克力托斯 雷德马运电
- 卡耶拉 页
- KAPRA
- 通綱の策言を用具の状態に、現状の状態に
- の外部専職員に満足の結果を提供。
- 貯장
- CFast 升元
- CFast 卡德森启航
Marque : Blackmagic Design
Modèle : Pocket Cinema Camera 6K
Catégorie : Caméscope