NW-S605 - Lecteur mp3 SONY - Notice d'utilisation et mode d'emploi gratuit
Retrouvez gratuitement la notice de l'appareil NW-S605 SONY au format PDF.

| Type de produit | Lecteur MP3 numérique |
| Capacité de stockage | 2 Go |
| Formats audio supportés | MP3, WMA, AAC, Linear PCM |
| Écran | Écran LCD de 1,5 pouces |
| Autonomie de la batterie | Jusqu'à 50 heures de lecture |
| Type de batterie | Batterie lithium-ion rechargeable |
| Dimensions approximatives | 90 x 40 x 10 mm |
| Poids | 60 g |
| Connectivité | USB 2.0 |
| Fonctions principales | Lecture de musique, radio FM, enregistrement audio |
| Entretien et nettoyage | Essuyer avec un chiffon doux, éviter les produits chimiques |
| Pièces détachées et réparabilité | Réparabilité limitée, pièces disponibles auprès de Sony |
| Sécurité | Ne pas exposer à l'eau, éviter les températures extrêmes |
| Informations générales | Compatible avec Windows et Mac, logiciel de gestion de musique inclus |
FOIRE AUX QUESTIONS - NW-S605 SONY
Questions des utilisateurs sur NW-S605 SONY
0 question sur cet appareil. Repondez a celles que vous connaissez ou posez la votre.
Poser une nouvelle question sur cet appareil
Téléchargez la notice de votre Lecteur mp3 au format PDF gratuitement ! Retrouvez votre notice NW-S605 - SONY et reprennez votre appareil électronique en main. Sur cette page sont publiés tous les documents nécessaires à l'utilisation de votre appareil NW-S605 de la marque SONY.
MODE D'EMPLOI NW-S605 SONY
SONY®

Operation Guide
NW-S603 / S605 / S703F / S705F / S706F
About the Manuals
Included with the player are the Quick Start Guide and this PDF-format Operation Guide. Additionally, after installing the SonicStage software from the supplied CD-ROM, you can refer to the Help within SonicStage.
- The Quick Start Guide explains set up and the basic operations, enabling you to import songs to a computer, to transfer them to the player, and to play them back.
- This Operation Guide explains standard and advanced features, enabling you to make full use of the player and troubleshoot problems.
- SonicStage Help explains details about using the SonicStage software (page 3).
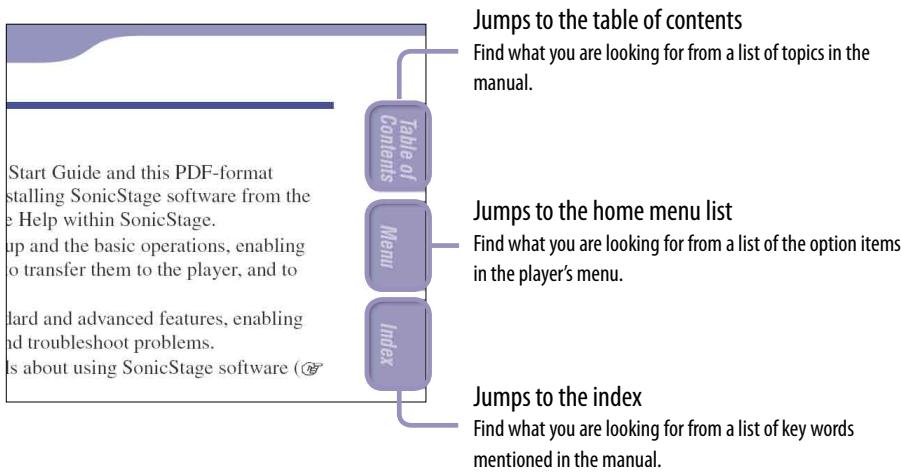
Browsing the Operation Guide
To use the buttons in the Operation Guide
Click the buttons located in the upper right of this manual to jump to "Table of Contents," "Home Menu List," or "Index."

Hints
- You can jump to the indicated page by clicking a page number in the table of contents, in the home menu list, or in the index.
- You can jump to the indicated page by clicking a page reference indication (e.g. © page 3) on each page.
- To search for a reference page by keyword, click the "Edit" menu, select "Search" of the Adobe Reader to display the navigation frame, type the keyword into the Search text box, and click "Search."
- You can jump to the previous or next page by clicking the and buttons located at bottom of the Adobe Reader screen.
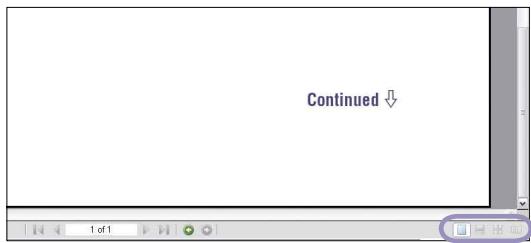
To change the page layout
The buttons at the bottom of the Adobe Reader screen enable you to select how pages are displayed.

Single Page
Pages are displayed one at a time. When you scroll, the display changes to a previous or succeeding page.

Continuous
Pages are displayed as a continuous roll of pages.
When you scroll, the previous and next pages scroll up or down continuously.

Continuous - Facing
Two pages are displayed side by side with each pair part of a continuous roll of pages. When you scroll, the previous and next pairs of pages scroll up or down continuously.

Facing
Two pages are displayed side by side. When you scroll, the display changes to previous or succeeding pairs of pages.
Using SonicStage Help
See SonicStage Help for details about using SonicStage, such as importing songs to your computer and transferring songs to the player.

Click "Help" - "SonicStage Help" while SonicStage is running. Help appears.
Note
- In SonicStage Help, the player is referred to as "ATRAC Audio Device."
Table of Contents
Home Menu List. 6
Supplied Accessories. 7
Parts and Controls. 8
Playing Songs
Playing Songs (All Songs) 12
Playing Lists of Songs
(Repository Select) 13
Playing lists of songs created in SonicStage (Playlists) 13
Playing songs from 100 favorite songs (Favorite 100) 15
Playing songs from albums recently transferred (Recent Transfers) 16
Playing Songs in Random Order
(Intelligent Shuffle) 17
Playing your 100 favorite songs in random order (My Favorite Shuffle) 17
Playing similar genre songs to the selected artist in random order (Artist Link Shuffle)...18
Playing songs released in the same year in random order (Time Machine Shuffle) 19
Playing songs in random order for a specified period of time (Sports Shuffle) 20
Searching for Songs (Search) 21
Searching for songs by song name (Song).....21
Searching for songs by artist (Artist) 22
Searching for songs by album (Album) 23
Searching for songs by genre (Genre) 24
Searching for songs by release year (Release Year). 25
Searching for Albums by Jacket
Picture (Jacket Search) 26
Changing the Play Mode
(PLAY MODE) 27
Reducing the Ambient Noise
(Noise Canceling)
(NW-S703F/S705F/S706F only) 28
Settings
Setting the Sound Quality. 30
Selecting the sound quality. 30
Changing the sound quality (Equalizer) 31
Setting the EQ Custom values. 33
Making the Sound More Vibrant (VPT).....35
Listening with Clear Stereo Sound
(Clear Stereo) 36
Adjusting the Volume Level
(Dynamic Normalizer) 37
Adjusting the Effect of the Noise Canceling Function
(Noise Cancel Control)
(NW-S703F/S705F/S706F only) 38
Changing the Song Order (Sort) 39
Changing the Display Mode 41
Changing the display mode. 42
Selecting the display types (Display Screen)....43
Setting the Jacket Picture Display
ON/OFF (Jacket Mode) 44
Setting the Volume Level
(Volume Mode). 45
Setting a Preset Volume (Preset Volume) 45
Setting a Preset Volume value 46
Setting to a Manual Volume (Manual Volume). 47
Limiting the Volume (AVLS). 48
Turning Off the Beep Sound (Beep)....49
Setting the Current Time
(Set Date-Time). 50
Selecting the current time setting. 50
Setting the current time manually. 52
Setting the Date Format
(DateDispType) 53
Setting the Time Format
(TimeDispType) 54
Displaying the Player Information
(Information) 55
Resetting to Factory Settings
(Reset All Settings). 56
Formatting Memory (Format) 57
Changing the USB Connection
Setting (USB Bus Powered) 59
Setting to the Power Save Screen
(Power Save Mode) 60
Listening to FM Radio (NW-S703F/S705F/S706F only)
Enjoy Listening to FM Radio 61
1 Switching to the FM tuner 61
2 Presetting broadcast stations automatically (FM Auto Preset). 62
3 Selecting broadcast stations. 63
Presetting Desired Broadcast
Stations 65
Deleting preset broadcast stations. 65
Setting the Reception (Scan Sens)
Changing the Monaural/Stereo
(Mono/Auto) 67
Recording
Recording (Rec) 68
Setting the Bit Rate for the Songs to
Record (Rec Mode). 70
Changing the Synchronized
Recording Settings (Sync Rec) 71
Playing the Recorded Songs
(Rec Data). 72
Changing the Play Mode of
Recorded Songs (PLAY MODE) 73
Deleting the Recorded Songs. 74
Deleting recorded songs
(Delete 1 Track) 74
Deleting the recorded folder
(Delete Folder) 76
Deleting all recorded songs
(Delete All Rec Data) 77
Advanced Features
Recharging the Player. 78
Maximizing Battery Life 79
What are Format and Bit Rate? 80
Playing Songs without Pauses. 82
How is Song Information Imported
to the Player? 83
Storing Data Other than Audio
Files. 84
Upgrading the Player's Firmware ....85
Troubleshooting
Troubleshooting. 86
Messages. 95
Uninstalling SonicStage. 99
Additional Information
Precautions 103
On Copyrights 107
Specifications. 108
Index 112
Note
- Depending on the country/region in which you have purchased the player, some models may not be available.
Home Menu List
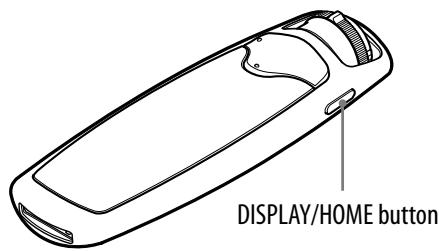
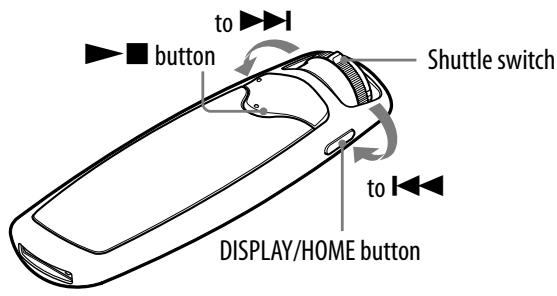
You can display the HOME screen by pressing and holding the DISPLAY/HOME button of the player.
The HOME screen is the starting point to play audio, search for songs, and change settings such as follows.
HOME screen*1
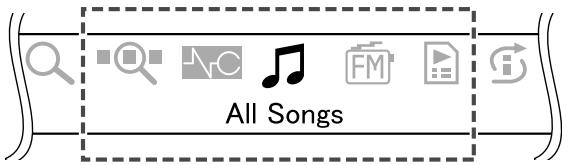
*1 5 of the 10 icons appear in the display with the current selection in the centre. The current icon changes depending on the function you use. By rotating the shuttle switch, you can select an icon and press the button to confirm.
(Search) 21
Song. 21
Artist. 22
Album. 23
Genre. 24
Release Year.. 25
(Dacket Search) 26
No (Noise Canceling) ^x4 28
(Rec Data)72
O(Rec)^*3 68
All Songs 12
FM (FM)4 61
(Manifest Select) 13
Playlists. 13
Favorite 100. 15
Recent Transfers.. 16
(Intelligent Shuffle) 17
My Favorite Shuffle 17
Artist Link Shuffle 18
Time Machine Shuffle 19
Sports Shuffle 20
(Settings)
Sound Equalizer. 31 VPT. 35
Clear Stereo. 36
Sort. 39
Jacket Mode. 44
Display Screen 43
Scan Sens*4 66
Mono/Auto*4. 67
FM Auto Preset*4 62
Rec Mode*3 70
Sync Rec*3 71
Delete Rec Data*2
Delete 1 Track.74
Delete Folder .76
Delete All Rec Data..77
Advanced Settings - Date-Time - Set Date-Time 50 - Date Disp Type 53 - Time Disp Type 54
Power Save Mode.. 60
Dynamic Normalizer.37
AVLS. 48
Volume Mode 45
Beep 49
Noise Cancel Control*4 38
Information 55
Initialize
Reset All Settings .56
Format .57
USB Bus Powered. 59
^2 (Rec Data) appears when you have data recorded with the player.
^3 (Rec) appears when an optional accessory for recording is connected to the player.
*4 NW-S703F/S705F/S706F only.
Supplied Accessories
Please check the accessories in the package.
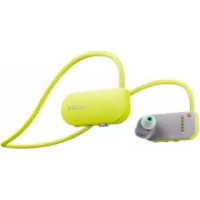
□ Headphones (1)
Headphone extension cord (1)
□ Earbuds (Size S, L) (1)
USB cable (1)
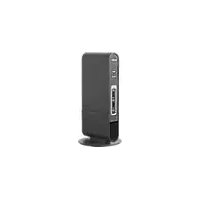
□ Attachment (1) Use when connecting the player to the optional cradle (BCR - NWU3)^*1 , etc.
CD-ROM*2 (1) -SonicStage software -Operation Guide (PDF file)
Quick Start Guide (1)
1 Depending on the country/region in which you have purchased the player, some optional accessories may not be available.
2 Do not attempt to play this CD-ROM in an audio CD player.
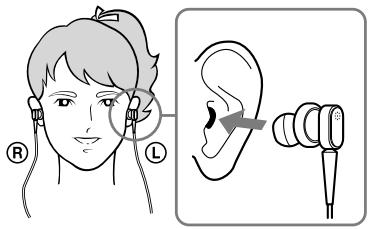
How to install the earbuds correctly
If the earbuds do not fit your ears correctly, low bass sound may not be heard or the Noise Canceling function (page 28) (NW-S703F/S705F/S706F only) may not work. To enjoy better sound quality, adjust the earbuds position to sit on your ears comfortably or push them into the inside of your ears so that they fit your ears snugly. At purchase, M size earbuds are installed. If the earbuds do not fit your ears, try one of the other supplied sizes, S or L.
About the serial number
The serial number provided for this player is required for the customer registration. The number is shown on the rear of the player.
You can also check the serial number on this player. See page 55 for details.
Parts and Controls
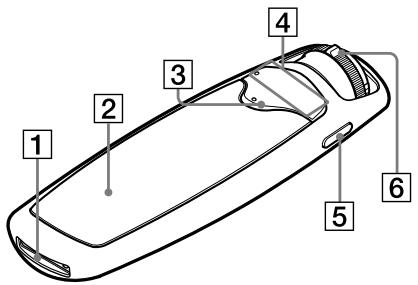
1 WM-PORT
Connect to the supplied USB cable, accessories for WM-PORT such as optional accessories for recording with the player, or peripheral device.
2 Display
See page 11.
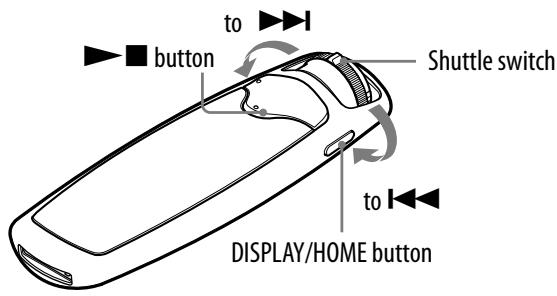
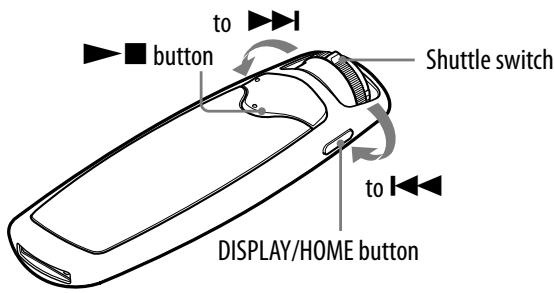
3 button
Starts song playback. When starting playback, appears in the display, and if the button is pressed again, appears and playback stops. When a menu appears on the display, use this button to confirm the item of the menu.

Hint
- There is no power button on the player. When you stop song playback or FM reception (NW-S703F/S705F/S706F only) by pressing the button, after about a few seconds, the display goes off automatically and the player enters Sleep status.
The player consumes very little battery power.
4 VOL +^ - button
Adjusts the volume.
- There are tactile dots. Use them to help with button operation.
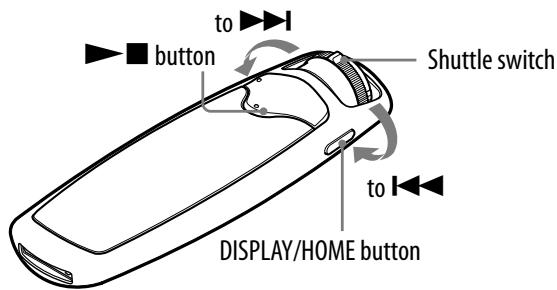
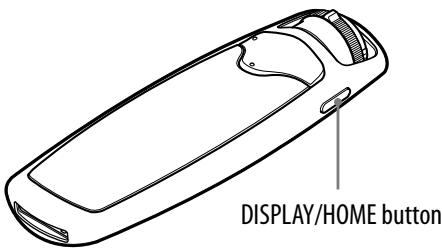
5 DISPLAY/HOME button
When you press this button while the player is in the play or stop mode, you can change the display (page 41). When you press this button while using the FM tuner (NW-S703F/S705F/S706F only) or Intelligent Shuffle, the current time appears for a specified duration.
Press and hold this button to display the HOME screen.
While the menu appears, when this button is pressed again, the previous screen returns and when pressing and holding, the screen returns to the HOME screen.
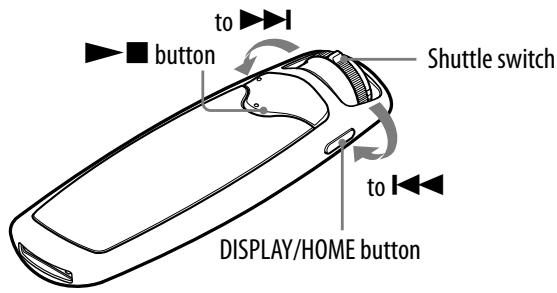
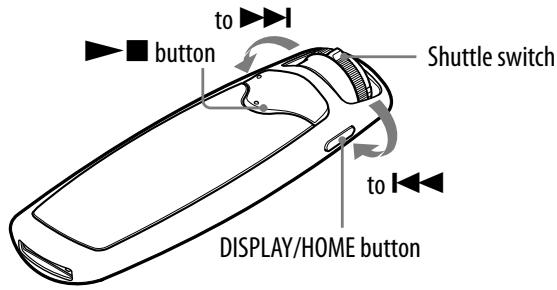
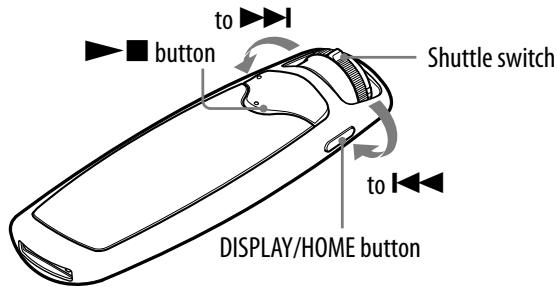
6 Shuttle switch
By rotating the shuttle switch, you can select a menu item, skip to the beginning of the song, or fast-forward /fast-rewind (page 9).
You can also set to the FOLDER mode or normal mode by sliding the shuttle switch.
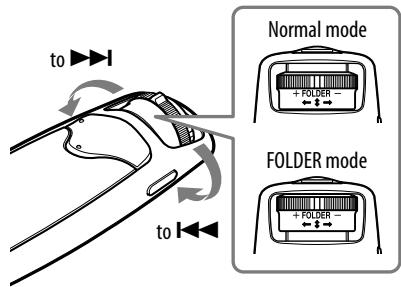
To operate the player with the shuttle switch
| Normal mode | |
| To | Operation |
| In play mode | |
| Skip to the beginning of the next song. | Rotate the shuttle switch to▶▶ briefly. |
| Skip to the beginning of the current song. | Rotate the shuttle switch to▶▶ briefly. |
| Fast-forwards the current song. | Rotate the shuttle switch to▶▶ and release it at the desired point. |
| Fast-rewinds the current song. | Rotate the shuttle switch to▶▶ and release it at the desired point. |
| In stop mode | |
| Select the beginning of the next song, and if held longer, continues to skip through the next song(s). | Rotate and hold the shuttle switch to▶▶. |
| Select the beginning of the current song, and if held longer, continues to skip through the previous song(s). | Rotate and hold the shuttle switch to▶▶. |
| FOLDER mode | |
| To | Operation |
| In play mode/In stop mode | |
| Skip to the first song in the next sort category set by the song order (® page 39). | Rotate the shuttle switch to ➔ briefly. |
| Skip to the first song in the current sort category set by the song order (® page 39). | Rotate the shuttle switch to ➔ briefly. |
| Select the first song in the next sort category, and if held longer, continues to skip through the next sort category set by the song order (® page 39). | Rotate and hold the shuttle switch to ➔. |
| Select the first song in the current sort category, and if held longer, continues to skip through the previous sort category set by the song order (® page 39). | Rotate and hold the shuttle switch to ➔. |

7 HOLD switch
You can protect the player against accidental operation by using the HOLD switch when carrying it. By sliding the HOLD switch to the HOLD position, all operation buttons are disabled. If you press buttons or rotate the shuttle switch while the HOLD function is activated, "HOLD" appears in the display. If you slide the HOLD switch to the opposite position, the HOLD function is released.
8 Strap hole
This is used to attach a strap (sold separately).
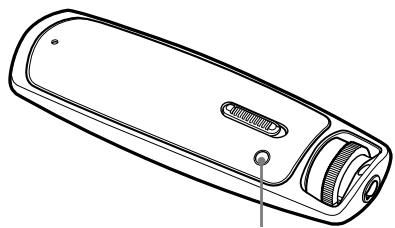
9 RESET button
Resetstheplayerbypressingthe RESETbuttonwithasmallpin,etc. Fordetails,see page86.
10 PLAY MODE/SOUND button
Switches the play mode (page 27). Press and hold this button to change the sound quality setting.
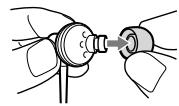
11 Headphone jack
For connecting the headphones. Connect until it clicks into place. If connecting the headphones improperly, it may not sound right.
For NW-S703F/S705F/S706F users
Connect the headphone plug securely following to the plug shape for the headphones, and to the orientation mark () and the plug shape for the headphone extension cord.
When using the headphone extension cord

About the Noise Canceling function (NW-S703F/S705F/S706F only)
The Noise Canceling function is available only when using the supplied headphones.
Noise Canceling does not work with models without the Noise Canceling function (NW-S603/S605), even if the supplied headphones are used.
Display
When selecting Jacket Mode ON (Default setting)
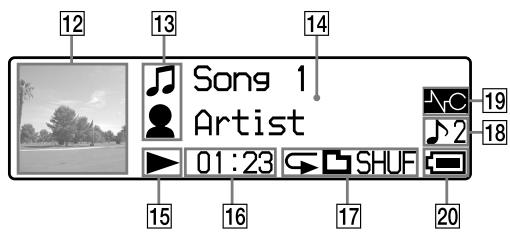
12 Jacket picture display
Displays the jacket picture of an album after you register the jacket and transfer songs from SonicStage. You can set the jacket picture to not display (page 44).
13 Icon indication
For the normal mode, displays on the first line, and displays or according to the song order setting (page 39) on the second line. For the FOLDER mode, displays an icon of the category set in the song order (page 40) on the first line, and displays or on the second line.
When selecting the FOLDER mode during playback of a playlist ( page 13), displays the selected playlist: playlist created by SonicStage, : favorite 100 songs, and : the latest transferred album) on the first line.
14 Text/graphic information display
Displays album title, artist name, song title, current date and time, messages and menu.
To change the display mode, press the DISPLAY/HOME button (page 42). Switch the display to the Power Save mode when you do not operate the player for a while (page 60).
When selecting Jacket Mode OFF
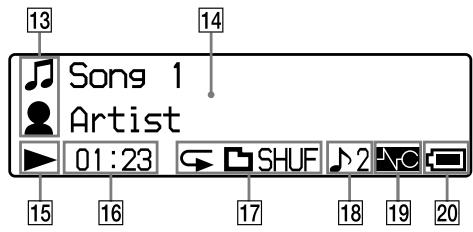
15 Playing status indication
Displays the current play mode (▶: playback, ■: stop, ←(▶): fast-rewinds (fast-forwards), ↓(▶): skips to the beginning of the current (or next) song).
16 Lapse time indication
Displays the elapsed time.
17 Play mode indication (PLAY MODE)
Displays the current play mode icon (page 27). If the play mode is set to "Normal," no icon appears.
Sound quality setting indication
Displays the current sound quality icon ( page 30). If the sound quality is not set, no icon appears.
19 Noise Canceling indication (NW-S703F/S705F/S706F only)
Displays when the Noise Canceling function is set ( page 28).
20 Remaining battery indication
Displays the remaining battery power.

Hint
- For information on the FM tuner (NW-S703F/S705F/S706F only) display, see "Enjoy Listening to FM Radio" (6 page 61).
Playing Songs (All Songs)
The transferred songs on the player are played back.
Press and hold the DISPLAY/HOME button until the HOME screen appears.
2 Rotate the shuttle switch to select (All Songs) and press the button to confirm.
Playback starts from the last song you listened to. If you did not play any song, playback starts from the beginning.
Playback continues in order through to the last song and then stops.
To skip to the beginning of the song
By rotating the shuttle switch to ( ) briefly while in the play or stop mode, the player skips to the beginning of the current (or next) song.
If the shuttle switch is slipped, and then rotated to ( ) briefly while in the play or stop mode, the player skips to the beginning of the first song of the current (or next) sort category set by the song order (page 39).

Hints
- You can change the play mode to random, repeat, etc., by pressing the PLAY MODE/ SOUND button (page 27).
- The songs appear in the order that you set in the Sort menu (page 39). The songs appear in the album order at the default settings.
Playing Lists of Songs ( Playlist Select)
You can play songs from "Playlists created in SonicStage," "Albums recently transferred" and "Your 100 favorite songs."
Note
- When ( Playlist Select) is selected, (Search) and (Jacket Search) do not appear in the HOME screen.
Playing lists of songs created in SonicStage (Playlists)
You can play lists of songs (Playlists) created in SonicStage. If you change a name in SonicStage, the changed name appears on the player. See SonicStage Help for details.
Press and hold the DISPLAY/HOME button until the HOME screen appears.
2 Rotate the shuttle switch to select ( Playlist Select) and press the button to confirm.
The Playlist menu appears.
Rotate the shuttle switch to select "Playlists" and press the button to confirm.
Playback starts from the last song you listened to. If you did not play any song, playback starts from the beginning of the playlist created in SonicStage. Playback continues in the order through to the last song and then stops.
To skip to the beginning of the song
By rotating the shuttle switch to I ( I) briefly while in the play or stop mode, the player skips to the beginning of the current (or next) song. If the shuttle switch is slipped, and then rotated to I ( I) briefly while in the play or stop mode, the player skips to the beginning of the current (or next) playlist.

Hint
- You can change the play mode to random, repeat, etc., by pressing the PLAY MODE/ SOUND button (page 27).
Continued
Playing songs from 100 favorite songs (Favorite 100)
You can play lists of songs automatically created in SonicStage. When connected to SonicStage, 100 frequently-played songs are renewed and appear in the order of times and frequency.
Press and hold the DISPLAY/HOME button until the HOME screen appears.
2 Rotate the shuttle switch to select ( Playlist Select) and press the button to confirm.
The Playlist menu appears.
3 Rotate the shuttle switch to select "Favorite 100" and press the button to confirm.
Playback starts from the last song you listened to. If you did not play any song, playback starts from the beginning. Playback continues in the order through to the last song and then stops.

Hint
- The 100 most frequently-played songs are updated every time you connect the player to SonicStage.
Continued
Playing songs from albums recently transferred (Recent Transfers)
You can play albums transferred most recently.
Press and hold the DISPLAY/HOME button until the HOME screen appears.
2 Rotate the shuttle switch to select ( Playlist Select) and press the button to confirm.
The Playlist menu appears.
Rotate the shuttle switch to select "Recent Transfers" and press the button to confirm.
Playback starts from the last song you listened to. If you did not play any song, playback starts from the beginning. Playback continues in the order through to the last song and then stops.
To skip to the beginning of the song
By rotating the shuttle switch to ( ) briefly while in the play or stop mode, the player skips to the beginning of the current (or next) song. If the shuttle switch is slipped, and then rotated to ( ) briefly while in the play or stop mode, the player skips to the beginning of the first song of the current (or next) sort category set by the song order (page 39).
Playing Songs in Random Order (Intelligent Shuffle)
The player offers 4 different random and repeat play modes (also known as "shuffle play") (Intelligent Shuffle).

Notes
- The play mode automatically switches to the shuffle mode during Intelligent Shuffle.
- When you press the DISPLAY/HOME button during Intelligent Shuffle, the current time appears for a specified duration.
Playing your 100 favorite songs in random order (My Favorite Shuffle)
The player selects the 100 songs that have been played the most and plays them in random order repeatedly.
Press and hold the DISPLAY/HOME button until the HOME screen appears.
2 Rotate the shuttle switch to select (Intelligent Shuffle) and press the button to confirm.
The Intelligent Shuffle mode menu appears.
Rotate the shuttle switch to select "My Favorite Shuffle" and press the button to confirm.
The 100 songs that have been played the most are shuffled and played back repeatedly.
Hints
- If you slide and rotate the shuttle switch, the 100 most frequently played songs are reshuffled and played back from the first song.
- The 100 most frequently-played songs are updated every time you connect the player to SonicStage.
- If the total number of songs transferred on the player is less than 100, all transferred songs on the player are played in random order.
Playing similar genre songs to the selected artist in random order (Artist Link Shuffle)
The player randomly selects an artist, searches similar genre songs to the selected artist (Artist Link Shuffle), and plays them in random order repeatedly.
Press and hold the DISPLAY/HOME button until the HOME screen appears.
2 Rotate the shuttle switch to select (Intelligent Shuffle) and press the button to confirm.
The Intelligent Shuffle mode menu appears.
Rotate the shuttle switch to select "Artist Link Shuffle" and press the button to confirm.
An artist is randomly selected, similar genre songs to the selected artist are shuffled, and played back repeatedly.

- If you slide and rotate the shuttle switch, an artist is selected randomly, and similar genre songs to the selected artist are reshuffled and played back from the first song.
Continued
Playing songs released in the same year in random order (Time Machine Shuffle)
The player randomly selects a release year and plays all transferred songs of that year in random order repeatedly.
Press and hold the DISPLAY/HOME button until the HOME screen appears.
2 Rotate the shuttle switch to select (Intelligent Shuffle) and press the button to confirm.
The Intelligent Shuffle mode menu appears.
Rotate the shuttle switch to select "Time Machine Shuffle" and press the button to confirm.
A release year is randomly selected, the songs of that year are shuffled, and played back repeatedly.

Hint
- If you slide and rotate the shuttle switch, a release year is selected randomly, and the songs of that year are reshuffled and played back from the first song.
Continued
Playing songs in random order for a specified period of time (Sports Shuffle)
The player randomly selects songs from all transferred songs and plays them in random order repeatedly (between 1 and 99 minutes).
Press and hold the DISPLAY/HOME button until the HOME screen appears.
2 Rotate the shuttle switch to select (Intelligent Shuffle) and press the button to confirm.
The Intelligent Shuffle mode menu appears.
Rotate the shuttle switch to select "Sports Shuffle" and press the button to confirm.
The screen to select the playback time appears.
Rotate the shuttle switch to select the playback time and press the button to confirm.
The selected playback time appears, and songs are randomly selected from all transferred songs and played back.
Elapsed time appears while playing the song.

Hint
- If you slide and rotate the shuttle switch, songs from the transferred songs are selected randomly again, and reshuffled and played back from the first song.
Searching for Songs (Search)
You can search for songs by "Song name," "Artist name," "Album name," etc.

Searching for songs by song name (Song)
Press and hold the DISPLAY/HOME button until the HOME screen appears.
2 Rotate the shuttle switch to select Q (Search) and press the button to confirm.
Rotate the shuttle switch to select "Song>" and press the button to confirm.
The song lists appear.
4 Rotate the shuttle switch to select a song and press the button to confirm.
The song you selected starts playback. Playback continues in the order through to the last song and then stops.

- The play mode (B page 27) does not change when Q (Search) is activated.
Continued
Searching for songs by artist (Artist)
Press and hold the DISPLAY/HOME button until the HOME screen appears.
2 Rotate the shuttle switch to select Q (Search) and press the button to confirm.
Rotate the shuttle switch to select "Artist>" and press the button to confirm.
The artist lists appear.
Rotate the shuttle switch to select the desired artist and press the button to confirm.
The album lists for the selected artist appear.
Rotate the shuttle switch to select the desired album and press the button to confirm.
The song lists for the album of the selected artist appear.
Rotate the shuttle switch to select a song and press the button to confirm.
The song you selected starts playback. Playback continues in the order through to the last song and then stops.

Hint
- The play mode (E page 27) does not change when Q (Search) is activated.
Continued
Searching for songs by album (Album)
Press and hold the DISPLAY/HOME button until the HOME screen appears.
2 Rotate the shuttle switch to select Q (Search) and press the button to confirm.
3 Rotate the shuttle switch to select "Album>" and press the button to confirm.
The album lists appear.
Rotate the shuttle switch to select the desired album and press the button to confirm.
The song lists for the selected album appear.
Rotate the shuttle switch to select a song and press the button to confirm.
The song you selected starts playback. Playback continues in the order through to the last song and then stops.

- The play mode (B page 27) does not change when Q (Search) is activated.
Continued
Searching for songs by genre (Genre)
Press and hold the DISPLAY/HOME button until the HOME screen appears.
2 Rotate the shuttle switch to select Q (Search) and press the button to confirm.
3 Rotate the shuttle switch to select "Genre>" and press the button to confirm.
The genre list appear.
Rotate the shuttle switch to select the desired genre and press the button to confirm.
The artist lists for the selected genre appear.
Rotate the shuttle switch to select the desired artist and press the button to confirm.
The album lists for the artist selected from the genre appear.
Rotate the shuttle switch to select the desired album and press the button to confirm.
The song lists for the selected artist's album appear.
7 Rotate the shuttle switch to select a song and press the button to confirm.
The song you selected starts playback. Playback continues in the order through to the last song and then stops.

Hint
- The play mode (E page 27) does not change when Q (Search) is activated.
Searching for songs by release year (Release Year)
Press and hold the DISPLAY/HOME button until the HOME screen appears.
2 Rotate the shuttle switch to select Q (Search) and press the button to confirm.
Rotate the shuttle switch to select "Release Year>" and press the button to confirm.
The release year lists appear.
Rotate the shuttle switch to select the desired release year and press the button to confirm.
The artist lists for the selected release year appear.
Rotate the shuttle switch to select the desired artist and press the button to confirm.
The song lists for the artist, selected from the release year, appear.
Rotate the shuttle switch to select a song and press the button to confirm.
The song you selected starts playback. Playback continues in the order through to the last song and then stops.

Hint
- The play mode (E page 27) does not change when Q (Search) is activated.
Searching for Albums by Jacket Picture (Jacket Search)
You can search for songs by album jacket picture after you register the album jacket picture and transfer songs from SonicStage.

Notes
- The song order is always listed in the album order when you search songs by ■ (Jacket Search).
- If no jacket pictures have been registered, a preinstalled image in the player appears.
Press and hold the DISPLAY/HOME button until the HOME screen appears.
2 Rotate the shuttle switch to select "■" (Jacket Search) and press the button to confirm.
The jacket list appears and at the same time the first song of the selected album will be monitored.
By rotating the shuttle switch, you can go forward or backward one jacket picture at a time in the normal mode, and three pictures at a time in the FOLDER mode.
3 Rotate the shuttle switch to select the desired album and press the button to confirm.
The first song of the selected album starts to playback. Playback continues in the order through to the last song and then stops.
Hint
- The play mode (page 27) does not change when ■■ (Jacket Search) is activated.
Changing the Play Mode (PLAY MODE)
The player offers a variety of play modes, including random play and selected repeat play.
PLAY MODE/SOUND button
Press the PLAY MODE/SOUND button repeatedly to select the desired play mode.
List of play modes
| Play mode type/Icon | Description |
| Normal/No icon | All transferred songs after the current song are played once, and then playback stops. (Default setting) |
| Folder/□ | All transferred songs of a sort category set by the song order (®, page 39), including the current song are played once, and then playback stops. |
| Repeat All (all repeat)/□ | All transferred songs after the current song are played repeatedly. |
| Repeat Folder (folder repeat)/□ | All transferred songs of a sort category set by the song order (®, page 39), including the current song are played repeatedly. |
| Repeat 1 Song (one song repeat)/□1 | The current song is played repeatedly. |
| Repeat Shuffle All (all song shuffle repeat)/SHUF | The current song is played, and then all transferred songs are played in random order. |
| Repeat Shuffle Folder (folder shuffle repeat)/SHUF | The current song is played, and then all transferred songs of a sort category set by the song order (®, page 39), including the current song are played in random order. |
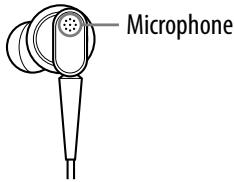
Reducing the Ambient Noise (Noise Canceling) (NW-S703F/S705F/S706F only)
The internal microphone of the headphones can catch the ambient noise. It reduces noise by outputting an antiphase sound against the noise.

Notes
-
You cannot use the Noise Canceling function when:
-
you are using headphones other than the supplied headphones.
-
playback stops.
-
you are monitoring the sound of a recording.
-
The setting screen for this function appears only when the supplied headphones are connected to the player.
- The following operation is only available while in the play or stop mode or using the FM tuner (NW-S703F/S705F/S706F only).
Press and hold the DISPLAY/HOME button until the HOME screen appears.
2 Rotate the shuttle switch to select (Noise Canceling) and press the button to confirm.
NC appears on the basic display, and the Noise Canceling function is set.
Hint
- You can adjust the effect of the Noise Canceling function. For details, see © page 38.
To set to off
Repeat the steps above when appears on the basic screen.
To return to the previous menu
Press the DISPLAY/HOME button.
Notes
- If the supplied headphones are not used properly, the Noise Canceling function may not work. To enjoy the better sound quality, adjust the earbuds' position to sit on your ears comfortably or push them into your ears so that they fit snugly.
- The Noise Canceling function mainly reduces the noise in the low frequency bands and has no effect against the noise in the high frequency bands. It has no effect on some sounds.
- Do not cover the microphone part of the headphones with your hands, etc., otherwise the Noise Canceling function may not work.
- The Noise Canceling function may not work properly depending on your way to use the headphones.
- You may hear a slight noise when the Noise Canceling function is active. This is operational noise of the Noise Canceling function and not a malfunction.
- You may feel the Noise Canceling function does not work or noise is louder in a quiet environment or depending on the noise. In this case, release the Noise Canceling function.
- Cellular phones may affect noise. In that case, keep the player away from cellular phones.
Setting the Sound Quality
You can set the sound quality according to the music genre, etc. There are two preset settings, either of which can be selected by the PLAY MODE/SOUND button during the play or stop mode.
Selecting the sound quality
Default settings
| Sound quality (Indication) | Sound 1 (▷ 1) | Sound 2 (▷ 2) | Sound OFF (None) |
| Clear Bass | +1 | +3 | 0 |
| Equalizer | Custom (0, 0, 0, 0, 0) | Custom (0, 0, 0, 0, 0) | Off |

PLAY MODE/SOUND button
Note
- You cannot select the sound quality setting while using the FM tuner (NW-S703F/S705F/S706F only).
Press and hold the PLAY MODE/SOUND button.
Each time the button is pressed, the sound quality setting is changed as follows:

To return to the normal sound quality
Select "None (Sound OFF)."
Changing the sound quality (Equalizer)
You can select a sound quality for Sound1 and Sound2 from "EQ Heavy," "EQ Pop," "EQ Jazz" or "EQ Unique." You can listen to music with your favorite sound quality by selecting and adjusting "EQ Custom".

Note
- You cannot change the sound quality while using the FM tuner (NW-S703F/S705F/ S706F only).
Press and hold the DISPLAY/HOME button until the HOME screen appears.
2 Rotate the shuttle switch to select (Settings) and press the button to confirm.
3 Rotate the shuttle switch to select "Sound>" and press the button to confirm.
Rotate the shuttle switch to select "Equalizer>" and press the button to confirm.
Rotate the shuttle switch to select "L Edit>" displayed under Sound 1 or Sound 2 to change, and press the button to confirm.
Rotate the shuttle switch to select the desired Equalizer setting (6 page 32) and press the button to confirm.
To return to the previous menu
Press the DISPLAY/HOME button.
List of Equalizer settings
| Setting item | Description |
| EQ OFF | Sound quality setting is not activated. (Default setting) |
| EQ Heavy | Emphasizes high and low ranges for a powerful sound. |
| EQ Pop | Stresses the middle range audio, ideal for vocals. |
| EQ Jazz | Emphasizes high and low ranges for a lively sound. |
| EQ Unique | Emphasizes high and low ranges, so that a small sound can be listened easily. |
| EQ Custom | User-customizable sound settings. See page 33 for setting. |
Notes
- If the sound quality setting you choose is distorted when you turn up the volume, turn it down.
- If your personal settings saved as "EQ Custom" seem to produce a different volume level than the other settings, you may have to adjust the volume manually to compensate.
Continued
Setting the EQ Custom values
You can preset the value of Clear Bass (4 phases) and 5 bands Equalizer (7 phases) to Sound1 or Sound2 of the sound quality setting as "EQ Custom".

Notes
- If the "EQ Custom" value is set in "Equalizer" of the Setting menu, the "EQ Custom" setting is applied to the sound.
- You cannot set the "EQ Custom" values while using the FM tuner (NW-S703F/S705F/S706F only).
Press and hold the DISPLAY/HOME button until the HOME screen appears.
2 Rotate the shuttle switch to select (Settings) and press the button to confirm.
3 Rotate the shuttle switch to select "Sound>" and press the button to confirm.
Rotate the shuttle switch to select "Equalizer>" and press the button to confirm.
Rotate the shuttle switch to select "L Edit>" displayed under Sound 1 or Sound 2 to change, and press the button to confirm.
Rotate the shuttle switch to select "L Edit>" displayed under "EQ Custom," and press the button to confirm.
The slider of "Clear Bass" appears highlighted.
7 Rotate the shuttle switch to set the Clear Bass value, and press the button to confirm.
The slider of the "Equalizer" value appears highlighted.
Rotate the shuttle switch to select the Equalizer value and press the button to confirm.
To return to the previous menu
Press the DISPLAY/HOME button.
Making the Sound More Vibrant (VPT)
You can select from “VPT Studio,” “VPT Live,” “VPT Club” or “VPT Arena” to make the sound even more vibrant.

Note
- This setting cannot be made while using the FM tuner (NW-S703F/S705F/S706F only).
Press and hold the DISPLAY/HOME button until the HOME screen appears.
2 Rotate the shuttle switch to select (Settings) and press the button to confirm.
3 Rotate the shuttle switch to select "Sound>" and press the button to confirm.
Rotate the shuttle switch to select "VPT>" and press the button to confirm.
Rotate the shuttle switch to select the desired VPT setting and press the button to confirm.
To return to the previous menu
Press the DISPLAY/HOME button.
List of VPT settings
| Setting item | Description |
| VPT OFF | VPT setting is not activated. (Default setting) |
| VPT Studio | Creates the sound of a studio. |
| VPT Live | Creates the sound of a concert hall. |
| VPT Club | Creates the sound of a club. |
| VPT Arena | Creates the sound of an arena. |
Listening with Clear Stereo Sound (Clear Stereo)
Clear Stereo enables individual left and right digital processing of the sound.
Notes
- This setting cannot be made while using the FM tuner (NW-S703F/S705F/S706F only).
- The Clear Stereo function is set to obtain maximum effect with the supplied headphones. The Clear Stereo effect may not be obtained with other headphones. In this case, set the Clear Stereo function to off.
Press and hold the DISPLAY/HOME button until the HOME screen appears.
2 Rotate the shuttle switch to select (Settings) and press the button to confirm.
Rotate the shuttle switch to select "Clear Stereo>" and press the button to confirm.
Rotate the shuttle switch to select the desired setting and press the button to confirm.
- Clear Stereo ON: Plays back clearly the sound from the right and left headphones. (Default setting)
- Clear Stereo OFF: Enables the Clear Stereo function and plays back normal sound.
To return to the previous menu
Press the DISPLAY/HOME button.
Adjusting the Volume Level (Dynamic Normalizer)
You can set to reduce the volume level between songs. With this setting, when listening to album songs in the shuffle play mode, the volume level between songs is moderated to minimize the difference in their recording levels.

Note
- You cannot adjust the volume level while using the FM tuner (NW-S703F/S705F/S706F only).
Rotate the shuttle switch to select desired setting and press the button to confirm.
Press and hold the DISPLAY/HOME button until the HOME screen appears.
2 Rotate the shuttle switch to select (Settings) and press the button to confirm.
Rotate the shuttle switch to select "Advanced Settings>" and press the button to confirm.
Rotate the shuttle switch to select "Dynamic Normalizer>" and press the button to confirm.
D. Normalizer ON: Minimizes the difference of the volume level between songs.
- D. Normalizer OFF: Plays back songs with its original volume level as transferred.
To return to the previous menu
Press the DISPLAY/HOME button.
Adjusting the Effect of the Noise Canceling Function (Noise Cancel Control) (NW-S703F/S705F/S706F only)
The player is designed to obtain the maximum effect of the Noise Canceling function (page 28), but you may be able to enhance the effect depending on your ear shape or usage environment, or by increasing (or decreasing) the sensitivity of the microphone installed in the headphones. You can adjust the microphone sensitivity by the Noise Cancel Control function. Adjust the function when the Noise Canceling effect is poor.

Notes
- This function is only available with the supplied headphones.
- The setting screen for this function appears only when the supplied headphones are connected to the player.
- The following operation is only available while in the play or stop mode or using the FM tuner (NW-S703F/S705F/S706F only). However, this function is not available while in the stop mode.
Press and hold the DISPLAY/HOME button until the HOME screen appears.
2 Rotate the shuttle switch to select (Settings) and press the button to confirm.
Rotate the shuttle switch to select "Advanced Settings>" and press the button to confirm.
Rotate the shuttle switch to select "Noise Cancel Control>" and press the button to confirm.
Rotate the shuttle switch to select the desired value and press the button to confirm.
Changing the Song Order (Sort)
You can set the song order by "Album order," "Albums by artist order," "Artist order," "Genre order" or "Release year order."

Press and hold the DISPLAY/HOME button until the HOME screen appears.
2 Rotate the shuttle switch to select (Settings) and press the button to confirm.
3 Rotate the shuttle switch to select "Sort>" and press the button to confirm.
Rotate the shuttle switch to select a song order (4 page 40) and press the button to confirm.
Slide the shuttle switch to the FOLDER mode, the song order appears as an icon.

Sorting status indication
To return to the previous menu
Press the DISPLAY/HOME button.
List of song order
| Setting item/Icon | Description |
| Sort Album (Album order)/ | Songs appear in album order. In the album, songs appear in song number order. In the FOLDER mode, songs are skipped by album. (Default setting) |
| Sort Artist/Album (Albums by artist order)/ | Songs appear in album order by artist. In the album, songs appear in song number order. In the FOLDER mode, songs are skipped by album. |
| Sort Artist (Artist order)/ | Songs appear in artist order. The same artist's songs appear in song number order for each album. In the FOLDER mode, songs are skipped by artist. |
| Sort Genre (Genre order)/ | Songs appear in artist order by genre. The same artist's songs appear in album order, and in the album, songs appear in song number order. In the FOLDER mode, songs are skipped by genre. |
| Sort Release Year (Release year order)/ | Songs appear in artist order by release year. The same artist's songs appear in song title order. In the FOLDER mode, songs are skipped by release year. |
Changing the Display Mode
You can change the desired display for the play or stop mode. Press the DISPLAY/HOME button to change the screen.
The following shows the screen types. You can select the screen to use from the setting menu in advance (G page 43).
- Basic: The basic display (Default setting)
- Property: Song information
- Displays the current play mode, the current category number/total category number of the play range, the current song number/total song number of the play range, Clear Stereo icon (page 36), VPT icon (page 35), codec (compression type), and bit rate.
- Changes according to the category set by the song order (page 39).

- Clock: Time information
- Displays the year, month, date, and current time. For information on setting the time, see “Setting the Current Time (Set Date-Time)” (page 50).
- Breath: Displays animations.

Hint
- Set the Power Save Mode setting (@ page 60) to "Save OFF" to show the screen constantly.
Notes
- When the Clear Stereo function (@ page 36) or VPT function (@ page 35) is set to "Clear Stereo OFF" or "VPT OFF," icons do not appear on the "Property" screen.
- When you press the DISPLAY/HOME button while using the FM tuner (NW-S703F/ S705F/S706F only) or Intelligent Shuffle, the current time appears for a specified duration. In this case, the display does not change to the one you set as Display Screen (page 43).
Continued
Changing the display mode
Press the DISPLAY/HOME button while in the play or stop mode.
Each press changes the display mode as follows:

Notes
- The diagram above shows the order when all display types are set to on (check mark applied) in the "Display Screen" menu (6 page 43). Display types set to off (no check mark) will not appear. All display types are set to on (check mark applied) at the default setting.
- When you press the DISPLAY/HOME button while using the FM tuner (NW-S703F/S705F/S706F only) or Intelligent Shuffle, the current time appears for a specified duration. In this case, the display does not change to the one you set as Display Screen (page 43).
Continued
Selecting the display types (Display Screen)
You can select whether or not to display the following screens: "Property," "Clock," and "Breath" when pressing the DISPLAY/HOME button. You can only view the screen which is set to on (check mark applied) in the "Display Screen" menu.
Press and hold the DISPLAY/HOME button until the HOME screen appears.
2 Rotate the shuttle switch to select (Settings) and press the button to confirm.
Rotate the shuttle switch to select "Display Screen>" and press the button to confirm.
Rotate the shuttle switch to select the desired display type and press the button to confirm.
If a check is already marked “ ”, the above steps will uncheck “ ”.
To return to the previous menu Press the DISPLAY/HOME button.
Setting the Jacket Picture Display ON/OFF (Jacket Mode)
You can display the album jacket picture after you register the album jacket picture and transfer songs from SonicStage. For details on registering the jacket picture, see SonicStage Help.

Notes
- If no jacket pictures have been registered, a preinstalled image in the player appears.
- Jacket pictures you register for playlists do not appear on the player.
Press and hold the DISPLAY/HOME button until the HOME screen appears.
2 Rotate the shuttle switch to select (Settings) and press the button to confirm.
Rotate the shuttle switch to select "Jacket Mode>" and press the button to confirm.
Rotate the shuttle switch to select the desired setting and press the button to confirm.
- Jacket Mode ON: Displays an album jacket picture. (Default setting)
- Jacket Mode OFF: Does not display an album jacket picture.
To return to the previous menu
Press the DISPLAY/HOME button.
Setting the Volume Level (Volume Mode)
There are 2 modes to adjust the volume level.
Manual Volume: Press the VOL + / - button to adjust the volume level from 0 to 30. Preset Volume: Press the VOL + / - button to select the volume level to any of 3 preset levels: "Low," "Mid," or "High."
Setting a Preset Volume (Preset Volume)
Press and hold the DISPLAY/HOME button until the HOME screen appears.
2 Rotate the shuttle switch to select (Settings) and press the button to confirm.
Rotate the shuttle switch to select "Advanced Settings>" and press the button to confirm.
Rotate the shuttle switch to select "Volume Mode>" and press the button to confirm.
Rotate the shuttle switch to select "Preset Volume" and press the button to confirm.
With this setting, you can select the volume level ("Low," "Mid," or "High") by pressing the VOL + / - button.
To return to the previous menu
Press the DISPLAY/HOME button.
Note
- If AVLS (page 48) is set, the actual volume may be lower than the settings. Releasing AVLS (AVLS OFF) returns the volume to the preset level.
Setting a Preset Volume value
Press and hold the DISPLAY/HOME button until the HOME screen appears.
2 Rotate the shuttle switch to select (Settings) and press the button to confirm.
Rotate the shuttle switch to select "Advanced Settings>" and press the button to confirm.
Rotate the shuttle switch to select "Volume Mode>" and press the button to confirm.
Rotate the shuttle switch to select "L Edit>" displayed under "Preset Volume" and press the button to confirm.
The "Low" value appears highlighted.
Rotate the shuttle switch to set each value for "Low," "Mid" or "High," and press the button to confirm.
With this setting, you can select the set value of the volume level ("Low", "Mid," or "High") by pressing the VOL +/- button.
To return to the previous menu
Press the DISPLAY/HOME button.
Note
- If AVLS (page 48) is set, the actual volume may be lower than the settings. Releasing AVLS (AVLS OFF) returns the volume to the preset level.
Setting to a Manual Volume (Manual Volume)
Press and hold the DISPLAY/HOME button until the HOME screen appears.
2 Rotate the shuttle switch to select (Settings) and press the button to confirm.
Rotate the shuttle switch to select "Advanced Settings>" and press the button to confirm.
Rotate the shuttle switch to select "Volume Mode>" and press the button to confirm.
Rotate the shuttle switch to select "Manual Volume" and press the button to confirm.
You can adjust the volume from 0 to 30 by pressing the VOL +/- button with this setting.
To return to the previous menu
Press the DISPLAY/HOME button.
Limiting the Volume (AVLS)
You can set AVLS (Automatic Volume Limiter System) to limit the maximum volume to prevent auditory disturbance or distraction. With AVLS, you can listen to music at a comfortable volume level.
"AVLS OFF" is set by default.

Press and hold the DISPLAY/HOME button until the HOME screen appears.
2 Rotate the shuttle switch to select (Settings) and press the button to confirm.
Rotate the shuttle switch to select "Advanced Settings>" and press the button to confirm.
Rotate the shuttle switch to select "AVLS>" and press the button to confirm.
Rotate the shuttle switch to select "AVLS ON" and press the button to confirm.
The volume is kept at a moderate level.
To set to off
Select "AVLS OFF" in step ⑤ and press the button.
To return to the previous menu
Press the DISPLAY/HOME button.

Hint
- "AVLS" appears by pressing the VOL + / - button if AVLS is set to "AVLS ON."
Turning Off the Beep Sound (Beep)
You can turn off the beep sounds of the player.
"Beep ON" is set by default.

Press and hold the DISPLAY/HOME button until the HOME screen appears.
2 Rotate the shuttle switch to select (Settings) and press the button to confirm.
Rotate the shuttle switch to select "Advanced Settings>" and press the button to confirm.
Rotate the shuttle switch to select "Beep>" and press the button to confirm.
Rotate the shuttle switch to select "Beep OFF" and press the button to confirm.
To change the setting to on
Select "Beep ON" in step ⑤ and press the button.
To return to the previous menu
Press the DISPLAY/HOME button.
Setting the Current Time (Set Date-Time)
You can set and display the current time.
There are 2 modes to adjust the current time.
Date-Time Automatic: You can set the date and time of the player to
synchronize with your computer automatically.
Date-Time Manual: You can set the date and time of the player manually.

Selecting the current time setting
Press and hold the DISPLAY/HOME button until the HOME screen appears.
2 Rotate the shuttle switch to select (Settings) and press the button to confirm.
Rotate the shuttle switch to select "Advanced Settings>" and press the button to confirm.
Rotate the shuttle switch to select "Date-Time>" and press the button to confirm.
Rotate the shuttle switch to select "Set Date-Time>" and press the button to confirm.
Rotate the shuttle switch to select the desired setting and press the button to confirm.
- Date-Time Automatic: Synchronizes the date and time of the player with your computer when connecting the player to your computer after starting the SonicStage software. (Default setting)
- Date-Time Manual: To set the date and time manually. For details, see "Setting the current time manually" ( page 52).
To return to the previous menu
Press the DISPLAY/HOME button.
To display the current time
Press the DISPLAY/HOME button repeatedly until "Clock" appears on the display during song playback or in the stop mode (page 41). However, when "Clock" is set to off in the "Display Screen" menu (page 43), you cannot display the current time by the procedure above.

Hint
- You can select the date format from among "year/month/day," "day/month/year," and "month/day/year." Furthermore, you can select the time format from either a 12 or 24 hour display. For details, see "Setting the Date Format (Date Disp Type)" (67 page 53), or "Setting the Time Format (Time Disp Type)" (67 page 54).
Notes
- If the player is not used for a long time, your settings for date and time may need to be reset.
- If the current time is not set and the display is set to "Clock" (page 41), "---" appears.
Continued
Setting the current time manually
To set the current time manually, select "Date-Time Manual" in the current time setting in advance (65 page 50).
Press and hold the DISPLAY/HOME button until the HOME screen appears.
2 Rotate the shuttle switch to select (Settings) and press the button to confirm.
Rotate the shuttle switch to select "Advanced Settings>" and press the button to confirm.
Rotate the shuttle switch to select "Date-Time>" and press the button to confirm.
Rotate the shuttle switch to select "Set Date-Time>" and press the button to confirm.
Rotate the shuttle switch to select "Date-Time Manual>" and press the button to confirm.
The year value appears highlighted.
Rotate the shuttle switch to adjust the year setting and press the button to confirm.
The month value appears highlighted.
As you did in step 7, adjust the settings for month, date, hour, and minute.
After rotating the shuttle switch to adjust the date and time setting, press the button to confirm.
To return to the previous menu
Press the DISPLAY/HOME button.
Setting the Date Format (Date Disp Type)
You can select the date format displayed for the current time (page 41) from among "year/month/day," "day/month/year," and "month/day/year."

Press and hold the DISPLAY/HOME button until the HOME screen appears.
2 Rotate the shuttle switch to select (Settings) and press the button to confirm.
Rotate the shuttle switch to select "Advanced Settings>" and press the button to confirm.
Rotate the shuttle switch to select "Date-Time>" and press the button to confirm.
Rotate the shuttle switch to select "Date Disp Type>" and press the button to confirm.
Rotate the shuttle switch to select the desired format and press the button to confirm.
You can select the date from the following 3 types.
- Date yy/mm/dd: The date appears as "year/month/day." (Default setting)
- Date dd/mm/yy: The date appears as "day/month/year."
- Date mm/dd/yy: The date appears as "month/day/year."
To return to the previous menu
Press the DISPLAY/HOME button.
Setting the Time Format (Time Disp Type)
You can select the time format displayed for the current time ( page 41) from either a “12 h” or “24 h” display.

Press and hold the DISPLAY/HOME button until the HOME screen appears.
2 Rotate the shuttle switch to select (Settings) and press the button to confirm.
Rotate the shuttle switch to select "Advanced Settings>" and press the button to confirm.
Rotate the shuttle switch to select "Date-Time>" and press the button to confirm.
Rotate the shuttle switch to select "Time Disp Type>" and press the button to confirm.
Rotate the shuttle switch to select the desired setting and press the button to confirm.
- Time 12h: Displays the current time in 12 hours.
- Time 24h: Displays the current time in 24 hours. (Default setting)
To return to the previous menu
Press the DISPLAY/HOME button.
Displaying the Player Information (Information)
Information such as product name, built-in flash memory capacity, serial number, and firmware or WM-PORT version can be shown.

Press and hold the DISPLAY/HOME button until the HOME screen appears.
2 Rotate the shuttle switch to select (Settings) and press the button to confirm.
Rotate the shuttle switch to select "Advanced Settings>" and press the button to confirm.
Rotate the shuttle switch to select "Information>" and press the button to confirm.
Rotate the shuttle switch to show the following information.
1: product name
2: built-in flash memory capacity
3: serial number
4: version information for the player's firmware
5: version information for WM-PORT
Press and hold the DISPLAY/HOME button until the display changes.
To return to the previous menu
Press the DISPLAY/HOME button.
Resetting to Factory Settings (Reset All Settings)
You can reset the player to the default settings. Resetting the player does not delete the music songs you have transferred to the player.

Note
- This function is only available in the stop mode.
Rotate the shuttle switch to select "OK" and press the button to confirm.
Press and hold the DISPLAY/HOME button in the stop mode until the HOME screen appears.
2 Rotate the shuttle switch to select (Settings) and press the button to confirm.
Rotate the shuttle switch to select "Advanced Settings>" and press the button to confirm.
Rotate the shuttle switch to select "Initialize>" and press the button to confirm.
Rotate the shuttle switch to select "Reset All Settings>" and press the button to confirm.
When resetting is completed, "COMPLETE" appears.
To cancel restoration of factory settings
Select "Cancel" in step ⑥ and press the button.
To return to the previous menu
Press the DISPLAY/HOME button.
Formatting Memory (Format)
You can format the built-in flash memory of the player.
If the memory is formatted, all music data, other stored data and registered jacket pictures will be erased. Be sure to verify the data stored in memory prior to formatting and export any necessary data to SonicStage or the hard disk of your computer.

Note
- This function is only available in the stop mode.
Press and hold the DISPLAY/HOME button in the stop mode until the HOME screen appears.
2 Rotate the shuttle switch to select (Settings) and press the button to confirm.
Rotate the shuttle switch to select "Advanced Settings>" and press the button to confirm.
Rotate the shuttle switch to select "Initialize>" and press the button to confirm.
Rotate the shuttle switch to select "Format>" and press the button to confirm.
Rotate the shuttle switch to select "OK" and press the button to confirm.
"FORMATTING..." appears and formatting starts.
When formatting is completed, "COMPLETE" appears.
To cancel formatting
Select "Cancel" in step ⑥ and press the button.
To return to the previous menu
Press the DISPLAY/HOME button.
Note
- Do not format the built-in flash memory of the player using Windows Explorer.
Changing the USB Connection Setting
(USB Bus Powered)
Depending on how you are using the computer, if the power supply (USB Bus Power) is insufficient, incomplete data transfer may occur from the computer to the player. In this case, setting the USB connection (USB Bus Powered) to "Low-Power100mA" may improve data transfer.
Note
- You cannot set this during the USB connection.
Press and hold the DISPLAY/HOME button until the HOME screen appears.
2 Rotate the shuttle switch to select (Settings) and press the button to confirm.
Rotate the shuttle switch to select "Advanced Settings>" and press the button to confirm.
Rotate the shuttle switch to select "USB Bus Powered>" and press the button to confirm.
Rotate the shuttle switch to select the desired setting and press the button to confirm.
- Low-Power100mA: Sets the power rating from computer to 100mA.
- High-Power500mA: Sets the power rating from computer to 500mA. (Default setting)
To return to the previous menu
Press the DISPLAY/HOME button.

Hints
- When you connect the player to a laptop computer, we recommend to connect the laptop computer to a power supply.
- The charging time will be longer if the "USB Bus Powered" is set to "Low-Power100mA."
Setting to the Power Save Screen (Power Save Mode)
The screen changes to the power save screen when the player is not operated for about 15 seconds.

Press and hold the DISPLAY/HOME button until the HOME screen appears.
2 Rotate the shuttle switch to select (Settings) and press the button to confirm.
Rotate the shuttle switch to select "Advanced Settings>" and press the button to confirm.
Rotate the shuttle switch to select "Power Save Mode>" and press the button to confirm.
Rotate the shuttle switch to select the power save setting and press the button to confirm.
To return to the previous menu
Press the DISPLAY/HOME button.
Lists of the power save setting
| Setting item | Description |
| Save ON Normal | The power save screen appears in the display when no operation is performed for about 15 seconds. (Default setting) |
| Save ON Super | The screen disappears when no operation is performed for about 15 seconds. This setting uses the least battery consumption. |
| Save OFF | The icon(s) or letter(s) appears in the display constantly during playback or FM reception (NW-S703F/S705F/S706F only). |
Enjoy Listening to FM Radio
You can listen to FM radio. Charge the built-in rechargeable battery before using the player (6 page 78), and connect the headphones to the headphone jack.
Note
- When you press the DISPLAY/HOME button while using the FM tuner, the current time appears for a specified duration.
1 Switching to the FM tuner

Press and hold the DISPLAY/HOME button until the HOME screen appears.
2 Rotate the shuttle switch to select FM (FM) and press the button to confirm.
The FM tuner screen appears.
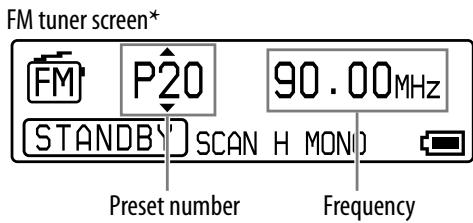
- The illustrated FM tuner screen may be different from your model.
To stop the FM tuner and return to the audio player
Press and hold the DISPLAY/HOME button until the HOME screen appears, and then select (All Songs), ( Playlist Select), (Intelligent Shuffle) or (Rec Data) from the menu screen and press the button to play back. If there are no songs in the playlist or recorded date, select (All Songs).
To turn off the volume of the FM tuner briefly
By pressing the button, FM tuner sound is not output. The FM tuner enters the Sleep status after a few seconds and the display goes off. By pressing the button again, the FM tuner sound is output again.
Note
- When you rotate the shuffle switch to (▶▶) while the player is in the Sleep status, the previous (or next) preset number or frequency is selected. At that time, the sound is not output, regardless of the VOL +/- button.
2 Presetting broadcast stations automatically (FM Auto Preset)
You can preset receivable broadcast stations (up to 30 stations) in your area automatically by selecting "FM Auto Preset." When you use the FM tuner for the first time, or when you move to a new area, we recommend to preset receivable broadcast stations by selecting "FM Auto Preset."

Note
- The "FM Auto Preset" operation will delete already preset broadcast stations.
Press and hold the DISPLAY/HOME button until the HOME screen appears.
2 Rotate the shuttle switch to select (Settings) and press the button to confirm.
Rotate the shuttle switch to select "FM Auto Preset>" and press the button to confirm.
Rotate the shuttle switch to select "OK" and press the button to confirm.
The receivable broadcast stations will be preset in order from low to high frequency.
"COMPLETE" appears when presetting is completed, then the first preset station is received.
To stop the automatic presetting
Select "Cancel" in step 4 and press the button.
To return to the previous menu
Press the DISPLAY/HOME button.
If several unnecessary stations are received
If interference is prevalent or reception is too sensitive, change the reception setting (F page 66) to "Scan Sens Low."
3 Selecting broadcast stations
There are 2 ways (manual or preset tuning) to select broadcast stations.

Slide the shuttle switch to enter the manual tuning mode. Slide back the shuttle switch to the normal position to enter the preset tuning mode.
- Manual Tuning
In the manual tuning mode, you can select broadcast stations by frequency.
- Preset Tuning
In the preset tuning mode, you can select broadcast stations by preset number.
Manual Tuning
Frequency appears with and above and below.
| To | Operation |
| Select the previous frequency | Rotate the shuttle switch to ↓▲ briefly. |
| Select the next frequency | Rotate the shuttle switch to ▷▲ briefly. |
| Select the previous receivable broadcast station* | Rotate and hold the shuttle switch to ↓▲. |
| Select the next receivable broadcast station* | Rotate and hold the shuttle switch to ▷▲. |
- By rotating and holding the shuttle switch to | | | | | | | | | | | | | | | | | | | | | | | | | | | | | | | | | | 1 | | | | | | | during FM reception, the previous (or next) broadcast station is found. If the broadcast station is receivable, the reception is accepted.
If interference is prevalent or reception is too sensitive, change the reception setting (page 66) to "Scan Sens Low."
If you rotate the shuttle switch to ( ) in the Sleep status, the frequency decreases (or increases), and the previous (or next) broadcast station is not found and sound is not output.
Preset Tuning
Preset number appears with and above and below.
| To | Operation |
| Select the previous preset number | Rotate the shuttle switch to ↓← briefly. |
| Select the next preset number | Rotate the shuttle switch to ▷→1 briefly. |
Note
- You cannot select broadcast stations if no preset stations are entered. Preset the receivable stations using "FM Auto Preset" (page 62).

Improving the reception
- The headphones cord serves as the antenna, so extend it as far as possible.
Presetting Desired Broadcast Stations
You can preset broadcast stations that "FM Auto Preset" misses (page 62).
1 Select the desired frequency by the manual tuning mode (6 page 63).
Press and hold the button.
The frequency you select in step ① is preset and the preset number appears to the left of the frequency.

Hint
- You can preset up to 30 stations (P01 to P30).
Note
- The preset number is always sorted from low to high frequency order.
Deleting preset broadcast stations
1 Select the preset number of the frequency to delete.
Press and hold the button.
3 Rotate the shuttle switch to select "OK" and press the button to confirm.
The preset broadcast station is deleted and the next one appears.
To cancel deletion of the preset broadcast station
Select "Cancel" in step ③ and press the button.
Setting the Reception (Scan Sens)
When you set the "FM Auto Preset" (6 page 62) or "Manual Tuning" (6 page 63), it may receive many unnecessary broadcast stations because the reception is too sensitive. In this case, set the reception to "Scan Sens Low." "Scan Sens High" is set by default.

Press and hold the DISPLAY/HOME button until the HOME screen appears.
2 Rotate the shuttle switch to select (Settings) and press the button to confirm.
Rotate the shuttle switch to select "Scan Sens>" and press the button to confirm.
Rotate the shuttle switch to select "Scan Sens Low" and press the button to confirm.
To set back the reception
Select "Scan Sens High" in step 4 and press the button.
To return to the previous menu
Press the DISPLAY/HOME button.
Changing the Monaural/Stereo (Mono/Auto)
If noise occurs during FM reception, set to "Mono" for monaural. If you set to "Auto," stereo/monaural reception is automatically set, depending on reception conditions. "Auto" is set by default.

Press and hold the DISPLAY/HOME button until the HOME screen appears.
2 Rotate the shuttle switch to select (Settings) and press the button to confirm.
Rotate the shuttle switch to select "Mono/Auto>" and press the button to confirm.
Rotate the shuttle switch to select "Mono" and press the button to confirm.
To return to the automatic setting
Select "Auto" in step 4 and press the button.
To return to the previous menu
Press the DISPLAY/HOME button.
Recording (Rec)
You can record songs on the player without using the computer by connecting the player and the audio device with the optional accessory for recording with the player. A cradle (BCR-NWU3) and recording cable (WMC-NWR1) are available for the player as optional accessories.
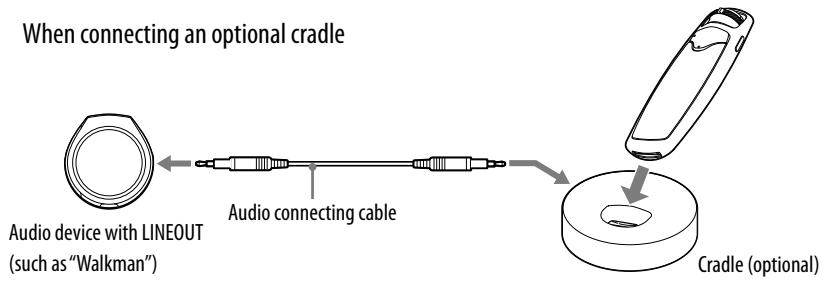
* Depending on the country/region in which you have purchased the player, some optional accessories may not be available.
Connect the audio device to the optional accessory for recording with the player.
For details, see the operation guide supplied with the optional accessories for recording with the player.
Connect the player to the optional accessory for recording with the player.
Press and hold the DISPLAY/HOME button until the HOME screen appears.
Rotate the shuttle switch to select (Rec) and press the button to confirm.
The player enters the record standby mode, so that you can monitor the source sound by the supplied headphones. You can also adjust the monitor sound level with the VOL +/- button, but it does not affect to the recording sound level.
An animation appears while calculating the recording remaining time. No operation will be available while an animation appears.

Press the button of the player, and then start playing the audio device.
When the synchronized recording is set, recording starts automatically when the player detects sound from the audio device.
If no sound is detected, the player pauses recording, and when the player detects sound again, it starts recording sound as the next song.
If no sound is detected more than 5 minutes, the player enters the recording standby mode.
The recorded song names are labeled as "NNN_hhmm" (serial number_hour/minute), and folder names are labeled as "NN_mmdd" (serial number_month/day). When the current time is not set on the player, "NNN_0000" (serial number_0000) appears. Setting the current time is recommended (page 50).
To stop recording
Press the button.
If the synchronized recording is set to disable
Press the button to start recording in step ⑤. The player does not detect sound from the audio device.
Press the button to stop recording.

Hints
- To enable/disable the synchronized recording setting, see "Changing the Synchronized Recording Settings" (page 71).
- To switch to the recording remaining time screen, press the DISPLAY/HOME button.
Notes
- 2 GB is the maximum recording capacity for a song. If a song is more than 2 GB, the part after 2 GB will be recorded as the next song.
- You may not be able to record with the proper sound quality, depending on the audio output level from the audio device. In case of an accessory with a record level shift switch, you may be able to achieve the proper recording level by adjusting the record level shift switch.
For details, see the operation guide supplied with the optional accessories for recording with the player.
Setting the Bit Rate for the Songs to Record (Rec Mode)
You can select the bit rate for the songs to record.

Note
- The recording function will be displayed when connected to the optional accessories for recording with the player.
1 Follow steps 1 to 4 in "Recording" (page 68), and then the player enters the record standby mode.
Press and hold the DISPLAY/HOME button until the HOME screen appears.
3 Rotate the shuttle switch to select (Settings) and press the button to confirm.
Rotate the shuttle switch to select "Rec Mode>" and press the button to confirm.
Rotate the shuttle switch to select the desired bit rate and press the button to confirm.
To return to the previous menu
Press the DISPLAY/HOME button.
Lists of the bit rate setting
| Setting item | Description |
| ATRAC 256kbps | Records with ATRAC 256 kbps. |
| ATRAC 128kbps | Records with ATRAC 128 kbps. (Default setting) |
| ATRAC 64kbps | Records with ATRAC 64 kbps. |
| PCM | Records with Linear-PCM 1,411 kbps. |
Changing the Synchronized Recording Settings (Sync Rec)
You can select the synchronized recording settings. If no sound* continues during recording for more than 2 seconds, the player pauses recording automatically, and when the sound comes again, recording starts.
- No sound means less than about 4.8mV input level on this player.

Note
- The recording function will be displayed when connected to the optional accessories for recording with the player.
1 Follow steps 1 to 4 in "Recording" (page 68), and then the player enters the record standby mode.
Press and hold the DISPLAY/HOME button until the HOME screen appears.
Rotate the shuttle switch to select (Settings) and press the button to confirm.
Rotate the shuttle switch to select "Sync Rec>" and press the button to confirm.
Rotate the shuttle switch to select the desired setting and press the button to confirm.
- Sync Rec ON: Enable synchronized recording. (Default setting)
- Sync Rec OFF : Disable synchronized recording.
To return to the previous menu
Press the DISPLAY/HOME button.
Playing the Recorded Songs (Rec Data)
Play back songs recorded by the player.

Note
- Sort (G page 39), Q (Search) (G page 21), ■ (Jacket Search) (G page 26) and F (Intelligent Shuffle) (G page 17) are not available for recorded songs. These functions can be available if you export recorded songs to SonicStage and then transfer them back to the player. For details, see SonicStage Help.
Press and hold the DISPLAY/HOME button until the HOME screen appears.
2 Rotate the shuttle switch to select (Rec Data) and press the button to confirm.
The first song starts to play back according to the selected play mode (page 73).
To skip to the beginning of the song
By rotating the shuttle switch to ( ) briefly while in the play or stop mode, the player skips to the beginning of the current (or next) song. If the shuttle switch is slipped, and then rotated to ( ) briefly while in the play or stop mode, the player skips to the beginning of the first song of the current (or next) folder.
To return to the previous menu
Press the DISPLAY/HOME button.
Changing the Play Mode of Recorded Songs (PLAY MODE)
The player offers a variety of play modes, including random play and selected repeat play. It is not possible to play back songs continuously with songs transferred to the player.
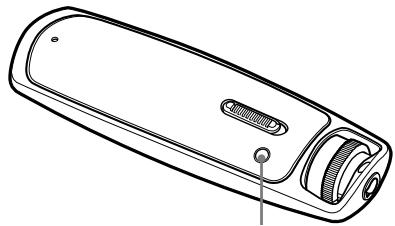
PLAY MODE/SOUND button
Press the PLAY MODE/SOUND button repeatedly to select the desired play mode.
List of play modes
| Play mode type/Icon | Description |
| Normal/No icon | All recorded songs from the current song are played once, and then playback stops. (Default setting) |
| Folder/□ | All songs in a folder including the current song are played once, and then playback stops. |
| Repeat All (all repeat)/□ | All recorded songs from the current song are played repeatedly. |
| Repeat Folder (folder repeat)/□ | All songs in a folder including the current song are played repeatedly. |
| Repeat 1 Song (one song repeat)/□1 | The current song is played repeatedly. |
| Repeat Shuffle All (all song shuffle repeat)/□SHUF | The current song is played, and then all recorded songs are played in random order. |
| Repeat Shuffle Folder (folder shuffle repeat)/□SHUF | The current song is played, and then all songs in a folder including the current song are played in random order. |
Deleting the Recorded Songs
You can delete songs recorded by the player. Only songs recorded by the player can be deleted. When you delete songs recorded by the player, you cannot restore them again. Be careful when you delete songs.

Deleting recorded songs (Delete 1 Track)
Press the button while playing the song to be deleted.
Press and hold the DISPLAY/HOME button until the HOME screen appears.
3 Rotate the shuttle switch to select (Settings) and press the button to confirm.
Rotate the shuttle switch to select "Delete Rec Data>" and press the button to confirm.
Rotate the shuttle switch to select "Delete 1 Track" and press the button to confirm.
The song to be deleted starts playing back for confirmation.
Rotate the shuttle switch to select "OK" and press the button to confirm.
"COMPLETE" appears after the song is deleted.
Note
- When you select "Delete 1 Track" and delete all songs in a folder, the folder will be erased automatically.
To stop deleting song
Select "Cancel" in step ⑥ and press the button.
To return to the previous menu
Press the DISPLAY/HOME button.
Continued
Deleting the recorded folder (Delete Folder)
Note
- It may take time to complete deleting in the case of many songs.
Press the button while playing the song in the folder to be deleted.
Press and hold the DISPLAY/HOME button until the HOME screen appears.
3 Rotate the shuttle switch to select (Settings) and press the button to confirm.
Rotate the shuttle switch to select "Delete Rec Data>" and press the button to confirm.
Rotate the shuttle switch to select "Delete Folder" and press the button to confirm.
Rotate the shuttle switch to select "OK" and press the button to confirm.
"COMPLETE" appears after the song is deleted.
To stop deleting album
Select "Cancel" in step ⑥ and press the button.
To return to the previous menu
Press the DISPLAY/HOME button.
Continued
Deleting all recorded songs (Delete All Rec Data)
Note
- It may take time to complete deleting in the case of many songs.
Press the button while playing the recorded song.
Press and hold the DISPLAY/HOME button until the HOME screen appears.
3 Rotate the shuttle switch to select (Settings) and press the button to confirm.
Rotate the shuttle switch to select "Delete Rec Data>" and press the button to confirm.
Rotate the shuttle switch to select "Delete All Rec Data" and press the button to confirm.
Rotate the shuttle switch to select "OK" and press the button to confirm.
"COMPLETE" appears after the song is deleted.
To stop deleting songs
Select "Cancel" in step ⑥ and press the button.
To return to the previous menu
Press the DISPLAY/HOME button.
Recharging the Player
The player is rechargeable when connected to a computer
When you connect the player to your computer, use the supplied USB cable. When the remaining battery indication of the display shows: Full, charging is completed (charging time is approx. 120 minutes*).
When you use the player for the first time, or if you have not used the player for a long time, recharge it fully (to Full in the remaining battery indication of the display).
- This is the approximate charging time when the battery power is low and the "USB Bus Powered" setting (® page 59) is "High-Power500mA" under room temperature. The charging time will vary depending on remaining battery power and battery condition. If the battery is charged in a low-temperature environment, the charging time will be longer. It will also be longer if you transfer audio file(s) to the player while charging.
On the remaining battery indication
The battery icon in the display (F page 11) changes as shown below. See F page 110 on battery duration.

The battery power gets low as shown in the battery icon. If "LOW BATTERY" appears, you cannot play back with the player. In this case, charge the battery by connecting to your computer.
Notes
- Charge the battery in an ambient temperature of between 5 to 35^ (41 to 95^ ).
- "DATA ACCESS" appears in the display while the player accesses the computer. Do not disconnect the player while "DATA ACCESS" appears or the data being transferred may be destroyed.
- Some USB devices connected to the computer may interfere with the proper operation of the player.
- The control buttons on the player are all disabled while it is connected to a computer.
Maximizing Battery Life
By following a few simple guidelines, you can extend the playing time available from a battery charge.
Screen display auto-off
Setting the display to turn off after a certain period of time of not using the player (approx. 15 seconds), can help to save battery power.
See "Setting to the Power Save Screen (Power Save Mode)" (6 page 60) for the setting method.
Adjust song format and bit rate
The playing time varies, as battery charge can be affected by the format and bit rate of the audio files that are played.
For example, a full battery charge offers about 50 hours of playing time for songs in ATRAC format at 132 kbps, but only about 40 hours for songs in WMA format at 128 kbps (For NW-S603/S605, or when the Noise Canceling function is set to "OFF" for NW-S703F/S705F/S706F). For details, see "Battery life (continuous playback)" (page 110). The exact playing time available from a full charge varies with the operating conditions and environment of the player.
To enter the Sleep status
If you press the button to stop playback or receiving an FM broadcast (NW-S703F/S705F/S706F only), the display disappears and the player enters the Sleep status automatically after a few seconds. The batteries are consumed a little in the Sleep status.
Note
- Do not leave the player connected for extended periods to a laptop computer that is not connected to AC power, because the player may discharge the computer's battery.
What are Format and Bit Rate?
What is format?
The format of a song refers to the method used by SonicStage to store the song's audio information when songs are imported to SonicStage from the Internet or audio CDs.
Common formats include MP3, WMA and ATRAC, etc.
MP3: MP3 (MPEG-1 Audio Layer3) is a common audio compression technology developed by the MPEG working group of the ISO (International Organization for Standardization).
MP3 can compress audio files to about 1/10 the size of standard CD audio files.
WMA: WMA (Windows Media Audio) is a common audio compression technology developed by Microsoft Corporation. The WMA format produces the same sound quality as that of the MP3 format with smaller file size.
ATRAC: ATRAC (Adaptive Transform Acoustic Coding) is a general term used to refer to ATRAC3, ATRAC3plus and ATRAC Advanced Lossless formats. ATRAC3 is an audio compression technology that satisfies the demand for both high sound quality and high compression rates. ATRAC3 can compress audio files to about 1/10 the size of standard CD audio files. ATRAC3plus, a more advanced version of ATRAC3, can compress audio files to about 1/20 the size of standard CD audio files.
"ATRAC Advanced Lossless" is an audio compression technology for recording without deterioration. To maintain playback compatibility with conventional devices, this technology records data by compressing CD music data to approximately 30 - 80% * of its original size in combination with audio compression technology "ATRAC3" or "ATRAC3plus."
- Compression rate depends on song.
AAC: AAC (Advanced Audio Coding) is a common audio compression technology developed by the MPEG working group of the ISO (International Organization for Standardization). The AAC format produces the same sound quality as that of the MP3 format, with a smaller file size.
Linear-PCM: Linear-PCM is an audio recording format without digital compression. You can listen to the sound with the same quality as CD music by recording with this format.
What is bit rate?
Bit rate refers to the amount of data used to store each second of audio. Generally, higher bit rates provide better sound quality, but require more storage space for the same length of audio.
What is the relationship between bit rate, sound quality, and storage size?
Generally, higher bit rates provide better sound quality, but require more storage space for the same length of audio, so you can store fewer songs on the player. Lower bit rates enable you to store more songs, but at a lower sound quality. For details on supported audio formats and bit rate, see pages 108 and 109.
Note
- If you import a song from a CD to SonicStage at a low bit rate, you cannot improve the song's sound quality by selecting a high bit rate when transferring the song from SonicStage to the player.
Playing Songs without Pauses
If you import songs to SonicStage in ATRAC* format and transfer them to the player, you can play them on the player continuously, without pauses between the songs.
For example, an album that includes a long recording of a live performance with no pauses between songs can be played continuously without pauses after the songs are imported to SonicStage in ATRAC* format and then transferred to the player.
Note
-
For songs to be played without pauses, you must import all the songs on a single album without pauses at one time to the SonicStage software in the same ATRAC* format.
-
Except ATRAC Advanced Lossless.
How is Song Information Imported to the Player?
When you import CD songs into SonicStage, SonicStage automatically retrieves information about the songs (such as album title, artist name, and song name) from a CD database service (CDDB, the Gracenote CD DataBase) on the Internet at no charge. When songs are transferred to the player, this song information is transferred along with the songs.
Having this information attached to your songs makes possible various advanced searching features of the player.
Note
- Song information of some CDs may not be able to retrieved from the Internet. For songs that are not in the Internet database, you can manually enter and edit song information in SonicStage. For details on editing song information, see SonicStage Help.
Storing Data Other than Audio Files
You can store computer data into the built-in flash memory of the player by transferring it from your computer with Windows Explorer. If the player is connected to the computer, the built-in flash memory appears in Windows Explorer as a removable storage drive.
Notes
- Do not use SonicStage while using Windows Explorer to interact with the built-in flash memory of the player.
- Always use SonicStage to transfer audio files that you want to play to the player. Audio files transferred with Windows Explorer cannot be played by the player.
- Do not disconnect the supplied USB cable while transferring data between a computer and the player because the data being transferred could be damaged.
- Do not format the built-in flash memory using Windows Explorer. If you format the built-in flash memory, format it using the "Format" menu of the player (6 page 57).
Upgrading the Player's Firmware
You can update the player's firmware, ensuring you to add new features for the player by installing the latest player's firmware to the player. For details about the latest firmware information and how to install it, visit the following web site:
For customers in the USA: http://www.sony.com/walkmansupport
For customers in Canada: http://www.sony.ca/ElectronicsSupport/
For customers in Europe: http://www.support-nwwalkman.com
For customers in Latin America: http://www.sony-latin.com/pa/info/
For customers in other countries/regions: http://www.css.ap.sony.com
For customers who purchased the overseas models: http://www.sony.co.jp/overseas/support/
1 Download the update program to your computer from the web site.
Connect the player to your computer, and then start up the update program.
3 Follow the on-screen instructions to update the player's firmware.
Firmware update is complete.
Troubleshooting
If the player does not function as expected, try the following steps to resolve the issue.
1 Press the RESET button with a small pin, etc.
All the songs and settings stored on the player will not be erased even when you reset it.
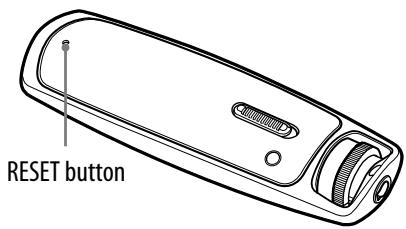
2 Find the symptoms of the issue in the following troubleshooting tables, and try any corrective actions listed.
3 Check for information about the issue in SonicStage Help.
4 Look for information about the issue on one of the support Web sites.
For customers in the USA, visit: http://www.sony.com/walkmansupport
For customers in Canada, visit: http://www.sony.ca/ElectronicsSupport/
For customers in Europe, visit: http://www/support-nwwalkman.com
For customers in Latin America, visit: http://www.sony-latin.com/pa/info/
For customers in other countries/regions, visit: http://www.css.ap.sony.com
For customers who purchased the overseas models, visit:
http://www.sony.co.jp/overseas/support/
5 If the approaches listed above fail to resolve the issue, consult your nearest Sony dealer.
Operation
| Symptom | Cause/Remedy |
| There is no sound. | The volume level is set to zero. → Turn the volume up (⓷ page 8). The headphone jack is not connected properly. → Connect the headphone jack properly (⓹ page 10). The headphone plug is dirty. → Clean the headphone plug with a soft dry cloth. No audio files are stored in the built-in flash memory. → If “NO DATA” appears, transfer audio file(s) from the computer. |
| Noise is generated. | • Noise Canceling is set in a quiet place. → Noise tends to be more noticeable in a quiet place or depending on the noise type. Release Noise Canceling (® page 28). Furthermore, headphones supplied with NW-S703F/S705F/S706F are designed for fairly high sensitivity to maximize the effectiveness of Noise Canceling in noisy places such as outside or in the train. For this, you may hear White noise in a quiet place even if you release Noise Canceling. • An apparatus emitting radio signals, such as a mobile phone is being used near the player. → When using such apparatus as mobile phones, keep them away from the player. |
| Noise Canceling function is not effective. | • Headphones do not fit correctly. → Adjust headphones to fit your ears (® page 29). • The player is in the stop mode. → The Noise Canceling function is only available while in the play mode or receiving FM. • The player is used in a quiet place. → The Noise Canceling function may not be effective in a quiet place or depending on the noise type. |
| VPT setting or Clear Stereo function is not effective. | • When outputting to external audio speakers using the optional cradle, VPT settings and Clear Stereo function may not be effective because the player is designed for compatible headphones only. This is not a malfunction. |
| Buttons do not work. | • The HOLD switch is set to the HOLD position. → Slide the HOLD switch to the opposite position (® page 10). • The player contains moisture condensation. → Wait a few hours to let the player dry. • The remaining battery is low or insufficient. → Charge the battery connecting to the computer (® page 78). → Even if charging the battery and nothing is changed, press the RESET button to reset the player (® page 86). |
| The player does not work. | • The remaining battery is insufficient. → Charge the battery connecting to the computer (® page 78). → Even if charging the battery and nothing is changed, press the RESET button to reset the player (® page 86). |
| The transferred songs cannot be found. | • The built-in flash memory of the player was formatted using Windows Explorer. → Format the built-in flash memory using the “Format” menu of the player (® page 57). • The supplied USB cable is disconnected from the player while data is being transferred. → Transfer usable files back to your computer and format the built-in flash memory using the “Format” menu of the player (® page 57). |
| The volume is not loud enough. | ·AVLS is enabled. → Disable AVLS (® page 48). |
| There is no sound from right channel of the headphones. Or right channel sound is heard from both sides of the headphones. | ·The headphone jack is not fully inserted. → If the headphones are not connected correctly, sound will not be output properly. Connect the headphones into the jack until it clicks (® page 10). |
| Playback has stopped suddenly. | ·The remaining battery is insufficient. → Charge the battery connecting to the computer (® page 78). |
| The player cannot format. | ·Remaining battery power is insufficient or exhausted. → Charge the battery fully. |
Display
| Symptom | Cause/Remedy |
| “□” appears for a title. | ● Characters that cannot appear on the player are involved. → Use the supplied SonicStage to rename the title with appropriate characters. |
Charging the battery
| Symptom | Cause/Remedy |
| Battery life is short. | ·The operating temperature is below 5 °C (41 °F). → Battery life becomes shorter due to the battery characteristics. This is not malfunction. ·Battery charging time is not enough. → Charge the battery longer if the USB connection (USB Bus Powered) is set to “Low-Power100mA” (® page 59). ·By adjusting the settings or managing the power supply properly, it is possible to save the battery power and use the player for a longer time (® page 79). ·The battery is required to be replaced. → Consult your nearest Sony dealer. |
| The player cannot charge the battery. | ·The USB cable is not connected to a USB port on your computer properly. → Disconnect the USB cable, and then reconnect it. → Use the supplied USB cable. ·The battery is charged in an ambient temperature out of the range 5 °C (41 °F) to 35 °C (95 °F). → Charge the battery in an ambient temperature of 5 °C (41 °F) to 35 °C (95 °F). |
Connection with the computer/SonicStage
| Symptom | Cause/Remedy |
| The SonicStage software cannot be installed. | ·The computer's operating system software is not compatible with SonicStage. →See the system requirements (®page 111). ·All Windows applications are not closed. →If you start the installation while other programs are running, an error may occur. This is especially true for programs that require significant system resources, such as virus-protection software. ·There is not enough free space on the hard disk of your computer. →You need 200 MB or more of free space. Delete any unnecessary files on your computer. ·You are not logged on as an “Administrator.” →If you are not logged on as an “Administrator,” the installation of SonicStage might fail. Make sure that you are logged on using an account with “Administrator” privileges. |
| The progress bar on the display of your computer is not moving when installing. The access lamp of your computer has not lit for a few minutes. | ·The installation is progressing normally. Please wait. The installation may take 30 minutes or more, depending on your system environment. |
| SonicStage does not start up. | ·Your computer's system environment has changed, perhaps due to an update of the Windows operating system. |
Continued
Connection with the computer/SonicStage (continued)
| Symptom | Cause/Remedy |
| “USB CONNECT” does not appear when connected to the computer with the supplied USB cable. | ·The USB cable is not connected to a USB port on your computer properly. →Disconnect the USB cable, and then reconnect it. →Use the supplied USB cable. ·A USB hub is being used. →Connecting the player via a USB hub may not work. Connect the player directly to the computer. ·Please wait for the authentication of the SonicStage software. ·Another application is running on the computer. →Disconnect the USB cable, wait a few minutes, and reconnect it. If the problem persists, disconnect the USB cable, restart the computer, and then reconnect the USB cable. ·The player's USB connection (USB Bus Powered) is set to “High-Power500mA.” →Set the “USB Bus Powered” to “Low-Power100mA” (® page 59). ·The installation of the SonicStage software was not successful. →Disconnect the player from your computer, and reinstall the software using the supplied CD-ROM (® “Quick Start Guide”). Audio files registered with the earlier installation will be available with the new SonicStage installation. |
| The player is not recognized by the computer when it is connected to the computer. | ·The USB cable is not connected to a USB port on your computer properly. →Disconnect the USB cable, and then reconnect it. ·A USB hub is being used. →Connecting the player via a USB hub may not work. Connect the player directly to the computer. |
| Audio data cannot be transferred to the player from your computer. | ·The USB cable is not connected to a USB port on your computer properly. → Disconnect the USB cable, and then reconnect it. ·There is not enough free space in the built-in flash memory. → Transfer any unnecessary songs back to your computer to increase free space. ·You have already transferred over 65,535 songs or over 8,192 playlists to the built-in flash memory, or you are trying to transfer a playlist that contains over 999 songs. ·Songs with a limited playing period or playing count may not be transferred due to restrictions set by copyright holders. For details on the settings of each audio file, contact the distributor. |
| Only a small number of songs can be transferred to the player. (Available recording time is short.) | ·There is not enough free space in the built-in flash memory. → Transfer any unnecessary songs back to your computer to increase free space. ·Non-audio data is stored in the built-in flash memory. → Move non-audio data to the computer to increase free space. |
| Audio data cannot be transferred back to your computer from the player. | ·The computer you are trying to transfer songs to is not the same computer from which the songs were originally transferred. → Songs can be transferred only to the computer that they originally came from. If songs cannot be transferred back to the computer and you want to delete songs on the player, select songs on the SonicStage software and click×to delete them. ·The audio data has been deleted from the computer you used to transfer to the player. → The audio data cannot be transferred back to your computer if the song is deleted from the computer used to transfer to the player. |
| The player becomes unstable while it is connected to the computer. | ·A USB hub or USB extension cable is being used. → Connecting the player via a USB hub or extension cable may not work. Connect the supplied USB cable directly to the computer. |
FM Tuner (NW-S703F/S705F/S706F only)
| Symptom | Cause/Remedy |
| You cannot hear the FM broadcast well. | The receiving frequency is not fully tuned in. → Select the frequency manually to improve reception (频道 page 63). |
| Reception is weak and sound quality is poor. | The radio signal is weak. → Listen to the FM broadcast near a window since the signal may be weak inside buildings or vehicles. → The headphone cord does not extend enough. → The headphone cord functions as an antenna. Extend the headphone cord as far as possible. |
| The FM broadcast is affected by interference. | An apparatus emitting radio signals, such as a mobile phone is being used near the player. → When using such apparatus as mobile phones, keep them away from the player. |
Recording
| Symptom | Cause/Remedy |
| Noise occurs while recording. | ·If the optional accessories for recording with the player has a record level shift switch, it is not set correctly. →Set the switch to the position corresponding to the audio device connected. For details, see the operation guide of the optional accessories for recording with the player. |
| Recording remaining time is displayed as “0:00:00” and cannot record, even though there is free space. | ·About 6 MB is needed as reserve capacity on the system. |
| The first few seconds was not recorded. | ·Recording was started before the record standby mode was set. →Start recording after confirming “REC STANDBY” is displayed. ·When the synchronized recording is set, sound may not be detected on songs that, for example, slowly fade in or out, depending on the recorded song. →Disable the synchronized recording, and record the songs (®page 71). |
| “TRACK FULL” is displayed even though the maximum recording time is not reached. | ·The maximum number of songs to be recorded by the player is 4,000. No more songs than the maximum number can be recorded. →Delete unnecessary songs (®page 74). →Export the recorded songs to a computer. |
| The recording remaining time remains the same even though songs are deleted. | ·Due to system restrictions, the record remaining time may not recover even though some short songs are deleted. |
| Cannot record. | ·The player is not connected to the optional accessories for recording with the player such as the cradle. →Connect to the optional accessories for recording with the player such as the cradle (®page 68). ·The player memory is low. →Delete unnecessary songs (®page 74). →Export the recorded songs to a computer. ·The maximum number of songs you can record on the player is 4,000. You cannot record more than 4,000 songs. →Delete unnecessary songs (®page 74). →Export the recorded songs to a computer. ·The player is not connected to the sound source properly. →Connect properly using the optional accessories for recording with the player. ·The connecting cable corresponding to the player is not used. →Connect the corresponding connecting cable to the player. ·The player is connected to a computer. →Disconnect the computer. ·The power cord was disconnected during recording. →The data that was recorded will be lost. Start recording from the first song again. |
| The total of the recorded time and the remaining time does not match the maximum recording time. | ·When you record many short songs, they may be recorded with automatically inserted blank spaces between songs due to system restrictions. This cause an increase in total recorded time and result in the mismatch. |
| The recorded sound is low. | ·The output level of the source sound is low. →Adjust the level according to the operation guide of the optional accessories for recording with the player. |
| It takes time to switch to the record standby mode. | ·The file is fragmented. →After exporting the songs recorded by the player to SonicStage, format the internal flash memory in the “Format” menu of the player (© page 57). |
| Recorded songs cannot be deleted. | ·The song or the folder which cannot be deleted is set to “Read only” on a computer. →Display the data in Windows Explorer, and uncheck “Read only” in “Property” of the file or folder. ·The battery power is low or exhausted. →Charge the battery fully (© page 78). |
| The folder is not deleted even though recorded songs have all been deleted. | ·Files other than the recorded songs are included in the folder. →Open the data in Windows Explorer, and delete the files other than songs recorded by the player. |
Other
| Symptom | Cause/Remedy |
| There is no beep sound when the player is operated. | • Beep is set to “Beep OFF” → Set “Beep ON” in the “Beep” menu (®page 49). |
| The player gets warm. | • While charging, the player may become slightly warm. |
Messages
Follow the instructions below if a message appears in the display.
| Message | Meaning | Remedy |
| ACCESS | This message appears after disconnecting the USB cable from the computer, or resetting the player (® page 86). | This is not an error message. Wait until the message disappears. |
| AVLS (blinks) | The volume level exceeds the rated value while AVLS is enabled. | Turn the volume down or disable AVLS (® page 48). |
| CANNOT PLAY | • The player cannot play certain files because of incompatible formats. • Transferring has been interrupted forcefully. | If the song which cannot be played is unnecessary, you can erase it from the built-in flash memory. For details, see “To delete abnormal data from the built-in flash memory” (® page 98). |
| CHARGE ERROR | The power supply is abnormal. | Try using another computer. |
| DATA ACCESS | Accessing the built-in flash memory. | Please wait for access to complete. This message appears while the built-in flash memory is being accessed. |
| DRM ERROR | An unauthorized distribution file is detected for copyright protection. | Transfer the normal audio file back to the computer and then format the built-in flash memory. For details, see “To delete abnormal data from the built-in flash memory” (® page 98). |
| EXPIRED | You are trying to play a song that has a playback time restriction. | If the song which cannot be played is unnecessary, you can erase it from the built-in flash memory. For details, see “To delete abnormal data from the built-in flash memory” (® page 98). |
| FILE ERROR | ·The file cannot be read. ·The file is not normal. | Transfer the normal audio file back to the computer and then format the player. For details, see “To delete abnormal data from the built-in flash memory” (® page 98). |
| FOLDER FULL | The maximum number of the folders you can record is reached. | The maximum number of folders you can record on the player is 255. Delete unnecessary folders (® page 76) and start recording again. |
| FORMAT ERROR | The built-in flash memory was formatted on a computer. | Format the player using the “Format” menu. For details, see “To delete abnormal data from the built-in flash memory” (® page 98). |
| HOLD | The player cannot be operated because the HOLD switch is set to the HOLD position. | To operate the player, slide the HOLD switch to the opposite position (® page 10). |
| LOW BATTERY | The battery is low. | You must charge the battery (® page 78). |
| MEMORY ERROR | There is a problem with the built-in flash memory. | Transfer the normal audio file back to the computer and then format the player using the “Format” menu. For details, see “To delete abnormal data from the built-in flash memory” (® page 98). If this message still appears, consult your nearest Sony dealer. |
| MEMORY FULL | ·The player ran out of memory during recording. ·You started recording when memory was low. | The recording time depends on the free space of the internal flash memory. Delete unnecessary songs (® page 74), and start recording again. Also, when the message keeps on displaying, press and hold the DISPLAY/ HOME button to release the recording mode. |
| NO DATA | There are no audio files in the built-in flash memory. | If there are no audio files in the built-in flash memory, use SonicStage to transfer audio files. |
| NO DATABASE | The player is disconnected from the computer while transferring audio files. | Data may be restored by starting SonicStage via a computer. If data is not restored, transfer the normal audio file back to the computer and then format the player. For details, see “To delete abnormal data from the built-in flash memory” (® page 98). |
| NO ITEM | No song exists in the selected item. | Use SonicStage to transfer audio files. |
| PRESET FULL | 30 broadcast stations are already preset. | You can preset up to 30 broadcast stations. If you want to preset more stations, delete unnecessary stations first (® page 65), then preset the stations you want. |
| READ ONLY | You tried to delete “Read only” songs. | Uncheck “Read only” in the folder or song on a computer. |
| SIMPLE MODE | The player is connected and disconnected from a computer when the intelligent function of SonicStage is disable. | This is not an error. Wait until the message disappears. |
| SYSTEM ERROR | There is a problem with the hardware. | Consult your nearest Sony dealer. |
| TRACK FULL | • You tried to record more than 255 songs in a folder. • You tried to record more than 4,000 songs. | The maximum number of songs you can record in a folder is 255 and the maximum number of songs is 4,000. Record again after deleting unnecessary songs. |
| UPDATE ERROR | The player fails to update the firmware. | Follow the on-screen instructions on the computer and update again. |
| USB CONNECT | The player is connected to a computer. | This is not a malfunction. You can operate the player using SonicStage, but you cannot operate the controls on the player. |
| USE ORIGINAL HEADPHONE (NW-S703F/S705F/S706F only) | The following functions were used when the headphones corresponding to the Noise Canceling function were not connected. • Noise Canceling (® page 28) • Noise Cancel Control setting (® page 38) | Connect the supplied headphones or headphones corresponding to the Noise Canceling functions. |
To delete abnormal data from the built-in flash memory
If "CANNOT PLAY," "DRM ERROR," "EXPIRED," "FILE ERROR," "FORMAT ERROR," "MEMORY ERROR," or "NO DATABASE" appears, there is a problem with all or part of the data stored in the built-in flash memory. Please follow the procedure below to erase data you cannot play.
1 Connect the player to the computer, and start SonicStage.
2 If you have already specified the data with problems, erase the data using SonicStage.
3 If the problem persists, transfer all data without problems back to the computer using SonicStage while the player is connected to the computer.
4 Disconnect the player from the computer and then format the built-in flash memory using the "Format" menu (G page 57).
Uninstalling SonicStage
To uninstall the supplied software from your computer, follow the procedure below.
1 Click"Start"- "Control Panel."1)
Double-click "Add/Remove Programs." 2)
3 Click "SonicStage X.X" in the "Currently Installed Programs" list, and then click "Remove."
Follow the displayed instruction and restart your computer. The uninstallation is completed when the computer has restarted.
1) "Settings" - "Control Panel" in the case of Windows 2000 Professional.
2) "Change/Remove" in the case of Windows 2000 Professional.
Note
- When you install SonicStage, "OpenMG Secure Module" is installed at the same time. Do not delete "OpenMG Secure Module" since it may be used by other software.
Owner's Record
The model and serial numbers are located on the rear of the player. Record the serial number in the space provided below. Refer to these numbers whenever you call upon your Sony dealer regarding this product.
Model No.
Serial No.
For Customers in the USA
NOTE:
This equipment has been tested and found to comply with the limits for a Class B digital device, pursuant to Part 15 of the FCC Rules. These limits are designed to provide reasonable protection against harmful interference in a residential installation. This equipment generates, uses, and can radiate radio frequency energy and, if not installed and used in accordance with the instructions, may cause harmful interference to radio communications.
However, there is no guarantee that interference will not occur in a particular installation. If this equipment does cause harmful interference to radio or television reception, which can be determined by turning the equipment off and on, the user is encouraged to try to correct the interference by one or more of the following measures:
- Reorient or relocate the receiving antenna.
- Increase the separation between the equipment and receiver.
- Connect the equipment into an outlet on a circuit different from that to which the receiver is connected.
- Consult the dealer or an experienced radio/TV technician for help. You are cautioned that any changes or modifications not expressly approved in this manual could void your authority to operate this equipment.
If you have any questions about this product:
Visit:
www.sony.com/walkmansupport
Contact:
Sony Customer Information Service Center at 1-(866)-456-7669
Write:
Sony Customer Information Services Center
12451 Gateway Blvd.,
Fort Myers, FL 33913
Declaration of Conformity
Trade Name: SONY
Model No.: NW-S603/S605/S703F/
S705F/S706F
Responsible Party: Sony Electronics Inc.
Address: 16530 Via Esprillo,
San Diego CA 92127 U.S.A.
Telephone Number: 858-942-2230
This device complies with Part 15 of the FCC Rules. Operation is subject to the following two conditions: (1) This device may not cause harmful interference, and (2) this device must accept any interference received, including interference that may cause undesired operation.
Disposal of Old Electrical & Electronic Equipment (Applicable in the European Union and other European countries with separate collection systems)

This symbol on the product or on its packaging indicates that this product shall not be treated as household waste. Instead it shall be handed over to the applicable collection point for the recycling of electrical and electronic equipment. By ensuring this product is disposed of correctly, you will help prevent potential negative
consequences for the environment and human health, which could otherwise be caused by inappropriate waste handling of this product. The recycling of materials will help to conserve natural resources. For more detailed information about recycling of this product, please contact your local Civic Office, your household waste disposal service or the shop where you purchased the product.
Applicable accessories: Headphones
For Customers in Russia
LHpOBOMy3bIKAJIbHbI npOnIrPbIBaTeIb
I3roTOBnteJIb:COH KopnopeuH
Ampec: 1-7-1 KonaH,
MnHaTo-Ky, Tokno 108-0075, JnoHna
Ctpana-mpoN3BODnteJb:MaIaI3nIa
Precautions
On safety
- Be sure not to short-circuit the terminals of the player with other metallic objects.
- Do not touch the rechargeable battery with bare hands if it is leaking. Since battery liquid may remain in the player, consult your nearest Sony dealer if the battery has leaked. If the liquid gets into your eyes, do not rub your eyes as it may lead to blindness. Wash out your eyes with clean water, and consult a doctor.
Also, if the liquid gets on to your body or clothes, wash it off immediately. If you do not, it may cause burns or injury. If you get burned or injured by the liquid from the battery, consult a doctor.
- Do not pour water or put any foreign object in the player. Doing so may cause fire or electric shock.
If this occurs, turn off the player immediately, disconnect the USB cable from the player, and consult your nearest Sony dealer or Sony Service Center.
- Do not put the player into the fire.
- Do not take apart or remodel the player. Doing so can result in electric shock.
Consult your nearest Sony dealer or Sony Service Center for exchange of rechargeable batteries, internal checks or repair.
On installation
- Do not put any heavy object on top of the player or apply a strong shock to the player. It may cause a player to malfunction or damage.
- Never use the player where it will be subjected to extremes of light, temperature, moisture or vibration. The player may become discolored, distorted or damaged.
- Never leave the player exposed to high temperature, such as in a car parked in the sun or under direct sunlight.
- Do not leave the player in a place subject to excessive dust.
- Do not leave the player on an unstable surface or in an inclined position.
-
If the player causes interference to radio or television reception, turn the player off and move it away from the radio or television.
-
When using the player, remember to follow the precautions below in order to avoid warping the cabinet or causing the player to malfunction.
-
Make sure not to sit down with the player in your back pocket.

-
Make sure not to put the player into a bag with the headphones/earphones cord wrapped around it and then subject the bag to strong impact.
-
The earbuds may deteriorate due to long-term storage or use.
- If you experience discomfort after using the player, stop using the unit immediately.
On heat build-up
Heat may build up in the player while charging if it is used for an extended period of time.
On the headphones
Road safety
Do not use headphones while driving, cycling, or operating any motorized vehicle. Doing so may create a traffic hazard and is illegal in many areas. It can also be potentially dangerous to play the player at a high volume while walking, especially at pedestrian crossings. You should exercise extreme caution or discontinue use in potentially hazardous situations. Also, when using the player while you are walking, watch out for traffic and road surface conditions. Use of the Noise Canceling function (NW-S703F/S705F/S706F only) blocks ambient sound, so it may be difficult to hear warning sounds coming from traffic or construction sites, etc.
Avoid listening with your headphones in situations where hearing must not be impaired.
Preventing hearing damage
Avoid using the headphones at a high volume. Hearing experts advise against continuous, loud and extended play. If you experience a ringing in your ears, reduce the volume or discontinue use.
Do not turn the volume up high all at once, especially when using headphones. Turn up the volume gradually so that loud sound will not hurt your ears.
Caring for others
Keep the volume at a moderate level. This will allow you to hear outside sounds and to be considerate to the people around you.
Warning
If there is lightning when you are using the player, take off the headphones immediately.
If you experience an allergic reaction to the supplied headphones, stop using them at once and contact a doctor.
On the use
- When using a strap (sold separately), be careful to avoid hooking it on objects you pass by.
- Refrain from using the player according to the in-flight announcements during take off or landing in an aircraft.
On cleaning
- Clean the player's case with a soft cloth, such as cleaning cloth for eyeglasses.
- If the player's case becomes very dirty, clean it with a soft cloth slightly moistened with water or a mild detergent solution.
- Do not use any type of abrasive pad, scouring powder, or solvent, such as alcohol or benzene, as it may mar the finish of the case.
- Be careful not to let water get into the player from the opening near the connector.
- Clean the headphone plug periodically.
- To clean the earbuds, remove them from the headphones, and hand wash with a mild detergent solution. Dry off sufficiently before use after washing.
If you have any questions or problems concerning the player, please consult your nearest Sony dealer.
On software
Copyright laws prohibit reproducing the software or the manual accompanying it in whole or in part, or renting the software without the permission of the copyright holder.
- In no event will SONY be liable for any financial damage, or loss of profits, including claims made by third parties, arising out of the use of the software supplied with this player.
- In the event a problem occurs with this software as a result of defective manufacturing, SONY will replace it. However, SONY bears no other responsibility.
- The software provided with this player cannot be used with equipment other than that which is so designated.
- Please note that, due to continued efforts to improve quality, the software specifications may be changed without notice.
- Operation of this player with software other than that provided is not covered by the warranty.
-
The ability to display the languages on your SonicStage will depend on the installed OS on your computer. For better results, please ensure that the installed OS is compatible with the desired language you want to display.
-
We do not guarantee all the languages will be able to be displayed properly on your SonicStage.
-
User-created characters and some special characters may not be displayed.
-
The explanations in this manual assume that you are familiar with the basic operations of Windows.
For details on the use of your computer and operating system, please refer to the respective manuals.
On sample audio data
The player is pre-installed with sample audio data so that you can try it out right away. To delete this audio data, delete it using SonicStage.
- The recorded music is limited to private use only. Use of the music beyond this limit requires permission of the copyright holders.
- Sony is not responsible for incomplete recording/downloading or damaged data due to problems of the player or computer.
-
Depending on the types of the text and characters, the text shown on the player may not be displayed properly on device. This is due to:
-
The capacity of the connected player.
- The player is not functioning normally.
- The ID3 TAG information for the song is written in the language or the character that is not supported by the player.
About the customer support Web site
If you have any questions about or issue with this product, visit the following web sites.
For customers in the USA: http://www.roy.com/walkmansupport
For customers in Canada: http://www.sony.ca/ElectronicsSupport/
For customers in Europe: http://www.support-nwwalkman.com
For customers in Latin America: http://www.sony-latin.com/pa/info/
For customers in other countries/regions: http://www.css.ap.sony.com
For customers who purchased the overseas models:
http://www.sony.co.jp/overseas/support/
On Copyrights
- SonicStage and the SonicStage logo are trademarks or registered trademarks of Sony Corporation.
- OpenMG, ATRAC, ATRAC3, ATRAC3plus, ATRAC Advanced Lossless and their logos are trademarks of Sony Corporation.
- “WALKMAN” and “WALKMAN” logo are registered trademarks of Sony Corporation.
- Microsoft, Windows, Windows NT and Windows Media are trademarks or registered trademarks of Microsoft Corporation in the United States and/or other countries.
- Adobe and Adobe Reader are trademarks or registered trademarks of Adobe Systems Incorporated in the United States and/or other countries.
- MPEG Layer-3 audio coding technology and patents licensed from Fraunhofer IIS and Thomson.
- IBM and PC/AT are registered trademarks of International Business Machines Corporation.
- Macintosh is a trademark of Apple Computer, Inc.
- Pentium is a trademark or a registered trademark of Intel Corporation.
- CD and music-related data from Gracenote, Inc., copyright © 2000-2006 Gracenote. Gracenote Software, copyright © 2000-2006 Gracenote. This product and service may practice one or more of the following U.S. Patents: #5,987,525; #6,061,680; #6,154,773, #6,161,132, #6,230,192, #6,230,207, #6,240,459, #6,330,593, and other patents issued or pending. Some services supplied under license from Open Globe, Inc. for U.S. Patent: #6,304,523. Gracenote and CDDB are registered trademarks of Gracenote. The Gracenote logo and logotype, and the "Powered by Gracenote" logo are trademarks of Gracenote.
- All other trademarks and registered trademarks are trademarks or registered trademarks of their respective holders. In this manual, ^TM and ^ marks are not specified.
Program ©2006 Sony Corporation
Documentation ©2006 Sony Corporation
Specifications
Audio compression technology
-MPEG-1 Audio Layer-3 (MP3)
- Windows Media Audio (WMA)
- Adaptive Transform Acoustic Coding (ATRAC)
- Advanced Audio Coding (AAC)
- Linear-PCM (PCM)
* Copyright protected WMA/AAC files cannot be played back.
Maximum recordable number of songs and time (Approx.)
The approximate times are based on a transferred or recorded 4-minute ATRAC, MP3 or Linear-PCM format song. Other playable audio file formats may be different from ATRAC or MP3 format.
Except ATRAC Advanced Lossless. Compression rate of ATRAC Advanced Lossless varies depending on songs. For example, one CD (containing 15 4-minute songs) is approximately 200 to 500MB .
| NW-S603/S703F | NW-S605/S705F | |||
| Bit rate | Songs | Time | Songs | Time |
| 48 kbps | 685 | 45 hr. 40 min. | 1,350 | 90 hr. 00 min. |
| 64 kbps | 510 | 34 hr. 00 min. | 1,000 | 66 hr. 40 min. |
| 66 kbps | 500 | 33 hr. 20 min. | 995 | 66 hr. 20 min. |
| 96 kbps | 340 | 22 hr. 40 min. | 680 | 45 hr. 20 min. |
| 128 kbps | 255 | 17 hr. 00 min. | 515 | 34 hr. 20 min. |
| 132 kbps | 250 | 16 hr. 40 min. | 495 | 33 hr. 00 min. |
| 160 kbps | 205 | 13 hr. 40 min. | 410 | 27 hr. 20 min. |
| 192 kbps | 170 | 11 hr. 20 min. | 340 | 22 hr. 40 min. |
| 256 kbps | 125 | 8 hr. 20 min. | 255 | 17 hr. 00 min. |
| 320 kbps | 100 | 6 hr. 40 min. | 205 | 13 hr. 40 min. |
| 352 kbps | 94 | 6 hr. 10 min. | 185 | 12 hr. 20 min. |
| 1,411 kbps (Linear-PCM) | 23 | 1 hr. 30 min. | 47 | 3 hr. 00 min. |
| NW-S706F | ||
| Bit rate | Songs | Time |
| 48 kbps | 2,700 | 180 hr. 00 min. |
| 64 kbps | 2,000 | 133 hr. 20 min. |
| 66 kbps | 2,000 | 133 hr. 20 min. |
| 96 kbps | 1,350 | 90 hr. 00 min. |
| 128 kbps | 1,000 | 66 hr. 40 min. |
| 132 kbps | 1,000 | 66 hr. 40 min. |
| 160 kbps | 820 | 54 hr. 40 min. |
| 192 kbps | 685 | 45 hr. 40 min. |
| 256 kbps | 515 | 34 hr. 20 min. |
| 320 kbps | 410 | 27 hr. 20 min. |
| 352 kbps | 375 | 25 hr. 00 min. |
| 1,411 kbps (Linear-PCM) | 94 | 6 hr. 10 min. |
Capacity (User available capacity)*
NW-S603/S703F: 1 GB (Approx. 968MB = 1,015,726,080 bytes)
NW-S605/S705F: 2 GB (Approx. 1.89GB = 2,035,974,144 bytes)
NW-S706F: 4 GB (Approx. 3.79GB = 4,075,716,608 bytes)
- Available storage capacity of the player may vary.
A portion of the memory is used for data management functions.
Supported bit rates
MP3: 32 to 320 kbps variable bit rate-compliant
WMA: 32 to 192 kbps variable bit rate-compliant
ATRAC: 48/64/66 (ATRAC3)/96/105 (ATRAC3)/128/132 (ATRAC3)/160/192/256/320/352 kbps
- CD recording cannot be done using the SonicStage software in ATRAC3 at 66/105 kbps.
ATRAC Advanced Lossless*: 64/128/132 (ATRAC3 base layer)/ 256/352 kbps - The bit rate description of ATRAC Advanced Lossless shows the bit rate for the contents which enables fast transfer to ATRAC compatible devices or media.
AAC: 16 to 320 kbps variable bit rate-compliant* - Nonstandard bit rates or non-guaranteed bit rates are included depending on the sampling frequency.
Linear-PCM: 1,411 kbps
Sampling frequency*
MP3: 32, 44.1, 48 kHz
WMA: 44.1 kHz
ATRAC: 44.1 kHz
AAC: 11.025, 12, 16, 22.05, 24, 32, 44.1, 48 kHz
Linear-PCM: 44.1 kHz
- Sampling frequency may not correspond to all encoders.
Frequency response
20 to 20,000Hz (single signal measurement)
FM Frequency range (NW-S703F/S705F/S706F only)
87.5 to 108.0MHz
IF (FM)
375 kHz
Antenna
Headphone cord antenna
Interface
Headphone: Stereo mini
WM-PORT (multiple connecting terminal): 22 pin
Hi-Speed USB (USB 2.0 compliant)
Operating temperature
5^ to 35^ (41^ to 95^)
Power source
Built-in rechargeable lithium-ion battery
- USB power (from a computer through supplied USB cable)
Battery life (continuous playback)*
- This is when the power save setting (@ page 60) is "Save ON Super," and Equalizer (@ page 32), VPT (@ page 35), Clear Stereo (@ page 36), or Dynamic Normalizer (@ page 37) is set to "OFF." The battery duration will vary depending on temperature and usage.
| NW-S603/S605 | |
| Playback at ATRAC 132 kbps | Approximately 50 hours |
| Playback at ATRAC 128 kbps | Approximately 45 hours |
| Playback at ATRAC 48 kbps | Approximately 48 hours |
| Playback at ATRAC Advanced Lossless 64 kbps | Approximately 35 hours |
| Playback at MP3 128 kbps | Approximately 47 hours |
| Playback at WMA 128 kbps | Approximately 40 hours |
| Playback at AAC 128 kbps | Approximately 47 hours |
| Playback at Linear-PCM 1,411 kbps | Approximately 42 hours |
| At recording | Approximately 10 hours |
| NW-S703F/S705F/S706F | ||
| With Noise Canceling function ON | With Noise Canceling function OFF | |
| Playback at ATRAC 132 kbps | Approximately 43 hours | Approximately 50 hours |
| Playback at ATRAC 128 kbps | Approximately 40 hours | Approximately 45 hours |
| Playback at ATRAC 48 kbps | Approximately 43 hours | Approximately 48 hours |
| Playback at ATRAC Advanced Lossless 64 kbps | Approximately 32 hours | Approximately 35 hours |
| Playback at MP3 128 kbps | Approximately 42 hours | Approximately 47 hours |
| Playback at WMA 128 kbps | Approximately 36 hours | Approximately 40 hours |
| Playback at AAC 128 kbps | Approximately 42 hours | Approximately 47 hours |
| Playback at Linear-PCM 1,411 kbps | Approximately 38 hours | Approximately 42 hours |
| At receiving FM broadcasting | Approximately 16 hours | Approximately 18 hours |
| At recording | — | Approximately 10 hours |
Dimension (w/h/d)
87.2× 27.4× 14.9mm (3^1 / 2× 1^1 / 8×^19 / _32 inches)
(w/h/d, projecting parts not included)
Mass
Approx. 47g (Approx. 2 oz)
Minimum System Requirements (for the player)
- Computer
IBM PC/AT or compatible computer preinstalled with the following Windows operating systems:
- Windows 2000 Professional (Service Pack 3 or later)
- Windows XP Home Edition
- Windows XP Professional
- Windows XP Media Center Edition
- Windows XP Media Center Edition 2004
- Windows XP Media Center Edition 2005
Not supported by OSs other than above.
- CPU: Pentium III 450 MHz or higher
- RAM: 128 MB or more
- Hard Disk drive: 200 MB or more of available space (1.5 GB or more is recommended)
- More space may be required, depending on the version of the operating system. Additional space is required for storing music data.
-
Display:
-
Screen Resolution: 800 × 600 pixels (or higher) (recommended 1,024 × 768 or higher)
-
Colors: High Color (16 bit) (or higher) (SonicStage may not operate properly at color settings at or below 256 colors.)
-
CD-ROM drive (supporting Digital Music CD playback capabilities using WDM) To create original CDs or to back up audio CDs, a CD-R/RW drive is required.
Sound board
- USB port (Hi-Speed USB is recommended)
- Internet Explorer 5.5 or later needs to be installed.
- Internet connection is required to use the CD Data Base (CDDB) or Electronic Music Distribution (EMD).
We do not guarantee operation for all computers even if they meet the above System Requirements.
Not supported by the following environments:
- Personally constructed computers or operating systems
- An environment that is an upgrade of the original manufacturer-installed operating system
- Multi-boot environment
- Multi-monitor environment
- Macintosh
Design and specifications are subject to change without notice.
US and foreign patents licensed from Dolby Laboratories.
Index
Symbols
(Album). 40
(Artist) 40
(Artist/Album) 40
(Favorite 100) 11
□ (Folder) 27, 73
(Genre) 40
(Playlists) 11
(Recent Transfers) 11
(Release year) 40
一 1 (Repeat 1 Song) 27, 73
(Repeat All) 27, 73
口 (Repeat Folder) 27, 73
SHUF (Repeat Shuffle All)...27, 73
SHUF (Repeat Shuffle Folder) 27, 73
A
AAC. 80, 109
Accessories 7,68
Adobe Reader. 3
Album 23
All Songs. 12
Artist 22
Artist Link Shuffle. 18
ATRAC. 80, 109
Attachment 7
AVLS (Limiting the volume) 48
B
Battery. 11, 78, 79, 110
Beep (Beep sound) 49
Bit rate. 80, 109
C
Clear Bass 33
Clear Stereo 36
Clock. 41
Computer. 3, 111
D
Data. 84
Date-Time 50, 53, 54
DateDispType 53
Delete 74
All data. 77
Folder 76
Song. 74
Display 11
DISPLAY button. 8
Display Screen. 43
Dynamic Normalizer 37
E
Earbuds 7
Equalizer 31, 33
Explorer 84
F
Fast-forward 9
Fast-rewind. 9
Favorite 100. 15, 17
Firmware. 85
FM 61
FM Auto Preset 62
FOLDER (mode) 8,63
Format. 80
Format (Initialize) 57
G
Genre. 24, 40
H
Headphone extension cord 10
Headphones. 7, 10, 29, 104
Help 3
HOLD switch 10
HOME button 8
Home menu (HOME) 6
1
Information 55
Initialize (Format) 56, 57
Intelligent Shuffle 17
Artist Link Shuffle 18
My Favorite Shuffle 17
Sports Shuffle 20
Time Machine Shuffle. 19
J
Jacket picture. 11, 26, 44
Jacket Search 26
L
Linear-PCM 80,109
M
Manual Volume 47
Manual tuning 63
Memory Capacity. 109
Messages 95
Mono/Auto 67
MP3. 80, 109
My Favorite Shuffle 17
N
Noise Canceling. 10, 28, 38
P
Playback. 8, 12
Playlists 13
Playlist Select. 13
Play Mode. 27, 73
Play Range 27, 73
Power button 8
Power Save Mode. 60
Preset Custom 33
Preset (Volume) 45, 46, 47
Preset tuning. 63
R
Radio. 61
Rec. 68
Rec Data. 72
Rec Mode. 70
Recent Transfers 16
Recharging. 78
Recording 68
Accessory. 68
Bit rate. 70
Delete 74
Playback 72
Synchronized Recording. 69, 71
Release Year. 25, 40
Remaining battery. 78
Repeat. 27, 73
RESET (the player) 86
Reset All Settings. 56
S
Scan Sens 66
Search. 21
by album 23
by artist. 22
by genre. 24
by release year 25
by song name. 21
Serial Number. 7, 55
Set Date-Time 50
Set the current time. 50
Settings. 6
Shuffle 17,27,73
Shuttle switch 8
Skip to the beginning of a song.....9
Sleep status 8,64,79
Song Information 83
Song order 39
SonicStage. 3, 99
Sort 39
Sound 30
Sound preset. 30
Sound quality 31, 33
Sports Shuffle 20
Synchronized recording (Sync Rec) 69, 71
T
TimeDispType 54
Time information 41
Time Machine Shuffle. 19
Time setting. 50
Transferring. 3
Troubleshooting. 86
Tuner 61
U
Uninstalling. 99
Upgrading. 85
USB Bus Powered (USB connection setting) 59
USB cable. 8
V
Volume. 8, 45
Volume Mode. 45
VOL +/- button. 8
VPT 35
W
Windows Explorer. 84
WM-PORT. 8,55
WMA 80,109