MODE D'EMPLOI SRN4000 Hanwha
ENREGISTREUR VIDÉO EN RÉSEAU
Manuel d'utilisation
SRN-4000
Enregistreur video en réseau Manuel d'utilisation
Droits d'auteur
©2014 Samsung Techwin Co., Ltd. Tous droits réservés.
Marque commerciale
SAMSUNG TECHWIN est le logo déposé de Samsung Techwin Co., Ltd.
Le nom de ce produit est la marque commerciale déposée de Samsung Techwin Co., Ltd.
Les autres marques commerciales mentionnées dans ce manuel sont des marques déposées de leurs propriétaires respectifs.
Restriction
Les droits de copyright de ce document sont la propriété exclusive de Samsung Techwin Co., Ltd. Ce document ne saurait en aucun cas etre reproduit, distribue ou modifie, tout ou en partie, sans le consentement formel de Samsung Techwin.
Clause de non responsabilité
Samsung Techwin fait de son moyen pour vérifier l'intégrité et l'exactitude des contenus de ce document, mais aucune garantie formelle ne sera fournie à cet effet. L'utilisation de ce document et les résultats subséquents seront entieriement de la responsabilité de l'utilisateur. Samsung Techwin se reserve le droit de modifier les contenus de ce document sans avis préalable.
La conception et les caractéristiques techniques sont susceptibles d'être modifiées sans préavis.
Lidentifant initial de I administrateur est "admin" et le mot de passé doit être définis lors de la premiere connexion.
Réglez le mot de passer de votre réseau sans fil si vous utilisez l'appareil avec un routeur sans fil. Si vous réseau n'est pas protégé par un mot de passer ou si vous utilisez le mot de passer par défaut du routeur sans fil, les données de votre video peuvent être exposées à des menaces potentielles.
Veuillez Changeer voit de passes tous les trois mois afin de protetei sans risque les informations personnelles et eviter les prejudices occasionnes par un vol de donnees.
Veuillez noter qu'il en est de la responsabilité de l'utiliser quant à la sécurité et autres problèmes causés par une mauvaise gestion du mot de passer.
CONSIGNES DE SECURITE IMPORTANTES
Lisez attentivement ces instructions d'utilisation avant d'utiliser l'appareil
Conformez-vous à toutes les consignes de sécurité listedes ci-dessous.
Conservez ces instructions d'utilisation en vue d'une consultation ultérieure.
1) Lisez les instructions.
Approbations des Normes
FCC
Cet équipement a ete teste et se conforme aux limites relatives a un apparieil numerique de classe A, conformement a la partie 15 des Reglementations FCC. Ces limites sont elaborees pour fournir un degré raisonnable de protection contre les interférences dangereuses si l'equipement fonctionne dans un environnement commercial.
Cet équipement génére, utilise et peut produces une énergie à radio fréquence, s'il n'est pas installé et utilisé selon le manuel d'instruction, il peut causer des interférences nuisibles aux communications radiophoniques. Le fonctionnement de cet équipement au sein d'une zone résidentielle peut provoquer des interférences dangereuses, dans ce cas l'utilisateur est.Commé de corriger l'interférence à ses propres frais.
AVANT LE DEMARRAGE
Ce manuel fournit des informations de fonctionnement nécessaires à l'utilisation de l'appareil et contient une description de chaque piece et sa fonction ainsi que le menu ou les paramétres du réseau. Gardez à l'esprit les mises en garde suivantes :
SAMSUNG est propriété des droits d'auteurs de ce manuel.
Attention
Pile
Mettre un mauvais type de pile dans votre produit peut cause une explosion. Vous doivent donc utiliser le même type que celle actuellément utilisé avec le produit.
Veuillez trouver ci-dessous les caractéristiques de la pile à utiliser.
Tensionnormale:3V
Attention
Branchez le cordon d'alimentation à une prise mise à la terre.
Les piles ne doivent pas etre exposées à des températures excessives, telles que la chaleur du soleil, le feu ou toute autre source de même type.
Il existe un risque d'explosion lié au remplacement de la batterie par un type de batterie inapproprié. Veillez àmettre au rebut les batteries usées selon les instructions fournies.
Arrêt système
Eteindre l'appareil alors qu'il est en fonctionnement ou effectuer des actions non autorisées peut endommager le disque dur ou le produit lui-même. En outre, cela peut cause un dysfonctionnement du disque dur lors de l'utilisation du produit.
Pour couper l'alimentation en toute sécurité, appuyez sur le bouton frontal de mise sous/hors tension situé sur l'appareil pour afficher le message de confirmation.
Cliquez sur < OK> puis débranchez le cable d'alimentation.
Vouss pouvez installer un systeme d'alimentation sans coupure pour garantir un fonctionnement sécurisé et prévenir les dommages causés par des coupures d'alimentation inattendues. (Pour toutes questions concernant les systèmes d'alimentation sans coupure, veuillez consulterer vos distributeur).
En cas de mise hors tension anormale, le redemarrage peut prendre plus de temps car le système restaure les données provenant du disque dur afin de garantir un fonctionnement correct.
Température de fonctionnement
La gamme de température de fonctionnement garantie de ce produit est de 0^ 40^ (32^ 104^)
Cet apparéil peut ne pas fonctionner correctement si rangiépendant une période prolongée à des températures inférieures aux températures garanties.
Si vous désirez utiliser l'appareil suite à un rangement prolongé à température faible, installez le produit à température ambiente pendant quelques temps puis faites-le fonctionner.
La gamme de température relative au disque dur intégré est de 5^ 55^ ( 41^ 131^ ). Le disque dur peut ne pas fonctionner sous des températures inférieures aux températures garanties.
Port Ethernet
Cet apparéil est destiné à un usage en interieur et l'ensemble du câblage de communication est limité pour l'intérieur d'un[bâtiment.
Consignes de sécurité
L'identifant initial de l'administrateur est "admin" et le mot de passage doit être définis lors de la première connexion.
Réglez le mot de passer de votre réseau sans fil si vous utilisez l'appareil avec un routeur sans fil. Si vous réseau n'est pas protégé par un mot de passer ou si vous utilisez le mot de passer par défaut du routeur sans fil, les données de votre video peuvent être exposées à des menaces potentielles.
Veuillez Changeer voit de passe tous les trois mois afin de proteger sans risque les informations personnelles et eviter les prejudices occasionnés par un vol de donnees.
Veuillez noter qu'il en est de la responsabilité de l'utilisateur quant à la sécurité et autres problèmes causés par une mauvaise gestion du mot de passer.
TabLe deS maTièreS
préSenTaTion
3 3 Consignes de Sécurité Importantes
4 Avant le Démarriage
6 Table des Matières
8 Caracteristicques
10 Noms des Composants et Fonctions (Façade)
11 Noms des Composants et Fonctions (Panneau Arrière) inSTaLLaTion
12 12 Vérification de l'environnement d'installation
13 Installation du rack
13 Ajout de Disque dur Connexion à d'auTreS périphériqueS
15 15 Connexion à un périhérique externe
16 Connexion USB
17 Connexion de l'entrée/Sortie d'alarme
18 Connexion reseau Live
21 21 Mise en route
23 Configuration de l'écran Live (Direct)
30 Mode Écran Live (Direct)
34 Zoom
35 Mise en page
35 Activation/Désactivation Audio
36 Gel
36 Surveillance des Événements
37 Commande PTZ ConfiguraTion du menu
40 40 Configuration du Systeme
51 Configuration du Périhérique
72 Configuration de l'enregistrement
76 Configurer l'évenement
80 Configuration réseau
reCherChe eT LeCTure
92
92 Recherche
démarrage de Web vieWer
98
98 Qu'est-ce que Web Viewer?
Live viewer
101
101 Live Viewer
SearCh vieWer
112
112 Search Viewer
SeTup vieWer
116
116 Setup Viewer
baCKup vieWer
134
134 Visionneur de Sauvegarde au Format SEC
annexeS
136
136 Caracteristiques du Produit
CaraCTériSTiqueS
L'appareil permet d'enregistrer des données video et audio depuis les cameras sans fil vers un disque dur, et de dire depuis le disque dur.
Il fournit également un environnement de surveillance à distance pour les données video et audio sur le réseau à l'aide d'un ordinateur distant.
Interface utiliseur conviviale
VGA, 4CIF, enregistrement pris en charge jusqu'à un maximum de 2592X1944 (5M pixel)
Enregistrement et lecture videoe
Enregistrement et lecture de données audio
Prend en charge la norme ONVIF Pofile S et les protocoles RTP/RTSP
Lecture de videos haute définition via un cable HDMI
Affichage des états de fonctionnement du disque dur à l'aide de HDD SMART
Réinscription du disque dur autorisé
Sauvegarde utilisant les protocoles USB 2.0 et un disque dur externe
Lecture simultanée de 16 chaînes
Divers modes de recherche disponibles (Recherche par heures, événement, sauvegarde et carte thermique)
Divers modes d'enregistrement disponibles (Normal, Évenement et Enregistrement programme)
Entrée et sortie d'alarme
Fonction de contrôle à distance via Windows Network Viewer
Contrôle en direct de laamera reseau
Fonction Détction de mouvement avancée (AMD) / Carte thermique (Détction de Voiture/Personne)
Fonction Assistant d'installation (Configuration Facile, Configuration Rapide)
Contenu
Déballez le produit et placez-le sur une surface plane ou à l'emplacement qui lui est réservé.
NVR Souris Cordon d'alimentation CD du Logiciel Network Viewer / manuel d'utilisation Manuel utilisé ou manuel de référence rapide Vis de montage du disque dur Bornier de connexion Montage en rack Vis de montage du chassis Clé de verrouillage de porte du disque dur
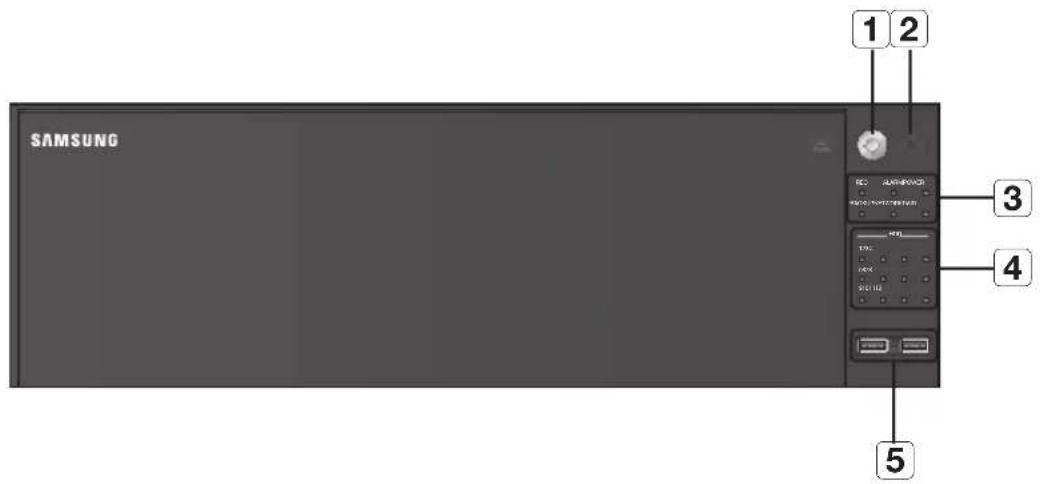
nomS deS CompoSanTS eT fonCTionS (faCade)
Noms des éléments Fonctions 1 Clé de verrouillage de porte du disque dur 2 Alimentation 3 Voyant DEL 4 HDD 5 USB
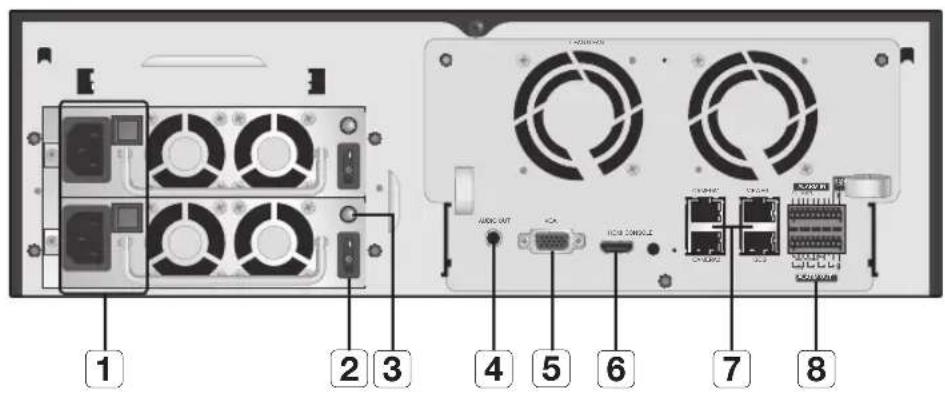
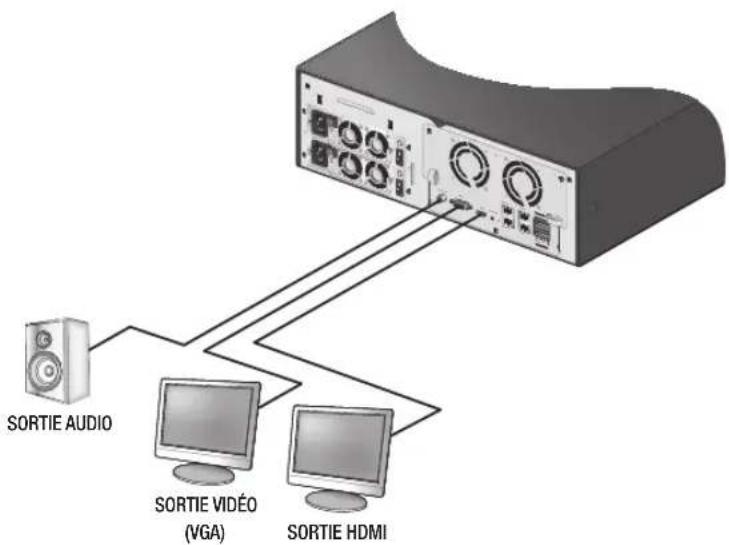
Noms des éléments Fonctions 1 Puisance Borne de connexion de l'alimentation.
■ Avec une alimentation en duplex, même si vous connectez une seule alimentation, elle peut fonctionner correctement. Cependant, pour la fiabilité, il est recommendé d'utiliser des alimentations séparées. Si un seul bloc d'alimentation n'est pas connecté pendant le fonctionnement, l'avertisseur SMPS s'éteint et vous pouvez appuyer sur le bouton de la boîte rouge pour éteindre la sonnerie. 2 Commutateur d'alimentation C'est un commutateur de commande de l'alimentation électrique. 3 LED d'état SMPS Affiche le SMPS à l'aide d'un LED coloré. Une lumière rouge signifie que l'alimentation électrique est coupée et la lumière verte signifie que tout est normal. 4 AUDIO OUT Port de sortie du signal audio (prise RCA). 5 VGA Port de sortie du signal video VGA. 6 HDMI Port de connecteur HDMI. 7 CAMERA1 Port pour connexions de la camera, destiné à receivevoir la video à partir d'uneamera. CAMERA2 Port pour connexions de la camera, destiné à receivevoir la video à partir d'uneamera. VIEWER Port utilisé pour envoyer la video vers l'afficheur. iSCSI Port destiné à établier une connexion avec l'iSCSI externe. 8 ALARM - ALARM IN : Ports d'entrée d'alarme.
- ALARM RESET : Port de réinitialisation d'alarme.
- ALARM OUT : Ports de sortie d'alarme.
[CONSOLE] est concu à des fins de réparation uniquement.
Voici quelques recommandations importantes qu'il convient de respecter avant d'utiliser le produit.
N'utilisez pas le produit en extérieur.
Ne versez pas de l'eau ou des liquides sur les connexions du produit.
Ne soumettez pas le système à une force ou une pression excessive.
Ne tirez pas sur le cordon d'alimentation.
Ne démontré pas l'apparil vous-même.
N'excédez pas la puissance nominale d'entrée/sortie de l'appareil.
Pour les produits équipés d'une masse d'entrée, utilisez une fiche d'alimentation avec mise à la terre.
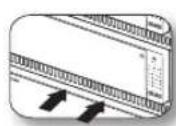
verifiCaTion de L'environnement d'inSTaLLaTion
Cet apparéil est un périhérique hautement sécurisé équipé d'un disque dur de grande capacité et de circuits imprimés maièurs.
Veuillez noter qu'une température interne du produit trop élevée peut provoquer une défaillance du système ou écapter sa durée de vie (voir la figure de droite). Gardez à l'esprit les instructions suivantes avant l'installation du produit.
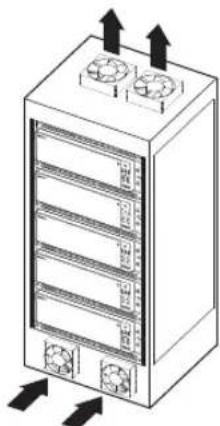
Lors du montage de l'appareil sur un rack, respectez les instructions suivantes.
Vérifiez que l'intérieur du rack n'est pas hermétique.
Verifiez que la circulation de l'air est assurée au niveau des entrées/sorties tel qu'indiqué sur l'illustration.
Si vous empíze les apparèils ou d'autres périhériques de montage en rack comme indiqué sur la figure 2, librez de l'espace pour l'aération ou installez un ventilateur.
Pour une convection naturelle de l'air, placez l'entrée dans la partie inférieure du rack et la sortie dans la partie supérieure.
Il est fortement recommandé d'installer un moteur de ventilateur à l'entrée et à la sortie afin de favoriser la circulation de l'air. (Installez un filtre à l'entrée pour arreter la poussière et les corps étrangers.)
Veillez à maintainir la température à l'intérieur du rack ou dans son environnement immédiat entre 0^ et 40^ (32^ 104^) , tel qu'illustré sur la figure 1.
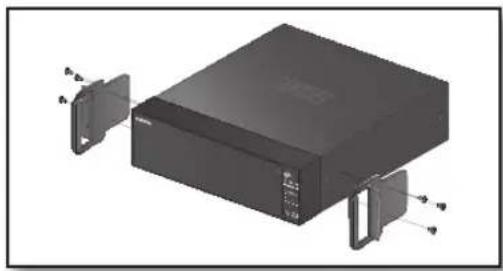
INSTALLATION DU RACK
Installez le rack de support comme illustré sur la figure, puis serrez les vis de chaque côte (3 vis de chaque côte).
Serrez les vis de sorte que les vibrations ne les desserrent pas.
AJOUT DE DISQUE DUR
Veillez à débrancher le cordon d'alimentation de la prise murale afin d'eviter toute electrocution, blessure ou endommagement du produit.
Veuillez consultier toute fournisseur pour de plus amples informations. Une installation ou des réglages non appropriés peuvent endommager le produit.
Nombre de disques durs pris en charge: Jusqu'a 12 disques durs peuvent etre pris en charge
- Précautions à prendre pour éviter la perte de données (manipulation du disque dur)
Soyez vigilant afin de ne pas corrompre les données à l'intérieur du disque dur.
Avant d'ajouter un disque dur, vérifie sa compatibilité avec cet apparéil.
En raison de sa nature sensible, le disque dur est particulierement sujet aux defaillances en cas de chocol en cours de fonctionnement.
Veillez à protéger le disque dur de tels chocs.
Nous n'assumons aucune responsabilité en cas de dommages survenus au disque dur du fait de la néligence de l'utilateur ou d'une mauvaise utilisation.
Exemples de conditions susceptibles d'endommager le disque dur ou les données enregistrées
Pour minimiser le risque de pertes de données en raison d'un disque dur endommagé, veilz à sauvegarder vos données aussi souvent que possible.
S'il est exposé à un chocol lors du démontage ou de l'installation, les données stockées dans le disque dur risquent d'être endommagées.
Une soudaine coupure de courant ou une mise hors tension de l'appareil lorsque le disque dur fonctionne peut l'endommager.
Le disque dur ou les fichiers qui y sont stockés risquent d'être endommages si le corps principal est déplace ou heures durant le fonctionnement du disque dur.
Précautions à prendre lors de l'installation d'un disque dur
Ne pas appliquer de force excessive sur le disque dur.
Assurez-vous de ne pas perdre les vis de désassemblage ou les accessoires.
Si les vis ou les accessoires ne sont pas correctement fixe(s), le produit pourra connaître une panne ou ne pas fonctionner correctement.
Vérifiez la compatibilité du disque dur avant de l'ajouter à l'enregistreur.
Contactez votre revendeur local pour obtenir la liste des périhériques compatibles.
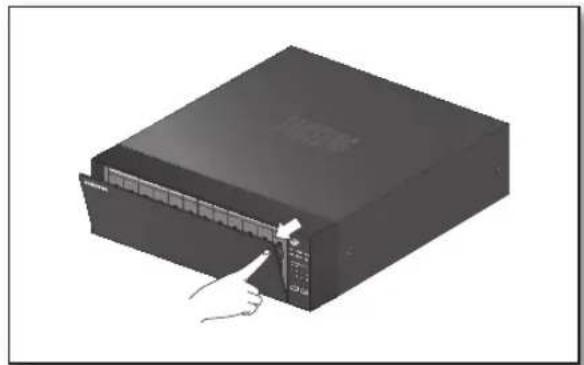
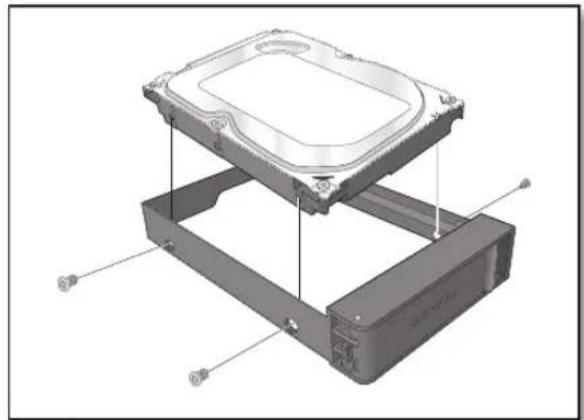
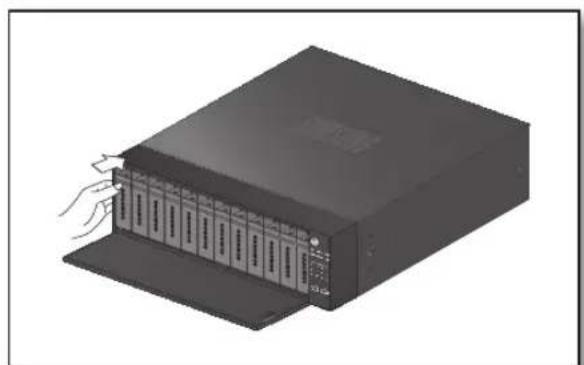
Lorsque you montez un disque dur
Appuyez sur le bouton à l'avant pour ouvrir le couvercle frontal.
ÀpRES avoir appuyé sur le bouton bleu du support du disque dur, tirez-le manuellement pour séparer le support du disque dur du corps principal.
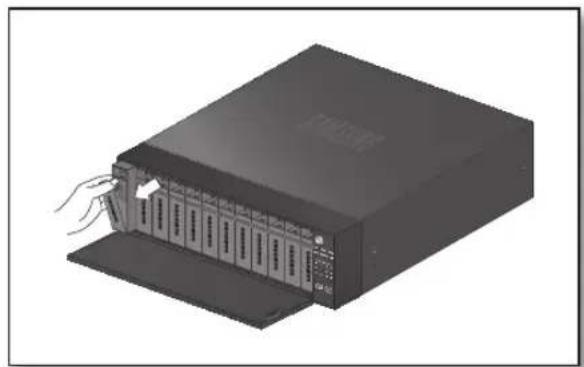
Montez le disque dur sur le support du disque dur et vissez-le à l'aide des vis fournies.
Une fois le disque dur monté sur le support, poussez le support dans le corps principal et fermez le couvercle frontal.
connexion à d'autres périphériques
Connexion à un périphérique exTerne
Une source d'alimentation non adaptée ou ne fournissant pas le courant nominal approprié peut endommager le système. Assurez-vous que la valeur nominale de la source d'alimentation est adaptée avant d'appuyer sur le bouton de démarrage.
connexion à d'autres périphériques
CONNEXION USB
Sur le devant du produit se trouve un port USB.
Voues pouvez connecter au port USB un disque dur USB, un lecteur CD/DVD USB, une memoire USB ou une souris.
Si un disque dur USB est relié au système, la reconnaissance du périhérique et ses réglages seront disponibles sous « Configuration du Menu > Periph > Périhérique de stockage » (Page 63)
L'appareil prend en charge la fonction de remplacement des composants à chaud, ce qui permet de connecter ou de déconnecter les péripériques USB alors que le système est en cours d'exécution.
Si you utilisez le periphérique USB à des fins de sauvegarde, formatez-le en FAT32 sur l'ordinateur au cas ou celui-ci serait pas formated sur I'enregistreur reseau.
Certains péripériques USB peuvent ne pas fonctionner correctement suite à des problèmes de compatibilité, veuillez donc vérifier le péripéroide avant de l'utiliser.
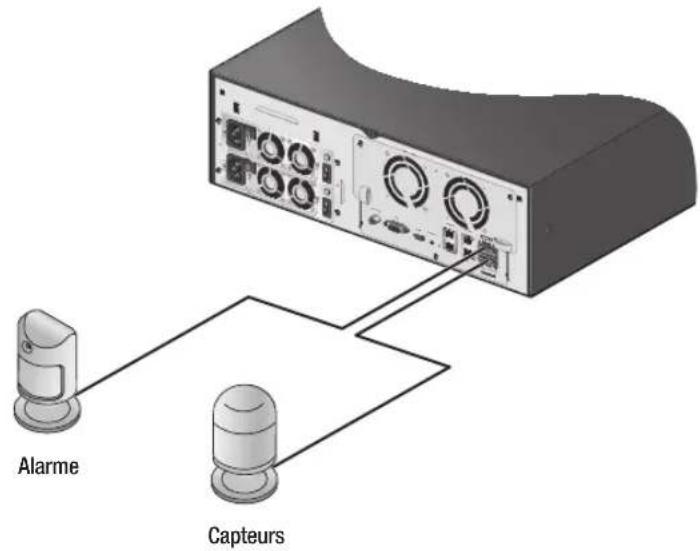
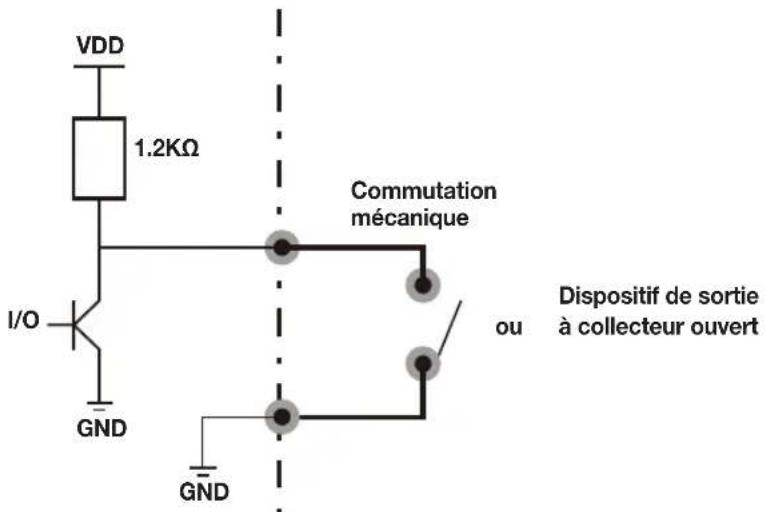
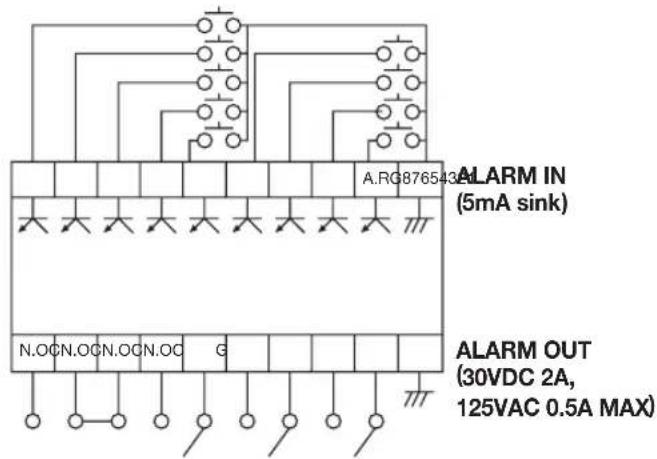
Le port d'entrée/sortie d'alarme situé à l'arrière de l'appareil est composé des éléments suivants.
ALARM IN 1 ~ 8: Port d'entrée d'alarme
ALARM RESET: À la réception d'un signal de réinitialisation d'alarme, le système annule l'entrée de l'alarme en cours et reprend la détction.
ALARM OUT 1 ~ 4 : Port de sortie d'alarme
N.C
connexion à d'autres périphériques
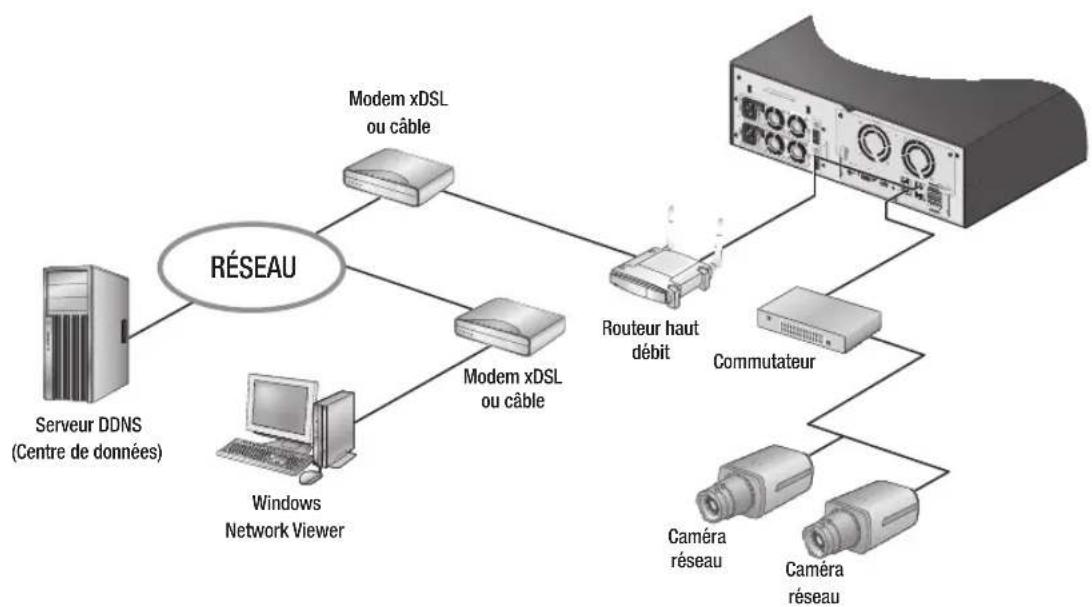
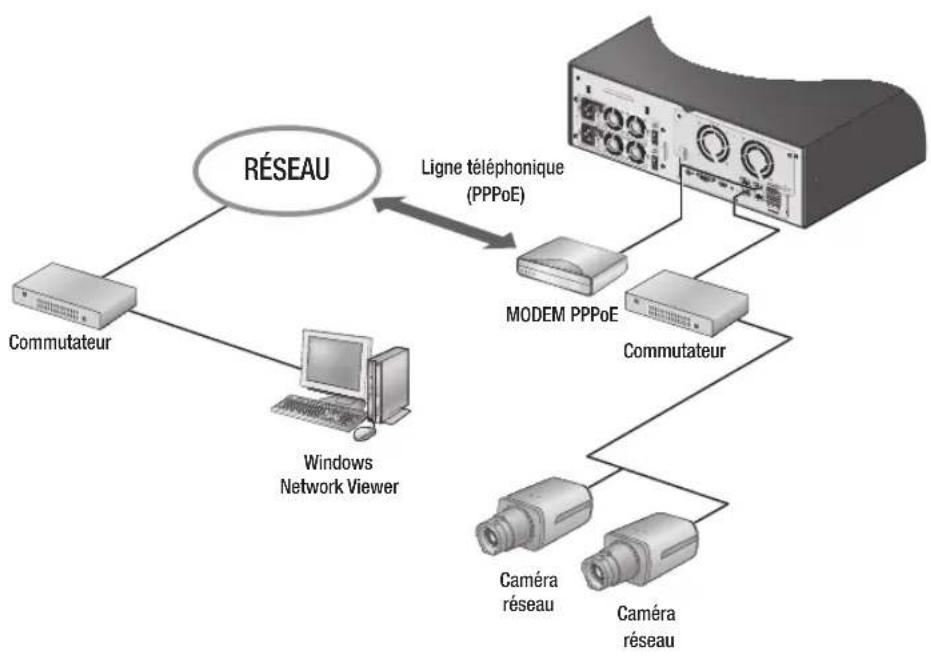
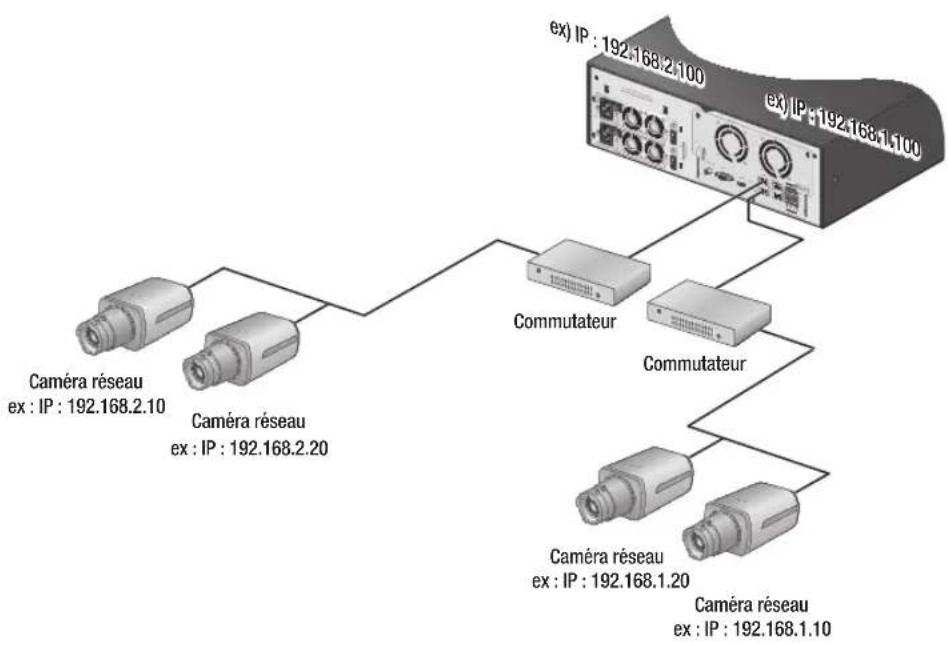
CONNEXION RÉSEAU
Pour plus d'informations sur la connexion au réseau, reportez-vous à « Configuration réseau » (Page 80)
Connexion au réseau via Ethernet (10/100/1000BaseT)
Connexion au réseau via un routeur
connexion à d'autres périphériques
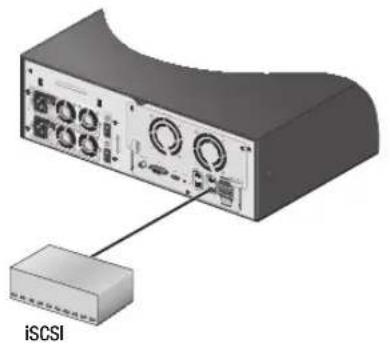
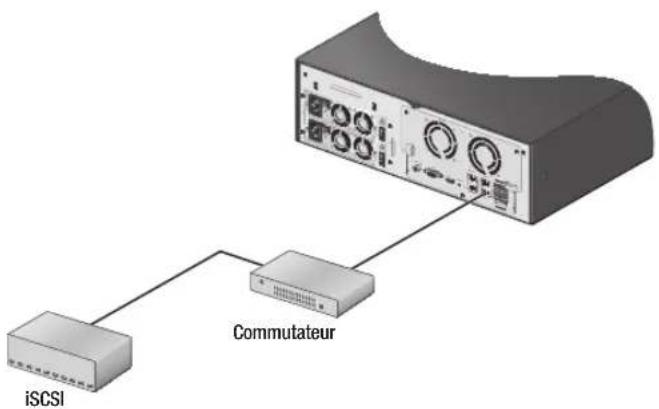
Connector le iSCSI
Connector directement au NVR
Un commutateur peut être utilisé pour la connexion
Démarrage du système
Branchez le cordon d'alimentation de l'enregistreur réseau dans la prise murale.
Si I'alimentation est connectee, appuyez longuement sur le bouton d'alimentation à l'avant.
L'écran d'initialisation apparait.
Le processus d'initialisation nécessite environ 2 minutes.
Si un nouveau disque dur est installé, le processus
d'initialisation pourra s'avérer plus long.
Easy Setup
Ce paramètre permet de configurer facilement langue, ID / mot de passer, reseaux, et date / heures.
L'écran d'initialisation apparait lorsque vous démarrez le produit. Ensuite l'écran apparait. pour passer à l' étape suivante.
Àprouv avoir entré et confirmé le, appuyez sur le bouton pour passer à l'étape suivante.
Àpès avoir configuré l'environnement de l'accès réseau, appuyez sur le bouton pour passer à l'étape suivante.
Avec avoir configuré la date / heures, appuyez sur le bouton
pour lancer la fenêtre popup d'enregistrement de laamera.
Appuyez sur le bouton pour lancer I'ecran d'enregistrement de laamera et appuyez sur le bouton
pour lancer I'écran en direct.
Pour en savoir plus sur comment enregistrer uneamera, reportez-vous à la section « Pour enregistrer uneamera » (Page 51)
La fenetre d'enregistrement de la camera apparait uniquement lorsqu'il n'y a pas de camera enregistree sur un canal.
ÀpRES que toutes les étapes soient terminées en utilisant les informations IPv4 du réseau régles à l' étape 4, le serveur DHCP commercera automatiquement a fonctionner de nouveau.
La camera peut être recherchée en moins d'une minute après le démarrage du serveur DHCP.
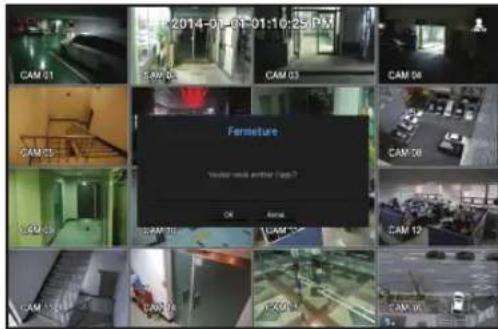
Arrêt du système
Dans le menu de l'écran en direct, Sélectionnez .
La fenêtre contextuelle de confirmation « Fermeture » s'affiche.
Cliquez sur OK> Le système s'eteint.
Seul l'utilisateur ayant I'autorisation de «Fermeture » peut eteindre le systeme.
Pour la gestion des droits d'accès, reportez-vous à « Utilisateur >Réglages des droits d'accès ».(Page 44)
Connex
Si you souhaitez acceder a un menu spécifique de l'enregistreur reseau ou a un menu restreint, vous devez obtenir le droit d'acces correspondant.
Cliquez avec le bouton croit de la souris sur l'écran du mode en direct.
Sélectionnez . La boîte de dialogue de connexion apparait.
L'identifant initial de l'administrateur est «admin» et le mot de passage doit être définis lors de la première connexion.
Pour la restriction des droits d'accès, reportez-vous à « Utilisateur > Réglages des droits d'accès » (Page 44)
CONFIGURATION DE L'ÉCRAN LIVE (DIRECT)
Icônes de l'écran Live (Direct)
Vou puez verifier l'etat ou le fonctionnement de I'enregistreur reseau a I'aide des icones de I'ecran Live (Direct).
Nom Description 1 Date et heures actuelles Affiche l'heure et la date actuelles. 2 Infos connexion Lorsque vous étés connecté, l'icône « LOG ON » s'affiche. 3 Mode Écran L'affichage apparait lorsqu'une sauvegarde est en cours dans les conditions en direct. REC Si l'accès au menu d'annulation de l'enregistrement est limité, alors il s'affiche uniquement quand il y a un enregistrement manuel en cours.
■ Seul un utilisateur avec le droit d'annuler l'enregistrement peut le faire. + Il s'affiche lorsque la fonction d'agrandissement est en marche. # Cette icône est affichée lorsque vous appuyez sur la touche Figer. √ Il s'affiche lorsque tous les canaux sont commutés à l'intervalle de temps défini. 4 Fonctionnement du système Il s'affiche lorsque le ventilateur a un problème. # Il s'affiche lorsque l'alimentation a un problème. # Il s'affiche lorsque la date d'enregistrement ne peut être reçue correctement en raison d'un problème lié à l'appareil. # S'affiche lorsque le disque dur est plein et l'enregistreur réseau dispose d'un espace insuffisant pour l'enregistrement. # S'affiche en l'absence de disque dur installé ou lorsque le disque dur existant doit être remplaça. # S'affiche lorsque le disque dur nécessite une vérification technique. Nom Description 4 Fonctionnement du système PFDI Il s'affiche lorsqu'il y a un disque dur défectueux dans le RAID. Il y a une ou deux défaillances du disque dur mais vous pouvez toujours le dire ou écrire dessus. Il s'affiche lors de la récapération d'une erreur du RAID. Il s'affiche lorsque vous ne pouvez pas écrire sur le RAID en raison d'un dysfonctionnement du disque dur. Il s'affiche lorsque la quantité maximal autorisée de données pour chaque canal est dépassée. Il s'affiche lorsque, en raison d'une déterioration des performances du réseau (10fps ou moins), la fonction AMD échoue. Il s'affiche lorsqu'un pérophérique iSCSI est déconnecté. Il s'affiche lorsque le réseau est surcharge. Il apparait lorsque l'allocation de réception maximale est atteinte, provoquant une surcharge du microprocesseur. Il disparait si vous modifie les paramétres de laamera ou supprimez uneamera pour réduire le charge de la performance. Il s'affiche lorsqu'il y a un micrologiciel disponible pour la mise à jour du serveur. 5 État de l'entrée videoe 0 SANSU Si uneamera est en <ARRÉT>, ou si aucuneamera n'est enregistrée, ou qu'elle est en mode <Cache2>, rien ne sera affché sur l'écran. Si laamera est réglée sur <Cache1>, la vente s'affiche mais pas les menus OSD. 6 Titre / canal deamera Affichage du titre de laamera et du numéro du canal. 7 Fonctionnement de laamera PZ AFFiche l'activation/là mise en sourdine audio. Ne s'affiche pas en mode video en cas de désactivation. Si le capteur est régé sur <ON>, le signal d'entrée s'affiche sur l'écran du canal connecté. Cette icône est affichée lorsque D'étection de mouvement est régé sur <ACTIVÉE> et qu'un mouvement ou un événement deamera est déclenché. Il affiche l'état de l'enregistrement général /evénement /prévu. Il s'affiche quand il ne parvient pas à décoder toutes les trames en raison de la performance de décodage limitée et dans ce cas seul l'I-Frame est décodé. Il s'affiche quand un événement AMD se produit.
Info erreur
Si le disque dur intégré n'est pas connecté, l'icone « PAS DE DD » ( — ) s'affiche dans le coin supérieur gauche. Le cas échéant, contactez le centre de dépannage pour demander de l'assistance car ceci peut provoquer un dysfonctionnement au niveau de l'enregistrement, de la lecture ou de la sauvegarde.
Si le ventilateur ne fonctionne pas correctement ou connait une défaillance, la fenêtre apparait et l'icone (♂) signalant la défaillance du ventilateur s'affiche dans le coin supérieur gauche.
Dans ce cas, vérifie que le ventilateur interieur fonctionne.
Une défaillance du ventilateur pouvant raccourcir la durée de vie du produit, veilles à contacter le centre de dépannage pour demander de l'assistance.
Si you voez s afficher a I'ecran les icones Err. ventil., PAS DE DD ou Echec disque dur, contactez le centre de depannage pour de plus amples renseignements.
Si vous cliquez avec le bouton droit de la souris en mode d'écran en direct, l'opération lancera le menu de l'écran en direct où vous pouvez acceder à chaque menu.
Le menu contextual est différent selon si vous étés connecté ou non, en mode de partage et selon les états de fonctionnement de l'enregistreur réseau.
Selon les droits d'accès de l'utilisateur, vous pouze avoir un accès limiteaux éléments du menu de Live View, Sauvegarde, Arrêt de l'enregistrement, Recherche, PTZ, Sortie d'alarme à distance et Quitter.

Le menu mode unique n'est disponible qu'en mode Unique.
Le menu contextuel du mode 1 canal en mode partagé est différent de celui qui s'affiche en mode Unique.

Menu Description 1 Plein écran Sélectionnez le canal souhaité puis cliquez dessus en mode Mosaïque pour basculer sur le mode plein écran du canal sélectionné. 2 Commande PTZ Permet d'acceder au menu Commande PTZ. Le menu PTZ sera actif sur l'écran Live (Direct) après avoir sélectionné un seul canal. (Page 37) 3 ZOOM Vou陏vez agrandir l'écran sélectionné. (Page 34) 4 Prise Capture l'écran du canal sélectionné.
En mode Live mosaïque, effectuez un cli croit pour afficher le menu contextuel comme indiqué. En mode mosaïque, le menu contextuel est différent selon les états connecté/deconnecté.

Menu Description 1 Mode Scène Permet de sélectionner un mode pour l'écran Direct.
Se reporter à « Mode Écran Live (Direct) ».(Page 30) 2 Info canal Il affiche les informations de connexion de laamera pour chaque canal.
Reportez-vous à la section « Informations relatives au canal ».(Page 31) 3 État en direct Affiche l'état en direct de laamera connectée à chaque canal.
Se reporter à « État en direct »(Page 33) 4 État de l'enreg. Affiche l'état de l'enregistrement de chaque canal.
Reportez-vous à « État de l'enreg. »(Page 33) 5 Mise en page Définissez la mise en page de chaque canal.
Reportez-vous à la section « Mise en page ».(Page 35) 6 Audio activé/désac. Permet d'activer/mettre en sourdine le son de la voie sélectionnée.
Se reporter à « Activation/désactivation Audio ».(Page 35) 7 Gel Permet d'interr compromise momentarilyément la lecture de la video. Se reporter à « Gel ».(Page 36) 8 Arrêter alarme Permet d'arrêter la sortie d'alarme, de désactiver l'iconde d'événement et de désactiver le séquencerage automatique.
Se reporter à « Surveillance des Événements ».(Page 36) 9 Enreg./Arrêt Permet de démarrer/arrêter l'enregistrement standard. 10 Lecture Se reporter à « Recherche et lecture > Lecture ». (Page 96) 11 Recher. Se reporter à « Recherche et lecture > Recher. ». (Page 92) 12 Sauveg Recherche un périhérique de sauvégarde et exécute la sauvégarde pour chaque canal, ou programme la sauvégarde pour plus tard à un moment plus préféable. 13 Menu Accédez au menu principal. Reportez-vous aux paramètres du menu. (Page 40) 14 Rég rapiède Les écrans « Caméra Enregist. » et « Réglage d'enregistrement » apparaissent immédiatement. 15 Fermeture La boîte de dialogue de fermeture du système apparaît. 16 Afficher/Masquer
Lanceur Permet d'afficher ou de masquer le lanceur. Se reporter à « Visualiser le menu Lanceur ».
(Page 29) 17 Connex/Déconn Permet de vous connecter ou de vous déconnecter.
Le menu Lanceur apparait au bas de I'ecran Direct.
1. Sélectionnez dans le menu contextual de l'écran Direct.
2. Positionnez le curseur sur le bouton et cliquez sur l'element de votrechioix dans le menu Lanceur.

Si aucune entree n'est saisie pendant 10 secondes, le menu disparait de I'ecran.
Le menu Lanceur n'est accessible que via la souris.

Layout 01 Layout 01 1 3 4 5 2 6 7 9 10 8 11 12 Menu Description 1 Mise en page Sélection nez la mise en page à afficher sur l'écran. 2 Réglage de la mise en page Vous pouvez définir, modifier ou supprimer la nouvelle mise en page de chaque canal. 3 Mode Écran Permet d'afficher une liste des modes de partage disponibles dans une barre d'outils.
Le mode d'écran actuel s'affiche en gris. 4 Bouton Extension de menu Cliqueur sur ce bouton permet d'afficher le menu masqué à droite. 5 Sauveg Recherche un pérophérique de sauvêgarde et exécute la sauvêgarde pour chaque canal, ou programme la sauvêgarde pour plus tard à un moment plus préféable. 6 Zoom Permet d'agrandir la zone sélectionnée. Ceci n'est disponible qu'en mode Single Live. 7 PTZ Si laamera réseau connectée au canal sélectionné prend en charge les fonctions PTZ, ce bouton permet d'activer le lanceur de commande PTZ. Ceci n'est valable que pour le mode Live unique. 8 Alarme Permet d'accêter l'alarme si celle-ci est activée. Menu Description 9 Gel Permet de geler temporairement l'écran Live (Direct). 10 Prise Capture l'écran du canal sélectionné. 11 Lecture Permet de basculer en mode Lecture en cas d'existence d'un fichier à生存, et dans le cas contraire, de passer en mode Recherche. 12 Enreg. Permet de démarrer/d'arrête l'enregistrement de l'écran Live (Direct).
MODE ÉCRAN LIVE (DIRECT)
Vou puez dire qu'a 64 canaux video en direct en mode unique, en mode en 6 ou en mode sequence auto.

L'enregistreur video en reseau (NVR) en direct demande le profil de la camera le plus proche pour chaque taillde canal. Prenez l'exemple du mode d'ecran en 16 sur le moniteur 1280x1024. Chaque taillde canal sera de 320x256. Si le profil de la camera connectee prend en charge trois résolutions de 1920x1080, 1280x1024 et 720x480, I'enregistreur video en reseau demande le profil le plus proche sur 720x480.
Basculement en mode partagé
Voupez ealement lre 64 canaux en direct dans I'ordre de : modes Unique, Divise en 4 parties, Divise en 9 parties et Divise en 16 parties.
Sequence auto


En mode partagé, lorsque vous avez spécifique sous « Réglage du péripérisque > Écran », la fonction Sérieance auto est executée selon l'intervalle défin. (Page 70)
Lorsque you changez de voie, la video peut etre differée selon I'etat du reseau.
Basculement manuel
Cliquez sur la touche fléchéée < / > pour passer au mode partagé suivant.
- Si vous appuyez sur le bouton de croite] [en Mode partagé en 16 :
Canal (canaux CH 1 à 16) → Canal (canaux CH 17 à 32) → Canal (canaux CH 33 à 48) → Canal (canaux CH 49 à 64)


Selectionnez dans le menu de l'écran en direct pour vérifier l'état de connexion de laamera à chaque canal.

Réglage de voie
Yououpouvezafficherlavoiedanslazonedevoretchoixd'unécranpartagé.
1. Positionnez le curseur sur le nom de la camera de chaque voie afin d'afficher la touche < > sur la droite de l'écran.
2. Cliquez sur un nom deamera afin d'afficher une liste de voies parmi lesquels vous pourrez selectionner une voie différente.
3. Cliquez sur la voie que vous souhaitez selectionner.
Cette voie remplacera I'actuelle.
Utilisez le curseur pour selectionner une voie à déplacer, faites-la glisser et déposez-la sur la voie souhaitee.
Cette action peut également modifier la position de la voie.
Ex: en basculant de la voie 1 à la voie 7
CH1 CH2 CH3 CH4 CH5 CH6 CH7 CH8 CH9 CH10 CH11 CH12 CH13 CH14 CH15 CH16
Basculement en mode Unique
En mode partagé, selectionnez et double-cliquez sur la voie de votre choix pour passer sur son mode Unique.
Ex:Lorsque yousdouble-cliquez sur la voie 一 3
Q=1 CH2 G=3 CH4 Q=5 CH6 G=7 CH8 Q=9 CH10 G=11 CH12 Q=13 CH14 G=15 CH16
Etat en direct
Selectionnez à partir du menu de l'écran en direct afin d'afficher l'etat et les informations de transfert de laamera connectée à chaque canal.
- Modèle : Affiche le nom du modele de laamera reliée à chaque canal.
- État : Affiche l'etat de connexion de laamera définie pour chaque canal.
: Affiche l'adresse IP d'une camera definite sur chaque canal.
- Codec : Affiche le profil en direct des informations de codec pour uneamera définie sur chaque canal.

- Résolution : Affiche la résolution du profil en direct d'uneamera définie sur chaque canal.
- Vit. image : Affiche le taux de transmission de profil en direct pour une camera définie sur chaque canal.
- Qualité : Affiche la qualité de transmission de profil en direct pour uneamera définie sur chaque canal.
Etat de l'enreg.
Selectionnez à partir du menu de l'écran en direct afin d'afficher le profil de laamera, la vitesse de prise de vue entrée/enregistrement et la vitesse bps entrée/limite/ enregistrement de chaque canal.
- Débit binaire total (enregistrement/maxi.): le débit binaire d'enregistrement affiche la quantité de données en cours d'enregistrement tandis que le débit binaire total indique le transfert de données maximal autorisé par le NVR.
- Profil : affiche le profil video configuré pour chaque canal.
- Image (ips): Affiche la fréquence d'images par seconde (entree/enregistrement) pour chaque canal.
- Débit binaire. (bps)

- Limite / Entre / Enreg. : affiche la quantite de donnees limite/d'entree/d'enregistrement pour chaque canal.
- Ent. / Limité: affiche le ratio entre les données en cours de transfert depuis laamera et le maximum autorisé tel qu'il a été définir par l'utilisateur.
- actuel : affiche l'etat d'enregistrement des données en cours de transfert.
- MAX : affiche les informations d'enregistrement relatives aux plus grandes données d'enregistrement ; cela, a partir de la norme configurée et des événements enregistrés.

: recharge les informations d'enregistrement.
- Conf enr: L'écran de menu bascule sur l'écran de réglage d'enregistrement.

- Un message d'ajretissement peut apparaitre en fin de listede si le profil selectionné est remplaced par le NVR avec un profil disponible différent. Cela peut se produire si le profil selectionné n'arrive pas à produit des données video. Si l'écran affiche de la video, l'enregistreur revient au profil selectionné et son nom s'affiche en jaune dans la liste.
Si I'enregistrement Vit image cle depasse la quantite de donnees autorise specifiee par le debit binaire limite, une fenetre contextuelle d'alerte et un icone apparaissent a I'ecran.
La fenêtre contextuelle d'alerte signalant un enregistrement limite ne se repete pas après s'être affichee une fois sauf si les parametes de la camera ou de I'enregistrement sont modifiés. Elle peut apparaitre a nouveau si les parametes sont modifiés pour notification d'un tel statut.
Si vous souhaitez configurer que la fenetre contextuelle d'alerte ne doit pas apparaitre, modifiez votre réglage
afin qu'il n'affiche pas les fenêtres contextualles.
Pour plus d'informations sur la limite de débit binaire des données d'enregistrement, reportez-vous à « Reglage de
I'enregistrement. (Page 73)
ZOOM
Cette fonction n'est active que pour le mode Live unique.
Si you utilisez la fonction Loupe apres avoir selectionné un seul écran, la zone selectionnée sera agrandie par 2.
1. Dans le menu de l'écran en direct, Sélectionnez .
Vou puez égarlement cliquer sur < 心 > dans le menu de lancement.
L'icone Loupe dans le milieu de I'écran s'affiche.
2. Faites glisser et déposer avec votre souris pour sélectionner la zone à agrandir.
3. Double-cliquez dessus pour agrandir la zone selectionnee par 2.
- Dans l'écran agrandi, vous pouvez glisser et déposer la zone sélectionnée pour l'agrandissement.
4. Dans le menu de l'écran en direct, Sélectionnez .
Cliquez sur < 一 > dans le menu de demarrage pour libérer la fonction d'agrandissement.


Normal>
Dans l'écran en direct, vous pouvez définir la mise en page pour chaque canal.
1. Sélectionnez la . L'écran de configuration de mise en page apparait.
- Nouveau : Vous pouvez configurer une nouvelle mise en page.
- Renommer : Vous pouvez apporter des modifications à la mise en page sélectionnée.
La modification de la mise en page entraine l'initialisation de l'ordre des canaux.
Suppr : Vous pouvez supprimer la mise en page selectionnée.
- Tableau canau : Vous pouvez selectionner les canaux dans tableau à enregistrer ou à supprimer de la mise en page.
- Lieste canaux : Vous pouvez selectionner les canaux dans la liste à enregistrer ou à supprimer de la mise en page.
2. Appuyez sur le bouton et entrez le nom de la mise en page à ajouter.
3. Dans le ou , cliquez sur et selectionnez le canal à afficher sur l'écran de mise en page.
4. Cliquez sur pour sauvegarder la mise en page sélectionnée.


La division d'écran de chaque utilisateur est enregistrée séparément.
ACTIVATION/DÉSACTIVATION AUDIO
Vou puez activer/desactiver le son correspondant à la voie en mode Live (Direct).
ACTIVATION/DÉSACTIVATION audio en mode Unique
Cliquez sur I'icone audio (I sur I'ecran pour la mesure en mode ARRET/MARCHE.

Si you ave correctement configre la sortie audio mais qu'aucun son n'est emis, verifiez si la camera reseau connectee.
pend en charge le signal son et si you ave correctement configre les parametes du son. L'icone du son peut s'afficher si le signal de son n'est pas emis.
Seule la voie pour laquelle l'option est reglee sur sous « Periph > Camera » affiche l'icone audio ( ) en mode Live (Direct) dont vous pouvez vous servir pour activer/desactiver le son.
GEL
Ct i t l.
1. Cliquez sur < 品> du mode de demarrage. La video en cours de lecture est en pause.
2. Cliquez sur < > La Pause est annulée. La lecture reprend.
SURVEILLANCE DES ÉVÉNEMENTS
Cette fonction affiche la voie en synchronisation avec un événement spécifique (Capt./Enr mvt/Perte video) s'il se produit. Dans « Écran > Affichage évén.», activez ou désactivez la surveillance des événements et spécifique leur heures d'affichage. (Page 70)
- Si plusieurs événements se produit simultanément, l'écran bascule en mode partagé.
- 2 à 4 événements : Mode partagé en 4
- 5 à 9 événements : Mode partagé en 9
- 10 à 16 événements : Mode partagé en 16
- Si le deuxième événement se produit durant la période définie pour , le premier événement durera jusqu'à la fin du second.
Ex: lorsque vous reglez sur 5 secondes et qu'un seul événement se produit sur la voie 1.

Ex: lorsque vous reglez sur 5 secondes et qu'un deuxieme événement se produit sur la voie 2 durant la période définie après que le premier événement se soit produit dans la voie 1.


Selectionnez pour initiaiser l'etat de sortie d'alarme et désactiver la fonction de I'evénement.
Si vous avez déterminé une émission d'alarme à l'heure d'un pré-evénement ou d'un post-evénement dans les réglages d'enregistrement d'un événement, cet enregistrement d'évenement s'effectue selon le type spécifique (pré-evénement ou post-evénement).

En cas d'evénements en continu tels que la détction de mouvement, commuter sur un autre affichage de mode partagé peut ne pas etre immediatis une concatenation d'evénements s'enchaine,meme lorsque vous avez arrete l'alarme de I'evénement.
La video peut être différée en fonction de l'etat du réseau.
La sortie d'evénement peut etre differe du fait du temps neceassaire au transfert de I'evenement provoant l'alme depuis la camera du reseau.
COMMANDPETZ
Avec cet enregistrure reseau, vous pouvez configurer les reglages d'une camera PTZ aussi bien que ceux des cameras du commerce selon vos préférences.
Péripétrique PTZ
Ce périphérique n'est actif que si une voie connectée à laamera PTZ est seLECTIONnée.
Mise en route des fonctions de laamera PTZ
Laamera PTZ ne sera activée que si sa voie est selectionnée, ce qui peut etre effectue comme suit :


- À l'aide du menu du lanceur : cliquer sur > dans le menu du lanceur de l'écran Live (Direct).
- À l'aide du menu de l'écran Live (Direct) : Sélectionnez dans le menu contextuel de l'écran Live (Direct).
- A l'aide des icones de l'écran Live (Direct) : cliquez simplement sur I'icone 1 sur l'écran Live (Direct).

Cettefonctionn'estdisponibuequeisiacameraPTZestconnecteeetque son < _口> icone est affiché sur I'ecran.
Meme si la camera reseau connectee ne prend pas en charge les fonctions PTZ, vous pouvez configurer les reglages de commande PTZ (si possible) en installing le pilote PTZ (periphérique physique).
- Cette fonction prend en charge uniquement une camera reseau avec la fonction PTZ de Samsung Techwin et une camera enregistrree dans l'ONVIF.
utilisation de laamera pTZ
Voupeus utilise une camera PTZ unique pour executer les fonctions panoramicque, inclinaison et zoom pour contrcler plusieurs lieux, et personaliser les preréglages d'un mode souhaite.

1. Ouvrez le menu .
L'icone <[PTZ] en bas à gauche sur l'écran devient jaune, ce qui indique que le système est passé au mode « pTZ Commande ». Vous verrez apparaitre le menu du lanceur « pTZ Commande »

Le signe de fonctionnement (actif) PTZ peut etre actif meme si ce fonctionnement PTZ n'est pas disponible en mode normal.
Veillez donc a terminer les reglages PTZ avant la procedure.
2. Utilisez la Roue de PTZ dans le menu de lancement pour ajuster l'emplacement de l'enregistrement par une camera.
Sensibilité: Ajustez la sensibilité des contrôles Pan et Tilt.
- Molette PTZ : cliquez sur une zone proche du centre pour déplacer lentement l'objet de laamera. Cliquer sur une zone éloignée la fait déplacer rapidement.
- Clicer et maintainir la souris à gauche fait tourner laamera en sens inverse des aiguilles d'une montre. Clicer et maintainir la souris à droite déplacent l'objectif de laamera dans le sens des aiguilles d'une montre.
- Zoom : permet d'activer la fonction de zoom de laamera PTZ.
- Iris: permet de régler la luminosité entrant dans laamera.
Focus : you pouvez régler la mise au point manuellement.
- Balayage : swing est une fonction de surveillance qui permet de se déplacer entre deux points prédéfinis et vous permet de tracer le mouvement.
- Groupe : la fonction de groupe vous permet de regrouper les divers prêrglages avant de les appeler en séquence.
- Trace : la fonction Suivi memorise la trace des mouvements que vous avez commandés et la produit à des fins de reference.
Tour:Surveille tous les groupes crees par un utilisateur.
Certaines cameras peuvent différer dans le titre du menu et l'opération en ce qui concerne Balavage, Groupe, Tour et Trace.

Meme si la camera reseau prend en charge les fonctions PTZ par defaut, la commande PTZ ne peut etre activee que si son menu correspondant est actif dans le menu du lanceur.
PréRéglage
Le préréglage est une position spécifique ménorisée par laamera PTZ. Vous pouvez utiliser la fonction Préréglage pour en définir jusqu'à 255 pour une seuleamera PTZ.

Pour ajouter un préréglage
1. Cochez la case preréglage.
2. Sélectionnez
Le clavier virtuel apparait sur I'ecran. Utilisez-le pour entre le nom du prereglage.
Reportez-vous à « Utilisation du clavier virtuel ».(Page 42)
- Renommer : vous pouvez modifier les prééglages selon vos préférences.
Suppr:permet de supprimer un preréglage sélectionné.
- Suppr tout : permet de supprimer tous les prêrglages existants.

Vouespuvezajouter jusqu'a255preréglages,valeurmaximale prise encharge par l'enregistreureseau.
Si you remplacez une camera sur laquelle sont sauegardes vos preréglages par une autre, vous nece les reconfigurer.
3. Sélectionner OK>
Les prêrglages seront enregistrés sous le nom donné.
Pour changer ou supprimer un préreglage enregistré

1. Cochez la case des préroglages et Sélectionnez-en un à modifier ou à supprimer.
2. Appuyez sur < ou < selon votre besoin.
:permét de supprimer tous les prérglages existants.

Si you supprimez tous les prerégliages, ceux par defaut specifiés dans la camera reseau pourront également etre supprimés.
3. Entrez un nouveau nom et appuyez sur OK>.
Vous pouvez configurer le système, les périphériques et les options d'enregistrement, d'évenement et de réseau.
CONFIGURATION DU SYSTÉME
Vou puez configurer les Date / Heure / Langue, Utilisateur, Propriétés système et Journal.
Date/Heure/Langue
Vou puez verifier et configurer la date / l'heure actuelle et les propriétés liées au temps, ainsi que la langue utilise pour l'interface à l'écran.


- Date: Permet de configurer la date et le format qui s'affichent à l'écran.
- Heure: Permet de configurer la date et le format qui s'affichent à l'écran.
- Fus. hor.: Définit le fuseau horsaire de votre région sur la base du temps universel (UT).
TU (Temps universel) est le temps universel standard et la base des fuseaux horaires du monde.
- Sync. hor.: Sécicfiez l'utilisation de la synchronisation avec le serveur de temps.
Cliquez sur le bouton pour afficher I'ecran de configuration de synchronisation du temps.
Si vous choisissez d'utiliser , l'heure actuelle sera synchronisée sur une base régulière par le serveur défini comme .
Si c'est le cas, vous ne pouvez pas modifier manuellement la configuration de l'heure.
- Synchronisation : Spécifiez l'utilisation de la synchronisation avec le serveur de temps.
- Serveur synchro. : Entrez une adresse IP ou URL dans le serveur du temps.
- Heure dem. sync.: Affiche l'heure de synchronisation la plus récente du serveur de temps choisi.
- Activ. comme serv.: Configurer sur pour permettre au NVR d'agir comme serveur du temps pour les autres NVR.
- DST: Configurez l'Heure d'été avec sa période pour ramener le temps d'une heures plus tout que le TU de son fuseau horsaire au cours de la période définie.
- Langue : Sélectionnez votre langue. Définit la langue de l'interface.
Anglais, Francais, Allemand, Espagnol, Italien, Chinois, Russe, Coreen, Polonais, Japonais, Nederlandais, Portugais, Turc, Tchèque, Danois, Suédois, Thai, Roumain, Serbe, Croatie, Hongrois, Grec, Finnois, et Norvégien sont pris en charge.
Ferie : Un utiliseur peut selectionner des dates specifiques comme jours feries en fonction de ses propres
préférences.
Les jours fériés sont appliqués dans le ou le réglage également.


par exemple chaque premier jour de l'année est configuré comme un jour férié si vous Sélectionnez 1er Janvier et cochez <1/1>, et chaque premier jour de l'année et tous les premiers mercredis de Janvier sont configures pour etre des vacances si vous cochez <1/1> et .
Pour utiliser le calendrier

1. Sélectionnez l'année et le mois.
Selectionnez la clé < > sur les deux extrémites de l'année et du mois pour revenir / avancer à l'année précédente / suivante ou les trois mois précédents / suivants.
2. Sélectionnez la date et cliquez sur le bouton OK>
Une date est marquee en gris s'il existe des données pour la recherche du journal syste, joural des événements, recherche de temps et recherche d'evénements.
Utilisateur
Vou puez definir des autorisations pour chaque utiliseur pour une fonction et des parametes spécifiques du NVR.
Vou puez defineir et modifier l'ID et le mot de passage de I'administrateur. L'administrateur peut utiliser et fixer tous les éléments et fonction du menu.

- ID:Changer l'ID de I'admin.
- Nouveau : Saisissez un nouveau mot de passer.

L'ID initial de l'administrateur est « admin » et le mot de passée doit être configuré lors de la première connexion.
Veuiliez changer votre mot de passer tous les trois mois afin de proteter les renseignements personnels en toute sécurité et prévenir le vol d'informations.
Sachez que l'utilisateur est responsable de la sécurité et de tout autre problème causé par la mauvaise gestion d'un mot de passer.
Utilisation du Clavier Virtuel


1. La fenêtre du clavier virtuel apparaît pour les entrées alphanumeriques.
2. À l'aide de la souris, cliquez sur l'onglet du caractère désiré.
3. Dans la zone supérieure de saisie de texte du clavier virtuel, il s'affiche une liste de mots candidats contenant le caractère selectionné.
4. Sélectionnez un mot dans la liste, ou utilisez le clavier pour entrer le mot en entier.
S'il y a beaucoup de mots candidats, utilisez les boutons < < > pour se déplacer entre eux en avant et en arriere.
5. Sélectionnez OK>.
Le mot entre est appliqué.
Pour les majuscules, utilisez la touche.
Pour les caractères spéciaux, utilisez la touche .
L'utilisation du clavier virtuel identique à l'utilisation normale du clavier dans notre région.
L'ID accepte uniquement des caractères alphanumerices.
- Un mot de passer doit être une association de chiffres et de lettres avec huit caractères ou plus. Il ne doit pas avoir de caractères spéciaux tels que &', #', <', >', {}, ', '', ' ~'.
Configuration de l'utilisateur
Voupez creer un groupe ou definir des autorisations pour chaque groupe.
Voupez ajouter un utilisateur et modifier les informations de l'utilisateur enregistré.


Si vous désirez ajouter un groupe
1. Cliquez sur le bouton < > pour lancer la fenetre contextuelle d'Ajout de Groupe. Si vous désirez ajouter un groupe, cliquez sur .
2. Appuyez sur l'élément nom du groupe pour lancer le clavier virtuel utilisé pour saisir les noms de groupe. Entrez le nom du groupe à enregistrer.
- Vous pouvez ajouter un maximum de 10 groupes.
Si vous voulez définir des autorisations de groupe
Définir des autorisations pour acceder à chaque groupe.
Les utilisateurs de chaque groupe ne peuvent acceder qu'aux éléments attenants à une coche.

1. Sélectionnez le menu pour définir les autorisations de groupe.
Le menu avec des autorisations d'accès apparait quand un utilisateur du groupe se connecte
- Visu Live : Vous pouvez définir des autorisations pour acceder à l'écran en direct pour chaque canal.
- Recher. : Vous pouvez définir des autorisations pour acceder au menu de recherche pour chaque canal.
- Sauveg : Vous pouvez définir des autorisations pour acceder au menu de sauvegarde pour chaque canal.
- Menu : Vous pouvez sélectionner et configurer le menu de réglage qui peut être consulté. Un utilisateur du groupe ne peut acceder qu'au menu sélectionné. Si vous sélectionné le menu, l'écran de réglage de l'autorisation du menu s'affiche.
- Stop enregis., PTZ, Camde S. alarme, Ferneture: Vous pouvez selectionner ces fonctions à ajouter à des autorisations d'un groupe.
2. Cliquez sur <0k> .
Cochez un utilisateur de groupe pour lui donner l'autorisation d'acceder à l'élement sélectionné.

Si vous voulez enregistrer un utilisateur
1. Cliquez sur le bouton < > pour lancer la fenetre contextuelle d'Ajout d'Utilisateur. Si vous désirez ajouter un utilisateur, cliquez sur < OK> .
2. Sélectionnez un groupe.
Lors de l'enregistrement d'un utilisateur, le groupe sélectionné sera automatiquement enregistré.
- Un groupe peut être modifié après la saisie de toutes les informations nécessaires.
3. Entrez le nom, l'ID, le mot de passer, etCHOISSEZ d'utiliser la visionneuse. Si vous activez l'utilisation de Visualisateur>, vous aurez le droit d'utiliser le web viewer et le network viewer.
4. Cliquez sur OK>. Les informations utilisateurs enregistrées seront sauvegardés.
1. Pour effacer, cliquez sur le bouton [ ]
2. La fenêtre de confirmation de suppression apparait et vous pouvez selectionner un élément à supprimer et cliquez sur .
Configurations des Autorisations
Vou puez définir un accès limite pour tous les utilisateurs généraux. L'utilisation des éléments avec restrictions nécessitant une connexion.

- Accès limite : Tous les éléments de menu autorisés pour un utilisateur peuvent être définis avec un accès restreint.
- (Loche: Restreint
- (mon coché : Accessible
S'il n'est pas coché ( ) dans , n'importe quel utiliseur peut acceder à l'élement quel que soit le paramètre .
S'il est coche ( ) dans , un utiliseur peut acceder à l'elément uniquement s'il a une autorisation dans le parametre .
- Restriction accès au réseau : Restreint l'accès à distance à partir d'un réseau .
- Tous réseaux: Limité tous les cas d'accès via Network Viewer et Web Viewer.
- Web Viewer : Restreint l'accès via le Web Viewer.
- Déconnex. auto: Un utiliseur sera automatiquement déconnecté si aucune opération n'est effectuee sur le NVR pour une période de temps définie.
- Saisie manuelle ID : Dans la fenêtre de connexion,CHOISSES d'entrée un ID.
Si l'utilisateur a un accès limite
Si un nouveau groupe a un accès limite à tous les menus, les utilisateurs de ce groupe peuvent acceder uniquement aux menus de base et ne peuvent changer que leur mot de passer correspondant.
Si toutes les autorisations sont limitées, vous ne verrez que certains éléments de menu accessibles dans le menu de l'écran en Direct.


Modifier le mot de passer utiliseur
Si vous vous connectez avec le compte d'utilisateur d'un groupe à accès restreint, vous ne pouvez changer que votre mot de passer.

1. Fournissez les données de connexion.
2. Sélectionnez . L'écran de gestion des autorisations s'affiche.
3. Sélectionnez . La boîte de dialogue du mot de passer s'affiche.
4. Fournissez un nouveau mot de passer.
5. Sélectionnez OK>. L'ancien mot de passer sera changé pour un nouveau.
gestion du Systeme
Vou puez verifier la version du système, la mise à jour vers une nouvelle version, ainsi que la sauvegarde des données et l'initialisation.
Yououpouvezverifierla versionactuelledulogicieletladresseMACavantdeprocederàlaisemea niveau.

- Info système : Affiche les informations du système actuel.
Les valeurs ne peuvent pas etre modifiées par un utiliseur.
- Version Micom : Ceci est la version du Micom.
- M à J logiciel : Met à jour le logiciel du NVR.
- Nom du péripérique: S'affiche si I'afficheur réseau est connecté à NVR.
Pourmettrea nivea la version actuelle dulogiciel

1. Branchez un périhérique de stockage du logiciel àmettre à jour.
Cela peut prendre environ 10 secondes pour reconnaître le périhérique.
- Les peripériques évolutifs incluent la clé USB et le péripérisque réseau.
Pourmettrea jourle reseau,le NVR actuel doit etre connecte au reseau. La mise a jour via le serveur proxy ne peut pas etre activee en raison de l'acces restreint.
2. Sélectionnez de la fenêtre .
3. Sélectionnez .
4. Lorsque le periphérique reconnu apparait, selectionnez < Mise a jour>.
Si you connectez un périhérique dans la fenêtre de menu de mise à niveau, vous pouvez appuyer sur le bouton < pour rechercher les logiciels disponibles.
S'il y a une image de mise à niveau sur le réseau, la fenêtre contextualue s'affiche.
Le bouton sera activé uniquement si la des est la même ou plus ancienne que celle de .
5. Appuyez sur OK> dans la fenetre « M à J logiciel »
La progression s'affiche键盘 la mise a jour.
6. Lorsque la mise à jour est terminée, l'appareil redémarre automatiquement.
Ne mettez pas l'appareil hors tension jusqu'à la fin du redémarrage.

Si « Éché de la mise à niveau. » apparait, réessayez de l'étape 4. Lorsque vous rencontres un éché continu, consultez le centre de service d'assistance.
Réglages
YououpouvezcopieretimporerlesparametesNVRaI'aide d'un supportde stockage.


- Periph. stock.: Affiche le péripérisque de stockage connecté.
- Exporter: Exporte les paramètres NVR au périphérique de stockage connecté.
- Importer : Importe les paramètres NVR du périhérique de stockage et les applique au NVR.
- Decochez la case d'un élément que vous souhaitez importer
Seuls les articles autres que celui sélectionné seront appliquées au NVR.
- Retour Réglage Usine : Restaure les paramétres d'usine par défaut du NVR.
Décochez la case d'un élément que vous souhaitez réinitialiser. Ensuite, seuls les articles autres que celui sélectionné reviendront aux paramétres d'usine.
Si vous sélectionné , une boîte de dialogue de confirmation pour « Retour Réglage Usine » apparait. Appuyez sur pour initiaïser le système aux paramétres d'usine.

Lorsque you initiaizez le systeme sans changer la , vous nevez saisir l'identifant (ID) et le mot de passage pour vous connecter au systeme après son redemarrage. L'identifant et le mot de passage sont respectivement « admin » et « 4321 »
Veuillez Change le mot de passage après vous estre connecté.
Voupez naviguer dans les journaux du systeme et des événements.
Vérification du journal du système
Le Journal système affiche le journal et l'horodatage pour chaque démarche du système, chaque arrêt du système, et les changements sur les réglages du système.

- Rech date: Cliquez sur l'icone Calendrier pour afficher la fenetre du calendrier, ou utilisez les touches de direction pour indiquer la période de recherche du journal système.
Pour utiliser le calendrier, voir « Pour utiliser le calendrier ».(Page 41)
- Recher. : Spécifiez la date et appuyez sur ce bouton pour afficher le résultat de la recherche dans la liste des journaux.
- Type: Quand il y a trop de journaux, vous pouvez afficher leurs du format souhaite en selectionnant le type.
- Exporter : Conservez toutes les informations consignées enregistrées dans le NVR sur le support de stockage.
Vérification du journal d'événements
Voupe recher des enrgres y compris les alarmes, les evenements des cameras et la perte video.
Il montre également le journal et son horodatage.

- Rech date : Cliquez sur l'icone Calendrier pour afficher la fenetre du calendrier, ou utilisez les touches de direction pour indiquer la période de recherche du journal système.
Pour utiliser le calendrier, voir « Pour utiliser le calendrier ».(Page 41)
- Recher. : Spécifiez la date et appuyez sur ce bouton pour afficher le résultat de la recherche dans la liste des journaux.
- Type: Quand il y a trop de journaux, vous pouvez afficher les journaux du format souhaite en selectionnant le type.
- Exporter : Conservez toutes les informations consignées enregistrées dans le RNV sur le support de stockage.
Vérification du journal de sauvegarde
Voupez saoir qui a sauegarde et les details (temps de sauegarde, le canal, le peripherique autiliser, le format de fichier, etc.)

- Rech date : Cliquez sur l'icone Calendrier pour afficher la fenetre du calendrier, ou utilisez les touches de direction pour indiquer la période de recherche du journal système.
Pourutiliserlecalendrier,voir«Pourutiliserlecalendrier》.(Page41)
- Recher. : Spécifiez la date et appuyez sur ce bouton pour afficher le résultat de la recherche dans la liste des journaux.
Vouspouvez configurer la camera, un periphérique de stockage et un moniteur.
Caméra
Pour enregistrer uneamera
Vou puez enregistrer une camera reseau pour chaque canal et etablr la connexion entre eux.


Aperçu : Affiche la video du canal comme une image courante.
- Protocole : Affiche les informations de protocole d'uneamera reseau enregistrree.
- Modèle : Affiche le nom du modele de laamera.
- Adresse IP: Affiche l'adresse IP de la camera réseau.
- Connexion : Affiche l'etat de la connexion.
- Deb. Bin.: Affiche la volume total des données reçues par le canal.
Performance: Affiche le taux d'occupation de la performance necessaire pour receivevoir la quantite de donnees. Une camera enregistrree avec le protocole RTSP ou ONVIF peut occuper deux fois la capacite de la quantite de donnees existante.

Si le NVR a ete initiaise, il ne peut pas connecter a des cameras. Configure d'abord les parametes de reseau, et ajoute des cameras.
Pour plus de détails sur les paramètres réseau, reportez-vous à « Configuration réseau » (Page 80)
Rechner automatiquement et enregistrer une camera reseau

1. Dans le champs , cliquez sur le bouton .
2. Rechercher uneamera reliée au réseau.
- Une camera déjà enregistrée sera marquee en bleu dans la liste.
Si you recherche a nouveau la camera ou si I'aresse IP est une ancienne adressie IP qui n'avait pas ete assignee par le serveur DHCP (telle que -192.168.1.100), appuyez alors sur la touche < 一> pour verifier si une nouvelle adressie IP a ete assignee. Si I'aresse IP est always la meme, selectionnee alors Assigner adressie IP pour assigner manuellement I'aresse IP.
3. Sélectionner uneamera dans la liste des caméras pour voir un aperçu de son flux video en cours.
4. Cochez la case a cote d'une camera reseau a laquelle vous souhaitez vous connecter.
- Vous pouze selectionner toutes les cameras reseau dans la liste et fournir des et à la fois.
- Cliquez sur un en-tête en haut de liste pour trier la liste selon cet en-tête.

L'enregistrement d'une camera avec un compte d'utilisateur autre qu'administrateur peut limiter le fonctionnement de la camera.
5. Cliquez sur le bouton pour acceder aux et d'uneamera reseau selectionnée.
6. Appuyez sur le bouton pour étabir une connexion avec laamera.
7. Appuyez sur . pour enregistrer laamera selectionnée.
Rechercher manuellement et enregistrer une camera reseau


1. Dans le menu ., cliquez sur le bouton .
2. La fenêtre de recherche manuelle apparait.
3. Sélectionnez un canal et le protocole utilisé pour la connexion à uneamera. Les éléments d'entrée peuvent varier en fonction du protocole sélectionné.
- SAMSUNG: Respectez les protocoles de réseau internes adoptés par Samsung Techwin.
- ONVIF : Signifie que l'appareil prend en charge les protocoques ONVIF. Sélectionnéz lors de la connexion d'uneamera dont le nom ne peut être trouve dans la liste.

La camera ne peut pas etre connecte si le decalage horaire entre la camera ONVIF et NVR depasse plus de 2 minutes.Dans ce cas, synchronisez l'heure de la camera ONVIF pour le NVR ou reglez le temps de la camera et du NVR a un meme serveur NTP (sils sont dans le meme fuseau horaire), ou rendez le NVR un serveur NTP.
- RTSP: Se conformer à la norme RFC 2326, l'un des « (RTSP) Real Time Streaming Protocole » est pour la diffusion en temps réel.
4. Si vous sélectionné le protocole , vérifie les options selon le cas.
- Modèle : Sélectionnez un modele deamera.
- Caméra/Encodeur réseau Samsung : Signifie que laamera / le codeur prend en charge le protocole de SVNP de Samsung Techwin. Pendant la connexion d'uneamera qui ne figure pas dans la liste des camères, sélectionnez laamera réseau Samsung / Encodeur.
- Cependant, vous nevez selectionner le nom du modele adequat de l'appareil, s'il est dans laiste. Certains des modetes de cameras obsoletes ne peuvent pas etre pris en charge.
Les modeles ci-dessous sont abandonnés. Si vous les enregistrez avec ONVIF, certaines fonctions de laamera seront limitées ou provoqueront des erreurs.
Il est recommandé d'enregistrer le protocole Samsung.
- SNB-2000, SNB-3000, SNC-B2315, SNC-B2331, SNC-B2335, SNC-B5368, SNC-B5395, SNC-B5399, SNC-570, SNC-1300, SND-460V, SND-560, SND-3080, SND-3080C, SND-3080CF, SND-3080F, SND-3081, SNP-3301, SNP-3301H, SNP-3350, SNP-3370, SNP-3370TH, SNP-3750, SNV-3080, SNP-3430
- Type d'adresse : Sélectionnez un type d'adresse de laamera.
Le type d'adresse peut etre differenct selon le mode du produit connecté.
- Statique (IPv4)/Statique (IPv6) : Utilisé pour fournir l'adresse IP de laamera manuellement.
- iPOLiS DDNS: Valable uniquely si la camera est enregistree avec le serveur iPOLiS DDNS (www. samsungipolis.com). Fournir le nom de domaine enregistré pour les DDNS ID.
Ex) http://www.samsungipolis.com/snb5000 fournit 工 snb5000 pour iPOLiS DDNS
-URL:Utilisé pour l'entrée d'adresse URL.

- Reportez-vous au manuel d'utilisation de la camera connectée et vérifie les specifications de DDNS pris en charge par la camera.
- Adresse IP: Fournir l'adresse IP de laamera.
- Port périphér. : Fournir le port périphérique de laamera.
- Port HTTP : Fournir le port HTTP de laamera.
- ID: Fournir l'ID de laamera que vous souhaitez enregistrer.
- Mot de p.: Entrez le mot de passer de laamera à enregistrer.
5. Sélectionnez ou pour le protocole et saisissez votre entrée pour chaque champ qui s'affiche.
- Adresse ONVIF / RTSP URL : Entrez l'adresse d'accès RTSP de la camera qui prend en charge le protocole ONVIF ou RTSP.
Pour plus de détails sur l'adresse de RTSP, reportez-vous au manuel de chaqueamera réseau applicable.
- ID: Entrez l'identifant d'accès via le protocole ONVIF/RTSP.
- Mot de p.: Entrez le mot de passer d'accès via le protocole ONVIF/RTSP.
Mode : Selectionnez un mode pris en charge par laamera de reseau en mode connexion RTSP.
- TCP : Le type de connexion à la camera réseau passera à « RTP sur TCP »
- UDP: Le type de connexion à la camera réseau passera à « RTP sur UDP »
- HTTP: Le type de connexion à laamera réseau passera à « RTP sur TCP (HTTP) »
- HTTPS : Le type de connexion à laamera réseau passera à « RTP sur TCP (HTTPS) »
Si vous souhaitez vérifier les détails de l'erreur d'enregistrement de laamera
Si vous avez échoué à enregistrer uneamera, la raison de l'éché sera affichée.
- La connexion a échoué en raison d'une erreur inconnue. : Ce message apparait si l'appareil n'a pas pu être enregistré en raison du statut de connexion inconnu.
- En raison du verrouillage du compte de laamera, l'accès a échoué.: Ce message s'affiche lorsque vous entrez un mauvais ID / mot de passer 5 fois pour vous connecter sur le compte de laamera.. Essayez de vous connecter à nouveau après 30 secondes. Si le même message apparait, vous devrez peut-être vérifier si quelqu'un a essayé d'acceder à votre compte deamera de l'extérieur.
- Connexion réussie.: Ce message apparait si laamera est connectée avec succès.
- Information de modulo incorrecte. Fournir les informations de modulo correct.: Ce message s'affiche si les informations du modulo fournies pour l'enregistrement de laamera sont incorrectes.
- Échec de l'authentication : Ce message s'affiche si l'ID ou le mot de passer fournis pour l'enregistrement de laamera sont incorrents.
- La connexion a échoué car trop d'utilisateurs essaient simultanément l'accès. : Ce message apparait si le nombre d'utilisateurs simultanés dépasse la limite supérieure.
- La connexion a échoué en raison d'informations de port HTTP incorrectes.: Ce message apparait si le nombre de port HTTP de laamera n'est pas valide
- La connexion a échoué. État de connexion inconnu.: Ce message apparait si laamera n'a pas réussi à se connecter en raison d'une erreur inconnue.
- Modification de modulo de l'utilisateur : Lors de l'enregistrement d'une nouvelleamera, elle est nommée en fonction des paramétres par défaut du périphérique si l'utilisateur règle le modulo sur . En cas d'éché de l'enregistrement automatique, l'utilisateur peut changer le nom de modulo de laamera à enregistrer.
Modifier le profil de laamera
Lorsqu'uneamera est ajoutée pour la première fois, elle est ajoutée comme profil par défaut de H.264, MPEG4 et MJPEG dans l'ordre temporairement.
Pour modifier son profil, reportez-vous à la section « Réglage du profil d'enregistrement de la camera reseau » (Page 74) ou « Configuration du Direct » (Page 61).

En cas d'enregistreur video en reseau, si vous reglez 3 profils differents pour un profil en direct, d'enregistrement et de reseau, une camera produira des flux video en consquence, disposant de formats de flux différents. Notez surtout que le profil en direct peut varier en fonction du mode de partage d'écran utilisé.
Pour les cameras, en cas d'application avec seulement un profil, la vitesse d'enregistrement produit est fixe comme spécifié par l'appareil. En cas d'application avec des profils multiples, la vitesse d'enregistrement du flux de la vente produits n'est pas garantie. Par exemple, en cas d'application avec 2 profils de 30 fps, laamera peut transmettre des flux à 20 fps.
Configuration ONVIF
Dans le bas de l'écran d'ajout de laamera, cliquez sur le bouton pour définir les paramétres supplémentaires des cameras avec le protocole ONVIF.
Vou puez modifier les informations unquement si le compte utiliseur (comte de la camera utilise pour l'enregistrement de la camera) est utilise pour dire les informations de I'utilisateur et une connexion est etable avec le privilege dadministration.
Profil

Voie : Il affiche la liste de caméras enregistrées avec le réglage ONVIF.
- Ajouter profil : Vous pouvez ajouter un profil deamera.
Après l'ajout d'un profil, cliquez sur le bouton < OK> pour I'ajouter a la liste.
- Suppr : Àpès avoir sélectionné le profil à supprimer, cliquez sur le boutonSuppr pour le supprimer.
- Informations profil : Vous pouvez définir les détails du profil sélectionné.
Après avoir terminé le réglage de chaque éléments, cliquez sur le bouton pour enregistrer les modifications.
Utilisateur

- Ajouter utilis. : Vous pouvez ajouter un utilisateur deamera.
Après l'ajout d'un utiliseur, cliquez sur le bouton pour l'ajouter à la liste.
- Suppr : Àpès avoir séLECTIONné l'utilisateur à supprimer, cliquez sur le bouton pour le supprimer.
- Informations utilisateur : Vous pouvez définir les détails de l'utilisateur sélectionné.
Réseau
You pouvez définir les détails du réseau.

Type d'IP : Choisissez parmi les types d'IP IPv4/IPv6.
- DHCP: Sélectionné si vous souhaitez utiliser le DHCP.
DNS / Serveurs NTP : Uniquement si le parametre DHCP est sur, la case DHCP est activée.
Si le DHCP est coché, vous pouvez enter manuellement l'adresse IP.
Relais
Yououpouvezdéfinirles détailsdrelais.

Sortie numérique : Vous pouvez selectionner un canal de sortie numérique.
Mode relais : Sélectionnéz soit le mode stable bi soit le mode mono.
Relais en attente : Sélectionnez le mode de veille relais ouvert ou fermé.
- Attente: Sélectionnez le temps d'attente de l'opération de relais.
Événement
YououpezdefinirledetallsdeI'evénement.

- Événements compatibles (caméra) : Il affiche la liste de tous les événements pris en charge par uneamera en utilisant le protocole ONVIF.
- Evén. Comp. NVR : Vous pouvez mapper la liste des événements pris en charge par uneamera à des événements que le NVR peut détecter. Il n'y a pas de valeur par défaut. Il ne montre que la valeur envoyée par uneamera.
Configuration de laamera
Vou puez modifier les parametes video d'une camera reseau enregistrree pour chaque canal.

- Ajout : Vous pouvez ajouter un profil deamera. Cliquez sur le bouton Ajout pour lancer la fenetre d'ajout. Entrez l'information et cliquez sur le bouton pour l'aigueter à la liste.
- Suppr : Vous pouvez supprimer le profil sélectionné de la liste.
- Sélection de laamera : Sélectionnez le canal de laamera pour changer les paramétres de transmission video.
- Profil : Montré un profil video pour laamera connectée.
- Codec : Montré les informations codec pour le profil sélectionné.
- Résolution : Vous pouvez changer la résolution du profil sélectionné.
Vit. image : Yous pouvez changer la fréquence de transmission du profil sélectionné.
- Qualité : Vous pouvez changer la qualité video du profil sélectionné.
- Contr. déb. Bin. : Vous pouvez changer le début binaire pour la transmission video du profil sélectionné.

Si vous modifiez les parametes d'un profil spécifique pour chaque mode, la portée effective de la vitesse de transmission peut etre modifiee en consequence.
Ex) si vous définièsez le taux de transmission du premier profil à 30fps, le taux d'envoi du deuxième profil sera changé à 15fps.
Les elements de menu, sauf Codec, Resolution, Debit de transfert, et Qualite de transfert peuvent etre configres dans le menu des parametes de la camera reseau.
Si you modifie les parametes du profil en cours, vous pouze nxtrner une lecture interrompe de l'enregistrement ou de Iecran en direct pour un certain temps.
- Les modifications apportées à la page de configuration de laamera sont appliquées immédiatement, tandis que les modifications apportées via la page Internet de laamera peuvent nécessiter jusqu'à 3 minutes.
Régl.
Dans le bas de l'écran de réglage de laamera, appuyez sur le bouton pour régler votre apparéil tout en regardant la vente en direct de laamera sélectionnée.

Si voire camera ne prend pas en charge SUNAPI ou les autorisations d'administrateur, vous ne pouze pas vous y connecter. En outre, vous serez dirigé vers la page de la camera avec le premier numero.
Pour plus de renseignements sur les réglages de laamera, veuillez vous reférer au manuel de l'utilisateur. Les paramètres et specifications opérationnelles varient en fonction de chaqueamera.
- Cette fonction n'est pas prise en charge sur certains modèles.
SSDR
S'il existe une différence significative entre les zones noires et les zones claires, augmentez la luminosité des parties sombres pour dévelopir le niveau de luminosité de l'ensemble de la zone. Le mode, le niveau et la gamme D peuvent être régles.

Ctre/jour
Vou puez afficher les zones claires et sombres. Les mode, niveau WDR, niveaux de noir / blanc WDR peuvent etre regles.

Expositi.
VoupeuzreglerI'expositiondevotrecamera.
Le reglage de la luminosité, l'obturator, SSNR, Sens-up, obturator / objectif et les gains peuvent être régles.

Jour/Nuit
Vou puez modifier le mode pour ajuster la couleur et le contraste.
Le mode, le temps, le changement de luminosité, l'heure de l'alarme, entree / sortie d'alarme, négatif couleur, commutation jour / nuit et simple mise au point, ainsi que le temps d'activation peuvent etre regles.

Spécial
DIS (anti-tremblements), l'utilisation des niveaux de désembuage peuvent être régles.

focus
Yououpouzereglerlatnettetede lavideodevotrecamera.
Les éléments de mise au point simple et les paramètres de Focus-initialisation peuvent être régles.

pivoter
Les modes de pivotement et de retournement peuvent être régles.

Après avoir terminé le réglage de laamera, cliquez sur le bouton pour revenir à l'écran précédent.
Configuration du Direct
Voupez changer les parametes de transfert en direct (live) de la camera reseau.


- Remp. à chaud : Vous pouvez sélectionner le mode de configuration de profil en direct.
Si vous sélectionné , les éléments de configuration de profil sont actifs et vous pouvez modifier les paramétres manuellement.
- AUTO. : Pour la surveillance en direct, le profil qui correspond approximativement à la résolution de sortie de chaque canal doit être sélectionné automatiquement.
par exemple, Profil camera : Trois profils (1280 x 720, 800 x 600 et 640 x 480) sont compatibles.
Si la résolution de l'écran de sortie est de 1920 × 1080 :
Le profil 1280× 720 est selectionné automatiquement si la résolution du canal unique est de 1920× 1080 Le profil 640× 480 est selectionné automatiquement si la résolution du canal en 16 canaux partages est de 480× 270
- Manuel : La surveillance en direct est effectue avec le profil selectionné par l'utilisateur dans les profils enregistrés de laamera.
- Enreg.: La surveillance en direct est effectuee avec le profil configured pour I'enregistrement.
- Profil : Vous pouze selectionner le profil video des parametes de laamera connectee.
- Codec : Affiche le codec du profil d'enregistrement sélectionné.
- Résolution : Affiche la résolution du profil sélectionné.
Vit. image : Affiche la vitesse d'enregistrement du profil selectionné.
- Qualité : Affiche la qualité du transfert video du profil sélectionné.
Configuration des canaux
Vos pouvez configurer les paramètres video pour chaque canal.

- Appliquer à CH : Si vous sélectionnez , la fenêtre de confirmation « Appliquer à CH » apparait.
Après la sélection des canaux auxquels les réglages seront appliqués, cliquez sur pour les appliquer aux canaux sélectionnés.
- Video
- : Vous pouvezmettre en ACTIVÉ / ARRÉT laamera du canal sélectionné.
- : Affiche des informations autres que la video du canal selectionné.
Pour la protection de la vie privée, il n'affiche pas la video en cours d'enregistrement.
- : N'affiche rien d'autre qu'un écran vide pendant que l'enregistrement continue.

Si le canal est en mode <Caché1> ou <Caché2> , le son du canal n'est pas audible.
Cependant, le son du canal est enregistré si son réglage audio est réglé sur , même si le son n'est pas entendu en mode en Direct.
Audio
- S'il est regle sur , vous pouvez activer l'audio du canal ACTIVE / ARRET sur l'écran en Direct.
- S'il est regle sur < ARRET, le son du canal est hors de I'ecran en direct et non enregistré.
- Nomamera : Indiquez un nom deamera.
Vou pouvez saisir jusqu'à 15 caractères, espace inclus.
Yououpezverifierlesinformationdesperhequesdestockage.
Voupe zier les peripheriques de stockage et leur capacite, l'utilisation aisi que le statut. Les peripheriques disponibles sont des disques durs et dispositifs USB (memoire, disque dur).


- État du Stockage : Affiche l'etat de fonctionnement d'un périphérique de stockage.
- Rouge : Affiche la situation de perte de video.
- Vert : Affiche la situation normale sans enregistrement des pertes de video.
-État
BPS complet: Affiche le taux actuel de l'enregistrement.
Le taux de perte actuel : Affiche le taux de perte d'enregistrement en cours.
Montant maximal des pertes : Affiche le montant maximal des pertes jusqu'ici.
- N'You pouze vérifier le nombre désigné pour le disque dur intégré.
Si you voulez trouver I'emplacement correspondant au numero du disque dur, reportez-vous a .
- Capacité : Affiche la quantité d'utilisation du périhérique de stockage et la pleine capacité.
- Utilisat.: Désigne les fins d'utilisation pour un périhérique de stockage.
- État : Affiche l'etat de fonctionnement actuel d'un périphérique de stockage.
Pour l'inspection ou le remplacement des alarmes de disque dur, veuillez vous reporter à la section
Configuration de l'Alarme du disque dur » (Page 69)
- Normal : Il est affchépendant le fonctionnement normal.
- Inspection : Fonctionnement avec des problèmes partiels.
Dans le cas de la matrice RAID, il est affiché lorsqu l'etat est affiché comme dégradé ou en reconstruction.
- Remplacement : Il s'affiche lorsque vous ne pouvez plus l'utiliser.
Dans le cas de la matrice RAID, il est affiché lorsqu'il y a une panne du système.
- RAID(?) : RAID inconnu. Il s'agit d'un disque dur qui a utilisé le RAID dans le passé. Actuellement, le RAID n'est pas utilisé. Si vous organisez à nouveau le RAID, il sera inclus dans le plein format. Pour utiliser le disque dur général, vous devez d'abord le formater.
- Inconnu : La matrice RAID est installée dans l'emplacement actuellément utilisé, mais le disque dur ne constitue pas le RAID.
- Température : Vous pouvez vérifier la température du disque dur monté dans le NVR.
- Format : Sélectionnez un périhérique, puis cliquez sur le format après lequel une fenêtre de confirmation de formatage apparait.
Cliquez sur le bouton < 0K> pour formater le péripérisque de stockage sélectionné.
Le formatage supprime toutes les données d'enregistrement qui ont ete enregistrées. Attention!
- Vous ne pouvez pas enregistrer de videos alors que le formatage est en cours.
Ne retirez pas un périhérique de formatage avant la fin de l'exercice.
- Carte DD : Vous pouvez vérifier l'emplacement selon le numero attribué aux disques durs installés à l'intérieur.
- Reportez-vous à cet emplacement lors de l'entretien ou l'installation d'un disque dur supplémentaire.
Connector le iSCSI
Si vous connectez le NVR à un périhérique iSCSI, vous pouvez rechercher, connecter et déconnecter le périhérique iSCSI.

- Nom iSCSI usable : Il affiche le nom du iSCSI en conformité avec le format de protocole iSCSI.
- Capacité : Il affiche la quantité / capacité totale actuellément utilisée des périhériques iSCSI.
- État : Affiche l' état d'un périphérique iSCSI installé.
Listedes produits pris en charge
Promise Technology vessRAID 1740i / 1840i 1ea JBOD 3ea
Ajouter automatiquement un apparéil iSCSI (protocole de stockage en réseau)

1. Dans la fenêtre iSCSI, cliquez sur le bouton .
2. Sur l'écran Ajout auto, saisissez l'adresse IP et le port de connexion, puis cliquez sur .
3. Dans la liste , cliquez sur le périphérique à ajouter.
4. Avec avoir entree ID / mot de passage, cliquez sur le bouton OK>
Ajouter un apparéil iSCSI manuillagement

1. Sur l'écran iSCSI, cliquez sur .
2. Sur l'écran Ajout Manuel, saisissez l'adresse IP et le port de connexion, l'ID et le mot de passage puis cliquez sur OK>.
Annulation de l'enregistrement des périhériques iSCSI

1. Dans la liste , Sélectionné un périhérique iSCSI à supprimer.
2. Cliquez sur le bouton < Suppr> pour lancer la fenetre de suppression.
3. Si vous cliquez sur < OK> ,le periphérique iSCSI sera retire de la liste.

- Les périhériques iSCSI utilisent un port iSCSI uniquement.
Lors de l'utilisation d'un hub pour connecter un periphérique iSCSI à un magnétoscope numérique réseau, assurez-vous d'utiliser un hub gigabit et d'utiliser un réseau independant pour sauegarder les données normalement.
Dans un périphérique iSCSI, une unité logique ne doit pas dépasser 16 To.
Lorsque you efectuez l'authentication CHAP unidirectionnelle dans la version RAID, un periphérique iSCSI en conformite avec le NVR, you nevez utilise la fonction Ajout Manuel iSCSI pour etabrir une connexion iSCSI.
Si plusieurs NVR tentent d'acceder à un périhérique iSCSI unique, cela peut causeur un problème.
- Un problème peut se produit, si vous modifie le réglage de l'appareil iSCSI, alors que le NVR est connecté à un périhérique iSCSI.
Un disque dur à monter dans VessRAID doit être répertorié dans la liste de compatibilité RAID.
Si you activez la fonction de mappage LUN pour un periphérique iSCSI, il ne sera pas enregistré dans le RNV.
- Les équipements iSCSI prennt uniquement en charge un volume de RAID 5/6. (Chaque tableau doit etre compose de 5 à 6 disques durs pour l'utilisation.)
Lorsque you enregistrrez un periphérique iSCSI dans le NVR pour la première fois, vous nevez d'abord le formater.
Configuration du mode RAID
Si vous activez le mode RAID (Redundant Array of Independent Disks), quand un disque dur système est endommagé, vous pouvez restaurer les données en toute sécurité. Le NVR n'est compatible qu'avac les RAID de niveau 5 et 6. Le RAID de niveau 5 pris en charge par le NVR peut travailler à restaurer les données d'un seul disque dur uniquement en cas de défaillance de ce dernier. Le RAID de niveau 6 permet de restaurer les données et le fonctionnement de jusqu'à deux disques durs défectueux.

Dans ce NVR, vous pouvez organiser deux RAID. Le premier RAID utilise uniquement les disques durs installés à l'emplacement HDD 1 à 6, et le second RAID utilise uniquement les disques durs installés à l'emplacement HDD 7 à 12.
Si le RAID dispose de 5 à 6 disques durs installés, vous pouze l'utiliser et l'organiser.
- Vous pouvez utiliser le RAID de niveau de 6 uniquement si un seul RAID dispose de 6 disques durés montés.

- État : Affiche l'etat de fonctionnement du RAID.
- Active: Signale le fonctionnement normal du RAID.
- Création:L'utilisateur est en train d'organiser un RAID et le fonctionnement normal est en cours.
- Détérioré : Il s'affiche lorsque un ou plusieurs disques durs qui composent le RAID sont défectueux. Lorsque le nombre maximum de disques durs autorisés dans le niveau RAID sont défectueux, vous ne pouvez pas utiliser ou rétabir le RAID si un dysfonctionnement de disque dur supplémentaire survient. Immédiatement, remplacez le disque dur et procédez à la restauration.
Pour en savoir plus sur la façon de replacer le disque dur et de restaurer le RAID, reportez-vous à la section « Restaurer une matrice RAID ». (Page 68)
- Nouvelle création : Cela signifie qu'un RAID est en cours de restauration. Lorsque le nombre maximum de disques durs en RAID sont en cours de reconstruction (en raison d'un dysfonctionnement), si un dysfonctionnement de disque dur supplémentaire survient, vous ne pouvez pas utiliser ou rétablier le RAID.
- Échec : Cela signifie que le RAID ne peut pas etre utilisé ou rétabli.
- État : Affiche l' étatde fonctionnement actuel des disques durs installés dans un RAID.
- Active: Affiche que le disque dur fonctionne normalement.
- Défecteurs : Il affiche que le disque dur est défecteurs. Vous doivent remplaner immédiatement le disque dur pour la récapération en douceur du RAID.
- Supprimé : Il affiche qu'un disque dur ne fonctionne pas et ne peut pas être détecté. Vous doivent remplaner immidiatement le disque dur pour la récapération en douceur du RAID.
- Restaurer : Affiche que le disque dur est en cours de restauration.
- Capacité : Affiche la capacité totale des disques durs qui composent un RAID.
- Température : Vous pouvez vérifier la température du (des) disque(s) dur(s) qui composer un RAID.
Configuration du mode RAID

1. Cliquez sur les boutons ou .
2. Dans la fenetre utilise de RAID, selectionnez les parametres de RAID et cliquez sur le bouton OK>.
- Utilisation/Ne pas utiliser : Vous pouvez désirir d'utiliser le mode RAID ou non.
Niv. 5/Niv. 6: Affiche le type de RAID pris en charge par le NVR.
3. Il affichera la liste des disques durs qui compose un RAID. Dans l'écran RAID, cliquez sur OK>.
4. Une fenêtre de suppression de données et de redémarrage système s'affiche. Vous pouvez cliquer sur le bouton pour redémarrer le système afin de régler le mode RAID.
5. Lorsque la construction du RAID est achevée, Sélectionnez - - - pour vérifier la construction.

Lorsque you generrez le RAID de niveau 5, la capacité disponible d'un RAID est (capacité du disque dur le plus faible) x (nombre total de disques durs - 1).
Lorsque you generrez le RAID de niveau 6, la capacité disponible d'un RAID est (capacite du disque dur le plus faible) x (nome total de disques durs - 2).
Si you utilisez des disques durs de differentes capacités, le disque dur ayant la plus petite capacité sera utilise pour construire un RAID.
Si you desactivez le mode RAID, tous les RAID seront desactives. Si you voulez selectionner un seul RAID a annuler, un RAID particulier a desactiver peut etre choses dans la fenetre de configuration.
Si le statut du disque dur est affiché comme inspecté / remplace à la page périphérique / formatage, vous ne pouvez pas l'utiliser pour construire un RAID.
Lorsqu'un RAID est en cours de construction, I'enregistrement sera arrêté.
Plus la capacité du disque dur est grande, plus il faut assez de temps pour terminer la construction d'un RAID.

Si vous activez ou désacteve le mode RAID, les données existantes seront supprimées. Assurez-vous que vos données sont sauvegardees.
Restaurer une matrice RAID

1. Si vous VOYZ un numero pour un disque dur dont le déclare Défectueux / Enlevé, vérifie alors l'emplacement du disque dur à remplacer dans la carte du disque dur. En outre, vérifie l'emplacement du disque dur pour lequel le LED du disque dur est sur fond rouge.
2. Remplacez le disque dur defectueux du NRV par un nouveau disque dur.
3. Àpès avoir remplace le disque dur, si la fenêtre contextuelle de récapération apparait, cliquez sur le bouton OK>.
4. Lorsque la récuppération commence, le LED pour le disque dur remplace clignote en orange. Le menu - - va montré la progression de la récuppération.

Remplacez-le avec le même modèle de disque dur ou un disque dur de meme capacité chez le meme fabricant.
Un disque dur utilise pour construire le RAID devrait etre l'un des modeles recommandes.
S'il n'est pas possible d'utiliser le même modèle de disque dur, vous nevez alors utiliser un disque dur de même capacité et du même constructeur.
Si you retirez le cordon d'alimentation tout en utilisant le RAID, ceci peut I'endommager, alors soyez prudent.
Pour une alimentation fiable, il est recommendé d'utiliser un onduleur.
Configuration de l'Alarme du disque dur
Pour les dysfonctionnements du disque dur, vous pouvez configurer la borne de sortie de l'alarme de contrôle, la borne de sortie de l'alarme de remplacement, la borne de sortie de l'alarme iSCSI et l'heure de l'alarme.

- Alarme
- Le signal de l'alarme sera émis par le port d'alarme à l'arrière en cas de seLECTION <1> , <2> , <3> , et <4> .
- Si < BIP> a été sélectionné, un signal sonore sera émis.
- Si est sélectionné, le bip sonore et le signal de l'alarme seront émis via les ports situés à l'arrière.
- Vér. port sortie alarme : Si le disque dur génére une alarme de vérification, le signal d'alarme va sortir du port de sortie spécifique.
- Remp. port sort. alar.: Si le disque dur génére une alarme de remplacement, le signal d'alarme va sorting du port de sortie spécifique.
- Port alarmé iSCSI : Si une connexion à votre périphérique iSCSI est perdue, un signal est envoyé à la borne de l'alarme désignée.
- Durée alarme : Définit la durée de l'alarme pour le signal d'alarme et le bip sonore.

Le statut signifie que le disque dur fonctionne, mais il a des problèmes qui exigent un examen technique.
parait sur I'ecran en Direct.
Si un RAID est degradé ou en reconstruction, < / > s'affiche sur l'écran en Direct.
Le statut signifie que le disque dur est defectueux et requiert un remplacement immediat.
(1) affiche sur l'écran en Direct.
Si un RAID échoue, < > s'affiche sur l'écran en Direct.
Écran
Yououpouzdefinirlesinformationsaffichéessurl'écranaisiinguélesysteme de sortie.
Paramètres de l'écran
Voupez configurer les parametes liés à la sortie-ecran avec l'information affichée, le temps deSEDeur et le systeme de sortie.

- Affichage évén. : Définit le temps de séjour de l'affichage du canal de l'événement surl'écran lorsqu'un événement se produit.
Si vous définissez , il gardera l'affichage jusqu'à l'annulation.
- Affich. : Affiche uniquement les éléments cochés sur l'écran du moniteur.
- Tps SEQ m.CA: Réglez le temps de changement automatique pour l'écran segmenté en mode direct.
- Sortie videoe : Sélectionnez un type de sortie videoe de et .
Si voitse selectionHDMI> ou ne correspond pas avec le reglage de I'ecran, la video peut ne pas etre emise.
Si le changement de resolution n'est pas pris en charge par I'ecran, la video peut ne pas s'afficher correctement. Si tel est le cas, I'ecran va restaurer la resolution par defaut après un certain temps. Ensuite, vous pouvez la changer pour une autre resolution.

- Spécifiez la durée d'affichage de l'évenement et le temps deSED sur tenant compte du déali de video en fonction de l'environnement réseau.
Pour ajuster la position de l'affichage
Certsains moniteurs ne peuvent pas afficher des informations (nom de laamera, icone, informations de temps, etc) du NVR, selon l'etat. Ensuite, vous pouvez modifier la position d'affichage des données.

1. Dans le menu de configuration du moniteur, selectionnez .
2. Utilisation de la touche numérique pour régler l'écran coupé.
3. Appuyez sur < OK>
CONFIGURATION DE L'ENREGISTREMENT
Voupvez configurer l'enregistrementprogramme, I'enregistrement des événements et d'autres parametes d'enregistrement connexes.
Calendrier d'enregistrement
Faites vous réservation sur une date et heures pour programmer I'enregistrement a I'heure indiquee.


- Tous : L'ensemble de la gamme de temps (du lundi au dimanche y compris les jours fériés, AM 0 ~ PM 23) sera réservé avec le même programme d'enregistrement
- Appliquer à CH : Si vous Sélectionnez , la fenêtre de confirmation contextuelle « Appliquer à CH » apparait.
Après la sélection des canaux auxquels les réglages seront appliqués, cliquez sur pour les appliquer aux canaux sélectionnés.
Réglage d'enregistrement par la couleur
Couleur Fonction Description Pas de couleur Pas d'enreg Pas d'enregistrementprogrammé / d' événement Vert Continu Enregistrementprogrammé uniquement Orange Événement Enregistrement d'événement uniquement Blanc Enr cont+ éven Enregistrentes programmes / d'événement ensemble
À chaque fois que vous appuyez sur une cellule sélectionnée, les fonctions ----<Événement>-- passeront en boucle.
Enregistrement des specifications de performance pour l'etat du disque dur
Non État du disque dur Réception (Mbps) Enregistrement (Mbps) Interne iSCSI 1 Disque dur pour CE / Pas de RAID 400 300 - 2 Disque dur pour CE / RAID 5 400 300 - 3 Disque dur pour CE / RAID 6 400 200 - 4 Disque dur pour serveur / Pas de RAID 400 300 - 5 Disque dur pour serveur / RAID 5 400 400 300 6 Disque dur pour serveur / RAID 6 400 300 200
Configuration d'enregistrement
Voupez regler la resolution, l'IPS, et la qualite des enregistements par canal, et par type d'enregistrement standard / événement.
Voupe zier le taux et le montant de transfert de donnees des enregistrements Plein ecran et Image cef pour chaque canal, et definir la limite de transfert pour les enregistrements.

- Appliquer à CH : Si vous sélectionnez , la fenêtre de confirmation « Appliquer à CH » apparait.
Après la sélection des canaux auxquels les réglages seront appliqués, cliquez sur pour les appliquer aux canaux sélectionnés.
- Standard, Événement : Configure l'enregistrement standard et l'enregistrement des événements.
- PLEIN: Enregistre toutes les images alimentées par laamera.
- CLE: Enregistre seulement les images clés alimentées par laamera.
La vitesse d'enregistrement réelle peut différer des réglages de laamera. En général, 1 à 2 images par seconde sont enregistrées.
- ARRÉT: Aucun enregistrement n'est effectué.
Image
- PLEIN: Indique la quantité de données pour tous les enregistrements de la scene.
- CLÉ: Indique la quantité de données pour les enregistements de la scène principale.
- Limite: Paramétrez la quantité de données autorisée en entrée de chaque canal.
- Événement : Lorsqu'un événement se produit, vous pouvez définir àquel point vous allezCOMMencer ou arrêté l'enregistrement.
- Avant : Lorsqu'un événement se produit, l'enregistrement est démarcheé indépendamment du réglage de l'heure.
Si vous le définissez à cinq secondes, l'enregistrement débute à cinq secondes avant qu'un événement ne se produit.
- Àpres : Lorsqu'un événement se produit, l'enregistrement continue après l'heure définie.
Si vous le définissez à cinq secondes, l'enregistrement continue cinq secondes de plus après que l'évenement ne se soit terminé.
Audio : Indiquez si vous souhaitez enregister le son reçu de laamera ou non.

Si le transfert de données d'un canal dépasse la limite autorisée définie, il peut s'affector à d'autres canaux, et peut forcer le passage à l'enregistrement même lorsque le canal est configuré pour le mode d'enregistrement . Pour les canaux d'enregistrement Image cef, l'icone d'enregistrement limite apparait sur le côte supérieur de l'écran en direct.
Un canal affiché en jaune indique que les données enregistrées ne sont pas en cours de transfert à partir de laamera et que l'enregistrement est effectué en utilisant temporairement un autre profil sur laamera.
Vérifiez les informations de canal pour voir le profil appliqué au canal qui figure en jaune.
Un canal affiché en orange indique que la quantité de données entrees est supérieure à la quantité de données autorisée.
Dans ce cas, il est impossible d'enregistrer toutes les images entrantes. Au lieu de cela, il n'est possible d'enregistrer qu'une seule partie des images (1 ou 2 images par seconde). Pour résoudre ce problème, vous doivent définir une quantité de données autorisée supérieure à la quantité de données entrées.
Voir les notes sur « État de l'enreg. » (Page 33)
Réglage du profil d'enregistrement de laamera reseau
Voussoupiez configurer les parametes du profil video pour instruire la camera reseau (connectee a chaque canal) pour faire I'enregistrement.


- Vous pouvez configurer les paramètres uniquement pour les profils pris en charge par laamera.
Si les profils utilisés pour l'enregistrement et le réseau sont différents, le flux video de laamera peut ne pas etre conforme a la vitesse d'enregistrement comme specifiée dans laamera.
- Profil : Sélectionnez un profil video pour laamera connectée.
- Codec : Affiche les informations codec pour le profil d'enregistrement sélectionné.
- Résolution : Affiche la résolution du profil d'enregistrement sélectionné.
Vit. image : Affiche la vitesse de transmission pour le profil d'enregistrement selectionné.
- Qualité : Affiche la qualité video pour le profil d'enregistrement sélectionné.
- AMD : Affiche s'il faut définir l'évenement de détction de mouvement avancée (AMD) pour le canal.
Lorsque la capacité du disque dur est pleine, vous pouvez définir si vous pouze arrêter l'enregistrement ou demarrer l'écrasement.

Mode non FIFO : Sélectionnez un type d'enregistrement sur disque dur répétitif .
- Remplacer: Si le disque dur est plein, cette action écrase les données existantes et maintain l'enregistrement.
- Arret: Si le disque dur est plein, cette fonction arrête automatiquement l'enregistrement.
- Signal fin disq : Si vous selectionnez pour le mode de fin de disque, ce bouton s'active. Spécifiez l'utilisation du bip lorsque l'enregistrement du disque dur se terminé.
Si you cochez cette case, un signal sonore retentit sur le disque complet et l'enregistrement s'arrête.
- Suppr. auto: Si vous cochez cette option, la boîte de liste de la période est active. Precisez la période de suppression pour supprimer les données antérieures à la date prévue. Cependant, vous pouvez rechercher des données à partir de l'heure actuelle jusqu'à la date sélectionnée.

Si you appuyez sur < 0K> lorsque you ave terminé vos reglages, toutes les données existantes avant la période specifiée seront automatiquement suprimées. Il est donc recommandé de sauvegarder les données precedentes le cas échéant pour une utilisation ultérieure.
Vou puez regler les parametres de facon a enregirrer en cas de detection du capteur, d'evenement camera ou de detction de perte video.
Détction du Capteur
Voupouz definir I'etat de fonctionnement du capteur et la camera connectee, ainsqula sortie d'alarme et sa durée.


- Appliquer à d'autres capteurs : Si vous sélectionnez , la fenêtre de confirmation « Appliquer à d'autres capteurs » apparait.
Après la sélection des canaux auxquels les réglages seront appliqués, cliquez sur pour les appliquer aux canaux sélectionnés.
- État : Définit le mode de fonctionnement des capteurs.
Dans l'onglet , vous pouvez définir s'il faut utiliser ou non un capteur.
- : Le capteur est ouvert. Si le capteur est fermé, il générale une alarmé.
- : Le capteur est fermé. Si le capteur est ouvert, il générale une alarmé.


- Cam : Sélectionnez un canal à connecter au capteur. Si uneamera est Sélectionnée, la fenêtre « Config preset cam » apparait. Sélectionnez un canal et configrez le pré-réglage. La configuration des pré-réglages peut être effectue en mode PTZ.
- Sortie alarme : Sélectionne une méthode de sortie de l'alarme. Pour plus de renseignements sur la sortie d'alarme, reportez-vous à la section « Alarme DD > Alarme » (Page 69)
- Durée alarme : Définit la durée du signal d'alarme et le son d'alarme.

Si you selectionnez Ionglet , you pouez configurer les parametes de fonctionnement du capteur de la camera reseau connectee a chaque canal.
Si la camera connectee au reseau qui a configurede l'alarme entree / sortie declene une alarme,NVR va effectuer la sortie d'alarme.
Vou puez choisir d'executer un événement envoye par le NVR ou laamera (detection de mouvement, un événement d'analyse video, événement audio) et la méthode de sortie d'alarme ainsi que l'heure de l'alarme.
NVR


- AMD: Sélectionnez s'il faut utiliser ou non la détction de mouvement.
- Profil : Affiche le profil video configuré pour chaque canal.
Vit. image : Affiche le nombre d/images pour chaque canal.
- Cam : Sélectionnez un canal de détction d'événement.
Si vous sélectionnez un élément de laamera, l'écran « Pré-réglage de laamera » apparait. Sélectionné un canal à connecter et configurez le pré-réglage.
- Vous pouvez définir le pré-réglage en mode PTZ.
- Alarme: Sélectionnéz la méthode de sortie d'alarme.
- Continu: L'alarme continue jusqu'à l'annulation.
Pour plus de détails, reportez-vous à la section « Alarme DD > Alarme » (Page 69)
Durée alarme: Reglez la durée de l'alarme.
- DM de pointe : Vous pouvez définir les paramètres détaillés de la détction de mouvement.
S'il existe au moins un canal AMD ON, il sera activé.
- Rég. zone : Vous pouvez définir la zone de détction de mouvement.
- Sensibilité : Réglez la sensibilité de la détction de mouvement. (haute / moyenne / basse).
- Heure d'activ.: Sélectionnez la durée de fonctionnement de la détction de mouvement.
- Pos. camera : Sélectionnez l'emplacement d'uneamera (intérieur / extérieur) objet de la détction de mouvement.

Le NVR peut émettre des alarmes uniquement lorsque la détction d'evénements est réalisée pour une camera réseau connectée.
Vou puez activer la detction de mouvement AMD pour un maximum de quatre canaux. Cela neccessite I'enregistrement d'un reglage du profil de 10fps minimum. Il est recommanded d'utiliser 30fps avec une resolution de moins de 2M. (Si le fps du profil d'enregistrement est hors de portee, la fonction de detection de mouvement AMD ne fonctionne pas normalement.)
ll est recommanded d'installer ou de configurer une camera de sort que la taille d'un objet enregistré est dans la plaque ci-dessous.
- Taille de détention minimale : Plus de 1/4 de la zone de treillis unique
Taille de détction maximale : Moins de 1/4 de l'écran complet
Si you definissez l'emplacement de la camera a < Extérieur> alors la fonction de classification voiture / humain fonctionnera. Si you la reglez sur , la carte thermique ne peut pas afficher le résultat de detection pour les voitures. Les données de la carte thermique seront enregistrés en 30 secondes après avoir definite la detection de mouvement AMD. Pour en savoir plus sur les cartes thermiques, reportez-vous à « Rech. par carte chaleur » (Page 94)
Si la video a une faible intensité ou est floue, il est recommendé de régler la sensibilité à et si la video a un fond dynamique (arbre secoué, vague), il est recommendé de la régler sur .
Camera reseau

- Appliquer à CH : Si vous Sélectionnez , la fenêtre de confirmation « Appliquer à CH » apparait.
Après la Sélection des canaux auxquels les réglages seront appliqués, cliquez sur pour les appliquer aux canaux Sélectionnés.
Evt cam : Sélectionnez s'il faut ou non utiliser l'évenement deamera.
- MD : Sélectionnéz s'il faut ou non utiliser la détction de mouvement de laamera.
- Cam: Sélectionnez un canal de détction d'évenement.
- Si vous sélectionnez un élément de laamera, l'écran « Pré-réglage de laamera » apparait. Sélectionnez un canal à connecter et configurez le pré-réglage.
- Vous pouvez définir le pré-réglage en mode PTZ.
- Alarme : Sélectionnéz la méthode de sortie d'alarme.
Pour plus de détails, reportez-vous à la section « Alarme DD > Alarme » (Page 69)
Durée alarmé: Reglez la durée de l'alarme.
- MD camera : You pouze définir les parametres détaillés de la détction de mouvement pour une camera réseau connectée.

- Mode: Reglez le mode de détention de mouvement.
- Zone : Cliquez sur et lorsque le menu de configuration détaillée apparait, définiSEEz la zone de détction de mouvement.
- Sensibilité: Reglez la sensibilité de la détction de mouvement. (Très faible / Faible / Moyenne / Élevée / Très élevé)
- Taille: Cliquez sur . Lorsque le menu de configuration détaillée apparait, définiSEEz la taille max / min de l'objet à détecter.
- Heure d'activ.: Sélectionnez la durée de fonctionnement de la détction de mouvement.
Après avoir terminé la configuration, cliquez sur le bouton pour revenir à l'écran précédent après avoir enregistré la configuration.
Détection perte video
Vou puez regler la camera de sorte qu'elle déclenché l'alarme si elle est déconnectee ou si la video est perdue suite à une connexion réseau instable.


- Appliquer à CH : Si vous sélectionnez , la fenêtre de confirmation « Appliquer à CH » apparait.
Après la sélection des canaux auxquels les réglages seront appliqués, cliquez sur pour les appliquer aux canaux sélectionnés.
- Etat perte vid.: Spécificiez l'utilisation de la détction de perte video.
- Sortie alarme : Sélectionnez une méthode de sortie de l'alarme.
Pour de plus amples informations sur la sortie d'alarme, reportez-vous à « Alarme DD > Alarmes » (Page 69)
- Durée alarme : Spécificiez la durée de la sortie d'alarme avec le signal sonore.
Alarme programmee
Vou puez definir les conditions et les heures de fonctionnement des alarmes programmées.


- Sortie alarme : Sélectionne une méthode de sortie de l'alarme.
Pour de plus amples informations sur la sortie d'alarme, reportez-vous à « Alarme DD > Alarmes » (Page 69)
- : Marqué en vert, et générale toujours l'alarme à l'heure prévue.
- : Marqué en noir, pas d'alarme généraee, même si un événement se produit.
- : Marqué en orange, génére une alarme uniquement lorsqu'un événement se produit.
- Appl à tt les sort d'alar : Applique le programme configuré pour toutes les alarmes.

Lorsque I'alarme est generee a l'heure prevue, vous pouze I'arreter en annulant la programmation.
CONFIGURATION RÉSEAU
Elle assures the surveillance en reseau de I'ecran en direct a partir d'un lieu eoigné, et prend en charge la fonction de transfert de courrier avec les événements. Vous pouvez configurer l'environnement de reseau qui permet de telles fonctions.
Interface
Yououpouvezdéfinir l'itinérairede la connexion réseau et le protocole.
Configuration d'une connexion réseau
Définit le protocole et l'environnement du réseau.


- Réseau1(Caméra) : Port pour les connexions de laamera, destiné à receivevoir la video à partir d'uneamera.
- Réseau2(Caméra) : Port pour les connexions de laamera, destiné à receiveoir la video a partir d'uneamera.
- Réseau3(Visualisateur) : Port utilisé pour envoyer la video vers le visionneur web.
- Réseau4(iSCSI): Port pour étabir une connexion avec l'iSCSI exteme.
- Configuration Réseau1(caméra) / Réseau2(caméra) / Réseau3(Visualisateur) / Réseau4(iSCSI)
- Type d'IP: Sélectionnez le type de connexion réseau.
- Adresse IP, Masq ss-rés, Passerelle, DNS
: Vous pouvez entrer manuellement l'adresse IP, le masque de sous-réseau, la passerelle et le DNS.
: Les valeurs d'adresse IP, du masque de sous-réseau et de la passerelle seront automatiquement régliées.
: Les valeurs d'adresse IP, du masque de sous-réseau et de la passerelle seront automatiquement régées.
- IDutil,Mot de p. : Si vous configurez le mode de connexion en PPPoE, vousdezvez entrer « IDutil » et
"Mot de p." pour les enregistrer en PPPoE.
- Transférer bande passante (Réseau3): Saisissez le taux maximum de la bande passante de données de téléchargement.
Vérifiez le réglage attribué en mode de connexion avant d'entrée libre valeur.
Si la somme du réseau TX / RX est inférieure à 700Mbps, il existe un début de transmission maximum de 400 Mbps.
- Passerelle par déf : Configurer la passerelle de base en utilisant les paramètres Réseau1(caméra) / Réseau2(caméra) / Réseau3(Visualisateur) / Réseau4(iSCSI).

- Vous pouvez manuellement saisir le DNS de et quand il est régé sur .
Connexion et configuration du réseau
Le reseauage peut différer de la methode de connexion, vérifie votre environnement avant de régler le mode de connexion.


Lorsqu'aucun routeur n'est utilisé
Mode IP statique
- Connexion Internet: IP statique, ligne louée, et les environnementes LAN permettent une connexion entre le NVR et l'utilisateur à distance.
- Paramètres de Réseau NVR : Définir le dans le menu du NVR connecté sur .
- Consultez votre gestionnaire de réseau pour l'IP, la passerelle et le masque de sous réseau.
Mode DHCP
- Connexion Internet : Connectez le NVR directement à un modem cable, modem ADSL DHCP ou réseau FTTH.
- Paramétres de Réseau NVR : Définissez le dans le menu du NVR connecté sur .
- PPPoE
- Connexion Internet : Un modem PPPoE est directement relié au NVR, où la connexion PPPoE nécessite un ID utilisateur et un mot de passer.
- Paramétres de Réseau NVR : Définissez le dans le menu du NVR connecté sur .
Le PPPoE et devraient etre les memes que les informations utiliseur PPPoE. Si vous ne connaissiez pas I'ID et le mot de salle, consultez votre fournisseur de service PPPoE.
Lorsqu'un routeur est utilisé
Pour éviter un conflit d'adresse IP avec l'IP statique du NVR, consultez les points suivants :
- Réglage du NVR avec une IP statique
- Connexion Internet : Vous pouvez connecter le NVR à un routeur qui est connecté à un modem PPPoE / cable ou un routeur dans un environnement de réseau local (LAN).
- Configuration du réseau NVR
1. Définissez le dans le menu du NVR connecté sur .
2. Vérifiez si l'adresse IP définié est dans la plage d'adresses IP statique fournie par le routeur à large bande. L'adresse IP, la passerelle et le masque de sous-résseau : Consultez votre administrateur réseau.
Vérifiez si l'adresse IP définie est dans la plage d'adresses IP statique fournie par le routeur à large bande.
Si un serveur DHCP est configuré avec l'adresse de début (192.168.0.100) et l'adresse de fin (192.168.0.200), vous devrez paramétrer l'adresse IP en dehors de la plage configurée du DHCP (192.168.0.2 ~ 192.168.0.99 et 192.168.0.201 ~ 192.168.0.254).
3. Vérifiez si l'adresse de passerelle et du masque de sous-réseau sont égales à celles fixées dans le routeur à large bande.
- Réglage de l'adresse IP DHCP du routeur à large bande
1. Pour acceder aux configurations du routeur à large bande, ouvrez un navigateur Internet sur le PC local connecté au routeur haut débit et saisissez l'adresse du routeur (http://192.168.1.1 par exemple).
2. À ce stade, étabir les configurations réseau Windows de l'ordinateur local à l'exemple ci-dessous : Ex) IP : 192.168.1.2
Masque de sous-réseau : 255.255.255.0
Passerelle:192.168.1.1
- Une fois connecté au routeur haut débit, il lance une invite de mot de passer. En laissant le champ Nom d'utilisateur vide, saisissez « admin » dans le champ de mot de passage et appuyez sur pour acceder aux configurations routeurs.
- Accédez au menu de configuration DHCP du routeur et définisseez son activation du serveur DHCP, et fournissez l'adresse de départ et de fin.
Reglez l'adresse de début (192.168.0.100) et l'adresse de fin (192.168.0.200).

- Les étapes ci-dessus peuvent différer entre les dispositifs de routage en fonction du fabricant.
Configuration du port

- Type de Protocole : Sélectionnez le type de protocole entre TCP, UDP - Monodiffusion et UDP - Multidiffusion.
- Port périphér.: Entreze le numéro du port connectable. Initialement, <554> est régèle.
- TCP: Il a une(Meilleure stabilité et une vitesse inférieure par rapport aux UDP, et est recommandé pour les environnementes Internet.
- Port UDP: Initialement, < 8000 8159> est régèle. Il augmente / diminue de 160.
- UDP: Il a moins de stabilité et une vitesse plus rapide par rapport aux TCP, et est recommendé pour les environnements de réseaux locaux (LAN).
- Multi-diffusion d'adresse IP: L'utilisateur peut saisir directement.
- Multi-diffusion TTL: Sélectionnez de 0 ~ 255. Valeur initiale pour le TTL est réglée sur < 5> .
- Port de flux web : Entrez le numero de port pour le Web Viewer. Initialement, il est regle sur < 80>
- Envoyer SSL : Sélectionné cette option pour envoyer un SSL.
- Bande passante sauv. : Sélectionnez la mesure de la bande passante de sauvegarde.
DDNS
Si un utiliseur distant accede au reseau, vous pouze définir s'il faut ou non utiliser DDNS et le site à connecter.


- Site DDNS: Spécifiez l'utilisation de DDNS et Sélectionnez un site que vous avez enregistré.
- Nom serveur : Fournissez le nom d'hôte que vous avez enregistré avec le site DDNS.
- ID produit : Fournissez le nom d'utilisateur que vous avez enregistré avec le site DDNS.
- Mot de p.: Fournissez le mot de passer que vous avez enregistré avec le site DDNS.

Se référer à « Utilisation du Clavier Virtuel ».(Page 42)
Si vous selectionnez ARRET, la boite de saisie sera inactive.
Si you selectionnez , la boite de saisie du nom de l'hote sera inactive. La zone de saisie du nom d'utilisateur sera activée.
- Connexion rapide: Apparait si est selectionné pour . Pour utiliser la fonction, réglez sur après connexion du NVR avec un routeur UPnP.

En cas d'annulation lors de la configuration Quick Connect, il passe automatiquement en mode et est sauvegardé.
Pour vérifier l'etat de Quick Connect
Une barre de progression et son message apparait pour une connexion rapide.
- Connexion rapiè réussie : Message pour une connexion réussie.
- Configuration réseau non valide : Un message s'affiche si la configuration du réseau n'est pas valide.
Vérifiez la configuration.
- Activez la fonction UPnP du routeur : Un message s'affiche si le routeur nécessite la fonction UPnP.
- Impossible de trouver un routeur : Un message s'affiche si le routeur n'est pas trové. Vérifiez les configurations du routeur.
- Redémarrez le routeur: Un message s'affiche si le routeur doit être redémarré.
Configuration DDNS
DDNS est la forme courte de Dynamic Domain Naming System.
DNS (Domain Name System) est un service qui achemine un nom de Domaine composé de caractères facies à utiliser (www.google.com par exemple) à une adresse IP composée de chiffres (64.233.189.104).
DDNS (Dynamic DNS) est un service qui enregistre un nom de Domaine et l'adresse IP flottante avec le serveur DDNS de sorte que le nom de Domaine peut etre acheminé vers la meme adresse IP si cette derniere est modifiée dans un système IP dynamique.
- Paramétrre le DDNS dans le NVR
Paramétre le dans le menu du NVR connecté comme suit :
Ex) Type de protocole : TCP
Port(TCP):554,555,556,557,558
Site DDNS : iPOLiS
- Paramétres DDNS du routeur
Selectionnez le menu correspondant pour le protocole de transfert de réseau du routeur.
- Mise en place du UPnP du routeur
Reportez-vous à la documentation du routeur pour activer la fonction UPnP du routeur.
Filtrage d'IP
Voupez preper laiste des adresses IP pour autoriser ou bloquer les acces a une adresse IP specifie.

- Type de contrôle :
- Refuser: Si vous sélectionnez rejoeter, l'accès à l'adresse IP enregistrée sera limité.
- Accep. : Si vous choisissez permettre, alors ils ne peuvent acceder qu'aux adresses IP enregistrées.
- Utilisation : Cochez la case pour l'adresse IP qui va utiliser le filtrage IP.
- Adresse IP: Entrez l'adresse IP pour filtrage.
- Plage de filtrage : Si vous entrez une adresse IP ou un préfixe, alors la plage d'adresses IP bloquées ou autorisées s'affiche.

Si I'aresse IP d'une camera n'est pas incluse dans la liste Permettre ou est dans la liste Rejeter, l'acces lui sera refusé.
SSL
Vou puez selectionner un système de connexion de sécurité ou installer des certificats publics.

- Système de Connexion Sécurisée : Vous pouvez sélectionner un type de système de connexion de sécurité.
- HTTP (connexion non-securisée)
- HTTPS (connexion sécurisée avec certificat unique)
- HTTPS (connexion sécurisée avec certificat public)
- Installer certificat public : Vous pouvez numériser et enregistrer des certificates publics à installer.
Si you souhaitez utilisen un certificat, you deez installer un fichier de certificat et un fichier de chiffrement.
Le menu peut etre selectionne uniquely s'il y a un certificat public recommande.
802.1x
Lors de la connexion à un réseau, vous pouvez désirir d'utiliser le protocole 802.1x et installer un certificat correspondant.
802.1x est un système de certificat pour le serveur et le client. Il peut garantir une belle performance contre le piratage des données du réseau Tx / Rx, les virus ou les fuites d'informations.
En utilisant ce système, vous pouvez bloquer l'accès d'un client qui n'est pas certifié et ne permettre la communication qu'aux utilisateurs certifiés et ainsi augmenter le niveau de sécurité.


- Version EAPOL : Sélectionnez la version EAPOL à utiliser en tant que protocole.
- Certains hubs de commutation ne fonctionneront pas si vous les mettez à la version <2> . Choisir la version <1> .
- ID: Entrez I'ID fourni par l'administrateur du serveur RADIUS.
Si I'ID ne correspond pas à l'ID du certificat du client, il ne sera pas traité correctement.
- Mot de p. : Entrez le mot de passerie fourni par l'administrateur du serveur RADIUS.
Si le mot de passer que vous avez saisi ne correspond pas a celui de la clé privée du client, il ne sera pas traité correctement.
- Certificates : Rechercheur un périhérique. Cliquez sur pour chercher un périhérique encore une fois.
- Certificat CA : Sélectionnez cette option uniquement si votre certificat public comprend la clé publique.
- Certificat Client : Sélectionnez si le certificat public comprend la clé d'authentication d'un client.
- Clé privée client : Sélectionnez si le certificat public comprend la clé privée d'un client.

Pour la mise en œuvre réussie de l'environnement d'exploitation 802.1x, l'administrateur doit utiliser le serveur RADIUS. De plus, le hub de commutation relié au serveur doit être un périhérique qui prend en charge la norme 802.1x.
Si le réglage de l'heure du serveur RADIUS, le hub de commutation et un péripérisque NVR ne correspondant pas, la communication entre eux peut échouer.
Si un mot de passage est attribué à la clé privée du client, l'administrateur du serveur doit confirmer l'ID et le mot de passage. L'ID et le mot de passage permettent 30 caractères chacun. (Mais ils prennten en charge uniquement les lettres, les chiffres et les caractères spéciaux ("-","_","." 3 types) uniquely. L'accès aux fichiers non protégés par mot de passage est autorisé sans entrez de mot de passage.
Le protocole 802.1x adopté par le NVR est EAP-TLS.
Voudevez installer tous les trois certificats pourutiliser 802.1x.
Configuration des retransmissions en Direct
Yououpouzeconfigurerle profil pour transfere la video en direct de chaque canal via le reseau.

- Profil : Sélectionnez un profil réseau pour laamera connectée.
- Codec : Montre les informations codec pour le profil réseau sélectionné.
- Résolution : Affiche la résolution du profil réseau sélectionné.
- Vit. image : Affiche la vitesse de transmission pour le profil réseau selectionné.
- Qualité : Affiche la qualité video pour le profil réseau selectionné.

Si les profils utilisés pour l'enregistrement et le réseau sont différents, le flux video de laamera peut ne pas etre conforme à la vitesse d'enregistrement comme specifiée dans laamera.
Courriel
Vou puez envoyer un courriel à un utilisateur de NVR enregistré à un intervalle de temps spécifique, ou si un événement se produit.

Si la camera est configurée sur ou l'évenement du canal est Perte de Video, une notification est envoyée à l'adresse email désignée uniquement en texte.
Configuration SMTP
Configure le serveur mail SMTP.

- Adresse de serveur: Entrez l'adresse du serveur SMTP pour se connecter.
- Port: Configure le port de communication.
- Utilis. authentifi.: Cochez cette case si le serveur SMTP utilise l'authentication de l'utilisateur. La zone de saisie de compte sera activée.
- ID: Entrez un ID pour utiliser l'authentication lors de la connexion au serveur SMTP.
- Mot de p.: Entrez le mot de passer de l'utilisateur du serveur SMTP.
- Transf. sécurisé : Choisir entre et Configuration de l'événement
Voupeuz definir l'intervalle et le type de I'evénement qui sera envoye a l'utilisateur.

- Intervalle événement: Reglez l'intervalle d' événement.
Si une série d'evénements se produit, le courriel sera envoyé à l'intervalle spécifique, et non pour chaque événement.
- Transfert évén. utilise : Sélectionnez un type d'évenement à envoyer si un événement se produit.
Si I'evénement selectionné se produit, le courriel sera envoyé au groupe qui a l'autorité destinataire.
Configuration destinataire
Vou puez creer un groupe et y ajouter des utilisateurs ou, vous pouvez supprimer des utilisateurs et modifier un groupe.


- Cliquez sur > pour ajouter un groupe.
Selectionnez un nom de groupe et le privilège.
- Sélectionnez un groupe de destinataires pour receivevoir des courriels.
Si un groupe est ajouté, il apparaitra dans la liste des groupes.
- Cliquez sur pour ajouter un destinataires.
Selectionnez un groupe et entrez les noms et les courriels.
Si un groupe est créé, vous pouvez ajouter un destinataire.
Pour entrer le nom du destinataire et le courriel, reportez-vous a la section « Utilisation du Clavier Virtuel » (Page 42)
SNMP
Avec le protocole SNMP, l'administrateur du système ou du réseau peut surveiller à distance les péripériques du réseau ainsi que l'environnement d'opération.

- Activer SNMP v1: SNMP version 1 est utilisé.
- Activer SNMP v2: SNMP version 2 est utilisé.
- Commun. Lecture : Entrez le nom de la communauté en lecture seule pour acceder aux informations SNMP. Il est défini sur par défaut.
- Commun. écriture : Entrez le nom de la communauté en écriture seule pour acceder aux informations SNMP. Il est défini sur par défaut.
- Activer SNMP v3: SNMP version 3 est utilisé.
- Mot de p.: Définir le mot de passer de l'utilisateur initial pour la version 3 de SNMP.
- Activerte SNMP : La trappe SNMP est utilisé pour envoyer des événements et des conditions d'importance au système administrateur.
- Gestion déroute : Saisissez l'adresse IP à laquelle le message sera envoyé.

SNMP v3 peut être régé uniquement si la méthode de connexion de sécurité est régée sur le mode HTTPS. Se référer au « SSL » pour plus de détails. (Page 86)
Yououpouvez parametrerle serveur DHCP interne et allouer une adresse IPa la camera reseau.
Paramétrages réseau


- Réseau 1/2/4 : Sélectionnez , et vous pouvez régler la plage d'IP utilisée par le serveur ainsi que l'heure.
Paramétrage du serveur DHCP
1. Dans la fenetre de configuration du serveur DHCP, cliquez sur .
2. Sélectionnez dans le champ <État>.
3. Saisissez l'IP de départ et l'IP de fin dans le champ .
4. Remplissez le champ .
5. Cliquez sur < OK>
La plage d'IP saisie est définié comme adresse du serveur DHCP sur le réseau.
Vérification de l'IP
Vou puez verifier les adresses IP et MAC actuellement utilisées via le serveur DHCP, ainsi que le port reseau connecté.

- Réseau : Sélectionnéz le port réseau afin de vérifier les informations relatives à l'IP et autres.
RECHERCHE
Voupue effectuer la recherche de donnees enregistrées par le temps ou par les citeres de recherche tels qu'un événement.
Vou puez acceder au menu directement dans le mode en Direct.

1. Dans le mode en Direct, cliquez avec le bouton droit de la souris. Le menu en Direct apparait.
2. Sélectionnez .
3. Le menu Recherche devra s'afficher.
4. La recherche peut être limitée par la fonction Suppression automatique. Se référer à « Configurer l'enregistrement > Option d'enregistrement » (Page 75)

- Chevauchement de données : Il apparait seulement s'il existe des données qui se chevauchent surun certain temps, produites en raison du changement de la configuration de l'heure du NVR. Les données les plus récentes viennent en premier, à partir de . Il n' apparait pas dans .
Le temps de recherche est basé sur le début fixé par le NVR.
Recherche par heures
Yououpez researcher desdonnées enregistréesà l'heure souhaitée.
L'heure affichee est basée sur le fuseau hora local et sur l'heure d'etre avancée (DST). Par conséquent, les données enregistrées au même moment depuis différentes zones peuvent différer en fonction du fuseau hora et de l'heure d'etre avancée (DST).


1. Sélectionnez dans le menu .
2. Dans la fenêtre de selection de la date, cliquez sur le bouton < ♣> pour sélectionner une date de recherche.
Pour utiliser le calendrier, voir « Pour utiliser le calendrier » (Page 41)
3. Les données d'enregistrement surla date précise seront listedes.
La barre d'affichage est différente selon le type de données. Vérifiez donc le type de données pour la couleur dans le volet de gauche.

Si DST (heure d'ete) est configuerée, plusieurs enregistements qui se chevauchent peuvent etre produits pour un certain temps. Cette section de temps se distinguue par la couleur rouge qui permet de marquer la section DST.
- Allez au 1er : Allez à la date d'enregistrement la plus tout.
- All Dernier: Allez à la date d'enregistrement la plus tard.
- Heure : Entrez une heures pour effectuer une recherche ou utilisez le bouton haut/bas <▼> pour en seLECTIONner une.
- Zoom av : La carte s'élargit en détails.
Cela va basculer la série de 24 heures - 12 heures - 6 heures - 2 heures - 1 heures.
- Zoom arr.: La carte va basculer dans le sens inverse du mode détaillé ci dessous.
Cela va basculer la sequence de 1 heures - 2 heures - 6 heures - 12 heures - 24 heures.
- Aperçu : Cliquez sur et Sélectionnez (cliquez, glissez) une heures dans pour afficher une image fixe de la portion.
- Si le canal sélectionné ne contient pas de données enregistrées, il sera marqué noir.
4. Sélectionnez un élément de données et cliquez sur .
L'écran passé en mode de lecture des données.
Indications des couleurs selon l'etat de l'enregistrement actuel
Les types de données enregistrées sont représentés par l'utilisation de différentes couleurs. Chaque couleur correspond à un type d'enregistrement.
Recherche par événement
Yououpouze researcher des événements par le canal et les lire.

1. Sélectionnez dans le menu .
2. Reglez le canal, la date de recherche, et recherche les éléments d'etat.
- Selon le menu sélectionné, il va rechercher tout / détention de mouvement / analyse video / détction audio / capteurs / réservation / événements d'enregistrement général.
- Aperçu date/heure : Si vous sélectionnez un élément de données dans la liste, l'image fixe des données选拔onnées s'affiche dans le volet d'aperçu.gauche.
- Événement : Affiche le type d'événement survenu.
3. Sélectionnez un élément de données et cliquez sur .
L'écran passé en mode de lecture des données de l' événement.
Rech. par carte chaleur
À l'aide de la fonction de recherche par carte thermique, vous pouvez vérifier la fréquence de tous les événements tels que les humains, les voitures et les humains / voitures grâce à l'utilisation de huit couleurs différentes.
Après verification des résultats de la recherche par carte thermique, vous pouvez définir la zone de vérification des informations des événements survenus, dans l'écran de pré-visualisation.

1. Dans le menu , selectionnez l'element .
2. Voupez selectionner un canal et une cible pour les recherches (voitures, personne ou objets par exemple).
3. Dans la fenêtre de selection de la date, cliquez sur le bouton < ♣> pour sélectionner une date de recherche.
Pour plus de renseignements, veuillez vous reférer à la section « Pour utiliser le calendrier » (Page 41)
4. Sélectionnez les données d'intervalle de temps pour votre recherche.
5. Appuyez sur le bouton pour vérifier la fréquence de tous les événements tels que les humains, les voitures, ou les objets dans les huit couleurs différentes.
Niveau 1: Fréquence de l'évenement faible ~ Niveau 8: Haute fréquence de l'évenement
6. Dans les résultats de la recherche par carte thermique, faites glisser votre souris sur la zone pour laquelle vous souhaitez rechercher des événements.
- De multiples zones peuvent être sélectionnées.
7. Appuyez sur le bouton pour afficher les résultats de recherche d'evénements pour cette zone.
8. Àpres avoir sélectionné un événement recherche, appuyez sur le bouton de lecture pour lancer la lecture video avant le temps de recherche.
Appuyez sur le bouton < Eff.> pour initiaiser la zone de réglage utilisateur selectionnée pour les recherches de l'événement.
Pour vous assurer que la fonction de la carte thermique fonctionne correctement
- La fonction de classification humain / voiture s'execute à un niveau optimal lorsque l'angle d'installation de la camera est réglée entre 30 et 60 degrés.
- Il est recommandé d'installer uneamera à une hauteur où tous les aspects des objets enregistrés peuvent être给你们.

Si you definiess 1 emplacement de la camera a alors la fonction de classification voiture / personne fonctionne. Si you la reglez sur , la carte thermique ne peut pas afficher les résultats de detection pour les voitures.
Pour en savoir plus sur les paramètres d'emplacement de laamera, reportez-vous à la section « Détction d'évenement » (Page 77)
Lorsque I'evénement AMD est défini, vous pouvez effectuer des recherches par la carte thermique pour les canaux qui sont enregistrés en même temps.
Pour en savoir plus sur les paramètres d'événements AMD, reportez-vous à la section « Détction d'événement » (Page 77)
Recherche les données de sauvegarde dans le périhérique de sauvegarde connecté. Seules les données au format du NVR sont incluses dans la recherche.

1. Sélectionnez dans le menu .
2. Reglez le canal, la date de recherche, et recherchez les conditions.
- Canal: Affiche les canaux enregistrés.
- Periode enreg.: Affiche la période d'enregistrement.
- Lect.par Tps : Sélectionnez une heures à laquête vous commencez la lecture.
3. Sélectionnez un élément de données et cliquez sur . L'écran passe en mode de lecture des données de sauvégarde.
RELECTURE
Lecture
Vou puez lles données stocke dans le disque dur et sauvegardre une partie souhaitee des donnees.


1. Dans le menu de l'écran en direct, Sélectionnez le menu ou cliquez sur <▶ > dans le menu lanceur.
2. Choisissez un menu de recherches.
Si you essayez la lecture pour la premiere fois, vous commencerez avec la fenetre de recherche de données. Pour la recherche de données, reportez-vous à la section « Recher. » (Page 92)
3. Sélectionnez un élément de données et cliquez sur dans le menu Recherche. Les données sélectionnées sont lues et le lanceur de lecture apparait sur l'écran.
S'il y a des données existantes, démarre immédiatement sans effectuer la recherche.


- Informations de relecture : Affiche la date et l'heure des données actuelles dans le coin supérieur.
- Sauveg : Cliquez sur < > pour parameter l'houre actuelle à l'heure du début de sauvegarde ; vous pouvez specifier une zone de sauvegarde à l'aide de la souris (triangle jaune).
Cliquez sur < >encore une fois pour parameter l'heure actuelle a I'heure de fin de la sauvegarde et la fenetre « Plage sauveg » apparait.
- Type: Prend en charge les formats de NVR et SEC.
- Periph : Sélectionnez un périhérique de sauvegarde.
- Vérif. capacité : Vous permet de vérifier la capacité du périhérique de stockage sélectionné.
4. Si vous pouze revenir à l'écran en direct pendant les lectures, cliquez alors sur < > du menu de lancement.
Utilisation du bouton de relecture

Nom Description 1 Ligne chronologique de lecture Indique le point de relecture courant, et peut être utilisée pour avancer. 2 Saut en arrêté Se déplace en arrêté par unité de temps. 3 Lecture rapide en arrêté Utilisée pourcherer en arrêté rapidement durant la lecture. 4 Lecture lente en arrêté Utilisée pour une recherche en arrêté image par image alors que l'appareil est à PAUSE. 5 Retour pas à pas Va en arrêté par une seule image à la fois. 6 Pause Arrêté temporairment la lecture de la video en cours. 7 Arrêt Arrêté la lecture et se déplace à l'écran en direct. 8 Avance pas à pas Va en avant par une seule image à la fois. 9 Lecture lente en avant Dans un mode partagé, la lecture en temps réel peut ne pas être prise en charge, en fonction de la qualité d'enregistrement, de la résolution et du nombre de canaux. Et certaines fréquences d'images peuvent être prises en charge. 10 Lecture rapide en avant Utilisée pour la lecture rapide en avant. 11 Passer en avant Se déplace en avant par unité de temps. 12 Retour Retour à l'écran de configuration de la recherche. 13 Audio Configure l'audio ACTIVÉ / ARRÊT. 14 REC Enregistre tous les canaux en mode Direct. 15 ZOOM Disponible en un mode simple, qui élargira la video à partir d'un canal sélectionné. Pour annuler le zoom, il suffit de double-cliquer sur l'image agrandie ou sélectionner dans le menu de l'écran en Direct. 16 Sauvegarde partielle Débute la sauvégarde de la section sélectionnée de la video en cours de lecture, avec le point de départ / d'arrivée spécifique. 17 Commutateur de mode Cliquez sur le mode de lecture déséré pour changer le mode de segmentation de l'écran.
démarriage de Web Viewer
QUIEST-CE QUE WEB VIEWER?
WebViewer est un logiciel avec lequel l'opérateur peut acceder à un NVR (enregistrreur video réseau) distant pour une surveillance en temps réel, pour acceder à la commande PTZ (panoramaique/inclination/zoom) (si configurée) ou effectuer des recherches.

Caracteristiques du produit
- Connexion à distance à l'aide du navigateur
Commande camera PTZ activée
- Prise en charge des formats d'affichage de 1, 4, 9, 16, 25, 36, 64 caméras (maximum de 64 caméras dans la liste).
- Fonction de sauvegarde en format JPEG/BMP/PNG pour l'impression et le stockage.
- Enregistrement video au format AVI, compatible avec les lecteurs de support les plus courants. (Le codec intégré est requis)
- Pour lire la video sur Windows Media Player, vous doivent télécharger et installer le codec correspondant sur www.windows7codecs.com. (version 4.0.3 ou supérieure)
Exigences du système
La liste suivante répertorie les exigences matérielles et du système d'exploitation en vue de l'execution de Web Viewer.
Élément Minimum Recommendé Microprocesseur Intel Core 2 Quad 2,5 GHz ou supérieur Intel i7 (3.5GHz) ou supérieur RAM 3 Go ou plus 4 Go minimum 1024 ou supérieur Disque dur 200 Go ou plus 500 1 Go ou plus Mémoire VGA 512 Mo ou plus 1 Go ou plus Résolution d'affichage 1280 x SE Windows XP (service pack 2 ou supérieur), Vista, 7, 8, Mac OS X (10.6 ou supérieur) OpenGL (Accelerateur GPU pris en charge) Environnement Windows du navigateur web : Dernier patch de sécurité, IE 8 ou supérieur avec les correctifs de bugs (IE 9 recommendé), IE 10, Chrome 26.x ou supérieur, Firefox version 19.x ou supérieur Environnement Mac OS X Dernier patch de sécurité, Safari 6.0.3 ou supérieur avec les correctifs de bugs Réseau Carte réseau 10/100/1 1000 Ethernet
1. Ouvrez votre navigateur Web et saisissez l'adresse IP ou l'URL du NVR dans la zone d'adresse URL.
vous devez connecter le réseau 3 avant de pouvoir acceder à Web viewer.

192.168.3.200 est l'adresse IP reglee par défaut.
Vou desveez avoir indiquedl'aresse IP dans «Reseau>Mode connexion
La connexion via l'URL est activée uniquement une fois le réglage des paramétres de connexion DDNS terminé. Pour plus de détails, reportez-vous à la section « Configuration du réseau > DDNS » (Page 84)
2. Un utilisateur disposant de droits d'administration doit fournir une ID et un mot de passer d'administrateur. Un utilisateur enregistré doit fournir un ID et un mot de passer d'utilitaire.

!
L'identifant (ID) et le mot de passer de l'administrateur du navigateur web sont respectivement « admin » et « 4321 ». ÀpRES VOIRE PREMIÈRÉ IDENTIFICATION, VOUS DEVEZ CHANGER LE MOT DE PASSE AU COUR DU PROCESSUS D'INSTALLATION SIMPLIFIÉE.
Parametrez le mot de passer pour votre réseau sans fil si vous utilisez le produit avec un routeur sans fil. Ne pas proteger libre compte avec un mot de passage, ou laisser le mot de passage par défaut peut exposer vos données video à une menace potentielle.
Voues pries de changer votre mot de passet tous les trois mois afin de proteger les renseignements personnels en tout
sucrity et de prevenir les dommages lies au vol d'informations. Veuillez noter que la responsabilité de l'utiliseur est engagée en ce qui concerne la sécurité et tout autre probleme causé
par la mauvaise gestion d'un mot de passer.
Autorise jusqu'à 10 accès simultanés, y compris en tant qu'administrateur et utilisateur général.
Le mot de passer de I administrateur et des utilisateurs généraux peut etre modifie via le menu du NVR.
- Les utilisateurs normaux doivent configurer sous à utiliser avant la connexion au Web Viewer. (Page 44)
Tous les paramètres sont appliqués par les paramètres du NVR.
3. La fenêtre contextuelle de confirmation de l'installation du plug-in s'affiche.

démarriage de Web Viewer
4. Quand une fenêtre de l'assistant d'installation du programme apparait, appuyez sur le bouton [Install] pour installer le programme.
- La version du programme installée peut varier en fonction de la version de la mise à jour.

5. Lorsque l'installation du programme est terminée, cliquez sur le bouton [Finish].

6. Lorsque l'installation est terminée et que vous vous connectez avec succès, avant que l'écran principal de Live Viewer ne s'affiche, la fenêtre contextuelle de l'enregistrement de laamera apparait. Pour enregistrer uneamera, appuyez sur le bouton .
Pour en savoir plus sur comment enregistrer uneamera, reportez-vous à la section « Pour enregistrer uneamera » (Page 51)

LIVE VIEWER
Voupe zier la video de la camera enregistree dans I'enregistrure video en reseau lssquil est connecte depuis un ordinateur distant. En outre, you pouze ajuster la camera et verifier I'etat de transfert du reseau.
Écran Live Viewer

Menu Description 1 Indicateur d'etat du système Il affiche les iconônes permettant d'afficher l'etat de l'écran ou du système. 2 Sélection du menu Permet de commuter entre les écrans du menu correspondant en cliquant sur chaque menu. 3 Date/canal Affiche la date/heure d'accès et le canal sélectionné. Son Permet de régler le son connecté à chaque canal sur MARCHE/ARRÊT. Prise Enregistre la réserve en cours pour le canal sélectionné dans le chemin désigné par l'utilisateur. Imprimer Permet d'imprimer l'image de la réserve actuelle du canal sélectionné via l'imprimante désignée. 4 Changement de canal/cliné écran Bascule sur le groupe de canaux préçédent/suivant.Bascule du plein écran à l'écran partagé. 5 Informations du canal Affiche les informations du canal sélectionné. Gel Permet d'arrête temporairement les vidés dans tous les canaux ou de désactiver la fonction Pause en état de suspension. Arrêter alarme Permet de désactiver l'alarme une fois qu'elle se déclenché. OSD Accès à l'écran de menu de laamera qui prend en charge le menu OSD pour modifier les paramètres. Enregistrement PC Enregistre la video en temps réel du canal sélectionné, au format AVI, dans un dossier désigné sur le PC. Enregistrement NVR Démarre et arrêté l'enregistrement NVR. 6 Réglages des mises en page Définit la mise en page. 7 Commutation Définit la série. 8 PTZ Permet de contrôle la(les)amera(s) PTZ connectée(s) 9 Volet d'informations Permet d'afficher la video de laamera connectée à l'enregistreur video en réseau. 10 ID Affiche l'ID de l'utilisateur connecté. Installation rapide. Enregistrement simple de laamera et paramètres d'enregistrement. Sauvegarde manuelle Sauvegarde manuellement la video de laamera connectée. État Affiche laamera en direct et le statut d'enregistrement. Aide Passe à la fenêtre d'aide. 11 Déconnexion Permet de lancer le processus de déconnexion. Fermer Éteint le système NVR.
État du système
YououpezverifierI'etatoulefonnennementduNVRàlaide desiconesdeI'ecranendirect.
Élement Description Fonctionnement du système S'affiche quand il y a un problème avec le ventilateur. S'affiche quand il y a un problème avec l'alimentation. S'affiche quand il y a un problème avec les conditions d'enregistrement. FULL S'affiche lorsque le disque dur est plein et que le NVR dispose d'un espace insuffisant pour l'enregistrement. NO S'affiche en l'absence de disque dur installé ou lorsque le disque dur existant doit être remplaced. S'affiche si le disque dur a besoin d'un examen technique. RADIUS S'affiche quand il y a un disque dur défectueux dans le RAID.
■ Il y a une ou deux défaillances du disque dur mais vous pouvez toujours dire ou écrire dessus. RADIUS S'affiche lors de la récapération d'une erreur du RAID. RADIUS Il s'affiche lorsque vous ne pouvez pas écrire sur le RAID en raison d'un dysfonctionnement du disque dur. RECA S'affiche lorsque le maximum autorisé de la quantité de données pour chaque canal est dépasse. S'affiche lorsque, en raison d'une déterioration des performances du réseau (10fps ou moins), la fonction AMD échoue. Élément Description Fonctionnement du système ISCSI S'affiche lorsqu'un périphérique iSCSI est déconnecté. S'affiche lorsque le réseau est surcharge. S'affiche lorsque le réseau est surcharge. Il se produit lorsque la performance de réception maximale est atteinte, provoquant une surcharge du microproesseseur. Il disparaitra si vous modifiez les paramétres de laamera ou supprimez uneamera pour réduire le niveau de surcharge de la performance. S'affiche quand il y a un micrologiciel pourmettre à jour le serveur. S'affiche quand il y a un micrologiciel pourmettre à jour le serveur. S'affiche si le niveau de la batterie d'un dispositif NVR est vide. Si vous appuyez sur le bouton de l'écran d'arrêt, il est affché. S'affiche lorsqu tous les canaux sont commutés à l'intervalle de temps définir.
Pour capturer un écran
1. Cliquez sur le bouton <
Quand une fenêtre pop-up apparait, Sélectionnez le chemin d'enregistrement pour l'image capturée.
2. Sélectionnez le chemin et le nom du fichier. Ensuite cliquez sur le bouton [OK].
3. Enregistrez l'image video de laamera en cours en tant que fichier .bmp, .jpg ou .png.

Si le visionneur est en cours d'execution sans l'autorisation de I'administrateur dans Windows Vista / 7, vous ne pouvez pas enregistrer l'image capturé en tant que fichier .bmp, .jpg ou .png.

Pour imprimer un écran
1. Cliquez sur le bouton <

2. Imprimez l'image video de laamera actuelle avec l'imprimante connectee à l'ordinateur sur lequel Web Viewer est utilisé.

Configuration de la mise en page
Si vous ne l'ajoutez ou ne l'enregistrez pas dans la mise en page après l'enregistrement d'uneamera, l'écran en direct ne sera pas affché.
Cliquez sur le bouton < 100 > pour lancer l'écran de réglage de la mise en page.

Si vous désirez ajouter une mise en page
Cliquez sur < 一>
Définissez le nom de la mise en page à ajouter, puis cliquez sur le bouton pour l'ajouter.

Si vous désirez modifier le nom d'une mise en page
Selectionnez le nom de la mise en page à modifier et cliquez sur <1>.
Après avoir changé le nom, cliquez à l'extérieur de la fenêtre de mise en page pour modifier le nom.

Si vous désirez sauvegarder la mise en page.
Cliquez sur < [ ]>.
La mise en page modifiée sera enregistrée.

A division d'écran de chaque utilisateur est enregistrée.
separation.

Si vous désirez supprimer la mise en page.
Après avoir sélectionné la mise en page à supprimer, cliquez sur < ] >.
La mise en page selectionnelle sera supprimée.
les changements ne seront pas sauvegardés, sauf si vous appuyez sur le bouton Enregister ou Supprimer.

Changer la Mosaïque
Lorsque vous cliquez sur le bouton de selection de la Mosaïque, l'écran passe au mode partagé sélectionné.


Si vous poulez maintainir la proportion de l'écran en cours
Lorsque vous bascules d'un écran divisé, vérifie pour maintainir la proportion et changer pour une taille différente.

Pour acceder à l'écran du canal souhaité
Appuyez sur le bouton < > pour passer au groupe de canaux précédent / suivant.

Pour basculer au mode Plein écran
Cliquez sur < 一 \ 一 >
L'écran partagé actuel apparait en plein écran.
Appuyez sur la touche [ESC] pour quitter le mode plein écran.
Safari pour MAC ne prend pas en charge le plein écran.

Cliquez sur [ \ e^i /2] >
Pour passer de l'écran partagé de 64 canaux au plein écran. Pour quitter le mode plein écran, appuyez sur la touche [ESC]

basculement de l'écran de réglage
Si vous n'enregistrez pas la mise en page, la fonction de basculement de l'écran ne fonctionnera pas.
You pouvez afficher les mises en page une par une.
Cliquez sur le bouton < 0 > pour lancer la fenetre de réglage du basculement.

1. Sélectionnez les mises en page à montré à leur tour en appuyant sur <▶>
2. Entrez le temps de basculement de I'ecran.

3. Cliquez sur le bouton pour enregistrer la série désignée.

Pour effectuer un basculement
Cliquez sur le bouton pour activer le mode de basculement et demarrer une sequence.

Sequence auto


Zsque you basculez vers un autre canal, la video peut etre tegerement retardee selon I'etat du reseau.
Si vous effectuez le basculement automatique d'un seul écran, le menu de réglage de la mise en page sera désactivé pendant l'opération.
CONTRÔL D'UNE CAMÉRA RÉSEAU CONNECTÉE
Contrôle du PTZ
Si uneamera PTZ est connectee, l'icone < apparait sur I'ecran. Lors de la selection du canal de camera correspondant, I'onglet PTZ est present pour vous permettre de contrcler le PTZ.

Élément Description 1 Menu de laamera Affiche le menu de configuration de laamera. 2 Ajustement de la direction Utilisez cette fonction pour ajuster la direction de laamera ou cliquez sur la touche fléchée au centre pour l'utiliser en tant que touche de confirmation.. 3 IRIS Règle la luminosité de l'image en contrôle l'iris de laamera. 4 Son Voues pouvez définir le couple audio de laamera et leMETRE en muet. 5 Vitesse du PTZ Permet d'ajuster la vitesse de réaction PANORAMIQUE, HORIZONTALE-VERTICALE. 6 Pré-réglage Permet de définir la position prérégée pour le cadrage de laamera et de déplacer cette dernière sur la position prérégée désignée lors de la sélection du préréglage souhaïte. 7 Balayage Permet le déplacement entre les points de départ et d'arrivée prérégés. 8 Groupe Permet le déplacement sur la trajectory spécifiée en combinant le pré-réglage. 9 Trace Déplace le cadrage de laamera dans la trajectory prédéterminée. 10 Tour Permet le déplacement sur la trajectory spécifiée en combinant plusieurs groupes. 11 FOCUS Permet d'ajuster la mise au point de laamera. 12 ZOOM Permet d'effectuer un zoom avant/arrête sur l'image en contrôle le zoom de laamera. 13 Sensibilité Règle la sensibilité de votre fonctionnement deamera. 14 Déactivation du zoom numérique Rétablit la taille d'origine du contenu zoomé.
Pour définit un pré-réglage
1. Cliquez sur le bouton > pour afficher la fenetre « Preregl. »
2. Cliquez sur le bouton < > pour selectionner l'ordre de pré-réglage.
3. Entrez le nom de pré-réglage.
4. Utilisez les touches directionnelles pour ajuster la direction dans laquelle laamera est orientée.
5. Cliquez sur le bouton < _____.
Pour activer un pré-réglage
1. Cliquez sur le bouton < >pour afficher la fenetre « Préprégl. »
2. Sélectionnez le pré-réglage souhaïe à activer parmi la liste. Le cadrage de laamera rouge à la position prédéfinie.

Pour activer Swing(Pan-auto), Group(Recherche), Trace(Modèle) et Tour
Voupez activer les fonctions enumeratedes de la meme maniere en utilisant un pre-reglage. Pour plus d'informations, reportez-vous au manuel d'utilisation correspondant de la camera concernee.

elon laamera,seules ses fonctions selectives peuvent etre prises en charge.
SEARCH VIEWER
Vou puez recherer et lre enregistrement video effecte dans I'enregistre vid en reseau en accedant a distance.
Écran Search Viewer

Élement Description 1 Sélection du menu Permet de commuter sur l'écran du menu correspondant en cliquant sur chaque menu. 2 Calendrier Permet d'afficher la date à laquelle la video a été enregistrée en bleu et celle d'aujourd'hui en rouge. Cliquez sur la date de couleur bleue pour afficher les informations relatives à la video enregistrée dans le plan de montage chronologique. 3 Sélection des canaux Affiche les canaux de recherche. 4 Recherche Recherche le canal désigné par l'utilisateur pour la date sélectionnée. 5 Affichages des canaux Affiche le nombre de canal sélectionné. Élément Description 6 Son Permet de régler le son connecté à chaque canal sur MARCHE/ARRÊT. Prise Permet d'enregistrer la video actuelle pour le canal sélectionné selon le chemin désigné. Imprimer Permet d'imprimer l'image de la video actuelle pour le canal sélectionné via l'imprimante assignée. Sauvegarde de section Sauvegarde la video de la section sélectionnée. Agrandir / Rétécir Agrandir ou rétrécir la video en cours pour le canal sélectionné. OSD Affiche les informations du canal. Plein écran Afficher l'écran divisé à quatre voies en plein écran. 7 Contrôle du son Régler l'audio de la video recherchee. 8 Enregistrement de couleur Permet d'afficher la couleur correspondante en fonction du type de données enregistrées si vous placez le curseur de la souris sur cette zone. 9 Volet d'informations Permet d'afficher les données correspondantes sur l'écran si vous sélectionnez un résultat de recherche.
Pour rechercher par date
Yououpouze selectionner la date de recherche enutilisantle calendrier.
1. Cliquez sur < , > pour selectionner I'annnee / mois de votre recherche.
Si une date a des données associées, elle est affichée en bleu. La date du jour s'affiche sous la forme d'une case bleue.
2. Cliquez sur la date à rechercher dans le calendrier.
La première image de données video recherche à la date est affichée sur l'écran et les données sont affichées dans la chronologie.
3. Pour rechercher des données video d'aujourd'hui, cliquez sur.
La date d'aujourd'hui est selectionnee.
Indications des couleurs selon l'etat de l'enregistrement actuel
La couleur correspondante s'affiche en fonction du type de données enregistrées.
Standard
Enr mvt
Calendrier
Capteur
Evt cam
Detec. Auto
DST
Zi deux ou plusieurs sortes de types d'enregistrement sont melangés pour le même plan de montage chronologique, seul le type d'enregistrement avec une priorite plus elevée est affiché.
(Priorite : Standard > Evt cam > Calendrier > Capteur > Enr mvt > Detec. Auto > DST)
Pour ajuster le plan de montage chronologique
Si les données recherches se chevauchent, vous pouvez selectionner une donnée de votrechioix, déplacer son point d'heure de lecture et effectuer un zoom avant/ariere sur le plan de montage chronologique.

1. Sélectionnez le nombre de données à rechercher si les données se chevauchent. Cela apparait uniquement lorsque des données se chevauchent et assigne < 0> aux données les plus récentes.
2. Cliquez sur votre point de temps désire à jour sur le plan de montage chronologique. Le point de départ de la lecture est déplace.
3. Cliquez sur < + > / < -> pour faire un zoom avant / arriere du facteur de zoom pour afficher l'heure.
4. Lorsqu'elle est agrandie, si vous voulez voir la pre / post chronologie, cliquez sur la ligne de temps et faites-la glisser dans la direction où vous souhaitez la déplacer.
Si vous voulez consulter la liste des enregistrements
Les résultats pour chaque section d'enregistrement seront affichés.

Noms et fonctions des boutons de lecture

Élément Description 1 Retour en arrière Rétablit l'événement précédent. 2 Mouvement de cadre en arrière Déplacer un cadre dans la direction inverse. 3 Lecture arrière à la vitesse X Permet de rembobiner à la vitesse X. 4 Arrêt Après avoir terminé la lecture, aller sur le mode en direct. 5 Lecture/Pause La video est lui et mise en pause. 6 Lecture en avant à la vitesse X Lire la video vers l'avant à la vitesse X. 7 Mouvement de cadre en avant Déplacer un cadre vers l'avant. 8 Saut en avant Passe à l'événement suivant.
SETUP VIEWER
Yououpouze configurer les parametres NVR a distance sur leseau.
Pour configurer les paramètres NVR, cliquez sur .
Écran des paramètres

Élément Description 1 Sélection du menu Cliquez sur chaque menu pour basculer dans l'écran de menu correspondant. 2 Menu Parent Configurez les paramètres ou sélectionnez un élément parent pour modifier les paramètres existants. 3 Sous-Menu Parmi les sous-menus du menu parent sélectionné, sélectionnez un élément que vous souhaitez régler. 4 Menu Détailé Cliquez dans le champ d'entrée de l'élement souhaité pour modifier et entrez la valeur désirée. 5 OK Appliquez les paramètres modifiés.
Système
Yououpouvezconfigurerlesdifferenteparametesdu systemeNVR.
Date/Heure/Langue
Pour plus d'informations, reportez-vous à « Date/Heure/Langue » dans le menu « Système ». (Page 40)
Date/Heure
Réglez la date et l'heure.

Configuration de la synchronisation de l'heure
Réglez la synchronisation de l'heure.

DST (heure d'été)
Pendant l'été, l'heure d'été avancée (DST) avance les horloges d'une heures par rapport au fuseau hora normal.
Langue
Selectionnez une langue préféérée pour le NVR.
FéRé
Un utiliseur peut selectionner des dates spécifiques comme jours feries en fonction de ses propres prevalences.

Gestion des autorisations
Pour plus d'informations, reportez-vous à « Utilisateur » dans le menu « Configuration Systeme ». (Page 42)
Administrator
VouppouvezmodifierI'IDoulemotdepassade administrateur.
L'D n'accepte que des caractères alphanumeriques.
Si I'ID administrateur n'est pas utilisée pour l'accès, vous ne pouvez pas changer I'ID.
Si I'ID utilisée est modifiée, vous serez automatiquement déconnecté.

Utilisateur
Vou pouvez ajouter, modifier ou supprimer un ou plusieurs utilisateurs.

Rég Autorisation
Yououpouvezconfigurerles autorisationsde l'utilisateur.

Gestion du Systeme
Pour plus d'informations, reportez-vous à « Gestion Système » dans le menu « Système ». (Page 46)
Info système
Yououpouvezvoirlesinformationsdusystèmeactuel.
Verifiez la version du logiciel et l'adresse MAC.

Réglages
En utilisant un périhérique de stockage, vous pouvez appliquer la configuration actuelle du NVR à un autre NVR.
Appuyez sur la touche Initialiser pour rétabir les paramètres du réseau à leur état d'usine par défaut. Les éléments de la catégorie sont exclus de l'initialisation.

Infos journal
Journal système
Les données enregistrées dans le journal du système affichent les journaux liés au système / date / heures que le démarrage du système, l'arrêt du système et les changements des réglages du menu.

setup viewer
journal événements
Les éléments enregistrés des listedes du journal d'événements tels que les événements de capteur, les événements deamera ou les pertes d'images.

journal sauv.
Voussouvez you renseigner sur un utiliseur qui a effectue une sauvegarde, le temps d'execution, les détails (I'heure de sauvegarde, le canal, le periphérique de sauvegarde, le type de fichier de sauvegarde).

Péripérisque
Voupez verifier la listedes peripheriques connectés au NVR et configurer les parametes nécessaires.
Cliquez sur dans l'écran de menu.
Pour obtenir plus de détails, reportez-vous à « Configuration du Periphérique » (Page 51)
Caméra
Enreg cam
Vous pouvez ajouter une (plusieurs) camera(s) reseau.

Conf. de cam.
Vou puez modifier les parametes d'une camera reseau connectee.

Configendirect
Vou puez Change les parametes de transfert en direct de la camera reseau.

setup viewer
Config.Voies
Vos pouvez configurer les parametes video pour chaque canal.

Periph.stock.
Voupeuz verifier et modifier les parametes lies au peripherique de stockage de donnees.
Vous pouvez vérifier un périhérique de stockage, la quantité d'utilisation, le type d'utilisation et l'etat du périhérique de stockage.

iSCSI
Si vous connectez un NVR à un périhérique iSCSI, vous pouvez rechercher, connecter ou déconnecter le périhérique iSCSI.

RAID
Si vous activez le mode RAID, alors même si le disque dur du système est endommagé, vous pouvez recuperer les données en toute sécurité.

Alarme DD
Vou puez définir le port de sortie de l'alarme et sa durée au cas ou une erreur se produit.

Écran
Écran
Vouspouvez configurer les parametes de I'ecran de contrôle et regler le systeme de sortie.
La video ne joue pas correctement, reportez-vous à la section de dépannage dans le present manuel. (Page 145)
- Les paramètres de configuration du monitér contrôlent le monitér connecté au NVR.

Enregistrement
Pour obtenir plus de détails, reportez-vous à « Configuration de l'enregistrement » (Page 72)
Enregistrement programme
Si vous définissez un calendrier d'enregistrement pour une date et une heures précises, l'enregistrement démarre à ce moment précis.

Config de l'Enr.
NVR
Selectionnez un type de fréquence d/images d'enregistrement normal / d'événement pour chaque canal.

Caméra
Vous pouvez définir le profil d'enregistrement d'uneamera reseau.

Option d'enregistrement
Vous pouvez regler le mode de fin de disque.

Événement
Pour obtenir plus de détails, reportez-vous à « Réglage de l'Événement » (Page 76)
Detection capteur
NVR / Camera
Vou puez regler le mode de fonctionnement du capteur et la camera synchronisée ainsi que le type de sortie d'alarme et la durée.
Si laamera connectee au réseau qui a configuré les paramétres de l'alarme in / out déclenché une alarme, NVR va effectuer la sortie d'alarme.

Detection d'évenement
NVR / Camera
Vou puez regler le mode d'evenement de la camera et du NVR, le type de sortie d'alarme et la durée de l'alarme.

Detection perte video
Voupeuvezreglerledeclenchementde lalarmencasdeperte video.

Progr sortiealarme
Vou puez programme la sortie d'alarme en fonction du jour de la semaine et de l'heure.
Le réglage par défaut est synchronisation de l'évenement, qui déclenché l'alarme seulement si un évenement se produit.

Réseau
Pour plus d'informations, reportez-vous à « Configuration du réseau ». (Page 80)
Interface
Un utiliseur distant peut acceder au NVR via le reseau pour vérifier le mode actuel et l'adresse IP.
Réseau
Sécicfiez le chemin de la connexion réseau.

Port
Vou puez configurer les parametes liés au protocole.

setup viewer
DDNS
Réseau3
YououpuvezverifierlesreglagesDDNS.

Filtrage d'IP
Vou puez preparer la liste des adresses IP pour autoriser ou bloquer les accès à une adresse IP spécifique.

SSL
Voupeuze selectionner un systeme de connexion de sécurité ou installer des certificate publics.
out en utilisant le protocole HTTPS, si vous voulez passer à HTTP, alors un fonctionnement anormal peut avoir lieu puisque le navigateur contient les valeurs de réglage. Vous devez modifier l'URL à HTTP et vous reconnectcer ou réinitialiser les paramétres des cookies du navigateur.

802.1x
Lors de la connexion à un réseau, vous pouvez désir d'utiliser le protocole 802.1x et installer un certificat correspondant.

Diffusion en direct
Vou puez configurer les parametes de transfert reseau de la camera reseau.

Courriel
Voupe specifier le serveur SMTP qui envoie un courriel si un événement se produit et défini r les groupes des destinataires et des utilisateurs.
SMTP
Vous pouvez configurer le serveur qui envoie des courriels et spécifique si vous utilisez le processus d'authentication.

setup viewer
Événement
Voupeuz regler l'intervalle de I'evénement et spécifier pour quels événements le serveur envoie des courriels.

Destinataire
Vous pouvez définir des groupes et des destinataires pour recevoir des courriels.

SNMP
En utilisant le protocole SNMP, l'administrateur du système ou du réseau peut surveiller à distance les périhériques du réseau et définir l'environnement.

Serveur DHCP
Réseau
Vou puez parametrer le serveur DHCP interne et allouer une adresse IP à laamera reseau.

Verifiez l'IP
YououpouvezverifierlesadressesIPetMACactuellement utiliséesparle serveurDHCP,etle port reseauconnecté.

utilisation des icones de réglage
1
admin Rég rapiè Sauvegarde manuelle État Aide
- Affiche l'ID de l'utilisateur connecté.
:Vous pouvez enregistrer une camera reseau pour chaque canal et facilement regler la resolution et le nombre de prises de vue en cas de survenance d'evénement ou d'enregistrement manuel.
Pour en savoir plus sur comment enregistrer uneamera, reportez-vous à « Pour enregistrer uneamera » (Page 51)


:Vouspouvezentrer manuelles le canal de sauvegarde desire et la date /heure pour la sauvegarde de la video enregistrree.

:VoupezverifierI'etatdeI'enregistrementetlestatutdelacameraconnectee.
- LIVE: Sélectionnez pour vérifier l'objet de la camera connectée à chaque canal et les informations de transmission.

- Enreg.: Sélectionnez pour vérifier pour chaque canal ce qui suit : profil, type enreg., taux de transmission entrées / enregistrement, paramètres / entrées / quantité des données enregistrées.

& >: Vousserezimmediatementredirigeversla page\ & d'accueildeSamsungTechwin. (http://www.samsungcctv.com/).

Voupsousvezlireunfichier sauvegardeau formatSEC.
Sauvegarder au format SEC produit un fichier des données de sauvegarde, un fichier de bibliothèque et un fichier de la visionneuse auto-exécutable.
Si you executez le fichier de sauvegarde spectateur, le fichier de données de sauvegarde sera joue.

Configuration minimum requise
Les ordinateurs non-conformes aux specifications ci-dessous risquent ne pas prendre en charge les fonctions de lecture avant/arrête et a grande vitesse.
- Système d'exploitation : Windows XP professionnel, Windows Vista, Windows 7
- Proceseur : Intel Core 2 Quad 2,5 GHz ou supérieur
- Mémoire vivie : 3 Go minimum
VGA: Geforce 6200 ou supérieur
Élement Description 1 zoom numérique + Agrandissement l'image par 100 fois (max.) afin qu'elle soit aussi grande que l'image actuelle.Appuyez sur le bouton Zoom av( ) pour agrandir l'image; appuyez sur lebouton Zoom arr.( ) pour réduire l'image.Vous pouvez également utiliser la barre coulissante ( ) dans la fenêtrecontextuelle pour effectuer un zoom avant/arrête.Appuyez sur ( ) sur une video dont la taille a été modifiée pour restaurer lefacteur de zoom par défaut (100 %).Si vous agrandissement l'image par plus de 200 %, la zone agrandie sera induquée sur l'écran de zoom numérique. Cliquez sur la zone indiquée et déplacez-la sur la position souhaiée.Le zoom numérique est appliqué à tout le visionneur de sauvegarde. Lorsque le zoomnumérique est annulé, la taille de la video restaure la quantité par défaut de 100 %. 2 Impression decapture d'écran + Sauvegarde l'image video actuelle comme sur un filier image. Prend encharge le format JPEG. + Imprime l'écran actuellément sélectionné. Vous devrez avoir préalablementinstallé le pilote d'imprimante approprié avant d'imprimer l'écran. 3 Audio / Bouton de bascule. Chaque fois que vous appuyez sur ce bouton, la sortie audio bascule entre les états d'activation et de désactivation. - Vous pouvez régler le niveau de volume sur une plage de valeurs comprise entre0 et 100. 4 Filigrane / Appuyez sur le bouton pour activer la détction de sabotage de fichiers, pourdéctector la contrefaçon de fichiers. 5 Deinterlace - Vous pouvez activer la fonction Désentrelacer. 6 Montre OSD - Cochez la case OSD (Affichage à l'écran) pour afficher les informations OSD à l'écran de lecture des données de sauvegarde.Des informations telles que la date de sauvegarde, le jour de la semaine, le nomde modèle et le numéro de canal seront affichées à l'écran. 7 Agrandit/réduit la ligne temporelle - Comprime le créneau horsaire affiché sur la barre chronologique du temps destophage. Vous pouvez réduire la barre chronologique jusqu'à ce que la plageglobale soit réduite à 24 heures. + Agrandit le créneau horsaire affiché sur la barre chronologique du temps destophage. Vous pouvez agrandir la barre chronologique jusqu'à ce que la plagechronologique toute entière soit étedue à 1 minute. 8 Restitue la lignetemporelle - Restitue la ligne temporellesur le défaut. 9 Affichage du créneau horsaire destockage Affiche le créneau horsaire d'un filier video stocké.Vous pouvez déplacer la ligne de quadrillage de la barre chronologique pour sélectionner un point dans le temps pour lancer la lecture. 10 Commande delecture + Vous pouvez régler la lecture video de ligne temporelle.
CaraCTériSTiqueS du produit
Élément Détails Display Caméra réseau Entrées 64 canaux maxi. Résolution CIF ~ 5MP Protocoles Samsung, ONVIF Direct Affichage local HDMI/VGA Affichage Multi-canaux [Écran local] 1 / 4 / 6 / 8 / 9 / 13 / 16 / Séquence[Réseau] 1 / 4 / 9 / 16 / 32 / 64 / Séquence Performances Système d'exploitation Intégré Linux Enregistrement Compression H.264, MPEG-4, MJPEG Bande passante d'enregistrement Max. 400Mbps(enregistrement en temps réel avec 64 camères 2MP) Résolution CIF ~ 5MP Type Manuel, Programmé (Continu/Evénement), Événement (Pré/Post) Déclencheur d'événement Entrée d'alarme, Perte videoe, Événement de laamera (MD, Analytique videoe), VA interne (Jusqu'à 4 canaux scélectionnables, MD avancée, Classement d'objets (Personnes, Voitures)) Action d'événement Courriel, PTZ prérégle, alarme hors service, avertisseur, monitour hors service Recherche et Lecture Lecture de la bandepassante 25Mbps (16ch simultanémence) Mode Date et heures (Calendrier) / listened du journal des événements Lecture simultanée 16 canaux (Monitaur Local)4 ch (Web), 16 ch (CMS) Résolution CIF ~ 5MP Commande de lecture Avance rapide/Retour rapide, Saut avant/Saut arrêté Élement Détails Stockage Intégreé 1 EA Disque dur interne 12 (Changement rapide), Max 36TB Externe NAS(iSCSI) : vessRaid 1840i, Max. 192TB(JBOD) RAID RAID-5/6 Sauvegarde Sauvegarde de fichiers (via Internet) BU/EXEGUI), JPG, AVI (Réseau) Fonction Lecture de canal unique, Affichage Date-Heure/Titre Capteur E/S 8/4 (NO/NC SéLECTIONNABLES) Audio Entrée 64 canaux (réseau) Compression G.711, G.726 Communication audio Bidirectionnelle Réseau Interface RJ-45, Gigabit Ethernet x4 Protocole TCP/IP, UDP/IP, RTP(UDP), RTP(TCP), RTSP, NTP, HTTP, DHCP, PPPoE SMTP, ICMP, IGMP, ARP, DNS, DDNS, uPnP, ONVIF, HTTPS, SNMP DDNS Samsung iPolis DDNS Network Bande passante de transmission Up to 700Mbps Transmission Bandwidth Up to 400Mbps Nombre maximal d'utilisateurs distants Recherche (1)/ Diffusion individuelle en direct (10) /Multidiffusion en direct (20) Version IP IPv4/v6 Sécurité Registre d'accès utilisateur, Filtrage IP, 802.1x, Cryptage Élément Détails Langue(24) Anglais, Français, Allemand, Italien, Espagnol, Russé, Turque, Polonais, Néerlandais, Suédois, Tchêque, Portugais, Danois, Roumain, Serbe, Croatia, Hongrois, Grec, Norvégien, Finnois, Coréeen, Chinois, Japonais, Thai SE Système d'exploitation pris en charge : Windows XP(service pack 2 ou supérieur), Vista, 7, 8, Mac OS X(10.6 ou supérieur) Navigateur Internet IE 8 ou supérieur avec les correctifs de bugs (IE 9 commande), IE 10, Chrome 26.x ou supérieur, Firefox version 19.x ou supérieur Logiciel d'affichage Type Webviewer, Smart Viewer Prise en charge CMS Prise en charge SDK/CGI Smartphone Plateforme Android, iOS Prise en charge de protocôles RTP, RTSP, HTTP, CGI Nombre maximum d'utilisateurs distants Direct (10), Playback(1) Fonctions Configuration de laamera Enregistrement Auto/Manuel Éléments de configuration 1) Adresse IP, Ajouter modification du profil, Bitrate, Compression, GOP, Qualité2) Configuration video (MD, ABF, Luminosité / Contraste, Retournement / Miroir, IRIS, WDR, D & N, SSNR, Obiturateur) PTZ Commande Via Webviewer GUI Pré-réglage 255 pré-réglages Smartphone Modèle pris en charge I-Phone, Android Commande Direct (4ch) / Playback (1ch) Commande du système Sours Indicateur/Interface Face avant Voyant LED Indicateur d'etat :Action du disque dur (12), État du RAID (1), Alarme (1), Alimentation (1), Enregistrement (1), Sauvegarde (1), Réseau (1)" Commutateur Commutateur PWR 1EAVerrouillage par clé 1EA Connecteurs VGA 1 EA HDMI 1 EA Audio Sortie (1EA, RCA, Ligne) DVD N/A Série N/A Ethernet RJ-45(4EA, GbE) w/ LINK/ACT LED Alarme Entrée (4EA, Bornier de connexion)Sortie (4EA, Bornier de connexion)" USB 2EA (Avant) Réinitialisation Commutateur (1EA) Cordon d'alimentation Prise CA 2x Système Journaliste des journaux Max. 20000 (Journal Système, Journal des Événements, Journal sauv. pour chacun) Environnement Température de fonctionnement / Humidité +0°C à +40°C Taux d'humidité 20% ~ 85%
annexes
Élément Détails Alimentation électrique Puisance 100 à 240 V CA ± 10%; 50/60 Hz, 3 ~ 1,5 (Dual) SMPS) Consommation électrique 187 W max. (546 BTU avec 12 DD) Mécanique Couleur/Matière Noire/Métal Dimensions (L x P x H) L436.0 x P468.7 x H132.0 mm (3U) Poids 11.8Kg(sans DD) Normes Homologations Sécurité UL, KC CEM CE, FCC, KCC, CCC, Gost-R
unite : mm (pouce)


RÉGLAGE PAR DÉFAUT
Pour réinitialiser le système, allez à « Gestion système > Gestion de la configuration > Réinitialiser » et appuyez sur le bouton .
Ceci réinitialise les réglages sur les paramètres par défaut.
Vou ne sise t e i i i i i i i i i i i i i i i i i i i i i i i i i i i i i i i i i i i i i i i i i i i i i i i i i i i
Lidentifant initial de Iadministrateur est admin et le mot de passe doit etre defini lors de la preme connexion.
Veuillez Changeer voit de passes tous les trois mois afin de proteger sans risque les informations personnelles et eviter les prejudices occasionnes par un vol de donnees.
Veuillez noter qu'il en est de la responsabilité de l'utilisateur quant a la sécurité et autres problèmes causés par une mauvaise gestion du mot de passer.
Catégorie Détais Paramètres par défaut Système Date/Heure/Langue Date/Heure/Langue Date AAAAA/MM/JJ Heure 24 heures Fus. hor. GMT Sync hor. ARRÊT DST ARRÊT Langue Anglais Utilisateur Admin ID admin Rég Autorisation Accès limité Sauveg/Enreg./Stop enregis./Recher./PTZ/Cmde S.alarme/Fermeture Restriction accès au réseau Aucun Déconnex. Auto 3 min Saisie manuelle ID ARRÊT Gestion système Info système Nom du péripérique NVR Périph Caméra Synchroniser conf. canal Védo ACTIVÉ Audio ARRÊT Nom caméra Cam 01 ~Cam 64 Périph. stock. Alarme DD Vér. port sortie alarme BIP Durée alarme Continu Remp. port sortie. alar. BIP Durée alarme Continu iSCSI Alarm Output Port BIP Durée alarme Continu Écran Écran Affichage évén. ARRÊT Affich. Tous Tps SEQ m.CA 5 s. Sortie video VGA(1280x1024) Configuration positionaffichage 30 Enreg. Enregistrementprogramme Voie1~Voie64 Enr cont+évén Config de l'Enr. Standard PLEIN Événement PLEIN Pré-événement ARRET Post-évén. 1 min Optiond'enregistrement Mode non FIFO Remplacer Signal fin disq ARRÊT Suppr. Auto 180 Événement Détection capteur NVR État ARRÊT Cam Caméra N° Sortie alarme Aucun Durée alarme 10 s. Caméra réseau Sensor Operation ARRÊT Cam Caméra N° Sortie alarme Aucun Durée alarme 10 s. Détectiond'événement AMD ARRÊT Evt cam ARRÊT DM ARRÊT Cam Caméra N° Alarme Aucun Durée alarme 10 s. Détection perte videoo Etat perte vid. ARRÊT Sortie alarme Aucun Durée alarme 10 s. Progr sortie alarme Sortie alarme 1 Réseau Interface Réseau Type d'IP IP stat Réseau 1(caméra) 192.1 68.1.200 Réseau 2(caméra) 192.1 68.2.200 Réseau 3(Visualisateur) 192.1 168.3.200 Réseau 4(ISCSI) 192.16 8.4.200 Masq ss-rés 255.255 255.0 Passerelle 192.168.1.1 DNS 168.126.63.1 Port Type de protocole TCP Type de péripérisque 554 Port UDP 8000~8159 Multi-diffusion d'adresse IP 2 24.126.63.1 Multi-diffusion TTL 5 Port de flux Web 80 DDNS Réseau3 Site DDNS ARRÉT Filtrage d'IP Type de filtré Refuser SSL Système de connexion sécurisé HTTP (connexion non sécurisée)) 802.1x Réseau Activ. IEEE 802.1x ARRÉT Courriel SMTP Port 25 Utilis. authentifi. ARRÉT Transf. sécurisé Jaams Événement Intervalle événement 10 min Use Event Transfer ARRÉT SNMP Activer SNMP v1 ARRÉT Activer SNMP v2 ARRÉT Activer SNMP v3 ARRÉT Activ alerte SNMP ARRÉT Serveur DHCP Réseau 1(caméra) Plage d'IP 192.168.1.1 ~ 192.168.1.254 Tps alloc. IP 86400 Réseau 2(caméra) Plage d'IP 192.168.2.1 ~ 192.168.2.254 Tps alloc. IP 86400 Réseau 4(ISCSI) Plage d'IP 192.168.4.2 ~ 192.168.4.254 Tps alloc. IP 86400
dépannage (faq)
Problème Mesures à prendre Le système ne s'allume pas et l'indicateur en façade est inopérant. Vérifiez si le système d'alimentation est correctement branché.Vérifiez la tension d'entrée du système à partir de la source d'alimentation.Si le problème persististe même après que vous ayez effectué les deux mesures précédentes, vérifie le module d'alimentation électrique et procédez à son remplacement si nécessaire.Vérifiez à l'intérieur que les cables sont correctement branchés. (Alimentation à découpage, avant) Certains canaux affichent uniquement un écran noir, même lorsqu'ils recoivent des sources video. Vérifiez si laamera est correctement alimentée en électricité.Vérifiez la sortie video reliée au Viewer de laamera.Vérifiez que le port reseau est correctement connecté et que le réglage reseau est correctement définir.Changez le concentrateur PLLANT en charge le Gigabit, cela pourrait résoudre le problème. L'écran affiche l'image du logo en boucle. Seci peut être causé par un problème de carte mère. Il se peut également que le logiciel correspondant soit corrompu.Contactdez le centre de dépannage le plus proche pour un complément d'informations. Le bouton des canaux est inopérant sur l'écran Live (Direct). Le bouton des canaux ne fonctionnera pas si l'écran actuel est en mode de suivi d'évenement. Le curseur ne se positionne pas sur le bouton Démarrer lorsque je lance la recherche calendrier. Vérifiez si le canal et la date que vous souhaitez lire sont signalés par le symbole V.Vous doivent vérifier le canal et la date avant de commencer à manipuler avec le bouton Démarrer. Aucune video ne s'affiche sur l'écran connecté. Vérifiez si les cables requis sont correctement connectés à l'écran.Certains écans ne prenant pas en charge les sorties NVR (HDMI ou VGA).(Résolution de la sortie NVR : VGA : 1024*768, 1280*1024, HDMI : 720P, 1080P)Vérifier la résolution de l'écran. Aucune réponse du contrôle PTZ dans Live Viewer Vérifiez que laamera enregistrée prend en charge la fonction PTZ. Laamera n'est pas connectée ou l'ordinateur ne parlient pas à se connecter au produit. Vérifiez si le cable reseau est correctement branché.Assurez-vous d'avoir régèle Résseau - Mode connexion.Vérifiez le réglage de l'adresse IP de l'ordinateur ou de laamera.Procédez à un test de Ping.Vérifiez si un périhérique situé à proximité du produit utilise la même adresse IP. J'ai enregistré uneamera, mais le visionneur web ne montre pas la video en direct. Après l'enregistrement d'uneamera, un utilisateur a besoin de modifier / enregistrer la configuration désirée, avant que le mode d'écran partagé l'écran en direct adéquats pour le réglage n'apparaissent. Problème Mesures à prendre Dans le visionneur web, l'écran ne change pas automatiquement. Yous avez besoin de sélectionner la mise en page désirée pour l'opération de séquences, dans le menu de changement automatique. L'écran Live (Direct) est trop lumineux ou trop nombre. Vérifiez les réglages video de laamera enregistrée. Le message « Réinit. date/heure requise » s'affiche à l'écran. Ce message s'affiche en cas de problème lié au réglage de l'houre de l'horloge interne ou provoqué par une déficience de l'horloge elle-même. Contactez votre fournisseur ou le centre de dépannage pour un complément d'informations. La barre chronologique ne s'affiche pas en mode Recherche. Le plan de montage chronologique bascule entre le mode normal et le mode d'extension.En mode d'extension, la barre chronologique peut ne pas s'afficher dans le plan de montage chronologique actuel. Passez en mode normal ou utilisez le bouton directionnel gauche ou droite pour naviguer via la barre chronologique. L'icône « Pas de DD » et un message d'erreur sont affichés Vérifiez le disque dur en termes de connexion. Si le problème persististe dans des conditions de fonctionnement normales, contactez le centre de dépannage le plus proche pour faire vérifier votre disque dur par le personnel qualifié. J'ai installé un disque dur supplémentaire sur l'enregistreur video en réseau mais il ne reconnaît pas le disque dur. Reportez-vous à la liste de compatibilité pour vérifier si le disque dur supplémentaire est pris en charge par l'enregistreur video en réseau. Pour obtenir la liste de compatibilité, contactez le fournisseur auprès duquel vous avez acheté l'enregistreur video en réseau. J'ai connecté à l'enregistreur video en réseau un péripérisque de stockage externe (Mémoire USB, DD USB) mais l'enregistreur ne semble pas reconnaître le péripérisque. Reportez-vous à la liste de compatibilité des péripérisques de stockage externes pour vérifier si le péripérisque connecté est pris en charge par l'enregistreur video en réseau. Pour obtenir la liste de compatibilité, contactez le fournisseur auprès duquel vous avez acheté l'enregistreur video en réseau. Si j'accue sur la touche ECH en mode plein écran de WebViewer, le système ne BASculera pas sur un mode partagé normal. Appuyez sur les touches ALT+TAB pour sélectionner « VIDÉO ACTIVE » et appuyez à nouveau sur la touche ECH.Le système passée alors en mode partagé normal. Je n'arrive pas à configurer facilement les réglages réseau en utilisant les réglages de recherche, de sauvegarde et de routeur par défaut. Pour obtenir des informations supplémentaires, reportez-vous au manuel d'utilisation.Si vous souhaitez vérifier les fonctions de base du produit pour un démarrage rapide, reportez-vous au guide de démarrage rapide (sauvégarde, recherche).Si vous utilisez le routeur pour la connexion réseau, reportez-vous à la section « Connexion à Internet via le routeur » de ce manuel. Mot de passer oublie. Contactez l'administrateur de l'enregistreur video en réseau pour obtenir de l'aide. Problème Mesures à prendre Les données de sauvegarde ne sont lues ni par l'ordinateur ni par l'enregistreur video en réseau. Lorsque vous sauvegardez les données, vous ave le choix du lecteur : ordinateur ou enregistreur video en réseau. Faites votre sélection avant de lancer la procédure.Si vous utilisez l'ordinateur pour dire les données, le format du filchier de sauvegarde devra être de type SEC.Si vous servez de l'enregistreur video en réseau à cet effet, le formatage des fichiers de sauvegarde devra être effectué par l'enregistreur video en réseau. L'enregistrement ne fonctionne pas. Lorsque vous lecteur n'affiche aucune image Live, ceci indique que l'enregistrement ne fonctionne pas. Par conséquent, il vous faut d'abord vérifier si vous voirz une image à l'écran.Enregistrement ne fonctionnera pas si les régles d'enregistrement ne sont pas correctement configurés.Enregistrementprogrammé : Spécifiez l'heure souhaitée dans Menu - Enreg - Enregistrementprogrammé. L'enregistrement démarre à l'heure spécifique.Enregistrement: L'enregistrement sera lancé à l'heure indiquée quelles que soient les conditions.Enregistrement:Lorsqu'un événement se produit, l'enregistrement ne sera effectué que s'il s'agit d'une alarme, d'une détction de mouvement ou d'une perte video. Si aucun événement n'est trouvez, l'enregistrement ne sera pas exécuté.Enregistrement: Si aucun événement n'est trouvez, l'enregistrement continu sera exécuté. Entretempis, si un événement se produit, l'enregistrement par événement sera exécuté. La qualité d'image des données enregistrées n'est pas bonne. Augmentez la résolution et la qualité dans Menu - Enreg - Qualité / Résolution.1) Résolution : Sélectionnez une taillie supérieure lorsque vous spécifie la taillie de l'image pour l'enregistrement.La qualité de l'image enregistrée au format CIF est déterminée lorsqu'elle est agrandie à partir d'une image plus petite.2) Qualité enreg. : Spécifiez un niveau plus élevé pour la qualité d'enregistrement.Si vous augmentez la résolution et la qualité d'enregistrement, la taillie des données augmentera en conséquence. Le disque dur sera rempli plusrapidement. L'écrasement replacera les données existantes et l'enregistrement s'exécutera à un intervalle plus court. Problème Mesures à prendre La vitesse d'enregistrement de l'enregistrement actuel ne correspond pas à celle configurée sur laamera. Si des profils multiples ont été appliqués à uneamera pour la transmission videoe, le flux videoe réel peut être entretenu par laamera à une vitesse d'enregistrement inférieure à celle spécifiée.Configuez votreamera pour utiliser un profil pour le flux de données selon les possibilités.Par exemple, si vous règlez le même profil pour les profils d'enregistrement et réseau, l'enregistrement réel est effectué à la vitesse d'enregistrement spécifiée.En outre, l'affichage de la réserve en direct à l'aide du mode d'écran partagé peut encore appliquer un autre profil à laamera en fonction du mode d'écran utilisé.Notez que le début binaire autorisé pour l'enregistrement/les paramétres d'enregistrement doit être une valeur supérieure à celle du flux de laamera. L'enregistrement n'est pas effectué en conformité avec les paramétres. Si l'état d'enregistrement indique que les données d'entree sont dépassees.Ensuite, allez à Menu - Enregistrement - Paramètres d'enregistrement et définir la capacité maximale de données comme supérieures aux données d'entree.Bn dépassement des performances du disque dur est affchéé à l'état de l'enregistrement.Réglez la quantité totale d'enregistrement en vous reférant au tableau ci-dessous. Non État du disque dur Réception (Mbps) Enregistrement (Mbps) Interne iSCSI 1 Disque dur pour CE Pas de RAID 400 300 2 Disque dur pour CE RAID 5 400 300 3 Disque dur pour CE RAID 6 400 200 4 Disque dur pour serveur Pas de RAID 400 300 5 Disque dur pour serveur RAID 5 400 400 300 6 Disque dur pour serveur RAID 6 400 300 200 L'icône de déconnexion iSCSI et le message d'erreur pop-up s'afficheront. Vérifiez si le port iSCSI est connecté au cable réseau.Vérifiez le réglage de l'adresse IP de l'appareil iSCSI.Tentez un test ping. L'écran d'enregistrement va ralentir. Vérifiez si les specifications d'enregistrement pour chaque état du disque dur (reportez-vous au réglage de l'enregistrement dans le menu) sont appropriées pour le réglage d'enregistrement réel.Seuls les principaux cadres de la réserve seront affichés si le taux de traitement de données dépasse la performance de lecture (voir les specifications du produit dans le menu)
The software included in this product contains copyrighted software that is licensed under the GPL/LGPL. You may obtain the complete Corresponding Source code from us for a period of three years after our last shipment of this product by sending email to help.cctv@samsung.com
If you want to obtain the complete Corresponding Source code in the physical medium such as CD-ROM, the cost of physically performing source distribution might be charged.
For more details about Open Source, refer to the CD.
- GPL Software: Linux Kernel 3.0.34, Linux Kernel 2.6.37, uboot, busybox 1.18.5, memtester 4.0.5, Net-SNMP 5.6.2, wpa-supplicant 0.7.3, mdadm 3.2.2, open-iscsi 2.0-873, smartmontools 5.43, xfsprogs 3.1.8, msmtp 1.4.31, parted 3.1, dosfstools 3.0.0, wget 1.14, dibbler 0.8.4
LGPL Software:FFmpeg,QT 4.7.2,glibc 2.0,alsa-lib 1.0.24.1-r0.6,Live555,inetutils
- BSD : math-linux, pcre 8.31, ppp 2.4.5
- BSD 2.0: lighttpd1.4.32, MiniUPnP Project Client
- OpenSSL License : OpenSSL 0.9.8
- Libxml2 License: Libxml2
- Boost Software License: boost 1.43.0
- MIT 2.0: Prototype JavaScript Framework 1.7
PHP 3.01 License : PHP 5.2.0
- MPL 1.1: NPAPI
- UNDER THE ZLIB:tinymx12.6.2
GNU GENERAL PUBLIC LICENSE
Version 2, June 1991
Copyright (C) 1989, 1991 Free Software Foundation, Inc.
51 Franklin St, Fifth Floor, Boston, MA 02110-1301 USA
Everyone is permitted to copy and distribute verbatim copies of this license document, but changing it is not allowed.
Preamble
The licenses for most software are designed to take away your freedom to share and change it. By contrast, the GNU General Public License is intended to guarantee your freedom to share and change free software-- to make sure the software is free for all its users. This General Public License applies to most of the Free Software Foundation's software and to any other program whose authors commit to using it. (Some other Free Software Foundation software is covered by the GNU Library General Public License instead.) You can apply it to your programs, too.
When we speak of free software, we are referring to freedom, not price. Our General Public Licenses are designed to make sure that you have the freedom to distribute copies of free software (and charge for this service if you wish), that you receive source code or can get it if you want it, that you can change the software or use pieces of it in new free programs; and that you know you can do these things.
To protect your rights, we need to make restrictions that forbid anyone to deny you these rights or to ask you to surrender the rights.
These restrictions translate to certain responsibilities for you if you distribute copies of the software, or if you modify it.
For example, if you distribute copies of such a program, whether gratis or for a fee, you must give the recipients all the rights that you have. You must make sure that they, too, receive or can get the source code. And you must show them these terms so they know their rights.
We protect your rights with two steps: (1) copyright the software, and (2) offer you this license which gives you legal permission to copy, distribute and/or modify the software.
Also, for each author's protection and ours, we want to make certain that everyone understands that there is no warranty for this free software. If the software is modified by someone else and passed on, we want its recipients to know that what they have is not the original, so that any problems introduced by others will not reflect on the original authors' reputations.
Finally, any free program is threatened constantly by software patents. We wish to avoid the danger that redistributors of a free program will individually obtain patent licenses, in effect making the program proprietary. To prevent this, we have made it clear that any patent must be licensed for everyone's free use or not licensed at all.
The precise terms and conditions for copying, distribution and modification follow.
GNU GENERAL PUBLIC LICENSE
TERMS AND CONDITIONS FOR COPYING, DISTRIBUTION AND MODIFICATION
0. This License applies to any program or other work which contains a notice placed by the copyright holder saying it may be distributed under the terms of this General Public License. The "Program", below, refers to any such program or work, and a "work based on the Program" means either the Program or any derivative work under copyright law; that is to say, a work containing the Program or a portion of it, either verbatim or with modifications and/or translated into another language. (Hereinafter, translation is included without limitation in the term "modification".) Each licensee is addressed as "you".
Activities other than copying, distribution and modification are not covered by this License; they are outside its scope. The act of running the Program is not restricted, and the output from the Program is covered only if its contents constitute a work based on the Program (independent of having been made by running the Program).
Whether that is true depends on what the Program does.
1. You may copy and distribute verbatim copies of the Program's source code as you receive it, in any medium, provided that you conspicuously and appropriately publish on each copy an appropriate copyright notice and disclaimer of warranty; keep intact all the notices that refer to this License and to the absence of any warranty; and give any other recipients of the Program a copy of this License along with the Program.
You may charge a fee for the physical act of transferring a copy, and you may at your option offer warranty protection in exchange for a fee.
2. You may modify your copy or copies of the Program or any portion of it, thus forming a work based on the Program, and copy and distribute such modifications or work under the terms of Section 1 above, provided that you also meet all of these conditions:
a) You must cause the modified files to carry prominent notices stating that you changed the files and the date of any change.
b) You must cause any work that you distribute or publish, that in whole or in part contains or is derived from the Program or any part thereof, to be licensed as a whole at no charge to all third parties under the terms of this License.
c) If the modified program normally reads commands interactively when run, you must cause it, when started running for such interactive use in the most ordinary way, to print or display an announcement including an appropriate copyright notice and a notice that there is no warranty (or else, saying that you provide a warranty) and that users may redistribute the program under these conditions, and telling the user how to view a copy of this License. (Exception: if the Program itself is interactive but does not normally print such an announcement, your work based on the Program is not required to print an announcement.)
These requirements apply to the modified work as a whole. If identifiable sections of that work are not derived from the Program, and can be reasonably considered independent and separate works in themselves, then this License, and its terms, do not apply to those sections when you distribute them as separate works. But when you distribute the same sections as part of a whole which is a work based on the Program, the distribution of the whole must be on the terms of this License, whose permissions for other licensees extend to the entire whole, and thus to each and every part regardless of who wrote it.
Thus, it is not the intent of this section to claim rights or contest your rights to work written entirely by you; rather, the intent is to exercise the right to control the distribution of derivative or collective works based on the Program.
In addition, mere aggregation of another work not based on the Program with the Program (or with a work based on the Program) on a volume of a storage or distribution medium does not bring the other work under the scope of this License.
3. You may copy and distribute the Program (or a work based on it, under Section 2) in object code or executable form under the terms of Sections 1 and 2 above provided that you also do one of the following:
a) Accompany it with the complete corresponding machine-readable source code, which must be distributed under the terms of Sections 1 and 2 above on a medium customarily used for software interchange; or,
b) Accompany it with a written offer, valid for at least three years, to give any third party, for a charge no more than your cost of physically performing source distribution, a complete machine-readable copy of the corresponding source code, to be distributed under the terms of Sections 1 and 2 above on a medium customarily used for software interchange; or,
c) Accompany it with the information you received as to the offer to distribute corresponding source code. (This alternative is allowed only for noncommercial distribution and only if you received the program in object code or executable form with such an offer, in accord with Subsection b above.)
The source code for a work means the preferred form of the work for making modifications to it. For an executable work, complete source code means all the source code for all modules it contains, plus any associated interface definition files, plus the scripts used to control compilation and installation of the executable. However, as a special exception, the source code distributed need not include anything that is normally distributed (in either source or binary form) with the major components (compiler, kernel, and so on) of the operating system on which the executable runs, unless that component itself accompanies the executable.
If distribution of executable or object code is made by offering access to copy from a designated place, then offering equivalent access to copy the source code from the same place counts as distribution of the source code, even though third parties are not compelled to copy the source along with the object code.
4. You may not copy, modify, sublicense, or distribute the Program except as expressly provided under this License. Any attempt otherwise to copy, modify, sublicense or distribute the Program is void, and will automatically terminate your rights under this License.
However, parties who have received copies, or rights, from you under this License will not have their licenses terminated so long as such parties remain in full compliance.
5. You are not required to accept this License, since you have not signed it. However, nothing else grants you permission to modify or distribute the Program or its derivative works. These actions are prohibited by law if you do not accept this License. Therefore, by modifying or distributing the Program (or any work based on the Program), you indicate your acceptance of this License to do so, and all its terms and conditions for copying, distributing or modifying the Program or works based on it.
6. Each time you redistribute the Program (or any work based on the Program), the recipient automatically receives a license from the original licensor to copy, distribute or modify the Program subject to these terms
and conditions. You may not impose any further restrictions on the recipients' exercise of the rights granted herein.
You are not responsible for enforcing compliance by third parties to this License.
7. If, as a consequence of a court judgment or allegation of patent infringement or for any other reason (not limited to patent issues), conditions are imposed on you (whether by court order, agreement or otherwise) that contradict the conditions of this License, they do not excuse you from the conditions of this License. If you cannot distribute so as to satisfy simultaneously your obligations under this License and any other pertinent obligations, then as a consequence you may not distribute the Program at all. For example, if a patent license would not permit royalty-free redistribution of the Program by all those who receive copies directly or indirectly through you, then the only way you could satisfy both it and this License would be to refrain entirely from distribution of the Program.
If any portion of this section is held invalid or unenforceable under any particular circumstance, the balance of the section is intended to apply and the section as a whole is intended to apply in other circumstances.
It is not the purpose of this section to induce you to infringe any patents or other property right claims or to contest validity of any such claims; this section has the sole purpose of protecting the integrity of the free software distribution system, which is implemented by public license practices. Many people have made generous contributions to the wide range of software distributed through that system in reliance on consistent application of that system; it is up to the author/donor to decide if he or she is willing to distribute software through any other system and a licensee cannot impose that choice.
This section is intended to make thoroughly clear what is believed to be a consequence of the rest of this License.
8. If the distribution and/or use of the Program is restricted in certain countries either by patents or by copyrighted interfaces, the original copyright holder who places the Program under this License may add an explicit geographical distribution limitation excluding those countries, so that distribution is permitted only in or among countries not thus excluded. In such case, this License incorporates the limitation as if written in the body of this License.
9. The Free Software Foundation may publish revised and/or new versions of the General Public License from time to time. Such new versions will be similar in spirit to the present version, but may differ in detail to address new problems or concerns.
Each version is given a distinguishing version number. If the Program specifies a version number of this License which applies to it and "any later version", you have the option of following the terms and conditions either of that version or of any later version published by the Free Software Foundation. If the Program does not specify a version number of this License, you may choose any version ever published by the Free Software Foundation.
10. If you wish to incorporate parts of the Program into other free programs whose distribution conditions are different, write to the author to ask for permission. For software which is copyrighted by the Free Software Foundation, write to the Free Software Foundation; we sometimes make exceptions for this. Our decision will be guided by the two goals of preserving the free status of all derivatives of our free software and of promoting the sharing and reuse of software generally.
no WarranTy
11. BECAUSE THE PROGRAM IS LICENSED FREE OF CHARGE, THERE IS NO WARRANTY FOR THE PROGRAM, TO THE EXTENT PERMITTED BY APPLICABLE LAW. EXCEPT WHEN OTHERWISE STATED IN WRITING THE COPYRIGHT HOLDERS AND/OR OTHER PARTIES PROVIDE THE PROGRAM "AS IS" WITHOUT WARRANTY OF ANY KIND, EITHER EXPRESSED OR IMPLIED, INCLUDING, BUT NOT LIMITED TO, THE IMPLIED WARRANTY OF MERCHANTABILITY AND FITNESS FOR A PARTICULAR PURPOSE. THE ENTIRE RISK AS TO THE QUALITY AND PERFORMANCE OF THE PROGRAM IS WITH YOU. SHOULD THE PROGRAM PROVE DEFECTIVE, YOU ASSUME THE COST OF ALL NECESSARY SERVICING, REPAIR OR CORRECTION.
12. IN NO EVENT UNLESS REQUIRED BY APPLICABLE LAW OR AGREED TO IN WRITING WILL ANY COPYRIGHT HOLDER, OR ANY OTHER PARTY WHO MAY MODIFY AND/OR REDISTRIBUTE THE PROGRAM AS PERMITTED ABOVE, BE LIABLE TO YOU FOR DAMAGES, INCLUDING ANY GENERAL, SPECIAL, INCIDENTAL OR CONSEQUENTIAL DAMAGES ARISING OUT OF THE USE OR INABILITY TO USE THE PROGRAM (INCLUDING BUT NOT LIMITED TO
LOSS OF DATA OR DATA BEING RENDERED INACCURATE OR LOSSES SUSTAINED BY YOU OR THIRD PARTIES OR A FAILURE OF THE PROGRAM TO OPERATE WITH ANY OTHER PROGRAMS), EVEN IF SUCH HOLDER OR OTHER PARTY HAS BEEN ADVISED OF THE POSSIBILITY OF SUCH DAMAGES.
END OF TERMS AND CONDITIONS
How to Apply These Terms to Your New Programs
If you develop a new program, and you want it to be of the greatest possible use to the public, the best way to achieve this is to make it free software which everyone can redistribute and change under these terms.
To do so, attach the following notices to the program. It is safest to attach them to the start of each source file to most effectively convey the exclusion of warranty; and each file should have at least the "copyright" line and a pointer to where the full notice is found.
Copyright (C)
This program is free software; you can redistribute it and/or modify it under the terms of the GNU General Public License as published by the Free Software Foundation; either version 2 of the License, or (at your option) any later version.
This program is distributed in the hope that it will be useful, but WITHOUT ANY WARRANTY; without even the implied warranty of MERCHANTABILITY or FITNESS FOR A PARTICULAR PURPOSE. See the GNU General Public License for more details.
You should have received a copy of the GNU General Public License along with this program; if not, write to the Free Software Foundation, Inc., 51 Franklin St, Fifth Floor, Boston, MA 02110-1301 USA
Also add information on how to contact you by electronic and paper mail.
If the program is interactive, make it output a short notice like this when it starts in an interactive mode:
Gnomovision version 69, Copyright (C) year name of author
Gnomovision comes with ABSOLUTELY NO WARRANTY; for details type `show w'.
This is free software, and you are welcome to redistribute it under certain conditions; type `show c' for details.
The hypothetical commands 'show w' and 'show c' should show the appropriate parts of the General Public License. Of course, the commands you use may be called something other than 'show w' and 'show c'; they could even be mouse-clicks or menu items--whatever suits your program.
You should also get your employer (if you work as a programmer) or your school, if any, to sign a "copyright disclaimer" for the program, if necessary. Here is a sample; alter the names:
Yoyodyne, Inc., hereby disclaims all copyright interest in the program 'Gnomovision' (which makes passes at compilers) written by James Hacker.
, 1 April 1989
Ty Coon, President of Vice
This General Public License does not permit incorporating your program into proprietary programs. If your program is a subroutine library, you may consider it more useful to permit linking proprietary applications with the library. If this is what you want to do, use the GNU Library General Public License instead of this License.
GNU LESSER GENERAL PUBLIC LICENSE
Version 2.1, February 1999
Copyright (C) 1991, 1999 Free Software Foundation, Inc.
51 Franklin Street, Fifth Floor, Boston, MA 02110-1301 USA
Everyone is permitted to copy and distribute verbatim copies of this license document, but changing it is not allowed.
[This is the first released version of the Lesser GPL. It also counts as the successor of the GNU Library Public License, version 2, hence the version number 2.1.]
Preamble
The licenses for most software are designed to take away your freedom to share and change it. By contrast, the GNU General Public Licenses are intended to guarantee your freedom to share and change free software--to make sure the software is free for all its users.
This license, the Lesser General Public License, applies to some specially designated software packages--typically libraries--of the Free Software Foundation and other authors who decide to use it. You can use it too, but we suggest you first think carefully about whether this license or the ordinary General Public License is the better strategy to use in any particular case, based on the explanations below.
When we speak of free software, we are referring to freedom of use, not price. Our General Public Licenses are designed to make sure that you have the freedom to distribute copies of free software (and charge for this service if you wish); that you receive source code or can get it if you want it; that you can change the software and use pieces of it in new free programs; and that you are informed that you can do these things.
To protect your rights, we need to make restrictions that forbid distributors to deny you these rights or to ask you to surrender these rights. These restrictions translate to certain responsibilities for you if you distribute copies of the library or if you modify it.
For example, if you distribute copies of the library, whether gratis or for a fee, you must give the recipients all the rights that we gave you. You must make sure that they, too, receive or can get the source code. If you link other code with the library, you must provide complete object files to the recipients, so that they can relink them with the library after making changes to the library and recompiling it. And you must show them these terms so they know their rights.
We protect your rights with a two-step method: (1) we copyright the library, and (2) we offer you this license, which gives you legal permission to copy, distribute and/or modify the library.
To protect each distributor, we want to make it very clear that there is no warranty for the free library. Also, if the library is modified by someone else and passed on, the recipients should know that what they have is not the original version, so that the original author's reputation will not be affected by problems that might be introduced by others.
Finally, software patents pose a constant threat to the existence of any free program. We wish to make sure that a company cannot effectively restrict the users of a free program by obtaining a restrictive license from a patent holder. Therefore, we insist that any patent license obtained for a version of the library must be consistent with the full freedom of use specified in this license.
Most GNU software, including some libraries, is covered by the ordinary GNU General Public License. This license, the GNU Lesser General Public License, applies to certain designated libraries, and is quite different from the ordinary General Public License. We use this license for certain libraries in order to permit linking those libraries into non-free programs.
When a program is linked with a library, whether statically or using a shared library, the combination of the two is legally speaking a combined work, a derivative of the original library. The ordinary General Public License therefore permits such linking only if the entire combination fits its criteria of freedom. The Lesser General Public License permits more lax criteria for linking other code with the library.
We call this license the "Lesser" General Public License because it does Less to protect the user's freedom than the ordinary General Public License. It also provides other free software developers Less of an advantage over competing non-free programs. These disadvantages are the reason we use the ordinary General Public License for many libraries. However, the Lesser license provides advantages in certain special circumstances.
For example, on rare occasions, there may be a special need to encourage the widest possible use of a certain library, so that it becomes a de-facto standard. To achieve this, non-free programs must be allowed to use the library. A more frequent case is that a free library does the same job as widely used non-free libraries. In this case, there is little to gain by limiting the free library to free software only, so we use the Lesser General Public License.
In other cases, permission to use a particular library in non-free programs enables a greater number of people to use a large body of free software. For example, permission to use the GNU C Library in non-free programs enables many more people to use the whole GNU operating system, as well as its variant, the GNU/Linux operating system.
Although the Lesser General Public License is Less protective of the users' freedom, it does ensure that the user of a program that is linked with the Library has the freedom and the wherewithal to run that program using a modified version of the Library.
The precise terms and conditions for copying, distribution and modification follow. Pay close attention to the difference between a "work based on the library" and a "work that uses the library". The former contains code derived from the library, whereas the latter must be combined with the library in order to run.
gnu LeSSer general public LiC CiCenSe
TermS and ConditionS for Copying, diTribuTion and modifiCaTion
0. This License Agreement applies to any software library or other program which contains a notice placed by the copyright holder or other authorized party saying it may be distributed under the terms of this Lesser General Public License (also called "this License").
Each licensee is addressed as "you".
A "library" means a collection of software functions and/or data prepared so as to be conveniently linked with application programs (which use some of those functions and data) to form executables.
The "Library", below, refers to any such software library or work which has been distributed under these terms. A "work based on the Library" means either the Library or any derivative work under copyright law: that is to say, a work containing the Library or a portion of it, either verbatim or with modifications and/or translated straightforwardly into another language. (Hereinafter, translation is included without limitation in the term "modification".)
"Source code" for a work means the preferred form of the work for making modifications to it. For a library, complete source code means all the source code for all modules it contains, plus any associated interface definition files, plus the scripts used to control compilation and installation of the library.
Activities other than copying, distribution and modification are not covered by this License; they are outside its scope. The act of running a program using the Library is not restricted, and output from such a program is covered only if its contents constitute a work based on the Library (independent of the use of the Library in a tool for writing it). Whether that is true depends on what the Library does and what the program that uses the Library does.
1. You may copy and distribute verbatim copies of the Library's complete source code as you receive it, in any medium, provided that you conspicuously and appropriately publish on each copy an appropriate copyright notice and disclaimer of warranty; keep intact all the notices that refer to this License and to the absence of any warranty; and distribute a copy of this License along with the Library.
You may charge a fee for the physical act of transferring a copy, and you may at your option offer warranty protection in exchange for a fee.
2. You may modify your copy or copies of the Library or any portion of it, thus forming a work based on the Library, and copy and distribute such modifications or work under the terms of Section 1 above, provided that you also meet all of these conditions:
a) The modified work must itself be a software library.
b) You must cause the files modified to carry prominent notices stating that you changed the files and the date of any change.
c) You must cause the whole of the work to be licensed at no charge to all third parties under the terms of this License.
d) If a facility in the modified Library refers to a function or a table of data to be supplied by an application program that uses the facility, other than as an argument passed when the facility is invoked, then you must make a good faith effort to ensure that, in the event an application does not supply such function or table, the facility still operates, and performs whatever part of its purpose remains meaningful.
(For example, a function in a library to compute square roots has a purpose that is entirely well-defined independent of the application. Therefore, Subsection 2d requires that any application-supplied function or table used by this function must be optional: if the application does not supply it, the square root function must still compute square roots.)
These requirements apply to the modified work as a whole. If identifiable sections of that work are not derived from the Library, and can be reasonably considered independent and separate works in themselves, then this License, and its terms, do not apply to those sections when you distribute them as separate works. But when you distribute the same sections as part of a whole which is a work based on the Library, the distribution of the whole must be on the terms of this License, whose permissions for other licensees extend to the entire whole, and thus to each and every part regardless of who wrote it.
Thus, it is not the intent of this section to claim rights or contest your rights to work written entirely by you; rather, the intent is to exercise the right to control the distribution of derivative or collective works based on the Library.
In addition, mere aggregation of another work not based on the Library with the Library (or with a work based on the Library) on a volume of a storage or distribution medium does not bring the other work under the scope of this License.
3. You may opt to apply the terms of the ordinary GNU General Public License instead of this License to a given copy of the Library. To do this, you must alter all the notices that refer to this License, so that they refer to the ordinary GNU General Public License, version 2, instead of to this License. (If a newer version than version 2 of the ordinary GNU General Public License has appeared, then you can specify that version instead if you wish.) Do not make any other change in these notices.
Once this change is made in a given copy, it is irreversible for that copy, so the ordinary GNU General Public License applies to all subsequent copies and derivative works made from that copy.
This option is useful when you wish to copy part of the code of the Library into a program that is not a library.
4. You may copy and distribute the Library (or a portion or derivative of it, under Section 2) in object code or executable form under the terms of Sections 1 and 2 above provided that you accompany it with the complete corresponding machine-readable source code, which must be distributed under the terms of Sections 1 and 2 above on a medium customarily used for software interchange.
If distribution of object code is made by offering access to copy from a designated place, then offering equivalent access to copy the source code from the same place satisfies the requirement to distribute the source code, even though third parties are not compelled to copy the source along with the object code.
5. A program that contains no derivative of any portion of the Library, but is designed to work with the Library by being compiled or linked with it, is called a "work that uses the Library". Such a work, in isolation, is not a derivative work of the Library, and therefore falls outside the scope of this License.
However, linking a "work that uses the Library" with the Library creates an executable that is a derivative of the Library (because it contains portions of the Library), rather than a "work that uses the library". The executable is therefore covered by this License.
Section 6 states terms for distribution of such executables.
When a "work that uses the Library" uses material from a header file that is part of the Library, the object code for the work may be a derivative work of the Library even though the source code is not.
Whether this is true is especially significant if the work can be linked without the Library, or if the work is itself a library. The threshold for this to be true is not precisely defined by law.
If such an object file uses only numerical parameters, data structure layouts and accessors, and small macros and small inline functions (ten lines or less in length), then the use of the object file is unrestricted, regardless of whether it is legally a derivative work. (Executables containing this object code plus portions of the Library will still fall under Section 6.)
Otherwise, if the work is a derivative of the Library, you may distribute the object code for the work under the terms of Section 6.
Any executables containing that work also fall under Section 6, whether or not they are linked directly with the Library itself.
6. As an exception to the Sections above, you may also combine or link a "work that uses the Library" with the Library to produce a work containing portions of the Library, and distribute that work under terms of your choice, provided that the terms permit modification of the work for the customer's own use and reverse engineering for debugging such modifications.
You must give prominent notice with each copy of the work that the Library is used in it and that the Library and its use are covered by this License. You must supply a copy of this License. If the work during execution displays copyright notices, you must include the copyright notice for the Library among them, as well as a reference directing the user to the copy of this License. Also, you must do one of these things:
a) Accompany the work with the complete corresponding machine-readable source code for the Library including whatever changes were used in the work (which must be distributed under Sections 1 and 2 above); and, if the work is an executable linked with the Library, with the complete machine-readable "work that uses the Library", as object code and/or source code, so that the user can modify the Library and then relink to produce a modified executable containing the modified Library. (It is understood that the user who changes the contents of definitions files in the Library will not necessarily be able to recompile the application to use the modified definitions.)
b) Use a suitable shared library mechanism for linking with the Library. A suitable mechanism is one that (1) uses at run time a copy of the library already present on the user's computer system, rather than copying library functions into the executable, and (2) will operate properly with a modified version of the library, if the user installs one, as long as the modified version is interface-compatible with the version that the work was made with.
c) Accompany the work with a written offer, valid for at least three years, to give the same user the materials specified in Subsection 6a, above, for a charge no more than the cost of performing this distribution.
d) If distribution of the work is made by offering access to copy from a designated place, offer equivalent access to copy the above specified materials from the same place.
e) Verify that the user has already received a copy of these materials or that you have already sent this user a copy.
For an executable, the required form of the "work that uses the Library" must include any data and utility programs needed for reproducing the executable from it. However, as a special exception, the materials to be distributed need not include anything that is normally distributed (in either source or binary form) with the major components (compiler, kernel, and so on) of the operating system on which the executable runs, unless that component itself accompanies the executable.
It may happen that this requirement contradicts the license restrictions of other proprietary libraries that do not normally accompany the operating system. Such a contradiction means you cannot use both them and the Library together in an executable that you distribute.
7. You may place library facilities that are a work based on the Library side-by-side in a single library together with other library facilities not covered by this License, and distribute such a combined library, provided that the separate distribution of the work based on the Library and of the other library facilities is otherwise permitted, and provided that you do these two things:
a) Accompany the combined library with a copy of the same work based on the Library, uncombined with any other library facilities. This must be distributed under the terms of the Sections above.
b) Give prominent notice with the combined library of the fact that part of it is a work based on the Library, and explaining where to find the accompanying uncombined form of the same work.
8. You may not copy, modify, sublicense, link with, or distribute the Library except as expressly provided under this License. Any attempt otherwise to copy, modify, sublicense, link with, or distribute the Library is void, and will automatically terminate your rights under this License. However, parties who have received copies, or rights, from you under this License will not have their licenses terminated so long as such parties remain in full compliance.
9. You are not required to accept this License, since you have not signed it. However, nothing else grants you permission to modify or distribute the Library or its derivative works. These actions are prohibited by law if you do not accept this License. Therefore, by modifying or distributing the Library (or any work based on the Library), you indicate your acceptance of this License to do so, and all its terms and conditions for copying, distributing or modifying the Library or works based on it.
10. Each time you redistribute the Library (or any work based on the Library), the recipient automatically receives a license from the original licensor to copy, distribute, link with or modify the Library subject to these terms and conditions. You may not impose any further restrictions on the recipients' exercise of the rights granted herein.
You are not responsible for enforcing compliance by third parties with this License.
11. If, as a consequence of a court judgment or allegation of patent infringement or for any other reason (not limited to patent issues), conditions are imposed on you (whether by court order, agreement or otherwise) that contradict the conditions of this License, they do not excuse you from the conditions of this License. If you cannot distribute so as to satisfy simultaneously your obligations under this License and any other pertinent obligations, then as a consequence you may not distribute the Library at all. For example, if a patent license would not permit royalty-free redistribution of the Library by all those who receive copies directly or indirectly through you, then the only way you could satisfy both it and this License would be to refrain entirely from distribution of the Library.
If any portion of this section is held invalid or unenforceable under any particular circumstance, the balance of the section is intended to apply, and the section as a whole is intended to apply in other circumstances.
It is not the purpose of this section to induce you to infringe any patents or other property right claims or to contest validity of any such claims; this section has the sole purpose of protecting the integrity of the free software distribution system which is implemented by public license practices. Many people have made generous contributions to the wide range of software distributed through that system in reliance on consistent application of that system; it is up to the author/donor to decide if he or she is willing to distribute software through any other system and a licensee cannot impose that choice.
This section is intended to make thoroughly clear what is believed to be a consequence of the rest of this License.
12. If the distribution and/or use of the Library is restricted in certain countries either by patents or by copyrighted interfaces, the original copyright holder who places the Library under this License may add an explicit geographical distribution limitation excluding those countries, so that distribution is permitted only in or among countries not thus excluded. In such case, this License incorporates the limitation as if written in the body of this License.
13. The Free Software Foundation may publish revised and/or new versions of the Lesser General Public License from time to time.
Such new versions will be similar in spirit to the present version, but may differ in detail to address new problems or concerns.
Each version is given a distinguishing version number. If the Library specifies a version number of this License which applies to it and "any later version", you have the option of following the terms and conditions either of that version or of any later version published by the Free Software Foundation. If the Library does not specify a license version number, you may choose any version ever published by the Free Software Foundation.
14. If you wish to incorporate parts of the Library into other free programs whose distribution conditions are incompatible with these, write to the author to ask for permission. For software which is copyrighted by the Free Software Foundation, write to the Free Software Foundation; we sometimes make exceptions for this. Our decision will be guided by the two goals of preserving the free status of all derivatives of our free software and of promoting the sharing and reuse of software generally.
no WarranTy
15. BECAUSE THE LIBRARY IS LICENSED FREE OF CHARGE, THERE IS NO WARRANTY FOR THE LIBRARY, TO THE EXTENT PERMITTED BY APPLICABLE LAW.
EXCEPT WHEN OTHERWISE STATED IN WRITING THE COPYRIGHT HOLDERS AND/OR OTHER PARTIES PROVIDE THE LIBRARY "AS IS" WITHOUT WARRANTY OF ANY KIND, Either EXPRESSED OR IMPLIED, INCLUDING, BUT NOT LIMITED TO, THE IMPLIED WARRANTY OF MERCHANTABILITY AND FITNESS FOR A PARTICULAR PURPOSE. THE ENTIRE RISK AS TO THE QUALITY AND PERFORMANCE OF THE LIBRARY IS WITH YOU. SHOULD THE LIBRARY PROVE DEFECTIVE, YOU ASSUME THE COST OF ALL NECESSARY SERVICING, REPAIR OR CORRECTION.
16. IN NO EVENT UNLESS REQUIRED BY APPLICABLE LAW OR AGREED TO IN WRITING WILL ANY COPYRIGHT HOLDER, OR ANY OTHER PARTY WHO MAY MODIFY AND/OR REDISTRIBUTE THE LIBRARY AS PERMITTED ABOVE, BE LIABLE TO YOU FOR DAMAGES, INCLUDING ANY GENERAL, SPECIAL, INCIDENTAL OR CONSEQUENTIAL DAMAGES ARISING OUT OF THE USE OR INABILITY TO USE THE LIBRARY (INCLUDING BUT NOT LIMITED TO LOSS OF DATA OR DATA BEING RENDERED INACCURATE OR
LOSSES SUSTAINED BY YOU OR THIRD PARTIES OR A FAILURE OF THE LIBRARY TO OPERATE WITH ANY OTHER SOFTWARE), EVEN IF SUCH HOLDER OR OTHER PARTY HAS BEEN ADVISED OF THE POSSIBILITY OF SUCH DAMAGES.
END OF TERMS AND CONDITIONS
How to Apply These Terms to Your New Libraries
If you develop a new library, and you want it to be of the greatest possible use to the public, we recommend making it free software that everyone can redistribute and change. You can do so by permitting redistribution under these terms (or, alternatively, under the terms of the ordinary General Public License).
To apply these terms, attach the following notices to the library. It is safest to attach them to the start of each source file to most effectively convey the exclusion of warranty; and each file should have at least the "copyright" line and a pointer to where the full notice is found.
Copyright (C)
This library is free software; you can redistribute it and/or modify it under the terms of the GNU Lesser General Public License as published by the Free Software Foundation; either version 2.1 of the License, or (at your option) any later version.
This library is distributed in the hope that it will be useful, but WITHOUT ANY WARRANTY; without even the implied warranty of MERCHANTABILITY or FITNESS FOR A PARTICULAR PURPOSE. See the GNU
Lesser General Public License for more details.
You should have received a copy of the GNU Lesser General Public License along with this library; if not, write to the Free Software Foundation, Inc., 51 Franklin Street, Fifth Floor, Boston, MA 02110-1301 USA
Also add information on how to contact you by electronic and paper mail.
You should also get your employer (if you work as a programmer) or your school, if any, to sign a "copyright disclaimer" for the library, if necessary. Here is a sample; alter the names:
U-Boot is Free Software. It is copyrighted by Wolfgang Denk and many others who contributed code (see the actual source code for details). You can redistribute U-Boot and/or modify it under the terms of version 2 of the GNU General Public License as published by the Free Software Foundation. Most of it can also be distributed, at your option, under any later version of the GNU General Public License -- see individual files for exceptions.
NOTE! This license does "not" cover the so-called "standalone" applications that use U-Boot services by means of the jump table provided by U-Boot exactly for this purpose - this is merely considered normal use of U-Boot, and does "not" fall under the heading of "derived work".
The header files "include/image.h" and "include/asm-/u-boot.h" define interfaces to U-Boot. Including these (unmodified) header files in another file is considered normal use of U-Boot, and does *not* fall under the heading of "derived work".
Also note that the GPL below is copyrighted by the Free Software Foundation, but the instance of code that it refers to (the U-Boot source code) is copyrighted by me and others who actually wrote it.
-- Wolfgang Denk
GNU GENERAL PUBLIC LICENSE
Version 3, 29 June 2007
Copyright (C) 2007 Free Software Foundation, Inc. Preamble
The GNU General Public License is a free, copyleft license for software and other kinds of works.
The licenses for most software and other practical works are designed to take away your freedom to share and change the works. By contrast, the GNU General Public License is intended to guarantee your freedom to share and change all versions of a program--to make sure it remains free software for all its users. We, the Free Software Foundation, use the GNU General Public License for most of our software; it applies also to any other work released this way by its authors. You can apply it to your programs, too.
When we speak of free software, we are referring to freedom, not price. Our General Public Licenses are designed to make sure that you have the freedom to distribute copies of free software (and charge for them if you wish), that you receive source code or can get it if you want it, that you can change the software or use pieces of it in new free programs, and that you know you can do these things.
To protect your rights, we need to prevent others from denying you these rights or asking you to surrender the rights. Therefore, you have certain responsibilities if you distribute copies of the software, or if you modify it: responsibilities to respect the freedom of others.
For example, if you distribute copies of such a program, whether gratis or for a fee, you must pass on to the recipients the same freedoms that you received. You must make sure that they, too, receive or can get the source code. And you must show them these terms so they know their rights.
Developers that use the GNU GPL protect your rights with two steps: (1) assert copyright on the software, and (2) offer you this License giving you legal permission to copy, distribute and/or modify it.
For the developers' and authors' protection, the GPL clearly explains that there is no warranty for this free software. For both users' and authors' sake, the GPL requires that modified versions be marked as changed, so that their problems will not be attributed erroneously to authors of previous versions.
Some devices are designed to deny users access to install or run modified versions of the software inside them, although the manufacturer can do so. This is fundamentally incompatible with the aim of protecting users' freedom to change the software. The systematic pattern of such abuse occurs in the area of products for individuals to use, which is precisely where it is most unacceptable. Therefore, we have designed this version of the GPL to prohibit the practice for those products. If such problems arise substantially in other domains, we stand ready to extend this provision to those domains in future versions of the GPL, as needed to protect the freedom of users.
Finally, every program is threatened constantly by software patents. States should not allow patents to restrict development and use of software on general-purpose computers, but in those that do, we wish to avoid the special danger that patents applied to a free program could make it effectively proprietary. To prevent this, the GPL assures that patents cannot be used to render the program non-free.
The precise terms and conditions for copying, distribution and modification follow.
TERMS AND CONDITIONS
0. Definitions.
"This License" refers to version 3 of the GNU General Public License.
"Copyright" also means copyright-like laws that apply to other kinds of works, such as semiconductor masks.
"The Program" refers to any copyrightable work licensed under this License. Each licensee is addressed as "you". "Licensees" and "recipients" may be individuals or organizations.
To "modify" a work means to copy from or adapt all or part of the work in a fashion requiring copyright permission, other than the making of an exact copy. The resulting work is called a "modified version" of the earlier work or a work "based on" the earlier work.
A "covered work" means either the unmodified Program or a work based on the Program.
To "propagate" a work means to do anything with it that, without permission, would make you directly or secondarily liable for infringement under applicable copyright law, except executing it on a computer or modifying a private copy. Propagation includes copying, distribution (with or without modification), making available to the public, and in some countries other activities as well.
To "convey" a work means any kind of propagation that enables other parties to make or receive copies. Mere interaction with a user through a computer network, with no transfer of a copy, is not conveying.
An interactive user interface displays "Appropriate Legal Notices" to the extent that it includes a convenient and prominently visible feature that (1) displays an appropriate copyright notice, and (2) tells the user that there is no warranty for the work (except to the extent that warranties are provided), that licensees may convey the work under this License, and how to view a copy of this License. If the interface presents a list of user commands or options, such as a menu, a prominent item in the list meets this criterion.
1. Source Code.
The "source code" for a work means the preferred form of the work for making modifications to it. "Object code" means any non-source form of a work.
A "Standard Interface" means an interface that either is an official standard defined by a recognized standards body, or, in the case of interfaces specified for a particular programming language, one that is widely used among developers working in that language.
The "System Libraries" of an executable work include anything, other than the work as a whole, that (a) is included in the normal form of packaging a Major Component, but which is not part of that Major Component, and (b) serves only to enable use of the work with that Major Component, or to implement a Standard Interface for which an implementation is available to the public in source code form. A "Major Component", in this context, means a major essential component (kernel, window system, and so on) of the specific operating system (if any) on which the executable work runs, or a compiler used to produce the work, or an object code interpreter used to run it.
The "Corresponding Source" for a work in object code form means all the source code needed to generate, install, and (for an executable work) run the object code and to modify the work, including scripts to control those activities. However, it does not include the work's System Libraries, or general-purpose tools or generally available free programs which are used unmodified in performing those activities but which are not part of the work. For example, Corresponding Source includes interface definition files associated with source files for the work, and the source code for shared libraries and dynamically linked subprograms that the work is specifically designed to require, such as by intimate data communication or control flow between those subprograms and other parts of the work.
The Corresponding Source need not include anything that users can regenerate automatically from other parts of the Corresponding Source.
The Corresponding Source for a work in source code form is that same work.
2. Basic Permissions.
All rights granted under this License are granted for the term of copyright on the Program, and are irrevocable provided the stated conditions are met. This License explicitly affirms your unlimited permission to run the unmodified Program. The output from running a covered work is covered by this License only if the output, given its content, constitutes a covered work. This License acknowledges your rights of fair use or other equivalent, as provided by copyright law.
You may make, run and propagate covered works that you do not convey, without conditions so long as your license otherwise remains in force. You may convey covered works to others for the sole purpose of having them make modifications exclusively for you, or provide you with facilities for running those works, provided that you comply with the terms of this License in conveying all material for which you do not control copyright. Those thus making or running the covered works for you must do so exclusively on your behalf, under your direction and control, on terms that prohibit them from making any copies of your copyrighted material outside their relationship with you.
Conveying under any other circumstances is permitted solely under the conditions stated below. Sublicensing is not allowed; section 10 makes it unnecessary.
3. Protecting Users' Legal Rights From Anti-Circumvention Law.
No covered work shall be deemed part of an effective technological measure under any applicable law fulfilling obligations under article 11 of the WIPO copyright treaty adopted on 20 December 1996, or similar laws prohibiting or restricting circumvention of such measures.
When you convey a covered work, you waive any legal power to forbid circumvention of technological measures to the extent such circumvention is effected by exercising rights under this License with respect to the covered work, and you disclaim any intention to limit operation or modification of the work as a means of enforcing, against the work's users, your or third parties' legal rights to forbid circumvention of technological measures.
4. Conveying Verbatim Copies.
You may convey verbatim copies of the Program's source code as you receive it, in any medium, provided that you conspicuously and appropriately publish on each copy an appropriate copyright notice; keep intact all notices stating that this License and any non-permissive terms added in accord with section 7 apply to the code; keep intact all notices of the absence of any warranty; and give all recipients a copy of this License along with the Program.
You may charge any price or no price for each copy that you convey, and you may offer support or warranty protection for a fee.
5. Conveying Modified Source Versions.
You may convey a work based on the Program, or the modifications to produce it from the Program, in the form of source code under the terms of section 4, provided that you also meet all of these conditions:
a) The work must carry prominent notices stating that you modified it, and giving a relevant date.
b) The work must carry prominent notices stating that it is released under this License and any conditions added under section 7. This requirement modifies the requirement in section 4 to "keep intact all notices".
c) You must license the entire work, as a whole, under this License to anyone who comes into possession of a copy. This License will therefore apply, along with any applicable section 7 additional terms, to the whole of the work, and all its parts, regardless of how they are packaged. This License gives no permission to license the work in any other way, but it does not invalidate such permission if you have separately received it.
d) If the work has interactive user interfaces, each must display Appropriate Legal Notices; however, if the Program has interactive interfaces that do not display Appropriate Legal Notices, your work need not make them do so.
A compilation of a covered work with other separate and independent works, which are not by their nature extensions of the covered work, and which are not combined with it such as to form a larger program, in or on a volume of a storage or distribution medium, is called an "aggregate" if the compilation and its resulting copyright are not used to limit the access or legal rights of the compilation's users beyond what the individual works permit. Inclusion of a covered work in an aggregate does not cause this License to apply to the other parts of the aggregate.
You may convey a covered work in object code form under the terms of sections 4 and 5, provided that you also convey the machine-readable Corresponding Source under the terms of this License, in one of these ways:
a) Convey the object code in, or embodied in, a physical product (including a physical distribution medium), accompanied by the Corresponding Source fixed on a durable physical medium customarily used for software interchange.
b) Convey the object code in, or embodied in, a physical product (including a physical distribution medium), accompanied by a written offer, valid for at least three years and valid for as long as you offer spare parts or customer support for that product model, to give anyone who possesses the object code either (1) a copy of the Corresponding Source for all the software in the product that is covered by this License, on a durable physical medium customarily used for software interchange, for a price no more than your reasonable cost of physically performing this conveying of source, or (2) access to copy the Corresponding Source from a network server at no charge.
c) Convey individual copies of the object code with a copy of the written offer to provide the Corresponding Source. This alternative is allowed only occasionally and noncommercially, and only if you received the object code with such an offer, in accord with subsection 6b.
d) Convey the object code by offering access from a designated place (gratis or for a charge), and offer equivalent access to the Corresponding Source in the same way through the same place at no further charge. You need not require recipients to copy the Corresponding Source along with the object code. If the place to copy the object code is a network server, the Corresponding Source may be on a different server (operated by you or a third party) that supports equivalent copying facilities, provided you maintain clear directions next to the object code saying where to find the Corresponding Source. Regardless of what server hosts the Corresponding Source, you remain obligated to ensure that it is available for as long as needed to satisfy these requirements.
e) Convey the object code using peer-to-peer transmission, provided you inform other peers where the object code and Corresponding Source of the work are being offered to the general public at no charge under subsection 6d.
A separable portion of the object code, whose source code is excluded from the Corresponding Source as a System Library, need not be included in conveying the object code work.
A "User Product" is either (1) a "consumer product", which means any tangible personal property which is normally used for personal, family, or household purposes, or (2) anything designed or sold for incorporation into a dwelling. In determining whether a product is a consumer product, doubtful cases shall be resolved in favor of coverage. For a particular product received by a particular user, "normally used" refers to a typical or common use of that class of product, regardless of the status of the particular user or of the way in which the particular user actually uses, or expects or is expected to use, the product. A product is a consumer product regardless of whether the product has substantial commercial, industrial or non-consumer uses, unless such uses represent the only significant mode of use of the product.
"Installation Information" for a User Product means any methods, procedures, authorization keys, or other information required to install and execute modified versions of a covered work in that User Product from a modified version of its Corresponding Source. The information must suffice to ensure that the continued functioning of the modified object code is in no case prevented or interfered with solely because modification has been made.
If you convey an object code work under this section in, or with, or specifically for use in, a User Product, and the conveying occurs as part of a transaction in which the right of possession and use of the User Product is transferred to the recipient in perpetuity or for a fixed term (regardless of how the transaction is characterized), the Corresponding Source conveyed under this section must be accompanied by the Installation Information. But this requirement does not apply if neither you nor any third party retains the ability to install modified object code on the User Product (for example, the work has been installed in ROM).
The requirement to provide Installation Information does not include a requirement to continue to provide support service, warranty, or updates for a work that has been modified or installed by the recipient, or for the User Product in which it has been modified or installed. Access to a network may be denied when the modification itself materially and adversely affects the operation of the network or violates the rules and protocols for communication across the network.
Corresponding Source conveyed, and Installation Information provided, in accord with this section must be in a format that is publicly documented (and with an implementation available to the public in source code form), and must require no special password or key for unpacking, reading or copying.
7. Additional Terms.
"Additional permissions" are terms that supplement the terms of this License by making exceptions from one or more of its conditions. Additional permissions that are applicable to the entire Program shall be treated as though they were included in this License, to the extent that they are valid under applicable law. If additional permissions apply only to part of the Program, that part may be used separately under those permissions, but the entire Program remains governed by this License without regard to the additional permissions.
When you convey a copy of a covered work, you may at your option remove any additional permissions from that copy, or from any part of it. (Additional permissions may be written to require their own removal in certain cases when you modify the work.) You may place additional permissions on material, added by you to a covered work, for which you have or can give appropriate copyright permission.
Notwithstanding any other provision of this License, for material you add to a covered work, you may (if authorized by the copyright holders of that material) supplement the terms of this License with terms:
a) Disclaiming warranty or limiting liability differently from the terms of sections 15 and 16 of this License; or
b) Requiring preservation of specified reasonable legal notices or author attributions in that material or in the Appropriate Legal Notices displayed by works containing it; or
c) Prohibiting misrepresentation of the origin of that material, or requiring that modified versions of such material be marked in reasonable ways as different from the original version; or
d) Limiting the use for publicity purposes of names of licensors or authors of the material; or
e) Declining to grant rights under trademark law for use of some trade names, trademarks, or service marks; or
f) Requiring indemnification of licensors and authors of that material by anyone who conveys the material (or modified versions of it) with contractual assumptions of liability to the recipient, for any liability that these contractual assumptions directly impose on those licensors and authors.
All other non-permissive additional terms are considered "further restrictions" within the meaning of section 10. If the Program as you received it, or any part of it, contains a notice stating that it is governed by this License along with a term that is a further restriction, you may remove that term. If a license document contains a further restriction but permits relicensing or conveying under this License, you may add to a covered work material governed by the terms of that license document, provided that the further restriction does not survive such relicensing or conveying.
If you add terms to a covered work in accord with this section, you must place, in the relevant source files, a statement of the additional terms that apply to those files, or a notice indicating where to find the applicable terms.
Additional terms, permissive or non-permissive, may be stated in the form of a separately written license, or stated as exceptions; the above requirements apply either way.
8. Termination.
You may not propagate or modify a covered work except as expressly provided under this License. Any attempt otherwise to propagate or modify it is void, and will automatically terminate your rights under this License (including any patent licenses granted under the third paragraph of section 11).
However, if you cease all violation of this License, then your license from a particular copyright holder is reinstated (a) provisionally, unless and until the copyright holder explicitly and finally terminates your license, and (b) permanently, if the copyright holder fails to notify you of the violation by some reasonable means prior to 60 days after the cessation.
Moreover, your license from a particular copyright holder is reinstated permanently if the copyright holder notifies you of the violation by some reasonable means, this is the first time you have received notice of violation of this License (for any work) from that copyright holder, and you cure the violation prior to 30 days after your receipt of the notice.
Termination of your rights under this section does not terminate the licenses of parties who have received copies or rights from you under this License. If your rights have been terminated and not permanently reinstated, you do not qualify to receive new licenses for the same material under section 10.
9. Acceptance Not Required for Having Copies.
You are not required to accept this License in order to receive or run a copy of the Program. Ancillary propagation of a covered work occurring solely as a consequence of using peer-to-peer transmission to receive a copy likewise does not require acceptance. However, nothing other than this License grants you permission to propagate or modify any covered work. These actions infringe copyright if you do not accept this License. Therefore, by modifying or propagating a covered work, you indicate your acceptance of this License to do so.
10. Automatic Licensing of Downstream Recipients.
Each time you convey a covered work, the recipient automatically receives a license from the original licensors, to run, modify and propagate that work, subject to this License. You are not responsible for enforcing compliance by third parties with this License.
An "entity transaction" is a transaction transferring control of an organization, or substantially all assets of one, or subdividing an organization, or merging organizations. If propagation of a covered work results from an entity transaction, each party to that transaction who receives a copy of the work also receives whatever licenses to the work
the party's predecessor in interest had or could give under the previous paragraph, plus a right to possession of the Corresponding Source of the work from the predecessor in interest, if the predecessor has it or can get it with reasonable efforts.
You may not impose any further restrictions on the exercise of the rights granted or affirmed under this License. For example, you may not impose a license fee, royalty, or other charge for exercise of rights granted under this License, and you may not initiate litigation (including a cross-claim or counterclaim in a lawsuit) alleging that any patent claim is infringed by making, using, selling, offering for sale, or importing the Program or any portion of it.
11. Patents.
A "contributor" is a copyright holder who authorizes use under this License of the Program or a work on which the Program is based. The work thus licensed is called the contributor's "contributor version".
A contributor's "essential patent claims" are all patent claims owned or controlled by the contributor, whether already acquired or hereafter acquired, that would be infringed by some manner, permitted by this License, of making, using, or selling its contributor version, but do not include claims that would be infringed only as a consequence of further modification of the contributor version. For purposes of this definition, "control" includes the right to grant patent sublicenses in a manner consistent with the requirements of this License.
Each contributor grants you a non-exclusive, worldwide, royalty-free patent license under the contributor's essential patent claims, to make, use, sell, offer for sale, import and otherwise run, modify and propagate the contents of its contributor version.
In the following three paragraphs, a "patent license" is any express agreement or commitment, however denominated, not to enforce a patent (such as an express permission to practice a patent or covenant not to sue for patent infringement). To "grant" such a patent license to a party means to make such an agreement or commitment not to enforce a patent against the party.
If you convey a covered work, knowingly relying on a patent license, and the Corresponding Source of the work is not available for anyone to copy, free of charge and under the terms of this License, through a publicly available network server or other readily accessible means, then you must either (1) cause the Corresponding Source to be so available, or (2) arrange to deprive yourself of the benefit of the patent license for this particular work, or (3) arrange, in a manner consistent with the requirements of this License, to extend the patent license to downstream recipients. "Knowingly relying" means you have actual knowledge that, but for the patent license, your conveying the covered work in a country, or your recipient's use of the covered work in a country, would infringe one or more identifiable patents in that country that you have reason to believe are valid.
If, pursuant to or in connection with a single transaction or arrangement, you convey, or propagate by procuring conveyance of, a covered work, and grant a patent license to some of the parties receiving the covered work authorizing them to use, propagate, modify or convey a specific copy of the covered work, then the patent license you grant is automatically extended to all recipients of the covered work and works based on it.
A patent license is "discriminatory" if it does not include within the scope of its coverage, prohibits the exercise of, or is conditioned on the non-exercise of one or more of the rights that are specifically granted under this License. You may not convey a covered work if you are a party to an arrangement with a third party that is in the business of distributing software, under which you make payment to the third party based on the extent of your activity of conveying the work, and under which the third party grants, to any of the parties who would receive the covered work from you, a discriminatory patent license (a) in connection with copies of the covered work conveyed by you (or copies made from those copies), or (b) primarily for and in connection with specific products or compilations that contain the covered work, unless you entered into that arrangement, or that patent license was granted, prior to 28 March 2007.
Nothing in this License shall be construed as excluding or limiting any implied license or other defenses to infringement that may otherwise be available to you under applicable patent law.
12. No Surrender of Others' Freedom.
If conditions are imposed on you (whether by court order, agreement or otherwise) that contradict the conditions of this License, they do not excuse you from the conditions of this License. If you cannot convey a covered work so as to satisfy simultaneously your obligations under this
License and any other pertinent obligations, then as a consequence you may not convey it at all. For example, if you agree to terms that obligate you to collect a royalty for further conveying from those to whom you convey the Program, the only way you could satisfy both those terms and this License would be to refrain entirely from conveying the Program.
13. Use with the GNU Affero General Public License.
Notwithstanding any other provision of this License, you have permission to link or combine any covered work with a work licensed under version 3 of the GNU Affero General Public License into a single combined work, and to convey the resulting work. The terms of this License will continue to apply to the part which is the covered work, but the special requirements of the GNU Affero General Public License, section 13, concerning interaction through a network will apply to the combination as such.
14. Revised Versions of this License.
The Free Software Foundation may publish revised and/or new versions of the GNU General Public License from time to time. Such new versions will be similar in spirit to the present version, but may differ in detail to address new problems or concerns.
Each version is given a distinguishing version number. If the Program specifies that a certain numbered version of the GNU General Public License "or any later version" applies to it, you have the option of following the terms and conditions either of that numbered version or of any later version published by the Free Software Foundation. If the Program does not specify a version number of the GNU General Public License, you may choose any version ever published by the Free Software Foundation.
If the Program specifies that a proxy can decide which future versions of the GNU General Public License can be used, that proxy's public statement of acceptance of a version permanently authorizes you to choose that version for the Program.
Later license versions may give you additional or different permissions. However, no additional obligations are imposed on any author or copyright holder as a result of your choosing to follow a later version.
15. Disclaimer of Warranty.
THERE IS NO WARRANTY FOR THE PROGRAM, TO THE EXTENT PERMITTED BY APPLICABLE LAW. EXCEPT WHEN OTHERWISE STATED IN WRITING THE COPYRIGHT HOLDERS AND/OR OTHER PARTIES PROVIDE THE PROGRAM "AS IS" WITHOUT WARRANTY OF ANY KIND, Either EXPRESSED OR IMPLIED, INCLUDING, BUT NOT LIMITED TO, THE IMPLIED WARRANTYES OF MERCHANTABILITY AND FITNESS FOR A PARTICULAR PURPOSE. THE ENTIRE RISK AS TO THE QUALITY AND PERFORMANCE OF THE PROGRAM IS WITH YOU. SHOULD THE PROGRAM PROVE DEFECTIVE, YOU ASSUME THE COST OF ALL NECESSARY SERVICING, REPAIR OR CORRECTION.
16. Limitation of Liability.
IN NO EVENT UNLESS REQUIRED BY APPLICABLE LAW OR AGREED TO IN WRITING WILL ANY COPYRIGHT HOLDER, OR ANY OTHER PARTY WHO MODIFIES AND/OR CONVEYS THE PROGRAM AS PERMITTED ABOVE, BE LIABLE TO YOU FOR DAMAGES, INCLUDING ANY GENERAL, SPECIAL, INCIDENTAL OR CONSEQUENTIAL DAMAGES ARISING OUT OF THE USE OR INABILITY TO USE THE PROGRAM (INCLUDING BUT NOT LIMITED TO LOSS OF DATA OR DATA BEING RENDERED INACCURATE OR LOSSES SUSTAINED BY YOU OR THIRD PARTIES OR A FAILURE OF THE PROGRAM TO OPERATE WITH ANY OTHER PROGRAMS), EVEN IF SUCH HOLDER OR OTHER PARTY HAS BEEN ADVISED OF THE POSSIBILITY OF SUCH DAMAGES.
17. Interpretation of Sections 15 and 16.
If the disclaimer of warranty and limitation of liability provided above cannot be given local legal effect according to their terms, reviewing courts shall apply local law that most closely approximates an absolute waiver of all civil liability in connection with the Program, unless a warranty or assumption of liability accompanies a copy of the Program in return for a fee.
end of TermS and ConditionS
How to Apply These Terms to Your New Programs
If you develop a new program, and you want it to be of the greatest possible use to the public, the best way to achieve this is to make it free software which everyone can redistribute and change under these terms.
To do so, attach the following notices to the program. It is safest to attach them to the start of each source file to most effectively state the exclusion of warranty; and each file should have at least the "copyright" line and a pointer to where the full notice is found.
Copyright (C)
This program is free software: you can redistribute it and/or modify it under the terms of the GNU General Public License as published by the Free Software Foundation, either version 3 of the License, or (at your option) any later version.
This program is distributed in the hope that it will be useful, but WITHOUT ANY WARRANTY; without even the implied warranty of MERCHANTABILITY or FITNESS FOR A PARTICULAR PURPOSE. See the GNU General Public License for more details.
You should have received a copy of the GNU General Public License along with this program. If not, see Copyright (C)
This program comes with ABSOLUTELY NO WARRANTY; for details type`show w'.
This is free software, and you are welcome to redistribute it under certain conditions; type `show c' for details.
The hypothetical commands 'show w' and 'show c' should show the appropriate parts of the General Public License. Of course, your program's commands might be different; for a GUI interface, you would use an "about box".
You should also get your employer (if you work as a programmer) or school, if any, to sign a "copyright disclaimer" for the program, if necessary.
For more information on this, and how to apply and follow the GNU GPL, see .
Copyright (C) 1991, 1999 Free Software Foundation, Inc.
51 Franklin Street, Fifth Floor, Boston, MA 02110-1301 USA
Everyone is permitted to copy and distribute verbatim copies of this license document, but changing it is not allowed.
[This is the first released version of the Lesser GPL. It also counts as the successor of the GNU Library Public License, version 2, hence the version number 2.1.]
NOTE! This copyright does not cover user programs that use kernel services by normal system calls - this is merely considered normal use of the kernel, and does not fall under the heading of "derived work".
Also note that the GPL below is copyrighted by the Free Software Foundation, but the instance of code that it refers to (the Linux kernel) is copyrighted by me and others who actually wrote it.
Also note that the only valid version of the GPL as far as the kernel is concerned is _this._particular version of the license (ie v2, not v2.2 or v3.x or whatever), unless explicitly otherwise stated.
Linus Torvalds
pCre LiCenCe
PCRE is a library of functions to support regular expressions whose syntax and semantics are as close as possible to those of the Perl 5 language.
Release 8 of PCRE is distributed under the terms of the "BSD" licence, as specified below. The documentation for PCRE, supplied in the "doc" directory, is distributed under the same terms as the software itself.
The basic library functions are written in C and are freestanding. Also included in the distribution is a set of C + + wrapper functions, and a just-in-time compiler that can be used to optimize pattern matching. These are both optional features that can be omitted when the library is built.
THE BASIC LIBRARY FUNCTIONS
Written by: Philip Hazel
Email local part: ph10
Email domain: cam.ac.uk
University of Cambridge Computing Service, Cambridge, England.
Copyright (c) 1997-2012 University of Cambridge
All rights reserved.
PCRE JUST-IN-TIME COMPILESION SUPPORT
Written by: Zoltan Herzeg
Email local part: hzmester
Emain domain: freemail.hu
Copyright(c) 2010-2012 Zoltan Herzzeg
All rights reserved.
STACK-LESS JUST-IN-TIME COMPILER
Written by: Zoltan Herczeg
Email local part: hzmester
Emaindomain:freemail.hu
Copyright(c) 2009-2012 Zoltan Herczeg
All rights reserved.
THE C++ WRAPPER FUNCTIONS
Contributed by: Google Inc.
Copyright (c) 2007-2012, Google Inc.
All rights reserved.
THE "BSD" LICENCE
Redistribution and use in source and binary forms, with or without modification, are permitted provided that the following conditions are met:
* Redistributions of source code must retain the above copyright notice, this list of conditions and the following disclaimer.
* Redistributions in binary form must reproduce the above copyright notice, this list of conditions and the following disclaimer in the documentation and/or other materials provided with the distribution.
* Neither the name of the University of Cambridge nor the name of Google Inc. nor the names of their contributors may be used to endorse or promote products derived from this software without specific prior written permission.
THIS SOFTWARE IS PROVIDED BY THE COPYRIGHT HOLDERS AND Contributors "AS IS" AND ANY EXPRESS OR IMPLIED WARRANTY, INCLUDING, BUT NOT LIMITED TO, THE IMPLIED WARRANTY OF MERCHANTABILITY AND FITNESS FOR A PARTICULAR PURPOSE ARE DISCLAIMED. IN NO EVENT SHALL THE COPYRIGHT OWNER OR COLNTRIBUTORS BE LIABLE FOR ANY DIRECT, INDIRECT, INCIDENTAL, SPECIAL, EXEMPLARY, OR CONSEQUENTIAL DAMAGES (INCLUDING, BUT NOT LIMITED TO, PROCEDURE OF SUBSTITUTE GOODS OR SERVICES; LOSS OF USE, DATA, OR PROFITS; OR BUSINESS INTERRUsION)HOWEVER CAUSED AND ON ANY THEORY OF LIABILITY, WHETHER IN CONTRACT, STRICT LIABILITY, OR TORT (INCLUDING NEGLIGENCE OR OTHERWISE)ARISING IN ANYWAY OUT OF THE USE OF THIS SOFTWARE, EVEN IF ADVISED OF THE POSSIBILITY OF SUCH DAMAGE.
End
Copyrights:
All of the code can be freely used and redistributed. The individual source files each have their own copyright and permission notice.
Pppd, pppstats and pppdump are under BSD-style notices.
Some of the pppd plugins are GPL'd. Chat is public domain.
Copyright (c) 2004, Jan Kneschke, incremental
All rights reserved.
Redistribution and use in source and binary forms, with or without modification, are permitted provided that the following conditions are met:
- Redistributions of source code must retain the above copyright notice, this list of conditions and the following disclaimer.
- Redistributions in binary form must reproduce the above copyright notice, this list of conditions and the following disclaimer in the documentation and/or other materials provided with the distribution.
- Neither the name of the 'incremental' nor the names of its contributors may be used to endorse or promote products derived from this software without specific prior written permission.
THIS SOFTWARE IS PROVIDED BY THE COPYRIGHT HOLDERS AND COLNTRIButors "AS IS" AND ANY EXPRESS OR IMplied WARRANTY, INCLUDING, BUT NOT LIMITED TO, THE IMPLIED WARRANTY OF MERCHANTABILITY AND FITNESS FOR A PARTICULAR PURPOSE ARE DISCLAIMED. IN NO EVENT SHALL THE COPYRIGHT OWNER OR COLNTRIButors BE LIABLE FOR ANY DIRECT, INDIRECT, INCIDENTAL, SPECIAL, EXEMPLARY, OR CONSEQUENTIAL DAMAGES (INCLUDING, BUT NOT LIMITED TO, PROCEDURE OF SUBSTITUTE GOODS OR SERVICES; LOSS OF USE, DATA, OR PROFITS; OR BUSINESS INTERIuPTION) HOWEVER CAUSED AND ON ANY THEORY OF LIABILITY, WHETHER IN CONTRACT, STRICT LIABILITY, OR TORT (INCLUDING NEGLIGENCE OR OTHERWISE) ARISING IN ANY WAY OUT OF THE USE OF THIS SOFTWARE, EVEN IF ADVISED OF THE POSSIBILITY OF SUCH DAMAGE.
Copyright (c) 2005-2009, Thomas BERNARD
All rights reserved.
Redistribution and use in source and binary forms, with or without modification, are permitted provided that the following conditions are met:
* Redistributions of source code must retain the above copyright notice, this list of conditions and the following disclaimer.
* Redistributions in binary form must reproduce the above copyright notice, this list of conditions and the following disclaimer in the documentation and/or other materials provided with the distribution.
* The name of the author may not be used to endorse or promote products derived from this software without specific prior written permission.
THIS SOFTWARE IS PROVIDED BY THE COPYRIGHT HOLDERS AND COLNTRIButors "AS IS" AND ANY EXPRESS OR IMplied WARRANTIES, INCLUDING, BUT NOT LIMITED TO, THE IMPLIED WARRANTY OF MERCHANTABILITY AND FITNESS FOR A PARTICULAR PURPOSE ARE DISCLAIMED. IN NO EVENT SHALL THE COPYRIGHT OWNER OR COLNTRIButors BE LIABLE FOR ANY DIRECT, INDIRECT, INCIDENTAL, SPECIAL, EXEMPLARY, OR CONSEQUENTIAL DAMAGES (INCLUDING, BUT NOT LIMITED TO, PROCEDURE OF SUBSTITUTE GOODS OR SERVICES; LOSS OF USE, DATA, OR PROFITS; OR BUSINESS INTERRUIPTION) HOWEVER CAUSED AND ON ANY THEORY OF LIABILITY, WHETHER IN CONTRACT, STRICT LIABILITY, OR TORT (INCLUDING NEGLIGENCE OR OTHERWISE) ARISING IN ANY WAY OUT OF THE USE OF THIS SOFTWARE, EVEN IF ADVISED OF THE POSSIBILITY OF SUCH DAMAGE.
LICENSE ISSUES
The OpenSSL toolkit stays under a dual license, i.e. both the conditions of the OpenSSL License and the original SSLeay license apply to the toolkit.
See below for the actual license texts. Actually both licenses are BSD-style Open Source licenses. In case of any license issues related to OpenSSL please contact openssl-core@openssl.org.
openSSL License
Copyright (c) 1998-2005 The OpenSSL Project. All rights reserved.
Redistribution and use in source and binary forms, with or without modification, are permitted provided that the following conditions are met:
1. Redistributions of source code must retain the above copyright notice, this list of conditions and the following disclaimer.
2. Redistributions in binary form must reproduce the above copyright notice, this list of conditions and the following disclaimer in the documentation and/or other materials provided with the distribution.
3. All advertising materials mentioning features or use of this software must display the following acknowledgment:
"This product includes software developed by the OpenSSL Project for use in the OpenSSL Toolkit. (http://www.openss.org/)
4. The names "OpenSSL Toolkit" and "OpenSSL Project" must not be used to endorse or promote products derived from this software without prior written permission. For written permission, please contact openssllcore@openssll.org.
5. Products derived from this software may not be called "OpenSSL" nor may "OpenSSL" appear in their names without prior written permission of the OpenSSL Project.
6. Redistributions of any form whatsoever must retain the following acknowledgment:
"This product includes software developed by the OpenSSL Project for use in the OpenSSL Toolkit (http://www.openss.org/)
THIS SOFTWARE IS PROVIDED BY THE OpensSL PROJECT "AS IS" AND ANY EXPRESSED OR IMPLIED WARRANTY, INCLUDING, BUT NOT LIMITED TO, THE IMPLIED WARRANTY OF MERCHANTABILITY AND FITNESS FOR A PARTICULAR PURPOSE ARE DISCLAIMED. IN NO EVENT SHALL THE OpensSL PROJECT OR ITS CONTRIButors BE LIABLE FOR ANY DIRECT, INDIRECT, INCIDENTAL, SPECIAL, EXEMPLARY, OR CONSEQUENTIAL DAMAGES (INCLUDING, BUT NOT LIMITED TO, PROCEDURE OF SUBSTITUTE GOODS OR SERVICES; LOSS OF USE, DATA, OR PROFITS; OR BUSINESS INTERRUPTION) HOWEVER CAUSED AND ON ANY THEORY OF LIABILITY, WHETHER IN CONTRACT, STRICT LIABILITY, OR TORT (INCLUDING NEGLIGENCE OR OTHERWISE) ASING IN ANY WAY OUT OF THE USE OF THIS SOFTWARE, EVEN IF ADVISED OF THE POSSIBILITY OF SUCH DAMAGE.
This product includes cryptographic software written by Eric Young (eay@cryptsoft.com). This product includes software written by Tim Hudson (tjh@cryptsoft.com).
original SSLeay License
Copyright (C) 1995-1998 Eric Young (eay@cryptsoft.com)
All rights reserved.
This package is an SSL implementation written by Eric Young (eay@ cryptsoft.com).
The implementation was written so as to conform with Netscapes SSL. This library is free for commercial and non-commercial use as long as the following conditions are ahead to. The following conditions apply to all code found in this distribution, be it the RC4, RSA, Ihash, DES, etc., code; not just the SSL code. The SSL documentation included with this distribution is covered by the same copyright terms except that the holder is Tim Hudson (tjh@cryptsoft.com).
Copyright remains Eric Young's, and as such any Copyright notices in the code are not to be removed.
If this package is used in a product, Eric Young should be given attribution as the author of the parts of the library used.
This can be in the form of a textual message at program startup or in documentation (online or textual) provided with the package.
Redistribution and use in source and binary forms, with or without modification, are permitted provided that the following conditions are met:
1. Redistributions of source code must retain the copyright notice, this list of conditions and the following disclaimer.
2. Redistributions in binary form must reproduce the above copyright notice, this list of conditions and the following disclaimer in the documentation and/or other materials provided with the distribution.
3. All advertising materials mentioning features or use of this software must display the following acknowledgement:
"This product includes cryptographic software written by Eric Young (eay@cryptsoft.com)"
The word 'cryptographic' can be left out if the rouines from the library being used are not cryptographic related :-).
4. If you include any Windows specific code (or a derivative thereof) from the apps directory (application code) you must include an acknowledgement:
"This product includes software written by Tim Hudson (tjh@cryptsoft.com)"
THIS SOFTWARE IS PROVIDED BY ERIC YOUNG "AS IS" AND ANY EXPRESS OR IMPLIED WARRANTY, INCLUDING, BUT NOT LIMITED TO, THE IMPLIED WARRANTY OF MERCHANTABILITY AND FITNESS FOR A PARTICULAR PURPOSE ARE DISCLAIMED. IN NO EVENT SHALL THE AUTHOR OR COLNTRIBUTORS BE LIABLE FOR ANY DIRECT, INDIRECT, INCIDENTAL, SPECIAL, EXEMPLARY, OR CONSEQUENTIAL DAMAGES (INCLUDING, BUT NOT LIMITED TO, PROCEDURE OF SUBSTITUTE GOODS OR SERVICES; LOSS OF USE, DATA, OR PROFITS; OR BUSINESS INTERRUsION) HOWEVER CAUSED AND ON ANY THEORY OF LIABILITY, WHETHER IN CONTRACT, STRICT LIABILITY, OR TORT (INCLUDING NEGLIGENCE OR OTHERWISE) ARISING IN ANY WAY OUT OF THE USE OF THIS SOFTWARE, EVEN IF ADVISED OF THE POSSIBILITY OF SUCH DAMAGE.
The licence and distribution terms for any publicly available version or derivative of this code cannot be changed. i.e. this code cannot simply be copied and put under another distribution licence [including the GNU Public Licence.]
Except where otherwise noted in the source code (e.g. the files hash.c, list.c and the trio files, which are covered by a similar licence but with different Copyright notices) all the files are:
Copyright (C) 1998-2003 Daniel Veillard. All Rights Reserved.
Permission is hereby granted, free of charge, to any person obtaining a copy of this software and associated documentation files (the "Software"), to deal in the Software without restriction, including without limitation the rights to use, copy, modify, merge, publish, distribute, sublicense, and/or sell copies of the Software, and to permit persons to whom the Software is furnished to do so, subject to the following conditions:
The above copyright notice and this permission notice shall be included in all copies or substantial portions of the Software.
THE SOFTWARE IS PROVIDED "AS IS", WITHOUT WARRANTY OF ANY KIND, EXPRESS OR IMPLIED, INCLUDING BUT NOT LIMITED TO THE WARRANTYES OF MERCHANTABILITY, FIT-NESS FOR A PARTICULAR PURPOSE AND NONINFRINGEMENT. IN NO EVENT SHALL THE DANIEL VEILLARD BE LIABLE FOR ANY CLAIM, DAMAGES OR OTHER LIABILITY, WHETHER IN AN ACTION OF CONTRACT, TORT OR OTHERWISE, ARISING FROM, OUT OF OR IN CONNECTION WITH THE SOFTWARE OR THE USE OR OTHER DEALINGS IN THE SOFTWARE.
Except as contained in this notice, the name of Daniel Veillard shall not be used in advertising or otherwise to promote the sale, use or other deal-ings in this Software without prior written authorization from him.
Boost Software License - Version 1.0 - August 17th, 2003
Permission is hereby granted, free of charge, to any person or organization obtaining a copy of the software and accompanying documentation covered by this license (the "Software") to use, reproduce, display, distribute, execute, and transmit the Software, and to prepare derivative works of the Software, and to permit third-parties to whom the Software is furnished to do so, all subject to the following:
The copyright notices in the Software and this entire statement, including the above license grant, this restriction and the following disclaimer, must be included in all copies of the Software, in whole or in part, and all derivative works of the Software, unless such copies or derivative works are solely in the form of machine-executable object code generated by a source language processor.
THE SOFTWARE IS PROVIDED "AS IS", WITHOUT WARRANTY OF ANY KIND, EXPRESS OR IMPLIED, INCLUDING BUT NOT LIMITED TO THE WARRANTY OF MERCHANTABILITY, FITNESS FOR A PARTICULAR PURPOSE, TITLE AND NON-INFRINGEMENT. IN NO EVENT SHALL THE COPYRIGHT HOLDERS OR ANYONE DISTRIBUTING THE SOFTWARE BE LIABLE FOR ANY DAMAGES OR OTHER LIABILITY, WHETHER IN CONTRACT, TORT OR OTHERWISE, ARISING FROM, OUT OF OR IN CONNECTION WITH THE SOFTWARE OR THE USE OR OTHER DEALINGS IN THE SOFTWARE.
The MIT License (MIT)
Copyright (c)
Permission is hereby granted, free of charge, to any person obtaining a copy of this software and associated documentation files (the "Software"), to deal in the Software without restriction, including without
limitation the rights to use, copy, modify, merge, publish, distribute, sublicense, and/or sell copies of the Software, and to permit persons to whom the Software is furnished to do so, subject to the following conditions:
The above copyright notice and this permission notice shall be included in all copies or substantial portions of the Software.
THE SOFTWARE IS PROVIDED "AS IS", WITHOUT WARRANTY OF ANY KIND, EXPRESS OR IMPLIED, INCLUDING BUT NOT LIMITED TO THE WARRANTY OF MERCHANTABILITY, FITNESS FOR A PARTICULAR PURPOSE AND NONINFRINGEMENT. IN NO EVENT SHALL THE AUTHORS OR COPYRIGHT HOLDERS BE LIABLE FOR ANY CLAIM, DAMAGES OR OTHER LIABILITY, WHETHER IN AN ACTION OF CONTRACT, TORT OR OTHERWISE, ARISING FROM, OUT OF OR IN CONNECTION WITH THE SOFTWARE OR THE USE OR OTHER DEALINGS IN THE SOFTWARE.
The PHP License, version 3.01
Copyright (c) 1999 - 2006 The PHP Group. All rights reserved.
Redistribution and use in source and binary forms, with or without modification, is permitted provided that the following conditions are met:
1. Redistributions of source code must retain the above copyright notice, this list of conditions and the following disclaimer.
2. Redistributions in binary form must reproduce the above copyright notice, this list of conditions and the following disclaimer in the documentation and/or other materials provided with the distribution.
3. The name "PHP" must not be used to endorse or promote products derived from this software without prior written permission. For written permission, please contact group@php.net.
4. Products derived from this software may not be called "PHP", nor may "PHP" appear in their name, without prior written permission from group@php.net. You may indicate that your software works in conjunction with PHP by saying "Foo for PHP" instead of calling it "PHP Foo" or "phpfoo".
5. The PHP Group may publish revised and/or new versions of the license from time to time. Each version will be given a distinguishing version number.
Once covered code has been published under a particular version of the license, you may always continue to use it under the terms of that version. You may also choose to use such covered code under the terms of any subsequent version of the license published by the PHP Group. No one other than the PHP Group has the right to modify the terms applicable to covered code created under this License.
6. Redistributions of any form whatsoever must retain the following acknowledgment:
"This product includes PHP software, freely available from
.
PHP includes the Zend Engine, freely available at .
Copyright (c) 2004, Apple Computer, Inc. and The Mozilla Foundation. All rights reserved.
Redistribution and use in source and binary forms, with or without modification, are permitted provided that the following conditions are met:
1. Redistributions of source code must retain the above copyright notice, this list of conditions and the following disclaimer.
2. Redistributions in binary form must reproduce the above copyright notice, this list of conditions and the following disclaimer in the documentation and/or other materials provided with the distribution.
3. Neither the names of Apple Computer, Inc. ("Apple") or The Mozilla Foundation ("Mozilla") nor the names of their contributors may be used to endorse or promote products derived from this software without specific prior written permission.
THIS SOFTWARE IS PROVIDED BY APPLE, MOZILLA AND THEIR
CONTRIBUTORS "AS IS" AND ANY EXPRESS OR IMPLIED WARRANTYES,
INCLUDING, BUT NOT LIMITED TO, THE IMPLIED WARRANTYES OF
MERCHANTABILITY AND FITNESS FOR A PARTICULAR PURPOSE ARE
DISCLAIMED. IN NO EVENT SHALL APPLE, MOZILLA OR THEIR
CONTRIBUTORS BE LIABLE FOR ANY DIRECT, INDIRECT, INCIDENTAL,
SPECIAL, EXEMPLARY, OR CONSEQUENTIAL DAMAGES (INCLUDING,
BUT NOT LIMITED TO, Procurement OF SUBSTITUTE GOODS OR
SERVICES; LOSS OF USE, DATA, OR PROFITS; OR BUSINESS
INTERRUPTION) HOWEVER CAUSED AND ON ANY THEORY OF
LIABILITY, WHETHER IN CONTRACT, STRICT LIABILITY, OR TORT
(INCLUDING NEGLIGENCE OR OTHERWISE) ASING IN ANY WAY OUT
OF THE USE OF THIS SOFTWARE, EVEN IF ADVISED OF THE
POSSIBILITY OF SUCH DAMAGE.
Version: MPL 1.1/GPL 2.0/LGPL 2.1
The contents of this file are subject to the Mozilla Public License Version 1.1 (the "License"); you may not use this file except in compliance with the License. You may obtain a copy of the License at
http://www.mozilla.org/MPL/
Software distributed under the License is distributed on an "AS IS" basis, WITHOUT WARRANTY OF ANY KIND, either express or implied. See the License for the specific language governing rights and limitations under the License.
The Original Code is mozill.org code.
The Initial Developer of the Original Code is Netscape Communications Corporation.
Portions created by the Initial Developer are Copyright (C) 1998 the Initial Developer. All Rights Reserved.
Contributor(s):
Alternatively, the contents of this file may be used under the terms of either the GNU General Public License Version 2 or later (the "GPL"), or the GNU Lesser General Public License Version 2.1 or later (the "LGPL"), in which case the provisions of the GPL or the LGPL are applicable instead of those above. If you wish to allow use of your version of this file only under the terms of either the GPL or the LGPL, and not to allow others to use your version of this file under the terms of the MPL, indicate your decision by deleting the provisions above and replace them with the notice and other provisions required by the GPL or the LGPL. If you do not delete the provisions above, a recipient may use your version of this file under the terms of any one of the MPL, the GPL or the LGPL.
TinyXML
TinyXML is a simple, small, C++ XML parser that can be easily integrated into other programs.
What it does.
In brief, TinyXML parses an XML document, and builds from that a Document Object Model (DOM) that can be read, modified, and saved. XML stands for "Extensible Markup Language." It allows you to create your own document backups. Where HTML does a very good job of marking documents for browsers, XML allows you to define any kind of document markup, for example a document that describes a "to do" list for an organizer application. XML is a very structured and convenient format. All those random file formats created to store application data can all be replaced with XML. One parser for everything. The best place for the complete, correct, and quite frankly hard to read spec is at http://www.w3.org/TR/2004/REC-xml-20040204/. An intro to XML (that I really like) can be found at http://skew.org/XML/tutorial. There are different ways to access and interact with XML data. TinyXML uses a Document Object Model (DOM), meaning the XML data is parsed into a C++ objects that
can be browsed and manipulated, and then written to disk or another output stream. You can also construct an XML document from scratch with C++ objects and write this to disk or another output stream.
TinyXML is designed to be easy and fast to learn. It is two headers and four cpp files. Simply add these to your project and off you go. There is an example file - xmltest.cpp - to get you started. TinyXML is released under the ZLib license, so you can use it in open source or commercial code. The details of the license are at the top of every source file. TinyXML attempts to be a flexible parser, but with truly correct and compliant XML output. TinyXML should compile on any reasonably C++ compliant system. It does not rely on exceptions or RTTI. It can be compiled with or without STL support. TinyXML fully supports the UTF-8 encoding, and the first 64k character entities.
What it doesn't do.
TinyXML doesn't parse or use DTDs (Document Type Definitions) or XSLs (eXtensible Stylesheet Language.) There are other parsers out there (check out www.sourceforge.org, search for XML) that are much more fully featured. But they are also much bigger, take longer to set up in your project, have a higher learning curve, and often have a more restrictive license. If you are working with browsers or have more complete XML needs, TinyXML is not the parser for you. The following DTD syntax will not parse at this time in TinyXML: @verbatim ] > @endverbatim because TinyXML sees this as a !DOCTYPE node with an illegally embedded !ELEMENT node. This may be addressed in the future.
Tutorials.
For the impatient, here is a tutorial to get you going. A great way to get started, but it is worth your time to read this (very short) manual completely. - @subpage tutorial0
Code Status.
TinyXML is mature, tested code. It is very stable. If you find bugs, please file a bug report on the sourceforge web site (www.sourceforge.net/projects/tinyxml). We'll get them straightened out as soon as possible. There are some areas of improvement; please check sourceforge if you are interested in working on TinyXML.
TinyXML projects you may find useful! (Descriptions provided by the projects.)
- TinyXPath (http://tinyxpath.sourceforge.net).TinyXPath is a small footprint XPath syntax decoder, written in C++.
- TinyXML++ (http://code.google.com/p/ticpp/). TinyXML++ is a completely new interface to TinyXML that uses MANY of the C++ strengths. Templates, exceptions, and much better error handling.
Features
Using STL
TinyXML can be compiled to use or not use STL. When using STL, TinyXML uses the std::string class, and fully supports std::istream, std::ostream, operator<<, and operator>>. Many API methods have both 'const char' and 'const std::string&' forms. When STL support is compiled out, no STL files are included whatsoever. All the string classes are implemented by TinyXML itself. API methods all use the 'const char' form for input. Use the compile time #define: TIXML_USE_STL to compile one version or the other. This can be passed by the compiler, or set as the first line of "tinyxml.h". Note: If compiling the test code in Linux, setting the environment variable TINYXML_USE_STL=YES/NO will control STL compilation. In the Windows project file, STL and non STL targets are provided. In your project, It's probably easiest to add the line "#define TIXML_USE_STL" as the first line of tinyxml.h.
UTF-8
TinyXML supports UTF-8 allowing to manipulate XML files in any language. TinyXML also supports "legacy mode" - the encoding used before UTF-8 support and probably best described as "extended ASCII". Normally, TinyXML will try to detect the correct encoding and use it. However, by setting the value of TIXML_DEFAULT_ENCODING in the header file, TinyXML can be forced to always use one encoding. TinyXML will assume Legacy Mode until one of the following occurs:
1. If the non-standard but common "UTF-8 lead bytes" (0xEF 0xffb 0xBF) begin the file or data stream, TinyXML will read it as UTF-8.
2. If the declaration tag is read, and it has an encoding="UTF-8", then TinyXML will read it as UTF-8.
3. If the declaration tag is read, and it has no encoding specified, then TinyXML will read it as UTF-8.
4. If the declaration tag is read, and it has an encoding="something else", then TinyXML will read it as Legacy Mode. In legacy mode, TinyXML will work as it did before. It's not clear what that mode does exactly, but old content should keep working.
5. Until one of the above criteria is met, TinyXML runs in Legacy Mode. What happens if the encoding is incorrectly set or detected? TinyXML will try to read and pass through text seen as improperly encoded. You may get some strange results or mangled characters. You may want to force TinyXML to the correct mode. You may force TinyXML to Legacy Mode by using LoadFile(TIXML_ENCODING_LEGACY) or LoadFilefilename, TIXXML_ENCODING_LEGACY). You may force it to use legacy mode all the time by setting TIXXML_DEFAULT_ENCODING = TIXXML_ENCODING_ LEGACY. Likewise, you may force it to TIXXML_ENCODING_UTF8 with the same technique. For English users, using English XML, UTF-8 is the same as low-ASCII. You don't need to be aware of UTF-8 or change your code in any way. You can think of UTF-8 as a "superset" of ASCII. UTF-8 is not a double byte format - but it is a standard encoding of Unicode! TinyXML does not use or directly support wchar, TCHAR, or Microsoft's_UNICODE at this time. It is common to see the term "Unicode" improperly refer to UTF-16, a wide byte encoding of unicode. This is a source of confusion. For "high-ascii" languages - everything not English, pretty much - TinyXML can handle all languages, at the same time, as long as the XML is encoded in UTF-8. That can be a little tricky, older programs and operating systems tend to use the "default" or "traditional" code page. Many apps (and almost all modem ones) can output UTF-8, but older or stubborn (or just broken) ones still output text in the default code page. For example, Japanese systems traditionally use SHIFT-JIS encoding. Text encoded as SHIFT-JIS can not be read by TinyXML. A good text editor can import SHIFT-JIS and then save as UTF-8. The Skew.org link does a great job covering the encoding issue. The test file "utf8test.xml" is an XML containing English, Spanish, Russian, and Simplified Chinese. (Hopefully they are translated correctly). The file "utf8test.gif" is a screen capture of the XML file, rendered in IE. Note that if you don't have the correct fonts (Simplified Chinese or Russian) on your system, you won't see output that matches the GIF file even if you can parse it correctly. Also note that (at least on my Windows machine) console output is in a Western code page, so that Print() or printf() cannot correctly display the file. This is not a bug in TinyXML - just an OS issue. No data is lost or destroyed by TinyXML. The console just doesn't render UTF-8.
Entities
TinyXML recognizes the pre-defined "character entities", meaning special characters. Namely: @verbatim & & < < >> '' ' ' @endverbatim These are recognized when the XML document is read, and translated to there UTF-8 equivalents. For instance, text with the XML of: @verbatim Far & Away @endverbatim will have the Value() of "Far & Away" when queried from the TIXmlText object, and will be written back to the XML stream/file as an ampersand. Older versions of TinyXML "preserved" character entities, but the newer versions will translate them into characters. Additionally, any character can be specified by its Unicode code point: The syntax '' or '' are both to the non-breaking space characher.
Printing
TinyXML can print output in several different ways that all have strengths and limitations. - Print( FILE* ). Output to a std-C stream, which includes all C files as well as stdout. - "Pretty prints", but you don't have control over printing options. - The output is streamed directly to the FILE object, so there is no memory overhead in the TinyXML code. - used by Print() and SaveFile(). - operator<<. Output to a c++ stream. - Integrates with standart C++轨道交通s. - Outputs in "network printing" mode without line breaks. Good for network transmission and moving XML between C++ objects, but hard for a human to read. - TiXmlPrinter. Output to a std::string or memory buffer. - API is less concise - Future printing options will be put here. - Printing may change slightly in future versions as it is refined and expanded.
Streams
With TIXML_USE_STL on TinyXML supports C++ streams (operator <<, >> ) streams as well as C (FILE*) streams. There are some differences that you may need to be aware of. C style output: - based on FILE* - the Print() and SaveFile() methods Generates formatted output, with plenty of white space, intended to be as human-readable as possible. They are very fast, and tolerant of ill formed XML documents. For example, an XML document that contains 2 root elements and 2 declarations, will still print. C style input: - based on FILE* - the Parse() and LoadFile() methods A fast, tolerant read. Use whenever you don't need the C++ streams. C++ style output: - based on std::osstream - operator<> Reads XML from a stream, making it useful for network transmission. The tricky part is knowing when the XML document is complete, since there will almost certainly be other data in the stream. TinyXML will assume the XML data is complete after it reads the root element. Put another way, documents that are ill-constructed with more than one root element will not read correctly. Also note that operator>> is somewhat slower than Parse, due to both implementation of the STL and limitations of TinyXML.
White space
The world simply does not agree on whether white space should be kept, or condensed. For example, pretend the `` is a space, and look at "Hello__world". HTML, and at least some XML parsers, will interpret this as "Hello_world". They condense white space. Some XML parsers do not, and will leave it as "Hello__world". (Remember to keep pretending the `` is a space.) Others suggest that __Hello__world should become __Hello__world. It's an issue that hasn't been resolved to my satisfaction. TinyXML supports the first 2 approaches. Call TiXmlBase::SetCondenseWhiteSpace(bool) to set the desired behavior. The default is to condense white space. If you change the default, you should call TiXmlBase::SetCondenseWhiteSpace(bool) before making any calls to Parse XML data, and I don't recommend changing it after it has been set.
Handles
Where browsing an XML document in a robust way, it is important to check for null returns from method calls. An error safe implementation can generate a lot of code like: @verbatim TXmlElement* root = document.FirstChildElement("Document"); if (root) { TXmlElement* element = root->FirstChildElement("Element"); if (element) { TXmlElement* child = element->FirstChildElement("Child"); if (child) { TXmlElement* child2 = child->NextSiblingElement("Child"); if (child2) { // Finally do something useful. @endverbatim Handles have been introduced to clean this up. Using the TXmlHandle class, the previous code reduces to: @verbatim TXmlHandle docHandle(&document); TXmlElement* child2 = docHandle.FirstChild("Document").FirstChild("Element").Child("Child", 1).ToElement(); if (child2) { // do something useful @endverbatim Which is much easier to deal with. See TXmlHandle for more information.
Row and Column tracking
Being able to track nodes and attributes back to their origin location in source files can be very important for some applications. Additionally, knowing where parsing errors occurred in the original source can be very time saving. TinyXML can tracks the row and column origin of all nodes and attributes in a text file. The TiXmlBase::Row() and TiXmlBase::Column() methods return the origin of the node in the source text. The correct tabs can be configured in TiXmlDocument::SetTabSize().
Using and Installing
To Compile and Run xmltest: A Linux Makefile and a Windows Visual C++ .dsw file is provided. Simply compile and run. It will write the file demotest.xml to your disk and generate output on the screen. It also tests walking the DOM by printing out the number of nodes found using different techniques. The Linux makefile is very generic and runs on many systems - it is currently tested on mingw and MacOSX. You do not need to run 'make depend'. The dependencies have been hard coded.
Windows project file for VC6
tinyxml: tinyxml library, non-STL
tinyxmlSTL: tinyxml library, STL
tinyXmlTest: test app, non-STL
tinyXmIteStSTL: test app, STL
Makefile
At the top of the makefile you can set: PROFILE, DEBUG, and TINYXML_USE_STL. Details (such that they are) are in the makefile. In the tinyxml directory, type "make clean" then "make". The executable file 'xmltest' will be created.
To Use in an Application:
Add tinyxml.cpp, tinyxml.h, tinyxmlerror.cpp, tinyxmlparser.cpp, tinystr.cpp, and tinystr.h to your project or make file. That's it! It should compile on any reasonably compliant C++ system. You do not need to enable exceptions or RTTI for TinyXML.
How TinyXML works.
An example is probably the best way to go. Take: @verbatim Go to the Toy store! Do bills @endverbatim Its not much of a To Do list, but it will do. To read this file (say "demo.xml") you would create a document, and parse it in: @verbatim TiXmlDocument doc("demo.xml"); doc.LoadFile(); @endverbatim And its ready to go. Now lets look at some lines and how they relate to the DOM. @verbatim @endverbatim The first line is a declaration, and gets turned into the TiXmlDeclaration class. It will be the first child of the document node. This is the only directive/special tag parsed by TinyXML. Generally directive tags are stored in TiXmlUnknown so the commands won't be lost when it is saved back to disk. @verbatim @endverbatim A comment. Will become a TiXmlComment object. @verbatim @endverbatim The "ToDo" tag defines a TiXmlElement object. This one does not have any attributes, but does contain 2 other elements. @verbatim @endverbatim Creates another TiXmlElement which is a child of the "ToDo" element. This element has 1 attribute, with the name "priority" and the value "1". @verbatim Go to the @endverbatim A TiXmlText. This is a leaf node and cannot contain other nodes. It is a child of the "Item" TiXmlElement. @verbatim @endverbatim Another TiXmlElement, this one a child of the "Item" element. Etc. Looking at the entire object tree, you end up with: @verbatim TiXmlDocument "demo. xml" TiXmlDeclaration "version='1.0'" "standalone=no" TiXmlComment "Our to do list data" TiXmlElement "ToDo" TiXmlElement "Item" Attributes: priority = 1 TiXmlText "Go to the "TiXmlElement "bold" TiXmlText "Toy store!" TiXmlElement "Item" Attributes: priority = 2 TiXmlText "Do bills" @ endverbatim
Documentation
The documentation is build with Doxygen, using the 'dox' configuration file.
License
TinyXML is released under the zlib license: This software is provided 'as-is', without any express or implied warranty. In no event will the authors be held liable for any damages arising from the use of this software. Permission is granted to anyone to use this software for any purpose, including commercial applications, and to alter it and redistribute it freely, subject to the following restrictions: 1. The origin of this software must not be misrepresented; you must not claim that you wrote the original software. If you use this software in a product, an acknowledgment in the product documentation would be appreciated but is not required. 2. Altered source versions must be plainly marked as such, and must not be misrepresented as being the original software. 3. This notice may not be removed or altered from any source distribution.
References
The World Wide Web Consortium is the definitive standard body for XML, and their web pages contain huge amounts of information. The definitive spec: http://www.w3.org/TR/2004/REC-xml-20040204/ I also recommend "XML Pocket Reference" by Robert Eckstein and published by OReilly...the book that got the whole thing started.
Contributors, Contacts, and a Brief History
Thanks very much to everyone who sends suggestions, bugs, ideas, and encouragement. It all helps, and makes this project fun. A special thanks to the contributors on the web pages that keep it lively. So many people have sent in bugs and ideas, that rather than list here we try to give credit due in the "changes.txt" file. TinyXML was originally written by Lee Thomason. (Often the "I" still in the documentation.) Lee reviews changes and releases new versions, with the help of Yves Berquin, Andrew Ellerton, and the tinyXML community. We appreciate your suggestions, and would love to know if you use TinyXML. Hopefully you will enjoy it and find it useful. Please post questions, comments, file bugs, or contact us at: www.sourceforge.net/projects/tinyxml Lee Thomason, Yves Berquin, Andrew Ellerton.

Samsung Techwin se soucie de l'environnement à toutes les phases de fabrication du produit et s'engage à tout mettre en œuvre pour offrir à ses clients des produits plus respectueux de l'environnement.
La marque Eco represente l'engagement de Samsung Techwin à creer des produits respectieux de l'environnement et indique que le produit est conforme à la Directive RoHS de l'Union europeenne.

Lesbons gestes demise au rebut de ce produit (Dechets d'equipements electriques et electroniques)
(Applicable dans les pays de l'Union Européenne et dans d'autres pays europeens pratiquant le tri sélectif)
Ce symbole sur le produit, ses accessoires ou sa documentation indique que ni le produit, ni ses accessoires Electroniques usages (chargeur, casque audio, cable USB, etc.) ne peuvent ete jetes avec les autres dechets menagers. La mise au rebut incontrolée des dechets presentant des risques environnementaux et de sante publique, veuillez separer vos produits et accessoires usages des autres dechets. Vous favorisez ainsi le recyclage de la matière qui les compose dans le cadre d'un développement durable.
Les particuliers sont invités à contacter le magasin leur ayant vendu le produit ou à se renseigner auprès des autorités locales pour connaître les procédures et les points de collecte de ces produits en vue de leur recyclage.
Les entreprises et professionnels sont invités à contacter leurs fournisseurs et à consuller les conditions de leur contrat de vente. Ce produit et ses accessoires ne peuvent être jetés avec les autres déchets professionnels et commerciaux.

Elimination des batteries de ce produit
Applicable aux pays de l'Union européenne et aux autres pays européens dans lesquels des systèmes de collecte sélective sont mis en place.)
Le symbole sur la batterie, le manuel ou l'emballage indique que les batteries de ce produit ne doivent pas etre eliminées en fin de vie avec les autres déchets menagers. L'indication eventuelle des symboles chimiques Hg, Cd ou Pb signifie que la batterie contient des quantités de mercure, de cadmium ou de plomb supérieures aux niveaux de reference stipulés dans la directive CE 2006/66. Si les batteries ne sont pas correctement eliminées, ces substances peuvent porter prejudice a la santé humaine ou a I'environnement.
Afin de proteger les rssources naturelles et d'encourager la reutilisation du materiel, veilz a sepaer les batteries des autres types de dechets et a les recycler via.
votte systeme local de collecte gratuite des batteries.
SAMSUNG
RéSEAU DE VENTES
SAMSUNG TECHWIN CO., LTD.
Samsungtechwin R&D Center, 701, Sampyeong-dong, Bundang-gu, Seongnam-si, Gyeonggi-do, Korea, 463-400
TEL:+82-70-7147-8740~60 FAX:+82-31-8018-3745
SAMSUNG TECHWIN AMERICA INC.
100 Challenger Rd. Suite 700 Ridgefield Park, NJ 07660
Toll Free: +1-877-213-1222 Direct: +1-201-325-6920
Fax: +1-201-373-0124
www.samsungcctvusa.com
www.samsungtechwin.com
www.samsungsecurity.com
www.samsungipolis.com
SAMSUNG TECHWIN EUROPE LTD.
Samsung House, 1000 Hillswood Drive, Hillswood Business Park
Chertsey, Surrey, UNITED KINGDOM KT16 OPS
TEL: +44-1932-45-5300 FAX: +44-1932-45-5325