
PDP42RXE - Téléviseur PIONEER - Notice d'utilisation et mode d'emploi gratuit
Retrouvez gratuitement la notice de l'appareil PDP42RXE PIONEER au format PDF.
| Type de produit | Téléviseur plasma |
| Marque | Pioneer |
| Modèle | PDP-42RXE |
| Dimensions (avec pied) | 1235 (L) x 699 (H) x 252 (P) mm |
| Poids (avec pied) | 40 kg |
| Alimentation | 220-240 V AC, 50/60 Hz |
| Consommation électrique | 300 W (veille 2,5 W) |
| Résolution | 1024 x 768 pixels |
| Système couleur | PAL / SECAM |
| Amplificateur audio | 10 W + 10 W (1 kHz, 1%, 4 Ω) |
| Son surround | SRS TruSurround XT |
| Connecteurs | ANT (75Ω), SCART (AV1, AV2, AV3), COMPOSANT (Y/Pb/Pr), HDMI, VIDEO (S-Vidéo, Vidéo, Audio), RS-232C |
| Fonctions principales | PIP/TWIN, écran de veille, orbiter, minuterie, arrêt automatique, verrouillage parental |
| Accessoires fournis | Télécommande, piles AAA (x2), câble d'alimentation, chiffon de nettoyage, crochets anti-bascule (x2), notice |
| Entretien et nettoyage | Chiffon doux sec ; ne pas utiliser de produits chimiques |
| Sécurité | Mise à la terre obligatoire ; ne pas exposer à l'humidité ; espace de ventilation minimal |
| Réparabilité | Pièces détachées spécifiées par le fabricant ; intervention par un technicien qualifié |
FOIRE AUX QUESTIONS - PDP42RXE PIONEER
Questions des utilisateurs sur PDP42RXE PIONEER
0 question sur cet appareil. Repondez a celles que vous connaissez ou posez la votre.
Poser une nouvelle question sur cet appareil
Téléchargez la notice de votre Téléviseur au format PDF gratuitement ! Retrouvez votre notice PDP42RXE - PIONEER et reprennez votre appareil électronique en main. Sur cette page sont publiés tous les documents nécessaires à l'utilisation de votre appareil PDP42RXE de la marque PIONEER.
MODE D'EMPLOI PDP42RXE PIONEER
Pioneer sound.vision.soul
PLASMA DISPLAY SYSTEM SYSTEME D'ÉCRAN PLASMA PLASMA DISPLAY-SYSTEM
PDP-42RXE
Discover the benefits of registering your product online at www.pioneer.co.uk (or www.pioneer-eur.com). Découvrez les nombreux avantages offerts en enregistrant votre produit en ligne maintenant sur www.pioneer.fr (ou www.pioneer-eur.com). Bitte nutzen Sie die Möglichkeit zur Registrierung Ihres Produktes unter www.pioneer.de (oder www.pioneer-eur.com)
Operating Instructions Mode d'emploi Bedienungsanleitung


Replacement and mounting of an AC plug on the power supply cord of this unit should be performed only by qualified service personnel.
IMPORTANT
FOR USE IN THE UNITED KINGDOM.
The wires in this mains lead are coloured in accordance with the following code:
Green and Yellow : Earth
Blue
Neutral
Brown
Live
If the plug provided is unsuitable for your socket outlets, the plug must be cut off and a suitable plug fitted.
The cut-off plug should be disposed of and must not be inserted into any 13 amp socket as this can result in electric shock. The plug or adaptor or the distribution panel should be provided with 5 A fuse. As the colours of the wires in the mains lead of this appliance may not correspond with coloured markings identifying the terminals in your plug, proceed as follows: The wire which is coloured green and yellow must be connected to the terminal in the plug which is marked with the letter E or by the earth symbol ⚙, or coloured green or green and yellow. The wire which is coloured blue must be connected to the terminal which is marked with the letter N or coloured black.
The wire which is coloured brown must be connected to the terminal which is marked with the letter L or coloured red.
NOTE
After replacing or changing a fuse, the fuse cover in the plug must be replaced with a fuse cover which corresponds to the colour of the insert in the base of the plug or the word that is embossed on the base of the plug, and the appliance must not be used without a fuse cover. If lost replacement fuse covers can be obtained from your dealer. Only 5 A fuses approved by B.S.I or A.S.T.A to B.S.1362 should be used.
P3-4-2-1-2-1 En
IMPORTANT

The lightning flash with arrowhead symbol, within an equilateral triangle, is intended to alert the user to the presence of uninsulated 'dangerous voltage' within the product's enclosure that may be of sufficient magnitude to constitute a risk of electric shock to persons.
CAUTION
RISK OF ELECTRIC SHOCK DO NOT OPEN
CAUTION:
TO PREVENT THE RISK OF ELECTRIC SHOCK, DO NOT REMOVE COVER (OR BACK). NO USER-SERVICEABLE PARTS INSIDE. REFER SERVICING TO QUALIFIED SERVICE PERSONNEL.

The exclamation point within an equilateral triangle is intended to alert the user to the presence of important operating and maintenance (servicing) instructions in the literature accompanying the appliance.
WARNING
This equipment is not waterproof. To prevent a fire or shock hazard, do not place any container filed with liquid near this equipment (such as a vase or flower pot) or expose it to dripping, splashing, rain or moisture.
D3-4-2-1-3_A_En
This product complies with the Low Voltage Directive (73/23/EEC, amended by 93/68/EEC), EMC Directives (89/336/EEC, amended by 92/31/EEC and 93/68/EEC).
WARNING
Before plugging in for the first time, read the following section carefully.
The voltage of the available power supply differs according to country or region. Be sure that the power supply voltage of the area where this unit will be used meets the required voltage (e.g., 230 V or 120 V) written on the rear panel.
D3-4-2-1-4_A_En
WARNING
This apparatus must be earthed.
WARNING
This product equipped with a three-wire grounding (earthed) plug - a plug that has a third (grounding) pin. This plug only fits a grounding-type power outlet. If you are unable to insert the plug into an outlet, contact a licensed electrician to replace the outlet with a properly grounded one. Do not defeat the safety purpose of the grounding plug. D3-4-2-1-6_A_En
The following symbols are found on labels attached to the product. They alert the operators and service personnel of this equipment to any potentially dangerous conditions.

WARNING
This symbol refers to a hazard or unsafe practice which can result in personal injury or property damage.

CAUTION
This symbol refers to a hazard or unsafe practice which can result in severe personal injury or death.
WARNING
To prevent a fire hazard, do not place any naked flame sources (such as a lighted candle) on the equipment.
D3-4-2-1-7a_A_En
VENTILATION CAUTION
When installing this unit, make sure to leave space around the unit for ventilation to improve heat radiation. For the minimum space required, see page 14.
WARNING
Slots and openings in the cabinet are provided for ventilation to ensure reliable operation of the product, and to protect it from overheating. To prevent fire hazard, the openings should never be blocked or covered with items (such as newspapers, table-cloths, curtains) or by operating the equipment on thick carpet or a bed.
CAUTION
The power switch does not completely separate the unit from the mains in off position. Therefore install the unit suitable places easy to disconnect the mains plug in case of the accident. The mains plug of unit should be unplugged from the wall socket when left unused for a long period of time.
STANDBY/ON Button
STANDBY:
When set to the STANDBY position, the main power flow is cut and the unit is no longer fully operational. A minute flow of power feeds the unit to maintain operation readiness.
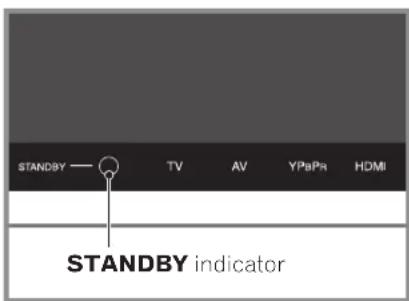
STANDBY Indicator
The indicator is lit red when the unit is in the standby mode.
Contents
Thank you for buying this Pioneer product.
Please read through these operating instructions so you will know how to operate your model properly. After you have finished reading the instructions, put them away in a safe place for future reference.
In some countries or regions, the shape of the power plug and power outlet may sometimes differ from that shown in the explanatory drawings. However the method of connecting and operating the unit is the same.
01 Important User Guidance Information
02 Safety Precautions
03 Supplied Accessories
04 Part Names
Plasma Display 10
Remote control unit 12
05 Preparation
Installing the Plasma Display 14
Preventing the Plasma Display from falling over 14
Preparing the remote control unit 15
Inserting batteries.... 15
Cautions regarding batteries 15
Allowed operation range of the remote control unit 15
Cautions regarding the remote control unit ..... 16
Connecting to an antenna 16
Connecting the power cord 17
06 Basic Operations
Turning the power on and off (Standby) 18
Watching TV channels.... 19
Selecting the analogue channels 19
Changing channels 19
Changing the volume and sound 20
Displaying Information 20
Using I-on the remote control unit 21
Using the multiscreen functions 22
07 Menu Setup
Menu configuration 24
Menu operations 24
08 Tuner Setup
Setting up TV channels 25
Scanning Channels Automatically 25
Scanning Analogue Channels Manually 25
Editing Channel List 26
Display the Channel List 26
Setting the Current Date and Time 27
09 Adjustments and Settings
Sleep Timer....28
Picture adjustments 28
Selecting the Picture Mode 28
Customizing the Picture Settings 29
Using the Noise Reduction Feature 29
Setting the Colour Temperature 30
Selecting the Sound Effect 30
Customizing the Sound Settings 30
Adjusting the Volume Automatically.... 31
Setting the Surround Sound 31
Changing the Screen Size.... 31
Viewing the Input Source 32
Selecting an input signal type 32
Selecting an output source 32
Setting for the language of on-screen display 32
Setting for the TTX (Teletext) Language 33
Screen Saver 33
Setting the Full White mode 33
Power Control 34
Switching the Plasma Display Off Automatically ..... 34
Setting the Plasma Display On Time 34
Setting the Plasma Display Off Time 34
10 Enjoying through External Equipment
Connecting to the SCART terminal 35
Connecting to the External Input 36
Connecting to the Component Input 36
Connecting to the HDMI Input 37
11 Using the Teletext Functions
What is Teletext? 38
Operating the Teletext basics.... 38
Turning on and off Teletext 38
Selecting and operating Teletext pages 38
12 Appendix
Troubleshooting 39
Connecting pin assignments for SCART 40
Specifications 41
In order to obtain maximum enjoyment from this Pioneer PureVision PDP-42RXE Plasma Display System, please first read this information carefully.
With the Pioneer PureVision PDP-42RXE, you can be assured of a high quality Plasma Display System with long-life and high reliability. To achieve images of exceptional quality, this Pioneer Plasma Display System incorporates state-of-the-art design and construction, as well as very precise and highly advanced technology.
Over the course of its lifetime, the luminosity of the Pioneer PDP-42RXE Plasma Display System will diminish very slowly, such as with all phosphor-based screens (for example, a traditional tube-type television). To enjoy beautiful and bright images on your Pioneer Plasma Display System for many years to come, please carefully read and follow the usage guidelines below.
Usage guidelines
All phosphor-based screens (including conventional tube-type televisions) can be affected by displaying static images for a prolonged period. Plasma Display Systems are no exception to this rule. After-image and permanent effects on the screen can be avoided by taking some basic precautions. By following the recommendations listed below, you can ensure longer and satisfactory results from your plasma:
- Whenever possible, avoid frequently displaying the same image or virtually still moving pictures (e.g. closed-captioned images or video game images which have static portions).
- Do not display Teletext for a prolonged period of time.
- Avoid viewing the On Screen Display for extended periods, from a DVD player, VCR, and all other components.
- Do not leave the same picture freeze-framed or paused continuously over a long period of time, when using the still picture mode from a TV, VCR, DVD player or any other component.
- Images which have both very bright areas and very dark areas side by side should not be displayed for a prolonged period of time.
- When playing a game, the "Game" mode setting within "AV Selection" is strongly recommended. However, please limit its use to less than 2 hours at a time.
- A f ter playing a game, or any still image, it is best to view a normal moving picture in the "Wide" or "Full" screen setting for over 3 times longer than the previous still/moving image.
- A f ter using the Plasma Display System, always switch the display to "STANDBY" mode.
Installation guidelines
The Pioneer PureVision PDP-42RXE Plasma Display System incorporates a very thin design. To ensure safety, please take the proper measures to mount or install the Plasma Display, in order to prevent the unit from tipping over in the event of vibration or accidental movement.
This product should be installed by using only parts and accessories designed by PIONEER. Use of accessories other than the PIONEER installation bracket may result in instability, and could cause injury. For custom installation, please consult the dealer where the unit was purchased. To ensure correct installation, experienced and qualified experts must install the unit. PIONEER will not be held responsible for accident or damage caused by the use of parts and accessories manufactured by other companies.
To avoid malfunction and overheating when installing, make sure that the vents on the main unit are not blocked. To ensure proper heat emission:
- Distance the unit slightly from other equipment, walls, etc. For the minimum space required around the unit, see page 14.
- Do not fit the unit inside narrow spaces where ventilation is poor.
- Do not cover with a cloth, etc.
- Clean the vents on the sides and rear of the unit to remove dust build-up by using a vacuum cleaner set to its lowest suction setting.
- Do not place the product on a carpet or blanket.
- Do not leave the product tilted over.
- Do not reverse the product.
Using the unit without proper ventilation may cause the internal temperature to rise, and could result in possible malfunction. When the surrounding or internal temperature exceeds a certain degree, the display will automatically power off in order to cool the internal electronics and prevent a hazardous occurrence.
Malfunction can be caused by many factors: inappropriate installation site, improper assembly/installation/mounting, improper operation of or modifications made to this product. However, PIONEER cannot be held responsible for accidents or malfunction caused by the above.

NOTE
The following are typical effects and characteristics of a phosphor-based matrix display and as such, are not covered by the manufacturer's limited warranties:
- P ermanent residual images upon the phosphors of the panel.
- The existence of a minute number of inactive light cells.
- Panel generated sounds, examples: Fan motor noise, and electrical circuit humming / glass panel buzzing.

CAUTION
PIONEER bears no responsibility for any damages arising from incorrect use of the product by you or other people, malfunctions when in use, other product related problems, and use of the product except in cases where the company must be liable.
Information of pixel defect
Plasma Display systems display images consisting of hundreds of thousands of minute pixels (light emitting cells), and there is a possibility of inactive, flashing or continually illuminated pixels.
Infrared rays
The Plasma Display releases infrared rays because of its characteristics. Depending on how the Plasma Display is in use, the remote controls of nearby equipment may be adversely affected or wireless headphones using infrared rays are interfered by noise. If this is the case, place that equipment at a location where its remote control sensor is not affected.
Radio interference
While this product meets the required specifications, it emits a small amount of noise. If you place such equipment as an AM radio, personal computer, and VCR close to this product, that equipment may be interfered. If this happens, place that equipment far enough from this product.
Plasma Display driving sound
The screen of the Plasma Display is composed of extremely fine pixels and these pixels emit light according to received video signals. This principle may make you hear buzz sound electrical circuit hamming from the Plasma Display.
Also note that the rotation speed of the cooling fan motor increases when the ambient temperature of the product becomes high. You may hear the sound of the fan motor at that time.
Do not attach such items as labels and tape to the product
- This may result in the discoloration or scratch of the cabinet.
When not using the product for a long period of time
- If you do not use the product for a long period of time, the functions of the product may be adversely affected. Switch on and run the product occasionally.
Condensation
- Condensation may take place on the surface or inside of the product when the product is rapidly moved from a cold place to a warm place or just after a heater is switched on in winter morning, for example. When condensation takes place, do not switch on the product and wait until condensation disappears. Using the product with condensation may result in malfunction.
Cleaning the screen
- When cleaning the screen of this product, gently wipe it with a soft dry cloth; the supplied cleaning cloth or other similar cloths (e.g., cotton and flannel). If you use a hard cloth or rub the screen hard, the surface of the screen will be scratched.
- If you clean the surface of the screen with a wet cloth, water droplets on the surface may enter into the product, resulting in malfunction.
Cleaning the cabinet
- When cleaning the cabinet of this product, gently wipe it with a soft dry cloth; the supplied cleaning cloth or other similar cloths (e.g., cotton and flannel). If you use a hard cloth or rub the cabinet hard, the surface of the cabinet will be scratched.
- The cabinet of this product is mostly composed of plastic. Do not use chemicals such as benzine or thinner to clean the cabinet. Using these chemicals may result in quality deterioration or coating removal.
- Do not expose the product to volatile gas or fluid such as pesticide. Do not make the product contact with rubber or vinyl products for a long period of time. The effect of plasticizer in the plastic may result in quality deterioration or coating removal.
- If you clean the surface of the cabinet with a wet cloth, water droplets on the surface may enter into the product, resulting in malfunction.
Handles at the rear of the Plasma Display
- Do not remove the handles from the rear of the Plasma Display.
- When moving the Plasma Display, ask another person for help and use the handles attached to the rear of the Plasma Display. Do not move the Plasma Display by holding only a single handle. Use the handles as shown.
- Do not use the handles to hang the product when installing or carrying the product, for example. Do not use the handles for the purpose of preventing the product from tilting over.
natural_image
Top-down schematic of a room layout with two doors and a central screen (no text or symbols)
CAUTION
Panel sticking and after-image lag
- Displaying the same images such as still images for a long time may cause after-image lagging. This may occur in the following two cases.
1. After-image lagging due to remaining electric load
When image patterns with very high peak luminance are displayed more than 1 minute, after-image lagging may occur due to the remaining electric load. The after-images remaining on the screen will disappear when moving images are displayed. The time for the after-images to disappear depends on the luminance of the still images and the time they had been displayed.
2. After-image (lag image) due to burning
Avoid displaying the same image on the Plasma Display continuously over a long period of time. If the same image is displayed continuously for several hours, or for shorter periods of time over several days, a permanent after-image may remain on the screen due to burning of the fluorescent materials. Such images may become less noticeable if moving images are later displayed, but they will not disappear completely.
- The Auto Power Off function can be set to help prevent damage from screen burning (see page 34).

If you want to dispose this product, do not mix it with general household waste. There is a separate collection system for used electronic products in accordance with legislation that requires proper treatment, recovery and recycling.
Private households in the 25 member states of the EU, in Switzerland and Norway may return their used electronic products free of charge to designated collection facilities or to a retailer (if you purchase a similar new one).
For countries not mentioned above, please contact your local authorities for the correct method of disposal.
By doing so you will ensure that your disposed product undergoes the necessary treatment, recovery and recycling and thus prevent potential negative effects on the environment and human health.
Electricity is used to perform many useful functions, but it can also cause personal injuries and property damage if improperly handled. This product has been engineered and manufactured with the highest priority on safety. However, improper use can result in electric shock and/or fire. In order to prevent potential danger, please observe the following instructions when installing, operating and cleaning the product. To ensure your safety and prolong the service life of your product, please read the following precautions carefully before using the product.
-
Read instructions—All operating instructions must be read and understood before the product is operated.
-
Keep this manual in a safe place—These safety and operating instructions must be kept in a safe place for future reference.
-
Observe warnings—All warnings on the product and in the instructions must be observed closely.
-
Follow instructions—All operating instructions must be followed.
-
Cleaning—Unplug the power cord from the AC outlet before cleaning the product. To clean the product, use the supplied cleaning cloth or other soft clothes (e.g., cotton, flannel). Do not use liquid cleaners or aerosol cleaners.
-
Attachments—Do not use attachments not recommended by the manufacturer. Use of inadequate attachments can result in accidents.
-
Water and moisture—Do not use the product near water, such as bathtub, washbasin, kitchen sink and laundry tub, swimming pool and in a wet basement.
-
Stand—Do not place the product on an unstable cart, stand, tripod or table. Placing the product on an unstable base can cause the product to fall, resulting in serious personal injuries as well as damage to the product. Use only a cart, stand, tripod, bracket or table recommended by the manufacturer or sold with the product. When mounting the product on a wall, be sure to follow the manufacturer's instructions. Use only the mounting hardware recommended by the manufacturer.
-
When relocating the product placed on a cart, it must be moved with utmost care. Sudden stops, excessive force and uneven floor surface can cause the product to fall from the cart.

-
Ventilation—The vents and other openings in the cabinet are designed for ventilation. Do not cover or block these vents and openings since insufficient ventilation can cause overheating and/or shorten the life of the product. Do not place the product on a bed, sofa, rug or other similar surface, since they can block ventilation openings. This product is not designed for built-in installation; do not place the product in an enclosed place such as a bookcase or rack, unless proper ventilation is provided or the manufacturer's instructions are followed.
-
Power source—This product must operate on a power source specified on the specification label. If you are not sure of the type of power supply used in your home, consult your dealer or local power company.
-
Power cord protection—The power cords must be routed properly to prevent people from stepping on them or objects from resting on them. Check the cords at the plugs and product.
-
The Plasma Display used in this product is made of glass. Therefore, it can break when the product is dropped or applied with impact. Be careful not to be injured by broken glass pieces in case the plasma Display breaks.
-
Overloading—Do not overload AC outlets or extension cords. Overloading can cause fire or electric shock.
-
Entering of objects and liquids—Never insert an object into the product through vents or openings. High voltage flows in the product, and inserting an object can cause electric shock and/or short internal parts. For the same reason, do not spill water or liquid on the product.
-
Servicing—Do not attempt to service the product yourself. Removing covers can expose you to high voltage and other dangerous conditions. Request a qualified service person to perform servicing.
-
Repair—If any of the following conditions occurs, unplug the power cord from the AC outlet, and request a qualified service person to perform repairs.
a. When the power cord or plug is damaged.
b. When a liquid was spilled on the product or when objects have fallen into the product.
c. When the product has been exposed to rain or water.
d. When the product does not operate properly as described in the operating instructions.
Do not touch the controls other than those described in the operating instructions. Improper adjustment of controls not described in the instructions can cause damage, which often requires extensive adjustment work by a qualified technician.
e. When the product has been dropped or damaged.
f. When the product displays an abnormal condition. Any noticeable abnormality in the product indicates that the product needs servicing.
-
Replacement parts—In case the product needs replacement parts, make sure that the service person uses replacement parts specified by the manufacturer, or those with the same characteristics and performance as the original parts. Use of unauthorized parts can result in fire, electric shock and/or other danger.
-
Safety checks—Upon completion of service or repair work, request the service technician to perform safety checks to ensure that the product is in proper operating condition.
-
Wall or ceiling mounting—When mounting the product on a wall or ceiling, be sure to install the product according to the method recommended by the manufacturer.
-
Heat sources—Keep the product away from heat sources such as radiators, heaters, stoves and other heat-generating products (including amplifiers).
-
Never expose the screen of the Plasma Display to a strong impact, for example, by hitting it. The screen may be broken, resulting in fire or personal injury.
-
Do not expose the Plasma Display to direct sunlight for a long period of time. The optical characteristics of the front protection panel changes, resulting in discoloration or warp.
-
The Plasma Display weighs about 40 kg (88.2 lbs.) for the PDP-42RXE. Because it has small depth and is unstable, unpack, carry, and install the product with one more person at least and use the handles.
| Power cord (1.83 m) |  |  | |
 (For Europe, except UK and Eire) (For Europe, except UK and Eire) |  (For UK and Eire) (For UK and Eire) | ||
| Only the power cord that is appropriate in your country or region is supplied. | Remote control unit | AAA size battery × 2(Alkaline battery) | |
 |  |  |  |
| Two operating Instructions | Warranty card | Hook × 2 | Cleaning cloth |

NOTE
• Always use the power cord supplied with the Plasma Display.
Plasma Display
Front view

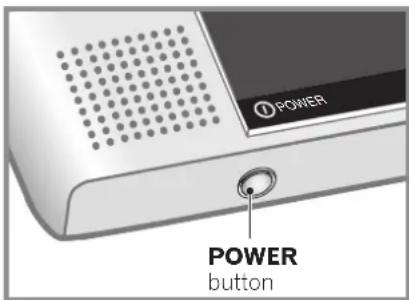
1 POWER button
2 S T ANDBY indicator
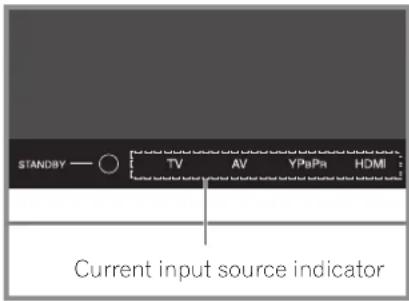
3 Current input source indicators
4 Remote control sensor
5 INPUT button
6 OK button
7 MENU button
8 VOLUME -/+ buttons
9 CHANNEL -/+ buttons
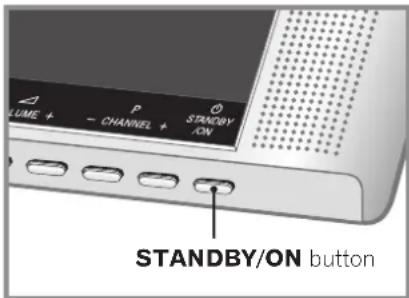
10 STANDBY/ON button
Rear view
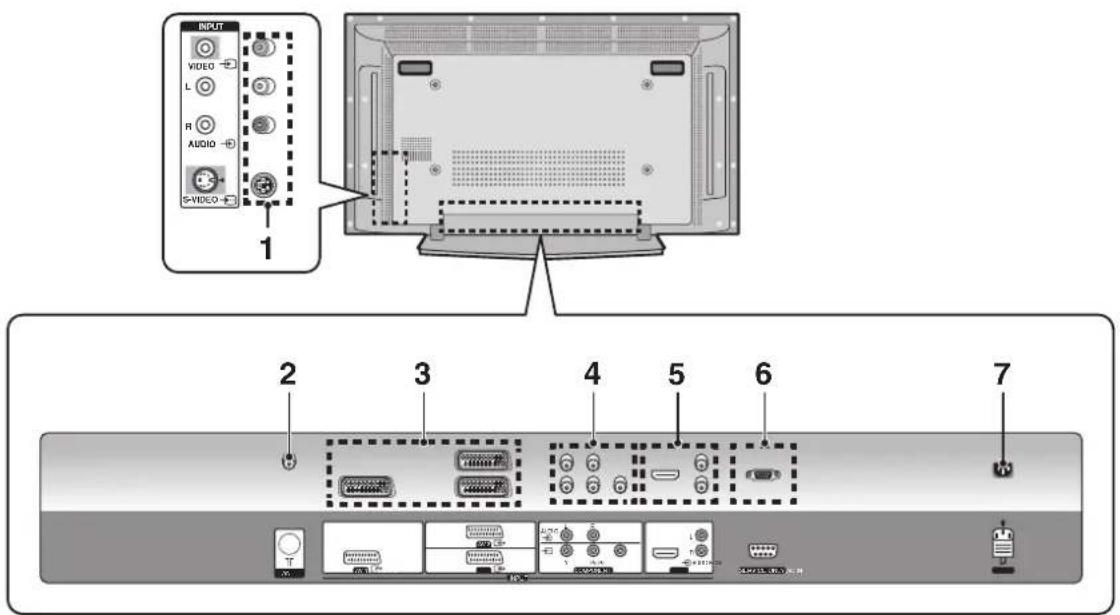
The terminals face downward.
1 VIDEO terminals (AUDIO/VIDEO/S-VIDEO)
2 ANT (Antenna) input terminal
3 AV1/AV2/AV3 terminals (SCART)
4 COMPONENT terminals (AUDIO/Y/P _B /PR)
5 HDMI terminals (AUDIO/HDMI)
6 RS-232C terminal (service only)
7 AC IN terminal
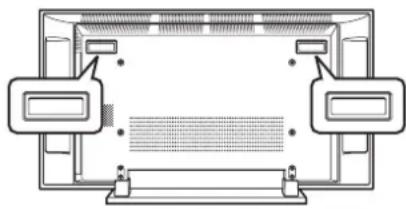
Remote control unit
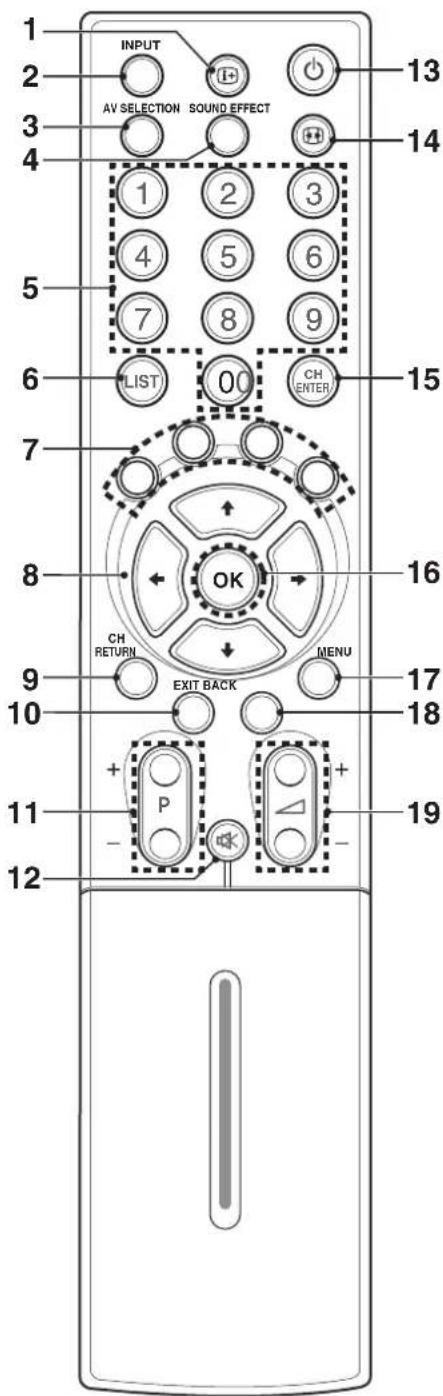
1: Shows the display.
2 INPUT: Displays all available input sources. Press the ↑ or ↓ button to select the required input source.
3 A V SELECTION: Selects the picture mode (Standard, Dynamic, Movie, Game or User).
4 SOUND EFFECT: Selects the sound effect (Flat, Speech, Movie, Music or User).
5 0-9: TV/External input mode: Selects a channel. TELETEXT mode: Selects a page.
6 LIST: Displays the channel list. Press the ↑ or ↓ button to select the required channel.
7 Colour (RED/GREEN/YELLOW/BLUE): TELE-TEXT mode: Selects a page. Menu mode (in the Editing Channel List): edits channel list.
8 ↑/↓/←/→: Controls the cursor in the on-screen menu.
9 CH RETURN: Returns the previous channels.
10 EXIT: Exits from any display.
11 P +/P -: Changes the channel.
12 ☒: Mutes the sound. To turn the sound back on, press the ☒, ☐ or - buttons.
13 ☐: Turns on the power to the Plasma Display or places it into the standby mode.
14 Selects the screen size.
15 CH ENTER: Enters channels.
16 OK: Executes a command.
17 MENU: Displays the on-screen menu.
18 BACK: Returns to the previous menu screen.
19 + / -: Sets the volume.
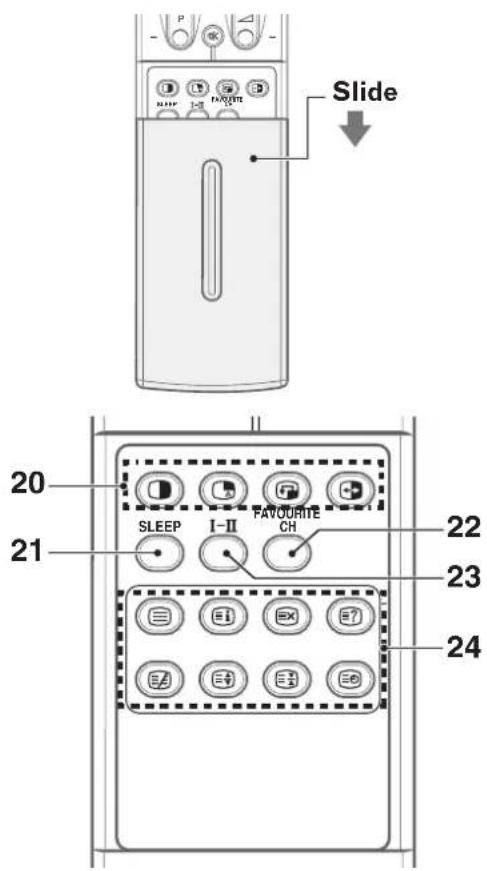
20 SPLIT Function Buttons
☐: Selects the SPLIT mode (Off, PIP, Twin1 or Twin2).
☐: Selects an input source for the sub picture.
: Selects a position for the sub-picture.
☐: Interchanges the main picture and sub-picture.
21 SLEEP: Sets the sleep timer.
22 FAVOURITE CH: Selects the favourite channel.
23 I Selects the sound mode.
24 TELETEXT Function Buttons
TELETEXT (☐): Activates/Deactivates the Teletext service.
INDEX (☐): Displays the Teletext index page.
CANCEL (☒): Displays the normal image while waiting for the new Teletext pages.
REVEAL (☐): Displays the concealed information.
MIX (☑): Displays the Teletext with the normal image.
SIZE (☐): Selects a Teletext size.
HOLD (☒) Stops updating Tetelet pages. Press again to cancel the function.
SUBPAGE (☐): Searches the sub-page using the sub code.

NOTE
- When using the remote control unit, point it at the Plasma Display.
Installing the Plasma Display
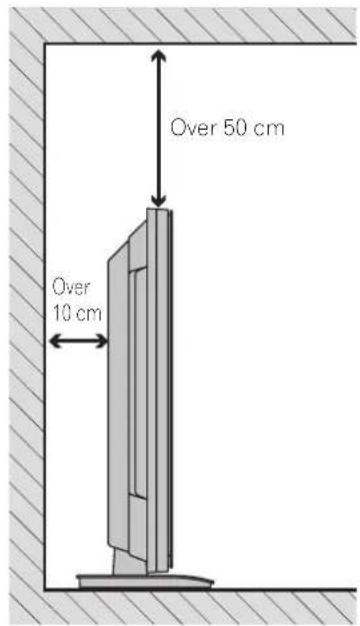
Locating
- Avoid direct sunlight. Maintain adequate ventilation.
- Because the Plasma Display is heavy, be sure to have someone help you when moving it.

CAUTION
- If you place anything on the top of the Plasma Display it will not receive enough ventilation and will not operate properly.

NOTE
- Allow enough space around the upper and back parts when installing to ensure ventilation around the backside.

CAUTION
Operating Environment
Operating environment temperature and humidity: +0°C - +40°C; less than 80 % RH (cooling vents not blocked) Do not install this unit in a poorly ventilated area, or in locations exposed to high humidity or direct sunlight (or storing artificial light)
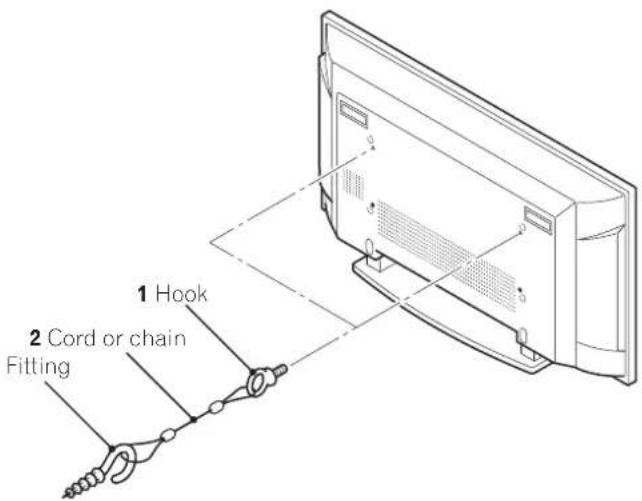
Preventing the Plasma Display from falling over
Be sure to take special care to ensure that the Plasma Display will not fall over.
Using a wall for stabilization
1 Attach the supplied falling prevention bolts (hooks) to the Plasma Display.
2 Use storing cords or chains to stabilize the Plasma Display appropriately and firmly to a wall, pillar, or other sturdy element.
- Perform this work in the same way for both the left and right sides.

NOTE
- Use ropes, chains and fittings that are available on the market.

CAUTION
- A table or an area of the floor with adequate strength should always be used to support the Plasma Display. Failure to do so could result in personal injury and physical damage.
- When installing the Plasma Display, please take the necessary safety measures to prevent it from falling or overturning in case of emergencies, such as earthquakes, or of accidents.
- If you do not take these precautions, the Plasma Display could fall down and cause injury.
- The screws, hooks, chains and other fittings that you use to secure the Plasma Display to prevent it from overturning will vary according to the composition and thickness of the surface to which it will be attached.
- Select the appropriate screws, hooks, chains and other fittings after first inspecting the surface carefully to determine its thickness and composition and after consulting a professional installer if necessary.
Preparing the remote control unit
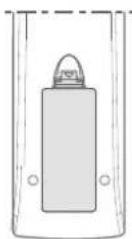
Inserting batteries
1 Open the battery cover.
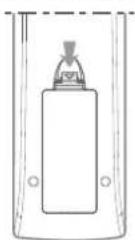
2 Insert the supplied two AAA (1.5 V) size batteries.
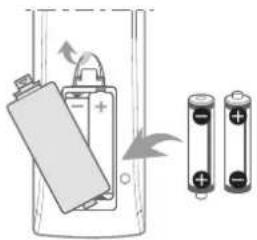
- The battery polarities must correspond with the (+) and (−) indicators in the battery compartment.
3 Close the battery cover.
Cautions regarding batteries
- The remote control unit cannot operate the system if the batteries in the unit are empty. When this happens, replace the batteries with new ones.
- Do not use manganese batteries. When you replace the batteries, use alkaline ones.
- Do not mix batteries of different types. Different types of batteries have different characteristics.
- Do not mix old and new batteries. Mixing old and new batteries can shorten the life of new batteries or cause chemical leakage in old batteries.
- Do not leave dead batteries in the remote control unit; chemical leakage will occur. If you find any chemical leakage, wipe thoroughly with a cloth.
- The batteries supplied with this product may have a shorter life expectancy due to storage conditions.
- If you will not use the remote control unit for an extended period of time, remove the batteries from it.

CAUTION
- WHEN DISPOSING OF USED BATTERIES, PLEASE COMPLY WITH GOVERNMENTAL REGULATIONS OR ENVIRONMENTAL PUBLIC INSTRUCTION'S RULES THAT APPLY IN YOUR COUNTRY/AREA.
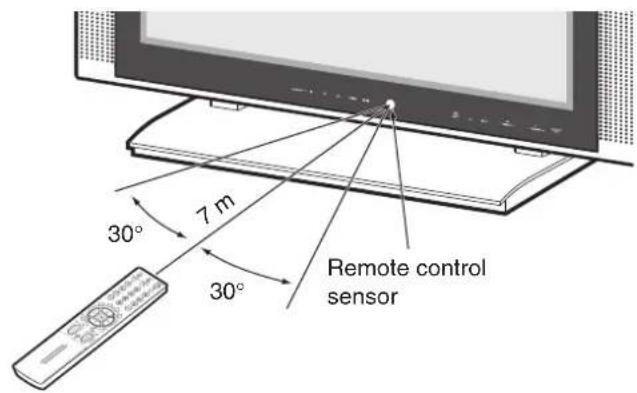
Allowed operation range of the remote control unit
Operate the remote control unit while pointing it toward the remote control sensor located at the bottom centre of the front panel of the Plasma Display. The distance from the remote control sensor must be within 7 m and the angle relative to the sensor must be within 30 degrees in the right or left direction.
Cautions regarding the remote control unit
- Do not expose the remote control unit to shock, liquid, or high humidity.
- Do not place the remote control unit under direct sunlight; the unit may deform.
- The remote control unit may not work properly if the remote sensor window of the Plasma Display is under direct sunlight or strong lighting. In such case, change the angle of the lighting or Plasma Display, or operate the remote control unit closer to the remote sensor window.
- When any obstacle exists between the remote control unit and the remote control sensor, the remote control unit may not function.
- As the batteries become empty, the remote control unit can function within a shorter distance from the remote control sensor. Replace the batteries with new ones if necessary.
- The Plasma Display emits very weak infrared rays from its screen. If you place such equipment operated through infrared remote control as a VCR nearby, that equipment may not receive commands from its remote control unit properly or entirely. If this is the case, place that equipment at a location far enough from the Plasma Display.
- Depending on the installation environment, infrared rays from the Plasma Display may not allow this system to properly receive commands from the remote control unit or may shorten allowable distances between the remote control unit and the remote control sensor. The strength of infrared rays emitted from the screen differs, depending on images displayed on the screen.
Connecting to an antenna
To enjoy a clearer picture, use an outdoor antenna. The following is a brief explanation of the types of connections that are used for a coaxial cable.
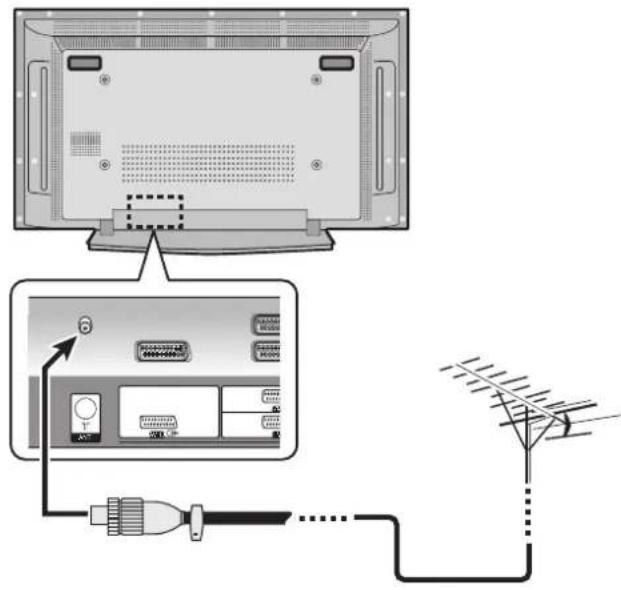
- Connect the 75-ohm coaxial cable (commercially available) to the ANT (Antenna) input terminal.
Antenna cable (commercially available)

natural_image
Simple line drawing of a screwdriver with no text or symbolsIf your outdoor antenna uses a 75-ohm coaxial cable with a standard DIN45325 plug (IEC169-2), plug it into the antenna terminal at the rear of the Plasma Display.
Connecting the power cord
Connect the power cord after all component connections are completed.
Plasma Display (rear view)


CAUTION
- Use only the supplied power cord.
- Be sure to use the specified power supply voltage; neglecting this can result in fire or electric shock.
- F or the Plasma Display, a three-core power cord with a ground terminal is used for efficiency protection. Always connect the power cord to a three-pronged outlet and make sure that the cord is properly grounded.

NOTE
- Disconnect the power cord from the power outlet when the Plasma Display is not going to be used for a long period of time.
Turning the power on and off (Standby)
1 Press the POWER button on the bottom of the Plasma Display to enter the standby mode.
• The STANDBY indicator lights up.
2 Press the ⏻ or any button from 0 to 9 on the remote control or the STANDBY/ ON button on the bottom of the Plasma Display.
- The Plasma Display switches to on. The STANDBY indicator lights off and the current input source indicator lights up.
3 To switch the Plasma Display off, press the button on the remote control or the STANDBY/ON button on the bottom of the Plasma Display for 1 second.
- The Plasma Display enters to standby mode and the STANDBY indicator lights up instead of the current input source indicator.
4 To switch the Plasma Display off completely, press the POWER button on the bottom of the Plasma Display.
- The STANDBY indicator lights off.

NOTE
- If you are not going to use the Plasma Display for a long period of time, press the POWER button on the bottom of the Plasma Display to switch the Plasma Display off completely and disconnect the power cord of the Plasma Display from a wall outlet.
- If the Plasma Display is switched off completely, you cannot turn the Plasma Display on by pressing the button on the remote control.
- If the Plasma Display is switched off completely, it cannot switch the Plasma Display on automatically by the "On Timer" setting.
Watching TV channels
Unless you set up TV channels that you can watch under the current conditions, you cannot tune in those channels. For the procedure, see "Setting up TV channels" on page 25.
Selecting the analogue channels
You can select the input mode analogue channels by pressing the INPUT button.

NOTE
- When you switch the input mode, the last channel you previously selected will be received.
Changing channels
To increase the channel number, press the P + button on the remote control unit. To decrease the channel number, press the P - button.
- CHANNEL +/- on the Plasma Display has the same function as P +/P - on the remote control unit.
When viewing Teletext information:
- Press P + to increase the page number.
- Press P – to decrease the page number.
Using 0 to 9 on the remote control unit
Select channels directly by pressing buttons 0 to 9.
EXAMPLE
• To select channel 5 (1-digit channel), press 5.
• To select channel 25 (2-digit channel), press 2 then 5.
When viewing the Teletext information:
View a page with 3-digit page number from 100 to 899 directly by pressing buttons 0 to 9. See page 38.

NOTE
- Pressing the CH ENTER button after entering the channel number, enables you select channels quickly.
• To return to the previous channel, press the CH RETURN button.
Changing the volume and sound
To increase the volume, press the △ + button on the remote control unit. To decrease the volume, press the △ - button.
- The VOLUME +/- buttons on the Plasma Display operate in the same way as the +1 - buttons on the remote control unit.
- To mute the sound output, press the button. " appears on the screen. To quit muting, press the button again. Pressing the △ +/- button also quits muting.
Plasma Display
(bottom view)
Volume adjustment

Muting

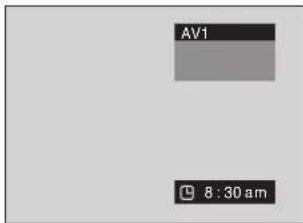
Displaying Information
You can display the channel information and the setting status you selected.
Press the ⓘ+ button.
For analogue
For SPLIT
For external input
Using I-dn the remote control unit
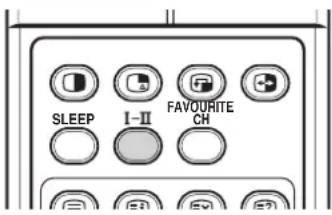
Each time you press I-MTS toggles as shown below.
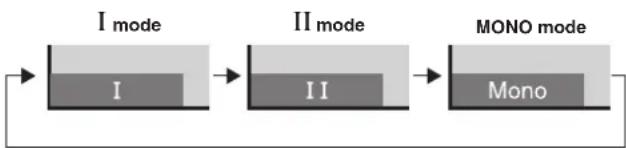
flowchart
graph LR
    A["I mode"] --> B["II mode"]
    B --> C["MONO mode"]
| Setting | ||||
| MONOIII | ||||
| NICAMBroadcasts | Stereo | ATV 1AAA NICAM Stereo | ATV 1AAA NICAM Stereo | ATV 1AAA MONO |
| Bilingual | ATV 1BBB NICAM I | ATV 1BBB NICAM II | ATV 1BBB MONO | |
| Monaural | ATV 1CCC NICAM Mono | ATV 1CCC NICAM Mono | ATV 1CCC MONO | |
| A2Broadcasts | Stereo | ATV 1DDD Stereo | ATV 1DDD Stereo | ATV 1DDD MONO |
| Bilingual | ATV 1EEE DUAL I | ATV 1EEE DUAL II | ATV 1EEE MONO | |
| Monaural | ATV 1FFF MONO | ATV 1FFF MONO | ATV 1FFF MONO | |

NOTE
- In each of the sound multiplex mode selected using the I-II button, the display changes depending on broadcasting signals being received.
- Once the MONO mode is selected, the Plasma Display System sound remains mono even if the system receives a stereo broadcast. You must switch the mode back to I or II mode if you want to hear stereo sound again.
- Selecting a sound multiplex mode while the input source is AV1, AV2, AV3, S-VIDEO, VIDEO, COMPONENT or HDMI, does not change the type of sound. In this case, sound is determined by the video source.
Using the multiscreen functions
You can display a sub-picture within the main picture. In this way you can watch a TV programme or monitor the video input from any connected device while watching TV or another video input.
Use this function following the procedures below to select the Twin (2-screen) or PIP (picture in picture) mode.

NOTE
- In the multiscreen function, the sound of a main input is always output.
PIP (picture in picture)
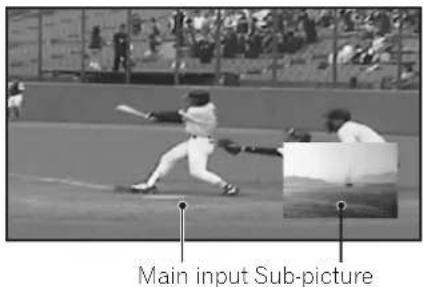
Twin 1 (2-screen)
Twin 2 (2-screen)
natural_image
Black-and-white photo collage showing baseball players in action and a beach with sailboats (no text or symbols)1 Press the MENU button.
2 Press the ↑ or ↓ button to move to Screen, then press the → or OK button.
3 Press the ↑ or ↓ button to move to PIP/TWIN, then press the → or OK button.
4 Select PIP/TWIN Mode and press the or OK button again.
5 Press the ↑ or ↓ button to select the required option as follows, then press the ← or the BACK button.
Off - PIP - TWIN1 - TWIN2
• If you set to Off, the following steps are not available.
6 Press the ↑ or ↓ button to move to PIP/TWIN Input, then press the → or OK button.
7 Press the ↑ or ↓ button to select the required input source as follows, then press ← or the BACK button. ANALOG CH - AV1 - AV2 - AV3 - S-VIDEO - VIDEO - COMPONENT - HDMI

NOTE
- You can select the mode by simply pressing the button on the remote control.
- You can select the source by simply pressing the button on the remote control.
- In Twin or PIP mode, press the button to switch the position of the 2-screen shown.
natural_image
Sequence of grayscale images showing a person in motion, with no visible text or symbols
natural_image
Black-and-white photo sequence showing a baseball pitcher in action and a close-up of the field with a sailboat and distant hills (no text or symbols)If you select "PIP" in step 5
You can select the position of picture in picture display.
Press the ↑ or ↓ button to move to PIP Position, then press the → or OK button.
(Upper left) (Upper right)
- You can select the positions by simply pressing the button on the remote control.
8 Press the ↑ or ↓ button to select the required position for the sub-picture, then press the ← or BACK button.
9 Press the EXIT button.
NOTE
- You can turn off the sub-picture by simply pressing the EXIT button on the remote control.
- Multiscreen function is available with the following combinations:
ANALOG CH - AV1/2/3, S-VIDEO, VIDEO COMPONENT or HDMI
Menu configuration
| Home Menu | Item | Page |
| Tuner Setup | Scan Channels | 25 |
| Scan Analog Channel | 25 | |
| Edit Channel List | 26 |
| Picture AV Selection 28 | |
| Brightness 29 | |
| Contrast 29 | |
| Sharpness 29 | |
| Colour 29 | |
| Tint 29 | |
| Noise Reduction 29 | |
| Colour Temp 30 |
| Sound | Effect | 30 |
| Bass | 30 | |
| Treble | 30 | |
| Balance | 30 | |
| Auto Volume Level | 31 | |
| SRS TruSurround XT | 31 |
| Screen | Screen Size | 31 |
| Main Input | 32 | |
| PIP/TWIN | 22, 23 | |
| AV1 Input 32 | ||
| AV2 Output | 32 | |
| Screen Saver | 33 |
| System | Menu Language | 32 |
| TTX Language | 33 | |
| Clock Setting | 27 |
Menu operations
The following describes the typical procedure for setting up the menus. For the actual procedures, see the appropriate pages that describe individual functions.
1 Press the MENU button.
2 Press ↑ or ↓ to select a menu item, then press the → or OK button.
3 Repeat step 2 until you access the desired submenu item.
- The number of menu layers differs depending on menu items.
4 Press ↑ or ↓ to select an option (or parameter), then press the → or OK button.
- For some menu items, press or instead of or .
5 Press the EXIT button to exit the menu.

NOTE
- You can return to the upper menu levels by pressing the BACK button.
Setting up TV channels
This section describes how to search and set up TV channels that you can watch under the current conditions. Unless you set up TV channels using Scan Channels, you may not be able to tune in any channels.
Scanning Channels Automatically
You can automatically scan channels for the frequency ranges available.
1 Press the MENU button.
2 Press the ↑ or ↓ button to move to Tuner Setup, then press the → or OK button.
3 Select Scan Channels and press the or OK button.
4 Select Country and press the or OK button.
5 Press the ↑ or ↓ button to select the desired country or area, then press the ← or BACK button.
- You can select from 22 countries or areas; Austria, Belgium, Denmark, Finland, France, Germany, Greece, Ireland, Italy, Luxembourg, Netherlands, Norway, Poland, Portugal, Russia, Spain, Sweden, Switzerland, Turkey, UK, East Europe and West Europe.
6 Move to Start by pressing the ↑ or ↓ button and start the search by pressing the → or OK button.

The scan starts. The scanned channels are automatically stored in order. To stop scanning, press the BACK button.
7 When finished scanning, press the EXIT button.

NOTE
- When using the Cable Converter, you may need to manually add Cable Converter output channels.
Scanning Analogue Channels Manually
You can choose if you want to store the channels.
1 Press the MENU button.
2 Press the ↑ or ↓ button to move to Tuner Setup, then press the → or OK button.
3 Press the ↑ or ↓ button to move to Scan Analog Channel, then press the → or OK button.
4 Select Colour System and press the or OK button.
5 Press the ↑ or ↓ button to select the desired colour system (Auto, PAL or SECAM), then press the ← or BACK button.
6 Press the ↑ or ↓ button to select Audio System, then press the → or OK button.
7 Press the ↑ or ↓ button to select the desired audio system (BG, I, DK, L or L'), then press the ← or BACK button.
8 Press the ↑ or ↓ button to select Band, then press the → or OK button.
9 Press the ↑ or ↓ button to select the desired band (VHF/UHF or Cable), then press the ← or BACK button.
10 Move to Channel by pressing the ↑ or ↓ button and select the channel number by pressing the ← or → button. Or move to Search by pressing the ↑ or ↓ button and search the channel by pressing ← or → button.
11 Press the ↑ or ↓ button to move to Programme No and select the programme by pressing ←, → or 0 to 9 buttons.
12 Press the ↑ or ↓ button to move to Store, then press the → or OK button.
- You can receive the selected channel.
13 If you want to edit the channel name, press the ↑ or ↓ button to move to Name Channel, then press the → or OK button.
14 Press the ↑ or ↓ button to select a letter (A\~Z, a\~z), a number (0\~9) or a symbol (space, {I}\~! “#\$%& ’()* +,-/;; <=>?@[.]^ _’). Move to the previous or next letter by pressing the ← or → button.
15 When you have finished entering the channel name, press the OK button.
16 Press the ↑ or ↓ button to move to Store, then press the → or OK button.
17 If you want to adjust the tuning, press the ↑ or ↓ button to move to Fine Tune, then press the ← or → button to obtain good picture and sound quality.
18 Press the ↑ or ↓ button to move to Store, then press the → or OK button.
19 Press the EXIT button.

NOTE
- "Scan Analog Channel" function is available only when the input source is set to "ANALOG CH". (See page 19.)
- You can also select the channel number by pressing the numeric buttons directly.
Editing Channel List
1 Press the MENU button.
2 Press the ↑ or ↓ button to move to Tuner Setup, then press the → or OK button.
3 Press the ↑ or ↓ button to move to Edit Channel List, then press the → or OK button.
The channel list is displayed.
4 Select the required channel by pressing the ↑ or ↓ button, and press the colour (RED/GREEN/YELLOW/BLUE) buttons to delete, copy, move or skip the programme.

Deleting a channel
- Select a channel to delete with the ↑ or ↓ buttons.
- Press the RED button. If you press the RED button again, the selected channel will be deleted.
Copying a channel
- Select a channel to copy with the ↑ or ↓ buttons.
- Press the GREEN button.
Moving a channel
- Select a channel to move with the ↑ or ↓ buttons.
- Press the YELLOW button to select the channel you wish to move. Use the ↑ or ↓ buttons to move the channel to the desired position, and press the YELLOW button again to store.
Skipping a channel
- Select a channel to skip with the ↑ or ↓ buttons.
- P press the BLUE button, the selected channel will change to the blue colour. Thereafter these channels will be skipped when using the P + / P- buttons.
- To return to the normal status, select the skipped channel and press the BLUE button again for 2 or 3 seconds.
5 If you want to find channels quickly and easily when watching TV, select the required channel by pressing the ↑ or ↓ button, then press the FAVOURITE CH button. The selected channel is stored with “FAV” displayed. Press the FAVOURITE CH button repeatedly to jump from one favorite channel to another.
6 Press the EXIT button.

NOTE
- Press the P + / P- buttons to move to the next or previous page.
- The channel list displays the channels of those scanned by the scanning channel functions.
If you want to cancel the Favourite mode, press the FAVOURITE CH button while "FAV" is displayed.
Display the Channel List
You can display a list of all channels.
1 Press the LIST button.
• The channel list is displayed.
2 To tune to a specific channel in the channel list, move the cursor to the required channel by pressing the ↑ or ↓ button, then press the OK button.

NOTE
- Press the P + / P- buttons to move to the next or previous page.
Setting the Current Date and Time
You can set the current date and time so that the current time is displayed when pressing the ⓘ button to display information.
1 Press the MENU button.
2 Press the ↑ or ↓ button to move to System, then press the → or OK button.
3 Press the ↑ or ↓ button to move to Clock Setting, then press the → or OK button again.
4 Select Date and press the or OK button.
5 Press the or button to move to Day, Mon (month) and Year, then set them by pressing the or button.
6 When you have finished, press the OK button.
7 Press the ↑ or ↓ button to move to Time, then press the → or OK button.
8 Press the ← or → button to move to Hour/Min, set them by pressing the ↑ or ↓ button, then press the OK button.
9 Press the EXIT button.
Sleep Timer
You can select a time period of 10 to 240 minutes after which the Plasma Display automatically switches to standby mode.
1 Press the MENU button.
2 Press the ↑ or ↓ button to move to System, then press the → or OK button.
3 Select Clock Setting and press the → or OK button again.
4 Press the ↑ or ↓ button to move to Sleep Timer, then press the → or OK button.
5 Press the ↑ or ↓ button to select the preset time interval as follows, then press the ← or BACK button. Off - 10 min - 20 min - 30 min - 60 min - 120 min - 180 min - 240 min
6 Press the EXIT button.

NOTE
- You can select the preset time by simply pressing the SLEEP button on the remote control.
Picture adjustments
Selecting the Picture Mode
You can select the picture mode that corresponds to your viewing requirements best.
1 Press the MENU button.
2 Press the ↑ or ↓ button to move to Picture, then press the → or OK button.
3 Select AV Selection and press the → or OK button again.
4 Press the ↑ or ↓ button to select the required picture mode as follows, then press the ← or BACK button. Standard - Dynamic - Movie - Game - User
Item Description
Standard For a highly defined image in a normally bright room
Dynamic For a very sharp image with the maximum contrast
Movie For a movie
Game Lowers image brightness for easier viewing.
User Allows the user to customize the settings as desired. You can set the mode for each input source.
5 Press the EXIT button.

NOTE
- You can select the modes by simply pressing the AV SELECTION button on the remote control.
Customizing the Picture Settings
This Plasma Display has several setting options that allow you to control the picture quality.
1 Press the MENU button.
2 Press the ↑ or ↓ button to move to Picture, then press the → or OK button.
3 Press the ↑ or ↓ button to select the required option as follows, then press the → or OK button.
Brightness - Contrast - Sharpness - Colour - Tint

A horizontal bar is displayed. Press the or button until you reach the optimal setting.
To select other options, press the ↑ or ↓ button.
Item ← button → button
Brightness For less brightness For more brightness
| Contrast | For less contrast | For more contrast |
| Sharpness For less sharpness For more sharpness | ||
| Colour For less colour For more colour intensity intensity | ||
| Tint | Skin tones become purplish | Skin tones become greenish |
4 Press the BACK or MENU button to return to the picture menu.
5 Press the EXIT button.

NOTE
- If you make any changes to the options, the picture mode is automatically switched to User.
Using the Noise Reduction Feature
1 Press the MENU button.
2 Press the ↑ or ↓ button to move to Picture, then press the → or OK button.
3 Press the ↑ or ↓ button to move to Noise Reduction, then press the → or OK button.
4 Press the ↑ or ↓ button to select the required option as follows, then press the ← or BACK button.
On - Off
5 Press the EXIT button.

NOTE
- If you make any changes to the options, "AV Selection" is automatically switched to User.
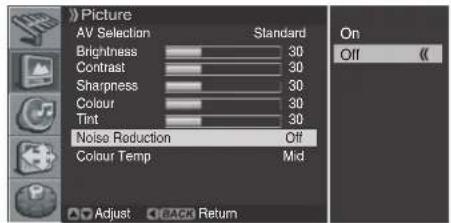
Setting the Colour Temperature
You can change tint of the screen to suit your requirements.
1 Press the MENU button.
2 Press the ↑ or ↓ button to move to Picture, then press the → or OK button.
3 Press the ↑ or ↓ button to move to Colour Temp, then press the → or OK button.
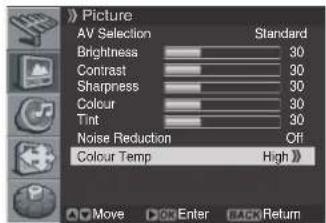
4 Press the ↑ or ↓ button to select the required option as follows, then press the ← or BACK button.
High - Mid - Low
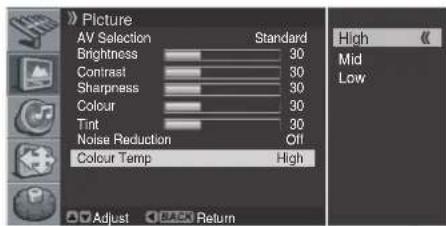
Item Description
High White with bluish tone
Mid Natural tone
Low White with reddish tone
5 Press the EXIT button.
Selecting the Sound Effect
You can select the sound effect to be used.
1 Press the MENU button.
2 Press the ↑ or ↓ button to move to Sound, then press the → or OK button.
3 Select Effect and press the or OK button again.
4 Press the ↑ or ↓ button to select the required sound effect as follows, then press the ← or BACK button. Flat - Speech - Movie - Music - User
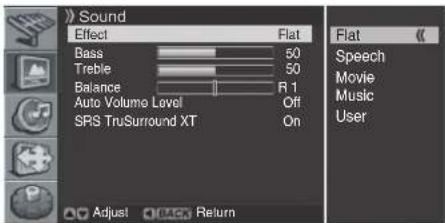
Item Description
Flat Flat and pure sound.
Speech Suitable for the programmes with speech, such as News, etc.
Movie You can enjoy sound effects like in a movie theater.
Music Suitable for the music programme.
User Allows the user to customize the setting as desired.
5 Press the EXIT button.

NOTE
- You can select the modes by simply pressing the SOUND EFFECT button on the remote control.
Customizing the Sound Settings
This Plasma Display has several setting options that allow you to control the sound quality.
1 Press the MENU button.
2 Press the ↑ or ↓ button to move to Sound, then press the → or OK button.
3 Press the ↑ or ↓ button to select the required option (Bass, Treble or Balance).
4 Press the ← or → button until you reach the optimal setting.
Bass: 0\~100
Treble: 0\~100
Balance: L50\~0\~R50
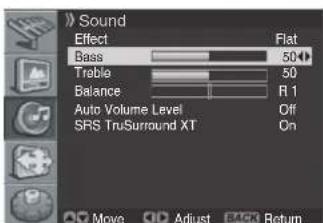
Item ← button → button
Bass For weaker bass For stronger bass
| Treble | For weaker treble | For stronger treble |
| Balance | Decreases audio from Decrease audio from the right speaker the left speaker | |
5 Press the EXIT button.

NOTE
- If you make any adjustment to the "Bass" or "Treble", the "Effect" is automatically switched to "User". Also, if you make any adjustment to the "Balance", the "Effect" is not switched.
Adjusting the Volume Automatically
This feature allows you to automatically adjust the volume of every channel by lowering the sound output when the modulation signal is high or by raising the sound output when the modulation signal is low.
1 Press the MENU button.
2 Press the ↑ or ↓ button to move to Sound, then press the → or OK button.
3 Select Auto Volume Level and press the → or OK button again.
4 Press the ↑ or ↓ button to select the required option (On or Off), then press the ← or BACK button.
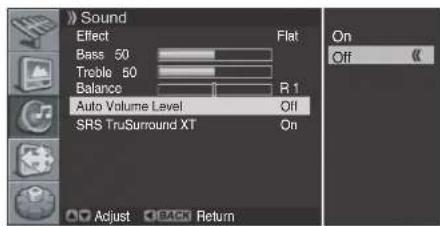
5 Press the EXIT button.
Setting the Surround Sound
You can enjoy the virtual surround sound effect.
1 Press the MENU button.
2 Press the ↑ or ↓ button to move to Sound, then press the → or OK button.
3 Press the ↑ or ↓ button to move to SRS TruSurround XT, then press the → or OK button.
4 Press the ↑ or ↓ button to select the required option (On or Off), then press the ← or BACK button.
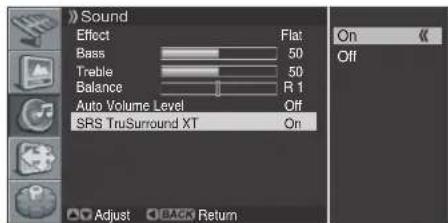
5 Press the EXIT button.
SRS(●)* TruSurround XT is a trademark of SRS Labs, Inc. TruSurround XT technology is incorporated under license from SRS Labs, Inc.
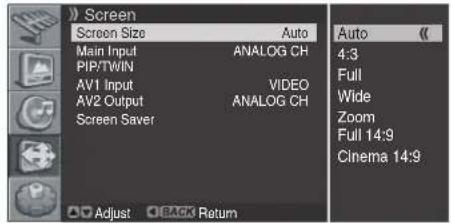
Changing the Screen Size
You can change the aspect ratio of the screen to correspond to your viewing requirements.
1 Press the MENU button.
2 Press the ↑ or ↓ button to move to Screen, then press the → or OK button.
3 Select Screen Size and press the or OK button again.
4 Press the ↑ or ↓ button to select the required aspect ratio as follows, then press the ← or BACK button.
Auto - 4:3 - Full - Wide - Zoom - Full 14:9 - Cinema 14:9

flowchart
graph TD
    A["4:3"] --> B["Auto"]
    A --> C["Full"]
    B --> D["Cinema 14:9"]
    C --> E["Wide"]
    D --> F["Full 14:9"]
    E --> G["Zoom"]
    F --> G
Item Description
| Auto In this mode, the Plasma Display automatically selects an appropriate screen size when the received video signals contain WSS (wide screen signaling) information. | |
| 4:3 | For 4:3 "standard" pictures. A side mask appears on each side. |
| Full | For 16:9 squeeze pictures. |
| Wide | In this mode the picture is progressively stretched toward each side of the screen. |
| Zoom | For 16:9 letterbox pictures. Bars may appear on the top and bottom with some programmes. |
| Full 14:9 | For 14:9 squeeze pictures. A thin side mask appears on each side. |
| Cinema 14:9 | For 14:9 letterbox pictures. A thin side mask appears on each side, and you may also see bars on the top and bottom with some programmes. |
5 Press the EXIT button.

NOTE
- You can select the modes by simply pressing the button on the remote control.
Viewing the Input Source
Once you have connected your audio and video systems, you can view different sources by selecting the corresponding input.
1 Press the MENU button.
2 Press the ↑ or ↓ button to move to Screen, then press the → or OK button.
3 Press the ↑ or ↓ button to move to Main Input, then press the → or OK button.
4 Press the ↑ or ↓ button to select the required input source as follows and press the OK button. ANALOG CH - AV1 - AV2 - AV3 - S-VIDEO - VIDEO - COMPONENT - HDMI
• The Plasma Display switches to the selected source.
5 Press the EXIT button.

NOTE
- You can select the sources by simply pressing the INPUT button on the remote control.
Selecting an input signal type
After connecting the equipment to the AV1 terminal, specify the type of video signals to be received from the connected equipment.
1 Press the MENU button.
2 Press the ↑ or ↓ button to move to Screen, then press the → or OK button.
3 Press the ↑ or ↓ button to move to AV1 Input, then press the → or OK button.
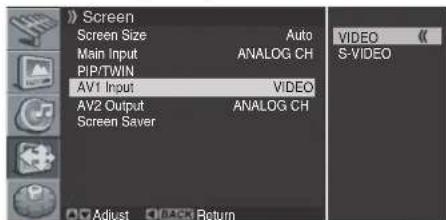
4 Press the ↑ or ↓ button to select the signal type (VIDEO or S-VIDEO), then press the ← or BACK button.
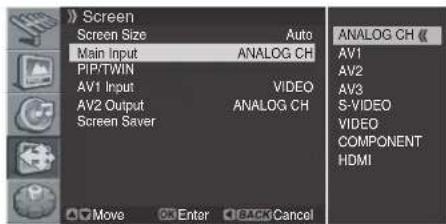
Selecting an output source
After connecting the equipment to the AV2 terminal, specify the source to be output to the connected equipment. 1 Press the MENU button. 2 Press the ↑ or ↓ button to move to Screen, then press the → or OK button. 3 Press the ↑ or ↓ button to move to AV2 Output, then press the → or OK button. 4 Press the ↑ or ↓ button to select the required source as follows and press the ← or BACK button. ANALOG CH -AV1 - AV2 - AV3 - S-VIDEO - VIDEO  5 Press the EXIT button.Setting for the language of on-screen display
You can select a language to be used for on-screen display such as menus from following languages: English, German, Italian, Spanish, French, Dutch, Swedish, Russian and Turkish. 1 Press the MENU button. 2 Press the ↑ or ↓ button to move to System, then press the → or OK button. 3 Press the ↑ or ↓ button to move to Menu Language, then press the → or OK button. 4 Press the ↑ or ↓ button to select the desired language as follows. English - Deutsch - Italiano - Español - Français - Nederlands - Svenska - Русский - Türkçe  5 Press the EXIT button.Setting for the TTX (Teletext) Language
For the language to be used in the Teletext mode, you can select from the following languages: West Europe, East Europe, Greece/Turkey, Russia and Arabia. 1 Press the MENU button. 2 Press the ↑ or ↓ button to move to System, then press the → or OK button. 3 Press the ↑ or ↓ button to move to TTX Language, then press the → or OK button. 4 Press the ↑ or ↓ button to select the desired language as follows. East Europe - West Europe - GRC/TUR - Russia - Arabia  5 Press the EXIT button.Screen Saver
You can prevent temporary or permanent screen burn caused by a still image. 1 Press the MENU button. 2 Press the ↑ or ↓ button to move to Screen, then press the → or OK button.  3 Press the ↑ or ↓ button to move to Screen Saver, then press the → or OK button. 4 Select Orbiter and press the or OK button again.  5 Press the ↑ or ↓ button to select the required option (On or Off), then press the ← or BACK button. 6 Press the ↑ or ↓ button to move to Orbiter Range, then press the → or OK button. 7 Press the ↑ or ↓ button to select the required option as follows, then press the ← or BACK button. Small - Mid - Large  8 Press the EXIT button.Setting the Full White mode
When displaying a still picture for a long time, it is recommended that you set "Full White" to "On" to reduce temporary or permanent screen burn. 1 Follow steps 1 to 3 in "Screen Saver". 2 Press the ↑ or ↓ button to move to Full White, then press the → or OK button. 3 Press the ↑ or ↓ button to select "On". NOTE
\- If you cancel the Full White mode, press the EXIT button. It is also canceled when 20 minutes elapse.Power Control
Power Control provides convenient functions for power saving.Switching the Plasma Display Off Automatically
1 Press the MENU button. 2 Press the ↑ or ↓ button to move to System, then press the → or OK button.  3 Select Clock Setting and press the or OK button again. 4 Press the ↑ or ↓ button to move to Auto Power Off, then press the → or OK button.  5 Press the ↑ or ↓ button to select the required option (On or Off), then press the ← or BACK button. 6 Press the EXIT button. NOTE
\- If "Auto Power Off" is set to "On", the Plasma Display automatically switches to standby mode when there is no input of a signal for 15 minutes.Setting the Plasma Display On Time
You can set the on time so that the Plasma Display will switch on automatically at the time you select. 1 Press the MENU button. 2 Press the ↑ or ↓ button to move to System, then press the → or OK button. 3 Select Clock Setting and press the or OK button again. 4 Move to On Timer by pressing the ↑ or ↓ button, then press the → or OK button.  5 Press the ↑ or ↓ button to select On, then press the ← or BACK button. 6 Press the OK button again. Press the ← or → button to move to the hour and minute, set them by pressing the ↑ or ↓ button, then press the OK button.  7 Press the EXIT button. NOTE
\- Once you set the On Timer, pressing the button switches the timer. On or Off, and pressing the OK button changes the time at step 4.Setting the Plasma Display Off Time
You can set the off time so that the Plasma Display will switch off automatically at the time you select. 1 Press the MENU button. 2 Press the ↑ or ↓ button to move to System, then press the → or OK button. 3 Select Clock Setting and press the or OK button again. 4 Move to Off Timer by pressing the ↑ or ↓ button, then press the → or OK button.  5 Press the ↑ or ↓ button to select On, then press the ← or BACK button. 6 Press the OK button again. Press the or button to move to the hour and minute, set them by pressing the or button, then press the OK button.  7 Press the EXIT button. NOTE
\- Once you set the Off Timer, pressing the button switches the timer. On or Off, and pressing the OK button changes the time at step 4. You can connect many types of external equipment to your Plasma Display, like a DVD player, VCR, game console, and camcorder. CAUTION
\- To protect all equipment, always turn off the Plasma Display before connecting to a DVD player, VCR, STB, or other external equipment. NOTE
\- Refer to the relevant instruction manual (STB, VCR, DVD player, etc.) carefully before making connections.Connecting to the SCART terminal
flowchart
graph TD
    A["Computer"] --> B["SCART cable (commercially available)"]
    B --> C["VCR"]
    B --> D["DVD Player"]
    B --> E["Set Top Box or other audio-visual equipment"]
NOTE
- Refer to the operation manual of the required equipment for the signal type. - When you connect the equipment to the AV1 terminal, set "AV1 Input". When you connect the equipment to the AV2 terminal, set "AV2 Output". For details, refer to page 32. - A V3 terminal is for the monitor output. However, the signal is not output if you select "COMPONENT" or "HDMI". Connecting to the External Input flowchart
graph TD
    A["Input"] --> B["OUTPUT"]
    B --> C["Audio Cable (commercially available)"]
    B --> D["Video Cable (commercially available)"]
    B --> E["S-Video Cable (commercially available)"]
    C --> F["VCR"]
    D --> G["DVD Player"]
    E --> H["Set Top Box or other audio-visual equipment"]
NOTE
\- For equipment with an S-VIDEO jack, connect the S-Video cable to the S-VIDEO input jack on the Plasma Display and the S-Video output jack on the required equipment. 2 Connect the audio cable to the AUDIO-L/R input jack on the Plasma Display and to the audio output jack on the required equipment. 3 Turn the Plasma Display on, then press the INPUT button to select VIDEO. NOTE
\- If you connect the Plasma Display and the required equipment using an S-Video cable, select S-VIDEO. Connecting to the Component Input flowchart
graph TD
    A["Audio Cable (commercially available)"] --> B["Component Video Cable (commercially available)"]
    B --> C["VCR"]
    B --> D["DVD Player"]
    B --> E["Set Top Box or other audio-visual equipment"]
NOTE
- Depending on the manufacturer, the Y / P_B / P_R jacks may be identified as Y / P_B / P_R, Y / B - Y / R - Y , or Y / C_B / C_R . • Refer to your DVD player instruction manual for the signal type. 2 Connect the audio cable to the AUDIO-L/R (COMPONENT) input jacks on the Plasma Display and to the audio output jacks on the required equipment. 3 Turn the Plasma Display on, then press the INPUT button to select COMPONENT. Connecting to the HDMI Input flowchart
graph LR
    A["Device"] --> B["Internal Display"]
    B --> C["HDMI Cable (commercially available)"]
    B --> D["Audio Cable (commercially available)"]
    C --> E["HDMI Cable (commercially available)"]
    D --> F["Audio Cable (commercially available)"]
    E --> G["HDMI Cable (commercially available)"]
    F --> H["Audio Cable (commercially available)"]
    G --> I["HDMI Cable (commercially available)"]
    H --> J["HDMI Cable (commercially available)"]
    I --> K["Audio Cable (commercially available)"]
    J --> L["Audio Cable (commercially available)"]
    K --> M["HDMI Cable (commercially available)"]
    L --> N["Audio Cable (commercially available)"]
    M --> O["HDMI Cable (commercially available)"]
    N --> P["HDMI Cable (commercially available)"]
    O --> Q["HDMI Cable (commercially available)"]
    P --> R["HDMI Cable (commercially available)"]
    Q --> S["HDMI Cable (commercially available)"]
    R --> T["HDMI Cable (commercially available)"]
    S --> U["HDMI Cable (commercially available)"]
    T --> V["HDMI Cable (commercially available)"]
    U --> W["HDMI Cable (commercially available)"]
    V --> X["HDMI Cable (commercially available)"]
    W --> Y["HDMI Cable (commercially available)"]
    X --> Z["HDMI Cable (commercially available)"]
    Y --> AA["HDMI Cable (commercially available)"]
    Z --> AB["HDMI Cable (commercially available)"]
| 1920*1080i@50Hz |
| 720*576p@50Hz |
| 1280*720p@50Hz |
| 1920*1080i@59.94/60Hz |
| 720*480p@59.94/60Hz |
| 1280*720p@59.94/60Hz |
NOTE
• PC signals are not supported. - If no image appears, specify another digital video signal type. - F or the digital video signal types to be specified, refer to the operation manual supplied with the connected equipment.What is Teletext?
Teletext broadcasts pages of information and entertainment to the specially equipped television sets. Your Plasma Display System receives Teletext signals broadcasted by TV networks, and decodes them into graphical format for viewing. News, weather and sports information, stock exchange prices and programme previews are available among many services. Operating the Teletext basics
Turning on and off Teletext
1 Select a TV channel or external input source providing a Teletext programme. 2 Press to display the Teletext (full screen). 3 Press again to display the normal screen.Selecting and operating Teletext pages
Use the following remote control buttons to select and operate Teletext pages.Colour (RED/GREEN/YELLOW/BLUE):
You can select a group or block of pages displayed in the coloured brackets at the bottom of the screen by pressing the corresponding colour (RED/GREEN/YELLOW/BLUE) on the remote control unit.0 to 9:
Directly select any page from 100 to 899 by using 0 to 9.P+/P-:
Selects the next or previous page.INDEX (≡i):
Displays the Teletext index page.CANCEL (EX):
Displays the normal image while waiting for the new Teletext page.REVEAL (≡?):
To display hidden information such as an answer to a quiz, press ☑? \- Press again to hide the information.MIX (日)
Displays the Teletext with the normal image.SIZE(≡):
Selects a Teletext size.HOLD(☐):
To stop updating Teletext pages, press 📄. \- Press again to release the hold mode.SUBPAGE (Eo):
Search the sub-page using the sub-code. NOTE
\- When the Teletext is in the display, no other buttons than △ +/△ - , and are available. Troubleshooting| Problem | Possible Solution |
| No power. | Make sure the Plasma Display is connected correctly. (See page 17.)Is the power cord disconnected? (See page 17.)H as the power been turned on? (See page 18.)Check if you have pressedon the remote control unit. (See page 18.)If the STANDBY indicator on the Plasma Display lights up red, press ). |
| No picture or sound | Check if the power cord is connected correctly.Check if you have pressed theon the remote control or the STANDBY/ON button on the bottom of the Plasma Display.Select an input source responding to that particular source.Check the picture contrast and brightness settings.Check the volume. |
| Normal picture but no sound | Check the volume.Check whether the button on the remote control has been pressed. |
| No picture or black and white picture | Adjust the colour settings.Check if the correct broadcast system is selected. |
| Sound and picture interference | Try to identify the electrical appliance that affects the Plasma Display, then move it further away.Plug the power cord of the Plasma Display into a different wall outlet. |
| Blurred or snowy picture, distorted sound | Check the direction, location and connections of your aerial. Such interference often occurs due to the use of an indoor aerial. |
| Remote control malfunctions | Press the INPUT button to select the Plasma Display or an external device.Replace the batteries in the remote control.Install batteries ensuring that the and ends of the batteries are inserted correctly.Check the angle and distance of the remote control to the Plasma Display. Make sure there are no obstacles between the remote control and the Plasma Display.Check if the correct function button has been pressed.Change the location of light sources or the direction of the Plasma Display to avoid glare.Is the Teletext function activated? (See page 38) |
Connecting pin assignments for SCART
Various audio and video devices may be connected via the SCART terminals. SCART (AV 1)
1. Audio right output 2. Audio right input 3. Audio left output 4. Common earth for audio 5. Earth 6. Audio left input 7. Not used 8. Audio-video control 9. Earth 10. Not used 11. Not used 12. Not used 13. Earth 14. Not used 15. Chroma S-Video input 16. Not used 17. Earth for video 18. Earth 19. Video output 20. Video input/S-Video input 21. Plug shieldSCART (AV 2)
1. Audio right output 2. Audio right input 3. Audio left output 4. Common earth for audio 5. Earth for blue 6. Audio left input 7. Blue input 8. Audio-video control 9. Earth for green 10. Not used 11. Green input 12. Not used 13. Earth for red 14. Not used 15. Red input 16. Red/Green/Blue control 17. Earth for video 18. Earth for Red/Green/Blue control 19. Video output 20. Video input 21. Plug shieldSCART (AV 3)
1. Audio right output 2. Audio right input 3. Audio left output 4. Common earth for audio 5. Earth for blue 6. Audio left input 7. Blue input 8. Audio-video control 9. Earth for green 10. Not used 11. Green input 12. Not used 13. Earth for red 14. Not used 15. Red input 16. Red/Green/Blue control 17. Earth for video 18. Earth for Red/Green/Blue control 19. Video output 20. Video input 21. Plug shield Specifications| Item 42" Plasma Display, Model: PDP-42RXE | |||
| Number of Pixels 1024 × 768 pixels | |||
| Audio Amplifier 10 W + 10 W (1 kHz, 1 %, 4 Ω) | |||
| Surround System SRS TruSurround XT | |||
| Power Requirement 220-240 V AC, 50/60 Hz, 300 W(2.5 W Standby) | |||
| Dimensions (with stand) | 1235 (W) × 699 (H) × 252 (D) mm | ||
| Weight (with stand) 40 kg (88.2 lbs.) | |||
| Colour System PAL/SECAM | |||
| TV Function Receiving System B/G, D/K, I, L/L' | |||
| Tuner | VHF/UHF | E2-E69ch, F2-F10ch, I21-I69ch, IR A-IR Jch | |
| CATV | Hyper-band, S1-S41ch | ||
| STEREO | NICAM/A2 | ||
| Terminals | Rear | ANTENNA | 75 Ω DIN Type for VHF/UHF/CATV in |
| AV1 | SCART (AV in, S-VIDEO in, TV out) | ||
| AV2 | SCART (AV in/out, RGB in)* | ||
| AV3 | SCART (AV in/out, RGB in) | ||
| * AV2 out: User selectable | |||
| COMPONENT | COMPONENT VIDEO in, AUDIO in | ||
| HDMI | HDMI in, AUDIO in | ||
| RS-232C | Service only | ||
| Side | VIDEO | S-VIDEO in, VIDEO in, AUDIO in | |
| OSD English/German/Italian/Spanish/French/Dutch/Swedish/Russian/Turkish | |||
12 Appendix
Trademarks
• SRS Trademark of SRS Labs, Inc. TruSurround XT technology is incorporated under license from SRS Labs, Inc. • HDMI, the HDMI logo and High-Definition Multimedia Interface are trademarks or registered trademarks of HDMI Licensing LLC. - The names of the companies or institutions are trademarks or registered trademarks of the respective companies or institutions.IMPORTANT
 Ce symbole de l'éclair, placé dans un triangle équilatéral, a pour but d'attirer l'attention de l'utilisateur sur la présence, à l'intérieur du coffret de l'appareil, de "tensions dangereuses" non isolées d'une grandeur suffisante pour représenter un risque d'électrocution pour les êtres humains.ATTENTION
DANGER D'ELECTROCUTION NES PAS OUVRIR
ATTENTION:
POUR EVITER TOUT RISQUE D'ELECTROCUTION, NE PAS ENLEVER LE COUVERCLE (NI LE PANNEAU ARRIERE). AUCUNE PIECE REPARABLE PAR L'UTILISATEUR NE SETROUVEAL'INTERIEUR. CONFIER TOUT ENTRETIEN A UN PERSONNEL QUALIFIE UNIQUEMENT.  Ce point d'exclamation, placé dans un triangle équilatéral, a pour but d'attirer l'attention de l'utilisateur sur la présence, dans les documents qui accompagnent l'appareil, d'explications importantes du point de vue de l'exploitation ou de l'entretien.AVERTISSEMENT
Cet appareil n'est pas étanche. Pour éviter les risques d'incendie et de décharge électrique, ne placez près de lui un récipient rempli d'eau, tel qu'un vase ou un pot de fleurs, et ne l'exposez pas à des gouttes d'eau, des éclaboussures, de la pluie ou de l'humidité. D3-4-2-1-3 A Fr Ce produit est conforme à la directive relative aux appareils basse tension (73/23/CEE, amendements 93/68/CEE), à la directive CE relative à la compatibilité électromagnétique (89/336/CEE, amendements 92/31/CEE et 93/68/CEE).AVERTISSEMENT
Avant de brancher l'appareil pour la première, lisez attentivement la section suivante. La tension de l'alimentation électrique disponible varie selon le pays ou la région. Assurez-vous que la tension du secteur de la région où l'appareil sera utilisé correspond à la tension requise (par ex. 230 V ou 120 V), indiquée sur le panneau arrière. D3-4-2-1-4 A FrAVERTISSEMENT
Cet appareil doit être mis à la terre.AVERTISSEMENT
Cet appareil est muni d'une fiche de mise à la terre (masse) à trois fils. Comme la fiche présente une troisième broche (de terre), elle ne peut se brancher que sur une prise de courant, prévue pour une mise à la terre. Si vous n'arrivez pas à insérer la fiche dans la prise de courant, contactez un électricien qualifié pour faire remplacer la prise par une qui soit mise à la terre. N'annulez pas la fonction de sécurité que procure cette fiche de mise à la terre. D3-4-2-1-6\_A\_Fr Les symboles suivants figurent sur les étiquettes apposées sur l'appareil. Ils appellent l'attention des utilisateurs et du personnel d'entretien sur des dangers potentiels. AVERTISSEMENT
Ce symbole signale une pratique dangereuse ou contraire à la sécurité qui peut entraîner une blessure ou des dégâts matériels. DANGER
Ce symbole signale une pratique dangereuse ou contraire à la sécurité qui peut entraîner une blessure grave, voire la mort.AVERTISSEMENT
Pour éviter les risques d'incendie, ne placez aucune flamme nue (telle qu'une bougie allumée) sur l'appareil. D3-4-2-1-7a\_A\_FrPRÉCAUTION DE VENTILATION
Lors de l'installation de l'appareil, veillez à laisser un espace suffisant autour de ses parois de manière à améliorer la dissipation de chaleur. L'espace minimum requis est indiqué à la page 14.AVERTISSEMENT
Les fentes et ouvertures du coffret sont prévues pour la ventilation, pour assurer un fonctionnement stable de l'appareil et pour éviter sa surchauffe. Pour éviter les risques d'incendie, ne bouchez jamais les ouvertures et ne les recouvrez pas d'objets, tels que journaux, nappes ou rideaux, et n'utilisez pas l'appareil posé sur un tapis épais ou un lit.DANGER
L'interrupteur POWER de cet appareil ne coupe pas complètement celui-ci de sa prise secteur. Comme le cordon d'alimentation fait office de dispositif de déconnexion du secteur, il devra être débranché au niveau de la prise secteur pour que l'appareil soit complètement hors tension. Par conséquent, veillez à installer l'appareil de telle manière que son cordon d'alimentation puisse être facilement débranché de la prise secteur en cas d'accident. Pour éviter tout risque d'incendie, le cordon d'alimentation sera débranché au niveau de la prise secteur si vous prévoyez une période prolongée de non utilisation (par exemple avant un départ en vacances). D3-4-2-2-2a\_A\_FrTouche STANDBY/ON
STANDBY:
Quand l'appareil est en mode veille, l'alimentation principale est coupée et l'appareil ne fonctionne plus. Une quantité minuscule de courant alimente cependant l'appareil pour qu'il reste prêt à fonctionner.Témoin STANDBY
Le témoin est allumé en rouge quand l'appareil est en mode veille et en bleu quand l'alimentation principale est en service.Nous vous remercions d'avoir acquis cet appareil Pioneer.
Veuillez lire attentivement ce mode d'emploi pour être en mesure d'utiliser l'appareil convenablement. La lecture de ce mode d'emploi terminée, conservez-le dans un endroit sûr pour référence. Dans certains pays ou régions, la forme de la prise secteur et celle de la fiche du cordon d'alimentation peuvent différer des illustrations de ce document. Toutefois, la manière de brancher le cordon et d'utiliser l'appareil est la même.01 Informations importantes pour l'utilisateur
02 Précautions de sécurité
03 Accessoires fournis
04 Nomenclature des pièces
Écran à plasma 10 Boîtier de télécommande 1205 Préparation
Installation de l'écran à plasma 14 Prévention d'une chute de l'écran à plasma.... 14 Préparation du boîtier de télécommande .... 15 Mise en place des piles 15 Mises en garde à propos des piles .... 15 Portée de fonctionnement permise du boîtier de télécommande.... 15 Mises en garde à propos du boîtier de télécommande.... 16 Raccordement d'une antenne 16 Raccordement du cordon d'alimentation .... 1706 Fonctionnement de base
Mise en/hors service (en veille) 18 Pour regarder des canaux de télévision 19 Sélection des canaux analogiques .... 19 Modification des canaux 19 Modification du volume et du son 20 Affichage des informations.... 20 Utilisation I de sur le boîtier de télécommande ..... 21 Utilisation des fonctions de partage d'écran ...... 2207 Configuration du menu
Configuration du menu 24 Utilisation des menus.... 2408 Configuration du syntoniseur
Réglage des canaux de télévision 25 Balayage automatique des canaux 25 Balayage manuel des canaux analogiques.... 25 Modification de la liste des canaux 26 Affichage de la liste des canaux 26 Réglage de la date et de l'heure actuelles ...... 2709 Réglages et paramètres
Minuterie de mise en veille 28 Réglages de l'image 28 Sélection du mode d'image 28 Personnalisation des réglages de l'image 29 Utilisation de la fonction de réduction du bruit ..... 29 Réglage de la température de couleur ...... 30 Sélection de l'effet de son 30 Personnalisation des réglages du son 30 Réglage automatique du volume 31 Réglage du son surround 31 Modification de la taille de l'écran 31 Affichage de la source d'entrée.... 32 Sélection d'un type de signal d'entrée.... 32 Sélection d'une source de sortie 32 Réglage de la langue d'affichage à l'écran 32 Réglage de la langue TTX (Télétexte) 33 Économiseur d'écran 33 Réglage du mode Tout blanc 33 Gestion de l'alimentation 34 Mise hors tension automatique de l'écran à plasma.... 34 Réglage de l'heure de mise sous tension de l'écran à plasma .... 34 Réglage de l'heure de mise hors tension de l'écran à plasma .... 3410 Utilisation avec un équipement externe
Raccordement à la prise SCART 35 Raccordement à l'entrée externe 36 Raccordement à l'entrée composante .... 36 Raccordement à l'entrée HDMI.... 3711 Utilisation des fonctions Télétexte
Qu'est-ce que le Télétexte ?...... 38 Fonctionnement de base du Télétexte 38 Marche et arrêt du Télétexte 38 Sélection et affichage des pages Télétexte ...... 3812 Annexe
Dépannage 39 Affectation des broches de connexion pour SCART ..... 40 Caractéristiques techniques 41 Veuillez lire attentivement ces informations de manière à profiter au mieux du système d'écran à plasma Pioneer PureVision PDP-42RXE. Avec le système d'écran à plasma Pioneer PureVision PDP-42RXE, vous disposez d'un ensemble de qualité qui assurera un service fiable et de longue durée. Afin de vous offrir des images de qualité exceptionnelle, le système d'écran à plasma Pioneer bénéficie d'une conception et d'une fabrication de très haut niveau, et incorpore les dernières avancées technologiques. Avec le temps, la luminosité de l'écran à plasma Pioneer PDP-42RXE diminuera légèrement, tout comme dans le cas des écrans à tube cathode luminescents (écran des téléviseurs habituels). Pour profiter longtemps des belles images lumineuses que produit le système d'écran à plasma Pioneer, lisez ce qui suit et respectez les consignes qui vous sont données:Instructions d'usage
Tous les écrans cathodoluminescents (y compris ceux des téléviseurs habituels) sont détériorés par l'affichage prolongé d'images fixes. Les écrans plasma ne font pas exception à cette règle. Les images rémanentes et les effets permanents peuvent être évités en prenant quelques précautions simples. En suivant les consignes qui vous sont données ci-dessous, vous vous assurez d'obtenir des résultats satisfaisants de l'écran à plasma: - Dans toute la mesure du possible, évitez l'affichage de la même image, ou d'une image pratiquement fixe (par exemple, les images sous-titrées et les images statiques des jeux vidéo). - N'affichez pas de télétexte pendant une longue période. - Évitez d'afficher pendant une période prolongée l'affichage sur écran issu d'un lecteur de DVD, d'un magnétoscope et tout autre composant. - Ne laissez pas la même image fixe affichée ou l'appareil en pause continuelle pendant une période prolongée, lorsque vous utilisez le mode image fixe avec un téléviseur, un magnétoscope, un lecteur de DVD ou tout autre composant. - Les images comportant côte à côte des zones très lumineuses et des zones très sombres ne doivent pas, non plus, demeurer sur l'écran pendant de longues périodes. - Lorsque vous jouez, nous vous conseillons vivement d'employer le mode "jeu" de "Sélection AV". Veillez également à ce que les sessions de jeu ne dépassent pas 2 heures. - Après un jeu, ou bien après l'affichage d'une image fixe, il est souhaitable de passer des images animées avec les réglages "Large" ou "Plein" pendant une période supérieure à 3 fois la durée de l'image fixe précédemment affichée. - Lorsque vous n'utilisez plus le système d'écran à plasma, n'oubliez pas de repasser en veille ("STANDBY").Instructions d'installation
Le système d'écran à plasma Pioneer PureVision PDP-42RXE, présente une très faible épaisseur. Pour des raisons de sécurité et pour éviter que l'appareil ne puisse se renverser en cas de vibration ou contact accidentel, veillez à fixer ou à installer le système d'écran à plasma de la manière convenable. Cet appareil doit être installé en faisant usage des pièces et des accessoires conçus par PIONEER, à l'exclusion de tous autres. L'emploi d'accessoires autres que le support et l'applique PIONEER peut se traduire par une instabilité de l'appareil qui peut être la cause d'une blessure. Dans le cas où vous désirez une installation spéciale, consultez le magasin où vous avez acheté l'appareil. Pour vous garantir une installation correcte et sûre, il est préférable de vous adresser à un technicien expérimenté et qualifié. PIONEER ne saurait être tenue responsable ni des accidents ni des dommages provoqués par l'utilisation de pièces ou d'accessoires provenant d'autres fabricants. Pour éviter toute anomalie et toute surchauffe, veillez à ce que les ouïes de l'appareil ne soient pas obstruées de manière que la chaleur puisse se dissiper: - Éloignez légèrement l'appareil des autres équipements, des murs, etc. L'espace minimum requis est indiqué à la page 14. - N'introduisez pas l'appareil dans un espace exigu où la ventilation est médiocre. - Ne recouvrez pas l'appareil d'un linge, etc. - Au moyen d'un aspirateur réglé à la puissance minimale, nettoyez périodiquement les ouïes latérales et arrière pour supprimer les poussières qui pourraient s'y accumuler. - Ne posez l'appareil ni sur un tapis ni sur une couverture. - Ne conservez pas l'appareil incliné. - Ne renversez pas l'appareil. L'utilisation de l'appareil sans ventilation convenable peut provoquer une élévation de la température intérieure qui peut se traduire par une anomalie de fonctionnement. Lorsque la température ambiante ou interne excède une certaine valeur, l'écran se met de lui-même hors tension pour que les circuits électroniques puissent se refroidir et que tous les risques soient ainsi écartés. Une anomalie de fonctionnement peut survenir en raison du choix de l'emplacement d'installation, d'un montage non conforme, d'une installation défectueuse, de l'utilisation même de l'appareil, de modifications apportées à ses caractéristiques. Toutefois, PIONEER ne saurait être tenue responsable de ces anomalies. REMARQUE
Les effets et caractéristiques indiqués ci-après sont habituellement rencontrés sur les écrans matriciels à luminophores et en tant que tels ne sont pas couverts par les garanties limitées du fabricant: - Images rémanentes sur les luminophores du panneau. - P résence d'un très faible nombre de cellules lumineuses inactives. - Sons propres au panneau, par exemple: bruit de ventilateur de refroidissement et ronflement de circuit électrique / bourdonnement du panneau de verre. DANGER
PIONEER ne saurait être tenue responsable des dommages survenant à la suite d'un usage incorrect de l'appareil, par vous-même ou d'autres personnes, des anomalies de fonctionnement, des perturbations que l'appareil peut causer à d'autres équipements à moins que sa responsabilité soit clairement engagée.Information relative aux pixels défectueux
Les systèmes d'écran à plasma affichent des images constituées de milliers de pixels minuscules (des cellules émettant de la lumière), et il arrive que certains pixels soient ou deviennent inactifs, clignotent ou restent allumés en permanence.Rayonnement infrarouge
En raison de ses caractéristiques mêmes, l'écran à plasma émet un rayonnement infrarouge. Selon la manière dont l'écran à plasma est utilisé, le fonctionnement des boîtiers de télécommande des appareils à proximité de l'écran peut être profondément perturbé; pareillement des combinés téléphoniques sans cordon qui sont alors brouillés. Dans une telle situation, changez l'emplacement de l'appareil pour que son capteur de télécommande soit hors de la zone de perturbation.Brouillage radioélectrique
Bien que cet appareil réponde aux caractéristiques exigées, il faut savoir qu'il génère un brouillage. Si vous placez un récepteur de radio AM, un ordinateur personnel ou un magnétoscope dans le voisinage de cet appareil, leur fonctionnement peut être perturbé par le brouillage. En ce cas, éloignez l'appareil concerné.Bruit de fonctionnement d'écran à plasma
L'affichage de l'écran à plasma est composé de pixels extrêmement fins et ces pixels émettent de la lumière en fonctions des signaux vidéo reçus. Ce principe peut faire que l'écran à plasma donne lieu à un son de bourdonnement ou de ronflement de circuit électrique. Notez également que la vitesse de rotation du moteur du ventilateur de refroidissement augmente lorsque la température ambiante de l'appareil devient élevée. Le son du moteur du ventilateur peut alors être audible.Ne collez aucune étiquette ni aucun ruban sur l'appareil
\- Cela peut décolorer ou rayer la carrosserie.Si vous n'utilisez pas l'appareil pendant une longue période
\- Si vous conservez l'appareil non utilisé pendant longtemps, son fonctionnement peut en souffrir profondément. Mettez l'appareil en service et faites-le fonctionner régulièrement.Condensation
\- De la condensation peut se former à la surface ou à l'intérieur de l'appareil si vous le transportez rapidement d'une pièce froide dans une pièce chaude, ou bien, lorsque, le matin, en hiver, vous allumez un appareil de chauffage. Si de la condensation se forme, ne mettez pas l'appareil en service et attendez qu'elle ait disparu. Mettre l'appareil en service alors que de la condensation s'est formée, peut provoquer une anomalie de fonctionnement.Nettoyage de l'écran
- P our nettoyer l'écran de cet appareil, essuyez-le doucement avec un chiffon doux et sec, avec le chiffon de nettoyage fourni ou d'autres chiffons similaires (par exemple en coton ou flanelle). Si vous utilisez un chiffon dur ou si vous frottez fort, la surface de l'écran sera rayée. - Si vous utilisez un chiffon humide pour le nettoyage de l'écran, des gouttelettes d'eau en surface peuvent pénétrer dans l'appareil et provoquer un dysfonctionnement.Nettoyage de la carrosserie
- P our nettoyer la carrosserie de cet appareil, essuyez-la doucement avec un chiffon doux et propre (par exemple, en coton ou flanelle). Si vous utilisez un chiffon sale ou dur ou si vous essuyez excessivement fort, la surface peut être rayée. - La carrosserie de cet appareil est essentiellement composée de matières plastiques. N'utilisez aucun produit chimique (essence, diluant, etc.) pour la nettoyer. Ces produits chimiques peuvent endommager la finition ou la faire peler. - N'exposez pas l'appareil à des gaz ni à des liquides vaporisés tels que les insecticides. Ne conservez pas l'appareil en contact prolongé avec des matériaux en caoutchouc ou en vinyle. Le plastifiant de la matière plastique peut endommager la finition ou la faire peler. - Si vous utilisez un chiffon humide pour le nettoyage de l'écran, des gouttelettes d'eau peuvent pénétrer dans l'appareil et provoquer une anomalie de fonctionnement.Poignées placées à l'arrière de l'écran à plasma
- Ne déposez pas les poignées que porte l'écran à plasma, à l'arrière. - P our déplacer l'écran à plasma, faites-vous aider par une autre personne et utilisez les poignées fixées à l'arrière de l'écran à plasma. Ne déplacez pas l'écran à plasma en ne vous aidant que d'une seule poignée. Utilisez les poignées de la manière illustrée. - N'utilisez pas les poignées pour suspendre l'appareil au cours de son installation ou de son transport. N'utilisez les pas les poignées pour empêcher la chute de l'appareil. natural_image
Top-down schematic of a room layout with two doors and a central screen (no text or symbols)DANGER
Rémanence d'image sur le panneau
\- L'affichage de la même image pendant une longue période peut provoquer une rémanence de cette image. Cela peut spécialement se produire dans les circonstances suivantes.1. Image rémanente due à la charge électrique
Si une image présentant des zones très lumineuses est affichée pendant plus d'une minute, une image rémanente produite par la charge électrique importante peut en résulter. Cette image rémanente s'estompe peu à peu dès qu'une image animée la remplace. Le temps requis pour la disparition de l'image dépend de la luminosité de l'image fixe qui lui a donné naissance et du temps d'exposition de cette image.2. Image rémanente due au brûlage
Évitez d'afficher sur l'écran à plasma la même image pendant longtemps. Si la même image demeure sur l'écran pendant plusieurs heures, ou encore apparaît tous les jours au cours d'une période plus courte mais répétée, une image rémanente peut être produite par brûlage de la couche fluorescente de l'écran. Cette image rémanente devient moins visible après l'affichage d'images animées mais elle ne disparaît jamais complètement. \- La fonction Extinction auto peut être employée pour éviter ce genre de phénomène dommageable (reportez-vous à la page 34).  Si vous souhaitez vous débarrasser de cet appareil, ne le mettez pas à la poubelle avec vos ordures ménagères. Il existe un système de collecte séparé pour les appareils électroniques usagés, qui doivent être récupérés, traités et recyclés conformément à la législation. Les habitants des 25 états membres de l'UE, de Suisse et de Norvège peuvent retourner gratuitement leurs appareils électroniques usagés aux centres de collecte agréés ou à un détaillant (si vous rachetez un appareil similaire neuf). Dans les pays qui ne sont pas mentionnés ci-dessus, veuillez contacter les autorités locales pour savoir comment vous pouvez vous débarrasser de vos appareils. Vous garantirez ainsi que les appareils dont vous vous débarrassez sont correctement récupérés, traités et recyclés et préviendrez de cette façon les impacts néfastes possibles sur l'environnement et la santé humaine. L'électricité permet de disposer d'un grand nombre de fonctions utiles mais elle peut être la source de blessures et de dommages matériels si certaines précautions ne sont pas respectées. Cet appareil a été conçu et fabriqué en tenant le plus grand compte de la sécurité. Toutefois, son utilisation incorrecte peut conduire à ressentir une secousse électrique, ou à provoquer un incendie. Pour éviter tout risque potentiel, observez les instructions qui suivent lorsque vous installez, utilisez ou nettoyez l'appareil. Pour votre sécurité et pour prolonger la durée de service de l'appareil, lisez soigneusement ce qui suit avant de l'utiliser. 1. Prenez connaissance du mode d'emploi — Vous devez lire toutes les instructions relatives à la sécurité et au fonctionnement avant de faire usage de l'appareil. 2. Conservez le mode d'emploi — De manière à pouvoir vous y reporter ultérieurement, conservez soigneusement les instructions relatives à la sécurité et au fonctionnement. 3. Observez les mises en garde — Toutes les mises en garde apposées sur l'appareil ou mentionnées dans le mode d'emploi doivent être observées. 4. Respectez les instructions — Toutes les instructions de fonctionnement et d'entretien doivent être respectées. 5. Nettoyage — Débranchez la fiche du câble d'alimentation avant de nettoyer cet appareil. Pour nettoyer cet appareil, utilisez le chiffon fourni ou tout autre chiffon doux (p. ex., en coton ou flanelle). N'utilisez aucun liquide de nettoyage ni aucun aérosol. 6. Accessoires — N'utilisez aucun accessoire qui ne soit pas conseillé par le fabricant. Tout accessoire non conseillé peut entraîner un accident. 7. Eau et humidité — N'utilisez pas l'appareil près d'un point d'eau tel que baignoire, lavabo, évier, machine à laver, piscine, ni dans un sous-sol humide. 8. Support — Ne déposez pas l'appareil sur une table, un chariot, un support, un trépied, une console instables. L'appareil pourrait tomber, être gravement endommagé ou sérieusement blesser quelqu'un. Utilisez uniquement un chariot, un support, un trépied, une console ou une table conseillés par le fabricant ou vendus avec l'appareil. Si l'appareil doit être fixé sur un mur, respectez scrupuleusement les instructions de montage du fabricant. N'utilisez que les accessoires de montage conseillés par le fabricant. 9. Si vous déplacez l'appareil en le posant sur un chariot, manoeuvrez celui-ci avec précaution. Des arrêts brusques, une poussée excessive, des irrégularités à la surface du sol peuvent provoquer la chute de l'appareil.  10. Ventilation — Les évents et autres ouvertures de la carrosserie sont destinés à la ventilation. Ne les couvrez pas, ne les obstruez pas car une réduction de la ventilation peut entraîner une augmentation de la température interne de l'appareil et par voie de conséquence une diminution de sa durée de vie. Ne posez pas l'appareil sur un lit, un canapé, un tapis ou une surface similaire car cela pourrait conduire à l'obstruction des ouvertures de ventilation. Cet appareil n'a pas été conçu pour être encastré; ne l'installez pas dans un endroit clos tel qu'une bibliothèque fermée ou une baie, à moins que la ventilation convenable puisse être assurée conformément aux instructions fournies par le fabricant. 11. Alimentation — Cet appareil ne doit être alimenté qu'à partir d'une source conforme à l'indication que porte la plaquette signalétique. Si vous ne connaissez pas la nature de la source, prenez conseil du distributeur ou de la compagnie d'électricité. 12. Protection du cordon d'alimentation — Le câble d'alimentation doit cheminer de manière qu'on ne puisse pas le piétiner, ni qu'il soit écrasé par un meuble ou un objet lourd. Examinez soigneusement le cheminement du câble d'alimentation près de la prise secteur et au point de sortie de l'appareil. 13. Le panneau de l'écran à plasma est en verre. Il peut donc être brisé par la chute de l'appareil, ou par un choc. En cas de casse du panneau, veillez à ne pas être blessé par les débris. 14. Surcharge — Ne surchargez pas les prises secteur ou les rallonges. Cela peut entraîner un incendie, ou encore vous exposer à une secousse électrique. 15. Introduction d'objets étrangers ou de liquide — N'introduisez aucun objet dans les ouvertures de l'appareil. Des tensions élevées existent à l'intérieur de l'appareil, de sorte que le contact d'un objet avec les points portés à haute tension peut entraîner un incendie, ou encore vous exposer à une secousse électrique. Pour les mêmes raisons, ne renversez ni eau ni autre liquide sur l'appareil. 16. Entretien — Ne tentez pas de réparer cet appareil par vous-même. La dépose des capots peut vous exposer à des tensions dangereuses ou à d'autres risques. Faites entretenir l'appareil par du personnel qualifié pour cela. 17. Réparations — Dans l'un des cas ci-dessous, débranchez la fiche du câble d'alimentation et faites vérifier ou réparer l'appareil par du personnel qualifié pour cela. a. Le câble ou la fiche d'alimentation sont endommagés. b. Un liquide a été renversé sur l'appareil, ou encore un objet étranger a été introduit dans l'appareil par une de ses ouvertures. c. L'appareil a été exposé à la pluie ou à l'eau. d.L'appareil ne fonctionne pas normalement bien que vous respectiez les instructions du mode d'emploi. N'agissez que sur les commandes mentionnées dans ce mode d'emploi. En effet, toute action sur les commandes autres que celles dont il est question dans ce document, entraîne, le plus souvent, l'intervention coûteuse d'un technicien qualifié à fin de rétablir les conditions normales de fonctionnement. e. L'appareil est tombé, ou sa carrosserie a été endommagée. f. Le fonctionnement anormal de l'appareil est évident. Toute anomalie de fonctionnement visible justifie que l'appareil soit apporté à un service après-vente. 18. Pièces de rechange — Si une pièce doit être remplacée, assurez-vous auprès du service de réparation qu'elle le sera par la pièce prescrite par le fabricant ou une pièce ayant des caractéristiques et des performances identiques. L'utilisation d'une pièce non conforme à l'original peut entraîner un incendie, ou vous exposer à une secousse électrique ou à d'autres dangers. 19. Contrôle de sécurité — Après toute intervention sur cet appareil, exigez du service de réparation qu'il effectue un contrôle de sécurité afin de s'assurer que l'appareil peut être utilisé sans danger. 20. Montage sur un mur ou au plafond — Si l'appareil doit être monté sur un mur ou au plafond, assurez-vous que cela sera exécuté conformément à la méthode conseillée par le fabricant. 21. Sources de chaleur — Conservez l'appareil loin des appareils de chauffage (radiateurs, poêles) et des appareils qui dégagent de la chaleur (y compris les amplificateurs). 22. Veillez à ce que le système d'écran à plasma ne soit pas heurté. Un choc ou un impact pourraient provoquer la rupture du panneau, ce qui pourrait entraîner un incendie ou causer des blessures. 23. N'exposez pas le système d'écran à plasma à la lumière directe du soleil pendant une longue période. Les caractéristiques optiques du panneau avant protecteur seraient modifiées, ce qui se traduirait pas des décolorations et des déformations. 24. Le système d'écran à plasma pèse environ 40 kg dans le cas du modèle PDP-42RXE. En raison de sa faible profondeur, cet appareil est instable et doit être déballé, transporté et installé par au moins deux personnes et en faisant usage des poignées prévues à cet effet. Cordon d'alimentation (1,83 m)  (Pour l'Europe, à l'exception du Royaume-Uni et de l'Irlande)  (Pour le Royaume-Uni et l'Irlande) Seul le cordon d'alimentation correspondant à votre pays ou région est fourni.  Boîtier de télécommande  Piles au format AAA × 2 (Pile alcaline) natural_image
Two overlapping rectangular sheets of white paper or foam, no text or symbols presentnatural_image
Simple line drawing of two overlapping rectangular sheets (no text or symbols)natural_image
Simple line drawing of a folded paper or blanket with no text or symbolsREMARQUE
\- N'utilisez que le cordon d'alimentation fourni avec l'écran à plasma.Écran à plasma
Vue de face  1 Touche POWER 2 Témoin STANDBY 3 Témoins de la source d'entrée actuelle 4 Capteur de la télécommande 5 Touche INPUT 6 Touche OK 7 Touche MENU 8 Touches VOLUME -/+ 9 Touches CHANNEL -/+ 10 Touche STANDBY/ONVue de dos
 Les prises sont dirigées vers le bas. 1 Prises VIDEO (AUDIO/VIDEO/S-VIDEO) 2 Prise d'entrée ANT (Antenne) 3 Prises AV1/AV2/AV3 (SCART) 4 Prises COMPONENT (AUDIO/Y/P _B /P _R ) 5 Prises HDMI (AUDIO/HDMI) 6 Prise RS-232C (service uniquement) 7 Prise AC INBoîtier de télécommande
 1 : cette touche affiche les informations d'écran. 2 INPUT: Cette touche affiche toutes les sources d'entrée disponibles. Appuyez sur la touche ↑ ou ↓ pour sélectionner la source d'entrée désirée. 3 A V SELECTION: Cette touche sélectionne le mode d'image (Standard, Dynamique, Cinéma, Jeu ou Utilisat.). 4 SOUND EFFECT: Cette touche sélectionne l'effet de son (Sans effet, Voix, Cinéma, Musique ou Utilisat.). 5 0-9: Mode d'entrée TV/Externe: Cette touche sélectionne un canal. Mode Télétexte: Cette touche sélectionne une page. 6 LIST: Cette touche affiche la liste des canaux. Appuyez sur la touche ↑ ou ↓ pour sélectionner le canal désiré. 7 Couleur (ROUGE/VERT/JAUNE/BLEU): Mode Télétexte: Cette touche sélectionne une page. Mode Menu (dans la modification de la liste des canaux): Cette touche permet de modifier la liste des canaux. 8 ↑/↓/←/→: Cette touche contrôle le curseur dans les menus d'écran. 9 CH RETURN: Cette touche rétablit les canaux précédente. 10 EXIT: Cette touche permet de quitter n'importe quel affichage. 11 P +/P -: Ces touches permettent de changer de canal. 12 ☒: Cette touche coupe le son. Pour rétablir le son, appuyez sur les touches ☒, ♣ou . 13 Ⓞ: Cette touche permet de mettre l'écran à plasma sous tension ou en mode veille. 14 📄: Cette touche sélectionne la taille de l'écran. 15 CH ENTER: Cette touche valide les canaux. 16 OK: Cette touche exécute une commande. 17 MENU: Cette touche affiche le menu d'écran. 18 BACK: Cette touche permet de revenir à l'écran du menu précédent. 19 ∠+/∆-: Cette touche règle le volume.  20 Touches de fonction SPLIT : Cette touche sélectionne le mode SPLIT (Arrêt, PIP, Twin1 ou Twin2). : Cette touche sélectionne une source d'entrée pour l'image secondaire. : Cette touche sélectionne une position pour l'image secondaire. : Cette touche permute l'image principale et l'image secondaire. 21 SLEEP: Cette touche règle la minuterie de veille. 22 FAVOURITE CH: Cette touche sélectionne le canal favori. 23 I-II: Cette touche sélectionne le mode audio. 24 Touches de fonction TELETEXT TELETEXT (☐): Active ou désactive le service Télétexte. INDEX (ei): Cette touche affiche la page d'index Télétexte. CANCEL (☒): Cette touche affiche l'image normale en attendant les nouvelles pages Télétexte. REVEAL (≡?): Cette touche affiche l'information cachée. MIX (34) Cette touche affiche le Télétexte avec l'image normale. SIZE (≡): Cette touche sélectionne la taille du Télétexte. HOLD (☑): Cette touche arrête l'actualisation des pages Télétexte. Appuyez à nouveau pour reprendre l'actualisation. SUBPAGE (≡) : Cette touche recherche la page secondaire à l'aide du code secondaire.REMARQUE
\- P our utiliser le boîtier de télécommande, dirigez-le vers l'écran à plasma. Installation de l'écran à plasma Emplacement
- Évitez la lumière directe du soleil sur l'écran à plasma. Veillez à ce qu'il soit convenablement ventilé. - Le poids de l'écran à plasma étant élevé, faites-vous aider si vous devez le déplacer. DANGER
- Si vous déposez un objet quelconque sur le dessus de l'écran à plasma, il sera mal ventilé et ne fonctionnera pas normalement. REMARQUE
\- Aménagez un espace suffisant au-dessus et à l'arrière de l'écran lors de l'installation, afin de garantir une ventilation correcte à l'arrière. DANGER
Environnement de fonctionnement
Température et humidité ambiantes de fonctionnement: +0°C – +40°C; moins de 80 % RH (aération froide non bloquée) N'installez pas l'appareil dans un endroit faiblement ventilé, ou dans un emplacement exposé à une forte humidité ou à la lumière directe du soleil (ou à une lumière artificielle de conservation)Prévention d'une chute de l'écran à plasma
Veillez à prendre les précautions nécessaires pour que l'écran à plasma ne tombe pas.Utilisation d'un mur pour la stabilisation.
1 Fixez les boulons de prévention de chute (crochets) fournis sur l'écran à plasma. 2 Utilisez des cordes solides ou des chaînes pour stabiliser solidement le dispositif contre un mur, un pilier ou un autre élément stable. - P rocédez de la même manière pour le côté droit et le côté gauche. REMARQUE
\- Utilisez des cordes, des chaînes et des fixations en vente dans le commerce.  DANGER
- Choisissez toujours une table ou une portion de sol avec une force suffisante pour supporter l'écran à plasma. Autrement, cela pourrait entraîner des blessures corporelles et des dégâts physiques. - Lors de l'installation de l'écran à plasma, veuillez prendre les mesures de sécurité nécessaires pour l'empêcher de tomber ou de basculer en cas de sinistres, comme un tremblement de terre, ou par accident. - Dans le cas contraire, l'écran à plasma pourrait tomber et provoquer des blessures. - Les vis, crochets, chaînes et autres fixations, utilisés pour fixer l'écran à plasma afin de l'empêcher de basculer, dépendront de la composition et de l'épaisseur de la surface sur laquelle il sera fixé. - Choisissez les vis, crochets, chaînes et autres fixations appropriés après avoir soigneusement inspecté la surface pour déterminer sa composition et son épaisseur et après avoir pris contact avec un installateur professionnel si besoin est.Préparation du boîtier de télécommande
Mise en place des piles
1 Ouvrez le couvercle du logement des piles.  2 Introduisez les deux piles au format AAA fournies (1,5 V).  \- Les polarités de la pile doivent correspondre aux indicateurs de polarité (+) et (−) situés dans le logement des piles. 3 Fermez le couvercle du logement des piles. Mises en garde à propos des piles
- Le boîtier de télécommande ne peut pas piloter le système si les piles qu'il contient sont épuisées. Dans ce cas, remplacez les piles par des piles neuves. - N'utilisez pas de piles au manganèse. Utilisez des piles alcalines comme piles de remplacement. - Ne mélangez pas des piles de types différents. Les différents types de piles possèdent des caractéristiques différentes. - Ne mélangez pas une pile neuve avec une pile usagée. Mélanger une pile neuve avec une pile usagée peut se traduire par une réduction de la longévité de la pile neuve, ou par une fuite de l'électrolyte de la pile usagée. - Ne conservez pas de piles usagées dans le boîtier de télécommande car une fuite de l'électrolyte pourrait en résulter. En cas de fuite de l'électrolyte, nettoyez soigneusement le logement des piles avec un chiffon. - Les piles fournies avec cet appareil peuvent avoir une longévité plus courte que prévue du fait des conditions de stockage. - Retirez les piles du compartiment si vous envisagez de ne pas faire usage du boîtier de télécommande pendant une longue période.DANGER
• L ORSQUE VOUS VOUS DÉBARRASSEZ DES PILES USAGÉES, VEILLEZ À RESPECTER LA LÉGISLATION NATIONALE OU LES RÉGLEMENTATIONS PUBLIQUES ENVIRONNEMENTALES EN VIGUEUR QUI S'APPLICUENT DANS VOTRE PAYS/RÉGION.Portée de fonctionnement permise du boîtier de télécommande
Utilisez le boîtier de télécommande en le dirigeant vers le capteur de la télécommande, placé au centre inférieur du panneau avant de l'écran à plasma. La distance du boîtier au capteur doit être inférieure à 7 m et l'angle du faisceau avec le capteur doit être inférieur à 30 degrés vers la droite ou vers la gauche. Mises en garde à propos du boîtier de télécommande
- Ne heurtez pas le boîtier de télécommande, ne l'exposez ni à des liquides ni à une forte humidité. - Ne placez pas le boîtier de télécommande à la lumière directe du soleil car cela pourrait le déformer. - Le boîtier de télécommande peut ne pas fonctionner normalement si le capteur de la télécommande de l'écran à plasma est éclairé par le soleil ou par une vive lumière. Dans une telle situation, vous pouvez soit changer l'emplacement de l'éclairage ou de l'écran à plasma, soit rapprocher le boîtier de télécommande du capteur de la télécommande. - Si un obstacle est situé entre le boîtier et le capteur de la télécommande, le boîtier de télécommande peut ne pas fonctionner. - Lorsque les piles deviennent usagées, la portée du boîtier de télécommande peut être sensiblement réduite. Dans ce cas, remplacez les piles du boîtier par des piles neuves. - Le panneau de l'écran à plasma émet un très faible rayonnement infrarouge. Si vous placez à proximité de l'écran un appareil commandé à distance par des signaux infrarouges, par exemple un magnétoscope, la réception des signaux émis par le boîtier de télécommande de l'appareil peut être perturbée. Dans ce cas, éloignez cet appareil de l'écran à plasma. - En fonction des caractéristiques de l'installation, les signaux infrarouges en provenance du panneau de l'écran à plasma peuvent interdire la réception convenable des ordres émis par le boîtier de télécommande, ou bien vous obliger à faire usage du boîtier à plus courte distance du capteur de la télécommande. La puissance du rayonnement infrarouge émis par le panneau dépend des caractéristiques de l'image affichée.Raccordement d'une antenne
Pour profiter d'une image plus nette, utilisez une antenne extérieure. Ce qui suit est une explication succinte des types de raccordement utilisés avec un câble coaxial.  \- Branchez le câble coaxial de 75 ohms (disponible dans le commerce) à la prise d'entrée ANT (Antenne). Câble d'antenne (disponible dans le commerce) natural_image
Simple line drawing of a screwdriver with no text or symbolsRaccordement du cordon d'alimentation
Branchez le cordon d'alimentation après avoir terminé de raccorder tous les autres composants. Écran à plasma (vue de dos)  DANGER
- N'utilisez que le cordon d'alimentation fourni. - V eillez à n'utiliser que la tension d'alimentation mentionnée; dans le cas contraire, cela pourrait provoquer un incendie ou une électrocution. - P our une sécurité accrue, l'écran à plasma est doté d'un cordon d'alimentation à trois conducteurs avec prise de terre. Veillez à brancher la fiche du cordon d'alimentation sur une prise secteur à trois broches convenablement reliée à la terre. REMARQUE
\- Débranchez le cordon d'alimentation de la prise secteur si vous envisagez de ne pas utiliser l'écran à plasma pendant une longue période.Mise en/hors service (en veille)
1 Appuyez sur la touche POWER au bas de l'écran à plasma pour entrer en mode veille. • Le témoin STANDBY s'allume. 2 Appuyez sur ⏻ ou sur n'importe quelle touche de 0 à 9 de la télécommande ou sur la touche STANDBY/ ON en bas de l'écran à plasma. \- L'écran à plasma se met sous tension. Le témoin STANDBY s'éteint et le témoin de la source d'entrée actuelle s'allume. 3 Pour éteindre l'écran à plasma, appuyez sur la touche de la télécommande ou sur la touche STANDBY/ ON en bas de l'écran à plasma pendant 1 seconde. \- L'écran à plasma entre en mode veille et le témoin STANDBY s'allume au lieu du témoin de la source d'entrée actuelle. 4 Pour éteindre complètement l'écran à plasma, appuyez sur la touche POWER en bas de l'écran à plasma. • Le témoin STANDBY s'éteint.REMARQUE
- Si vous n'allez pas utiliser l'écran à plasma pendant une période prolongée, appuyez sur la touche POWER en bas de l'écran à plasma pour éteindre l'écran complètement et débranchez le cordon d'alimentation de l'écran à plasma de la prise murale. - Si l'écran à plasma est éteint complètement, vous ne pouvez pas mettre sous tension l'écran à plasma en appuyant sur la touche de la télécommande. - Si l'écran à plasma est éteint complètement, il ne peut pas s'allumer automatiquement avec le réglage "Minuterie Activée".    Pour regarder des canaux de télévision
Vous ne pouvez pas syntoniser ces canaux de télévision à moins de régler les canaux que vous pouvez regarder dans les conditions actuelles. Pour la procédure à suivre, reportez-vous aux "Réglages des canaux de télévision" à la page 25.Sélection des canaux analogiques
Vous pouvez sélectionner le mode d'entrée des canaux analogiques en appuyant sur la touche INPUT. REMARQUE
\- Quand vous changez le mode d'entrée, vous recevez le dernier canal sélectionné précédemment.Modification des canaux
Pour sélectionner le canal supérieur, appuyez sur la touche P + sur le boîtier de télécommande. Pour sélectionner le canal inférieur, appuyez sur la touche P -. \- CHANNEL +/- sur l'écran à plasma a la même fonction que P +/P - sur le boîtier de télécommande. Lors de la visualisation des informations Télétexte: \- Appuyez sur P + pour augmenter le numéro de page. \- Appuyez sur P – pour diminuer le numéro de page.Utilisation des touches 0 à 9 sur le boîtier de télécommande
Sélectionnez directement les canaux en appuyant sur les touches 0 à 9.EXEMPLE
- Pour sélectionner le canal 5 (canal à 1 chiffre), appuyez sur 5. - P our sélectionner le canal 25 (canal à 2 chiffres), appuyez sur 2 puis sur 5. Lors de la visualisation des informations Télétexte: Affichez une page avec un numéro à 3 chiffres de 100 à 899 directement en appuyant sur les touches 0 à 9. Reportez-vous à la page 38. REMARQUE
- Un appui sur la touche CH ENTER après avoir entré le numéro de canal vous permet de sélectionner plus rapidement les canaux. - Pour revenir au canal précédent, appuyez sur la touche CH RETURN. Modification du volume et du son
Pour augmenter le volume, appuyez sur la touche △ + du boîtier de télécommande. Pour diminuer le volume, appuyez sur la touche △ - Les touches VOLUME +/- sur l'écran à plasma fonctionnent comme les touches +/- du boîtier de télécommande. - P our couper la sortie du son, appuyez sur la touche " apparaît sur l'écran. Pour rétablir le son, appuyez à nouveau sur la touche m'un appui sur la touche +/- rétablit le son également. Écran à plasma  Réglage du volume  Silencieux Affichage des informations
Vous pouvez afficher l'information du canal et l'état du réglage que vous avez sélectionné. Appuyez sur la touche ⓘ+. Pour de l'analogique  Pour SPLIT  Pour une entrée externe  Utilisation I de sur le boîtier de télécommande  A chaque appui sur I-ITS change comme ci-dessus. flowchart
graph LR
    A["Mode I"] --> B["Mode II"]
    B --> C["Mode MONO"]
| Réglage | ||||
| MONOIII | ||||
| Emissions NICAM | Stéréo | ATV 1AAA NICAM Stereo | ATV 1AAA NICAM Stereo | ATV 1AAA MONO |
| Bilingue | ATV 1BBB NICAM I | ATV 1BBB NICAM II | ATV 1BBB MONO | |
| Son mono | ATV 1CCC NICAM Mono | ATV 1CCC NICAM Mono | ATV 1CCC MONO | |
| Emissions A2 | Stéréo | ATV 1DDD Stereo | ATV 1DDD Stereo | ATV 1DDD MONO |
| Bilingue | ATV 1EEE DUAL I | ATV 1EEE DUAL II | ATV 1EEE MONO | |
| Son mono | ATV 1FFF MONO | ATV 1FFF MONO | ATV 1FFF MONO | |
REMARQUE
- Dans chaque mode sonore multiplex sélectionné avec la touche I-II, l'affichage change en fonction des signaux d'émissions reçus. - Après sélection du mode MONO, les sons émis par l'écran à plasma demeurent monophoniques même si l'émission captée est en stéréo. Vous devez revenir au mode I ou II si vous souhaitez à nouveau écouter le son en stéréo. - La sélection d'un mode sonore multiplex alors que la source d'entrée est AV1, AV2, AV3, S-VIDEO, VIDEO, COMPONENT, HDMI, ne modifie le type de son. Dans ce cas, le son est déterminé par la source vidéo.Utilisation des fonctions de partage d'écran
Vous pouvez afficher une image secondaire à l'intérieur d'une image principale. De cette manière, vous pouvez regarder un programme de télévision ou surveiller l'entrée vidéo à partir d'un autre dispositif raccordé, tout en regardant la télévision ou une autre entrée vidéo. Utilisez cette fonction en suivant les procédures ci-dessous pour sélectionner le mode Twin (2 écrans) ou le mode PIP (image dans l'image). REMARQUE
\- Avec la fonction de partage d'écran, le son de l'entrée principale est toujours émis. PIP (image dans l'image)  Twin 1 (2 écrans)  Twin 2 (2 écrans) natural_image
Black-and-white photo collage showing baseball players in action and a coastal landscape with distant hills (no text or symbols)REMARQUE
- Vous pouvez sélectionner les modes en appuyant simplement sur la touche de la télécommande. - Vous pouvez sélectionner les sources en appuyant simplement sur la touche de la télécommande. - En mode Twin ou PIP, appuyez sur la touche 📄 sur passer à la position de 2 écrans indiquée. natural_image
Sequence of grayscale images showing a person in motion, with no visible text or symbolsnatural_image
Black-and-white photo sequence showing a baseball pitcher in action and a close-up of the field with a sailboat on shore (no text or symbols)Si vous sélectionnez "PIP" à l'étape 5
Vous pouvez sélectionner la position de l'image dans l'image affichée. Appuyez sur la touche ↑ ou ↓ pour vous déplacer sur Position PIP, puis appuyez sur la touche → ou OK.  (En haut à gauche) (En haut à droite)  - Vous pouvez sélectionner les positions en appuyant simplement sur la touche 📄 la télécommande. 8 Appuyez sur la touche ↑ ou ↓ pour sélectionner la position désirée pour l'image secondaire, puis appuyez sur la touche ← ou la touche BACK. 9 Appuyez sur la touche EXIT. REMARQUE
- Vous pouvez désactiver l'image secondaire en appuyant simplement sur la touche EXIT de la télécommande. - La fonction de partage d'écran est disponible avec les combinaisons suivantes: CN ANALOG. - AV1/2/3, S-VIDÉO, VIDÉO COMPOSANTE ou HDMI Configuration du menu| Menu d'accueil | Paramètre | Page |
| Inst. du tuner | Balayer canaux | 25 |
| Balayer canaux analog | 25 | |
| Editer liste de canaux | 26 |
| Image Sélection AV 28 | ||
| Luminos. 29 | ||
| Contraste 29 | ||
| Netteté 29 | ||
| Couleur 29 | ||
| Teinte 29 | ||
| Réduction bruit 29 | ||
| Temp. couleur 30 | ||
| Son | Effet | 30 |
| Graves | 30 | |
| Aigus | 30 | |
| Balance | 30 | |
| Niv. volume auto | 31 | |
| SRS TruSurround XT | 31 |
| Écran | Taille d’écran | 31 |
| Entr. principale | 32 | |
| PIP/TWIN | 22, 23 | |
| Entrée AV1 | 32 | |
| Sortie AV2 | 32 | |
| Économiseur d’écran | 33 |
| Système | Langue de menu | 32 |
| Langue Télétexte | 33 | |
| Réglage d'horloge | 27 |
Utilisation des menus
La section suivante décrit la procédure générale pour le réglage des menus. Pour chaque procédure, reportez-vous aux pages concernées qui décrivent les fonctions individuelles.  1 Appuyez sur la touche MENU. 2 Appuyez sur ↑ ou ↓ pour sélectionner un paramètre de menu, puis appuyez sur la touche → ou OK. 3 Répétez l'étape 2 jusqu'à ce que vous ayez atteint le paramètre du menu secondaire désiré. \- Le nombre de couches d'un menu varie en fonction des paramètres du menu. 4 Appuyez sur ↑ ou ↓ pour sélectionner une option (ou un paramètre), puis appuyez sur la touche → ou OK. \- Dans le cas de certains paramètres de menu, vous devez appuyer sur ou au lieu de ou . 5 Appuyez sur la touche EXIT pour sortir du menu.REMARQUE
\- Vous pouvez accéder aux niveaux supérieurs du menu en appuyant sur la touche BACK.Réglage des canaux de télévision
Cette section décrit comment rechercher et configurer des canaux de télévision que vous pouvez regarder dans les conditions actuelles. Il est possible que vous ne puissiez pas syntoniser des canaux de télévision à moins de les configurer en utilisant le balayage des canaux.Balayage automatique des canaux
Vous pouvez balayer automatiquement les canaux pour rechercher les plages de fréquences disponibles. 1 Appuyez sur la touche MENU. 2 Appuyez sur la touche ↑ ou ↓ pour vous déplacer sur Inst. du tuner, puis appuyez sur la touche → ou OK.  3 Sélectionnez Balayer canaux et appuyez sur la touche → ou OK. 4 Sélectionnez Pays et appuyez sur la touche → ou OK. 5 Appuyez sur la touche ↑ ou ↓ pour sélectionner la région ou le pays désiré, puis appuyez sur la touche ← ou BACK. • V ous pouvez sélectionner parmi 22 régions ou pays : Autriche, Belgique, Danemark, Finlande, France, Allemagne, Grèce, Irlande, Italie, Luxembourg, Pays-Bas, Norvège, Pologne, Portugal, Russie, Espagne, Suède, Suisse, Turquie, Royaume-Uni, Europe de l'Est et Europe de l'Ouest. 6 Déplacez-vous sur Démarrer en appuyant sur la touche ↑ ou ↓ et lancer la recherche en appuyant sur la touche → ou OK.  Le balayage démarre. Les canaux balayés sont mémorisés automatiquement dans l'ordre. Pour arrêter le balayage, appuyez sur la touche BACK. 7 Une fois le balayage terminé, appuyez sur la touche EXIT. REMARQUE
\- Si vous utilisez le convertisseur de câble, il est possible que vous deviez ajouter manuellement les canaux de sortie du convertisseur de câble.Balayage manuel des canaux analogiques
Vous pouvez choisir si vous voulez mémoriser les canaux. 1 Appuyez sur la touche MENU. 2 Appuyez sur la touche ↑ ou ↓ pour vous déplacer sur Inst. du tuner, puis appuyez sur la touche → ou OK. 3 Appuyez sur la touche ↑ ou ↓ pour vous déplacer sur Balayer canaux analog, puis appuyez sur la touche → ou OK.  4 Sélectionnez Système couleur et appuyez sur la touche → ou OK. 5 Appuyez sur la touche ↑ ou ↓ pour sélectionner le système de couleurs désiré (Auto, PAL ou SECAM), puis appuyez sur la touche ← ou BACK. 6 Appuyez sur la touche ↑ ou ↓ pour vous déplacer sur Système audio, puis appuyez sur la touche → ou OK. 7 Appuyez sur la touche ↑ ou ↓ pour sélectionner le système audio désiré (BG, I, DK, L ou L'), puis appuyez sur la touche ← ou BACK. 8 Appuyez sur la touche ↑ ou ↓ pour vous déplacer sur Bande, puis appuyez sur la touche → ou OK. 9 Appuyez sur la touche ↑ ou ↓ pour sélectionner la bande désirée (VHF/UHF ou Câble), puis appuyez sur la touche ← ou BACK. 10 Déplacez-vous sur Canal en appuyant sur la touche ↑ ou ↓ et sélectionnez le numéro de canal en appuyant sur la touche ← ou →. Ou déplacez-vous sur Recherche en appuyant sur la touche ↑ ou ↓ et cherchez le canal en appuyant sur la touche ← ou →.  11 Appuyez sur la touche ↑ ou ↓ pour vous déplacer sur Programme No et sélectionnez le programme en appuyant sur ←, → ou sur une touche 0 à 9. 12 Appuyez sur la touche ↑ ou ↓ pour vous déplacer sur Mémoriser, puis appuyez sur la touche → ou OK. • V ous pouvez recevoir le canal sélectionné. 13 Si vous voulez modifier le nom du canal, appuyez sur la touche ↑ ou ↓ pour vous déplacer sur Nommer canal, puis appuyez sur la touche → ou OK.  14 Appuyez sur la touche ↑ ou ↓ pour sélectionner une lettre (A\~Z, a\~z), un numéro (0\~9) ou un symbole (espace, {I}\~! "#\$%& '()\*+,-/;; <=>?@[N]^\_'). Déplacez-vous sur la lettre précédente ou suivante en utilisant la touche ← ou →.08 Configuration du syntoniseur
15 Quand vous avez terminé d'entrer le nom de canal, appuyez sur la touche OK. 16 Appuyez sur la touche ↑ ou ↓ pour vous déplacer sur Mémoriser, puis appuyez sur la touche → ou OK. 17 Si vous voulez ajuster la syntonisation, appuyez sur la touche ↑ ou ↓ pour vous déplacer sur Synt. précise, puis appuyez sur la touche ← ou → pour obtenir une meilleure qualité d'image et de son.  18 Appuyez sur la touche ↑ ou ↓ pour vous déplacer sur Mémoriser, puis appuyez sur la touche → ou OK. 19 Appuyez sur la touche EXIT.REMARQUE
- La fonction "Balayer canaux analog" n'est disponible que quand la source d'entrée est réglée sur "CN ANALOG.". (Reportez-vous à la page 19.) - V ous pouvez également sélectionner le numéro de canal en appuyant directement sur les touches numérotées.Modification de la liste des canaux
1 Appuyez sur la touche MENU. 2 Appuyez sur la touche ↑ ou ↓ pour vous déplacer sur Inst. du tuner, puis appuyez sur la touche → ou OK. 3 Appuyez sur la touche ↑ ou ↓ pour vous déplacer sur Editor liste de canaux, puis appuyez sur la touche → ou OK.  La liste de canaux s'affiche. 4 Sélectionnez le canal désiré en appuyant sur la touche ↑ ou ↓, puis appuyez sur les touches couleur (ROUGE/VERT/JAUNE/BLEU) pour supprimer, copier, déplacer ou ignorer le programme. Supprimer un canal
– Sélectionnez un canal à supprimer avec les touches ↑ ou ↓. - Appuyez sur la touche ROUGE. Si vous appuyez à nouveau sur la touche ROUGE, le canal sélectionné sera supprimé.Copier un canal
– Sélectionnez un canal à copier avec les touches ↑ ou ↓. - Appuyez sur la touche VERT.Déplacer un canal
- Sélectionnez un canal à déplacer avec les touches ↑ ou ↓. - Appuyez sur la touche JAUNE pour sélectionner le canal à déplacer. Utilisez les touches ↑ ou ↓ pour déplacer le canal à la position désirée, puis appuyez à nouveau sur la touche JAUNE pour le mémoriser.Ignorer un canal
- Sélectionnez un canal à ignorer avec les touches ↑ ou ↓. - Appuyez sur la touche BLEU, et la couleur du canal sélectionné deviendra bleue. Par la suite, ces canaux seront ignorés lors de l'utilisation des touches P+/P-. - P our revenir à l'état normal, sélectionnez le canal ignoré et appuyez à nouveau sur la touche BLEU pendant 2 ou 3 secondes. 5 Si vous voulez trouver rapidement et facilement des canaux quand vous regardez la télévision, sélectionnez le canal désiré en appuyant sur la touche ↑ ou ↓, puis appuyez sur la touche FAVOURITE CH. Le canal sélectionné est mémorisé avec "FAV" affiché. Appuyez plusieurs fois sur la touche FAVOURITE CH pour passer d'un canal favori à un autre. 6 Appuyez sur la touche EXIT.REMARQUE
- Appuyez sur les touches P+/P- pour vous déplacer à la page suivante ou précédente. - La liste de canaux affiche les canaux balayés par les fonctions de balayage des canaux. Si vous voulez annuler le mode Favori, appuyez sur la touche FAVOURITE CH pendant l'affichage de "FAV".Affichage de la liste des canaux
Vous pouvez afficher une liste de tous les canaux. 1 Appuyez sur la touche LIST. • La liste des canaux s'affiche.  2 Pour syntoniser un canal spécifique dans la liste des canaux, déplacez le curseur sur le canal désiré en appuyant sur la touche ↑ ou ↓, puis appuyez sur la touche OK.REMARQUE
\- Appuyez sur les touches P+/P- pour vous déplacer à la page suivante ou précédente.Réglage de la date et de l'heure actuelles
Vous pouvez régler la date et l'heure actuelles pour que l'heure soit affichée dès que la touche Ⓕ est pressée. 1 Appuyez sur la touche MENU. 2 Appuyez sur la touche ↑ ou ↓ pour vous déplacer sur Système, puis appuyez sur la touche → ou OK.  3 Appuyez sur la touche ↑ ou ↓ pour vous déplacer sur Réglage d'horloge, puis appuyez sur la touche → ou OK.  4 Sélectionnez Date et appuyez sur la touche → ou OK. 5 Appuyez sur la touche ← ou → pour vous déplacer sur le jour, le mois et l'année puis réglez-les en appuyant sur la touche ↑ ou ↓. 6 Une fois le réglage terminé, appuyez sur la touche OK. 7 Appuyez sur la touche ↑ ou ↓ pour vous déplacer sur Heure, puis appuyez sur la touche → ou OK.  8 Appuyez sur la touche ← ou → pour vous déplacer sur Heure/Minute, réglez-les en appuyant sur la touche ↑ ou ↓, puis appuyez sur la touche OK. 9 Appuyez sur la touche EXIT.Minuterie de mise en veille
Vous pouvez sélectionner un intervalle de temps de 10 à 240 minutes au bout duquel l'écran à plasma se met en veille automatiquement. 1 Appuyez sur la touche MENU. 2 Appuyez sur la touche ↑ ou ↓ pour vous déplacer sur Système, puis appuyez sur la touche → ou OK.  3 Sélectionnez Réglage d'horloge et appuyez à nouveau sur la touche → ou OK. 4 Appuyez sur ↑ ou ↓ pour vous déplacer sur Minuterie veille, puis appuyez sur la touche → ou OK. 5 Appuyez sur la touche ↑ ou ↓ pour sélectionner l'intervalle de temps préprogrammé désiré comme suit, puis appuyez sur la touche ← ou BACK. Arrêt - 10 mn - 20 mn - 30 mn - 60 mn - 120 mn - 180 mn - 240 mn  6 Appuyez sur la touche EXIT. REMARQUE
\- Vous pouvez sélectionner la période de veille en appuyant simplement sur la touche SLEEP de la télécommande.Réglages de l'image
Sélection du mode d'image
Vous pouvez sélectionner le mode d'image qui correspond le mieux à vos besoins. 1 Appuyez sur la touche MENU. 2 Appuyez sur la touche ↑ ou ↓ pour vous déplacer sur Image, puis appuyez sur la touche → ou OK. 3 Sélectionnez Sélection AV et appuyez à nouveau sur la touche → ou OK. 4 Appuyez sur la touche ↑ ou ↓ pour sélectionner le mode d'image désiré comme suit, puis appuyez sur la touche ← ou BACK. Standard - Dynamique - Cinéma - Jeu - Utilisat. Paramètre Description
Standard Pour obtenir une image bien définie dans une pièce à la luminosité normale. Dynamique Pour obtenir une image très nette présentant un contraste maximum. Cinéma Pour les films. Jeu La luminosité de l'image est diminuée afin qu'elle soit plus agréable à regarder. Utilisat. Ce paramètre vous permet de personnaliser les réglages. Vous pouvez définir le mode d'image pour chaque source d'entrée. 5 Appuyez sur la touche EXIT. REMARQUE
\- Vous pouvez sélectionner les modes en appuyant simplement sur la touche AV SELECTION de la télécommande.Personnalisation des réglages de l'image
Cet écran à plasma offre diverses options de réglage pour optimiser la qualité de l'image. 1 Appuyez sur la touche MENU. 2 Appuyez sur la touche ↑ ou ↓ pour vous déplacer sur Image, puis appuyez sur la touche → ou OK. 3 Appuyez sur la touche ↑ ou ↓ pour sélectionner l'option désirée comme suit, puis appuyez sur la touche → ou OK. Luminos. - Contraste - Netteté - Couleur - Teinte  Une bande horizontale est affichée. Appuyez sur la touche ← ou → pour atteindre le réglage optimal. Pour sélectionner d'autres options, appuyez sur la touche ↑ ou ↓.| Paramètre Touche ← Touche → | |
| Luminos. Diminution de la luminosité | Augmentation de la luminosité |
| Contraste Diminution du contraste | Augmentation du contraste |
| Netteté Diminution de la netteté | Augmentation de la netteté |
| Couleur Diminution de l'intensité des couleurs | Augmentation de l'intensité des couleurs |
| Teinte Les teintes chair deviennent plus violettes | Les teintes chair deviennent plus vertes |
REMARQUE
\- Si vous changez les options, le mode d'image revient automatiquement à Utilisat.Utilisation de la fonction de réduction du bruit
1 Appuyez sur la touche MENU. 2 Appuyez sur la touche ↑ ou ↓ pour vous déplacer sur Image, puis appuyez sur la touche → ou OK. 3 Appuyez sur la touche ↑ ou ↓ pour vous déplacer sur Réduction bruit, puis appuyez sur la touche → ou OK. 4 Appuyez sur la touche ↑ ou ↓ pour sélectionner l'option désirée comme suit, puis appuyez sur la touche ← ou BACK. Marche - Arrêt  5 Appuyez sur la touche EXIT. REMARQUE
\- Si vous changez les options, "Sélection AV" revient automatiquement à Utilisat.Réglage de la température de couleur
Vous pouvez changer la teinte de votre écran pour correspondre à vos besoins. 1 Appuyez sur la touche MENU. 2 Appuyez sur la touche ↑ ou ↓ pour vous déplacer sur Image, puis appuyez sur la touche → ou OK. 3 Appuyez sur la touche ↑ ou ↓ pour vous déplacer sur Temp. Couleur, puis appuyez sur la touche → ou OK.  4 Appuyez sur la touche ↑ ou ↓ pour sélectionner l'option désirée comme suit, puis appuyez sur la touche ← ou BACK. Haut - Moyen - Bas Paramètre Description
Haut Le blanc a une tonalité bleutée Moyen Tonalité naturelle Bas Le blanc a une tonalité rosée 5 Appuyez sur la touche EXIT.Sélection de l'effet de son
Vous pouvez sélectionner l'effet de son à utiliser. 1 Appuyez sur la touche MENU. 2 Appuyez sur la touche ↑ ou ↓ pour vous déplacer sur Son, puis appuyez sur la touche → ou OK. 3 Sélectionnez Effet et appuyez à nouveau sur la touche → ou OK. 4 Appuyez sur la touche ↑ ou ↓ pour sélectionner l'effet de son désiré comme suit, puis appuyez sur la touche ← ou BACK. Sans effet - Voix - Cinéma - Musique - Utilisat. Paramètre Description
Sans effet Son pur et sans effet. Voix Convient à des émissions parlées, telles que les journaux télévisés, etc. Cinéma Vous pouvez profiter des effets de son comme dans une salle de cinéma. Musique Convient à des émissions musicales. Utilisat. Permet à l'utilisateur de personnaliser les réglages suivant ses désirs. 5 Appuyez sur la touche EXIT.REMARQUE
\- Vous pouvez sélectionner les modes en appuyant simplement sur la touche SOUND EFFECT de la télécommande.Personnalisation des réglages du son
Cet écran à plasma offre diverses options de réglage pour optimiser la qualité du son. 1 Appuyez sur la touche MENU. 2 Appuyez sur la touche ↑ ou ↓ pour vous déplacer sur Son, puis appuyez sur la touche → ou OK. 3 Appuyez sur la touche ↑ ou ↓ pour sélectionner l'option désirée (Graves, Aigus ou Balance). 4 Appuyez sur la touche ← ou → pour atteindre le réglage optimal. Graves: 0\~100 Aigus: 0\~100 Balance: L50\~0\~R50 | Paramètre | Touche ← | Touche ➔ |
| Graves Les graves sontatténués | Les graves sontaccentués | |
| Aigus Les aigus sontatténués | Les aigus sontaccentués | |
| Balance La puissance émisepar l'enceintedroite diminue | La puissance émisepar l'enceinte gauchediminue | |
REMARQUE
\- Après avoir effectué un réglage de "Graves" ou "Aigus", "Effet" revient automatiquement à "Utilisat". Par contre, après avoir effectué un réglage de "Balance", "Effet" reste affiché.Réglage automatique du volume
Cette fonction vous permet de régler automatique le volume de chaque canal en diminuant la sortie du son quand le signal de modulation est élevé ou en augmentant la sortie du son quand le signal de modulation est faible. 1 Appuyez sur la touche MENU. 2 Appuyez sur la touche ↑ ou ↓ pour vous déplacer sur Son, puis appuyez sur la touche → ou OK. 3 Sélectionnez Niv. volume auto et appuyez à nouveau sur la touche → ou OK. 4 Appuyez sur la touche ↑ ou ↓ pour sélectionner l'option désirée (Marche ou Arrêt), puis appuyez sur la touche ← ou BACK.  5 Appuyez sur la touche EXIT.Réglage du son surround
Vous pouvez profiter d'un effet de son virtuel tridimensionnel (surround). 1 Appuyez sur la touche MENU. 2 Appuyez sur la touche ↑ ou ↓ pour vous déplacer sur Son, puis appuyez sur la touche → ou OK. 3 Appuyez sur la touche ↑ ou ↓ pour vous déplacer sur SRS TruSurround XT, puis appuyez sur la touche → ou OK. 4 Appuyez sur la touche ↑ ou ↓ pour sélectionner l'option désirée (Marche ou Arrêt), puis appuyez sur la touche ← ou BACK.  5 Appuyez sur la touche EXIT. SRS(●)\* TruSurround XT est une marque de SRS Labs, Inc. TruSurround XT technologie est incorporé sous licence de SRS Labs, Inc.Modification de la taille de l'écran
Vous pouvez changer le format d'image de l'écran pour correspondre à vos besoins. 1 Appuyez sur la touche MENU. 2 Appuyez sur la touche ↑ ou ↓ pour vous déplacer sur Écran, puis appuyez sur la touche → ou OK. 3 Sélectionnez Taille d'écran et appuyez à nouveau sur la touche → ou OK. 4 Appuyez sur la touche ↑ ou ↓ pour sélectionner le format d'écran désiré comme suit, puis appuyez sur la touche ← ou BACK. Auto - 4:3 - Plein - Large - Zoom - Plein 14:9 - Ciné 14:9  flowchart
graph TD
    A["4:3"] --> B["Auto"]
    A --> C["Plein"]
    B --> D["Ciné 14:9"]
    C --> E["Large"]
    D --> F["Plein 14:9"]
    E --> G["Zoom"]
    F --> G
| Auto Dans ce mode, l'écran à plasma sélectionne automatiquement le format d'écran approprié lors de la réception des signaux vidéo contenant des informations WSS (signalisation d'écran large). | |
| 4:3 Pour afficher des images 4:3 “standard”. Un masque latéral apparaît de chaque côté. | |
| Plein Pour afficher des images 16:9 allongées. | |
| Large Dans ce mode, l'image est allongée jusqu'à toucher les bords de l'écran. | |
| Zoom Pour afficher des images 16:9 au format boîte aux lettres. Dans certains programmes, une bande peut être visible en haut et en bas de l'image. | |
| Plein 14:9 Pour afficher des images 14:9 allongées. Un fin masque latéral apparaît de chaque côté. | |
| Ciné 14:9 Pour afficher des images 14:9 au format boîte aux lettres. Un fin masque latéral apparaît de chaque côté, et une bande peut aussi être visible en haut et en bas de l'image dans certains programmes. |
REMARQUE
\- Vous pouvez sélectionner les modes en appuyant simplement sur la touche à la télécommande.Affichage de la source d'entrée
Après avoir raccordé vos systèmes audio et vidéo, vous pouvez regarder des sources différentes en sélectionnant l'entrée correspondante. 1 Appuyez sur la touche MENU. 2 Appuyez sur la touche ↑ ou ↓ pour vous déplacer sur Écran, puis appuyez sur la touche → ou OK. 3 Appuyez sur la touche ↑ ou ↓ pour vous déplacer sur Entr. principale, puis appuyez sur la touche → ou OK. 4 Appuyez sur la touche ↑ ou ↓ pour sélectionner la source d'entrée désirée comme suit et appuyez sur la touche OK. CN ANALOG. - AV1 - AV2 - AV3 - S-VIDÉO - VIDÉO - COMPOSANTE - HDMI  • L'écran à plasma bascule vers la source sélectionnée. 5 Appuyez sur la touche EXIT. REMARQUE
\- Vous pouvez sélectionner les sources en appuyant simplement sur la touche INPUT de la télécommande.Sélection d'un type de signal d'entrée
Après avoir raccordé un équipement à la prise AV1, précisez le type de signal vidéo à recevoir en provenance de l'équipement raccordé. 1 Appuyez sur la touche MENU. 2 Appuyez sur la touche ↑ ou ↓ pour vous déplacer sur Écran, puis appuyez sur la touche → ou OK. 3 Appuyez sur la touche ↑ ou ↓ pour vous déplacer sur Entrée AV1, puis appuyez sur la touche → ou OK. 4 Appuyez sur la touche ↑ ou ↓ pour sélectionner le type de signal (VIDÉO ou S-VIDÉO), puis appuyez sur la touche ← ou BACK.  5 Appuyez sur la touche EXIT.Sélection d'une source de sortie
Après avoir raccordé un équipement à la prise AV2, spécifiez la source à envoyer à l'équipement raccordé. 1 Appuyez sur la touche MENU. 2 Appuyez sur la touche ↑ ou ↓ pour vous déplacer sur Écran, puis appuyez sur la touche → ou OK. 3 Appuyez sur la touche ↑ ou ↓ pour vous déplacer sur Sortie AV2, puis appuyez sur la touche → ou OK. 4 Appuyez sur la touche ↑ ou ↓ pour sélectionner la source désirée comme suit et appuyez sur la touche ← ou BACK. CN ANALOG. - AV1 - AV2 - AV3 - S-VIDÉO - VIDÉO  5 Appuyez sur la touche EXIT.Réglage de la langue d'affichage à l'écran
Vous pouvez sélectionner la langue à utiliser pour l'affichage à l'écran des menus parmi les langues suivantes: Anglais, Allemand, Italien, Espagnol, Français, Néerlandais, Suédois, Russe et Turc. 1 Appuyez sur la touche MENU. 2 Appuyez sur la touche ↑ ou ↓ pour vous déplacer sur Système, puis appuyez sur la touche → ou OK. 3 Appuyez sur la touche ↑ ou ↓ pour vous déplacer sur Langue de menu, puis appuyez sur la touche → ou OK. 4 Appuyez sur la touche ↑ ou ↓ pour sélectionner la langue désirée comme suit: English - Deutsch - Italiano - Español - Français - Nederlands - Svenska - Русский - Türkçe  5 Appuyez sur la touche EXIT.Réglage de la langue TTX (Télétexte)
Pour la langue à utiliser en mode Télétexte, vous pouvez sélectionner l'une des langues suivantes: Europe de l'Ouest, Europe de l'Est, Grèce/Turquie, Russie et Arabie. 1 Appuyez sur la touche MENU. 2 Appuyez sur la touche ↑ ou ↓ pour vous déplacer sur Système, puis appuyez sur la touche → ou OK. 3 Appuyez sur la touche ↑ ou ↓ pour vous déplacer sur Langue Télétexte, puis appuyez sur la touche → ou OK. 4 Appuyez sur la touche ↑ ou ↓ pour sélectionner la langue désirée comme suit: Europe E - Europe O - Grèce/Turc - Russie - Arabie  5 Appuyez sur la touche EXIT.Économiseur d'écran
Vous pouvez empêcher les brûlures d'écran temporaires ou permanentes occasionnées par une image fixe. 1 Appuyez sur la touche MENU. 2 Appuyez sur la touche ↑ ou ↓ pour vous déplacer sur Écran, puis appuyez sur la touche → ou OK.  3 Appuyez sur la touche ↑ ou ↓ pour vous déplacer sur Économiseur d'écran, puis appuyez sur la touche → ou OK. 4 Sélectionnez Orbiteur et appuyez à nouveau sur la touche → ou OK.  5 Appuyez sur la touche ↑ ou ↓ pour sélectionner l'option désirée (Marche ou Arrêt), puis appuyez sur la touche ← ou BACK. 6 Appuyez sur la touche ↑ ou ↓ pour vous déplacer sur Portée orbiteur, puis appuyez sur la touche → ou OK. 7 Appuyez sur la touche ↑ ou ↓ pour sélectionner l'option désirée comme suit, puis appuyez sur la touche ← ou BACK. Petit - Moyen - Grande  8 Appuyez sur la touche EXIT.Réglage du mode Tout blanc
Quand vous affichez une image fixe pendant une longue période, il vous est recommandé de régler "Tout blanc" sur "Marche" pour réduire les brûlures d'écran temporaires ou permanentes. 1 Suivez les étapes 1 à 3 dans "Économiseur d'écran". 2 Appuyez sur la touche ↑ ou ↓ pour vous déplacer sur Tout blanc, puis appuyez sur la touche → ou OK. 3 Appuyez sur la touche ↑ ou ↓ pour sélectionner "Marche". REMARQUE
\- Si vous annulez le mode Tout blanc, appuyez sur la touche EXIT. Il s'annule aussi lorsque 20 minutes se sont écoulées.Gestion de l'alimentation
La gestion de l'alimentation propose différents moyens d'économiser l'énergie.Mise hors tension automatique de l'écran à plasma
1 Appuyez sur la touche MENU. 2 Appuyez sur la touche ↑ ou ↓ pour vous déplacer sur Système, puis appuyez sur la touche → ou OK.  3 Sélectionnez Réglage d'horloge et appuyez à nouveau sur la touche → ou OK. 4 Appuyez sur la touche ↑ ou ↓ pour vous déplacer sur Extinction auto, puis appuyez sur la touche → ou OK.  5 Appuyez sur la touche ↑ ou ↓ pour sélectionner l'option désirée (Marche ou Arrêt), puis appuyez sur la touche ← ou BACK. 6 Appuyez sur la touche EXIT. REMARQUE
\- Si "Extinction auto" est réglé sur "Marche", l'écran à plasma se met automatiquement en veille si aucun signal n'est capté pendant 15 minutes.Réglage de l'heure de mise sous tension de l'écran à plasma
Vous pouvez régler l'heure pour que l'écran à plasma se mette automatiquement sous tension à l'heure que vous avez sélectionnée. 1 Appuyez sur la touche MENU. 2 Appuyez sur la touche ↑ ou ↓ pour vous déplacer sur Système, puis appuyez sur la touche → ou OK. 3 Sélectionnez Réglage d'horloge et appuyez à nouveau sur la touche → ou OK. 4 Déplacez-vous sur Minuterie Activée en appuyant sur la touche ↑ ou ↓, puis appuyez sur la touche → ou OK.  5 Appuyez sur la touche ↑ ou ↓ pour sélectionner Marche, puis appuyez sur la touche ← ou BACK. 6 Appuyez à nouveau sur la touche OK. Appuyez sur la touche ← ou → pour vous déplacer sur les heures et les minutes, réglez-les en appuyant sur la touche ↑ ou ↓, puis appuyez sur la touche OK.  7 Appuyez sur la touche EXIT. REMARQUE
\- Une fois la minuterie de mise sous tension réglée, un appui sur la touche active ou désactive la minuterie et un appui sur la touche OK change l'heure à l'étape 4.Réglage de l'heure de mise hors tension de l'écran à plasma
Vous pouvez régler l'heure pour que l'écran à plasma se mette automatiquement hors tension à l'heure que vous avez sélectionnée. 1 Appuyez sur la touche MENU. 2 Appuyez sur la touche ↑ ou ↓ pour vous déplacer sur Système, puis appuyez sur la touche → ou OK. 3 Sélectionnez Réglage d'horloge et appuyez à nouveau sur la touche → ou OK. 4 Déplacez-vous sur Minuterie Désactiv en appuyant sur la touche ↑ ou ↓, puis appuyez sur la touche → ou OK.  5 Appuyez sur la touche ↑ ou ↓ pour sélectionner Marche, puis appuyez sur la touche ← ou BACK. 6 Appuyez à nouveau sur la touche OK. Appuyez sur la touche ← ou → pour vous déplacer sur les heures et les minutes, réglez-les en appuyant sur la touche ↑ ou ↓, puis appuyez sur la touche OK.  7 Appuyez sur la touche EXIT. REMARQUE
\- Une fois la minuterie de mise hors tension réglée, un appui sur la touche active ou désactive la minuterie et un appui sur la touche OK change l'heure à l'étape 4. Vous avez la possibilité de raccorder divers types d'appareils externes à l'écran à plasma, par exemple un lecteur DVD, un magnétoscope, une console de jeu et un caméscope. DANGER
\- De manière à protéger les appareils, veillez à mettre l'écran à plasma hors tension avant de brancher un lecteur DVD, un magnétoscope, un décodeur ou tout autre appareil externe. REMARQUE
\- Avant d'effectuer les raccordements, reportez-vous au mode d'emploi qui accompagne chaque appareil (décodeur, magnétoscope, lecteur DVD, etc.).Raccordement à la prise SCART
flowchart
graph TD
    A["Device"] --> B["Cable SCART (disponible dans le commerce)"]
    B --> C["Magnétoscope"]
    B --> D["Lecteur DVD"]
    B --> E["Décdeur ou autre équipement"]
    B --> F["audiovisuel"]
REMARQUE
- R eportez-vous au mode d'emploi de l'équipement désiré pour connaître le type de signal. - Lorsque vous raccordez l'équipement à la prise AV1, sélectionnez "Entrée AV1". Et lorsque vous raccordez l'équipement à la prise AV2, sélectionnez "Sortie AV2". Pour de plus amples détails, reportez-vous à la page 32. - La prise AV3 sert pour la sortie du moniteur. Cependant, si vous sélectionnez "COMPOSANTE" ou "HDMI", le signal n'est pas envoyé. Raccordement à l'entrée externe flowchart
graph TD
    A["Input"] --> B["OUTPUT"]
    B --> C["Câble audio (disponible dans le commerce)"]
    B --> D["Câble vidéo (disponible dans le commerce)"]
    B --> E["Câble S-vidéo (disponible dans le commerce)"]
    C --> F["Magnétoscope"]
    D --> G["Lecteur DVD"]
    E --> H["Décodeur ou autre équipement audiovisuel"]
REMARQUE
\- Avec un équipement muni d'une prise S-VIDEO, raccordez le câble S-Veréo entre la prise d'entrée S-VIDEO de l'écran à plasma et la prise de sortie S-Veréo de l'équipement désiré. 2 Raccordez le câble audio à la prise d'entrée AUDIO-L/R de l'écran à plasma et à la prise de sortie audio de l'appareil désiré. 3 Mettez l'écran à plasma sous tension, puis appuyez sur la touche INPUT pour sélectionner VIDEO. REMARQUE
\- Si vous avez raccordez l'écran à plasma et l'équipement désiré à l'aide d'un câble S-Verdeo, sélectionnez S-VIDEO. Raccordement à l'entrée composante flowchart
graph TD
    A["Component"] --> B["Câble audio (disponible dans le commerce)"]
    A --> C["Câble video Composante (disponible dans le commerce)"]
    C --> D["Magnétoscope"]
    C --> E["Lecteur DVD"]
    C --> F["Décodeur ou autre équipement"]
    C --> G["audiovisuel"]
REMARQUE
- En fonction du fabricant, les prises Y/P_B/P_R peuvent être identifiées comme Y/P_B/P_R , Y/B-Y/R-Y ou Y/C_B/C_R . - R eportez-vous au mode d'emploi de votre lecteur DVD pour connaître le type de signal. 2 Raccordez le câble audio aux prises d'entrée AUDIO-L/R (COMPONENT) de l'écran à plasma et aux prises de sortie audio de l'appareil désiré. 3 Mettez l'écran à plasma sous tension, puis appuyez sur la touche INPUT pour sélectionner COMPOSANTE. Raccordement à l'entrée HDMI  Les signaux numériques audio et vidéo peuvent entrer par la prise HDMI. Pour utiliser la prise HDMI, mettez cette prise en service et précisez le type de signaux audio et vidéo en provenance de l'appareil raccordé. Pour de plus amples détails concernant ces types de signaux, reportez-vous au mode d'emploi qui accompagne l'appareil raccordé. Tableau de corrélation des signaux d'entrée| 1920*1080i@50Hz |
| 720*576p@50Hz |
| 1280*720p@50Hz |
| 1920*1080i@59,94/60Hz |
| 720*480p@59,94/60Hz |
| 1280*720p@59,94/60Hz |
REMARQUE
- Les signaux en provenance d'un PC ne sont pas pris en charge. - Si aucune image n'apparaît, spécifiez un autre type de signal vidéo numérique. - Pour de plus amples détails concernant les types de signaux vidéo numériques, reportez-vous au mode d'emploi qui accompagne l'appareil raccordé.11 Utilisation des fonctions Télétexte
Qu'est-ce que le Télétexte ?
Le Télétexte diffuse des pages d'information et de divertissement aux téléviseurs spécialement équipés. Votre écran à plasma reçoit les signaux Télétexte diffusés par les réseaux de télévision, et les décode dans un format d'affichage graphique. Les actualités, la météo, les informations sportives, les cours de la bourse et les avant-premières de programme font partie des nombreux services disponibles. Fonctionnement de base du Télétexte
Marche et arrêt du Télétexte
1 Sélectionnez un canal de télévision ou une source d'entrée externe diffusant un programme Télétexte. 2 Appuyez sur pour afficher le Télétexte (en plein écran). 3 Appuyez à nouveau sur pour afficher l'écran normal.Sélection et affichage des pages Télétexte
Utilisez les touches suivantes du boîtier de télécommande pour sélectionner et afficher les pages Télétexte.Couleur (ROUGE/VERT/JAUNE/BLEU):
Vous pouvez sélectionner un groupe ou un ensemble de pages affichés entre crochets colorés en bas de l'écran en appuyant sur les touches correspondantes Couleur (ROUGE/VERT/JAUNE/BLEU) du boîtier de télécommande.0 à 9:
Sélectionnez directement n'importe quelle page de 100 à 899 à l'aide des touches 0 à 9.P+/P-:
Cette touche sélectionne la page suivante ou précédente.INDEX (≡i):
Cette touche affiche la page d'index Télétexte.CANCEL (EX):
Cette touche affiche l'image normale en attendant les nouvelles pages Télétexte.REVEAL (≡?):
Pour afficher l'information cachée telle qu'une réponse à un questionnaire, appuyez sur E? \- Appuyez à nouveau sur ☐ pour cacher l'information.MIX (☐):
Cette touche affiche le Télétexte avec l'image normale.SIZE(≡):
Cette touche sélectionne la taille du Télétexte.HOLD(≡):
Pour arrêter l'actualisation des pages Télétexte, appuyez sur 📄. \- Appuyez à nouveau sur pour reprendre l'actualisation.SUBPAGE (E):
Cette touche recherche la page secondaire à l'aide du code secondaire. REMARQUE
\- Lorsque le Télétexte est affiché, seules les touches + / - , et dont disponibles. Dépannage| Anomalie | Action corrective possible |
| Absence d'alimentation. | V eillez à ce que l'écran à plasma soit correctement branché. (Reportez-vous à la page 17.)La fiche du cordon d'alimentation est-elle débranchée ? (Reportez-vous à la page 17.)Le système est-il sous tension ? (Reportez-vous à la page 18.)V érifiez si vous avez appuyé surdu boîtier de télécommande. (Reportez-vous à la page 18.)Si le témoin STANDBY de l'écran à plasma est alumé en rouge, appuyez sur. |
| Absence d'image et de son. | V érifiez si le cordon d'alimentation est correctement branché.V érifiez que vous avez bien appuyé surdu boîtier de télécommande ou sur la touche STANDBY/ON en bas de l'écran à plasma.Sélectionnez une source d'entrée correspondant à la source en question.V érifiez les réglages de contraste et de luminosité de l'image.V érifiez le volume. |
| D es images mais pas de son | V érifiez le volume.V érifiez si vous avez bien appuyé sur la touché du boîtier de télécommande. |
| Absence d'images ou images en noir et blanc | R églez la couleur.V érifiez que le système de diffusion correct soit bien sélectionné. |
| Interférences du son et de l'image | Essayez d'identifier l'appareil électrique qui perturbe l'écran à plasma, puis éloignez-le.B ranchez l'écran à plasma sur une autre prise murale. |
| Images brouillées ou neigeuses, son déformé | Vérifiez la direction, l'emplacement et les raccordements de votre antenne. De telles interférences se produisent souvent lors de l'utilisation d'une antenne intérieure. |
| D y sfonctionnements du boîtier de télécommande | Appuyez sur la touche INPUT pour sélectionner l'écran à plasma ou un dispositif externe.R emplacez les piles de la télécommande.Insérez les piles en veillant à ce que leurs polarités <+> et <> soient correctement positionnées.Vérifiez l'angle et la distance entre la télécommande et l'écran à plasma. Assurez vous qu'il n'y ait aucun obstacle entre la télécommande et l'écran à plasma.V érifiez d'avoir bien appuyé sur la touche correcte.Changez l'emplacement des sources de lumière ou la direction de l'écran à plasma pour éviter les reflets.Est-ce que la fonction Télétexte est activée ? (Reportez-vous à la page 38.) |
Affectation des broches de connexion pour SCART
Différents dispositifs audio et vidéo peuvent être raccordés aux prises SCART. SCART (AV 1)
1. Sortie audio droite 2. Entrée audio droite 3. Sortie audio gauche 4. Terre commune pour l'audio 5. Terre 6. Entrée audio gauche 7. Non utilisé 8. Contrôle audio-vidéo 9. Terre 10. Non utilisé 11. Non utilisé 12. Non utilisé 13. Terre 14. Non utilisé 15. Entrée chroma S-Vidéo 16. Non utilisé 17. Terre pour la vidéo 18. Terre 19. Sortie vidéo 20. Entrée vidéo/entrée S-Vidéo 21. Blindage de la priseSCART (AV 2)
1. Sortie audio droite 2. Entrée audio droite 3. Sortie audio gauche 4. Terre commune pour l'audio 5. Terre pour le bleu 6. Entrée audio gauche 7. Entrée du bleu 8. Contrôle audio-vidéo 9. Terre pour le vert 10. Non utilisé 11. Entrée du vert 12. Non utilisé 13. Terre pour le rouge 14. Non utilisé 15. Entrée du rouge 16. Contrôle Rouge/Vert/Bleu 17. Terre pour la vidéo 18. Terre pour le contrôle Rouge/Vert/Bleu 19. Sortie vidéo 20. Entrée vidéo 21. Blindage de la priseSCART (AV 3)
1. Sortie audio droite 2. Entrée audio droite 3. Sortie audio gauche 4. Terre commune pour l'audio 5. Terre pour le bleu 6. Entrée audio gauche 7. Entrée bleu 8. Contrôle audio-vidéo 9. Terre pour le vert 10. Non utilisé 11. Entrée du vert 12. Non utilisé 13. Terre pour le rouge 14. Non utilisé 15. Entrée du rouge 16. Contrôle Rouge/Vert/Bleu 17. Terre pour la vidéo 18. Terre pour le contrôle Rouge/Vert/Bleu 19. Sortie vidéo 20. Entrée vidéo 21. Blindage de la prise Caractéristiques techniques| Paramètre Écran à plasma 42", Modèle: PDP-42RXE | |||
| Nombre de pixels 1024 × 768 pixels | |||
| Amplificateur audio 10 W + 10 W (1 kHz, 1 %, 4 Ω) | |||
| Système surround SRS TruSurround XT | |||
| Alimentation électrique 220-240 V CA, 50/60 Hz, 300 W(2,5 W en veille) | |||
| Dimensions (avec socle) | 1235 (L) × 699 (H) × 252 (P) mm | ||
| Poids (avec socle) 40 kg | |||
| Système de couleurs PAL/SECAM | |||
| Fonction télévision Système de réception B/G, D/K, I, L/L' | |||
| Syntoniseur VHF/UHF | E2-E69ch, F2-F10ch, I21-I69ch, IR A-IR Jch | ||
| CATV | Hyper-band, S1-S41ch | ||
| STEREO | NICAM/A2 | ||
| Prises | Arrière | ANTENNA | 75 Ω, type DIN, entrée VHF/UHF/CATV |
| AV1 | SCART (entrée AV, entrée S-VIDEO, sortie TV) | ||
| AV2 | SCART (entrée/sortie AV, entrée RGB)* | ||
| AV3 | SCART (entrée/sortie AV, entrée RGB) | ||
| * Sortie AV2: à sélectionner par l'utilisateur | |||
| COMPONENT | Entrée COMPONENT VIDEO, entrée AUDIO | ||
| HDMI | Entrée HDMI, entrée AUDIO | ||
| RS-232C | Uniquement pour le service | ||
| Côté | VIDEO | Entrée S-VIDEO, entrée VIDEO, entrée AUDIO | |
| OSD | Anglais/Allemand/Italien/Espagnol/Français/Néerlandais/Suédois/Russe/Turc. | ||
12 Annexe
Marques de fabrique
• SRS (●)® TrueSurround X1 marque de SRS Labs, Inc. TruSurround XT technologie est incorporé sous licence de SRS Labs, Inc. - HDMI, le logo HDMI et High-Definition Multimedia Interface sont des marques de fabrique ou des marques déposées de HDMI Licensing LLC. - Les noms des sociétés ou des organismes sont des marques de commerce qui peuvent avoir fait l'objet d'un dépôt par leur propriétaire.WICHTIG
 Das Blitzsymbol in einem Dreieck weist den Nutzer darauf hin, dass eine Berührungsgefahr mit nicht isolierten Teilen im Geräteinneren, die eine gefährliche Spannung führen, besteht. Die Spannung kann so hoch sein, dass sie die Gefahr eines elektrischen Schlags bei Personen birgt.CAUTION
RISK OF ELECTRIC SHOCK DO NOT OPEN
ACHTUNG:
UM SICH NICHT DER GEFAHR EINES ELEKTRISCHEN SCHLAGS AUSZUSETZEN, DÜRFEN SIE NICHT DEN DECKEL (ODER DIE RÜCKSEITE) ENTFERNEN. IM GERÄTEINNEREN BEFINDEN SICH KEINE VOM NUTZER REPARIERBARE TEILE. ÜBERLASSEN SIE REPARATUREN DEM QUALIFIZIERTEN KUNDENDIENST.  Ein Ausrufungszeichen in einem Dreieck weist den Nutzer auf wichtige Bedienungs- und Wartungsanweisungen in den Dokumenten hin, die dem gerät beiliengen.WARNUNG
Dieses Gerät ist nicht wasserdicht. Zur Vermeidung der Gefahr von Brand und Stromschlag keine Behälter mit Flüssigkeiten (z.B. Blumenvasen und-töpfe) in die Nähe des Gerätes bringen und dieses vor Tropfwasser, Spritzwasser, Regen und Nässe schützen. D3-4-2-1-3\_A\_Ge Dieses Produkt entspricht den Niederspannungsrichtlinien (73/23/EEC, geändert durch 93/68/EEC) und den EMV-Richtlinien (89/336/EEC, geändert durch 92/31/EEC und 93/68/EEC).WARNUNG
Vor dem erstmaligen Anschluss des Gerätes an das Stromnetz bitte den folgenden Hinweis sorgfältig beachten. Die Netzspannung ist je nach Land verschieden. Vor der Inbetriebnahme des Gerätes sicherstellen, dass die örtliche Netzspannung mit der auf dem Typenschild an der Rückwand des Gerätes angegebenen Nennspannung (z.B. 230 V oder 120 V) übereinstimmt. D3-4-2-1-4\_A\_GeWARNUNG
Dieses gerät muss geerdet werden!WARNUNG
Das Netzkabel dieses Gerätes ist mit einem dreipoligen (einschließlich Erdungsstift) Netzstecker ausgestattet, der ausschließlich für den Anschluss an eine (geerdete) Schuko-Steckdose vorgesehen ist. Falls der Netzstecker aufgrund einer abweichenden Ausführung nicht an die Netzsteckdose angeschlossen werden kann, muss ein Elektriker mit der Installation einer vorschriftsmäßigen Netzsteckdose beauftragt werden. Beim Erdungsstift handelt es sich um eine Sicherheitsvorrichtung, die auf keinen Fall umgangen oder außer Kraft gesetzt werden darf. D3-4-2-1-6 A Ge Die nachstehenden Symbole befinden sich auf am Gerät angebrachten Aufklebern. Sie machen den Benutzer und das Wartungspersonal auf mögliche Gefahren aufmerksam. WARNUNG
Dieses Symbol weist auf eine gefährliche oder unsichere Vorgehensweise hin, die zu Personenverletzungen oder Sachschäden führen kann. VORSICHT
Dieses Symbol weist auf eine gefährliche oder unsichere Vorgehensweise hin, die schwere Personenverletzungen verursachen oder Leben kosten kann.WARNUNG
Keine Quellen offener Flammen (z.B. eine brennende Kerze) auf dieses Gerät stellen. D3-4-2-1-7a A GeVORSICHTSHINWEIS ZUR BELÜFTUNG
Bei der Aufstellung dieses Gerätes muss für einen ausreichenden Freiraum gesorgt werden, um eine einwandfreie Wärmeabfuhr zu gewährleisten. Bezüglich minimalet platzanforderungen siehe seite 14.WARNUNG
Im Gerätegehäuse sind Ventilationsschlitze und andere Öffnungen vorgesehen, die dazu dienen, eine Überhitzung des Gerätes zu verhindern und einen zuverlässigen Betrieb zu gewährleisten. Um Brandgefahr auszuschließen, dürfen diese Öffnungen auf keinen Fall blockiert oder mit Gegenständen (z.B. Zeitungen, Tischdecken und Gardinen) abgedeckt werden, und das Gerät darf beim Betrieb nicht auf einem dicken Teppich oder Bett aufgestellt sein.VORSICHT
Der POWER-Schalter dieses Gerätes trennt das Gerät nicht vollständig vom Stromnetz. Um das Gerät vollständig vom Netz zu trennen, muss der Netzstecker aus der Netzsteckdose gezogen werden. Daher sollte das Gerät so aufgestellt werden, dass stets ein unbehinderter Zugang zur Netzsteckdose gewährleistet ist, damit der Netzstecker in einer Notsituation sofort abgezogen werden kann. Um Brandgefahr auszuschließen, sollte der Netzstecker vor einem längeren Nichtgebrauch des Gerätes, beispielsweise während des Urlaubs, grundsätzlich von der Netzsteckdose getrennt werden. D3-4-2-2-2a A GeTaste STANDBY/ON
STANDBY:
Im Bereitschaftsmodus ist die Hauptstromversorgung zum Gerät getrennt, sodass es nicht mehr voll funktionsfähig ist. Das Gerät wird eine Minute lang weiter mit Strom versorgt, um betriebsbereit zu bleiben.Anzeige STANDBY
Im Bereitschaftsmodus leuchtet die Anzeige rot, im Einschaltmodus hingegen blau.Inhalt
Vielen Dank, dass Sie sich für dieses Pioneer-Produkt entschieden haben.
Lesen Sie diese Bedienungsanleitung bitte aufmerksam durch, sodass Sie mit der richtigen Bedienungsweise Ihres Modells vertraut werden. Nachdem Sie die Bedienungsanleitung gelesen haben, sollten Sie sie an einer sicheren Stelle griffbereit aufbewahren. In manchen Ländern oder Verkaufsgebieten weichen die Ausführungen von Netzstecker oder Netzsteckdose unter Umständen von den in den Abbildungen gezeigten ab. Die Anschluss- und Bedienungsverfahren des Gerätes sind jedoch gleich.01 Wichtige Grundregeln
02 Wichtige Sicherheitshinweise
03 Mitgeliefertes Zubehör
04 Teilebezeichnungen
Plasma Display 10 Fernbedienung 1205 Vorbereitungen
Installation des Plasma Displays 14 Vermeidung eines Umkippens des Plasma Displays ..... 14 Vorbereiten der Fernbedienung 15 Einlegen der Batterien 15 Vorsichtsmaßregeln zu Batterien 15 Reichweite der Fernbedienung 15 Beim Umgang mit der Fernbedienung zu beachten 16 Anschluss einer Antenne 16 Anschluss des Netzkabels 1706 Grundlegende Bedienung
Ein- und Ausschalten (Bereitschaftsmodus) 18 Fernsehempfang 19 Wahl der Analogkanäle 19 Kanalwechsel 19 Lautstärke- und Toneinstellungen 20 Anzeigen von Daten....20 Mit I-Än der Fernbedienung 21 Multiscreen-Funktionen 2207 Menü-Setup
Menükonfiguration 24 Menübedienung....2408 Tuner Setup
Einrichten von Fernsehkanälen 25 Automatisch Kanäle absuchen 25 Manuelles Absuchen der Analogkanäle 25 Bearbeit. Kanal-Liste 26 Die Kanalliste anzeigen 26 Einstellen des aktuellen Datums und der Uhrzeit ..... 2709 Justierungen und Einstellungen
Timer 28 Bild-Einstellungen 28 Wahl der Bildfunktion 28 Anpassen der Bildeinstellungen 29 Verwendung des Rauschreduzierung-Merkmals..... 29 Einstellen der Farbtemperatur 29 Wahl des Klangeffekts.... 30 Anpassen der Toneinstellungen 30 Automatische Einstellung der Lautstärke 30 Einstellen des Surround-Klangs 30 Ändern der Bildschirmgröße 31 Betrachten der Eingangsquelle 31 Wahl eines Eingangssignaltyps.... 32 Wahl einer Ausgangsquelle 32 Einstellen der für die Sprache der On-Screen-Anzeige ... 32 Einstellen der für die Videotextsprache 32 Schirmschoner 33 Einstellen des Vollweiß-Modus 33 Stromsteuerung 33 Automatisches Ausschalten des Plasma Display ..... 33 Einstellen der Plasma Display Einschaltzeit ...... 34 Einstellen der Plasma Display Ausschaltzeit ...... 3410 Unterhaltung durch externe Geräte
Anschluss an einen SCART-Anschluss 35 Anschluss an den externen Eingang 36 Anschluss an den Komponent-Eingang 36 Anschluss an den HDMI-Eingang 3711 Verwendung der Videotext-Funktionen
Was ist Videotext? 38 Bedienung der Grundfunktionen von Videotext ...... 38 Ein- und Ausschalten von Videotext 38 Wahl und Bedienen der Videotext-Seiten 3812 Anhang
Fehlerbehebung 39 Anschluss-Pinbelegung für SCART 40 Technische Daten 41 Damit Sie das Plasma Display-System Pioneer PureVision PDP-42RXE auch voll genießen können, sollten Sie zunächst diese Informationen aufmerksam lesen. Das Pioneer PureVision PDP-42RXE ist ein hochwertiges Plasma Display-System, das sich durch eine lange Lebensdauer und hohe Qualität auszeichnet. Die außergewöhnlich hohe Bildqualität dieses Pioneer Plasma Display-Systems beruht auf Design und Konstruktion nach neuesten Erkenntnissen sowie fortschrittlichster Präzisionstechnik. Über seine Lebensspanne nimmt die Leuchtdichte des Pioneer Plasma Display-Systems PDP-42RXE allmählich ab, wie dies auch bei allen Bildschirmen auf Phosphorbasis (z.B. bei herkömmlichen Fernsehern mit Bildröhre) der Fall ist. Damit Sie möglichst lange eine ansprechende helle Bildwiedergabe genießen können, sollten Sie die nachstehenden Grundregeln aufmerksam lesen und einhalten:Grundregeln zur Benutzung
Alle Bildschirme auf Phosphorbasis (einschließlich Fernseher mit herkömmlicher Bildröhre) können durch längere Wiedergabe eines unbewegten Bilds negativ beeinflusst werden. Dies gilt auch für Plasma Displays. Durch eine Reihe grundlegender Vorsichtsmaßnahmen können Nachbilder und bleibende Auswirkungen auf den Bildschirm vermieden werden. Bei Einhaltung der nachstehenden Empfehlungen liefert das Plasma Display zufrieden stellende Ergebnisse auf lange Sicht: - V ermeiden Sie häufige Wiedergabe des gleichen Bildes oder von bewegten Bildern mit statischen Bereichen (z.B. feste Einblendungen im Bild oder Videospiele mit unbewegten Zonen). - Geben Sie Videotext nicht über lange Zeit wieder. - V ermeiden Sie lange Wiedergabe der On-Screen-Einblendungen von einem Decoder, DVD-Spieler, Videorecorder oder anderen Geräten. - Lassen Sie das Bild nicht längere Zeit ununterbrochen auf Standbild oder Pause geschaltet, wenn Sie die Standbildfunktion eines Fernsehers, DVD-Spielers oder anderen Gerätes verwenden. - Bilder mit nebeneinander liegenden sehr hellen und sehr dunklen Zonen sollten nicht über längere Zeit wiedergegeben werden. - Bei Wiedergabe von einer Spielekonsole wird dringend empfohlen, unter „AV-Wahl“ die Einstellung „Spiele“ zu verwenden. Sie sollten die Verwendung aber auf jeweils höchstens 2 Stunden begrenzen. - Nach der Wiedergabe von einer Spielekonsole oder eines Standbilds empfiehlt es sich, in Bildschirm-Einstellung „Breitbild“ oder „Voll“ über mindestens die dreifache Dauer der vorherigen Standbildwiedergabe ein normales bewegtes Bild wiederzugeben. - Schalten Sie das Display nach Benutzung des Plasma Display-Systems stets auf den „Bereitschafts“-Modus (Standby).Grundregeln zur Aufstellung
Das Pioneer PureVision Plasma Display-System PDP-42RXE zeichnet sich durch eine sehr flache Bauweise aus. Aus Sicherheitsgründen sollten bei der Montage oder Aufstellung geeignete Maßnahmen getroffen werden, um ein Umkippen bei Vibrationen oder unbeabsichtigter Berührung zu verhindern. Zum Aufstellen des Produkts sollten ausschließlich die von PIONEER hierfür konstruierten Teile und Zubehörteile verwendet werden. Wenn andere Teile als der Fuß oder die Halterung von PIONEER verwendet werden, kann dies Instabilität und eventuell auch Verletzungen zur Folge haben. Wenn Sie eine individuelle Installation wünschen, wenden Sie sich bitte an Ihren Händler. Im Interesse einer sachgemäßen Aufstellung sind die entsprechenden Arbeiten von qualifiziertem Fachpersonal auszuführen. PIONEER übernimmt keine Gewähr für etwaige Unfälle oder Schäden, die auf die Verwendung von Teilen oder Zubehörteilen zurückzuführen sind, die von anderen Herstellern stammen. Zur Vermeidung von Störungen und Überhitzung dürfen die Belüftungsöffnungen an der Haupteinheit bei der Aufstellung nicht blockiert werden, damit einwandfreie Wärmeabfuhr gewährleistet ist: - Halten Sie einen gewissen Abstand zu anderen Geräten oder Wänden usw. ein. Bezüglich des um das Gerät erforderlichen minimalen Freiraums siehe Seite 14. - Stellen Sie das Gerät nicht an beengten Plätzen mit schlechter Belüftung auf. - Decken Sie es nicht mit einem Tuch oder Ähnlichem ab. - Befreien Sie die seitlichen und rückseitigen Belüftungsöffnungen mit einem Staubsauger, der auf die niedrigste Saugstärke einzustellen ist, von Staubansammlungen. - Stellen Sie das Produkt nicht auf einen Teppich oder eine Decke. - Belassen Sie das Produkt nicht in gekipptem Zustand. • Drehen Sie das Produkt nicht um. Wenn das Gerät bei nicht ausreichender Belüftung betrieben wird, kann seine Innentemperatur übermäßig ansteigen, was zu Störungen führen kann. Wenn die Umgebungs- oder Innentemperatur eine bestimmte Schwelle überschreitet, schaltet sich das Display automatisch aus, damit die elektronischen Bauteile abkühlen und gefährliche Situationen vermieden werden. Nicht vorhersehbare Störungen können verursacht werden durch: Aufstellung an einem ungeeigneten Ort, unsachgemäße Montage, Installierung, Befestigung oder Bedienung des Produkts bzw. am Produkt vorgenommene Modifikationen. PIONEER kann jedoch für derartige Störungen oder daraus entstandene Unfälle nicht zur Verantwortung gezogen werden. ZUR BEACHTUNG
Im Folgenden werden typische Effekte und Eigenschaften von Matrix-Displays auf Phosphorbasis, die als solche nicht durch Beschränkte Garantien des Herstellers abgedeckt sind, aufgeführt: - P ermanente Restbilder auf dem Phosphor des Panels. • Vorhandensein einer geringen Anzahl inaktiver Lichtzellen. - V om Panel erzeugte Geräusche, beispielsweise: Ventilatormotorgeräusche und Stromkreisbrummen / Glaspanel-Summen. VORSICHT
PIONEER übernimmt keine Verantwortung für jedwede Schäden aufgrund falschen Gebrauchs des Produkts durch den Eigentümer oder andere Personen, Funktionsstörungen bei Gebrauch, andere produktbezogene Probleme und Gebrauch des Produkts außer in Fällen, in denen die Firma haftpflichtig ist.Informationen zu Pixeldefekten
Plasma-Schirme zeigen Bilder an, die aus hunderttausenden von winzigen Pixeln bestehen (Leuchtzellen). Dabei können inaktive, blinkende oder ständig leuchtende Pixel auftreten.Infrarotstrahlen
Aufgrund seiner Bauweise gibt das Plasma Display Infrarotstrahlen ab. Je nach Gebrauch des Plasma Displays können Fernbedienungen von in der Nähe befindlichen Geräten und drahtlose Kopfhörer, die mit Infrarotstrahlen arbeiten, gestört werden. In einem solchen Fall ändern Sie den Aufstellort, sodass entsprechende Sensoren nicht beeinträchtigt werden.Funkstörungen
Obwohl dieses Produkt alle zutreffenden Normen erfüllt, kann es in begrenztem Maße Funkstörungen verursachen. MW-Radios, PCs und Videorecorder, die sich in unmittelbarer Nähe dieses Produkts befinden, könnten gestört werden. In diesem Fall vergrößern Sie den Abstand zwischen diesem Produkt und betroffenen Geräten entsprechend.Plasma Display-Antriebsgeräusch
Der Schirm des Plasma Displays besteht aus extrem feinen Pixeln, die den empfangenen Videosignalen entsprechend Licht ausstrahlen. Hierbei können Summgeräusche oder Stromkreisbrummen vom Plasma Display wahrgenommen werden. Beachten Sie bitte auch, dass die Drehzahl des Kühlventilatormotors bei zunehmender Umgebungstemperatur. In diesem Fall kann der Ventilatormotor hörbar werden.Haften Sie keine Gegenstände wie z.B. Etiketten oder Klebebänder am Produkt an.
\- Hierdurch könnte das Gehäuse verfärbt oder verkratzt werden.Bei längerem Nichtgebrauch des Produkts
\- Durch längerzeitigen Nichtgebrauch können Funktionen des Produkts beeinträchtigt werden. Schalten Sie das Produkt gelegentlich ein und betreiben Sie es.Kondenswasserbildung
\- Feuchtigkeit kann sich an der Oberfläche oder im Inneren des Produkts niederschlagen, wenn es schnell von einer kalten an eine warme Stelle gebracht wird, oder zum Beispiel an einem Wintermorgen unmittelbar nach Einschalten einer Heizung. Wenn eine derartige Kondenswasserbildung stattgefunden hat, schalten Sie das Produkt nicht ein, sondern warten Sie, bis die Feuchtigkeit verdunstet ist. Gebrauch des Produkts unter Feuchtigkeitsniederschlag kann zu Funktionsstörungen führen.Reinigen der Bildschirmoberfläche
- W ischen Sie die Bildschirmoberfläche zur Reinigung vorsichtig mit einem trockenen, weichen Tuch ab. Sie können dazu das mitgelieferte Reinigungstuch oder ein ähnliches Tuch (z.B. ein Baumwoll- oder Flanelltuch) verwenden. Wenn Sie ein hartes Tuch verwenden oder den Bildschirm stark abreiben, können Kratzer verursacht werden. - W enn Sie den Bildschirm mit einem nassen Tuch reinigen, können Wassertropfen an der Oberfläche in das Produkt gelangen, wodurch Funktionsstörungen verursacht werden.Reinigen des Gehäuses
- W ischen Sie das Gehäuse dieses Produkts zur Reinigung vorsichtig mit einem sauberen, weichen Tuch (z.B. mit einem Baumwoll- oder Flanelltuch) ab. Wenn Sie ein verstaubtes bzw. hartes Tuch verwenden oder Sie das Gehäuse stark abreiben, können Kratzer verursacht werden. - Das Gehäuse dieses Produkts besteht hauptsächlich aus Kunststoff. Verwenden Sie zur Reinigung des Gehäuses keine Chemikalien wie Benzin oder Verdünner. Derartige Chemikalien können das Finish beeinträchtigen und zu einer Ablösung der Beschichtung führen. - Setzen Sie das Produkt keinen flüchtigen Mitteln, wie z.B. Schädlings-Vertilgungsmitteln, aus. Lassen Sie das Produkt nicht längere Zeit mit Gummi- oder Kunststoffobjekten in Berührung. Der Plastifikator im Kunststoff kann das Finish angreifen und zu einer Ablösung der Beschichtung führen. - W enn Sie das Gehäuse mit einem nassen Tuch reinigen, können Wassertropfen an der Oberfläche in das Produkt gelangen, wodurch Funktionsstörungen verursacht werden.Griffe an der Rückseite des Plasma Displays
- Nehmen Sie die Griffe an der Rückseite des Plasma Displays nicht ab. - T ragen Sie das Plasma Display erforderlichenfalls an den rückseitigen Griffen und lassen Sie sich hierbei von einem Helfer unterstützen. Versuchen Sie nicht, das Display nur an einem Griff zu bewegen. Verwenden Sie die Griffe wie gezeigt. - W eder zur Installation, noch beim Tragen, noch zu einem anderen Anlass darf das Gerät an den Griffen aufgehängt werden. Setzen Sie die Griffe nicht als Kippschutzvorrichtungen ein. natural_image
Top-down schematic of a room layout with two doors and a central textured area (no text or symbols)VORSICHT
Einbrenner und Nachbilder
\- W enn das selbe Bild, zum Beispiel ein Standbild, über längere Zeit angezeigt wird, können Nachbilder entstehen. Dies kann in den folgenden beiden Fällen auftreten.1. Nachbild wegen elektrischer Restladung
Wenn Bildmuster mit sehr hoher Spitzenluminanz länger als 1 Minute angezeigt werden, können Nachbilder wegen elektrischer Restladung verursacht werden. Die Nachbilder lösen sich auf, wenn bewegte Bilder wiedergegeben werden. Die Zeitdauer bis zur Auflösung der Nachbilder hängt von der Luminanz der ehemaligen Standbilder und deren Anzeigedauer ab.2. Nachbild durch Einbrennen
Meiden Sie Wiedergabe des selben Bilds über eine längere Zeit. Wenn das selbe Bild fortwährend mehrere Stunden lang, oder für kürzere Zeit, jedoch über mehrere Tage hinweg angezeigt wird, kann es am Plasma Display einbrennen und ein permanentes Nachbild hinterlassen. Derartige Nachbilder fallen zwar nicht so stark auf, wenn bewegte Bilder wiedergegeben werden, sie lösen sich jedoch nicht mehr vollständig auf. • Die Auto-Ausschalten kann auch zur Vorbeugung gegen Einbrenner eingesetzt werden (siehe Seite 33).  Mischen Sie dieses Produkt, wenn Sie es entsorgen wollen, nicht mit gewöhnlichen Haushaltsabfällen. Es gibt ein getrenntes Sammelsystem für gebrauchte elektronische Produkte, über das die richtige Behandlung, Rückgewinnung und Wiederverwertung gemäß der bestehenden Gesetzgebung gewährleistet wird. Privathaushalte in den 25 Mitgliedsstaaten der EU, in der Schweiz und in Norwegen können ihre gebrauchten elektronischen Produkte an vorgesehenen Sammeleinrichtungen kostenfrei zurückgeben oder aber an einen Händler zurückgeben (wenn sie ein ähnliches neues Produkt kaufen). Bitte wenden Sie sich in den Ländern, die oben nicht aufgeführt sind, hinsichtlich der korrekten Verfahrensweise der Entsorgung an die örtliche Kommunalverwaltung. Auf diese Weise stellen Sie sicher, dass das zu entsorgende Produkt der notwendigen Behandlung, Rückgewinnung und Wiederverwertung unterzogen wird, und so mögliche negative Einflüsse auf die Umwelt und die menschliche Gesundheit vermieden werden. Elektrizität erfüllt viele nützliche Aufgaben, kann aber auch Personenverletzungen und Sachschäden verursachen, wenn sie unsachgemäß gehandhabt wird. Dieses Produkt wurde mit Sicherheit als oberster Priorität konstruiert und hergestellt. Dennoch besteht bei unsachgemäßer Handhabung u.U. Stromschlag- und Brandgefahr. Um mögliche Gefahren abzuwenden, befolgen Sie beim Aufstellen, Betreiben und Reinigen des Produkts bitte die nachstehenden Anleitungen. Lesen Sie im Interesse sicheren Betriebs und einer langen Produktlebensdauer zunächst die nachstehenden Hinweise sorgfältig durch. 1. Anweisungen lesen—Bedienen Sie das Produkt erst, nachdem Sie alle diesbezüglichen Hinweise gelesen und verstanden haben. 2. Handbuch gut aufbewahren—Sie sollten diese Anleitung mit den Sicherheits- und Bedienungshinweisen so aufbewahren, dass Sie im Bedarfsfall jederzeit darauf zurückgreifen können. 3. Warnungen beachten—Alle Warnungen auf dem Gerät und in der Anleitung sind streng zu beachten. 4. Anweisungen befolgen—Alle Anweisungen zur Bedienung müssen eingehalten werden. 5. Reinigung—Ziehen Sie vor dem Reinigen den Netzstecker. Zum Reinigen des Produkts verwenden Sie das mitgelieferte Reinigungstuch oder ein anderes weiches Tuch (z.B. ein Baumwoll- oder Flanneltuch). Verwenden Sie keine flüssigen Reiniger oder Aerosol-Sprays. 6. Zusatzgeräte/Zubehör—Verwenden Sie ausschließlich vom Hersteller empfohlenes Zubehör etc. Bei Verwendung anderer Zusatzgeräte/Zubehörteile besteht eventuell Unfallgefahr. 7. Wasser und Feuchtigkeit—Benutzen Sie das Gerät nicht in der Nähe von Wasser, wie z.B. neben einer Badewanne, einem Waschbecken, einer Spüle oder Waschwanne, an einem Swimmingpool oder in einem feuchten Keller. 8. Sicherer Stand—Stellen Sie das Produkt nicht auf instabilen Wagen, Gestellen, Stativen oder Tischen usw. auf. Bei instabiler Aufstellung kann das Gerät umkippen, wodurch ernsthafte Personenverletzungen sowie Geräteschäden verursacht werden können. Verwenden Sie nur vom Hersteller empfohlene oder mitgelieferte Wagen, Gestelle, Stative, Halterungen oder Tische. Bei Wandmontage sind die Anleitungen des Herstellers unbedingt zu befolgen. Verwenden Sie ausschließlich vom Hersteller empfohlene Befestigungsteile. 9. Beim Transportieren auf einem Wagen ist äußerste Vorsicht angebracht. Bei plötzlichem Halten, übermäßiger Kraftanwendung und auf unebenem Boden kann das Gerät vom Wagen kippen.  10. Belüftung—Das Gehäuse weist Belüftungsöffnungen wie Schlitze usw. auf. Diese Öffnungen dürfen nicht abgedeckt oder blockiert werden, da ungenügende Belüftung einen Wärmestau und/oder eine Verkürzung der Produktlebensdauer verursachen kann. Stellen Sie das Gerät nicht auf Betten, Sofas, Teppichen oder anderen Unterlagen auf, die die Belüftungsöffnungen blockieren könnten. Das Gerät ist nicht für Einbau bestimmt. Es darf daher nicht an beengten Plätzen wie in Bücherschränken oder Regalen aufgestellt werden, solange keine ausreichende Belüftung gewährleistet oder den Anweisungen des Herstellers nicht entsprochen ist. 11. Spannungsversorgung—Die verwendete Spannungsversorgung muss den Angaben auf dem Typenschild entsprechen. Bitte erkundigen Sie sich bei Ihrem Händler oder beim E-Werk, wenn Sie nicht sicher sind, ob Ihr Haushaltsnetz für das Produkt geeignet ist. 12. Netzkabel-Schutz—Die Netzkabel sind so zu verlegen, dass sie vor Tritten geschützt sind und keine schweren Gegenstände darauf abgestellt werden. Kontrollieren Sie die Kabel insbesondere an den Steckern und am Produkt. 13. Das Plasma Display enthält Glasteile. Es kann brechen, wenn es fallen gelassen oder Druck darauf ausgeübt wird. Im Falle des Falles ist Vorsicht geboten, um sich nicht an Scherben oder Splittern zu verletzen. 14. Überlastung—Netzsteckdosen und Verlängerungskabel dürfen nicht überlastet werden. Bei Überlastung besteht Brand- und Stromschlaggefahr. 15. Eindringen von Objekten und Flüssigkeiten—Es dürfen auf keinen Fall irgendwelche Objekte durch die Gehäuseöffnungen in das Produkt geschoben werden. Im Produkt liegen hohe Spannungen vor. Durch Einschieben von Objekten besteht Stromschlaggefahr und/oder die Gefahr von Kurzschlüssen zwischen den Bauteilen. Aus dem selben Grunde dürfen auch keine Flüssigkeiten auf das Produkt verschüttet werden. 16. Wartung—Versuchen Sie nicht, das Produkt selbst zu warten. Durch Entfernen von Abdeckungen setzen Sie sich hohen Spannungen und anderen Gefährdungen aus. Lassen Sie jegliche Wartung von qualifiziertem Service-Personal ausführen. 17. Reparaturen—In den folgenden Situationen ziehen Sie sofort den Netzstecker und lassen Sie das Produkt von qualifiziertem Service-Personal reparieren. a. Wenn das Netzkabel oder der Netzstecker beschädigt ist. b. Wenn Flüssigkeit auf das Produkt verschüttet wurde oder Fremdkörper eingedrungen sind. c. Wenn das Produkt Regen oder Wasser ausgesetzt war. d. Wenn das Produkt nicht wie in der Bedienungsanleitung beschrieben funktioniert. Nehmen Sie nur die in der Bedienungsanleitung beschriebenen Einstellungen vor. Unsachgemäße, nicht dokumentierte Einstellungen können Schäden verursachen und machen häufig umfangreiche Einstellarbeiten durch einen qualifizierten Service-Techniker erforderlich. e. Wenn das Produkt fallen gelassen oder beschädigt wurde. f. Wenn das Produkt einen anormalen Zustand anzeigt. Jede anormale Erscheinung bedeutet, dass Kundendienst erforderlich ist. 18. Ersatzteile—Wenn Ersatzteile benötigt werden, stellen Sie bitte sicher, dass der Service-Techniker nur die vom Hersteller bezeichneten Teile oder Teile mit gleichen Eigenschaften und gleichem Leistungsvermögen wie die Originalteile verwendet. Bei Verwendung unzulässiger Teile bestehen Brand-, Stromschlag- und/oder andere Gefahren. 19. Sicherheitsprüfung—Lassen Sie vom Service-Techniker nach Service- oder Reparaturarbeiten eine Sicherheitsüberprüfung vornehmen, um sicherzustellen, dass das Produkt in einem einwandfreien Betriebszustand ist. 20. Wand- und Deckenmontage—Bei Wand- oder Deckenmontage ist sicherzustellen, dass diese nach der vom Hersteller empfohlenen Methode durchgeführt wird. 21. Wärmequellen—Stellen Sie das Produkt nicht in der Nähe von Heizkörpern, Heizgeräten, Öfen oder anderen Geräten (einschließlich Verstärkern) auf, die Hitze abstrahlen. 22. Der Bildschirm des Plasma Displays darf keinen starken Erschütterungen oder Stößen ausgesetzt werden. Er kann sonst brechen, wodurch ein Brand oder Personenverletzungen verursacht werden können. 23. Setzen Sie das Plasma Display nicht längere Zeit direkter Sonnenbestrahlung aus. Die optischen Eigenschaften des vorderen Schutzpanels ändern sich sonst, wodurch Verfärbungen und Verzerrungen verursacht werden. 24. Das Plasma Display wiegt beim Modell PDP-42RXE etwa 40 kg. Da das Produkt nur eine geringe Tiefe aufweist und instabil ist, sollten Sie zum Tragen mindestens einen Helfer bemühen und es an den Griffen halten. ZUR BEACHTUNG
\- V erwenden Sie für das Plasma Display stets das jeweils mitgelieferte Netzkabel.Teilebezeichnungen
Plasma Display
Vorderseite 2 3 4 1 5 6 7 8 9 10 1 Taste POWER 2 Anzeige STANDBY 3 Anzeige der momentanen Eingangsquelle 4 Fernbedienungssensor 5 Taste INPUT 6 Taste OK 7 Taste MENU 8 Tasten VOLUME -/+ 9 Tasten CHANNEL -/+ 10 Taste STANDBY/ONRückseite
 Die Anschlusse weisen nach unten. 1 Anschlüsse VIDEO (AUDIO/VIDEO/S-VIDEO) 2 Antenneneingang ANT 3 Anschlüsse AV1/AV2/AV3 (SCART) 4 Anschlüsse COMPONENT (AUDIO/Y/P _B /P _R ) 5 Anschlüsse HDMI (AUDIO/HDMI) 6 Anschluss RS-232C (bei Werksvoreinstellung) 7 Anschluss AC IN (Netzeingang)Fernbedienung
 1: Zeigt den Bildschirm an. 2 INPUT: Zeigt alle vorhandenen Eingangsquellen an. Drücken Sie die Taste ↑ oder ↓, um die zutreffende Eingangsquelle zu wählen. 3 A VSELECTION: Wählt die Bildfunktion (Standard, Dynamisch, Film, Spiele oder Anwender). 4 SOUND EFFECT: Wählt den Klangeffekt (Flach, Sprache, Film, Musik oder Anwender). 5 0-9: TV/Externer Eingangsmodus: Wählt einen Kanal. TELETEXT-Modus: Wählt eine Seite. 6 LIST: Zeigt die Kanalliste an. Drücken Sie die Taste ↑ oder ↓, um den zutreffenden Kanal zu wählen. 7 F arbentasten (ROT/GRÜN/GELB/BLAU): TELETEXT-Modus: Wählt eine Seite. Menümodus (in Bearbeiten der Kanalliste): gestattet das Bearbeiten der Kanalliste. 8 ↑/↓/↔/→: Steuert den Cursor im On-Screen-Menü. 9 CH RETURN: Kehrt zu den vorherigen Kanälen zurück. 10 EXIT: Verlässt jegliches Display. 11 P +/P -: Wechselt den Kanal. 12 ☒: Schaltet den Ton stumm. Um den Ton wieder einzuschalten, drücken Sie die Tasten ☒, ☑ oder -. 13 ♂Stellt die Stromversorgung zum Plasma Display her oder schaltet es auf den Bereitschaftsmodus. 14 📄: Wählt die Bildschirmgröße. 15 CH ENTER: Gibt die Kanäle ein. 16 OK: Führt eine Instruktion aus. 17 MENU: Zeigt das On-Screen-Menü an. 18 BACK: Kehrt zum vorherigen Menübild zurück. 19 ∠ +/∆ -: Zum Einstellen der Lautstärke.  20 SPLIT-Funktionstasten ☐: Wählt den SPLIT-Modus (Aus, PIP, Twin1 oder Twin2). : Wählt die Eingangsquelle für das Subpicture (Bild im Bild). : Wählt die Position des Subpictures. : Tauscht das Hauptbild mit dem Subpicture aus. 21 SLEEP: Einstellen des Timers. 22 FAVOURITE CH: Wählt den Lieblingskanal. 23 I wählt die Toneinstellung. 24 VIDEOTEXT-Funktionstasten TELETEXT (☐): Aktiviert/Deaktiviert den Videotext. INDEX (≡i): Zeigt die Indexseite des Videotextes an. CANCEL (☒): Zeigt das normale Bild an, während die neue Seite des Videotextes geladen wird. REVEAL (≡?): Zeigt verdeckte Informationen an. MIX (☑): Zeigt den Videotext mit dem normalen Bild an. SIZE (3) Wählt die Größe des Videotextfeld. HOLD (☒): Beendet die Aktualisierung der Teletext-Seiten. Drücken Sie die Taste erneut, um die Funktion wieder aufzuheben. SUBPAGE (☐): Suchen Sie die Unterseite mit Hilfe des Subcodes.ZUR BEACHTUNG
\- Wenn Sie die Fernbedienung benutzen richten Sie diese auf das Plasma Display. Installation des Plasma Displays Positionierung
- V ermeiden Sie direkte Sonnenbestrahlung. Achten Sie auf ausreichende Belüftung. - Das Plasma Display ist schwer. Versuchen Sie nicht, es alleine zu tragen, lassen Sie sich helfen. VORSICHT
\- Wenn etwas auf das Plasma Display gestellt oder gelegt wird, erhält dieses zu wenig Belüftung und funktioniert nicht richtig. ZUR BEACHTUNG
\- Beim Installieren oben und hinten genügend freien Raum lassen, damit ausreichende Belüftung der Geräterückseite gewährleistet ist. VORSICHT
Betriebsumgebung
Betriebstemperatur und Betriebsluftfeuchtigkeit: +0°C – +40°C; 80 % rel. Feuchte max. (Ventilationsschlitze nicht blockiert) Eine Aufstellung dieses Gerätes an einem unzureichend belüfteten, sehr feuchten oder heißen Ort ist zu vermeiden, und das Gerät darf weder direkter Sonneneinstrahlung noch starken Kunstlichtquellen ausgesetzt werden.Vermeidung eines Umkippens des Plasma Displays
Vergewissern Sie sich, dass das Plasma Display nicht umkippen kann.Gebrauch einer Wand zur Stabilisierung
1 Bringen Sie die Umfallverhinderungsschrauben (Haken) am Plasma Display an. 2 Verwenden Sie starke Schnüre oder Ketten, um das Gerät auf geeignete Weise sicher an einer Wand, Säule oder einem anderen festen Bauelement zu stabilisieren. - Führen Sie diese Arbeit an beiden Seiten auf die gleiche Weise durch. ZUR BEACHTUNG
\- V erwenden Sie handelsübliche Seile, Ketten und Befestigungsteile.  VORSICHT
- Der vorgesehene Tisch oder Bodenbereich muss ausreichende Festigkeit zum Tragen des Plasma Displays haben. Wenn dies nicht der Fall ist, können Personenverletzungen oder Geräteschäden verursacht werden. - Bei der Installation des Plasma Displays sind entsprechende Vorkehrungen zu treffen, sodass es in Extremfällen, wie z.B. Erdbeben oder Unfällen, nicht herunterfallen oder umkippen kann. - W enn derartige Vorkehrungen unterlassen werden, könnte das Plasma Display herunterfallen und Verletzungen verursachen. • Die Wahl der Sicherungsmittel gegen ein Umkippen, wie z.B. Schrauben, Haken, Ketten usw., hängt von der Beschaffenheit und Dicke der Montagefläche ab. - Bevor Sie sich für eine Sicherungsmethode und die entsprechenden Befestigungsteile entscheiden, sollten Sie zunächst die Dicke und Beschaffenheit der Montagefläche untersuchen. Wenn Sie Zweifel haben, sollten Sie den Rat eines Fachmanns einholen.Vorbereitung der Fernbedienung
Einlegen der Batterien
1 Öffnen Sie den Deckel Batteriefachs.  2 Legen Sie die beiden mitgelieferten Batterien (AAA; 1,5 V) ein.  \- Legen Sie die Batterien polaritätsrichtig gemäß den Markierungen (+) und (−) im Batteriefach ein. 3 Schließen Sie den Deckel Batteriefachs. Vorsichtsmaßregeln zu Batterien
- Die Fernbedienung funktioniert nicht, wenn die eingelegten Batterien leer sind. Legen Sie in diesem Fall neue Batterien ein. - V erwenden Sie keine Manganzellen. Verwenden Sie beim Wechsel der Batterien stattdessen Alkalizellen. - V erwenden Sie Batterien unterschiedlichen Typs nicht zusammen. Unterschiedliche Typen weisen unterschiedliche Eigenschaften auf. - V erwenden Sie alte und neue Batterien nicht gemeinsam. Gemeinsamer Einsatz alter und neuer Batterien kann die Lebensdauer neuer Batterien verkürzen und eventuell ein Auslaufen alter Batterien zur Folge haben. - Lassen Sie keine leeren Batterien in der Fernbedienung. Dadurch kann Batteriesäure austreten. Etwaige ausgetretene Batteriesäure wischen Sie sorgsam mit einem Tuch ab. - Bei den Batterien, die dem Produkt beiliegen, kann die Lebensdauer lagerungsbedingt verkürzt sein. - Wenn die Fernbedienung voraussichtlich längere Zeit nicht benutzt wird, sollten Sie die Batterien entnehmen. VORSICHT
\- BEIM ENTSORGEN VERBRAUCHTER BATTERIEN SIND DIE IM JEWEILIGEN LAND/GEBIET GELTENDEN GESETZLICHEN VORSCHRIFTEN UND UMWELTBESTIMMUNGEN ETC. ZU BEACHTEN.Reichweite der Fernbedienung
Zur Benutzung der Fernbedienung ist diese auf den Fernbedienungssensor in der Mitte unten an der Vorderseite des Plasma Displays zu richten. Der Abstand der Fernbedienung vom Fernbedienungssensor sollte 7 m nicht überschreiten, und ihr Winkel zum Sensor sollte nach rechts oder links innerhalb von 30 Grad liegen. Beim Umgang mit der Fernbedienung zu beachten
- Setzen Sie die Fernbedienung keinen Stößen, Flüssigkeiten oder hoher Feuchtigkeit aus. - Setzen Sie die Fernbedienung nicht direkter Sonnenbestrahlung aus; die Einheit kann dadurch verformt werden. - W enn der Fernbedienungssensor des Plasma Displays direkter Sonnenbestrahlung oder starker Beleuchtung ausgesetzt ist, funktioniert die Fernbedienung unter Umständen nicht richtig. In einem solchen Fall ändern Sie den Lichteinfallwinkel bzw. die Ausrichtung des Plasma Displays, oder betätigen Sie die Fernbedienung in kürzerem Abstand vom Fernbedienungssensor. - Bei Hindernissen im Signalweg zwischen Fernbedienung und Sensor ist ein einwandfreies Ansprechen unter Umständen nicht gewährleistet. - Mit schwächer werdenden Batterien kann der Wirkungsgrad der Fernbedienung abnehmen, d.h. sie funktioniert in diesem Fall nur noch in einer kürzeren Entfernung vom Fernbedienungssensor. Ersetzen Sie die Batterien rechtzeitig durch neue. - V om Bildschirm des Plasma Displays gehen schwache Infrarotstrahlen aus. Wenn Sie in der näheren Umgebung Geräte betreiben, die über Infrarot-Fernbedienungen gesteuert werden, wie z.B. Videorecorder, können diese Instruktionen von den entsprechenden Fernbedienungen unter Umständen nicht richtig oder nicht vollständig empfangen werden. Stellen Sie in diesem Fall die betroffenen Geräte weiter entfernt vom Plasma Display auf. - Je nach Aufstellplatz können Infrarotstrahlen vom Plasma Display richtigen Empfang von Fernbedienungssignalen und den Wirkungsgrad der Fernbedienung beeinträchtigen. Die Stärke der vom Bildschirm abgegebenen Infrarotstrahlen hängt von den jeweils angezeigten Bildern ab.Anschluss einer Antenne
Um ein sauberes Bild zu erhalten, empfiehlt sich der Anschluss einer Außenantenne. Nachstehend finden Sie eine kurze Beschreibung der bei Verwendung eines Koaxialkabels vorzunehmenden Anschlüsse.  \- Das 75-Ohm-Koaxialkabel (Fachhandel) bitte an ANT (Antenneneingang) anschließen. Antennenkabel (Fachhandel) natural_image
Simple line drawing of a mechanical tool or connector (no text or symbols)Anschluss des Netzkabels
Schließen Sie das Netzkabel an, nachdem alle Komponenten angeschlossen sind. Plasma Display (Rückseite)  VORSICHT
- V erwenden Sie ausschließlich das mitgelieferte Netzkabel. - Stellen Sie sicher, dass die Netzspannung den Vorgebungen entspricht; bei Nichteinhaltung der Bestimmungen besteht Stromschlag- und Brandgefahr. - Zum Schutz der Leistungsfähigkeit des Plasma Displays wird ein Netzkabel mit drei Adern mit Erdungskontakt verwendet. Schließen Sie das den Netzstecker stets an eine 3-fach Schutzkontaktsteckdose an und stellen Sie sicher, dass die Leitung richtig geerdet ist. ZUR BEACHTUNG
\- Ziehen Sie den Netzstecker aus der Netzsteckdose heraus, wenn das Plasma Display voraussichtlich längere Zeit nicht benutzt wird.Ein- und Ausschalten (Bereitschaftsmodus)
1 Drücken Sie die Taste POWER unten auf dem Plasma Display, um in den Bereitschaftsmodus zu gelangen. • Die STANDBY-Anzeige leuchtet auf. 2 Drücken Sie 🔒 oder eine Taste zwischen 0 und 9 an der Fernbedienung oder die Taste STANDBY/ON unten auf dem Plasma Display. \- Das Plasma Display ist eingeschaltet. Die STANDBY-Anzeige erlischt und die Anzeige der momentanen Eingangsquelle leuchtet auf. 3 Zum Ausschalten des Plasma Displays drücken Sie 1 Sekunde lang die Taste can der Fernbedienung oder die Taste STANDBY/ ON unten auf dem Plasma Display. - Das Plasma Display wird auf Bereitschaftsmodus geschaltet; statt der Anzeige der momentanen Eingangsquelle leuchtet die STANDBY-Anzeige auf. 4 Um das Plasma Display völlig auszuschalten, drücken Sie die Taste POWER unten auf dem Plasma Display. • Die STANDBY-Anzeige erlischt.ZUR BEACHTUNG
- Wenn Sie das Plasma Display voraussichtliche längere Zeit nicht benutzen, drücken Sie die Taste POWER unten auf dem Plasma Display, um das Gerät völlig auszuschalten. Ziehen Sie außerdem den Netzstecker aus der Netzsteckdose heraus. - Wenn das Plasma Display völlig ausgeschaltet ist, können Sie das Gerät nicht durch Drücken der Taste in der Fernbedienung einschalten. - Wenn das Plasma Display völlig ausgeschaltet ist, kann es durch die Einstellung „Timer Ein“ nicht automatisch wieder eingeschaltet werden.    Fernsehempfang
Empfangbare Fernsehkanäle müssen eingerichtet werden, da sie sonst nicht abgestimmt werden können. Näheres hierzu finden Sie auf Seite 25 unter „Einrichten von Fernsehkanälen“.Wahl der Analogkanäle
Sie können den Eingangsmodus Analogkanäle wählen, indem Sie die Taste INPUT drücken. ZUR BEACHTUNG
\- Wenn Sie den Eingangsmodus wechseln, wird der zuvor gewählte Kanal empfangen.Kanalwechsel
Um die Kanalnummer zu erhöhen, drücken Sie die Taste P + an der Fernbedienung. Um die Kanalnummer zu verringern, drücken Sie die Taste P - . \- CHANNEL +/- am Plasma Display funktioniert wie P +/P - an der Fernbedienung. Beim Betrachten von Videotext: \- Drücken Sie P + zum Erhöhen der Seitennummer. \- Drücken Sie P – zum Verringern der Seitennummer.Mit 0 bis 9 an der Fernbedienung
Wählen Sie die Kanäle direkt durch Drücken der Tasten 0 bis 9.BEISPIEL
\- Zur Wahl von Kanal 5 (einstelliger Kanal) drücken Sie 5. \- Zur Wahl von Kanal 25 (zweistelliger Kanal) drücken Sie 2, dann 5. Beim Betrachten von Videotext: Zum Aufrufen einer Seite mit dreistelliger Nummer zwischen 100 und 899 geben Sie mit 0 bis 9 direkt die entsprechende Nummer ein. Siehe Seite 38. ZUR BEACHTUNG
- Wenn Sie die Taste CH ENTER drücken, nachdem Sie eine Kanalnummer eingegeben haben, können Sie die Kanäle schnell wählen. - Um zum vorherigen Kanal zurückzuschalten, drücken Sie die Taste CH RETURN. Lautstärke- und Toneinstellungen
Um die Lautstärke zu erhöhen, drücken Sie die Taste △ + an der Fernbedienung. Um die Lautstärke zu vermindern, drücken Sie die Taste △ - Die Tasten VOLUME +/- auf dem Plasma Display funktionieren wie die Tasten +/- an der Fernbedienung. - Um die Tonausgabe stumm zu schalten, drücken Sie die Taste "e scheint auf dem Bildschirm. Drücken Sie die Taste mirneut, um die Stummschaltung wieder aufzuheben. Die Stummschaltung kann auch durch Drücken von +/- aufgehoben werden. Plasma Display  Regeln der Lautstärke  Stumm Anzeige von Daten
Die von Ihnen gewählten Kanaldaten und der Einstellungsstatus können angezeigt werden. Drücken Sie die Taste i+. Für Analogkanäle  Für SPLIT  Für externen Eingang  Mit I-an der Fernbedienung  Mit jedem Druck auf I-II wird MTS wie unten gezeigt umgeschaltet. flowchart
graph LR
    A["Modus I"] --> B["Modus II"]
    B --> C["Modus MONO"]
| Einstellungen | ||||
| MONOIII | ||||
| NICAM-Sendungen | Stereo | ATV 1AAA NICAM Stereo | ATV 1AAA NICAM Stereo | ATV 1AAA MONO |
| Zweisprachig | ATV 1BBB NICAM I | ATV 1BBB NICAM II | ATV 1BBB MONO | |
| Mono | ATV 1CCC NICAM Mono | ATV 1CCC NICAM Mono | ATV 1CCC MONO | |
| A2-Sendungen | Stereo | ATV 1DDD Stereo | ATV 1DDD Stereo | ATV 1DDD MONO |
| Zweisprachig | ATV 1EEE DUAL I | ATV 1EEE DUAL II | ATV 1EEE MONO | |
| Mono | ATV 1FFF MONO | ATV 1FFF MONO | ATV 1FFF MONO | |
ZUR BEACHTUNG
- Bei jedem mit der Taste I-II gewählten Tonmultiplexmodus ändert sich das Display in Abhängigkeit von den empfangenen Sendesignalen. - Nachdem der Modus MONO gewählt worden ist, bleibt das Plasma Display-System auf Mono geschaltet, auch wenn das System ein Programm in Stereo empfängt. Wenn Sie wieder Stereo hören möchten, müssen Sie auf den Modus I oder II umschalten. - Wenn Sie einen Tonmultiplexmodus wählen, während die Eingangsprogrammquelle AV1, AV2, AV3, S-VIDEO, VIDEO, KOMPONENT oder HDMI ist, ändert sich der Tontyp nicht. In diesem Fall wird der Ton durch die Video-Programmquelle bestimmt.Multiscreen-Funktionen
Sie können das Subpicture innerhalb des Hauptbilds anzeigen lassen. Auf diese Weise können Sie fernsehen oder den Videoeingang jedes angeschlossenen Geräts kontrollieren, während Sie fernsehen oder sich ein Video ansehen. Um diese Funktion zu benutzen, folgen Sie den unten genannten Schritten, um den Modus Twin (2 Bilder nebeneinander) oder den Modus PIP (Bild-in-Bild) zu wählen. ZUR BEACHTUNG
\- Bei der Multiscreen-Funktion wird immer der Ton des Hauptprogramms ausgegeben. PIP (Bild-in-Bild) natural_image
Black-and-white photo of baseball players in action on a field, with inset close-up showing close-ups of the ball (no visible text or symbols)natural_image
Black-and-white photo collage showing baseball and a soccer match, with no visible text or symbols in the main subjects.ZUR BEACHTUNG
- Sie können die Modi wählen, indem Sie die Taste ☐ der Fernbedienung drücken. - Sie können die Quellen wählen, indem Sie die Taste ^a der Fernbedienung drücken. - Im Modus Twin oder PIP drücken Sie die Taste 📂m die Position der beiden Bilder zu wechseln. natural_image
Sequence of black-and-white photos showing a baseball pitcher in action, with spectators watching and a sailboat on the water (no text or symbols)Die Wahl von „PIP“ in Schritt 5
Sie können die Position des Bild-in-Bild-Displays ändern. Drücken Sie die Taste ↑ oder ↓, um zu PIP-Position zu gelangen. Drücken Sie dann die Taste → oder OK.  flowchart
graph TD
    A["(Oben links)"] --> B["(Oben rechts)"]
    B --> C["(Unten rechts)"]
    C --> D["(Unten links)"]
    D --> E["(Oben links)"]
ZUR BEACHTUNG
\- Um das Subpicture auszuschalten, drücken Sie die Taste EXIT an der Fernbedienung. • Die Multiscreen-Funktion steht für folgende Kombinationen zur Verfügung: ANALOG-KAN - AV1/2/3, S-VIDEO, VIDEO KOMPONENT oder HDMI Menükonfiguration| Menü Home | Gegenstand | Seite |
| Tuner-Setup | Kanäle suchen | 25 |
| Analog-Kanäle suchen | 25 | |
| Bearbeit. Kanal-Liste | 26 |
| Bild AV-Wahl 28 | ||
| Helligkeit 29 | ||
| Kontrast 29 | ||
| Schärfe 29 | ||
| Farbsätt. 29 | ||
| Tint 29 | ||
| Rauschreduzier. 29 | ||
| Farb-Temp. 29 |
| Ton | Effekt | 30 |
| Bass | 30 | |
| Höhen | 30 | |
| Balance | 30 | |
| Autom. Lautstärke | 30 | |
| SRS TruSurround XT | 30 |
| Bildschirm | Schirmgröße | 31 |
| Haupteingang | 31 | |
| PIP/TWIN | 22, 23 | |
| AV1-Eingang | 32 | |
| AV2-Ausgang | 32 | |
| Schirmschoner | 33 |
| System Menüsprache | 32 | |
| Videotextsprache | 32 | |
| Einstellen der Uhr | 27 |
Menübedienung
Im Folgenden wird das typische Verfahren zur Einrichtung der Menüs beschrieben. Bezüglich der genauen Verfahren siehe jeweils zutreffende Seiten für die einzelnen Funktionen.  1 Drücken Sie die Taste MENU. 2 Drücken Sie ↑ oder ↓ zum Wählen eines Menüpunkts. Drücken Sie dann die Taste → oder OK. 3 Wiederholen Sie Schritt 2, bis Sie Zugriff zum gewünschten Untermenü-Punkt haben. \- Die Anzahl der Menüebenen ist je nach Menüpunkt unterschiedlich. 4 Drücken Sie ↑ oder ↓ zum Wählen einer Option (oder eines Parameters). Drücken Sie dann die Taste → oder OK. \- Bei manchen Menüpunkten drücken Sie ← oder → anstelle von ↑ oder ↓. 5 Drücken Sie die Taste EXIT zum Verlassen des Menüs.ZUR BEACHTUNG
\- Sie können zu den oberen Menüebenen zurückgehen, indem Sie die Taste BACK drücken.Einrichten von Fernsehkanälen
In diesem Abschnitt finden Sie eine Beschreibung, wie Sie Fernsehkanäle suchen und einrichten, die Sie unter den aktuellen Bedingungen sehen können. Wenn Sie nicht die Fernsehkanäle mit der Funktion Kanäle suchen einrichten, können Sie evtl. nicht in der Lage sein, Kanäle abzustimmen.Automatisch Kanäle absuchen
Sie können automatisch Kanäle für die verfügbaren Frequenzbereiche absuchen. 1 Drücken Sie die Taste MENU. 2 Drücken Sie die Taste ↑ oder ↓, um zu Tuner-Setup zu gelangen. Drücken Sie dann die Taste → oder OK.  3 Wählen Sie Kanäle suchen und drücken Sie die Taste → oder OK. 4 Wählen Sie Land und drücken Sie die Taste → oder OK. 5 Drücken Sie die Taste ↑ oder ↓, um zum gewünschten Land oder Gebiet zu gelangen. Drücken Sie dann die Taste ← oder BACK. \- Sie können unter den folgenden 22 Ländern oder Gebieten wählen: Österreich, Belgien, Dänemark, Finnland, Frankreich, Deutschland, Griechenland, Irland, Italien, Luxemburg, Niederlande, Norwegen, Polen, Portugal, Russland, Spanien, Schweden, Schweiz, Türkei, GB, Osteuropa und Westeuropa. 6 Gehen Sie zu Start, indem Sie die Taste ↑ oder ↓ drücken, und starten Sie die Suche durch Drücken der Taste → oder OK.  Die Suche startet. Die abgesuchten Kanäle werden automatisch der Reihe nach gespeichert. Drücken Sie die Taste BACK zum Stoppen der Suche. 7 Wenn der Suchlauf beendet ist, drücken Sie die Taste EXIT.ZUR BEACHTUNG
\- Bei Verwendung des Kabelkonverters kann es erforderlich sein, die Kabelkonverter-Ausgangskanäle manuell hinzuzufügen.Manuelles Absuchen der Analogkanäle
Sie können wählen, ob Sie die Kanäle speichern wollen. 1 Drücken Sie die Taste MENU. 2 Drücken Sie die Taste ↑ oder ↓, um zu Tuner-Setup zu gelangen. Drücken Sie dann die Taste → oder OK. 3 Drücken Sie die Taste ↑ oder ↓, um zu Analog-Kanäle suchen zu gelangen. Drücken Sie dann die Taste → oder OK.  4 Wählen Sie Farbsystem und drücken Sie die Taste → oder OK. 5 Drücken Sie die Taste ↑ oder ↓, um das gewünschte Farbsystem zu wählen (Auto, PAL oder SECAM). Drücken Sie dann die Taste ← oder BACK. 6 Drücken Sie die Taste ↑ oder ↓ zum Wählen des Audiosystem. Drücken Sie dann die Taste → oder OK. 7 Drücken Sie die Taste ↑ oder ↓, um das gewünschte Audiosystem zu wählen (BG, I, DK, L oder L'). Drücken Sie dann die Taste ← oder BACK. 8 Drücken Sie die Taste ↑ oder ↓ zum Wählen des Freq.b. Drücken Sie dann die Taste → oder OK. 9 Drücken Sie die Taste ↑ oder ↓, um das gewünschte Frequenzband zu wählen (VHF/UHF oder Kabel), und drücken Sie die Taste ← oder BACK. 10 Gehen Sie zu Programm, indem Sie die Taste ↑ oder ↓ drücken und wählen Sie die Kanalnummer durch Drücken der Taste ← oder →. Oder drücken Sie die Taste ↑ oder ↓, um zu Suche zu gelangen und suchen Sie den Kanal durch Drücken der Taste ← oder →.  11 Drücken Sie die Taste ↑ oder ↓, um auf Programm-Nr. zu gehen und wählen Sie das Programm durch Drücken der Taste ←, → oder 0 bis 9. 12 Drücken Sie die Taste ↑ oder ↓, um zu Speichern zu gelangen. Drücken Sie dann die Taste → oder OK. - Sie können den gewählten Kanal empfangen. 13 Wenn Sie den Kanalnamen bearbeiten wollen, drücken Sie die Taste ↑ oder ↓, um zu Kanalname zu gelangen. Drücken Sie dann die Taste → oder OK.  14 Drücken Sie die Taste ↑ oder ↓, um einen Buchstaben (A\~Z, a\~z), eine Ziffer (0\~9) oder ein Symbol (Leertaste, {I}\~! "#\$%& '()\*+,-./;; <=>?@[N]^\_) zu wählen. Gehen Sie zum jeweils vorherigen oder nächsten Buchstaben, indem Sie die Taste ← oder → drücken. 15 Wenn Sie die Eingabe des Kanalnamens beendeet haben, drücken Sie die Taste OK. 16 Drücken Sie die Taste ↑ oder ↓, um zu Speichern zu gelangen. Drücken Sie dann die Taste → oder OK. 17 Wenn Sie die Abstimmung justieren wollen, drücken Sie die Taste ↑ oder ↓, um zu Feinabstimm. zu gelangen. Drücken Sie dann die Taste → oder OK, um eine gute Bild- und Tonqualität zu erhalten.  18 Drücken Sie die Taste ↑ oder ↓, um zu Speichern zu gelangen. Drücken Sie dann die Taste → oder OK. 19 Drücken Sie die Taste EXIT. ZUR BEACHTUNG
- Die Funktion „Analog-Kanäle suchen“ steht nur zur Verfügung, wenn die Eingangsquelle auf „ANALOG CH“ gestellt ist. (Siehe Seite 19.) - Sie können auch die Kanalnummer durch direktes Drücken der Zifferntlasten wählen.Bearbeit. Kanal-Liste
1 Drücken Sie die Taste MENU. 2 Drücken Sie die Taste ↑ oder ↓, um zu Tuner-Setup zu gelangen. Drücken Sie dann die Taste → oder OK. 3 Drücken Sie die Taste ↑ oder ↓, um zu Bearbeit. Kanal-Liste zu gelangen. Drücken Sie dann die Taste → oder OK.  Die Kanalliste wird angezeigt. 4 Wählen Sie den gewünschten Kanal durch Drücken der Taste ↑ oder ↓, und drücken Sie die Tasten für Farbsättigung (ROT/GRÜN/GELB/BLAU) zum Löschen, Kopieren, Verschieben oder Überspringen des Programms. Löschen eines Kanals
- Wählen Sie einen Kanal zum Löschen mit den Tasten ↑ oder ↓. - Drücken Sie die Taste ROT. Wenn Sie die Taste ROT erneut drücken, wird der gewählte Kanal gelöscht.Kopieren eines Kanals
– Wählen Sie einen Kanal zum Kopieren mit den Tasten ↑ oder ↓. – Drücken Sie die Taste GRÜN.Verschieben eines Kanals
- Wählen Sie einen Kanal zum Verschieben mit den Tasten ↑ oder ↓. - Drücken Sie die Taste GELB zum Wählen des zu verschieben gewünschten Kanals. Verwenden Sie die Tasten ↑ oder ↓ zum Verschieben des Kanals zur gewünschten Position, und drücken Sie die Taste GELB erneut zum Speichern.Überspringen eines Kanals
– Wählen Sie einen Kanal zum Überspringen mit den Tasten ↑ oder ↓. - Drücken Sie die Taste BLAU, und der gewählte Kanal wechselt auf blaue Farbe. Danach werden diese Kanäle übersprungen, wenn die Tasten P+/P- verwendet werden. – Zum Zurückschalten zum Normalzustand wählen Sie den übersprungenen Kanal und drücken die Taste BLAU erneut 2 oder 3 Sekunden lang. 5 Wenn Sie Kanäle schnell und leicht finden wollen, während Sie fernsehen, wählen Sie den gewünschten Kanal durch Drücken der Taste ↑ oder ↓, und drücken dann die Taste FAVOURITE CH. Der gewählte Kanal wird mit der Anzeige von „FAV“ angezeigt. Drücken Sie die Taste FAVOURITE CH wiederholt, um von einem bevorzugten Kanal zu einem anderen zu springen. 6 Drücken Sie die Taste EXIT. ZUR BEACHTUNG
- Drücken Sie die Tasten P + / P_- , um zur nächsten oder vorhergehenden Seite zu gelangen. • Die Kanalliste zeigt die von der Kanäle-Absuchen-Funktion gefundenen Kanäle an. Wenn Sie den Lieblingskanal-Modus annullieren wollen, drücken Sie die Taste FAVOURITE CH. während „FAV“ erscheint.Die Kanalliste anzeigen
Sie können eine Liste aller Kanäle anzeigen. 1 Drücken Sie die Taste LIST. • Die Kanalliste wird angezeigt.  2 Zum Abstimmen eines spezifischen Kanals in der Kanalliste bewegen Sie den Cursor zum erforderlichen Kanal, indem Sie die Taste ↑ oder ↓ drücken. Drücken Sie dann die Taste OK.ZUR BEACHTUNG
\- Drücken Sie die Tasten P + / P - , um zur nächsten oder vorhergehenden Seite zu gelangen.Einstellen des aktuellen Datums und der Uhrzeit
Sie können das aktuelle Datum und die Zeit so einstellen, dass die aktuelle Zeit angezeigt wird, wenn die Taste ☐ zur Anzeige von Information gedrückt wird. 1 Drücken Sie die Taste MENU. 2 Drücken Sie die Taste ↑ oder ↓, um zu System zu gelangen. Drücken Sie dann die Taste → oder OK.  3 Drücken Sie die Taste ↑ oder ↓, um zu Einstellen der Uhr zu gelangen. Drücken Sie dann die Taste → oder OK erneut.  4 Wählen Sie Datum und drücken Sie die Taste → oder OK. 5 Drücken Sie die Taste ← oder →, um zu Tag, Mon (Monat) und Jahr zu gelangen, und nehmen Sie die Einstellungen durch Drücken der Taste ↑ oder ↓ vor. 6 Wenn die Bedienung beendet ist, drücken Sie die Taste OK. 7 Drücken Sie die Taste ↑ oder ↓, um zu Zeit zu gelangen. Drücken Sie dann die Taste → oder OK.  8 Drücken Sie die Taste ← oder →, um zu Stunde/Min zu gelangen, nehmen Sie die Einstellungen durch Drücken der Taste ↑ oder ↓ vor, und drücken Sie dann die Taste OK. 9 Drücken Sie die Taste EXIT.09 Justierungen und Einstellungen
Timer
Sie können einen Zeitraum von 10 bis 240 Minuten wählen, nach dem das Plasma Display automatisch auf Bereitschaftsmodus schaltet. 1 Drücken Sie die Taste MENU. 2 Drücken Sie die Taste ↑ oder ↓, um zu System zu gelangen. Drücken Sie dann die Taste → oder OK.  3 Wählen Sie Einstellen der Uhr, und drücken Sie dann erneut die Taste → oder OK. 4 Drücken Sie die Taste ↑ oder ↓, um zu Timer. Drücken Sie dann die Taste → oder OK. 5 Drücken Sie die Taste ↑ oder ↓, um das vorgegebene Zeitintervall wie folgt zu wählen. Drücken Sie dann die Taste ← oder BACK. Aus - 10 Min - 20 Min - 30 Min - 60 Min - 120 Min - 180 Min - 240 Min  6 Drücken Sie die Taste EXIT. ZUR BEACHTUNG
\- Sie können die Timer-Zeit wählen, indem Sie die Taste SLEEP an der Fernbedienung drücken.Bild-Einstellungen
Wahl der Bildfunktion
Sie können die Bildfunktion wählen, die Ihren Betrachtungsbedingungen am besten entspricht. 1 Drücken Sie die Taste MENU. 2 Drücken Sie die Taste ↑ oder ↓, um zu Bild zu gelangen. Drücken Sie dann die Taste → oder OK. 3 Wählen Sie AV-Wahl, und drücken Sie dann die Taste → oder OK erneut. 4 Drücken Sie die Taste ↑ oder ↓, um die gewünschte Bildfunktion wie folgt zu wählen. Drücken Sie dann die Taste ← oder BACK. Standard - Dynamisch - Film - Spiele - Anwender Gegenstand Beschreibung
Standard Für ein hoch definiertes Bild in einem normal hellen Raum Dynamisch Für ein sehr scharfes Bild mit maximalem Kontrast Film Für einen Film Spiele Verringert die Helligkeit für leichteres Betrachten. Anwender Erlaubt es dem Anwender, die Einstellung nach Bedarf anzupassen. Sie können den Modus für jede Eingangsquelle einstellen. 5 Drücken Sie die Taste EXIT. ZUR BEACHTUNG
\- Sie können die Modi wählen, indem Sie die Taste AV SELECTION an der Fernbedienung drücken.Anpassen der Bildeinstellungen
Dieses Plasma Display hat mehrere Einstellungsoptionen, die die Steuerung der Bildqualität erlauben. 1 Drücken Sie die Taste MENU. 2 Drücken Sie die Taste ↑ oder ↓, um zu Bild zu gelangen. Drücken Sie dann die Taste → oder OK. 3 Drücken Sie die Taste ↑ oder ↓, um die gewünschte Option wie folgt zu wählen. Drücken Sie dann die Taste → oder OK. Helligkeit - Kontrast - Schärfe - Farbsätt. - Tint  Ein waagerechter Balken erscheint. Drücken Sie die Taste ← oder →, bis Sie die optimale Einstellung erzielen. Zm Wählen anderer Optionen drücken Sie die Taste ↑ oder ↓.| Gegenstand | Taste ← | Taste ➔ |
| Helligkeit | Für geringere Helligkeit Für mehr Helligkeit | |
| Kontrast | Für weniger Kontrast | Für mehr Kontrast |
| Schärfe | Für geringere Schärfe Für mehr Schärfe | |
| Farbsätt. | Für geringere Farbintensität Für mehr Farbintensität | |
| Tint | Hauttöne wirken violett Hauttöne wirken gefärbt grünlich | |
ZUR BEACHTUNG
\- Wenn Sie Änderungen an den Optionen vornehmen, wird der Bild-Modus automatisch auf Anwender umgeschaltet.Verwendung des Rauschreduzierung-Merkmals
1 Drücken Sie die Taste MENU. 2 Drücken Sie die Taste ↑ oder ↓, um zu Bild zu gelangen. Drücken Sie dann die Taste → oder OK. 3 Drücken Sie die Taste ↑ oder ↓, um zu Rauschreduzier. zu gelangen. Drücken Sie dann die Taste → oder OK. 4 Drücken Sie die Taste ↑ oder ↓, um die gewünschte Option wie folgt zu wählen. Drücken Sie dann die Taste ← oder BACK. Ein - Aus  5 Drücken Sie die Taste EXIT.ZUR BEACHTUNG
\- Wenn Sie Änderungen an den Optionen vornehmen, wird „AV-Wahl“ automatisch auf Anwender umgeschaltet.Einstellen der Farbtemperatur
Sie können den Tint des Bildschirms nach Wunsch einstellen. 1 Drücken Sie die Taste MENU. 2 Drücken Sie die Taste ↑ oder ↓, um zu Bild zu gelangen. Drücken Sie dann die Taste → oder OK. 3 Drücken Sie die Taste ↑ oder ↓, um zu Farb-Temp. zu gelangen. Drücken Sie dann die Taste → oder OK.  4 Drücken Sie die Taste ↑ oder ↓, um die gewünschte Option wie folgt zu wählen. Drücken Sie dann die Taste ← oder BACK. Hoch - Mittel - Tief | Gegenstand | Beschreibung |
| Hoch | Weiß mit bläulichem Ton |
| Mittel | Natürlicher Ton |
| Tief | Weiß mit rötlichem Ton |
09 Justierungen und Einstellungen
Wahl des Klangeffekts
Sie können den zu verwendenden Klangeffekt wählen. 1 Drücken Sie die Taste MENU. 2 Drücken Sie die Taste ↑ oder ↓, um zu Ton zu gelangen. Drücken Sie dann die Taste → oder OK. 3 Wählen Sie Effekt und drücken Sie dann die Taste → oder OK erneut. 4 Drücken Sie die Taste ↑ oder ↓, um den gewünschten Klangeffekt wie folgt zu wählen. Drücken Sie dann die Taste ← oder BACK. Flach - Sprache - Film - Musik - Anwender  Gegenstand Beschreibung| Flach | Flacher und reiner Ton. |
| Sprache Geeignet für Programme mit Sprache, wie Nachrichten usw. | |
| Film | Sie können Klangeffekte wie in einem modernen Kino genießen. |
| Musik | Geeignet für ein Musikprogramm. |
| Anwender | Erlaubt es dem Anwender, die Einstellung nach Bedarf anzupassen. |
ZUR BEACHTUNG
\- Sie können die Modi wählen, indem Sie die Taste SOUND EFFECT an der Fernbedienung drücken.Anpassen der Toneinstellungen
Dieses Plasma Display hat mehrere Einstellungsoptionen, die eine Steuerung der Tongualität erlauben. 1 Drücken Sie die Taste MENU. 2 Drücken Sie die Taste ↑ oder ↓, um zu Ton zu gelangen. Drücken Sie dann die Taste → oder OK. 3 Drücken Sie die Taste ↑ oder ↓, um die gewünschte Option zu wählen (Bass, Höhen oder Balance). 4 Drücken Sie die Taste ← oder →, bis Sie die optimale Einstellung erreicht haben. Bass: 0\~100 Höhen: 0\~100 Balance: L50\~0\~R50  Gegenstand Taste ← Taste → Bass Für schwächeren Bass Für stärkeren Bass Höhen Für schwächere Höhen Für stärkere Höhen Balance Verringert den Ton vom Verringert den Ton vom rechten Lautsprecher linken Lautsprecher 5 Drücken Sie die Taste EXIT. ZUR BEACHTUNG
\- Wenn Sie Änderungen an „Bass“ oder den „Höhen“ vornehmen, wird der „Effekt“ automatisch auf „Anwender“ umgeschaltet. Wenn Sie aber Änderungen an den „Balance“ vornehmen, wird der „Effekt“ nicht umgeschaltet.Automatische Einstellung der Lautstärke
Dieses Merkmal erlaubt es Ihnen, automatisch die Lautstärke jedes Kanals durch Senken der Tonausgabe einzustellen, wenn das Modulationssignal hoch ist oder durch Anheben der Tonausgabe wenn das Modulationssignal niedrig ist. 1 Drücken Sie die Taste MENU. 2 Drücken Sie die Taste ↑ oder ↓, um zu Ton zu gelangen. Drücken Sie dann die Taste → oder OK. 3 Wählen Sie Autom. Lautstärke, und drücken Sie dann die Taste → oder OK erneut. 4 Drücken Sie die Taste ↑ oder ↓, um die gewünschte Option (Ein oder Aus) zu wählen. Drücken Sie dann die Taste ← oder BACK.  5 Drücken Sie die Taste EXIT.Einstellen des Surround-Klangs
Sie können den virtuellen Surround-Klangeffekt genießen. 1 Drücken Sie die Taste MENU. 2 Drücken Sie die Taste ↑ oder ↓, um zu Ton zu gelangen. Drücken Sie dann die Taste → oder OK. 3 Drücken Sie die Taste ↑ oder ↓, um zu zu SRS TruSurround XT zu gelangen. Drücken Sie dann die Taste → oder OK. 4 Drücken Sie die Taste ↑ oder ↓, um die gewünschte Option (Ein oder Aus) zu wählen. Drücken Sie dann die Taste ← oder BACK. 5 Drücken Sie die Taste EXIT.
SRS(●) ist ein Warenzeichen von SRS Labs, Inc. TruSurround XT Technologie wird unter Lizenz von SRS Labs, Inc. mit eingeschlossen.Ändern der Bildschirmgröße
Sie können das Seitenverhältnis des Bildschirms entsprechend den Betrachtungsanforderungen einstellen. 1 Drücken Sie die Taste MENU. 2 Drücken Sie die Taste ↑ oder ↓, um zu Bildschirm zu gelangen. Drücken Sie dann die Taste → oder OK. 3 Wählen Sie Schirmgröße, und drücken Sie dann die Taste → oder OK erneut. 4 Drücken Sie die Taste ↑ oder ↓, um das gewünschte Seitenverhältnis wie folgt zu wählen. Drücken Sie dann die Taste ← oder BACK. Auto - 4:3 - Voll - Breitbild - Zoom - Voll 14:9 - Kino 14:9  flowchart
graph TD
    A["4:3"] --> B["Auto"]
    A --> C["Voll"]
    B --> D["Kino 14:9"]
    C --> E["Breitbild"]
    D --> F["Voll14:9"]
    E --> G["Zoom"]
    F --> G
| Auto In diesem Modus wählt das Plasma Display automatisch eine geeignete Schirmgröße, wenn die empfangenen Videosignale WSS (Breitbild-Signal) Information enthält. | |
| 4:3 Für 4:3 „Standard“-Bilder. Eine Seitenmaske erscheint an beiden Seiten. | |
| Voll Für 16:9 gestauchte Bilder. | |
| Breitbild In diesem Modus wird das Bild progressiv zu den Seiten des Bildschirms ausgedehnt. | |
| Zoom Für 16:9 Letterbox-Bilder. Balken können bei bestimmten Programmen oben und unten im Bild erscheinen. | |
| Voll 14:9 | Für 14:9 gestauchte Bilder. Eine dünne Seitenmaske erscheint an beiden Seiten. |
| Kino 14:9 Für 14:9 Letterbox-Bilder. Eine dünne Seitenmaske erscheint an beiden Seiten, und Sie könnten auch bei bestimmten Programmen Balken oben und unten im Bild sehen. | |
5 Drücken Sie die Taste EXIT.
ZUR BEACHTUNG
\- Sie können die Modi wählen, indem Sie die Taste mit der Fernbedienung drücken.Betrachten der Eingangsquelle
Wenn Sie Ihre Audio- und Videosysteme angeschlossen haben, können Sie verschiedene Quellen durch Wählen des entsprechenden Eingangs betrachten. 1 Drücken Sie die Taste MENU. 2 Drücken Sie die Taste ↑ oder ↓, um zu Bildschirm zu gelangen. Drücken Sie dann die Taste → oder OK. 3 Drücken Sie die Taste c oder d, um zum Haupteingang zu gelangen. Drücken Sie dann die Taste → oder OK. 4 Drücken Sie die Taste ↑ oder ↓, um die gewünschte Eingangsquelle wie folgt zu wählen. Drücken Sie dann die Taste OK. ANALOG-KAN - AV1 - AV2 - AV3 - S-VIDEO - VIDEO - KOMPONENT - HDMI  \- Das Plasma Display schaltet auf die gewählte Quelle um.5 Drücken Sie die Taste EXIT.
ZUR BEACHTUNG
\- Sie können die Quellen wählen, indem Sie die Taste INPUT an der Fernbedienung drücken.Wahl eines Eingangssignaltyps
Nach dem Anschließen des Geräts an den AV1-Anschluss legen Sie den Typ der von den angeschlossenen Geräten zu empfangenen Videosignale fest. 1 Drücken Sie die Taste MENU. 2 Drücken Sie die Taste ↑ oder ↓, um zu Bildschirm zu gelangen. Drücken Sie dann die Taste → oder OK. 3 Drücken Sie die Taste ↑ oder ↓, um zu AV1-Eingang zu gelangen. Drücken Sie dann die Taste → oder OK. 4 Drücken Sie die Taste ↑ oder ↓, um den Signaltyp (VIDEO oder S-VIDEO) zu wählen, und drücken Sie dann die Taste ← oder BACK.  5 Drücken Sie die Taste EXIT.Wahl einer Ausgangsquelle
Nach dem Anschließen des Geräts an den AV2-Anschluss legen Sie die zum angeschlossenen Gerät auszugebende Quelle fest. 1 Drücken Sie die Taste MENU. 2 Drücken Sie die Taste ↑ oder ↓, um zu Bildschirm zu gelangen. Drücken Sie dann die Taste → oder OK. 3 Drücken Sie die Taste ↑ oder ↓, um zum AV2-Ausgang zu gelangen. Drücken Sie dann die Taste → oder OK. 4 Drücken Sie die Taste ↑ oder ↓, um die gewünschte Quelle wie folgt zu wählen. Drücken Sie dann die Taste ← oder BACK. ANALOG-KAN - AV1 - AV2 - AV3 - S-VIDEO - VIDEO  5 Drücken Sie die Taste EXIT.Einstellen der für die Sprache der On-Screen-Anzeige
Sie können eine Sprache für die On-screen-Anzeige wie Menüs unter den folgenden Sprachen wählen: Englisch, Deutsch, Italienisch, Spanisch, Französisch, Holländisch, Schwedisch, Russisch und Türkisch. 1 Drücken Sie die Taste MENU. 2 Drücken Sie die Taste ↑ oder ↓, um zu System zu gelangen. Drücken Sie dann die Taste → oder OK. 3 Drücken Sie die Taste ↑ oder ↓, um zu Menüsprache zu gelangen. Drücken Sie dann die Taste → oder OK. 4 Drücken Sie die Taste ↑ oder ↓, um die gewünschte Sprache wie folgt zu wählen. English - Deutsch - Italiano - Español - Français - Nederlands - Svenska - Русский - Türkçe  5 Drücken Sie die Taste EXIT.Einstellen der für die Videotextsprache
Für die im Videotext-Modus verwendete Sprache können Sie unter den folgenden Sprachen wählen: Westeuropa, Osteuropa, Griechenland/Türkei, Russland und Arabien. 1 Drücken Sie die Taste MENU. 2 Drücken Sie die Taste ↑ oder ↓, um zu System zu gelangen. Drücken Sie dann die Taste → oder OK. 3 Drücken Sie die Taste ↑ oder ↓, um zu Videotextsprache zu gelangen. Drücken Sie dann die Taste → oder OK. 4 Drücken Sie die Taste ↑ oder ↓, um die gewünschte Sprache wie folgt zu wählen. Osteuropa - Westeuropa - Gr/Tk - Russland - Arabien  5 Drücken Sie die Taste EXIT.Schirmschoner
Sie können zeitweiliges oder permanentes Bildschirm-Einbrennen durch Standbilder vermeiden. 1 Drücken Sie die Taste MENU. 2 Drücken Sie die Taste ↑ oder ↓, um zu Bildschirm zu gelangen. Drücken Sie dann die Taste → oder OK.  3 Drücken Sie die Taste ↑ oder ↓, um zu Schirmschoner zu gelangen. Drücken Sie dann die Taste → oder OK. 4 Wählen Sie Orbiter, und drücken Sie dann die Taste → oder OK erneut.  5 Drücken Sie die Taste ↑ oder ↓, um die gewünschte Option (Ein oder Aus) zu wählen. Drücken Sie dann die Taste ← oder BACK. 6 Drücken Sie die Taste ↑ oder ↓, um zu Orbiter-Bereich zu gelangen. Drücken Sie dann die Taste → oder OK. 7 Drücken Sie die Taste ↑ oder ↓, um die gewünschte Option wie folgt zu wählen. Drücken Sie dann die Taste ← oder BACK. Klein - Mittel - Groß  8 Drücken Sie die Taste EXIT.Einstellen des Vollweiß-Modus
Bei langer Anzeige eines Standbildes empfehlen wir, „Vollweiß“ auf „Ein“ zu stellen, um kurzzeitiges oder permanentes Bildschirm-Einbrennen zu vermeiden. 1 Folgen Sie Schritt 1 bis 3 in „Schirmschoner“. 2 Drücken Sie die Taste ↑ oder ↓, um zu Vollweiß zu gelangen. Drücken Sie dann die Taste → oder OK. 3 Drücken Sie die Taste ↑ oder ↓, um „Ein“ zu wählen.ZUR BEACHTUNG
\- Wenn Sie den Vollweiß-Modus annullieren, drücken Sie die Taste EXIT. Der Modus wird auch nach 20 Minuten annulliert.Stromsteuerung
Stromsteuerung bietet praktische Funktionen zum Stromsparen.Automatisches Ausschalten des Plasma Display
1 Drücken Sie die Taste MENU. 2 Drücken Sie die Taste ↑ oder ↓, um zu System zu gelangen. Drücken Sie dann die Taste → oder OK.  3 Wählen Sie Einstellen der Uhr, und drücken Sie dann die Taste → oder OK erneut. 4 Drücken Sie die Taste ↑ oder ↓, um zu Auto-Ausschalten zu gelangen. Drücken Sie dann die Taste → oder OK.  5 Drücken Sie die Taste ↑ oder ↓, um die gewünschte Option (Ein oder Aus) zu wählen. Drücken Sie dann die Taste ← oder BACK. 6 Drücken Sie die Taste EXIT.ZUR BEACHTUNG
\- Wenn „Auto-Ausschalten“ auf „Ein“ gestellt ist, schaltet das Plasma Display automatisch auf Bereitschaftsmodus um, wenn 15 Minuten kein Signal anliegt.09 Justierungen und Einstellungen
Einstellen der Plasma Display Einschaltzeit
Sie können die Einschaltzeit einstellen, sodass das Plasma Display automatisch zur gewählten Zeit einschaltet. 1 Drücken Sie die Taste MENU. 2 Drücken Sie die Taste ↑ oder ↓, um zu System zu gelangen. Drücken Sie dann die Taste → oder OK. 3 Wählen Sie Einstellen der Uhr und drücken Sie dann die Taste → oder OK erneut. 4 Gehen Sie zu Timer Ein durch Drücken der Taste ↑ oder ↓. Drücken Sie dann die Taste → oder OK.  5 Drücken Sie die Taste ↑ oder ↓, um Ein zu wählen. Drücken Sie dann die Taste ← oder BACK. 6 Drücken Sie die Taste OK erneut. Drücken Sie die Taste ← oder →, um zu Stunde und Minunte zu gelangen, und nehmen Sie die Einstellungen durch Drücken der Taste ↑ oder ↓ vor. Drücken Sie dann die Taste OK.  7 Drücken Sie die Taste EXIT. ZUR BEACHTUNG
\- Wenn Sie den Timer Ein eingestellt haben, wird durch Drücken der Taste → auf Timer Ein oder Aus geschaltet, und durch Drücken der Taste OK wird die Zeit in Schritt 4 geändert.Einstellen der Plasma Display Ausschaltzeit
Sie können die Ausschaltzeit einstellen, sodass das Plasma Display automatisch zur gewählten Zeit ausschaltet. 1 Drücken Sie die Taste MENU. 2 Drücken Sie die Taste ↑ oder ↓, um zu System zu gelangen. Drücken Sie dann die Taste → oder OK. 3 Wählen Sie Einstellen der Uhr, und drücken Sie dann die Taste → oder OK erneut. 4 Gehen Sie zu Timer Aus durch Drücken der Taste ↑ oder ↓. Drücken Sie dann die Taste → oder OK.  5 Drücken Sie die Taste ↑ oder ↓, um Ein zu wählen. Drücken Sie dann die Taste ← oder BACK. 6 Drücken Sie die Taste OK erneut. Drücken Sie die Taste ← oder →, um zu Stunde und Minute zu gelangen und nehmen Sie die Einstellungen durch Drücken der Taste ↑ oder ↓ vor. Drücken Sie dann die Taste OK.  7 Drücken Sie die Taste EXIT. ZUR BEACHTUNG
\- Wenn Sie den Timer Aus eingestellt haben, wird durch Drücken der Taste → auf Timer Ein oder Aus geschaltet, und durch Drücken der Taste OK wird die Zeit in Schritt 4 geändert. Sie können verschiedene Typen externer Geräte an Ihr Plasma Display anschließen, wie einen DVD-Player, Videorecorder, Spielkonsole und Camcorder. VORSICHT
\- Zum Schutz aller Geräte schalten Sie immer das Plasma Display aus, bevor der Anschluss an einen DVD-Player, Videorecorder, STB oder ein anderes externes Gerät vorgenommen wird. ZUR BEACHTUNG
\- Siehe betreffende Bedienungsanleitung (STB, Videorecorder, DVD-Player usw.) vor dem Herstellen von Verbindungen.Anschluss an einen SCART-Anschluss
flowchart
graph TD
    A["Device"] --> B["SCART-Kabel (Fachhandel)"]
    B --> C["Video recorder"]
    B --> D["DVD-Player"]
    B --> E["Set-Top-Box oder anders audiovisuelles"]
    B --> F["Gerät"]
ZUR BEACHTUNG
- Siehe Bedienungsanleitung des betreffenden Geräts für den Signaltyp. - Bei Anschließen des Geräts an den Anschluss AV1 stellen Sie auf „AV1-Eingang“. Bei Anschließen des Geräts an den Anschluss AV2 stellen Sie auf „AV2-Ausgang“. Einzelheiten siehe Seite 32. - Der AV3-Anschluss ist für den Monitorausgang. Das Signal wird allerdings nicht ausgegeben, wenn Sie „KOMPONENT“ oder „HDMI“ wählen. Anschluss an den externen Eingang flowchart
graph TD
    A["Input"] --> B["Audio kabel (Fachhandel)"]
    B --> C["Videokabel (Fachhandel)"]
    C --> D["S-Videokabel (Fachhandel)"]
    D --> E["Set-Top-Box oder anders audiovisuelles"]
    E --> F["Videorecorder"]
    E --> G["DVD-Player"]
    E --> H["Gerät"]
ZUR BEACHTUNG
\- Für Geräte mit einer S-VIDEO-Buchse schließen Sie das S-Videokabel zwischen der S-VIDEO-Eingangsbuchse am Plasma Display und der S-Video-Ausgangsbuchse am betreffenden Gerät an. 2 Schließen Sie das Audiokabel an die AUDIO-L/R-Eingangsbuchse am Plasma Display und an die Audio-Ausgangsbuchse am betreffenden Gerät an. 3 Schalten Sie das Plasma Display ein, und drücken Sie dann die Taste INPUT zur Wahl von VIDEO. ZUR BEACHTUNG
\- Wenn Sie das Plasma Display und das betreffende Gerät mit einem S-Video-Kabel verbunden haben, wählen Sie S-VIDEO. Anschluss an den Komponent-Eingang flowchart
graph TD
    A["Input"] --> B["Component Audio System"]
    B --> C["Audio Receiver"]
    C --> D["Audio Receiver (Fachhandel)"]
    D --> E["Component Video Code"]
    E --> F["Component Video Code (Fachhandel)"]
    F --> G["Output: Videorecorder, DVD-Player, Set-Top-Box oder anders audiovisuelles, Gerät"]
ZUR BEACHTUNG
- Je nach Hersteller können die Y / P_B / P_R -Buchsen als Y / P_B / P_R , Y / B - Y / R - Y oder Y / C_B / C_R identifiziert werden. - Siehe Bedienungsanleitung Ihres DVD-Players für den Signaltyp. 2 Schließen Sie das Audiokabel an die AUDIO-L/R (COMPONENT)-Eingangsbuchsen am Plasma Display und an die Audio-Ausgangsbuchsen am betreffenden Gerät an. 3 Schalten Sie das Plasma Display ein, und drücken Sie dann die Taste INPUT zur Wahl von KOMPONENT. Anschluss an den HDMI-Eingang flowchart
graph LR
    A["Monitor"] --> B["Audio Interface"]
    B --> C["HDMI-Kabel (Fachhandel)"]
    B --> D["Audiokabel (Fachhandel)"]
    C --> E["HDMI-Gerät"]
    D --> F["DVD-Player"]
| Eingangssignal-Bezugstabelle |
| 1920*1080i@50Hz |
| 720*576p@50Hz |
| 1280*720p@50Hz |
| 1920*1080i@59,94/60Hz |
| 720*480p@59,94/60Hz |
| 1280*720p@59,94/60Hz |
ZUR BEACHTUNG
• P C -Signale werden nicht unterstützt. - Wenn kein Bild erscheint, legen Sie einen anderen digitalen Videosignaltyp fest. - Für die Typen der festzulegenden digitalen Videosignale siehe Bedienungsanleitung des betreffenden angeschlossenen Geräts.11 Verwendung der Videotext-Funktionen
Was ist Videotext?
Videotext sendet Seiten mit Information und Unterhaltung zu besonders ausgerüsteten Fernsehgeräten. Ihr Plasma Display System empfängt Videotext-Signale, die von Fernsehnetzen ausgestrahlt werden, und entschlüsselt sie zur grafischen Darstellung zur Betrachtung. Nachrichten, Wetter und Sport, Börsenpreise und Programmvorschaus gehören zu den zahlreichen verfügbaren Diensten. Bedienung der Grundfunktionen von Videotext
Ein- und Ausschalten von Videotext
1 Wählen Sie einen Fernsehkanal oder eine externe Eingangsquelle mit einem Videotext-Signal. 2 Drücken Sie zur Anzeige von Videotext (Vollbild). 3 Drücken Sie erneut zur Anzeige des Normalbildschirms.Wahl und Bedienen der Videotext-Seiten
Verwenden Sie die folgenden Fernbedienungstasten zum Wählen und Bedienen der Videotext-Seiten.Farbentasten (ROT/GRÜN/GELB/BLAU):
Sie können eine Gruppe oder einen Block von Seiten wählen, die in den farbigen Klammern unten im Bildschirm angezeigt werden, indem Sie die entsprechende Farbtaste (ROT/GRÜN/GELB/BLAU) an der Fernbedienung drücken. 0 bis 9: Wählen Sie direkt eine Seite von 100 bis 899 mit 0 bis 9. P+/P-: Wählt die nächste oder vorherige Seite. INDEX (31) Zeigt die Indexseite des Videotextes an. CANCEL (EX): Zeigt das normale Bild an, während die neue Seite des Videotextes geladen wird. REVEAL (≡?): Zur Anzeige ausgeblendeter Information wie z.B. die Antwort zu einem Quiz, drücken Sie ☐? \- Drücken Sie erneut ☑ am die Information auszublenden. MIX (菲) Zeigt den Videotext mit dem normalen Bild an. SIZE(≡): Wählt die Größe des Videotextfelds. HOLD(图) Drücken Sie zur Beendigung der Aktualisierung der Teletext-Seiten 📄. \- Drücken Sie erneut 📂 in die Anhalte-Funktion aufzuheben. SUBPAGE (30) Suchen Sie die Unterseite mit Hilfe des Subcodes. ZUR BEACHTUNG
\- Wenn Videotext angezeigt wird, stehen keine anderen Tasten zur Verfügung als + / - , und ⏻ . Fehlerbehebung| Problem | Mögliche Abhilfe |
| • Kein Strom. | • S t ellen Sie sicher, dass das Plasma Display korrekt angeschlossen ist. (Siehe Seite 17.)• Ist das Netzkabel abgetrennt? (Siehe Seite 17.)• W urde das Gerät eingeschaltet? (Siehe Seite 18.)• Überprüfen Sie, ob 🔒 an der Fernbedienung gedrückt wurde. (Siehe Seite 18.)Wenn die Anzeige STANDBY am Plasma Display rot aufleuchtet, drücken Sie 🔒. |
| • Kein Bild oder Ton | • Prüfen Sie, ob das Netzkabel richtig angeschlossen ist.• Prüfen Sie, ob Sie 🔒 an der Fernbedienung oder die Taste STANDBY/ON unten auf dem Plasma Display gedrückt haben.• W ählen Sie eine Eingangsquelle entsprechend der bestimmten Quelle.• Prüfen Sie die Einstellungen für Bildkontrast und Helligkeit.• Prüfen Sie die Lautstärke. |
| • Normales Bild, aber kein Ton | • Prüfen Sie die Lautstärke.• Überprüfen Sie, ob die Tasteren in der Fernbedienung gedrückt wurde. |
| • Kein Bild oder Schwarzweißbild | • Justieren Sie die Farbeinstellungen.• Prüfen Sie, ob das korrekte Sendesystem gewählt ist. |
| • S t örungen bei Ton und Bild | • Versuchen Sie, das elektrische Gerät zu identifizieren, das das Plasma Display beeinträchtigt, und stellen Sie es weiter entfernt auf.• Schließen Sie das Plasma Display an eine andere Steckdose an. |
| • Verschwommenes oder verschneites Bild, verzerrter Ton | • Prüfen Sie Richtung, Lage und Anschlüsse Ihrer Antenne. Solche Störungen treten häufig bei Verwendung einer Zimmerantenne auf. |
| • Fehlfunktionen an der Fernbedienung | • Drücken Sie die Taste INPUT zum Wählen des Plasma Displays oder eines externen Geräts.• Ersetzen Sie die Batterien in der Fernbedienung.• Setzen Sie die Batterien unter Beachtung der Markierungen für die richtige Ausrichtung der <+> und <-> Pole der Batterien ein.• Prüfen Sie Winkel und Reichweite der Fernbedienung für das Plasma Display. Vergewissern Sie sich, dass sich zwischen der Fernbedienung und dem Plasma Display keine Hindernisse befinden.• Prüfen Sie, ob die richtige Funktionstaste gedrückt wurde.• Ändern Sie die Lage von Lichtquellen oder die Ausrichtung des Plasma Displays, um Blendwirkung zu vermeiden.• Ist die Videotext-Funktion aktiviert? (Siehe Seite 38.) |
Anschluss-Pinbelegung für SCART
Verschiedene Audio- und Videogeräte können über die SCART-Anschlüsse angeschlossen werden. SCART (AV 1)
1. Audio rechter Ausgang 2. Audio rechter Eingang 3. Audio linker Ausgang 4. Gemeinsame Erde für Audio 5. Erde 6. Audio linker Eingang 7. Nicht belegt 8. Audio-Video-Steuerung 9. Erde 10. Nicht belegt 11. Nicht belegt 12. Nicht belegt 13. Erde 14. Nicht belegt 15. Chroma S-Video-Eingang 16. Nicht belegt 17. Erde für Video 18. Erde 19. Videoausgang 20. Videoeingang/S-Videoeingang 21. Stecker-AbschirmungSCART (AV 2)
1. Audio rechter Ausgang 2. Audio rechter Eingang 3. Audio linker Ausgang 4. Gemeinsame Erde für Audio 5. Erde für Blau 6. Audio linker Eingang 7. Blauer Eingang 8. Audio-Video-Steuerung 9. Erde für Grün 10. Nicht belegt 11. Grüner Eingang 12. Nicht belegt 13. Erde für Rot 14. Nicht belegt 15. Roter Eingang 16. Rot/Grün/Blau-Steuerung 17. Erde für Video 18. Erde für Rot/Grün/Blau-Steuerung 19. Videoausgang 20. Videoeingang 21. Stecker-AbschirmungSCART (AV 3)
1. Audio rechter Ausgang 2. Audio rechter Eingang 3. Audio linker Ausgang 4. Gemeinsame Erde für Audio 5. Erde für Blau 6. Audio linker Eingang 7. Blauer Eingang 8. Audio-Video-Steuerung 9. Erde für Grün 10. Nicht belegt 11. Grüner Eingang 12. Nicht belegt 13. Erde für Rot 14. Nicht belegt 15. Roter Eingang 16. Rot/Grün/Blau-Steuerung 17. Erde für Video 18. Erde für Rot/Grün/Blau-Steuerung 19. Videoausgang 20. Videoeingang 21. Stecker-Abschirmung Technische Daten| Gegenstand 42" Plasma Display, Modell: PDP-42RXE | |||
| Anzahl der Pixel 1024 × 768 Pixel | |||
| Audio-Verstärker 10 W + 10 W (1 kHz, 1 %, 4 Ω) | |||
| Surround-System SRS TruSurround XT | |||
| Netzstrom-Anforderungen 220-240 V AC, 50/60 Hz, 300 W(2,5 W Bereitschaft) | |||
| Abmessungen (mit Ständer) | 1235 (B) × 699 (H) × 252 (T) mm | ||
| Gewicht (mit Ständer) 40 kg | |||
| Farbsystem PAL/SECAM | |||
| TV-Funktion Empfangssystem B/G, D/K, I, L/L' | |||
| Tuner | VHF/UHF | Kanal E2-E69, Kanal F2-F10, Kanal I21-I69, Kanal IR A-IR J | |
| Kabelfernsehen | Hyper-Band, Kanal S1-S41 | ||
| STEREO | NICAM/A2 | ||
| Anschlüsse | Rückseite | ANTENNA | 75 Ω DIN-Eingang für VHF/UHF/CATV |
| AV1 | SCART (AV-Eingang, S-VIDEO-Eingang, TV-Ausgang) | ||
| AV2 | SCART (AV-Ein-/Ausgang, RGB-Eingang)* | ||
| AV3 | SCART (AV Ein-/Ausgang, RGB-Eingang) | ||
| * AV2-Ausgang: Anwender-wählbar | |||
| KOMPONENT | COMPONENT VIDEO-Eingang, AUDIO-Eingang | ||
| HDMI | HDMI-Eingang, AUDIO-Eingang | ||
| RS-232C | Nur Service | ||
| Seite | VIDEO | S-VIDEO-Eingang, VIDEO-Eingang, AUDIO-Eingang | |
| OSD | Englisch/Deutsch/Italienisch/Spanisch/Französisch/Holländisch/Schwedisch/Russisch/Türkisch | ||
12 Anhang
Marken
• SRS.COM Warenzeichen von SRS Labs, Inc. TruSurrend XT TruSurround XT Technologie wird unter Lizenz von SRS Labs, Inc. mit eingeschlossen. - HDMI, das HDMI-Logo und High-Definition Multimedia Interface sind Marken oder eingetragene Marken der HDMI Licensing LLC. - Alle anderen etwaigen bestehenden Marken oder sonstigen gewerblichen Schutzrechte an den hier zitierten Bezeichnungen erkennen wir an. www.pioneer.co.uk www.pioneer.fr www.pioneer.de www.pioneer-eur.com Published by Pioneer Corporation. Copyright © 2005 Pioneer Corporation. All rights reserved.PIONEER CORPORATION
4-1, Meguro 1-Chome, Meguro-ku, Tokyo 153-8654, Japan PIONEER ELECTRONICS (USA) INC. P.O. BOX 1540, Long Beach, California 90810-1540, U.S.A. TEL: (800) 421-1404 PIONEER ELECTRONICS OF CANADA, INC. 300 Allstate Parkway, Markham, Ontario L3R OP2, Canada TEL: 1-877-283-5901 PIONEER EUROPE NV Haven 1087, Keetberglaan 1, B-9120 Melsele, Belgium TEL: 03/570.05.11 PIONEER ELECTRONICS ASIACENTRE PTE. LTD. 253 Alexandra Road, #04-01, Singapore 159936 TEL: 65-6472-7555 PIONEER ELECTRONICS AUSTRALIA PTY. LTD. 178-184 Boundary Road, Braeside, Victoria 3195, Australia, TEL: (03) 9586-6300 PIONEER ELECTRONICS DE MEXICO S.A. DE C.V. Blvd.Manuel Avila Camacho 138 10 piso Col.Lomas de Chapultepec, Mexico,D.F. 11000 TEL: 55-9178-4270 K002\_A\_En
- Pioneer sound.vision.soul
- PLASMA DISPLAY SYSTEM SYSTEME D'ÉCRAN PLASMA PLASMA DISPLAY-SYSTEM
- PDP-42RXE
- IMPORTANT
- FOR USE IN THE UNITED KINGDOM.
- NOTE
- CAUTION
- RISK OF ELECTRIC SHOCK DO NOT OPEN
- WARNING
- VENTILATION CAUTION
- STANDBY/ON Button
- STANDBY:
- STANDBY Indicator
- Contents
- Thank you for buying this Pioneer product.
- Important User Guidance Information
- Safety Precautions
- Supplied Accessories
- Part Names
- Preparation
- Basic Operations
- Menu Setup
- Tuner Setup
- Adjustments and Settings
- Enjoying through External Equipment
- Using the Teletext Functions
- Appendix
- Usage guidelines
- Installation guidelines
- Information of pixel defect
- Infrared rays
- Radio interference
- Plasma Display driving sound
- Do not attach such items as labels and tape to the product
- When not using the product for a long period of time
- Condensation
- Cleaning the screen
- Cleaning the cabinet
- Handles at the rear of the Plasma Display
- Panel sticking and after-image lag
- After-image lagging due to remaining electric load
- After-image (lag image) due to burning
- Plasma Display
- Rear view
- Remote control unit
- Locating
- Operating Environment
- Preventing the Plasma Display from falling over
- Using a wall for stabilization
- Preparing the remote control unit
- Inserting batteries
- Cautions regarding batteries
- Allowed operation range of the remote control unit
- Cautions regarding the remote control unit
- Connecting to an antenna
- Connecting the power cord
- Turning the power on and off (Standby)
- Watching TV channels
- Selecting the analogue channels
- Changing channels
- Using 0 to 9 on the remote control unit
- EXAMPLE
- Changing the volume and sound
- Displaying Information
- Using the multiscreen functions
- If you select "PIP" in step 5
- Menu operations
- Setting up TV channels
- Scanning Channels Automatically
- Scanning Analogue Channels Manually
- Editing Channel List
- Deleting a channel
- Copying a channel
- Moving a channel
- Skipping a channel
- Display the Channel List
- Setting the Current Date and Time
- Sleep Timer
- Picture adjustments
- Selecting the Picture Mode
- Item Description
- Customizing the Picture Settings
- Using the Noise Reduction Feature
- Setting the Colour Temperature
- Selecting the Sound Effect
- Customizing the Sound Settings
- Adjusting the Volume Automatically
- Setting the Surround Sound
- Changing the Screen Size
- Viewing the Input Source
- Selecting an input signal type
- Selecting an output source
- Setting for the language of on-screen display
- Setting for the TTX (Teletext) Language
- Screen Saver
- Setting the Full White mode
- Power Control
- Switching the Plasma Display Off Automatically
- Setting the Plasma Display On Time
- Setting the Plasma Display Off Time
- Connecting to the SCART terminal
- What is Teletext?
- Operating the Teletext basics
- Turning on and off Teletext
- Selecting and operating Teletext pages
- Colour (RED/GREEN/YELLOW/BLUE):
- to 9:
- P+/P-:
- INDEX (≡i):
- CANCEL (EX):
- REVEAL (≡?):
- MIX (日)
- SIZE(≡):
- HOLD(☐):
- SUBPAGE (Eo):
- Connecting pin assignments for SCART
- SCART (AV 1)
- SCART (AV 2)
- SCART (AV 3)
- Trademarks
- ATTENTION
- DANGER D'ELECTROCUTION NES PAS OUVRIR
- ATTENTION:
- AVERTISSEMENT
- DANGER
- PRÉCAUTION DE VENTILATION
- Touche STANDBY/ON
- Témoin STANDBY
- Nous vous remercions d'avoir acquis cet appareil Pioneer.
- Informations importantes pour l'utilisateur
- Précautions de sécurité
- Accessoires fournis
- Nomenclature des pièces
- Préparation
- Fonctionnement de base
- Configuration du menu
- Configuration du syntoniseur
- Réglages et paramètres
- Utilisation avec un équipement externe
- Utilisation des fonctions Télétexte
- Annexe
- Instructions d'usage
- Instructions d'installation
- REMARQUE
- Information relative aux pixels défectueux
- Rayonnement infrarouge
- Brouillage radioélectrique
- Bruit de fonctionnement d'écran à plasma
- Ne collez aucune étiquette ni aucun ruban sur l'appareil
- Si vous n'utilisez pas l'appareil pendant une longue période
- Nettoyage de l'écran
- Nettoyage de la carrosserie
- Poignées placées à l'arrière de l'écran à plasma
- Rémanence d'image sur le panneau
- Image rémanente due à la charge électrique
- Image rémanente due au brûlage
- Écran à plasma
- Vue de dos
- Boîtier de télécommande
- Emplacement
- Environnement de fonctionnement
- Prévention d'une chute de l'écran à plasma
- Utilisation d'un mur pour la stabilisation.
- Préparation du boîtier de télécommande
- Mise en place des piles
- Mises en garde à propos des piles
- Portée de fonctionnement permise du boîtier de télécommande
- Mises en garde à propos du boîtier de télécommande
- Raccordement d'une antenne
- Raccordement du cordon d'alimentation
- Mise en/hors service (en veille)
- Pour regarder des canaux de télévision
- Sélection des canaux analogiques
- Modification des canaux
- Utilisation des touches 0 à 9 sur le boîtier de télécommande
- EXEMPLE
- Modification du volume et du son
- Affichage des informations
- Utilisation des fonctions de partage d'écran
- Si vous sélectionnez "PIP" à l'étape 5
- Utilisation des menus
- Réglage des canaux de télévision
- Balayage automatique des canaux
- Balayage manuel des canaux analogiques
- Modification de la liste des canaux
- Supprimer un canal
- Copier un canal
- Déplacer un canal
- Ignorer un canal
- Affichage de la liste des canaux
- Réglage de la date et de l'heure actuelles
- Minuterie de mise en veille
- Réglages de l'image
- Sélection du mode d'image
- Paramètre Description
- Personnalisation des réglages de l'image
- Utilisation de la fonction de réduction du bruit
- Réglage de la température de couleur
- Sélection de l'effet de son
- Personnalisation des réglages du son
- Réglage automatique du volume
- Réglage du son surround
- Modification de la taille de l'écran
- Affichage de la source d'entrée
- Sélection d'un type de signal d'entrée
- Sélection d'une source de sortie
- Réglage de la langue d'affichage à l'écran
- Réglage de la langue TTX (Télétexte)
- Économiseur d'écran
- Réglage du mode Tout blanc
- Gestion de l'alimentation
- Mise hors tension automatique de l'écran à plasma
- Réglage de l'heure de mise sous tension de l'écran à plasma
- Réglage de l'heure de mise hors tension de l'écran à plasma
- Raccordement à la prise SCART
- Qu'est-ce que le Télétexte ?
- Fonctionnement de base du Télétexte
- Marche et arrêt du Télétexte
- Sélection et affichage des pages Télétexte
- Couleur (ROUGE/VERT/JAUNE/BLEU):
- à 9:
- MIX (☐):
- HOLD(≡):
- SUBPAGE (E):
- Affectation des broches de connexion pour SCART
- Marques de fabrique
- WICHTIG
- ACHTUNG:
- WARNUNG
- VORSICHT
- VORSICHTSHINWEIS ZUR BELÜFTUNG
- Taste STANDBY/ON
- Anzeige STANDBY
- Inhalt
- Vielen Dank, dass Sie sich für dieses Pioneer-Produkt entschieden haben.
- Wichtige Grundregeln
- Wichtige Sicherheitshinweise
- Mitgeliefertes Zubehör
- Teilebezeichnungen
- Vorbereitungen
- Grundlegende Bedienung
- Menü-Setup
- Justierungen und Einstellungen
- Unterhaltung durch externe Geräte
- Verwendung der Videotext-Funktionen
- Anhang
- Grundregeln zur Benutzung
- Grundregeln zur Aufstellung
- ZUR BEACHTUNG
- Informationen zu Pixeldefekten
- Infrarotstrahlen
- Funkstörungen
- Plasma Display-Antriebsgeräusch
- Haften Sie keine Gegenstände wie z.B. Etiketten oder Klebebänder am Produkt an.
- Bei längerem Nichtgebrauch des Produkts
- Kondenswasserbildung
- Reinigen der Bildschirmoberfläche
- Reinigen des Gehäuses
- Griffe an der Rückseite des Plasma Displays
- Einbrenner und Nachbilder
- Nachbild wegen elektrischer Restladung
- Nachbild durch Einbrennen
- Teilebezeichnungen
- Rückseite
- Fernbedienung
- Positionierung
- Betriebsumgebung
- Vermeidung eines Umkippens des Plasma Displays
- Gebrauch einer Wand zur Stabilisierung
- Vorbereitung der Fernbedienung
- Einlegen der Batterien
- Vorsichtsmaßregeln zu Batterien
- Reichweite der Fernbedienung
- Beim Umgang mit der Fernbedienung zu beachten
- Anschluss einer Antenne
- Anschluss des Netzkabels
- Ein- und Ausschalten (Bereitschaftsmodus)
- Fernsehempfang
- Wahl der Analogkanäle
- Kanalwechsel
- Mit 0 bis 9 an der Fernbedienung
- BEISPIEL
- Lautstärke- und Toneinstellungen
- Anzeige von Daten
- Multiscreen-Funktionen
- Die Wahl von „PIP“ in Schritt 5
- Menübedienung
- Einrichten von Fernsehkanälen
- Automatisch Kanäle absuchen
- Manuelles Absuchen der Analogkanäle
- Bearbeit. Kanal-Liste
- Löschen eines Kanals
- Kopieren eines Kanals
- Verschieben eines Kanals
- Überspringen eines Kanals
- Die Kanalliste anzeigen
- Einstellen des aktuellen Datums und der Uhrzeit
- Timer
- Bild-Einstellungen
- Wahl der Bildfunktion
- Gegenstand Beschreibung
- Anpassen der Bildeinstellungen
- Verwendung des Rauschreduzierung-Merkmals
- Einstellen der Farbtemperatur
- Wahl des Klangeffekts
- Anpassen der Toneinstellungen
- Automatische Einstellung der Lautstärke
- Einstellen des Surround-Klangs
- Drücken Sie die Taste EXIT.
- Ändern der Bildschirmgröße
- Betrachten der Eingangsquelle
- Wahl eines Eingangssignaltyps
- Wahl einer Ausgangsquelle
- Einstellen der für die Sprache der On-Screen-Anzeige
- Einstellen der für die Videotextsprache
- Schirmschoner
- Einstellen des Vollweiß-Modus
- Stromsteuerung
- Automatisches Ausschalten des Plasma Display
- Einstellen der Plasma Display Einschaltzeit
- Einstellen der Plasma Display Ausschaltzeit
- Anschluss an einen SCART-Anschluss
- Was ist Videotext?
- Bedienung der Grundfunktionen von Videotext
- Ein- und Ausschalten von Videotext
- Wahl und Bedienen der Videotext-Seiten
- Farbentasten (ROT/GRÜN/GELB/BLAU):
- Anschluss-Pinbelegung für SCART
- Marken
- PIONEER CORPORATION
Marque : PIONEER
Modèle : PDP42RXE
Catégorie : Téléviseur