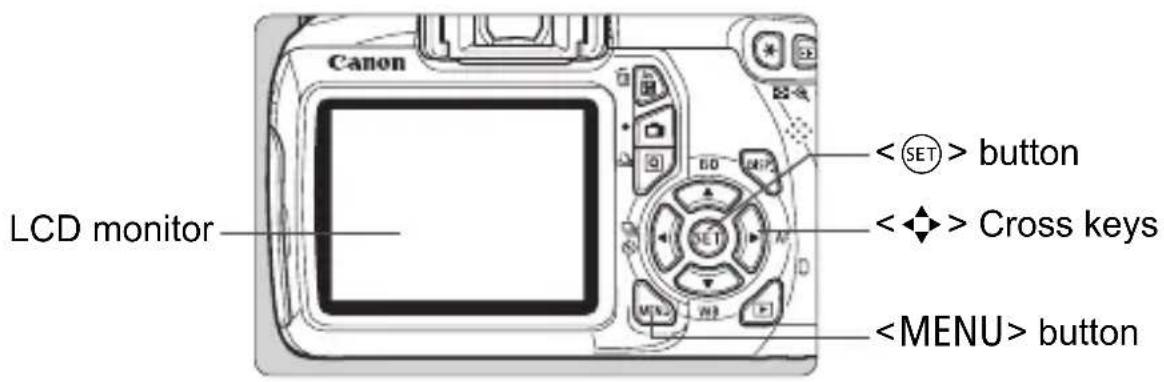
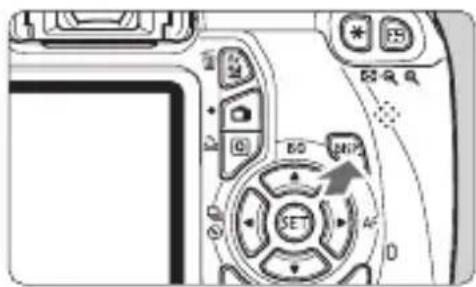
button on the camera back to operate the menus.
In the Basic Zone, Movie shooting mode, and Creative Zone, the tabs and menu options displayed will be different.
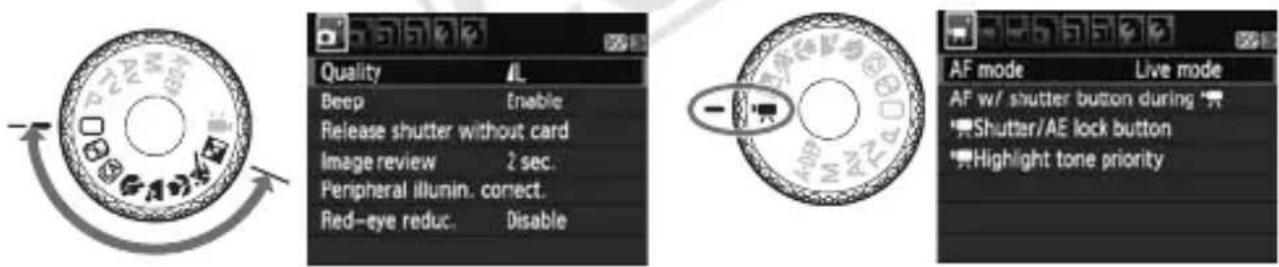
Basic Zone modes Movie shooting mode
- Press the
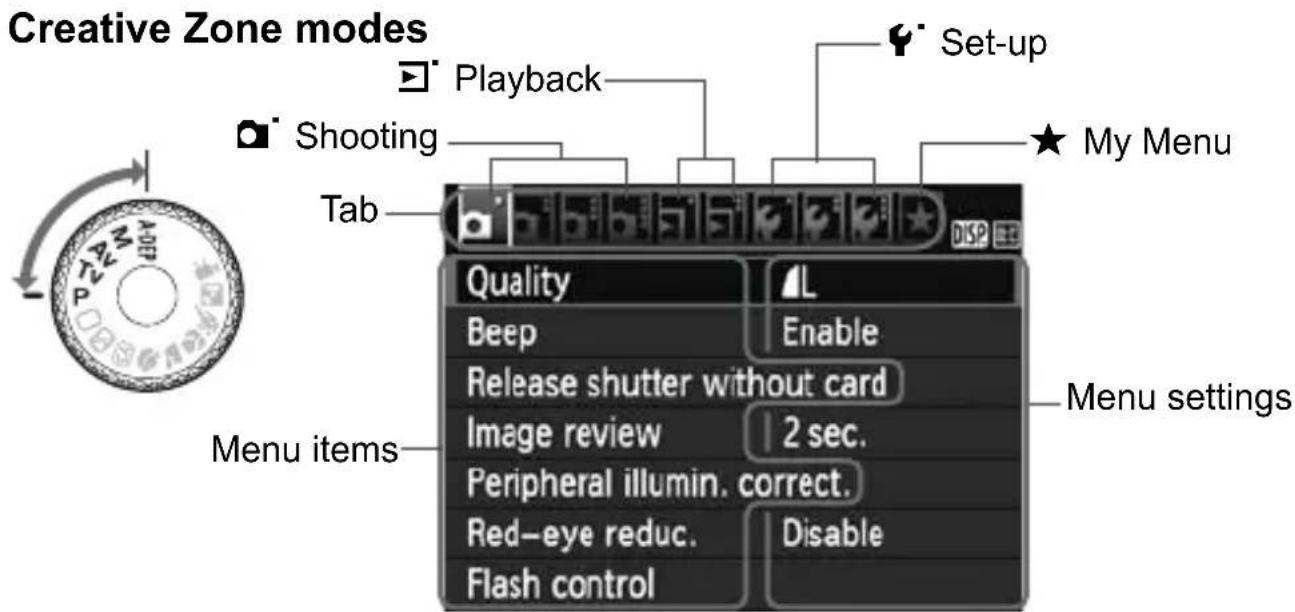
2 Select a tab.
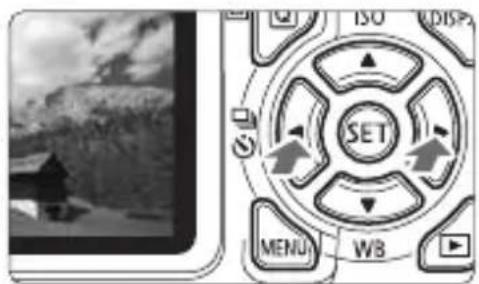
- Press the <> key to select a menu tab.
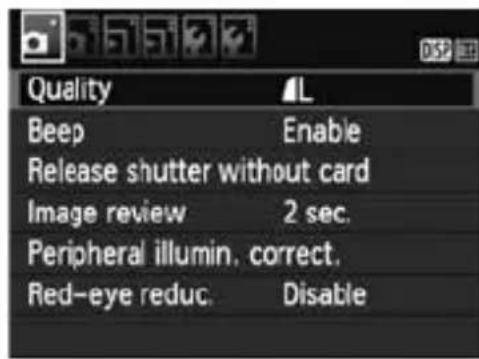
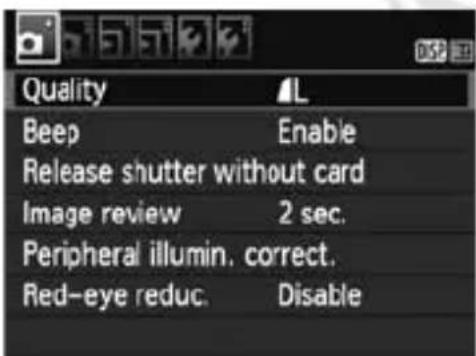
2 Select the desired item.
- Press the < > key to select the item, then press <> .
4 Select the setting.
- Press the < > or <> key to select the desired setting. (Some settings require you to press either the < > or <> key to select it.)
The current setting is indicated in blue.
5 Set the desired setting.
- Press < ( SET) > to set it.
6 Exit the setting.
- Press the

In Step 2, you can also turn the < dial to select a menu tab.
- The explanation of menu functions hereinafter assumes that you have pressed the
- Select [OK], then press < > .
The card will be formatted.
When the formatting is completed, the menu will reappear.
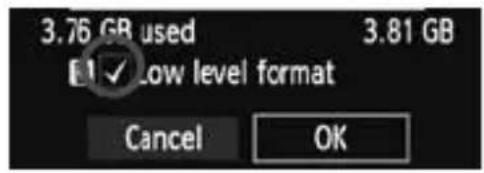
- For low-level formatting, press the <面> button to checkmark [Low level format] with <√>, then select [OK].

The card is new.
- The card was formatted by a different camera or a computer.
The card is full with images or data.
A card-related error is displayed ( ) .
- Do low-level formatting if the card's recording or reading speed seems slow or if you want to totally erase all data in the card.
- Since low-level formatting will erase all recordable sectors in the card, the formatting will take slightly longer than normal formatting.
- You can stop the low-level formatting by selecting [Cancel]. Even in this case, normal formatting will have been completed and you can use the card as usual.

- When the card is formatted or data is erased, only the file management information is changed. The actual data is not completely erased. Be aware of this when selling or discarding the card. When discarding the card, execute low-level formatting or destroy the card physically to prevent the data from being leaked.
- Before using a new Eye-Fi card, the software in the card must be installed in your computer. Then format the card with the camera.

- The card capacity displayed on the card format screen might be smaller than the capacity indicated on the card.
- This device incorporates exFAT technology licensed from Microsoft.
Switching the LCD Monitor Display
The LCD monitor can display the shooting settings screen, menu screen, captured images, etc.
Shooting Settings
- When you turn on the power switch, the shooting settings will be displayed.
- When you press the shutter button halfway, the display will turn off. And when you let go of the shutter button, the display will turn on.
- You can also turn off the display by pressing the button. Press the button again to turn on the display.
- Appears when you press the
- Appears when you press the < > button. Press the button again to return to the shooting settings screen.

- You can set [Y: LCD off/on btn] so that the shooting settings display does not keep turning off and on (
- Even when the menu screen or captured image is displayed, pressing the shutter button will enable you to shoot immediately.
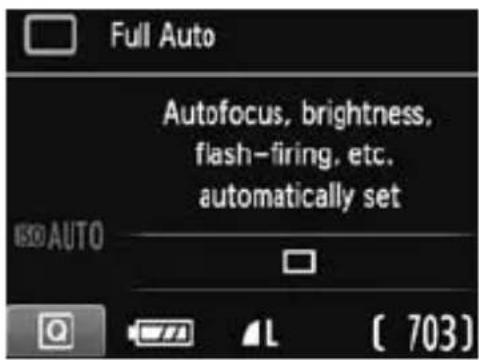
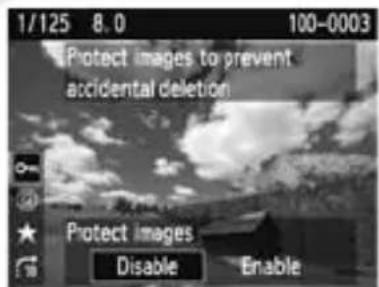
Feature Guide
The Feature guide is a simple description of the respective function or option. It is displayed when you change the shooting mode or use the Quick Control screen to set a shooting function, Live View shooting, movie shooting, or playback. When you select a function or option on the Quick Control screen, the Feature guide description is displayed. The Feature guide turns off when you further proceed with any operation.
Quick Control (Sample)
Shooting function Live View shooting Playback
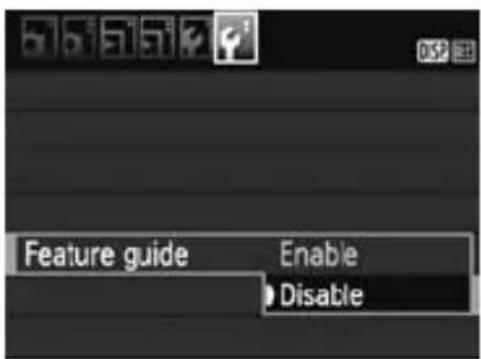
Select [Feature guide].
Under the [Y] tab, select [Feature guide], then press <> . Select [Disable], then press <> .
![CANON EOS Rebel T3 - Select [Feature guide]. - 1](/content/2026/02/354825/images/31b2356cb62ddaf604cde7dc3583b04e2f6d5072d6703228bcf07a2345d85092.jpg)
2
Basic Shooting
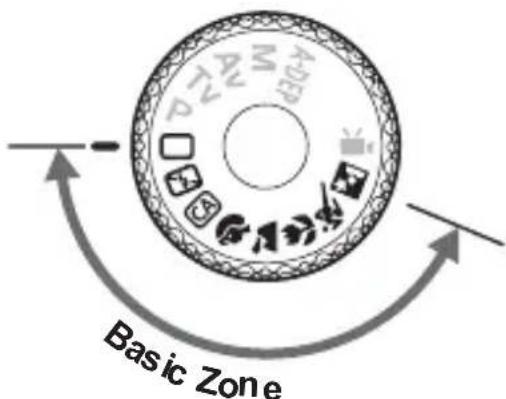
This chapter explains how to use the Basic Zone modes on the Mode Dial for best results.
With Basic Zone modes, all you do is point and shoot and the camera sets everything automatically (p.54). Also, to prevent botched pictures due to mistaken operations, major shooting settings cannot be changed in fully-automatic modes.

About the Auto Lighting Optimizer
In Basic Zone modes, the Auto Lighting Optimizer ( ) will adjust the image automatically to obtain the optimum brightness and contrast. It is also enabled by default in Creative Zone modes.
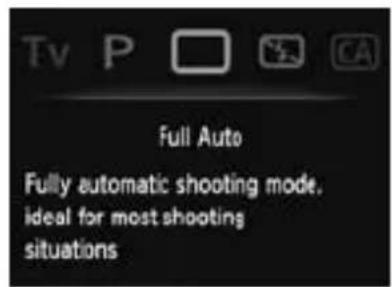
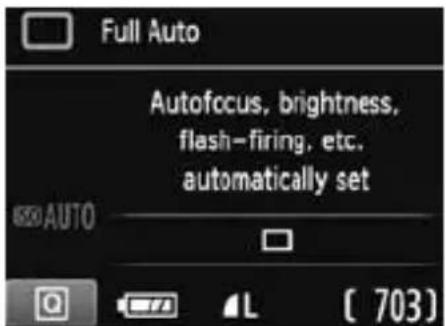
Fully Automatic Shooting

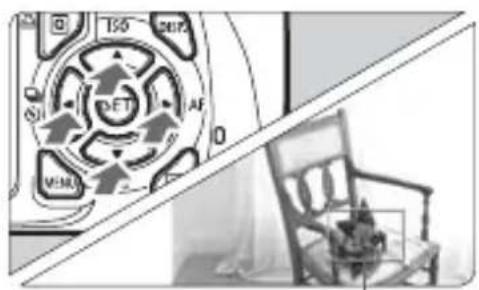
1 Set the Mode Dial to < > .
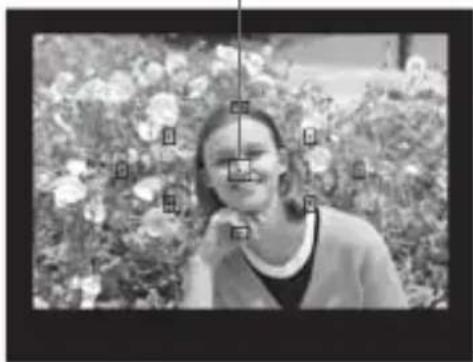
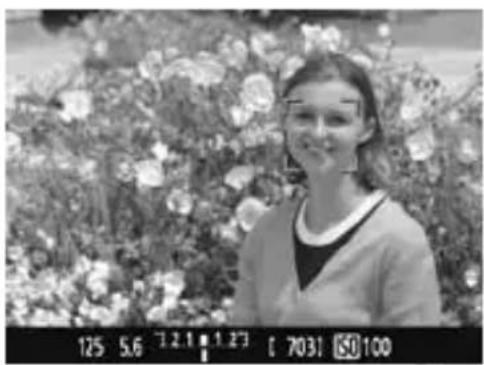
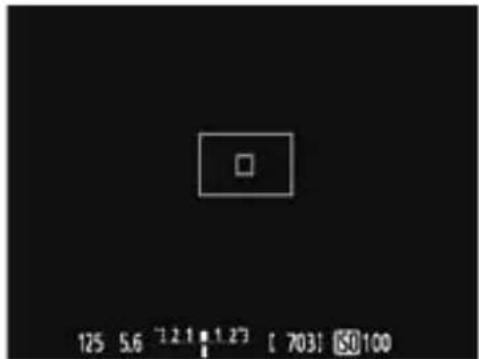
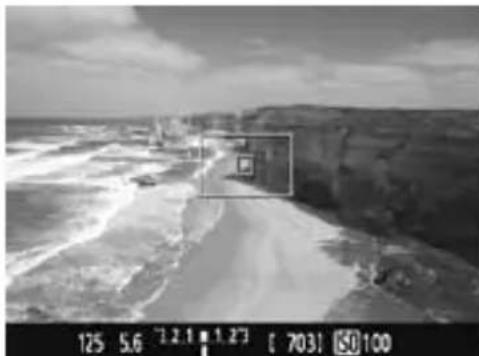
AF point
2 Aim any AF point over the subject.
- All the AF points will be used to focus, and generally the closest object will be focused.
Aiming the center AF point over the subject will make focusing easier.
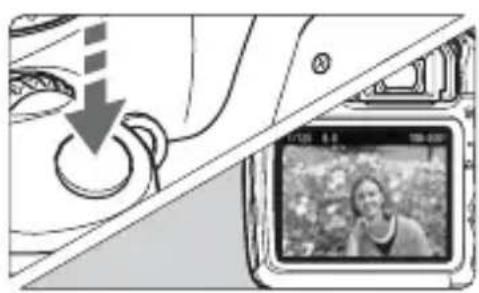
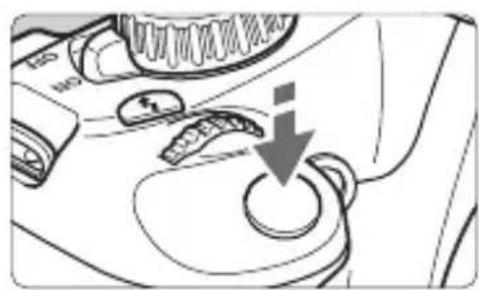
3 Focus the subject.
- Press the shutter button halfway, and the lens focusing ring will rotate to focus.
The dot inside the AF point achieving focus flashes briefly in red. At the same time, the beeper will sound and the focus confirmation light < > in the viewfinder will light.
If necessary, the built-in flash will pop-up automatically.

Focus confirmation light
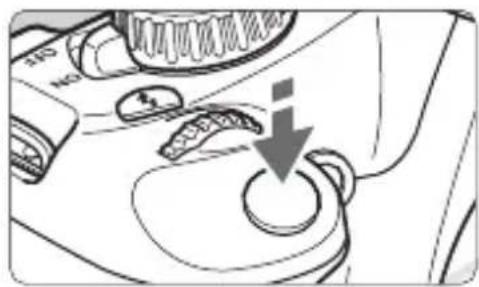
4 Take the picture.
- Press the shutter button completely to take the picture.
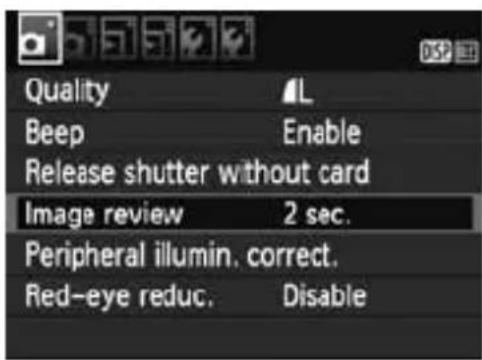
The captured image will be displayed for approx. 2 sec. on the LCD monitor.
- If the built-in flash has popped up, you can push it back down with your fingers.

FAQ
- The focus confirmation light < > blinks and focus is not achieved. Aim the AF point over an area having good contrast, then press the shutter button halfway (p.33). If you are too close to the subject, move away and try again.
Sometimes multiple AF points flash simultaneously.
This indicates that focus has been achieved at all those AF points. When the AF point covering the desired subject flashes, take the picture.
- The beeper continues to beep softly. (The focus confirmation light < > does not light.)
It indicates that the camera is focusing continuously on a moving subject. (The focus confirmation light < > does not light.) You can take sharp pictures of a moving subject.
- Pressing the shutter button halfway does not focus the subject. If the focus mode switch on the lens is set to <MF> (Manual Focus), set it to <AF> (Auto Focus).
- Although it is daylight, the flash popped up.
For a backlit subject, the flash may pop up to help lighten the subject's dark areas.
In low light, the built-in flash fired a series of flashes.
Pressing the shutter button halfway may trigger the built-in flash to fire a series of flashes to assist autofocusing. This is called AF-assist beam. Its effective range is about 4 meters/13.1 feet.
- Although flash was used, the picture came out dark.
The subject was too far away. The subject should be within 5 meters/16.4 feet from the camera.
- When flash was used, the bottom part of the picture came out unnaturally dark.
The subject was too close to the camera, and a shadow was created by the lens barrel. The subject should be at least 1 meter/3.3 feet away from the camera. If a hood has been attached to the lens, remove it before taking the flash picture.
Full Auto Techniques
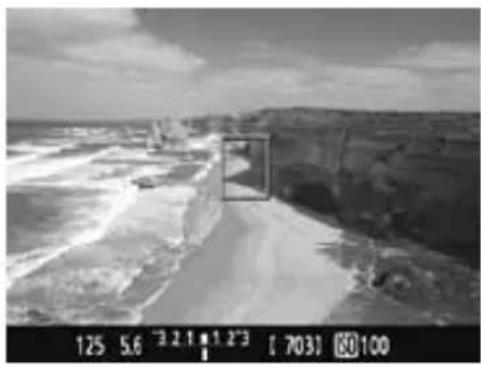
Recomposing the Shot

Depending on the scene, position the subject toward the left or right to create a balanced background and good perspective.
In the < > (Full Auto) mode, while you press the shutter button halfway to focus a still subject, the focus will be locked. You can then recompose the shot and press the shutter button completely to take the picture. This is called "focus lock". Focus lock is also possible in other Basic Zone modes (except < 心 > Sports).
Shooting a Moving Subject
In the < > (Full Auto) mode, if the subject moves (distance to camera changes) during or after you focus, AI Servo AF will take effect to focus the subject continuously. As long as you keep aiming the AF point on the subject while pressing the shutter button halfway, the focusing will be continuous. When you want to take the picture, press the shutter button completely.
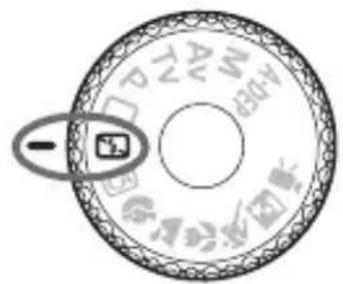
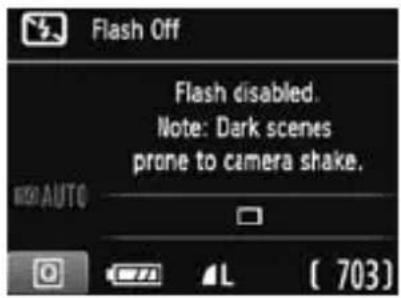
Disabling Flash
In places where flash photography is prohibited, use the <> (Flash Off) mode. This mode is also effective for capturing the particular ambience of a scene, such as candlelight scenes.

Shooting Tips
- Prevent camera shake if the numeric display in the viewfinder blinks.
Under low light when camera shake is prone to occur, the viewfinder's shutter speed display will blink. Hold the camera steady or use a tripod. When using a zoom lens, use the wide-angle end to reduce blur caused by camera shake.
- Taking portraits without flash.
In low-light conditions, tell the subject to keep still until the picture is taken. If the person moves during the exposure, he or she might look blurred in the picture.
CA Creative Auto Shooting
Unlike the < > Full Auto mode where the camera sets everything, the < > Creative Auto mode enables you to easily change the depth of field, drive mode, and flash firing.
You can also choose the ambience you want to convey in your images. The default setting is the same as the < > (Full Auto) mode.
- CA stands for Creative Auto.

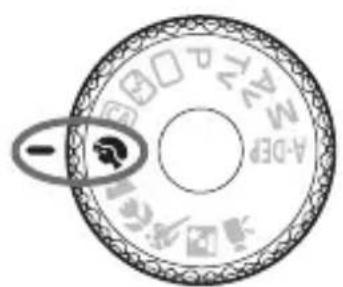
1 Set the Mode Dial to <> .
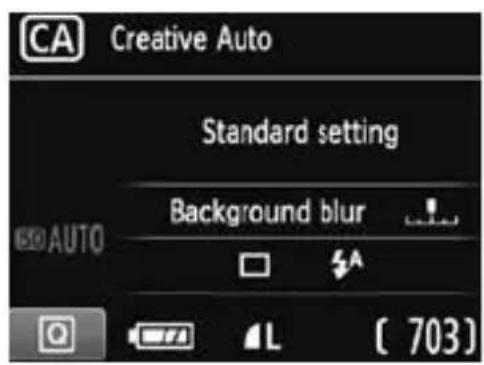
The Quick Control screen will appear.
3 Set the desired function.
- Press the < > key to select a function.
The selected function and Feature guide (p.39) will be displayed.
- For details on setting each function, see pages 47-48.
4 Take the picture.
- Press the shutter button completely to take the picture.

If you change the shooting mode or turn the power switch to <OFF> , the function you have set on this screen will revert to the default setting. However, the self-timer setting will be retained.
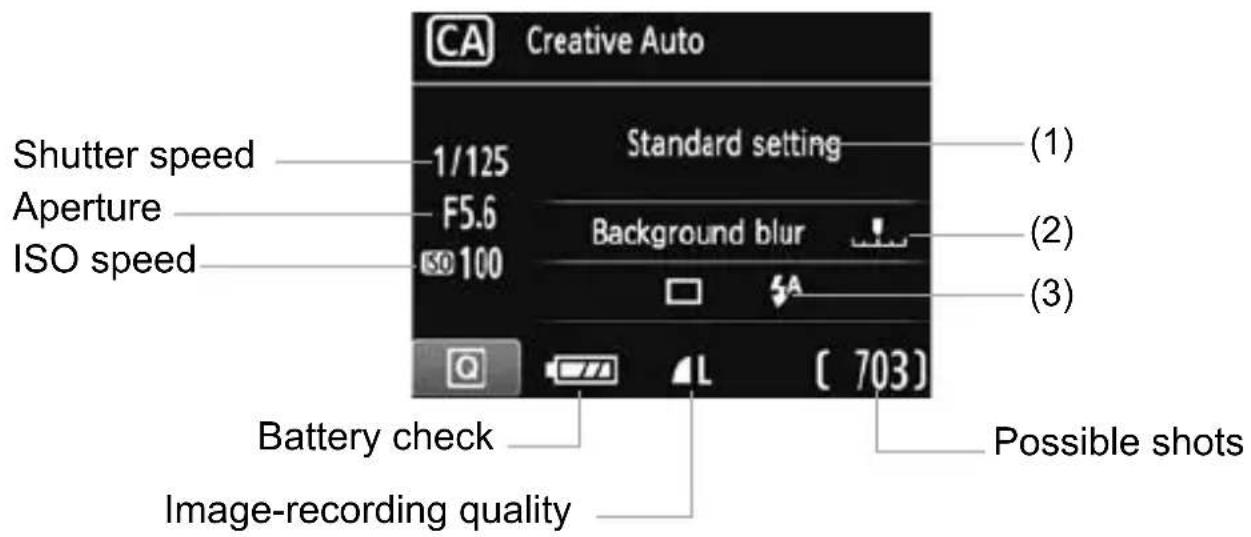
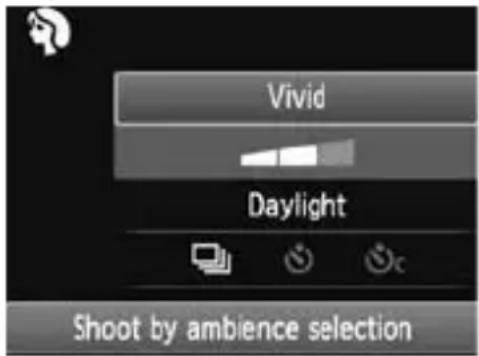
(1) Shoot by ambience selection
You can set the ambience you want to convey in your images. Press the < > key or turn the < dial to select the desired ambience. You can also select it from a list by pressing < For details, see the Camera Instruction Manual CD-ROM.
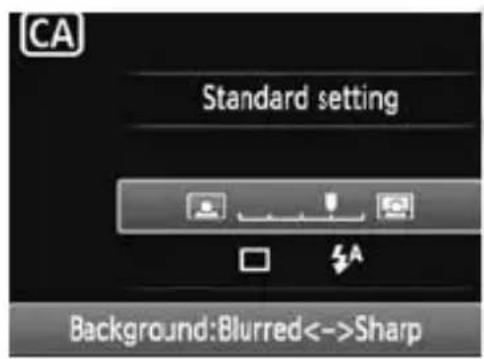
(2) Blurring/sharpening the background

If you move the index mark toward the left, the background will look more blurred. If you move it toward the right, the background will look more in focus. If you want to blur the background, see "Shooting Portraits" on page 49. Press the <> key or turn the <> dial to adjust it as desired.
Depending on the lens and shooting conditions, the background might not look so blurred. This function cannot be set (grayed out) if f has been set or if the built-in flash is raised with < f^A > set. If flash is used, this setting will not be applied.
(3)Drive mode/Flash firing
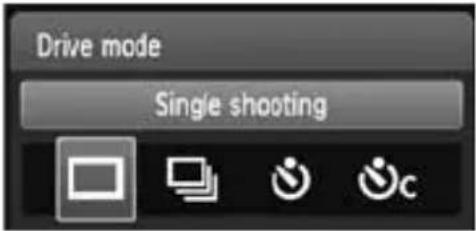
When you press <> , the drive mode or flash firing setting screens will appear. Set as desired, then press <> to finalize the setting and return to the Quick Control screen.
Drive mode: Press the <> key or turn the <> dial to set it as desired.
<□> Single shooting : Shoot one image at a time.
<口> Continuous shooting:
While you hold down the shutter button completely, shots will be taken continuously. You can shoot up to about 3 shots per sec.
<♂> Self-timer:10 sec: The picture is taken 10 seconds after you press the shutter button.
< _C> Self-timer:Continuous:
Press the < > key to set the number of multiple shots (2 to 10) to be taken with the self-timer. 10 seconds after you press the shutter button, the set number of multiple shots will be taken.
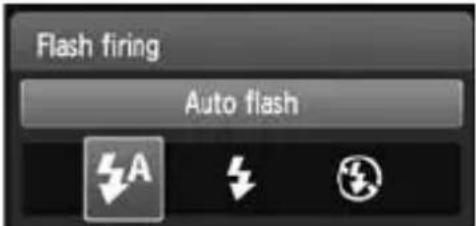
Flash firing: Press the <> key or turn the <> dial to set it as desired.
< 4^A> Auto flash: The flash fires automatically when necessary.
<4> Flash on : The flash fires at all times.
<Flashoff:Theflashisdisabled.

- If the image-recording quality is RAW or RAW + L ( ), the continuous shooting speed will be max. approx. 2 fps and approx. 0.8 fps (averaged value) respectively.
- When using < ⑦ > , see "Disabling Flash" on page 45.

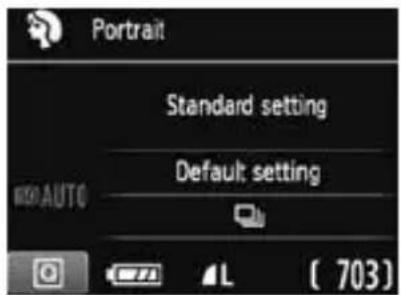
Shooting Portraits
The <口> (Portrait) mode blurs the background to make the human subject stand out. It also makes skin tones and the hair look softer than with the <> (Full Auto) mode.


Shooting Tips
- The further the distance between the subject and background, the better.
The further the distance between the subject and background, the more blurred the background will look. The subject will also stand out better in front of a plain, dark background.
Use a telephoto lens.
If you have a zoom lens, use the telephoto end to fill the frame with the subject from the waist up. Move in closer if necessary.
Focus the face.
Check that the AF point covering the face flashes in red.

- If you hold down the shutter button, you can shoot continuously to obtain different poses and facial expressions. (Up to approx. 3 shots per sec. in JPEG quality.)
- If necessary, the built-in flash will pop up automatically.

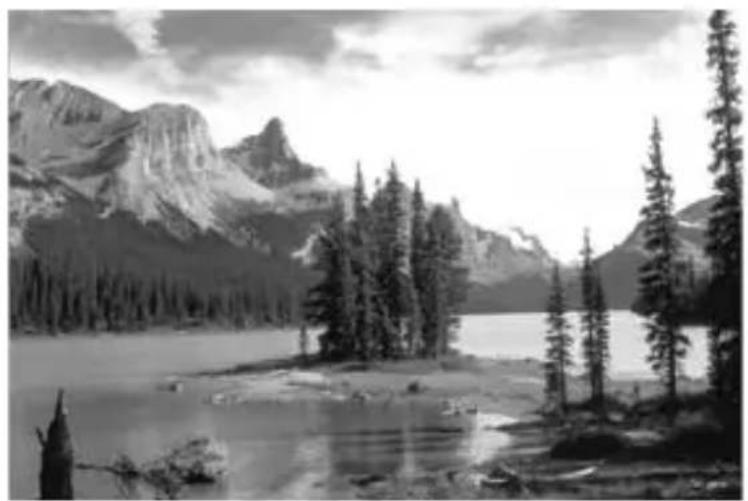
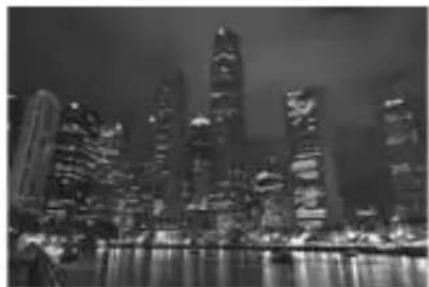
Shooting Landscapes
Use the <> (Landscape) mode for wide scenery, night scenes, or to have everything in focus from near to far. The greens and blues also become more vivid and the image sharper than with <> (Full Auto).


Shooting Tips
- With a zoom lens, use the wide-angle end.
When using the wide-angle end of a zoom lens, objects near and far will be in focus better than at the telephoto end. It also adds breadth to landscapes.
Since the built-in flash will be disabled, this mode < is also good for night scenes. Use a tripod to prevent camera shake. If you want to photograph a person against a night scene, set the Mode Dial to < (Night Portrait) and use a tripod (p.53).

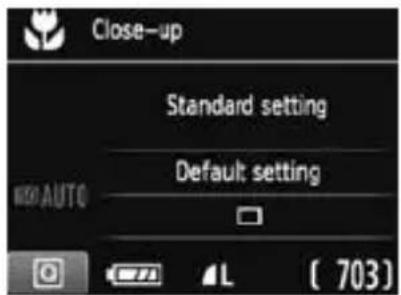
Shooting Close-ups
When you want to photograph flowers or small things up close, use the < (Close-up) mode. To make small things appear much larger, use a macro lens (sold separately).

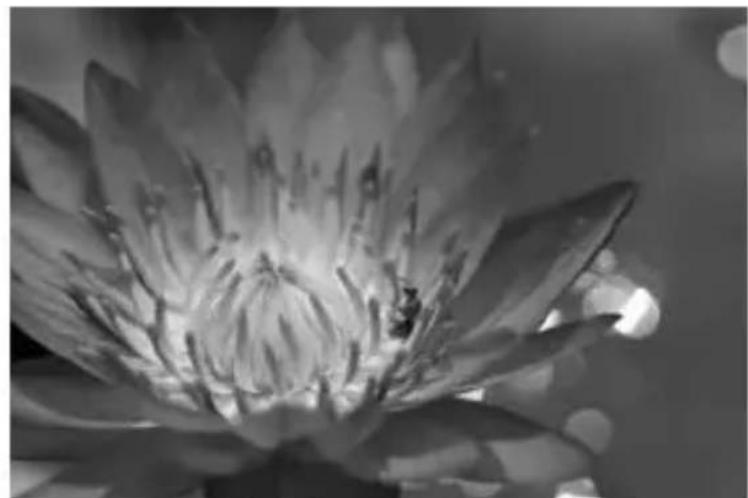

Shooting Tips
A simple background makes the flower, etc., stand out better.
- Move to the subject as close as possible.
Check the lens for its minimum focusing distance. Some lenses have indications such as < 0.25m/0.8ft>. The lens minimum focusing distance is measured from the < (focal plane) mark on the top left of the camera to the subject. If you are too close to the subject, the focus confirmation light will blink.
Under low light, the built-in flash will fire. If you are too close to the subject and the bottom of the picture looks dark, move away from the subject.
- With a zoom lens, use the telephoto end.
If you have a zoom lens, using the telephoto end will make the subject look larger.

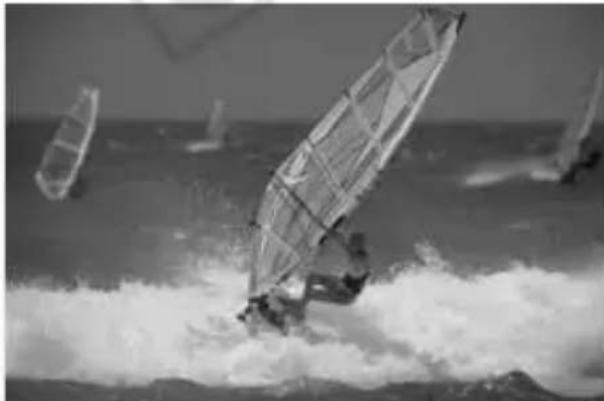
Shooting Moving Subjects
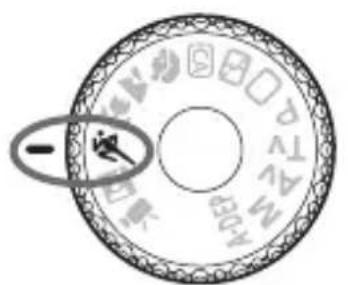
To photograph a moving subject, whether it is a child running or a moving vehicle, use the <> (Sports) mode.
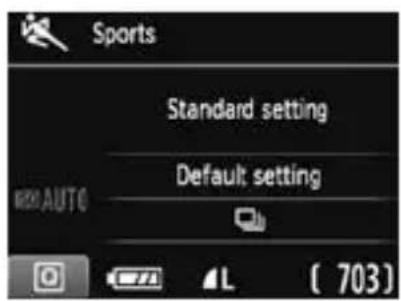


Shooting Tips
Use a telephoto lens.
Using a telephoto lens is recommended so you can shoot from afar.
- Use the center AF point to focus.
Aim the center AF point over the subject, then press the shutter button halfway to autofocus. During autofocusing, the beeper will continue beeping softly. If focus cannot be achieved, the focus confirmation light < > will blink.
When you want to take the picture, press the shutter button completely. If you hold down the shutter button, continuous shooting (max. approx. 3 shots per sec. in JPEG quality) and autofocusing will take effect.

Under low light when camera shake is prone to occur, the viewfinder's shutter speed display on the bottom left will blink. Hold the camera steady and shoot.

Shooting Portraits at Night
To shoot someone at night and obtain a natural-looking exposure in the background, use the <日> (Night Portrait) mode.

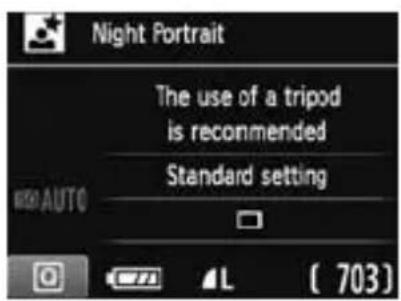


Shooting Tips
- Use a wide-angle lens and a tripod.
When using a zoom lens, use the wide-angle end to obtain a wide night view. Also, use a tripod to prevent camera shake.
- Keep the person within 5 meters/16.4 feet from the camera.
Under low light, the built-in flash will fire automatically to obtain a good exposure of the person. The maximum effective distance of the built-in flash is 5 meters/16.4 feet from the camera.
- Shoot also with < > (Full Auto).
Since camera shake is prone to occur with night shots, shooting also with < > (Full Auto) is recommended.

- Tell the subject to keep still even after the flash fires.
- If you use the self-timer together with flash, the self-timer lamp will light briefly after the picture is taken.

Quick Control
Example: Portrait mode
In Basic Zone modes when the shooting settings screen is displayed, you can press the <> button to display the Quick Control screen. The table below indicates the functions that can be set with the Quick Control screen in each Basic Zone mode.
1 Set the Mode Dial to a Basic Zone mode.
The Quick Control screen will appear.
3 Set the function.
- Press the < > key to select a function. (Step not necessary in the / mode.)
The selected function and Feature guide (p.39) will be displayed.
- Press the <> key or turn the <> dial to change the setting.
Settable Functions in Basic Zone Modes
-: Set automatically : User selectable : Not selectable
| Function | ☐ (p.42) | ☐ (p.45) | CA (p.46) | ☐ (p.49) | ☐ (p.50) | ☐ (p.51) | ☐ (p.52) | ☐ (p.53) |
| Drive mode | ☐: Single shooting | ○○ | ○○ | ○○ | | | | | |
| ☐: Continuous shooting | | | ○○ | ○ | | | | |
| Self-timer | ☐: 10 sec. | ○○ | ○○ | ○○ | ○○ | | | | |
| ☐C: Continuous* | ○○ | ○○ | ○○ | ○○ | | | | |
| Flash firing | Automatic firing | ●○ | ●● | ● | | | | | |
| Flash on (Fires at all times) | | | ○ | | | | | |
| Flash off | | ●○ | ●● | | | | | |
| Shoot by ambience selection (→○) | | | ○○ | ○○ | ○○ | | | |
| Shoot by lighting or scene type (→○) | | | | ○○ | ○○ | | | |
| Blurring/sharpening the background (p.47) | | | ○ | | | | | |
- Use the < > key to set the number of continuous shots.
3
Shooting with the LCD Monitor (Live View Shooting)
You can shoot while viewing the image on the camera's LCD monitor. This is called "Live View shooting".
Live View shooting is effective for still subjects which do not move.
If you handhold the camera and shoot while viewing the LCD monitor, camera shake can cause blurred images. Using a tripod is recommended.
For other functions, more details, and cautions related to Live View shooting, see the Camera Instruction Manual (PDF) in the Camera Instruction Manual CD-ROM.

About Remote Live View Shooting
With EOS Utility (provided software, p.76) installed in your computer, you can connect the camera to the computer and shoot remotely while viewing the computer screen. For details, see the Software Instruction Manual (p.78) in the CD-ROM.

Shooting with the LCD Monitor
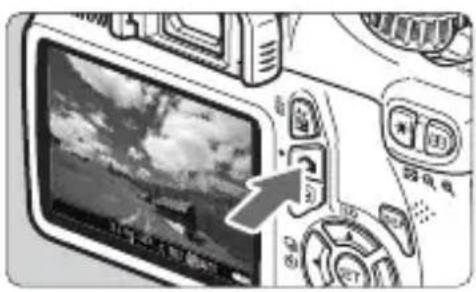
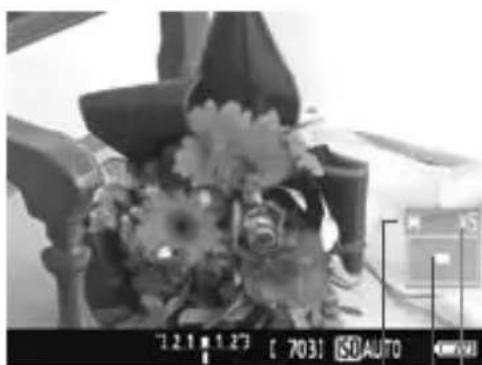
1 Display the Live View image.
- Press the < > button.
The Live View image will appear on the LCD monitor.
The Live View image will closely reflect the brightness level of the actual image you capture.
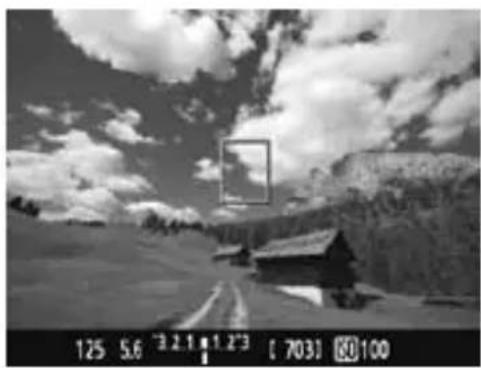
Focus the subject.
- When you press the shutter button halfway, the camera will focus with the current AF mode (p.59-63).
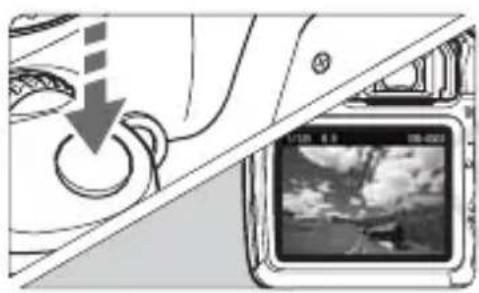
3 Take the picture.
- Press the shutter button completely.
The picture will be taken and the captured image is displayed on the LCD monitor.
After the image review ends, the camera will return to Live View shooting automatically.
- Press the < > button to exit Live View shooting.

- The image's field of view is approx. 99% (when the image-recording quality is set to JPEG).
- The metering mode will be fixed to evaluative metering for Live View shooting.
- During continuous shooting, the exposure set for the first shot will also be applied to subsequent shots.
Enabling Live View Shooting
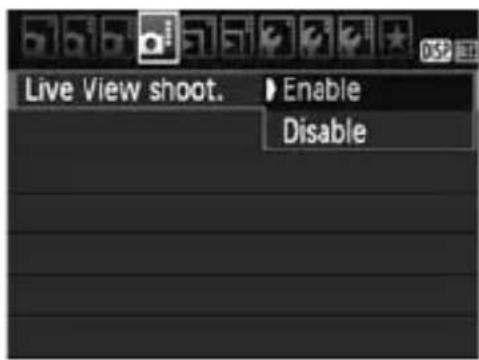
Set [Live View shoot.] to [Enable].
In Basic Zone modes, [Live View shoot.] will be displayed under [0^·] , and in Creative Zone modes, it will be displayed under [0^·] .
Battery Life with Live View Shooting [Approx. number of shots]
| Temperature | Shooting Conditions |
| No Flash 50% | Flash Use |
| At 23°C / 73°F 240 | 220 | |
| At 0°C / 32°F 230 21 | 0 | |
- The figures above are based on a fully-charged Battery Pack LP-E10 and CIPA (Camera & Imaging Products Association) testing standards.
- With a fully-charged Battery Pack LP-E10, continuous Live View shooting is possible for approx. 2 hr. at 23^ / 73^ and approx. 1 hr. 40 min. at 0^ / 32^ .

During Live View shooting, do not point the lens toward the sun. The sun's heat can damage the camera's internal components.

- When flash is used, there will be two shutter sounds, but only one shot will be taken.
- If the camera is not operated for a prolonged period, the power will turn off automatically as set with [♀' Auto power off] ( ) . If [♀' Auto power off] is set to [Off], the Live View function will terminate automatically after 30 min. (camera power remains on).
- With an HDMI cable (sold separately), you can display the Live View image on a TV (
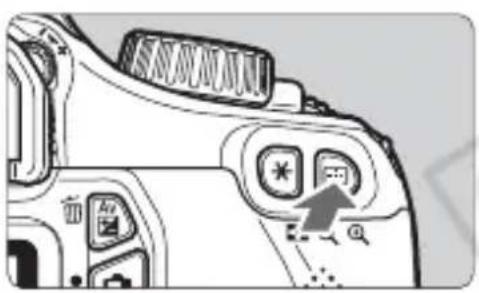
Each time you press the button, the information display will change.
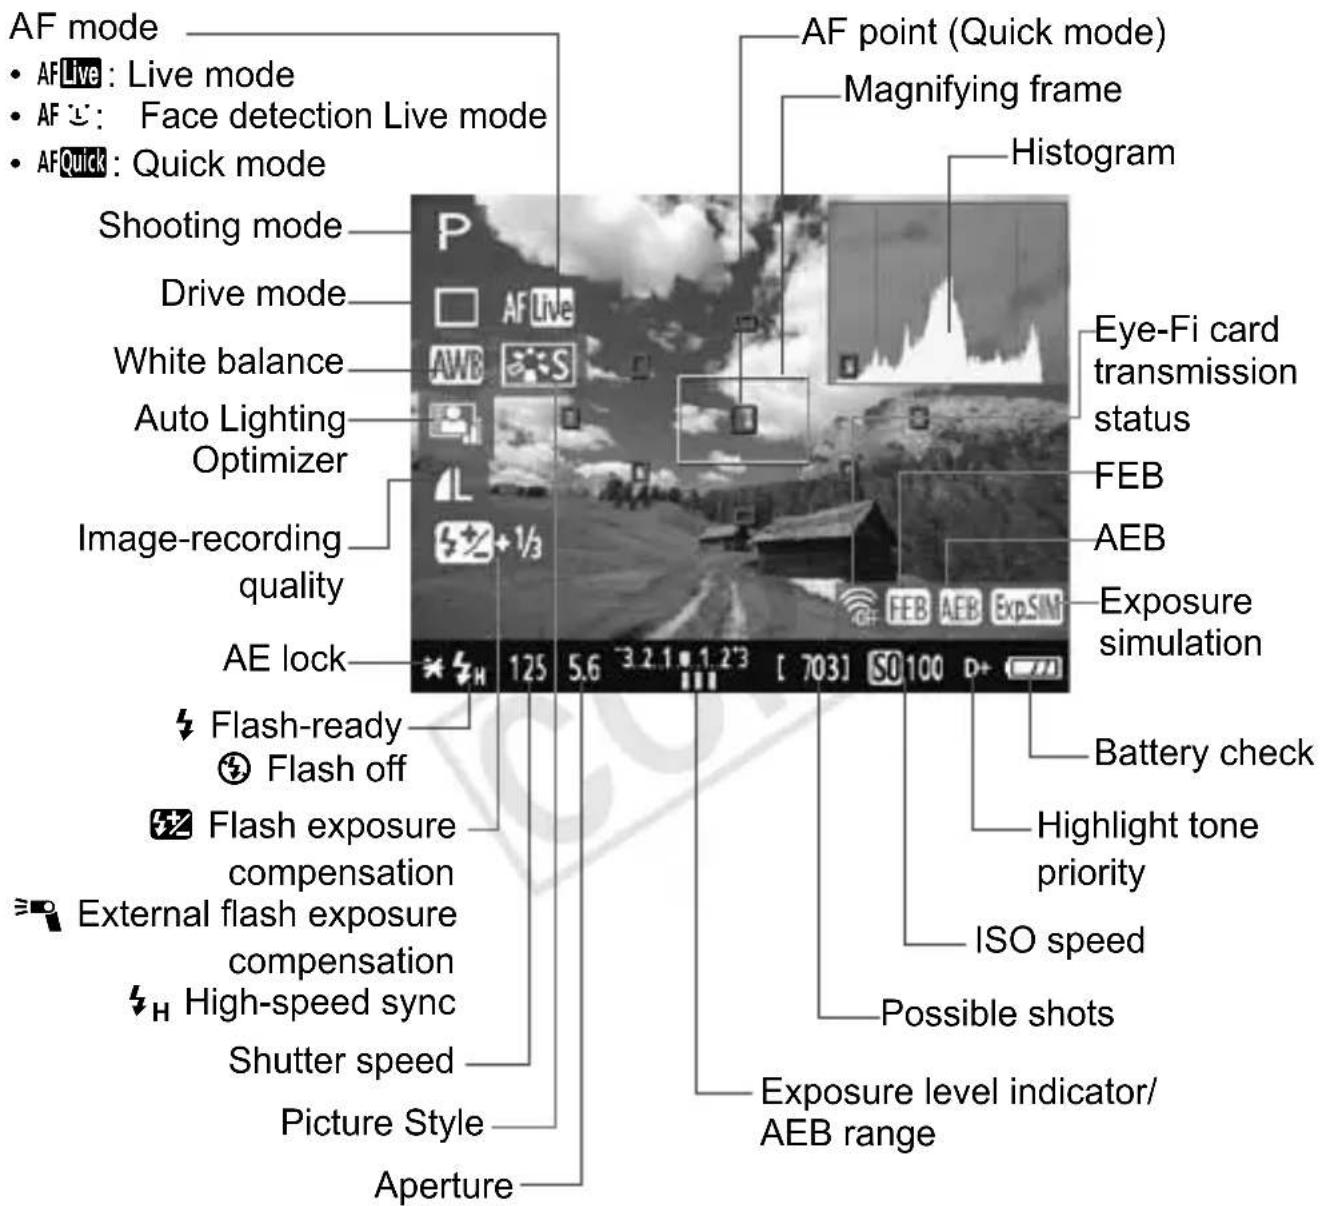

- When < Exp.SIM > is displayed in white, it indicates that the Live View image brightness is close to what the captured image will look like.
- If <ExpSIM> is blinking, it indicates that the Live View image is not being displayed at the suitable brightness due to low- or bright-light conditions. However, the actual image recorded will reflect the exposure setting.
- If flash is used or bulb is set, the < Exp.SIM> icon and histogram will be grayed out (for your reference). The histogram might not be properly displayed in low- or bright-light conditions.
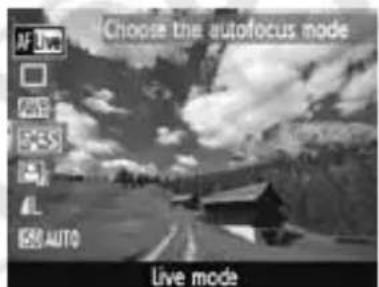
Changing the Autofocus Mode
Selecting the AF Mode
The AF modes available are [Live mode], [Live mode] (face detection, p.60), and [Quick mode] (p.62).
If you want to achieve precise focus, set the lens focus mode switch to , magnify the image, and focus manually (p.64).
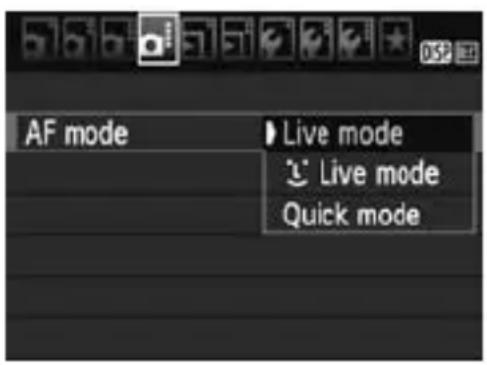
Select the AF mode.
Under the [O] tab, select [AF mode].
- Select the desired AF mode, then press <> .
While the Live View image is displayed, you can press the < > button to select the AF mode on the Quick Control screen (
Live Mode: AFLive
The image sensor is used to focus. Although AF is possible with the Live View image displayed, the AF operation will take longer than with the Quick mode. Also, achieving focus may be more difficult than with the Quick mode.
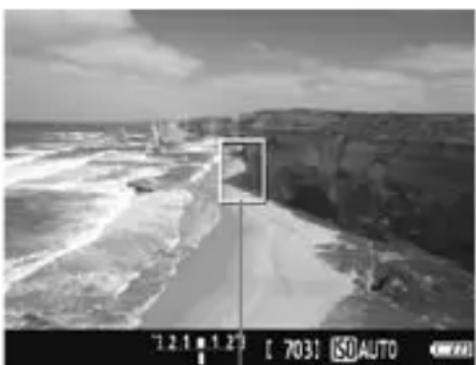
AF point
1 Display the Live View image.
- Press the < > button.
The Live View image will appear on the LCD monitor.
The AF point 日 > will appear.
Move the AF point.
- Press the <> key to move the AF point to where you want to focus (it cannot go to the edges of the picture).
To return the AF point to the center, press <> .
Focus the subject.
- Aim the AF point over the subject and press the shutter button halfway.
When focus is achieved, the AF point will turn green and the beeper will sound.
If focus is not achieved, the AF point will turn orange.
4 Take the picture.
- Check the focus and exposure, then press the shutter button completely to take the picture (p.56).
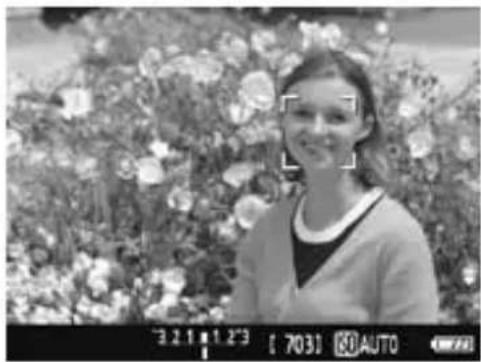
Face detection) Live Mode: AF
With the same AF method as the Live mode, human faces are detected and focused. Have the target person face the camera.
1 Display the Live View image.
Press the < > button.
The Live View image will appear on the LCD monitor.
- When a face is detected, the < : : > frame will appear over the face to be focused.
- If multiple faces are detected, < > will be displayed. Press the <> key to move the < > frame over the desired target face.
Focus the subject.
- Press the shutter button halfway and the camera will focus the face covered by the <·> frame.
When focus is achieved, the AF point will turn green and the beeper will sound.
If focus is not achieved, the AF point will turn orange.
- If a face cannot be detected, the AF point < will be displayed and AF will be executed at the center.
Take the picture.
- Check the focus and exposure, then press the shutter button completely to take the picture (p.56).

- If the focus is way off, face detection will not be possible. If the lens enables manual focusing even while the lens focus mode switch is set to < AF> , turn the focusing ring to attain rough focus. The face will then be detected and < [· ] > will be displayed.
- An object other than a human face might be detected as a face.
- Face detection will not work if the face is very small or large in the picture, too bright or too dark, titled horizontally or diagonally, or partially hidden.
- The < ] > focusing frame might cover only part of the face.

- When you press <> , the AF mode will switch to the Live mode (p.59). You can press the <> key to move the AF point. Press <> again to return to the face detection) Live mode.
- Since AF is not possible with a face detected near the edge of the picture, the <> will be grayed out. Then if you press the shutter button halfway, the center AF point <> will be used to focus.
Quick Mode: AFQuick
The dedicated AF sensor is used to focus in One-Shot AF mode ( using the same AF method as with viewfinder shooting.
Although you can focus the target area quickly, the Live View image will be interrupted momentarily during the AF operation.
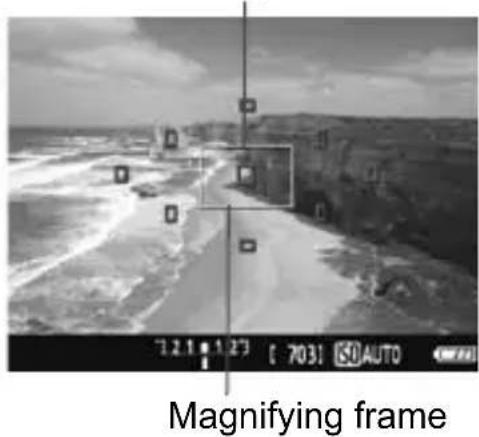
AF point
1 Display the Live View image.
- Press the < > button.
The Live View image will appear on the LCD monitor.
The small boxes on the screen are the AF points, and the larger box is the magnifying frame.
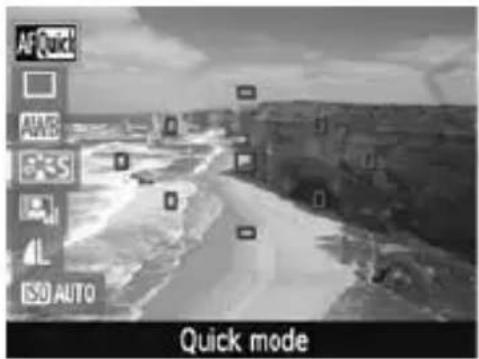
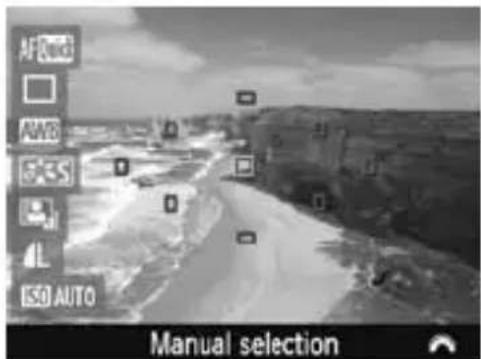
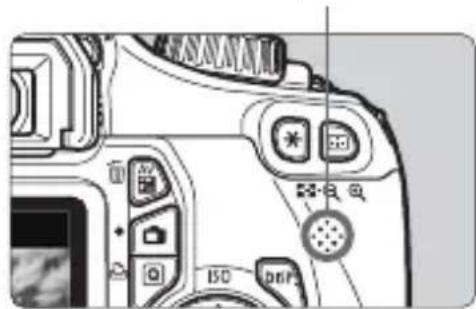
2 Select the AF point.
Press the < > button (10) to display the Quick Control screen.
The settable functions will be displayed on the left of the screen.
- Press the < > key to make the AF point selectable.
- Turn the < dial to select the AF point.
Focus the subject.
- Aim the AF points over the subject and press the shutter button halfway.
The Live View image will turn off, the reflex mirror will go back down, and AF will be executed.
When focus is achieved, the AF point which achieved focus will turn green and the Live View image will reappear.
If focus is not achieved, the AF point will turn orange and blink.
4 Take the picture.
- Check the focus and exposure, then press the shutter button completely to take the picture (p.56).

You cannot take a picture during autofocusing. Take the picture while the Live View image is displayed.
MF: Focusing Manually
You can magnify the image and focus precisely manually.
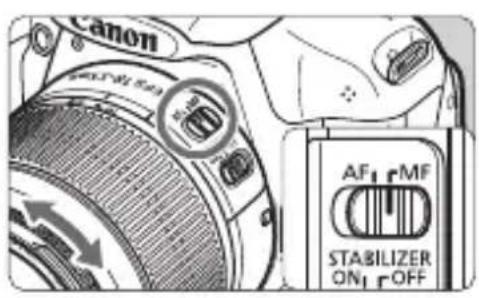
1 Set the lens focus mode switch to .
- Turn the lens focusing ring to focus roughly.
Magnifying frame
Move the magnifying frame.
- Press the <> key to move the magnifying frame to the position where you want to focus.
To return the magnifying frame to the center, press <> .
Magnify the image.
Press the < 心> button.
The area within the magnifying frame will be magnified.
Each time you press the < 心> button, the view will change as follows:
AE lock Magnified area position Magnification
4 Focus manually.
While looking at the magnified image, turn the lens focusing ring to focus.
After achieving focus, press the < +> button to return to the normal view.
Take the picture.
- Check the focus and exposure, then press the shutter button to take the picture (p.56).
4
Shooting Movies
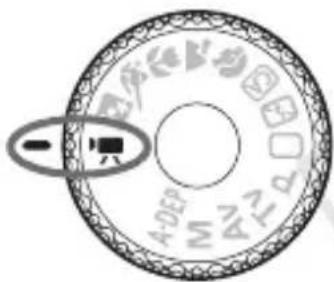
When you set the Mode Dial to < ,you can shoot HighDefinition (HD) movies. The movie recording format will be MOV.
For other functions, more details, and cautions related to movie shooting, see the Camera Instruction Manual (PDF) in the Camera Instruction Manual CD-ROM.

Cards which can record movies
When shooting movies, use a large-capacity SD card rated SD Speed Class 6 "Clothes higher.
If you use a slow-writing card when shooting movies, the movie might not be recorded properly. And if you playback a movie on a card having a slow reading speed, the movie might not playback properly.
To check the card's read/write speed, refer to the card manufacturer's Web site.

Shooting Movies
When you set the shooting mode to < , you can easily shoot HighDefinition (HD) movies with autoexposure. When playing movies, connecting the camera to a TV set is recommended (

1 Set the Mode Dial to < ^ >
The reflex mirror will make a sound, then the image will appear on the LCD monitor.

Focus the subject.
Before shooting a movie, autofocus or manual focus (p.59-64).
- When you press the shutter button halfway, the camera will focus with the current AF mode.
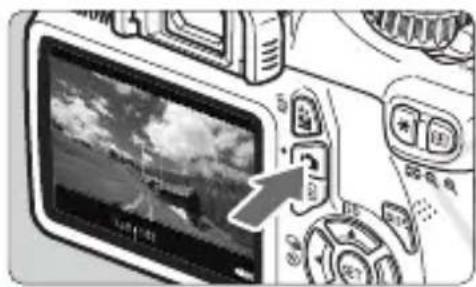
3 Shoot the movie.
- Press the < > button to start shooting a movie. To stop movie shooting, press < > again.
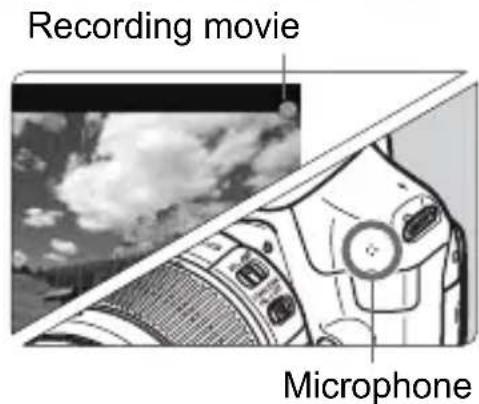
While the movie is being shot, the "●" mark will be displayed on the upper right of the screen.
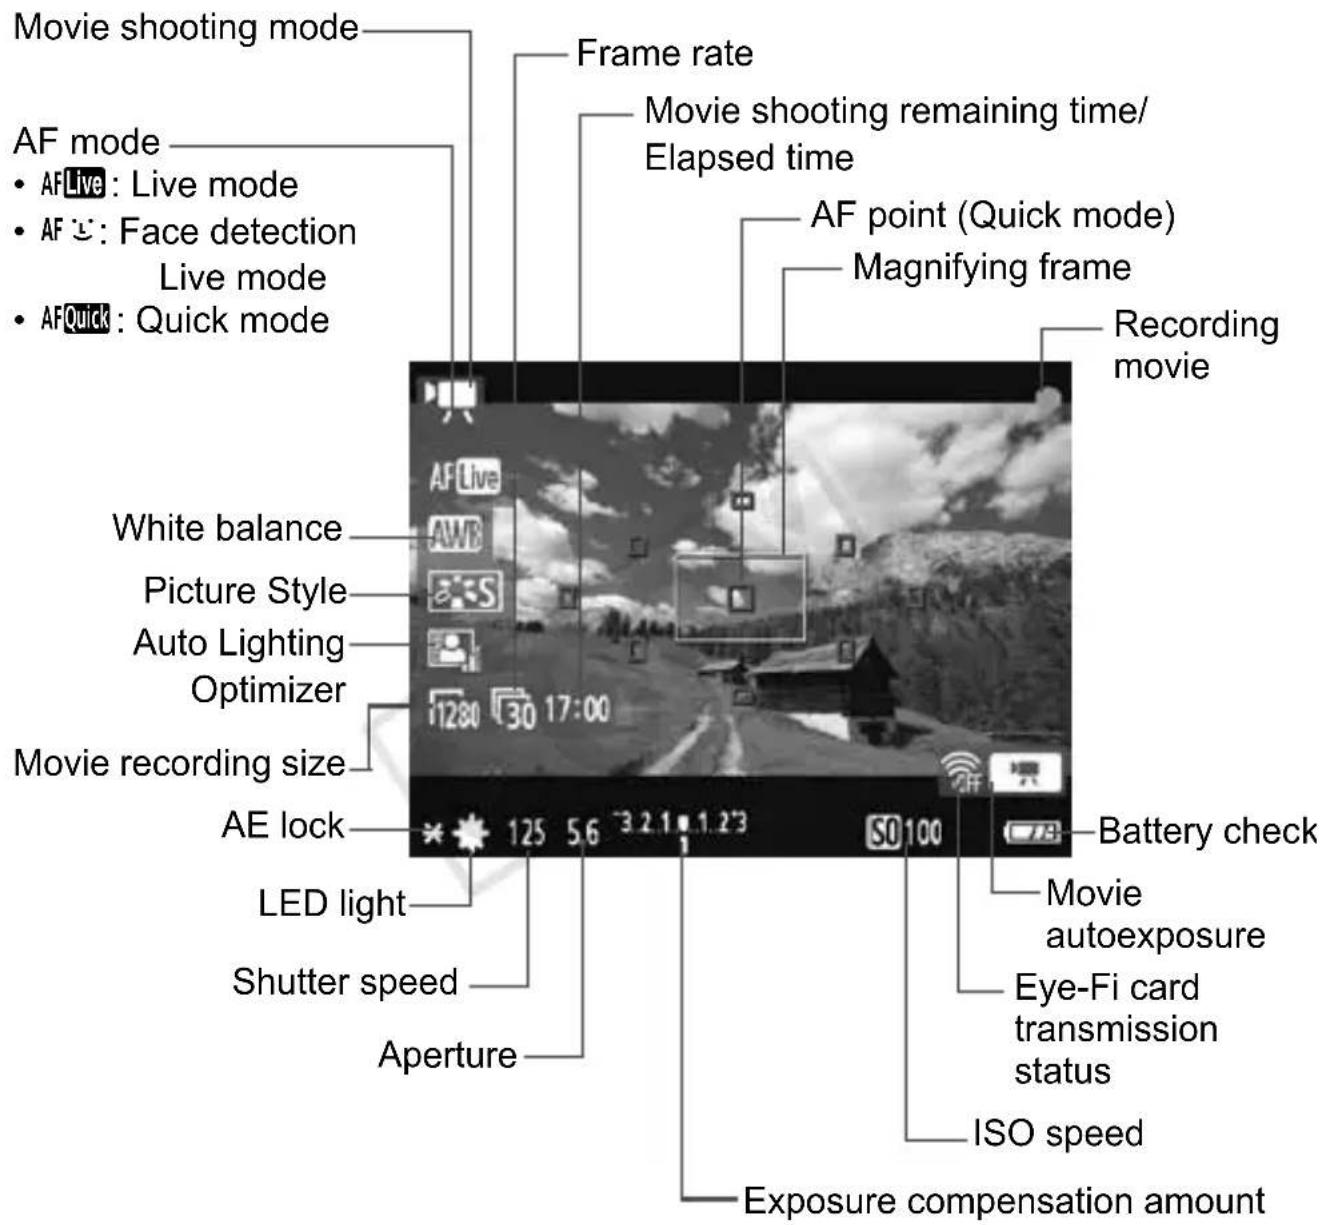
Each time you press the button, the information display will change.

- If there is no card in the camera, the movie shooting remaining time will be displayed in red.
- When movie shooting starts, the movie shooting remaining time will change to the elapsed time.

- In the movie shooting mode, you cannot take a still photo even if you press the shutter button completely.
- During movie shooting, do not point the lens toward the sun. The sun's heat can damage the camera's internal components.

A movie file is recorded each time you shoot a movie.
The image's field of view is approx. 99% .
- The ISO speed, shutter speed, and aperture are set automatically.
- When you press the shutter button halfway, the exposure setting displayed at the screen bottom is for your reference.
- The sound will be recorded by the camera's built-in monaural microphone (p.66).
The sound recording level will be adjusted automatically.
- With a fully-charged Battery Pack LP-E10, the total shooting time will be as follows: At 23^ / 73^ : Approx. 1 hr. 50 min., At 0^ / 32^ : Approx. 1 hr. 30 min.
Total Movie Recording Time and File Size per Minute
- Due to the file system, movie shooting will stop automatically if the file size of a single movie clip reaches 4GB.
- You can immediately resume shooting another movie by pressing the <> button. (A new movie file starts being recorded.)
| Movie-recording Size | Total Recording Time (approx.) | File Size (approx.) |
| 4GB Card 8 | GB Card 16GB | Card |
| [1280x720] [30] [25] | 17 min. | 34 min. | 1 hr. 8 min. | 222.6 MB/min. |

- An increase of the camera's internal temperature may cause movie shooting to stop before the maximum recording time shown in the table above ( )
The maximum recording time of one movie clip is 29 min. 59 sec.

Movie shooting in Full High-Definition (Full HD) or Standard Definition (SD) quality is not possible.
5
Image Playback
This chapter explains the basic ways to playback images and movies.
For other functions, more details, and cautions related to playback operations, see the Camera Instruction Manual (PDF) in the Camera Instruction Manual CD-ROM.
About images taken with another camera:
The camera might not be able to properly display images captured with a different camera or edited with a computer or whose file name was changed.

Image Playback
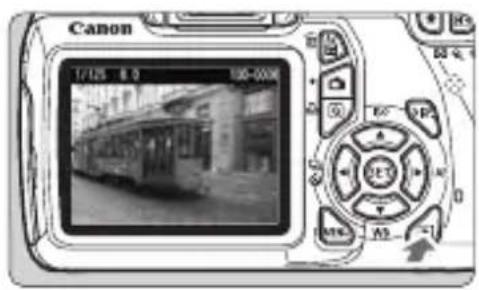
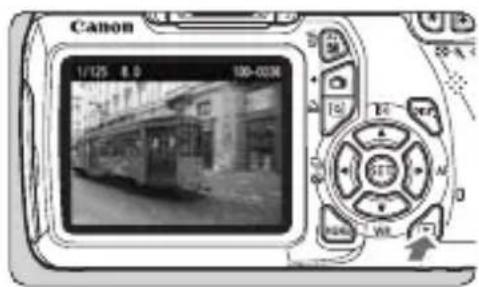
1 Playback the image.
- When you press the < > button, the last image captured will be displayed.
Select an image.
- To view images starting with the last image, press the < > key. To view images starting with the first (oldest) image, press the < > key.
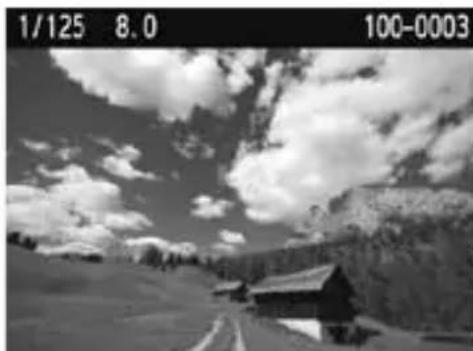
Each time you press the button, the display format will change.
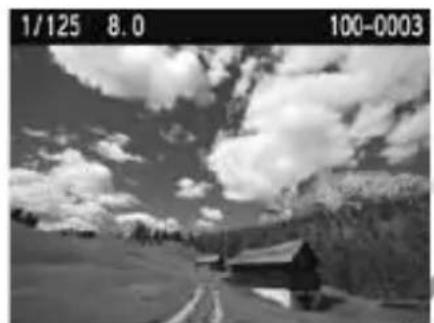
With basic information
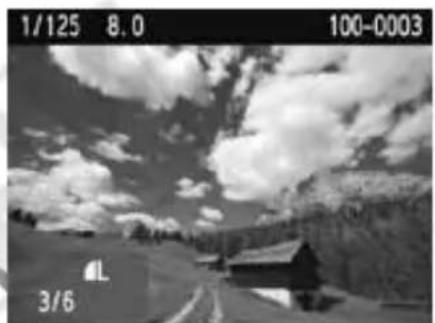
Basic information + Image quality/Playback number
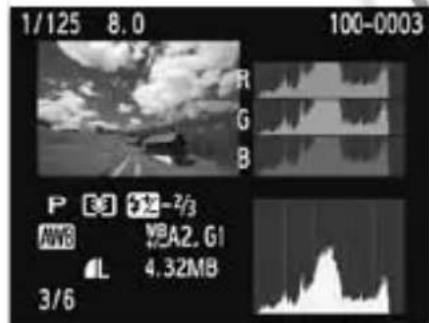
Histogram
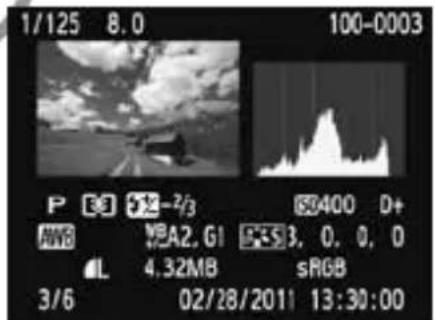
Shooting information display
3 Exit the image playback.
- Press the < > button to exit the image playback and return to the shooting settings display.

To erase an image, press the < button, select [Erase] and press <

Playing Movies
1 Playback the image.
- Press the < > button to display images.
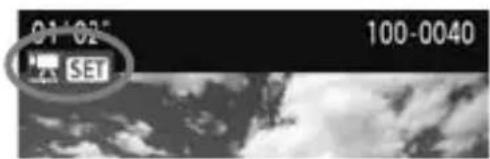
Select a movie.

- Press the < > key to select a movie.
- On the single-image display, the icon displayed on the upper left indicates a movie.
- On the index display, the perforation on the left edge of the image indicates a movie. As movies cannot be played on the index display, press < > to switch to the single-image display.
3 On the single-image display, press <> .
The movie playback panel will appear on the bottom.

4 Playback the movie.
- Select [▶] (Play), then press <> .
The movie will start playing.
- You can pause the movie playback by pressing < > .
During movie playback, you can turn the < dial to adjust the built-in speaker's sound volume.
- For more details on the playback procedure, see the next page.
Speaker
| Function Playback Description |
| Exit Returns to the single-image display. |
| Play | Pressing <SET> toggles between play and stop. |
| Slow motion | Adjust the slow motion speed by pressing the <▲> key. The slow-motion speed is indicated on the upper right. |
| First frame | Displays the movie's first frame. |
| Previous frame | Each time you press <SET>, a single previous frame is displayed. If you hold down <SET>, it will rewind the movie. |
| Next frame | Each time you press <SET>, the movie will play frame-by-frame. If you hold down <SET>, it will fast forward the movie. |
| Last frame | Displays the movie's last frame. |
| Edit | Displays the editing screen (→) |
| Playback position |
| "Volume" | You can adjust the built-in speaker's (p.71) sound volume by turning the <> dial. |

- With a fully-charged Battery Pack LP-E10, the continuous playback time at 23^ / 73^ will be as follows: Approx. 4 hr.
- During the single-image display, you can press the button to change the display format.
- If you connect the camera to a TV set ( ) to playback a movie, adjust the sound volume with the TV set. (Turning the < > dial will not adjust the sound volume.)
- This camera cannot playback Full High-Definition (Full HD) or High-Definition (HD) movies (60/50 fps frame rate) taken with another EOS camera. This camera can only playback High-Definition (HD) and Standard-Definition (SD) movies having a 30/25 fps frame rate.
Viewing the Camera Instruction Manual CD-ROM / Software Start Guide
This chapter explains how to view the PDF files in the Camera Instruction Manual CD-ROM and Software Instruction Manual CD-ROM. It also gives an overview of the software in the EOS DIGITAL Solution Disk CD-ROM and explains how to install them on a personal computer.
Camera Instruction Manual

EOS DIGITAL Solution Disk (Software)
Software Instruction Manual
Viewing the Camera Instruction Manual CD-ROM

Camera Instruction Manual
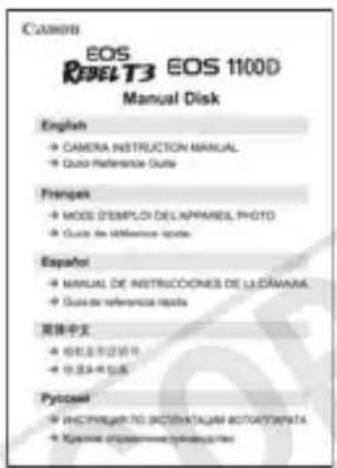
The Camera Instruction Manual CD-ROM contains the Camera Instruction Manual and Quick Reference Guide.
Camera Instruction Manual (PDF file)
Explains all the camera's functions and operation procedures and includes also all the contents in this Basic Instruction Manual. Refer to the Camera Instruction Manual in this CD-ROM for information and details not found in the Basic Instruction Manual, advanced shooting and playback procedures, photo printing, Custom Functions, and more.
Quick Reference Guide (PDF file)
Simple guide centering on shooting procedures. Its A4 size enables easy printing to carry it around.
Viewing the Camera Instruction Manual CD-ROM
To view the Camera Instruction Manual and Quick Reference Guide, your personal computer must have Adobe Reader (version 6.0 or higher) installed. You can download Adobe Reader from the Internet for free. After installing Adobe Reader, follow the procedure below.
1 Insert the Camera Instruction Manual CD-ROM into your computer.
Double-click the CD-ROM icon.
- For Windows, the icon will be displayed in [(My) Computer].
- For Macintosh, the icon will be displayed on the desktop.
The icon that appears will differ depending on your computer.

Canon (D:)
STARTpdf
3 Double-click the "START" file.
The screen shown in step 4 will appear.
- The icon that appears will differ depending on your computer.
4 Click on the name of the instruction manual you want to view.
- Click on the name of the instruction manual under the desired language.
The Instruction Manual/Quick Reference Guide in the desired language will be displayed.
Camera Instruction Manual Quick Reference Guide

- You can copy and save the PDF files to your personal computer.
- The Camera Instruction Manual PDF incorporates page links so you can quickly go to the desired page. On the Contents or Index page, just click on the page number to jump to that page
- For more information about how to use Adobe Reader, see the Adobe Reader's Help menu.
Software Start Guide

EOS DIGITAL Solution Disk
This disk contains various software for EOS DIGITAL cameras.
EOS Utility
With the camera connected to a personal computer, EOS Utility enables you to transfer still photos and movies shot with the camera to the computer. You can also use the personal computer to set various camera settings and shoot remotely with the computer connected to the camera.
Digital Photo Professional
This software is recommended for users who mainly shoot RAW images. You can view, edit, process, and print RAW images at high speed. You can also edit JPEG images while retaining the original images.
ZoomBrowser EX (Win) / ImageBrowser (Mac)
This software is recommended for users who mainly shoot JPEG images. You can easily view, edit, organize, and print JPEG images. You can also play and edit MOV movies and extract still photos from movies.
Picture Style Editor
You can edit Picture Styles and create and save original Picture Style files. This software is aimed at advanced users who are experienced in processing images.
Installing the Software

- Do not connect the camera to your computer before you install the software. The software will not be installed correctly.
- Even if a previous version of the software is installed, install the software by following the steps below (the newer version will overwrite the previous version).
1 Insert EOS DIGITAL Solution Disk (CD-ROM).
- For Macintosh, double-click to open the CD-ROM icon displayed on the desktop, then double-click on [Canon EOS Digital Installer].
2Click [Easy Installation] and follow the on-screen instructions to install.
- For Macintosh, click [Install].
![CANON EOS Rebel T3 - 2Click [Easy Installation] and follow the on-screen instructions to install. - 1](/content/2026/02/354825/images/25cb50499d125ccfe87f012b216b83b7c39b0e80c53bd20a70fe576c5a51344f.jpg)
3Click [Restart] and remove the CD-ROM after the computer restarts.
- When the computer has restarted, the installation is complete.
![CANON EOS Rebel T3 - 3Click [Restart] and remove the CD-ROM after the computer restarts. - 1](/content/2026/02/354825/images/5258784de4615f9b10f674c55ecaa0e9b4a09d883ff0ec36d1eab5cf909bc432.jpg)
Software Instruction Manual
Contains the Software Instruction Manuals.
Copying and Viewing the Instruction Manual PDFs
1 Insert the [Software INSTRUCTION MANUAL] CD-ROM into your computer.
2 Double-click the CD-ROM icon.
- For Windows, the icon is displayed in [(My) Computer].
- For Macintosh, the icon is displayed on the desktop.
3Copy the [English] folder to your computer.
- Instruction Manual PDFs with the names below are copied.
Windows Macintosh
| EOS Utility EUx.xW_E_xx EUx.xM_E_xx | | |
| Digital Photo Professional DPPx.xW_E_xx DPPx.xM_E_xx | | |
| ZoomBrowser EX / ImageBrowser | ZBx.xW_E_xx IBx.xM_E_xx | |
| Picture Style Editor PSEx.xW_E_xx PSEx.xM_E_xx | | |
4Double-click the copied PDF file.
- Adobe Reader (Version 6.0 or later) must be installed in your computer.
Adobe Reader can be downloaded free from the Internet.
Trademarks
Adobe is a trademark of Adobe Systems Incorporated.
- Windows is a trademark or registered trademark of Microsoft Corporation in the United States and other countries.
- Macintosh and Mac OS are trademarks or registered trademarks of Apple Inc. in the United States and other countries.
SDXC logo is a trademark of SD-3C, LLC.
- HDMI, HDMI logo, and High-Definition Multimedia Interface are a trademark or registered trademark of HDMI Licensing LLC.
- All other corporate and product names and trademarks mentioned in this manual are the property of their respective owners.
About MPEG-4 Licensing
"This product is licensed under AT&T patents for the MPEG-4 standard and may be used for encoding MPEG-4 compliant video and/or decoding MPEG-4 compliant video that was encoded only (1) for a personal and non-commercial purpose or (2) by a video provider licensed under the AT&T patents to provide MPEG-4 compliant video. No license is granted or implied for any other use for MPEG-4 standard."
- Notice displayed in English as required.
Use of genuine Canon accessories is recommended
This product is designed to achieve excellent performance when used with genuine Canon accessories. Canon shall not be liable for any damage to this product and/or accidents such as fire, etc., caused by the malfunction of non-genuine Canon accessories (e.g., a leakage and/or explosion of a battery pack). Please note that this warranty does not apply to repairs arising out of the malfunction of non-genuine Canon accessories, although you may request such repairs on a chargeable basis.
SafetyWarnings
Follow these safeguards and use the equipment properly to prevent injury, death, and material damage.
Preventing Serious Injury or Death
-
To prevent fire, excessive heat, chemical leakage, and explosions, follow the safeguards below:
-
Do not use any batteries, power sources, and accessories not specified in this booklet. Do not use any home-made or modified batteries.
- Do not short-circuit, disassemble, or modify the battery pack or back-up battery. Do not apply heat or apply solder to the battery pack or back-up battery. Do not expose the battery pack or back-up battery to fire or water. And do not subject the battery pack or back-up battery to strong physical shock.
- Do not install the battery pack or back-up battery in reversed polarity (+ -). Do not mix new and old or different types of batteries.
- Do not recharge the battery pack outside the allowable ambient temperature range of 0^ - 40^ ( 32^ - 104^ ). Also, do not exceed the recharging time.
-
Do not insert any foreign metallic objects into the electrical contacts of the camera, accessories, connecting cables, etc.
-
Keep the back-up battery away from children. If a child swallows the battery, consult a physician immediately. (Battery chemicals may harm the stomach and intestines.)
- When disposing of a battery pack or back-up battery, insulate the electrical contacts with tape to prevent contact with other metallic objects or batteries. This is to prevent fire or an explosion.
- If excessive heat, smoke, or fumes are emitted during battery pack recharging, immediately unplug the battery charger from the power outlet to stop the recharging and prevent a fire.
- If the battery pack or back-up battery leaks, changes color, deforms, or emits smoke or fumes, remove it immediately. Be careful not to get burned in the process.
- Prevent any battery leakage from contacting your eyes, skin, and clothing. It can cause blindness or skin problems. If the battery leakage contacts your eyes, skin, or clothing, flush the affected area with lots of clean water without rubbing it. See a physician immediately.
- During the recharging, keep the equipment away from the reach of children. The cord can accidentally choke the child or give an electrical shock.
- Do not leave any cords near a heat source. It can deform the cord or melt the insulation and cause a fire or electrical shock.
- Do not fire the flash at someone driving a car. It may cause an accident.
- Do not fire the flash near a person's eyes. It may impair the person's vision. When using flash to photograph an infant, keep at least 1 meter away.
- Before storing the camera or accessory when not in use, remove the battery pack and disconnect the power plug. This is to prevent electrical shock, heat generation, and fire.
-
Do not use the equipment where there is flammable gas. This is to prevent an explosion or fire.
-
If you drop the equipment and the casing breaks open to expose the internal parts, do not touch the internal parts due to the possibility of electrical shock.
- Do not disassemble or modify the equipment. High-voltage internal parts can cause electrical shock.
- Do not look at the sun or an extremely bright light source through the camera or lens. Doing so may damage your vision.
- Keep the camera from the reach of small children. The neck strap can accidentally choke the child.
- Do not store the equipment in dusty or humid places. This is to prevent fire and electrical shock.
- Before using the camera inside an airplane or hospital, check if it is allowed. Electromagnetic waves emitted by the camera may interfere with the plane's instruments or the hospital's medical equipment.
-
To prevent fire and electrical shock, follow the safeguards below:
-
Always insert the power plug all the way in.
- Do not handle a power plug with wet hands.
- When unplugging a power plug, grasp and pull the plug instead of the cord.
- Do not scratch, cut, or excessively bend the cord or put a heavy object on the cord. Also do not twist or tie the cords.
- Do not connect too many power plugs to the same power outlet.
-
Do not use a cord whose insulation has been damaged.
-
Occasionally unplug the power plug and use a dry cloth to clean off the dust around the power outlet. If the surrounding is dusty, humid, or oily, the dust on the power outlet may become moist and short-circuit the outlet to cause a fire.
Preventing Injury or Equipment Damage
- Do not leave equipment inside a car under the hot sun or near a heat source. The equipment may become hot and cause skin burns.
- Do not carry the camera around while it is attached to a tripod. Doing so may cause injury. Also make sure the tripod is sturdy enough to support the camera and lens.
- Do not leave a lens or lens-attached camera under the sun without the lens cap attached. Otherwise, the lens may concentrate the sun's rays and cause a fire.
- Do not cover or wrap the battery-recharging apparatus with a cloth. Doing so may trap heat within and cause the casing to deform or catch fire.
- If you drop the camera in water or if water or metal fragments enter inside the camera, promptly remove the battery pack and back-up battery. This is to prevent fire and electrical shock.
- Do not use or leave the battery pack or back-up battery in a hot environment. Doing so may cause battery leakage or a shorter battery life. The battery pack or back-up battery can also become hot and cause skin burns.
- Do not use paint thinner, benzene, or other organic solvents to clean the equipment. Doing so may cause fire or a health hazard.
If the product does not work properly or requires repair, contact your dealer or your nearest Canon Service Center.
Digital Camera Model DS126291 Systems
This device complies with Part 15 of the FCC Rules. Operation is subject to the following two conditions: (1) This device may not cause harmful interference, and (2) this device must accept any interference received, including interference that may cause undesired operation.
Note: This equipment has been tested and found to comply with the limits for class B digital devices, pursuant to Part 15 of the FCC Rules. These limits are designed to provide reasonable protection against harmful interference in a residential installation. This equipment generates, uses and can radiate radio frequency energy and, if not installed and used in accordance with the instructions, may cause harmful interference to radio communications. However, there is no guarantee that interference will not occur in a particular installation. If this equipment does cause harmful interference to radio or television reception, which can be determined by turning the equipment off and on, the user is encouraged to try to correct the interference by one or more of the following measures:
Reorient or relocate the receiving antenna.
- Increase the separation between the equipment and receiver.
- Connect the equipment into an outlet on a circuit different from that to which the receiver is connected.
- Consult the dealer or an experienced radio/TV technician for help.
The cable with the ferrite core provided with the digital camera must be used with this equipment in order to comply with Class B limits in Subpart B of Part 15 of the FCC rules.
Do not make any changes or modifications to the equipment unless otherwise specified in the manual. If such changes or modifications should be made, you could be required to stop operation of the equipment.
Canon U.S.A. Inc.
One Canon Plaza, Lake Success, NY 11042, U.S.A.
Tel No. (516)328-5600
This Class B digital apparatus complies with Canadian ICES-003.

When connecting to and using a household power outlet, use only AC Adapter Kit ACK-E10 (rated input: 100-240 V AC 50/60 Hz, rated output: 7.4 V DC). Using anything else can cause fire, overheating, or electrical shock.
IMPORTANT SAFETY INSTRUCTIONS
- SAVE THESE INSTRUCTIONS — This manual contains important safety and operating instructions for Battery Charger LC-E10 & LC-E10E.
- Before using the charger, read all instructions and cautionary remarks on (1) the charger, (2) the battery pack, and (3) the product using the battery pack.
- CAUTION — To reduce risk of injury, charge only the Battery Pack LP-E10. Other types of batteries may burst, causing personal injury and other damage.
- Do not expose the charger to rain or snow.
- Use of an attachment not recommended or sold by Canon may result in fire, electric shock, or personal injury.
- To reduce risk of damage to electric plug and cord, pull by plug rather than by cord when disconnecting charger.
- Make sure cord is located so that it will not be stepped on, tripped over, or otherwise subjected to damage or stress.
- Do not operate the charger with damaged cord or plug - replace them immediately.
- Do not operate the charger if it has received a sharp blow, been dropped, or otherwise damaged in any way; take it to a qualified serviceman.
- Do not disassemble the charger; take it to a qualified serviceman when service or repair is required. Incorrect reassembly may result in a risk of electric shock or fire.
- To reduce risk of electric shock, unplug charger from outlet before attempting any maintenance or cleaning.
MAINTENANCE INSTRUCTION
Unless otherwise stated in this manual, there are no user serviceable parts inside. Refer servicing to qualified serviceman.

USA and Canada only:
The Lithium ion/polymer battery that powers the product is recyclable. Please call 1-800-8-BATTERY for information on how to recycle this battery.
For CA, USA only
Included lithium battery contains Perchlorate Material - special handling may apply.
See www.dtsc.ca.gov/hazardouswaste/perchlorate/ for details.
CAUTION
RISK OF EXPLOSION IF BATTERY IS REPLACED BY AN INCORRECT TYPE.
DISPOSE OF USED BATTERIES ACCORDING TO LOCAL REGULATION.
Canon
This Instruction Manual booklet is current as of January 2011. For information on the camera's compatibility with any accessories and lenses introduced after this date, contact any Canon Service Center.
EOS REBELT3 EOS 1100
sie5ue
Mode d'emploi de base
Ce manuel de base ne couvre que les opérations les plus élémentaires. Pour d'autres fonctions et des informations plus détaillées, voir le mode d'emploi de l'ordinateil photo au format pdf sur le CD-ROM.
Introduction
L'EOS REBEL T3/1100D est un apparéil photo numérique reflex à objectif interchangeable haute performance équipé d'un capteur CMOS aux détails fins d'environ 12,2 megapixels, du processeur DIGIC 4 et d'un système autofocus de grande précision et à grande vitesse doté de 9 collmateurs. Il offre une prise de vue en rafale d'environ 3 images par seconde, une prise de vue avec Visée par l'écran et un enregistrement video HD (Haute définition).
Il peut s'adapter à tout moment à toute prise de vue, intégre de nombreuses fonctions permettant une prise de vue avancée et offre bien d'autres fonctionnalités.
Consultez ce manuel tout en utilisant votre apparéil photo pour vous familiariser avec ce dernier
Un apparéil photo numérique permet de visionner sur-le-champ l'image capturée. Tout en lisant ce mode d'emploi, procédez à des prises de vue de test pour voir le résultat. Ceci vous aidera à mieux connaître votre apparéil photo.
Afin d'éviter les photos bâclées ou les accidents, lisez en premier les « Consignes de sécurité » (p.80, 81) et les « Précautions d'utilisation » (p.8, 9).
Prises de vue de test avant utilisation et responsabilité
Une fois les photos prises, affichez les images pour vérifier qu'elles ont bien été enregistrées. Canon ne peut être tenu responsable pour toute perte ou désgrément occasionné en cas de défectuosité de l'ordinateil ou de la carte mémoire faisant que les photos ne s'enregistrent pas ou que leur téléchargement est impossible sur un ordinateur.
Droits d'auteur
La loi régissant les droits d'auteur de votre pays peut interdire l'utilisation des images que vous avez enregistrées de certaines personnes et de certains sujets à des fins autres que strictement personnelles. Notez également que la prise de vue lors de représentations ou d'expositions publiques peut être interdite, même à des fins strictement personnelles.

Cet apparéil accepte les cartes mémoire SD, SDHC et SDXC. Dans ce mode d'emploi, toutes ces cartes seront simplement appelées « cartes ».
* L' apparéil est livré sans carte permettant l'enregistrement d'images. Vous doivent séparément.
Modes d'emploi
Ce mode d'emploi de base ne présente que les opérations et fonctions de base de l'appareil photo. Pour en savoir plus sur les instructions, les procédures de prise de vue et de lecture avancées, l'impression des photos, les fonctions personalisées et autres fonctions, consultez le CD-ROM du mode d'emploi de l'appareil photo.
Les modes d'emploi de l'EOS REBEL T3/EOS 1100D comprend les éléments suivants :
Mode d'emploi de l'appareil photo

Mode d'emploi de base de l'appareil photo (le present manuel)
Mode d'emploi de l'appareil photo (CD-ROM)
Contenu du CD-ROM
Mode d'emploi de l'appareil photo
(fichier PDF)
Explique toutes les fonctions et opérations de l'appareil photo. Compendégressément l'intégrality du contenu de ce mode d'emploi de base.
Guide de référence rapide
(fichier PDF)
Guide élémentaire axé sur les procédures de prise de vue. Son format A4 permet de l'imprimer facilement pour l'emporter partout.
Voir page 74 pour savoir comment acceder au mode d'emploi de l'appareil photo (PDF) sur le CD-ROM.
- Logiciels et modes d'emploi des logiciels

EOS DIGITAL Solution Disk (CD-ROM des logiciels)
MODES D'EMPLOI des logiciels (CD-ROM)
Voir pages 76 à 78 pour un aperçu des logiciels, de leur procédure d'installation sur un ordinateur et pour savoir comment acceder au CD-ROM des modes d'emploi des logiciels.
Liste de vérification des éléments
Avant de commencer, vérifie qu'il ne manque aucun des accessoires ci-dessous fournis avec votre apparéil photo. Si un accessoire manquait, contactez votre revendeur.
Appareil photo (avec cieilleton et bouchon du boitier)
Batterie LP-E10 (avec couvercle de protection)
Chargeur de batterie LC-E10/LC-E10E*

Courroie large EW-200D

Cable d'interface

Mode d'emploi de l'appareil photo (CD-ROM)

EOS DIGITAL Solution Disk (CD-ROM des logiciels)

MODES D'EMPLOI des logiciels (CD-ROM)

Mode d'emploi de base de l'appareil photo (le present manuel)
-
Le chargeur de batterie LC-E10 ou LC-E10E est fourni. (Le LC-E10E est livré avec un cordon d'alimentation.)
-
Si vous avez fait l'acquisition d'un kit d'objetif, vérifie que l'objetif est inclus.
Veillez à ne perdre aucun des accessoires ci-dessus.
Conventions utilisées dans ce mode d'emploi
Icônes utilisées dans ce mode d'emploi
< : Représente la molette principale.
: Représenté le joypad < < >
< (SET)> : Représente la touche de réglage.
4, 6, 10, 16 : Indique que la fonction correspondante reste active respectivement pendant 4, 6, 10 ou 16 secondes lorsque vous relâchez la touche.
- Dans ce mode d'emploi, les icônes et les repères représentant les touches, molettes et réglages de l'appareil correspondent aux icônes et aux repères figurant sur l'appareil et sur le moniteur LCD.
MENU: Indique une fonction modifiable en appuyant sur la touche
- Toutes les opérations décrites dans ce mode d'emploi supposent que le commutateur d'alimentation est déjà positionné sur < ON> (p.25).
- Il est supposé que tous les régles du menu et les fonctions personnalisées sont définis par défaut.
- Pour plus de clarté, les instructions représentent l'appareil photo équipé d'un objectif EF-S18-55mm f/3,5-5,6 IS II.
Table des matieres
Introduction 2
3
LiTe de verification des éléments 4
Conventions utilisées dans ce mode d'emploi 5
Précautions d'utilisation 8
Guide de démarrage rapide 10
Nomenclature 12
1 Mise en route 19
Charge de la batterie 20
Installation et retrait de la batterie et de la carte 22
Mise sous tension 25
Réglage de la date et de l'heure 27
Selection de la langue d'interface 28
Montage et retrait de l'objectif 29
A propos du stabilisateur d'image de l'objectif 31
Fonctionnement de base 32
MENU Utilisation des menus 34
Formatage de la carte 36
Changement de I'affichage du moniteur LCD. 38
Guide des fonctions 39
2 Prise de vue élémentaire 41
□ Prise de vue entierement automatique 42
□ Techniques d'automatism total. 44
Désactivation du flash 45
CA Prise de vue en mode Creatif auto 46
Prise de vue de portraits 49
Prise de vue de paysages 50
Prise de vue en gros-plan 51
Prise de vue de sujets en mouvement 52
Prise de vue de portraits de nuit 53
Contrôle rapide 54
3 Prise de vue avec le moniteur LCD (Prise de vue avec Visée par l'écran) 55
Prise de vue avec le moniteur LCD 56
Changement de mode autofocus 59
MF:Mise au point manuelle 64
4 Enregistrement de videos 65
Enregistrement de videos 66
5 Lecture des images 69
Lecture des images. 70
Lecture des videos 71
6 Visionnage du CD-ROM du mode d'emploi de l'appareil photo / Guide du CD-ROM (Logiciels) 73
Visionnage du CD-ROM du mode d'emploi de l'appareil photo. 74
Guide du CD-ROM (Logiciels) 76
Consignes de sécurité 80
Précautions d'utilisation
Précautions lors de l'utilisation
- Cet apparueil photo est un instrument de précision. Ne le faites pas tomber et ne lui faites pas subir de chic.
L'appareil n'était pas étanche, il ne doit pas être utilisé sous la pluie ni dans l'eau. Si par accident il tombait dans l'eau, contactez le Service Àpres-Vente Canon le plus proche dés que possible. S'il est mouillé, essuyez-le avec un chiffon propre et sec. S'il a été exposé à l'air marin, essuyez-le avec un chiffon humide bien essore.
- Ne laisses pas l'appareil à proximé d'appareils engendrant des champes magnétiques puissants, par exemple un aimant ou un moteur électrique. Évitez également d'utiliser ou de laisser l'appareil dans des endroits soumis à des ondes radio puissantes, par exemple des émetteurs de radiétélédiffusion. Les champes magnétiques puissants peuvent entraîner des dysfonctionnements de l'appareil et détruire les données d'image.
- N'exposez pas l'appareil photo à une chaleur excessive, par exemple au soleil, dans une voiture. Les haute températures peuvent entraîner un mauvais fonctionnement de l'appareil photo.
- L'appareil renferme des circuits électroniques de précision. N'essayez jamais de le démonter.
Utilisez une poire soufflante pour éliminer la poussière qui s'accumule sur l'objectif, le viseur, le miroir reflex et le verre de visée. Évitez de nettoyer le boîtier de l'appareil ou l'objectif avec des nettoyeurs à base de solvants organiques. Si vous n'arrivez pas à enlever la saleté, contactez le Service Àpres-Vente Canon le plus proche.
- Ne touchez pas les contacts électriques de l'appareil avec les doigts. Ceci afin d'empêcher leur corrosion. La corrosion pourrait comprometter le bon fonctionnement de l'appareil.
- Si vous déplacezrapidement l'appareil d'un environnement froid à un endroit chaud, il risque de se former de la condensation sur l'appareil et sur les pièces internes. Pour éviter toute condensation, mettez l'appareil photo dans un sac en plastique hermétique et laissez-le se stabiliser à la température ambientevant de le sortir du sac.
- N'utilise pas l'appareil s'il présente des traces de condensation. Cela pourrait l'endommager. En cas de condensation, retirez l'objectif, la carte ainsi que la batterie et attendez que la condensation s'évapore avant d'utiliser l'appareil.
- Si vous ne prévoyez pas d'utiliser l'appareil pendant une longue période, retirez la batterie et rangez l'appareil dans un endroit frais, sec et bien ventilé. Lorsque vous n'utilise pas l'appareil pendant une période prolongée, appuyez de temps en temps sur le déclencheur deux ou trois fois de suite, pour vous assurer que l'appareil fonctionne toujours.
- Évitez de ranger l'appareil dans des endroits où sont stockés des produits chimiques corrosifs, par exemple dans une,chambre noire ou dans un laboratoire.
- Lorsque l'appareil photo n'a pas eteutilisedependant une longue pereiode,testez toutes ses fonctions avant de I'utiliser.Si you n'vez pas utilise l'appareil pendant un certain temps ou que you prevoyez de faire tres prochainement une series de photos importantes,faites vérifier le fonctionnement de voite apparieil aupres du ServiceApres-Vente Canon ou assurez-vous personnellement de son bon fonctionnement.
Moniteur LCD
- Le monitreur LCD fait appel à une technologie de haute précision avec plus de 99,99 % de pixels effectifs. Toutefois, il est possible qu'il y ait quelques pixels morts dans le 0,01 % de pixels restants, voir moins. Les pixels morts sont de minuscules points noirs ou rouges, etc., mais ne sont pas le signe d'un mauvais fonctionnement. Ils constituent un problème d'affichage et sont sans effet sur les images enregistrées.
- Si vous laissiez allumé le moniteur LCD pendant une période prolongée, un marquage du phosphore à l'écran peut avoir lieu, c'est-à-dire qu'une image rémanente peut apparaitre sur l'écran. Toutefois, ce phénomène ne dure pas et disparait lorsque vous cessez d'utiliser l'appareil pendant quelques jours.
- L'affichage du moniteur LCD peut sembler lent ou nombre à basse ou haute température. Il redevient normal à température ambiente.
Cartes
Pour protéger la carte et les données qui y sont enregistrées, prenez en considération les points suivants :
- Ne faites pas tomber, ni ne pliez ou mouillez la carte. Ne la soumettez pas à une force excessive, un choc physique ou des vibrations.
- Ne touchez pas les contacts électriques de la carte avec les doigts ou tout objet en métal.
- Évitez de conserver ou d'utiliser la carte à proximité de tout ce qui peut générer des champs magnétiques puissants tels que les téléviseurs, les haut-parleurs ou les aimants. Évitez également tout endroit charge d'électricité statique.
- Ne laisses pas la carte au soleil ni pres d'une source de chaleur.
- Rangez la carte dans son boîtier.
- Ne rangez pas la carte dans des endroits chauds, poussiêux ou humides.
Objectif
Lorsque vous retirez l'objet de l'appareil, fixez les bouchons d'objet ou posez l'objet avec sa monture orientée vers le haut pour éviter d'endommager la surface de l'objet et les contacts électriques.
Précautions à suivre en cas d'usage prolongé
Si vous utilisez la prise de vue en rafale, la prise de vue avec Visée par l'écran ou l'enregistrement video pendant une période prolongée, l'appareil photo peut devenir chaud. Bien que cela soit normal, vous risquez de légères brûlures si vous tenez l'appareil chaud pendant longtemps.
Contacts
À propos des taches se collant à l'avant du capteur
Outre la poussière extérieure qui s'infiltrre dans l'appareil, dans de rares cas, le lubrifiant des pieces internes de l'appareil peut adhérer à l'avant du capteur. Si des taches sont toujours visibles sur l'image, nous vous recommendons de confier le nettoyage du capteur à un Service Àpres-Vente Canon.
Guide de démarrage rapide
1
Insérez la batterie. (p.22)
Pour charger la batterie, voir page 20.
2
Insérez la carte. (p.22)
- Avec l'étiquette de la carte tournée vers l'arrière de l'appareil, inséréz la carte dans le logement.
3
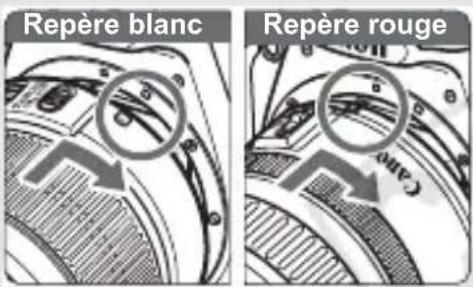
Montez I'objectif. (p.29)
- Alignez le repère blanc ou rouge de l'objet sur celui de l'appareil photo de même couleur.
4
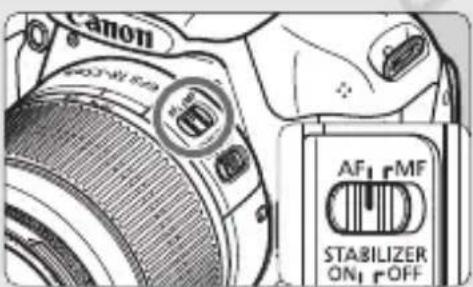
Positionnez le sélection de mode de mise au point de l'objet sur AF (p.29)
5

Positionnez le commutateur d'alimentation sur . (p.25)
Lorsque le moniteur LCD affiche l'écran de réglage de la date/heure, voir page 27.
6

Positionnez la molette de sélection des modes sur < > (Automatisme total). (p.42)
- Tous les réglages nécessaires de l'appareil photo sont définis automatiquement.
7

Effectuez la mise au point. (p.33)
- Regardez dans le viseur et orientez le centre du viseur sur le sujet.
- Enforcez le déclencheur à mi-course et l'appareil photo effectuera la mise au point.
Le cas échéant, le flash intégré sortira automatique.
8
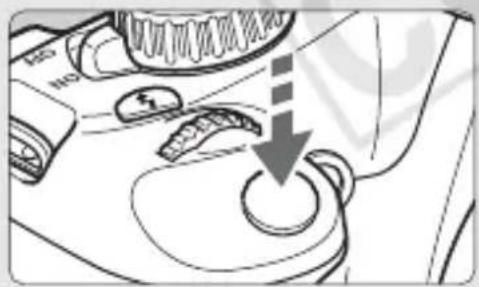
Prenez la photo. (p.33)
- Enforcez à fond le déclencheur pour prendre la photo.
9
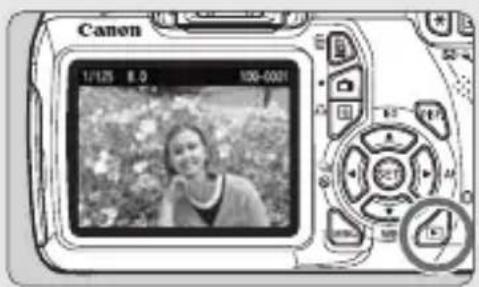
Vérifiez l'image. ()
-
L'image capturée s'affichependant environ 2 secondes sur le moniteur LCD.
Pour afficher à nouveau l'image, appuyez sur la touche < > (p.70).
-
Pour prendre des photos tout en regardant le moniteur LCD, voir « Prise de vue avec Visée par l'écran » (p.55).
- Pour afficher les images capturées, reportez-vous à la section « Lecture des images » (p.70).
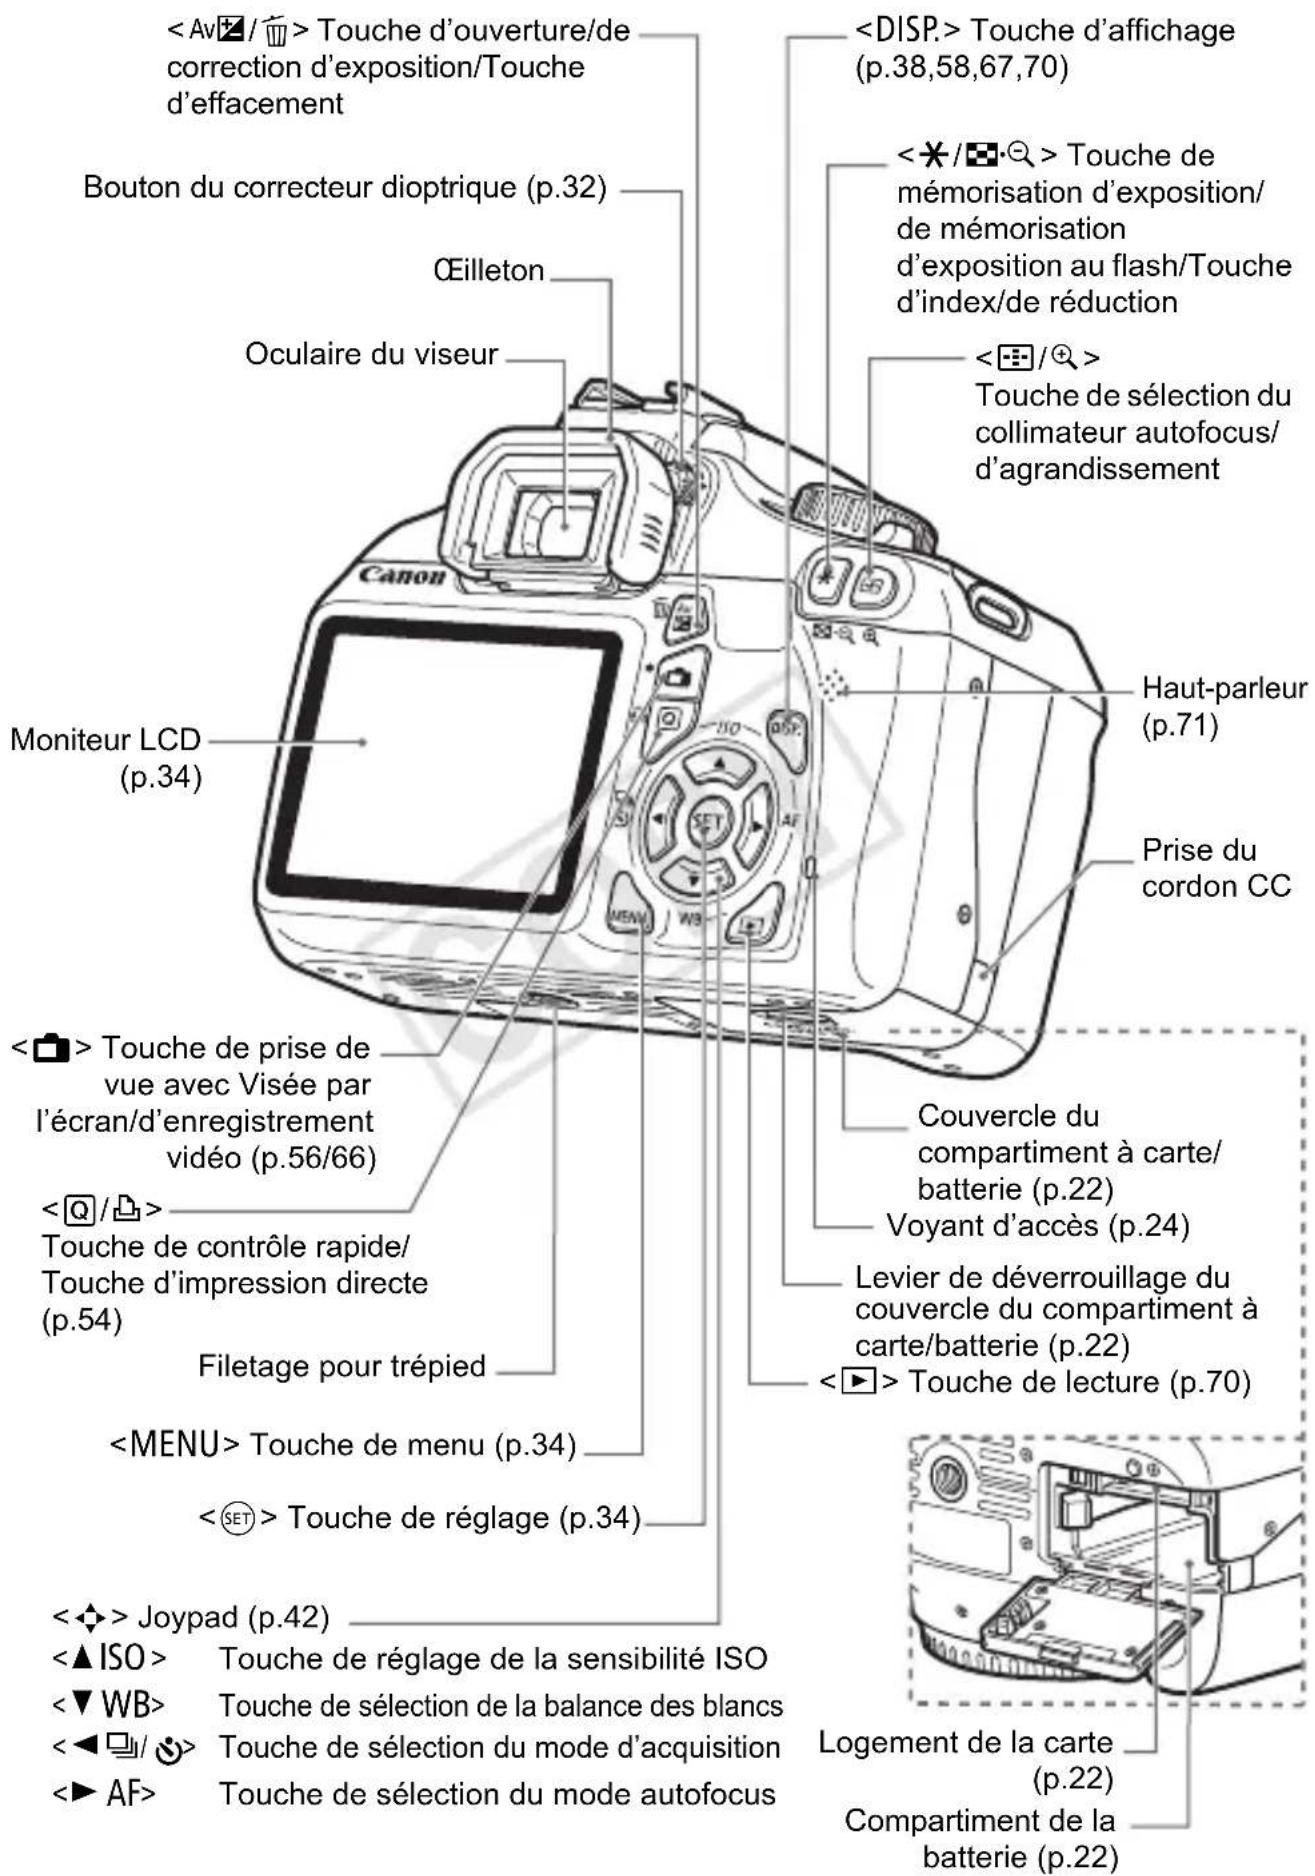
Nomenclature
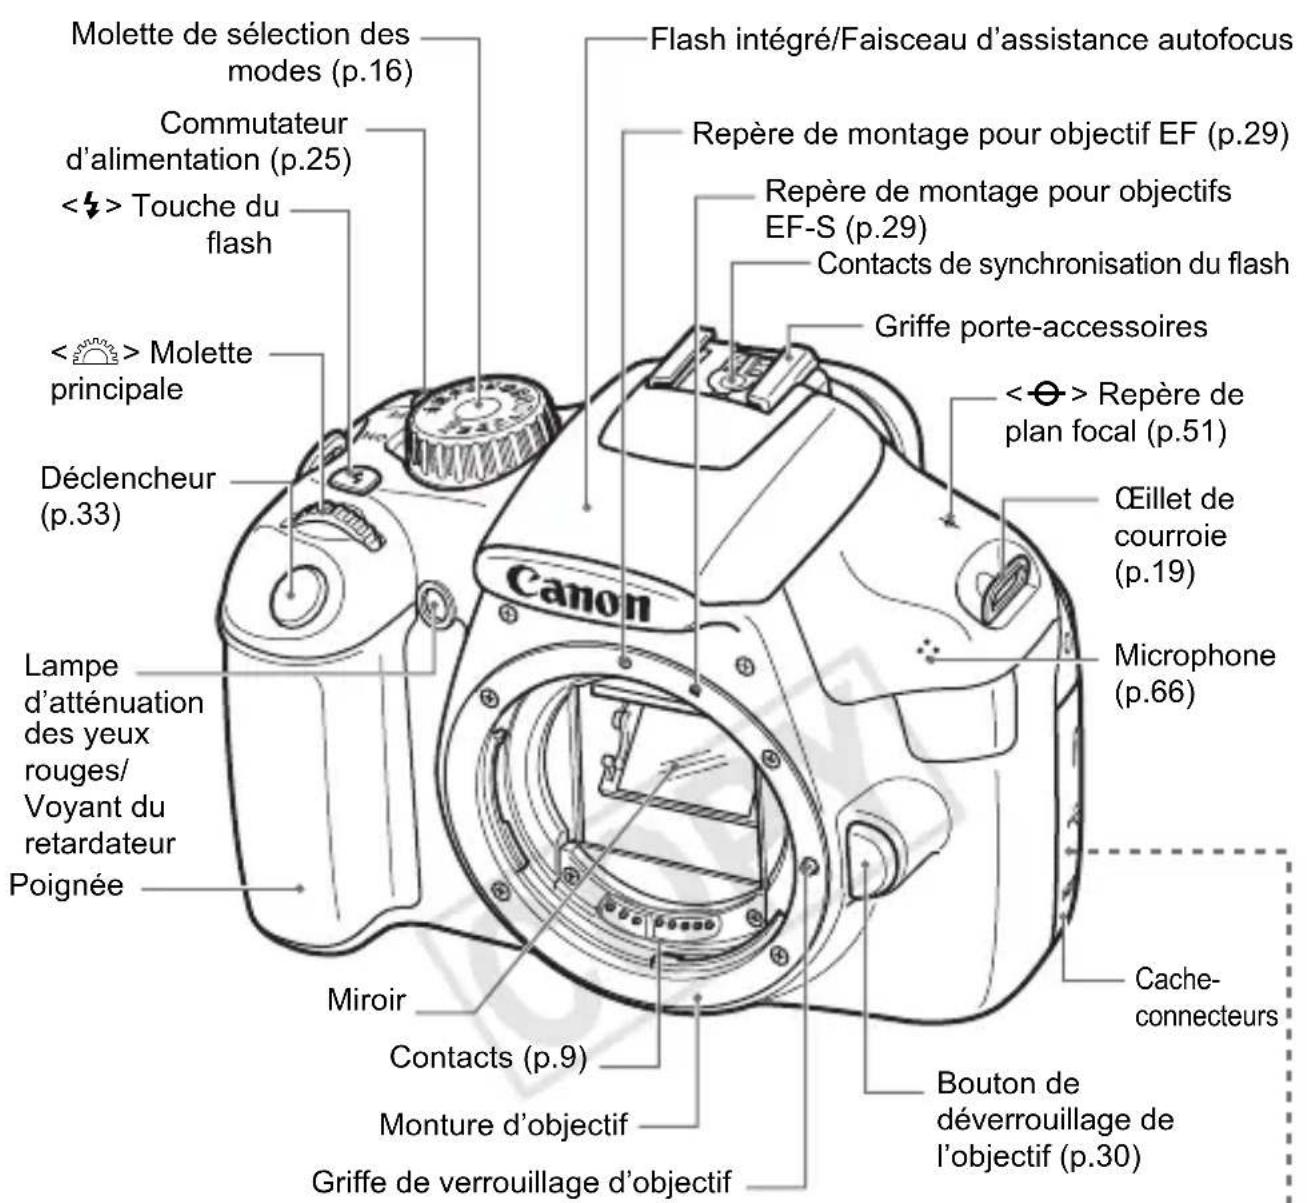

Bouchon du boîtier (p.29)
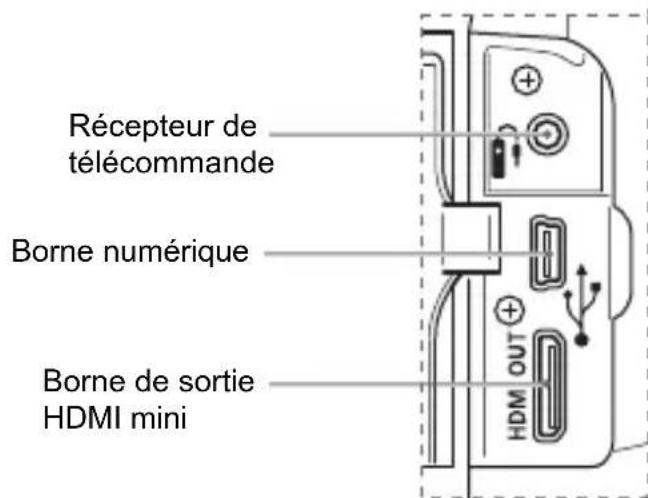

Pour les commandes de l'appareil photo sans numérores de page de référence, voir le mode d'emploi de l'appareil photo (PDF) sur le CD-ROM du mode d'emploi de l'appareil photo.
Affichage des réglages de prise de vue
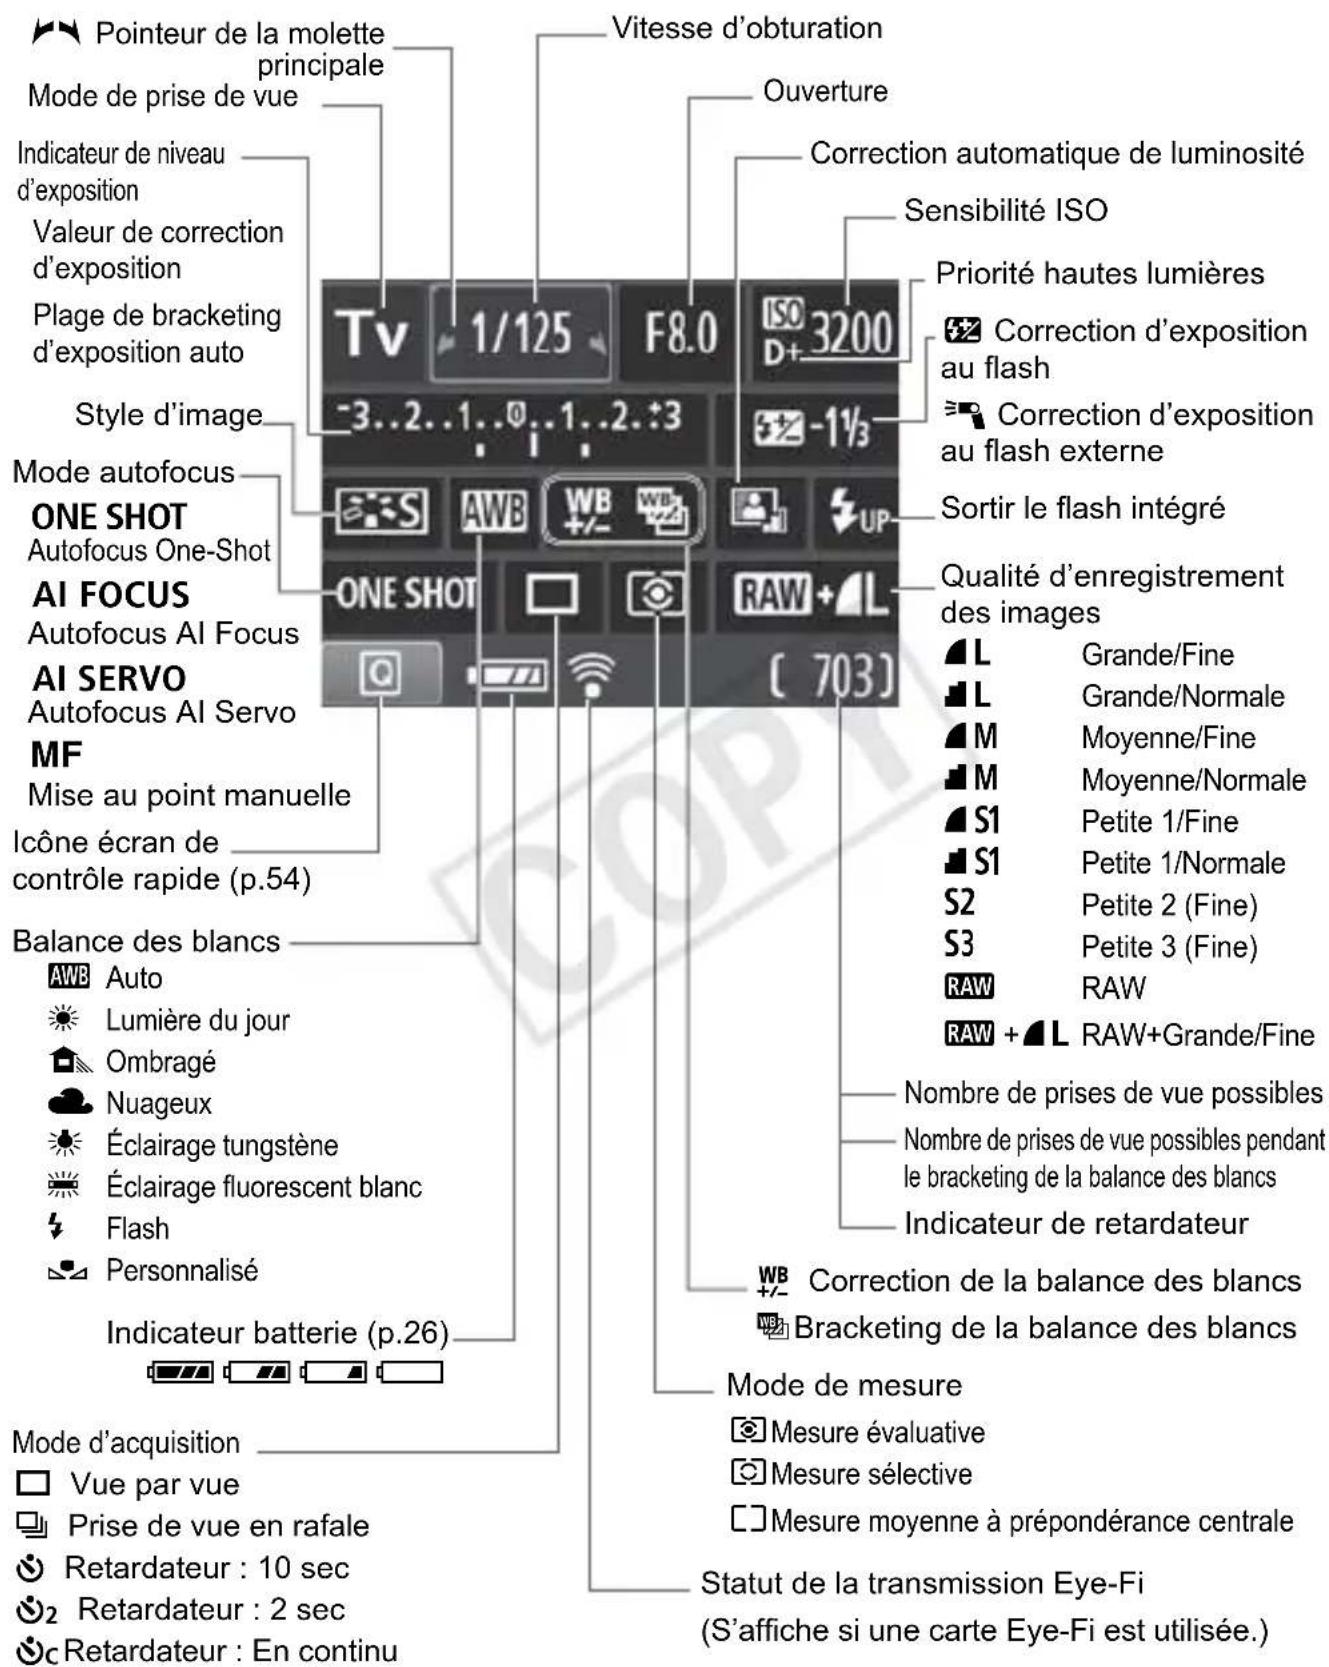
L'affichage n'indiquera que les réglages actuelsment appliqués.
L'affichage n'indiquera que les réglages actuelsment appliqués.
Molette de selection des modes
La molette de selection des modes comprend les modes de la zone élémentaire, les modes de la zone de création et le mode d'enregistrement video.
Zone de creation ()
Ces modes vous donnent davantage de contrôle pour photographier un grand nombre de sujets.
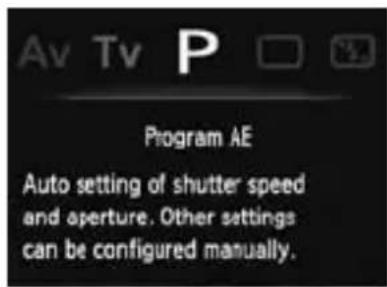
P :Programme d'exposition automatique
Tv : Priorité à l'obturation
Av : Priorité à l'ouverture
M : Exposition manuelle
A-DEP: Contrôle de profondeur de champ automatique
Zone élémentaire
Il vous suffit d'appuyer sur le déclencheur. L'appareil procèle à tous les réglages en fonction du sujet.
: Automatism total (p.42)
:Flash annulé (p.45)
CA: Créatif auto (p.46)
: Enregistrement video (p.65)
Image Zone
: Portrait (p.49)
: Paysage (p.50)
:Gros-plan (p.51)
:Sports (p.52)
: Portrait de nuit (p.53)
Objectif
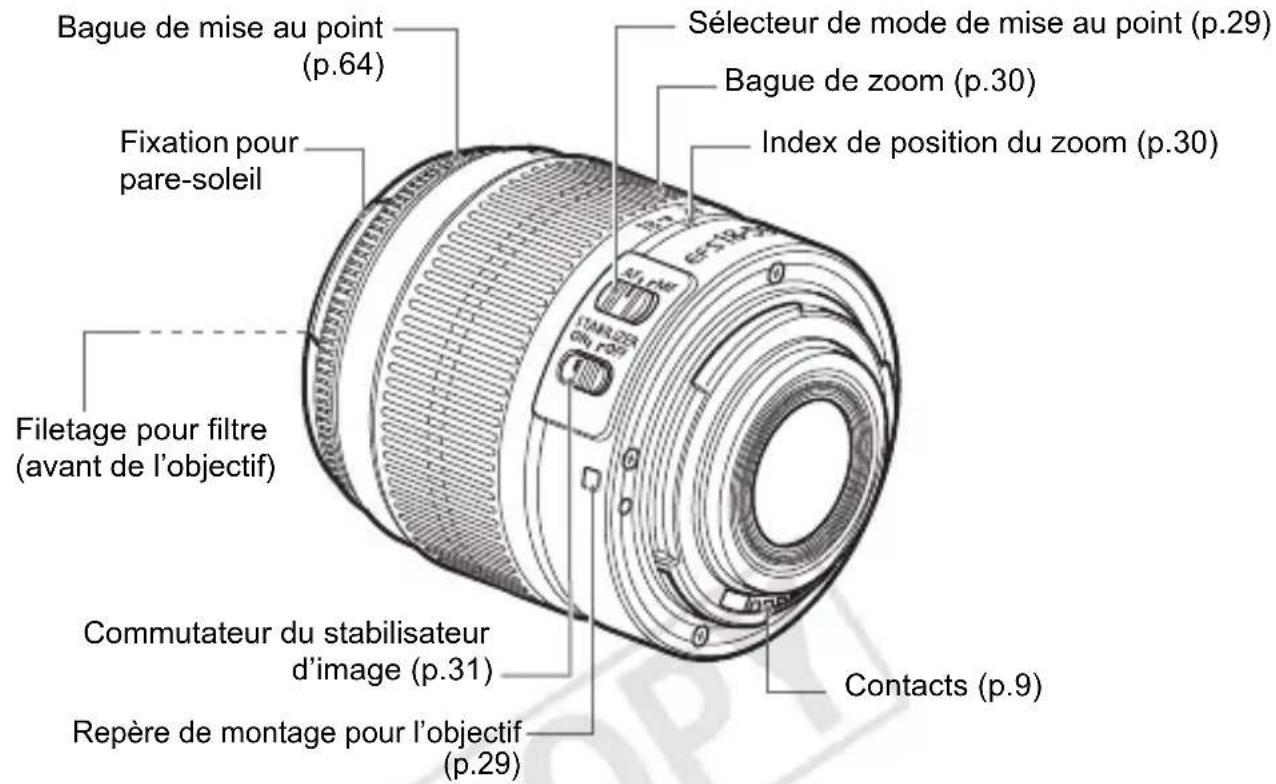
Objectif sans échelle des distances
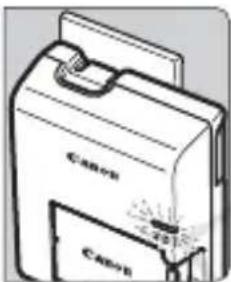
Chargeur de batterie LC-E10
Chargeur pour batterie LP-E10 (p.20).
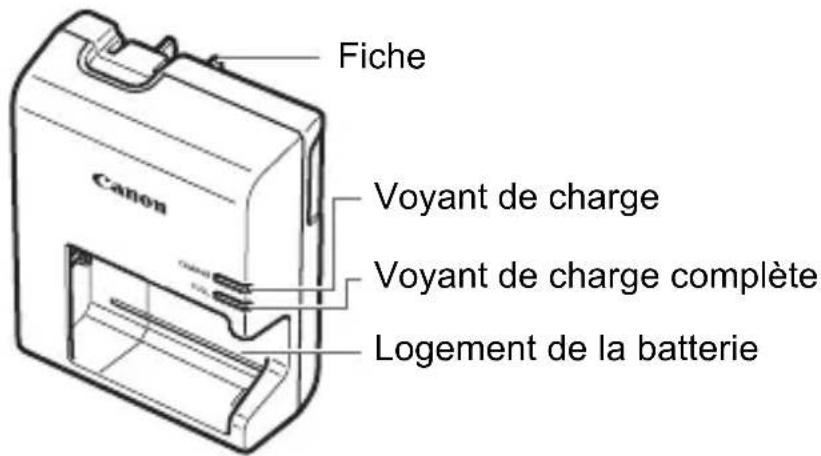
Ce chargeur doit être correctement orienté à la verticale ou posé au sol.
CONSIGNES DE SECURITE IMPORTANTES - CONSERVEZ-LES. DANGER - AFIN DE DIMINUER LE RISQUE D'INCENDIE OU D'LECTROCUTION, RESPECTEZ SCRUPULEUSEMENT CES CONSIGNES.
Pour le branchement sur secteur en dehors des États-Unis, utilisez si nécessaire un adaptateur pour prise correspondant à la prise secteur.
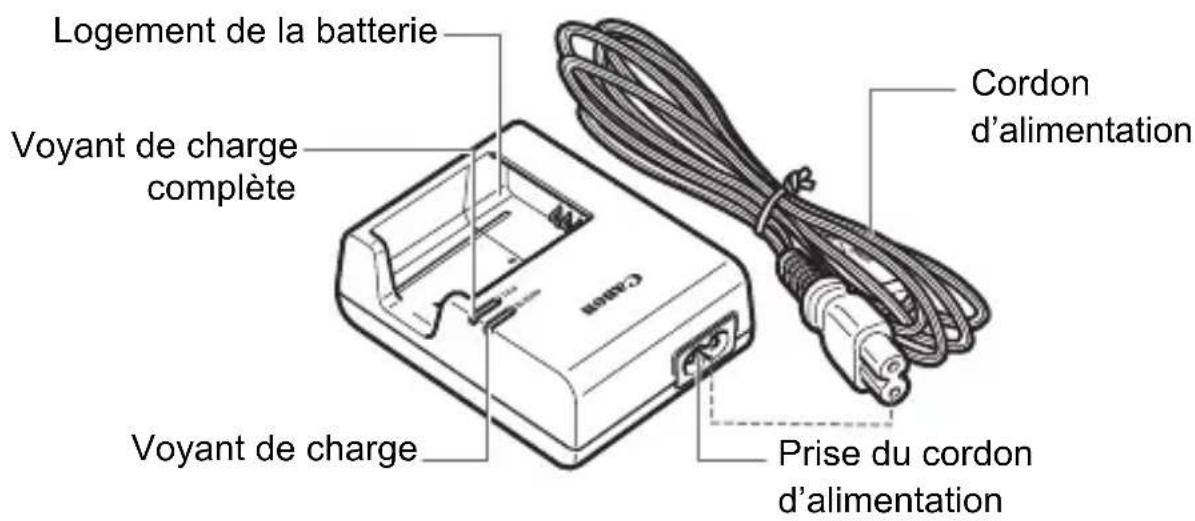
Chargeur de batterie LC-E10E
Chargeur pour batterie LP-E10 (p.20).
#
Mise en route
Ce chapitre déscrit les étapes préparatoires avant la prise de vue et le fonctionnement de base de l'appareil photo.

Fixation de la courroie
Passez l'extrémité de la courroie à travers l'eellet de courroie de l'appareil par le bas. Ensuite, faites-la passer dans la boucle de la courroie de la manière illustrée. Tendez la courroie en tirant dessus et assurez-vous qu'elle est bien fixée.
Le volet d'oculaire est également attaché à la courroie () .
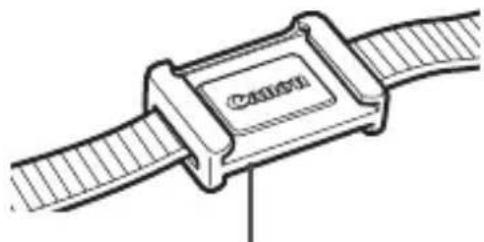
Volet d'oculaire
Charge de la batterie
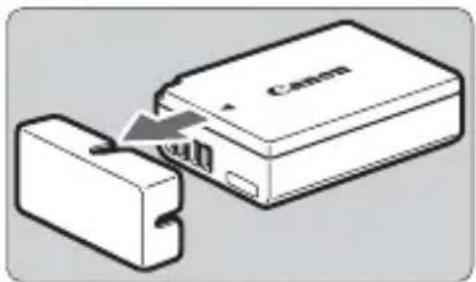
1 Retirez le couvercle de protection.
- Retirez le couvercle de protection fourni avec la batterie.
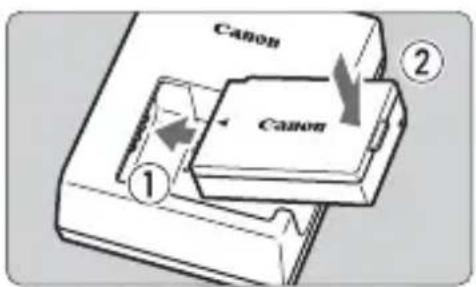
2 Insérez la batterie.
Fixez la batterie bien en place sur le chargeur de la maniere illustrée.
Pour retirer la batterie, suivez la procEDURE ci-dessus dans l'ordre inverse.
LC-E10
LC-E10E
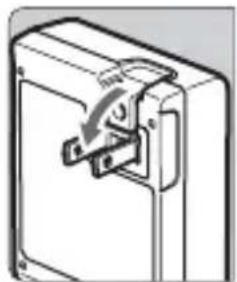
3 Rechargez la batterie. Pour LC-E10
Dégagez la fiche du chargeur comme indiqué par la flèche et branchez le chargeur sur une prise secteur.
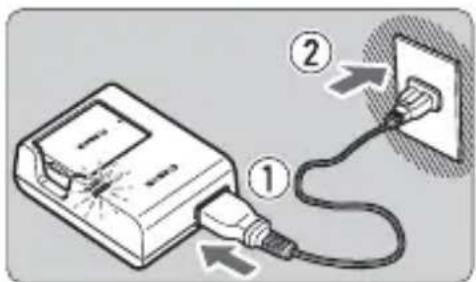
Pour LC-E10E
Raccordez le cordon d'alimentation au chargeur et branchez la fiche du cordon d'alimentation sur la prise secteur.
La recharge commence automatiquement et levoyant de charge devient orange.
Lorsque la batterie est complètement chargee, le voyant de charge complete devient vert.
Il faut environ 2 heures, à 23^ / 73^ , pour recharger complètement une batterie totalément déchargée. Le temps nécessaire pour recharger la batterieDEPEND de la température ambiente et du niveau de charge de la batterie.
- Pour des raisons de sécurité, la recharge à basse température (6 °C - 10 °C / 43 °F - 50 °F) prend plus de temps (jusqu'à 4 heures).

Conseils d'utilisation de la batterie et du chargeur
- La batterie n'est pas complètement chargée à l'achat. Rechargez-la avant de l'utiliser.
- Rechargez la batterie un jour avant ou le jour même où vous l'utiliserez.
Meme lorsqu'elle est rangée, une batterie chargée se décharge progressivement et perd son énergie.
- Lorsque la recharge est terminée, détachez la batterie et débranchez le chargeur de la prise secteur.
- Retirez la batterie de l'appareil, lorsque vous ne l'utilise pas. Si vous laissez la batterie dans l'appareil photo pendant une période prolongée, une faible quantité de courant est libérée, entraînant une décharge excessive et une diminution de l'autonomie de la batterie. Rangez la batterie avec son couvercle de protection (fourni) en place. Le stockage d'une batterie complètement rechargée peut réduire ses performances.
- Le chargeur de batterie peut également être utilisé dans un pays étranger.
Le chargeur de batterie est compatible avec une source d'alimentation de 100 à 240 V CA 50/60 Hz. Au besoin, fixez une fiche adaptatrice en vente dans le commerce convenant au pays ou à la région correspondant. Ne fixez pas un transformateur de tension portable au chargeur de batterie, ceci pourrait l'endommager.
Si la batterie s'épuise rapidement même après l'avoir complètement rechargée, c'est qu'elle a atteint la fin de sa durée de vie.
Achetez une batterie neuve.

- Ne touchez pas la fiche du chargeur pendant au moins 3 secondes après l'avoir débranchée.
- Ne chargez pas de batteries autres que la batterie LP-E10.
- La batterie LP-E10 est destinée aux produits Canon uniquement. Son utilisation avec un chargeur de batterie ou un produit incompatible peut entraîner un dysfonctionnement ou des accidents pour lesquels Canon ne saurait être tenu pour responsable.
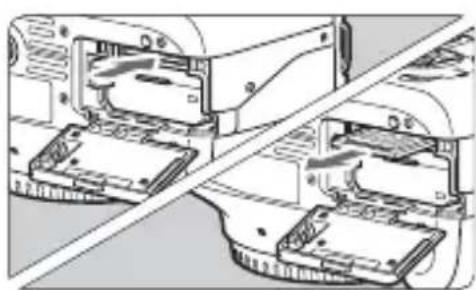
Installation et retrait de la batterie et de la carte
Introduisez une batterie LP-E10 complètement chargée dans l'appareil photo. Vous pouvez utiliser une carte mémoire SD, SDHC ou SDXC (vendue séparation). Les images capturées sont enregistrées sur la carte.
Assurez-vous que le taquet de protection contre l'écriture de la carte est tournée vers le haut pour permettre l'écriture/effacement.
Installation de la batterie/carte

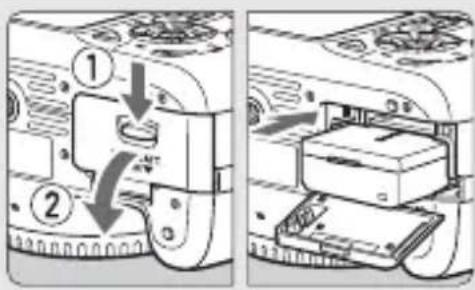
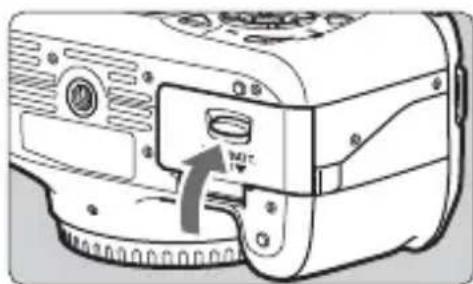
1 Ouvrez le couvercle.
- Faites glisser le levier comme indiqué par les flèches et ouvre le couvercle.
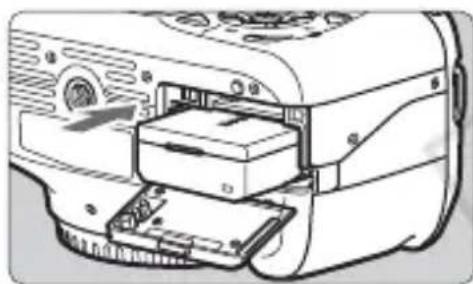
Insérez la batterie.
- Insérez l'extrémité dotée des contacts de batterie.
Insérez la batterie jusqu'au déclic.
Taquet de protection contre l'écriture
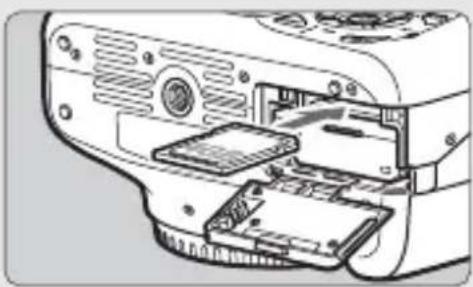
3 Insérez la carte.

- Orientez la face de la carte avec l'étiquette vers l'arrière de l'appareil photo de la manière illustrée.
Insérez la carte complètement.
4 Fermez le couvercle.
Fermez le couvercle en exerçant une légère pression.
Lorsque le commutateur d'alimentation est positionné sur < ON>, le nombre de prises de vue possibles (p.26) s'affiche sur le moniteur LCD.

Après avoir ouvert le couvercle du compartment à batterie/carte, faites attention à ne pas le pousser davantage en arrière. La charnière risquerait, autrement, de se briser.

- Le nombre de prises de vue possibles dépend de la capacité restante de la carte, de la qualité d'enregistrement des images, de la sensibilité ISO, etc.
- Régler [Déclencher obturat. sans carte] sur [Désactiver] vous évitera d'oublier d'insérer une carte () .
Retrait de la batterie/carte
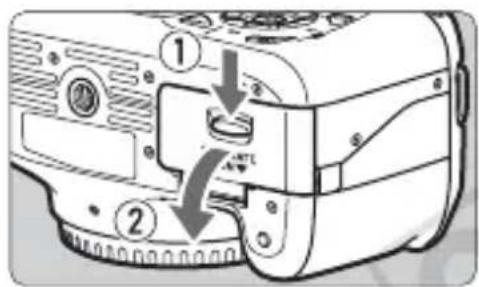
1 Positionnez le commutateur d'alimentation sur . (p.25)
Ouvrez le couvercle.
Vérifiez que levoyant d'accès est eteint,puis ouvre le couvercle.
Si « Enregistrement... » s'affiche, refermez le couvercle.
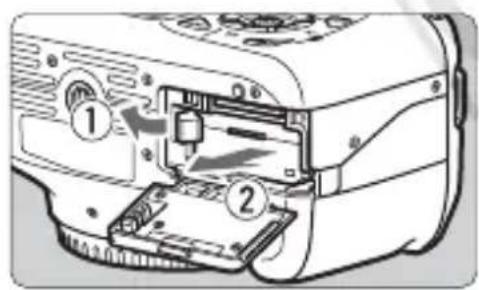
3 Retirez la batterie.
- Appuyez sur le levier de déverrouillage de la batterie comme indiqué par la flèche et retirez la batterie.
Pour éviter un court-circuit des contacts de la batterie, pensez à fixer le couvercle de protection (fourni, p.20) sur la batterie.
4 Retirez la carte.
- Poussez délicatement sur la carte, puis relâchéz. La carte sortira.
- Retirez la carte.
5 Fermez le couvercle.
Fermez le couvercle en exerçant une légère pression.

-
Unvoyant d'accès allumé ou clignotant indique que les images sont effacées, écrites sur la carte ou lues par la carte ou bien que des données sont transférées. Lorsque levoyant d'accès est allumé ou clignote, n'ouvre pas le couvercle du compartment à carte/batterie, ni n'effectuez aucune des opérations suivantes. À défaut, les données d'image poursaient être détruites, ou la carte ou l'appareil endommagé.
-
Retirer la carte.
- Retirer la batterie.
- Secouer et faire subir des chocs à l'appareil.
Si la carte contient déjà des images enregistrées, la numérotation des images peut ne pas commencer à partir de 0001 ()
- Ne touchez pas les contacts de la carte avec les doigs t ou des objets métalliques.
- Si un message d'erreur lie à la carte s'affiche sur le moniteur LCD, retirez et réinsérez la carte. Si l'erreur persiste, utilisez une carte différente. Si vous pouvez transférer toutes les images de la carte sur un ordinateur, transférez-les en totalité, puis formatez la carte avec l'appareil photo (p.36). La carte peut alors revenir à la normale.
Mise sous tension
Si l'écran de réglage de la date/heure apparait lorsque vous allumez l'appareil, voir page 27 pour régler la date et l'heure.

: L'appareil est mis sous tension.
: L'appareil est hors tension et ne fonctionne pas. Placez le commutateur sur cette position lorsque vous n'utilisez pas l'appareil.
- Afin déconomiser la batterie, l'appareil photo s'éteint automatiquement au bout d'environ 30 secondes d'inactivité. Pour pallumer l'appareil photo, il suffit d'enforcer le déclencheur à mi-course (p.33).
- Vous pouvez modifier le temps d'extinction automatique à l'aide de [F'Arrêt auto] ( ).

Si vous positionnez le commutateur d'alimentation sur <OFF> alors qu'une image est en cours d'enregistrement sur la carte, [Enregistrement...] s'affiche et l'appareil se met hors tension après que la carte a enregistré l'image.

Vérification du niveau de charge de la batterie
Lorsque le commutateur d'alimentation est positionné sur < ON> , l'indicateur du niveau de charge de la batterie affiche l'un des quatre niveaux suivants:
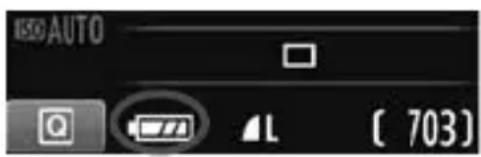
: La charge est suffisante.
: Le niveau de charge de la batterie est à moins vide.
: La batterie est presque vide. (Clignote)
: Recharge nécessaire.
Autonomie de la batterie
| Température | À 23 °C / 73 °F | À 0 °C / 32 °F |
| Sans flash Environ | 800 prises de vue Environ | 750 prises de vue |
| Flash à 50 % | Environ 700 prises de vue | Environ 650 prises de vue |
- Les chiffres ci-dessus sont basés sur une batterie LP-E10 complètement chargée, sans prise de vue avec Visée par l'écran et sur les normes d'essai de la CIPA (Camera & Imaging Products Association).

-
Le nombre de prises de vue possibles diminuera si vous effectuez les opérations suivantes :
-
Enfoncer le déclencheur à mi-coursependant une période prolongée.
- Activer souvent et uniquement l'autofocus sans prendre de photo.
Utiliser souvent le moniteur LCD.
-
Utiliser le stabilisateur d'image de l'objectif.
-
L'objet fonctionne sur la batterie de l'appareil photo. Selon l'objet utilisé, le nombre de prises de vue possibles peut être inférieur.
- Pour connaître le nombre de prises de vue possibles avec la prise de vue avec Visée par l'écran, voir page 57.
Lorsque vous allumez l'appareil pour la première fois ou si la date/heure a ete reinitialisée, Iecran de reglage de la Date/Heure apparait. Suivez les etapes 3 et 4 pour regler la date et l'heure. Notez que la date et l'heure ajoutees aux images enregistrées reposeront sur ce reglage de la date/heure. Veillez a regler correctement la date/heure.
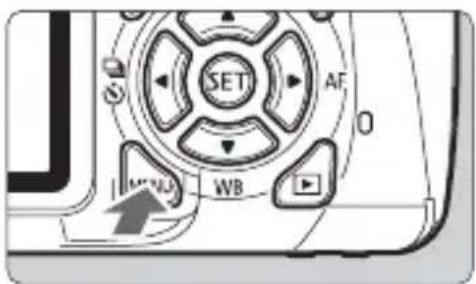
- Appuyez sur la touche
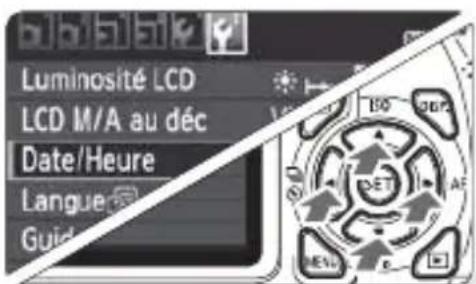
2 Dans l'onglet [4], Sélectionnez [Date/Heure].
- Appuyez sur la touche < > pour sélectionner l'onglet [F].
- Appuyez sur la touche < > pour sélectionnner [Date/Heure], puis appuyez sur < (SET)> .
![CANON EOS Rebel T3 - Dans l'onglet [4], Sélectionnez [Date/Heure]. - 1](/content/2026/02/354825/images/6b95e0f9955dded24648cbc0e7ea5188c550e44e85a587aa7ad44f3a9a765f71.jpg)
3 Réglez la date et l'heure.
- Appuyez sur la touche < > pour sélectionner le chiffre de la date et de l'heure.
- Appuyez sur < > pour afficher < > .
- Appuyez sur la touche < > pour selectionner le nombre, puis appuyez sur < > . (Revient à .)
4 Quittez le réglage.
- Appuyez sur la touche < > pour sélectionner [OK], puis appuyez sur
La date et l'heure sont régées.

Si vous rangez l'appareil sans la batterie ou si sa batterie est épuisée, il se peut que la date/heure soit réinitialisée. Le cas échéant, réglez à nouveau la date et l'heure.

La date/heure régée sera appliquée au moment où vous appuyez sur à l'objet 4.
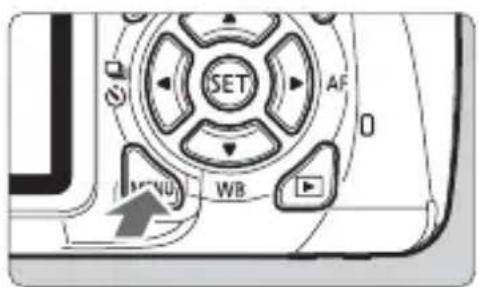
- Appuyez sur la touche
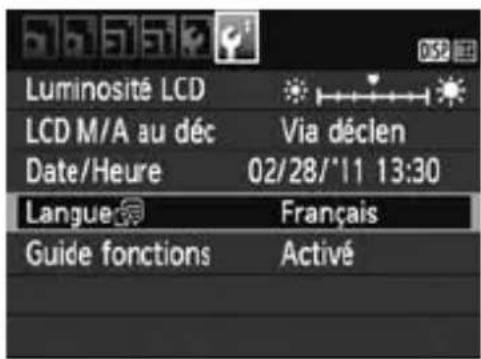
2 Dans l'onglet [Y], selectionnez [Langue].
-
Appuyez sur la touche < > pour selectionner l'onglet [F].
-
Appuyez sur la touche < > pour selectionner [Langue ] (le quatrième élément à partir du haut), puis appuyez sur < SET> .
![CANON EOS Rebel T3 - Dans l'onglet [Y], selectionnez [Langue]. - 1](/content/2026/02/354825/images/6f591543039b81ff047b53280db9e1be65e627eaef5d384f85f011973d42e358.jpg)
3 Réglez la langue souhaitatione.
- Appuyez sur la touche < ♦> pour selectionner la langue, puis appuyez sur < SET> .
La langue d'interface est modifiée.

Montage et retrait de l'objectif
Montage de l'objet
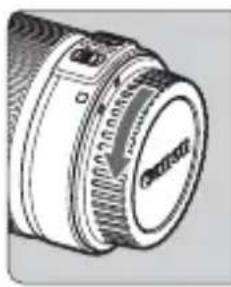
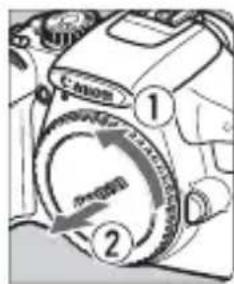

Repère blanc
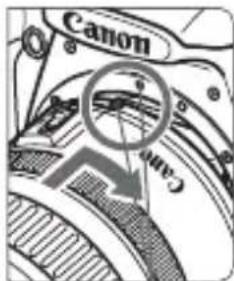
Repere rouge
1 Retirez les bouchons.
- Retirez le bouchon arrêté de l'objet et le bouchon du boîtier en les tournant comme indiqué par les flèches.
Montez I'objectif.
- Alignez le repère blanc ou rouge de l'objectif sur celui de l'appareil photo de même couleur. Tournez l'objectif dans le sens de la flèche jusqu'àu déclic.
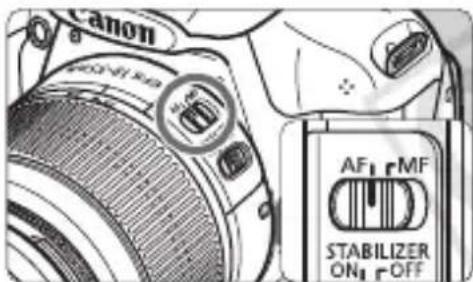
3 Positionnez le selecteur de mode de mise au point de l'objet sur (mise au point automatique).
- S'il est positionné sur <MF> (mise au point manuelle), la mise au point automatique ne fonctionnera pas.
4 Enlevez le bouchon avant de l'objetif.
Minimiser la poussiere
- Changez d'objet dans un endroit peu poussièreux.
Fixez le bouchon du boitier sur l'appareil photo lorsque vous le rangez sans son objectif.
- Retirez la poussière du bouchon du boîtier avant de le fixer.
À propos du zoom
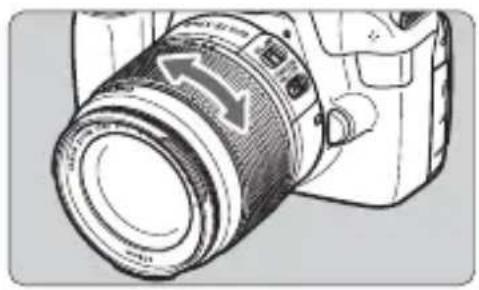
Pour effectuer un zoom, tournez manuellement la bague de zoom sur l'objectif.
Si vous souhaitez effectuer un zoom, faites-le avant la mise au point. Vous risquez de modifier légèrement la mise au point en tournant la bague de zoom après avoir effectué la mise au point.
Retrait de l'objet
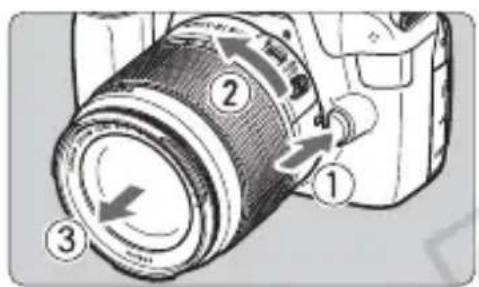
Tout en appuyant sur le bouton de déverrouillage de l'objectif, tournez l'objet comme indiqué par les flèches.
- Tournez l'objectif jusqu'à ce qu'il se bloque, puis retirez-le.
Fixez le bouchon arrêté de l'objetif sur l'objetif une fois retire.

- Ne regardez jamais le soleil directement à travers un objectif. Ceci pourrait provoquer une perte de la vision.
- Si la partie avant (bague de mise au point) de l'objet tourne pendant la mise au point automatique, ne touche pas la piece en rotation.

Facteur de conversion des images
Comme la taille du capteur d'image est inférieure au format d'un film 35mm, la focale d'objectif équivalente semblera augmenter d'environ 1,6x.

Taille du capteur d'image (Environ) (22,0× 14,7mm / 0,87× 0,58 po.)
Taille de l'image 35mm (36 x 24 mm / 1,42 x 0,94 po.)
À propos du stabilisateur d'image de l'objectif
L'utilisation du stabilisateur d'image intégré à un objectif IS permet de corriger le flou de bouge afin d'obtenir une photo plus nette. La marche à suivre décrite ici prend comme exemple l'objectif EF-S18-55 mm f/3,5-5,6 IS II.
- IS signifie « Image Stabilizer » (stabilisateur d'image).

1 Placez le commutateur IS sur .
- Positionnez également le commutateur d'alimentation de l'appareil photo sur .
2 Enoncez le déclencheur à mi-course.
Le stabilisateur d'image entre en fonctionnement.
3 Prenez la photo.
Lorsque l'image semble stable dans le viseur, enforcez à fond le déclencheur pour prendre la photo.
#
- Il se peut que le stabilisateur d'image soit sans effet si le sujet rouge au moment de l'exposition.
- Il se peut que le stabilisateur d'image soit sans effet en cas de sécousses trop fortes dues au tangage d'un bateau, par exemple.
园
- Le stabilisateur d'image peut fonctionner avec le sélecteur de mode de mise au point placé sur <AF> ou <MF> .
- Si l'appareil est monté sur un trédied, vous pouvez économiser la batterie en plaçant le commutateur IS sur .
- Le stabilisateur d'image est également efficace lorsque l'appareil photo est monté sur un monopied.
- Certains objectifs IS vous permettent de changer manuellement de mode IS pour satisfaire aux conditions de prise de vue. Néanmoins l'objet EF-S18-55 mm f/3,5-5,6 IS II change automatiquement de mode IS.
Fonctionnement de base
Réglage de la clarté du viseur
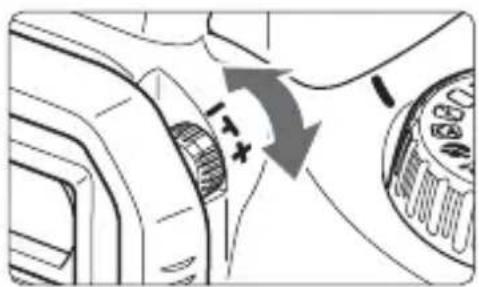
Tournez le bouton du correcteur dioptrique.
- Tournez le bouton vers la gauche ou la droite jusqu'à ce que les neuf collimateurs autofocus du viseur deviennent nets.

Si le réglage dioptrique de l'appareil photo ne permet toujours pas d'obtenir une image nette dans le viseur, il est recommendé d'utiliser un correcteur dioptrique de la série E (10 types, vendu séparément).
Prise en main de l'appareil
Pour obtenir des images nettes, immobilisez l'appareil pour éviter tout risque de flou de bouge.
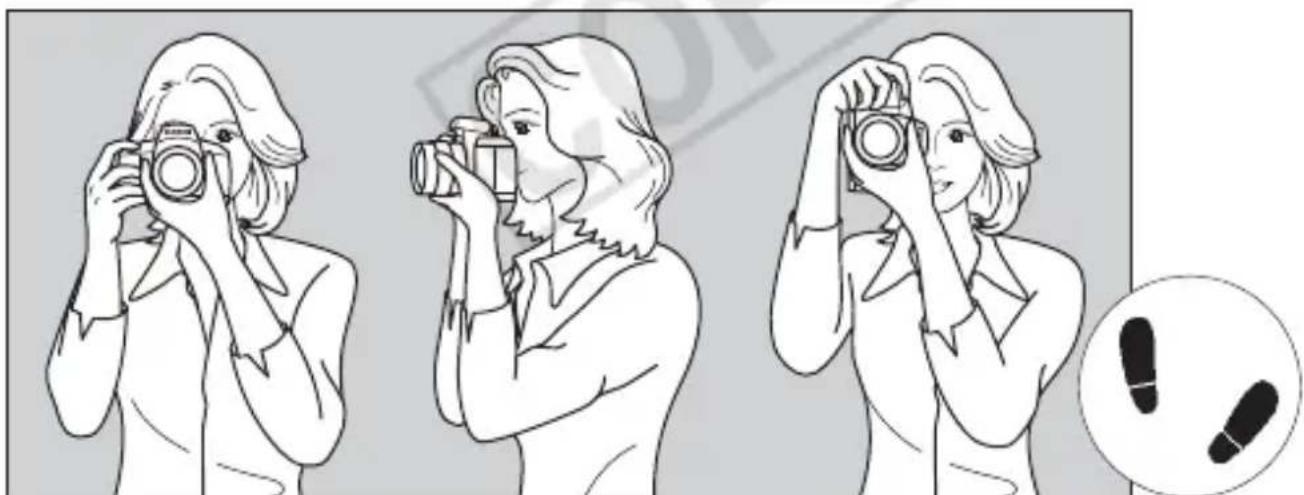
Prise de vue à l'horizontalé
Prise de vue à la verticale
- Placez fermementYOUR main droite autour de la poignee de l'appareil photo.
- Tenez l'objectif par dessous avec la main gauche.
- Enoncez légèrement le déclencheur avec l'index de votre main droite.
- Appuyez légarement vos bras et vos coudes contre l'avant de votre corps.
- Pour avoir un bon équilibre, mettez un pied légarement devant l'autre.
- Appuyez l'appareil contre le visage et regardez dans le viseur.

Pour prendre des photos tout en regardant le moniteur LCD, voir page 55.
Déclencheur
Le déclencheur possède deux positions. Vous pouvez l'enforcer à mi-course, puis l'enforcer à fond.
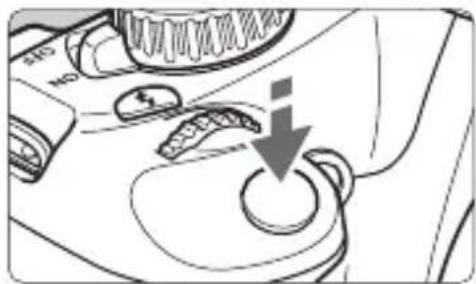
Enforcement à mi-course
Ceci active la mise au point automatique et le système d'exposition automatique qui regle la vitesse d'obturation et l'ouverture.
Le réglage d'exposition (vitesse d'obturation et ouverture) s'affiche dans le viseur (口 4) .
Le moniteur LCD s'eteint lorsque vous enforcez à mi-course le déclencheur.
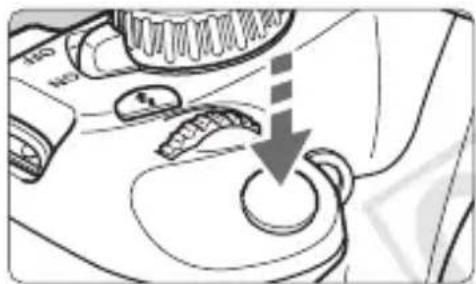
Enforcement à fond
L'obturator est déclenché et la photo est prise.
Prévention des flous de bouge
Le mouvement de l'appareil photo au moment de l'exposition en prise de vue à main levée s'appelle un flou de bouge. Cela peut produit des images flues. Pour éviter tout flou de bouge, prenez en considération les points suivants :
- Maintenez et immobilisez l'appareil photo comme illustré à la page précédente.
- Enforcez le déclencheur à mi-course pour faire la mise au point automatique, puis offensez-le à fond lentement.

- Si vous enforcez à fond le déclencheur sans l'enforcer d'abord à mi-course ou si vous l'enforcez à mi-course puis l'enforcez à fond immédiatement, il s'écoulera un court laps de temps avant que l'appareil prenne la photo.
- Meme pendant l'affichage des menus, la lecture des images ou l'enregistrement des images, vous pouze immédiatement revenir à l'état prét pour la prise de vue en,enfantant à mi-course le déclencheur.
Les menus vous permettent de définir différentes fonctions, telles que la qualité d'enregistrement des images, la date et l'heure, etc. Tout en regardant le moniteur LCD, utilisez la touche