
E195 trío - Téléphone fixe ALCATEL-LUCENT - Notice d'utilisation et mode d'emploi gratuit
Retrouvez gratuitement la notice de l'appareil E195 trío ALCATEL-LUCENT au format PDF.
| Type de produit | Téléphone fixe sans fil DECT |
| Marque | Alcatel-Lucent |
| Modèle | E195 trio |
| Nombre de combinés | Jusqu'à 4 (3 inclus) |
| Portée extérieure | Jusqu'à 300 mètres en champ libre |
| Portée intérieure | Jusqu'à 50 mètres |
| Répertoire | 50 entrées avec nom et numéro |
| Fonctions d'appel | Intercom, conférence à 3, transfert d'appel, liste de rappel (20 numéros) |
| Identification de l'appelant | Oui (sur abonnement réseau) |
| Mains libres | Oui (sur combiné E195) |
| Écran | LCD avec icônes d'état |
| Alimentation | Base : adaptateur secteur 230 V ; combiné : 2 piles NiMH AAA rechargeables |
| Autonomie batterie | 10 heures en communication, 200 heures en veille |
| Nettoyage | Chiffon antistatique légèrement humidifié |
| Sécurité | Ne pas exposer à l'eau, ne pas ouvrir la batterie, éviter les orages |
| Environnement | Recyclage séparé en fin de vie, piles usagées à déposer en point de collecte |
| Température de fonctionnement | 5°C à 40°C |
| Garantie | 2 ans (estimation) |
| Dimensions (estimées) | Combiné : 170 x 50 x 30 mm ; Base : 120 x 100 x 80 mm |
| Poids (estimé) | Combiné : 130 g ; Base : 200 g |
| Réparabilité | Piles remplaçables par l'utilisateur ; pour autres pièces, contacter SAV |
FOIRE AUX QUESTIONS - E195 trío ALCATEL-LUCENT
Questions des utilisateurs sur E195 trío ALCATEL-LUCENT
0 question sur cet appareil. Repondez a celles que vous connaissez ou posez la votre.
Poser une nouvelle question sur cet appareil
Téléchargez la notice de votre Téléphone fixe au format PDF gratuitement ! Retrouvez votre notice E195 trío - ALCATEL-LUCENT et reprennez votre appareil électronique en main. Sur cette page sont publiés tous les documents nécessaires à l'utilisation de votre appareil E195 trío de la marque ALCATEL-LUCENT.
MODE D'EMPLOI E195 trío ALCATEL-LUCENT
Alcatel
€155 / €155 DUO / €155 TRIO
€195 / €195 DUO / €195 TRIO
www.alcatel-home.com
GUIA DEL USUARIO
FAVOR DE LEER ESTE MANUAL ANTES DE
IZAR SU TELEFONO
GUIDE
BEFORE TO USE YOUR PHONE, PLEASE READ ALL THIS
USER'SGUIDE

Ecologic
attitude
ESPANOL
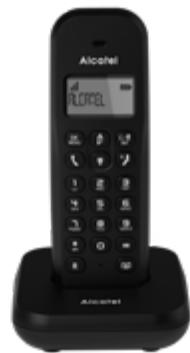
1. CONOCIENDO SU TELEFONO
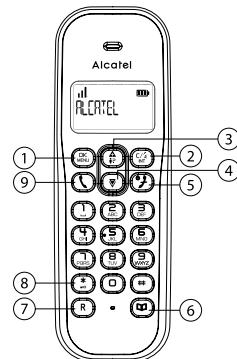
1.1. Vista general del auricular y la estación base

OK 1. MENU
En modo inactivo: Pulselo para acceder al menu principal
En modo submenu: Pulselo para confirmar la seleccion
C/2
En做什么 menu principal: Pulselo para volver a la pantalla inactiva
En modo submenu: Pulselo para volver al nivel anterior En modo edicion/premaracion: Pulselo para bbarrar un parceter/digito
En modoedition/premaracion:Pulselo y mantengalo
pulsado para borrar todos los characteres/digitos
Durante una llamada: Púlselo para silenciar/dar volumen al microfono
En modo inactivo: Pulse para seleccionar el numero de auricular o y bajo OK para confirmar.
Al sonar: Pulselo para suprimir el volumen del auricular.
- A
En做什么 inactivo: Pulselo para acceder a la lista de llamadas
En modo menu: Pulselo para desplazarse por los elements del menu
En lista de agenda/lista de rellamadas/lista de llamasadas. Pulselo para desplazarse por la lista
Durante una llamada: Pulselo para subir el volumen
Al sonar: Pulselo para subir el volumen del timbre
4.
En modo inactivo: Pulselo para acceder a la lista de remarcacion
En modo menu: Pulselo para desplazarse por los elements del menu
En lista de agenda/lista de rellamadas/lista de llamasadas. Púlselo para desplazarse por la lista
Durante una llamada: Púlselo para bajar el volumen Al sonar: Púlselo para bajar el volumen del timbre
5.
Durante una lllamada: Pulselo para finalizar una llamada yvoltar a la Pantalla inactiva
En modoedition/premaracion:Pulselo paravoltal al menuanterior
En modo inactivo: Pulselo y mantengalo pulsado para encender/apagar el auricular
6.
En modo inactivo: Pulselo para acceder a la lista de la agenda
- R (sólo para el E155), (sólo para el E195)
En modo inactivo/marcación previa: Púlselo para insertar un flash, durante una llamada: Púlselo para marcar un flash
Para E195:
Durante una llamada: Púlselo para encender/apagar e altevzo (sólo para el E195).
En modo inactivo/mojo premarciación/lista de remarcación/Lista de lllamadas/entradra de agenda: Púlselo para realizar una llamada con el altavoz (sólo para el E195)
Durante una llamada: Púlselo para responder a una llamada con el altovoz (sólo para el E195).
8. TECLADO ALFANUMÉRICO, -*, #
Tecla * en modo inactivo: Pulselo y mantengalo pulsado paraactivar o desactivar elbloqueo del teclado
Tecla 1, 2 en modo inactivo/desconexión: Pulselo y manténgalo pulsado para marcar el número directo almacenado en la memoria
9.
En modo inactivo/marcación previa: Pulselo para hacer una lllamada
En lista derellamadas/Lista de lllamadas/Entrada de agenda:
Pulselo para hacer una llamada a la entrada seleccionada de la lista
Durante una llamada: Púlselo para enceder/apagar el altovo (sólo para el E195)
10.
Pulse en la的最佳 base paraocular. Sonar durante proximamente 60 segundos.
Pulse y mantenga pulsado en la estación base durante aproximamente cinco segundos; la estación base entraía en modo registrar y estaré preparada para registrar el auricular.
1.2. Iconos y SYMBOLOS de la pantalla
La pantalla LCD le offre informacion sobre el estado actual del téléphone.
Indica que la bateria está Completely cargada.
Indica que esnecessarycargar la bateria.
Indica que una llama externa está conectada o retenida (er espera).
El icono parpadea al recibir una llamada entrada.
a.0 Indica que se han recibido新模式es de voz en esperaurrentdavia no leidos.
F
- Aparecde durante la navigation en el registrar de lllamadas y llamadas entrantes contestadas.
G
Aparece durante la navigación de la lista de remarcación.
.
Parpadae cuando Tiene lllamadas perdidas新品* Parmenones inclendido durante la pavagacion en el
llamadas elrialtiene llamadas perdidas sin responder que no se han leido.
Aparece cuando la alarma está activada.
(Después de que la alarma termina, para desactivar la función de BK)
alarma GR / o selezione RELOJ/ALARMA / GR / AJUST
ALARMA /DK /O selezione DESACTIVADA /DK
Indica que se está usingo el manos libres (sólo para el E195).
X
Indica que el tono está apagado.
Indica que el auricular está registrado y bajo del rango de alcance de la estación base. El icono parpadea cuando el auricular está fuer de rango o está buscado una base. Si aparece E en la parte superior del icono, significa que el modo ECO estáactivado.
Indica cuando el usuarioenta en el menu.
Indica que el teclado está bloqueado.
Indica la navegacion en la agenda.
2. Precauciones
Como para toda conexión de radio, la calidad de las通讯aciones depende de la posición de la base, de lostelefonos, asi como de su entorno.
El téléphone inalámbrico DECT debe mantenerse alejado de toda fuente de excessivo calor (radiadores, luz solar, etc.) y protego contra las vibriciones y el polvo.
Advertencia: noURTARnuncaqueeltelefonento encontacto con el agua uotvosliquidos o aeroasoles.
Para reducir los riesgos de interferencias y optimizar la calidad de la recepcion, se recomienda evaporar, en particular, instalar la base a proximidad immediata de: ventanas, objetos metálicos grandes, superficies de hormigon armado,televisiónes,equipos de sonido, miniteles, lampara halogenos, tubos fluorescentes,centrales de alarma, hornos de microondas,placas electrolyicas halogenas, computadoras,etc.En caso de utiliser el téléphone en una linea proviasta de un modem ADSL,utilizar un bajo ADSL.
Para limpiar el Telefono, utiliser un paño antiestálico ligeramente humedecido con agua.
3. INSTALLACION DEL TELEFONO
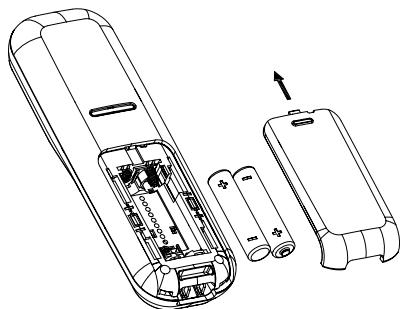
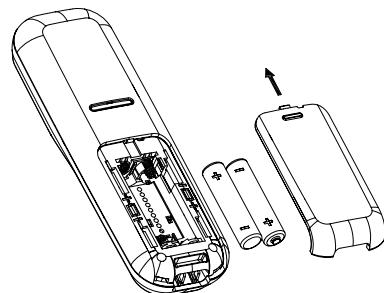
3.1 Instalación y energia de las pilas
- Desircle hacía bajo la tapa para partir el compartmento de las pilas.
- Colque las 2 pilas recarrogables AAA que se adjuntan tal y como se indica. Preste atencion especial a la direccion de la polaridad.
- Vuela a deslizar hacía irriba la tapa del compartmento de las pilas.
- Coloque el auricular en la base y cagruelo durante 15 horas antes de usar el téléphone por primera vez. El auricular emitirá un pitido cuando se colque adecuadamente en la base del cargador.
Notas:
-
Use únicamente las pilas recargables NiMH que se
-
En caso de que no vaya a utiliser el auricular durante un periodo prolongado de tiempo, desconctelo y retire las pilas para hacer posibles fujas.
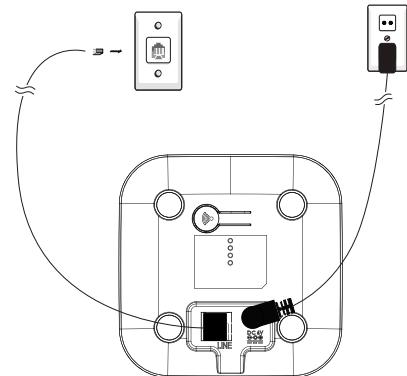
3.2. Conexión de la estación base
- Conecte un extremo del cable de la linea Telefonica en la toma Telefonica situada en la parte inferior de la base.
- Enchufe el extremo corto del adaptor de
alimentación a la toma de alimentación situada en la parte inferior de la base. - Conecte el enchufe de alimentacion a la toma de la base.
- Conectar el extremo长大o del adaptor de alimentacion a una toma de corriente de pared.
-
Conecte el(other extremo del cable de linea Telefonica a la toma del Telefono o microfilto.
-
Use sometime los cables que se adjuntan en la caja.

Si dispone de service de banda ancha, se necessita un microfiltro (no incluido).
3.3. Conexión de los cargadores
Enchufé el adaptor de alimentación a una toma de corrente.
Si dispone de una linea de banda ancha
Si conecta su téléphone a una linea con交代 de banda ancha, deben insertar un microfiltro entre el téléphone y la linea Telefonica; en caso contrario pueda tener
interferencias entre eltelefono y la banda ancha que pueda occasionarle problemas.
En una casa con banda ancha, cada téléphone debe disponible de un microfiltro connectado, no solo uno en el punto Telefonico al que está connectado su@modem. Si necesita más microfiltros de banda ancha,pongase en contacto con su operador de banda ancha.
4. USO DEL TELEFONO
4.1. Hacer una Ilamada
4.1.1. Marcación preparatoria
Introduzca el numero de telofono y pulse o (solo para el E195) para marcar el numero. Pulse para barrar la entrada.
4.1.2. Marcación directa
Pulse o (sólo para el E195) para要看 linea e introduzca el numero de téléphone.
4.1.3. Marcación desdelasteclasmemoria directas En modo inactivo o desconnectado, pulse ymantenga pulsado //2, para MARcer el numero de memoria directa.Tiene que guardar el numero en la tecla relacionada en primer lugar. Vease la seccion 7.3 para tener una referencia.
4.1.4. Llamada desdela lista derellamadas
Pulse para acceder a la lista derellamadas y pulse A/ para seleccionar el numero de rellamada que desee. Pulse o (solo para el E195) para marcar al numero de rellamada que haya selectionado.
4.2. UTILIZAR EL MODO MANOS LIBRES (E195)
En哪一个quimiento se puele pulsar la tecla (sólo para el E195) para activar el modo manoslibres.
5. AGENDA PRIVADA
El Telefono puede guardar hasta 50 entradas privadas de agenda con nombres y nombres. Cada entrada de la agendaovable tener un máximo de 24 digitos para el número de Telefono y 12 caracteres para el nombre. Las entradas de la agenda se almacenan alfabetetricamente por nombre.
5.1. Añadir una nuevo entrada a la agenda
En modo inactivo:
-
Pulse OK y / para selectionar el elemento de menu principal AGENDA y posteriormente pulse para acceder a la agenda.
-
Pulse OK MENU para introducir el nombre.
- Pulse OK para introducir el numero
-
Pulco OK para guardar la entrada de la agenda
-
Pulse OK y A / para seleccionar ANADIR NUEV.
3.1.2.1.1.1.1.1.1.1.1.1.1.1.1.1.1.1.1.1.1.1.1.1.1.1.1.1.1.1.1.1.1.1.1.1.1.1.1.1.1.1.1.1.1.1.1.1.1.1.1.1.1.
5.2. Llamada desdela agenda
En modo inactivo:
- Pulse para acceder a la agenda. O
Pulse OK y / para selectionar el numero del menu principal AGENDA y posteriormente pulse para acceder a la agenda. - Pulse 口 (sólo para el E195) para marcar la entrada de la agenda seleccionada.
5.3. Agenda组成部分 entre multiples auricu
Iares (para duo y trio)
Sincronizacion automatica entre auriculas
6. MOSTRAR A LA PERSONA QUE LLAMA (DEPENDIENTE DE RED)
Esta propididad está disponible si tiene una suscripción al Servicio de Identficación de llamadas con su proveedor de servicios Telefonicos. El téléphone可以选择 almacenar hasta 20 llamadas recibidas con información sobre Fecha/hora en la lista de llamadas. El número aparecerá en la pantalla LCD cuando suene el número. Si el número se corresponde con una de las entradas de la Agenda privada, aparecerá el nombre de la persona que llama almacenado en la agenda privada de forma alternatively al número.
Si el número de la persona que llama está desactivado para enviar la información de la persona que llama, apareceré en pantalla "PRIVADO".
Si no se dispone del numero de la persona que llama, aparecerá “FUERA AREA”.
6.1. Ver la lista de llamadas
Todas las llamadas que se reciben se guardan en la lista de llamadas con la ultima llamada en la parte superior de la lista.
Cuando la lista está llena, se sustituya thellamada mas Antigua por una nuevo llamada. Las llamadas sin responder que no se hayan leido aparecen marcadas con un icono 5 situado en el centro de la linea inferior de la pantalla.
-
Pulse A para acceder a la lista de llamadas
-
Pulse A / ▼ para seleccionar la entrada
- Pulse OK para ver el número del llamante
- Pulse a para selectionar VISUALIZAR, y bajo pulsar DK para leer la Fecha/hora de la llamada recibida.
6.2. Llamada desdela lista dellamadas
En modo inactivo:
1. Siga los pasos 1 al 2 en las secciones 6.1.
2. Pulse o i (solo para el E195).
7. CONFIGURACION DEL TELEFONO
7.1. Configurar la melodia del tiempo
- Pulse OK y A/▼ para seleccionar AJUSTES PERS.
- Pulse OK y / para seleccionar TONOS TELEF..
- Pulse OK y A/ para seleccionar MELODIA
- Pulse OK y /▼ para的选择ar la melodia del timbre que紊看出。
Nota: La melodia del timbre refresiva se reproduciramierminas busca en la lista de melodias.
5. Pulse OK para confirmarlo.
7.2. Configurar el volumen del tiempo
- Pulse OK y A/ para seleccionar AJUSTES PERS.
-
Pulse OK y / para seleccionar TONOS TELEF..
-
Pulse OK y A / para seleccionar VOLUMEN
-
Pulse OK y A / para selectionar el volumen del timbre que desee (un total de 6 volumenes de时间和 incluyendo DESACTIVADA).
- Pulse OK para confirmarlo
7.3. Configurar el número de memoria directa
- Pulse OK y A / para seleccionar AGENDA.
-
Pulse OK y A / para seleccionar EDITAR.
-
Pulse OK y A/ para selecciona la tecla de memoria directa desde 1, o 2
- Pulse OK e introduzca el nombre a guardar.
- Pulse DK para confirmarlo, yiego ingresar el numero.
- Pulse DK para confirmarlo.
Note: Pulse y mantenga pulsado, 2, ABC para llamar al numero guardado.
7.4. Configurar número de和地区 (La configuración de Area está sujeta a la red de Telefonía en el País local)
- Pulse OK y A / ▼ para seleccionar AJUSTE AVANZ
- Pulse OK y / para selectionar CÓDIGOÁREA.
-
Pulse OK e introduzca el numero de 2 o 3 digitos.
-
Pulse OK para confirmarlo.
7.5. Cambiar Fecha/Hora y número de auricular en la pantalla en modo inactivo
- Pulse y mantenga pulsado OK paraCambiar la Fecha/ hora y numero de auricular en la pantalla durante modo inactivo (standby).
8. REALIZAR UNA LLAMADA INTERNA (VERSIONES DÜO Y TRÍO)
Esta caracteristica solo es aplicable cuando hay al menos
dos auriculares registrados. Le permite realizar llamadas internas, transferir llamadas externas de un auricular aOTHERY realizar conferencias. Si el auricular al que se llama no ha respondido en 60 segundos, el auricular al que se llama dejarde de sonar y el auricular que llama volvera a modo enespera.
Nota: Si solo está registrado un auricular a la estación base, pulse C/2 eschara tono de error.
8.1. Intercomunicación con(other auriculars
- En modo inactivo, pulse
- Pulse A / ▼ para seleccionar el numero de auricular con el que deseee intercomunicarse,iego pulse OK MENJ.
- El auricular al que se llama suena y pulse en el auricular al que se llama para establecer la llamada interna.
Note: Si sólo está registrados dos auriculares en la estación base, al pulsar C/ se llamará a otro auricular de forma immediata.
8.2. Transferir una llamada externa aanother auriculari. Durante una llamada externa:
- Pulse y mantenga pulsado 口 y A / para seleccionar el numero de auricular y bajo pulse OK
- La llamada externa se pone en espera de forma automática y el auricular al que se llama suena.
- Pulse en el auricular al que se llama para establerce la llamada interna.
- Pulse en el auricular que llama o coloque el auricular en la base de carga para finalizar la llamada actual con la persona externa.
- La llamada externa se transfiere al auricular al que se llama.
8.3. Hacer una llamada de conferencia a 3
La characateristica de llamada de conferencia permite que una llamada externa se compara con dos auriculares (en intercomunicacion). Las tres personas peuvent partir la conversacion y no esnecessary a suscripción de red. Durante una llamada externa:
- Siga los pasos 1 al 3 en la sección 8.2.
- Pulse y mantenga pulsado DK en el auricular que llama para establecer la llamada de conferencia.
Note: Cualquier auricular que se(cajue) durante una lllamada de conferenciadea al other auricular en conexión con la lllamada externa.
9. Registrar
El auricular y la estación base ya está registrados previamente. Se pueda registrar hasta 4 auriculas en una sola estación base.
Si porrialquiermotivo,el auricular noestuviera registrado en la estacion base (elicono il parpadea,incluso cuando el auricular estácerca dela estacionbase),registre el auricular seguesimilaresperidimento.
1. Pulse y sostenga pulsado en la estación base durante uno cincosegundos;la estación baseenta en modo registrato.
2. Pulse OK y A/ para seleccionar AJUSTE AVANZ.
3. Pulse OK y / para seleccionar REGISTRAR.
4. Pulse on y se le solicita que introduzca el PIN del sistema de 4 digitos (el PIN por defecto es 0000)
5. Introduza el PIN del sistemas de 4 digitos.
6. Pulse OK para confirmarlo.
Si el registrar del auricular se ha realizado con exito, oira un tono de confirmacion y el icono de. Il dejarde parpaear. El auricular se ubicare de forma automatica en el asigniente numero de auricular disponible. Este numero de auricular aparece en la pantalla del auricular en modo en espera. Si el registrar del auricular no se ha realizado con exito, todasvaparpadear elicono.
10. DETALLES TÉCNICOS
| Alcance en campo abierto | Hasta 300 metros* |
| Cobertura interna | Hasta 50 metros* |
| Duración de la batería del auricular (valores medios) | 10 horas en uso **200 horas en espera** |
| Número de auriculares | Hasta 4 |
| modo Intercomunicador | Sí |
| Llamada a tres (1 correspondiente除外 + 2 correspondientes internos) | Sí |
| Conexión electrónica/ Adaptador a la corriente de la base/Cargador | Use únicamente los adaptadores que se adjuntan con el téléphone |
| Conexión Telefonica | Electrodomésico Diseño para la conexión a una linea Telefonica analógica bajo TINV3 (telecommunications network voltage). |
Pilas
| Se adjuntan con el telérneo. El uso de cualquier(other tipo de pilas presente riesgo de explôsión. Se debe deshacer de las baterías usadas cumplido con la normativa actual de protección medioambiental. |
Temperatura operativa De 5^ a 40^
- Los values peuvent variar según el entorno.
** Dependiendo de la energia inicialede las pilas.
11. PROBLEMAS Y SOLUCIONES
Si tiene cualquier problema con el téléphone, rogamos intente probar las sugerencias que se enumeran abajo.
Como norma general, si se produce un problema, retire las pilas de todos los auriculares de su instalacion durante aproximamente 1 minuto; posteriormente desconecte ywhelming a conectar la alimentacion a la base ywhelming a instalar las pilas del auricular.
| Problema | Causa | Solutaciones |
| No hay tono de MARCación al pulsar la tecla\ | a. El cable de conexión de la estación base no está conectado. | a. Compruebe las conexiones. Desenchufe y vuelva a enchufarlo a la corriente electrónica. Compruebe que el cable de ligne Telefonica se ha conectado a la estación base y a la toma Telefonica. |
| b. El cable del adaptorador no está conectado a la estación base. | b. Compruebe el enchufe de la estación base y el enchufe de corriente alterna (retírelo y vuelva a enchufarlo). | |
| c. La linea está occupancya que se está empleando除外 auricular. | c. Espere a que la linea está desocu-pada. | |
| d. Cable de conexión incorrecto. | d. Use el cable de conexión original. | |
| Aparece "BUSCAN-DO". | a. Estación base sinSEOI. | a. Reducir laSEOI. |
| b. Estación base no conectada a la corriente electrónica. | b. Conectar la estación base a la corriente electrónica. | |
| La llamada no funciona. | Servicio no activado, operador erroneo o configuración errónea. | Compruebe la suscripción a la red. |
| No hay pantalla. | Batería gastada. | Recargue la batería. |
12. SEGURIDAD
En el caso de que se produzca un riego electrique, el adaptoratador de alimentacion funciona como dispositivo de
aislamento de alimentacion de la corrente alterna. Por lo tanto, como precauccion,derabadse circa del electrodomestico y con un fácil acceso.
Para desconectar el dispositivo de la alimentacion primaria el adaptorado de alimentacion debe retirarse de la toma de la corriente alterna.
En caso de que falle el adaptador de alimentacion, deben sustituirse por un modelo identico.
En caso de que el adaptorador de alimentacion no este
conectaro o si hay una falla en la alimentacion electrica, no
funcionaran los Telefonos que usen auriculares
inalambricos. Por lo que usted sera incapaz de hacer o
recibir lllamadas en caso de una emergencia.
Esta es larzon porla que recomendamos que disponga asimismo de untelefonoconversional-uno que no
requiera alimentacion electrica--como medidapreventiva. i No use el Telefono para avisar de una fuga de gas s
I se enquiry en las cercanias de dicha fugais.
Se recomienda que evite usar este disposativo durante tormentas electricas.
No intenteAbrir la bateria ya que contiene sustancias quimicas.
En caso de fuga, evite el contacto con la piel, ojos, nariz y boca. En caso de que se produca el contacto, limpie bien la zona afectada durante uno veinte horas con agua del grifo y busque atencion medica urgente. Limpie el producto con un papel absorbente o un paño seco.
13. MEDIO AMBIENTE
Este symbolo indica que el electrodomestico electrónico no operativo debe recogerse de forma separada y no mezclarse con los residuos
domesticos.
Este electrodométrico ha sido Diseñado y fabricado con materiales y componentes de gran calidad que;puede reciclarse y reutilizaré. Los electrodométricos electricos y electrónicos;puede contener piezas que son necessities para que elistema funciona debidamente pero que;puede convertirse en un riesgo sanitario y medioambiental si no se manejan y se eliminan de forma adecuada. Por consiguiente, rogamos no tire el electrodométrico inoperativo como si FPGA sureshindo dométrico.
En caso de que sea el propietario del electrodoméstico, debe depositarlo en el punto apropiado local de recoilección. Deseoso de conservar el medio ambiente, ATLINKS ha equipado este electrodoméstico con un dispositivo de alimentación que Offerce una mayor energia energetica. Las ventajas incluyen no solo un consumo muy bajo de energia, sino también un formatting más compacto que las unidades de alimentación convencionesque se empleaban en la gama anterior.
Las baterias usadas del teléfono (si dispone de las mismas) deben eliminarse según la normativa de protección medioambiental actual. Cumpla con la normativa local. Lleve las baterías a un centro de reciclaje aprobado. iAyudenos a proteger el medio ambiente en el que vivimos!
ENGLISH
. . . . . . . . . . . . . . . . . . . . . . . . . . . . . . . . . . . . . . . . . . . . . . . . . . . . . . . . . . . . . . . . . . . . . . . . . . . . . . . . . . . . . . . . . . . . . . . . . . ..
1.1. Handset and Base Station Overview
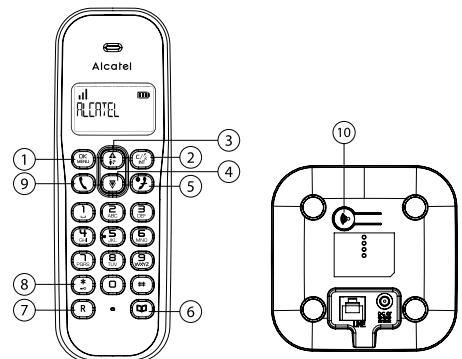
OK 1. MENU
In idle mode: Press to access the main menu In sub-menu mode: Press to confirm the selection
C/2. INT
In main menu mode: Press to go back to idle screen
In sub-menu mode: Press to go back to previous level
In editing / predialing mode: Press to clear a character / digit
In editing / predialing mode: Press and hold to delete all the characters / digits
During a call: Press to mute/unmute the microphone In idle mode: Press to select handset number by or and then to confirm.
In ringing: Press to suppress handset ringer
3.
In idle mode: Press to access the call list
In menu mode: Press to scroll up the menu items
In Phonebook list/Redial list/Call List: Press to scroll up the list
During a call: Press to increase the volume In ringing: Press to increase the ringer volume
4.
In idle mode: Press to access the radial list
In menu mode: Press to scroll down the menu items
In Phonebook list/Redial list/Call List: Press to scroll
down the list During a call: Press to decrease the volume In ringing: Press to decrease the ringer volume
5.
During a call: Press to end a call and go back to idle screen
In menu/editing mode: Press to go back to previous menu
In idle mode: Press and hold to power off the handset
6.
In idle mode: Press to access the phonebook list
7. R (only for E155), (only for E195)
In idle/predialing mode: Press to insert a flash; during a call: Press to dial a flash (for E155) For E195:
During a call: Press to turn on/off the speakerphone In Idle mode/Predialing mode/Redial list/Call List/Phonebook entry: Press to make a call with speakerphone
During ringing: Press to answer a call with speakerphone
8. ALPHANUMERIC KEYPAD, 一 * , #
- key in idle mode: Press and hold to enable or disable the keypad lock
1, 2 key in idle/off hook mode: Press and hold to dial the stored direct memory number
9.
In idle/predialing mode: Press to make a call
In Redial list/Call List/Phonebook entry: Press to make a call to the selected entry in the list
During ringing: Press to answer a call
During a call: Press to dial a flash (for E195)
10.
Press on the base station to page your handset. It will ring for approximately 60 seconds.
Press and hold the base station for about five seconds, the base station is entered into registration mode and allows handset registration.
1.2. Display Icons and Symbols
The LCD display gives you information on the current status of the telephone.
#
Indicates battery is fully charged.
Indicates battery is fully discharged
- Indicates that an external call is connected or held
- Icon blinks when receiving an incoming call.
0.0 Indicates you have a new voice mail message*.
Displays during browsing call log answered incoming call item.
Displays during browsing radial list.
Blinks when you have new missed calls*.
Steadily on during browsing call log which has missed calls that have been read.
Displays when the alarm clock is activated.
(After alarm is finished, to turn off Alarm function by OK / A or select CLOCK / ALARM / OK / MENU / SET ALARM / OK / MENU / A or select OFF / OK / )
Displays when handsfree is activated (only for E195).
Displays when ringer volume is turned off.
Indicates that the handset is registered and within range of the base station. Icon blinks when the handset is out of range or is searching for a base. If E appears on top of the icon, it means ECC mode is ON.
Indicates when user enters the menu.
Indicates the keypad is locked
Indicates during browsing phonebook
2. PRECAUTIONS
The signal quality will depend on the location and environment of the base and handset.
Position your E155 / E195 away from sources of excessive heat (radiators, direct sunlight, etc.) and protect it from vibrations and dust. Never allow your telephone to come into contact with water or other liquids, or with aerosols. To reduce the risk of interference and optimize reception, take particular care not to install the base in the immediate vicinity of windows, large metal objects, reinforced concrete, televisions, music centres, VCR or DVD players, halogen lamps or heating devices, fluorescent lighting, burglar alarms, microwave ovens, computers, etc. This telephone requires an electrical power supply in order to function.
To clean your E155 / E195, use an antistatic cloth lightly moistened with water.
3. INSTALLING YOUR PHONE
3.1. Installing and Charging the Batteries
- Slide down to open the battery compartment cover.
- Place the 2 supplied AAA rechargeable batteries as indicated. Pay extra attention to direction of polarity
- Slide the battery compartment cover back.
- Put the handset on the base and charge for 15 hours before using the handset for the first time. The handset will give a beep when it is properly placed on the base or charger.
Notes:
- Use only the supplied NiMH rechargeable batteries.
- If the handset will not be used for a long time, disconnect and remove the batteries to prevent possible leakage.
3.2. Connecting the Base Station
- Plug one end of the telephone line cord into the telephone jack on base bottom.
- Plug the small end of power adapter into a power jack on base bottom.
- Connect the power supply plug to the base jack.
- Plug the large end of power adapter into a wall power outlet.
- Plug the other end of the telephone line cord in to the telephone jack or micro-filter.
- Always use the cables provided in the box.
If you have broadband service, a micro-filter (not included) is required.
3.3. Connecting the Charger(s)
Plug the power adapter into mains socket.
If you have a Broadband line
If you connect your telephone to a line with a broadband connection, you will need to insert a micro-filter between
the telephone and the telephone line, otherwise you may
get interference between the telephone and the broadband which could cause problems.
In a home with broadband, every telephone must have a micro-filter connected, not just the one at the telephone point that your modem is connected to. If you need more broadband microfilters, contact your broadband supplier.
4. USING YOUR PHONE
4.1.Make a Call
4.1.1. Preparatory Dialing
Enter the phone number and press \ or \ (only for E195) to dial the number.
Press to clear the entry.
4.1.2. Direct Dialing
Press or (only for E195) to take the line and enter the phone number.
4.1.3. Dial from Direct Memory Keys
In idle or off hook mode, press and hold 1 / 2 to dial the direct memory number. You have to store number to the related key first. See section 7.3 for reference.
4.1.4. Call from the Redial List
Press to access the radial list and press to select the desired radial number.
Press or (only for E195) to dial out to the selected radial number.
4.2.Handset Speakerphone (E195)
During a call, you can press (only for E195) to alternate between handsfree and normal handset use.
5. PRIVATE PHONEBOOK
Your phone can store up to 50 private phonebook entries with names and numbers. Each phonebook entry can have a maximum of 24 digits for the phone number and 12 characters for the name. Phonebook entries are stored alphabetically by name.
5.1. Add a New Phonebook Entry
In idle:
- Press menu item and select PHONEBOOK main menu item and then press to access the phonebook
- Press UK and A / to select ADD NEW.
- Press OK to enter the name.
- Press OK to enter t
5 Press OK to store the phonebook entry.
5.2. Call from the Phonebook
In idle mode
- Press to access the phonebook. OR Press OK and A / to select PHONEBOOK main menu item and then press to access the phonebook
- Press or (only for E195) to dial out to the selected phonebook entry.
5.3. Shared phonebook entries among multiple
handsets (for duo and trio)
Automatic synchronization between handsets.
6. CALLER DISPLAY (NETWORK
DEPENDENT)
This feature is available if you have subscribed the Caller Line Identification service with your telephone service provider. Your phone can store up to 20 received calls with date/time information in the Call List. The number will be shown on the LCD when the phone is ringing. If the number matches with one of the entries in your Private Phonebook, the caller's name stored in the private phonebook will be displayed alternatively with the number.
If the caller number is disabled to send caller information, "PRIVATE" will display.
If the caller number is not provided, "OUT OF AREA" will display.
6.1. View the Call List
All received calls are saved in Call List with the latest call putting at the top of the list. When the call list is full, the oldest call will be replaced by a new call. The unanswered call which has not been read is marked with a at the centre of the bottom line of the display.
- Press A to access the call list.
- Press A / to select the desired entry.
- Press OK to see calling number
- Press A or V to select VIEW, and then press OK to read date/time of the call received.
6.2. Call from the Call List
In idle mode
- Follow step 1 and 2 in Section 6.1.
- Press or (only for E195) to dial out to the selected entry.
7. PHONE SETTINGS
7.1. Set the Ringer Melody
- Press OK and A / to select PERSONAL SET.
- Press OK and A / to select HANDSET TONE
- Press OK and A / to select RING MEODY.
- Press OK and A / V to select the desired ringer melody from the melody list.
Note: The respective ringer melody will be played while browsing the melody list.
- Press OK to confirm
7.2 Set the Pinger Volume
- Press OK and A / to select PERSONAL SET
- Press MEND to select HANDSET TONE
-
Press OK and A / to select RING VOLUME.
-
Press OK and A / to select the desired ringer
volume (a total of 6 ringer volume levels including OFF). - Press OK to confirm
7.3. Store Direct Memory Access Number
You can store three direct access numbers into digit KEY 1, KEY 2, which will be convenient for you to dial to these numbers directly.
- Press OK and A / to select PHONEBOOK.
- Press OK and A / to select EDIT.
- Press OK and A / to select 1, or 2
- Press OK and then enter the name you would like to store, or edit the name existed before.
- Press OK to confirm and then enter the number.
- Press OK to confirm
Note: Press and hold 1, to call the stored number.
7.4. Switch Date/Time and Handset number in standby display
- Long press OK to switch date/time and handset number on the display during standby mode.
8. Make an Internal Call (Duo/Trio versions)
This feature is only applicable when there are at least two registered handsets.
It allows you to make internal calls, transfer external calls from one handset to another handset and make conference calls. If the called handset is not answered within 60 seconds, the called handset will stop ringing and the calling handset will return to standby mode.
Note: If only one handset is registered to the base station, press will hear error tone.
8.1. Intercom Another Handset
- In idle mode, press C/
- Press / to select the desired handset number to intercom with, then press OK...
- The called handset rings and press on the called handset to establish the internal call.
Note: If only two handsets are registered to the base station, press C_INT^% will call another handset immediately.
8.2. Transfer an External Call to another handset
During an external call
- Long press _K^F and / to select handset number, and then press OK.
- The external call is put on hold automatically and the called handset rings.
-
Press on the called handset to establish an internal call.
-
Press on the calling handset or put the calling handset on the charging cradle to end the current call with the external party.
- The external call is transferred to the called handset.
8.3. Make a 3-way Conference Call
The conference call feature allows one external call to be shared with two handsets (in intercom). The three parties can share the conversation and no network subscription is required.
During an external call
- Follow Steps 1 to 3 in section 8.2.
- Press and hold menu on the calling handset to establish the conference call.
Note: Any handset hangs up during a conference call will leave the other handset still in connection with the external call.
9. REGISTRATION
Your handset and base station are pre-registered. Up to four handsets can be registered to a single base station. If for some reason, the handset is not registered to the base station 1I flashes (even when the handset is near the base station), register your handset according to the following procedure.
- Press and hold on the base station for about five seconds, the base station is entered into registration mode.
- Press OK / to select ADVANCED SET
- Press OK and A / to select REGISTER
- Press OK and / and you are requested to enter the 4-digit system PIN (default PIN is 0000).
- Enter the 4-digit system PIN.
- Press OK to confirm
If the handset registration is successful, you will hear a confirmation tone and the will stop flashing. The handset will automatically be allocated the next available handset number.
This handset number is shown in the handset display in standby mode. If the handset registration is unsuccessful the will still flash.
10. TECHNICAL DETAILS
| Free Field Range | Up to 300 metres* |
| Indoor Range | Up to 50 metres* |
| Handset Battery Life (average values) | 10 hours talk time** 200 hours standby** |
| Number of Handsets | Up to 4 |
| Intercom Mode | Yes |
| Three-Way Conference (1 outside correspondent + 2 internal correspondents) | Yes |
| Electrical Connection/Base Mains Adaptor/Charger | Only use the adaptors supplied with the telephone Caution: The network voltage is classified as a hazard by the criteria of this standard. |
| Telephone Connection | Appliance designed for connection to a TV3 class (telecommunications network voltage) analogue tele-line. |
| Batteries | Only use the batteries supplied with the telephone. Use any other type of battery presents a risk of explosion. Used batteries must be disposed of in compliance with current environmental protection regulations. |
| Operating Temperature | From 5°C to 40°C |
- Values may vary according to environment.
** Depending on initial battery charge.
11. TROUBLESHOOTING
If you have difficulty with your phone, please try the suggestions listed below.
As a general rule, if a problem occurs, remove the batteries from all the handsets in your installation for about 1
minute, then disconnect and reconnect the power supply to the base and reinstall the handset batteries.
| Problem | Cause | Solutions |
| No dialing tone when pressing key | a. The connection cord of the base station is not plugged in. | a. Check the connections. Unplug and plug back in the mains. Check that the telephone line cord has been plugged into the base station and the phone socket. |
| b. The adapter cord is not plugged in correctly in the base station. | b. Check the base station plug and the AC plug (remove and plug-in). | |
| c. The line is busy, as another handset is used. | c. Wait until the line is unoccupied. | |
| d. Wrong connection cord. | d. Use the original connection cord. | |
| "SEARCH-ING" is displayed. | a. Base station out of range. | a. Reduce the range. |
| b. Base station is not connected to mains. | b. Connect base station to mains. | |
| The call does not work. | Service not activated or wrong operator. | Check your Subscription with network. |
| No display. | Empty battery. | Recharge battery. |
The store where you bought your telephone can also provide you with information and after-sales support.
12. SAFETY
In the event of an electrical hazard, the mains adapter acts as AC power isolating device. It should therefore, as a precaution, be installed close to the appliance and be easily accessible. To disconnect the device from the primary power source, the mains adapter must be removed from the AC socket.
If the mains adapter fails, it must be replaced by an identical model.
If not connected to the mains power or if there is a mains power failure, telephones that use cordless handsets will not work.
You will then be unable to make or receive calls in the event of an emergency.
This is why we recommend that you also keep a conventional telephone - one that doesn't require a power supply - as a backup.
Do not use your telephone to notify a gas leak when standing in the vicinity of the leak.
It is recommended that you avoid using this device during electrical storms.
Do not attempt to open the batteries, as they contain chemical substances. In the event of leakage, avoid contact with the skin, eyes, nose and mouth. In the event of contact, rinse the affected part for about twenty minutes with running water and seek urgent medical attention. Clean the product with absorbent paper or a dry cloth.
ENVIRONMENT
This symbol means that your inoperative electronic appliance must be collected separately and not mixed with the household waste.
This appliance has been designed and manufactured with high quality materials and components that can be recycled and reused. Electrical and electronic appliances are
liable to contain parts that are necessary in order for the system to work properly but which can become a health and environmental hazard if they are not handled or disposed of in the proper way. Consequently, please do not throw out
your inoperative appliance with the household waste. You must deposit it at the appropriate local collection point. Keen to preserve the environment, ATLINKS has equipped this appliance with a switching power supply, offering
better energy efficiency. The advantages include not only very low electricity consumption, but also a more compact format than the conventional power supply units used by the previous range.
The used batteries from your telephone (if it has batteries) must be disposed of in compliance with current
environmental protection regulations. Comply with your local regulations. Dispose the batteries at an approved recycling centre.
Help us protect the environment in which we live!
www.alcatel-home.com
ATLINKS Europe
147 avenue Paul Doumer
92500 RUEIL-MALMAISON
Fra
© ATLINKS 2019 - Reproducción prohibida.
El fabricante se reserva eldeocho de modifier sin previo aviso lascharacteristicas de sus products para introducirolestes, ycomplir con nuevas regulaciones officiales. ALCASTEL v. ATLINKS-con-marcas regicadas
Alcatel es unamarca de Nokia,utilizada bajo licencia por ATLINKS.
© ATLINKS 2019 - Reproduction prohibited.
The Manufacturer reserves the right to modify the specifications of its products in order to make technical improvements or comply with new regulations.
ALCATEL and ATLINKS are registered trademarks.
Alcatel is a trademark of Nokia, used under license by ATLINKS.


- Alcatel
- GUIA DEL USUARIO
- ESPANOL
- CONOCIENDO SU TELEFONO
- TECLADO ALFANUMÉRICO, -*, #
- Iconos y SYMBOLOS de la pantalla
- Precauciones
- INSTALLACION DEL TELEFONO
- Instalación y energia de las pilas
- Conexión de la estación base
- Conexión de los cargadores
- Si dispone de una linea de banda ancha
- USO DEL TELEFONO
- Marcación preparatoria
- Marcación directa
- Llamada desdela lista derellamadas
- UTILIZAR EL MODO MANOS LIBRES (E195)
- AGENDA PRIVADA
- Añadir una nuevo entrada a la agenda
- Llamada desdela agenda
- Agenda组成部分 entre multiples auricu
- Iares (para duo y trio)
- MOSTRAR A LA PERSONA QUE LLAMA (DEPENDIENTE DE RED)
- Ver la lista de llamadas
- Llamada desdela lista dellamadas
- CONFIGURACION DEL TELEFONO
- Configurar la melodia del tiempo
- Configurar el volumen del tiempo
- Configurar el número de memoria directa
- Configurar número de和地区 (La configuración de Area está sujeta a la red de Telefonía en el País local)
- Cambiar Fecha/Hora y número de auricular en la pantalla en modo inactivo
- REALIZAR UNA LLAMADA INTERNA (VERSIONES DÜO Y TRÍO)
- Intercomunicación con(other auriculars
- Transferir una llamada externa aanother auriculari. Durante una llamada externa:
- Hacer una llamada de conferencia a 3
- Registrar
- DETALLES TÉCNICOS
- PROBLEMAS Y SOLUCIONES
- SEGURIDAD
- MEDIO AMBIENTE
- domesticos.
- ENGLISH
- . . . . . . . . . . . . . . . . . . . . . . . . . . . . . . . . . . . . . . . . . . . . . . . . . . . . . . . . . . . . . . . . . . . . . . . . . . . . . . . . . . . . . . . . . . . . . . . . . ..
- Handset and Base Station Overview
- OK 1. MENU
- C/2. INT
- 3.
- 4.
- 5.
- 6.
- R (only for E155), (only for E195)
- ALPHANUMERIC KEYPAD, 一 * , #
- 10.
- Display Icons and Symbols
- #
- PRECAUTIONS
- INSTALLING YOUR PHONE
- Installing and Charging the Batteries
- Notes:
- Connecting the Base Station
- Connecting the Charger(s)
- If you have a Broadband line
- USING YOUR PHONE
- 4.1.Make a Call
- Preparatory Dialing
- Dial from Direct Memory Keys
- Call from the Redial List
- 4.2.Handset Speakerphone (E195)
- PRIVATE PHONEBOOK
- Add a New Phonebook Entry
- Call from the Phonebook
- In idle mode
- Shared phonebook entries among multiple
- handsets (for duo and trio)
- CALLER DISPLAY (NETWORK
- DEPENDENT)
- View the Call List
- Call from the Call List
- PHONE SETTINGS
- Set the Ringer Melody
- Set the Pinger Volume
- Store Direct Memory Access Number
- Switch Date/Time and Handset number in standby display
- Make an Internal Call (Duo/Trio versions)
- Intercom Another Handset
- Transfer an External Call to another handset
- Make a 3-way Conference Call
- REGISTRATION
- TECHNICAL DETAILS
- TROUBLESHOOTING
- SAFETY
- ENVIRONMENT
- www.alcatel-home.com
- ATLINKS Europe
- avenue Paul Doumer
- RUEIL-MALMAISON
- Fra
Marque : ALCATEL-LUCENT
Modèle : E195 trío
Catégorie : Téléphone fixe