MODE D'EMPLOI HW120-B14979 HAIER
User manual Washing machine
HW80-B14979
HW80-B14979S
HW100-B14979
HW100-B14979S
HW120-B14979
HW120-B14979S
EN
Thank you for purchasing a Haier Product.
Please read these instructions carefully before using this appliance. The instructions contain important information which will help you get the best out of the appliance and ensure safe and proper installation, use and maintenance.
Keep this manual in a convenient place so you can always refer to it for the safe and proper use of the appliance.
If you sell the appliance, give it away, or leave it behind when you move house, make sure you also pass this manual so that the new owner can become familiar with the appliance and safety warnings.

Legend
Warning - Important Safety information

General information and tips

Environmental information

Disposal
Help protect the environment and human health. Put the packaging in applicable containers to recycle it. Help to recycle waste of electrical and electronic appliances. Do not dispose appliances marked with this symbol with the household waste. Return the product to your local recycling facility or contact your municipal office.

WARNING!
Risk of injury or suffocation!
Disconnect the appliance from the mains supply. Cut off the mains cable and dispose of it. Remove the door catch to prevent children and pets to get closed in the appliance.
1-Safety information. 4
2-Product description. 7
3-Control panel 8
4-Programmes 11
5-Consumption. 12
6-Daily use 13
7-Eco-friendly washing 18
8-Care and cleaning 19
9-Troubleshooting 22
10-Installation 25
11-Technical data 29
12-Customer service 31
Before switching on the appliance for the first time read the following safety hints!

WARNING!
Before first use
Make sure there is no transport damage.
Make sure all transport bolts are removed.
Remove all packaging and keep out of children's reach.
- Handle the appliance always with at least two persons because it is heavy.
Daily use
This appliance can be used by children aged from 8 years and above and persons with reduced physical, sensory or mental capabilities or lack of experience and knowledge if they have been given supervision or instruction concerning use of the appliance in a safe way and understand the hazards involved.
- Keep away children under 3 years of age from the appliance unless they are constantly supervised.
Children shall not play with the appliance.
- Do not let children or pets come close to the appliance when the door is open.
- Store washing agents out of reach of children.
- Pull up zips, fix loose threads and take care for small items to prevent laundry from being entangled. If necessary, use an appropriate bag or net.
- Do not touch or use the appliance when barefoot or with wet or damp hands or feet.
- Do not cover or encase the appliance during operation or afterwards to allow any moisture or dampness to evaporate.
- Do not place heavy objects or sources of heat or damp on top of the appliance.
- Do not use or store flammable detergent or dry cleaning agent in close vicinity to the appliance.
- Do not use any flammable sprays in close vicinity to the appliance.
- Do not wash any garments treated with solvents in the appliance without having dried them previously in the air.

WARNING!
Daily use
- Do not remove or insert the plug in the presence of flammable gas.
- Do not hot wash foam rubber or sponge-like materials.
- Do not wash any laundry which is polluted with flour.
Do not open detergent drawer during any wash cycle.
Do not touch the door during the washing process, it gets hot.
Do not open the door if the water level is visibly over the porthole.
- Do not force the door to open. The door is fitted with a self-lock device and will open shortly after the washing procedure is ended.
- Switch off the appliance after each wash programme and before undertaking any routine maintenance and disconnect the appliance from the electrical supply to save electricity and for safety.
Hold the plug, not the cable, when unplugging the appliance.
Maintenance / cleaning
Make sure children are supervised if they carry out cleaning and maintenance.
- Disconnect the appliance from the electrical supply before undertaking any routine maintenance.
- Keep the lower part of the porthole clean and open door and detergent drawer if appliance is not in use to prevent odours.
Do not use water spray or steam to clean the appliance.
Replace a damaged supply cord only by the manufacturer, its service agent or similarly qualified persons in order to avoid a hazard.
- Do not try to repair the appliance by yourself. In case of repair please contact our customer service.
Installation
The appliance should be placed in a well-ventilated place. Ensure a location which allows opening the door fully.
- Never install the appliance outdoors in a damp place, or in an area which may be prone to water leaks such as under or near a sink unit. In the event of a water leak cut power supply and allow the machine to dry naturally.

WARNING!
Installation
Install or use the appliance only where the temperature is above 5^ C .
- Do not place the appliance directly on a carpet, or close to a wall or furniture.
- Do not install the appliance in direct sunlight or in the near of heat sources (e.g. stoves, heaters).
Make sure that the electrical information on the rating plate agrees with the power supply. If it does not, contact an electrician.
Do not use multi- plug adapters and extension cables.
Make sure only the delivered electric cable and hose set are used.
- Make sure not to damage the electric cable and the plug. If damaged have it replaced by an electrician.
- Use a separate earthed socket for the power supply which is easy accessible after installation. The appliance must be earthed.
Only for UK: The appliance's power cable is fitted with 3-cord (grounding) plug that fits a standard 3-cord (grounded) socket. Never cut off or dismount the third pin (grounding). After the appliance is installed, the plug should be accessible.
Make sure the hose joints and connections are firm and there is no leakage.
Intended use
This appliance is intended for washing machine-washable laundry only. Anytime follow the instructions given on the label of each garment label. It is designed exclusively for domestic use inside the house. It is not intended for commercial or industrial use.
Changes or modifications to the device are not allowed. Unintended use may cause hazards and loss of all warranty and liability claims.

Note:
Due to technical changes and different models, the illustrations in the following chapters may differ from your model.
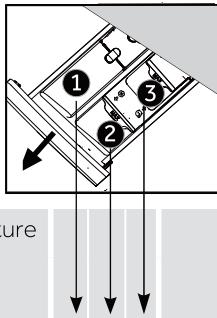
2.1 Picture of appliance
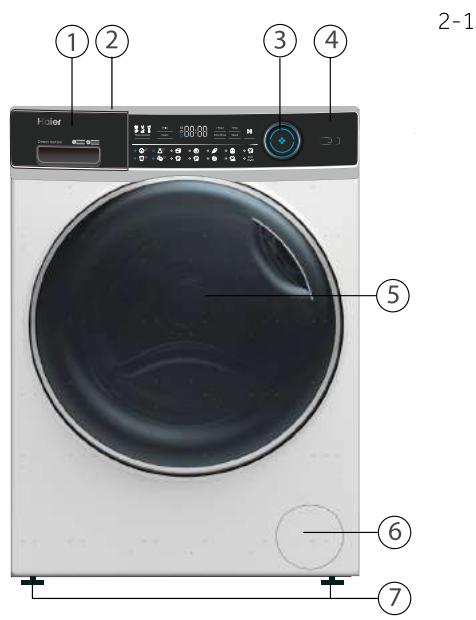
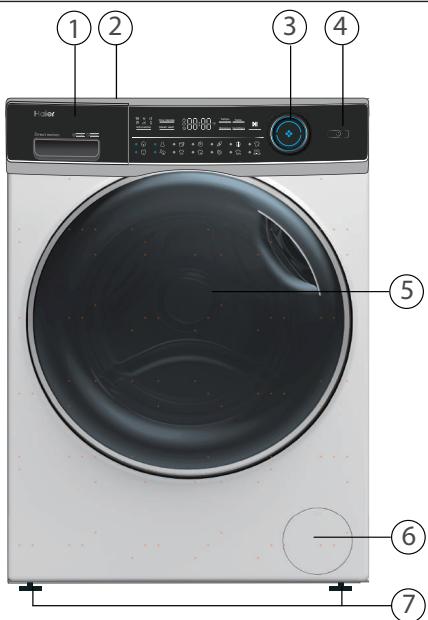
Front (Fig. 2-1):
1 Detergent/ Softener drawer
5 Washer door
2 Work top
6 Service flap
3 Programme selector
7 Adjustable feet
4 Panel
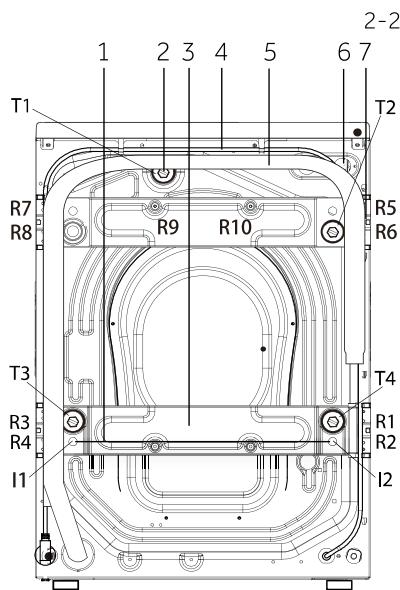
Rear side (Fig. 2-2):
1 Iron bar (I1 - I2)
(Only HW100/120-B...)
2 Transportation bolts (T1-T4)
3 Rear wall reinforcement (Only HW100/120-B...)
4 Power cord
5 Drain hose
6 Water inlet valve
7 Rear wall reinforcement screws (R1-R10) (Only HW100/120-B...)
2.2 Accessories
Check the accessories and literature in accordance with this list (Fig.:2-3):
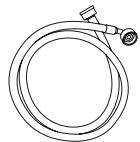
Inlet hose-assembly
6 Blanking plugs

Drain hose bracket
2x
2x

Noise reduction pads

Warranty card

User manual
2-3
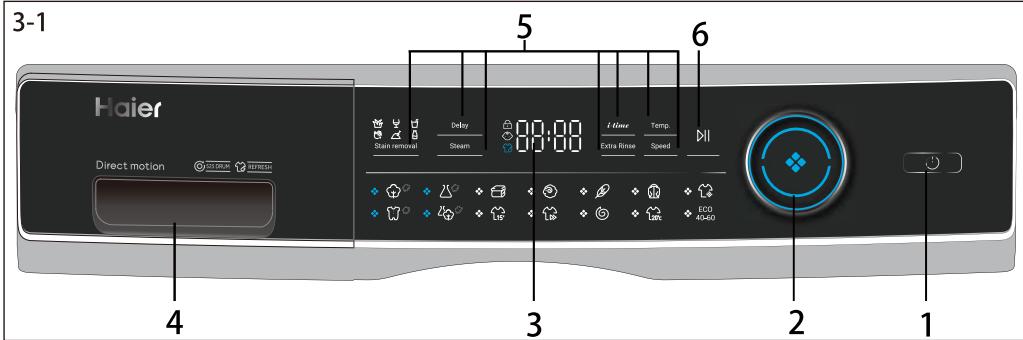
1 "Power" button
2 Programme selector
3 Display
4 Detergent/Softener drawer
5 Function buttons
6 "Start/Pause" button

Note : Acoustic signal
In following cases, an acoustic signal is no sounds by default:
when pressing a button
at the end of programme
when turning the programmes selector
The acoustic signal can be selected if necessary ; see DAILY USE(see P17 6.13).
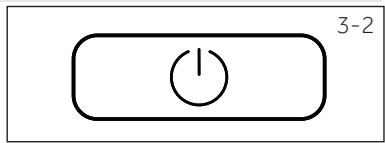
3-2

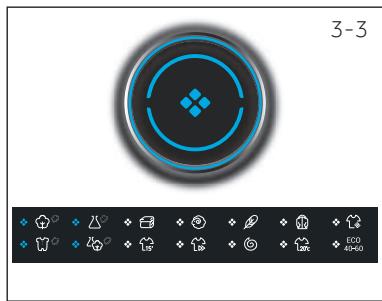
3-3

3-4
Touch this button (Fig. 3-2) gently to switch on, the display is shining, the indicator of the "Start/Pause" button is flashing. Press it again for about 2 seconds to switch off. If no panel element or programme is activated after a while machine will shut down automatically.
3.2 Programme selector
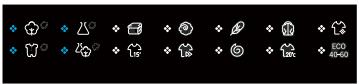
By turning the knob (Fig. 3-3) one of 14 programmes can be selected, related LED will light up, its default settings will be displayed.
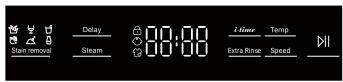
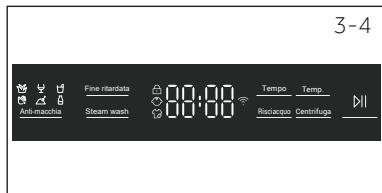
3.3 Display
The display (Fig. 3-4) shows following information:
Washing time
End time delay
Error codes and service information
Function buttons and "Start/Pause" button
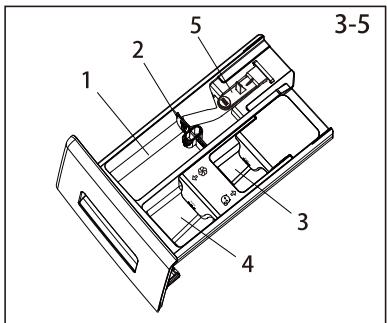
3.4 Detergent drawer
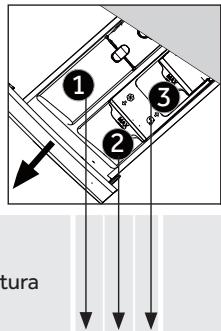
Open dispenser drawer, the following components can be seen (Fig. 3-5):
1: compartment for powder or liquid detergent.
2: detergent flap slector, lift it up for powder detergent, keep it down for liquid detergent.
3: compartment for sanitizer.
4: compartment for softner.
5: lock tab, press it down to pull out dispenser drawer
The recommendation on the type of detergents is suitable for the various washing temperatures, please refer to the manual of detergent(see P11).
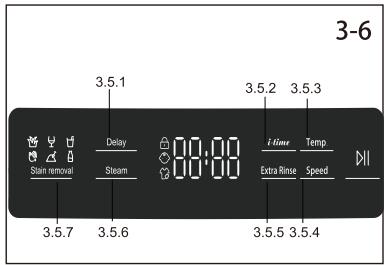
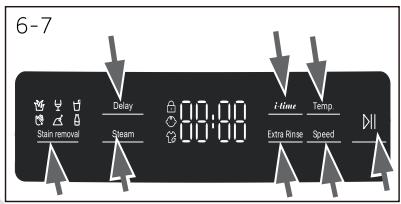
The function buttons (Fig. 3-6) enable additional options in the selected programme before programme starts. The related indicators are displayed.
By switching off the appliance or setting a new programme, all options are disabled.
If a button has multiple options, the desired option can be selected by pressing the button sequentially.
By touching the buttons, when it is in dull light, the function is unselected; when it is in bright light, the function is selected.

Note: Factory settings
To get best results in each programme Haier has well defined specific default settings. If there is no special requirement default settings are recommended.
Touch this button (Fig. 3-7) to start the programme with a delay. End time delay could be increased in steps of 30 minutes from 0,5-24h (add time to the original programme time). For example display off 6:30 means end of programme cycle will be in 6 hours and 30 minutes. Touch "Start/Pause" button to activate the time delay. It is not applicable to programme Spin,Refresh, Eco 40-60.
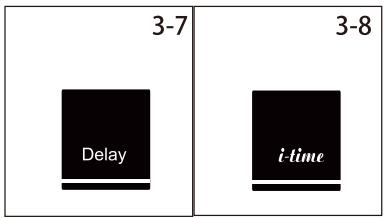

Note: Liquid detergent
If using liquid detergent, it is not recommended to activate the end time delay.
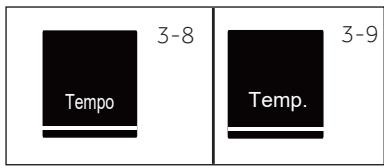
This function (Fig. 3-8) intensifies different washing time. Not all programmes can select this function. See P11 for programs that can select this function.
Touch this button (Fig. 3-9) to change the washing temperature of the programme. If no value is illuminated (the display"--") the water will not heated.

3-10

3-11

3-12


3-13
Stain removal
3-14

3-15
3-16

Touch this button (Fig. 3-10) to change or deselect the spin of the programme. If no value is illuminated the display"")the laundry will not spin.
Touch this button (Fig. 3-11) to rinse the laundry more intense with fresh water. This is recommended for people with sensitive skin.
By touching the button several times one to three additional cycles can be selected. They appear in the display with P--1/P--2/P--3.
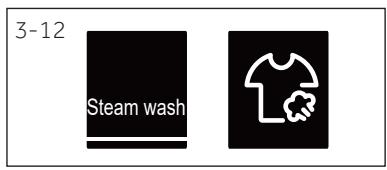
Touch this button (Fig. 3-12), the steam programme can be selected. For programs with the steam function, the indicator is green, and the indicator in the middle of the knob is on. You can select if you require this funtion when programmes "Cotton,Synthetics,Mix,Baby care," are used. The steam wash icon will light up when using the steam wash function.
Touch this button (Fig. 3-13) to choose special features for stains. The symbols are explained in the following table.

Grass

Wine

Blood

Soil

Juice

Milk
Touch this button (Fig. 3-14) gently to start or interrupt the currently displayed programme. During programme setting and during programme run the LED above the button is shining, or if interrupted blinking.
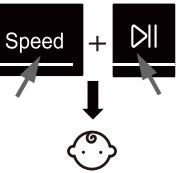
3.7 Child lock

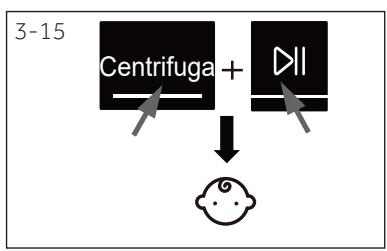
Choosing a program and then start, touch button" Speed"and "Start/Pause"(Fig.3-15) for 3 seconds simultaneously to block all panel elements against activation, p-anel display .For unlocking please Touch again the two buttons.The child lock indicator lights up when the child lock works feature is optional when the machine is running.
The display shows c f o t (Fig. 3-16) if a button will be pressed, when the child lock is activated. The change is not running.
Detergent compartment for:
Detergent
2 Softener or care product
3 sanitizer 3)
| Programme | Max. load
in kg
HW80/HW100
/HW120 | Temperature
in °C 1) | 1 | 2 | 3 | Fabrics type | Preset
spin
speed
in rpm | Function |
| selectable
range | Preset | i-time | Steam | ExtraRinse | Delay | Stain removal |
| 8/10/12 | * to 90 | 40 | ● | ○ | ○ | Cotton | 1400 | ● | ● | ● | ● | ● |
| 4/5/6 | * to 60 | 40 | ● | ○ | ○ | Synthetic or mixed
fabric | 1200 | / | ● | ● | ● | ● |
| 4/5/6 | * to 40 | 30 | ● | ○ | / | Duvet | 800 | ● | / | ● | ● | / |
| 2/2.5/3 | * to 40 | * | ● | ○ | / | Machine-washable
fabric made of wool
or with wool content | 800 | ● | / | ● | ● | / |
| 2/2.5/3 | * to 30 | 30 | ● | ○ | / | Delicate laundry and
silk | 600 | / | / | ● | ● | / |
| 4/5/6 | * to 40 | 30 | ● | ○ | ○ | Cotton | 1000 | ● | / | ● | ● | / |
| 1 | / | / | / | / | / | Cotton / Synthetic | 0 | / | / | / | / | / |
| 4/5/6 | * to 90 | 40 | ● | ○ | ○ | Cotton / Synthetic | 1000 | ● | ● | ● | ● | / |
| 4/5/6 | * to 60 | 30 | ● | ○ | ○ | Lightly soiled mixed-
laundry of cotton and
synthetic | 1000 | ● | ● | ● | ● | ● |
| 15' | 1 | * to 40 | * | ● | ○ | ○ | Cotton / Synthetic | 1000 | ● | / | ● | ● | / |
| 4/5/6 | * to 40 | 40 | ● | ○ | ○ | Cotton / Synthetic | 1000 | / | / | ● | ● | / |
| 8/10/12 | / | / | / | / | / | all fabrics | 1000 | / | / | / | / | / |
| 20c | 8/10/12 | * to 20 | 20 | ● | ○ | ○ | Cotton | 1000 | ● | / | ● | ● | / |
| ECO
40-60 | 8/10/12 | / | / | ● | ○ | ○ | / | 1400 | / | / | / | / | / |
- Water is not heated up.
1) Choose 90^ wash temperature only for special hygienic requirements.
2) Reduce detergent amount because programme duration is short.
3) Do not use chemical reaction with detergent
The design and specifications are subject to change without notice for quality improvement purposes.
5- Consumption
The indicated consumption values may accordingly differ to local conditions.
| Programme | Temper- ature in °C
HW120/100/80 | Max. load
in kg
HW120/100/80 | Energy
in kW·h
HW120/100/80 | Water
in L
HW120/100/80 | Washing time
in h:min
HW120/100/80 | Spin drying
performance
HW120/100/80 |
| Eco 40-60* | 40°C | 6/5/4 | 0.65/0.55/0.50 | 42/42/32 | 4:08/4:16/4:23 | B |
| 60°C | 6/5/4 | 0.78/0.58/0.53 | 42/42/32 | 4:38/4:20/4:25 | B |
| 60°C | 12/10/8 | 0.76/0.58/0.54 | 58/56/46 | 4:38/4:20/4:25 | B |
- Standard programme for the Energy Labelling according to 2010/30 EU:
"Eco 40-60" "60°C/40°C" with "max. spin" speed setting. (Select Eco 40 60, long press the button "Speed" for 5 seconds. After the temperature function is displayed, select the temperature and the maximum speed.)
The standard 60^ and 40^ cotton programmes are suitable to clean normally soiled cotton laundry. They are the most efficient programmes in terms of combined energy and water consumption for cotton laundry. Used water temperature may differ from declared cycle temperature.

Note: Auto Weight
The appliance is equipped with a loading recognition. At low loading, energy, water and washing time will be reduced automatically in some programmes. The display shows RUE0.
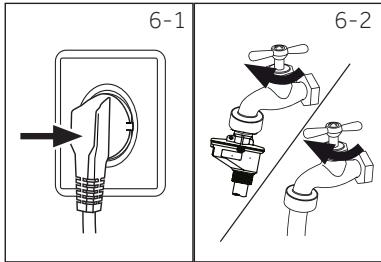
6.1 Power supply
Connect the washing machine to a power supply (220V to 240V~/50Hz; Fig. 6-1). Please refer also to section INSTALLATION (see P28).
6.2 Water connection
Before connecting check the cleanliness and clarity of the water inlet.
Turn on the tap (Fig.6-2).
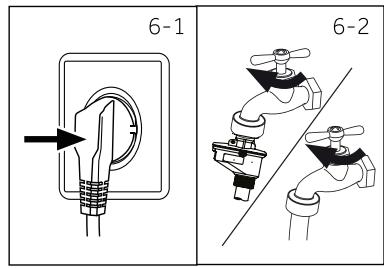

Note: Tightness
Before use check for leakage in the joints between the tap and the inlet hose by turning on the tap.
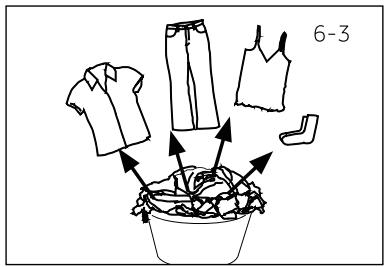
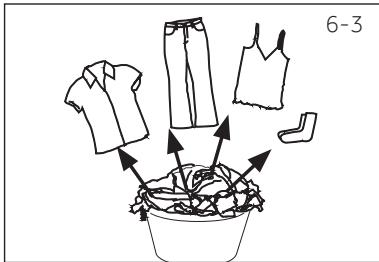
6.3 Preparing laundry
- Sort out clothes according to fabric (cotton, synthetics, wool or silk etc.) and to how dirty they are (Fig. 6-3). Pay attention to the care labelling of washing labels.
Separate white clothes from coloured ones. Wash coloured textiles first by hand to check if they fade or run.
Empty pockets (keys, coins, etc.) and remove harder decorative objects (e.g. brooches).
Garments without hems, delicates and finely woven textile such as fine curtains are to be put into a wash bag to care for this delicate laundry (hand or dry cleaning would be better).
- Close zippers, velco fastener and hooks, make sure the buttons are sewn on tightly.
- Place sensitive items like laundry without firm hem, delicate underwear (Dessous) and small items such as socks, belts, bras, etc. in a wash bag.
Unfold large pieces of fabric such as bed sheets, bedspreads etc.
Turn jeans and printed, decorated or color-intensive textiles inside out; possibly wash separately.

CAUTION!
Non-textile, as well as small, loose or sharp-edged items may cause malfunctions and damage of clothes and appliance.
Care chart
Washing
| 95 | Washable up to 95°C
normal process | 60 | Washable up to 60°C
normal process | 60 | Washable up to 60°C
mild process |
| 40 | Washable up to 40°C
normal process | 40 | Washable up to 40°C
mild process | 40 | Washable up to 40°C
very mild process |
| 30 | Washable up to 30°C
normal process | 30 | Washable up to 30°C
mild process | 30 | Washable up to 30°C
very mild process |
| Wash by hand
max. 40°C | | Do not wash |
| Bleaching |
| Any bleaching allowed | Only oxygen/
non -chlorine | Do not bleach |
| Drying |
| Tumble drying possible
normal temperature | Tumble drying possible
lower temperature | Do not tumble dry |
| Line drying | Flat drying |
| Ironing |
| Iron at a maximum
temperature
up to 200°C | Iron at a medial tem-
perature
up to 150°C | Iron at a low temper-
ature up to 110 °C;
without steam (steam
ironing may cause irre-
versible damage) |
| Do not iron |
| Professional Textile Care |
| Dry cleaning in tetra-
chloroethene | Dry cleaning in hy-
drocarbons | Do not dry clean |
| Professional wet clean | Do not professional
wet clean |
6.4 Loading the appliance
Put in the laundry piece by piece
- Don't overload. Note the different maximum load according to programmes! Rule of thumb for maximum load: Keep six inches between load and drum top.
- Close the door carefully. Make sure that no pieces of laundry are pinched.
6.5 Selecting detergent
Washing efficiency and performance is determined by used detergent quality.
Use only machine wash approved detergent.
If needed use specific detergents, e.g for synthetic and woolen fabric.
See tips for countertop detergent stickers.
Do not use dry cleaning agents such as trichloroethylene and similar products.
Choose the best detergent
| Programme | Kind of detergent |
| Universal | Colour | Delicate | Special | Softener |
| L/P | L/P | - | - | ○ |
| - | - | L/P | - | ○ |
| - | - | L | L/P | ○ |
| - | - | L/P | L/P | ○ |
| - | - | - | L/P | ○ |
| - | - | L/P | L/P | ○ |
| - | - | - | - | - |
| L/P | L/P | - | - | ○ |
| L/P | L/P | - | - | ○ |
| L | L | - | - | ○ |
| L/P | L/P | - | - | ○ |
| - | - | - | - | - |
| L/P | L/P | - | - | ○ |
| ECO 40-60 | L/P | L/P | - | - | ○ |
L = gel- /liquid detergent P = powder detergent O = optional - = no If using liquid detergent, it is not recommended to activate the time delay.
We recommend by using:
Laundry powder: 20^ to 90^^* (best use: 40 - 60^)
Color detergent: 20^ C to 60^ C (best use: 30 - 60^ C )
Wool/delicate detergent: 20^ to 30^ (best use:20-30°C)
- Choose 90°C wash temperature only for special hygienic requirements.
- If you choose the water temperature 60^ or above, we would like to advise you to use less detergent. Please kindly use the special disinfectant, which is suitable for cotton or synthetic cloth.
- It is better to use less or free suds detergent powder.

6.6 Adding detergent
- Slide out the detergent drawer.
- Put the required chemicals into corresponding compartments (Fig. 6-4),
- Push back the drawer gently.

Note:
Remove detergent residues before next wash cycle from the detergent drawer.
- Do not overuse detergent or softener.
Please follow the instruction on the detergent package.
Always fill the detergent just before the beginning of the wash cycle.
Concentrated liquid detergent should be diluted before adding.
- Do not use liquid detergent if function "Delay" is selected.
- Carefully choose the programme settings according to the care symbols on all laundry labels and according to the programme table.
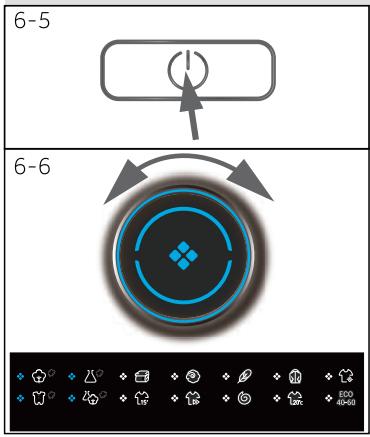
6.7 Switch on the appliance
Touch the "Power" button to switch on the appliance (Fig. 6-5). The LED of the "Start/Pause" button is flashing.
6.8 Select a programme
To get the best washing results, select a programme which fits the degree of soiling and sort of laundry type.
Turn the programme knob (Fig. 6-6) to select the right programme. Related programme LED lights up and the default settings are displayed.

Note: Odour removal
Before first use we recommended to run programme "COTTON+90°C+600rpm" with no load and small amount of detergent in washing agent compartment (2) or special machine cleaner to remove possibly corruptive residues.
6.9 Add individual selections
Select required options and settings (Fig. 6-7); refer to Control Panel.
6.10 Start wash programme
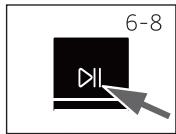
Touch"Start/Pause" button (Fig. 6-8) to start. The LED of the "Start/Pause" button stops flashing and lights up continuously.
Appliance operates according to present settings.
Changes are only possible by cancelling the programme.
6.11 Interrupt / cancel wash programme
To interrupt a running programme press gently "Start/Pause". The LED above the button is flashing. Press it again to resume operation.
To cancel a running programme and all its individual settings:
- Touch"Start/Pause" button to interrupt the running programme.
- Touch" Power " button for about 2 seconds to switch the appliance off.
- Touch the "Power" button to turn on the appliance, run programme Spin and select "no Speed"(speed lights are off) to drain the water.
- After closing the programm to restart the appliance,select a new programme and start it.
6.12 After washing

Note: Door lock
For safety reasons the door is locked partially during the washing cycle. It is only possible to open the door at the end of the programme or after the programme was cancelled correctly (see description above).
In case of high water level, high water temperature and during spinning it is not possible to open the door; Loc is displayed.
- At programme cycle end END is displayed.
- The appliance switches off automatically.
- Remove laundry as soon as possible to go easy on it and to prevent more wrinkling.
- Turn off the water supply.
- Unplug the power cord.
- Open the door to prevent formation of moisture and odours. Let it open while not used.

Note: Standby-mode / energy -saving mode
The switched on appliance will go into standby-mode if it will not be activated within 2 minutes before starting the program or at the end of program. The display switsches off. This saves energy. To interrupt the standby mode touch "Power" button.
6.13 Activate or deactivate the buzzer
The acoustic signal can be deselected if necessary:
- Switch on the appliance.
- Select the MIX programme.
- Touch the "Delay" button and "Temp." button at the same time for about 3 seconds. "bEEP OFF" will be displayed and the buzzer will be deactivated.
For activating the buzzer touch these two buttons at the same time again. "bEEP ON" will be displayed.

Environmentally responsible use
To achieve best use of energy, water, detergent and time you should use the recommended maximum load size.
Do not overload (hand width clearance above laundry).
For slightly soiled laundry select the Express 15' programme.
Apply exact dosages of each washing agent.
Choose the lowest adequate washing temperature - modern detergents are efficiently cleaning below 60^ .
Raise default settings only due to heavy staining.
Select max. spinning speed if a domestic dryer is used.
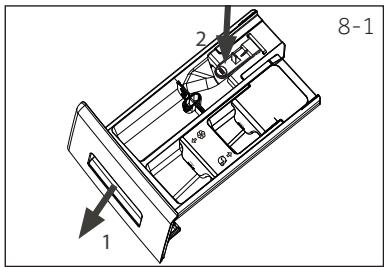
8.1 Cleaning the detergent drawer
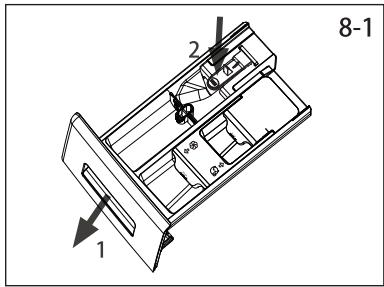
Take always care there are no detergent residues. Clean the drawer regularly (Fig. 8-1):
- Pull out the drawer until it stops.
- Press the release button and remove the drawer.
- Flush the drawer with water until it is clean and insert the drawer back in the appliance.
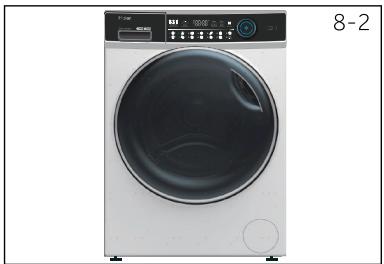
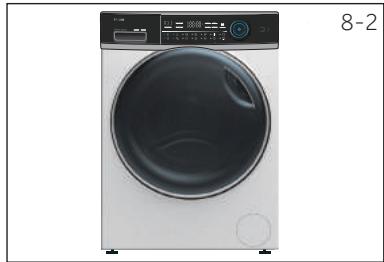
8.2 Cleaning the machine
Unplug the machine during cleaning and maintenance.
Use a soft cloth with soap liquid to clean the machine case (Fig. 8-2) and rubber components.
Do not use organic chemicals or corrosive solvents.
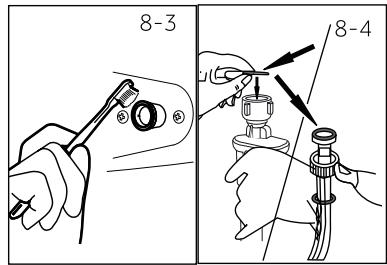
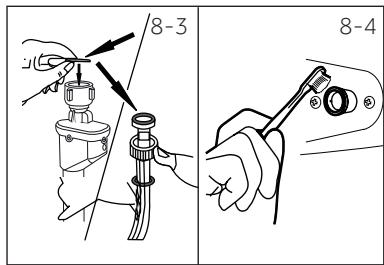
8.3 Water inlet valve and inlet valve filter
To prevent blockage of water supply by solid substances like lime clean regularly the inlet valve filter.
Unplug the power cord and turn off the water supply.
Unscrew the water inlet hose at the back (Fig. 8-3) of the appliance as well as on the tap.
Flush the filters with water and a brush (Fig. 8-4).
Insert the filter and install the inlet hose.
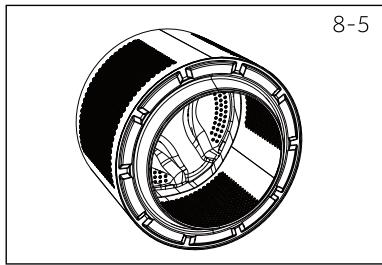
8.4 Cleaning the drum
- Remove accidentally washed items, especially metal parts such as pins, coins, etc. from the drum (Fig. 8-5) because they cause rust stains and damage.
Use a non-chloride cleaner for removing rust stains. Observe the warning hints of the cleaning agent manufacturer.
- Do not use any hard objects or steel wool for cleaning.
8-Care and cleaning

8.5 Long periods of disuse
If the appliance is left idle for a longer period:
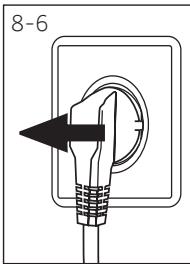
- Pull out the electrical plug (Fig. 8-6).
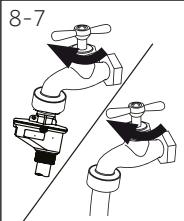
- Turn off water supply (Fig. 8-7).
- Open the door to prevent formation of moisture and odours. Let door open while not used.
Before next usage check carefully power cord, water inlet and drain hose. Make sure everything is properly installed and without leackage.
8.6 Pump filter
Clean the filter once a month and check the pump filter for instance if the appliance:
Doesn't drain the water.
Doesn't spin.
Cause unusual noise while running.

WARNING!
Scalding Risk! Water in the pump filter can be very hot! Before any action please ensure water has cooled down.
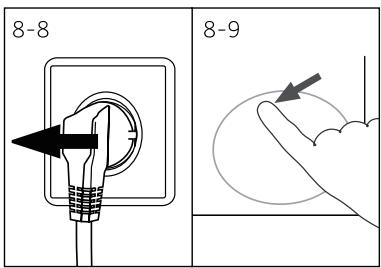
- Turn off and unplug the machine (Fig. 8-8).
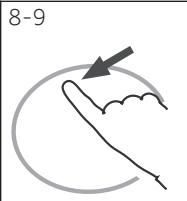
- Push and open service flap.(Fig. 8-9).
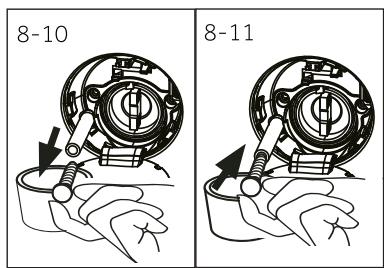
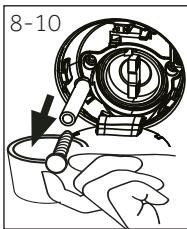
- Provide a flat container to catch leach water (Fig. 8-10). There could be bigger amounts!
- Pull the drainhose out and hold its end above the container (Fig. 8-10).
- Take the sealing plug out of the drainhose (Fig. 8-10).
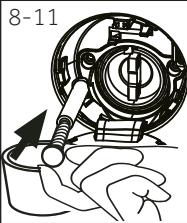
- After complete drainage close drainhose (Fig. 8-11). and push it back into the machine.
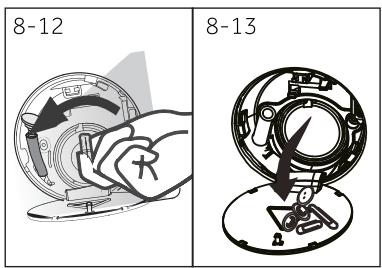
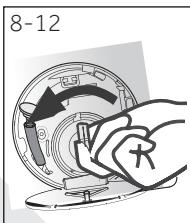
- Unscrew and remove counter clockwise the pump filter (Fig. 8-12).
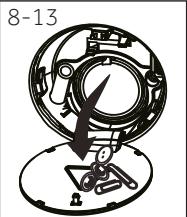
- Remove contaminants and dirt (Fig. 8-13).
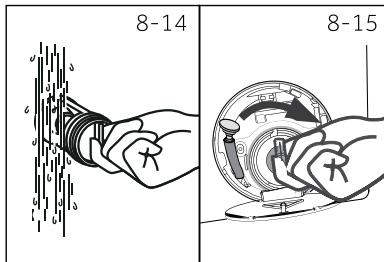
- Clean carefully pump filter, e.g. using running water (Fig. 8-14).
- Reflex it thoroughly (Fig. 8-15).
11.Close service flap.

CAUTION!
- Pump filter sealing has to be clean and unhurt. If the lid is not full tightened, water can escape.
The filter must be in place, or it may lead to leakage.
9-Troubleshooting
Many occurring problems could be solved by yourself without specific expertise. In case of a problem please check all shown possibilities and follow below instructions before you contact an after sales service. See CUSTOMER SERVICE.

WARNING!
Before maintenance, deactivate the appliance and disconnect the mains plug from the mains socket.
- Electrical equipment should be serviced only by qualified electrical experts, because improper repairs can cause considerable consequential damages.
A damaged power cable should only be replaced by the manufacturer, its service agent or similarly qualified persons in order to avoid a hazard.
Following codes are displayed only for information referring to the washing cycle. No measures must be performed.
| Code | Message |
| 1:25 | The remaining wash cycle time will be 1 hour and 25 minutes. |
| 6:30 | The remaining wash cycle time including chosen end-time delay will be 6 hours and 30 minutes. |
| AUTO | Automatic load detection is working; only in some programmes. |
| End | The washing cycle is finished. The appliance shuts off automatically. |
| Lock- | Door is closed because of high water level, high water temperature or spinning cycle. |
| bEEP OFF | The buzzer is deactivated. |
| bEEP ON | The buzzer is activated. |
| cL or | The function keys is closed. The programme changing is invalid. |
9.2 Troubleshooting with display code
| Problem | Cause | Solution |
| CLR FLTR | • Drainage error, water is not fully drained within 6 minutes. | • Clean pump filter.
• Check drain hose installation. |
| E2 | • Lock - error. | • Shut the door properly. |
| E4 | • Water level not reached after 12 minutes.
• Drain hose is self-syphoning. | • Make sure that tap is fully opened and water pressure is normal.
• Check drain hose installation. |
| E8 | • Water protective level - error. | • Contact the After sales service. |
| F3 | • Temperature sensor - error. | • Contact the After sales service. |
| F4 | • Heating error. | • Contact the After sales service. |
| F7 | • Motor - error. | • Contact the After sales service. |
| FA | • Water level sensor error. | • Contact the After sales service. |
| FC0, FC1 or FC2 | • Abnormal communication error. | • Contact the After sales service. |
| Unb | • Unbalanced load - error. | • Check and balance laundry load in the drum.
Reduce the load. |
9.3 Troubleshooting without display code
| Problem | Cause | Solution |
| Washing machine fails to operate. | Programme is not yet started.
Door is not properly closed.
Machine has not been switched on.
Power failure.
Child lock is activated. | Check programme and start it.
Close the door properly.
Switch the machine on.
Check power supply.
Deactivate child lock. |
| Washing machine will not be filled with water. | No water.
Inlet hose is kinked.
Inlet hose filter is blocked.
Water pressure is less than 0.03 MPa.
Door is not properly closed.
Water supply failure. | Check water tap.
Check inlet hose.
Unblock inlet hose filter.
Check water pressure.
Close the door properly.
Ensure the water supply. |
| Machine is draining while being filled. | Height of drain hose is below 80 cm.
Drain hose end could reach into water. | Make sure that drain hose is properly installed.
Make sure the drain hose is not in water. |
| Drainage failure. | Drain hose is blocked.
Pump filter is blocked.
Drain hose end is higher than 100 cm above floor level. | Unblock drain hose.
Clean pump filter.
Make sure that drain hose is properly installed. |
| Strong vibration while spinning. | Not all transportation bolts have been removed.
Appliance has no solid position.
Machine load is not correct. | Remove all transportation bolts.
Ensure solid ground and avelled position.
Check load weight and balance. |
| Operation stops before completing wash cycle. | Water or electric failure. | Check power and water supply. |
| Operation stops for a period of time. | Appliance displays error code.
Problem due to load pattern.
Programme performs soaking cycle | Consider display codes.
Reduce or adjust load.
Cancel programme and restart. |
9-Troubleshooting
| Problem | Cause | Solution |
| Excessive foam fl- oats drum and/or detergent drawer. | ·Detergent is not a appropriate.
·Excessive use of detergent. | ·Check detergent recommen-dations.
·Reduce amount of detergent. |
| Automatic adjust- ment of washing time. | ·Washing programme duration will be adjusted. | ·This is normal and doesn't af- fect functionality. |
| Spinning fails. | ·Unbalance of laundry. | ·Check machine load and laun- dry and run a spinning pro- gramme again. |
| Unsatisfactory washing result. | ·Degree of pollution does not agree with selected programme
·Detergent quantity was not suf- ficient.
·Maximum load has been excee- ded.
·Laundry was unevenly distribu- ted in the drum. | ·Select an other programme.
·Choose the detergent acc. to the degree of pollution and acc. to manufacturer specifications.
·Reduce loading.
·Loose the laundry. |
| Washing powder residues are on the laundry. | ·Insoluble particles of detergent can remain as white spots on the laun- dry. | ·Perform extra rinse.
·Try to brush the points from the dry laundry.
·Choose an other detergent. |
| Laundry has grey patches. | ·Caused by fats such as oils, creams or ointments. | ·Pretreat the laundry with a spe- cial cleaner. |

If too much foam is inspected during spin cycle, motor stops and drain pump will be activated for 90 seconds. If that elimination of foam fails up to 3 times, programme ends without spinning.
Should the error messages reappear even after the taken measures, switch off the appliance, disconnect the power supply and contact the customer service.
9.4 In case of power failure
The current programme and its setting will be saved. When power supply is restored operation will be resumed.
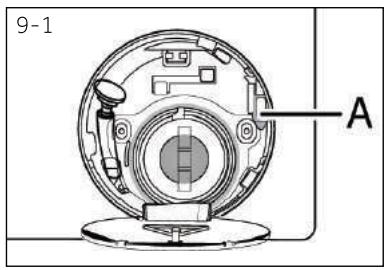
If a power failure cuts an operating wash programme door opening is mechanically blocked. To get out any laundry water level should not be seen in the glassy porthole of the door. - Danger of burns! Water level has to be lowered as described in "Pump filter". Not till then pull lever (A) beneath service flap (Fig. 9-1) until door is unlocked by a gentle click. Afterwards refill all parts.

When the washing machine in a safe state (under the water level below the window along a certain distance, barrel temperature below 55^ , the inner barrel did not turn), may unlock the doors of the machine operation
10.1 Preparation
Take the appliance out of the packaging.
- Remove all packaging material including protecting film on cabinet, polystyrene base, keep them out of childrens reach. While opening the package, water drops may be seen on plastic bag and porthole. This normal phenomenon results from water tests in the factory.

Note: Packaging disposal
Keep all packaging materials out of children's reach and dispose them in an environmentally friendly manner.
10.2 OPTIONAL: Install noise reduction pads
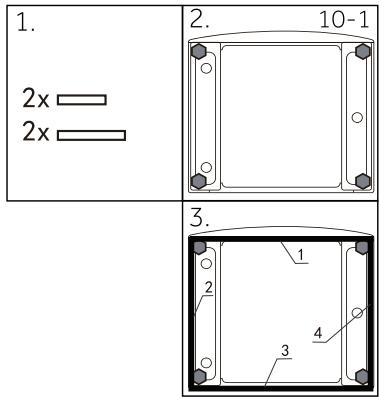
- When opening the shrink package, you will find four noise reduction pads. These are used for reducing noise(Fig. 10-1).
- Lay the washing machine down to its side, port-hole pointing upwards, bottom side towards operator.
- Take out the noise reduction pads and remove the double-sided adhesive protective film; paste around the bottom; the noise reduction pads under the washing machine cabinet as shown in Figure 3.(two longer pads in position 1 and 3, two shorter pads in position 2 and 4). Finally set the machine upright again.
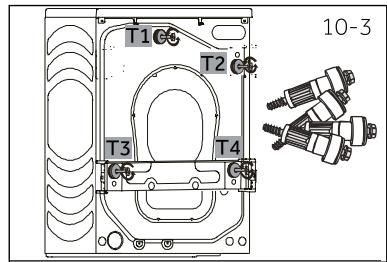
10.3 Dismantle the transportation bolts
The transport protection on the rear side is designed for clamping anti-vibration components inside the appliance during transportation to prevent inner damage. All elements (I, R, S and T, Fig 10-2) must be removed before use.
- Remove all 4 bolts (T1 - T4) (Fig. 10-3).
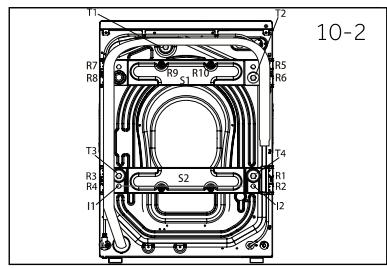
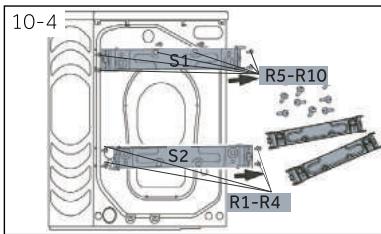
- Remove the 10 screws (R1 - R10) from lower back reinforcement. take out reinforcements (S1 and S2) from the machine(Fig. 10-4). *Only HW100/ 120-B...
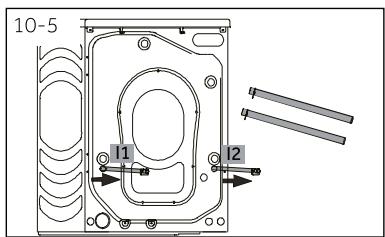
-
Pull out the 2 iron bars I1 and I2 (Fig. 10-5).
*Only HW100/120-B...
-
Fill the 6 left holes with blanking plugs (Fig. 10-6).
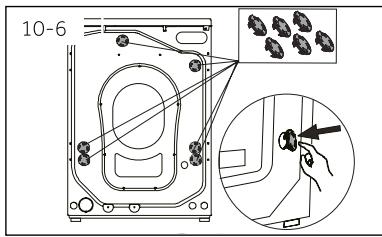

Note: Keep in safe place
Keep all parts of the transport protection in a safe place for later use. Whenever the appliance is to be moved at first reinstall the protection parts.
10.4 Moving the appliance
If the machine is to be moved to a distant location, replace the transportation bolts removed before installation to prevent damage: The assembly takes place in reverse order.
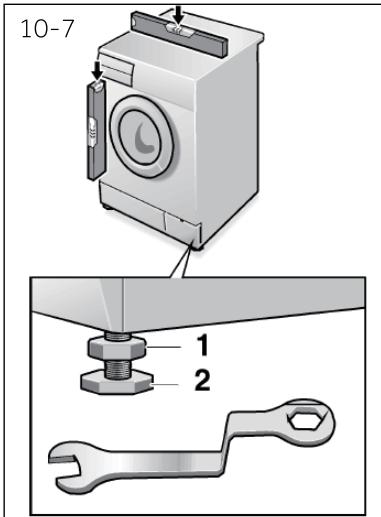
10.5 Aligning the appliance
Adjust all feet (Fig. 10-7) to achieve a complete level position. This will minimize vibrations and thus noise during use. It will also reduce wear and tear. We recommend to use a spirit level for adjustment. Floor should be as stable and flat as possible.
- Loose the locknut (1) by using a wrench.
- Adjust the high by turning the foot (2).
- Tighten lock ut (1) against the housing.
10.6 Drain Water Connection
Fix the water drain hose properly to the piping. The hose has to reach at one point a height between 80 and 100cm above the appliance bottom line! If possible keep always drain hose fixed to the clip at the appliance back.

WARNING!
Use only the supplied hose set for the connection.
Never reuse old hose sets!
Only connect to cold water supply.
Before connection, check whether the water is clean and clear.
Following connections are possible:
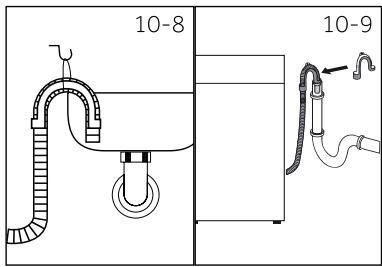
10.6.1 Drain hose to sink
Hang the drain hose with the U-support over the edge of a sink with adequate size (Fig. 10-8).
Protect the U-support sufficiently against slipping.
10.6.2 Drain hose to waste water connection
The internal diameter of the stand pipe with vent-hole must be minimum 40mm
Put the drain hose for 80 - 100mm in the wastewater pipe.
Attach the U-support and secure it sufficiently (Fig. 10-9).
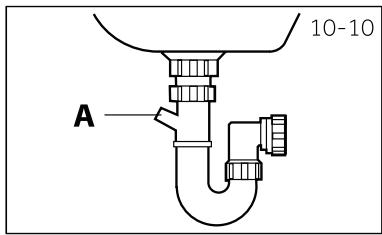
10.6.3 Drain hose to sink connection
The junction must lie above the siphon.
A spigot connection is usually closed by a pad (A). That must be removed to prevent any disfunction (Fig. 10-10).
Secure the drain hose with a clamp.

CAUTION!
- The drain hose should not be submerged in water and should be securely fixed and leak-free. If the drain hose is placed on the ground or if the pipe is at a height of less than 80~cm , the washing machine will continuously drain while being filled (self-siphoning).
Drain hose is not to be extended. If necessary contact after sales service.
10.7 Fresh Water Connection
Make sure that the gaskets are inserted.
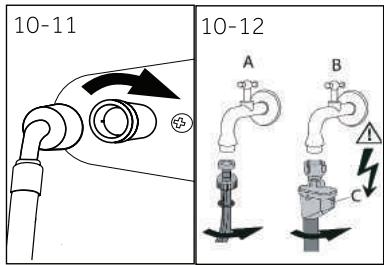
- Connect the water inlet hose with the angled end to the appliance (Fig. 10-11). Tighten the screw joint by hand.
- The other end connect to a water tap with a 3/4'' thread (Fig. 10-12).
10.8 Electrical Connection
Before each connection check if:
- power supply, socket and fusing are appropriate to the rating plate.
the power socket is earthed and no multi-plug or extension are used.
the power plug and socket are strictly according.
Only UK: The UK plug meets BS1363A standard.
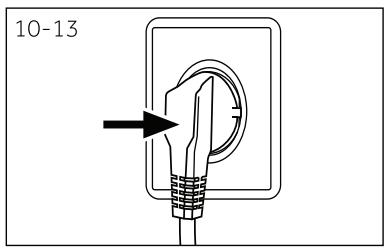
Put the plug into the socket (Fig. 10-13).

WARNING!
- Ensure always that all connections (power supply, drain and fresh water hose) are firm, dry and leack free!
Take care these parts are never to be crushed, kinked, or twisted.
If the supply cord is damaged, it must be replaced by the service agent (see warranty card) in order to avoid a hazard.
11.1 Product fiche according to regulation EU No. 1061/2010
| Suppliers name or trade mark | Haier |
| Supplier's model identifier | HW80-B14979
HW80-B14979S | HW100-B14979
HW100-B14979S | HW120-B14979
HW120-B14979S |
| Rated capacity (kg) | 8 | 10 | 12 |
| Energy efficiency class | A+++ | A+++ | A+++ |
| Energy consumption per year (\( AE_c \) in kW·h/year)\(^{1)}\) | 119 | 129 | 165 |
| Energy consumption of standard cotton programme 60°C, fullload (kW·h/cycle) | 0.54 | 0.58 | 0.76 |
| Energy consumption of standard cotton programme 60°C, partial load (kW·h/cycle) | 0.53 | 0.58 | 0.78 |
| Energy consumption of standard cotton programme 40°C, partial load (kW·h/cycle) | 0.50 | 0.55 | 0.65 |
| Weighted power consumption of the off mode (W) | 0.40 | 0.41 | 0.48 |
| Weighted power consumption of the left-on mode (W) | 0.48 | 0.45 | 0.50 |
| Water consumption per year (\( AW_c \) in L/year)\(^{2)}\) | 8360 | 10560 | 10750 |
| Spin-drying efficiency class\(^{3)}\) | B |
| Max. spin speed (rpm)\(^{4)}\) | 1351 |
| Remaining moisture content (\( \% \))\(^{4)}\) | 53 |
| Standard 60°C cotton programme\(^{5)}\) | Eco 40-60 + 60°C\(^{8)}+ max. spin |
| Standard 40°C cotton programme\(^{5)}\) | Eco 40-60 + 40°C\(^{8)}+ max. spin |
| Programme time of cotton 60°C full load (min) | 280 | 280 | 295 |
| Programme time of cotton 60°C partial load (min) | 275 | 280 | 295 |
| Programme time of cotton 40°C partial load (min) | 275 | 270 | 260 |
| Duration of the left-on mode (\( T_i \)in min)\(^{6)}\) | 3 |
| Airborne acoustical noise (washing/spinning) in dB(A) re 1pW\(^{7)}\) | 54/69 |
| Type | freestanding |
1) Based on 220 standard washing cycles for cotton programmes at 60^ and 40^ at full and partial load, and the consumption of the low-power modes. Actual energy consumption will depend on how the appliance is used.
2) Based on 220 standard washing cycles for cotton programmes at 60^ and 40^ at full and partial load. Actual water consumption will depend on how the appliance is used.
3) Class G is the least efficiency and Class A is the most efficient.
4) Based on the standard 60^ cotton programme at full load and the standard 40^ cotton programme at partial load.
5) "Standard 60^ cotton programme" and "standard 40^ cotton programme" are standard washing programmes to which the information in the label and fiche relates. These programmes are suitable to clean normally soiled cotton laundry and they are the most efficient programmes in terms of combined energy and water consumption.
6) In case there is a power management system.
7) Based on the standard 60^ cotton programme at full load.
8) Enter the European standard test procedure (Select Eco 40 60, often touch speed for 5 seconds. After the temperature function is displayed, select the temperature and the maximum speed.)
11-Technical data
11.2 Additional technical data
| HW80-B14979
HW80-B14979S | HW100-B14979
HW100-B14979S | HW120-B14979
HW120-B14979S |
| Dimension (HxDxW in mm) | 850x460x595 | 850x530x595 | 850x600x595 |
| Voltage in V | 220-240 V~/50Hz |
| Current in A | 10 |
| Max. power in W | 2000 |
| Water pressure in MPa | 0.03≤P≤1 |
| Netto weight in kg | 72 | 77 | 80 |
11.3 Standards and Directives
This product meets the requirements of all applicable EC directives with the corresponding harmonised standards, which provide for CE marking.
We recommend our Haier Customer Service and the use of original spare parts.
If you have a problem with your appliance, please first check section TROUBLESHOOTING.
If you cannot find a solution there, please contact:
your local dealer.
- the Service & Support area at www.haier.com where you can find telephone numbers and FAQs and where you can activate the service claim.
To contact our Service, ensure that you have the following data available.
The information can be found on the rating plate.
Model
Serial No.
Also check the Warranty Card supplied with the product in case of warranty.
For general business enquiries please find below our addresses in Europe:
| European Haier addresses |
| Country* | Postal address | Country* | Postal address |
| Italy | Haier Europe Trading SRL Via De Cristoforis, 12 21100 Varese ITALY | France | Haier France SAS 3-5 rue des Graviers 92200 Neuilly sur Seine FRANCE |
| Spain Portugal | Haier Iberia SL Pg. Garcia Faria, 49-51 08019 Barcelona SPAIN | Belgium-FR Belgium-NL Netherlands Luxembourg | Haier Benelux SA Anderlecht Route de Lennik 451 BELGIUM |
| Germany Austria | Haier Deutschland GmbH Konrad-Zuse-Platz 6 81829 München GERMANY | Poland Czechia Hungary Greece Romania Russia | Haier Poland Sp. zo.o. Al. Jerozolimskie 181B 02-222 Warszawa POLAND |
| United Kingdom | Haier Appliances UK Co.Ltd. One Crown Square Church Street East Woking, Surrey, GU21 6HR UK |
*For more information please refer to www.haier.com

Haier
Manuale utente Lavatrice
HW80-B14979
HW80-B14979S
HW100-B14979
HW100-B14979S
HW120-B14979
HW120-B14979S
Vi ringraziamo per aver deciso di acquistare un prodotto Haier.
Vi invitiamo a leggere attendamente queste istruzioni prima di iniziare a usare il dispositivo. Le istruzioni contengono informazioni importanti che vi aiuteranno a trarre il meglio da questo dispositivo e vi garantiranno altresi sicurezza in fase di installmente, uso e manutenzione del dispositivo.
Conservare quello manuale in un luogo pratico, di modo da poterlo sempre consultare e garantire un utilizzo sicuro e adeguato del dispositivo.
Qualora il disposativo venga venduto, ceduto o lasciato nella vecchia abitazione in fase ditrasferimento, accertarsi sempre di lasciare ancè il manuale, di modo che il nuovo proprietario possa acquisire familiarità col disposativo e con le relative avertenze di sicurezza.
Legenda


Informazioni e suggerimenti generali
Informazioni ambientali
Smaltimento
Contribuire alla protezione dell'ambiente e alla salute umana. Collocare l'imballaggio in contentitori adeguati per poterlo riciclare. Contribuire al ricericlaggio dei rifiuti provenienti da dispositivi elettrici ed elettronici. Non smaltire i dispositivi recanti quello simbolo con i normali rifiuti domestici. Riortare il prodotto presso la struttura di ricericlaggio locale o contattare il proprio ufficio municipale competente in merito.

ATTENZIONE!
Rischio di lezione o soffocamento!
Scollegare il dispositivo alla presa di corrente. Tagliare il cavo di rete e smaltirlo. Togliere il blocco dell'oblo per evitare che bambini e animali restino bloccati all'interno dell'apparecchiatura stessa.
IT
Indices
1-Informazioni di sicurezza 4
4-Programmi 13
5-Consumo 14
6-Uso quotidiano 15
7-Lavaggio rispetto dell'ambiente 20
8-Cura e pulizia 21
9-Guida alla risoluzione dei problemi 24
10-Installazione 28
11-Dati tecnici 32
12-Assistenza clienti 34
Prima di accendere il disposativo per la prima volta, leggere i seguenti suggerimenti di sicurezza:

ATTENZIONE!
Prima di iniziare a usare il dispositivo
Verificare che non vi siano danni verificatisi in fase di trasporto.
- Verificare che siano stati rimossi tutti i bulloni usati in fase di trasporto.
Rimuovere completamente l'imballaggio e tenere fuori alla portata dei bambini.
- Spostare sempre il dispositivo in due persone, dato che è molto pesante.
Uso quotidiano
- Questa apparecchiatura può essere usata da bambini a partire dagli 8 anni di età ed altri e da persone con ridotte capacità fisiche, sensoriali o mentali o con scarsa esperienza o conoscenza sull'uso dell'apparecchiatura, solamente se sorvegliati o se sono stati istruiti relativamente all'uso sicuro dell'apparecchiatura stessa e se ne hanno compreso i rischi.
- Tenere i bambini di età inferiore ai 3 anni lontano dal dispositorio a meno che non siano sotto costante supervisione.
I bambini non devono giocare con l'apparecchiatura.
- Evitare che bambini e animali si avvincinino all'apparecchiatura perché l'oblo è aperto.
Riporre gli agenti detergenti fuori alla portata dei bambini.
Chiudere le cerniere, riparare i fili allentati e fare attenzioneagli oggetti di piccole dimensioni per evitare che il bucato si impigli all'interno. Ove necessario, servirsi di una borsa o di una retina adeguata.
Non toccare outilizzare l'apparecchio a piedi nudi o con mani o piedi bagnati o umidi.
Non coprir e fissare l'apparecchio durante il funzionamento o in seguito, per consentire l'evaporazione di umidità o umidità.
Non posizionare oggetti pesanti o fonti di calorie o umidità sulla parte superiore dell'apparecchio.
Non usare o conservare detergenti inflammabili o agenti detergenti asciutti nelle immediate vicinanze dell'apparecchiatura.

ATTENZIONE!
Uso quotidiano
Non usare spray inframmabili nelle immediate vicinanze dell'apparecchiatura.
Non lavare indumenti trattati con solventi all'interno dell'appa-recchiatura alla veneri prima asciugati all'aria.
Non togliere o inserire la spina in presenza di gas inflammabili
Non lavare a caldo materiali in gomma schiumosa o materiali simili alla spugna.
Non lavare bucato sporco di farina.
Non apriere il cassetto del detergente durante il ciclo di lavaggio.
Non toccare l'oblò durante il processo di lavaggio: si potrebbsurriscaldare.
Non aprir e l'oblo se il livello dell'acqua è visibilmente al di sopra della finestrella dell'oblò.
Non forzare l'apertura dell'oblò. L'oblò è dotato di un dispositivo di auto-blocco e si apree peu dopo il termine della procedura di lavaggio.
- Specnere l'apparecchiatura dopo ogni programma di lavaggio e prima di intraprendere eventuali interventi di manutenzione routinaria, quando scollegare l'apparecchiatura alla sorgente di alimentazione elettrica per risparmiare elettricità及其他 che a fini di sicurezza.
- Tenere la presa e non il cavo in fase di scollegamento del dispositivo.
Manutenzione / pulizia
- Verificare che i bambini siano supervisionati se eseguono operazioni di pulizia e manutenzione.
- Scollegare il dispositivo dall'alimentazione elettrica prima di intraprenderere qualsiasi intervento di manutenzione.
- Tenere pulita la parte bassa dell'oblò e aprire l'oblò e il cassetto del detersivo qualora il disposativo non sia in uso, per evitare i cattivi odori.
Non usare acqua spray o vapore per pulire il dispositivo.
Sostituire un cavo danneggiato unicamente rivolgendosi al produttore, al suo agente di servizio o a persona debitamente qualificate per evitare di correre inutili rischi.

ATTENZIONE!
Non cercare di riparare l'apparecchiatura da soli. In caso di ripara-zioni rimandiamo al nostro centro assistenza clienti.
Installazione
L'apparecchiatura dovrebbe essere collocata in un luogo ben ventilato. Posizione l'apparecchiatura in una zona in cui sia possibile après completamente l'oblò.
Non installare mai l'apparecchiatura all'esterno, in un luogo umido o in zone che potrebbero essere soggette a perdite d'acqua come ad esempio vicino a un lavandino o tutto allo stesso. In caso di perdite di acqua, togliere la corrente e lasciare che la macchina si asciughi in modo naturale.
Installare o utiliser l'apparecchio solo quando la temperatura supera i 5^ .
Non mettere l'apparecchiatura direttamente sul tappeto o vicino a una parete o a mobili.
Non installare il dispositivo direttamente esesto alla luce del sole o vicino a sorgenti di alimentazione (ad esempio: stufe, riscaldatori).
- Verificare che le informazioni elettriche sulla targhetto elettrica siano in linea con l'alimentazione disponibile. In caso contrario, contattare un elettricista.
Non usare ciabatte e prolunghe.
- Verificare di utilizzato unicamente il cavo elettrico e il tubo forniti in dotazione.
- Verificare di non danneggiare il cavo elettrico e la presa. Qualora siano danneggiati, rivolgersi a un elettricista per effettuire la sostituzione.
Serviri di una presa con messa a terra separata per l'alimentazione che sia disponente accessibile dopo l'installazione. L'apparecchiatura deve disporre di una messa a terra.
Unicamente per il Regno Unito: Il cavo di alimentazione del dispositivo è dotato di una presa a 3 poli (con messa a terra), adatta per una normale presa a 3 poli. Non tagliare o smontare mai il terzo polo (messa a terra). Dop o aver installato il dispositivo, la presa dovrebbe essere accessibile.
- Verificare che i giunti e i connettori del tubo siano saldamente fissati e che non vi siano perdite.
Uso previsto
Questa apparecchiatura è stata pensata per lavare unicamente capi che possono essere lavati in lavatrice. Attenersi sempre alle istruzioni fornite sull'etichetta di agli indumento. L'apparecchiatura è stata progettata unicamente per un uso domestico in casa. Non è stata pensata per un uso di tipo commerciale o industriale.
Non sono ammesses modifiche o trasformazioni all'apparecchiatura. Un uso della interruzioni potrebbe causare pericoli e perdita del servizio di copertura della garanzia, esponendo l'utente a responsabilità.
2-Descrizione del prodotto

Nota:
A causa di modifiche tecniche e modelli diversi, le illustrazioni nei seguenti capitoli potrebbero differire rispetto al modello attuale.
2.1 Imagine dell'apparecchiatura
2-1
Lato anteriore (Fig. 2-1):
1 Detersivo/
Cassetto ammorbidente
2 Piano di lavoro
3 Selettore del programma
4 Pannello
5 Oblò
6 Aletta di servizio
7 Piedini regolabili
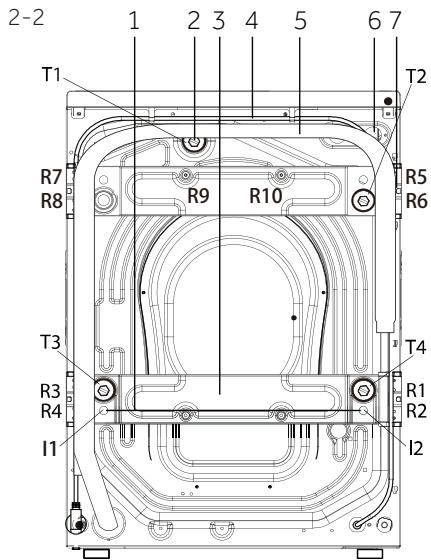
Lato posteriore (Fig. 2-2):
1 Barra di ferro (I1-I2)(HW100/120-...)
2 Bulloni di trasporto (T1-T4)
3 Rinforzo parete posteriore (HW100/120...)
4 Cavo di alimentazione
5 Tubo di scarico
6 Valvola di ingresso dell'acqua
7 Viti rinforzo parete posteriore (R1-R10) (HW100/120-...)
2.2 Accessori
Controllare gli accessori e la documentazione conformmente al presente elenco (Fig.:2-3):

Gruppo tubo ingresso

6 Tappidichiusura

Staffa del tubo di scarico

Cuscinetti riduzione del rumore

Certificato di garanzia

Manuale utente
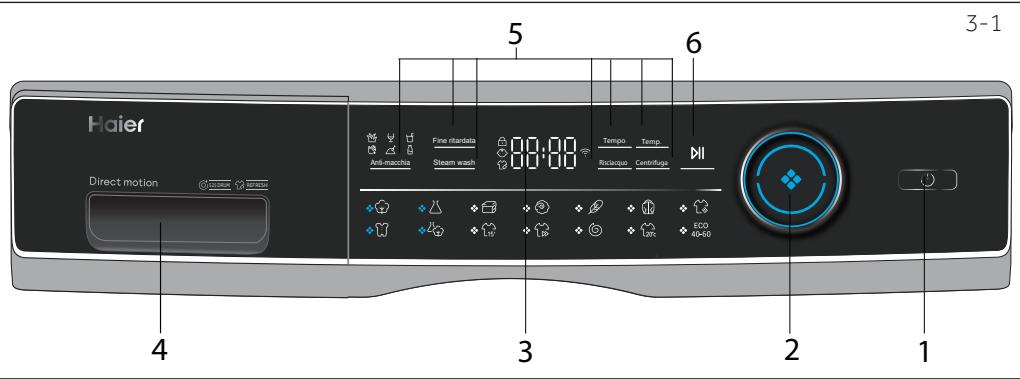
1 "Pulsante"ON/OFF
3 Display
5 Pulsanti funzione
2 Selettore del programma
4 Cassetto detersivo / Ammorbidente
6 Pulsante "Start/Pausa"

Nota: Segnale acustico
Nei seguenti casi viene emesso un segnale acustico:
- quando viene premuto un pulsante
al terminidelprogramma
- quando viene girato il selettore programmata
Il segnale acustico più essere deselezionato ove necessario: cfr. USO QUOTIDIANO (P17 6.13).
3.1 Pulsante "ON/OFF"
Premere delicatamente quello pulsante (Fig. 3-2) per eseguire l'accensione; il display si accende eanche l'in dicatore del pulsante Start/Pausa lampeggia. Premerlo nuovamente per 2 secondi per spegnere. Qualora nessun elemento del pannello o programma venga attivato molto un po' di tempo la macchina si spegnerà automaticamente.
3.2 Selettore programma
Ruotando la manopola (Fig. 3-3) è possible selezione re uno degli 14 programmi; il relative LED si accenderà e verranno visualizzate le sue impostazioni predefini-te.
3.3 Display
Il display (Fig. 3-4) alla le seguenti informazioni:
Tempo di lavaggio
Tempo di ridardo con l'opzione fine ridadata
Codici di erre e informazioni di servizio
▶ Pulsanti funzione e pulsante "Start/Pausa"
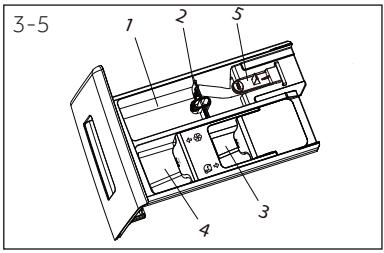
3.4 Cassetto del detergent
Aprendo il cassetto del dispenser, è possibile vedere i seguenti componenti (figura 3-5):
1: Scomparto per detersivo liquido o in polvere
2: Selettore aletta del detersivo, solleverlo per detersivo in polvere, tenerlo premuto per detersivo liquido.
3: Scomparto per disinfettante.
4: Scomparto per ammorbidente.
5: Blocco della linguetta; premere verso il basso per estrarre il cassetto del dispenser
fare riferimento al manuale del detersivo (cfr. P13).
La raccomandazione sul tipo di detersivo è adatta alle varie temperature di lavaggio, si prega di consultare il manuale del detersivo (cfr. P13).
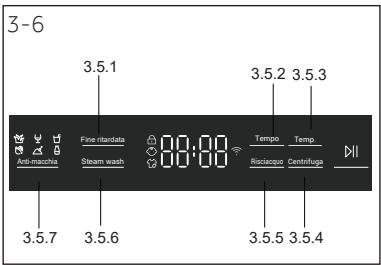
3.5 Pulsanti funzione
I pulsanti funzione (Fig. 3-6) consentono di eseguire ulteriori operazioni nel programma selezionato prima dell'inizio del programma stesso. Vengono visualizzati i relativi indicatori.
Specnendo l'apparecchiatura o impostando un nuovo programma vengono disattivate tutte le opzioni.
Qualora un pulsante abbia diverse opzioni, sare possibile selezionare l'opzione desiderata premendo il pulsante in sequenza.
Toccando i pulsanti, quando è in luce spenta, la funzione non è selezionata; quando emette una luce chiara, la funzione è selezionata.

Nota: Impostazioni di fabbrica
Per ottenere i risultati miglior in agli lavaggio, Haier ha definito in modo corretto diverse impostazioni predefinite. Qualora non vi siano requisiti speciali vengono consigiate le impostazioni predefinite.
3-7

3.5.1-Pulsante funzione "Delay" (fine ritardata)
Premere quello pulsante (Fig. 3-7) per avviare il programma
di fine ritardata. La fine del tempo di ritardo cui estere augmentata a scaglioni di 30 minuti, da 0,5-24 ore (aggiungere tempo al tempo del programma originale). Ad esempio, display off 6:30 significa che la fine del ciclo del programma sare alla 6 ore e 30 minuti. Toccare il pulsante "Start/Pausa" per attivare il ritardo di tempo. Non applicabile al programma "Centrifuga (Spin) ", "Rinfresca (Refresh)" ed Eco 40-60.

Nota: Detersivo liquido
Qualora si usi detergente liquido, consigliamo di non attivare il ritardo tempo di fine.
3.5.2-Pulsante funzione "Tempo"
Questa funzione (Fig. 3-8) intensifica differenti tempi di pulizia. Non tutti i programmi possono usfuquire di但这a funzione. Cfr. P13 Per i programmi che possono utilizzato questa funzione.
3.5.3-Pulsante funzione "Temp." (Temperatura)
Premere quello pulsante (Fig. 3-9) per modificare la temperature di lavaggio del programma. Qualora non si illumini nessun valore l'acqua non verrà riscaldata.
3-Pannello di controllo


3.5.4-Pulsante funzione "Centrifuga"
Toccare quello pulsante (Fig. 3-10) per modificare o de selezionare la centrifuga del programma. Qualora nessun vale si illumini sul display ("O"), il bucato non verrà sottomosto a centrifuga.
3.5.5 Pulsante "Risciacquo +"
Toccare quello pulsante (Fig. 3-11) per risciacquare il bucato più intenseo con acqua fresca. Questa opzione è particolarmente consigliata per le persone con una pelle sensibile. Premendo il pulsante diverse volte sarebbe selezionare da uno a tre cicii aggiuntivi. Essi appaio sul display come P--1/P--2/P--3.
3.5.6 Pulsante "Steam wash" (Vapore)
Toccando questo tasto (Fig. 3-12) si può selezionare il programma a vapore. Per i programmi con la funzione vapore, l'indicatore è di colore verde al centro della manopola è accesso. É possibile selezionare, se lo si desidera, questa funzione quando si utilizzato i programmi "Cotton,Synthetics, Mix, Baby care,"(Cotone, Sintetici, Misti e Babycare). L'icona del lavaggio a vapore si accende quando si utilizza la funzione di lavaggio a vapore.
3.5.7 Pulsante "Anti-macchia"
Premere quello pulsante (Fig. 3-13) per scegliere funzioni speciali per le macchie. I simboli vengono spiegati nella tabella seguente.

Grass

Wine

Juice

Blood

Soil

Milk
3.6 Pulsante "Start/Pausa"
Premere quello pulsante (Fig. 3-14) con gentilezza, per avviare o interrompere il programma allastrato. In fase di impostazione del programma e in fase di esecuzione dello stesso, il LED sul pulsante lampeggia, oppure - se viene interrotto - lampeggia comunique.
3.7 Blocco bambini

Scegliere un programma e poi avviarlo, toccare il tasting "Centrifuga" e "Start/Pausa" (Fig.3-15) per 3 secondi contemporaneamente, per bloccare tutti gli elementi del pannello display dall'attivazione. Per sbloccarlo, toccare di nuovo i due pulsanti. La funzione è opzonale quando la macchina è in funzione
Il display在哪 (Fig. 3-16) seiene premuto un pulsante quando è attivato il blocco bambini. La variazione non funziona.
Scomparto detergente per:
1 Detersivo
2 Ammorbidente o prodotto per la cura dei capi
3 Disinfettante 3)
| Programma | Carico mas-simo1)in kg | Temperatura | ↓ | ↓ | ↓ | Tipo di tessuto | Ve-locitàcen-trifuga preim-posta-tat in giri/min | Funzione |
| in °C2) | γamma selezionabile | Temp. predefi-nita | 1 | 2 | 3 | Tempo | Steam wash (Va-pore) | Risciacquo +Fine ritradata | Anti-Macchia | |
| 8/10/12 | *a 90 | 40 | ● | ○ | ○ | Cotone | 1400 | ● | ● | ● | ● | |
| 4/5/6 | *a 60 | 40 | ● | ○ | ○ | Tessuti sinteticiomisti | 1200 | / | ● | ● | ● | |
| 4/5/6 | *a 40 | 30 | ● | ○ | / | Piumone | 800 | ● | / | ● | / | |
| 2/2,5/3 | *a 40 | * | ● | ○ | / | Tessuti lavabili a mac-china, in lana o concontainuto di lana | 800 | ● | / | ● | / | |
| 2/2,5/3 | *a 30 | 30 | ● | ○ | / | Bucato delicato e seta | 600 | / | / | ● | / | |
| 4/5/6 | *a 40 | 30 | ● | ○ | ○ | Cotone | 1000 | ● | / | ● | / | |
| 1 | / | / | / | / | / | Cotone/Sintetici | 0 | / | / | / | / | |
| 4/5/6 | *a 90 | 40 | ● | ○ | ○ | Cotone/Sintetici | 1000 | ● | ● | ● | / | |
| 4/5/6 | *a 60 | 30 | ● | ○ | ○ | Bucato legger-mente sporco,cotone e capisintetici | 1000 | ● | ● | ● | ● | |
| 1*2) | *a 40 | * | ● | ○ | ○ | Cotone/Sintetici | 1000 | ● | / | ● | / | |
| 4/5/6 | *a 40 | 40 | ● | ○ | ○ | Cotone/Sintetici | 1000 | / | / | ● | / | |
| 8/10/12 | / | / | / | / | / | Tutti i tessuti | 1000 | / | / | / | / | |
| 8/10/12 | *a 20 | 20 | ● | ○ | ○ | Cotone | 1000 | ● | / | ● | / | |
| ECO40-60 | 8/10/12 | / | / | ● | ○ | ○ | / | 1400 | / | / | / | / | |
- L'acqua non viene riscaldata.
1) Scegliere una temperatura di lavaggio 90^ solo per particolari requisiti igienici
2) Ridurre il quantitativo di detersivo in quanto la durata del programma è breve.
3) Non usare reagenti chimici con il detersivo
Il designe e le specifiche sono soggetti a modifiche perché preavviso, ai fini del miglioramento della qualità.
I valori di consumo indicati potrebbero variate a seconda delle condizioni locali.
| Programma | Tempe- ratura in °C | Carico mas- simo in kg | Energia in kWh | Acqua in L | Tempo di lavaggio in h:min | Presta- zioni di asciuga- tura cen- trifuga in % |
| HW120 / 100 / 80 |
| Eco 40- 60* | 40°C | 6/5/4 | 0,65/0,55/0,50 | 42/42/32 | 4:08/4:16/4:23 | B |
| 60°C | 6/5/4 | 0,78/0,58/0,53 | 42/42/32 | 04:38/04:20/04:25 | B |
| 60°C | 12/10/8 | 0,76/0,58/0,54 | 58/56/46 | 04:38/04:20/04:25 | B |
Programma Standard per Classificazione Energetica conformmente a 2010/30 EU:
"Eco 40-60" "60°C/40°C" con impostazione velocità "max. spin" (massima centrifuga). (Selezionale Eco 40 60, toccare il tasto velocità per 5 secondi. Dop o la visualizzazione della funzione temperatura, selezionare la temperatura e la velocità massima).
I programmi standard 60^ e 40^ cotone sono adatti per pulire bucato con un livello di sporcizia normale. Sono i programmi più efficaci in termini di consumo combinato di energia e acqua per il bucato in cotone. La temperatura dell'acqua usata potrebbe variare rispetto alla temperatura del ciclo individata.

Nota: Peso automatico
L'apparecchiatura è dotata di unsystema di riconoscimento del carico. Con un carico piccolo, energia, acqua e tempo di lavaggio verranno ridotti automaticamente in alcuni programmi.
6.1 Alimentazione
Collegare la lavatrice a una sorgente di alimentazione (da 220V a 240V~/50Hz; Fig. 6-1). Rimandiamo inoltre alla sezione INSTALLAZIONE. (Cfr pagina 28.)
6.2. Collegamento acqua
Prima di eseguire il collegamento controllare la pulizia e verificare che l'ingresso dell'acqua non sia ostruito.
Apriere l rubinetto (Fig.6-2).

Nota: Ermeticità
Prima dell'uso controllare la presenza di perdite nei giunti fra il rubinetto e il tubo di ingressso attivando il rubinetto.
6.3 Preparazione del bucato
Ordinare gli indumenti a seconda del tessuto (cotone, sintetici, lana o seta) e a seconda del livello di sporcizia (Fig. 6-3). Prestare attenzione alle etichette sugli indumenti che forniscono indicatori a livello di lavaggio.
Separare gli indumenti bianchi da quelli colorati. Lavare prima a mano gli indumenti colorati per verificare che non perdano colore o si rovinino.
Svuotare le tasche (chiavi, monete, ecc.) e togliere gli oggetti decorativi più duri (ad esempio spille).
Gli indumenti senza orli, i capi delicati e i tessuti delicati come ad esempio le tende sottili, vanno messi in un apposto sacchetto pensato per que-sta tipologia di indumenti (il lavaggio a mano o il lavaggio a secco sarebbero due opzioni migliorieri).
- Chiudere cerniere, chiusure in velcro e gancetti, verificare che i bottoni siano saldamente cuciti.
- Mettere i capi più particolari, ad esempio quelli除去 orlo, oppure quelli delicati (intimo) e quelli si si piccoli come ad esempio calzini, cinghie, reggise-ni, ecc. all'interno di un sacchetto da lavaggio.
Srotolare i pezzi più grande di tessuto quali ad esempio lenzuola, copriletto, ecc.
Capovolgere i jeans i tessuti stampati, decorati o particolarmente carichi di colore; se possibile, lavare separamente.

ATTENZIONE!
Gli articoli non in tessuto, comeanche quelli piccoli, sfilacciati o con estremità appun-tite potrebbero causare anomalie di funzionamento e danni siaagli indumenti che alle apparecchiature.
Tabella per prendersi cura degli indumenti
Lavaggio

Lavabile fino a 95^ lavaggio normale

Lavabile fino a 40^ lavaggio normale

Lavabile fino a 30^ lavaggio normale

Lavaggio a mano max. 40^ C

Lavabile fino a 60^ lavaggio normale

Lavabile fino a 40^ lavaggio delicato

Lavabile fino a 30^ lavaggio delicato

Non lavare

Lavabile fino a 60^ lavaggio delicato

Lavabile fino a 40^ lavaggio molto
delicato

Lavabile fino a 30^ lavaggio molto delicato
Candeggio

Consentito agli tipo di candelgio
Asciugatura

Asciugabile in asciugatrice temperaturenormale

Asciugatura su filo
Stiro

Stirare a una temperatura massima di 200^

Non stirare

Solo ossigeno/ no cloro

Asciugabile in asciugatrice a bassa temperatura

Asciugatura in piano

Stirare a temperaturermediafino a 150^

Non candeggiare

No asciugatrice

Stirare a una temperatura bassafino a 110^ ;enza vapore (lo stiro a vapore pottrebbe causare danni irreversibili)
Cura professionale per vostri tessuti

Lavaggio a secco in tetracloroetilene

Pulizia a umido professionale

Lavaggio a secco in idrocarburi

No pulizia a umido professionale

No lavaggio a secco
6.4 Caricamento dell'apparecchiatura
Inserire il bucato, un pezzo alla volta
Non sovraccaricare. Si prega di notare che il carico massimo varia a seconda dei programmi! Regola per il carico massimo: Lasciare uno spazio libero di quindici cm circa fra il carico e la parte superiore del cestello.
- Chiudere I'oblò facendo attenzione. Verificare che non vi siano degli indumenti che ostruiscono.
6.5 Selezionare il detergente
L'efficacia et le performance di lavaggio sono determinate dans la qualità del detergente usato.
Serviri unicamente di detersivi approvati per essere usati all'interno di lavativici.
Ove necessario, servirsi di detergenti specifici, ad esempio per indumenti sintetici e in lana.
Attenersi sempre alleindicazioni fornite dal produttore del detersivo.
Non usare agenti detergenti secchi come ad esempio tricloroetilene e prodotti si-mili.
Scegliere il detergente miglioré
| Programma | Tipodi detergente |
| Quotidiano | Colore | Delicati | Speciale | Ammorbidente |
| L/P | L/P | - | - | o |
| - | - | L/P | - | o |
| - | - | L | L/P | o |
| - | - | L/P | L/P | o |
| - | - | - | L/P | o |
| - | - | L/P | L/P | - |
| - | - | - | L | o |
| L/P | L/P | - | - | o |
| L/P | L/P | - | - | o |
| L/P | L/P | - | - | o |
| L/P | L/P | - | - | o |
| - | - | - | - | - |
| L/P | L/P | - | - | o |
| L/P | L/P | - | - | o |
L = detergente gel-/liquido P = detergente in polvere O = opzionale - = no
Qualora si usi detergente liquido, consigliamo di non attivare l'opzione fine ritardata.
Consiglio di usare:
▶ Polvere per il bucato: da 20^ C a 90^ C^* (miglior utilizzato: 40-60°C)
Detersivo per i colori: da 20^ a 60^ (miglior utilizzo: 30 - 60^ )
Detersivo lana/delicati: da 20^ a 30^ (=miglior uso:)
Scegliereunatemperaturadilavaggio90°Csoloperparticularirequisitiigienici.
Se si scegliare la temperatura dell'acqua di 60^ o superiore, consigliamo di utilizzato meno detersivi, utilizzando un disinfettante speciale, adatto per il cotone o per i tessuti sintetici.
* E 'meglio utilizzato un detersivo in polvere che faccia alla schiuma o non ne produca affatto.
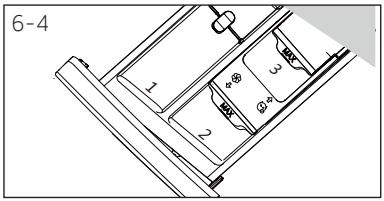
6.6 Aggiunta di detersivo
- Far fuoriuscire il cassetto del detersivo.
- Mettere le sostanze chimiche necessarie all'interno degli scomparti corrispondenti (Fig. 6-4).
- Spingere nuovamente all'interno il cassetto.

Nota:
- Togliere i residui di detersivo prima del ciclo di lavaggio successivo dal cassetto del detergente.
Non usare in modo eccessivo detergenti o ammorbidenti.
Attenersi alle istruzioni fornite sulla confazione del detergente.
Riempire sempre con detergente prima dell'inizio del ciclo di lavaggio.
Il detergente liquido concentrato dovrebbe essere diluito prima di essere aggiunto.
Non usare detersivi liquidi se viene selezionata la modalità "Delay"(Fine ritardata).
Scegliere conattenzione le impostazioni del programma a seconda dei symboli sulle etichette del bucato e conformmente alla tabella programmata.
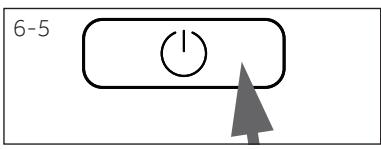
6.7 Accendere l'apparecchiatura
Premere il pulsante "Power" (Accensione), per accendere l'elettrodomestico (Fig. 6-5). Il LED del pulsante "Start/Pausa" lampeggia.
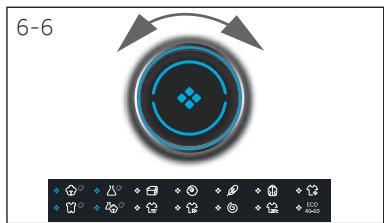
6.8 Selezionare un programma
Per ottenere risultati di lavaggio impeccabili, selezionare un programma che si adatti al livello di sporciazza, e al tipo di bucato.
Ruotare la manopola del programma (Fig. 6-6) per selezionere il programma giusto. Il LED del programma relativivo di accende e vengono visualizzate fe impostazioni predefinite.

Nota: Rimozione odori
Prima di iniziare a useare il dispositivo consiglio di usare il programma COTONE 90^ C +600rpm perché carico e un po'di detersivo nelle scomparto dell'agente di lavaggio (2) oppure un detersivo particolare per togliere i residui che potrebbero causare danni.
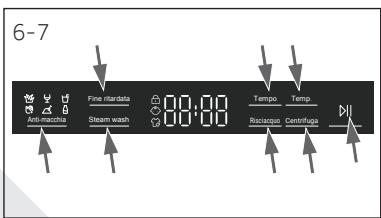
6.9 Aggiungere singole opzioni
Selezionare le opzioni e le impostazioni richieste (Fig. 6-7); rimandiamo al PANNELLO DI CONTROLLO.
6.10 Avviare programmà di lavaggio
Premere il pulsante "Start/Pausa" (Fig. 6-8) per iniziare. Il LED del pulsante "Start/Pausa" smette di lampegliare e resta accesso fisso
L'apparecchiatura opera conformmente alle impostazioni attuali. Le modifiche sono possibili solo annullando il programma.

6-8
6.11 Interrompere/annullare il programma di lavaggio
Per interrompere un programma in funzione premere delicatamente il pulsante "Start/ Pausa". Il LED sopra al pulsante lampeggia. Premerlo nuovamente per riprendere il funzionamento.
Per annullare un programma in corso e tutte le sue impostazioni individuali
- Premere il pulsante "Start/Pausa" per interrompere il programma in funzione.
- Premere il pulsante "On/Off" per circa 2 secondi per spegnere l'apparecchiatura.
- Toccare il pulsante "On/Off" per accendere l'apparecchio, eseguire il programma Spin e selezionare "no Speed" (le spie di velocità sono spente) per spurgare l'acqua.
- Dopo aver chiuso il programma per riavviare l'apparecchio, selezionare un nuovo programma e avviarlo.
6.12 Dopo il lavaggio

Nota: Blocco oblo
Per ragioni di sicurezza l'oblò della lavatrice viene di norma parzialmente bloccato durante il ciclo di lavaggio. Sarà possibile aprir e'oblò solo alla fine del programma o dopo aver annullato correttamente il programma (cfr. descrizione più sopra).
In caso di alto livello dell'acqua, alta temperature dell'acqua e durante la centrifuga non è possibile apree la porta; verrà visualizzato Loci.
- Alla fine del ciclo del programma viene visualizzata la scritta End.
- L'apparecchiatura si spegne automaticamente.
- Togliere il bucato non appena possibile in modo delicato, evitando casi che si increspui ulterioriorte.
- Spagnere l'alimentazione di acqua.
- Togliere il cavo di alimentazione.
- Aprière l'oblò per evitare la formazione di umidità e cattivi odori. Lasciarlo aperto quando l'apparecchiatura non è in funzione.

Nota: Modalità Standby / Modalità di risparmio energetico
L'apparecchiatura accesa passa in modalità standby se non viene attivata entro 2 minuti prima dell'avvio del programma oppure al termine del programma stesso. Il display si spegne. Cio consente di risparmiare energia. Per interrompere la modalità standby premère il pulsante "On/Off".
6.13 Attivare o disattivare il segnale acustico
Il segnale acustico più essere deselezionato ove necessario:
- Accendere l'apparecchiatura.
- Selezionare il programma Misti.
- Premere contemporaneamente il pulsante "Fine Ritardata" e il pulsante "Temp.", quando teneri premuti per circa 3 secondi. "BEEP DFF" verrà visualizzato e il cicalino verrà disattivato.
Per attivare il segnale acustico premere questi nuovamente questi due pulsanti. "bEEP n" verrà visualizzato.

Uso rispettoo nei confronti dell'ambiente
Per sfruttare al meglio l'energia, l'acqua, il detergente e il tempo consigliamo di attenersi alle indicazioni relativamente al carico massimo.
Non sovraccaricare (lasciare lo spazio di una mano sopra al bucato).
Per indumenti leggermente sporchi, selezionare il programma di Lavaggio Rapido.
Appicare dosaggi esatti per agli lavaggio.
- Scegliere la temperatura di lavaggio adeguata più bassa possibile - i detergenti moderni sono più efficaci a temperature inferiori ai 60^ .
Alzare i valori predefiniti solo in caso di elevato livello di sporco.
- Selezionare la velocità di centrifuga massima qualora venga asciugata un'asciugatri- ce domestica.
8.1 Pulizia del cassetto del detergente
Verificare sempre che non vi siano residui di detersivo. Pulire il cassetto a intervalli regolari (Fig. 8-1):
- Estrarre il cassetto fino a che non si ferma.
- Premere il pulsante di rilascio, quindi rimuovere il cassetto.
- Lavare il cassetto con acqua fino a che non sare pulito, quindi reinserire il cassetto nell'apparecchiatura.
8.2 Pulizia dell'apparecchiatura
Scollegare la macchina durante le operazioni di pulizia e manutenzione.
Serviri di un panno morbido con un detergente liquido per pulire l'alloggiamento della macchina (Fig. 8-2) e le componenti in gomma.
Non usare agenti chimici organici o solventi corrosivi.
8.3 Valvola di ingresso dell'acqua e filtrlo della valvola di ingresso
Per evitare blocchi dell'alimentazione dell'acqua causati da sostanze solide, come ad esempio il calcare, pulire a intervalli regolari il filtrlo della valvola di ingresso dell'acqua.
Scollegare il cavo di alimentazione e chiudere l'alimentazione idrica.
Svitare il tubo di ingresso dell'accqua sulla parte posteriore (Fig. 8-3) dell'apparecchiatura nelle che sul rubinetto.
Lavare i filtri servendosi di acqua e spazzola (Fig. 8-4).
Inserire il filtrro, quindi installare il tubo di ingresso.
8.4 Pulizia del cestello
- Togliere le componenti lavate per sbaglio, in particolare quale in metallo, come ad esempio spille, monete, ecc, dal cestello (Fig. 8-5) dato che causano macchie di ruggine e danni.
Serviri di un detersivoswana cloro per la rimozione delle macchie di ruggine. Osservare i segnali di avvertenza del produttore dell'agente detersivo.
Non usare oggetti pesanti o lana di roccia per le operazioni di pulizia.


8.5 Lunghi periodi di inutilizzato
Se l'elettrodomestico viene lasciato inattivo per un periodo più lungo di tempo:
- Staccare la spina elettrica (Fig. 8-6).
- Spagnere l'alimentazione idrica (Fig. 8-7).
- Aprire l'oblò per evitare la formazione di umidità e cattivi odori. Lasciare l'oblò aperto quando non viene utilizzato.
Prima dell'uso successivo controllare con attenzione il cavo di alimentazione, la linea di ingresso dell'acqua e il tubo di scarico. Verificare che tutto sia installato correttamente e che non vi siano perdite.
8.6 Filtró della pompa
Pulire il filtro una volta al mese e controllare il filtro della pompa per verificare se il disposativo:
Non scarica l'acqua.
Noncentrifuga.
- Fa rumori anomali in fase di funzionamento.

ATTENZIONE!
Attenzione! Rischio di scottatura! L'acqua all'interno del filtro della pompa può essere molto calda! Prima di agire verificare che l'acqua si sia raffreddata.
- Spagnere e scollegare la macchina (Fig. 8-8).
- Aprire l'alletta di servizio. Usare una moneta o un cacciavite (Fig. 8-9).
- Disporre di un contentatore piano per raccogliervi l'acqua (Fig. 8-10). Il quantitativo di acqua potrebbe essere importante!
- Estrarre il tubo di scarico e tenere l'estremità sulla contentitore (Fig. 8-10).
- Estrarre il tappo-guarnizione dal tubo di scarico (Fig. 8-10).
- D再也没有 unquidico.
- D再也没有 unquidico.
- D再也没有 unquidico.
- D再也没有 unquidico.
- D再也没有 unquidico.
- D再也没有 unquidico.
- D再也没有 unquidico.
- D再也没有 unquidico.
- D再也没有 unquidico.
- D再也没有 unquidico.
- D再也没有 unquidico.
- D再也没有 unquidico.
- D再也没有 unquidico.
- D再也没有 unquidico.
- D再也没有 unquidico.
- D再也没有 unquidico.
- D再也没有 unquidico.
- D再也没有 unquidico.
- D再也没有 unquidico.
-
D再也没有 unquidico.
-
Svitare e togliere in senso anti-orario il filtro della pompa (Fig. 8-12).
- Rimuovere i contaminanti e lo sporco (Fig. 8-13).
- Pulire accuratamente il filtro della pompa, ad es. uso acqua corrente (Fig. 8-14).
- Riposizionarlo accuramente (Fig. 8-15).
- Chiudere l'alletta di servizio.
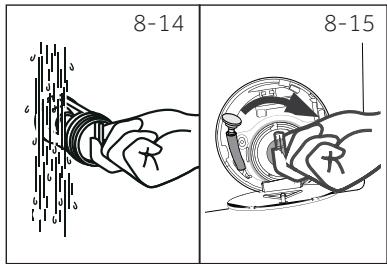

ATTENZIONE!
La guarnizione del filtro della pompa deve essere pulita e non danneggiata. Qualora il coperchio non sia completingmente chiuso, l'acqua potrebbe fuoriuscire.
Il filtrodeveesserein posizione,oppure potrebbeportareaperdite.
9-Guida alla risoluzione dei problemi
Molti dei problemi più ricorrenti possono essere risolti nella competenze specifiche. In caso di problemi controllare tutte le possibilità indicate e attenerisi alle seguenti istruzioni prima di contattare il servizio post vendita. Cfr. ASSISTENZA CLIENTI.

ATTENZIONE!
- Prima di eseguire qualunque intervento di manutenzione, spegnere l'apparecchio ed estrarre la spina alla presa.
Gli interventi di manutenzione sulla strumentazione elettrica vanno eseguiti unicatione da elettricisti esperti, dato che l'ecuzione di riparazioni in modo non adeguato cui po弧asare gravi danni alla strumentazione.
Un cavo di alimentazione danneggiato va sostituito unicamente dal produttore, dal suo agente di servizio o da persona qualificate al fine di evitare pericoli.
I seguenti codici vengono visualizzati unicamente per informazioni relative al ciclo di lavaggio. Non è richiesto nessun intervento.
| Codice | Messaggio |
| 1:25 | Il tempo del ciclo di lavaggio restante sareà di 1 ora e 25 minuti |
| 6:30 | Il tempo del ciclo di lavaggio restante, compreso il ritardo del tempo di fine ridadata sarà di 6 ore e 30 minuti |
| AUTO | Il rilevamento automatico del carico è in funzione; solo in alcuni programmi. |
| End | Il ciclo di lavaggio è concluso. L'apparecchiatura si spegne automaticamente. |
| Loci- | L'oblo è viene chiuso dato l'élevato livello dell'accua, la temperatura dell'accua elevata o il ciclo di centrifuga. |
| bEEP OFF | Il segnale acustico è disattivato |
| bEEP On | Il segnale acustico è attivato |
| cLoci- | I tasti funzione sono bloccati, ilchio di programma non è valido. |
9.2 Guida alla risoluzione dei problemi con codice display
| Problema | Causa | Soluizione |
| CLR FLTR | ·Errore di scarico, l'accua non è comple-mente scaricata dopo 6 minuti. | ·Pulire il filtrlo della pompa.
·Controllare l'installazione del tubo di scarico. |
| Ε2 | ·Errore blocco | ·Chiudere correttamente l'obli. |
| Ε4 | ·Livello dell'accua non raggiunto dopo 12 minuti.
·Il tubo di scarico si sta svuotando da solo mediate sifone. | ·Verificare che il rubinetto sia completamen-te aperto e che la pressione dell'accua sia normale.
·Controllare l'installazione del tubo di scarico. |
| Ε8 | ·Errore livello di protezione acqua | ·Contattare il servizio Post vendita. |
| F3 | · Errore sensore della temperatura | · Contattare il servizio Post vendita. |
| F4 | · Errore di riscaldamento. | · Contattare il servizio Post vendita. |
| F7 | · Errore motore | · Contattare il servizio Post vendita. |
| FR | · Errore sensore livllo acqua. | · Contattare il servizio Post vendita. |
| FCDouFCIouFC2 | · Errore di comunazione anomalo. | · Contattare il servizio Post vendita. |
| Unb | · Errore carico non equilibrato | · Controllare ed equilibrare il carico del bucato all'interno del cestello. Ridurre il carico. |
9.3 Guida alla risoluzione dei problemisenza codice display
| Problema | Causa | Soluzione |
| La lavatrice non funziona. | Il programma non è ancora partito.L'oblò non è stato chiuso corretta-mente.La macchina non è stata accesa.Guasto di alimentazione.II blocco bambini è attivato. | Controllare il programma, quando avviarlo.Chiudere correttamente l'oblò.Accendere la macchina.Controllare l'alimentazione.Disattivazione blocco bambini. |
| La lavatrice non vie-ne riempita di acqua. | Assenza di acqua.II tubo di ingressso èiegato.II filtrlo del tubo di ingressso è blocato.La pressione dell'acqua è inferiore a 0.03 MPa.L'oblò non è stato chiuso corretta-mente.Guasto dell'alimentazione dell'acqua. | Controllare il rubinetto dell'acqua.Controllare il tubo di ingressso.Sbloccare il filtrlo del tubo di ingressso.Controllare la pressione dell'acqua.Chiudere correttamente l'oblò.Controllare che l'alimentazione dell'acqua funzioni corretta-mente. |
| La macchina scarica perché è in faso di riempimento. | L'altezza del tubo di scarico è inferioreagli 80 cm.L'estremità del tubo di scarico arrivane nell'acqua. | Verificare che il tubo di scarico sia installato correttamente.Verificare che il tubo di scarico non sia immerso in acqua. |
| Guasto del sistema di scarico. | II tubo di scarico è bloccato.II filtrlo della pompa è bloccato.L'estremità del tubo di scarico è supe-riore di 100 cm rispetto al livello del pa-vimento. | Sbloccare il tubo di scarico.Pulire il filtrlo della pompa.Verificare che il tubo di scarico sia installato correttamente. |
| Forti vibrazioni nelle centrifuga è in corso. | Non sono stati rimossi i bulloni di trasporto.L'apparecchiatura non ha una posi-zione solida.II carico della macchina non è corretto. | Rimuovere tutti i bulloni di traspor-to.Verificare che l'apparecchiatura sia saldamente appoggiata in piano e che sia a bolla.Controllore il peso e il bilancia-mente del carico. |
9-Guida alla risoluzione dei problemi
| Problema | Causa | Soluizione |
| L'operazione si interrompe prima di completare il ciclo di lavaggio. | • Guasto acqua o guasto elettrico. | • Controllare l'alimentazione di corrente e l'alimentazione idri- ca. |
| Il funzionamento si interrompe per alcu- ni momenti. | • L'apparecchiatura visualizza il codi- ce di erre. • Problema dovuto allo schema di carico. • Il programma esegue un ciclo di am- mollo. | • Prenderere in considerazione i co- dici di erre. • Ridurre o regolare il carico. • Annullare il programma e riavviare. |
| C'è troppa schiuma galleggiante nel cestel- lo e/o nel cassetto del detersivo. | • Il detersivo non è adeguato. • Uso di un quantitativo excessivo di detergente. | • Controllare le istruzioni del detergente. • Ridurre il quantitativo di deter- gente. |
| Regolazione auto-matica del tempo di lavaggio. | • Verrà regolata la durata del pro- gramma di lavaggio. | • Questo è normale e non influi- sce sulle funzialità dell'appa- recchiatura. |
| La centrifuga non va a buon fine. | • Sbilanciamento del carico. | • Controllare il carico della macchina e il bucato e avviare nuovamente un programma di centrifuga. |
| Risultati di lavaggio non soddisfacenti. | • Il livello di sporcia non è conforme al programma selezionato. • La quantità di detergente non era sufficiente. • Il carico massimo è stato superato. • Il bucato non è stato distribuito in modo uniforme all'interno del ce- stello. | • Selezionare un altro program- ma. • Scegliere il detergente a secon- da del livello di sporcia, e in linea con le specifiche tecniche del produttore. • Ridurre il carico. • Ammorbidire il bucato. |
| Sul bucato ci sono residui del detersivo in polvere. | • Le particelle insolubili di detersivo possono ri-presentarsi come pun- tini bianchi sul bucato. | • Eseguire un ulteriore risciacquo. • Provare a spazzolare via i punti bianchi dal bucato. • Scegliere un altre detergente. |
| Il bucato presente delle chiazze di colo- re grigio. | • Queste chiazze sono causate da grassi quali ad esempio olio, panna o pomate. | • Pre-trattare il bucato con un detersivo speciale. |

Se durante il ciclo di centrifuga si forma troppa schiuma, il motore si ferma e la pompa di scarico viene attivata per 90 secondi. Se I'eliminazione della schiuma non va a buon fine per 3 volte consecutive, il programma si conclude nella concentrifuga.
Qualora compaiano nuovamente i messaggi di errecco ago aver intrapreso le misure necessarie, spegnere l'apparecchiatura, scollegare l'alimentazione e contattare l'assistenza clienti.
9.4 In caso di guasto a livello di alimentazione
Il programma attuale, e le relative impostazioni, verranno salvate.
Quando viene ripristinata l'alimentazione, l'apparecchiatura inizia nuovamente a funzionare.
Qualora un blackout interrompa un programma di lavaggio in funzione, l'apertura dell'oblò viene bloccata automaticamente. Per poter togliere il bucato, il livello dell'acqua non si deve vedere dall'oblò. Pericolo di usstioni! Il livello dell'acqua deve essere abbassato, conformmente a quanto descripto nella sezione "Filtro della pompa". Attendere, quindi tirare le leva (A) sotto all'aletta di servizio (Fig. 9-1) sono a che l'oblò non si sblocca con un clic delicato. Quindi, fissare nuovamente tutte le componenti.
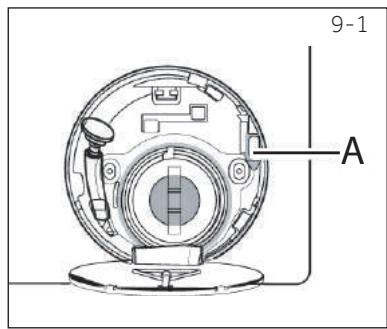

Nota: Sblocco dell'oblo
Quando la lavatrice è in uno stato di sicurezza (sotto il livello dell'acqua, sotto l'oblò, a una certa distanza, temperatura cestello inferiore a 55^ , il cestello interno non sta girando), si può sbloccare l'oblò della macchina
10.1 Preparazione
Estrarre il dispositivo dall'imballaggio.
- Togliere tutti i materiali dell'imballaggio, la base in polistirene, e tenere il tutto fuori alla portata dei bambini.
In fase di apertura della confezione, sul sacchetto e sull'oblò si potrebbero vedere delle goccioline di acqua. Si tratta di un fenomeno normale dovuto ai collaudi eseguiti in fabbrica.

Nota: Smaltimento dell'imballaggio
Conservare tutti i materiali dell'imballaggio fuori alla portata dei bambini e smaltirli in modo rispettoso dell'ambiente.
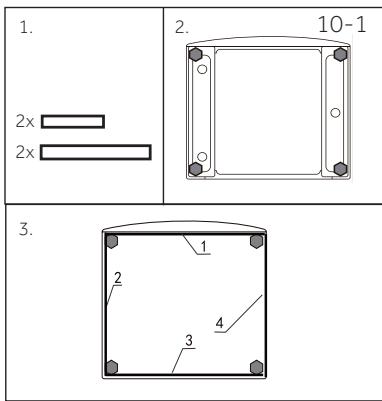
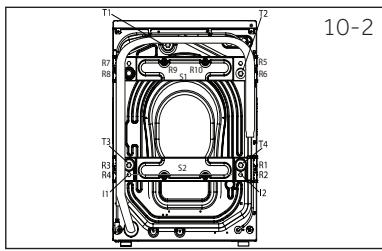
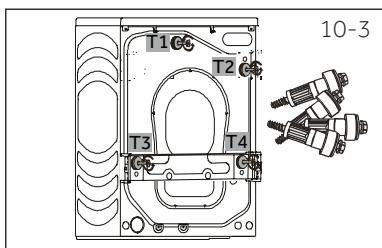
10.2 OPZIONALE: Installare i cuscinetti di riduzione del rumore
- Quando si après la confezione termoretraibile, si troveranno alcuni cuscinetti per la riduzione del rumore, che vengono utilizzati per ridurre il rumore. (Fig. 10-1)
- Appoggiare la lavatrice su un lato, con l'oblò rivolto versuso l'alto e il lato inferiore versuso l'operatore.
- Togliere i cuscinetti di riduzione del rumore e rimuovere il film protettivo biadesivo; incollarli intorno al fondo, sotto l'armadietto della lavatrice come molto in Figura 3. (due cuscinetti più lunghi in posizione 1 e 3, i due più corti in posizione 2 e 4). Da ultimo mettere la macchina nuova-
10.3 Eliminare i bulloni di trasporto
La protezione usata in fase di trasporto sul lato posteriore è stata progettata per fissare le componenti e proteggerle dalle vibrazioni all'interno dell'apparecchiatura in fase di trasporto al fine di evitare danni interni. Tutti gli elementi (I,R,S e T, Fig. 10-2) vanno rimossi prima dell'uso.
- Togliere tutti 4 i bulloni (T1-T4) (Fig. 10-3)
-
Rimuovere le 10 viti (R1 - R10) dal rinsforzo posteriore inferiore. togliere i rinsforzi (S1 e S2) alla macchina.*HW100/120-B...
-
Estrarre le 2 barre di ferro I1 e I2 (Fig. 10-5). *HW100/120-B...
- Riempire i 6 fori rimasti con tappi di chiusura (Fig. 10-6).
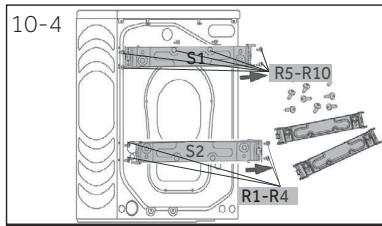
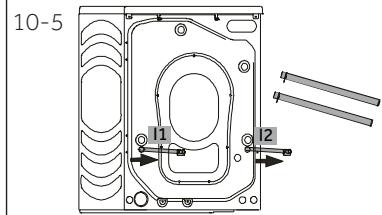
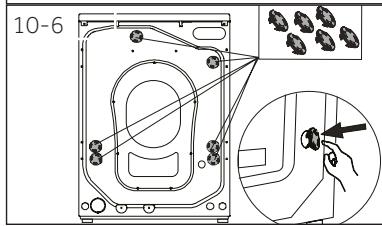

Nota: Conservare in un luogo sicuro
Tenere i bulloni di trasporto in una posizione sicura per poterli riutilizzare in seguito.
Quando l'apparecchiatura deve essere spostata, come prima casa procedere alla re-in-stallazione dei bulloni.
10.4 Spostamento dell'apparecchiatura
Se l'apparecchiatura deve essere spostata in un luogo lontano, riposizione are i bulloni di trasporto tolti prima dell'installazione al fine di evitare danni:
mente in verticale.
10.5 Regolazione dei piedini
Regolare tutti i piedini (Fig. 10-7) per ottenere una posizione di perfetto equilibrio. In questo modo le vibrazioni e il segmente rumore in fase di utilizzato, verranno ridotti al minimo. Verrà inoltre ridotta l'usura dei materiali. Consigliamo di usare una balla per eseguire le regolazioni. Il pavimento dovrebbe essere quando più stabile e in piano.
- Allentare il dato di blocco (1) servendosi di una chiave inglese.
- Regolare l'altezza ruotando i piedini (2).
- Serrare il dato di blocco (1) contro l'alloggiamo.
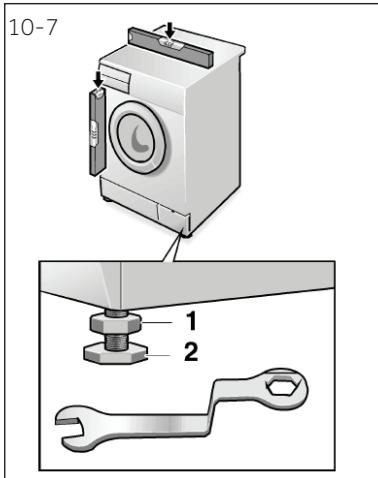
10.6 Collegamento dello scarico dell'acqua
Fissare il tubo di scarico dell'acqua in modo corretto alle tubazioni. Il tubo deve raggiun-gere un'altezza compresa fra 80 e 100 cm dal pavimento. Ove possibile, tenere sempre il tubo di scarico fissato al clip, sulla parte posteriore dell'apparecchiatura.

ATTENZIONE!
Serviri unicamente del set di tubi fornito in dotazione per eseguire il collegamento.
Non riutilizzare mai set di tubi vecchi!
Collegare unicamente ad alimentazioni di acqua fredda.
Prima del collegamento, verificare che l'acqua sia pulita e trasparente.
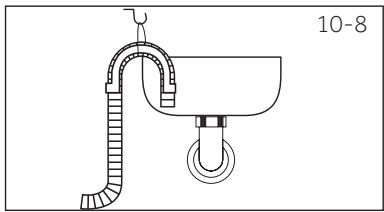
Sarà possible eseguire i seguenti collegamenti:
10.6.1 Tubo di scarico verso il lavandino
Suspendere il tubo di scarico col supporto a U sull'estremità di un lavandino di dimensioni ade guate (Fig. 10.-8).
Proteggere quantoasta il supporto a U per impedirne lo scivolamento.
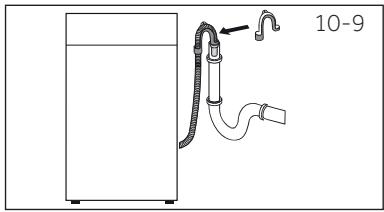
10.6.2 Collegamento del tubo di scarico all'acqua di scarico
Il diametro interno del tubo di scarico deve come minimo essere 40 mm.
- Mettere il tubo di scarico per circa 80-100 mm all'interno del tubo dell'acqua di scarico.
Applicare il supporto a U e fissarlo a sufficienta (Fig. 10-9).
10.6.3 Connessione tubo di scarico e lavandinO
La giunzione delve avvenire sopra al sifone
Viene di norma usato un collegamento a tappo, chiuso da un cuscinetto (A). Togliere per evitare eventuali malfunzionamenti (Fig. 10-10).
Fissare it tubo di scarico con una fascetta.
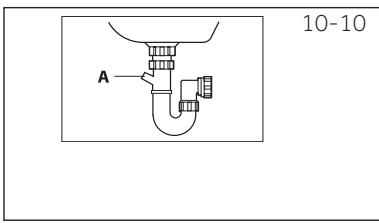

ATTENZIONE!
Il tubo di scarico non va immerso in acqua e va saldamente fissato per non causare perdite. Qualora il tubo di scarico venga posizionato a terra, oppure se il tubo si trovava a un'altezza inferioreagli 80~cm ,la lavatrice continuera a scaricare in fase di riempimento (autosifonaggio).
Il tubo di scarico non va allungato. Ove necessario, contattare il servizio post-vendita.
10.7 Collegamento all'acqua fresca
Verificare che vengano inserte le guarnizioni.
- Collegare il tubo di ingresso dell'acqua con l'estremità angolata all'apparecchio (Fig. 10.-11). Serrare il giunto a vite con una mano.
- L'altra estremità si collega a un rubinetto dell'acqua con una filettatura da 3/4'' (Fig. 10-12).
10.8 Collegamento elettrico
Prima di agli collegamento, verificare che:
la sorgente di alimentazione, la presa e il fusibile siano adeguati alla targhetto informativa.
la presa di alimentazione sia dotata di messa a terra e non vengano usate ciabatte o prolunghe.
- il cavo di alimentazione e la presa siano conformi a quantoindicato.
Solo per il Regno Unito: La spina del Regno Unito soddisfa lo standard BS1363A.
Inserire la spina nella presa (Fig. 10-13).
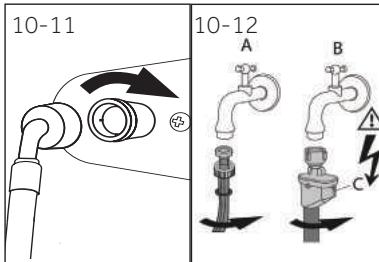
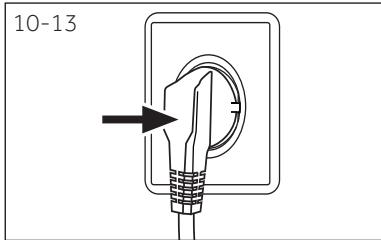

ATTENZIONE!
- Verificare sempre che tutti i collegamenti (alimentazione, tubo di scarico e tubo dell'acqua) siano saldamente fissati e sono perdite!
Fare attenzione ed evitare che queste componenti vengano schiacciate, piegate o attorcigliate
Se il cavo di alimentazione è danneggiato, deve essere sostituito dall'agente di servizio (cfr. scheda garanzia) al fine di evitare situazioni di pericol..
11.1 Scheda prodotto conformmente alla normative UE numero 1061/2010
| Nome del fornitore o marchio commerciale | Haier |
| Identificativo del modello del fornitore | HW80-B14979(S)/ HW100-B14979(S)/ HW120-B14979(S) |
| Capacità nominale (kg) | 8/10/12 |
| Classe di efficienza energetica | A+++ |
| Consumo energetico annuale (\( A_{C} \) in kWh/anno)\(^{1)}\) | 119 / 129 / 165 |
| Consumo energetico del programma standard cotone 60°C pieno carico (kWh/ciclo) | 0.54 / 0.58 / 0.76 |
| Consumo energetico del programma standard cotoni 60°C carico parziale (kWh/ciclo) | 0.53 / 0.58 / 0.78 |
| Consumo energetico del programma standard cotone 40°C, , carico parziale (kWh/ciclo) | 0.50 / 0.55 / 0.65 |
| Consumo energetico ponderato in modalità spento (W) | 0.40 / 0.41 / 0.48 |
| Consumo energetico ponderato della modalità lasciato acceso (W) | 0.48 / 0.45 / 0.50 |
| Consumo di acqua per anno (\( AW_{C} \) in L/anno)\(^{2)}\) | 8360 / 10560 / 10750 |
| Classe di efficienza di centrifuga\(^{3)}\) | B |
| Velocità di centrifuga massima (giri/min)\(^{4)}\) | 1351 |
| Contenuto di umilità rimanente (\%)\(^{4)}\) | 53 |
| Programma cotone 60°C standard\(^{5)}\) | Eco 40-60 + 60°C\(^{8)}\) + max. velocità |
| Programma cotone 40°C standard\(^{5)}\) | Eco 40-60 + 40°C\(^{8)}\) + max. velocità |
| Tempo del programma cotone 60°C pieno carico (min) | 280 / 280 / 295 |
| Tempo del programma cotone 60°C carico parziale (min) | 275 / 280 / 295 |
| Tempo del programma cotone 40°C carico parziale (min) | 275 / 270 / 260 |
| Durata in modalità lasciata accesa (\( T_{l} \) in min)\(^{6)}\) | 3 |
| Rumore acustico (lavaggio/centrifuga) in dB(A) re 1pW\(^{7)}\) | 54/69 |
| Tipo | indipendente |
1) Sulla base di 220 cicli di lavaggio standard per programmi cotone a 60^ e 40^ e carico pieno e parziale e il consumo delle modalità a risparnio energetico. Il consumo effettivo di energia dipendera alla modalità d'uso.
2) Sulla base di 220 cicli di lavaggio standard per programmi cotone a 60^ e 40^ e carico piano e parziale. Il consumo effettivo di acqua dipende da come viene utilizzato l'apparecchio
3) La Classe G è la classe con minor efficacía, cuando la Classe A è quella con la maggiore efficacía.
4) Sulla base del programma standard cotone 60^ a piano carico e il programma standard cotone 40^ on carico parziale
5) "Programma cotone standard a 60^ " e "programma cotone standard a 40^ " sono programmi di lavaggio standard a cui si riferiscono le informazioni contenute nell'etichetta e nella sched. Questi programmi sono adatti alla pulizia di biancheria in cotone normalmente sporca e sono i programmi più efficienti in termini di consumo combinato di energia e acqua
6) Qualora vi sua un systema di gestione della corrente.
7) Sulla base del programma standard cotone 60^ a piano carico.
8) Inserire la procedura di prova standard europea (Selezionare Eco 40 60, toccare il tasto velocità per 5 secondi. Dopo la visualizzazione della funzione temperatura, selezionare la temperatura e la velocità masima).
11.2 Dati tecnici aggiuntivi
| Dimensioni (A x L x P in mm) | 850x460x595 / 850x530x595 / 850x600x595 |
| Tensione in V | 220-240 V~/50Hz |
| Corrente in A | 10 |
| Potenza max in W | 2000 |
| Pressione dell'acqua in MPa | 0.03≤P ≤1 |
| Peso netto in kg | 72 / 77 / 80 |
11.3 Standarde Direttive
C
Questo prodotto soddisfa i requisiti di tutte le direttive CE applicabili con i corrispondenti standard armonizzati, il che gli conferisce la marcatura CE.
12-Assistenza clienti
Consigliamo di fare riferimento alla nostra Assistenza Clienti Haier; consigliamo inoltre di servirsi di componenti originali.
In caso di problemi col dispositivo, controllare come prima casa la sezione GUIDA ALLA RISOLUZIONE DEI PROBLEMI.
Qualora non fosse possibile trovare una soluzione, contattare
il proprio rivenditore locale
l'area Assistenza & Supporto su www.haier.com dove è possibile trovare numero di Telefono e Domande Frequenti e da dove è possibile attivare la richiesta di intervento.
Per contattare il nostro Servizio, verificare di disporre dei seguenti dati.
Le informazioni si trovano sulla targhetto.
Modello
Numero seriale
Consigliamo inoltre di controllare la Scheda Garanzia fornita in dotazione col prodotto qualora si debba fare ricorso alla garanzia.
Per richieste commerciali generiche indichiamo qui di seguito i nostri indirizzi in Europa:
| Indirizzi Haier europei |
| Paese* | Indirizzo postale | Paese* | Indirizzo postale |
| Italia | Haier Europe Trading SRL Via De Cristoforis, 12 21100 Varese ITALIA | Francia | Haier France SAS 53 Boulevard Ornano – Pleyad 3 93200 Saint Denis FRANCIA |
| Spagna Portogallo | Haier Iberia SL Pg. Garcia Faria, 49-51 08019 Barcellona SPAGNA | Belgio-FR Belgio-NL Paesi Bassi Lussemburgo | Haier Benelux SA Anderlecht Route de Lennik 451 BELGIO |
| Germania Austria | Haier Allemagne GmbH Konrad-Zuse-Platz 6 81829 MUNICH AUSTRIA | Polonia Repubblica Ceca Ungheria Grecia Romania Russia | Haier Polonia Sp. zo.o. Al. Jerozolimskie 181B 02-222 Varsavia POLONIA |
| Regno Unito | Haier Appliances Regno Unito Co.Ltd. One Crown Square Church Street East Woking, Surrey, GU21 6HR REGNO UNITO |
*Per ulteriori informazioni rimandiamo a www.haier.com
Haier
Gebrauchsanleitung Waschmaschine
HW80-B14979
HW80-B14979S
HW100-B14979
HW100-B14979S
HW120-B14979
HW120-B14979S
Danke, dass Sie sich für ein Haier Produkt entschieden haben.
Bitte lessen Sie diese Gebrauchsanleitung sehr sorgfältig devant Sie das Gerät in Betriebnehmen. Sie enthalt wichtige Informationen, damit Sie viel Freude an Ihr Gemät haben und ein{sicherer und sauberer Betrieb gewährleistet ist.
Bewahren Sie diesen Handbuch gut auf, damit Sie bei Bedarf immer wieder darauf zu Rückgreifen können.
Wenn Sie die Maschine verkaufen, abgeben oder bei einem Umzug zusücken, geben Sieitte die Gebrauchsanleitung dazu,damit der neue Besitzer sich mit den Anweisungen zur Benutzung und zum sicheren Betrieb vertraut machen kann.

Legende
Achtung! Unbedingtesen!
Wichtige Sicherheitshinweise.

Allgemeine Hinweise und Tipps

Umwelt-Tipps
Entsorgung
Produkte mit thisem Symbol)durfen am Ende ihrer Lebensdauer nicht in den Hausmull gegeben werden, sondern müssen an einem Sammelpunkt fur das Recycling von elektrischen und elektronischen Geräten abgegeben werden.

WARNING!
Verletzungs- und Erstickungsrisiko!
Das Altgerät ist vor der Verschrottung Funktionuntüchtig zu machen, damit Kinder sich nicht selbst einschließlich konnen.
Trennen Sie das Gerät vom Stromnetz, entfernen Sie das Netzanschlusskabel und machen Sie den Turverschluss unbrauchbar.
1-Sicherheitshinweise 4
2-Produktbeschreibung. 7
3-Bedienblende 8
4-Programme 11
5-Verbrauchswerte 12
6-Täglicher Gebrauch 13
7-Umweltschutzhinweise 18
8-Reinigung und Pflege 19
9-Fehlerbehebung 22
10-Installation 25
11-Technische Daten 29
12-Kundendienst 31
1-Sicherheitshinweise
These Hinweise dieren der Sicherheit und sollen denaher vor der Installation und Inbetriebnahme aufmerksam gelesen werden.

WARNING!
Vor dem ersten Gebrauch:
Vergewissern Sie sich, dass das Gerät keinen Transportschaden aufweist.
Entfernen Sie alle Transportsicherungsschrauben.
Entfernen Sie alle Verpackungsmaterialien und bewahren Sie diese außerhalb der Reichweite von Kindern auf.
Bewegen Sie das Gerät nur mit Hilfe einer zweiten Person, da es schwer ist.
Täglicher Gebrauch
- Dieses Gerätarf nur dann von Kindern ab 8 Jahren und darüber sowie von Personen mit verringerten physischen, sensorischen oder mentalen Fähigkeiten, oder Mangel an Erfahrung und Wissen benutzt werden, wenn sie beaufsichtigt oder bezüglich des sicheren Gebrauchs des Gerätes unterwiesen wurden und die daraus resultierenden Gefahren verstehen.
- Halten Sie Kinder unter 3 Jahren vom Gerät fern, es sei dann, sie sind unter kontinuierlicher Aufsicht.
▶ Kinder dürfen nicht mit dem Gerät spielen.
Lassen Sie Kinder oder Haustiere nicht in die Nähe des Gerätes, wenn die Tur offen stehen.
Bewahren Sie Waschmittel außerhalb der Reichweite von Kindern auf.
Schließen Sie Reißverschlüsse und fixieren Sie lose Teile damit die Wäsche keinen Schaden nimmt und geben Sie auf keine Wäschestücks acht, Falls nötig, verwenden Sie ein Wäschenetz.
Berühren und benutzten Sie das Gerät nicht, wenn Sie barfuß sind oder nasse oder feuchte Höhe oder Fuß haben.
Decken Sie das Gerät nicht ab und stellen Sie es nicht zu. Im Betrieb entstehende Feuchtigkeit muss abtrocknen können!
Stellen Sie keine schweren, freißen oder feuchten Gegenstände oder Hitzequellen auf das Gerät
- Verwenden oder lagern Sie keine leicht entflammbaren Wasch-oder Reinigungsmittel in der Nähe des Gerätes.

WARNING!
Täglicher Gebrauch
Benutzen Sie keine entzündlichen Sprays in der Nähe des Geräts.
- Waschen Sie keine mit Lösungsmitteln vorbehandelten Wäsche-stücke in dem Gerät, ohne diese zuvor an der Luft getrocknet zu haben.
Wenn in der Höhe entflammbares Gas verwendet wird, ziehen oder stecken Sie nicht den Gerätestecker.
Waschen Sie Schwämme oder Ähnliches nicht zu halten.
Waschen Sie keine Wäsche, die mit Mehl beschmutzt ist.
- Öffnen Sie nicht die Waschmittelschublade, während der Waschvorgang lauft.
Berühren Sie nicht die Tür, solange der Waschvorgang lauft. Die Tür wird heiß!
Öffnen Sie nicht die Tür, solange der Wasserstand sightbar oberhalb der Türoeffnung stehen.
Öffnen Sie die Tur des Geräts nicht mit Gewalt. Ein Sicherheitsmechanismus gibt die Tur erst eine gewisse Zeit nach Beendigung des Waschvorgangs frei.
Schalten Sie das Gerät nach jedem Waschgang aus undziehen Sie den Netzstecker. Dies dient sowohl ihrer Sicherheit als auch der Senkung Ihres Energieverbrauchs.
Ziehen Sie nur am Stecker und nicht am Anschlusskabel, um das Gerät vom Stromnetz zu trennen.
Reinigung und Pflege
Die Reinigung und Wartungarf nur dann von Kindern durchgeführrt werden, wenn sie beaufsichtigt werden.
Schalten Sie das Gerät vor der Durchführung von Wartungsarbeiten aus undziehen Sie den Netzstecker.
Halten Sie den unteren Teil der Tursauber und trocken und las-
sen Sie die Turs bei Nichtbenutzung leicht geöffnet, damit sich
keine unangenehmen Gerüche bilden.
Reinigen Sie das Gerät weder mit Dampf- noch mit Wasserstrahl.
Lassen Sie ein beschädigtes Stromkabel nur vom Hersteller, dem Kundendienst oder einem entsprechenden Fachmann ersetzen.
Versuchen Sie nicht, das Gerät selbst zu reparieren, sondern wenden Sie sich an den Kundendienst.

WARNING!
Installation
Der Aufstellort muss so beschaffen sein, dass sich die Gerätetur vollständig öffnen lässt und der Raum gut beluftet ist.
- Setzen Sie das Gerät keiner Nässe oder Feuchtigkeit aus. Falls das Gerät aus irgendem Grund nass werden sollen, unterbrechen Sie die Stromversorgung und setzen Sie es von selbst wieder trocknen.
Installieren und benutzen Sie das Gerät nur bei Umgebungs-temperaturen von mindestens 5^ .
Stellen Sie das Gerät nicht auf einen Teppich oder zu nah an eine Wand oder ein Möbelstück.
Setzen Sie das Gerät weder Frost, Hitze noch direktem Sonnenlicht aus.
Vergewissern Sie sich, dass die Angaben auf dem Typenschild mit den elektrischen Anschlussbedingungen übereinstimmen. Falls nicht, kontaktieren Sieitte einen Elektriker.
Verwenden Sie keine Mehrfachsteckdosen oder Verlängerungskabel.
- Verwenden Sie nur das mitgelieferte elektrische Anschlusskabel und das beiliegende Wasserschlauchset.
Vergewissern Sie sich, dass das Anschlusskabel und der Stecker nicht beschädigt ist. Ein beschädigtes Stromkabelarf nur vom Hersteller, dem Kundendienst oder einem entsprechenden Fachmann ersetzt wird.
Der Stromanschluss muss separat geerdet und stets zugänglich sein. Nur gültig im Vereinigten Königreich (England): Das Netzkabel der Maschine ist mit einem dreipoligen Schutzkontaktstecker (geerdet) ausgestattet, der sich nur in eine passende Schutzkontaktsteckdose (geerdet) einsteckenlässt. Trennen Sie den dritten Kontakt (Erdungskontakte) niemals ab. Achten Sie daraufuf, dass Sie auch nach dem Aufstellen der Maschine ohne Weitereres an den Stecker herankommen
Vergewissern Sie sich, dass die Wasserschläuche fest angeschlossen sind und bei geöffnetem Wasserhahn kein Wasser austritt.
Bestimmungsgemäßer Gebrauch
Das Gerät ist nur für den privaten, häuslichen Gebrauch und nur zum Waschen von maschinenwaschbaren Textilien bestimmt. Die Pflegeanleitungen auf den Etiketten sind damit stets zu beachten. Bei gewerblicherutzung entfällt die Haier Garantie. Verwenden Sie das Gerät nicht für andere Zwecke als die, für die es ausgelegt ist.
Veränderungen oder Modifikationen an dem Gerät sind nicht zulässig. Solche Eingriffe führen zum Verlust aller Gewährleistungs- und Haftungsansprüche.

Hinweis: Abweichungen
Aufgrund technischer Änderungen können die Zeichnung in den nachfolgenden Kapiteln ev. von dem von Ihnen erworbenen Modell abweichen.
2.1 Geräteansicht

Gerätevorderseite (Abb. 2-1):
1 Waschmittelschublade
2 Abdeckplatte
3 Programmwahler
4 Bedienblende
5 Turgriff
6 Serviceklappe
7 Verstellbare FüSe
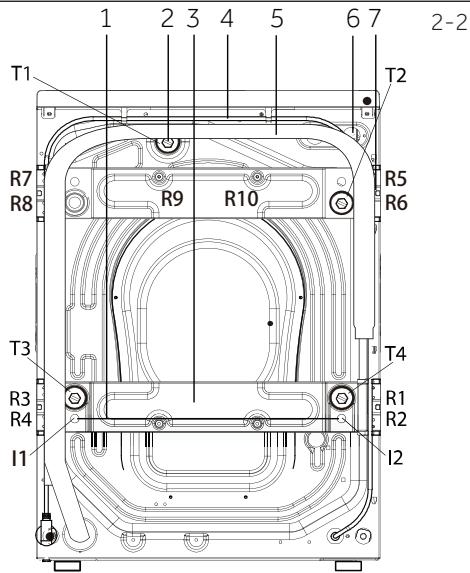
Geräterückseite (Abb. 2-2):
1 Metallstange (I1-I2) (HW100/120-B...)
2 Transportsicherung (T1-T4)
3 Rückwandverständlung (HW100/120-B...)
4 Stromkabel
5 Ablaufschlauch
6 Zulaufventil
7 Schrauben hintere Abdeckung (R1-R10) (HW100/120-B...)
2.2 Zubehör
Zubehör entsprechend der nachfolgenden Ende (Abb. 2-3) überprüfen:
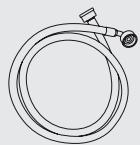
Einlauf-schlauch

6 Abdeck-kappen

Schlauchkrümmer

Gerausch dammungspolster

Garantiekarte

Bedienungs-anleitung
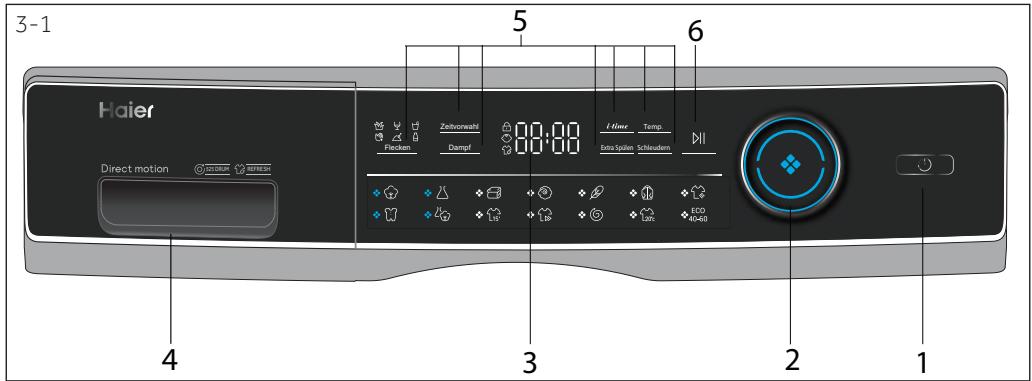
1 Taste „Ein/Aus"
3 Display
5 Funktionstasten
2 Programmwahler
4 Waschmittelschublade
6 Taste „Start/Pause"

Hinweis : Akustisches Signal
In folgenden Fällen ertönt ein akustisches Signal:
▶beiTastendruck
am Ende des Programms
▶ bei Betätigung des Programmwählers
Der Signalon kann bei Bedarf abgewählt werden, siehe TÄGLICHER GEBRAUCH(S.17, 6.13)
3-2

3-3


3-4

3.1 Taste „Ein/Aus"
Zum Einsatzten Taste (Abb. 3-2) kurz betätigten, das Display leuchtet, die Anzeige der „Start/Pause" Taste blinkt. Um auszuschalten ist die Taste länger (ca. 2 Sekunden) zu drücken. Läuft kein Programm, bzw. wird kein Programm angewählt, schaltet sich das Gerät nach einiger Zeit automatisch ab.
3.2 Programmwahler
Durch Drehen des Programmwählers (Abb. 3-3) wird eines der 14 Programme ausgewählt, die Programm LED am Wahrer sowie die, Grundeinstellungen leuchten im Display auf.
3.3 Display
Im Display (Abb. 3-4) werden folgende Informationen angezeigt:
Programmlaufzeit
Zeitvorwahl
Fehlercodes und Service Informationen
Funktionstaten und „Start/Pause" Taste
3.4 Waschmittelschublade
Beim Öffnen der Waschmittelschublade (Abb. 3-5) sind folgende Komponenten zu sehen:
1: Fach für Pulver- oder Flüssigwaschmittel
2: Waschmittelwahlklappe - anheben für Pulver-, nach unten drücken für Flüssigwaschmittel.
3. Fach für Desinfektionsspüssen
4. Fach für Weichspüler
5. Verriegelung - zum Herausziehen nach unter drücken. Informationen darüber, welche Waschmittel für welche Waschtemperaturen geeignet sind, sind den Empfehlungen der Waschmittelhersteller zu entnahmen.
3.5 Funktionstasten
Die Funktionstasten (Abb. 3-6) aktivieren vor Programmstart zusätzliche Optionen im gewählten Programm. Die entsprechenden Anzeigen leuchten. Durch Ausschalten, oder eine neue Programmwahr werden alle Optionen deaktiviert. Ist eine Taste mit mehreren Optionen hinterlegt, kann die gewünschte Option durch mehrmaliges Drücken der Taste ausgewählten werden. Durch Berühren der Tasten wird entweder eine Funktion abgewähl - das Licht erlischt, oder angewähl - das Licht leuchtet.
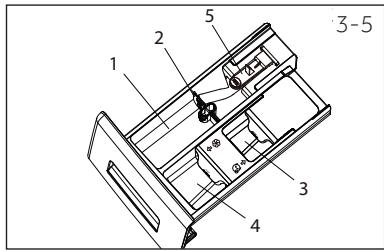
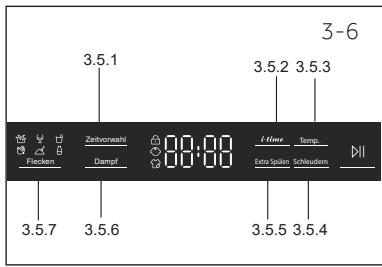

Hinweis: Werkseinstellungen
Für optimale Waschresulte hat jeder Programm von Haier empfohlene, eigene Voreinstellungen und Grenzwerte. Liegen keine besonderen Anforderungen/Bedingungen vor, werden diese Standardeinstellungen empfohlen.
3.5.1-Funktionstaste „Zeitvorwahr" (Endzeitvorwahr)
Durch Drücken dieser Taste (Abb. 3-7) kann der Start des Programmes verzögert werden. Die Zeit kann in Schritten von 30 Minuten zwischen 0.5-24 Std. eingestellt werden. Z.B. bedeutet 6:30, dass das Programm im 6 Stunden 30 Minuten beendet ist. Zum Aktivieren der Zeitvorwah die Taste "Start/Pause" drucken. Nicht verfügbar im Programm „Schleudern", „Refresh" und Eco 40-60.


Hinweis: Flüssigwaschmittel
Bei Verwendung von flüssigem Waschmittel sollte die Zeitvorwahr nicht aktiviert werden.
3.5.2-Funktionstaste "i-time"
These Funktion (Abb. 3-8) intensiviert verschiedene Waschvorgänge. Sie ist nicht mit allen Programmen kombinierbar. Siehe S.11 welche Programme „I-time" nutzen können.
3.5.3-Funktionstaste „Temp."
Durch Drücken dieser Taste (Abb. 3-9) kann die Waschtemperatur für das angewählte Programm eingestellt werden. Wenn kein Wert „--“ leuchtet, wird das Wasser nicht erhützt.


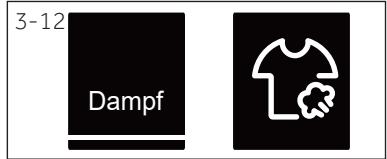

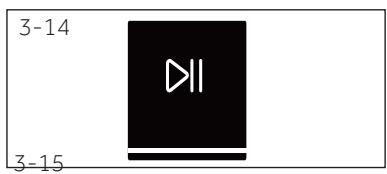
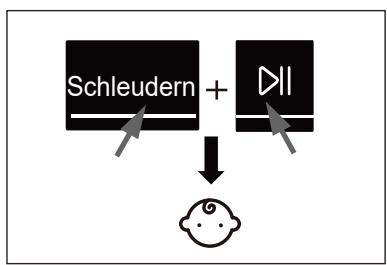

3.5.4 Funktionstaste „Schleudern"
Durch Drücken dieser Taste (Abb. 3-10) wird die Schleuderdrehzahl des Programms verändert. Wenn kein Wertleuchtet(), wirdie Wäschenicht geschleudert.
Durch Drucken der Taste (Abb. 3-11) wird die Wäsche intensiver mit Frischwasser gespütt. Dies ist zu empfehlen für Menschen mit empfindlicher Haut.
Durch mehrmaliges Drucken der Taste konnen ein bis drei zusätzliche Spülgänge gewählt werden. Diese werden im Display mit P-- 1/P-- 2/P-- 3 angezeigt.
3.6 Funktionstaste „Dampf"
Durch Drücken dieser Taste (Abb. 3-12) kann das Dampfprogramm gewählt werden. Bei Programmen mit der Dampffunktion ist die Anzeige grün und die Anzeige in der Mitte des Knopfes leuchtet. Sie konnen wahren, ob Sie diese Funktion bei den Programmen "Baumwolle, Synthetik, Mix, Babywäsche" benötigen. Das Dampfwaschsymbol leuchtet bei Verwendung der Dampfwäsche auf.
3.7 Funktionstaste „Flecken"
Drücken Sie diese Taste (Abb. 3-13), um Sonderfunktionen für Flecken zu wahren. Die Symbole sind in der folgenden Tabelle erlautert.

3.8 Taste „Start/Pause"
Drücken der „Start/Pause" -Taste (Abb. 3-14) startet bzw. unterbricht das aktuell eingestellte Programm. Wahrend der Programmwahl und während des Programmablaufs leuchtet die LED über der Taste konstant bzw. blinkt bei Unterbrechung.
3.9 Kindersicherung
Wahlen Sie ein Programm aus und berühren Sie dānngleichzeitig die Tasten „Schleudern." und „Start/Pause" (Abb. 3-15) für ca. 3 Sekunden um alle Bedienelemente zu sperren, das Display zeigt Erneutes gleichzeitiges Drückenheits die Sperrung wieder auf. Die Anzeige leuchtet, wenn die Funktion in Betrieb ist. Die Funktion ist bei laufender Maschine optional.
Wird bei aktivierter Kindersicherung eine Taste gedrückt leuchtet cLo t im Display auf (Abb. 3-16); die Änderung wird nicht ausgeführrt..

Ja, Optional, /Nein
Waschmittelkammer für:
1 Waschmittel
2 Weichspüler od. Pflegemittel
3 Desinfektionsspuler
| Programme | Max. Beladung1)in kgHW80-B14979HW100-B14979HW120-B14979 | Temperatur | Vorstellung | Empfohlene Wäsche | vorainge- stellte Schleu- der-dreh- zahl inU/ min | Funktion |
| in °C2)währbarer Bereich | Vorstellung | 1 | 2 | 3 | | I-timeDampf | Extra Spülen | Zeitvorwahr | Flecken |
| 8/10/12 | * bis 90 | 40 | ● | ○ | ○ | Baumwolle | 1400 | ● | ● | ● | ● |
| 4/5/6 | * bis 60 | 40 | ● | ○ | ○ | Baumwolle/Synthetik | 1200 | / | ● | ● | ● |
| 4/5/6 | * bis 40 | 30 | ● | ○ | / | Daunen | 800 | ● | / | ● | / |
| 2/2.5/3 | * bis 40 | * | ● | ○ | / | maschinenwaschbare Wäsche aus Wolle oder mit Wollanteil | 800 | ● | / | ● | / |
| 2/2.5/3 | * bis 30 | 30 | ● | ○ | / | Empfindliches wie Seide | 600 | / | / | ● | / |
| 4/5/6 | * bis 40 | 30 | ● | ○ | ○ | Baumwolle | 1000 | ● | / | ● | / |
| 1 | / | / | / | / | / | Baumwolle/Synthetik | 0 | / | / | / | / |
| 4/5/6 | * bis 90 | 40 | ● | ○ | ○ | Baumwolle/Synthetik | 1000 | ● | ● | ● | / |
| 4/5/6 | * bis 60 | 30 | ● | ○ | ○ | leichtverschmutzte Mischwäsche aus Baumwolle und Synthetik | 1000 | ● | ● | ● | ● |
| 152) | * bis 40 | * | ● | ○ | ○ | Baumwolle/Synthetik | 1000 | ● | / | ● | / |
| 4/5/6 | * bis 40 | 40 | ● | ○ | ○ | Baumwolle/Synthetik | 1000 | / | / | ● | / |
| 8/10/12 | / | / | / | / | / | alle Wäschearten | 1000 | / | / | / | / |
| 8/10/12 | * bis 20 | 20 | ● | ○ | ○ | Baumwolle | 1000 | ● | / | ● | / |
| 8/10/12 | / | / | ● | ○ | ○ | / | 1400 | / | / | / | / |
- Das Wasser wird nicht erhitzt
1) 90^ Waschtemperaturesnur fur besondere hygienische Anforderungen wahlen.
2) Waschmittelmenge reduzieren, da die Programmlaufzeit sehr kurz ist.
3) Keine chemische Reaktion mit Reinigungsmittel verwenden Das Design und die Spezifikationen konnen ohne Vorankündigung geändert werden, um die Qualität zu gewährleisten.
5-Verbrauchswerte
Die Verbrauchsangaben sind Richtwerte und können in Abhängigkeit der ortlichen Gegebenheiten abweichen.
| Programm | Temperatur in °C | Max. Beladung in kg | Energie-verbrauch in kWh | Wasser-verbrauch in L | Programm-dauer in h:min | Schleuder-wirkung in % |
| HW 120 / 100 / 80 |
| Eco 40-60* | 40°C | 6/5/4 | 0.65/0.55/0.50 | 42/42/32 | 4:08/4:16/4:23 | B |
| 60°C | 6/5/4 | 0.78/0.58/0.53 | 42/42/32 | 4:38/4:20/4:25 | B |
| 60°C | 12/10/8 | 0.76/0.58/0.54 | 58/56/46 | 4:38/4:20/4:25 | B |
- Prüfprogramm für die Energieeitikettierung nach 2010/30 EU:
Eco 40-60 „ 60^ C/40°C" mit max. Schleuderdrehzahl. (Drücken Sie Eco 40-60 für 5
Sekunden. Nachdem die Funktion angezeigt wird, wahren Sie die Temperatur und die Höchstgeschwindigkeit).
Die Standard 60^ u. 40^ Baumwoll-Programme sind, bezogen auf den Energie- und
Wasserverbrauch, die effizientesten Programme zur Reinigung normal verschmutzer
Wäsche aus Baumwolle. Die tatsächliche Waschtemperatur kann darauf von der am Gerät
eingestelltener Temperatur abweichen.

Hinweis: Beladungserkennung
Das Gerät ist mit einer Beladungserkennung ausgestattet. Bei entsprechend geringer Beladung werden bei einigen Programmen Wasser, Energie und Waschzeit automatisch reduziert.
6.1 Stromanschluss
Gerät an eine ordnungsgemäß installierte Steckdose anschließen(220V-240V~/50Hz;Abb.6-1);sieheKapitel INSTALLATION.
6.2 Wasseranschluss
Vor Anschluss des Gerätes Zulaufwasser auf Sauberkeit und Klarheit überprüfen.
Wasserhahn aufdrehen (Abb. 6-2).
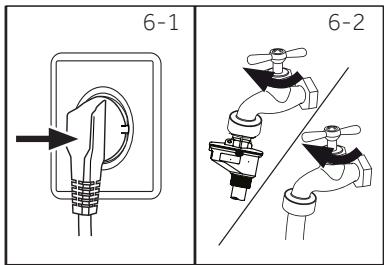

Hinweis: Dichtheit
Prufen Sie nach dem Aufdrehen des Wasserhahns, ob der Wasserzulaufschlauch dicht angeschlossen ist und kein Wasser austritt, bevor Sie die Maschine einschalten.
6.3 Vorbereitung der Wäsche
Wäsche nach Stoffart (Baumwolle, Synthetik, Seide, Wolle) und Grad der Verschmutzung sortieren (Abb. 6-3). Dabei auf die Pflegekennzeichnung der Waschetiketten achten.
Weiße und farbige Wäsche getrennt wansen. Durch Handwäsche, prüfen ob farbige Wäschestücke, ausbleichen oder abfärben.
- Taschen leeren (Münzen, Schlüssel, Papiertaschentücher etc.) und schmückende Accessoires entfernen (Broschen etc.).
Wäschestrecke ohne festen Saum, feine Unterwäsche (Dessous) und empfindliche Textilien wie Gardinen sollenen, wenn überhaupt, in Wäschenetzen geschützt gewaschen werden.
Rei- und Klettverschlüsse sowie Haken schlieben. Überprüfen, dass alle Knöpfes fest sitzen.
- Empfindliche Stücke wie Wäsche ohne festen Saum, feine Unterwäsche (Dessous) und keine Wäschestrücke wie Socken, Gürtel, Büstenhalter etc. in Wäschenetzen waschen.
Grosse Wäschestücke wie Betttücher etc. entfallen.
Bedrucktes, Dekoriertes sowie farbintensive Textilien und Jeans auf links drehen; ggf. separat waschen.
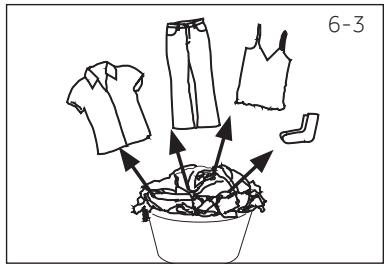

VORSICHT!
Fremdtiele konnen zu Fehlfunktionen und Beschädigungen an Wäsche und Gerät führen.
6-Täglicher Gebrauch
Pflegesymbole
Waschen
| 95 | Waschbar bis 95°C
Normalwässche | 60 | Waschbar bis 60°C
Normalwässche | 60 | Waschbar bis 60°C
Schonwässche |
| 40 | Waschbar bis 40°C
Normalwässche | 40 | Waschbar bis 40°C
Schonwässche | 40 | Waschbar bis 40°C
Feinwässche |
| 30 | Waschbar bis 30°C
Normalwässche | 30 | Waschbar bis 30°C
Schonwässche | 30 | Waschbar bis 30°C
Feinwässche |
| Handwässche bis 40°C | | Nur Trockenreinigung | | |
| Bleichen |
| Jegliches Bleichen
erlaubt | | Sauerstoffbleiche | | Nicht bleichen |
| Trocknen |
| Trocknen im Trockner
Normale Temperatur | | Trocknen im Trockner
Niedrige Temperatur | | Nicht in den Trock-
ner |
| I | Hängend trocknen | | Flach trocknen | | |
| Bügeln |
| Bügeln mit hoher
Temperatur
bis 200°C | | Bügeln mit mittlerer
Temperatur
bis 150°C | | Bügeln mit nied-
riger Temperatur
bis 110°C; ohne
Dampf (Bügeln mit
Dampf kann Schä-
den verursachen) |
| Nicht böglén |
| Professionelle Reinigung |
| P | Reinigen mit
Perchlorid | F | Benzin
Trockenreinigung | | Nicht chemisch
reinigen |
| W | Professionelle
Nassreinigung | W | Professionelle
Nassreinigung nicht
erlaubt | | |
6.4 Beladen der Waschmaschine
Wäschestücke einzeln einlegen.
Waschmaschine nicht überladen. Auf entsprechliche maximale Beladung je nach Programm achten! Faustregel für maximale Beladung: Es sollte eine Handbreit Abstand zwischen Beladung und Trommeloberkante frei bleiben.
Tur sorgfältig schreiben und darauf achten, dass keine Wäschestücke eingeklemmt sind.
6.5 Waschmittel wahlen
- Waschqualität und Leistung der Maschine sind abhängig vom verwendeten Waschmittel.
Nur Waschmittel verwenden, das für Maschinenwäsche geeignet ist.
Spezialwaschmittel, z.B. für Synthetik und Wolle verwenden.
Die Empfehlungen der Waschmittelhersteller sind zu beachten.
Auf keinen Fall Lösungsmittel, z.B. Trockenreiniger, Trichlorethylen und ähnliche Produktve verwenden.
Wahl der optimalen Waschmittelart
| Programme | Art des Waschmittels |
| Universal | Color | Fein | Spezial | Weichspüler |
| L/P | L/P | - | - | ○ |
| - | - | L/P | - | ○ |
| - | - | L | L/P | ○ |
| - | - | L/P | L/P | ○ |
| - | - | - | L/P | ○ |
| - | - | L/P | L/P | - |
| - | - | - | L | ○ |
| L/P | L/P | - | - | ○ |
| L/P | L/P | - | - | ○ |
| L/P | L/P | - | - | ○ |
| L/P | L/P | - | - | ○ |
| - | - | - | - | - |
| L/P | L/P | - | - | ○ |
| L/P | L/P | - | - | ○ |
F = Flüssig-/Gelwaschmittel P = Pulver Waschmittel O = optional - = nein
Bei Verwendung von flüssigem Waschmittel sollte die Zeitvorwahr nicht aktiviert werden
Wir empfehlen bei Verwendung von:
Vollwaschmittel: 20^ bis 90^^* (optimale Wirksamkeit: 40-60°C)
Colorwaschmittel: 20^ C bis 60^ C (optimale Wirksamkeit: 30-60^ C )
Woll/Feinwaschmittel: 20^ bis 30^ (optimale Wirksamkeit)
- 90°C Waschtemperaturesnur für besondere hygienische Anforderungen wählten
- Wenn Sie die Wassertemperatur 60^ oder hoher wahren, empfehlen wir Ihnen, weniger Waschmittel zu verwenden.
Bitte verwenden Sie nur spezielle Desinfektionsmittel, die für Baumwolle oder synthetische Stoffe geeignet sind.
- Es ist better, weniger oder konzentriertes Waschmittelpulver zu verwenden.
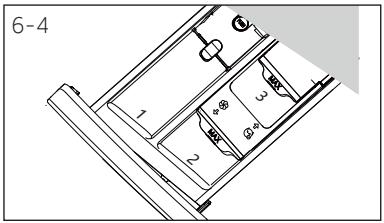
6.6 Waschmittel einfüllen
- Waschmittelschublade herausziehen.
- Waschmittel und Weichspüler in die entspruchenden Kammern einfüssen (Abb. 6-4).
- Waschmittelschublade sorgfältig schreiben.

Hinweis: Waschmittel
Entfernen Sie vor jedem Gebrauch Waschmittelrückstände in der Maschine.
Nicht mehr Waschmittel verwenden als nötig.
Richten Sie sich nach den Dosieranweisungen des Waschmittelherstellers.
Fullen Sie das Waschmittel immer erst direkt vor Beginn des Waschgangs ein.
Konzentriertes Flüssigwaschmittel sollte verdünnt werden.
Keine Flüssigwaschmittel verwenden, wenn die Zeitvorwahr aktiviert wurde.
Wahlen Sie die Programmeinstellungen sorgfältig gemäß den Pflegesymbolen auf allen Wäscheetiketten und der Programmtabelle.
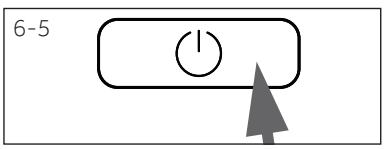
6.7 Gerä einschalten
„Ein/Aus" -Taste zum Einsatz des Gerätes drücken (Abb. 6-5). Die LED über der „Start/Pause" Taste blinkt.

6.8 Programm einstellen
Durch Drehen am Programmwähler wird das gewünschte Programm aktiviert (Abb. 6-6) und die LED leuchtet.
Es sollte unbedingt der Wäsbeart und dem Verschmutzungsgrad entsprechen. Die Anzeigen für das gewählteProgramm und seine Laufzeit leuchten.

Hinweis: Geruchsbeseitigung
Vor der ersten Benutzung empfehlen wir, das Programm „Baumwolle90°C" + Schleuder-drehzahl 600 ohne Wäsche, aber mit einer geringen Menge Waschmittel in Kammer 2 oder mit Spezialreiniger durchlaufen zu halten, um mögliche unangenehme Gerüche zu beseitigen.
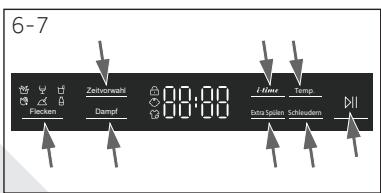
6.9 Zusätzliche Einstellungen
Gewünschten Optionen durch Drücken der Funktionstasten aktivieren (Abb. 6-7), siehe Kapitel BEDIENBLENDE.
6.10 Programm starten
Taste „Start/Pause" drücken (Abb. 6-8). Die LED über der „Start/Pause" Taste hört auf zu blinken und leuchtet nun dauerhaft. Das Gerät startet das eingestellte Waschprogramm. Änderungen sind nur noch mit Programmabbruch möglich

6-8
6.11 Programm unterbrechen - abbrechen
Um ein laufendes Programm zu unterbrechen: „Start/Pause" drücken. Die LED über der Taste blinkt. Nochmaliges Betätigten setzen das Programm fort. Um den Programmablauf abzubrechen und alle Einstellungen zulöschen:
- "Start/Pause" drücken, um das laufende Programm zu unterbrechen.
- "Ein/Aus" Taste für ca. 2 Sekunden drücken, um das Gerät auszuschalten.
- Zum Abpumpen des Wassers Programm SCHLEUDERN mit Einstellung „nicht schleudern" (alle LEDs der Funktion SCHLEUDERN sind an) ablaufen setzen.
- Nachdem das Programm zum Neustart des Gerätes geschlossen ist, kann ein neues Programm gewählt und gestartet werden.
6.12 Nach dem Waschen

Hinweis: Turverriegelung
Die Einfülltür ist aus Sicherheitsgründen teilweise während des gesamten Programmablaufs verriegelt. Sie wird erst am Ende des Programmes zum Offnen frei gegeben oder nach dem das Programm ordnungsgemäß abgebrochen wurde (siehe oben).
- Wenn der Wasserstand oder die Wassertemperatur zu hoch ist oder das Gerätschleudert,lässt sich die Tur nicht öffnen;Loc wird im Display angezeigt.
- Am Programmende erscheint End im Display.
- Das Gerät schaltet sich automatisch aus.
- Wäsche baldmöglichst entnahmen, um Knitterbildung der Wäsche zu vermeiden.
- Wasserzulauf schlieben.
- Netzsteckerziehen.
- Nach Betriebsende Tur und Waschmittelschublade stets öffnen. So kann Feuchigkeit entweichen und unangenehmer Geruch nicht entstehen.

Hinweis: Standby-Modus / Energiesparmodus
Das eingescheltete Gerät goes in den Standby-Modus, wenn es nicht innerhalb von zwei Minuten vor dem Programmstart oder am Ende des Programms aktiviert wird. Das Display schaltet sich ab. Dies spart Energie. Zum Unterbrechen des Stromsparmodus, „Start/Pause" Taste drücken.
6.13 Signalton
Der Signalon kann bei Bedarf abgewählt werden:
- Gerä einschalten
- Das Programm MIX wahlen.
- Taste "Zeitvorwahl"und "Temp." gleichzeitig fur 3 Sekunden drücken. Im Display wird "bEEP OFF" angezeigt; der Summer ist ausgeschaltet.
Zum Aktivieren des Summers erneut die beiden Tasten gleichzeitig drücken - im Display wird „bEEP Ün" angezeigt.
7- Umweltschutzhinweise

Tipps zum umweltfreundlichen Waschen
Sammeln Sie Wäsche und waschen Sie stets mit maximaler Beladung.
Gerät nicht überladen (eine Handbreit Abstand zwischen Wäsche und oberer Trommelwand).
Wahlen Sie für geringverschmutzte Wäsche das Express 15 min-Programm.
- Waschchemie exakt dosieren.
- Waschtemperatur niedrig wahlen - moderne Waschchemie wirkt auch in Bereichen deutlich unter 60^ sehr gut.
Standardeinstellungen nur bei extremen Verschmutzungen ändern.
Höchste Schleuderdrehzahl bei Einsatz eines Wäschetrockners.
8.1 Waschmittelschublade reinigen
Waschmittelrückstände sollen sofort entfernt werden und die Waschmittelschublade sollte regelmäßig gereinigt werden (Abb. 8-1):
- Schublade am Griff bis zum Anschlag herausziehen.
- Entriegelung drücken und Schublade entnehmen.
- Schublade mit klarem Wasser reinigen und wieder einsetzen.
8.2 Maschine reinigen
Vor Reinigung und Wartung der Maschine immer den Netzsteckerziehen.
Mit einem weichen feuchten Tuch und Seifenlauge das Maschinengehäuse (Abb. 8-2) und die Gummidichtungen abwischen.
Keine organischen Reiniger oder aggressive Lösemittel verwenden.
8.3 Wasserzulauf und Siebe reinigen
Der Wasserzulaufschlauch sollte regelmäßig geprüft und die dazugehörigen Siebe gereinigt werden, um Verstopfungen zu vermeiden.
Netzsteckerziehenund Wasserhahn schlieben.
Wasserzulaufschlauch auf Geräterückseite (Abb. 8-3) sowie am hahnseitigen Ende abschrauben.
Siebe entnehmen und gründlich mit Wasser und einer Bürste reinigen (Abb. 8-4).
Siebe einsetzen und Zulaufschlauch montieren.
8.4 Trommel reinigen
- Versehentlich mitgewaschene Metallteile wie Nadeln, Münzen usw. aus der Trommel (Abb. 8-5) entfernen, da sie Rostbildung verusichen konnen.
Zur Beseitigung von Rostflecken ein nicht-chloridhaltiges Reinigungsmittel verwenden. Warnhinweise des Reinigungsmittel-Herstellers beachten!
Keine harten Gegenstände oder Stahlwolle für die Reinigung verwenden.
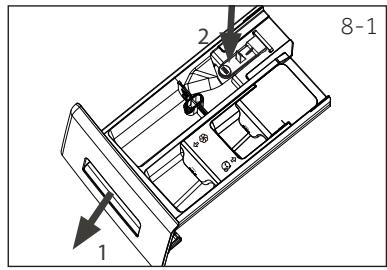
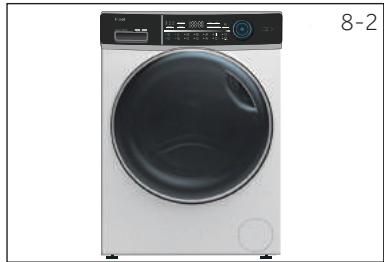
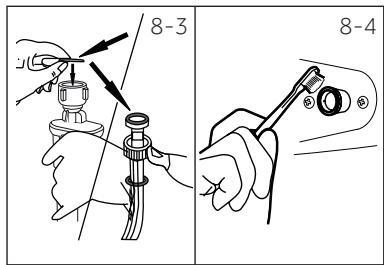
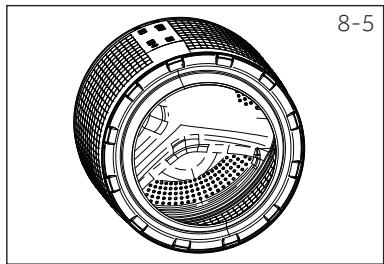
8-Reinigung und Pflege
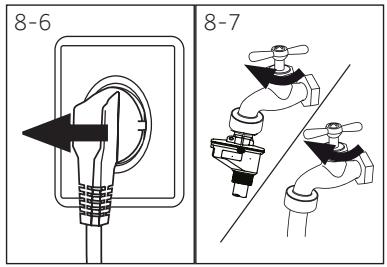
8.5 Bei längerer Nichtbenutzung
Wenn die Waschmaschine für längerere Zeit nicht be-nutzt wird:
- Netzsteckerziehen (Abb.8-6).
- Wasserzulaufschlieben (Abb. 8-7).
- Tür geöffnet{lassen. So kann Feuchtigkeit entweichen und kein unangenehmer Geruch entstehen.
Vor Wiederinbetriebnahme sind das Stromkabel und alle Anschlüsse auf Funktionsfähigkeit und Dichtheit zu prüfen
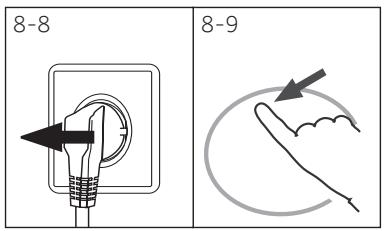
8.6 Fremdkörperfalle
Fremdkörperfalle ca. einmal im Monat prüfen; insbesondere wenn das Gerät
nicht abpumpt.
nicht schleudert.
ungewöhnliche Gerausche macht.

WARNING!
Verbrühungsgefahr! Das Wasser in der Fremdkörperfalle kann direkt nach dem Waschen sehr heiß sein! Warten Sie mit dem Öffnen, bis das Wasser abgekühlt ist.
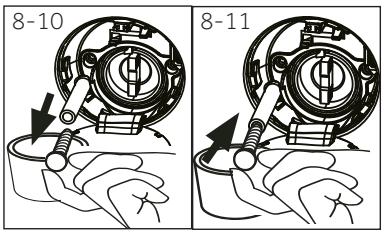
- Gerät ausschalten und Netzsteckerziehen (Abb. 8-8).
- Serviceklappe mit Hilfe einer Münze oder eines Schraubenziehers öffnen (Abb. 8-9).
- Flachen Behälter unter die Filterabdeckung stellen, um das Laugenwasser aufzufangen (Abb. 8-10). Es konnen großere Mengen Laugenwasser austreten!
- Notentleerungs-Schlauch herausziehen und das Ende über den Behälter halten (Abb. 8-10).
- Verschluss-Stopfen aus dem Schlauch entfernen (Abb. 8-10).
- Sobald kein Wasser mehr ausluft, Notentleerungs-Schlauch wieder verschreiben (Abb. 8-11) und ins Gerät schieren.
- Fremdkörperfalle entgegen dem Uhrzeigersinn herausschrauben (Abb. 8-12).
- Eventuell vorhandene Fremdkörper und Verunreinigungen entfernen (Abb. 8-13).
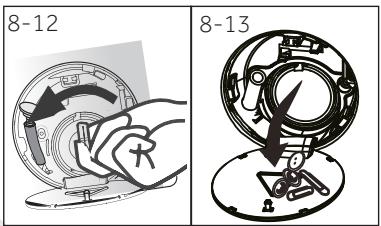
- Fremdkörperfalle unter fließendem Wasser saubern (Abb.8-14).
- Fremdkörperfalle im Uhrzeigersinn wieder sorgfältig festschrauben (Abb.8-15).
- Serviceklappe schließen.
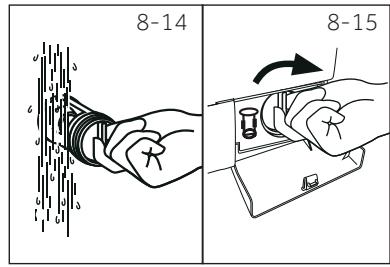

VORSICHT!
Achten Sie daraufuf, dass die Dichtung der Fremdkörperfalle sauber und unbeschädigt ist. Ansonsten kann Wasser austreten.
Die Fremdkörperfalle muss eingesetzt sein.
9-Fehlerbehebung
Die im Folgenden auf gezahlten Probleme können meinest selbst behoben werden. Wenn Sie sich erst dann an den Kundendienst (siehe Garantiekarte), wenn Sie alles geprüft haben und den Fehler nicht beseitigen konnen.

WARNING!
Schalten Sie vor jeder Wartung das Gerät aus undziehen Sie den Netzstecker.
Elektrogeräte)dürfen nur durch Elektrofachkräfte repariert werden, da durch unsachgemäß Reparaturen erhebliche Folgeschäden entstehen können.
- Wenn das Netzkabel beschädigt ist, muss es durch den Kundendienst (siehe Garantiekarte) ersetzt werden, um eine Gefahr auszuschreiben.
Folgende Codes werden nur zu Informationszwecken bezüglich des Waschzyklusses angezeigt und erfordern keine Maßnahmen.
| Code | Bedeutung |
| 1:25 | Die verbleibende Restlaufzeit ist 1 Stunde und 25 Minuten. |
| 6:30 | Das Waschprogramm wird inklusive der gewährten Startzeitverzögerung in 6 Stunden und 30 Minuten beendet sein. |
| AUTO | Die automatische Beladungserkennung Funktioniert; nur in einigen Pro-
grammen.. |
| End | Das Waschprogramm ist beendet. Die Maschine schaltet sich automatisch aus. |
| Loci- | Die Tür ist verriegelt, weil der Wasserstand oder die Wassertemperatur zu
hoch ist oder sich das Gerät im Schleudergang befindet. |
| bEEP DFF | Der Signalton ist ausgeschaltet. |
| bEEP On | Der Signalton ist eingeschaltet. |
| cLo f | Die Bedienung ist gespehtt. Programmänderungen sind nicht möglich. |
9.2 Fehlerbehebung mit Display Codes
| Problem | Mögliche Ursachen | Lösungen |
| E1 | · Wasser wird nicht innerhalb von 6 Minuten abgepumpt. | · Fremdkörperfalle reinigen.
· Ablaufschauch-Installation prüfen |
| E2 | · Tür verriegelt nicht. | · Tür sorgfältig schließen. |
| E4 | · Wasserstand in der Maschine nach 12 Minuten nicht erreicht.
· "Saughebereffekt" - Fehler. | · Wasser - Versorgung prüfen.
· Ablaufschauch - Installation prüfen. |
| E8 | · Wasserstand - Fehler. | · Kundendienst rufen. |
| F3 | · Temperatur Sensor Fehler. | · Kundendienst rufen |
| Problem | Cause | Solution |
| F4 | ·Heizungs Fehler | ·Kundendienst rufen. |
| F7 | ·Motor Fehler. | ·Kundendienst rufen. |
| FA | ·Wasserstands Fehler. | ·Kundendienst rufen. |
| FC0 or FC1 or FC2 | ·Kommunikationsfehler | ·Kundendienst rufen. |
| Unb | ·Unwucht- / Beladungsproblem. | ·Beladung prüfen.
·Wäsche gleichmäßig verteilen |
9.3 Fehlerbehebung ohne Display-Codes
| Problem | Mögliche Ursachen | Lösungen |
| Waschmaschine startet nicht. | · Ist das Programm gestartet? · Ist die Tür richtig geschlossen? · Ist die Maschine eingeschaltet? · Hat das Gerät Strom? · Werde die Kindersicherung aktiviert? | · Programm starten. · Tur sorgfältig schreiben. · Maschine einschalten. · Prüfen der Stromversorgung. · Kindersicherung deaktivieren. |
| Es lauft kein Wasser in die Waschmaschine. | · Ist der Wasserhahn aufgedreht? · Ist der Zulaufschlauch geknicht? · Ist das Sieb im Wasserzulauf verstopft? · Wasserdruck unter 0,03 MPa? · Ist die Türtrechtig geschlossen? · Ist das Wasser abgestellt? | · Wasserhahn aufdrehen. · Zulaufschlauch prüfen. · Sieb im Zulaufschlauch reinigen. · Wasserdruck prüfen. · Tur sorgfältig schreiben. · Wasserleitung prüfen. |
| Waschmaschine pumph ab, während Wasser einläuft. | · Hängt der Ablaufschauch niedriger als 80 cm? · Hängt der Ablaufschauch im Wasser? | · Wasser-Ablauf korrekt instalieren. · Sicherstellen, dass der Ablaufschauch nicht im Wasser hängt. |
| Waschmaschine pumph nicht ab. | · Ist der Ablaufschauch blockiert. · Fremdkörperfalle verstopft? · Hängt der Ablaufschauch höher als 1 m über dem Boden? | · Ablaufschauch prüfen. · Fremdkörperfalle reinigen. · Wasser-Ablauf korrekt instalieren. |
| Starke Vibrationen beim Schleudern. | · Sind alle Bolzen der Transportsicherung entfern? · Die Maschine stehn nicht fest am Boden. · Beladungsproblem. | · Prüfen, ob alle Sicherungen entfern't werden. · Maschine waagerecht auf feste tem Grund aufstellen. · Beladung prüfen; ggf. ändern und nochmals starten. |
| Maschine bleibt vor Ende des Pro-gramms stehen. | · Störung im Wasserzulauf oder Stromnetz. | · Stromzuführ und Wasserzuführ prüfen. |
| Maschine bleibt eine Zeit lang stehen. | · Fehlercodes auf dem Display. · Beladungsproblem. · Störung im Programmablauf. | · Siehe DISPLAY CODES. · Beladung reduzieren oder auflö-ckern. · Programmlöschen, Neustart. |
| Schaumbildung bis in die Waschmittel-schublade. | ·Waschmittel ungeeignet.
·Zuviel Waschmittel verwendet. | ·Waschmittel prüfen.
·Weniger Waschmittel benutzen. |
| Automatische Anpassung der Waschzeit. | ·Dauer des Programms wird der Wäschemenge und der Temperatur des einlaufenden Wassers angepasst. | ·Normal - beeinträchtigt nicht die Funktionsfähigkeit. |
| Maschine schleu-dert nicht. | ·Beladungsproblem. | ·Wäsche in der Trommel prüfen (Menge/Verteilung) Schleuder-programm neu starten. |
| Unbefriedigendes Waschergebnis. | ·Verschmutzungsgrad stimmt nicht mit dem gewährten Programm überein.
·Waschmittelmenge nicht ausrei-chend.
·Maximale Beladungsmenge wurde übersritten.
·Wäsche ist in der Trommel un-gleichmäßig verteil. | ·Anderes Programm wahren.
·Waschmittel entsprechend Ver-schmutzungsgrad und Herstel-lerangaben dosieren.
·Beladung reduzieren.
·Wäsche aufflockern. |
| Auf der Wäsche be-funden sich Wasch-mittelreiste. | ·Nicht lösbare Partikel des Wasch-mittels konnen als weitere Punkte auf der Wäsche verbleiben. | ·Zusätzlichen Spülgang durchführren
·Punkte durch Bürsten von der trockenen Wäsche entfernen.
·Anderes Waschmittel verwenden. |
| Wäsche hat graue Flecken. | ·Verursacht durch Fette wie Öl, Cremes oder Salben. | ·Wäsche mit einem Spezialreiniger vorbehandeln. |

Hinweis: Schaumbildung
Ist während des Schleuderns zu viel Schaum in der Trommel, wird der Schleudergang unterbrochen und die Maschine pumph 90 Sekunden lang ab. Diese Vorgang wird maximal 3 Mal wiederholt.äre ein zusätzlicher Vorgang nötig, wird das Schleudern vorzeitig beendet.
Sollten die Fehlermeldungen auch nach der ergriffen Maßnahme erneut erscheinen, schalten Sie das Gerät aus,ziehen den Netzstecker und benachrichtigen Sie den Kundendienst.
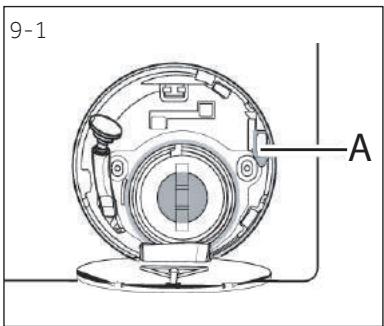
9.4 Hinweise im Falle eines Stromausfalls
Das aktuelle Programm und seine Einstellung wird gespeichert. Bei Wiederherstellung der Stromversorgung wird der Betrieb wieder aufgenommen. Bei einem Stromausfall wird die Türoeffnung eines laufenden Waschprogramms Mechanisch blockiert. Um Wäsche zu entnahmen, darf der Wasserstand nicht im gläsern Bullauge der Tur zu sehen sein - Verbrennungsgefahr! Der Wasserstand muss, wie unter „Fremdkörperfälle" beschreiben, gesenkt werden. Erst dann den Hebel (A) unter der Serviceklappe ziehen (Abb. 9-1), bis die Tur durch ein leichtes Kücken entriegelt wird. Anschließlich alle Teile wieder befestigen.

Hinweis: Türentriebelung
Wenn sich die Waschmaschine in einem sicheren Zustand befindet (Wasserspiegel unterhalb des Fensters, Temperatur unter 55^ , bei Stillstand der Trommel) kann die Tur entriegelt werden.
10.1 Auspacken
Gerät aus der Verpackung entnehmen.
Alle Verpackungsmaterialien inklusive der Styropor-Unterlage entfernen. Diese müssen unzugänglich für Kinder aufbewahrt werden.
Beim Öffnen der Verpackungen können sich evtl. Wassertropfen zeigen, die aus den regulären Tests im Werk resultieren.

Hinweis: Verpackungsentsorgung
Entsorgen Sie die Verpackung auf umweltfreundliche Weise. Informationen über die aktuelle Entsorgungswege erhalten Sie bei Ihr hem Handler oder bei den lokalen Behörden.
10.2 OPTIONAL: Gerauschdämmingspolster
In der Folienverpackung befinden sich eine Lärmschutz-Polster. Diese werden zur Geräuschminderung eingesetzt. (Abb. 10.1)
- Legen Sie die Waschmaschine auf die Seite - das Bullauge zeigt nach oben, die Unterseite zum Benutzer.
- Nehmen Sie die Polster aus der Verpackung. Entfernen Sie die doppelseitig klebende Schutzfolie und kleben Sie die Polster auf den Boden der Waschmaschine (Abb. 3). Zwei langere Polster in Position 1 und 3, zwei kürzere Polster in Position 2 und 4. Stellen Sie die Maschine danach wieder aufrecht.
10.3 Transportsicherung entfernen
Der Schutz auf der Rückseite dient zur Sicherung beim Transport, da schwingungsdämpfende Bauteilen im Inneren des Gerätes beschädigt werden konnten. Alle Elemente (I, R, S und T, Abb. 10-2) müssen vor dem Gebrauch halten.
- Transportsicherung entfernen (Abb.10-3).
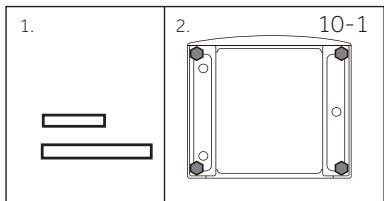
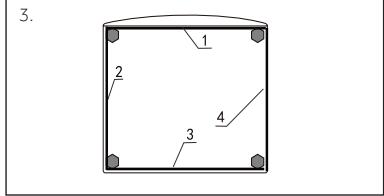
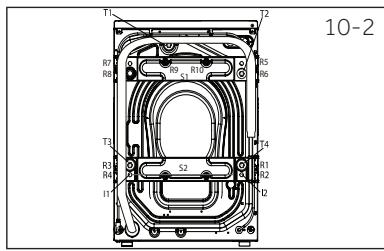
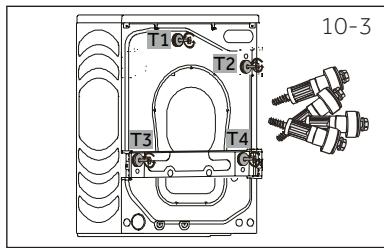
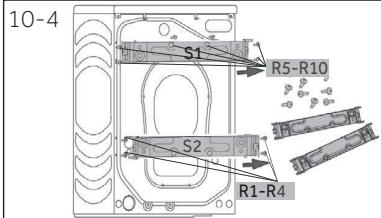
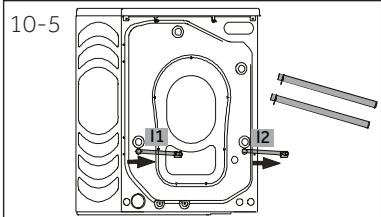
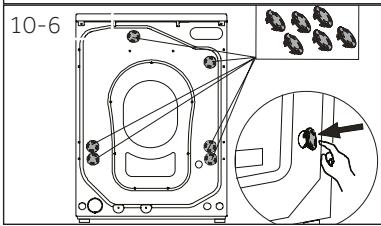
- Entfernen Sie die 10 Schrauben (R1 - R10 der unteren Rückenverstärkung. Nehmen Sie die Verstärkungen (S1 und S2) aus der Maschine(Abb. 10-4).*HW100 /120-B...
- Ziehen Sie die 2 Eisenstangen I1 und I2 heraus (Abb. 10-5).*HW100/120-B...
- Schließen Sie die 6 entstandenen Löscher mit den Abdeckkappen (Fig. 10-6).

Hinweis: Sorgfältig aufbewahren
Bewahren Sie die Transportsicherung sorgfältig auf. Zum Transport der Maschine sind die Sicherungen unbedingt wieder einzusetzen.
10.4 Transport der Maschine
Vor einem Transport unbedingt die Transportsicherungen wieder einsetzen, die bei der Aufstellung der Maschine entfernt wurden, um Beschädigungen zu vermeiden.
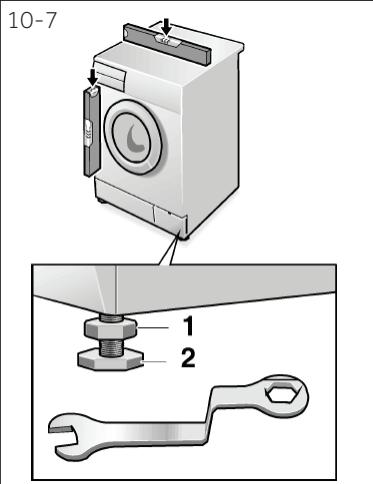
10.5 Gerät ausrichten
Gerät auf ebenen harten Boden aufstellen und mit Hilfe der vier Verstellfüsse/genau in der Waage ausrichten (Abb.10-7). Dadurch werden Schwingungen und damit Lärm während der Nutzung minimiert; der Verschleiß wird verringert.
- Kontermutter (1) mit einem Maulschlüssellös.
- Höhenanpassung durch Regulieren der Fuß (2) vornehmen.
- Kontermutter (1) gegen das Gehäuse wieder anziehen.
10.6 Wasser-Ablauf anschließen
Der Wasserablaufschlauch kann auf verschiedene Weise installiert werden. Sein hochster Punkt muss zwischen 80 und 100 cm über der Geräteunterkante liegen. Der Ablaufschlauch sollte an dem Clip auf der Rückseite des Gerätes fixiert werden.

WARNING!
Verwenden Sie nur das mitgelieferte Schlauchset!
Verwenden Sie niemalsalte Schlauchsets!
Schlieben Sie den Anschluss nur an Kaltwasser an!
Prufen Sie vor Anschluss, ob das Wasser sauber und klar ist.
Folgende Anschlüsse sind möglich:
10.6.1 Wasch-Spülbeckenanschluss
Ablaufschlauch mit Schlauchkrümmer über den Rand eines Wasch- oder Spülbeckens ausreichender Große einhängen (Abb.10-8).
Ablaufschlauch zusammen gegen Abrutschen sichern.
10.6.2 Abwasserrohr
Der Innendurchmesser des Rohres muss mindestens 40mm betragen
Schlauch ca. 80 - 100 mm tief in das Rohr stcken und gegen Verrutschen fixieren.
Ablaufschlauch in das Abwasserrohr hangen. Schlauchkrümmer befestigen (Abb.10-9).
10.6.3 Siphonanschluss
Das Verzweigungsstück muss oberhalb des Siphons liegen.
Die Siphon Verbindungsstelle ist gewöhnlich mit einem Stopfen (A) verschlüssen (Abb.10-8). Dieser muss entfernt werden!
Ablaufschlauch siphon-seitig mit einer Schelle befestigen.
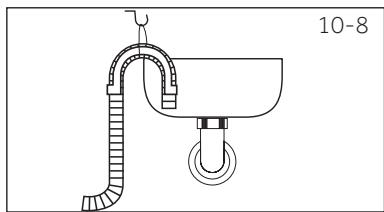
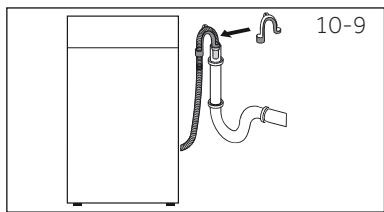
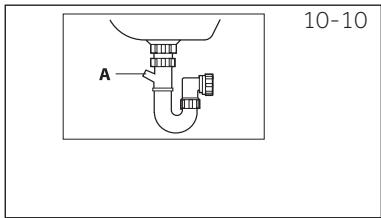

VORSICHT!
Der Ablaufschlauch muss dicht und sicher fixiert sein. Wenn der Ablauf zu niedrig ist, bzw. das Schlauchende im Wasser endet, pumpt die Waschmaschine kontinuierlich ab, während gleichzeitig Wasser einläuft (Saughebereffekt).
Der Wasserschlauch darf keinesfalls verlangert werden. Wenn ein längerer Ablaufschauch benötigt wird, wenden Sie sich an unseren Kundendienst.
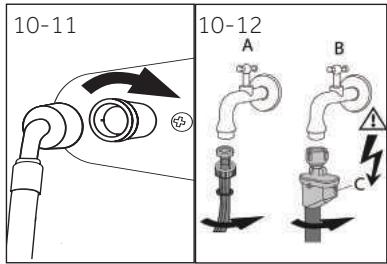
10.7 Frischwasser-Anschluss
Sicherstellen, dass sich in beiden Anschlussenden eine Dichtung befindet.
- Abgewinkeltes Schlauchende mit dem Gerät verbinden (Abb.10-11). Verschraubung von Hand festziehen.
- Anderes Ende an einen Kaltwasserhahn mit 3/4 Gewinde schrauben (Abb.10-12).
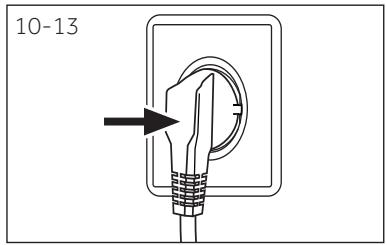
10.8 Elektrischer Anschluss
Vor jedem Anschluss prüfen ob
die Stromversorgung dem Typenschild entspricht.
die Anschlussdose geerdet und keine Mehrfachdose oder Verlangerung ist.
Stecker und Dose sich exakt entsprechen.
Nur GB: derBritische Stecker entspricht dem BS1363A-Standard.
Gerätestecker an eine vorschriftmäßig installierte Haushaltssteckdose anschließen (Abb.10-13).

WARNING!
Stellen Sie sicher, dass stets alle Verbindungen (Stromversorgung, Wasserabfluss und Wasserzufluss) fest, trocken und dicht sind.
Achten Sie darauf, dass diese Verbindungen nie geknicht, gequetscht oder verdrecht werden.
- Um Gefahren zu vermeiden setzen Sie ein beschädigtes Netzkabel durch den Kundendienst ersetzen (siehe Garantiekarte).
11.1 Produktdatenblatt (gemäß EU 1061/2010)
| Hersteller/Markek | Haier |
| Modellkennung | HW80-B14979/S
HW100-B14979/S
HW120-B14979/S |
| Nennkapazität (kg) | 8/10/12 |
| Energieeffizienzklasse | A+++ |
| Jährlicher Energieverbrauch (AEc in kWh/Jahr)1) | 119 / 129 / 165 |
| Energieverbrauch des Standarprogramms
"Baumwolle 60 C", volle Beladung (kWh)) | 0.54 / 0.58 / 0.76 |
| Energieverbrauch des Standarprogramms
"Baumwolle 60°C", Teil-Beladung (kWh) | 0.53 / 0.58 / 0.78 |
| Energieverbrauch des Standarprogramms
"Baumwolle 40 C", Teil-Beladung (kWh) | 0.50 / 0.55 / 0.65 |
| Gewichtete Leistungsaufnahme im Aus-Zustand(W) | 0.40 / 0.41 / 0.48 |
| Gewichtete Leistungsaufnahme im unausgeschalteten
Zustand (W) | 0.48 / 0.45 / 0.50 |
| Jährlicher Wasserverbrauch (AWc in L/Jahr)2) | 8360 / 10560 / 10750 |
| Schleudereffizienzklasse3) | B |
| Max. Schleuderrehzahl (U/min)4) | 1351 |
| Restfeuche (%)4) | 53 |
| Standardprogramm „Baumwolle 60°C”5) | Eco 40-60 + 60°C8)+ max. Drehzahl |
| Standardprogramm „Baumwolle 40°C”5 | Eco 40-60 + 40°C8)+ max. Drehzahl |
| Programmdauer des Standarprogramms
"Baumwolle 60°C" volle Beladung (min) | 280 / 280 / 295 |
| Programmdauer des Standarprogramms
"Baumwolle 60°C" Teil-Beladung (min)) | 275 / 280 / 295 |
| Programmdauer des Standarprogramms
"Baumwolle 40°C" Teil-Beladung (min) | 275 / 270 / 260 |
| Dauer des unausgeschalteten Zustands (Tj in min)6) | 3 |
| Luftschallemissionen (Waschen /Schleudern)
in dB(A) re 1pW7) | 54/69 |
| Einbaustimmung / alternativer Einbau | Standgerät |
1) Auf Grundlage von 220 Standard-Waschzyklen für 60^ - und 40^ -Baumwollprogramme bei vollständiger Befüllung und Teilbefüllung sowie dem Verbrauch der Betriebsarten mit geringer Leistungsaufnahme. Die tatsächliche Energieverbrauch hängt von der Art der Nutzung des Gerätes ab.
2) Auf Grundlage von 220 Standard-Waschzyklen für 60^ - und 40^ -Baumwollprogramme bei vollständiger Befüllung und Teilbefüllung. Der tatsächliche Wassererverbrauch hangt von der Art der Nutzung des Gerätes ab.
3) Klasse G (geringste Effizienz) bis Klasse A (hochste Effizienz)
4) Basierend auf den Standardprogrammen „Baumwolle 60^ " bei vollständiger Befüllung und „Baumwolle 40^ " bei Teilbefüllung.
5) Die Standardprogramme, Baumwolle 60°C und, Baumwolle 40°C sind die Standardprogramme, auf die sich die Informationen auf dem Etikett und im Datenblatt beziehen. Diese Programme sind zur Reinigung normal schmuztzer Baumwollwäsche geeignet und in Bezug auf den kombinierten Energie- und Wasserverbrauch am effizienten.
6) Bei Geräten mit Leistungssteuerung.
7) Im Standardprogramm "Baumwolle 60^ " bei vollständiger Befüllung.
8) Europäisches Standardtestverfahren: (Eco 40-60) Schleudern 5Sek. drücken. Nachdem die Temperaturfungtion angezeigt wird, können Temperatur und maximale Geschwindigkeit gewählt werden.
11-Technische Daten
11.2 Ergänzende Daten
| HW80-B14979 / HW100-B14979 / HW120-B14979
HW80-B14979S / HW100-B14979S / HW120-B14979S |
| Abmessungen - HxBxT in mm | 850x460x595 / 850x530x595 / 850x600x595 |
| Spannung in V | 220-240 V~/50Hz |
| Strom in A | 10 |
| max. Eingangsleistung in W | 2000 |
| Wasserzufuhr-Fließdruckin bar | 0,3-10 ≤P ≤1 |
| Nettogewicht in kg | 72 / 77 / 80 |
11.3 Normen und Richtlinien
Dieses Produkt erfüllt die Anforderungen aller anwendbaren EG-Richtlinien,die eine CE-Kennzeichnung vorsehen.
Wir empfehlen Ohnen unseren Haier Kundendienst und die Verwendung von Original Ersatzteilen.
Sollte eine Störung an Ihr Gemärk auftreten, überprüfen Sieitte zuerst die Hinweise im Kapitel FEHLERBEHEBUNG.
Wenn Sie dort keine Lösung finden, kontaktieren Sieitte
- Ihr Handlert vor Ort oder
unseren Kundenservice im Internet unter www.haier.com. HierfindenseService-Telefonnummernsowie dieGarantiebedingungenund konnen eine Reparaturanfrage stellen.
Wenn Sie unseren Kundendienst Kontaktieren, halten Sieitte folgende Geratedaten bereit; (These Informationen finden Sie auf dem Typenschild.):
Model Serial No.
Im Garantiefall ziehen Sieitte auch die Informationen auf der Garantiekarte zu Rate.
Für allgemeine Geschäftsanfragen nutzen Sieitte die folgenden Adressen in Europa:
| Europäische Haier Adressen |
| Land* | Postanschrift | Land* | Postanschrift |
| Italien | Haier Europe Trading SRL Via De Cristoforis, 12 21100 Verese ITALY | Frankreich | Haier France SAS 3-5 rue des Graviers 92200 Neuilly sur Seine FRANCE |
| Spanien Portugal | Haier Iberia SL Pg. Garcia Faria, 49-51 08019 Barcelona SPAIN | Belgien-FR Belgien-NL Niederlande Luxemburg | Haier Benelux SA Anderlecht Route de Lennik 451 BELGIUM |
| Deutschland Österreich | Haier Deutschland GmbH Konrad-Zuse-Platz 6 81829 München GERMANY | Polen Tschechien Ungarn Griechenland Rumänien Russland | Haier Poland Sp. zo.o. Al. Jerozolimskie 181B 02-222 Warszawa POLAND |
| Großbritannien | Haier Appliances UK Co.Ltd. One Crown Square Church Street East Woking, Surrey, GU21 6HR UK |
- Die Telefonnummern von weiteren Ländern finden Sie im Internet unter www.haier.com