
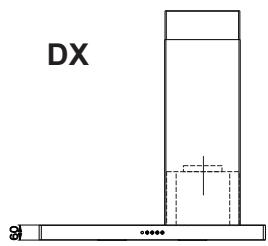
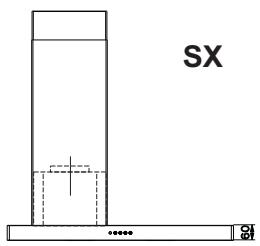
STILO SX - Stylo FABER - Notice d'utilisation et mode d'emploi gratuit
Retrouvez gratuitement la notice de l'appareil STILO SX FABER au format PDF.

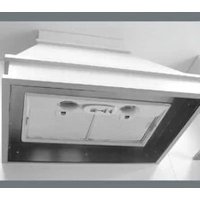
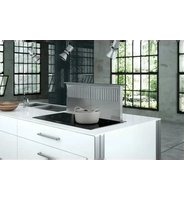
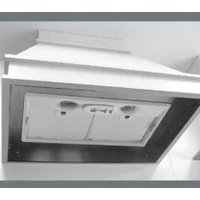
| Type de produit | Hotte aspirante |
| Marque | FABER |
| Modèle | STILO SX |
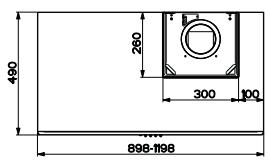
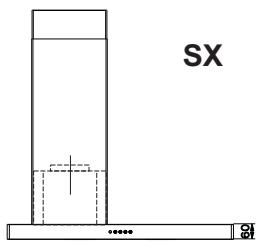
| Dimensions (L x P x H) | 90 cm x 50 cm x (hauteur télescopique réglable) |
| Poids approximatif | 15 kg |
| Alimentation électrique | 220-240 V ~ 50 Hz |
| Puissance maximale | 280 W (moteur + éclairage) |
| Nombre de vitesses | 3 |
| Type d'éclairage | Ampoules à incandescence 28 W (E14) ou halogènes 20 W (G4, GU10, etc.) |
| Filtres à graisse | Métalliques, lavables au lave-vaisselle (tous les 2 mois) |
| Filtre à charbon | Actif, non lavable, à remplacer tous les 4 mois (version recyclage) |
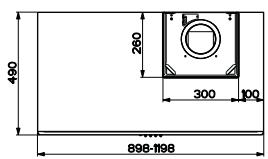
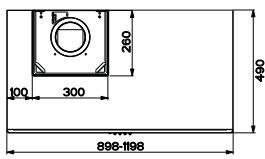
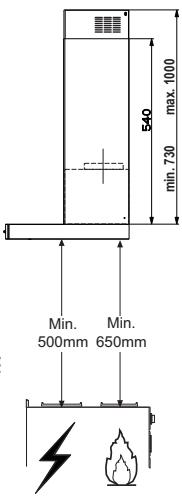
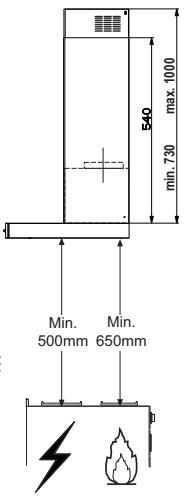
| Distance minimale de sécurité | 650 mm entre la table de cuisson et la hotte |
| Diamètre de la buse d'évacuation | 150 mm (réductible à 120 mm avec bride fournie) |
| Classe électrique | Classe I (mise à la terre obligatoire) |
| Fonctions disponibles | Extraction (évacuation) et recyclage (filtre à charbon) |
| Contrôle | Panneau de commande avec boutons poussoirs et LED |
| Entretien | Nettoyer avec un chiffon humide et détergent neutre |
| Sécurité | Arrêt automatique via le bouton T1 (passe par la vitesse 1) |
| Pièces détachées | Filtres à graisse et à charbon, ampoules, télécommandes non fournies |
| Réparabilité | Remplacer les lampes et filtres par l'utilisateur; pour le moteur, contacter le service technique |
| Garantie | 2 ans (pièces et main-d'œuvre) |
FOIRE AUX QUESTIONS - STILO SX FABER
Questions des utilisateurs sur STILO SX FABER
0 question sur cet appareil. Repondez a celles que vous connaissez ou posez la votre.
Poser une nouvelle question sur cet appareil
Téléchargez la notice de votre Stylo au format PDF gratuitement ! Retrouvez votre notice STILO SX - FABER et reprennez votre appareil électronique en main. Sur cette page sont publiés tous les documents nécessaires à l'utilisation de votre appareil STILO SX de la marque FABER.
MODE D'EMPLOI STILO SX FABER
Instruction Manual
PykoBoDcTBo no 3KcnIyatauIN
INDEX
EN
RECOMMENDATIONS AND SUGGESTIONS 3
CHARACTERISTICS 6
INSTALLATION 8
USE 11
MAINTENANCE 12
YKA3ATEJIb
RU
COBETbI IN PEKOMEHdALUIN 14
XAPAKTEPNUCTIKI 17
YCTAHOBKA 19
3KcPJIyATALIy 22
yXoI 23
The Instructions for Use apply to several versions of this appliance. Accordingly, you may find descriptions of individual features that do not apply to your specific appliance.
INSTALLATION
- The manufacturer will not be held liable for any damages resulting from incorrect or improper installation.
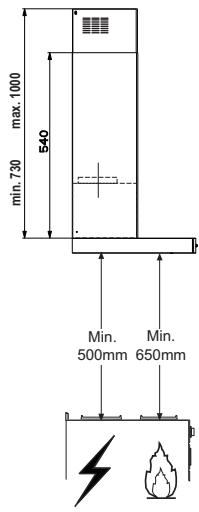
- The minimum safety distance between the cooker top and the extractor hood is 650~mm (some models can be installed at a lower height, please refer to the paragraphs on working dimensions and installation).
- Check that the mains voltage corresponds to that indicated on the rating plate fixed to the inside of the hood.
- For Class I appliances, check that the domestic power supply guarantees adequate earthing.
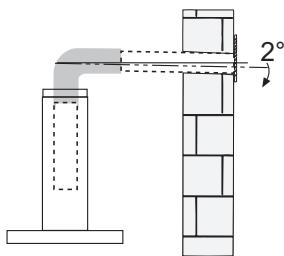
Connect the extractor to the exhaust flue through a pipe of minimum diameter 120mm . The route of the flue must be as short as possible.
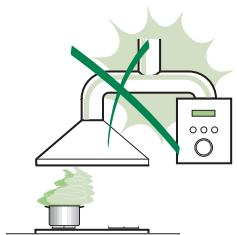
- Do not connect the extractor hood to exhaust ducts carrying combustion fumes (boilers, fireplaces, etc.).
- If the extractor is used in conjunction with nonelectrical appliances (e.g. gas burning appliances), a sufficient degree of aeration must be guaranteed in the room in order to prevent the backflow of exhaust gas. The kitchen must have an opening communicating directly with the open air in order to guarantee the entry of clean air.
When the cooker hood is used in conjunction with
appliances supplied with energy other than electric, the negative pressure in the room must not exceed 0,04 mbar to prevent fumes being drawn back into the room by the cooker hood.
- In the event of damage to the power cable, it must be replaced by the manufacturer or by the technical service department, in order to prevent any risks.
- If the instructions for installation for the gas hob specify a greater distance specified above, this has to be taken into account. Regulations concerning the discharge of air have to be fulfilled.
- Use only screws and small parts in support of the hood.
Warning: Failure to install the screws or fixing device in accordance with these instructions may result in electrical hazards.
- Connect the hood to the mains through a two-pole switch having a contact gap of at least 3mm .
USE
- The extractor hood has been designed exclusively for domestic use to eliminate kitchen smells.
- Never use the hood for purposes other than for which it has been designed.
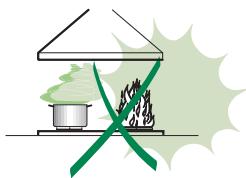
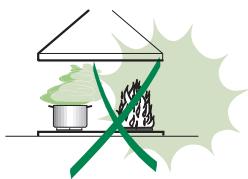
- Never leave high naked flames under the hood when it is in operation.
- Adjust the flame intensity to direct it onto the bottom of the pan only, making sure that it does not engulf the sides.
- Deep fat fryers must be continuously monitored during use: overheated oil can burst into flames.
- Do not flambé under the range hood; risk of fire.
- This appliance can be used by children aged from 8 years and above and persons with reduced physical, sensory or mental capabilities or lack of
experience and knowledge if they have been given supervision or instruction concerning use of the appliance in a safe way and understand the hazards involved. Children shall not play with the appliance. Cleaning and user maintenance shall not be made by children without supervision.
- “CAUTION: Accessible parts may become hot when used with cooking appliances.”
MAINTENANCE
- Switch off or unplug the appliance from the mains supply before carrying out any maintenance work.
- Clean and/or replace the Filters after the specified time period (Fire hazard).
- The Grease filters must be cleaned every 2 months of operation, or more frequently for particularly heavy usage, and can be washed in a dishwasher.
- The Activated charcoal filter is not washable and cannot be regenerated, and must be replaced approximately every 4 months of operation, or more frequently for particularly heavy usage.
- Clean the hood using a damp cloth and a neutral liquid detergent.
The symbol on the product or on its packaging indicates that this product may not be treated as household waste. Instead it shall be handed over to the applicable collection point for the recycling of electrical and electronic equipment. By ensuring this product is disposed of correctly, you will help prevent potential negative consequences for the environment and human health, which could otherwise be caused by inappropriate waste handling of this product. For more detailed information about recycling of this product, please contact your local city office, your household waste disposal service or the shop where you purchased the product.
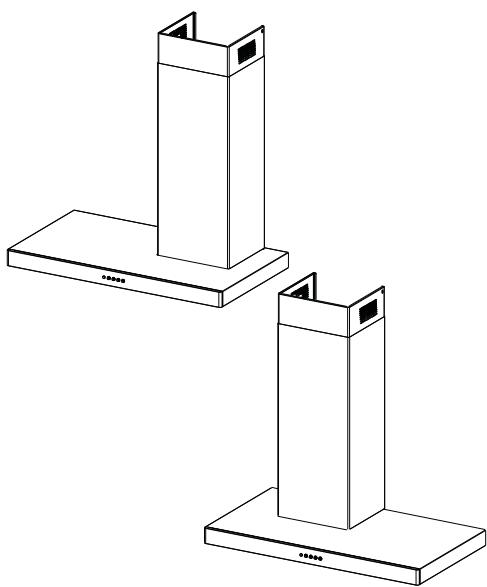
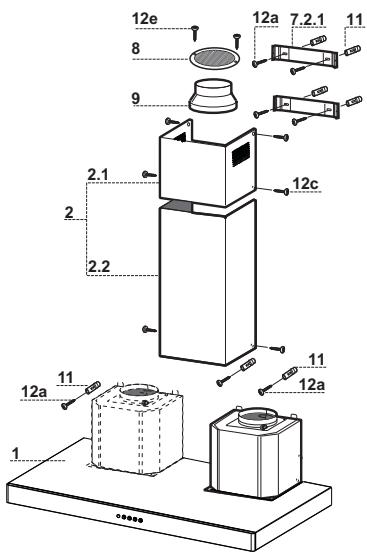
Components
| Ref. | Q.ty | Product Components |
| 1 | 1 | Hood Body complete with: Controls, Light, Blower, Filters |
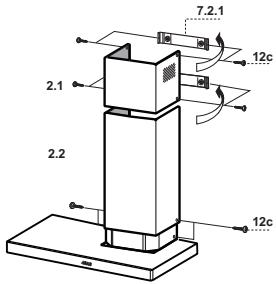
| 2 | 1 | Telescopic Chimney comprising: |
| 2.1 | 1 | Upper Section |
| 2.2 | 1 | Lower Section |
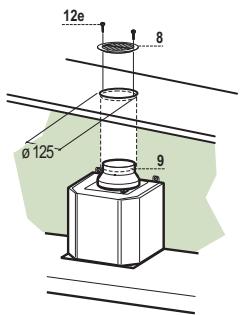
| 8 | 1 | Directional Air outlet Grilleø 125 mm |
| 9 | 1 | Reducer Flangeø 150-120 mm |
Ref. Q.ty Installation Components
7.2.1 2 Upper Chimney Section Fixing Bracket
11 7 Wall Plugs
12a 7 Screws 4,2 x 44,4
12c 6 Screws 2,9 x 6,5
12e 2 Screws 2,9 x 9,5
13 1 Washer
Q.ty Documentation
1 Instruction Manual


Wall drilling and bracket fixing
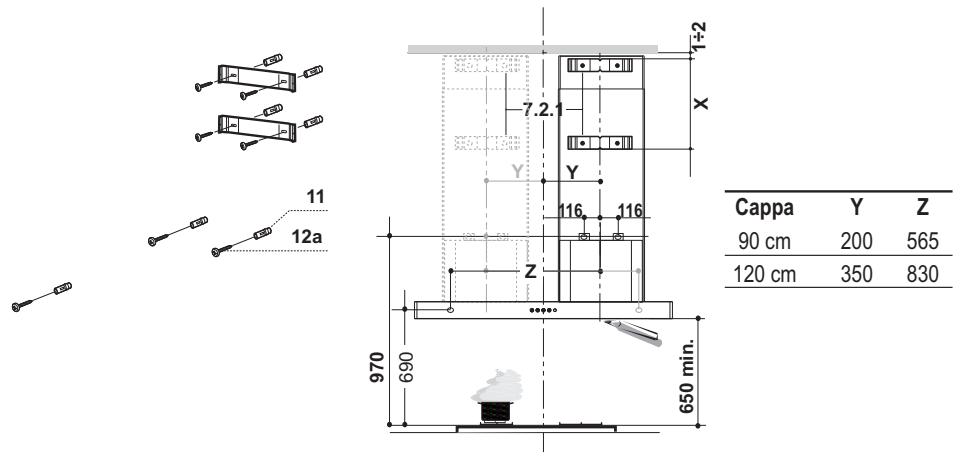
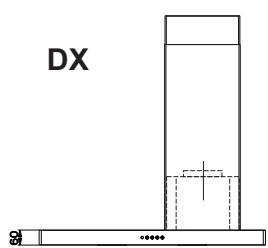
- Draw a vertical line on the wall on the right or on the left side depending on the hood model, at 200mm (90 cm hood version) or at 350mm (120 mm hood version) taking as a reference point the centre of the hob. Start the line from the ceiling or from other upper limit and finish it at the 650mm distance from the hob. This line is needed when aligning the brackets.
- Place the 7.2.1 bracket, as indicated, at 1 - 2mm from the ceiling or from other upper limit aligning its central point on the vertical reference line.
- Draw the central points of the bracket holes.
- Place the 7.2.1 bracket, as indicated, at X mm under the first bracket ( X = upper chimney height) aligning its central point on the vertical reference line.
- Draw the central points of the bracket holes.
- Draw the reference point, as indicated, at 116mm from the vertical reference point and at 970mm above the hob.
- Repeat the same procedure on the opposite side.
- Draw the reference point, as indicated, at Z mm ( Z = see the table) from the vertical reference point and at 690 mm above the hob.
- Drill 8mm the marked points.
- Insert the 11 plugs into the holes.
Fix the brackets using the 12a screws (4,2× 44,4) supplied with the hood. - Screw the 2 12a screws (4,2 x 44,4), supplied with the hood, in the hood body fixing holes. It is necessary to leave a 5-6 mm gap between the wall and the screw head.
Hood body installation
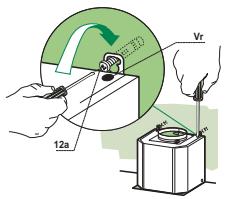
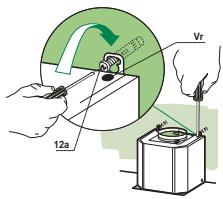
- Before hooking the hood body it is necessary to tighten 2 Vr screws placed in the fixing points of the body.
- Hook the hood body on the 12a screws.
- Tighten completely 12a support screws.
- The correct hood body position can be levelled with Vr screws.
Fix the hood definitively by tightening the 12a screw together with the 13 washer in the security hole.
Connections
DUCTED VERSION AIR EXHAUST SYSTEM
When installing the ducted version, connect the hood to the chimney using either a flexible or rigid pipe 150 or 120mm the choice of which is left to the installer.
- To install a 120mm air exhaust connection, insert the reducer flange 9 on the hood body outlet.
Fix the pipe in position using sufficient pipe clamps (not supplied). - Remove possible charcoal filters.
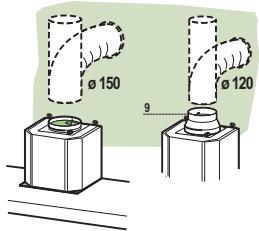
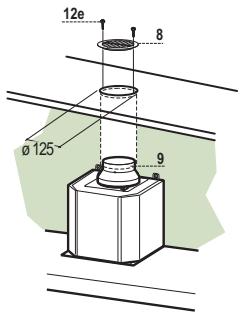
RECIRCULATION VERSION AIR OUTLET
- Cut a hole 125mm in any shelf that may be positioned over the hood.
- Insert the reducer flange 9 on the hood body outlet.
- Connect the flange to the outlet on the shelf over the hood by using a flexible or rigid pipe 120mm .
Fix the pipe in position using sufficient pipe clamps (not supplied).
Fix the air outlet grid 8 on the recirculation air outlet by using the 2 screws 12e (2,9 x 9,5) provided. - Ensure that the activated charcoal filters have been inserted.
ELECTRICAL CONNECTION
- Connect the hood to the mains through a two-pole switch having a contact gap of at least 3mm .
- Remove the grease filters (see paragraph Maintenance) being sure that the connector of the feeding cable is correctly inserted in the socket placed on the side of the fan.
Chimney assembly
Upper exhaust Chimney
- Slightly widen the two sides of the upper chimney and hook them behind the brackets 7.2.1, making sure that they are well seated.
- Secure the sides to the brackets using the 4 screws 12c (2,9 x 9,5) supplied.
Lower exhaust Chimney
- Slightly widen the two sides of the chimney and hook them between the upper chimney and the wall, making sure that they are well seated.
Fix the lower part laterally to the hood body using the 2 screws 12c (2,9 x 9,5) supplied.
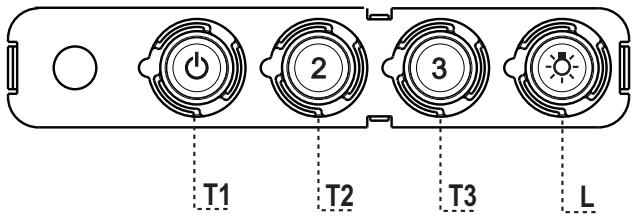
Control panel
| BUTTON | LED | FUNCTIONS | |
| T1 | Speed | On | Turns the Motor on at Speed one. |
| Turns the Motor off. | |||
| T2 | Speed | On | Turns the Motor on at Speed two. |
| T3 | Speed | Fixed | When pressed briefly, turns the Motor on at Speed three. |
| L | Light | Turns the Lighting System on and off. | |
Warning: Button T1 turns the motor off, after first passing to speed one.
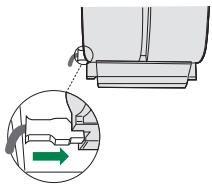
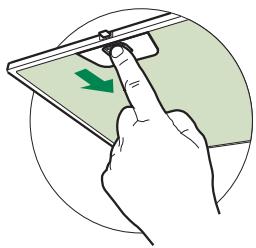
Grease filters
CLEANING METAL SELF- SUPPORTING GREASE FILTERS
- The filters must be cleaned every 2 months of operation, or more frequently for particularly heavy usage, and can be washed in a dishwasher.
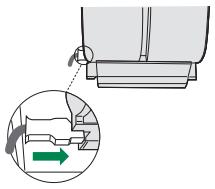
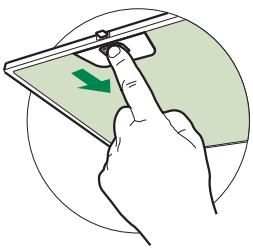
- Remove the filters one at a time by pushing them towards the back of the group and pulling down at the same time.
- Wash the filters, taking care not to bend them. Allow them to dry before refitting.
- When refitting the filters, make sure that the handle is visible on the outside.
Activated charcoal filter (Recirculation version)
REPLACING THE ACTIVATED CHARCOAL FILTER
- The filter is not washable and cannot be regenerated, and must be replaced approximately every 4 months of operation, or more frequently for particularly heavy usage.
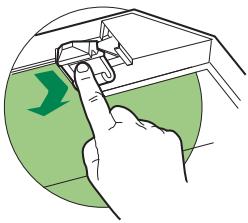
- Remove the metal grease filters.
- Remove the saturated activated carbon filter by releasing the fixing hooks.
- Fit the new filter by hooking it into its seating.
- Refit the metal grease filters.
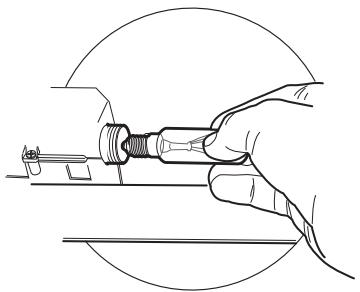
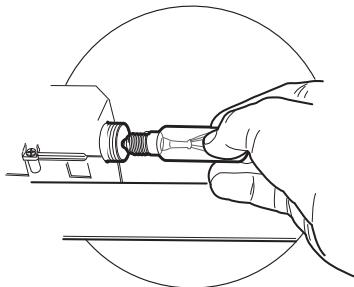
LIGHT REPLACEMENT
28W - 40W incandescent light.
- Remove the screw fixing the Lighting support.
Pull the Lighting support down. - Extract the lamp and replace with another of the same type.
- Replace the lighting support in reverse order.
| Lamp | Power (W) | Socket | Voltage (V) | Dimension (mm) | ILCOS Code |
| 28 | E14 | 220 – 240 | 104 x 35 | HSGSB/C/UB-28-220/240-E14 | |
| 20 | G4 | 12 | 33 x 9 | HSG/C/UB-20-12-G4 | |
| 35 | GU10 | 230 | 51 x 50,7 | HAGS-35-230-GU10-51/40 | |
| 50 | GU10 | 230 | 51 x 50,7 | HAGS-35-230-GU10-51/20 | |
| 20 | GU4 | 12 | 40 x 35 | HRGS-20-12-GU4-35/30 | |
| 20 | GU5.3 | 12 | 46 x 51 | HRGS-20-12-GU5.3-50/10 | |
| 16 | G13 | 95 | 720 x 26 | FD--16/40/1B-E--G13--26/720 | |
| 18 | G13 | 57 | 589,8 x 26 | FD--18/40/1B-E--G13--26/600 | |
| 9 | G23 | 60 (lamp) 220-240 (starter) | 167 x 28 | FSD-9/27/1B-I-G23 | |
| 11 | G23 | 91 (lamp) 220-240 (starter) | 235,8 x 28 | FSD-11/40/1B-I-G23 |
B INHCTpykuxyI NO 3KcIIpyatauIOnIcaHbI pa3IINHbIe MoJeI npIbopa. I03TOMy Bbl MOKeTe BCTpeITb ONICAHne HeKOTOpbIX xapaKTepnCTNK, He OTHOCAUHXcK pIno6pTeHHOMy Bamn npIbopy.
YCTAHOBKA
-
I3ROTOBtIEL he HecET OTBETCTBEHHOCb 3a y6bITKN, BO3HnKaHOUcne B pe3yIbTaTe He npabINbHOJ yCTaHOBKn IIn NkCnPyatauN pnp6opa.
-
Be3oNaChoe paCCToHHe MExdy BapOuHoi NaHeJIbIO IN BCaCbIbAIOUeBbITJgKoN DoJIgKHO 6bITb He MeHee 650 MM (HEKOTOpBIE MOdeJIIM MOXHO yCTaHaBnIBaTb HIXKe; CM. pa3dEi, IocBraIeHHbI paBOOHm pa3MePam IOnepaIqM IO yCTaHOBKe npIbopa).
-
Поберпес COOTBETCTBNE HANPRAKHeNЯ CETN yKa3aHHOMY Na TablNHKe, 3aKpeIJIeHHoB BHyTpN BbITJxKKN.
-
Д�� пиборов Класа I鞘верьт, чобь I в Злелктуческй сети Baшero Дома
- РадусмOTрпа COOTBETCTBYOUССТЕма 3a3eMLENHЯ.
- Сешип Te Bыгжky CдыIMOXODOM CnomOUsb Tpyбь МИнIMальНOrO Диametpa
- 120 MM. ТPyбдп OTBeDEHЯ Dыima ДолЖна 6ыт Кak моЖно короч.
He coeHnHrTe BCaCbIBaIOUyO BbITRAKy C DbIMOXODAMN, NO KOTOpBIM BbIBOHTCTA DbIM, Oba3ayUoIcR B IpoueCE ropeHna (Haipmep, OTONITeHbIe KOTJIbI, KAMHbI n IpOu.).
- EcTn BbITJXHOn aIppaT NcNOJIb3yETcB COUeTaHm C npi6bopam, pa6OtaIOUzIMn He OT 3JIeKTPnueCKoTO Toka (HaNPImep, ra3OboBIE npi6Opbl), POMeUeHne DoJxHO xopoIo IpoBETpNbBaTcB BO n36exKaHne O6paTHOrO NOTOKa OTXODAUX Ra3OB. IJa IpiNTOKA B IOMeUeHne


CBEXEBO3Dyxa Ha KUxHe D0JXHO 6bITb PpeDyCMOTpeHO BbIXOJaIeHa yIINuOKHO. Iprn POJIb3OBAHmN KUXOHNO BByTAKKO B COHTAHN C PpIbOpAMn, pa6oTaIOUIMn HE OT 3JIeKTPnueCKORo TOKa, OTPnCaTeNbHOe DaBJIeHne B IOMeUeHN He D0JHKHO PpeBbIaTb 0,04 M6ap C TeM, YTObI DbIM He BCaCbIbAICIa BByTAKKO ObaTHO B IOMeUeHne.
-Bo n36exahne onachoctn B clyuae noBpejdeHna Ka6eIaTahn, OH doJxeh 6bItb 3aMeHen n3ROTOBHTeJIem NJIcNeUaNCTAmN OTdEJa TEXHueCKOro 06cnykBaHn.
- Ecπn B INHCTpykuiŋx No yCTaHOBke r30BOy PΠIbI cKa3aHO, YTO paCCTOJHne Do BbITJXKKN DOJIKHO 6bITb 6OJIbIe yKa3aHHOrO BblIe, CneIyET npIdepIXBaTbCppeIINcAHbIX pa3MepOB. Co6JIouJaTe BCE HopMaTHNBHbIe Tpe6OBaHnNo OTBeDEHnO OTPa6OTaHHOrO BO3dYxa.
- IcnoJIb3yIte TOJIbKO BnHTbI IN MeTbI, pInrOdHbIe IJRA yCTaHOBKn BbITJXKII. PpeDynpeXdHeNHe: IcNoJIb3OBAHne BnHTOB IN 3axHMbIX YCTPOIcTB, He COOTBeTCTByIOx yKa3aHnA M daHHbIX INCTpyKcN, MOxET npINBeCTn K BO3HNKHOBeHnO ONaCHbIX CNTyaCm IN K ΚJIeKTPnueckm Udapam.
- CoeHInHe BbITJxKcY C cetbIO NITaHnC NOMOuIbO DByXNoJIHOCHOrOBbIKNUOHTaTeJIc MHNMaJIbHbIM pa3BeDeHEm KOHTaKTOB 3 MM.
3KcπJyATAUЯ
- BcacbBaIOUaBbITgKa IpeHa3NaYeHa TOfbKO IpyPIMHeHnB 6bIy DJIy UdaJIeHnI3 KUYHN 3aIaxOB OT rOTOBKn.
- HNKoIa He nOJIb3yIeTcB BbITJxKoB B INbIX cIeJX, OTIIuHbIX OT TEX, dJIa KOTopbIX OHa IpeHa3HaueHa.
- HNKoRda He OCTaBnIte BbICOKoe PIIaMЯ NOd BbITJxKoH, HaxOJaIeIcR Ba6Ote.
- Perynipyte cnly nIamEni TAKIM o6pa3OM, YTO6bI OHO OCTaBaIocb NOI DNOM eMKoCTN IJRA rOTOBKN H He BblpBbIaIocb 3a erO npedeJIbl.
- При ratobke BO ФрntHOpHnue NOCTOAnHc CJIeIte 3a ee pa6ToT: cnIbHo HarpTeOE MacNo MoKet BOCIIaMeHHTbcr.
He roTOBbTe 6JIoDa fIaM6e nOd BbITJxKoN: ONaCHOCTb BO3HnKHOBeHn IOnXapa. - Ппбором могут поьзоватся DeTи CTapшe 8 Лети Лица C оранчehнblIM NcIxNueCKIMN, ФиЗИчecKMIM N ceHCOPHbIM Спосбнoctам, a ТAKKE He ИМЕОШе ДОCTaTOCHORO ONbIТА N 3HaHIN, HO TOJIbKO ПОД писмOTPOM OTBETCTBEHHbIX Лиц и РИ YCЛOBIM, YTO OHI Бочени БeЗОпаСНОД ЭКПЛУаТAZIM Ппбора и 3HAOT O CBЯЗнblX C erO НЕРавиьнblIM ИСПОьзOBaHemeОпАСХOTX. СлдNTe, YTOБы DeTи H Играли C рпборom. OчИстку и ухOD 3a пборom DoJIXeH obecпeЧИВаТь ПОЛьзовател, ТAKNE DeIeCTBnA MOrY T BblIOJIHЯТь N DeTи, HO TOJIbKO ПОД Надзором ВЗрсныx.
“BHIMAHHE:IOCTyHbIe Yactn BbITJxKmMOryt CnJIbHO HArpeBaTbcr BO BpemraPabOtblra3OBbIX npi6OpOB.
yXoI
- Пераць Вьлолпенем Любов onepaци по очирке и ухodied выковочи влп OTосeднichte пибор OT зелктуеско сети.
- OuNsauTe n/nn 3aMeHnTe fNbTpbl NcTeueHn yKa3aHHOro nepNoDa BpeMeHn (OnaCHOCTb BO3HnKHOBeHn NOxapa).
JnpoBbIe nIbTpbl Heo6xOIMO OunuataB pa3 B 2 Mecaa pa60tbl nnu yaue B cIyae ouehb INTEHCINBHO IcNoJIb3OBAHnI np60pa; JnpoBbIE nIbTpbl MOxHO MbITb INOCyIDOMOEuHm MaUNHe. - Φильър на akтувированьюгле Heьья Мыть И BOCCTанвьт, erg cneуet Meнъ пимерно pa3В 4 месяca pa6otь Ипчae В слуаe Oчени ИHTEHCBHOrO ИСПОЛьЗOBAHЯ пббopa.
OuHuaTe BbITgKky BnJxHoN TpIKNo, CMOeHHoB HHeITpaIbHOM XnIKOM MOUcEM BeIecTBe.
CnmboHa n3deJInn nn Ha ynaKOBKe yka3bIbaeT, YTO npnbop HeJIb3a Bb6paCbIbAtb, KaK obbyHbN 6bITOBoMycOp. Pnp6Op, NOJLekauny HnHTOKeHNIO, HeoBXdmo CdaTb B CpeUaNbHbN C6OpNbIpyHK TДЯ IOBTOPOrO hCNOJb3OBaHnR 3JIeKTPnuCeKNX I 3JIeKTPoHHbIX KOMNoHErTOB. POnb3OBaTeJIb, PpABuNbHO cdaUoNIN Pnp6Op Ha nepepa6OTKy, NOMORAET PpeD0TBpATNTb NOTeHuaNBHbIE HeratNBbIE NOcJeDCTBNI DnIg OKpyKaHOSe Cpebl I dIra 3IOPOBBy IIODei, BO3HnKaIOUne B Cnyuae He npabUNbHO rO yHnHTOKeHnra. 3a 6Oone NOpO6Ho INHΦOPMaUne O BTOPNHOM NcNoJb3OBaHnN Pnp6opa OBpaAaTEcb B TropODCKoB COBET, B MeCTHyO clyx6y IIO nepepa6OTke OTXoDob NN B MaRa3HN, rDe np6Op bbl npno6peTeH.
Yactn
K-BO Dokymentaunia
| Овозн.К-Во | Части Истелемia |
| 1 | Корпс Витяжkin B KOMПЛЕКТС ручам уразалени, освеценьем, вентлиаторМ, Фимьтами |
| 2 | Телес_KОпунec sixthдымовая труба, состotingуан3: |
| 2.1 | Верх新聞 дымовий трубы |
| 2.2 | Ножнеддымовий трубы |
| 8 | Рergлuyер第六peшетка Вьлуха bo3dya x 0 125 mm |
| 9 | Перекондный Фразец 0 150-120 MM |
| Овозн.К-Во | Установочьke kompoнentы |
| 7.2.1 | Крөнөнгье скобы Берх新聞 дымовий трубы |
| 11 | Вкадышin |
| 12a | ВИNTы 4,2 x 44,4 |
| 12c | ВИNTы 2,9 x 6,5 |
| 12e | ВИNTы 2,9 x 9,5 |
| 13 | Шайба |
1 RykoBoDCTBO no 3KcIpyatauun

OtbepcTnB CteHe N KpePnIeHne cKo6

- Bo3bMHTe B KaueCTBe TOUKN OTCueta IeHTp IIINbI h IpoBcJIte Ha cTHe BePTHKaJIbHyIO JINHHIO CIIpaBA HJIN CJIeBA OT IeHTpa, B 3aBHCHMOCTH OT MOJIIN BbITJIKK, Ha pacCTOHHN 200 MM (JIJRA BbITJIKK N BICOTOI 90 MM) H Na pacCTOHHN 350 MM (JIJRA BbITJIKK N 120 MM) OT BEPxHErO IIpeJa I IO OTMeTKH N HA BbICOTE 650 MM OT IIINbI. 3Ta JINHHN CJIyKHT IJRA BbIPaBHHBHncko6 II BepTHKaJIH.
- IIpHIOKHTe, KaK IIOKa3aHo, cKo6y 7.2.1 K cTeHe Ha pacCTOJHHN 1 - 2 MM OT IIOToJIka HJIH BepXHeI ppeJa H bIbOPBHyIte ee IeHTp (IIa3bl) IIO BepTHKaJIbHOJ JHHHH.
OTMeTbTeIeHTpbIOBtBepCTHcKo6bl. - IIpnIIOxHHe, KaK IIOka3aHo, cKo6y 7.2.1 Ha paCCToaHHN X MM IIOI IepBoi cKo6oi (X = BbICota IIpHIIaeraMoB Y KOMIIIEKeT BePxAHe YacTH IbIMOXOJa) N BbIPOBHnTe ee IeHTp (Pi3bI) IIO yCTaHOBOUHOB BePTKaJIbHOJ JINHH.
OTMeTbTeIeHTpbIOBtBepCTHcKo6bl. - O603NaUbTe, KAK IOKa3aHO Ha pncyHke, KOHTpOJIbHyIO TOky Ha paCCToHHN 116 MM ot BePTHKaJIbHOJ JHHHH N Ha paCCToHHN 970 MM HAI IIJIHTOn.
-Повторе 3у ту операцию с ротоньюложенho CTOPOHbVEpTHKaJIbHOJINHHN. - 0603NaUbTe, KaK IIIOKA3aHO Ha pncyHke, KOHTPOJIbHyTOUky Ha paCCTOHH Z MM (Z = cm. Ta6JIHuy) OT BepTnKaJIbHOJ IINHH H Ha paCCTOHH 690 MM HAД ПЛHToI.
-ПорocверлінтЕТВерстгЯ8MMВОБЗHAчЕHHьIXTOUКАX.
BcTabbTe BOTBepCTHn BKJaIbIIIN 11.
3aKpeIITe cKO6bI IIpHJIaIgEMbIMB BHHTaMH 12a (4,2 x 44,4).
BbHTte 2 pHJIaeraMbIX BnHTa 12a (4,2 x 44,4) B OTBepCTHa JI KpeJIeHHKoPpUca BbITJKKN H OCTaBte IIPOCTpaHCTBO 5-6 MM MeKJy CTehO Hi TIOBJKAMn BnHTOB.
YctaHOBka KopnyCa BbITJxKn
- IIpeJxIe IIOBecHTb KOpIyuc BbITJgKKn, 3aTaNHTe 2 BnHTa Vr B ToUkax HABeCKN KOpIyca IpH6opa.
-ПовсьтЕ КОПИЦВБИТЯЖКИ HA BИNTBI 12a. - OkOHuaTeJIbHO 3aTHeHTe OIIOpHbIe BnHTbI 12a.
BHTAMN Vr BbIPOBHnTe IIOJIOKeHHe KOpIyCa BbITaKn. - OkohyateJIbHO 3aΦHKChpyIte IIOJOKeHne BbITJxKHN BHTOM 12a HIIaIbOoi 13 B IIpeIOxpaHHTeJIbHOM OTBepCTHH.
CoeHHnHn
BbIpyCK BO3JyXA I3 BCACbIBAIOUeB BbITJXKIN
Дя установки BCасьlaIошe BытЯжн coeINHHTb ee c BыИпскHoT pyбои kectkoи ИлгИбКоT pyбКоI dHaMeTpOM 150 HIn 120 MM, TnI KOTopoи мОжет БИбpaTb MOТаЖнК.
-ⅡHcoeHHHn Tpyko0 120 MM BCTaBHb IepexOHNb ΦHaHei 9B BbIyCKHO OEtBcTHe KOpIyCa BbIgKKn.
3aKpeHb Ty6Ky COOTBeCTBHyUIMn Tpy6HbIMn 3aJHMamH. Heo6XoImMb KpeIeKHB MaTePnaJI He BXoINB KOMIIJEKT.
- BbHyt bHJbTpbl OT 3aIIaxOB Ha aKTHBHOM yIe.

BbIXoD BO3IyXa I3 ΦNJIbTPYIOUe BbITJAKK
CJIaIbBIOJIkeHaI BbITJIKOITBePcTHe 125MM.
BcTaBnTb IepexoIhBn _IIaHeII 9 B BVbIXOJHoe OTBepCTne B KOpIyCe BbITJxKKn.
CoeHHHTb JIaHeu C BbIyucKbIM OTBepCThem IOJIKN HaD BBITJAKKO JcEeKoH HIN rH6KO Tpy60 120 MM.
3aKpeIINTB Tpy6y COOTBeTCTBYIOHMM 3aJHMAMH. Heo6xoIHMbI IJIg 3TOrO MaTePHaJI He BXoIHT B KOMJIJEKT IOCTaBKn.
3aKpeINITb peIeTky 8Ha BbIyckHOM OTBepCTHN 2 BHHTAMH 12e (2,9x9,5) (IIpHJIraHOTcJ.
- IIpoBepHTb HaJIINHe B BbITJKe HJIbTpOB OT 3aIIaxOB Ha aKTHBHOM yTJIe.
3JIeKTPnueCKOE NIOKJIIOUHHE
CoeHHHTb BbITJgKc CcTeBBIM HApJxKeHHeM, yCTaHOBnB JByXIOJIIOCHbI BbIKJIOuAteJIb C pa3BeJeHHem KOHTaKTOB He MeHee 3 MM.
CHTbIPOTHBOXKHPOBBIEΦHJIbTpBI(CMOTPNpa3JeI“YxOJ) HIIPOBEBNTIpaBUNJIbHOCTbIOJIIOKeHHaPa3BeMa IHTaIOUeRo Ka6EJI B PO3ETKE BBITJKKH
YcTaHOBKa DbIMOXOda
BepxHHn IbIM0XoI
CJIeKa pa3BecTH IBe 6OKOBIe KpOMKn IbIMOxoJa, 3aIeHHTb Hx 3a cKO6bl 7.2.1 H BHOb CBecTH IN Do yIopa.
3aKpeHnTB bIMOXoI c6Oky 4 BXOJIIHMN B KOMJIeKT BHTAMH 12c (2,9 x 9,5).
HnKnnIbIMOXoJ
CJIeKpa3BecTHIBe6OKOBIE KpOMKn IbIMOXOJa,3aIIeINtB Hx MeKJy BepXHm IbIMOXOJOM IN CTeHOIN BHOBb CBecTH IN YIO yIopa.
3aKpeHnTb HnKHHIOU YaCTb IbIMOXoJa c6Oky K KopNycy BbITJAKKN BXOJAAHMMN B KOMIIJEKT 2 BNHTAMH 12c (2,9 x 9,5).


IIaHeJIb yInpabJIeHnIa
| КЛАВИНИА | ИнДИКATОР | ФУHKПИЙ |
| T1Сkopocть | Горот | ВКЛЮает ДВИга teль на певой скорoctи. |
| Быклюает ДВИга teль. | ||
| T2Сkopocть | Горот | ВКЛЮает ДВИга teль на втори скорoctи. |
| T3Сkopocть | Горот | Кратуким Нажатем ВКЛЮает ДВИга teль на特有的 skорoctи. |
| LОсveшениe | ВКЛЮает и ВБКЛЮает освetedе lyнчу сн�temу. |
BHHMaHHe: KJIaBHIIa T1 BbIKJIIOuaET IbHrAteJIb, pa6Ota KOtOpOro BCeIgIa IpOxoIHT uepe3 IIepByIO cKOpocTb.
IpoTHBOXHIpOBbIe qHJIbTpbl
OuNCTKA METAJIINUECKNX IPOTNBOXIKPOBbIX ΦЛьТРОВ
Takoi HJIbtp MoKHO TaKKe MbytB BIOcyDOMOeHNO MaHHe. MbytB HJIbtp Heo6xoJIMo He peKe OJHO p3a B 2 MeCya HIN Yauie BCJyue erO aKTHBHOrO IprImeHeHH.
- CnIbHJIbTp, IJIa Yero IIpIHKaTb Eero K 3aJHei cSTOPHe y3Ja H OJHOBpeMeHHO IOTAHyTB BHN3.
- IIOMbIb ΦHJIbTp, CJIeIa 3a TeM, YTO6bI OH He IIOrHyJIcR, H JATb EMy IPOCOXHyTb.
-ПocTaBnTbФньTpHaMeTo TaK,ЧТоБыpyчkaHaxOДиJIaCb c HapyЖHoi CTopoHbIибьЛЯВДha.
ФильтnpOTnB 3anaxOB (Фильтpyюэг BAITJKA)
3AMEHA YTOJIbHOrO ΦIJIbTPA
-ДанньиФнЛьтг He MoETcH He BOCCTaHaBJIbHaeTc; erO cIeIyET MeHЯТb He peKe OJHOrO pa3a B 4 Mecya HJIn YauE BCJIyuae AKTHBHOTo IIpHMHeHn.
- ChrTB MeTaJIINHueckn IIpoTbHOxHPOBOI ΦJIbTp.
- OTCOeINHHTb HacbIeHHbIy yTOJIbHbI ΦHJIbTp IpOTnB 3aIIaXOB IIPIH NIOOMIIN CIEIIHaJIbHbIX 3aIIeJIOK.
- YctaHOBHTb HOBbI ΦHJIbTp B IIOJIOKeHHN N 3aKpeIIHTb erO 3aIeJIkAMH.
- IocTaBnTb Ha MeCTO metaJIInueckHn IIpoTHBOJKHpOBoI _IIbTp

OcBeHne
3AMEHA JIAMI
JAmIbHaKaJIHBaHHa 28W-40W Bt.
- ChrBbNHT KpeJIeHnI IlafoHa.
OTBHTbJAMIyH3aMeHHtbe HaHOByIO c TaKHM JxapaKTePncTHKaMn. - IIocTaBHTb Ha MeCTO MetaJIINueCKHe IpoTbBOKHPOBBleΦHJIbTpbl.
| Пампа | ПOT repeльни (Вт) | Патрон | Наррахени (В) | Размер (MM) | КоД ILCOS |
| 28 | E14 | 220 - 240 | 104 x 35 | HSGSB/C/UB-28-220/240-E14 | |
| 20 | G4 | 12 | 33 x 9 | HSG/C/UB-20-12-G4 | |
| 35 | GU10 | 230 | 51 x 50,7 | HAGS-35-230-GU10-51/40 | |
| 50 | GU10 | 230 | 51 x 50,7 | HAGS-35-230-GU10-51/20 | |
| 20 | GU4 | 12 | 40 x 35 | HRGS-20-12-GU4-35/30 | |
| 20 | GU5.3 | 12 | 46 x 51 | HRGS-20-12-GU5.3-50/10 | |
| 16 | G13 | 95 | 720 x 26 | FD--16/40/1B-E--G13--26/720 | |
| 18 | G13 | 57 | 589,8 x 26 | FD--18/40/1B--E--G13--26/600 | |
| 9 | G23 | 60 (пампа) 220-240 (nускател) | 167 x 28 | FSD-9/27/1B-I-G23 | |
| 11 | G23 | 91 (пампа) 220-240 (nускател) | 235,8 x 28 | FSD-11/40/1B-I-G23 |
- Instruction Manual
- PykoBoDcTBo no 3KcnIyatauIN
- INDEX
- EN
- YKA3ATEJIb
- RU
- INSTALLATION
- USE
- MAINTENANCE
- Wall drilling and bracket fixing
- Hood body installation
- Connections
- DUCTED VERSION AIR EXHAUST SYSTEM
- RECIRCULATION VERSION AIR OUTLET
- ELECTRICAL CONNECTION
- Chimney assembly
- Upper exhaust Chimney
- Lower exhaust Chimney
- Grease filters
- CLEANING METAL SELF- SUPPORTING GREASE FILTERS
- Activated charcoal filter (Recirculation version)
- REPLACING THE ACTIVATED CHARCOAL FILTER
- LIGHT REPLACEMENT
- 28W - 40W incandescent light.
- YCTAHOBKA
- 3KcπJyATAUЯ
- yXoI
- OtbepcTnB CteHe N KpePnIeHne cKo6
- YctaHOBka KopnyCa BbITJxKn
- CoeHHnHn
- BbIpyCK BO3JyXA I3 BCACbIBAIOUeB BbITJXKIN
- BbIXoD BO3IyXa I3 ΦNJIbTPYIOUe BbITJAKK
- 3JIeKTPnueCKOE NIOKJIIOUHHE
- YcTaHOBKa DbIMOXOda
- BepxHHn IbIM0XoI
- HnKnnIbIMOXoJ
- IpoTHBOXHIpOBbIe qHJIbTpbl
- OuNCTKA METAJIINUECKNX IPOTNBOXIKPOBbIX ΦЛьТРОВ
- ФильтnpOTnB 3anaxOB (Фильтpyюэг BAITJKA)
- 3AMEHA YTOJIbHOrO ΦIJIbTPA
- OcBeHne
- 3AMEHA JIAMI
- JAmIbHaKaJIHBaHHa 28W-40W Bt.
Marque : FABER
Modèle : STILO SX
Catégorie : Stylo