GX-SM650SJ - Décodeur tnt SAMSUNG - Notice d'utilisation et mode d'emploi gratuit
Retrouvez gratuitement la notice de l'appareil GX-SM650SJ SAMSUNG au format PDF.
| Type de produit | Décodeur satellite HD / Récepteur TNT (adapté) |
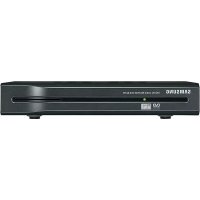
| Marque et modèle | Samsung GX-SM650SJ |
| Dimensions (approx.) | 30 cm x 20 cm x 5 cm |
| Poids (approx.) | 1.2 kg |
| Alimentation | Adaptateur secteur externe : entrée 100-240 V AC, 50/60 Hz ; sortie 12 V DC, 2 A |
| Résolution vidéo maximale | 1080p (HD) via HDMI |
| Formats audio supportés | Dolby Digital Plus, MPEG, AAC, HE-AAC, WMA |
| Connectivité | HDMI, SCART, 2 ports USB 2.0, sortie optique audio, Ethernet, entrée antenne satellite (double tuner) |
| Fonctions principales | Enregistrement PVR, Time Shift, PIP (incrustation d'image), HbbTV, guide EPG, liste de favoris, verrouillage parental, mise à jour OTA et USB |
| Support de stockage USB | Clé USB ou disque dur externe (USB 2.0, min. 16 Go, ext4 recommandé) pour enregistrement et lecture de médias |
| Formats de fichiers compatibles | Vidéo : AVI, MKV, MP4, TS, etc. ; Audio : MP3 ; image : JPEG ; sous-titres : .srt, .txt, VobSub |
| Services interactifs | HbbTV, DLNA (Media Renderer), chaînes HD+ (avec carte et module CI+) |
| Entretien et nettoyage | Dépoussiérer avec un chiffon sec ; ne pas utiliser de produits liquides ou abrasifs ; ne pas obstruer les fentes de ventilation |
| Sécurité | Ne pas ouvrir le boîtier (aucune pièce réparable par l'utilisateur) ; utiliser l'adaptateur fourni ; déconnecter en cas d'orage ; tenir éloigné de l'humidité et des sources de chaleur |
| Pièces détachées et réparabilité | Pas de pièces détachées accessibles. En cas de panne, contacter le SAV Samsung ou un réparateur agréé. La garantie constructeur est de 24 mois. |
| Informations générales | Notice disponible en PDF (86 pages) ; télécommande fournie avec piles ; câble SCART et adaptateur secteur inclus ; HDMI et autres câbles non fournis |
FOIRE AUX QUESTIONS - GX-SM650SJ SAMSUNG
Questions des utilisateurs sur GX-SM650SJ SAMSUNG
0 question sur cet appareil. Repondez a celles que vous connaissez ou posez la votre.
Poser une nouvelle question sur cet appareil
Téléchargez la notice de votre Décodeur tnt au format PDF gratuitement ! Retrouvez votre notice GX-SM650SJ - SAMSUNG et reprennez votre appareil électronique en main. Sur cette page sont publiés tous les documents nécessaires à l'utilisation de votre appareil GX-SM650SJ de la marque SAMSUNG.
MODE D'EMPLOI GX-SM650SJ SAMSUNG
SAMSUNG
Samsung Electronics (UK) Ltd, Euro QA Lab.
Blackbushe Business Park
Saxony Way, Yateley, Hampshire
GU46 6GG United Kingdom
Part No: GL68-00686A(Ed.01)
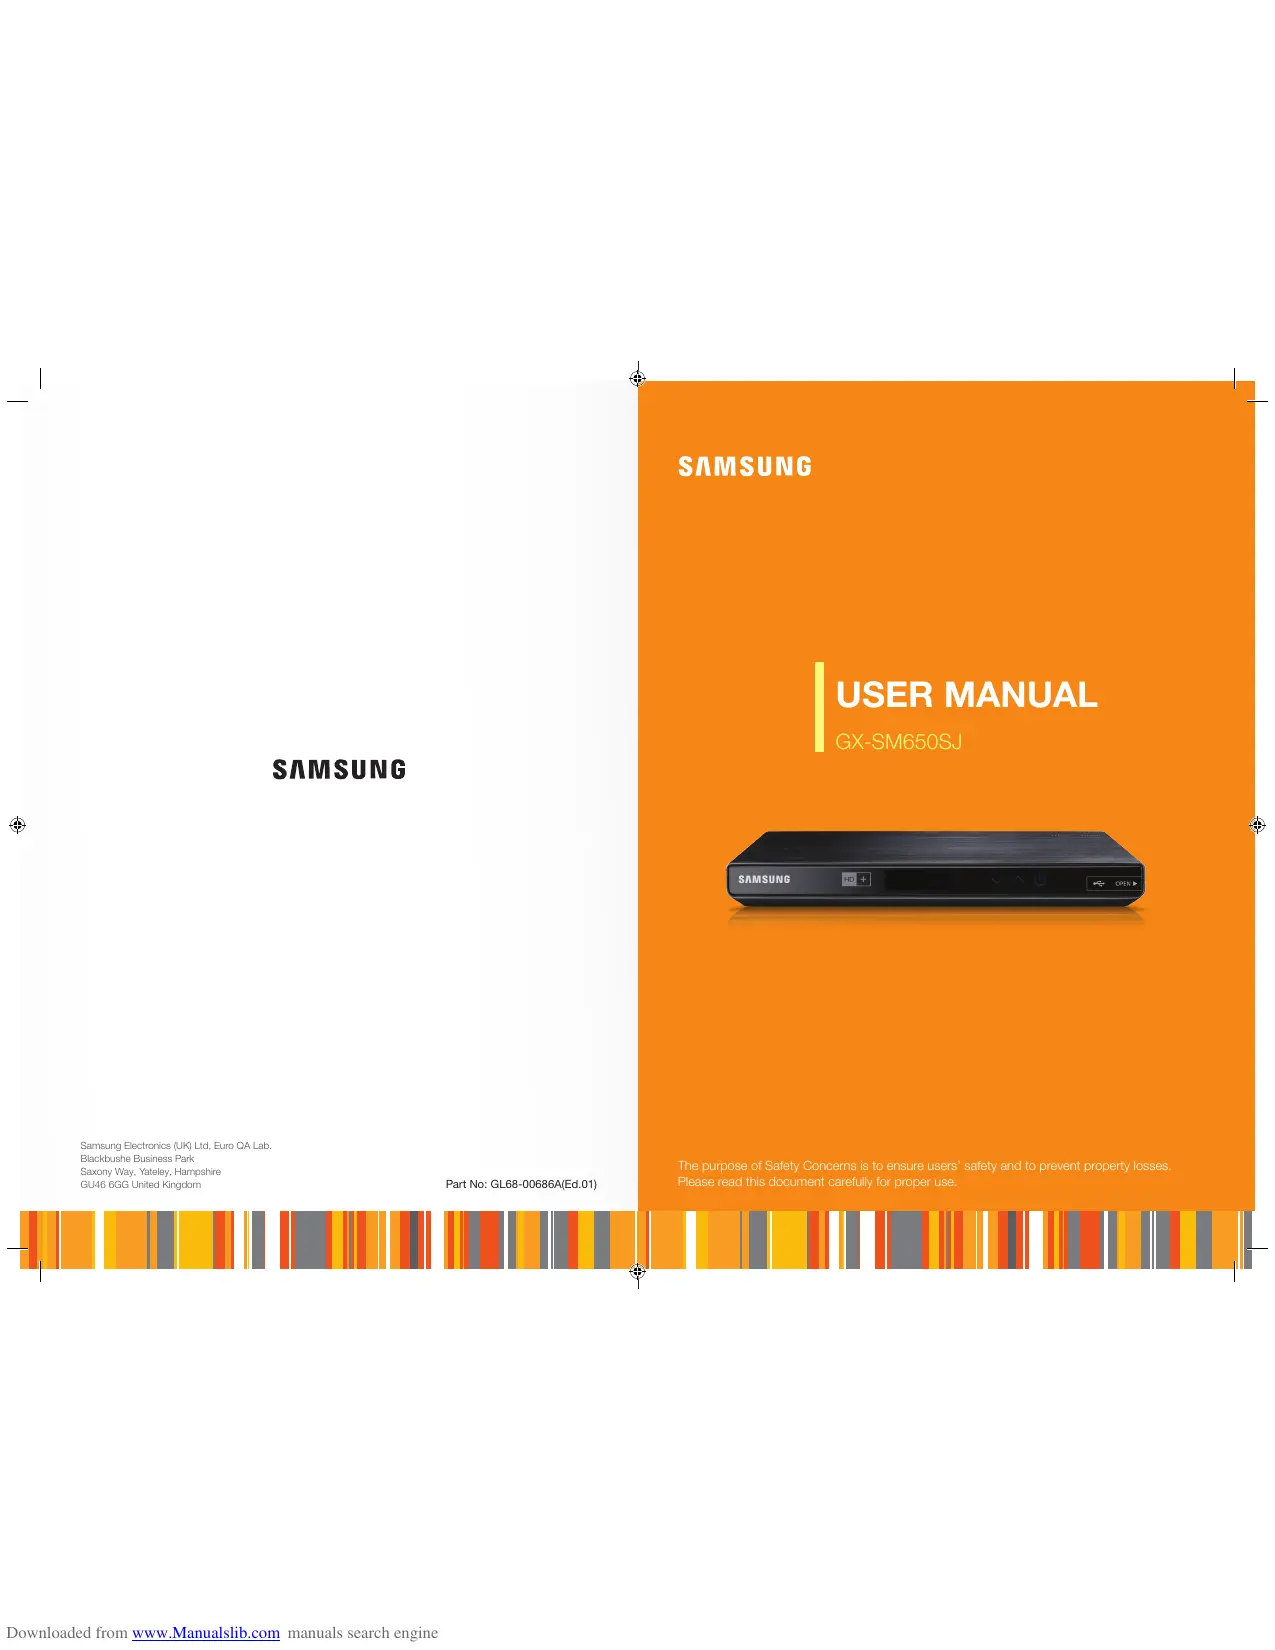
SAMSUNG
USER MANUAL
GX-SM650SJ

The purpose of Safety Concerns is to ensure users' safety and to prevent property losses.
Please read this document carefully for proper use.

TRADEMARKS
Product names mentioned in this document may be trademarks and/or registered trademarks of their respective companies.
The term STB used in this manual represents this product of HD + Satellite Receiver.
WEEE SYMBOL INFORMATION

CORRECT DISPOSAL OF THIS PRODUCT
(WASTE ELECTRICAL & ELECTRONIC EQUIPMENT)
This marking on the product, accessories or literature indicates that the product and its electronic accessories (e.g. charger, headset, USB cable) should not be disposed of with other household waste at the end of their working life. To prevent possible harm to the environment or human health from uncontrolled waste disposal, please separate these items from other types of waste and recycle them responsibly to promote the sustainable reuse of material resources.
Household users should contact either the retailer where they purchased this product, or their local government office, for details of where and how they can take these items for environmentally safe recycling.
Business users should contact their supplier and check the terms and conditions of the purchase contract. This product and its electronic accessories should not be mixed with other commercial wastes for disposal.
BATTERY SYMBOL INFORMATION

CORRECT DISPOSAL OF BATTERIES IN THIS PRODUCT
This marking on the battery, manual or packaging indicates that the batteries in this product should not be disposed of with other household waste at the end of their working life. Where marked, the chemical symbols Hg, Cd or Pb indicate that the battery contains mercury, cadmium or lead above the reference levels in EC Directive 2006/66. If batteries are not properly disposed of, these substances can cause harm to human health or the environment.
To protect natural resources and to promote material reuse, please separate batteries from other types of waste and recycle them through your local, free battery return system.
This guide may be changed for product improvement, standardization or other technical reasons without prior notice.
© 2015 SAMSUNG ELECTRONICS Co., Ltd. Alle Rechte vorbehalten.
Information in this document is proprietary to SAMSUNG ELECTRONICS Co., Ltd. No information contained here may be copied, translated, transcribed or duplicated by any from without the prior written consent of SAMSUNG. Information in this document is subject to change without notice.
SAMSUNG

Safety Information
The purpose of the Safety Concerns section is to ensure the safety of users and prevent property damage. Please read this document carefully for proper use.
WARNING
TO REDUCE THE RISK OF ELECTRIC SHOCK, DO NOT REMOVE THE COVER (OR BACK). NO USER-SERVICEABLE PARTS ARE INSIDE. REFER SERVICING TO QUALIFIED SERVICE PERSONNEL.
| CAUTION RISK OF ELECTRIC SHOCK DO NOT OPEN | ||
| This symbol indicates "dangerous voltage" inside the product that presents a risk of electric shock or personal injury. | CAUTION: TO REDUCE THE RISK OF ELECTRIC SHOCK, DO NOT REMOVE COVER (OR BACK) NO USER SERVICEABLE PARTS INSIDE. REFER SERVICING TO QUALIFIED SERVICE PERSONNEL. | This symbol indicates important instructions accompanying the product. |
Do not install this equipment in a confined space such as a bookcase or similar unit.
WARNING
To prevent damage which may result in fire or electric shock hazard, do not expose this appliance to rain or moisture.
CAUTION
USE OF CONTROLS OR ADJUSTMENTS OR PERFORMANCE OF PROCEDURES OTHER THAN THOSE SPECIFIED HEREIN MAY RESULT IN HAZARDOUS RADIATION EXPOSURE. DO NOT OPEN COVERS AND DO NsOT REPAIR YOURSELF. REFER SERVICING TO QUALIFIED PERSONNEL.
This product satisfies CE regulations when shielded cables and connectors are used to connect the unit to other equipment. To prevent electromagnetic interference with electric appliances, such as radios and televisions, use shielded cables and connectors for connections.
IMPORTANT NOTE
If the power plug on this unit does not fit the wall outlets in your house, have the wall outlets replaced with outlets that fit by a licensed electrician. If the power cord is not long enough, obtain a suitable, safety-approved extension cord. If you have questions about the power cord or plug, or need additional help, consult your dealer for assistance.
To turn off this unit completely, you must disconnect it from the wall outlet. Consequently, the unit's power plug must be readily accessible at all times.
This product is manufactured under license in accordance with certain intellectual property rights of certain third parties.
HANDLING CAUTIONS
WARNING
- Never remove the top cover of this product. There are no user-serviceable parts inside it.
- Make sure all electrical connections are properly made.
- Connect all equipment to the unit first, and then plug in their power cords.
- Disconnect the STB's power plug from the wall outlet before you disconnect any equipment from the product's rear panel.
- Never push anything into the holes, slots or other openings in the case.
- If the supplied power plug does not fit your wall outlets DO NOT plug it in. Have the wall outlets replaced with appropriate wall outlets by a qualified electrician.
- To turn off this product completely, you must disconnect it from the wall outlet. Consequently, the unit's power plug must be readily accessible at all times.
CAUTION
- Do not move the STB when it is on.
- Do not use or store the STB in hot, cold, damp or dusty places.
- Do not block the ventilation holes of the STB. Leave a space of at least 5cm around all sides.
- Never place the STB on soft furnishings or carpets.
- Do not put anything on the STB which might spill liquid into it or place it in an environment where it may be subject to moisture or rain.
- Do not place the STB on top of other powered electrical equipment such as an amplifier or DVD player.
- Do not operate in an enclosed space such as a Hi-Fi cabinet.
- Do not allow the power cable or DC wire from the power supply to become trapped under any object, crushed or jammed in a cabinet door.
- Do not clean with spray polish.
- Only dust with a dry cloth.
- Do not place the STB in front of a heat source such as a radiator or fire.
- Do not throw away used batteries near flammable areas.
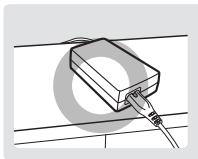
- Make sure to rest the AC/DC Adapter flat on a table or the floor. If you place the AC/DC Adapter so that it is hanging with the AC cord input facing upwards, water or other foreign substances could enter the Adapter and cause the Adapter to malfunction. See the illustration below.

COPYRIGHT
© 2015 SAMSUNG ELECTRONICS Co., Ltd.
All rights reserved. No part of this user's manual may be reproduced or copied without the prior written permission of SAMSUNG ELECTRONICS Co., Ltd.
02
About the product 07
Key Feature 07
Media file format compatibility 08
Contents your product can play 08
Supported Formats 09
Accessories 10
Front Panel 11
Rear Panel 12
Remote Control 13
Connections 16
Connecting to a TV 16
Connecting to an antenna 19
Double tuning configuration 19
Tuner loop configuration 19
Connecting to an Audio System 20
Method 1) Connecting to an HDMI supported AV receiver. 20
Method 2) Connecting to an AV receiver with Optical input. 20
Connecting to a Network Router 21
Wired Network 21
Connecting the Power 22
Settings 23
The Setup Procedure 23
Run the first installation procedure 23
Scanning 25
Software Upgrade 27
Main Menu 28
Accessing the Settings Screen 29
Remote Control 29
Channel 30
ASTRA channel list update 30
Auto tune 30
Manual tune 31
Installation type 31
Guide timeline 37
HbbTV 37
Channel list export/import 37
Sound 38
Preferred audio type 38
Digital volume control 38
Audio primary 38
Audio secondary 38
Contents
Picture 39
Screen resolution 39
3D mode 39
Anti flicker 39
HDMI aspect ratio 39
HDMI video conversion 40
PIP (Picture-In-Picture) 40
Channel list preview 40
TVScart aspect ratio 41
TVScart video conversion 41
TVScart. 41
Information banner timeout 41
Screen saver 41
Language 42
Language 42
Automatic subtitles 42
Subtitles primary 42
Subtitles secondary. 42
Library / Media 43
Media auto open 43
Instant recording. 43
Initial-guard time 43
Final-guard time 43
Subtitle settings 43
HDD/USB storage settings 43
Media renderer 44
Media renderer name. 44
CAS 45
Smart card information 45
ChangeSmartcardPIN-Code 45
Common Interface information 45
CI PIN-Code 45
CI Menu 45
CI Profiles List. 45
System 46
Product information 46
Auto Turn off 46
Timeout to power saving mode 46
Network settings 47
Reset to default settings 48
Software upgrade 49
Change STB PIN-Code 51
Open source licenses 51
Contents
Using the Basic Functions 52
Watching TV Channels 52
Using the remote control buttons 52
Switching channel 53
Volume control 53
Audio language 53
Subtitle language 53
Viewing the service Information 54
Channel Information 54
Program Information 56
Signal Information 56
Viewing the EPG information 57
Using the Timer 57
Viewing Program information 58
Searching programs 58
Pausing and rewinding live TV 59
Recording programs 60
Channel list 62
Locking channels 62
Favourites list 62
Sorting channel list 64
Using the HbbTV 65
Watching Picture-In-Picture 66
Using the Library 67
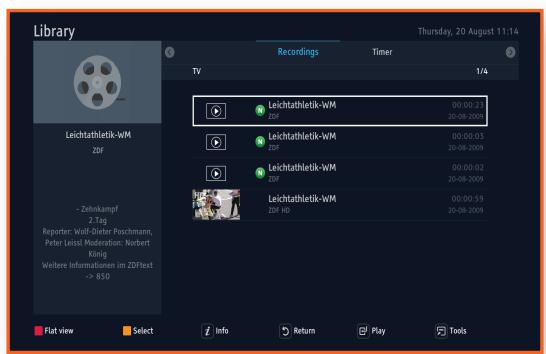
Contents & Timer list 67
Contents 67
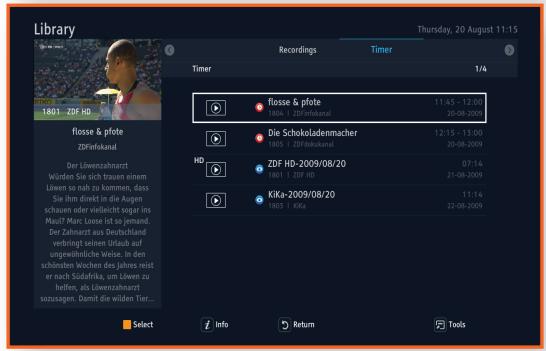
Timer 67
To select all/deselect all timers. 67
To delete the timer 68
To sort timers 68
To add timer 68
To edit timer 68
dia Play 69
Playing Files on a USB Device 69
ControllingPlayback 70
To delete the files 70
To copy the files 70
To move the files. 70
To create a new folder 71
To sort the files 71
To select all the files. 71
To deselect all the files. 71
Contents
Using the DLNA 72
Appendix 74
Troubleshooting 74
Specifications 76
Licence 77
Manufacturer wording 77
Network Service Disclaimer 78
Allgemeine Geschäftsbedingungen HD+ 79
Limited Warranty to Original Purchaser 83
Open Source License Notice 84
KEY FEATURE
Image Display of HD Grade
Supports high-resolution video output of up to 1080p, enabling you to enjoy clear and sharp video.
Electronic Program Guide (EPG) Function
Using the EPG Channel Guide, you can check the program information and broadcasting schedule of a desired channel, and schedule the programs to watch.
Enjoy Contents with an External USB Device
Allows you to play media files using a USB storage device.
Convenient recording function
You can record TV or radio programs on an external USB storage device by pressing the REC button on the remote control or scheduling recording of programs via the EPG for instance.
Dolby Digital Plus Sound
Produces realistic digital sound by connecting the product to a STB amplifier through the HDMI port which supports Dolby Digital Plus.
HbbTV
Innovative and interactive hybrid television, connecting conventionally broadcasted TV with a multimedia from the broadband internet.
PIP (Picture-in-Picture)
Allows watching simultaneously two channels on a single screen. While watching one service on the main screen a second program can be watched in small window in the screen corner.
CI
Common interface module used for pay-to-view TV.
DLNA
Technology allowing sharing and streaming media on the TV display from the other electronic devices over the home local network.
About the product > Media file format compatibility
PVR (Personal Video Recorder)
Allows recording chosen TV/Radio programs and watch them later. This feature will help you to avoid missing favorite shows and movies while you are not available.
Dual Recording
Thanks to double tuner configuration, a simultaneous PVR recording from two separate sources are possible at the same time.
Media Play
Two USB build-in allow viewing pictures, watching movies and listening music stored on removable storage devices.
SATCR
SATCR is a satellite TV technology that enables the delivery of broadcast signal to multiple users over a single coaxial cable.
Channel list Preview
This function allows previewing a channel in a mini popup screen when the channel is focused on a channel list.
Customized channel lists
It allows channel list and list of favorites edition. Channels can be modified internally in the STB system or exported to USB storage and changed on the PC.
USALS (Universal Satellites Automatic Location System)
USALS is a satellite dish motor protocol that automatically calculates satellites position based on entered local coordinates.
3D
This function allows watching 3D service if the service selected provides 3D signal.
MEDIA FILE FORMAT COMPATIBILITY
Contents your product can play
| Contents | Media | Details |
| VIDEO / MUSIC / PHOTO | USB | Video, music and photos stored in USB drive. |
08
Supported Formats
| File Extension | Container | Video Codec | Resolution | Frame rate (fps) | Bit rate (Mbps) | Audio Codec |
| *.avi | AC3 | |||||
| *.wmv | AC3+ | |||||
| *.asf | AVI | VC1/WMV-9 | MPEG1 | |||
| *.mp4 | MKV | H264 | MPEG2 | |||
| *.mpg | ASF | MPEG4 | 1920x1080 | 15~30 | 20 | LPCM |
| *.mpeg | MP4 | SP/ASP (Xvid) | HE-AAC (SBR+PS) | |||
| *.ts | MOV | MPEG2 | WMA | |||
| *.mov | TS | WMA PRO | ||||
| *.mkv | ||||||
| *.xvid |
-
Limitations
-
Even when the file is encoded by a supported codec listed above, a file may not be played if there is a problem with its content.
-
Normal playback is not guaranteed if the file's container information is wrong or the file itself is corrupted.
-
The supported subtitle formats are microdvd, srt and vobsub embedded in containers .txt and .srt
- The supported music file format is mp3 and the supported picture file format is JPEG.
Notes on the USB connection
- The STB supports USB 2.0 mass storage devices such as USB flash drives and USB HDD. It also supports connection of the drives via USB HUB.
- The USB input has power limitation (max. current 1A) which can result as insufficient power supply for the drives after connecting too many devices at once to passive HUB. Recommended is usage of the HUB with external power supply.
- There is no limitation neither size nor speed for the drive to be used in media library, to store pictures or music. Nevertheless there are minimum requirements to assign device to PVR functionality. This minimum requirements are recommended to play video from the drive.
- Minimum requirements for PVR:
Capacity more than 16GB
- Minimum write speed 8MB/s
- Minimum read speed 16MB/s
- Recommended drive file system is ext4, but STB supports ext2, ext3, FAT16, FAT32, NTFS (read-only mode). Note that xFAT file system is not supported. You can always format drive to ext4 file system using STB functionality ([Settings] > [Library / Media] > [HDD/USB storage settings]).
- Using slow drives may result in a long time of loading media.
- The STB does not support media with DRM (Digital Rights Management) downloaded from commercial sites.
- The STB does not support PTP protocol (Picture Transfer Protocol).
- Do not remove USB storage device while in use (recording, formatting, etc.).
- SAMSUNG is not responsible for any loss of data on USB storage device.
- USB HDD for PVR should be connected to rear USB port.
ACCESSIONS
Check for the supplied accessories below.
Remote Control/ Batteries for Remote Control (AAA Size)
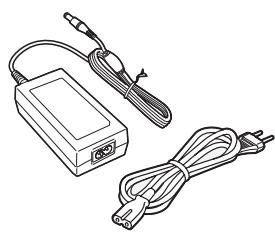
Power Adapter/ Power Cable
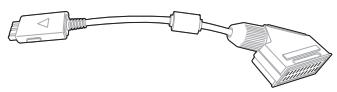
SCART Gender Cable

HD+ Supplement
User Manual
Smart Card

You can purchase the cable accessories (not supplied with the product) from a local Samsung dealer.
Not supplied cable:
-HDMI cable
Coaxial cable
- LAN cable
- Optical cable
-Scart cable
10


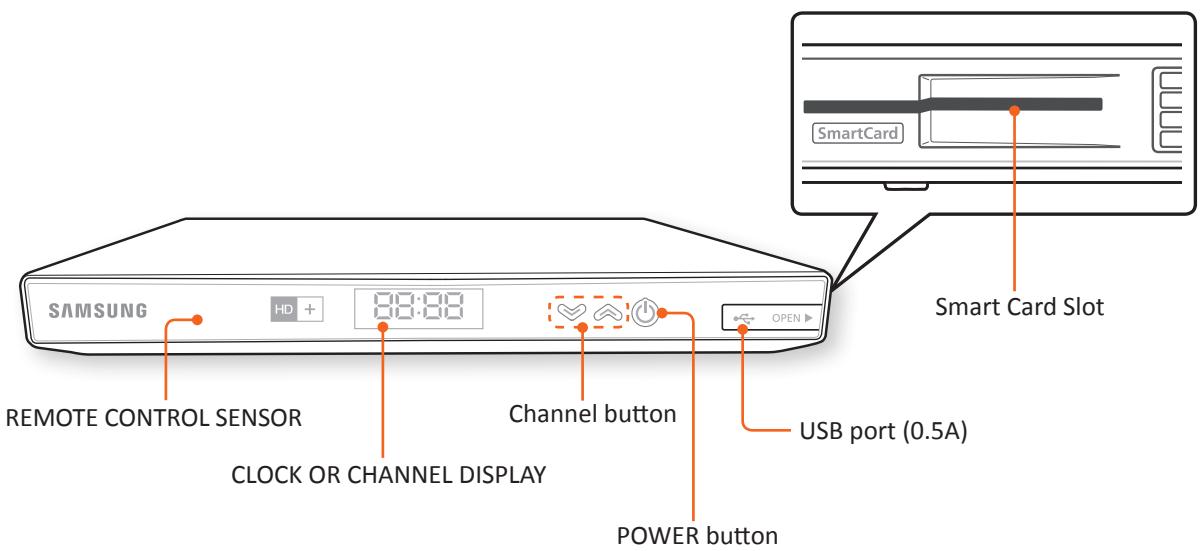
FRONT PANEL
This section describes the button and LEDs at the front panel.
ENG
7 Segment
7-segment display presents simple information about current status of the device. When the device is in standby mode, the current time value is presented with blinking colon every second. When the STB goes to energy saving mode from standby mode, only dot is being displayed to show that the device is connected to electricity.
Table below shows display behaviors at different STB states:
| STB State | 7 display state |
| Live | Channel number |
| Standby mode | Current time (blinking colon per second) |
| Energy Saving mode (Passive standby) | Displaying dot (no blinking) |
| Playback of Library or Media | Playing time HH:MM |
| Library | L1b |
| Media | FILE |
| First Installation | InIt |
| RCU Action | Blinking colon |
| SW Update | UPdt |
| On Booting | LoAd |
REAR PANEL
This section describes the names and functions of the ports on the rear panel.
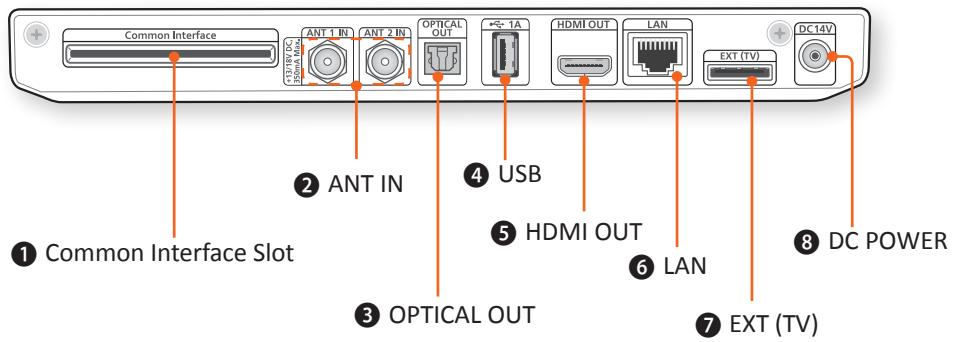
| ① | Slot to insert Conditional Access Module. |
| ② | To connect the Satellite antenna cable from your cable system. |
| ③ | A digital audio output port, which is connected to an audio system with an OPTICAL OUT port with an optical cable. |
| ④ | Port that connects to the external USB device. (1 rear panel, 1A) |
| ⑤ | To connect to TV with an HDMI cable. |
| ⑥ | LAN connection to router for interactive functionality. |
| ⑦ | To connect a TV with a SCART gender cable. |
| ⑧ | To connect external power adaptor. |
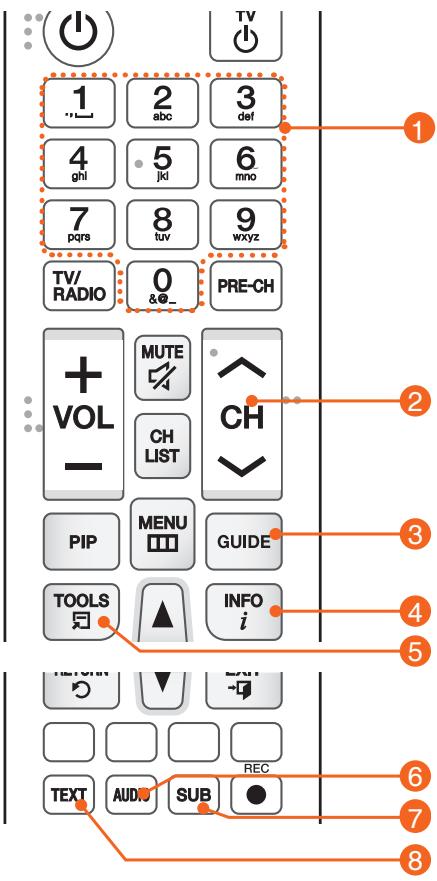
REMOTE CONTROL
This section describes the function of each button on a remote control.
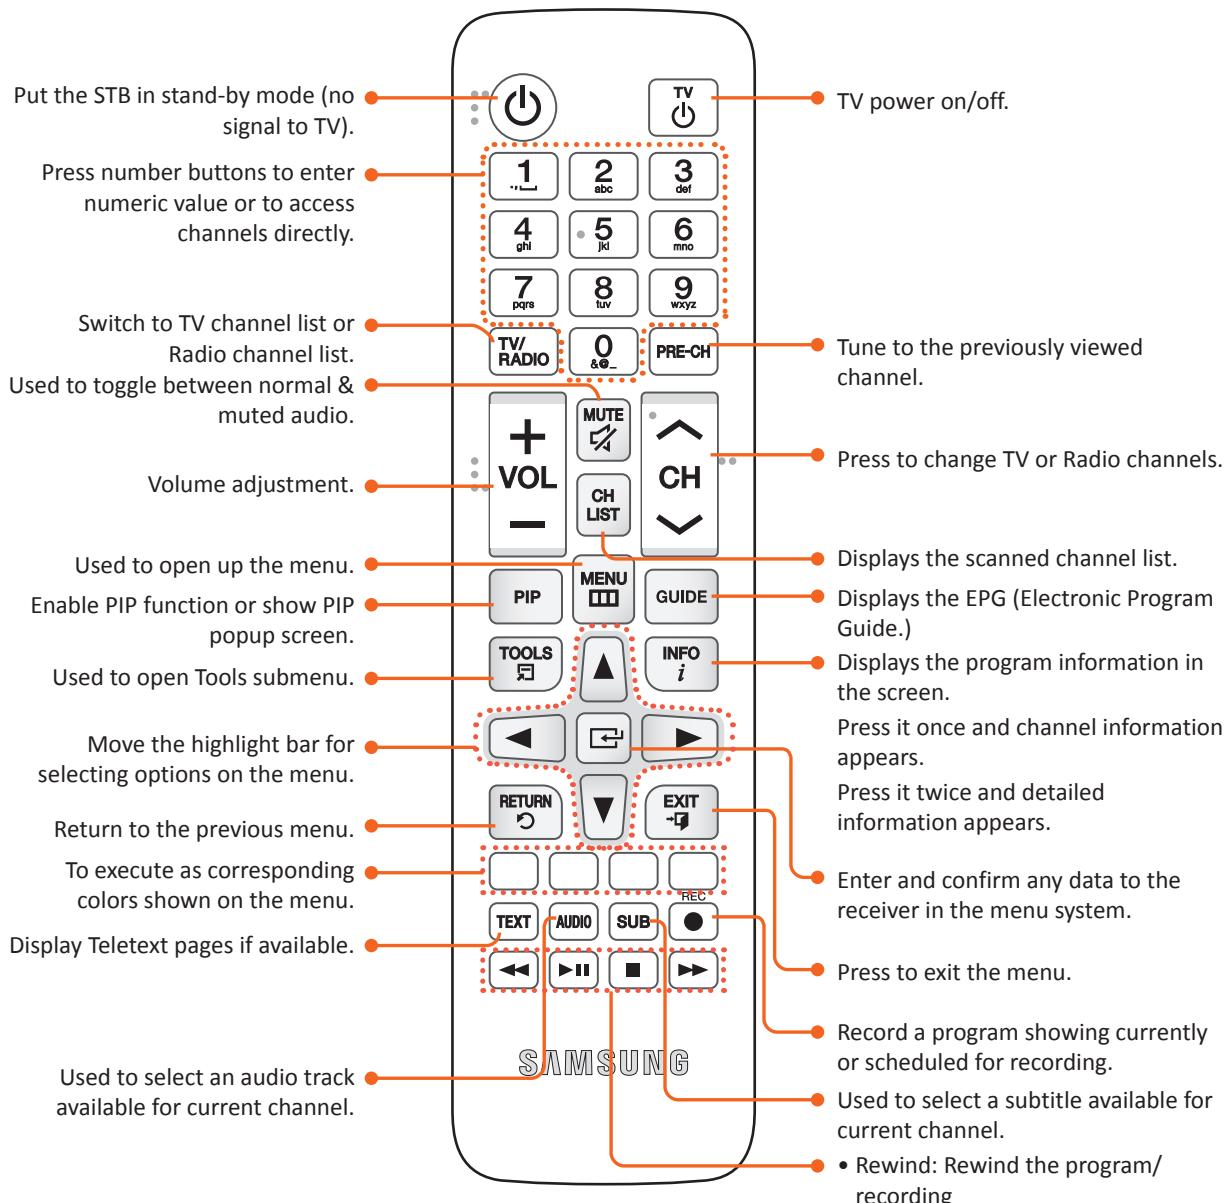
TV power on/off.
Tune to the previously viewed channel.
Press to change TV or Radio channels.
Displays the scanned channel list.
Displays the EPG (Electronic Program Guide.)
Displays the program information in the screen.
Press it once and channel information appears.
Press it twice and detailed information appears.
Enter and confirm any data to the receiver in the menu system.
Press to exit the menu.
Record a program showing currently or scheduled for recording.
Used to select a subtitle available for current channel.
- Rewind: Rewind the program/ recording
- Play/Pause: Play and pause the program/recording /Change to Time Shift mode
- Stop: Stop the playback or recording
- Forward: Fast-forward the program
About the product > Remote Control
Installing batteries

If the remote does not operate properly:
- Check the polarity + / - of the batteries.
- Check if the batteries are drained.
- Check if the remote sensor is blocked by obstacles.
- Check if there is any fluorescent lighting nearby.

- Dispose of batteries according to local environmental regulations. Do not put them in the household trash.
- Two identical and new batteries should be used for the remote control.
- When a remote control is not used for a long time, remove the batteries.
Setting the Remote Control to Operate Your TV
-
To determine whether your television is compatible, follow the instructions below.
-
Turn your television on.
- Point the remote control towards the television.
- Press the TV button to set the remote to TV mode.
- Press and hold the TV button, and then enter the two-figure code in the table to the right that corresponds to the brand of your television by pressing the appropriate number buttons. If your television is compatible with the remote control, it will turn off. The remote is now programmed to operate the TV.

If several codes are listed for your television brand, try each one in turn until you find one that works.
If you replace the remote control's batteries, you must set the brand code again.
You can control the TV function below with this remote control.
| Button | Function |
| TV | Use to turn the television on and off. |

The function above will not necessarily work on all televisions. If you encounter problems, use the TV remote control.
TV Control Codes
| Brand | Code |
| SAMSUNG | TV+01, +02, +03, +04, +05, +06, +07, +08, +09 |
| AIWA | TV+82 |
| ANAM | TV+10, +11, +12, +13, +14, +15, +16, +17, +18 |
| BANG & OLUFSEN | TV+57 |
| BLAUPUNKT | TV+71 |
| BRANDT | TV+73 |
| BRIONVEGA | TV+57 |
| CGE | TV+52 |
| CONTINENTAL EDISON | TV+75 |
| DAEWOO | TV+19, +20, +23, +24, +25, +26, +27, +28, +29, +30, +31, +32, +33, +34 |
| EMERSON | TV+64 |
| FERGUSON | TV+73 |
| FINLUX | TV+06, +49, +57 |
| FORMENTI | TV+57 |
| FUJITSU | TV+84 |
| GRADIENTE | TV+70 |
| GRUNDIG | TV+49, +52, +71 |
| HITACHI | TV+60, +72, +73, +75 |
| IMPERIAL | TV+52 |
| JVC | TV+61, +79 |
| LG | TV+06, +19, +20, +21, +22, +78 |
| LOEWE | TV+06, +69 |
| LOEWE OPTA | TV+06, +57 |
| MAGNAVOX | TV+40 |
| METZ | TV+57 |
| MITSUBISHI | TV+06, +48, +62, +65 |
| MIVAR | TV+52, +77 |
| NEC | TV+83 |
| NEWSAN | TV+68 |
| NOBLEX | TV+66 |
| Brand | Code |
| NOKIA | TV+74 |
| NORDMENDE | TV+72, +73, +75 |
| PANASONIC | TV+53, +54, +74, +75 |
| PHILIPS | TV+06, +55, +56, +57 |
| PHONOLA | TV+06, +56, +57 |
| PIONEER | TV+58, +59, +73, +74 |
| RADIOLA | TV+06, +56 |
| RADIOMARELLI | TV+57 |
| RCA | TV+45, +46 |
| REX | TV+74 |
| SABA | TV+57, +72, +73, +74, +75 |
| SALORA | TV+74 |
| SANYO | TV+41, +42, +43, +44, +48 |
| SCHNEIDER | TV+06 |
| SELECO | TV+74 |
| SHARP | TV+36, +37, +38, +39, +48 |
| SIEMENS | TV+71 |
| SINGER | TV+57 |
| SINUDYNE | TV+57 |
| SONY | TV+35, +48 |
| TELEAVA | TV+73 |
| TELEFUNKEN | TV+67, +73, +75, +76 |
| THOMSON | TV+72, +73, +75 |
| THOMSON ASIA | TV+80, +81 |
| TOSHIBA | TV+47, +48, +49, +50, +51, +52 |
| WEGA | TV+57 |
| YOKO | TV+06 |
| ZENITH | TV+63 |

onnections
This section describes the connection to peripherals. Connect the peripherals (TV, DVD, etc.) referring to the descriptions in the following page.
CONNECTING TO A TV
You can connect your product to your TV using one of the methods illustrated on page 16 or 17.
Method 1)
Connection to a TV with the EXT(TV) Port - Scart Connection
This section describes how to connect to a TV with Scart cable.
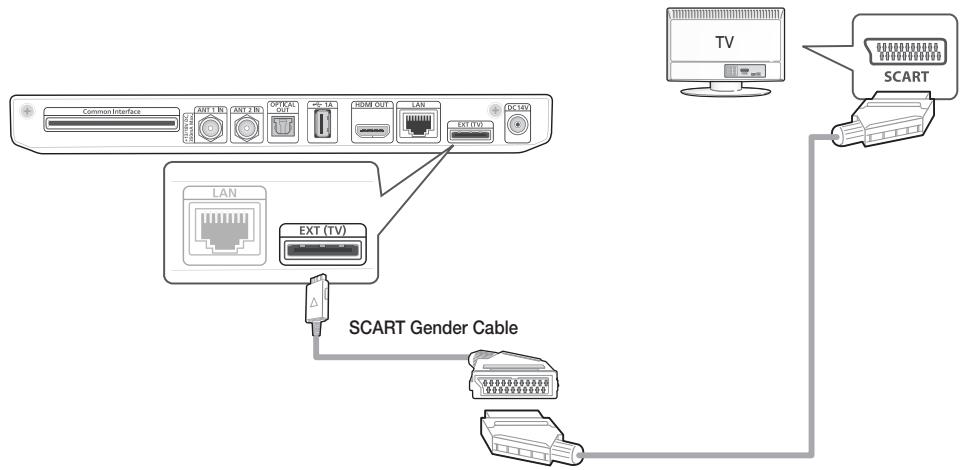
- Connect the small end of the Scart cable gender(supplied) to the EXT(TV) port at the rear of your STB.
- Connect the large end(scart jack) of the Scart cable gender to your TV using an scart cable(not supplied).
- Turn on the product and TV.
- Press the input selector on your TV remote control until the signal from the product appears on the TV screen.
Method 2)
Connection to a TV with the HDMI Port
This section describes how to connect to a TV with an HDMI cable.
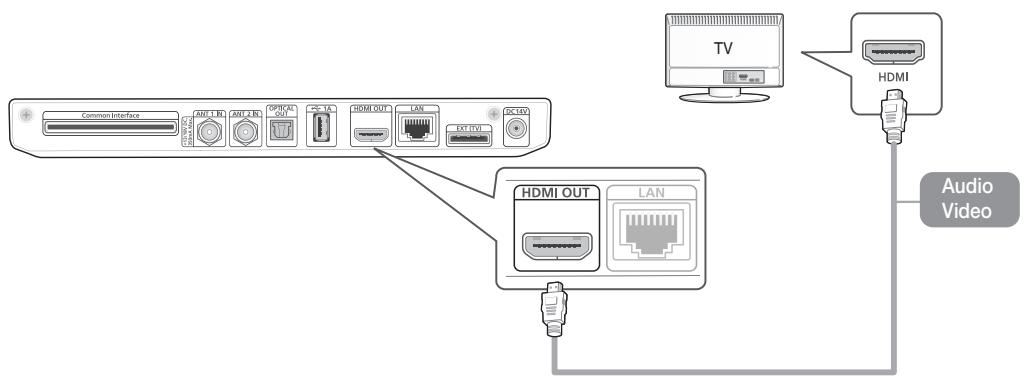
- Connect the product to your TV using an HDMI cable.
- Turn on the product and TV.
- Press the input selector on your TV remote control until the signal from the product appears on the TV screen.

- High Definition Multimedia Interface (HDMI) is a video-audio integrated port to provide high definition images by connecting a STB to an HD TV. Connect it to the HDMI input port (not output port) on an HD TV.

Do not connect the power cord until you have made all the other connections.
- When you change connections, turn off all devices before you start.
An HDMI cable outputs digital video/audio, so you don't need to connect an audio cable.
If you use an HDMI-to-DVI cable to connect to your display device, you must also connect the Digital Audio Out on the product to an audio system to hear audio.
- Depending on your TV, certain HDMI output resolutions may not work. Please refer to the user manual of your TV.
- When you connect the product to your TV for the first time using an HDMI cable or connect it to a new TV using an HDMI cable, it will automatically set the HDMI output resolution to the highest supported by the TV.
- HDMI outputs only a pure digital signal to the TV. If your TV does not support HDCP (High-bandwidth Digital Content Protection), random noise appears on the screen.
Connections Connecting to a TV
Supported HDMI CEC function on Remote control
Anynet+ is a convenient function that offers linked operations with other Samsung products that have the Anynet+ feature. To operate this function, connect this product to an Anynet+ Samsung TV using an HDMI cable. The STB supports HDMI Anynet+ functionality (extensions of the HDMI CEC standard). This makes it possible to control the STB using a TV remote control (or to control the TV using the STB remote control in the case of the automatic power on function).
Supported functions are:
- Automatic power off (when the Standby button is pressed on the TV, the TV goes to standby mode together with the STB)
- Automatic power on (when the Standby button is pressed on the STB, the STB wakes up from standby mode together with the TV)
- Remote control command sending; the following remote control buttons are supported: channel change, menu, guide, channel list and arrows.
CONNECTING TO AN ANTENNA
You can connect your double tuner STB to an antenna in two supported configurations.

Double tuner configuration
In this configuration, both tuners have to be connected to antenna signal independently by two separate coaxial cables. This configuration allows both tuners tuning to two satellite transponders at the same time. With double tuner configuration, the user can take advantage of all possible feature set of PIP, Double-REC with no restrictions.
(Notice) Be aware that double tuner configuration does not support connecting two satellite dishes separately to the STB! To receive multiple satellites signal, a DiSEqC switch should be used in between dishes and tuner where tuners are connected to switch independently.
Tuner loop configuration
In this configuration, antenna signal is passed by only one coaxial cable and the connection between tuners is created internally. This configuration introduces minor limitations when both tuners are used at the same time. In this case, functionalities like PIP or Double-REC are restricted to services with the same transponder polarization (Vertical/Horizontal).
In case of the loop configuration, satellite signal should be connected to the first tuner (ANT 1 IN) (i.e. next to Common Interface Slot).
CONNECTING TO AN AUDIO SYSTEM
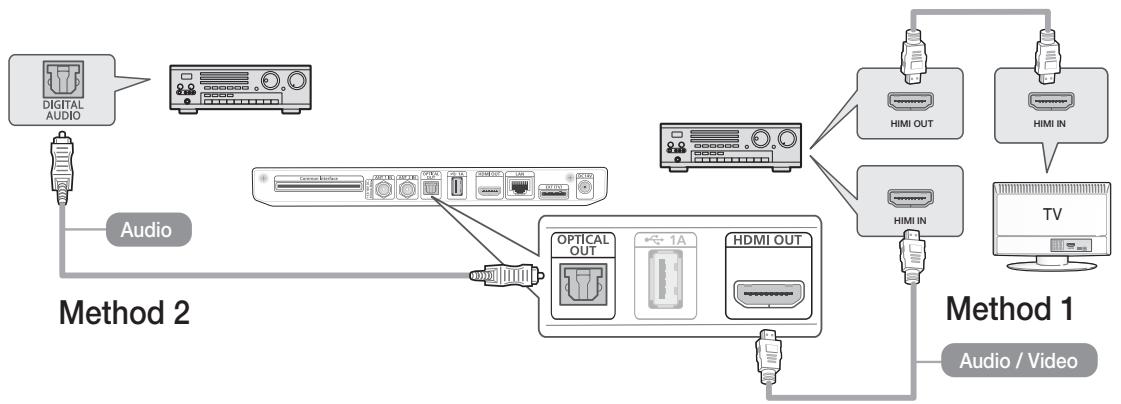
- Connect the product to an audio system using one of the two methods illustrated above.
-
Turn on the product, audio system, and TV.
-
Do not connect the power cord until you have made all the other connections.
-
When you change the connections, turn off all devices before you start.
-
Press the input selectors of the connected audio system and TV until the video signal from the product appears on your TV and you hear the audio signal through your audio system.
Method 1)
Connecting to an HDMI supported AV receiver
Method 2)
- Use an HDMI cable (not included)
Connecting to an AV receiver with Optical input - Use an Optical Cable (not included)
CONNECTING TO A NETWORK ROUTER
You can connect your product to your network router using illustrated on page.
Wired Network
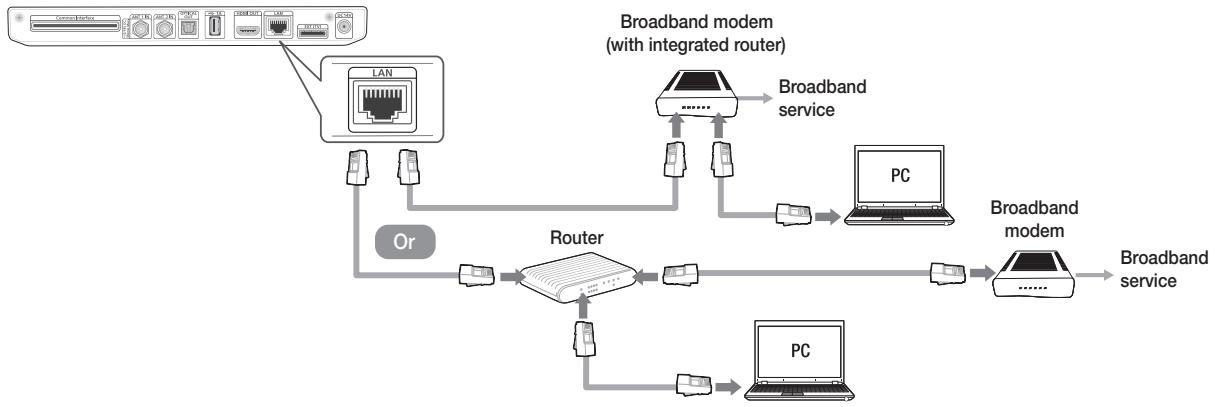

- Internet access to HbbTV service may not be allowed, depending on the router you use or your ISP's policy. For more information, contact your ISP (Internet Service Provider).
- DSL users, please use a router to make a network connection.
To use the Samsung Link function with your PC, you must connect your PC to your network.
CONNECTING THE POWER
After connecting your STB to your TV, connect the included power adaptor to the STB, and then plug the power adaptor with power cord into a wall socket. When you plug in the power adapter for the first time, the STB will turn on automatically and display the first installation screen.
To turn off the product, press the Power button on your remote control. To turn it on, press the Power button again.
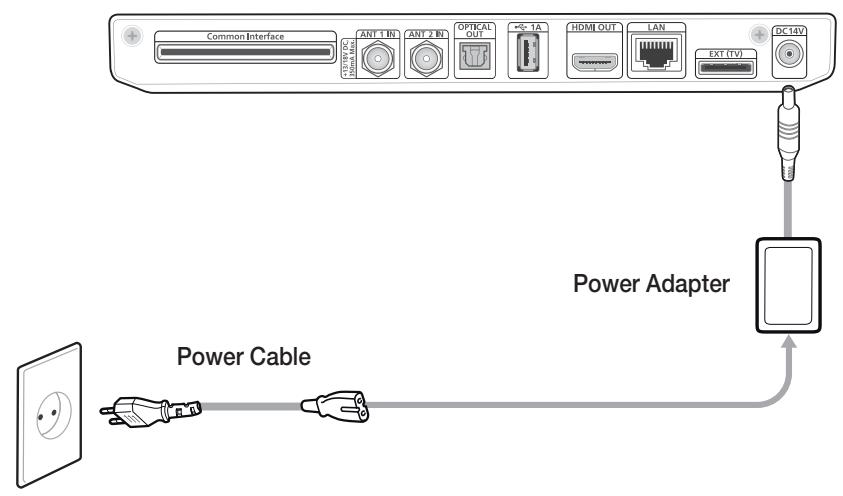

If power is disconnected from the STB while it is operating normally, the product will turn on automatically when power is reconnected.

- If the STB has been turned off or left unplugged for more than 1 week, the device may lose authorization for satellite TV services. To restore satellite TV services, please contact your satellite TV service provider.
Settings
THE SETUP PROCEDURE
- The OSD (On Screen Display) of this product may change after you upgrade the software version.

You can download the latest user manual on www.samsung.de
- The access steps may differ depending on the menu you selected.
Turn on your TV after connecting the STB. When you connect the STB to a TV for the first time, the product turns on automatically and the first installation screen appears. See 'Run the first installation procedure' below.

- When you connect the power to the STB for the first time, the product turns on automatically. This is normal operation.
Run the first installation procedure
- You have to insert the Smart Card into the Smart Card slot on the right side of the STB. And you can insert SkyDE CI CAM into the Common Interface Slot on the rear of the STB.
- Plug in the STB, and then turn on your TV. When you connect the STB to a TV for the first time, the product turns on automatically and the first installation screen appears. If the installation screen does not appear, change the TV's source setting to the source you've connected the product to (for example, HDMI 1, HDMI 2). For instructions, see your TV's user's manual.
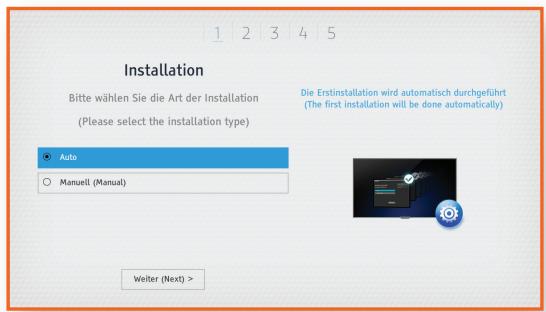
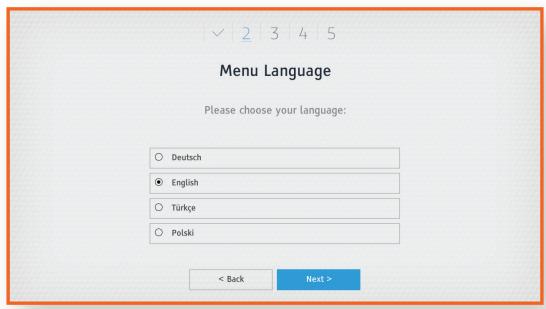
-
Use the buttons to select an installation mode, and then press the button. (Auto/Manuelles). Select [Weiter (Next)], and then press the button on the remote control.
-
[Auto]: In this mode the STB will automatically select all such settings as resolution, language and screen ratio. The STB will next automatically detect the Astra 19.2E and/or HotBird satellites, perform quick scanning and complete the installation procedure. For more information about quick scanning, see 'Quick Scanning' on page 25.
-
When you select [Manuell (Manual)], then you can do the installation according to your selections. Use the buttons to choose a language on the language selection window, and then press the button. Select [Next], and then press the button on the remote control.
Settings The Setup Procedure
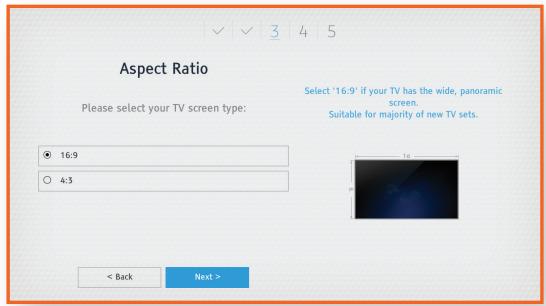
- Use the buttons to choose a TV aspect ratio, and then press the button. Select [Next], and then press the button on the remote control.
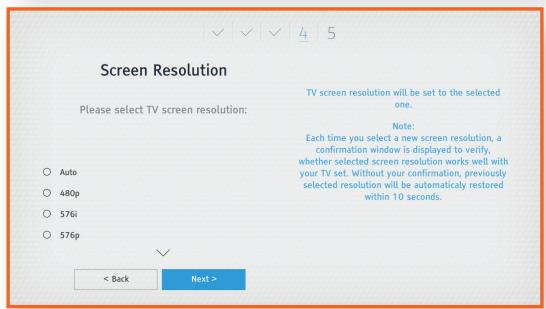
- Use the buttons to choose a resolution, and then press the button. Select [Next], and then press the button on the remote control.
-
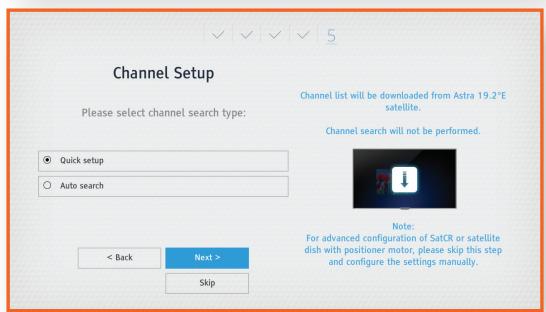
Use the buttons to choose a search type, and then press the button. Select [Next], and then press the button on the remote control. For more information about quick scanning, see 'Quick Scanning' on page 25.
-
[Auto Search]: This option will linearly scan all transponders on the Astra and HotBird satellites one by one.
- For advanced configuration of SatCR or satellite dish with positioned motor, please skip this step and configure the settings manually
- When you press skip button all previous settings as (language, aspect ratio, screen resolution, etc) will be saved but the service scanning will not be performed.
Scanning
There are three different scanning options.
Quick Scanning
This is the recommended scanning type; it is the simplest and the fastest. It downloads the complete channel list from a dedicated Astra transponder:
1 111
GHz
2 108
GHz
3 57
GHz
12.60375
GHz
12.55150
GHz
10.83225
GHz
Horizontal
1
Vertical
1
Horizontal
1
22000
KS/s
22000
KS/s
22000
KS/s
5/6
5/6
3/2
DVB-S
QPSK
5/6
DVB-S
QPSK
DVB-S
QPSK
DVB-S2
8PSK

- If the STB is in the SatCR environment, then there can't be any scanned channel. In that case, you have to upgrade the software according to the USB update way, NOT the OTA update way. The USB update is described in [Settings] > [System] > [USB Update] in detail. (Refer to page 50.)
Settings The Setup Procedure
Auto Scanning
Auto scanning performs channel search on all predefined transponders of the selected satellite.
After successful scanning, a result screen appears with showing the numbers of the TV and radio channels found. Select [Save] and press the button to confirm.

- Auto scanning can take several minutes depending on the satellite selected.
Manual Scanning
Manual scanning allows the user to scan particular transponders. Predefined transponder parameters may be used or the transponders to be scanned may be set manually.
Settings The Setup Procedure
Software Upgrade
- You have to upgrade your STB with the latest software to use all the functionalities.
- The detail upgrade way is described in [Settings] > [System] > [Software upgrade].
- SatCR environment users have to do the [USB Update] way for the first time.
- Refer to page 50 to do the software upgrade by the [USB Update] way.
MAIN MENU
Guide : View the program schedule, select programs to watch, and view information about future programs. (See page 57.)
Channel: Displays the list of channels memorized. (See page 62.)
3 Library : Provides access to and allows management of the list of recorded material. (See page 67.)
Media : Plays videos, photos or music content from an external USB storage device. (See page 69.)
5 Info : Displays information about the channel currently being watched. (See page 54.)
Settings: Set various functions to suit your personal preferences. (See pages 29~51.)
ACCESSING THE SETTINGS SCREEN
- Press the MENU button on the remote control. The Main menu appears.
- Select [Settings], and then press the button.
- To access the Settings menus, sub-menus, and options, please refer to the remote control illustration and the Settings Control Button table in the below.
Remote Control
Settings Control Button Table
| 1 | MENU Button:Press to show the Main menu. |
| 2 | RETURN Button:Return to the previous menu. |
| 3 | (Enter)/DIRECTION Buttons: Press the▲▼▲→buttons to move the cursor or select an item. Press the按钮 to activate the currently selected item or confirm a setting. |
| 4 | EXIT Button:Press to exit the current menu. |
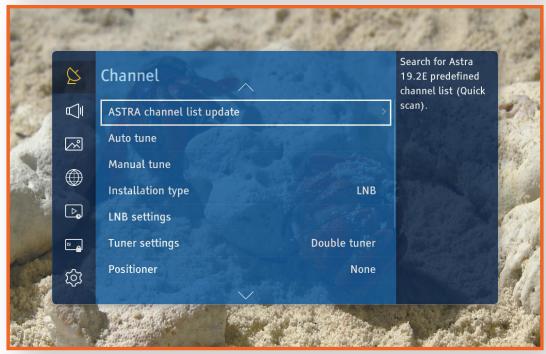
CHANNEL
You can configure various channel options.
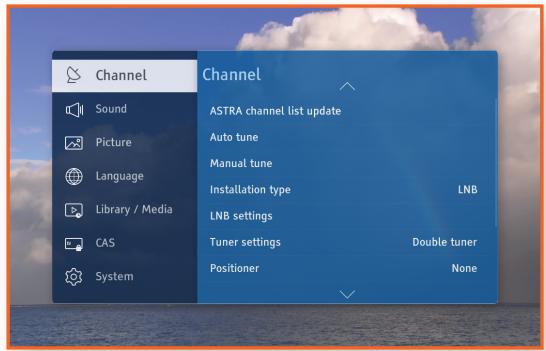
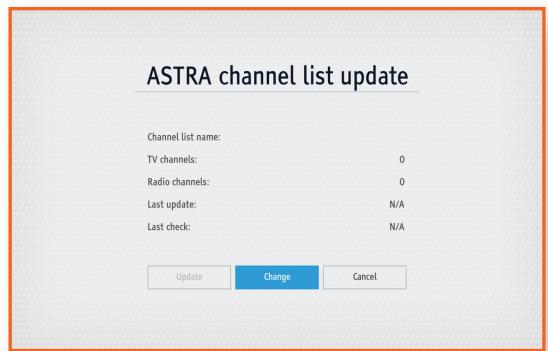
ASTRA channel list update
Astra channel list update is the simplest and fastest way of scanning services. This option allows you to Change or Update the channel list available for the ASTRA satellite network.
If channel list has not been chosen previously, please select Change option and press the button. The STB will start looking for all available channel lists. Please select one of them and press the button to scan all services from the list. Once the services have been scanned, please select Save and press the button to save them.
If a channel list has already been scanned, you can choose the Update option to update the channel list.
Updating of the channel list is also performing automatically when the STB is booted or when the STB wakes up from the standby mode.
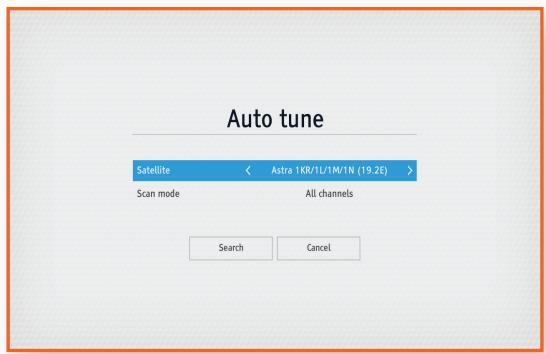
Auto tune
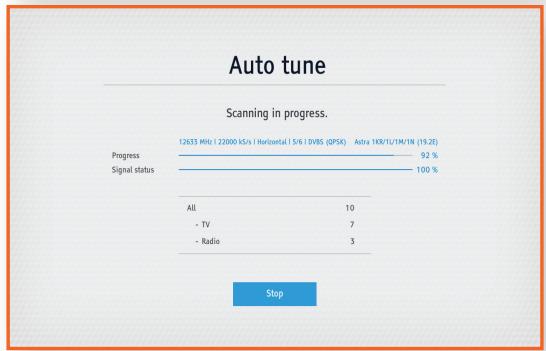
When you select this option, the STB automatically scans and indexes all channels received through the STB's cable input connector. The channels in the index of channels then appear when you press the CH LIST button on your remote control.
After successful scanning, a result screen appears with showing the numbers of TV and radio channels found. Select [Save], and then press the button to confirm.
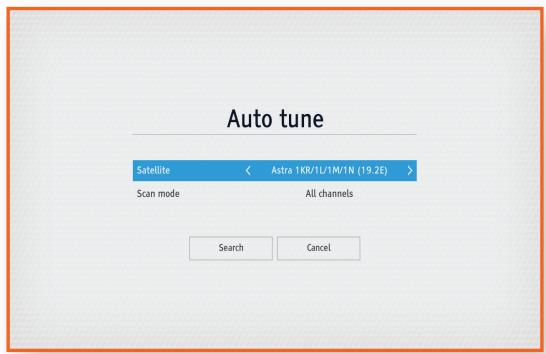

If an index of channels already exists, it will be overwritten.
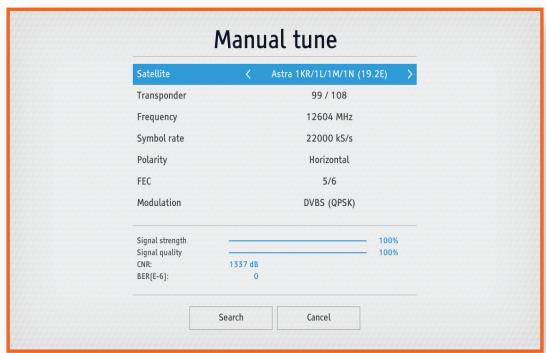
Manual tune
To scan the channel list of a satellite manually, follow these steps.
- Select the [Channel] option using the / button, and then press the button.
- Select the [Manual tune] option using the / button, and then press the button.
- Select an option you want using the / button, and set its value using the / button.
- When you are finished setting options, select [Search], and then press the button to confirm.
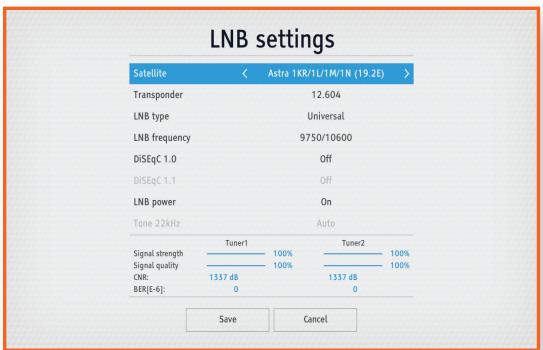
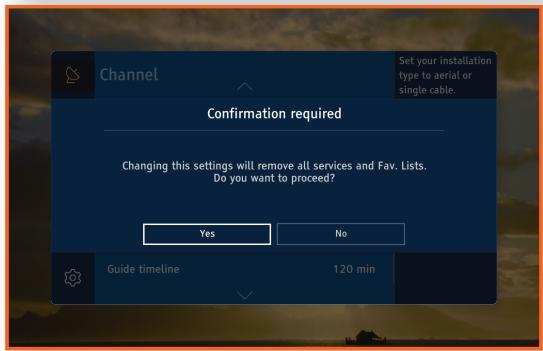
Installation type
Your product supports the setting up of various satellite reception configurations. Depending on the installation in your home, first you can choose one of the two possible installation types: [LNB] or [SATCR].
Changing between those installation types will cause removing all services and Favorite Lists. You will be asked to confirm whether this operation should be proceeded or not.
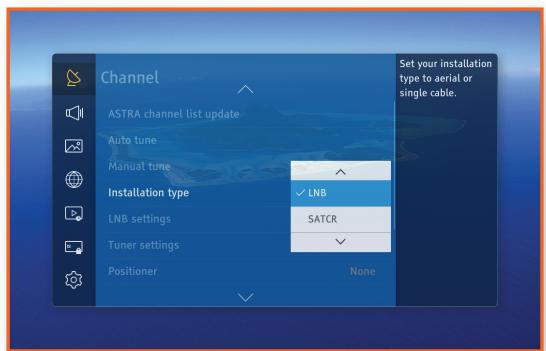
- If the [Installation type] option is set to [LNB], additional [LNB settings], [Tuner settings] and [Positioner] will appear in the [Channel] menu.
LNB Settings
It is possible to change current LNB settings in accordance with your antenna configuration.
Settings Channel
Tuner Settings
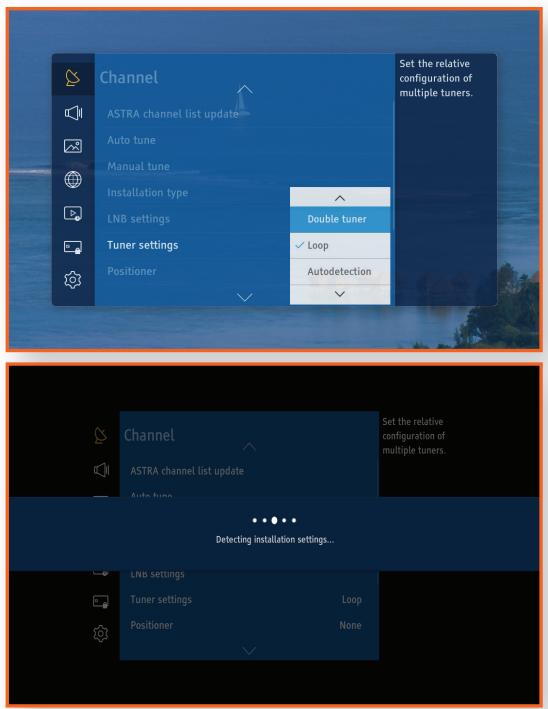
Loop configuration
In this configuration, antenna signal is passed by only one coaxial cable and the connection between tuners is created internally. And satellite signal has to be connected to the first tuner (ANT 1 IN) (near PCMCIA slot).
This configuration introduces minor limitations when both tuners are used at the same time.
The limitation is connected with polarization and lo/hi band. E.g. when the first tuner (ANT 1 IN) is tuned to TS with Horizontal polarization, LNB sets 18V, and the second tuner (ANT 2 IN) is connected to TS with Vertical polarization LNB sets 13V. But it is not possible to have 18V and 13V on single cable, so 18V is set. It means that the second tuner (ANT 2 IN) cannot be tuned to TS and no signal is observed.
In this case, functionalities like PIP or Double-REC are restricted to services with the same transponder polarization (Vertical/Horizontal, Tone On/Off).
Double tuner configuration
In this configuration, both tuners have to be connected to antenna signal independently by two separate coaxial cables. This configuration allows both tuners tuning to two satellite transponders at the same time. With double tuner configuration, the user can take advantage of PIP or Double-REC with no restrictions.
Please refer to the following table for the detail functionalities.
| Installation Type | Tuner settings | Available/Restricted Services | Expected Result |
| 1.LNB | 1.1 Double [Tuner1 (ANT 1 IN), Tuner2 (ANT 2 IN)] | - 2 REC: same TS | O |
| - 2 REC: different TS | O | ||
| - PIP: same TS | O | ||
| - PIP: different TS | O | ||
| - Zapping among different TS with 1 REC | O | ||
| O | |||
| 1.2 Loop [Tuner1 (ANT 1 IN)] | 1.2.1 Merged satellite signal -- Tuner1 | ||
| 1) Under same Position(Horizontal/Vertical) and same Tone(On/Off) | |||
| - 2 REC: same TS | O | ||
| - 2 REC: different TS | O | ||
| - PIP: same TS | O | ||
| - PIP: different TS | O | ||
| - Zapping among different TS with 1 REC | O | ||
| 2) Under different Position(Horizontal/Vertical) and different Tone(On/Off) | |||
| - 2 REC: same TS | - | ||
| - 2 REC: different TS | X | ||
| - PIP: same TS | - | ||
| - PIP: different TS | X | ||
| - Zapping among different TS with 1 REC | X | ||
| 1.2.2 Single(Not merged) satellite signal -- Tuner1 (only signal from MPEG player) | |||
| - 2 REC in same TS | O | ||
| - 2 REC among different TS | X | ||
| - PIP among same TS | O | ||
| - PIP among different TS | X | ||
| - Zapping among different TS with 1 REC | X | ||
| 1.3 Loop [Tuner2 (ANT 2 IN)] | Not Supported (No AV) : It will be mentioned in 1st install help description and User manual to avoid user confusion. | ||
Settings Channel
| Installation Type | Tuner settings | Available/Restricted Services | Expected Result |
| 2.SatCR | 2.1 Disabled status [Tuner1 (ANT 1 IN)] | - 2 REC in same TS | 0 |
| - 2 REC among different TS | 0 | ||
| - PIP | 0 | ||
| - Zapping among different TS with 1 REC | 0 | ||
| 2.2 Disabled status [Tuner2 (ANT 2 IN)] | Not Supported (No AV) : It will be mentioned in 1st install help description and User manual to avoid user confusion. | ||
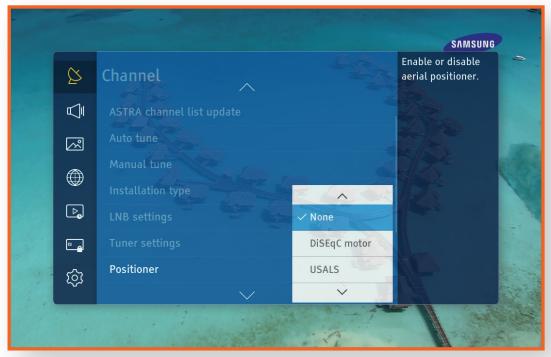
Positioner
According to this option, you can disable or enable the positioner.
You can select one of the following options: [DiSEqC Motor] / [USALS] or disable it by selecting [NONE].
Positioner Settings
If one of the [Positioner] types between DiSEqC motor and USALS, additional [Positioner Settings] option will appear in the [Channel] menu. You are able to use one of the following options: [User settings] or [Installer settings].
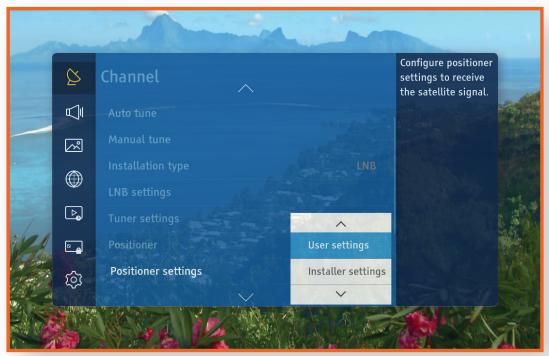
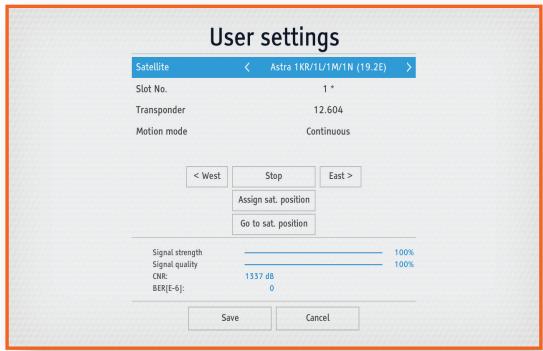
User settings
Accordingly which antenna motor type has been selected, its configuration can be done in user settings window.
DiSEqC Motor settings
In this window, you are able to:
- < West : Drive West
- East >: Drive East
- Assign Sat. Position : Store a position
- Go To Sat. Position : Move to the stored position For Drive West/East two options are possible in Motion mode.
- [Continuous]: If you press the button, the motor drives until the button is released.
- [Step]: If you press the button, the motor drives by several degrees only.
Each satellite has its own slot number. So after correcting dish adjustment, you must store it as the current position. This stored position will be used for the dish moving during scanning or channel change.
USALS settings
In this window, you are able to set longitude and latitude coordinates of your antenna location. Based on this coordinates all satellites positions will be calculated automatically. It is possible to test settings by selecting satellite with its transponder and press [Go To Sat. Position]. Starting position of the dish can be restored by pressing [Go to Position 0].
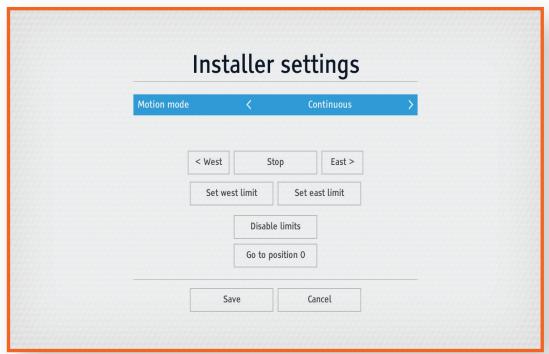
Installer settings
These settings should be done while mounting the antenna with a motor and shouldn't be changed during normal use. It is to set limits on the positioner motor if the satellite dish can't move over whole driver angle (~180 degrees). These limits are important because if on the way of the dish from one side you have the wall or someone remove the limits from this side, dish can be destroyed.
In the [Installer settings], you will be able to:
- Set East limit
- Set West limit
- Go to initial position
- Disable limits
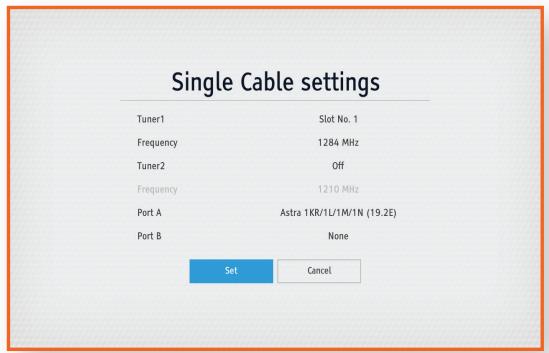
- If the [Installation type] option is set to [SATCR], additional [Single Cable settings] option will appear in [Channel] menu.
Single Cable settings
SatCR allows the connection up to 8 STBs via single coaxial cable.
There are 4 and 8 slot devices available on the market. Each device must be assigned to unique slot number and its corresponding frequency.
Splitters must be used to connect STBs to common coaxial cable.
SatCRs support switching between two satellites (DiSEqC A and DiSEqC B) but this functionality is implemented in only few devices.
For 4 slot SatCR the following frequencies for devices are available on market.
-
1210 MHz
-
1420 MHz
-
1680 MHz
-
2040 MHz
For 8 slot SatCR the following frequencies for devices are available on market.
-
1284 MHz
-
1400 MHz
-
1516 MHz
-
1632 MHz
-
1748 MHz
-
1864 MHz
-
1980 MHz
-
2096 MHz
Settings Channel
Guide timeline
This menu specifies the standard for setting the time interval for the display of the program list on a channel guide screen. The longer the interval the more programs can be checked on a single screen.
HbbTV
You can launch a Hybrid Broadcast Broadband TV interactive service while watching a TV program. To use an HbbTV service, you have to select [On] for this option and connect the STB to the internet
Channel list export/import
This function let the user export or import channel list map to or from an editable xml file. To use this functionality, a USB storage device has to be connected to the STB. In this case, channel list will be saved in the "ChList.xml".
Exporting/Importing channel list.
You can export or import channel list to or from USB storage. This functionality is a quick and easy way to save and restore favorite services lists after factory reset. It is also possible to transfer saved favorite channels between devices. Channel map is saved as xml in directory chosen in device browser.

- Before importing favorite channel lists from the file, main channel list have to be downloaded from the satellite. If services from imported file will not be found within current services list, they will be ignored.
Exported file carries information only about favorite lists and "Predefined 1-99" channels.
SOUND
You can configure various audio options such as the [Preferred audio type], [Digital volume control], etc.
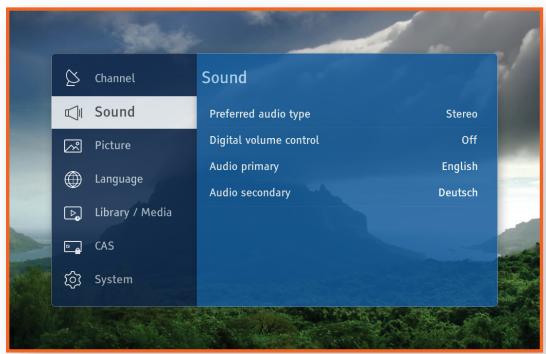
Preferred audio type
This allows selection of which audio type (Stereo or Multichannel) should be used when both are available on the service selected.
Digital volume control
This menu allows turning on/off volume control for HDMI and SPDIF digital outputs. The default value is off because the volume of some audio formats, such as AC3, cannot be controlled by the STB. If this setting is set to [On], you can control the volume but the digital audio output becomes available in PCM format instead.
Audio primary
You can change the audio language other than your preferred Audio language.
Audio secondary
You can change the language for the Audio secondary, which is available if an Audio secondary service is provided by the program provider.

Audio primary and secondary options are settings for audio tracks selection preference. That is, when primary set to Deutsch, and secondary to English, an Deutsch track will be selected by default, if available. If Deutsch track is unavailable, English track will be selected.
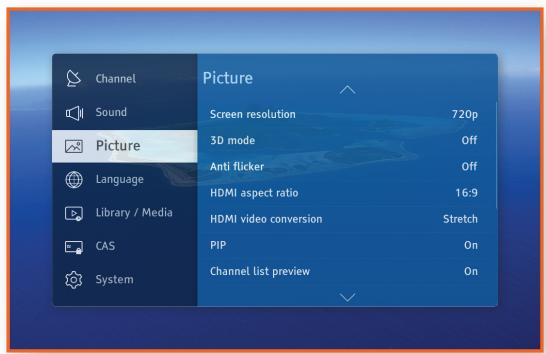
PICTURE
You can configure various display options such as the [Screen resolution], [HDMI aspect ratio], etc.
ENG
Screen resolution
This allows you to set the output resolution of the video signal. The number indicates the number of lines of video per frame. The i and p indicate interlaced and progressive scan, respectively. The more lines, the higher quality.
3D mode
This allows setting of 3D mode if the service selected provides 3D signal.
Select [Auto] to enable 3D mode if mode is recognized from the signal.
Select [Off] to disable 3D mode.
If 3D mode is not recognized automatically although service is in the 3D format, you can force this mode manually:
- [SBS-3D]: Convert SIDE-BY-SIDE 3D format to the 3D view
- [SBS-2D]: Convert SIDE-BY-SIDE 3D format to the 2D view
- [TB-3D]: Convert TOP-Bottom 3D format to the 3D view
- [TB-2D]: Convert TOP-Bottom 3D format to the 2D view

If you use one of the forced 3D formats (not Auto) you should remember to set 3D mode to [Off] or [Auto] when you change channel, because standard 2D channels will not display correctly.
Anti flicker
This allows turning on and off of the anti-flicker filter. This option may improve analogue video quality.
HDMI aspect ratio
This lets you adjust the output of the STB to the screen size of your TV when you connect them by using an HDMI cable.
HDMI video conversion
This allows you to change the screen output type when you connect them using an HDMI cable.
| HDMI aspect ratio | HDMI video conversion |
| 4:3 Setting for how standard programs display on a widescreen TV | [Auto], [Letter box], [Centre cut out], [Stretch], [None] |
| 16:9 Setting for how widescreen programs display on a standard TV | [Auto], [Pillar box], [Centre cut out], [Stretch], [None] |
PIP (Picture-In-Picture)
This option allows you to enable the picture-in-picture feature [On] or disable it [Off]. It allows you to simultaneously watch channels (programs) from both tuners. One of the services is displayed on main screen while second one is displayed in popup window.
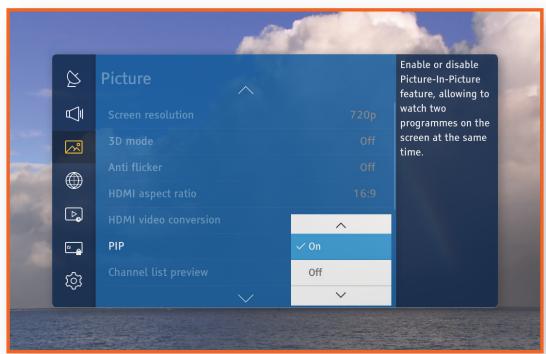

- [PIP] can be used only while STB is connected to TV via HDMI cable. SCART output is automatically disabled when PIP option is set to [On].
For more details how to use [PIP] functionality refer to chapter "Using the Basic Functions / Watching Picture-In-Picture".
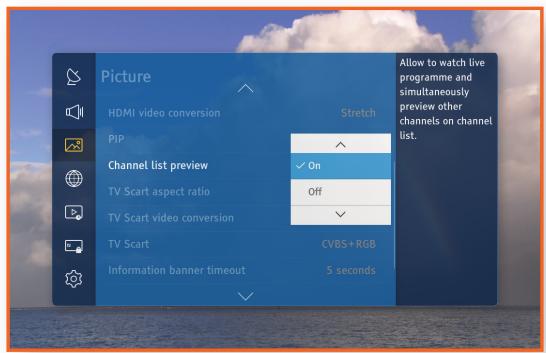
Channel list preview
While [PIP] option is [On], [Channel list preview] option in menu becomes available. It allows you to preview programs in popup window while browsing channel list. By default, this option is [On], however you can also switched it [Off].
Settings Picture
TV Scart aspect ratio
This lets you adjust the output of the STB to the screen size of your TV when you connect them by using a TV Scart cable.
TV Scart video conversion
This allows you to change the screen output type when you connect the TV and STB by using a Scart cable. Screen output types are the same as the HDMI video conversion. Refer to the table of HDMI video conversion.
TV Scart
SCART analogue output may provide CVBS signal only or both CVBS and RGB. Generally RGB signal provides better quality. Setting this option does not affect HDMI digital output.
Information banner timeout
This allows you to change the display time for the service information that appears at the top of the screen when you change channels or press the INFO button.
Screen saver
You can set the time delay for the screen saver.
If there is no input from the remote control for a given period of time, the menu window disappears and the screen saver is activated.

The screen saver is enabled only when any part of OSD is visible. It will be never shown during watching television.
Settings Language
LANGUAGE
You can configure on-screen message language as well as subtitle languages. The selected language will only appear if it is supported.
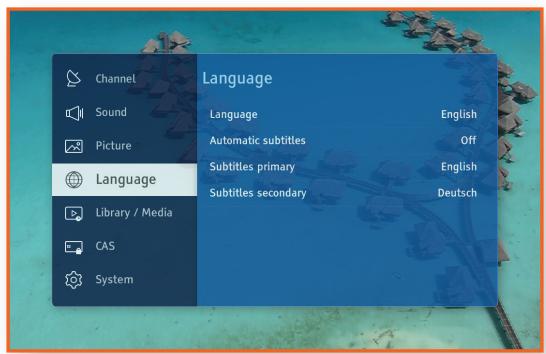
Language
On Screen Display (OSD) is used to change the language of the menu screen.
Automatic subtitles
This allows you to enable/disable subtitles, or change to Hearing Impaired.
Subtitles primary
This allows you to change the primary language for the subtitles.
Subtitles secondary
This allows you to change the secondary language for the subtitles. Subtitles are available when a secondary language service is provided by the program provider.
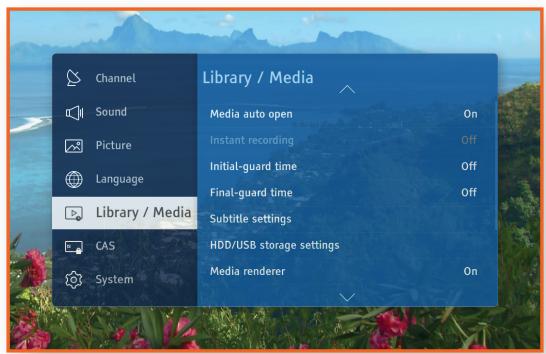
LIBRARY / MEDIA
You can configure various options related to recording and USB storage setting.
ENG
Media auto open
Allows you to automatically open the library/media when a USB memory stick is inserted.
Instant recording
This allows you to choose the automatic recording of the program currently being watched. A temporary recording starts when you change from the channel you are watching to another one and stops when you change channels again. Note that when one temporary recording stops, it is deleted and another starts at the same time.
Initial-guard time
This allows you to set how many minutes will be recorded in advance before your scheduled recording should be started.
Final-guard time
This allows you to set how many minutes will be recorded more after your scheduled recording should be ended.
Subtitle settings
This allows you to change Color/Size/Position and Encoding of subtitles for movies displayed from Media (USB or DLNA). This option do not concern subtitles displayed while watching satellite services.
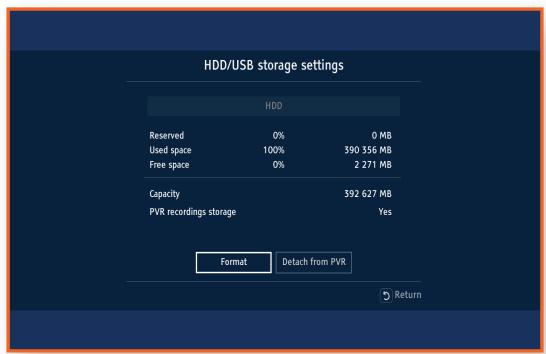
HDD/USB storage settings
When a USB Hard Disk Drive is not connected this option is not available. When connecting a USB HDD it is possible to choose the option and to get information about used and free space and also to format or attach/ detach the connected USB HDD for PVR purposes.
Settings Library / Media
Media renderer
DLNA Media Renderer is one DLNA functionality that enables you to remotely control viewing of content on device. Instead of browsing DMS (Digital Media Server) directly on STB, you can browse DMS (Digital Media Server) on tab or phone and also control from the playback of content on STB. DMR (Digital Media Renderer) is advertising itself on network, so it is available to every DLNA Media Controller in local network.
Media renderer name
DLNA Media Renderer is visible in network under certain name so called friendly name. Predefined value is [STB] + ip address of STB. This name can be changed via Settings menu: Library - Media Renderer name.
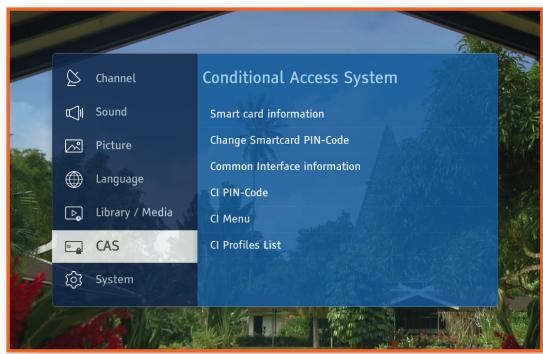
CAS
This section of the Settings contains information about Conditional Access System i.e. inserted Smart Card and Cl + module.
ENG
Smart card information
When you select this option, the STB displays the information about inserted Smart Card.
Change Smartcard PIN-Code
This option allows changing of an inserted Nagravision Smart Card's PIN code.
The Smartcard's PIN Code is not the same as the STB's PIN code and is not set to 0000 when performing a reset to default settings.
Common Interface information
When you select this option, the STB displays the information about Cl+ module.
CI PIN-Code
This option allows storing CI+ PIN code. Stored PIN will be used during scheduled or automatic recordings.
CI Menu
Selecting this option will display CI content broadcasted by the module provider.
CI Profiles List
This option allows downloading additional list of services shared by the CI module provider.

GX-SM650SJ is a Cl+ certified product from Digital TV Labs. So you can use any Cl+ certified CAM(Conditional Access Module). But some interoperability issues may happen even though the Cl+ CAM got certified.
SYSTEM
You can check product information or reset the STB to default settings.
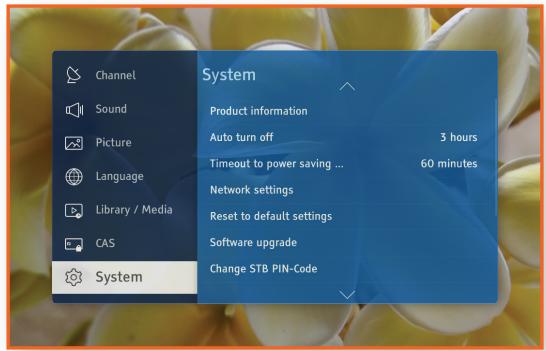
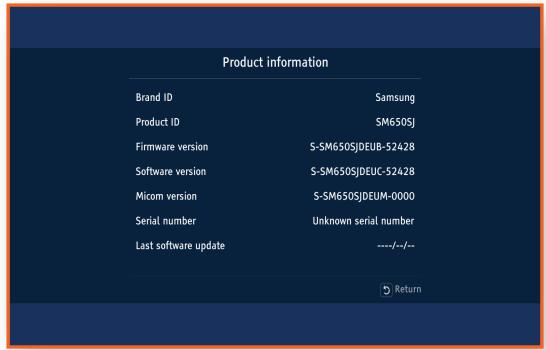
Product information
This menu displays the product information: [Brand ID], [Product ID], [Firmware version], [Software version], [Micom version], [Serial number] and [Last software update].
Auto Turn off
This lets you set the STB go into the standby mode automatically from live mode if your STB is not being used for the set up time.
When [Auto Turn off] is set to one of the available timeout values and the STB is idle for a certain period of time, the product saves energy by turning off the STB automatically.

- If the STB has been turned off or left unplugged for more than 1 week, the device may lose authorization for satellite TV services. To restore satellite TV services, please contact your satellite TV service provider.
Timeout to power saving mode
This lets you set the STB go into the deep standby mode automatically from the standby mode. The deep standby mode means the most Low Power mode and the STB is required to reboot when it turns on.
When [Timeout to power saving mode] is set to one of the available timeout values and the STB gets turned off for a certain period of time on the standby mode status, the product saves energy the most by powering off the STB automatically.
Network settings
Before you begin, contact your ISP (Internet Service Provider) to find out if your IP address is static. If it is dynamic and you have a wired network, we recommend using the Automatic configuration procedures described below.
Connect the STB to your router using a LAN cable before you start the configuration procedure.
To begin configuring your network connection, follow these steps:
Automatic
- Press the MENU button on the remote control.
- Select [Settings] > [System], and then press the button.
- Select [Network settings], and then press the button.
- Select [Auto] in the Network Settings screen.
- Select [OK], and then press the button. The STB detects the wired connection, verifies the network connection and then connects to the network.
Manual
If you have a static IP address or the Automatic procedure does not work, you'll need to set the Network Settings parameters manually.
- Select [Manual] in the Network Settings screen.
- Enter IP address, Mask, Gateway and DNSs manually.

You can get the Network parameters from your Internet provider.
- Select [OK] to save settings, and then press the button.
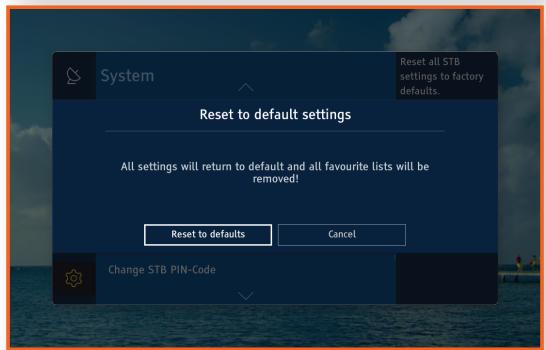
Reset to default settings
- Resets all settings to their default settings. The default PIN is 0000.
To Reset to the default, follow these steps:
- Press the MENU button.
- Select [Settings] > [System], and then press the button.
- Select [Reset to default settings], and then press the button.
- Enter the PIN code by using the number buttons.
- Select [Reset to defaults], and then press the button to confirm.
- When the factory reset is completed, the product will restart and the first installation procedure starts again on the screen.
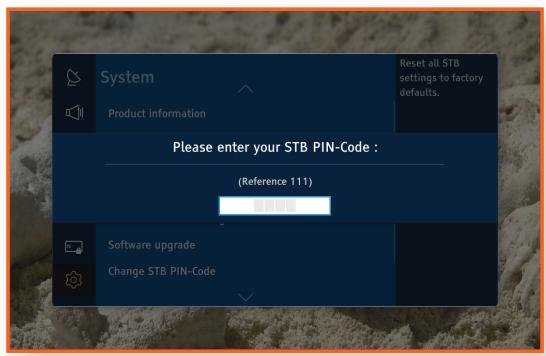

- You must enter your 4 digit PIN by using the number buttons on the remote control to access the Reset function. If you didn't change the PIN, use the default PIN: 0000.
Please note that once you perform the [Reset to default settings], all data such as the channel setting, channel list and all user configured data will be deleted.
Software upgrade
The Software Update menu allows you to upgrade the STB's software for performance improvement or additional services.

Never turn the STB off during the update process.

When the update is completed, the STB turns off and then turns on again by itself.
SAMSUNG ELECTRONICS takes no legal responsibility for STB malfunction caused by consumer negligence during a software Update.
- When recording is in progress you cannot use this functionality.
If the main image is broken and it is impossible to perform a software update from the menu, the Force Update function can be used.
Reboot the STB and keep pressing the [CH ] (Channel DOWN) button on the front panel. The Loader application will try to update the image from USB, if connected, or from the satellite.
OTA Update
You can use manual update to update the software through your network connection.
- Press the MENU button on the remote control.
- Select [Settings] > [System] > [Software upgrade] and then press the button.
- Choose OTA mode by pressing the button.
- Select [Search] and press the button.
- A [Searching for new software] window appears on the screen and searching is performed automatically. Searching can be cancelled by pressing the on the [CANCEL] button.
- If there is a new software, then a [Software upgrade] window appears on the screen. When you select [Yes], then the STB restarts and the upgrade selection window appears.
- When you can see the [Schedule] button on the upgrade selection window, then you have to select it for the first OTA Update time. If you can't see the [Schedule] button on the window, then you have to select the [Yes] button for the first time.
USB Update
You can update the software by using a USB flash drive.
- Visit www.samsung.de
- Enter the product's model name into the search field. As you enter the model name, a drop down will display products that match the model name.
- On the page that appears, click Support in the left side of the page.
- Click Firmware in the submenu of the Support menu.
- Click Firmware menu for your product in the right side of the page.
- On the page that appears, scroll down to Downloads & Handbucher.
- Click "Datei Upgrade File(USB type)(MainApplmage)" for Main SW Image and click "Datei Upgrade File(USB type)(LoaderImage)" for Loader Image.
- Click Send in the first pop-up that appears. Click OK in the second pop-up to download and save the firmware file to your PC.
- Copy the files(LoaderImage.bin and MainApplmage.bin) to the main directory of your USB flash drive.
- Insert the USB flash drive into the USB port of the STB.
- In the STB's menu, go to [Settings] > [System] > [Software upgrade].
- Select [USB] in the mode and select [Search], and then press the button on the remote control.
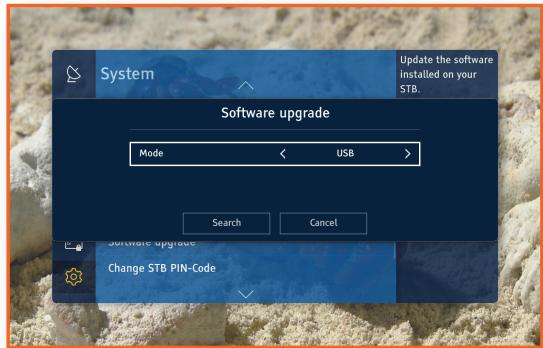
- The STB searches for the software on the USB drive. When it finds the software, the software can be updated.
- The STB turns off and then turns on automatically to upgrade the software.

- When the software upgrade is done, check the software details in [Settings] > [System] > [Product Information].
Do not turn off the STB during the software Update. It may cause the product to malfunction.
Software Updates using the USB must be performed with a USB flash memory stick only.
Change STB PIN-Code
This function works in conjunction with the Parental Rating function which requires you to enter a PIN before it allows access.
You can change the 4-digit PIN used to access the Parental Rating function. To change the PIN, follow these steps:
- Press the MENU button on the remote control.
- Select [Settings] > [System] and then press the button.
- Select [Change STB PIN-Code], and then press the button.
- Under [Current STB PIN code], enter the old PIN by using the number buttons on your remote.
- Under [New STB PIN code], enter the new PIN by using the number buttons.
- Under [Confirm new STB PIN code], enter the new PIN again.
- Select [Save], and then press the button on your remote. When the PIN is changed successfully, then [PIN code changed] message appears.

The default password is set to 0000.
Open source licenses
This provides information about open source licenses used in the product.
WATCHING TV CHANNELS
After Auto scanning is completed, you can watch your TV channels.
Using the remote control buttons
To use these buttons, see the table on the right.
| 1 | NUMBER buttons: To move to a TV channel directly, press the number buttons that correspond to the desired TV channel. |
| 2 | CH button: Press this button to change TV channels. |
| 3 | GUIDE button: Press this button to open Electronic Program Guide. |
| 4 | INFO button: Press this button to display detailed channel information. |
| 5 | TOOLS button: Press this button to use additional options. |
| 6 | AUDIO button: Lets you select another audio track in a different language if the TV program provides multi track sound. |
| 7 | SUB button: Lets you turn on/off DVB or TXT subtitles in a different language if the TV program provides subtitle tracks. |
| 8 | TEXT button: Press this button to display Teletext pages if available. Teletext is a free service broadcast which gives the latest information on news, weather and many other topics. You can use interactive services in teletext mode. |
Using the Basic Functions Watching TV Channels
Switching channel
You can switch the current channel by pressing the CH button or entering the channel number directly using the NUMERIC(0-9) buttons.
- Press the TV/RADIO button to switch between TV channels and radio channels.
- You can switch channels by using the channel list, program banner or TV guide.
- To return to the previous channel, press the PRE-CH button.
ENG
Volume control
You can adjust the volume level using the VOLUME + / - button.
- Press the MUTE button to disable the audio.
- Press the MUTE button again or VOLUME + / - buttons in order to enable the audio.
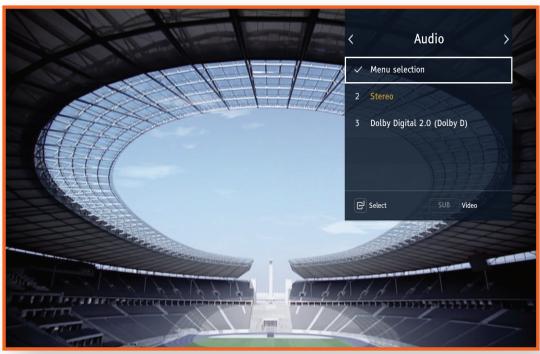
Audio language
You can select another audio track in a different language available for current channel.
- Press the AUDIO button to display audio language banner.
- Use the / button to select preferred language, and then press the button.
- Press the AUDIO button again or EXIT button to close the banner.
Subtitle language
You can select another subtitle in a different language available for current channel.
- Press the SUB button to display subtitle language banner.
- Use the / button to select preferred language, and then press the button.
- Press the SUB button again or EXIT button to close the banner.

53
Using the Basic Functions Viewing the service Information
VIEWING THE SERVICE INFORMATION
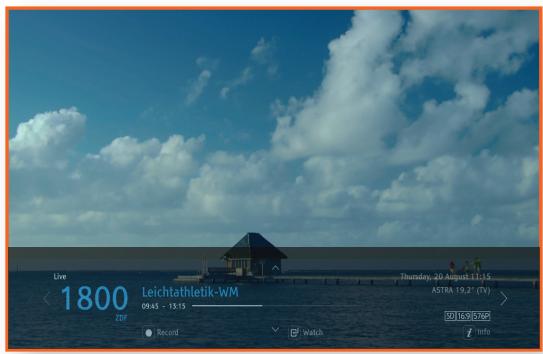
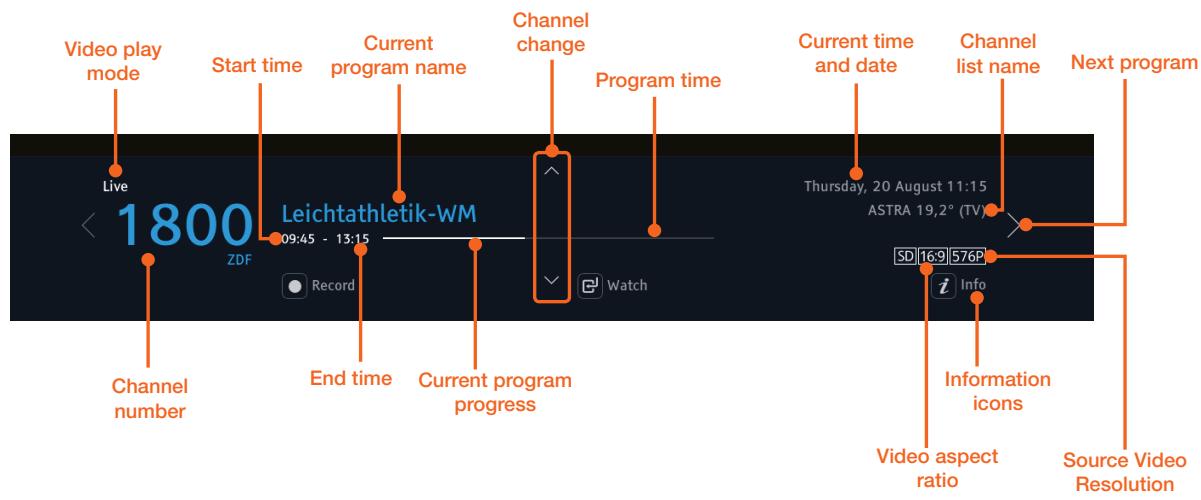
Pressing the INFO button displays a channel information.
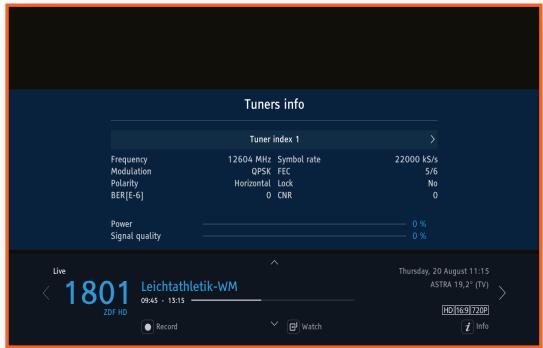
Pressing the INFO button on the remote control displays information about the channel being watched. Pressing the INFO banner twice makes more detailed information appear. Pressing it three times produces a display of current tuner information, including data on signal strength and quality.
Channel Information
You can see the channel info banner by pressing once the INFO button while watching a program.
- You can see the next programs on current channel and another channel by using the / / / buttons.
- You can check the current program's status (channel, title and broadcast time).
Using the Basic Functions Viewing the service Information
Display icons
| Icon | Definition | Icon | Definition |
| ♥ | Favourite channel | Digital | Dolby Digital Sound |
| a | Lock channel | Digital+ | Dolby Digital Plus Sound |
| HD | HD channel | AD | Audio description |
| SD | SD channel | Subtxt | DVB Subtitle |
| Parental Lock | TXT | Digital text | |
| Watch timer | N | New recording | |
| Record Timer | 4:3 | Video aspect ratio | |
| S | Subtitle available | 14:9 | |
| STEREO | Audio stereo | 16:9 | |
| MONO | Audio mono | ● | Recording in progress |
| ///AAC | AAC sound | 1080p | Video source resolution |
| AAC+ | AAC+ sound | 1080i | |
| ///DTS | Digital Theater Systems | 720p | |
| ((●)) | Multi Sound | 576p | |
| 576i |
Using the Basic Functions Viewing the service Information
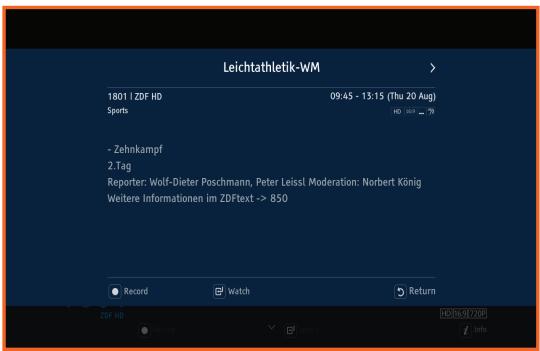
Program Information
You can see the synopsis of current watching program by pressing the INFO button twice.
- Press the EXIT button to close the banner.
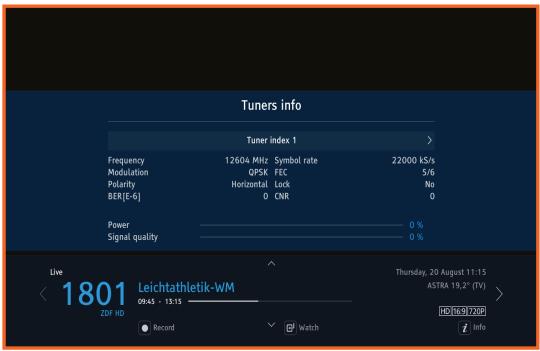
Signal Information
You can see the signal information by pressing the INFO button three times.
- Press the INFO button again or EXIT button to close the banner.
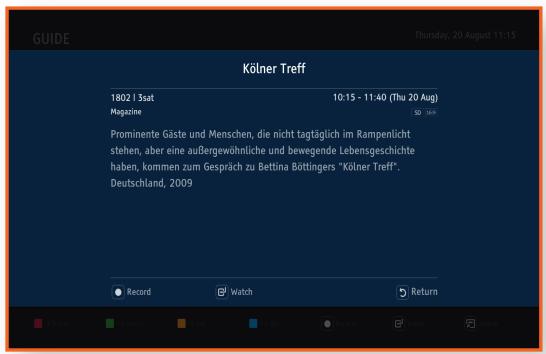
VIEWING THE EPG INFORMATION
EPG (Electronic Program Guide) provides users with television, radio, and other media applications with continuously updated menus that display broadcast programming and scheduling information for current and upcoming programs.
The EPG information is provided by broadcasters.
When you press the GUIDE button on the remote control while watching TV program, the EPG screen is displayed.
The color button on the remote control is operated by the functions displayed at the bottom of a screen:
- Press the / / buttons to navigate programs.
- Select a channel in the Guide, and then press the button to jump to that program right away if the program is on now.
- Jump backward/forward two hours by using red or green button.
- Jump backward/forward one day by using yellow or blue button. Search by Day/Time/Category/Search Text/Genre using the TOOLS button.
- Press the EXIT button to return to the program you have been watching.
- To set a reminder or recording, highlight the upcoming program that interests you and press the button. You can also set a recording by highlighting a program and pressing the REC button.
- You can view the list of scheduled programs from [Library] > [Timer].
Using the Timer
You can set two types of "Timer".
- Select the desired program from the program list.
- Press the REC button on the remote control for the record timer.
- Press the button on the remote control for the watch timer.
- To the right of the chosen program, the "record" or "watch" icon will be visible.
- If there is a "Timer" conflict appropriate information will be displayed.
- In the case of "Watch" timer, when the programme is starting, a pop-up with this information will be displayed on the screen.
- Pressing the REC button, or button again on the program to cancel the timer.

Before using record timer, you must assign an external USB HDD to STB. For detailed information, please refer to RECORDING PROGRAMS in 60 page.
Using the Basic Functions Viewing the EPG information
Viewing Program information
- Select a channel in the EPG screen, and then press the INFO button on the remote control.
- The program's detail information will appear in the banner on the screen.
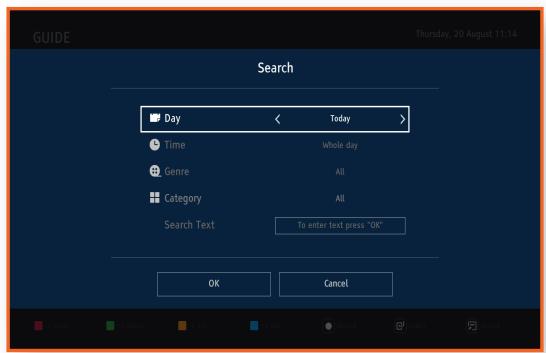
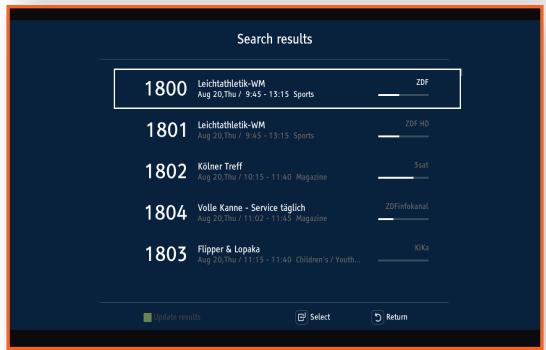
Searching programs
You can search programs by selecting the appropriate search options(Day/Time/Genre/Category/Search text).
- Press the TOOLS button on the remote control.
-
Select the desired option and set it as you want.
-
If you press the button on the Search Text menu, you can search for program by entering words or characters by using the virtual keyboard popped up.
-
Select [OK], and then press the button.
- The [Search results] window appears.
PAUSING AND REWINDING LIVE TV
While watching live TV or listening live radio, after pressing button the time shifting mode starts. This mode makes it possible to stop live mode, rewind and review the program that was recorded the moment before.
- Press the button to freeze the live program.
Press the button again to resume the paused program.
Press the button to rewind the recorded program.
Press the button to fast-forward the recorded program.


-
Fast-forward functionality may be blocked or its speed may be limited by the content provider's request. In such case proper info banner will appear.
-
To go back to the live program, press the , RETURN or EXIT button.
- You can increase the rewind/fast-forward speed by pressing the or button again.
- You can use the or button to jump backwards or forwards.
When time-shift mode is on, you can jump between programs in the channel. Pressing INFO button will show information about currently played program. Time-shift progress bar marks the recorded and seen content by blue color, while the unseen part is marked by green color.
- You can watch recorded program by selecting it with and buttons from within channel information and pressing OK button.
- Press the REC button to store recorded program in the [Library].
Watching the stored recording from the [Library] will not stop this recording.
The model GX-SM650SJ allows using time shifting mode in two scenarios. First, by using the internal memory only and second with the external USB storage device.
Internal memory only:
- The maximum temporary recording length is 30 minutes
- Instant recording feature is not available
- ( CAUTION) The total guaranteed lifecycle time for Timeshift with internal memory is 1500 hours
External USB-HDD:
- The external USB-HDD has to be connected to the USB port on the back panel
- The maximum temporary recording length is 2 hours
- Instant recording feature is switched on by default
- Internal memory not used

- If [Settings] > [Library / Media] > [Instant Recording] is turned on, the STB automatically temporarily saves the TV channel being watched or the radio channel being listened to, starting 5 seconds after last channel change.
Connecting both tuners to the satellite signal allows time shifting on presently watched channel with on-going recording on another channel in the same time.
RECORDING PROGRAMS
You can record a program not only whilst watching the desired program, but also after selecting the desired program from the information banner, the TV guide or the Search menu.
To record TV channels or Radio programs, press the REC button on the remote control.

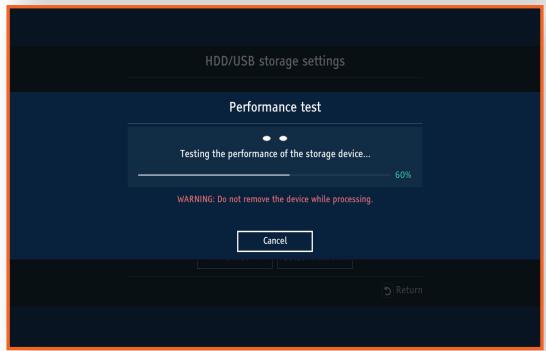
Before using this function you must connect an external USB HDD to the USB port on the rear panel of the STB and the HDD must be assigned to PVR.
To assign an external USB HDD to PVR, follow the below steps.
1. Connect an external USB HDD to the USB port on the rear panel of the STB.
2. Go to [Menu] > [Settings] > [Library / Media] > [HDD/USB storage settings].
3. Press [Format] button and check formatting is succeeded.
4. Press [Assign to PVR] and check Performance test is succeeded.
- Programs to be recorded are marked with red icon in the information banner and the channel list.
- If the program is to be broadcasted at a later time or day, the STB will automatically book it, and will record it when it is broadcasted.
- You can see the recorded programs list in the [Library] List by pressing the MENU button and select the [Library] category.
- Press the button or REC button in the program you are recording to stop video recording.
- You can delete a booked program in the Library List.
Using the Basic Functions Recording programs
Double tuner architecture allows Dual-REC functionality. After connecting both tuners to the antenna, it is possible to watch and record or time-shift other channels while previously started recording in the background. Available scenarios are:
| Service on tuner 1 (ANT 1 IN) | Service on tuner 2 (ANT 2 IN) | |
| Case 1 | Watch live | REC |
| Case 2 | Watch & REC | REC |
| Case 3 | Time-shift | REC |

- The Dual-REC feature is fully available on all services only when the [Tuner settings] option is set to [Double tuner] and both tuners are connected independently to the dish. The [Loop] configuration restricts available services as described in the chapter "Connections".
Using the Basic Functions Channel list
CHANNEL LIST
The Channel list displays the list of channels memorized and indexed during the Scanning process. On the Channel list screen, you can select and change channels, lock and unlock channels, view indexed channels by sort order (name, number), and access and edit Favourites.
Press the CH LIST or button on the remote control while watching TV program. The channel list will be displayed.

The actual latitude/longitude and channel settings of [ASTRA 19,2° (TV)] may differ from the locations of installed ASTRA satellite antenna.
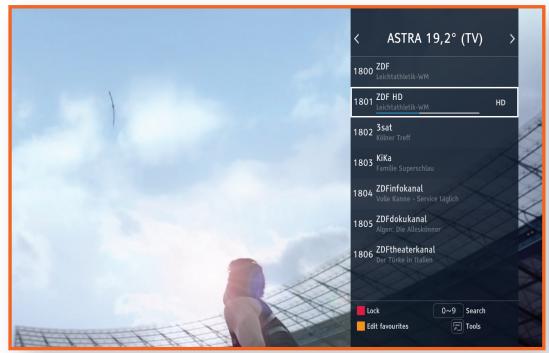
Locking channels
You can lock a specific channel. Once locked, you must enter your PIN code in order to view those locked channels.
Select a channel in the Channel list, and then press the Red button on the remote control to lock a channel.
Favourites list
You can designate frequently watched channels as Favourites. Favourite channels are identified in Edit favourites and the Channel list with the symbol. You can create new favourite channel list. You can also edit Favourite channel lists.
To display the favourite lists screen, press the Yellow button on your remote control in the Channel list.
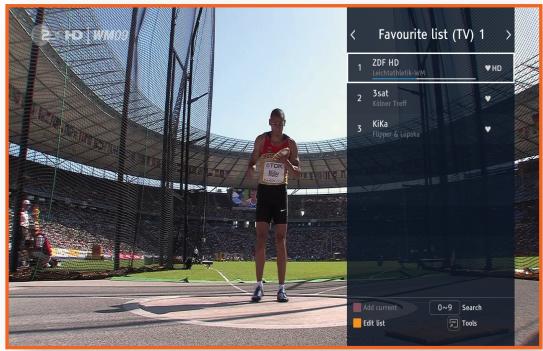
Create new favourite channel list
Add a channel to new favourite channel list.
- In the Channel list, press the Yellow button.
- Select the [Create new favourites list], and then press the button. The virtual keyboard appears.
- Input the favourite list name using the pop-up keyboard.
- When finished, select [Done] on the keyboard, and then press the button. The [Edit favourite list] screen appears.
- In the [ASTRA 19,2° (TV)], select channel you want to add by highlighting the channel.
- Press the button to add the selected channel to the favourite channel list.
- If you add all necessary channel to favourite channel list, press the RETURN button on the remote control.
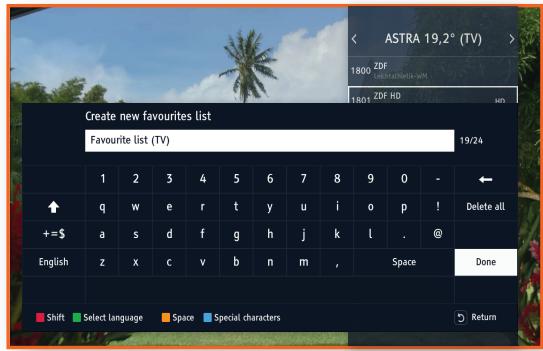
ENG
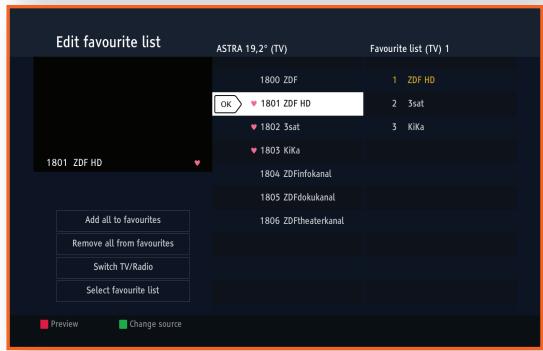
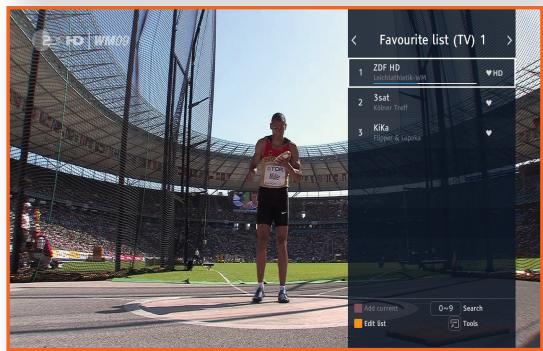
Remove Favourite Channels
Remove channels from a Favourite channels list.
- In the Channel list, press the Yellow button.
- Press the button on the remote control to go to a favourite channel list.
- In the favourites channel list, select channel you want to delete by highlighting the channel
- Press the button to delete the channels from the list.
- After all modification, press the RETURN button on the remote control.
Using the Basic Functions Channel list
Sorting channel list
To sort the channels in the Channel list. You can order the list by name or number.
- In the Channel list, press the TOOLS button on the remote control.
- Select the sort option you want, and then press the button.
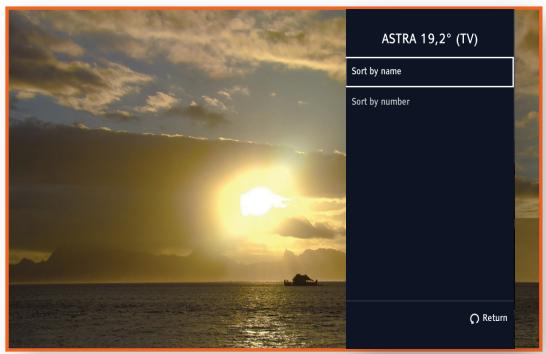
USING THE HBBTV
HbbTV(Hybrid Broadcast Broadband TV) is a major new pan-European initiative aimed at harmonizing the broadcast and broadband delivery of entertainment to end consumers through connected TVs and set-top boxes. If the satellite TV service provider which you are subscribed to offers the interactive service, you can launch it at any time by pressing the RED button on the remote control while watching a TV program.
If an HbbTV (Hybrid Broadcast Broadband TV) option is supported by the program, you can start HbbTV by using the RED button on the remote control when HbbTV supporting program is displayed on screen.
To use the HbbTV service, connect your STB to the internet (Refer to Page 21, CONNECTING TO A NETWORK ROUTER, and Page 47, Network setting, for the detail information) and select [On] for HbbTV option([Settings] > [Channel] > [HbbTV]). The default setting is [On].

WATCHING PICTURE-IN-PICTURE
Picture-In-Picture (PIP) functionality allows you watching services simultaneously from both tuners. After enabling this feature in menu settings you can activate it by pressing [PIP] button on the remote control. PIP shows up as a resizeable popup window in the left corner of the display. Pressing [Tools] button displays popup control panel which allows you to:
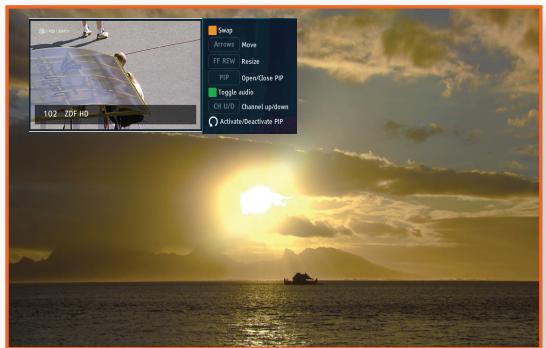
- Swap services between full screen and popup [Yellow] button
- Move the PIP window using [Up] [Down] [Left] [Right] arrows
- Resize window using , buttons
- [PIP] button to open/close PIP window
- Toggle audio between main display and popup window using [Green] button
- Change channel in popup by pressing [CH Up] [CH Down] buttons
- Deactivate popup controls by pressing [RETURN] button
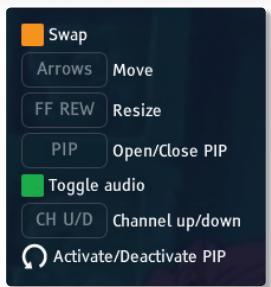

- Deactivating the PIP window controls will pass control for main display but PIP will still be visible. To close the PIP window press [PIP] button on RCU.
If both [PIP] and [Channels list preview] option are enabled, a small PIP window will be displayed while browsing channel list. The PIP window is placed just next to channel list window and presents live preview of currently selected channel.


Channel list preview is unavailable while the PIP window is already opened.
- Only when tuner configuration is set to [double tuner] a full PIP functionality is available. If satellite signal is passed through only one cable to the tuners, which corresponds to [Loop] configuration, services available in PIP are constrained. For detailed information about tuner configuration, refer to chapter "Connections->Connecting to an antenna".
Using the Library
This function launches the PVR contents list by using the [Library / Media] menu. Cyclic recordings can be browsed within their own folders. You may play a selected recording and browse through it using Rewind, Forward, Pause and Play. You can also delete selected recordings. If you want to use this function, you must connect the external HDD to the USB port on the rear panel of the STB.
CONTENTS & TIMER LIST
Contents
You can see a list of the TV programs that you have recorded and are recording.
- Press the INFO button on the remote control to display the program information of the selected recording.
- Press the button on the remote control to playback the selected content.
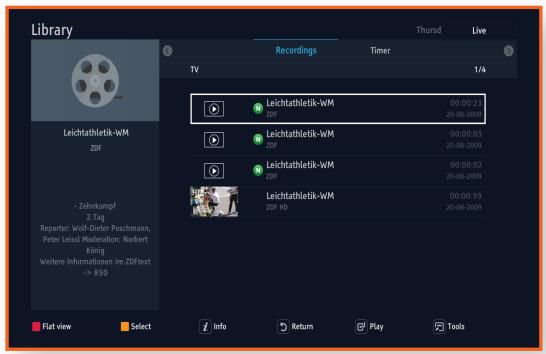
Timer
You can see the list of scheduled programs.
Playback related buttons
- To return to normal speed playback, press the button.
| ▶II button | Pause or resume playback. |
| ■ button | Stops playback. |
| Fast Rewind | During playback, press the ⇔ button. Each time you press the ⇔ button, the Fast Rewind speed will change. |
| Fast Forward | During playback, press the ➔ button. Each time you press the ➔ button, the Fast Forward speed will change. |
To select all/deselect all timers
- Press the TOOLS button on the remote control.
- Select [Select All] or [Deselect All], and then press the button on the remote control.
Using the Library Contents & Timer list
To delete the timer
- Select a timer by pressing the Yellow button on the remote control.
- Press the TOOLS button on the remote control.
- Select [Delete] on the pop-up window and press the button on the remote control.
To sort timers
- Press the TOOLS button on the remote control.
- Select [Sort], and then press the button on the remote control.
- Choose the sorting mode and sorting order.
- Confirm with the button on the remote control.
To add timer
- Press the TOOLS button on the remote control.
- Select [Add timer], and then press the button on the remote control.
- You can now select the Type, Bouquet, channel, Date, Start, Stop, Frequency, Initial-guard time, Final guard time and title of the new timer.
To edit timer
- Select a timer by pressing the Yellow button on the remote control.
- Press the TOOLS button on the remote control.
- Select [Edit timer], and then press the button on the remote control.
- You can now select the Type, Bouquet, channel, Date, Start, Stop, Frequency, Initial-guard time, Final-guard time and title of the edited timer.
Media Play
Your STB can play the contents located on the USB devices.
It is also possible to navigate through menus, selecting items, viewing information about items, browsing and playing/viewing an item. You can delete, copy, move, sort, select and deselect all items on the storage medium by pressing the TOOLS button and choosing an option from the list. You can also create a new folder on the storage medium by pressing the TOOLS button and choosing the option "New folder".
PLAYING FILES ON A USB DEVICE
You can play contents by using a USB storage device.
To connect a USB storage device, follow the following steps:
- Turn the STB on.
- Connect the USB storage device containing photos, music and/or movie files to the USB port at the front of the product.
- Press the MENU button on the remote control.
-
Select [Media], and then press the button.
-
When the USB storage device is connected to the product, you can see the USB directory on the Media screen.
-
Select Photo, Music, Video or All, and then press the button.
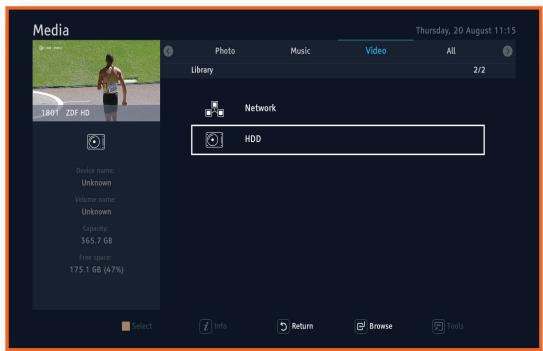
- Use the buttons to select the desired device and then press the button.
Depending on how the contents are arranged, you will see either folders, individual files, or both.
- If necessary, use the buttons to select a folder, and then press the button.
- Use the buttons to select a file to view or play, and then press the button.
- Press the RETURN button to browse up in a sub folder.
- Press the EXIT button from any position or press the RETURN button on the root folder to return to the Live TV.

- Even though the STB will display folders for all content types, it will only display files of the Content Type you select in Step 5. For example, if you select music, you will only be able to see just music files. You can change this selection by returning to the Photo, Video and All on the screen.
CONTROLLING PLAYBACK
You can control the playback of media file located on an external USB storage device. Depending on the contents, some of the functions described in this manual may not be available.
- Press the button on the remote control to pause or resume playback.
- Press the button on the remote control to stop playback.
- During playback or in pause mode, press the TOOLS button on the remote control to show progress bar.
- You can see additional information by pressing the INFO button on the remote control if a file has additional information.

Depending on the storage device, the Tools menu may differ. All options may not be displayed.
To delete the files
- Select the files by pressing the Yellow button on the remote control.
- Press the TOOLS button on the remote control.
- Select [Delete] on the pop-up window.
- Confirm with the button on the remote control.
To copy the files
- Select files by pressing the Yellow button on the remote control.
- Press the TOOLS button on the remote control.
-
Select [Copy] on the pop-up window.
-
Press the Green button to create a new folder.
-
Press the Red button to see the root folder.
-
Select the destination folder to be copied by navigating in the pop-up window.
- Press the Yellow button to confirm.
To move the files
- Select the files by pressing the Yellow button on the remote control.
- Press the TOOLS button on the remote control.
-
Select [Move] on the pop-up window.
-
Press the Green button to create a new folder.
-
Press the Red button to see the root folder.
-
Select the destination folder to be copied by navigating in the pop-up window.
- Press the Yellow button to confirm.
To create a new folder
- Press the TOOLS button on the remote control.
- Select [New Folder] on the pop-up window, and then press the button on the remote control.
- Input the name of the new folder by using the / / / and buttons on the remote control.
- Confirm with the [Save] button on the pop-up window.
To sort the files
- Press the TOOLS button on the remote control.
- Select [Sort] on the pop-up window, and then press the button on the remote control.
- Choose the sorting mode and the sorting order you want to do.
- Confirm with the button on the remote control.
To select all the files
- Press the TOOLS button on the remote control.
- Select [Select all] on the pop-up window, and then press the button on the remote control.
To deselect all the files
- Press the TOOLS button on the remote control.
- Select [Deselect all] on the pop-up window, and then press the button on the remote control.
USING THE DLNA
DLNA functionality gives you to share digital contents between STB and other multimedia devices, control the contents remotely and render the contents by using external device e.g. phone. The STB supports DLNA Media Player and DLNA Media Renderer device profiles.
DLNA Media Player allows you to perform the following operations:
- Discover DLNA media servers
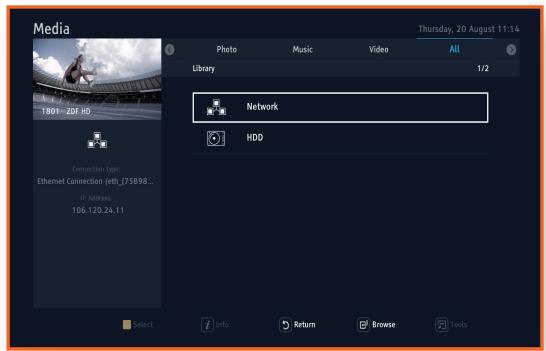
- Show the list of media servers available in [Media/Network].
- Refresh the list of servers by sending M-SEARCH request.

- Browse all servers as classic storage directory and display files according to DLNA type provided by server or extension (if available).
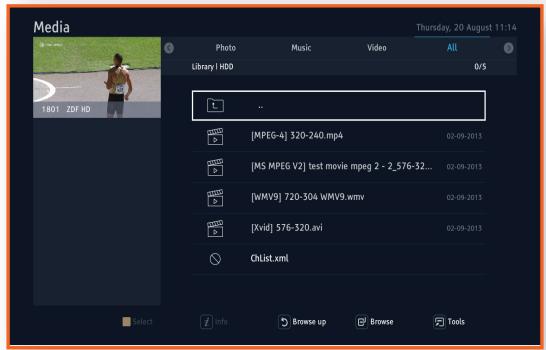
- Play files similarly to playback from USB or HDD. For more information about playback from USB or HDD, see 'Playing Files on a USB Device' on page 69.
In the DLNA, Trick modes are not supported, audio jumps are limited to 15 second steps and files are not cached. DLNA Media Renderer profile allows you to perform the following operations:
- Turn on/off [Media renderer] from [Settings] > [Library / Media] menu.
- Operate [Media renderer] via DLNA Media Controller device or program – preferably a phone or a tab.
- Change the Renderer's name in Settings menu.
When a device is requesting the playback for the first time, a banner is shown and you can make decision. For the [Media renderer] trick modes are not supported, audio jumps are limited to 15 second steps and files are not cached.
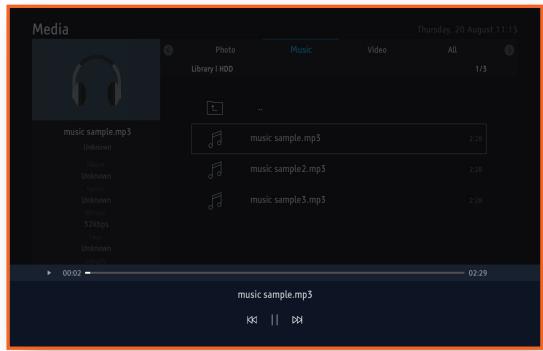
ENG
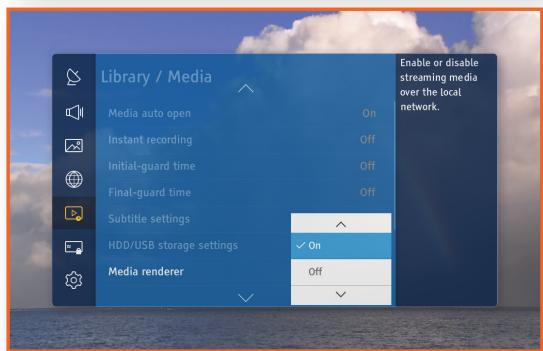
Network configuration
Default gateway must be set properly.
Additional information
- Specification: DLNA v1.5.
- Supported media profile
a. Video: i. MPEGTS_SD_EU (normal, iso)
ii. MP4 (as a content type not as a profile)
iii. MPEG_PS PAL
iv. WMV
b. Audio: i. MP3
ii. PCM (LPCM)
iii. WMA (Base, Full, Pro)
c. Image: i. JPEG (small, large, medium)
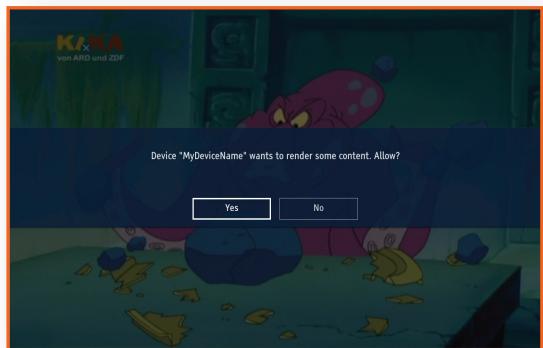
TROUBLESHOOTING
No operation can be performed with the remote control.
- Check the batteries in the remote control. They may need replacing.
- Operate the remote control at a distance of no more than 6.1m .
- Remove the batteries and hold down one or more buttons for several minutes to drain the microprocessor inside the remote control to reset it. Reinstall the batteries and try to operate the remote control again.
Play mode differs from the [Media] Menu selection.
- Some of the functions selected in the [Media] Menu may not work properly if the content file is not encoded with the corresponding function.
The screen aspect ratio cannot be changed.
- This is not a problem with the STB.
No sound comes out from TV or audio equipment.
- If the cable is connected normally, check if the MUTE function is enabled. If the MUTE function is enabled, press the MUTE button on the remote control to disable it.
Blank screen, No HDMI output or No SCART output.
- Check if your TV set is power ON
- Check if your STB is power ON
- Check the connection between the TV input port set and the STB output port.
-
Check if your TV input source is correct
-
When you use HDMI, then the TV input source must be [HDMI] or the connected [HDMI (port No)] if there are one more HDMI input ports.
-
When you use SCART, then the TV input source must be [AV]. The use of SCART isn't recommended due to the low resolution.
-
If the HDMI output is set to a resolution your TV cannot support (for example, 1080p), you cannot see a picture on your TV.
- Press the MENU button and then select [Auto] or the TV possible resolution option in [Settings] > [Picture]
[Screen resolution] in another TV which supports the setup resolution on the STB(for example, 1080p).
- When you select [Auto], the maximum resolution is set up available on TV.
- Press the MENU button and then select [Settings] > [System] > [Reset to default settings] in another TV which supports 1080p. When the factory default settings are restored, all stored user data is deleted.
Forgot password
- Call the service center of Samsung Germany.
- Samsung Germany Call center: 01806 7267864
If you experience other problems.
- Go to the table of contents and find the section of the user manual that contains the explanations regarding the current problem, and follow the procedure once again.
-
If the problem still cannot be solved, please contact your nearest Samsung authorized service center.
-
Samsung Germany Call center: 01806 7267864
Abnormal HDMI output screen.
- If random noise appears on the screen, it means that TV does not support HDCP (High-bandwidth Digital Content Protection).
- Plug Out/In the TV and the STB again.
First installation screen is shown again after performing the [Reset to default settings].
- It is a correct operation. When you perform the [Reset to default settings] in [Settings] > [System], All settings including the PIN will revert to the factory settings. When the factory default settings are restored, all stored user data is deleted.
During the booting, 'No signal' screen keeps over one minute.
- Check if your STB is power ON
- Check the connection between the TV input port set and the STB output port.
- Plug out the STB for over 2 seconds and then plug it in.
If TimeShift function using internal flash memory isn't working.
- Samsung guarantees a lifecycle time of internal memory up to 1500 hours.
SPECIFICATIONS
Model Name
GX-SM650SJ
General
Net Weight: 0.6Kg
Dimensions: 240 (W) x 30 (H) x 174 (D) mm
- Operating Temperature Range: +32 °F to +113 °F (0 °C to +45 °C)
- Operating Humidity Range: 0 % to 90 %
HDMI
Video Output Resolution: 1080p, 1080i, 720p, 576p
Audio Output Format: PCM, Dolby Digital Plus
Input Connector Type
Female connector follow IEC 60169-2 [4] input impedance 75
Optical Digital Audio
- Terminal: TOS-Link Optical
Audio Output Format: PCM, Dolby Digital
Digital Audio/Video Output port
Audio/Video: 1 x HDMI 1.4
USB port
USB 2.0 (1 rear panel, 1A / 1 front panel, 0.5A)
Power
Power Consumption
Power On: Max. 35 W
Power Off: 0.5 W
Power Rating: DC 14 V / 2.5 A
Network
Wired LAN: RJ-45 Ethernet Port x 1, 100M BASE-TX
Satellite
- RF Input Tuning Range: 950 MHz to 2150 MHz
Input Signal Level: -25 dBm to -65 dBm
Symbol Rates: 1-45 MS/s
RF Demodulation: DVB-S QPSK, DVB-S2 QPSK & 8PSK - DiSeqC: Support DiSeqC 1.2
- LNB Current: Max 350 mA
- LNB Voltage Range: 13/18 V

Network speeds equal to or below 10 Mbps are not supported.
Design and specifications are subject to change without prior notice.
For the power supply and power consumption, refer to the label attached to the STB.
Weight and dimensions are approximate.
Appendix > Licence
LICENCE
HDMI Product Notice
- The terms HDMI and HDMI High-Definition Multimedia Interface, and the HDMI Logo are trademarks or registered trademarks of HDMI Licensing LLC in the United States and other countries.
- Manufactured under license from Dolby Laboratories. Dolby and the double-D symbol are trademarks of Dolby Laboratories.
- DLNA®, the DLNA Logo and DLNA CERTIFIED® are trademarks, service marks, or certification marks of the Digital Living Network Alliance.
- The "CI Plus" Logo is a trademark of CI Plus LLP.
HOMI HIGH DEFINITION MULTIMEDIA INTERFACE

DOLBY DIGITAL PLUS

dlna CERTIFIED

MANUFACTURER WORDING
This device enables the reception of Sky channels with a Sky CI Plus-Module.
With a Sky CI Plus-Module and a Cl+ capable Samsung STB you can receive Sky. The Sky CI Plus-Module is easy: just plug it together with your Sky Smartcard in the Cl+ slot of your Samsung STB, GX-SM650SJ. No need for any additional cable and remote control. And of course you can watch also HD TV or 3D.
NETWORK SERVICE DISCLAIMER
All content and services accessible through this device belong to third parties and are protected by copyright, patent, trademark and/or other intellectual property laws. Such content and services are provided solely for your personal noncommercial use. You may not use any content or services in a manner that has not been authorized by the content owner or service provider. Without limiting the foregoing, unless expressly authorized by the applicable content owner or service provider, you may not modify, copy, republish, upload, post, transmit, translate, sell, create derivative works, exploit, or distribute in any manner or medium any content or services displayed through this device.
THIRD PARTY CONTENT AND SERVICES ARE PROVIDED "AS IS." SAMSUNG DOES NOT WARRANTY CONTENT OR SERVICES SO PROVIDED, EITHER EXPRESSLY OR IMPLIEDLY, FOR ANY PURPOSE. SAMSUNG EXPRESSLY DISCLAIMS ANY IMPLIED WARRANTYES, INCLUDING BUT NOT LIMITED TO, WARRANTYES OF MERCHANTABILITY OR FITNESS FOR A PARTICULAR PURPOSE. SAMSUNG DOES NOT GUARANTEE THE ACCURACY, VALIDITY, TIMELINESS, LEGALITY, OR COMPLETENESS OF ANY CONTENT OR SERVICE MADE AVAILABLE THROUGH THIS DEVICE AND UNDER NO CIRCUMSTANCES, INCLUDING NEGLIGENCE, SHALL SAMSUNG BE LIABLE, WHETHER IN CONTRACT OR TORT, FOR ANY DIRECT, INDIRECT, INCIDENTAL, SPECIAL OR CONSEQUENTIAL DAMAGES, ATTORNEY FEES, EXPENSES, OR ANY OTHER DAMAGES ASING OUT OF, OR IN CONNECTION WITH, ANY INFORMATION CONTAINED IN, OR AS A RESULT OF THE USE OF ANY CONTENT OR SERVICE BY YOU OR ANY THIRD PARTY, EVEN IF ADVISED OF THE POSSIBILITY OF SUCH DAMAGES.
Third party services may be terminated or interrupted at any time, and Samsung makes no representation or warranty that any content or service will remain available for any period of time. Content and services are transmitted by third parties by means of networks and transmission facilities over which Samsung has no control. Without limiting the generality of this disclaimer, Samsung expressly disclaims any responsibility or liability for any interruption or suspension of any content or service made available through this device.
Samsung is neither responsible nor liable for customer service related to the content and services. Any question or request for service relating to the content or services should be made directly to the respective content and service providers.
ALLGEMEINE GESCHÄFTSBEDINGUNGEN HD+
1. Geltungsbereich, Vertragsgegenstand und HD+ Karte
2. Nutzerkreis und Nutzungsvoraussetzungen
1.1 These allgemeinen Geschäftsbedingungen der HD PLUS GmbH mit Sitz in der Betastrasse 1-10, 85774 Unterführung ( ,HDP^ ) gelten ausschließlich für den HD+ Service.
1.2 HDP überlässt dem Nutzer nach Maßgabe dieser allgemeinen Geschäftsbedingungen den Besitz an einem Datenträger (,HD + Karte^ ) . Die auf der HD+ Karte gespeicherte Software bzw. Daten (zusammen die „HD+ Software“) sind lediglich technische Voraussetzung zum entschlüsselten Empfang bestimmter, digital verschlüsselt ausgestrahller TV-Angebote (,Programmangebote^ ) über einen Digitalempfänger mit HD+ Zertifizierung (,HD + Service^ ) .
1.3 HDP räumt dem Nutzer eine nicht ausschließlich, nicht übertragbare Lizenz zur beddingungsgemäßenutzung der auf der HD+ Karte befindlichen HD+ Software zum Zwecke der vertragsgemänen Entschlüsselung von Programmangeboten ein. Dieses Recht ist auf das Gebiet der Bundesrepublik Deutschland beschränkt. Es ist dem Nutzer entsprechet, die HD+ Karte außerhalb Deutschlands zu nutzen. HDP kann verlangen, dass die HD+ Karte ausschließlich in Verbindung mit einem ihr zugeordneten Digitalempfänger verwendet wird. Außer dem ist HDP berechtigt, dies technisch sicherzustellen (sog. Pairing von Digitalempfänger und HD+ Karte).
1.4 Die Aktivierung der HD+ Karte obliegt dem Nutzer. Die HD+ Kartearf nicht anders als vereinbart verwendet werden. Der Nutzer ist nicht berechtigt, die HD+ Software zu kopieren, zu modifizieren, zu disassemblieren, zu dekompilieren oder andere Verfahren auf sie anzuwenden, um deren Quellcode oder deren Struktur zu erfahren oder Prozesse oder deren Zustandsrepräsentation unberechtigt in Erfahrung zu bringen oder zu beeinflussen. Gesetzliche Dekompilierungsrechte bleiben unberührt.
1.5 Der Digitalempfänger, das Wiedergabegerät (z. B. TV) und die Programmangebote sind ausdrücklich nicht Leistungsgegenstand. Zertifizierte Digitalempfänger sind im Handel erhältlich. Ihr Installation obliegt dem Nutzer. Im Falle technischer oder allgemeiner Probleme mit dem Digitalempfänger liegt die Verantwortung für den Kundenservice beim Hersteller des Digitalempfangers.
1.6 Die Anzahl und Zusammenstellung der Programmangebote kann sich während der Vertragslaufzeit ändern.
1.7 HDP besteht sich vor, die zur Nutzung des HD+ Services sowie zu dessen Ergänzung oder Änderung erforderliche Software auf die HD+ Karte sowie den Digitalempfänger in unregelmäßigen Zeitabständen kostenfrei aufzuspielen oder Dort vorhandene HD+ Software zuactualisieren, zu ergänzen oder zu ändern. Unbeschadet der vorstehenden Regelungen ist die Haftung von HDP bei Datenverlusten auf den typischen Wiederherstellungsaufwand beschränkt.
1.8 HDP besteht sich vor, HD+ Karten zu sperren bzw. nicht mehr zu Unterstützung, die aufgrund von Rechtsverletzungen auch durch Dritte die unerlaubte Nutzung des HD+ Services bzw. eine Umgebung der Verschlussung erfolglichen. Eine Veränderung des HD+ Services nach Ablauf der Freischaltung gemäß Ziffer 3.1 ist auf gespernten bzw. nicht mehr Unterstützung HD+ Karten nicht möglich.
2.1 Der HD+ Service steht natürlichen Personen im Alter von mindestens 18 Jahren zur Verfügung und ist ausschließlich für die private, nicht-gewerbliche Nutzung bestimmt. Die Nutzung außerhalb des privaten Haushalts bzw. die Weitergabe an Dritte zur Nutzung ist nicht gestattet.
2.2 Voraussetzung für die Nutzung des HD+ Services ist eine digitaltaugliche Satellitenempfangsanlage, welche auf einen von HDP genutzten Satelliten ausgerichtet ist bzw. vereinzt auch Kabel-Empfang (siehe www.hd-plus.de/faq) sowie die Verwendung eines mit dem HD+ Logo gekennzeichneten Digitalempfängers und ein Wiedergabegerät (z. B. TV), die im Leistungsumfang jedoch nicht enthalten sind (vgl. Ziffer 1.5).
Appendix Allgemeine Geschäftsbedingungen HD+
2.3 Eine uneingeschrankte, vollumfängliche Nutzung des HD+ Services ist nur bei der Verwendung von HD+ zertifizierten Digitalempfängern möglich. Bei der Verwendung von Digitalempfängern ohne HD+ Zertifizierung kann es zu technischen Nutzungseinschränkungen des HD+ Services kommt, auch wenn HD+ zertifizierte Common-Interface- ^+ Empfangsmodule verwendet werden. Insbesondere kann es sein, dass die Entschlussung bzw. Darstellung einzelner Programmangebote nicht möglich ist. Der Nutzer hat deswegen gegenüber HDP weder einen Gewährleistungsanspruch noch ein Sonderkündigungsrecht.
3. Serviceauschale / Laufzeit und Veränderung des HD+ Services
3.1 Im Rahmen von Vermarktungsangeboten, beispelsweise in Verbindung mit dem Kauf eines für HD+ zertifizierten Digitalempfängers, werden HD+ Karten ausgegeben, die bereits eine Freischaltung über mehrere Monate für den HD+ Service ohne weitere Kosten für den Nutzer beinhalten.
3.2 Im Übrigen fällt für die Nutzung des HD+ Services eine Servicepauschale zu den jeweiligen besonderen Bedingungen an.
3.3 Die Laufzeit der Nutzung des HD+ Services beginnt mit Aktivierung der HD+ Karte. Aktiviert wird eine Karte, wenn sie in den darauf vorgesehenen Schacht eines für HD+ zertifizierten Digitalempfängers steckt und ein HD+ Programm damit erstmals entschlusselt wird bzw. mit Veränderung und Freischaltung durch den Nutzer
3.4 Rechtzeitig vor Ablauf der jeweiligen Freischaltung des HD+ Services wird der Nutzer durch eine Einblendung auf dem Wiedergabegerät auf Ablauf und eventuell mögliche Verlängerungs- bzw. Neukaufoptionen für die Nutzung des HD+ Services aufmerksam gemacht. Die Freischaltung einer HD+ Karte sollte erst nach Einblendung auf dem Wiedergabegerät verlangert werden. Andernfalls kann sich der Zeitraum einer bestehenden Freischaltung verkürzen. Der Erwerb einer HD+ Karte beinhaltet jeder nicht den Anspruch auf Verlängerung derselben.
3.5 Die Programmangebote und Services Dritter und deren Empfang bzw. Nutzung können gesonderte Kosten auslösen, für die der Nutzer selbst verantwortlich ist.
4. Beachtung von Urheberrechten
4.1 Die HD+ Software und die HD+ Karte sindrechtlich geschützt. Soweit Programme von Lizenzgebern zur Anwendung kommt, ist deren Eigentum in gleichem Umfang geschützt. Die unerlaubte Vervielfaltigung oder Verbreitung der HD+ Software oder der HD+ Karte und/oder deren Nachahmung wird HDP durch zivil-, gegebenenfalls auch strafrechtliche Maßnahmen verfolgen.
5. Rechte und Pflichtenden des Nutzers
5.1 Jeder Nutzer des HD+ Servicesträgt selbst die Verantwortung für die bestimmungsgemäße Nutzung; der Nutzer hat insbesondere sicherzustellen, dass jugendgefährdende Sendeinalte nur dem gesetzlich zugelassenen Personenkreis zugänglich sind.
5.2 Der Nutzer darf den HD+ Service nicht missbrauchlich nutzen und ist verpflichtet, seine HD+ Karte vor Verlust und Missbrauch zu schützen. Der Nutzer darf insbesondere keine Eingriffe in die HD+ Software vornehmen oder vornehmen halten, um beispisseweise den unberechtigten Empfang von verschlüsselten Programmangeboten zu ermöglichen. Auch die Benutzung von Vorrichtungen zur Umgehung der Verschlussung ist verboten. Solche Missbrauche können zivil- und strafrechtlich verfolgt werden. Auf Ziffer 6 und Ziffer 7.3 wird verwiesen.
5.3 Ersetzt HDP die HD + Karte aufgrund einer vom Nutzer zu vertretenden Beschädigung oder eines Verlustes, hat dieser Schadensersatz zu leisten.
5.4 Wird die Bereitstellung des HD+ Services aufgrund von Eingriffen in die Software oder Hardware des Nutzers beeinträchtigt oder unterbrochen, die HDP nicht zu vertreten hat, ist der Nutzer nicht zur Rückerstattung einer bereits entrichteten Servicepauschale berechtigt. Dies gilt auch, wenn die HD+ Karte beschädigt wurde oder abhanden gekommen ist.
Appendix Allgemeine Geschäftsbedingungen HD+
6. Freistellung
6.1 Der Nutzer haftet gegenüber HDP für die Einhaltung der in den Ziffern 4 und 5 aufgeführten Pflichten. Er stellt HDP von sãmtlichen Ansprüchen Dritter frei, die infolge einer schuldhaften Verletzung dieser Pflichten und/oder schädigender Handlungen des Nutzers gegen HDP geltend gemacht werden und leistet. Ersatz für darüber hinausgehende Schäden einschließlich der Kosten für eine eventuell erforderliche Rechtsverfolgung und -verteidigung.
7. Rechte und Pflichten von HDP
7.1 HDP wird den Nutzer von einer nicht nur unwesentlichen vorübergehenden Leistungseinstellung oder -beschränkung unterrichten. Diese Mitteilungspflicht besteht nicht, wenn die Unterrichtung nach den jeweiligen Umständen objektiv vor Beginn der Leistungseinstellung oder -beschränkung nicht möglich ist oder die Beseitigung bereits eingetretener Unterbrechungen verzögern wurde.
7.2 HDP besteht sich vor, ohne weitere Ankündigung Wartungs- und Instandhaltungsarbeiten an ihren technischen Anlagen zur Aufrechterhaltung bzw. Verbesserung des HD+ Services durchzuführen. In diesen Wartungsfenster kann es zu Unterbrechungen oder Beeinträchtigungen beim Empfang der Programmangebote kommt, die den Nutzer jedoch nicht zur Minderung berechtigen.
7.3 Bei einem Verstoß gegen diese Nutzungsbedingungen oder dem begründeten Verdacht eines Verstoßes durch den Nutzer, insbesondere im Sinne der vorstehenden Ziffern 4 und 5, ist HDP nach eigenen Ermessen berechtigt:
7.3.1 den Nutzer vorübergehend oder dauerhaft von der Nurzung des HD+ Services auszuschreiben und/oder
7.3.2 das Nutzungsvershältnis außerordentlich gemäß Ziffer 10.1zu kündigen.
7.4 HDP wird den Nutzer vor Ausschluss oder Kündigung abmahen, wenn nicht der Verstoß so schwer wiegt, dass HDP eine Fortsetzung des Nutzungsverhältnisses nicht zumutbar ist.
7.5 Bei einem auf dem Verschulden des Nutzers beruhenden Nutzungsausschluss gemäß Ziffer 7.3 bleibt der Nutzer auch für den Zeitraum des Nutzungsausschlusses und der Leistungsunterbrechung zur Zahlung der Vergütung verpflichtet.
8. Gewährleistung
8.1 HDP erbringt Leistungen unter Inanspruchnahme von Kommunikationsnetzen oder technischen Einrichtungen Dritter, die sich außerhalb der Kontrolle von HDP befinden. Zeitweilige Beschränkungen, Beeinträchtigungen oder Ausfälle des HD+ Services aufgrund von Einflüssen, die HDP nicht zu vertreten hat, kann HDP darum nicht ausschreiben. HDP übernimmt insbesondere keine Gewähr darauf, dass bestimmte Programmangebote zu einem bestimmten Zeitpunkt empfangen werden können; dies gilt nicht, soweit HDP eine Störung zu vertreten hat.
8.2 Der Nutzer erkennt an, dass die Qualität der entschlussen bzw. zugänglich gemachteten Programmangebote einsersects von der durch Dritte bereitgestelltten Signalqualität und anderersects von der Leistungsfähigkeit der vom Nutzer eingesetzten Wiedergabegeräte abhängig ist und beides außerhalb des Verantwortungsbereiches der HDP liegt. Der Nutzer erkennt ebenfalls an, dass die Aufnahme und Wiedergabe aufgezeichneter Programmangebote durch Dritte eingeschränkt werden kann.
8.3 HDP weist daraufhin, dass Softwareprogramme nicht so entwickelt werden konnen, dass sie fur alle Anforderungen fehlerfrei laufen.
8.4 HDP behebt im Rahmen der bestehenden technischen und betrieblichen Mochlichkeiten alle ihr gemeldeten Störungen des HD+ Services, für deren Behebung es nicht des Austauschs der HD+ Karte bedarf, unverzüglich. Die Kosten für die Inanspruchnahme des Kundendienstes von HDPträgt der Nutzer. Vorübergehende Beeinträchtigungen des Empfanges durch atmosphärische Störungen oder Sender-, oder Satellten-/Kabelnetzausfall berechtigten den Nutzer nicht zur Minderung.
Appendix Allgemeine Geschäftsbedingungen HD+
9. Haftung
9.1 HDP haftet nur, soweit HDP, ihren Erfüllungsgehilfen und/oder gesetzlichen Vertretern ein vorsätzliches oder groß fahrlässiges Verhalten zur Last fällt.
9.2 Bei leicht fahrlich verursachten Schäden haftet HDP nur, wenn eine wesentliche Vertragspflicht verletzt wurde oder ein Fall des Verzugs oder der Unmöglichkeit vorliegt. In diesen Fällen ist die Haftung auf den typischen vorhersehbaren Schaden begrenzt.
9.3 Soweit es zu zeitweiligen Beeinträchtigungen beim Empfang der Programmangebote kommt, die außerhalb des Einflussbereichs von HDP liegen, insbesondere bei einem Ausfall des Signals, den HDP nicht zu vertreten hat, haftet HDP nicht.
9.4 HDP ist nicht verantwortlich für die von ihr entschlussen zugänglich gemachteten Programmangebote und deren Inhalte.
9.5 Eine gesetzlich vorgeschriebene, verschuldensunabhängige Haftung von HDP, insbesondere eine Haftung nach Produktthaftungsgesetz sowie eine gesetzliche Garantiehaftung, bleibt von den vorstehenden Haftungseinschrankungen unberührt. Gleiches gilt für die Haftung von HDP bei schuldhafter Verletzung von Leben, Körper oder Gesundheit eines Nutzers. Die verschuldensunabhängige Haftung gemäß § 536a BGB ist ausgeschlossen, wenn HDP dem Nutzer eine HD+ Karte überlässt.
9.6 Die Ziffern 9.1, 9.2 und 9.5 umfassen sümttliche vertraglichen und gesetzlichen Ansprüche, die wegen der Nutzung des HD+ Services geltend gemacht werden können.
10. Kündigung des Vertrages und Änderung des HD+ Services
10.1 Der Vertrag über die Nutzung des HD+ Service lauft für die jeweils vereinbarte Dauer ab Aktivierung der HD+ Karte Eine Veränderung setzen voraus, dass die HD+ Karte nicht gem. Ziffer 1.8gespert ist. Unberührt hiervon bleiben etwaige außerordentliche Kündigungsrechte.
10.2 Der Nutzer kann nicht außerordentlich kündigen, weil sich die Anzahl oder Zusammenstellung der Programmangebote, welche der Nutzer mithilfe der HD+ Software entschlussen kann, während der Vertragslaufzeitändert.
10.3 Kündigt HDP den HD+ Service nach Abmahnung im Fall der Ziffer 7.3, kann HDP Schadensersatz nach den gesetzlichen Vorschriften fordern.
11. Datenschutz
11.1 Einzelheiten zur Datenverarbeitung sind im Datenschutzmerkblatt enthalten (siehe www.hd-plus.de/datenschutz).
12. Schlussbestimmungen
12.1 HDP ist berechtigt, ihre Rechte und Pflichten aus thisem Vertrag ganz oder teilweise auf einen zur ordnungsgemäßen Fortführung des Vertrages geeigneten Dritten zu übertragen. Der Nutzer ist in thisem Fall berechtigt, das Vertragsverhältnis mit Wirksamkeit zum Zeitpunkt der Übertragung zu kündigen.
12.2 Es gilt das Recht der Bundesrepublik Deutschland. Die Anwendung von UN-Kaufrecht ist ausgeschlossen.
Stand:Juli 2014
LIMITED WARRANTY TO ORIGINAL PURCHASER
Auf这点 Samsung-Produkt wird vom Hersteller eine vierundzwanzig-monatige Garantie gegen Material- und Verarbeitungsfehler gegeben. Die Garantiezeit beginnnt mit dem Kauf des Gerätes beim Fachhändler.Sollete es erforderlich werden, Garantieleistungen in Anspruch zunehmen, wenden Sie sichitte an den Fachhändler, bei dem Sie das Gerät erworben haben. Garantieleistungen können jederoch auch von Samsung-Vertragswerkstätten in anderen Ländern eingefordert werden; darauf gelten die Garantiebedingungen des jeweiligen Landes. Bei Fragen zu unseren Vertragswerkstätten wenden Sie sichitte an fol-gende Adresse:
Samsung Electronics GmbH, Am Kronberger Hang 6,
65824 Schwalbach/Taunus
0180 6 SAMSUNG bzw.
018067267864*
(^*0,20 nrf aus dem dt. Festnetz, aus dem Mobilfunk max. 0,60 €/Anrf)
www.samsung.de
GARANTIEBEDINGUNGEN
- Bei der Anmeldung von Garantieansprüchen muß der Kunde die vollständig und richtig ausgefüllte Garantiekarte sowie die Originalrechnung oder den vom Handler ausgestelltten Kassenbeleg oder eine entsprechende Bestätigung vorlegen. Die Seriennummer am Gerät muß lesbar sein.
- Es liegt im Ermessen von Samsung, ob die Garantie durch Reparatur oder durch Austausch des Geruates bzw des defekten Teils erfüllt wird. Weitere Ansprüche sind ausgeschlossen.
- Garantie-Reparaturen müssen von Samsung-Fachhändern oder Samsung-Vertragswerkstätten ausgeführrt werden. Bei Reparaturen, die von anderen Handlern durchgeführt werden, besteht kein Anspruch auf Kostenerstattung, da so che Reparaturen sowie Schäden, die dadurch am Gerät entstehen können, von dieser Garantie nicht abgedeckt werden.
- Soll das Gerät in einem anderen als dem Land betrieben werden, für das es ursprünglich entwickelt und produziert wurde, müssen eventuell Veränderungen am Gerät vorgenommen werden, um es an die technischen und/oder Sicherheitstechnischen Normen theses anderen Landes anzupassen. Solche Veränderungen sind nicht auf Material oder Verarbeitungsfehler des Gerätes zurückzuführen und werden von dieser Garantie nicht abgedeckt. Die Kosten für solche Veränderungen sowie für dadurch am Gerät entstandene Schäden werden nicht erstattet.
- Ausgenommen von der Garantieleistung sind:
a) Regelmäßige Inspektionen, Wartung und Reparatur oder Austausch von Teilen aufgrund normaler Verschleiberscheinungen;
b) Transport- und Fahrtkosten sowie durch Auf- und Abbau des Gerätes entstandene Kosten;
c) Mißbrauch und zweckentfremdete Verwendung des Gerätes sowie falsche Installation;
d) Schäden, die durch Blitzschlag, Wasser, Feuer, höhere Gewalt, Krieg, falsche Netzspannung, unzureichende Belüftung oder andere von Samsung nicht zu verantwortende Grunde entstanden sind.
These Garantie ist Produktbezogen und kann innerhalb der Garantiezeit von jeder Person, die das Gerät legal erworben hat, in Anspruch genommen werden.
- Die Rechte des Käufers nach der jeweils geltenden nationalen Gesetzgebung, d.h. die aus dem Kaufvertrag abgeleiteten Rechte des Käufers nach der jeweils geltenden nationalen Gesetzgebung, d.h. die aus dem Kaufvertrag abgeleiteten Rechte des Käufers gegenüber dem Verkafer wie auch andere Rechte, werden von dieser Garantie nicht angetastet. Soweit die nationale Gesetzgebung nicht anders vorsieht, beschränken sich die Ansprüche des Käufers auf die in dieser Garantie genannten Punkte. Die Samsung Ltd. sowie deren Tochtergesellschaften und Handler haften nicht für den indirekten bzw. in Folge auftretenden Verlust von Schallplatten, CDs, Video- und Audiokasseten oder anderen ähnlichen Material bzw. Zusatzgeruaten.
- SAMSUNG does not warrant Remote Control related return due to customer's fault, such as Remote Control damage or breakage due to customer's fault, or dead battery of remote control or Antenna or Signal related external problems, such as broadcasting signal not available due to low signal power (not a problem of the Samsung box) and noise added signal from exterior.
EUROPÄISCHE GARANTIEKARTE
Appendix Open Source License Notice
OPEN SOURCE LICENSE NOTICE
Open Source used in this product can be found on the following webpage. (http://opensource.samsung.com) Open Source License Notice is written only English.