HIML 95225 SXE - Plaque de cuisson BEKO - Notice d'utilisation et mode d'emploi gratuit
Retrouvez gratuitement la notice de l'appareil HIML 95225 SXE BEKO au format PDF.

| Type de produit | Plaque de cuisson à gaz encastrable |
| Marque | BEKO |
| Modèle | HIML 95225 SXE |
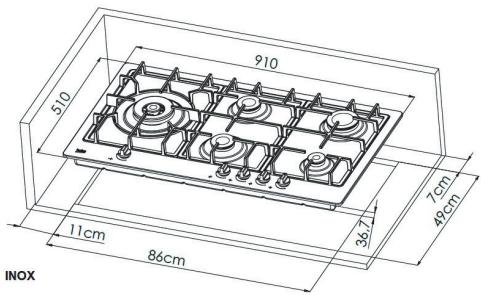
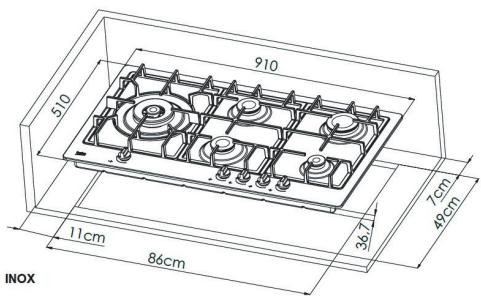
| Dimensions extérieures (H x L x P) | 97 x 910 x 510 mm |
| Dimensions d’encastrement (L x P) | 860 x 490 mm |
| Alimentation électrique | 220-240 V ~ 50-60 Hz |
| Type de gaz | Gaz naturel G20 (20 mbar) ou GPL G30/G31 (28-30/37 mbar) convertissable |
| Nombre de brûleurs | 5 |
| Brûleur auxiliaire | 1 kW |
| Brûleurs normaux (x2) | 1,75 kW chacun |
| Brûleur rapide | 3 kW |
| Brûleur wok | 4,2 kW (gaz naturel) / 4,0 kW (GPL) |
| Consommation totale de gaz | 11,70 kW (gaz naturel) / 11,50 kW (GPL) |
| Efficacité énergétique du plan | 55,1 % |
| Sécurité | Dispositif de coupure de gaz (thermocouple), allumage électronique à étincelle |
| Matériau de la surface | Inox |
| Accessoires inclus | Adaptateur pour cafetière, adaptateur pour wok |
| Entretien | Nettoyer avec un chiffon doux et humide ; ne pas utiliser de produits abrasifs |
| Sécurité enfant | Surfaces chaudes ; ne pas laisser les enfants sans surveillance |
| Longueur du câble d’alimentation | Max. 1,5 m |
| Réparabilité | Pièces détachées disponibles (injecteurs, têtes de brûleur, etc.) |
FOIRE AUX QUESTIONS - HIML 95225 SXE BEKO
Questions des utilisateurs sur HIML 95225 SXE BEKO
0 question sur cet appareil. Repondez a celles que vous connaissez ou posez la votre.
Poser une nouvelle question sur cet appareil
Téléchargez la notice de votre Plaque de cuisson au format PDF gratuitement ! Retrouvez votre notice HIML 95225 SXE - BEKO et reprennez votre appareil électronique en main. Sur cette page sont publiés tous les documents nécessaires à l'utilisation de votre appareil HIML 95225 SXE de la marque BEKO.
MODE D'EMPLOI HIML 95225 SXE BEKO
Built-In Hob
User manual
HIML 95225 SXE
EN IT
01M-8860873200-0219-01
beko
Please read this manual first!
Dear Customer,
Thank you for purchasing a Beko product. We hope that you get the best results from your product which has been manufactured with high quality and state-of-the-art technology. Therefore, please read this entire user manual and all other accompanying documents carefully before using the product and keep it as a reference for future use. If you handover the product to someone else, give the user manual as well. Follow all warnings and information in the user manual.
Remember that this user manual is also applicable for several other models. Differences between the models are explicitly described in the manual.
Meanings of the Symbols
Following symbols are used in the various section of this manual:
| i | Important information and useful hints about usage. |
| ! | WARNING:Warnings for dangerous situations concerning the safety of life and property. |
| Warning for electric shock. |
| Warning for hot surfaces. |
| Warning: Fire risk |

This product has been manufactured in environmentally modern facilities.
CONTENTS
ENGLISH 04-26
ITALIANO 27-52
1
Important instructions and warnings for safety and environment
This section contains safety instructions that will help protect from risk of personal injury or property damage.
Failure to follow these instructions shall void any warranty.
1.1 General safety
-
This appliance can be used by children aged from 8 years and above and persons with reduced physical, sensory or mental capabilities or lack of experience and knowledge if they have been given supervision or instruction concerning use of the appliance in a safe way and understand the hazards involved. Children shall not play with the appliance. Cleaning and user maintenance shall not be made by children without supervision.
-
Installation and repair procedures must always be performed by Authorized Service Agents. The manufacturer shall not be held responsible for damages arising from procedures carried out by unauthorized persons which may also void the warranty. Before installation, read the instructions carefully.
-
Do not operate the product if it is defective or has any visible damage.
- Ensure that the product function knobs are switched off after every use.
- If the hob glass plate is broken: Immediately switch off all the burners and electrical heating elements, and disconnect the product from the power supply. Do not touch the surface of the appliance. Do not use the appliance.
1.2 Safety when working with gas
- Any works on gas equipment and systems may only be carried out by authorised qualified persons who are Gas Safe registered.
- If you need to use your product with a different type of gas, you must consult the authorised service for the related conversion procedure.
- Prior to the installation, ensure that the local distribution conditions (nature of the gas and gas pressure) and the adjustment of the appliance are compatible.
1
Important instructions and warnings for safety and environment
- This appliance is not connected to a combustion products or evacuation device. It shall be installed and connected in accordance with current installation regulations. Particular attention shall be given to the relevant requirements regarding ventilation.
- CAUTION: The use of gas cooking appliance results in the production of heat and moisture in the room in which it is installed. Ensure that the kitchen is well ventilated: keep natural ventilation holes open or install a mechanical ventilation device (mechanical extractor hood). Prolonged intensive use of the appliance may call for additional ventilation, for example increasing the level of the mechanical ventilation where present.
-
Using the product intensively for prolonged periods (1 hour and more) may require additional ventilation (e.g. increasing the speed of the aspirator, if present, or opening the windows).
-
Gas appliances and systems must be regularly checked for proper functioning. Regulator, hose and its clamp must be checked regularly and replaced within the periods recommended by its manufacturer or when necessary.
- Clean the gas burners regularly. The flames should be blue and burn evenly.
- Good combustion is required in gas appliances. In case of incomplete combustion, carbon monoxide (CO) might develop. Carbon monoxide is a colourless, odourless and very toxic gas, which has a lethal effect even in very small doses.
- Request information about gas emergency telephone numbers and safety measures in case of gas smell from you local gas provider.
What to do when you smell gas
- Do not use open flame or do not smoke. Do not operate any electrical buttons (e.g. lamp button, door bell and etc.) Do not use fixed or mobile phones. Risk of explosion and toxication!
- Open doors and windows.
1
Important instructions and warnings for safety and environment
- Turn off all valves on gas appliances and gas meter at the main control valve, unless it's in a confined space or cellar.
- Check all tubes and connections for tightness. If you still smell gas leave the property.
- Warn the neighbours.
- Call the fire-brigade. Use a telephone outside the house.
- Do not re-enter the property until you are told it is safe to do so.
1.3 Electrical safety
- If the product has a failure, it should not be operated unless it is repaired by an Authorised Service Agent. There is the risk of electric shock!
-
Only connect the product to a grounded outlet/line with the voltage and protection as specified in the "Technical specifications". Have the grounding installation made by a qualified electrician while using the product with or without a transformer. The Manufacturer shall not be liable for any problems arising due to the product not being earthed in accordance with the local regulations.
-
Never wash the product by spreading or pouring water onto it! There is the risk of electric shock!
- Never touch the plug with wet hands! Never unplug by pulling on the cable, always pull out by holding the plug.
- The product must be disconnected during installation, maintenance, cleaning and repairing procedures.
- If the power connection cable for the product is damaged, it must be replaced by the manufacturer, its service agent or similarly qualified persons in order to avoid a hazard.
- The appliance must be installed so that it can be completely disconnected from the mains supply. The separation must be provided by a switch built into the fixed electrical installation, according to construction regulations.
- Any work on electrical equipment and systems should only be carried out by authorised and qualified persons.
- In case of any damage, switch off the product and disconnect it from the mains. To do this, turn off the fuse at home.
1
Important instructions and warnings for safety and environment
- Make sure that fuse rating is compatible with the product.
1.4 Product safety
- The appliance and its accessible parts become hot during use. Care should be taken to avoid touching heating elements. Children less than 8 years of age shall be kept away unless continuously supervised.
- Never use the product when your judgment or coordination is impaired by the use of alcohol and/or drugs.
- Be careful when using alcoholic drinks in your dishes. Alcohol evaporates at high temperatures and may cause fire since it can ignite when it comes into contact with hot surfaces.
- Do not place any flammable materials close to the product as the sides may become hot during use.
- Keep all ventilation slots clear of obstructions.
-
Do not use steam cleaners to clean the appliance as this may cause an electric shock.
-
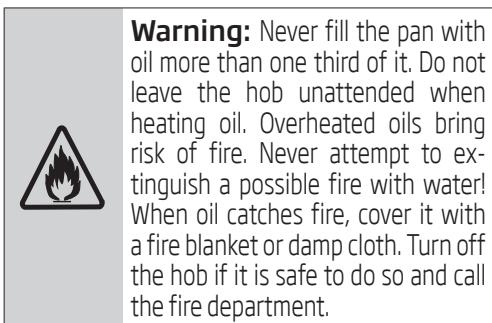
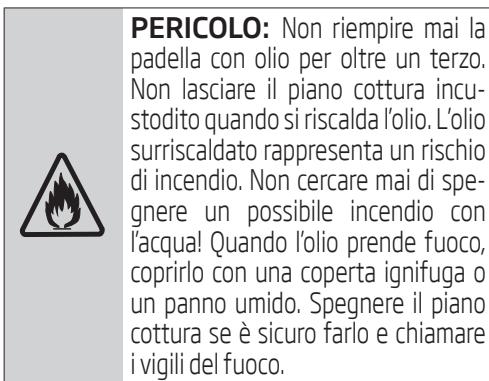
Unattended cooking on a hobwith fat or oil can be dangerous and may result in fire. NEVER try to extinguish a fire with water, but switch off the appliance and then cover flame e.g. with a lid or a fire blanket.
- Danger of fire: Do not store items on the cooking surfaces.
- If the surface is cracked, switch off the appliance to avoid the possibility of electric shock.
- CAUTION: In case of hotplate glass breakage : Shut immediately off all burners and any electrical heating element and isolate the appliance from the power supply. Do not touch the appliance surface. Do not use the appliance.
Prevention against possible fire risk!
- Ensure all electrical connections are secure and tight to prevent risk of arcing.
- Do not use damaged cables or extension cables.
- Ensure liquid or moisture is not accessible to the electrical connection point.
- To prevent gas leakage ensure that the gas connection is sound.
1
Important instructions and warnings for safety and environment
1.5 Intended use
- This product is designed for domestic use. Commercial use will void the guarantee.
- CAUTION: This appliance is for cooking purposes only. It must not be used for other purposes, for example room heating.
- The manufacturer shall not be liable for any damage caused by improper use or handling errors.
- This is a built-in product. It is of Class 3. It is not suitable to be used as a countertop hob.
1.6 Safety for children
- Accessible parts may become hot during use. Young children should be kept away.
- The packaging materials will be dangerous for children. Keep the packaging materials away from children. Please dispose of all parts of the packaging according to environmental standards.
-
Electrical and/or gas products are dangerous to children. Keep children away from the product when it is operating and do not allow them to play with the product.
-
Do not place any items above the appliance that children may reach for.
1.7 Compliance with the WEEE Directive and Disposing of the Waste Product:
This product complies with EU WEEE Directive (2012/19/EU). This product bears a classification symbol for waste electrical and electronic equipment (WEEE).
This product has been manufactured with high quality parts and materials which can be reused and are suitable for recycling. Do not dispose of the waste product with normal domestic and other wastes at the end of its service life. Take it to the collection center for the recycling of electrical and electronic equipment. Please consult your local authorities to learn about these collection centers.
1.8 Compliance with RoHS Directive:
The product you have purchased complies with EU RoHS Directive (2011/65/EU). It does not contain harmful and prohibited materials specified in the Directive.
1.9 Package information

Packaging materials of the product are manufactured from recyclable materials in accordance with our National Environment Regulations. Do not dispose of the packaging materials to
gether with the domestic or other wastes. Take them to the packaging material collection points designated by the local authorities.
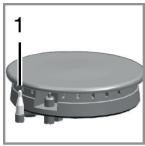
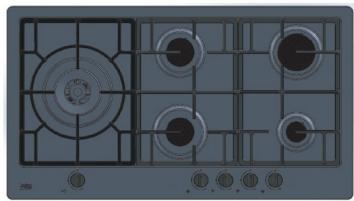
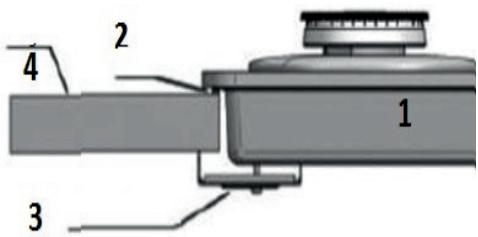
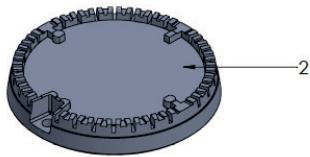
2.1 Overview
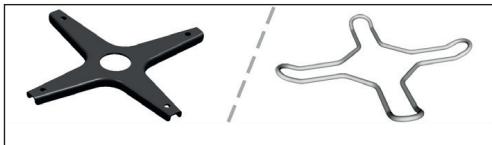
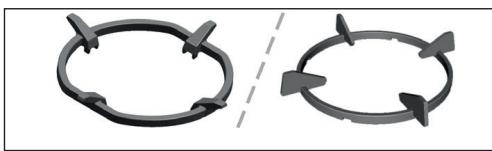
- Pan support
- Normal burner
- Assembly clamp
- Control panel
-
Base cover
-
Auxiliary burner
- Burner plate
- Rapid burner
- Wok burner
- Normal burner
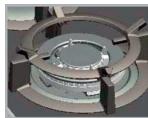
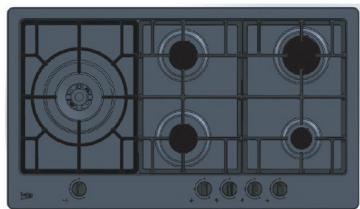
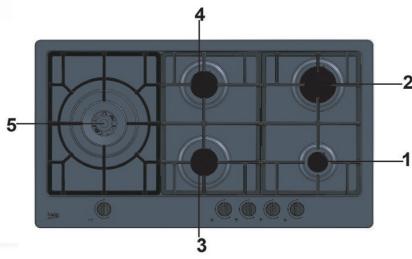
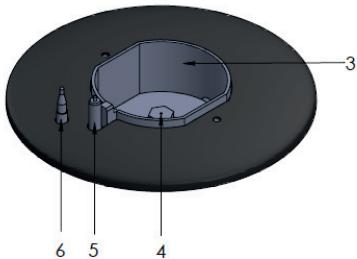
2.2 Control panel
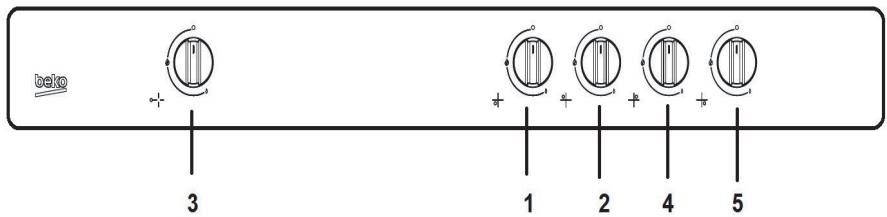
- Normal burner Front left
- Normal burner Rear left
-
Wok burner Middle
-
Rapid burner Rear right
- Auxiliary burner Front right
2.3 Package contents

Accessories supplied can vary depending on the product model. Not every accessory described in the user manual may exist on your product.
2.3.1 Coffee pot adaptor
Used for coffee pots.
2.3.2 Wok pan adaptor
Used for hosting a wok pan with a round bottom.
2.4 Technical specifications
| Inox | |
| HIML 95225 SXE | |
| Burners | 5 Gas Burner |
| Voltage / frequency | 220-240 V ~ 50-60Hz |
| Cable type / section | H05V2V2-F 3 x 0,75 mm2 |
| Cable length | max. 1.5 m |
| Category of gas product | II 2H3+ |
| Gas type / pressure | NG G20-20 mbar |
| Converting the gas type / pressure optional | G30-28...30mbar / G31-37mbar |
| Rear left / Normal burner | 1,75 kW |
| Front left / Normal burner | 1,75 kW |
| Left / Wok burner | 4.2 kW(NG), 4.0kW(LPG) |
| Front right / Auxiliary burner | 1 kW |
| Rear right / Rapid burner | 3 kW |
| Total gas consumption | 11,70 kW (NG), 11,50 kW (LPG) |
| Gas consumption NG G20 - 20 mbar LPG G30-28....30 mbar / G31-37mbar | - 836 g/h |
| External dimensions (height / width / depth) | 97x910x510 mm |
| Installation dimensions (width / depth) | 860 mm/490 mm |

Technical specifications may be changed without prior notice to improve the quality of the product.

Figures in this manual are schematic and may not exactly match your product.

Values stated on the product labels or in the documentation accompanying it are obtained in laboratory conditions in accordance with relevant standards. Depending on operational and environmental conditions of the product, these values may vary.
2.4.1 Injector table
| Hob zone | Auxiliary burner 1 kW | Normal burner 1.75 kW | Rapid burner 3 kW | Wok burner (4.2 kW) | Wok burner (4 kW) |
| Gas type / Gas pressure | |||||
| NG G20-20 mbar | 0,72 mm | 0,97 mm | 1,15 mm | 1,53 mm | - |
| LPG G30-28....30 mbar/G31-37 mbar | 0,50 mm | 0,65 mm | 0,87 mm | - | 1,01 mm |
Product must be installed by a qualified person in accordance with the regulations in force. The manu-facturer shall not be held responsible for damages arising from procedures carried out by unauthorized persons which may also void the warranty.

Preparation of location and electrical and gas installation for the product is under customer's responsibility.
WARNING: The product must be installed in accordance with all local gas and/or electrical regulations.
WARNING: Prior to installation, visually check if the product has any defects on it. If so, do not have it installed. Damaged products cause risks for your safety.
3.1 Before installation
The hob is designed for installation into commercially available work tops. A safety distance must be left between the appliance and the kitchen walls and furniture. See figure (values in mm).
- (^*) If a cooker hood is to be installed above the cooker, refer to cooker hood manufacturer' instructions regarding installation height (min 650 mm)
- Remove packaging materials and transport locks.
- Surfaces, synthetic laminates and adhesives used must be heat resistant (100 °C minimum).
- The worktop must be aligned and fixed horizontally.
- Cut aperture for the hob in worktop as per installation dimensions.
3.2 Room ventilation
All rooms require an openable window, or equivalent, and some rooms will require a permanent vent as well.
The air for combustion is taken from the room air and the exhaust gases are emitted directly into the room.
Good room ventilation is essential for safe operation of your appliance. If the room where the appliance is installed does not have a door or a window that opens directly to the outer environment, there must definitely be a fixed ventilation opening in the room. The fixed ventilation must be nonadjustable and non-closable. On the doors or Windows that open directly to the outer environment, there must be a ventilation opening with the dimension specified based on the total gas-power of the appliance (as shown below) You can find the gas power and ventilation opening match-up in the table below.
| Total gas con-sump- tion (kW) | min. Ventilation opening (cm2) |
| 0-2 | 100 |
| 2-3 | 120 |
| 3-4 | 175 |
| 4-6 | 300 |
| 6-8 | 400 |
| 8-10 | 500 |
| 10-11.5 | 600 |
| 11.5-13 | 700 |
| 13-15.5 | 800 |
| 15.5-17 | 900 |
| 17-19 | 1000 |
| 19-24 | 1250 |
If the doors or windows that open directly to the outer environment do not have openings corresponding to the ventilation opening specified according to the total gas power of the product, there must definitely be a fixed ventilation opening in the doom. The fixed venti-lation opening should also be in compliance with the values in the gas power-ventilation opening table. There should be a minimum clearance of 10mm on the bottom edge of the door-that opens to the inner environment- in the room where the product is instal-led. You must make sure that items such as carpets, floorings, etc. do not cover this clearnace when the door is closed.
The cooker may be located in a kitchen, kitchen/ dinner or a bed-sitting room, but in a room containing a bath or shower. The cooker must not be installed in a bed-sitting room of less than 20m^3 Do not install this appliance in a room below ground level unless it open to ground level on at least one side.
3.2.1 Installation and connection
The product must be installed in accordance with all local gas and electrical regulations.
3.3 Electrical connection
Connect the product to a grounded outlet/line protec-ted by a fuse of suitable capacity as stated in the "Technical specifications" table. Have the grounding installation made by a qualified electrician while using the product with or without a transformer.
The Manufacturer shall not be liable for any damages that will arise due to using the product without a grounding installation in accordance with the local regulations.

WARNING: The product must be connected to the mains supply only by an authorised and qualified person. The product's warranty period starts only after correct installation. Manufacturer shall not be held responsible for damages arising from procedures carried out by unauthorised persons.

WARNING: The power cable must not be clamped, bent or trapped or come into contact with hot parts of the product. A damaged power cable must be replaced by a qualified electrician. Otherwise, there is risk of electric shock, short circuit or fire!
- Connection must comply with national regulations.
- The mains supply data must correspond to the data specified on the type label of the product. Type label is at the rear housing of the product.
- Power cable of your product must comply with the values in "Technical specifications" table.
| 4 | WARNING: Before starting any work on the electrical installation, disconnect the product from the mains supply. There is the risk of electric shock! |
| i | Power cable plug must be within easy reach after installation (do not route it above the hob). |
Plug the power cable into the socket.
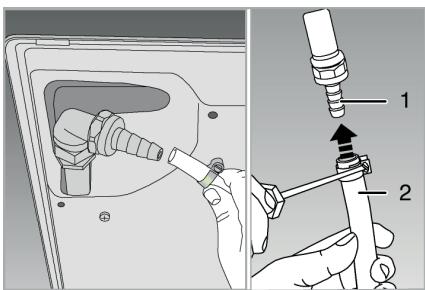
3.4 Gas connection
|  | WARNING: Product can be con- nected to gas supply system only by an authorised and qualified person or technician with licence. Risk of explosion or toxication due to unprofessional repairs! Manufacturer shall not be held re- sponsible for damages arising from procedures carried out by unauthor- ised or unlicensed persons. |
| ! | WARNING: Before starting any work on the gas installation, disconnect the gas supply. There is the risk of explosion! |
Gas adjustment conditions and values are stated on labels (or in type label).
| i | The gas type of your product is stated on type label placed bottom of hob. |
The flexible tube shall be fitted in such a way that it cannot come into contact with a moveable part of the housing unit (e.g. a drawer) and does not pass through any space susceptible of becoming congested.
3.4.1 Connecting the gas hose For NG
- Natural gas installation must be prepared before installing the product.
- There must be a pipe (Piping advised to be buy from a licensed installer), must comply with local gas standard, at the outlet of the ins-tallation for the natural gas connection of your product and the tip of this pipe must be closed with a blind plug. Service Representative will remove the blind plug during connection and connect your product by means of a straight connec-tion device (coupling).
- Make sure that the natural gas valve is readily accessible.
- If you need to use your product later with a different type of gas, you must consult the Aut-horised Service Agent for the related conversion procedure.
3.4.2 Connecting the gas hose For LPG
- Have your product connected so that it is close to the gas connection and it does not leak.
- Plastic hose to be used must not be longer than 125 ~cm .
- Install the clamp to the hose. Soak one end of the hose (15 mm inner diameter) into boiling water for one minute to soften it.
- Than, slip the softened end of the hose completely onto the sharp hose tip of your product. Fi-nally, tighten the clamp completely with a screwdriver.
- Repeat the same procedure for the other end of the hose and complete the gas cylinder connection.
- Never forget to make the gas leakage control.
WARNING: Risk of explosion and suffocation! Do not keep LPG cylinders in home.
- If you need to use your product later with a different type of gas, you must consult the Aut-horised Service Agent for the related conversion procedure.
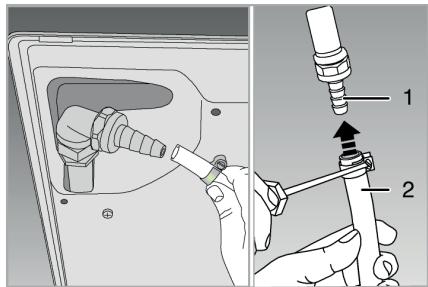
- LPG hose tip
- Plastic hose
3.5 Leakage control at the connection point
- Make sure that all knobs on the product are turned off. Make sure that the gas supply is open. Prepare soapy foam and apply it onto the connection point of the hose for gas leakage control.
- Soapy part will froth if there is a gas leakage. In this case, inspect the gas connection once again.

Never use a match or lighter to make the gas leakage control.
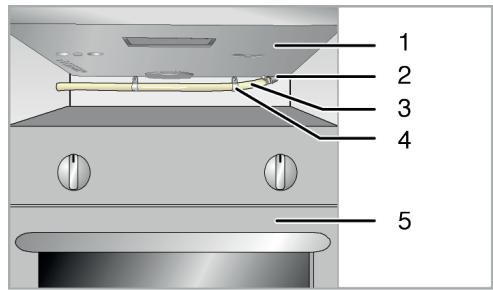
3.5.1 If there is a built-in oven installed under the hob;
- Gas hose must be routed in a way that it will not touch the oven, sharp edges or corners beneath the hob, or will not be kinked or twisted.
- If you will make the gas connection from left hand side when viewed from your position, fix the hose with clamps.
- Bottom view
- Hose tip
- Hose
- Clamp
- Oven
3 Installation
3.6 Installing the product
- Remove burners, burner caps and grills on the hob from the product.
- Turning the hob upside down, place it on a flat surface.
- In order to avoid the foreign substances and liquids penetrate between the hob and the counter, please apply the putty supplied in the package on the contours of the lower housing of the hob but make sure that the putty does not overlap.
- Fill the corners by forming bends at the corners as illustrated in the figure. Form as much bend as required to fill the gap in the corners.

Make sure that the skirting sections on the lower housing of the hob are filled with putty.
- Turning the hob again, align and place it on the counter.
- You can secure your hob to the counter by using the clamp and the screws supplied.
- Hob
- Putty
- Installation clamp
- Counter
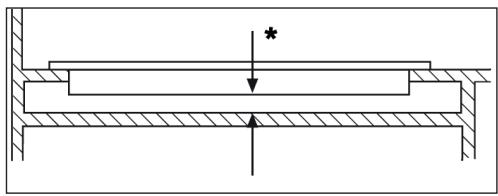
Thickness of the counter must be at least 40~mm

When installing the hob onto a cabinet, a shelf must be installed in order to separate the cabinet from the hob as illustrated in the above figure. This is not required when installing onto a builtunder oven.
For example, if it is possible to touch the bottom of the product since it is installed onto a drawer, this section must be covered with a wooden plate.
min.25mm
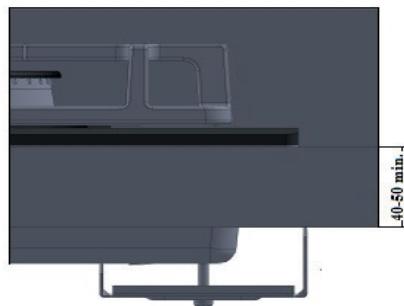
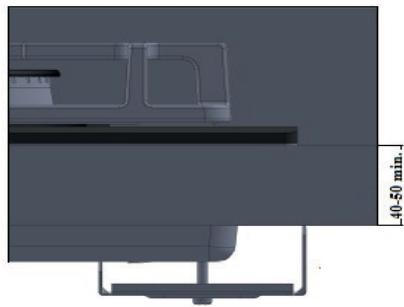
For counters with a thickness of 40 - 50mm , install the clamps as shown below.
You must leave a ventilation opening on the remaining part in order to provide ventilation at the lower part of the hob. In addition to being necessary for component temperatures, this process is also compulsory for the TC burner to take in air from the bottom. It can be "100 cm² at least".

Flame must be blue and have a regular shape. If the flame is yellowish, check if the burner cap is seated securely or clean the burner.
3 Installation
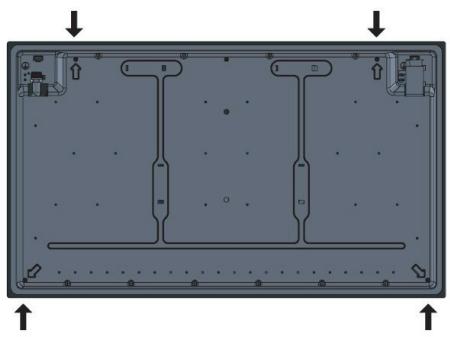
3.6.1 Rear view (connection holes)
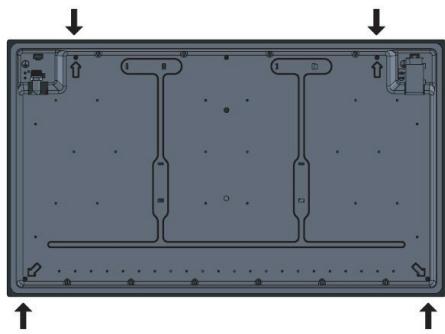
Place the burner plates, burner plate caps and grills back to their seating after installation.

WARNING: Making connections to different holes is not a good practice in terms of safety since it can damage the gas and electrical system.

WARNING: There are gas and electric components on hobs. Therefore stove, only the connection hole shown in this manual should only be fixed to the unit as shown in the manual using the supplied fasteners and screws supplied. Otherwise, it is dangerous to the life and property safety.
3.7 Final check
- Open gas supply.
- Check gas installations for secure fitting and tightness.
- Ignite burners and check appearance of the flame.

Flame must be blue and have a regular shape. If the flame is yellowish, check if the burner cap is seated securely or clean the burner.
Gas Conversion

WARNING: Before any work regarding gas installation, please cut off gas supply. There is the risk of explosion.
To use the product with another type of gas, replace all gas injectors and adjust the burning of gas cocks in idle mode.
Replacing the gas injector of the burner
- Remove the cap and head of the burner.
- Rotate the gas injectors counterclockwise to remove them.
- Install new gas injectors.
- Check all connections to ensure that they are secure and tight.

Location of the new injectors is marked on the packaging. You can also refer to the table.
4.1 Tips for saving energy
The following information will help you to use your appliance in an ecological way, and to save energy:
- Defrost frozen dishes before cooking them.
- Use pots/pans with cover for cooking. If there is no cover, energy consumption may increase 4 times.
- Select the burner which is suitable for the bottom size of the pot to be used. Always select the correct pot size for your dishes. Larger pots require more energy.
4.2 Initial use
4.2.1 First cleaning of the appliance
| i | The surface might get damaged by some detergents or cleaning materials. Do not use aggressive detergents, cleaning powders/creams or any sharp objects during cleaning. Do not use harsh abrasive cleaners or sharp metal scrapers to clean the oven door glass since they can scratch the surface, which may result in shattering of the glass. |
- Remove all packaging materials.
- Wipe the surfaces of the appliance with a damp cloth or sponge and dry with a cloth.
5.1 General information about cooking
- Before frying foods, always dry them well and gently place into the hot oil. Ensure complete thawing of frozen foods before frying.
- Do not cover the vessel you use when heating oil.
- Place the pans and saucepans in a manner so that their handles are not over the hob to prevent heating of the handles. Do not place unbalanced and easily tilting vessels on the hob.
- Do not place empty vessels and saucepans on cooking zones that are switched on. They might get damaged.
- Operating a cooking zone without a vessel or saucepan on it will cause damage to the product. Turn off the cooking zones after the cooking is complete.
- As the surface of the product can be hot, do not put plastic and aluminum vessels on it.
- Such vessels should not be used to keep foods either.
- Use flat bottomed saucepans or vessels only.
- Put appropriate amount of food in saucepans and pans. Thus, you will not have to make any unnecessary cleaning by preventing the dishes from overflowing.
-
Do not put covers of saucepans or pans on cooking zones.
-
Place the saucepans in a manner so that they are centered on the cooking zone. When you want to move the saucepan onto another cooking zone, lift and place it onto the cooking zone you want instead of sliding it.
5.1.1 Gas cooking
- Size of the vessel and the flame must match each other. Adjust the gas flames so that they will not extend the bottom of the vessel and center the vessel on saucepan carrier.
5.2 Using the hobs
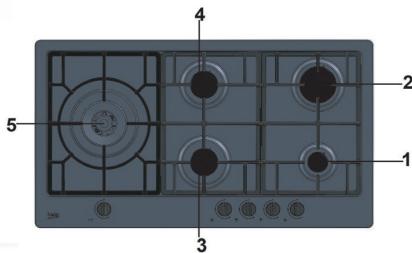
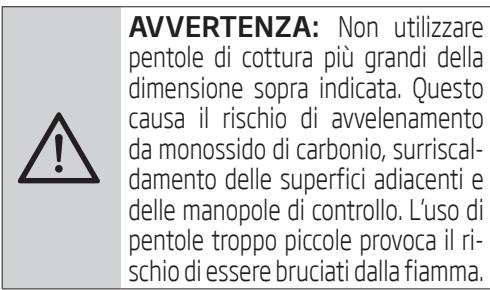
- Auxiliary burner 12-16 cm
- Rapid burner 18-24 cm
- Normal burner 16-18 cm
- Normal burner 16-18 cm
- Wok burner 22-26 cm is list of advised diameter of pots to be used on related burners.
Large flame symbol indicates the highest cooking power and small flame symbol indicates the lowest cooking symbol. In turned off position (top), gas is not supplied to the burners.

WARNING: Do not use cooking pans beyond the dimension limits given above. Using larger pans causes risk of carbon monoxide poisoning, overheating of adjacent surfaces and control knobs. Using smaller pans causes your risk of being burned by the flame.
The use of inappropriate hob guards can cause accidents.
5.2.1 Igniting the gas burners
- Keep burner knob pressed.
- Turn it counter clockwise to large flame symbol.
» Gas is ignited with the spark created. - Adjust it to the desired cooking power.
5.2.2 Turning off the gas burners
Turn the keep warm zone knob to off (upper) position.
5.2.3 Gas shut off safety system (in models with thermic component)
As a counter measure against blow out due to fluid overflows at burners, safety mechanism trips and shuts off the gas.
-
Gas shut off safety
-
Push the knob inwards and turn it counter clockwise to ignite.
- After the gas ignites, keep the knob pressed for 3-5 seconds more to engage the safety system.
- If the gas does not ignite after you press and release the knob, repeat the same procedure by keeping the knob pressed for 15 seconds.

WARNING: Release the button if the burner is not ignited within 15 seconds. Wait at least 1 minute before trying again. There is the risk of gas accumulation and explosion!
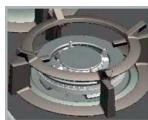
5.2.4 Wok burner
Wok burners help you to cook faster. Wok, which is particularly used in Asian kitchen is a kind of deep and flat fry-pan made of sheet metal, which is used to cook
minced vegetable and meat at strong flame in a short time.
Since meals are cooked at strong flame and in a very short time in such fry-pans that conduct the heat rapidly and evenly, the nutrition value of the food is preserved and vegetables remain crispy.
You can use wok burner for regular saucepans as well.
If you want to use regular saucepan on wok burner, you must take out the wok fry-pan carrier from the hob.
6.1 General information
Service life of the product will extend and the possibility of problems will decrease if the product is cleaned at regular intervals.
Disconnect the product from mains supply before starting maintenance and cleaning works.
There is the risk of electric shock!
Allow the product to cool down before you clean it.
Hot surfaces may cause burns!
Clean the product thoroughly after each use. In this way it will be possible to remove cooking residues more easily, thus avoiding these from burning the next time the appliance is used.
- No special cleaning agents are required for cleaning the product. Use warm water with washing liquid, a soft cloth or sponge to clean the product and wipe it with a dry cloth.
- Always ensure any excess liquid is thoroughly wiped off after cleaning and any spillage is immediately wiped dry.
- Do not use cleaning agents that contain acid or chloride to clean the stainless or inox surfaces and the handle. Use a soft cloth with a liquid detergent (not abrasive) to wipe those parts clean, paying attention to sweep in one direction.

The surface might get damaged by some detergents or cleaning materials.
Do not use aggressive detergents, cleaning powders/creams or any sharp objects during cleaning.
Do not use harsh abrasive cleaners or sharp metal scrapers to clean the oven door glass since they can scratch the surface, which may result in shattering of the glass.

Do not use steam cleaners to clean the appliance as this may cause an electric shock.
6.2 Cleaning the hob
6.2.1 Cleaning the burner
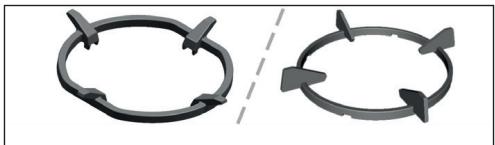
- Remove the pan supports, burner heads and burner caps and clean them with a soft and damp cloth.
- Clean the dirt in burner chamber and on injector with a soft and damp cloth and wipe them dry with a dry cloth.
- Use commercially available potassium stearate (soft soap) for stubborn dust and dirt on the burner heads.
- Clean the burner plate of the hob.
- Make sure that the burner heads are installed on their correct places and seated tightly. Incorrect installation will result with gas leakage, misfire or irregular burning.
- When fitting the pan supports, pay attention to place the pan support feet so that the burners are centered.


6 Maintenance and care

In case of any overflow, turn off the burner immediately. Remove the pots and pan supports on it. Clean the overflowed material with a dry and absorbent cloth. Pay attention not to let liquids enter into burners. Clean inside of the burners as well if any liquid has entered. Do not re-operate the hob before cleaning it.
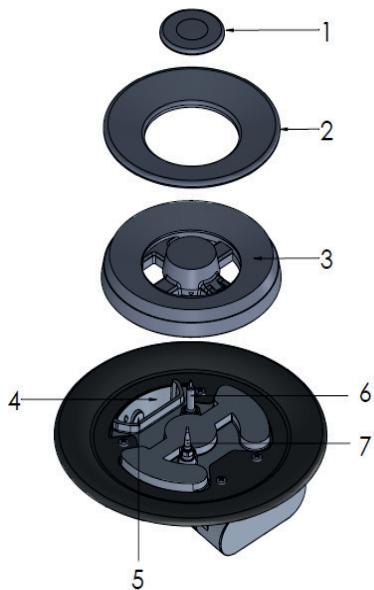
6.2.2 Assembling the Wok burner parts
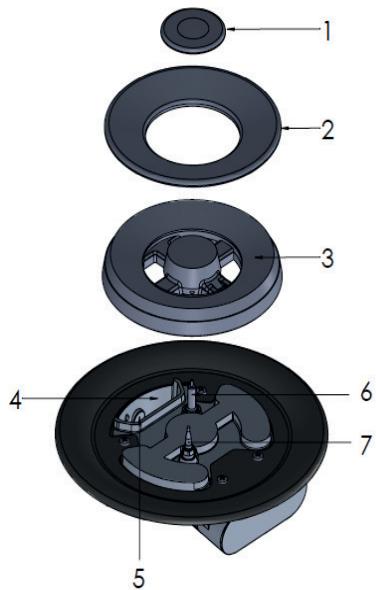
- Inner burner cap
- Outer burner cap
- Burner head
- Burner chamber
- Injector
- Plug (in products with igniter)
- Thermic element (in products with thermic element)
Assemble all parts in order after cleaning the burner.
- Place the burner head on the burner chamber such that it passes through the plug (6) hole.
- Place the burner caps on the burner heads.
6.2.3 Assembling the burner parts
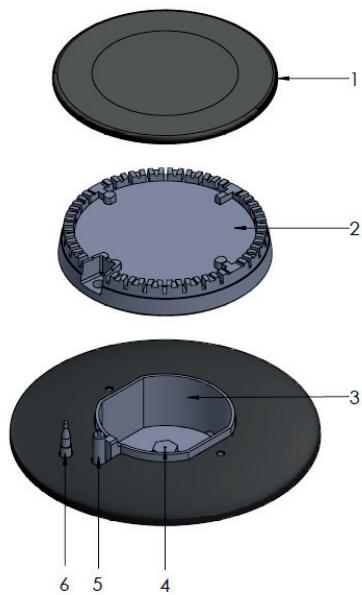
- Burner cap
- Burner head
- Burner chamber
- Injector
- Plug (in products with igniter)
- Thermic element (in products with thermic element)
Assemble all parts in order after cleaning the burner.
- Place the burner head on the burner chamber such that it passes through the plug (5) hole.
- Place the burner cap on the burner head.
6 Maintenance and care
6.2.4 Glass ceramic surfaces
Wipe the glass ceramic surface using a piece of cloth dampened with cold water in a manner as not to leave any cleaning agent on it. Dry with a soft and dry cloth. Residues may cause damage on the glass ceramic surface when using the hob for the next time.
Dried residues on the glass ceramic surface should under no circumstances be scraped with hook blades, steel wool or similar tools.
Remove calcium stains (yellow stains) by a small amount of lime remover such as vinegar or lemon juice. You can also use suitable commercially available products.
If the surface is heavily soiled, apply the cleaning agent on a sponge and wait until it is absorbed well. Then, clean the surface of the hob with a damp cloth.
Slight color fading may occur on coatings or other surfaces in time. This will not affect operation of the product.
Color fading and stains on the glass ceramic surface is a normal condition, and not a defect.
6.3 Cleaning the control panel
Clean the control panel and knobs with a damp cloth and wipe them dry.

Do not remove the control buttons/ knobs to clean the control panel. Control panel may get damaged!
- Knob
- Sealing element

Do not remove the sealing elements under the knobs for cleaning.
6.4 Future transportation
- If you have kept the product's original package, transport the product in it. Follow the instructions on the package. If you do not have the original package, pack the product in bubble wrap or a thick cardboard and tape it securely.
- Tightly secure the burner caps, burner heads and pan supports using tape.

Check the general appearance of your product for any damages that might have occurred during transportation.
7 Troubleshooting
Clanging is heard while the product is heating and cooling.
- When the metal parts are heated, they may expand and make noise. This is not a failure.
There is no ignition spark.
- Power is cut. >> Check the fuses in the fuse box.
The product is continuously sparking.
- The effluent fluids may have penetrated into the ignition mechanism under the control knobs. >> Unplug the product and wait for it to cool.
There is no gas.
- Main gas valve is shut off. >> Turn on the gas valve.
- The pipe has leaned. Install the gas pipe properly.
Burners are not burning properly or at all.
- Burners are dirty. >>> Clean the burner components.
- Burners are wet. Dry the burner parts.
- Burner cap is not securely positioned. >> Position the burner cap correctly.
- Main gas valve is shut off. Turn on the gas valve.
- Gas cylinder is empty (when using LPG). Replace the gas cylinder.
- The burner knob/b button has not been hold pressed enough during ignition. Ignite the burner by pressing and holding for at least 3-5 seconds.

Consult the call centre if you can not remedy the trouble although you have implemented the instructions in this section. Never attempt to repair a defective product by yourself.
7 Troubleshooting
| Brand | BEKO | ||
| Hob Type | Built-in Gas Hob | ||
| Model | Inox | ||
| Symbol | Value | Unit | |
| Number of the gas burners | 5 | % | |
| Energy efficiency of the rear right burner | EE gas-powered burner | 55,3 | % |
| Energy efficiency of the front right burner | EE gas-powered burner | - | % |
| Energy efficiency of the front left burner | EE gas-powered burner | 56,2 | % |
| Energy efficiency of the rear left burner | EE gas-powered burner | 56,2 | % |
| Energy efficiency of the left burner | EE gas-powered burner | 52,8 | % |
| Energy efficiency for the gas-powed hob | EE gas-powered burner | 55,1 | % |
Based on the Eco-design Requirements for Energy-related Products Directive No. 2009/125/EC, the product information below is given in parallel with the European Union's Commission Regulation No. (EU) 66/2014 in respect of the Eco-design Requirements for Domestic hobs.
With the aim of specifying the features of the product, measurements and calculations are specified with the standard given below in accordance with the eco-design requirements.
En 30-2
Leggere per prima casa quello manuale utente!
Gentile Cliente,
Grazie per aver scelto un prodotto Beko. Speriamo che Lei riesca ad otteneri risultati migliorari da quello prodotto, realizazo con Tecnologia di alta qualità e all'avanguardia. Pertanto, legga quello intero manuale utente e tutti gli altri documenti allegati con attenzione prima di utilizzato il prodotto e lo conservi come riferimento per usi futuro. Se passa il prodotto ad altre persona, dia loroanche quello manuale utente. Segua tutte le avvertenze e le informazioni del manuale utente.
Ricordi che questo manuale utente puòanche essere applicato a molti altri modelli. Le differenze tra i modelli saranno identificare nel manuale.
Spiegazione dei symboli
Per tutto quello manuale utente si utilizzato i seguenti simboli:
| i | Informazioni importanti o suggerimenti utili sull'utilizzo. |
| ! | Avvertenze per situazioni pericolose per vita e propietà. |
| 4 | Avvertenza per shock elettrico. |
| 5 | Avvertenze per superfici calde. |
| Avvertenze per rischio di incendio. |

Questo prodotto è realizzato utilizzando la Tecnologia più aggiornata in condizioni rispettose dell'ambiente.
1
Istruzioni importanti per sicurezza e ambiente
Questa sezione contiene istruzioni di sicurezza che consentono di prevenire il pericolo di lesioni personali o di danni materiali. L'inosservanza di queste istruzioni invalida la garanzia accordata.
1.1 Sicurezza generale
- Questo apparecchio può essere usato da bambini di età superioreagli 8 anni e da persona con ridotte capacità fisiche, sensoriali o mentali o privile dell'esperienza e delle conoscenze necessarie solo tutto supervisione o con l'ausilio delle istruzioni riguardanti l'uso dell'apparecchio in modo sicuro e con la comprensione dei rischi che ne derivano.
- I bambini non devono giocare con l'apparecchio. Le operazioni di pulizia e manutenzione non devono essere eseguite da bambini in assenza di supervisione.
- Le procedure di installatione e riparazione devono sempre essere eseguite da agenti autorizzati per l'assistenza. Il produttore non sare considerato responsable dei danni derivanti da procedure eseguite da persona non autorizzate.
Ciò renderà inoltre nulla la garanzia. Leggere attendamente le istruzioni prima dell'installazione.
Non mettere in funzione il prodotto se risulta essere difettoso o presente danni visibili.
- Controllare che le manopole delle funzioni dell'apparecchio siano disattivate快来?!
- Se la piatra in vetro del piano cottura è roffa: spegnere immediamente tutti i bruciatori e gli elementi riscaldanti elettrici e scollegare il prodotto alla fonte di alimentazione. Non toccare la superficie dell'apparecchio. Non utilizzato l'apparecchio.
1.2 Fare attenzione durante l'utilizzo del gas
- Tutti gli interventi su apparecchi e sistemi a gas possono essere eseguiti solo da personale qualificato e autorizzato registrato Gas Safe.
- Se è necessario usare il prodotto con un tipo diverso di gas, bisogna consultare l'agente autorizzato per l'assistenza per la relativa procedura di conversione.
1
Istruzioni importanti per sicurezza e ambiente
- Prima dell'installazione, assicurarsi che le condizioni della distribuzione locale (tipodi gas e pressione del gas) e le regolazioni dell'apparecchio siano compatibili.
- Questo appearecchio non è collegato a un dispositivo di evacuation per prodotti a combustione. Deve essere installato e collegato secondo i regolamenti currenti per l'installazione. Bisogna prestare particolare attenzione ai requisiti pertinenti relativi alla ventilazione; Vedere Prima dell'installazione,网页.
- ATTENZIONE: L'uso di cucine a gas provoca produzione di calorie e umidità nell'ambiente in cui sono installate. Assicurare che la cucina sia ben ventilata:mantenere le naturali aperture di ventilationazione aperte o installare un dispositivo meccanico di ventilationazione (cappa aspirante meccanica).L'uso intenso prolongato dell'apparecchio cui richiedere una ventilationazione aggiuntiva, per esempio aumento il livello di ventilationazione meccanica dove è presente.
Utilizzare il prodotto in maniera intensa per periodi prolongati (1 ora e più) cui richiedere una ventilazione aggiuntiva (per esempio augmentare il livello della velocità di aspirazione, se presente, o après le finestre).
Gli appearecchi e i sistemi a gas devono essere controllati regolarmente per un funzionamento corretto. Regolatore, flessibile e relativivo morsetto devono essere controllati regolarmente e sostititi secondo i periodi consigliati dal produttore o quando necessario.
- Pulire regolarmente i bruciatori a gas. Le fiamme devono essere blu e bruciare in modo uniforme.
- Una buona combustione è necessaria negli appearecchi a gas. In caso di combustione non completa, cui svilupparsi monossido di carbonio (CO). Il monossido di carbonio non ha colore, odore ed è un gas molto tossico che ha effetti letalianche a piccole dosi.
1
Istruzioni importanti per sicurezza e ambiente
Richiedere informazioni sui numero di Telefono di emergenza per il gas e sulle misure di sicurezza in caso di odore di gas al proprio fornitore locale di gas.
Cosa fare quando si sente odore di gas
- Non usare fiamme libero o non fumare. Non azionare i tasti elettrici (per es. luci, campanello di ingressso, ecc.). Non usare un telemono o un cellulare. Rischio di esplosione e intossicazione!
- Aprire porte e finestre.
- Chiudere tutte le valvole sugli apparenti e sui contatori del gas in corrispondenza della valvola di controllo principale, salvo in caso sua posizionata in uno spazio confinato o in cantina.
- Controllare tutti i tubi e i collegamenti per verificarne la tenuta. Se si sente ancora odore di gas, lasciare l'abitazione.
- Avvisare i vicini.
- Chiamare i pompieri. Usare un Telefono fuori dall'abitazione.
Non entrare di nuovo finché non si riceve comunicazione sulla sicurezza.
1.3 Sicurezza elettrica
- In caso di guasti al prodotto, non utilizzato a meno che non venga riparato da un agente autorizzato per l'assistenza. C'è il rischio di shock elettrico!
- Collegare il prodotto solo ad una presa messa a terra/linea con tensione e protezione secondo quando specificato in "Specifiche tecniche". Far eseguire la messa a terra da un elettricista qualificato quando si usa il prodotto con ozza un trasformatatore. La nostra azienda non sare responsabile di problemi derivanti dall'uso del prodottoenza messa a terra conforme ai regolamenti locali.
Non lavare mai l'apparecchio spargendo o versando acqua su diesso! C'e il rischio di shock elettrico! - Mai toccare la spina con le mani bagnate! Mai scollegare l'apparecchio tirando il cavo, ma sempre afferrando e tirando la spina.
- Scollegare il prodotto alla rete durante le procedure di installazione, manutenzione, pulizia e riparazione.
1
Istruzioni importanti per sicurezza e ambiente
- Se il cavo di alimentazione del prodotto risulta danneggiato, devese sostituito dal produttore, dal suo agente per l'assistenza o da una persona con qualifica simile, in modo da evitare l'insorgere di pericoli.
- L'apparecchio deve essere installato in modo che possa essere completamente scollegato alla rete. La separazione deve essere garantita da un interrottore integrato nell'installazione elettrica fissa, secondo i regolamenti di costruzione.
- Tutti gli interventi su apparecchi e sistemi elettrici possono essere eseguiti solo da personale qualificato e autorizzato.
- In caso di danni, spegnere il prodotto e scollegarlo alla rete. Per farlo, disattivare il fusabile domestico.
- Assicurarsi che la corrente del fusibile sia compatible con il prodotto.
1.4 Sicurezza del prodotto
- La macchina e le sue parti accessibili diventano molto calde durante l'uso. Prestare attenzione a non toccare gli elementi riscaldanti. I bambini di età inferioreagli 8 anni devono essere tenuti lontani a meno che non ricevano continua supervisione.
Non usare mai il prodotto quando giudizio e coordinazione sono danneggiati dall'uso di alcool e/o droghe. - Prestare attenzione quando si usano bevande alcoliche nei piatti. L'alcool evapora ad alte temperature e cui provocare incendi poiché prende fuoco a lavoro con superfici calde.
Non mettere materiali infiammabili vicini al prodotto poiché i lati possono diventare caldi durante l'uso. - Tenere tutte le aperture di ventilazione libero da ostruzioni.
Non usare pulitori a vapore per pulire l'apparecchio poiché ciò potrebbe provocare uno shock elettrico.
1
Istruzioni importanti per sicurezza e ambiente
- La cotturaenza supervisione di oli o grassi sul piano cottura cui essere pericolosa e causare incendi. Non cercare MAI di estinguere il fuoco con acqua, ma spegnere l'apparecchio e poi coprire la fiamma, per es. con un coperchio o una coperta ignifuga.
- Pericolo di incendio: non conservare oggetti sulle superfici di cotura.
Se la superficie è lesionata, spe-gnere l'apparecchio per evitare la possibilità di shock elettrico.
ATTENZIONE: In caso di rottura del vetro della piastra: spegnere immediatamente tutti i bruciatori e tutti gli elementi riscaldanti elettrici e staccare l'apparecchio alla rete elettrica. Non toccare la superficie dell'apparecchio. Non utilizzato l'apparecchio.
Evitare possibili rischi di incendiol!
- Assicurarsi che tutti i collegamenti elettrici siano fissi e serrati per evitare il rischio di archi elettrici.
Nonutilizzare cavi danneggiati o prolonghe.
Assicurarsi che non vi sia liquido o umidità sulla presa quando viene collegata all'apparecchio.
- Per evitare perdite di gas, assicurarsi che il collegamento sia saldo
1.5 Uso previsto
- L'apparecchio è destinato solo ad un uso domestico. L'uso commerciale non è amesso.
ATTENZIONE: Questo apparecchio serve solo per cucinare. Non deve essere usato per altri scopi, per esempio riscaldare l'ambiente. - Il produttore non sare responsabile per danni provocati da uso o gestione non corretti.
- Questo è un prodotto integrato.
Classe 3. Non è adatto a essere utilizzato come piano cottura da appoggio.
1
Istruzioni importanti per sicurezza e ambiente
1.6 Sicurezza dei bambini
Le parti accessibili possono diventare calde durante l'uso. I bambini devono essere tenuti lontani.
- I materiali di imballaggio sono pericolosi per i bambini. Tenere i materiali di imballaggio lontani alla portata dei bambini. Smaltire tutte le parti dell'imballaggio secondo gli standard ambientali,
Gli apparecchi elettrici e/o a gas sono pericolosi per i bambini. Tenere i bambini lontano dall'apparecchio quando è in uso e non lasciarli giocare con il prodotto.
Non mettere sopra all'apparecchio alcun oggetto che possa essere raggiunto dai bambini.
1.7 Conformità alla direttiva WEEE e allo smaltimento dei rifiuti:
Questo appearecchio è conforme alla Direttiva UE WEEE (2012/19/EU). Questo appearecchio riportà il symbolo di classificazione per i rifiuti delle appearecchiature elettriche ed elettroniche (WEEE).
Questo appearecchio è stato realizazo con parti e materiali di alta qualità che possono essere riutilizzati e sono adatti ad essere ricolati. Non smaltire i rifiuti dell'apparecchio con i normali rifiuti do
mestici e gli altri rifiuti alla fine della vita di servizio. Portarlo al centro di raccolta per il riciclaggio di apparecchiature elettriche ed elettroniche. Consultare le autorità locali per conoscere la collocazione di questi centri di raccolta.
1.8 Conformità alla Direttiva RoHS:
L'apparecchio acquistato è conforme alla Direttiva UE RoHS (2011/65/EU). Non contiene materiali pericolosi o proibiti specificati nella Direttiva.
1.9 Informazioni di imballaggio

L'imballaggio del prodotto è fatto di materiali riciclabili in conformità con la normativa nazionale. Non smaltire i materiali di imballaggio con i rifiuti domestici
o altri rifiuti. Portarli ai punti di raccolta per materiali di imballaggio previsti dalle autorità locali.
2.1 Panorama

- Poggiapentola
- Bruciatore normale
- Morsetto per il montaggio
- Pannello di controllo
-
Coperchio base
-
Bruciatore ausiliario
- Piastra bruciatore
- Bruciatore rapido
- Bruciatore wok
- Bruciatore normale
2.2 Pannello di controllo

- Bruciatore normale Sinistra anteriore
- Bruciatore normale Sinistra posteriore
-
Bruciatore wok Centrale
-
Bruciatore rapido Destra posteriore
- Bruciatore ausiliario Destra anteriore
2.3 Contenuto della confezione

Gli accessori in dotazione possono variate a seconda del modello del prodotto. Non tutti gli accessori descritti nel manuale utente potreb-bero esistere con il prodotto acquistato.
2.3.1 Adattatore caffettiera
Usato per caffeitiere.
2.3.2 Adattatore wok
Usato come alloggamento del wok con fondo ro-tondo.
2.4 Specifiche tecniche
| Inox | |
| HIML 95225 SXE | |
| Brucitori | 5 bruciatori a gas |
| Tensione / frequenza | 220-240 V ~ 50-60Hz |
| Tipo /sezione cavo | H05V2V2-F 3 x 0,75 mm2 |
| Lunghezza cavo | max. 1,5 m |
| Categoria di prodotto a gas | Cat II 2H3+ |
| Tipodi gas / pressione | Gas metano G20-20 mbar |
| Conversione del tipo di gas / pressione opzionale | G30-28...30mbar / G31-37mbar |
| Sinistra posteriore / Bruciatore normale | 1,75 kW |
| Sinistra anteriore / Bruciatore normale | 1,75 kW |
| Sinistra / Bruciatore wok | 4,2 kW(Gas metano), 4,0kWGPL) |
| Destra anteriore / Bruciatore ausiliario | 1 kW |
| Destra posteriore / Bruciatore rapido | 3 kW |
| Consumo totale gas | 11,70 kW (Gas metano), 11,50 kW (GPL) |
| Consumo di gas Gas metano G20 - 20 mbar GPL G30-28....30 mbar / G31-37mbar | - 836 g/h |
| Dimensioni esterne (altezza / larghezza / profondità) | 97x910x510 mm |
| Dimensioni installazione (larghezza / profondità) | 860 mm/490 mm |

Le specifiche tecniche potrebbero essere modificare perché preavviso per migliorare la qualità del prodotto.

Le figure in quello manuale sono schematiche e potrebbero non corrispondere esattamente al prodotto.

I valori dichiarati sulle etichette del prodotto o nella documentazione che lo accompaniesa si ottengono in condizioni di lavoratorio secondi gli standard relativi. Questi valori potrebbero variate a seconda delle condizioni di funzio-namento e ambientali del prodotto.
2.4.1 Tabella iniettori
| Zona di cottura | Bruciatore ausiliario 1 kW | Bruciatore normale 1,75 kW | Bruciatore rapido 3 kW | Bruciatore wok (4,2 kW) | Bruciatore wok (4 kW) |
| Tipo di gas / Pressio- ne del gas | |||||
| Gas metano G20-20 mbar | 0,72 mm | 0,97 mm | 1,15 mm | 1,53 mm | - |
| GPL G30-28....30 mbar/G31-37 mbar | 0,50 mm | 0,65 mm | 0,87 mm | - | 1,01 mm |
3 Installazione
Il prodotto deve essere installato da personale qualificato secondo i regolamenti correnti. Il produttore non sare considerato responsable dei danni derivanti da procedure eseguite da persona non autorizzate. Ciò renderà inoltre nulla la garanzia.
| i | La preparazione della posizione e l'installazione elettrica e del gas per il prodotto sono responsabilità del cliente. |
| PERICOLO: Il prodotto deve esse- re installato secondo i regolamenti locali per il gas e/o elettrici. |
| PERICOLO: Prima dell'installazione, controlling visamente se il prodotto presente difetti. Se è così, non installarlo. Prodotti danneggiati provocano rischi per la sicurezza. |
3.1 Prima dell'installazione
Il piano cottura è progettato per essere installato in piani da lavoro in commercio. Lasciare una distanza di sicurezza tra l'apparecchio e le pareti e i mobili della cucina. Vedere la figura (valori in mm).
- () Se la cappa deve essere installata sopra al piano cottura, videere le istruzioni del produttore della cappa sull'altezza dell'infallazione (min 650 mm).
- Rimuovere i materiali di imballaggio e i blocchi per il trasporto.
Superfici, laminati sintetici e adesivi usati devono essere resistenti al calorie (100°C minimo). -
Il piano da lavoro deve essere allineato e fissato in modo orizzontale.
-
Tagliare l'apertura per il piano cottura nel piano da lavoro secondo le dimensioni dell'infallazione.
3.2 Ventilazione ambiente
Tutti gli ambienti richiedono una finestra apribile o equivalente, e alcune stanze richiedonoanche un'apertura fissa.
L'aria per la combustione viene presa dall'aria dell'ambiente e i gas di scarico sono emessi direttamente nelle ambiente.
Una Buona ventilazione dell'ambiente è essenziale per il funzionamento sicuro dell'apparecchio. Se nella stanza dove viene installato l'apparecchio non c'é una finestra o una porta per la ventilazione esterna, bisogna installare un'apertura di ventilazione fissa nella stanza. La ventilazione fissa non deve essere regolabile né chiudibile.
Porte e finestre che si affacciano direttamente all'esterno devono essere dotate di un'apertura di ventilazione delle dimensioni specificate in base alla portata di gas totale dell'apparecchio (come migliorato di seguito. I rispetti valori di portata di gas e aperture di ventilationazione sono riportati nella tabella segunte.
| Consumo totale gas (kW) | Apertura di ventilazione min. (cm2) |
| 0-2 | 100 |
| 2-3 | 120 |
| 3-4 | 175 |
| 4-6 | 300 |
| 6-8 | 400 |
| 8-10 | 500 |
| 10-11.5 | 600 |
| 11.5-13 | 700 |
| 13-15.5 | 800 |
| 15.5-17 | 900 |
| 17-19 | 1000 |
| 19-24 | 1250 |
Se porte e finestre che si affacciano direttamente all'esterno non sono dotate di aperture corrispondenti all'apertura di ventilazione specificata secondo la portata totale di gas del prodotto, è necessario installare un'apertura di ventilazione fissa nella stanza. L'apertura di ventilazione fissa deveanche rispetto i valori nella tabella porta di gasapertura di ventilazione. Deve esserci un vuoto minimo di 10mm sul margine inferiore della porta che si apree all'interno nella stanza quando il prodotto è installato. Assicurarsi che elementi quali tappeti, pavimentazione, ecc. non coprano tale vuoto quando la porta è chiusa.
L'apparecchio può essere collocato in una cucina, in una cucina/sala da pranzo o in un ambiente unico, ma non in una camera che contenga una vasca o una doccia. Il piano cottura non deve essere installato in un ambiente unico più piccolo di 20m^3
Non installare quello appearecchio in un ambiente sottoterra a meno che non sia aperto all'aria da almeno un lato.
3.2.1 Installazione e collegamento
Il prodotto deve essere installato secondo i regolamenti locali per il gas e/o elettrici.
3.3 Collegamento elettrico
Collegare il prodotto ad una presa messa a terra/ linea protetta da un fusibile della capacité adatta, dichiarata nella tabella "Specifiche tecniche". Far eseguire la messa a terra da un elettricista qualificato quando si usa il prodotto con o alla non un trasformatore. La nostra azienda non sare responsabile di danni derivanti dall'uso del prodotto alla sua installatione di messa a terra conforme ai regolamenti locali.

PERICOLO: Il prodotto deve essere collegato alla rete elettrica solo da una persona autorizzata e qualificata. Il periodo di garanzia dell'apparecchio comincía solo dopo la corretta installmentazione.
Il produttore non sare considerato responsabile dei danni derivanti da procedure eseguite da persona non autorizzate.

PERICOLO: Il cavo di alimentazione non deve essere schiacciato, piegato o bloccato né deve venire in contatto con le parti calde dell'apparecchio. Un cavo di alimentazione danneggiato deve essere sostituito da un elettricista qualificato. Altrimenti c're rischio di shock elettrico, cortocircuito o incendio!
3 Installazione
- Il collegamento deve essere conforme ai regolamenti nazionali.
- I dati sull'alimentazione di rete devono corrispondere ai dati specificati sull'etichetta con il tipo del prodotto. L'etichetta con il tipo è sull'alloggiamento posteriori del prodotto.
- Il cavo di alimentazione del prodotto deve essere conforme ai valori della tabella "Specifiche tecnche".
| 41 | PERICOLO: Prima di cominciare un lavoro sull'installazione elettrica, scollegare il prodotto dall'alimentazione di rete. C'e il rischio di shock elettrico! |
| i | Il cavo di alimentazione deve essere facilemente raggiungibile dopo l'in-stallazione (non farlo correre sopra al piano cottura). |
Inserire il cavo di alimentazione nella presa.
3.4 Collegamento del gas
| PERICOLO: Il prodotto può essere collegato alsystema di alimentazione del gas solo da una persona autorizzata e qualificata o da un technician in possesso di una licenza. Rischio di esplosioni o intossicazione a causa di riparazioni non professionali! Il produttore non sare considerato responsable dei danni derivanti da procedure eseguite da personne non autorizzate o non fornite di licenza. |
| PERICOLO: Prima di cominciare un lavoro sull'installazione del gas, scollegare l'alimentazione del gas. C'e il rischio di esplosione! |
Condizioni di regolazione e valori del gas sono presenti sulle etichette (o nelle'etichetta del tipo).

Il tipo di gas del prodotto acquistato è riportato sull'etichetta del tipo di apparecchio posta sul fondo del piano cottura.
Il tubo flessibile deve essere montato in modo tale da non poter entrare in contatto con una parte mobile dell'unità abitativa (ad esempio un cassetto) e non attavrare qualiasi spazio che può essere congestionato.
3.4.1 Collegare il tubo flessibile del gas per Gas metano
- L'installazione con gas naturale deve essere pre-disposita prima di installare il prodotto.
- Deve essere presente un tubo (si raccomanda di acquistarlo da un installatore con licenza e che sia conforme agli standard sul gas locali) all'uscita dell'installazione per il collegamento del gas naturale del prodotto e la punta di quello tubo deve essere chiusa con un tazzo. Il rappresentante dell'assistenza rimuove il tappo durante il collegamento e collega il prodotto mediante un dispositivo di collegamento diretto (accoppiamento).
- Assicurarsi che la valvola di gas naturale sia subito accessibile.
- Se è necessario usare il prodotto con un tipo diverso di gas, bisogna consultare l'agente autorizzato per l'assistenza per la relativa procedura di conversione.
3.4.2 Collegare il tubo flessibile del gas per GPL
- Posizione are il prodotto in modo tale che sia vicino all'allacciamento del gas e non presenti perdite.
- Il tubo flessibile di plastica utilizzato non deve avere una lunghezza superiore a 125 cm.
- Installare il morsetto sul tubo. Immergere un'estremità del tubo flessibile (15 mm diametro interno) in acqua bollente per un minuto per ammonbidirla.
- Quindi far scivolare tale estremità del tubo flessibile sulla punta del tubo del prodotto. Infine serrare il morsetto con un cacciavite.
Ripetere tale procedura per l'altra estremita del tubo flessibile e completare il collegamento del cilindro del gas. - Controllare sempre che non vi siano perdite di gas.

PERICOLO: Rischio di esplosion e soffocamento! Non tenere cilindri di GPL in casa.
- Se è necessario usare il prodotto con un tipo diverso di gas, bisogna consultare l'agente autorizzato per l'assistenza per la relativa procedura di conversione.
- Punta del tubo flessibile di GPL
- Tubo di plastica
3.5 Controllo perdite nel punto di collegamento
- Assicurarsi che tutte le manopole del prodotto siano spente. Assicurarsi che l'alimentazione di gas sia aperta. Preparare una soluzione saponata e applicarla sul punto di collegamento del tubo flessibile per controllare che non vi siano perdite di gas.
- La parte insaponata schiumera se è presente una perdita di gas. In tal caso, verificare nuovamente il collegamento del gas.

Mai usare un accendino o un fiammi-fero per verificare che non vi siano perdite di gas.
3.5.1 Se除去 il piano cottura è presente unorno incassato;
- Il tubo flessibile del gas deve essere posizionato in modo che non tocchi il forn, gli angoli o i bordi non smussati tanto l'apparecchio e in modo che non si pieghi o si ritorca.
- Fissare il tubo flessibile con morsetti se si realizzza il collegamento del gas dal lato sinistro.
- Vista dal basso
- Punta del tubo flessibile
- Tubo flessible
- Morsetto
- Forno
3 Installazione
3.6 Installazione del prodotto
- Rimuovere bruciatori, copertura dei bruciatori e grill del piano cottura dall'apparecchio.
- Ruotando il piano cottura a testa in giù, metterlo su una superficie piatta.
- Per evitare che sostanje estranee e liquidi entrino tra il piano cottura e il ripiano, applicare il mastice in dotazione nella confezione sul contorno dell'alloggiamento inferiore del piano cottura ma assicurarsi che il mastice non si sovrapponga.
- Riempire gli angoli formando pieghe agli angoli stessi, come illustrato nella figura. Formare la piegatura secondo necessità per riempire il vuoto negli angoli.


Assicurarsi che lesezioni marginalis sull'alloggiamento inferiore del piano cottura siano riempite di mastice.
- Girando di nuovo il piano cottura, allinearlo e metterlo sul ripiano.
- Si cui assicurare il piano cottura al ripiano usando il morsetto e le viti in dotazione.
- Piano cottura
- Mastice
- Morsetto per l'installazione
- Ripiano
Lo spessore del ripiano non deve essere inferiore a 40 mm..

Quando si installa il piano cottura su un alloggiamento, bisogna installare una mensola per分开are l'alloggiamento dal piano cottura, come illustrato nella figura sopra. Questo non è necessario quando si installa su unorno incassato.
Per esempio, se è possible toccare il fondo del prodotto che è installato su un cassetto, quella sezione deve essere coperta con una piastra in legno.
min.25mm
Per ripiani con uno spessore di 40-50 mm, installare i morsetti come migliorato di seguito.
Lasciare un'apertura di ventilazione sulla parte restante per consentire la ventilazione della parte inferiore del piano cottura. Iltre a essere necessario per la temperature dei componenti, quello passaggio è inoltre obblatorioio affinché il bruciatore TC assorba aria dal fondo. Pò èssere "100 cm2 almeno".

La fiamma deve essere blu e avea una orma regolare. Se la fiamma tende al giallo, controllare se il coperchio del bruciatore è posizionato in modo sicuro o pulire il bruciatore.
3.6.1 Vista posteriore (fori di collegamento)
Posizione are le piastre dei bruciatori, le copertura relative e i grill nella loro sede dopo l'installazione.

PERICOLO: Eseguire i collegamenti a fori diversi non è una buona pratica in termini di sicurezza poichésicouldanneggiareilsystemaagased elettrico.

PERICOLO: Vi sono componenti elettrici e a gas sul piano cottura. Pertanto, solo il foro di collegamento所以我 sovrato in quello manuale devese sereffatto all'unità come对我 sostrato nel manuale utilizzando i dispositivi di fissaggio e le viti in dotazione. In caso contrario, si incorre in pericolo per la vita e l'abitazione stessa.
3.7 Controllo finale
- Aprire la fornitura del gas.
- Controllare le installmenti del gas per montaggio e tenuta sicuri.
- Accendere i bruciatori e controllare l'aspetto della fiamma.

La fiamma deve essere blu e ave forma regolare. Se la fiamma tends al giallo, controllare se il coperchio del bruciatore è posizionato in modo sicuro o pulire il bruciatore.
Conversion gas

AVVERTENZA: Prima di qualisi asi lavoro riguardante l'installazione del gas, si prega di interrompere l'alimentazione del gas. C'e il rischio di esplsozione!
Perutilizzare il prodotto con un'alto tipo di gas, sostituire tutti gli iniettori di gas e regolare la combustione dei rubinetti del gas in modalità inattivo.
Sostituire l'iniettre del gas del bruciatore
- Rimuovere la copertura e la testa del bruciatore.
- Ruotare gli iniettori del gas in senso antiorario per estrarli.
- Installare i nuovi iniettori del gas.
- Verificare tutte le concessioni affinché siano salde in posizione.

La posizione dei nuovi iniettori è indicata sulla confezione. Fare riferimentoanche alla tabella.
4.1 Consigli per il risparmio energetico
Le informazioni che seguono aiutano ad usare l'apparecchio in modo ecologico e a risparmiare energia:
- Scongelare gli alimenti congelati prima di cuocerli.
- Usare pentole/padelle con coperchi per la cottura. In assenza di un coperchio, il consumo energetico può essere augmentare 4 volte.
- Selezionare il bruciatore adatto per la dimensione del fondo della pentola da usare. Selezionare sempre la dimensione corretta della pentola per i piatti. Pentole più grandi richiedono più energia.
4.2 Uso iniziale
4.2.1 Prima pulizia dell'apparecchio
| i | La superficie più danneggiarsi a causa di alcuni detergenti o materi di pulizia.Non usare detergenti aggressivi, polveri/creme pulenti o oggetti taglienti durante la pulizia.Non usare detergenti molto abrasivi o raschietti in metallo tagliente per la pulizia dello sportello delorno, poché potrebbero graffiare la superficie e distruggere il vetro. |
- Rimuovere tutti i materiali di imballaggio.
- Pulire le superfici dell'apparecchio con un panno o una spugna umidi e asciugare con un panno.
5 Comeutilizzareilpiano cottura
5.1 Informazioni generali sulla cottura
- Prima di friggere gli alimenti, sempre asciugarli bene e metterli delicatamente nell'olio caldo. Assicurarsi che gli alimenti congelati siano completamente scongelati prima di friggerli.
Non coprire il contentitore usato quando si risca l'olio. - Posizione pentole e padelle in modo tale che i manici non siano sul piano cottura per evitare il riscaldamento dei manici stessi. Non posizione contentori sbilanciati e che si inclinano facilitmente sul piano cottura.
Non posizionare contentitori e padelle vuoti sulle zone di cottura accese. Potrebbero danneggiarsi. - L'uso di una zona di cotturaenza un contentatore o una padella sopra provoca danni all'apparecchio. Specnere le zone di cottura quando la cottura è completa.
- Poiché la superficie dell'apparecchio potrebbe essere calda, non collocare contentitori in plastica e alluminio su diessa.
- Tali contentitori non devono essere nemmeno usati per conservare gli alimenti.
- Usare solo padello o contentitori con fondo piatto.
- Mettere la quantità appropriata di alimenti in pentole e padelle. Così non bisognera eseguire alcuna operazione di pulizia non necessaria, evitando traboccamenti.
Non mettere coperchi di pentole o padelle sulle zone di cottura.
- Mettere le padelle in modo tale che siano al centro della zona di cottura. Quando si desidera spostare la padella su un'altra zona di cottura, sollevarla e metterla sulla zona di cottura scelta, non trascinarla.
5.1.1 Cottura a gas
- La dimensione del contentatore e la fiamma devono corrispondere. Regolare la fiamma del gas in modo che non superi il fondo del contentatore e centrare il contentatore sul poggiapentola.
5.2 Uso del piano cottura
- Bruciatore austinio 12-16 cm
- Bruciatore rapido 18-24 cm
- Bruciatorenormale 16-18 cm
- Bruciatore normale 16-18 cm
- Bruciatore wok 22-26 cm è il diametro consigliato per le pentole da usare sui relativi bruciatori.
Il symbolo della fiamma grande indica la massima potenza di cottura e il symbolo della fiamma piccola indica la cottura più Bassa. In posizione off (superiore), il gas non è inviato ai bruciatori.
L'uso di protezioni del piano cottura inadequate.
puo causare incidenti.
5.2.1 Accensione dei bruciatori a gas
- Tenere premuta la manopola del bruciatore.
- Ruotarla in senso antiorario fino al symbolo della fiamma grande.
» Il gas è acceso grazie alla scintilla che si create.
3.Regolare secondo la potenza di cottura desiderata.
5.2.2 Spegnimento dei bruciatori a gas
Portare la manopola della zona per tenere in caldo nella posizione off (superiore).
5.2.3 Sistema di sicurezza di disattivazione del gas (nei modelli con componente termico)
Come contromisura di eventuali scoppi dovuti al traboccamento di liquidi sui bruciatori, si innesca un meccanismo di sicurezza e il gas viene disattivato.
-
Disattivazione di sicurezza del gas
-
Premere la manopola e ruotare in senso antiorario per accendere.
-
Quando il gas si accende, tenere la manopola premuta per 3-5 secondi più orecora per impegnare ilsystema di sicurezza.
-
Se il gas non si accende dopo aver premuto e rilasciato la manopola, ripetere la stessa procedura tenendo la manopola premuta per 15 secondi.

PERICOLO: Rilasciare il tastingo se il bruciatore non è accesso entro 15 secondi.
Aspettare almeno 1 minuto prima di riprovare. C'e il rischio di accumulo di gas ed esplosione!
5.2.4 Bruciatore wok
I brucitori wok aiutano a cucinare in modo più veloce. Il wok, particolaremente usato nella cucina asiatica, è un tipo di pentola profonda e con fondo piatto fattà di fogli di
metallo, usata per cucinare verdure e carni tritate con fiamma forte e in poco tempo.
Poiché gli alimenti sono cotti con fiamma forte e in poco tempo in tali pentole che conduccono il calorie in modo rapido e uniforme, il valore nutrzionale degli alimenti è preservato e le verdure restano croccanti.
Si può usare il bruciatore wok ancche per le normali pentole.
Se si desidera usare pentole normali su un bruciatore wok, bisogna estrarre il poggiapentola per wok dal piano cottura.
6.1 Informazioni generali
La vita utile dell'apparecchio si allunga e problemi frequenti diminuiscono se lo stesso è pulito ad intervalli regolari.
| PERICOLO: Scollegare l'appa- recchio dalla rete elettrica prima di avviare i lavori di manutenzione e pulizia. C'e il rischio di shock elettrico! |
| PERICOLO: Far raffreddare l'apparecchio prima di pulirlo. Le superfici calde possono provocare uszion! |
- Pulire Completely l'apparecchio après agli uso. In quello modo sera possibile rimuovere i residui di cottura con maggiorefacilitya, evitando così che quosti brucino all'uso successivo dell'apparecchio.
- Non sono necessari agenti di pulizia speciali per la pulizia dell'apparecchio. Usare acqua calda con detersivo liquido, un panno morbido o una spugna per pulire l'apparecchio e asciugare con un panno asciutto.
Assicurarsi sempre che il liquido in effesso sia completenesse asciugato dopo la pulizia e che tutti gli schizzi siano immediatamente asciugati.
Non usare agenti di pulizia che contengono acido o cloruro per pulire le superfici e la maniglia in acciaio inox. Usare un panno morbido con un detergente liquido (non abrasivo) per pulire queste parti, prestando attenzione a pulire in un'unica direzione.
| i | La superficie più danneggiarsi a causa di alcuni detergenti o materiali di pulizia.Non usare detergenti aggressivi, polveri/creme pulenti o oggetti taglienti durante la pulizia.Non usare detergenti molto abrasivi o raschietti in metallo tagliente per la pulizia dello sportello delorno, poiché potrebbero graffiare la superficie e distruggere il vetro. |
| i | Non usare pulitori a vapore per pulire l'apparecchio poiché ciò potrebberprovocare uno shock elettrico. |
6.2 Pulizia del piano cottura
6.2.1 Pulizia dei brucitori
- Rimuovere i poggiapentola, le teste dei brucitori e le copertura dei brucitori e pulirli con un panno morbido e umido.
- Pulire lo sporco presente nelle camere dei brucitori e sugli iniettori con un panno morbido e umido e asciugare con un panno asciutto.
- Usare stearato di potassio (sapone liquido) disponibile in commercio per lo sporco ostinato sulle teste dei bruciatori.
- Pulire la piatra dei brucitori del piano cottura.
- Assicurarsi che le teste dei brucitori siano posizionate correttamente e installare. Un'installazione non corretta porta a perdite di gas, cattiva erogazione e fiamma irregularare.
- Quando si installano i poggiapentola, prestare attenzione a posizionarli modo che i bruciatori siano al centro.

In caso di traboccamento, spegnere immediamente i brucitori. Rimuovere le pentole e i poggiapentola. Pulire il materiale traboccato con un panno asciutto e assorbente. Non far entrare liquidi nei brucitori. Pulire l'internalo dei brucitori in caso di penetrazione di liquidi. Non riazionare il piano cotturaenza prima averlo pulito.
6.2.2 Assemblare le parti del bruciatore wok
- Copertura del bruciatore interna
- Copertura del bruciatore esterna
- Testa del bruciatore
- Camera del bruciatore
- Iniettore
- Candeletta (in prodotti con accenditore)
- Termocoppia (in prodotti con termocoppia)
Assemblare tutte le parti nell'ordine après avoir pulito il bruciatore.
- Posizione are la testa del bruciatore sulla camera del bruciatore in modo che passi intraverso il foro della candeletta (6).
- Posizione are le copertura dei bruciatori sulle teste dei bruciatori.
6.2.3 Assemblare le parti del bruciatore
- Copertura del bruciatore
- Testa del bruciatore
- Camera del bruciatore
- Iniettore
- Candeletta (in prodotti con accenditore)
- Termocoppia (in prodotti con termocoppia)
Assemblare tutte le parti nell'ordine après avoir pulito il bruciatore.
- Posizione are la testa del bruciatore sulla camera del bruciatore in modo che passi trattaverso il foro della candeletta (5).
- Posizione are la copertura del bruciatore sulla testa del bruciatore.
6.2.4 Superfici in vetroceramica
Pulire la superficie in vetroceramica using an un panno inumidito con acqua fredda in modo da non lasciare alcun agente di pulizia su diessa. Asciugare con un panno morbido e asciutto. I residui possono danneggiare la superficie in vetroceramica quando si usa il piano cottura la volta successiva.
I residui asciutti sulla superficie in vetroceramica non devono essere gratati via in nessun caso con lame uncinate, lana di acciaio o strumenti simili.
Rimuovere le macchie di calcio (macchie giale) con una piccola quantità di agente di rimozione del calcare come aceto o succo di limone. èanche possibile usare prodotti adatti disponibili in commercio.
Se la superficie è molto sporca, aplicare l'agenté di pulizia su una spugna e aspettare finché non è assorbito bene. Pulire quando la superficie del piano cottura con un panno umido.

Alimenti a base di zucchero come creme dense e sciroppi devono essere puliti subito alla scopare che la superficie si raffreddi. Altrimenti la superficie in vetroceramica potrebbe danneggiarsi in modo permanente.
Nel tempo può verificarsi un leggero scolorimento sui rivestimenti o sulle altre superfici. Questo non influiisce sul funzionamento del prodotto.
Scolorimento e macchie sulla superficie in vetroceramica rappresentano una condizione normale, non un difetto.
6 Pulizia e manutenzione
6.3 Pulizia del pannello di controllo
Pulire pannello di controllo e le manopole con un panno umido e asciugare.

Non rimuovere tasti/manopole per pulire il pannello di controllo. Il pannello di controllo più danneggiars!
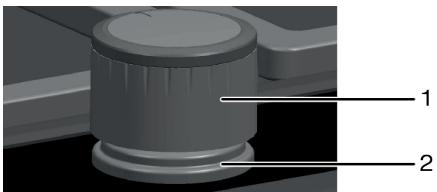
- Manopola
- Guarnizione

Non rimuovere le guarnizioni除去 alle manopole per la pulizia.
6.4 Trasporto futuro:
- Se il cartone originale del prodotto è stato conservato, trasportarlo inesso. Quindi seguire le istruzioni visualizzate. Se non si ha il cartone originale, imballare il prodotto nella carta con le bolle o in un cartone spesso e fermarlo con nastro adesivo.
Assicurare i coperchi e i poggiapentola con naestro adesivo.

Controllare l'aspetto generale del prodotto per eventuali danni che potrebbero essersi verificati durante il trasporto.
7 Ricerca e risoluzione dei problemi
L'apparecchio emette rumori metallici durante riscaldamento e raffreddamento.
- Quando le parti di metallo si riscaldano, possono espandersi e provocare rumori. >>> Non è guasto.
Non c'è scintilla di accensione.
- Corrente assente. >> Controllare i fusibili nella scatola dei fusibili.
L'apparecchio emette ripeturamente scintille.
- Fluidi possono essere penetrati nel meccanismo di accensione sotto le manopole di controllo. >>> Scollegare l'apparecchio e aspettare che si raffreddi.
Non c'egas.
- La valvola principale del gas è chiusa. >>>> Aprire la valvola del gas.
- Il tubo del gas è piegato. >>> Installare correttamente il tubo del gas.
I bruciatori non funzionano bene o non funzionano affatto.
- I brucatori sono sporchi. >>>> Pulire i componenti dei brucatori.
- I bruciatori sono bagnati. >>>> Asciugare i componenti dei bruciatori.
- La copertura del bruciatore non è posizionata in modo sicuro. >>>> Posizione correttamente la copertura del bruciatore.
- La valvola principale del gas è chiusa. >>>> Aprire la valvola del gas.
- Il cilindro del gas è vuoto ( quando si usa GPL).
Sostituire il cilindro del gas.
- La manopola del bruciatore/tasto non è stata premuta abbastanza durante l'accensione. >>> Accendere il bruciatore tenendo premuto per almeno 3-5 secondi.

Consultare l'assistenza se non si rieszce a risolverve il problema nonostanste siano state implementate le soluzioni di但这a sezione. Non cercare mai di riparare da soli un appearecchio difettioso.
7 Ricerca e risoluzione dei problemi
| Marca | BEKO | ||
| Tipo di piano cottura | Piano cottura a gas incassato | ||
| Modello | Inox | ||
| Simbolo | Valore | Unità | |
| Numero dei bruciatori a gas | 5 | % | |
| Efficienza energetica del bruciatore destro posteriore | bruciatore a gas EE | 55,3 | % |
| Efficienza energetica del bruciatore destro anteriore | bruciatore a gas EE | - | % |
| Efficienza energetica del bruciatore sinistro anteriore | bruciatore a gas EE | 56,2 | % |
| Efficienza energetica del bruciatore sinistro posteriore | bruciatore a gas EE | 56,2 | % |
| Efficienza energetica del bruciatore sinistro anteriore | bruciatore a gas EE | 52,8 | % |
| Efficienza energetica del piano cottura a gas | bruciatore a gas EE | 55,1 | % |
In conformità ai requisiti della progettazione ecocompatible dei prodotti connessi all'energia della direttiva n. 2009/125/CE, le informazioni del prodotto a seguire sono distribuente parallelamente al regolamento della Commissione europea n. (EU) 66/2014 in conformità ai requisiti della progettazione ecocompatible delle cucine domestiche.
Allo scopo di specificare le caratteristiche del prodotto, le misure e i calcoli sono specificati secondo gli standard a seguire ai sensi dei requisiti della progettazione ecocompatibile.
It 30-2