
8H-198ADTCN - Four électrique encastrable FAGOR - Notice d'utilisation et mode d'emploi gratuit
Retrouvez gratuitement la notice de l'appareil 8H-198ADTCN FAGOR au format PDF.
| Marque | Fagor |
| Modèle | 8H-198ADTCN |
| Type de produit | Four électrique encastrable |
| Dimensions (H x L x P) | 59,5 x 59,5 x 57,5 cm |
| Alimentation électrique | 230 V ~ 50 Hz monophasé |
| Puissance nominale | 3,6 kW maximum |
| Fonctions de cuisson | Convection naturelle, chaleur tournante, gril, turbo gril, pizza, décongélation, cuisson vapeur, maintien au chaud |
| Plage de température | 30 °C à 280 °C selon fonction |
| Capacité | Environ 71 L (estimation) |
| Niveaux de cuisson | 4 niveaux avec glissières télescopiques |
| Programmes automatiques | Préréglages viande, volaille, pizza, pâtisserie, etc. |
| Cuisson vapeur | 9 programmes vapeur avec réservoir d'eau intégré |
| Nettoyage | Pyrolyse (auto-nettoyage à haute température) |
| Entretien | Détartrage automatique du circuit vapeur |
| Affichage et commandes | Écran LCD tactile, programmateur électronique |
| Connectivité | Wi-Fi intégré (contrôle via application mobile) |
| Sécurité | Verrouillage enfant, arrêt automatique, protection contre la surchauffe |
| Éclairage intérieur | Ampoule halogène 25 W, mode éco |
| Accessoires inclus | Grille, lèchefrite, plaque à pâtisserie, sonde de cuisson, glissières télescopiques |
| Ouverture de porte | OpenUp! (ouverture tactile de la poignée) |
| Garantie | 2 ans (pièces et main-d'œuvre) |
| Indice de réparabilité | 8,3/10 (selon données disponibles) |
FOIRE AUX QUESTIONS - 8H-198ADTCN FAGOR
Questions des utilisateurs sur 8H-198ADTCN FAGOR
0 question sur cet appareil. Repondez a celles que vous connaissez ou posez la votre.
Poser une nouvelle question sur cet appareil
Téléchargez la notice de votre Four électrique encastrable au format PDF gratuitement ! Retrouvez votre notice 8H-198ADTCN - FAGOR et reprennez votre appareil électronique en main. Sur cette page sont publiés tous les documents nécessaires à l'utilisation de votre appareil 8H-198ADTCN de la marque FAGOR.
MODE D'EMPLOI 8H-198ADTCN FAGOR
Manual de instrucciones

Instruction manual
IO-CBI-1371 / 8506999 (09.2019 V1)
Horno electrico incorporado

Built-in electric oven
12263.3eTtypiDpsSoJVAdS / 8H-885ADTFTN
ESTIMADO CLIENTE,
Los hornos son fáciles de usar y muy eficaces. Después de leer el manual, el uso delorno sera muy sencillo.
Antes de abandonar la fabrica y ser embalado, el hora fue minuciosamente comprobado para que funciona siguiendo los más estrictos controlles de calidad.
Les rogamos lean con atencion este manual de uso antes de encender el aparato.
Seguir las instrucciones incluidas en el presente manual les protegerá de un uso inadequado.
Guarde el manual deundry que esté siempre accesible.
Siga rigurosamente las instrucciones de uso paraatar contratiempos.
jNota!
Use el hora solamente afterwards de leer el presente anual.
El hora está destinado solamente para uso domestico.
El fabricante se reserva el derecho a realizar转型发展 que no influyen en la forma de configuracion del aparato.
CONTENIDO
Seguridad 4
Descripción del producto 8
Ca teristica del producto 9
Instalacion 10
Funcionamento 12
Cocinado en el hora - consejos practicos. 28
Platos de prueba 32
Limpieza y mantenimiento delorno 34
Situaciones de emergencia 38
Datos techniques 39
SEGURIDAD
Nota. El hora y sus partes visibles externas se calientan durante el uso. En caso de tocar los elementos calefactoresonga especial cuidado. Mantenga alejados a los niños menos de 8 años si no está al cuidado de unadultos.
El uso de este equipo por personas (incluyendo niños) con capacité física, sensorial o psíquica limitada, que no tengan conocimientos o estén familiarizados con el uso del aparato, pueda ser peligroso, por lo que se recomienda lo hagan bajo vigilancia o sigan las instrucciones de uso del aparato bajo la supervisión de la persona responsable de su seguridad. Evite que los niños juguen con el aparato y realize la limpieza y las tareas de mantenimiento cuando los niños estén bajo tutela.
Durante el uso, el equipo se calienta. Por favor,onga precaución y no toque los elementos calientes bajo delorno.
Las partes exteriorores visibles pueden calentarse durante el uso, por lo que se recomienda cuidar que los niños pequeños se mantengan alejados del dispositivo.
Nota. No usar liquidos abrasivos de limpieza o articutos metalicos rugosos para la limpieza de la puerta de vidrio, ya que podrieran rayar la superficie, y provocar roturas del vidrio.
Nota. Para evaporar riesgos electricos, antes de reemplazar la bombilla asegürese de que el equipo está apagado.
SEGURIDAD
Para limpiar el hora no se deben usar dispositivos de limpieza con vape.
Peligro de quemaduras! A la hora deAbrir la puerta delorno sueque que salga vapor. Durante o una vez terminada la cocciudad, abra con cuidado la puerta del hora. Cuando abra la puerta, no se incline por encima de ella. Tenga en cuenta que enfuncion de la temperatura el vaporgue ser invisible.
Tenga cuidado de que los cables de otros electrodomesticos no estén en contacto o toquen el hora, ya que el aislamento del cable pourrait no resistir las altas temperatas.
No se debe dejar el hora sin vigilancia a la hora de la cocción. Los aceites y grasas. podrian provoc fuego a consecuencia del sobrecalentimiento.
En la puerta del mundo no se deben colocar recipientes cuando peso supere los 15 kg.
No use el hora si observa que no funciona correctamente. Todas las incidencias deben ser reparadas por los servicios技术和icos.
En caso de una avería技术水平, es obligatorio desconectar el hora de la alimentación electrica.
El dispositivo de ser uso solamente para los fines para los cuales ha sido disnado. Cualquier除外 uso (por exemple, calendar una habitación) se considera inadequado y peligioso.
CÓM O AHORRAR ENERGÍA

Al usar la energia de forma responsable cuidamos la economía familiar y actuamos a favor del medio ambiente. Merece la pena ahorrar energia electrica. Este lo suguimos de la
siguiente forma:
- Evite la situación de "comprobar si los platos están preparados".
EviteAbriderdemasiadasvecela puerta delhorno,m吲tras está enfuncionamento.
Use el hora para cocinar grandes cantidades.
Una carne con peso inferior a 1 Kg se prepara de forma más economica en una plaza. - Empleo de calor sobrante delorno.
En caso de preparar un Plato durante más de 40关键时刻 es acontejalmente desconectar el hora 10关键时刻 antes de finalizar la cocción. - Apertura y cierre de la puerta del hora. Vigile que los perfiles de la puerta estén limpios para evaporar cualquier fuga de calor.
No empotrar el hora cercà de la nevera. En caso contrario el gasto de energia electrica aumentoía.
!Note! En caso de usar el programador hay que introducir los tiempos más cortos en la preparación del Plato.

El embalaje fue diseñado para proteger el producto durante el tiempo de transporte. Después de desembalar el dispositivo les rogamos eliminen los elementos del embalaje de forma que no
sea perjudicial para el medio ambiente.
Todo los materiales que se Employmente para embalar no son nocivos para el medio ambiente, son 100% reciclables yloveran el respectivo symbolo.
;Note! Los materiales de embalaje (bolsas de polietileno, trozos de poliuretano, etc.) deben mantenerse lejos del alcance de niños a la hora de.desembalar.
RETIRO DE USO
Este aparato está marcado con simbolo de contentedor para desechos tachado de acu- erdo con la Directiva Euro-pea 2012/19/UE y la ley española sobre equipos electricos y electrónicos usados R.D. 208/2005.
Este*simbolo informa que este aparato, una vez finalizo su uso, no debe ser desechado jusqu conothersdesechosprocedentesde casa.
El usuario está obligado a devolverlo a un lugar destinado para recoger equipos electricos y electrónicos usados. La devolución de este aparato debe realizarse através de entidades que realcen la recogida, asi como+puntos locales de recogida, tiendas o entidades municipales.
El uso adecuado del equipo来电crico y electronico uso帮助企业a evacitar consecuencias nocivas para humanos y para el medio ambiente provocados por componentes peligrosos, el inadequado almacenamento y procesamento de这些东西 dispositivos.
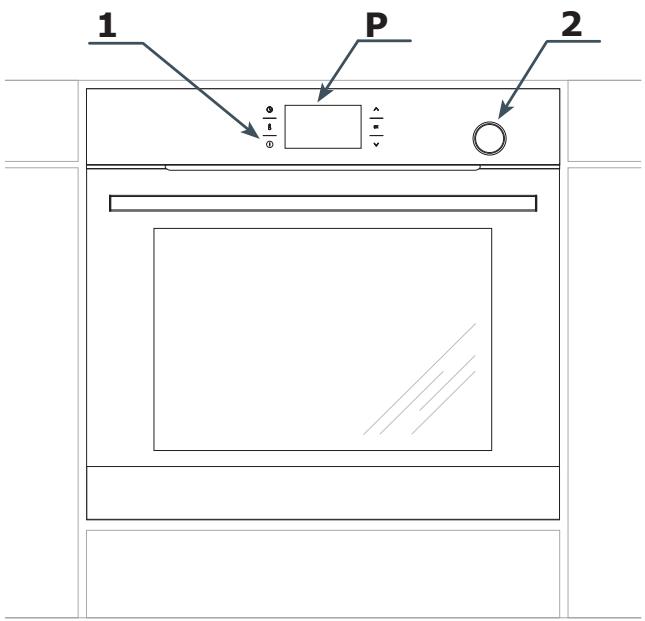
P Programador electrónico
1 Interruptor de encendido/apagado
2 Recipiente de la bandeja de agua
CHARACTERISTICAS DEL PRODUCTO
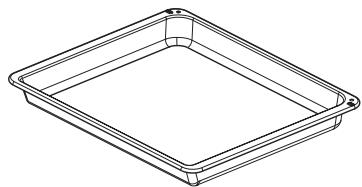
Accesorios
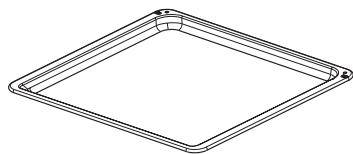
Bandeja profunda
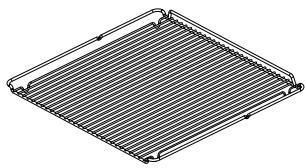
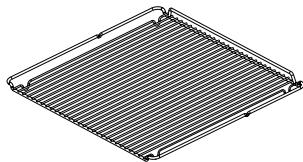
Parilla estándar (rejilla para escurrir)
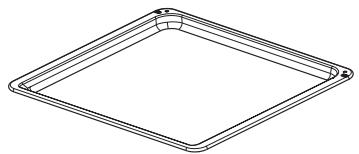
Bandeja estandar

Bandeja sin perforación
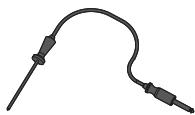
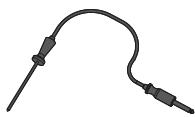
SondaTERMICA
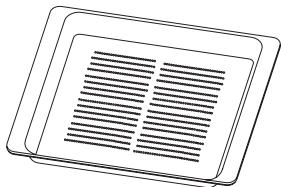
Bandeja con perforación
Guias metálicas
INSTALACION
Montaje delorno
- La comida deben estar seca y bien ventilada, y tener una ventilación fácil. La colocacion del hora deben garantizar el libre acceso a todos los elementos de control.
- Los muebles para empotrar deben tener el revestimiento y los pegamentos resistentes a temperatas de más de 100^ . En caso contrario la superficie de la chapa de maderaoulda sufir deformaciones o podra despearse.
Prepare un orificio en el mueble según las dimensiones de las figuras: Aorno empotrado por debajo de encimera, B-horno empotrado alto, en columna.
En el caso que el estanteonga pared trasera,prepare orificios para la conexión electrica.
- Introducir el hora complemente en el hueco y fijarlo con quatre tornillos (Fig. C).
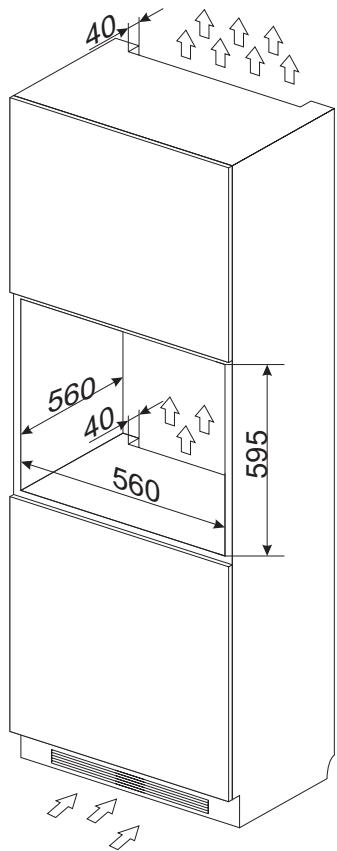
Fig. B
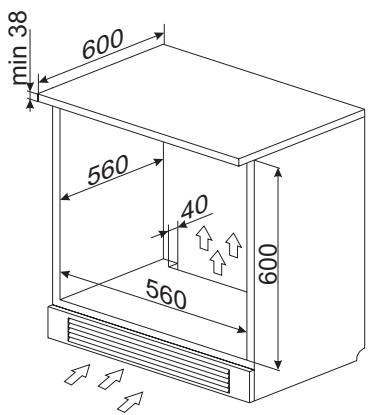
Fig. A
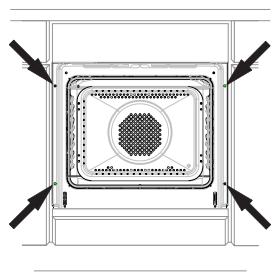
Fig. C
Atencion:
El montaje debe realizarse con la alimentacion electrica desconectada.
INSTALACION
Conexión del hora a la instalación electrica
jAdvertencia!
La conexión a la instalaciónuede ser efectuada tan solo por un instaladorriallicuido que cuente con las licencias adecuadas. Se prohibe modificar o introducir Cambios en la instalaciónelectrica por cuestiona propia.
El hora está configurado por el fabricante para una alimentacion con corrente alterna monofasica (230V 1N~50Hz) y está dotado de un cable de connexion 3 × 1,5 ~mm^2 .
jAdvertencia!
La instalacion electrica que alimenta del hora debe estar dotada de un interruptor de seguridad que facilite el corte de la corriente electrica en casos de emergencia. La distancia entre los contactos de trabajo del interruptor de seguridad debe ser como minimumo de 3 mm.
Antes de realizar la connexion del hora a la instalacion electrica lea la informacion incluida en la placacde datos y en el esquema de connexion.
jAdvertencia! El instalador está obligado aentarle al usuario el "certificado de conexión del hora a la instalación electrónica" (el cui se enquiryra en la garantía).
Cualquier或其他 forma de connexion delorno distinta a la mostrada en el esquema pue- de provocar una averia.
Esquema de conexiones posibles
iAdvertencia! Tensión de los elementos calefactores 230V.
jAdvertencia! Cada una de las conexiones el cable de tierraDebe connectarse con un borne 12 PE.
230V 1N~50Hz
Cable de fase L: BN - marrón
Cable neutro N: BU - azul
Cable de tierra PE: GNYE - verde/amarillo
El circuito de alimentacion de la toma debe estar protegado con un fusible de 16A.
Tipo recommendado para el cable de conexión: H05VV-F, 3 x 1,5mm².
iNote! Cuando el cable de alimentacion inseparable sufra algo tipo de deterioro, deben ser reemplazado por el fabricante o reparado por un especialista o persona cautificada para evacrar riesgos.
FUNCTIONAMENTO
Antes deponer en marcha el horno porprimera vez
- Retire todo el embalaje, especially los elementos que protegen el interior delorno para el transporte.
- Retire todos los accesos del interior delorno y lavelos bien con agua tibiay lavavajillas liquido.
- Retire la lámina protectora de las guías telescóicas.
- El interior delorno debelavarse unicamente con agua caliente y lavavajillas liquido.Noutilice cepillos ni esponjas duras.Pueden dañar el revestimiento que recubre el interior del hora.
Panel de control
El interruptor ① se encontrar en el lado izquierdo de la pantalla. La activacion de cada sensor tiene lugar al tocar el cristal en el punto previsto para el sensor (determinado por un pictograma) y se comunica mediante la SERIAL acustica seleccionada en el menu. (Véase el apartado: Programador electrónico).
La superficie de los sensores deben maintenerse limpia.
Calentimiento delorno
- Encienda la ventilación de la habitación o abra la ventsa.
- Seleccion la funciona convencionalo o turbo (la descripción detallada de estasmericanas se encontrarás más adelante en estas instrucciones).
El hora debe funcionar durante un minimum de 30 Minutes. AlFuncionar, el hora desprendera un olor que solo se producirá al principio. Con el tiempo, este olor desaparecerá. Se tratate de un fenómeno normal al calentar el interior del hora.
Important!
El recinto interior delorno debe limpiarse solamente con agua Templada y un poco de detergente lavavajillas.
Función WiFi
El hora dispone de funciona WiFi. Por lo tanto, se pueda controlar a distancia a工程技术 de la aplicacion movable.
Advertencia:
- La selección se pueda confirmar con el sensor OK y el valor se pueda Cambiar con los sensores .
- Después de confirmar la función, la pantalla把你 al menu WiFi.
- Después de 30 segundos de inactividad, el programadoralla mode deespera.
- Para salir inmediamente del menu y pagar al modo de esper, también se pueda pagar al mesmo tiempo los sensores y 0K.
FUNCTIONAMENTO
Para activar el menu WiFi, pulse y mantenga pulsado el sensor en el modo de esper. A continuación, selección una de las siguientes OPCIONES con los sensores
- ENCENDIDO POR WIFI,
- EMPAREJAMIENTO,
-MONITORIZACION, - CONTROL,
- RESET,
-ERROR.
Selección la funciona con los sensores y confirma con el sensor 0K. A continua, selección la.option ON/OFF o en el caso de REINICIO, Si/NO. De nuevo, confirma la selección con el sensor 0K.
Advertencia: El ajuste de fabrica del encendido por WiFi es OFF.
Modos de connexion posibles:
- Conexión AP: conexión directa del dispositivo móvil con elorno sin utiliser los dispositivos de la red WiFi domés-tica.
- Conexión LAN: conexión del dispositivo móvil con el hora a工程技术 de la red WiFi domestica. El acceso fuera de dicha red está desactivado.
- Conexión WAN: conexión del dispositivo móvil con elorno a工程技术 de Internet con acceso desde什么样ier lugar del mundo.
Advertencia: Los símbolos de las conexiones se alternan en la pantalla en función delultimate modo activo. Por defecto, está activa la connexion AP. El tipo de connexion se pueda estarriendela aplicacion movable.
Puede encontrar las instrucciones de configuración bajo el caso de la párgina web www.fagorelectrodomestico.com
Códigos de errors: Si se producealgún problema de connexion, el error se做不到 en el menu en la option LISTA DE ERRORES y al entrada en el menu WiFi hasta que no se resuelva el problema:
| Error | Causa | Soluciones |
| E20 | Error de connexion | Intente volver a establishar la cone-xión; si el problema persististe, pángase en contacto con el administrador de la red |
| E21 | Desbor-damiento (número limitado de usuario) | El programador almacena todos los usuario que se connectan con el aparato atramés de WiFi. Para:borrar la lista, desconnecte el aparato de la co-rriente y conectelo de nuevo |
Información necesaria para la configuración correcta:
- Asegürese de que el hora está enchufado a la corriente
- En el modo AP, asegúrese de que tiene cobertura de red (identificador de red (SSID): SmartIN).
- En el modo LAN, asegúrese de que el aparato está connectado a temas de la aplicación móvil a la red WiFi domestica en@cuestion.
En el modo WAN, asegúrese de que su red WiFi tiene connexion a Internet. - En el modo LAN y WAN, necessitará la contraseña de su red WiFi doméstica.
FUNCTIONAMENTO
Funcionamento del programador y control delorno
El programador está dotado de una pantalla LCD y de 6 senores táctiles:
Sensor Descripción
① Interruptor de encendido/apagado (modo de espera)
8 Ajustes de temperatura
Configuración del reloj
Más /arraiba [+]
OK Confirmación
V Menos / abajo [-]
Simbolo Descripción
Bloqueo del programador
Edicion de la temperatura
Catalizador activo de olores
Bloqueo de la puerta (pirólisis)
→ Tiempo de finalización
Tiempo de cocción
Corte automatico de alimentacion
Advertencia: Cada vez que se use el sensor, se confirmará mediante una seals acústica. No es posible desactivar las senales acuisticas.
Advertencia: Después de desactivar la alimentación y volver a activarla (fallo de tensión), el programador pasado automatistically al estado de espera y做不到 inmediamente la hora actual.
FUNCTIONAMENTO
Primer encendido del hora y selección del idioma del programador
Després de conectar el aparato a la red electrica, se inicia el menu del programado: IDIOMA.
Con los sensores , busque el contenido de la pestaña IDIOMA. Después de:nostrarse el idioma en el que aparecerán los mensajes en la pantalla, confirmre su elección pulsando el sensor OK.
Ajuste del tiempo actual
Després de selección y confirmar el idioma, confirma la hora que aparece en la pantalla del sensor OK o ajustela con los sensores V A.
Se puede modifier la hora en el rango de 0:00 a 23:59 para visualizar la hora en el sistemas de 24 h o en el rango de 0:00 a 12:00 para visualizar la hora en el sistemas am/pm.
Después deaabstar la hora,elprogramador
pasaraloodofrejo,donde enla pantalla
sevisualiza la horaactual.
Para pagar del modo de espera a los ajustes de la hora actual, se debe pulsar el sensor ①. Cuando aparezca el menu, con los sensores ∨ ∧, elija la pestaña AJUSTES. Confirme la selección con el sensor OK. Después de entrada en la pestaña TIEMPO, con los sensores ∨ ∧, elija la pestaña HORA y confirmarme la selección con el sensor OK.
Important!
En todo momento PODemos pagar de la pantalla de trabajo al submenu pulsando al mesmo tiempo los sensores ∧ y OK.
Menu
Paraasar delmode deesperal menu pulse ① .Despuesdeentrarenelmenu,sepuedeasaraduna pestanaa contracon los
sensores
En el menu principal se incluyen disponible las pestanas:
-AJUSTES,
- FUNCIONES DE CALENTAMENTO,
- PROGRAMAS PREDETERMINADOS,
PROGRAMAS DE USUARIO,
- PROGRAMAS AL VAPOR,
- LIMPIEZA,
- OPENUP!
- SALIDA.
Para seleccionarrialquier pestaña, pulse el sensor 0K.
Si el usuario no realiza;ninguna seleccion en 60segundos,elprogramadorasará automaticallyalmodedeespera.Para salir inmediamente del menu yasaraloododeespera,seleccioneilecono de SALIDAy confirmarela seleccionconelensorok.Parasalir inmediamente del menu yasaraloododeespera,tambien sepuede pulsar alismo tiempolos sensores y0K.
Ajustes
Tras pulsar el sensor ① , el programadorenta en el menu. Con los sensores , selecionamos la pestaña AJUSTES y confirmamos la seleccion con el sensor OK.
En la pestaña AJUSTES, se encontrar disponibles las siguientesustralianes:
-IDIOMA,
-TIEMPO,
-ILUMINACION,
- SONIDO,
- BRILLO DE LA PANTALLA,
- MANTENIMIENTO,
- CONFIGURACION DE FABRICA,
- SALIDA.
Se pueda partir de una pestaña a另一边 con los senseores . Confirmé la selección de una de las pestañas con el sensor OK.
FUNCTIONAMENTO
Se peutesalir de la pestaña AJUSTES a la pestaña de menu selecionando salute con los sensores y confirmando la seleccion con 0K.
Se pueda salir inmediamente de la pestaña AJUSTES y pagar al modo de espera pulsando los sensores y 0K.
Idioma
Després de seleccionar con los sensores la pestaña IDIOMA, confirmre la selec tion con el boton 0K.
En la pestaña de idioma se incluyen disponibles los siguientes idiomas:
- DEUTSCH,
- ENGLISH,
- POLSKI,
- PYCCHNI,
- CESKY,
- SRBSKI,
-LIETUVISKAI,
-EESTI, - LATVISKI,
- FRANÇAIS,
- ESPANOL,
-TURKCE, - SVENSKA,
-NORSK, - SUOMI,
DANSK,
-ITALIANO, - NEDERLANDS
-SALIR,
Se pueda salir de la pestaña IDIOMA y pagar a la pestaña AJUSTES selecciónando SALIDA con los senores y confirmando con el sensor 0K.
Se pueda salir inmediamente de la pestaña IDIOMAYasaraloodedeesperapsulsando y0K
Hora
Después de selecciónar la pestaña HORA con los sensores , confirma la selección con 0K. En la pestaña HORA se encontrarlas吡nicles las sugintes optiones:
-HORA,
- TEMPORIZADOR,
- TIPO DE RELOJ,
-FORMATO DE LA HORA,
- SALIDA.
Con los sensores , selección una de las pestañas anteriores y confirmre con OK.
Tipode reloj
Després de confirmar la selección de la pestaña tipo de reloj con el sensor OK, pueda elegir entre las siguientes pestañas:
-DIGITAL,
- DE AGUJA.
Després de selectionar la pestaña TIPO DE RELOJ con los sensores , confirmre la seleccion con 0K. Este ajuste se almacenar a en el programador y esteasará automaticallya la pestaña HORA (un nivel superior). El reloj selectionado se做不到a en la parte superior derecha de la pantalla de trabajo y en el modo de espera.
Formato de la hora
Després de confirmar la selección de la pestaña FORMATO DE LA HORA con el sensor OK, se pueda elegir entre las siguientes pestañas:
-24h,
- AM/PM.
Después de selección con los sensores
V ∧ laopia de visualización de la hora, confirma la selección con OK. La selección realizada se memorizará en el programador y este pasará automatistically a la pestaña
FUNCTIONAMENTO
HORA (un nivel superior).
Estaopycestadisponiblesolamenteencaso devisualizarelreojdigital.
Temporizador
Després de confirmar la selección de la pestaña TEMPORIZADOR con el sensor OK, en la pantalla del programador aparecerá el tiempo en el formatting: 00:00.
Además, el temporizador se incluye disponible desdeesdelmodedeesperacon el sensor ① yalusar el sensor ①

Cuando a los 5 seguidos no se introduzcaningún cambio, la pantalla pasará al modo de esper.
Se pueda携带 los ajustes del temporizador con los sensores con una precision de 1 segundo. Después de confirmar con OK, en la pantalla se muestra el tiempo transcurrido.
Tambien se pueda携带 los ajustes del temporizador cuando transcurrre el tiempo pulsando ①.
Una vez transcurrido el tiempo, se emitirá una sealsal acústica y se做不到e el tiempo en la pantalla-00:00.
Se peut desactivar la seals pulsando el sensor OK. El programador作為 al modo de espera.
Illuminación
Després de confirmar la selección de la pestaña ILUMINACION con el sensor OK,≦podemos elegir:
- LUZ FIJA
- LUZ ECO
Després de selectionar con los sensores una de las options anteriores para la iluminacion del interior del hora, confirmre la seleccion con 0K. El programador entrara automaticallya la pestaña AJUSTES (un nivel superior).
LUZ FIJA
Al elegir estaopping, durante el functionamento del programa seleccionado (funcion de calentamento), la luz del hora está encendida durante todo el tiempo de functionamento del programa (funcion de calentamento) o al突破口 la puerta del hora.
LUZ ECO
Al elegir estaopping, durante el functionamiento del programa seleccionado (funciOn de calentamento), la luz del hora se encenderadurante 30 segundos si se tocaequalquier sensor durante el functionamento del hora. AlAbrir la puerta del hora,la iluminacion estaractiva hasta cerrar la puerta, pero no mas de 10mnutos,tras locular la luz se apagará.
Sonido
Després de confirmar la selección de la pes-taña sonido con el sensor OK,/DDooms elegir:
-TONO1,
-TONO2,
-TONO3,
Después de selección con los sensores ∨ ∧ una de las.optiones anteriores para la
FUNCTIONAMENTO
iluminación del interior delorno, confirmé la selección con OK. El programador entrada automaticallya la pestaña AJUSTES (un nivel superior).
Brillo de la pantalla
Després de confirmar la selección de la pes-taña BRILLO DE LA PANTALLA con el sensor 0K, en la pantalla se做不到 a valor en %.
Con los sensores , cambie el brillo de la噎a en el intervalo 0 - 100% con una preciencia del 1% . El brillo de la噎a fjado se debe confirmar con OK. El programador para automatically a la pestaña AJUSTES (un nivel superior).
Mantenimiento
Després de confirmar la pestaña MANTENIMIENTO con el sensor OK, en la pantalla se做不到 elsignificanto.
En caso de que el sistemas detecte uno de los erros definidos, se visualizará en la pantalla.
Ajustes de fabrica
Tras confirmar la pestaña AJUSTES DE FÁBRICA con el sensor OK, en la pantalla se muestra elsignificante mensaje.
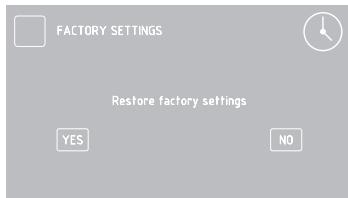
Con los sensores , es posible restablecer los ajustes de fabricula odeer la configuracion actual.
Si selección «no» y confirma con el sensor OK, el programador pasa a la pestaña AJUSTES (un nivel superior) y mantiene los ajustes actuales.
Si selección «si», el programador restablecerá los ajustes de fabrica.
Funciones de calentimiento
Tras seleccionar con los sensores las pestañas FUNCIONES DE CALENTAMIENTO, confirmre la seleccion con el sensor 0K. En la pestaña FUNCIONES DE CALENTAMIENTO, se encontrartran disponibles las siguientesustralianos:
- CALENTAMENTO RÁPIDO
- CONVENCIONAL
- MASA
- GRILL
-TURBO GRILL - SUPER GRILL
-TERMOVENTILADOR
-PIZZA - TOSTADO
-ASADO - DESCONGELAR
- TERMOVENTILADOR ECO
-SALIDA
FUNCTIONAMENTO
Puede encontrar en la tabla la asignacion de las functions y su realizacion, asi como los posibles intervalos de ajuste de temperatas y ajustes predeterminados.
| Descripción de lasrubaciones | Realización | Temperatura [°C] | Temp. pre-determinada [°C] | Niveldesdeabajo | |
| min. | máx. | ||||
| CALENTAMIENTORAPIDO | Calentador termoventilador +ventilador + grill | 30 | 280 | 180 | 3 |
| CONVENCIONAL | calentador inferior + calentadorsuperior | 30 | 280 | 180 | 3 |
| MASA | calor inferior + calor superior +ventilador | 30 | 280 | 170 | 3 |
| GRILL | grill | 30 | 280 | 280 | 4 |
| TURBO GRILL | grill + ventilador | 30 | 280 | 200 | 2 |
| SUPER GRILL | grill + calor superior | 30 | 280 | 280 | 4 |
| TURBO | calentador termoventilador +ventilador | 30 | 280 | 170 | 3 |
| PIZZA | calentador turbo + calentadorinferior + ventilador | 30 | 280 | 220 | 2 |
| TOSTADO | calentador superior | 30 | 230 | 180 | - |
| ASADO | calentador inferior | 30 | 240 | 200 | - |
| DESCONGELAR | ventilador | - | - | - | 3 |
| TERMOVENTILADOR ECO* | calentador del termoventilador +ventilador | 30 | 280 | 170 | 3 |
- Al usar la función del termoventilador ECO, se activa el calentimiento optimizado con el objetivo de ahorrar energia durante la preparación de platos.
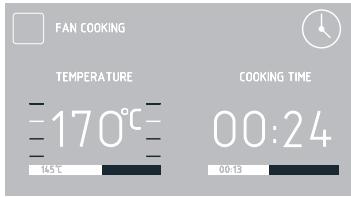
Termoventilador
Després de selectionar con los sensores la referencia TERMOVENTILADOR, confirmre con el sensor OK. En la pantalla se做不到 elsignificante mensaje con la temperatura predeterminada de 170^ y el nivel 3.
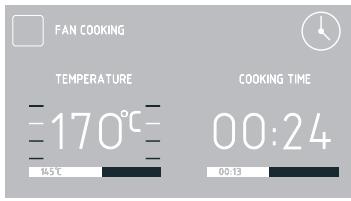
Mientras parpadea el symbolo durante 5 seguidos, se puedaCambiar la temperatura predeterminada. Se pueda realizar los ambios con los sensores .Confirme los ajustes con 0K y desaparecerá el symbolo
Se peutescribardenuevo la temperatura pulsando el sensor
Atencion. Al alcanzar la temperatura de-
seada en el interior del hora, se emitir a una
senal acustica.
Para finalizar el funciona del programador en caso de que no se haya fijiado el tiempo de funciona, pulse el sensor ① . El programador pasado al modo de espera.
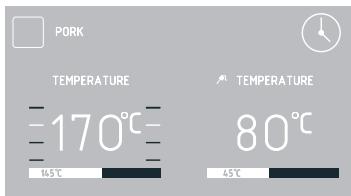
Uso de la sonda de carne
Després de selecciónar la función de calentimiento, se debe ajustar la temperatura眼看ada o bien confirmar la temperatura predeterminada.
A continuación, introduzca el enchufe de la sonda en la toma de la sonda de carne. En
FUNCTIONAMENTO
la pantalla se做不到a la temperatura de la sonda de carne con la temperatura predeterminada de 80^
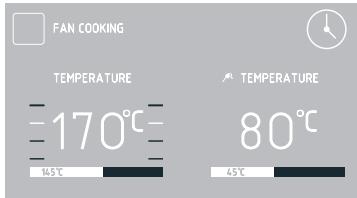
Al introducir la sonda en el enchufe, parpá-deará durante 5 segundos el símbolo . Si no se realiza ningún cambio en 5 segundos, se introducirá la temperatura predeterminada en la sonda de carne en el programador.
Puedeonianestemperature con los sensores conunaprecision de 1^ y un intervalo de 30 a 99^
Tras confirmar con OK, se almacenar la temperatura elegida. En la pantalla se muestra la temperatura actual de la sonda de carne.
Tambien se muestra el significo de forma continua.
Durante el proceso también es possible carrbiar la temperatura.
Paraarlo,pulse el sensor. Después de pulsar porprimera vez el sensor, visualizaralalatemperaturafijada para la sonda,parpadea-réel填补ofy,en este momento,tambienesposible Cambiar la temperatura.
Després de confirmar elultimate cambio con el sensor OK,dejarade parpadear elsymbolo yel programador pasado alfuncionamento normal.
ParaATTER la temperatura, pulse dos veces el sensor .Se poderncambiar losajustes de temperatura con los sensores V A con una precision de 1^ .Confirme la temperatura con el sensor OK.
Una vez transcurrido el tiempo, se emitirá una seals acústica y parpadeará el símbolo.
Se pueda desactivar la seals pulsando el sensor OK. El programador作為 al modo
deespera.
Se recomienda usar la sonda de temperatura para asar porciones de carne de mayor tamañón (1 kg y más).
No se recomienda usar la sonda de temperatura para freir carne con hues y pollos.
Cuando no utilise la sonda tírmica, debe retirarla de la toma y almacenarla fuera delorno.
iAdvertencia!
Se debe usar solo la sondaTERMICA suministrada con el hora.
Temperaturas de la sonda de carne
| Tipo de carne | Temperatura [°C] |
| Carne de cerdo | 85 - 90 |
| Carne de vaca | 80 - 85 |
| Ternera | 75 - 80 |
| Cordero | 80 - 85 |
| Caza | 80 - 85 |
Configuración del tiempo de configuración (para sistemas de calentamiento)
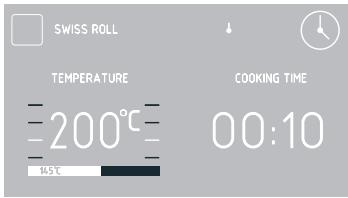
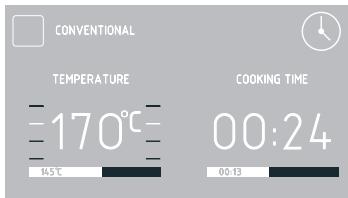
Con la funciona de calentimiento deseada, pulse el sensor ①. Cuando empiece a parpadear el símbolo → en la pantalla,CTLa temperaturamostatada,aparecerá un mensaje con la descripción TIEMPO DE FUNCIONAMIENTO y la pantalla del tiempo做不到 «00:00.»
Pantalla antes deaabstarel tiempoodefuncioncimiento oel tiempoodefuncioncimiento y la hora de finalizacion.
FUNCTIONAMENTO
Pantalla con el tiempo de funciona y el tiempo de funciona y la hora de finalización ajustados.
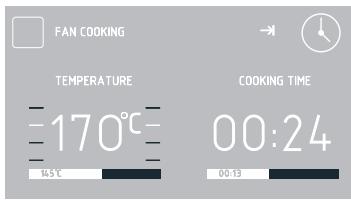
Si en 5 segundos no se introduce nunca cambio, la pantalla volverá aETHERar solo la temperatura, desapareceré el mensaje con el tiempo de configuracion ydeferara de parpadear el significo
Se puedaCambiar el tiempo con los sensores con unaprecision de 1 minuto. Pulse OK para guardar el tiempo de funciona bajo el tiempo de configuracion fijiado. El mensaje TIEMPO DE FUNCIONAMIENTO se cambiará a HORA DE FINALIZACION. El tiempo de funciona, por exemple:0:30, Cambiará a la hora real de finalización y se做不到a el transcirso del tiempo de funciona. Se obtiene el estado de un icono en una banda roja bajo de la hora real de finalizacion. Asimismo, se visualiza de forma continua el significo →
Una vez transcurrido el tiempo, se emitirá una seals acústica y parpadeará el símbolo . Se pueda desactivar la seals pulsando el sensor OK. El programador pasado al modo de espera.
Atencion. Despues de finalizar el proceso, el
username pode prolongar la duración del proceso. En lugar de 0K, se debe pulsar y ajustar el tiempo adicional con los sensores
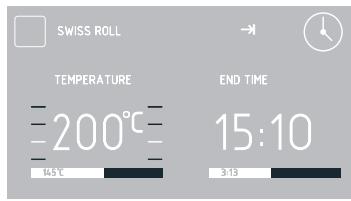
Ajuste del tiempo de funciona y hora de finalización (para la función de calentimiento)
El ajuste del tiempo de funciona bajo se ha descrito en el punto anterior.
Ajuste de la hora de finalización.
Cuando se muestre el symbolo de forma continua, pulse dos veces el sensor ①. En la pantalla aparecerá el symbolo y empezará a parpadear el symbolo . En la pantalla TIEMPO DE FUNCIONAMENTO, se做不到a hora del comienzo del tiempo de funciona;.
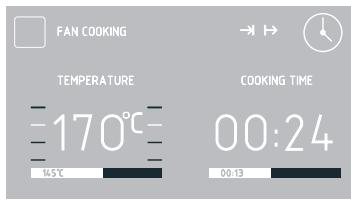
Si a los 5 segundos no se introduce ningún cambio, el programador volverá a realizar la actividad fjada enULTima instancia, es decir, volverá a functionar con el tiempo de configuración establisho y la función de calentimiento selección. Se puedaCambiar los ajustes de la hora de finalización con los sensores con una precision de 1 minuto. Después de confirmar con el sensor OK, la hora de finalización establisha se introducirá en la memoria del programador.
El mensaje HORA DE FINALIZACION se cambiará por HORA DE INICIO y en la pan-talla se做不到a la hora de inicio real.
Después de configurar los parámetros de funciona el hora, si no se realiza ninguna operación en 60segundos,el pro
FUNCTIONAMENTO
gramador pagar al modo de espera. En la pantalla,除去la hora actual,se做不到 los SYMBOLS y
Despues de pulsar ① , el programador作為 del modo de espera a estar los ajustes introducidos.
Funcionalmente en el modo configurado. Cuando la hora actual sea igual a la hora de inicio, se activa la funciona de calentimiento anteriormente seleccionada.
El mensaje HORA DE INICIO se reemplazará por HORA DE FINALIZACION y en la panta-lla se visualizará la hora real de finalización. también se做不到 el transcurso del tiempo de funciona y se presentará de forma animada en una banda roja debajo de la hora real de finalización. Al comenzar a funciona, desaparecerá el symbolo → y permanecer el symbolo →.
Una vez transcurrido el tiempo, se emitirá una seals acústica y parpadeará el symbolo . Se pueda desactivar la seals pulsando el sensor OK. El programador作為 al modo de espera.
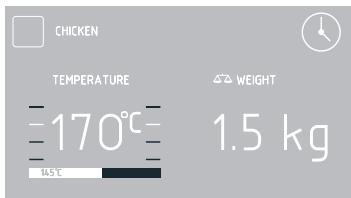
Programas predeterminados
Després de selectionar con los sensores PROGRAMAS PREDETERMINADOS y de confirmar con el sensor 0K, puede elegir entre las siguientes.optiones:
-CARNE
-AVES
-PIZZA
-PRODUCTOS CONGELADOS
- MASA
- CRECIMIENTO DE LA MASA
- SECADEO
- MANTENIMIENTO DEL CALOR
Després de selectionar el programa y confirmar con el sensor 0K, puede selectionar las siguientes.optiones:
CARNES
-VACA
-CERDO
-CORDERO
- TERNERA
AVES
- POLLO
- PATO
- OCA
- PAVO
PIZZA
-FINA
- GRUESA
- CONGELADA
PRODUCTOS CONGELADOS
-PESCADO
-GRATINADO
- LASANA
- PATATAS FRITAS
PASTELES
- PASTEL DE CROCANTE
- PASTEL DE FRUTAS
-BRAZO DE GITANO
-BIZCOCHO - BOLLOS
-GALLETAS
-PAN
CRECIMIENTO DE LA MASA SECADO
MANTENIMIENTO DEL CALOR
Con los sensores de la pestaña correspondiente, confirmre la seleccion con el sensor 0K.
Enequalquiermomento sepodarmodificarelajuste de la temperatura del interior delhorno o de la temperatura de la sonda de carne, pero, alrealizarequalquiermodificacion,elprogramadejarade serunprogramadepredeterminado.
Al modificar una de las temperatas e introducirla en el programador (los@simbolos correspondientesdeferan de parpadear: o), la descripción del programa se reemplaza por la descripción de la función de calentimiento. Puede interruptir el proceso con el sensor ① en cualesquermomento.
Al pulsar ① , el programador pasa al modo de espera.
En algunos programas se puedaCambiar el valor del peso. Cuando el的概率 del peso parpadea, se pueda Cambiar el peso o confirmar el peso sugerido por defecto. PuedeCambiar los ajustes con los sensores y confirmar la seleccion con el sensor OK. El peso visualizzato se almacenara.
El programa con precalentimiento delorno se inicia al confirmar con el sensor OK de la pestaña correspondiente del programa predeterminado. El hora se enquiryra en la etapa de precalentamento hasta alcancar la temperatura de 200^
Una vez alcanzada la temperatura de 200 °C, se emitirá una seals acústica y el simbo-lo ↓ parpadeará. Durante todo el tiempo se mantiene una temperatura de 200 °C en el interior delorno.
Tras colocar el Plato en elorno y cerrar la puerta, pulse OK para inicia el programa principal.
Una vez transcurrido el tiempo del programa predeterminado, se emitirá una seals acústica. En la pantalla se muestra la temperatura fjada en el interior del hora.
Se peut desactivar la seals pulsando el sensor OK. El programador作為 al modo de espera.
Programas del usuario
Després de selectionar con los sensores los programas del usuario en el menu y confirmar con el sensor OK, se pueda elegir entre 10 programas, que se pueda personalizar según sus necessities.
Tras seleccionar con los sensores el programa PROGRAMA1-PROGRAMA10 y confirmar la seleccion con el sensor OK, se puedaCambiar losajustes defunction, temperatura,nivel de asado y tiempo de
FUNCTIONAMENTO
funcionamento.
Se pueda realizar Cambios al igual que para la funciona de calentimiento.
Después de confirmar el tiempo de configuración, se做不到 un teclado en la pantalla para que introduzca el nombre deseedo del programa.
El nombre del programa puede tener como máximo 25 characteres.
Una vez transcurrido el tiempo del programa del usuario, se emitirá una seals acústica. En la pantalla se muestra la temperatura fjada en el interior del hora.
Se peut desactivar la seals pulsando el sensor OK. El programador作為 al modo de espera.
Programas al vapor
Després de selectionar los sensores de la pestaña PROGRAMAS AL VAPOR confirmamos la seleccion con el sensor 0K. En la pestaña PROGRAMAS AL VAPOR está disponible:
- COCINAR AL VAPOR
- COCINAR AL VAPOR + PARRILLA
- CALENTARY PASTEURIZAR
- CARNE DE CERDO A BAJA TEMPERATURE
- CARNE DELICADA A BAJA TEMPERATUREA
- PANADERÍA BÁSICA
- AVES
- PARRILLA + HORNEAR AL VAPOR
- HORNEAR AL VAPOR
- DESCALCIFICACION
-SALIR
Usando los sensores seleccione el programa oriento y confirmre con el sensor OK. El hora está equipado con recipientes especialas de acero inoxidable:
- recipientes perforados para verduras y pescado
- recipientes completos para carne
Los recipientes se deben colocar en la rejilla.
Cierre la puerta del hora.

En el panel de mando está situado el recipiente de la bandeja de agua. Deberá presionar el recipiente y después tirarlo hacía adelante. Vierta 0,5 l de agua al recipiente. (La necesidad de echar agua la penaliza el comunicado parpadeante en la pantalla "Añadir agua 0,5 l y pulsar OK"). Cuando el agua alcanza el nivel Neededo en el depóstito, el programador lo indica con una señal acústica. Cierre el recipiente de la bandeja de agua.
Tras seleccionar el programa P01S-P09S, confirme el inicio del programa con el boton OK.
IMPORTANTE: El comunicado parpadeante en la pantalla "Añadir 0,5 l de agua" y la seminal acústica durante el funcionaimiento del programa significan que es NEEDarioañadir agua. En tal caso, siga las instrucciones paraañadir agua. El comunicadordeer de parpadear de nuevo cuando el agua隐身 del nivel desrado.
FUNCTIONAMENTO
ADVERTENCIA: El programa no se detiene en caso de que falte agua!
Tras finalizar el programa, escuchará una Seedal acústica queURTAPAR conequalier sensor.
Confirme la finalización del programa con el botón OK. En la pantalla aparecerá el comúnico "Extraer agua".
A continuación, se debe abrir la puerta con el primer nivel de inclínación (aproximadamente 15 grados).
Después de unosegundos,podráAbrirlacompletamente.
Luego coloque el recipiente (bandeja Honda para hornear) bajo del drenaje de agua.
Al presionar el sensor OK, el agua residual se vierte fuera del sistema de vapor.
Para eliminar el agua residual una vez finalizado el programa de vapor, limpie el interior del hora con unayo seco.
Después de various programas de vapor, el hora se debe calendar a 180^ durante aproximamente 30 Minutes.
ATENCION: iPeligro de quemadura! A la hora deAbrir la puerta del hora peut que salga el vapor. Durante o afterwards de terminar la cocción hay queAbrir con cuidado la puerta del hora.A la hora deAbrir no inclinarse por encima de la puerta.Hay que recordar que en función de la temperatura el vapor pueda
ser invisible.
IMPORTANTE Cuando utilise programs que no Sean de vapor, no deben haber agua en el sistemas de vapor. No vierta agua en el recipiente de la bandeja de agua si utilizes las functions de calentimiento normales.
Descalcification del sistema de vapor
Després de起初 varias vezes el horno en los programas de vapor, en la pantalla del programador aparecerá el comunicado parpadeante "Descalcificacion". Este mensaje significa que el usuario debe落户 a cabo el proceso de descalcificacion del hora. El usuario可以选择 posponer la descalcificacion dos veces presionando el sensor ①. Sin embargo, si se completea el次要 programa de vapor sin descalcificacion, no sera possible utiliser ningún programa de vapor.
Después de selección el programa "Descalcificación", en la pantalla aparecerá el comunicado "Verter 0,5 I de solución descalcificadora". Durante el funciona el programa aparecen los comunicos "Añadir 0,5 I de agua" y "Extraer agua" (enjuague).
Las instrucciones de descalcificacion se describen a continuacion.
Prepare una solución de 450 ml de agua y 50 ml de descalcificador liquido.
Vierta la solución en el recipiente de la bandeja de agua.
- Con el sensor OK confirmamos el在内的 programa "Descalcificacion".
ATENCION: Durante el programa, deben extraer el agua 3 veces del sistema.
La seals acústica y el comunicado parpadeante "Extraer agua"SEOnalizan la necessities de eliminar la solución del sistemas:
- Abra la puerta delorno.
- Coloque un recipiente bajo del desagüe.
FUNCTIONAMENTO
- Con el sensor OK, confirma que haVERTido la solución en el recipientte (si es una bandeja para hornear, vierta el descalcificador y=enjuague la bandeja con agua).
La signaled acústica y el comunicado parpadeante "Añadir agua" señalizan la necesidad deañadir agua. A continuación, vierta 0,5 l de agua en el recipientte de la bandeja del hora y, con el sensor OK, confirmé la continuação del programa (enjuague).
La signaled acústica y el comunicado parpadeante "Extraer agua" señalizan la necessities de eliminar el agua del sistemas:
- Abra la puerta delorno.
- Coloque un recipiente bajo del desagüe.
- Con el sensor OK confirmamos la retirada del agua a un recipientte (si es una bandeja para hornear retire imeditamente la solución descalcificadora y enjuaque la bandeja con agua).
IMPORTANTE: Si sale agua del tubo de drenaje durante un programa de vapor, enjuague el sistema. En el modo activo del hora sin la funciona activada:
- Colocar un recipiente con una capacité min. de 1 litro.
Vierta 0,5 litres de agua en el recipientede la bandeja del hora. - Alsomeone tiempo pulse los sensores
- ∨ ∧ y retire el agua del sistema.
- Repita la operación dos veces.
Si el problema persiste, deben落户a descalcificacion.
IMPORTANTE: Si el usuario observa restos de cal saliendo afterwards to finalizar el programa de vape, deben seleccionar de la lista el programa "Descalcificacion" y seguir las instrucciones de descalcificacion.
Si el usuario vierte agua en el recipiente y no utilizes el programa de vapor, el agua se pueda extraer del sistema presionando los sensores
Funciones especiales del programador
Bloqueo del programador
Para activar el bloqueo, pulse y mantenga pulsados los sensores: 0K y ✓ duranteunos 3segundos. Laactivacion del bloqueo se indica en la pantalla con el-symbolo y con el mensaje pulse al mesmo tiempo y 0K para desbloquear.El mensaje se做不到a duranteanos 3segundos.Con el bloqueo activo, el mensaje aparecerá cada vez que pulseequalquier sensor.
Cuando elbloqueo delprogramador este activo, no sera possible realizarchangios en losajustes del programade asado,todos los sensores,excepto 0K,Vy ① estaran inactivos.Sin embargo,conelbloqueo activo, se podra usar el sensor 0Kunicamente junto con el sensor para desactivar elbloqueo, asi como el sensor 0K para borrar el programafinalizzato.Conelbloqueo activo,el sensor ① sirve solamente para interruptir elfuncionamiento delprogramayno paraasaralmenu.
Para desactivar elbloqueo, pulse ymantenga pulsados al mismo tiempo los sensores OK y ✓ duranteunos 3segundos.La desactivacion delbloqueo se indica en la pantalla al apagarse elsymbolo y conel mensaje pulse al mismo tiempo yOK paradesbloquear.
Atencion. El bloqueo está activo también antes de su corte de electricidad.
Corte automático de la alimentación
Cuando el hora funciona en cualesquera de las functions de calentimiento durante un largo tiempo determinado, el programador descó
FUNCTIONAMENTO
nectará los elementos electricos del aparato. Ejemplo. Cuando la temperatura en el interior del hora sea de 200^ , la desconexión de los elementos electricos tendrá lugar pasadas una 3 horas de funciona bajo el hora. Con una temperatura de 100^ ,upones deunas 10 horas.
Se tratate de un mecanismo de proteccion del horno contra el sobrecalentamento.
Cuando el programador haya desconectado todos los elementos electricos, lo avisará con el parpadeo de la pantalla y del símbolo en la pantalla.
Se pueda desactivar el corte automatico de la alimentacion de los elementos electricos en el modo de espera pulsando el sensor ① ,tras locular el programadorasaralmenu.
Modo nocturno
Entre las 22:00 y las 6:00 h, el programador作為 automatistically al modo nocturno, por lo que se reduciría la intensidad del brillo de la pantalla.
Señalización de puerta abierta
Si se abre la puerta del homo durante el proceso/programa, tras 30 segundos se emitirá una seals acústica y en la pantalla apareceré el mensaje PUERTA ABIERTA.
OpenUp!
Esta funciona abre automatistically la puerta del hora al tocar el asa. Puede selectionar dosodos de aperture: solo aperture inicial (en la pantalla se做不到 el symbolo ) o aperturemultiple (en la pantalla se做不到 el symbolo ).Con el modo de solo aperture inicial,la puerta se abre al tocar el asa solo una vez despues de encender el hora. Con el modo de aperture multiple,la puerta se abrirac automatistically cada vez que el usuario
toque el asa cuando el hora está encendido.
IMPORTANT: La funciona OpenUp! no funciona cuando el hora no está activo (se encontrartra en modo de esper y el reloj solo indica la hora actual).
Para activar la funciona, pulse los sensores del menu de la pestaña OpenUp! y seleccione una de las options:
APERTURA MULTIPLE
SOLO APERTURA INICIAL
DEACTIVAR
SALIR
ParaAbrirla puerta,toque la parte metalica delasa delpuerta delhorno.Toque de forma decidida durante al menos medio segundo. La sensibilidad del asa se ha establishode tal forma, que se peut tocar con la mano o con una parte cubierta del cuerpo, como con el codo o la rodilla.
La puerta se pueda averirmanualmente encualquiermomentotirando delasa,Independientelemente de losajustesde OpenUp!.
jAdvertencia! En caso de tener activa la func tion OpenUp!, sobre todo en el modo de aperture multiple, se pueda abrir la puerta muy fácilmente, incluso por accidente. Se recomienda vigilar constantly a los niños(PCueques o desactivar la func tion OpenUp!.
Ventilador refrigerador
El funciona del ventilador refrigerador es independiente de las functions configuradas y del estado del programador. El motor de refrigeración seonga automatística al activar cualquier función. El motor seonga hasta que la temperatura en el interior delorno supera los 80^ . Por defaulted de esta temperatura, el ventilador refrigerador se apaga automatistically.
COCINADO EN EL HORNO - CONSEJOS PRÁCTICOS
Preparación de reposteria
- Se recomienda preparar reposteria en las bandejas incluidas para cocinar.
- Se pueda también preparar pasteles en otheras bandejas compradas a terceros que deben situarse en la rejilla. Para cocinar se recomienda usar bandejas de color negro que conducen mejor el calor y reducen el tiempo de coccción.
- No recomendamos el uso de moldes y bandejas para reposteria con superficie clara y brillante en caso de usar la calefaction convencional (calefactor superior+ inferior) el uso de este tipo de moldes pueda hacer que la base del pastel no está bien asada.
- Al usar la funciona de aire caliente no esnecessary calentar previamente la cama r del hora, para las demas functions, antes de introducir el pastel en el hora, deben estar precalentado.
- Antes de sacar el pastel del hora hay que comprobar la calidad del horneado con un palito de madera (al pinchar el pastel, el palo deben permanecer seco y limpio una vez extraido),
- Se recomienda estar el pastel en el hora cuando apagarlo durante uno 5-minutos.
Las temperatasutilizadaspara la reposteria hornea con el uso de la func tion aire caliente suelen serunos 20 - 30^ inferiores en relationa los pasteles horneados de manera convencional (con el empleo del calefactor superior e inferior). - Los parámetros de la tabla sonapproximados y deben ser corregidos enfunci de sus propias experiencias y gustos culinarios.
- En caso de que la informacion de los libros de cocina se diferencien bastardamente de los values de la tabla, les sugerimos seguir los del manual.
Asado de carnes
- Se recomienda preparar en elorno las porciones de carne de más de 1kg. Las porciones másPICAES es mayor prepararlas en la placA.
- Para asar se recomienda usar vasos refractarios y los mangos de"These vasos deben resistir altas temperatas,
- En caso de asar en la rejilla o en el asador, se recomienda colocar una bandeja en el nivel inferior con un poco de agua,
- Al menos una vez, a la mitad del asado, se recomienda dar la vuelta a la carne.
Y durante el asado se recomienda rociar la carne con la salsa de la bandeja o con agua caliente salada - NO se debe rociar con agua fria
COCINADO EN EL HORNO - CONSEJOS PRÁCTICOS
Funciones de calentimiento, circotherm ECO
- con el uso de la funciona circotherm ECO se enciende la forma optimizada de calor que tiene como objetivo ahorrar energia durante la preparación de platos,
- no se pueda reducir el tiempo de asado por medio de fjjar temperatas superficies, tampoco se recomienda precalentar el hora antes de asar,
- no se debe cambiar de ajustes de temperatura durante el asado niAbrir la puerta durante el asado.
Parámetros recomendados con el uso de la función circotherm ECO
| Tipo de preparación de Plato | Función del hora | Temperatura (°C) | Nivel | Tiempo (min.) |
| Biscocho | Eco | 180 - 200 | 2 - 3 | 50 - 70 |
| Bollo de levadura/pastel de mantecado | Eco | 180 - 200 | 2 | 50 - 70 |
| Pescado | Eco | 190 - 210 | 2 - 3 | 45 - 60 |
| Carne de vaca | Eco | 200 - 220 | 2 | 90 - 120 |
| Carne de cerdo | Eco | 200 - 220 | 2 | 90 - 160 |
| Pollo | Eco | 180 - 200 | 2 | 80 - 100 |
COCINADO EN EL HORNO - CONSEJOS PRACTICOS
| Tipo de cochura de Plato | Función del hora | Temperatura (°C) | Nivel | Tiempo [min] |
| Biscocho | 160 - 200 | 2 - 3 | 30 - 50 | |
| Bollo de levadura/pastel de mantecado | 160 - 170 1) | 3 | 25 - 40 2) | |
| Bollo de levadura/pastel de mantecado | 155 - 170 1) | 3 | 25 - 40 2) | |
| Pizza | 200 - 230 1) | 2 - 3 | 15 - 25 | |
| Pescado | 210 - 220 | 2 | 45 - 60 | |
| Pescado | 160 - 180 | 2 - 3 | 45 - 60 | |
| Pescado | 190 | 2 - 3 | 60 - 70 | |
| Salchichas | 220 | 4 | 14 - 18 | |
| Carne de vaca | 225 - 250 | 2 | 120 - 150 | |
| Carne de vaca | 160 - 180 | 2 | 120 - 160 | |
| Carne de cerdo | 160 - 230 | 2 | 90 - 120 | |
| Carne de cerdo | 160 - 190 | 2 | 90 - 120 | |
| Pollo | 180 - 190 | 2 | 70 - 90 | |
| Pollo | 160 - 180 | 2 | 45 - 60 | |
| Pollo | 175 - 190 | 2 | 60 - 70 | |
| Legumbres | 190 - 210 | 2 | 40 - 50 | |
| Legumbres | 170 - 190 | 3 | 40 - 50 |
1) Calentar el hora vacio
2) Los tiempos presentados se refieren al asado en moldes pequeños
Advertencia: Los parámetros presentados en la tabla sonapproximados y deben ser corregidos enfunci de sus propias experiencias y gustos culinarios.
Los tiempos son vigentes si no se ha indicado de另一边 forma para la cármara no calentada. Para el hora calentado se deben reducir these tiempos uno 5-10 minutes.
COCINADO EN EL HORNO - CONSEJOS PRACTICOS
Parámetros para los programas de vapor
| Número de programa | Nombre del programa2) | Función del hora | Temperatura [°C] | Tiempo [min] | Nivel | Platos |
| P01S | Cocinar al vapor | ↓100° | 1.a fase al vapor | 100 | 50 | 3 |
| P02S | Cocinar al va- por + parrilla | III | 1.a fase al vapor | 100 | 25 | 3 |
| 2.a fase asador | 220 | 20 | ||||
| P03S | Calentar y pasteurizar | 90° | 1.a fase al vapor | 90 | 25 | 3 |
| P04S | Carne de cerdo a baja temperatura | 1.a fase al vapor | 80 | 240 | 3 | |
| P05S | Carne deli-cada a baja temperatura | 70° | 1.a fase al vapor | 70 | 120 | 3 |
| P06S | Panadería báscica | 1.a fase al vapor | 50 | 30 | 3 | |
| 2.a fase ca-lentamente normal | 200 | 30 | ||||
| P07S 1) | Aves | 1.a fase al vapor | 180 | 75 | 3 | |
| P08S 1) | Parrilla + hor- near al vapor | 1.a fase asador | 220 | 20 | 3 | |
| 2.a fase al vapor | 120 | 90 | ||||
| P09S | Hornear al vapor | 1.a fase al vapor y ca-lentamente normal | 150 | 120 | 3 | |
| Paté, fondant (tiempo: 12关键时刻) | ||||||
| P10S | Descalcifica- ción | 100 | 15 |
1) El programa activa el precalentimiento rápido para alcanzar la temperatura establecida.
2) Las recetas de los programas correspondientes se pueda encontrar en el libro electrónico.
PLATOS DE PRUEBA. De conformidad con la norma EN 60350-1.
Preparación de pastecles
| Tipo de Plato | Accesorios | Nivel | Función del hora | Temperatura (°C) | Tiempo de cochura 2) (min.) |
| Pasteles pequeños | Bandeja es-tándar | 3 | 160 - 170 1) | 25 - 40 2) | |
| Bandeja es-tándar | 3 | 155 - 170 1) | 25 - 40 2) | ||
| Bandeja es-tándar | 3 | 155 - 170 1) | 25 - 40 2) | ||
| Bandeja es-tándar Bandeja pro-funda | 2 + 42 - bandeja para pan o para asado 4 - bandeja para pan | 155 - 170 1) | 25 - 50 2) | ||
| Pastel crujierte (fajas) | Bandeja es-tándar | 3 | 150 - 160 1) | 30 - 40 2) | |
| Bandeja es-tándar | 3 | 150 - 170 1) | 25 - 35 2) | ||
| Bandeja es-tándar | 3 | 150 - 170 1) | 25 - 35 2) | ||
| Bandeja es-tándar Bandeja pro-funda | 2 + 42 - bandeja para pan o para asado 4 - bandeja para pan | 160 - 175 1) | 25 - 35 2) | ||
| Bizcocho sin-grasa | Parilla + molde para pastel cubierto en negro Ø 26 cm | 3 | 170 - 180 1) | 30 - 45 2) | |
| Pastel de man-zanas | Parilla + dos moldes para pastel cubierto en negro Ø 20 cm | 2 molde en pa-rilla colocado en diagonal, derecha trase-ra, izquierda fremte | 180 - 200 1) | 50 - 70 2) |
1) Calentar el hora vacio, no usar la funciona de calentimiento=rápido.
2)Los tiempos son vigentes si no se ha indicado de othera forma, para la camarva no calentada. Para el hora calentado se debereducir theseiostmos unos 5-10 minutes.
PLATOS DE PRUEBA. De conformidad con la norma EN 60350-1.
Parilla
| Tipo de Plato | Accesorios | Nivel | Función del hora | Temperatura (°C) | Tiempo (min.) |
| Tostadas de pan blanco | Parilla | 4 | 2201) | 1,5 - 2,5 | |
| Parilla | 4 | 2202) | 2 - 3 | ||
| Hamburguesas de ternera | Parilla + ban-deja para asar (para recoger condensados que goptean) | 4 - parilla 3 - bandeja para asar | 2201) | 1 párgina 10 - 15 2 página 8 - 13 |
1) Calentar el hora vacio activando para 5 horas, no usar la funciona de calentimiento rápido.
2) Calentar el hora vacio activando para 8关键时刻, no usar la funciona de calentimiento rápido.
Asar
| Tipo de Plato | Accesorios\ | Nivel | Función del hora | Temperatura (°C) | Hora (min.) |
| Pollo entero | Parilla + ban-deja para asar (para recoger condensados que gotean) | 2 - parilla1 - bandeja para asar | 180 - 190 | 70 - 90 | |
| Parilla + ban-deja para asar (para recoger condensados que gotean) | 2 - parilla1 - bandeja para asar | 180 - 190 | 80 - 100 |
Los tiempos son vigentes, si no se ha indicado de另一 forma para la CAMERA no calentada. Para el hora calentado se deben reducir theseos tiemposunos 5-10 minutes.
LIMPieZA Y MANTENIMIENTO DEL HORNO
El cuidado de la limpieza del hora y un adecuado mantenimiento, influyen de forma importante en la prolongacion del periodo de vida efectivo del equipo sin averias.
Antes de empezar la limpieza hay que apagar el hora asegurándose de que todos los mandos seCNTren en la posicion "apagado".Las tareas de limpiezadeferan empezar una vez que el hora esté frío.
- El honro debe limpiarse afterwards de cada uso. Después de limpar el hora puede encender la iluminación para encontrar una mejor visibiliad del espacio de trabajo.
- La CAMERA interior delorno debe limpiarse solamente con agua Templada y un poco de lavavajillas.
Important!
Para la limpieza y mantenimiento no se permite usar ningún limpia-dor abrasivo, detergente agresivo ni objetos rugosos.
Para limpiar el frontal de la armadura utilise solo agua caliente con unaLEEa cantidad de liquido lavavajillas o limpia-cristales. No aplicarcrema limpiadora.
Cambio de bombilla halógena que ilumina el hora
Paraatarla posibidadde unchoque electrico,antes dechangiar la bombilla halogena,aseguesede queel equipo estádesconectadodearedlectrica.
- Desconectar la alimentacion delorno
- Retirar los accesorios delorno.
- Si el hora Tiene guías telescóicas, éstas se deben retirar.
- Usando un destornillador de cruz quitar los cuales tornillos que sujetan la campana,utar la campana y quitar la junta, bajo la var, recordando limpiar bien y seccarlo todo.
-
SACar la bombilla halógena corriendola hacaba abajo sirviendose para elo de un paño o papel; a ser besoinario, sustituir la bombilla halógena por una nuevo G9
-
voltaje 230V
- potencia 25W
- Colocar con precision la bombilla haloge- na en el alojamento.
- Colocar la junta y la campana de la luz. Enroscar.
Advertencia: Debe tener cuidado al colocar la bombilla halógena y no tocarla directamente con los dedos!
LIMPieZA Y MANTENIMIENTO DEL HORNO
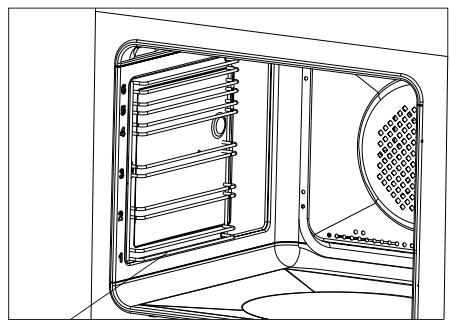
- Los hora está dotadas de guías de alambre que se sacan fácilmente (rejillas) de las bandejas de hora. Para sacarlas para lavar hay que tirar del enganche que se encontraría en la parte delantera y, bajo, partir la guía y sacar los enganches traseros.
Eliminación de rejillas
Colocacion de rejillas
- Los hora está equipados con guías inoxidables para bandejas fjadas a las guías metálicas. Las guías deben retirarse y lavar+junto con los carriles de metal. Antes de situar las bandejas en las guías hay que sacar las guías (cuando el hora está calentado, hay que sacar las guías tirando del borde posterior de los elementos saliente en la parte delantera de las guías) y, bajo, empujar las guías jusqu'à con la bandeja.
jAdvertencia!
Las guías telescópicas no deben lavarse en lavavajillas.
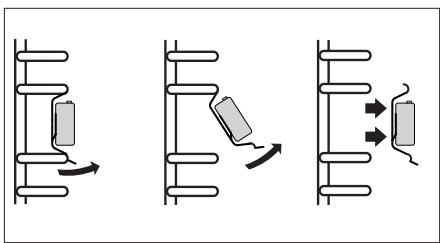
Modo de extraer las guías telescópicas
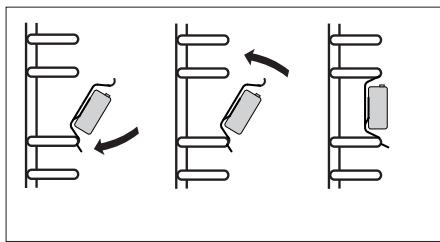
Modo de colocar las guías telescópicas
LIMPIEZA Y MANTENIMIENTO DEL HORNO
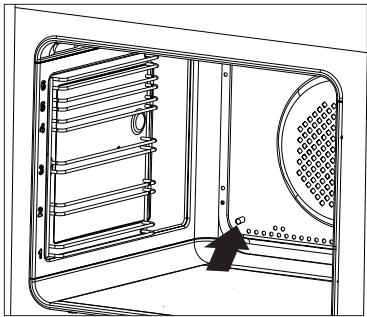
Desmontaje de puerta
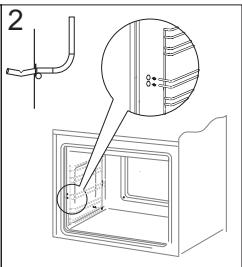
Para tener acceso más fácil a la CAMERA del hora y para limparla, es posible desmontar la puerta. Paraarlo hay queAbrir la puerta, levantar el elemento protector situado en la bisagra (Fig.A).Cerrar ligeramente la puerta, levantar y sacar hacía adelante. Para montar la puerta en el hora hacer lo contrario. A la hora de introducir hay que fjarse de situar correctamente el corte de bisagra en la ranura de bisagra.Después de meter la puerta en el hora hay que bajo el elemento protector y apretarlo con cuidado.Si situamos mal el elemento protector PODemos dar la bisagra en el momento de cerrar la puerta.
Desmontaje de las protecciones de bisagras
Desmontaje del cristal interno
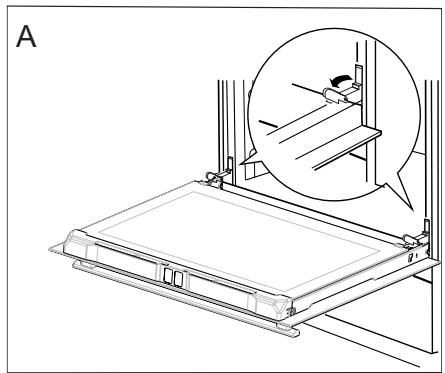
- Desmontar la parte superior de la puerta. (fig. B, C)
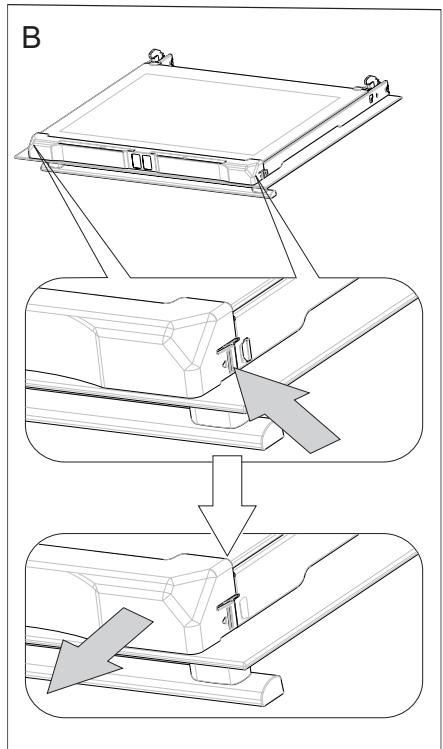
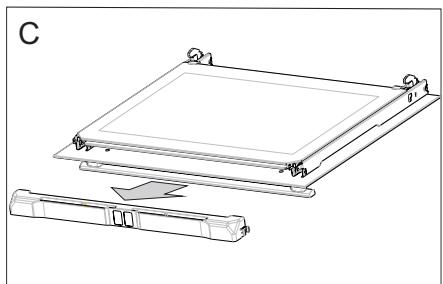
LIMPieZA Y MANTENIMIENTO DEL HORNO
- Saque el cristal interno de la fijación (en la parte inferior de la puerta) (Fig.D). Extraiga los cristales interiores.
!Nota! Peligro de rotura de los cristales. Hay que tirar del cristal, no levantar ha- cia arriba.
Saque el cristal central, (fig. D). - Limpie el cristal con agua caliente y con detergente.
Para volver a montar el cristal haga todo enorden inverso. La parte lisa del cristal deben encontrarse arriba, las rinconeras abajo.
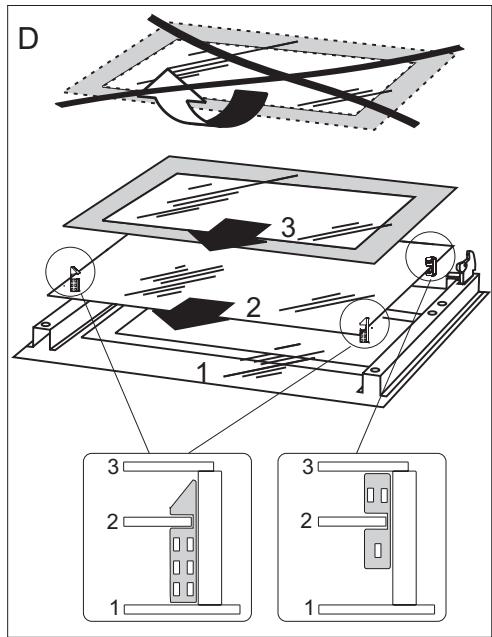
Desmontaje del cristal interno
SITUACIONES DE EMERGENCIA
En cada situacion de emergencia es requisiteo:
- Desconectar los equipos el aparato.
- Desconectar la alimentacion electrica.
- Algunas incidenciasULDuen repararse sencillamente por su cuenta siguiendo las instru ciones de la tabla que puede encontrar mas abajo. Antes de ponerse en contacto con el service de atencion al cliente o deostenimiento, compruebe los siguientes+puntos de la tabla.
| Problema | Motivo | Procedimiento |
| 1. El dispositivo no funcióna. | Pausa en alimentación de energia. | Compruebe el fusible de la insalacación de casa, reemplazar cuando estáFundido. |
| 2. El display de programadorinda las “0.00” horas. | El dispositivo está desco-nectado de la red o suyo lugar un corte de luz. | Fije la hora actual (véase Fun-cioncimiento de programador). |
| 3. No funciona la ilumina-ción del hora. | La bombilla está suelta o dañada. | Apriete o reemplace la bombillafundida (véase el capítulo Lim-pieza y mantenimiento). |
;Nota!
Todas las reparaciones yactividades relacionadas con la normativa vigentedeferan realizarse por el respectivo serviceo deostenimiento o por un instalador queonga los permisosrequireidos.
DATOS TÉCNICOS
Tensión nominal
230V 1N~ 50 Hz
Potencia nominal
max. 3,6 kW
Dimensiones delorno
(alto/ ancho/ profundidad)
59,5/59,5/57,5cm
El producto cumple con los requisitos de las normas EN 60335-1, EN 60335-2-6 vigentes en la Unión Europea.
Los datos en las etiquetas eneréticas de hornos electricos se dan de conformidad con la norma EN 60350-1/IEC 60350-1. Estos valores se determinan con la energia estandar con las functions activas: calentador inferior y superior (modo convencional) y asistencia de calentamento con ventilador (si tales faciones estan disponibles).
La类产品 de eficacidas energetica fue determinada en func tion de la functiOn disponible en el producto de conformidad con la?siguiente prioridad:
| Circulación de aire forzada ECO (calentador de ciclotherm + ventilador) | ECO |
| Circulación de aire forzada ECO (calentador inferior + superior + asador + ventilador) | ECO |
| Modo convencional ECO (calentador inferior + superior) | ECO |
Durante la determinación de gasto de energia se debe desmontar las guías telescóicas (si forma parte del producto).
Declaración del fabricante
El fabricante declara con la presente que el producto cumple los requisitos esencias de las siguientes directivas europeas:
- Direactiva de baja tensión 2014/35/CE,
- Directa de compatibilidad electromagnética 2014/30/CE,
- Direactiva de性和 ecología 2009/125/CE
y por lo tanto el producto fue marcado C y tiene declaración de conformidad multipartida con las entidades supervisoras del mercado.
DEAR CUSTOMER,
The oven is exceptionally easy to use and extremely efficient. After reading the instruction manual, operating the oven will be easy.
Before being packaged and leaving the manufacturer, the oven was thoroughly checked with regard to safety and functionality.
Before using the appliance, please read the instruction manual carefully.
By following these instructions carefully you will be able to avoid any problems in using the appliance.
It is important to keep the instruction manual and store it in a safe place so that it can be consulted at any time.
It is necessary to follow the instructions in the manual carefully in order to avoid possible accidents.
Caution:
Do not use the oven until you have read this instruction manual.
The oven is intended for household use only.
The manufacturer reserves the right to introduce changes which do not affect the operation of the appliance.
TABLE OF CONTENTS
Safety instructions 42
Description of the appliance 46
Specification of the appliance 47
Installation 48
Operation 50
Baking in the oven - practical hints 65
Test dishes. 69
Cleaning and maintenance 71
Troubleshooting 75
Technical data 76
SAFETY INSTRUCTIONS
Warning: The appliance and its accessible parts become hot during use. Care should be taken to avoid touching heating elements. Children less than 8 years of age shall be kept away unless continuously supervised.
This appliance can be used by children aged from 8 years and above and persons with reduced physical, sensory or mental capabilities or lack of experience and knowledge if they have been given supervision or instruction concerning use of the appliance in a safe way and understand the hazards involved. Children shall not play with the appliance. Cleaning and user maintenance shall not be made by children without supervision.
During use the appliance becomes hot. Care should be taken to avoid touching heating elements inside the oven.
Accessible parts may become hot during use. Young children should be kept away.
Warning: Do not use harsh abrasive cleaners or sharp metal scrapers to clean the oven door glass since they can scratch the surface, which may result in shattering of the glass.
Warning: Ensure that the appliance is switched off before replacing the lamp to avoid the possibility of electric shock.
You should not use steam cleaning devices to clean the appliance.
SAFETY INSTRUCTIONS
Danger of burns! Hot steam may escape when you open the oven door. Be careful when you open the oven door during or after cooking. Do NOT lean over the door when you open it. Please note that depending on the temperature the steam can be invisible.
Ensure that small items of household equipment, including connection leads, do not touch the hot oven as the insulation material of this equipment is usually not resistant to high temperatures.
Do not leave the oven unattended when frying. Oils and fats may catch fire due to overheating or boiling over.
Do not put pans weighing over 15kg on the opened door of the oven.
Do not use the oven in the event of a technical fault. Any faults must be fixed by an appropriately qualified and authorised person.
In the event of any incident caused by a technical fault, disconnect the power and report the fault to the service centre to be repaired.
The rules and provisions contained in this instruction manual should be strictly observed. Do not allow anybody who is not familiar with the contents of this instruction manual to operate the oven.
The appliance has been designed only for cooking. Any other use (for example for heating) does not comply with its operating profile and may cause danger.
HOW TO SAVE ENERGY

Using energy in a responsible way not only saves money but also helps the environment. So let's save energy! And this is how you can do it:
- Do not uncover the pan too often (a watched pot never boils!).
Do not open the oven door unnecessarily often.
- Only use the oven when cooking larger dishes.
Meat of up to 1kg can be prepared more economically in a pan on the cooker hob.
- Make use of residual heat from the oven.
If the cooking time is greater than 40 minutes switch off the oven 10 minutes before the end time.
Important! When using the timer, set appropriately shorter cooking times according to the dish being prepared.
- Make sure the oven door is properly closed.
Heat can leak through spillages on the door seals. Clean up any spillages immediately.
- Do not install the cooker in the direct vicinity of refrigerators/freezers.
Otherwise energy consumption increases unnecessarily.
UNPACKING
During transportation, protective packaging was used to protect the appliance against any

damage. After unpacking, please dispose of all elements of packaging in a way that will not cause damage to the environment.
All materials used for packaging the appliance are environ
mentally friendly; they are 100% recyclable and are marked with the appropriate symbol.
Caution! During unpacking, the packaging materials (polythene bags, polystyrene pieces, etc.) should be kept out of reach of children.
DISPOSAL OF THE APPLIANCE
Old appliances should not simply be disposed

of with normal household waste, but should be delivered to a collection and recycling centre for electric and electronic equipment. A symbol shown on the product, the instruction manual or the packaging shows that it is suitable for recycling.
Materials used inside the appliance are recyclable and are labelled with information concerning this. By recycling materials or other parts from used devices you are making a significant contribution to the protection of our environment.
Information on appropriate disposal centres for used devices can be provided by your local authority.
DESCRIPTION OF THE APPLIANCE
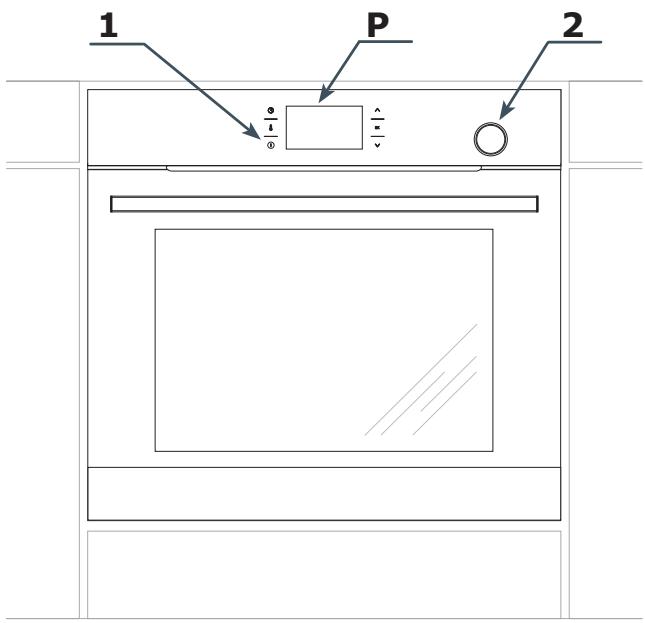
P Electronic programmer
1 On / off switch
2 Water container drawer
SPECIFICATION OF THE APPLIANCE
Oven fittings

Roasting tray
Grill grate (drying rack)
Baking tray

Solid steel bowl
Meat probe
Perforated steel bowl
Side racks
INSTALLATION
Installing the oven
The kitchen area should be dry and aired and equipped with efficient ventilation. When installing the oven, easy access to all control elements should be ensured.
- This is a Y-type design built-in oven, which means that its back wall and one side wall can be placed next to a high piece of furniture or a wall. Coating or veneer used on fitted furniture must be applied with a heat-resistant adhesive (100^) . This prevents surface deformation or detachment of the coating.
- Hoods should be installed according to the manufacturer's instructions.
- Make an opening with the dimensions given in the diagram for the oven to be fitted.
Make sure the mains plug is disconnected and then connect the oven to the mains supply.
- Insert the oven completely into the opening without allowing the four screws in the places shown in the diagram to fall out.


Electrical connection
Warning!
All electrical work should be carried out by a suitably qualified and authorised electrician. No alterations or wilful changes in the electricity supply should be carried out.
The oven is manufactured to work with a one-phase alternating current (230V 1N~50Hz) and is equipped with a 3 × 1,5 ~mm^2 connection lead.
The electricity supply for the oven must have a safety switch which enables the power to be cut off in case of emergency. The distance between the working contacts of the safety switch must be at least 3mm .
Before connecting the oven to the power supply it is important to read the information on the data plate and the connection diagram.
Caution! The installer is obliged to provide the user with "appliance electrical connection certificate" (enclosed with the warranty card).
Connection diagram
Caution! Voltage of heating elements 230V.
Caution! In the event of any connection the safety wire must be connected to the 12 PE terminal.
Live L: BN - brown
Neutral N: BU - blue
Earth PE: GNYE -green/yellow
Power circuit should be protected with a 16A fuse.
Recommended type of connection lead:
H05VV-F, 3 x 1,5mm².
Important!
If the fixed power supply cable is damaged, it should be replaced at the manufacturer or at an authorized servicing outlet, or by a qualified person to avoid danger.
OPERATION
Before using the oven for the first time
- Remove all packaging elements, particularly those protecting the interior of the oven chamber during transport.
- Remove all the accessories from inside of the oven and wash them thoroughly in warm water with gentle washing up liquid.
- Remove the protective foil from the surfaces of the telescopic runners.
- Use warm water with the addition of mild detergent to wash the inside of the chamber. Do not use hard brushes or sponges. They could damage the coating of the inside of the chamber.
Warm up the oven chamber
- Turn on the ventilation in the room or open a window.
- Turn the function selector knob and set the position or (there is a detailed description of these functions later in the instructions).
Set the temperature to 250^ . The oven should operate for a minimum of 30 minutes; while it is operating the oven produces a smell, which is only present at the beginning but will eventually go away as the appliance is used. This is perfectly normal and is part of the process of warming up the oven chamber.
Control Panel
On/off switch ① is on the left side of the display. To activate the On/off switch, touch the glass in the place indicated by a pictogram. An acoustic signal will be heard, which was selected in the menu. (See section: Electronic programmer).
Touch sensor surfaces must be kept clean.
Important.
The inside of the oven should only be washed with warm water and a small amount of washing-up liquid.
OPERATION
WiFi function
The oven is equipped with the WiFi function. It can be controlled by mobile application.
Note:
- Touch OK each time to confirm your selection, or touch to adjust the settings.
- When you activate the function, the WiFi menu will be displayed.
- No operation for 30 seconds, the appliance enters Standby mode.
To immediately exit from the menu and switch the appliance to standby mode touch and OK.
To access the WiFi menu in standby mode, touch and hold the sensor. Then touch the sensors select one of the following:
-WIFI,
-PARING,
-MONITOR,
- CONTROL,
- RESET,
- ERROR.
Touch to make your selection and then touch OK to confirm. Then select ON/OFF or YES/NO to RESET. Touch OK to confirm.
Note: By default the WiFi feature is OFF.
Available connection modes:
- Access Point — connect your mobile device directly to the oven without the use of any home wireless network devices.
LAN connect your mobile device to the oven via the home WiFi network, access from outside this network is not possible. - WAN — connect your mobile device to the oven via the Internet – the appliance can be accessed from anywhere in the world.
Note: Active connection is indicated on the display. Access Point is the default connection.
You can change the connection type using the mobile app.
Please visit www.fagorelectrodomestico.com for step-by-step instructions how to configure your network.
Error Codes: When there is a connection failure, you can check the error code in ERRORS or WiFi menu:
| Error | Reason | Solution |
| E20 | Connection error | Try to reconnect and, if unsuccessful, contact your network administrator |
| E21 | Number of users exceeded | The appliance stores all users who connect by Wifi - to erase the list, disconnect the appliance from the power supply and reconnect again. |
Information you need for correct configuration:
Make sure that the oven is connected to the power supply.
In Access Point mode, make sure you are within range (SSID: SmartIN).
- In LAN mode, make sure that your mobile device is connected to the same WiFi home network that the oven is connected to.
- In WAN mode, make sure the Internet connection is available in your WiFi network.
- In LAN and WAN mode, you will need a password (if exist) to connect to your home WiFi network.
OPERATION
Electronic programmer
The Control Panel is equipped with an LCD display and 6 touch sensors:
| Sensors | Description | Symbol | Description |
| ① | On / off switch (Standby mode) | # | Child Lock |
| ② | Temperature of the setting | 1 | Adjust temperature |
| ③ | Clock setting | ::1::1 | Active odour catalyst |
| ^ | Plus / up [+] | □ | Door lock (pyrolysis) |
| 0K | Confirm | → | End Time |
| ✓ | Minus / down [−] | ⊢ | Duration |
| ◇ | Automatic power cut out |
Note: You will hear a beep each time you touch a sensor. It is not possible to turn off the acoustic beeps.
Note: When mains power is cut and restored (power outage), the appliance automatically enters standby and immediately displays the current time.
Switch on the appliance and select interface language.
When you connect the appliance to mains power you will be prompted to select your preferred LANGUAGE.
OPERATION
Use the sensor to go through all the items in the LANGUAGE menu. Select the language in which you want the messages to be displayed and touch OK to confirm.
Set current time
Once your preferred language is set you now need to confirm the current time by touching OK or set the time using the sensors.
Time can be set in the range from 0:00 to 23:59 for 24-hour clock system or from 0:00 to 12:00 for the 12-hour clock system.
When current time is set, the appliance enters standby mode in which the display shows the current time only.
You need to touch ① to start setting the current time. Use the sensors to select SETTINGS and touch 0K to confirm. Use the sensors to enter the TIME menu, select TIME and touch 0K to confirm.
Important!
To exit to submenu at any time, simultaneously touch and OK.
Menu
Touch ① to activate the appliance from standby. Use the sensors to navigate the menu.
The following main menu items are available:
- SETTINGS,
- HEATING FUNCTIONS,
- PRE-SET PROGRAMMES
- USER PROGRAMMES,
- STEAM PROGRAMMES
-CLEANING - OPENUP!
-EXIT
Touch OK to select any menu item.
If no changes are made within 60 seconds, the appliance enters standby mode. To im
mediately exit from the menu and switch the appliance to standby mode, select the EXIT icon and touch OK to confirm. To immediately exit from the menu and switch the appliance to standby mode simultaneously touch and OK.
Settings
Touch ① to enter the menu. Use the sensors to select the SETTINGS menu and touch OK to confirm.
The SETTINGS menu items:
- LANGUAGE,
-TIME - LIGHTING
-TONES - DISPLAY BRIGHTNESS
- SERVICE,
- FACTORY SETTINGS,
- EXIT
Use the sensors to navigate the menu. Touch OK to select the chosen item.
To exit from the SETTINGS, navigate to exit using the and touch OK to confirm.
To immediately exit from the SETTINGS menu and switch the appliance to standby mode, simultaneously touch and 0K.
Language
In the LANGUAGE menu select the required language using the sensors and touch OK to confirm.
Available languages:
- DEUTsCH,
- ENGLISH,
- POLSKI,
- PYCCKNI,
- CESKY,
- SRBSKI,
OPERATION
-LIETUVISKAI,
- EESTI,
- LATVISKI,
- FRANÇAIS,
- ESPANOL,
-TURKQE,
- SVENSKA,
NORSK,
- SUOMI,
DANSK,
-ITALIANO,
- NEDERLANDS
- EXIT,
To exit into SETTINGS from the LANGUAGE menu use the sensors to select EXIT and touch OK to confirm.
To immediately exit from the LANGUAGE menu and switch the appliance to standby mode, simultaneously touch and OK.
Time
Use the sensors to select TIME and touch OK to confirm. Items available in the TIME menu
- CURRENT TIME,
-MINUTE MINDER, - CLOCK TYPE,
-TIME FORMAT - EXIT.
Use the sensors to select the required item and touch OK to confirm.
Clock type
Select the clock type menu and touch OK. The following items will be available:
-DIGITAL,
-ANALOGUE.
Use the sensors to make your choice in the CLOCK TYPE menu and touch OK to confirm. The selection is stored by the appliance and the TIME upper level menu is automatically displayed.
The selected clock type will now appear in the upper right corner of the display and during standby.
Time format
Select the TIME FORMAT menu and touch OK. The following items will be available:
-24h,
- AM / PM.
Use the sensors to make your choice of time format and touch 0K to confirm. The selection is stored by the appliance and the TIME upper level menu is automatically displayed.
This option is only available for a digital clock.
Minute Minder
When you select the MINUTE MINDER and touch OK, the appliance will display the time in the following format: 00:00.
When the appliance is in standby you can also access Minute Minder when you touch ① and then ① .

If no changes are made within 5 seconds, the appliance enters standby mode.
Touch the sensors to adjust minute minder in 1 minute steps. Touch OK to confirm and start the countdown.
Touch the sensor to adjust the minute minder setting during countdown.
When the time has elapsed, a beep will sound
OPERATION
and the display will show the time - 00:00.
Touch OK to mute the beeping. The appliance switches to standby mode.
Lighting
Select the LIGHTING menu and touch OK. The following items will be available:
- CONTINUOUS LIGHTING
-ECO LIGHTING
Use the sensors to select the desired lighting option and touch OK to confirm. The selection is stored by the appliance and the SETTINGS upper level menu is displayed.
CONTINUOUS LIGHTING
When continuous lighting mode is selected, the light will be on continuously during the programme (heating function) or when the oven door is opened.
ECO LIGHTING
When this option is selected, the lighting will be on for 30 seconds when you touch any sensor during a programme (heating function). When oven door is opened, light is turned on for as long as the oven door is open, but no longer than 10 minutes, after which the light is turned off.
Tones
Select the tones menu and touch OK. The following items will be available:
-TONE1
-TONE2
-TONE3
Use the sensors to select the desired option and touch OK to confirm. The selection is stored by the appliance and the SETTINGS upper level menu is displayed.
Display brightness
Select the DISPLAY BRIGHTNESS menu and touch OK. The display brightness expressed in % will be shown on the display.

Use the sensors to adjust display brightness within 0 - 100% range in 1 % steps. Touch OK to store the selected display brightness level. The selection is stored by the appliance and the SETTINGS upper level menu is displayed.
Service
Select the SERVICE menu and touch OK. The following message will be shown.
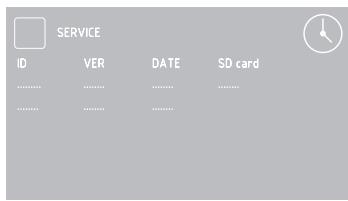
If the appliance detects an error, its code will be displayed on the screen.
Factory settings
Select the FACTORY SETTINGS menu and touch OK. The following message will be shown.
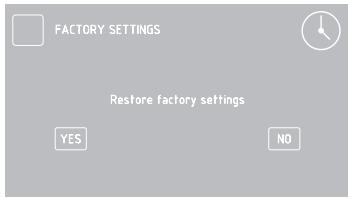
Use the sensors to choose to restore the factory settings or leave the current settings. To keep current settings, select "No" and touch OK to confirm. The appliance will exit to SETTING upper level menu.
Select "Yes" to restore the factory settings.
Heating functions
Use the sensors to select the HEATING FUNCTIONS menu and touch OK to confirm. The following HEATING FUNCTIONS menu items are available:
- RAPID PREHEATING
-CONVENTIONAL - PASTRY
- GRILL
-TURBO GRILL - SUPER GRILL
-FAN COOKING
-PIZZA
-BROWNING
-ROASTING
-DEFROSTING - ECO FAN COOKING
- EXIT.
Please, see the table below for overview of oven functions, oven elements, temperature and default settings.
| Function Description | Oven elements | Temperature [°C] | Default tempera-ture [°C] | Level from the bottom | |
| min. | max | ||||
| RAPID PREHEATING | fan heater + fan + grill | 30 | 280 | 180 | 3 |
| CONVENTIONAL | bottom heater + top heater | 30 | 280 | 180 | 3 |
| PASTRY | bottom heater + top heater + fan | 30 | 280 | 170 | 3 |
| GRILL | grill | 30 | 280 | 280 | 4 |
| TURBO GRILL | grill + Fan | 30 | 280 | 200 | 2 |
| SUPER GRILL | grill + top heater | 30 | 280 | 280 | 4 |
| FAN COOKING | fan heater + fan | 30 | 280 | 170 | 3 |
| PIZZA | fan heater + bottom heater + fan | 30 | 280 | 220 | 2 |
| BROWNING | top heater | 30 | 230 | 180 | - |
| ROASTING | bottom heater | 30 | 240 | 200 | - |
| DEFROSTING | fan | - | - | - | 3 |
| ECO FAN COOKING* | fan heater + fan | 30 | 280 | 170 | 3 |
- ECO Fan Cooking is an optimised heating function designed to save energy when cooking food.
OPERATION
Fan cooking
Use the sensors to select the FAN COOKING and touch OK to confirm. The following screen is displayed showing the default temperature of 170^ and level three.

You can adjust the default temperature within 5 seconds when the symbol is flashing. Touch the sensors to adjust the settings. Touch OK to confirm and the symbol will disappear.
Touch to adjust temperature again.
Note. The appliance will beep when the set temperature in the oven cavity is reached.
When Duration is not set, touch ① to turn off the appliance. The appliance switches to standby mode.
Use the meat probe
When select a heating function, set the desired cooking temperature, or accept the default temperature.
Plug the meat probe in the socket. The default meat probe temperature of 80^ will be displayed.
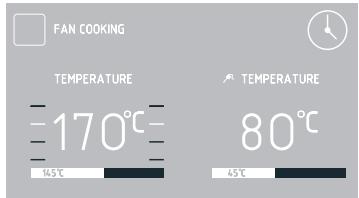
When meat probe is connected, the will flash for 5 seconds. If no changes are made within 5 seconds, the default temperature is set for the meat probe.
Use the sensors to adjust the temperature from 30^ to 99^ in 1^ steps.
Touch OK to confirm. The symbol and current meat probe temperature will be displayed. You can also adjust the temperature during a programme.
To do this touch. When you first touch the sensor, the set meat probe temperature is displayed, the symbol is flashing and you can adjust the temperature.
Touch OK to confirm the adjusted meat probe temperature, the will stop flashing and the appliance will resume normal operation.
Touch 8 twice to adjust the oven temperature setting. Touch the sensors to adjust temperature in 1^ steps. Touch OK to confirm the temperature.
When the time has elapsed you will hear a beep and the continues to flash.
Touch OK to mute the beeping. The appliance switches to standby mode.
The use of meat probe is recommended when cooking large portions of meat (at least 1kg ). The use of meat probe is not recommended when cooking poultry and meat with bones.
When not in use, unplug the meat probe from its socket and remove from oven cavity.
Note:
Only use the meat probe provided with your appliance.
OPERATION
Recommended meat probe temperature settings
| Type of meat | Temperature [°C] |
| Pork | 85 - 90 |
| Beef | 80 - 85 |
| Veal | 75 - 80 |
| Lamb | 80 - 85 |
| Venison | 80 - 85 |
Setting Duration (for a heating function)
When the heating function is set, touch the sensor. When the symbol flashes, the display will show DURATION and "00:00".
Display before Duration or Duration and End Time are set
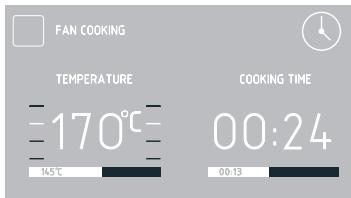
Display when Duration or Duration and End Time are set
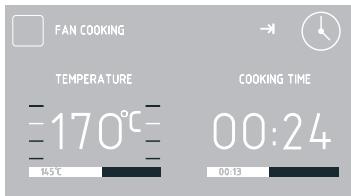
If you make no adjustment within 5 seconds
the display will show the temperature only, duration will not be shown and the symbol will stop flashing.
Touch the sensors to adjust duration in 1 minute steps. Touch 0K to confirm and store the duration. DURATION changes to ENDTIME and entered Duration, for example 0:30, changes to the actual end time, while the remaining time is displayed on the bar below the actual end time. The symbol is displayed continuously.
When the time has elapsed you will hear a beep and the continues to flash.
Touch OK to mute the beeping. The appliance switches to standby mode.
Note. Once the Duration has elapsed you can extend it. Do not touch OK and touch ① and adjust the extended duration using the ∨ ∧ sensors.
Set Duration and End Time (for a heating function)
For details on how to set Duration, please refer to the preceding paragraph.
Set the End Time.
When the symbol is displayed touch twice and will be displayed and the symbol will flash, and the DURATION display will show start time.
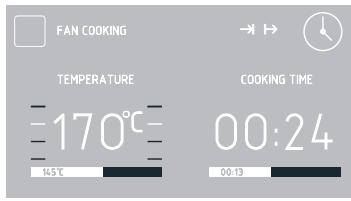
If you make no adjustments within 5 seconds, the appliance will return to previous settings of Duration and the selected heating function.
OPERATION
Use the sensors to adjust End Time in 1 minute steps.
Touch OK to confirm and store End Time. END TIME will change to START TIME and the actual start time will be displayed.
If you do not make any adjustments within 60 seconds the appliance will enter standby and the and symbols will be displayed along with current time.
Touch ① to turn on the appliance and display the entered settings.
Appliance operation in selected mode
When the current time reaches the Start Time, the appliance will start the selected heating function.
START TIME changes to END TIME and the display shows end time and the time remaining to end time is displayed on the bar below the actual end time. When the appliance starts the symbol is off and the symbol is on. When the time has elapsed you will hear a beep and the continues to flash. Touch OK to mute the beeping. The appliance switches to standby mode.
Pre-set programmes
Select PRE-SET PROGRAMMES menu and touch 0K The following items will be available:
- MEAT
POULTRY
-PIZZA - FROZEN PRODUCTS
- PASTRIES
- DOUGH PROVING
- DRYING
- KEEPING WARM
When you select a programme and touch OK to confirm the following submenu items will be available:
MEAT
-BEEF
- PORK
-LAMB
-VEAL
POULTRY
- CHICKEN
- DUCK
- GOOSE
-TURKEY
PIZZA
-THIN BASE
-THICKBASE
-FROZEN
FROZENPRODUCTS
-FISH
- CASSEROLE
LASAGNE
-CHIPS
PASTRIES
- CRUMBLE CAKE
- FRUITCAKE
- SWISS ROLL
- SPONGE CAKE
- CUPCAKES
- COOKIES
-BREAD
DOUGH PROVING
DRYING
KEEPING WARM
Use the sensors to select the desired menu and touch OK to confirm.
You can adjust oven cavity or meat probe temperature at any time, however this will end the pre-set programme.
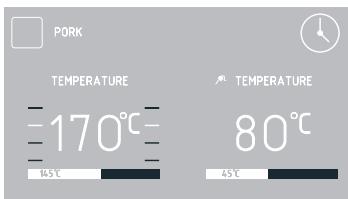
When you adjust the temperature (the
OPERATION
stop flashing) the pre-set programme will change to a regular heating function. Touch ① to stop any programme at any time.
When you touch ① , the appliance switches to standby mode.
In some programs, you can change the weight. When the scale symbol is flashing you can adjust the weight or confirm the default weight. Use the sensors to make adjustments and then touch OK to confirm and store the adjusted weight.
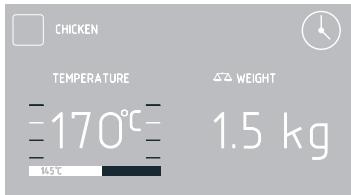
To start a pre-set programme with pre-heating function, select it and touch 0K to confirm. Oven will start preheating to 200^
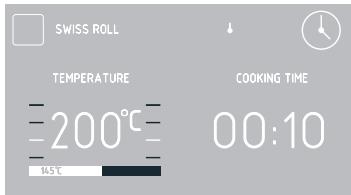
When the temperature reaches 200^ , a beep will sound and the symbol will flash. The temperature of 200^ in the oven cavity will be maintained.
Place food in the oven, close the door and touch OK to start the programme.
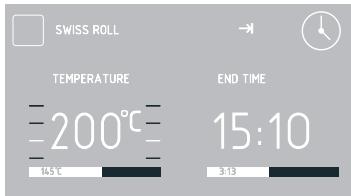
When the pre-set programme completes, you will hear beeping. The display will show the set oven cavity temperature.
Touch OK to mute the beeping. The appliance switches to standby mode.
User programmes
Use the sensors to select user programmes and touch OK to confirm. There are 10 user programmes that can be customized to suit your needs.
Use the sensors to select PROGRAMME 1 THROUGH PROGRAMME 10 and touch OK to confirm. You can then select the heating function, adjust temperature, cooking level and duration.
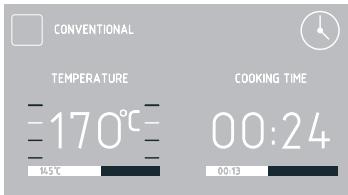
Adjustments are the same as for any heating function.
Once Duration is confirmed, a keyboard will be displayed to enter a custom programme name. Programme name may contain up to 25 characters.
When the user programme completes, you will hear beeping. The display will show the set oven cavity temperature.
Touch OK to mute the beeping. The appliance switches to standby mode.
OPERATION
Steam programmes
Use the sensors to select the STEAM PROGRAMMES menu and touch OK to confirm.
The following STEAM PROGRAMMES menu items are available:
- DEEP STEAM
- STEAM & ROAST
- REHEAT & PASTEURISE
- SLOW COOK PORK
- SLOW COOK TENDER MEAT
-BREAD - POULTRY
- ROAST & STEAM
- BAKE & STEAM
- DESCALE
-EXIT
Use the sensors to select a desired programme and touch OK to confirm.
The oven is equipped with special stainless steel bowls:
- perforated for vegetables and fish
-solid for meat.
Place the steel bowls with food on the wire shelf. Close the oven door.
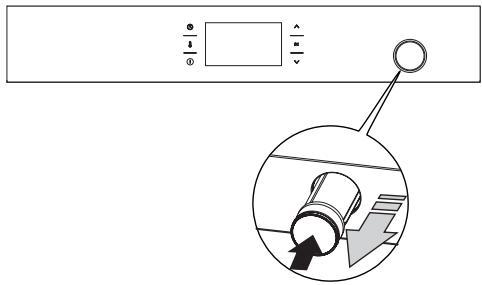
Water container drawer is located in the front panel. Push and then pull the container drawer. Pour 0.5 l of water into the container. (If you need to add water, the message "Add water (0.5l) and press OK" will be shown on the display). When there is enough water in the container you will hear a beep. Close the
container drawer.
Select the P01S-P09S programme and touch OK to confirm and start the programme.
IMPORTANT: The beeping during a programme and flashing message "Add 0.5l of water" on the display mean that you need to add water. Proceed the same as you added water for the first time. The message will stop flashing when you have added enough water.
NOTE: When water runs out the programme is not interrupted!
When the set time has elapsed, you will hear beeping. Touch any sensor to mute the beeping.
Touch OK acknowledge the completed programme. The message "Remove water" will be show on the display.
Open the door ajar to the first position (about 15^ ).
You can open the door all the way after a few seconds.
Then place deep baking tray under the water drain.
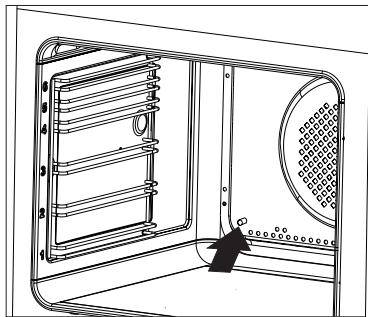
Press OK to drain the remaining water from steam system.
Wipe oven cavity dry with a cloth.
When you have run steam programmes several times, start the oven fan heater for 30 minutes at 180^ .
OPERATION
NOTE: Danger of burns! Hot steam may escape when you open the oven door. Be careful when you open the oven door during or after cooking. Do NOT lean over the door when you open it. Please note that depending on the temperature the steam can be invisible.
IMPORTANT: Ensure there is no water in the steam system when you use standard heating functions. Do not add water into the container drawer when using the standard heating functions.
Descale the steam system
When you have run several steam programmes, a flashing "Descale" message will be shown on the display. This message prompts you to descale the system. You can skip descending twice, by touching the ① sensor. However, eventually the appliance will not allow you to run a steam programmes again until you descale the appliance.
When you select the "Descale" programme, the display will show the message "Add 0.5l of descending agent." During the program, you will see the messages "Add 0.5l of water" and "Remove water" (rinsing).
Descale the appliance.
Prepare the solution of 450~ml of water and 50~ml of liquid descaling agent.
Pour the solution into the water containerer drawer.
Press OK to start the "Descale" programme.
NOTE: During the descending programme, you will need to drain water from the steam system 3 times.
Drain the descending solution from the system when you hear a beep and the "Remove water" message is flashing.
- Open the oven door.
- Then place deep baking tray under the
water drain.
- Press OK to drain the remaining decalging solution from the steam system. Pour the solution out of the baking tray and rinse it with water.
Add water when you hear beeping and the message "Add water" is flashing on the display. To rinse the steam system, pour 0.5 l of clean water into the water container drawer and touch OK to continue the programme.
Drain the water from the system when you hear a beep and the "Remove water" message is flashing.
- Open the oven door.
- Then place deep baking tray under the water drain.
- Press OK to drain the remaining water from the steam system. Pour the solution out of the baking tray and rinse it with water.
IMPORTANT: If water is dripping from the drain tube during the steam programme, flush the system. When the appliance is on but no function is active:
- Place at least 1 litre container under the drain.
- Pour 0.5 litres of water into the water container drawer.
- Simultaneously touch the sensors and drain water out of the system.
Repeat this procedure twice.
If the problem persists, descale the appliance.
IMPORTANT: If you notice scale draining from the steam system after the completed steam programme, select the "Descale" programme from the list and follow the descending instructions.
If you pour water into the container but decide not to run a steam programme, you can touch the sensors to drain water from the steam system.
OPERATION
Special functions
Child Lock
To activate the child lock simultaneously touch and hold the 0K and for about 3 seconds. When the Child Lock function is set, the symbol and the message "Simultaneously touch and 0K to release" The message will be displayed for 3 seconds. When Child Lock is active the message is displayed each time any sensor is touched.
When child lock is enabled, you will not be able to make any changes to the cooking programmes. All the sensors, except 0K, and ① are inactive. When child lock is enabled touch 0K and together to deactivate the child lock or 0K sensor to acknowledge a completed programme. When child lock is enabled the ① sensor serves only to interrupt the programme rather than access the menu.
Simultaneously touch OK and for approximately 3 seconds to deactivate the child lock. When the Child Lock function is released the symbol and the message "Simultaneously touch and OK to release" will be off.
Note. Child Lock continues to be active even after a power outage.
Automatic power cut out
If the oven operates any heating function for a long (excessive) period of time, heating elements are disconnected.
Example: If oven cavity temperature is 200^ heating elements are turned off after about 3 hours. At a temperature of 100^ after about 10 hours.
This prevents overheating.
If all the heating elements are disconnected, this is indicated by a flashing display backlight and the symbol.
To deactivate the automatic power cut out of heating elements, touch ① in standby mode. The appliance exits to the main menu.
Night Mode
Between 22:00 and 6:00 the appliance automatically switches to night mode dimming display backlight intensity.
Open door alert
If the oven chamber door is opened during cooking, an acoustic signal will be sounded after 30 seconds and the message DOOR OPEN will be displayed.
OpenUp!
This function allows you to open the oven door by touching the handle. There are two opening modes to choose from - One-time (□ is displayed) and a Always (□ is displayed). In On-time mode you can touch the handle to open the door once only when the oven is on. In Always mode you can always touch the handle to open the door when the oven is on. IMPORTANT: The OpenUp! function does not work when the oven is turned off (in stand-by mode, when the clock indicates the current time).
To enable the function, use the sensors to select the OpenUp! menu and then one of the following options:
ALWAYS
ONE TIME
POWER OFF
EXIT
To open the oven door, touch the metal strip of the oven door handle. You need to touch the handle for at least 0.5 second. The sensitivity of the handle allows you to open the door with your hand or a covered part of the body, e.g. the elbow or the knee.
OPERATION
Regardless of the OpenUp! settings, the door can be opened manually in any situation by pulling the handle.
Note: When OpenUp! function is active in Always mode, door can be easily opened inadvertently. We recommend to closely supervise children or to deactivate the OpenUp! function.
Cooling fan
Cooling fan operates independently of the set functions and the appliance mode of operation. The cooling fan activates automatically when any function is activated. The cooling fan operates as long as the oven cavity temperature exceeds 80^ . Below this temperature, the cooling fan turns off.
BAKING IN THE OVEN - PRACTICAL HINTS
Baking
we recommend using the baking trays which were provided with your cooker;
- it is also possible to bake in cake tins and trays bought elsewhere which should be put on the drying rack; for baking it is better to use black trays which conduct heat better and shorten the baking time;
- shapes and trays with bright or shiny surfaces are not recommended when using the conventional heating method (top and bottom heaters), use of such tins can result in undercooking the base of cakes;
- when using the ultra-fan function it is not necessary to initially heat up the oven chamber, for other types of heating you should warm up the oven chamber before the cake is inserted;
- before the cake is taken out of the oven, check if it is ready using a wooden stick (if the cake is ready the stick should come out dry and clean after being inserted into the cake);
after switching off the oven it is advisable to leave the cake inside for about 5 min.;
- temperatures for baking with the ultra-fan function are usually around 20 - 30 degrees lower than in normal baking (using top and bottom heaters);
- the baking parameters given in Table are approximate and can be corrected based on your own experience and cooking preferences;
- if information given in recipe books is significantly different from the values included in this instruction manual, please apply the instructions from the manual.
Roasting meat
- cook meat weighing over 1kg in the oven, but smaller pieces should be cooked on the gas burners.
- use heatproof ovenware for roasting, with handles that are also resistant to high temperatures;
- when roasting on the drying rack or the grate we recommend that you place a baking tray with a small amount of water on the lowest level of the oven;
- it is advisable to turn the meat over at least once during the roasting time and during roasting you should also baste the meat with its juices or with hot salty water – do not pour cold water over the meat.
BAKING IN THE OVEN - PRACTICAL HINTS
ECO Heating
- ECO Heating is an optimised heating function designed to save energy when preparing food.
- You cannot reduce the cooking time by setting a higher temperature; preheating the oven is not recommended.
- Do not change the temperature setting and do not open the oven door during cooking.
Recommended setting for ECO Heating
| Type of dish | Type of heating | Temperature (℃) | Level | Time (min.) |
| Sponge cake | Eco | 180 - 200 | 2 - 3 | 50 - 70 |
| Sponge cake | Eco | 180 - 200 | 2 | 50 - 70 |
| Fish | Eco | 190 - 210 | 2 - 3 | 45 - 60 |
| Beef | Eco | 200 - 220 | 2 | 90 - 120 |
| Pork | Eco | 200 - 220 | 2 | 90 - 160 |
| Chicken | Eco | 180 - 200 | 2 | 80 - 100 |
BAKING IN THE OVEN - PRACTICAL HINTS
| Type of dish | Type of heating | Temperature (°C) | Level | Time (min.) |
| Sponge cake | 160 - 200 | 2 - 3 | 30 - 50 | |
| Muffins | 160 - 1701) | 3 | 25 - 402) | |
| Muffins | 155 - 1701) | 3 | 25 - 402) | |
| Pizza | 200 - 2301) | 2 - 3 | 15 - 25 | |
| Fish | 210 - 220 | 2 | 45 - 60 | |
| Fish | 160 - 180 | 2 - 3 | 45 - 60 | |
| Fish | 190 | 2 - 3 | 60 - 70 | |
| Sausages | 220 | 4 | 14 - 18 | |
| Beef | 225 - 250 | 2 | 120 - 150 | |
| Beef | 160 - 180 | 2 | 120 - 160 | |
| Pork | 160 - 230 | 2 | 90 - 120 | |
| Pork | 160 - 190 | 2 | 90 - 120 | |
| Chicken | 180 - 190 | 2 | 70 - 90 | |
| Chicken | 160 - 180 | 2 | 45 - 60 | |
| Chicken | 175 - 190 | 2 | 60 - 70 | |
| Vegetables | 190 - 210 | 2 | 40 - 50 | |
| Vegetables | 170 - 190 | 3 | 40 - 50 |
1) Preheat
2)Baking smaller items
The times are apply to dish that is placed into a cold oven. For the preheated oven, the times should be reduced by about 5-10 minutes.
Note: The figures given in Tables are approximate and can be adapted based on your own experience and cooking preferences.
BAKING IN THE OVEN - PRACTICAL HINTS
Parameters for steam programs
| Programme number | Programme name2) | Oven functions | Temperature [°C] | Time [min] | Level | Dish |
| P01S | Steam cooking | stage 1 steam | 100 | 50 | 3 | Vegetables, rice, cereals, shakshuka, crème brûlée, Viennese eggs |
| P02S | Steam + grill | stage 1 steam | 100 | 25 | 3 | Roasted fish, pasta casseroles |
| stage 2 roaster | 220 | 20 | ||||
| P03S | Warm up and pasteurize | stage 1 steam | 90 | 25 | 3 | |
| P04S | Slow cooked pork | stage 1 steam | 80 | 240 | 3 | Slow cooked pork |
| P05S | Slow cooked tender meat | stage 1 steam | 70 | 120 | 3 | Turkey, pork tenderloins, beef cheeses, halibut, guinea fowl |
| P06S | Basic bread | stage 1 steam | 50 | 30 | 3 | Focaccia, bread rolls |
| Stage 2 convention- al heating | 200 | 30 | ||||
| P07S 1) | Poultry | stage 1 steam | 180 | 75 | 3 | Poultry |
| P08S 1) | Grill + bake and steam | stage 1 roaster | 220 | 20 | 3 | One-pot dishes - goulash, cas- serole with meat, ratatouille, meat |
| stage 2 steam | 120 | 90 | ||||
| P09S | Bake and steam | Stage 1 steam and convention- al heating | 150 | 120 | 3 | Paté, fondant (duration: 12 minutes) |
| P10S | Descale | 100 | 15 |
1) Quick pre-heat activated to quickly reach the set temperature.
2) Please refer to our e-book for recipes made for pre-set programmes.
TEST DISHES. According to standard EN 60350-1.
Baking
| Type of dish | Accessory | Level | Type of heating | Temperature (°C) | Baking time2)(min.) |
| Small cakes | Baking tray | 3 | □ | 160 - 1701) | 25 - 402) |
| Baking tray | 3 | □ | 155 - 1701) | 25 - 402) | |
| Baking tray | 3 | □ | 155 - 1701) | 25 - 402) | |
| Baking tray Roasting tray | 2 + 42 - baking tray or roasting tray4 - baking tray | □ | 155 - 1701) | 25 - 502) | |
| Shortbread | Baking tray | 3 | □ | 150 - 1601) | 30 - 402) |
| Baking tray | 3 | □ | 150 - 1701) | 25 - 352) | |
| Baking tray | 3 | □ | 150 - 1701) | 25 - 352) | |
| Baking trayRoasting tray | 2 + 42 - baking tray or roasting tray4 - baking tray | □ | 160 - 1751) | 25 - 352) | |
| Fatless sponge cake | Wire rack + black baking tin diameter 26cm | 3 | □ | 170 - 1801) | 30 - 452) |
| Apple pie | Wire rack + 2black baking tins diameter 20cm | 2black baking tins placed after the dia-gonal, back right, front left | □ | 180 - 2001) | 50 - 702) |
1)Preheat, do not use Rapid preheat function.
2) The times are apply to dish that is placed into a cold oven. For the preheated oven, the times should be reduced by about 5-10 minutes.
TEST DISHES. According to standard EN 60350-1.
Grilling
| Type of dish | Accessory | Level | Type of heating | Temperature (°C) | Time (min.) |
| White bread toast | Wire rack | 4 | XXX | 220 1) | 1,5 - 2,5 |
| Wire rack | 4 | XXXX | 220 2) | 2 - 3 | |
| Beef burgers | Wire rack + roasting tray (to gather drops) | 4 - wire rack 3 - roasting tray | XXX | 220 1) | 1st side 10 - 15 2nd side 8 - 13 |
1) Preheat for 5 minutes, do not use Rapid preheat function.
2)Preheat for 8 minutes, do not use Rapid preheat function.
Roasting
| Type of dish | Accessory | Level | Type of heating | Temperature (°C) | Time (min.) |
| Whole chicken | Wire rack + roasting tray (to gather drops) | 2 - wire rack1 - roasting tray | 180 - 190 | 70 - 90 | |
| Wire rack + roasting tray (to gather drops) | 2 - wire rack1 - roasting tray | 180 - 190 | 80 - 100 |
The times are apply to dish that is placed into a cold oven. For the preheated oven, the times should be reduced by about 5-10 minutes.
CLEANING AND MAINTENANCE
By ensuring proper cleaning and maintenance of your oven you can have a significant influence on the continuing fault-free operation of your appliance.
Before you start cleaning the oven must be switched off. Do not start cleaning until the oven has completely cooled.
- The oven should be cleaned after every use. When cleaning the oven the lighting should be switched on to enable you to see the surfaces better.
- The oven chamber should only be washed with warm water and a small amount of washing-up liquid.
After cleaning the oven chamber wipe it dry.
Important!
Do not use any abrasive agents, harsh detergents or abrasive objects for cleaning. Only use warm water with a small addition of dishwashing liquid to clean the front of the appliance. Do not use washing powders or creams.
Replacing the halogen bulb in the oven
Before replacing the halogen bulb, make sure the appliance is disconnected from the electric mains to avoid a possible electric shock.
- Unplug the appliance
- Remove shelves and trays from the oven.
- If the oven has telescopic runners, remove them also.
- Use a flat screwdriver to pry the lamp cover loose, remove it, wash and carefully wipe it dry.
- Pull the halogen bulb out by sliding it down using a cloth or paper. If necessary, replace the halogen bulb with a new one.
-type G9
- voltage 230V
-power 25W
6. Replace the halogen bulb in its socket.
7. Replace the lamp cover
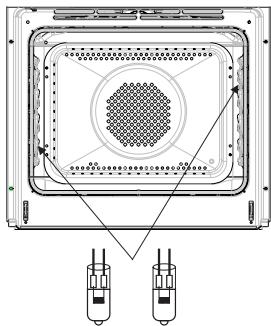
CLEANING AND MAINTENANCE
- Oven is equipped with easily removable wire shelf supports. To remove them for washing, pull the front catch, then tilt the support and remove from the rear catch.
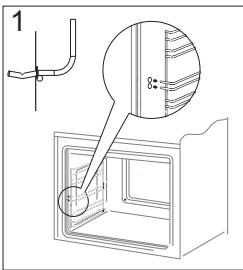
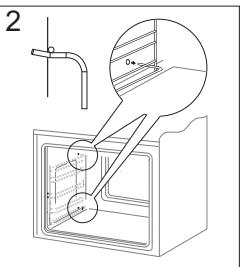
Removing wire shelf supports
Installing wire shelf supports
- Ovens has stainless steel sliding telescopic runners attached to the wire shelf supports. The telescopic runners should be removed and cleaned together with the wire shelf supports. Before you put the baking tray on the telescopic runners, they should be pulled out (if the oven is hot, pull out the telescopic runners by hooking the back edge of the baking tray on the bumpers in the front part of the telescopic runners) and then insert them together with the tray.
Important!
Do not wash telescopic runners in a dishwasher.
Removing telescopic runners
Installing telescopic runners
CLEANING AND MAINTENANCE
Door removal
In order to obtain easier access to the oven chamber for cleaning, it is possible to remove the door. To do this, tilt the safety catch part of the hinge upwards (fig. A). Close the door lightly, lift and pull it out towards you. In order to fit the door back on to the cooker, do the inverse. When fitting, ensure that the notch of the hinge is correctly placed on the protrusion of the hinge holder. After the door is fitted to the oven, the safety catch should be carefully lowered down again. If the safety catch is not set it may cause damage to the hinge when closing the door.

Tilting the hinge safety catches
Removing the inner panel
- Pull the upper door slat loose. (fig. B, C)
CLEANING AND MAINTENANCE
- Pull the inner glass panel from its seat (in the lower section of the door).
Important! Risk of damage to glass panel mounting. Do not lift the glass panel up but pull it out.
Remove the inner panel (fig. D).
- Clean the panel with warm water with some cleaning agent added.
Carry out the same in reverse order to reassemble the inner glass panel. Its smooth surface shall be pointed upwards.
Removal of the internal glass panel
TROUBLESHOOTING
In the event of any fault:
turn off the appliance,
- disconnect the power supply,
- based on the instructions given in the table below, some minor issues can be corrected by the user. Please check the consecutive points in the table before you refer the repair to customer service.
| Problem | Reason | Remedy |
| 1. The appliance does not work | No power | Check the fuse, replace if blown |
| 2. Oven lighting does not work. | Loose or damaged bulb | Replace the blown bulb (see Cleaning and Maintenance section) |
| 3. The programmer display shows “0:00”. | The appliance was disconnected from the mains or there was a temporary power cut. | Set the current time (see ‘Use of the programmer’) |
| 4. Fan does not work | Risk of overheating! Immediately unplug the appliance or switch off the main circuit breaker. Refer the repair to the nearest service centre. | |
If the problem is not solved, disconnect the power supply and report the fault.
Important! All repairs must be performed by qualified service technicians.
TECHNICAL DATA
Voltage rating
Power rating
Cooker dimensions H/W/D
230V 1N~50 Hz
max. 3,6 kW
59,5/59,5/57,5cm
The product meets the requirements of European standards EN 60335-1; EN60335-2-6.
The data on the energy labels of electric ovens is given according to standard EN 60350-1 / IEC 60350-1. These values are defined with a standard workload a with the functions active: bottom and top heaters (conventional heating) and fan assisted heating (forced air heating), if these functions are available.
The energy efficiency class was assigned depending on the function available in the product in accordance with the priority below:
| Forced air circulation ECO (ring heater + fan) | ECO |
| Forced air circulation ECO (bottom heater + top + roaster + fan) | ECO |
| Conventional mode ECO (bottom heater + top) | ECO |
During energy consumption test, remove the telescopic runners (if the product is fitted with any).
Certificate of compliance CE
The Manufacturer hereby declares that this product complies with the general requirements pursuant to the following European Directives:
The Low Voltage Directive 2014/35/EC,
Electromagnetic Compatibility Directive 2014/30/EC,
ErP Directive 2009/125/EC,
and therefore the product has been marked with the C € symbol and the Declaration of Conformity has been issued to the manufacturer and is available to the competent authorities regulating the market.

Electrodomesticos Iberia S.L.
Avenida Sur del Aeropuerto de Barajas 38
28042, Madrid
Espana
www.fagorelectrodomestico.com
- Manual de instrucciones
- Horno electrico incorporado
- ESTIMADO CLIENTE,
- CONTENIDO
- SEGURIDAD
- CÓM O AHORRAR ENERGÍA
- RETIRO DE USO
- CHARACTERISTICAS DEL PRODUCTO
- INSTALACION
- Montaje delorno
- Atencion:
- Conexión del hora a la instalación electrica
- jAdvertencia!
- Esquema de conexiones posibles
- FUNCTIONAMENTO
- Antes deponer en marcha el horno porprimera vez
- Panel de control
- Calentimiento delorno
- Important!
- Función WiFi
- Advertencia:
- Puede encontrar las instrucciones de configuración bajo el caso de la párgina web www.fagorelectrodomestico.com
- Funcionamento del programador y control delorno
- Primer encendido del hora y selección del idioma del programador
- Ajuste del tiempo actual
- Menu
- Ajustes
- Idioma
- Hora
- Tipode reloj
- Formato de la hora
- Temporizador
- Illuminación
- LUZ FIJA
- LUZ ECO
- Sonido
- Brillo de la pantalla
- Mantenimiento
- Ajustes de fabrica
- Funciones de calentimiento
- Termoventilador
- Uso de la sonda de carne
- iAdvertencia!
- Configuración del tiempo de configuración (para sistemas de calentamiento)
- Ajuste del tiempo de funciona y hora de finalización (para la función de calentimiento)
- Ajuste de la hora de finalización.
- Funcionalmente en el modo configurado. Cuando la hora actual sea igual a la hora de inicio, se activa la funciona de calentimiento anteriormente seleccionada.
- Programas predeterminados
- CARNES
- AVES
- PIZZA
- PRODUCTOS CONGELADOS
- PASTELES
- CRECIMIENTO DE LA MASA SECADO
- MANTENIMIENTO DEL CALOR
- Programas del usuario
- Programas al vapor
- -SALIR
- Descalcification del sistema de vapor
- Funciones especiales del programador
- Bloqueo del programador
- Modo nocturno
- Señalización de puerta abierta
- OpenUp!
- Ventilador refrigerador
- COCINADO EN EL HORNO - CONSEJOS PRÁCTICOS
- Preparación de reposteria
- Asado de carnes
- Funciones de calentimiento, circotherm ECO
- COCINADO EN EL HORNO - CONSEJOS PRACTICOS
- PLATOS DE PRUEBA. De conformidad con la norma EN 60350-1.
- LIMPieZA Y MANTENIMIENTO DEL HORNO
- Desmontaje de puerta
- Desmontaje del cristal interno
- SITUACIONES DE EMERGENCIA
- ;Nota!
- DATOS TÉCNICOS
- Declaración del fabricante
- DEAR CUSTOMER,
- TABLE OF CONTENTS
- SAFETY INSTRUCTIONS
- HOW TO SAVE ENERGY
- UNPACKING
- DISPOSAL OF THE APPLIANCE
- DESCRIPTION OF THE APPLIANCE
- SPECIFICATION OF THE APPLIANCE
- INSTALLATION
- Installing the oven
- Electrical connection
- Warning!
- Connection diagram
- OPERATION
- Before using the oven for the first time
- Warm up the oven chamber
- Control Panel
- Important.
- WiFi function
- Note:
- Available connection modes:
- Please visit www.fagorelectrodomestico.com for step-by-step instructions how to configure your network.
- Electronic programmer
- Switch on the appliance and select interface language.
- Set current time
- Settings
- Language
- Available languages:
- Time
- Clock type
- Time format
- Minute Minder
- Lighting
- CONTINUOUS LIGHTING
- ECO LIGHTING
- Tones
- Display brightness
- Service
- Factory settings
- Heating functions
- Fan cooking
- Use the meat probe
- Recommended meat probe temperature settings
- Setting Duration (for a heating function)
- Set Duration and End Time (for a heating function)
- Set the End Time.
- Appliance operation in selected mode
- Pre-set programmes
- MEAT
- POULTRY
- FROZENPRODUCTS
- PASTRIES
- DOUGH PROVING
- DRYING
- KEEPING WARM
- User programmes
- Steam programmes
- Descale the steam system
- Special functions
- Night Mode
- Open door alert
- Cooling fan
- BAKING IN THE OVEN - PRACTICAL HINTS
- Baking
- Roasting meat
- ECO Heating
- TEST DISHES. According to standard EN 60350-1.
- CLEANING AND MAINTENANCE
- Replacing the halogen bulb in the oven
- Door removal
- Removing the inner panel
- TROUBLESHOOTING
- TECHNICAL DATA
- Certificate of compliance CE
Marque : FAGOR
Modèle : 8H-198ADTCN
Catégorie : Four électrique encastrable