UR30080 - Aspirateur ROYAL - Notice d'utilisation et mode d'emploi gratuit
Retrouvez gratuitement la notice de l'appareil UR30080 ROYAL au format PDF.
| Type de produit | Aspirateur traîneau (upright) |
| Marque | ROYAL |
| Modèle | UR30080 |
| Alimentation | 120 V, secteur (cordon d'alimentation avec enrouleur automatique) |
| Puissance nominale | Non spécifiée (type aspirateur standard) |
| Type de sac | Sac à poussière en papier (type U) |
| Capacité du sac | Non spécifiée (ne pas dépasser la ligne de remplissage) |
| Filtres | Filtre interne de la chambre à sac + filtre d'échappement (remplaçables) |
| Brosse principale | Brosse rotative avec courroie, réglable en hauteur |
| Accessoires inclus | Brosse turbo, suceur fentes, brosse à poussière, tube d'extension |
| Fonctions | Nettoyage des sols et tapis, nettoyage hors sol (tuyau + accessoires) |
| Réglage de hauteur | Molette de réglage pour tapis, actionnable en position verticale ou de fonctionnement |
| Indicateur de sac plein | Fenêtre indicateur (jaune/rouge) |
| Éclairage | Phare avant (lampe automobile n°906, 13 V) |
| Longueur du cordon | Non spécifiée (enrouleur automatique avec pédale) |
| Poids approximatif | 7 kg (estimation pour un aspirateur traîneau standard) |
| Dimensions (L x l x H) | Environ 30 x 30 x 110 cm (estimation) |
| Sécurité | Protecteur thermique, arrêt automatique en cas de surchauffe, fiche polarisée |
| Garantie | 1 an (pièces et main-d'œuvre) |
| Entretien | Changement régulier du sac et des filtres, nettoyage de la brosse et du tuyau |
FOIRE AUX QUESTIONS - UR30080 ROYAL
Questions des utilisateurs sur UR30080 ROYAL
0 question sur cet appareil. Repondez a celles que vous connaissez ou posez la votre.
Poser une nouvelle question sur cet appareil
Téléchargez la notice de votre Aspirateur au format PDF gratuitement ! Retrouvez votre notice UR30080 - ROYAL et reprennez votre appareil électronique en main. Sur cette page sont publiés tous les documents nécessaires à l'utilisation de votre appareil UR30080 de la marque ROYAL.
MODE D'EMPLOI UR30080 ROYAL
0R-L00690L96-L#SsNeAeSn sno⊥ 6002
(1)
aennnnnne nnnnne ennnnne ennnnne ennnnne ennnnne ennnnne ennnnne ennnnne ennnnne ennnnne ennnnne ennnnne ennnnne ennnnne ennnnne ennnnne ennnnne ennnnne ennnnne ennnnne ennnnne ennnnne ennnnne ennnnne ennnnne ennnnne
eep
: aepn ap n
nne nnnnne nee eae
Euebd - Joueds
nne nnnnne nnnnne nnnnne nnnnne nnnnne nnnnne nnnnne nnnnne nnnnne nnnnne nnnnne nnnnne nnnnne nnnnne nnnnne nnnnne nnnnne nnnnne nnnnne nnnnne nnnnne nnnnne nnnnne nnnnne nnnnne nennnne nnnnne nnnnne nnnnne nnnnne nnnnne nnnnne nnnnne nnnnne nnnnne nnnnne nnnnne nnnnne nnnnne nnnnne nnnnne nnnnne nnnnne nnnnne nnnnne nnnnne nnnnne nnnnne nnnnne nnnnne nannnee
:LNNEeSsIgA
ooc-sunnneJeFJMMM
:qM 1S
(epenege 3
vL-LZc-008-L
: e zesodcpe
nondssnnnsbse
e e enen ene ene ene ene ene ene ene ene ene ene ene ene ene ene ene ene ene ene ene ene ene ene ene ene ene ene ene ene ene ene ene ene ene ene ene ene ene ene ene ene ene ene ene ene ene ene ene ene ene ene enee
eepn snoaonod snon
E
VADINNDNNDNNDNNNN
eONNEEN
A
Ae
LNNEANNNNNEAENNNNNSNOININNNSNI
S3E3I17:LNVADW
nne nnnnne nnnnne nnnnne
Ae

OWNER'S MANUAL
Operating and
Servicing Instructions
IMPORTANT- READ CAREFULLY BEFORE ASSEMBLY AND USE.
THIS PRODUCT IS INTENDED FOR HOUSEHOLD USE ONLY. IF USED COMMERCIAALLY, WARRANTY IS VOID.
- Let us help you put your vacuum together or answer any questions, call:
1-800-321-1134
(USA & Canada)
Website:
www.royalvacuums.com
WARNING:
Cleaner assembly may include small parts.
Small parts can present a choking hazard.
Espanol - página E1
For quick reference, please record your vacuum information below.
Model #:
Mfg. Code:
(Mfg. code located on the lower backside of cleaner)
IMPORTANT SAFETY INSTRUCTIONS SAVE THESE INSTRUCTIONS
When using an electrical appliance, basic precautions should always be followed, including the following:
READ ALL INSTRUCTIONS BEFORE USING THIS APPLIANCE.
WARNING: TO REDUCE THE RISK OF FIRE, ELECTRIC SHOCK OR INJURY:
- Fully assemble before operating.
- Operate vacuum only at voltage specified on data label on lower backside of cleaner.
- Do not leave appliance when plugged in. Unplug from outlet when not in use and before cleaning or servicing.
- Do not use outdoors or on wet surfaces.
- Do not allow to be used as a toy. Not intended for use by children age 12 and under. Close supervision is necessary when used near children. To avoid injury or damage, keep children away from product, and do not allow children to place fingers or other objects into any openings.
- Use only as described in this manual. Use only manufacturer's recommended attachments and products.
- Do not use with damaged cord or plug. If appliance is not working as it should, has been dropped, damaged, left outdoors, or dropped into water, take it to a service center prior to continuing use.
- Do not pull or carry by cord, use cord as a handle, close a door on cord, or pull cord around sharp edges or corners. Do not place product on cord. Do not run appliance over cord. Keep cord away from heated surfaces.
- Do not unplug by pulling on cord. To unplug, grasp the plug, not the cord.
- Do not handle plug or appliance with wet hands.
- Do not put any object into openings. Do not use with any opening blocked; keep free of dust, lint, hair, and anything that may reduce air flow.
- Keep hair, loose clothing, fingers, and all parts of body away from openings and moving parts. Brushroll continues to rotate when in the upright position, unless it is turned off by the brushroll activation pedal.
- Turn off all controls before unplugging.
- Use extra care when cleaning on stairs. To avoid personal injury or damage, and to prevent the cleaner from falling, always place cleaner at bottom of stairs on floor. Do not place cleaner on stairs or furniture, as it may result in injury or damage.
- Do not use to pick up flammable or combustible liquids, such as gasoline, or fine wood sandings, or use in areas where they may be present.
- Hold plug when rewinding onto cord reel. Do not allow plug to whip when rewinding.
- Unplug before connecting Turbo Brush Tool.
- Do not pick up anything that is burning or smoking, such as cigarettes, matches, or hot ashes.
- Do not use without Dust Bag and/or Filters in place.
- WARNING: This product contains chemicals known to the State of California to cause cancer, birth defects or reproductive harm.
sabewop sep no
ssssssssssssssssssssssssssssssssssssssssssssssssssssssssssssssssssssssssssssssssssssssssssssssssssssssssssssssssssssssssssssssss
e e e e e e e e e e e e e e e e e e e e e e e e e e e e
e e e e e e e e e e e e e e e e e e e e e e e e e e e e e e e e e e e e e e e e e e e e e e e e e e e e e e e ee
e e e e e e e e e e e e e e e e e e e e e e e e e e e e e e e e e e e e e e e e e e e e e e
nnnn nnnn nnnn nnnn nnnn nnnn nnnn nnnn nnnn nnnn nnnn nnnn nnnn nnnn nnnn nnnn nnnn nnnn nnnn nnnn nnnn nnnn nnnn nnnn nnnn nnnn nnnn nnnn nnnn nnnn nnnn nnnn nnnn nnnn nannn nannn nannn nannn nannn nannn nannn nannn nannn nannn nannn nannn nannn nannn nannn nannn nannn nannn nannn nannn nannn nannn nannn nannn nannn nannn nannn nannn nannn nannn nannn
e e e e e e e e e e e e e e e e e e e e e e e e e e e e e e e e e e e e e e e e e e e e e e e e e e e e
nond nne nee en e ene ene ene ene ene ene ene ene ene ene ene ene ene ene ene ene ene ene ene ene ene ene ene ene ene ene ene ene ene ene ene ene ene ene ene ene ene ene ene ene ene ene ene ene ene ene ene ene ene ene enee
e e e e e e e e e e e e e e e e e e e e e e e e e e e e e e e e e e e e e e e e e e e e e e e e e e e e ee
nne nnnn nee nne nne nne nne nne nne nne nne nne nne nne nne nne nne nne nne nne nne nne nne nne nne nne nne nne nne nne nne nne nne nne nne nne nne nne nne nne nne nne nne nne nne nne nne nne nne nne nne nne nne nnee
e e e e e e e e e e e e e e e e e e e e e e e e e e e e e e e e e e e e e e e
ns nnnnne nne nne nne nne nne nne nne nne nne nne nne nne nne nne nne nne nne nne nne nne nne nne nne nne nne nne nne nne nne nne nne nne nne nne nne nne nne nne nne nne nne nne nne nne nne nne nne nne nne nne
: SRESSEESSEENONONONONONONONONONONONONONONONONONONONONONONONONONONONONONONONONONONON
e e e e e e e e e e e e e e e e e e e e e e e e e e e e e e e e e e e e e e e e e
sne nnnnne eonnnnne ennnnne ennnnne ennnnne ennnnne ennnnne ennnnne ennnnne ennnnne ennnnne ennnnne ennnnne ennnnne ennnnne ennnnne ennnnne ennnnne ennnnne ennnnne ennnnne ennnnne ennnnne ennnnne ennnnne ennnnne ennnnne
SNNIOIINNSNI ESEKREERNEENSSNNOEHNNSNCO
e e e e e e e e e e e e e e e e e e e e e e e e e e e e e e e e e e e e e e e e e e e e e e e e e e e e ee
:LNNESSIJIERVA
e e e e e e e e e e e e e e e e e e e e e e e e e e e e e e e e e e e e e e e e e e e e e e e e e e e e e e e e e ee 1
: SsSsSsSsSsSsSsSsSsSsSsSsSsSs
'ennn nnnn nnnn nnnn nnnn nnnn nnnn nnnn nnnn nnnn nnnn nnnn nnnn nnnn nnnn nnnn nnnn nnnn nnnn nnnn nnnn nnnn nnnn nnnn nnnn nnnn nnnn nnnn nnnn nnnn nnnn nnnn nnnn nnnn nnn nnnn nnnn nnnn nnnn nnnn nnnn nnnn nnnn nnnn nnnn nnnn nnnn nnnn nnnn nnnn nnnn nnnn nnnn nnnn nnnn nnnn nnnn nnnn nnnn nnnn nnnn nnnn nnnn nnnn nnnn nnnn nnnn nnnn nnnee nee nee nee nee nee nee nee nee nee nee nee nee nee nee nee nee nee nee nee nee nee nee nee nee nee nee nee nee nee nee nee nee nee nee nee nee nee nee nee nee nee nee nee nee nee nee nee nee nee nee nea eae ee eae ee eae ee eae ee eae ee eae ee eae ee eae ee eae ee eae ee eae ee eae ee eae ee eae ee eae ee eae ee eae ee eae ee eae ee eae ee eae ee eae ee eae ee eae ee eae ee eae ee eae ee eae ee eae ee eae ee eae ee eae ee eae ee eae ee ee eae ee eae ee eae ee eae ee eae ee eae ee eae ee eae ee eae ee eae ee eae ee eae ee eae ee eae ee eae ee eae ee eae ee eae ee eae ee eae ee eae ee eae ee eae ee eae ee eae ee eae ee eae ee eae ee eae ee eae ee eae ee eae ee eae
-
An internal thermal protector has been designed into your cleaner to protect it from overheating. When the thermal protector activates the cleaner will stop running. If this happens proceed as follows:
-
Turn cleaner OFF and disconnect it from the electrical outlet.
- Inspect the exhaust, inlet, hose and filters for any obstructions. Clear obstructions if present.
- When cleaner is unplugged and motor cools for 30 minutes, the thermal protector will deactivate and cleaning may continue.
If the thermal protector continues to activate after following the above steps, your cleaner may need servicing.
CAUTION: TO REDUCE THE RISK OF DAMAGE:
- Avoid picking up hard, sharp objects with this product, as they may cause damage.
- Store in a dry place. Do not expose machine to freezing temperatures.
- Brushroll continues to turn while product is turned on and handle is in upright position. To avoid damage to carpet, rugs, furniture and flooring, avoid tipping cleaner or setting it on furniture, fringed area rugs, or carpeted stairs during tool use. Always insure that the brushroll is off by stepping on the brushroll activation pedal.
- Do not use sharp objects to clean out hose as they can cause damage.
WARNING:
- To reduce the risk of electric shock, this appliance has a polarized plug (one blade is wider than the other). This plug will fit in a polarized outlet only one way. If the plug does not fit fully in the outlet, reverse the plug. If it still does not fit, contact a qualified electrician to install the proper outlet. Do not change the plug in any way.
CONGRATULATIONS
You are now the proud owner of a Royal Upright. We trust your new purchase will bring you many years of satisfaction.
We are very proud of our products and hope that you are equally satisfied with their quality and performance.
Thank you for your support of Royal products.
Visit our website at www.royalvacuums.com
TABLE OF CONTENTS
Safety Instructions. Page 2, 3
Features. Page 5
How to Assemble. Page 6
Handle. Page 6
Tool Storage . 6
How To Operate. Page 7
Floor/Carpet Cleaning . Page 7
Above Floor/Stair Cleaning. Page 7
Paper Bag: Removal & Replacement . 8
Filter: Removal & Replacement Page 8, 9
Lightbulb: Removal & Replacement . Page 9
Belt or Brushroll: Removal & Replacement. Page 10
General Maintenance. Page 11
Transporting Cleaner Page 11
Troubleshooting Guide. Page 12
LIMITED WARRANTY
To the consumer, Royal Appliance Mfg. Co. warrants this vacuum cleaner to be free of defects in material or workmanship for 1 year from the date of the original purchase. Save your original sales receipt to validate start of warranty period.
If the vacuum cleaner should become defective within the warranty period, we will repair or replace any defective parts free of charge. The complete machine must be delivered prepaid to any ROYAL® Authorized Sales & Warranty Service Station. Please include complete description of the problem, day of purchase, copy of original sales receipt and your name, address and telephone number. If you are not near a Warranty Station, call the factory for assistance at USA & Canada: 1-800-321-1134. Use only genuine Royal® replacement parts.
The warranty does not include unusual wear, damage resulting from accident or unreasonable use of the vacuum cleaner. This warranty does not cover brushes, bags, flat belts, filters, bulbs or fan damage. This warranty does not cover unauthorized repairs. This warranty gives you specific legal rights and you may also have other rights. (Other rights may vary from state to state in the USA).
IMPORTANT: USE ONLY GENUINE ROYAL* REPLACEMENT PARTS.
SsHnNnHNnHNnHNnHNnHNnHNnHNnHNnHNnHNnHNnHNnHNnHNnHNnHNnHNnHNnHNnHNnHNnHNnHNnHNnHNnHNnHNnHNnHNnHNnHNnHNnHNnHNnHNnHNnHNnHNnHNnHNnHNnHNnHNnHNnHNnHNnHNnHNnHNnHNn
(sun nn ene eane ene ene ene ene ene ene ene ene ene ene ene ene ene ene ene ene ene ene ene ene ene ene ene ene ene ene ene ene ene ene ene ene ene ene ene ene ene
e e e e e e e e e e e e e e e e e e e e e e e e e e e e e e e e e e e e e e e e e e e e e e e e e e ee
eae eae eae eae eae eae eae eae eae
e e e e e e e e e e e e e e e e e e e e e e e e e e e e e e e e e e e e e e e e e e e e e e e e e e e e e e e ee
e e e e e e e e e e e e e
e e e e e e e e e e e e e e e e e e e e e e e e e e e e e e e e e e e e e e e e e e e e e e
EETTNTNNTNNTNNTNNTNNTNNTNNTNNTNNTNNTNNTNNTNNTNNTNNTNNTNNTNNTNNTNNTNNTNNTNNTNNTNNTNNTNNTNNTNNTNNTNNTNNTNNTNNTNNTNNTNNTNNTNNTNNTNNTNNTNNTNNTNNTNNTNNTNNTN
21 abed aebuedep ap aping
e e e e e e e e e e e e e e e e e e e e
Ld
e e e e e e e e e e e e e e e e e e e e e e e e e
6 6e6d
6 8 aed
e e e e e e e e e e e e e e e e e e e e e e e e e e e e
e e e e e e e e e e e e e e e e e e e e e e e e e e e
eep
AeBd
g aebd
aee
g aebd
e e e
e 2 eed
S
mnnnne nnnnne nnnnne nnnnne nnnnne nnnnne nnnnne nnnnne nnnnne nnnnne nnnnne nnnnne nnnnne nnnnne nnnnne nnnnne nnnnne nnnnne nnnnne nnnnne nnnnne nnnnne nnnnne nnnnne nnnnne nnnnne
Rnne nnnnne nee
e e e e e e e e e e e e e e e e e e e e e e e e e e e e e e e e e e e e e e e e e e e e e e e e e ee
e e e e e e e e e e e e e e e e e e e e e e e e e e e e e e e e e e e e e e e e e e
i SNOIALIARIL
eepnne 1
Pnnaeepa, p
oepoeepoeepoeepoeepoeepoeepoeepoeepoeepoeepoeepoeepoeepoeepoeepoeepoeepoeepoeepoeepoeepoeepoeepoeepoeepoeepoeepoeepoeepoeepoeepoeepoeepoeepoeepoeepoeepoeepoeepoeepoeepoe
ononeepeepoeepoeepoeepoeepoeepoeepoeepoeepoeepoeepoeepoeepoeepoeepoeepoeepoeepoeepoeepoeepoeepoeepoeepoeepoeepoeepoeepoeepoeepoeepoeepoeepoeepoeepoeepoeepoeepoeepoeepoeepoeepoeepoeepoe
81
aubiod
eepnpeeppeepd L
e 1
anbjuwne
e e
enbnse nean L
eessnne eess
nne nnnn nee eae ene ene ene ene ene ene ene ene ene ene ene ene ene ene ene ene ene ene ene ene ene ene ene ene ene ene ene ene ene ene ene ene ene ene ene ene ene ene ene ene ene ene ene ene ene ene ene ene ene
np nwnneppsds 2L
A
B
e e 1
nneepaeaeepd 0p
sides 1e 1nnepeepnne
8
rnnn nnnn nn nnnn nnnn nnnn nnnn nnnn nnnn nnnn nnnn nnnn nnnn nnnn nnnn nnnn nnnn nnnn nnnn nnnn nnnn nnnn nnnn nnnn nnnn nnnn nnnn nnnn nnnn nnnn nnnn nnnn nnnn nnnn nnnn nnnn nnnn
Jnne nee 9
Irrnneeppeeppeepd
eae
Jue neaed
essssps
a#d
LNVA
INOR
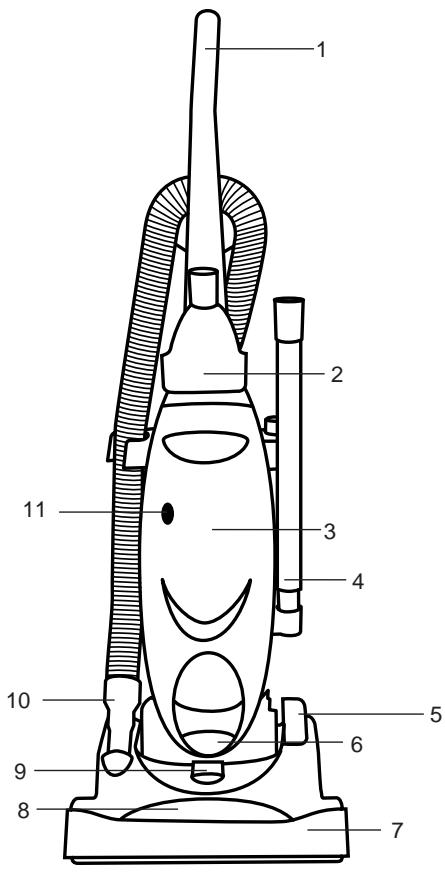
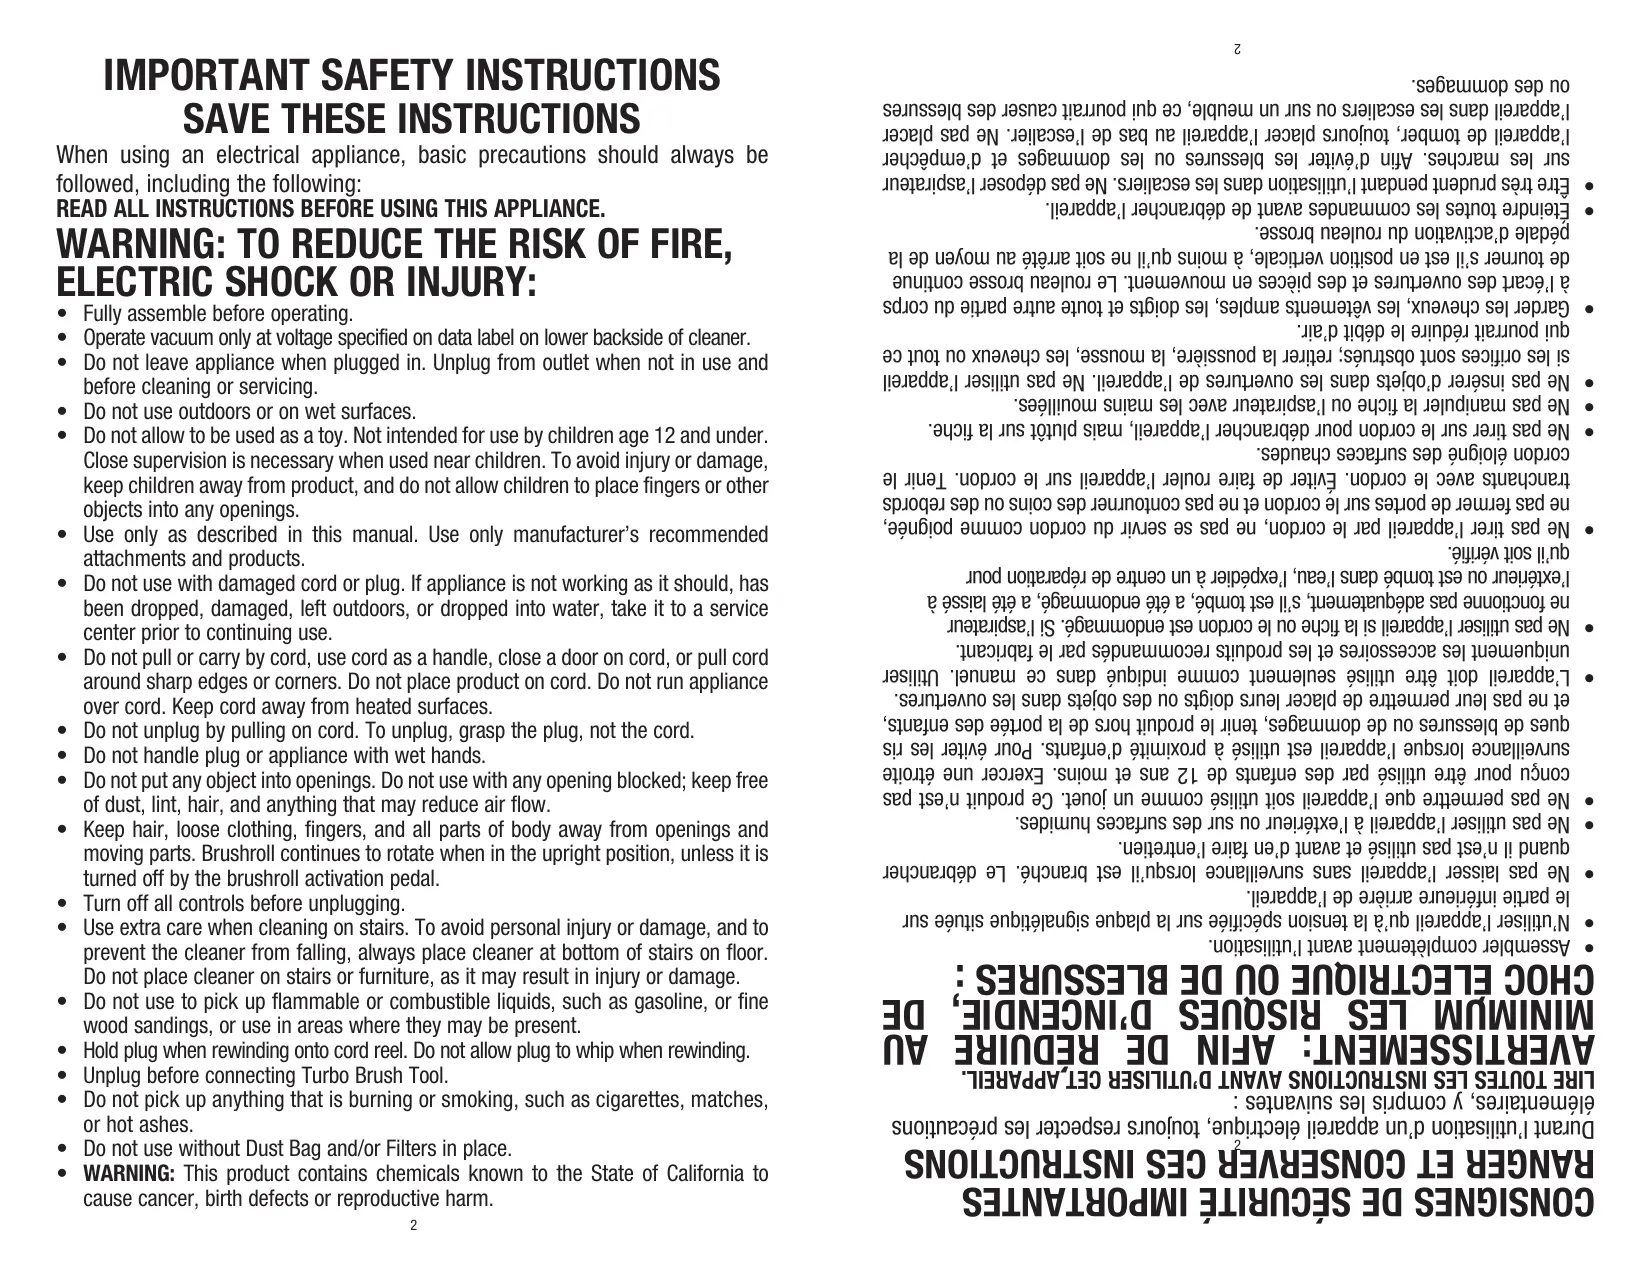
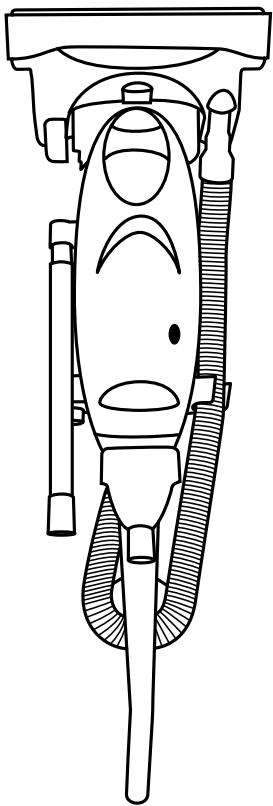
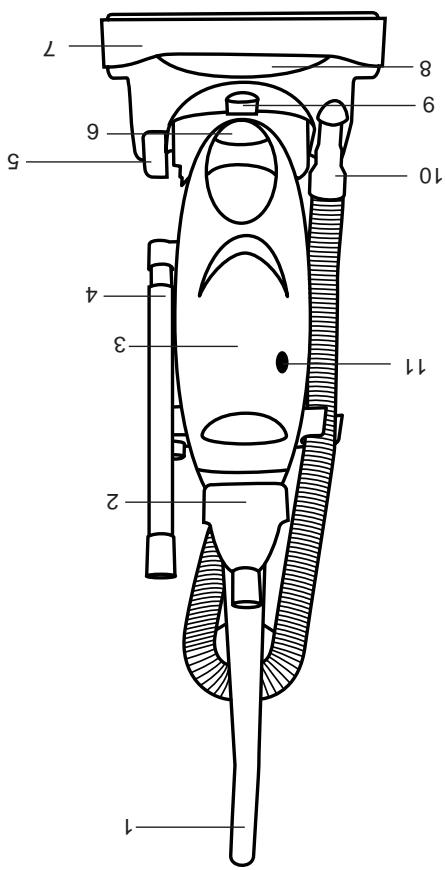
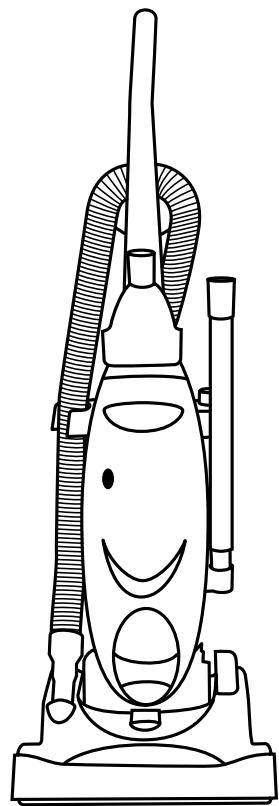
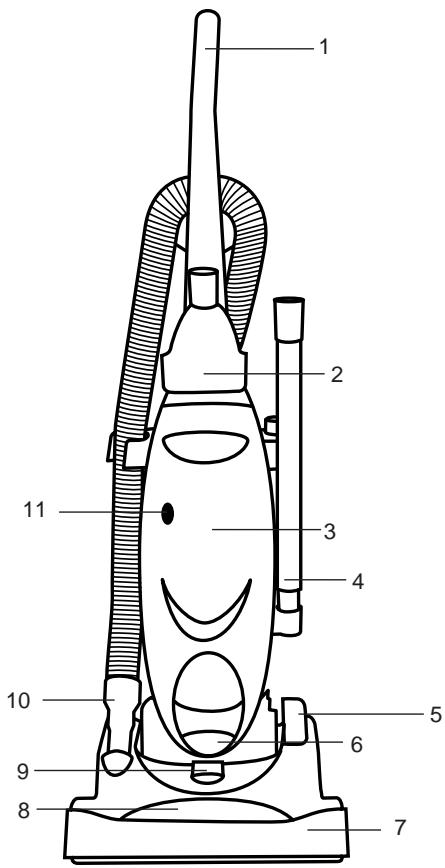
FRONT
FRONT
- Handle Grip
- Turbo Brush Tool
- Front Panel
- Extension Wand
- Brushroll Activation Pedal
- Headlight
- Scuff Guard Bumper
- Brush View Window
- Carpet Height Adjustment Knob
- Hose Grip
- Full Bag Indicator
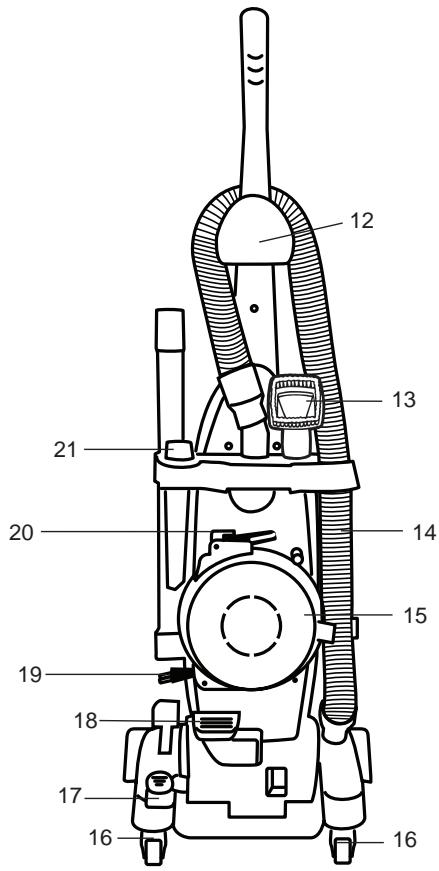
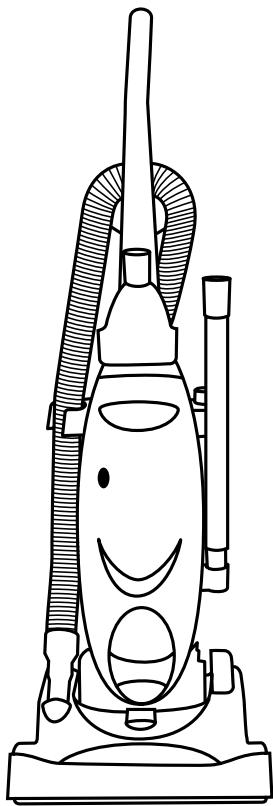
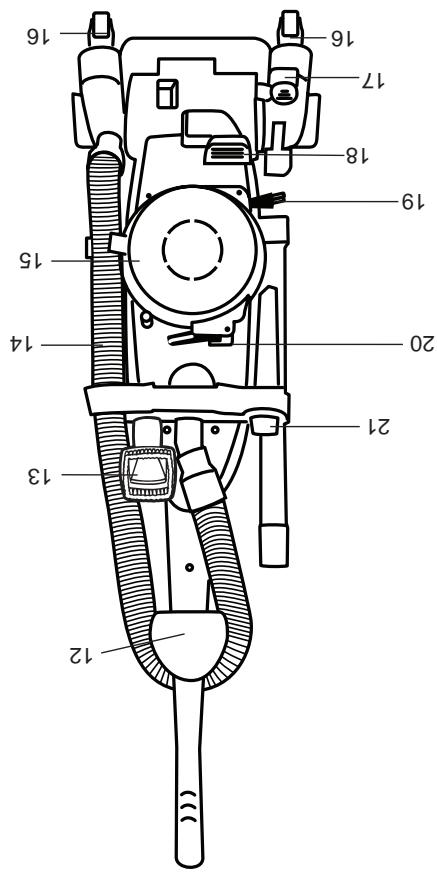
BACK
BACK
- Hose Wrap/Carry Handle
- Dust Brush
- Stretch Hose
- Automatic Cord Rewind
- Swivel Casters
- Handle Release Pedal
- On/Off Pedal
- Power Cord
- Cord Rewind Button
- Crevice Tool
HOW TO ASSEMBLE
TOOL REQUIRED: PHILLIPS SCREWDRIVER
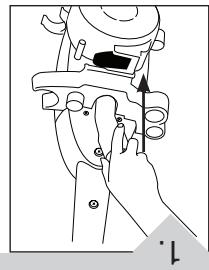
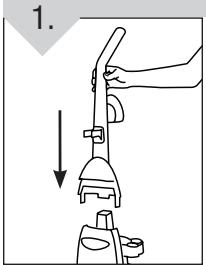
HANDLE ASSEMBLY
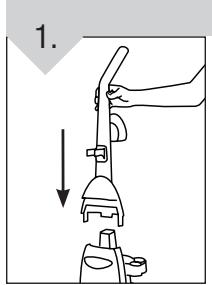
Stand unit in upright position, align tabs on either side on the handle and push down.
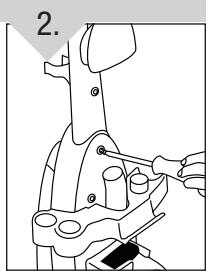
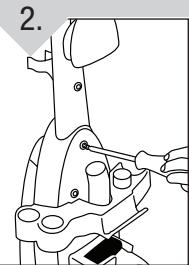
Secure the handle by installing the three (3) screws provided into the holes on the back of the unit. Make sure to fully tighten screws.
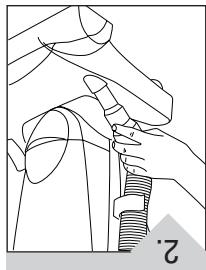
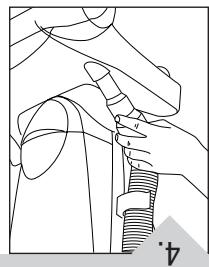
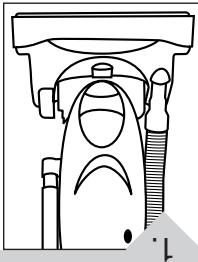
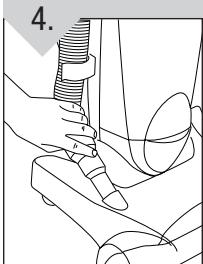
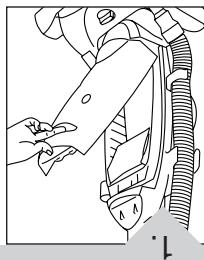
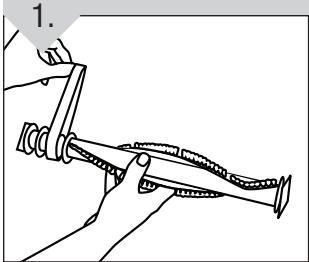
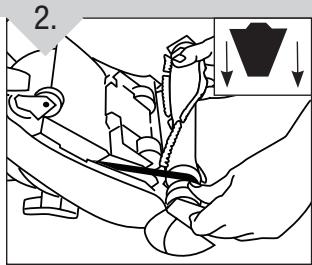
HOSE ASSEMBLY
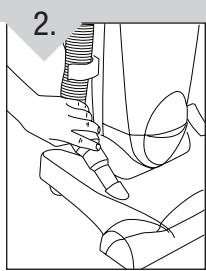
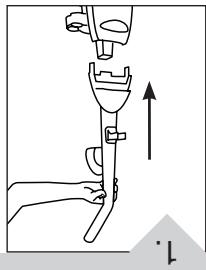
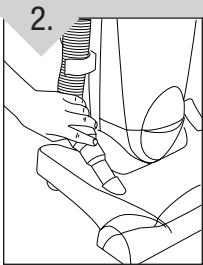
Place hose onto hose wrap (located on back of handle) to secure.
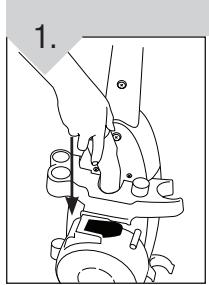
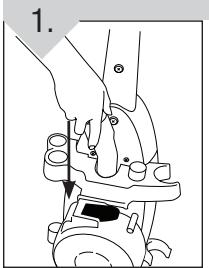
Insert the hose grip into the side of the cleaner. Press down firmly to secure. NOTE: A slight twisting motion may help.
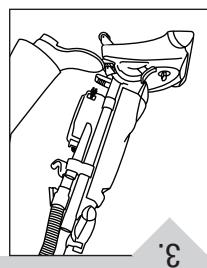
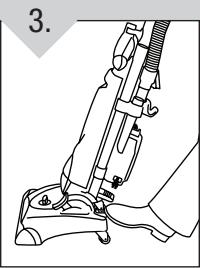
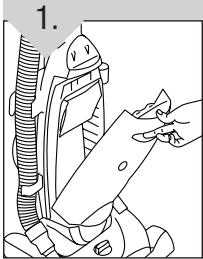
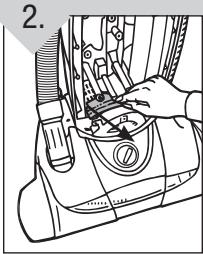
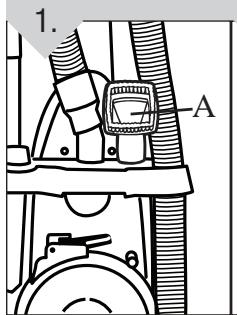
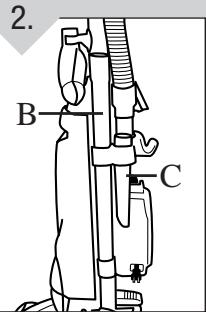
TOOL STORAGE
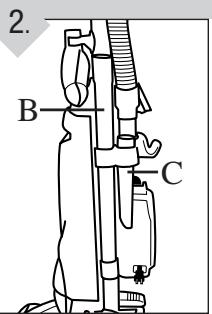
Attach Tools: Place dust brush (A) onto peg on the tool caddy with bristles facing out (Diagram 1). Slide the extension wand (B) and crevice tool (C) through the rings on the back left side of tool caddy (Diagram 2).
e eee e e ee e e e e e e e e e e e e e e e e e e e e e e e e e e e e e e e e e e e e e e e e e e e e e e
ES
e e e e e e e e e e e e e e e e e e e e e e e e e e e e e e e e e e e e e e e e e e e e e e e e
Ae 10n D (aegbod eep aeepeep P e nns) npnnneepnnp
VAAALNOIILVAISNI
sssssssssssssssssssssssssssssssssssssssssssssssssssssssssssssssssssssssssssssssssssssssssssss
e e e e e e e e e e e e e e e e e e e e e e e e e e e e e e
ENIOD VZEHHOALL
NEENNNNNEENNEENNEENNEENNEENNEENNEENNE
eae eae ae aee nee ene eae ene ene ene ene ene ene ene ene ene ene ene ene ene ene ene ene ene ene ene ene ene ene ene ene ene ene ene ene ene ene ene ene ene ene ene ene ene ene ene ene ene ene ene ene ene ene ene ene ene ene eneaen eae
NOOOROON
aSSOq
nne nnnnne nee
eeppeep
e
e eae
-
e e e e e e e e e e e e e
e e e e e e e e e e e e e e e e e e e e e e e e e e e e e e e e e e e e e e e e e e e e e e e e e ee
e e e e e e e e e e e e e e e e e e e e e e e e e e e e e e e e e e e e e e e e
Ss
sabnod sape nns jnejndse,ep abessed np roonrnnnepp eanopnnppepepepepepepepepepepepepepepepepepepepepepepepepepepepepepepepepepepepepepepepepepepepepepepepepepepepepepepepepepepepepepepepepepepepepepepepepepepepepepepepepepepepepepepe pee
e e e e e e e e e e e e e e e e e e e e e e e e e e e e e e e e e e e e e e e e e e e
ENNNNNE
e e e e e e e e e e e e e e e e e e e e e e e e e e e e e e e e e e e e e e e e e e e e ee
e e e e e e e e e e e e e e e e e e e e
e e e e e e e e e e e e e e e e e e e e e e e e e e e e e e e e e e e e e e e e e e e e e
e e e e e e e e e e e e e e e e e e e e e e e e e e e e e e e e e e e e e e e e e e ee
SldVaLsEeRnOoRrReReRn
nne nne nee
sssse ne eonne nnoe ene ene ene ene ene ene ene ene ene ene ene ene ene ene ene ene ene ene ene ene ene ene ene ene ene ene ene ene ene ene ene ene ene ene ene ene ene ene ene ene ene ene ene ene ene
NOI⊥SINILN NVAV NNEWERN EERWESSS:NOIINELA
LNEWENNOILO
HOW TO OPERATE
WARNING: FULLY ASSEMBLE BEFORE OPERATING.
NOTE: Cleaner must be in the upright position to lift the rotating brush off the carpet when cleaning above the floor.
CARPET SETTINGS
NOTE: The cleaner may be in the upright or operating position to adjust carpet setting.
ADJUSTING IN THE UPRIGHT POSITION: Rotate the knob to the desired setting.
NOTE: The knob will rotate easily. Once the carpet setting is selected, and the cleaner placed in the operating position, the setting will be in the correct position.
ADJUSTING IN THE OPERATING POSITION: Rotate the knob to the desired setting.
NOTE: The knob will rotate with some resistance. The nozzle will raise and lower as the knob is rotated.
CARPET CLEANING
Plug cord into electrical outlet. Turn cleaner "ON". Power Pedal located on lower left side of back of unit.
With foot, depress the handle release pedal on back, left side of the cleaning nozzle. NOTE: Rotating brush could cause area rug fringe to become tangled within cleaner. Use caution when vacuuming throw rugs with fringe.
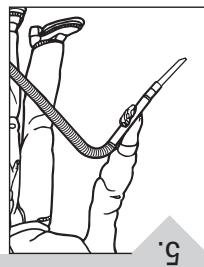
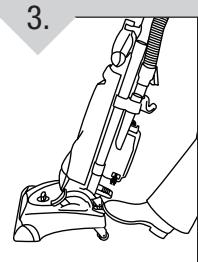
ABOVE FLOOR/STAIR CLEANING
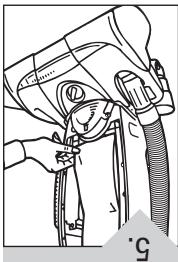
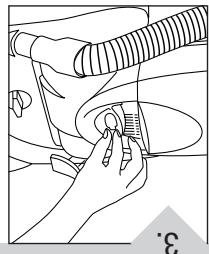
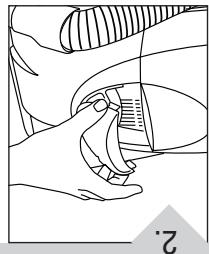
Put cleaner in its upright position. Remove the hose from the side of the cleaner by pulling out the hose grip. NOTE: A slight twisting motion may help.
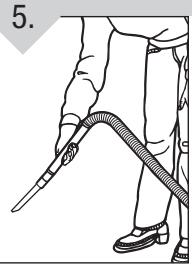
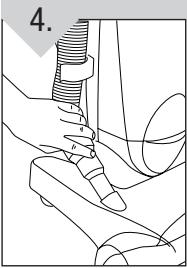
Choose any of the handy accessories or use the hose alone. Simply push the attachment firmly onto the end of the wand or hose grip. To remove tool, twist and pull apart gently.
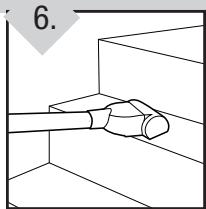
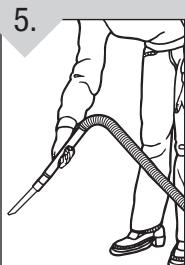
Use the hose and power brush tool for stair cleaning. When using tools, always turn the brushroll off by stepping on the brush- roll activation pedal.
CAUTION
Use extra care when cleaning on stairs. To avoid personal injury or damage, and to prevent the cleaner from falling, always place cleaner at bottom of stairs or on floor. Do not place cleaner on stairs or furniture, as it may result in injury or damage. When using tools, always turn the brushroll off by stepping on the brushroll activation pedal.
CORD RETRACT
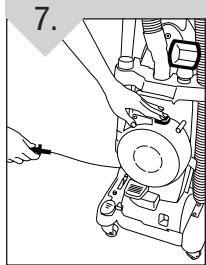
Press the automatic cord rewind lever to draw in the power cord. NOTE: Hold plug when rewinding onto cord reel. Do not allow plug to whip when rewinding.
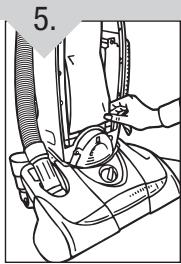
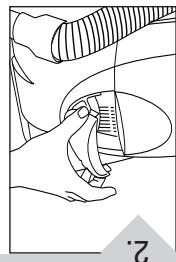
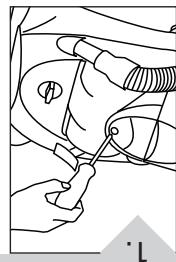
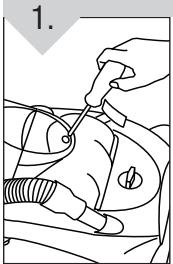
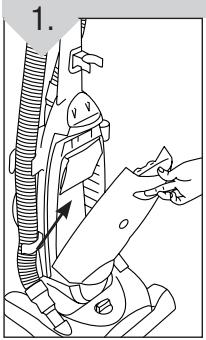
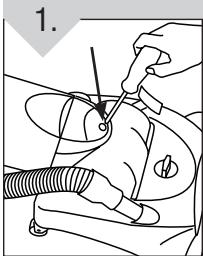
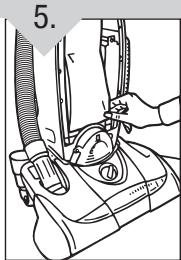
PAPER BAG: REMOVAL & REPLACEMENT
CAUTION: TO REDUCE THE RISK OF INJURY FROM MOVING PARTS - UNPLUG BEFORE SERVICING.
NOTE: Unplug cleaner before changing paper bag. Cleaner must have paper bag in place at all times.
You can tell your bag needs replacing when you experience less suction or when the Full Bag Indicator changes to yellow or red. Do not exceed marked fill line on paper bag. Different types of dirt may require bag replacement more often.
FULL BAG INDICATOR: When the Full Bag Indicator window changes to yellow or red, it may be time for a new paper bag. Check the paper bag, and if full, replace as described below. If not, the cleaner may have a clogged dirt passage (See "Trouble Shooting" Pg. 12).

For Bag Type U replacement, please call 1-800-321-1134 or visit
www.royalvacuums.com to locate a dealer nearest you.
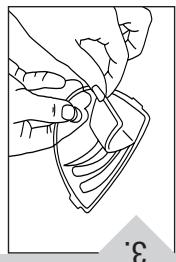
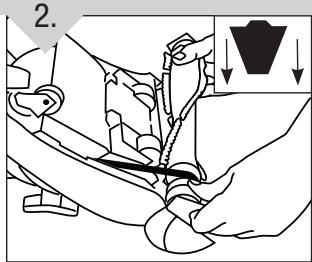
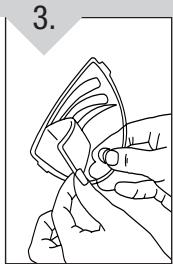
REMOVE OLD BAG
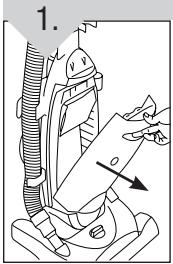
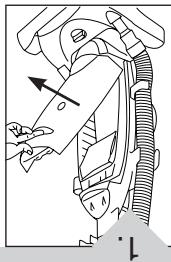
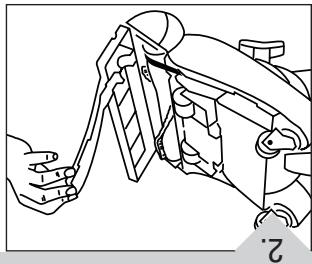
Pull release lever on front panel to remove front panel.
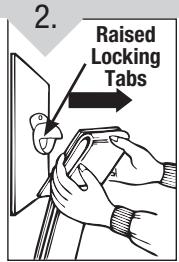
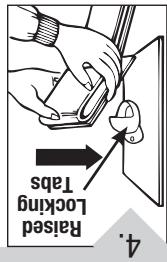
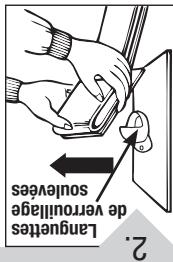
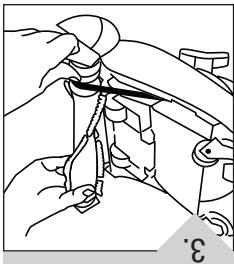
Grasp cardboard collar of paper bag with both hands and pull past raised locking tabs on the dirt tube. Dispose of old paper bag.
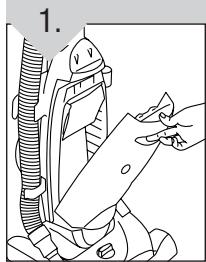
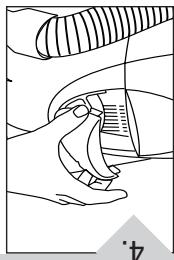
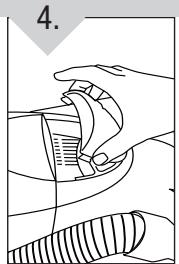
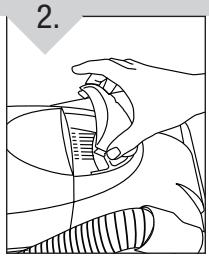
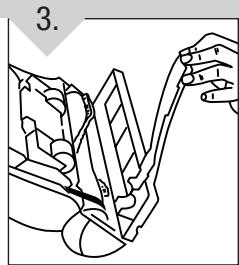
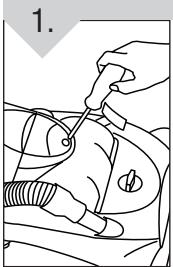
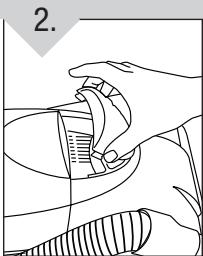
TO INSTALL NEW BAG
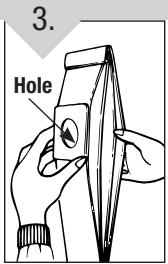
IMPORTANT: Expand bag away from hole before installing. Press in opening to clear paper away from hole.
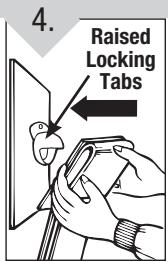
Grip cardboard collar and push past raised locking tabs on dirt tube with both hands.
Fold bag inward about 3^ from bottom to rest on top of bag support posts. Reattach front panel. NOTE: Be sure not to let the bag get caught between the front and back panel.
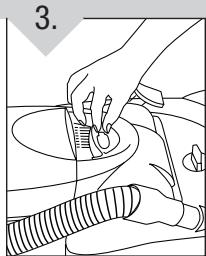
FILTER: REMOVAL & REPLACEMENT
CAUTION: TO REDUCE THE RISK OF INJURY FROM MOVING PARTS- UNPLUG BEFORE SERVICING
NOTE: The Filter should be changed when necessary- inspect regularly.
For Bag Chamber filter replacement, please call 1-800-321-1134 or visit
www.royalvacuums.com to locate a dealer nearest you.
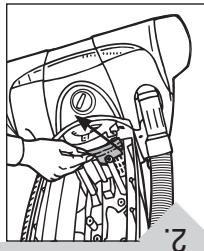
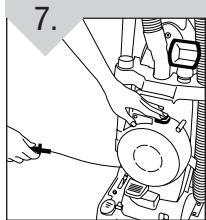
BAG CHAMBER FILTER (INTERNAL)
Located under the paper bag.
Remove front panel.

Lift up on front edge and pull towards you to remove. Shake or brush excess dirt off of filter. Slide filter pad back into position. Replace front panel.
rnnnne nnnnne eae
(1) deded ap oes a snos sns
ENNEE
mnnnne nnnnne nee
no 1008 1e 0e 0e 0e 0e 0e 0e 0e 0e 0e 0e 0e
eepnne eaeenee ne ene nene eee
NNEHNE NOSVREEREO
e e e e e e e e e e e e e e e e e e e e e e e e e e e e e e e e e e e e e e e e e e e e e e e
m = 311
Jae Juee Xie Xue Juee Sae
e e e e e e e e e e e e e e e e e e e e e e e e e e e e e e e e e e e e e e e e e e e
aee aee
e e e e e e e e e e e e e e e e e e e e e e e e e e e e e e e e e e e e e e e e e e e e e
e e e e e e e e e e e e e e e e e e e e e e e e e e e e e e e e e e e e e e e e e e

Prrnne nnnnne nnnnne nnnnne nnnnne nnnnne nnnnne nnnnne nnnnne nnnnne nnnnne nnnnne nnnnne nnnnne nnnnne nnnnne nnnnne nnnnne nnnnne nnnnne nnnnne nnnnne nnnnne nnnnne nnnnne nnnnne nannne nnnnne nnnnne nnnnne nnnnne nnnnne nnnnne nnnnne nnnnne nnnnne nnnnne nnnnne nnnnne nnnnne nnnnne nnnnne nnnnne nnnnne nnnnne nnnnne nennnee
C
OVS NENONNANNNNNNNNNNNNNNNNNNNNNNNNNNNNNNNNNNNNNNNNNNNNNNNNNNNNNNNNNNNNNNNNNNNNN
mnnnne ennnnne ennnnne ennnnne ennnnne ennnnne ennnnne ennnnne ennnnne ennnnne ennnnne ennnnne ennnnne ennnnne ennnnne ennnnne ennnnne ennnnne ennnnne ennnnne ennnnne ennnnne ennnnne ennnnne ennnnne ennnnne
no 1000000000000000000000000000000000000000000

(2) 6d 'eaeeneeppeeppeeppeeppeeppeeppeeppeeppeeppeeppeeppeeppeeppeeppeeppeeppeeppeeppeeppeeppeeppeeppeeppe
s e s s s s s s s s s s s s s s s s s s s s s s s s s s s s s s s s s s s s s s s s s s s s s s s s s s
e e e e e e e e e e e e e e e e e e e e e e e e e e e e e e e e e e e e e e e e e e e e e e e e e e e e e ee
NNEENNSOSVRECEDE
LNANNNNHNNNSNNNNNNNNNNNNNNNNNNNNNNNNNNNNNNNNNNNNNNNNNNNNNNNNNNNNNNNNNNNNNNNNNNNNNNNNNNNNNNNNNNNNNNNNNNNNNNNN
LNEENeRnEeRnEeRnEeNEn : RrEeRdN EoS
e e e e e e e e e e e e e e e e e e e e e e e e e e e e e e e e e e e
eepnnepeepnneepnneepnneepnneepnneepnneepnneepnneepnneepnneepnneepnneepnneepnneepnneepnneepnneepnneepnneepnneepnneepnneepnneepnneepnneepnneepnneepnneepnneepnneepnneepnneepnneepnne
e e
e e e e e e e e e e e e e e e e e e e e e e e e e e e e e e e e e e e e e e e
seonone, p s eed ap uisebun suep no 12-008-1e esodow
e 1000000000000000000000000000
NnNnNnNnNnNnNnNnNnNnNnNnNnNnNnNnNnNnNnNnNnNnNnNnNnNnNnNnNnNnNnNnNnNnNnNnNnNnNnNnNnNnNnNnNnNnNnNnNnNnN
Wnno n no 1
LNEeRnEeReeReeReeReeReeReeReeReeReeReeReeReeReeReeReeReeReeReeReeReeReeReeReeReeReeReeReeReeReeReeReeReeReeReeReeReeReeReeReeReeReeReeReeReeReeReeReeReeReeRee
SIAI 1
e e
nnae nne ne e ne ne ne ne ne ne ne ne ne ne ne ne ne ne ne ne ne ne ne ne ne ne ne ne ne ne ne ne ne ne ne ne ne ne ne ne ne ne ne ne ne ne ne ne ne ne ne ne ne ne ne ne ne ne ne ne ne ne ne ne ne ne ne
e e
e e e e e e e e e e e e e e e e e e e e e e e
inanepeae,epaenee eamS
NOLOVVA
mnnnne ennnnne ennnnne ennnnne ennnnne ennnnne ennnnne ennnnne ennnnne ennnnne ennnnne ennnnne ennnnne ennnnne ennnnne ennnnne ennnnne ennnnne ennnnne ennnnne ennnnne ennnnne ennnnne ennnnne ennnnne ennnnne
no 1008 10000
e e e e e e e e e e e e e e e e e e e e e e e e e e e e e e e e
NENNNN NOSVAD
LNNN NNNNNNNNNNNNNNNNNNNNNNNNNNNNNNNNNNNNNNNNNNNNNNNNNNNNNNNNNNNNNNNNNNNNNNNNNNNNNNNNNNNNNNNNNNNNNNNNN
Rnrrnnrnnnne nnnnne rnrnnnne
EINS : NOI⊥VATVADSNIEREERRERERERER
FILTER REMOVAL & REPLACEMENT: CONTINUED
TOOL REQUIRED: PHILLIPS SCREWDRIVER
CAUTION: TO REDUCE THE RISK OF INJURY FROM MOVING PARTS- UNPLUG BEFORE SERVICING
NOTE: The filter should be changed when necessary- inspect regularly
For exhaust filter replacement, please call 1-800-321-1134 or visit
www.royalvacuums.com to locate a dealer nearest you.
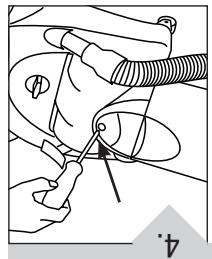
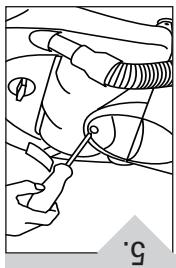
EXHAUST FILTER
Located on the front of the cleaner.
Lay cleaner flat.
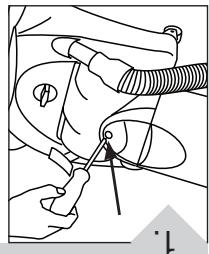
Unscrew the one
(1) screw on the
headlight lens
panel.

Lift cover to remove.

Remove exhaust filter from lens and replace with new filter
Reattach headlight lens panel.

Replace screw to secure into place.
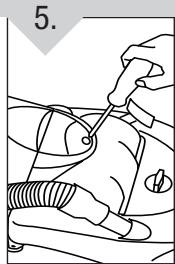
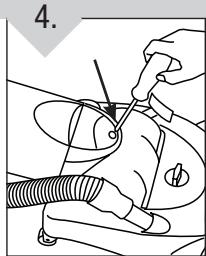
LIGHTBULB: REMOVAL & REPLACEMENT
TOOL REQUIRED: PHILLIPS OR FLATHEAD SCREWDRIVER
WARNING: TO REDUCE THE RISK OF ELECTRIC SHOCK - UNPLUG CLEANER BEFORE REMOving OR REPLACING LIGHTBULB.
This cleaner uses a common automotive lamp #906, 13.0 volts. For bulb replacement call 1-800-321-1134 or your local auto parts store.

Lay cleaner flat. Unscrew the one (1) screw on the headlight lens panel.
Lift cover to remove.
Pull bulb out of socket to remove. Push bulb into socket to replace.

Reattach headlight lens panel and replace screw to secure into place. Reattach front panel.
BELT OR BRUSHROLL: REMOVAL & REPLACEMENT
TOOL REQUIRED: PHILLIPS OR FLATHEAD SCREWDRIVER
CAUTION: TO REDUCE THE RISK OF INJURY FROM MOVING PARTS - UNPLUG BEFORE SERVICING.
For Belt replacements, please call 1-800-321-1134 or visit
www.royalvacuums.com to locate a dealer nearst you.
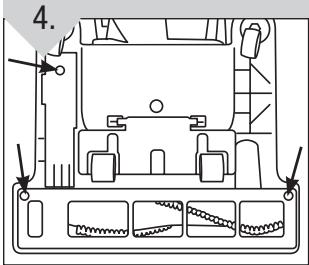
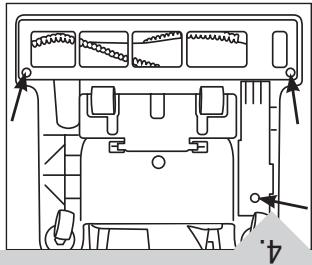
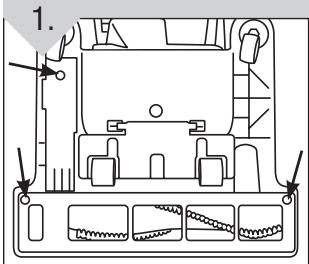
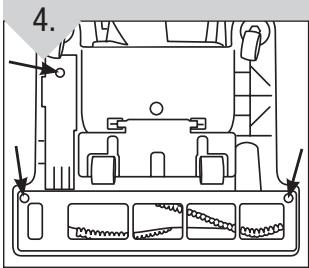
TO REMOVE OLD BELT
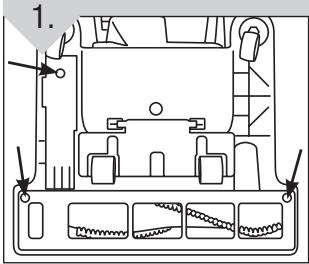
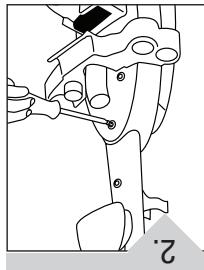
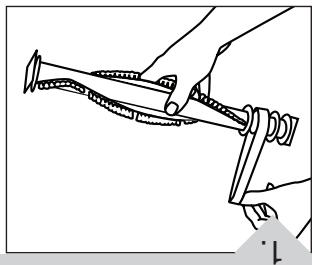
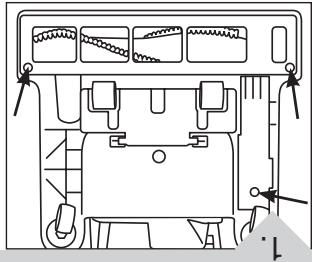
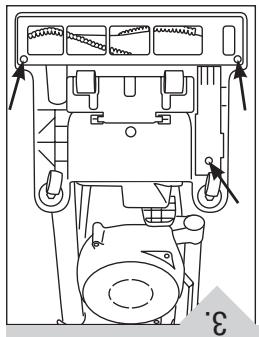
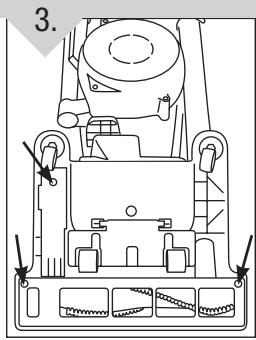
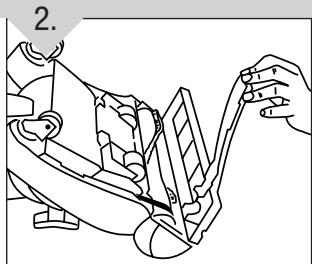
Lay cleaner flat and flip cleaner to expose nozzle base. Base should lay flat and face up. To remove nozzle guard, use Phillips screwdriver to remove the three (3) screws. Arrows show location of screws.
Rotate/pivot the nozzle guard and pull off.
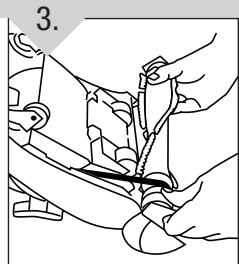
Lift and remove brushroll. Dispose of old belt.
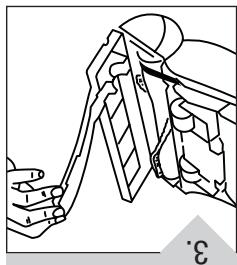
TO REPLACE NEW BELT
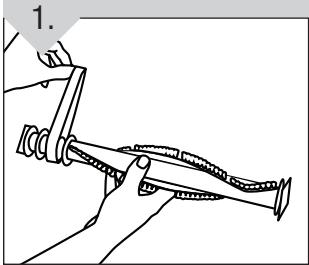
Slide belt onto motorshaft. Place new belt in area of brushroll without bristles (see inset).
With new belt in place, pull and slide brushroll into nozzle making sure that the brushroll end caps are in the correct orientation (see inset). Rotate brushroll manually to make sure belt is properly aligned.
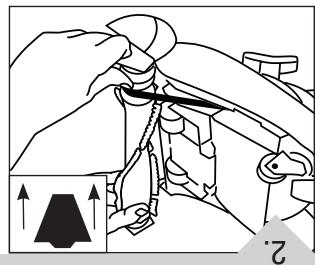
Secure by aligning the three (3) tabs in the base slots. To reattach nozzle guard, rotate/pivot back into position.
Replace all three (3) screws to secure
nozzle guard. NOTE: Make sure bumper
is secure before replacing screws.
'SIA SAI
e e e e e e e e e e e e e e e e e e e e e e e e
-aeae enbn ennss, S : eennnnne
nne nnnnne eep
Expn s (E) sss
(ouniipepa
e e e e e e e e e e e e e e e e e e e e e e e e e e e e e e e e e e e e e e e e e e e e
no no nnnnne nee eae ene nee nee nee nee nee nee nee nee nee nee nee nee nee nee nee nee nee nee nee nee nee nee nee nee nee nee nee nee nee nee nee nee nee nee nee nee nee nee nee nee nee nee nee nee nee nee nee nee nee nee
e e e e e e e e e e e e e e e e e e e e e e e e e e e e e e e e e e e e e e e e e e e e e e e e e e ee
Prrnne nnnnne nnnnne nnnnne nnnnne nnnnne nnnnne nnnnne nnnnne nnnnne nnnnne nnnnne nnnnne nnnnne nnnnne nnnnne nnnnne nnnnne nnnnne nnnnne nnnnne nnnnne nnnnne nnnnne nnnnne nnnnne nannnee
eaeesn e
Pnne nnnnne nee eae enne nne nne nne
e e e e e e e e e e e e e e e e e e e e e e e e e e e e e e e e e e e e e e e e e e e e e
Pnrrnnne nnnnne
mnnnne nnnnne ennnnne ennnnne ennnnne ennnnne ennnnne ennnnne ennnnne ennnnne ennnnne ennnnne ennnnne ennnnne ennnnne ennnnne ennnnne ennnnne ennnnne ennnnne ennnnne ennnnne ennnnne ennnnne ennnnne ennnnne ennnnne
no 1LZ008 L3eodoeaeoeae
eessssssss
NNEENNNNNEENNNNEENNNNEENNNNEENNNNEENNNNEENNNNEENNNNEENNNNEENNNNEENNNNEENNNNEENNNNEENNNNEENNNNEENNNNEENNNNEENNNNEENNNNEENNNNEENNNNEENNNNEENNNNEENNNNEENNNNEENNNNEENNNNEENNNNE
e e e e e e e e e e e e e e e e e e e e e e e e
NOIaTtAaTSNREETREER:ESSSBnRnno
nne nnnnne nee nne nne nne nne nne nne nne nne nne nne nne nne nne nne nne nne nne nne nne nne nne nne nne nne nne nne nne nne nne nne nne nne nne nne nne nne nne nne nne nne nne nne nne nne nne nne nne nne nne nne nnee
Rnrrnnrnrnnn rnrnnn nnnn
e e e e e e e e e e e e e e e e e e e e e e e e e e e e e e e e e
e e e e e e e e e e e e e e e e e e e e e e e e e e e e e e e
e e e e e e e e e e e e e e e e e
e e e e e e e e e e e e e e e e e e e e e e
e e e e e e e e e e e e e e e
Prrnne nnnnne eannne
e e e e e e e e e e e e e e e e e e e e e e e e e e e e e e e e e e e e e e e e e e e e e e e e e e e e ee
SNNN NNNNNNNNNNNNNNNNNNNNNNNNNNNNNNNNNNNNNNNNNNNNNNNNNNNNNNNNNNNNNNNNNNNNNNNNNNNNNNNNNNNNNNNNNNNNNNNNNNNNNNNNNNNNNNNNNNNNNNNNNNNNNNNNNNNNNNNNNNNNNNNNN
TAYENNEIEN
GENERAL MAINTENANCE
CAUTION: TO REDUCE THE RISK OF INJURY FROM MOVING PARTS - UNPLUG BEFORE SERVICING. ANY OTHERServICING SHOULD BE DONE BY AN AUTHORIZED SERVICE REPRESENTATIVE
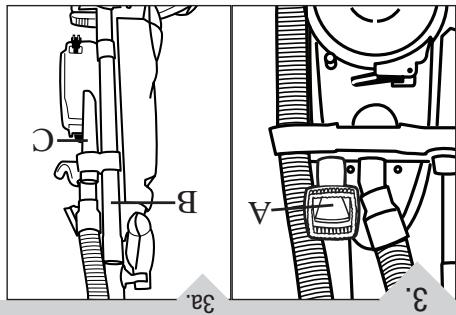
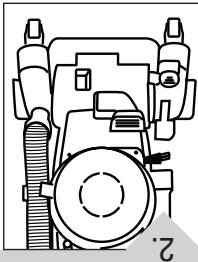
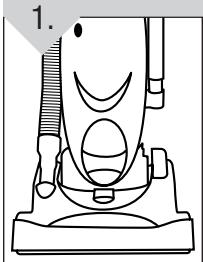
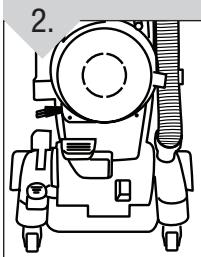
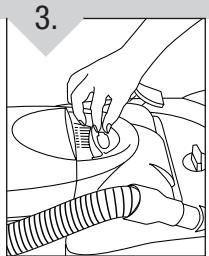
DEBRIS REMOVAL/HOSE
DEBRIS REMOVAL/ NOZZLE GUARD
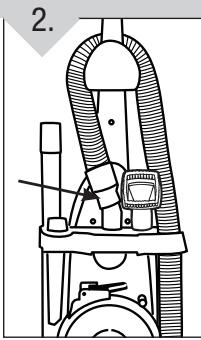
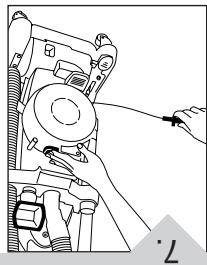
- Check to see if bag is full; replace if needed.
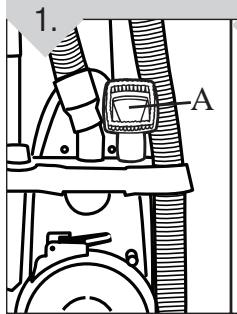
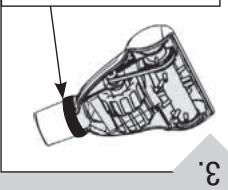
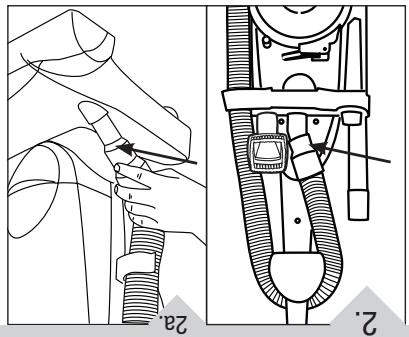
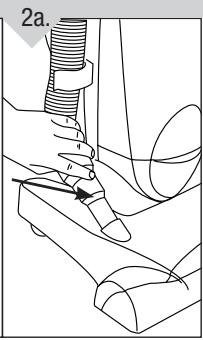
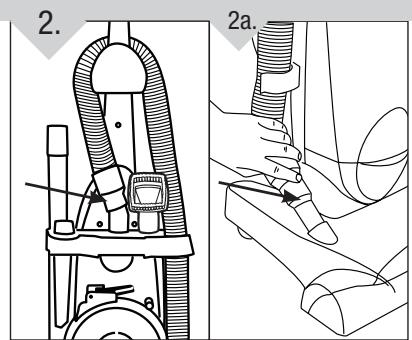
- Plug cleaner in and check to see if there is any suction at end of hose (Diagram 2). If there is suction at end of hose, move on to Diagram 3. If there is no suction at the end of hose, unwrap hose from caddy. Remove the hose from the side of the cleaner by pulling out the hose grip (Diagram 2a). Check hose and remove obstruction.
- Remove nozzle guard (see Diagram 3) by removing the three (3) screws. Remove obstruction.
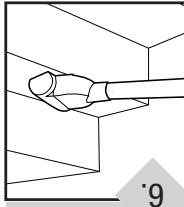
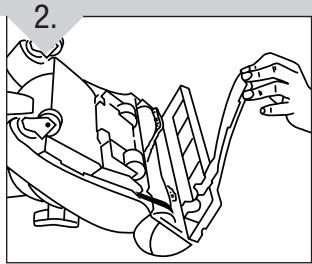
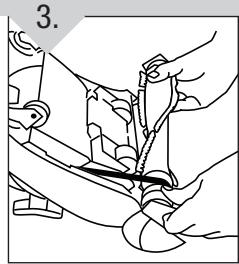
DEBRIS REMOVAL/TURBO BRUSH TOOL
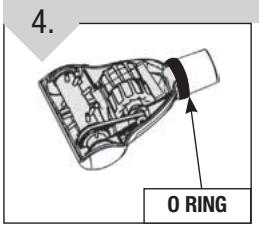
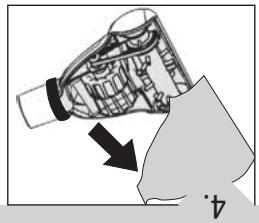
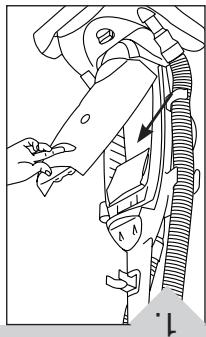
Turn the Turbo Brush over and slide off the O-ring.
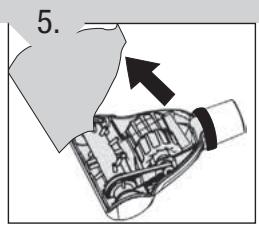
Pivot lower housing and remove clog.
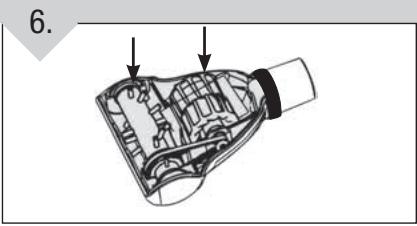
To reassemble, be sure tabs are engaged. Pivot the lower housing closed. Slip the O-ring into the groove at the neck of the Turbo Brush to complete reassembly.
HOW TO TRANSPORT CLEANER
Use the carrying handle on the back of the cleaner to move cleaner from room to room (See Pg. 5, #12 for location).
NOTE: Do not push cleaner forward while leaning on back casters, pull cleaner on back casters, or attempt to lift cleaner using upper handle.
TROUBLESHOOTING GUIDE
WARNING: TO REDUCE RISK OF PERSONAL INJURY - UNPLUG CLEANER BEFORE SERVICING
| PROBLEM | POSSIBLE REASON | POSSIBLE SOLUTION |
| Cleaner won't run | 1. Power cord not firmly plugged into outlet. | 1. Plug cord in firmly. |
| 2. Blown fuse or tripped breaker. | 2. Replace fuse or reset breaker in home. | |
| 3. Needs service. | 3. Take to service center or call 1-800-321-1134. | |
| 4. Thermal Protector shut cleaner off due to high motor temperatures. | 4. Review safety instructions on page 3 or call 1-800-321-1134. | |
| 5. No voltage in wall plug | 5. Check fuse or breaker in home | |
| Cleaner won't pick up or low suction | 1. Paper bag is not opened. | 1. Insert finger into hole and push paper away from opening - Pg. 8. |
| 2. Paper bag full. | 2. Replace paper bag - Pg. 8. | |
| 3. Brushroll worn. | 3. Replace brushroll - Pg. 10. | |
| 4. Broken or worn belt. | 4. Replace belt - Pg. 10. | |
| 5. Clogged filter pad. | 5. Clean or replace filter - Pg. 8 & 9. | |
| 6. Nozzle/dirt passage clogged. | 6. Remove base nozzle cover - Pg. 10; remove obstruction OR remove hose - Pg. 11. | |
| 7. Carpet height setting is incorrect. | 7. Set carpet height adjustment to appropriate setting for carpet being cleaned - Pg. 7. | |
| 8. No paper bag. | 8. Clean filter - Install bag - Pg. 8. | |
| 9. Bag inlet clogged. | 9. Remove hose & paper bag and clean inlet -Pg. 6 & 8. | |
| Dust escaping from cleaner | 1. Paper bag full. | 1. Replace paper bag - Pg. 8. |
| 2. Bag not installed correctly. | 2. Review paper bag installation - Pg. 8. | |
| 3. Puncture/hole in paper bag. | 3. Replace paper bag - Pg. 8. Clean/Replace filter - Pg. 8 & 9. | |
| 4. No bag in cleaner. | 4. Install bag/clean filter - Pg. 8 & 9. | |
| 5. Hose not installed correctly. | 5. Review hose installation - Pg. 6. | |
| Cleaner tools won't pick-up | 1. Hose clogged. | 1. Remove hose and tools; remove obstruction - Pg. 11. |
| 2. Bag inlet clogged. | 2. Remove hose & paper bag and clean inlet - Pg. 6 & 8. | |
| 3. Paper bag full. | 3. Replace paper bag - Pg. 8. | |
| 4. No bag in cleaner; filter clogged. | 4. Install paper bag - Pg. 8, clean filter - Pg. 8 & 9. | |
| Headlight not work-ing | 1. Bulb burnt out. | 1. Replace bulb - Pg. 9. |
| 2. Loose electrical wires. | 2. Call 1-800-321-1134 for nearest authorized Royal® dealer. | |
| Cleaner is difficult to push or won't move forward | 1. Carpet height setting is incorrect. | 1. Set carpet height adjust lever to appropriate setting for carpet being cleaned - Pg. 7. |
| PROBLEM | POSSIBLE REASON | POSSIBLE SOLUTION |
| Belt burns or breaks | 1. Brush may be jammed with debris. | 1. Remove brush - Pg. 10. Clean brush or debris. |
| 2. Brush End Caps are clogged with debris. | 2. Remove brush. Determine if End Caps rotate freely. If not, replace brushroll - Pg. 10. | |
| 3. Carpet Height Setting is incorrect. | 3. Set Carpet Height adjustment to appropriate setting for carpet being cleaned - Pg. 7. | |
| 4. Belt is broken. | 4. Replace belt - Pg. 10. |
ANY OTHER SERVICING SHOULD BE DONE BY AN AUTHORIZED SERVICE REPRESENTATIVE
TO LOCATE A DEALER NEAR YOU, VISIT OUR WEBSITE AT
www.royalvacuums.com OR CALL CUSTOMER SERVICE AT (1-800-321-1134)
In the event that further assistance is required, see your Yellow Pages for an Authorized Royal® Dealer. Costs of any transportation to and from any place of repair are to be paid by the owner. The service parts used in this unit are easily replaced and readily available from an Authorized Royal® Dealer or retailer. Always identify your cleaner by the model number and manufacturing code when requesting information or ordering replacement parts. The model number appears on the lower backside of the cleaner.
(ineaeiee eaeene aeneae ene eaeene aeene eaeene ene eaeene ene eaeene ene eaeene ene eaeene ene eaeene ene eaeene ene eaeene ene eaeene ene eaeene ene eaeene ene eaeene ene eaeene ene eaeene ene eaeene ene eaeene ene eaeene ene eaeene ene eaeene ene eaeene ene eaeene enee
(44LL-2C008 L) VAEETENING VVAEIEAEESEETZEBDAA 00
nne nnnnne nee eee nne nne nne nne nne nne nne nne nne nne nne nne nne nne nne nne nne nne nne nne nne nne nne nne nne nne nne nne nne nne nne nne nne nne nne nne nne nne nne nne nne nne nne nne nne nne nne nne nne nne nnee
| 10.10 - 10.10 | 10.10 | |||
| 10.10 - 10.10 | 10.10 - 10.10 | |||
| 10.10 - 10.10 | 10.10 - 10.10 | |||
| 10.10 - 10.10 | 10.10 - 10.10 | |||
| 10.10 - 10.10 | 10.10 - 10.10 | |||
| 20.10 - 20.10 | 20.10 - 20.10 | |||
| 20.10 - 20.10 | 20.10 - 20.10 | |||
| 20.10 - 20.10 | 20.10 - 20.10 | |||
| 20.10 - 20.10 | 20.10 - 20.10 | |||
| 25.10 - 25.10 | 25.10 - 25.10 | |||
| 25.10 - 25.10 | 25.10 - 25.10 | |||
| 25.10 - 25.10 | 25.10 - 25.10 | |||
| 25.10 - 25.10 | 25.10 - 25.10 | |||
| 25 10 - 25 10 | 25 10 - 25 10 | |||
| 25 10 - 25 10 | 25 10 - 25 10 | |||
| 25 10 - 25 10 | 25 10 - 25 10 | |||
| 25 10 - 25 10 | 25 10 - 25 10 | |||
| 25 20 - 25 20 | 25 20 - 25 20 | |||
| 25 20 - 25 20 | 25 20 - 25 20 | |||
| 25 20 - 25 20 | 25 20 - 25 20 | |||
| 25 20 - 25 20 | 25 20 - 25 20 | |||
| 25 25 - 25 25 | 25 25 - 25 25 | |||
| 25 25 - 25 25 | 25 25 - 25 25 | |||
| 25 25 - 25 25 | 25 25 - 25 25 | |||
| 25 25 - 25 25 | 25 25 - 25 25 | |||
| 25 25 10 - 25 25 | 25 25 10 - 25 25 | |||
| 25 25 10 - 25 25 | 25 25 10 - 25 25 | |||
| 25 25 10 - 25 25 | 25 25 10 - 25 25 | |||
| 25 25 10 - 25 25 | ||||
| 25 25 10 - 25 25 | ||||
| 25 25 10 - 25 25 | ||||
| 25 25 10 - 25 25 | ||||
| 25 25 10 - 25 25 | ||||
| 25 25 10 - 25.25 | ||||
| 25 25 10 - 25 25 | ||||
| 25 25 10 - 25 25 | ||||
| 25 25 10 - 25 25 | ||||
| 25 25 10 - 25 25 | ||||
| 25 25 11 - 25 25 | 25 25 - 25 25 | |||
| 25 25 11 - 25 25 | 25 25 - 25 25 | |||
| 25 25 11 - 25 25 | 25 25 - 25 25 | |||
| 25 25 11 - 25 25 | 25 25 - 25 25 | 25 25 - 25 25 | ||
| 25 25 11 - 25 25 | 25 25 - 25 25 | |||
| 25 25 11 - 25 25 | 25 25 - 25 25 | |||
| 25 25 11 - 25 25 | 25 25 - 25 25 | |||
| 25 25 11 - 25 25 | 25 25 - 25 25 | |||
| 25 25 11 - 25 25 | 25 25 - 25 25 | |||
| 25 25 11 - 25 25 | 25 25 - 25 25 | |||
| 25 25 11 - 25 25 | 25 25 - 25 25 | |||
| 25 25 11 - 25 25 | 25 25 - 25 25 | |||
| 25 25 11 - 25 25 | 25 25 - 25 25 | |||
| 30.10 - 30.10 | 30.10 - 30.10 | |||
| 30.10 - 30.10 | 30.10 - 30.10 | |||
| 30.10 - 30.10 | 30.10 - 30.10 | |||
| 30.10 - 30.10 | 30.10 - 30.10 | |||
| 30.10 - | 30.10 - | 30.10 - | 30.10 - | |
| 30.10 - | 30.10 - | 30.10 - | 30.10 - | |
| 30.10 - | 30.10 - | 30.10 - | 30.10 - | |
| 30.10 - | 30.10 - | 30.10 - | 30.10 - | |
| 30.10 - | ||||
| 30.10 - | ||||
| 30.10 - | ||||
| 30.10 - | ||||
| 30.10 - | ||||
| 30.10 - | ||||
| 30.10 - | ||||
| 30.10 - | ||||
| 30.10 - | ||||
| 40.10 - | ||||
| 40.10 - | ||||
| 40.10 - | ||||
| 40.10 - | ||||
| 40.10 - | ||||
| 40.10 - | ||||
| 40.10 - | ||||
| 40.10 - | ||||
| 40.11 - | ||||
| 40.11 - | ||||
| 40.11 - | ||||
| 40.11 - | ||||
| 40.11 - | ||||
| 40.11 - | ||||
| 40.11 - | ||||
| 40.11 - | ||||
| 40.11 - | 76 | |||
| 40.11 - | ||||
| 40.11 - | ||||
| 40.11 - | ||||
| 40.11 - | ||||
| 40.11 - | ||||
| 40.11 - | ||||
| 40.11 - | ||||
| 40.11 - | ||||
| 30.10 - | ||||
| 30.10 - | ||||
| 30.10 - | ||||
| 30.10 - | ||||
| 30.10 - | ||||
| 30.10 - | ||||
| 30.10 - | ||||
| 30.10 - | 76 | |||
| 30.10 - | ||||
| 30.10 - | ||||
| 30.10 - | ||||
| 30.10 - | ||||
| 30.10 - | ||||
| 30.10 - | ||||
| 30.10 - | ||||
| 30.10 - | ||||
| 8.10 - | ||||
| 8.10 - | ||||
| 8.10 - | ||||
| 8.10 - | ||||
| 8.10 - | ||||
| 8.10 - | ||||
| 8.10 - | ||||
| 8.10 - | ||||
| 8.10 - | ||||
| 8 10 - | ||||
| 8 10 - | ||||
| 8 10 - | ||||
| 8 10 - | ||||
| 8 10 - | ||||
| 8 10 - | ||||
| 8 10 - | ||||
| 8 10 - | ||||
| 8 10 - | ||||
| 8 9 - | ||||
| 8 9 - | ||||
| 8 9 - | ||||
| 8 9 - | ||||
| 8 9 - | ||||
| 8 9 - | ||||
| 8 9 - | ||||
| 8 9 - | ||||
| 8 9 - | ||||
| 8 9 - | ||||
| 8 10 - | ||||
| 8 10 - | ||||
| 8 10 - | ||||
| 8 10 - | ||||
| 8 10 - | ||||
| 8 10 - | ||||
| 8 10 - | ||||
| 8 10 - | ||||
| 8 10- | ||||
| 8 10 - | ||||
| 8 10 - | ||||
| 8 10 - | ||||
| 8 10 - | ||||
| 8 10 - | ||||
| 8 10 - | ||||
| 8 10 - | ||||
| 8 10 - | ||||
| 8 10 - | ||||
e e e e e e e e e e e e e e e e e e e e e e e e e e e e e e e e e e e e e e e e e
ENNNNNE
GUIA DE SOLUCION DE PROBLEMAS
ADVERTENCIA: PARA REDUCIR EL RIESGO DE LESIONES PERSONALES, DESCONECTE ANTES DE DAR SERVICIO
| PROBLEMA | POSIBLE CAUSA | SOLUCION POSIBLE |
| La aspiradora no funciona | 1. El cordón eletrico no está bien connectado en la toma de corrente. | 1. Conecte el enchufe firmamente. |
| 2. Fusible quemado o interruptor desconnectado. | 2. Reemplace el fusible o reajuste el disyuntor en el hogar | |
| 3. Necesita servicios. | 3. Lívela al centro de service o llama al 1-800-321-1134. | |
| 4. Protectorístico activado. | 4. Revise la parte inferior de las instructiones de seguridad - Pág. E3 O llama al 1-800-321-1134. | |
| 5. No hay voltaje en la toma de corrente de pared. | 5. Revise el fusible o el disyuntor en el hogar | |
| La aspiradora no recoge o presenta bajo poder de succión | 1. Bolsa no abierta. | 1. Introduzce el dedo en el agujero para despegar el papel - Pág. E8. |
| 2. Bolsa llena. | 2. Reemplace la Bolsa - Pág. E8. | |
| 3. Cepillo desgastado. | 3. Reemplace el cepillo - Pág. E10. | |
| 4. Bando rota o desgastada. | 4. Reemplace la banda - Pág. E10. | |
| 5. Filtrbloqueado. | 5. Limpie o reemplace el filtrto - Pág. E8, E9. | |
| 6. Está tapada la boquilla / el paso de polvo de la manguera. | 6. Quite la cubierta de la boquilla - Pág. E10; elimine la obstrucción O Quite la manguera - Pág. E11 | |
| 7. Ajuste incorrecto de alta de alfombra. | 7. Ponga el ajuste en el nivel apropriado para la alfombra que se está limpiando - Pág. E7. | |
| 8. Bolsa ausente. | 8. Limpie el filtrto - e instale la Bolsa - Pág. E8. | |
| 9. Entrada de Bolsa bloqueada. | 9. Quite la manguera, saque la Bolsa y limpie la entrada - Pág. E6, E8. | |
| Polvo escapando de la aspiradora | 1. Bolsa llena. | 1. Reemplace la Bolsa - Pág. E8. |
| 2. Bolsa no correctamente instalada. | 2. Repase la instalación de la Bolsa - Pág. E8. | |
| 3. Bolsa perforada/rotra. | 3. Reemplace la Bolsa - Limpie/reemplace el filtrto - Pág. E8, E9. | |
| 4. Bolsa ausente. | 4. Limpie el filtrto e instale la Bolsa - Pág. E8, E9. | |
| 5. Manguera no correctamente instalada. | 5. Revise la instalación de la manguera - Pág. E6. | |
| Los accesos de la aspiradora no recogen | 1. Manguera tapada. | 1. Retire la manguera y los accesos; retire la obstrucción - Pág. E11. |
| 2. Entrada de Bolsa bloqueada. | 2. Quite la manguera, saque la Bolsa y limpie la entrada - Pág. E6, E8. | |
| 3. Bolsa llena. | 3. Reemplace la Bolsa - Pág. E8. | |
| 4. Bolsa ausente, filtrbloqueado. | 4. Instale la Bolsa -Pág. E8, y limpie el filtrto -Pág. E8, E9. | |
| No funciona la lámpara frontal | 1. Bombilla fundida. | 1. Reemplace la bombilla - Pág. E9. |
| 2. Alambres electricos sueltos. | 2. Llame al 1-800-321-1134 para encontrar al Distribuidor Autorizzato Royal® más cercano. | |
| La aspiradora resulta dificil de empujar | 1. Ajuste incorrecto de alta de alfombra. | 1. Ponga el ajuste en el nivel apropriado para la alfombra que se está limpiando - Pág. E7. |
| Se quema o se rompe la banda | 1. El cepillo可以选择 estar bloqueado con sucidido. | 1. Saque el cepillo - Pág. E10. Limpie la sociedad. |
| 2. Los capacetés del cepillo están bloqueados con sociedad. | 2. Saque el cepillo. Averigüe si los capacetés se giran libremente. Si no, reemplace el cepillo - Pág. E10. | |
| 3. Ajuste incorrecto de alta de alfombra. | 3. Ponga el ajuste en el nivel apropriado para la alfombra que se está limpiando - Pág. E7. | |
| 4. Correa rota o desgastada. | 4. Reemplace la correa - Pág. E10. |
CUALQUIER OTRO SERVICIO DEBERÁ SER EFFECTUADO POR UN REPRESENTANTE DE SERVICIO AUTORIZADO
PARA ENCONTRAR A UN DISTRIBUTOR CERCANO A SU DOMICILIO, VISITE NUESTRO SITIO WEB EN
www.royalvacuums.com O LLAME A SERVICIOAL al CLIENTE (1-800-321-1134)
En caso de besoin mas帮你, vea en las Páginas Amarillas para encontrar a un Distribuidor Autorizo Royal. Los costos de transporte hacía y desde el situ de reparación seran pagados por el propietario. Las partes de reposto realizadas en esta unidad son de reemplazo fácil y está disponible a工程技术 de un Distribuidor Autorizo Royal o en otheras tiendas. Siempre identifique su aspiradora por medio del numero de modelos y el已久的 fabricacion cuando pida informacion u ordene partes de reposto. (El numero de modelo aparece en el lado posterior inferior de la aspiradora.)
ROYAL
MANUAL DEL PROPIETARIO
Instrucciones de Funcionamento
y Servicio
IMPORTANT: LEA ATENTAMENTE ANTES DE ENSAMBLAR Y USAR.
ESTE PRODUCTO ESTÁ DISENADO SOLO PARA USO DOMÉSTICO. EL USO COMERCIAL DE ESTE PRODUCTO ANULA LA GARANTÍA.
- Permitanos poderle a ensamblar su aspiradora o a contestar sus preguntas, llame al:
1-800-321-1134
(EE.UU. y Canadá)
- Sitio Web: www.royalvacuums.com

ADVERTENCIA:
El ensamble de la aspiradora sueñas. Las partes pequeñas peuvent incluir partes(PC). Presentar riesgo de ahog-.
amento.
Para tener una referencia rápida, anote por favor la información de su aspiradora ahora.
No. de Modelo:
Códio del Fabricante:
(El número de fabricación se incluye en la parte posterior inferior de la aspiradora.)
SALVAGUARDIAS IMPORTANTES! GUARDE ESTAS INSTRUCCIONES!
Al usar un aparato electrico, observe siempre las precaucionesasicas, incluyendo las作為:
LEA TODAS LAS INSTRUCCIONES ANTES DE USAR Este APARATO
ADVERTENCIA: PARA REDUCIR EL RIESGO DE INCENDIOS, CHOQUES ELECTRICOS O LESIONES:
- Ensemble Completely el producto antes de hacerlo funciona.
- Haga funciona la aspiradora solo al voltaje spécifique en la plac de datos en parte posterior inferior de la aspiradora.
- No deje el aparato sin supervisión cuando está enchufado. Desenchúfelo de la toma de corriente cuando no lo está usando y antes de limpiarlo o darle mantenimiento.
- No use este aparato en lugares al aire libre ni en superficies humedas.
- No permitted that el aparato se use como un juguete. No está diseñado para que lo uses niños de 12 años o menos. Se requires una supervisión stricta cuando este aparato se usa cerca de los niños. Para evitar lesiones o daños, mantenga a los niños lejos del producto y no permitta que coloquen los dedos nithers objetivos dentro de las aberturas.
- Use el producto solo como se describe en este manual. Use solo los accesos y produits recomendados por el fabricante.
- No use este aparato con un cordón o enchufe dañados. Si el aparato no está fácilnando adecuadamente, se dejo caer, se dañó, se dejo a la intemperie o se dejo caer bajo del agua, llévelo a un Centro de servicios antes decontinuar usándolo.
- No tire del cordón ni traslade el aparato jalando del cordón, ni tampoco lo use como manija; no ciderre la puerta cuando el cordón está atravesado ni tire de este alrededor de bordes o esquinas filosos. No coloque el producto sobre el cordón. No haga func-. nar el aparato encima del cordón. Mantenga el cordón lejos de superficies calientes.
- No lo desenchufe tirando del cordón. Para desenchufarlo, sujete el enchufe, no el cordón.
- Nunca manipule el enchufe ni el aparato con las manos humedes.
- No Coloque nunca objs en las aberturas. No use este aparato con ninguna abertura obstruida; manténgalo libre de sueidad, pelusa, cabelo y cualeser objeto que pueda reducir el flujo de aire.
- Mantenga el Cable, la ropa holgada, los dedos y todas las partes del cuerpo fuera de las aberturas y otheras piezas en movimiento. El rodillo de cepillos continua girando cuando se enquiryra en posicjion vertical, a menos que se apague con el pedal de activacion del rodillo de cepillos.
- Aqueous: all the controls are controlled by the desenchufarrio.
- Tenga especial cuidado al limpiar escaleras. Para evitar lesiones personales o daños, y evitar que la aspiradora se caiga, siempre colóquela al pie de la escalera, en el sueño. No coloque la aspiradora sobre escaleras ni muebles, ya que pueda occasionar lesiones o daños.
- No use este aparato para aspirar liquidos inflamables o combustibles, como gasolina, o restos de madera lijada, ni lo use en和地区 donde dichos materiales pudieran estar presentes.
MANTENIMIENTO GENERAL
ADVERTENCIA: PARA REDUCIR EL RIESGO DE LESIONES PERSONALES - DESCONECTE LA ASPIRADORA ANTES DE DARLE SERVICO.
Cualquier otra tarea de mantenimiento debe ser realizada por un representante de mantenimiento autorizzato.

RETIRO DE LOS DESECHOS / MANGUERA
RETIRO DE LOS DESECHOS / PROTECCION DE LA BOQUILLA

- Verifique si la Bolsa está llena; reemplacela si es besoino.
- Conecte la aspiradora y verifique que haya succion en el extremo de la manguera. Si hay succion en el extremo de la manguera, vaya al Diagrama 3. Si no hay succion en el extremo de la manguera, saque la manguera del contentedor. Retire la manguera del lado de la aspiradora tirando de la empunadura hacía afuera. Revise la manguera y retire la obstruccion.
- Retire la proteccion de la boquilla (vea el Diagrama 3) al quitar los tres (3) tornillos. Retire la obstruccion.
RETIRO DE LOS DESECHOS / CEPILLO TURBOACCIONADO
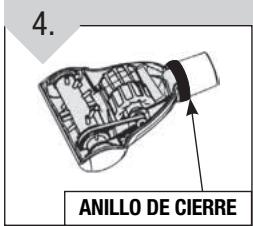
Dé la vuelta al turboceppillo/
accesorio con motor y haga
deslizar el anillo de cierre.
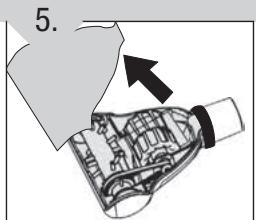
Haga girar el compartmento inferior y quite el tapon de sociedad.
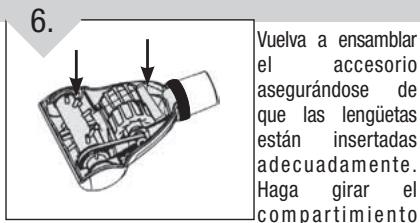
inferior para cerrarlo. Inserte el anillo de cierre en la ranura que se encuesta al extremo del turboceppillo/ accesorio con motor para terminar el ensamblaje.
TRANSPORTE DE LA ASPIRADORA
Para desplazar la aspiradora de cuarto en cuarto, utilise el mango ubicado en el dorso de laquia. (Vea la pág. E5, No. 12 para laubicación.)
NOTA: No empuje la aspiradora hacía adelante utilizing solamente las ruedecillas traseras, ni tire la aspiradora utilizing solamente las ruedecillas traseras, ni trate de levantar la aspiradora utilizing el mango superior.
BANDA Y CEPILLO: QUITAR Y REEMPLAZAR
HERRAMIENTA REQUIRIDA: DESTORNILLADOR PHILLIPS O PLANO
ADVERTENCIA: PARA REDUCIR EL RIESGO DE LESIONES CAUSADAS POR LAS PARTES MOVILES, DESCONECTE ANTES DE DAR SERVICIO.
Para reemplazar la correa, llama al 1-800-321-1134 o visite www.royalvacuums.com para encontrar el concesionario más cercano.
PARA QUITAR LA BANDA USADA
Acuesta the aspiradora y voltaea para ver la base de la boquilla. La base debe quedar plana y mirando hacia arriba. Utilice un destomillador Phillips parautar los tres (3) tornillos y asi quitar la proteccion de la boquilla. Las flechas indican la posicion de los tornillos.
Rote/gire la proteccion de la boquilla y tirela hacia fauna.
Levante y retire el cepillo giratorio. Deseche la banda usada.
COLOCACION DE LA BANDA NUEVA
Deslice la banda en el eje del motor.
Coloque la banda ahora en el area sin cerdas del cepillo giratorio (insertion).
Una vez que la banda ahora está puesta en su lugar, tire del cepillo giratorio y desiliceno bajo de la boquilla aseguarándose que las tapas finalas estén en la orientación correcta (inserción). Gire el cepillo giratorio de forma manual para asegararse que la banda está alineada apropiamente.

Fijela alineando las tres (3) lenguetas en las ranuras de la base. Paravoltar a colocar la proteccion de la boquilla, rote/ girela hasta que quede en su lugar.
Vuela a colocar los tres (3) tornillos para asegurar el protector de la boquilla. NOTE: Asegúrese que la protección está firme antes de colocar los tornillos.
- Sujete el enchufe cuando enrolle el cordón en la bobina. No permitita que el enchufe délatigazos al enrollarlo.
- Desenchufe antes de conectar el cepillo turboactionado.
- No aspire ningún objeto que se está quemando o que libere humano, como cigarrillos, fósforos o cenizas calientes.
- No use sin bolsas para polvo y/o filtro en su lugar.
- ADVERTENCIA: Este produit contiene sustancias químicas reconocidas por el estado de California como causantes de cancer, defectos congenitos o daño reproductivo.
-
Su aspiradora tiene incorporeal un protector tírmico interno para impeder el sobrecalentimiento. Cuando se activa el protector tírmico, la aspiradora deja de funciona. Si este sucede, proceda de la?sugianteforma:
-
Apane la aspiradora y desconectela de la toma de corriente electrica.
- Inspeccione la boquilla y las aberturas de entrada de la bolsa en busca de obstru ciones. Elimine las obstrucciones, si las hay.
- Cuando la aspiradora está desenchufada y el motor se haya enfiado durante 30 horas, el protector temico se desactiva, y se puedaContinuar pasando la aspiradora.
Si el protector temico vigue activandose afterwards de efectuar los pasos anteriores, es possible que su aspiradora necesse Maintainimiento.
ADVERTENCIA: PARA REDUCIR EL RIESGO DE DANOS:
- Evite aspirar objetos duros y filosos con este producto, ya que pueda causar daños.
- Guarde laquina en un lugar seco. No la exponga a temperatas de相关内容.
- El rodillo de cepillos continua girando cuando el producto está encendido y el mango está en posición vertical. Paraatar que las moquetas,los tapetes,los muebles y los sueños se dañen, evite inclinar la aspiradora o apoyarla sobre muebles, alfombras de area con flecos o escaleras enmoquetadas durante el uso del accesorio. Siempre asegúrese de que el rodillo de cepillos está apagadopisando el pedal de activación del rodillo de cepillos.
- No use objetos filosos para limpiar la manguera, ya que pueda causar daños.
ADVERTENCIA:
- Para disminuir el riesgo deCHOque electrico, este aparato tiene un enchufe polarizzato (una patilla es más ancha que la othera). Este enchufe peut usarse en una toma de corriente polarizada, de una sola manera. Si el enchufe no encaja Completely en la toma de corriente, colóquelo al revés. Si aun asi no encaja, comuniqué con un electricista calificado para que instale la toma de corriente apropiada. No haga ningún tipo de modificacion al enchufe.
FELICITACIONES
Usted es ahora el orgulioso propietario de una Royal. Confiamos en que sunea adquisión le Offercerá muchos años de satisfacción.
Estamos muy orgullosos de nuestros productos y esperamos queusted esté igualmente satisfecho con su calidad y rendimiento.
Gracias por su apoyo a los productos Royal.
Visite nuestro situ Web en www.royalvacuums.com
INDICE
Instrucciones de seguridad. Pagina E2, E3
Characteristicas Pagina E5
Cómo ensambar . Página E6
Ensamblaje del asa. Pagina E6
Almacenamento de accesorios. Pagina E6
Cómo funciona. Págrina E7
Limpieza de piso / alfombras. Pagina E7
Limpieza sobre sueños/escaleras. Págrina E7
Bolsa de papel: quitar y reemplazar. Pagina E8
Filtro: guitar y reemplazar . Pagina E8, E9
Foco: guitar y reemplazar. Pagina E9
Banda y cepillo: guitar y reemplazar . Pagina E10
Mantenimiento General Pagina E11
Transporte de la aspiradora. Pagina E11
Guía de solución de problemas . Págrina E12
GARANTÍA LIMITADA
Royal Appliance Mfg. Co. garantiza al consumidor que esta aspiradora está libre de defectos de materiales o de mano deobra durante 1 año a partir de la Fecha de compra original. Guarde su recibo de compra original para validar el comienzo del periodo de garantía.
Si la aspiradora presenta algo ndefecto dento del periodo de garantia, repararemos o reemplazaremosrialquier pieza defectuosa sin cargo. La这其中 completa de integrarse con envio prepagado a qualier Estacion deostenimiento de la garantia y ventas autorizada de ROYAL@. Incluya una descripcion completa del problema, la fecha de compra, una copia del recibo de compra original, y su nombre, direccion y numero de Telefono. Si eslejos de una Estacion de garantia, lame a la fabrica para Obtener ayud, en los EE. UU, y el Canada: 1-800-321-1134. Use unicamente piezas de recambio genuines de Royal.
La garantía no incluye desgaste inusual, daños como consecuencia de accidentes o uso irrazionale de la aspiradora.Esta garantía no cubre daños de cepillos, bolas, correas planas, filtres, bombillas ni ventiladores.Esta garantía no cubre reparaciones no autorizadas.Esta garantía le otorga derechos legales espécificos, y es possible que tambiénongathers derechos. (Es possible que los derechos varien de un estado a othern los EE. UU.).
IMPORTANT: USE SOLAMENTE PARTES DE REPUESTO GENUINAS ROYAL
FILTRO: QUITAR Y REEMPLAZAR: CONTINUACION
HERRAMIENTA REQUERIDA: DESTORNILLADOR PHILLIPS O PLANO
ADVERTENCIA: PARE REDUCIR EL RIESGO DE LESIONES CAUSADAS POR LAS PARTES MOVILES, DESCONECTE ANTES DE DAR SERVICIO.
NOTA: Inspeccione periodicamente el filtro y cambielo cuando sea necessitiesario.
Para reemplazar el filtro de escape, llama al 1-800-321-1134 o visite www.royalvacuums.com para encontrar el concesionario más cercano.
FILTRO DE DESCARGA
Se encontrar en la parte delantera de la aspiradora.
Acuesta la aspiradora. Desatornille el un (1) tornillos de la cubierta de la luz frontal.

Levante la cubierta para quitarla.
Retire el filtro de descarga de la lente y reemplácelo con el nuevo.

Vuelva a colocar la cubierta de la luz frontal.
Substituya el tornillo para asegurar en lugar.
FOCO: QUITAR Y REEMPLAZAR
HERRAMIENTA REQUERIDA: DESTORNILLADOR PHILLIPS O PLANO
ADVERTENCIA: PARA MINIMizar EL RIESGO DE ELECTROCHOQUE, DESENCHUFE LA ASPIRadora ANTES DE QUITAR O REEMPLAZAR LA BOMBILLA.
Esta aspiradora empSEA una bombilla normal de tipo automotor No. 906 de 13,0 voltios. Para Obtener una bombilla de recambio, Iame al 1-800-321-1134, o Iame a su tienda de recambios automotores.
Acuesta la aspiradora. Desatornille el un (1) tornillos de la cubierta de la luz frontal.
Levante la cubierta para qitarla.
Para SACAR la bombilla, tirela del portalamparas. Para reemplazarla, presiona para que entre en el portalamparas.
Vuelva a colocar la cubierta de la luz frontal asegurandola en su situ con los un tornillo. Vuelva a colocar la cubierta frontal.
BOLSADEPAPEL:QUITARYREEMPLAZAR
ADVERTENCIA: PARE REDUCIR EL RIESGO DE LESIONES CAUSADAS POR LAS PARTES MOVILES, DESCONECTE ANTES DE DAR SERVICIO.
NOTA: Desenchufe la aspiradora antes deCambiar la bolsa de papel. La aspiradora debe tener la bolsa colocada en todo momento. Usted se da cuenta que necesita reemplazar la bolsa cuandonota una disminuacion en la succion o cuando la luz indicadora de bolsa llena se vuelve amarilla o roja. So sobrepase la linea de llenado maximo de la bolsa. Los distinctos tips de bolsarequirecen Cambiarase frecuenciasdistinctas.
INDICADOR DE BOLS A LLENA: Cuando la luz indica la bella llena se vuela amarilla o roja, es possible que sea hora de colocar una bella de papel ahora. Compruebe la bella, y si está llena, reemplacela segun se describe a continuacion. En caso de no estar llena, es posible que el aparatoonga un bloqueo en el paso de sociedad (Vease la section de Problemas y Soluciones, Pagina E12).

Para reemplazar la bolsa tipo U, llame al 1-800-321-1134 o visite www.royalvacuums.com para encontrar el concesionario más cercano.
SACAR LA BOLSALLENA

Tire de la palanca de liberacion de la cubierta frontal para retirarla.
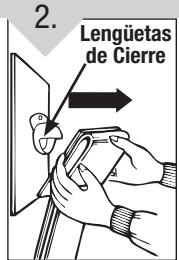
Coja con las dos manos el cuello de cartón de la bolsa y tire para que salga de las lengüetas de cierra del tubo de sueididad. Eche la Bolsa llena a la basura.
INSTALAR UNA BOLSANAUEVA
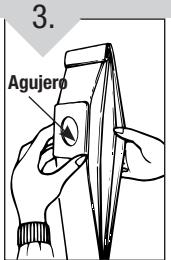
IMPORTANTE: Antes de instalar, abra la Bolsa para separarla del agujero. Con los dedos, abra el agujero para despegar el papel delismo.
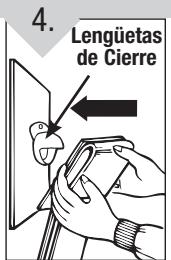
Coja con las dos manos el cuello de carton de la bolsa, y presione para que pase por encima de las lengüetas de cierre.
Doble la salsa hacidadentro 7.5cm 3 (pulg.) del fondo para que se apoye encima de los postes de apoyo para la salsa.Reponga la cubierta frontal.NOTA: Aseguirese que la salsa no quede atrapada entre la cubierta frontal y posterior.
FILTRO: QUITAR Y REEMPLAZAR
ADVERTENCIA: PARE REDUCIR EL RIESGO DE LESIONES CAUSADAS POR LAS PARTES MOVILES, DESCONECTE ANTES DE DAR SERVICIO.
NOTA: Inspeccione periodicamente el filtro y candidelo cuando sea necessitiesario.
Para reemplazar el filtro de la-camera de laolta, llame al 1-800-321-1134 o visite www.royalvacuums.com para encontrar el concesionario más cercano.
FILTRO DE CÁMARA DE BOLSA (INTERNO)
(Ubicado bajo de la Bolsa de papel.)
Quite el panel delantero.
Levante el borde delantero y tire hacía ustad para quitarlo Sacuda o cepille el excesso de polvo del filtro. Deslice la almohadilla del filtro a su posión. Reponga la cubierta frontal.
CHARACTERISTICAS
PARTE FRONTAL
PARTE FRONTAL
- Asa con empuñadura
- Cepillo turboactionado
- Cubierta frontal
- Lanza de extension
- Pedal de la Activacion de Brushroll
- Luz frontal
- Tope Scuff Guard
- Ventana del cepillo
- Botón de ajuste de alta de alfombras
- Empuñadura de manguera
- Indicador de bolsa llena

PARTE POSTERIOR
PARTE POSTERIOR
- Gancho de la manguera/Asa de transporte
- Cepillo para polvo
- Manguera extensible
- Rebobinado Automática del Cordon
- Swivel Casters
- Pedal de liberacion del asa
- Pedal de Encendido/Apagado
- Cordonélectrico
- Repliegue del Cordon Eléctrico
- Accesorio para Hendiduras
CÓMÖ ENSAMBLAR
HERRAMIENTA NECESARIA: DESTORNILLADOR PHILLIPS
ENSAMBLAJE DEL ASA
Ponga laiedad en posicón vertical, alinee las lengüetas a ambos lados del asa y empujé hacía abajo.
Asegure el asa al insertar los tres (3) tornillos incluidos en los orificios localizados en la parte delantera de launities. Asegürese de apretar bien los tornillos.
ENSAMBLAJE DE MANGUERA
Coloque la manguera en la abrazadora de la manguera (localizada en la parte posterior del asa) para asegurarla.
Inserte la empuñadura de la manguera en el lado de la aspiradora. Presione firmamente hacía abajo para asegurarla. NOTE: Puede ayudar que la tuerza ligeramente.
ALMACENAMIENTO DE ACCESORIOS
Para fazer los accesos: Coloque el cepillo para polvo (A) en el gancho del contentedor de accesos con las cerradas hacía afuera (Diagrama 3). Deslice el tubo de extension (B) y el accesorio para hendiduras (C) por los anillos de la parte posterior izquierda de la funda del accesorio.
CÓMOFUÑCIONA
ADVERTENCIA: ENSAMBLE TOTALMENTE LA ASPIRADORA ANTES DE USARLA.
NOTA: La aspiradora debe estar en la posicion vertical para que se levante del sueo el cepillo giratorio cuando se limpie por encima del sueo.
AJUSTES DE ALFOMBRA
NOTA: Para Cambiar el ajuste de alfombras, la aspiradora puede estar en la posicion vertical o en la posicion de operation.
CAMBIAR EN LA POSICION VERTICAL: Gire el botón al ajuste deseado.
NOTA: El botón se girará fácilmente. Una vez elegido el ajuste y la aspiradoraonga en la posición de operación, el ajuste está en la posición correcta.
CAMBIAR EN LA POSICION DE OPERATION: Gire el boton al ajuste deseado.
NOTA: El botón se girará con cierta resistencia. La boquilla subirá y bajo a medida que se gire el botón.
LIMPIEZA DE LA ALFOMBRA
Enchufe el cable en la toma electrica. "Encienda" la aspiradora. El interruptor de pedal se localiza en el lado izquierdo de lainstitution.
Con el pie pise el pedal de liberacion del asa que se enquirytra atras, en el lado izquierdo de la boquilla de limpieza. NOTEA: El cepillo giratorio puede hacer que el fleco de una alfombra se enrede Dentro de la aspiradora. Tenga cuidado al limpar las alfombras con fleco.
LIMPIEZA SOBRE SUELOS/ESCALERAS
Ponga la aspiradora en la posicion vertical. Retire la manguera del lado de la aspiradora tirando de la empunadura hacía afuera. NOTE: Puede ayudar que la tuerza ligeramente.
Elijarialquiera delos accesorios convenrientes,ouillice la manguera sola. Presione firmamente el accesorio hacía abajo en el extremo de la lanza o de la empañadura de manguera.Para
quitar el accesorio, tuerza y tire suavamente.

Use la manguera y el cepillo turboactionado para limpiar escaleras. Al usar accesarios, siempre apague el rodillo de cepillos lisando el pedal de activacion del rodillo de cepillos.
ADVERTENCIA
Tenga especial cuidado al limpiar escaleras. Para evaporar lesiones personales o daños, y evaporar que la aspiradora se caiga, siempre colóquela al pie de la escalera o sobre el sueño. No colque la aspiradora sobre escaleras ni muebles, ya que pueda occasionar lesiones o daños. Al usar accesorios, siempre apague el rodillo de cepillos pisando el pedal deactivación del rodillo de cepillos.
REPLIEGUE DEL CORDON ELECTRICO
Oprima la palanca de rebobinado automatico del cordon eléctrico para guardarlo. NOTE: Sujete el enchufe cuando enrolle el cordón en la bobina. No permitta que el enchufe de latigazos al enrollarlo.