
NB300 - Caméra vidéo GENUIS - Notice d'utilisation et mode d'emploi gratuit
Retrouvez gratuitement la notice de l'appareil NB300 GENUIS au format PDF.
| Type de produit | Caméra vidéo USB (Webcam) |
| Marque | GENUIS |
| Modèle | NB300 (VideoCAM NB 300) |
| Dimensions (approx.) | 80 x 30 x 30 mm |
| Poids | 50 g |
| Alimentation | Port USB (5 V) |
| Interface | USB 2.0 |
| Capteur | CMOS |
| Résolution vidéo | 640 x 480 pixels (VGA) |
| Cadence maximale | 30 images par seconde |
| Fonctions principales | Capture vidéo, photo, visioconférence, système de surveillance, envoi d'e-mail |
| Logiciel fourni | Logiciel de pilotage et pilotes, DirectX |
| Bouton de capture | Oui, pour capture d'image fixe |
| Mise au point | Rotation du capuchon de l'objectif |
| Système d'exploitation supporté | Windows (98, ME, 2000, XP) |
| Entretien et nettoyage | Nettoyer l'objectif avec un chiffon doux et sec |
| Sécurité | Ne convient pas à un usage extérieur sans protection |
| Pièces détachées | Câble USB fourni, aucune pièce détachée disponible |
| Réparabilité | Non réparable par l'utilisateur, contacter le SAV |
FOIRE AUX QUESTIONS - NB300 GENUIS
Questions des utilisateurs sur NB300 GENUIS
0 question sur cet appareil. Repondez a celles que vous connaissez ou posez la votre.
Poser une nouvelle question sur cet appareil
Téléchargez la notice de votre Caméra vidéo au format PDF gratuitement ! Retrouvez votre notice NB300 - GENUIS et reprennez votre appareil électronique en main. Sur cette page sont publiés tous les documents nécessaires à l'utilisation de votre appareil NB300 de la marque GENUIS.
MODE D'EMPLOI NB300 GENUIS

Important Notice:
Please install the driver first and then connect VideoCAM NB 300 to the USB port.
Please read the important notice before the installation.
1. Installing VideoCAM NB 300 software
A. Insert the VideoCAM NB 300 software CD into CD-ROM drive.
B. After few seconds, the setup screen will show the picture of VideoCAM NB 300. Click the "Utility Driver" then simply follow the on-screen instructions.
C. Please remember to install DirectX of the CD-ROM.
Notice:
If the setup screen doesn't show the picture of VideoCAM NB 300, please proceed the following installation:
- Go to the taskbar and click Start then Execute.
- Type D : \SETUP.EXE , then click Enter key.
(Suppose your CD-ROM is in Drive D)
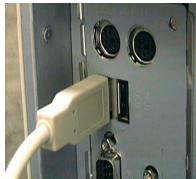
USB Port
2. Connect the VideoCAM NB 300 to your computer.
Connect the VideoCAM NB 300 to the USB port as shown on the right drawing.
- To get rid of driver installation, please go to the taskbar and follow "Start Program VideoCAM NB 300 VideoCAM NB 300 Uninstall, then follow the on-screen instruction to remove the installation.
- You can install the recognize software for video conferencing or chat with your friends.

You can use snapshot button to capture still image or rotate the lens cover to adjust the focus.
5. Function description for the major icon
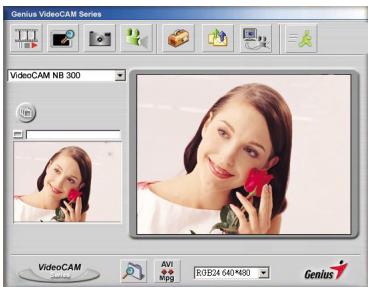
A.

Play the .avi file.
B.

Preview the video image.
C.

Capture image with full motion video.
D.

Take a picture.
E.

Send photo through e-mail.
F.

Use PC camera as a security monitoring system.
G.

Exit the Genius VideoCAM Series UI.
H.

Convert AVI files into MPEG format

NOTE
- Make sure to install the USB driver before connecting the device otherwise unable to install properly. If you encounter problems, uninstall the driver and software then follow the proper installation.
- Should you need the device under high luminance environment, please follow the steps as below:

Camera Control Control Exposure
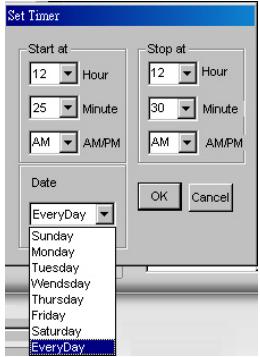
- Function description for the security monitoring system icon.
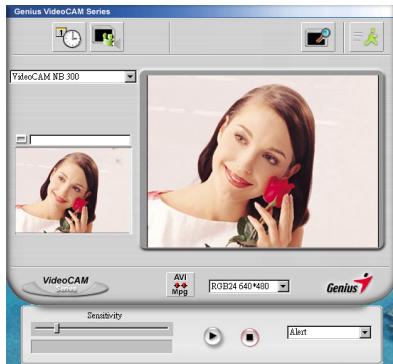
You can record any movements that appear in front of your monitor automatically. It can also record anytime until the HD is full. If there's no movement, it will shut down automatically after four seconds or until there is new movement. It's a great security monitoring system and you can set the software so it works at times when you're not around.
A.

Setup time of the security monitoring system.
When you start to record video, please press the play button.


NOTE
- The recording file will be retained in C:\WINDOWS\Album.