
MRY7500 - Aspirateur ROYAL - Notice d'utilisation et mode d'emploi gratuit
Retrouvez gratuitement la notice de l'appareil MRY7500 ROYAL au format PDF.
| Type de produit | Aspirateur vertical |
| Marque | ROYAL |
| Modèle | MRY7500 |
| Alimentation | Secteur, cordon d'alimentation avec libération rapide |
| Puissance | Standard (non spécifiée) |
| Type de sac | Sac en papier (Type U) |
| Filtration | Filtre HEPA (réf. 3-690320-001), remplacement annuel |
| Capacité du réservoir | Sac en papier standard |
| Réglage de hauteur | Molette de réglage pour différentes surfaces |
| Brosse motorisée | Brosse rotative avec courroie (réf. 3-910340-600) |
| Éclairage | Ampoule automobile n°906, 13V |
| Accessoires inclus | Suceur fente, brosse à épousseter, embout pour tissus, rallonge |
| Poids | Environ 5-7 kg (estimation) |
| Dimensions | Environ 30 x 30 x 110 cm (estimation) |
| Niveau sonore | Standard (non spécifié) |
| Usage | Domestique uniquement |
| Entretien courant | Vidange du sac, nettoyage/remplacement du filtre HEPA, vérification de la courroie |
| Sécurité | Fiche polarisée, arrêt automatique en position verticale, ne pas utiliser sur surfaces humides |
| Pièces détachées disponibles | Sac papier, filtre HEPA, courroie, ampoule, brosse |
| Réparabilité | Accès facile aux composants (courroie, filtre, ampoule) – tournevis cruciforme requis |
FOIRE AUX QUESTIONS - MRY7500 ROYAL
Questions des utilisateurs sur MRY7500 ROYAL
0 question sur cet appareil. Repondez a celles que vous connaissez ou posez la votre.
Poser une nouvelle question sur cet appareil
Téléchargez la notice de votre Aspirateur au format PDF gratuitement ! Retrouvez votre notice MRY7500 - ROYAL et reprennez votre appareil électronique en main. Sur cette page sont publiés tous les documents nécessaires à l'utilisation de votre appareil MRY7500 de la marque ROYAL.
MODE D'EMPLOI MRY7500 ROYAL
(ine)
aennnne nnnnne ennnnne ennnnne ennnnne ennnnne ennnnne ennnnne ennnnne ennnnne ennnnne ennnnne ennnnne ennnnne ennnnne ennnnne ennnnne ennnnne ennnnne ennnnne ennnnne ennnnne ennnnne ennnnne ennnnne ennnnne ennnnne
: oonoeaeep
: aepow ap oN
Pnnnne nnnnne nee
nod snossep-oee eaeenee eee
Pnne Pnne Pnne Pnne Pnne Pnne Pnne Pnne Pnne Pnne Pnne Pnne Pnne Pnne Pnne Pnne Pnne Pnne Pnne Pnne Pnne Pnne Pnne Pnne Pnne Pnne Pnne Pnne Pnne Pnne Pnne Pnne Pnne Pnne P
:LNNESSIeA
Wooonnnnneepnnae eaege n 008-
: 1z0s0e0e0e0e0e0e0e0e0e0e0e0e0e0e0e0e0e0e0e0e0e0e0e0e0e0e0e0e0e0e0e0e0e0e0e0e0e0e0e0e0e0e0e0e0e0e0e0e0e0e0
nne nnnnne
eessssssssssssssssssssssssssssssssssssssssssssssssssssssssssssssssssssssssssssssssssssssssssssssssssssssssssssssssssssss
aennnnnne nnnnne nnne nnnnne
Aeae
D
Dirt Devil
OWNER'S MANUAL
Operating and Servicing Instructions
-
Please read these instructions carefully before using your cleaner.
-
Let us help you put your vacuum together or answer any questions, call:
1-800-321-1134
(USA & Canada)
www.dirtdevil.com
WARNING:
Cleaner assembly may include small parts. Small parts can present a choking hazard.
For quick reference, please record your vacuum information below.
Model #:
Mfg. Code:
(Mfg. code located on the lower backside of cleaner)
THIS VACUUM CLEANER IS INTENDED FOR HOUSEHOLD USE ONLY.
IMPORTANT SAFETY INSTRUCTIONS
When you use an appliance, basic precautions should always be followed, including the following:
- READ ALL INSTRUCTIONS BEFORE USING THIS APPLIANCE.
- ALWAYS FOLLOW THESE SAFETY INSTRUCTIONS.
- BRING CLEANER TO UPRIGHT POSITION WHEN USING THE HOSE AND ATTACHMENTS.
- DO NOT LEAVE CLEANER UNATTENDED WHEN PLugged IN.
- REGULARLY CHECK THE FILTERS TO CLEAN OR REPLACE.
- WARNING: DO NOT USE ANY SHARP OBJECTS TO CLEAN OUT HOSE SINCE THEY COULD CAUSE DAMAGE TO THE HOSE.
- WARNING: THE CORDS, WIRES, AND/OR CABLES SUPPLIED WITH THIS PRODUCT CONTAINS CHEMICALS, INCLUDING LEAD OR LEAD COMPOUNDS, KNOWN TO THE STATE OF CALIFORNIA TO CAUSE CANCER AND BIRTH DEFECTS OR OTHER REPRODUCTIVE HARM. WASH HANDS AFTER USING.
WARNING: TO REDUCE THE RISK OF FIRE, ELECTRIC SHOCK OR INJURY:
- Do not leave appliance when plugged in. Unplug from outlet when not in use and before servicing.
- Do not use outdoors or on wet surfaces. Electrical shock could occur.
- Do not allow to be used as a toy. Close attention is necessary when used by or near children.
- Use only as described in this manual. Use only manufacturer's recommended attachments.
- Do not use with damaged cord or plug. If appliance is not working as it should, has been dropped, damaged, left outdoors, or dropped into water, return it to a service center for inspection. Call 1-800-321-1134 for the nearest service center.
- Do not pull or carry by cord, use cord as handle, close a door on cord, or pull cord around sharp edges or corners. Do not run appliance over cord. Keep cord away from heated surfaces.
- Do not unplug by pulling on cord. To unplug, grasp the plug, not the cord.
- Do not handle plug or appliance with wet hands.
- Do not put any objects into openings. Do not use with any opening blocked; keep free of dust, lint, hair, and anything that may reduce air flow.
- Keep hair, loose clothing, fingers, and all parts of body away from openings and moving parts.
- Do not pick up anything that is burning or smoking, such as cigarettes, matches, or hot ashes.
- Do not use without dust bag and filters in place.
Ooo
zerrn rnrnnrnnnrrnne nnnn nn nnnn nnnn nnnn nnnn nnnn nnnn nnnn nnnn nnnn nnnn nnnn nnnn nnnn nnnn nnnn nnnn nnnn nnnn nnnn nnnn nnnn nnnn nnnn nnnn nnnn nnnn nnnn nnnn nnnn nnnn nnnn nnnn nnnn nnnn
e e e e e e e e e e e e e e e e e e e e e e e
e e e e e e e e e e e e e e e e e e e e e e e e e e e e e e e e e e e e e e e e e e e e e e e e e e e e e e ee
e 1s e n enen enn ennn ennn ennn ennn ennn ennn ennn ennn ennn ennn ennn ennn ennn ennn ennn ennn ennn ennn ennn ennn ennn ennn ennn ennn ennn ennn ennn ennn ennn ennn ennn ennn ennn ennn ennn ennn ennn ennn ennn ennn ennn ennn ennn ennn enenn ne aee
e e e e e e e e e e e e e e e e e e e e e e e e e
zssnnn nnne nne eonne ene ne ene ene ene ene ene ene ene ene ene ene ene ene ene ene ene ene ene ene ene ene ene ene ene ene ene ene ene ene ene ene ene
e e e e e e e e e e e e e e e e e e e e e e e e e e e e e e
e e e e e e e e e e e e e e e e e e e e e e e e e e e e e e e e e e e e e e e e e e e e
e e e e e e e e e e
zənod snəsəeillnnow səeRns sən no nəeEeEedde, sed zesinnN
e e e e e e e e e e e e e e e e e e e e e e e e e e e e e e e
: SRESSESE NOSENHOSSSCHN EHNsEHNnDnOd : LNEeessss
NOVILS
SRESAANSNNSNSESSNNNEANNNNNNNNNNNNNNNNNNNNNNNNNNNNNNNNNNNNNNNNNNNNNNNNNNNNNNNNNNN
LNANONNNEENNNNNNNNNNNNNNNNNNNNNNNNNNNNNNNNNNNNNNNNNNNNNNNNNNNNNNNNNNNNNNNNNNNNNNNNNNNNNNNNNNNNNNN
Rrnnnnoe no nne eae nee eee
SNEENNNNNEEHNNEEHNNEEHNNEEHNNEEHNNEEHNNEEHNNEEHNNEEHNNEEHNNEEHNNEEHNNEEHNNEEHNNEEHNNEEHNNEEHNNEEHNNEEHNNEEHNNEEHNNEEHNNEEHNNEEHNNEEHNNEEHNNEEHNNEEHNNEEHNNEEHNNEEHNNEEHNNEEHNNEEHN
e 10000000000000000000000000000000000000000000000
Rnrrnnrnnnne nnnnne nnnnne nnnnne nnnnne nnnnne nnnnne nnnnne nnnnne nnnnne nnnnne nnnnne nnnnne nnnnne nnnnne nnnnne nnnnne nnnnne nnnnne nnnnne nnnnne nnnnne nnnnne nnnnne nnnnne nnnnne
DES DES AVEEN IYI YI YI YI YI YI YI YI YI YI YI YI YI YI YI YI YI YI YI YI YI YI YI YI YI YI YI YI YI YI YI YI YI YI YI YI YI YI YI YI YI YI YI YI YI YI YI YI YI YI YI
Rnrrnrnnn nnnnne nnnnne nnnnne
BnNn
LSEIINNDNNDNNDNNDNNDNNDNNDNNDNNDNNDN
SSSSSS
SNONANNDNANDNNDNNDNNDNNDNNDNNDNNDN
E E E E E E E E E E E E E E E E E E E E E E E E E E E E E E E E E E E E E E E E E E E E
e e e e e e e e e e e e e e e e e e e e e e e e e e e e
: s aes nss
e e e e e e e e e e e e e e e e e e e e e e e e e e e e e e e e e e
SSESS
e e e e e e e e e e e e e e e e e e e e e e e e e e e e
e e e e e e e e e e e e e e e e e e e e e e e e e e e e e e e e e e e e e e e e e e e e e e e e e e e e e e e e e e e e ee
:LNNESSI
SNOLI LONSLNISSECRSNONZTIN
Jnne nne ne ne ne ne ne ne ne ne ne ne ne ne ne ne ne ne ne ne ne ne ne ne ne ne ne ne ne ne ne ne ne ne ne ne ne ne ne ne ne ne ne ne ne ne ne ne ne ne ne ne ne ne ne ne ne ne ne ne ne ne ne ne ne ne ne ne ne ne ne ne ne ne ne ne ne ne ne ne ne ne ne ne ne ne ne ne ne ne ne ne ne ne ne ne ne nne nne nne nne nne nne nne nne nne nne nne nne nne nne nne nne nne nne nne nne nne nne nne nne nne nne nne nne nne nne nne nne nne nne nne nne nne nne nne nne nne nne nne nne nne nne nne nne nne nne nae nae nae nae nae nae nae nae nae nae nae nae nae nae nae nae nae nae nae nae nae nae nae nae nae nae nae nae nae nae nae nae nae nae nae nae nae nae
- Turn off all controls before unplugging.
- Use extra care when cleaning on stairs.
- Do not use to pick up flammable or combustible liquids, such as gasoline, or use in areas where they may be present.
- Keep the vacuum cleaner on the floor. Only the hand-held vacuum cleaners may be set on furniture.
- Cleaner must be in the upright position to lift the rotating brush off the carpet when doing above floor cleaning.
- Do not use an extension cord with this vacuum cleaner.
- Store the vacuum cleaner indoors. Put the vacuum cleaner away after use to prevent tripping accidents.
- Using improper voltage may result in damage to the motor and possible injury to the user. Proper voltage is listed on the cleaner plate.
SAVE THESE INSTRUCTIONS
WARNING:
To reduce the risk of electric shock, this appliance has a polarized plug (one blade is wider than the other). This plug will fit in a polarized outlet only one way. If the plug does not fit fully in the outlet, reverse the plug. If it still does not fit, contact a qualified electrician to install the proper outlet. Do not change the plug in any way.
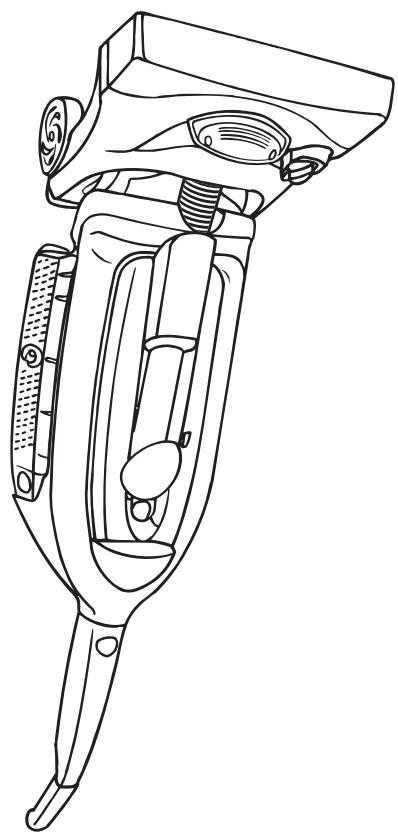
CONGRATULATIONS
You are now the proud owner of the Dirt Devil®. We trust your new purchase will bring you many years of satisfaction.
Our company has designed and developed this product with you in mind.
We are very proud of our products and hope that you are equally satisfied with their quality and performance.
Thank you for your support of Dirt Devil® products.
Visit our website at www.dirtdevil.com
TABLE OF CONTENTS
Safety Instructions. Page 2, 3
Features. Page 5
How to Assemble. Page 6
How To Operate. Page 7
Carpet Settings Page 7
Transporting . Page 7
Above Floor Cleaning. Page 7
Paper Bag: Removal & Replacement . Page 8
HEPA Filter: Removal & Replacement Page 8, 9
Belt Storage. Page 9
Belt or Brushroll: Removal & Replacement. Page 9, 10
General Maintenance. Page 10
Dirt Path Maintenance. Page 10
Filter Pad: Removal & Replacement. Page 10
Lightbulb: Removal & Replacement . Page 11
Troubleshooting Guide Page 12
LIMITED WARRANTY
To the consumer, Royal Appliance Mfg. Co. warrants this vacuum cleaner to be free of defects in material or workmanship commencing upon the date of the original purchase. Refer to your vacuum cleaner carton for the length of warranty and save your original sales receipt to validate start of warranty period.
If the vacuum cleaner should become defective within the warranty period, we will repair or replace any defective parts free of charge. The complete machine must be delivered prepaid to any ROYAL® Authorized Sales & Warranty Service Station. Please include complete description of the problem, day of purchase, copy of original sales receipt and your name, address and telephone number. If you are not near a Warranty Station, call the factory for assistance at USA & Canada: 1-800-321-1134. Use only genuine Royal® replacement parts.
The warranty does not include unusual wear, damage resulting from accident or unreasonable use of the vacuum cleaner. This warranty does not cover brushes, bags, flat belts, filters and bulbs. This warranty does not cover unauthorized repairs. This warranty gives you specific legal rights and you may also have other rights (Other rights may vary from state to state in the USA).
IMPORTANT: USE ONLY GENUINE ROYAL® REPLACEMENT PARTS.
NOTE: TO REGISTER YOUR PRODUCT, RETURN YOUR WARRANTY CARD OR REGISTER ONLINE AT WWW.DIRTDEVIL.COM.
e e e e e e e e e e e e e e e e e e e e e e e e e e e
E E E E E E E E E E E E E E E E E E E E E E E E E E E E E E E E E E E E E E E E E E E E
SsEHNNEHNNNNEHNNNNEHNNNNEHNNNNEHNNNNEHNNNNEHNNNNEHNNNNEHNNNNEHNNNNEHNNNNEHNNNNEHNNNNEHNNNNEHNNNNEHNNNNEHNNNNEHNNNNEHNNNNEHNNNNEHNNNNEHNNNNEHNNNNEHNNNNEHNNNNEHNN
(1) (2) (3) (4) (5) (6) (7) (8) (9) (10) (11) (12) (13) (14) (15) (16) (17) (18) (19) (20) (21) (22) (23) (24) (25) (26) (27) (28) (29) (30) (31) (32) (33) (34) (35) (36) (37) (38) (39) (40) (41) (42) (43) (44) (45) (46) (47) (48) (49) (50)
e e e e e e e e e e e e e e e e e e e e e e e e e e e e
Ae e aee eae ee e ae ene eae eae eae eae eae eae eae eae eae eae eae eae eae eae eae eae eae eae eae eae eae eae eae eae eae eae eae eae eae eae eae eae eae eae eae eae eae eae eae eae eae eae eae eae eae eae eae eae eae eae eee
aeneae6 ep
eepn eepn ennnn nnnn nnnn nnnn nnnn nnnn nnnn nnnn nnnn nnnn nnnn nnnn nnnn nnnn nnnn nnnn nnnn nnnn nnnn nnnn nnnn nnnn nnnn nnnn nnnn nnnn nnnn nnnn nnnn nnnn nnnn nnnn nnnn nnnn nennn nnnn nnnn nnnn nnnn nnnn nnnn nnnn nnnn nnnn nnnn nnnn nnnn nnnn nnnn nnnn nnnn nnnn nnnn nnnn nnnn nnnn nnnn nnnn nnnn nnnn nnnn nnnn nnnn nnnn nnnn nann
Ee
21 66d 66
e e e e e e e e e e e e e e e e e e e e e e e
0000000000000000000000000000000000000000000000000000
01 066d ssssees aeeessed np nneene
0000
01 6 666666666666666666666666666666666666666666666
6 66666666666666666666666666666666666
6 8e6d
8 86d
e e e e e e e e e e e e e e e
e e e e e e e e e e e e e e e e e e e e e e e e e
e e e e e e e e e e e e e e e e e
eepd
g eed
e e e e e e e e e e e e e e e e e e e e e e e e e e e
e 2 e e e e e e e e e e e e e e e e e
S
mnnn mnnnnnnnnnnnnnnnnnnnnnnnnnnnnnnnnnnnnnnnnnnnnnnnnnnnnnnnnnnnnnnnnnnnnnnnnnnnnnnnnnnnnnnnnnnnnnnnnnnnnnnnnnn
e e e e e e e e e e e e e e e e e e e e
e e e e e e e e e e e e e e e e e e e e e e e e e e e e e e e e e e e e e e e e e e e e e
e e e e e e e e e e e e e e e e e e e e e e e e e e e e e e e e e e e e e e e e e e e
sne sns nneepn ees snon needde enb sspens -ed sss snon nn un pnnn enn ene
i SNNOIeRrREeR
eees ennnnneepn nee eonod 42
e 2
e e e e e e e e e e e e e e e e e e e e
aee nee nee nee nee nee nee nee nee nee nee nee nee nee nee nee nee nee nee nee nee nee nee nee nee nee nee nee nee nee nee nee nee nee nee nee nee nee nee nee nee nee nee nee nee nee nee nee nee nee nee nea
02
aoujd
eeppeeppeepd 6
nne nnnnne nee eaepeep
eessnne eess
eessss
nne nnnnne nee eae
anbne nehnn
eae
oepnpeep
(ahnne eep) nneon
A
A
Dpsnepaegubod 01
e e 6
nne nne ne ne ne ne ne ne ne ne ne ne ne ne ne ne ne ne ne ne ne ne ne ne ne ne ne ne ne ne ne ne ne ne ne ne ne ne ne ne ne ne ne ne ne ne ne ne ne ne ne ne ne ne ne ne
Pnngnnnsocssoeaepe 2
Spaep aep aep aep aep
edue 9
edehn
e e e e e e e e e e e e e e e e e e e e e e e
aeepeessepeeepd 2
assb-ueaubod
LNVA
LNVA
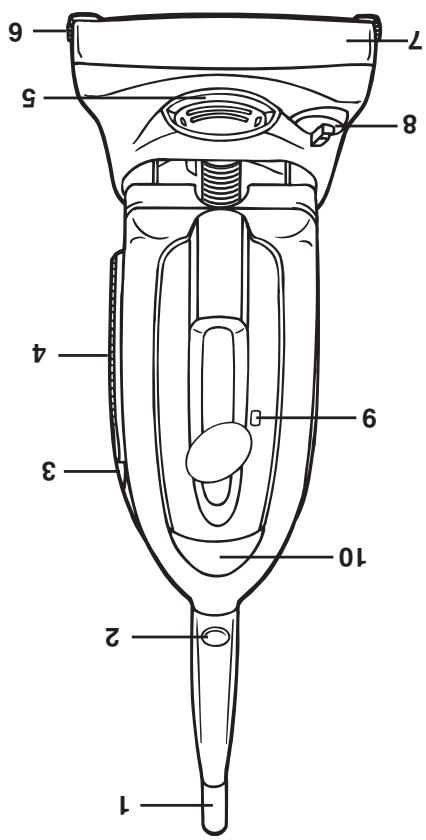
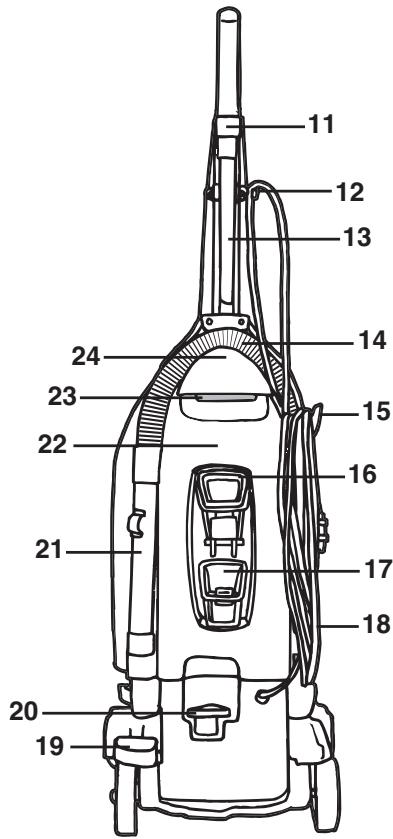
FEATURES
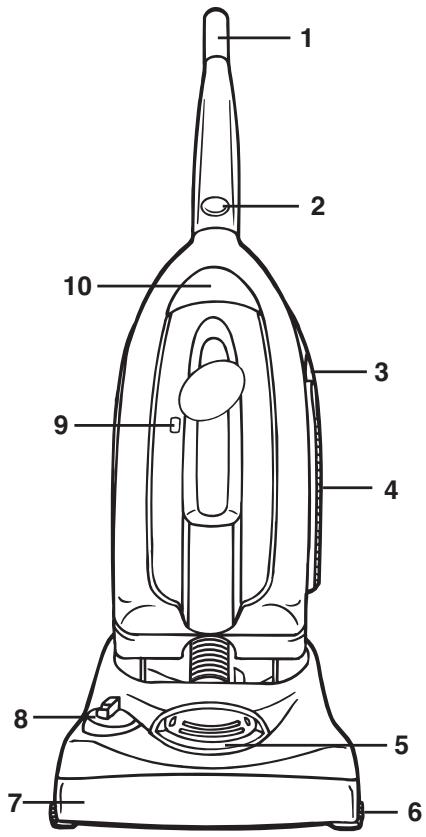
FRONT
FRONT
- Non-Slip Grip
- Handle Fastener
- Extra Belt Storage
- Hepa Filter
- Headlight
- Edge Cleaning Bristles
- Scuff Guard™ Bumper
- Height Adjustment Knob
- Full Bag Indicator
- Carry Handle
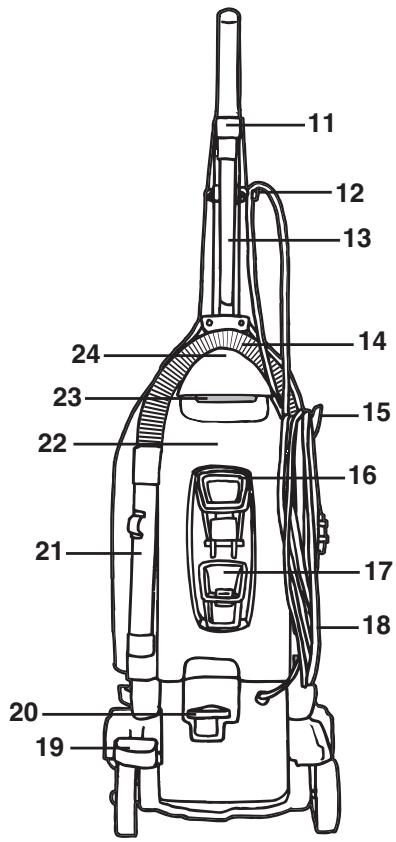
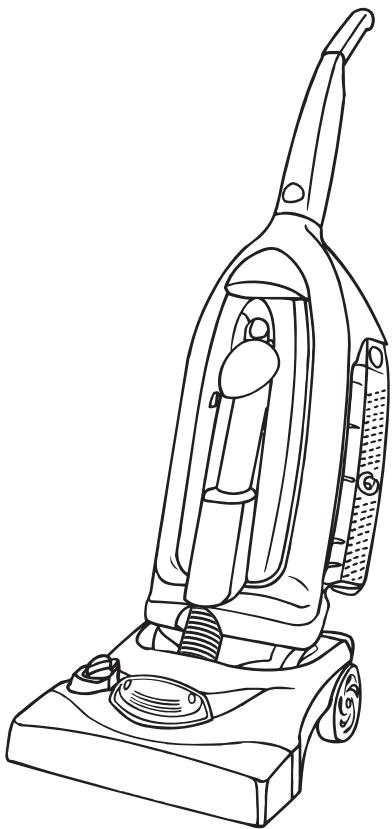
BACK
BACK
- Crevice Tool (in extension wand)
- Cord Guide
- Extension Wand
- Stretch Hose
- Quick Cord Release
- Upholstery Tool
- Dust Brush
- Power Cord
- Handle Release Pedal
- Power Pedal
- Hose Wand
- Bag Compartment
- Bag Release Lever
- Bag Compartment Handle
HOW TO ASSEMBLE
TOOL REQUIRED:PHILLIPS SCREWDRIVER
LIST OF PARTS NEEDED:
1 handle screw

4 body screws

1 fastener

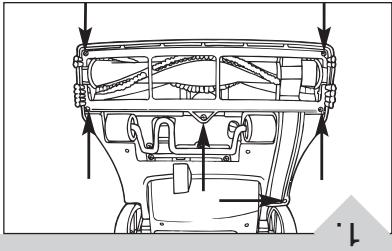
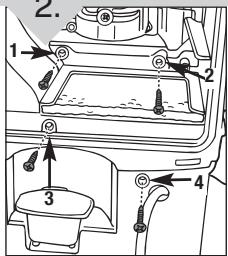
Gently push midsection onto base. The midsection guides go into the nozzle slots.
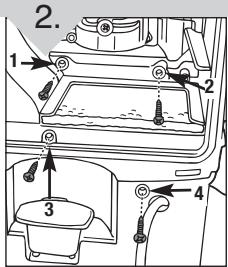
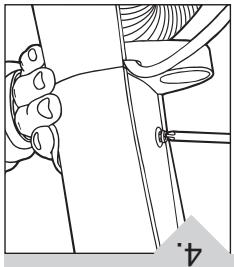
Insert the four (4) screws into the hole openings. Three screw holes are located inside bag chamber. The fourth screw hole is located underneath bag chamber opening (4). Secure by tightening the screws with a Phillips screwdriver.
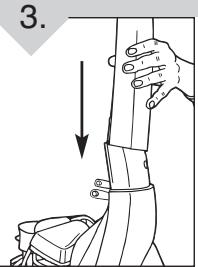
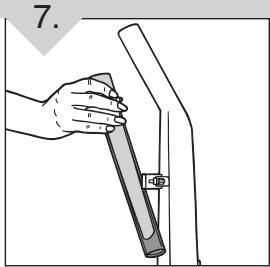
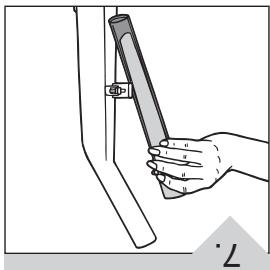
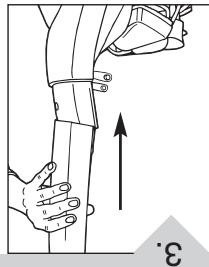
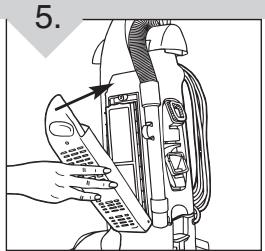
Push upper handle onto upright, aligning upper handle with handle opening.
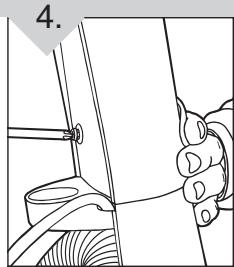
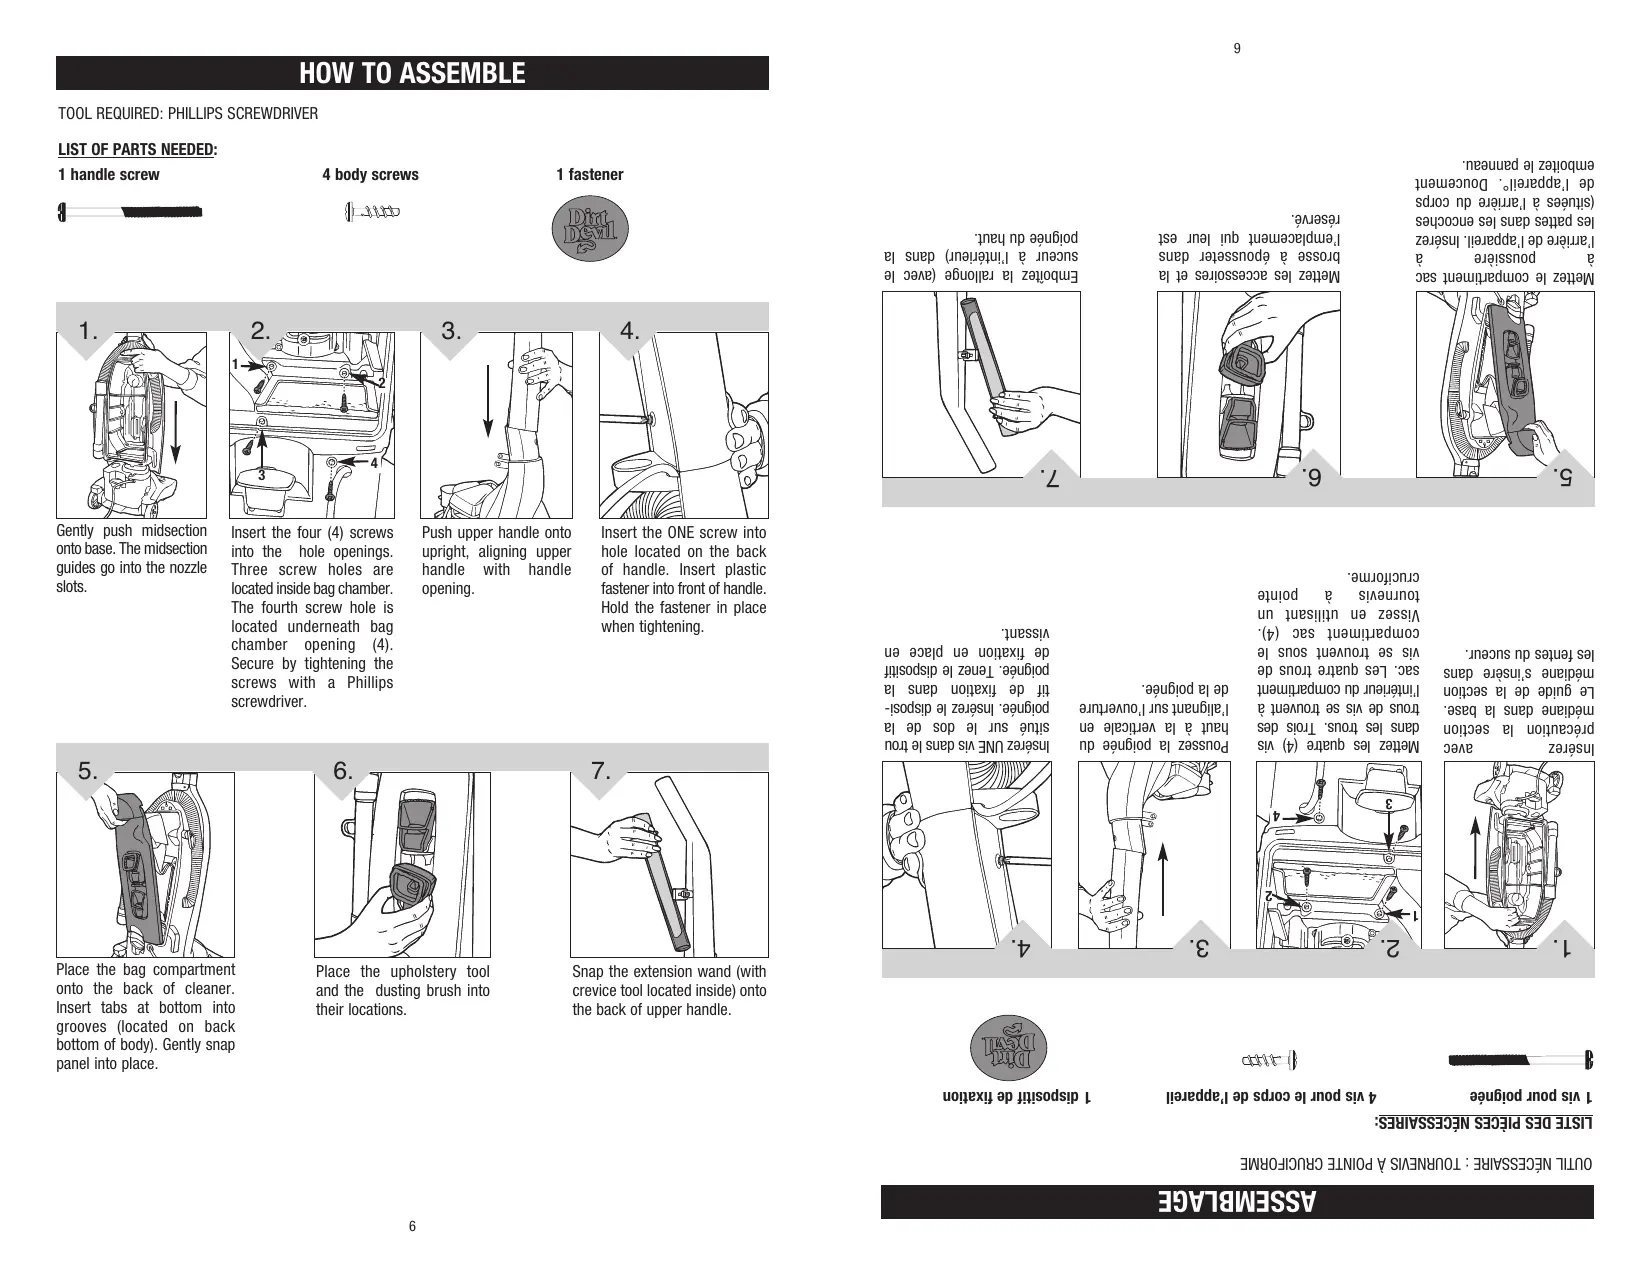
Insert the ONE screw into hole located on the back of handle. Insert plastic fastener into front of handle. Hold the fastener in place when tightening.

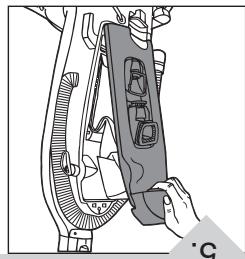
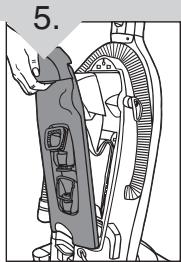
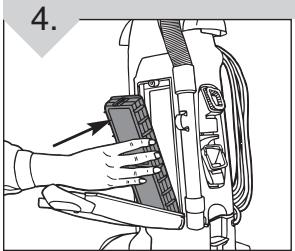
Place the bag compartment onto the back of cleaner. Insert tabs at bottom into grooves (located on back bottom of body). Gently snap panel into place.
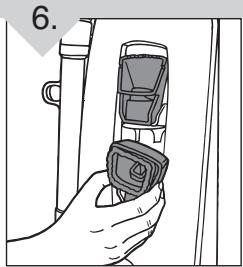
Place the upholstery tool and the dusting brush into their locations.
Snap the extension wand (with crevice tool located inside) onto the back of upper handle.
nne nne nee eae
e e e e e e e e e e e e e e e e e e e e e e e e e
e e e e e e e e e e e e e e e e e e e e e e e e e e e e e e e e e e e e e e e e e e e e e
e e e e e e e e e e e e e e e e e e e e e e e e e e e e e e e e e e e e e e e e e e e e e e e e e e e e e e e e e
eepnnepeepnneepnneepnneepnneepnneepnneepnneepnneepnneepnneepnneepnneepnneepnneepnneepnneepnneepnneepnneepnneepnneepnneepnneepnneepnneepnneepnneepnneepnneepnneepnneepnneepnneepnne
QUSS
e e enen ene ene ene ene ene ene ene ene ene ene ene ene ene ene ene ene ene ene ene ene ene ene ene ene ene ene ene ene ene ene ene ene ene ene ene ene ene ene ene ene ene ene ene ene ene ene ene ene ene ene enee

e e e e e e e e e e e e e e e e e e e e e e e e e e e e


ouexy ap misodsip

peedde,ap sdoa onod si

aod mod s
eessssssssss
nne nnnnne nnnnne nnnnne nnnnne nnnnne nnnnne nnnnne nnnnne nnnnne nnnnne nnnnne nnnnne nnnnne nnnnne nnnnne nnnnne nnnnne nnnnne nnnnne nnnnne nnnnne nnnnne nnnnne nnnnne nnnnne nannnee
A
e e e e e e e e e e e e e e e e e e e e e e e e e e e e e e e e e e e e e e e e
aBIOIOIJI EJ
suea aee as puenb
ZESITLLO.N:3NE0REW
e e e e e e e e e e e e e e e e e e e e e e e e e e e e e e e e e e e e e e e
esnnssnssnne nee eae ene ene ene ene ene ene ene ene ene ene ene ene ene ene ene ene ene ene ene ene ene ene ene ene ene ene ene ene ene ene ene ene ene ene ene ene ene ene ene ene ene ene ene ene ene ene ene ene ene ene enee
Pnne nnnnne nee nee nee nee nee nee nee nee nee nee nee nee nee nee nee nee nee nee nee nee nee nee nee nee nee nee nee nee nee nee nee nee nee nee nee nee nee nee nee nee nee nee nee nee nee nee nee nee nee nee neee
Hnne nnnnne nnnnne nnnnne nnnnne nnnnne nnnnne nnnnne nnnnne nnnnne nnnnne nnnnne nnnnne nnnnne nnnnne nnnnne nnnnne nnnnne nnnnne nnnnne nnnnne nnnnne nnnnne nnnnne nnnnne nnnnne nannnne nnnnne nnnnne nnnnne nnnnne nnnnne nnnnne nnnnne nnnnne nnnnne nnnnne nnnnne nnnnne nnnnne nnnnne nnnnne nnnnne nnnnne nnnnne nnnnne nnnnne nnnnne nnnnne nnnnne nennnne nnnnne nnnnne nnnnne nnnnne nnnnne nnnnne nnnnne nnnnne nnnnne nnnnne nnnnne nnnnne nannnee
TOS SNSSSEEN
aee aee e e e ee e e e e e e e e e e e e e e e e e e e e e e e e e e e e e e e e e e e e e
Peeepnneeppeep
e e e e e e e e e e e e e e e e e e e e e e e e e e e e e e e e e e e e e e e e e e e e e e

Rnrrnnrnrnnn rnrnnn nnnnne
e e e e e e e e e e e e e e e

(1) (2)
Rnrrnnrnnnne nnnnne
nne nnnnne nnnnne nnnnne nnnnne nnnnne nnnnne nnnnne nnnnne nnnnne nnnnne nnnnne nnnnne nnnnne nnnnne nnnnne nnnnne nnnnne nnnnne nnnnne nnnnne nnnnne nnnnne nnnnne nnnnne nnnnne nannnee
eepnne eepnne ene ene ene ene ene ene ene ene ene ene ene ene ene ene ene ene ene ene ene ene ene ene ene ene ene ene ene ene ene ene ene ene ene ene ene
EN9IOd
VH 8HNONENDE
WnreRrRee
NNEEN
NOO0000
ENNANNNNNEHNNE
Rnrrnnrnrnnnne
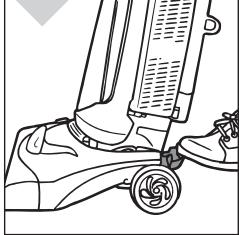
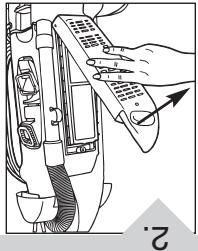
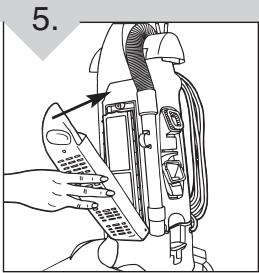
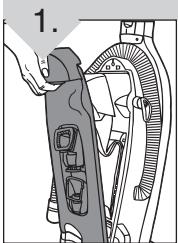
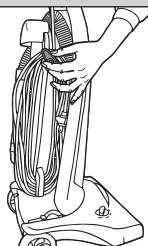
HOW TO OPERATE
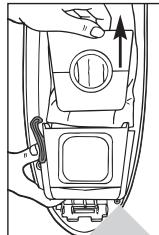
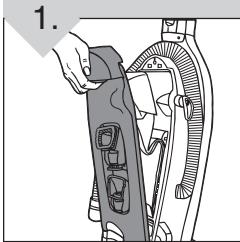
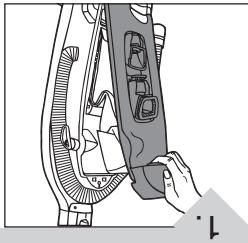
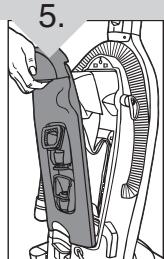
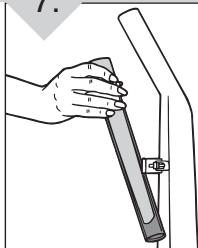
QUICK CORD RELEASE
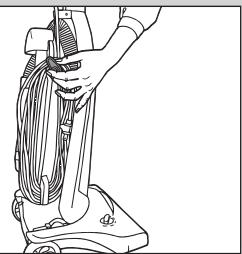
1.
- Turn Quick Cord Release for easy cord removal.
Plug cord into electrical outlet. - Store cord in cord guide (see Features - pg. 4) to keep out of way while in use.
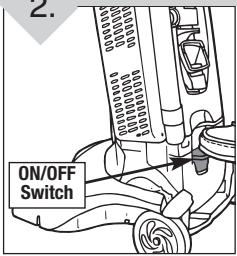
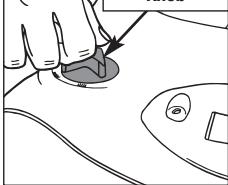
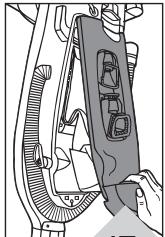
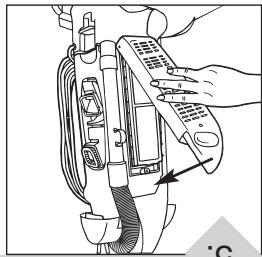
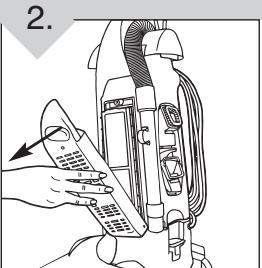
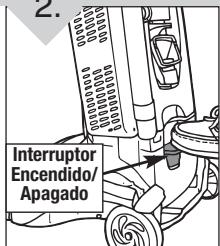
ON/OFF RELEASE
一
Turn cleaner "on" by depressing power pedal (on the back of the cleaner).
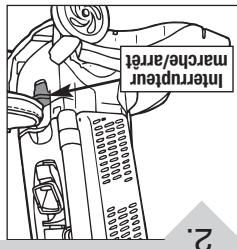
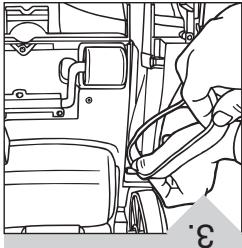
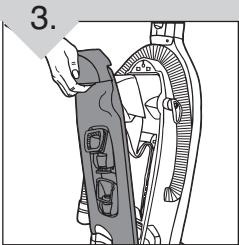
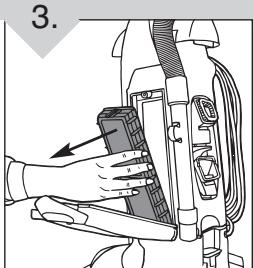
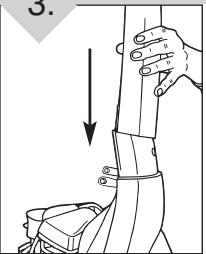
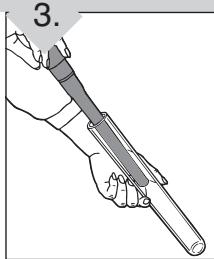
HANDLE RELEASE
3.
Release handle by depressing handle release pedal.
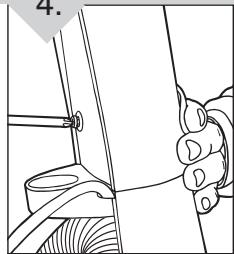
CARPET SETTINGS
Heig
Adjust Kno
Handle should be in the upright position before adjusting the carpet setting. Turn height adjustment knob to match the surface being cleaned. Once height is selected, the nozzle will go to the correct position when the handle is lowered. NOTE: Rotating brush could
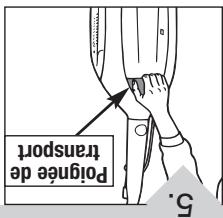
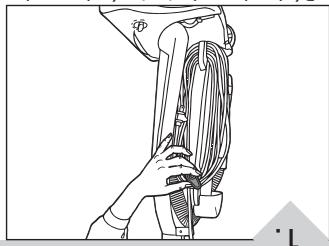
TRANSPORTING CLEANER
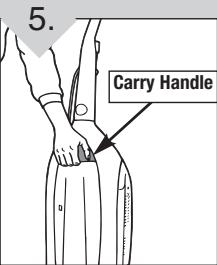
Use the convenient front carry handle when lifting vacuum to transport.
cause area rug fringe to become tangled within cleaner. Use caution when vacuuming throw rugs with fringe.
ABOVE FLOOR CLEANING
CAUTION: BRUSH AGITATOR CONTINUES TO ROTATE WHILE HOSE IS REMOVED OR IN USE AT ALL TIMES WHILE CLEANER IS ON. KEEP HAIR, LOOSE CLOTHING, FINGERS AND ALL BODY PARTS AWAY FROM BRUSH AREA WHILE CLEANER IS ON.

1.
2
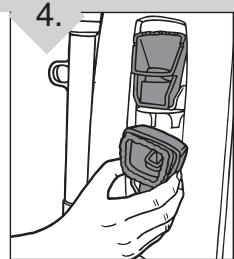
Remove crevice tool and extension wand for above-the-floor cleaning.
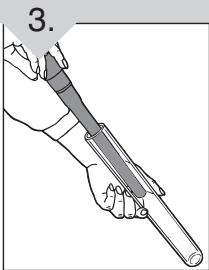
Remove crevice tool from wand and fit on end of wand for additional reach. NOTE: DO NOT use crevice tool while in extension wand.

Remove dust brush or upholstery brush and attach to hose or wand end to clean various surfaces.
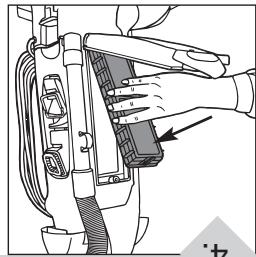
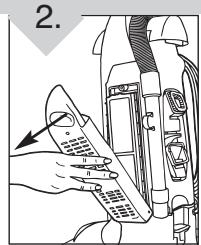
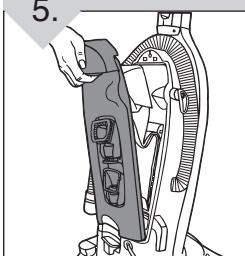
PAPER BAG: REMOVAL & REPLACEMENT
WARNING: TO REDUCE THE RISK OF INJURY FROM MOVING PARTS - UNPLUG BEFORE SERVICING.
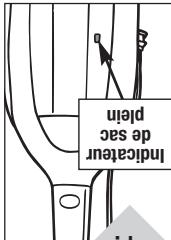
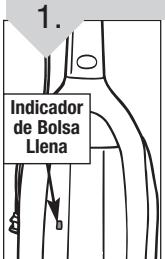
NOTE: You can tell your bag needs replacing when you experience less suction or when the Full Bag Indicator changes to yellow. Do not exceed marked fill line on paper bag. Different types of dirt may require bag replacement more often.

For Bag Type U replacements, please visit our website at www.dirtdevil.com to buy online or locate a dealer nearest you.
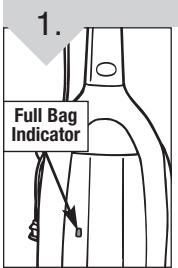
When the full bag indicator window changes to yellow, check the paper bag. It may be time for a new paper bag.
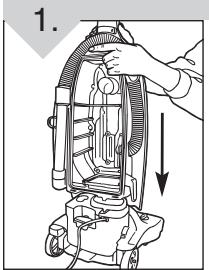
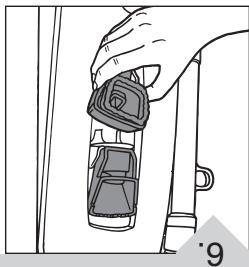
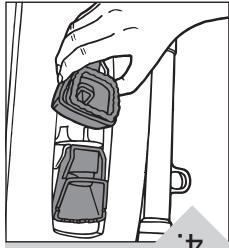
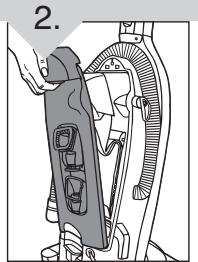
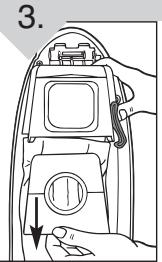
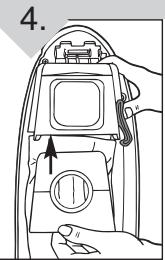
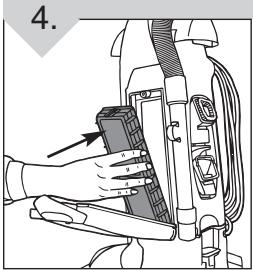
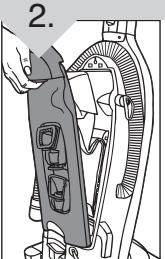
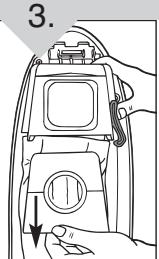
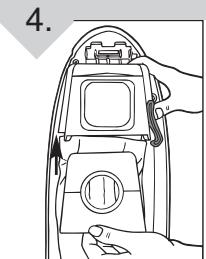
Pull release lever and lift to remove bag compartment.
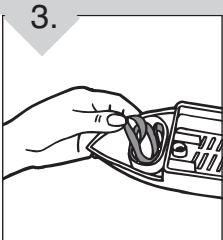
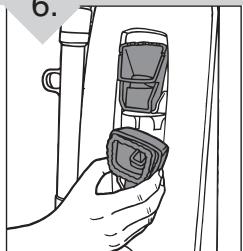
Over trash receptacle, press lever on bag holder to release full paper bag.
Slide collar of new paper bag into bag holder. Hole in bag should face out.
IMPORTANT: INSERT FINGER INTO HOLE AND
PUSH PAPER AWAY FROM OPENING
B E F O R E INSTALLING. NOTE:
Be sure lever on bag holder secures bag collar into place.
Replace bag compartment. NOTE: Cover MUST be securely fastened before operating.
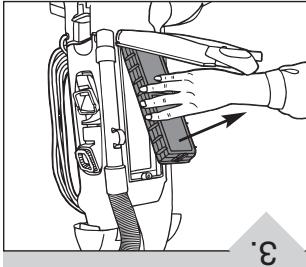
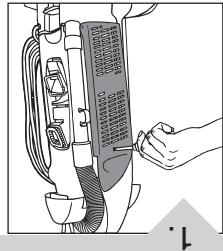
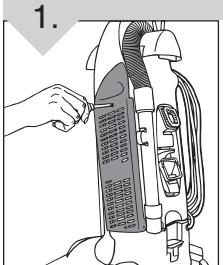
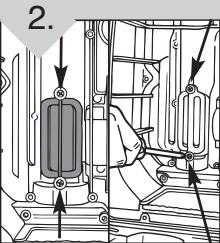
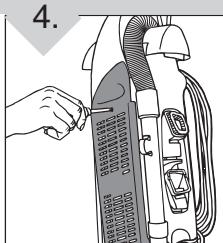
HEPA FILTER: REMOVAL & REPLACEMENT
TOOL REQUIRED:PHILLIPS SCREWDRIVER
HEPA filter, part # 3-690320-001, is located on the side of cleaner.
NOTE: Unplug cleaner before changing filter.
NOTE: For best performance, replace filter yearly.
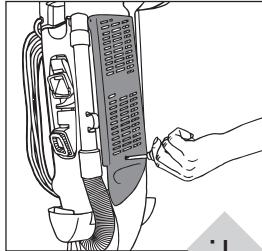
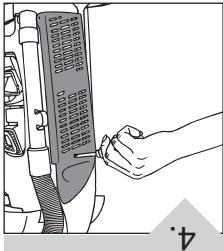
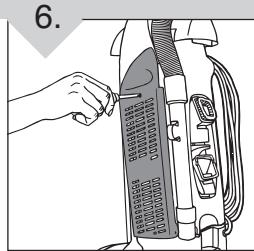
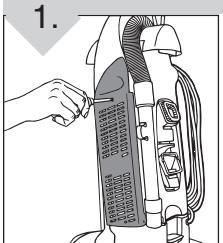
Loosen screw: the one (1) screw at the top of filter cover.
NOTE: To prevent misplacing screw, do not take screw completely out of filter cover.

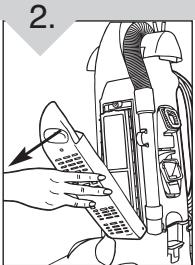
Gently lower filter cover from body.
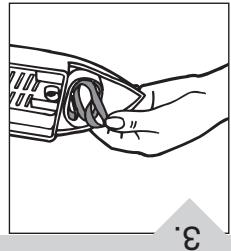
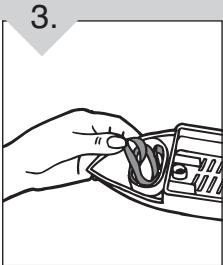
Grasp HEPA filter cartridge and remove. IMPORTANT: DO NOT CLEAN WITH WATER. For HEPA filter replacements call 1-800-321-1134 (USA & Canada).
(snnnne
(1epeuege) 4ELL-2Zc-008-L ne
eannnnnne nnnnne eaeene
ep saeesepnneepnneep
Ae
ZESTNIUN.N:INVANBDW
rAeHnne nnnnne ene ene
a np
e e e e e e e e e e e e e e e e e e e
aepnpeon
Pn Pnnnnnnnnnnnnnnnnnnnnnnnnnnnnnnnnnnnnnnnnnnnnnnnnnnnnnnnnnnnnnnnnnnnnnnnnnnnnnnnnnnnnnnnnnnnnnnnnnnnnnnnnnnnnnnnnnnnn
eepnnd:
n nnnnne
aonnnsinSs(L)Ezss

e e ene ene ene ene ene ene ene ene ene ene ene ene ene ene ene ene ene ene ene ene ene ene ene ene ene ene ene ene ene ene ene ene ene ene ene ene ene ene ene ene ene ene ene ene ene ene ene ene ene ene
rnnnne nne nee eae ene nee nee nee nee nee nee nee nee nee nee nee nee nee nee nee nee nee nee nee nee nee nee nee nee nee nee nee nee nee nee nee nee nee nee nee nee nee nee nee nee nee nee nee nee nee nee nee nee nee nee
e e e e e e e e e e e e e e e e e e e e e e e e e e e e e e e e
Rnrrnnrnnn rnrnnn nnnn nnrnnn nnnn nnnn
LNEWENWENWENWENWENWENWENWENWENWENWENWENWENWEN
eae du uuaq ccs
aexy ees ap oodns
a n
P 2000 :
NOI⊥V7VANSN1
Ae
00
ETZ49308
SNADGNO
Z3ESNI : INVADW
eae
e e e e e e e e e
eep
eessnnnneennnnnne nnnnnnnnnnnnnnnnnnnnnnnnnnnnnnnnnnnnnnnnnnnnnnnnnnnnnnnnnnnnnnnnnnnnnnnnnnnnnnnnnnnnnnnnnnnnnnnnnnn
e
e
Jnod 0eS-0eD
np 1e1e1e1e1nS
zAnndpe 10nnp
aun.p ssssep-n
e
e e
01 ZAAnUa
T
e e e e e e e e e e e e e e e e e e e e e e e e e e e
9
8
:
2
aepnne nnnnne eae nee enne nee nee nee nee nee nee nee
mnnn nnnn nnnn nnnn nnnn nnnn nnnn nnnn nnnn nnnn nnnn nnnn nnnn nnnn nnnn nnnn nnnn nnnn nnnn nnnn nnnn nnnn nnnn nnnn nnnn nnnn nnnn nnnn nnnn nnnn nnnn nnnn nnnn nnnn nannn nannn nannn nannn nannn nannn nannn nannn nannn nannn nannn nannn nannn nannn nannn nannn nannn nannn nannn nannn nannn nannn nannn nannn nannn nann

e e e e e e e e e e e e e e e e e e e e e e e e e e e e e e e e e e e e e e e e e e e e e e e e e ee
NNEEN NOSV ANV
T 1
LNEENREENNEEINNNEEINNEEINNEEINNEEINNEEINNEEINNEEINNEEINNEEINNEEINNEEINNEEINNEEINNEEINNEEINNEEINNEEINNEEINNEEINNEEINNEEINNEEINNEEINNEEINNEEINNEEINNEEINNEEINNEEINNEEINNEEINNEEINNEEINNEEIN
e e e e e e e e e e e e e e e e e e e e e e e e
eessnne
e e e e e e e e e e e e e e e e e e e e e e e e e e e e e e e e e e e e e e e e e e e e ee
Ee 1
Rnrrnnrnnnne nnnnne nnnnne nnnnne nnnnne nnnnne nnnnne nnnnne nnnnne nnnnne nnnnne nnnnne nnnnne nnnnne nnnnne nnnnne nnnnne nnnnne nnnnne nnnnne nnnnne nnnnne nnnnne nnnnne nnnnne nnnnne
Rnrrnnrnnnne nnnnne nnnnne nnnnne nnnnne
LNEENWENRENNNENEENNEENNEENNEENNEENNEENNEEN
3
nepnne nnnnne nnnnne nnnnne nnnnne nnnnne nnnnne nnnnne nnnnne nnnnne nnnnne nnnnne nnnnne nnnnne nnnnne nnnnne nnnnne nnnnne nnnnne nnnnne nnnnne nnnnne nnnnne nnnnne nnnnne nnnnne nannnee
aannnnnne aannnnnne nnnnnnne nnnnnnne nnnnnnne nnnnnnne nnnnnnne nnnnnnne nnnnnnne nnnnnnne nnnnnnne nnnnnnne nnnnnnne nnnnnnne nnnnnnne nnnnnnne nnnnnnne nnnnnnne nnnnnnne nnnnnnne nnnnnnne nnnnnnne nennnnnne nnnnnnne nnnnnnne nnnnnnne nnnnnnne nnnnnnne nnnnnnne nnnnnnne nann
e e e e e e e e e e e e e
nnp npepepepepepepepepepepepepepepepepepepepepepepepepepepepepepepepepepepepepepepepepepepepepepepepepepepepepepepepepepepepepepepepepepepepepepepepepepepepepepepepepepepepepepepepepepepepepepe pe pe pe pe pe pe pe pe pe pe pe pe pe pe pe pe pe pe pe pe pe pe pe pe pe pe pe pe pe pe pe pe pe pe pe pe pe pe pe pe pe pe pe pe pe pe pe pe pe pe pe pe pe pe pe pe pe pe pe pe pe pe pe pe pe pe pe pe pe pe pe pe pe pe pe pe pe pe pe pe pe pe pe pe pe pe pe pe pe pe pe pe pe pe pe pe pe
e e e e e e e e e e e e e e e e e e e e e e e e e e e e e e e e e
e e e e e e e e e e e e e e e e e e e e e e e e e e e e
RNEENNEE NNNNNEE
EONNEENNNNNEENNNNEEN
e e e e e e e e e e e e e e e
e eee

e e e e e e e e e e e e e e e e e e e e e e e e e e e e
EINS : LNEWENrERnRENwENrERnRENwENrERnRENrERnRENrERnRE
HEPA FILTER REMOVAL & REPLACEMENT: CONTINUED
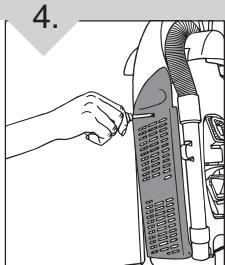
To replace: Insert HEPA filter into housing (gasket on inside) and push into place.
Lift filter cover back into place.
Secure the one (1) screw at the top of filter cover.
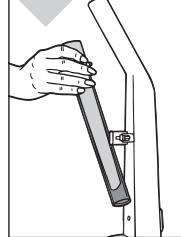
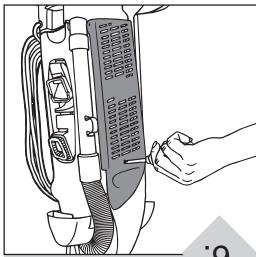
BELT STORAGE
TOOL REQUIRED: PHILLIPS SCREWDRIVER
Belt, part # 3-910340-600, is located on the side of cleaner.

For Belt Style 12 replacements, please visit our website at www.dirtdevil.com to buy online or locate a dealer nearest you.
Loosen the one (1) screw located at the top of filter cover.
Gently lower filter cover from body.
Belt is stored on the inside of the filter cover on top. Remove and replace with another NEW belt.
Replace filter cover. Secure the one (1) screw at the top of filter cover.
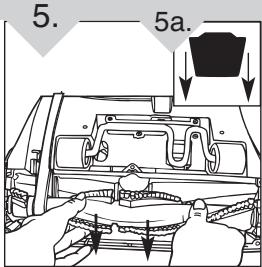
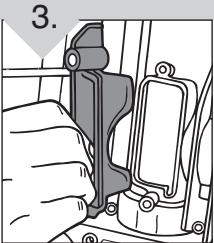
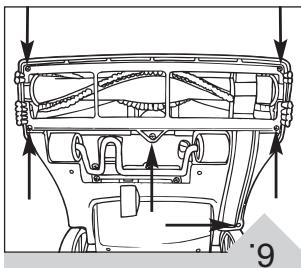
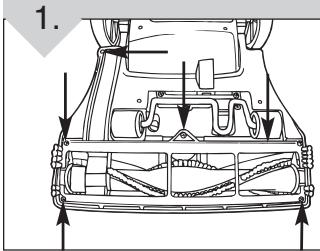
BELT OR BRUSHROLL: REMOVAL & REPLACEMENT
TOOL REQUIRED: PHILLIPS SCREWDRIVER
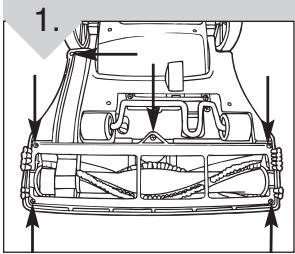
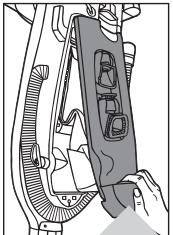
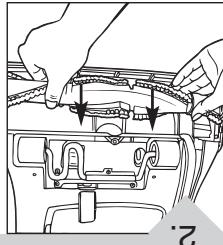
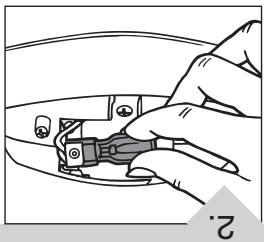
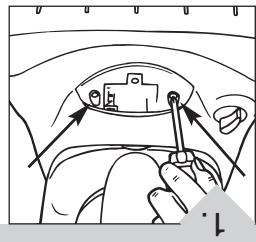
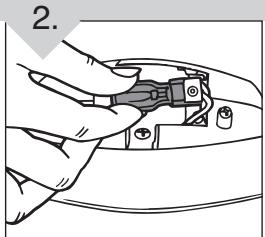
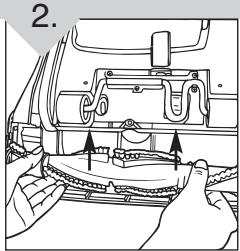
Flip cleaner to expose nozzle base. Base should lay flat and face up. To remove nozzle guard, use Phillips screwdriver to remove the six (6) screws. Arrows show location of screws. Lift nozzle guard off.
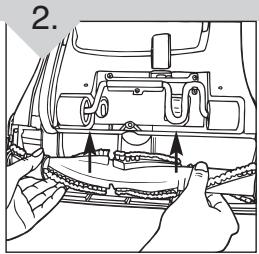
Lift and remove brushroll.
Slide old belt off motor shaft. Dispose of old belt.
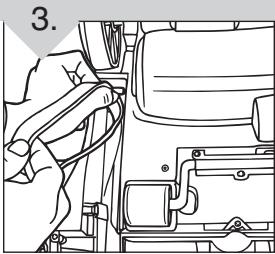
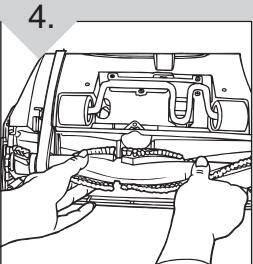
BELT OR BRUSHROLL REMOVAL & REPLACEMENT: CONTINUED
Place belt on motor shaft, then slip brushroll through belt. Place belt in area of brushroll without bristles.
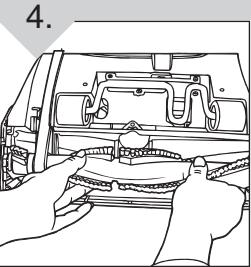
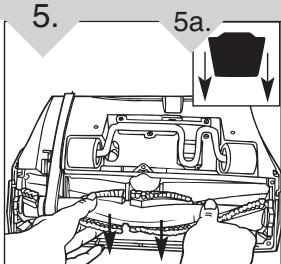
With belt in place, pull and slide brushroll into nozzle making sure that the brushroll end caps are in the correct orientation (5a). IMPORTANT: ROTATE BRUSHROLL MANUALLY TO MAKE SURE BELT IS NOT TWISTED.
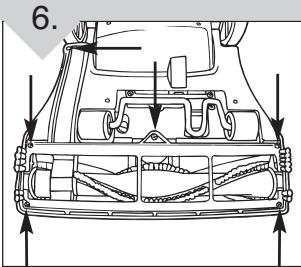
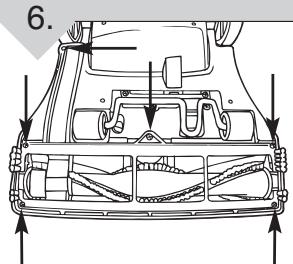
Reattach nozzle guard. Secure by replacing the six (6) screws.
GENERAL MAINTENANCE
TOOL REQUIRED: PHILLIPS SCREWDRIVER
NOTE: Unplug cleaner before checking dirt path or filter.
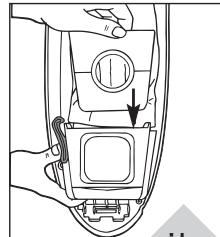
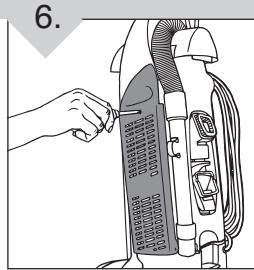
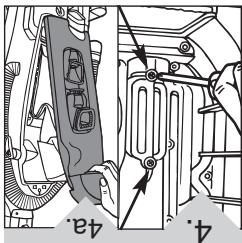
DIRT PATH MAINTENENCE
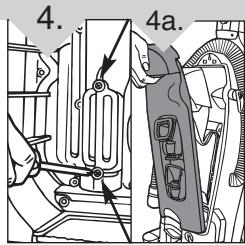
Pull release lever and lift to remove bag compartment.
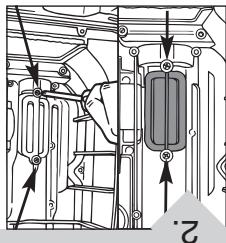
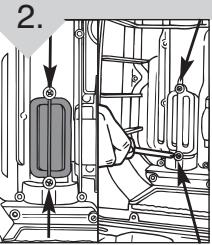
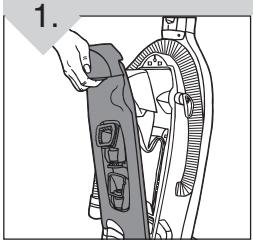
Unscrew the two (2) screws located on the inside of the cleaner.
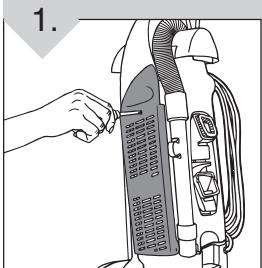
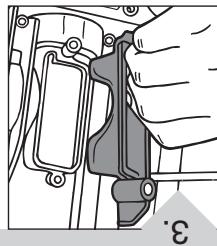
Remove the access panel and remove all visible debris.
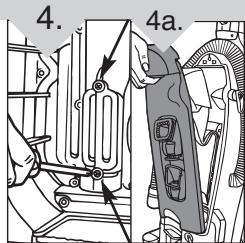
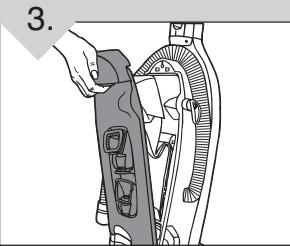
Replace access panel. Secure by replacing the two (2) screws (4). Return bag compartment to its position (4a).
FILTER MAINTENENCE
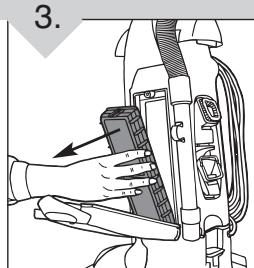
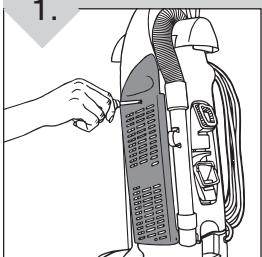
Pull release lever on the bag compartment. Pull away from cleaner.

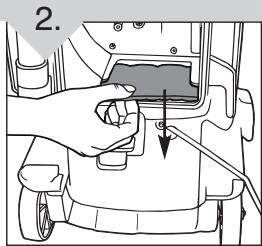
Remove filter and shake out loose dirt. Replace filter.
Replace bag compartment. For filter replacement part #1-910115-000, please call 1-800-321-1134.
01
1ELL-1ZE-008-L
: eesosodznnn
000-111016-L uheaepepepepepepepepepepepepepepepepepepepepepepepepepepepepepepepepepepepepepepepepepepepepepepepepepepepepepepepepepepepepepepepepepepepepepepepepepepepepepepepepepepepepepepepepepepepe pe
e e e e e e e e e e e e e e e e e e e
Jnnepeae
eepn eaeenee eeeeee

383840N3138383
e e e e e e e e e e e e e e e e e e e e e e e e e e e e e e e e e e e e e e e e e e e e e
eessss
eepnnepepepepepepepepepepepepepepepepepepepepepepepepepepepepepepepepepepepepepepepepepepepepepepepepepepepepepepepepepepepepepepepepepepepepepepepepepepepepepepepepepepepepepepepepepepepepepe pe pe pe pe pe pe pe pe pe pe pe pe pe pe pe pe pe pe pe pe pe pe pe pe pe pe pe pe pe pe pe pe pe pe pe pe pe pe pe pe pe pe pe pe pe pe pe pe pe pe pe pe pe pe pe pe pe pe pe pe pe pe pe pe pe pe pe pe pe pe pe pe pe pe pe pe pe pe pe pe pe pe pe pe pe pe
e e e e e e e e e e e e e e e e e e

SSESS
e e e e e e e e e e e e e e e e e e e e e e e e e e e e e e e e e e e
NEONNEONNEONNEONNEON
TENENEN
e eae
e
e e e e e e e e e e e e e e e e e e e e e e e e e e e e e e e e e e e e e e e e e e e e ee

SOS
eeppepepepepepepepepepepepepepepepepepepepepepepepepepepepepepepepepepepepepepepepepepepepepepepepepepepepepepepepepepepepepepepepepepepepepepepepepepepepepepepepepepepepepepepepepepepepe pe pe pe pe pe pe pe pe pe pe pe pe pe pe pe pe pe pe pe pe pe pe pe pe pe pe pe pe pe pe pe pe pe pe pe pe pe pe pe pe pe pe pe pe pe pe pe pe pe pe pe pe pe pe pe pe pe pe pe pe pe pe pe pe pe pe pe pe pe pe pe pe pe pe pe pe pe pe pe pe pe pe pe pe pe pe pe pe pe pe pe pe pe pe pe pe pe pe pe pe p e e e e e e e e e e e e e e e e e e e e e e e e e e e e e e e e e e e e e e e e e e e e e e e e

ENNS:LNNEWEDREWEENNE
Eeess
LIGHTBULB: REMOVAL & REPLACEMENT
TOOL REQUIRED: FLATHEAD SCREWDRIVER
WARNING: TO REDUCE THE RISK OF ELECTRIC SHOCK - UNPLUG CLEANER BEFORE REMOVAL OR REPLACING LIGHTBULB.
This cleaner uses a common automotive lamp #906, 13.0 volts. For bulb replacement call 1-800-321-1134 or your local auto parts store.
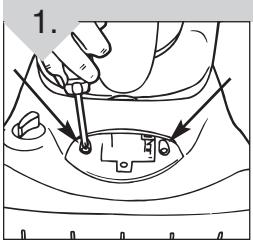
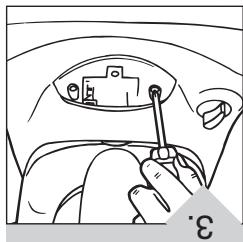
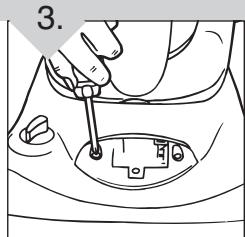
Put cleaner into an upright position. Remove the two (2) screws located on either side of the headlight lens.
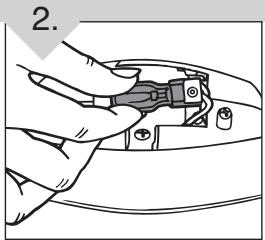
Pull bulb out of socket to remove. Do NOT twist. Push bulb into socket to replace.

Secure the headlight lens by replacing the two screws.
eae eae ene ane 2) xep
sepepepepepepepepepepepepepepepepepepepepepepepepepepepepepepepepepepepepepepepepepepepepepepepepepepepepepepepepepepepepepepepepepepepepepepepepepepepepepepe pe pe pe pe pe pe pe pe pe pe pe pe pe pe pe pe pe pe pe pe pe pe pe pe pe pe pe pe pe pe pe pe pe pe pe pe pe pe pe pe pe pe pe pe pe pe pe pe pe pe pe pe pe pe pe pe pe pe pe pe pe pe pe pe pe pe pe pe pe pe pe pe pe pe pe pe pe pe pe pe pe pe pe pe pe pe pe pe pe pe pe pe pe pe pe pe pe pe pe pe
e e e e e e e e e e e e e e e e e e e e e e e e e e e e e e e e e e e e e e
e e e e e e e e e e e e e e e e e e e e e e e e e e e e e e e e e e e e e e e e e
e e e e e e e e e e e e e e e e e e e e e e e e e e e e e e e e e e e e e e e e e e e e e
dNnNnNnNnNnNnNnNnNnNnNnNnNnNnNnNnNnNnNnNnNnNnNnNnNnNnNnNnNnNnNnNnNnNnNnNnNnNnNnNnNnNnNnNnNnNnNnNnNnNnN
RnRnRnRnRnRnRnRnRnRnRnRnRnRnRnRnRnRnRnRnRnRnRnRnRnRnRnRnRnRnRnRnRnRnRnRnRnRnRnRnRnRnRnRnRnRnRnRnRnRnR
Ee Ee eee ee eee eee eee eee
LNEeRnEeReeReeReeReeReeReeReeReeReeReeReeReeReeReeReeReeReeReeReeReeReeReeReeReeReeReeReeReeReeReeReeReeReeReeReeReeReeReeReeReeReeReeReeReeReeReeRee
TROUBLESHOOTING GUIDE
WARNING: TO REDUCE RISK OF PERSONAL INJURY - UNPLUG CLEANER BEFORE SERVICING
| PROBLEM | POSSIBLE REASON | POSSIBLE SOLUTION |
| Cleaner won't run | 1. Power cord not firmly plugged into outlet. | 1. Plug cord in firmly. |
| 2. Blown fuse or tripped breaker. | 2. Check fuse or breaker in home. Replace fuse/reset breaker. | |
| 3. Needs service. | 3. Take to service center. To find nearest location, visit our website at www.dirtdevil.com or call 1-800-321-1134. | |
| Cleaner won't pick-up or low suction | 1. Paper bag full. | 1. Replace paper bag - Pg. 8 |
| 2. Paper bag not installed correctly. | 2. Insert finger into hole and push paper away from opening OR review paper bag removal and replacement - Pg. 8. | |
| 3. Broken or worn belt. | 3. Review belt removal and replacement - Pg. 9, 10. | |
| 4. Carpet height setting is incorrect. | 4. Set carpet height adjustment to appropriate setting for carpet being cleaned - Pg. 7. | |
| 5. Unit misassembled resulting in air flow leakage. | 5. Reassemble unit / review assembly - Pg. 6. | |
| 6. Dirty HEPA filter. | 6. Replace HEPA filter - Pg. 8, 9. | |
| 7. Brushroll worn. | 7. Review brushroll removal and replacement - Pg. 9, 10. | |
| 8. Dirty bag chamber filter. | 8. Review general maintenance - Pg. 10. | |
| Dust escaping from cleaner | 1. Paper bag full. | 1. Replace paper bag - Pg. 8. |
| 2. Paper bag not installed correctly. | 2. Review paper bag installation - Pg. 8. | |
| 3. Puncture/hole in paper bag. | 3. Replace paper bag-Pg. 8. Clean/replace filters - Pg. 8, 9. | |
| 4. No bag in cleaner. | 4. Install bag & clean filter - Pg. 8, 9. | |
| 5. Dirty bag chamber filter. | 5. Review general maintenance - Pg. 10. | |
| Cleaner tools won't pick-up | 1. Hose clogged. | 1. Remove hose and tools; remove obstruction - Pg. 7. |
| 2. Bag inlet clogged. | 2. Remove hose (Pg. 7) and paper bag (Pg. 8). | |
| 3. Paper bag full. | 3. Replace paper bag - Pg. 8. | |
| 4. No bag in cleaner, filter clogged. | 4. Install paper bag (Pg. 8) and clean filter (Pg. 8, 9). | |
| Headlight not working | 1. Bulb burnt out. | 1. Replace bulb - Pg. 11. |
| 2. Loose electrical wires. | 2. Take to service center. To find nearest location, visit our website at www.dirtdevil.com or call 1-800-321-1134. | |
| Cleaner is difficult to push | 1. Carpet height setting is incorrect. | 1. Set carpet height adjust lever to appropriate setting for carpet being cleaned - Pg. 7. |
| Brushroll not rotating | 1. Broken belt. | 1. Review belt removal and replacement - Pg. 9, 10. |
| 2. Brushroll jammed with an obstruction. | 2. Turn the unit off and unplug. Remove the obstruction. Plug unit back into outlet and turn the power to the "on" position. | |
| Belt burns or breaks | 1. Brush may be jammed with debris. | 1. Remove brushroll - Pg. 9, 10. Clean brush of debris. |
| 2. Brush end caps are clogged with debris. | 2. Remove brushroll. Determine if end caps rotate freely. If not, replace brushroll - Pg. 9, 10. | |
| 3. Carpet height setting is incorrect. | 3. Set capet height adjustment to appropriate setting for carpet being cleaned - Pg. 7. |
ANY OTHER SERVICING SHOULD BE DONE BY AN AUTHORIZED SERVICE REPRESENTATIVE CUSTOMER SERVICE (1-800-321-1134)
In the event that further assistance is required, see your Yellow Pages for an authorized Royal® Dealer or visit our website at www.dirtdevil.com. Costs of any transportation to and from any place of repair are to be paid by the owner. The service parts used in this unit are easily replaced and readily available from an authorized Royal® Dealer or retailer. Always identify your cleaner by the model number and manufacturing code when requesting information or ordering replacement parts. (The model number appears on the bottom of the cleaner.)
e e e e e e e e e e e e e e e e e e e e e e e e e e e e e e e e e e e e e e e e e e e e e e e e e e e ee
(2ELL-LZE-008-L) : EETLNEENIINI IAI
Ae e aee eae ee e e e e e e e e e e e e e e e e e e e e
| L'abed - lafoure sides ne journées, l'obed de 1500 (en millions d'e) | L'abed - lafoure sides ne journées, l'obed de 1500 (en millions d'e) | L'abed - lafoure sides ne journées, l'obed de 1500 (en millions d'e) | L'abed - lafoure sides ne journées, l'obed de 1500 (en millions de |
| -6 abed - 6 abed | -6 abed - 6 abed | -6 abed - 6 abed | -6 abed - 6 abed |
| -6 abed - 6 abed | -6 abed - 6 abed | -6 abed - 6 abed | -6 abed - 6 abed |
| -6 abed - 6 abed | -6 abed - 6 abed | -6 abed - 6 abed | -6 abed - 6 abed |
| -6 abed - 6 abed | -6 a/bé - 6 abed | -6 abed - 6 abed | -6 abed - 6 abed |
| -6 abed - 6 abed | -6 abed - 6 abed | -6 abed - 6 abed | -6 abed - 6 abed |
| -6 abed - 6 abed | -6 abed - 6 abed | -6 abed - 6 abed | |
| -6 abed - 6 abed | -6 abed - 6 abed | -6 abed - 6 abed | -6 abed - 6 abed |
| -6 abed - 6 abed | -6 abed - 6 abed | -6 abed - 6 abed | -6 abed - 6 abed |
| -6 abed - 6 abed | -6abé - 6 abed | -6abé - 6 abed | -6abé - 6 abed |
| -6 abed - 6 abed | -6abé - 6 abed | -6abé - 6 abed | -6abé - 6 abed |
| -6 abed - 6 abed | -6abé - 6 abed | -6abé - 6 abed | -6abé - 6 abed |
| -6 abed - 6abé | -6abé - 6 abed | -6abé - 6 abed | -6abé - 6 abed |
| -6 abed - 6abé | -6abé - 6 abed | -6abé - 6 abed | -6abé - 6 abed |
| -6 abed - 6abé | -6abé - 6 abed | -6abé | -6abé - 6 abed |
| -6 abed - 6abé | -6abé - 6 abed | -6abé - 6 abed | -6abé - 6 abed |
| -6 abed - 6abé | -6abé - 6 abed | -6abé - 6 abed | -6abé - 6 abed |
| -6abé - 6abé | -6abé - 6 abed | -6abé - 6 abed | -6abé - 6 abed |
| -6abé - 6abé | -6abé - 6 abed | -6abé - 6 abed | -6abé - 6 abed |
| -6abé - 6abé | -6abé - 6 abed | ||
| -6abé - 6abé | -6abé - 6 abed | ||
| -6abé - 6abé | -6abé - 6 abed | ||
| -6abé - 6abé | -6abé - 6 abed | ||
| -6abé - 6abé | -6abé - 6 abed | ||
| 2 | 2 | 2 | 2 |
| 3 | 3 | 3 | 3 |
| 4 | 4 | 4 | 4 |
| 5 | 5 | 5 | 5 |
| 6 | 6 | 6 | 6 |
| 7 | 7 | 7 | 7 |
| 8 | 8 | 8 | 8 |
| 9 | 9 | 9 | 9 |
| 10 | 10 | 10 | 10 |
| 11 | 11 | 11 | 11 |
| 12 | 12 | 12 | 12 |
| 13 | 13 | 13 | 13 |
| 14 | 14 | 14 | 14 |
| 15 | 15 | 15 | 15 |
| 16 | 16 | 16 | 16 |
| 17 | 17 | 17 | 17 |
| 18 | 18 | 18 | 18 |
| 19 | 19 | 19 | 19 |
| 20 | 20 | 20 | 20 |
| 21 | 21 | 21 | 21 |
| 22 | 22 | 22 | 22 |
| 23 | 23 | 23 | 23 |
| 24 | 24 | 24 | 24 |
| 25 | 25 | 25 | 25 |
| 26 | 26 | 26 | 26 |
| 27 | 27 | 27 | 27 |
| 28 | 28 | 28 | 28 |
| 29 | 29 | 29 | 29 |
| 30 | 30 | 30 | 30 |
| 31 | 31 | 31 | 31 |
| 32 | 32 | 32 | 32 |
| 33 | 33 | 33 | 33 |
| 34 | 34 | 34 | 34 |
| 35 | 35 | 35 | 35 |
| 36 | 36 | 36 | 36 |
| 37 | 37 | 37 | 37 |
| 38 | 38 | 38 | 38 |
| 39 | 39 | 39 | 39 |
| 40 | 40 | 40 | 40 |
| 41 | 41 | 41 | 41 |
| 42 | 42 | 42 | 42 |
| 43 | 43 | 43 | 43 |
| 44 | 44 | 44 | 44 |
| 45 | 45 | 45 | 45 |
| 46 | 46 | 46 | 46 |
| 47 | 47 | 47 | 47 |
| 48 | 48 | 48 | 48 |
| 49 | 49 | 49 | 49 |
| 50 | 50 | 50 | 50 |
| 51 | 51 | 51 | 51 |
| 52 | 52 | 52 | 52 |
| 53 | 53 | 53 | 53 |
| 54 | 54 | 54 | 54 |
| 55 | 55 | 55 | 55 |
| 56 | 56 | 56 | 56 |
| 57 | 57 | 57 | 57 |
| 58 | 58 | 58 | 58 |
| 59 | 59 | 59 | 59 |
| 60 | 60 | 60 | 60 |
| 61 | 61 | 61 | 61 |
| 62 | 62 | 62 | 62 |
| 63 | 63 | 63 | 63 |
| 64 | 64 | 64 | 64 |
| 65 | 65 | 65 | 65 |
| 66 | 66 | 66 | 66 |
| 67 | 67 | 67 | 67 |
| 68 | 68 | 68 | 68 |
| 69 | 69 | 69 | 69 |
| 70 | 70 | 70 | 70 |
| 71 | 71 | 71 | 71 |
| 72 | 72 | 72 | 72 |
| 73 | 73 | 73 | 73 |
| 74 | 74 | 74 | 74 |
| 75 | 75 | 75 | 75 |
| 76 | 76 | 76 | 76 |
| 77 | 77 | 77 | 77 |
| 78 | 78 | 78 | 78 |
| 79 | 79 | 79 | 79 |
| 80 | 80 | 80 | 80 |
| 81 | 81 | 81 | 81 |
| 82 | 82 | 82 | 82 |
| 83 | 83 | 83 | 83 |
| 84 | 84 | 84 | 84 |
| 85 | 85 | 85 | 85 |
| 86 | 86 | 86 | 86 |
| 87 | 87 | 87 | 87 |
| 88 | 88 | 88 | 88 |
| 89 | 89 | 89 | 89 |
| 90 | 90 | 90 | 90 |
| 91 | 91 | 91 | 91 |
| 92 | 92 | 92 | 92 |
| 93 | 93 | 93 | 93 |
| 94 | 94 | 94 | 94 |
| 95 | 95 | 95 | 95 |
| 96 | 96 | 96 | 96 |
| 97 | 97 | 97 | 97 |
| 98 | 98 | 98 | 98 |
| 99 | 99 | 99 | 99 |
| 100 | 100 | 100 | 100 |
e e e e e e e e e e e e e e e e e e e e e e e e e e e e e e e e e e e e e e e e
ENNNNNE
GUIA DE SOLUTION DE PROBLEMAS
ADVERTENCIA: PARA REDUCIR EL RIESGO DE LESIONES PERSONALES, DESCONECTE ANTES DE DAR SERVICIO
| PROBLEMA | POSIBLE CAUSA | SOLUCION POSIBLE |
| La aspiradora no funciona | 1. El cordón electrico no está bienonetado en la toma de corriente. | 1. Conecte la cordón electrico con firmeza. |
| 2. Fuseible quemado o interruptor desconnectado. | 2. Revise el fusible o el interruptor en casa. Reemplace el fusible / reajuste el interruptor. | |
| 3. Necesita servicios. | 3. Lívela a un centro de service. Para encontrar el lugar más cercano a su domicilio, visite我们的址Web en www.dirtdevil.com o llame al 1-800-321-1134. | |
| La aspiradora no aspira o la succion es muy débil | 1. Bolsa de papel llena. | 1. Reemplace la Bolsa de papel - Pág. E8. |
| 2. Bolsa de papel no colocada correctamente. | 2. Coloque el dedo en el orificio y empujé el papel para alejarlo de la abertura O revise el retiro y reemplazo de la Bolsa de papel - Pág. E8. | |
| 3. Banda rota o desgastada. | 3. Revise la forma de retiro y reemplazo de la banda - Pág. E9, E10. | |
| 4. Ajuste incorrecto de la alta de alfombra. | 4. Mueva el ajuste de alta de alfombra a un nivel apropiado para la alfombra que se está limpiando - Pág. E7. | |
| 5. Unidad mal ensamblada causa fuga del flujo de aire. | 5. Vuelva a ensambarla unidad / revise el ensam blaje - Pág. E6. | |
| 6. Filtró HEPA sucio. | 6. Reemplace el filtró HEPA - Pág. E8, E9. | |
| 7. Cepillo giratorio desgastado. | 7. Revise la forma de retiro y reemplazo del cepillo giratorio - Pág. E9, E10. | |
| 8. Filtró de la*camera de la bolsa sucio. | 8. Revise el mantenimiento general - Pág. E10. | |
| Polvo escapando de la aspiradora | 1. Bolsa de papel llena. | 1. Reemplace la Bolsa de papel - Pág. E8. |
| 2. Bolsa de papel no instaladacorrectamente. | 2. Revise la instalación de la Bolsa de papel - Pág. E8. | |
| 3. Perforación/agujero en la bolsa de papel. | 3. Reemplace la Bolsa de papel - Pág. E8. Limpie/reemplaza los filtres - Pág. E8, E9. | |
| 4. No hay Bolsa en la aspiradora. | 4. Instale la Bolsa y limpie el filtre - Pág. E8, E9. | |
| 5. Filtró de la*camera de la bolsa sucio. | 5. Revise elostenimiento general - Pág. E10. | |
| Los accesos de la aspiradora no recogen | 1. Manguera tapada. | 1. Retire la manguera y los accesos; retire la obstrucción - Pág. E7. |
| 2. La entrada de la bolsa está tapada. | 2. Retire la manguera (Pág. E7) y la bolsa de papel (Pág. E8). | |
| 3. La entrada de la bolsa está tapada. | 3. Reemplace la bolsa de papel - Pág. E8. | |
| 4. No hay Bolsa en la aspiradora, filtró tapado. | 4. Instale la bolsa de papel (Pág. E8) y limpie el filtre (Pág. E8, E9). | |
| La luz frontal no funciona | 1. Foco fundido. | 1. Reemplace el foco - Pág. E11. |
| 2. Cables electricos sueltos. | 2. Lívela a un centro de service. Para encontrar el lugar más cercano a su domicilio, visite我们的址Web en www.dirtdevil.com o llame al 1-800-321-1134. | |
| Es dificil empujar la aspiradora | 1. Ajuste incorrecto de la alta de alfombra. | 1. Mueva el ajuste de alta de alfombra a un nivel apropiado para la alfombra que se esté limpiando - Pág. E7. |
| El cepillo giratorio no gira | 1. Banda rota. | 1. Revise la forma de retiro y reemplazo de la banda - Pág. E9, E10. |
| 2. El cepillo giratorio está atascado con "encendido." | 2. Aqueve la�性 y desconectela. Retire la obstrucción. Conectar de nuevo la�性 en la toma de corriente y colque los interruptores de corriente en la posición de"encendido." | |
| La banda se quema o rompe | 1. El cepillo está atascado conresiduos. | 1. Retire el cepillo giratorio - Pág. E9, E10. Límpielo para que no queden residuos. |
| 2. LasTapas finaledes cepilloestán tapadas conresiduos. | 2. Retire el cepillo giratorio. Determine si lasTapas finaledes可以把 girar libremente. De no hacerlo reemplaza el cepillo giratorio - Pág. E9, E10. | |
| 3. Ajuste incorrecto de la alta de alfombra. | 3. Mueva el ajuste de alta de alfombra a un nivel apropiado para la alfombra que se esté limpiando - Pág. E7. |
CUALQUIER OTRO SERVICIO DEBE SER REALIZADO POR UN REPRESENTANTE AUTORIZADO DE SERVICIO
SERVICIO AL CLIENTE (1-800-321-1134)
En caso de necessitar más帮你, consulte las Páginas Amarillas para encontrar a un Distribuidor Autorizo Royal o看你ctoesteio Web en www.dirtdevil.com. Loscostos de transporte hacayesdeel sitio de reparacion seran pagados por el propietario. Las partedes de reipoetudoutilizado en esta unidad son de remplazo fácil y estan disponibles abravés de un Distribuidor Autorizo Royal o en otheras tiendas.Siempre identifique su aspiradora por medio del numero del modelo y el codelo de fabricacion cuando pida informacion u ordene partes de reipoetto.(El numero del modelo aparece en la parte posterior de la aspiradora).

MANUAL DEL PROPIETARIO
Instrucciones de
Funcionamento y Servicio

- Por favor lea estas instrucciones con cuidado antes de usar su aspiradora.
- Permitanos poderle a ensamblar su aspiradora o a contestar sus preguntas, llame al:
1-800-321-1134
(EE.UU. y Canada)
www.dirtdevil.com

ADVERTENCIA:
El ensamble de la aspiradora sueñas.
Las partes pequeñas peuvent Presented riesgo de ahogamente.
Para tener una referencia rápida, anote por favor la información de su aspiradora ahora.
No. de Modelo:
Códio del Fabricante:
(El)codido del fabricante aparece en la parte posterior e inferior de la aspiradora).
ESTA ASPIRADORA ESTÁ DISEÑADA PARA USO DOMÉSTICO SOLAMENTE.
INSTRUCCIONES DE SEGURIDAD IMPORTANTES
Cuando use un electrodoméstico se deben seguir siempre las precauciones tíbasicas, incluyendo las siguientes:
- LEA TODAS LAS INSTRUCCIONES ANTES DE USAR Este APARATO.
- SIEMPRE SIGA ESTAS INSTRUCCIONES DE SEGURIDAD.
- PONGA LA ASPIRADA EN POSICION VERTICAL CUANDO USE LA MANGUERA Y LOS ACCESORIOS.
- NO DEJE LA ASPIRADORA SIN VIGILANCIA CUANDO ESTÉ CONECTADA.
REVISE CON FRECUENCIA LOS FILTROS PARA LIMPIARLOS O REEMPLAZARLOS. - ADVERTENCIA: NO UTILICE OBJECTOS CON FILO PARA LIMPIAR LA MANGUERA, DEBIDO A QUE PUEDEN CAUSAR DANO.
- ADVERTENCIA: LOS CORDONES, ALAMBRES Y/O CABLES SUMINISTRADOS CON THIS PRODUCTO CONTIENEN PRODUCTOS QUIMICOS QUE INCLUYEN PLOMO O COMPUESTOS DE PLOMO ACERCA DE LOS CUALES SE HASABIDO EN EL ESTADO DE CALIFORNIA, PRODUCEN CANCER, DEFECTOS DE NACIMIENTO U OTROS DANOS REPRODUCTIVOS. LAVSE LAS MANOS DESPUES DE SU USO.
ADVERTENCIA: PARA REDUCIR EL RIESGO DE INCENDIO, CHOQUE ELECTRICO O LESIONES:
- No deja solo el aparato cuando está conectado. Desconctelo de la toma de corriente cuando no lo use y antes de darle servicios.
- No lo utilise en exteriores o en superficies mojadas. Puede ourir un besoin électrique.
- No permitted use as a game. Ponga mucha atencion cuando lo use un niño ooca de niños.
- Uselo solamente como se indica en este manual. Use solamente los accesos recomendados por el fabricante.
- No lo utilizes con el cordón electrico o la clavija dañados. Si el aparato no trabaja como debiera, se ha caido, dañado, dejado en exteriores o caido en agua, regréselo a un centro de servicios para su inspeccion. Llame al 1-800-321-1134 para encontrar el centro de servicios más cercano a su domicilio.
- No tire ni lo transporte tomándole del cordón electrico, no utilise el cordón electrico como asa, no ciderre la puerta sobre el cordón electrico, o tire del cordón electrico alrededor de rebordes o esquinas agudos. No pase el aparato sobre el cordón electrico. Mantenga el cordón electrico lejos de superficies calientes.
- No lo desconecte tirando del cordón electrico. Para desconectarlo, tome la clavija, no el cordón electrico.
- No tome la clavija o el aparato con las manos mojadas.
- No Coloque objetivos en las aberturas. No lo use con una abertura bloqueada; manténgalo libre de polvo, pelusa,leo yrialquier casa que pueda reducir el
REMOCION Y REEMPLAZO DEL FOCO
HERRAMIENTA NECESARIA: DESTORNILLADOR PLANO
ADVERTENCIA: PARA REDUCIR EL RIESGO DE CHOQUE ELECTRICO, DESCONECTE LA ASPIRADORA ANTES DE RETIRAR O REEMPLAZAR EL FOCO.
Esta aspiradora utilizes un foco automotor común No.906, 13.0 voltios. Para focos de reemplazo, llame al 1-800-321-1134 o a su Tienda de partes automatrices.

Cologne the aspiradora en posicion vertical. Retire los dos (2) tornillos colocados en cualesera de los lados de la lente de la luz frontal.
Para retirar el foco, sáquelo del receptáculo. NO lo gire. Para reemplazarlo, colocque el foco en el receptáculo.
Fije la lente de la luz frontal volviendo a colocar los dos (2) tornillos.
BANDA O CEPILLO RETIRO Y REEMPLAZO: CONTINUACION
Coloque la banda en el eje del motor y bajo pase el cepillo giratorio por la banda.
Coloque la banda en el area sin cerradas del cepillo giratorio.
Una vez que la banda está puesta en su lugar, tire del cepillo giratorio y deslíciolo dentro de la boquilla aseguraróse que las tapas finales estén en la orientación correcta (5a). IMPORTANTE: GIRE EL CEPILLO GIRATORIO DE FORMA MANUAL PARA ASEGURARSE QUE LA BANDA NO ESTÁ TORCIDA.
Vuela a colocar la proteccion de la boquilla. Fijela reponiendo losSES (6) tornillos.
MANTENIMIENTO GENERAL
HERRAMIENTA NECESARIA: DESTORNILLADOR PHILLIPS
NOTA: Desconecte la aspiradora antes de verificar el bajo o el bajo del polvo.
MANTENIMIENTO DEL PASO DEL POLVO

Tire de la palanca de liberacion y levante parautar el compartmento de la bolsa.
Destornille los dos (2) tornillos localizados en el interior de la aspiradora.

Retire la cubierta de acceso y quite todos los residuos visibles.
Reponga la cubierta de acceso. Fijela volviendo a poder los dos (2) tornillos (4). Vuelva a colocar el compartmente de la Bolsa en su posicion (4a).
MANTENIMIENTO DEL FILTRO
Tire de la palanca de liberacion del compartmentido de la bolsa y retiredo de la aspiradora.
Quite el filtro y sacuda el polvo.
Vuelva a colocar el filtro.
Vuela aponer el compartmentido de la Bolsa. Para reemplazar el filto, No. de parte 1-910115-000, por favor flame al 1-800-321-1134.
flujo de aire.
- Mantenga lejos de las aberturas y partesuales, elleo, ropasuela, dedos y todas las partes del cuerpo.
- No aspire objetos que estén quemándose o emitiendo humano, tales como cigarrillos, cerillos o cenizas calientes.
- No use la aspiradora sin la bolsa para polvo o los filtros en su lugar.
- Aquege todos los controlles antes de desconectar.
- Tenga más cuidado cuando aspire escaleras.
- No lo use para aspirar liquidos inflamables o combustibles, tales como gasolina, ni lo use en areas donde这些东西 pudieran estar presentes.
- Mantenga la aspiradora en el sueño. Solamente las aspiradoras de mano能把 ser colocadas sobre muebles.
- La aspiradora debe estar en posicion vertical para levantar de la alfombra al cepillo giratorio cuando haga limpieza por encima del nivel del piso.
- No use una extension electrica al usar esta aspiradora.
- Guarde la aspiradora en interiores. Guarde la aspiradorauponés de su uso para evacitar accidentes de tropiezos.
- Usar el voltaje inapropiado puede resultar en dano al motor y posibles lesiones al usuario. El voltaje apropiado está listedo en la placac de la aspiradora.
GUARDE ESTAS INSTRUCCIONES
ADVERTENCIA:
Para reducir el riesgo deCHOque electrico, este aparato tiene una clavija polarizada (una hoja mas ancha que la othera.)Esta clavija encajara en una toma de corriente polarizada de una manera solamente. Si la clavija no encaja totalmente en la toma de corriente, invierta la clavija. Si aun no encaja,pongase en contacto con un electricista calificado para instalar la toma de corriente apropia. No modifique la clavija de ninguna manera.
FELICITACIONES
Usted es ahora el orgulioso propietario de una Dirt Devil. Confiamos en que sunea adquisión le ofrecerá muchos años de satisfacción.
Nuestra compañero diseño y descarrolló este producto teniéndolo austed en mente.
Estamos muy orgullosos de nuestros productos y esperamos queusted esté igualmente satisfecho con su calidad y rendimiento.
Gracias por su apoyo a los productos Dirt Devil. Visiteneastero situWeb en www.dirtdevil.com
INDICE
Instrucciones de seguridad . Pagina E2, E3
Characteristicas. Pagina E5
Cómo ensamblar . Página E6
Cómo funciona. Págrina E7
Ajustes para alfombra. Pagina E7
Cómo transporte la aspiradora. Página E7
Limpieza por encima del nivel del piso . Pagina E7
Bolsa de papel: retiro y reemplazo . Pagina E8
Filtro HEPA:retiro y reemplazo.. Pagina E8, E9
Almacenamento de la Banda. Pagina E9
Banda o cepillo: retiro y reemplazo Pagina E9, E10
Mantenimiento general . Pagina E10
Mantenimiento del paso del polvo. Páginé E10
Almohadilla del filtró:退回 y reemplazo....... Páginia E10
Foco:retiro y reemplazo. Pagina E11
Guía de solución de problemas . Página E12
GARANTÍA
Royal Appliance Mfg. Co, garantiza al consumidor que this aspiradora no Tiene defectos ni de material ni de mano deobra. La garantía comienza en la Fecha de compra original. Vea la caja para informacion de la duracion de la garantia y guarde el recibo de compra original para hacer valido el inico del periodo de garantia.
En caso que la aspiradora mueste algo ndefecto bajo del periodo de garantía, reparamos o reemplazamos de manos gratuite bajo parte defectuosa. Laquina completa de ser enviada con porte pagado aichever Estación Autorizada ROYAL de Ventas y Servicio de Garantía. Por favor incluya una descripción completa del problema, Fecha de compra, copia del recibo de compra original y su nombre, domicilio y número de téléphone. Si no se encontraría cerca de una Estación de Garantía, llama a la fabricula para pedir asistencia en los EE.UU. y CANADA: 1-800-321-1134. Use solamente partes de repuestos genuinas Royal.
La garantía no incluye el desgaste anormal, daño como resultado de un accidente o del uso no adecuado de la aspiradora.Esta garantía no cubre los cepillos, bandas planas, bolas, filtres o daño al ventilador.Esta garantía no cubre reparaciones no autorizadas. esta garantía le confiere derechos legalespecificos y podradahaberotros derechos también.Losotereschos varian de Estado a Estado en los EE.UU.)
IMPORTANT: USE SOLAMENTE PARTES DE REPUESTO GENUINAS ROYAL
NOTA: PARA REGISTRAR SU PRODUCTO, REGRESE LA TARJETA DE GARANTIA O REGISTRESE EN LÍNEA EN WWW.DIRTDEVIL.COM.
FILTRO HEPA RETIRO Y REEMPLAZO: CONTINUACION
Reemplazo: Inserte el filtro HEPA en su alojamenti (empaquetadura puesta adentro) y empújelo hasta que quede en su lugar.
Levante la cubierta del filtro paravoltarocolarain su situ.
Fije el tornillo colocado en la parte superior de la cubierta del filtro.
ALMACENAMIENTO DE LA BANDA
HERRAMIENTA NECESARIA: DESTORNILLADOR PHILLIPS
La banda, No. de parte 3-910340-600, está localizada en elazo de la aspiradora.

Para el reemplazo de la banda Estilo 12, por favor visite nuestro situ Web en www.dirtdevil.com para comprar en linea o encontrar el distribuidor más cercano a su domicilio.
Afloje el tornillo que estáubicado en la parte superiorde la cubierta del filtró.
Con suavidad bajo la cubierta del filtro.
La banda está guardada en la parte inferior superior de la cubierta del filto. Retire la banda y reemplacela con other NUEVA.
Reponga la cubierta del filtro. Fije el tornillo ubicado en la parte superior de la cubierta del filtró.
BANDA O CEPILLO: RETIRO Y REEMPLAZO
HERRAMIENTA NECESARIA: DESTORNILLADOR PHILLIPS
ADVERTENCIA: PARA REDUCIR EL RIESGO DE LESIONES CAUSADAS POR LAS PARTES MOVILES,
DESCONECTE LA ASPIRADORA ANTES DE CAMBIAR LA BANDA O EL CEPILLO GIRATORIO.
Voltee la aspiradora para ver la base de la boquilla. La base debe quedar plana y mirando hacía arriba. Utilice un destornillador Phillips para retirar los.SEIS (6) tornillos y asi qutar la proteccion de la boquilla.Las flechas indican la posicion de los tornillos.Levante la proteccion de la boquilla.
Levante y retire el cepillo giratorio.
Deslice la banda vieja fuera del eje del motor y desechela.
BOLSADEPAPEL:QUITARYREEMPLAZAR
ADVERTENCIA: PARA REDUCIR EL RIESGO DE CHOQUE ELECTRICO Y/O LESIONES CAUSADAS POR LAS PARTES MOVILES, DESCONECTE LA ASPIRadora ANTES DE RETIRAR O REEMPLAZAR EL FOCO.
NOTA: Usted se da conta que necessita reemplazar la bolsa cuandonota una disminución en la succion o cuando la luz indicadora de Bolsa llena se vuelve amarilla. So sobrepase la linea dellenado maximo de la Bolsa. LosDistinctos tips de bolsa requieren cambiarse a frequencies distinctas.

Para el reemplazo de la bolsa Tipo U, por favor visite nuestro situ Web en www.dirtdevil.com para comprar en linea o encontrar el distribuidor más cercano a su domicilio.
Revise la sola de papel cuando la ventana indicaora de sola llena se vuelva amarilla. Es possible que sea hora de colocar una solaresha.
Revise la sola de papel cuando la ventana indicaora de sola llena se vuelva amarilla. Es possible que sea hora de colocar una solareshuela.
Revise la bolsa de papel cuando la ventana indicaora de Bolsa llena se vuelva amarilla. Es possible que sea hora de colocar una bolsa nuevo.
Deslice el collar de la sola de papel ahora en el sujétador de la sola. El orificio de la sola debe mirar hacía更名为.
IMPORTANT: COLOQUE EL DEDO EN EL ORIFICIO Y EMPUJE EL PAPEL PARA ALEJARLO DE LA ABERTURA ANTES DE COLOCAR LA BOLSAA.
NOTA: Asegúrese que la palanca en el sujétador de la salsa sostenga el collar de la salsa en su lugar.
Vuelva aponer el compartmento de la bolsa. NOTE: La cuberta DEBE estar bien
asegurada antedelsfunctionamento.
PARTE FRONTAL

PARTE FRONTAL
- Asa Antideslizante
- Sujetador del Asa
- Almacenamento de la Banda Extra
- Filtro Hepa
- Luz Frontal
- Cerdas para la Limpieza de Bordes
- Tope Scuff GuardTM
- Perilla de Ajuste de Altura
- Indicador de Bolsa Llena
- Asa de Transporte
FILTRO HEPA: RETIRO Y REEMPLAZO
HERRAMIENTA NECESARIA: DESTORNILLADOR PHILLIPS
El filtro HEPA, No. de parte 3-690320-001, está localizzato en el lado de la aspiradora.
NOTA: Desconnecte la aspiradora antes de Cambiar el filtro.
NOTA: Para un mejor desempo, reemplace el filtro cada ano.
Afloje el tornillo: el que está ubicado en la parte superior de la cubierta del filtro. NOTEA: Para evaporar perdier el tornillo, no lo saque del todo de la cubierta del filtró.
Con suavidad bajo la cubiertadel filtrlo.
Tome el cartucho del filtro HEPA y retirelo. IMPORTANTE: NO LO LIMPIE CON AGUA. Para adquirir filtros de repuesto HEPA, llame al 1-800-321-1134 (EE.UU. y Canada.)
CHARACTERISTICAS
PARTE POSTERIOR
PARTE POSTERIOR
- Accesorio para Hendiduras (en la lanza de extension)
- Guía del Cordon Eléctrico
- Lanza de Extension
- Manguera Estirable
- Liberación Rápida del Cóndo Eléctrico
- Accesorio para Tapiceria
- Cepillo para Polvo
- Cordon Eléctrico
- Pedal de Liberación del Asa
- Pedal de Corriente
- Lanza de la Manguera
- Compartimento de la Bolsa
- Palanca de liberación de la salsa
- Asa del compartmento de la sola
CÓMÖ ENSAMBLAR
HERRAMIENTA NECESARIA: DESTORNILLADOR PHILLIPS
LISTA DE PARTES NECESARIAS:
1 tornado para el asa

4 tornillos para el cierto
1
1 sujetador


1.
Empujé suavamente la sección media en la base. Las guías de esta sección van en las ranuras de la boquilla.
2
Inserte los quatre (4) tornillos en los orificios. Tres de los orificios se encontrartran bajo de la casa de la bolsa. El cuarto está localizzato bajo de la abertura de la casa de la Bolsa (4). Fije los tornillos ajustandolos con un destornillador Phillips.
3.
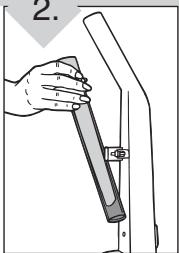
Empujé el asa superior a la posicion vertical, alineando el asa superior con la abertura del asa.
4
Inserte el UNICO tornillo en el orificio localizzato en la parte posterior del asa. Colque el sujetador de plastico en el frente del asa y mantengalo en su situccion主要包括 lo aprieta.
5.
Coloque el compartmento de la Bolsa en la parte posterior de la aspiradora. Inserte las lenguetas de la parte inferior en las ranuras (localizadas en el fondo posterior del cypero). Con suavidacion encaje la cubierta en su lugar.
6
Coloque el accesorio de tapiceria y el cepillo para polvo en su situ.
一
Fije la lanza de extension (con el accesorio para hendiduras bajo) en la parte posterior del asa superior.
CÓMOFUNCIONA
LIBERACION RAPIDA DEL CORDON ELECTRICO
PEDAL DE ENCENDIDO/APAGADO
LIBERACION DEL ASA
1.
- Gire la Liberación Rápida del Cordon Eléctrico para una fácil disposicion del cordón eléctrico.
- Conecte el cordón eletrico en la toma de corriente.
- Guarde le cordón electrico en la guía del cordón electrico (vea Característica - pág. E4) para Maintenerlo cuando el camino发展模式e se usa.
2
Encienda la aspiradora oprimiendo el pedal de corriente (en la parte posterior de la aspiradora).
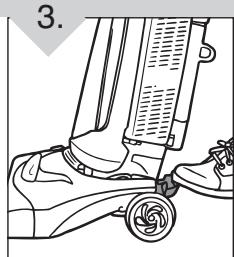
3
Libere el asa al pisar el pedal de liberacion del asa.
AJUSTES PARA ALFOMBRA
COMO TRANSPORTAR LA ASPIRADORA
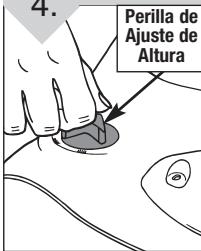
4.
El asa deben estar en posicion vertical antes deaabstar la seleccion de alfombra.Gire la perilla de ajuste de alta para que corresponda con la superficie que se va a limpiar. Una vez que la alta ha sido selectionada, la boquilla estara en la posicion correcta cuando s bajo el asa. NOTE: El cepillo giratoriouedehacer que los flecitos de un
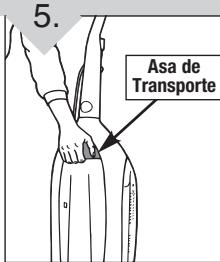
Use la conveniente asa de transporte frontal cuando levante la aspiradora para su transporte.
tapete se enreden en la aspiradora. Tenga precaución cuando aspire tapetes con flecos.
LIMPIEZA POR ENCIMA DEL NIVEL DEL PISO
PRECAUCI: El agitador del cepillo continua girando cuando estudo a retra la manguera si la aspiradora está的功能。Mantenga lejos del area del cepillo el pelo, la ropa suelta, los dedos y other partes del cuerpo cuando la aspiradora está的功能。
1.
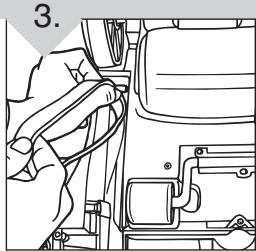
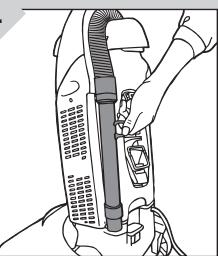
La aspiradora debe estar en posicjion vertical para levantar de la alfombra el cepillo giratorio cuando limpie por encima del nivel del piso. Coloque la aspiradora en su posicjion vertical. La sucion se desvia automatically a la manguera cuando la unidad esta en posicjion vertical. Retire la manguera del lado de la aspiradora usinge el asa.
2
Saque el accesorio para hendiduras y la lanza de extension para la limpieza por encima del nivel del piso.
3.
Saque el accesorio para hendiduras de la lanza de extension y colóquelo en el extremo de la lanza para mayor alcance. NOTE: NO use el accesorio para hendiduras cuando seswanae en la lanza de extension.
4.
Retire el cepillo para polvo o para tapiceria y fijelo a la manguera o al extremo de la lanza para limpar differentes superficies.