PRO 6100X - Ordinateur de bureau MAXDATA - Notice d'utilisation et mode d'emploi gratuit
Retrouvez gratuitement la notice de l'appareil PRO 6100X MAXDATA au format PDF.


| Type d'appareil | Ordinateur portable |
| Écran | Non précisé |
| Processeur | Non précisé |
| Mémoire RAM | Non précisé |
| Stockage | Non précisé |
| Système d'exploitation | Non précisé |
| Connectivité | Wi-Fi, Ethernet (général) |
| Ports | USB, VGA, audio (général) |
| Autonomie | Non précisé |
| Dimensions | Non précisé |
| Poids | Non précisé |
| Clavier | Azerty/Qwerty (selon région) |
| Webcam | Non précisé |
| Audio | Haut-parleurs intégrés |
| Batterie | Non précisé |
| Garantie | Non précisé |
FOIRE AUX QUESTIONS - PRO 6100X MAXDATA
Questions des utilisateurs sur PRO 6100X MAXDATA
0 question sur cet appareil. Repondez a celles que vous connaissez ou posez la votre.
Poser une nouvelle question sur cet appareil
Téléchargez la notice de votre Ordinateur de bureau au format PDF gratuitement ! Retrouvez votre notice PRO 6100X - MAXDATA et reprennez votre appareil électronique en main. Sur cette page sont publiés tous les documents nécessaires à l'utilisation de votre appareil PRO 6100X de la marque MAXDATA.
MODE D'EMPLOI PRO 6100X MAXDATA
User's Manual
UK
Note 51
Important Safety Information 55
Wireless LAN 57
Additional safety notes for units with wireless LAN 58
CE-labelling for units with wireless LAN 59
Restrictions 60
France 60
Italy 60
Netherlands 60
Radio frequencies for units with wireless LAN 61
Legal requirements - exception clauses 62
Shipping Contents 63
Preparation 65
Inserting the Battery. 66
Removing the Battery. 66
Power Supply 67
Switching the Computer on 68
Power Management 69
System Overview 71
Left Side 71
Right Side 71
Front View. 71
Rear View 72
Underside 72
Explanation of LED Displays 73
Hot Keys 74
The Quick Buttons (Quick Launch keys) 75
The Keyboard 76
The TouchPad 77
The TouchPad - Operation 77
The CD-ROM/DVD Drive 78
The PC Card Slot 79
The Memory Card Slot 79
The Data/Fax Modem 80
The LAN Port 80
Installation Instructions 81
Restoring the Drivers. 81
The Utility CD 81
Setting the Resolution 81
Specifications 83
Fault Diagnosis and Troubleshooting 87
Index 89
Note
The company reserves the right to make unadvertised modifications to this document. Information contained in this document is intended solely for reference purposes and in no way constitutes a basis for asserting obligations on the part of the manufacturer or vendor. Neither the manufacturer nor the vendor accept liability for any errors or inaccuracies that this document may contain. Nor is liability accepted for damages or losses that arise from the incorrect application of this guide. No part of this document and the accompanying software may be copied, translated, or distributed without the prior permission of the dealer, manufacturer, or authors. Archive copies for private use are excepted from this rule. The use of this product's trademarks is subject to the conditions listed in the advanced service handbook on the device drivers and utilities CD-ROM. Brand or product names mentioned in this document may be names protected by copyright law or registered trademarks of other companies. These are mentioned only for identification purposes and have no recommendationary character in regard to the product or manufacturer.
© MAXDATA 2004
Legal Information
You can find additional legal information and conditions in the advanced service handbook on the device drivers and utilities CD-ROM (Utility CD).
Acrobat and the Acrobat Logo are trademarks of Adobe Systems Incorporated or its subsidiaries. In certain jurisdictions these trademarks may be registered.
Intel® and Pentium® are registered trademarks of Intel Corporation. MS-DOS®, Microsoft® Windows®, Microsoft® Windows® 95, Microsoft® Windows® 98, Microsoft® Windows® Me, Microsoft® Windows® 2000, Microsoft® Windows® XP, and Microsoft® Windows® NT are registered trademarks of Microsoft.
Application and References
This user guide offers an introduction and is intended to provide instructions for your first steps with your new computer.
For more in-depth specialist information, please consult the advanced service handbook. All references refer to the accompanying device drivers and utilities CD-ROM, which contains the advanced service handbook (in Adobe Acrobat format), drivers, and special utilities for your notebook. If you wish to use an operating system that is not mentioned in these documents, consult the ReadMe files on the CD-ROM for the relevant information. Please also consult your dealer to make sure that it is possible to run your chosen operating system on your notebook. The operating system is not contained on the device drivers and utilities CD-ROM.
Note: Some or all system configurations may have been made already. If this is not the case or if parts of the system need to be reconfigured, please consult the advanced service handbook on the device drivers and utilities CD-ROM for instructions on how to do this.
Declaration:
This device meets the EN 55022 product standard for interference emissions, the EN 50082-1 basic standard for interference, and the EN 60950 low voltage directive standard.
If any modification that has not been agreed upon with the manufacturer is made to the device, adherence to these standards can no longer be guaranteed.
To ensure electromagnetic compatibility (EMC), please observe the information given in the handbook.
Sound Power Level
The workplace-based sound power level is less than 55 dB A.
Federal Communications Commission (FCC) Note
This device has been tested and found to comply with the limits for a Class B digital device, pursuant to Part 15 of the FCC Rules.
Warranty
The warranty period for the device is 36 months. In the case of damage occurring outside the scope of the warranty, it is the intention to offer repair of the devices through original replacement parts or exchange of modules or devices with cost for at least 5 years (from end of production).
Operator Note:
This device has been carefully RF suppressed and tested to avoid radio interference. However, please pay attention to the following concerning external data cables:
If it becomes necessary to replace a data cable specified by the manufacturer, the operator must ensure that replacement cables also match the original cable in terms of screening quality for correct radio interference suppression.
Use only screened cables and external devices that are identical with this product in terms of safety level and EMC behavior.
In the event of non-observance, compliance with the standards mentioned above is no longer guaranteed!
CD-ROM Drive:
Built-in CD-ROM drives are Class 1 laser products. Do not open the device and do not look into the beam, even using optical instruments.
Unless the drive is expressly designated for the simultaneous use of more than one CD, never insert more than one CD into the drive.

Returning the Device/Battery
We accept the return of all our products after they have been used if the condition corresponds to standard proper usage. Returned devices are either slated for further use or dismantled and recycled in an environmentally sound manner. The return is handled through your dealer.
Rechargeable and disposable batteries containing heavy metals should not be thrown in with household waste. They are accepted free of charge by manufacturers, dealers or their representatives for recycling or disposal.
The outside packaging and all inner parts of the box can be disposed of as waste paper.
UK
Important Safety Information
Although the notebook is highly robust, it is not indestructible. To prevent damage from occurring, please pay attention to the following:
- Avoid exposing the notebook to strong shocks or vibrations.
- Keep it away from intense heat (radiators, direct sunlight).
- Protect the notebook from electromagnetic interference. This will also prevent data loss.
- Don't expose it to moisture. This is an electrical device!
- Be sure to use the correct power supply.
Always use an approved power adapter.

The power adapter requires a fluctuation-free and uninterrupted power supply. If you have any questions, consult your local electricity supply company.
The power adapter must be fitted with a grounded (earthed) plug.
Never pull on the cable to unplug the power supply - always pull the plug itself.
Disconnect the external power supply (power adapter or car adapter) before cleaning the computer.
Notes on Using Batteries

Only use batteries designed exclusively for use with this computer.
Recharge batteries via the notebook.
Do not attempt to repair faulty batteries yourself. Entrust repairs to your dealer or qualified service personnel.
Keep damaged batteries away from children and dispose of them properly as soon as possible. Exercise caution in handling damaged batteries. Batteries may explode if exposed to fire or improperly handled or disposed of.
The notebook is provided with a battery. The battery is recyclable. It is prohibited by law to dispose of the battery in ordinary household waste. If you have questions concerning proper disposal, consult your garbage collection service.
Note on the System Clock Battery

Caution: There is a risk of explosion if batteries are replaced incorrectly. Replace the battery only with a battery recommended by the manufacturer or with a battery of the same type. Dispose of the battery according to the manufacturer's instructions.
Servicing
Do not service your computer yourself! You could invalidate your warranty rights and expose yourself and the device to the risk of electrical shock. If servicing is required, consult qualified service personnel. Disconnect the computer from the power supply.
If the following problems occur, consult qualified service personnel:

- Power adapter or power cable is damaged or frayed.
- Liquid has entered the computer.
- Despite operating it correctly, the computer is not functioning properly.
-
The computer has been dropped or damaged.
-
Cleaning
Never apply cleaning agents directly to the computer. Use only a soft, lint-free cloth. Never use volatile (petroleum distillates) or scouring cleaning agents.
Wireless LAN
(wireless network - abbreviation = WLAN)
Your notebook may contain a wireless LAN module of the type "Intel® Pro Wireless Mini PCI" (optional). This module allows you to set up a wireless-based network, and to connect to an existing wireless network. It works according to the IEEE802.11b+g standard.
WLAN technology allows users to set up wireless connections inside a local area (e.g. in a company or campus building, or in a public building such as an airport). WLANs can be used in temporary offices, in locations where it is not possible to set up extensive cable installations, or to extend an existing LAN so that users in different parts of a building can work at different times.
There are two different ways to operate a WLAN.
In fixed WLANs, wireless stations (devices with radio network cards or external modems) set up connections with wireless access points, which act as bridges between the stations and the existing network backbone. In Peer-to-Peer (ad hoc) WLANs several users can set up a temporary network within a limited area such as a conference room, without using access points, and providing there is no need to use network resources.
In 1997 the IEEE confirmed the standard 802.11 for WLANs; this set a data transfer rate of from 1 to 2 Mbit/s (Megabits per second). With 802.11b, the new governing standard, the maximum data transfer rate is 11 Mbit/s over a frequency band of 2.4 GHz (Gigahertz).
Additional safety notes for units with wireless LAN
If a wireless LAN module is integrated in your notebook, it is essential that you observe the following safety information when using your notebook:

- Switch off the Notebook when you are in an aircraft or while driving a car.
- If you are in a hospital, an operating room or close to an electronic medical system, switch off the wireless components in the Notebook! The radio waves which are transmitted could disrupt the working of the medical equipment.
- Keep the Notebook at least 20cm away from a heart pacemaker, otherwise there is a risk that the radio waves could disrupt the normal working of the pacemaker.
- The radio waves which are transmitted could give rise to interference noise in hearing aids.
- When its radio components are switched on, do not place the Notebook close to inflammable gases or in an environment which could be at risk of explosion (e.g. paint shop), since the radio waves which are transmitted could set of a fire or an explosion.
- The range of the wireless connection depends on the environmental and other ambient conditions.
- When transferring data over a wireless connection, unauthorized Third Parties can also receive the data.
MAXDATA Computer AG is not responsible for disruptions to radio or television reception which are caused by unauthorized alterations to this unit. MAXDATA also accepts no responsibility for the replacement or the exchange of connecting cables and units which were not specified by MAXDATA Computer AG. The user alone is responsible for the elimination of disruptions caused by this type of unauthorized alteration; he is also responsible for the replacement or the exchange of the units.
CE-labelling for units with wireless LAN
C E ①
As delivered, this device complies with the requirements of the Guideline 1999/5/EG of the European Parliament and of the Council dated the 9. March 1999 concerning radio equipment and telecommunications facilities, and the mutual recognition of conformity.
This Notebook may be used in Belgium, Denmark, Germany, Finland, France, Greece, Great Britain, Ireland, Italy, Luxembourg, the Netherlands, Austria, Portugal, Sweden, Switzerland, Spain, Iceland, Liechtenstein and Norway.
Current information on any possible restrictions in its operation can be obtained from the appropriate authorities in each country. If your country is not included in the above list, then please contact the appropriate supervising authority, in order to check whether the use of this product is permitted in your country.
Belgium - www.bipt.be
Denmark - www.tst.dk
Germany - www.regtp.de
Finland - www.ficora.fi
France - www.artelecom.fr
Greece - www.eett.gr
England - www.oftel.gov.uk
Ireland - www.comreg.ie
Italy - www.agcom.it
Luxembourg - www.etat.lu/ILT
Netherlands - www.opta.nl
Austria - www.rtr.at
Portugal - www.urt.gov.pt
Sweden - www.pts.se
Switzerland - www.bakom.ch
Spain - www.cmt.es
Iceland - www.pta.is
Liechtenstein - www.ak.li
Norway - www.npt.no
Restrictions
France
Restricted frequency range: In France, you may only use channels 10 to 11 (2457 MHz or 2462 MHz). It is forbidden to use the unit outside of enclosed areas.
Info: www.artelecom.fr
Italy
An official authorization is also required to use the unit in internal areas. For more detailed information about the necessary procedure to do this, please contact your provider. It is forbidden to use the unit outside of enclosed areas.
Info: www.agcom.it
Netherlands
A licence is required to use the unit in the open. For more detailed information about the procedure to be followed for this, please contact your provider.
Info: www.optiona.nl
Radio frequencies for units with wireless LAN
The following information was correct at January 2002. You can obtain current information from the appropriate authorities in your country (e.g. www.regtp.de).
FREQUENCIES
Radio network cards and adapters are designed in accordance with IEEE-Standard 802.11b for use in the ISM frequency band (Industrial, Scientific, Medical) between 2.4 and 2.4835 GHz. Because of the DSSS-procedure (Direct Sequence Spread Spectrum), each of the 11 usable radio channels takes up a width of 22MHz ; this means that up to three, independent channels are available (e.g. 3, 8 and 11). The following table lists the authorised channels in your country:
| Channel | MHz | Europe, R&TTE | France, R&TTE |
| 1 | 2412 | X | |
| 2 | 2417 | X | |
| 3 | 2422 | X | |
| 4 | 2427 | X | |
| 5 | 2432 | X | |
| 6 | 2437 | X | |
| 7 | 2442 | X | |
| 8 | 2447 | X | |
| 9 | 2452 | X | |
| 10 | 2457 | X | X |
| 11 | 2462 | X | X |
Legal requirements - exception clauses
EXCEPTION CLUSES FOR UNITS WITH WIRELESS LAN
The installation and use of an unit with Wireless LAN may only take place when in accordance with the instructions contained in the user documents. The user documents are included in the material supplied with the product. All alterations or modifications made to this unit which are not expressly authorised by the manufacturer may lead to cancellation of the right of the user to operate the unit. The manufacturer is not liable for radio disruptions during the reception of radio and television signals which are due to non-authorised alterations to the unit or to the exchange or connection of cables and accessories, where these are not in accordance with the recommendations of the manufacturer. It is the responsibility of the user to remove any interference which may arise as a result of any non-authorised alterations, or the addition or replacement of components. Neither the manufacturer nor his authorised dealer and wholesaler are liable for damages or breaches of legal regulations which result from an infringement of these guidelines.
Shipping Contents
Before you begin installing your notebook, make sure that all components are present. If any item listed in the shipping contents is missing from your computer package, please contact your dealer immediately.
Notebook
Battery
Utility CD
Power adapter
Power cable
- User guide
CD/combo or DVD-ROM drive (built-in)
Modem cable
Please retain the original packaging in case you need to send the device for repairs or upgrades. Please store the packaging safely.
Before first using the computer, make sure you are familiar with the individual components of your system.
Slide the release catch (1) to the right and open the display (2).
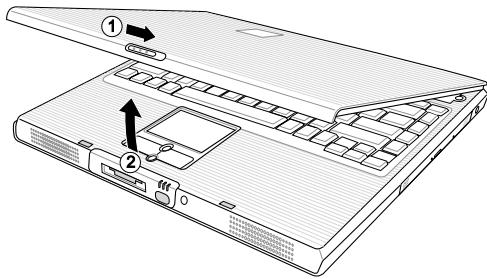
Fig. 1
(1) Release catch
(2) Open the display
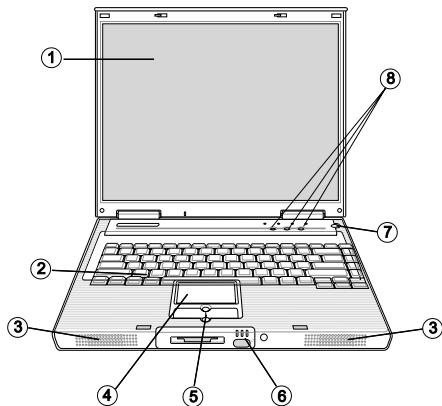
Fig. 2
(1) LCD display
(2) Keyboard
(3) Loudspeakers
(4) TouchPad
(5) Keys and scroll pad
(6) Status LEDs
(7) Power button
(8) Quick launch keys
Inserting the Battery
The battery is included in the notebook's shipping contents. This battery is only partially charged.
Note that the charging time for the battery is three hours if the computer is switched off, or four hours if the computer is switched on.

It is absolutely essential to fully charge the battery for initial operation! Do not unplug the power adapter until the battery is fully charged.
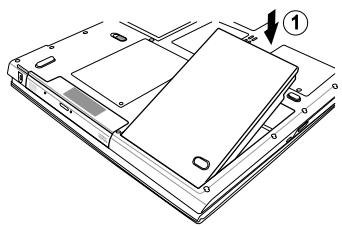
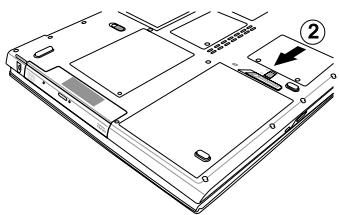
Fig. 3
(1) Insert the battery into the battery slot in the direction of the arrow.
Gently push the battery until it locks into place.
(2) Lock the battery into position.
The battery can now be charged.
Removing the Battery
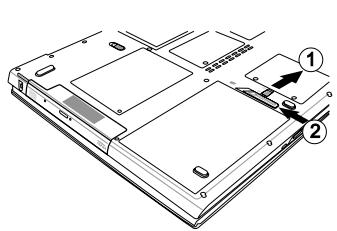
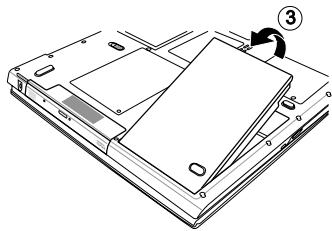
Fig. 4
Slide the release catch (1) back and (2) inwards. The battery is released.
Slide the battery out of the holder and lift it upwards (3) out of the battery slot.
You can now run the notebook with the power adapter alone!
Power Supply
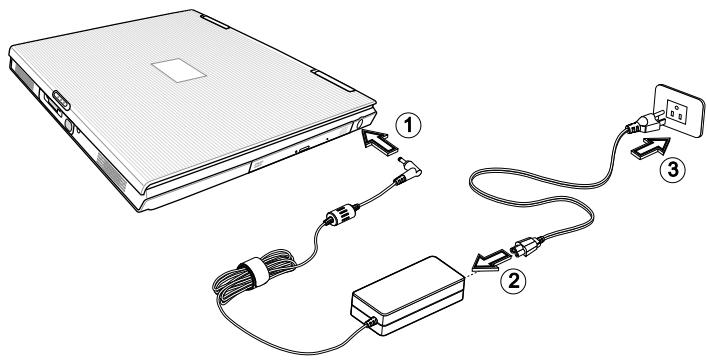
The notebook is supplied with a power cable and a universal, self-adjusting power adapter. The power adapter can operate with any constant voltage between 100 and 240 volts.
To use the power adapter:
- Connect the power adapter to the DC IN
socket on the computer.
- Connect the power cable to the power adapter.
- Connect the power cable to a power outlet.

You can choose to run the notebook via battery or power supply. The first time you use the computer, you need to use the power adapter. Use only the supplied power adapter. Using the wrong power adapter can cause damage to the computer.
The power adapter contains no serviceable parts.

NEVER OPEN THE POWER ADAPTER!
RISK OF FATAL INJURY!
Switching the Computer on
You've now completed the preparations. Now press the ON/OFF button to switch on the notebook.
Tip:
If you experience a program or system crash, press the following key combination: Ctrl + Alt + Del In most cases, only the task that has crashed will be ended or the computer will be restarted (warm restart). If this does not work, hold down the on/off button for more than four seconds - this will switch off the computer. You can now restart the computer in the normal fashion (cold restart).

Please note that with Microsoft® Windows® operating systems you should always switch off the computer as follows:
Click the Start button. Select Shut Down.
Click OK.
This avoids any problems with the hard disk and operating system.
Once the computer is switched on, the on/off button can perform several functions depending on the energy settings. In the standard setting, pressing the on/off button again will switch off the computer.
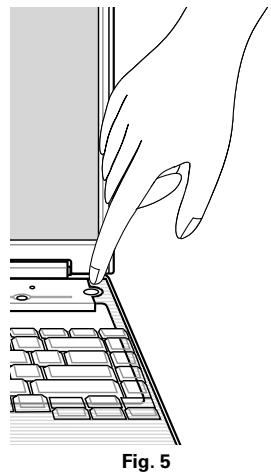
The operating system is turned on the first time you switch on the computer. Please follow the installation instructions from the operating system at this point.
After installing the operating system and restarting, the computer is ready to use.
You can change some of the basic display settings such as the resolution, color depth and desktop background image.
You can find more detailed information on this point in the installation instructions.
Power Management
Your system is compatible with the ACPI power saving system.
The basic power management settings can be found under the following in Microsoft® Windows® operating systems:
Here you can set the behavior separately for various battery charge levels.
Standby: - low energy consumption -
The display is dimmed and the hard disk remains unchanged. The power LED flashes. By pressing the on/off button, the computer returns to the normal operating state. The user must log on again.
Hibernating: – without power adapter no energy consumption –
The current operating state is saved to the hard disk; the computer is switched off. All open documents or applications become available again when the computer is switched on.
Switching off the notebook and disconnecting it from the power supply (pulling the plug of the power adapter) can prevent any energy consumption.
Note on PC cards:

Never remove a PC card while the system is in save-to-disk mode. This deactivates the PC slot, thus changing the system configuration. This can lead to problems the next time the computer is started.
Left Side
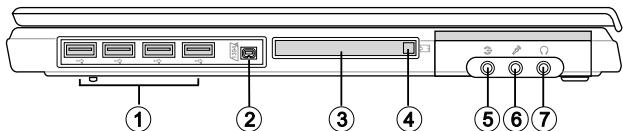
Fig. 6
(1) USB ports
(2) IEEE 1394 port
(3) PC card slot
(4) PC card release catch
(5) Line In port
(6) Microphone socket
(7) Loudspeakers/headphones
Right Side
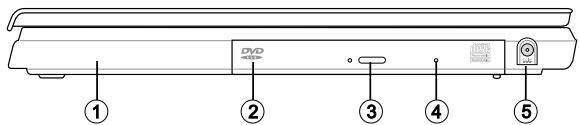
Fig. 7
(1) Lithium ion battery
(2) CD/combo or DVD-ROM drive
(3) Eject button
(4) Emergency release (only if notebook is switched off)
(5) Socket for power adapter
Front View
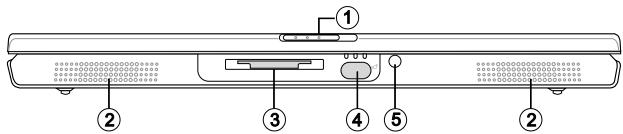
Fig. 8
(1) Display release
(2) Loudspeakers
(3) Memory card slot
(4) Infrared sender/receiver
(5) Wireless network (LAN) on/off (optional, works only when WLAN module integrated)
Rear View

All air intake and ventilation openings must be kept free from obstructions at all times. If not, the device is liable to overheat.

Fig. 9
(1) Modem port
(2) Network port
(3) Port replicator connection
(4) Printer port
(5) Connector for external monitor
(6) S-Video TV output
(7) Kensington lock - anti-theft device
Underside
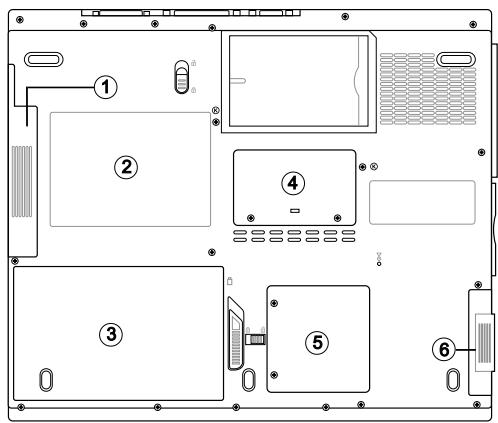
Fig. 10
(1) Built-in slot for optical drives
(2) Type plate
(3) Battery slot
(4) 2nd RAM cover
(5) Mini PCI card cover
(6) Hard disk slot
Explanation of LED Displays
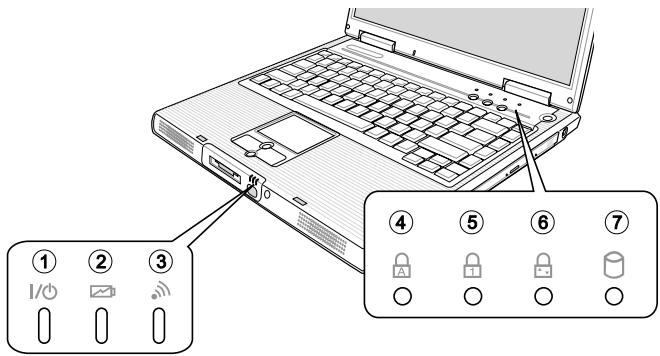
Fig. 11
(1) Power
(2) Battery
(3) Wireless LAN
(4) Caps Lock
(5) Num Lock
(6) Scroll Lock
(7) Drive access
Table 1
| Symbol | Meaning |
| I/O | Lights when the computer is switched on. Flashes in power saving mode. |
| Lights orange when the battery is charging and lights green when it's fully charged. | |
| Lights when the wireless LAN is activated. | |
| A | Lights when Caps Lock is on. |
| 1 | Lights when Num Lock is on. |
| Lights when Scroll Lock is on. | |
| Lights when the hard disk or optical drive is being accessed. |
Hot Keys
(Shortcut key combinations with special functions)
To activate the hot keys, press and hold down the Fn key and then press the desired additional key. For certain functions it may be necessary to install the Quick Button software. You can find additional information on this on the next page.
Table 2
| Keys | Meaning |
| Fn + F1 | Switches to power saving mode |
| Fn + F2 | Switches WLAN on/off (optional) |
| Fn + F3 | Switches between LCD display/monitor/both |
| Fn + F4 | Reduces LCD brightness |
| Fn + F5 | Increases LCD brightness |
| Fn + F6 | Switches the loudspeaker on/off |
| Fn + F7 | Reduces the volume |
| Fn + F8 | Increases the volume |
| Fn + F9 | Switches between Playback and Pause with the Microsoft®Windows®Media Player |
| Fn + F10 | Stops the Microsoft®Windows®Media Player playback |
| Fn + F11 | Switches to the previous track (Media Player) |
| Fn + F12 | Switches to the next track (Media Player) |
The Quick Buttons (Quick Launch keys)
There are three Quick buttons just above the keyboard. You can use these to launch frequently used applications.
If the keys are not assigned to any functions, you can find the driver to activate the function on the Utility CD. To do this, please follow the instructions in the "Installation Instructions" section.
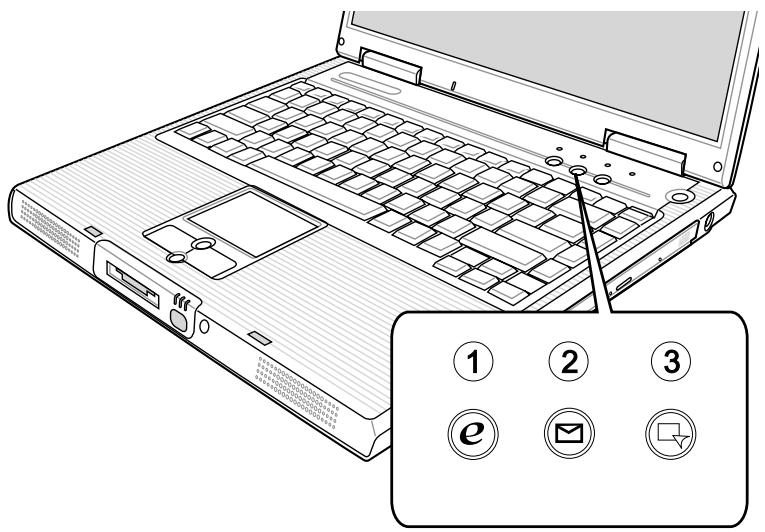
Fig. 12
(1) Internet - starts the Internet browser
(2) E-mail - starts the e-mail program
(3) Freely programmable – can be freely assigned using the quick button software.
The Keyboard
Your notebook's keyboard has all the functions of a normal AT-compatible keyboard plus some extras:
Typewriter
These keys correspond to a typewriter's keys.
Function keys
In many operating systems (and applications), special functions are available via these keys. You can find more detailed information on this in the relevant handbooks.
Special keys
These keys (and key combinations) are used for controlling various hardware functions.
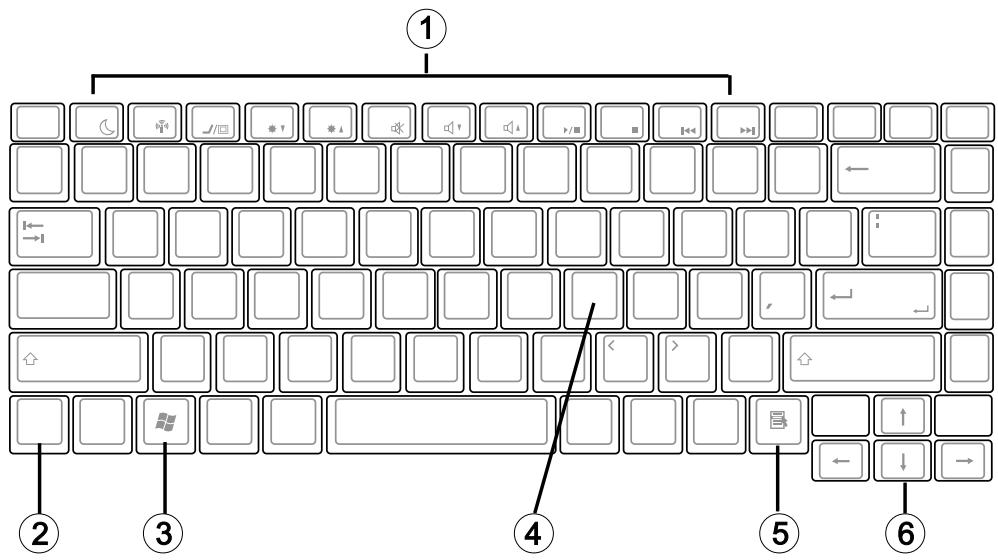
Fig. 13
(1) Function keys - for more on functions, see table 2 (hot keys)
(2) Fn key
(3) Microsoft® Microsoft® Windows® key
(4) Numerical keypad (press Num Lock key to activate this field)
(5) Microsoft®Windows®key
(6) Arrow keys
The TouchPad
The system automatically sets up the integrated TouchPad. If you are using Microsoft® Windows®, no driver needs to be installed for the basic functions. If you wish to use the advanced functions, you can find the driver to activate the function on the Utility CD. To do this, please follow the instructions in the "Installation Instructions" section.
(1) Sensor field
(2) Left "mouse" button
(3) Scroll buttons - work like a mouse wheel
(4) Right "mouse" button
Note for left-handed users: most operating systems enable reversal of the mouse buttons.
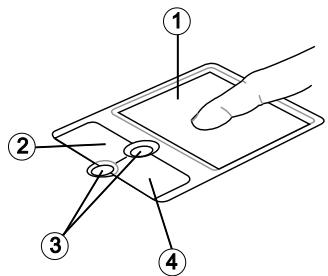
Fig. 14
The TouchPad - Operation
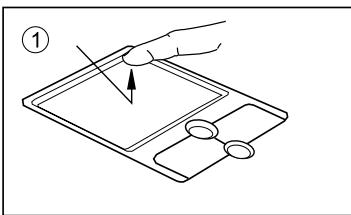
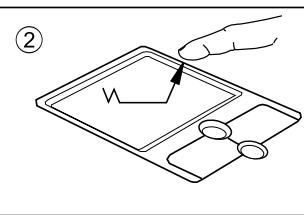

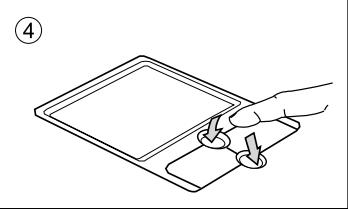
(1) Select
(2) Select, drag and drop
(3) Double-click - to execute/ open files
(4) Scrolling
When using the TouchPad, make sure it as well as your finger are clean and dry. The TouchPad reacts to finger movements. The lighter it is touched, the better it reacts. Pressing hard will not increase its accuracy.
The CD-ROM/DVD Drive
To insert a CD, press the eject button on the front side of the drive.
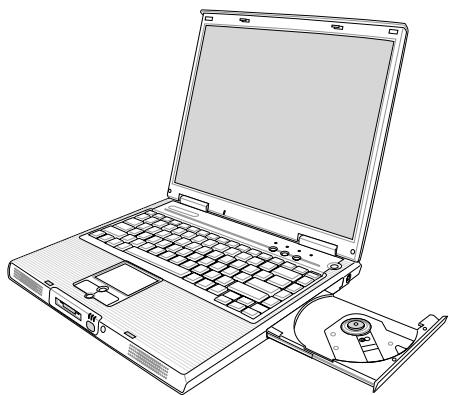
Fig. 15
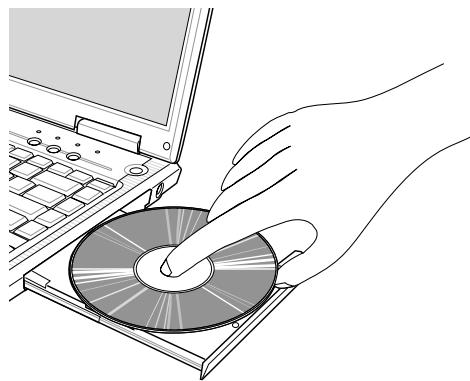
Fig. 16
Place a CD onto the spindle with the label side facing up and push it gently down onto the spindle.
Push the CD tray back in until it locks into place. The CD is now ready to read.
Some CDs have an autostart function. This means that installation programs or music CDs automatically run after you place them in the drive.
The PC Card Slot
The computer is provided with a PC card slot. This is a PCMCIA 3.3 V/5 V slot, Type II.
To insert a PC card, push it into the slot until it locks into place. Set the connection you require (e.g. network connection).
You can also consult the documents for the relevant card.
To remove the card, push the eject button next to the slot. The button will pop outwards. Pressing the slot again releases the PC card.
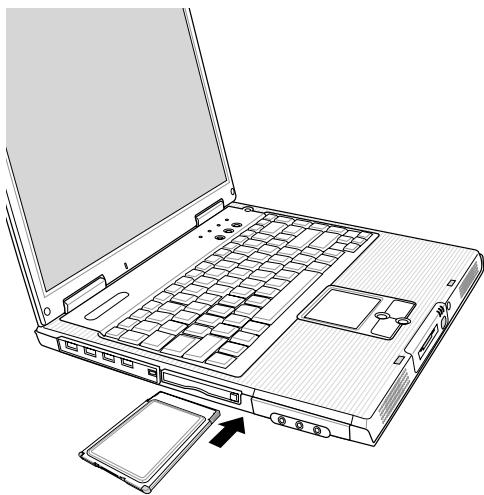
Fig. 17
The Memory Card Slot
The computer is provided with a combination slot. This slot accepts Memory Sticks, SD (Secure Digital), SM (Smart Media) and MMC (Multimedia card) cards.
Insert these cards into the slot holding the printed side upwards. After the card is inserted correctly into place, it is recognized as an additional drive. The data on the card can then be accessed.
To remove it, simply pull the card out.
Never remove the card while data is being read from or written to the card!
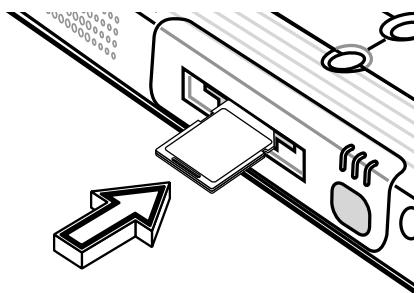
Fig. 18
The Data/Fax Modem
The system automatically sets up the integrated analog modem. To use the modem functions, connect the modem socket to an analog telephone socket (not ISDN) using the telephone cable.
Proper use:
The modem can be connected to all analog sockets (TBR 21) in Europe.
It is to be used solely for data communication purposes.

Do not attempt to connect the modem to an ISDN telephone socket! This would result in serious damage to the device.
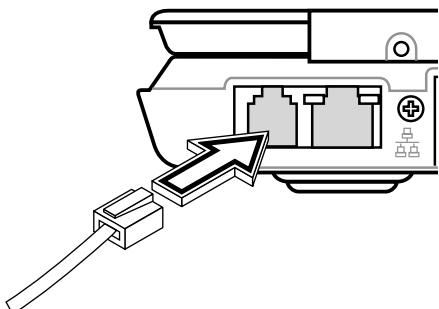
Fig. 19
The LAN Port
The built-in network adapter enables your computer to connect to the Internet via a 10/100 Mbps network or DSL.
The connection is made via an Ethernet network cable and RJ-45 connectors. These are inserted on the back of the computer and into an available network hub or DSL socket.

Under no circumstances should you confuse a network cable RJ-45 connector with an ISDN connector! NEVER attempt to connect the LAN adapter to an ISDN telephone socket! This would result in serious damage to the device.
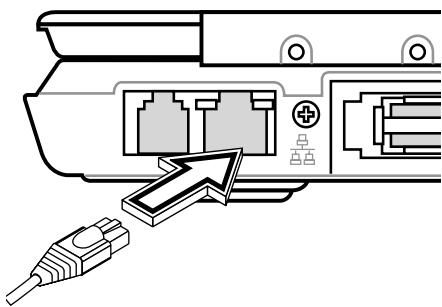
Fig. 20
Installation Instructions
Restoring the Drivers
Your system is supplied in a preloaded condition. This means that all the data and drivers that the system requires are already on the hard disk. In case you erase and/or format your hard disk drive, the system drivers are stored on the Utility CD supplied with the computer. After reinstalling the operating system (for example, with the Recovery CD), this allows you to restore your notebook to a usable condition.
The Utility CD
The Utility CD will run automatically after you place it in the drive. If this is not the case, you can run the CD as follows: select
You can select the driver that you want to install in the "Drivers" section. Recommended: All of the drivers listed from top to bottom.
In addition, you can later install the advanced functions you require in the "Utility" section.
When using the Utility CD, please follow the menu instructions.
Setting the Resolution
After installation of the graphics driver, you can set the resolution to the desired size (e.g. 1024 x 768).
You do this in the following way:
Right-click on any free area of the desktop. Select
In the Display Properties window, click the Settings tab.
Here you can set the slider to a resolution you find comfortable.
Click
Processor and Platform
Intel® Centrino™ Mobile Technology
- Intel® Pentium® M Processor 1.3 GHz to 2 GHz or
Intel® Celeron® M Processor to 1.5 GHz
- Intel® PRO 802.11b+g wireless network connection (optional)
Intel® 855GM/GME chipset
RAM
- Main memory expandable to 1 GB DDR SDRAM
(Only allow qualified service personnel to expand the main memory)
- Two PC2700 (DDR 333) SODIMM sockets
Display and Video
- 15.0 inch XGATFT display. Supported resolution 1024 × 768 with up to 16,7 million colors.
Intel® 855 Extreme Graphics Controller - AGP 4X support - Simultaneous LCD/ external monitor
External monitor:
Supports up to 1280 x 1024, 16.7 million colors, 85 Hz
or
1600 × 1200, 16.7 million colors, 60Hz
S-Video output
Storage Capacity
One E-IDE hard disk drive (2.5", 9.5 mm)
One internal DVD, combo drive or DVD+/-RW
One memory card slot
Audio
- AC '97 compatible stereo sound with 3D sound effects
Built-in stereo loudspeakers
Modem
High-speed 56 Kbps V.90/92 fax/data software MCD modem
LAN
Built-in fast Ethernet function for 10Base-T and 100Base-TX
- Intel® Centrino™ 802.11b+g wireless network mini PCI module
Input Devices
86/87/88-key Microsoft® Windows® keyboard
- Ergonomically positioned TouchPad with scroll buttons
- Quick launch keys
Ports
One 15-pin VGA port
One Line OUT / Headphone socket
One microphone input socket
One Line In socket
Infrared port (FIR)
Four USB ports (v2.0)
One standard telephone socket (RJ-11)
One standard network socket (RJ-45)
One DC IN socket
One IEEE1394 i.Link port
One Type II PC card slot
One parallel port (ECP)
One Extension port
Power Supply
- Main battery Li-Ion 4400 mAh, 65 Watt
- AC power adapter 100-240 V, AC 50-60 Hz, 65 W.
Recharging System OFF: 3 hours (95%)
System ON: 4 hours (95%)
- Fully-supported ACPI Power Management, standby, suspend to Disk, suspend to RAM
Operating System
O/S Microsoft® Windows® 2000/XP
Other Data
Dimensions 280 (D) x 334 (W) x 29.8 (H) mm
Weight 2.78kg (depending on model)
- Operating temperature: 5 to 35^ C
- Operating humidity: 20 to 80% RH
Storage temperature: -10 to 65^
Fault Diagnosis and Troubleshooting
If a problem occurs while working with your computer, first of all try using the following information to solve the problem. If the problem cannot be solved in this way, you can find additional information in the advanced service handbook (on the device drivers and utilities CD-ROM). If the problem persists, switch off the system for several minutes and then restart it. You will lose all unsaved data, but the system may work properly again. Subsequently contact your dealer or customer support agent.
Despite pressing the power switch the computer remains switched off.
Possible cause of the problem:
- The battery is missing or is incorrectly installed.
Note:
The power on LED is not lit.
Troubleshooting:
- Make sure that the battery is in the battery compartment and is inserted properly.
- Check that the battery terminals are making direct contact.
- Connect your notebook to the power adapter so that the battery (if present) can recharge.
Possible cause of the problem:
- Battery level low.
Note:
- The battery display LED flashes.
Troubleshooting:
- Operate the computer using the power adapter. If the system does not immediately start up, switch off the computer and then restart it.
The screen is not working.
Possible cause of the problem:
The energy saving mode is activated.
Note:
- The suspend LED flashes.
Troubleshooting:
- Press the on/off button.
Possible cause of the problem:
- The screen settings are incorrect.
Troubleshooting:
- Press the spacebar, several times if necessary.
If an external monitor is connected, switch it on.
Possible cause of the problem:
- In the System Settings, a screen type other than the existing one has been set.
Troubleshooting:
- Press the Fn + F3 key combination.
- If an external monitor is connected, connect this to a power source and switch it on
Also check the brightness and contrast settings.
The system stops working.
Possible cause of the problem:
- An energy saving function has been activated.
Note:
- The screen switches itself off.
Troubleshooting:
- Press any key, or press the on/off button if none of the status LEDs are lit.
Possible cause of the problem:
- A software error has caused a system crash.
Troubleshooting:
Additional information is available in the operating system handbook.
- If you cannot remedy the problem, restart the system. You will lose any unsaved data. If this doesn't work either, briefly switch off the computer and then switch it back on again.

Each time the system starts, it carries out a self-test (POST). If an error occurs, an error message appears, briefly describing the problem.
Index
IEEE 1394. 71
Infrared. 71,84
ISDN connector . 80
A Accuracy 77
ACPI power saving system .69
Arrow keys. 76
B Battery 53, 56, 63, 66, 72, 73, 87 Battery slot 66
C
Charging times 66
Cleaning. 55, 56
Cold restart.. 68
Color depth .. 68
Ctrl ^+ Alt ^+ Del . 68
D Data/Fax Modem 80 Display 65,74,68,69,83,87
E
Emergency release. 71
Energy consumption. 69
Energy settings. 68
External monitor .72,83,87,88
F
Finger movements 77
Fn key 74, 76
Function keys 76
G Garbage collection service 55
H
Headphones 71
Hibernate 69
Household waste. 53, 55
K
Keyboard 65,76
Keys 65,74,65,74
LAN Port 80 LCD display. 65,74 Line In. 71,84 Liquid 56 Loudspeakers 65,71
M
Memory card. 71
Microphone . 71
Modem socket. 80
Moisture . 55
N Network 57,61,71,79,80,83,84 Network adapter. 80
Operating state 69
Operating system 68, 69, 76, 77
Original packaging 63
PC card 69, 71, 79, 84
Port replicator 72
Power adapter 55, 66, 67, 69, 71, 84, 87
Power button 65
Power cable 56, 67
Power supply 55, 56, 67, 69
Printer 72
Q Qualified service personnel. 55, 56, 83 Quick launch keys. 65, 84
R Release catch 65 Resolution. 68, 81, 83
s
Scroll Pad 65
Shipping contents 63
Shocks/Vibrations 55
Special keys. 76
Standby 69
Status LEDs. 65
Sunlight. 55
Switch on 68
System crash 68, 88
T
TouchPad 65,77,84
Typewriter 76
V
Voltage 52,67
W
Warm restart 68
Warranty. 52