FA 602 - Alarme de sécurité DEXAPLAN - Notice d'utilisation et mode d'emploi gratuit
Retrouvez gratuitement la notice de l'appareil FA 602 DEXAPLAN au format PDF.
| Type d'appareil | Alarme de sécurité |
| Alimentation | Piles bouton 3V (CR 2450) |
| Durée de vie des piles | Environ 5 ans |
| Portée | Jusqu'à 5 mètres |
| Volume sonore | Environ 85 dB |
| Installation | Intérieure, sur fenêtres et portes |
| Type de détection | Contact magnétique |
| Matériau | Plastique ABS |
| Dimensions | Environ 55 x 40 x 20 mm |
| Poids | Environ 50 g |
| Température de fonctionnement | -10 à 50 °C |
| Humidité de fonctionnement | 10 à 90 % sans condensation |
| Installation sans fil | Oui |
| Indicateur de batterie faible | Oui |
| Mode d'alarme | Sonore |
| Utilisation recommandée | Usage domestique uniquement |
| Garantie | Non précisé |
FOIRE AUX QUESTIONS - FA 602 DEXAPLAN
Questions des utilisateurs sur FA 602 DEXAPLAN
0 question sur cet appareil. Repondez a celles que vous connaissez ou posez la votre.
Poser une nouvelle question sur cet appareil
Téléchargez la notice de votre Alarme de sécurité au format PDF gratuitement ! Retrouvez votre notice FA 602 - DEXAPLAN et reprennez votre appareil électronique en main. Sur cette page sont publiés tous les documents nécessaires à l'utilisation de votre appareil FA 602 de la marque DEXAPLAN.
MODE D'EMPLOI FA 602 DEXAPLAN

T52
Operating and safety instructions
Introduction
Please read these operating instructions thoroughly and carefully. They are part of this product and contain important instructions relating to its operation and handling. Please always observe all safety instructions. Before initial operation, please check that all parts are fitted correctly. If you have any questions or are unsure about handling of the device, please contact the dealer or the service office. Please keep these instructions in a safe place and pass them on to anyone else intending to use the device.
Proper use
This mini window alarm is suitable for doors (including cupboard doors, etc.) and windows. The device is designed exclusively for operation in dry, enclosed spaces. This product must only be operated by three round cell batteries LR44/357A - 1.5 Volt. Any use other than that described above or alteration of the device is not permitted and causes damage. Other hazards such as injury and technical malfunctions (e.g. short circuit, fire, electric shock) may ensue. This device is only intended for use in private households.
Delivery scope
Please check the contents immediately after unpacking to ensure that the delivery scope is complete and the device is in perfect condition.
4x Alarm units FA 602
4x Magnets
Adhesive strips for installation
Batteries (inserted in the device)
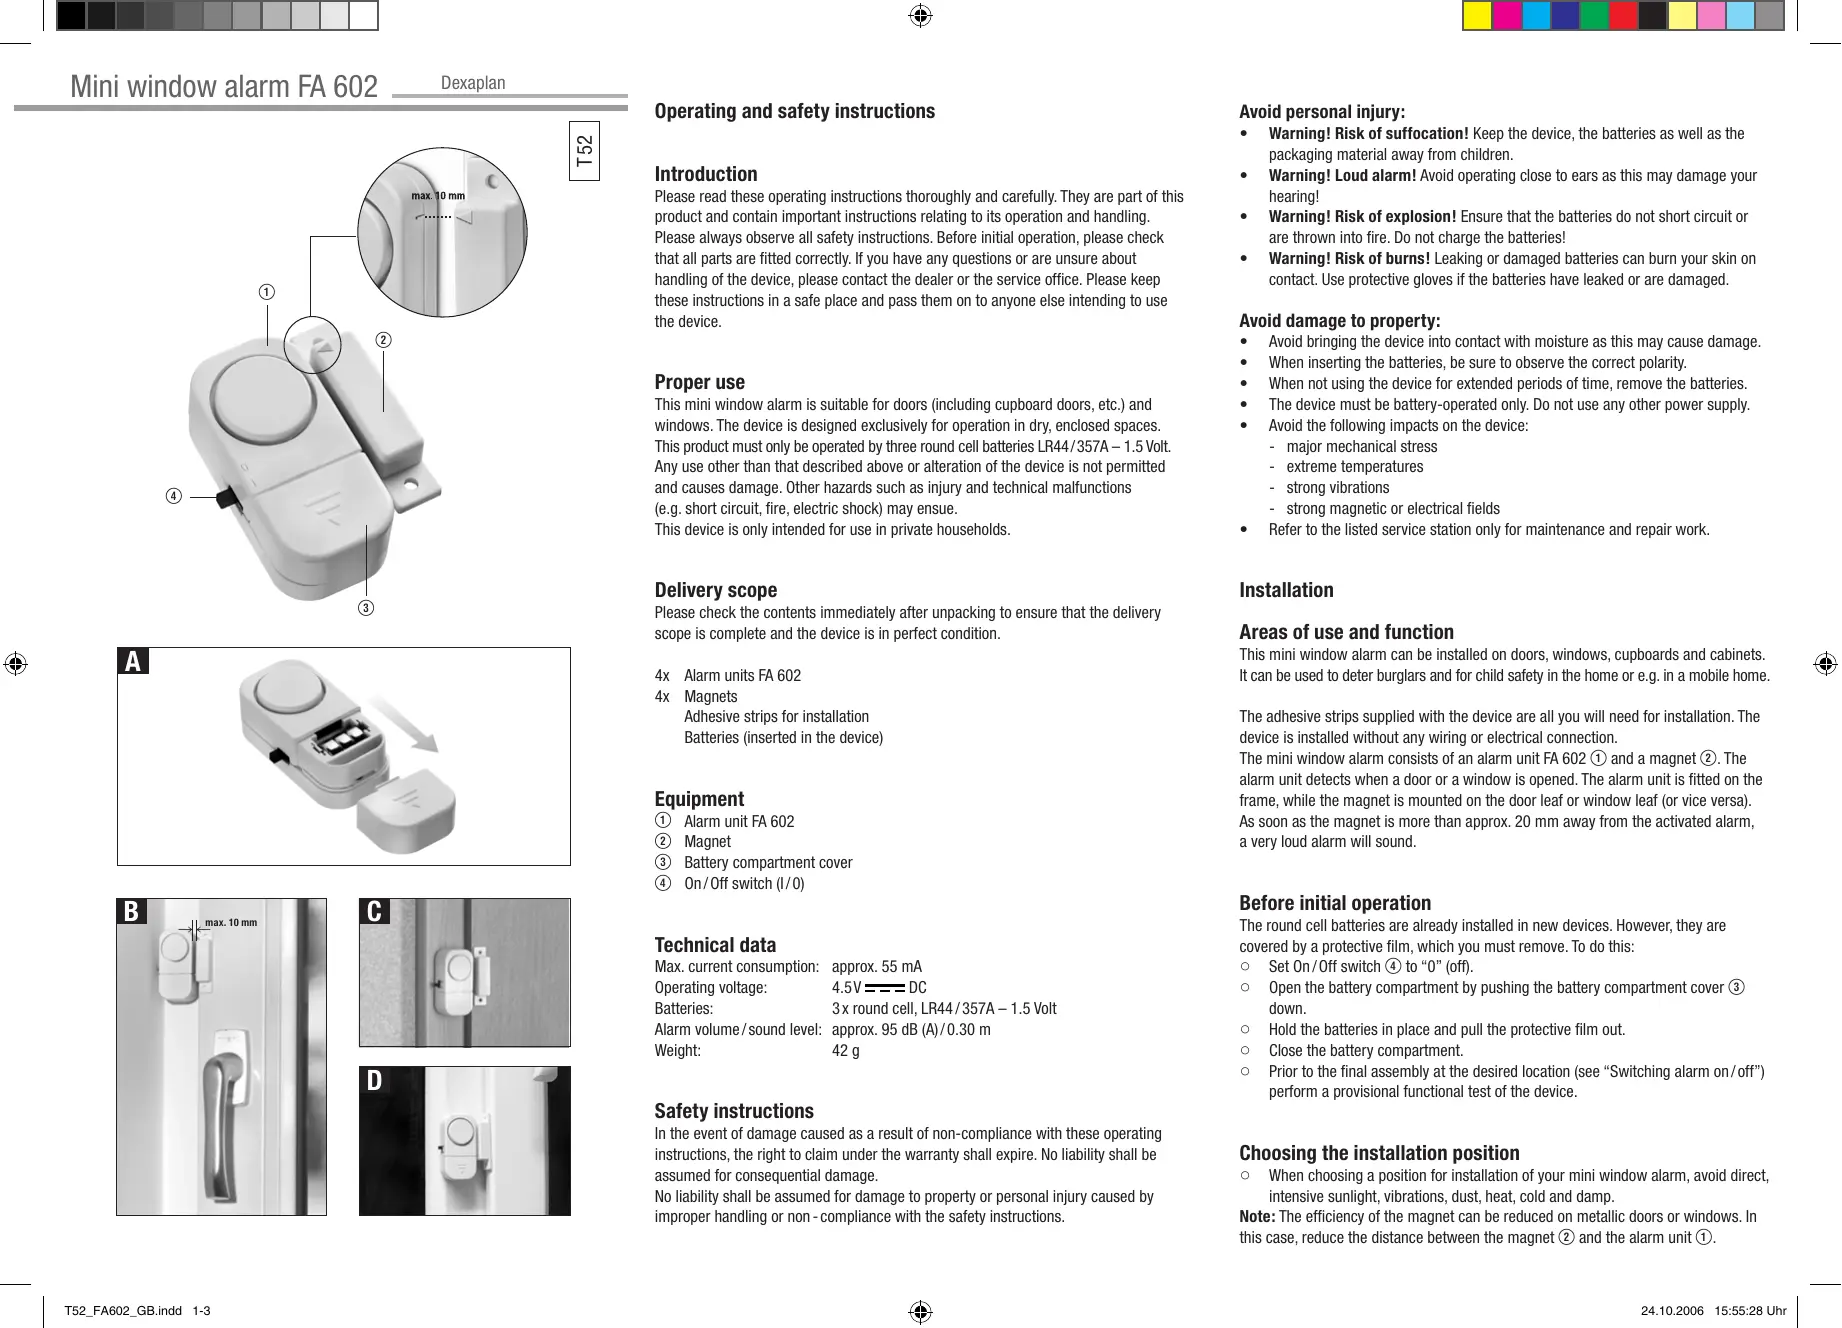
Equipment
① Alarm unit FA 602
② Magnet
③ Battery compartment cover
④ On/Off switch (1/0)
Technical data
Max. current consumption: approx. 55 mA
Operating voltage: 4.5V DC
Batteries: 3x round cell, LR44/357A - 1.5 Volt
Alarm volume/sound level: approx. 95 dB (A)/0.30 m
Weight: 42 g
Safety instructions
In the event of damage caused as a result of non-compliance with these operating instructions, the right to claim under the warranty shall expire. No liability shall be assumed for consequential damage.
No liability shall be assumed for damage to property or personal injury caused by improper handling or non-compliance with the safety instructions.
Avoid personal injury:
- Warning! Risk of suffocation! Keep the device, the batteries as well as the packaging material away from children.
- Warning! Loud alarm! Avoid operating close to ears as this may damage your hearing!
- Warning! Risk of explosion! Ensure that the batteries do not short circuit or are thrown into fire. Do not charge the batteries!
- Warning! Risk of burns! Leaking or damaged batteries can burn your skin on contact. Use protective gloves if the batteries have leaked or are damaged.
Avoid damage to property:
- Avoid bringing the device into contact with moisture as this may cause damage.
- When inserting the batteries, be sure to observe the correct polarity.
- When not using the device for extended periods of time, remove the batteries.
The device must be battery-operated only. Do not use any other power supply. -
Avoid the following impacts on the device:
-
major mechanical stress
- extreme temperatures
- strong vibrations
- strong magnetic or electrical fields
Refer to the listed service station only for maintenance and repair work.
Installation
Areas of use and function
This mini window alarm can be installed on doors, windows, cupboards and cabinets. It can be used to deter burglars and for child safety in the home or e.g. in a mobile home.
The adhesive strips supplied with the device are all you will need for installation. The device is installed without any wiring or electrical connection.
The mini window alarm consists of an alarm unit FA 602 ① and a magnet ② . The alarm unit detects when a door or a window is opened. The alarm unit is fitted on the frame, while the magnet is mounted on the door leaf or window leaf (or vice versa).
As soon as the magnet is more than approx. 20mm away from the activated alarm, a very loud alarm will sound.
Before initial operation
The round cell batteries are already installed in new devices. However, they are covered by a protective film, which you must remove. To do this:
Set On/Off switch ④ to "0" (off).
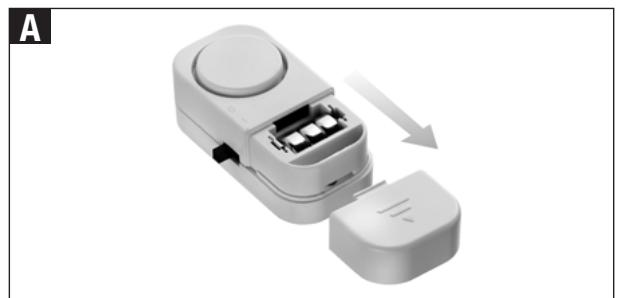
- Open the battery compartment by pushing the battery compartment cover ③ down.
Hold the batteries in place and pull the protective film out.
- Close the battery compartment.
Prior to the final assembly at the desired location (see "Switching alarm on/off") perform a provisional functional test of the device.
Choosing the installation position
- When choosing a position for installation of your mini window alarm, avoid direct, intensive sunlight, vibrations, dust, heat, cold and damp.
Note: The efficiency of the magnet can be reduced on metallic doors or windows. In this case, reduce the distance between the magnet ② and the alarm unit ①.


It is important that there are no appliances with electromagnetic fields near to the alarm, e.g. radio telephone, radio set or electric motor. These could have an effect on the alarm function.
Installing the alarm unit
Attention! Do not drill or screw any additional screws into the housing of the alarm unit ① or the magnet ② for installation purposes.
- Use the supplied adhesive strips to fix the alarm unit (1) and the magnets (2).
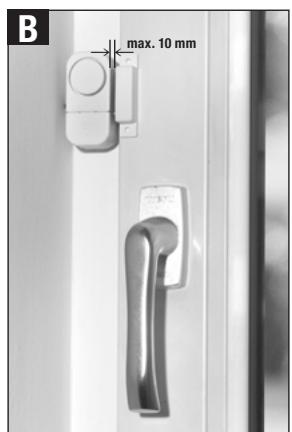
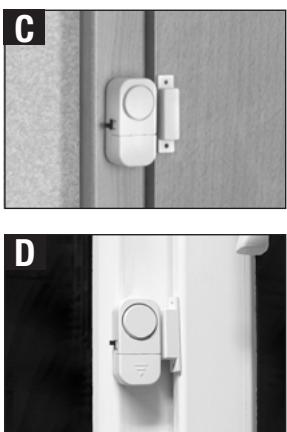
Place the alarm unit ① at the edge of the window or door handle side (see also Fig. B). - Place the magnets ② on the window or door frame (see also Fig C). If the frame measures more than 12mm , place the magnet to the side of the frame (see Fig D). Ensure that the side mark of the alarm ① is directly opposite the magnet's arrow ② (tip of magnet's arrow ② must always show in the direction of the alarm ①). The marking on the alarm and the magnets must also face one another.
Note: Alternatively, the magnets ② can also be attached using screws (not supplied) rather than using the adhesive strip. In this case, use a maximum 3.5 mm screws (e.g. wooden screws 3 × 12 ~mm or tapping screws 2.9 × 13 ~mm ) – the length of the screws depends on the material and thickness of the frame. Please be sure not to bore or screw into glass when attaching to a glass frame.
Important: the distance between the alarm ① and magnet ② must be max. 10mm (see Fig. B).
Lefthand installation:
If you wish to fit the alarm on the lefthand side, turn it by 180^ ("on its head").
Operation
Switching the alarm on and off
To activate the alarm, switch the On/Off switch ④ to "1" (On). The alarm is now activated and emits a signal when the door or window is opened (more than approx. 20mm between the alarm unit and the magnet). The signal is only switched off when the door /window etc. is closed or by the On/Off switch ④.
To deactivate the alarm or after the alarm signal has been triggered, switch the On/Off switch ④ to "0".
Changing the batteries
Set On/Off switch ④ to "0" (off).
- Open the battery compartment by pushing the battery compartment cover ③ down (see Fig. A).
Carefully remove the batteries, e.g. using a screw driver.
- Place the new batteries in the correct positions. The correct polarity is indicated in the battery compartment.
- Push the battery compartment cover ③ back onto the alarm unit ① . Note: always change all three batteries at the same time. If possible always use alkaline batteries, as these guarantee longer service life.
Troubleshooting
| Fault | Cause | Remedy |
| Alarm sounds although windows/door are closed. | The distance between the magnet and the magnet switch is too large (or the arrow is pointing in the wrong direction). | Reduce the distance. |
| Weak alarm signal. | The batteries have run out. | Insert new batteries. |
| The device does not work or does not work properly. | - The batteries have run out. - The batteries are in-serted with the wrong polarity. - The arrow on the magnet is not pointing to the mark on the alarm unit. | Insert new batteries. Check that the batteries have the correct polarity and make contact. |
Maintenance and cleaning
Check the technical safety and function of the mini window alarm regularly.
○ Remove the batteries before maintenance or repair of the device.
To clean the alarm, use a soft cloth, if necessary with a little mild soap suds. Never use benzene, thinner or similar chemical substances.
Disposal
Please dispose of the packaging materials in local containers. For details of the current possibilities for disposing of unwanted electrical appliances, please contact your local or city council.

Do not dispose of electrical appliances with the household waste!
In accordance with European Directive 2002/96/EC on used electrical and electronic appliances and its implementation in national law, used electrical devices must be collected separately and recycled in an ecologically compatible manner.
Remove the batteries before disposing of the device.
Disposal of used batteries/accumulators
As the consumer you are required by law (Battery Ordinance) to return all used batteries and accumulators. Disposal of batteries in the household waste is prohibited.
○ You can hand in your used batteries/accumulators free of charge at local council collection points, the point of sale or wherever batteries/accumulators are sold.
By following these requirements you are meeting your legal obligations and making an important contribution to protecting the environment.
Warranty / Service
Warranty
This device has a warranty of 3 years from the date of purchase. The device was manufactured with care and inspected thoroughly before delivery. Please keep your receipt as proof of purchase. If you have a claim under the warranty, please contact the service office for your country. This is the only way to ensure that your device can be sent in free of charge.
This warranty is only valid for the first purchaser and is not transferable.
The warranty furthermore covers material or manufacturing defects only. It does not apply to wear parts or damage to fragile parts, e.g. switches or accumulators. The product is solely intended for private use and not for commercial use. No claim for damages may be made in the event of a burglary. An alarm is no substitute for insurance cover and does not replace your duty of care.
In the event of incorrect and/or improper handling, the use of force or any work on the device that is not performed by the service office, the warranty shall expire. This warranty does not restrict your statutory rights.
Service
Information on dealing with problems can be found under www.dexaplan.com. If you have any questions, please contact our service office by email (service@dexaplan.de) or by telephone (GB 0870 - 241 3029; IE 1890 851 851; Monday - Friday between 8.30 and 17.00). Here you will find all necessary information on service questions such as returns, etc.
Dexaplan GmbH
Paul-Böhringer-Str. 3 · D-74229 Oedheim
Last Information Update 10/2006 · Ident.No.: 10-2006-FA 602-GB/IE