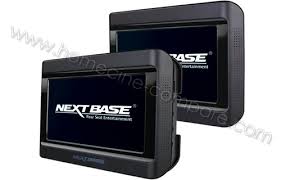
SDV97-AM - Lecteur DVD portable NEXT BASE - Notice d'utilisation et mode d'emploi gratuit
Retrouvez gratuitement la notice de l'appareil SDV97-AM NEXT BASE au format PDF.

| Type de produit | Lecteur DVD portable double écran |
| Marque | NEXT BASE |
| Modèle | SDV97-AM |
| Dimensions du lecteur DVD | 210 x 175 x 40 mm |
| Dimensions du moniteur | 210 x 175 x 31 mm |
| Poids du lecteur DVD | 710 g (sans batterie) |
| Poids du moniteur | 445 g |
| Alimentation principale | Adaptateur AC/DC 100-240 V, sortie 12 V CC |
| Alimentation par piles | 6 piles AA (rechargeables NI-MH 2300 mAh recommandées) |
| Consommation du lecteur DVD | < 8,5 W |
| Consommation du moniteur | < 4 W |
| Formats de disques supportés | DVD-Vidéo, CD audio, CD-R/RW |
| Formats fichiers lus | MP3, WMA, JPEG, DivX, DAT, VOB, MPEG2, MPEG4 (AVI, DIV) |
| Écran TFT intégré | Oui, avec réglages luminosité, couleur, format (16:9 / 4:3) |
| Haut-parleur intégré | Oui |
| Télécommande | Oui, avec piles bouton CR2025 |
| Port USB | Oui, USB 1.1 |
| Sortie audio numérique optique | Oui (SPDIF) |
| Sortie vidéo composite | Oui |
| Prise casque | Oui (jack 3,5 mm) |
| Fonction double écran | Oui (moniteur supplémentaire inclus, connexion par câble AVP) |
| Entretien | Chiffon doux et sec, pas de solvants |
| Sécurité laser | Classe 1 (ne pas ouvrir, confier à un professionnel) |
| Réparabilité | Confier à un personnel qualifié uniquement |
FOIRE AUX QUESTIONS - SDV97-AM NEXT BASE
Questions des utilisateurs sur SDV97-AM NEXT BASE
0 question sur cet appareil. Repondez a celles que vous connaissez ou posez la votre.
Poser une nouvelle question sur cet appareil
Téléchargez la notice de votre Lecteur DVD portable au format PDF gratuitement ! Retrouvez votre notice SDV97-AM - NEXT BASE et reprennez votre appareil électronique en main. Sur cette page sont publiés tous les documents nécessaires à l'utilisation de votre appareil SDV97-AM de la marque NEXT BASE.
MODE D'EMPLOI SDV97-AM NEXT BASE
DUAL SCREEN
IMPORTANT SAFETY INSTRUCTIONS
- Read these instructions.
- Keep these instructions.
3 Heed all warnings. - Follow all instructions.
- Do not use this apparatus near water.
- Clean only with dry cloth.
- Do not block any ventilation openings. Install in accordance with the manufacturer's instructions.
- Do not install near any heat sources such as radiators, heat registers, stoves, or other apparatus (including amplifiers) that produce heat.
- Do not defeat the safety purpose of the polarized or grounding-type plug. A polarized plug has two blades with one wider than the other. A grounding type plug has two blades and a third grounding prong. The wide blade or the third prong are provided for your safety. If the provided plug does not fit into your outlet, consult an electrician for replacement of the obsolete outlet.
- Protect the power cord from being walked on or pinched particularly at plugs, convenience receptacles, and the point where they exit from the apparatus.
- Only use attachments/accessories specified by the manufacturer.
- Use only with the cart, stand, tripod, bracket, or table specified by the manufacturer, or sold with the apparatus. When a cart is used, use caution when moving the cart/apparatus combination to avoid injury from tip-over.

- Unplug this apparatus during lightning storms or when unused for long periods of time.
- Refer all servicing to qualified service personnel. Servicing is required when the apparatus has been damaged in any way, such as power-supply cord or plug is damaged, liquid has been spilled or objects have fallen into the apparatus, the apparatus has been exposed to rain or moisture, does not operate normally, or has been dropped.
- To reduce the risk of fire or electric shock, do not expose this appliance to rain or moisture.
- The shock hazard marking and associated graphical symbol is provided on the bottom panel of unit.
- Apparatus shall not be exposed to dripping or splashing and no objects filled with liquids, shall be placed on the apparatus.
PRECAUTIONS
Thank you for purchasing this tablet DVD player. Please read this manual carefully before operating and reserve it for future reference. It will be helpful to you if you encounter any operational problem.
WARNING:
TO REDUCE THE RISK OF FIRE OR ELECTRIC SHOCK, DO NOT EXPOSE THIS APPLIANCE TO RAIN OR MOISTURE, DRIPPING OR SPLASHING AND THAT NO OBJECTS FILLED WITH LIQUIDS, SUCH AS VASES, SHALL BE PLACED ON THE APPARATUS. DANGEROUS HIGH VOLTAGES ARE PRESENT INSIDE THE ENCLOSURE. DO NOT OPEN THE CABINET. REFER SERVICING TO QUALIFIED PERSONNEL ONLY.
ATTENTION:
TO PREVENT ELECTRIC SHOCK, MATCH WIDE BLADE OF PLUG TO WIDE SLOT, FULLY INSERT.
LASER:
This Digital Video Disc player employs a Laser System. To ensure proper use of this product, please read this owner's manual carefully and retain for future reference. Should the unit require maintenance, contact an authorized service location - see service procedure.
Use of controls, adjustments or the performance of procedures other than those specified may result in hazardous radiation exposure.
To prevent direct exposure to laser beam, do not try to open the enclosure.
Visible and invisible laser radiation when open and interlocks defeated.
DO NOT STARE INTO BEAM
LASER
Type
Wave length
Output Power
Beam divergence
Semiconductor laser GaAlAs
650 nm/780nm
5mW
60degree
CLASS 1
LASER PRODUCT
CAUTION:
These servicing instructions are for use by qualified service personnel only. To reduce the risk of electric shock, do not perform any servicing other than that contained in the operating instructions unless you are qualified to do so.
WARNING:
To reduce the risk of fire or electric shock, do not expose this appliance to rain or moisture.
CAUTION:
Use of controls or adjustments or performance of procedures those specified may result in hazardous radiation exposure.
CAUTION
RISK OF ELECTRIC SHOCK. DO NOT OPEN
To reduce the risk of electric shock, do not remove cover (or back). No user serviceable parts inside. Refer servicing to qualified service personnel.

SA1965
DANGEROUS VOLTAGE
The lightning flash with arrowhead symbol, with in an equilateral triangle, is intended to alert user to the presence of uninsulated "dangerous voltage" within the product enclosure that may be of sufficient magnitude to constitute a risk of electric shock to persons.

SA 1966
INSTRUCTION
The exclamation point within an equilateral triangle is intended to alert the user to the presence of important operating and maintenance (servicing) instruction in the literature accompanying the appliance.

CAUTION:
INVISIBLE LASER RADIATION WHEN OPEN AND INTERLOCK Failed OR DEFEATED. AVOID DIRECT EXPOSURE TO LASER BEAM.
PRECAUTIONS
MACROVISION:
This product incorporates copyright protection technology that is protected by U.S. patents and other intellectual property rights. Use of this copyright protection technology must be authorized by Macrovision, and is intended for home and other limited viewing uses only unless otherwise authorized by Macrovision. Reverse engineering or disassembly is prohibited.
DOLBY:
Manufactured under license from Dolby Laboratories. "Dolby" and the double-D symbol are trademarks of Dolby Laboratories.
DivX:
This device incorporates copyright protection technology that is protected by DivX, Inc.
DivX, DivX Certified and associated logos are trademarks of DivX, Inc. and used under license.
TABLE OF CONTENTS
PRECAUTIONS
PRECAUTIONS. 1
TABLE OF CONTENTS
TABLE OF CONTENTS. 4
CAUTIONS ON USING THIS PLAYER
CAUTIONS ON USING THIS PLAYER. 6
DISCS PLAYABLE
TYPES OF DISCS PLAYABLE ON THIS PLAYER......8
PACKAGE CONTENTS
PACKAGE CONTENTS. 9
PARTS AND CONTROLS
DVD PLAYER (FRONT SIDE) 10
DVD PLAYER (RIGHT SIDE) 10
BUTTON DEFINITION 11
MONITOR (LEFT SIDE) 12
MONITOR (RIGHT SIDE) 12
MAIN UNIT REAR SIDE 13
HOW TO STAND. 13
REMOTE CONTROL. 14
KEY DESCRIPTION OF REMOTE CONTROL 15
NOTES ON USING THE REMOTE CONTROL UNIT....16
REPLACING THE BATTERY. 16
FITTING HEADREST MOUNT. 17
FITTING PORTABLE DVD PLAYER TO
HEADREST MOUNT. 17
AUDIO /VIDEO CONNECTIONS
CONNECTING THE PLAYER TO A TV SET. 18
CONNECTING THE ADAPTER TO THE DC IN 12V SOCKET. 19
USING THE EARPHONE 19
CONNECTING THE PLAYER TO OTHER DEVICES
CONNECTING TO A DOLBY DIGITAL / MPEG DECODER OR AN AMPLIFIER WITH BUILT-IN
DECODER 20
CONNECTING TO A DIGITAL AMPLIFIER THAT IS NOT DOLBY DIGITAL / MPEG COMPATIBLE. 21
CONNECTING TO ACTIVE SPEAKER SYSTEMS 22
CONNECTING THE PLAYER TO THE MONITOR
AVP CABLE. 23
MOVIE SHARE OPERATION 23
BASIC OPERATIONS
TURING ON THE POWER. 24
TURNING OFF THE POWER 24
LOADING 25
REPLACE 6 PCS AA BATTERIES. 26
PLAYBACK 27
STOPPLAYBACK 27
TABLE OF CONTENTS
| PAUSE PLAYBACK......27 | |
| PLAYING AT FAST SPEED......28 | |
| PLAYBACK IN SLOW MOTION......28 | |
| A-B/REPEAT PLAYBACK......28 | |
| ZOOM FUNCTION......29 | |
| SEARCHING FOR A SPECIFIC SCENE......29 | |
| SELECTING SUBTITLE......29 | |
| CHANGING THE ANGLE......29 | |
| CHANGING THE AUDIO LANGUAGE......29 | |
| PROGRAM PLAYBACK......30 | |
| USING THE ON-SCREEN DISPLAY......31 | |
| PLAYING A MP3 FORMAT DISC AND JPEG CD......31 | |
| PLAYING DivX FILES......32 | |
| USING THE USB PORT......32 | |
| SETUP THE PLAYER | GENERAL STEPS OF SETUP......33 |
| SYSTEM SETUP | TV SYSTEM......34 |
| SCREEN Saver......34 | |
| TV TYPE......35 | |
| PASSWORD......36 | |
| RATING......36 | |
| DEFAULT......36 | |
| LANGUAGE SETUP | OSD LANGUAGE......37 |
| AUDIO LANGUAGE......37 | |
| SUBTITLE LANGUAGE......38 | |
| MENU LANGUAGE......38 | |
| AUDIO SETUP | AUDIO OUT......39 |
| IR HEADPHONE......39 | |
| VIDEO SETUP | BRIGHTNESS......40 |
| CONTRAST......40 | |
| HUE......41 | |
| SATURATION......41 | |
| DIGITAL SETUP | OP MODE......42 |
| DYNAMIC RANGE......42 | |
| DivX VOD......43 | |
| OTHERS | SIZE AND PARAMETER......44 |
| TROUBLE SHOOTING......45 |
CAUTIONS ON USING THIS PLAYER
1 DO NOT MOVE THE PLAYER DURING PLAYBACK
During playback, the disc spins at high speed. So do not lift or move the player.
Doing so may damage the disc.
2 TRANSPORTING THE PLAYER
Before transporting the player, be sure to remove the disc and turn off the power, then unplug the power cord.
3 PLACE OF INSTALLATION
Select a stable place near the TV or stereo system to which you are going to connect the player.
Do not place the player on top of a TV or color monitor.
Install the player away from cassette decks or other devices which are easily affected by magnetic forces.
4 DO NOT PLACE OBJECTS ON THE TOP OF THE PLAYER
Do not expose this apparatus to rain, moisture, dripping or splashing and no objects filled with liquids, such as vases, shall be placed on the apparatus.
5 TURN OFF THE POWER WHEN NOT USING THE PLAYER
If the player is connected to your TV but not in use, switch the power off. It can avoid interference to your normal TV picture.
Noise problems may also be experienced if used near a radio.
6 SPECIAL NOTE REGARDING USE OF PLAYER IN VEHICLES
We strongly advise against using the player while driving.
- Most countries and states have laws which prohibit or severely restrict the use of the player in vehicles while driving.
- Do not leave the player or the battery pack in places where the temperature is extremely low (about -10^ or lower) or extremely high (about 60^ or higher), such as inside the passenger cabin or trunk in midsummer. Doing so may warp the outer case or reduce the performance or quality of the battery pack.
CAUTIONS ON USING THIS PLAYER
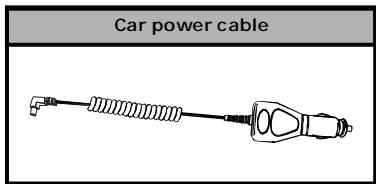
7 WHEN USING WITH CAR POWER CABLE IN CARS
Please turn on the engine and then connect with the car power cable for using.
8 CLEANING THE PLAYER
Normally clean the player with a soft, dry cloth. For tough dirt, apply some neutral detergent diluted in 5 to 6 parts water to a soft cloth, wring out thoroughly. Wipe off the dirt, then wipe off the player with a dry cloth. Note that alcohol, thinner, benzene, insecticides, etc., may cause the print or coating to peel off. Also avoid leaving rubber or plastic products in contact with the player for long periods of time, as this may damage the cabinet. When using chemically treated cloths, read the cloth's instructions carefully. Always unplug the power cord from the power outlet before cleaning the player.
9 COPYRIGHTS
Unauthorized duplication, broadcast, public performance or rental of discs is prohibited by law.
=TYPES OF DISCS PLAYABLE ON THIS PLAYER
The discs listed on the table below can be played on this player without an adapter.
The marks shown on the table below are indicated on the disc's label, package or jacket.
| Types of playable discs and their marks | Diameter/Playable sides | Playback time | |
| DVD-Video disc VIDEO V ID E O | DVD video 12cm/single-sided 12cm/double-sided | 1 layer 2 layer 1 layer 2 layer | Playback time (MPEG 2 format) 133 minutes (4.7GB) 242 minutes (8.5GB) 266 minutes (9.4GB) 484 minutes (17GB) |
| DVD video 8 cm/single-sided 8 cm/double-sided | 1 layer 2 layer 1 layer 2 layer | (MPEG 2 format) 41 minutes 75 minutes 82 minutes 150 minutes | |
| CD COMPACT DISC DIGITAL AUDIO | CD 12 cm/single-sided | 74 minutes | |
| CD 8 cm/single-sided | 20 minutes | ||
Marks indicated on DVDs
DVD discs or packages include the marks shown below. These marks indicate the type of video or audio signals recorded on the disc and the functions that can be used.
| Mark | Meaning |
| ②) | Indicates the number of audio tracks. |
| 3 | Indicates the number of angles. |
| 16:9 LB | Indicates the selectable picture aspect ratio. |
| Indicates the playable region number. |
PLAYABLEFORMATS
The unit is able to play most audio/video files such as:
PICTURE:JPEG
AUDIO: MP3, WMA
VIDEO: DAT, VOB, MPEG2, MPEG4 (AVI, DIV)
PACKAGE CONTENTS
三PACKAGCONTENTS三
After unpacking, first check the contents of your DVD player package as listed below:
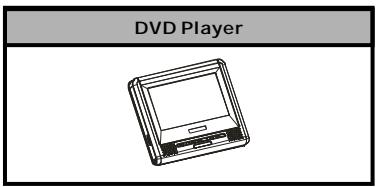
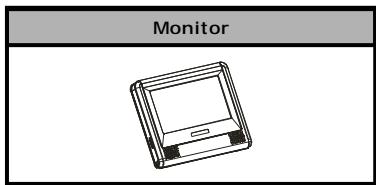
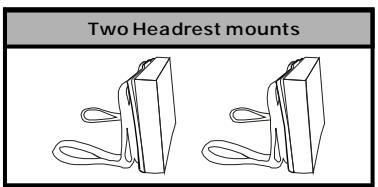
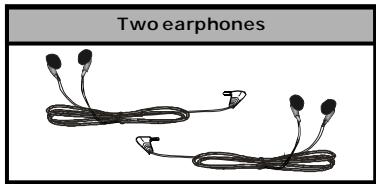
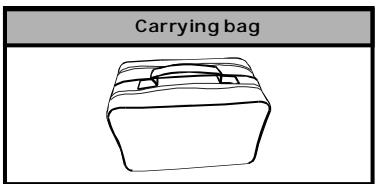

NOTES:Actual products' appearance might vary slightly from the pictures shown.
=DVD PLAYER (FRONT SIDE)
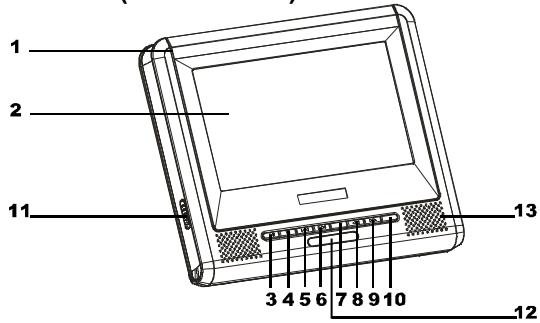
1 Disc compartment cover
2 TFT Screen
3 PLAY/PAUSE button
4 STOP button
5 PREVIOUS button
6 NEXT button
7 MODE button
8 REV button
9 FWD button
10 AUDIO button
11 OPEN button (Push it to open the cover.)
12 Remote control sensor
13 Loudspeaker
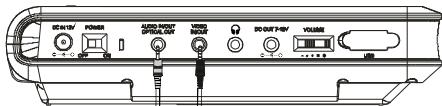
三DVD PLAYER (RIGHT SIDE)三
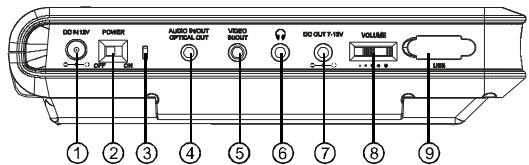
1 DC IN jack (DC 12V)
2 POWER ON / OFF
3 LED indicator
4 AUDIO IN/OUT/OPTICAL OUT
5VIDEOIN/OUT
6 EARPHONE jack
7 DC OUT jack (DC 7~12V)
8 VOLUME CONTROL
9 USB port
PARTS AND CONTROLS
BUTTONDEFINITION

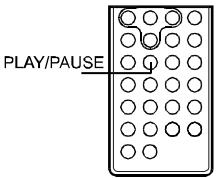
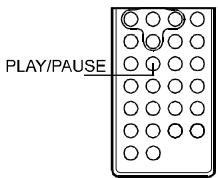
1 PLAY/PAUSE button
Press it to play. When pressing during playback, pause mode is set. Press again to resume playback.
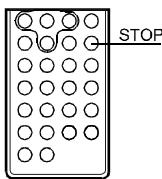
2 STOP button
Press it to stop playback.
3 PREVIOUS button
Press it to locate at the beginning of the previous track or chapter.
4 NEXT button
Press it to locate at the beginning of the next track or chapter.
5 MODE button
Press it to enter AV IN/OUT adjustment, brightness, color, TFT mode and view mode.
Press the button once to enter AV IN / OUT adjustment. Use M- / M+ to adjust.
Press the button again to enter BRIGHTNESS mode. Use M-/M+ button to adjust among level 0 to level 8.
Press the button again to enter COLOR mode. Use M- / M+ button to adjust among level 0 to level 8.
Press the button again to enter TFT mode. Use M-/M+ button to switch between 16:9 and 4:3.
Press the button again to enter VIEW mode. Use M-/M+ button to switch between obverse picture and reverse picture.
Keep pressing the button for about 1.5 seconds to turn off the TFT display and press it again to resume display.
6 REV button
Press it during playback to backward the playing speed through X2, X4, X8, X20, X1.
7 FWD button
Press it during playback to forward the playing speed through X2, X4, X8, X20, X1.
8 AUDIO button
Press it to switch the audio language.
=MONITOR (LEFT SIDE)
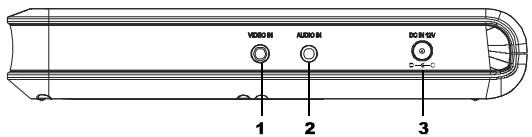
1 Video IN
2 Audio IN
3 DC IN 12V
=MONITOR (RIGHT SIDE)
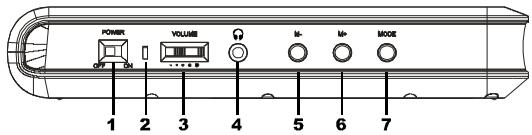
1 Power ON/OFF
4 Earphone jack
7 Mode
2 LED Indicator
5 M-
3 Volume control
6 M+
MODE BUTTON DEFINITION
Press it to enter brightness, color, TFT mode and view mode.
Press the button once enter BRIGHTNESS mode. Use M- / M+ button to adjust among level 0 to level 8.
Press the button again to enter COLOR mode. Use M- / M+ button to adjust among level 0 to level 8.
Press the button again to enter TFT mode. Use M- / M+ button to switch between 16:9 and 4:3.
Press the button again to enter VIEW mode. Use M-/M+ button to switch between obverse picture and reverse picture.
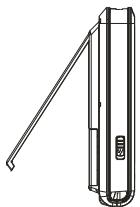
MAIN UNIT REAR SIDE
1 Support
The unit can stand with this device.
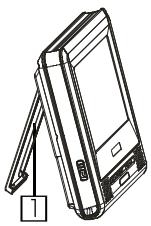
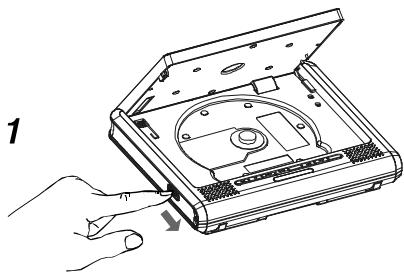
≡HOW TO STAND
1 Pull out the support.
2 Draw out the support to a proper position.
1
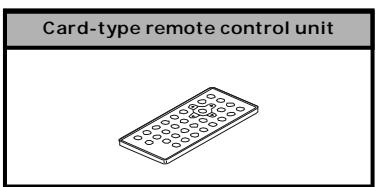
=REMOTE CONTROL
PARTS AND CONTROLS
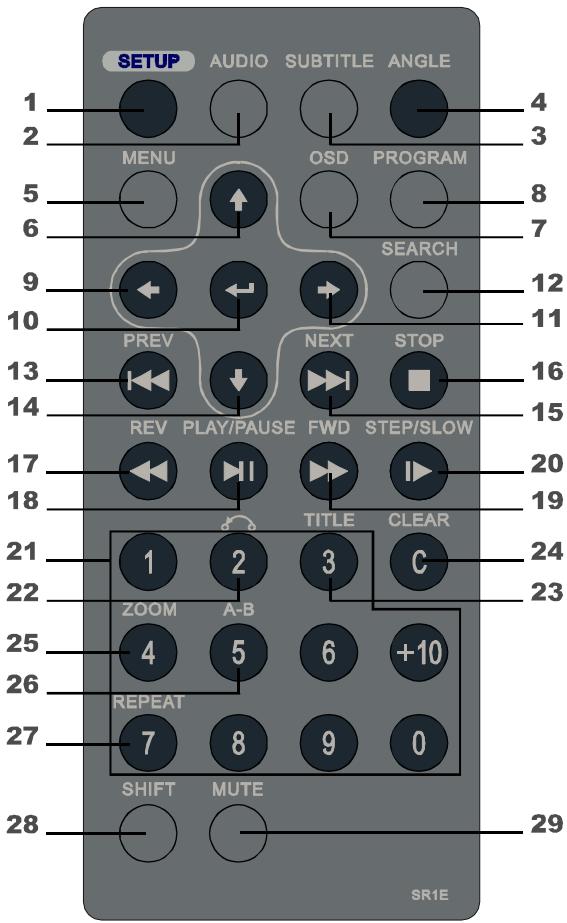
KEY DESCRIPTION OF REMOTE CONTROL
1 SETUP
Press this button to display setup screen when at stop status.
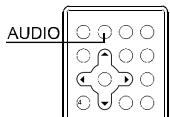
2 AUDIO
Press this button to switch the audio language.
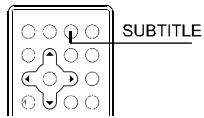
3 SUBTITLE
Press this button to switch the DVD's subtitle language.
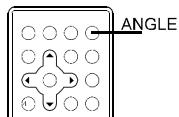
4 ANGLE
Press this button to switch angle.
5 MENU
Press this button to display the DVD's menu screen.
While playing VCD disc, press it to switch between menu on or off.
6(4)
Move the cursor up.
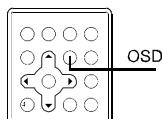
7 osd
Press this button to display the disc information.
8 PROGRAM
Program playing order of tracks.
9(+)
Move the cursor left.
10ENTER( )
Enter the selected item.
11 ()
Move the cursor right.
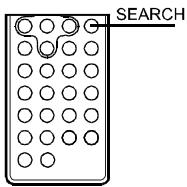
12 SEARCH
Locate title/ chapter/ playtime to play.
13 PREV(
Jump to previous track.
14(↓)
Move the cursor down.
15 NEXT(▶▶i)
Jump to next track.
16STOP(■)
Press this button to stop playback.
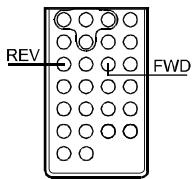
17 REV(△)
Fast backward key.
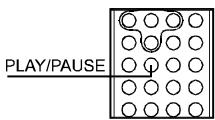
18 PLAY/PAUSE (▶II)
Press this button to play or pause playback.
19 FWD(▶)
Fast forward key.
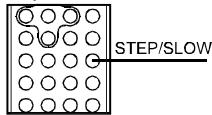
20 STEP/SLOW(1>
During playing status, press it to switch to SLOW mode, while switch to STEP mode at pause status.
21 NUMBER KEYS
Input number.
22 RETURN
Return back to menu screen.
If menu setting is off when playing VCD, the key is invalid.
23 TITLE
Press this button to display the DVD's title.
24 CLEAR
Clear the numbers inputted before.
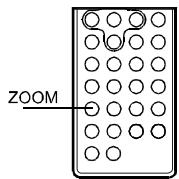
25 zoom
Zoom the picture on screen.
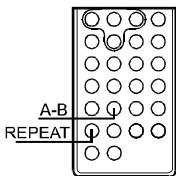
26 A-B REPEAT
Press this button during playback to set two points and play the section between them repeatedly.
PARTS AND CONTROLS
27 REPEAT
For DVDs, use this button to play titles or chapters repeatedly. For CDs, use this button to play tracks or the entire disc repeatedly.
28 SHIFT
Press this button to switch between number & function. (Default: function)
29 MUTE
Press this button to mute the player.
NOTES ON USING THE REMOTE CONTROL UNIT
- Do not drop or step on the remote control unit or subject it to shocks.
Note that the remote control unit may not work if there are obstacles between the remote sensor and itself. - Do not expose the remote sensor to strong light. Doing so may make operation impossible.
Use the remote control unit within the specified operating range.
REPLACING THE BATTERY
1 Insert your finger nails into A and B on the diagram below, press A according to the direction, then pull out the battery holder.

3 Fit the battery holder back to its place.
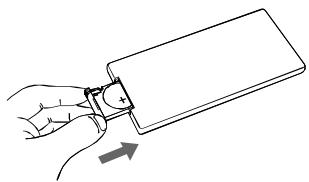
2 Remove the old battery, then insert the new battery into the battery holder with the + side facing upwards.
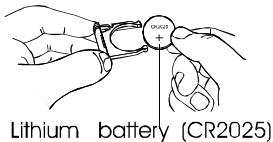
NOTE:
To prevent leakage of fluid from the lithium battery, remove the battery when not using the remote control unit for long periods of time (one month or more). If the battery leaks fluid, carefully wipe it out of the battery case, then change to a new lithium battery.
Caution: The battery may present a risk of fire if mistreated. Do not recharge, disassemble, or heat it above 100^ . Replace battery with the same type.
- Dispose of used battery properly, keep away from children and do not dispose of in fire.
PARTS AND CONTROLS
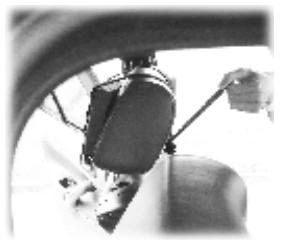
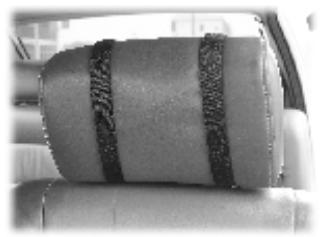
FITTING HEADREST MOUNT
The headrest mount is designed to fit the wide variety of shapes and sizes of the headrests in modern cars. The foam pad allows you to set the angle of the screen and will eliminate vibration when the car is moving.
- Place the two mounting straps over your headrest with the mount's sponge facing headrest, and release button on top.
- Adjust to your deserved viewing angle, then firmly secure the mount by tightening the straps. See diagrams below.
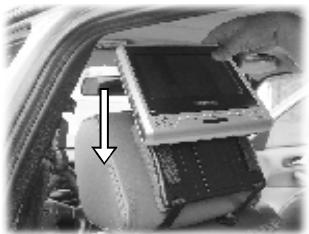
FITTING PORTABLE DVD PLAYER TO HEADREST MOUNT
Gentle slide the Portable DVD player down by aligning the backpanel groove with the headrest mount, until you hear the click sound.
See diagram below.
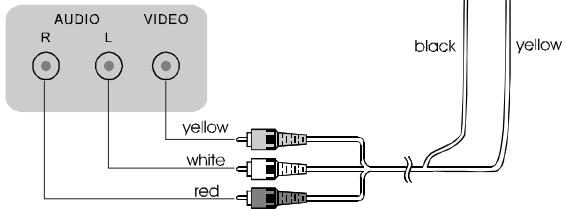
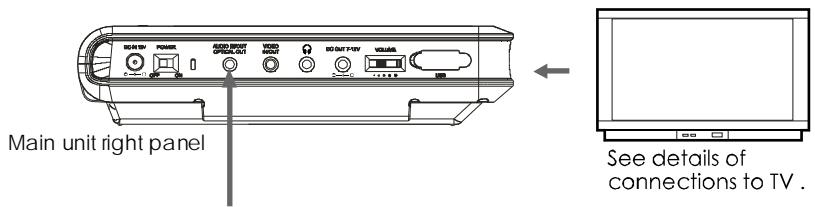
CONNECTING THE PLAYER TO A TV SET
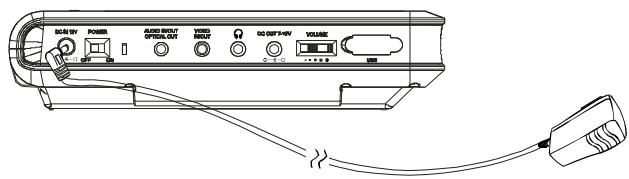
CONNECTING THE ADAPTER TO THE DC IN 12V SOCKET
=USING THE EARPHONE

- Set the volume control to minimum sound level.
- Connect the plug of earphone to the player's " "jack.
- Adjust the volume control to the preferred sound level.
CONNECTING TO A DOLBY DIGITAL / MPEG
DECODER OR AN AMPLIFIER WITH BUILT-IN DECODER
With this player, you can enjoy powerful Dolby Digital or MPEG sound. Output the digital signals from the player's digital output to a decoder or amplifier with built-in decoder.
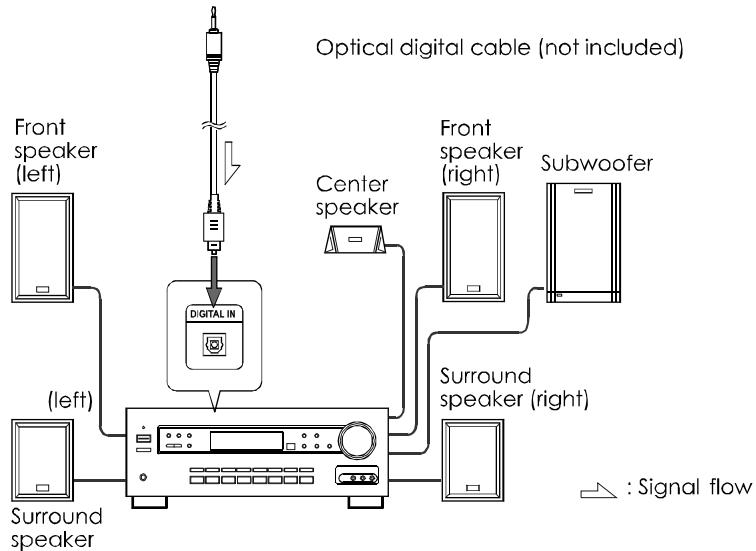
Hint:
For a compatible decoder or amplifier, 5 speakers (front left/right, center and surround left/right) and a subwoofer are required to enjoy Dolby Digital channel sound.
CONNECTING TO A DIGITAL AMPLIFIER THAT IS NOT DOLBY DIGITAL / MPEG COMPATIBLE
Output the digital signals from the player's digital output to a digital amplifier that is not Dolby/MPEG compatible. For instructions of audio settings, refer to AUDIO OUT of AUDIO SETUP.
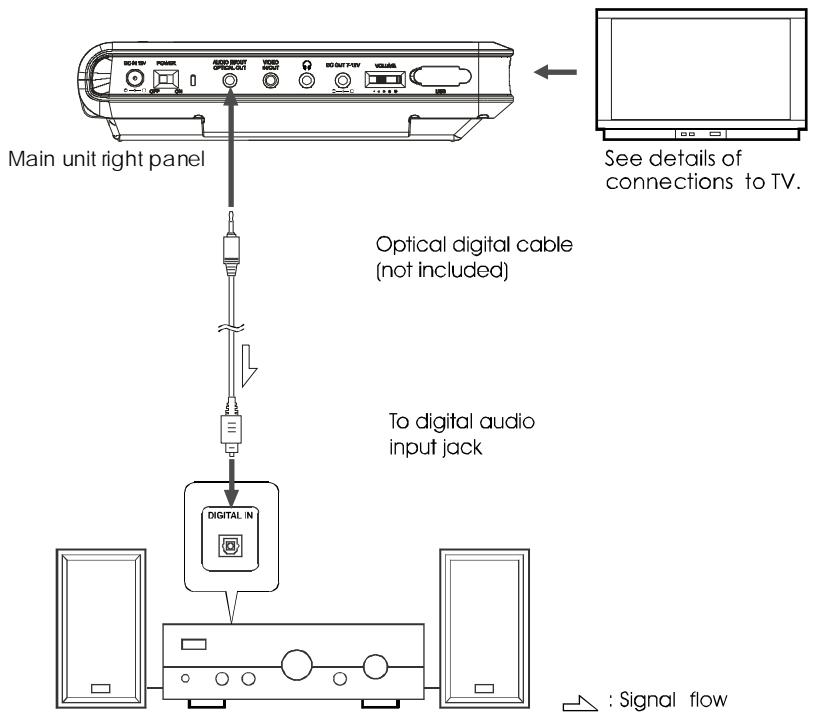
Notes:
Carefully check the player's digital output settings before connecting the player to an amplifier equipped with a digital audio input jack which is not Dolby Digital / MPEG compatible.
Do not play DVDs when the audio settings are not correct. Or may cause strong noise and damage your speakers.
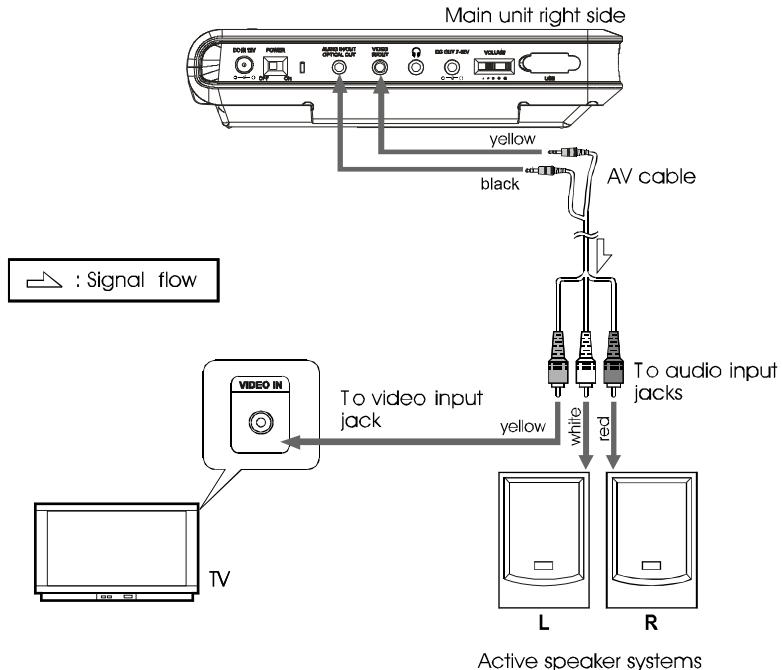
CONNECTING TO ACTIVE SPEAKER SYSTEMS
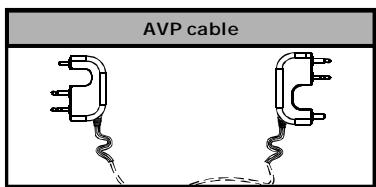
AVP CABLE
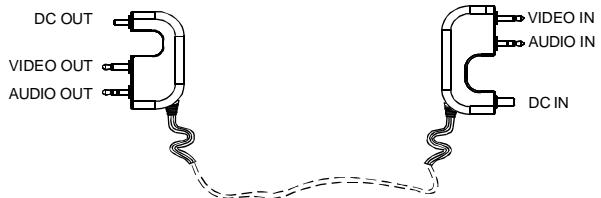
Connect the DVD player and the Monitor with AVP cable as described below:
- First, connect the AVP cable and the DVD player by inserting the DC OUT section of the cable to the DC OUT socket of the DVD player.
- Second, plug the DC IN section of the cable to the DC IN socket of the Monitor.
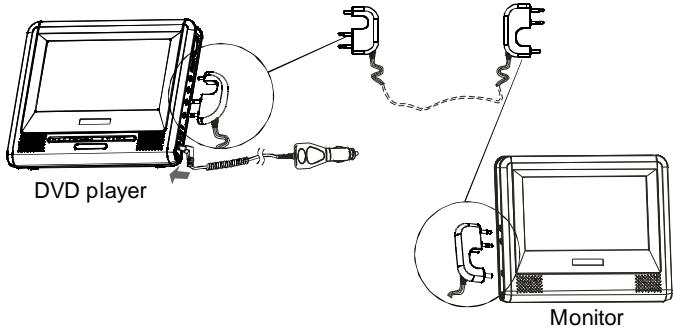
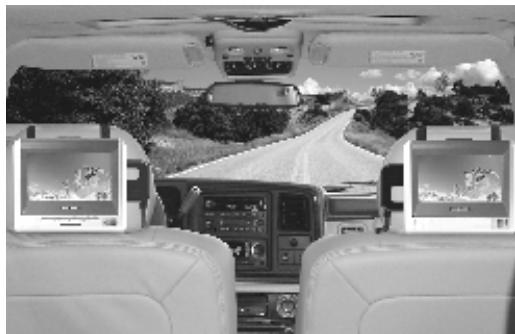
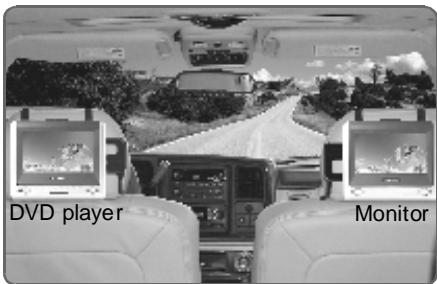
MOVIE SHARE OPERATION
- After the connection action of the DVD player and the Monitor, please turn on them.
- Put a disc into the DVD player to play the movie.
- Then two of you can enjoy the same movie with your own player simultaneously.
TURNSING ON THE POWER
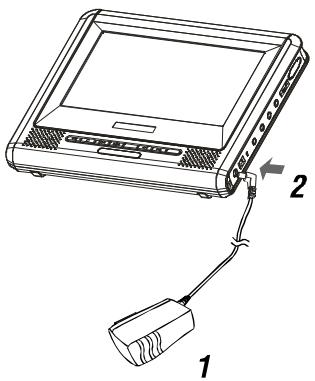
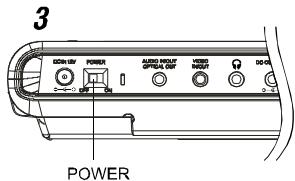
1 Connect the AC/DC adapter to socket.
2Connect the DC output plug of the adapter to the DC input jack on the main unit.
3 Switch the POWER button to ON position.
Hint:
The included AC/DC adapter is compatible with voltage from 100 to 240V you can use it on trips overseas.
Note that you need a converter plug (available in stores) suited for the region in which you are travelling.
TURING OFF THE POWER
1 When the power is on, switch the power button to OFF position.
2 Unplug the power cord from the power outlet.
3 Disconnect the AC/DC adapter from the player's DC input jack.
BASIC OPERATIONS
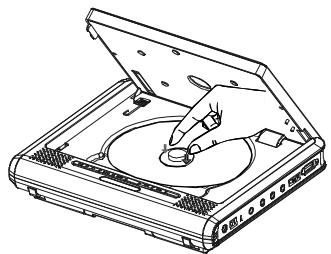
LOADING
2
1 Press OPEN button to open the cover.
2 Place in a disc and press down the disc with your fingers near the center hole.
A click is heard.
Notes:
- Set the disc securely. Failure to set it securely could result in damage.
- Do not use cracked or warped discs.
Doing so could result in damage. - Place single-sided DVDs or CDs in with the label (printed) side facing upwards.
For double-sided DVDs, check each side carefully, then place the disc in securely (until a click is heard).
- For CDs or one-sided DVDs, you do not have to worry about touching the label (printed) side of the disc with your fingers. Since two-sided DVDs have signals recorded on both sides, so be careful not to scratch them when removing them from the player.
3 Close the disc cover.
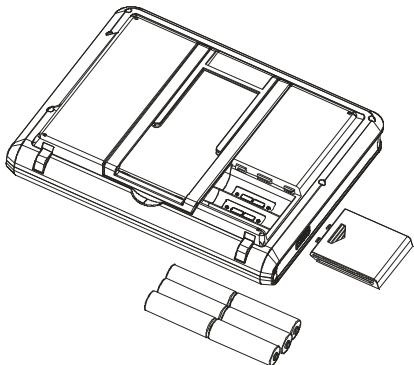
REPLACE 6 PCS AA BATTERIES
- Open the batteries cover.
- Replace the 6 PCS AA batteries.
- Generally speaking, DVD playback time will be more than two hours with 6 PCS NI-MH batteries of 2300mAh .
NOTE:
- The playback time of the batteries has much to do with discs and operation factors etc..
- It is suggested to use at least 2300mAh or better rechargeable batteries for best performance.
- Remove the batteries when the player is not turned on.
- Rechargeable batteries cannot be charged with the player.
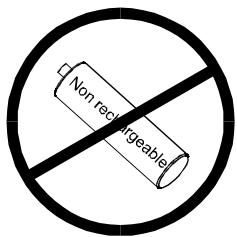
WARNING:
Non rechargeable batteries may not work properly on this device.
PLAYBACK
- Turn on the power of the player.
2.Open the disc cover.
3.Insert a disc correctly.
4.Close the cover.
5.The player will load the disc and play automatically. If the disc cannot be played, push the button.
STOP PLAYBACK
1 Press on the key board or on the remote control while playing.
2 The player remembers the stopping place.
3 Resume playback from the point where it stopped just press key.
4 To clear stopping mark, press again at stop status. The player will not play from the stopping place when pressing next time.
PAUSE PLAYBACK
1 Press on the key board or on the remote control during playback.
2 Press again to resume normal playback.
PLAYINGATFAST SPEED
1 Press or button on the key board or on the remote control during playback.
2 The playback speed will be changed each time you press the or .
The speed will be changed to 2X, 4X, 8X, 20X, 1X.
PLAYBACK IN SLOW MOTION
1 Press the button on the remote control during playback. The playback speed becomes 1 / 2 , 1 / 3 , 1 / 4 , 1 / 5 , 1 / 6 or 1 / 7 of the normal speed each time
you press the button.
2 When pressing during pause status, the player will show still picture on the screen The picture will be changed one frame each time the button is pressed.
NOTE:
During fast or slow motion playback, the sound is muted except playing CD & MP3 disc. To resume normal playback, press
A-B/REPEAT PLAYBACK
1 A-B playback
- When pressing A-B button on the remote control during playback, the current point would be located on the remote control, and "REPEAT A-" appears on the screen.
Press A-B button again. B point would be located and the player would play from A point to B point repeatedly.
Press A-B button again. "A-B" playback would be cancelled and the player resume normal playback.
2 Repeat a Title, Chapter or Track
Press REPEAT button on the remote control during playback.
The chapter or the title(for DVD) and the track or entire disc (for CD) will be played repeatedly.
- The REPEAT mode will be changed each time when the repeat button is pressed.
= ZOOM FUNCTION
1 Press ZOOM on the remote control during playback. The picture on the screen will be zoomed.
2 The zooming rate changes each time when the ZOOM button is pressed.
The sequence is 2X, 3X, 4X, 1/2X, 1/3X, 1/4X, 1X.
SEARCHING FOR A SPECIFIC SCENE
1 Press the SEARCH button on the remote control.
2 Press the UP, DOWN and ENTER button to move to desired section.
3 Input valid number to choose specific time or title, chapter or track.
4 Press ENTER button to play the specific scene.
5 Press SEARCH button to resume normal screen.
SELECTING SUBTITLE
You can select a preferred subtitle from those included on the DVD video disc by pressing SUBTITLE button on the remote control during playback.
CHANGING THE ANGLE
Press the ANGLE button on the remote control while playing a scene recorded with multiple angles. If your DVD disc is not recorded with multiple angles, pressing ANGLE button will not effect at all.
CHANGING THE AUDIO LANGUAGE
1 Press the AUDIO button on the remote control during playback. You can select different audio languages included on the DVD video disc.
2 For VCD or CD, you can choose the channel to play.
PROGRAM PLAYBACK
The program playback function can automatically play titles, chapters, or tracks in accordance with the programmed order.
- Insert a disc and then press the PROGRAM button on the remote control.
At this time, menu appears as below.
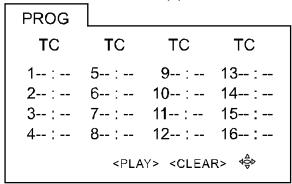
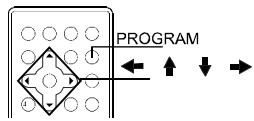
- Using / / / and the number buttons to select the title and chapter in your preferred order.
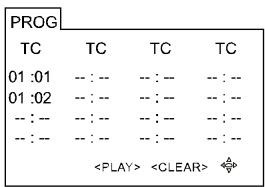
- Using / / / to move the cursor to PLAY and press ENTER button. The player starts PROGRAM playback.
- To exit, press the PROGRAM again.
NOTES:
- When the DVD video player is turned off or the discs are removed, the programmed items will be removed.
Referring to the disc, some may not have this function. - Selecting an inexistent title or chapter, program playback will be canceled automatically.
USING THE ON-SCREEN DISPLAY
1 This DVD video player allows you to view the operational status and disc information on screen.
2 Press OSD button on the remote control during playback. The disc information will be displayed on screen.
3 Press OSD button again, the information will disappear.
PLAYING A MP3 FORMAT DISC AND JPEG CD
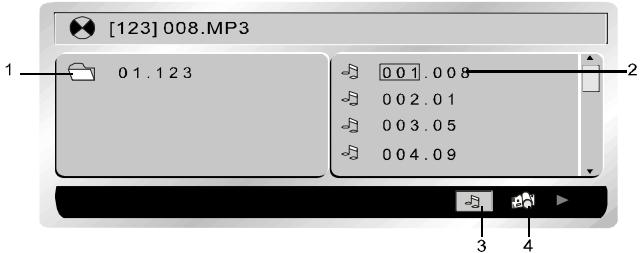
- Folder
- 102.103.104.105.106.107.108.109.110.111.
- MP3 ICON
- JPEG ICON
Use / to move the cursor to a folder, a file, MP3 ICON or JPEG ICON.
In order to play Mp3 files, move the cursor to MP3 ICON and press ENTER button. In order to play JPEG files, move the cursor to JPEG ICON and press ENTER button.
Choose the desired file and press ENTER to play.
- Press A-B button to get A-B REPEAT function. Press REPEAT button to switch repeat mode(REP1, REP DIR, REP ALL, REP OFF). REP1 means repeating the track; REP DIR means repeating the folder; REP ALL means repeating the whole disc.
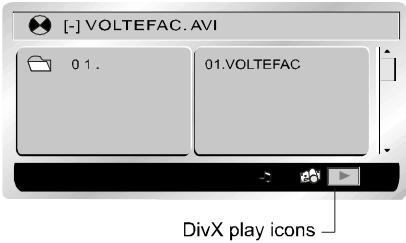
PLAYING DivX FILES
Your player is an Official DivX Certified product that plays DivX.5, DivX.4, DivX.3, and DivX.VOD video content, in compliance with DivX Certified technical requirements.
NOTE:
To guarantee playback of DivX files the audio must be mp3 format. DivX Certified devices can play any interleaved mp3 audio at any bitrate, both CBR and VBR. The audio must be sampled at standard frequencies, such as 32 kHz, 44.1 kHz, and 48 kHz, and must conform to the AVI file specification. Apart from MP3, the audio formats recognised by your player are MPEG layer 1/2, AC3, DTS, PCM. Formats such as AAC and Ogg Vorbis are not supported by this player.
- Open the compartment by sliding the OPEN button to the right.
- Place the disc with the printed side facing up and close the compartment.
- A menu appears on the screen. Select a folder using the and buttons on the remote control, then press to see the folder's contents.
NOTE:
When there are music, images and DivX files contained on one disc, press several times the button to access the Play type at the bottom of the screen, then use the or button to select the DivX icon and press to confirm.
- Select a file using the and buttons on the remote control.
NOTE:
To go back to the folder list, press
- Press to start playback.
- Press STOP to stop playback.
=USING THE USB PORT
- Turn on the power of the player.
- Plug the USB card into the USB port of the DVD player.
Then the USB card will be read automatically.
NOTE:
- If the disc is playing, the USB card can not be read.
- The player may not work properly if using USB connecting cable. Suggested not to use it.
- Supply USB 1.1 use.
GENERAL STEPS OF SETUP
1 Press the SETUP button on the remote control. The main setup menu appears.
2 Press the LEFT or RIGHT button to highlight the icon of the desired page, then press the DOWN or UP button to activate that page.
3 Press the DOWN button to highlight the desired option. Press ENTER or RIGHT to select the choices of that option appear.
4 Press LEFT/RIGHT/UP/DOWN button to highlight the EXIT SETUP option, then press ENTER or SETUP again to exit SETUP MENU.
NOTE:
The pressing of the following buttons will turn off the setup menu, and the choices that have been changed will be saved at the same time: Subtitle, Title, Return, Stop, Play/Pause, Step, Next, Prev, Zoom, Program, Repeat, Angle, Mute.
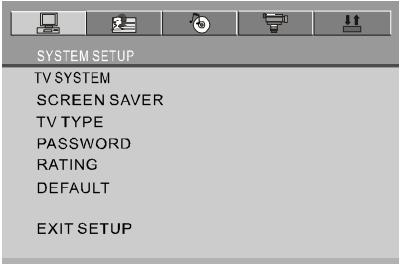
The system setup options are illustrated below:
三TV SYSTEM三
If you want to connect the player to a TV, please choose a correct TV system first.
AUTO: Choose this setting if your DVD player is connected to a multi-system TV.
NTSC: Choose this setting if your DVD player is connected to a NTSC TV.
PAL: Choose this setting if your DVD player is connected to a PAL TV.
The default setting is NTSC.
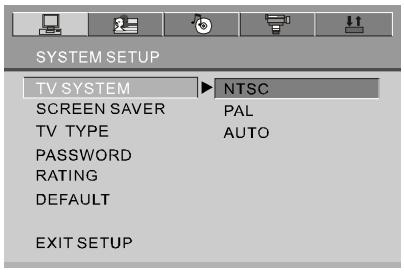
NOTE:
Setting with incorrect TV system will result in black and white picture on your TV screen.
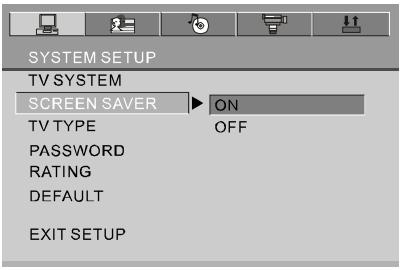
SCREENSAVER
Set the screen saver option to ON status. When your DVD player is at STOP or NO DISC status, or there is a frame frozen for a little long time, the screen saver will be displayed. This feature can protect the screen from damage.
ON: Choose this setting to activate the screen saver.
OFF: Choose this setting to cancel the screen saver.
The default setting is ON.
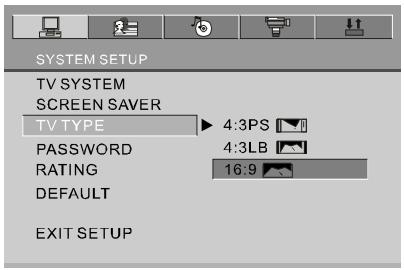
三TV TYPE三
16:9 (Wide Screen): Choose this setting if your DVD player is connected to a wide screen TV. If you choose this setting and you don't have a wide screen TV, the images on the screen may appear distorted due to vertical compression.
4:3 LB (Letter Box): Choose this setting if your DVD player is connected to a normal ratio TV. You'll see the movies in their original aspect ratio (height-to-width ratio). You'll see the entire frame of the movie. The movie might appear with black bars at the top and bottom of the screen.
4:3 PS (Pan & Scan): Choose this setting if your DVD player is connected to a normal ratio TV. You can fill the movie to the entire screen of your TV. This might mean that parts of the picture (the left and right edges) won't be seen.
NOTES:
The image display ratio is related to the recorded disc format. Some discs can not be displayed in the aspect ratio preferred.
If you play a disc recorded in 4:3 format on a wide screen TV, black bars will appear on the left and right sides of the screen.
■ You must adjust the screen setting depending on the type of the TV.
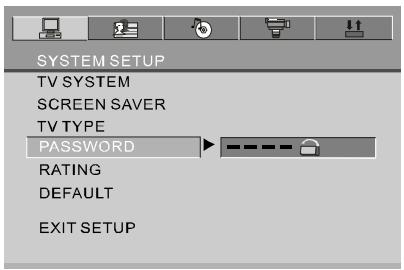
= PASSWORD
Step1: For first time use: enter 0000 as password or assigned password to unlock.
Step2: Once parental control is unlock, go to rating menu and assign rating.
Step3: Enter new password of your choose in 4 digit number to lock player rating. If you forget your assigned password, you can use 0000 to unlock the rating again.
RATING
The rating feature works with DVD discs that have been assigned a rating. This helps you to control the types of DVDs that the player can be watched.
■ There are eight limited rating options: KID SAFE, G, PG, PG13, PG-R, R, NC-17, ADULT.
The default setting is ADULT.
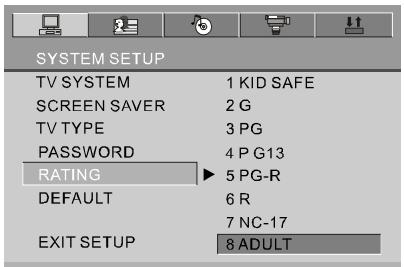
NOTE:
If the password option is locked, you cannot change rating.
DEFAULT
Choose this option to resume factory settings.
The language setup options are illustrated below:
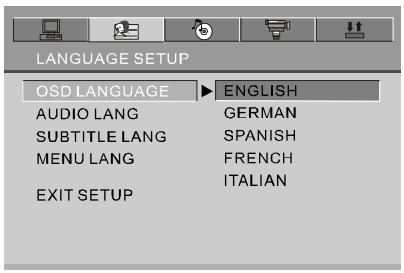
=OSD LANGUAGE =
Highlight the OSD LANGUAGE option, and press the Arrow buttons to choose the OSD language you prefer. Press ENTER to confirm, and it will display OSD in that language. There are 5 optional OSD languages :English, German, Spanish, French and Italian.
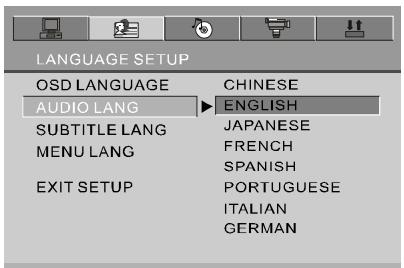
AUDIO LANGUAGE
Highlight the AUDIO LANG option, and press the Arrow buttons to choose the audio language you prefer. Press ENTER to confirm. If the disc you are playing has that language available, it will output audio in that language. There are 8 optional audio languages: Chinese, English, Japanese, French, Spanish, Portuguese, Italian and German.
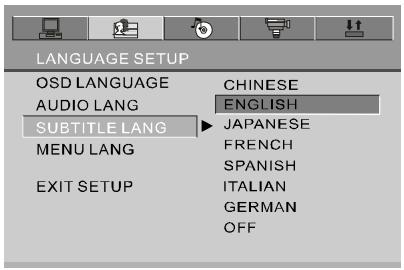
=SUBTITLE LANGUAGE=
Highlight the SUBTITLE LANG option, and press the Arrow buttons to choose the subtitle language you prefer. Press ENTER to confirm. If the disc you are playing has that language available, it will display subtitles in that language. There are 7 optional subtitle languages: Chinese, English, Japanese, French, Spanish, Italian and German.
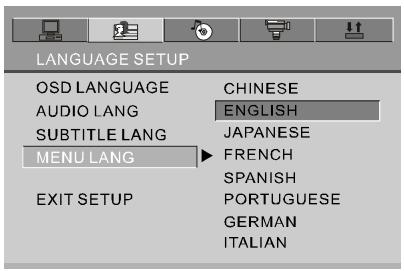
三MENU LANGUAGE 三
Highlight the MENU LANGUAGE option, and press the Arrow buttons to choose the menu language you prefer. Press ENTER to confirm. If the disc you are playing has that language available, it will display menu in that language. There are 8 optional menu languages: Chinese, English, Japanese, French, Spanish, Portuguese, German and Italian.
NOTE:
If your preferred language isn't available, the disc's default language will be played. The default language of your DVD player is English.
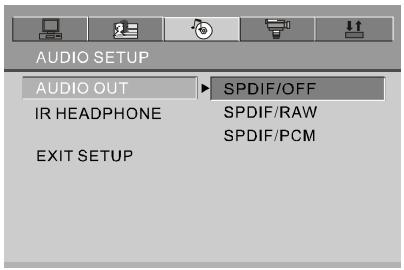
AUDIO OUT
Highlight the AUDIO OUT option, and press the Arrow buttons to choose the audio output mode you prefer. Press ENTER to confirm:
There are 3 optional audio output modes: SPDIF/OFF, SPDIF / RAW and SPDIF/ PCM.
SPDIF/OFF: Choose this setting to output analog signal, and there will be no signal output from an optical jack.
SPDIF/ RAW: Choose this setting if your DVD player is connected to a power amplifier with an optical cable. When playing a disc recorded with Dolby Digital, DTS and MPEG audio formats, the corresponding digital signals will be output from the Coaxial Output jack.
SPDIF / PCM: Choose this setting if your DVD player is connected to a 2-channel digital stereo amplifier. When playing a disc recorded with Dolby Digital and MPEG audio formats, audio signals will be modulated into a 2-channel PCM signal, and it will be output from the optical Output jack.
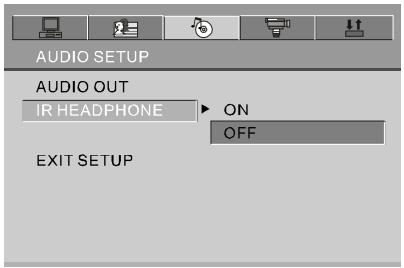
三IR HEADPHONE三
Highlight IR HEADPHONE and use the Arrow buttons to choose the IR HEADPHONE options. Press ENTER to confirm.
There are 2 options: ON/OFF.
The default setting is OFF.
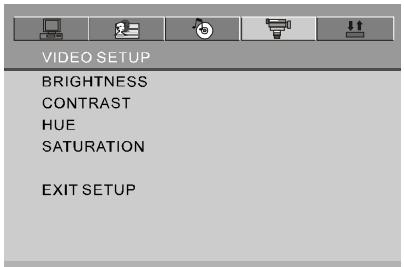
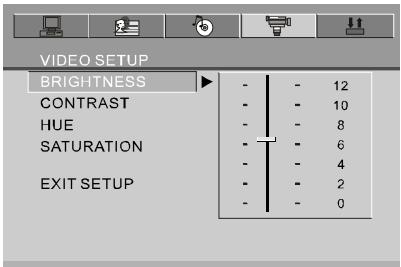
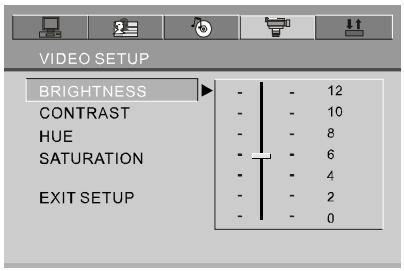
The video setup options are illustrated below:
BRIGHTNESS
Use the UP and DOWN buttons to move the scroll and adjust the brightness.
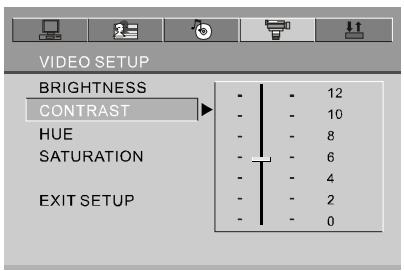
=CONTRAST
Use the UP and DOWN buttons to move the scroll and adjust the contrast.
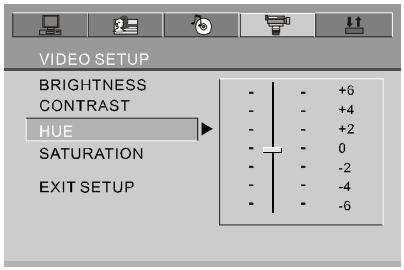
HUE
Use the UP and DOWN buttons to move the scroll and adjust the hue.
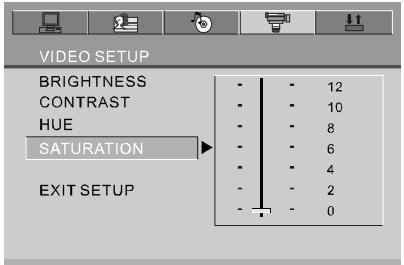
= SATURATION
Use the UP and DOWN buttons to move the scroll and adjust the saturation.
The digital setup options are illustrated below:
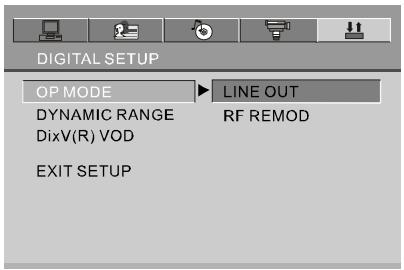
三OP MODE三
There are two output modes: one is LINE OUT; the other is RF REMOD.
LINE OUT: To carry out the linear compression function for input signal.
Choose it in the evenings for the sake of its low volume.
RF REMOD: Choose it during daytime for the sake of its high volume.
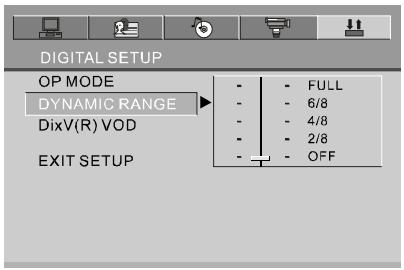
DYNAMIC RANGE
Choose this setting to adjust the line out compressing ratio and get different effects. If adjusting to FULL, the audio signal peak value will be compressed to be minimum; while adjusting to OFF, to be maximum.
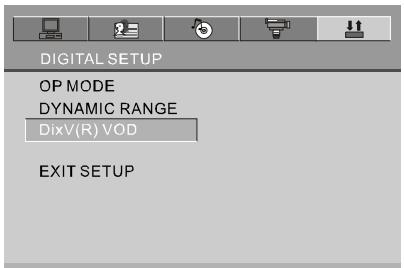
=DivX VOD
DivX VOD
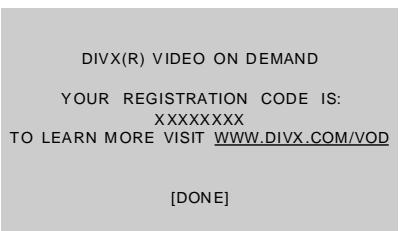
DivX VOD files are downloaded after paying a rental from certain commercial websites. Prior to downloading a VOD you need to input the registration number of your DVD player on the purchase form on the site.
Write down the VOD 8-character registration number so that you can fill in the form on the website you purchase your DivX VOD files from.
Note: If you cannot play a DivX VOD file recorded on a CD-R disc after downloading it, the rental period allocated during purchasing from the website may have expired. It is also possible that the recorded file is not compatible with your player because of different versions or incorrect download parameters. The parameters used when copying to CD-R may be another reason for this.
Since it is not possible here to supply all the information, parameters and advice relating to the use of DivX VOD files, we recommend that you visit specialist websites such as www.divx.com/vod.
NOTE:
The registration code will be changed each time you use it to download the DivX files. You have to use new code to carry out downloading operation next time.
SIZE AND PARAMETER
Product name:
TABLET DVD player
Power:
DC12V
Consumption:
<8.5W
Audio out:
R/L 2ch, OPTICAL
Video out:
Composite
Size:
210X175X40mm
Weight:
710g (W/O battery)
Product name:
MONITOR
Power:
DC 12V
Consumption:
<4W
Audio in:
R/L 2ch
Video in:
Composite
Size:
210X175X31mm
Weight:
445g
TROUBLESHOOTING
| Symptoms | Possible causes | Remedies |
| The disc does not play | Load the disc incorrectly. | Load the disc with the label side up, and firmly pressed into center. |
| Disc is dirty or scratched. | Make sure the disc is free from scratches or fingerprints. | |
| Wrong region disc. | Use right region disc. | |
| No display | AV cable is disconnected. | Connect the cable firmly. |
| Wrong setting or connection for the player or TV. | Setting or connecting correctly with your player or TV. | |
| No sound | AV cable is disconnected. | Connect the cable firmly. |
| Wrong setting or connection for the player or TV. | Setting or connecting correctly with your player or TV. |
Maintenance and clean the unit only as recommended in the operational instructions.
DAMAGE REQUIRING SERVICE
Have the unit serviced by a qualified service technician if:
The unit has been exposed to rain or water.
The unit does not seem to operate normally.
The unit exhibits a marked change in performance.
DO NOT ATTEMPT TO SERVICE THE UNIT BY YOURSELF!