
P313 - Appareil photo GENIUS - Notice d'utilisation et mode d'emploi gratuit
Retrouvez gratuitement la notice de l'appareil P313 GENIUS au format PDF.


| Type de produit | Appareil photo numérique |
| Marque | Genius |
| Modèle | P313 |
| Résolution du capteur | 3,3 mégapixels (CCD) |
| Taille d'image maximale | 2048 x 1536 pixels |
| Mémoire interne | 8 Mo |
| Support de stockage amovible | Carte SD/MMC (optionnelle, jusqu'à 256 Mo) |
| Écran LCD | 1,5 pouces TFT couleur |
| Objectif | Focale fixe 7,9 mm, ouverture F3,5 |
| Zoom numérique | 4x |
| Modes de mise au point | Paysage, Portrait, Macro |
| Flash intégré | Auto, réduction d'yeux rouges, forcé, désactivé |
| Retardateur | 10 secondes |
| Exposition | Compensation EV de -1,8 à +1,8 EV par pas de 0,3 EV |
| Balance des blancs | Auto, Lumière du jour, Nuageux, Coucher de soleil, Tungstène, Fluorescent |
| Sensibilité ISO | Auto, 100, 200, 400 |
| Mode vidéo | 320 x 240 pixels, format M-JPEG |
| Connectique | USB, sortie vidéo (NTSC/PAL), entrée DC |
| Alimentation | 2 piles AA (alcalines ou Ni-MH) ou adaptateur secteur optionnel |
| Dimensions (L x H x P) | 105 x 55 x 41 mm |
| Poids (sans piles ni carte) | Environ 120 g |
| Entretien et nettoyage | Essuyer l'extérieur avec un chiffon doux et sec. Ne pas utiliser de solvants ni de produits abrasifs. |
| Sécurité | Ne pas exposer à l'humidité, ne pas démonter, ne pas utiliser en cas de fumée ou d'odeur anormale. |
| Pièces détachées et réparabilité | Contactez votre revendeur ou un centre de service agréé. Ne pas tenter de réparer soi-même. |
| Informations générales | Notice disponible en plusieurs langues. Compatible DPOF, EXIF 2.1, DCF 1.1. |
FOIRE AUX QUESTIONS - P313 GENIUS
Questions des utilisateurs sur P313 GENIUS
0 question sur cet appareil. Repondez a celles que vous connaissez ou posez la votre.
Poser une nouvelle question sur cet appareil
Téléchargez la notice de votre Appareil photo au format PDF gratuitement ! Retrouvez votre notice P313 - GENIUS et reprennez votre appareil électronique en main. Sur cette page sont publiés tous les documents nécessaires à l'utilisation de votre appareil P313 de la marque GENIUS.
MODE D'EMPLOI P313 GENIUS
READ THIS FIRST
Please start by reading the important messages below first.
- The bundled driver, software, design, specifications and user's manual that were packaged with the camera are subject to change without notice.
- The accessories that come with the camera may vary between regions.
- For driver updates, you can contact the dealer where you purchased the camera for help.
- We are not liable whatsoever for any compensation arising from errors in descriptions in this user's manual.
WARNING
- Do not use the camera if it is emitting smoke, becomes unusually hot to be touched, emitting any unusual odor or noise, or if it is in any other abnormal state. Operating the camera in any of these situations may cause a fire or an electrical shock. Stop using the camera immediately, turn the camera off, and then disconnect the power source (batteries or AC power adapter). (If you are using the AC power adapter, unplug the adapter from the AC power outlet after you have disconnected the camera.) After checking that smoke is no longer being emitted, contact your dealer or a local authorized service facility and request repairs. Never attempt to repair the camera yourself as this is dangerous.
- Do not use the camera if any foreign objects have entered the camera. Turn the camera off, and then disconnect the power source (batteries or AC power adapter). (If you are using the AC power adapter, unplug the adapter from the AC power outlet after you have disconnected the camera.) Then contact your dealer or a local authorized service facility. Do not continue to use the camera as this may cause a fire or an electrical shock.
If the camera has been dropped or if the camera case has been damaged, turn the camera off, and then disconnect the power source (batteries or AC power adapter). (If you are using the AC power adapter, unplug the adapter from the AC power outlet after you have disconnected the camera.) Then contact your dealer or a local authorized service facility. Do not continue to use the camera as this may cause a fire
or an electrical shock.
- Do not place the camera in any unstable locations such as on a wobbly table or sloping surface where the camera may fall or tip over and cause injury.
- Do not expose the camera to moisture and make sure that there is no water getting into the camera. Take particular care when using the camera under extreme weather conditions such as rain or snow, or when operating the camera at the beach on near water. Water in the camera may cause a fire or an electrical shock.
Do not attempt to modify the camera. This may cause a fire or an electrical shock. - Do not remove the camera casing. This may cause an electrical shock. Internal inspection, maintenance and repairs should only be carried out by your dealer or a local authorized service facility.
- Do not touch the power plug during a thunderstorm if you are using the AC power adapter. This may cause an electrical shock.
CAUTIONS
Do not place the camera in damp or dusty locations. This may cause a fire or an electrical shock.
Do not place the camera in a location affected by oil fumes or steam, such as near a cooking stove or humidifier. This may cause a fire or an electrical shock.
Exposure to high temperatures may adversely affect the camera case and internal components and may cause a fire.
- Do not cover or wrap the camera or the AC power adapter with a cloth or quilt. This may cause heat to build up and distort the case and cause a fire. Always use the camera and its accessories in well-ventilated locations.
■ Handle the camera carefully and do not bump the camera into any hard object. Handling the camera roughly may cause a malfunction.
- Do not move the camera while it is switched on. (If you are using the AC power adapter, unplug the adapter from the AC power outlet after you have switched off the camera.) Ensure that any connector cords or cables to other devices are disconnected before
moving the camera. Failure to do so may damage the cords or cables and cause a fire or an electrical shock.
When leaving the camera unused for long periods, such as during a vacation, always unplug the camera from the power source (batteries or AC power adapter) for safety. (If you are using the AC power adapter, unplug the adapter from the AC power outlet after you have disconnected the camera.) Failure to do so could result in a fire.
- Do not use batteries other than those specified for use with the camera. The use of unsuitable batteries may result in the batteries splitting or leaking and causing a fire, injury, or soiling of the battery compartment.
When fitting batteries into the camera, check the polarity markings on the battery (- and +) to ensure that you insert the battery correctly. Incorrect battery polarity may result in the batteries splitting or leaking and causing a fire, injury, or soiling of the battery compartment.
Remove the batteries if the camera will not be used for an extended period of time. The batteries may leak and cause a fire, injury or soiling of the battery compartment. If the batteries leak, clean and wipe the battery compartment carefully and install new batteries. Wash your hands carefully if you touch the battery fluid.
CONTENTS
INTRODUCTION 6
Overview
Package contents
Optional accessories
GETTING TO KNOW THE
CAMERA 7-12
Front view
Rear view
Mode dial
LED indicators
LCD monitor information
GETTING STARTED 12-16
Installing the batteries
Using the AC power adapter
(optional accessory)
Loading an SD memory card
(optional accessory)
Attaching the strap
Choosing the language
Setting the date and time
Setting the image resolution
and quality
RECORD MODE 16-22
Taking pictures
Using the viewfinder
Using the LCD monitor
Using the portrait mode
Using the landscape mode
Using the digital zoom
Using the self-timer
Using the macro mode
Using the flash
Taking pictures manually
PLAYBACK MODE 22-27
Viewing images
Zoom playback
Displaying thumbnail images
Slide show display
Protecting one image / video
clip
Protecting one image / video
clip
Removing protection from
one image/video clip
Setting DPOF
Deleting images/video clips
To delete one image / video
clip at a time:
To delete all images / video
clips at once:
MOVIE MODE 27-29
Recording video clips
Viewing video clips
TRANSFERRING
RECORDED IMAGES
TO YOUR COMPUTER, 29-31
Step 1: Installing the USB
driver on Windows
computers
Installing the USB driver on
Macintosh computers
Step 2: Connecting the
camera to your computer
Step 3: Downloading images
/video clips
For computers running
Windows
For computers running Mac
OS
MENU OPTIONS 31-35
Record menu
Image size
Quality
Exposure
White balance
Digital zoom
ISO
Quick view
LCD brightness
Movie menu 35
Playback menu 35-36
Protect
Delete all
Slide show
LCD brightness
DPOF
Copy to card
Setup menu 36-39
Format
Beep
Power off
Reset to default
Date type
Date setup
Date imprint
Video out
Language
CONNECTING THE
CAMERA TO OTHER
DEVICES 39
CAMERA
SPECIFICATIONS 39-40
INTRODUCTION
Overview
Your new digital camera delivers high quality, 2048x1536 resolution images using a 3.3-Megapixel CCD imager. Using either the optical viewfinder or the 1.5" TFT color image LCD monitor, you can compose images and then examine them in detail. An auto-flash sensor automatically detects the shooting (lighting) conditions and determines whether the flash should be used. This feature helps ensure that your images turn out right.
8MB internal (built-in) memory lets you capture and store images without the need for an additional memory card. However, you may wish to expand the memory capacity (up to 256MB capacity) by using an external memory card.
In addition to still images, you can record short videos using the movie function. Images you have taken can be downloaded to your computer using the USB cable (USB driver required for Win98 and Mac OS 8.6). You can enhance and retouch your images on your computer by using the provided editing software, or image editing software you may already own. You may share your images with your friends via e-mail, in a report, or on a website.
DPOF functionality allows you to print your images on a DPOF compatible printer by simply inserting the memory card.
Package contents
Carefully unpack your package and make sure that you have the following items. In the event that any item is missing or if you find any mismatch or damage, promptly contact your dealer.
Digital camera
Video cable
User's manual
Quick guide
USB cable
Software CD-ROM
Camera strap
Camera pouch
Optional accessories
SD/MMC memory card (up to 256MB capacity)
AC power adapter
2 x AA alkaline batteries
GETTING TO KNOW THE CAMERA
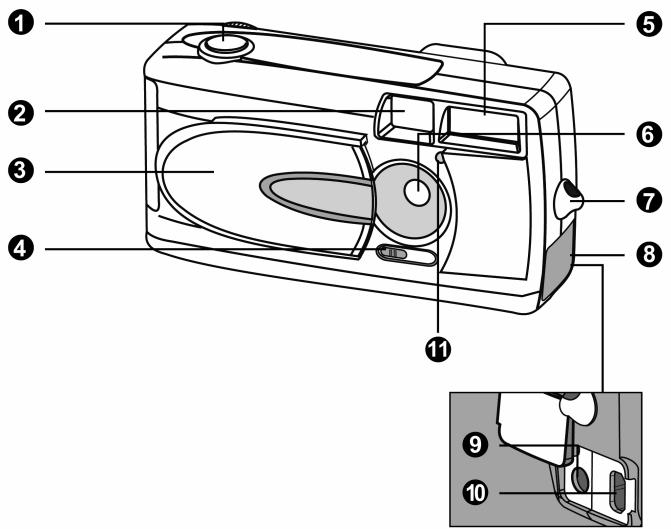
Front view
1.Shutter button
2. Viewfinder window
3. Lens cover
4. Focus switch

Macro mode

Portrait mode

Landscape mode
- Flash
- Lens
- Strap eyelet
- Jack cover
- DC IN jack
- USB connector
- Self-timer lamp
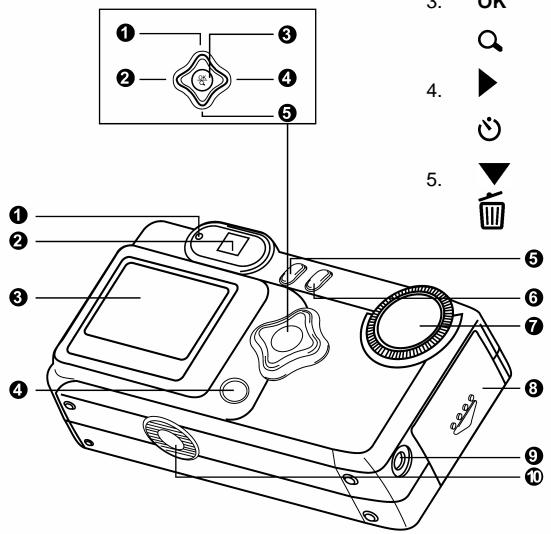
1.

Arrow button (up)

Thamburger button
2.

Arrow button (left)
Flash button
3.
OK
OK button
Digital zoom button
4.
Arrow button (right)
Self-timer button
5.
Arrow button (down)
Delete button
- LED indicator
- Viewfinder
- LCD monitor
- IOI Display button
- 3 Menu button
6.

Power button
7.
Mode dial
8.
Battery/SD card cover
9.
VIDEO OUT jack
10
Tripod socket
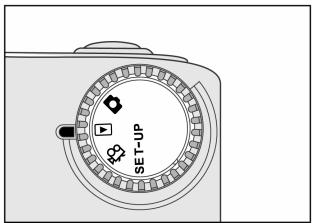
Mode dial
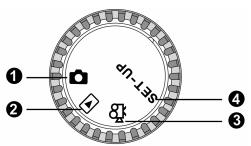
| Mode | Description | |
| 1. | Record Mode | Use this mode to capture still images. |
| 2. | Playback mode | Use this mode to view images / video clips, delete images / video clips, view a slide show, or view thumbnail displays. |
| 3. | Movie mode | Use this mode to record video (movie) clips. |
| 4. | SET-UP | Setup mode |
LED indicators
| Indicator | Status | Description/Activity | Sound |
| LED Indicator | Solid red | The camera is powering up. | No |
| LED Indicator | Blinking red | Camera system error | Yes *(3) |
| LED Indicator | Solid red | Charging the flash | No |
| LED Indicator | Blinking red | Image is being recorded to the memory card. | No |
| LED Indicator | Blinking red | USB communication/transfer in progress | No |
| LED Indicator | Solid green | The camera is ready to record images (or movies). | Yes *(1) |
| Self-timer Indicator | Blinking red | The self-timer function is activated. | Yes *(1) |
| — | — | Error message | Yes *(3) |
| — | — | Valid button event | Yes *(1) |
*(1) The camera sounds one beep.
^*(3) The camera sounds three beeps.
LCD monitor information
These indicators are displayed when recording still images:
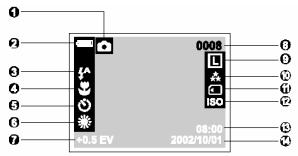
- Record mode
- Battery level
Full battery power
Medium battery power
Virtually no battery power
- Flash mode
A Auto flash
Red-eye reduction
Fill flash (on)

Flash off
- Macro mode
- Self-timer mode
- White balance (no indication for auto white balance)

Daylight

Cloudy

Sunset
Tungsten
-
Fluorescent
-
EV compensation
- Possible number of shots (at the current size and quality settings)
- Image size
2048x1536pixels
M 1024 x 768 pixels
640x480pixels
- Image quality
Super fine
★ Fine
★ Normal
- Card indicator
- ISO speed (no indication for AUTO)
AUTO
100
200
400
- Time (24-hour-format)
- Date (year-month-day)
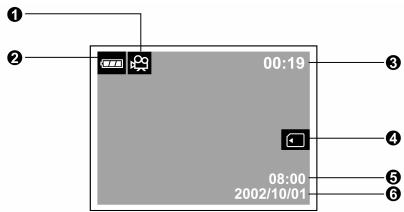
These indicators are displayed when recording video clips:
- Movie mode
- Battery level
Full battery power
Medium battery power
Virtually no battery power
- Recordable movie time
4.Card indicator
5. Time (24-hour-format)
6. Date (year-month-day)
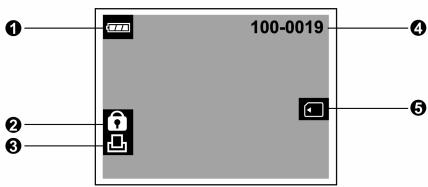
These indicators are displayed when playing images back:
- Battery level
Full battery power
Medium battery power
Virtually no battery power
- Protect indicator
- DPOF indicator
- Folder number and image number
5.Card indicator
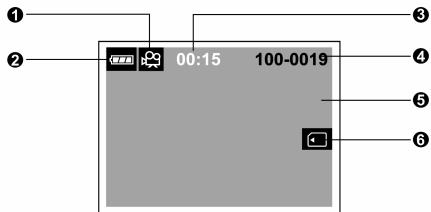
These indicators are displayed when playing video clips back:
- Movie mode
- Battery level
Full battery power
Medium battery power
Virtually no battery power
- Count
- Folder number and image number
- The first frame of the movie
6.Card indicator
GETTING STARTED
You can use either 2 AA size batteries (Alkaline, Ni-MH) or an AC power adapter (optional accessory) to power the camera. Battery power is convenient for recording images or video clips while AC adapter power is recommended for transferring images to your computer.
Installing the batteries
- Make sure the camera is off.
- Slide the battery/SD card cover in the direction of the OPEN arrow.
- Insert the batteries according to the correct polarity marks (+ or -) .
- Close the battery/SD card cover firmly.
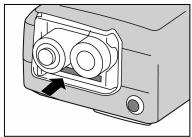

NOTE
- If you won't be using the batteries for an extended period of time, remove them from the camera to prevent leaks or corrosion.
- Never use manganese batteries.
- Never use different types of batteries (together) or mix old and new batteries.
- Avoid using the camera in extremely cold environments. Otherwise, it may damage the camera. (Such damage is not covered under the warranty.)
Using the AC power adapter (optional accessory)
- Make sure the camera is off.
- Open the jack cover and connect one end of the AC power adapter to the DC IN jack on the camera.
- Connect the other end to an electrical outlet.
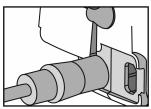

NOTE
- Make sure to use only the specified AC power adapter for the camera. Otherwise, it may cause damages to the camera, which is not covered under the warranty.
- To prevent unexpected auto power off resulting from no battery power left during the process of transferring your images to the computer, use the AC power adapter as a power supply.
Loading an SD/MMC memory card (optional accessory)
The camera comes with 8MB of internal memory, allowing you to store images and video
clips in the camera. However, you can expand the memory capacity by using an optional SD/MMC memory card so that you can store additional
images and video clips.
- Make sure the camera is off.
- Slide the battery/SD/MMC card cover in the direction of the OPEN arrow.
- Insert the SD/MMC memory card.
The front side of the memory card (printed arrow) should face towards the front side of the camera.
If the card cannot be inserted, check the orientation.
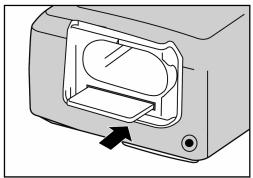
- Close the battery/SD/MMC card cover.
To remove the SD/MMC memory card, make sure the camera is off. Open the battery/SD/MMC card cover. Press lightly on the edge of the memory card and it will eject.

NOTE
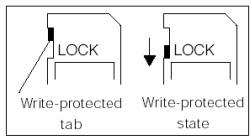
- To prevent valuable data from being accidentally erased from an SD/MMC memory card you can slide the write-protected tab (on the side of the SD/MMC memory card) to "LOCK".
- To save, edit, or erase data on an SD/MMC memory card, you must unlock the card.
Attaching the strap
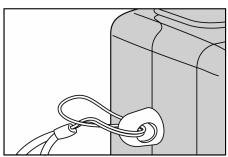
To prevent accidental slippage during the use, always use the strap.
- First thread the small loop of the wrist strap through the strap eyelet on the camera and then pull the large loop through the small loop until the strap is firmly secured.
Choosing the language
When you first turn the camera on, the language setting screen appears, prompting you to choose a language for displayed information on the LCD
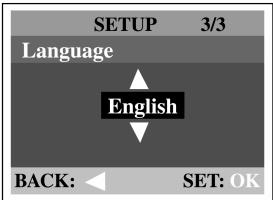
monitor. Follow the steps below to set the OSD (On-Screen Display) language.
- Select a language that you prefer by using the / button.
- Press the OK button to confirm.

NOTE
- The language setting will be retained even if the camera is turned off.
- The provided languages are [English], [François], [Deutsch], [Espanol], [Portugues], [Italiano], [日本語], [繁體中文], and [簡体中文].
Setting the date and time
The Date/Time screen will be presented if/when:
Camera is turned on for the first time (after setting the language).
Camera is turned on after removing the batteries/AC power adapter or replacing the batteries.
When the date and time setting screen appears, follow these steps to set the correct date and time.
You may skip this procedure by pressing OK.
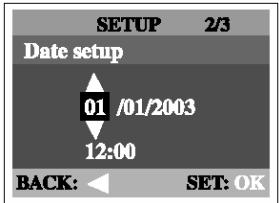
- Enter the values of the year, month, day and time fields by using the / button. Press OK after all field is set.
To increase a value, press the / button.
To decrease a value, press the / button.
Setting the image resolution and quality
Resolution and quality settings determine the pixel size (dimension), image file size, and compression ratio for your image. These settings affect the number of images that can be stored in internal memory, or on an SD memory card.
Higher resolution and higher quality images offer the best photographic results but take up more memory space. High resolution/quality settings are recommended for printed output and situations requiring the finest detail. Lower resolution/quality images take up less memory space and may be quite suitable for sharing images via e-mail, in a report, or on a web page.
To change image resolution or image quality, perform the steps below:
- Turn the mode dial to mode and power on the camera.
- Press the button on the rear side of the camera.
The Record menu appears.
- Select Image size or Quality by using the / button.
- Press the button. Select the image size or image quality you prefer by using the / button.
- Press OK to confirm. To exit the menu screen, press the button.
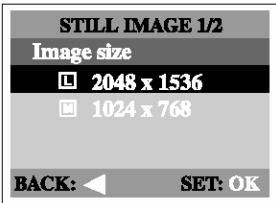
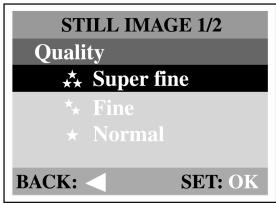
The table below shows the approximate number of shots that you can take at each setting based on 8MB internal memory or an 8MB SD memory card.
| Resolution | Quality | Compression ratio | 8MB internal memory |
| 2048x1536 pixels | * Super Fine | 4:1 | 3 |
| * Fine | 8:1 | 6 | |
| * Normal | 12:1 | 9 | |
| 1024x768 pixels | * Super Fine | 4:1 | 12 |
| * Fine | 8:1 | 24 | |
| * Normal | 12:1 | 36 | |
| 640x480 pixels | Super Fine | 4:1 | 30 |
| Fine | 8:1 | 60 | |
| Normal | 12:1 | 90 |
- The above data shows the standard testing results. The actual capacity varies according to the shooting conditions and settings.
RECORD MODE
Taking pictures
Your camera is equipped with both an optical viewfinder and a 1.5" LCD monitor to compose images. Taking images using the optical viewfinder will conserve battery power. If your batteries are low, it is recommended that you only compose images by using the viewfinder. The LCD monitor can help you accurately compose pictures and examine all details, but using it also consumes more battery power. However, always use the LCD monitor for macro shots to avoid parallax effects.
Using the viewfinder
- Open the lens cover.
- Turn the mode dial to mode.
- Turn the camera on by pressing the ① button.
- Compose the picture in the viewfinder.
- Press the shutter button.
The LED indicator blinks red while the camera is processing a captured image.
Using the LCD monitor
- Open the lens cover.
- Turn the mode dial to mode.
- Turn the camera on by pressing the ① button.
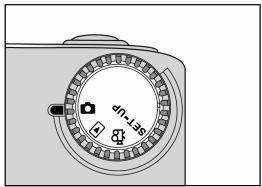
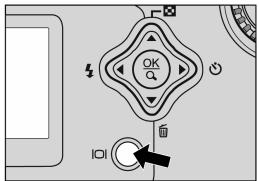
- Turn the LCD monitor on by pressing the I0I button.
- Compose the picture.
- Press the shutter button.
The LED indicator blinks red while the camera is processing a captured image.

NOTE
- By pressing the IDI button repeatedly in mode when quick view is ON, the LCD status will change cyclically.
LCD on and OSD LCD on LCD off
- The image on the LCD monitor darkens when in strong sunlight or bright light. This is not a malfunction.
- Using the LCD monitor for an extended period of time may reduce the number of shots you can take. To conserve battery power and increase the number of shots you can take, turn the LCD monitor off and use the viewfinder instead.
Always use the image LCD for macro shots. - The LCD monitor must be on when Digital zoom is to be used.
Using the portrait mode
Taking pictures by selecting the portrait mode will produce an image with sharp subject and indistinct background. The effective range is between 0.9m and 1.9m.
- Open the lens cover, turn the mode dial to mode, and power on the camera.
- Move the focus switch located on the front side of the camera to the position.
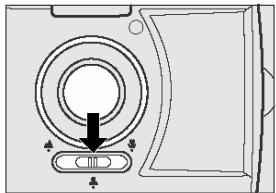
- Compose the picture.
- Press the shutter button.
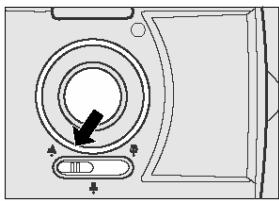
Using the landscape mode
The landscape mode, suitable for scenery shooting, is used when the distance to the subject is between 1.9m and infinity.
- Open the lens cover, then the mode dial to
mode, and power on the camera. - Move the focus switch located on the front side
of the camera to the position. - Compose the picture.
- Press the shutter button.
Using the digital zoom
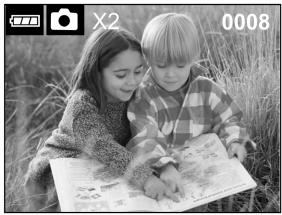
By using the digital zoom, images can be enlarged so that the subject appears closer. However, the more the image is enlarged, the grainier the image will become. The digital
zoom function is only available when you set the
LCD monitor and the digital zoom to ON. To capture a digitally zoomed image, perform the following steps:
- Open the lens cover, turn the mode dial to

mode, and power on the camera.
-
Turn the LCD monitor on by pressing the button.
-
Press OK to activate the digital zoom function;
press the / button to magnify the
image to 4X.
The digital zoom magnification appears on the LCD monitor.
- Press the shutter button to capture a "zoomed" image.

NOTE
- The more the image is enlarged, the more pixilated (grainier) the image.
Using the self-timer
The self-timer duration is 10 seconds. After the activation of the self-timer by pressing the shutter button, the self-timer lamp starts blinking slowly for 7 seconds and then blinking faster for the rest of 3 seconds. This allows you to get into the scene when taking group images.
- Secure the camera to a tripod or place it on a stable surface.
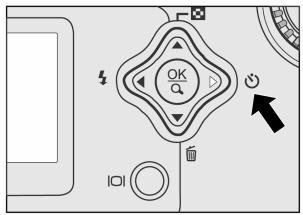
- Open the lens cover, turn the mode dial to mode, and power on the camera.
- Press the button.
The icon appears on the LCD monitor.
- Compose the picture.
- Press the shutter button.
The self-timer function is activated.
- After ten seconds, the camera takes an image.
To cancel self-timer photography at any time, press the shutter button to disrupt the sequence.

NOTE
After one shot is taken, the self-timer mode is turned to off.
Using the macro mode
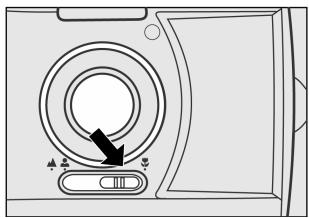
Use the macro mode to shoot a close-up of the subject, such as flowers or insects. The
effective range is between 0.55m and 0.9m .
- Open the lens cover, turn the mode dial to

mode, and power on the camera.
- Move the focus switch located on the front
side of the camera to the position.

The icon appears on the LCD
monitor .
- Compose the picture.
- Press the shutter button.

To disable macro photography, slide the
focus switch back to portrait mode or landscape mode.

NOTE
- When shooting a close-up in macro mode, use the image LCD monitor to compose your shot, avoiding the off-center parallax phenomenon.
- After a macro shot is taken DO NOT FORGET to reset the lens to the normal position.
Using the flash
The flash is designed to function automatically when lighting conditions warrant the use of
flash. You can take an image using a flash mode suitable to your circumstances. If you change the flash mode, the camera will retain that setting even if the camera is turned off.
- Open the lens cover, turn the mode dial to

mode, and power on the camera.
- Press the button located on the rear side of the camera repeatedly until your desired flash mode appears on the LCD monitor.
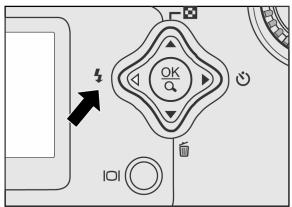
- Compose the picture and press the shutter button.
The camera has four flash modes: Automatic Flash (default), Red-Eye Reduction, Fill Flash (on), and Flash Off. The modes appear cyclically when you press the button on the rear side of the camera. The table below will help choose the appropriate flash mode:
| Flash Mode | Description |
| Auto Flash | The flash fires automatically according to the ambient conditions. Select this mode for general photography. |
| Red-eye Reduction | The flash emits a precursor-flash before the main flash fires. This causes the pupil in the human eye to constrict, reducing the red-eye. Select this mode when taking pictures of people and animals in low-light conditions. |
| Fill Flash on | The flash will always fire regardless of the surrounding brightness. Select this mode for recording images with high contrast (backlighting) and deep shadows. Also known as forced flash. |
| Flash off | The flash will not fire. Select this mode when taking images in a place where flash photography is prohibited, or when the distance to the subject is beyond the effective range of the flash. |
Taking pictures manually
You can manually adjust conditions such as EV compensation, white balance, or ISO speed when taking pictures. For EV compensation, white balance, or ISO speed information, refer to Exposure, White balance, or ISO in the Record menu.
To take pictures manually:
- Open the lens cover, turn the mode dial to mode, and power on the camera.
- Press the button.
-
Move to Exposure, White balance, or ISO by using the / button.
-
Press the button to enter the sub-menu.
- Change the settings by using the / button and then press OK.
- Compose the picture.
- Press the shutter button.
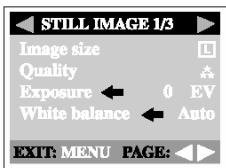
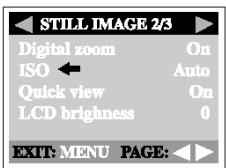
PLAYBACK MODE
In mode, you can view, magnify, delete images, play video clips, or run a slide show. Playback mode also provides a thumbnail image display, allowing you to quickly scan for the image you want.
Viewing images
You may view your images without opening the lens cover since the lens is not used for playback. The camera lens is protected during playback.
- Turn the mode dial to mode and power on the camera.
- Select the image that you want to view by using the / button.
To view the previous image, press the button. To view the next image, press the button.
Pressing the button displays the detailed information for the captured image, such as image quality, image size and Date.

NOTE
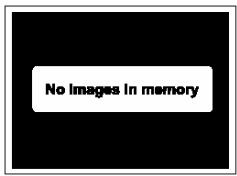
- If there is no image stored in the internal memory or on the memory card, "No images in memory" will appear on the LCD monitor.
- You can also view your images on the TV screen. Connect one end of the video cable to the video out jack of the camera and connect the other end to the video input of your TV. Turn the mode dial to mode and then turn on both TV and camera.
Zoom playback
While reviewing your images, you may enlarge a selected portion of an image. This magnification allows you to view fine details.
- Turn the mode dial to mode and power on the camera.
- Select the image that you want to view by using the / button.
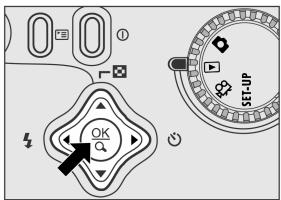
- Enlarge the image by pressing OK.
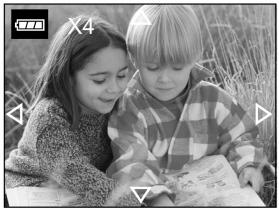
Pressing OK once magnifies the image to 2X. Pressing it again magnifies the image to 4X.
- To view the different portion of the enlarged image, press the / / / button.
- To return to the regular display from 4X-enlarged status, press OK again.
Displaying thumbnail images
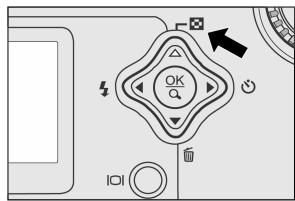
This function allows you to view nine thumbnail images on the LCD monitor simultaneously so you can quickly scan for a particular image.
-
Turn the mode dial to the mode and power on the camera.
-
Press the button.
Nine thumbnail images appear on the LCD monitor (assuming there are nine or more images in the memory).
To view a full-sized image, press OK after selecting it by using the / / button.
Slide show display
The slide show function enables you to play your images back automatically in sequential order as a slide show. This is a very useful and entertaining feature for reviewing recorded images and for presentations.
- Turn the mode dial to mode and power on the camera.
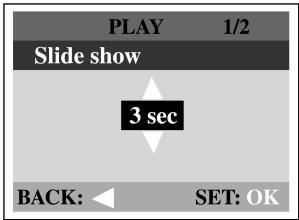
- Press the button and move to Slide show by using the / button.
- Press the button.
- Set the playback interval by using the / button and then press OK.
The slide show starts, displaying your images on the LCD monitor one by one with the set interval.
To stop the slide show display, press OK.
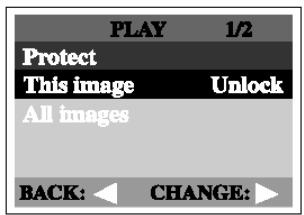
Protecting one image/video clip
You can protect the image/video clip you prefer from being accidentally erased by using the protect function in the Playback menu. Follow the steps below to perform protect function:
- Turn the mode dial to mode and power on the camera.
The last image/video clip appears on the LCD monitor.
- Select the image/video clip you wish to protect by using the / button.
- Press the button. Select Protect by using the / button.
- Press the button. Use the / button to select One image and then press the button. To protect all images, select All images in this step.
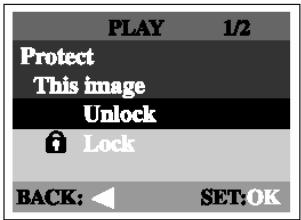
- Select Lock by pressing the / button and then press OK.
Once the image/video clip is protected, the protection icon will display on the protected image/video clip.
Removing protection from one image/video clip
- Perform the steps above 1 to 4 in "Protecting one image/video clip".
- Select Unlock by pressing the / button and then press OK.

NOTE
- To erase the protected image/video clip, use the format function. For more information about formatting, refer to Format in the Setup menu.
Setting DPOF
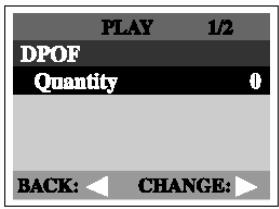
DPOF allows you to embed printing information on your memory card. By using DPOF, you can select an image to be printed and then specify how many prints you would like. Take your memory card to a DPOF enabled printer that accepts SD memory cards. The DPOF/card-compatible printer will read the embedded information on the memory card and print your images as specified.
To set DPOF:
- Turn the mode dial to mode and power on the camera.
- Press the button. Select DPOF by using the button.
- Press the button. Select the option you prefer by using the / button.
- Press the button. Make the setting by pressing the / button and then press OK.
The DPOF icon will appear on the DPOF set image.
The DPOF menu options:
[Quantity]: sets image quantity
Deleting images/video clips
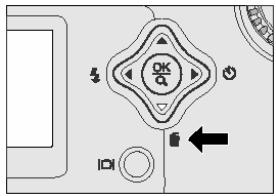
To delete one image/video clip at a time, use the button on the rear side of the camera. To delete all images/video clips at once, go to Delete all in the Playback menu.
To delete one image/video clip at a time:
- Turn the mode dial to mode and power on the camera.
- Select unwanted image/video clip by using the button and then press the button.
- When delete message appears, select [Yes] by using the / button and then press OK.
The next image/video clip appears. If you want to cancel the deletion, select [No].
- Continue the deletion if necessary. If all images are deleted, [No images in memory] will
pop up. To exit this screen, turn the mode dial to the other mode.
To delete all images/video clips at once:
- Turn the mode dial to mode and power on the camera.
- Press the button on the rear side of the camera.
- Select Delete all by using the / button.
- Press the button.
- Select [Yes] by using the / button and then press OK.
After that, [No images in memory] pops up.
Turn the mode dial to the other mode to exit the screen.


NOTE
- To delete the image or video clip stored in the internal memory, remember not to insert the memory card in the camera. Otherwise, you will delete the image or video clip stored in the memory card.
MOVIE MODE
Recording video clips
The movie mode allows you to record video clips at the resolution of 320 × 240 pixels.
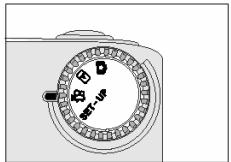
- Open the lens cover, turn the mode dial to
mode, and power on the camera.
The recordable movie time displays on the LCD monitor.
- You can start recording a video clip by pressing the shutter button.
The elapsed time displays on the LCD monitor while recording a video clip.
To stop recording, press the shutter button again.
- You can also activate the digital zoom function to 4X by pressing OK and the / button.
Digital zoom must be set before recording the video clips.
While recording the video clip, digital zoom cannot be set or activated.

NOTE
- In movie mode, resolution/quality, self-timer cannot be set or activated.
- In movie mode, the flash mode is automatically set to [OFF].
Viewing video clips
To view the recorded video clips, follow the steps below.
- Turn the mode dial to mode and power on the camera.
- Select the video clip that you want to view by using the / button.
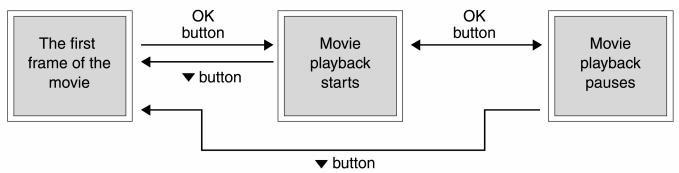
- Press OK to start.
To pause playback at any time, press OK again.
To stop playback. press the button.
Pressing OK or the button while playing back the video clip will change the status as follows:

NOTE
- The zoom function cannot be activated while playing the video clip back.
- To play the video clip back on the computer, we recommend that you use the "QuickTime Player". This software is free of charge, compatible with Mac- and Windows- computers and can be downloaded from the Apple Web site at www.apple.com. For QuickTime Player usage, please refer to its on-line help for more information.
TRANSFERRING RECORDED IMAGES TO YOUR COMPUTER
You can share recorded images/video clips with your family or friends via e-mail or post them on the Web. Before doing those things, you need to connect the camera to your computer by using the USB cable and then transfer the images/ video clips.
To transfer images/video clips from the camera to your computer, follow the steps below.
Step 1: Installing the USB driver
Step 2: Connecting the camera to your computer
Step 3: Downloading images/video clips
| System requirements ( Windows ) | System requirements ( Macintosh ) | |
| CPU | Pentium 166 MHz processor or higher | PowerPC G3/G4 |
| OS | Windows 98/98SE/Me/2000/XP | OS 8.6 or later |
| Memory | 32MB RAM ( 64MB recommended ) | 32MB RAM ( 64MB recommended ) |
| Free Space on Hard Disk | 128MB hard disk space | 128MB hard disk space |
| Required Devices | A CD-ROM drive, An available USB port | A CD-ROM drive, An available USB port |
| Color Monitor | Color monitor (800x600, 24-bit or higher recommended) | Color monitor (800x600, 24-bit or higher recommended) |
Step 1: Installing the USB driver on Windows computers
The USB driver on the supplied CD-ROM is exclusively for Windows 98. Installing the USB
driver on computers running Windows 2000/ME/XP is not necessary.
- Insert the CD-ROM packaged with the camera into the CD-ROM drive. The welcome screen appears.
- Click "Install USB Driver". Follow the onscreen instructions to complete the installation. After the USB driver installation is complete, restart your computer.
Installing the USB driver on Macintosh computers
Mac OS 8.6 users must install a USB driver. For Mac OS 9.0 or higher, the computer will automatically recognize the camera and load its own USB drivers.
- Insert the CD-ROM packaged with the camera into the CD-ROM drive.
- Select and double-click "Digital Camera Driver Installer".
- Select "Install Location" and click "Install".
- Follow the on-screen instructions to complete the installation and restart your computer.
Step 2: Connecting the camera to your computer
- Connect one end of the USB cable to an available USB port on your computer.
- Connect the other end of the USB cable to the USB connector on the camera.
- Turn the camera on.
- Look for a new "removable disk" icon appearing in the "My Computer" window. Your recorded images/video clips will be in a folder on this
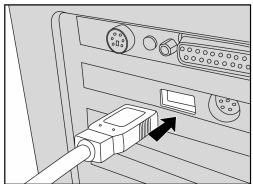
"removable disk". (For Mac users, double-click the "untitled" disk drive on the desktop.)
Step 3: Downloading images/video clips
When the camera is turned on and connected to your computer, it is recognized as a disk drive. You can download images/video clips by coping them from the "removable disk"
("untitled" disk on a Macintosh) to your hard drive or to another kind of disk.
For computers running Windows
Open the "removable disk" by double-clicking on it. Double-click on the folder contains your recorded images/video clips. Select the images/video clips that you prefer and choose "Copy" from the "Edit" menu. Then, open the destination location and choose "Paste" from the "Edit" menu.
For computers running Mac OS
Open the "untitled" disk window and the hard disk or the destination location. Drag and drop from the camera disk to the desired destination.

NOTE
- It is recommended that you use the AC power adapter as a power supply for the camera while transferring images/video clips from the camera to you computer since camera power maybe cut off unexpectedly if the batteries run out.
MENU OPTIONS
Record menu
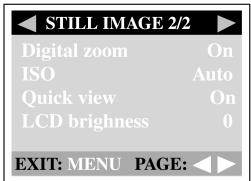
You can use the Record menu to select image size, image quality, or ISO speed. You can also adjust exposure, white balance, or LCD brightness in the Record menu. The Record menu even allows you to enable digital zoom or quick view function. To access the Record
menu, turn the mode dial to mode and then press the button. Scroll through the menu options by using the / button.
Image size
For more information about setting image size, refer to "Setting the image size and quality".
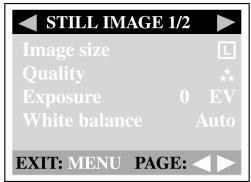
Quality
For more information about setting image quality, refer to "Setting the image size and quality".
Exposure
Your camera adjusts the exposure of each scene automatically. However, when the subject is too dark or too bright, the camera adjusts the brightness to make the subject appears brighter or darker. This is called EV compensation. The EV compensation of your camera can be adjusted from -1.8EV to +1.8EV. To select the EV compensation you wish, first press the button. Then increase or decrease the EV compensation depending on what you need by using the or the
button and press OK.
Effective Subjects and Set Values
Positive (+) Compensation
Imaging of printed text (black characters on white paper)
Backlit portraits
Very bright scenes (such as snowfields) and highly reflective subjects
Shots made up predominantly of sky
Negative (-) Compensation
Spot lighted subjects, particularly against dark backgrounds
Imaging of printed text (white characters on black paper)
Scenes with low reflectivity, such as shots of green or dark foliage
White balance
Your camera adjusts the white balance of each scene automatically. However, the images that your camera captures will appear different under different lighting conditions (daylight, cloudy, sunset, tungsten, fluorescent lights). Unlike your eyes, which can easily adjust to
different lighting conditions (lighting temperatures), a digital camera cannot always differentiate between lighting types. Under some lighting conditions the image may appear in strange shades. If that occurs you may change the white balance setting by specifying a lighting condition (temperature) most appropriate for your scene. To set the white balance, first press the button. Then choose the white balance you prefer by using the or button and press OK.
[Auto]
: adjusts the white balance automatically

Daylight]
: records outdoors on a bright day

Cloudy]
: records under cloudy or shady sky

Sunset]
: records a sunset

Tungsten]
records under tungsten lighting condition

Fluorescent]
records under fluorescent lighting condition
Digital zoom
You can take shots with the digital zoom by activating the digital zoom function. To enable this option, first press the button. Then select [On] by using the / button and press OK.
ISO
The ISO speed decides the sensitivity to the lights. The higher the ISO number is, the more sensitive it is to the lights. When recording under dark situations or recording a fast-moving subject, use a high-number setting. When recording high quality images, use a low number setting. To set the ISO speed, first press the button. Then choose the ISO speed you prefer by using the / button and press OK.
[Auto] : adjusts the ISO speed automatically
[100] :equivalent to ISO 100
[200] : high-sensitive photography, equivalent to ISO 200
[400] : high-sensitive photography, equivalent to ISO 400
Quick view
By enabling quick view, you can temporarily view the image on the LCD monitor right after you take a picture. After a temporary preview, the camera returns to mode automatically. To enable quick view, first press the button. Then select [On] by using the / button and press OK.
LCD brightness
This option adjusts the brightness of the LCD monitor. To adjust the LCD brightness, first press the button. Then increase or decrease the LCD brightness depending on what you need by using the or the button and press OK.
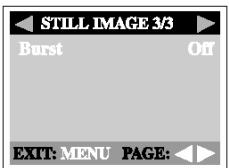
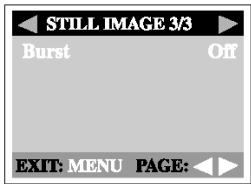
Burst
This function allows you to capture the continuous moving images. After photography is finished, check the images and select the most satisfied image from your computer. In this mode, the image size can only be set as "M" (1024x768 pixels).
The approximate number of burst photography varies according to the quality conditions and settings.

Super fine approx. 2

Fine approx. 4

Normal approx. 7
The remaining capacity of internal memory also affects photography in this mode.
The average speed of burst mode is approximately 0.7 sec interval.
Movie menu
You can use the Movie menu to adjust exposure, white
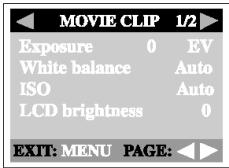
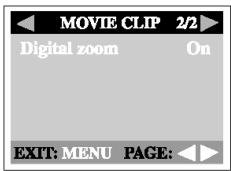
balance, ISO speed, or LCD brightness. To access the Movie menu, turn the mode dial to mode and then press the button. Scroll through the menu options by using the / button. For more information about Exposure, White balance, ISO, LCD brightness, or digital zoom, refer to its correspondent description in the Record menu.
Playback menu
Use the Playback menu to create an on-camera slide show, configure DPOF settings, or transfer images to a memory card. You can also use the Playback menu to protect an image, delete all images at once, or adjust the LCD brightness. To access the Playback menu, turn the mode dial to mode and then press the button. Scroll through the menu options by using the / button.
Protect
Refer to "Protecting one image/video clip" in PLAYBACK MODE.
Delete all
Refer to "Delete images/video clips" in PLAYBACK MODE.
Slide show
Refer to "Slide show display" in PLAYBACK MODE.
LCD brightness
Refer to LCD brightness in the Record menu.
DPOF
Refer to "Setting DPOF" in PLAYBACK MODE.
Copy to card
This feature allows you to copy your images from the camera's internal memory to a memory card. However, you can only do this when the memory card is installed and the internal memory contains images.
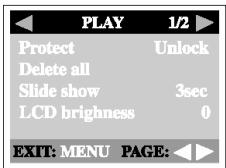
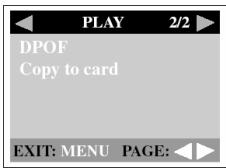
To perform this function, first press the button. Then select [Yes] by using the / button and press OK. A progress bar displays, showing the process of coping.
Setup menu
You can select your preferences for the camera settings in SET-UP mode. Turn the mode dial to SET-UP mode and navigate to the option you wish to configure by using the / button.
Format
This option formats the internal memory (or memory card) and erases all stored images and data. To perform the format function, first press the button. Then select [Yes] by using the / button and press OK.
Beep
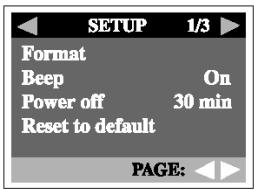
The camera makes a sound (beep) each time you press the camera button if this function is
enabled. Press the button. Select [On] or [Off] by using the / button and then press OK.
Power off
If the camera goes unused for a certain period of time while the camera is powered on, the camera will switch to an idle mode, and eventually turn itself off to conserve power.
| Inactivity period (batteries) | Inactivity period (AC power adapter) | Camera status |
| 60 seconds | 60 seconds | Stay idle |
| 30 minutes | 30 minutes | Shut off |
If the camera is idle, re-activate the camera by pressing 10 button or switch the mode dial. If the camera has powered-off you must turn the camera on again by pressing the ① button. The table (above) shows the default time settings for idle, and power-off. To change the power saving interval, first press the button. Then select the power-off interval you prefer by using the / button and press OK.
Reset to default
If you wish to restore all camera settings to their original status, select this option and then press the button. Select [Yes] by using the / button and then press OK.
The table below shows the default setting for each item.
| Item | Description |
| Image size | 2048x1536 pixels |
| Image quality | ★Fine |
| Flash | Auto |
| LCD brightness | 0 |
| Quick view | On |
| White balance | Auto |
| EV compensation | 0.0 |
| Slide show delay | 3 seconds |
| Auto power off | 3 minutes |
| Beep | On |
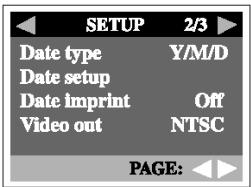
Date type
You can select the date type that is imprinted on your image. To set the date type, first press the button. Then select one date type you prefer by using the / button and press OK.
[Y/M/D]
[D/M/Y]
[M/D/Y]
Date setup
After removing the batteries from the camera, the date and time will return to the default setting. If this happens, reset the date and time when using the camera. For more information about the date setup, refer to "Setting the date and time".
Date imprint
If you set imprint function, your image will be displayed with date on it. To enable this function, first press the button. Then select [Yes] by using the / button and press OK.
Video out
You can view your images on a TV. Remember to select correct video output type according to where you locate. Otherwise, there will be white lines on a stored image. To set this option, first press the button. Then select the / button and press OK.
[NTSC]: select this format when located in the U.S.A., Canada, Japan, Korea, Taiwan, Central America, or Mexico.
[PAL]: select this format when located in Australia, Austria, Belgium, China, Denmark, Finland, Germany, Great Britain, Holland, Italy, Kuwait, Malaysia, New Zealand, Singapore, Spain, Sweden, Switzerland, Thailand, or Norway.
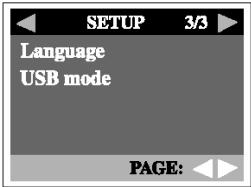
Language
This option allows you to select the language for the menus and the texts displayed on the LCD monitor. To set the language, refer to the section, "Choosing the language".
USB mode
While connecting camera to your computer via USB cable, those images can be transferred to your computer.
CONNECTING THE CAMERA TO OTHER DEVICES
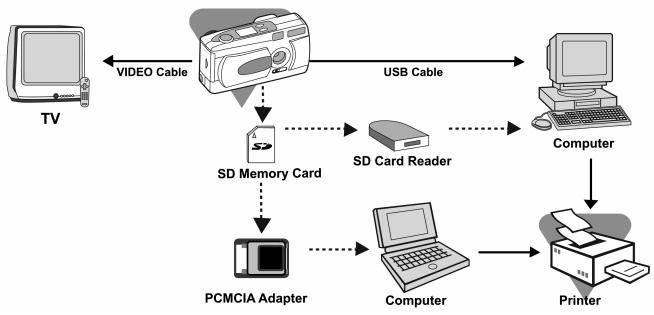
CAMERA SPECIFICATIONS
| Item | Description |
| Image sensor | 3.3-Megapixel CCD |
| Image quality | Super-Fine/Large (2048 x 1536 pixels) Fine/Medium (1024 x 768 pixels) Normal/Small (640 x 480 pixels) |
| Recording media | 8MB internal memory; SD/MMC memory card (optional) (up to 256MB capacity) |
| Lens | Fixed focal length: 7.9mm Focusing range: Landscape---1.9m~infinity; Portrait---0.9m~1.9m; Macro---0.55m~0.9m F-number: 3.5 |
| LCD monitor | 1.5" color TFT LCD monitor |
| Self-timer | 10-second delay |
| Zoom | 4X digital zoom |
| Exposure compensation | Auto; Manual: -1.8 ~ +1.8EV (0.3EV step) |
| White balance | Auto; Manual: Daylight, Cloudy, Sunset, Tungsten, Fluorescent |
| Compressed format | JPEG, Motion JPEG for video clip |
| Standards | JPEG, EXIF 2.1, DPOF 1.1, DCF 1.1, M-JPEG |
| Interface | DC IN jack, USB connector, VIDEO OUT jack (NTSC or PAL) |
| Operating environment | Operation: 0°C~40°C, 15%~90% humidity Storage: -20°C~60°C, 10~95% humidity |
| Power | 2 x AA Alkaline batteries, 2 x AA Ni-MH batteries, AC power adapter |
| Tripod socket | Yes |
| Dimensions | 105 x 55x 41 mm (W x H x D) (without protruding parts) |
| Weight | Approx. 120g (without batteries and the SD/MMC memory card) |
*Design and specifications are subject to change without notice.
- READ THIS FIRST
- WARNING
- CAUTIONS
- CONTENTS
- INTRODUCTION 6
- GETTING TO KNOW THE
- CAMERA 7-12
- GETTING STARTED 12-16
- RECORD MODE 16-22
- PLAYBACK MODE 22-27
- MOVIE MODE 27-29
- TRANSFERRING
- RECORDED IMAGES
- TO YOUR COMPUTER, 29-31
- MENU OPTIONS 31-35
- Movie menu 35
- Playback menu 35-36
- Setup menu 36-39
- CONNECTING THE
- CAMERA TO OTHER
- DEVICES 39
- SPECIFICATIONS 39-40
- INTRODUCTION
- Overview
- Package contents
- Optional accessories
- GETTING TO KNOW THE CAMERA
- Front view
- Mode dial
- LED indicators
- LCD monitor information
- GETTING STARTED
- Installing the batteries
- NOTE
- Using the AC power adapter (optional accessory)
- Loading an SD/MMC memory card (optional accessory)
- Attaching the strap
- Choosing the language
- Setting the date and time
- Setting the image resolution and quality
- RECORD MODE
- Taking pictures
- Using the viewfinder
- Using the LCD monitor
- Using the portrait mode
- Using the landscape mode
- Using the digital zoom
- Using the self-timer
- Using the macro mode
- Using the flash
- Taking pictures manually
- PLAYBACK MODE
- Viewing images
- Zoom playback
- Displaying thumbnail images
- Slide show display
- Protecting one image/video clip
- Removing protection from one image/video clip
- Setting DPOF
- To set DPOF:
- Deleting images/video clips
- To delete one image/video clip at a time:
- To delete all images/video clips at once:
- MOVIE MODE
- Recording video clips
- Viewing video clips
- TRANSFERRING RECORDED IMAGES TO YOUR COMPUTER
- Step 1: Installing the USB driver on Windows computers
- Installing the USB driver on Macintosh computers
- Step 2: Connecting the camera to your computer
- Step 3: Downloading images/video clips
- For computers running Windows
- For computers running Mac OS
- MENU OPTIONS
- Record menu
- Image size
- Quality
- Exposure
- Effective Subjects and Set Values
- Positive (+) Compensation
- Negative (-) Compensation
- White balance
- Digital zoom
- ISO
- Quick view
- LCD brightness
- Burst
- Movie menu
- Playback menu
- Protect
- Delete all
- Slide show
- DPOF
- Copy to card
- Setup menu
- Format
- Beep
- Power off
- Reset to default
- Date type
- Date setup
- Date imprint
- Video out
- Language
- USB mode
- CONNECTING THE CAMERA TO OTHER DEVICES
- CAMERA SPECIFICATIONS
Marque : GENIUS
Modèle : P313
Catégorie : Appareil photo