
AZUR 340A SE - Amplificateur intégré CAMBRIDGE AUDIO - Notice d'utilisation et mode d'emploi gratuit
Retrouvez gratuitement la notice de l'appareil AZUR 340A SE CAMBRIDGE AUDIO au format PDF.

| Type de produit | Amplificateur intégré |
| Marque | CAMBRIDGE AUDIO |
| Modèle | AZUR 340A SE |
| Puissance de sortie | 45 watts (8Ω), 55 watts (4Ω) |
| Consommation maximale | 360 watts |
| Distorsion harmonique totale | < 0.01% (1 kHz), < 0.09% (20 kHz) |
| Réponse en fréquence | 5 Hz - 50 kHz (-1 dB) |
| Rapport signal/bruit | 92 dB (non pondéré) |
| Vitesse de balayage | 20 V/µs (sous 8 Ω) |
| Impédance des enceintes | 4-8 Ω (une paire), 6-8 Ω (deux paires) |
| Entrées analogiques | Aux, CD, Tuner/DAB, DVD, AV/MD, Tape In, MP3 avant (SE) |
| Sorties | Enceintes A/B, Record Out, Casque (6,35 mm) |
| Fonctions spéciales | Direct, Contrôle de tonalité (Bass/Treble), Balance, Tape Monitor |
| Protection | Surcharge, court-circuit, surchauffe, DC offset |
| Télécommande | Oui, Azur remote (piles AAA fournies) |
| Compatibilité iPod | Oui (via dock Apple Universal) |
| Dimensions (H x L x P) | 70 x 430 x 310 mm |
| Poids | 6,2 kg |
| Alimentation | Secteur (tension selon modèle) |
| Nettoyage | Chiffon sec non pelucheux |
| Sécurité | Ne pas exposer à l'humidité, débrancher avant nettoyage |
| Garantie | Limitée, consulter le revendeur |
FOIRE AUX QUESTIONS - AZUR 340A SE CAMBRIDGE AUDIO
Questions des utilisateurs sur AZUR 340A SE CAMBRIDGE AUDIO
0 question sur cet appareil. Repondez a celles que vous connaissez ou posez la votre.
Poser une nouvelle question sur cet appareil
Téléchargez la notice de votre Amplificateur intégré au format PDF gratuitement ! Retrouvez votre notice AZUR 340A SE - CAMBRIDGE AUDIO et reprennez votre appareil électronique en main. Sur cette page sont publiés tous les documents nécessaires à l'utilisation de votre appareil AZUR 340A SE de la marque CAMBRIDGE AUDIO.
MODE D'EMPLOI AZUR 340A SE CAMBRIDGE AUDIO
azur 340A/340A SE
Integrated amplifier
User's manual
CONTENTS
Introduction 3
Safety precautions 4
Important safety instructions. 5
Rear panel connections. 6
Connecting. 8
Front panel controls. 10
Remote control. 12
Protection system 13
Troubleshooting. 14
Technical specifications 15
Limited warranty 16
INTRODUCTION
Thank you for purchasing this Cambridge Audio Azur 340A or 340A SE integrated amplifier.
About the 340A
The design of a high quality but cost-effective audio amplifier presents a major challenge. Providing first-class performance on an unlimited budget is one matter; achieving the same performance within tight price limits is quite another, and requires the expertise and experience that Cambridge Audio brings to its product design process. We believe we have succeeded in our aim of creating a first-class affordable amplifier.
For instance, separate very high quality Integrated Circuit Amplifiers modules are used for each channel for freedom from crosstalk and best possible stereo imaging.
The power supply is also a vital part of a power amplifier. A toroidal transformer, selected for low external magnetic field, is used in conjunction with generously specified reservoir capacitors and optimally placed decoupling components.
Close attention has been paid to the performance and quality of the passive components used, both in the signal paths and for decoupling purposes.
The 340A incorporates tone controls that give subtle control of the frequency response, allowing the correction of imperfect source material, and compensation for loudspeaker inadequacies or problems with room acoustics. These tone controls can be switched completely out of the audio path by use of the DIRECT switch, to give the shortest possible audio path.
The 340A has full protection against misuse and possible faults. The overload and short-circuit protection systems continuously monitor the voltage, current and temperature of the output devices, allowing the protection to act positively in case of need, without triggering spurious.
About the 340A SE
The 340A Special Edition incorporates all the features of the 340A but also has larger PSU reservoir capacitors for slightly more power coupled to enhanced bass response and greater dynamics.
In addition the 340A SE has a convenient dedicated front mounted auxiliary MP3/iPod™ input for gaining the best possible sound quality from portable music players. This input is automatically selected when something is plugged into it.
Your amplifier can only be as good as the system it is connected to. Please do not compromise on your source equipment, speakers or cabling. Naturally we particularly recommend models from the Cambridge Audio Azur range, which have been designed to the same exacting standards as our amplifiers. Your dealer can also supply excellent quality Cambridge Audio interconnects to ensure your system realises its full potential.
Thanks for taking the time to read this manual, we do recommend you keep it for future reference.

Matthew Bramble
Technical Director
SAFETY PRECAUTIONS
Checking the Power Supply Rating
For your own safety please read the following instructions carefully before attempting to connect this unit to the mains.
Check that the rear of your unit indicates the correct supply voltage. If your mains supply voltage is different, consult your dealer.
This unit is designed to operate only on the supply voltage and type that is indicated on the rear panel of the unit. Connecting to other power sources may damage the unit.
This equipment must be switched off when not in use and must not be used unless correctly earthed. To reduce the risk of electric shock, do not remove the unit's cover (or back). There are no user serviceable parts inside. Refer servicing to qualified service personnel. If the power cord is fitted with a moulded mains plug the unit must not be used if the plastic fuse carrier is not in place. Should you lose the fuse carrier the correct part must be reordered from your Cambridge Audio dealer.
The lightning flash with the arrowhead symbol within an equilateral triangle is intended to alert the user to the presence of un-insulated 'dangerous voltage' within the product's enclosure that may be of sufficient magnitude to constitute a risk of electric shock to persons.


The exclamation point within an equilateral triangle is intended to alert the user to the presence of important operating and maintenance instructions in the service literature relevant to this appliance.
This product complies with European Low
Voltage (73/23/EEC) and Electromagnetic Compatibility (89/336/EEC) Directives when used and installed according to this instruction manual. For continued compliance only Cambridge Audio accessories should be used with this product and servicing must be referred to qualified service personnel.

The crossed-out wheeled bin is the European Union symbol for indicating separate collection for electrical and electronic equipment. This product contains electrical and electronic equipment which should be reused, recycled or recovered and should not be disposed of with unsorted regular waste. Please return the unit or contact the authorised dealer from whom you purchased this product for more information.

Plug Fitting Instructions (UK Only)
The cord supplied with this appliance is factory fitted with a 13 amp mains plug fitted with a 3 amp fuse inside. If it is necessary to change the fuse, it is important that a 3 amp one is used. If the plug needs to be changed because it is not suitable for your socket, or becomes damaged, it should be cut off and an appropriate plug fitted following the wiring instructions below. The plug must then be disposed of safely, as insertion into a 13 amp socket is likely to cause an electrical hazard. Should it be necessary to fit a 3-pin BS mains plug to the power cord the wires should be fitted as shown in this diagram. The colours of the wires in the mains lead of this appliance may not correspond with the coloured markings identifying the terminals in your plug. Connect them as follows:
The wire which is coloured BLUE must be connected to the terminal which is marked with the letter 'N' or coloured BLACK.
The wire which is coloured BROWN must be connected to the terminal which is marked with the letter 'L' or coloured RED.
The wire which is coloured GREEN/YELLOW must be connected to the terminal which is marked with the letter 'E' or coloured GREEN.
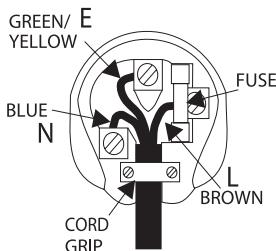
If your model does not have an earth wire, then disregard this instruction.
If a 13amp (BS 1363) plug is used, a 3amp fuse must be fitted, or if any other type of plug is used a 3amp or 5amp fuse must be fitted, either in the plug or adaptor, or on the distribution board.
IMPORTANT SAFETY INSTRUCTIONS
Please take a moment to read these notes before installing your Azur amplifier, they will enable you to get the best performance and prolong the life of the product. We advise you follow all instructions, heed all warnings and keep the instructions for future reference.
Only use the specified attachments/accessories with this unit.
The unit is of Class 1 construction and must be connected to a Mains socket outlet with a protective earthing connection.
This unit must be installed on a sturdy, level surface. Do not place in a sealed area such as a bookcase or in a cabinet. Any space open at the back (such as a dedicated equipment rack) is fine however.

When a cart is used, use caution when moving the cart to avoid injury from tip-over.
The unit requires ventilation. Do not situate it on a rug or other soft surface and do not obstruct any air inlets or outlet grilles. Do not install near any heat sources such as radiators, heat registers, stoves, or other apparatus (including amplifiers) that produce heat.
Due to stray magnetic fields turntables should not be located nearby due to interference.
It is recommended that when bi-amping, the same type power amplifiers are used.
Do not defeat the safety purpose of the polarized or grounding-type plug. A polarized plug has two blades with one wider than the other. A grounding type plug has two blades and a third grounding prong. The wide blade or the third prong are provided for your safety. If the provided plug does not fit into your outlet, consult an electrician for replacement of the obsolete outlet.
Do not route the power cable so that it can be walked upon or damaged by other items near it. The unit must be installed in manner that makes disconnection of the mains plug from the mains socket outlet (or appliance connector from the rear of the unit) possible.
When using for the first time it is advisable that it is left on, playing music, for at least 36 hours prior to critical listening. For subsequent use, a warm up period of 10-15 minutes is recommended for maximum enjoyment.
This unit must be disconnected from the mains socket to be turned off completely. If you do not intend to use this unit for a long period of time, unplug it from the mains socket. Unplug this unit during lightning storms.
WARNING - To reduce the risk of fire or electric shock, do not expose this unit to rain or moisture. This unit must not be exposed to dripping or splashing water or other liquids. No objects filled with liquid, such as vases, shall be placed on the unit. In the event of spillage, switch off immediately, disconnect from the mains supply and contact your dealer for advice.
To clean the unit, wipe its case with a dry, lint-free cloth. Do not use any cleaning fluids containing alcohol, ammonia or abrasives. Do not spray an aerosol at or near the unit.
Ensure that small objects do not fall through any ventilation grille. If this happens, switch off immediately, disconnect from the mains supply and contact your dealer for advice.
Refer all servicing to qualified service personnel. Servicing is required when the unit has been damaged in any way, such as a damaged power-supply cord or plug, liquid has been spilled or objects have fallen into the unit, the unit has been exposed to rain or moisture, does not operate normally, or has been dropped.
If you have checked the Troubleshooting section in this manual with no improvement, do not attempt to repair, disassemble or reconstruct the unit. A serious electric shock could result if this precautionary measure is ignored.
REAR PANEL CONNECTIONS

① Aux, CD, Tuner/DAB, DVD, AV/MD
These inputs are suitable for any 'line level' source equipment such as CD players, DAB or FM/AM tuners etc.
Note: These inputs are for analog audio signals only. They should not be connected to the digital output of a CD player or any other digital device.
② Record Out
This socket can be connected to a tape deck or to the analog Record In sockets on a MiniDisc or CD recorder.
③ Tape In
Connect to a tape deck or to the analog output sockets on a MiniDisc, portable digital music player or CD recorder using an interconnect cable from the recorder's Line Out sockets to the amplifier's Tape In sockets.
The Tape Input circuit of the amplifier is a "monitor" type, different from
the other 5 inputs. For the 5 normal inputs, the source selected for listening to will be sent out of Rec Out for recording. The source currently being listened to and (optionally) recorded is then shown on the front panel by a corresponding blue LED.
However, when the Tape Mon Input is selected a second LED will illuminate indicating that the Tape Monitor Input is now being listened to with a different source being sent out of the Rec output for recording. The recording source is shown by the first LED and can be changed by pressing the other source buttons. To switch Tape Monitor off, simply press the Tape Mon button again, toggling this function off.
This feature is most useful when using 3-head analog cassette decks which allow the signal being recorded to be played back live off tape (via a 3rd head) whilst it is simultaneously recorded. It is then possible by toggling the Tape Monitor input on and off to compare directly in real time the original and recorded signal so that adjustments to the recording parameters of the tape machine can be made (consult the manual of your 3-head analog cassette deck for full details).
④ Loudspeaker terminals
Two sets of loudspeaker terminals are available, A (main loudspeaker terminals) and B (secondary switchable loudspeaker terminals). Connect the wires from your left channel loudspeaker to the LEFT + & - terminals, and the wires from the right channel loudspeaker to the RIGHT + & - terminals. In each case, the red terminal is the positive output and the black terminal is the negative output.
Care should be taken to ensure no stray strands of wire are shorting speaker outputs together. Please ensure that the loudspeaker terminals have been tightened adequately to provide a good electrical connection. It is possible for the sound quality to be affected if the screw terminals are loose.
Note: When using one pair of speakers, use speakers with a nominal impedance of between 4-8 ohms. When using two pairs of speakers, use speakers with a nominal impedance of between 6-8 ohms each.
⑤ AC power socket
Once you have completed all connections to the amplifier, plug the AC power cable into an appropriate mains socket. Your amplifier is now ready for use.
CONNECTING
When designing our amplifiers we have tried to include features that allow you to connect your system in various ways. The inclusion of features such as Speaker B connections mean that you can flexibly configure your system depending on your requirements. The following diagrams are designed to make connection easy.
Basic connection
The diagram below shows the basic connection of your amplifier to a CD player and a pair of loudspeakers.
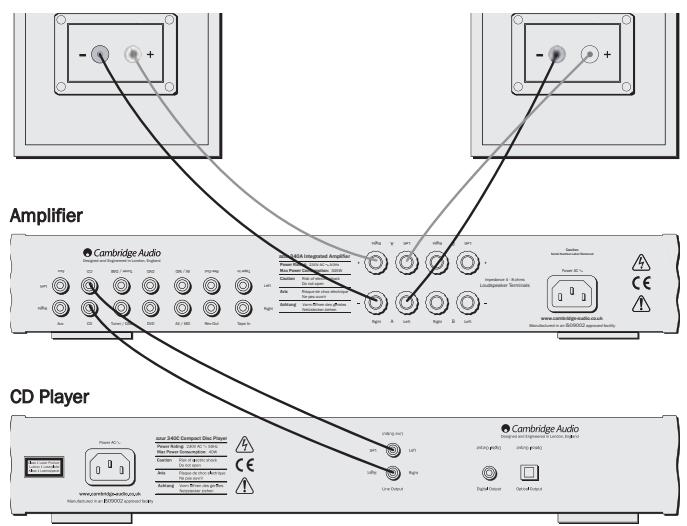
8 Azur integrated amplifier
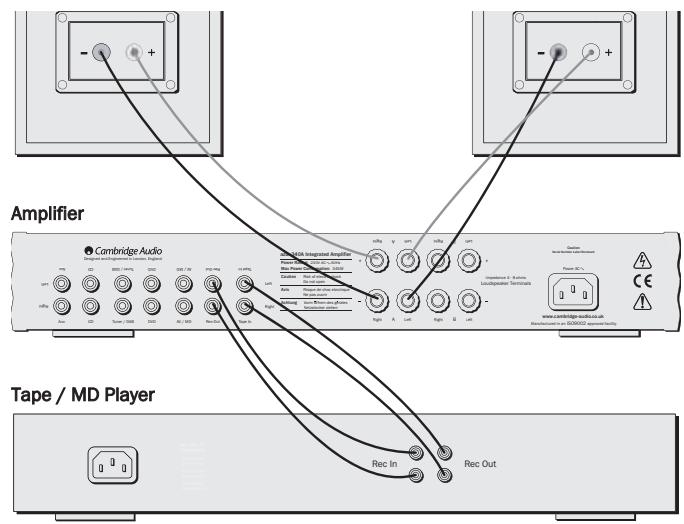
Tape connection
The diagram below shows how to connect the amplifier to a tape recorder or other source with a record and monitor connection.
Please note that either of the tape loop outputs can be used (as they are both the same signal in parallel).
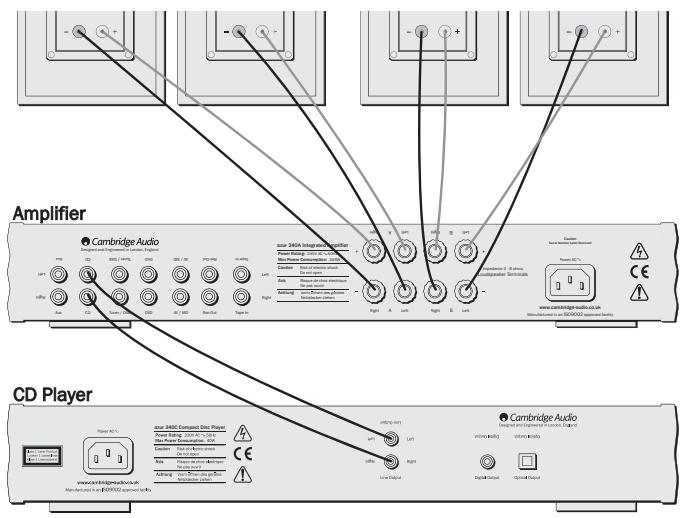
Speaker B connections
The Speaker B connections on the back of the amplifier allow for a second set of speakers to be used (ie speakers located in another room). The Speaker B button on the front panel allows this second set of speakers to be switched on and off.
Note: When using two pairs of speakers, use speakers with a nominal impedance of between 6-8 ohms each.
FRONT PANEL CONTROLS

① Power
Switches the unit on and off.
② Auxiliary MP3 In (340A SE only)

Connect your MP3/iPod/portable music player to the 340A SE with a 3.5mm to 3.5mm jack plug lead. Plugging a source into the MP3 input causes the 340A SE to automatically select this input. Remove the plug to return to normal use.
Note: It is possible to use both the front and rear auxiliary inputs separately. The front input is selected by inserting a jack plug, while the rear input is selected by pressing Aux on the front panel or remote.
③ Phones
Allows for the connection of headphones with a 14 jack plug connector. Headphones with an impedance of 32 and 600 ohms are recommended. When the headphones are connected, the loudspeaker relay is released switching off the output to the loudspeakers (speakers A and B).
④ Speaker B
Turns on/off the secondary set of loudspeaker terminals on the back panel. This can be used for listening to an extra set of loudspeakers in another room.
Note: When using two pairs of speakers, use speakers with a nominal impedance of between 6-8 ohms each.
⑤ Direct
This control gives the audio signal a more direct path to the power amplifier stage of your amplifier, bypassing the tone control circuits for the purest possible sound quality.
Bass and Treble
These controls allow subtle adjustments to the tonal balance of the sound. In the central position these controls have no effect. These controls only modify the sound through your loudspeakers and the Pre-Out sockets, they do not affect the signals sent through the Tape Out connections. With a well produced CD and a good system the tone controls are unnecessary and can be switched out by the Direct switch. If the musical recording is of poor quality or other factors are affecting the sound quality, it may be necessary to adjust the tone controls to compensate.
⑦ Infrared sensor
Receives IR commands from the supplied Azur remote control. A clear unobstructed line of sight between the remote control and the sensor is required.
Volume
Use to increase/decrease the level of the sound from the outputs of the amplifier. This control affects the level of the loudspeaker output, the pre-amp output and the headphone output. It does not affect the Tape Out connections. It is advisable to turn the Volume control fully anticlockwise before switching the amplifier on.
⑨ Balance
This control allows you to adjust the relative output levels of the left and right channels. In the central position the output from each channel is equal. This control only modifies the sound through your loudspeakers and the Pre-Out sockets, it does not affect the signals sent through the Tape Out connections.
10 Aux, CD, Tuner/DAB, DVD, AV/MD
Push the appropriate input selection button to select the source component that you wish to listen to. The signal selected is also fed to the Tape Out sockets so that it may be recorded. The input should not be changed whilst recording (but the recorded signal can be checked using the tape input Tape Monitor).
1 Tape Monitor
This control lets you listen to the output signal from a tape recorder or signal processor connected to the amplifier's Tape In/Rec Out sockets. When Tape Monitor is selected, the source component chosen by the input selection push buttons continues to be routed to the Rec Out sockets for recording or processing.
REMOTE CONTROL
The 340A and 340A SE are supplied with an Azur remote control that operates both this amplifier and Cambridge Audio Azur range CD players. Insert the supplied AAA batteries to activate. The functions relevant to the amplifier are as follows:

Power
Switches Azur CD players between Standby and On.
Note: The 340A/340A SE is switched On/Off from the front panel only.
Mute
Mutes the audio on the amplifier. The mute mode is indicated by the channel LED flashing. Press again to cancel mute.
Volume + / -
Increase or decrease the volume of the amplifier output.
Aux, CD, Tuner/DAB, DVD, AV/MD, Tape Mon
The six source select buttons are used to change the input source to the amplifier.
iPODCOMPATIBILITY
The 340A/340A SE remote control can now control the basic functions of Apple iPods when mounted in Apple's Universal Dock (or other docks or IR receivers compatible with the Apple Remote). Refer to your dock's instruction manual on how to connect it to your amplifier. We recommend you plug your dock into the auxiliary (Aux) input on the rear of the unit.
To use the Azur remote to control the docked iPod, hold down the Aux button whilst pressing one of the following buttons:

Play/Pause
Press to play the iPod, press again to pause play.

忍 Skip
Press once to skip forwards or backwards one track.
Release the Aux button to return the remote control to normal functionality.
For the 340A SE there is also a dedicated auxiliary MP3/iPod input on the front panel. Plugging a source into the MP3 input causes the 340A SE to automatically select the front auxiliary input. Remove the plug to return to normal use.

PROTECTION SYSTEM
The Azur 340A/340A SE protection system comprises of:
1. Overload and Short-Circuit Protection
Indicator - Output distorted and at unexpectedly low level.
Description - The amplifier is fully protected against excessively low load impedances. The overload and short-circuit protection systems continuously monitor the voltage, current and temperature conditions of each of the output devices, and comparing them with the defined Safe Operating Area or SOA. This sophisticated system allows the protection to act positively in case of genuine necessity, but without false triggering.
Remedy - Check loudspeaker impedance is not too low. Very often loudspeakers of too low an impedance can be driven at low levels but not high levels.
2. Over temperature detection
Indicator - Output appears to cut out frequently, independently on the two channels.
Description - The instantaneous temperatures of the output devices of the amplifier are continuously monitored to ensure that junction temperatures do not get dangerously high. When an over temperature condition occurs, the output is muted until the devices cool. The operation is carefully controlled to minimise the exposure of the output devices to wide temperature variations, which can impair reliability by thermal cycling. This is accomplished by making the muting periods relatively short, so the amplifier appears to be turning on and off. This puts the least stress on the output devices.
Remedy - Ensure ventilation is not obstructed, and loudspeakers are not of too low impedance. Switch the amplifier off for 15 minutes to cool down if necessary.
3. DC offset protection
Indicator - Amplifier will not operate; all input LEDs are flashing.
Description - The DC offset protection system immediately isolates the amplifier from the loudspeakers by positively opening an output relay, in the unlikely event of an amplifier fault. Errors of either polarity on both channels are detected.
Remedy - This can sometimes be triggered by excessive mains noise etc; if so switching the unit off and on again will reset it. If unit will not reset then there is an amplifier fault that will require servicing. Switch the unit off and contact your dealer.
4. Voltage clamping
When rapid transients are applied to reactive loads in extreme circumstances, flyback pulses can be generated which are larger than the amplifier supply rail voltages and have the potential to cause harm to the output devices. The amplifier has a comprehensive voltage clamping system that ensures that such pulses are safely absorbed by the amplifier and no damage can result.
TROUBLESHOOTING
There is no power
Ensure the AC power cord is connected securely.
Ensure the plug is fully inserted into the wall socket and is switched on.
Check fuse in the mains plug or adaptor.
There is no sound
Make sure the unit is not in Standby mode.
Check that source component is properly connected.
Check that 'TAPE MON' is not switched on (unless tape input is required).
Check that your speakers are properly connected.
If using Speaker B terminals check they are switched on.
If channel LED is flashing turn mute off.
There is no sound on one channel
Ensure that balance control is in the correct position.
Check speaker connections.
Check interconnects.
There is a loud buzz or hum
Check turntable or tone arm for ground and connection lead fault.
Ensure no interconnects are loose or defective.
Ensure that your tape deck/turntable is not too close to the amplifier.
Unable to make or play tape recordings
Check that TAPE MON and TAPE OUT have been connected correctly.
There is weak bass or diffused stereo imaging
Ensure that speakers are not wired out of phase.
TECHNICAL SPECIFICATIONS
| 340A | 340A SE | |
| Power output | 40 watts (into 8Ω) | 45 watts (into 8Ω) |
| 50 watts (into 4Ω) | 55 watts (into 4Ω) | |
| Max power consumption | 345w | 360w |
| Total harmonic distortion | 1kHz < 0.01% | 1kHz < 0.01% |
| 20kHz < 0.09% | 20kHz < 0.09% | |
| Frequency response (-1dB) | 5Hz - 50kHz | 5Hz - 50kHz |
| S to N ratio (unweighted) | 92dB | 92dB |
| Slew rate (into 8Ω) | 20V/uS | 20V/uS |
| Dimensions (H x W x D) | 70 x 430 x 310mm | 70 x 430 x 310mm |
| (2.8 x 16.9 x 12.2") | (2.8 x 16.9 x 12.2") | |
| Weight | 6.2kg (13.6Lbs) | 6.2kg (13.6Lbs) |
This guide is designed to make installing and using this product as easy as possible. Information in this document has been carefully checked for accuracy at the time of printing; however, Cambridge Audio's policy is one of continuous improvement, therefore design and specifications are subject to change without prior notice. If you notice any errors please feel free to email us at: support@cambridgeaudio.com
This document contains proprietary information protected by copyright. All rights are reserved. No part of this manual may be reproduced by any mechanical, electronic or other means, in any form, without prior written permission of the manufacturer. All trademarks and registered trademarks are the property of their respective owners.
iPod is a registered trademark of Apple Computer, Inc. All rights reserved.
© Copyright Cambridge Audio Ltd 2006
LIMITED WARRANTY
Cambridge Audio warrants this product to be free from defects in materials and workmanship (subject to the terms set forth below). Cambridge Audio will repair or replace (at Cambridge Audio's option) this product or any defective parts in this product. Warranty periods may vary from country to country. If in doubt consult your dealer and ensure that you retain proof of purchase.
To obtain warranty service, please contact the Cambridge Audio authorised dealer from which you purchased this product. If your dealer is not equipped to perform the repair of your Cambridge Audio product, it can be returned by your dealer to Cambridge Audio or an authorised Cambridge Audio service agent. You will need to ship this product in either its original packaging or packaging affording an equal degree of protection.
Proof of purchase in the form of a bill of sale or receipted invoice, which is evidence that this product is within the warranty period, must be presented to obtain warranty service.
This Warranty is invalid if (a) the factory-applied serial number has been altered or removed from this product or (b) this product was not purchased from a Cambridge Audio authorised dealer. You may call Cambridge Audio or your local country Cambridge Audio distributor to confirm that you have an unaltered serial number and/or you purchased from a Cambridge Audio authorised dealer.
This Warranty does not cover cosmetic damage or damage due to acts of God, accident, misuse, abuse, negligence, commercial use, or modification of, or to any part of, the product. This Warranty does not cover damage due to improper operation, maintenance or installation, or attempted repair by anyone other than Cambridge Audio or a
Cambridge Audio dealer, or authorised service agent which is authorised to do Cambridge Audio warranty work. Any unauthorised repairs will void this Warranty. This Warranty does not cover products sold AS IS or WITH ALL FAULTS.
REPAIRS OR REPLACEMENTS AS PROVIDED UNDER THIS WARRANTY ARE THE EXCLUSIVE REMEDY OF THE CONSUMER. CAMBRIDGE AUDIO SHALL NOT BE LIABLE FOR ANY INCIDENTAL OR CONSEQUENTIAL DAMAGES FOR BREACH OF ANY EXPRESS OR IMPLIED WARRANTY IN THIS PRODUCT. EXCEPT TO THE EXTENT PROHIBITED BY LAW, THIS WARRANTY IS EXCLUSIVE AND IN LIEU OF ALL OTHER EXPRESS AND IMPLIED WARRANTYES WHATSOEVER INCLUDING, BUT NOT LIMITED TO, THE WARRANTY OF MERCHANTABILITY AND FITNESS FOR A PRACTICAL PURPOSE.
Some countries and US states do not allow the exclusion or limitation of incidental or consequential damages or implied warranties so the above exclusions may not apply to you. This Warranty gives you specific legal rights, and you may have other statutory rights, which vary from state to state or country to country.

- azur 340A/340A SE
- CONTENTS
- INTRODUCTION
- About the 340A
- About the 340A SE
- SAFETY PRECAUTIONS
- Checking the Power Supply Rating
- Plug Fitting Instructions (UK Only)
- IMPORTANT SAFETY INSTRUCTIONS
- REAR PANEL CONNECTIONS
- ① Aux, CD, Tuner/DAB, DVD, AV/MD
- ② Record Out
- ③ Tape In
- ④ Loudspeaker terminals
- ⑤ AC power socket
- CONNECTING
- Basic connection
- Tape connection
- Speaker B connections
- FRONT PANEL CONTROLS
- ① Power
- ② Auxiliary MP3 In (340A SE only)
- ③ Phones
- ④ Speaker B
- ⑤ Direct
- Bass and Treble
- ⑦ Infrared sensor
- Volume
- ⑨ Balance
- Aux, CD, Tuner/DAB, DVD, AV/MD
- Tape Monitor
- REMOTE CONTROL
- Power
- Mute
- Volume + / -
- Aux, CD, Tuner/DAB, DVD, AV/MD, Tape Mon
- iPODCOMPATIBILITY
- Play/Pause
- 忍 Skip
- PROTECTION SYSTEM
- Overload and Short-Circuit Protection
- Over temperature detection
- DC offset protection
- Voltage clamping
- TROUBLESHOOTING
- There is no power
- There is no sound
- There is no sound on one channel
- There is a loud buzz or hum
- Unable to make or play tape recordings
- There is weak bass or diffused stereo imaging
- LIMITED WARRANTY
Marque : CAMBRIDGE AUDIO
Modèle : AZUR 340A SE
Catégorie : Amplificateur intégré