
PHP5320X - Cuisinière encastrable PROGRESS - Notice d'utilisation et mode d'emploi gratuit
Retrouvez gratuitement la notice de l'appareil PHP5320X PROGRESS au format PDF.


| Type de produit | Cuisinière encastrable |
| Marque | PROGRESS |
| Modèle | PHP5320X |
| Dimensions (H x L x P) | 600 x 560 x 550 mm |
| Volume intérieur | 53 L |
| Alimentation | 230 V, 50 Hz |
| Puissance totale du four | 2740 W |
| Fonctions de cuisson | Chaleur tournante, chaleur supérieure et inférieure, chaleur inférieure, gril, gril ventilé, décongélation |
| Nettoyage | Pyrolyse (deux niveaux : P1 et P2) |
| Sécurité | Verrouillage enfant, thermostat de sécurité, arrêt automatique, verrouillage porte durant la pyrolyse |
| Type de porte | Triple vitrage amovible |
| Nombre de niveaux de cuisson | 4 |
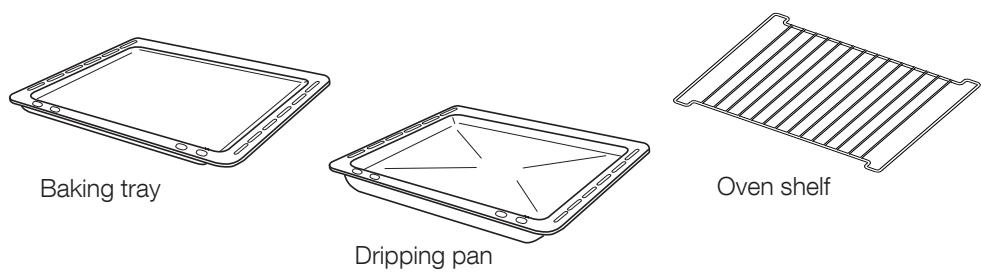
| Accessoires fournis | Grille, lèchefrite, plateau de cuisson |
| Éclairage intérieur | Oui, 40 W |
| Ventilateur de refroidissement | Oui |
| Commande | Électronique avec afficheur numérique |
| Types de boutons | Encastrables (système push-pull) |
| Matériau extérieur | Acier inoxydable |
| Fabricant | Electrolux Home Products Italy S.p.A. |
| Service après-vente | Contactez le service client Electrolux |
FOIRE AUX QUESTIONS - PHP5320X PROGRESS
Questions des utilisateurs sur PHP5320X PROGRESS
0 question sur cet appareil. Repondez a celles que vous connaissez ou posez la votre.
Poser une nouvelle question sur cet appareil
Téléchargez la notice de votre Cuisinière encastrable au format PDF gratuitement ! Retrouvez votre notice PHP5320X - PROGRESS et reprennez votre appareil électronique en main. Sur cette page sont publiés tous les documents nécessaires à l'utilisation de votre appareil PHP5320X de la marque PROGRESS.
MODE D'EMPLOI PHP5320X PROGRESS
Inbouwfornuis
Built-in under
Inhoud
Waarschuwingen en belangrijke veiligheidsinstructies.... 3
Beschrijving van het apparaat 5
Bedieningspaneel 6
Bedieningspaneel 7
Eerste installatie 8
Functiesymbolen 11
Gebruik van de oven 12
Programmeren van de oven 19
Speciale functies 21
Bak-tabellen 24
Reiniging en onderhoud 26
Het oplossen van problemen 37
Technische gegevens 38
Instructies voor de installateur 39
Instructies voor de inbouw 41
Klantenservice 42
Handleiding voor de gebruiksaanwijzing

Veiligheidsinstructies

Stap-voor-stap handleiding

Adviezen

Milieu-informatie
CE Dit apparaat beantwoordt aan de volgende EEG-Richtlijnen:
- 2006/95 (laagspanningsrichtlijn);
- 89/336 (EMC-richtlijn);
- 93/68 (Algemene richtlijn);
en de daarop volgende wijzigingen.
FABRIKANT:
ELECTROLUX HOME PRODUCTS ITALY S.p.A.
Viale Bologna, 298
47100 FORLÏ (Italy)

Waarschuwingen en belangrijke veiligheidsinstructies
Bewaar de bij dit apparaat geleverde gebruiksaanwijzing zorgvuldig. Mocht het apparaat aan derden doorgegeven of verkocht worden, of indien u het apparaat wanneer u gaat verhuizen in uw oude woning achterlaat, dan is het van groot belang dat de nieuwe gebruiker over deze gebruiksaanwijzing en de aanwijzingen kan beschikken.
Deze aanwijzingen zijn bedoeld voor de veiligheid van de gebruikers en hun huisgenoten. Lees ze dus aandachtig door, voordat u het apparaat aansluit en/of in gebruik neemt.
Installatie
- De installatie moet verricht worden door vakkundig personeel, met inachtneming van de geldende voorschriften. De afzonderlijke installatiewerkzaamheden zijn beschreven in de instructies voor de installateur.
- Laat de installatie en aansluiting uitvoeren door een vakman, overeenkomstig de hem, dankzij zijn vakkennis bekende richtlijnen.
- Ook eventuele voor de installatie noodzakelijke wijzigingen aan de elektriciteitsvoorziening moeten door een erkend installateur uitgevoerd worden.
- Deze oven is geschikt voor gebruik als afzonderlijk apparaat of in combinatie met een elektrische kookplaat, voor aansluiting op een 1-,2- of 3-fasige spanningsbron (of groepen) van 230 V. De aansluiting op meerdere fasen zonder nulleider (400 V) leidt tot het defect van de oven en de aangesloten kookplaten.
Werking
- Deze oven is ontworpen voor de bereiding van gerechten; gebruik hem nooit voor andere doeleinden.
- Tijdens de werking van de oven extra voorzichtig zijn. Door de grote hitte van de verwarmingselementen zijn de roosters en andere delen erg heet.
- Indien u - om welke reden dan ook - aluminiumfolie in de oven gebruikt, laat dit dan nooit in direct contact komen met de bodem van de oven.
-
Ga bij het reinigen van de oven voorzichtig te werk: sproei nooit vloeistof op het vetfilter (indien aanwezig), de verwarmingselementen en de thermostaatsensor.
-
Het is gevaarlijk veranderingen van welke aard ook aan te brengen aan het apparaat of aan de kenmerken ervan.
- Tijdens het bak-, braad- en grillproces worden de ovendeur en de andere onderdelen van het apparaat erg heet, Houd kinderen daarom uit de buurt van het apparaat. Indien er elektrische apparaten worden aangesloten op stopcontacten in de buurt van de oven, let er dan op dat de aansluitsnoeren niet in aanraking komen met hete oppervlakken of vastgeklemd raken tussen de ovendeur.
- Gebruik altijd ovenwanten om vuurvaste, hete schotels of schalen uit de oven te halen.
- Een regelmatige reiniging voorkomt de achteruitgang van het oppervlakte-materiaal van de oven.
- Schakel voordat u de oven gaat reinigen de stroom uit of haal de stekker uit het stopcontact.
- Verzeker u ervan dat de oven in de stand «UIT» staat, als de oven niet meer gebruikt wordt.
- Het apparaat mag niet worden gereinigd met een stoomreiniger.
- Gebruik geen schuurmiddelen of scherpe metalen schrapers. U kunt daarmee krassen op de deur veroorzaken en dat kan leiden tot het barsten van het glas.
Veiligheid
- Dit apparaat is bestemd voor gebruik door volwassenen. Het is gevaarlijk om het door kinderen te laten gebruiken of hen ermee te laten spelen.
- Houd kinderen uit de buurt, zolang de oven in werking is. Ook nadat u de oven heeft uitgeschakeld, blijft de deur nog lange tijd heet.
- Dit apparaat mag niet gebruikt worden door kinderen of andere personen wiens lichamelijke, motorische of geestelijke gesteldheid of gebrek aan ervaring en kennis die daardoor het apparaat niet kunnen gebruiken zonder supervisie of instructies van een verantwoordelijk persoon om zeker te zijn van dat het apparaat veilig kan worden gebruikt.
Afvalverwerking

Verpakkingsmateriaal
- De verpakking bestaat uit milieu-vriendelijke materialen die geschikt zijn voor hergebruik. De onderdelen van kunststof zijn voorzien van de volgende merktekens, bijv. >PE>, >PS< enz. Gooi de verpakkingsmaterialen weg in overeenstemming met hun kenmerken bij de gemeentelijke afvaldienst in de daarvoor bedoelde containers.

Oude apparaten
- Het symbool op het product of op de verpakking wijst erop dat dit product niet als huishoudafval mag worden behandeld, maar moet worden afgegeven bij een verzamelpunt waar elektrische en elektronische apparatuur wordt gerecycled. Als u ervoor zorgt dat dit product op de juiste manier wordt verwijderd, voorkomt u mogelijke negatieve gevolgen voor mens en milieu die zich zouden kunnen voordoen in geval van verkeerde afvalverwerking. Voor gedetailleerdere informatie over het recyclen van dit product, kunt u contact opnemen met de gemeente, de gemeentereiniging of de winkel waar u het product hebt gekocht.

Let op: Opdat een afgedankt apparaat geen gevaar meer oplevert, moet het voordat het als afval wordt verwerkt, onbruikbaar gemaakt worden.
Trek de stekker uit het stopcontact en verwijder de hoofdkabel van het apparaat.
Klantenservice
- Laat controlewerkzaamheden of reparaties uitvoeren door de klantenservice van de fabrikant of door een door de fabrikant geautoriseerde klantenservice en gebruik alleen originele onderdelen.
- Probeer nooit zelf storingen van of beschadigingen aan het apparaat te repareren. Reparaties die door niet-deskundige personen uitgevoerd worden, kunnen tot schade of letsel leiden.

- Bedieningspaneel
- Knop voor kookzone linksvoor
- Knop voor kookzone linksachter
- Elektronische ovenregeling
- Knop voor kookzone rechtsachter
-
Knop voor kookzone rechtsvoor
-
Ventilatiesleuf voor afkoelventilatie
- Grill
- Binnenverlichting
- Oven-ventilator
- Typeplaatje
Accessoires

Verzinkbare knoppen
Deze modellen zijn uitgerust met verzinkbare knoppen. Deze schakelaarknoppen werken volgens het druk-trekprincipe. Ze kunnen volledig in het paneel worden verzonken wanneer de oven buiten bedrijf is.

natural_image
Illustration of a hand pressing down on a circular device with a black arrow indicating rotation (no text or symbols)Bedieningsknop voor de kookplaat
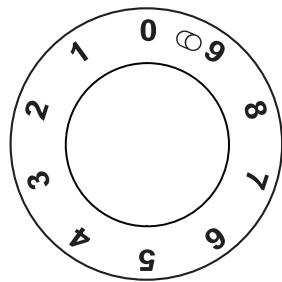
Op het bedieningspaneel bevinden zich de schakelknoppen voor de vier verwarmingselementen van de kookzones. De kookzones worden ingesteld met een schakelaar met 9 standen waarvan de volgende standen gebruikt kunnen worden:
$$ 0 = \text { UIT } $$
$$ 1 = \text {Minimum} $$
$$ 9 = \text {Maximum} $$

Tweekringskookzone - Inschakeling (zie de lijst van apparaten in hoofdstuk «Technische gegevens»)
Door de kookzoneknop van stand 9 in de stand “☐” (naar rechts) te zetten, worden de beide verwarmingskringen ingeschakeld; “klik” is hoorbaar. Beide verwarmingskringen worden nu tegelijk ingeschakeld. Daarna wordt de gewenste stand ingesteld (knop naar links draaien).
De bereiding van gerechten met olie of vetten zoals bijv. frites, mag niet zonder toezicht plaatsvinden, daar olie en vetten bij oververhitting gemakkelijk in brand kunnen vliegen.
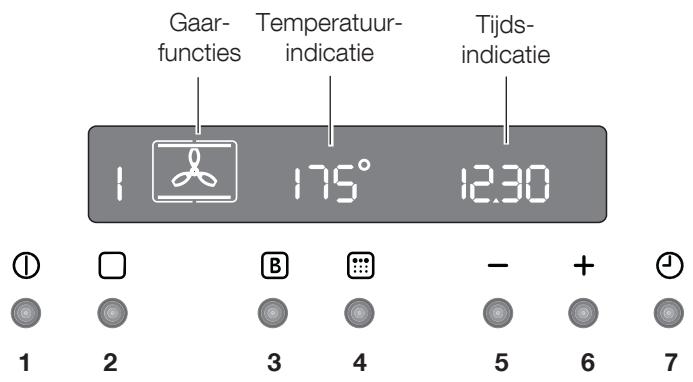
Drukknoppen
- AAN/UIT
- Oven-functietoets
- Snelopwarmfunctie
- Pyrolytische reinigingsfunctie
- Verlagingstoets “—” (tijd of temperatuur)
- Verhogingstoets “+” (tijd of temperatuur)
- Kookwekker / bereidingsduur / einde bereidingsduur
Alle functies van de oven worden elektronisch geregeld.
U kunt willekeurige combinaties van gaarfuncties, gaartemperaturen en automatische tijdinstellingen kiezen.
Opmerking
Als de stroom uitvalt blijven de instellingen (klok, ingesteld of lopend programma) ongeveer 3 minuten in het programma-geheugen bewaard. Als de stroom langer uitvalt, worden alle instellingen gewist. Als de stroomtoevoer weer hersteld is, knipperen de cijfers in het display. De klok en de timer moeten in een dergelijk geval wel opnieuw worden ingesteld.

Verwijder al het verpakkings- materiaal binnen en buiten, voor- dat u de oven in gebruik neemt.
Wanneer de oven voor het eerst op de elektriciteit wordt aangesloten, verschijnt in het display automatisch 12:00 en het symbool knippert.
Verzeker u ervan dat het juiste tijdstip van de dag is ingesteld voor het eerste gebruik van de oven.
Om het juiste tijdstip van de dag in te stellen:
- Druk op de toets 📁 en, terwijl het symbool ▶ knippert, stelt u met de toetsen “—” of “+” de tijd in (afb. 1). Het pijltjessymbool van de tijd ▶ verdwijnt ongeveer 5 seconden na weergave van de precieze tijd.
- Zodra het symbool ▶ niet meer knippert, drukt u tweemaal op de ⏻ toets. Ga vervolgens te werk als onder punt 1.
Voor het eerste gebruik
Voordat u de oven in gebruik neemt, moet de oven opgewarmd worden zonder voedsel.
Ga als volgt te werk om dat te doen:
- Druk op de toets Ⓐ om de oven in te schakelen.
- Druk tweemaal op de toets □ en kies de functie «Hete lucht» (afb. 2).
- Zet de temperatuur op 250°C, gebruik daarvoor de toets “+”.
- Laat de oven leeg ongeveer 45 minuten lang in werking.
- Open een raam voor de ventilatie.
Doe dit opnieuw met de functie «Boven- en onderwarmte» en «Ventilatorgrill» gedurende zo'n 5-10 minuten.
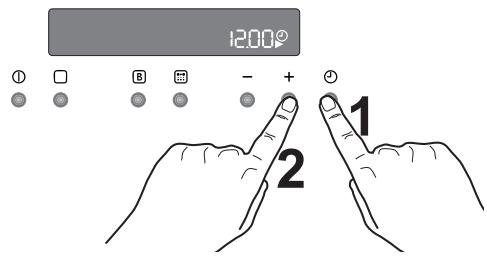
Afb. 1

Afb. 2
Gedurende deze tijd kan er een onaange-naam luchtje ontstaan. Dit is heel normaal. Het wordt veroorzaakt door fabricageresten.
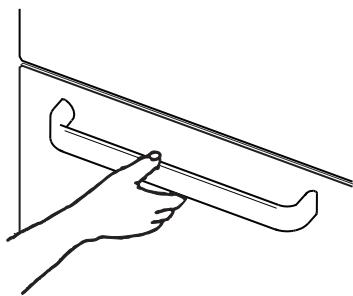
Laat de oven vervolgens afkoelen en reinig dan de ovenruimte met een in warm zeepsop vochtig gemaakte doek. Reinig ook de roosters en bakplaten voor het eerste gebruik grondig. Pak, om de deur te openen, altijd de handgreep in het midden vast (afb. 3).
"Aan-/Uit" - toets
Voor het instellen van gaarfuncties of andere programma's moet de oven worden ingeschakeld. Als de knop Ⓕ is ingedrukt, verschijnt in het display het ovensymbool en de oververlichting wordt ingeschakeld (afb. 4).
Om te oven uit te schakelen, kunt u de knop Ⓕ. te allen tijde indrukken. Alle gaarfuncties of programma's worden beëindigd, de ovenverlichting wordt uitgeschakeld en in de tijdindicatie verschijnt alleen nog de tijd van de dag.
U kunt de oven te allen tijde uitschakelen.
Zo kiest u een bereidingsfunctie
- Schakel de oven in door op de Ⓐ toets te drukken.
- Druk op de toets □ om de gewenste functie te selecteren. Elke keer dat toets □ wordt ingedrukt, wordt een functiesymbool zichtbaar in het display en links van het geselecteerde functiesymbool verschijnt het bijbehorende functienummer (afb. 5).
- Wanneer de vooraf ingestelde temperatuur niet geschikt is, dan stelt u met de toets “—” of “+” de temperatuur in. Het temperatuurniveau kan in stappen van 5 graden worden ingesteld.
- Met het stijgen van de temperatuur in de oven begint het thermometersymbool langzaam te stijgen en geeft daarmee de daadwerkelijke oventemperatuur aan. Wanneer de gewenste temperatuur is bereikt, dan weerklinkt een kort akoestisch signaal en het thermometersymbool gaat branden.
natural_image
Line drawing of a hand holding a curved object against a wall (no text or symbols)Afb. 3

Afb. 4

Afb. 5
De temperatuur en de tijd instellen
Druk de toetsen “—” en “+” in, om de vooraf ingestelde temperatuur te verhogen of verlagen, terwijl het symbool “o” knippert (afb. 6). De maximale temperatuur bedraagt 250°C.
Druk de toetsen “—” en “+” in, om de vooraf ingestelde temperatuur te verhogen of verlagen, terwijl het symbool ▶ knippert.
Veiligheidsthermostaat
Om te voorkomen dat de oven oververhit raakt (door onjuist gebruik van het apparaat of vanwege defecte onderdelen), is de oven voorzien van een veiligheids-thermostaat die indien nodig de stroom-toevoer onderbreekt. Zodra de temperatuur is gedaald, wordt de oven automatisch weer ingeschakeld.
Als de veiligheidsthermostaat is geactiveerd vanwege onjuist gebruik van het apparaat, hoeft u (nadat de oven is afgekoeld) alleen de fout te verhelpen. Is de thermostaat echter geactiveerd vanwege een defect onderdeel, neem dan contact op met de klantenservice.
Koelventilator
De koelventilator koelt de oven en het bedieningspaneel. De ventilator wordt nadat de oven enkele minuten in werking is automatisch ingeschakeld. Warme lucht wordt door het paneel in de buurt van de greep van de ovendeur uitgeblazen. Nadat de oven is uitgeschakeld, blijft de ventilator mogelijk nog even lopen om de bedieningselementen te koelen. Dit is helemaal normal.

De werking van de ventilator hangt af van hoe lang en op welke temperatuur de oven gebruikt is. Het is mogelijk dat de ventilator helemaal niet ingeschakeld wordt op lagere temperatuurinstellingen of als de oven maar korte tijd gebruikt is.

Functiesymbolen

Hete lucht - Bij deze instelling kunt u op meerdere niveaus tegelijkertijd braden of bakken en braden, zonder dat dit tot aroma-overdracht leidt. Vooraf ingestelde temperatuur: 175°C

Boven- en onderwarmte - De warmte komt van boven en beneden en wordt gelijkmatig in de ovenruimte verdeeld. Vooraf ingestelde temperatuur: 200°C

Onderwarmte - De warmte komt alleen van het onderste verwarmingselement in de oven- ruimte. Bij deze instelling kunt u gerechten heel goed afmaken. Vooraf ingestelde temperatuur: 250°C
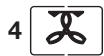
Ventilatorgrill - Dit is een alternatieve gaarmethode voor gerechten die anders met de normale grill worden bereid. Het grillelement en de ventilator van de oven werken samen, zodat de hetelucht rond de gerechten circuleert. Vooraf ingestelde temperatuur: 180°C

Maximumtemperatuur: 200 °C.
Grill - Via de grill gaat snel directe warmte naar het middelste gedeelte van de grillpan. Met de grill kunnen goed kleinere hoeveelheden worden gegrilleerd. Op deze wijze kan ook energie worden bespaard. Vooraf ingestelde temperatuur: 250 °C

Ontdooien - De ventilator circuleert de hetelucht zonder warmte bij kamertemperatuur in de ovenruimte. Deze functie is bijzonder geschikt om kwetsbare levensmiddelen te ontdooien, die door opwarmen beschadigd raken, bijvoorbeeld taarten met crèmevulling, ijstaarten, gebak, brood en bakwaren van gistdeeg.

Pyrolytische reiniging - Met deze functie kunt u de ovenruimte grondig reinigen.

Belangrijk! - Bekleed de oven niet met aluminiumfolie, en leg geen bakplaten e.d. op de bodem, aangezien anders het email van de oven beschadigd raakt door de optredende warmtestuwing. Zet potten en pannen, hittebestendige potten en pannen alsmede aluminiumplaten altijd op het plateau, dat in één van de inzetniveaus is geschoven. Bij het verwarmen van levensmiddelen komt stoom vrij net als in een ketel. Wanneer de stoom in aanraking komt met de glazen deur van de oven, wordt er condens gevormd en ontstaan er waterdruppels.
Warm de lege oven altijd 10 minuten voor, om condensvorming te beperken.
Wij adviseren u na elke bereiding de waterdruppels weg te vegen.

De ovendeur moet tijdens het gaarproces gesloten zijn.
Ga bij het openen van de ovendeur zorgvuldig te werk. Laat de deur niet „open vallen“, maar gebruik de deurgreep, tot de deur helemaal is geopend.

De oven heeft vier inzetniveaus.
De plaatsen voor het plateau worden van de bodem van de oven geteld, zoals aangegeven in de afbeelding. De plateaus moeten hoe dan ook op de juiste manier worden ingezet (zie afbeelding). Zet vaatwerk en pannen niet direct op de bodem van de oven.

Hete lucht
De gerechten worden gegaard met hete lucht, die via een ventilator aan de achterwand van de oven gelijkmatig in de binnenruimte van de oven wordt verdeeld.
De warmte komt snel en gelijkmatig in alle ovenzones terecht. Dat betekent dat u tegelijkertijd verschillende gerechten op meerdere niveaus kunt bakken, braden en stoven.
Deze gaarfunctie biedt de volgende voordelen:
- Sneller voorverwarmen
Doordat de heteluchtoven snel op temperatuur komt, is het over het algemeen niet nodig om de oven voor te verwarmen. Wellicht heeft u echter toch 5-7 minuten extra bereidingsduur nodig. Voor recepten die hogere temperaturen vereisen, zoals brood, pasteien, scones of soufflés, verkrijgt u de beste resultaten als de oven eerst wordt voorverwarmd.
- Lagere temperaturen
Bereiding met hete lucht vereist over het algemeen lagere temperaturen dan bereiding met boven- en onderwarmte.
Houd de aanbevolen temperaturen in de bak- en braadtabel aan. Denk eraan, de temperaturen van uw eigen recepten voor boven- en onderwarmte met 20-25 °C te verlagen.
- Gelijkmatige warmteverdeling bij het bakken
De oven met ventilator verwarmt alle inzetniveaus gelijkmatig. Dit betekent dat verschillende baksels met hetzelfde voedsel tegelijk in de oven bereid kunnen worden. De baksels op het bovenste niveau kunnen echter iets bruiner worden dan die op het onderste niveau.
Dit is helemaal normaal. Aroma's en geuren worden daarbij niet van het ene op het andere gerecht overgedragen.
Hoe gebruikt u de heteluchtfunctie
- Oven inschakelen.
- Druk daarvoor op de toets oven-functies □, tot het symbool 📋 op het display verschijnt.
- Indien nodig met de toetsen “+” of “—” de temperatuur instellen.
Boven- en onderwarmte
- De warmte wordt het beste verdeeld bij gebruik van het middelste niveau. Wanneer u wilt dat uw baksel een bruinere bodem krijgt, moet u het op een lager niveau in de oven zetten. Wanneer u wilt dat uw baksel een bruinere bovenkant krijgt, moet u het op een hoger niveau in de oven zetten.
- Het materiaal en de afwerking van de bakplaten en schalen is van invloed op de mate waarin het voedsel een bruin korstje krijgt. Email, donker, zwaar en met teflon gecoat bakgerei bevorderen het bruinen, terwijl bakgerei van glas, glanzend aluminium of gepolijst edelstaal warmte reflecteren en afremmen.
- Zet gerechten altijd in het midden van het rooster, om een gelijkmatige bruining te garanderen.
- Plaats schalen op een bakplaat van de juiste afmeting, om te voorkomen dat er voedsel op de bodem van de oven wordt gemorst en ervoor te zorgen dat de oven gemakkelijker kan worden gereinigd.
- Zet nooit gerechten, blikken of bakgerei direct op de bodem van de oven, omdat die erg heet wordt en het vaatwerk kan beschadigen. Als u deze instelling gebruikt komt de warmte van de bovenste en onderste verwarmings-elementen. Daarmee kunt u gerechten op één enkel niveau bereiden. Dit is bijzonder geschikt voor gerechten, waarvan de bodem extra bruin moet worden, bijv. quiches en flans.
Gratins, lasagnes en ovenschotels die ook wat extra bruinering aan de bovenkant vergen kunnen ook heel goed bereid worden in de conventionele oven.
Gebruik van boven- en onderwarmte
- Oven inschakelen.
- Functie boven-/onderwarmte kiezen; Druk daarvoor op de toets oven-functies □, tot het symbool □ op het display verschijnt.
- Indien nodig met de toetsen “+” of “—” de temperatuur instellen.
Onderwarmte
Deze functie is bijzonder geschikt voor het bakken van taart- en vlaaibodems, en voor het afbakken van quiches resp. flans, om ervoor te zorgen dat de quiche- resp. taartbodem gaar is.
Grilleren
- Te grilleren gerechten moeten altijd op het rooster van de grillplaat worden geplaatst, om ervoor te zorgen dat de lucht optimaal kan circuleren en het gerecht niet in het afdruipende vet resp. grillsap drijft. Als u dat wilt, kunt u gerechten zoals bijv. vis, lever en niertjes direct op de grillplaat leggen.
- Droog het voedsel vóór het grillen goed af, zodat het niet gaat spatten. Strijk mager vlees en vis licht in met een beetje olie of gesmolten boter, zodat de gerechten tijdens de bereiding mals blijven.
- Meegegrilleerde bijlagen zoals bijv. tomaten of paddenstoelen kunnen tijdens het grillen van vlees onder het grillrooster (direct op de grillplaat) worden gelegd.
- Voor het roosteren van brood raden wij u aan het bovenste inzetniveau te gebruiken.
- Indien nodig moet het voedsel tijdens de bereiding worden omgedraaid.
Gebruik van de grill
De grill levert snelle directe warmte voor het midden van de grillplaat. Door de kleine grill te gebruiken voor de bereiding van kleinere hoeveelheden kunt u energie besparen.
- Oven inschakelen.
-
Functie grill kiezen; druk daarvoor op de toets oven-functies □, tot het symbool ▼ op het display verschijnt.
-
Indien nodig met de toetsen “+” of “—” de temperatuur instellen.
-
Kies het passende inzetniveau voor grillpan en rooster, al naargelang of het om platter of dikker grillgoed gaat. Volg vervolgens de instructies voor het grillen op.
Ventilatorgrill
Dit is een alternatieve bereidingsmethode voor gerechten die anders met de normale grill bereid worden. Grillelement en ventilator werken samen, zodat de hete lucht rond de gerechten circuleert. De noodzaak om het voedsel te controleren en om te draaien is daardoor minder. Ventilatorgrill minimaliseert kookluchtjes in de keuken.
Met uitzondering van toast en biefstukken, die van binnen rood moeten blijven, kunt u alle levensmiddelen met hete lucht bereiden die u normaal met boven- en onderwarmte zou bereiden. Het bereiden verloopt geleidelijker; ventilatorgrill vergt daarom iets meer tijd dan conventioneel grillen. Een van de voordelen is dat grotere hoeveelheden tegelijkertijd bereid kunnen worden.
- Oven inschakelen.
-
Functie ventilatorgrill kiezen; druk daarvoor op de toets oven-functies □,
tot het symbool op het display verschijnt. -
Evt. op de toetsen “+” of “—” drukken, om de temperatuurinstelling aan te passen.
Maximumtemperatuur: 200 °C.
- Kies het passende inzetniveau voor grillpan en rooster, al naargelang of het om platter of dikker grillgoed gaat. Volg vervolgens de instructies voor het grillen op.
Ontdooien
De ventilator loopt zonder warmte en laat de lucht bij kamertemperatuur in de binnenruimte van de oven circuleren. Hierdoor wordt het voedsel sneller ontdooid. De temperatuur in de keuken beïnvloedt echter de ontdooitijd.
Deze functie is bijzonder geschikt om kwetsbare levensmiddelen te ontdooien, die door opwarmen beschadigd raken, bijvoorbeeld taarten met crèmevulling, ijstaarten, gebak, brood en bakwaren van gistdeeg.
Gebruik van de ontdooifunctie
-
Druk voor het inschakelen van de oven op de toets Ⓔ.
-
Functie Ontdooien kiezen; druk daarvoor op de toets Oven-functies □, tot het symbool ⚙ op het display verschijnt.
-
Het display geeft de melding "def".

Adviezen
Bakken:
Bakgoed vraagt gewoonlijk om een gemiddelde temperatuur (150°C-200°C). Daarom dient de oven ca. 10 minuten lang te worden voorverwarmd.
Doe de ovendeur niet open voordat drie- kwart van de baktijd is verstreken.
Bak kruimeldeeg in een springvorm of op een bakblik tot tweederde van de baktijd. Vervolgens kunt u het garneren en afbakken. De verdere baktijd hangt af van de soort en hoeveelheid garnering of vulling. Biscuitdeeg moet moeilijk van de lepel lopen. Door te vloeibaar deeg zou de baktijd onnodig langer duren.
Worden twee bakplaten met gebak tegelijkertijd in de oven geschoven, dan moet tussen de platen een inzetniveau open worden gelaten.
Worden twee bakplaten met gebak tegelijkertijd in de oven geschoven, dan moeten de platen na ongeveer 2/3 van de baktijd van boven naar beneden verwisseld en gedraaid worden.
Braden:
Neem geen braadstukken die minder wegen dan 1 kg. Kleinere stukken kunnen tijdens het braden uitdrogen. Donker vlees, dat van buiten goed gebraden maar van binnen roze tot rood moet blijven, moet bij een hogere temperatuur (200°C-250°C) worden gebraden.
Licht vlees, gevogelte en vis hebben daarentegen een lagere temperatuur (150°C-175°C) nodig. Doe bij een korte bereidingsstijd de ingrediënten voor de saus of jus direct aan het begin in de braadslede. In andere gevallen worden ze het laatste halfuur toegevoegd.
U kunt controleren of het vlees gaar is met behulp van een lepel: als het vlees niet kan worden ingedrukt, is het gaar. Rosbief en ossenhaas, die van binnen roze moeten blijven, moeten op een hogere temperatuur en in kortere tijd worden gebraden.
Bij het bereiden van vlees direct op het rooster de braadslede in het onderliggende inzetniveau schuiven.
Laat het braadstuk minstens 15 minuten staan, zodat het vleesvocht niet kan weglopen.
Om rookvorming in de oven te beperken, kunt u een beetje water in de braadslede gieten. Om condensvorming te voorkomen, een paar keer water toevoegen. Borden kunnen tot zij geserveerd worden in de oven op de laagste temperatuur warm gehouden worden.

Voorzichtig!
De oven niet met aluminiumfolie bekleden en geen kookgerei, geen braadslede of bakplaat op de bodem leggen, aangezien anders het email van de oven door de optredende warmtestuwing beschadigd raakt.
Bereidingstijden
De bereidingstijden kunnen verschillen al naar gelang de samenstelling, ingrediënten en hoeveelheid vocht in de afzonderlijke gerechten.
Noteer de instelgegevens bij de eerste keer bereiden resp. braden, om bij bereiding van dezelfde gerechten in de toekomst ervaring te kunnen opdoen.
U kunt de aangegeven waarden in de tabellen aanpassen op basis van uw eigen ervaringen.
Zo stelt u de kookwekker in
- Gebruik de toets 📁 om de kookwekkerfunctie te selecteren. Het overeenkomstige symbool 📋 knippert en op het bedieningspaneel verschijnt "0.00" (afb. 7).
- Stel met de toets “+” de gewenste tijd in. De maximale tijdsduur is 23 uur 59 minuten. Nadat dit is ingesteld, wacht de kookwekker 3 seconden, waarna hij begint te lopen.
- Na afloop van de geprogrammeerde tijd hoor u een akoestisch signaal.
- Druk op een willekeurige toets om het signaal uit te schakelen.

Als de oven op dit moment werkt, wordt hij NIET uitgeschakeld.
De kookwekker kan ook gebruikt worden als de oven uitgeschakeld is.
De instelling van de kookwekker wijzigen:
Druk op de toets ⏻, tot de symbolen en ▶ gaan knipperen.
Nu kunt u de instelling van de kookwekker wijzigen. Druk daarvoor op de toets “—” of “+”.
Zo schakelt u de kookwekker uit:
druk op toets ⏻, tot de symbolen ⏱ en ▶ gaan knipperen.
De toets “—” indrukken om de tijds-aanduiding te resetten, tot het display “0.00” aangeeft (afb. 8).
Zo programmeert u een uitschakeltijd van de oven
- Zet gerechten in de oven, schakel de oven in, kies de gewenste functie en stel indien nodig de gewenste temperatuur in.
- De toets ⏻ indrukken, om de functie "Bereidingsduur" te kiezen. Het bereidingsduursymbool |→| knippert en op het display wordt "0.00" aangegeven (afb. 9).

Afb. 7

Afb. 8

Afb. 9
- Terwijl het symbool ▶ knippert, met de toets “+” de gewenste tijd instellen. De maximale tijdsduur is 23 uur 59 minuten. De programmeerfunctie wacht 3 seconden, waarna hij begint te lopen.
- Na afloop van de geprogrammeerde tijd wordt de oven automatisch uitgeschakeld. Er weerklinkt een akoestisch signaal en op het bedieningspaneel verschijnt "0.00".
- Druk op een willekeurige toets om het signaal uit te schakelen.
Zo annuleert u de bereidingstijd:
- Druk op de toets ⏻, tot het symbool ▶ knippert.
- Druk op de toets “—” om de tijds-aanduiding te resetten, tot het display “0.00” aangeeft (afb. 10).
Zo programmeert u het in-/uitschakelen van de oven
- Stel de bereidingsduur in zoals beschreven in het betreffende hoofdstuk.
- Druk op toets ⏻, tot de functie voor het einde van de bereidingsduur →| geselecteerd is en het betreffende symbool knippert. Op het bedieningspaneel wordt het eind van de bereidingsduur (actuele tijd plus aangegeven gaartijd) weergegeven - (afb. 11).
- Druk op de toets “+” om het gewenste einde van de bereidingsduur te selecteren.
- 3 seconden na het instellen begint de programmaschakelaar te lopen.
- De oven wordt automatisch in- en weer uitgeschakeld. Wanneer de oven wordt uitgeschakeld, klinkt er een akoestisch signaal.
- Druk op een willekeurige toets om het signaal uit te schakelen.
Indien u het programma wilt annuleren, annuleert u eenvoudig de ingestelde tijdsduur.

Afb. 10

Afb. 11
Automatische uitschakeling van de oven
Wanneer de instellingen niet worden gewijzigd, wordt de oven automatisch volgens onderstaande tabel uitgeschakeld (afb. 12).
| Temperatuurinstelling: | Uitschakeling oven: |
| 250°C | na 3 uur |
| van 200 tot 245°C | na 5,5 uur |
| van 120 tot 195°C | na 8,5 uur |
| minder dan 120°C | na 12 uur |
Restwarmtefunctie
Als er een bereidingsduur is ingesteld, wordt de oven automatisch een paar minuten voor het einde van de geprogrammeerde bereidingsduur uitgeschakeld, zodat de gerechten in de oven zonder verder energieverbruik helemaal gaar worden. Alle actuele instellingen worden getoond tot de bereidingsduur is afgelopen.
Bij een bereidingsduur van minder dan 15 minuten kunt u deze functie niet gebruiken.
Kinderblokkering voor de oven
De bedieningselementen op de oven kunnen geblokkeerd worden, zodat de oven niet per ongeluk door kinderen kan worden ingeschakeld.
- Schakel de oven uit en druk op de toets
①. - Druk tegelijkertijd de toetsen □ en “—” ongeveer 3 seconden lang in. Een akoestisch signaal weerklinkt en de melding „SAFE“ verschijnt op het display (afb. 13).
- De oven is nu geblokkeerd. Er kunnen nu geen afzonderlijke functies en ook geen temperatuur geselecteerd worden.
Zo deblokkeert u de oven:
Druk de toetsen □ en “—” tegelijkertijd ongeveer 3 seconden in. Er klinkt een akoestisch signaal en de weergave „SAFE” verdwijnt. Nu kan de oven weer worden bediend.

Afb. 12

Afb. 13
Snelopwarmfunctie
Na selectie van een bereidingsfunctie en van de temperatuur warmt de oven langzaam op tot de gewenste temperatuur is bereikt. Dit duurt 10 tot 15 minuten, afhankelijk van de geselecteerde functie en temperatuur.
Als de noodzakelijke temperatuur sneller bereikt moet worden, kunt u de snelopwarmfunctie gebruiken.
- Druk voor het inschakelen van de oven op de toets Ⓔ.
- Stel de gewenste bereidingsfunctie en temperatuur in zoals beschreven op de voorgaande pagina's.
- Druk voor het kiezen van de temperatuur op de toets “—” of “+”. De temperatuur wordt in het display aangegeven.
- Druk op toets □. In het temperatuurdisplay verschijnt „FHU” (afb. 14).
- Druk op toets □. Het symbool “o” knippert ongeveer 10 seconden lang. Nu kunt u de temperatuur selecteren. Druk daarvoor op de toets “—” of “+”.
- Nadat de gewenste temperatuur bereikt is, klinkt een korte signaaltoon en in de temperatuurweergave verschijnt weer de ingestelde temperatuur.
Deze functie is bij alle bereidingsfuncties en temperaturen beschikbaar.
Demo-modus
Deze modus is bedoeld voor speciaalzaken om de ovenfuncties te presenteren zonder stroomverbruik, afgezien van de binnenverlichting, het display en de ovenventilator. Deze functie kan alleen bij eerste aansluiting worden ingeschakeld.
Na een stroomuitval kan de demo-modus alleen worden ingeschakeld, wanneer in het display 12:00 en het symbool automatisch knipperen.
- De toets 📁 ca. 2 seconden indrukken. Er klinkt een kort signaal.

- Druk de toetsen 📁 en “—” tegelijkertijd in. Er klinkt een kort signaal en op het display verschijnt 12:00 (afb. 15).
Bij het inschakelen van de oven verschijnt het symbool ⏻ op het display.Dat betekent dat de demo-modus geactiveerd is.
Alle functies van de oven kunnen geselecteerd worden.
De oven is niet echt in werking en de verwarmingselementen worden niet ingeschakeld.
Schakel de oven uit en ga zoals hierboven beschreven te werk om de demo-modus weer uit te schakelen.

De demo-modus blijft bij stroomuitval in het programma opgeslagen.
Informatietoon regeltoets
U kunt de oven zodanig instellen dat er altijd een signaal te horen is wanneer u op een toets drukt. Deze functie kan alleen bij een uitgeschakelde oven worden geactiveerd.
- Druk de toetsen □ en “+” tegelijkertijd ongeveer 3 seconden in. Het signaal klinkt één keer (afb. 16).
Zo deactiveert u de informatietoon regeltoets:
- Druk bij een ingeschakelde oven de toets Ⓐ in, zodat de oven wordt uitgeschakeld.
- Drukt u de toetsen □ en “+” tegelijkertijd ongeveer 3 seconden in. Het signaal klinkt één keer.
Foutcodes
Het elektronische programmageheugen voert voortdurend een systeemdiagnose uit. Wanneer sommige parameters niet kloppen, worden de betreffende functies uitgeschakeld en op het display verschijnt de bijbehorende foutcode (afb. 17).
Meer hierover vindt u in het hoofdstuk "Het oplossen van problemen".
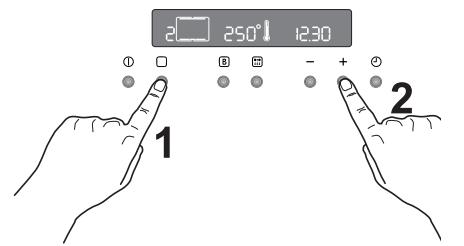
Afb. 15
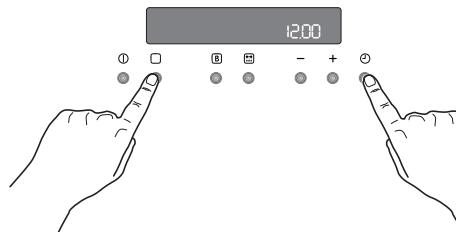
Afb. 16

Afb. 17
Boven- en onderwarmte en hete lucht

Tijden zijn exclusief voorverwarmen.
Lege oven altijd 10 Minuten voorverwarmen.
| GERECHT | Boven-en onderwarmte | Hete lucht | Grilltijd in minuten | OPMERKINGEN | ||
| Niveau4000 | Temp. (°C) | Niveau4331 | Temp. (°C) | |||
| GEBAK | ||||||
| Roerdeeg | 2 | 170 | 2 (1 en 3)* | 160 | 45-60 | Taartvorm |
| Zandtaartdeeg | 2 | 170 | 2 (1 en 3)* | 160 | 20-30 | Taartvorm |
| Karnemelk-kaaskoek | 1 | 175 | 2 | 165 | 60-80 | Taartvorm |
| Appeltaart | 1 | 170 | 2 (1 en 3)* | 160 | 90-120 | Taartvorm |
| Strudel | 2 | 180 | 2 | 160 | 60-80 | Bakplaat |
| Jamtaart | 2 | 190 | 2 (1 en 3)* | 180 | 40-45 | Taartvorm |
| Cake | 2 | 170 | 2 | 150 | 60-70 | Taartvorm |
| Scones | 1 | 170 | 2 (1 en 3)* | 165 | 30-40 | Taartvorm |
| Stol | 1 | 150 | 2 | 150 | 120-150 | Taartvorm |
| Pruimentaart | 1 | 175 | 2 | 160 | 50-60 | Broodpan |
| Kleine taart | 3 | 170 | 2 | 160 | 20-35 | Bakplaat |
| Biscuits | 2 | 160 | 2 (1 en 3)* | 150 | 20-30 | Bakplaat |
| Schuimgebak | 2 | 135 | 2 (1 en 3)* | 150 | 60-90 | Bakplaat |
| Met gist gebakken koekjes | 2 | 200 | 2 | 190 | 12~20 | Bakplaat |
| Gebak: Soezendeeg | 2 of 3 | 210 | 2 (1 en 3)* | 170 | 25-35 | Bakplaat |
| Taartjes | 2 | 180 | 2 | 170 | 45-70 | Taartvorm |
| BROOD EN PIZZA | ||||||
| Witbrood | 1 | 195 | 2 | 185 | 60-70 | |
| Roggebrood | 1 | 190 | 1 | 180 | 30-45 | Broodpan |
| Broodjes | 2 | 200 | 2 (1 en 3)* | 175 | 25-40 | Bakplaat |
| Pizza | 2 | 200 | 2 | 200 | 20-30 | Bakplaat |
| FLANS | ||||||
| Pasta-flan | 2 | 200 | 2 (1 en 3)* | 175 | 40-50 | Bakvorm |
| Groente-flan | 2 | 200 | 2 (1 en 3)* | 175 | 45-60 | Bakvorm |
| Quiches | 1 | 210 | 1 | 190 | 30-40 | Bakvorm |
| Lasagne | 2 | 200 | 2 | 200 | 25-35 | Bakvorm |
| Cannelloni | 2 | 200 | 2 | 200 | 25-35 | Bakvorm |
| VLEES | ||||||
| Rund | 2 | 190 | 2 | 175 | 50-70 | Rooster |
| Varken | 2 | 180 | 2 | 175 | 100-130 | Rooster |
| Kalf | 2 | 190 | 2 | 175 | 90-120 | Rooster |
| Engelse rosbief | ||||||
| rood | 2 | 210 | 2 | 200 | 50-60 | Rooster |
| rosé | 2 | 210 | 2 | 200 | 60-70 | Rooster |
| doorbakken | 2 | 210 | 2 | 200 | 70-80 | Rooster |
| Varkensschouder | 2 | 180 | 2 | 170 | 120-150 | met zwoerd |
| Varkenspoot | 2 | 180 | 2 | 160 | 100-120 | s stuks |
| Lamsvlees | 2 | 190 | 2 | 175 | 110-130 | Bout |
| Kip | 2 | 190 | 2 | 200 | 70-85 | Heel |
| Kalkoen | 2 | 180 | 2 | 160 | 210-240 | Heel |
| Eend | 2 | 175 | 2 | 220 | 120-150 | Compleet |
| Gans | 2 | 175 | 1 | 160 | 150-200 | Compleet |
| Konijn | 2 | 190 | 2 | 175 | 60-80 | In stukken |
| Haas | 2 | 190 | 2 | 175 | 150-200 | In stukken |
| Fazant | 2 | 190 | 2 | 175 | 90-120 | Compleet |
| Gebraden gehakt | 2 | 180 | 2 | 170 | totaal.. 150 | Broodpan |
| VIS | ||||||
| Forel/zeebrasem | 2 | 190 | 2 (1 en 3)* | 175 | 40-55 | 3-4 vissen |
| Tonijn/zalm | 2 | 190 | 2 (1 en 3)* | 175 | 35-60 | 4-6 filets |
De aangegeven temperaturen zijn richtlijnen. Zo nodig moeten de temperaturen aan uw persoonlijke wensen worden aangepast.
(*) Indien u tegelijkertijd meerdere gerechten bereidt, dan adviseren wij, deze op de tussen haakjes aangegeven niveaus te plaatsen.

Tijden zijn exclusief voorverwarmen.
Lege oven altijd 10 Minuten voorverwarmen.
Grilleren
| GERECHT | Hoeveelheid | Grilleren | Bereidingstijd (minuten) | |||
| Stuks | gr. | Niveau | Temp. (°C) | 1e kant | 2e kant | |
| Filetsteaks | 4 | 800 | 3 | 250 | 12~15 | 12~14 |
| Biefstuk | 4 | 600 | 3 | 250 | 10~12 | 6~8 |
| Grillworst | 8 | / | 3 | 250 | 12~15 | 10~12 |
| Varkenskotelet | 4 | 600 | 3 | 250 | 12~16 | 12~14 |
| Haantje (in 2 helften) | 2 | 1000 | 3 | 250 | 30~35 | 25~30 |
| Spiezen | 4 | / | 3 | 250 | 10~15 | 10~12 |
| Kippenborst | 4 | 400 | 3 | 250 | 12~15 | 12~14 |
| Hamburger* | 6 | 600 | 2 | 250 | 20-30 | |
| *5'00'' voorverwarmen | ||||||
| Visfilet | 4 | 400 | 3 | 250 | 12~14 | 10~12 |
| Belegd toastbrood | 4~6 | / | 3 | 250 | 5~7 | / |
| Sneeën witbrood | 4~6 | / | 3 | 250 | 2~4 | 2~3 |
Ventilatorgrill

Bij het ventilatorgrill stelt u een maximale temperatuur in van 200°C.
| GERECHT | Hoeveelheid | Grillen met hete lucht | Bereidingstijd (minuten) | |||
| Stuks | gr. | Niveau4321 | Temp.(°C) | 1e kant | 2e kant | |
| Rollade (kalkoen) | 1 | 1000 | 3 | 200 | 30~40 | 20~30 |
| Kip (in helften) | 2 | 1000 | 3 | 200 | 25~30 | 20~30 |
| Kippenpoot | 6 | - | 3 | 200 | 15~20 | 15~18 |
| Kwartel | 4 | 500 | 3 | 200 | 25~30 | 20~25 |
| Groentegratin | - | - | 3 | 200 | 20~25 | - |
| St. Jacobsschelpen | - | - | 3 | 200 | 15~20 | - |
| Makreel | 2-4 | - | 3 | 200 | 15~20 | 10~15 |
| Vis moten | 4-6 | 800 | 3 | 200 | 12~15 | 8~10 |

De aangegeven temperaturen zijn richtlijnen. Zo nodig moeten de temperaturen aan uw persoonlijke wensen worden aangepast.

Trek voordat u de oven gaat schoonmaken altijd eerst de stekker uit het stopcontact en laat de oven afkoelen.

Het apparaat mag niet worden gereinigd met een stoomreiniger.
Belangrijk: Vóór alle reinigingswerkzaamheden het apparaat beslist spanningloos maken.
Voor een lange levensduur is het nodig, regelmatig de volgende reinigingswerkzaamheden uit te voeren:
- Maak de oven pas schoon als deze is afgekoeld.
- Maak de geëmailleerde delen schoon met een sopje.
- Gebruik geen schuurmiddelen.
- Droog de onderdelen van roestvrij staal en de glasplaat met een zachte doek.
- Gebruik bij hardnekkige vlekken normaal verkrijgbare reinigingsmiddelen voor roestvrij staal of warme azijn.
Het email van de oven is uiterst duurzaam en in hoge mate resistent. Inwerking van hete vruchtenzuren (citroen, pruim en dergelijke) kan echter blijvende, matte en ruwe vlekken op het emailoppervlak achterlaten. Dergelijke vlekken op het hoogglanzende oppervlak van het email hebben echter geen invloed op de functies van de oven. Reinig de oven grondig na elk gebruik. Zo kunt u verontreinigingen het makkelijkst verwijderen. Verder inbranden wordt daardoor voorkomen.
Reinigingsmiddelen
Controleer voor het gebruik van schoonmaakmiddelen altijd of deze geschikt zijn voor uw oven en of ze door de fabrikant worden aanbevolen.
Reinigingsmiddelen met bleekmiddel mogen NIET worden gebruikt, aangezien deze de toplaag van de oppervlakken dof kunnen maken. Gebruik geen agressieve schuurmiddelen.
Buitenkant reinigen
Neem regelmatig het bedieningspaneel, de ovendeur en de afdichting af met een zachte, goed uitgewrongen doek met warm water en wat vloeibaar reinigingsmiddel.
Gebruik in geen geval de volgende middelen, om beschadiging van de glazen ovendeur te vermijden:
• Huishoudreiniger en bleekwater
- Geïmpregneerde reinigingssponzen, die niet geschikt zijn voor kookpannen met anti-aanbaklaag
• Brillo- of staalwolsponsjes
- Chemische ovensponsjes of spuitbussen
• Roestverwijderaars
- Vlekverwijderaars voor wasbakken/aanrechten
Reinig het venster aan de binnen- en buitenkant met een warm sopje. Mocht de binnenkant van de glazen deur erg vuil zijn, gebruik dan reinigingsproducten als 'Hob Brite'. Gebruik geen krabber om aangekoekt vuil te verwijderen.
Pyrolytische reiniging
De oven is bekleed met een speciaal hittebestendig email.
Tijdens de pyrolytische zelfreiniging kan de temperatuur in het binnenste van de oven oplopen tot meer dan 500 °C en zo etensresten verbranden.
Voor uw eigen veiligheid wordt de ovendeur tijdens de pyrolytische reiniging automatisch vergrendeld, zodra de temperatuur in de binnenruimte ca. 300 °C bereikt.
Na beëindiging van de zelfreiniging blijft de ovendeur vergrendeld tot de oven is afgekoeld.
De koelventilator blijft in werking tot de oven is afgekoeld. Het wordt geadviseerd alle voedselresten na de bereiding met een natte spons te verwijderen.
Van tijd tot tijd is echter een intensievere reiniging nodig, die u met de functie van de pyrolytische zelfreiniging kunt uitvoeren. Af-hankelijk van de vervuiling van de oven kunt u twee niveaus van pyrolytische zelfreiniging kiezen.
Als de oven niet erg is vervuild, dan raden wij aan de pyrolytische 1 functie (P I) op het programmeerdisplay te kiezen.
Het is zinvol, de oven na elke pyrolytische reiniging af te nemen met een zachte spons die met zeepsop vochtig is gemaakt.
Als de binnenkant van de oven erg is vervuild, dan raden wij aan de pyrolytische 2 functie (P 2) op het programmeerdisplay te kiezen.
Tijdens de pyrolytische schoonmaakfunctie kan de oven gedurende 2 uur niet worden gebruikt als de Pyr 1 functie is gekozen en 2 1/2 uur als de Pyr 2 functie actief is.

Na een aantal bak- en braadprocessen en afhankelijk van de mate van vervuiling van de oven adviseert de Pyro Reminder een pyrolytische reinigingsfunctie uit te voeren. Er klinkt een signaal en op het display brandt de melding Pyro ca. 15 seconden, er klinkt een tweede signaal.
Kies afhankelijk van de mate van vervuiling van de oven de geschikte pyrolytische reinigingsfunctie.
Zolang er geen complete reinigingsfunctie wordt uitgevoerd, verschijnt telkens wanneer de oven wordt uitgeschakeld de melding van de Pyro Reminder op het display.
Gebruik van de pyrolytische zelfreiniging

Voordat u de pyrolytische schoonmaakfunctie inschakelt, moet alle vuil worden verwijderd en moet u controleren of de oven leeg is. Laat niets in de oven zitten (bijv. pannen, roosters, bakplaat, braadslede, enz.), deze kunnen ernstig beschadigd raken.

Vergewist u zich er voor het in- schakelen van de pyrolytische reinigingsfunctie van of de oven- deur gesloten is.

Gebruik tijdens de pyrolytische reiniging het kookraam niet, omdat het apparaat hierdoor oververhit en beschadigd kan raken.

Tijdens de pyrolytische reiniging wordt de ovendeur erg heet. Houd kinderen uit de buurt totdat de oven is afgekoeld.
Kies voor de pyrolytische zelfreiniging deze functie.
De volgende pyrolytische reinigingsniveaus zijn beschikbaar:
Pyrolyse 1 (P I), duur : 2 uur = 30 min. opwarming +1 uur met 480°C + 30 min. afkoeltijd.
Pyrolyse 2 (P 2), duur : 2 uur 30 min. = 30 min. opwarming +1 uur 30 min. met 480°C + 30 min. afkoeltijd.
De duur van de pyrolytische reiniging kan niet worden veranderd.

Voor het uitvoeren van de pyrolyse moeten de inhangroosters volledig worden verwijderd.
Verwijderen
Houd het inhangrooster aan de ene kant van de oven vast en schroef de kartelschroef voor eruit. Til het inhangrooster achter op om het uit de oven te halen.
Ga met het inhangrooster aan de andere kant op dezelfde wijze te werk.

natural_image
Illustration of hands using a rotary tool to adjust or install a multi-layered rack (no text or symbols present)
natural_image
Illustration of hands installing or adjusting a mechanical component with a magnified inset showing internal structure (no text or symbols)Reiniging
De beide inhangroosters alleen met in de handel gebruikelijke schoonmaakmiddelen buiten reinigen.
De inhangroosters mogen in de vaatwasser worden gereinigd.
Breng de inhangroosters na het reinigen weer aan; Ga daarbij in omgekeerde volgorde te werk.

Controleer voordat u de oven-roosters in de oven schuift, of de kartelschroeven weer goed zijn vastgedraaid.
Schakel de pyrolytische reinigingsfunctie op de volgende wijze in:
- Schakel met de toets Ⓐ de oven in.
Druk zo lang op toets ☐ tot het symbool van de functie Pyro [icon] (niveau 1 - P I) op het display verschijnt (afb. 18).
Het symbool |----| en de melding Pyro knipperen tegelijkertijd op het display, er klinkt een signaal (afb. 19).
Dit betekent dat u voor het inschakelen van de pyrolytische reiniging alle voorwerpen en de inhangroosters uit de binnenruimte van de oven moet verwijderen.
-
Het symbool "Bereidingsduur" |→| knippert 5 seconden; druk gedurende die tijd op de toets ‘—’ of ‘+’ om pyrolytische functie 1 (P I) of 2 (P 2) te kiezen (afb. 20).
-
Nadat u de pyrolytische functie heeft gekozen, begint het symbool Pyro op het display te knipperen en wacht op de bevestiging dat de reinigingscyclus kan worden gestart.
-
Druk ter bevestiging van de gewenste pyrolytische functie op de toets 📄. De melding Pyro knippert niet meer en het symbool |----| verdwijnt, het akoestische signaal stopt, de


Afb. 19

binnenverlichting gaat uit en de pyrolytische reiniging begint (afb. 21). Naarmate de temperatuur in de oven toeneemt, stijgt het thermometersymbool langzaam en geeft daarmee de temperatuurstijging in het binnenste van de oven aan.
- Na een tijdje wordt de ovendeur vergrendeld en het bijbehorende symbool verschijnt (afb. 22). Nu is de toets niet meer actief.
Na afloop van de pyrolytische zelfreiniging geeft het display de tijd van de dag aan. De ovendeur blijft vergrendeld.
Zodra de oven is afgekoeld, klinkt een akoestisch signaal, het symbool verdwijnt en de deur wordt ontgrendeld.
U kunt de pyrolytische reinigingscyclus op elk moment onderbreken. Druk daarvoor op de toets Ⓔ.

OPMERKING: Bij de tijdaanduiding is de afkoeltijd inbegrepen. Mocht u tijdens het verloop van de pyrolytische zelfreiniging een kookfunctie inschakelen, dan wordt de reinigingscyclus automatisch onderbroken.

Na het vergrendelen van de ovendeur is de selectie van alle kookfuncties geblokkeerd.

Wacht tot de ovendeur ontgrendeld is voordat u de oven gaat gebruiken.


Afb. 22
Programmering van de pyrolytische reinigingscyclus (starttijdkeuze, automatisch stoppen)
Wanneer u dat wilt, kunt u programmeren, wanneer de pyrolytische reiniging moet starten en stoppen.
- Schakel met de toets Ⓐ de oven in. Druk zo lang op toets □ tot het symbool van de functie Pyro [icon] (niveau 1 - P I) op het display verschijnt.
De melding Pyro en het symbool |----| knipperen tegelijkertijd op het display en er klinkt een geluidssignaal. Dit betekent dat u voor het inschakelen van de pyrolytische reiniging alle voorwerpen en de inhangroosters uit de binnenruimte van de oven moet verwijderen (zie het vorige hoofdstuk).
- Het symbool Bereidingsduur |→| knippert gedurende enkele seconden; Druk gedurende die tijd op de toets ‘_’ of ‘_’ om pyrolytische functie 1 (P I) of 2 (P 2) te kiezen.
- Nadat u de pyrolytische functie heeft gekozen, begint het symbool Pyro op het display te knipperen en wacht op de bevestiging dat de reinigingscyclus kan worden gestart.
Druk op dit moment op de tijdfunctietoets (afb. 23). Het symbool “Einde bereiding” → en het pijlsymbool knipperen. op het bedieningspaneel wordt het einde van de bereidingsduur (daadwerkelijke tijd plus aangegeven bereidingsduur) getoond.
Druk op ‘—’ of ‘+’ om de gewenste tijd van het eind van de cyclus te selecteren (afb. 23). Na een paar seconden knipperen de melding Pyro en het symbool |----| niet meer, het geluidssignaal stopt en het symbool Bereidingsduur |→| knippert tot de pyrolytische reinigingscyclus begint.
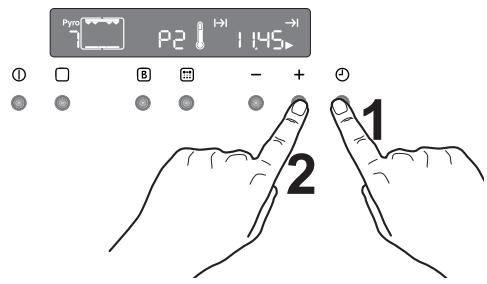
Afb. 23
- Na een tijdje wordt de ovendeur vergrendeld en het bijbehorende symbool verschijnt.
Na afloop van de pyrolytische reiniging wordt het tijdstip van de dag op het display weergegeven. De ovendeur is vergrendeld.
Zodra de oven is afgekoeld, klinkt een akoestisch signaal en de ovendeur wordt ontgrendeld.
U kunt de pyrolytische reinigingscyclus op elk moment onderbreken; Druk daarvoor op de toets Ⓔ.
De ovendeur
De ovendeur bestaat uit drie glasplaten. De ovendeur kan worden gedemonteerd en de binnenste glasplaten kunnen worden verwijderd, om het schoonmaken gemakkelijker te maken.

Belangrijk - Verwijder de ovendeur voordat u de deur gaat reinigen. De ovendeur kan tijdens het monteren plotseling dichtvallen, als u de binnenste glasplaten aan het verwijderen bent.

Ga als volgt te werk:
- Open volledig te deur.
- Bepaal de positie van de twee scharnieren (afb. 24).
- Hef en draai aan de hendels op de twee scharnieren (afb. 25).
- Pak de deur aan de zijkanten vast en doe hem voorzichtig dicht maar niet VOLLEDIG (afb. 26).
- Trek de deur naar voren en verwijder hem uit de inkeping (afb. 26).
- Plaats de deur op een stabiel oppervlak waarop een zachte doek is gelegd, om te voorkomen dat het oppervlak wordt beschadigd (afb. 27).

- Ontgrendel het vergrendelsysteem om de binnenste glasplaten te verwijderen (afb. 28).
- Draai de 2 houders 90° en verwijder ze uit hun zitting (afb. 29).
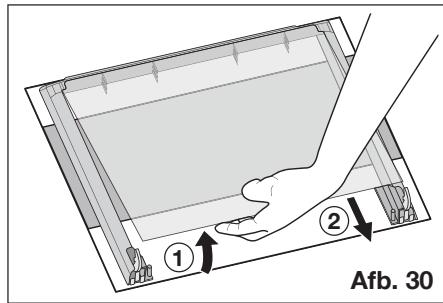
- Hef voorzichtig de bovenste plaat en haal hem eraf (afb. 30).
- Herhaal de procedure die beschreven is onder punt 9. voor de middelste plaat, die aan vier zijkanten voorzien is van een sierlijst (afb. 31).

natural_image
Two-step diagram showing a hand using a tool to adjust or adjust a mechanical component, with no visible text or symbols.

Reinig de ovendeur met lauw water en een zachte doek. Gebruik geen producten zoals schuursponsjes, staalwol, schuurmiddelen of zuren, omdat ze het speciaal warmtereflecterend oppervlak van de binnenste glasplaten kunnen beschadigen.
Na het reinigen dient u de glasplaten weer in de deur aan te brengen, volg hierbij de omgekeerde volgorde van de hier boven beschreven procedure. Zorg ervoor dat u de platen correct aanbrengt.

Om deze handeling correct uit te voeren dient u als volgt te werk te gaan:
a) de middelste afdekplaat, die op de vier zijkanten voorzien is van een lijst, moet zodanig terug worden aangebracht dat de afdruk naar buiten is gericht. De zijde van de glasplaat is correct aangebracht als de afdruk op de plaat niet ruw aanvoelt, als u met uw vingers over het oppervlak wrijft.
De middelste glasplaat moet worden aangebracht in de rechter zitting, zoals weergegeven in afb. 32.
b) de bovenste plaat moet worden aangebracht zoals weergegeven in afb. 33.
Nadat de glasplaten opnieuw zijn aangebracht in de ovendeur, dient u in omgekeerde volgorde de procedure te volgen die beschreven staat onder punt 8., om ervoor te zorgen dat de platen vergrendeld worden.

Maak de ovendeur nooit schoon als hij warm is, de ruiten zouden kunnen barsten. Als u krassen of scheuren in de glasplaat constateert, onmiddellijk contact opnemen met de Klantenservice en de ruiten laten vervangen.

natural_image
Diagram showing a layered structure with an inset magnified view of a component (no text or symbols)Afb. 32

natural_image
Technical diagram showing a mechanical assembly with two views of a component, one with an arrow indicating direction (no text or symbols present)Afb. 33
Modellen van roestvrij staal of aluminium:
Maak de ovendeur en het bedieningspaneel van roestvrij staal of aluminium schoon met een vochtige spons en droog hem daarna zorgvuldig af met een zachte doek. Gebruik geen metaalsponsjes, staalwol, zuren of schuurmiddelen die krassen op het oppervlak kunnen veroorzaken.
Reinigen van de ovendeurdichting
Rond de opening van de oven is een afdichting aangebracht.

Controleer de toestand van deze afdichting regelmatig.
Wanneer u beschadigingen aan de afdichting vaststelt, bel dan direct de dichtstbijzijnde klantenservice. Gebruik de oven niet, zolang de afdichting niet is vervangen.
Vervangen van de binnenverlichting

Neem het apparaat van de stroomvoorziening zodat ook de zekering uitgeschakeld wordt.
Als het ovenlampje moet worden vervangen, dan moet dit voldoen aan de volgende eisen:
- Vermogen: 40 W
- Voltage: 230 V (50 Hz)
- Hittebestendigheid tot 300 °C
- Soort aansluiting: E14
Deze lampen zijn verkrijgbaar bij uw vakhandelaar.

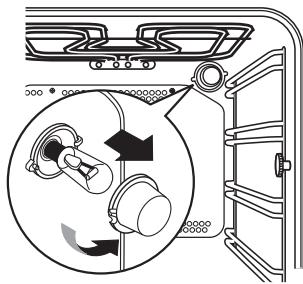
Zo vervangt u de ovenlamp:
- Vergewist u zich er eerst van dat de oven is afgekoeld en van de stroom- voorziening is gescheiden.
- Draai vervolgens de glazen afdekking van de lamp linksom.
- Verwijder de doorgebrande lamp en plaats een nieuwe.
- Breng de glazen afdekking weer aan en sluit de oven weer aan op de stroom- voorziening.
natural_image
Diagram of a refrigerator interior showing airflow direction and component placement (no text or symbols)Het oplossen van problemen
Wanneer het apparaat niet goed werkt, controleer dan het volgende, voordat u zich tot het Electrolux Service-Center wendt.
| PROBLEEM | OPLOSSING |
| ■ De oven gaat niet aan. | ◆ druk op toets ➊ en kies vervolgens een bereidingsfunctie.of◆ Heeft de zekering in de meterkast gereageerd?of◆ Is de kinderblokkering voor de oven of de automatische uitschakeling actief?of◆ Is per ongeluk de demo-modus geactiveerd?of◆ Controleer of het apparaat correct is aangesloten en de stopcontactschakelaar of de netstroomtoevoer op AAN staan. |
| ■ De binnenverlichting van de oven brandt niet. | ◆ Druk op toets ➌ en kies vervolgens een bereidingsfunctie.of◆ Controleer de gloeilamp, en vervang deze indien nodig (zie „Vervangen van de binnenverlichting“). |
| ■ Het bereiden van de gerechten duurt te lang, of ze worden te snel gaar. | ◆ Eventueel moet de temperatuur worden gewijzigd,of◆ Raadpleeg de inhoud van deze gebruiksaanwijzing, met name het hoofdstuk „Gebruik van de oven“. |
| ■ Damp en condens slaan neer op de gerechten en in de oven-ruimte. | ◆ Laat de gerechten na het bereiden niet langer dan 15 - 20 minuten in de oven staan. |
| ■ De ovenventilator maakt lawaai. | ◆ Controleer of de roosters en het bakgerei niet tegen het achterpaneel van de oven trillen. |
| ■ De foutcode “F” gevolgd door cijfers verschijnt op het display. | ◆ Wij verzoeken u de foutcode te noteren en door te geven aan de dichtstbijzijnde klantenservice. |
| ■ Het display geeft “12.00”. | ◆ Klok gelijk zetten (zie hoofdstuk "Om het juiste tijdstip van de dag in te stellen"). |
Technische gegevens
Vermogen verwarmingselementen
| Onderwarmte | 1000 W |
| Boven- en onderwarmte | 1800 W |
| Hete lucht | 1825 W |
| Grill | 1650 W |
| Ventilatorgrill | 1675 W |
| Pyrolytische reiniging | 2475 W |
| Ovenverlichting | 40 W |
| Motor van de heteluchtventilator | 25 W |
| Motor koelventilator | 25 W |
Totale aansluitwaarde 2740 W
| Spanning (50 Hz) | 230 V-400 V 3N~ |
Inbouw
| Hoogte | 600 mm |
| Breedte | 560 mm |
| Diepte | 550 mm |
Inzet
| Hoogte | 335 mm |
| Breedte | 395 mm |
| Diepte | 400 mm |
| Ovencapaciteit | 53 l |
Het apparaat kan met de volgende inbouwkookplaten en keramische glazen inbouwkookvelden worden gecombineerd:
• Type keramische glazen kookplaat:
PEM 6000 E
| Totale aansluitwaarde | 6000 W |
| Spanning (50 Hz) | 230 V |
- Type keramische glazen kookplaat:
PES 6000 E
| Totale aansluitwaarde | 5800 W |
| Spanning (50 Hz) | 230 V |
• Type keramische glazen kookplaat:
PES 6060 E
| Totale aansluitwaarde | 7600 W |
| Spanning (50 Hz) | 230 V |
Maximaal nominaal verwarmingsvermogen
- Oven + keramische glazen
kookplaat 10340 kW

Inbouw en installatie moeten uitgevoerd worden met strikte inachtneming van de geldende voorschriften. Ingrepen mogen alleen worden uitgevoerd wanneer het apparaat is uitgeschakeld. Ingrepen mogen uitsluitend worden uitgevoerd door een erkend installateur. De fabrikant kan niet aansprakelijk gesteld worden als de veiligheidsvoorschriften niet opgevolgd worden.
Elektrische aansluiting
Let voor het aansluiten op het volgende:
- De zekering en de huisinstallatie moeten op de max. belasting van het apparaat berekend zijn (zie typeplaatje).
- De huisinstallatie moet voorzien zijn van een aardaansluiting overeenkomstig de voorschriften en voldoen aan de betreffende geldende voorschriften.
- Het stopcontact of de meerpolige contactverbreker moeten ook na voltooiing van de installatie van het apparaat makkelijk bereikbaar zijn.
Het apparaat wordt zonder aansluitsnoer geleverd, daar afhankelijk van de aanwezige voedingsbron, een aansluitsnoer met stekker noodzakelijk is dat voldoet aan de desbetreffende norm en geschikt moet zijn voor de op het typeplaatje aangegeven belasting. Steek de stekker in een geschikt stopcontact.
De volgende typen aansluitsnoeren zijn geschikt, met inachtneming van de nominale doorsneden:
H07RN-F, H05RN-F, H05RR-F, H05VV-F, H05V2V2-F (T90), H05BB-F.
Als de aansluiting zonder stekker wordt uitgevoerd, of als de stekker tussen het apparaat en de aansluiting op het stroomnet niet toegankelijk is, moet er tussen het apparaat en de aansluiting op het stroomnet een meerpolige stroomonderbreker (bijv. zekeringen, LS-schakelaar) met een minimale afstand tussen de contacten van 3 mm aangebracht worden. De schakelaar mag de aardleiding nergens onderbreken. De geel-groene aardleiding dient 2-3 cm langer te zijn dan alle andere kabels.
Het aansluitsnoer moet in ieder geval zo- danig geplaatst zijn, dat het nergens 50°C (boven kamertemperatuur) bereikt.
Na voltooide aansluiting moeten de verwarmingselementen gecontroleerd worden, door ze ong. 3 minuten in werking te stellen.
Klemmenbord
Het apparaat is met een gemakkelijk toegankelijke 6-polige aansluitklem uitgerust, waarvan de aansluitingen al voorbereid zijn op de werking met 400 V met nulleider (zie afbeelding).
In geval van andere netspanningen moeten de aansluitingen van de aansluitklem overeenkomstig het schema afbeelding worden verlegd. De aardleiding komt op de klem ⏻. Kabel na het aansluiten op de aansluitklem met een snoerontlastingsklem bevestigen.
Elektrische aansluiting op de kookplaat

Let op: montagehandleiding voor de kookplaat, inbouwoven of schakelkast volgen!
Dit apparaat kan worden aangesloten op de in hoofdstuk «Technische gegevens» aangegeven kookplaatmodellen. Het stopcontact voor het aansluiten van de kookplaat bevindt zich op de behuizing van de oven. Uit de inbouwkookplaat steken de aansluitkabels van de verwarmings-elementen en de aardkabel; deze kabels zijn voorzien van een steekaansluiting. Steek de stekker en de aansluitkabel in het desbetreffende stopcontact van de oven. De mogelijkheid van een verkeerde aansluiting is zodoende uitgesloten.
De fabrikant kan niet aansprakelijk gesteld worden als de veiligheidsvoorschriften niet opgevolgd worden.

natural_image
Pure electrical connector diagram showing six terminal blocks connected by wires (no text or symbols)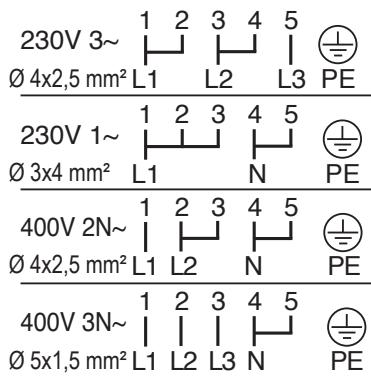
Om een probleemloze werking van het inbouwapparaat te kunnen waarborgen, moeten de keukenmeubelen of de uitsparing waarin het apparaat wordt ingebouwd de geschikte afmetingen hebben.
In overeenstemming met de geldende voorschriften moeten alle delen, die de bescherming tegen aanraking van onder spanning staande en geïsoleerde delen garanderen, zodanig bevestigd zijn, dat ze niet zonder gereedschap verwijderd kunnen worden.
Hierbij hoort ook de bevestiging van eventuele afsluitende kanten aan het begin of einde van een rij inbouwapparaten.
De bescherming tegen aanraking moet in ieder geval door het inbouwen gegarandeerd zijn.
Het apparaat kan met de achterkant of zijkant tegen hogere keukenmeubelen, apparaten of wanden worden geplaatst. Aan de andere zijkant mogen er echter geen andere apparaten of meubelen van dezelfde hoogte als het apparaat geplaatst worden.
Afmetingen van oven (zie afbeelding)
Instructies voor de inbouw
Om een probleemloze werking van het inbouwapparaat te kunnen waarborgen, moeten de keukenmeubelen of de uitsparing waarin het apparaat wordt ingebouwd de geschikte afmetingen hebben.
Bevestiging in het meubel
- Open de ovendeur.
- Bevestig de oven met behulp van de vier afstandshouders in de meubelen (zie afbeelding - A). Deze passen exact in de gaten van het frame. Draai aansluitend de vier meegeleverde houtschroeven vast (zie afbeelding - B).


natural_image
Pure diagram of a 3D rectangular box with internal arrows indicating flow or movement (no text or symbols)
Klantenservice
Wanneer het probleem na de beschreven controles niet kan wortden opgelost, bel dan de dichtstbijzijnde klantenservice van de fabrikant en geef de aard van het defect, het model van het apparaat (Mod.), het productienummer (Prod. nr.) en het fabricagenummer (Ser. nr.) aan, die u op het typeplaatje van de oven vindt.

natural_image
Line drawing of an oven with fan and ventilation system (no text or symbols)Contents
Warnings and important safety information.... 44
Description of appliance 46
Operation 47
Control panel 48
Before using for the first time 49
Function symbols 52
Using the oven 53
Programming the oven 60
Special functions 62
Cooking tables 65
Cleaning and maintenance 67
Troubleshooting 78
Technical data 79
Instructions for the Installer 80
Installation instructions 82
Customer services 83
How to read the instruction book

Safety information

Step by step instructions

Hints and tips

Environmental information
CE This appliance conforms to the following ECC Directives:
- 2006/95 (Low Voltage Directive);
- 89/336 (EMC Directive);
- 93/68 (General Directive);
And subsequent changes.
MANUFACTURER:
ELECTROLUX HOME PRODUCTS ITALY S.p.A.
Viale Bologna, 298
47100 FORLì (Italy)

Warnings and important safety information
Always keep these user instructions with the appliance. Should the appliance be passed on to third persons or sold, or if you leave this appliance behind when you move house, it is very important that the new user has access to these user instructions and the accompanying information.
These warnings are provided for the safety of users and co-residents. So read them carefully before connecting and/or using the appliance.
Installation
- Installation must be carried out by qualified technicians, whilst observing the prevailing guidelines. The individual operations for installing the appliance are described under the instructions for the installer.
- Leave installation and connection to an expert who has the expert knowledge to carry these out in accordance with known guidelines.
- Also ask an expert to make any necessary modifications to the electricity supply as a result of installation.
- Depending on the version, this oven has been manufactured as a single appliance or as a combination appliance with electric hotplate for connection to 1, 2 or 3 phases (without groups) of a 230V supply. Connection to multiple phases without a neutral (400V) will lead to destruction of the oven and the connected hotplates.
Operation
- This oven is intended for the preparation of food; never use it for other purposes.
- Beware hot air escaping from the oven if the oven door is opened during or after cooking.
- Operate the oven with utmost care. Shelves and other parts become very hot as a result of the intense heat from the heating elements.
- Should you, for whatever reason, use aluminium foil whilst cooking food in the oven, never let it come into direct contact with the bottom of the oven.
- Proceed carefully when cleaning the oven: never spray anything onto the grease filter (if fitted), the heating elements and the thermostat sensor.
-
It is dangerous to make modifications of any type to this appliance or its properties.
-
The oven window and surrounding appliance parts become hot during baking, roasting and grilling. Children should therefore be kept away from the appliance. Make sure that when connecting electrical appliances to sockets near to the oven, the electrical leads do not come into contact with hot cooking areas or become jammed in the hot oven door.
- Always use oven gloves to remove hot heatproof dishes or pots from the oven.
- Regular cleaning prevents deterioration of the surface materials.
- Before cleaning the oven, either switch off the electricity or pull out the mains plug.
- Make sure that the oven is switched off when it is not in use.
- The appliance must not be cleaned with a steam cleaner or a steam jet cleaner.
- Do not use any abrasive cleaners or sharp metal scrapers. You could scratch the door glass and that could lead to cracking of the glass.
Personal safety
- This appliance is designed for use by adults. It is dangerous to allow children to use it or play with it.
- Keep children away whilst the oven is in use. Even after turning off the oven, the doors remain hot for a long time.
- This appliance is not intended for use by children or other persons whose physical, sensory or mental capabilities or lack of experience and knowledge prevents them from using the appliance safely without supervision or instruction by a responsible person to ensure that they can use the appliance safely.
Disposal

Packaging material
- The packaging materials are environmentally safe and can be reused. The plastic parts are labelled, e. g. >PE>, >PS< etc. Dispose of the packaging materials according to their label in communal disposal areas in the designated collection containers.

Old appliances
- The symbol 🏠 on the product or its packaging indicates that this product cannot be handled like normal household rubbish, but that it must be taken to a collection point for the recycling or electrical and electronic appliances. Correct disposal of this appliance will help prevent possible negative consequences for the environment and the health of persons. Environment and health are endangered by incorrect disposal. Further information on recycling this product can be obtained from your town hall, your refuse collection service, or the shop from where you purchased it.

Warning: So that no more dangers can arise from the disused appliance, render it unusable before disposing of it.
Separate the appliance from the mains supply and remove the mains supply cable from it.
Customer service
- Inspection and/or repairs must be carried out by the manufacturer's customer service or a customer service authorised by the manufacturer, and use only original replacement parts used.
- Do not try to repair malfunctions or damages yourself. Repairs carried out by untrained persons may cause damage or injury.

- Control panel
- Knob for front left hob
- Knob for back left hob
- Electronic programmer
- Knob for back right hob
-
Knob for front right hob
-
Air Vents for Cooling Fan
- Grill
- Internal lighting
- Oven Fan
- Rating Plate
Accessories
Retractable knob
This model is equipped with retractable knobs. These control knobs function according to the push-pull system. They can be fully retracted when the oven is not in use.

natural_image
Illustration of a hand pressing a circular button on a device, with no text or symbols present.Control knobs for hob
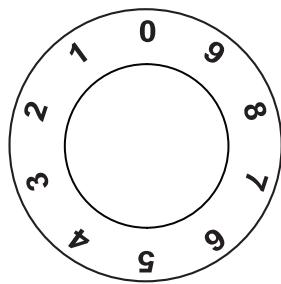
The selector knobs for the four hob heating elements are located on the switch panel. The hotplates are controlled by a 9-position switch, from which the following working levels can be used:
$$ 0 = \text { OFF } $$
$$ 1 = \text { Minimum } $$
$$ 9 = \text {Maximum} $$
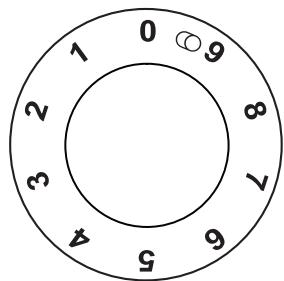
Dual-circuit switching (see the list of appliances in the «Technical Data» chapter)
Switch on both hot rings by turning the cooking zone knobs from level 9 to “☐” position (clockwise); There is an audible “click”. Both heating circuits are now switched on simultaneously. You can then set the level you want (turn the knob anti-clockwise).
Never leave the appliance unsupervised when preparing food with oil or fat, like chips, for example, as oil and fat can easily catch fire if overheated.

Push buttons
- ON / OFF
- Cooking functions button
- Fast heat-up function
- Pyrolytic cleaning function
- Decrease button “—” (Time or temperature)
- Increase button “+” (Time or temperature)
- Minute minder / Cooking time function / End of cooking function
All the oven functions are controlled by an electronic programmer.
You can select any combination of cooking function, cooking temperature and automatic timing.
Note
In the event of a power failure, the programmer will keep all the settings (time of day, programme setting or programme in operation) for about 3 minutes. In the case of a longer power failure, all the settings will be cancelled. When the power supply is restored again, the numbers in the display flash. If this happens, the clock and timer must be re-set.

Remove all packaging, both inside and outside the oven, before using the oven.
When the oven is first connected to the electrical supply, the display will automatically show 12:00 and the symbol 📊 flashes.
Ensure the correct time of day is set before using the oven.
Setting the clock:
- Press the button ⏻ and, while the symbol ▶ is flashing, set the correct time of day by pressing buttons “—” or “+” (Fig. 1).
The time arrow symbol ▶ will disappear about 5 seconds after the correct time is displayed.
- As soon as the symbol ▶ stops flashing, press button ⏻ twice.
Then, proceed as described in point 1.
Before first use
Before the first use, the oven should be heated while empty.
To do this, proceed as follows:
- Press the button Ⓐ to switch on the oven.
- Press the button ☐ twice and select the «Hot air» function 📁 (Fig. 2).
- Set the temperature to 250^ C by using the button “+”.
- Allow the oven to run empty for approximately 45 minutes.
- Open a window for ventilation.
This procedure should be repeated with the function «Top and bottom heating element» and «Thermal grill» for about 5-10 minutes.
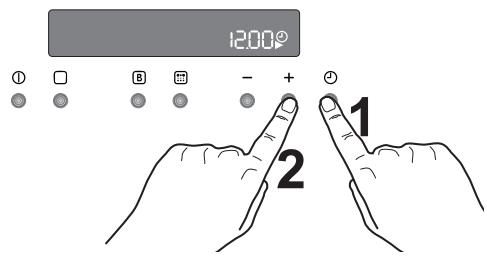
Fig. 1

Fig. 2
During this time, an unpleasant odour may be emitted. This is absolutely normal. It is caused by manufacturing residues.
Once this operation is carried out, let the oven cool down, then clean the oven cavity with a soft cloth soaked in warm soapy water. Before cooking for the first time, thoroughly wash the shelves and the baking tray. To open the oven door, always hold the handle in the centre (Fig. 3).
"On / Off" - button
The oven must be switched on before setting any cooking functions or programmes. After the button ⏻ is pressed, the oven symbol will appear in the display, and the oven light will switch on (Fig. 4).
To switch off the oven, you can press button Ⓐ. This is possible at any time. Any cooking function or programme will stop, the oven light will switch off and the time display will show the time of day only.
It is possible to switch off the oven at any time.
How to select a cooking function
- Switch on the oven by pressing the Ⓐ button.
- Press the button ☐ to select the required oven function. Each time button ☐ is pressed, a cooking symbol will come on in the display and the corresponding cooking function number will appear to the left of the currently selected cooking function symbol (Fig. 5).
- If the pre-set temperature is not suitable, press button “—” or “+” to set the correct temperature. The temperature is adjusted in 5 degree steps.
- As soon as the oven heats up, the thermometer symbol rises slowly ⚙ indicating the degree to which the oven is currently heated.
When the required temperature is reached, an acoustic alarm will sound for a short time and the thermometer symbol will lights up.

natural_image
Line drawing of a hand holding a curved object against a wall (no text or symbols)Fig. 3
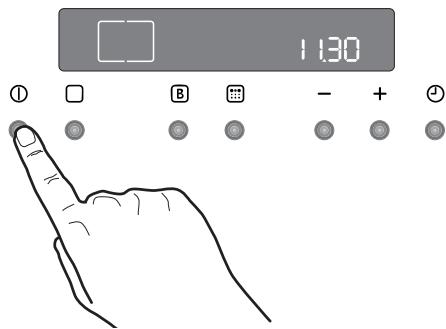
Fig. 4

Fig. 5
To set the temperature and cooking time
Press the buttons “—” and “+” to increase or decrease the pre-set temperature while the “°” symbol is flashing (Fig. 6). The maximum temperature is 250^ C.
Press the buttons “—” and “+” to increase or decrease the pre-set cooking time while the symbol ▶ flashes.
Safety thermostat
To prevent dangerous overheating (through incorrect use of the appliance or defective components), the oven is fitted with a safety thermostat, which interrupts the power supply. The oven switches back on again automatically, when the temperature drops.
Should the safety thermostat trigger due to incorrect use of the appliance, simply remedy the error after the oven has cooled down. If, on the other hand, the thermostat triggers because of a defective component, please contact Customer service.
Cooling fan
The cooling fan is designed to cool the oven cavity and the control panel. The fan switches on automatically after a few minutes of cooking. Warm air is blown out through the slots near to the oven door handle. The fan may continue to run after the oven is switched off to cool the appliance. This is absolutely normal.

The action of the cooling fan will depend on how long the oven has been used and at what temperature. It may not switch in at all at lower temperature settings or run on if the oven has only been used for a short time.

Function symbols

Hot air - This allows you to roast or roast and bake simultaneously using any shelf without flavour transference. Pre-set temperature: 175°C
Top and bottom heating element - The heat comes from both the top and bottom and is distributed evenly inside the oven. Pre-set temperature: 200°C

Bottom oven element - The heat comes from the bottom heating element only. This setting is very good for finishing off dishes. Preset temperature: 250°C

Thermal grill - This function offers an alternative method of cooking food items, normally associated with conventional grilling. The grill element and the oven fan operate simultaneously, circulating hot air around the food. Pre-set temperature: 180°C
Highest temperature: 200 °C.

Grill - Direct heat is provided to the central area of the grill pan via the grill. The grill is perfect for cooking smaller portions. This way, energy can also be saved. Pre-set temperature: 250°C

Defrosting - The oven fan circulates the hot air without heat at room temperature inside the oven. This function is particularly suitable for defrosting delicate food which could be damaged by heat, e.g. cream filled gateaux, iced cakes, pastries, bread and other yeast products.

Pyrolytic cleaning - This function allows you to clean the oven cavity thoroughly.

Important! - Do not lay aluminium foil, or place baking trays, etc. on the oven floor, as the heat built up will damage the oven surface enamel. Always place pans and pots, oven-proof pans and pots as well as aluminium trays on the shelf which has been inserted in the shelf runners. When food is heated, steam is created, similar to a kettle. When the steam comes into contact with the glass in the oven door, it condenses and creates water droplets.
To reduce condensation, always preheat the empty oven for 10 minutes.
We recommend you wipe the water droplets away after every cooking process.

Always cook with the oven door closed.
Always open the oven door carefully. Do not allow the door to "fall open", support the door using the door handle, until it is fully open

The oven has four shelf levels.
The shelf positions are counted from the floor of the oven upwards, as shown in the figure.
The slide-in components must always be properly inserted (see figure).
Do not place cookware and pots directly on the floor of the oven.

Hot air
The food is cooked by means of preheated air force-blown evenly round the inside of the oven by a fan set on the rear wall of the oven itself.
The heat reaches all parts of the oven evenly and fast. This means that you can simultaneously cook different types of food positioned on the various oven shelves.
The advantages of cooking with this function are:
- Faster preheating
As the fan oven quickly reaches temperature, it is not usually necessary to preheat the oven although you may find that you need to allow an extra 5-7 minutes on cooking times. For recipes which require higher temperatures, best results are achieved if the oven is preheated first, e.g. bread, pastries, scones, souffles, etc.
- Lower temperatures
Fan-assisted cooking generally requires lower temperatures than conventional cooking.
Follow the temperatures recommended in the cooking chart. Remember to reduce temperatures for top and bottom heat by about 20-25 °C for your own conventional recipes.
- Even heating for baking
The fan oven has uniform heating on all shelf positions. This means that batches of the same food can be cooked in the oven at the same time. However, the top shelf may brown slightly quicker than the lower one.
This is absolutely normal. There is no flavour transference between dishes.
How to use the fan oven
- Switch the oven on.
-
Press the cooking functions button ☐
until the symbol 📁 appears in the display. -
If necessary, adjust temperature setting using the “+” or “—” buttons.
Top and bottom heating element
- The middle shelf position allows for the best heat distribution. If you want a base browning, simply place the cakes and pastries on to a lower shelf position in the oven. To increase top browning, raise the shelf position.
- The material and finish of the baking trays and dishes used will affect base browning. Enamelware, dark, heavy or non-stick utensils increase base browning, while oven glassware, shiny aluminium or polished steel trays reflect the heat away and give less base browning.
- Always place dishes centrally on the shelf to ensure even browning.
- Stand dishes on suitably sized baking trays to prevent spillage onto the base of the oven and make cleaning easier.
- Do not place dishes, tins or baking trays directly on the oven base as it becomes very hot and damage will occur. When using this setting, heat comes from both the top and bottom elements. This allows you to cook on a single level. This is particularly suitable for dishes which require extra base browning such as, e.g. quiches and flans.
Gratins, lasagne and hotpots which require extra top browning also cook well in the conventional oven.
How to use the conventional oven
- Switch the oven on.
- Select the top and bottom heating element function; to do this, press the cooking functions button □ until the symbol □ appears in the display.
- If necessary, adjust temperature setting using the “+” or “—” buttons.
Bottom oven element
This function is particularly useful when baking cakes and pastry bases as well as finishing off quiches or flans, to ensure that the quiche or pastry base is cooked through.
Grilling
- Most foods should be placed on the grid in the grill pan to allow maximum circulation of air and to lift the food out of the fats or juices. If preferred, foods such as, e. g. fish, liver and kidneys may be placed directly on the grill pan.
- Food should be thoroughly dried before grilling to minimise splashing. Brush lean meats and fish lightly with a little oil or melted butter to keep them moist during cooking.
- Accompaniments such, e. g. tomatoes and mushrooms may be placed underneath the grid when grilling meats.
- When toasting bread, we suggest that the top runner position is used.
- The food should be turned over during cooking, as required.
How to use the grill
The grill provides quick direct heat to the central area of the grill pan. By using the inner grill element for cooking small quantities, it can help to save energy.
- Switch the oven on.
-
Select the function grill; to do this, press the cooking functions button ☐, until the symbol 📌 appears in the display.
-
If necessary, adjust temperature setting using the “+” or “—” buttons.
-
Select the grid and grill pan runner position to allow for different thicknesses of food. Then follow the instructions for grilling.
Thermal grill
Thermal grill offers an alternative method of cooking food items normally associated with conventional grilling. The grill element and the oven fan operate simultaneously, circulating hot air around the food. The need to check and turn the food is reduced. Thermal grill helps to minimise cooking smells in the kitchen.
With the exception of toast and rare steaks, you can thermally grill all the foods you would normally cook under a conventional grill. Cooking is more gentle; therefore food generally takes a little longer to cook with thermal grilling compared with conventional grilling. One of the advantages is that larger quantities can be cooked at the same time.
- Switch the oven on.
- Select the function thermal grill; to do this, press the cooking functions button □, until the symbol 📄 appears in the display.
- If necessary, press the buttons “+” or “—”, to adjust the temperature setting. Highest temperature: 200 °C.
- Select the grid and grill pan runner position to allow for different thicknesses of food. Then follow the instructions for grilling.
Defrosting
The oven fan operates without heat and circulates the air, at room temperature, inside the oven. This increases the speed of defrosting. However, please note that the temperature of the kitchen will influence the speed of defrosting. This function is particularly suitable for defrosting delicate food which could be damaged by heat, e.g. cream filled gateaux, iced cakes, pastries, bread and other yeast products.
How to use defrosting function
- Switch the oven on by pressing button
①.
- Select the function defrosting; to do this, press the oven functions button ☐, until
the symbol 📁 appears in the display. - The display will show the indication "def".

Hints and tips
On baking:
Cakes and pastries usually require a medium temperature (150°C-200°C). Therefore, it is necessary to pre-heat the oven for approx. 10 minutes.
Do not open the oven door before 3/4 of the baking time has elapsed.
Shortcrust pastry is baked in a springform tin or on a tray for up to 2/3 of the baking time and then garnished before being fully baked. This further baking time depends on the type and amount of topping or filling. Sponge mixtures must separate with difficulty from the spoon. The baking time would be unnecessarily extended by too much liquid.
If two baking trays with pastries or biscuits are inserted into the oven at the same time, a shelf level must be left free between the trays.
If two baking trays with pastries or biscuits are inserted into the oven at the same time, the trays must be swapped and turned around after about 2/3 of the baking time.
When roasting:
Do not roast joints smaller than 1 kg. Smaller pieces could dry out when roasting. Dark meat, which is to be well done on the outside but remain medium or rare inside, must be roasted at a higher temperature (200°C-250°C).
White meat, poultry and fish, on the other hand, require a lower temperature (150°C-175°C). The ingredients for a sauce or gravy should only be added to the roasting pan right at the beginning if the cooking time is short. Otherwise add them in the last half hour.
You can use a spoon to test whether the meat is cooked: if it cannot be depressed, it is cooked through. Roast beef and fillet, which is to remain pink inside, must be
roasted at a higher temperature in a shorter time.
If cooking meat directly on the oven shelf, insert the roasting pan in the shelf level below.
Leave the joint to stand for at least 15 minutes, so that the meat juices do not run out.
To reduce the build up of smoke in the oven, it is recommended to pour a little water in the roasting pan. To prevent condensation forming, add water several times. The plates can be kept warm in the oven at minimum temperature until serving.

Important!
Do not line the oven with aluminium foil and do not place baking trays, pots, etc. on the oven floor, as the heat that builds up will damage the oven enamel.
Cooking times
Cooking times can vary according to the different composition, ingredients and amounts of liquid in the individual dishes.
Note the settings of your first cooking or roasting to gain experience for later preparation of the same dishes.
Based upon your own experiences you will be able to alter the values given in the tables.
To set the minute minder
- Using the button ⏻ to select the minute minder function. The relevant symbol ⏻ will flash and the control panel will display "0.00" (Fig. 7).
- Using the button “+” to enter the required time. The maximum time is 23 hours 59 minutes. After it has been set, the minute minder will wait 3 seconds and then start running.
- When the programmed time has elapsed, an acoustic alarm will be heard.
- To switch off the acoustic alarm, press any button.

The oven will NOT switch off if in use. The minute minder function can be used as well when the oven is off.
To use or to change the minute minder setting:
Press the buttons ⏻ until the symbols

and ▶ flash.
Now you can change the settings of the minute minder. To do this, press the button “—” or “+”.
To cancel the minute minder:
Press the buttons ⏻ until the symbols

and ▶ flash.
Press the button “—” to decrease the time until «0.00» is displayed (Fig. 8).
To programme the oven to switch off
- Place food in the oven, switch on the oven, select a cooking function and adjust the cooking temperature, if required.
- Press the button ⏻ to select the «Cooking time» function. The cooking time symbol |→| will flash and the control panel will display «0.00» (Fig. 9).
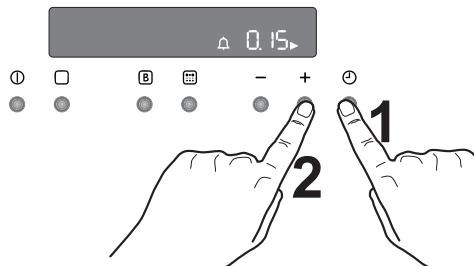
Fig. 7
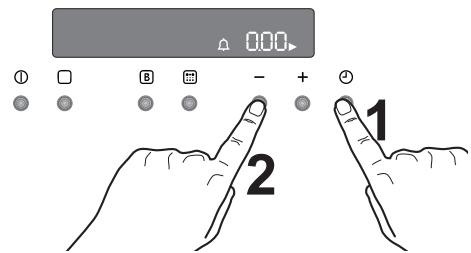
Fig. 8
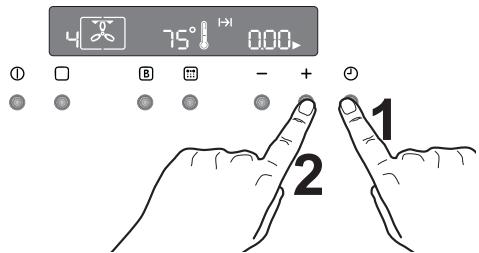
Fig. 9
- While the symbol ▶ is flashing, press the button “+” to select the required time. The maximum time is 23 hours 59 minutes. The programmer will wait 3 seconds and then start running.
- After the time programmed has elapsed, the oven switches off automatically. An acoustic alarm will be heard and "0.00" will appear on the control panel.
- To switch off the acoustic alarm, press any button.
To cancel the programmed cooking time:
- Press the button ⏻, until the symbol ▶ flashes.
- Press the button “—” to decrease the time until the display shows “0.00” (Fig. 10).
To programme the oven to switch on and off
- Carry out the “Cooking time” setting as described in the relevant chapter.
- Press the buttons ⏻ until the «End of Cooking» function →| is selected and the relevant symbol flashes. The control panel will display the end of cooking time (that is, the actual time + Cooking time - Fig. 11).
- Press the button “+” to select the required end of cooking time.
- Once the setting has been made, the programmer will wait 3 seconds and then start running.
- The oven will switch on and off automatically. The end of cooking will be marked by an acoustic alarm.
- To switch off the acoustic alarm, press any button.
To cancel the programme, simply cancel the Cooking Time.

Fig. 10
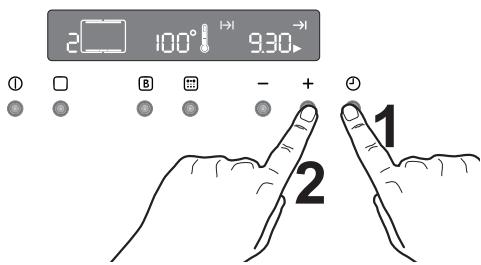
Fig. 11
Oven safety switch-off
The oven will switch off automatically if any change of setting is made, according to the following table (Fig. 12).
| Temperature setting: | the oven will switch off: |
| 250°C | after 3 hours |
| from 200 up to 245°C | after 5.5 hours |
| from 120 up to 195°C | after 8.5 hours |
| less than 120°C | after 12 hours |
Residual heating function
When a cooking time is set, the oven will automatically switch off a few minutes before the end of the programmed time, and use the residual heat to finish your dishes without energy consumption. All current settings will be displayed until the cooking time is over.
This function will not operate when the cooking time is less than 15 minutes.
Child lock for the oven
To prevent children from switching on the oven, it is possible to lock the oven controls.
- Turn off the oven by pressing button Ⓙ.
- Press the □ and “—” buttons at the same time for about 3 seconds. An acoustic signal will be emitted and the indication ‘SAFE’ will appear in the display (Fig. 13).
- The oven is now locked. Neither oven functions nor temperatures can be selected.
To unlock the oven:
Press the □ and “—” at the same time and keep them pressed for about 3 seconds. An acoustic signal will be emitted and the indication “SAFE” will go out.
The oven can now be operated.

Fig. 12
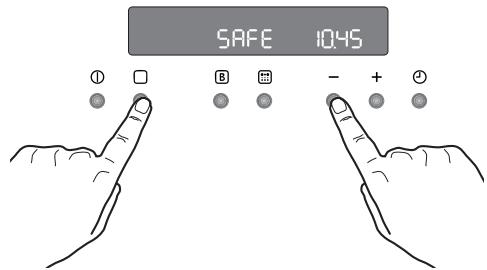
Fig. 13
Fast heat-up function
After a cooking function and the temperature have been selected, the cavity will gradually heat up until the selected temperature is reached. This will take from 10 to 15 minutes, depending on the selected function and temperature.
If it is necessary to reach the required temperature in a shorter time, the “Fast Heat Up” function can be used.
- Switch the oven on by pressing button ①.
- Set the required cooking function and temperature as explained in the previous pages.
- Set the temperature by pressing button “—” or “+”. The temperature will appear in the display.
- Press the buttons ☐. The temperature display will show "FHU" (Fig. 14).
- Press the buttons □ The symbol “o” will flash for approximately 10 seconds. Now it is possible to select the required temperature. To do this, press the button “—” or “+”.
- When the required temperature is reached, the electronic control beeps for a short time, and the temperature display reverts to the selected temperature.
This function can be used with any cooking function or temperature.
Demo mode
This mode is intended to be used in shops to demonstrate the oven functionality without any power consumption except the interior light, the display and the fan. This function can only be switched on when the appliance is first connected.
If there is a power failure, when the power supply is restored again the Demo function can only be switched on if, in the display, 12:00 and the symbol 🏠 are flashing automatically.
- Press the button ⏻ for approx. 2 seconds. A short acoustic alarm will be heard.

Fig. 14
- Press the bottoms ⏻ and “—” at the same time. A short acoustic alarm will be heard and the time 12:00 appears in the display (Fig. 15).
When the oven is switched on, the symbol appears ⏻ in the display. This means that the demo function is activated.
All oven functions can be selected.
The oven is not really working and the heating elements do not switch on.
Switch off the oven and follow the above described procedure to disable the demo mode.

The demo mode remains saved in the programme in the event of a power failure.
Beep on touch
You can choose to make the electronic control beep each time that a button is pressed. To enable this function, the oven must be off.
- Press the buttons □ and “+” at the same time and keep them pressed for about 3 seconds. The alarm signal beeps once (Fig. 16).
To disable the beep on touch:
- With the oven switched on, press the button Ⓐ to switch the oven off.
- Press the buttons □ and “+” at the same time and keep them pressed for about 3 seconds. The electronic control beeps once.
Error codes
The electronic programmer does a continuous diagnostic check of the system. If some parameters are not correct, the control unit will stop the activated functions and it will display the corresponding error code (Fig. 17).
For further details, refer to chapter "Troubleshooting".

Fig. 15
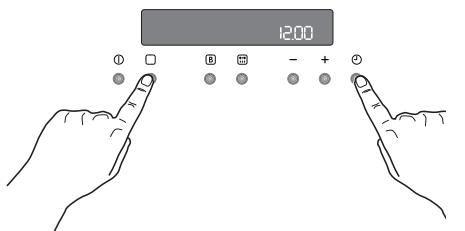
Fig. 16
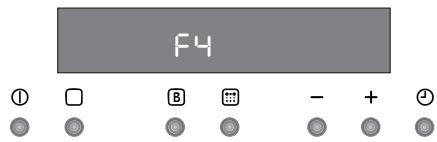
Fig. 17
Top and bottom heating element and hot air
Timings do not include pre-heating. The empty oven should always be pre-heated for 10 minutes.
| TYPE OF DISH | Top and bottom heating element | Hot air | Cooking time In minutes | NOTE | ||
| level | Temp. (°C) | level | Temp. (°C) | |||
| CAKES | ||||||
| Whisked recopies | 2 | 170 | 2 (1 and 3)* | 160 | 45-60 | Cake tin |
| Shortbread dough | 2 | 170 | 2 (1 and 3)* | 160 | 20-30 | Cake tin |
| Buttermilk cheese cake | 1 | 175 | 2 | 165 | 60-80 | Cake tin |
| Apple cake | 1 | 170 | 2 (1 and 3)* | 160 | 90-120 | Cake tin |
| Strudel | 2 | 180 | 2 | 160 | 60-80 | Baking tray |
| Jam tart | 2 | 190 | 2 (1 and 3)* | 180 | 40-45 | Cake tin |
| Fruit cake | 2 | 170 | 2 | 150 | 60-70 | Cake tin |
| Sponge cake | 1 | 170 | 2 (1 and 3)* | 165 | 30-40 | Cake tin |
| Christmas cake | 1 | 150 | 2 | 150 | 120-150 | Cake tin |
| Plum cake | 1 | 175 | 2 | 160 | 50-60 | Bread tin |
| Small cakes | 3 | 170 | 2 | 160 | 20-35 | Baking tray |
| Biscuits | 2 | 160 | 2 (1 and 3)* | 150 | 20-30 | Baking tray |
| Meringue | 2 | 135 | 2 (1 and 3)* | 150 | 60-90 | Baking tray |
| Fancy biscuits | 2 | 200 | 2 | 190 | 12~20 | Baking tray |
| Pastries: Choux pastry | 2 or 3 | 210 | 2 (1 and 3)* | 170 | 25-35 | Baking tray |
| Tartlets | 2 | 180 | 2 | 170 | 45-70 | Cake tin |
| BREAD AND PIZZA | ||||||
| White bread | 1 | 195 | 2 | 185 | 60-70 | |
| Rye bread | 1 | 190 | 1 | 180 | 30-45 | Bread tin |
| Bread rolls | 2 | 200 | 2 (1 and 3)* | 175 | 25-40 | Baking tray |
| Pizza | 2 | 200 | 2 | 200 | 20-30 | Baking tray |
| FLANS | ||||||
| Pasta flan | 2 | 200 | 2 (1 and 3)* | 175 | 40-50 | Baking tin |
| Vegetable flan | 2 | 200 | 2 (1 and 3)* | 175 | 45-60 | Baking tin |
| Quiches | 1 | 210 | 1 | 190 | 30-40 | Baking tin |
| Lasagne | 2 | 200 | 2 | 200 | 25-35 | Baking tin |
| Cannelloni | 2 | 200 | 2 | 200 | 25-35 | Baking tin |
| MEATS | ||||||
| Beef | 2 | 190 | 2 | 175 | 50-70 | Shelf |
| Pork | 2 | 180 | 2 | 175 | 100-130 | Shelf |
| Veal | 2 | 190 | 2 | 175 | 90-120 | Shelf |
| English roast beef rare | 2 | 210 | 2 | 200 | 50-60 | Shelf |
| medium | 2 | 210 | 2 | 200 | 60-70 | Shelf |
| well done | 2 | 210 | 2 | 200 | 70-80 | Shelf |
| Shoulder of pork | 2 | 180 | 2 | 170 | 120-150 | with rind |
| Knuckle of pork | 2 | 180 | 2 | 160 | 100-120 | 2 pieces |
| Lamb | 2 | 190 | 2 | 175 | 110-130 | Leg |
| Chicken | 2 | 190 | 2 | 200 | 70-85 | Whole |
| Turkey | 2 | 180 | 2 | 160 | 210-240 | Whole |
| Duck | 2 | 175 | 2 | 220 | 120-150 | complete |
| Goose | 2 | 175 | 1 | 160 | 150-200 | complete |
| Rabbit | 2 | 190 | 2 | 175 | 60-80 | In pieces |
| Hare | 2 | 190 | 2 | 175 | 150-200 | In pieces |
| Pheasant | 2 | 190 | 2 | 175 | 90-120 | complete |
| Meatloaf | 2 | 180 | 2 | 170 | complete.. 150 | Bread tin |
| FISH | ||||||
| Trout / Sea bream | 2 | 190 | 2 (1 and 3)* | 175 | 40-55 | 3-4 fish |
| Tuna fish / Salmon | 2 | 190 | 2 (1 and 3)* | 175 | 35-60 | 4-6 Filets |
The temperatures quoted are guidelines. If necessary, the temperatures should be adjusted to personal requirements.
(*) If you cook several dishes at the same time, we recommend that you place them on the levels quoted between brackets.

Timings do not include pre-heating.
The empty oven should always be pre-heated for 10 minutes.
Grilling
| TYPE OF DISH | Quantity | Grilling | Cooking time in minutes | |||
| Pieces | g | level | Temp. (°C) | 1st side | 2nd side | |
| Fillet steaks | 4 | 800 | 3 | 250 | 12~15 | 12~14 |
| Beef steaks | 4 | 600 | 3 | 250 | 10~12 | 6~8 |
| Sausages | 8 | / | 3 | 250 | 12~15 | 10~12 |
| Pork chops | 4 | 600 | 3 | 250 | 12~16 | 12~14 |
| Chicken (cut in 2) | 2 | 1000 | 3 | 250 | 30~35 | 25~30 |
| Kebabs | 4 | / | 3 | 250 | 10~15 | 10~12 |
| Breast of chicken | 4 | 400 | 3 | 250 | 12~15 | 12~14 |
| Hamburger* *Pre-heat 5'00'' | 6 | 600 | 2 | 250 | 20-30 | |
| Fish Fillet | 4 | 400 | 3 | 250 | 12~14 | 10~12 |
| Toasted sandwiches | 4~6 | / | 3 | 250 | 5~7 | / |
| Toast | 4~6 | / | 3 | 250 | 2~4 | 2~3 |
Thermal grill

With the thermal grill, select a maximum temperature of 200^ C.
| TYPE OF DISH | Quantity | Thermal grilling | Cooking time in minutes | |||
| Pieces | g | level4321 | Temp.(°C) | 1st side | 2nd side | |
| Rolled joints (turkey) | 1 | 1000 | 3 | 200 | 30~40 | 20~30 |
| Chicken (cut in two) | 2 | 1000 | 3 | 200 | 25~30 | 20~30 |
| Chicken drumsticks | 6 | - | 3 | 200 | 15~20 | 15~18 |
| Quail | 4 | 500 | 3 | 200 | 25~30 | 20~25 |
| Vegetable gratin | - | - | 3 | 200 | 20~25 | - |
| pieces. Scallops | - | - | 3 | 200 | 15~20 | - |
| Mackerel | 2-4 | - | 3 | 200 | 15~20 | 10~15 |
| Fish slices | 4-6 | 800 | 3 | 200 | 12~15 | 8~10 |

The temperatures quoted are guidelines. If necessary, the temperatures should be adjusted to personal requirements.

Before any cleaning, switch the oven off and let it cool down.

The appliance must not be cleaned with a superheated steam cleaner or a steam jet cleaner.
Important: Before carrying out any cleaning operation, the device must be disconnected from the power supply.
To ensure a long life for your appliance, it is necessary to perform the following cleaning operations regularly:
- Only perform when the oven has cooled down.
- Clean the enamelled parts with soapy water.
- Do not use abrasive cleaners.
- Dry the stainless steel parts and glass with a soft cloth.
- If there are stubborn stains, use commercially available cleaners for stainless steel or warm vinegar.
The oven's enamel is extremely durable and highly impermeable. The action of hot fruit acids (from lemons, plums or similar) can, however, leave permanent, dull, rough marks on the surface of the enamel. However such marks in the brightly polished surface of the enamel do not affect the operation of the oven. Clean the oven thoroughly after every use. This is the easiest way to clean dirt off. It prevents dirt being burnt on.
Cleaning materials
Before using any cleaning materials on your oven, check that they are suitable and that their use is recommended by the manufacturer
Cleaners that contain bleach should NEVER be used as they may dull the surface finishes. Harsh abrasives should also be avoided.
External cleaning
Regularly wipe over the control panel, oven door and door seal using a soft cloth well wrung out in warm water to which a little liquid detergent has been added.
To prevent damaging or weakening the door glass panels avoid the use of the following:
• Household detergents and bleaches
- Impregnated cleaning pads that are unsuitable for non-stick saucepans
- Brillo/Ajax pads or steel wool pads
• Chemical oven pads or aerosols
- Rust removers
- Bath/Sink stain removers
Clean the outer and inner door glass using warm soapy water. Should the inner door glass become heavily soiled it is recommended that a cleaning product such as "Hob Brite" is used Do not use paint scrapers to remove soilage.
Pyrolytic cleaning
The oven cavity is coated with a special enamel resistant to high temperatures.
During the pyrolytic cleaning operation, the temperature inside the oven can reach about 500^ C thus burning food residues.
For your security, during the pyrolytic cleaning operation, the oven door automatically locks when the temperature inside the oven approaches about 500 °C. 300 °C has been reached.
Upon completion of the cleaning operation, the oven door will be locked until the oven cavity has cooled down.
The cooling fan operates during cooking until the oven has cooled down. After cooking, it is advisable to remove all the food residues with a wet sponge.
However, from time to time, it will be necessary to do a more complete and thorough cleaning, using the pyrolytic cleaning function. You can select two different levels of pyrolytic cleaning depending on how dirty the oven is.
If the oven cavity is not very dirty, we recommend that you select the pyrolytic 1 function (P I) in the programmer display.
It is advisable to wipe the oven over with a soft sponge soaked in warm water after each pyrolytic cleaning cycle is carried out.
If the oven cavity is very dirty, we advise you to select the pyrolytic 2 function (P 2) in the programmer display.
During the pyrolytic cleaning function, it is not possible to use the oven for 2 hours when selecting the Pyr 1 function and up to 2 1/2 hours when the Pyr 2 function is active.

The Pyro reminder recommends that a pyrolytic cleaning function should be carried out after several baking and roasting processes and depending on dirty the oven is. An acoustic signal will be heard and the indication Pyro is displayed for approx. 15 seconds and then a second acoustic signal can be heard. Depending on how dirty the oven is, select the most suitable pyrolytic cleaning function.
For as long as no complete cleaning function is carried out, Pyro reminders are displayed each time the oven is switched off.
How to use the pyrolytic cleaning function

Before activating the pyrolytic cleaning function, remove any excessive spillage and make sure that the oven is empty. Do not leave anything inside it (e.g. pans, grids, baking tray, drip pan, etc.) as they could become severely damaged.

Ensure that the oven door is closed before activating the pyrolytic cleaning function.

When the pyrolytic cleaning function is on, it is advisable not to use the hob as this could cause overheating and damage the appliance.

During the pyrolytic cleaning cycle the oven door becomes very hot. Children should be kept away until it has cooled.
Choose this function to clean the oven by pyrolysis.
The following pyro levels are available:
Pyrolytic 1 (P I), Time: 2 hours. = 30 mins Heating-up +1 hour. at 480 °C + 30 mins Cooling down time.
Pyrolytic 2 (P 2), Time: 2 hours. 30 mins. = 30 mins Heating-up +1 hour. 30 mins. at 480 °C + 30 mins Cooling down time.
The pyro duration time cannot be changed.

Before performing the pyrolysis, all side rails must have been removed.
Removal
Take hold of the side rails on one side of the oven and undo the knurled nut at the front. Lift the side rails at the back in order to unhook them.
Do the same thing on the other side of the oven.

natural_image
Illustration of a hand using a tool to adjust or install a rack with a circular arrow indicating rotation (no text or symbols present)
natural_image
Illustration of hands using a tool to lift or rotate a mechanical component, with no visible text or symbols.Cleaning
Clean the two sets of side rails on the outside only with commercially available detergents.
The side rails must not be cleaned in the dishwasher.
Once the cleaning is carried out; refit the shelf supports following the procedure in reverse.

Please ensure that the retaining nuts are secure when refitting the shelf support.
To activate the pyrolytic cleaning function proceed as follows:
- Using the button Ⓐ switch on the oven.
Press the button □ as often as necessary, until the Pyro function symbol (level 1 - P I) appears in the display (Fig.) 18.
and the symbol |----| and the indicator Pyro flashes in the display at the same time and an acoustic signal is emitted (Fig. 19).
This means that, before activating the pyrolytic cleaning function, you have to remove all the oven accessories and the side rails from the oven cavity.
- The “Cooking time” symbol will flash for 5 seconds; during this time, press the button ‘—’ or ‘+’ to select the pyrolytic 1 (P I) or pyrolytic 2 (P 2) function (Fig. 20).
-
Once you have chosen the desired pyrolytic function, Pyro will flash in the display waiting for confirmation to start the pyrolytic cleaning function.
-
To confirm the desired pyrolytic cleaning function, press the button 📄. The display Pyro stops flashing and the symbol |----| will disappear, the acoustic signal will stop, the oven lamp will switch off and the pyrolytic cleaning cycle starts (Fig. 21).
As soon as the temperature in the oven increases, the thermometer symbol increases slowly, indicating that the temperature inside the oven is increasing.
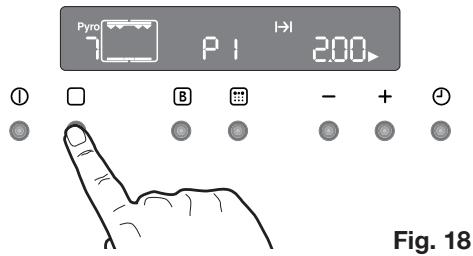

Fig. 19


Fig. 21
- After some time the door lock will be
activated and the respective symbol will be displayed (Fig. 22). Now the button
☐ is no longer active.
After ending the pyrolytic cleaning process, the display shows the time of day. The oven door is still locked.
Once the oven has cooled down, an acoustic signal will be emitted, the symbol
will disappear and the door will unlock.
To stop the pyrolytic cleaning cycle at any time; press the button Ⓐ.

NOTE: The time indication includes the cooling down time. If you select a cooking function while the pyrolytic function is active, the cleaning cycle will be interrupted.

If the oven door lock is activated, it is impossible to select any cooking function until the door lock is off.

Wait until the door lock is off to use the oven.

Fig. 22
To programme the pyrolytic cleaning cycle (delayed start, automatic stop)
If you desire, you can programme the starting and ending time of the pyrolytic cleaning cycle.
- Use the button Ⓐ to switch on the oven.
Press the button □ as often as necessary, until the Pyro function symbol

(level 1 - P I) appears in the display.
Simultaneously the “Pyro indicator and the symbol |----| will flash in the display and an acoustic signal will be emitted. This means that, before activating the pyrolytic cleaning function, you have to remove all the oven accessories and the side rails from the oven cavity (see the previous chapter).
- The Cooking Time symbol will flash for some seconds; during this time push the button ‘—’ or ‘+’ to select the pyrolytic 1 (P I) or pyrolytic 2 (P 2) function.
- Once you have chosen the desired pyrolytic function, Pyro will flash in the display waiting for confirmation to start the pyrolytic cleaning function.
At this time, push the time function button
(Fig. 23). “The End of Cooking”
symbol →| and the arrow symbol ▶ flash. On the control panel, the cleaning cycle (that is, the actual time + cooking time) will displayed.
Press the ‘—’ or ‘+’ buttons to select the required end of cycle time (Fig. 23). After a few seconds, the word Pyro and the symbol |----| will stop flashing, the acoustic signal will stop while the Cooking time symbol |→| will flash until the pyrolytic cleaning cycle starts.
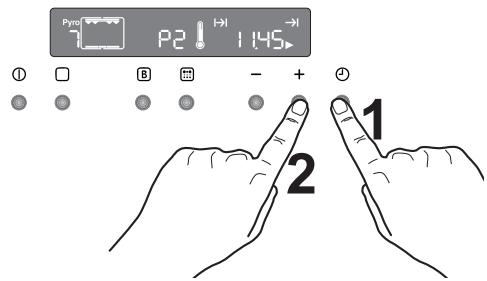
Fig. 23
- After some time the door lock will be
Activated and the respective symbol will be displayed.

At the end of the pyrolytic cleaning process, the display shows the time of day. The oven door is locked.
Once the oven has cooled down, an acoustic signal will be emitted and the door will unlock.
To stop the pyrolitic cleaning cycle at any time: press the button ①.
The oven door
The oven door consists of three panes of glass. The oven door can be disassembled and the internal panes can be removed to make cleaning easier.

Important - Remove the oven door before cleaning it. The oven door could abruptly close if you try to remove the internal panes of glass when the door is still assembled.

To do so, proceed as follows.
- open the door fully;
- Locate the two door hinges (Fig. 24).
- Lift and turn the levers on the two hinges (Fig. 25).
- Hold the door by the side edges and close it slowly but not COMPLETELY (Fig. 26).
- Pull the door forward, removing it from its seat (Fig. 26).
- Place the door on a stable surface protected by a soft cloth to prevent the handle surface from being damaged (Fig. 27).

natural_image
Technical diagram showing a mechanical assembly with an arrow pointing to a component, labeled as Fig. 24 (no text or symbols on the diagram itself)
natural_image
Mechanical assembly diagram showing a lever mechanism with an arrow indicating rotation (no text or symbols present)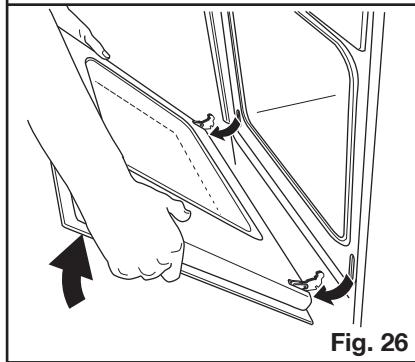
natural_image
Diagram of a hand holding a door clip with arrows indicating movement, labeled Fig. 26 (no text or symbols on diagram itself)
natural_image
Technical diagram of a rectangular electronic component with two circular annotations highlighting features (no text or symbols present)- Release the locking system to remove the internal panes of glass (Fig. 28).
- Turn the 2 fasteners 90^ and extract them from their seats (Fig. 29).
- Gently lift and carefully take off the uppermost pane (Fig. 30).
- Repeat the procedure described in point 9. for the middle pane marked by a decorative frame on 4 sides (Fig. 31).

natural_image
Two-step diagram showing hand tool application on a mechanical component, labeled Fig. 28 (no text or symbols on the diagrams themselves)


Clean the oven door with lukewarm water and a soft cloth. Do not use products such as scouring pads, steel wool, abrasive sponges or acids because they could damage the special heat-reflecting surface of the internal panes of glass.
After cleaning, reassemble the panes in the door and then the oven door, following the procedure described above in reverse. Make sure you reposition the panes correctly.

To perform this operation correctly, proceed as follows:
a) the decorated middle pane with a frame on the 4 sides must be reassembled so that the screen-printing is facing outwards. The side of the pane of glass is correct if you do not feel any roughness near the screen printing when you pass your fingers over the surface.
The middle pane of glass must be put back into the right seats as shown in Fig. 32.
b) the uppermost pane must be reassembled as shown in Fig. 33.
After the panes of glass have been reassembled in the oven door, perform the procedure described in point 8. in reverse to ensure they are locked.

Never clean the oven door when it is warm as the panels might shatter. If you can see scratches or cracks in the glass panel, call your nearest service centre immediately to have the panel replaced.
Models in stainless steel or aluminium:
Clean the oven door and operating panel in stainless steel or aluminium with a damp sponge and then dry carefully with a soft cloth. Never use metal pads, metal wool, acids or abrasives for cleaning because they may scratch the surfaces.

natural_image
Diagram showing a layered structure with an inset magnified view of a component (no text or symbols)Fig. 32
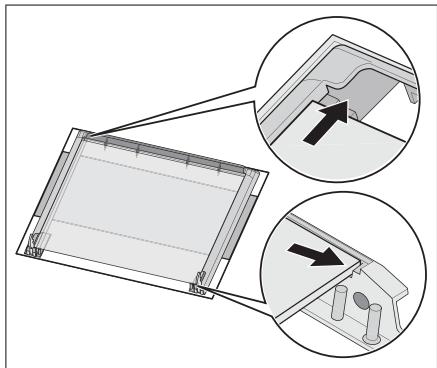
natural_image
Technical diagram showing a 3D panel assembly with two views of internal components, one with an arrow indicating direction (no text or symbols present)Fig. 33
Cleaning the oven door seals
A seal is fitted around the opening of the oven.

Check the condition of the seal on a regular basis.
If you notice damage to the seal, please contact the nearest service centre immediately. Do not use the oven until the seal has been replaced.
Replacing the oven light

Separate the appliance from the power supply by switching off the fuse.
If the oven bulb needs replacing, the new bulb must have the following specifications:
- Electric power: 40 W
- Electrical rating: 230 V (50 Hz)
- Heat resistance up to 300 °C
- Connection type: E14
These replacement bulbs can be purchased from your dealer.

To change the oven light:
- Before proceeding ensure the oven is cool and is disconnected from the electricity supply.
- Push in and turn the glass cover anticlockwise
- Remove the faulty bulb and replace with the new one.
- Refit the glass cover and restore the electrical supply.

natural_image
Diagram of a kitchen appliance showing internal components and directional arrows (no text or symbols)Troubleshooting
If the appliance is not working correctly, please check the following before contacting the Electrolux Service Centre.
| PROBLEM | SOLUTION |
| ■ The oven does not switch on. | ◆ Press the button Ⓙ and then select a cooking function.or◆ Has the fuse in the domestic electrical installation been tripped?or◆ Is the child lock for the oven or the automatic deactivation active?or◆ Was the Demo mode accidentally activated?or◆ Check whether the appliance is correctly connected and the socket switch or the mains supply to the oven is ON. |
| ■ The internal oven light does not come on. | ◆ Press the button Ⓙ and then select a cooking function.or◆ check the bulb and replace if necessary (see “Replacing the oven light”). |
| ■ It takes too long to cook the dishes or they cook too quickly. | ◆ Adjust the temperature if necessary,or◆ follow the advice contained in these instructions, especially the section “Using the oven”. |
| ■ Steam and condensation settle on the food and in the oven cavity. | ◆ Leave dishes inside the oven no longer than 15 - 20 minutes after the cooking is completed. |
| ■ The oven fan is noisy. | ◆ Check that shelves and bakeware are not vibrating in contact with the oven back panel. |
| ■ The error code „F“ followed by digits appears on the control panel. | ◆ Please take note of the error code and pass to our nearest Customer Service office. |
| ■ The display shows „12.00“. | ◆ Set the time of day (see chapter "Setting the clock"). |
Heating element ratings
| Bottom oven element | 1000 W |
| Top and bottom heating element | 1800 W |
| Hot air | 1825 W |
| Grill | 1650 W |
| Thermal grill | 1675 W |
| Pyrolytic cleaning | 2475 W |
| Oven light | 40 W |
| Hot air fan motor | 25 W |
| Cooling fan motor | 25 W |
| Total connection rating | 2740 W |
| Operating voltage (50 Hz) | 230 V |
Dimensions of the recess
| Height | 587 mm |
| Width | 560 mm |
| Depth | 550 mm |
Oven levels
| Height | 335 mm |
| Width | 395 mm |
| Depth | 400 mm |
| Oven capacity | 53 l |
The appliance can be combined with the following built-in hobs and built-in glass ceramic hobs:
• Glass ceramic hob types:
PEM 6000 E
Total connected load 6000 W
Supply voltage(50 Hz) 230V
• Glass ceramic hob types:
PES 6000 E
Total connected load 5800 W
Supply voltage(50 Hz) 230V
• Glass ceramic hob types:
PES 6060 E
Total connected load 7600 W
Supply voltage(50 Hz) 230V
Maximum rated heating capacity
- Oven + glass ceramic hob 10340 W

Installation and connection must be done in compliance with the regulations in force. All repairs may only be carried out once the appliance is turned off. Repairs must only be carried out by qualified service engineers.
The manufacturer denies all liability in cases where safety regulations have not been followed.
Connecting to the electrical supply
Please take note of the following requirements before connecting:
- The fuse or other protective device and the domestic electrical installation must be designed for the max. load of the appliance (see rating plate).
- The domestic electrical installation must be equipped with a proper earth connection in accordance with the regulations in force.
- The socket or multi-pole off switch must be easily accessible, even after completed installation of the appliance.
The appliance is shipped without a mains cable, as - depending on the type of supply available - a mains lead with a standard plug designed for the load specified on the rating plate is required. Insert the plug into a socket that satisfies the regulations.
The following cable types are suitable for use as mains cables, taking into account the respective rated cross-section required:
H07RN-F, H05RN-F, H05RR-F, H05VV-F, H05V2V2-F (T90), H05BB-F.
If the appliance is connected without a plug, or if the plug is not accessible, a multipole off switch (e.g. fuses, circuit breaker) with a minimum gap of 3 mm between the contacts must be installed between the appliance and mains connection. The switch must not interrupt the protective conductor at any point. The yellow/green protective conductor must be 2-3 cm longer than all other cables.
In any case, the mains cable must be designed in such a way that it never reaches
50°C (above room temperature) at any point along its length.
After the connection has been carried out, the heating elements must be tested by being operated for about. 3 minutes.
Terminal block
The appliance is fitted with an easily-accessible 6-way terminal block, with its links already set for operation on a 400V supply with neutral (see illustration).
In the case of a different supply voltage, the terminal block links must be turned in line with the schemes shown in the illustration. The protective conductor is connected to the ⏻ terminal. After connection, secure the cable to the terminal block with strain relief.
Electrical connection to the hob

Attention - observe the installation instructions for hob, built-in cooker or control box!
This appliance can be connected to the hob models specified in the «Technical data» section. The socket for connecting the hob is located on the cooker housing. The connecting cables of the heating elements and the protective conductor cable are brought out from the built-in hob; these cables are fitted with plug connections. Insert the plugs and connecting cables in the appropriate sockets. This prevents any possible wrong connection.
The manufacturer accepts no liability if the safety measures are not observed.

natural_image
Pure electrical connector diagram showing six terminal blocks connected by wires (no text or symbols)
To ensure trouble-free operation of the built-in appliance, the kitchen units or recess that the appliance is built into must have suitable dimensions.
In accordance with the regulations in force, all parts which ensure protection against accidental contact with live parts and parts with basic insulation must be secured in such a way that they cannot be removed without tools.
These also include the fixing of any end panels at the beginning or end of a line of built-in units.
In any case, the accidental contact protection must be ensured by the building in of the appliance.
The appliance can be positioned with its back or side wall against higher kitchen units, appliances or walls. However, only other appliances or units of the same height as the appliance can be placed against the other side wall.
Oven dimensions (see illustration)
Instructions for building in
To ensure trouble-free operation of the built-in appliance, the kitchen units or recess that the appliance is built into must have suitable dimensions.
Securing in the unit
- Open the oven door.
- Secure the oven in the unit using the four spacers (see illustration - A). These fit exactly in the holes in the frame. Then screw in the four woodscrews (supplied) tightly (see illustration - B).

If the problem persists after the checks described, contact your nearest service centre and describe the fault, appliance model (Mod.), product number (Prod. No.) and series number (Ser. No.) which you will find on the oven rating plate.
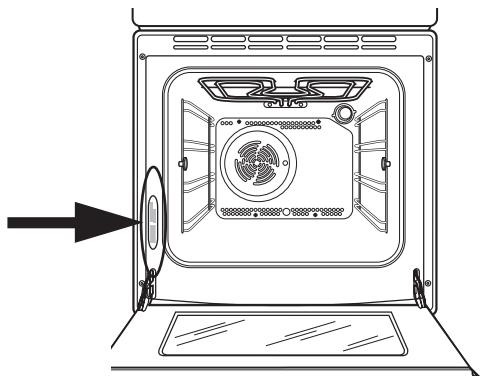
natural_image
Line drawing of an oven with a fan and ventilation system, showing airflow direction (no text or symbols)www.progress-hausgeraete.de
- Inhoud
- Handleiding voor de gebruiksaanwijzing
- FABRIKANT:
- Waarschuwingen en belangrijke veiligheidsinstructies
- Installatie
- Werking
- Veiligheid
- Afvalverwerking
- Verpakkingsmateriaal
- Oude apparaten
- Trek de stekker uit het stopcontact en verwijder de hoofdkabel van het apparaat.
- Klantenservice
- Verzinkbare knoppen
- Bedieningsknop voor de kookplaat
- Tweekringskookzone - Inschakeling (zie de lijst van apparaten in hoofdstuk «Technische gegevens»)
- Drukknoppen
- Opmerking
- Verwijder al het verpakkings- materiaal binnen en buiten, voor- dat u de oven in gebruik neemt.
- Om het juiste tijdstip van de dag in te stellen:
- Voor het eerste gebruik
- "Aan-/Uit" - toets
- Zo kiest u een bereidingsfunctie
- De temperatuur en de tijd instellen
- Veiligheidsthermostaat
- Koelventilator
- Functiesymbolen
- Maximumtemperatuur: 200 °C.
- Warm de lege oven altijd 10 minuten voor, om condensvorming te beperken.
- De ovendeur moet tijdens het gaarproces gesloten zijn.
- Hete lucht
- Deze gaarfunctie biedt de volgende voordelen:
- - Sneller voorverwarmen
- - Lagere temperaturen
- - Gelijkmatige warmteverdeling bij het bakken
- Boven- en onderwarmte
- Onderwarmte
- Grilleren
- Gebruik van de grill
- Ventilatorgrill
- Ontdooien
- Adviezen
- Bakken:
- Braden:
- Voorzichtig!
- Bereidingstijden
- Zo stelt u de kookwekker in
- De instelling van de kookwekker wijzigen:
- Zo schakelt u de kookwekker uit:
- Zo programmeert u een uitschakeltijd van de oven
- Zo annuleert u de bereidingstijd:
- Zo programmeert u het in-/uitschakelen van de oven
- Automatische uitschakeling van de oven
- Restwarmtefunctie
- Kinderblokkering voor de oven
- Zo deblokkeert u de oven:
- Snelopwarmfunctie
- Demo-modus
- Informatietoon regeltoets
- Zo deactiveert u de informatietoon regeltoets:
- Foutcodes
- Boven- en onderwarmte en hete lucht
- Tijden zijn exclusief voorverwarmen.
- Lege oven altijd 10 Minuten voorverwarmen.
- Bij het ventilatorgrill stelt u een maximale temperatuur in van 200°C.
- De aangegeven temperaturen zijn richtlijnen. Zo nodig moeten de temperaturen aan uw persoonlijke wensen worden aangepast.
- Reinigingsmiddelen
- Buitenkant reinigen
- Pyrolytische reiniging
- Gebruik van de pyrolytische zelfreiniging
- Verwijderen
- Reiniging
- Controleer voordat u de oven-roosters in de oven schuift, of de kartelschroeven weer goed zijn vastgedraaid.
- Programmering van de pyrolytische reinigingscyclus (starttijdkeuze, automatisch stoppen)
- De ovendeur
- Modellen van roestvrij staal of aluminium:
- Reinigen van de ovendeurdichting
- Vervangen van de binnenverlichting
- Het oplossen van problemen
- Technische gegevens
- Het apparaat kan met de volgende inbouwkookplaten en keramische glazen inbouwkookvelden worden gecombineerd:
- Elektrische aansluiting
- Klemmenbord
- Elektrische aansluiting op de kookplaat
- Let op: montagehandleiding voor de kookplaat, inbouwoven of schakelkast volgen!
- De fabrikant kan niet aansprakelijk gesteld worden als de veiligheidsvoorschriften niet opgevolgd worden.
- Afmetingen van oven (zie afbeelding)
- Instructies voor de inbouw
- Bevestiging in het meubel
- Contents
- How to read the instruction book
- MANUFACTURER:
- Warnings and important safety information
- Installation
- Operation
- Personal safety
- Disposal
- Packaging material
- Old appliances
- Separate the appliance from the mains supply and remove the mains supply cable from it.
- Customer service
- Retractable knob
- Control knobs for hob
- Dual-circuit switching (see the list of appliances in the «Technical Data» chapter)
- Push buttons
- Note
- Remove all packaging, both inside and outside the oven, before using the oven.
- Setting the clock:
- Before first use
- "On / Off" - button
- How to select a cooking function
- To set the temperature and cooking time
- Safety thermostat
- Cooling fan
- Function symbols
- Highest temperature: 200 °C.
- To reduce condensation, always preheat the empty oven for 10 minutes.
- Always cook with the oven door closed.
- Hot air
- The advantages of cooking with this function are:
- - Faster preheating
- - Lower temperatures
- - Even heating for baking
- Top and bottom heating element
- Bottom oven element
- Grilling
- How to use the grill
- Thermal grill
- Defrosting
- How to use defrosting function
- Hints and tips
- On baking:
- When roasting:
- Important!
- Cooking times
- To set the minute minder
- To use or to change the minute minder setting:
- To cancel the minute minder:
- To programme the oven to switch off
- To cancel the programmed cooking time:
- To programme the oven to switch on and off
- To cancel the programme, simply cancel the Cooking Time.
- Oven safety switch-off
- Residual heating function
- Child lock for the oven
- To unlock the oven:
- Fast heat-up function
- Demo mode
- Beep on touch
- To disable the beep on touch:
- Error codes
- Top and bottom heating element and hot air
- Timings do not include pre-heating.
- The empty oven should always be pre-heated for 10 minutes.
- The temperatures quoted are guidelines. If necessary, the temperatures should be adjusted to personal requirements.
- Before any cleaning, switch the oven off and let it cool down.
- The appliance must not be cleaned with a superheated steam cleaner or a steam jet cleaner.
- Cleaning materials
- External cleaning
- Pyrolytic cleaning
- How to use the pyrolytic cleaning function
- Removal
- Cleaning
- Please ensure that the retaining nuts are secure when refitting the shelf support.
- To programme the pyrolytic cleaning cycle (delayed start, automatic stop)
- The oven door
- Models in stainless steel or aluminium:
- Cleaning the oven door seals
- Replacing the oven light
- Troubleshooting
- The appliance can be combined with the following built-in hobs and built-in glass ceramic hobs:
- PEM 6000 E
- PES 6000 E
- PES 6060 E
- Connecting to the electrical supply
- Terminal block
- Electrical connection to the hob
- Attention - observe the installation instructions for hob, built-in cooker or control box!
- Oven dimensions (see illustration)
- Instructions for building in
- Securing in the unit
Marque : PROGRESS
Modèle : PHP5320X
Catégorie : Cuisinière encastrable