
PBK3360X - Four encastrable PROGRESS - Notice d'utilisation et mode d'emploi gratuit
Retrouvez gratuitement la notice de l'appareil PBK3360X PROGRESS au format PDF.
| Type de produit | Four encastrable |
| Marque | PROGRESS |
| Modèle | PBK3360X |
| Alimentation | 230 V ~ 50 Hz, 1875 W |
| Capacité | 53 L |
| Dimensions d'encastrement (H x L x P) | 587 x 560 x 550 mm |
| Dimensions de la cavité (H x L x P) | 335 x 395 x 400 mm |
| Nombre de fonctions | 7 (chaleur tournante, chaleur voûte/sole, sole, gril ventilé, gril + tournebroche, décongélation, éclairage) |
| Type de porte | Double vitrage amovible |
| Nettoyage | Parois catalytiques et nettoyage manuel |
| Éclairage intérieur | Ampoule 15-25 W, culot E14, 230 V |
| Accessoires fournis | Grille, lèchefrite, plaque à pâtisserie, tournebroche avec fourche et poignée |
| Sécurité | Thermostat de sécurité, arrêt automatique programmable |
| Réparabilité | Pièces détachées disponibles (ampoule, joint de porte, etc.) |
| Informations générales | Fabricant : Electrolux Home Products Italy S.p.A. ; Conforme aux directives CE |
FOIRE AUX QUESTIONS - PBK3360X PROGRESS
Questions des utilisateurs sur PBK3360X PROGRESS
0 question sur cet appareil. Repondez a celles que vous connaissez ou posez la votre.
Poser une nouvelle question sur cet appareil
Téléchargez la notice de votre Four encastrable au format PDF gratuitement ! Retrouvez votre notice PBK3360X - PROGRESS et reprennez votre appareil électronique en main. Sur cette page sont publiés tous les documents nécessaires à l'utilisation de votre appareil PBK3360X de la marque PROGRESS.
MODE D'EMPLOI PBK3360X PROGRESS
Inbouwoven Built-in oven
Inhoud
Waarschuwingen en belangrijke veiligheidsinstrumenties 3
Beschrijving van het apparatus 5
Bediening 6
Voor het eerste gezbruik 7
Elektronischprogrammeren 8
Bereidingswijzen in de oven 13
Bak-tabellen 18
Reiniging en onderhoud 20
Storingen-Wat moet u doeon? 26
Technische gegevens 27
Voor de installmenter 28
Instructies voor de inbouw 29
Klantenservice 30
Handleiding voor de gebruiksaanwijzing

Veiligheidsinstructies

Stap-voor-stap-handleiding

Adviezen

Milieu-informatie

Dit apparaat voldoet aan de volgende EU-richtlijnen:
- 2006/95 (laagspanningsrichtlijn);
- 89/336 (EMC-richtlijn);
- 93/68 (Algemene richtig);
en de waarop volgende wijzigingen.
FABRIKANT:
ELECTROLUX HOME PRODUCTS ITALY S.p.A.
VialeBologna,298
47100 FORLI (Italy)

Bewaar de bij dit apparaat geleverde gebruiksaanwijzing zorgvuldig. Als het apparaat aan derden worden geschonken of verkocht, of als u het apparaat bij verhuizing in de oude woning achefterlaat, is het belangrijk dat de neue gebruiker over deze gebruiksaanwijzing en de adviezen kan beschikken.
Deze aanwijzingen zijn bedoeld voor de verilgheid van de gebruikers en hun huisgenoten. Lees ze dus aandachtig door, voordat u het apparaat aansluit en/of in gebruik neemt.
Opstellen
- De installmentie要去en worden uitgevoerd door een erkend installer, met inachtneming van de geldende voorschriften. De afzonderlijke installmentiewerkzaamheden zijn beschreiben in de instructies voor de installerur.
- Laat het apparaat installereren en aansluiten door een erkend installerateur overeenkomstig de richtlijnen.
- Mochten er op grond van de installmentie aanpassingen aan de stroomvoorziening nodig+zijn, dan dienen ook die door een vakman te worden aangebracht.
Werking
- Deze oven is bedoeld voor het bereiden van gerechten; gebruik hem nooit voor andere doeleinden.
- Pas, bij het openen van de deur, tijdens of aan het einde van de bereiding,.altijd op de het luchtstroom, die uit de oven maar buiten komt.
Wees extra voorzichtig wanner u met de oven werkt. Door de grote hitte van de verwarmingselementen zijn rooster en overige onderdelen erg heet. -
Indien u - om weltke reden dan ook - aluminiumfolie macht gebruiken voor het bereiden van gerechten in de oven, maar dit dan nooit in direct contact komt met de bodem van de oven.
Ga bij het reinigen van de oven voorzichtig te werk: sproei nooit vloeistof op het vetfilter (indien aanwezig), de verwarmingselementen en de thermostaatsensor. -
Het is gevaarlijk veranderingen van welke aard ook aan te brengen aan het apparaat of aan de kenmerken ervan.
Tijdens het bakken, braden en grillen worden het venster van de deur en de overige onderdelen van het apparaat erg heet. Houd kinderen aanom uit de buurt van het apparaat. Indien er elektrische apparaten worden aangesloten op stopcontacten in de buurt van de oven, let er dan op dat de aansluitsnoeren nicht in aanraking komen met heteoppervlakken of vastgeklemd raken tussen de overdeur. - Gebruik algid ovenwanten, om vuurvaste hete schalen of pannen uit de oven te halen.
Regelmatig reinigen voorkomt dat het oppervlaktemateriaal van de oven中断uitgaat.
Schakel voordat u de oven gaat reinigen de stroom uit of haal de stekker uit het stopcontact. - Verzeker uervaan dat de oven in de stand "UIT" staat als de oven Niet meer gebruikt worden.
- Deze oven is afhankelijk van deuitvoering gemaatk als los apparaat of als combinatieapparaat met elektrische planta voor eenfaseaansluiting op 230 V.
- Het apparaat mag nicht worden gereinigd met een stoomreiniger.
- Gebruik geen schuurmiddelen of scherpe metalen krabbers. U kunt daarmee krassen op het glas van de deurveroorzaken en dat kan leiden tot het barsten van het glas.
Veiligkeit van Personen
- Dit apparaat is bedoeld voor gebruik door volwassenen. Het is gevaarlijk om het door kinderen teLATEN gebruiken of hen ermee teLATEN spelien.
- Houd kinderen uit de buurt, zolang de oven in werkung is. Ook nedat u de oven heeft uitgeschakeld, blijft de deur nog lange hijd heet.
- Dit apparaat mag Niet gebruikt worden door kinderen of andere Personen wiens lichamelijke, motorische of geestelijkke gesteldheid of gebrek aan ervaring en kennis die daardoor het apparaat Niet kunnen gebruiken zonder supervisie of instructies van een verantwoordelijk person om zeker teijken van dat het apparaat veilig kan worden gebruikt.
Afvalverwerking

Verpakkingsmaterialiaal
- De verpakkingsmaterialen zijn milieuvriendelijk en herbruikbaar. De kunststofdelen zijn gekenmerkt, bijv. >PE>, >PS< etc. Gooi de verpakkingsmaterialen volgens hun markingsweg bij de gemeentelijk ine Zamelpunten in de waarvoor bedoelde inzamelcontainers.

Oud apparatus
- Het symbolism op het product of op de verpakking geeft aan dat dit apparaat Niet behandeld mag worden als normal haishoudelijk afval, maar ingeleverd moet worden bij een inzamelingspunt voor recycling van elektrische en elektronische apparaten. Door uw bijdrage aan de juiste afvalverwerking van dit product helpt u het milieu en de gezondheid van uw medemensen te beschermen. Het milieu en de gezondheid worden door verkeerde afvalverwerking in gevaar gebracht. Meer informatie over de recycling van dit product krijgt u op het gemeentehuis, uw vuilnisophaaldienst of bij de winkel waar u het product heeft gekocht.

Let op: Om te zorgen dat het apparaat geen gevaar vormt要去 de stekker onbruikbaar gemaatk worden voordat u het apparaat weggooit.
Maak het apparaat hiervoor los van de stroomvoorziening en verwijder het elektriciteitssnoer van het apparaat.
Klantenservice
- Laat inspectie- en/of herstelwerkzaamheden uitvoeren door de service-afdeling van de fabrikant of door een service-afdeling die door de fabrikant geauthoriseerd is en gebruik alleen originele onderdelen.
- Reparaties aan elektrische apparaten mogen alleen door vakmensen worden uitgevoerd. Reparaties die door niedeskundige Personen uitgevoerd worden, können tot schade of letsel leiden.

- Bedieningspaneel
- Ovenregelaar
- Thermostaatknop
- Thermostaatknop - contro-indicatie
- Controlelampje
-
Ventilatiesleuf voor afkoelventilatie
-
Grill
- Binnerverlichting
- Ovenventilator
- Typeplaatje
- Draaispitopening
- Elektronisch programmeren
Accessoires


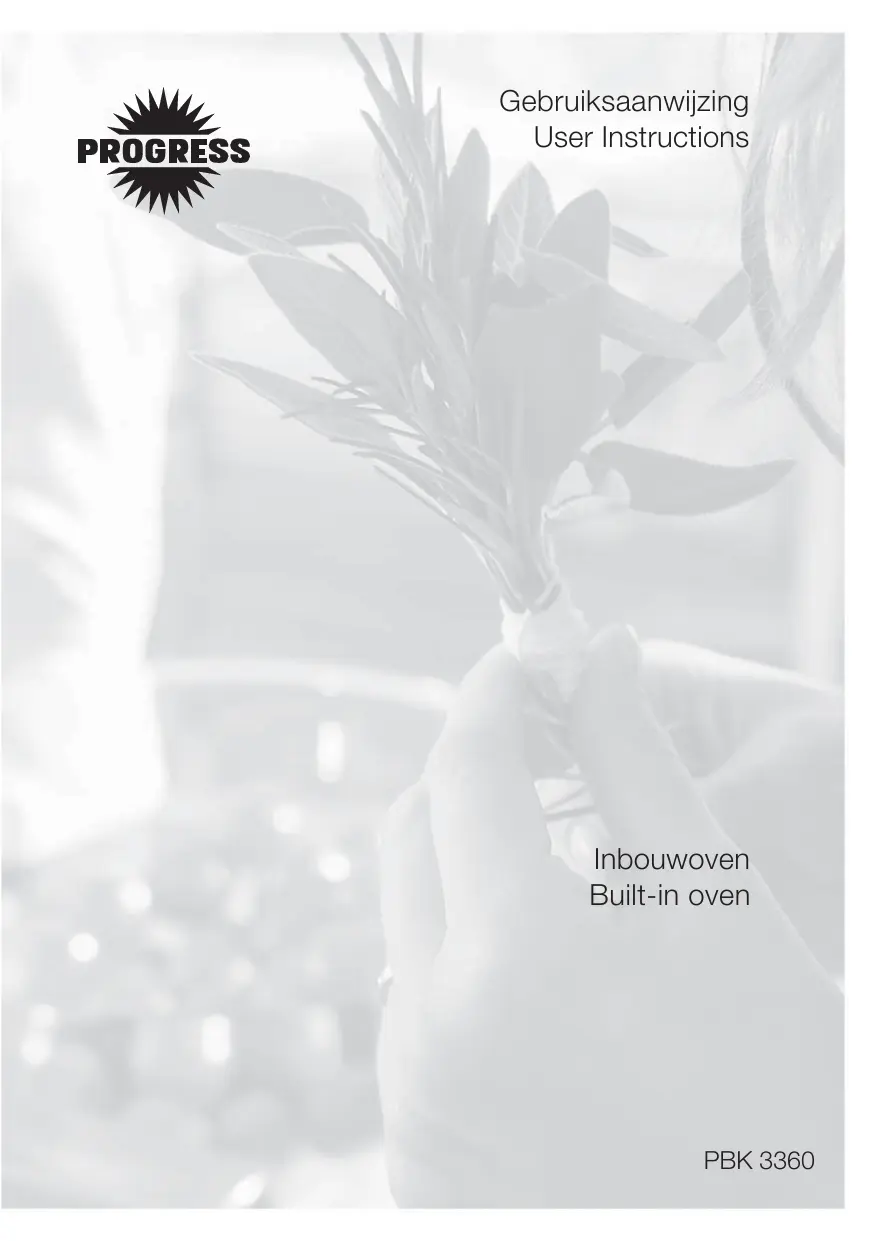
Verzinkbare knuppen
Deze modellen zich uitgerust met verzinkbare knuppen. Deze schakelaarknuppen werken volgens het druk-trekprincpe. Ze können volledig in het paneel worden verzonken wanner de oven buiten bedrijf is.
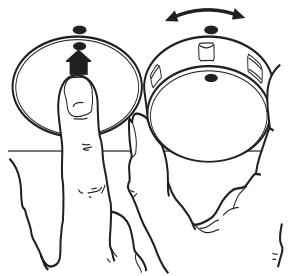
Ovenregelaar
0 Ovenuitgeschakeld

Hete lucht

Boven- en onderwarmte

Onderwarmte

Ventilatorgrill

Grill - en draaispit

Ontdooien
Indicatielampje
Het indicatielampje brandt wanner de ovenregelaar worden ingesteld.
Thermostaatknop
Draai de thermostaatknopaar links, om temperaturen tussen 50^ en 250^ te selectoren.
Thermostaatknop - controle-indicatie
Deze controle-indicatie brandt wanner aan de thermostaatknop worden gedraaid. Het lampje blijft branden tot de gewenste temperatuur is bereikt. Daarna gunshot het knipperen om aan te gehen dat de temperatuur in stand worden gehonden.

Veiligheidsthermostaat
Om te voorkomen dat de oven oververhit raakt (door onjuist gebruik van het apparaat of vanwege defekte onderden), is de oven voorzien van een verilgheidsthermostat die indien nodig de stroomtoevoer onderbreekt. Zodra de temperatuur is gedaald, worden de oven automatisch werden ingeschakeld.
Als de veiligheidsthermostat is geactiveerd vanwege onjuist gebruik van het apparaat, hoeft u (nadat de oven is afgekoeld) alleen de fouit te verhelpen. Is de thermostatchalter geactiveerd vanwege een defect onderdeel, neem dan contact op met de klantenservice.
Koelventilator
De koelventilator koelt de oven en het bedieningspaneel af. De ventilator worden nadat de oven enkele Minutes in werkig is automatisch ingeschakeld. Warme lucht wordt door de afscherming in de buurt van de deurgreep van de oven maar buiten afgevoerd. Als de oven worden uitgeschakeld kan de ventilator nog enigeijd draaien om de bedieningselementen af te koelen. Dit is helemaal normal.

De werkung van de ventilator hangt af van hoe lang en op welke temperatuur de oven gebruikt is. Het is möglichk dat de ventilator helemaal Niet ingeschakeld worden op lagere temperatuurinstellenen of als de oven maar korteijd gebruikt is.
Voordat u de oven voor het eerst in gebruik neemt

Verwijder al het verpakkingsmaterial, zowel aan de buitenkant als aan de binnenkant van de oven, voordat u de oven in gebruik neemt.
Voordat u de oven in gebruik neemt, moet de oven eén keer opgewarmd worden zonder dat u er gerechten in geplaatst heeft.
Gedurende dezeijd kan er een onaanganam luchtje ontstaan. Dit is—helemaal normal. Het worden veroorzaakt door fabricageresten.

De oven functioneert alleen als u de klok hebt ingesteld.
Zorg ervoor dat de ruimte goed geventi-leerd is.

- Stel het tijdstip van de dag in met de optie elektronisch programmeer (zie hoofdstuk "Elektronisch programmeer").
- Draai de functieknop op Hete lucht
- Draai de thermostaatknop maar 250^
- Zet een raam open voor de ventilatie.
- Laat de lege oven ongeveer 45 minutes werken.
Herhaal deze procedure voor de functie Boven- en onderwarmte en voor de functie Ventilatorgrill gedurende ongeveer 5-10 minutes.

Laat de oven daarna afkoelen. Maak een doek vochtig met warm water en wat mild reinigingsmiddel en maak daarmee de binnenkant van de oven schoon.

Maak, voordat u de oven voor het eerst gebruikt, ook alle accessoires grondig schoon.


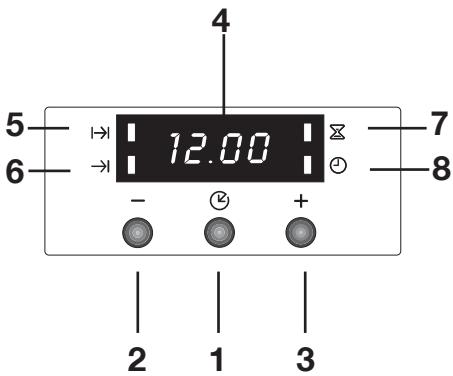
Pak, om de deur te openen,
altijd de handgreep in het
midden vast.
Elektronisch programmeren

De oven werkt pas nadat de klok is ingesteld.
De oven kan darüber ook zonder enige programmering bediend worden.
Instellen van deijd
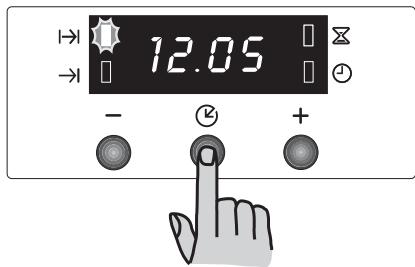
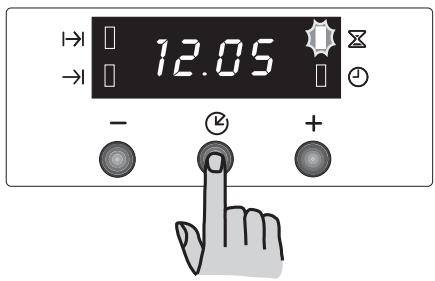
Wanneer de stroomtoevoer wordt ingeschakeld, of nadat de stroom isuitgevallen, knippert op het display het controelampje "Tijdstip van de dag" ①.
Om het juiste tijdstip van de dag in te stellen:
- Druk op toets " ^+ of "
- Wacht verwolgens 5 seconden: Het contrôlelampje "Tijdstip van de dag" 📁发展格局, en op het display verschijnt de ingestelde tijd. Het apparaat is maar voor gebruik.
Om het juisteijdstip van de dag opnieuw in te stellen:
-
Druk de toets herhaaldelijk in, om de functie "Tijdstip van de dag" te selecteren. Het overeenkomstige contrôlelampjeGa knipperen.Ga dan verdier zoals hierboven is beschreiben. Hetijdstip van de dag kan alleen opnieuw worden ingesteld als er geen automatische functie (bereidingsduur of einde bereidingstijd ) is ingesteld.
-
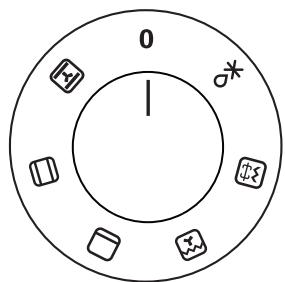
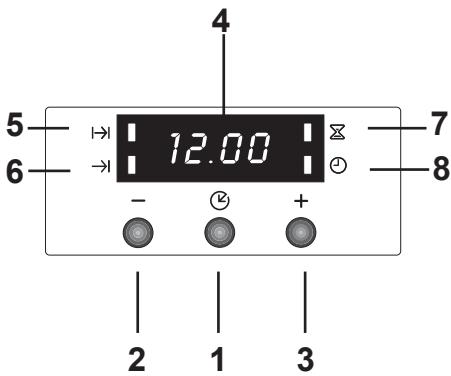
Toets voor de functiekeuze ()
2.Toets
3.Toets 十 ^ 一 - Indicatie
- "Bereidingstijd"- controlelampje | |
- "Einde bereidingsstijd"- controlelampje
- "Kookwekker" - controlelampje
- "Tijd"- controlelampje

Bij stroomuitval worden de gegevens gewist en要去en opnieuw worden ingevoerd. Wanner er wee stroom is, knipperen de functielampjes en kan de tijd opnieuw worden ingesteld.

Bereidingsduur
Met deze functie worden de oven automatisch uitgeschakeld als deijd van een geprogrammeerde vereidingsduur afgelopen is. Zet het gerecht in de oven, selecteer een vereidingsfunctie en stel de
bereidingstemperatuur in. Druk de toets herhaaldelijk in, om de functie "Bereidingsduur" te selecteren. Het overeenkomstige controelampje gaat knipperen. Ga dan als volgt verd:
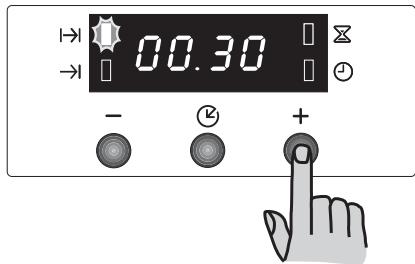
Zostelt u de bereidingsduur in:
- Druk op toets " ^+ of 一 ^
- Wacht 5 seconden nadat u deinstalling hebt uitgevoerd: het "Bereidingsduur" contrôlelampje gaat branden en op het display verschijnt weeer het tijdstip van de dag.
- Na afloop van de geprogrammeerde tijsdsduur, worden de oven automatischuitgeschakeld. Er klinkt een geluidssignaal, en het controleampje knippert. Draai de ovenregelaar en dethermostaatknop op nul.
De signaaltoon kan worden uit gezet door op een willekeurige toets te drukken.
OPMERKING: Door het uitschakelen van het geluidssignaal worden de oveneer op handmatig gezet. Als de ovenregelaar en dethermostaatknop Niet op nul gezet zich, zal de oven weer gaan opwarmen.
Zo annuleert u de bereidingstijd:
- Druk de toets herhaaldelijk in, om de functie "Bereidingsduur" te selecteren. Het desbetreffende controleampje gaat knipperen en op het display verschijnt de resterende bereidingsstijd.
- Druk op de toets "—" tot op het display "0:00" verschijnt. 5 seconden later gaat het contrôlelampje uit en zal het tijdstip van de dag weer op het display verschijnen.
Einde van de bereidingstijd
Met deze functie kurz u de oven zodanig instellen dat deutsche automatisch uitgeschakeld worden als deijd van een geprogrammeerde vereidingsduur afgelopen is. Zet het gerecht in de oven, selecteer een vereidingsfunctie en stel de vereidingstemperatuur in. Druk op de toets

Druk de toets herhaaldelijk in, om de functie "Einde van de bereidingstijd" te selecteren. Het overeenkomstige controle lampje gaat knipperen. Ga dan als volgt verder:
Zo stelt u het einde van de bereidingstijd in:
- Druk op toets " ^+ of 一
- Wacht 5 seconden nadat u deinstalling hebt uitgevoerd: Het controelampje "Einde van de bereidingstijd" brandt, en op het display verschijnt weer het tijdstip van de dag.
- Na afloop van de geprogrammeerde tijdsduur, worden de oven automatischuitgeschakeld. Er klinkt een geluidssignaal, en het controlelampje knippert. Draai de ovenregelaar en dethermostaatknop op nul.
De signaaltoon kan worden uitgezet door op een willekeurige toets te drukken. OPMERKING: Door het uitschakelen van het geluidssignaal wordt de oven weer op handmatig gezet. Als de ovenregelaar en dethermostaatknop Niet op nul gezet zich, zal de oven weer gaan opwarmen.
Zo annuleert u het einde van de bereidingstijd:
- Druke de toets herhaaldelijk in, om de functie "Einde van de bereidingstijd" te selecteren. Het desbetreffende controleampje knippert, en op het display verschijnt het geprogrammeerde einde van de bereidingstijd.
- Druk op de toets "—", tot op het display het tijdstip van de dag verschijnt. Er klinkt een geluidssignaal en het controlelampje staat uit.
Combinatie van "bereidingsduur" | | en "einde van de bereidingstijd" |
De functies "Bereidingsduur" en "Einde van de bereidingsstijd" können tegelijk gebrukt worden om de oven automatisch in te schakelen en later uit te schakelen.


- Stel met behulp van de functie "Bereidingsduur" de vereidingsduur in (stel het einde van de vereidingsstijd in zoals beschreiben in het betreffende hoofdstuk). Druk verwolgens op de toets: op het display verschijnt de geprogrammeerde instelling.
- Stel met behulp van de functie "Einde van de bereidingstijd" het einde van de bereidingstijd in (stel het einde van de bereidingstijd in zoals beschreiben in het betreffende hoofdstuk). Het overeenkomstige controleampje gaat branden en op het display verschijnt het tijdstip van de dag. De oven zal in- en uitgeschakeld worden volgens de ingestelde programma's.
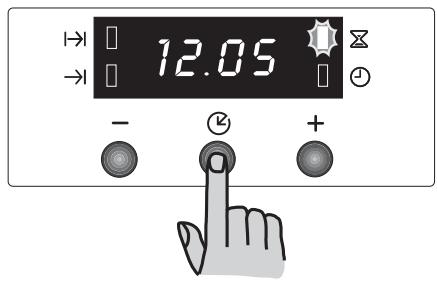
Kookwekker
Het alarm van de kookwekker klinkt na afloop van de ingestelde tjdsduur; de oven blijftECHTER aan, indien hij in gebruik is.
Zosteltudekookwekkerin:
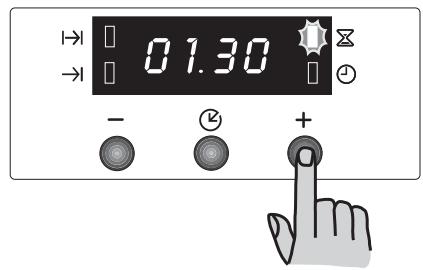
- Druke de toets herhaaldeijk in, om de functie "Kookwekker" te selecteren. Het overeenkomstige controelampje x gaat knipperen.
- Druk verzolgens op toets "+" of "-" (maximaleijd: 2aar, 30 minuten).
- Wacht 5 seconden nadat u deinstelling hebt uitgevoerd. Het controleampje "Kookwekker" brandt.
- Als de ingestelde tijsdsduur is afgelopen begint het controleampje te knipperen en klinkt er een geluidssignaal. Druk op een willeleurige toets om het geluidssignaaluit te zetten.
Zoschakeltudekookwekkeruit:
- Druke de toets herhaaldelijk in, om de functie "Kookwekker" te selecteren. Het desbetreffende controleampje knippert, en op het display verschijnt de resterendeijd.
- Druk op de toets "—" tot op het display "0:00" verschijnt. 5 seconden later gaat het contrôlelampje uit en zal het tijdstip van de dag waar op het display verschijnen.

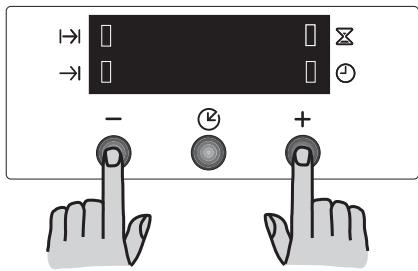
Zoschakelt u het display uit
- Druk twee van de programmatoetsen tegelijkertijd in, en houd ze ca. 5 seconden lang ingedrukt. Het display wordenuitgeschakeld.
- Om het display in te schakelen, dient u een willekeurige toets in te drukken.
Het display kan alleen uitgeschakeld worden als er geen andere functies zich ingesteld.

Belangrijk! - Plaats tijdens de bereiding geen bakplaten op de bodem van de oven endek geen onderdelen van de oven af met aluminiumfolie. Dit kan oververhitting veroorzaken, wat de bakresultaten beinvloedt en het@emailvean de oven kan beschadigen.Zet pannen, hittebestendige pannen en aluminium bakplaten alttid op het plateau, dat in een van de geleiders is geschoven. Wanner voedsel verwarmd worden, ontstaat er stoom, net als in een ketel. Wanner de stoom in aanraking komt met de glazen deur van de oven, wordt er condens gezvormd en ontstaan er waterdruppels.
Warm de lege oven.altijd 10 minuten voor,om condensvorming te beperken.
Wij adviseren u na elke bereiding de waterdruppels weg te vegen.

Houdijdens de bereiding de ovendeur altijd gesloten. Ga bij het openen van de ovendeur zorgvuldig te werk. Laat de deur Niet "open vallen", maar gebruik de deurgreep, tot de deur helemaal is geopend.
De oven heeft vier niveaus voor ovenrekken. Deplaatsen voor het plateauu worden van de bodem van de oven geteld,zoals aangegeven in de afbeeding.
De plateauus moeten hoe dan ook op de juiste manier worden ingezet (zie afbeelding).
Zet vaatwerk en pannen nicht direct op de bodem van de oven.

Hete lucht
- Het voedsel worden bereid met behulp van voorverwarmde lust捷 die gelijkmatig rond geblazen worden in de oven door een ventilator in de weiterwand van de oven zichl.
- De warmte bereikt zodoende gelijkmatig en snel alle delen van de oven. Dit betekent dat u gezeltijdig verschillende soorten voedsel kunt vereiden, die op de verschillende niveaus geplaatst zich. Bereiden met hete lucht garandeert een snelle verwijdering van vocht; de drogere omgeving van de oven voorkomt dat de verschillende aroma's en smaken van het ene gerecht maar het andere worden overgebracht.
De möglichkehoid om op meerere niveaus voedsel te bereiden betekent dat u verschilnde gerechten tegelijkkertijd en tot drie taartvormen of minipizza's voor consumptie of voor invriezen kutbakken. - Natuurlijk(Int)kunt u de oven ook met slechts een plateau gebruiken. Daarbij(Int)kunt u het best de laagste niveaus gebruiken, dan(Int)kunt u de voortgang makkelijker in de gaten honden.
- Bovendien is de oven met name aanbevolen voor het steriliseren van jam en eigen- vruchten op siroop en om paddenstoelen en fruit te drogen.
Grillen
- De meeste levensmiddelen moeten op het rooster in de grillpan worden gelegd, om maximale luchtcirculatie möglich te makeen en om te voorkomen dat de levensmiddelen Niet in het vet en in hun eigén sap liggen. Vis, lever en niertjes kuren desgewenst ook direct in de grillpan worden gelegd.
- De levensmiddelen要去 zo droog möglichelijk zijn voordat ze worden gegrildd, om spatten te voorkomen. Bestrijk mager vlees of vislicht met olie of gesmolten boter om ervoor te zorgen dat het grillgoedijdens het bereiden sappig blijft.
Groenten als bijlage, zoals tomaten en paddenstoelen, könnenijdens het grillen van vlees onder het grillrooster worden gelegd.
Voor het roosteren van brood raden wij u aan het bovenste inzetniveau te gebruiken. - Het grillgoed moet vanijd totijd worden gekeerd.
Gebruik van de grill
Via de grill gaat snel directe warmte\ aar het middelste gedeelte van de grillpan. Met de grill kunnen goed Kleinere\ hoeveelheden worden gegrilleerd. Op deze\ wijze kan ook energia worden bespaard.
- Draai aan de ovenregelaar om de oven in te schakenen
- Zet de thermostaatknop op de gewenste temperatuur.
- Stem het niveau van het rooster en de grillpan af op de dikte van het voedsel. Volg verwolgens de instructies voor het grillen op.
Het grillelement wordt gestuurd via de thermostat. Tijdens het grillen wordt de grill met regelmatige tussenpozen in- enuitgeschakeld om oververhitting te voorkomen.
Onderwarmte

Deze functie is bijzonder handig bij het blind bakken van deeg. De functie kan ook worden gebruikt voor quiches of pasteien, om ervoor te zorgen dat het basisdeeg goed.gaar is.

Het controlelampje van de thermostaatknop brandt zo lang tot de juiste temperatuur is bereikt. Daarna发展格局 om aan tegeven dat de temperatuur in stand worden gehonden.
Boven- en onderwarmte

Op het middelsteinzetniveau wordt de warmte het beste verdeld. Wanner de onderkant van gerechten bruiner要去en, dan neemt u gewoon een lagerinzetniveau. Moet de bovenkant juist bruiner想去, dan zet u het plateau hoger in de oven.
- Het materiaal en de afwerking van de bakplaat en de schalen is van invloed op de mate waarin het voedsel een bruin korstje krijgt. Geëmailleerde, donkere, zware of ongecoate vormen en keukenapparaten makeen een sterkere bruining van de onderkant möglichk, terwijl vormen van glas of glanzend aluminium of gepolijste staalplaten de warmte reflecteren en.daarom slechts een geringe bruining van de onderkant toelaten.
- Zet gerechten alkijd in het midden van het plateau om een gelijkmatige bruining te verkrijgen.
Zet de gerechten op bakplaten met een passende grotte, zodat vloeistoffen nicht op de bodem van de oven terecht kunden komen. Zo hoeft u ook minder schoon te make.
Zet gerechten,blinkken of bakplaten nooit direct op de bodem van de oven,omdat die erg heet worden en er beschadigingen kuren optreden.Bij deze instelling komt de warmte van de verwarmingselementen van boven en beneden. Daarom heeft u voor het bereiden maar eeninzentiveau nodig.Dezeinstilling is met name geschikt voor gerechten die ook van onder goed bruin要去en worden,zoals quiches en pasteien.
Ook gratins, lasagne en andere gegratineerde gerechten, die met name van boven Mooi bruin moeten worden, kuren met deze instelling goed worden bereid.
Zo gebruikt u boven- en onderwarmte:
- Draai de ovenregelaar op de gewenste functie
- Zet dethermostaatknop op de gewenste temperatuur.
Ontdooien

De ovenventilator werkt zonder warmte en的那一ut de lucht in de oven op kamertemperatuur circuleren.
Controller of dethermostaatknop op de stand UIT staat.
Ventilatorgrill

Bij de ventilatorgrill een maximale temperatuur van 200^ instellen.
Vervolgens gaat de grill afwisselend met de ventilator werken (convectiewerking). Deze werkwijze maakt het gelijkmatte binnendringen van de warmte in het gerecht möglichk, zonder de bovenkant te langdurig bloot te stellen aan de directe bestraling van de grill.
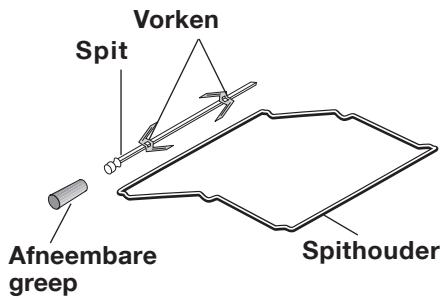
Draaispit

Ovendeur altijd gesloten houden.

Neem de volgende instructies in acht:
Vlees aan het draaispit rijgen en met de vorken vastzetten.
- Spit op de houder plaatsen en het geheel in het tweedeinzetau van onder schuiven.
- Het uiteinde van het spit in de desbetreffende opening van dechterwand aanbrengen.
- De grep van het spit thereof schroeven.
- De braadslede met ca. 1/2 l. water op het eerste inzetniveau plaatsen.
- De functiekeuzeschakelaar op stand +3 draaien en de gewenste temperatuur instellen.

De vorken en het spit van het draaispit zichn spits en scherp (Indien uw apparaat is uitgerust met een draaispit). Ga voorzichtig met het draaispit te werk om verwondeningen te voorkomen.

Braden met het draaispit


Tijden zijn exclusief voorverwarmen.
De lege oven algtd 10 minuten voorverwarmen.
| Soort gerecht | Hoeveelheid (gr.) | Niveau 4 3 2 1 | Temp. °C | Kooptijd in minutes |
| Gevogelte | 1000 | 2 | 200 | 50/60 |
| Braadstuk | 800 | 2 | 200 | 50/60 |

De aangegeven temperaturen zijn richtlijnen. Zo nodig要去en de temperaturen aan uw persoonlijke wensen worden aangepast.

Adviezen
Bakken:
Taart en gebak vereisen gewoonlijk een gematigde temperatuur (150^ - 200^) . Daarom is het nodig om de oven ca. 10 minutes voor te verwarmen.
Doe de ovendeur Niet open voordat driekwart van de baktijd is verstreken.
Bak kruimeldeeg in een springvorm of op een bakblik tot tweederde van de baktijd. Vervolgens kut u het garneren en afbakken. De verdere baktijd hangt af van de soort en hoeveelheid garnering of vulling. Biscuitdeeg moet moeillijk van de lepel lopen. Door te vloeijaar deeg zou de baktijd onnodig longer duren.
Als er twee bakblikken met gebak tegelijkkertijd in de oven worden geplaatst, moet er:tussen de blinkken een niveau worden vrijgelaten.
Worden twee bakplaten met gebak tegelijkkertijd in de oven geschoven, dan moeten de platen na ongeveer 2/3 van de baktijd van bovenaar beneden verwisseld en gedraaid worden.
Braden:
Braad geen stukken die minder wegen dan 1kg .Kleinere stukken konnen tijdens het braden uitdrogen.Donker vlees,dat van buiten goed gebraden maar van binnen roze tot rood要去 blijven, moet bij een hogere temperatuur (200^ - 250^) worden gebraden.
Licht vlees, gezogelte en vis hebben daarentegen een lagere temperatuur (150^-175^) nodig. Doe bij een korte bereidingsstijd de ingredienten voor de saus of jus direct aan het begin in de braadslede. Heeft het gerecht een langere bereidingsstijd nodig, voeg deze ingredienten dan pas het LASTe half uur toe.
U kunt controleren of het vlees gaar is met behulp van een lepel: als het vlees Niet kan worden ingedrukt, is het gaar. Rosbief en ossenhaas, die van binnen roze要去en blijven,要去en op een hogere temperatuur en in kortereijd worden gebraden.
Als u vlees direct op het rooster braadt, plaats dan de braadslede op het onderste niveau zodate de sappen worden opgevangen.
Laat het braadstuk minstens 15 Minutes staan, zodate het vleesvocht nicht kan weglopen.
Om rookvorming in de oven te beperken, cunt u een beetje water in de braadslede gieten. Om condensvorming te voorkomen, eenaarkee watertoevoegen.Borden kunnen tot zij geserveerd worden in de oven op de laagste temperatuur warm gehonden worden.

Voorlichtig!
Bedek de oven nooit met aluminiumfolie en plaats geen bakblikken, ovenschotels endergelijk op de bodem van de oven, anders kan het@email van de oven door de opgebouwde hitte beschadigd raken.
Bereidingstijden
De bereidingsstijden können verschillen al\
aar gelang de samenstellung, ingredienten
en hoeveelheid vocht in de afzonderlijke\
gerechten.
Noteer de instellingen, die u bij uw eerste gaar- en braadpogingen heeft gedaan, om ervaringen op te doen voor het geval dat udezelfde gerechten later opnieuw wilt bereiden.
U kunt de aangegeven waarden in de tabellen aanpassen op basis van uw eigenervaringen.
De Boven- en onderwarmte en hete lucht

Tijden zijn exclusief voorverwarmen.
Lege oven.altijd 10 Minuten voorverwarmen.
| GERECHT | Deconventionalleen | Hete lucht | Grilltijd in minutes | OPMERKINGEN | ||
| Niveau | Temp. (°C) | Niveau | Temp. (°C) | |||
| GEBAK | ||||||
| Schuimtaart | 2 | 170 | 2 (1 en 3)* | 160 | 45-60 | Cakevorm |
| Zandkoekdeeg | 2 | 170 | 2 (1 en 3)* | 160 | 20-30 | Cakevorm |
| Karnemelk-kaaskoek | 1 | 175 | 2 | 165 | 60-80 | Cakevorm |
| Appeltaart | 1 | 170 | 2 (1 en 3)* | 160 | 90-120 | Cakevorm |
| Strudel | 2 | 180 | 2 | 160 | 60-80 | Bakplaat |
| Jamtaart | 2 | 190 | 2 (1 en 3)* | 180 | 40-45 | Cakevorm |
| Fruitcake | 2 | 170 | 2 | 150 | 60-70 | Cakevorm |
| Biscuitgebak | 1 | 170 | 2 (1 en 3)* | 165 | 30-40 | Cakevorm |
| Kerstcake | 1 | 150 | 2 | 150 | 120-150 | Cakevorm |
| Pruimentaart | 1 | 175 | 2 | 160 | 50-60 | Broodvorm |
| Kleine cake | 3 | 170 | 2 | 160 | 20-35 | Bakplaat |
| Koekjes | 2 | 160 | 2 (1 en 3)* | 150 | 20-30 | Bakplaat |
| Schuijmpes | 2 | 135 | 2 (1 en 3)* | 150 | 60-90 | Bakplaat |
| Koffiebroodjes | 2 | 200 | 2 | 190 | 12~20 | Bakplaat |
| Gebak: Soesjes | 2 of 3 | 210 | 2 (1 en 3)* | 170 | 25-35 | Op bakplaat |
| Taartjes | 2 | 180 | 2 | 170 | 45-70 | In cakevorm |
| BROOD EN PIZZA | ||||||
| Wit brood | 1 | 195 | 2 | 185 | 60-70 | |
| Roggebrood | 1 | 190 | 1 | 180 | 30-45 | Broodvorm |
| Broodjes | 2 | 200 | 2 (1 en 3)* | 175 | 25-40 | Bakplaat |
| Pizza | 2 | 200 | 2 | 200 | 20-30 | Bakplaat |
| FLANS-ovenschotels | ||||||
| Pasta-flan | 2 | 200 | 2 (1 en 3)* | 175 | 40-50 | Bakvorm |
| Groente-flan | 2 | 200 | 2 (1 en 3)* | 175 | 45-60 | Bakvorm |
| Quiches | 1 | 210 | 1 | 190 | 30-40 | Bakvorm |
| Lasagne | 2 | 200 | 2 | 200 | 25-35 | Bakvorm |
| Cannelloni | 2 | 200 | 2 | 200 | 25-35 | Bakvorm |
| VLEES | ||||||
| Rund | 2 | 190 | 2 | 175 | 50-70 | Op rooster |
| Varken | 2 | 180 | 2 | 175 | 100-130 | Op rooster |
| Kalf | 2 | 190 | 2 | 175 | 90-120 | Op rooster |
| Rosbief, medium rood | 2 | 210 | 2 | 200 | 50-60 | Op rooster |
| medium | 2 | 210 | 2 | 200 | 60-70 | Op rooster |
| doorbakken | 2 | 210 | 2 | 200 | 70-80 | Op rooster |
| Varkensbraadstuk | 2 | 180 | 2 | 170 | 120-150 | met zwoerd |
| Varkenspoot | 2 | 180 | 2 | 160 | 100-120 | 2 stuks |
| Lam | 2 | 190 | 2 | 175 | 110-130 | Bout |
| Kip | 2 | 190 | 2 | 200 | 70-85 | Heel |
| Kalkoen | 2 | 180 | 2 | 160 | 210-240 | Heel |
| Eend | 2 | 175 | 2 | 220 | 120-150 | Complet |
| Gans | 2 | 175 | 1 | 160 | 150-200 | Complet |
| Konijn | 2 | 190 | 2 | 175 | 60-80 | In stukken |
| Haas | 2 | 190 | 2 | 175 | 150-200 | In stukken |
| Fazant | 2 | 190 | 2 | 175 | 90-120 | Complet |
| Gebraden gehakt VIS | 2 | 180 | 2 | 170 | totaal 150 | Broodvorm |
| Forel/zeebrasem | 2 | 190 | 2 (1 en 3)* | 175 | 40-55 | 3-4 vissen |
| Tonijn/zalm | 2 | 190 | 2 (1 en 3)* | 175 | 35-60 | 4-6 fillets |
De aangegeven temperatenen zijn richtlijnen. Zo nodig要去en de temperaturen aan uw persoonlijke wensen worden aangepast.
(*) Als u geglijtijdig meer dan een gerecht wilt bereiden, adviseren wij u deze op de+tussen haakjes aangegeven inzetniveauus teplaatsen.

Tijden zich exclusief voorverwarmen.
Lege oven.altijd 10 Minuten voorverwarmen.
| GERECHT | Hoeveelheid | Grillen | Bereidingsstijd (minutes) | |||
| Stuks | gr. | Niveau | Temp. (°C) | 1e kant | 2e kant | |
| Tournedos | 4 | 800 | 3 | 250 | 12~15 | 12~14 |
| Biefstuk | 4 | 600 | 3 | 250 | 10~12 | 6~8 |
| Worstjes | 8 | / | 3 | 250 | 12~15 | 10~12 |
| Varkenskarbonades | 4 | 600 | 3 | 250 | 12~16 | 12~14 |
| Kip (in 2 gehen) | 2 | 1000 | 3 | 250 | 30~35 | 25~30 |
| Kebabs | 4 | / | 3 | 250 | 10~15 | 10~12 |
| Kip (borst) | 4 | 400 | 3 | 250 | 12~15 | 12~14 |
| Hamburger* | 6 | 600 | 2 | 250 | 20-30 | |
| *Voorverwarmen 5'00" Vis (filets) | 4 | 400 | 3 | 250 | 12~14 | 10~12 |
| Sandwiches | 4~6 | / | 3 | 250 | 5~7 | / |
| Toast | 4~6 | / | 3 | 250 | 2~4 | 2~3 |
Ventilatorgrill


Bij de ventilatorgrill stelt u een maximale temperatuur in van 200^ .
| GERECHT | Hoeveelheid (gr.) | Niveau | Temp. °C | Bereidingsstijd (minutes) Ε | |
| onder kant | boven kant | ||||
| Opgerolde braadstukken (kalkoen) | 1000 | 3 | 200 | 30 ~ 40 | 20 ~ 30 |
| Kip (in 2 helften) | 1000 | 3 | 200 | 25 ~ 30 | 20 ~ 30 |
| Kippenpoten | - | 3 | 200 | 15 ~ 20 | 15 ~ 18 |
| Kwartel | 500 | 3 | 200 | 25 ~ 30 | 20 ~ 25 |
| Groentegratin | - | 3 | 200 | 20 ~ 25 | - |
| St. Jacobsschellen | - | 3 | 200 | 15 ~ 20 | - |
| Makreel | - | 3 | 200 | 15 ~ 20 | 10 ~ 15 |
| Vismoten | 800 | 3 | 200 | 12 ~ 15 | 8 ~ 10 |

De aangegeven temperatenen zijn richtlijnen. Zo nodig要去en de temperaten aan uw persoonlijke wensen worden aangepast.
Reiniging en onderhoud

Trek voordat u de oven gaat schoonmaken alsijd eerst de stekker uit het stopcontact en LAST de oven afkoelen.
Het apparaat mag nicht worden gereinigd met een stoomreiniger.
Belangrijk: Voordat u de oven gaat reinigen,要去 de stekker van het apparatusuit het stopcontact worden gehaald.
Voor een lange levensduur is het nodig, regelmatig de volgende reinigingswerkzaamheden uit te voeren:
Maak de oven pas schoon als deze is afgekoeld.
Maak de geëmailleerde delen schoon met een sopje.
- Gebruik geen schuurmiddelen.
- Droog de onderdelen van roestvrij staal en de glasplaat met een zachte doek.
- Gebruik bij hardnekkige vlekken normal verkrijgbare reinigingsmiddlesen voor roestvrij staal of warme azijn.
Het@email van de oven is uiterst duurzaam en in hoge mate resilient. Inwerking van hete vruchtenzuren (citroen, pruim en dergelijk) kanECHTER blijvende, matte en ruwe vlekken op het@emailoppervlak achterlaten.Dergelijk vlekken op het hoogglanzende oppervlak van het@email hebbenECHTER geen invloed op op de functies van de oven.Reinig de oven grondig na elk gebruik.Zo kunt u verontreinigungen het makkelijkst verwijderen.Verder inbranden wordt daardoor voorkomen.
Reinigingsmiddelen
Voordat u welke schoonmaakmiddelen dan ook voor uw oven gebruikt,要去 u controleren of ze geschikt zich en of hun gebruik worden aanbevolen door de fabrikant.
Reinigungsmiddelen met bleekmiddel mogen NIET worden gebruikt, aangezien deze de toplaag van de oppervlakken dof konnen make. Gebruik geen agressieve schuirmiddelen.
Buitenkant reinigen
Neem regelmatig het bedieningspaneel, de ovendeur en de afdichting af met een zachtte, goed uitgewrongen doek met warm water en wat vloeijaar reinigingsmiddel.
Om beschadigen of verzwakken van de glasplaten van de deur te voorkomen,要去 het gebruik van de volgende producten vermijden:
Huishoudreiniger en bleekwater
- Geimpregneerde reinigingssponzen, die nicht geschickt zijn voor kookpannen met anti-aanbaklaag
Brillo- of staalwolsponsjes
Chemische ovenreiniger of spuitbussen
- Roestverwijderaars
Vlekverwijderaars voor wasbakken/aanrechten
Reinig het venster aan de binnen- en buitenkant met een warm sopje. Mocht de binnenkant van de glazen deur erg vuil zich, gebruik dan reinigingsproducten als 'Hob Brite'. Gebruik geen krabber om aangekoekt vuil te verwijdersen.
Binnenkant oven
De geëmailleerde bodem van de ovenruimte kan het best worden gereinigd zolang de oven nog warm is.
Neem de oven af met een zachte doeck, die na ieder gebruik in warm zeepsop wordenuitgewassen. Van tijd tot tijd is een grondigere reiniging nodig. Gebruik hiervoor een normale ovenreiniger.
Verzorging van de katalytische wanden
Katalytisch@emaille vernietigt olie, vet, opspattend voedsel etc. dat bij het bakken worden geprodueer. Om dit proces te helpen is het een goed idee om de oven wekelijks een uur of twee aan te zetten, zonder voedsel, om voortdurende goede prestaties van de katalytische wanden te garanderen.
Ga als volgt te werk om de ovenruimte te reinigen:
- Haal de ovenaccessoires - voor zoven aanwezig (pannen, inschuifrooster, bakplaat, braadslede enz.)uit de oven. Laat niets in de ovenchter.
- Zet de functiekiezer van de oven in de
stand hetelucht
- Zet de oventhermostaat op 250^
- Laat de lege oven ongeveer 45 Minutes Werken.
- Zet een raam open voor de ventilatie.
Deze procedure dient herhaald te worden met de "Grill - en draaispit " functie gedurende ongeveer 5 Minutes.
Als de ovenruimte koud is, waar dan de oven gedurende 60 minutes aan staan.

Probeer nicht om het katalytische@email schoon te make.
Adviezen
- Handmatig reinigen van de katalytische wanden worden aufgeraden. Als u met zoep geimpregneerde staalwolsponsjes, spuitbussen en andere schuurmiddelen gebruikt, können deze wanden beschadigd raken.
- Na verloop vanijd kan het katalytische oppervlaklicht verkleuren of glimmern. Dit heeft geen invloed op de katalytische eigenschappen.
- Volg de aanbevelingen in "Aangekoekt vuil tijdens de bereiding beperken".
Aangekoekt vuilijdens de bereiding beperken
Houd u zich aan de aanbevolen temperaturen. Hogere temperaturenijdens het braden zorgen ervoor dat er meer vuil aankoekt. Probeer eens bij een lagere temperatuur (wel wat langer) te bereiden. Hierdoor bespaart u energie en blift het vlees bovendien malser.
Gebruik geen of heel weinig olie of vet voor het braden van vlees; Aardappelen hoeven alleen voor het bereiden met vet te worden bestreken. Extra vet in de oven tijdens het bradenveroorzaakt spatten en aangekoeekte resten. Het is NIET nodig om tijdens het braden water aan de braadslede toe te voegen. Door het water en het vet uit het vlees gaat het gerecht tijdens de bereidingeer spatten (ook bij normale temperaten) en ontstaat er condensvorming.
Als u het vlees afdektijdens de bereiding, voorkomt u dat het ovenoppervlak vuil worden; verwijder indien gewenst de afdekking de LASTe 20-30 minuten, zodate het gerecht extra kan bruineren. Deze vereidingsmethode is met name geschikt voor bepaalde grotere braadstukken en kalkoen, omdat het vlees gaar kan worden voordat de buitenkant te bruin is.
Gebruik de braadslede. Tijdens het braden wordt het vet van het braadstuk onder het rooster opgevangen, zodat het Niet gegen de katalytische wand kan spatten.
Telescopischereksteunen enkatalytische platen
De reksteunen en de katalytische platen können worden verwijderd om ze gemakkelijk schoon te konnen make.

Zorg ervoor dat de oven volledig is afgekoeld voordat u dit doet.

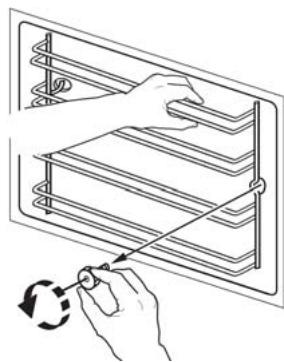
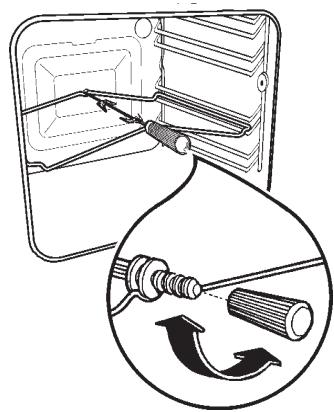
Ga hiervoor als volgt te werk:
1) Verwijder de voorste schroef en houd waar bij de reksteun met uw andere hand vast (zie afbeelding 1);
2) houd de reksteun en de katalytische plaat op hun plaats en til ze met een hand op, terwijl u met uw andere hand de achechterste haak losmaakt. Haal de reksteun en de katalytische plaat eraf (zie afbeelding 2);
Maak de telescopische recksteunen alleen aan de buitenkant schoon met in de handel verkrijgbare schoonmaakmiddelen.
Belangrijk: De telescopische recksteunen\ mogen nicht in de vaatwasser worden gereinigd.
LET OP: de wieltjes mogen nicht worden ingevet.
3) Breng de reksteun en de katalytischeplaat na het reinigen weeer aan; ga waar bij in omgekeerde volgorde te werk.
Zorg ervoor dat de borgmoeren goed vast zitten wanneer u de reksteun en katalytischeplaat terugplaatst.
Vervangen van de binnerverlichting

Neem het apparaat van de stroomvoorziening zodat ook de gezekerig uitgeschakeld worden.
Als het ovenlampje moet worden verrangen, dan要去 dit voldoen aan de volgende eisen:
- Vermogen: 15 W / 25 W
Voltage: 230V (50 Hz) - Hittebestendigheid tot 300 °C
Soort aansluiting: E14.
Deze lampen zich verkrijgbaar bij uw vakhandelaar.
Zo verwangt u de ovenlamp:
- Controller erest of de oven is afgekoeld en van de stroomvoorziening is gescheiden.
- Druk het glazen dekseltje in en draai het maar links.
- Verwijder het kapotte lampje en verrang dit door een新模式.
- Plaats het glazen dekseltje terug en steek de stekker wee in het stopcontact.
1

2

Ovendeur
De ovendeur bestaat uit twee glasplaten. Om het schoonmaken makkelijker te make n kan de ovendeur verwijderd worden en kunnen de roosters maar buiten getrokken worden.

Let op - De ovendeur moet gedemonteerd worden voordat u hem schoon=kunt maken. De deur zou plotseling zich{kunnen slaan, als u probeert de binnenste rui- ten te verwijderen als de deur nog vastzit aan de oven.

Ga voor de demontage als volgt te werk.
- Zet de deur helemaal open.
- Zoek de beide deurscharnieren.
- Til de hendel op de scharnieren op en trek\ deze waar voren.
- Pak de deur aan beiden buitenkanten vast en sluit hem tot ongeveer 45^
- Trek de deuruitzijing zittingnarriven.
- Leg de deur op een vaste ondergrond en bescherm het oppervlak van de hand-greep met een zachte doeck.
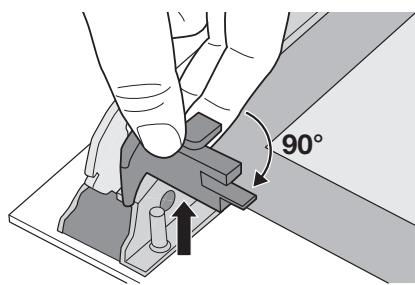
- Maak voor het verwijderen van de binnenruiten het vergrendelingssystem los.


- Draai de bevestigingen 90^ om en trek zeuit hun zitting.
- Til de bovenste ruit voorzichtig een stukje op en trek hem waar buiten, deze is herkenbaar aan de decoratie op alle vier de kanten.
Maak de ovendeur schoon met lauw water en een zachte doek. Gebruik geen metaal-sponsjes, schuursponsjes of zuren, die het speciale warmtereflecterende oppervlak van de binnenruit können beschaden.
Zet de binnenruit na het schoonmaken weer in de deur. Monteer de deur weeer aan de oven; ga waaroor in omgekeerde volgorde van de demontage te werk. Let er op dat u de ruiten weeer op de goede plaats zet.

Ga als volgt te werk:
a) De binnenruit met de decoratie op de vier kanten要去zadanig gemonteerd worden dat de zeeefdruk aan de buitenkant van de oven gericht is. De ruit is goed geplaatst als u met uw vinger over het zichbare oppervlak strijknt en u geen oneffenhedenter hoogte van de zeeefdruk voelt.
De binnenruit moet in+zijn sponning geplaatst worden zoals aangegeven op de afbeelding. Nadat u de ruiten in de ovendeur geplaatst heeft moet u ze vastzetten zoals beschreiben in Punt 8.

Maak de ovendeur nooit schoon als hij warm is, de ruiten zouden kuren barsten. Als u krassen of scheuren in de glasplaat constaert, onmiddelijk contact opnemen met de Klantenservice en de ruiten lien verrangen.
Modellen van roestvrij staal of aluminium:
Maak de overdeur en het bedieningspaneel van roestvrij staal of aluminium schoon met een vochtige spons en droog hem daarna zorgvuldig af met een zachte doek. Gebruik geen metaalsponses, staalwol, zuren of schuurmiddelen die krassen op het oppervlak hunnenveroorzaken.


De affdichting van de ovendeur schoonmake
Rondom de opening van de oven is een aufdichting aangebracht.

Controleer regelmatig of de affdichting intact is. De affdichting, indien nodig, schoonmaken, zichonder waar bij voorwerpen of schuurniddelen te gebruiken. Als u beschadiging van de affdichting constaeteert, neem dan onmiddelijk contact op met de dichtstbijzijdige Klantenservice. Gebruik de oven Niet zolang de affdichting nicht verwangen is.
Storingen - Wat要去 ulopen?
Wanner het apparaat Niet goed werk, lees dan eerst de onderstaande aanwijzingen door, voordat u contact opneemt met het Electrolux Service-Center:
| PROBLEM | OPLOSSING |
| ■ De oven schakelt nicht in. | ◆ Controller of er een bereidingsfunctie en een temperatuur is ingesteld, of ◆ Controller of het apparaat goed is aangesloten en de zekering in de huisinstallatie in orde is |
| ■ Het contrôlelampje voor de oventemperatuur brandt Niet. | ◆ Kies een temperatuur met behulp van de thermostaatknop, of ◆ kies met behulp van de ovenregelaar een functie. |
| ■ De binnenverlichting van de oven brandt Niet. | ◆ Kies met behulp van de ovenregelaar een functie, of ◆ Controller de gloeilamp, en verrang deze in-dien nodig (zie "Vervangen van de binnenverlichting"). |
| ■ De bereiding van de gerechten duurt te lang of de gerechten worden te snel.gaar. | ◆ Eventuele要去 de temperatuur worden gewijzigd, of ◆ neem de inhoud van deze gebruiks-aanwijzing ter harte, met name het hoofdstuk "Adviezen". |
| ■ Damp en condens slaan neer op de gerechten en in de oven-ruimte. | ◆ Laat de gerechten na het bereiden Niet lan-ger dan 15 - 20 minutes in de oven staan. |
| ■ De ovenventilator maakt lawaai. | ◆ Controller of de roosters en het bakgerei Niet gegen hetchyterpaneel van de oven trillen. |
| ■ Op het display staat "12.00" | ◆ Stel het tijdstip van de dag in (zie hoofdstuk "Instellen van deijd") |
Technische gegevens
Vermogen verwarmingselementen
Onderwarmte 1000 W
Boven- en onderwarmte 1800 W
Hetelucht 1825W
Ventilatorgrill 1650 W
Grill - en draaispit 1650 W
Ovenlampje 25W
Motor van de heteluchtventilator 25 W
Motor koelventilator 25 W
Draaispit 4W
Totale aansluitwaarde 1875 W
Spanning (50 Hz) 230 V
Inbouw
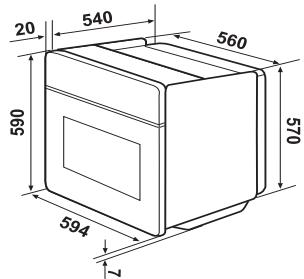
Hoogte onder bovenkant 600 mm
in uitsparing 587 mm
Breedte 560 mm
Diepte 550 mm
Inzet
Hoogte 335 mm
Breedte 395 mm
Diepte 400 mm
Ovencapaciteit 531

Inbouw en installmentie moeten uitgevoerd worden met strikte inachtneming van de geldende voorschriften. Ingrepen mogen alleen worden uitgevoerd wonneer het apparaat is uitgeschakeld. Ingrepen mogen uitsluitend worden uitgevoerd door een erkend installerur. De fabrikant kan nicht aansprakelijk gesteld worden als de veiligheidsvoorschriften Niet opgevolgd worden.
Aansluiten op netstroom
Let voor het aansluien op het volgende:
- Dezekering en de huisinstallatie要去en op de max. belasting van het apparaat berekend zijn (zie typeplaatje).
- De huisinstallatie moet voorzien zichen van een aardaansluiting overeenkomstig de geldende voorschriften.
- Het stopcontact of de meerpolige contactverbreker要去en ook na voltooing van de installmentie van het apparaat makkelijk bereikbaar�.
Het apparaat worden geleverd met een aansluitsnoer waarop een standard stekker is bevestigd, die geschikt is voor de totale aangegeven elektrische spanning die op het typeplaatje staat. De stekker moet in een geschikte wandcontactdoos worden gestoken.
De volgende typen aansluitsnoren zich geschikt, met inachtneming van de nominale doorsneden: H07 RN-F, H05 RN-F, H05 RR-F, H05 VV-F, H05 V2V2-F (T90), H05 BB-F.
Bij directe aansluiting van de oven op het net of wanner het stopcontact Niet toegankelijk is, dient u een omnipolaire schakelaar teplaatsen met een minimumafstand van 3mm tussen de contactpunter. De schakelaar mag de aardleiding nergens onderbreken. De aardleiding要去 ca. 2-3 cm longer zichn dan de fase- en de nulleider.
Het aansluitsnoer moet in ieder geval zodanig geplaatst+zijn,dat het nergens 50^ (boven kamertemperatuur) bereikt.
Na voltooide aansluiting moeten de verwarmingselementen gecontroleerd worden, door ze ont. 3 Minutes lang in werkung te stellen.
Klemmenbord
De oven is voorzien van een makkelijk toegankelijk klemmenbord, dat berekend is voor de werkung op een eenfase-stroomvoorziening van 230 V.
L - spanningvoerende klem
N - nulleiderklem

of E - aardingsklem

Om een probleemloze werkung van het inbouwapparaat te kuren waarborgen, moeten de keulenmeubelen of de uitsparing waarin het apparaat worden ingebouwd de geschikte afmetingen hebben.
In overeenstemming met de geldende voorschriften要去en alle delen, die de bescherming gegen aanraking van onder spanning staande en geisoleerde delen garanderen, zodanig bevestigd�, dat ze niert zonder gereedschap verwijderd können worden.
Hierbij hoort ook de bevestiging van eventuele aflsuitende kanten aan het begin of einde van een rij inbouwapparaten.
De bescherming gegen aanraking moet in ieder geval door het inbouwen gegarandeerd zijn.
Het apparaat kan met de achterkant of zichkant gegen hogere keukenmeubelen, apparaten of wanden worden geplaatst. Aan de andere zichkant mogen er darüber geen andere apparaten of meubelen vandezelfde hoogte als het apparaat geplaatst worden.
Afmetingen van de oven
Instructies voor de inbouw
Om een probleemloze werkung van het inbouwapparaat te kunnen waarborgen, moeten de keulenmeubelen of de uitsparing waarin het apparaat worden ingebouwd de geschikte afmetingen hebben.
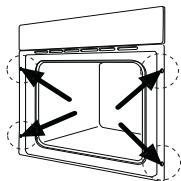
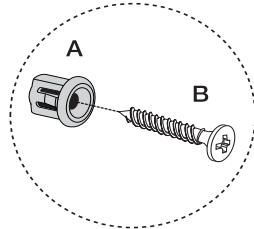
Bevestiging in het meubel
- Open de ovendeur.
- Bevestig de oven met behulp van de vier afstandhoulders in het meubel (A). Deze passen exact in de gaten van het frame. Draaiervoalgens de vier meegeleverde houtschroeven (B) vast.


Klantenservice
Wonneer het probleem na de beschreven contrôles Niet kan worden opgelost, bel dan de dichtstbijzende klantenservice van de fabrikant en geef de aard van het defect, het model van het apparaat (Mod.), het productienummer (Prod. nr.) en het fabricagenummer (Ser. nr.) aan, die u op het typeplaatje van de oven vindt.

Contents
Warnings and important safety advice 32
Description of the appliance 34
Operation 35
Before using for the first time 36
Electronic timer 37
Using the oven 42
Baking charts 47
Cleaning and servicing 49
Troubleshooting 55
Technical data 56
Instructions for the installation engineer 57
Instructions for building in 58
Customer service 59
How to read the instruction book

Safety information

Step-by-step instructions

Hints and tips

Environmental information

This appliance conforms to the following EEC guidelines:
- 2006/95 (low voltage guidelines);
- 89/336 (EMC guidelines);
93/68 (General guidelines); and subsequent changes.
MANUFACTURER:
ELECTROLUX HOME PRODUCTS ITALYS.p.A.
VialeBologna,298
47100 FORLI (Italy)
Always keep these user instructions with the appliance. Should this appliance be given or sold to a third party, or in case you leave it behind when you move house, it is highly important that the new user has this user manual and advice at their disposal.
These warnings are provided for the safety of the users and those living with them. So read them carefully before connecting and/or using the appliance.
Installation
- Installation must be carried out by qualified technicians, whilst observing the prevailing guidelines. The individual operations for installing the appliance are described under the instructions for the installer.
- Leave installation and connection to an expert who has the expert knowledge to carry these out in accordance with known guidelines.
- Also ask an expert to make any necessary modifications to the electricity supply as a result of installation.
Operation
- This oven is intended for the preparation of food; never use it for other purposes.
- Beware hot air escaping from the oven if the oven door is opened during or after cooking.
- Operate the oven with utmost care. Shelves and other parts become very hot as a result of the intense heat from the heating elements.
- Should you, for whatever reason, use aluminium foil whilst cooking food in the oven, never let it come into direct contact with the bottom of the oven.
-
Proceed carefully when cleaning the oven: never spray anything onto the grease filter (if fitted), the heating elements and the thermostat sensor.
-
It is dangerous to make modifications of any type to this appliance or its properties.
- The oven window and surrounding appliance parts become hot during baking, roasting and grilling. Children should therefore be kept away from the appliance. Make sure that when connecting electrical appliances to sockets near to the oven, the electrical leads do not come into contact with hot cooking areas or become jammed in the hot oven door.
Always use oven gloves to remove hot heatproof dishes or pots from the oven. - Regular cleaning prevents deterioration of the surface materials.
- Before cleaning the oven, either switch off the electricity or pull out the mains plug.
- Make sure that the oven is switched off when it is not in use.
- This oven has been manufactured for use as a single appliance or a combination appliance with electric plates for single phase connection to 230 V.
- The appliance must not be cleaned with a steam cleaner or a steam jet cleaner.
- Do not use any abrasive cleaners or sharp metal scrapers. You could scratch the door glass and that could lead to cracking of the glass.
Personal safety
- This appliance is designed for use by adults. It is dangerous to allow children to use it or play with it.
- Keep children away whilst the oven is in use. Even after turning off the oven, the doors remain hot for a long time.
- This appliance is not intended for use by children or other persons whose physical, sensory or mental capabilities or lack of experience and knowledge prevents them from using the appliance safely without supervision or instruction by a responsible person to ensure that they can use the appliance safely.
Disposal

Packaging material
- The packaging materials are environmentally safe and can be reused. The plastic parts are labelled, e.g. >PE> , >PS< etc. Dispose of the packaging materials according to their label in communal disposal areas in the designated collection containers.

Old appliances
- The symbol on the product or its packaging indicates that this product cannot be handled like normal household rubbish, but that it must be taken to a collection point for the recycling or electrical and electronic appliances. Correct disposal of this appliance will help prevent possible negative consequences for the environment and the health of persons. Environment and health are endangered by incorrect disposal. Further information on recycling this product can be obtained from your town hall, your refuse collection service, or the shop from where you purchased it.

Warning: So that no more dangers can arise from the disused appliance, render it unusable before disposing of it.
Separate the appliance from the mains supply and remove the mains supply cable from it.
Customer service
Inspection and/or repairs must be carried out by the manufacturer's customer service or a customer service authorised by the manufacturer, and use only original replacement parts used.
- Do not try to repair malfunctions or damages yourself. Repairs carried out by untrained persons may cause damage or injury.
Description of the appliance
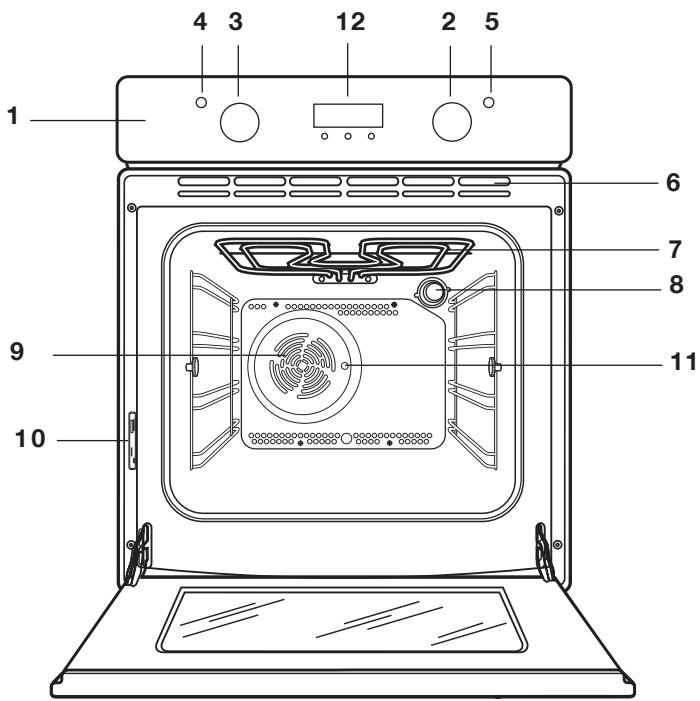
- Control panel
- Oven controller
- Temperature controller
- Temperature control - control indicator
- Power indicator
-
Vents for cooling fan
-
Grill
- Interior light
- Oven ventilator
- Rating plate
- Rotisserie opening
- Electronic timer
Accessories

Drip pan

Baking tray

Shelf

Forks
Spit
Removable spit handle
Spit support
Rotisserie
Retractable knob
This model is equipped with retractable knobs. These control knobs function according to the push-pull system. They can be fully retracted when the oven is not in use.
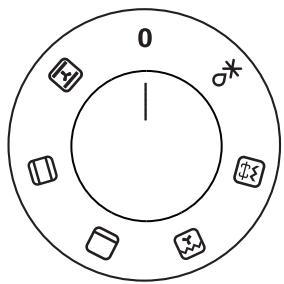
Oven controller
0 Oven is switched off

Hot air

Top and bottom heating element

Bottom oven element

Thermal grill

Grill and rotisserie

Defrosting
Power indicator
The power indicator lights up when the oven control is in use.
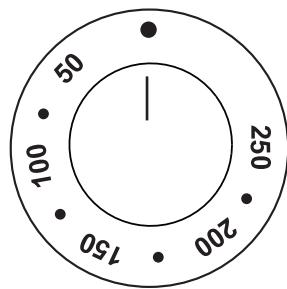
Temperature controller
Turn the temperature controller anticlockwise to select temperatures between 50^ and 250^ .
Temperature controller - control indicator
This control indicator lights up when the temperature controller is turned. The display remains lit until the temperature you want is reached. It then cycles on and off to indicate that the temperature is being maintained.

Safety Thermostat
To avoid dangerous overheating (through improper use of the appliance or defective components) the oven is fitted with a safety thermostat which breaks the electricity supply. The oven switches back on again automatically, when the temperature drops.
Should the safety thermostat react as a result of improper use of the appliance, just eliminate the cause of the defect once the oven is cooled. If the thermostat reacts because of a defective component, please contact customer services.
Cooling fan
The fan cools the oven and control panel. The fan switches on automatically after a few minutes of cooking. Hot air is extracted through the vents near the oven door handle. When the oven has been switched off, the fan may continue to run to cool the operating elements. This is absolutely normal.

The action of the cooling fan will depend on how long the oven has been used and at what temperature. It may not cut in at all at lower temperature settings or continue to run if the oven has only been used for a short time.
Before using for the first time

Remove all packaging materials in and outside the oven before use.
Before using for the first time, the empty oven should be heated up.
During this time, an unpleasant odour may be emitted. This is absolutely normal. It is caused by manufacturing residues.

The oven will only function when the clock has been set to the time of day.
Ensure that the kitchen is well ventilated.

-
Store the clock time in the electronic programme memory (see the chapter entitled "Electronic timer")
-
Turn the oven regulator to hot air
- Turn the temperature regulator to 250^ C .
- Open a window for ventilation.
- Allow the oven to run empty for approximately 45 minutes.
Repeat the procedure for top and bottom heating and thermal grill for about 5-10 minutes.

Then let the oven cool down. Now dampen a soft cloth with warm water and mild washing-up liquid and clean the oven cavity.

Before using for the first time, carefully wash the oven accessories as well.
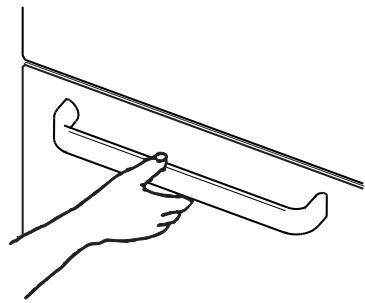

Always grasp the handle in the middle to open the door.

The oven will work only if the time of day has been set.
However, the oven can also be operated without any programme.
Setting the time
After the electricity supply has been switched on or if a power cut has occurred, the "Time" control light flashes on the display.
To enter the time:
- Press the button " + " or " - ".
- Wait for 5 seconds: the control light "Time" goes out and the input time is shown in the display. The appliance is ready for use.
To reset the correct time of day:
-
Press the button repeatedly in order to select the "Time" function. The relevant control light starts flashing. Then proceed as described above. The time can only be reset if no automatic functions (cooking time or cooking end time have been set.
-
Buttons for selecting functions
- Button"
- Button "+"
- Indicator Display
- "Cooking time" control light
- "Cooking end time" control light
- "Countdown" control light
- "Time" control light

During a power cut data will be erased and must be entered again. When the electricity supply returns, the function lights flash and you can reset the time.
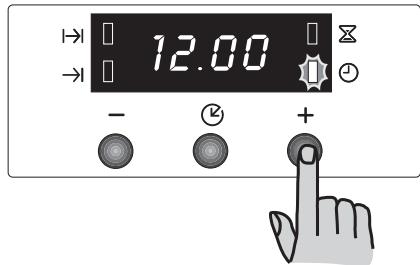
Cooking time | |
This function allows the oven to automatically switch off at the end of a programmed cooking duration time. Put the food in the oven, select a cooking function, and set the cooking temperature you want.
Press the button repeatedly in order to select the "Cooking time" function. The relevant control light starts flashing. Then, proceed as follows:
To set the duration time:
- Press the button " + " or " "
- After you have made the setting, wait 5 seconds: the control light "Cooking time" lights up and the time is shown on the display again.
- When the programmed time is up, the oven switches itself off automatically. An audible signal sounds and the control light flashes. Turn the oven function and the temperature control knobs to zero. The signal sound can be turned off by pressing any button.
NOTE: By turning off the audible signal the oven is reset to manual operation. If the oven controller and the temperature controller are not turned to zero, the oven heats up again.
To cancel the programmed cooking time:
- Press the button repeatedly in order to select the "Cooking time" function. The relevant control light flashes and the remaining cooking time is shown on the display.
- Press the button "—" until "0.00" is shown in the display. After 5 seconds the control light goes out and the display reverts to the time of day.
End of cooking time
With this function, you can set the oven to switch off automatically when a programmed end of cooking time is over. Put the food in the oven, select a cooking function, and set the cooking temperature you want. Press the button 2 .

Press the button repeatedly to select the "Cooking end time" function. The relevant control light starts flashing. Then, proceed as follows:
To set the end of cooking time:
- Press the button "+" or -".
- After you have made the setting, wait 5 seconds: the control light "Cooking end time" lights up and the time is shown on the display again.
- When the programmed time is up, the oven switches itself off automatically. An audible signal sounds and the control light flashes. Turn the oven function and the temperature control knobs to zero. The signal sound can be turned off by pressing any button. NOTE: By turning off the audible signal the oven is reset to manual operation. If the oven controller and the temperature controller are not turned to zero, the oven heats up again.
To cancel the programmed end of cooking time:
- Press the button repeatedly to select the "Cooking end time" function. The relevant control light flashes and the programmed cooking end time is shown on the display.
- Press the button " _ _ _ _ _ _ until the time is shown in the display. The timer beeps and the indicator goes out.
Setting both "Cooking time" || and "Cooking end time"
The "Cooking time" and "Cooking end time" functions can be used simultaneously so that the oven can automatically be turned off and then on again at a later time.


- Set the cooking time with help from the "Cooking time" function (follow the procedure as explained in the relevant chapter for setting the cooking time). Then press the button 2 : the programmed adjustment is shown on the display.
- Set the "Cooking end time" by using the "Cooking end time" function (follow the procedure as explained in the chapter on setting the cooking end time). The relevant control lights come on and the display shows the time of day. The oven switches on and off according to the set programmes.
Countdown
The countdown signal sounds at the end of the set period of time; however, the oven remains on in case it needs to be used again.
To set the minute minder:
- Press the button repeatedly in order to select the "Countdown" function. The relevant control light starts flashing.
- Press the button " +1 or (longest time period: 2 hours, 30 minutes).
- After you have made the setting, wait 5 seconds: The "Countdown" control light lights up.
- If the end of the input time period has been reached, the control light begins to flash and an audible signal sounds. Press any button to cancel the signal.
To cancel the Minute Minder:
- Press the button repeatedly in order to select the "Countdown" function. The relevant control light flashes and the remaining time is shown on the display.
- Press the button " _ _ _ _ _ until "0.00" is shown in the display. After 5 seconds the control light goes out and the display reverts to the time of day.
How to switch off the display
- Press both the programme buttons simultaneously and hold them down for approx. 5 seconds. The display switches off.
- To switch the display on again, press any button.
The display can be switched off only if no other functions have been set.


Important! - Do not line the oven with aluminium foil and do not put a backing tray or similar on the bottom or else the oven enamel will be damaged as a result of the arising heat spots. Always place pots and pans, heat-resistant pots and pans as well as aluminium trays on the shelf which has been placed on one of the shelving rails. When heating food, steam is generated as in a kettle. When the steam comes into contact with the glass in the oven door, it condenses and creates water droplets.
To reduce condensation, always preheat the empty oven for 10 minutes.
We recommend you wipe the water droplets away after every cooking process.

The oven door must be closed during cooking. Open the oven door carefully. Do not let the door "fall open", but use the door handle until the door is fully open.
The oven has four shelf levels. The shelf positions are counted from the floor of the oven upwards, as shown in the figure.
The shelves must be absolutely correctly installed (see diagram).
Do not place crockery or pots directly on the bottom of the oven.

Hot air

Food is cooked by hot air, which is evenly distributed in the oven's interior by a fan on the oven's back wall.
- The heat reaches all areas of the oven quickly and evenly. This means that you can simultaneously bake, roast and braise different foods on several levels. Hot air cooking quickly removes moisture; the dry oven air prevents the different aromas and odours from one food transferring to another.
- The possibility of cooking on several levels means that you can cook different dishes at the same time and up to three cake tins or mini pizzas for consumption or freezing.
Naturally you can also use the oven with only one shelf. In this case you should use the lowest shelf so that you can better keep the oven mechanism in sight.
- Additionally the oven is especially suitable for sterilising canned goods, cooking -homemade jams and for drying mushrooms and fruit.
Grilling
Most foods should be placed on the rack in the grill pan in order to enable maximum air circulation and so the food does not lie in fat and its own juices. Fish, liver and kidneys can be placed directly in the grill pan if required.
- The foods should be as dry as possible before they are grilled in order to avoid splatter. Brush lean meat or fish lightly with oil or melted butter so that the food remains succulent whilst cooking.
- Accompanying vegetables such as tomatoes and mushrooms can be placed in the grill when cooking meat.
- Bread should be grilled on the uppermost shelf.
The food to be grilled should be turned from time to time.
Using the grill
The grill causes direct heat to gather quickly in the middle of the grill pan. For best results, grill food in small quantities. Energy can also be saved in this way.
- Turn the oven control in order to turn on the oven
- Turn the temperature control to the temperature you want.
- Choose the suitable shelf for the grill pan and grill according to whether or not the food to be grilled is thick or thin. Follow the instructions for grilling.
The grill element is controlled by the thermostat. During the grilling process the grill intermittently switches itself on and off in order to avoid overheating.
Bottom heat

This function is especially useful when blind-baking pastry. It can also be used for quiches or pies which have to have the pastry base baked through first.

The temperature controller's lamp lights up until the correct temperature is reached. It then cycles on and off to indicate that the temperature is being maintained.
Top and bottom heat

- The heat is best distributed around the middle shelf height. If the underside of the food should be more strongly browned, simply use a lower shelf height. If you want the top to brown more intensely, place the shelf in a higher position.
- The material and finish of the baking tray and dishes used affect base browning. Enamelled, dark, heavy or uncoated moulds and cooking appliances enable stronger browning on the underside, whilst moulds made of glass or glazed aluminium or polished steel trays reflect the heat and therefore only permit moderate browning.
Always place dishes centrally on the shelf to ensure even browning.
- Place the dish on an appropriately sized oven tray so that juices do not overflow onto the bottom of the oven. This also saves the effort of cleaning.
- Never place dishes, jars or oven trays directly on the bottom of the oven as this becomes very hot and could lead to damage. On this setting, the heat from the heating elements is generated above and below. Therefore you only need one shelf for this cooking method. This is especially suitable for dishes that must also be browned on the bottom, for example, quiches and pies.
Gratins, lasagne and other grilled dishes which are especially intended to be browned from above can also be cooked in this way.
So use heat from above and below:
- Turn the oven controller to the function
you want - Turn the temperature control to the temperature you want.
Defrosting

The fan runs without heat and circulates the air at room temperature in the oven.
Make sure that the temperature controller is in the OFF position.
Thermal grill


Set the Thermal grill at a maximum temperature of 200^ .
After that introduce alternating functions between the grill and ventilator (convection operation). This mode of operation means that the heat can penetrate the food evenly, without exposing the surface to the direct radiation of the grill for too long a time.
Rotisserie

Always keep the oven door closed.

Heed the following advice:
- Push the meat onto the rotisserie and fix it in the middle of the fork.
- Fit the spit on the support and slide the whole assembly in on the second level up.
- Insert the point of the spit in the rotisserie motor opening on the back wall of the oven.
- Unscrew the rotisserie handle.
- Fill the drip pan with approx. 1/2 litre of water and slide it in on the first level.
- Turn the function selector switch to the position 和 and set the temperature you want.

The rotisserie forks and spit are sharp and may cut (in case your appliance is fitted with a rotisserie). The rotisserie must be handled carefully to avoid injuries.

Roasting with the rotisserie


Timings do not include pre-heating. Always preheat the empty oven for 10 minutes.
| Type of food | Quantity (g.) | Level 4 3 2 1 | Temp. °C | Cooking time inminutes |
| Poultry | 1000 | 2 | 200 | 50/60 |
| Roast | 800 | 2 | 200 | 50/60 |

The temperatures quoted are guidelines. and must be adjusted to personal requirements where necessary.

Hints and tips
Baking:
Baked goods usually require a medium temperature (150°C - 200°C). Therefore the oven must be pre-heated for 10 minutes.
Do not open the oven door before 3/4 of the cooking time has passed.
Shortcrust pastry is baked in a springform tin or on a tray for up to 2/3 of the baking time and then garnished before being fully baked. This further baking time depends on the type and amount of topping or filling. Sponge mixtures must be thoroughly stirred with a spoon. The baking time would be unnecessarily extended by too much liquid.
If two baking trays with pastries or biscuits are inserted into the oven at the same time, a shelf level must be left free between the trays.
If two baking trays with pastries or biscuits are inserted into the oven at the same time, the trays must be swapped and turned around after approximately 2/3 of the baking time.
Roasting:
Do not roast any joints that weigh less than 1kg . Smaller pieces could dry out when roasting. Dark meat that is well-cooked on the outside but should remain medium to rare on the inside, must be roasted at a higher temperature (200^ - 250^) .
Light meat, poultry, and fish therefore require a lower temperature (150°C - 175°C). Only add sauce ingredients to the roasting pan at the beginning if the cooking time is short. Otherwise add them in the last half hour.
You can use a spoon to test whether the meat is cooked: if it cannot be depressed, it is cooked through. For medium/rare roast beef and fillet, roast at a higher temperature in a shorter time.
If cooking meat directly on the oven shelf, insert the roasting pan in the shelf level below to catch the juices.
Leave the roast to stand for at least 15 minutes before carving so that the meat juices cannot flow out.
To reduce the build up of smoke in the oven, it is recommended to pour a little water in the roasting pan. To prevent condensation forming, add water several times. The plates can be kept warm in the oven at minimum temperature until serving.

Important!
Do not line the oven with aluminium foil and do not place baking trays, pots, etc. on the oven floor, as the heat that builds up will damage the oven enamel.
Cooking times
Cooking times can vary according to the consistency, ingredients and amount of liquid in the individual foods.
Note the settings you used during your first attempts at cooking and roasting so that you can collect notes in case you want to prepare the same food again at a later date.
Based upon your own experiences you will be able to alter the values given in the charts.
Top and bottom heat and hot air

Timings do not include pre-heating.
Always pre-heat the empty oven for 10 minutes.
| TYPE OF DISH | Top and bottom heat | Hot air | Cooking time in minutes | INSTRUCTIONS | ||
| Level | Temp. (°C) | Level | Temp. (°C) | |||
| CAKES | ||||||
| Sponge mixture | 2 | 170 | 2 (1 and 3)* | 160 | 45-60 | Cake tin |
| Shortcrust pastry | 2 | 170 | 2 (1 and 3)* | 160 | 20-30 | Cake tin |
| Buttermilk cheesecakes | 1 | 175 | 2 | 165 | 60-80 | Cake tin |
| Apple cakes | 1 | 170 | 2 (1 and 3)* | 160 | 90-120 | Cake tin |
| Strudel | 2 | 180 | 2 | 160 | 60-80 | Baking tray |
| Jam tart | 2 | 190 | 2 (1 and 3)* | 180 | 40-45 | Cake tin |
| Sponge cakes | 2 | 170 | 2 | 150 | 60-70 | Cake tin |
| Biscuits | 1 | 170 | 2 (1 and 3)* | 165 | 30-40 | Cake tin |
| Stollen | 1 | 150 | 2 | 150 | 120-150 | Cake tin |
| Plum cakes | 1 | 175 | 2 | 160 | 50-60 | Bread tin |
| Small cakes | 3 | 170 | 2 | 160 | 20-35 | Baking tray |
| Biscuits | 2 | 160 | 2 (1 and 3)* | 150 | 20-30 | Baking tray |
| Meringue | 2 | 135 | 2 (1 and 3)* | 150 | 60-90 | Baking tray |
| Small raised pastries | 2 | 200 | 2 | 190 | 12~20 | Baking tray |
| Pastries: Choux pastry | 2 or 3 | 210 | 2 (1 and 3)* | 170 | 25-35 | On baking tray |
| Fairy cakes | 2 | 180 | 2 | 170 | 45-70 | In cake tin |
| BREAD AND PIZZA | ||||||
| White bread | 1 | 195 | 2 | 185 | 60-70 | |
| Rye bread | 1 | 190 | 1 | 180 | 30-45 | Bread tin |
| Rolls | 2 | 200 | 2 (1 and 3)* | 175 | 25-40 | Baking tray |
| Pizza | 2 | 200 | 2 | 200 | 20-30 | Baking tray |
| FLANS - soufflés | ||||||
| Pasta-Flan | 2 | 200 | 2 (1 and 3)* | 175 | 40-50 | Baking tin |
| Vegetable flan | 2 | 200 | 2 (1 and 3)* | 175 | 45-60 | Baking tin |
| Quiches | 1 | 210 | 1 | 190 | 30-40 | Baking tin |
| Lasagne | 2 | 200 | 2 | 200 | 25-35 | Baking tin |
| Cannelloni | 2 | 200 | 2 | 200 | 25-35 | Baking tin |
| MEAT | ||||||
| Beef | 2 | 190 | 2 | 175 | 50-70 | On shelf |
| Pork | 2 | 180 | 2 | 175 | 100-130 | On shelf |
| Veal | 2 | 190 | 2 | 175 | 90-120 | On shelf |
| Roast beef, medium rare | 2 | 210 | 2 | 200 | 50-60 | On shelf |
| medium | 2 | 210 | 2 | 200 | 60-70 | On shelf |
| well done | 2 | 210 | 2 | 200 | 70-80 | On shelf |
| Shoulder of pork | 2 | 180 | 2 | 170 | 120-150 | With rind |
| Knuckle of pork | 2 | 180 | 2 | 160 | 100-120 | 2 pieces |
| Lamb | 2 | 190 | 2 | 175 | 110-130 | Leg |
| Chicken | 2 | 190 | 2 | 200 | 70-85 | Whole |
| Turkey | 2 | 180 | 2 | 160 | 210-240 | Whole |
| Duck | 2 | 175 | 2 | 220 | 120-150 | whole |
| Goose | 2 | 175 | 1 | 160 | 150-200 | whole |
| Rabbit | 2 | 190 | 2 | 175 | 60-80 | In pieces |
| Hare | 2 | 190 | 2 | 175 | 150-200 | In pieces |
| Pheasant | 2 | 190 | 2 | 175 | 90-120 | whole |
| Meatloaf | 2 | 180 | 2 | 170 | insg.150 | Bread tin |
| FISH | ||||||
| Trout/porgy | 2 | 190 | 2 (1 and 3)* | 175 | 40-55 | 3-4 fish |
| Tuna/salmon | 2 | 190 | 2 (1 and 3)* | 175 | 35-60 | 4-6 fillets |
The temperatures quoted are guidelines. and must be adjusted to personal requirements where necessary.
(*) If you cook several dishes at the same time, we recommend that these are cut off at the levels given in brackets.
Grilling


Timings do not include pre-heating. Always pre-heat the empty oven for 10 minutes.
| TYPE OF DISH | Quantity | Grilling | Cooking time in minutes | Θ | ||
| Pieces | g. | Level | Temp. (℃) | First side | 2nd side | |
| Fillet steaks | 4 | 800 | 3 | 250 | 12~15 | 12~14 |
| Beef steaks | 4 | 600 | 3 | 250 | 10~12 | 6~8 |
| Grilled sausages | 8 | / | 3 | 250 | 12~15 | 10~12 |
| Pork cutlets | 4 | 600 | 3 | 250 | 12~16 | 12~14 |
| Chicken (in 2 halves) | 2 | 1000 | 3 | 250 | 30~35 | 25~30 |
| Kebabs | 4 | / | 3 | 250 | 10~15 | 10~12 |
| Chicken breast | 4 | 400 | 3 | 250 | 12~15 | 12~14 |
| Hamburger* | 6 | 600 | 2 | 250 | 20-30 | |
| *Pre-heat 5'00" | ||||||
| Fish fillet | 4 | 400 | 3 | 250 | 12~14 | 10~12 |
| Crispy toast | 4~6 | / | 3 | 250 | 5~7 | / |
| Slices of white bread | 4~6 | / | 3 | 250 | 2~4 | 2~3 |
Thermal grill


Set Thermal grill at a maximum temperature of 200^ .
| TYPE OF DISH | Quantity (gr.) | Level | Temp. °C | Cooking time in minutes | |
| below side | above side | ||||
| Rolled joints (turkey) | 1000 | 3 | 200 | 30 ~ 40 | 20 ~ 30 |
| Chicken (in 2 halves) | 1000 | 3 | 200 | 25 ~ 30 | 20 ~ 30 |
| Chicken drumsticks | - | 3 | 200 | 15 ~ 20 | 15 ~ 18 |
| Quails | 500 | 3 | 200 | 25 ~ 30 | 20 ~ 25 |
| Vegetable gratin | - | 3 | 200 | 20 ~ 25 | - |
| Pieces. Scallops | - | 3 | 200 | 15 ~ 20 | - |
| Mackerel | - | 3 | 200 | 15 ~ 20 | 10 ~ 15 |
| Fish slices | 800 | 3 | 200 | 12 ~ 15 | 8 ~ 10 |

The temperatures quoted are guidelines. and must be adjusted to personal requirements where necessary.
Cleaning and servicing

Before any cleaning switch the oven off and let it cool down.
The appliance must not be cleaned with a steam cleaner or a steam jet cleaner.
Important: Before carrying out any cleaning operation, the appliance must be disconnected from the power supply.
For a longer appliance life it is necessary to carry out the following cleaning operations regularly:
Only perform when the oven has cooled down.
- Clean the enamelled parts with soapy water.
- Do not use abrasive cleaners.
- Dry the stainless steel parts and glass with a soft cloth.
- If there are stubborn stains, use commercially available for stainless steel or warm vinegar.
The oven's enamel is extremely durable and highly impermeable. The effect of hot fruit acids (lemon, plum or similar) can however leave behind permanent, matte and rough stains on the enamel surfaces. However, such marks in the brightly polished surface of the enamel do not affect the operation of the oven. Clean the oven thoroughly after every use. This is the easiest way to clean dirt off. It prevents dirt being burnt on.
Cleaning materials
Before using cleaning materials, always check that these are suitable for your oven and recommended by the manufacturer.
Cleaners that contain bleach should NEVER be used as they may dull the surface finishes. Harsh abrasives should also be avoided.
External cleaning
Regularly wipe over the control panel, oven door and door seal using a soft cloth well wrung out in warm water to which a little liquid detergent has been added.
To avoid damage to the oven's glass door do not use the following under any circumstances:
Household cleaners and bleaching solution
- Coated cleaning sponges which are unsuitable for saucepans with non-stick coating
- Brillo/Ajax pads or steel wool pads
Chemical oven pads or aerosols
Rustremovers
- Stain removers for sinks/washing up
Clean the outer and inner door glass using warm soapy water. Should the inside of the glass door be heavily soiled, use cleaning products such as "Hob Brite". Do not use paint scrapers to remove dirt.
Oven cavity
The enamelled oven floor is best cleaned whilst the oven is still warm.
Wipe the oven with a soft cloth which is washed out in warm soapy water after every use. From time to time a more thorough cleaning is required. Use a commercially available oven cleaner for this.
Care of Catalytic Liners
As cooking produces oil, fats, splashes of food, etc., catalytic enamel destroys them. To aid this process it is a good idea to run the oven for an hour or two per week, without food, to ensure continued good performance from the catalytic liners.
To clean the oven cavity, proceed as follows:
-
remove the oven accessories, if present (e.g. pans, grids, baking tray, dripping pan, etc.). Do not leave anything inside the oven.
-
Turn the oven control to the hot air

- Turn the thermostat control to 250^ .
- Allow the oven to run empty for approximately 45 minutes.
- Open a window for ventilation.
Repeat this procedure with the "Grill and
rotisserie " function 水 for approximately 5 minutes.
If the oven cavity is cold, let the oven run for 60 minutes.

Do not attempt to clean catalytic enamel.
Hints and tips
- Manual cleaning of the catalytic liner is not recommended. Damage will occur if soap impregnated steel wool pads, aerosol cleaners and any other abrasives are used.
- Slight discolouration and polishing of the catalytic surface may occur in time. This does not affect the catalytic properties in any way.
- Follow the recommendations made in the chapter "How to avoid staining while cooking".
Cooking to reduce soilage
Cook at the recommended temperatures. Higher temperatures during roasting will increase soilage. Try to cook at a lower temperature for a longer time. That way you will save energy and the roast will be more tender.
Use minimal, if any, extra oil or fat when roasting meat; potatoes only require brushing with fat before cooking. Extra fat in the oven during roasting will increase splashing and soilage. It is NOT necessary to add water to the meat tin when roasting. Water and fat juices flow out of the roast during cooking and splatter excessively, even at normal temperatures. This also causes condensation. Covering joints during cooking will also prevent splashing onto the interior surfaces; removing the covering for the last 20-30 minutes will allow extra browning, if required. Some large joints and turkeys especially benefit by this method of cooking, allowing the joint to cook through before the outside is overbrowned.
Please use the roasting dish. During roasting, the fat from the joint will be contained beneath the roasting dish and therefore prevent it from splattering onto the ,catalytic' liner.
Telescopic Shelf Supports and Catalytic Panels
The shelf supports and the catalytic panels can be removed for easy cleaning.

Make sure the appliance is completely cooled before carrying out this operation.

Proceed as follows:
1) remove the front screw while keeping the shelf support and the catalytic panel in position with the other hand (see diagram 1);
2) keep the shelf support and the catalytic panel in position and lift them with a hand while disengaging the rear hook. Take off the shelf support and the catalytic panel (see diagram 2); Clean the telescopic shelf supports on the outside only with commercially available detergents.
Important: The telescopic shelf supports must not be cleaned in the dishwasher.
IMPORTANT: the rollers must not be greased.
3) Reattach the telescopic shelf supports and the catalytic panel after cleaning; proceed in reverse order.
Please, ensure the retaining nuts are secure when refitting the shelf support and the catalytic panel.
Changing the interior light

Separate the appliance from the power supply by switching off the fuse.
If the oven bulb needs replacing, the new bulb must have the following specifications:
- Electric power: 15 W / 25 W
- Electric rate: 230 V( 50 Hz)
- Heat resistance to 300^ C
- Connection type: E14
These replacement bulbs can be purchased from your dealer.
To change the oven bulb:
- Before proceeding ensure the oven is cool and is disconnected from the electricity supply.
- Twist the bulb's glass cover in an anticlockwise direction.
- Remove the burnt out bulb and replace it with a new one.
- Replace the glass cover and reconnect the oven to the electricity supply.
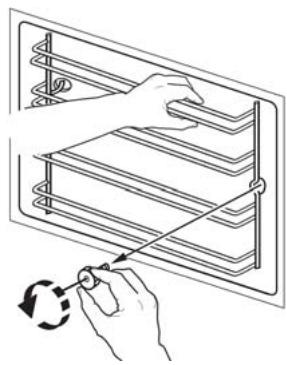
1

2
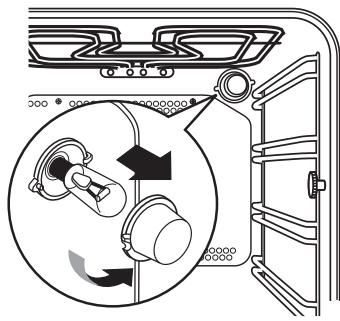
Oven door
The oven door comprises two glass panels. For easy cleaning, the oven door can be unhinged and the internal panels removed.

Caution: the oven door must be disassembled before cleaning. The oven door may suddenly slam shut if you attempt to remove the inner panels while the oven door is still in position.

To remove the door, proceed as follows:
- Open the door completely.
- Locate the two door hinges.
- Lift the levers on the hinges and fold them forwards.
- Hold the door by the two outside edges and close the door by about 45^ only.
- Pull the door forwards out of its seat.
- Lie the door on a firm surface and protect the surface of the handle with a soft cloth.
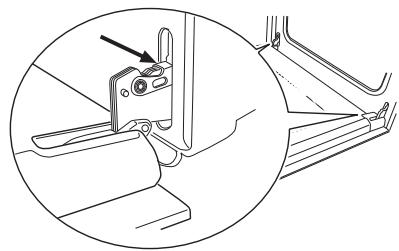


- Use the bolts to remove the inner panels.
- Turn both locking screws by 90^ and remove them.
- Carefully lift the top panel slightly and remove the panel which is framed on all 4 sides by an ornamental border.
Clean the oven door with luke-warm water and a soft cloth. Do not use metal pads, metal wool, abrasive pads or acids to clean the oven door as they will damage the special heat-reflective surfaces of the inner panels. After cleaning the inner panels, re-insert them in the door. Refit the oven door; to do so, repeat the above sequence in reverse. Ensure the panels are the right way round.

Then, proceed as follows:
a) The inner panel with the frame on 4 sides must be inserted so that the printing on the screen is facing to the outside of the oven. You will know the panel is properly in place if, when you touch the visible surface with your fingers, it doesn't feel rough where the printing is.
The inner panel must be inserted in positionas shown in the diagram. After inserting the panel in the oven door, fix in position as described under point 8.

Never clean the oven door when it is warm as the panels might shatter. If you can see scratches or cracks in the glass panel, call your nearest service centre immediately to have the panel replaced.
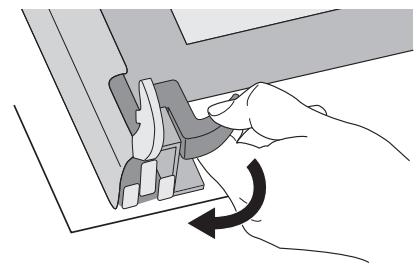
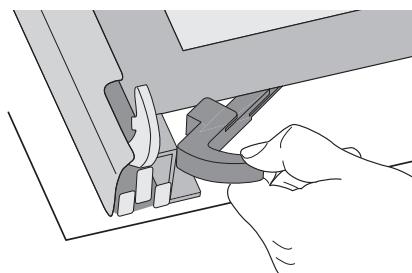


Models in stainless steel or aluminium: Clean the oven door and operating panel in stainless steel or aluminium with a damp sponge and then dry carefully with a soft cloth. Never use metal pads, metal wool, acids or abrasives for cleaning because they may scratch the surfaces.
Cleaning the oven door seal
A seal is attached around the opening of the oven.

Regularly check the condition of the seal. Clean the seal if necessary without using any abrasive materials or objects. If you find that the seal is damaged, call your nearest service centre immediately. Do not use the oven until the seal has been changed.
Troubleshooting
If the appliance does not work properly, please check the following before calling an Electrolux Service Centre:
| PROBLEM | SOLUTION |
| ■ The oven does not switch on. | ◆ Check whether a cooking function and a temperature have been selected, or ◆ Check that the appliance is properly connected and the socket switch or the mains supply to the oven is on. |
| ■ The control light for the oven temperature does not come on. | ◆ Use the temperature controller to choose a temperature, or ◆ Use the oven controller to select a function. |
| ■ The oven's interior light does not come on. | ◆ Use the oven controller to select a function. or ◆ Check the light bulb and change it if necessary (see "Changing the interior light") |
| ■ Cooking the food takes too long or it cooks too fast. | ◆ Where required the temperature must be changed, or ◆ Refer to the contents of this user guide, in particular, the "Hints and Tips" chapter. |
| ■ Steam and condensation settles on the food and in the oven cavity. | ◆ Do not leave dishes in the oven after cooking for longer than 15-20 minutes. |
| ■ The fan is too loud. | ◆ Check that the shelves and the cookware do not knock the back of the oven and vibrate as a result. |
| ■ The display shows "12.00": | ◆ Set the clock (see the chapter "Setting the clock"). |
Technical data
Heating element ratings
Bottom oven element 1000 W
Top and bottom heating element 1800 W
Hot air 1825W
Thermal grill 1650 W
Grill and rotisserie 1650 W
Oven light 25 W
Hot air fan motor 25 W
Cooling fan motor 25 W
Rotisserie 4W
Total power requirement 1875 W
Operating voltage (50 Hz) 230 V
Dimensions of the recess
Height Under top edge 600 mm
In recess 587 mm
Width 560 mm
Depth 550 mm
Oven cavity
Height 335 mm
Width 395 mm
Depth 400 mm
Oven capacity 531

Installation and connection must be done in compliance with the regulations in force. All repairs may only be carried out once the appliance is turned off. Repairs must only be carried out by qualified service engineers.
The manufacturer denies all liability in cases where safety regulations have not been followed.
Connecting to the electrical supply
Please take note of the following requirements before connecting:
- The fuse or other protective device and the domestic electrical installation must be designed for the max. load of the appliance (see rating plate).
- The domestic electrical installation must be equipped with a proper earth connection in accordance with the regulations in force.
- The socket or multi-pole off switch must be easily accessible, even after completed installation of the appliance.
This appliance is supplied with a connection cable incorporating a standard plug, suitable for the total electric load shown on the rating plate. The plug is to be inserted into a suitable wall socket.
The following types of connection cable are suitable, considering the required rated cross-section for the given situation: H07 RN-F, H05 RN-F, H05 RR-F, H05 VV-F, H05 V2V2-F (T90), H05 BB-F.
With a direct connection between the oven and the electricity supply or if the socket is inaccessible, an all-pole circuit breaker with a minimal contact port of 3mm must be built in. The switch must not interrupt the protective conductor at any point. The earth wire must be 2-3 cm longer than the phaseto-neutral conductor.
The connection cable must in any case be laid out so that at no point does it reach 50^ (over room temperature).
Once successfully connected, check the heating elements after approx. 3 minutes of use.
Terminal block
The oven is equipped with an easily accessible terminal block, which is meant for operation with a single phase voltage of 230V .
Live terminal
N Neutral terminal

or E -
Earth terminal

Instructions for building in
To ensure trouble-free operation of the built-in appliance, the kitchen units or recess that the appliance is built into must have suitable dimensions.
According to current regulations all parts that ensure shock protection from live power and operation isolating components are attached in this way so that they cannot be removed without tools.
These also include the fixing of any end walls at the beginning or end of a line of built-in units.
In any case, the accidental contact protection must be ensured by the building in of the appliance.
The appliance can be positioned with its back or side wall against higher kitchen units, appliances or walls. However, only other appliances or units of the same height as the appliance can be placed against the other side wall.
Oven dimensions
Instructions for building in
To ensure trouble-free operation of the built-in appliance, the kitchen units or recess that the appliance is built into must have suitable dimensions.
Securing in the unit
1 Open the oven door.
2 Secure the oven with the aid of the four separators in the unit (A). These fit exactly in the holes in the frame. Then tighten the four provided wood screws (B).


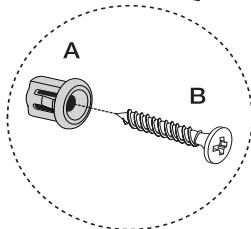
If following the described checks (see page 55) the problem cannot be solved, call the manufacturer's nearest customer service and give the type of defect, the applicance model (mod.) and the production number (prod. number) as well as the serial number (ser. number), which can be found on the oven's rating plate.
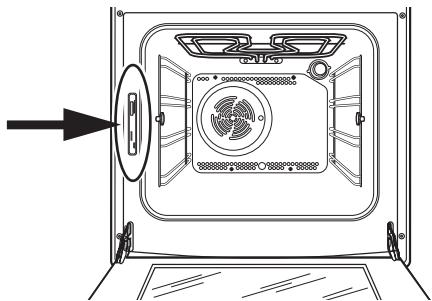
wwwprogress-hausgeraete.de
- Inhoud
- Handleiding voor de gebruiksaanwijzing
- FABRIKANT:
- Opstellen
- Werking
- Veiligkeit van Personen
- Afvalverwerking
- Verpakkingsmaterialiaal
- Oud apparatus
- Klantenservice
- Accessoires
- Verzinkbare knuppen
- Ovenregelaar
- Indicatielampje
- Thermostaatknop
- Thermostaatknop - controle-indicatie
- Veiligheidsthermostaat
- Koelventilator
- Voordat u de oven voor het eerst in gebruik neemt
- De oven functioneert alleen als u de klok hebt ingesteld.
- Elektronisch programmeren
- De oven werkt pas nadat de klok is ingesteld.
- Instellen van deijd
- Om het juiste tijdstip van de dag in te stellen:
- Om het juisteijdstip van de dag opnieuw in te stellen:
- Bereidingsduur
- Zostelt u de bereidingsduur in:
- Zo annuleert u de bereidingstijd:
- Einde van de bereidingstijd →
- Zo stelt u het einde van de bereidingstijd in:
- Zo annuleert u het einde van de bereidingstijd:
- Combinatie van "bereidingsduur" |→ | en "einde van de bereidingstijd" → |
- Kookwekker
- Zosteltudekookwekkerin:
- Zoschakeltudekookwekkeruit:
- Zoschakelt u het display uit
- Warm de lege oven.altijd 10 minuten voor,om condensvorming te beperken.
- Hete lucht
- Grillen
- Gebruik van de grill
- Onderwarmte
- Boven- en onderwarmte
- Ontdooien
- Ventilatorgrill
- Draaispit
- Ovendeur altijd gesloten houden.
- Braden met het draaispit
- Adviezen
- Bakken:
- Braden:
- Voorlichtig!
- Bereidingstijden
- De Boven- en onderwarmte en hete lucht
- Tijden zijn exclusief voorverwarmen.
- Tijden zich exclusief voorverwarmen.
- Lege oven.altijd 10 Minuten voorverwarmen.
- Bij de ventilatorgrill stelt u een maximale temperatuur in van 200°C .
- De aangegeven temperatenen zijn richtlijnen. Zo nodig要去en de temperaten aan uw persoonlijke wensen worden aangepast.
- Reiniging en onderhoud
- Reinigingsmiddelen
- Buitenkant reinigen
- Binnenkant oven
- Verzorging van de katalytische wanden
- Probeer nicht om het katalytische@email schoon te make.
- Aangekoekt vuilijdens de bereiding beperken
- Telescopischereksteunen enkatalytische platen
- Zorg ervoor dat de oven volledig is afgekoeld voordat u dit doet.
- Vervangen van de binnerverlichting
- Neem het apparaat van de stroomvoorziening zodat ook de gezekerig uitgeschakeld worden.
- Ovendeur
- Modellen van roestvrij staal of aluminium:
- De affdichting van de ovendeur schoonmake
- Storingen - Wat要去 ulopen?
- Technische gegevens
- Vermogen verwarmingselementen
- Totale aansluitwaarde 1875 W
- Inbouw
- Inzet
- Aansluiten op netstroom
- Klemmenbord
- Afmetingen van de oven
- Instructies voor de inbouw
- Bevestiging in het meubel
- Contents
- How to read the instruction book
- MANUFACTURER:
- Installation
- Operation
- Personal safety
- Disposal
- Packaging material
- Old appliances
- Customer service
- Description of the appliance
- Accessories
- Retractable knob
- Oven controller
- Power indicator
- Temperature controller
- Temperature controller - control indicator
- Safety Thermostat
- Cooling fan
- Before using for the first time
- The oven will only function when the clock has been set to the time of day.
- The oven will work only if the time of day has been set.
- Setting the time
- To enter the time:
- To reset the correct time of day:
- Cooking time |→ |
- To set the duration time:
- To cancel the programmed cooking time:
- End of cooking time →
- To set the end of cooking time:
- To cancel the programmed end of cooking time:
- Setting both "Cooking time" |→| and "Cooking end time" →
- Countdown
- To set the minute minder:
- To cancel the Minute Minder:
- How to switch off the display
- To reduce condensation, always preheat the empty oven for 10 minutes.
- Hot air
- Grilling
- Using the grill
- Bottom heat
- Top and bottom heat
- Defrosting
- Thermal grill
- Set the Thermal grill at a maximum temperature of 200°C .
- Rotisserie
- Always keep the oven door closed.
- Roasting with the rotisserie
- Hints and tips
- Baking:
- Roasting:
- Important!
- Cooking times
- Top and bottom heat and hot air
- Timings do not include pre-heating.
- Cleaning and servicing
- Before any cleaning switch the oven off and let it cool down.
- The appliance must not be cleaned with a steam cleaner or a steam jet cleaner.
- Cleaning materials
- External cleaning
- Oven cavity
- Care of Catalytic Liners
- Do not attempt to clean catalytic enamel.
- Cooking to reduce soilage
- Telescopic Shelf Supports and Catalytic Panels
- Make sure the appliance is completely cooled before carrying out this operation.
- Changing the interior light
- Separate the appliance from the power supply by switching off the fuse.
- Oven door
- Cleaning the oven door seal
- Troubleshooting
- Technical data
- Heating element ratings
- Dimensions of the recess
- Connecting to the electrical supply
- Terminal block
- Instructions for building in
- Oven dimensions
- Securing in the unit
Marque : PROGRESS
Modèle : PBK3360X
Catégorie : Four encastrable