TFT-720 - Tablette LENCO - Notice d'utilisation et mode d'emploi gratuit
Retrouvez gratuitement la notice de l'appareil TFT-720 LENCO au format PDF.


| Type d'appareil | Téléviseur DVB-T 7 pouces |
| Usage recommandé | Hôtels, bureaux, véhicules, domicile |
| Portabilité | Oui, conçu pour être transporté facilement |
| Installation | Facile et rapide |
| Service sans problème | Oui, conçu pour une utilisation fiable |
| Précautions de sécurité | Ne pas utiliser en conduisant un véhicule |
| Recommandation enfants | Ne pas permettre aux enfants de défaire leur ceinture en usage |
| Compatibilité véhicule | Non précisé |
| Alimentation | Non précisé |
| Résolution écran | Non précisé |
| Dimensions écran | 7 pouces |
| Type d'écran | Non précisé |
| Langues supportées | Non précisé |
| Connectivité | Non précisé |
| Accessoires inclus | Non précisé |
| Garantie | Non précisé |
FOIRE AUX QUESTIONS - TFT-720 LENCO
Questions des utilisateurs sur TFT-720 LENCO
0 question sur cet appareil. Repondez a celles que vous connaissez ou posez la votre.
Poser une nouvelle question sur cet appareil
Téléchargez la notice de votre Tablette au format PDF gratuitement ! Retrouvez votre notice TFT-720 - LENCO et reprennez votre appareil électronique en main. Sur cette page sont publiés tous les documents nécessaires à l'utilisation de votre appareil TFT-720 de la marque LENCO.
MODE D'EMPLOI TFT-720 LENCO
Introduction
Thank you for choosing the 7" DVB-T Player. The unit applies the latest state of the art electronics and is designed for use in hotels, offices, vehicles or your home. The unit is constructed to provide years of reliable, trouble-free service, and is compact so that you can take it with you anywhere and is designed for quick and easy setup. Please read all documentation prior to using this product. The documentation will assist you in obtaining the best equipment performance. Save this manual for later use.
Important Notice
It is unlawful in most jurisdictions for a person to drive a motor vehicle which is equipped with a television viewer or screen that is located in the motor vehicle at any point forward of the back of the driver's seat, or that is visible, directly or indirectly, to the driver while operating the vehicle. In the interest of safety, this system should never be installed where it will be visible, directly or indirectly, by the operator of the motor vehicle.
Safety Precaution
For safety reasons, when changing video media, it is recommended that the vehicle is not in motion, and that you do not allow children to unfasten seat-belts to change video media or make any adjustments to the system. Enjoy your entertainment system but always remember: safety of all passengers remains the number one priority.

CAUTION
RISK OF ELECTRIC SHOCK DO NOT OPEN!


The lightning flash with arrowhead symbol, within an equilateral triangle, is intended to alert the user to the presence of un-insulated "dangerous voltage" within the product's enclosure that may be of sufficient magnitude to constitute a risk of electric to persons.

The exclamation point within an equilateral triangle is intended to alert the user to the presence of important operating and maintenance (servicing) instructions in the literature accompanying the appliance.
CAUTION
- To reduce the risk of electric shock, do not remove the cover (or back). No user-serviceable parts inside. Refer servicing to qualified service personnel. Unplug the product from the wall outlet before servicing or when it is unused for a long period of time.
- The manufacturer should not hold responsibility for the damage caused by any substitutions and modifications of the product without authorization from the manufacturer or authorized unit.
- Danger of explosion if battery is incorrectly replaced. Replace only with the same or equivalent type.
WARNING
The apparatus shall not be exposed to dripping or splashing and no objects filled with liquids, such as vases, shall be placed on the apparatus.
NOTES
- Read these instructions.
- Keep these instructions.
- Heed all warnings.
- Follow all instructions.
- Do not use this apparatus near water.
- Clean only with dry cloth.
- Do not block any ventilation openings. Maintain well ventilated conditions around the product. Do not put product on bed, sofa or anything that blocks ventilation. Install according to the manufacturer's instructions.
- Do not install near any heat sources such as radiators, heat registers, stoves or other apparatus (including amplifiers) that produce heat.
- Read, heed and follow all instructions to ensure correct and safe installation and interconnection of the apparatus;
- The apparatus shall not be exposed to dripping or splashing and that no objects filled with liquids, such as vases, shall be placed on the apparatus;
- The mains socket-outlet shall be installed near the apparatus and the mains plug shall remain readily operable;
- Protect the power cord from being walked on or pinched particularly at plugs, convenience receptacles, and the point where they exit from the apparatus.
- Only use attachments/accessories specified by the manufacturer.
- Use only with the cart, stand, tripod, bracket, or table specified by the manufacturer, or sold with the apparatus. When a cart is used, use caution when moving the cart/apparatus combination to avoid injury from tip-over.
- Unplug the apparatus during lightning storms or when unused for long periods of time.
- Refer all servicing to qualified service personnel. Servicing is required when the apparatus has been damaged in any way, such as power-supply cord or plug is damaged, liquid has been spilled or objects have fallen into the apparatus, the apparatus has been exposed to rain or moisture, does not operate normally, or has been dropped.
Note: Do not touch the color TFT LCD screen by hand directly.
This unit incorporates analog TV and portable DVB-T receiver in one system.
DVB-T receiving function
DVB-T signal reception.
CATV receiving function
Can be connected to the CATV antenna for receiving CATV signal.
Radio receiving function
Receiving DVB-T radio signal via the external antenna.
EPG function
PG (Electronic Program Guide) function.
High Resolution
Provides high-resolution image.
Superior Sound
Built-in 2x1.5w stereo amplifier realizes high quality sound effects.
LCD (Liquid Crystal Display)
Designed with 7^ color TFT liquid crystal display to provide clear picture.
Audio and Video Output
Audio and video output can be connected to an external audio and video device.
TTX Function
Designed with teletext function to provide more entertainment and information.
Channel Search Function
Auto and manual channel search function.
Table Of Contents
Introduction 1
Important Safety Instruction 2
Function Features 4
Table of Contents 5
Unit Introduction 6
Main Panel 6
Rear Panel 7
Remote Control 8
Preparation of Remote Control 10
Rechargeable Battery 11
System Connections 14
Power Supply Connection 14
Connecting to a TV 14
Connecting to an Amplifier 15
Connecting to a DC Adapter 15
Connecting to a Headphone 16
Connecting to DVB-T Antenna 16
Connecting to External Antenna 17
Connecting to CATV Antenna 17
TV Setup 18
DVB-T Setup 21
Preparation 21
Main Menu 21
System Setting 21
Channel Setting 24
Channel List 26
28
EPG 29
System Info 29
Troubleshooting 30
Specifications 31
Main Panel
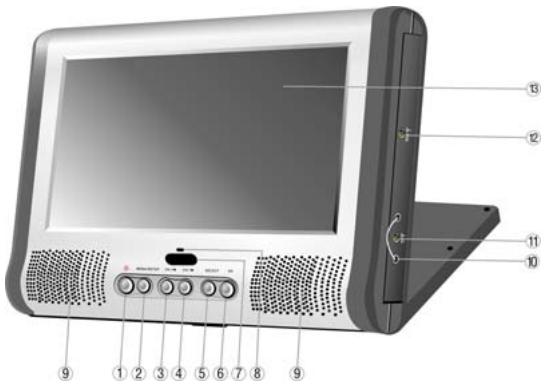
- STANDBY button
Press to enter or exit the standby mode.
- MENU/SETUP button
Press to enter or exit the setup menu.
- CH-/ 卡 button
In TV or DVB-T mode, press to select channel.
In the menu, press to adjust the value.
- CH+/ button
In TV or DVB-T mode, press to select channel.
In the menu, press to adjust the value.
- SELECT button
Press to select item in the setup menu.
- OK button
In DVB-T mode, press to confirm selection in the setup menu.
- Remote sensor
IR receiver for remote control operation.
- Power Indicator
In standby mode, the light will turn off; in working status, it turns green.
- Speakers
Output high quality stereo sound.
- Fixing jack
Used to connect to the external antenna. - TV Antenna jack
Used to connect to the antenna and the connecting line of CATV. - DVB antenna jack
Used to connect to the DVB-T antenna. - LCD screen
7" color TFT LCD screen.
Left Panel
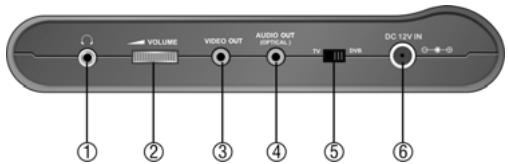
- Headphone jack
When the headphone is plugged in, the internal speakers output will turn off automatically. - Volume Control knob
Used to adjust the volume of the headphone and speaker. - Video Output Jack
Used to connect to an external monitor for output video signal. - Audio Output and Optical Digital Output Jack.
Used to connect for analog or optical audio output. - TV/DVB switch
Shift the TV or DVB signal input mode. - DC 12V Input Jack
Used to connect the AC adapter or DC adapter.
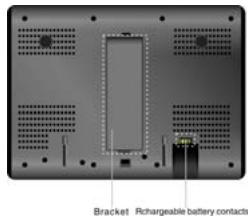
Rear Panel
Pull the bracket, located on
the rear panel, out to be able
to put the unit in an upright position.
Remote Control
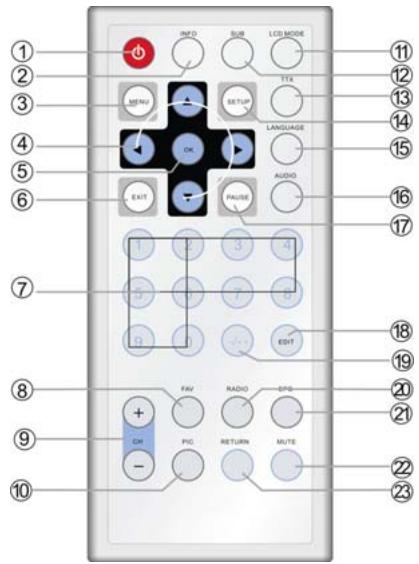
1. STANDBY button
Press to access or exit standby mode.
2. INFO
Press to display the status information, press again to cancel.
3. MENU button
In DVB mode, press to enter or exit the setup menu.
4. Directional buttons (▲▼▲)
Used to select different items in the menu.
5. OK button
Press to confirm the selection in setup menu.
- EXIT button
In the DVB-T mode, during setting, press to return to the previous menu.
- 0-9 numeric buttons
Select numbers by pressing these buttons.
- FAV button
Press to enter the favorite list, and then use the direction button to select, then press the OK button to confirm and start playback.
- CH +/- button
Press to change the channel forward or backward.
10.PIC button
Press to switch the current picture mode between standard, memory, soft and light.
11.LCD MODE
Press to shift the aspect ratio of the screen between 16:9,4:3 and turning off the screen.
- SUB button
In the DVB-T mode, press to select the subtitle language.
- TTX button
In DVB-T mode, press to display the teletext information, press it again to cancel the display.
- Setup button
In TV mode, press this button to enter the picture, TV and function setup.
In DVB-T mode, press to enter picture and function setup menu.
- LANGUAGE button
In DVB-T mode, press to select the audio language.
16.AUDIO button
In DVB-T mode, press this button repeatedly to choose Left, Right, Mono, Stereo.
- PAUSE button
In DVB-T mode, press to freeze the current image.
18.EDIT button
In TV mode, press to edit the channels.
19.--- button
In TV mode, press this button and the additional number buttons to select item numbers which are greater than 9.
- RADIO button
Press to enter or exit the DVB-T radio mode.
- EPG button
In DVB-T mode, press to enter the channel schedule.
- MUTE button
Press to turn on/off the speaker output.
- RETURN button
Press to return to the previous channel that you have viewed.
Preparation of remote control
- refer to the drawing below, take out the battery holder.
- Insert the battery with the correct polarity facing up according to the mark on the battery holder.
- Close the back cover.
The battery size is CR2025
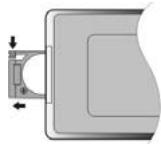
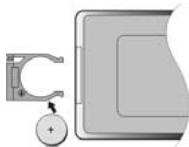
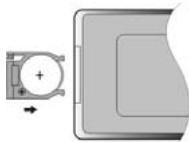
Usage of remote control
For best results, please aim the remote control directly at the unit's remote sensor. Please operate the remote control within angles about 60 degrees and distance about 5 meters without obstructions between the remote control and the unit.
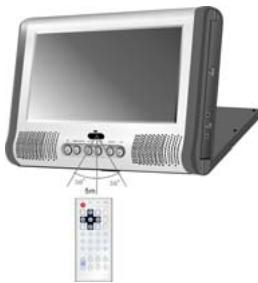
- The service life of the battery is about six months in normal use. Please replace the battery when the remote control becomes less sensitive.
- Please take out the battery when the remote control is not used for a long time, in order to avoid damage to the remote control caused by possible liquid leakage.
About Rechargeable Battery Pack
Your portable DVB-T receiver can be connected with a lithium polymer rechargeable battery that attaches to the bottom of the unit. Your new battery should be fully charged before initial use. Charging time is normally about 4 hours. A fully charged battery delivers about 2.5-3 hours of use. If the battery will not be used for a long period of time, first fully charge the battery prior to storage.
Working conditions and precautions of the battery
- Battery should only be used and charged when temperatures are between 32^ and 80^ . (0^ - 27^)
- Never put the battery in fire or water.
- Do not expose the battery to high temperatures or store in hot, sunny places.
- Maintain well-ventilated conditions around the product, avoiding heat. Don't put the product on bed, sofa or anything that may block ventilation to the product.
Do not open the battery. - Never charge the battery for more than 8 hours. Detach battery immediately after charging is complete if not being used. When charging the battery pack, the light on the battery will turn red, when the charging is complete or the battery is being used, the light will turn green.
- Detach battery when not in use.
- When the battery is weak, there will be a mark displayed on the LCD screen, and about one minute later, the unit will power off automatically.
Battery Pack Attaching and Placement
The unit's power supply is the AC power adapter or the battery pack. The battery pack can also be used as a stand.
Refer to the following steps for attaching the Battery Pack:
- Place the unit on a soft and smooth surface with its back cover facing up (to avoid scratching the screen).
- Position the Battery Pack directly toward the battery slot on the back cover of the unit.
- Align the pins on the battery pack with the holes on the unit and plug them in. You will hear a click when it's locked into place.
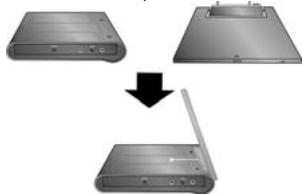
After attaching the Battery Pack, place the unit LCD screen in normal position. The attached Battery Pack serves as a stand.
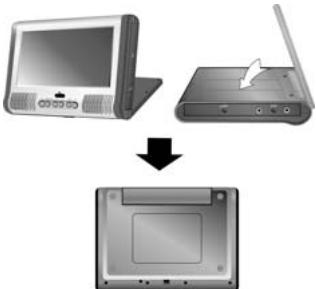
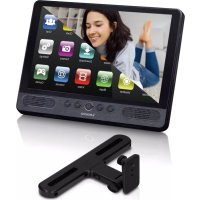
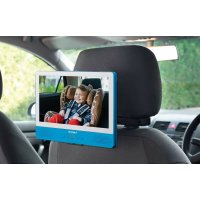
When used in a vehicle, the unit is placed into a sturdy carrying Bag/Mount. The Bag/Mount is easy to attach to a headrest and fits on most vehicle headrest types. This makes it convenient for the rear seat passengers to view the screen.
Charging the Battery Pack
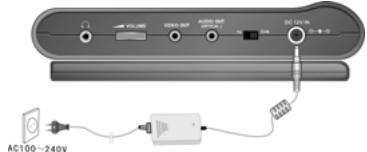
The battery must be attached to the unit to charge it. Plug the Power Adapter into the unit's DC 12V IN Jack, which is located on left Side of the unit. Plug the other end of the Power Cord into a wall Outlet.
Detaching the Battery Pack
If the unit is not going to be used for long periods of time, the Battery Pack should be detached.
Make sure the power is turned off before detaching the Battery Pack. After detaching the battery pack, take care when handling the unit.
- Place the unit on a soft and smooth surface with its back cover up to avoid scratching the screen.
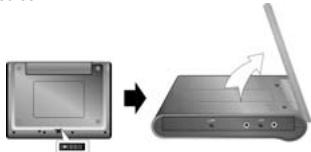
- Press the button located on the backside of the unit to unlock the battery pack and while pressing the button pull the battery pack out from the unit.
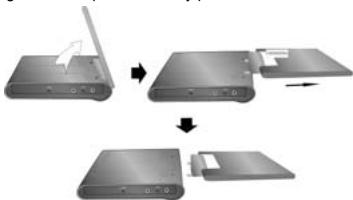
NOTE: When attaching or detaching the battery pack, make sure to protect the LCD screen.
- Before plugging the power cord into an AC outlet, make sure that all other connections have been made as described below.
- Always ensure that the unit, TV and any other electrical components are switched OFF before connecting to the unit.
Power Supply Connection
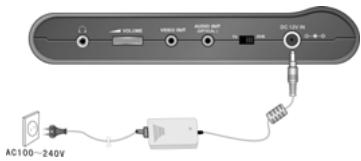
Connect the supplied adapter to the side of the unit in the jack marked "DC 12V IN". Plug the two-prong end of the power cord to an AC100-240V outlet. If you have difficulty inserting the plug, turn it over and reinsert it. If the unit will not be used for a long time, disconnect the plug from the outlet.
Connecting to a TV
Use the audio/video cable to connect the audio/video output of the unit to the audio/video input of the TV. Ensure that you observe the color coding when connecting audio and video cables.
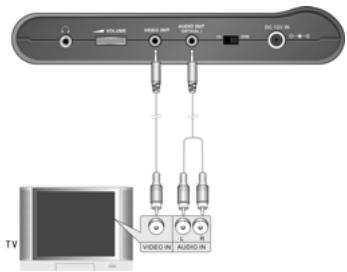
In TV mode, it outputs an analog audio signal; in DVB-T mode, it can output both analog and optical digital audio signal.
Connecting to an Amplifier
The unit can be connected to an amplifier. Plug the A/V cable into the audio jack on the left side of the unit and plug the other end into an audio input on the amplifier. Please refer to the equipment's manual before connecting.
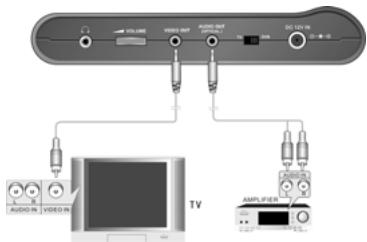
In TV mode, it can output an analog audio signal; in DVB-T mode, it can output both an analog as an optical digital audio signal. It can be connected to a digital amplifier.
Connecting to a DC Adapter
Connect one end of the specific DC adapter to the "DC 12V IN" jack on the left panel of the unit, and connect the other end to the cigarette lighter socket in the car as shown below:
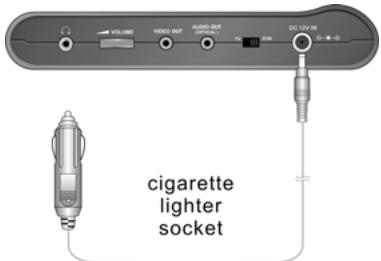
The power supply of the car is not suitable for charging the battery.
Make sure the unit is not connected to the car adapter when the car is started.
Connecting a Headphone
Connect the headphone to the headphone jack on the left side of the unit.
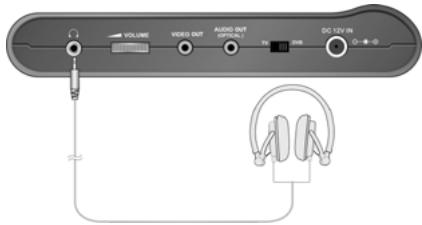
When headphones are connected, the speaker will be turned off automatically
Connecting to DVB-T Antenna
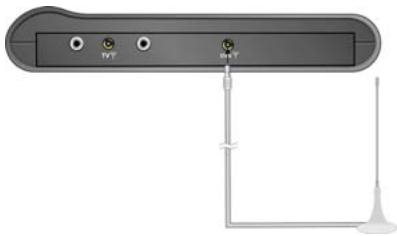
The unit is designed with an antenna input jack. Plug the DVB-T antenna into the jack on the right panel of the unit to receive TV signal, then slide the DVB /TV selector to DVB, As shown below:
Connecting to external antenna
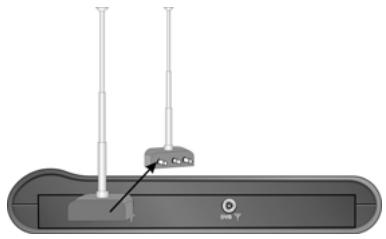
Plug the provided external antenna into the TV signal input jack on the right panel of the unit, as shown below. Then slide the DVB /TV selector (left side of unit) to TV.
Connecting to CATV antenna
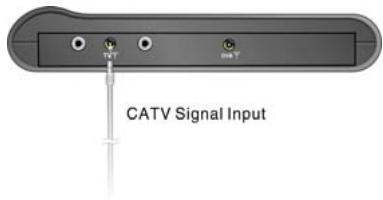
Connect one end of the provided connecting line to the TV signal input jack on the right panel of the unit, and the other end to the CATV cable, as shown below. Then switch the DVB /TV selector to TV (left side of unit).
Preparation
- Connect the unit to the external antenna or CATV connecting cord.
- Connect the unit to a power supply.
- Turn on the power of the unit.
- Switch the DVB /TV on the left panel to TV.
- Press the TV SETUP button to enter the setup menu.
Picture Setup Menu
Press the TV SETUP button once to enter the Picture setup menu, as shown below:
| PICTURE | |
| COLOR | 30 |
| BRIGHT | 32 |
| CONTRAST | 30 |
The items in the menu are used to adjust the brightness, contrast, and color of the screen.
Press the SELECT or button to select the desired item. Then use the or button to adjust the value.
You can adjust the items in this menu to compensate for environment influences or to setup the screen to your own preference.
TV Setup Menu
Press the TV SETUP button twice to enter the TV setup menu, as shown below:
| TV SETUP | |
| SYSTEM | PAL B/G |
| CHANNEL | 28 |
| FINE | 487.25UHF |
| SKIP | OFF |
| MANUAL | ◆ |
| AUTO | OFF |
In the TV Setup menu, press the SELECT or buttons to select item.
1. System
Press the SELECT or buttons to select SYSTEM, press the buttons to select item.
2. Channel
Press the SELECT or buttons to select CHANNEL, press the buttons to select the channel number.
3. Fine Tuning
When reception quality is less than desirable, you can improve this with the fine tuning function.
Press the SELECT or buttons to select FINE, press the button to start fine tuning, when video and audio are at their best, stop the fine tuning and the program will be stored automatically.
4. Skip
Press the buttons to select ON, the channel will be skipped when using the CH+/to select channels.
5. Manual Searching
Press the SELECT or buttons to select MANUAL, press the buttons to start searching, press the buttons again to stop searching, the programs searched will be stored automatically.
6. Auto Searching
Press the SELECT or buttons to select AUTO, press the buttons to select ON. It will start auto searching. It will take a few minutes, when searching is finished, it will exit and return to channel 1. All found programs will be placed in sequence.
Function Setup Menu
Press the TV SETUP button three times to enter the Function Setup menu, as shown here:
| FUNCTION | |
| LANGUAGE | ENGL |
| TIME OFF | |
| DEFAULT | --- |
In the Function setup menu, press the SELECT or buttons to select item.
1. Language
Press the SELECT or buttons to select LANGUAGE, press the buttons to select different languages.
2. Time Off
Press the SELECT or buttons to select TIME OFF, press the buttons to select the time when the unit should shut itself off.
3. Default
Press the SELECT or button to select DEFAULT, press the OK button to return to the default setting.
Channel Editing
Press the EDIT button on the remote control to enter the TV program edit mode. Then the screen will display as below.
| CHANNEL EDIT | |
| SWAP | -←→- |
| COPY | -→- |
| CLEAR ALL | -◇- |
Press the buttons to select different items. The selected one will be highlighted.
1. SWAP
Meant to swap the program number of a TV station with another TV station. The first number is the current channel number. Use the --/-- button and the 0-9 numeric buttons to enter the target channel number, and then press the directional buttons to swap and exit from the menu. Then the currently playing channel will change to the target channel automatically.
2. COPY
Meant to copy the program of the current channel to a target channel. Use the --/button and the 0-9 numeric buttons to enter the target channel number, and then press directional buttons to copy and exit from the menu. Then the currently playing channel will change to the target channel automatically.
3. CLEAR ALL
To turn the SKIP function of all the saved channels to ON. Highlight this item and press the directional buttons to engage. The player will go back to channel 1 after finishing.
NOTE: If the menu is not used for more than 10 seconds, the menu will disappear automatically.
Preparation
- Connect the unit to the power.
- Slide the DVB/TV selector switch to DVB.
- Press the MENU button on the remote control to enter the DVB-T setup menu.
- You can take the following steps to continue setup:
Main Menu
Press the MENU button, the screen will display the following:
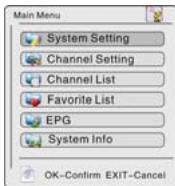
In the main menu, press the directional buttons to select the item you want to set up. Press the OK button to select the item. Press the MENU or EXIT button to exit
System Setting
Press the directional buttons to select System Settings. Press the OK button to enter the submenu, screen will display as below:
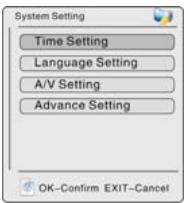
In the menu, press the buttons to select the item you want to configure, press the OK button to select the item. Press the MENU or EXIT button to return to the previous menu.
Time Setting
Press the buttons to select Time Setting, press the OK button to enter, the screen will display as below:

There are three items for setting: TimeZone Setting, and DisplayTimer Setting. Press the buttons to select item, press the OK button to enter, press the Exit button to return.
1. TimeZone Setting
Press the buttons to select the TimeZone Setting, press the OK button to enter the TimerZone Setting menu, then press the button to enter the item, press the buttons to select GMT+(0~11), GMT-(1~12), then press the OK button to confirm selection and return. Press the EXIT button to return.
2. DisplayTimer Setting
Press the buttons to select the DisplayTimer Setting, press the OK button to enter the DisplayTimer Setting menu, then press the button to enter the item, press the buttons to select different Display times, then press the OK button to confirm selection and return. During setting, press the EXIT button to return.
Language Setting
Here you can set the menu or audio language.
Press the buttons to select Language Setting, press the OK button to enter the Language Setting menu, the screen will display as below:
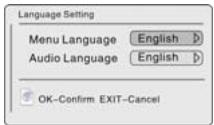
In the menu, press the buttons to select Menu or Audio. Press the EXIT button to return.
1. Menu Language
Select Menu Language, press the button to enter the item, and then press the buttons to select different menu language, then press the OK button to confirm selection and return. Press the EXIT button to return.
2. Audio Language
Select Audio Language, press the button to enter the item, and then press the buttons to select different audio languages, then press the OK button to confirm selection and return. Press the EXIT button to return.
A/V Setting
This item is used to change the audio and video settings.
Press the buttons to select A/V Setting, press the OK button to enter, the screen will display as below:
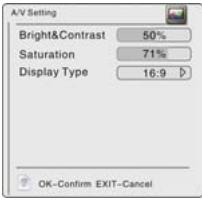
In the menu, press the buttons to select items, press the buttons to adjust the values. Press the EXIT button to return.
- Brightness&Contrast
Select Bright&Contrast, press the buttons to adjust the value.
- Saturation
Select Saturation, press the buttons to adjust the value.
- Display Type
Select Display Type, press the to enter, then press the buttons to select 4:3 or 16:9. Press the button to return.
Advanced Setting
Press the buttons to select Advance Setting, press the OK button to enter the menu, the screen will display as below:
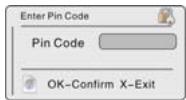
In the menu, use the numeric buttons to enter the pin code, press the OK button to confirm.
The default code is:888888
When you have entered the PIN code, press the OK button to enter the menu shown below:
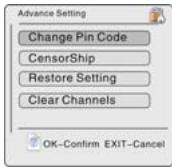
In the menu, press the buttons to select item. Press the EXIT button to return.
1. Change Pin Code
In the menu, press the buttons to select Change Pin Code, press the OK button to enter the menu shown below:
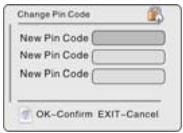
In the menu, enter the pin code according to the indication. Press the EXIT button to return.
2. CensorShip
Press the buttons to select CensorShip, press the OK button to enter the setup menu, then press the button to enter, press the buttons to select items, press the ENTER button to confirm selection.
3. Restore Setting
Press the buttons to select Restore Setting, press the OK button to return to the default settings.
4. Clear Channels
Press the buttons to select Clear Channels, press the OK button to clear all the channels.
Channel Setting
Select Channel Setting, press the OK button to confirm and enter the channel setting menu, as shown below:
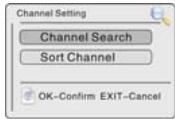
In the channel setting menu, press the directional buttons to select the item you want to set up, press the OK button to enter the item. Press the EXIT button to return to the previous menu.
Channel Search
Use the directional buttons to select Channel Search, press the OK button to confirm, the screen will display as below:
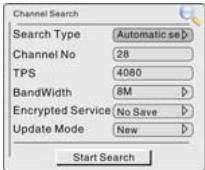
In the channel search menu, press the directional buttons to select the item you want to set up, press the button to enter the submenu. Press the EXIT button to return to the previous menu.
1. Search Type
Select Search Type, press the button to enter, then press the directional buttons to select Auto Search, Manual Search or Scan By NIT. Press the EXIT or button to return.
2. Channel No.
Select Channel No., use the number buttons to input the channel No., press the EDIT button to enter the character or number list, in the list, press the direction buttons to select character or number, press the OK button to confirm input, press the EXIT button to return.
3. TPS
Select TPS, use the numeric buttons to input, press the button to delete the input, press the EDIT button to enter the character or number list, in the list, press the directional buttons to select character or number, press the OK button to confirm input, press the EXIT button to return.
4. BandWidth
Select BandWidth, press the button to enter, then press the directional buttons to select item, press the EXIT or button to return.
5.Encrypted Service
Select Encrypted Service, press the button to enter, and then press the directional buttons to select Save or No Save, press the EXIT or button to return.
6. Update Mode
Select Update Mode, press the button to enter, and then press the directional buttons to select Append or New, press the EXIT or button to return.
After setting these items, use the directional buttons to highlight Start Search, and press the OK button to start searching. During searching, press the MENU or EXIT button to stop searching.
Sort Channel
Select Sort Channel, press the button to enter, the screen will display as below:
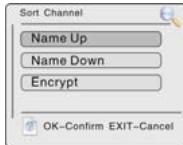
In the menu, press the directional buttons to select the desired item, press the OK button to confirm. Press the EXIT button to return to the previous menu.
This setting is used to sort channels from A-Z or from Z-A or to encrypt the selected channel.
Channel List
Select the Channel List, press the OK button to confirm and enter, the screen will display as below:
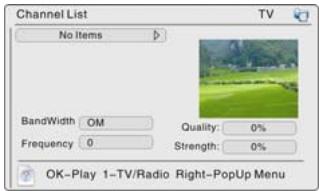
The first time you use this menu, you should add some programs into the channel list. Press the OK button to start playback, press numeric button 1 to select TV or Radio, press the (right) button to display the menu.
Add Channel
Select a number, and press the button to enter, press the OK button, the screen will display as below:
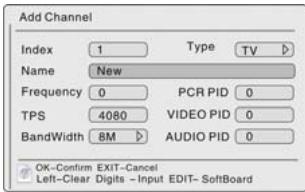
Press the directional or numeric buttons to select the desired item, press the button to enter. Press the button to delete the input. Press the EDIT button to enter the character or number list. In this list, press the directional buttons to select a character or a number, press the OK button to confirm input. Press the EXIT button to return. Repeat the above procedure to set different programs. In the channel list, the set program will be displayed with the name and Index number. There are a few more options you can use with every program: Select the program and press the button to enter, and then use the button to select Add, Modify, Delete, Lock/Unlock or move. See the picture below:
Comment: Please put the translation for these items behind the English.
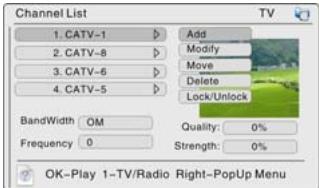
Select Add to add new programs into the list. Follow the procedure mentioned above to add programs.
Select Modify to modify the information of the program. Use the to select Modify and press the ENTER button to enter the below menu:
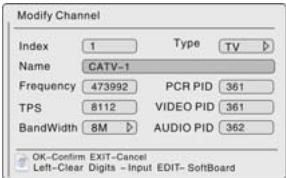
Press the directional or numeric buttons to select the desired item, press the button to enter. Press the button to delete the input. Press the EDIT button to enter the character or number list. In this list, press the directional buttons to select a character or a number, press the OK button to confirm input. Press the EXIT button to return.
- Select Move to change the place of this channel in the list. Press the button to select Move and press the ENTER button to enter, screen will display: Move to 1 press the button to delete input, use the numeric buttons to enter the channel index
Then press the ENTER button to confirm and the program will be moved to the selected index number.
Select Delete to delete the program. Press the button to select Delete, the screen will display a menu, according to the indication on the menu, press the ENTER button to confirm and delete the program; press the EXIT button to cancel and return.
Press the button to select Lock/Unlock to lock or unlock the program, according to the indication on the menu, you should enter the pin code.
Favorites List
Select the Favorites List, press the button to enter, the screen will display as below:

In the menu, press numeric button 1 to select the favorite group, press the directional buttons to select a channel, press the OK button to confirm. Press the EXIT button to return to the previous menu.
Add Favorite
Press the button to enter, press the OK button, the screen will display as below:
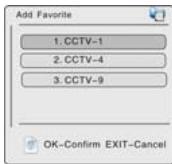
During initial setting, you should set the channel list at first. Then you can select channels from the channel list, and add the channel into the favorites list. You can also delete the channel from the favorites list.
Press the directional button to enter, and then use the directional buttons to select channels, press the OK button to add, press the EXIT button to return.
EPG (Electronic Program Guide)
Select EPG, press the OK button to enter, the screen will display as below:

Use the Booking function to receive a reminder when a program in this list is about to start:
Use the button to select channel, and the buttons to select the program.
Press the OK button to add the program to the booking list. Then press the EXIT button
to return.
System Info
Select System Info, press the OK button to enter, the screen will display as below:
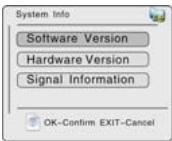
In the menu, press the directional buttons to select the item, press the OK button to enter. Press the EXIT button to return to the previous menu.
Troubleshooting
| Problem | How To Check |
| There is no sound. | Make sure the system connection is correct. If headphones are plugged in, unplug them. |
| There is no picture. | Make sure your system connection is correct. Make sure the DVB-T antenna is connected. Make sure the unit is turned on. |
| The remote control does not work. | Make sure there is no obstruction between the remote control and the unit. Make sure you are pointing the remote control towards the unit. Make sure battery is inserted correctly (check polarity). Replace weak battery. |
Other possibilities:
Static or other external interference may cause the unit to function abnormally. Unplug the power-supply cord from the outlet and plug it in again to reset the unit so that normal operation can resume. If you are still having problems, then disconnect the power to the unit and consult a qualified technician.
Specifications
| TFT screen size | 7 inches | |
| TV System | PAL | |
| Frequency Response (DVB-T) | 20Hz~20kHz ±2.5dB | |
| Audio Out (DVB-T) | Analog Audio Out | Output Level: 1.5V±1.0, Load: 10KΩ |
| Video Out (DVB-T) | Video Out | Output Level:1VP-p±0.2, Load: 75Ω Unbalanced Negative |
| Power | AC100-240V~50/60Hz | |
| Power Consumption | <15W | |
| Dimension | 200mmX154mmX41mm | |
| Weight(Without Battery) | About 0.53 Kg | |
DESIGN AND SPECIFICATIONS ARE SUBJECT TO CHANGE WITHOUT NOTICE