
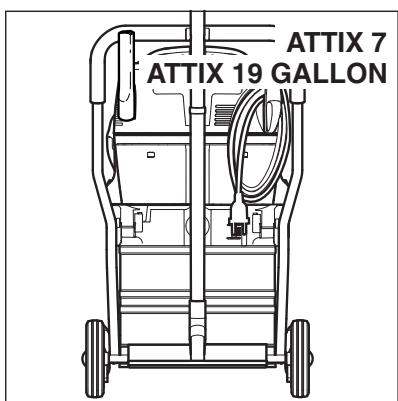
ATTIX 19 GALLON - Aspirateur industriel NILFISK - Notice d'utilisation et mode d'emploi gratuit
Retrouvez gratuitement la notice de l'appareil ATTIX 19 GALLON NILFISK au format PDF.

| Type de produit | Aspirateur industriel eau et poussière |
| Marque | Nilfisk |
| Modèle | ATTIX 19 GALLON |
| Utilisation | Usage commercial intensif (hôtels, écoles, hôpitaux, usines, bureaux) |
| Capacité du réservoir | 70 litres (19 gallons) |
| Dimensions (L x P x H) | 580 x 605 x 970 mm |
| Poids | 25 kg |
| Alimentation électrique | 230 V ~ 50/60 Hz (version EU), 120 V ~ 60 Hz (version US) |
| Puissance absorbée | 1200 W (EU) / 1040 W (US) |
| Débit d'air | 3600 l/min (127 cfm) |
| Dépression | 23000 Pa (93 po de colonne d'eau) |
| Niveau sonore | 64 dB(A) à 1 m |
| Classe de protection | I (avec prise de courant pour outil) |
| Indice de protection | IP X4 (éclaboussures) |
| Système de filtration | Filtre à cartouche avec système de nettoyage Push&Clean ou automatique selon version |
| Fonctionnalités principales | Aspiration sec et humide, prise outil intégrée avec marche/arrêt automatique, variateur de puissance |
| Longueur du câble | 7,5 m |
| Accessoires fournis | Tuyau d'aspiration, suceurs, sac filtrant, sac à déchets |
| Entretien | Nettoyage du filtre par impulsion d'air, vidage du réservoir, remplacement du sac filtrant |
| Sécurité | Arrêt automatique en cas de réservoir plein (flotteur), protection contre les surcharges, classe I |
| Pièces détachées | Sac filtrant (réf. 302001484), sac à déchets (réf. 302001480), élément filtrant (réf. 302000726) |
| Réparabilité | Entretien facile grâce à l'accès au réservoir et aux filtres, service après-vente Nilfisk |
| Informations générales | Conforme aux normes CE, garantie selon conditions générales |
FOIRE AUX QUESTIONS - ATTIX 19 GALLON NILFISK
Questions des utilisateurs sur ATTIX 19 GALLON NILFISK
0 question sur cet appareil. Repondez a celles que vous connaissez ou posez la votre.
Poser une nouvelle question sur cet appareil
Téléchargez la notice de votre Aspirateur industriel au format PDF gratuitement ! Retrouvez votre notice ATTIX 19 GALLON - NILFISK et reprennez votre appareil électronique en main. Sur cette page sont publiés tous les documents nécessaires à l'utilisation de votre appareil ATTIX 19 GALLON de la marque NILFISK.
MODE D'EMPLOI ATTIX 19 GALLON NILFISK
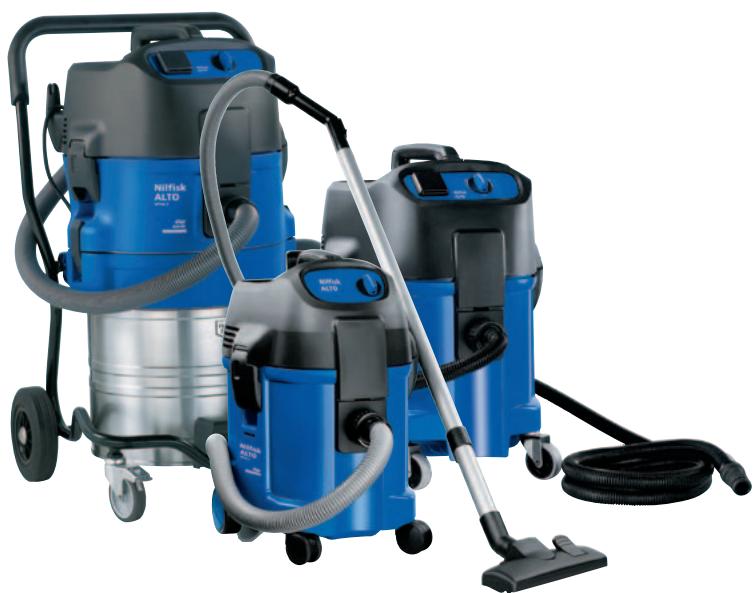
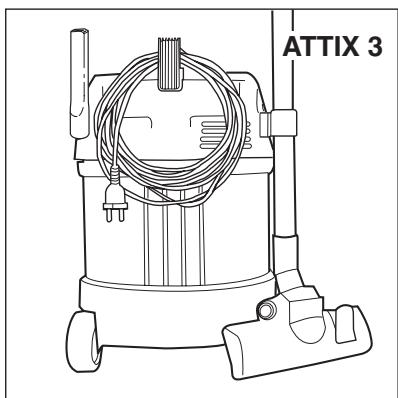
ATTIX 3
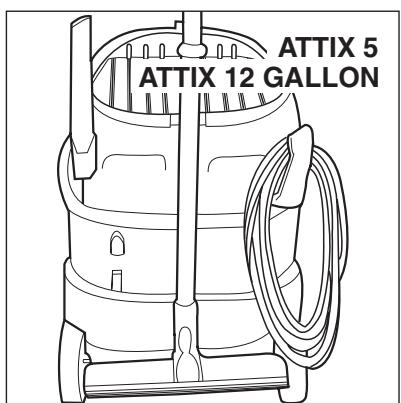
ATTIX 5
ATTIX 7
ATTIX 12 GALLON
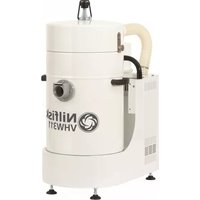
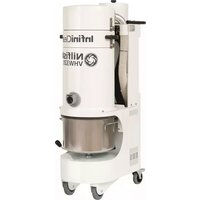
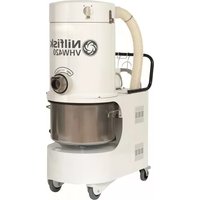
ATTIX 19 GALLON
English Operating Instructions. 1-13
deutsch Betriebsanleitung 14-26
français Notice d'utilisation 27-39
nederlands Gebruiksaanwijzing 40-52
italiano Istruzioni sull'uso. 53-65
norsk Driftsinstruks 66-78
svensk Bruksanvisning 79-91
dansk Driftsvejledning 92-104
suomi Käytöohje 105-117
slovensci Navodilo za uporabo 118-130
hrvatski Uputstvo za rad 131-143
slovenský Prevádkový námod 144-156
český Provozní námod 157-169
polski Instrukcja obslugi 170-182
magyar Kezelésiutasítás 183-195
pyccn KyoBoDCTBO no 3KcPnyaTaunn 196-208
español Instrucciones de manejo 209-221
portugues Instruções de operação 222-234
εληνικό Θηγίες λειτουργίας 235-247
türkce Isletme kilavuzu. 248-260
NilfiskALTO
Why Compromise
Contents
1 Important safety instructions
2
2 Description
2.1 Purpose 4
2.2 Operating elements 4
3 Before starting
3.1 Assembling the vacuum cleaner 4
4 Operation
4.1 Connections 5
4.1.1 Connecting the suction hose.. 5
4.1.2 Electrical connection 5
4.1.3 Connecting electrical appliances1) 5
4.1.4 Connecting pneumatic tools1) 5
4.2 Switching on the vacuum cleaner.. 5
4.2.1 Switch position "I" 5
4.2.2 Switch position "auto"1) 5
4.2.3 Setting suction power1) 6
4.3 Cleaning the filter element 6
4.3.1 Cleaning the filter element (Push&Clean System)1) 6
4.3.2 Cleaning the filter element (Automatic Filter Cleaning System)1) 6
5 Applications and techniques
5.1 Techniques 6
5.1.1 Picking up dry substances 7
5.1.2 Picking up liquids. 7
6 After finishing work
6.1 Switching the vacuum cleaner off and storage.. 7
7 Maintenance
7.1 Maintenance plan 8
7.2 Maintenance work 8
7.2.1 Replacing the waste bag 8
7.2.2 Replacing the filter bag.. 8
7.2.3 Emptying dirt tank (ATTIX 3 / 5 / 12 GALLON)............9
7.2.4 Emptying the dirt tank (ATTIX 7/19 GALLON)............9
7.2.5 Replacing filter element (Push&Clean System)1) 9
7.2.6 Replacing filter element (Automatic Filter Cleaning System)1) 10
8 Troubleshooting
11
9 Further information
9.1 Recycling the vacuum cleaner 12
9.2 Guarantee 12
9.3 Tests and approvals 12
9.4 Technical data 13
9.5 Accessories 13
9.6 EC declaration of conformity 13
1 Important safety instructions
Symbols used to mark instructions

ily available.
Before using the vacuum cleaner, always read the operating instructions and keep them read-

This symbol is used to mark safety instructions that must be observed to prevent damage
to the vacuum cleaner and its performance.

prevent damage to persons.
This symbol isused to marksafetyinstructions that mustbe observed to

This symbol indicates tips and instructions to
simplify work and to ensure safe operation.
For your own safety
Only allow the vacuum cleaner to be used by persons who have been trained in its use and who have been explicitly authorized to use it.
Despite its simple handling the vacuum cleaner is not suitable for children.
The use of the vacuum cleaner
is subject to valid national regulations. Besides the operating instructions and the binding accident prevention regulations valid in the country of use, observe recognized regulations for safety and proper use.
Do not use any unsafe work techniques.
Transport
Before transporting the dirt tank, close all the locks.
Do not tilt the cleaner if there is
liquid in the dirt tank.
Do use a crane hook to lift the cleaner.
Purpose and intended use

The vacuum cleaners described in this operating manual are suitable for
- commercial use, e.g. in hotels, schools, hospitals, factories, shops, offices and rental businesses.
The following materials should not be picked up by the vacuum
cleaner:
- hazardous dust
- hot materials (burning cigarettes, hot ash, etc.)
- flammable, explosive, aggressive liquids (e.g. petrol, solvents, acids, alkalis, etc.)
flammable, explosive dust (e.g. magnesium or aluminium dust, etc.)
Precautions and safety regulations when using the vacuum cleaner
Before start-up
Inspect power cord regularly to detect signs of damage, e.g. cracks or ageing.
If the power cord is damaged, it must be replaced by AltoService or an electrician to avoid danger before use of the vacuum cleaner is continued.
Use only the type of power cord specified in the operating manual.
Do not damage the power cord (e.g. by moving over it or pulling or crushing it).
Disconnect the power cord by pulling the plug only (do not pull
If foam develops or liquid emerges, stop work immediately and empty the dirt tank.
Regularly clean the built in float1) or level indicator hose to limit the
Check the rated voltage of the vacuum cleaner before connecting it to the mains supply system. Ensure that the voltage shown on the rating plate corresponds to the voltage of the local mains power supply.
If you are using an extension cord, use only those specified by the manufacturer or higher quality ones (see section 9.4, "Technical data").
It is recommended that the vacuum cleaner should be connected via a residual current circuit breaker. This stops the supply of electricity if the leakage current to earth exceeds 30 mA for 30 ms or it has an earth tester circuit.
Use the socket on the vacuum cleaner for the purpose defined in the operating instructions only.
Before plugging an appliance into the appliance socket:
- Switch off the vacuum cleaner.
Only carry out maintenance work described in the operating instructions.
or tug the power cord).
Inspect the vacuum cleaners to ensure that they are in proper condition. Plugs and couplings in power cords must at least have splash protection.
Never use the vacuum cleaner if the filter element is damaged.
water level1) and check that they are not damaged.
See section 5 for information on handling liquids and (hazardous) dust.
When using an extension lead, check the minimum cross-sections of the cable:
| Cable length m | Cross section | |
| <16 A | <25 A | |
| up to 20 m | Ø1.5mm² | Ø2.5mm² |
| 20 to 50 m | Ø2.5mm² | Ø4.0mm² |
Arrange the electrical parts (sockets, plugs and couplings) and lay down the extension lead so that the protection class is maintained.
Never spray water on to the upper section of the vacuum cleaner. Danger for persons, risk or short-circuiting.
Observe the latest edition of the IEC regulations.
- Switch off the appliance to be connected.
CAUTION!
Follow the operating instructions and safety instructions for appliances connected to the power tool socket.
Always pull out the mains plug before cleaning and maintenance of the vacuum cleaner.
2 Description
2.1 Purpose
When used properly, the industrial vacuum cleaners described in these instructions
are suitable for sucking up dry, non-flammable, non-hazardous dusts and liquids.
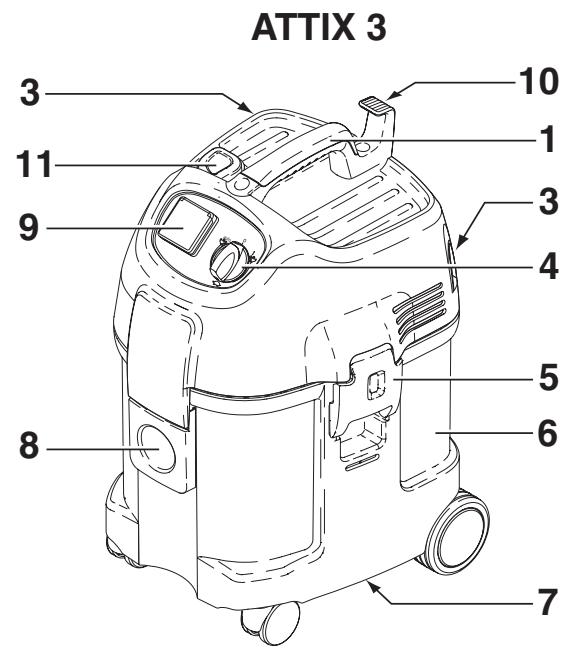
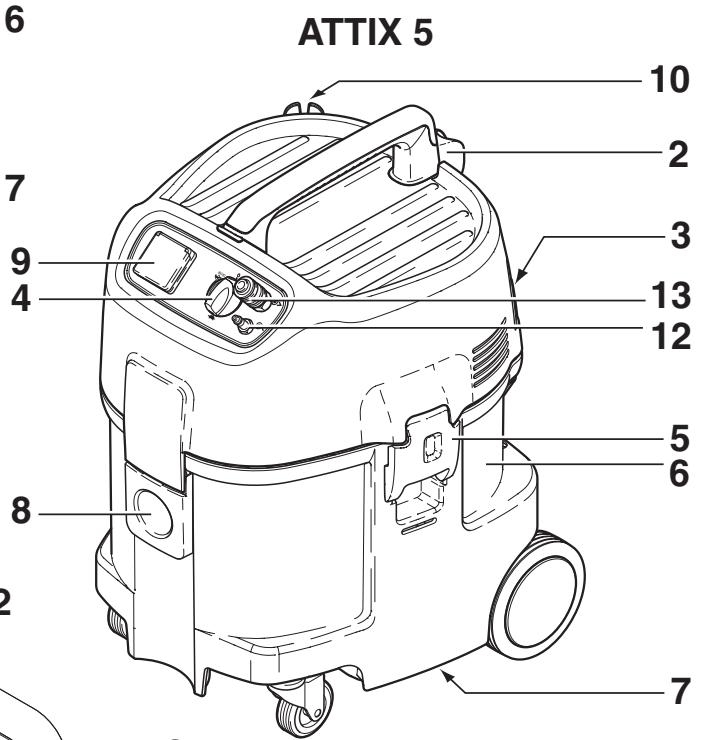
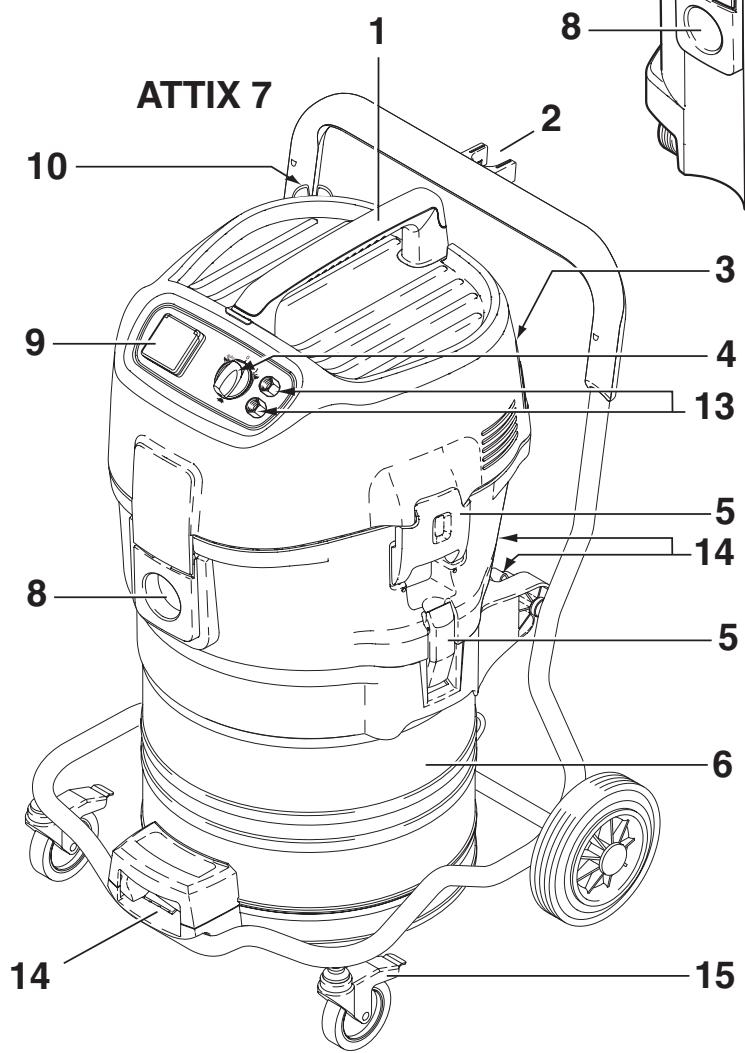
2.2 Operating elements
See fold-out page at front of these operating instructions.
1 Handle
2 Suction pipe support
3 Accessory holder
4 Applicance switch with suction power control
5 Retaining clamp
6 Dirt tank
7 Grip to empty tank 1)
8 Inlet fitting
9 Appliance socket 1)
10 Cable hook
11 Operating knob for filter cleaning 1)
12 Connection for compressed air supply 1)
13 Connection for pneumatic tool 1)
14 Tank locks 1)
15 Castor with brake
3 Before starting
3.1 Assembling the vacuum cleaner

On delivery some of the accessories are lying in the tank and must be removed before the vacuum cleaner is used for the first time. Remove the upper section of the vacuum cleaner: The mains plug should not yet be inserted into a socket.
- The mains plug should not yet be inserted into a socket.
- Open the retaining clamps (1) and remove upper section of the cleaner.
- Take the accessories ^1) out of the dirt tank and the packaging.
- Place a filter bag into the tank as described in the instructions (printed on the filter bag).
IMPORTANT!
Press the filter bag connection firmly on to the inlet fitting.
- Fit the upper section of the cleaner (do not damage the filter bag) and close the retaining clamps.
NOTE!
Ensure that the retaining clamps fit properly.
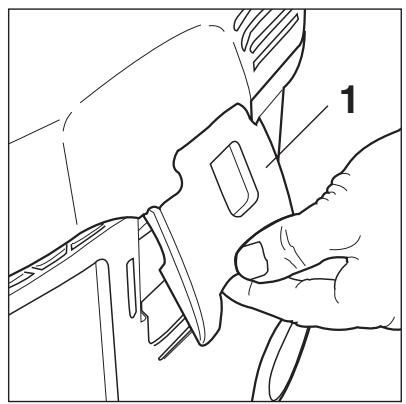
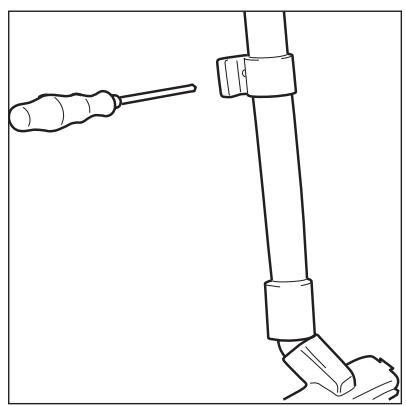
6. Fit the suction tube fastener1) about 20cm from the edge of the lower extension tube as shown in the figure.
4 Operation
4.1 Connections
4.1.1 Connecting the suction hose
4.1.2 Electrical connection
The operating voltage shown on the rating plate must correspond to the voltage of the mains power supply.
-
Connect the suction hose.
-
Ensure that the cleaner is switched off.
-
Insert the power cord into a properly installed and fused socket with earthing contact.
-
Connect the electrical appliance to the appliance socket1) on the control panel.
4.1.3 Connecting electrical appliances1)

Before switching the switch to position „auto“, ensure that the tool con
nected to the appliance socket is switched off.
To comply with regulations, only approved dust producing tools should be connected.
The maximum power consumption of the connected electrical appliance is stated in section 9.4 "Technical data".
4.1.4 Connecting pneumatic tools ^1)

Before switching the switch to position „auto“, ensure that the tool con
nected to the appliance socket is
switched off.
Operating pressure of the pneumatic tool is stated in section 9.4 "Technical data".
-
Connect the pneumatic tool to the upper quick coupling1) on the control panel.
-
Connect the compressed air supply to the lower push-in nipple1).
4.2 Switching on the vacuum cleaner
4.2.1 Switch position "I"
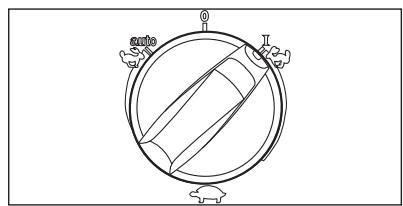
- Turn the switch to position "I".
The vacuum cleaner motor starts.
4.2.2 Switch position "auto"

Before switching the switch to position „auto“, ensure that the tool con
nected to the appliance socket is switched off.
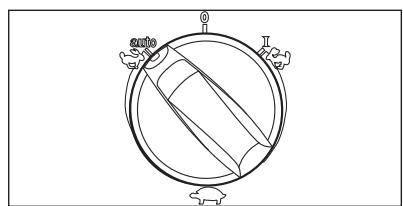
- Turn the switch to position "auto"1).
The vacuum cleaner motor starts when the connected power tool/pneumatic tool is switched on.
- When the power tool is switched off, the vacuum cleaner continues to run for a short moment so that any dust in the suction hose is conveyed to the filter bag.
english
4.2.3 Setting suction power
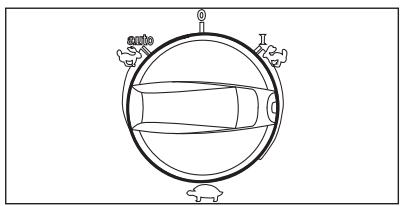
The motor speed and the suction power can be varied with the suction power control1). This allows precise adaptation of the suction power for different cleaning tasks.
4.3 Cleaning the filter element
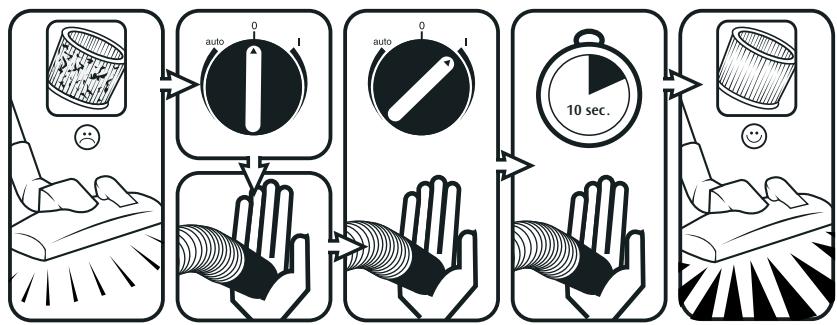
4.3.1 Cleaning the filter element (Push&Clean System)

If suction performance drops.

- Set the suction power to maximum.
-
Close the nozzles or suction hose opening with the palm of your hand.
-
Press the button to start filter cleaning three times. The resulting stream of air removes attached dust from the slats of the filter elements.
4.3.2 Cleaning the filter element (Automatic Filter Cleaning System)1)

To ensure that suction performance is always at its best, the filter element is automatically cleaned during operation. We recommend complete cleaning if the filter element becomes extremely dirty.
- Switch off the vacuum cleaner
-
Close the nozzles or suction hose opening with the palm of your hand.
-
Turn the switch to position ^ 1^ and let the cleaner operate for approx. 10 seconds with the suction hose opening closed.
5 Applications and techniques
5.1 Techniques
If used correctly, additional accessories, suction nozzles and suction hoses can enhance the cleaning action and reduce the cleaning effort.
Effective cleaning is achieved if you follow just a few guidelines in combination with your own practical experience in special fields.
Here are some basic tips.
5.1.1 Picking up dry substances

CAUTION! Do not pick up flammable substances.
Before picking up dry substances, always ensure that a filter bag is inserted in the tank (see section 9.5 "Accessories" for order number). Disposal of the picked up material is then simple and hygienic.
After picking up liquids, the filter element is wet. A damp filter element clogs more quickly when dry substances are picked up. For this reason the filter element should be washed and dried or replaced by a dry element before dry substances are picked up.
english
5.1.2 Picking up liquids
CAUTION! Do not pick up flammable liquids.

Before liquids are picked up, always remove the filter bag/ waste bag and check that the float1) or the water level limit1) works properly. (See section 7.2.4 and 7.2.5 "Replacing the filter element".)
The use of a separate filter element or filter screen is recommended.
If foam appears, stop work immediately and empty the tank.
To reduce the amount of foam, use foam killer Alto Foam Stop (see section 9.5 "Accessories" for order number).
6 After finishing work
6.1 Switching the vacuum cleaner off and storage
- Switch off the vacuum cleaner and pull the mains plug out of the socket.
- Wind up the power cord and hang it on the handle.
- Empty the tank and clean the vacuum cleaner.
- After picking up liquids: Store the upper section of the cleaner separately so that the filter element can dry.
- Store the cleaner in a dry room where it is protected from unauthorized use.
english
7 Maintenance
7.1 Maintenance plan
| After finishing work | As required | ||
| 7.2.1 | Replacing the waste bag | ● | |
| 7.2.2 | Replacing the filter bag | ● | |
| 7.2.3 | Emptying dirt tank (ATTIX 3 / ATTIX 5 / 12 GAL) | ● | |
| 7.2.4 | Emptying dirt tank (ATTIX 7 / 19 GAL) | ● | |
| 7.2.5 | Replacing filter element (Push&Clean System)1) | ● | |
| 7.2.6 | Replacing filter element (Automatic Filter Cleaning System)1) | ● |
7.2 Maintenance work
7.2.1 Replacing the waste bag

Press the waste bag connection of the new waste bag firmly on to the inlet fitting.
7.2.2 Replacing the filter bag

Press the filter bag connection of the new filter bag firmly on to the inlet fitting.
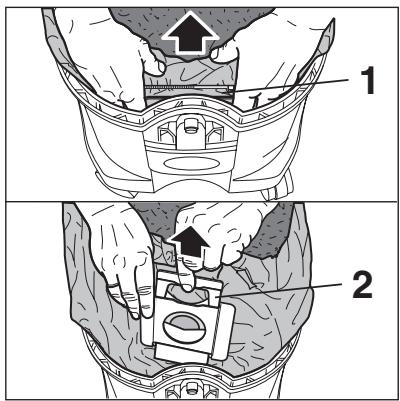
- Open the retaining clamps and remove the upper section of the cleaner from the dirt tank.
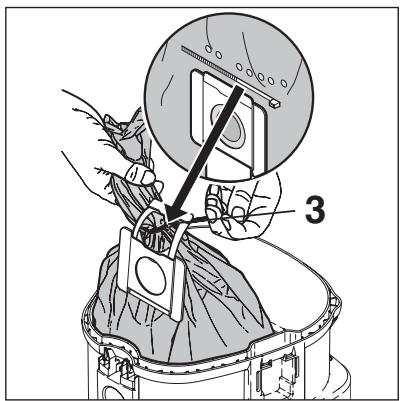
- Carefully remove the waste bag connection (1) from the inlet fitting.
- Close the waste bag connection with the slide (2).
- Close the waste bag using the cable binder (3).
- Dispose of the dirt in accordance with legal regulations.
-
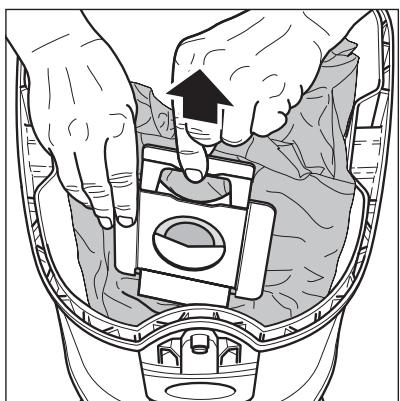
Insert a new waste bag into the cleaned tank as described in the instructions enclosed.
-
Open the retaining clamps and remove the upper section of the cleaner from the dirt tank.
- Carefully remove the filter bag connection from the inlet fitting.
- Close the filter bag connection with the slide.
- Dispose of the filter bag in accordance with legal regulations.
- Place a new filter bag into the cleaned tank as described in the instructions (printed on the filter bag).
7.2.3 Emptying dirt tank (ATTIX 3 / 5 / 12 GALLON)
7.2.4 Emptying the dirt tank (ATTIX 7/19 GALLON)

To empty the dirt tank after picking up liquids: remove the intermediate ring as a proper seal is only ensured during suction.
After emptying the tank: clean the rim of the tank and the seals in the intermediate ring and the upper section of cleaner before refitting them.
If the seal or groove is dirty or damaged, the suction performance will be reduced.
Before reinserting the suction hose: clean the inlet fitting and hose collar.
7.2.5 Replacing filter element (Push&Clean System) ^1)
- Remove the upper section of the cleaner from the dirt tank.
english
- Hold the dirt tank at the grip underneath the tank and tip out the dirt.
- Dispose of the dirt in accordance with legal regulations.
- Clean the rim of the tank before fitting the upper section of cleaner.
Before reinserting the suction hose:
-
Clean the inlet fitting and hose collar.
-
Remove the upper section of cleaner from the dirt tank.
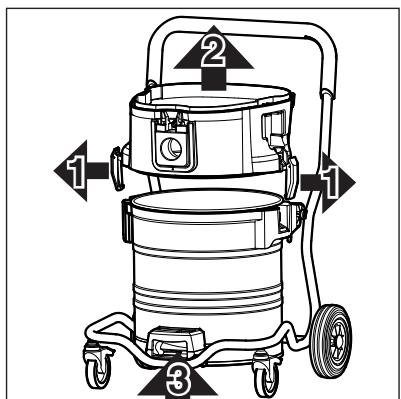
- Open the retaining clamps (1) and remove the intermediate ring (2) from the tank.
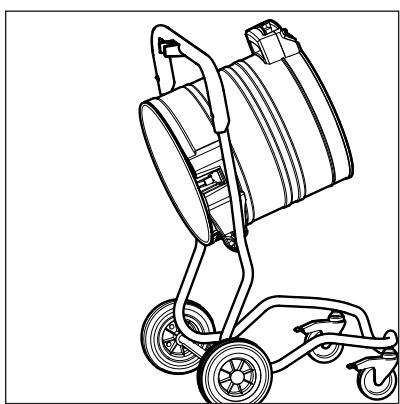
- Pull the lever in the handle (3) upwards and tilt the tank.
- Tip out the collected dirt.
- Dispose of the dirt in accordance with legal regulations.
or:
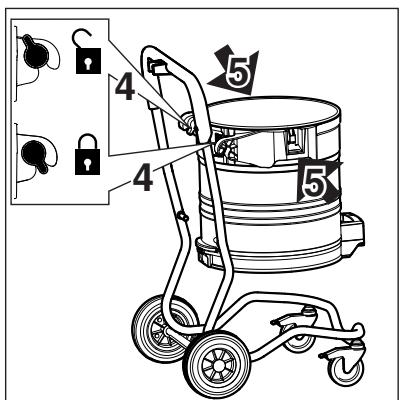
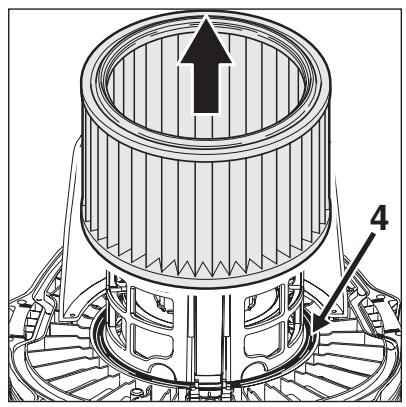
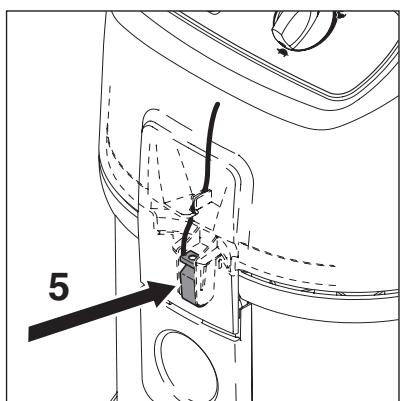
- Open the tank locks (4).
- Use the handles (5) to lift the tank out of the frame.
- Tip out the collected dirt.
- Place the empty tank in the frame and close the locks (4).
-
Dispose of the dirt in accordance with legal regulations.
-
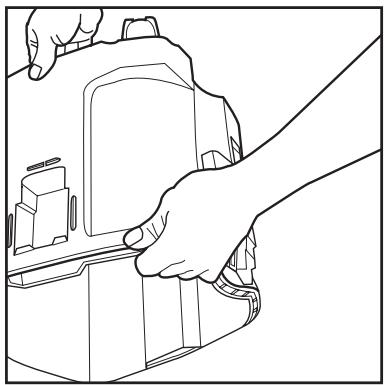
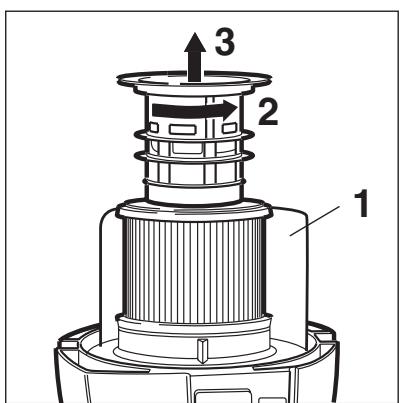
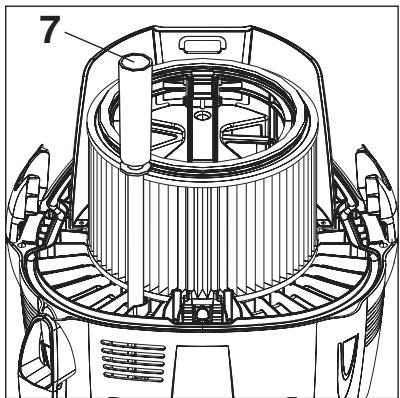
Remove the upper section of the cleaner from the dirt tank and deposit with the filter element facing upwards. Do not place the upper section of the cleaner on the guard (1).
- Turn the filter holder anticlockwise (2) and remove it (3).
- Carefully remove the filter element.
english


Never use the vacuum cleaner without a filter.
7.2.6 Replacing filter element (Automatic Filter Cleaning System)1)

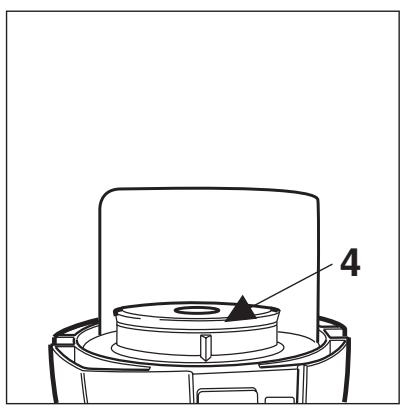
- Clean the filter seal (4). Check it for damage and replace if necessary.
- Check antistatic clamp (5) for damage and have it replaced by Alto Service if necessary.
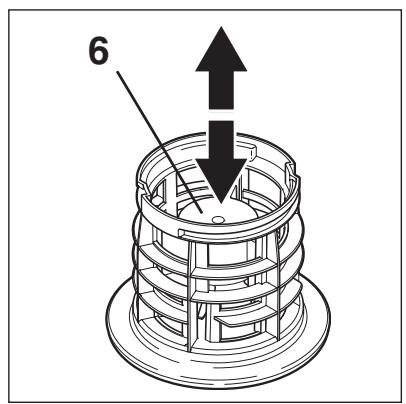
- Check the floater (6) for proper operation: When you turn the filter holder, the floater should move back and forth easily.
- Fit a new filter element.
- Fit the filter holder and turn it clockwise to secure it.
-
Dispose of the used filter element in accordance with legal regulations.
-
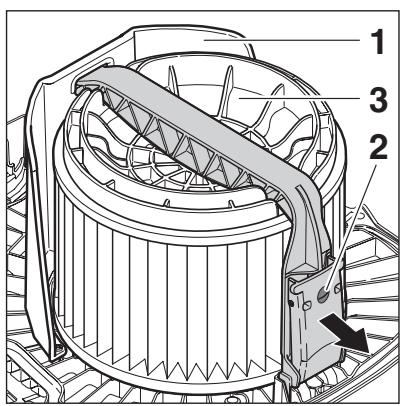
Open the retaining clamps and remove the upper section of the cleaner from the dirt tank. Lay the upper section of the cleaner down with the filter element facing upwards. Do not place the upper section of the cleaner on the guard (1) and do not damage the filter element.
- Open the bar handle (2) and remove it.
- Remove the filter holder (3).
- Carefully remove the filter element.
- Clean the filter seal (4). Check it for damage and replace it if necessary.
- Check the antistatic clamp (5) for damage and have it replaced by Alto Service if necessary.
- Check that the control flap (6) for filter cleaning works properly. The control flap should move back and forwards easily.

Never use the vacuum cleaner without a filter.
- Clean the level hose (7).
- Fit a new filter element.
10.Fit the filter holder. Ensure that it is in the correct position.
11.Fit bar and close bar handle. - Dispos of the used filter element in accordance with legal regulations.
8 Troubleshooting
| Fault | Cause | Remedy |
| ‡ Motor does not start | > Fuse of the mains socket has blown. >Overload protection switch has tripped. >Self-acting carbon brush is worn. | •Connect mains fuse. •Switch off the vacuum cleaner and allow it to cool for approx. 5 minutes. If the cleaner cannot be started again, contact the Alto service department. •Have carbon brushes changed by Alto Service. |
| ‡ Motor does not run in automatic mode | >Power tool/pneumatic tool is defective or not connected properly. >The power rating of the electrical tool is too low. | •Check that the power tool works or that the plug is inserted correctly. •Note that minimum power rating is P>40W |
| ‡ Reduced suction power | >Suction power selected with suction power control is too low. >Clogged suction hose/nozzle. >Filter bag is full. >Filter element is clogged. >Automatic Filter Cleaning System only: Defective cleaning mechanism | •Set suction power in accordance with section 4.2.3. „Setting suction power“. •Clean suction hose/nozzle •See section 7.2.2 „Replacing filter bag“. •See section 4.5 „Cleaning filter element“ and 7.2.5+7.2.6 „Replacing filter element“. •Contact Alto Service |
| ‡ No suction power during wet cleaning | >Tank is full. (Float has closed the suction opening). | •Switch off the cleaner. Empty the tank. |
| ‡ The vacuum cleaner switches off during wet cleaning | >Tank is full. | •Switch off the cleaner. Empty the tank. |
| ‡ Voltage fluctuations | >Impedance of power supply is too high. | •Connect the cleaner to another socket closer to the fuse box. Voltage fluctuations over 7% should not occur if the impedance at the transfer point is ≤0.15 Ω. |
lish
english
9 Further information
9.1 Recycling the vacuum cleaner
Make the old cleaner unusable immediately.
- Unplug the cleaner and cut the power cord.
Do not discard of electrical appliances with household waste.
As specified in European Directive 2002/96/EC on old electrical
and electronic appliances, used electrical goods must be collected separately and recycled ecologically.
Contact your local authorities or your nearest dealer for further information.
9.2 Guarantee
Our general conditions of business are applicable with regard to the guarantee.
Subject to change as a result of technical advances.
9.3 Tests and approvals
Electrical tests must be performed in accordance with the provisions of safety regulations (VBG4) and to DIN VDE 0701 Part 1 and Part 3. In accordance with DIN VDE 0702 these tests must be performed
at regular intervals and after repairs or modifications.
The vacuum cleaner has been approved in accordance with IEC/EN 60335-2-69.
english
9.4 Technical data
| ATTIX 3/5/7 | ATTIX12 GALLON | ATTIX12 GALLON RDFEC 12 GALLON AS/E | ATTIX12 GALLONRDFD 12 GALLONAS/PE | ATTIX19 GALLON19 GALLON AS/PE2 | |||||
| EU | CH, DK | GB230/240V | GB 110V | US 120 V | |||||
| Voltage | V | 230 | 230/240 | 110 | 120 | ||||
| Mains frequency | Hz | 50/60 | 60 | ||||||
| Fuse | A | 16 | 10 | 13 | 16 | 15 | |||
| Power consumption | W (HP) | 1200 | 1000 (1.4) | 840 (1.1) | 940 (1.3) | 1040 (1.4) | |||
| Connected load for appliance socket | W (HP) | 2400 | 1100 | 1800 | 560 | - | 600 (0.8) | 500 (0.7) | 400 (0.5) |
| Total connected load | W (HP) | 3600 | 2300 | 3000 | 1760 | 1000 (1.4) | 1440 (1.9) | ||
| ATTIX350-01 | ATTIX360-11360-21 | ATTIX550-01550-11 MOBIL550-21 / 590-21560-21 / 560-31 | ATTIX 12 GALLON12 GALLON RDFEC 12 GALLON AS/E12 GALLON RDFD12 GALLON AS/PE | ATTIX751-01 / 751-11751-21 / 761-21 XC791-21 | ATTIX 19 GAL19 GAL AS/PE2 | ||||
| Volume flow (air) | l/min (cfm) | 3600 (127) | |||||||
| Negative pressure(water lift) | Pa (in) | 23000 (93) | 23000 (93)25000 (100)2) | 23000 (93) | |||||
| Sound pressure level at adistance of 1 m, EN 60704-1 | dB(A) | 62 | 60 | 64 | |||||
| Operating noise | dB(A) | 59 | 57 | ||||||
| Power cord: Length | m (ft) | 7.5 | 7.510.0(GB) | 7.5 (25) | |||||
| Power cord: Type | H05RR-F 2x0.75 | H05RR-F 3x1.5 | H05RR-F 3x0.75H05RR-F 3x1.51) | SJTW-A AWG 18/34)SJTW-A AWG 14/3 | H05RR-F 3x1.5H07BQ-F 3x2.5 | SJTW-A AWG 14/3 | |||
| Protection class | II | I | |||||||
| Type of protection (splashwater protected) | IP X4 | ||||||||
| Radio interference level | EN 55014-1 | ||||||||
| Tank volume | I (gal) | 27 | 45 (12) | 70 (19) | |||||
| Width | mm (in) | 380 | 476 (19) | 580 (23) | |||||
| Depth | mm (in) | 390 | 506 (20) | 605 (24) | |||||
| Height | mm (in) | 570 | 655 (26) | 970 (38) | |||||
| Weight | kg (lb) | 10 | 14 / 161) | 25 / 273) (56/60) | |||||
| 1) ATTIX 560-21/-31, ATTIX 12 GALLON RDFD, ATTIX 12 GALLON AS/PE3) ATTIX 761-21 XC / 19 GALLON AS/PE22) ATTIX 791-214) ATTIX 12 GALLON | |||||||||
9.5 Accessories
| Description | Order No. | ||||
| ATTIX 3 | ATTIX 512 GAL12 GAL RDF | ATTIX 560-21/-3112 GAL RDFD12 GAL AS/PEEC12 GAL AS/E | ATTIX 75119 GAL | ATTIX 76119 GAL AS/PE2 | |
| Filter bag(5 pcs.) | 302000449 | 302000527 | - | 302001484 | - |
| Waste bag (5 pcs.) | 302000804 | 302000728 | 302000728 | 302001480 | 302001480 |
| Filter element | 30200046111753 (ZA) | 30200046111753 (ZA) | 302000726 | 30200046111753 (ZA) | 302000726 |
| Cloth insert filter | 302000606 | 302000525 | - | - | - |
| Description | Order No. |
| ATTIX 3 / 5 / 7 | |
| Filter screen | 15475 |
| Alto FoamStop (6 x 1 l) | 8469 |
9.6 EC declaration of conformity

EC declaration of conformity
ALTO Deutschland GmbH
Guido-Oberdorfer-StraBe 2-8
D-89287 Bellenberg
Product:
Vacuum cleaner for wet and dry operation
Model:
ATTIX 350-01 / 360-11 / 360-21
ATTIX 550-01 / 550-11 MOBIL / 550-21
ATTIX 560-21/560-31/590-21
ATTIX 751-01 / 751-11 / 751-21 / 761-21 XC / 791-21
Description:
110/230-240 V\~, 50/60 Hz
The design of the appliance corre
sponds to the following pertinent
regulations:
EC Machine Directive 98/37/EC
EC Low Voltage Directive 73/23/EC
EC EMC Directive 89/336/EC
Applied harmonized standards:
EN 12100-1, EN 12100-2
EN60335-1
EN 60335-2-69
EN 55014-1, EN 55014-2, EN 61000-3-2
Applied national stand
DIN EN 60335-1
DIN EN 60335-2-69
Dipl.-Ing. Wolfgang Nieuwkamp
Tests and approvals
Bellenberg, 28.10.2004
HEADQUARTER
Nilfisk-Advance Group
Sognevej 25
2605 Brøndby
Denmark
Tel.: +45 4323 8100
AUSTRALIA
Nilfisk-ALTO
48 Egerton St.
Silverwater NSW 2128
Tel.: +61 2 8748 5966
Fax: +61 2 8748 5960
AUSTRIA
ALTO Osterreich GmbH
Metzgerstr. 68
5101 Bergheim/Salzburg
Tel.: +43 6624 5 64 00-11
Fax: +43 6624 5 64 00-34
E-mail: info@nilfisk-alto.at
Web: www.nilfisk-alto.at
BRAZIL
Wap do Brasil Ltda.
Rua 25 de Agosto, 608
83323-260 Pinhais/Parana
Tel.: +55 4 12 10 67 40 0
Fax: +55 4 12 10 67 40 3
E-mail: export@wapdobrasil.com.br
CANADA
ALTO Canada
24 Constellation Road
Rexdale
Ontario M9W 1K1
Tel.: +1 416 6 75 58 30
Fax: +1 416 6 75 69 89
CROATIA
Wap ALTO Strojevi za ciscenje, d.o.o.
Siget 18a
10020 Zagreb
Tel.: +385 1 65 54 144
Fax: +38516554112
E-mail: admin.wap@wap-sistemi.hr
CZECH REPUBLIC
ALTO Ceska Republika s.r.o.
Zateckych 9
14000 Praha 4
Tel.: +420 2 41 40 84 19
Fax: +420 2 41 40 84 39
E-mail:wap_p@mbox.vol.cz
Web: www.wap-alto.cz
DENMARK
ALTO Danmark A/S
Industrivej 1
9560 Hadsund
Tel.: +45 7218 21 00
Fax: +45 7218 21 11
E-mail: salg@nilfisk-alto.dk
service@nilfisk-alto.dk
Web: www.nilfisk-alto.dk
FRANCE
ALTO France S.A.
Aéroparc 1
19 Rue lcare
F-67960 Entzheim
Tel.: +33 3 88 28 84 00
Fax: +33 3 88 30 05 00
E-mail: info@nilfisk-alto.fr
Web: www.nilfisk-alto.com
GERMANY
Nilfisk-Advance AG
Geschäftsbereich Nilfisk-ALTO
Guido-Oberdorfer-Straße 10
89287 Bellenberg
Tel.: +49 0180 537 37 37
Fax: +49 0180 537 37 38
E-mail: info@nilfisk-alto.de
Web: www.nilfisk-alto.de
GREAT BRITAIN
Nilfisk-ALTO
Division of Nilfisk-Advance Ltd.
Bowerbank Way
Gilwilly Industrial Estate
UK-Penrith, Cumbria CA 11 9BQ
Tel.: +44 1768 86 89 95
Fax: +44 1768 86 47 13
E-mail: sales@nilfisk-alto.co.uk
Web: www.nilfisk-alto.co.uk
MALAYSIA
ALTO DEN-SIN Malaysia Sdn Bhd
SD 14, Jalan KIP 11, Taman
Perindustrian KIP, SRI Damansara
52200 Kuala Lumpur
Malaysia
Tel.: +603 627 4 6 913
Fax: +603 627 4 6 318
E-mail: densin@tm.net.my
NETHERLANDS
ALTO Nederland BV
Houtschelf 7
NL-3371 KB Hardinxveld-Giessendam
Tel.: +31 184 677 200
Fax: +31 184 677 201
E-mail: info@nilfisk-alto.nl
Web: www.nilfisk-alto.nl
NEW ZEALAND
ALTO Overseas Inc.
5A Tarndale Grove
Albany Auckland
Tel.: +64 9 414 4520
Fax: +64 9 414 4521
E-mail: altonz@ihug.co.nz
NORWAY
ALTO Norge A/S
Bjørnerudveien 24
1266 Oslo
Tel.: +47 22 75 17 70
Fax: +47 22 75 17 71
E-mail: info@nilfisk-alto.no
SINGAPORE
ALTO DEN-SIN Singapore Pte Ltd.
No.17 Link Road
Singapore 619034
Tel.: +65 62 68 10 06
Fax: +65 62 68 49 16
E-mail: densin@singnet.com.sg
Web: www.densin.com
SLOVENIA
Wap ALTO cistilni sistemi, d.o.o.
Letaliska 33
SLO-1110 Ljubljana
Tel.: +368 15 20 62 00
Fax: +368 15 20 62 10
E-mail: wap.prodaja@siol.net
SLOWAKIA
Wap ALTO Čistiace systémy s.r.o.
Remeselnicka 42
83106 Bratislava-Raca
Tel.: +421 2 44 881 402/405
Fax: +421 2 44 881 395
E-mail:wap@gtinet.sk
Web: www.wap-alto.sk
SPAIN
Nilfisk-ALTO
Division of Nilfisk-ALTO S.A.
Torre D'Ara
Paseo del Ringle, 5 PI.10
E-08302 Mataró Barcelona
Tel.: +34 93 741 24 00
Fax: +34 93 757 80 20
E-mail: info@nilfisk-alto.es
Web: www.nilfisk-alto.com
SWEDEN
ALTO Sverige AB
Aminogatan 18,BOX4029
431 04 Moindal
Tel.: +46 3 17 06 73 00
Fax: +46 3 17 06 73 41
E-mail: info@nilfisk-alto.se
Web: www.nilfisk-alto.se
USA
ALTO Cleaning Systems, Inc.
Part of the Nilfisk-Advance Group
12249 Nations Ford Road
28134 Pineville
Tel.: +1 704 971 1240
Fax: +1 704 971 1241
E-mail: info@altocsi.com
Web: www.nilfisk-alto.com


- NilfiskALTO
- Contents
- Important safety instructions
- Description
- Before starting
- Operation
- Applications and techniques
- After finishing work
- Maintenance
- Troubleshooting
- Further information
- Symbols used to mark instructions
- For your own safety
- Transport
- Purpose and intended use
- cleaner:
- Precautions and safety regulations when using the vacuum cleaner
- Before start-up
- CAUTION!
- Purpose
- Operating elements
- Assembling the vacuum cleaner
- IMPORTANT!
- NOTE!
- Connections
- Connecting the suction hose
- Electrical connection
- Connecting electrical appliances1)
- Connecting pneumatic tools 1)
- Switching on the vacuum cleaner
- Switch position "I"
- Switch position "auto"
- Setting suction power
- Cleaning the filter element
- Cleaning the filter element (Automatic Filter Cleaning System)1)
- Techniques
- Picking up dry substances
- CAUTION! Do not pick up flammable substances.
- Picking up liquids
- CAUTION! Do not pick up flammable liquids.
- Switching the vacuum cleaner off and storage
- Maintenance plan
- Maintenance work
- Replacing the waste bag
- Replacing the filter bag
- Emptying dirt tank (ATTIX 3 / 5 / 12 GALLON)
- Emptying the dirt tank (ATTIX 7/19 GALLON)
- Replacing filter element (Push&Clean System) 1)
- or:
- Recycling the vacuum cleaner
- Guarantee
- Tests and approvals
- EC declaration of conformity
- EC declaration of conformity
- HEADQUARTER
- AUSTRALIA
- AUSTRIA
- BRAZIL
- CANADA
- CROATIA
- CZECH REPUBLIC
- DENMARK
- FRANCE
- GERMANY
- GREAT BRITAIN
- MALAYSIA
- NETHERLANDS
- NEW ZEALAND
- NORWAY
- SINGAPORE
- SLOVENIA
- SLOWAKIA
- SPAIN
- SWEDEN
- USA
Marque : NILFISK
Modèle : ATTIX 19 GALLON
Catégorie : Aspirateur industriel