
G1U - Pédale d'effets pour guitare ZOOM - Notice d'utilisation et mode d'emploi gratuit
Retrouvez gratuitement la notice de l'appareil G1U ZOOM au format PDF.

| Type de produit | Pédale d'effets pour guitare avec interface audio USB |
| Marque | ZOOM |
| Modèle | G1U |
| Dimensions (L x P x H) | 136 mm x 155 mm x 52 mm |
| Poids (sans piles) | 350 g |
| Alimentation | Adaptateur secteur 9 V DC, 300 mA (centre négatif) ou 4 piles alcalines AA (environ 10 h d'autonomie) |
| Mémoire de patches | 200 patches (100 utilisateur + 100 préréglés) |
| Nombre d'effets | 67 types d'effets, jusqu'à 8 modules simultanément |
| Fonctions principales | Accordeur chromatique, rythmes intégrés (40 motifs), boucleur (5 secondes), interface audio USB 16 bits, éditeur/librarien ZFX Tools |
| Entrée/Sortie | Entrée jack mono, sortie jack stéréo (casque/ligne), port USB, entrée pour contrôleur externe |
| Accessoires optionnels | Pédale d'expression FP01/FP02, footswitch FS01 |
| Nettoyage et entretien | Chiffon doux et sec ; ne pas utiliser de solvants ni d'abrasifs |
| Sécurité | Utiliser exclusivement l'adaptateur ZOOM AD-0006 ; éviter l'humidité, la chaleur et les chocs ; retirer les piles en cas de non-utilisation prolongée |
| Réparabilité et pièces détachées | Contacter un service agréé ; pas de pièces détachées fournies par l'utilisateur |
| Informations générales | Fabricant : ZOOM Corporation, Japon ; compatible Windows XP/Vista et Mac OS X |
FOIRE AUX QUESTIONS - G1U ZOOM
Questions des utilisateurs sur G1U ZOOM
0 question sur cet appareil. Repondez a celles que vous connaissez ou posez la votre.
Poser une nouvelle question sur cet appareil
Téléchargez la notice de votre Pédale d'effets pour guitare au format PDF gratuitement ! Retrouvez votre notice G1U - ZOOM et reprennez votre appareil électronique en main. Sur cette page sont publiés tous les documents nécessaires à l'utilisation de votre appareil G1U de la marque ZOOM.
MODE D'EMPLOI G1U ZOOM
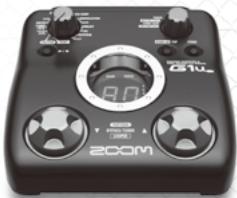
GUITAR EFFECTS & USB AUDIO I/F PEDAL
61u.
Operation Manual
Thank you for selecting the ZOOM G1u (hereafter simply called the "G1u"). Please take the time to read this manual carefully to get the most out of the unit and to ensure optimum performance and reliability. Keep this manual at hand for future reference.
| Contents | |
| SAFETY PRECAUTIONS / Usage Precautions 2 | Using the G1u as an Audio Interface 20 |
| Terms Used in This Manual 3 | About ZFX Tools 20 |
| Controls and Functions / Connections 4 | Effect Types and Parameters 21 |
| Selecting a Patch for Playing 6 | Explanation of symbols 21 |
| Using the Tuner 8 | PATCH LEVEL 21 |
| Using the Rhythm Function 10 | COMP/EFX module 21 |
| Using the Looping Function 12 | DRIVE module 22 |
| Editing a Patch 14 | EQ module 23 |
| Storing/Copying Patches 16 | ZNR/AMP module 23 |
| Restoring Factory Defaults 17 | MODULATION module 24 |
| Changing the Way Patches Are Called Up 18 | DELAY module 25 |
| Using a Foot Switch or Pedal 18 | REVERB module 26 |
| Using a foot switch 18 | Rhythm Function Preset Patterns 27 |
| Using an expression pedal 19 | Checking the G1u Version 27 |
| Troubleshooting 27 | |
| Specifications 27 | |
| Rear cover 27 | |
200
© ZOOM Corporation Reproduction of this manual, in whole or in part, by any means, is prohibited.
SAFETY PRECAUTIONS / Usage Precautions
SAFETY PRECAUTIONS
In this manual, symbols are used to highlight warnings and cautions for you to read so that accidents can be prevented. The meanings of these symbols are as follows:

This symbol indicates explanations about extremely dangerous matters. If users ignore this symbol and handle the device incorrectly, serious injury or death could result.

This symbol indicates explanations about dangerous matters. If users ignore this symbol and handle the device incorrectly, bodily injury and damage to the equipment could result.
Please observe the following safety tips and precautions to ensure hazard-free use of the G1u.
Power requirements

Since power consumption of this unit is fairly high, we recommend the use of an AC adapter whenever possible. When powering the unit from batteries, use only alkaline types.
[AC adapter operation]
- Be sure to use only an AC adapter which supplies 9 V DC, 300mA and is equipped with a "center minus" plug (Zoom AD-0006). The use of an adapter other than the specified type may damage the unit and pose a safety hazard.
- Connect the AC adapter only to an AC outlet that supplies the rated voltage required by the adapter.
- When disconnecting the AC adapter from the AC outlet, always grasp the adapter itself and do not pull at the cable.
- During lightning or when not using the unit for an extended period, disconnect the AC adapter from the AC outlet.
[Battery operation]
- Use four conventional IEC R6 (size AA) batteries (alkaline).
- The G1u cannot be used for recharging.
Pay close attention to the labelling of the battery to make sure you choose the correct type. - When not using the unit for an extended period, remove the batteries from the unit.
- If battery leakage has occurred, wipe the battery compartment and the battery terminals carefully to remove all remnants of battery fluid.
- While using the unit, the battery compartment cover should be closed.
Environment

To prevent the risk of fire, electric shock or malfunction, avoid using your G1u in environments where it will be exposed to:
- Extreme temperatures
- Heat sources such as radiators or stoves
- High humidity or moisture
- Excessive dust or sand
- Excessive vibration or shock
Handling

- Never place objects filled with liquids, such as vases, on the Glu since this can cause electric shock.
- Do not place naked flame sources, such as lighted candles, on the G1u since this can cause fire.
- The Glu is a precision instrument. Do not exert undue pressure on the keys and other controls. Also take care not to drop the unit, and do not subject it to shock or excessive pressure.
Take care that no foreign objects (coins or pins etc.) or liquids can enter the unit.
Connecting cables and input and output jacks

You should always turn off the power to the G1u and all other equipment before connecting or disconnecting any cables. Also make sure to disconnect all connection cables and the power cord before moving the G1u.
Alterations

Never open the case of the G1u or attempt to modify the product in any way since this can result in damage to the unit.
Volume

Do not use the Glu at a loud volume for a long time since this can cause hearing impairment.
Usage Precautions
Electrical interference
For safety considerations, the G1u has been designed to provide maximum protection against the emission of electromagnetic radiation from inside the device, and protection from external interference. However, equipment that is very susceptible to interference or that emits powerful electromagnetic waves should not be placed near the G1u, as the possibility of interference cannot be ruled out entirely.
With any type of digital control device, the Glu included, electromagnetic interference can cause malfunctioning and can corrupt or destroy data. Care should be taken to minimize the risk of damage.
Cleaning
Use a soft, dry cloth to clean the G1u. If necessary, slightly moisten the cloth. Do not use abrasive cleanser, wax, or solvents (such as paint thinner or cleaning alcohol), since these may dull the finish or damage the surface.
Please keep this manual in a convenient place for future reference.
Terms Used in This Manual
This section explains some important terms that are used throughout the G1u manual.
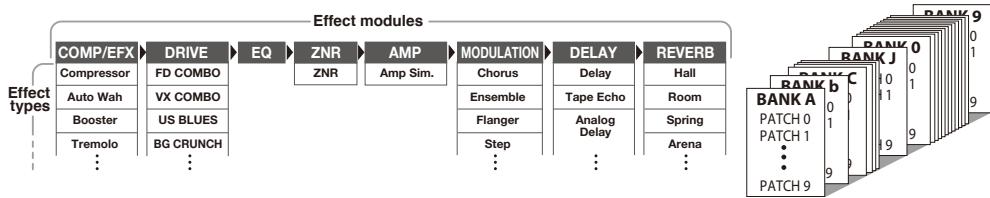
- Effect module
As shown in the illustration above, a patch in the Glu can be thought of as a combination of up to eight single effects. Each such effect is referred to as an effect module.
- Effect type
Some effect modules have several different effects which are referred to as effect types. For example, the MODULATION module is comprised of chorus, flanger, pitch shifter, and other effect types. Only one of these can be selected at a time.
Effect parameter
All effect modules have various parameters that can be adjusted. These are called effect parameters or simply parameters. When thinking of an effect module as a compact effect, the parameters change the tone and effect intensity similar to the knobs on the device.
Patch
In the Glu, effect module combinations are stored and called up in units referred to as patches. A patch is comprised of information about the on/off status and effect parameter settings used in each module.
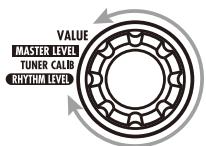
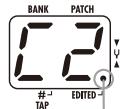
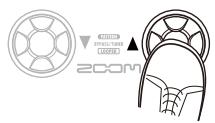
Bank
A group of ten patches is called a bank.
The memory of the G1u is comprised of a total of 20 banks, labeled with letters A to J (user-editable banks) and numbers 0 to 9 (read-only preset banks), as shown in the illustration at top right.
Mode
The internal status of the G1u is referred to as the operation mode. The function of keys and controls differs, depending on the respective mode. Modes of the G1u include play mode for selecting and playing patches, rhythm mode for playing a rhythm pattern, edit mode for modifying effects, and store mode for saving patches.
Operating the G1u on batteries
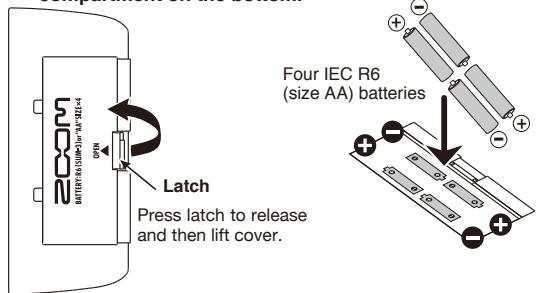
1. Turn the G1u over and open the cover of the battery compartment on the bottom.
2. Insert four fresh IEC R6 (size AA) batteries.
3. Close the cover of the battery compartment.
When the batteries are getting low, the indication "bt" appears on the display.
When operating the G1u on batteries, it is advisable to disconnect the guitar cable plug from the [INPUT] jack when not using the unit, to conserve battery power.
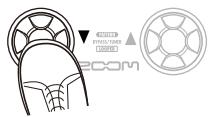
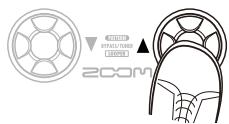
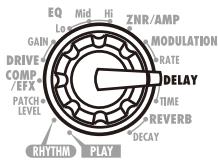
Controls and Functions / Connections
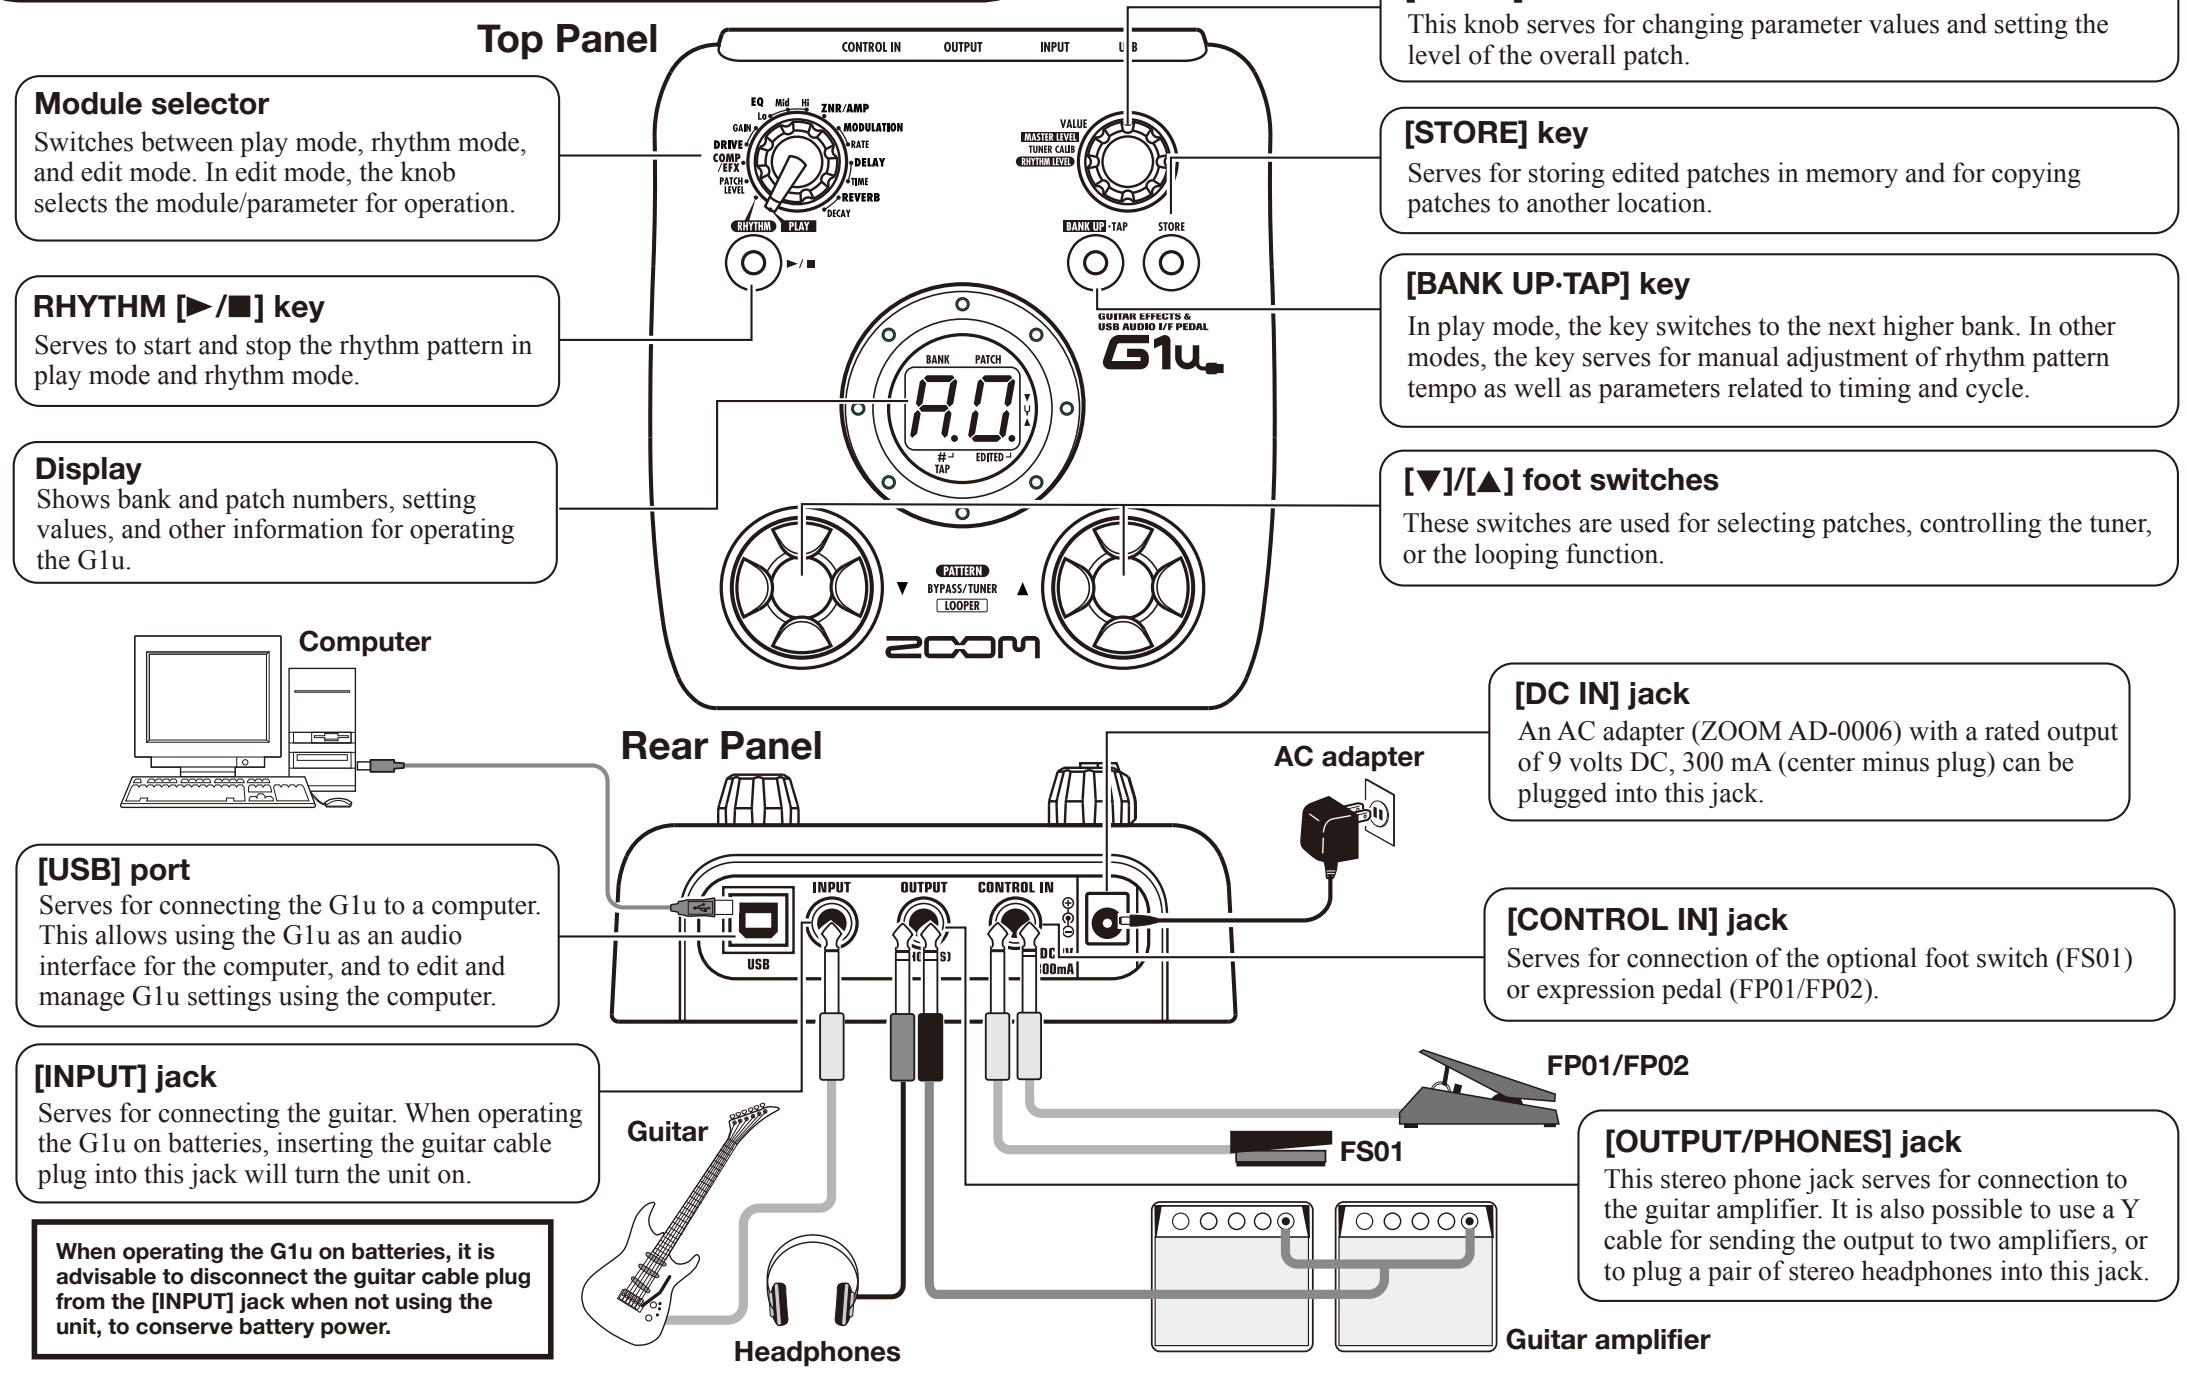
Selecting a Patch for Playing (Play Mode)
This section explains basic functions of the play mode.

Turn power on
The volume control on the connected amplifier should be turned down.
When using the unit on batteries
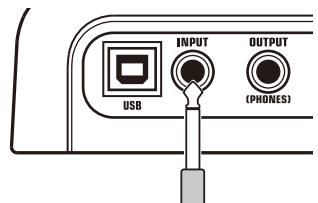
Plug a shielded cable into the [INPUT] jack.
When using the unit with an AC adapter
Plug the cable from the adapter into the [DC IN] jack.
Turn the guitar amplifier on and adjust the volume to a suitable position.

If the Glu is connected to a computer via a USB cable, and the AC adapter is not connected, power will be supplied via the USB port.

Set the G1u to play mode
Set the Module selector to "PLAY".
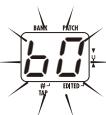
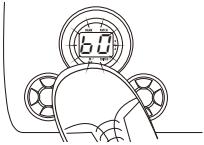
The bank and patch number are shown on the display.

Immediately after turning the Glu on, the unit will be in play mode, regardless of the position of the Module selector.

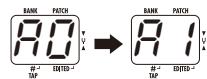
Select a patch
Use the foot switches.
Press the [▲] foot switch to call up the next higher patch.
Press the [] foot switch to call up the next lower patch.
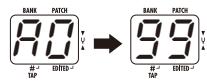
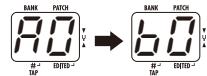
The unit cycles through patches in the order A0-A9 ... J0-J9 00-09 ... 90-99 A0.

Directly switch a bank
Press the [BANK UP·TAP] key.
The unit cycles through banks in the order A ... J, 0 ... 9, A.

You can also use an external foot switch (FS01) to switch banks ( p, 18) .


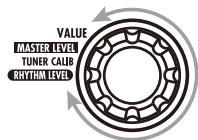
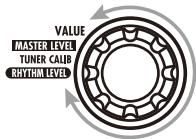
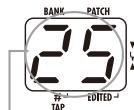
Adjust the master level
Operate the [VALUE] knob.
The master level setting appears on the display.
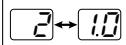
The master level setting applies to all patches. The setting range is 0 - 98, 1.0. It will be reset to 80 when power is turned off and then on again.

When using headphones, this knob adjusts the listening volume.

Using the Tuner
To use the tuner function of the G1u, the built-in effects must be bypassed (temporarily turned off) or muted (original sound and effect sound turned off).

Switch to bypass or mute
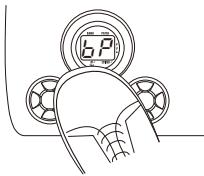
- Setting the G1u to the bypass condition
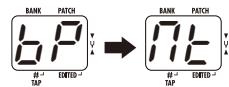
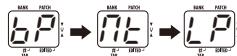
In play mode or rhythm mode ( p. 10), press both [ ] / [ ] foot switches together. When the indication "bP" appears on the display, release the switches within 1 second.
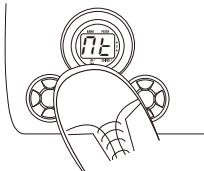
- Setting the G1u to the mute condition
In play mode or rhythm mode ( p. 10), press both [ ] / [ ] foot switches together. Wait until the indication "bP" on the display changes to "Mt" and then release the switches within 1 second.

If you keep pressing the foot switches for more than 1 second after the indication "Mt" has appeared, the looping function ( p.12) will be activated.
The bypass or mute condition cannot be activated when the unit is in edit mode ( p.14)

Patch change at bypass/mute
When you press both [] / [] foot switches together while playing your instrument, the sound may change momentarily just before the bypass/mute condition is activated. This is because the G1u switches to the next higher or lower patch when one of the foot switches is pressed slightly earlier. (When you cancel the bypass/mute condition, the original patch number will be
active again.)
This behavior is not a defect. It is due to the very high speed at which the G1u responds to patch switching. To prevent the sound change caused by the above condition, do not produce sound with your instrument until the bypass/mute condition is fully established.

Tune your instrument
Play the open string to tune, and adjust the pitch.
The left side of the display shows the note which is closest to the current pitch.
A = F (20 C^# = . F = F
A^# = - D = ^- F^# = -
B D"=D. G =
C = [ & E = & G^# = _ ]
The right side of the display shows a symbol that indicates by how much the tuning is off.
Pitch is high Pitch is correct Pitch is low


Indication turns faster the more the pitch is off

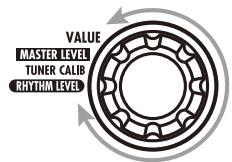
Adjusting the reference pitch of the tuner
To fine-adjust the reference pitch of the G1u tuner, turn the [VALUE] knob in the bypass/mute condition.
When you turn the knob, the current reference pitch is shown for a time on the display. The default setting is 40 (center A = 440 Hz).

While the reference pitch is shown, turn the [VALUE] knob to adjust the value in the range from 35 - 45 (center A = 435 to 445Hz

When power is turned off and on again, the reference pitch setting will be reset to 40 (center A = 440Hz

Return to play mode
Press one of the [] / [] foot switches.

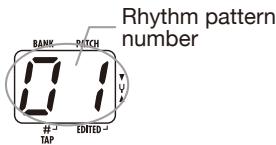
Using the Rhythm Function (Rhythm Mode)
This section describes how to use the built-in rhythm function that plays realistic drum sounds in various patterns.

Select rhythm mode
Set the Module selector to the "RHYTHM" position.
The number of the currently selected rhythm pattern (01 - 40) appears on the display.

In rhythm mode, the last selected patch will always be active. However, reverb effects are disabled while playing rhythm patterns. The rhythm function can also be used in play mode and looping mode.


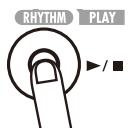
Start the rhythm function
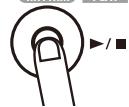
Press the RHYTHM [▶/■] key.

Rhythm pattern playback will start also if you press the RHYTHM [▶/■] key in play mode. However, changing the rhythm pattern or adjusting the rhythm volume and tempo is not possible.

Select a rhythm pattern
To switch between the 40 built-in rhythm patterns, press one of the [] / [] foot switches. (For information on pattern contents, see page 27.)

When you press both []/[] foot switches in rhythm mode, the Glu switches to the bypass/mute condition. The tuning function ( p, 8) can be used in this condition while playing the rhythm pattern.

Adjust the rhythm volume
Turn the [VALUE] knob.
The current setting (0 - 30) is shown briefly on the display.


Adjust the tempo
The rhythm pattern tempo can be adjusted in the range of 40 - 250 BPM (beats per minute).
- To continuously change the tempo
Hit the [BANK UP-TAP] key once and then turn the [VALUE] knob while the tempo value is being shown on the display.
- To manually specify the tempo
Hit the [BANK UP·TAP] key at least twice in the desired interval. The G1u automatically detects the interval in which the key is pressed the second and subsequent times, and sets the tempo accordingly (tap tempo function).
While the above steps are carried out, the new tempo value (40 - 250) is shown briefly on the display. For values in the range from 100 to 199, a dot is shown in the center, and for values of 200 and above, dots are shown in the center and in the bottom right corner.

You can also use the foot switch (FS01) to specify the tempo ( p.18) .

Dot is shown
Tempo = 120 BPM

-Dots are shown Tempo = 240 BPM

Stop the rhythm
Press the RHYTHM [▶/■] key. The G1u returns to the previous condition.
RHYTHM PLAY
Using the Looping Function (Looping Mode)
The G1u has a built-in looping function that can record and repeat up to five seconds of your play or record phrases as an overdub. This section describes how to use the looping mode.

Select looping mode
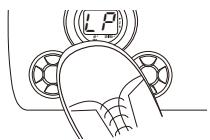
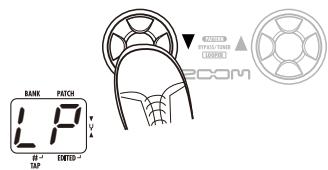
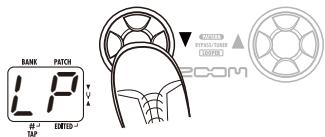
In play mode, press both [] / [] foot switches together and wait until the indication changes from "bP" to "Mt" and then to "LP". When "LP" is shown, release the switches.

In looping mode, delay effects are disabled.

Select the recording method
Turn the [VALUE] knob to select the recording method. The following settings are available.
- 1 - 8 Recording time is set using the current tempo setting, in quarter notes. For example, with a setting of "2", recording will stop automatically when two beats of the current tempo have elapsed.
- Mn Recording start and stop are controlled manually.

Recording time set in multiple quarter notes

Recording time set manually

Adjust the tempo
If a setting from 1 to 8 was selected as recording method, use the [BANK UP·TAP] key and [VALUE] knob to set the tempo. The procedure is the same as for the rhythm function. The tap tempo function can also be used ( p. 11).


Record/play a phrase
Press the [▲] foot switch and play the phrase to record.
The indication changes to "rC" and recording starts.


- When 1 - 8 was selected as recording method
After the specified time has elapsed, recording terminates and loop playback starts.
- When Mn was selected as recording method
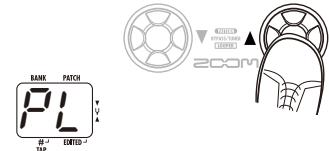
When the [ ] foot switch is pressed again, or when the maximum recording duration (5 seconds) is reached, recording terminates and loop playback starts. The display indication changes to "PL".
To stop loop playback, press the [] foot switch. The display indication reverts to "LP".

When a 1-8 setting was selected, the maximum recording duration (5 seconds) may be exceeded, depending on the tempo. In such a case, recording will terminate when one half (or one quarter) of the selected time has elapsed.

Overdub a phrase
Perform recording as described in step 4. While the phrase is playing in loop playback, press the [▲] foot switch.
The display indication changes to "rC" and overdub recording starts. When the end of the recorded phrase is reached, the unit returns to the beginning, and continues overdub recording. To stop overdub recording and return to loop playback, press the [▲] foot switch once more. The display indication changes to "PL".
To stop loop playback, press the [] foot switch. The display indication reverts to "LP".


Clear the recorded content
Hold down the [] foot switch.
The display indication changes to "CL", and the recorded content is cleared.

When you change the recording method or tempo setting, recorded content is also cleared.

Return to play mode
Press both [] / [] foot switches together.
Editing a Patch (Edit Mode)
The patches of the G1u can be freely edited by changing the effect type used by the various modules and by changing the parameter settings. Try editing the currently selected patch to create your own sound.

Select the effect module/parameter
Turn the Module selector to select the effect module and parameter to edit. The available settings are listed below.
(1) PATCH LEVEL (Prm)
(2) COMP/EFX module (Type&Prm)
(3) DRIVE module (Type)
(4) DRIVE module (Prm)
(5)-(7) EQ module (Prm)
(8) ZNR/AMP module (Type&Prm)
(9) MODULATION module (Type&Prm1)
(10) MODULATION module (Prm2)
(11) DELAY module (Type&Prm1)
(12) DELAY module (Prm2)
(13) REVERB module (Type&Prm1)
(14) REVERB module (Prm2)
The "Type" and "Prm" indication in brackets indicates the item category.
- Type&Prm or Type&Prm1 (Type & Parameter)
Item where the effect type (left side of display) and parameter setting value (right side of display) are adjusted simultaneously. - Type
Item where the effect type only is selected. - Prm or Prm2 (Parameter)
Item where the parameter setting value only is adjusted.
The EQ module has three parameters, and the
MODULATION, DELAY, and REVERB modules have two parameters each.
Switching the type gives access to the second and third parameter.
Effect type
Parameter
setting value

Effect type
Parameter setting value

Change the setting
Turn the [VALUE] knob.
The setting of the selected item changes, and a dot (. ) appears in the bottom right of the display. This indicates that a setting has been changed from the currently stored value.

When you have selected a parameter that can be set with the tap function ( p.21) , you can repeatedly hit the [BANK UP-TAP] key at the desired interval to specify the timing.
Dot indicates that setting has been changed

To switch an effect module on and off
Press one of the [] / [] foot switches.
The indication "oF" appears on the display and the module is turned off. Pressing one of the switches once more returns the setting to the previous condition.


Terminate the edit mode
Set the Module selector to the "PLAY" position to return to the play mode.

When you return to play mode and have made any changes to the patch, the dot () will be shown in the bottom right of the display. If you select another patch in this condition, the changes you have made in edit mode will be lost unless you store the patch first. To retain the changes, store the patch as described on page 16.
Storing/Copying Patches (Store Mode)
An edited patch can be stored in the user-editable banks (A - J). It is also possible to store an existing patch in another location to create a copy.

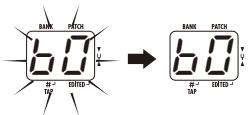
In play mode or edit mode, press the [STORE] key
The bank and patch number flash on the display.
![ZOOM G1U - In play mode or edit mode, press the [STORE] key - 1](/content/2025/01/152204/images/f35479b6bdeb14b746297f436a7d618cb3d5404ffe51260ea1f3bc717069119b.jpg)
Patches of the preset banks (0 - 9) are read-only. No patches can be stored or copied into these locations. If you press the [STORE] key while a patch from the preset area is selected, the patch "A0" (bank A, patch number 0) will be selected automatically as default store/copy target.
![ZOOM G1U - In play mode or edit mode, press the [STORE] key - 2](/content/2025/01/152204/images/f98a36f18032487f60f46753d288359c01f29f4c666bd91f18018e75f0ebf800.jpg)
![ZOOM G1U - In play mode or edit mode, press the [STORE] key - 3](/content/2025/01/152204/images/8156792a71bc0fd2f3387fdf7e6501dba589dc118e4c532a780b67f34519e046.jpg)
![ZOOM G1U - In play mode or edit mode, press the [STORE] key - 4](/content/2025/01/152204/images/03546b682c3c62bfad111780c02bfd1f65f09f916a0bfaf14036be437216fc34.jpg)
Select the store/copy target bank and patch number
- Use the [] / [] foot switches to select the bank/patch number.
- To switch only the bank, use the [BANK UP-TAP] key.

Only a user-editable bank (A - J) can be selected as store/copy target bank.
During the store/copy process, the foot switch (FS01) cannot be used to change banks.


Press the [STORE] key once more
When the store/copy process is completed, the G1u returns to the previous mode, with the target patch selected.
![ZOOM G1U - Press the [STORE] key once more - 1](/content/2025/01/152204/images/fc087a56e94be83a0f89aa90df133a8751cb74da7edbbd9d1f6a012e88cdada3.jpg)
To cancel the store process, operate the [VALUE] knob before pressing the [STORE] key again.
![ZOOM G1U - Press the [STORE] key once more - 2](/content/2025/01/152204/images/1a25f1f77d88cb181872834f5c94027500043fae2253afb780e1c810bae63634.jpg)
![ZOOM G1U - Press the [STORE] key once more - 3](/content/2025/01/152204/images/3585018da717a6184381f7a29594aa71567c27d766366d29dbdb2e927502a420.jpg)
Restoring Factory Defaults
Even after overwriting user patches with other patches, their original content can be restored in a single operation ("All Initialize" function).
To do this, turn power to the G1u on while holding down the [STORE] key.
The indication "AL" appears on the display.
To carry out the All Initialize function, press the [STORE] key once more. All patch settings are returned to the factory default condition, and the unit switches to play mode.
To cancel All Initialize, press the RHYTHM
[/] key instead of the [STORE] key.

When you carry out All Initialize, any newly created patches that were stored in the user-editable bank will be deleted (overwritten). Perform this operation with care to prevent losing any patches that you want to keep.
Changing the Way Patches Are Called Up
This section describes how to change the patch selection method of the Glu to "pre-select". In this mode, you first select the patch to use next, and then perform an additional step to activate the patch.
- Turn power to the G1u on while holding down the [▲] foot switch.
The indication "PrE-SEIEct" scrolls on the display.
- In play mode, select the patch to use next.
The selected new bank and patch number flash on the display. The sound does not change yet.
- When you have specified the patch to use, press both [] / [] foot switches together.
The patch change is accepted, causing the sound to change, and the display changes from flashing to permanently lit.
- To return the G1u to the normal patch selection method, simply turn power off and then on again.
The patch selection method is automatically reset to conventional operation.
Using a Foot Switch or Pedal
This section explains how to use an optional foot switch or expression pedal.
Using a foot switch
When an optional foot switch (FS01) is connected to the [CONTROL IN] jack of the Glu, you can switch banks and specify the tempo for rhythm patterns with the foot switch. Depending on the currently selected mode, the foot switch operates as follows.
- Play mode
Pressing the foot switch selects the next higher bank.
- Rhythm mode/Looping mode
When you press the foot switch two times or more, the Glu detects the interval and automatically adjusts the tempo accordingly (tap tempo function).
- Edit mode/Store mode
The foot switch has no effect.


Using an expression pedal
When the optional expression pedal (FP01/ FP02) is connected to the [CONTROL IN] jack of the G1u, you can change effect parameters in real time or use the pedal as a volume controller. The function of the expression pedal can be saved individually for each patch.
- Plug the FP01/FP02 into the [CONTROL IN] jack.
- In play mode, select a patch for which you want to use the expression pedal.
- Set the Module selector to a position other than "PLAY" or "RHYTHM".
The G1u goes into edit mode.
4.Hold down the RHYTHM [▶/■] key and turn the [VALUE] knob to select one of the following modules for control by the expression pedal.
| Display | Control target |
| OF | Off |
| UP | Volume |
| BP | COMP/EFX module |
| OP | DRIVE module |
| NP | MODULATION module |
| DP | DELAY module |
| RP | REVERB module |

In the section "Effect Types and Parameters" ( p.21) , effect types/parameters that can be controlled with the expression pedal are indicated by a pedal symbol.
If a module is selected for which no pedal symbol is shown, the expression pedal will have no effect for that patch.
5.Save the patch.
The expression pedal setting is stored with the patch.
6. In play mode, select the patch and operate the expression pedal.
The respective parameter changes. In bypass mode, the expression pedal always functions as a volume pedal, regardless of the setting.

The expression pedal operates also in edit mode.
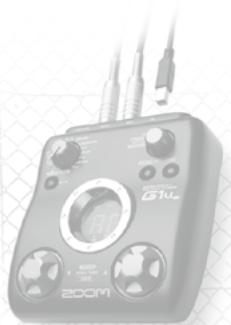
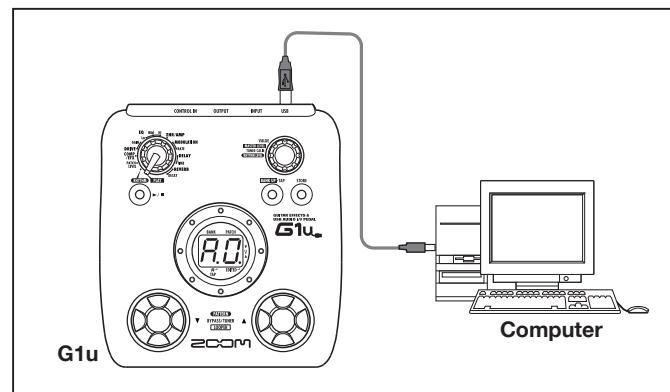
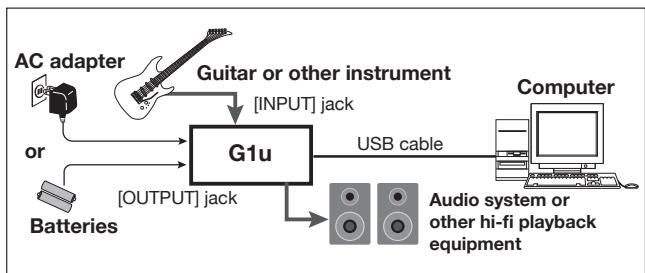
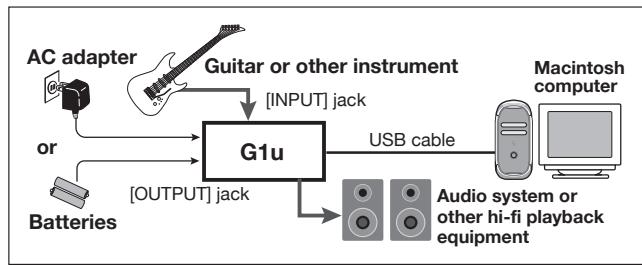
Using the G1u as an Audio Interface
When the Glu is connected to a computer via the USB port, it can function as an audio interface for the computer. The operating environment conditions for this type of use are as follows.
Compatible operating systems
- Windows XP SP2 or later Windows Vista or later
- MacOS X (version 10.4.6 or later/10.5 or later
Quantization
16-bit
Sampling frequencies
32kHz / 44.1kHz / 48kHz
With the operating systems listed above, the G1u will function as an audio interface simply by connecting the USB cable. There is no need to install any special driver software.
However, the supplied dedicated ASIO driver allows low-latency audio recording and playback.

If the G1u is connected to a computer via a USB cable, and the AC adapter is not connected, power will be supplied via the USB port.
In this condition, the sound of a guitar connected to the [INPUT] jack of the G1u can be processed with the effects of the G1u and then be recorded on the audio tracks of a DAW (Digital Audio Workstation) software application running on the computer.
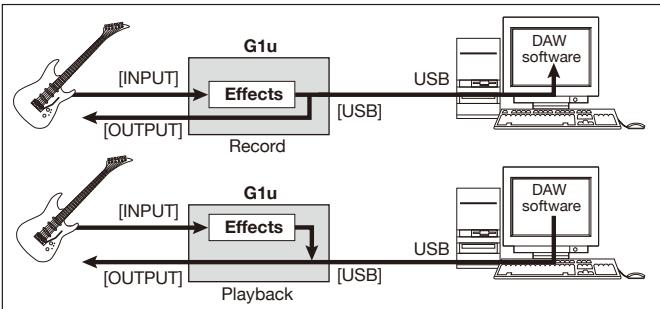
At the same time, the [OUTPUT] jack of the G1u carries the playback sound from the audio tracks of the DAW application, mixed with the guitar sound processed by the effects of the G1u.
For details on recording and playback steps, refer to the documentation of the DAW application.

Also when using the Glu as an audio interface, the signal after effect processing is always available directly at the [OUTPUT] jack (allowing use of the unit as an effect).
If the DAW application has an echo back function (input signal during recording is supplied directly to an output), this must be disabled when using the Glu. If recording is carried out with this function enabled, the output signal will sound as if processed by a flanger effect.
Use a high-quality USB cable and keep the connection as short as possible. If power is supplied to the Glu via a USB cable that is more than 3 meters in length, the low voltage warning indication may appear.
About ZFX Tools
The Glu is supplied with a software application called ZFX Tools which comprises editor/librarian functions and recording functions.
When the G1u is connected to a computer via USB, ZFX Tools can be used to import patch data from the G1u to the computer for editing and storage, and the signal from the G1u can be recorded on the computer.
Effect Types and Parameters
Explanation of symbols
- Module selector

Shows the position of the knob at which this module/parameter is called up.
- Expression pedal

Indicates a parameter that can be controlled with the expression pedal.
- Tap

Indicates a parameter that can be set by repeatedly tapping the [BANK UP-TAP] key. When the module/effect type is selected in edit mode, the parameter (modulation rate or delay time, etc.) will be set according to the interval in which the key is pressed.
- Manufacturer names and product names mentioned in this listing are trademarks or registered trademarks of their respective owners. The names are used only to illustrate sonic characteristics after which the effects are modeled and do not indicate any affiliation with ZOOM CORPORATION.
For some effect modules, you can select an effect type from several possible choices.
PATCH LEVEL

PATCH LEVEL (Prm)
Sets the overall volume level of the patch.
The setting range is 2 - 98, and 1.0. A setting of 80 corresponds to unity gain (input level and output level are equal).
COMP/EFX (Compressor/Special Effects) module
COMP/EFX (Type&Prm)
Selects the COMP/EFX module effect type and parameter.
Compressor
This is an MXR Dynacomp type compressor which limits high-level signals and boosts low-level signals to compress the overall dynamics of the signal. Higher settings result in higher sensitivity.
Auto Wah
This effect varies wah in accordance with picking intensity. Higher settings result in higher sensitivity.
Booster
Raises signal gain and creates a dynamic sound. Higher settings result in higher gain.
Tremolo
This effect periodically varies the volume. Higher settings result in faster modulation rate.
RingMod (Ring Modulator)
This effect produces a metallic ringing sound. Higher settings result in higher modulation frequency.
Slow Attack
This effect reduces the attack rate of each individual note. Higher settings result in slower attack times.
| Pedal Vox | |
| This effect simulates a vintage Vox wah pedal at half-open. Higher settings shift the emphasized frequency upwards. | |
| Pedal Cry | |
| This effect simulates a vintage Jen Crybaby pedal at half-open. Higher settings shift the emphasized frequency upwards. | |
| Octave | |
| This effect adds a one-octave lower component to the original sound. Higher settings result in higher effect mix ratio. |
DRIVE module (distortion effects)
| DRIVE (Type) | |||
| Selects the effect type for the DRIVE module. | |||
| FD COMBO | UH | VX COMBO | |
| Sound of a Fender Twin Reverb ('65 model) favored by guitarists of many music styles. | Sound modeled on the Class A drive combo amp Vox AC30. | ||
| US BLUES | B | BG CRUNCH | |
| Crunch sound of a Fender Tweed Bassman. | Crunch sound of the Mesa Boogie MkIII combo amp. | ||
| HW STACK | HC | MS CRUNCH | |
| Sound of the legendary all-tube Hiwatt Custom 100 from Britain. | Crunch sound of the Marshall 1959 that has become legendary. | ||
| MS DRIVE | P | PV DRIVE | |
| High gain sound of the Marshall stack amp JCM2000. | High gain sound of a Peavey 5150 developed in cooperation with a world-famous hard rock guitarist. | ||
| DZ DRIVE | B | BG DRIVE | |
| High gain sound based on the channel 3 of the hand-made German guitar amp Diezel Herbert with three separately controllable channels. | High gain sound of the Mesa Boogie Dual Rectifier red channel (vintage mode). | ||
| OVER DRIVE | E5 | T SCREAM | |
| Sound of the Boss OD-1 that first created the "overdrive" concept. | Simulation of the often copied Ibanez TS808 used by many guitarists as a booster. | ||
| GOVERNOR | DP | DIST+ | |
| Sound of the Guv'nor distortion effect from Marshall. | Simulation of MXR distortion+ that made distortion popular worldwide. | ||
| Dist1 | S9 | SQUEAK | |
| Sound of the Boss distortion DS-1, a long-time favorite. | Simulation of the ProCo Rat famous for its edgy distortion sound. | ||
| FUZZ SMILE | G7 | GREAT MUFF | |
| Sound of the Fuzz Face that made rock history with its zany look and smashing sound. | Simulation of the Electro-Harmonix Big Muff preferred by famous artists for its fat, sweet fuzz sound. | ||
| METAL WORLD | H6 | HOT BOX | |
| Sound of the Boss Metal Zone with long sustain and dynamic lower midrange. | Simulation of the compact Matchless HotBox preamp with built-in tubes. | ||
| E0 | Z CLEAN | E0 | Z WILD |
| Zoom original flat clean sound. | High-gain sound with further boost in the overdrive. | ||
| E7 | Z MP1 | E6 | Z BOTTOM |
| Original sound that combines characteristics of the ADA MP1 and Marshall JCM800. | High-gain sound with pronounced low and mid range. | ||
| E9 | Z DREAM | E5 | Z SCREAM |
| High-gain sound for lead guitar based on the Lead channel of the Mesa Boogie Road King Series II. | Original high-gain sound with good balance from the low to high range. | ||
| E7 | Z NEOS | E0 | LEAD |
| Crunch sound modeled on a modified Vox AC30. | Smooth, bright distortion sound. | ||
| Ed | EXTREME DS | Ac | ACO.SIM (Acoustic Simulator) |
| High gain sound with the most powerful gain of any distortion effect in the world. | This effect makes an electric guitar sound like an acoustic guitar. | ||
| GAIN (Prm) | |||
| Sets the DRIVE module parameters. The parameter action differs, depending on whether a distortion effect type (Fd – Ed) or Aco.Sim (Ac) is selected. | |||
| When distortion effect type (Fd – Ed) is selected | |||
| GAIN | |||
| Adjusts the gain (distortion intensity). | |||
| When Ac is selected | |||
| TOP | |||
| Adjusts the characteristic string tone of acoustic guitar. | |||
- Manufacturer names and product names mentioned in this listing are trademarks or registered trademarks of their respective owners. The names are used only to illustrate sonic characteristics after which the effects are modeled and do not indicate any affiliation with ZOOM CORPORATION.
EQ module (equalizer)
| EQ LO (Prm) | EQ MID (Prm) | EQ HI (Prm) | ||
| Adjusts the LO band of the EQ module. | Adjusts the MID band of the EQ module. | Adjusts the HI band of the EQ module. | ||
| Lo | Mid | Hi | ||
| Adjusts the low range (160 Hz) boost/cut. | Adjusts the midrange (800 Hz) boost/cut. | Adjusts the high range (3.2 kHz) boost/cut. | ||
ZNR/AMP (ZNR/Amp Simulator) module
| ZNR/AMP | ZNR/AMP (Type&Prm) |
| This module combines ZOOM's proprietary ZNR (removes noise during play pauses without affecting sound quality) with an amp simulator (recreates the sound of various speaker cabinets). Type and parameters are adjusted at the same time. | |
| ZNR (ZOOM Noise Reduction) | |
| This is the noise reduction function only. Higher settings result in a stronger effect. Set the value as high as possible without causing the sound to be cut off unnaturally. | |
| COMBOS←COMS | Combo & ZNR |
| Combination of ZNR with amp simulator that recreates the sound of a combo amp with closed-back cabinet. The right-digit value controls ZNR sensitivity. | |
| COMBOS←COMS | Bright Combo & ZNR |
| Combination of ZNR with amp simulator that recreates the sound of a bright combo amp with open-back cabinet. The right-digit value controls ZNR sensitivity. | |
| COMBOS←COMS | Stack & ZNR |
| Combination of ZNR with amp simulator that recreates the sound of a stack amp cabinet. The right-digit value controls ZNR sensitivity. |
■ MODULATION module
| MODULATION (Type&Prm1) | MODULATION | ||
| Selects the MODULATION module effect type and controls parameter 1 at the same time. | Controls the value of parameter 2 of the MODULATION module. The parameter action differs, depending on the effect type. | ||
| Chorus | Rate | ||
| This effect mixes a variable pitch-shifted component to the original signal. Higher right-digit settings result in higher effect sound mixing ratio. | Adjusts the modulation rate. | ||
| Ensemble | |||
| This is a chorus ensemble with three-dimensional movement. Higher right-digit settings result in higher effect sound mixing ratio. | |||
| Flanger | Rate TAP | ||
| This effect produces a resonating and strongly undulating sound. Higher right-digit settings emphasize the characteristics of the effect. | Adjusts the modulation rate. | ||
| Step | |||
| Special effect that changes the sound in a staircase pattern. Higher right-digit settings emphasize the characteristics of the effect. | |||
| Pitch Shift | Shift | ||
| This effect shifts the pitch of the original sound up or down. Higher right-digit settings increase the mixing ratio of the effect sound. | Sets the pitch shift amount in semitones. "dt" results in a detune effect. | ||
| Mono Pitch | |||
| This is a monophonic pitch shifter (for single-note playing) with reduced flutter. Higher right-digit settings increase the mixing ratio of the effect sound. | |||
| HPS(Harmonized Pitch Shifter) | Key | ||
| This is an intelligent pitch shifter that automatically generates major scale harmonies according to a preset key. Higher right-digit settings increase the mixing ratio of the effect sound. | Specifies the tonic for the scale used for pitch shifting. The "o" symbol stands for#. |
| 1←9 | Vibrato | 1←50 | Rate TAP |
| This is an effect with automatic vibrato. Higher right-digit settings emphasize the vibrato intensity. | Adjusts the modulation rate. | ||
| 61←69 | Pitch Bend | 0←10 | Pedal Position |
| This effect allows using the expression pedal to change the pitch in real time. Right-digit settings select the pitch change type caused by the expression pedal (see Table 1). | Sets the initial value for the pitch shift amount (the value that is active when the pedal is at rest). The original sound/effect sound level balance also changes according to the parameter 1 setting. |
| [Table 1] | |||||
| Type&Prm1 | Prm2=0 | Prm2=1.0 | Type&Prm1 | Prm2=0 | Prm2=1.0 |
| Pedal fully raised (minimum) | Pedal fully depressed (maximum) | Pedal fully raised (minimum) | Pedal fully depressed (maximum) | ||
| b1 | 0 cent | +1 octave | b6 | -1 octave + original sound | +1 octave + original sound |
| b2 | 0 cent | +2 octaves | b7 | -700 cent + original sound | +500 cent + original sound |
| b3 | 0 cent | -100 cent | b8 | Doubling | Detune + original sound |
| b4 | 0 cent | -2 octaves | b9 | -∞(0Hz) + original sound | +1 octave + original sound |
| b5 | 0 cent | -∞ | |||
| Delay | Time (Delay Time) TAP |
| This is a delay with a maximum setting of 2000 msec. Higher right-digit settings increase the mixing ratio of the effect sound and the feedback amount. | Sets the delay time. In the 10-1000 millisecond range, the adjustment is performed in 10-msec steps (1-99, 1.0). Above 1 second, the adjustment is performed in 100-msec steps (1.1-2.0). |
| CombFilter | Frequency |
| This effect uses the comb filter characteristics generated by using fixed modulation on the flanger as an equalizer. Higher settings increase the mixing ratio of the effect sound. | Sets the frequency to be emphasized by the filter. Higher settings shift the emphasized frequency upwards. |
| Air | Size |
| This effect reproduces the ambience of a room, to create spatial depth. Higher settings increase the mixing ratio of the effect sound. | Sets the size of the simulated space. Higher settings values make the space bigger. |
| Phaser | Rate TAP |
| This effect produces sound with a pulsating character. The setting values change the type of sound. | Adjusts the modulation rate. |
■ DELAY module
| DELAY (Type&Prm1) | |
| Selects the DELAY module effect type and controls parameter 1 at the same time. | |
| Delay ≤ | |
| This is a delay with a maximum setting of 5000 msec. The right-digit setting values control the mixing ratio of the effect sound and the feedback amount. | |
| Tape Echo ≤ | |
| This effect simulates a tape echo with a long delay time of up to 5000 msec. The right-digit setting values control the mixing ratio of the effect sound and the feedback amount. | |
| Analog Delay | |
| This effect simulates an analog delay with a long delay time of up to 5000 msec. The right-digit setting values control the mixing ratio of the effect sound and the feedback amount. | |
| Ping Pong Delay | |
| This is a ping-pong type delay where the delay sound alternates between left and right. The right-digit setting values control the mixing ratio of the effect sound and the feedback amount. | |
| Reverse | |
| This is a special delay where the effect sounds as if playing in reverse. Maximum delay time is 2500 msec. Higher settings result in stronger effect sound. | |
| TIME (Prm2) | |
| Controls parameter 2 of the DELAY module. The setting range is different for the Reverse effect type and other effect types. | |
| When Delay - Ping Pong Delay is selected | |
| Time (Delay Time) TAP | |
| Sets the delay time. In the 10 - 1000 millisecond range, the adjustment is performed in 10-msec steps (1 - 99, 1.0). Above 1 second, the adjustment is performed in 100-msec steps (1.1 - 5.0). | |
| When Reverse is selected | |
| Time (Delay Time) TAP | |
| Sets the delay time. In the 10 - 1000 millisecond range, the adjustment is performed in 10-msec steps (10 - 99, 1.0). Above 1 second, the adjustment is performed in 100-msec steps (1.1 - 2.5). |
REVERB module
| REVERB (Type&Prm1) | |
| Selects the REVERB module effect type and controls parameter 1 at the same time. | |
| Hall | |
| This reverb effect simulates the acoustics of a concert hall. Higher right-digit settings increase the mixing ratio of the effect sound. | |
| Room | |
| This reverb effect simulates the acoustics of a room. Higher right-digit settings increase the mixing ratio of the effect sound. | |
| Spring | |
| This effect simulates a spring-type reverb. Higher right-digit settings increase the mixing ratio of the effect sound. | |
| Arena | |
| This reverb effect simulates the acoustics of a large venue such as a sports arena. Higher right-digit settings increase the mixing ratio of the effect sound. | |
| Tiled Room | |
| This reverb effect simulates the acoustics of a tiled room. Higher right-digit settings increase the mixing ratio of the effect sound. | |
| DECAY (Prm2) | |
| Controls parameter 2 of the REVERB module. This parameter is common to all effect types. | |
| Decay | |
| Adjusts the decay duration. |
Rhythm Function Preset Patterns
| # | Name | TimSig | # | Name | TimSig | # | Name | TimSig | # | Name | TimSig |
| 1 | 8beat 1 | 4/4 | 11 | METAL 2 | 4/4 | 21 | POP 3 | 4/4 | 31 | BALLAD 1 | 4/4 |
| 2 | 8beat 2 | 4/4 | 12 | THRASH | 4/4 | 22 | DANCE 1 | 4/4 | 32 | BALLAD 2 | 3/4 |
| 3 | 8beat 3 | 4/4 | 13 | PUNK | 4/4 | 23 | DANCE 2 | 4/4 | 33 | BLUES 1 | 4/4 |
| 4 | 8shuffle | 4/4 | 14 | DnB | 4/4 | 24 | DANCE 3 | 4/4 | 34 | BLUES 2 | 3/4 |
| 5 | 16beat 1 | 4/4 | 15 | FUNK 1 | 4/4 | 25 | DANCE 4 | 4/4 | 35 | JAZZ 1 | 4/4 |
| 6 | 16beat 2 | 4/4 | 16 | FUNK 2 | 4/4 | 26 | 3per4 | 3/4 | 36 | JAZZ 2 | 3/4 |
| 7 | 16shuffle | 4/4 | 17 | HIPHOP | 4/4 | 27 | 6per8 | 3/4 | 37 | METRO 3 | 3/4 |
| 8 | ROCK | 4/4 | 18 | R'nR | 4/4 | 28 | 5per4 1 | 5/4 | 38 | METRO 4 | 4/4 |
| 9 | HARD | 4/4 | 19 | POP 1 | 4/4 | 29 | 5per4 2 | 5/4 | 39 | METRO 5 | 5/4 |
| 10 | METAL 1 | 4/4 | 20 | POP 2 | 4/4 | 30 | LATIN | 4/4 | 40 | METRO |
Checking the G1u Version
Checking the G1u Software Version, perform the following steps.
- Turn power to the G1u on while holding down the [BANK UP·TAP] key and the [▲] foot switch.
The higher two digits of the current version are shown on the display.
- Press the [A] foot switch.
The lower two digits of the current version are shown on the display.
- Pressing either of the [] / [] foot switches causes the version display to go off, and the G1u restarts.
Detailed information about the latest software version can be found on the ZOOM web site: http://www.zoom.co.jp/
Troubleshooting
No power
Refer to "Turn power on" on page 6.
- Reverb effect does not operate
While a rhythm pattern is playing, the reverber effect is not available. Stop the rhythm pattern first ( p. 10).
- Delay effect does not operate
While the looping function is being used, the delay effect is not available. Stop the looping function first ( p.12)
- Patch switching does not change the
sound
Is the patch selection method of the G1u set to "pre-select" ( p. 18)? Turn power off and then on again to return to normal operation.
High level of noise
Is ZOOM AC adapter being used? Be sure to use only an adapter for 9VDC 300mA with center minus plug (ZOOM AD-0006).
Battery life is short
Are manganese batteries being used? Continuous operation time is about 10 hours with alkaline batteries.
| Effect types | 67 | Control input | For FP01/FP02 or FS01 |
| Effect modules | max. 8 simultaneous modules | ||
| Patch memory | User banks: 10 patches x 10 banks = 100 | USB interface | 16-bit PC interface (one line each for stereo record/play) |
| Preset banks: 10 patches x 10 banks = 100 | |||
| Total 200 patches | Sampling frequencies | 32 kHz, 44.1 kHz, 48 kHz | |
| Sampling frequency A/D converter | 96 kHz | Power requirements | |
| 24 bit 64 times oversampling | AC adapter | 9 V DC, 300 mA (center minus plug) (ZOOM AD-0006) | |
| D/A converter | 24 bit 128 times oversampling | ||
| Signal processing | 32 bit | Batteries | Four IEC R6 (size AA) batteries, approx. 10 hours continuous operation (alkaline batteries) |
| Frequency response | 20 Hz - 40 kHz +1.0 dB -4.0 dB (10-kilohm load) | ||
| Display | 2-digit 7-segment LED | USB bus power | |
| Input | Standard mono phone jack | Dimensions | 155 mm (D) x 136 mm (W) x 52 mm (H) |
| Rated input level | -20 dBm | ||
| Input impedance | 470 kilohms | Weight | 350 g (without batteries) |
| Output | Standard stereo phone jack (doubles as line/headphone jack) | Options | Expression pedal FP01/FP02 or Foot switch FS01 |
| Maximum output level | Line +3 dBm (output load impedance of 10 kilohms or more) | ||
| Phones 20 mW + 20 mW (into 32-ohm load) |
The FCC regulation warning (for U.S.A.)
This equipment has been tested and found to comply with the limits for a Class B digital device, pursuant to Part 15 of the FCC Rules. These limits are designed to provide reasonable protection against harmful interference in a residential installation. This equipment generates, uses, and can radiate radio frequency energy and, if not installed and used in accordance with the instructions, may cause harmful interference to radio communications. However, there is no guarantee that interference will not occur in a particular installation. If this equipment does cause harmful interference to radio or television reception, which can be determined by turning the equipment off and on, the user is encouraged to try to correct the interference by one or more of the following measures:
- Reorient or relocate the receiving antenna.
- Increase the separation between the equipment and receiver.
- Connect the equipment into an outlet on a circuit different from that to which the receiver is connected.
- Consult the dealer or an experienced radio/TV technician for help.
For EU Countries

Declaration of Conformity:
This product complies with the requirements of EMC Directive 2004/108/EG and Low Voltage Directive 2006/95/EC
Disposal of Old Electrical & Electronic Equipment (Applicable in European countries with separate collection systems)
This symbol on the product or on its packaging indicates that this product shall not be treated as household waste. Instead it shall be handed over to the applicable collection point for the recycling of electrical and electronic equipment. By ensuring this product is disposed of correctly, you will help prevent potential negative consequences for the environment and human health, which could otherwise be caused by inappropriate waste handling of this product. The recycling of materials will help to conserve natural resources. For more detailed information about recycling of this product, please contact your local city office, your household waste disposal service or the shop where you purchased the product.
GUITAR EFFECTS & USB AUDIO I/F PEDAL
61u
PATCH LIST
| PATCH NAME | COMMENT | ||
| A | 0 | ArenaLd | Sharp-edged high-gain lead sound using MS DRIVE with Delay and Arena reverb added. |
| 1 | OGRhythm | 70's British rock sound using MS CRUNCH and Booster. | |
| 2 | ChoCln | Great clean sound for Arpeggios. Using the Compressor, Chorus and Reverb gives a wide, fat tone with a nice attack. | |
| 3 | BigDuck | Auto wah sound using slightly distorted fullup FD COMBO plus Spring reverb. The tone responds to volume knob changes. | |
| 4 | JetFly | Combination sound of MS CRUNCH and Flanger. Great for chords or muted lower strings. | |
| 5 | MdrnPnk | Powerful modern punk sound. Great for rhythm tracks. | |
| 6 | TrickDly | Clean sound using two delays set for different delay times. | |
| 7 | PhaseCLN | Clean sound using FD COMBO and Phaser. Great for funk rhythm. | |
| 8 | LapStlD | Lap Steel modeled sound using FD COMBO and H.P.S. Great for slide parts. Set to key of D. | |
| 9 | WetWood | Acoustic guitar sound using chorus and reverb. Use with a single coil neck pickup for best results. | |
| B | 0 | MtlMtl | ZOOM's original Z BOTTOM metal sound with chorus. A wide, high-gain sound. Great for 80's metal. |
| 1 | VntgPnk | Punk crunch sound. This slightly distorted sound works great with Les Pauls and Telecasters. | |
| 2 | JazzWet | Fat clear jazz sound created by boosting the low end with EQ. Use a neck position humbucking pickup for the most authentic results. | |
| 3 | ChnkBluz | US BLUES crunch sound. This clear and bright sound is great for both blues rhythm playing and solos. | |
| 4 | RaGaRthm | Clean reggae sound with a nice high frequency attack. Made with Spring reverb and chorus. | |
| 5 | CompCln | Powerful compressed clean sound. | |
| 6 | ClscFuzz | Authentic Fuzz sound using GREAT MUFF and Compressor. A nice, even fuzz tone for all guitars. | |
| 7 | Church | Compressed clean sound with chorus and hall reverb. Great "cathedral sound" with open voiced chords. | |
| 8 | Niaga | Psychedelic 60's sound using Slow Attack and Reverse. | |
| 9 | DryWood | Dry acoustic guitar sound with a touch of ambience. Great for finger picking and chord strumming. Use with a single coil neck pickup for best results. | |
- The preset area of banks 0 - 9 contains the same patches as A - J.
- We recommend you to adjust the Noise Reduction parameter according to your guitars, amps and recording or performance situation.
Manufacturer names and product names mentioned in this patch list are trademarks or registered trademarks of their respective owners and do not indicate any affiliation with ZOOM CORPORATION.
All product and artist names are intended only to illustrate sonic characteristics that were used as reference in the development of this product.
| PATCH NAME | COMMENT | ||
| ARTIST C | 0 | LiverPL | Day Tripper intro style sound. VOX sound works with both single coil or humbuck- ing pickups. |
| 1 | JimiFuzz | The "Jimi" style fuzz sound. The pitch shifter adds an octave up to emulate an Octavia. | |
| 2 | ZepStd | Early Page "Zep style" recording sound. Bright and crunchy. | |
| 3 | EC LEAD | "Layla" style sound. Fender crunch, great with single coil pickups. | |
| 4 | Iomizm | "Paranoid" style sound. | |
| 5 | RitchStd | "Machine Head" style sound. | |
| 6 | BrianDrv | Uses the Z NEOS drive to make a May, "Queen" style sound. | |
| 7 | JB Boots | "Led Boots" intro style sound. Nice, warm echoes. | |
| 8 | 335 Solo | "Room 335" style sound. Sustained lead sound with a little bit of delay. | |
| 9 | EVH1959 | Early "EVH" style sound using Marshall 1959. Sounds best with humbucking pickups. | |
| ARTIST D | 0 | FineRose | "Crazy Train" style sound. Rhoads / Marshall 80's metal. |
| 1 | BS Riff | Rockabilly sound for "Rock This Town" style sound. This echoed tone responds to picking dynamics. | |
| 2 | Police | "Every Breath You Take" style sound. Great sound made by mixing chorus and delay. | |
| 3 | SRV | TS808 "SRV" style sound. Nice mids and sounds great with a Strat. | |
| 4 | SV DS1 | "Attitude Song" style sound. Utilizes DS1 metal sound. | |
| 5 | Lynchpin | "Kiss of Death" style sound. Metallic saturated sound for 80's style metal. | |
| 6 | SilkyJoe | "Surfing with the Alien" style sound. Edgy distortion sound with a touch of modula- tion. | |
| 7 | WizenDrv | "Into The Arena" style sound. Similar to MSG tone with the wah in the middle position. | |
| 8 | DeepSand | "Enter Sandman" style sound. Deep metal sound, great for heavy riffs. | |
| 9 | Carlos | Smooth "Carlos S" solo recording sound using the BG CRUNCH. | |
| MODELING E | 0 | FdComp | Fender Twin Reverb and compressor. Great for clean funk rhythm playing. |
| 1 | FullVx | Overdriven Vox AC30 with room reverb. The reverb adds a unique closed back like sound. | |
| 2 | TexasMan | Texas blues sound of a Fender Bassman on 10. The sound responds to the guitar's volume knob. Great for blues. | |
| 3 | BgLead | MESA/BOOGIE MKIII drive sound. Great for sustained leads. | |
| 4 | HwClean | Fat clean sound of HIWATT CUSTOM 100. Great rock clean sound. | |
| 5 | McCrunch | Marshall 1959 classic crunch sound. | |
| 6 | MdRhythm | Marshall JCM2000 rhythm sound. Heavy, but still classic Marshall sound. | |
| 7 | PvRhythm | Peavey 5150 rhythm sound. Great for metal rhythm. | |
| 8 | DzRhythm | Diezel Herbert heavy rhythm sound. Great for tuned down guitars. | |
| 9 | BdRhythm | MESA/BOOGIE Rectifier rhythm sound. Great for the progressive metal. | |
| MODELING F | 0 | FatOd | Natural overdriven sound using OD-1 and EQ. Great for both lead and rhythm. |
| 1 | TsDrive | Tube Screamer overdriven sound. Great for blues to rock. | |
| 2 | GvDrive | Guv'nor pedal hard rock sound. | |
| 3 | dist+ | MXR distortion+ drive sound. | |
| 4 | DS1 | DS-1 pedal sound modded with some extra low end. | |
| 5 | RAT | RAT pedal long sustained lead sound. | |
| 6 | FatFace | FUZZ FACE with added some low end. | |
| 7 | MuffDrv | BIG MUFF high gain sound. | |
| 8 | M World | Classic Metal Zone shred sound. | |
| 9 | HOT DRV | Mild drive sound made by a tube saturation feel. Even though it is hard driving but still has a strong core in the sound. | |
| ORIGINAL G | 0 | Z CLEAN | Crystal clean sound based on Z CLEAN with chorus and delay. Good for arpeggio playing. |
| 1 | Z WILD | ZOOM's original hard overdrive sound. Overdrive boost with compression. | |
| 2 | Z MP1 | A combination of ADA MP1 and Marshall JCM800. | |
| 3 | Z BOTTOM | ZOOM's original high gain sound. Rich depth in the midds and lows. Great for 80's metal. | |
| 4 | Z DREAM | ZOOM's original high gain sound. Great for 7 strings or drop tuned guitar. Great progressive metal sound. | |
| 5 | Z SCREAM | Well balanced tuning of ZOOM's original high gain sound. Sharp and cutting. | |
| 6 | Z NEOS | Modified VOX AC30 crunch sound. Responds well to the guitar's volume knob. | |
| 7 | LEAD | ZOOM's classic lead sound with strong mid-boost and long sustain. | |
| 8 | EXT DS | Super saturated distortion sound. Full and smooth. | |
| 9 | ACOSIM | Acoustic guitar simulator. Sounds best with single coil pickups in the neck position. | |
| PATCH NAME | COMMENT | ||
| SIMPLE H | 0 | Comprs | Single knob compressor. Turn up the sensitivity for that pumping effect. |
| 1 | Auto Wah | Auto Wah. Set sensitivity to work with rhythm or lead lines. | |
| 2 | Booster | Bright booster with punch and edge. | |
| 3 | Tremolo | Rich versatile tremolo for all styles. | |
| 4 | Ring Mod | Ring Modulator highlighting various harmonics. | |
| 5 | Slow | Slow Attack creating the effect of using a volume pedal. Works well with full chords or lead. | |
| 6 | PDLWah 1 | Vox Wah. Use the optional FP02 expression pedal to control. | |
| 7 | PDLWah 2 | Cry Wah. Use the optional FP02 expression pedal to control. | |
| 8 | Octave | Octave divider. Produces original note and one octave lower simultaneously. | |
| 9 | Chorus | Chorus. Warm, rich and appropriate for all styles. | |
| SIMPLE I | 0 | Ensemble | Chorus ensemble. Natural and transparent great for clean arpeggios. |
| 1 | Flanger | Short feedback delay, sweeping flanger pedal. | |
| 2 | Step | Adjustable step phaser. Effective with or without distortion. | |
| 3 | PitchSFT | Pitch shifter up or down to create 12 string guitar effect. | |
| 4 | MN Pitch | Mono pitch shifter for single note playing. | |
| 5 | H.P.S | Harmonized pitch shifter set to the key of C major. | |
| 6 | Vibrato | Automatic Vibrato sound. | |
| 7 | PitchBND | Pitch bend. Use the optional FP02 expression pedal to control the amount of bend. | |
| 8 | Air | Reverb creating an light spatial open effect. | |
| 9 | Phaser | Versatile phaser with four types to choose from. | |
| SIMPLE J | 0 | Delay | Adjustable delay. |
| 1 | TapeEcho | Echo effect that simulates tape delay. | |
| 2 | AnalgDLY | Simulated analog delay. | |
| 3 | PP Delay | Ping Pong delay. Stereo output switches delay between left and right. | |
| 4 | Reverse | Reverse delay creating a backwards effect. | |
| 5 | Hall | Concert hall reverb. Size controlled by Decay. | |
| 6 | Room | Room reverb. Natural sounding of a large room. | |
| 7 | Spring | Spring reverb. Simulation of reversals built into guitar amplifiers. | |
| 8 | Arena | Huge reverb creating a large concert hall or arena effect. | |
| 9 | TileRoom | Tiled wall reverb. Loud with lots of decay. | |
ZFX Tools is an application combining a number of useful functions. It includes a recorder that makes it easy to capture your instrument, a sound-coordinated rhythm machine that gives you a virtual drummer and bassist, an editor with an intuitive mouse-based interface, a librarian function for managing patches, and a precision tuner. In addition, a search function lets you download the latest patches or rhythms and access a vast assortment of preset patches and rhythm patterns. This Startup Guide explains how to install ZFX Tools on your computer. The steps for recording while playing rhythm patterns are also explained.
For Users of Windows Vista/XP
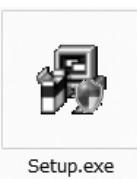
Insert the Install Disc and click on "ZFX Tools 1. * . * . * Setup.exe" in the "Windows" folder to start the installer.
2 Select the setup language and click [OK].
The installation wizard starts up. Click [Next] to begin the installation.
4 The "Software License Agreement" screen appears.
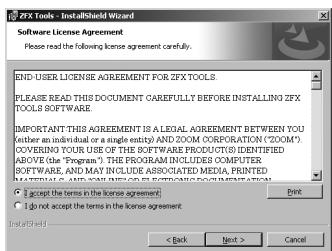
Read the agreement and check the "I accept the terms in the license agreement" radio button to confirm your acceptance of the agreement. Then click [Next].
A warning message appears.

Do not yet connect the USB cable at this point.
Select the installation target folder.
To accept the default installation target folder, click [Next]. To select a different folder, click [Change].
- If you do not want a shortcut to be created on the Desktop, remove the check mark from the box.
7 Click [Install] to start the installation.
ZFX Tools will be installed
Next, proceed to the installation of the driver software.
Driver Installation
The ZOOM G Series Audio Driver installation wizard appears
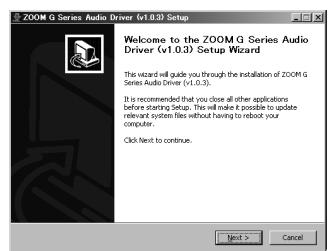
Click [Next].
- If the driver install wizard window is not visible, click on "ZOOM G Series Audio Driver" in the task bar.
2 License Agreement
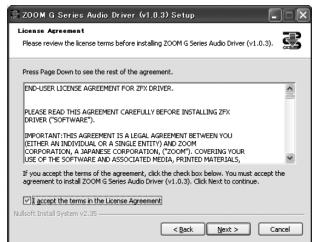
The License Agreement is displayed. Read the agreement and place a check mark in the "I accept the terms in the License Agreement" box to confirm your acceptance of the agreement. Then click [Next]
3 Choose Start Menu Folder
You can specify the destination folder where the shortcut to uninstall/repair the driver will be located. Normally, simply click [Install].
(4) Welcome to ZOOM Driver Setup!
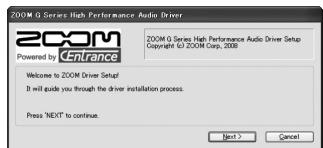
A dialog box such as shown here will appear three times Click [Next] every time to proceed.
If a software installation warning dialog box is shown, click [Continue].
If a Windows Security message indicating that the driver software publisher cannot be verified appears, click [Install this driver].
- In this case, the message "ZOOM G Series Audio Driver (Not Responding)" may appear, but this is not a problem. Wait until the driver responds.
(5) Please plug in the device now
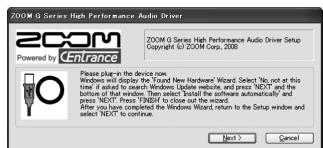
When the "Please plug in the device now" dialog box appears, connect the unit and the computer with the USB cable and click [Next].
(6) Standard driver installation
When you connect the unit to the computer, a dialog box for installing the standard driver appears.
- When using Windows XP
When the message "Welcome to the Hardware Update Wizard" appears, select "Install the software automatically" and click [Next] to complete the process.
- When using Windows Vista
Select "Locate and install driver software" and click [Continue] to complete the process.
When the installation of the standard driver for your operating system has completed, return to "ZOOM G Series Audio Driver" and click [Next].
7 ZOOM G Series Audio Driver installation
If a warning message to confirm Hardware installation appears, click [Continue Anyway].
Click [Finish] to complete the installation
For Users of MacOS X
Insert the Install Disc and click on"ZFX Tools 1. * . * . * Setup.mpkg" in the "MacOS X" folder to start the installer.
- Before the Installer starts, a dialog box may be displayed. Click [Continue].
The Installer starts, and the "Introduction" screen appears. Click [Continue].
The "Software License Agreement" screen appears. Read the information carefully and then click [Continue].
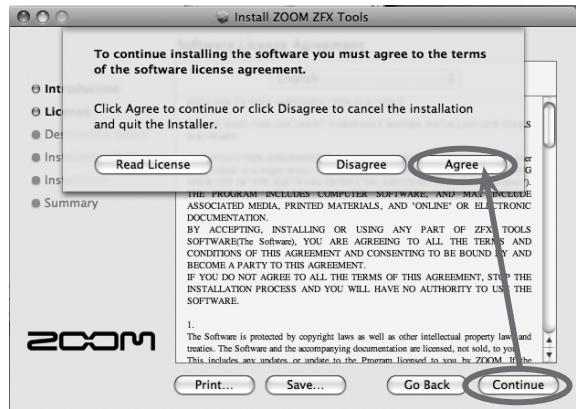
- When you click [Continue], a confirmation dialog box appears. Click [Agree] to continue.
4 The "Installation Destination" screen appears. Click [Continue].

-
The installation destination for ZFX Tools cannot be changed.
-
This screen appears only under OS X 10.4, not under OS X 10.5.
The ZFX Tools "Standard Installation" screen appears. Click [Install].

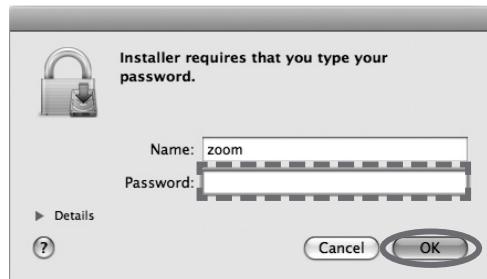
The password entry dialog box appears. Enter the name and password of a user with administrator privileges, and click [OK].
- When you click [OK], the installation confirmation dialog box appears again. Click [Continue installation].
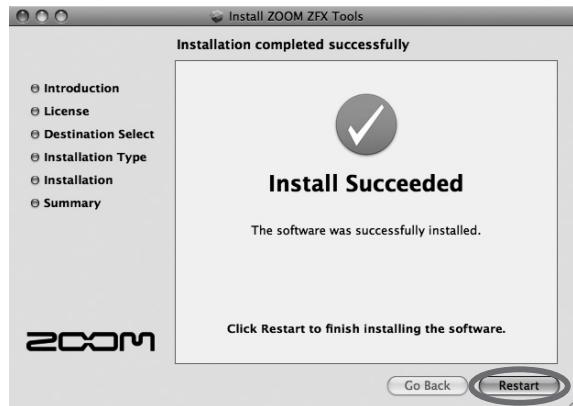
7 Click [Restart] to complete the installation.
Installation precautions
- You must have Administrator privileges to install the software. If your user level does not provide this, please contact your system administrator.
- Before starting the installation, shut down all other applications.
- Before starting the installation, disconnect the USB cable between the G1u and the computer.
- When installation is complete, a restart of the computer may be necessary.
Startup
Connect the G1u to the computer
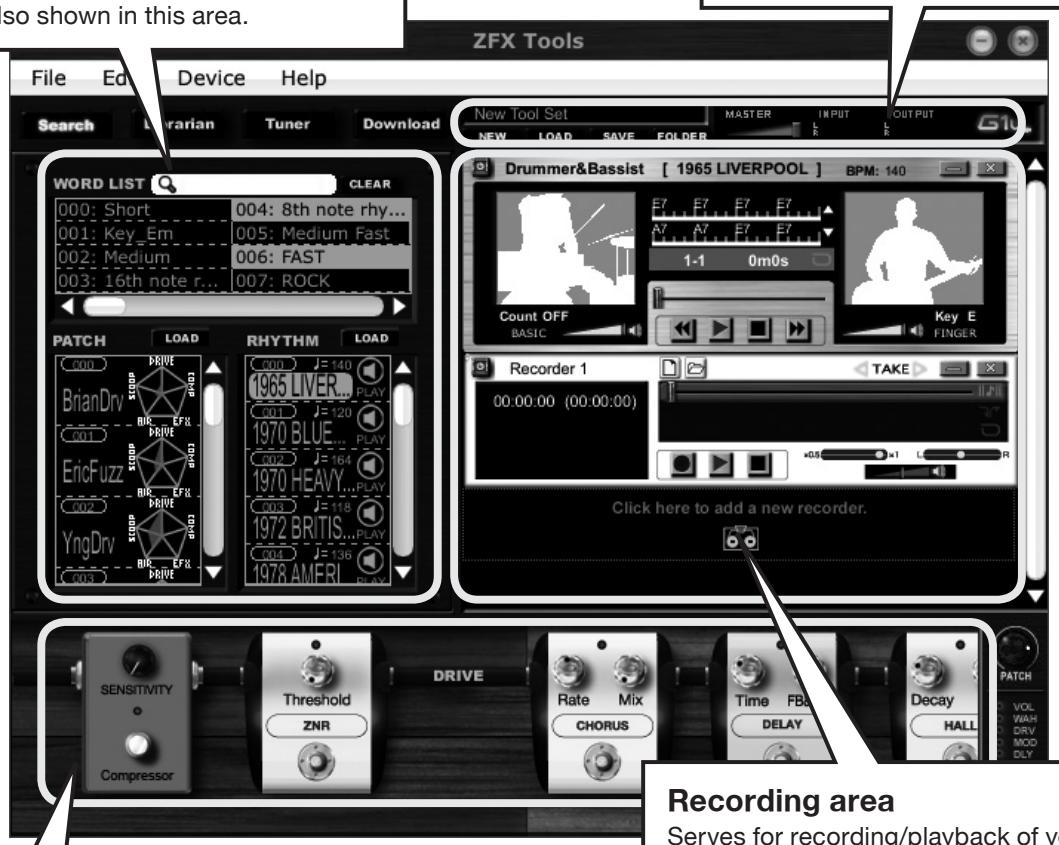
When you connect the G1u to the computer, ZFX Tools starts up automatically, and the main screen such as shown below appears.
If ZFX Tools does not start automatically, you can start the application as follows.
- Windows: Double-click the "ZFX Tools" shortcut that was created on the Desktop.
- MacOS X: Open the "Applications" folder and then the "ZFX Tools" folder, and double-click "ZFX Tools.app".
Search & Librarian area
Serves for patch and rhythm management, searching, downloading and other functions. The tuner is also shown in this area.
Tool Set area
Serves for managing settings for the various functions of ZFX Tools as "Tool Sets". The master level is also adjusted here.
Main screen
Editor area
Serves for editing the currently selected patch.
Recording area
Serves for recording/playback of your instrument, rhythm playback etc.
For details on each area, please refer to the PDF Manual.
Recording an Instrument
Use the search function to find a patch and rhythm pattern

Click the [Search] button to bring up the search screen.


You can use word search to find sound settings by association. For example, if you enter "Rock" in the search field, results such as shown below will appear.
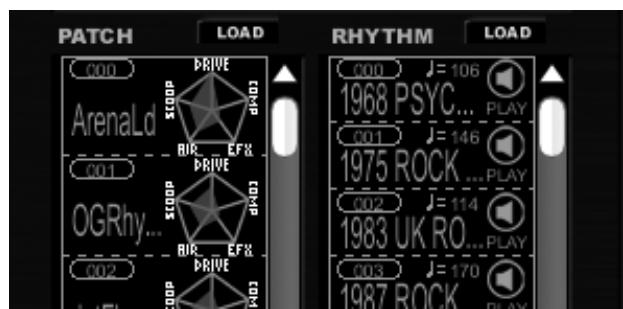
Select a patch

Next to the patch name, a "sound chart" indicates the sound character of the patch. Use this as reference when selecting patches.
When you have decided on the patch to use for recording, click the [LOAD] button to load the patch into the Glu.
3 Select a rhythm pattern
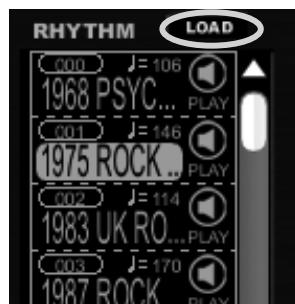
By clicking the [PREVIEW] icon, you can check how the rhythm pattern sounds.
When you have decided on the rhythm pattern to use for recording, click the [LOAD] button to load the rhythm into the rhythm machine.
Start to record
Click the [Record] button and then the [Play] button in the Recording area to start recording while playing the selected rhythm pattern as a backing.

(1) [Record] button
(2) [Play] button
Check the result
When you have finished recording, click the [Play] button to check the result.
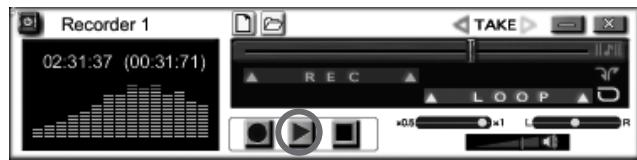
Starting over
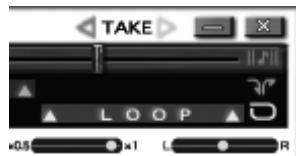
When you click the left-pointing arrow next to the [TAKE] icon, the recorder returns to the condition before the current recording.
Save the result
When you are satisfied with the recording, save the Tool Set. Clicking the [SAVE] button in the Tool Set area saves the current recorder settings, rhythm machine settings, and edited effect information as a Tool Set.

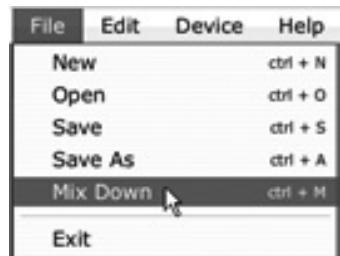
Saving as audio data
Open the File menu and select "Mix Down". The recorded instrument sound and the rhythm sound will be mixed and saved as audio data.
Operating environment
Windows XP (SP2) or later / Windows Vista or later Pentium 4 1.4 GHz or higher / Athlon XP or higher 512 MB RAM (1 GB or more recommended)
1024 x 600 or better screen resolution
USB 1.1 or 2.0 compatible port
64-bit operating systems are not supported
* Do not use a USB hub.
Mac OS X 10.4.6 or later / 10.5 or later
Intel Core Duo processor 1.66 GHz or higher (Intel Mac only)
512 MB RAM (1 GB or more recommended)
1024 x 600 or better monitor resolution
USB 1.1 or 2.0 compatible port
* Do not use a USB hub.
Trademark information
- Microsoft, Windows XP and Windows Vista are registered trademarks of Microsoft Corporation in the U.S.A. and in other countries.
- Mac, the Mac Logo, Mac OS, and Apple are registered trademarks of Apple Inc. in the U.S.A. and in other countries.
-
Intel, Pentium, and Core are registered trademarks of Intel Corporation.
-
AMD and Athlon are registered trademarks of Advanced Micro Devices, Inc.
- All other trademarks, product names, and company names are the property of their respective owners.
- Trademarks and registered trademarks mentioned in this document are used only to indicate sonic characteristics and do not indicate any affiliation with ZOOM Corporation.
For support, contact:

ZOOM CORPORATION
ITOHPIA Iwamotocho 2chome Bldg. 2F, 2-11-2, Iwamoto-cho,
Chiyoda-ku, Tokyo 101-0032, Japan
Web Site: http://wwwzoomo.co.jp/
Planning and development by:

SONICWARE Ltd.
2-26-17 Higashi-ikebukuro,
Toshima-ku, Tokyo 170-0013, Japan
Web Site: http://www.sonicware.jp/
This guide explains how to install Ableton Live Lite 7 ZOOM Edition (hereafter simply called "Live Lite 7") on a computer, make connections and settings for this unit and record.
Live Lite 7 installation
Connections and preparation
Using Live Lite 7 to record
Windows Vista/XP
To connect this unit to a computer running Windows Vista (or Windows XP) and to enable audio input/output, perform the following steps. The installation description uses Windows Vista as an example.

Insert the supplied Installation Disc (DVD-ROM) into the DVD drive of the computer, navigate to the "Windows" folder, and execute "G-Series_ASIO.exe" to install the driver.
When the contents of the DVD-ROM are shown, open the "Windows" folder and use "G-Series_ASIO.exe" to start the installation process.

HINT
If ZFX Tools are already installed, there is no need to perform the driver installation steps.

Install Live Lite 7.
To install Live Lite 7, insert the Installation Disc and click on "Setup.exe" of the "ableton_live_7017zoom_win" in the "Windows" folder.

Connect G1u to the computer using a USB cable.
NOTE
- If the ZFX Tools are installed, the tools application will start up when you connect the USB cable. To use Live Lite 7, you should first terminate ZFX Tools.
- Use a high-quality USB cable and keep the connection as short as possible. If USB bus power is supplied to this unit via a USB cable that is more than 3 meters in length, the low voltage warning indication may appear.

Bring up the "Sound" window from the Control Panel and select the input device setting for the computer.
To bring up the "Sound" window, select "Control Panel" from the Start menu, click "Hardware and Sound", and then click "Sound".
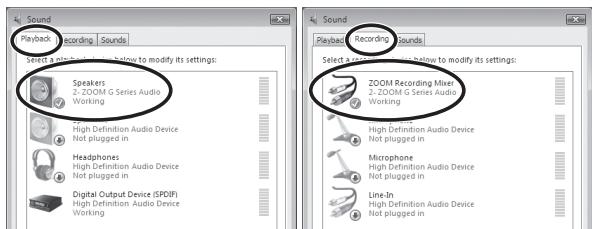
In the "Sound" window, verify that "G Series Audio" is listed under playback/recording devices, and that the entry is checked. (To switch between playback and recording devices, click the tabs at the top of the window.)
If "G Series Audio" is not shown with a check mark, right-click on the icon for the device and click "Set Default" so that a check mark appears.

Start Live Lite 7. Then access the "Options" menu, select "Preferences", and make the settings for the Audio Device.
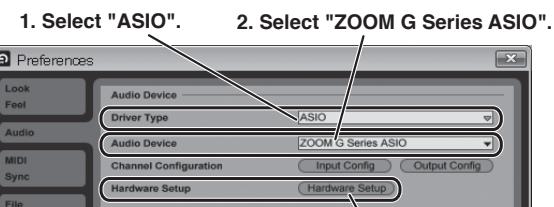
The latency should be set to a value that is as low as possible without causing sound dropouts during recording and playback.
When the setting is complete, close the respective windows.
HINT
During initial startup, a prompt for entering the serial number will appear. The number can be found on the supplied "Upgrade & Unlock Card".
NOTE
- To perform the online unlocking procedure, the computer must be connected to the Internet.
- If the computer is not connected to the Internet, the program can only be used as a trial version.
Live Lite 7 installation
Connections and preparation
Using Live Lite 7 to record
Live Lite 7 installation
Connections and preparation
Using Live Lite 7 to record
Mac OS X
To connect this unit to a computer running Mac OSX and to enable audio input/output, perform the following steps.

Insert the supplied Installation Disc (DVD-ROM) into the DVD drive of the Macintosh computer.
The contents of the DVD-ROM appear automatically. If nothing happens when you insert the DVD-ROM, double-click the "Installation Disc" icon shown on the desktop.

Install Live Lite 7.
To install Live Lite 7, insert the Installation Disc and click on "ableton_live_7017_zoom_mac pkg" in the "MacOS X" folder.

ableton_live_7017_zoom mac.pkg
If another device is selected, use the pull-down menu to change the selection to "USB Audio CODEC".
When the setting is complete, close Audio MIDI Setup.

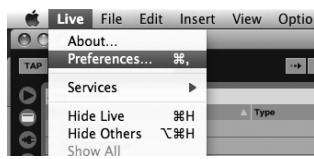
Start Live Lite 7. From the "Live" menu, select "Preferences" and then make the settings for the Audio Device.

Connect G1u to the computer using a USB cable.
NOTE
- If the ZFX Tools are installed, the tools application will start up when you connect the USB cable. To use Live Lite 7, you should first terminate ZFX Tools.
- Use a high-quality USB cable and keep the connection as short as possible. If USB bus power is supplied to this unit via a USB cable that is more than 3 meters in length, the low voltage warning indication may appear.

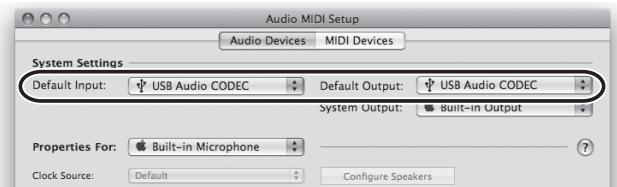
From the "Applications" folder, open the "Utilities" folder and double-click on "Audio MIDI Setup".
The "Audio MIDI Setup" screen appears. Click on "Audio Devices" and verify that "USB Audio CODEC" is selected as Default Input and Default Output.
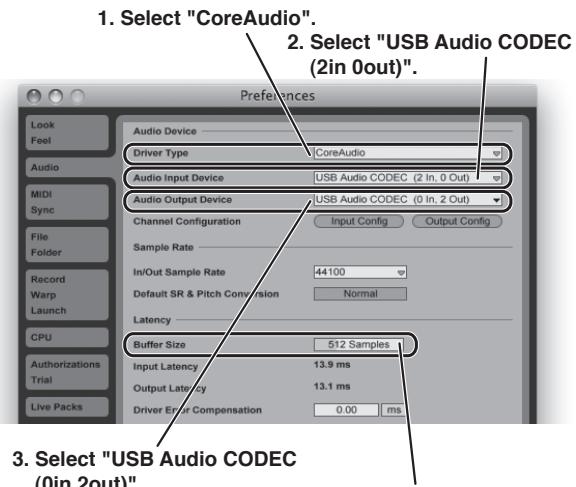
You can adjust latency by changing the buffer size.
The latency should be set to a value that is as low as possible without causing sound dropouts during recording and playback.
When the setting is complete, close the window.
HINT
During initial startup, a prompt for entering the serial number will appear. The number can be found on the supplied "Upgrade & Unlock Card".
NOTE
- To perform the online unlocking procedure, the computer must be connected to the Internet.
- If the computer is not connected to the Internet, the program can only be used as a trial version.
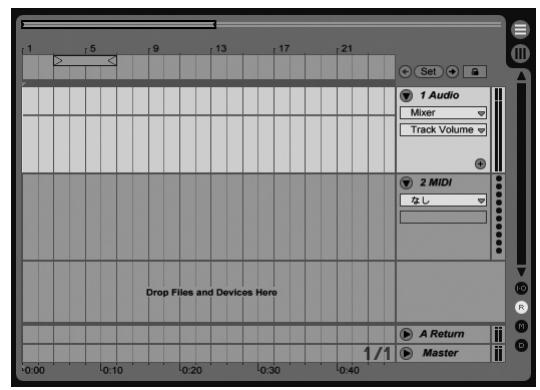
From the "File" menu of Live Lite 7, select "New Live Set".
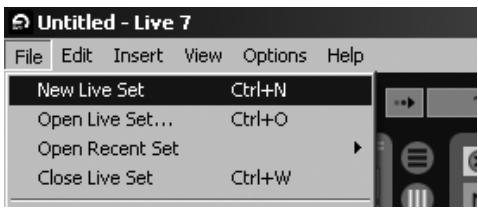
When you execute "New Live Set", the following Live Set is created.
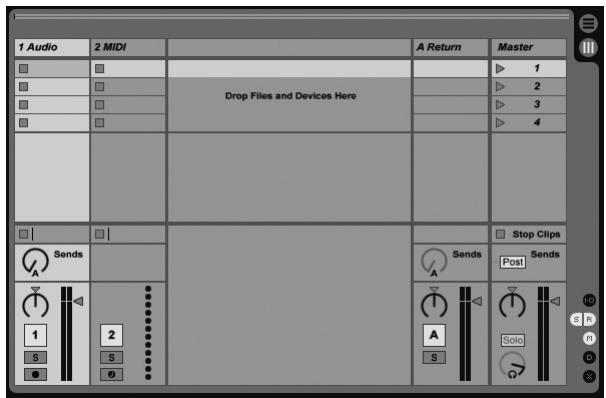
Session View
HINT
To add a track, right-click in the "Clip/Devices Drop Area" and use the menu that appears.
NOTE
There are two views for the Live Set: Session View and Arrangement View. The initial setting is Session View. This view serves as a scratch pad for music, letting you freely improvise and arrange ideas.
7 Connect the guitar to the Input jack of the G1u and select an effect patch.
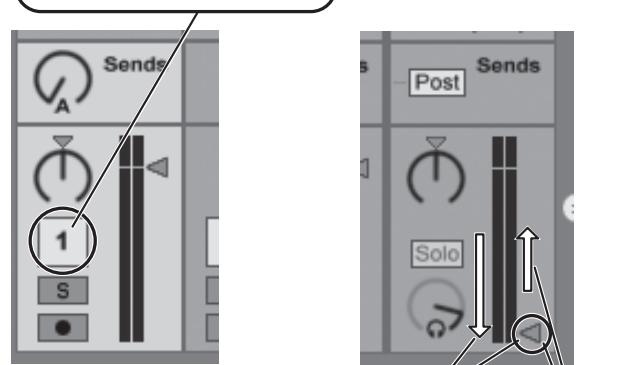
Click the Arm button of the track on which you want to record so that the track is ready to record.
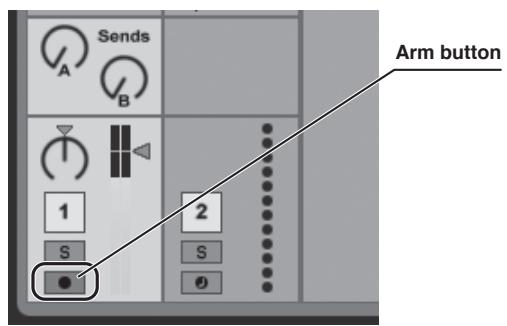
Adjust the track recording level while playing your instrument.
To obtain the optimum recording level, turn up the master volume control on the Glu until just before the level meter registers in red.
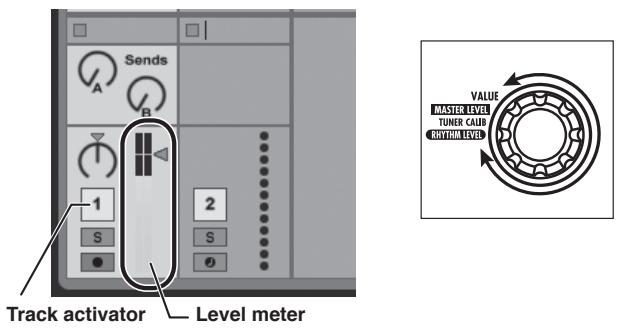
When the recording level setting is complete, turn the track activator off.
The level meter is now shown in gray and the signal returned to the Glu via the computer is muted.
NOTE
If the track activator is on, the G1u output and the monitoring signal of the computer will be output simultaneously, which may cause a flanger-like effect in the sound.
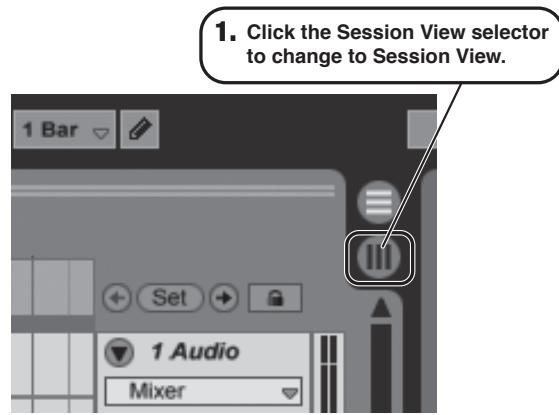
Click the Arrangement View selector to switch to Arrangement View.
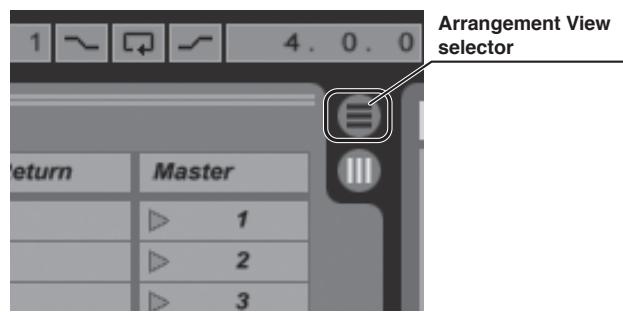
- Clicking on the Arrangement View selector switches from Session View to Arrangement View.
Arrangement View
NOTE
The Arrangement View lets you perform general recording, arranging, editing and other tasks on a timeline.
To start recording, first click the Record button to set the application to the recording standby mode. You can then start recording by clicking the Play button.

Check the recorded content.
To play the recording, perform the following steps.
- Turn the track activator on.
-
Move the master channel fader down.
-
Raise the fader to obtain a suitable volume.
-
Double-click the Stop button to move the song position to the beginning.

5. Click the Play button to start playback of the recorded content.
Using the application together with ZFX Tools
To access the ZFX Tools Editor and Librarian functions while using Live Lite 7, proceed as follows.

Start ZFX Tools first.

Access "Connect" from the menu and cancel the connect setting of ZFX Tools and the G1u.
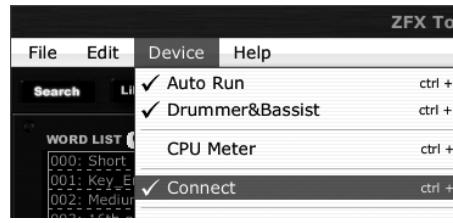
HINT
Leave the USB cable connected.

While ZFX Tools is running, start Live Lite 7.
NOTE
There is no need to change any settings in Live Lite 7.
For optimum performance
While using Live Lite 7, other applications may sometimes slow down notably or become unstable.
If this happens frequently, consider taking the following steps to optimize the operation conditions for Live Lite 7.

Shut down other applications besides Live Lite 7.
In particular, check for resident software and other utilities.

Reduce the number of plug-ins (effects, instruments) used by Live Lite 7.
When there is a high number of plug-ins, the computer's processing power may not be able to keep up. Reducing the number of tracks for simultaneous playback can also be helpful.
If applications still run very slowly or the computer itself does not function properly, disconnect the Glu from the computer and shut down Live Lite 7. Then reconnect the USB cable and start Live Lite 7 again.
Trademark information
- Microsoft, Windows XP and Windows Vista are registered trademarks of Microsoft Corporation in the U.S.A. and in other countries.
- Mac OS and Core Audio are registered trademarks of Apple Inc. in the U.S.A. and in other countries.
- Ableton and Ableton Live are registered trademarks of Ableton AG.
- ASIO is a registered trademark of Steinberg Soft- and Hardware GmbH.
- MIDI is a registered trademark of the AMEI (Association of Musical Electronics Industry).
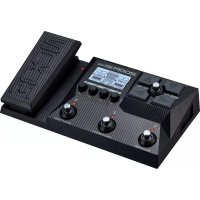
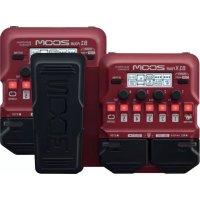
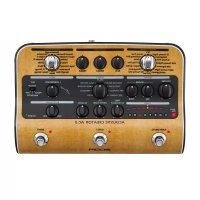
- GUITAR EFFECTS & USB AUDIO I/F PEDAL
- 61u.
- Operation Manual
- 200
- SAFETY PRECAUTIONS / Usage Precautions
- SAFETY PRECAUTIONS
- Power requirements
- [AC adapter operation]
- [Battery operation]
- Environment
- Handling
- Connecting cables and input and output jacks
- Alterations
- Volume
- Usage Precautions
- Electrical interference
- Cleaning
- Terms Used in This Manual
- - Effect module
- - Effect type
- Effect parameter
- Patch
- Bank
- Mode
- Operating the G1u on batteries
- Controls and Functions / Connections
- Selecting a Patch for Playing (Play Mode)
- Turn power on
- When using the unit on batteries
- When using the unit with an AC adapter
- Set the G1u to play mode
- Select a patch
- Directly switch a bank
- Adjust the master level
- Using the Tuner
- Switch to bypass or mute
- Patch change at bypass/mute
- Tune your instrument
- Adjusting the reference pitch of the tuner
- Return to play mode
- Using the Rhythm Function (Rhythm Mode)
- Select rhythm mode
- Start the rhythm function
- Select a rhythm pattern
- Adjust the rhythm volume
- Adjust the tempo
- Stop the rhythm
- Using the Looping Function (Looping Mode)
- Select looping mode
- Select the recording method
- Record/play a phrase
- Overdub a phrase
- Clear the recorded content
- Editing a Patch (Edit Mode)
- Select the effect module/parameter
- Change the setting
- To switch an effect module on and off
- Terminate the edit mode
- Storing/Copying Patches (Store Mode)
- In play mode or edit mode, press the [STORE] key
- Select the store/copy target bank and patch number
- Press the [STORE] key once more
- Restoring Factory Defaults
- Changing the Way Patches Are Called Up
- Using a Foot Switch or Pedal
- Using a foot switch
- Using an expression pedal
- 5.Save the patch.
- In play mode, select the patch and operate the expression pedal.
- Using the G1u as an Audio Interface
- Compatible operating systems
- Quantization
- Sampling frequencies
- About ZFX Tools
- Effect Types and Parameters
- Explanation of symbols
- - Module selector
- - Expression pedal
- - Tap
- PATCH LEVEL
- PATCH LEVEL (Prm)
- COMP/EFX (Compressor/Special Effects) module
- COMP/EFX (Type&Prm)
- Compressor
- Auto Wah
- Booster
- Tremolo
- RingMod (Ring Modulator)
- Slow Attack
- Rhythm Function Preset Patterns
- Checking the G1u Version
- Troubleshooting
- The FCC regulation warning (for U.S.A.)
- For EU Countries
- Disposal of Old Electrical & Electronic Equipment (Applicable in European countries with separate collection systems)
- 61u
- PATCH LIST
- For Users of Windows Vista/XP
- Driver Installation
- License Agreement
- For Users of MacOS X
- Installation precautions
- Startup
- Search & Librarian area
- Tool Set area
- Editor area
- Recording area
- Recording an Instrument
- Use the search function to find a patch and rhythm pattern
- Select a rhythm pattern
- Start to record
- Check the result
- Save the result
- Operating environment
- Trademark information
- For support, contact:
- ZOOM CORPORATION
- Planning and development by:
- SONICWARE Ltd.
- Live Lite 7 installation
- Connections and preparation
- Using Live Lite 7 to record
- Windows Vista/XP
- HINT
- Install Live Lite 7.
- Connect G1u to the computer using a USB cable.
- NOTE
- Mac OS X
- Using the application together with ZFX Tools
- For optimum performance
Marque : ZOOM
Modèle : G1U
Catégorie : Pédale d'effets pour guitare