
ELECTRAMAC 340 SCHUKO WSS - Tronçonneuse électrique MCCULLOCH - Notice d'utilisation et mode d'emploi gratuit
Retrouvez gratuitement la notice de l'appareil ELECTRAMAC 340 SCHUKO WSS MCCULLOCH au format PDF.

| Type de produit | Tronçonneuse électrique |
| Marque | MCCULLOCH |
| Modèle | ELECTRAMAC 340 SCHUKO WSS |
| Poids | 3,5 kg |
| Longueur du guide-chaîne | 40 cm (16 pouces) |
| Pas de chaîne | 3/8 pouce |
| Capacité du réservoir d'huile | 150 cm³ |
| Tension nominale | 230 V |
| Fréquence | 50 Hz |
| Puissance nominale | 2200 W |
| Indice de protection | IP20 |
| Double isolation | Oui |
| Niveau de puissance acoustique garanti | 104 dB(A) |
| Niveau de pression acoustique à l'oreille | 94 dB(A) |
| Vibration (poignée avant) | 1,96 m/s² |
| Vibration (poignée arrière) | 7,30 m/s² |
| Frein de chaîne | Oui |
| Blocage de sécurité | Oui |
| Lubrification automatique | Oui |
| Type de chaîne | MPG370GLX |
| Longueur maximale du guide | 400 mm |
| Section minimale du câble | 2 × 1 mm² |
| Longueur maximale du câble | 30 m |
FOIRE AUX QUESTIONS - ELECTRAMAC 340 SCHUKO WSS MCCULLOCH
Questions des utilisateurs sur ELECTRAMAC 340 SCHUKO WSS MCCULLOCH
0 question sur cet appareil. Repondez a celles que vous connaissez ou posez la votre.
Poser une nouvelle question sur cet appareil
Téléchargez la notice de votre Tronçonneuse électrique au format PDF gratuitement ! Retrouvez votre notice ELECTRAMAC 340 SCHUKO WSS - MCCULLOCH et reprennez votre appareil électronique en main. Sur cette page sont publiés tous les documents nécessaires à l'utilisation de votre appareil ELECTRAMAC 340 SCHUKO WSS de la marque MCCULLOCH.
MODE D'EMPLOI ELECTRAMAC 340 SCHUKO WSS MCCULLOCH
natural_image
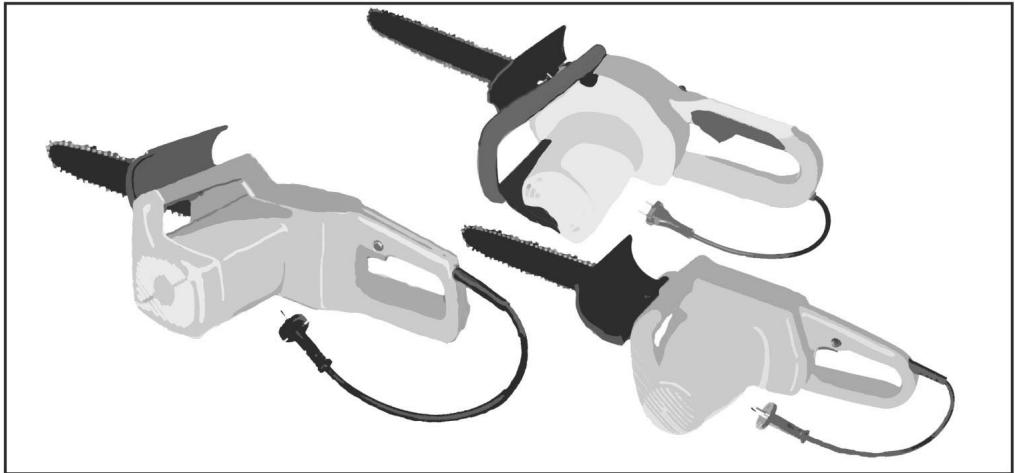
Illustration of two electric shaver tools with black and gray components, shown from different angles (no text or symbols)| GB | INSTRUCTION MANUALIMPORTANT INFORMATION: Please read these instructions carefully and make sure you understand them before using this unit. Retain these instructions for future reference. | IT | LIBRETTO D'ISTRUZIONIINFORMAZIONI IMPORTANTI: Leggere le istruzioni attentamente e capirle bene prima di usare l'utensile. Conservare per ulteriore consultazione. |
| DE | BETRIEBSANWEISUNG WICHTIGE INFORMATION: Lesen Sie diese Hinweise zur Handha-bung des Geräts aufmerksam durch. Verwenden Sie es erst, wenn Sie sicher sind, daß Sie alle Anweisungen verstanden haben und gut aufbewahren. | HU | HASZNÁLATI ÚTMUTATÓJótállást vállalni csak rendeltetésszerüen használatba vett gépekre tudunk. Kérj ü hogy a gép használatba vétele előtt gondosan olvassa el a kezelési autitásokat. |
| FR | MANUEL D'INSTRUCTIONSRENSEIGNEMENTS IMPORTANTS: Avant d'utiliser cet appareil, veuillez lire atentivement les instructions et assurez-vous de les avoir comprises. Conservez les instructions pour référence ultérieure. | GR | ΕΓΧΕΙΡΙΔΙΟ ΧΕΙΡΙΣΜΟΕΣΗΜΑΝΤΙΚΕΣ ΠΛΗΡΟΦΟΡΙΕΣ: Διαβάστε προσεχτιχά αντές τις οδηγίες και Φροντιστε να τις κατανοήσετε αντό το μηχάνημα και Φιλάζτε το για να το συμβουλευεστε στο μέλλον. |
| NL | HANDLEIDINGBELANGRIJKE IMPORTANTS: Lees deze handleiding aandachtig en zorg dat u ailes begrijpt alvorens de kettingzaag te gebruiken en be-waar ze voor toekomstige raadpleging. | CZ | NAVOD K POUŽIVANDUŁEZITA INFORMACE: Než začnete stroj používat přečtete si prosím velmi pozorně tyto instrukce a ujištete se, že jste jim porozuméli. Uschovejte si tento návod pro použití i v budóucnu. |
| NO | BRUKERHÄNDBOKVIKTIG INFORMATIONJON: Les disse anvisningene nøye og forsikre deg om at du forstår dem før du bruker enheten og oppbevar dem for sen-ere bruk. | PL | INSTRUKCJA OBSUUGI Gwarancja traci waynoúå w przypadku uýywania urządzenia do celów innych niý wymienione w instrukcji obsuugi. Prosímy o uwayne przeczytanie instrukcji oraz o stoowanie siae do zaleceň i wskazówek w niej zawartych. |
| FI | OHJEKIRJATÁRKEÄÄ TIETOA: Lue nämä ohjeet huolellisesti ja varmista, että olet ymmärtänyt ne, ennen kuin alat kayttää tata laitetta ja säilytä myohempää tarvetta varten. | SK | NAVOD NA OBSLUHUDOŁEZITA INFORMÁCIA: Pred použitím stroja si starostlivo preëitajte tento návod na obsluhu a uistite sa že ste mu dökladne porozumeli. Návod starostlivo uschovajte pre potrebu v budúcnosti. |
| SE | BRUKSANVISNINGVIKTIG INFORMATION: Läs instruktionerna noggrant och försäkra dig om att du förstår dem innan du använder utrustningen och spara dem för framtida behov. | RU | PABOЧИЕ ИНСТРУКЦИИВАЖНЫЕ СВЕДЕНИЯ: Внимательно прочитать и понять инструкции перед использованием оборудования. Хранить инструкции для дальнейших консультаций. |
| DK | BRUGERHÄNDBOGVICTIGE OPLYSNINGER: Læs instruktionerne omhyggeligt, før du bruger enheden og gemme til senere henvisning. | EE | KASUTUSJUHENDTAHTIS INFORMATSIOON: Lugege kasutusjuhend enne seadme kasutamist kindlasti põhjalikult läbi ning veenduge, et olete köigest täpselt aru saanud. |
| ES | MANUAL DE INSTRUCCIONESINFORMACIÓN IMPORTANTE: Lea atentamente las instrucciones y asegúrese de entenderlas antes de utilizar esta aparato. Conserve las instrucciones para la referencia en el futuro. | LV | ROKASGRÄMATSVARIGA INFORMÂCIJA: Pirms ierices izmantoðanas uzmanîgi izlasiet rokasgrâmatu un pärliecinieties, ka jüs labi saprotat tãs saturu. Saglabâjiet rokasgrâmatu, lai nâkotnç bûtu iespcjams atsvaidzinât jüsu zinâðanas. |
| PT | MANUAL DO OPERADORINFORMAÇÕES IMPORTANTES: Queira ler cuidadosamente estas instruções e tenha certeza de entendê las antes de usar a serra e guarde para consulta futura. | TR | KULLANMA KYLAVUZUÖNEMLİ TALİMATLAR: Buradaki bilgileri dikkatlice okuyunuz ve aleti kullanmaya başlamadan önce tüm talimatların tarafinizdan anlaşılmış olduğundan emin olunuz. Gerektiği zaman başvurabilmeniz için saklayiniz. |
Electrolux Outdoor Products
Via Como 72
23868 Valmadrera (Lecco)
ITALIA
Phone +39 0341 203111 - Fax +39 0341 581671
www.electrolux.com
Our policy of continuous improvement means that the specification of products may be altered from time to time without prior notice.
Electrolux Outdoor Products manufacture products for a number of well known brands under various registered patents, designs and
trademarks in several countries.
© Electrolux Outdoor Products

The Electrolux Group. The world's No.1 choice.
The Electrolux Group is the world's largest producer of powered appliances for kitchen, cleaning and outdoor use. More than 55 million
Electrolux Group products (such as refrigerators, cookers, washing machines, vacuum cleaners, chain saws and lawn mowers) are
sold each year to a value of approx. USD 14 billion in more than 150 countries around the world.

2
3
4
natural_image
Illustration of a hand operating a wooden post with tools (no text or symbols)H
flowchart
graph TD
    A["Step 5: Pump with flow"] --> B["Step 6: Valve with internal component"]
    B --> C["Step 7: Truck with valve and ramp"]
    style A fill:#f9f,stroke:#333
    style B fill:#ccf,stroke:#333
    style C fill:#cfc,stroke:#333


natural_image
Illustration of a person in protective gear holding a long tool, no text or symbols present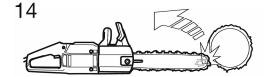

natural_image
Mechanical assembly diagrams showing two views of a mechanical component with labeled parts (no text or symbols present)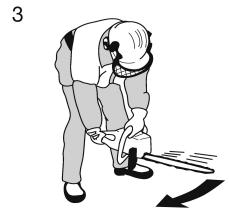
natural_image
Illustration of a person bending forward with a walking stick and motion lines (no text or symbols)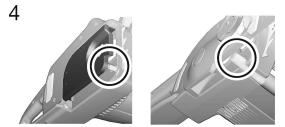
natural_image
3D mechanical component diagram showing two views of a cylindrical part with hexagonal features (no text or symbols)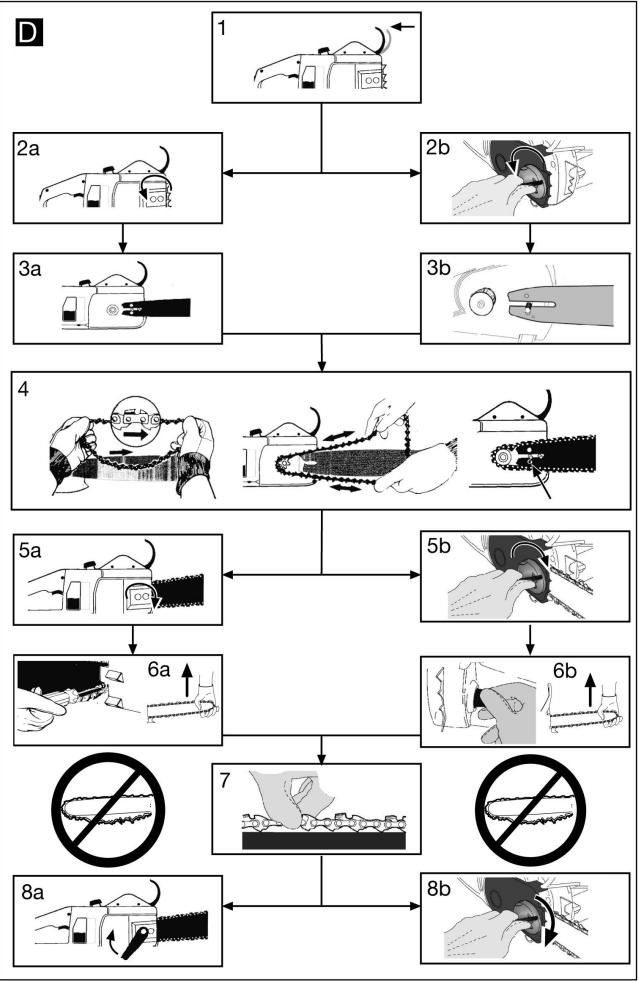
flowchart
graph TD
    A["1"] --> B["2a"]
    B --> C["3a"]
    C --> D["4"]
    D --> E["5a"]
    E --> F["6a"]
    F --> G["7"]
    G --> H["8a"]
    H --> I["8b"]
    style A fill:#f9f,stroke:#333
    style I fill:#bbf,stroke:#333
natural_image
Technical illustration of a chain-linking device with labeled parts (no text or symbols present)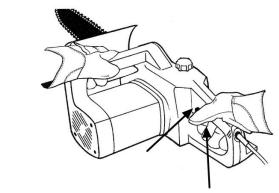
natural_image
Line drawing of a mechanical device with hands operating it, no text or symbols present
natural_image
Illustration of a chain saw with a magnified inset showing the blade geometry (no text or symbols)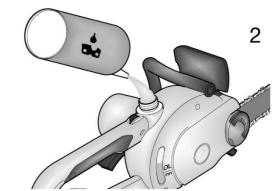
natural_image
Mechanical device with a cylindrical component and lever mechanism (no visible text or symbols)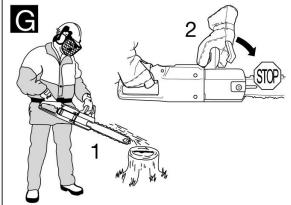

GB Due to a constant product improvement programme, the factory reserves the right to modify technical details mentioned in this manual without prior notice.
DE Im Sinne des Fortschritts behält sich der Hersteller das Recht vor, technische Änderungen ohne vorherigen Hinweis durchzuführen.
FR La Maison se réserve la possibilité de changer des caractéristiques et des données de ce manuel à n'importe quel moment et sans préavis.
NL Door konstante produkt ontwikkeling behoud de fabrikant zich het recht voor om rechnische specificaties zoals vermeld in deze handleiding te veranderen zonder biervan vooraf bericht te geven.
NO Produsenten forbeholder seg all rett og mulighet til å forandre tekniske detaljer i denne manualen uten forhåndsvarsel.
FI Jatkuvan tuotteen parannusohjelman tähden valmistaja pidättää oikeuden vaihtaa ilman ennakkovaroitusta tässä ohjekirjasessa mainittuja teknisiä yksityiskohtia.
SE Tilverkaren reserverar sig rätten att ändra fakta och uppgifter ur handboken utan förvarning.
DK Producenten forbeholder sig ret til ændringer, hvad angår karakteristika og data i nærværende instruktion, når som helst og uden varsel.
ES La firma productora se reserva la posibilidad de cambiar las características y datos del presente manual en cualquier momento y sin previo aviso.
PT A casa productora se reserva a possibilidade de variar características e dados do presente manual em qualquer momento e sen aviso prévio.
La casa produttrice si riserva la possibilità di variare caratteristiche e dati del presente manuale in qualunque momento e senza preavviso.
HU A gyártó cég fenntartja a jogot arra, hogy a használati utasitásban megadott adatokon és technikai tulajdonságokon bármikor és előzetes bejelentés nélkül változtasson.
GR Λόγω προγράμματος συνεχο'θς βελτίωσης προιόντων, το εργοστάσιο επιφυλάσσεται του δικαιώματος να τροποποιεί τις τεχνικές λεπτομέρειες που αναφέρονται στο εγχειρίδιο αυτό χωρίς προηγούμενη ειδοποίηση.
Vzhledem k pokračujícím inovacím si vyrobce výhrazuje právo minit technické hodnoty uvedené v této příručce bez predčhozího upožornení.
PL W związku z programem ciągłego ulepszania swoich wyrobów, producent zastrzega sobie prawo do wprowadzania zmian w szczegółach technicznych wymienionych w tej instrukcji bez uprzedniego zawiadomienia. Instrukcja jest częścią wyposażen
SK Proizvajalec si pridržuje pravico, da spremeni značilnosti in podatke pričujočega priročnika v katerem koli trenutku in brez predhodnega obvestila.
RU Компания производитель сохраняет за собой право изменять характеристики и данные в настоящем руководстве, в любой момент и без предварительного извещения.
EE Tootja jätab endale öiguse muuta käesolevas kasutusjuhendis kirjeldatud omadusi ja andmeid suvalisel hetkel ja sellest eelnevalt ette teatamata.
Izgatavotājs saglabā tiesības jebkurā brīdī un bez brīdinājuma mainīt šajā rokasgrāmatā esošos datus un raksturlīknes.
TR Üretici firma bu kullanma kılavuzunda yer alan özellik ve verilerin istediği zamanda ve haber vermeksizin değiştirebilme hakkını kendinde sahip tutar.
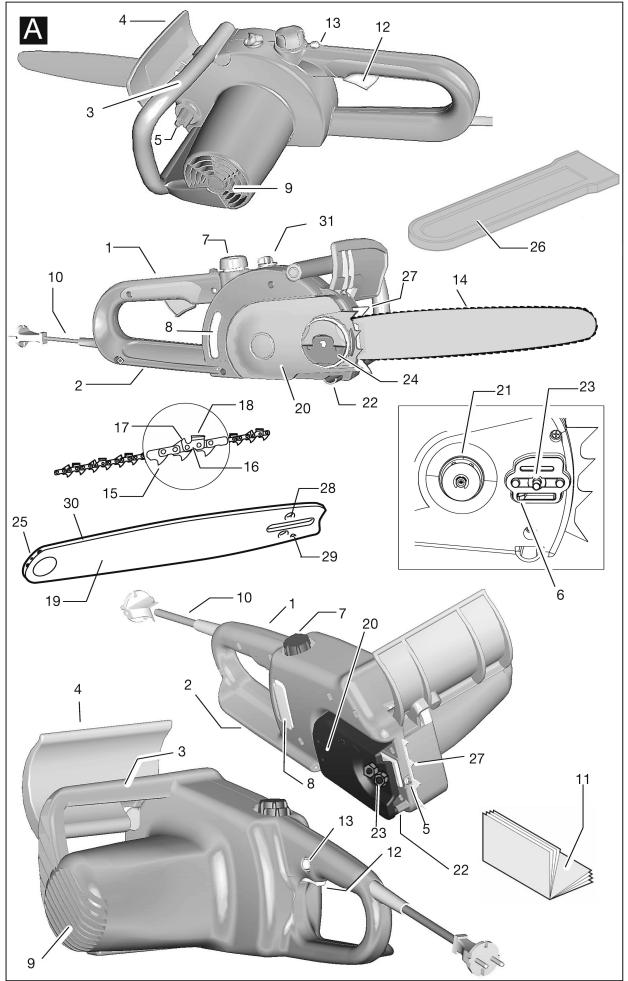
A. GENERAL DESCRIPTION
1) Rear handle
2) Rear hand guard
3) Front handle
4) Front hand guard/chain brake lever
5) Chain tensioner knob/screw
6) Chain tensioner pin
7) Oil tank cap
8) Oil tank inspection gauge
9) Air vents
10) Cable
11) Manual
12) Switch
13) Switch block
14) Chain
15) Drive tooth
16) Cutting link
17) Cutting depth gauge
18) Cutting tooth
19) Bar
20) Chain cover
21) Pinion
22) Chain catcher
23) Bar retaining screws
24) Bar retaining knob / nuts
25) Nose sprocket
26) Guide bar cover guard
27) Spiked bumper
28) Chain tensioner pin housing
29) Lubrication hole
30) Guide groove
31) Oil pump adjustment knob


Example of identification label
LEGEND:
1) Guaranteed noise level according to directive 2000/14/EC
2) Double insulation
3) CE marking of conformity
4) Protection degree
5) Rated frequency
6) Rated power
7) Alternate current
8) Rated voltage
9) Type
10) Prefix
11) Product code
12) Year of manufacture (last two figures; e.g. 04=2004)
13) Maximum bar length
14) Manufacturer's name and address
15) Serial number
16) Model
MEANING OF SYMBOLS
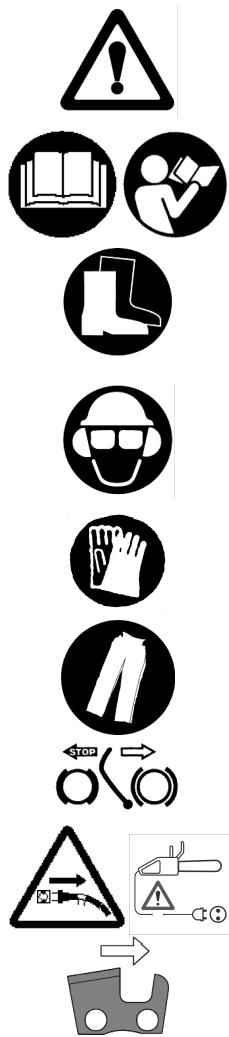
Warning!
Read the instruction manual carefully
Protective boots
Protective goggles or visor, protective helmet and hearing protection
Protective cut-proof gloves
Protective long, cut-proof trousers
Chain brake: deactivated, activated
Disconnect the plug if the cable is damaged
Correct direction of the cutting teeth.
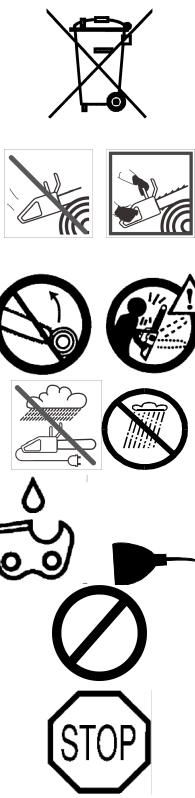

Do not dispose inappropriately of the machine. Deliver it to an authorized organization.
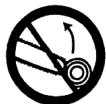
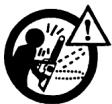
Always grip the machine with two hands
Kickback danger
Do not expose to rain or moisture.
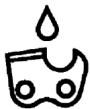
Chain oil
Refrain from
Turn the machine off
Manual use. All persons using this machine must read the user manual completely with extreme care, (and where possible must also be present during a practical demonstration on correct machine use) in order to be familiar with all user operations in complete safety, as well as all the cutting techniques possible with this machine. For this reason, the user manual must be included with the machine in the case of sale or loan to another person. Please
remember that ALL parts of the user manual are important, as they are included to help prevent injury to the user and damage to the machine. Following correct manual procedure does not necessarily prevent all danger risk, but certainly reduces the probability or effects of injury or damage.
Manual layout: Section B is divided into various parts that are referred to in the rest of the manual and marked with the "Warning" sign, followed by the
reference number of the corresponding component to draw the reader's attention to the main safety procedure linked with that particular situation; the machine parts shown in “A – GENERAL DESCRIPTION” are indicated in italics in the text for easy identification.
Precautions prior to machine use. Never permit this machine to be used by any persons who are not perfectly familiar with the manual instructions, who are not in good physical and mental condition, who are not sufficiently competent and by children (local regulations may sometimes limit the age of operators permitted to use the machine). Inexperienced persons must follow a training period operating on a saw horse only. The user is responsible for any accidents that may cause injury to other persons and damage to property, as well as any other type of danger risk. The machine must never be used for operations other than those specifically described in this manual, and exclusively with the bars and chains indicated. This machine must never be used when users are tired, or not in good physical condition, or if under the effect of any substance that may alter their physical or mental condition (pharmaceuticals, alcohol, drugs etc.) Make certain that the user knows how to stop the motor and chain in case of necessity. Take great care and pay close attention at all times when using this machine, following all general behaviour rules according to good sense.
-
Control checks. Control the machine with care before use each time, especially if it has been subject to strong impact, or if it shows any signs of malfunction. Check that the machine has been assembled correctly, that all components are in correct condition and perfectly clean. Perform all operations described in the chapter "Maintenance – before each use". Make sure that all spanners and tools used for adjustment operations have been removed, that all screws and nuts are in their correct housing and tightened correctly, and that the bar and the chain are mounted correctly. If even one single condition described above is not satisfactory DO NOT USE the machine.
-
Repairs and Maintenance. All the machine parts that can be replaced personally, are clearly explained in the “Assembly / disassembly” instructions chapter. In the case of damaged or worn components, always use exclusively original homologated accessories and spare parts that are available from official distributors.
Where necessary, all other machine parts must be replaced exclusively by an Authorised Service Centre. All danger risks increase considerably if maintenance operations are not performed regularly, not performed by competent professional personnel, or if non-original accessories /spare parts are mounted on the machine. In any of the cases described above, the manufacturer will not be held responsible for any injury to persons or damage to property. In the case of any doubt, please contact an Authorised Service Centre.
-
Maintenance in complete safety. All maintenance, assembly, disassembly and oil tank filling operations must be performed with the machine set in a stable position on a flat solid surface and with the cable plug disconnected from the electricity supply (unless this is explicitly specified otherwise). The chain must be arrested and the user must wear suitable protective gloves.
-
Clothing. When using this machine the user must wear the following homologated individual protective clothing: close-fitting protective clothing, safety boots with non-slip soles, crush-proof toe puffs and cut-proof protection; cut-proof vibration-proof gloves, protective goggles or safety visor (remove protective film where present); ear protection muffs; helmet (if there is any danger of falling objects); some efficient method to cover or tie hair back from shoulder length (if hair is longer than shoulders); dust-proof mask. DO NOT WEAR shorts, loose clothing, unbuttoned clothing, or any jewellery that could become caught in moving machine parts. Do not wear sandals and never work bare-footed.
-
Health precautions – Vibrations and Noise levels. Avoid using the machine for long periods of time: the noise and vibrations can be dangerous causing irritation, stress, fatigue and hypacusia (hearing problems). Prolonged machine use exposes the user to vibrations that can generate “white finger phenomenon” (Raynaud’s Phenomenon), carpal tunnel syndrome and similar disturbances. This can lead to a lack of sensitivity in the hands making it difficult to notice changes in temperature as well as causing numbness. When using the machine regularly or in continuation, the user must control the condition of his hands very carefully. If any of the symptoms described above appear, consult a doctor immediately.
-
Health precautions – Chemical agents. Avoid all chain oil contact with skin and eyes.
-
Health precautions - Electricity. All extension cords, plugs, and electricity lines must be homologated, to standard and in compliance with current regulations. Make sure that the main line to which the machine is connected is equipped with a residual current device (RCD) with a current capacity no higher than 30mA. Make sure that all cables, plugs, and the residual current device are in correct working condition, that they comply with required characteristics, are mounted or hooked up correctly and are perfectly clean. Never disconnect the machine from the main line by pulling on the cable. Never use or store the machine and extension cord in damp environments. If the cable is damaged in any way, disconnect immediately from the main line socket, taking great care not to touch any exposed wires. Avoid all contact with grounded surfaces when using the machine (metal piping, cables, lightening conductors, etc). When working outdoors, all extension cords attached to the machine must be homologated for use out of doors. Avoid tying any knots in electric cables and never use rolled up extension cords.
-
Health precautions - Heat. During use pinion and chain reach very high temperatures, take care not to touch these parts while hot.
-
Health precautions – Sharp or moving parts. Never touch the chain except when the machine is switched off; in any case, always take great care since the chain is very sharp and can cut even when stopped. Remember that the chain will continue to rotate for a short time after the machine has been switched off.
-
Work area. Control the whole work area carefully to check for any danger source (e.g.: roads, paths, electric cables, dangerous trees, etc) Take special care when working on sloping ground. Cluttered areas can lead to injuries: before using the machine remove any stones, glass, cables, metal components, cans, bottles and any other foreign matter from the work area. Also take into consideration any danger risks that may not be noticed because of machine noise. Make sure that a second person is within calling distance in the case of accident. When working in isolated areas, always carry a first aid kit and make sure you have advised others of your exact location.
11. Work operations
Never start work with the machine before performing the following: remove the giude bar cover guard; make sure that a sufficient amount of oil has reached the chain; make sure you have a planned retreat path from falling trees (when cutting trees).
It is strictly forbidden to use the machine for: moving branches or roots; in cases where there is any danger that the chain may come into contact with the ground, electric protection, or piled wood; for cutting very thin branches or bushes (these will break easily and can whip bystanders or the user causing serious injury); for felling trees without adequate training and equipment (correct ropes, hooks, etc); starting sawing operations with the blade already engaged in a previous groove or slit; using the machine while standing on stepladders or other unstable surfaces; using the machine in extreme weather conditions, inclement weather, with reduced visibility and insufficient lighting (very low temperatures, very hot damp climates, fog, rain, wind, at night, etc.); using the machine with arms stretched: work must always be performed in a manner to ensure that the user can react immediately to unexpected conditions; it is forbidden to leave the machine unguarded; permitting others to touch the cable, extension cord, or the machine; forcing the machine during cutting action (this can lead to motor damage or loss of control over the machine); blocking the switch or the switch block with adhesive tape or other materials.
Always remember to: cut wood only (never cut plastic, metal, or other materials); make sure that the switch is NOT turned ON before inserting the plug in the socket or releasing the chain brake lever, make sure that the chain is not in contact with any objects at the moment the switch is turned ON; Keep all bystanders and animals well clear of the work area (where necessary, fence off the area and use warning signs) at a minimum distance of 2.5 m times the trunk height; in any case no less than ten meters. Wherever possible use a vice or a saw horse to block the wood to be cut; always hold the machine as follows: Grip the front handle with the left hand and the rear handle with the right hand, closing the thumb and other fingers firmly around the handle (during use, the machine could slide forwards or backwards, or create a reverse action, provoking a kickback reaction: holding the machine correctly reduces the risk of loosing control over the tool); Always make
sure that the cable/extension cord is kept behind the user, controlling that it does not create a source of danger for the user or for other persons, and check that it cannot be damaged (by heat, sharp objects, sharp edges, oil, etc); Always assume a stable standing position on both legs; keep the handles dry and clean; during use keep all body parts and clothing well clear of the chain; turn off the switch, wait until the chain has stopped turning, and activate the chain brake lever before putting down the saw; never attempt to cut at heights over shoulder height; always handle the machine with the utmost care; check that the oil level never drops below MIN level, controlling frequently, before and during use; Always remain on the left hand side of the machine during use, and take great care if the bar needs to be inserted in a previously cut slit; remove the bar from the slit when the chain is still in rotation.
-
Transport and storage precautions. Each time the work area is changed to another location, disconnect the machine from the main line and activate the chain brake lever. Mount the guide bar cover guard each time before transporting or storage. Always carry the machine by hand with the bar facing backwards, or when transporting the machine in a vehicle, always attach it securely to prevent damage. Never carry the machine by the cable. After use, store the machine in a dry, high place, far from heat sources and out of reach of children.
-
Precautions against fire risk. Never use the machine in areas where there are naked flames, inflammable or potentially explosive materials.
-
Kickback reaction. The kickback reaction consists of a violent upwards-reverse action of the bar towards the user. This generally occurs if the upper part of the bar nose (called the "kickback danger zone") comes into contact with some object, or if the chain is blocked in the wood. The kickback reaction is a very quick sudden motion along the bar cutting plane (generally in an upward direction, but this also depends on the machine position during cutting action). Kickback can make the user loose control of the machine provoking dangerous and even mortal accidents (i.e: if the saw with the chain in rotation is thrust back against the user). The chain brake lever and other safety devices are not sufficient to protect the user against injury: the user must be well aware of the conditions that can provoke the reaction, and prevent them by paying very close attention according to experience, together with prudent and correct machine handling (for example: never cut several branches at a time because this can cause accidental impact on the "kickback danger zone"; never mount incorrect bars or chains; make sure the chain is always sharp and sharpen according to correct methods, because incorrect sharpening can cause kickback; when choosing the bar, remember that the smaller the nose radius, the smaller the kickback danger zone).
C. SAFETY EQUIPMENT DESCRIPTION⚠ 1,3,6,8,12
SWITCH BLOCK
Your machine is equipped with a device (fig.1) that when deactivated, stops the switch from being pressed thus preventing accidental start-up.
CHAIN BRAKE ACTION ON SWITCH RELEASE (for ES18 models only)
Your machine is equipped with a device that blocks the chain immediately as soon as the switch is released; If this device should not work at any time, the machine must NOT be used, and must be taken to an Authorised Service Centre.
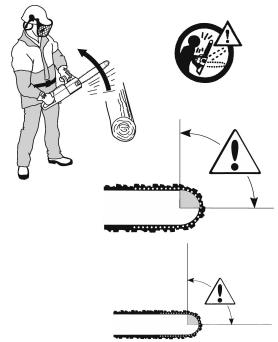
FRONT HAND GUARD / CHAIN BRAKE LEVER
The front hand guard (fig.2) is designed to prevent your left hand from coming into contact with the chain (on condition that the machine is held correctly according to instructions). The front hand guard also acts as a chain brake, including a device that blocks the chain in a few fractions of a second in the case of kickback. The chain brake is released when the front hand guard is pulled backwards and blocked in position (the chain is able to move). The chain brake is activated when the front hand guard is pushed forward (the chain is blocked).
The chain brake can be activated in two modes: the first using the left wrist by pushing forwards, or when it comes into contact with the brake system as a result of kickback; or by inertia, in the case of particularly violent kickback.
When the machine is used with the bar in horizontal position, for example during tree felling, the chain brake offers less protection, because it can be activated by inertia only, since the user's hand is outside the range of action of the front hand guard (fig.3).
N.B.: When the chain brake is activated, a safety switch cuts off all current to the motor.
CHAIN CATCHER
This machine is equipped with a chain catcher (fig.4) located under the pinion. This mechanism is designed to arrest the backward chain movement in the case of chain breaking or derailing. These situations can be avoided by ensuring correct chain tension (Refer to chapter "D. Assembly/disassembly").
REAR HAND GUARD
This acts to protect(fig.5) the hand in the case of chain breaking or derailing.
D. ASSEMBLY / DISASSEMBLY ⚠ 2,3,6,7,8,9,12
BAR AND CHAIN ASSEMBLY
Assembly methods change according to the type of your machine- so please take care to refer to the illustrations and machine type marked on the label (A- Legend - 9 [ES15 / ES16 / ES18]), Take great care when assembling to ensure this is performed correctly.
| FOR ES 15 / ES 16 | FOR ES 18 |
| 1. Control that the chain brake is not activated. If so, deactivate it. | |
| 2a. Unscrew the bar retaining nuts and remove the chain cover. | 2b. Unscrew the bar retaining knob and remove the chain cover. |
| 3a. Mount the bar on the bar retaining screws pushing it as far backward towards the pinion as possible. | 3b. Mount the bar on the bar retaining screw pushing it as far backward towards the pinion as possible. |
| 4. Oil the chain, then position it over the pinion, making it slide into the bar guide groove, beginning with the upper part. Attention! Control that the sharp side of the cutting teeth face in a frontward direction on the upper part of the bar; Set the chain tensioner pin in the chain tensioner pin housing. Mount the chain cover making sure that the drive teeth of the chain are engaged in the pinion and in the guide groove. | |
| 5a. Close the bar retaining nuts, screwing by hand. | 5b. Screw the bar retaining knob loosely tightened. |
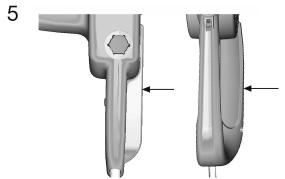
| 6a. To spread the chain screw the chain tensioner screws in a clockwise direction, to loosen tension, screw in an anti-clockwise direction (when performing this operation maintain the bar nose raised upwards) | 6b. To spread the chain screw the chain tensioner knob in a clockwise direction, to loosen tension, screw in an anti-clockwise direction (when performing this operation maintain the bar nose raised upwards) |
| 7 Spread the chain until the tension is correct; that is, when the chain is pulled upwards, the drive tooth rise to the same level as the bar. (the chain must never droop on the underside of the bar) | |
| 8a. Tighten the bar retaining nuts using an appropriate tool. | 8b. Tighten the bar retaining knob strongly. |
Tensioning the chain too tightly will overload the motor and cause damage, insufficient tension can provoke chain derailing, whereas a chain tightened correctly provides the best cutting characteristics and prolonged work life. Check the tension regularly because the chain length tends to stretch with use (especially when the chain is new; after the first assembly, the chain tension must be controlled after 5 minutes machine operation); in any
case do not tighten the chain immediately after use, but wait until it cools down.
In cases where the loosened chain needs to be adjusted, always unscrew the bar retaining nuts / knob before adjusting the chain tensioning screw/knob ; adjust the tension and tighten the bar retaining nuts / knob accordingly.
E. START-UP AND ARREST ⚠ 1,4,5,6,7,8,9,11,12,13
Start-up: grip both handles firmly, release the chain brake lever, press and maintain the switch block pressed in, then press the switch (at this point the switch block can be released).
Arrest: The machine will stop whenever the switch is released. In the case where the machine does not stop, activate the chain brake, disconnect the cable from the main line socket and take the machine to the Authorised Service Centre.
F. BAR AND CHAIN LUBRICATION ⚠ 3,6,7,8,9,12
ATTENTION! Insufficient lubrication will provoke chain breaking and can cause serious and even mortal injury.
Bar and chain lubrication is performed by an automatic pump. If your machine is equipped with an oil pump adjustment knob (optional) the chain lubrication can be adjusted as shown in the illustration (fig.1), according to the type of cutting operation in hand (dry wood – more oil, green wood - less oil, long bar- more oil, short bar - less oil).
Take great care to ensure that the chain is always sufficiently lubricated by never closing the pump completely. Refer to “Maintenance” for indications on ensuring that the chain oil is sufficiently distributed.
Choice of chain oil
Always use new oil only (special type for chains) with
adequate viscosity: the oil must adhere well and guarantee good running properties in both winter and summer. If chain oil is not available, EP 90 transmission oil can be used.
Never use waste oil because this is this harmful to health, the machine and the environment. Make sure that the oil is suitable for the temperature of the environment where the tool will be used: For temperatures under 0^ C certain oils become denser, overloading the pump and causing damage. Contact your Authorised Service Centre for advice on oil choice.
Filling oil tank
Unscrew the oil tank cap, and fill the tank taking care not to spill any oil (if this occurs clean the machine carefully) (fig.2), and then screw the cap back on tightly.
G. MAINTENANCE ⚠ 1,2,3,4,5,6,7,8,9,12,13
ATTENTION! In cases where work environments are particularly dirty or dusty, the operations described must be performed more frequently than mentioned in the instructions.
Before each use
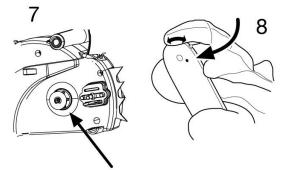
Control that the chain oil pump functions correctly: direct the bar towards a clear surface at a distance of about 20 centimetres; after the machine has run for about a minute, the surface should show clear traces of oil(fig.1).
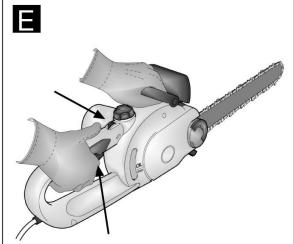
Check that excessive strength is not needed for activating and deactivating the chain brake. Also check that it is not activated too easily and that it is not blocked. Then check chain brake function as follows: release the chain brake, grip the machine correctly and start up the machine, activate the chain brake by pushing the front hand guard forward with the left wrist or arm but without removing the hand from the handle (fig.2). If the chain brake is working correctly, the chain should be blocked immediately.
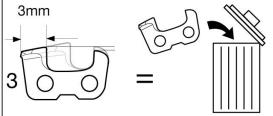
Check that the chain is sharpened correctly (See below), in good working condition and that the tension is correct. If the chain is irregularly worn, or if the cutting teeth are only 3 mm high, the chain must be replaced(fig.3).
Clean the air vents regularly to prevent motor overheating.
Check that the switch and switch block function correctly (to be performed with the chain brake released): press the switch and the switch block and control that they return to idle position as soon as they are released; control that it is impossible to press the switch without activating the switch block.
Check that the chain catcher and the right hand guard are in correct condition without any visible faults such as damaged material.
Every 2-3 hours of use
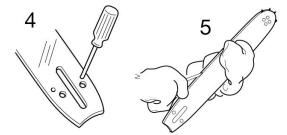
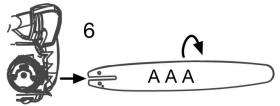
Control the bar condition, if necessary clean the lubrication holes(fig.4) and the guide grooves(fig.5) carefully; If the groove is worn or shows signs of deep notching, it must be replaced. Turn the bar to ensure even wear(fig.6). Clean the pinion regularly and check that it has not been subject to excess wear(fig.7). Lubricate the nose sprocket with bearing grease through the hole shown in the illustration (fig.8).
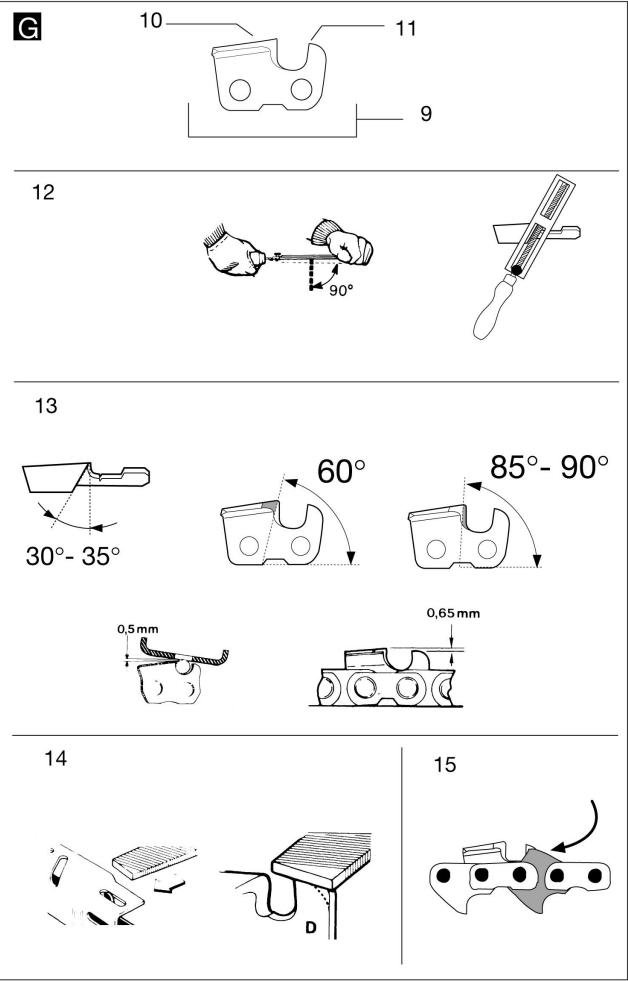
Chain sharpening (When necessary)
If the chain does not cut correctly, or requires hard bar pressure against the wood, and if the sawdust is very fine, this is a sign that it is not sharpened correctly. If the cutting action produces no sawdust, this means the cutting edge has been worn completely and the chain is pulverising the wood during cutting. A well-sharpened chain crosses through the wood without effort or pressure and produces large long wood shavings.
The cutting side of the chain is composed of the cutting link (fig.9) with a cutting tooth (fig.10) and a cutting limit gauge (fig.11). The difference between these determines the cutting depth; a file guide and a 4mm diameter round file are needed to obtain good sharpening results; Follow the instructions below: Once the chain has been mounted and the tension is correctly adjusted, and the chain brake is activated, position the file guide perpendicular to the bar as shown in the illustration (fig.12), filing the cutting teeth at the angle shown (fig.13), always working from the interior towards the exterior, lessening the pressure during the return stage (it is very important to follow the instructions perfectly: excessive or insufficient sharpening angles, or an incorrect file diameter will increase the risk of kickback.) To obtain higher precision on side angles, it is advisable to position the file so that it exceeds the upper cutter by about 0.5 mm. File all the teeth on one side first, then turn the machine over and repeat the operation. Make sure that after sharpening operations, all teeth are the same length and that the height of the depth gauge is 0.6 mm lower than the upper cutter: check the height using a proper template and file (with a flat file) all protruding parts, rounding off the front part of the depth gauge (fig.14), paying attention to not file the kickback protection tooth (fig.15)
Every 30 hours use.
Take the machine to the Authorised Service Centre for general revision and control check on brake components.
PERIODS OF PROLONGED DISUSE
Always empty the fuel tank with the same precautions used in filling it.
H. CUTTING TECHNIQUES ⚠ 1,2,3,4,5,6,7,8,9,10,11,12,13,14
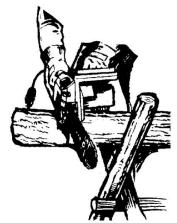
When using the machine, prevent: (fig.1)
- cutting in conditions where the trunk could split during cutting (wood under pressure, dry dead trees, etc): sudden splitting can be very dangerous.
- the bar or the chain from becoming blocked in the cutting notch: if this should occur, disconnect the machine from the main electricity supply and try to raise the trunk using an appropriate tool as a lever; do not attempt to free the machine by shaking or pulling as this could cause damage or injury.
- situations that can lead to kickback reactions.
During machine use: (fig.1)
- When cutting on sloping ground, always work uphill of the trunk to avoid being hit if the trunk should roll downhill.
- Release the switch after each cutting action: prolonged dry running of the motor will provoke serious damage.
- When felling trees, always finish the job: a partially cut tree could break and fall.
- At the end of each cutting operation the user will notice a considerable change in the strength necessary for controlling the machine. Great care must be taken not to loose control.
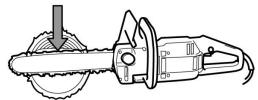
Below is a description of two different types of cutting operation:
Cutting action by pulling the chain (from top to bottom) (fig.2) can lead to dangerous sudden movement of the machine towards the trunk with consequential loss of control. Where possible, use the spiked bumper during cutting operations.
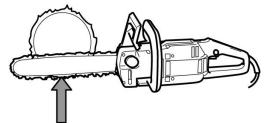
Cutting action pushing the chain (from bottom to top) (fig.3) will lead to the danger of a sudden movement of the machine in the direction of the user, with the risk of hitting the user, or an impact of the “kickback danger zone” on the trunk resulting in strong kickback; extreme care must be taken when cutting in this manner.
The safest method for using the machine, is to block the log on a sawhorse, cutting from top to bottom, on the portion outside the sawhorse. (fig.4)
Spiked bumper use.
Where possible, use the spiked bumper to ensure safer cutting action: plant it in the bark or surface of the trunk in order to maintain more control over the machine.
Below are descriptions of typical cutting procedure to be adopted for specific situations. However, these should be assessed each time to calculate whether the method is most suitable or not, in order to use a method with the least possible risk.
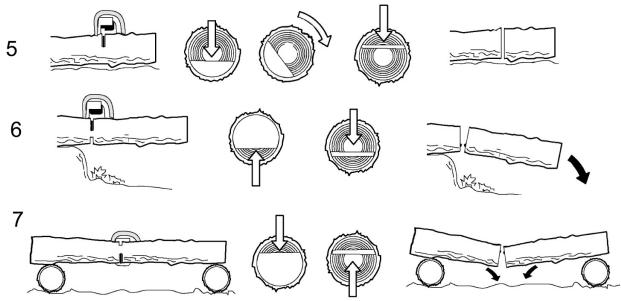
Trunk on the ground. (Risk of touching the ground with the chain once the bar has passed trough the trunk). (fig.5)
Cut from top to bottom through the whole trunk. Towards the end of the cut, proceed very carefully to prevent the chain from hitting the ground. If it is possible, cut 2/3 of the trunk, roll it over, and cut the remaining third from top to bottom to limit the risk of the chain touching the ground.
Trunk supported at one end only (Risk of trunk breaking during cutting action). (fig.6)
Begin the cut from underneath for about 1/3 of the diameter, and then finish the cutting action from the top to meet the undercut.
Trunk supported at both ends. (Risk of pinching the chain). (fig.7)
Begin the cut from above for about 1/3 of the diameter, and then continue from underneath to meet the overcut.
Tree felling.
ATTENTION! : Never attempt to fell a tree if you do not have the necessary experience, and in any case never fell trees that have trunks with a diameter larger than the length of the bar ! This operation is reserved for expert machine users with adequate equipment.
When felling a tree, the aim is to have the tree fall in the most convenient position for the following limbing and bucking operations. (Avoid trees falling on top of other trees: Felling trees that are entangled with other trees is a very dangerous operation).
First of all decide which is the best direction for the tree to fall by evaluating the following: objects or other plants around the tree, the inclination, the curve, wind direction, and greatest branch concentration. Take into account dead or broken branches that may break off during felling creating a further danger risk.
ATTENTION! During tree felling operations in critical conditions, always remove ear protection immediately after cutting operations to be able to listen for unusual noises and any warning signals.
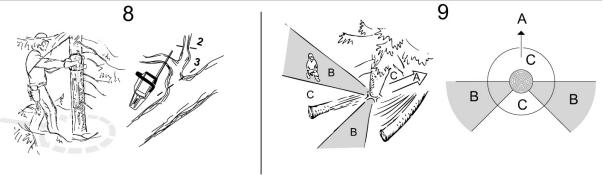
Preliminary cutting operations and identifying the retreat path.
Eliminate any branches that interfere with the job (fig.8), starting from top to bottom, and then, always keeping the trunk between the user and the machine eliminate the more difficult branches afterwards, piece by piece. Eliminate all plants that interfere with work operations and control the area for possible obstacles (rocks, roots, ditches, etc.) when planning the retreat path (to follow during tree fall); Refer to the illustration (fig.9) for the directions to be maintained (A. predicted tree fall direction. B. Retreat path. C. Danger zone).
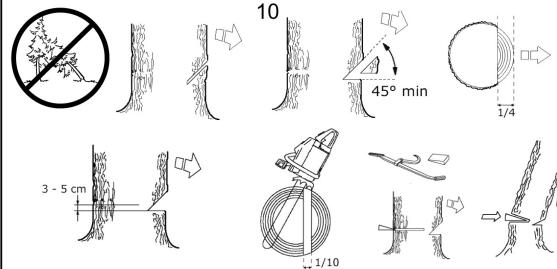
FELLING CUTS (fig.10)
In order to ensure that the user has complete control over the tree fall, the cutting instructions are as follows:
The cut that controls the fall direction of the tree is to be executed first: First of all cut the UPPER PART of the directional notch on the side the tree must fall. Remain on the right hand side of the tree and cut using the chain pull method; then cut the LOWER PART that must meet the end of the upper part. The depth of the directional notch must be 14 of the trunk diameter, with an angle of at least 45^ between upper
and lower cut. The meeting point between the two sides of the notch is called “directional cut line” This line must be perfectly horizontal at right angles (90°) to the felling direction.
The felling cut that provokes the tree fall, is performed at 3 to 5 cm above the lower part of the directional felling cut line, finishing at a distance of 1/10 of the trunk from the notch. Remain on the left hand side of the tree and cut using the chain pulling method and the spiked bumper. Check that the tree does not move in a direction other than that predicted for the fall. As soon as possible insert a felling lever or wedge into the cut. The uncut part of the trunk is called the "hinge", as it is intended to guide the tree as it falls; in cases where the cuts are not sufficient, not straight, or have been cut through completely, the tree fall cannot be controlled (extremely dangerous!). For this reason the various cuts must be performed with great precision.
When cutting operations are completed the tree will begin to fall. Where necessary help tree fall using wedges or felling levers
Limbing
Once the tree has been felled, the trunk must be limbed: in other words, the branches are removed from the trunk. Do not underestimate this operation because the large majority of kickback accidents occur during this stage. For this reason pay close attention to the position of the bar nose during cutting operations and always work on the left hand side of the trunk.
I. ENVIRONMENTAL INFORMATION
This section contains information useful for maintaining the characteristic of ecocompatibility included in the origin design of the machine, and as regards proper use and disposal of chain oil
DESIGN
In the design stage, care was taken to develop an engine with reduced consumption and low emission of noise.
USE OF THE MACHINE
The operations of filling the oil tank should be carried out in such a way as to avoid spilling oil and contaminating the soil and the environment.
DISPOSAL
Do not dispose inappropriately of the machine when it is no longer usable. Deliver it to an authorized organization for proper disposal in compliance with the regulation in force.
The symbol 📄 on the product or on its packaging indicates that this product may not be treated as household waste. Instead it shall be handed over to the applicable collection point for the recycling of electrical and electronic equipment. By ensuring this product is disposed of correctly, you will help prevent potential negative consequences for the environment and human health, which could otherwise be caused by inappropriate waste handling of this product. For more detailed information about recycling of this product, please contact your local council office, your household waste disposal service or the shop where you purchased the product.
M. TROUBLESHOOTING TABLE
| Motor does not start | Motor turns with difficulty or loses power | The machine starts but does not cut properly | Motor turns improperly or at reduced speeds | Braking devices do not stop the chain properly | |
| Make sure the main line is powered | ● | ||||
| Make sure the machine is properly plugged in | ● | ||||
| Make sure your cable/ext. cord is not damaged | ● | ||||
| Make sure that chain brake is not activated | ● | ||||
| Check that chain is properly assembled | ● | ● | |||
| Check chain lubrification as in chapters F and G | ● | ||||
| Make sure that the chain is sharp | ● | ||||
| Contact your authorised centre | ● | ● | ● | ● |
N. DECLARATION OF CONFORMITY
The undersigned, authorized by E.O.P.I., declares that the following products model: type ES15, ES 15/1, ES 15/2, ES16, ES 16/1, ES18 starting from 2004 onwards, manufactured by E.O.P.I., Valmadrera, Italy, comply with European Directive: 98/37/EEC (Machine Directive), 93/68/EEC (EEC Marking Directive) & 89/336/CEE (Electromagnetic Compatibility Devices), directive 2000/14/EEC (Enclosure V).
Toduo Cuiu
Valmadrera, 19/05/2004
Pino Todero (Technical Manager)
Electrolux Outdoor Products Italy S.p.A.
Via Como 72, 23868 Valmadrera (Lecco)
ITALIA
O. Technical Data
| Type: | ES 15 | ES 16 | ES 18 |
| ES 15/1 | ES 16/1 | ||
| ES 15/2 | |||
| Dry weight (Kg) | 3,5 | 3,5 | 3,5 |
| Oil tank volume (cm3) | 200 | 200 | 150 |
| Bar length (cm/inches) | 30/12" | 35/14" | 40/16" |
| Chain | MPG370GLX | 91VJ | |
| Chain pitch (inches) | 3/8 | 3/8 | 3/8 |
| Vibration | |||
| Front handle (m/s2) (ISO 7505) | 3,5 | 3,5 | 1,96 |
| Rear handle (m/s2) (ISO 7505) | 7,9 | 7,9 | 7,30 |
| Measured sound power level LWav dB(A) (ISO 9207) | 111,14 | 111,14 | 103 |
| Guaranteed sound power level Lwav dB(A) (ISO 9207) | 113 | 113 | 104 |
| Sound pressure level at operator's ear dB(A)(EN 27182) | 98 | 98 | 94 |
| Minimum wire cross-section (wires num./mm2) | 2x1 | 2x1 | 2x1 |
| Maximum cable length (m) | 30 | 30 | 30 |
- GENERAL DESCRIPTION
- LEGEND:
- MEANING OF SYMBOLS
- Work operations
- SAFETY EQUIPMENT DESCRIPTION⚠ 1,3,6,8,12
- SWITCH BLOCK
- CHAIN BRAKE ACTION ON SWITCH RELEASE (for ES18 models only)
- FRONT HAND GUARD / CHAIN BRAKE LEVER
- CHAIN CATCHER
- REAR HAND GUARD
- ASSEMBLY / DISASSEMBLY ⚠ 2,3,6,7,8,9,12
- BAR AND CHAIN ASSEMBLY
- START-UP AND ARREST ⚠ 1,4,5,6,7,8,9,11,12,13
- BAR AND CHAIN LUBRICATION ⚠ 3,6,7,8,9,12
- Choice of chain oil
- Filling oil tank
- MAINTENANCE ⚠ 1,2,3,4,5,6,7,8,9,12,13
- Before each use
- Every 2-3 hours of use
- Chain sharpening (When necessary)
- Every 30 hours use.
- PERIODS OF PROLONGED DISUSE
- CUTTING TECHNIQUES ⚠ 1,2,3,4,5,6,7,8,9,10,11,12,13,14
- When using the machine, prevent: (fig.1)
- During machine use: (fig.1)
- Spiked bumper use.
- Tree felling.
- Preliminary cutting operations and identifying the retreat path.
- FELLING CUTS (fig.10)
- Limbing
- ENVIRONMENTAL INFORMATION
- DESIGN
- USE OF THE MACHINE
- DISPOSAL
- DECLARATION OF CONFORMITY
Marque : MCCULLOCH
Modèle : ELECTRAMAC 340 SCHUKO WSS
Catégorie : Tronçonneuse électrique