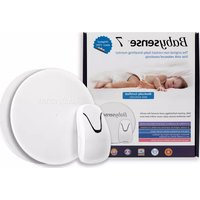
7 - Produits bébés BABYSENSE - Notice d'utilisation et mode d'emploi gratuit
Retrouvez gratuitement la notice de l'appareil 7 BABYSENSE au format PDF.


| Type de produit | Baby Monitor (Moniteur de mouvements pour bébé) |
| Marque | Babysense |
| Modèle | 7 |
| Catégorie | Produits bébés |
| Dimensions du capteur | 30 x 25 cm |
| Poids du capteur | 200 g |
| Alimentation | Adaptateur secteur 220-240 V (inclus) ou 4 piles AA (non incluses) |
| Autonomie sur piles | Environ 30 heures avec piles alcalines |
| Fonctions principales | Surveillance des mouvements respiratoires, alarme d'absence de mouvement, réglage de sensibilité |
| Détection | Détection des mouvements respiratoires du bébé via capteur de pression |
| Alarme | Alarme sonore et visuelle (LED) après 20 secondes d'absence de mouvement |
| Capteurs | Capteur piezo-électrique de pression |
| Installation | Placer le capteur sous le matelas du lit de bébé, brancher l'unité parentale |
| Entretien et nettoyage | Nettoyer le capteur avec un chiffon légèrement humide, ne pas immerger |
| Sécurité | Homologation CE, respect des normes de sécurité européennes |
| Pièces détachées et réparabilité | Adaptateur secteur disponible, unité parentale et capteur non réparables séparément |
| Garantie | 2 ans |
| Pays d'origine | Israël |
| Contenu de la boîte | Capteur, unité parentale, adaptateur secteur, manuel d'utilisation |
| Numéro de modèle | 7 |
FOIRE AUX QUESTIONS - 7 BABYSENSE
Questions des utilisateurs sur 7 BABYSENSE
0 question sur cet appareil. Repondez a celles que vous connaissez ou posez la votre.
Poser une nouvelle question sur cet appareil
Téléchargez la notice de votre Produits bébés au format PDF gratuitement ! Retrouvez votre notice 7 - BABYSENSE et reprennez votre appareil électronique en main. Sur cette page sont publiés tous les documents nécessaires à l'utilisation de votre appareil 7 de la marque BABYSENSE.
MODE D'EMPLOI 7 BABYSENSE
Babysense™ 7
The original non-contact baby breathing monitor Now with enhanced sensitivity
User Guide
English
Babysense™
Babysense
ISO 13485
ISO 9001
三
m = 311
1

MED

hisense
Health Monitoring Technologies
Since 1991

0459
User Guide
Babysense™ 7
The original non-contact baby breathing monitor Now with enhanced sensitivity
Warnings
Ensure you read this user guide before installing and using the product.
Babysense is a high quality, high sensitivity electronic device, which must be handled with care:
- Do not handle roughly, drop or throw.
- Follow the installation instruction carefully to ensure the device is installed securely and correctly.
- Babysense is not a toy. Do not allow children of any age to play with it.
- Do not put any additional baby or pet in the bed. Babysense cannot be used for two infants in one bed.
- Do not operate the unit in the presence of electromagnetic interference.
- Portable and mobile RF communications equipment may effect operation of this device.
- You must undertake the performance test daily and every time you move the monitor, change bedding or relocate crib/bed position (as set out on page 3).
- Do not operate vaporizer or ventilator directly towards the bed.
- To avoid possible danger from sensor cords, ensure that excess cords are pulled back under the mattress, secured with the included cable tie and are not visible or reachable.
• Install 4 new and identical size AA 1.5 volt batteries, preferably alkaline.
• IMPORTANT: It is strongly advised that parents and caregivers learn how to give first aid. - Please remove batteries if the device is not in use for a long time (more than 3 months).
- If you have any problems with this device, such as setting up, maintaining or using, please contact the manufacturer's service personnel. Also, please report to the manufacturer if any unexpected operation or events occur.
- Do not use the equipment if you notice a change in the system's performance, if the system is damaged, or if any of its components are worn or frayed.
- The equipment should not be used adjacent to or stacked with other equipment. If adjacent or stacked use is necessary, the equipment should be observed to verify normal operation in the configuration in which it is used.
Please note
Babysense monitors and alerts, but cannot prevent cessation of breathing. The responsibility for applying first aid rests on caretakers. The Babysense senses breathing movements and motion only, and cannot monitor other occurrences. The purpose of the device is to alert when stopping or slowing of breathing and movement occur. Babysense is a unique safety system which has helped save infants, giving parents (or caretakers) assurance, by enabling intervention in the event of irregular breathing movement or distress, before it becomes critical. There are a number of cautionary steps, which are internationally recommended for SAFE SLEEPING:
* Always lay baby to sleep on his or her back.
* Refrain from smoking near or around baby.
* Avoid over-heating of baby's surrounding.
* Do not leave any objects near your baby that can cause suffocation.
Babysense is an addition to these precautions.
Babysense 7 is a home breathing movement monitor for infants up to one year of age, and is not to be used with high-risk infants requiring constant medical supervision.
Medically trained staff such as nurses, or non-medically trained users such as parents or caregivers may use the Babysense. Babysense 7 is intended for home use.
Principal Of Operation
Babysense continually detects baby's motion and breathing movements, and will set off a sound and visual alarm if movement stops for 20 seconds or if the breathing rate slows to below 10 breaths per minute. The system's non-touch sensor pads under the mattress monitor baby's movement without restraining him.
Installation
- For inserting the batteries, remove the battery cover by inserting a wide flat screw driver into the opening recess (see illustration 6). Insert, in accordance with the markings, 4 new and identical size AA 1.5 volt batteries, preferably alkaline and close cover.
Note: Please dispose of used batteries in accordance with local waste regulations.
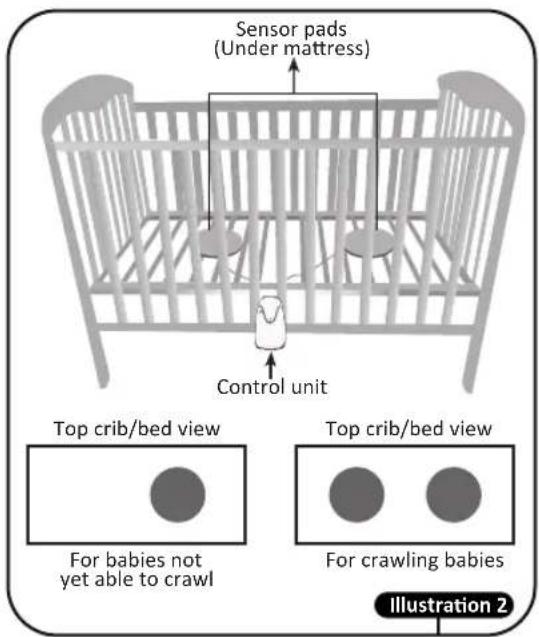
2. Place control unit holder on the base of the crib or bed and in between two bars as shown in illustration 1.

- Sensor pad installation:
- When using for infant not yet able to crawl, place one sensor pad as shown in illustration 2. Make sure the sensor is placed underneath baby's location in crib.
- When baby begins to crawl, and is able to move onto areas not "covered" by a single sensor pad, attach the second sensor and place the two sensors as shown in illustration 2.
PLEASE NOTE: The sensors shall be placed with the marking "THIS SIDE UP" facing upfront.
User Guide
- Pass the cord(s) of the sensor pad(s) through special openings in the holder (see illustration 3).

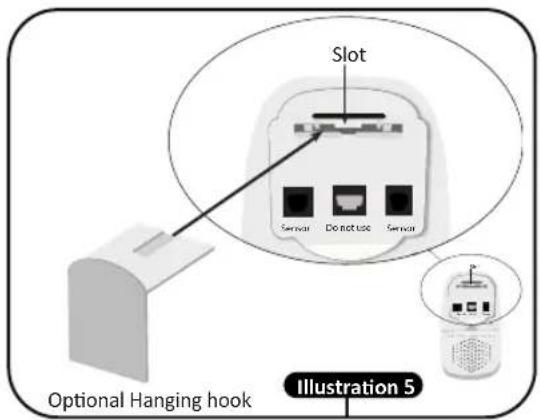
- Attach end(s) of the cord(s) to the outlets marked "SENSOR" on the back of control unit (see illustration 5 and 6). When using one sensor pad, attach to any "SENSOR" outlet.
PLEASE NOTE: Do not attach any cable to the blocked socket, marked "DO NOT USE"
- Should the design of the crib / bed not allow proper installation with the control unit holder, please use the optional hanging hook (see illustration 5) and hang the control unit from the bottom edge of the crib.
- Press control unit holder or hanging hook firmly into slot in back of control unit (see illustration 4 and 5).
- Place mattress firmly on top of sensor pads. If the mattress cannot be in contact with the sensor pads, or if the bed base is soft, padded or contains springs, place extra plywood on the bed base, place the sensor pads on the plywood and place the mattress firmly on top.


IMPORTANT: To avoid possible danger from sensor cords, ensure that excess cords are pulled back under the mattress, secured with the included cable tie and are not visible or reachable.
User Guide
Layout of control unit
See illustration 7 for layout of control unit featuring:
- On/Off button.
- Green breathing movement indicator light.
• Acoustic and visual red alarm light. - Low battery red warning light.
- Yellow shutdown indicator light

Operation
Babysense is ready for operation and use once the installation is completed. To operate, follow the below instructions:
- Place your baby in crib/bed.
- Turn control unit on by pressing On / Off button.
- Make sure red control lights switch on briefly and a DOUBLE click sound is heard.
- When breathing and movement are sensed, the green light flashes.
- Acoustic and visual red alarm light are activated if baby's breathing stops or slows significantly.
- If red low-battery warning light flashes, replace all batteries as soon as possible. If in addition clicking is heard, all batteries must be replaced immediately.
- Turn off by pressing On / Off button before taking your baby out of crib / bed. Make sure the Yellow shutdown indicator light momentarily blinks and no other lights are seen thereafter to indicate the device is turned off.
Testing Operation
Babysense is a highly sensitive device, which monitors baby's breathing movements through the mattress during sleep. There are two main causes of malfunction - technical malfunctions and malfunctions due to environmental factors.
Technical malfunction
In order to minimize technical problems, follow installation and operation instructions carefully.
Environmentally caused malfunction
Due to the high sensitivity of Babysense, fans, wind, air conditioning, and so forth can influence it. Such environmental effects could be picked up by the sensors on a similar level to that of breathing movements, thus preventing or delaying alarm activation.
If the Babysense is concurrently used with other devices, it is required to conduct the daily performance test (below) under an environment identical to the actual situation and while all concurrently used devices are "ON". Under such conditions, it is required to verify that the acoustic and visual alarms of Babysense are activated.
Conduct this performance test daily
Do not conduct performance test by picking up baby out of bed and waiting for the alarm to sound
- The performance test should be conducted while baby is not in bed.
- Turn device on and take two steps away from bed.
- Ensure that alarm goes off within 20 seconds (due to absence of breathing movements).
- The alarm may sound with or without preliminary ticking.
- Check that alarm can be heard in all locations throughout the home or place of care.
- In case that alarm does not sound within 20 seconds refer to troubleshooting on page 4-5.
- Performance test must be conducted daily and every time you move the monitor, change bedding or relocate crib/bed position.
False alarms
Isolated cases of false alarms are possible. Check if caused by faulty connection of the sensor pad(s) to the control unit, connection of only one sensor pad when baby can move off the immediate area or failure of the sensor pads to be directly against the mattress.
In case of false alarms, kindly refer to troubleshooting guide on page 4-5. If the problem cannot be solved, please contact manufacturer's service personnel.
In the event of alarm
Act immediately according to the following:
- Approach the bed and check that baby is breathing. Note pallor (color of skin), muscle tone and movement.
- If baby does not seem normal, pinch baby's heel and check that there is no cause for choking, such as an object lodged in baby's throat.
When breathing resumes, consult a doctor.
- If breathing does not resume, apply first aid and seek medical assistance immediately.
Symbol Guide
| No. | Symbol | Description | No. | Symbol | Description |
| 1 |  | Symbol for "SERIAL NUMBER". This symbol shall be accompanied by the manufacturer's serial number. | 9 |  | Keep away from rain. |
| 2 |  | DATE OF MANUFACTURE. This symbol shall be accompanied by a date to indicate the date of manufacture. | 10 |  | Temperature limitation. |
| 3 |  | Symbol for "MANUFACTURER". This symbol shall be accompanied by the name and the address of the manufacturer. | 11 |  | Humidity limitation. |
| 4 |  | Please dispose of the device in accordance with the legal obligation in your area. | 12 |  | Atmospheric pressure limitation. |
| 5 | IP21 | Protected against vertically falling water drops. | |||
| 6 |  | TYPE BF APPLIED PART. | |||
| 7 |  | Refer to User Guide. | |||
| 8 |  | Authorised representative in the European Community. | |||
Troubleshooting Guide
| Symptom | Possible Cause | Solution |
| Lights on Control Unit don't illuminate when turned ON | Batteries are not inserted correctly or may be flat. | Check batteries are inserted in the Control Unit observing the correct polarity.Control Unit requires 4 X AA 1.5V Alkaline batteries (not supplied). |
| Low battery voltage warning (red light) on the Control Unit | Batteries low.If red low-battery | warning light flashes, replace all batteries as soon as possible. If in addition clicking is heard, all batteries must be replaced immediately. |
| False alarm up to 1/2 minute from activating | Sensor pad is out of order.Cable is connected to monitor's blocked socket. | Connect one sensor pad and lay the baby on the bed for 1 minute. If the alarm does not activate, the sensor pad is in order. If the alarm activates, disconnect and place the sensor pad aside.Connect the other sensor pad and repeat steps above.Do not connect any cables to the blocked socket (only to "SENSOR" socket). |
| False alarm after 1/2 minute from activating | The mattress is not touching the sensor pads. | Make sure that the mattress and the sensor pads are touching. |
| The mattress is raised (there is an object near the sensor pads). | Make sure that there are no objects next to the sensor pads. | |
| Placing two sensors next to each other (or using one sensor) when the baby is of crawling age or using two sensor pads far apart from each other when baby is young and is not crawling yet. | Connect according to instructions.It is important to use only one sensor pad when the baby is young and is not crawling yet.It is important to make sure that two sensor pads are used when the baby is moving around.Make sure the sensor pads are placed underneath baby's location in bed / crib. | |
| The mattress does not enable transfer of baby movements (a rigid mattress, a mattress with springs or a mattress with air pockets).Soft or spring bed / crib base. | Place extra plywood under the sensor pad so that the sensor pad and the mattress will be tightly pressed together. | |
| Delayed alarms while taking the baby out of the bed | Performance test is not correct. | Do not conduct performance test by taking the baby out of bed and waiting for the alarm to sound. Kindly conduct performance test according to guidance in page 3. |
Troubleshooting Guide
The alarm does not go off within20 seconds when performing the correct performance test
• Environmental influences detected by the sensor pads, such as wind, fan, air conditioner, baby mobile toy, vibrations.
- Perform a test which will detect the source of the movement that the device detects. For example, sources of wind such as: air conditioner, an open window or a fan; movements of a baby mobile toy (which can vibrate even if it's not turned on) or walking around the bed area. Solutions: Eliminate sources of wind, remove the mobile toy etc. After neutralizing all environmental influences, perform the test again. If even after neutralizing all of the environmental influences, the alarm does not go off within 20 seconds, perform the following:
1. Test the control unit:
- Disconnect all cables from the control unit.
- Turn control unit on (with no cables attached).
- Alarm activation within 20 seconds indicates that the unit is OK – proceed to the next steps.
- If the alarm does not sound within 20 seconds, stop using the device and contact your local distributor.
2. Test each sensor pad separately:
- Connect one sensor pad to either "SENSOR" socket on control unit.
- Turn control unit on and take two steps back from the bed.
- Alarm activation within 20 seconds indicates that the sensor is OK – perform the above procedures with the second sensor pad.
- If the alarm does not sound within 20 seconds, place the sensor pad aside.
Note: If one of the sensor pads is NOT OK, continue using the product with only the one correctly functioning sensor. If one or both sensors are NOT OK, contact your local distributor for further guidance.
3. Test two sensor pads together:
- If both sensors were OK in Step 2, connect both sensors to "SENSOR" sockets on the control unit.
- Turn control unit on and take two steps back from the bed.
- Alarm activation within 20 seconds indicates that the sensors are OK
- continue using the product.
- If the alarm does not sound within 20 seconds, connect one sensor only and continue using the product. Contact your local distributor for further guidance.
Technical Specifications
- Powered by 4 size AA, 1.5 volt batteries. Power consumption approx. 1mA.
- Battery life approx. 6 months using alkaline batteries.
- Alarm volume typically 85dB SPL at distance of one meter.
• Size of sensor pad is 216 mm. - Babysense has a service life of 3 years from the date of purchase.
Conditions of operation and storage
Conditions of operation are as follows: Temperature: 0 °C to 40 °C
Relative humidity: 20 %RH to 80 %RH
Atmospheric pressure: 55kPa to 102kPa
Conditions of storage between uses are as follows: Temperature: 0 °C to 40 °C
Relative humidity: 5 %RH to 95 %RH
Atmospheric pressure: 55kPa to 102kPa
Contents
- Control Unit
• Control Unit Holder - Optional Hanging Hook
- 2 Sensor pads
- 2 Cable Ties (tied around the sensor cables when supplied)
- User guide
Please note that the batteries are not supplied.
Cleaning and Disposal
As necessary, the device (sensor pads and control unit) may be wiped with a damp cloth.
The device and accessories are to be disposed of according to local regulations after their service lives. Alternatively, they can be returned to the dealer or the manufacturer for recycling or proper disposal.
Caring for your babysense
Babysense requires no special treatment beyond replacing batteries when the battery indicator light goes on. The sensor pads and control unit may be wiped with a damp cloth. Batteries should be removed and the device stored in a dry shaded place when not in use.
It is recommended to replace sensor pads two years after their first use. Use only Babysense sensor pads.
Made by Hisense Ltd., an ISO 9001 and
ISO 13485 certified company.
23 Becker St., Rishon le Zion 7535929, Israel
Tel +(972) 3.956.66.04 www.hisense.co.il

0459
European Authorised Representative
OBELIS s.a email@obelis.net
Boulevard Général Wahis 53, 1030 Brussels, Belgium
Tel +(32) 2.732.59.54 Fax +(32) 2.732.60.03
For all product related questions kindly contact your nearest distributor, which can be found at www.hisense.co.il

- Babysense™ 7
- User Guide
- Warnings
- Please note
- Principal Of Operation
- Installation
- Layout of control unit
- Operation
- Testing Operation
- Technical malfunction
- Environmentally caused malfunction
- Conduct this performance test daily
- Do not conduct performance test by picking up baby out of bed and waiting for the alarm to sound
- False alarms
- In the event of alarm
- Troubleshooting Guide
- Test the control unit:
- Test each sensor pad separately:
- Test two sensor pads together:
- Technical Specifications
- Conditions of operation and storage
- Contents
- Cleaning and Disposal
- Caring for your babysense
Marque : BABYSENSE
Modèle : 7
Catégorie : Produits bébés