CPHVVBSPFF - Programmateur d'arrosage RAIN BIRD - Notice d'utilisation et mode d'emploi gratuit
Retrouvez gratuitement la notice de l'appareil CPHVVBSPFF RAIN BIRD au format PDF.


| Type de produit | Programmateur d'arrosage |
| Marque | Rain Bird |
| Modèle | CPHVVBSPFF |
| Dimensions (L x l x h) | 20 x 15 x 5 cm |
| Poids | 0,5 kg |
| Alimentation | 24 V CA, transformateur inclus |
| Nombre de zones | 4 à 6 zones |
| Programmation | Jours de la semaine, durée, départ |
| Fonctions principales | Programmation indépendante par zone, délai de pluie, arrosage manuel, calendrier saisonnier |
| Matériau du boîtier | Plastique ABS résistant aux UV |
| Indice de protection | IP54 (protection contre les éclaboussures) |
| Température de fonctionnement | de 0°C à 50°C |
| Affichage | Écran LCD rétroéclairé |
| Type de batterie de secours | Pile 9V (non incluse) pour sauvegarde de la programmation |
| Compatibilité électrovanne | 24 V CA, courant maximum 1 A par zone |
| Entretien et nettoyage | Nettoyer avec un chiffon humide ; ne pas utiliser de solvants |
| Sécurité | Transformateur à isolation renforcée ; circuit protégé contre les surcharges |
| Pièces détachées et réparabilité | Les pièces détachées (transformateur, capteur de pluie) sont disponibles auprès du service après-vente Rain Bird |
| Garantie | 2 ans |
| Informations générales | Programmateur électronique pour arrosage automatique, idéal pour jardins et espaces verts |
FOIRE AUX QUESTIONS - CPHVVBSPFF RAIN BIRD
Questions des utilisateurs sur CPHVVBSPFF RAIN BIRD
0 question sur cet appareil. Repondez a celles que vous connaissez ou posez la votre.
Poser une nouvelle question sur cet appareil
Téléchargez la notice de votre Programmateur d'arrosage au format PDF gratuitement ! Retrouvez votre notice CPHVVBSPFF - RAIN BIRD et reprennez votre appareil électronique en main. Sur cette page sont publiés tous les documents nécessaires à l'utilisation de votre appareil CPHVVBSPFF de la marque RAIN BIRD.
MODE D'EMPLOI CPHVVBSPFF RAIN BIRD
CPHVVBSPFF 26 x 34 mm
TECHNICAL SPECIFICATIONS
Flow 0.05–6.82 m ^3 /h (0.8–113 l/min)
Pressure 1.0–10.3 bar (15–150 psi)
Electrical 24 VAC (50/60 Hz)
BEFORE INSTALLING VALVE
- Make sure you have sufficient water supply, pressure, and flow.
- Flush system until water runs clear.
- For best performance, install a pressure regulator if water pressure exceeds 10.3 bar (150 psi).
- If water source has sediment, install a 100 mesh or finer filter.
- Do not use with water exceeding 43.3^ C (125°F).
Refer to local building codes for other plumbing and electrical requirements.
INSTALLATION STEPS (Outdoor Use Only)
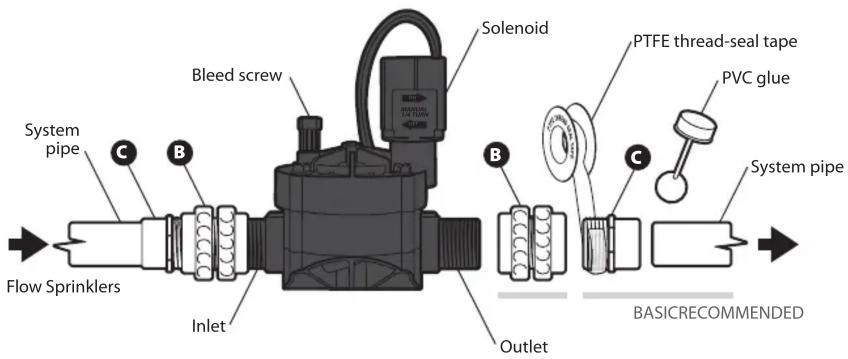
Connect Pipe and Adapters to Valve
TIP: Using pipe unions (B) on both the inlet and outlet side of the valve as shown will greatly simplify installation and allow retightening to correct for leaks. Unions will also permit connections to be preassembled on a benchtop and enable easier valve maintenance/replacement in the future.
- Apply PTFE thread-seal tape to all male threads (A and C). DO NOT USE pipe sealant paste which will damage your system. Assemble in the order shown and tighten.
- Tighten the union (B) collars and test fit the entire assembly in the valve box.
CAUTION
Make sure the valve arrows face correctly in direction of flow.
- When satisfied with fit of all components, clean the ends to be glued with primer and apply solvent glue.
Connect Valve Wires
TIP: Use watertight connectors (gel caps) and multi-strand direct burial wire only.
- Connect the common wire from the controller (typically white) to one of the two wires from valve solenoid. It does not matter which wire you use.
- Attach the valve's remaining wire lead to the strand color for that zone.
Operate Valve Manually
- To flush the valve, turn on water and open bleed screw for one full minute (this will flush smaller debris).
- Tighten bleed screw and test system. If valve does not close fully, check solenoid and bleed screw for leaks.
- If valve still does not close fully, remove bonnet, flush and reinstall.
Made in Mexico
RAIN BIRD CORPORATION
6991 East Southpoint Road, Tucson, AZ 85756, USA
UK Authorised Representative
Comply Express Ltd, Unit C2, Coalport House, Stafford Park 1, Telford TF3 3BD, UK
Imported in EU by RAIN BIRD EUROPE
Bât A, Parc Clamar, 240 rue René Descartes - BP 40072 - 13792 Aix-en-Provence, CEDEX 3, France

A Male x Male adapter
B Female threaded union
C Male x Slip adapter
CPHVVBSPMM 25 mm
TROUBLESHOOTING
| Problem | Leaks at the valve |
| Solution | Check pipe fittings, solenoid, bleed screw, etc. Retighten or replace as required. |
| Problem | Leaks at sprinkler heads (valve doesn't close) |
| Solution | Possible cause 1: Debris.Open the bleed screw. Flush one minute. Open the solenoid.Flush five minutes. |
| Possible cause 2: External leaks at the valve.See above. | |
| Problem | Sprinklers do not turn on (valve doesn't open) |
| Solution | Possible cause 1: Damaged or disconnected wire.Inspect and repair as required. |
| Possible cause 2: Damaged solenoid.Replace solenoid. Kit # SRKCP/CPF. | |
| Possible cause 3: Damaged diaphragm.Remove bonnet (top) and replace diaphragm. Kit # DRK-JTV. |
NOTE: During winter shutdown, drain the system to protect HV valves from freezing.
www.rainbird.com
® Registered trademark of Rain Bird Corporation © 2022 Rain Bird Corporation
Rev. 09/22

WIRING

flowchart
graph TD
    A["1"] --> B["COMMON"]
    C["2"] --> B
    D["3"] --> B
    B --> E["123"]

WASTE ELECTRICAL AND
ELECTRONIC EQUIPMENT (WEEE)
This symbol means that end of life
(WEEE) should not be mixed with general household waste. For proper treatment, recovery and recycling, please take this product to designated collection points. Rain Bird has met its national obligations to the EU WEEE Directive by registering in those countries to which Rain Bird is an importer. Rain Bird has also elected to join WEEE Compliance Schemes in some countries to help manage customer returns at end of life.
- CPHVVBSPFF 26 x 34 mm
- TECHNICAL SPECIFICATIONS
- BEFORE INSTALLING VALVE
- INSTALLATION STEPS (Outdoor Use Only)
- Connect Pipe and Adapters to Valve
- CAUTION
- Connect Valve Wires
- Operate Valve Manually
- RAIN BIRD CORPORATION
- Imported in EU by RAIN BIRD EUROPE
- CPHVVBSPMM 25 mm
- WASTE ELECTRICAL AND
- ELECTRONIC EQUIPMENT (WEEE)
Marque : RAIN BIRD
Modèle : CPHVVBSPFF
Catégorie : Programmateur d'arrosage