
KIV 3244 - Réfrigérateur combiné LIEBHERR - Notice d'utilisation et mode d'emploi gratuit
Retrouvez gratuitement la notice de l'appareil KIV 3244 LIEBHERR au format PDF.

| Type de produit | Réfrigérateur combiné |
| Marque | LIEBHERR |
| Modèle | KIV 3244 |
| Classe climatique | SN, N, ST, T |
| Tension nominale | 230 V ~ |
| Fréquence | 50 Hz |
| Fusible recommandé | 10 A |
| Réfrigérant | R600a |
| Type de dégivrage (réfrigérateur) | Automatique |
| Type de dégivrage (congélateur) | Manuel |
| Éclairage intérieur | 15 W, culot E14 |
| Réversibilité des portes | Oui |
| Installation | Encastrable |
| Dimensions de l'appareil (H x L x P) | 177.2 x 55.9 x 54.6 cm (estimation) |
| Poids net | ~65 kg (estimation) |
FOIRE AUX QUESTIONS - KIV 3244 LIEBHERR
Questions des utilisateurs sur KIV 3244 LIEBHERR
0 question sur cet appareil. Repondez a celles que vous connaissez ou posez la votre.
Poser une nouvelle question sur cet appareil
Téléchargez la notice de votre Réfrigérateur combiné au format PDF gratuitement ! Retrouvez votre notice KIV 3244 - LIEBHERR et reprennez votre appareil électronique en main. Sur cette page sont publiés tous les documents nécessaires à l'utilisation de votre appareil KIV 3244 de la marque LIEBHERR.
MODE D'EMPLOI KIV 3244 LIEBHERR
7080 461-00
KIV SN/EN 1205
Disposal notes
The packaging is made of recyclable materials.
- Corrugated board/board
- EPS moulded parts
- Polythene sheets
-
Polypropylene straps
-
Keep packaging materials away from children - polythene sheets and bags can suffocate!
- Please return the packaging material to an official collection point.
Your old appliance: This contains some reusable materials and should be disposed of properly - not simply with unsorted household refuse.
- Disable discarded appliances by removing the plug and cutting through the connection cable. Render the catch unusable so that children cannot become trapped inside.
- Make sure that the refrigerant circuit of an appliance that is no longer needed is not damaged before it is collected or handed in at a municipal collection point.
- Details of the refrigerant used can be found on the type plate.
- Information on collection dates or collection points can be obtained from the waste disposal authorities or local council.
Contents
Connecting to the mains 9
Notes on energy saving. 9
Switching the appliance on and off. 9
Cool Plus 9
Setting the temperature 9
Cooling, Interior light 9
Changing shelf arrangement 10
Freezing. 10
Notes on freezing and storage 10
Defrosting, Cleaning, Malfunctions 11
Shutting your appliance down 11
Changing over door hinges 12
Installing in a kitchen unit 12
Attaching inside a kitchen unit 12
Changing the compartment door. 12
Fitting a unit door 13
Fitting recessed doors. 13
Safety instructions and warnings
- To prevent injury or damage to the unit, the appliance should be unpacked and set up by two people.
- In the event that the appliance is damaged on delivery, contact the supplier immediately before connecting to the mains.
- To guarantee safe operation, ensure that the appliance is set up and connected as described in these operating instructions.
- Disconnect the appliance from the mains if any fault occurs. Pull out the plug, switch off or remove the fuse.
- When disconnecting the appliance, pull on the plug, not on the cable.
- Any repairs and work on the appliance should only be carried out by the customer service department, as unauthorised work could prove highly dangerous for the user. The same applies to changing the mains power cable.
- Do not allow naked flames or ignition sources to enter the appliance. When transporting and cleaning the appliance ensure that the refrigerant circuit is not damaged. In the event of damage, make sure that there are no ignition sources nearby and keep the room well ventilated.
- Do not stand on the plinth, drawers or doors or use them to support anything else.
- This appliance is not intended for use by persons (including children) with reduced physical, sensory or mental capabilities or lack of experience and knowledge unless they have been given initial supervision or instruction concerning use of the appliance by a person responsible for their safety. Children should be supervised to ensure that they do not play with the appliance.
- Avoid prolonged skin contact with cold surfaces or chilled/frozen food. This could cause pain, numbness and frostbite. In the case of prolonged skin contact, protective measures should be taken, e.g. gloves should be worn.
- Do not eat ice cream, particularly ice lollies or ice-cubes, immediately after taking them from the freezer compartment as there is a risk of "burning" because of the very cold temperatures.
- Do not consume food which has been stored for too long, as it could cause food poisoning.
- The appliance is designed for cooling, freezing and storage of food, and for making ice and is intended for domestic use. If used for commercial purposes, the relevant legal regulations applicable to the trade concerned must be observed.
- Do not store explosives or sprays using combustible propellants such as butane, propane, pentane etc. in the appliance. Electrical components might cause leaking gas to ignite. You may identify such sprays by the printed contents or a flame symbol.
- Do not use electrical appliances inside the appliance.
The operating instructions apply to several models. Differences may therefore occur.
The appliance is set to operate within specific ambient temperature limits according to its climate rating. These temperature limits should not be exceeded. The correct climate rating for your appliance is indicated on the type plate.
Climate rating Ambient temperature
SN +10^ up to +32^
N +16^ up to +32^
ST +18^ up to +38^
T +18 ^ up to +43^
Setting up
Standard EN 378 specifies that the room in which you install your appliance must have a volume of 1m^3 per 8g of R 600a refrigerant used in the appliance, so as to avoid the formation of inflammable gas/air mixtures in the room where the appliance is located in the event of a leak in the refrigerant circuit. The quantity of refrigerant used in your appliance is indicated on the type plate on the inside of the appliance.
Connecting to the mains
Power supply (a.c.) and voltage at the operating point must comply with the details on the type plate, which is located in the refrigerator compartment on the left-hand side. The socket must be fused with a 10 A fuse or higher, it must be away from the rear of the appliance and must be easily accessible.
Connect the appliance with a properly earthed fused plug and socket only.
The wires in the mains lead are coloured in accordance with the following code: green/yellow = earth, blue = neutral, brown = live.
Warning! This appliance must be earthed.
Notes on energy saving
- Avoid opening the door unnecessarily for long periods of time.
- Allow hot food to cool to room temperature before storing it in the appliance.
- If an ice layer forms, defrost the appliance. This will improve the cold transfer and reduce energy consumption.
Switching the appliance on and off
You are recommended to clean the appliance before switching it on for the first time (see "Cleaning").
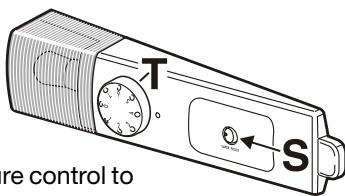
Turn the temperature control T clockwise from "0" to "1". The appliance is now switched on and the interior light comes on. The appliance is switched off at the "0" setting.
Cool Plus
Turn on switch ④ on the temperature control housing for operation at low room temperatures os 18^ C or below. The warning light in the switch comes on. This guar. the necessary low temperatur compartment.
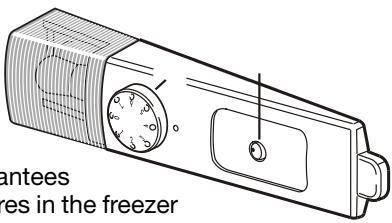
It is not necessary to turn on the switch at normal room temperatures (above 18^ ). The switch should remain switched off: - the warning light will not be illuminated.
Setting the temperature
Turn the temperature control T to set the desired temperature.
Setting "1" = lowest cooling setting, highest temperature Setting "7" = highest cooling setting, lowest temperature
When storing pre-frozen food in the freezer compartment, we recommend a temperature setting of between 4 and 7, in order to achieve temperatures of -18^ or lower inside the compartment.
Remember that the temperature depends on the ambient temperature (location of appliance), the number of times the door is opened and how much frozen food is stored. The setting should be adjusted accordingly if necessary.
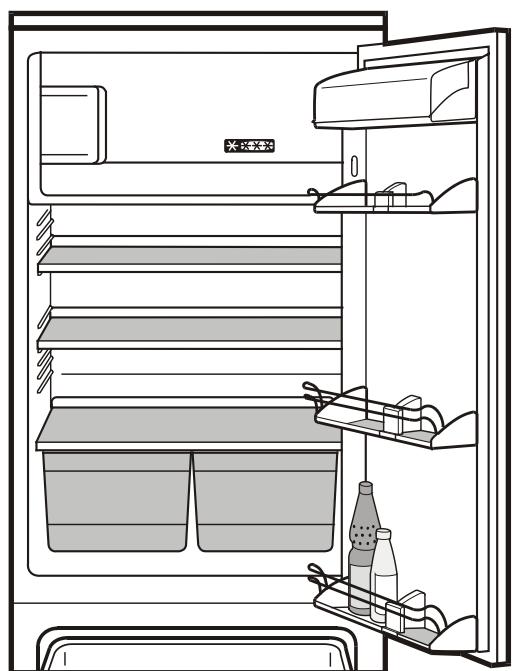
Cooling
Storage example
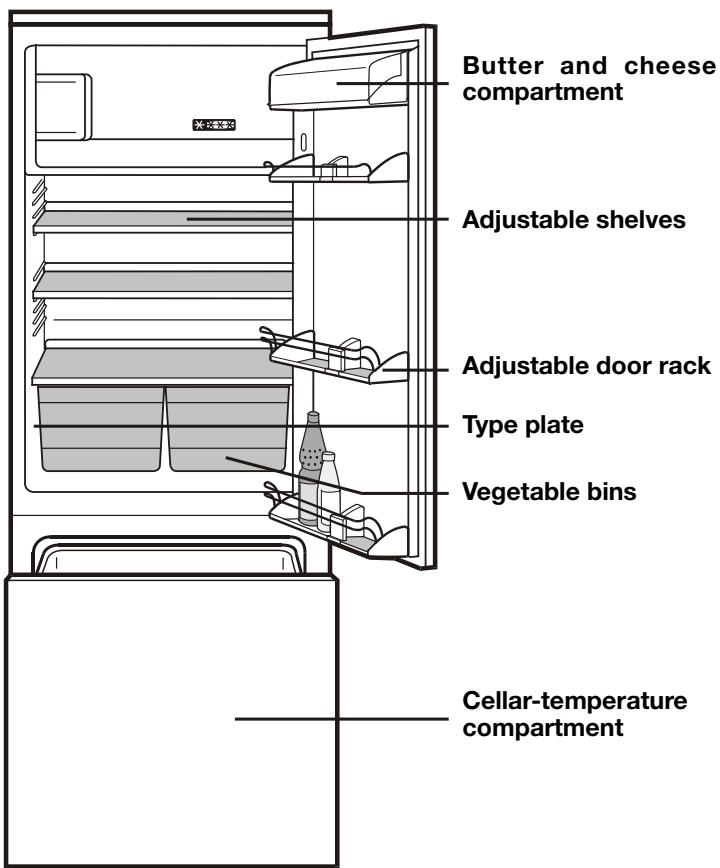
1 butter, cheese
eggs
top: small bottles, cans, tubes bottom: large bottles
4 frozen food, ice cubes
meat, sausage products, dairy products
⑥ baked goods, pre-cooked meals, drinks
fruit, vegetables, salad, fresh herbs
Note
- Food which gives off or absorbs odours and flavours (8) as well as liquids should always be stored covered or in closed containers. High-percentage alcohols should be tightly sealed and stored upright.
- Fruit, vegetables and salad can be stored unpacked in the bins.
- Reuseable plastic, metal, aluminium and glass containers can be used for packaging.
Interior light
Bulb data: 15 W (never use a bulb rated at more than 15 W). The voltage should agree with the details on the type plate. Socket: E 14.
Replacing the bulb:
Pull out the mains plug or remove/unscrew the fuse.
- Reach inside the lamp cover, press upwards at the front and remove cover to the side.
- Replace the bulb.
- Replace the cover and click into position.

Changing shelf arrangement
You can re-arrange the storage shelves as required. Slide the shelf forwards, lift and remove. When inserting a shelf, the guard bar at the back must be facing upwards, otherwise food may freeze to the rear wall.
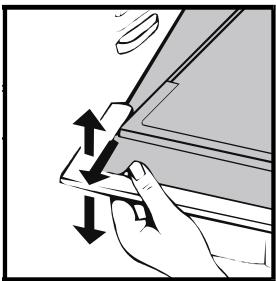
Repositioning the door racks
- Lift door rack vertically, lift out to the front and re-insert at a different height, following these steps in the reverse order.
- By shifting the bottle holder you can protect the bottles from falling over when opening or closing the door.
If you require space for large bottles and containers simply slide half the glass shelf to the back.
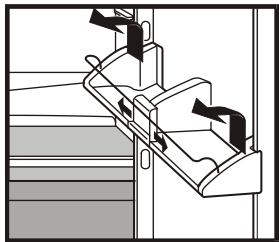
Pull-out compartment with cellar temperatures
suitable for storing cold-sensitive vegetables, tropical fruit and any food or drink you do not wish to consume too cold.
The temperature in the cellar compartment is about 5^ higher than the temperature set in the refrigerator compartment.
Bottle container
6 Container for vegetables and tropical fruits
7 Container for small fruits and vegetables
Containers ⑤ and ⑥ can be removed for cleaning by simply lifting them out of the appliance. Container ⑦ is fastened with screws.
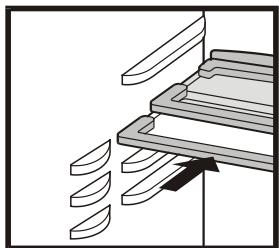
To insert container 6:
- Extend the pull-out rails as far as they will go.
- First insert the container at the back and the press down at the front.
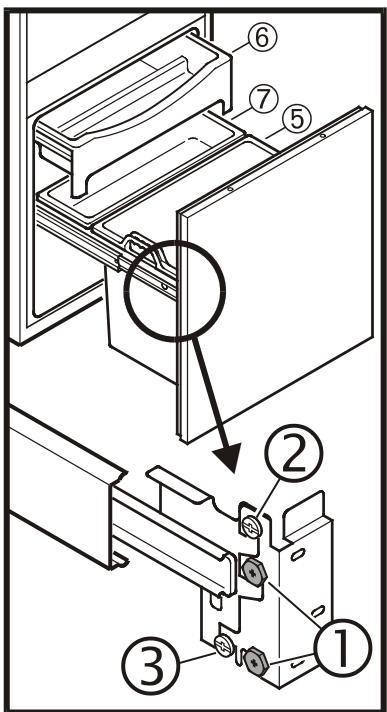
Adjusting appliance door
- Slacken screws ① right and left.
- Adjust door angle with set screws ② and height with set screw ③ .
- Fasten appliance door with screws ①.
Freezing
Fresh food should be frozen to the core as rapidly as possible. This ensures that the nutritional value, appearance and flavour of the food remain intact.
The maximum amount of food which can be frozen in 24 hours is shown on the type plate ("Freezing capacity ...kg/24 hours"). This amount varies according to the model and climate rating.

Freezing
- Set the temperature control T to a medium to cold setting. Switch on switch S.
- Wait 24 hours.
- Place the fresh food in the freezer.
- After approx. 24 hours the fresh food will be frozen.
- Now switch back the temperature control to the required setting.
- Switch off switch S.
You can freeze smaller quantities of up to 1kg of food daily without changing the temperature setting.
When storing pre-frozen food, the freezer compartment can be filled straight away. It is not necessary to change the temperature setting.
Making ice-cubes
Fill the ice-cube tray three-quarters full with water and freeze. The ice-cubes can be removed from the tray by twisting or by holding upside down for a short time under running water.

Notes on freezing and storage
- Use material or containers suitable for freezing to wrap the food. The material must be sufficiently strong, neutral in flavour and impermeable to air and liquids in order to avoid loss of quality.
- Always write the date and contents on the pack and do not exceed the stated storage time for the food. This prevents any risk of quality impairment.
- Do not freeze bottles and cans which contain carbonated drinks as they might burst. Drinks can be placed in the freezer to cool them down quickly, but take the bottles out again after an hour the most.
- Only take out as much food as is immediately required for thawing. Use food which has been thawed in prepared meals as quickly as possible.
Frozen food can be thawed in the following ways:
- in a fan oven
- in a microwave oven
- at room temperature
- in the refrigerator: the cold given off by the frozen food is used for cooling.
Solid cuts of meat and fish can be cooked when partly thawed. Vegetables can be cooked from frozen (in half the normal time).
Defrosting
Refrigerator compartment
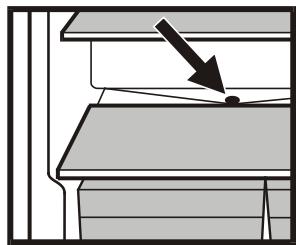
The refrigerator compartment defrosts automatically. The water that forms on the rear wall drains into a reservoir at the back of the appliance and evaporates automatically through the compressor heat.
Ensure that the water can flow without hindrance through the hole above the vegetable bins.
Freezer compartment
After a long period of operation, a layer of frost or ice can build up inside the freezer compartment. This increases energy consumption. You should therefore defrost the freezer compartment regularly.
- Switch the appliance off to defrost.
Pull out the mains plug or set the temperature control to "0". - Wrap the frozen food in paper or blankets and store in a cool place.
- To speed up the defrosting process put a saucepan of hot but not boiling water on one of the cooling elements.
- Leave the door of the appliance open while defrosting. After defrosting mop up the remaining water and clean the appliance.
Do not use any mechanical devices or other artificial aids for defrosting other than those recommended by the manufacturer.
Cleaning
Before cleaning always switch off the appliance. Pull out the mains plug or remove/unscrew the fuse.
Clean the inside, equipment parts and outer walls with lukewarm water and a little detergent. Do not use abrasive or acid cleaners or chemical solvents.
Do not use steam cleaners because of the risk of injury and damage.
- Ensure that no cleaning water penetrates into the electrical components or ventilation grille.
- Dry all parts well with a cloth.
- The dust should be removed from the refrigeration unit and heat exchanger – metal grid at the back of the appliance – once a year.
- Do not damage or remove the type plate on the inside of the appliance. It is very important for servicing purposes.
- Clean the drain hole in the refrigerator compartment with a thin object, e.g. cotton swab or the like.
Malfunctions
Your appliance is designed and manufactured for a lengthy, reliable operating life with no malfunctions. If a malfunction nonetheless occurs during operation, check whether it is due to an operating error. Please note that even during the warranty period the resultant servicing costs in this case will have to be borne by the owner.
You may be able to rectify the following faults by checking the possible causes yourself:
- Appliance does not function:
- Is the appliance switched on?
- Is the plug correctly fitted in the mains socket?
- Is the socket fuse intact?
- Loud running noise:
- Is the appliance set up firmly on the floor?
- Does the appliance cause nearby items of furniture or objects to vibrate? Please note that noises caused by the refrigerant circuit cannot be avoided.
- The temperature is not low enough:
- Is the temperature setting correct (see "Setting the temperature")?
- Does the separately installed thermometer show the correct reading?
- Is the ventilation system working properly?
- Is the appliance set up too close to a heat source?
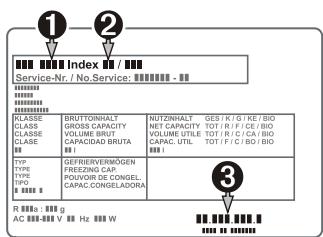
If none of the above causes apply and you cannot rectify the fault yourself, contact the nearest customer service department stating the type of appliance 1, index 2 and appliance number 3 as indicated on the type plate. The type plate is located in the refrigerator compartment on the left-hand side next to the vegetable bins.
Shutting your appliance down
If your appliance is to be shut down for any length of time, switch it off and disconnect the plug or remove the fuse. Clean the appliance and leave the door open in order to prevent unpleasant smells.
The refrigerant circuit has been tested for leaks.
The appliance is radio-suppressed to EN 55014 and thus complies with EC Directive 87/308/EEC.
All types and models are subject to continuous improvement and the manufacturer therefore reserves the right to make modifications to the shape, equipment and technology.
Changing over door hinges (fig. A)
- Loosen attachment screws ① on the appliance using a Pozidriv screwdriver (detail X in fig. A).
- Remove the doors.
- Lift off covers ③.
- Replace all attachment screws ① on the other side and screw in a little way.
- Undo door attachment screws ② and transfer the hinges to the diagonally opposite corner.
- Suspend the appliance doors on the screws inserted previously 1 and tighten the screws.
- Cover all open attachment holes with covers 0 .

Installing in a kitchen unit (fig. B)
Align housing unit with spirit level and set square using shims if necessary. The shelves and sides of the housing unit must be perpendicular to each other.
At least 200~cm^2 is required for ventilation at the bottom and around the housing unit.

Fitting dimensions (mm):
Attaching inside a kitchen unit
-
Fig. C1: Slide the attachment element ⑨ into the rail underneath the appliance on the handle side on the left or right, depending on which side the handle is. Screw into place with the 3.5 × 11 countersunk screw. If the recess is more than 560 ~mm wide, use attachment bracket ⑩ instead. Fit this on the opposite side to the hinges
-
Fasten the appliance in the recess:
- with the attachment profile at the top, fig. C3,
- with the hinges at the side, fig. C2,
- with the attachment element 9 / 10 at the bottom, fig. C1.
- Cover the attachment brackets with the cover strip and click into place.
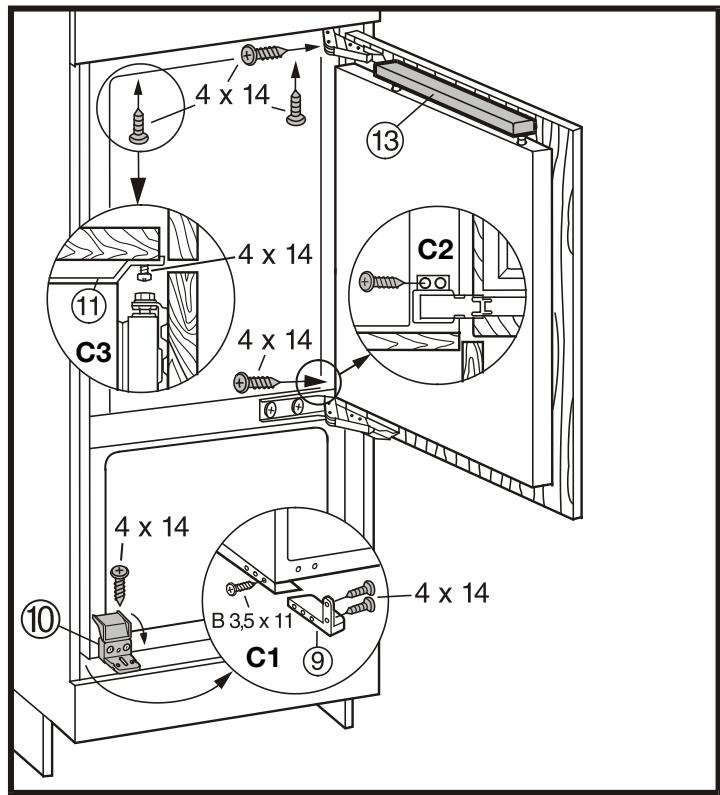
fig. C
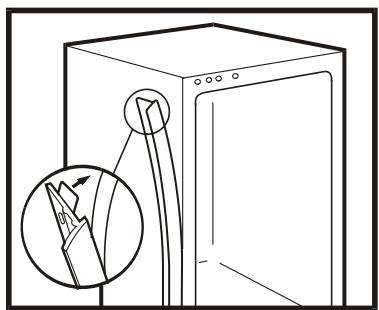
Pull off film and stick sealing strip to handle side of applince, shortening to the height of the recess if necessary.
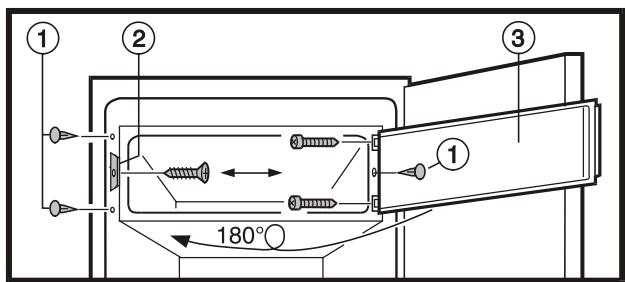
Changing the compartment door.
- Remove plugs 1.
- Unscrew lash ②. Unscrew compartment door with bearings ③, turn through 180^ and reassemble on the other side.
- Cover holes with plugs 1.
Fitting a unit door
- Slide the fitting aids ④ up level with the unit door: underside of stop edge of fitting aid = upper edge of unit door (fig. D).
- Unscrew the counternuts ③

fig. D
- Suspend the attachment strut ① on the unit door (fig. E).
Depending on the width of the recess, the middle line of the attachment strut will have to be moved towards the hinge!
- Fasten the attachment strut ①:
- With at least 6 screws (4x14) if the doors are made of wood board.
- With 4 screws round the edge in the case of panel doors.
- Lift the fitting aids ④ out to the top, turn round and insert into the adjacent openings.

fig. E
- Suspend the unit door on the door of the appliance/adjusting pins ② . Screw the counternuts ③ loosely onto the adjusting pins (fig. F).
- Align the unit door flush with the surrounding unit fronts: align lafterally X by sliding in the corresponding direction, adjust height Y and lateral tilt with the adjusting pins ② with a screwdriver (fig. F1). Tighten counternuts ③.
- Adjust the depth of the unit door Z: loosen the cross-headed screws ⑥ (fig. F1).
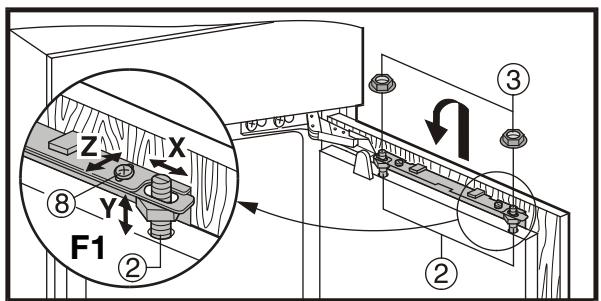
fig. F
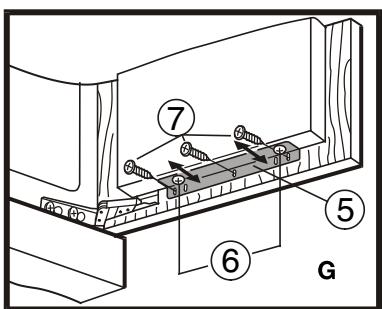
- Attach bracket ⑤ to housing unit door with 4 × 14 wood board screws ⑦ (fig.G).
- Loosen the cross-headed screws ⑥.
- Align housing unit door parallel to appliance door. Tighten M6 screws ⑥ .
- Close the door and check distance between door and surrounding housing unit doors.
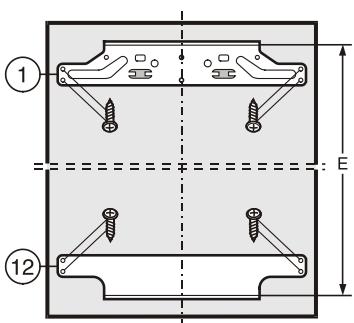
Fitting recessed doors
- Unscrew attachment bracket ⑤ (fig.H).
- Screw adjusting screws underneath into the appliance doors as far as they will go (fig. H).
- Slide the fitting aids ④ up level with the unit door: underside of stop edge of fitting aid = upper edge of unit door. (fig. D).
- Suspend the attachment strut ① on the unit door (fig. 1).
Depending on the width of the recess, the middle line of the attachment strut will have to be moved towards the hinge!
- Fasten the attachment strut ①: With 4 screws (4x14) round the edge in the case of panel doors (fig. 1).
- Lift the fitting aids ④ out to the top, turn round and insert into the adjacent openings (fig. 1).
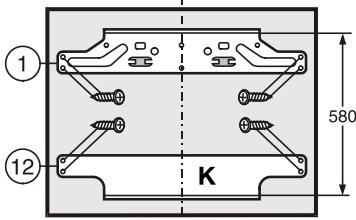
- Fasten the attachment strut (fig. K).
Recess height = 1524mm E = 839 mm
Recess height = 1778mm E = 1093mm
- Suspend the unit door on the door of the appliance/adjusting pins ② . Screw the counternuts ③ loosely onto the adjusting pins (fig. F).
- Align the unit door flush with the surrounding unit fronts: align laaterally X by sliding in the corresponding direction, adjust height Y and lateral tilt with the adjusting pins ② with a screwdriver (fig. F1).
- Tighten counternuts (fig. F).
- Adjust the depth of the unit door Z: loosen the cross-headed screws ⑧ (fig. F1).
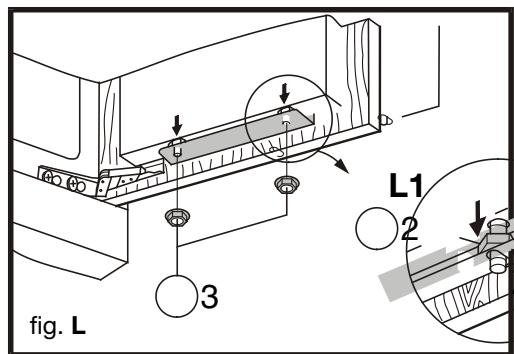
- Open up the adjusting screws underneath until they make contact with the bottom attachment plate (fig. L1).
- Screw the counternuts ⑧ loosely onto the adjusting pins (fig. L).
- Adjust the depth of the unit door Z (fig. L1).
- Tighten counternuts ③ (fig. L).


- Disposal notes
- Contents
- Safety instructions and warnings
- Climate rating Ambient temperature
- Setting up
- Connecting to the mains
- Notes on energy saving
- Switching the appliance on and off
- Cool Plus
- Setting the temperature
- Setting "1" = lowest cooling setting, highest temperature Setting "7" = highest cooling setting, lowest temperature
- Cooling
- Storage example
- Note
- Interior light
- Changing shelf arrangement
- Repositioning the door racks
- Pull-out compartment with cellar temperatures
- Adjusting appliance door
- Freezing
- Making ice-cubes
- Notes on freezing and storage
- Frozen food can be thawed in the following ways:
- Defrosting
- Refrigerator compartment
- Freezer compartment
- Cleaning
- Do not use steam cleaners because of the risk of injury and damage.
- Malfunctions
- You may be able to rectify the following faults by checking the possible causes yourself:
- Shutting your appliance down
- Changing over door hinges (fig. A)
- Installing in a kitchen unit (fig. B)
- Attaching inside a kitchen unit
- Changing the compartment door.
- Fitting a unit door
- Depending on the width of the recess, the middle line of the attachment strut will have to be moved towards the hinge!
- Fitting recessed doors
Marque : LIEBHERR
Modèle : KIV 3244
Catégorie : Réfrigérateur combiné