JA-83P - Caméra de surveillance Jablotron - Notice d'utilisation et mode d'emploi gratuit
Retrouvez gratuitement la notice de l'appareil JA-83P Jablotron au format PDF.


| Type de produit | Caméra de surveillance |
| Résolution | 1080p (1920x1080) |
| Vision nocturne | Jusqu'à 10 mètres avec LEDs infrarouges |
| Angle de vision | 120° |
| Connectivité | Wi-Fi 2.4 GHz |
| Stockage | Carte microSD (jusqu'à 128 Go) |
| Alimentation | Adaptateur secteur 12V DC (inclus) |
| Dimensions (LxHxP) | 10 x 6 x 6 cm |
| Poids | 300 g |
| Indice de protection | IP65 (résistant aux intempéries) |
| Fonctions principales | Détection de mouvement, alarme, vision nocturne, audio bidirectionnel |
| Entretien et nettoyage | Nettoyer l'objectif avec un chiffon doux et sec |
| Sécurité | Ne pas exposer à des températures extrêmes ou à l'humidité excessive |
| Pièces détachées et réparabilité | Contactez le service client Joblotron pour les pièces de rechange |
| Informations générales | Garantie 2 ans, fabriqué en Chine |
FOIRE AUX QUESTIONS - JA-83P Jablotron
Questions des utilisateurs sur JA-83P Jablotron
0 question sur cet appareil. Repondez a celles que vous connaissez ou posez la votre.
Poser une nouvelle question sur cet appareil
Téléchargez la notice de votre Caméra de surveillance au format PDF gratuitement ! Retrouvez votre notice JA-83P - Jablotron et reprennez votre appareil électronique en main. Sur cette page sont publiés tous les documents nécessaires à l'utilisation de votre appareil JA-83P de la marque Jablotron.
MODE D'EMPLOI JA-83P Jablotron
The JA-83P wireless PIR motion detector
The JA-83P is a component of Jablotron's OASiS alarm system. It is designed to detect human body movement inside buildings. The detection pattern can be modified by optional lenses. Detector immunity has two selectable levels. The battery-powered detector communicates via OASiS radio protocol.
Installation
Installation shall only be undertaken by technicians holding a certificate issued by an authorized distributor. The detector can be installed on a flat wall or in the corner of a room. Avoid objects rapidly changing in temperature, such as electrical heaters, gas appliances etc. being positioned within its detection area. Moving objects with a temperature close to that of humans such as curtains moving above a radiator, and pets should also be avoided. Detectors should not face windows or spotlights or be near fast-moving air e.g. near ventilation fans or open windows or doors. There should also be no obstacles blocking the detector's "view" of the protected area. Keep the detector away from metal objects which could interfere with radio communication.
- Open the detector cover by pressing the tab (5). Avoid touching the internal PIR element or damaging the antenna.
- Remove the PCB which is held by an internal tab (3).
- Punch screw holes through the rear plastic cover – for a flat wall (1) or for a 45° (corner) installation (4).
- At least one screw should penetrate the tamper-sensitive section (2).
- Screw the rear cover onto the wall, about 2.5 metres above the floor (vertically, with the tab down).
- Return the PCB to its original place.
- Leave the battery disconnected and the cover open and then follow the control panel or receiver manual. The basics of enrollment are:
a. Enter enrollment mode on the control panel by keying in "1" in Service mode.
b. Install a battery into the detector to activate enrollment.
c. Exit enrollment mode by pressing “#”
-
Close the cover and the tab can be finally fixed using the supplied screw. Notes:
-
To enroll a detector after having already connected a battery, first disconnect the battery, and press and release the tamper sensor (11) to discharge any remaining charge to ready the device for enrollment. After installing a battery into the detector, allow three minutes for stabilisation. During this period the LED is continuously lit.
- The detector can also be enrolled by entering its serial number – the last eight digits of the bar code (7)
- To comply with EN-50131-2-2 the battery must be secured in the holder using the supplied clip and the front cover tap must be fixed using the supplied screw.
DIP switches
DIP switch 1 Selection of immunity to false alarms. The NORM (OFF) position combines very good immunity with fast sensor reactions. The HIGH (ON) position gives increased immunity with a slower reaction time and is only used for problematic installations.

Warning:
The most frequent cause of false alarms is bad detector positioning.
DIP switch 2 The DEL (OFF) position provides entrance & exit delays for detectors installed in a building entrance. The INS (ON) position allows the detector to instantly trigger alarm activation if the control panel is armed. This setting only has an effect if the detector has a natural reaction assigned to it in the Oasis control panel. It also has no effect when used with a UC-8x or AC-8x receiver.
Testing the detector
15 minutes after closing the detector cover, the indicator shows detector activation. The strength and quality of detector signals can be measured by the control panel in Service mode.
5 minutes / 1 minute sleep time
To save battery energy, the detector switches to battery-save mode 15 minutes after its cover is closed. During battery-save mode the detector still always watches out for movement. The first movement detected is then signalled to the control panel instantly, and for the next 5 minutes the detector ignores any further movement. After these 5 minutes, the detector then returns to watching out for movement until re-triggered. The sleep time can be shortened to 1 minute by pressing the tamper switch during battery installation. Not pressing the tamper switch gives a sleep time of 5 minutes.
Battery replacement
The detector monitors its battery voltage and if too low, a transmission is sent to the control panel to inform the installer or user. The detector continues to function and shows each detected movement with a flash of its LED. Battery replacement should not be delayed by more than two weeks. This should be done by a qualified technician with the control panel in Service mode. Notes:
- After battery replacement, the detector needs about 3 minutes to stabilise during which its LED lights continuously. After the LED has stopped indicating, test the detector's functioning.
- If a partly discharged battery is inserted then the LED starts flashing for one minute. Then the detector will work but the Lo Bat signal will be sent to the control panel.
- Expired batteries should not be thrown into the garbage, but disposed of according to local regulations.
Removing the detector from the system
If a detector is removed, the control panel announces the removal. The detector has to be deleted in the control panel before intentional removal.
Detection characteristics
The default lens supplied covers an angle of 120^ and a distance of 12 metres. The area is covered by three beams as shown in the following picture.

Top view

Side view
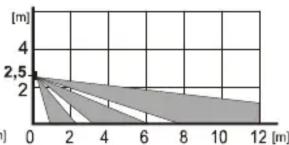
area
| X-axis (m) | Y-axis (m) | |---|---| | 0 | 2.5 | | 1 | 2.4 | | 2 | 2.3 | | 3 | 2.2 | | 4 | 2.1 | | 5 | 2.0 | | 6 | 1.9 | | 7 | 1.8 | | 8 | 1.7 | | 9 | 1.6 | | 10 | 1.5 | | 11 | 1.4 | | 12 | 1.3 |The characteristics can be changed by using optional lenses:
| JS-7904 | Suitable for long corridors. The middle beam covers 20 meters. |
| JS-7906 | Only employs an upper beam with a 120° angle and a 12 metre range. Ignoring the floor eliminates the effect of the movement of small pets. |
| JS-7901 | Has a vertical beam forming a wall-like detection barrier which triggers the detector if someone walks through it. |
Note: After changing the lens, test that the desired area is protected. Incorrect installation of the lens can disable detection.
Technical parameters
Voltage 3.0 V lithium battery, type CR123A
Typical battery lifetime approx. 3 years (5 min. sleep mode)
Communication band 868 MHz, Oasis protocol Communication range approx. 300m (open area)
Recommended installation height 2.0 to 2.5 m above floor level Detection angle/detection range 120° / 12 m (with basic lens)
Operational environment according to EN 50131-1 II.indoor general
Operational temperature range -10 to +40 °C Dimensions 85 x 60 x 55 mm
EN 50131-1, CLC/TS 50131-2-2, EN 50131-5-3 classification grade 2
Complies with ETSI EN 300220, EN 50130-4, EN 55022, EN 60950-1
Can be operated according to ERC REC 70-03

Jablotron Ltd. hereby declares that the JA-83P is in compliance with the essential requirements and other relevant provisions of Directive 1999/5/EC The original of the conformity assessment can be found at www.jablotron.com, Technical Support section

Note: Although this product does not contain any harmful materials we suggest you return the product to the dealer or directly to the producer after use.
Marque : Jablotron
Modèle : JA-83P
Catégorie : Caméra de surveillance