
DPX 768 - Lecteur dvd SCOTT - Notice d'utilisation et mode d'emploi gratuit
Retrouvez gratuitement la notice de l'appareil DPX 768 SCOTT au format PDF.


| Type de produit | Lecteur DVD |
| Marque | SCOTT |
| Modèle | DPX 768 |
| Disques compatibles | DVD, DVD±R/RW, CD, CD-R/RW, MP3-CD |
| Formats vidéo | MPEG-2, DivX, XviD |
| Formats audio | Dolby Digital, MP3, PCM |
| Résolution maximale | 720p (progressive) |
| Sorties vidéo | Composite (RCA), S-Vidéo, Composante (YUV) |
| Sorties audio | Stéréo analogique (RCA), sortie coaxiale numérique |
| Alimentation | 220-240 V ~ 50 Hz |
| Consommation électrique | < 15 W |
| Dimensions (L x P x H) | 430 x 260 x 45 mm |
| Poids | 2,5 kg |
| Télécommande | Oui (infrarouge, piles incluses) |
| Affichage | Afficheur LED à l'avant |
| Fonctions spéciales | Lecture progressive, zoom, répétition A-B, programmation |
| Entretien | Nettoyer avec un chiffon doux et sec. Ne pas utiliser de produits liquides. |
| Sécurité | Débrancher avant tout nettoyage. Ne pas exposer à l'humidité ou à des températures extrêmes. |
| Pièces détachées | Disponibles auprès du service après-vente SCOTT |
| Réparabilité | Réparable par un technicien agréé. Consulter la notice pour les procédures. |
| Garantie | 2 ans, pièces et main-d'œuvre |
FOIRE AUX QUESTIONS - DPX 768 SCOTT
Questions des utilisateurs sur DPX 768 SCOTT
0 question sur cet appareil. Repondez a celles que vous connaissez ou posez la votre.
Poser une nouvelle question sur cet appareil
Téléchargez la notice de votre Lecteur dvd au format PDF gratuitement ! Retrouvez votre notice DPX 768 - SCOTT et reprennez votre appareil électronique en main. Sur cette page sont publiés tous les documents nécessaires à l'utilisation de votre appareil DPX 768 de la marque SCOTT.
MODE D'EMPLOI DPX 768 SCOTT
CONTENT
| ACCESSORIES | 1 |
| IMPORTANT | 2 |
| SAFETY | 2 |
| PLAYER ZONES | 5 |
| INSTALLATION | 5 |
| CONNECTIONS | 5 |
| MAIN UNIT | 7 |
| REMOTE CONTROL | 7 |
| BASIC SETUP | 8 |
| SYSTEM SETUP | 10 |
| PLAYING BACK A DISC | 13 |
| PLAYING BACK A KODAK PICTURE CD/JPEG | 13 |
| PLAYING BACK A MP3 CD | 14 |
| LOCATING A SPECIFIC TITLE, CHAPTER OR TRACK | 15 |
| PLAYING REPEATEDLY | 15 |
| ZOOMING A PICTURE | 16 |
| USB OR CARD PLAYBACK | 16 |
| DISC NOTES | 17 |
| TROUBLE SHOOTING GUIDE | 18 |
| TECHNICAL SPECIFICATIONS | 19 |
ACCESSORIES
Supplied Accessories
| Remote Control | X 1 |
| AC adaptor | X 1 |
| Cigarette adaptor | X 1 |
| Carry bag | X 1 |
| Earphone | X 1 |
| Female RCA-jack AV adapter cable | X 1 |
IMPORTANT
Since CD circuitry may cause interference to other radio tuners nearby, switch this unit off when not in use or move it away from the affected radio tuner.
NOTE:
This equipment generates uses and can radiate radio frequency energy and if not installed and used in accordance with the instruction, may cause harmful interference to radio communications. However, there is no guarantee that interference will not occur in a particular installation. If this equipment does cause harmful interference to radio or television, which can be determined by turning the equipment off and the user is encouraged to try to correct the interference by one or more of the following measures:
• Reorient or relocate the receiving antenna.
- Increase the separation between the equipment and receiver.
- Connect the equipment into an outlet on a circuit different from that to which the receiver is connected.
- Consult the dealer or an experienced radio / TV technician for help.
Caution When Using
Be careful of ambient temperature
- Using the DVD player in a place where the temperature is over 40 deg C or under 0 deg C will result in abnormal function.
- Never expose this unit to prolonged periods of high temperature or leave the unit situated where high temperatures can occur (such as the dash panels of vehicles on very hot days). This could cause malfunctions or damage to the product.
SAFETY
WARNING:
TO REDUCE THE RISK OF FIRE OR ELECTRIC SHOCK, DO NOT EXPOSE THIS APPLIANCE TO RAIN OR MOISTURE. DANGEROUS HIGH VOLTAGES ARE PRESENT INSIDE THE ENCLOSURE. DO NOT OPEN THE CABINET. REFER SERVICING TO QUALIFIED PERSONNEL ONLY.
- The AC/DC adaptor and DVD player shall not be exposed to dripping or splashing and that no objects filled with liquids, such as vases, shall be placed on apparatus or other equivalent.
• Minimum distances around the apparatus for sufficient ventilations. - The ventilation should not be impeded by covering the ventilation openings with items such as newspaper, tablecloths, curtains etc.
- No open flame sources such as lighted candles should be placed on the apparatus.
- Attention should be drawn to the environmental aspects of battery disposal.
• The use of apparatus in moderate climates.
LASER:
This Digital Video Disc Player employs a Laser System.
To ensure proper use of this product, please read this owner's manual carefully and retain for future reference. Should the unit require maintenance, contact the qualified service personnel.
Use of controls, adjustments or the performance of procedures other than those specified may result in hazardous radiation exposure.
To prevent direct exposure to laser beam, do not try to open the enclosure. Visible and invisible laser radiation when open and interlocks defeated.
SAFETY
DO NOT STARE INTO BEAM

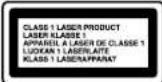

WARNING :
To reduce the risk of fire or electric shock, do not expose this appliance to rain or moisture.
CAUTION :
Use of controls or adjustments or performance of procedures other than those specified may result in hazardous radiation exposure.
CAUTION
RISK OF ELECTRIC SHOCK DO NOT OPEN
To reduce the risk of electric shock, do not remove cover (or back).
No user serviceable parts inside. Refer servicing to qualified service personnel

The lightning flash with arrowhead symbol, with in an equilateral triangle, is intended to alert user to the presence of uninsulated "dangerous voltage" within the products enclosure that may be of sufficient magnitude to constitute a risk of electric shock to persons.

The examination point within an equilateral triangle is intended to alert the user to the presence of important operating and maintenance (servicing) instruction in the literature accompanying the appliance.

CAUTION
INVISIBLE LASER RADIATION WHEN OPEN AND INTERLOCK
FAILED OR DEFEATED
AVOID DIRECT EXPOSURE TO LASER BEAM.

CAUTION
PLEASE READ AND OBSERVE ALL WARNINGS AND
INSTRUCTIONS GIVEN IN THIS OWNER'S MANUAL AND THOSE
MARKED ON THE UNIT. KEEP THESE INSTRUCTIONS, RETAIN
THIS BOOKLET FOR FUTURE REFERENCE
This set has been designed and manufactured to assure personal safety. Improper use can result in electric shock or fire hazard. The safeguards incorporated in this unit will protect you if you observe the following procedures for installation, use and servicing. This unit does not contain any parts that can be repaired by the user.
DO NOT REMOVE THE CABINET COVER, OR YOU MAY BE EXPOSED TO DANGEROUS VOLTAGE. REFER SERVICING TO QUALIFIED SERVICE PERSONNEL ONLY.
- Read these instructions.
After unpacking this product, read the owner manual carefully.
- Keep these instructions
Retain this booklet for future reference.
3.Heed all warnings.
-
Follow all the operating and other instructions
-
Do not use this apparatus near water.
-
Clean only with a damp cloth.
SAFETY
7.Do not block any of the ventilation openings. Install in accordance with the manufacturer's instructions.
8.Do not install near any heat sources such as radiators, heat registers, stoves, or other apparatus (including amplifiers) that produce heat.
-
Protect the power cord from being walked on or pinched particularly at plugs, convenience receptacles and the point where they exit from the apparatus.
-
Only use attachments/accessories specified by the manufacturer.
-
Use only with a cart, stand, tripod, bracket or table specified by the manufacturer, or sold with the apparatus. When a cart is used, use caution when moving the cart/apparatus combination to avoid injur
-
Unplug this apparatus during lightning storms or when unused for long periods of time.
-
Refer all servicing to qualified service personnel. Servicing is required when the apparatus has been damaged in any way, such as when the power-supply cord or plug is damaged, liquid has been spilled or objects have fallen into the apparatus, the apparatus has been exposed to rain or moisture, does not operate normally, or has been dropped.
14.Burden
Do not place a heavy object on, or step on the product. The object may fall, causing serious personal injury and serious damage to the product.
15.Disc
Do not use a cracked, deformed, or repaired disc. These discs are easily broken and may cause serious personal injury and product malfunction.
- Damage Requiring Service
Unplug this product from the wall refer servicing to qualified service personnel under the following conditions:
a) When the power-supply cord or plug is damaged.
b) If liquid has been spilled, or objects have fallen into the product.
C) If the product has been exposed to rain or water.
d) If the product does not operate normally by following the operating instructions. Adjust only those controls that are covered by the operating instructions. Improper adjustment of other controls may result in damage and will often require extensive work by a qualified technician to restore the product to its normal operation.
e) If the product has been dropped or damaged in any way.
f) When the product exhibits a distinct change in performance - this indicates a need for service.
- Servicing
Do not attempt to service this product yourself as opening or removing covers may expose you to dangerous voltage or other hazards. Refer all servicing to qualified service personnel.
18.Replacement Parts
When replacement parts are required, be sure the service technician has used replacement parts specified by the manufacturer or have the same characteristics as the original part. Unauthorized substitutions may result in fire, electric shock, or other hazards.
- Safety Check
Upon completion of any service or repairs to this product, ask the service technician to perform safety checks to determine that the product is in proper operating condition.
20.AC Power disconnect
The AC/DC adaptor is used as the disconnection device and it shall remain readily operable. To be completely disconnected the power input, the AC/DC adaptor of the apparatus shall be disconnected from the mains completely.
NOTE: See the marking on the bottom of cabinet
PLAYER ZONES
For the purpose of distribution of DVD Discs, the world has been separated into 6 zones. The zone your player is intended for is indicated on the "Zone Label". This should be the same as the label on discs available in your region. If you have any difficulties in playing a disc, make sure that the disc is for the same zone as your player.
INSTALLATION
Install your DVD player on a stable flat surface. The unit should be situated with enough space around it so that proper heat ventilation is assured. Allow 20cm clearance from the rear and the top of the unit, and 10cm from each side. Caution: Do not install this equipment in confined space with poor ventilation.
CONNECTIONS
1. Connecting to TV
Connect the AV OUT jack on your DVD player to the audio and video input jacks on your TV using the female RCA-jack AV adapter cable (supplied) and an AV cable (not supplied).

CONNECTIONS
2. Connecting for in car use
Use the Car Power Adaptor (included) for power when using the DVD player in a car.
1. Plug the adaptor into the car cigarette lighter.
2. Plug the pin into the DC IN 9V jack on the main unit.

Replacing the fuse of the car power adaptor
Make sure the amperage matches the specified value when replacing the fuse. If the fuse is blown, check the power connection and replace with a new one. If the same problem occurs, there must be a malfunction. In such cases, please consult the nearest repair center.
Warning:
Never use the fuse with rated amperage over the one specified, otherwise you risk damaging the unit.
MAIN UNIT
- Speakers
- Disc door
- PUSH OPEN knob
- IR Infrared sensor, Power ON LED, Charge LED
- USB port
- SD/MMC card slot
- DC IN 9V ⊙ ● + jack
- Screen
- Screen display off switch
10 MODE button - MUTE button
12 MENU button - ▲/▼ /▲/▼ Navigation buttons
/ / / Skip/ Search buttons
14 OK (ENTER) button - SETUP button
- ■ STOP button
- Play/Pause button
- OFF/ON switch
- OFF/ON switch
- AYOUT jack
- AV OUT JACK
- VOLUME/knok
- VOLUME KNOD
- O Headphone
21.1 Headphone jack

REMOTE CONTROL
-
DIGIT- (1,2,3,.....0) For direct digit entry.
-
TITLE-Displays DVD title menu (Only for DVD if available).
-
AUDIO-Selects sound track (For VCD).
Press to select audio language
for DVD / SVCD if available
-
SETUP-Enters the DVD player setup menu.
-
🐎/→-Skips to the next/previous chapter, track, title.
▲ / ▼Navigation in setup menu
6.◀/◀- Searches the track fast
forward/backward.
▲ / ▼Navigation in setup menu
- ENTER-Confirms the highlighted items.
Starts the disc playback
-
OSD-Displays detailed information when is playing.
-
Play/Pause -Starts or pauses
playback.
-
■ STOP - Stops the disc playback.
-
AV IN/OUT-Switch between analog Audio and Video IN/ OUT function.
-
MODE-Select disc or media (USB or SD / MMC card).
-
MENU-Displays DVD menu on the screen (For DVD).
-
SUBTITLE-Selects a subtitle language or turn the
subtitle off (For DVD / SVCD if available).
- ANGLE-Changes angle selection
(For DVD if available).
- A-B-Marks a segment to repeat A and B.
- REPEAT-Repeats track, chapter, title or disc once.
- RETURN-Returns to the main menu
- MUTE- Turn off the sound output.
- VOL +/- -To adjust the volume.
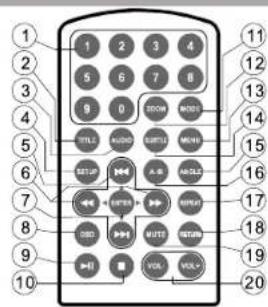
Remarks:
The DIGIT buttons (0-9) will
be used in following
conditions:
CD / MP3 / WMA / playback;
VCD / SVCD / PBC menu;
DVD menu;
DVD title menu;
Password setting.
BASIC SETUP
Carrying bag installation
SAFETY WARNING!
On no account should this unit be used by the driver of a moving motor vehicle, or left unsecured in the vehicle whilst driving. If this unit is being used by a passenger in your vehicle, be sure that it is secured or held safely, and does not obstruct any safety device (i.e. airbag, seat belt etc.) that is fitted.
NOTE:
In order to use the carrying bag, fold up the unit with the screen facing outwards. Refer to the previous section before installing the carrying bag.
- Insert the straps on carrying bag as shown.

- Take straps and hook up the neck headrest of the driver's seat as shown.

-
Untie the vertical straps on the back of the bag as shown.
-
Adjust the straps tightly so that the unit is secured.


BASIC SETUP
Using the Remote Control
- Point the remote control at the IR sensor located on the unit.
- When there is a strong ambient light source, the performance of the infrared IR
sensormay be degraded, causing unreliable operation.
• The recommended effective distance for remote operation is about 16 feet (5 meters).
Take out the PVC sheet before operating the remote control.
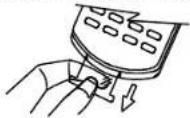
To change remote control battery
1.Open the battery door.
- Insert one CR2025 (3V) size battery
with correct polarity marked on the
battery door.

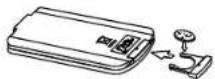
Battery Placement
When battery become weak, the operating distance of the remote control is greatly
reduced and you will need to replace the battery.
NOTES:
- If the remote control is not to be used for a long time, remove the battery to avoid damage caused by battery leakage corrosion.
- WARNING: Do not dispose of batteries in fire, batteries may explode or leak.
Usage of Adapter
-
The player is supplied with an AC/DC adapter.
-
Connect the AC/DC adapter to the DC IN 9V jack at the back of the DVD player.
-
Plug the AC/DC adapter into a household power outlet.

GB-9
BASIC SETUP
Recharging the battery
-
Connect the AC/DC adapter to the unit and plug the AC/DC adapter into a mains socket.
-
Switch off the unit by sliding the OFF/ON switch to OFF.
-
The battery will start charging automatically, at this moment, the charging LED is red. When the charge LED turns green, charging is completed.
NOTES:
-
Charge only with the supplied AC/DC adapter.
-
The battery has no "Memory Effect" and thus can be recharged safely regardless of whether the battery is fully or partially discharged.
3.Do not charge for more than 6 hours as it could reduce service life.
-
A fully recharged battery can last about 2 hours.
-
The normal working temperature is: 0°C \~ 45°C.
-
When the battery level is low, the screen display may flicker and the sound may be distorted. The battery should be recharged using the AC/DC adapter.
Playback Preparation / Quick Operation Guide
-
Connecting to power (AC/DC adapter, external DC power source through Cigarette connector cable).
-
Lift the main cover up (display screen), and open the disc cover by pressing the OPEN knob.
-
Load the disc and close the door lid.
-
Switch on the unit by sliding the OFF/ON button to ON. The POWER LED will light up blue.
-
The DVD/Media menu will be displayed. Use the navigation buttons (▲/▼/◄/►) to select DVD. Press the ENTER button to confirm.
-
Adjust the volume to your desired level.
SYSTEM SETUP
General Setup
Access the GENERAL SETUP by pressing the "SETUP" button on the unit or
remote control.
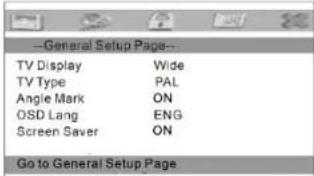
1.TV Display
NORMAL/PS If you want the movie to fill the entire screen of your TV. NORMAL/LB If you want to see movies in their original aspect ratio. The movie might appear with black bars at the top and bottom of the screen. WIDE You can select this setting if your DVD player is connected to a wide-screen (16:9) TV.
2.TV Type
Select the TV Video output format (PAL or NTSC) to match your TV.
GB-10
SYSTEM SETUP
3. Angle Mark
The function only works for DVD disc having scenes recorded at different angles.
ON/OFF With this switched on, you will be notified if alternative viewing angles are
available
4.OSD Language
The languages menu enables you to set preferred language options for the DVD
player's menu.
5.Screen Saver
When activated, the screen saver automatically works if there has been no
operation for a period of time.
Video Setup
Access VIDEO SETUP page by pressing the "SETUP" and "►" buttons on the
unit or remote control
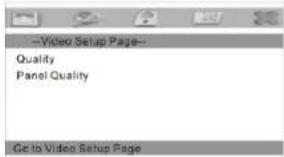

Quality
This option allows you to adjust the video settings of the external screen when the unit is in AV OUT mode.
Panel Quality
This option allows you to adjust the video settings of the DVD player's LCD screen (only allows you to adjust the display for the LCD screen of the DPX 768).
1. Brightness
Adjust the screen brightness.
2.Contrast
Adjust the contrast level of the screen display.
3.Hue
Adjust the hue of the screen display.
4.Saturation
Adjust the saturation of the screen display.
SYSTEM SETUP
Preference Setup
Access PREFERENCE SETUP page by pressing the "SETUP" and "▶" buttons on the unit or remote control.
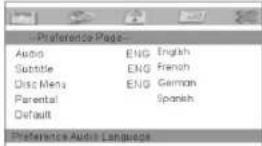
NOTE:
Only in STOP mode you can access PREFERENCE SETUP page.
1.Audio
You can set your language preference for movies you play in your DVD player the language in which you'll hear the dialogue when you're playing a movie.
2. Subtitle
You can set your language preference for the subtitles you see on the screen while playing a disc.
3.Disc Menu
You can set your language preference for disc menu.
4.Parental
You can set up ratings limits and lock your player in order to control the type of content people watch on your DVD player. Depending on the disc, you can replace or lock out violent scenes, or lock out playback of the disc altogether. Access parental control on the sub-menu by pressing direction buttons on the remote control, and then press the ENTER button. An interactive menu will appear.
5.Default
Reset all the settings.
Password Setup
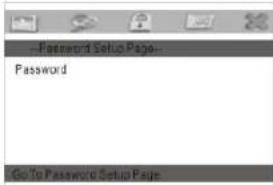
Access the PASSWORD SETUP page by pressing the "SETUP" and "►" buttons on the unit or remote control.
You can enter the password to change the parental control level. You can change the default password "8888" to your desired password if the player is locked.
PLAYING BACK A DISC
How to start playback from the menu screen
-
Press TITLE or MENU to access the menu screen.
-
Press (▲/▼/◄/►) or the number buttons to select the title.
-
Press the ENTER or button.
The DVD video player will start playback from the title selected.
NOTE:
You also can input the assigned number of the title to select it directly.
How to pause playback (still playback)
Press ▶ once during playback, then press the ENTER or ▶ button to resume normal
playback. During the still playback, the sound is muted.
How to stop playback
Press ■ STOP button once, playback stops and pressing ENTER or ▶ can resume
playback.
Press ■ STOP button twice, playback stops completely.
Fast forward and backward
You can playback a disc at 2x, 4x, 8x, 16x or 32x the normal speed for fast forward or
rewind.
![graph LR A["2x"] --> B["4x"] B --> C["8x"] C --> D["16x"] D --> E["32x"] E --> F[" "] G["2x"] --> H["4x"] H --> I["8x"] I --> J["16x"] J --> K["32x"] K --> L[" "]](/content/2026/06/1258674/images/9d50de5f600b97cce12adee94cb50f13a49123b93b5f08a8b38f092f7f90993e.jpg)
Press the ◀ or ▶ button during playback. The playback speed becomes double the normal speed.
The playback speed changes, each time you press the ◀ or ▶ button.
To resume normal playback, press the ENTER or ▶ button
NOTE:
The function is invalid on some DVD discs.
Warning:
• During fast forward/backward, playback, the sound is
muted.
• The function is invalid on some DVD discs.
PLAYING BACK A KODAK PICTURE CD/JPEG
- Load your KODAK Picture CD or JPEG disc.
When a KODAK Picture CD is loaded, it will start playback automatically.
- Select a folder or a picture/song contained on the JPEG or other data disc,
a menu will appear on the screen.
Press ▲ or ▼ to select a folder, and press ENTER or ▶ to view folder contents (shown
in right column).
- Select one play mode.
You can use the REPEAT button to select playback mode, repeat one or repeat all.
PLAYING BACK A KODAK PICTURE CD/JPEG
- Start playback
Press ▲ or ▼ to select a file. Press ENTER or ▶ to enjoy the pictures or songs.
- Use ■ STOP to view contents
When viewing JPG files, press to display the pictures in thumbnail mode. Press the ▲▼/▲/▶ buttons or the ENTER button to select and view a picture. You can also select "Slide Show" to start a slide show or "Menu" to display the remote control functions. To return to the previous page or go to the next page, select "Prev Next" on the screen.
6.Picture refresh modes
When viewing JPG files, press the OSD button to select the following picture refresh modes.
Creating your own Picture CDs
Using your computer to save pictures as JPEG format and burn them on a CD-R disc, then you can watch on your unit.
NOTE
Press NAVIGATION (▲/▼/◄/►) buttons to rotate the picture from the current position.
PLAYING BACK A MP3 CD
Multi-Media files such as MP3 can be played in the DVD player.
Operation
- Insert the MP3 disc into the disc compartment. The menu will show the files in the root directory.
The MP3 files can then be played by pressing ENTER or ▶.
- The MP3 menu shows a blue and an orange cursor. The blue cursor indicates the currently playing MP3 song and the orange cursor indicates a title to be selected.
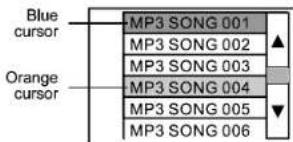
You can select the other songs by the NAVIGATION (▲/▼/◄/►) buttons or directly input the song number by pressing the DIGIT buttons. The orange cursor will move to the selected song. Then press ENTER or ► button to confirm.
NOTES:
-
There are three digits displayed. If you want call up a title with only one or two digits, you can either start the entry with "0" or "00", or you can enter the number of the song and then wait a few seconds until the cursor skips to the selected title.
-
Press REPEAT button to select: Repeat one, Repeat folder.
LOCATING A SPECIFIC TITLE, CHAPTER OR TRACK
DVD DISCS ARE NORMALLY DIVIDED INTO TITLES WHICH ARE SUB-DIVIDED INTO CHAPTERS. WHILE CD DISCS ARE DIVIDED INTO TRACKS.
Locating a title using the title menu
You can locate a specific title using the title menu function, if a DVD video disc
contains a title menu.
- Press TITLE button
On the LCD or TV screen, the title menu will appear
- Press (▲/▼/◄/►) buttons to select the title you want.
You can also directly locate a specific title by pressing its assigned number with
the DIGIT buttons.
- Press ENTER or ▶ button
This will cause the DVD video player to start playback from chapter one of the title selected.
You also can use skip buttons to select a title or track:
Press ↔ or ↔ repeatedly till the desired one displays.
PLAYING REPEATEDLY
THIS DVD VIDEO PLAYER ALLOWS YOU TO PLAYBACK A SPECIFIC TITLE, CHAPTER, TRACK, OR SEGMENT REPEATEDLY. (TITLE REPEAT, CHAPTER/TRACK REPEAT, A-B REPEAT)
How to repeat a title, chapter or disc
During normal playback, press the REPEAT button.
The repeat mode changes, each time you press the REPEAT button
![graph TD A["CHAPTER"] --> B["TITLE"] B --> C["ALL"] C --> D["OFF"] style A fill:#fff,stroke:#000 style B fill:#fff,stroke:#000 style C fill:#fff,stroke:#000 style D fill:#fff,stroke:#000](/content/2026/06/1258674/images/15123cf51bd111c077ce70b66349bbacd2420b2f85d58625d2b304206acf056a.jpg)
How to repeat a specific segment
-
Press A-B button at the beginning of the segment in which you want to repeat playback (point A).
-
Press A-B button again at the end of the segment (point B) The DVD video player will automatically return to point A and start to repeat playback of the selected segment (A-B).
-
Press A-B button to cancel the A-B repeat function The DVD video player will resume to normal playback.
![graph TD A["A"] -->|↓| SetPointA["Set point A"] AB["AB"] -->|↓| SetPointB["Set point B"] SetPointA --> ResumesNormalPlayback["Resumes normal playback"]](/content/2026/06/1258674/images/91a1f2ccfbd85f837567896898ab4ca385858728823b9350fbce8d0693daf72f.jpg)
GB-15
ZOOMING A PICTURE
Zooming a picture
This DVD video player allows you to zoom into a picture as well as the zoom point.
Press ZOOM during normal playback.
The player magnifies in the center of the picture in the following sequence: 2X, 3X.
4X, 1/2, 1/3, and 1/4.
If you press (▲/▼/◄/►) during zoom playback, the zoom point shifts.
To cancel the zoom function, press ZOOM again.
USB OR CARD PLAYBACK
Insert USB or SD/MMC card
Press MODE button, then disc/media menu will display.
Press NAVIGATION (▲/▼/◄/►) buttons to select "DVD" or "Media"
(USB or SD/MMC card)
Press ENTER button to confirm your selection.
The unit will read disc or USB or SD/MMC card according to your selection.
The operation steps refer to playing disc.
NOTES:
- Types of card supported: SD, MMC
• Card file formats supported: MP3, WMA, JPEG, MPEG4.
• USB file formats supported: MP3, WMA, JPEG, MPEG4.
• USB support for mass storage device only.
GB-16
DISC NOTES
Disc formats supported by this player
• DVD-VIDEO, DVD+R/RW, DVD-R/RW
• COMPACT DISC DIGITAL AUDIO
- CD - R/RW
• Mp3 / WMA / JPEG
• VCD 2.0/SVCD
• MPEG 4 / Xvid
Discs which cannot be played with this player
• DVD-ROM
• DVD-RAM
• CDV
Handling and Cleaning
- Dirt, dust, scratches and warping disc will cause misoperation.
- Do not place stickers or make scratches on discs.
- Do not warp discs.
• A disc should always be kept in its case when not in use to prevent from damaging.
- Do not place discs in the following places:
-
Direct sunlight
-
Dirty, dusty and damp areas
-
Near car heaters
-
On the seats or dashboard
Disc Cleaning
Use a dry soft cloth to wipe the surface. If the disc is quite dirty, use a soft cloth slightly moistened with isopropyl alcohol. Never use solvents such as benzene, thinner or conventional record cleaners as they may mark the surface of the disc.


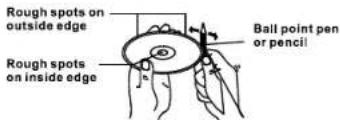
Preparing New Discs with Rough Spots
A new disc many have rough edges on its inside and outside edges. If a disc with rough edges is used, the proper setting will not be performed and the player will not play the disc. Therefore, remove the rough edges in advance by using a ballpoint pen or pencil as shown on the right.
To remove the rough edges, press the side of the pen or pencil against the inside and outside edges of the disc.
TROUBLE SHOOTING GUIDE
If it appears that your DVD-Video player is faulty, first consult this checklist. It may be that something simple has been overlooked.
Under no circumstances should you try to repair yourself. Only qualified service personnel can remove the cover or service this player.
NO POWER
- Check if power plug is properly connected
- Check if there is power at the AC outlet by plugging in another appliance.
NO PICTURE (When connected to TV)
- Check if the TV is connected and switched on.
- Select the correct AV input on the TV.
- Check the video connection.
- Check channel selector is set to AV on the TV (See your TV manual for instructions).
DISTORTED PICTURE
- Check the disc for fingerprints and clean with soft cloth, wiping from centre to edge.
• Sometimes little picture distortion may appear. This is not a malfunction.
COMPLETELY DISTORTED PICTURE (When connected to TV)
• The disc is not formatted to the TV-set used (PAL/NTSC).
NO COLOR IN PICTURE (When connected to TV)
- The unit is not formatted to the TV-set system (PAL/NTSC).
DISC CAN'T BE PLAYED
- Ensure the disc is label side up.
- Clean the disc.
- Check if the disc is defective by trying another disc.
NO SOUND
- Check audio connections.
• Make sure the sound setup of DVD disc is correct.
NO RETURN TO START-UP SCREEN WHEN DISC IS REMOVED
- Check to see if the program requires another disc to be loaded.
- Reset by unplugging the player from the power supply, then connect the power supply again.
THE PLAYER DOES NOT RESPOND TO THE REMOTE CONTROL
- Aim the remote control directly at the sensor on the front of the player.
- Avoid all obstacles which may interfere with the signal path.
- Inspect or replace the battery (Lithium battery "CR2025")
BUTTONS DO NOT WORK
- Unplug the player from power outlet and reconnect after a few seconds.
YOU HAVE FORGOTTEN THE PASSWORD
• The default password is "8888"
CHARGE LED NO LIGHT
- Check that the AC/DC adapter is properly connected.
TECHNICAL SPECIFICATIONS
| Power supply | AC adapter: AC 100 - 240V ~ 50/60HzDC source: DC 9V/1000mA (Center positive) |
| Power Consumption | 10W |
| Operation Temperature (humidity) | 5--- 40 deg C (Less than 95%, no condensation) |
| Screen Display | 7"/16:9 TFT panel |
| Resolution | 480 x 234 (RGB) |
| Viewing angle | 70°(left), 70°(right), 65°(up), 60°(down) |
| Brightness | 90 cd/m2 |
| Contrast | 500:1 |
| Discs Played | DVD-Video, DVD+R/RW, DVD-R/RW,MPEG 4,Xvid, CD-DA, CD-R/RW,MP3,JPEG, VCD 2.0 |
| Video Formats | PAL/NTSC |
| Frequency Response | 20Hz ~ 20kHz |
| Audio out | 1.4rms/10K ohm |
| Video Out | Composite video 1.0Vp-p 75 ohm |
| USB port type | 1.1 |
| USB maximum handling capacity | 2GB (Flash memory) |
| Card type | SD/MMC |
| Card maximum handling capacity | 2GB (Flash memory) |
| Battery | Rechargeable Lithium battery: 7.4V/1300 mAREchargeable time: approx. 4 hrsPlayback time: approx. 2 hrs |
| Dimension | Main unit: (200 X 162 X 39.6) mm |
| Weight (Full package) | Approx. 0.8 Kg |
NOTE:
- Some external hard disks may not be supported.
- The quality and speed of JPEG photos depend on the resolution & the compression ratio of the photos. Some JPEG photos may not be played due to the discs quality and the formats.
- Some DVD+R/RW, DVD -R/RW, CD-R/RW discs may not be played due to the quality or burning conditions.

If at any time in the future you should need to dispose of this product please note that waste electrical products should not be disposed of with household waste. Please recycle where facilities exist. Check with your Local Authority or retailer for recycling advice. (Waste Electrical and Electronic Equipment Directive)


- IMPORTANT
- NOTE
- CAUTION WHEN USING
- SAFETY
- WARNING
- LASER
- DO NOT STARE INTO BEAM
- CAUTION
- RISK OF ELECTRIC SHOCK DO NOT OPEN
- PLAYER ZONES
- INSTALLATION
- CONNECTIONS
- CONNECTING TO TV
- CONNECTING FOR IN CAR USE
- REPLACING THE FUSE OF THE CAR POWER ADAPTOR
- MAIN UNIT
- REMOTE CONTROL
- BASIC SETUP
- CARRYING BAG INSTALLATION
- SAFETY WARNING
- USING THE REMOTE CONTROL
- TO CHANGE REMOTE CONTROL BATTERY
- BATTERY PLACEMENT
- NOTES
- USAGE OF ADAPTER
- RECHARGING THE BATTERY
- PLAYBACK PREPARATION / QUICK OPERATION GUIDE
- SYSTEM SETUP
- GENERAL SETUP
- 1.TV DISPLAY
- 2.TV TYPE
- ANGLE MARK
- 4.OSD LANGUAGE
- 5.SCREEN SAVER
- VIDEO SETUP
- QUALITY
- PANEL QUALITY
- BRIGHTNESS
- 2.CONTRAST
- 3.HUE
- 4.SATURATION
- PREFERENCE SETUP
- 1.AUDIO
- SUBTITLE
- 3.DISC MENU
- 4.PARENTAL
- 5.DEFAULT
- PASSWORD SETUP
- PLAYING BACK A DISC
- PLAYING BACK A KODAK PICTURE CD/JPEG
- PLAYING BACK A MP3 CD
- LOCATING A SPECIFIC TITLE, CHAPTER OR TRACK
- DVD DISCS ARE NORMALLY DIVIDED INTO TITLES WHICH ARE SUB-DIVIDED INTO CHAPTERS. WHILE CD DISCS ARE DIVIDED INTO TRACKS
- PLAYING REPEATEDLY
- THIS DVD VIDEO PLAYER ALLOWS YOU TO PLAYBACK A SPECIFIC TITLE, CHAPTER, TRACK, OR SEGMENT REPEATEDLY. (TITLE REPEAT, CHAPTER/TRACK REPEAT, A-B REPEAT)
- HOW TO REPEAT A SPECIFIC SEGMENT
- ZOOMING A PICTURE
- USB OR CARD PLAYBACK
- DISC NOTES
- DISC FORMATS SUPPORTED BY THIS PLAYER
- HANDLING AND CLEANING
- DISC CLEANING
- PREPARING NEW DISCS WITH ROUGH SPOTS
- TROUBLE SHOOTING GUIDE
- NO POWER
- NO PICTURE (WHEN CONNECTED TO TV)
- DISTORTED PICTURE
- DISC CAN'T BE PLAYED
- NO SOUND
- NO RETURN TO START-UP SCREEN WHEN DISC IS REMOVED
- THE PLAYER DOES NOT RESPOND TO THE REMOTE CONTROL
- BUTTONS DO NOT WORK
- YOU HAVE FORGOTTEN THE PASSWORD
- CHARGE LED NO LIGHT
Marque : SCOTT
Modèle : DPX 768
Catégorie : Lecteur dvd