
TSX 712 Twin Monaco - Lecteur dvd SCOTT - Notice d'utilisation et mode d'emploi gratuit
Retrouvez gratuitement la notice de l'appareil TSX 712 Twin Monaco SCOTT au format PDF.


| Type de produit | Lecteur DVD |
| Marque | Scott |
| Modèle | TSX 712 Twin Monaco |
| Dimensions (L x P x H) | 430 x 260 x 45 mm |
| Poids | 2,5 kg |
| Alimentation | 220-240 V, 50/60 Hz |
| Consommation électrique | 15 W |
| Formats lus | DVD, DVD±R/RW, CD, CD-R/RW, MP3, JPEG, DivX |
| Sorties vidéo | HDMI, Composite (RCA), YUV |
| Sorties audio | Stéréo RCA, Audio numérique coaxiale |
| Fonctions spéciales | Lecture progressive, Zoom, Recherche rapide, Programmation |
| Télécommande | Oui, incluse |
| Entretien | Nettoyer avec un chiffon doux et sec ; ne pas utiliser de solvants |
| Sécurité | Ne pas exposer à l'humidité ou aux chocs ; débrancher avant nettoyage |
| Pièces détachées | Télécommande, câble audio/vidéo, pile CR2025 |
| Réparabilité | Confier à un technicien qualifié ; aucune pièce réparable par l'utilisateur |
| Accessoires inclus | Télécommande, câble audio/vidéo, manuel d'utilisation |
| Garantie | 2 ans (selon législation) |
FOIRE AUX QUESTIONS - TSX 712 Twin Monaco SCOTT
Questions des utilisateurs sur TSX 712 Twin Monaco SCOTT
0 question sur cet appareil. Repondez a celles que vous connaissez ou posez la votre.
Poser une nouvelle question sur cet appareil
Téléchargez la notice de votre Lecteur dvd au format PDF gratuitement ! Retrouvez votre notice TSX 712 Twin Monaco - SCOTT et reprennez votre appareil électronique en main. Sur cette page sont publiés tous les documents nécessaires à l'utilisation de votre appareil TSX 712 Twin Monaco de la marque SCOTT.
MODE D'EMPLOI TSX 712 Twin Monaco SCOTT
TABLE OF CONTENTS
Safety Precautions 1
Main Features 3
View of the Two Units 4
Remote Controls 5
Box Contents 6
Power Supply and Installation 7
Connecting the Two DVD Players Together 8
Connecting to a TV and Amplifier 9
Connecting to an External AV Device (using unit B as a monitor) 10
Installation Guide 11
Basic Operation 13
System Setup 18
Technical Specifications 23
Troubleshooting 24
SAFETY PRECAUTIONS

CAUTION RISK OF ELECTRIC SHOCK DO NOT OPEN

AVIS RISQUE DE CHOC ELECTRIQUE NE PAS OUVRIR

The lightning flash with an arrowhead symbol, within an equilateral triangle, is intended to alert the user to the presence of uninsulated dangerous voltage within the product's casing that may be of sufficient magnitude to cause an electric shock.

WARNING: TO REDUCE THE RISK OF ELECTRIC SHOCK, DO NOT REMOVE COVER (OR BACK). NO USER-SERVICEABLE PARTS INSIDE. REFER SERVICING TO QUALIFIED SERVICE PERSONNEL.

The exclamation mark within the equilateral triangle is intended to alert the user to the presence of important operating and maintenance (servicing) instructions in this owner's manual.
SAFETY PRECAUTIONS
Installation
Do not use the unit in places which are extremely hot, cold, dusty, or humid.
Do not restrict the air flow of the unit by placing it in a place with poor air flow, by covering it with a cloth, or by placing it on carpeting.
Safety
When connecting or disconnecting the power adapter, pull the plug and not the cord itself. Pulling the cord may damage it and may be dangerous. When you are not going to use the unit for a long period of time, disconnect the power adapter.
Condensation
When left in a heated room where it is warm and damp, water droplets or condensation may form inside the unit. When there is condensation inside the unit, the unit may not function normally. Let the unit stand for 1 to 2 hours before turning the power on, or gradually heat the room up and dry the unit before use.
Rating Plate Location
The rating plate is located on the back of unit.

WARNING:
Should any trouble occur, disconnect the AC power cord and refer servicing to a qualified technician.
No objects filled with liquids, such as vases, must be placed on the apparatus.
The mains plug is used to disconnect the unit and it must remain easily accessible.
Region Management Information

This unit is designed and manufactured to respond to the Region Management Information that is encoded on DVD discs. If the Region number printed on the DVD disc does not correspond to the Region number of this unit, this unit cannot play that disc.
The region number of this unit is 2.
Main Features
High brightness 7" color LCD screen
Compatible with the following discs/files: DVD, VCD, MP3, WMA, MP4, CD, JPEG, Xvid etc.
Built-in stereo speakers
Supports Multi-language OSD, fast forward/backward, repeat function
Zoom in/out function
AV out (unit A and B) and AV in (unit B only)
DVD content played on unit A can be displayed on unit B.
View of the two units
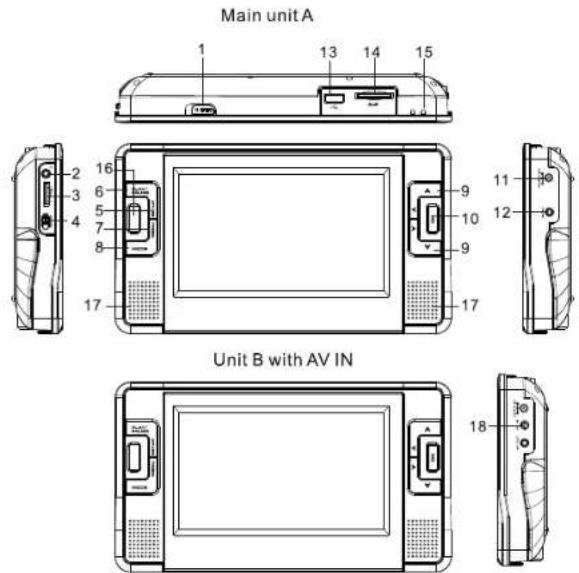
- OPEN button
Slide the button to the left to open
the disc compartment.
-
Earphones jack
-
Volume dial
-
Power ON/OFF switch
-
SETUP button
Press to display the setup menu
-
PLAY/PAUSE
-
MENU button
Press to display the root menu
- MODE button
Press to select the source:
DVD/Media (USB or card)
-
▲▼◀▶ Cursor buttons
-
OK button
-
DC IN 9-12V
-
AV OUT
-
USB port
-
SD/MMC card slot
-
LED power indicator
-
Infrared sensor
-
Speakers
-
AV IN (for unit B only)
Remote Controls

-
Number buttons
-
TITLE (To display title menu)
-
AUDIO (To select audio language)
-
SETUP (To go to or exit setup menu)
5.◀◀/▶◀(To go to previous/next chapter or track during play)
▲/▼ cursor up/down button in setup menu
- ↔ / (To search forward/backward at 2x, 4x, 8x, 16x, or 32x)
◀/▶ cursor left/right button in setup menu
-
OSD (To display disc information during play, such as elapsed and remaining time)
-
PLAY/PAUSE
-
STOP ■ : Press once to stop playback (press ▶ to resume playback from the point where you stopped) or press the STOP button twice to stop playback completely ( playback will resume from the beginning of the disc if you press )

-
IN/OUT: input or output signal (for unit B only)
-
MODE
To select the source: DVD/Media (USB/SD/MMC)
-
MENU (To enter or exit main menu)
-
SUBTITLE (To select subtitle language when playing DVD discs)
-
ANGLE (To change viewing angle when playing a disc with different angles)
-
A-B (repeat a specific portion from point A to B, press again to cancel repeat play)
-
REPEAT (To repeat current title, chapter or track)
-
RETURN (To return to the main menu)
-
ZOOM (To zoom in/out during playback)
-
VOL +/- (To adjust the volume)
-
ENTER (To confirm a selection)
-
MUTE (for main unit A only)
Use of the Remote Controls
Please insert a CR2025 battery into the remote control as in the illustration below.
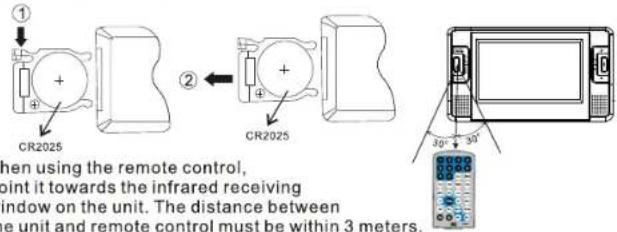
When using the remote control,
point it towards the infrared receiving
window on the unit. The distance between
the unit and remote control must be within 3 meters.
Please refer to the following illustration.
Notes
- Do not allow the remote control to fall and avoid using it in a damp environment.
- Do not expose the infrared receiving window on the unit to direct sunlight.
- Please replace the battery if the remote control does not work.
- If the remote control is not to be used for a long time, remove the battery to avoid corrosion damage caused by battery leakage.
- Do not dispose of batteries in fire, as they may explode or leak.
Box contents
| DVD Player | 2 |
| Remote control with battery | 2 |
| Audio/Video cable | 1 |
| AV cable with male RCA connectors | 1 |
| AC/DC power adapter | 2 |
| Cigarette lighter adapter (Dual outputs) | 1 |
| Instruction manual | 1 |
| Earphones | 2 |
| Carrying bag | 1 |
| Mounting kit | 2 |
Power supply and installation
Plug one end of the AC/DC power adapter into the DC IN 9-12V jack on the right side of the DVD player, then plug the other end into a mains outlet. Please refer to the following illustration.
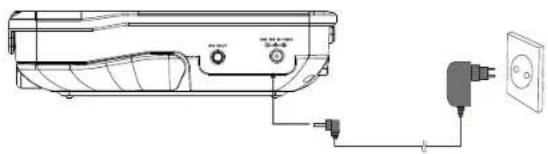
If using the car cigarette lighter adapter:
Plug the power jack for the cigarette lighter adapter into the DC IN 9-12V jack on the unit, and plug the other end into the car cigarette lighter socket. See the illustration below.

Notes
- The car cigarette lighter adapter can only be used when the car power supply is 9-12V.
- The cigarette lighter adapter has dual outputs that can be used for the two DVD players simultaneously.
Connecting the two DVD players together
This connection allows you to display the content played on unit A on unit B, as if unit B were used as a monitor.
Connect the AV OUT jack on the main unit A to the AV IN jack on unit B using the AV cable.
Please refer to the illustration below.

Operation
- Set the power switch to "ON" on both units.
- Insert a DVD into the disc compartment on the main unit A.
- For unit B, press the IN/OUT key on remote control B to select the input mode "IN".
Note: Remote control A can only operate the main unit A. Remote control B can only operate unit B. Please point the remote control towards the corresponding player that you intend to operate.
Connecting to a TV and amplifier
You can connect the unit's audio/video output to a TV. You can also connect the video output only to your TV and connect the audio outputs to an external amplifier. Please refer to the illustration below.
![graph TD A["TV"] --> B["Left front speaker"] A --> C["Center speaker"] A --> D["Right front speaker"] A --> E["Subwoofer"] A --> F["Left rear speaker"] A --> G["Right rear speaker"] H["AMPLIFIER"] --> I["Red"] H --> J["White"] H --> K["VIDEO IN"] H --> L["AUDIO IN"] H --> M["AV cable with male RCA c…](/content/2026/06/1279127/images/945db7e88b88f6e74cbfe4b503f3c610a6af7064c64692e4fc1c0b77cbd8b65d.jpg)
Connecting to an external AV device (using unit B as a monitor)
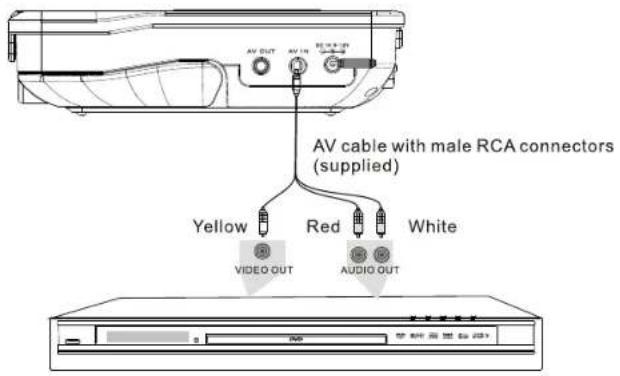
- Press the IN/OUT button on remote control B to select the AV input mode.
- Use the AV cable with male RCA connectors (supplied).
- To exit the AV input mode, press the IN/OUT button again.
Note: If no external AV device is connected, a blue screen is displayed if you press the IN/OUT button.
INSTALLATION Guide
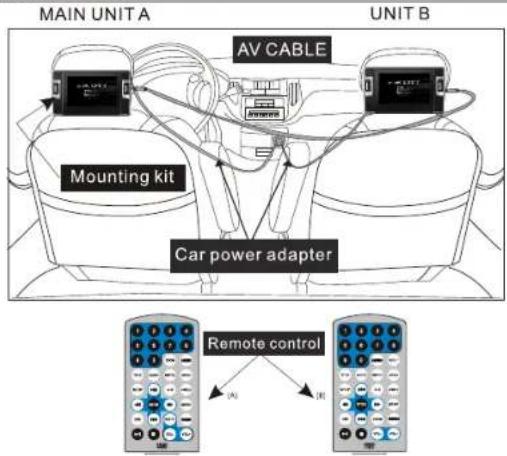
INSTALLING THE TWO DVD PLAYERS IN A CAR
Mounting kit contents:A: Screw used to fasten the mounting bracket to the unitB: Viewing angle adjustment screwC: Headrest mounting bracket release buttons (x2)D: Headrest mounting bracket + screws (x4)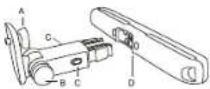 | 1. After unscrewing the headrest mounting bracket, position the 2 parts on either side of the headrest and fix the headrest mounting bracket securely onto the headrest according to the diameter of the headrest bars, using the 4 screws supplied. | 2. Attach the mounting bracket to the back of the DVD player using the fastening screw (A). |
5. To release the mounting kit, simultaneously press the release buttons and pull gently. | ||
3. Fit the mounting kit into the headrest mounting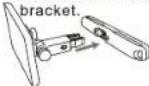 | 4. Adjust the viewing angle. |
SAFETY WARNING!

This unit should never be used by the vehicle's driver or left unsecured in the vehicle while driving.
If this unit is being used in your vehicle, be sure that it is secured or held safely, and does not obstruct any safety devices, including air bags or seat belts.
All passengers should wear seat belts in a moving vehicle.
If in doubt, please contact your vehicle manufacturer for further advice.
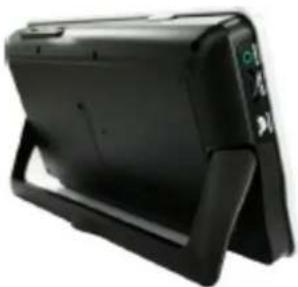
USING THE STAND
Stand for home use
GB-12
Basic Operation

Playing DVD, SVCD, VCD and CD discs and MP3, WMA and Xvid files.
- After connecting the unit to a power supply, turn it on by sliding the ON/OFF switch to ON. The source menu will be displayed on the screen.
DVD
MEDIA
Press 🔊 to enter DVD mode or Media mode and press OK to confirm. If you select "Media", ensure that you insert a USB device or an SD/MMC card.
-
Open the disc compartment by sliding the OPEN button to the left and insert a disc with the label side facing up.
-
Close the disc compartment. The unit will load the disc and start playing or will display the menu.
-
Press ■ once to stop playback. Then press ▶ to resume playback from the point where you stopped. Press ■ twice to stop playback completely.
-
During playback, press ▶ to pause. Press it again to resume playback.
-
When no longer using the player, please turn off the power by sliding the ON/OFF switch to OFF.
-
When playing DVD discs with titles or chapters, press the "MENU" button to enter this menu. Then use the ▲/▼/◄/► buttons to select the title/chapter of your choice. Press OK to confirm.
GB-13
Fast forward and fast backward

When playing DVD, SVCD, VCD and CD discs or MPEG4 and Xvid files, the unit can carry out a fast search forward or backward.
- Press ▶ and the unit will search forward. Press it repeatedly in order to change the speed at which the unit will play, in the following sequence: 2x, 4x, 8x, 16x, 32x normal speed.

- Press the ← button, and the unit will search backward. Press it repeatedly to change the playback speed according to the following sequence: 2x, 4x, 8x, 16x, 32x.

- Press the ▶ button when you reach the desired point to resume normal playback.
Repeat play

For DVD discs, press the "REPEAT" button to repeat one chapter. Press it again to repeat a title; press it a third time to repeat the whole disc. Press the button four times to cancel the repeat function.

For MP3, WMA, MPEG4 and Xvid files, press "REPEAT" to repeat the current file; press it again to repeat the folder; press it a third time to cancel the repeat function.

For CD/VCD discs, press "REPEAT" to repeat the track, or press this button twice to repeat the whole disc.

Note: For VCDs, the repeat function only works if PBC is OFF. Use the MENU button to select PBC ON or OFF.
Repeat a segment A-B

When playing DVD, SVCD, VCD and CD discs and MP3, WMA, MPEG4 and Xvid files, you can repeat a specific section.
During playback, press the "A-B" button at a point A, then press this button again to define point B (the end of the segment). The unit will automatically repeat the section A-B
Press it a third time, and the unit will resume normal playback.

Angle
When playing a DVD disc with different angles, press the "Angle" button. The following information will be displayed on the screen.
Press the number buttons to select the desired angle.
To return to normal play, please press "Angle". The unit will select the default angle.
Note:
This function is available only for discs with different angles.
Zoom in/out

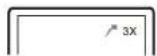
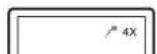
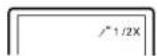
When playing DVD, SVCD and VCD discs or MPEG4 and Xvid files, you can zoom in or out.
During playback, press the "Zoom" button, to change the size of the image according to the following sequence: x2, x3, x4, x1/2, x1/3, x1/4.
When the image is enlarged, press the «/» buttons to move within the image.



Playing JPEG files
- Insert a disc, USB device or SD/MMC card containing JPEG files into the unit. Use the MODE button to select the source.
- Press ▲▼ to select a JPEG file and press "OK" to confirm.
- Note: you can press MENU to return to the folder list. Press ▶ or "OK" to preview the file selected.
- To rotate the picture counter-clockwise, press "◀"; Press "▶" to rotate the picture clockwise.
- Press OSD when viewing pictures to select a display mode:
a. from top to bottom
b. from bottom to top
c. from left side to right side
d. from right side to left side
e. from left top to right bottom
f. from right top to left bottom
g. from left bottom to right top
h. from right bottom to left top
i. from horizontal center to both sides
j. from vertical center to both sides
k. from top and bottom to center.
- from right and left to center.
m. vertical window.
n. horizontal window.
o. from four corners to center.
- When viewing JPEG files, press "■" to display the pictures in thumbnail mode. Press ◀▶▲▼ or "OK" button to view a picture. You can also select "Slide Show" to start a slide show or "menu" to display the remote control functions. To return to the previous page or go to the next page, use the ◀◀/▼buttons.
Playing MP3, WMA, MP4 and Xvid files
- Insert a disc, a USB device or an SD/MMC card containing MP3, WMA, MP4 or Xvid files into the unit. Press the "▲/▼" buttons to select a file; then press "OK" or ▶ to play the file.
Note: depending on the USB device or type of SD/MMC card, it may take several seconds for the unit to detect and read the content.

GB-17
System Setup
Press the "Setup" button and the main menu will be displayed on the screen. Press "Setup" again to exit.
Enter the sub-menu, press "▲/▼" to select an option and press the "OK" button to confirm.
You now have access to the setup. Please pay attention to the following points:
- The availability of some features such as Angle Mark is dependent on the disc.
- The factory default password is 8888.
- The Preference Page Menu is only available when the unit is in stop
mode - The choice of audio and subtitle language depends on the languages recorded on the disc.

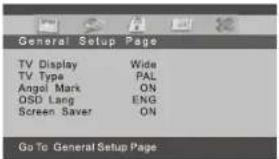

General Setup Page
 | In the General Setup Page, press the ▲/▼ buttons to highlight the item you want to adjust. Press the OK button to access the different options. Press▲/▼ the buttons to select the setting. Press the OK button to confirm your selection. Press ◀ the button to exit. |
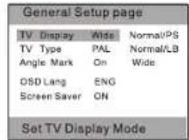 | 1.TV DisplayThe program screen format (Normal TV/ wide screen) is fixed by the DVD disc manufacturer.For a 16/9 movie (full screen display on this unit): Normal/PS (PAN SCAN): Choose this mode if your TV set has 4:3 screen format aspect ratio. The picture will fill the screen but the right and left portion will be letterboxed. Normal/LB (LETTER BOX): Choose this mode if your TV set has a 4:3 screen format aspect ratio. The picture will appear in its entire width but framed by black bars at the top and the bottom (letterboxing).Wide (16:9): Choose this mode when using a 15/16:9 wide screen TV set. This is the configuration of the screen included with this product.Note: these settings will also allow you to display a video or photo in 4:3 format without distortion on this unit. |
 | 2. TV TypeSelect the TV type: PAL, NTSC or AUTO. Select the one which matches your TV system. The default is PAL. |
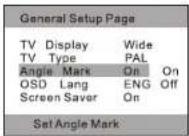 | 3. Angle MarkWhen various angles are available, a camera symbol appears on the screen to show that the DVD offers several different angles. Select "Off" and the camera symbol will disappear. |
| General Setup Page | |
| TV Display Wide TV Type PAL Angle Mark On OSD Lang ENG English Screen Saver French Spanish Germany Italian Set OSD Language | 4. OSD language There are several OSD menu languages supplied. |
| General Setup Page | |
| TV Display Wide TV Type PAL Angle Mark On OSD Lang ENG Screen Saver On On Set Screen Saver | 5. Screen Saver Select "On" to activate the screen saver function. When you activate this function, a moving DVD symbol appears on the screen when the unit is stopped or when it shows a still picture for several minutes. This feature saves the screen from the being damaged by a static image remaining on the LCD screen for long periods of time. Select "Off" to cancel this function. |
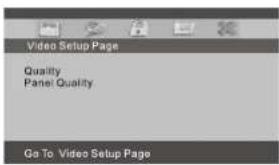
| Video Setup Page | |
| Quality Panel Quality Go To Video Setup Page | Quality: video output settings (this enables you to adjust the display on an external monitor) Panel quality: player screen settings (this enables you to adjust the display on the unit). Select these items to adjust the Brightness, Contrast, Hue and Saturation of the picture. |
Preferences page
Note: This menu is available only in complete STOP mode.
| Preference Page | |
| Audio ENG Subtitle Off Disc Menu ENG Parental Default | In the preferences page, press the▲/▼buttons to highlight the item you would like to adjust. Press the OK or ▶ button to access the different options. Press the▲/▼buttons to select the setting. Press the OK button to confirm your selection. Press the ◀ button to exit. |
| Go To Preference Page | |
| Preference Page | |
| Audio ENG English Subtitle Off French Disc Menu ENG Spanish Parental Italian Default Germany | 1. Audio Select your default audio language for DVDs. The audio language available depends on the audio material on each disc. You can also change the audio language during playback by pressing the Audio button. |
| Preference Audio Language | |
| Preference Page | |
| Audio ENG Subtitle Off English Disc Menu ENG French Parental Spanish Default Italian Germany | 2. Subtitle Select your preferred default language in which to show subtitles on the screen. The subtitle languages depend on the information available on each disc. You can also change the subtitle language during playback by pressing the SUBTITLE button. |
| Preference Subtitle Language | |
| Preference Page | |
| Audio ENG Subtitle OFF Disc Menu ENG English Parental French Default Spanish Italian Germany | 3. Disc Menu This function allows you to choose the disc menu language. |
| Preference Menu Language | |
| Audio ENG 1 KID SAFE Subtitle Off 2 G Disc Menu ENG 3 PG Parental 4 PG 13 Default 5 PGR 6 R 7 NC 17 8 ADULT Set Parental Control | 4. Parental DVD discs equipped with the child lock function are rated according to their content. The content authorized by a parental lock level and the way a disc can be controlled may vary from disc to disc. If the disc allows, you can edit out violent scenes and replace them or lock out playback of the disc altogether. Press the number buttons on the remote control to enter the password and press the OK button to return to the previous menu. The default password is 8888. |
| Preference Page | |
| Audio ENG Subtitle Off Disc Menu ENG Parental Default Reset Load Factory Setting | 5. Default Select this item and press the OK button to reset all settings to the original factory settings. |
Password Setup Page
| PasswordAll Parental Control features are password protected. This function allows you to change the password.Following the instructions, enter the old and new passwords and repeat the new password for confirmation. Then press the OK button to return to the previous menu.From now on the new password must be entered to adjust the parental control level. | |
| Password setup Page | |
| Password Change | |
| Go to Password Setup Page |
Technical specifications
Compatible discs: DVD, DVD+R/RW, DVD-R/RW, VCD, SVCD, CD, CD-
R/RW, HD-CD, MP3, WMA, JPEG, Xvid
Signal system: PAL/NTSC
Panel size: 7"
Picture resolution: 480x234 (RGB)
Viewing Angle: 90° vertically, 120° horizontally
Brightness: 180 cd/m
Contrast: 300:1
Frequency response: 20 Hz to 20 kHz
Video output: 1 Vp-p/75 Ohm, unbalanced
Audio output: 1.4 Vrms/10kOhm
Audio S/N: over 80 dB
Dynamic range: over 85 dB
USB: support USB 1.1, Maximum capacity: 2 GB
Card: SD/MMC. Maximum capacity: 2 GB for unit (B), only the main unit (A)
can support HCSD card.
Laser: Semiconductor Laser, Wavelength: 650 nm/795 nm
Power source: DC 9-12V
Power consumption: < 10 W
Operating temperature: 5-40°C
Weight: 0.7kg
Dimensions (W x D x H): 255 x 146 x 36mm
Note:
- External hard drives are not supported.
- Some models of USB storage devices or Mp3 players may not be played.
- The quality and speed for reading JPEG photos are dependent on the resolution and compression ratio of the photos. Some JPEG photos may not be played due to the disc quality and format.
- Some DVD+R/RW, DVD-R/RW, CD-R/RW discs may not be played due to the quality or burning conditions.
If at any time in the future you should need to dispose of this product please note that waste electrical products should not be disposed of with household waste. Please recycle where facilities exist. Check with your local authority or retailer for recycling advice. (Waste Electrical and Electronic equipment Directive).
Troubleshooting
| PROBLEM | SOLUTION |
| No sound or distorted sound | Make sure the unit is connected properly.Make sure all cables are securely connected into the appropriate jacks. |
| Sound level is too low. | Adjust the volume level on both the unit and your audio/video appliance. In case it is used with the car DVD audio system, adjust the speaker sound level to your preference. |
| The unit will not switch on | Refer to the "power supply and installation" section.Ensure that the cigarette-lighter voltage is 12V and not 24V.Check the fuse on the cigarette-lighter socket.Check the vehicle's fuse. |
| Fast forward/backward or skip function not available | Some discs are programmed so that you cannot skip or fast forward/backward through the opening credits and warning information that appears at the start of movies or certain titles or chapters. |
| The icon appears on screen | The operation cannot be completed at this time because:1. The disc restricts it;2. The disc doesn't support this feature (e.g. multiple angles);3. The feature is not available at the moment;4. You've requested a title or chapter number that does not exist. |
| No Picture | Check if the connections with the external AV device are correct.Select the right mode (AV input or output) using the IN/OUT button for unit (B) only. |
| Picture is distorted | The disc might be damaged. Try another disc. It is normal for some distortion to appear during forward or backward search. |
Owing to continuous improvements, no prior notice will be given regarding changes on above features and specifications.


- TABLE OF CONTENTS
- SAFETY PRECAUTIONS
- INSTALLATION
- SAFETY
- CONDENSATION
- RATING PLATE LOCATION
- WARNING
- REGION MANAGEMENT INFORMATION
- MAIN FEATURES
- USE OF THE REMOTE CONTROLS
- NOTES
- POWER SUPPLY AND INSTALLATION
- CONNECTING THE TWO DVD PLAYERS TOGETHER
- OPERATION
- CONNECTING TO A TV AND AMPLIFIER
- SAFETY WARNING
- USING THE STAND
- BASIC OPERATION
- FAST FORWARD AND FAST BACKWARD
- REPEAT PLAY
- REPEAT A SEGMENT A-B
- ANGLE
- NOTE
- ZOOM IN/OUT
- PLAYING JPEG FILES
- PLAYING MP3, WMA, MP4 AND XVID FILES
- SYSTEM SETUP
- TECHNICAL SPECIFICATIONS
Marque : SCOTT
Modèle : TSX 712 Twin Monaco
Catégorie : Lecteur dvd