
B-2220 - Machine à pain FUNAI - Notice d'utilisation et mode d'emploi gratuit
Retrouvez gratuitement la notice de l'appareil B-2220 FUNAI au format PDF.


| Type de produit | Machine à pain automatique |
| Marque | Funai |
| Modèle | B-2220 |
| Dimensions (L x P x H) | 30 x 25 x 35 cm |
| Poids | 5,2 kg |
| Alimentation | 220-240 V ~ 50/60 Hz, 600 W |
| Capacité maximale de pain | 1 kg |
| Nombre de programmes | 12 programmes automatiques |
| Fonctions principales | Pain basique, complet, sans gluten, sucré, pétrissage, cuisson seule, maintien au chaud, minuterie différée jusqu'à 13h |
| Cuve | Antiadhésive, amovible |
| Pétrisseur | Amovible, 1 ou 2 pales selon modèle |
| Fenêtre de visualisation | Oui, sur le couvercle |
| Distributeur automatique | Pour levure, fruits secs ou graines (selon programme) |
| Sécurité | Arrêt automatique en fin de cycle, protection contre la surchauffe, verrouillage du couvercle en fonctionnement |
| Entretien et nettoyage | Cuve et pétrisseur lavables à l'eau savonneuse, essuyer le corps avec un chiffon humide |
| Pièces détachées disponibles | Cuve, pétrisseur, couvercle, joint de couvercle |
| Réparabilité | Indice de réparabilité : 7.0/10 (selon avis utilisateurs) |
| Accessoires inclus | Cuve, pétrisseur, crochet de retrait, cuillère doseuse, gobelet doseur, manuel d'utilisation |
| Garantie | 2 ans |
FOIRE AUX QUESTIONS - B-2220 FUNAI
Questions des utilisateurs sur B-2220 FUNAI
0 question sur cet appareil. Repondez a celles que vous connaissez ou posez la votre.
Poser une nouvelle question sur cet appareil
Téléchargez la notice de votre Machine à pain au format PDF gratuitement ! Retrouvez votre notice B-2220 - FUNAI et reprennez votre appareil électronique en main. Sur cette page sont publiés tous les documents nécessaires à l'utilisation de votre appareil B-2220 de la marque FUNAI.
MODE D'EMPLOI B-2220 FUNAI
MACHINE À PAIN AUTOMATIQUE
AVEC FONCTION PÉTRISSEUR
OHM400626 Lame de pétrissage
MODÈLE B-2220
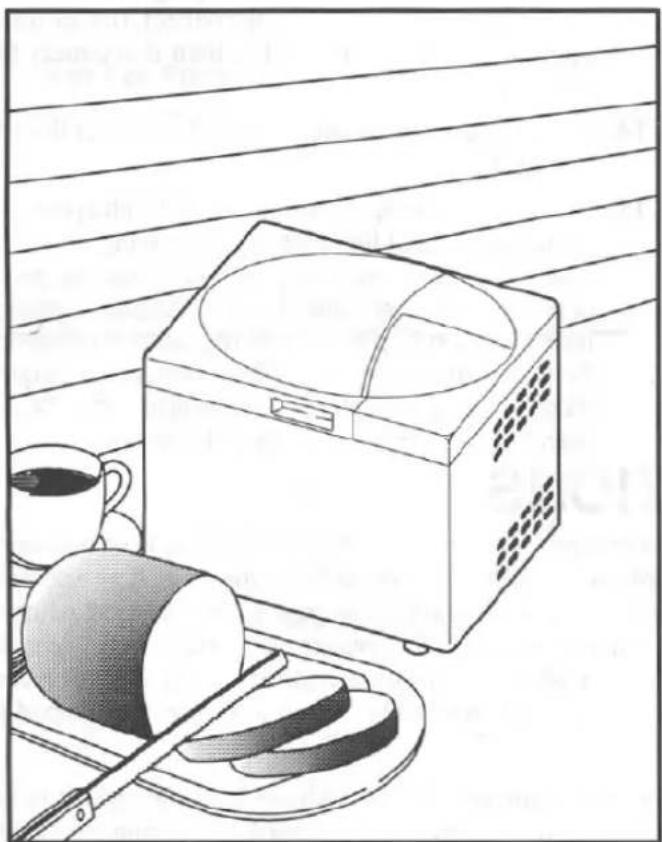
TABLE DES MATIÈRES
CONSIGNES DE SÉCURITÉ IMPORTANTES....2
PIÈCES ET INSTALLATION 3
PANNEAU DE COMMANDE....3
MONTAGE DE LA CUVE INTÉRIEURE 4
SÉLECTION DU MENU....4
PRÉPARATION DU PAIN 5
DU PÉTRISSAGE À LA CUISSON DU PAIN ..... 5
PRÉPARATION DE LA PÂTE UNIQUEMENT 7
PRÉCAUTIONS DE SÉCURITÉ 8
ENTRETIEN DE VOTRE MACHINE À PAIN AUTOMATIQUE..... 10
CONSEILS ET SUGGESTIONS POUR UN MEILLEUR
PAIN....11
AVANT DE DEMANDER UNE INTERVENTION... 12
SPÉCIFICATIONS....13
INFORMATIONS FCC....13
AVERTISSEMENT :
POUR RÉDUIRE LE RISQUE D'INCENDIE OU DE CHOC ÉLECTRIQUE, N'EXPOSEZ PAS CET APPAREIL À LA PLUIE OU À L'HUMIDITÉ.
ATTENTION
RISQUE DE CHOC ÉLECTRIQUE NE PAS OUVRIR

ATTENTION : POUR RÉDUIRE LE RISQUE DE CHOC ÉLECTRIQUE, NE RETIREZ PAS LE COUVERCLE (OU LE PANNEAU ARRIÈRE). AUCUNE PIÈCE INTERNE N'EST RÉPARABLE PAR L'UTILISATEUR. CONFIEZ TOUTE RÉPARATION À UN PERSONNEL QUALIFIÉ.
CE SYMBOLE INDIQUE QU'UNE TENSION DANGEREUSE CONSTITUANT UN RISQUE DE CHOC ÉLECTRIQUE EST PRÉSENTE DANS CET APPAREIL.

CE SYMBOLE INDIQUE QUE DES INSTRUCTIONS IMPORTANTES D'UTILISATION ET D'ENTRETIEN FIGURENT DANS LA DOCUMENTATION ACCOMPAGNANT L'APPAREIL.
GARANTIES IMPORTANTES
USAGE DOMESTIQUE UNIQUEMENT
Lors de l'utilisation d'appareils électriques, des précautions de sécurité de base doivent toujours être suivies, notamment les suivantes :
- Lisez toutes les instructions avant d'utiliser l'appareil.
- Ne touchez pas les surfaces chaudes.
- Pour vous protéger contre les chocs électriques, n'immergez pas le cordon d'alimentation, les fiches ou l'appareil dans l'eau ou tout autre liquide.
- Pour éviter les blessures ou les brûlures, n'insérez pas la main dans l'appareil lorsqu'il fonctionne.
- Une surveillance étroite est nécessaire lorsque l'appareil est utilisé par ou à proximité d'enfants.
- Débranchez l'appareil de la prise murale après utilisation et avant le nettoyage. Laissez l'appareil refroidir avant d'installer ou de retirer des pièces.
- Ne faites pas fonctionner un appareil avec un cordon ou une fiche endommagés, ou après un dysfonctionnement, ou si l'appareil a été endommagé de quelque manière que ce soit. Retournez l'appareil au centre de service agréé le plus proche pour examen, réparation ou réglage.
- L'utilisation d'accessoires non recommandés par le fabricant de l'appareil peut causer des blessures.
- N'utilisez pas l'appareil à l'extérieur.
- Ne laissez pas le cordon d'alimentation de l'appareil pendre du bord d'une table ou d'un comptoir.
- Ne placez pas l'appareil sur ou à proximité d'un brûleur à gaz ou électrique chaud, ou dans un four chauffé.
- Une extrême prudence est requise lors du déplacement d'un appareil contenant des liquides chauds.
- Lors de l'utilisation d'une rallonge, branchez toujours la fiche sur l'appareil d'abord, puis branchez la rallonge dans la prise murale. Pour débrancher, mettez d'abord toutes les commandes de l'appareil sur "OFF", puis débranchez la fiche de la prise murale.
- N'utilisez aucun appareil pour un usage autre que celui auquel il est destiné.
- Polarisation : Cet appareil est équipé d'une fiche de ligne à courant alternatif polarisée (une fiche ayant une lame plus large que l'autre). Cette fiche ne s'insère dans la prise de courant que d'une seule façon. C'est une caractéristique de sécurité. Si vous ne pouvez pas insérer complètement la fiche dans la prise, essayez de l'inverser. Si la fiche ne s'insère toujours pas, contactez un électricien qualifié pour remplacer votre prise obsolète. Ne contournez pas l'objectif de sécurité de la fiche polarisée.
CONSERVEZ CES INSTRUCTIONS.
Cordon d'alimentation court : Cet appareil est muni d'un cordon d'alimentation court pour réduire les risques de s'emmêler ou de trébucher sur un cordon plus long. Une rallonge peut être utilisée si vous êtes prudent lors de son utilisation. Si une rallonge est utilisée, (1) la puissance nominale indiquée sur la rallonge doit être au moins égale à la puissance nominale de l'appareil, et (2) le cordon doit être disposé de manière à ne pas pendre sur le comptoir ou la table où il pourrait être tiré par des enfants ou faire trébucher quelqu'un involontairement. Si l'appareil est de type mis à la terre, la rallonge doit être un cordon polarisé à 2 fils. Le cordon d'alimentation doit être maintenu au sec et ne doit pas être plié ni avoir quelque chose posé dessus.
Le numéro de série de ce produit se trouve à l'arrière de l'appareil. Aucun autre appareil n'a le même numéro de série que le vôtre. Vous devez noter ce numéro et d'autres informations importantes ici et conserver ce livret comme enregistrement permanent de votre achat pour faciliter l'identification en cas de vol.
| Date of Purchase | Dealer Phone No. | ||
| Dealer Purchase from | Model No. | ||
| Dealer Address | Serial No. |
NOMS ET FONCTIONS DES PIÈCES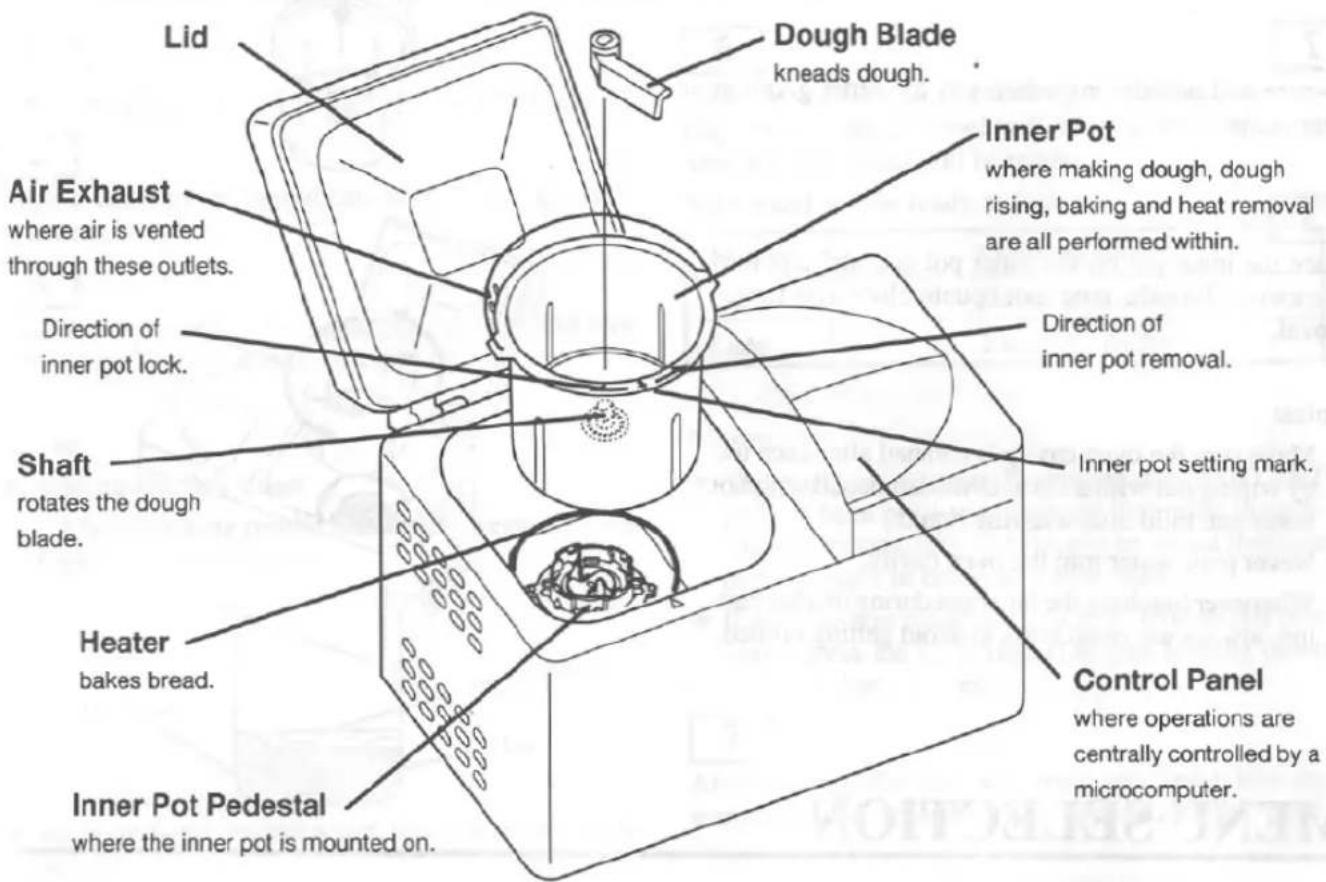
PANNEAU DE COMMANDE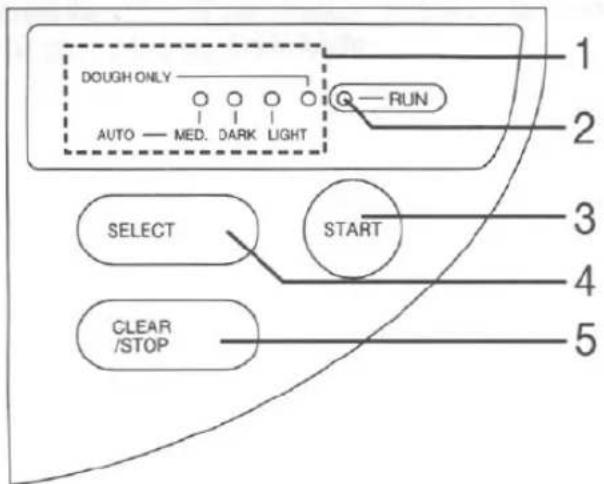
1 Voyants de mode
MOYEN (MEDIUM) – Pour une cuisson normale.
FONCÉ (DARK) – Pour une cuisson bien cuite avec une croûte plus foncée.
CLAIR (LIGHT) – Pour une cuisson moins cuite avec une croûte plus claire.
PÂTE SEULEMENT (DOUGH ONLY) – Réglage pour choisir l'option de pétrissage uniquement.
2 Voyant de fonctionnement (RUN)
3 Touche START – Démarre le processus de fabrication du pain.
4 Touche SELECT – Pour choisir Moyen, Foncé, Clair (croûte) ou Pâte seulement.
Touche CLEAR/STOP – Pour éteindre l'appareil et pour reprogrammer.
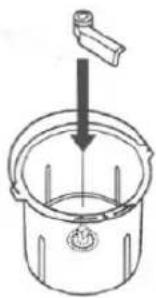
MONTAGE DE LA CUVETTE INTÉRIEURE
1
Placez la lame à pétrir sur l'axe dans la cuvette intérieure.
2
Préparez et ajoutez les ingrédients dans l'ordre indiqué dans votre recette.
3
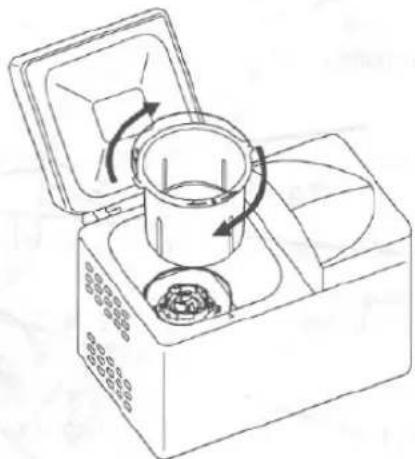
- Placez la cuvette intérieure sur le socle de la cuvette intérieure et tournez dans le sens des aiguilles d'une montre. Tournez la cuvette intérieure dans le sens inverse des aiguilles d'une montre pour la retirer.
Remarques :
- Assurez-vous de nettoyer la cavité du four après chaque utilisation en l'essuyant avec un chiffon propre imbibé d'eau chaude et de liquide vaisselle doux.
- Ne versez jamais d'eau dans la cavité du four.
- Lorsque vous touchez la cuvette intérieure pendant ou après la cuisson, utilisez toujours des gants de cuisine pour éviter de vous brûler.
SÉLECTION DU MENU
1
Branchez le cordon d'alimentation sur une prise secteur. Le témoin de mode (MOY.) s'allume.
Appuyez sur la touche SELECT pour choisir le mode souhaité.
Remarques :
- Les modes Medium, Dark, Light et Dough Only peuvent être sélectionnés.
- Medium, Dark et Light font référence à la couleur de la croûte ou au degré de cuisson du pain.
- Le mode Dough Only est utilisé uniquement pour préparer la pâte. Le pain ne sera pas cuit. Utilisez ce réglage pour faire de la pâte, par exemple pour des pizzas, des petits pains, des croissants, etc.
DU PÉTRISSAGE À LA CUISSON DU PAIN
Utilisez ce programme pour faire du pain automatiquement du début à la fin, y compris le cycle de maintien au chaud.
Les délicieuses recettes incluses dans le livret de recettes rendent la tâche encore plus facile.
1
Placez la lame de pétrissage sur l'axe dans la cuve intérieure.
2
Préparez et ajoutez les ingrédients dans l'ordre indiqué dans votre recette.
3
Placez la cuve intérieure sur le socle de la cuve et tournez-la dans le sens des aiguilles d'une montre. Tournez-la dans le sens inverse pour la retirer.
Remarques :
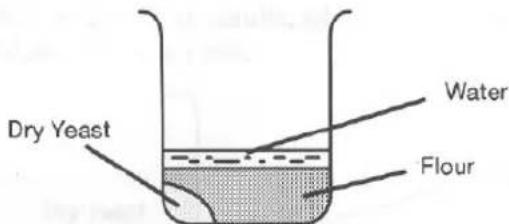
- Ajout de la levure sèche
Pour de meilleurs résultats de cuisson, ajoutez la levure sèche près du bord de la cuve intérieure.
- Tous les ingrédients, sauf l'eau, doivent être à température ambiante.
- N'ajoutez jamais trop d'ingrédients en même temps.
4
Ajoutez la quantité d'eau spécifiée à 20 °C à 30 °C (75 °F à 85 °F).
5
Appuyez sur la touche SELECT pour sélectionner la dorure de la croûte souhaitée : Moyenne, Foncée, Claire.
6
Appuyez sur la touche START pour lancer la cuisson immédiatement. L'affichage sur le panneau de commande vous indiquera le temps restant jusqu'à ce que le pain soit prêt.
Votre pain sera prêt comme suit.
| Medium | 2 hours 15 minutes |
| Dark | 2 hours 22 minutes |
| Light | 2 hours 8 minutes |
Remarques :
- L'appareil émet 10 bips 25 minutes après avoir appuyé sur la touche START pour indiquer que d'autres ingrédients comme les raisins secs, les noix, etc. peuvent être ajoutés si vous préparez du pain aux raisins ou d'autres types de pain.
- Si vous avez commis une erreur et souhaitez arrêter ce programme, appuyez sur la touche CLEAR/STOP en la maintenant enfoncée pendant plus d'une seconde.
7
Après la cuisson, l'appareil émet un bip et passe automatiquement en cycle de maintien au chaud pendant environ 1 heure.
Remarques :
- Il est préférable de sortir le pain de l'appareil immédiatement après la cuisson. Laisser le pain dans l'appareil, même après la fin du cycle de maintien au chaud, peut affecter le pain et le rendre humide.
- Si vous sortez le pain de l'appareil avant la fin du cycle de maintien au chaud, appuyez sur la touche CLEAR/STOP en la maintenant enfoncée pendant plus d'une seconde pour éteindre l'appareil.
- Ne faites pas fonctionner l'appareil immédiatement après la cuisson. Laissez-le refroidir à température ambiante.
RETRAIT DU PAIN
ATTENTION : Après la cuisson, l'appareil est extrêmement chaud. Lorsque vous manipulez les pièces métalliques (cavité du four, cuve intérieure et lame de pétrissage), assurez-vous de porter des gants de cuisine.
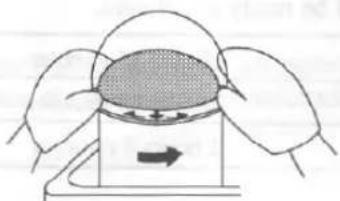
8
Tournez la cuve intérieure dans le sens inverse des aiguilles d'une montre pour la retirer de l'appareil.
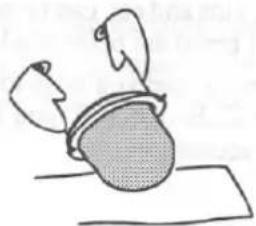
9
Placez la cuve intérieure à l'envers pour retirer délicatement le pain cuit.
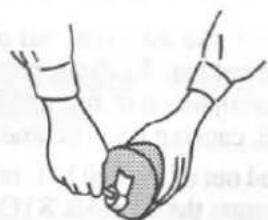
10
À l'aide d'un ustensile en plastique, retirez doucement la lame de pétrissage collée au fond du pain.
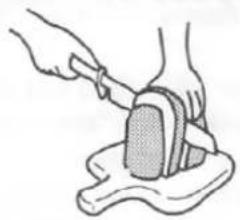
11
Coupez le pain comme vous le souhaitez.
PÉTRISSAGE UNIQUEMENT
Ce mode permet uniquement de préparer la pâte. Le mode Pâte uniquement est utilisé pour préparer uniquement la pâte, qui peut ensuite être utilisée pour faire des pizzas, des petits pains, des croissants ou d'autres pains qui seront façonnés à la main et cuits au four.
1
Placez la lame à pâte sur l'axe dans la cuve intérieure.
2
Préparez et ajoutez les ingrédients dans l'ordre indiqué dans votre recette.
3
Placez la cuve intérieure sur le socle de la cuve intérieure et tournez-la dans le sens des aiguilles d'une montre. Tournez-la dans le sens inverse pour la retirer.
Remarques :
- Ajout de la levure sèche
Pour de meilleurs résultats de cuisson, ajoutez la levure sèche près du bord de la cuve intérieure.
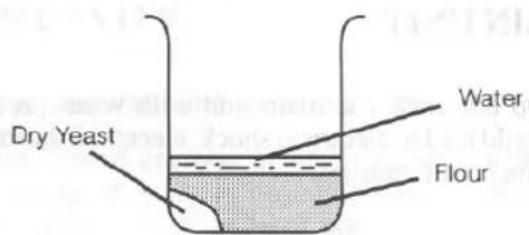
- Tous les ingrédients, sauf l'eau, doivent être à température ambiante.
- N'ajoutez jamais trop d'ingrédients en même temps.
4
Ajoutez la quantité d'eau spécifiée à 75 °F à 85 °F (20 °C à 30 °C).
5
Appuyez sur la touche SELECT pour sélectionner le mode Pâte uniquement.
6
Appuyez sur la touche START pour commencer à pétrir la pâte. La pâte sera prête dans environ 50 minutes. L'affichage sur le panneau de commande vous indiquera le temps restant jusqu'à ce que la pâte soit prête.
Remarques :
- L'appareil émet 10 bips 25 minutes après avoir appuyé sur la touche START pour indiquer que d'autres ingrédients comme les raisins secs, les noix, etc. peuvent être ajoutés si vous préparez des pains aux raisins ou d'autres types de pain.
- Si vous avez commis une erreur et souhaitez arrêter ce programme, appuyez sur la touche CLEAR/STOP en la maintenant enfoncée pendant plus d'une seconde.
7
La pâte est complètement prête lorsque l'appareil émet des bips pendant 5 minutes.
Remarque :
- Si vous souhaitez couper le son des bips, appuyez sur la touche CLEAR/STOP en la maintenant enfoncée pendant plus d'une seconde.
8
Lorsque la pâte est prête, retirez-la de la cuve intérieure.
9
Suivez les instructions de votre recette.
PROCESSUS DE CUISSON
- Ne touchez pas au couvercle car il devient extrêmement chaud pendant la cuisson et immédiatement après. Soyez particulièrement prudent si des nourrissons ou des enfants se trouvent à proximité. Utilisez toujours des gants de cuisine pour retirer le pain fraîchement cuit. Veillez à ne jamais placer d'objets inflammables sur le dessus de l'appareil, car cela pourrait provoquer un incendie.
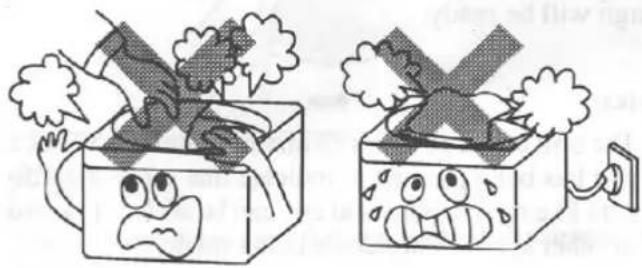
LIEUX D'UTILISATION APPROPRIÉS
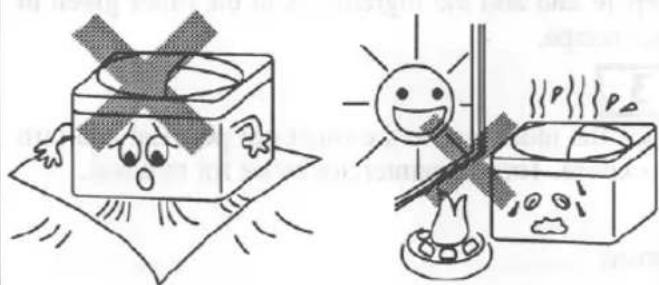
- Ne bloquez pas l'ouverture d'admission d'air située en bas de l'appareil.
- N'utilisez pas l'appareil à proximité d'objets inflammables, dans des endroits exposés à la pluie ou à la lumière directe du soleil, ou dans d'autres endroits inappropriés, car cela pourrait entraîner un dysfonctionnement ou des dommages.
ALIMENTATION ÉLECTRIQUE
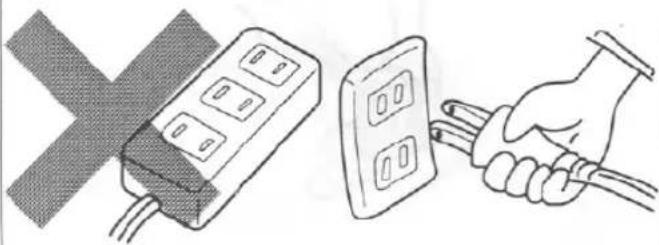
- Utilisez uniquement des prises de courant correctement câblées.
- Ne partagez jamais la même prise avec d'autres appareils.
- Retirez la fiche si l'appareil n'est pas utilisé pendant une période prolongée.
- Votre produit est équipé d'une fiche de courant alternatif polarisée (une fiche dont une lame est plus large que l'autre). Cette fiche ne s'insère dans la prise que d'une seule manière. Il s'agit d'une caractéristique de sécurité. Si vous ne pouvez pas insérer complètement la fiche dans la prise, essayez de l'inverser. Si la fiche ne s'insère toujours pas, contactez votre électricien pour remplacer votre prise obsolète. Ne contournez pas la fonction de sécurité de la fiche polarisée.
UNITÉ PRINCIPALE
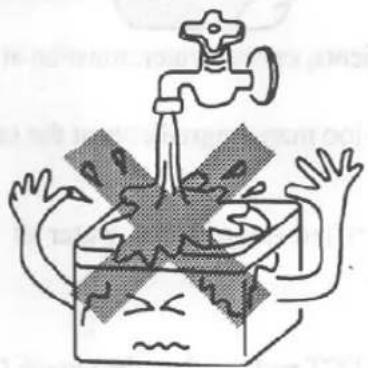
- Ne lavez pas l'unité principale à l'eau, car cela pourrait provoquer un choc électrique, un court-circuit ou d'autres dysfonctionnements.
MANIPULATION DE L'APPAREIL
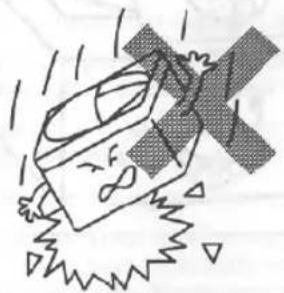
- Ne laissez pas tomber l'appareil et ne lui transmettez pas de chocs violents, car cela pourrait entraîner des dysfonctionnements.
- Cet appareil est exclusivement conçu pour la fabrication du pain et de la pâte. Ne placez aucun ingrédient autre que ceux utilisés pour la fabrication du pain dans l'appareil.
CAVITÉ DU FOUR
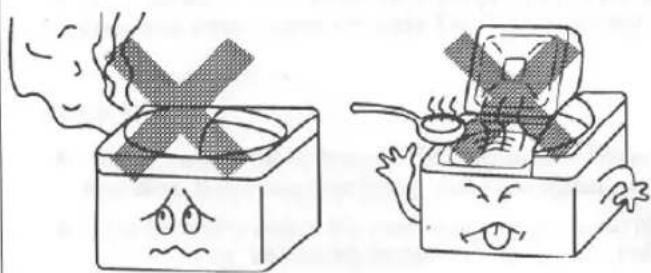
- Ne versez jamais d'eau dans la cavité du four.
- La farine, la chapelure ou toute autre matière étrangère accumulée dans la cavité du four peut rendre impossible l'insertion de la cuve intérieure.
- La farine et d'autres substances dispersées sur l'élément chauffant peuvent provoquer de la fumée pendant la cuisson.
EN CAS DE COUPURE DE COURANT PENDANT L'UTILISATION
- Si le courant est coupé pendant l'utilisation, en raison d'une panne de courant ou du débranchement de l'appareil, le processus de fabrication du pain s'arrêtera. Dans ce cas, retirez les ingrédients de la cuve intérieure, remplacez-les par des ingrédients frais et recommencez depuis le début.
Consultez un personnel qualifié :
- Si des dommages ou une anomalie sont constatés sur le cordon d'alimentation.
- Si l'appareil fonctionne de manière incorrecte.
- Si la température de la fiche augmente de manière alarmante pendant l'utilisation.
- Si des conditions inhabituelles se produisent.
ENTRETIEN DE VOTRE MACHINE À PAIN AUTOMATIQUE
UNITÉ PRINCIPALE
- Débranchez le cordon d'alimentation de la prise secteur avant le nettoyage.
- Essuyez délicatement la saleté avec une éponge humide ou un chiffon doux. Séchez avec un chiffon propre.
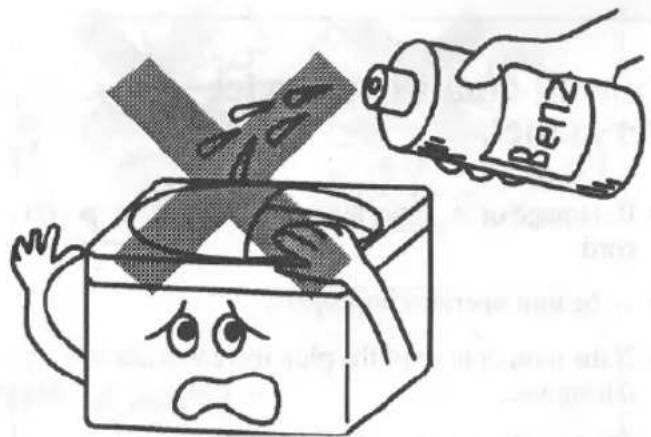
- N'utilisez jamais de nettoyants chimiques, de poudres abrasives ou de tampons à récurer.
- Les détergents non destinés à la cuisine ou l'eau de Javel ne doivent pas être utilisés.
CUVETTE INTÉRIEURE ET LAME À PÂTE
Nettoyez soigneusement ces pièces avec une éponge ou un chiffon doux imbibé d'eau tiède et de liquide vaisselle doux. Après le nettoyage, séchez-les complètement et rangez-les dans l'appareil principal.
Remarque :
La cuvette intérieure est recouverte de résine fluorée. Utilisez uniquement des ustensiles en plastique pour éviter de rayer ou d'endommager ce revêtement.
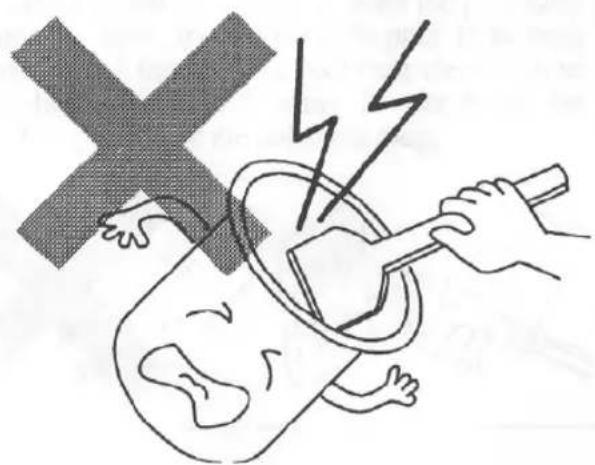
CAVITÉ DU FOUR
Retirez la farine, les miettes de pain et toute matière étrangère de la cavité du four avec un chiffon humide.
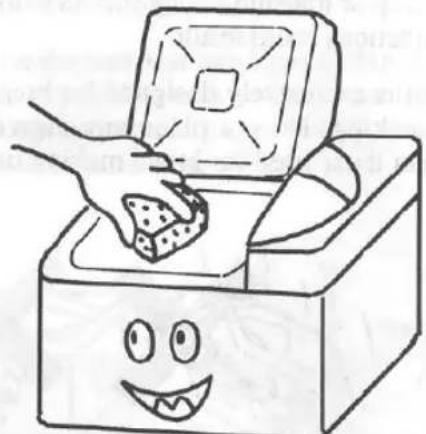
ARBRE
Retirez toutes les miettes après chaque utilisation. Utilisez une éponge ou un chiffon pour essuyer.
CONSEILS ET SUGGESTIONS POUR UN MEILLEUR PAIN
Le livret de recettes et le manuel du propriétaire de votre AUTO BREAD BAKER Funai peuvent vous aider à faire de meilleures pâtes et de meilleurs pains, que vous soyez expert ou débutant. Nous vous recommandons de lire à la fois ce livret de recettes et le manuel du propriétaire avant la première utilisation de l'AUTO BREAD BAKER. Il est conseillé de suivre les conseils ci-dessous :
INGRÉDIENTS
- Tous les ingrédients de cuisson doivent être frais, en particulier la levure.
- Vérifiez la date de péremption sur les paquets lors de l'achat de la levure.
- Utilisez uniquement des paquets de levure neufs et non endommagés.
- Comme la force de levée de la levure varie selon la marque et le type, si la pâte ne lève pas bien, essayez d'ajouter un peu de levure ; si la pâte lève trop, réduisez un peu la quantité de levure la prochaine fois.
- La farine à pain ou farine de force est plus riche en protéines que la farine tout usage et donne un meilleur pain.
- La qualité de la farine à pain affecte la qualité du pain. La farine à pain peut être différente à chaque fois, même si vous utilisez la même marque, car elle varie d'une récolte à l'autre, d'une année à l'autre.
- Le type/source d'eau utilisée peut affecter le pain. Si l'eau de votre région est extrêmement dure ou douce, nous vous recommandons d'utiliser de l'eau de source en bouteille à faible teneur en minéraux. ● Mesurez toujours les ingrédients avec soin en utilisant des tasses et cuillères de mesure standard américaines.
- Lors de la mesure de la farine, ne la prélevez jamais directement du sac ou du récipient avec la tasse à mesurer. Versez toujours la farine dans la tasse à l'aide d'une cuillère. Insérez un couteau de table propre dans la farine à quelques reprises pour éliminer les grumeaux ou les poches d'air. Nivelez le dessus de la tasse avec le couteau. Ne tassez jamais la farine.
CONDITIONS
- La température ambiante appropriée pour faire la pâte et le pain est de 60 à 75 °F (15 à 20 °C). L'humidité appropriée est de 50 à 60 %.
- Dans les zones de haute altitude, si la pâte lève trop, la prochaine fois réduisez la quantité de levure et/ou d'eau afin que la pâte lève et cuise correctement.
- Utilisez la quantité appropriée d'eau à environ 75 à 85 °F (20 à 30 °C) comme spécifié dans ce livret de recettes.
- Lorsque la température ambiante est supérieure à environ 85 °F (30 °C), utilisez de l'eau à environ 40 à 50 °F (5 à 10 °C).
LEVÉE
- Si l'humidité et/ou la température ambiante est trop élevée, la pâte peut être très molle, collante, humide et trop levée. Dans ce cas, la prochaine fois réduisez l'eau (environ 1 à 2 cuillères à soupe) et/ou la levure (environ 1/4 à 1/2 cuillère à café).
- Si l'humidité et/ou la température ambiante est trop basse, la pâte peut être ferme, grumeleuse, sèche et ne pas bien lever. Dans ce cas, ajoutez de l'eau (environ 1 à 2 cuillères à soupe) une fois que l'appareil commence le deuxième pétrissage.
CUISSON
- Vous pouvez ajuster le degré de brunissement de la croûte selon votre préférence. Si vous souhaitez une croûte plus foncée, sélectionnez FONCÉ avec SELECT la prochaine fois. Si vous préférez une croûte plus claire, choisissez CLAIR.
- Si l'humidité et/ou la température ambiante sont trop élevées ou trop basses, le pain peut être court, trop levé, affaissé ou ridé pendant la cuisson, et la texture de la mie sera grossière. Suivez les instructions de la section LEVÉE.
AUTRES CONSEILS
- Vous pouvez préparer de nombreux types de pâtes et de pains, non mentionnés dans ce livret de recettes, mais que vous trouverez dans des livres de recettes généraux.
- En ajustant ou en créant vos propres recettes, vous pouvez réaliser un pain original.
- Pour le nettoyage de cette machine à pain automatique, reportez-vous au manuel d'utilisation.
- Si la qualité du pain n'est pas satisfaisante malgré les conseils ci-dessus, ajoutez 1 à 2 cuillères à soupe de jus de citron en réduisant la même quantité d'eau, puis réessayez.
BONNE PRÉPARATION DE PÂTES ET DE PAIN AVEC CETTE MACHINE À PAIN AUTOMATIQUE !!
AVANT DE DEMANDER UNE INTERVENTION...
Pour les éléments marqués d'un *, reportez-vous à la section « CONSEILS ET SUGGESTIONS POUR UN MEILLEUR PAIN » de la page précédente pour plus de détails.
| PROBLEM | POSSIBLE CAUSE | SOLUTION |
| The unit does not start. | Is the power cord plugged in? | If not, plug the power cord in securely. |
| Have you just finished baking bread? | The unit will not operate if the oven's interior temperature is above 131°F (55°C)- such as immediately after baking. Open the lid and let it cool down. | |
| Dough does not knead or mix. | Is the dough blade attached correctly? | If not, remove the inner pot, take out ingredients, and attach the dough blade correctly. |
| Smoke is generated during baking. | Have flour or other ingredients spilled on the heating element? | If so, clean the oven cavity. If smoke results from any other cause, unplug the power cord and contact your qualified service personnel. |
| Bread cannot be baked. | Is the Dough Only mode being used? | The Dough Only mode is designed just for dough making and the unit will not enter the baking process. Remove the ingredients, replace with new ingredients, and start the unit in the correct mode. Be sure to press the CLEAR/STOP pad first. |
| Is the dough blade properly attached? | If not, attach the dough blade correctly. | |
| Was the lid opened during baking? | Keep the lid closed during baking. | |
| * Dough does not rise enough. | Is the amount of water used correct? Is the temperature of the water correct? | Use the right amount of water. (Approximately 75°~85°F; 20~30°C) |
| Was bread flour used? Were all ingredients measured correctly and at room temperature with the exception of the water? | The use of bread flour is highly recommended. Measure all ingredients carefully and make sure they are at room temperature. | |
| Is the dry yeast you are using old or has it been left for a long time with the package open? Has it been stored incorrectly? | Use fresh dry yeast from an unopened package. | |
| Is the bread being baked where the temperature is excessively high or low? | Use the unit in locations where the temperature is 60°~75°F (15~20°C). | |
| *Bread rises too much or collapses. | Is it very hot and/or humid? Are you using anything other than dry yeast? | If the dough is very moist, reduce dry yeast by 1/4-1/2 tsp and/or water by 1-2 Tbsp next time.If the dough is very dry, add 1-2 Tbsp of water once the unit begins the second kneading.If dough appears too dry 3 minutes after the kneading has been completed, add 1-2 Tbsp of water. |
| *Bread collapses or texture is coarse. | Have there been radical changes in the weather? Is the water warmer than 85°F (30°C)? | Make sure water is not warmer than 85°F (30°C).Flour is very absorbent. During changes in weather flour will absorb excess humidity causing dough to be too moist.If the dough is very moist, reduce water by 1-2 Tbsp next time.If the dough is very dry, add 1-2 Tbsp of water once the unit begins the second kneading.If dough appears too dry 3 minutes after the kneading has been completed, add 1-2 Tbsp of water. |
| CPU | 4 Bit 4KB |
| POWER SUPPLY | 120V AC 60Hz |
| POWER CONSUMPTION | Heater 450WMain Motor 95W |
| SIZE | 13-9/16"(345mm)x9-1/16"(230mm)x11-9/16"(294mm)(W/D/H) |
| WEIGHT | 13.2 lbs. (6.0 kg) |
| WEIGHT OF BREAD | Approx. 1.0 lbs. (450g) |
| SIZE OF BREAD | Approx. 5-5/16" x 6-5/16"(135 x 160 mm) (D/H) |
- Les spécifications sont sujettes à modification sans préavis et sans obligation légale de notre part.
INFORMATIONS FCC
Cet appareil a été testé et déclaré conforme aux limites applicables aux appareils numériques de classe B, conformément à la partie 15 des règles de la FCC. Ces limites sont conçues pour fournir une protection raisonnable contre les interférences nuisibles dans une installation résidentielle. Cet équipement génère, utilise et peut émettre de l'énergie radiofréquence et, s'il n'est pas installé et utilisé conformément aux instructions, peut provoquer des interférences nuisibles aux communications radio. Cependant, il n'y a aucune garantie que des interférences ne se produiront pas dans une installation particulière. Si cet équipement provoque des interférences nuisibles à la réception radio ou télévision, ce qui peut être déterminé en éteignant et en allumant l'équipement, l'utilisateur est encouragé à essayer de corriger les interférences par une ou plusieurs des mesures suivantes :
— Réorienter ou déplacer l'antenne de réception. — Augmenter la distance entre l'équipement et le récepteur. — Connecter l'équipement à une prise sur un circuit différent de celui auquel le récepteur est connecté. — Consulter le revendeur ou un technicien radio/TV expérimenté pour obtenir de l'aide.
Avertissement FCC – Cet équipement peut générer ou utiliser de l'énergie radiofréquence. Des modifications apportées à cet équipement peuvent causer des interférences nuisibles, sauf si elles sont expressément approuvées dans le manuel d'instructions. L'utilisateur pourrait perdre le droit d'utiliser cet équipement si une modification non autorisée est effectuée.
GARANTIE LIMITÉE DE FUNAI CORPORATION
FUNAI CORP. réparera ce produit, gratuitement aux États-Unis, en cas de défaut de matériaux ou de fabrication, comme suit :
DURÉE :
PIÈCES : FUNAI CORP. fournira des pièces pour remplacer les pièces défectueuses sans frais pendant un (1) an à compter de la date d'achat au détail initial.
MAIN-D'ŒUVRE : FUNAI CORP. fournira la main-d'œuvre sans frais pendant une période d'un (1) an à compter de la date d'achat au détail initial.
LIMITES ET EXCLUSIONS :
Cette garantie est accordée uniquement à l'acheteur initial au détail. Un reçu d'achat ou une autre preuve d'achat au détail initial sera exigé avec le produit pour obtenir un service sous cette garantie.
Cette garantie ne s'étend à aucune autre personne ou cessionnaire.
Cette garantie est nulle et sans effet si les numéros de série sur le produit sont modifiés, remplacés, défigurés ou manquants. Cette garantie limitée de FUNAI CORP. ne s'applique pas à tout produit non acheté et utilisé aux États-Unis.
Cette garantie ne couvre que les défaillances dues à des défauts de matériaux ou de fabrication qui surviennent lors d'une utilisation normale. Elle ne couvre pas les dommages survenant pendant le transport, ni les défaillances causées par des réparations, des altérations ou des produits non fournis par FUNAI CORP., ni les dommages résultant d'accidents, de mauvaise utilisation, d'abus, de mauvaise manipulation, de mauvaise application, d'altération, d'installation défectueuse, d'entretien inapproprié, d'utilisation commerciale telle que l'utilisation dans les hôtels, les locations ou les bureaux, ni les dommages résultant d'incendie, d'inondation, de foudre ou d'autres catastrophes naturelles.
CETTE GARANTIE NE COUVRE PAS LES MATÉRIAUX D'EMBALLAGE, LES ACCESSOIRES, LES PIÈCES COSMÉTIQUES OU LES PIÈCES D'ASSEMBLAGE COMPLET.
FUNAI CORP. ET SES REPRÉSENTANTS OU AGENTS NE SERONT EN AUCUN CAS RESPONSABLES DES DOMMAGES GÉNÉRAUX, INDIRECTS OU CONSÉCUTIFS DÉCOULANT DE L'UTILISATION OU DE L'INCAPACITÉ D'UTILISER CE PRODUIT. CETTE GARANTIE EST FOURNIE EN LIEU DE TOUTE AUTRE GARANTIE, EXPRESSE OU IMPLICITE, ET DE TOUTE AUTRE RESPONSABILITÉ DE FUNAI. TOUTES LES AUTRES GARANTIES, Y COMPRIS LA GARANTIE DE QUALITÉ MARCHANDE ET D'ADAPTATION À UN USAGE PARTICULIER, SONT PAR LES PRÉSENTES EXCLUES PAR FUNAI ET SES REPRÉSENTANTS AUX ÉTATS-UNIS.
TOUTES LES INSPECTIONS ET RÉPARATIONS SOUS GARANTIE DOIVENT ÊTRE EFFECTUÉES PAR UN CENTRE DE SERVICE AGRÉÉ FUNAI. CETTE GARANTIE EST VALABLE LORSQUE L'APPAREIL EST APPORTÉ DANS UN CENTRE DE SERVICE AGRÉÉ FUNAI.
LORSQUE VOUS RENVOYEZ LE PRODUIT POUR RÉPARATION AU CENTRE DE SERVICE DE L'USINE, VEUILLEZ CONTACTER LE SERVICE APRÈS-VENTE DE FUNAI POUR OBTENIR UN NUMÉRO D'AUTORISATION DE RETOUR DE MARCHANDISE (M.R.A.) AVANT L'EXPÉDITION. TOUS LES FRAIS DE PORT, D'ASSURANCE ET D'EXPÉDITION ENCOURUS POUR PRÉSENTER OU ENVOYER VOTRE PRODUIT FUNAI POUR RÉPARATION SONT À LA CHARGE DE L'EXPÉDITEUR.
Emballer soigneusement avec des matériaux d'emballage appropriés, de préférence dans le carton d'origine.
Joindre une documentation écrite détaillant la réclamation, à l'extérieur ou à l'intérieur du carton.
Le produit doit être accompagné d'une copie du reçu d'achat original. Si aucune preuve d'achat n'est jointe, la garantie ne sera pas honorée et les frais de réparation seront facturés.
IMPORTANT :
Cette garantie limitée vous confère des droits légaux spécifiques. Vous pouvez également bénéficier d'autres droits qui varient d'un État à l'autre. Si, à tout moment pendant la période de garantie, vous n'êtes pas satisfait de la réparation de ce produit, veuillez contacter FUNAI CORP.
ATTENTION :
FUNAI CORP. se réserve le droit de modifier tout design de ce produit sans préavis.
Pour obtenir des informations sur le centre de service agréé FUNAI le plus proche ou sur la procédure générale de service, veuillez appeler ou écrire à l'adresse suivante :
FUNAI CORPORATION.
Centre de service d'usine
100 North Street, Teterboro, NJ 07608
Tél : 800-242-7158
(Heure de l'Est, de 9h00 à 16h30)

- MACHINE À PAIN AUTOMATIQUE
- AVEC FONCTION PÉTRISSEUR
- MODÈLE B
- TABLE DES MATIÈRES
- AVERTISSEMENT
- ATTENTION
- GARANTIES IMPORTANTES
- USAGE DOMESTIQUE UNIQUEMENT
- CONSERVEZ CES INSTRUCTIONS
- VOYANTS DE MODE
- VOYANT DE FONCTIONNEMENT (RUN)
- MONTAGE DE LA CUVETTE INTÉRIEURE
- REMARQUES
- SÉLECTION DU MENU
- DU PÉTRISSAGE À LA CUISSON DU PAIN
- RETRAIT DU PAIN
- PÉTRISSAGE UNIQUEMENT
- REMARQUE
- PROCESSUS DE CUISSON
- LIEUX D'UTILISATION APPROPRIÉS
- ALIMENTATION ÉLECTRIQUE
- UNITÉ PRINCIPALE
- MANIPULATION DE L'APPAREIL
- CAVITÉ DU FOUR
- EN CAS DE COUPURE DE COURANT PENDANT L'UTILISATION
- CONSULTEZ UN PERSONNEL QUALIFIÉ
- ENTRETIEN DE VOTRE MACHINE À PAIN AUTOMATIQUE
- CUVETTE INTÉRIEURE ET LAME À PÂTE
- ARBRE
- CONSEILS ET SUGGESTIONS POUR UN MEILLEUR PAIN
- INGRÉDIENTS
- CONDITIONS
- LEVÉE
- CUISSON
- AUTRES CONSEILS
- AVANT DE DEMANDER UNE INTERVENTION
- INFORMATIONS FCC
- GARANTIE LIMITÉE DE FUNAI CORPORATION
- DURÉE
- LIMITES ET EXCLUSIONS
- IMPORTANT
Marque : FUNAI
Modèle : B-2220
Catégorie : Machine à pain