
RV-NB10B - Enceinte bluetooth JVC - Notice d'utilisation et mode d'emploi gratuit
Retrouvez gratuitement la notice de l'appareil RV-NB10B JVC au format PDF.

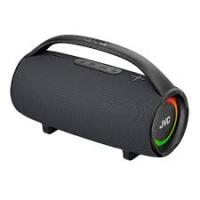
| Type de produit | Enceinte Bluetooth avec lecteur CD, cassette et radio FM/AM |
| Marque | JVC |
| Modèle | RV-NB10B |
| Dimensions (L × H × P) | 690 × 239 × 296 mm |
| Poids (sans piles) | 9,5 kg |
| Poids (avec piles) | 10,6 kg |
| Alimentation | AC 230 V / 50 Hz ; DC 15 V (10 piles R20/D) ; DC 12 V (adaptateur voiture optionnel) |
| Consommation (marche) | 43 W |
| Consommation (veille) | 1,6 W |
| Puissance de sortie (max.) | 20 W + 20 W (voies large bande) ; 40 W (woofer) |
| Entrées audio | AUX (mini-jack 3,5 mm), microphone/guitare (jack 6,3 mm) |
| Sortie casque | Prise jack 3,5 mm |
| Radio | FM (87,5 – 108 MHz), AM (PO : 522 – 1629 kHz, GO : 144 – 288 kHz) |
| Lecteur de disques | CD audio, CD-R/RW finalisés (format CD audio ou MP3) |
| Lecteur de cassettes | Auto‑reverse, compatible type I et II |
| Fonctions spéciales | ACS (Active Clear Sound), modes sonores (BEAT, POP, CLEAR, FLAT), super woofer réglable, programmation de plages, lecture aléatoire, répétition, minuterie, timer sommeil |
| Télécommande | Oui, RM-SRVNB10E (piles R6/AA fournies) |
| Accessoires fournis | Cordon d'alimentation, télécommande, piles (2× R6/AA), sangle d'épaule avec étuis, câble mini-jack 3,5 mm |
| Entretien | Nettoyer les têtes de cassette avec un coton‑tige imbibé d'alcool ; démagnétiser les têtes avec un démagnétiseur |
| Sécurité | Ne pas exposer à la pluie ou à l'humidité ; utiliser uniquement le cordon d'alimentation fourni ; débrancher avant toute intervention |
| Réparabilité | Pièces détachées non spécifiées ; contacter le revendeur pour toute réparation |
FOIRE AUX QUESTIONS - RV-NB10B JVC
Questions des utilisateurs sur RV-NB10B JVC
0 question sur cet appareil. Repondez a celles que vous connaissez ou posez la votre.
Poser une nouvelle question sur cet appareil
Téléchargez la notice de votre Enceinte bluetooth au format PDF gratuitement ! Retrouvez votre notice RV-NB10B - JVC et reprennez votre appareil électronique en main. Sur cette page sont publiés tous les documents nécessaires à l'utilisation de votre appareil RV-NB10B de la marque JVC.
MODE D'EMPLOI RV-NB10B JVC
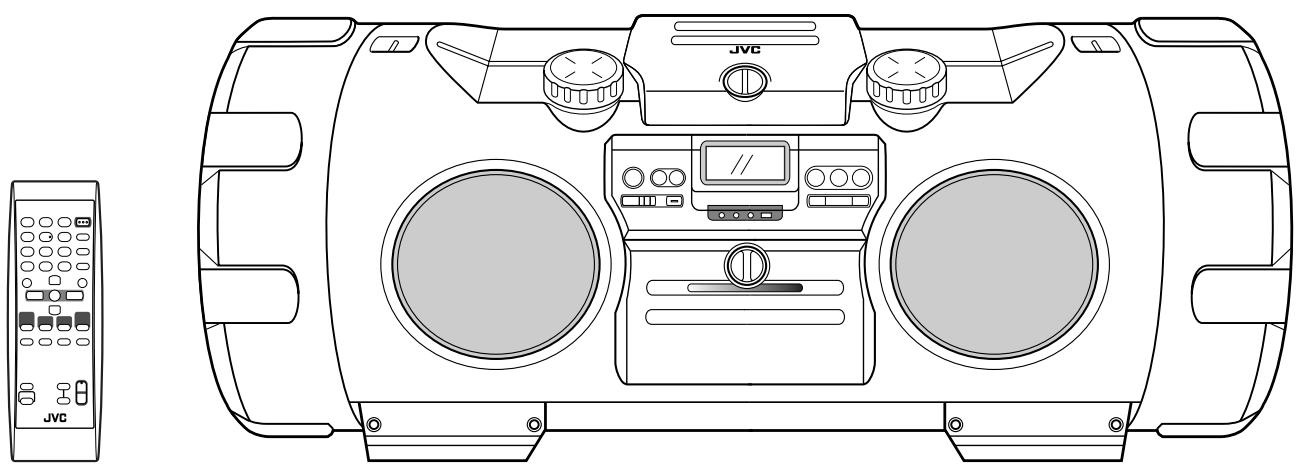
POWERED WOOFER CD SYSTEM
RV-NB10B/RV-NB10W


INSTRUCTIONS
IMPORTANT for the U.K.
DO NOT cut off the mains plug from this equipment. If the plug fitted is not suitable for the power points in your home or the cable is too short to reach a power point, then obtain an appropriate safety approved extension lead or consult your dealer.
BE SURE to replace the fuse only with an identical approved type, as originally fitted.
If nonetheless the mains plug is cut off ensure to remove the fuse and dispose of the plug immediately, to avoid a possible shock hazard by inadvertent connection to the mains supply.
If this product is not supplied fitted with a mains plug then follow the instructions given below:
IMPORTANT:
DO NOT make any connection to the terminal which is marked with the letter E or by the safety earth symbol or coloured green or green-and-yellow.
The wires in the mains lead on this product are coloured in accordance with the following code:
Blue: Neutral
Brown: Live
As these colours may not correspond with the coloured markings identifying the terminals in your plug proceed as follows:
The wire which is coloured blue must be connected to the terminal which is marked with the letter N or coloured black.
The wire which is coloured brown must be connected to the terminal which is marked with the letter L or coloured red.
IF IN DOUBT - CONSULT A COMPETENT ELECTRICIAN.
CAUTIONON/STANDBY button!
Disconnect the mains plug to shut the power off completely (the STANDBY lamp goes off). When installing the apparatus, ensure that the plug is easily accessible. The ON/STANDBY button in any position does not disconnect the mains line.
- When the unit is on standby, the STANDBY lamp lights red.
- When the unit is turned on, the STANDBY lamp goes off.
The power can be remote controlled.
CAUTION
To reduce the risk of electrical shocks, fire, etc.:
- Do not remove screws, covers or cabinet.
- Do not expose this appliance to rain or moisture.
IMPORTANT FOR LASER PRODUCTS
- CLASS 1 LASER PRODUCT
- CAUTION: Do not open the top cover. There are no user serviceable parts inside the unit; leave all servicing to qualified service personnel.
- CAUTION: Visible and/or invisible class 1M laser radiation when open. Do not view directly with optical instruments.
CAUTION:
- Do not block the ventilation openings or holes. (If the ventilation openings or holes are blocked by a newspaper or cloth, etc., the heat may not be able to get out.)
- Do not place any naked flame sources, such as lighted candles, on the apparatus.
- When discarding batteries, environmental problems must be considered and local rules or laws governing the disposal of these batteries must be followed strictly.
- Do not expose this apparatus to rain, moisture, dripping or splashing and that no objects filled with liquids, such as vases, shall be placed on the apparatus.
Caution: Proper Ventilation
To avoid risk of electric shock and fire, and to prevent damage, locate the apparatus as follow:
1 Front:
No obstructions and open spacing.
2 Sides/ Top/ Back:
No obstructions should be placed in the areas shown by the dimensions below.
3 Bottom:
Place on the level surface. Maintain an adequate air path for ventilation by placing on a stand with a height of 10cm or more.
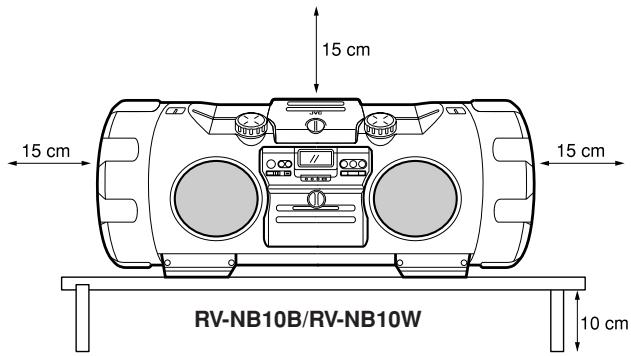
Front View
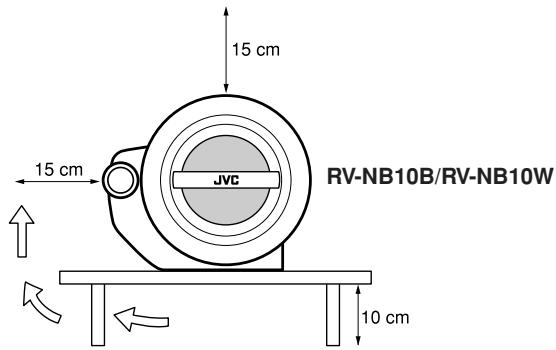
Side View
SAFETY INSTRUCTIONS
"SOME DOS AND DON'TS ON THE SAFE USE OF EQUIPMENT"
This equipment has been designed and manufactured to meet international safety standards but, like any electrical equipment, care must be taken if you are to obtain the best results and safety is to be assured.
☆☆☆☆☆☆☆☆☆☆☆☆☆☆☆☆☆☆☆☆☆☆☆☆☆☆☆☆☆☆
Do read the operating instructions before you attempt to use the equipment.
Do ensure that all electrical connections (including the mains plug, extension leads and interconnections between pieces of equipment) are properly made in accordance with the manufacturer's instructions. Switch off and withdraw the mains plug when making or changing connections.
Do consult your dealer if you are ever in doubt about the installation, operation or safety of your equipment.
Do be careful with glass panels or doors on equipment.
☆☆☆☆☆☆☆☆☆☆☆☆☆☆☆☆☆☆☆☆☆☆☆☆☆☆☆☆☆☆☆☆
DON'T continue to operate the equipment if you are in any doubt about it working normally, or if it is damaged in any way—switch off, withdraw the mains plug and consult your dealer.
DON'T remove any fixed cover as this may expose dangerous voltages.
DON'T leave equipment switched on when it is unattended unless it is specifically stated that it is designed for unattended operation or has standby mode.
Switch off using the switch on the equipment and make sure that your family know how to do this.
Special arrangements may need to be made for infirm or handicapped people.
DON'T use equipment such as personal stereos or radios so that you are distracted from the requirements of traffic safety. It is illegal to watch television whilst driving.
DON'T listen to headphones at high volume as such use can permanently damage your hearing.
DON'T obstruct the ventilation of the equipment, for example with curtains or soft furnishings.
Overheating will cause damage and shorten the life of the equipment.
DON'T use makeshift stands and NEVER fix legs with wood screws—to ensure complete safety always fit the manufacturer's approved stand or legs with the fixings provided according to the instructions.
DON'T allow electrical equipment to be exposed to rain or moisture.
ABOVE ALL
NEVER let anyone, especially children, push anything into holes, slots or any other opening in the case—this could result in a fatal electrical shock.
NEVER guess or take chances with electrical equipment of any kind—it is better to be safe than sorry!
Information for Users on Disposal of Old Equipment
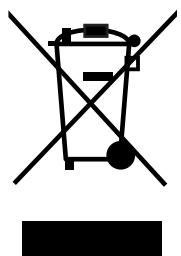
Attention:
This symbol is only valid in the European Union.
[European union]
This symbol indicates that the electrical and electronic equipment should not be disposed as general household waste at its end-of-life. Instead, the product should be handed over to the applicable collection point for the recycling of electrical and electronic equipment for proper treatment, recovery and recycling in accordance with your national legislation.
By disposing of this product correctly, you will help to conserve natural resources and will help prevent potential negative effects on the environment and human health which could otherwise be caused by inappropriate waste handling of this product. For more information about collection point and recycling of this product, please contact your local municipal office, your household waste disposal service or the shop where you purchased the product.
Penalties may be applicable for incorrect disposal of this waste, in accordance with national legislation.
(Business users)
If you wish to dispose of this product, please visit our web page www.jvc-europe.com to obtain information about the takeback of the product.
[Other Countries outside the European Union]
If you wish to dispose of this product, please do so in accordance with applicable national legislation or other rules in your country for the treatment of old electrical and electronic equipment.
Thank you for purchasing the JVC Powered Woofer CD System.
Before operating this system, read this manual carefully and thoroughly to obtain the best possible performance from your system, and retain this manual for future reference.
Features
Here are some of the things that make your system both powerful and simple to use.
General
- With JVC's COMPU PLAY you can turn on the system and automatically start the radio, disc player, or cassette deck with a single touch. (Only when AC power is used.)
- Shoulder strap with carrying cases for the remote control and auxiliary equipment (not supplied), and carrying handle
- ACS (Active Clear Sound) circuit for enhancing sound reproduction
- Super woofer volume control that provides powerful bass
Sound mode control—reproducing various sound fields - Remote control unit that operates the disc, cassette, and tuner functions
- Locking mechanism for disc and cassette door
- Microphone/guitar input
Disc playback mode includes Skip Play, Search Play, Repeat Play, Random Play, and Program Play.
Cassette player having full logic cassette mechanism, auto reverse, and auto tape mechanism.
A 45-station preset capability (30 stations in FM band and 15 stations in AM (MW/LW) band) in addition to auto-seek and manual tuning.
Clock/timer functions, timer on/off with preset volume function, and sleep timer.
IMPORTANT CAUTIONS
1.Where to place the system
- Select a place which is level, dry and neither too hot nor too cold (between 5^ and 35^ ).
- Leave sufficient distance between the system and a TV.
- Do not use the system in a place subject to vibrations.
2.Power cord
- Do not handle the power cord with wet hands!
- Some power is always consumed as long as the power cord is connected to the wall outlet.
- When unplugging the system from the wall outlet, always pull the plug, not the power cord.
3.When carrying the system
- Remove a disc from the system.
- Disconnect all the cords from the system.
4.Malfunctions,etc.
- There are no user serviceable parts inside. In case of system failure, unplug the power cord and consult your dealer.
- Do not insert any foreign object into the system.
- The system is not waterproof or dust proof.
Table of contents
Features 1
IMPORTANT CAUTIONS. 1
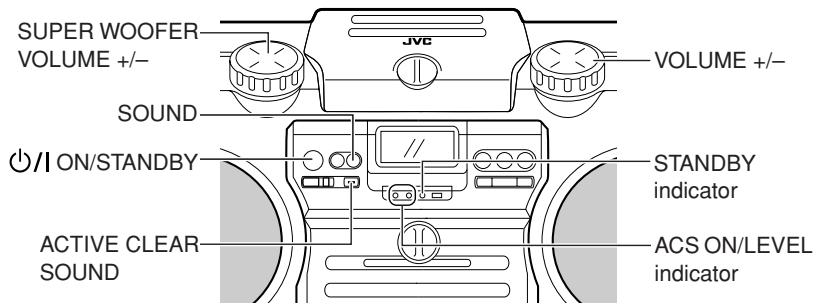
Index of parts and controls 2
Getting started. 3
Basic operations 7
Listening to the radio. 9
Playing back discs 10
Playing back tapes 13
Recording 14
Listening to auxiliary equipment 16
Using the microphone/guitar 16
Using the timer 17
Care and maintenance 19
Troubleshooting 20
Specifications 20

Display window
See pages in parentheses for details.
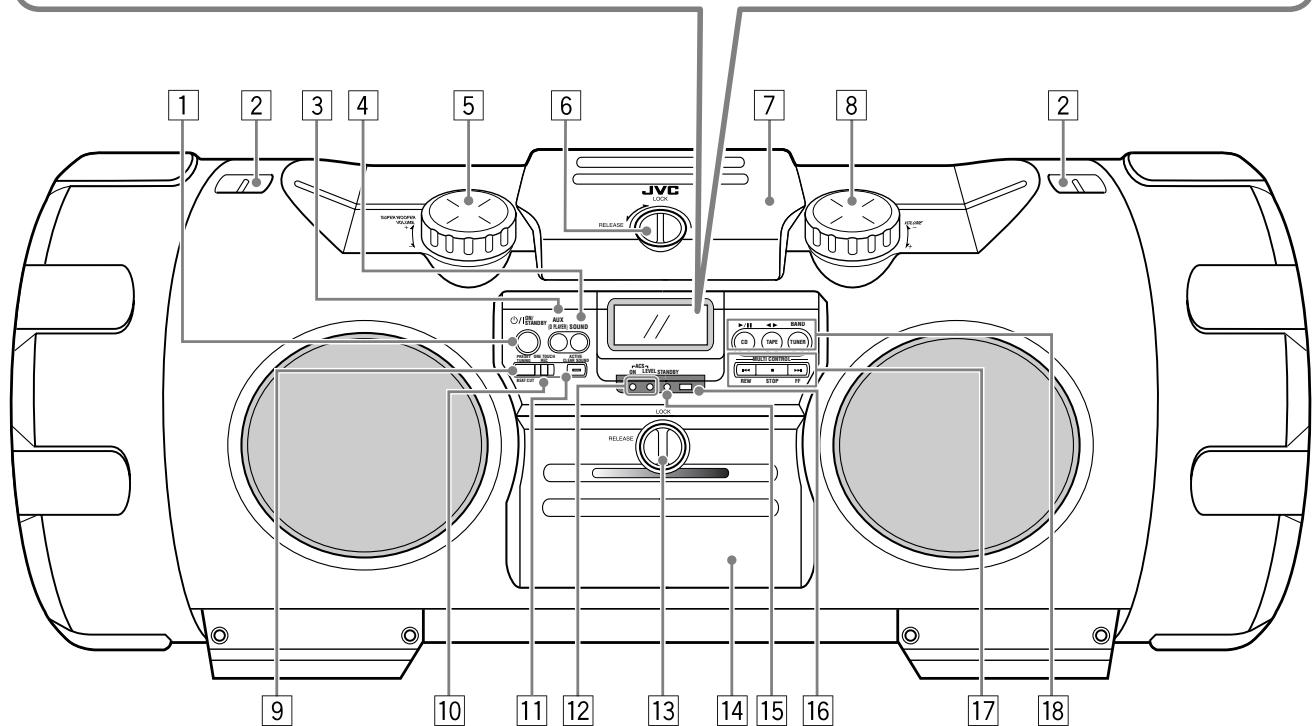
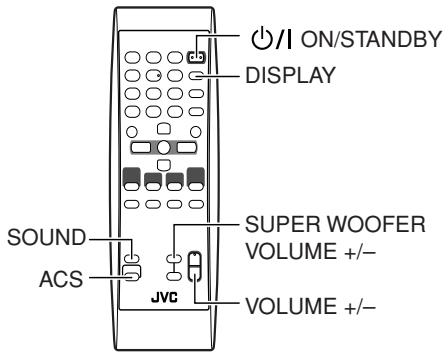
1ON/STANDBY button (7)
Shoulder strap hooks (4)
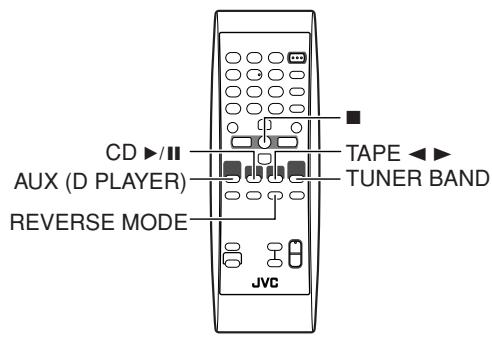
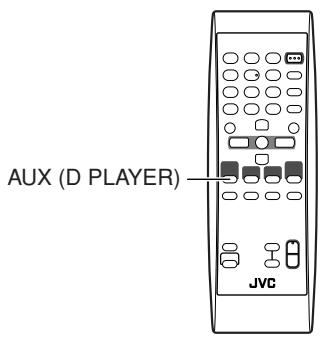
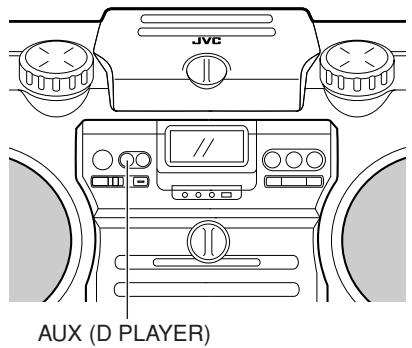
3 AUX (D PLAYER) button (3, 16)
-
Pressing this button also turns on the unit.
4 SOUND button (8)
5 SUPER WOOFER VOLUME + / - control knob (8)
6 LOCK/RELEASE knob (for disc) (10)
7 Disc compartment door (10)
8 VOLUME + / - control knob (7)
9 PRESET TUNING/BEAT CUT button (9, 15)
10 ONE TOUCH REC button (15)
11 ACTIVE CLEAR SOUND button (8)
12 ACS (Active Clear Sound) indicators (8)
ON, LEVEL
13 LOCK/RELEASE knob (for deck) (13)
Cassette holder (13)
15 STANDBY indicator (7)
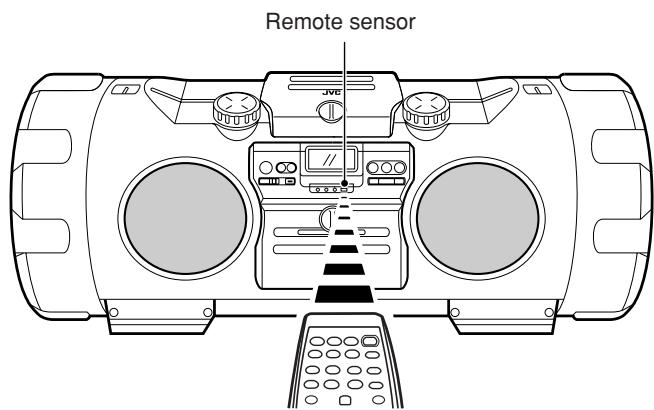
Remote sensor (4)
17 MULTI CONTROL buttons (9-15) -
1↔REW (rewind), ■ STOP, ▷FF (fast-forward)
18 Source and play mode buttons (3, 9 - 15)
- CD▶II, TAPE▶TUNER BAND
Pressing one of these buttons also turns on the unit.
Display window
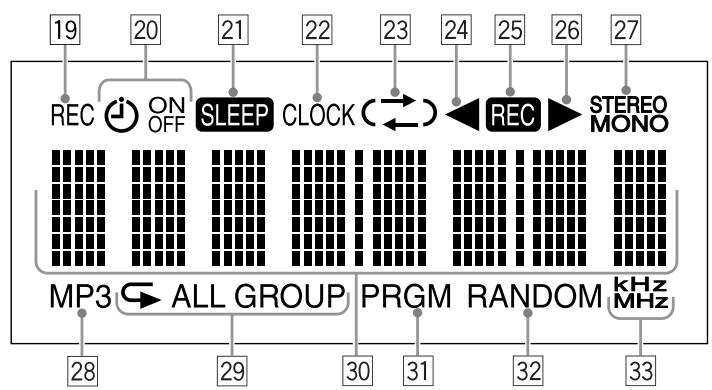
19 REC indicator (18)
20 Timer indicators (18)
- (timer), ON, OFF
21 SLEEP indicator (17)
22 CLOCK indicator (8, 17)
23 ( ) (reverse mode) indicator (13-15)
24 (reverse) tape direction indicator (13-15)
25 REC indicator (15)
forward) tape direction indicator (13-15)
27 FM mode indicators (9)
- STEREO, MONO
28 MP3 indicator (11)
29 Repeat indicators (12)
- , ALL, GROUP
30 Main display
31 PRGM (program) indicator (12)
32 RANDOM indicator (12)
33 Frequency unit indicators (8-9)
kHz ,MHz
See pages in parentheses for details.
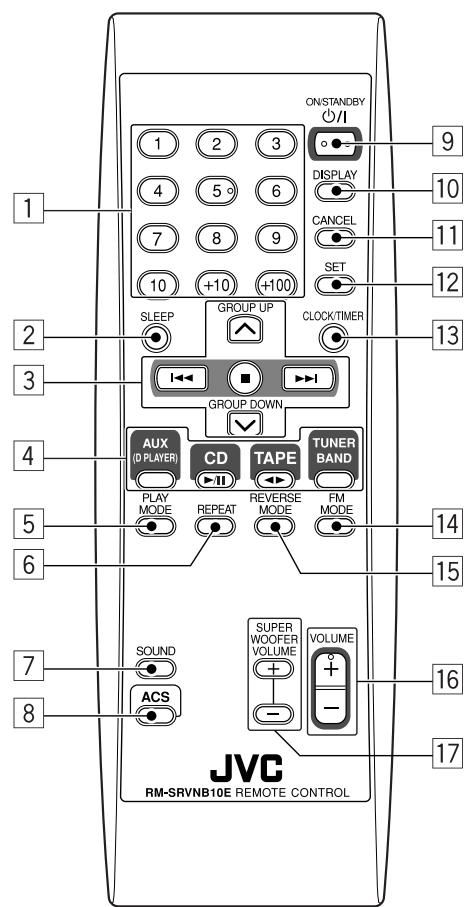
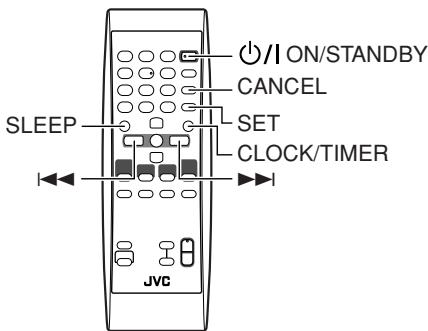
Number buttons (9, 11)
SLEEP button (17)
3 Multi control buttons (9-15, 17-18)
GROUPUP,VGROUPDOWN
·
4 Source buttons (3, 9 - 16)
- AUX (D PLAYER), CD▶/II, TAPE ▲▶, TUNER BAND Pressing one of these buttons also turns on the unit.
5 PLAY MODE button (12)
6 REPEAT button (12)
Sound button (8)
8 ACS (Active Clear Sound) button (8)
9 ON/STANDBY button (7, 17-18)
DISPLAY button (8)
CANCEL button (12, 17 - 18)
12 SET button (10, 17 - 18)
13 CLOCK/TIMER button (17-18)
FM MODE button (9)
15 REVERSE MODE button (13)
VOLUME + / - button (7)
17 SUPER WOOFER VOLUME + / - buttons (8)
COMPU PLAY — One Touch Operation
With One Touch Operation you can play a disc, a tape, or turn on the radio with a single press of the play button for that function. The system turns on and starts playing the source if it is ready.
The COMPU PLAY buttons are: On the system and remote control
CD▶/II button
TAPE button
TUNER BAND button
AUX (D PLAYER) button
Note: The COMPU PLAY feature is not effective when the system is operated on batteries or car battery (DC12V).
Getting started
Accessories
Check that you have all the following items, which are supplied with the system.
Power cord (1)
Remote control (1)
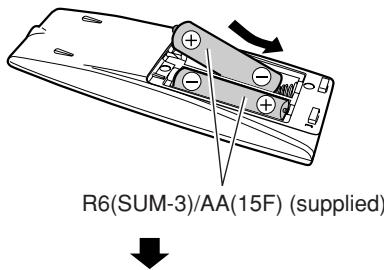
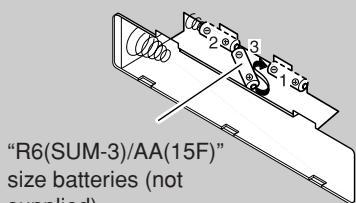
Batteries—R6(SUM-3)/AA(15F) (2)
Shoulder strap with carrying cases for the remote control and auxiliary equipment (1)
3.5 mm stereo mini plug cable (1)
If any of these items are missing, contact your dealer immediately.
Carrying the system
Using the carrying handles
Be sure to hold both handles when you carry the system.
If you carry the system by only one handle, because of the length of the system, the end may drag on the ground and be damaged as a result.
Do not lift the system by the woofer ducts, and do not insert any foreign objects into them.
Using the shoulder strap
Attach the supplied shoulder strap (adjustable in length) to each end of the system as illustrated.
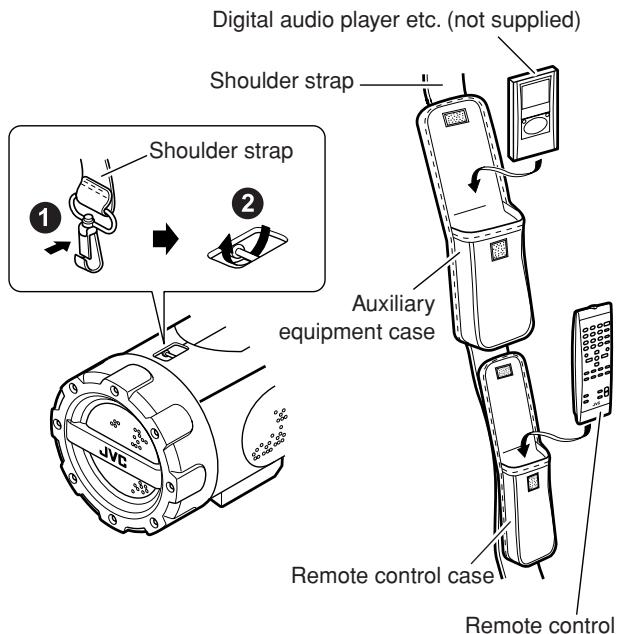
To detach the shoulder strap, press in the metal fitting and unhook it from the shaft.
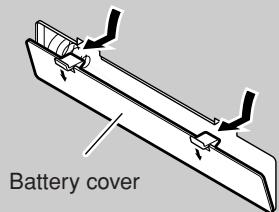
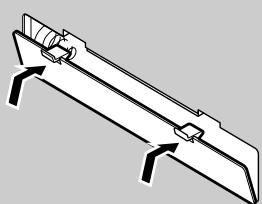
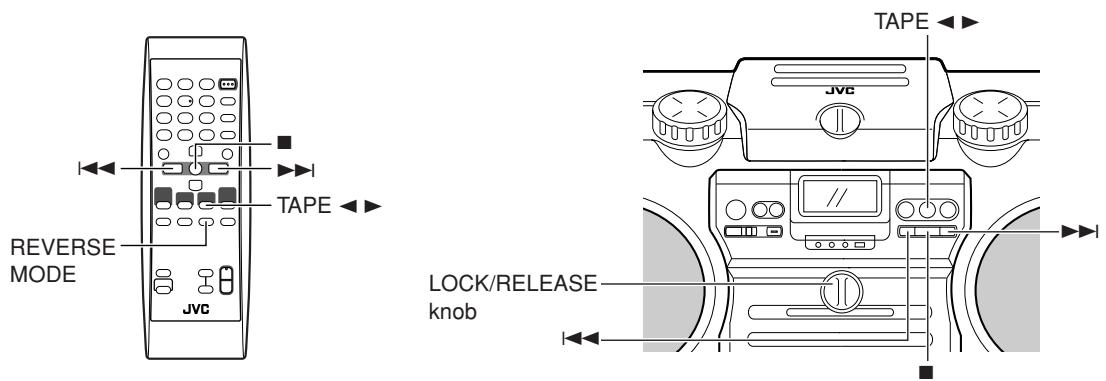
Using the remote control — RM-SRVNB10E
Installing the batteries
1
Match the polarity (+ and -) on the batteries with the + and - markings in the battery compartment.
CAUTION:
To avoid battery leakage or explosion:
- Remove batteries when the remote control is not in use for an extended period of time.
- When you need to replace the batteries, replace both batteries at the same time with new ones.
- Do not use different types of batteries together.
Point the remote control at the remote sensor on the system's control panel (from a distance of up to 7m ). If you point the remote control from the slant direction, the distance will be shortened.
- Do not expose the remote sensor to strong direct sunlight or artificial lighting.
- Make sure there are no obstacles between the remote sensor and the remote control.
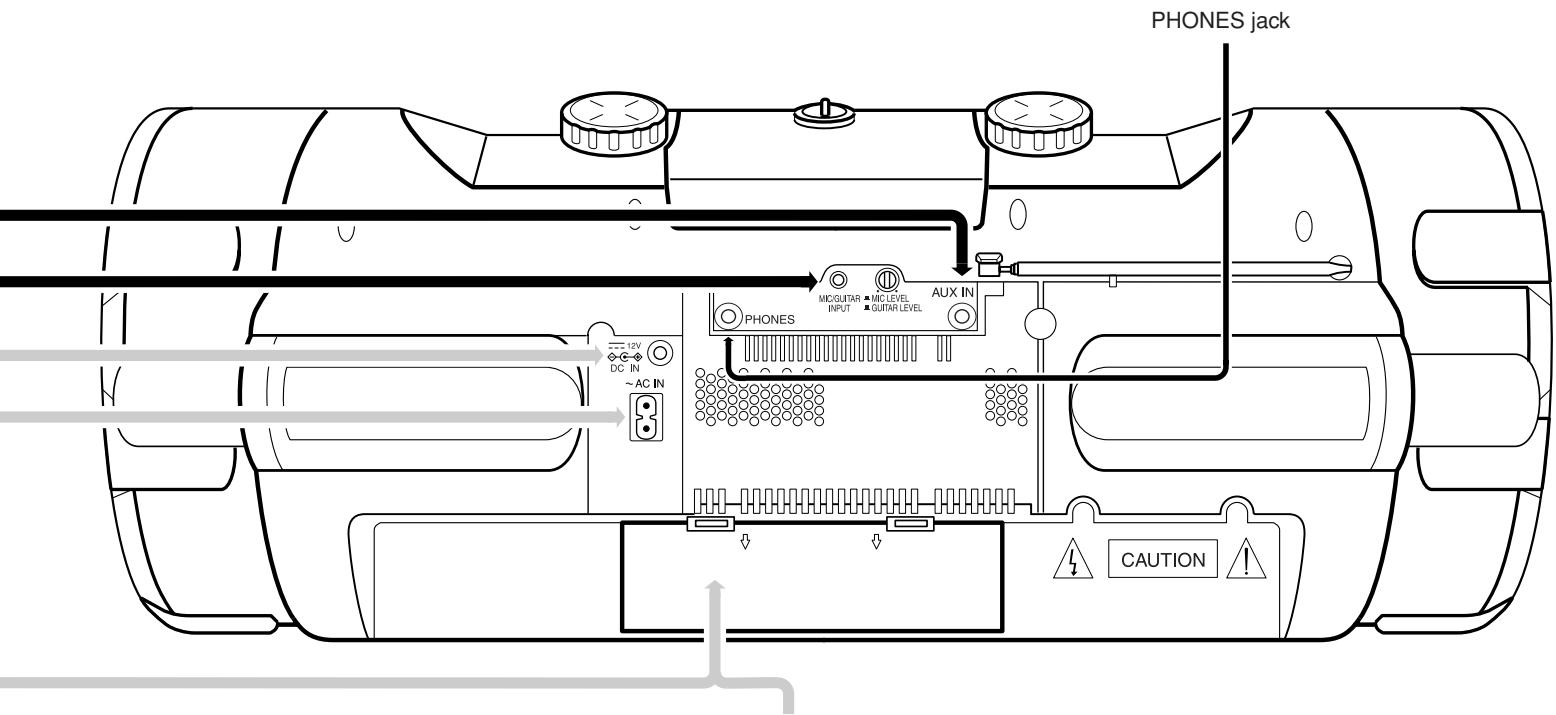
Connections
CAUTION: Make all connection before plugging the system into an AC power outlet.
- Connecting the auxiliary equipment (See page 16.)
Auxiliary equipment (not supplied)

3.5 mm stereo mini plug cable (supplied)
- Connecting the microphone/guitar (See page 16.)
- Connecting to the car battery
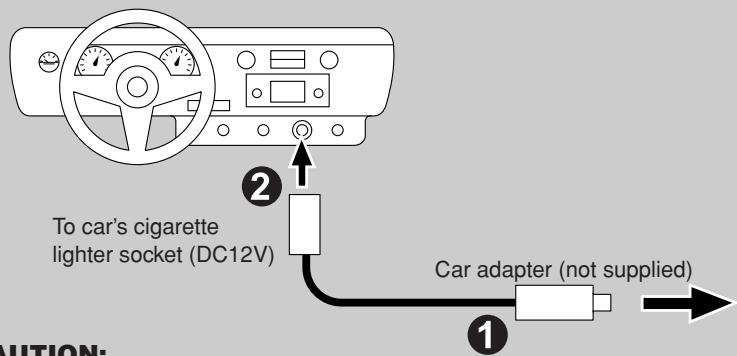
CAUTION:
- Be sure to use the car adapter (not supplied) with the same polarity design as the one equipped with this system to prevent mishaps or damage.
- For safety, stop the car before performing operations.
- Be sure to start the engine when you use the car adapter; otherwise, the car battery will be exhausted.
- During transport, stabilize the system in a box, etc.
- To prevent malfunctions, do not leave the system in a car for a long time.
- If the power is supplied through the car battery, the display will be blank with the system turned off (at standby).
Unplug the AC power cord from the system to supply the power through the car battery; otherwise, the system does not work.
Connecting the AC power cord

CAUTIONS:
- ONLY USE THE JVC POWER CORD PROVIDED WITH THIS SYSTEM TO AVOID MALFUNCTION OR DAMAGE TO THE SYSTEM.
BE SURE TO UNPLUG THE POWER CORD FROM THE OUTLET WHEN GOING OUT OR WHEN THE SYSTEM IS NOT IN USE FOR AN EXTENDED PERIOD OF TIME.
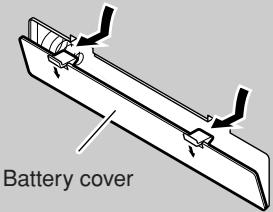
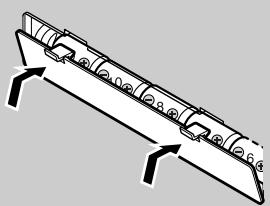
Memory backup batteries


Match the polarity (+ and -) on the batteries with the + and - markings in the battery compartment.


To remove the batteries, remove battery "3" first.
Notes:
- The memory backup batteries will not be consumed as long as the power is supplied from an AC outlet, loaded 10 batteries, or car battery (DC12V). However, if no power is supplied to the system, the memory backup batteries should be replaced with new ones approximately every 12 months to securely maintain the contents of the memory.
- Before replacing the memory backup batteries, always connect the AC power cord to the system to prevent the contents of memory from being erased.
- When a power failure occurs, the time indication disappears from the display to save the battery power of the memory backup batteries.
CAUTION:
To avoid battery leakage or explosion:
- When you need to replace the batteries, replace all batteries at the same time with new ones. Before replacing, you need to supply AC power to the system.
- Do not use an old battery with new ones.
- Do not use different types of batteries together.
Operating the system on batteries
1

Match the polarity (+ and -) on the batteries with the + and - markings in the battery compartment.
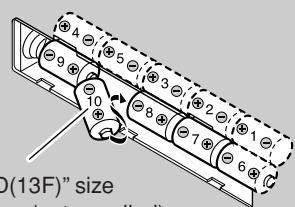
"R20/D(13F)" size batteries (not supplied)

3
To remove the batteries, remove battery "10" first.
Notes:
- When you operate the system on mains (AC) power or on car battery (DC12V), the power source automatically switches from batteries to AC or DC12V. However, you should remove the 10 batteries when operating on AC power or car battery (DC12V).
- When the batteries are exhausted, the following symptoms will occur: - Mistracking occurs during disc playback.
- Sounds are distorted intermittently during tape playback.
- "DC OFF" flashes on the display, then the power goes off.
If this happens, replace the batteries. - It is recommended to use AC power cord when recording important material or listening to a disc.
CAUTION:
To avoid battery leakage or explosion:
- Remove the 10 batteries when the system is not in use for an extended period of time.
- When you need to replace the batteries, replace all batteries at the same time with new ones.
- Do not use different types of batteries together.
- If the power is supplied through the batteries, the display will be blank with the system turned off (at standby).
Unplug the AC power cord from the system to supply the power through the batteries; otherwise, the system does not work.
Turning the power on and off
Note: The lighting condition for the STANDBY indicator and the display differs depending on the power source.
| Power source | STANDBY indicator/display |
| AC power | ·The STANDBY indicator lights when power is turned off. ·Backlighting of the display is illuminated when power is turned on. |
| Batteries or car battery (DC12V)* | ·The STANDBY indicator does not light. ·Backlighting of the display is not illuminated. ·With the system turned off (at standby), no indication is shown on the display. |
- If no source is playing and no operation is done for about 4 minutes, "DC OFF" starts flashing on the display for about one minute before the system turns off automatically (except when the source is FM/AM or AUX (D PLAYER), or when the microphone (or guitar) is used).
Turning on the system
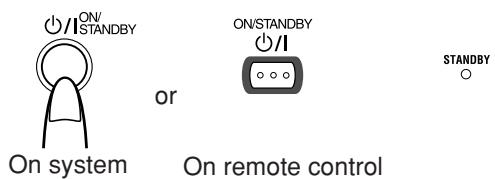
Press ON/STANDBY.
- When the system is operated on batteries or car battery (DC12V), press ON/STANDBY on the system.
The STANDBY indicator goes out when the system is operated on AC power.
The display comes on and the system is ready to continue in the mode it was in when the power was last turned off.
Turning off the system
Press ON/STANDBY again.
The STANDBY indicator lights up when the system is operated on AC power.
- When the AC power is used, the CLOCK indicator and the time are displayed without backlighting.
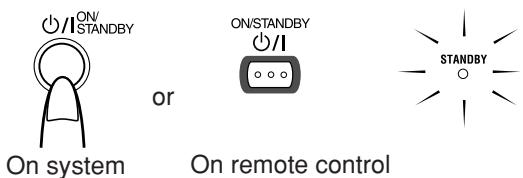
Some power is always consumed even though power is turned off (called standby mode).
- To disconnect the system from mains (AC) supply completely, unplug the AC power cord from the AC outlet. When you unplug the AC power cord, the clock will be reset to "0:00" if no memory backup batteries are installed.
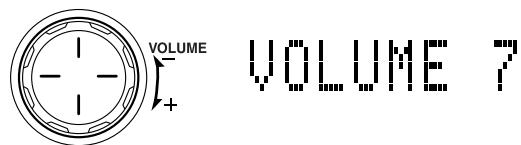
Adjusting the volume
You can adjust the volume level between 0 and 50.
Using the system
Turn the VOLUME + / - control clockwise to increase the volume or turn it counterclockwise to decrease the volume.
Using the remote control
Press VOLUME + to increase the volume or press VOLUME - to decrease it.
When you press and hold VOLUME + or -, the volume changes rapidly.
CAUTION: DO NOT start playing any source without first setting the volume to minimum, as a sudden blast of sound can damage your hearing, speakers and/or headphones.
For private listening
Connect a pair of headphones to the PHONES jack on the rear of the system (see page 6). No sound comes out of the speakers. Be sure to turn down the volume before connecting or putting on headphones.
Adjusting the super woofer volume
During play, you can adjust the bass level between BASS 1 (minimum) and BASS 6 (maximum).
Using the system
Turn the SUPER WOOFER VOLUME + / - control clockwise to increase the bass level or turn it counterclockwise to decrease the bass level.
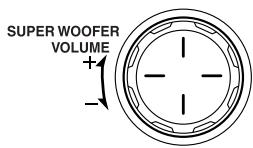
B55 6
Using the remote control
Press SUPER WOOFER VOLUME + to increase the bass level or press SUPER WOOFER VOLUME – to decrease it.
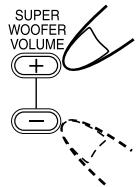
BASS 6
Note: This function is not effective when the headphones are in use.
Activating clear sound
The Active Clear Sound (ACS) circuit emphasizes high-frequency sound without lowering the signal-noise ratio, while adjusting its output according to the input signal level. This results in a better balance between the high-frequency sound and the low-frequency heavy bass.
Press ACS (active clear sound) on the system or on the remote control to turn it on or off.
When it is turned on, the ACS ON indicator lights in red.
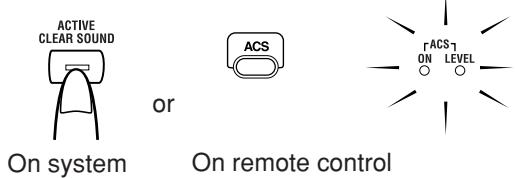
- The ACS LEVEL indicator flashes in green according to the input signal level.
Selecting the sound mode
Sound modes can be selected to enhance the type of music being played.
Press SOUND to select the sound mode.
Each time you press the button, the sound mode changes as follows:

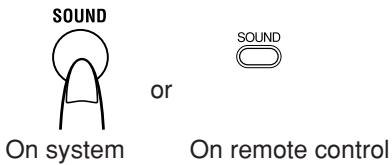
Sound mode selection:
BEAT: Set to this position for music with a heavy beat, such as rock and disco music.
POP: Set to this position for light music including popular and vocal music.
CLEAR: Set to this position for crisp and clear sounding music with transparent highs.
FLAT (no effect): Set to this position not to apply any sound mode.
Showing the time
While the power is turned on, you can see the current time (clock) at any time, as follows.
Using the remote control only
Press DISPLAY.
Each time you press the button, the display changes as follows:

Current sound source (e.g. FM103.50 MHz) (clock) (back to the beginning)
Note: To let the clock work, you need to set the clock first. (See "Setting the clock" on page 17.)
You can listen to FM and AM (MW/LW) stations. Stations can be tuned in manually, automatically, or from preset memory storage.
Before listening to the radio, fully extend the FM telescopic antenna.
Tuning in to a station
1. Press Tuner BAND.
Each time you press the button, the band changes as follows:
FM AM (back to the beginning)
The system tunes in to the last tuned station. The following information appears on the display.
- When "Manual Tuning" or "Auto Tuning" was used to tune in to the last tuned station (see below), the band frequency appears.

- When "Preset Tuning" was used to tune in to the last tuned station (see the right column), the preset number (displayed as "P-XX" on the display) and then the band frequency appear.

(After one second)
2. Select a station using one of the following methods.
- When you tune in to an FM stereo broadcast, the STEREO indicator lights up and you can hear stereo effect. If an FM stereo broadcast is hard to receive or noisy, press FM MODE on the remote control. The MONO indicator lights up and the sound becomes monaural, but the reception improves. When you tune in to another station, the MONO indicator goes off and stereo effect restores automatically.
Note: AM broadcasts are monaural.
Manual Tuning
Press or repeatedly to move from frequency to frequency until you find the station you want.
OR
Auto Tuning
Press and hold | | | | or for one second or more. The frequency changes automatically until a station frequency is found.
OR
Preset Tuning (possible only after presetting stations)
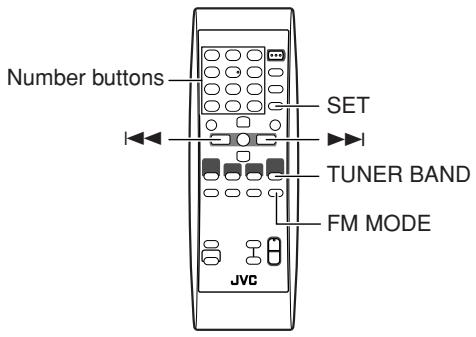
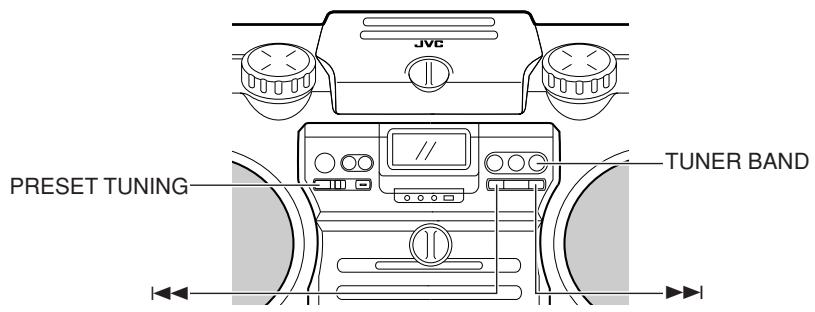
Select the desired preset number using PRESET TUNING on the system or the number buttons on the remote control. The preset number and then the band frequency appear on the display.
PRESET TUNING button: Each time you press the button, the preset number increases.
Number buttons:
To select P-5, press 5.
To select P-15, press +10 then 5.
To select P-20, press +10 once then press 10.
Notice: To adjust the reception condition
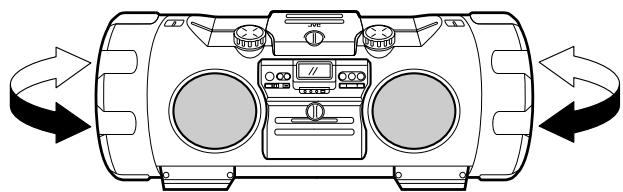
For FM: Adjust the FM telescopic antenna's length, angle and direction until the best reception is obtained.
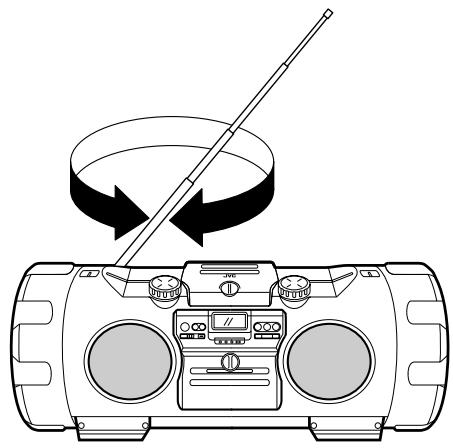
For AM: Change the direction of the system to obtain the best reception.
Placing the system near the window, for example, will improve AM reception.
Presetting stations
You can preset up to 30 FM stations and 15 AM (MW/LW) stations.
Note: Preset numbers may have been set to factory test frequencies prior to shipment. This is not a malfunction. You can preset the stations you want into memory as follows:
Using the remote control only
There is a time limit in doing the following steps. If the setting is canceled before you finish, start again from step 3.
- Select a band (either AM or FM) by pressing TUNER BAND.
- Press or to tune in to a station.
- Press SET.

- Press the number buttons to select the preset number you want.
- Press SET.
"STORED" appears on the display and the station is stored.
- Repeat above steps 1. to 5. for each station you want to store into memory with a preset number.
To change the preset stations, repeat the same steps as above to overwrite a new station.
CAUTION: To prevent the preset stations from being erased because of a power failure, etc., install memory backup batteries in the system. (See pages 5 and 6.)
Playing back discs
This system has been designed to play back the following discs—CD, finalized CD-R/CD-RW (recorded in audio CD format) and CD-R/CD-RW (in MP3 format).
- This system is not compatible with the other discs such as DVD, DVD-R, and DVD-RW.
Notes on MP3:
- The system can only recognize files (tracks) with "MP3" or "mp3" as the extensions, which can be in any combination of upper and lower case.
- It is recommended that you record your material at a 44.1kHz sampling rate, using the 128 kbps data transfer rate.
- You can play back the discs containing the tracks in music CD format or MP3 files in ISO 9660 format.
- Some MP3 tracks or discs may not be played back because of their characteristics or recording conditions.
- MP3 discs require a longer readout time than normal discs.
| Hierarchy | ||||
| Level 1 | Level 2 | Level 3 | Level 4 | Level 5 |
| G 1 (ROOT) | G 2 | G 4 | G 5 | 9 |
| G 3 | ③ | ⑦ | 10 | |
| G 3 | ④ | ⑧ | ||
| ① | ⑤ | G 6 | ⑪ | |
| ② | ⑥ | ⑫ | ||
| G 1 | Group with its play order | |||
| ① | MP3 track with its play order | |||
- This system recognizes up to 999 tracks on a disc (or less depending on the recording condition of a disc).
Setting a disc
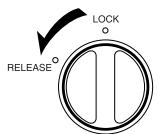
- Turn the LOCK/RELEASE knob counterclockwise to open the disc compartment door.
- Place a disc, with its label side up as shown above.
3.Close the disc compartment door and turn the knob to "LOCK" position.
To remove the disc, open the disc compartment door in stop mode.
You can place an 8cm disc without an adapter.
If the disc cannot be read correctly (because it is scratched, for example), "NO PLAY" or "NO DISC" appears on the display.
You can place a disc while listening to the other source.
Using the disc player—Normal Play
To play a disc
- Set a disc.
- Press CD >/II.
The first track of the disc starts playing.
For CDs:
- When playing an MP3 disc, the file name (then ID3 Tag if any) is displayed at the beginning of each track.
- If no disc is inserted, "NO DISC" appears on the display and the system remains in stop mode.
- The system automatically stops when the last track of the disc has finished playing.
To stop playing the disc, press ■.
The following information for the disc is displayed.

For CDs:
For MP3 discs:
- If a disc includes more than 99 groups, "G - -" will appear on the display.
To pause, press CD▶/II. The playback time flashes on the display.
To cancel pause, press the same button again. Playback continues from the point where it was paused.
Note: Do not turn the LOCK/RELEASE knob during playback.
Skip Play
Press or to select the track you want to play during playback.
- Press once to skip to the beginning of the next track.
- Press to skip to the beginning of the track being played. Press twice quickly to skip to the beginning of the previous track.
You can also select a track in stop mode with the same buttons.
For CD: Selected track and its playback time are shown on the display.
For MP3: Group and track numbers (then ID3 Tag if any) are shown on the display.
To start playback, press CD▶/II.
Search Play
Press and hold or to fast forward/ reverse the disc during playback.
You can quickly find a particular passage in the track you are listening to. During search play, you can hear the sound of approx. one forth level.
To locate a track directly
Using the remote control only
Press the number buttons to directly play a track.
To directly play track 5, press 5.
- To directly play track 15, press +10 then 5.
- To directly play track 20, press +10 once then press 10.
(Only for MP3 discs)
- To directly play track 109, press +100 once then press 9.
To directly play track 125, press +100 , +10 , +10 then 5.
To select a group (for MP3 disc)
Using the remote control only Press GROUP UP or GROUP DOWN to select the group you want to play during playing the MP3 disc.
- Press GROUP UP to skip to the next group.
- Press GROUP DOWN to skip to the previous group.
You can also select a group in stop mode with the same buttons.
To play the group after selection, press CD /II.
Programming the playing order of the tracks
Using the remote control only
-
You can program up to 50 tracks in any desired order including the same tracks.
You can only make a program when the system is stopped.
While making a program, you cannot specify a group number to select a track. -
Set a disc.
- Press CD /II.
- Press to stop the disc.
- Press PLAY MODE repeatedly to select "PROGRAM."
The system enters the programming mode and the PRGM indicator lights up.
-
Press the number buttons to select the track to program.
-
For detailed operations, see "To locate a track directly" on page 11.
Example: For track 7, press 7.
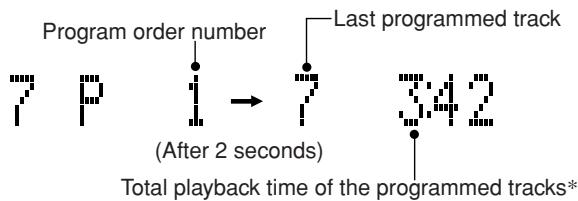
-
Total playback time will not appear while making a program using an MP3 disc.
-
Repeat step 5. to select other tracks for the program.
- To cancel the last track programmed, press CANCEL once.
- Press CD /II.
The system plays the tracks in the order you have programmed them.
- You can skip to a particular program track by pressing or during program play.
While stopped:
To confirm the programmed tracks, press or repeatedly; the tracks making up the program will successively be displayed in the programmed order.
- To add a track to the end of the program, simply press the number buttons.
To delete the tracks in the program, press CANCEL repeatedly. Each time you press the button, the last track will be erased.
To delete the entire program, press and hold CANCEL until "CLEAR!" appears on the display.
- Turning off the power will clear the program.
To exit from program mode, press PLAY MODE repeatedly until the track number and total playback time appear on the display.
Each time you press the button, the play mode changes as follows:
Normal play PROGRAM RANDOM (back to the beginning)
Note:
(For CDs) If the total playback time of the programmed tracks exceeds 99 minutes 59 seconds, “—:—” will appear on the display.
Random play
The tracks will play in no special order when you use this mode.
Using the remote control only
- Set a disc.
- Press CD /II.
- Press to stop the disc.
- Press PLAY MODE repeatedly to select "RANDOM."
The RANDOM indicator lights up on the display.
- Press CD /II.
The tracks are played in random order once.
To skip a track during playback, press to skip to another track in the random sequence. The button works only to go back to the beginning of the current track.
While stopped:
To exit from random mode, press PLAY MODE repeatedly until the track number and total playback time appear on the display.
Each time you press the button, the play mode changes as follows:
Normal play PROGRAM RANDOM (back to the beginning)
Repeating tracks
You can repeat the tracks or individual track as many times as you like.
Using the remote control only
Press REPEAT.
Each time you press the button, repeat indicator changes as follows:
For CDs:
ALL canceled (back to the beginning)
- ALL: Repeats all the tracks on the disc.
- : Repeats the current track.
For MP3 discs:
ALL GROUP canceled (back to the beginning)
- ALL: Repeats all the tracks on the disc.
- GROUP: In normal play mode, repeats all the tracks in a group.
In program and random play modes, group repeat cannot be selected.
- : Repeats the current track.
Repeat mode (except “GROUP”) remains in effect even when you change the play mode.
To exit from repeat mode, press REPEAT until the repeat indicator on the display goes out.
With automatic tape direction, you can listen to type I or II tapes without having to change any settings.
The use of tapes longer than 120 minutes is not recommended, since characteristic deterioration may occur and these tapes easily jam in the pinch-rollers and the capstans.
Regular play
1. Turn the LOCK/RELEASE knob counterclockwise to open the cassette holder.
2. Put the cassette in, with the side you want to listen to facing you.
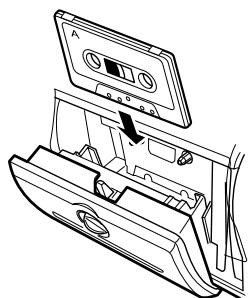
3.Close the holder gently and turn the knob to "LOCK" position.
4. Press TAPE
The tape is played in the direction shown by the tape direction indicator.
(Forward playback): The side of the tape facing you is played back.
(Reverse playback): The opposite side of the tape is played back.
5.If you need to change the playback direction,press TAPE
The opposite side tape direction indicator lights up and the tape playback direction changes.
To stop playing, press ■.
To remove the tape, stop the tape, and open the cassette holder by turning the LOCK/RELEASE knob to the "RELEASE" position.
Notes:
- Do not turn the LOCK/RELEASE knob during playback.
- When no tape is loaded in the deck, "NO TAPE" appears on the display.
To fast-wind/rewind a tape
Press or to fast-wind/rewind the tape.
- The cassette deck automatically stops when the tape reaches its end.
Reverse mode
You can set a tape to play just one side, both sides in succession, or both sides continuously.
Using the remote control only
Press REVERSE MODE.
Each time you press the button, reverse mode indicator changes as follows:
> () (back to the beginning)
- · : The cassette deck automatically stops after playing one side of the tape.
- : The cassette deck automatically stops when playback in the reverse ( ) direction is finished.
- ( ) : The cassette deck continues to play both sides of the tape until the button is pressed.
Things to know before you start recording
It should be noted that it may be unlawful to re-record pre-recorded tapes, records, or discs without the consent of the owner of copyright in the sound or video recording, broadcast or cable programme and in any literary, dramatic, musical, or artistic work embodied therein.
- When you want to record onto both sides of a tape, you can set reverse mode to . Recording automatically stops after recording in the reverse ( ) direction. Therefore, make sure that the tape direction is forward ( ) when recording with reverse mode is on.
The recording level is automatically set correctly, so it is not affected by the VOLUME control on the system or by adjusting the sound effects. Thus, during recording you can adjust the sound you are actually listening to without affecting the recording level.
- Two small tabs on the back of the cassette tape, one for side A and one for side B, can be removed to prevent accidental erasure or recording.
To record on a cassette with the tabs removed, you must cover the holes with adhesive tape first. However, when a type II tape is used, only cover part of the hole as shown, since the other part of the hole (type II detection slot) is used to detect the tape type.
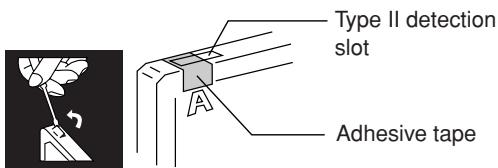
Type I and type II tapes can be used for recording.
Note:
At the start and end of cassette tapes, there is leader tape which cannot be recorded onto. Thus, before recording, wind on the leader tape first to ensure getting the beginning of the recording.
CAUTION: If a recording you make has excessive noise or static, the system may have been too close to a TV which was on during the recording. Either turn off the TV or increase the distance between the TV and the system.
Standard recording
You can record any sound source to tape.
The sources are disc, tuner, auxiliary equipment, microphone, and guitar. The microphone sound and guitar sound can be mixed with any source.
1.Insert a blank or erasable cassette tape into the cassette deck.
Be sure that the tape direction indicator and the tape insertion direction are as follows:
[Forward and reverse recording]
| Tape direction indicator | Tape insertion direction |
| (Forward) * Recording will be made on the tape side facing you. | (Front view) |
| (Reverse) * Recording will be made on the opposite side of the tape. | (Front view) |
- If the tape direction (reverse) is lit, press TAPE to change the direction. (In this case, since the tape play starts, you need to press . Then, press to rewind the tape up to the end point of the leader tape which cannot be recorded onto.)
- If the inserted tape is not fully rewound, press to rewind the tape up to the end point of the leader tape which cannot be recorded onto.
2. If you want to record on both sides of the tape, press REVERSE MODE on the remote control to set the cassette deck in reverse mode.
Press the button until “ ” is lit.
3.Prepare the source, for example, tuning in to a radio station, or turning on the connected auxiliary equipment.
Note: For disc recording, refer to "Disc direct recording" described on page 15.
4. Press ONE TOUCH REC on the system.
The REC indicator lights up and the system starts recording.
- If the tab of the cassette tape is removed to protect erasure or recording, recording does not start.
Tips: When you want to record on both sides of the tape, start recording from the forward direction.
To stop at any time during the recording process, press.
Recording an AM station on a tape
When recording an AM broadcast, beats may be produced which are not heard when listening to the broadcast. If this happens, press BEAT CUT to eliminate the beats.
1. Set to AM station and start recording.
2. Press BEAT CUT to eliminate the beats.
Each time you press the button, the display changes as follows: B.CUT-1 B.CUT-2 B.CUT-3 B.CUT-4 (back to the beginning)
Disc direct recording
Everything on the disc goes onto the tape in the order it is on the disc, or according to the order you have set in a program.
1.Insert a blank or erasable cassette tape into the cassette deck.
Be sure that the tape direction indicator and the tape insertion direction are as follows:
[Forward recording]
| Tape direction indicator | Tape insertion direction |
| (Forward) * Recording will be made on the tape side facing you. | (Front view) |
2.If you want to record on both sides of the tape, press REVERSE MODE on the remote control to set the system in reverse mode.
Press the button until “ ” is lit.
3. Set a disc.
4. Press CD /II.
5. Press ■
- If you want to record specific tracks only, program the tracks first. You can check their total playback time on the display during programming. (See page 12.)
6. Choose whether to have pauses between tracks.
- If nothing is done, a non-recorded pause of about four seconds will be automatically made between tracks.
- If you do not want pauses between tracks, press CD▶/II twice to enter pause mode—only possible with CDs.
7. Press ONE TOUCH REC on the system.
The REC indicator lights up and the cassette deck starts recording.
- When the tape reaches its end at the middle of a song in the forward direction () , the recording in the reverse direction () will start from the beginning of that track (or previous track). See diagram below.
Ex.: Case 1
[Recording direction (forward)]
![JVC RV-NB10B - [Recording direction (forward)] - 1](/content/2025/01/123412/images/323d847910beb0e3f00de1f8dc98e2ad76723692624e4d2ac251c474afd6102a.jpg)
- The recording in reverse side (←) starts from the beginning of track 2.
Ex.: Case 2
[Recording direction (forward)]
![JVC RV-NB10B - [Recording direction (forward)] - 1](/content/2025/01/123412/images/47ec9f725d5b8b5881279bb9ad3b6b0a107d9533941c124098d8df8df4849c4f.jpg)
-
The recording in reverse side (▲) starts from the beginning of track 1.
-
After the disc player has played the entire disc, or all the programmed tracks, the tape automatically stops.
- Recording will also stop when the end of the reverse side ( ) is reached (even if the disc play is not yet over).
To stop at any time during the recording process, press The tape stops after four seconds.
Note:
When making SLEEP timer settings while performing disc direct recording, set enough time to allow the disc to finish playing; otherwise, the power will go off before recording is completed.
One Track Recording
You can record the current track being played.
1. Insert a blank or erasable cassette tape into the cassette deck.
2. Play the track you wish to record.
3. Press ONE TOUCH REC on the system.
The disc player returns to the beginning of that track and the track is recorded on the tape. After recording, the disc player and the cassette deck automatically stop.
You can listen to auxiliary equipment.
-
First make sure that the auxiliary equipment is properly connected to the system. (See pages 5 and 6.)
-
Set the volume level to minimum.
- Press AUX (D PLAYER).
"AUX" appears on the display.

- To listen to the auxiliary equipment, start playing the auxiliary equipment.
- Adjust the volume to the desired listening level.
-
Apply sound effects, if you wish.
-
Adjust the super woofer volume to reinforce the bass sound.
Notes:
- For operation of the auxiliary equipment, refer to its instructions.
- While listening to a digital audio player... Be sure turn down the volume of the system before changing to another source, as high volume may output from the speakers.
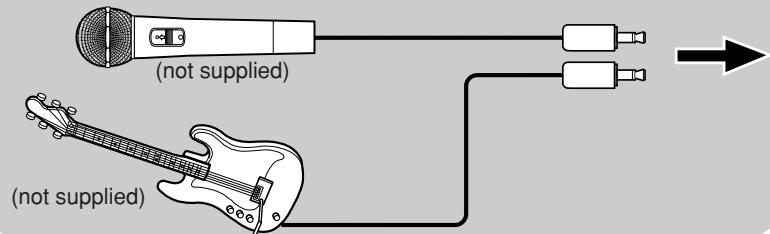
Using the microphone/guitar
Microphone/guitar mixing
Using a microphone or a guitar (not supplied), you can mix its sound with a source sound.
1.Make sure the MIC/GUITAR LEVEL control on the rear of the system is properly set.
- When using a microphone, make sure the knob is pressed in (二).
-
When using a guitar, make sure the knob is released (■).
-
Set the MIC/GUITAR LEVEL control to MIN by turning it fully counterclockwise.
- Connect a microphone or a guitar into the MIC/GUITAR INPUT jack on the rear of the system.
4.Start a source: disc, tape, tuner, or other equipment. - Adjust the VOLUME +/- control and the MIC/GUITAR LEVEL control, as you play the microphone or the guitar.
CAUTION: DO NOT connect a bass guitar to the MIC/GUITAR INPUT jack, as it may damage the system.
Recording microphone or guitar mixing on a tape
- Follow steps 1. - 5. on left column.
- To record, follow the steps in "Standard recording." (See page 14.)
Note: If "howling" occurs when using the microphone, keep the microphone away from the speaker.
The timers let you control the listening and recording functions automatically.
Setting the clock
When the power is first supplied, the CLOCK indicator and "0:00" blink on the display. Set the clock.
Note:
The clock must be correctly set for the timers to work.
Using the remote control only
- Press ON/STANDBY.
- Press CLOCK/TIMER repeatedly until the CLOCK indicator lights up.
The hour digit flashes on the display.
-
Press or to select the hour.
-
When you press and hold the button, the hour digit changes continuously.
-
Press SET to set the hour.
The minutes digits start flashing on the display.
-
Press or to select the minute.
-
When you press and hold the button, the minute digit changes continuously.
-
If you want to change the hour setting, press CANCEL.
-
Press SET to finish setting the clock.
CAUTION: If memory backup batteries are exhausted or not installed, and the AC power cord is plugged in again after being disconnected, or power is restored after a power failure, the CLOCK indicator will flash on the display. Set the current time (clock) again.
Setting the sleep timer
Use the sleep timer to turn the system off after a certain number of minutes when it is playing. By setting the sleep timer, you can fall asleep to the music and know that your system will turn off by itself rather than playing all night.
You can set the sleep timer only when the system is turned on.
Using the remote control only
- Press SLEEP.
The SLEEP indicator lights up on the display.

- Set the length of time you want the source to play before shutting off.
Each time you press the button, it changes the number of minutes shown on the display in this sequence:
10 20 30 60 90 120 OFF (back to the beginning)
After setting the number of minutes for the sleep timer, the indication will stop flashing and go off.
The system is now set to turn off after the number of minutes you set.
To confirm the sleep time:
When SLEEP is pressed, the remaining sleep time is displayed. Wait until the display returns to the original display.
To cancel the sleep timer:
Press SLEEP repeatedly to select "OFF." Turning off the system also cancels the sleep timer.
Setting the daily timer
Once the timer has been set, it will be activated at the same time everyday until the timer is turned off. Recording timer works only one time.
- While the timer is being set, the timer indicator ( ) lights up.
- While the timer has been set, the timer indicator ( ) also lights up if the power is supplied through the AC outlet.
- While the timer is working, the timer indicator ( ) flashes.
Using the remote control only
1. Press ON/STANDBY.
2. Press CLOCK.
"TIMER ON?" appears.
- Press SET to activate the timer setting you have made before.
- Press CANCEL to cancel the timer.
- Go to the next step to set the timer first time (or reset the timer).
3. Press CLOCK/TIMER again, so that the timer indicator ( ) and ON indicator light up.
The hour digit of the current ON time blinks on the display.

4. Set the on-time you want the system to turn on.
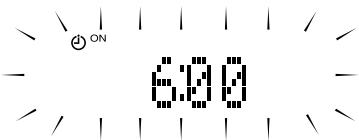
(1) Press or to select the hour, then press SET.
(2) Press or to select the minute, then press SET. The OFF indicator lights up.
- Press and hold the button to change the time rapidly.
- If you want to change the time setting, press CANCEL.
5. Set the OFF time (example: 1:30).
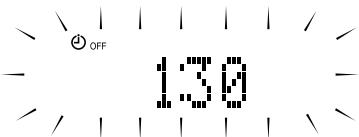
(1) Press or to select the hour, then press SET.
(2) Press or to select the minute, then press SET.
- Press and hold the button to change the time rapidly.
- If you want to change the time setting, press CANCEL.
6. Press▶or to select the music source you want to listen to, then press SET.
Each time you press the button, the display changes as shown below:
$$ \begin{array}{l}\text {T U N E R} \rightarrow \text {T U} \rightarrow \text {T A P E} \rightarrow \text {C D} \rightarrow \text {T A P E} \rightarrow (\text {b a c k t o t h e}\\text {b e g i n n i n g})\end{array} $$
When you select the "TU TAPE";
- The REC indicator appears on the display.
- The timer will be canceled after tuner recording has been finished.
7. Press or to select the volume level, then press SET.
-:-: The current volume level will be used.
0 to 50: When the timer is turned on, the volume will be automatically set to the selected level.

- The current timer setting appears for confirmation.
8.Before turning off the system, prepare the music source selected in step 6.
TUNE: Tune in to the desired station.
TU TAPE: Tune in to the station you want to record. Insert a cassette tape for recording.
CD: Set a disc.
TAPE: Insert a tape.
9. Press ON/STANDBY to turn off the system.
- When the timer turns on, the volume level gradually increases from 0 (zero) to the preset level in step 7.
However, if the volume has been set to - - " ,the volume level will be set to the last level directly.
To cancel the operation, press CLOCK/TIMER until the display returns to the original one.
To cancel the timer, press CLOCK/TIMER once, then press CANCEL. ("TIMEROFF" appears, only when power is on.)
To reactivate (or confirm) the canceled timer, press CLOCK/TIMER once, then press SET. (The current timer setting appears for confirmation.)
Notes:
- The timer cannot be set if on-time and off-time are the same.
- The timer does not work if the system is not in the standby mode (the system needs to be in standby mode at least one minute before the on-time).
CAUTION: If memory backup batteries are exhausted or not installed, and the AC power cord is disconnected or there is a power failure, time settings will be erased from memory. If this happens, set the current time (clock) and perform the timer setting again.
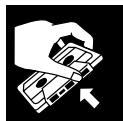
Handle your discs carefully, and they will last a long time.
Compact discs

- This system can play back the following discs: - Audio CD
- Finalized CD-R/CD-RW recorded in audio CD format or MP3 format
However, continued use of irregular shape discs (heart-shape, octagonal, etc.) can damage the system.


- Remove the disc from its case by holding it at the edges while pressing the case's center hole lightly.
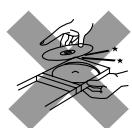
- Do not touch the shiny surface of the disc, or bend the disc.
- Put the disc back in its case after use to prevent warping.
- Be careful not to scratch the surface of the disc when placing it back in the case.
- Avoid exposure to direct sunlight, temperature extremes, and moisture.
- A dirty disc may not play correctly. If a disc does become dirty, wipe it with a soft cloth in a straight line from center to edge.
CAUTION: Do not use any solvent (for example, conventional record cleaner, spray thinner, benzine, etc.) to clean a disc.
General notes
In general, you will have the best performance by keeping your discs and the mechanism clean.
- Store discs in their cases, and keep them in cabinets or on shelves.
- Keep the disc compartment door closed when not in use.
Cleaning the lens
If the lens in the pickup is dirty, dropout, etc., could degrade sound. Open the disc compartment door and clean the lens as shown.
- Use a blower (available at camera stores) to blow dust off the lens.
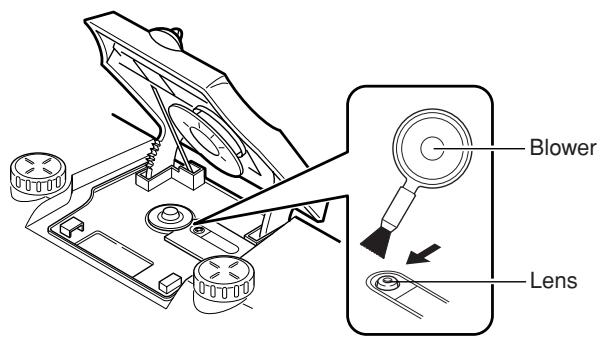
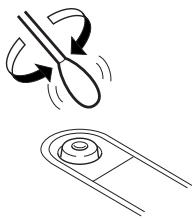
- If there are fingerprints, etc. on the lens, gently wipe clean with a cotton swab.
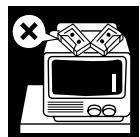
Moisture condensation
Moisture may condense on the lens inside the system in the following cases:
After turning on heating in the room.
- In a damp room.
- If the system is brought directly from a cold to a warm place.
Should this occur, the system may malfunction. In this case, leave the system turned on for a few hours until the moisture evaporates, unplug the AC power cord, and then plug it in again.

Cassette tapes
- If the tape is loose, it may get stretched, cut, or caught in the cassette. Take up the slack by inserting a pencil in one of the reels and rotating.
- Do not touch the tape surface.
-
Do not store the tape:
-
In dusty places
- In direct sunlight or heat
- In moist areas
- On a TV or speaker
Near a magnet
Cassette deck
-
If the heads, capstans, or pinch-rollers of the cassette deck become dirty, the following may occur:
-
Loss of sound quality
- Discontinuous sound
-Fading - Incomplete erasure
-
Difficulty recording
-
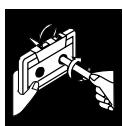
Clean the heads, capstans, and pinch-rollers using a cotton swab moistened with alcohol.
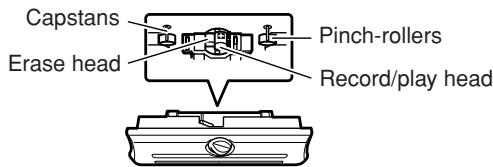
- If the heads become magnetized, the system will produce noise or lose high frequency notes.
- To demagnetize the heads, turn off the system, and use a head demagnetizer (available at electronics and record shops).
If you are having a problem with your system, check this list for a possible solution before calling for service.
If you cannot solve the problem from the hints given here, or the system has been physically damaged, call a qualified person, such as your dealer, for service.
| Symptom | Possible cause | Action |
| Power does not come on. | The power cord is not connected to an AC outlet. | Insert the plug into the socket. |
| No sound is heard. | • Connections are incorrect, or loose. • Headphones are connected. • MP3 disc is recorded with “packet writing.” | • Check all connections and make corrections. (See pages 5 and 6.) • Disconnect the headphones. • It cannot be played. Replace the disc. |
| Poor FM reception. | The FM telescopic antenna is not properly extended and positioned. | Fully extend the FM telescopic antenna and turn it for the best reception. |
| The track skips. | The disc is dirty or scratched. | Clean or replace the disc. |
| The disc does not play (“NO PLAY” or “NO DISC” appears). | • The disc is upside down. • The disc is dirty or scratched. | • Put the disc in with the label side up. • Change the disc. |
| Specific files (tracks) on an MP3 disc are not played. | Files other than MP3 are included in the disc. | They cannot be played. |
| Unable to record. | Cassette record protect tabs are removed. | Cover the holes on the back edge of the cassette with tape. |
| Unable to operate the remote control. | • The path between the remote control and the sensor on the system is blocked. • The batteries have lost their charge. | • Remove the obstruction. • Replace the batteries. |
| Operations are disabled. | The built-in microprocessor has malfunctioned due to external electrical interference. | Unplug the system then plug it back in after a few minutes. |
| The cassette holder cannot be opened. | During tape play, the power cord has been unplugged. | Plug in the power cord and press the ON/STANDBY button. |
| Indicators and the display do not light up while in standby mode. | Batteries or DC power is used to supply the power. |
Specifications
Amplifier
Output Power
(Max.) 20W(10W + 10W) at 4 (full range),
40W (20W + 20W) at 4 60Hz (woofer)
(10% THD) 10W(5W + 5W) at 4 (full range),
30W (15W + 15W) at 4 60Hz (woofer)
Input Sensitivity/Impedance (1 kHz)
AUX IN
300mV / 47k
MIC/GUITAR INPUT: Switchable
MIC
200 - 2k (6.3 mm dia. plug)
GUITAR
100k - 1M (6.3 mm dia. plug)
Output Sensitivity/Impedance (1 kHz)
Phones
16 - 1k
0 - 12mW / ch output into 32
Cassette Deck
Frequency Response
Type II (High position) 60Hz - 14kHz
Wow and Flutter
0.15% (WRMS)
Disc Player
Dynamic range 90 dB
Signal-to-noise ratio 95 dB
Wow and Flutter Unmeasurable
Tuner
FM Tuner
Tuning Range
87.50 MHz - 108.00 MHz
AM Tuner
Tuning Range
(MW) 522 - 1629kHz
(LW) 144 - 288kHz
Antenna
FM telescopic antenna
Ferrite core antenna for AM (MW/LW)
Speakers
Full range
8cm× 2,4
Super woofer
16cm× 2,4
General
Dimensions
690mm× 239mm× 296mm (W/H/D)
Mass
9.5kg (without batteries)
10.6kg (with batteries)
Power Specifications
Power Requirements AC 230V ,50Hz
DC 15V ("R20/D(13F)" batteries [10])
External DC 12V (car battery via optional car adapter)
Power Consumption 43W (power on mode)
1.6 W (in standby mode)
Design and specifications are subject to change without notice.
JVC
- POWERED WOOFER CD SYSTEM
- RV-NB10B/RV-NB10W
- IMPORTANT for the U.K.
- IMPORTANT:
- CAUTIONON/STANDBY button!
- CAUTION
- IMPORTANT FOR LASER PRODUCTS
- CAUTION:
- Caution: Proper Ventilation
- SAFETY INSTRUCTIONS
- "SOME DOS AND DON'TS ON THE SAFE USE OF EQUIPMENT"
- ABOVE ALL
- Information for Users on Disposal of Old Equipment
- Attention:
- [European union]
- (Business users)
- [Other Countries outside the European Union]
- Features
- General
- IMPORTANT CAUTIONS
- 1.Where to place the system
- 2.Power cord
- 3.When carrying the system
- 4.Malfunctions,etc.
- Table of contents
- Display window
- COMPU PLAY — One Touch Operation
- Getting started
- Accessories
- Carrying the system
- Using the carrying handles
- Using the shoulder strap
- Using the remote control — RM-SRVNB10E
- Installing the batteries
- Connections
- CAUTIONS:
- Notes:
- Operating the system on batteries
- Turning the power on and off
- Turning on the system
- Press ON/STANDBY.
- Turning off the system
- Press ON/STANDBY again.
- Adjusting the volume
- Using the system
- Using the remote control
- For private listening
- Adjusting the super woofer volume
- Activating clear sound
- Press ACS (active clear sound) on the system or on the remote control to turn it on or off.
- Selecting the sound mode
- Press SOUND to select the sound mode.
- Sound mode selection:
- Showing the time
- Using the remote control only
- Press DISPLAY.
- Tuning in to a station
- Press Tuner BAND.
- Select a station using one of the following methods.
- Note: AM broadcasts are monaural.
- Manual Tuning
- Auto Tuning
- Number buttons:
- Notice: To adjust the reception condition
- Presetting stations
- Playing back discs
- Notes on MP3:
- Setting a disc
- Using the disc player—Normal Play
- To play a disc
- To stop playing the disc, press ■.
- Skip Play
- Press or to select the track you want to play during playback.
- Search Play
- Press and hold ← or → to fast forward/ reverse the disc during playback.
- To locate a track directly
- Press the number buttons to directly play a track.
- (Only for MP3 discs)
- To select a group (for MP3 disc)
- Using the remote control only Press GROUP UP or GROUP DOWN to select the group you want to play during playing the MP3 disc.
- Programming the playing order of the tracks
- While stopped:
- Note:
- Random play
- Repeating tracks
- Press REPEAT.
- Regular play
- Turn the LOCK/RELEASE knob counterclockwise to open the cassette holder.
- Put the cassette in, with the side you want to listen to facing you.
- 3.Close the holder gently and turn the knob to "LOCK" position.
- Press TAPE
- 5.If you need to change the playback direction,press TAPE
- To fast-wind/rewind a tape
- Reverse mode
- Press REVERSE MODE.
- Things to know before you start recording
- Standard recording
- 1.Insert a blank or erasable cassette tape into the cassette deck.
- If you want to record on both sides of the tape, press REVERSE MODE on the remote control to set the cassette deck in reverse mode.
- 3.Prepare the source, for example, tuning in to a radio station, or turning on the connected auxiliary equipment.
- Press ONE TOUCH REC on the system.
- Recording an AM station on a tape
- Set to AM station and start recording.
- Press BEAT CUT to eliminate the beats.
- Disc direct recording
- 2.If you want to record on both sides of the tape, press REVERSE MODE on the remote control to set the system in reverse mode.
- Set a disc.
- Press CD /II.
- Press ■
- Choose whether to have pauses between tracks.
- Press ONE TOUCH REC on the system.
- [Recording direction (forward)]
- One Track Recording
- Insert a blank or erasable cassette tape into the cassette deck.
- Play the track you wish to record.
- Press ONE TOUCH REC on the system.
- Using the microphone/guitar
- Microphone/guitar mixing
- Recording microphone or guitar mixing on a tape
- Setting the clock
- Setting the sleep timer
- Setting the daily timer
- Press ON/STANDBY.
- Press CLOCK.
- Press CLOCK/TIMER again, so that the timer indicator ( ) and ON indicator light up.
- Set the on-time you want the system to turn on.
- Set the OFF time (example: 1:30).
- Press▶or to select the music source you want to listen to, then press SET.
- Press or to select the volume level, then press SET.
- 8.Before turning off the system, prepare the music source selected in step 6.
- Press ON/STANDBY to turn off the system.
- Compact discs
- General notes
- Cleaning the lens
- Moisture condensation
- Cassette tapes
- Cassette deck
- Specifications
- Amplifier
- Disc Player
- Tuner
- Speakers
- Power Specifications
- JVC
Marque : JVC
Modèle : RV-NB10B
Catégorie : Enceinte bluetooth