
4070333 - Accessoire pour outil électrique RYOBI - Notice d'utilisation et mode d'emploi gratuit
Retrouvez gratuitement la notice de l'appareil 4070333 RYOBI au format PDF.

| Type de produit | Plaque de coupe à jeu nul pour scie à table |
| Marque | RYOBI |
| Modèle | 4070333 |
| Compatibilité | Scies à table RYOBI BT3000 et BT3100 |
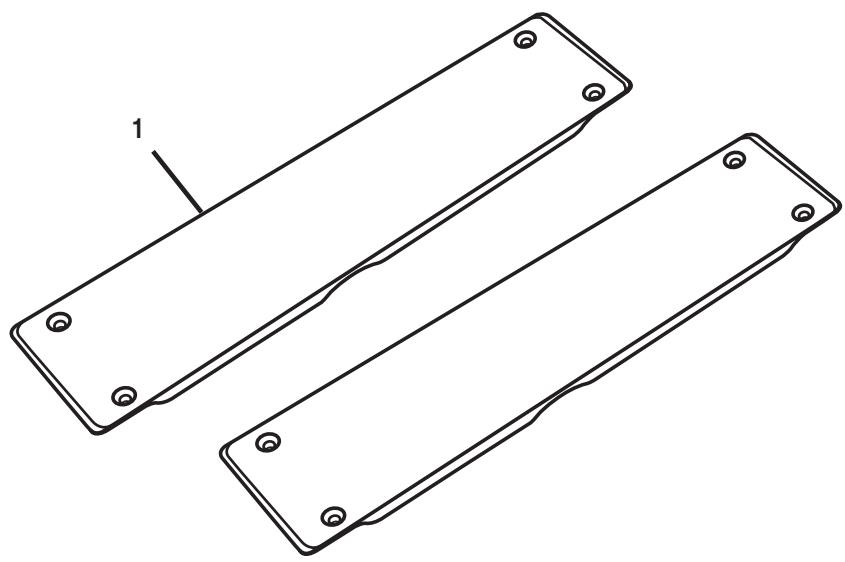
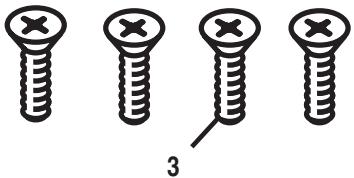
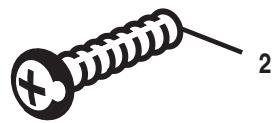
| Contenu de la trousse | 2 plaques de coupe à jeu nul, 1 vis à fileter (1 po), 4 vis à tête fraisée |
| Matériau | Plastique composite robuste |
| Dimensions approximatives | Environ 25 x 10 x 0,5 cm |
| Poids approximatif | Environ 0,2 kg |
| Fonctions principales | Réduction des déchirures, coupe à jeu nul, utilisation avec lame standard ou à dado |
| Instructions de sécurité | Lire le manuel, porter des lunettes de sécurité, débrancher la scie avant l'installation |
| Entretien et nettoyage | Essuyer avec un chiffon sec, ranger dans un endroit sec |
| Pièces détachées | Vis de rechange disponibles via le service client |
| Garantie | 90 jours pour les accessoires |
| Service client | Appeler le 1-800-525-2579 ou visiter www.ryobotools.com |
FOIRE AUX QUESTIONS - 4070333 RYOBI
Questions des utilisateurs sur 4070333 RYOBI
0 question sur cet appareil. Repondez a celles que vous connaissez ou posez la votre.
Poser une nouvelle question sur cet appareil
Téléchargez la notice de votre Accessoire pour outil électrique au format PDF gratuitement ! Retrouvez votre notice 4070333 - RYOBI et reprennez votre appareil électronique en main. Sur cette page sont publiés tous les documents nécessaires à l'utilisation de votre appareil 4070333 de la marque RYOBI.
MODE D'EMPLOI 4070333 RYOBI
Your new throat plate has been engineered and manufactured to Ryobi's high standard for dependability, ease of operation, and operator safety. Properly cared for, it will give you years of rugged, trouble-free performance.
WARNING: To reduce the risk of injury, the user must read and understand the operator's manual.
Thank you for buying a Ryobi accessory kit.
RULES FOR SAFE OPERATION
Safe operation of this accessory requires that you read and understand this operator's manual, the operator's manual for the table saw and all labels affixed to the tool.
READ ALL INSTRUCTIONS
■ KNOW YOUR ACCESSORY. Read the operator's manual carefully. Learn the product's applications and limitations as well as the specific potential hazards related to this product.
■ KEEP THE WORK AREA CLEAN. Cluttered work areas and work benches invite accidents. DO NOT leave tools or pieces of wood on the saw while operating.
■ ALWAYS WEAR SAFETY GLASSES WITH SIDE SHIELDS. Everyday eyeglasses have only impact-resistant lenses; they are NOT safety glasses.
DO NOT USE THIS PRODUCT WITH OTHER EQUIPMENT or for other purposes.
■ ALWAYS DISCONNECT THE SAW FROM THE POWER SUPPLY BEFORE ASSEMBLING THIS KIT. Make sure the switch is off when reconnecting the saw to a power supply.
BEFORE MAKING A CUT BE SURE ALL ADJUSTMENTS ARE SECURE.
SAVE THESE INSTRUCTIONS. Refer to them frequently and use them to instruct other users. If you loan someone this product, also loan these instructions.
| The purpose of safety symbols is to attract your attention to possible dangers. The safety symbols, and the explanations with them, deserve your careful attention and understanding. The safety warnings do not by themselves eliminate any danger. The instructions or warnings they give are not substitutes for proper accident prevention measures. | |
| SYMBOL | MEANING |
| SAFETY ALERT SYMBOL: Indicates danger, warning or caution. May be used in conjunction with other symbols or pictographs. | |
| DANGER: Failure to obey a safety warning will result in serious injury to yourself or to others. Always follow the safety precautions to reduce the risk of fire, electric shock and personal injury. | |
| WARNING: Failure to obey a safety warning can result in serious injury to yourself or to others. Always follow the safety precautions to reduce the risk of fire, electric shock and personal injury. | |
| CAUTION: Failure to obey a safety warning may result in property damage or personal injury to yourself or to others. Always follow the safety precautions to reduce the risk of fire, electric shock and personal injury. | |
| NO HANDS: Failure to keep your hands away from the blade will result in serious personal injury. | |
| WET CONDITIONS ALERT: Do not expose to rain or use in damp locations. | |
| NOTE: | Advises you of information or instructions vital to the operation or maintenance of the equipment. |

The operation of any power tool can result in foreign objects being thrown into your eyes, which can result in severe eye damage. Before beginning tool operation, always wear safety goggles or safety glasses with side shields and a full face shield when needed. We recommend Wide Vision Safety Mask for use over eyeglasses or standard safety glasses with side shields. Always wear eye protection which is marked to comply with ANSI Z87.1.
UNPACKING
INFORMATION
- Remove the loose parts from the box. Make sure that all items listed in the loose parts list are included.
Inspect all parts carefully to make sure no breakage or damage occurred during shipping.
If any parts are damaged or missing, please call 1-800-525-2579 for assistance.

WARNING:
If any parts are missing, replace the missing parts before assembling the kit. Failure to do so could result in serious personal injury.
LOOSE PARTS LIST
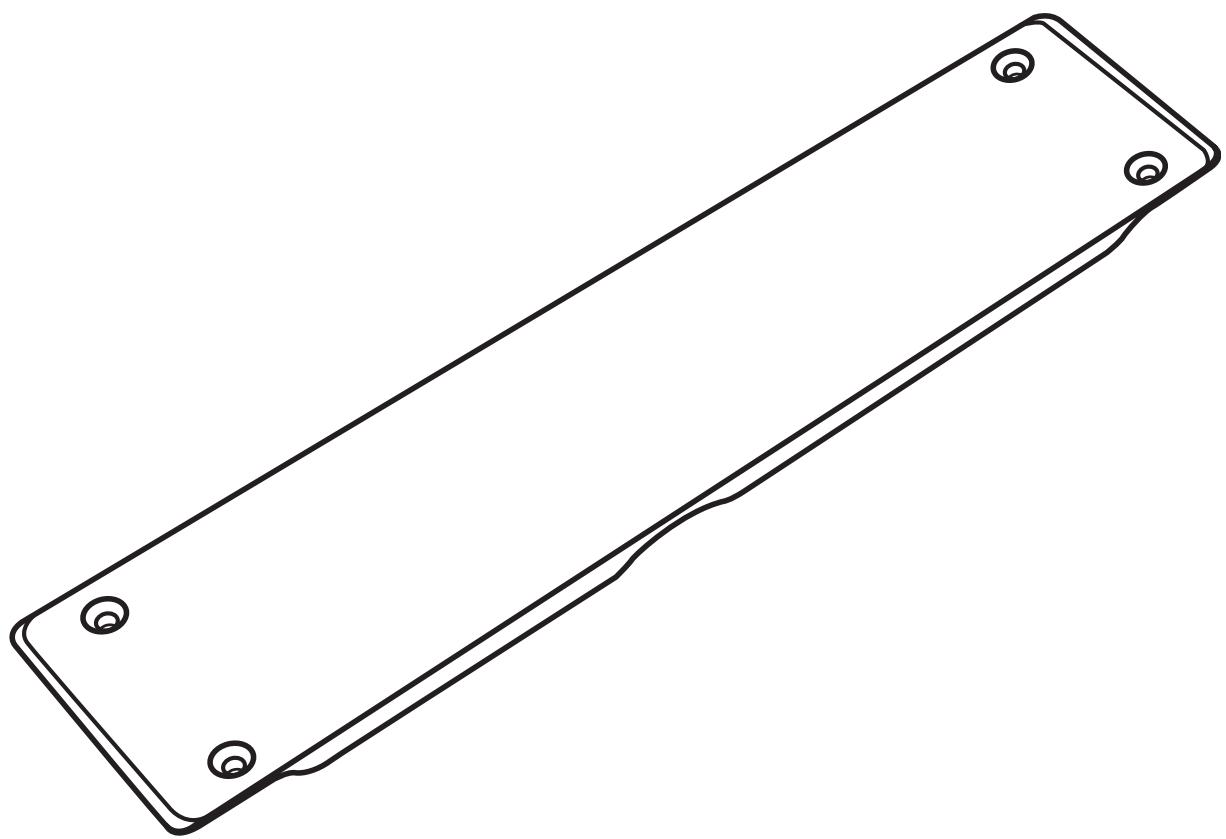
- Zero clearance throat plates (2)
- Thread cutting screw - 1 in. (1) (For use with BT3000)
- Flat head screws - (4)
TOOLS NEEDED
Phillips head screwdriver

WARNING:
The table saw should never be connected to a power supply when you are assembling or disassembling parts. Disconnecting the table saw will prevent accidental starting that could cause serious personal injury.
PREPARED THE ZERO CLEARANCE THROAT PLATE FOR USE WITH A STANDARD BLADE
To prepare the zero clearance throat plate for use with a standard blade, cut an opening for the blade guard, install the throat plate, and then make the zero clearance cut.
TO CUT AN OPENING FOR THE BLADE GUARD
Figures 1 and 2
Follow these directions to cut an opening for the blade guard.
- Set up the original throat plate and properly install the blade guard assembly on the table saw. Refer to the table saw operator's manual.
Position the new throat plate on the saw in front of the blade guard with the crescent-shaped opening to the right.
Measure from the rear of the throat plate, and mark lines at 6-1/8 in. and 7-1/8 in.
Raise the saw blade to a height of 1 in. and position it to 90^ by setting the blade bevel adjustment to 0^ .
Adjust the rip fence to the right edge of the original throat plate and lock it firmly in place.
Assure the riving knife portion of the blade guard assembly is aligned directly with the blade.
Plug the saw into a power source.
Insert the key plate and start the saw.
Guide the new throat plate along the left edge of the rip fence.
Make a rip cut from the rear to the mark at 7-1/8 in.
Turn the saw off and allow the blade to fully stop before removing the throat plate from the front.
Adjust the rip fence 5/8 in. to the right edge of the original throat plate and firmly lock in place.
Release the blade tilt lock lever and adjust the saw to a 22 - 1 / 2^ bevel.
Lock the blade tilt lever.
Start the saw.
Guide the throat plate again along the left edge of rip fence.
Make a bevel rip cut from the rear to the mark at 6-1/8 in.
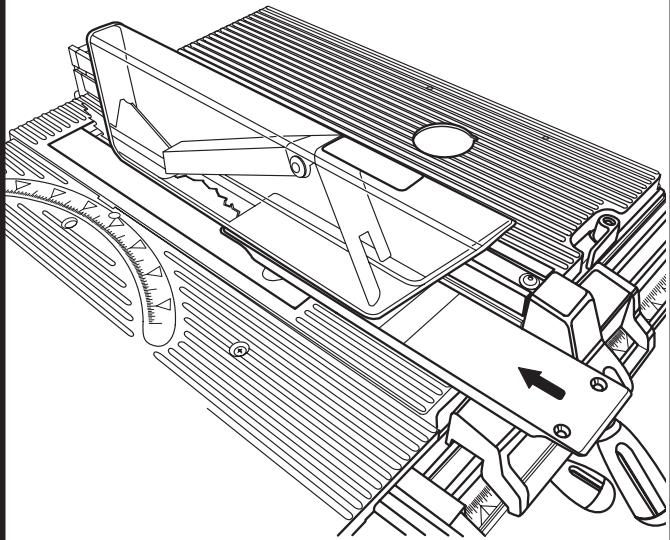
Fig. 1
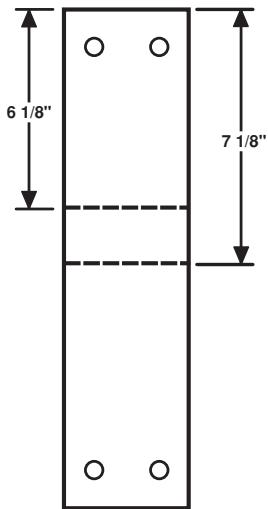
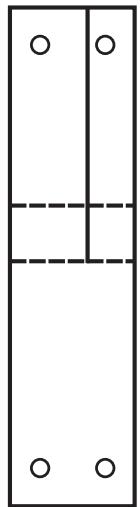
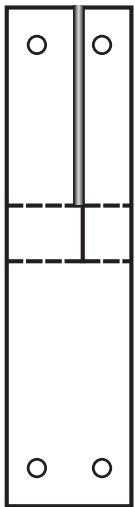
Fig. 2

WARNING:
Keep hands away from rotating blade during cut. Failure to heed this warning could result in serious personal injury.
Turn the saw off and allow the blade to fully stop before removing the throat plate from the front.
- Remove any remaining material that may still be attached between the two cuts.
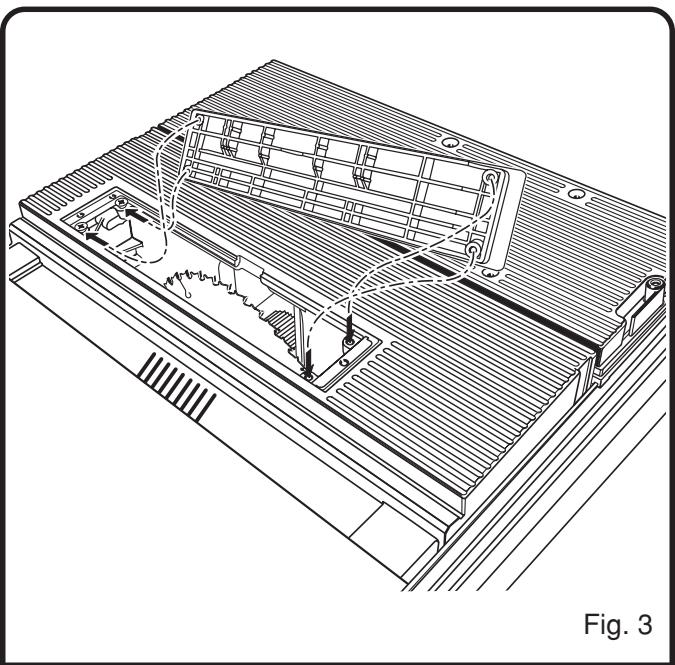
TO INSTALL THE ZERO CLEARANCE THROAT PLATE
See Figure 3.
Follow these steps to install the zero clearance throat plate.
Release the blade tilt lock lever and adjust the saw to 90^ cut by setting the bevel angle to 0^ .
Lock the blade tilt lever.
Adjust the saw blade to the lowest position.
Remove the key plate and unplug the saw from the power source.
Remove the original throat plate from the saw.
For the BT3000: Remove the three phillips machine screws on the top of the saw. Use the 1" long thread cutting screw provided to tap the four pre-drilled holes in the throat plate opening by alternately screwing and unscrewing the screw into each hole. Drop a light machine oil in the holes to aid in the operation.
For the BT3100: Remove the screw at the front of the plate, lift and remove the plate, and then remove the two screws underneath the plate.
■ Raise carefully the anti-kickback fingers on the blade guard assembly.
Install the zero clearance throat plate by sliding it under the fingers and surrounding the riving knife (splitter).
Make sure the saw blade is in the lowest position.
- Secure the zero clearance throat plate with the four flat head screws provided.
TO MAKE A ZERO CLEARANCE CUT
See Figure 4.
Follow these steps to make a zero clearance cut.
Plug the saw into a power source.
Insert the key plate.
Choose one of these options:
To make a straight zero clearance cut:
a) Turn on the saw.
b) Rotate the blade adjustment handle clockwise to raise the blade through the throat plate.
To make a bevel zero clearance cut:
a) Move the rip fence to the right at least 6 in. to provide clearance for the blade guard assembly in the bevel position.
b) Lower the saw blade fully.
c) Release the blade tilt locking lever.
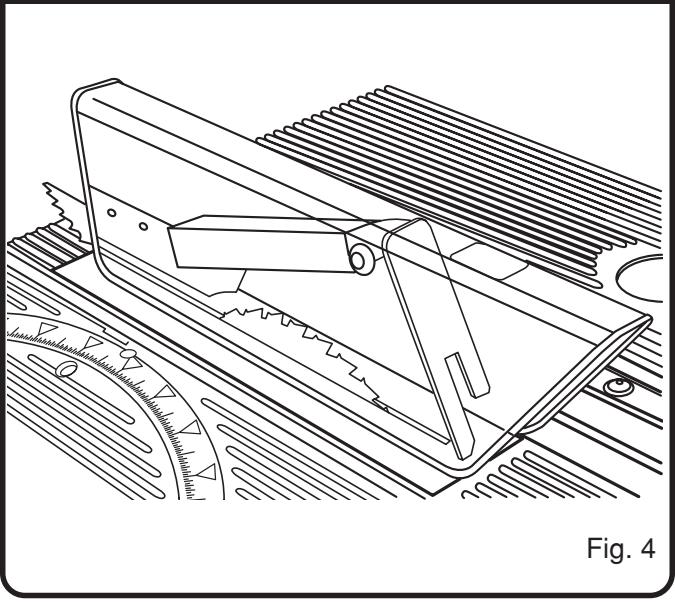
d) Adjust the bevel to the desired angle.
e) Turn on the saw.
f) Rotate the blade adjustment handle clockwise to raise the blade through the throat plate.
Turn off the saw.
NOTE: The saw blade must be at 90^ ( 0^ bevel setting) and the lowest setting to allow for installation or removal of a bevel cut zero clearance throat plate.
CAUTION:
When lowering the blade, always lift the anti-kickback fingers so they do not damage zero clearance throat plate or hinder lowering of the blade. Do not lower the blade with the saw on.
PREPARED THE ZERO CLEARANCE THROAT PLATE FOR USE WITH A DADO BLADE
NOTE: Use only the Dado Set, part number 4650306, with the BT3000 and BT3100 table saws.

WARNING:
Turn saw off, remove key plate and unplug saw from power source before proceeding. Failure to do so could result in accidental start-up, resulting in serious injury.
Remove the original throat plate from the saw.
For the BT3000: Remove the three phillips machine screws on the top of the saw.
For the BT3100: Remove the screw at the front of the plate and the two screws underneath the plate.
Remove the blade guard assembly. Refer to the table saw operator's manual.
Install the dato blade. Refer to dato set instructions.
Lower the saw blade by pushing the locking lever to the left and rotating the blade adjustment handle counterclockwise.
NOTE: For the BT3000, use the 1" long thread cutting screw provided and tap the four pre-drilled holes in the throat plate opening. Alternate screwing and unscrewing the screw into each hole until you tap all four. Drop a light machine oil in the holes to aid in the operation.
Install the new throat plate and secure it with the four flat head screws.
Plug the saw into a power source.
Insert the key plate and turn on the saw.
- Rotate the blade adjustment handle clockwise, cutting the new throat plate until the blade is in the highest desired position.
Turn off the saw and remove the key plate.
Unplug the saw from the power source.

WARNING:
Always put spacers in the proper location when changing back to the saw blade. Failure to do so may result in serious injury and damage the tool.
NOTE: The blade guard assembly cannot be used with the dado blade. Dado cuts are non-through cuts. Make sure the blade guard assembly is reinstalled for all through cuts.
NOTES
WARRANTY
Ryobi warrants its accessories for a period of 90 days from the date of purchase. Batteries and chargers are warranted for a period of two years from the date of purchase.
PARTS AND SERVICE
For parts or service, contact your nearest Ryobi authorized service center. Be sure to provide all relevant information when you call or visit. For the location of the authorized service center nearest you, please call 1-800-525-2579 or visit us online at www.ryobotools.com. When ordering parts, always give the model number:
MODEL NUMBER 4070333

- RULES FOR SAFE OPERATION
- READ ALL INSTRUCTIONS
- UNPACKING
- INFORMATION
- WARNING:
- LOOSE PARTS LIST
- TOOLS NEEDED
- PREPARED THE ZERO CLEARANCE THROAT PLATE FOR USE WITH A STANDARD BLADE
- TO CUT AN OPENING FOR THE BLADE GUARD
- Figures 1 and 2
- TO INSTALL THE ZERO CLEARANCE THROAT PLATE
- TO MAKE A ZERO CLEARANCE CUT
- CAUTION:
- PREPARED THE ZERO CLEARANCE THROAT PLATE FOR USE WITH A DADO BLADE
- NOTES
- WARRANTY
- PARTS AND SERVICE
Marque : RYOBI
Modèle : 4070333
Catégorie : Accessoire pour outil électrique